Owner's Manual High Wall Ductless System
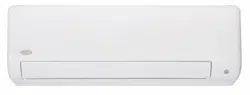
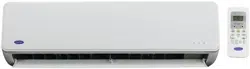
PART NAMES
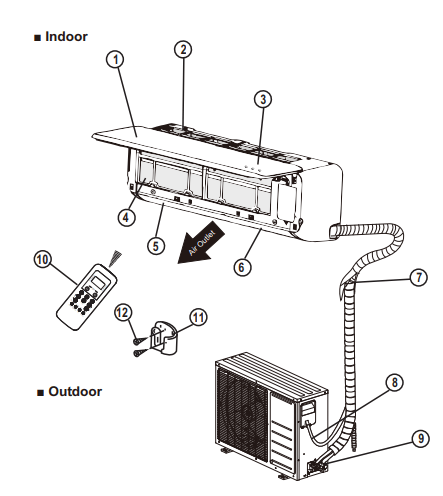
1. Front panel
2. Air Inlet
3. Display
4. Air Filter
5. Right−Left airflow grille
6. Up−Down air flow louver
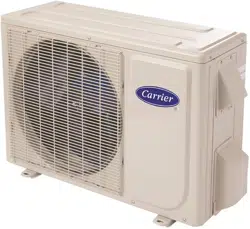
7. Interconnecting tubing
8. Control and power wiring to indoor unit
9. Service valves
10. Remote control
11. Remote control bracket
12. Self−tapping screws
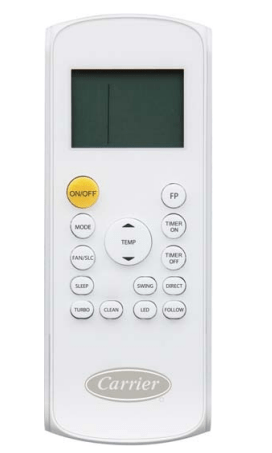
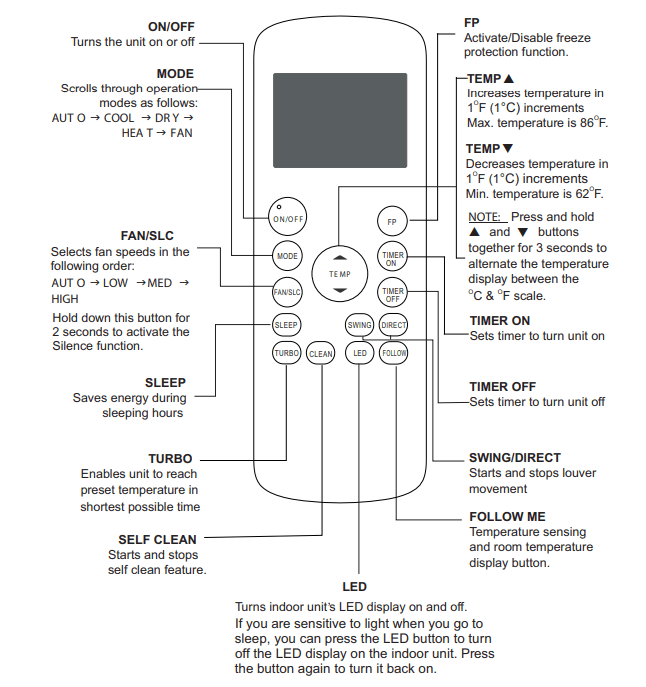
Before you begin using your new air conditioner, make sure to familiarize yourself with the remote control. The following is a brief introduction to the remote control.
NOTE: New Remote Controller Starting on production of week 41 year 2016 (serial number 4116V10001). For advanced functions refer to the Service Manual of the indoor unit.
DISPLAY PANELS
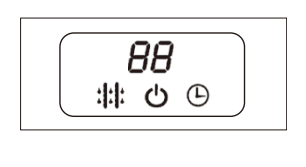
 SELECTED TEMPERATURE / SELF-DIAGNOSTIC CODES indicator
 DEFROST indicator: Illuminates when the coil is warming up to prevent cold blow or when the unit goes into defrost mode.
 OPERATION indicator: This indicator flashes once per second after power is on and illuminates when the unit is in operation.
 TIMER indicator Illuminates during TIMER operation
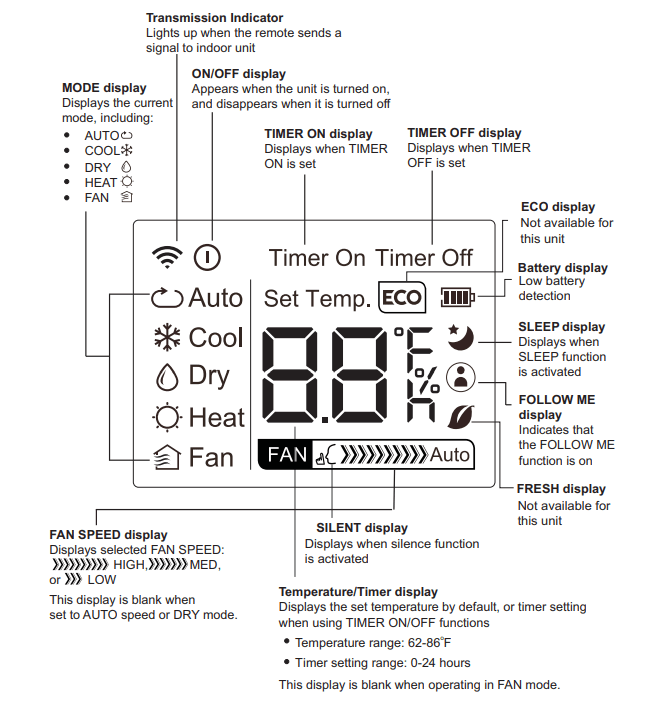
Remote LCD Screen Indicators
REMOTE CONTROL
CAUTION: EQUIPMENT DAMAGE HAZARD Failure to follow this caution may result in equipment damage. Handle the control with care and avoid getting the control wet.
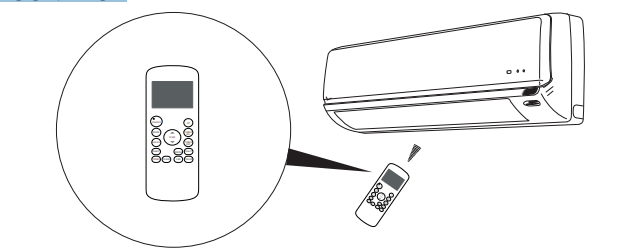
IMPORTANT: The remote control can operate the unit from a distance of up to 26 ft. (8 m) as long as there are no obstructions
When the timer function is used, the remote control should be kept in the vicinity of the fan coil (within 26 ft. / 8 m).
The remote control can perform the following basic functions:
- Turn the system ON and OFF
- Select operating mode
- Adjust room air temperature set point and fan speed
- Adjust right−left airflow direction
Refer to the Remote Control Function section for a detailed description of all the capabilities of the remote control.
Battery Installation: Two AAA 1.5v alkaline batteries (included) are required for operation of the remote control. To install or replace batteries:
- Slide the back cover off the control to open the battery compartment.
- Insert batteries. Follow the polarity markings inside the battery compartment.
- Replace the battery compartment cover.
NOTE:
- When replacing batteries, do not use old batteries or a different type battery. This may cause the remote control to malfunction.
- If the remote is not going to be used for several weeks, remove the batteries. Otherwise battery leakage may damage the remote control.
- The average battery life under normal use is about 6 months.
- Replace the batteries when there is no audible beep from the indoor unit or if the Transmission Indicator fails to light.
- When batteries are removed, the remote control erases all programmed settings. The control must be reprogrammed after insertion of new batteries.
Remote Control Operation − Quick Start
NOTE: When transmitting a command from the remote control to the unit, be sure to point the control toward the right side of the unit. The unit confirms receipt of a command by sounding an audible beep.
- Turn the unit on by pushing the ON/OFF button.
- If there is a preference for C rather than F (default), press and hold the increase ▲ and decrease ▼ temperature set point buttons together for approximately 3 seconds.
- Select the desired mode by pushing the mode button.

- Select the temperature set point by pointing the control toward the unit and pressing the increase/decrease temperature set point buttons until the desired temperature appears on screen
- Select the desired fan speed by pressing the FAN button. NOTE: If the unit is operating in DRY or AUTO mode, the fan speed will be automatically set.
- Set the airflow direction. When the unit is turned on, the Up−Down Airflow louvers default to the cooling or heating position. The user can adjust the horizontal Up−Down airflow louver position by pushing the DIRECT button or have continuous louver movement by pressing the SWING button
Manual Operation: If the remote control is lost, damaged, or the batteries are exhausted, the MANUAL button can be used to run the unit. When the MANUAL button is pressed once, the AUTO mode takes affect (heat or cool). When this button is pressed twice, the system enters the TEST mode and runs for 30 minutes in the COOLING mode (it will run in the AUTO mode afterward). When pressed three times, the system turns OFF.
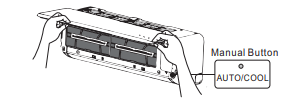
The set conditions of manual operation are as follows:
- Preset set point: 76F (24C)
- Fan speed: AUTO
- Discharge air direction: Pre−set position based on operation in “Cool”or “Heat” mode.
REMOTE CONTROL FUNCTIONS
Pressing the On/Off Button
When the air conditioner is not in operation, the remote control displays the last set point and mode.
- Press the On/Off button to start the unit. − The unit starts in the last operating mode and set point. The ON/OFF indicator appears.
- Press the button On/Off to stop the unit. − All the indicator lights on the unit go out, and the remote control displays the set point and mode
NOTE: If the On/Off button is pressed too soon after a stop, the compressor will not start for 3 to 4 minutes due to the inherent protection against frequent compressor cycling. The unit only emits an audible beep when the signals are received correctly
Selecting an Operating Mode
Use the Operating Mode button to select one of the available modes.

Setting the Room Temperature Set Point
- Press the increase temperature set point ▲ and decrease ▼ buttons to raise or lower the temperature.
- The unit confirms the signal receipt with a beep and the value of the set temperature appears on the display and changes accordingly. The temperature can be set between 62F (17C) and 86F (30C) in increments of 1F or 1C.
- NOTE: In the COOLING mode, if the temperature selected is higher than the room temperature, the unit will not start. The same applies for the HEATING mode if the selected temperature is lower than the room temperature
Selecting the Fan Speed

The fan speed can be selected by pressing the FAN button. NOTE: When the unit is on, the fan runs continuously in cooling or heating. When in heating, there might be situations where the fan will slow down or shut off to prevent cold blow.
Selecting the Up−Down Louver Position
- To optimize comfort, the Up−Down louver operates in a preset range as shown in the figure below.
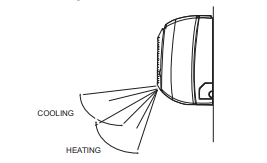
- The up−down airflow louver can be adjusted by pressing the DIRECT button in the remote control and can be set to be stationary or moving continuously pressing the SWING button. The up−down louver position is stored in the settings, however it is deactivated when the TURBO or MANUAL settings are set, or when a power interruption takes place.
Air Direction
- Press the DIRECT button repeatedly to choose one of the up−down louver positions. Every time this button is pushed, the specific louver swings by 6 degrees.
- In the COOLING, DRY, and FAN ONLY modes, the louver swings in the cooling range. In the HEATING mode, the louver swings in the heating range.
- NOTE: Always use the remote control to adjust the up−down louver position, otherwise abnormal operation may occur. If the up−down louver is manually adjusted out of its range, power the unit off and then back on again.
Auto Swing
- For automatic up−down louver swing, push the SWING button
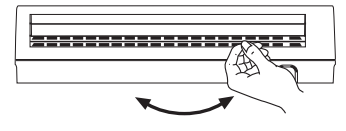
Selecting Right−Left Direction of the Louver
- The right-left louvers can be adjusted manually to direct the airflow to achieve optimal comfort in the space.
Timer Function
TIMER ON (to start the unit) and TIMER OFF (to stop the unit) can be used separately or together.
Timer ON only: This function allows the unit to start automatically at the set time. The TIMER ON function can be set while the unit is on or off.
UNIT ON
- Press the TIMER ON button to initiate the auto-on time sequence. The set time is displayed in the remote control display. Every time the TIMER ON button is pressed, the time increases by 30 minutes, up to 10 h. It increases by 60 minutes, afterwards, until the time setting reaches 24 h.
- When the TIMER ON is set, the TIMER light on unit illuminates. The unit continues to run at the set time.
UNIT OFF
- Set the timer described in the UNIT ON section.
- The unit starts at the set time.
Adjust the TIMER ON settings to 0.0 to cancel this option.
Timer OFF only: This function allows the unit to stop automatically at the set time. The timer can be set while the unit is on or while it is off.
UNIT ON
- Press the TIMER OFF button to initiate the auto−off time sequence. The set time appears on the remote control display. Every time the TIMER OFF button is pressed, the time increases by 30 minutes, up to 10 h. It increases by 60 minutes, afterwards, until the time settings reach 24 h.
- When the TIMER OFF is set, the timer light on the unit illuminates and the unit turns off automatically at the set time.
UNIT OFF
- Set the TIMER off as described in the UNIT ON section. The TIMER display on the unit illuminates and the unit remains off.
- Adjust the TIMER ON settings to 0.0 to cancel this option.
Timer ON and Timer OFF: Use both functions to program the unit to turn on and shut off at specified times.
UNIT OFF
- Set TIMER ON as previously described.
- Set TIMER OFF as previously described. The unit starts automatically at the set TIME ON and turns off at the set TIME OFF.
UNIT ON
- Set TIME OFF as previously described.
- Set TIME ON as previously described. The unit turns off automatically at the set TIME OFF and turns on at the set TIME ON.
Sleep Mode 
SLEEP mode is used to conserve energy and can be used when the unit is in the COOL, HEAT or AUTO mode only
Cool Mode
- Push the SLEEP button. After 1 hour the set point raises by 1.8F (1C). After another hour, the set point raises by another 1.8F (1C) and the fan runs in a low speed. The unit shuts off 5 hours after setting the SLEEP mode. The SLEEP mode cancels if either the “Mode”, “TEMP”, “Fan”, “Timer”, or “On/Off” buttons on the remote control is pressed.
Heat Mode
- Same as the COOLING mode however the set points are lowered by 1.8 F (1C).
TURBO Mode: Use the TURBO mode to cool or heat the room rapidly.
- Press TURBO. An audible “beep” is heard if the indoor unit supports this function. The fan runs on super high speed. The TURBO mode terminates automatically 20 minutes after pushing the TURBO mode button. It can be terminated immediately by selecting the TURBO mode again. When the TURBO mode is terminated, the unit reverts to the original setting
Self Clean Mode
- Press the “Self Clean” button to activate or deactivate the self−cleaning function. Under this function, the air conditioner automatically cleans and dries the evaporator. The cleaning cycle takes 30 minutes, after which the unit turns off automatically. Pressing the SLC button on the middle of the cycle cancels the operation and turn off the unit. This function can be activated only on COOL or DRY mode.
Follow Me Mode 
- Press Follow Me to activate or deactivate this function. Under this setting, the temperature that appears in the remote control is the actual temperature at its location. The remote control sends this signal to the air conditioner every 3 minutes. This function is not available for DRY and FAN modes.
Freeze Protection Mode
- Press the “FP” button for approximately 2 seconds to activate or deactivate the freeze protection mode (heating set back). The indoor unit displays “FP”.
- NOTE: This function is only available in the heating mode.
- Under this function, the unit operates at high fan speed and the coil temperature automatically sets to 46F (8C). This mode can also be deactivated by pressing the “On/Off”, “Sleep”, “Mode”,
“Fan”, or either “TEMP” buttons.
Silence Mode
- Press the SLC button to activate of deactivate the SILENCE Mode. Under this function, the compressor operates at low frequency and the indoor unit produces a faint breeze, which reduces the noise to the lowest level. Due to low the frequency operation of the compressor, it may result in insufficient cooling and heating capacity.
LED Light
- Press the LED button to turn the display light on and off.
Resetting the Remote Control
- If the batteries in the remote control are removed, the current settings will be cancelled and the control returns to the initial settings and will be in standby mode. Push the ON/OFF button to activate it.
Time Delay
- If the On/Off button is pressed too soon after a stop, the compressor will not start for 3 to 4 minutes due to the inherent protection against frequent compressor cycling. The unit only emits an audible beep when the signals are received correctly
Heating Features
- If the unit is in the heating mode, there is a delay when the fan starts. The fan starts only after the coil is warmed up to prevent cold blow.
Auto Defrost Operation
- In heating mode, if the outdoor coil is frosted, the indoor fan and outdoor fan turns off while the system removes the frost on the outdoor coil. The system automatically reverts to normal operation when frost is removed from the outdoor unit
Auto Start
- If the power fails while the unit is operating, the unit stores the operating condition, and it will start operation automatically under those conditions when the power is restored.
CLEANING, MAINTENANCE AND TROUBLESHOOTING
CAUTION: ELECTRICAL SHOCK HAZARD: Failure to follow this caution may result in personal injury or death. Always turn off power to the system before performing any cleaning or maintenance to the system. Turn off the outdoor disconnect switch located near outdoor unit. Be sure to disconnect indoor unit if on a separate switch
CAUTION: EQUIPMENT DAMAGE/OPERATION HAZARD: Failure to follow this caution may result in equipment damage or improper unit operation. Operating the system with dirty air filters may damage the indoor unit and could cause reduced cooling performance, intermittent system operation, frost build−up on indoor coil or blown fuses.
Periodic Maintenance
- Periodic maintenance is recommended to ensure proper operation of the unit. Recommended maintenance intervals may vary depending on the installation environment, e.g., dusty zones, etc.
- CUT HAZARD: Failure to follow this caution may result in personal injury. The coil fins are very sharp. Use caution when cleaning. Always wear safety protection.
Cleaning the Coil
- Clean the coil at the beginning of each cooling season, or when necessary. Use a vacuum cleaner or a long−bristle brush to avoid damage to the coil fins
Air Filters
Remove and clean the air filters once a month. NOTE: If air filters show signs of excessive wear or are torn, they must be replaced. Contact your local dealer for replacement filters.
- Open front panel on unit.
- Pull filters down to remove.
- Vacuum filters.
- Clean with warm water.
- Shake filter to remove excess water and dry thoroughly.
- Replace filter by sliding into rack until filter snaps in place.
- Close front panel on unit.
EQUIPMENT DAMAGE HAZARD
- Failure to follow this caution may result in equipment damage.
- When cleaning the front panel, do not use water hotter than 105 F(40.6C) and do not pour water onto the fan coil. Do not use abrasive or petroleum based cleaners as they may damage the front panel.
Indoor Unit Front Panel
- To clean the front panel on the indoor unit, wipe the outside with a soft, dry cloth.
Preparing for Extended Shutdown Period
- Clean the filters and reposition them in the unit. Operate the unit in Fan only mode for 12 hours to dry all internal parts.
- Turn main power supply off and remove batteries from the remote control.
System Operation Recommendations
The items outlined in the following list help to assure proper system operation:
- Replace both remote control batteries at the same time.
- Point the remote control toward the unit display panel when transmitting a command.
- Keep doors and windows closed while unit is operating.
- Contact an authorized service representative if a problem arises that cannot be easily resolved.
- Do not perform cleaning or maintenance activities while the unit is on.
- Keep the display panel on the unit away from direct sunlight and heat as this may interfere with remote control transmissions.
- Do not block air intakes and outlets on the indoor or outdoor units.
Energy Saving Recommendations
The following recommendations will add greater efficiency to the ductless system:
- Select a comfortable thermostat setting and leave it at chosen setting. Avoid continually raising and lowering the setting.
- Keep the filter clean. Frequent cleaning may be necessary depending on indoor air quality.
- Use drapes, curtains or shades to keep direct sunlight from heating the room on very hot days.
- Limit the unit’s run time by using the TIMER function.
- Do not obstruct the air intake on the front panel.
- Turn on the air conditioning unit before the indoor air becomes too uncomfortable.
Troubleshooting
Table 1—Periodic Maintenance
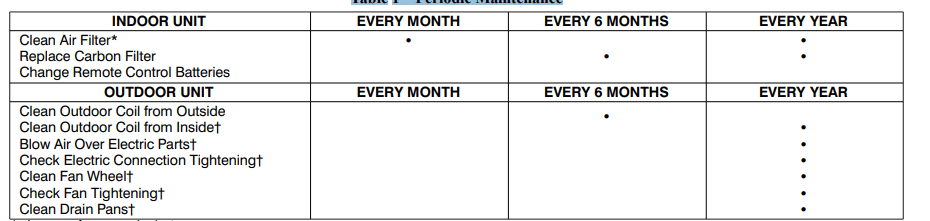
- * Increase frequency in dusty zones.
 Maintenance to be carried out by qualified service personnel. Refer to the Installation Manual
PROBLEM
1. Unit/System Does Not Work
- The circuit breaker has tripped or a fuse has blown.
- Reset the circuit breaker or replace the fuse with the specified replacement fuse.
- Power failure.
- Restart operation when the power is restored.
- Diagnostic lights illuminate.*
- Call your service representative.
- Voltage is too low.
- Call your service representative.
2. Cooling is Not Working Properly
- The filter is blocked with dust.
- Temperature is not set properly.
- Check the temperature and reset if necessary.
- A window or door is open.
- Close the window or door.
- The outdoor unit is obstructed.
- The fan speed is too low.
- Change the fan speed selection.
- The operation mode is in Fan instead of Cool.
- Change the operating mode to Cool or reset the unit.
3. Heating is Not Working Properly
-
The filter is blocked with dust.
-
Temperature is set too low.
-
A window or door is open.
-
The outdoor unit is obstructed
4. Unit Stops During Operation
- The Off timer is not operating correctly.
- Restart the operating mode.
- Diagnostic lights illuminate
- Call your service representative.