Loading ...
Loading ...
Loading ...
4■English
Precautions on Installation
• Check the strength and level of the installation surface so that the unit does not
cause any operating vibrations or noise after installation.
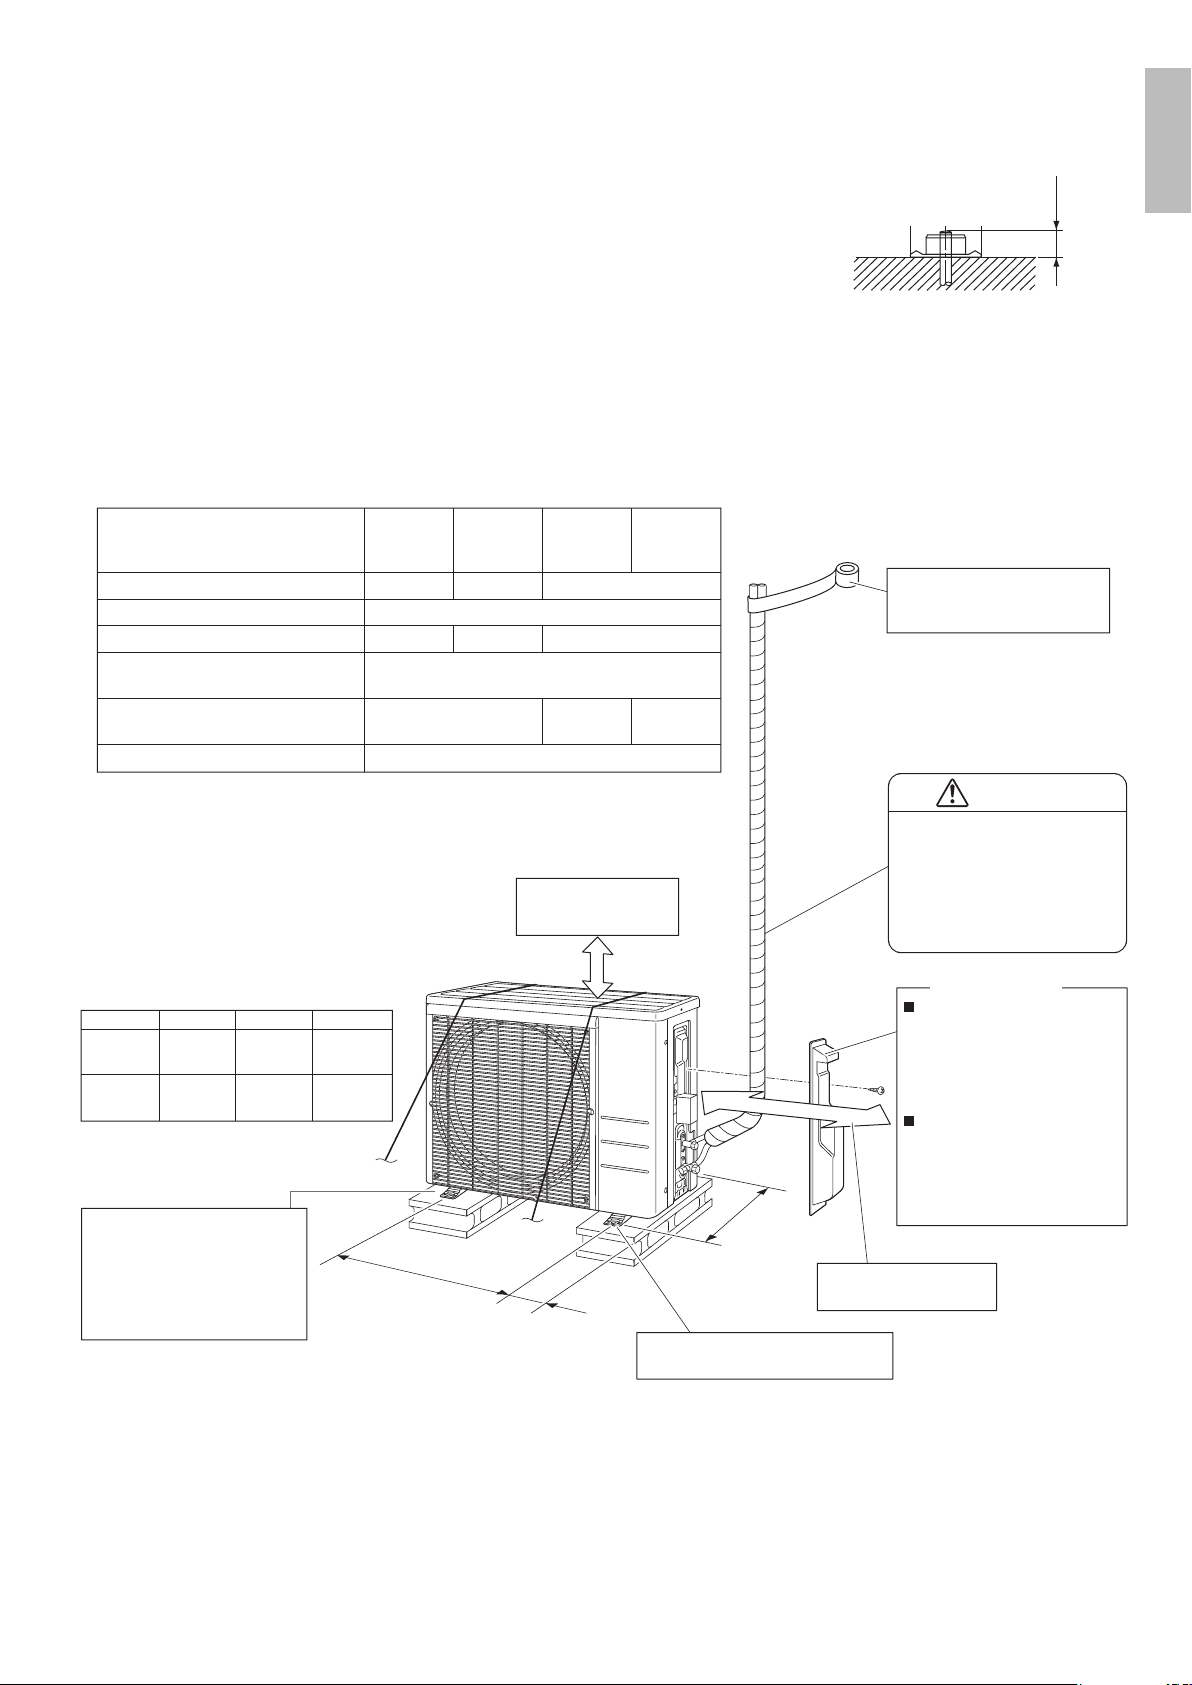
• Fixtheunitinplacesecurelyusingfoundationbolts,asinthegure.(Prepare4
sets of 5/16 inch (M8) or 3/8 inch (M10) foundation bolts, nuts and washers; all
separately available.)
• It is best to screw in the foundation bolts until their ends are 3/4 inch (20mm)
from the foundation surface.
3/4”
(20mm)
Outdoor Unit Installation Diagram
In sites with poor drainage,
use block bases for the
outdoor unit.
Adjust foot height until the unit
is level. Otherwise, water
leakage or pooling of water
may occur.
Appearance of outdoor units may differ from some models.
O.D. 3/8 inch (9.5mm)
Gas pipe
Liquid pipe O.D. 1/4 inch (6.4mm)
0.21oz/ft (20g/m)
Max. allowable piping length
49-1/4ft (15m) 39-3/8ft (12m)
65-5/8ft (20m) 49-1/4ft (15m)
Max. allowable piping height
Additional refrigerant required for refrigerant
pipe exceeding 32.8ft (10m) in length.
*
Be sure to add the proper amount of additional refrigerant.
Failure to do so may result in reduced performance.
**The suggested shortest pipe length is 10ft (3m), in order to avoid
noise from the outdoor unit and vibration.
(Mechanical noise and vibration may occur depending on how
the unit is installed and the environment in which it is used.)
10ft (3m)
O.D. 1/2 inch
(12.7mm)
O.D. 5/8 inch
(15.9mm)
RX18∗, RXN18∗
RK18∗, RKN18∗
RXL15∗
RX24∗, RXN24∗
RK24∗, RKN24∗
RX09/12∗
RK09/12∗
RXL09/12∗
RXN09/12∗
RKN09/12∗
65-5/8ft (20m)
98-1/2ft (30m)
Min. allowable piping length
X
(Foot bolt-hole centers)
(From unit’s side)
Z
(Foot bolt-hole
centers)
Y
**
*
Allow 11-13/16” (300mm)
of work space below the
ceiling surface.
Where there is a danger of the unit
falling, use foot bolts, or wires.
18-1/2
inch
(470mm)
23-5/8
inch
(600mm)
12-1/8
inch
(308mm)
13-5/8
inch
(346mm)
3-13/16
inch
(97mm)
4-15/16
inch
(125mm)
15/18/24 class
09/12 class
XYZ
CAUTION
Keep the piping length between
10ft (3m) and 65-5/8ft (20m)
(for RX09/12, RK09/12, RXL09/12),
10ft (3m) and 49-1/4ft (15m)
(for RXN09/12, RKN09/12),
10ft (3m) and 98-1/2ft (30m)
(for 15/18/24 class).
9-13/16
”
(250mm) from wall
How to remove the stop
valve cover
1) Remove the screw on the
stop valve cover.
2) Slide the stop valve cover
downward to remove it.
1) Insert the upper part of
the stop valve cover into
the outdoor unit.
2) Tighten the screw.
How to attach the stop
valve cover
Stop valve cover
Wrap the insulation pipe with
finishing tape from bottom to
top.
Allow space for piping
and electrical servicing.
English
01_EN_3P379970-6B.indd 4 11/13/2015 15:48:25
Loading ...
Loading ...
Loading ...