
INSTALLATION AND
OPERATION MANUAL


1 WARRANTY TERM 5
2 SAFETY INSTRUCTIONS
8
3 INSTALLATION
11
4 ROCKET EXPRESS TECHNOLOGY
14
5
PRINCIPLES OF OPERATION
15
6 CREATION OF RECIPES
17
7 OPERATION
18
7.1 PREHEATING
7.2 EXECUTING A RECIPE
7.3 ACCESSING THE OPTIONS
USER'S SETTINGS
7.4.1 EDIT GROUP
7.4.2
18
18
20
20
21
24
EDIT RECIPES
7.4.3 PREHEATING
7.4.4
29
29
USB
7.4.5 CHANGE LANGUAGE
7.4.6
30
30
CURRENT TEMPERATURE
7.4.7 DATE/TIME ADJUSTMENT
7.4.8
30
31
CELSIUS/FAHRENHEIT
7.4.9 CHANGE PASSWORD
7.4.10
31
31
EDIT ACCESSES
7.4.11 MANUFACTURER'S INFORMATION
7.4.12
32
32
7.4
7.4.13 32
SAC
RESTORE FACTORY SETTINGS
CONTENTS

CONTENTS
7.5 FAVORITES
7.6 TEST MODE
7.7 DAILY CLEANING GUIDE
33
34
35
8 ALERTS AND ERRORS: POSSIBLE SOLUTIONS
39
40 9 ACCESSORIES
10 CONCLUSION 42
ANNOTATIONS 43
7.7.1 STONE CLEANING GUIDE
7.7.2
37
37
AIR FILTER CLEANING GUIDE


04
LETTER TO CUSTOMERS
Práca Inc. are proud to become part of your day-to-day lives with our products. By
purchasing Práca's appliances, you will have a partner that always will be aenve
to your needs and interested in keeping customers sasfied.
We are available to serve you at any me, whether it is to hear your ideas, cricisms,
suggesons, or solve a problem.
Count on us!
Our Mission
Bring quality and producvity to the food preparaon environment.
Our Commitment
Ÿ Always knowing and meeng the needs of our customers.
Ÿ Offering reliable, high-performance, and energy-efficient products.
Ÿ Always looking for improvements of processes, products and cost to offer more
value to our customers every single day.
Ÿ Treat our customers with complete honesty and respect.
Ÿ Práca Inc. donates a poron of our profit to charitable causes.

INSTALLATION AND OPERATION MANUAL
05
1 WARRANTY TERM
1.1 Terms and detailing
a)
b)
c)
d)
e)
f)
g)
h)
Our products have a legal warranty of three months and contractual warranty
of nine months (one year in total) from purchase invoice issuance date and
applies only to the first purchaser. If for any reason the purchase invoice
cannot be found, the equipment manufacture date contained in the indicave
label will be considered as the start date of enforceability of this warranty. The
following will be covered under warranty.
Regardless of the actual installaon or use of the equipment, the warranty
period is started per the date of issuance of the purchase invoice.
For delivery and installaon of the equipment, Práca will send, at no cost to
the customer, an authorized technician to the site where the appliance will be
installed (or the customer can call a technician of their choice, if preferable).
If new visits are needed to complete the delivery/installaon of the product
due to the lack of adequate, electrical, or exhaust related condions, the costs
of such visits shall be the customer's responsibility.
For the appliance's installaon, the customer must provide all condions
required (water, light, gas, grounding and exhaust if needed) in the installaon
blueprint. The customer will also be responsible for transporng the
equipment to the installaon site.
The warranty only covers manufacturing and component failures.
The warranty will cover maintenance, adjustments or replacement of
defecve parts. It is the responsibility of the customer or technician to return
the defecve parts to Práca Inc. for analysis.
Warranty service calls will not jusfy the extent of the warranty, returns or
exchanges of the equipment, or any other type of claim.

06
1.2 Warranty Exclusions
a)
b)
c)
d)
e)
f)
g)
h)
i)
j)
The customer should thoroughly inspect the equipment upon delivery and
contact the carrier in case of shipping damage arising from transport. At the
me of installaon, the technician should find the equipment in its original
packaging (fully preserved).
Irregularies in building installaon systems.
Please use the Installaon and Operaon Manual that are included with the
product.
Failure to observe the installaon details per the Installaon and Operaon
Manual, such as: uneven floors, installing the oven next to equipment that
exude fat, heat or solid parcles, lack of air circulaon, etc.
Any damage and defects resulng from inappropriate cleaning that causes
damages to the components will not be covered under warranty. For example,
pouring water inside the electric panel, etc.
Changes performed by unauthorized technicians in the original condions of
installaon such as electrical distribuon, installaon locaon, etc.
Use of aggressive or abrasive products that are unsuitable for cleaning which
may tarnish, wear, scratch or damage accessories or equipment components.
Damage and operaonal failures arising from unfiltered water with great
calcium content or electrical supply with voltage oscillaon or noise/
interference in power line.
Occurrences from electrical discharges arising from acts of nature or voltage
peaks caused by generators or supply companies.
Damage to the equipment or its accessories because of accidents, abuse,
improper operaon, improper handling or Installaon as described by the
Operaon Manual included with this product.

07
1.3
Notes and Recommendaons
EQUIPMENT IDENTIFICATION
(Fill in to make technical support calls easier)
MODEL
VOLTAGE
SERIAL NUMBER
RESELLER
INVOICE
NUMBER
PURCHASE DATE
Repair aempts by unauthorized third pares or use of non-OEM parts and
components, regardless of the damage or defects.
Wear and tear components are excluded from the warranty such as lights,
seals, belts, bearings, chains, tarps, glass, plascs, etc.
The operator can use the Installaon and Operaon Manual as a guide.
Make sure that the electric and exhaust systems are made and installed by a
qualified company or technician.
Before contacng technical assistance, check the manual for troubleshoong
ps that can be solved without a technician.
The wear and tear of the unit is not covered by warranty. To ensure
producvity and increase the life of the product, it is essenal to perform the
daily cleaning and a prevenve maintenance regularly.
You can call our technical assistance to provide feedback, offer suggesons, or
get assistance troubleshoong during normal business hours at: +1 214 299-
7726.
k)
l)
a)
b)
c)
d)
e)
INSTALLATION AND OPERATION MANUAL

08
Read the manual carefully before installing the appliance.
When carrying out the daily cleaning, please use personal protecve
equipment such as protecve gloves, apron, mask and goggles.
The appliance MUST be grounded.
The oven must have a dedicated circuit breaker.
Do allow the power cord or the plug to get wet.
Keep the power cord away from heated surfaces.
If the power cord is damaged, it must be immediately replaced by an
authorized technician to avoid shock hazard.
Only qualified personnel should open the equipment panel.
Do not use plasc utensils.
Do not use the Microwave funcon without food as it can damage the
appliance.
Do not operate the equipment with the door open due to microwave energy
exposure.
Do not allow food residue or other debris to accumulate on the surface of the
door and hinge to avoid damaging the appliance.
Do not use the appliance if it is damaged. The oven's door should always close
properly.
Fully sealed packages should not be heated in the oven as they can explode.
Use this appliance only for the funcons described in this manual.
Do not allow children to use or operate this appliance.
Do not cover or block any air vents on unit.
Do not use the appliance outdoors or without coverage.
Do not use this product near water such as near the kitchen sink, in a wet
basement, or near a swimming pool.
Do not use a water jet for cleaning. Please see cleaning instrucons for proper
cleaning.
2 SAFETY INSTRUCTIONS
·
·
·
Goggles
Apron
Protecve Mask
Protecve Gloves
·
·
·
·
·
·
·
·
·
·
·
·
·
·
·
·
·

09
Remove all contents located inside the oven cavity.
If the product catches fire inside the cook cavity, close the door immediately
and turn the unit off or unplug it. The power can also be turned off at the
circuit breaker.
Do not use the cavity of the appliance for storage.
Always wear thermal gloves or use holders or tongs to remove the food from
inside the equipment to avoid burns.
Liquids heated in the microwave can a cause delayed erupon due to thermal
shock.
The appliance is not intended for use by persons (including children) with
reduced physical, sensory or mental capabilies, or that have not been
properly trained to operate the unit.
The minimum height of free space above the microwave should be of 5.9in
(150mm).
Only use utensils suitable for use in microwave ovens.
When heang food in microwave safe container, check the oven frequently
due to the possibility of ignion.
The oven should be cleaned daily and any food remains should be removed.
Failure to maintain the oven in a clean condion could lead to deterioraon of
the surface that could adversely affect the life of the appliance and possibly
result in the loss of warranty.
CAUTION: To avoid burns, do not use containers with liquids or kitchen
products that become liquids by heang up to boiling point. This marking
must be mounted aer installaon at 5.25in (1.6m) above floor level.
·
·
·
·
·
·
·
·
·
·
·
·
INSTALLATION AND OPERATION MANUAL

10
·
·
·
·
PRECAUTIONS TO AVOID POSSIBLE EXPOSURE
TO EXCESSIVE MICROWAVE ENERGY
Do not aempt to operate this oven with the door open since open-door
operaon can result in harmful exposure to microwave energy. It is important
not to defeat or tamper with the safety interlocks.
Do not place any object between the oven front face and the door or allow soil
or cleaner residue to accumulate on sealing surfaces.
Do not operate the oven if it is damaged. It is parcularly important that the
oven door close properly and that there is no damage to the:
a) Door (bent),
b) Hinges and latches (broken or loosened),
c) Door seals and sealing surfaces,
The oven should not be adjusted or repaired by anyone except properly
qualified service personnel.
11
3 INSTALLATION
The installaon of our products must be done with care to avoid problems or
damage to the equipment and guarantee its opmal performance.
This appliance must be installed by an authorized technician.
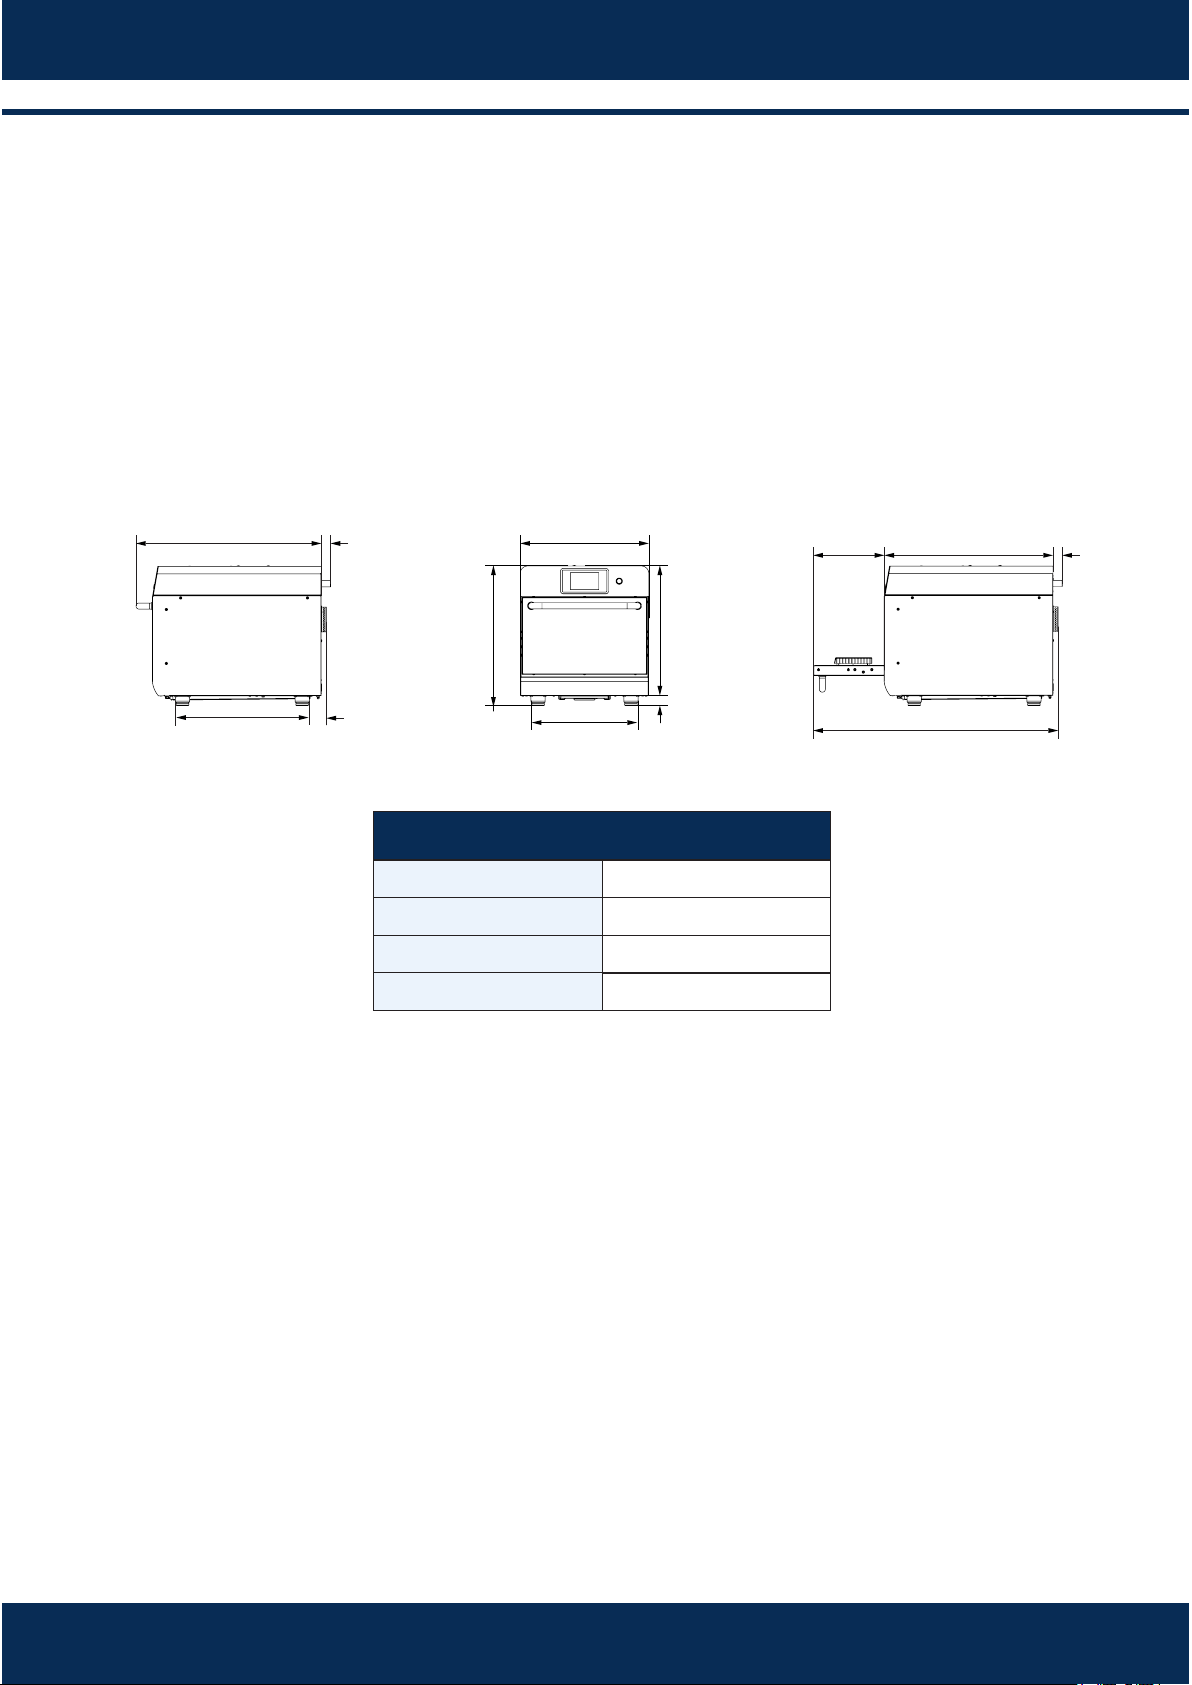
3.1 Dimensions
3.2 General Instrucons
The oven must be installed on a surface or counter that supports its weight of
approximately 194lb (88 Kg).
Do not block the air inlets or outlets of the unit.
The oven must not be posioned near stoves, deep fryers, hot plates and
other equipment that releases fat, fumes and heat. The venlaon, electrical
panel and motor vents must be far from these heat sources to prevent
damage to the electrical system of the appliance.
The oven must be installed in a leveled and well venlated area.
The installaon of the equipment in a non-suitable place can result in the loss
of warranty.
Chamber Dimension
Capacity
Height
Width
Depth
21 Litres
5 ³⁄" - 146 mm
15 ¹⁄" - 394 mm
14 ¹⁄" - 362 mm
·
·
·
·
·
INSTALLATION AND OPERATION MANUAL
27 ⁄"
(700 mm)
11 ⁄"
(294 mm)
1 ⁄"
(38 mm)
1 ⁄"
(38 mm)
3"
(75 mm)
30 ⁄"
(767 mm)
21 ⁄"
(546 mm)
21"
(532 mm)
40"
(1015 mm)
1 ⁄"
(32 mm)
21 ⁄"
(536 mm)
22 ⁄"
(570 mm)
17 ⁄"
(439 mm)

12
3.3 Electric Power
Make sure that the electrical characteriscs of building electric network
follow the technical specificaons of the oven which can be found on the
idenficaon plate located on the back panel and in the electrical table
below.
Use a dedicated circuit breaker for the oven, that must be located at least 6
(1.8 m) away from the right sides of the oven.
USA - CANADA
Voltage
Frequency
Power
Circuit Breaker
Consumpon
60 Hz
5.7 kW
30 A
4 kWh
Phases
Single
Cable
Socket
3x10AWG
NEMA 6-30
NEMA 6-30
EUROPA
Voltage
Frequency
Power
Circuit Breaker
Consumpon
230 V
50 Hz
7.2 kW
32 A
5 kWh
Phases
Single
Cable
3x4mm²
Socket
32A(2P+T)
32A(2P+T)
Power
Cable
Exhaust
Outlets
3"
(76 mm)
6
(1.8m)
Maximum
Distance
Circuit Breaker
Air Inlet
208/240 V

13
Properly size the circuit breaker and network cables.
The oven MUST be properly grounded. In the event of damage due to
improper grounding to third pares and/or to the equipment, the will be held
responsible and will characterized as negligence due to the non-compliance
with the standards.
There is an equipotenal point on the rear panel of the oven.
·
·
·
INSTALLATION AND OPERATION MANUAL
14
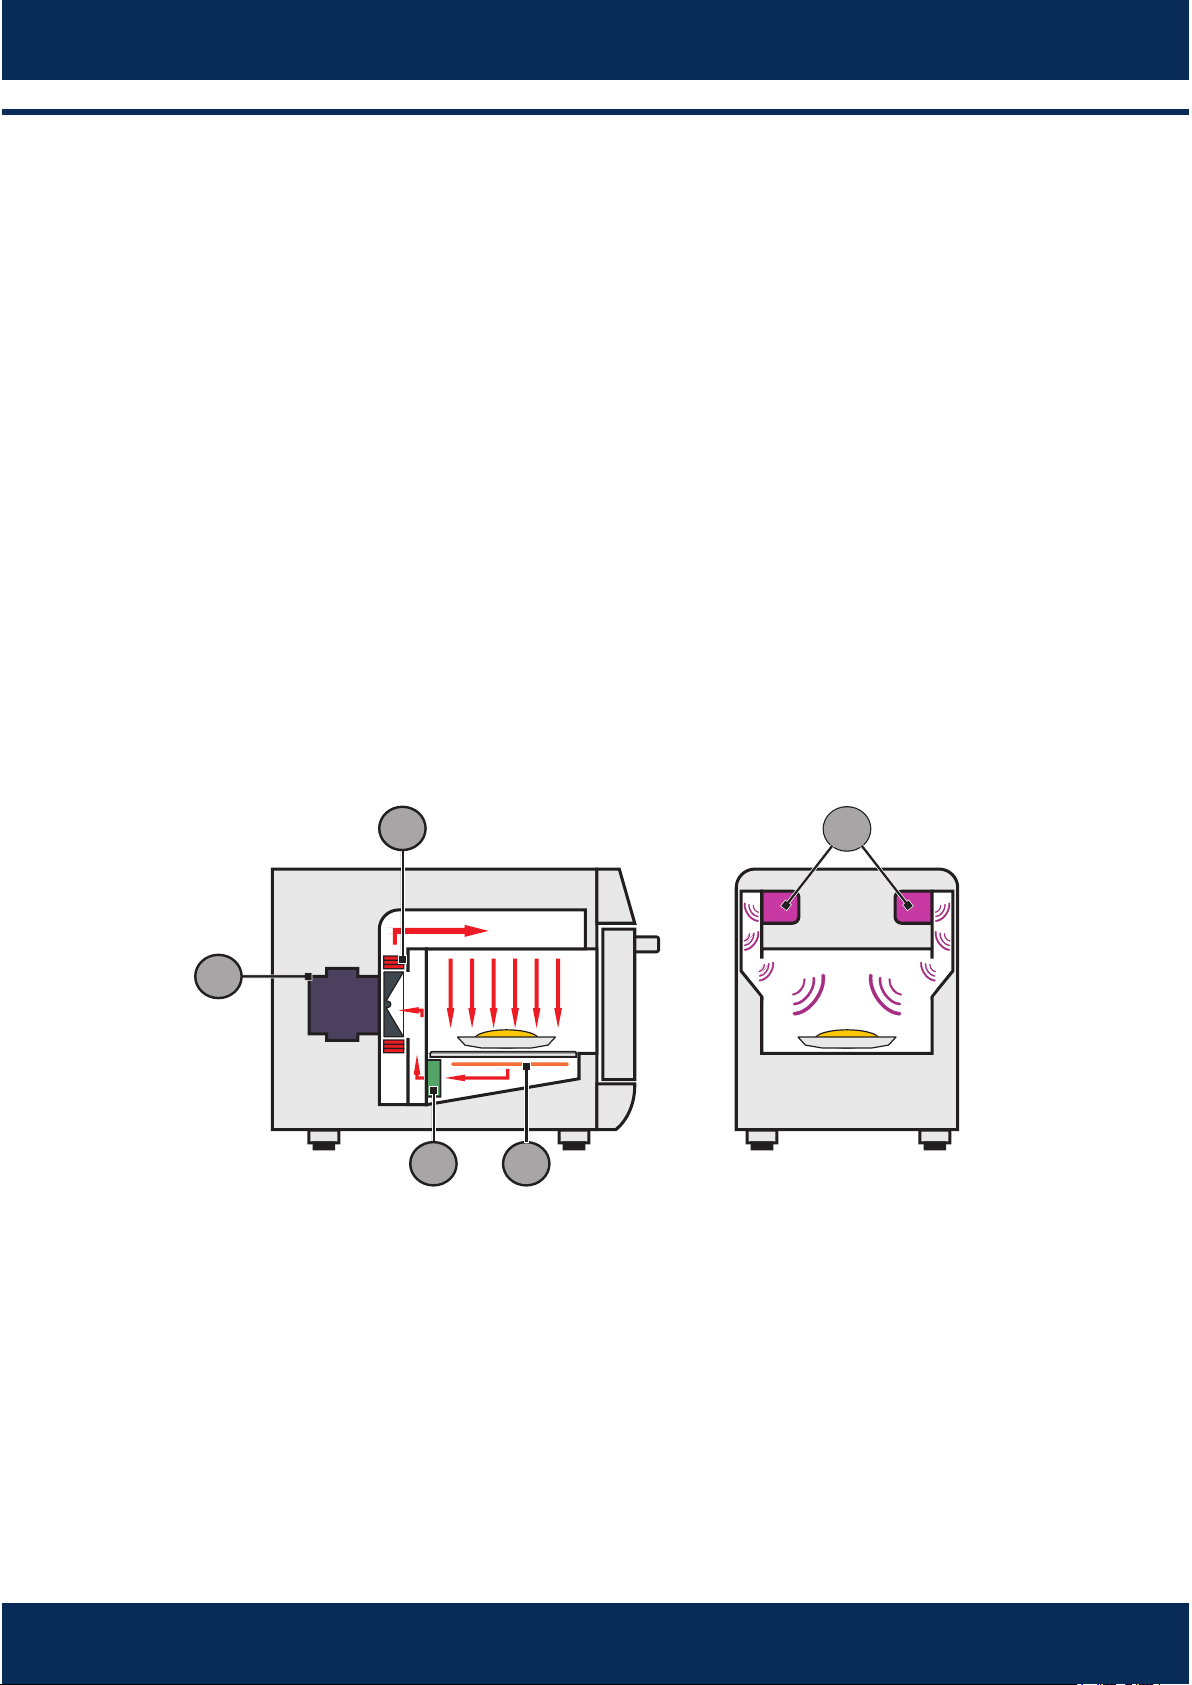
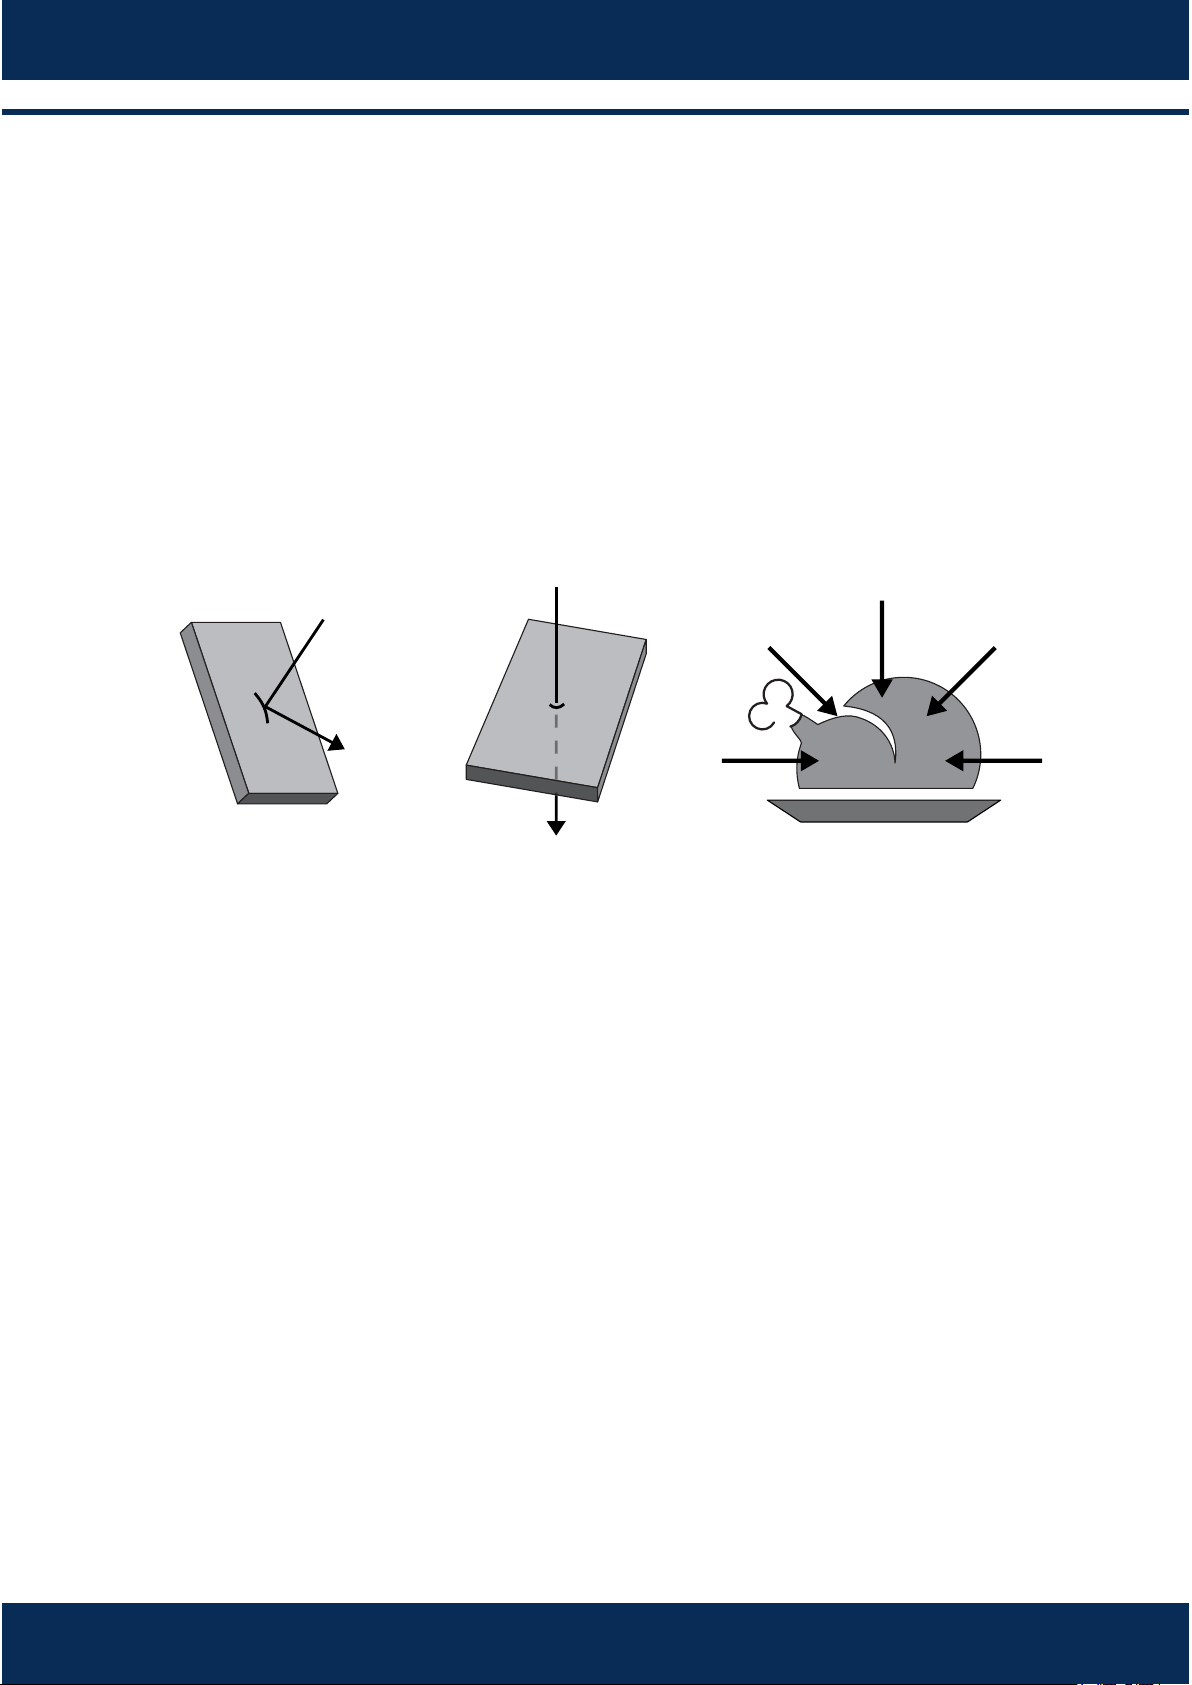
Internal heang elements transfer thermal energy to the circulang air.
The blower motor circulates air at high speed and envelops the food.
The circulang air goes through the catalyst where the greade-laden
vapors are broken down.
The boom heater helps the heat transfer within the chamber.
At the same me, Magnetrons generate energy via microwave that evenly
heats the food water molecules.
a)
b)
c)
d)
e)
4 ROCKET EXPRESS TECHNOLOGY
The Rocket Express oven uses a combinaon of heang for high-speed forced
air convecon and microwave energy to heat forced food more quickly than
the convenonal methods.
The figure below illustrates the steps involving the technology:
a
b
c d
e

15
5 OPERATION PRINCIPLES
Microwaves are a type of radiant energy. As well as radio waves, visible light
and infrared, the microwaves are part of the electromagnec spectrum, i.e., it
is a form of electromagnec radiaon. They are classified as non-ionizing
radiaon, because unlike x-rays and Alpha, Beta and Gamma rays, its effects
are strictly thermal and therefore do not alter the molecular structure of the
item that is being irradiated.
The basic principle of microwaves is to cook by molecular vibraon. They
penetrate the food surface in a depth that ranges from two to seven
cenmeters, heang the molecules of water, fat and sugar by making them
vibrate. The heat is transmied to the interior of the food by thermal
conducon, demysfying the idea that the microwaves cook food from the
inside out.
The Rocket Express works through the associaon between microwaves and
hot air directed towards the food. The variables in the operaon consist of:
Each operaon recipe can be programmed with up to six steps and each of
them can have the variables menoned above.
Temperatures: The preparaon mes are short and so are the steps. The
temperature variaon between steps will not be observed by the unit.
Normally the temperature used is the same temperature as the cook cavity
set point.
Operaon me.
Chamber temperature.
Microwaves power.
Air speed.
a)
b)
c)
d)
INSTALLATION AND OPERATION MANUAL
16
Microwaves: The microwave is adjustable between 0% and 100% for each 30
second fracon. For example, the microwaves in a one-minute recipe with
microwave programmed at 50% will run for 15 and stop for 15 seconds. Then
they will energize for another 15 seconds and stop for the remaining 15
seconds. In 1 minute, they will act for a total of 30 seconds. The microwaves
heat the food internally and do not require a specific mean to propagate.
Microwaves are reflected by metals but will penetrate glass, plascs, and
ceramics. The microwaves penetrate food and become aracted to sugar, fat
and water molecules.
The use of plasc or paper containers is forbidden because they will burn
inside the oven because of the heat.
Operaon Time: The food heated by microwaves occur from the outside in
and the penetraon level will vary depending on the type of food. Therefore,
you should relate the preparaon me to the food composion, the quanty
of food processed, as well as its density and thickness. The larger the food
amount (quanty or density), the greater the me or percentage will be
needed for the microwave to take effect.
Hot Air Speed: The hot air can be adjusted between 10% and 100% speed.
The hot air is controlled by a blower motor which will envelope the food.
The higher the air speed, the more likely it will be to burn the product on
the outside.
The higher the air speed, the more it will affect the texture and crispness of
the product.
a)
b)
CHARACTERISTICS
METAL GLASS, PAPER AND
PLASTIC
FOOD

17
6 RECIPES CREATION
When creang a recipe, all the variables menoned earlier should be
considered. The microwaves and the air speed are the crical factors for a
successful preparaon.
To get faster results in the recipe creaon, we suggest beginning
programming at 1/10 of the total me of preparaon used in a convenonal
process.
The effect of microwaves is more efficient at the beginning of the processes.
For frozen products, create a recipe with two or three steps so the food will
thaw at the beginning and the desired crispness and product presentaon are
achieved toward the end of the process.
Later, combine the air speed variaons to reach the desired crispness and
color. Remember, the air also transmits heat to the food so keep that in mind
when seng blower percentage. The food's weight, size, and shape are
crical when seng the total cook me.
The following informaon is crical when creang a new recipe.
The inial temperature of the product will change the desired results if not
considered (e.g.; frozen, cold, or room temperature).
The size and/or weight variaon of the poron of product will also play a
crucial role in determining the correct sengs.
Only use containers approved for a microwave oven to prevent any
damage and that the product gets properly cooked.
a)
b)
c)
INSTALLATION AND OPERATION MANUAL

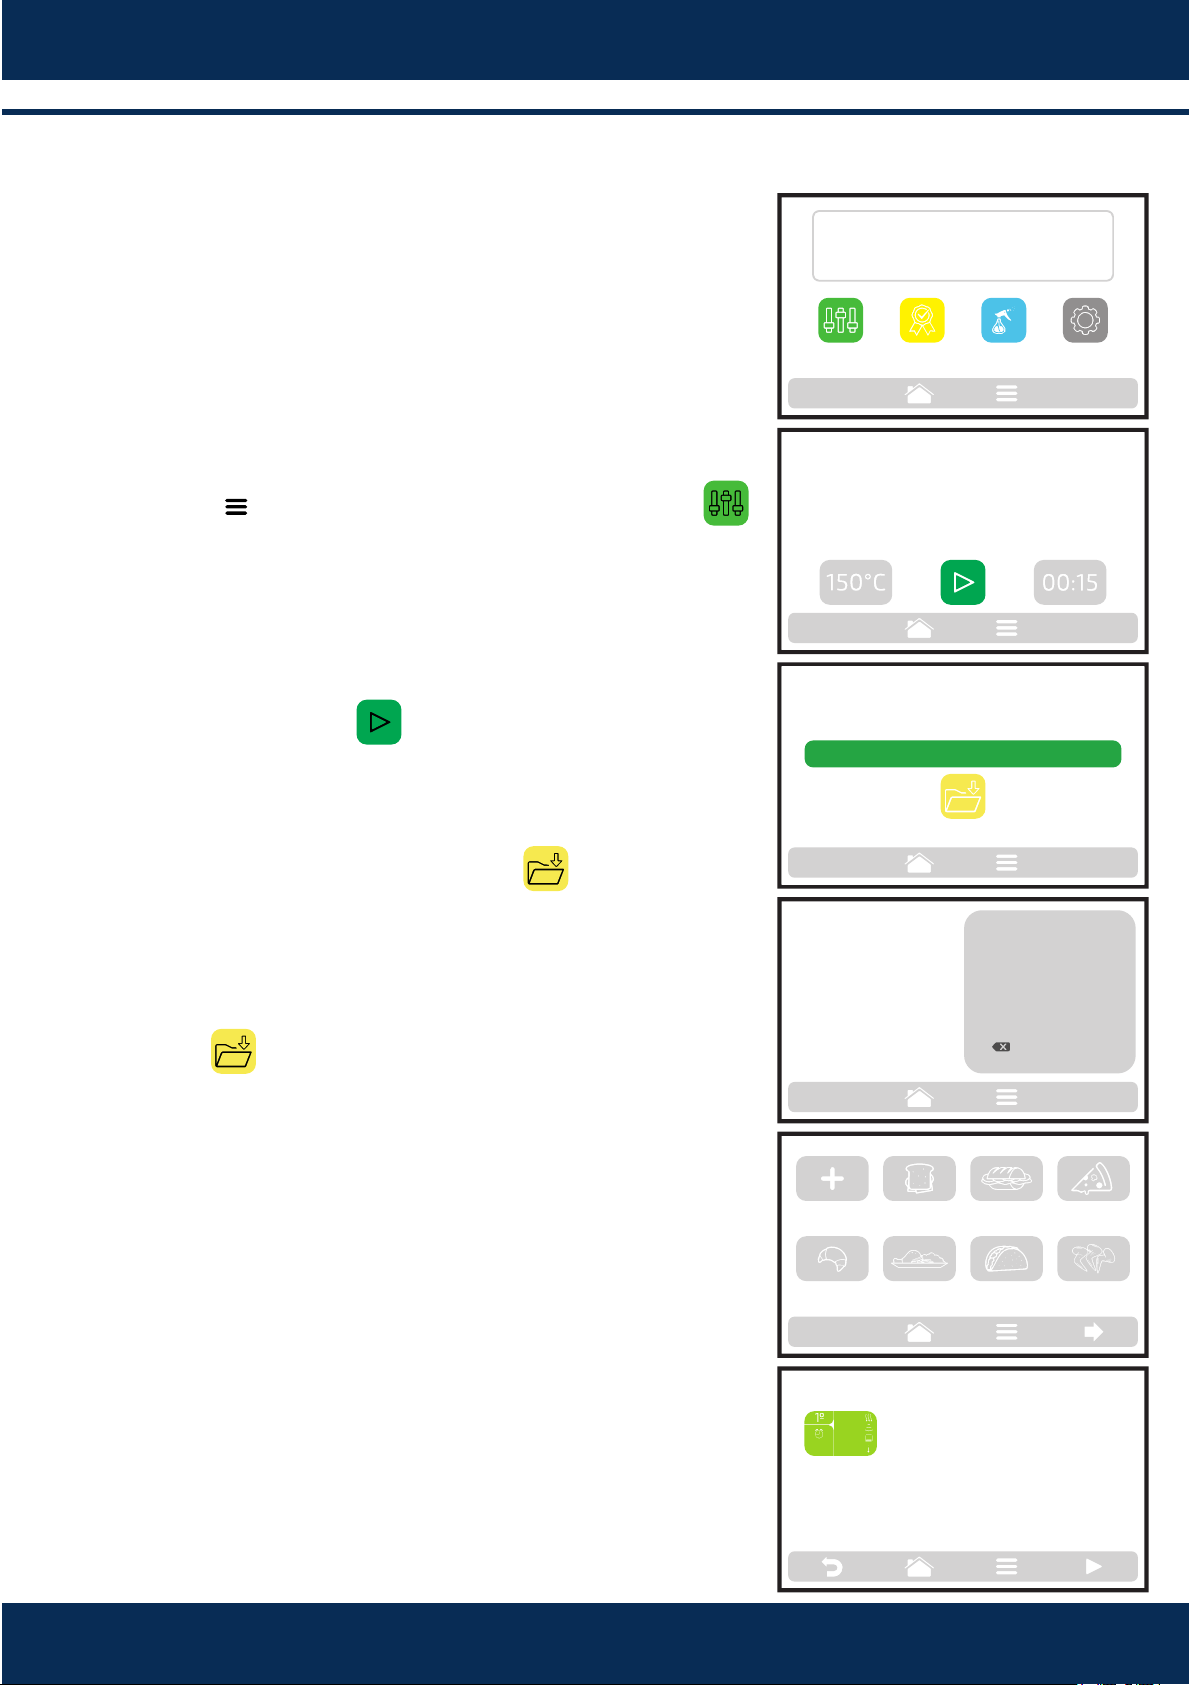
18
OPERATION
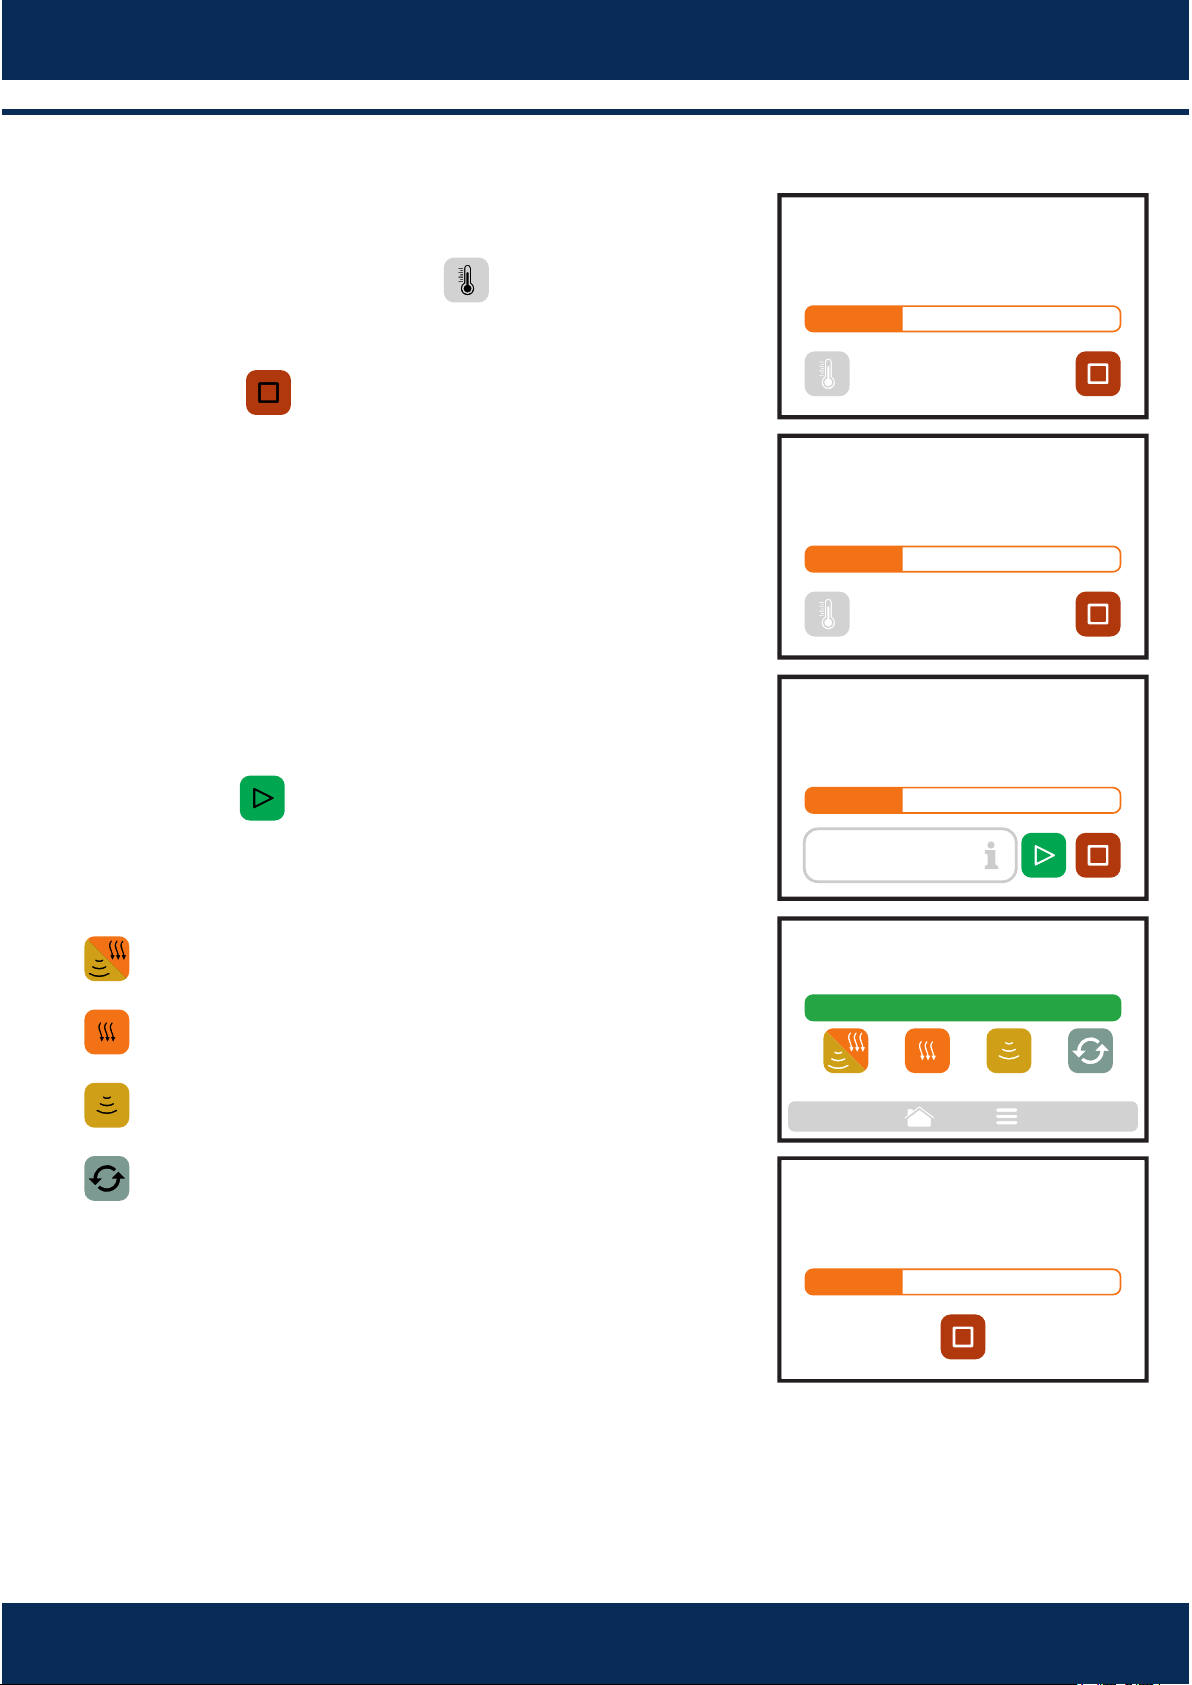
Preheang.
Pto start the oven preheang process, aer turning
on the equipment, push the buon .
The following screen will present the ACTUAL
temperature, PROGRAMMED temperature and the
bar indicang the remaining me to ulize the
equipment.
Note: The mer is only iniated when the ACTUAL
temperature is next to the PROGRAMMED; that
occurs so that the oven temperature enters in
uniformity throughout the chamber.
Execung a recipe.
Aer the preheang.
Acvate the desired GROUP. To access the next
groups page, ulize the paging arrows: / .
The RECIPES of the selected group will be displayed,
press on the recipe you wish.
To return to the GROUPS screen, push the buon: .
To access the next recipes page, ulize the paging
arrows: / .
Make sure there is food inside the oven, otherwise
it will cause damages to the equipment.
The recipe will enter in execuon immediately.
The screen will present the group name, recipe
name, situaon of the operaon (In progress or
paused), and the remaining me for conclusion of
the recipe.
WEDNESDAY
06/28/2017
15:40
PREHEATING SETTINGS
DAILY CLEANING
GUIDE
7
7.1
a)
b)
7.2
a)
b)
c)
d)
1min 30s
WAIT,
OVEN IN PRE-HEATING
274°C
CURRENT
280°C
PROGRAMMED
MEAL
FINISHING
TEX-MEX CHICKEN
WINGS
GRATIN
BREAKFAST
SANDWICH
PIZZASUBS BAKERY
GROUPS - page 1 CURRENT 210°C
2 SUB 15cm
or 2 SUB 30cm
1 SUB 15cm 2 SUB 15cm
1 SUB 30cm
3 SUB 15cm
3 SUB 15cm
2 SUB 30cm
SUBS - page 1
4 SUB 15cm
2 SUB 30cm
3 SUB 15cm
or 1 SUB 15cm
and 1 SUB 30cm
4 SUB 15cm
1 SUB 30cm
IN PROGRESS 1 min 33s
SUBS
1 SUB 15cm
19
It is possible to verify the temperature of the
CHAMBER RESISTAN CE and o f the LOWER
RESISTANCE pressing the buon.
In case you wish to cancel the execuon of a recipe,
push the buon.
If the equipment door is opened, the operaon will
be paused; however, it is resumed when the door is
closed.
If the programmer of the recipes adds informaon in
one of the steps, for example: 'ADD THE TOMATOES',
the recipe will be paused and the descripon of the
informaon will be presented beside the PLAY
buon, as in the opposite image:
Push the buon to resume the execuon.
Aer the compleon of a recipe, the following
opons will be released:
Heat/Brown More: Acvates the microwave and hot
air during a predetermined me.
Brown More: Acvates only the hot air during a
predetermined me.
Heat More: Acvates only the microwave during a
predetermined me.
Repeat Recipe: Repeats the same recipe chosen by
the user.
In 'Heat/Brown More', 'Brown More' and 'Heat
More', the me will be defined at the moment of
creang the recipe.
The four opons menoned above may be disabled
so that they do not appear in any recipe. Learn more
in the User's Sengs block: Edit Accesses (see page
31).
e)
f)
g)
h)
i)
j)
k)
IN PROGRESS 1 min 33s
SUBS
1 SUB 15cm
CHAMBER RESISTANCE: 250 °C
LOWER RESISTANCE: 250 °C
IN PROGRESS 1 min 33s
SUBS
1 SUB 15cm
ADD TOMATOES
PAUSED OPERATION 1 min 33s
SUBS
1 SUB 15cm
SUBS
1 SUB 15cm
REPEAT
RECIPE
HEAT/
BROWN MORE
BROWN
MORE
HEAT
MORE
IN PROGRESS 10s
SUBS
1 SUB 15cm
HEAT MORE
Example of Heat More in execuon:
READY!
INSTALLATION AND OPERATION MANUAL
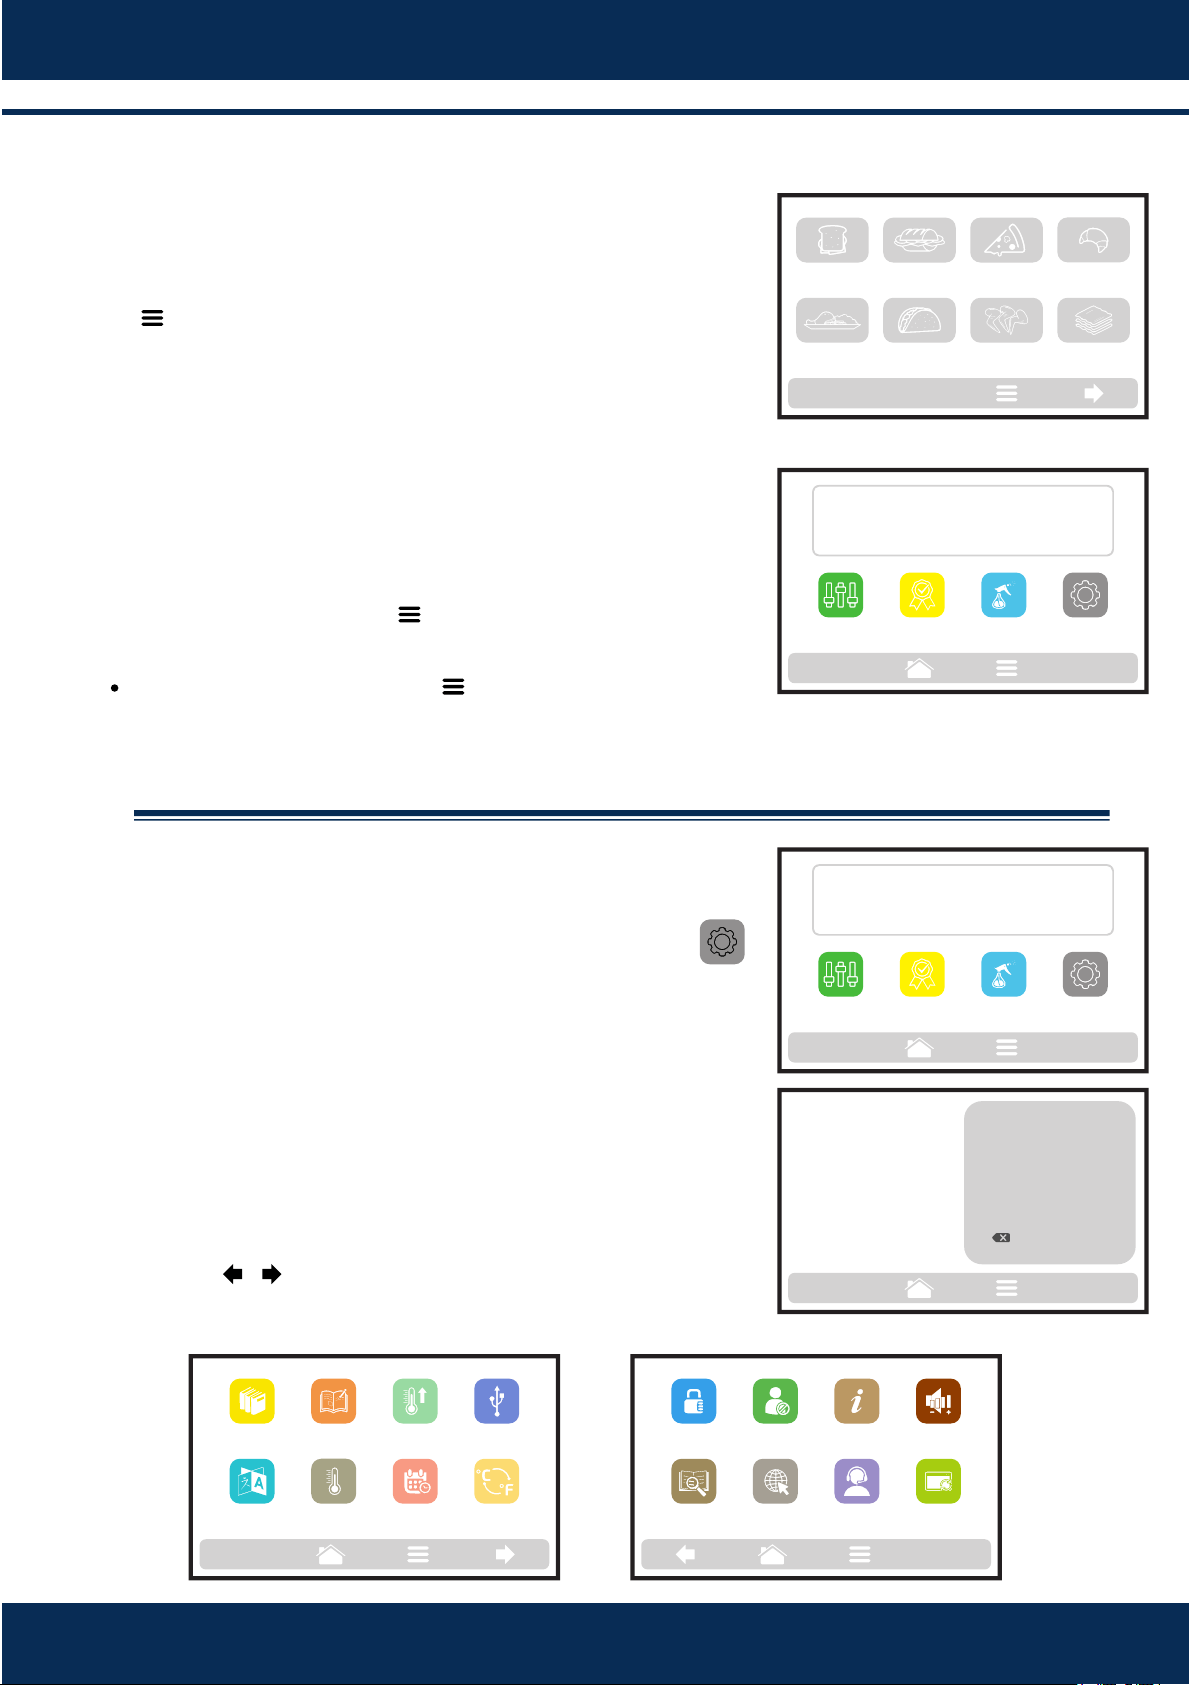
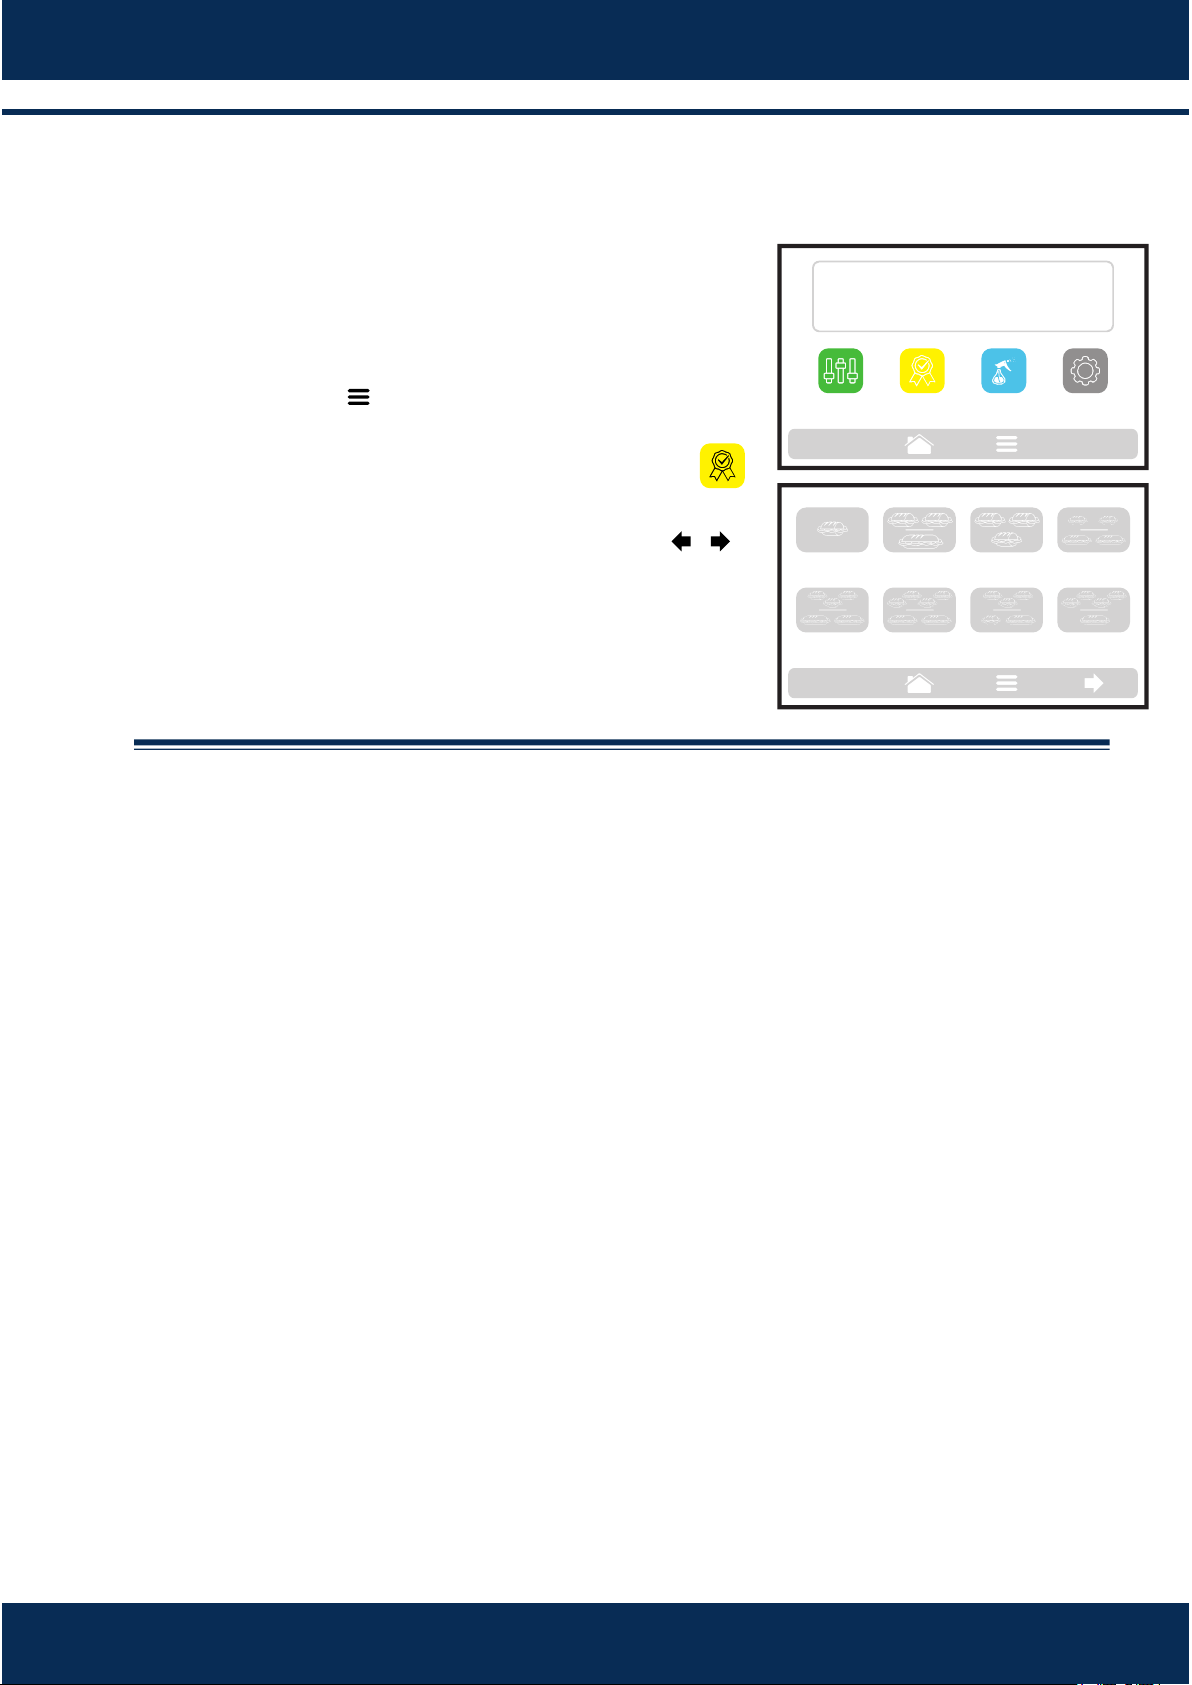
Accessing the Opons.
To access the sengs, at any me, touch on the icon
found in the fixed menu bar.
In the Opons Screen, there will be informaon such
as: Current temperature in the Chamber, Current
temperature of the Resistance, Test Mode (see page
34), Favorites (see page 33), Daily Cleaning Guide
(see page 35) and Sengs (below).
Touching on the icon once more will return to
the origin screen.
Example: If the buon was pressed from the
Recipes screen, pushing it once more will return to
the Recipes screen.
User's Sengs.
Inside the Opons Screen, click on the icon
on the screen to inform the User's Password that
will be presented.
The standard password for the sengs is 456789.
The password may be changed (see page 31).
The User's Sengs screen is composed by sixteen
items. Use the arrows to access the next opons
screen: / . Understand each item in detail in the
following pages.
7.3
a)
b)
c)
7.4
MEAL
FINISHING
TEX-MEX CHICKEN
WINGS
GRATIN
BREAKFAST
SANDWICH
PIZZASUBS BAKERY
GROUPS - page 1 CURRENT 210°C
LOWER
RESISTANCE:
250°C
TEMPERATURE
250°C
RESISTANCE
OF THE CHAMBER:
TEST
MODE
SETTINGSFAVORITES
GUIDE
DAILY CLEANING
LOWER
RESISTANCE:
250°C
TEMPERATURE
250°C
RESISTANCE
OF THE CHAMBER:
TEST
MODE
SETTINGSFAVORITES GUIDE
DAILY CLEANING
USBEDIT
RECIPE
EDIT
GROUP
PREHEATING
LANGUAGE DATE/TIME
CELSIUS /
FAHRENHEIT
CURRENT
TEMPERATURE
SETTINGS - page 1
SACMANUAL INTERNET
SETTINGS - page 2
CHANGE
PASSWORD
EDIT
ACESS
INFORMATION
OF THE MANUFACTURER
VOLUME
RESTORE
FACTORY
SETTINGS
TYPE THE ACCESS
PASSWORD TO THE
SETTINGS
******
1
4
7
2
5
8
0
3
6
9
OK
20

7.4
a)
b)
c)
7.4
a)
b)
USBEDIT
RECIPE
EDIT
GROUP
PREHEATING
LANGUAGE DATE/TIME
CELSIUS /
FAHRENHEIT
CURRENT
TEMPERATURE
SETTINGS - page 1
EDIT GROUP - page 1
CREATE NEW
GROUP
BREAKFAST
SANDWICH
SUBS PIZZA
BAKERY MEAL FINISHING TEX-MEX CHICKEN
WINGS
GROUP: SNACKS
EDIT
IMAGE
DELETE
GROUP
DELETE
RECIPES
EDIT
RECIPES
EDIT
NAME
ORDER
A S D
F
G H
J
K
L
C
Z X C V B N M
123/-*
E
R
T
U
I O
P
YW
RECIPE NAME
!
%
&
( )
-
. :
< >
/
ABCDE
°
3 4
5
7
8
9 06
2
1
,
@
+
#
*
RECIPE NAME
.1 User's Sengs: EDIT GROUP.
To edit the groups, touch on the icon, the groups
screen will be presented. However, in the first
posion will be the icon in which it is possible to
Create New Group.
Choose between creang a new group, or select the
group you wish to edit. It is possible to have up to a
total of sixteen groups.
The available opons aer choosing between eding
or creang a group will be:
Edit Name: changes the name of the group, you may
use leers, numbers or special characters.
Edit Image: changes the image the group icon takes.
Edit Recipes: accesses the opons of edion to the
recipes of the selected group.
Delete Group: deletes all the informaon of the
selected group, including the recipes.
Delete Recipes: deletes the previously selected
recipes.
Order: orders the locaon in which the group
appears among the exisng groups.
.1.1.Edit Name.
When selecng the Edit Name opon, the following
screen will be presented:
Clicking on and the screen will toggle
between leers and numbers/special characters.
Deletes a character;
Space bar;
Saves the name and returns to the opons.
123/-*
ABCDE
21
INSTALLATION AND OPERATION MANUAL

7.4
a)
b)
7.4
a)
7.4
a)
b)
.1.2. Edit image.
Rocket Express has an image gallery that enables the
user to change the images of the groups. Press the
icon .
A screen with an image library will be presented,
browse through the groups and select the desired
image. It is also possible, instead of adding an image,
to maintain the first leer of the group name as the
group icon, just click on the ABC icon.
For example: if your group is called SNACKS, on the
group screen, Snacks will have leer 'L' as its icon.
.1.3. Edit Recipes.
The opon to edit recipes will be explained in more
detail in item 7.4.2 (from page 24)
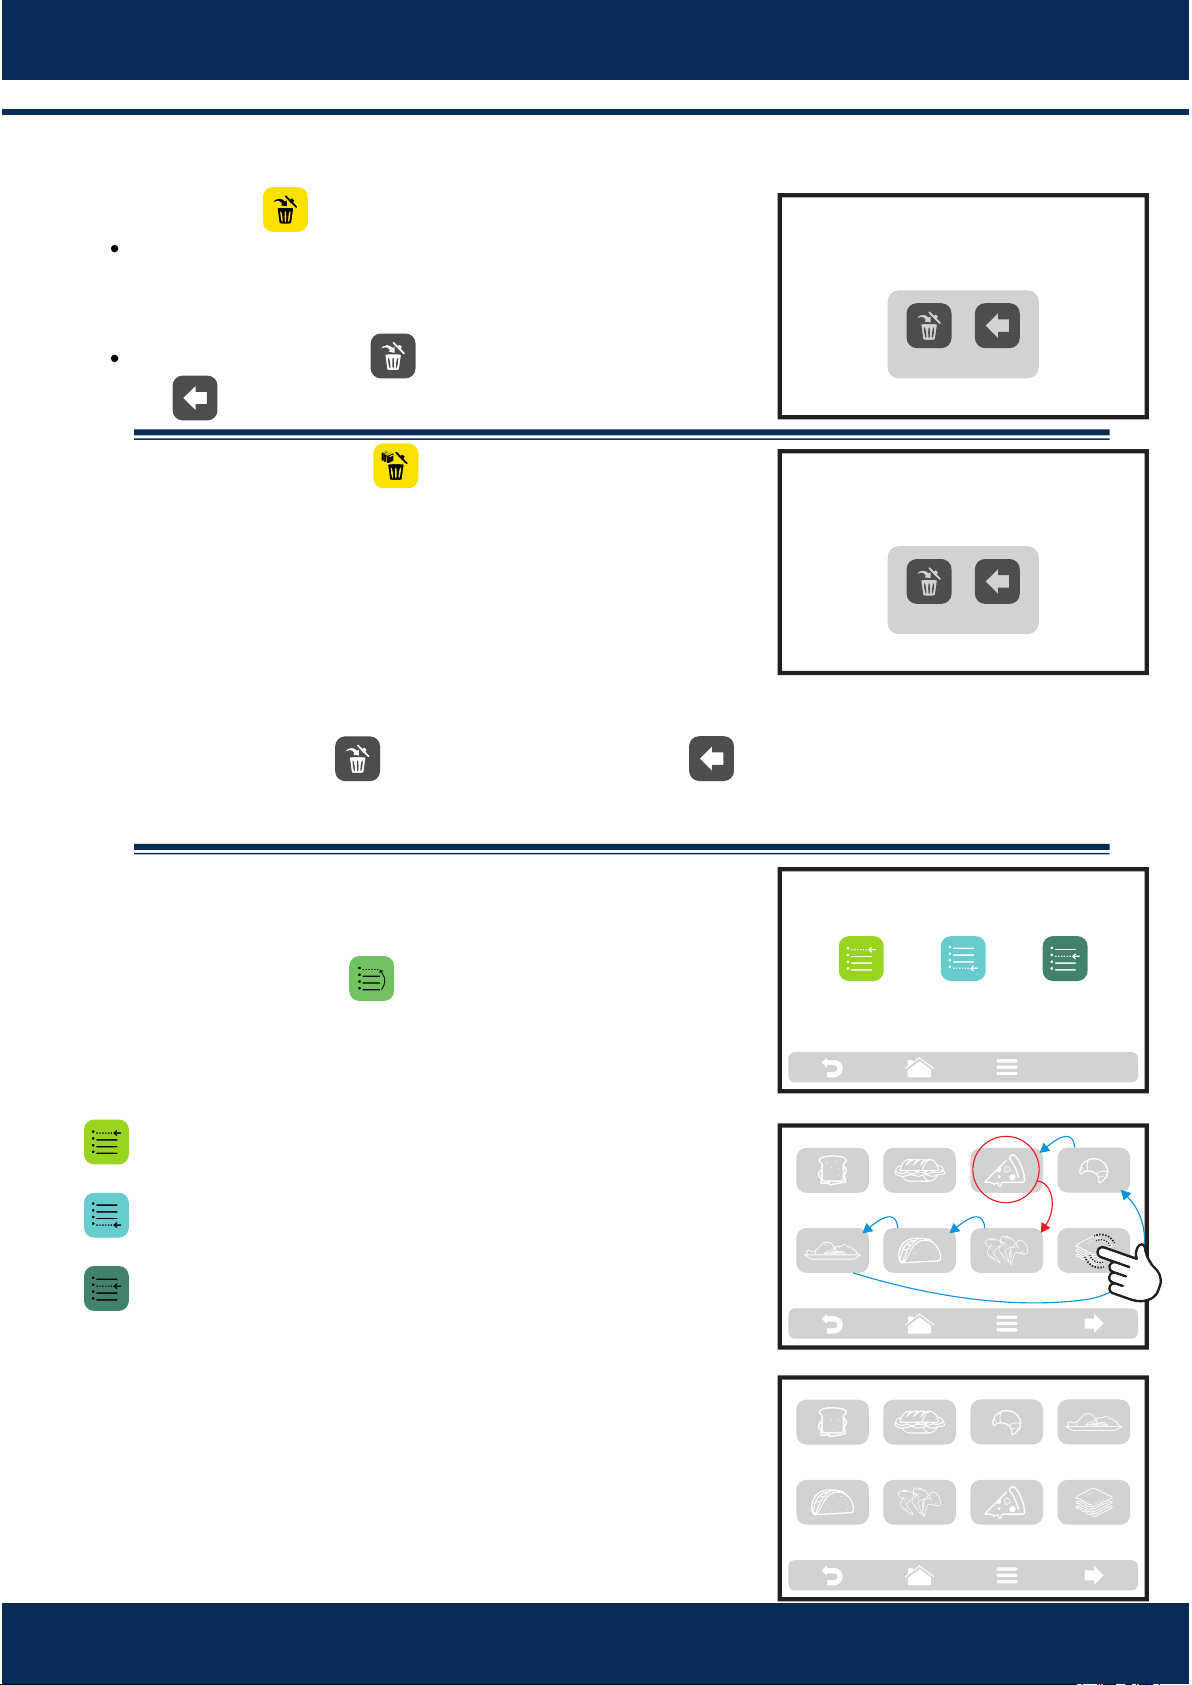
.1.4. Delete Recipes.
The delete recipes opon will enable you to delete
only the recipes of the previously selected group.
Press the buon. On the next screen, it will be
possible to delete a selecon of recipes, or all the
recipes:
Select recipes:
Sselect the recipes you wish to delete, the will
indicate the selected ones, and then click on the trash
can of the fixed bar .
The opposite message will appear - To confirm the
exclusion of the recipes, click on the icon 'DELETE
SELECTION'; to connue selecng, click on
‘CONTINUE SELECTION’:
BREAKFAST
SANDWICH
SUBS PIZZA
BAKERY MEAL FINISHING TEX-MEX CHICKEN
WINGS
CHOOSE AN IMAGE FOR THE RECIPE
FIRST
CHARACTER OF
RECIPE NAME
DELETE RECIPES
SELECT
RECIPES
DELETE
ALL
2 SUB 15cm
or 2 SUB 30cm
1 SUB 15cm 2 SUB 15cm
1 SUB 30cm
3 SUB 15cm
3 SUB 15cm
2 SUB 30cm
SELECT RECIPES FOR DELETION
4 SUB 15cm
2 SUB 30cm
3 SUB 15cm
or 1 SUB 15cm
and 1 SUB 30cm
4 SUB 15cm
1 SUB 30cm
x
x
x
x
DELETE
SELECTION
CONTINUE
SELECTION
MEAL
FINISHING
TEX-MEX CHICKEN
WINGS
GRATIN
SNACKS PIZZASUBS BAKERY
GROUPS - page 1 CURRENT 210°C
22
c)
7.4
a)
b)
7.4
a)
b)
Delete All:
When clicking on the Delete All icon, the following
message will be presented:
To confirm, click on or, to cancel, and return click
on .
.1.5. Delete Group
ATTENTION: When choosing the opon of deleng
the group, all the informaon referring to the group
will be lost: recipes, steps and other informaon. And
in case the user does not perform a Backup (see page
29), it will not be possible to recover this informaon.
Press the buon to confirm your choice, or to
return to the opons screen.
.1.6 Order
The Order funcon , enables to change the sequence
in which the groups will appear on the groups screen.
This screen is composed by three buons:
Place at the beginning of the list: The group is moved
to the beginning of the groups list.
Place at the end of the list: The group is moved to the
end of the groups list.
Choose locaon in the list: The operator will be
directed to the groups screen to choose the locaon
he/she wants.
According to adjacent screen, if the chosen group at
the beginning of the eding process is PIZZA, and the
user wishes to place it before LASAGNA, just click on
the LASAGNA icon. Observe by the example that the
origin and desnaon locaon are not replaced, the
soware just reorders the groups.
ALL THE RECIPES
OF THE SNACKS GROUP
WILL BE REMOVED
BACKDELETE
THE GROUP
WILL BE DELETED
BACKDELETE
CHANGE ORDER
PLACE AT THE
BEGINNING OF THE LIST
PLACE AT THE
END OF THE LIST
CHOOSE LOCATION
IN THE LIST
POSITION AFTER:
MEAL
FINISHING
TEX-MEX CHICKEN
WINGS
BREAKFAST
SANDWICH
SUBS BAKERY
GRATIN
PIZZA
CHOOSE LOCATION IN THE LIST: AFTER
POSITION BEFORE:
MEAL
FINISHING
TEX-MEX CHICKEN
WINGS
LASAGNA
BREAKFAST
SANDWICH
PIZZASUBS BAKERY
CHOOSE LOCATION IN THE LIST: BEFORE
23
INSTALLATION AND OPERATION MANUAL
7.4
a)
b)
c)
7.4
a)
b)
c)
A S D
F
G H
J
K
L
C
Z X C V B N M
123/-*
E
R
T
U
I O
P
YW
RECIPE NAME
!
%
&
( )
-
. :
< >
/
ABCDE
°
3 4
5
7
8
9 06
2
1
,
@
+
#
*
RECIPE NAME
123/-*
ABCDE
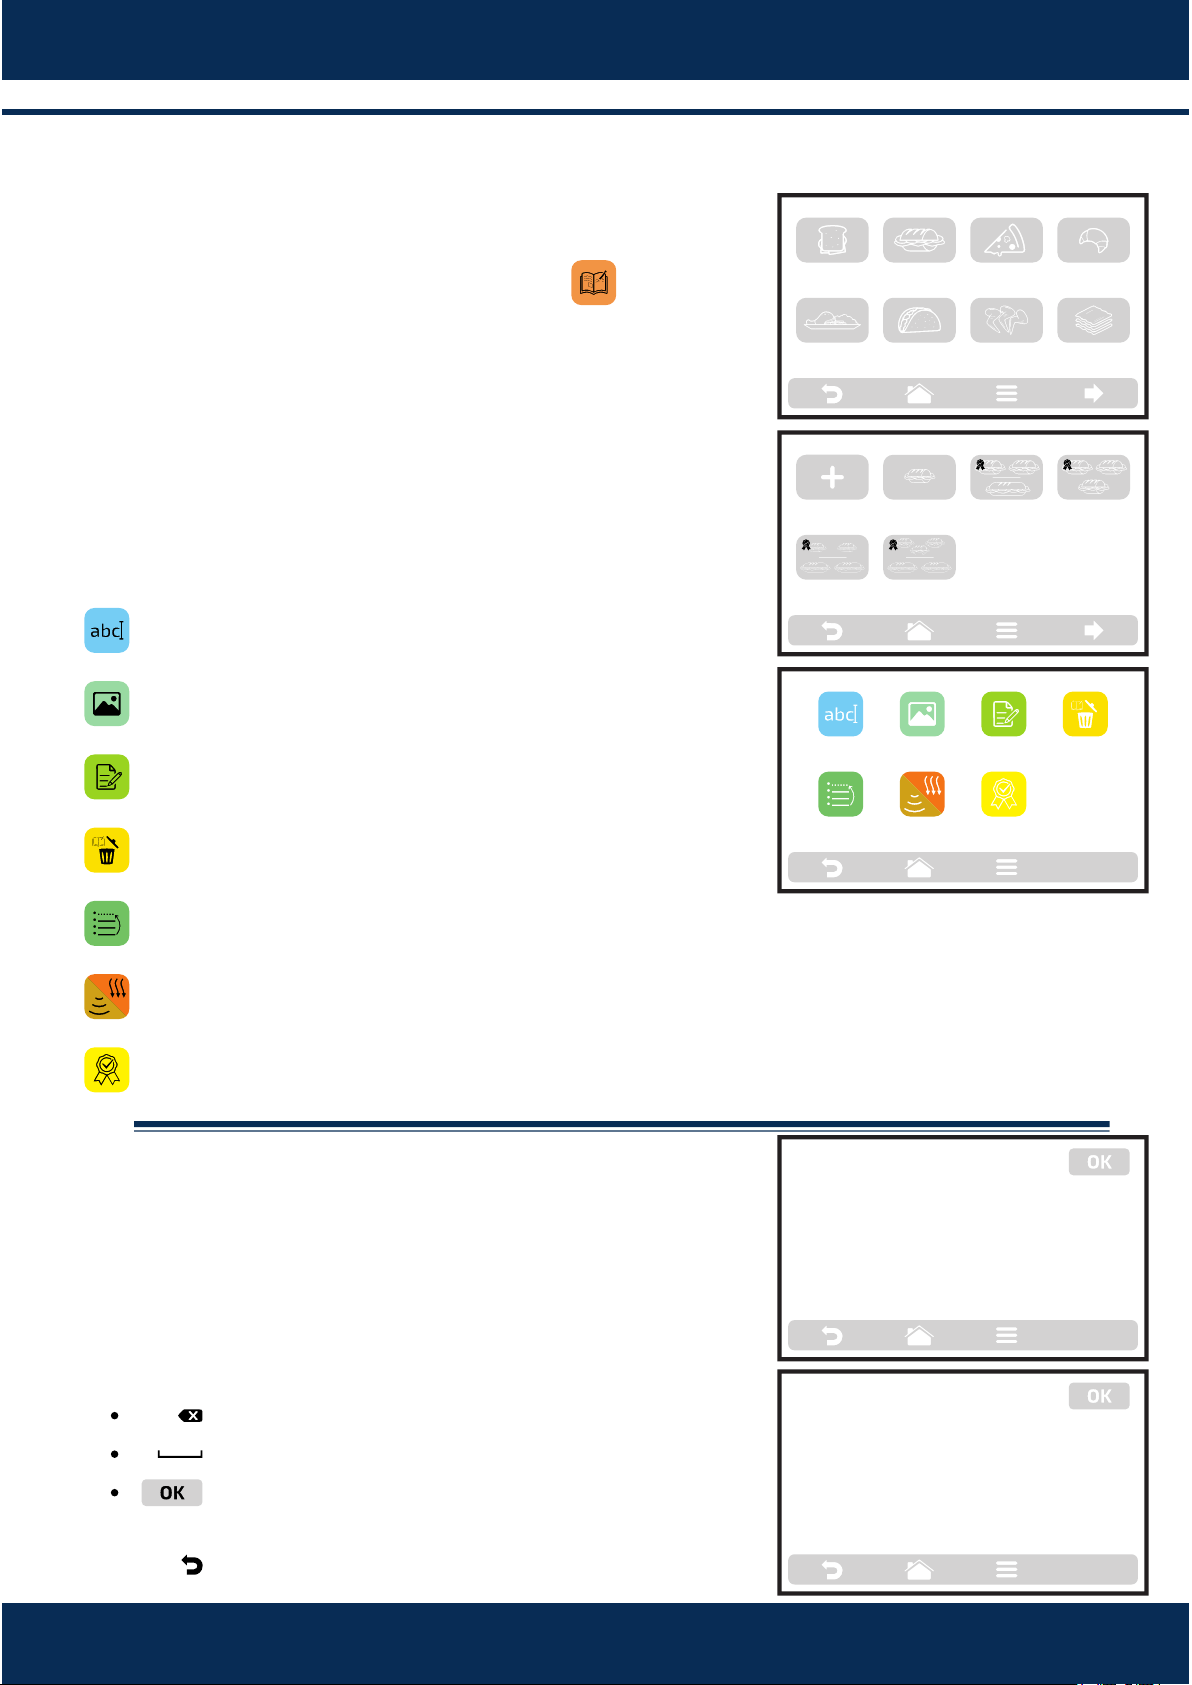
.2 User's Sengs: EDIT RECIPES.
To edit the recipes, touch on the icon . The groups
screen will be displayed. Choose in which group you
wish to change the recipes.
When accessing the recipes, it will be possible to edit
an already existent one or create a new recipe.
The available opons aer choosing between eding
or creang a recipe will be:
Edit Name: changes the name of the recipe, you may
use leers, numbers or special characters.
Edit Image: changes the image the recipe icon
takes.
Edit Steps: accesses the opons for edion of the
steps of the selected recipe.
Delete Recipe: deletes all the informaon of the
selected recipe, including the steps.
Order: orders the locaon in which the recipe
appears among the other recipes of the group.
Edit Heat/Brown More: Changes the me of Heat /
Brown More funcon.
Add/Remove from Favorites: Adds or removes the
recipe in the Favorites list.
.2.1. Edit Name.
When selecng the Edit Name opon, the following
screen will be presented:
Clicking on and the screen will toggle
between leers and numbers/special characters.
Deletes a character;
Space bar;
Saves the name and returns to the opons.
Use to return to the step eding opons.
TEX-MEX CHICKEN
WINGS
SUBS PIZZA
AND THE GROUP - page 1
MEAL FINISHING GRATIN
BREAKFAST
SANDWICH
BAKERY
2 SUB 15cm
or 2 SUB 30cm
3 SUB 15cm
2 SUB 30cm
1 SUB 15cm 2 SUB 15cm
1 SUB 30cm
3 SUB 15cmCREATE NEW
RECIPE
SELECT THE RECIPE - page 1
DELETE
RECIPE
EDIT
STEPS
ADD
TO THE
FAVORITE
SNACKS: 1 SUB 15cm
EDIT
IMAGE
EDIT
NAME
ORDER EDIT
HEAT/
BROWN MORE
24
7.4
a)
b)
c)
7.4
a)
b)
c)
d)
e)
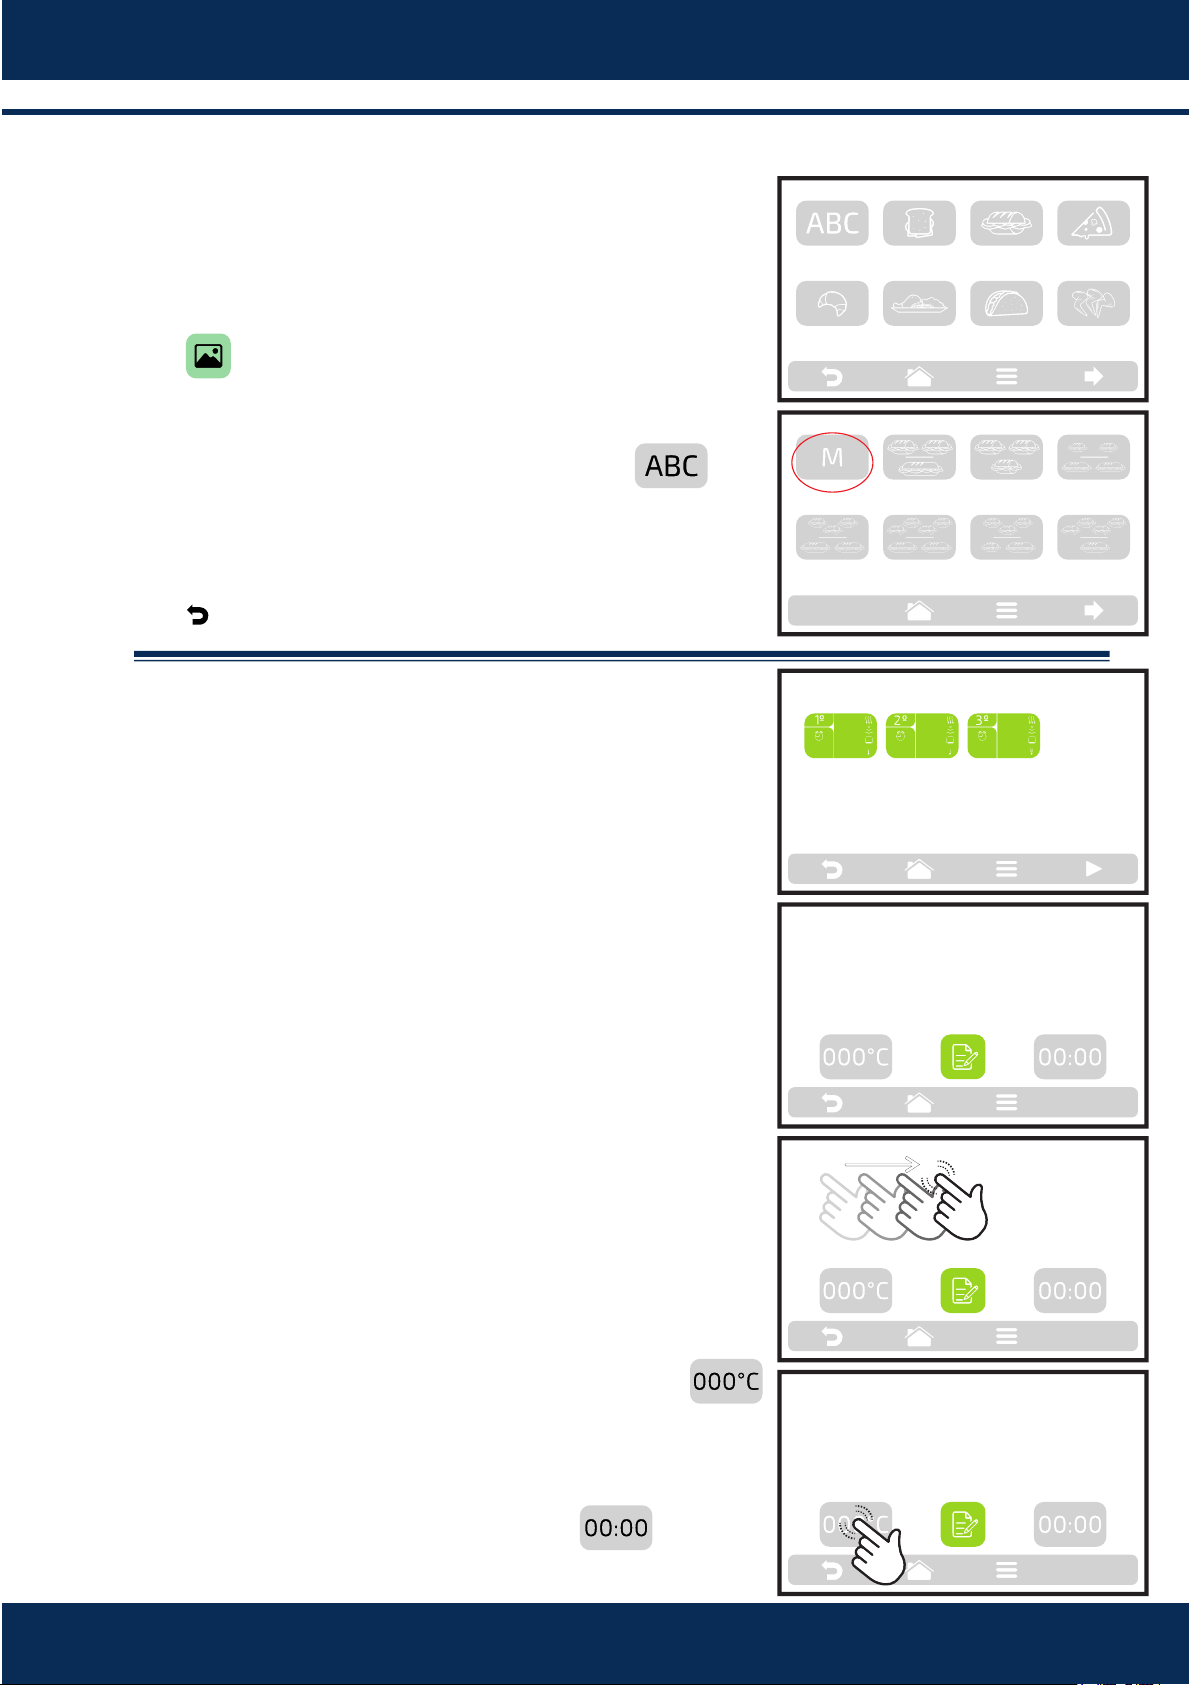
.2.2. Editar Imagem.
Rocket Express has an image gallery that enables the
user to change the images of the recipes. Press the
icon .
Browse through the groups of the image library to
select the desired icon or press the buon
to transform the first leer of the recipe name into an
icon. As shown in the adjacent example:
Use to return to the recipe eding opons.
.2.3. Edit Steps.
Every recipe supports up to 8 steps. The acve steps
will appear in green on the Edion screen. The other
ones will be transparent, according to the opposite
image. Click on a step to edit it.
For each step, it is necessary to inform:
- % of hot air;
- % of microwaves;
- % of the lower resistance (infra-red);
- temperature and me.
To change the percentage of Hot Air, Microwaves and
Lower Resistance (Infra-red), just swipe the finger
over the bar of each parameter or click on the desired
locaon.
To define the temperature, click on the icon
A keyboard will appear on the opposite side, define
the desired value and click on OK.
The same way, fill out the me:
BREAKFAST
SANDWICH
SUBS PIZZA
BAKERY MEAL FINISHING TEX-MEX CHICKEN
WINGS
CHOOSE AN IMAGE FOR THE RECIPE
FIRST
CHARACTER OF
RECIPE NAME
2 SUB 15cm
or 2 SUB 30cm
MIXED 2 SUB 15cm
1 SUB 30cm
3 SUB 15cm
3 SUB 15cm
2 SUB 30cm
SUBS - page 1
4 SUB 15cm
2 SUB 30cm
3 SUB 15cm
or 1 SUB 15cm
and 1 SUB 30cm
4 SUB 15cm
1 SUB 30cm
0 10 20 30 40 50 60 70 80 90 100
0
0
0
0 10 20 30 40 50 60 70 80 90 100
0
0
40
EDIT STEPS - SNACK: 1 SUB 15cm
30%
100%
20%
00:05
40°C
70%
50%
60%
80°C
00:20
10%
90%
100%
20°C
00:15
0 10 20 30 40 50 60 70 80 90 100
70
20
40
25
INSTALLATION AND OPERATION MANUAL

d)
e)
f)
g)
h)
i)
7.4
a)
Click on the buon to access the opons for
edion of the step parameters, which are:
Add Informaon the step, which will be displayed at
the end of the step during the execuon of the
recipe. Click on the icon .
Acvate and deacvate the step: The recipe only
executes acve steps. When a step is deacvated, it is
not deleted, it only remains hidden. To delete the
step, it is necessary to inform the 00:00 value to the
me parameter.
Aer concluding the edion of a step,use save
and return to the steps screen to edit, create new
step, or test the acve steps.
To test, click on the icon that is found in the fixed
bar on the steps screen. Before proceeding with the
test, make sure that there is food inside the chamber.
Use to return to the recipe eding opons.
.2.4. Delete Recipe.
Press to delete the recipe, press the buon
to confirm the exclusion or to return to
the opons for recipe edion.
ACTIVE INACTIVE
EDIT STEPS - SNACK: 1 SUB 15cm
30%
100%
20%
00:05
40°C
70%
50%
60%
80°C
00:20
10%
90%
100%
20°C
00:15
BEFORE CONTINUING THE TEST,
MAKE SURE THERE IS ANY PRODUCT
INSIDE THE OVEN.
THE RECIPE 1 SUB 15cm
WILL BE REMOVED
BACKDELETE
ADD
INFORMATION
ACTIVATE/
DEACTIVATE
PARAMETERS OF STEP 1
SAVE
26
7.4
a)
b)
7.4
a)
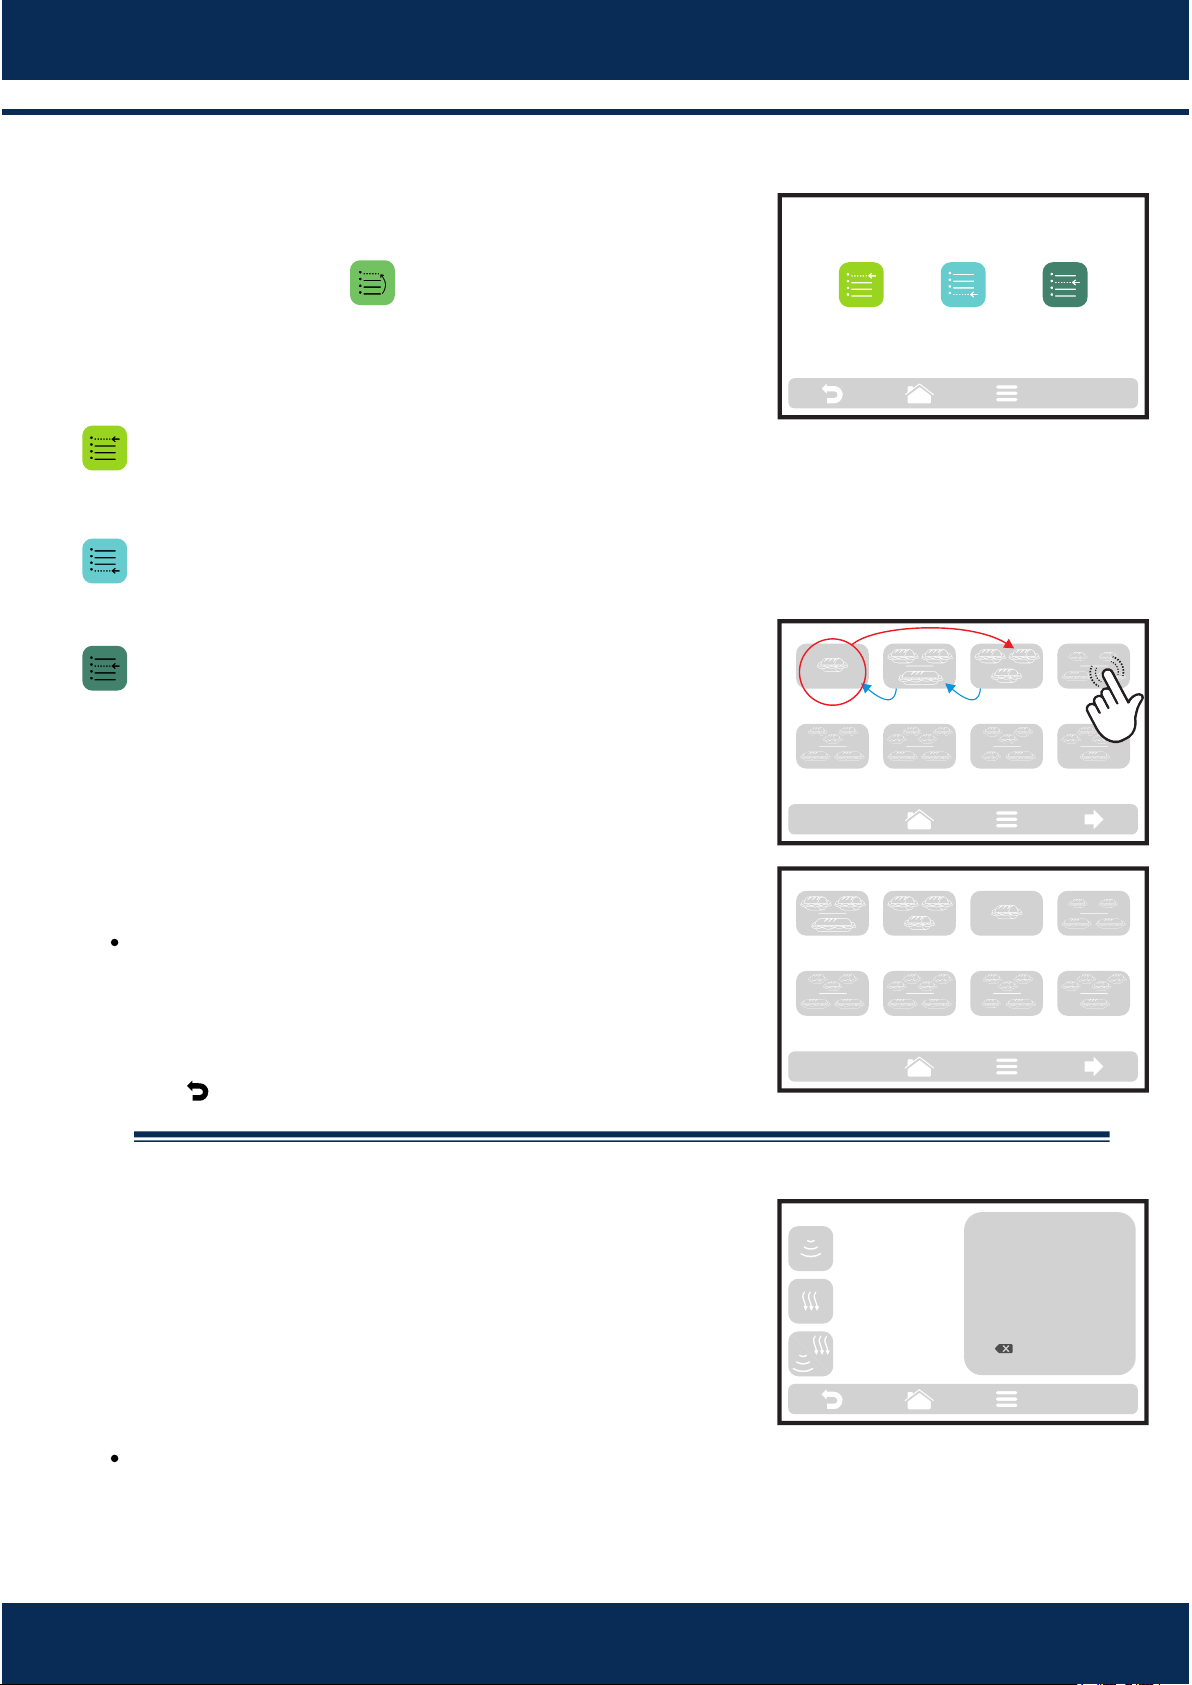
.2.5 Order
The Order funcon , enables to change the sequence
in which the groups will appear on the groups screen.
This screen is composed by three buons:
Place at the beginning of the list: The recipe is
moved to the beginning of the list.
Place at the end of the list: The recipe is moved to the
end of the list.
Choose locaon in the list: The operator will be
directed to the recipes screen to choose the locaon
he/she wants. according to adjacent example, if the
chosen recipe at the beginning of the eding process
is ’ and the user wishes to place it before ‘1 SUB 15cm
‘2 SUB 15cm 2 SUB 30cm’, just click on the icon of the
desired locaon.
Observe by the example that the origin and
desnaon locaon are not replaced, the soware
just reorders the recipes.
Use to return to the recipe eding opons.
.2.6. Edit Heat/Brown More.
The Heat/Brown More funcon is defined by recipe,
that is, it is not a fixed value for all of them, the user
may define the me he/she wishes for each one of
the opons.
Remember that:
Brown More - Only acvates HOT AIR.
Heat More - Acvates only the MICROWAVE.
Heat/Brown More - Merges both elements.
CHOOSE LOCATION IN THE LIST: AFTER
2 SUB 15cm
2 SUB 30cm
1 SUB 15cm2 SUB 15cm
1 SUB 30cm
3 SUB 15cm
3 SUB 15cm
2 SUB 30cm
SUBS - page 1
4 SUB 15cm
2 SUB 30cm
3 SUB 15cm
or 1 SUB 15cm
and 1 SUB 30cm
4 SUB 15cm
1 SUB 30cm
2 SUB 15cm
2 SUB 30cm
1 SUB 15cm 2 SUB 15cm
1 SUB 30cm
3 SUB 15cm
3 SUB 15cm
2 SUB 30cm
SUBS - page 1
4 SUB 15cm
2 SUB 30cm
3 SUB 15cm
or 1 SUB 15cm
an 1 SUB 30cm
4 SUB 15cm
1 SUB 30cm
CHOOSE LOCATION IN THE LIST: BEFORE
CHANGE ORDER
PLACE AT THE
BEGINNING OF THE LIST
PLACE AT THE
END OF THE LIST
CHOOSE LOCATION
IN THE LIST
EDIT HEAT/BROWN
1
4
7
2
5
8
0
3
6
9
OK
__s
BROWN MORE
__s
HEAT/BROWN MORE
__s
HEAT MORE
27
INSTALLATION AND OPERATION MANUAL
b)
c)
d)
e)
7.4
a)
b)
c)
d)
To define the me, just click on the icon or on
the value locaon, as the indicaons on the screen
show.
Use the number pad to inform the me and click on
OK.
The Heat/Brown More funcon may be disabled in
the Sengs of Edit Accesses (see page 31).
Use to return to the recipe eding opons.
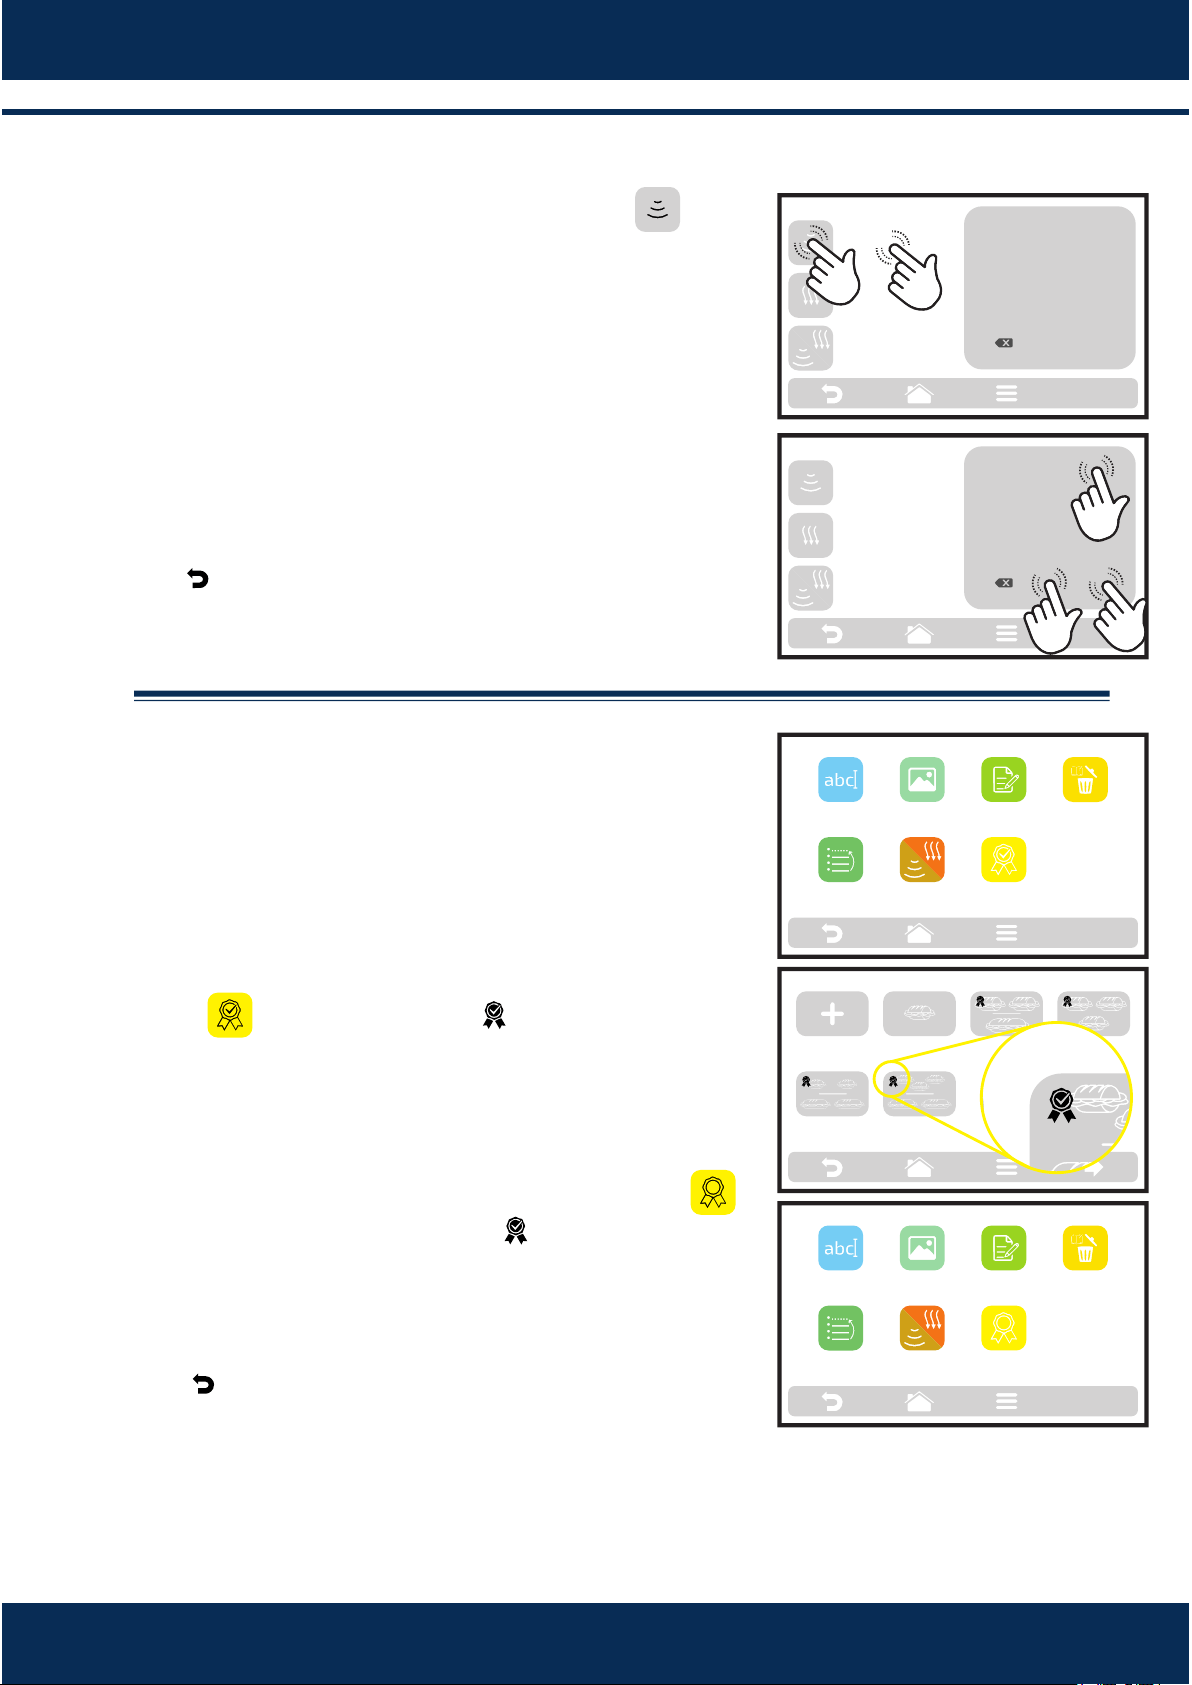
.2.7. Add / Remove from Favorites.
The Favorites funcon may be accessed through the
opons screen in the fixed bar. However, it will be
explained in detail on page 33.
To add the recipe to the favorites, click on the
icon . A small ribbon will be added in the
upper le corner of the recipe icon.
To remove the recipe from the favorites, just do the
same process. In the recipe edion opons screen,
the Remove from Favorites icon will appear: ,
when clicking on it, the ribbon will disappear from
the icon and the recipe will be removed from the
Favorites list.
Use to return to the user eding opons.
EDIT HEAT/BROWN
1
4
7
2
5
8
0
3
6
9
OK
__s
BROWN MORE
__s
HEAT/BROWN MORE
__s
HEAT MORE
EDIT HEAT/BROWN
1
4
7
2
5
8
0
3
6
9
OK
30s
BROWN MORE
__s
HEAT/BROWN MORE
__s
HEAT MORE
DELTE
RECIPE
EDIT
STEPS
ADD
TO
FAVORITE
SNACKS: 1 SUB 15cm
EDIT
IMAGE
EDIT
NAME
ORDER EDIT
HEAT/
BROWN MORE
2 SUB 15cm
or 2 SUB 30cm
3 SUB 15cm
2 SUB 30cm
1 SUB 15cm 2 SUB 15cm
1 SUB 30cm
3 SUB 15cmCREATE NEW
RECIPE
SELECT THE RECIPE- page 1
RELETE
RECIPE
EDIT
STEPS
REMOVE
FROM
FAVORITES
SNACKS: 1 SUB 15cm
EDIT
IMAGE
EDIT
NAME
ORDER EDIT
HEAT/
BROWN MORE
28
7.4
a)
b)
c)
7.4
a)
b)
c)
d)
e)
.3 User's Sengs: PREHEATING.
The editable parameters in Preheang are:
Chamber resistance.
Lower resistance.
Preheang Time: Define the me of the stopwatch
of the Preheang screen. The purpose is to equalize
the temperature inside the chamber when the
l o w e r a n d u p p e r r e s i s t a n c e s r e a c h t h e
temperature.
To e d i t t h e v a l u e s , c l i c k o n t h e i c o n s
and change the value ulizing the
number pad beside.
Use to return to the user eding opons.
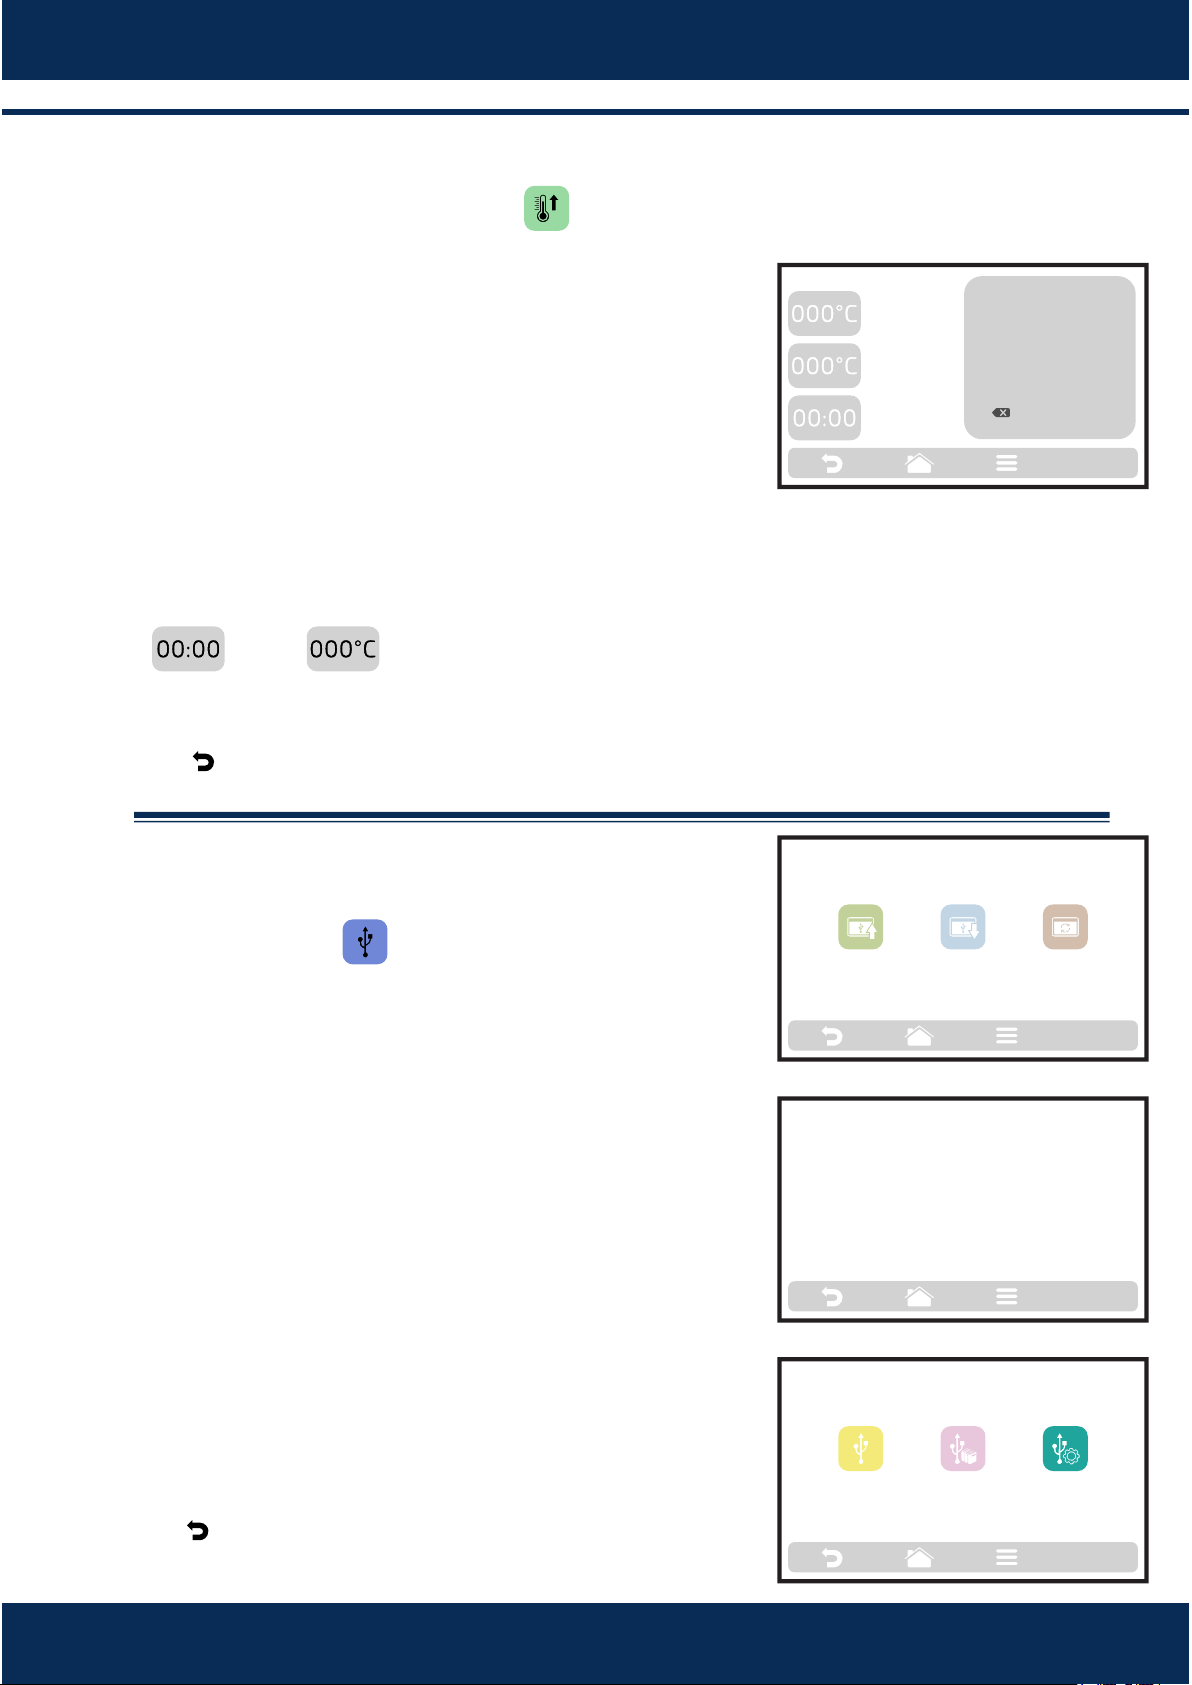
.4 User's Sengs: USB.
Press the buon . The funcons available in USB
are: Import, Export and Update System.
When selecng one of the funcons, the message: ‘Insert
the flash drive and wait for recognion ’ will appear.
AAer the recognion, the user will be taken to the
funcon opons previously chosen.
Import: All, Group or Sengs.
Export: All, Group or Sengs.
System Update.
In case of error, the displayed message will be: There was
an error during the Import/Export/Update. Please
remove the flash drive and restart the process.
Use to return to the user eding opons.
PREHEATING
1
4
7
2
5
8
0
3
6
9
OK
PREHEATING
TIME
UPPER RESISTANCE
(CEILING)
LOWER RESISTANCE
(PLATFORM)
EXPORTIMPORT
USB
SYSTEM
UPDATE
INSERT THE FLASH DRIVE AND
WAIT FOR RECOGNITION.
IMPORT
IMPORT
GROUPS
IMPORT
ALL
IMPORT
SETTINGS
29
INSTALLATION AND OPERATION MANUAL
7.4
a)
b)
7.4
a)
c)
7.4
a)
b)
c)
d)
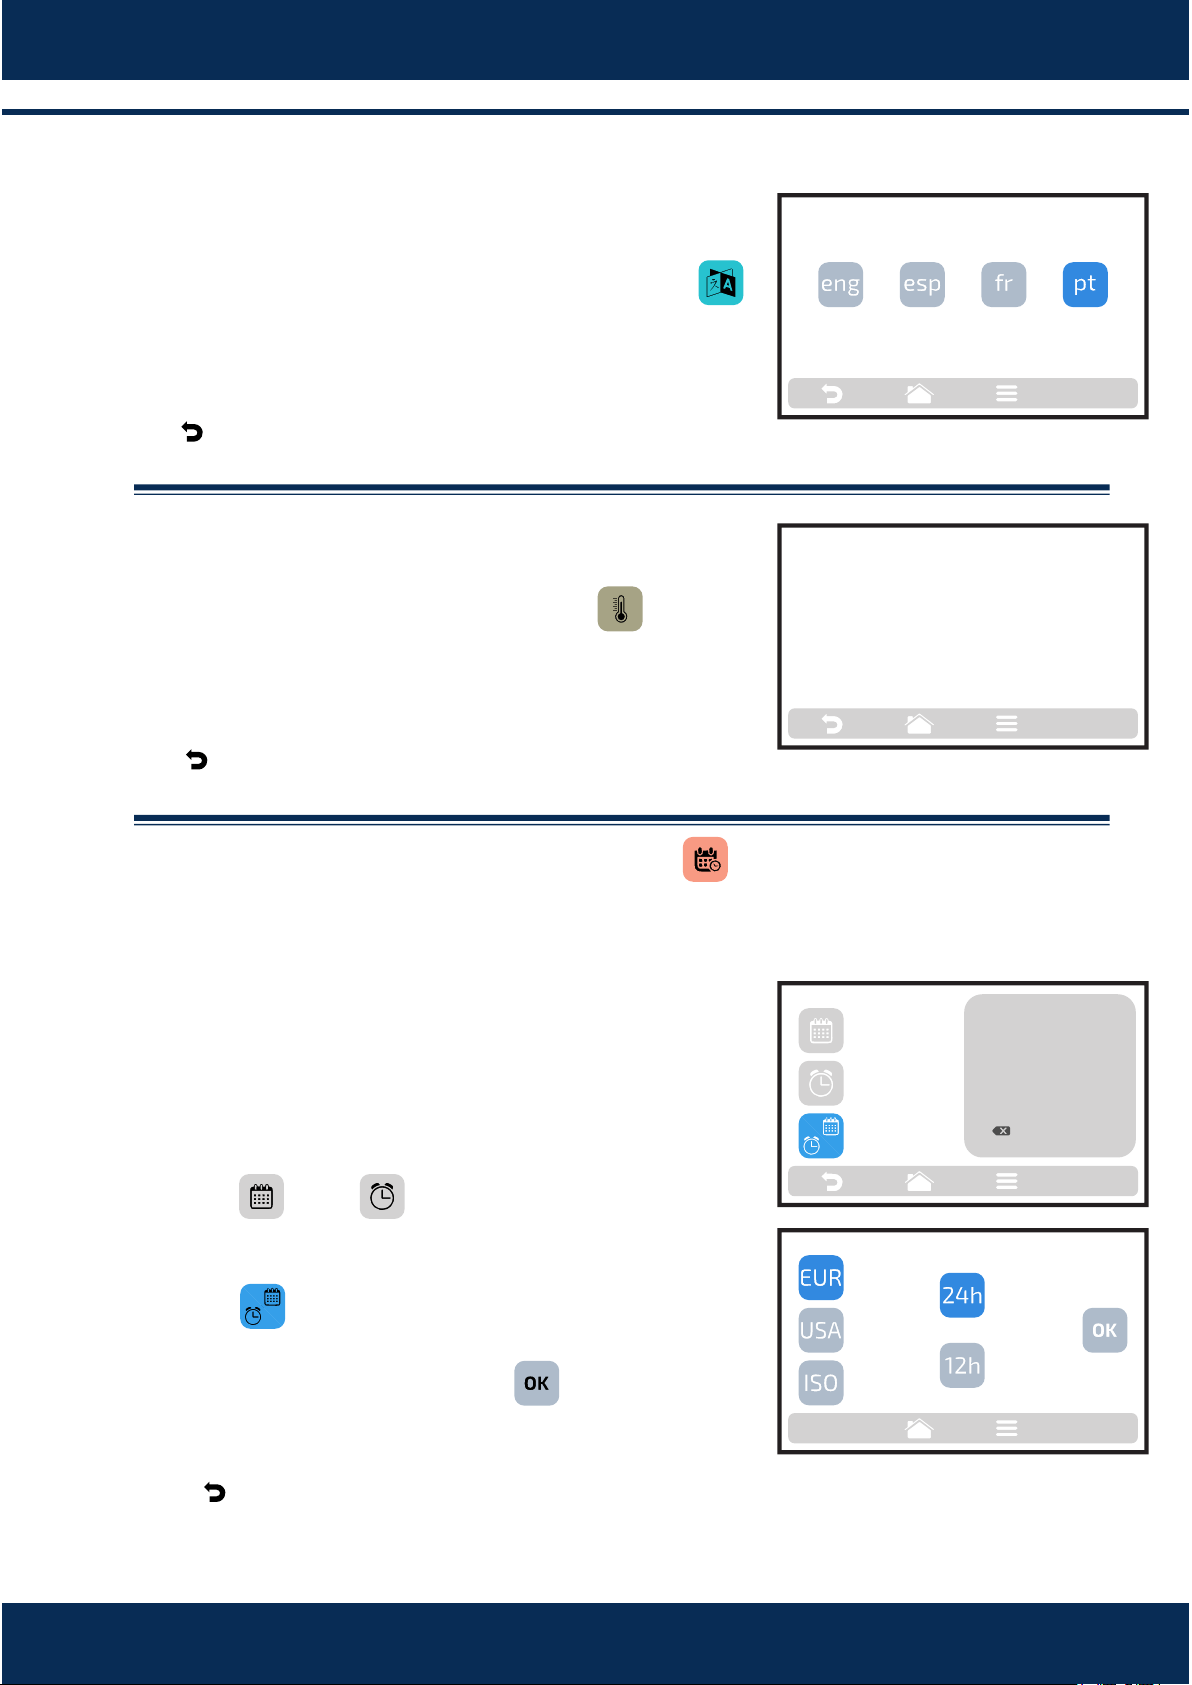
.5 User's Sengs: CHANGE LANGUAGE.
To change the language, just click on the icon
and choose the desired language.
English, Spanish, French or Portuguese.
Use to return to the user eding opons.
.6User's Sengs: CURRENT TEMPERATURE.
The Current Temperature screen : is only
informave. In it, it is possible to verify the temperature
of both resistances: the chamber and lower resistance.
Use to return to the user eding opons.
.7 User's Sengs: DATE/TIME ADJUSTMENT.
It is possible to adjust the Date, Time and format it
must be presented to the user, respecng the
following standards:
European: Time:
American:
ISO:
Click on and to edit, respecvely, the date
and me.
P r e s s to change the date/me format. The
opposite screen will be displayed. Choose the date
and me format and click on to confirm and
return to the opons.
Usee to return to the user eding opons.
PORTUGUESESPANISHENGLISH
CHANGE LANGUAGE
FRENCH
CHAMBER
RESISTANCE
CURRENT TEMPERATURE
LOWER
RESISTANCE
dd/mm/yyyy
mm/dd/yyyy
yyyy/mm/dd
DATE/TIME ADJUSTMENT
CHANGE FORMAT
__/__/__
DD/MM/YYYY
24H FORMAT
__:__
1
4
7
2
5
8
0
3
6
9
OK
MM/DD/YYYY
DD/MM/YYYY
YYYY/MM/DD
CHANGE DATE/TIME FORMAT
12H FORMAT
24H FORMAT
24h Format
12h Format
30
7.4
a)
b)
7.4
a)
b)
c)
7.4
a)
b)
c)
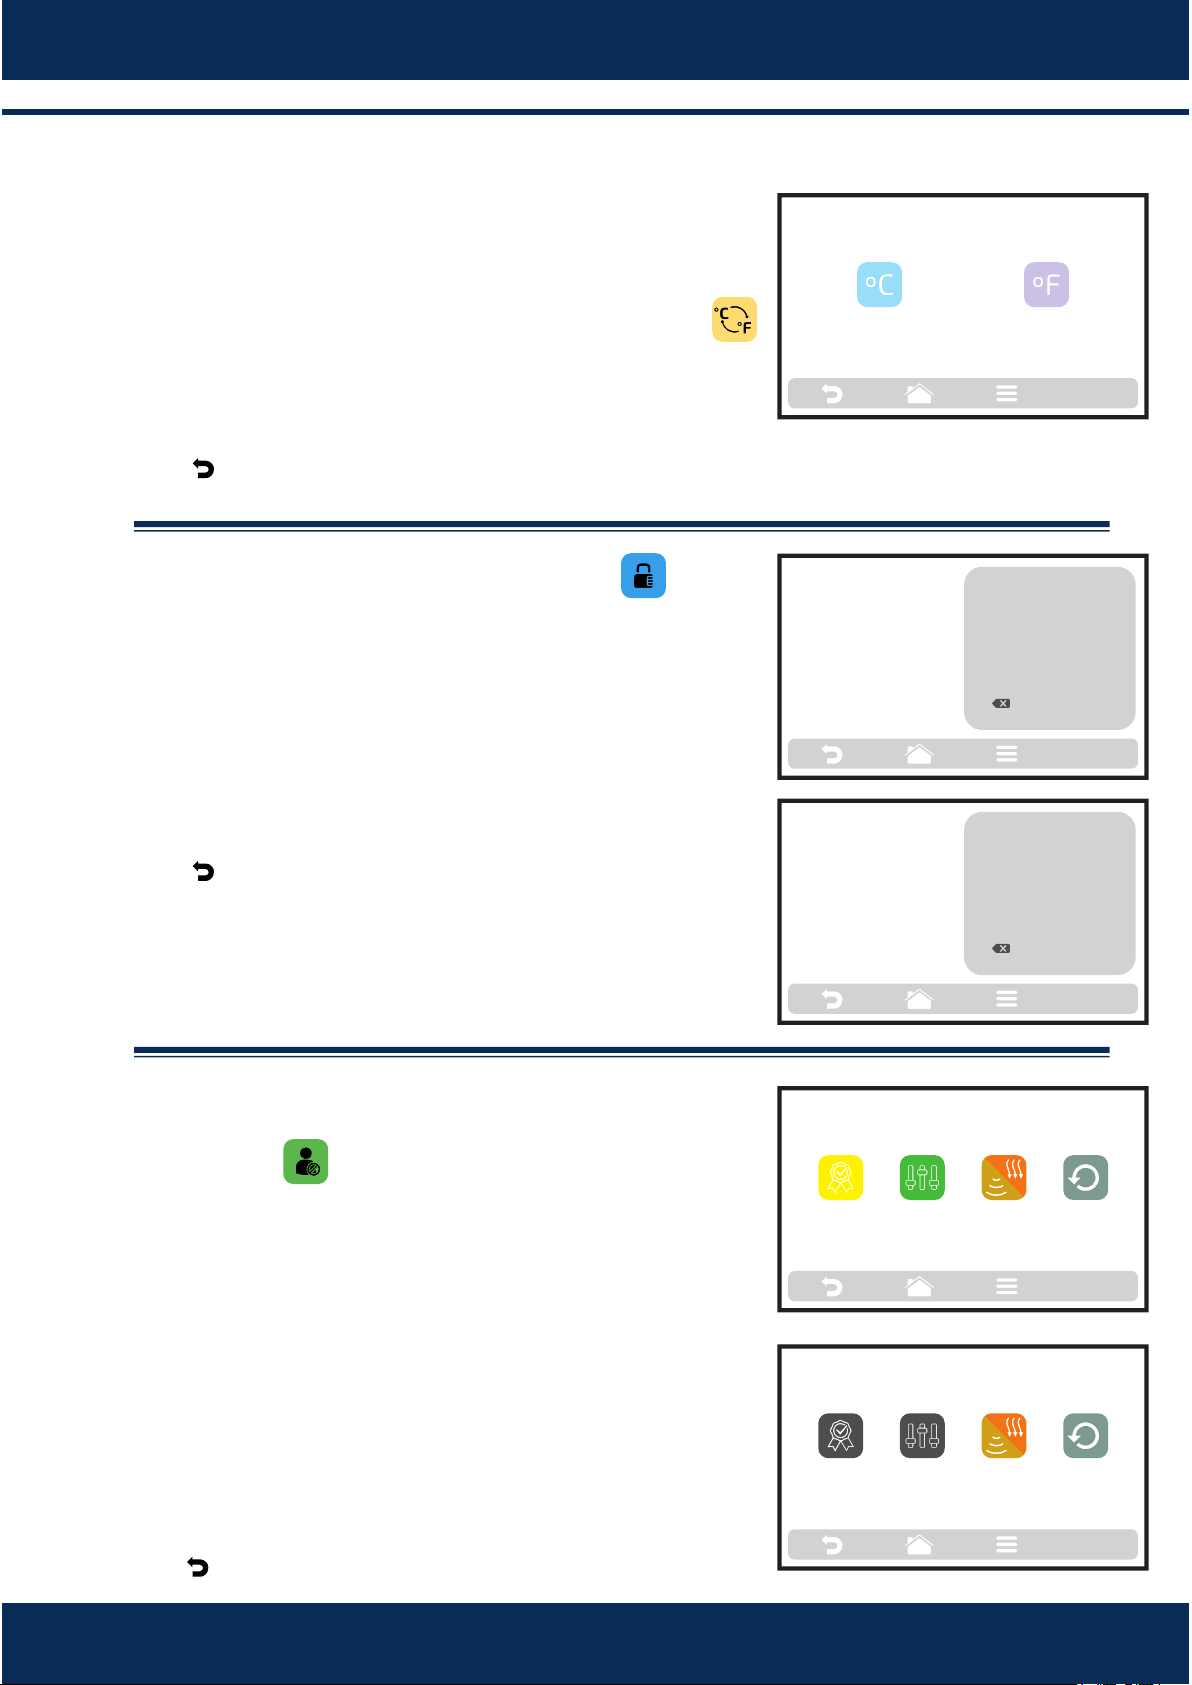
.8 User's Sengs: CELSIUS/FAHRENHEIT.
Change the temperature format displayed in the oven
between Celsius and Fahrenheit, Click on the icon
among the User's Sengs, and define the
temperature format you wish.
Use to return to the user eding opons.
.9 User's Sengs: CHANGE PASSWORD.
To change the user's password, just type the new
password and then confirm it.
In case you forget the password, contact Technical
Assistance.
Use to return to the user eding opons.
.10 User's Sengs: EDIT ACCESSES.
Edit Accesses corresponds to the funcon in which you
may block funcons to which the operators have access.
For example: If you wish that the Favorites and Test
Mode funcons are never accessed by the operators,
just click on both of them, which will turn dark gray,
indicang that they are locked unl the moment you
wish to unlock them.
To unlock, just click on the desired funcons once
more.
Use to return to the user eding opons.
CELSIUS/FAHRENHEIT ADJUSTMENT
CELSIUS
FAHRENHEIT
TYPE
NEW
PASSWORD
******
CHANGE PASSWORD
1
4
7
2
5
8
0
3
6
9
OK
CHANGE PASSWORD
CONFIRM
NEW
PASSWORD
******
1
4
7
2
5
8
0
3
6
9
OK
EDIT ACCESSES
FAVORITES
TEST MODE
HEAT/
BROWN
REPEAT
RECIPE
EDIT ACCESSES
FAVORITES
TEST MODE
HEAT/
BROWN
REPEAT
RECIPE
31
INSTALLATION AND OPERATION MANUAL
7.4
a)
b)
7.4
a)
b)
7.4
a)
b)
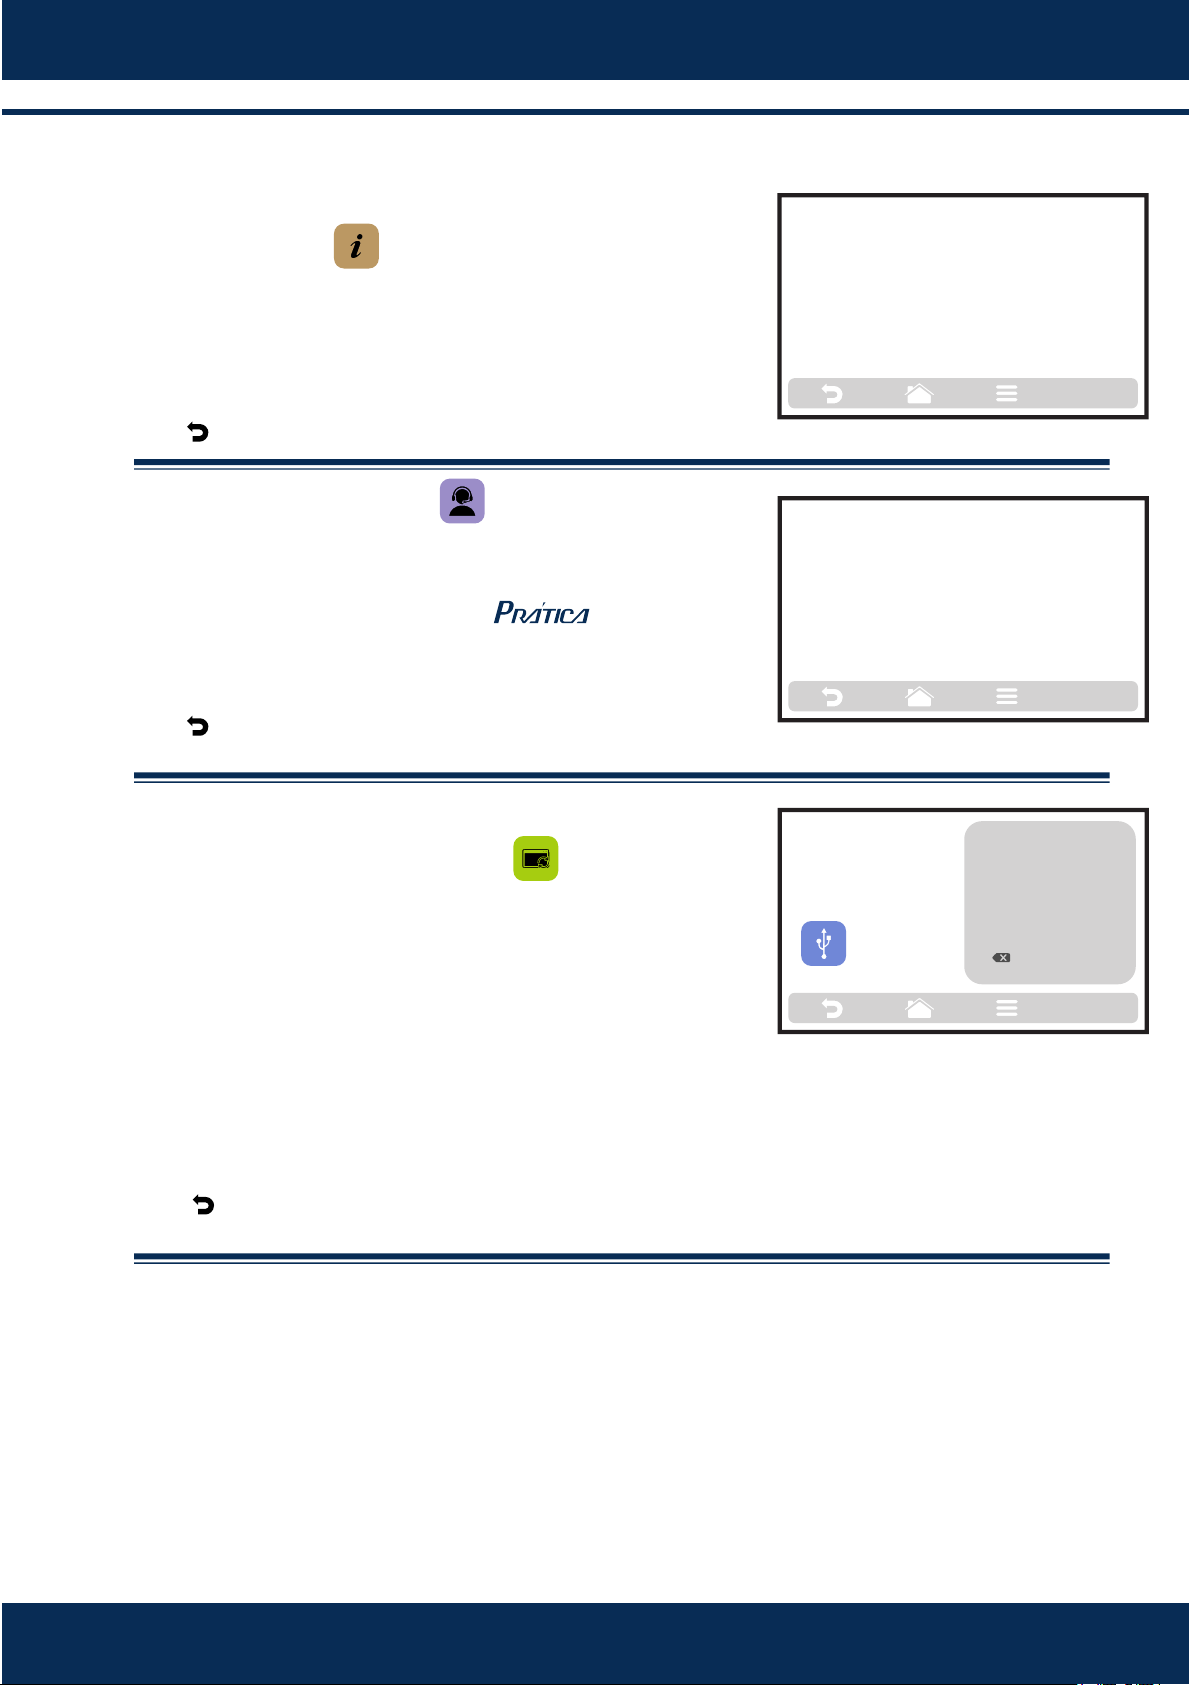
. 1 1 U s e r ' s S e n g s : M A N U FA C T U R E R ' S
INFORMATION.
Informaon on Firmware Version, Serial and
Manufacturing Date of the Rocket Express are contained.
Use to return to the user eding opons.
.12 User's Sengs: SAC.
In the SAC informaon, you will find all the
necessary data to contact to clear out
doubts, request repairs or technical visits
Use to return to the user eding opons.
.13 User's Sengs:
RESTORE FACTORY SETTINGS.
ATTENTION: The Restore Factory Sengs opon will
delete all the Groups, Recipes and their Steps,
besides the Sengs defined by the user. Make sure
to create a Backup through USB before proceeding.
Aer inserng the password and touching OK: IT IS
NOT POSSIBLE TO RECOVER THE INFORMATION.
Use to return to the user eding opons.
MANUFACTURER'S INFORMATION
Rocket Express
Firmware: V.1.0
Serial Number: 1234
Manufacturing Date: 08/11/2016
32
SAC
Address of the Factory:
Prática Produtos S.A.
Rodovia BR 459 - km 101
Pouso Alegre - MG - Brasil
ZIP: 37550-000
pratica@praticabr.com.br
at@praticabr.com.br
Grande São Paulo
+55 11 2526-1200
Other regions
+55 35 3449-1200
THE ACTION WILL DELETE
ALL THE GROUPS, RECIPES
ANDSETUP ADJUSTMENTS.
CREATE A BACKUP OR
CONFIRM WITH THE
PASSWORD.
******
1
4
7
2
5
8
0
3
6
9
OK
WWW.PRATICAFORNOS.COM.BR
WWW.PRATICAUSA.COM
7.5
a)
b)
c)
d)
Favorites
The Favorites funconality works as a shortcut,
in which you may allocate the main and most
ulized recipes. To access it, just press the
Opons buon in the fixed menu bar.
Aer opening the Opons screen, touch the icon .
Browse through the recipes using the arrows: / .
See how to Add or Remove a recipe from the
Favorites list on page 28.
LOWER
RESISTANCE
250°C
TEMPERATURE
250°C
CHAMBER
RESISTENCE:
TEST
MODE
SETTINGSFAVORITES DAILY CLEANING
GUIDE
2 SUB 15cm
or 2 SUB 30cm
1 SUB 15cm 2 SUB 15cm
1 SUB 30cm
3 SUB 15cm
3 SUB 15cm
2 SUB 30cm
FAVORITES - page 1
4 SUB 15cm
2 SUB 30cm
3 SUB 15cm
or 1 SUB 15cm
and 1 SUB 30cm
4 SUB 15cm
1 SUB 30cm
33
INSTALLATION AND OPERATION MANUAL
7.6
a)
b)
c)
d)
e)
f)
g)
h)
i)
Test Mode
In Test Mode, it is possible to define the parameters
of the step, execute it, and if the result of your test is
approved, at the end of the operaon, transform it in
Recipe.
To access the Test Mode, click on the Opons
buon . In the Opons screen, touch the icon .
Define the parameters of Time, Temperature,
percentage of Hot Air, Microwaves and of the Lower
Resistance (Infra-red).
Press the buon to start the operaon of Test
Mode.
Aer the conclusion of the operaon, the Copy
Parameters icon will be enabled: .
Copy Parameters enables the user to transport the
parameters defined in Test Mode for the Edion of
Groups and Recipes, that is, when click on the
icon ,it will be necessary to inform the user's
access password to the sengs.
Aer informing the user's password, choose
between creang a new group or allocang the
transported parameters in a new recipe in an already
existent group.
Define the name of the New Recipe, the Image and
choose in which posion (step) you wish to allocate
the transported informaon.
To finalize, if you wish, define the other steps of the
recipe.
OPERATING ON
TEST MODE
COPY
PARAMETERS
TYPE THE ACCESS
PASSWORD TO THE
SETTINGS
******
1
4
7
2
5
8
0
3
6
9
OK
EDIT GROUP - page 1
CREATE NEW
GROUP
BREAKFAST
SANDWICH
SUBS PIZZA
BAKERY MEAL FINISHING TEX-MEX CHICKEN
WINGS
EDIT STEPS
50%
90%
20%
00:15
150°C
LOWER
RESISTANCE
250°C
TEMPERATURE
250°C
CHAMBER
RESISTANCE:
TEST
MODE
SETTINGSFAVORITES DAILY CLEANING
GUIDE
0 10 20 30 40 50 60 70 80 90 100
20
50
90
READY!
34
7.7
a)
b)
c)
d)
e)
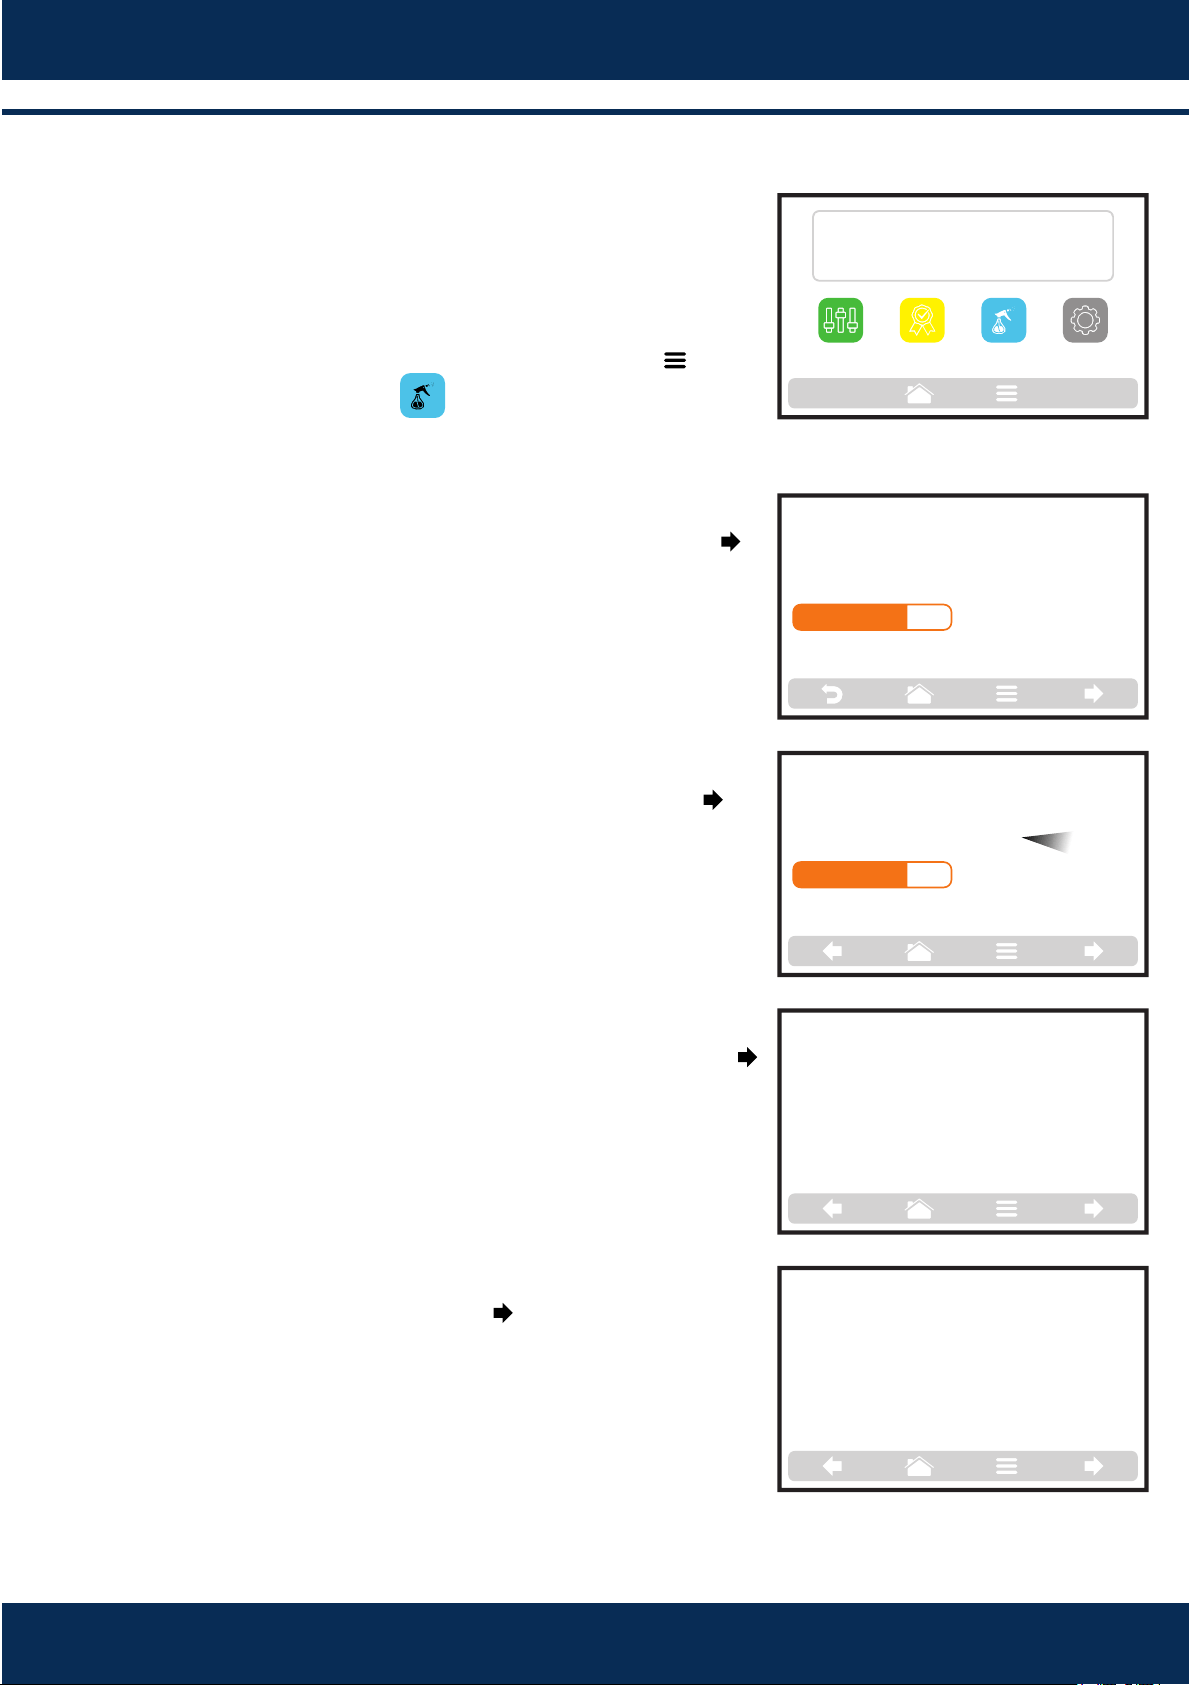
Daily Cleaning Guide
To help in the sanitaon of the Rocket Express, use
the Daily Cleaning Guide, access it through the
Opons screen, click on the Opons icon , and
then press the buon , follow the steps informed
on the screen carefully.
1: Open the oven door and wait for the temperature
to drop unl 90°C. Proceed clicking on the arrow:
2ⁿ: Apply the Kay Oven Cleaner in the oven and let it act
from 5 to 10 minutes. Proceed clicking on the arrow:
3: Rub the whole internal area of the oven with a
non-abrasive sponge. Proceed clicking on the arrow:
4: Rinse the oven using a piece of wet cloth.
Proceed clicking on the arrow:
LOWER
RESISTANCE
250°C
TEMPERATURE
250°C
CHAMBER
RESISTANCE
TEST
MODE
SETTINGSFAVORITES DAILY CLEANING
GUIDE
OPEN THE
OVEN DOOR AND WAIT
FOR THE TEMPERATURE
TO DROP TO 90°C.
102°C
APPLY THE KAY OVEN
CLEANER IN THE
OVEN AND LET IT ACT
FROM 5 TO 10 MINUTES
8min 30s
RUB THE WHOLE
INTERNAL AREA OF
THE OVEN WITH
A NON-ABRASIVE SPONGE
RINSE THE OVEN
WITH A PIECE OF WET CLOTH.
35
INSTALLATION AND OPERATION MANUAL
REMONTE O
FORNO
REASSEMBLE
THE OVEN
DRY IT USING
PAPER TOWEL
TO SANITIZE THE GRID,
REMOVE IT FROM THE OVEN
AND APPLY THE
KAY OVEN CLEANER
RUB THE GRID
AND SUPPORTS
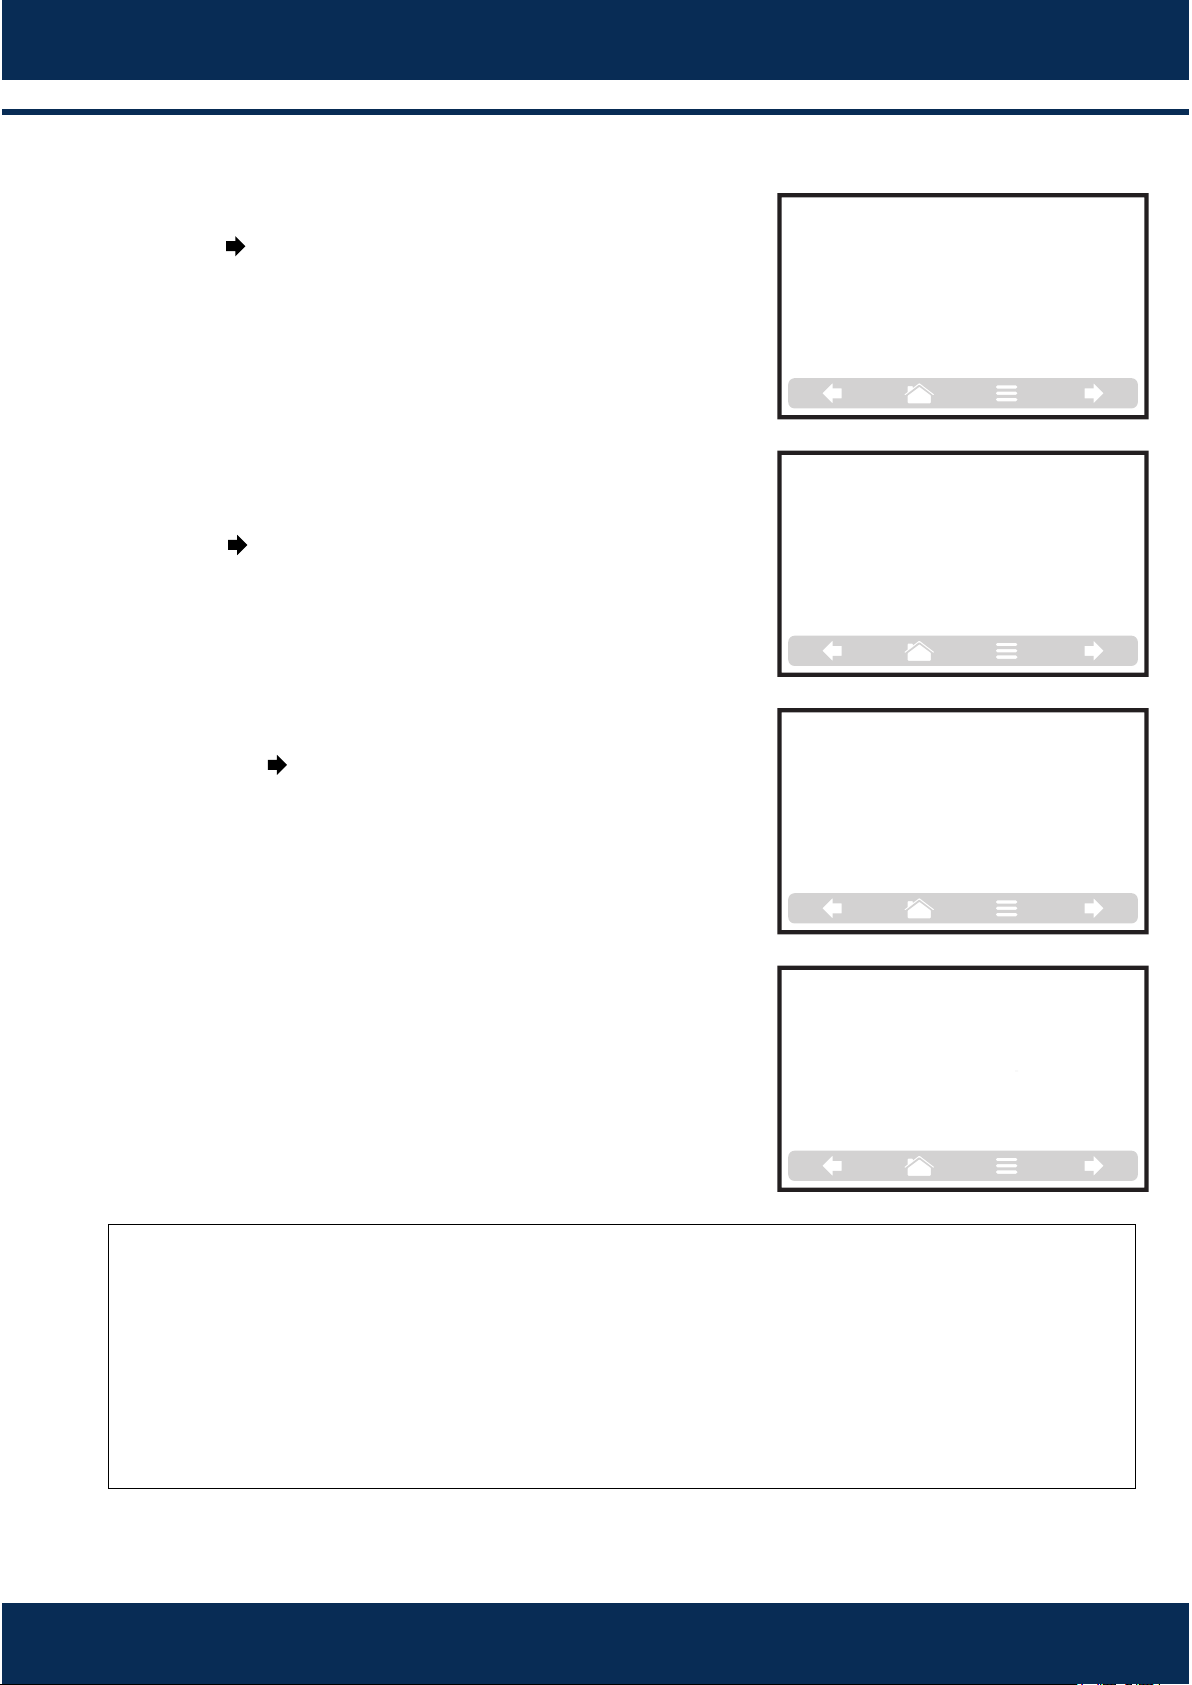
f)
g)
h)
i)
5: Dry it using paper towel. Proceed clicking on the
arrow:
6: To sanize the grid, remove it from the oven and
apply the Kay Oven Cleaner. Proceed clicking on the
arrow:
7: Rub the grid and supports. Proceed clicking on
the arrow:
8: Reassemble the oven.
ATTENTION
The equipment sanitaon process must be done daily. Failure to follow this
guideline may affect the device service life adversely, besides the possibility of
resulng in risks as informed in the Safety Instrucons contained in this manual
(see pages 6 to 9).
36

7.7
a)
b)
c)
7.7
.1 Stone Cleaning Guide
Follow the instrucons below for correct stone
cleaning:
Do not wash - water and pressure may break it.
Do not use Kay Oven Cleaner for cleaning of the stone.
Do not rub vigorously, that may crack or break the stone.
Do not immerse in water, in case of accidental immersion, wait for it to dry
completely before using it.
Cleaning:
Carefully remove it from the oven and, using a dry nylon mop, remove the food
parcles.
Only use cloth, sponge or spatula.
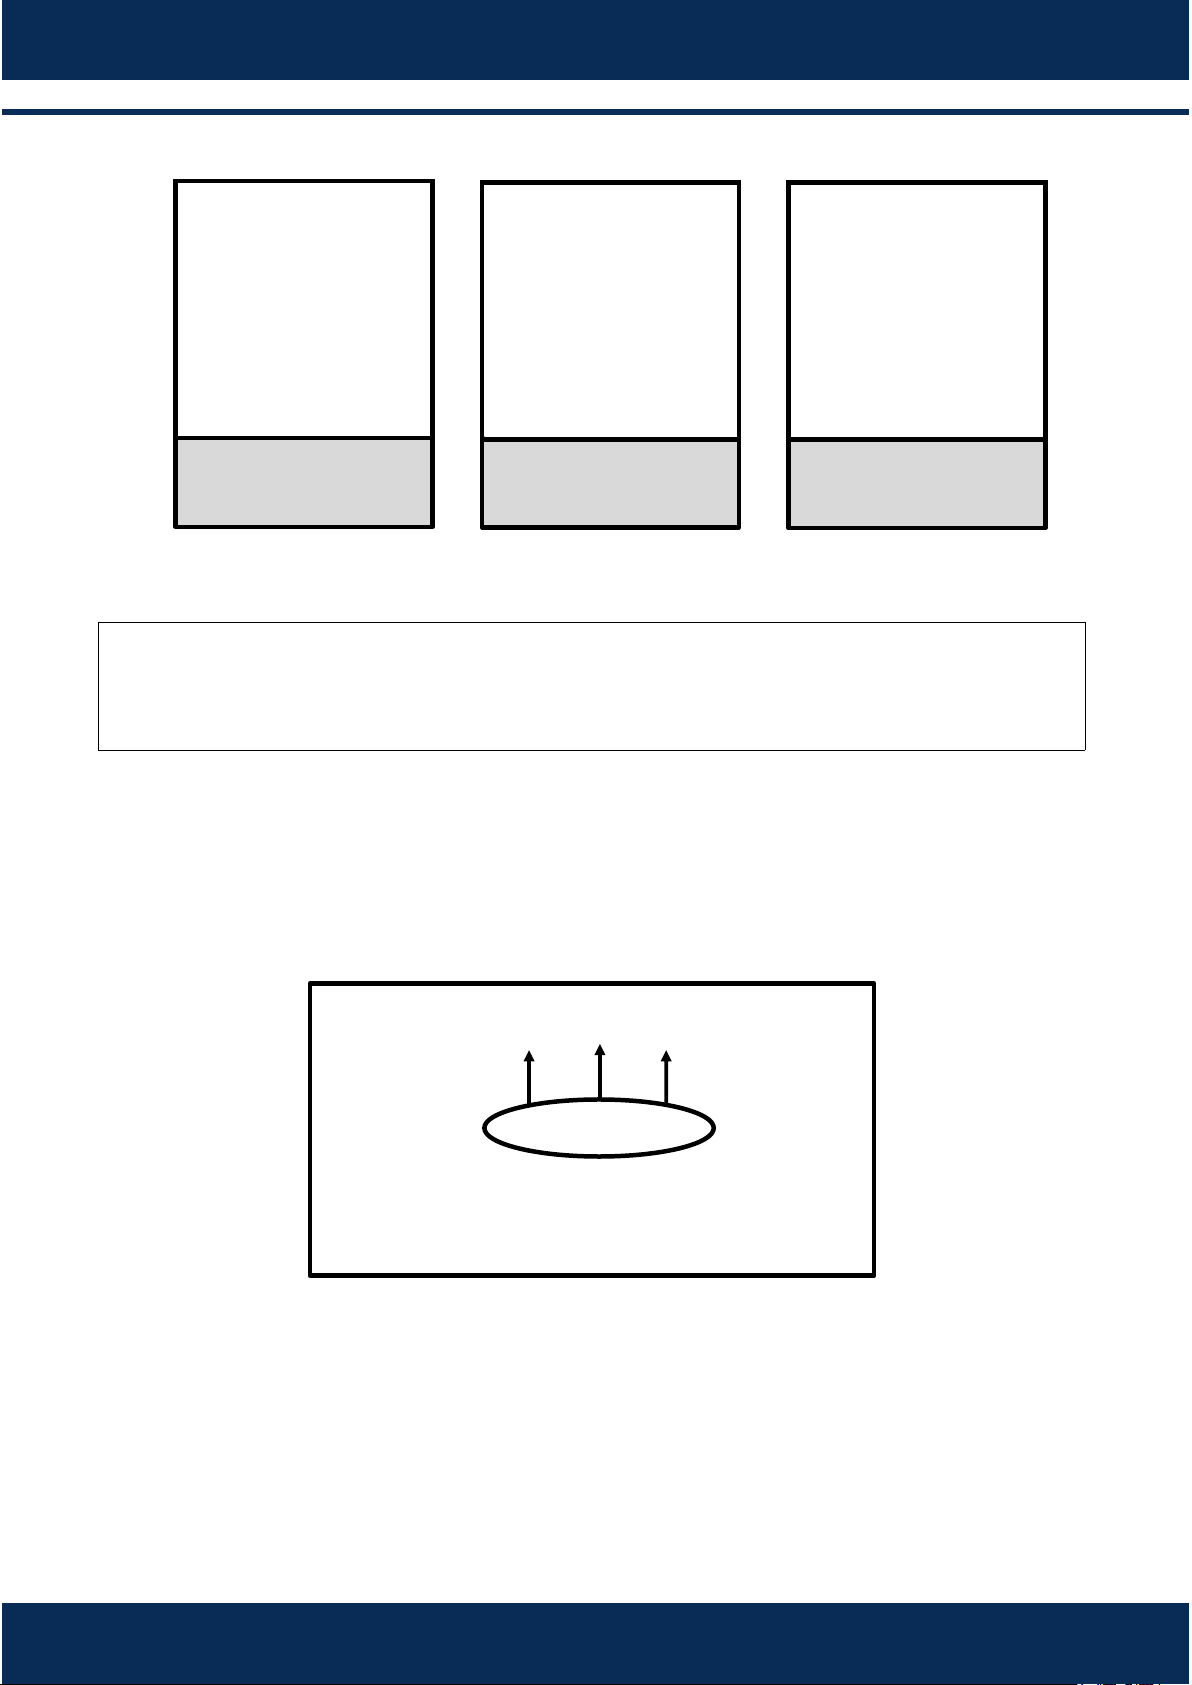
.2 Air Filter Cleaning Guide
To have access to the air filter, remove the stone, the grid and removable lower tray
from the oven.
Then, remove the filter with an upward movement, as in the image:
To sanize correctly, place the filter to soak in warm water with neutral detergent.
Aer 15 minutes, rinse well and install the filter again.
37
INSTALLATION AND OPERATION MANUAL
8
a)
b)
8.1
a)
b)
c)
d)
e)
8.2
a)
b)
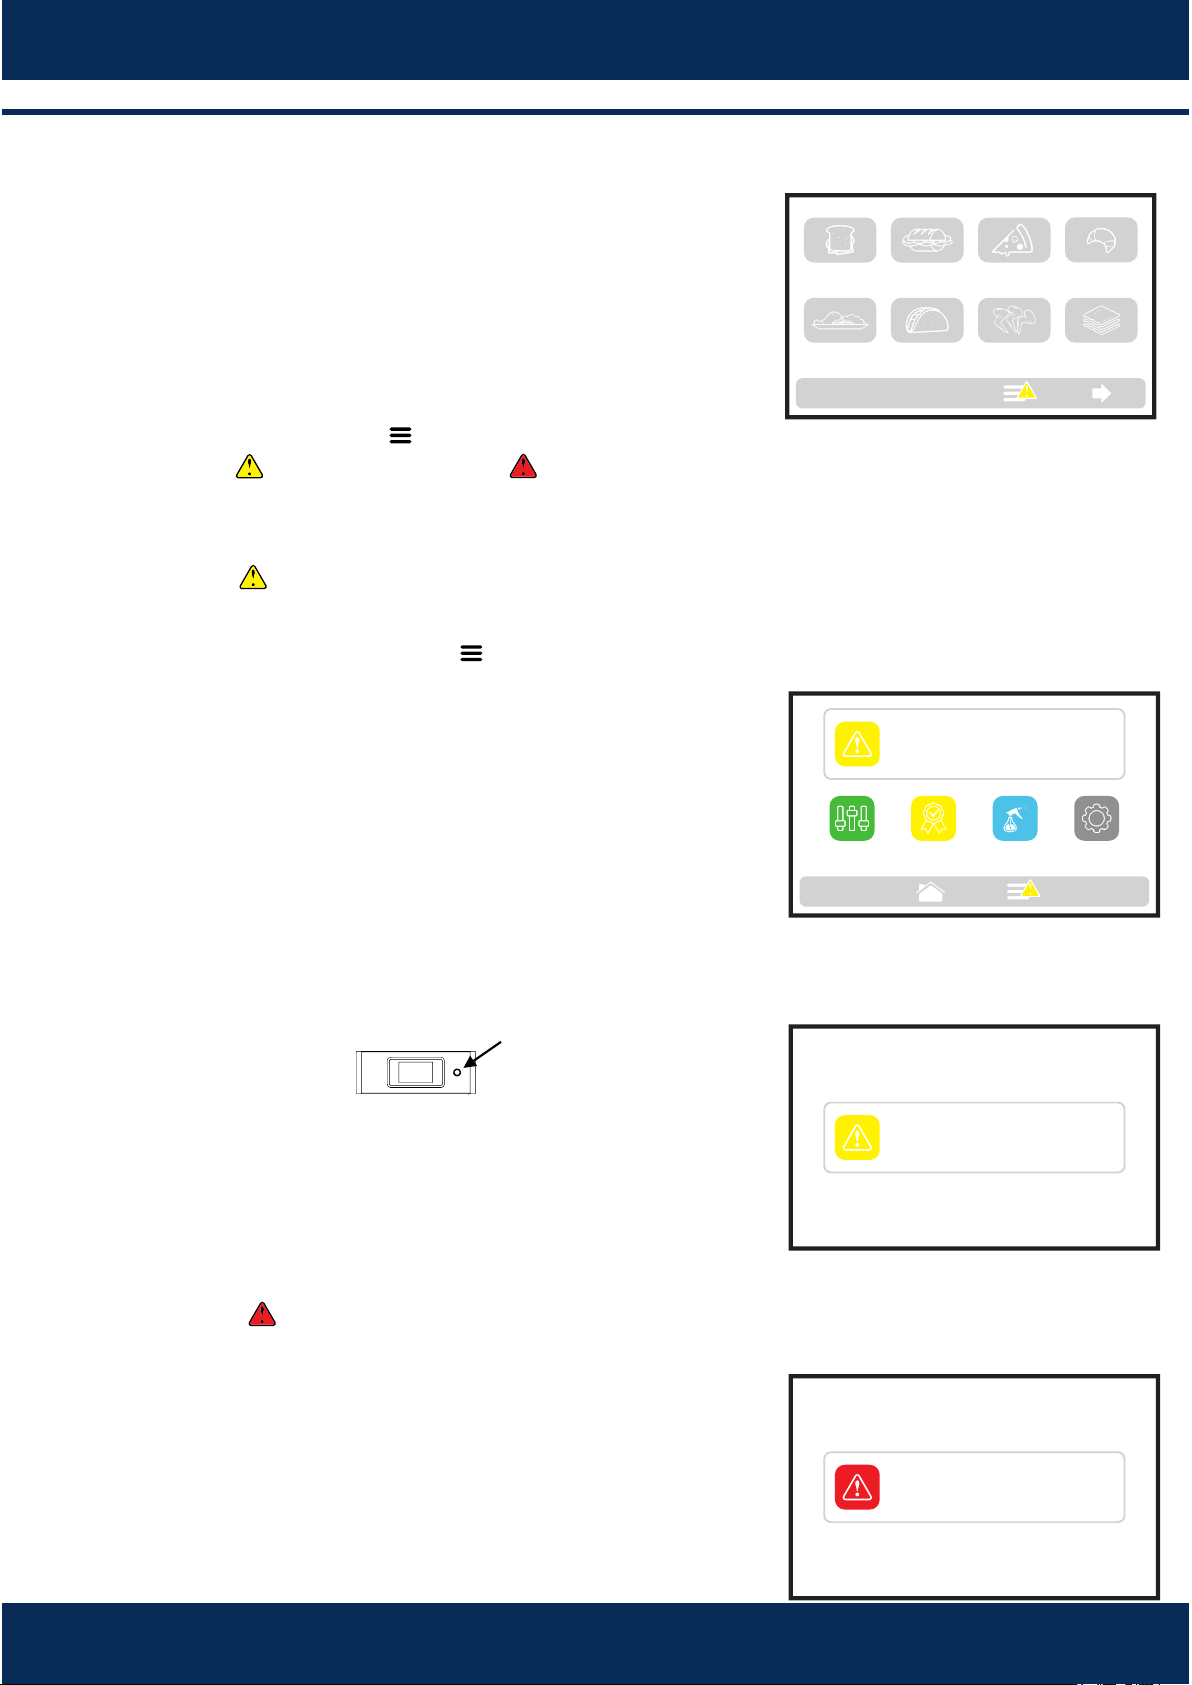
ALERTS AND ERRORS: POSSIBLE SOLUTIONS
The Rocket Express was programmed to signal any
possible error and alerts that may occur during the
operaon.
On the Opons icon , a yellow signal will appear for
alerts ( ) and red for errors ( ).
See how to proceed in each case below.
ALERTS
Click on the Opons icon .
The Opons screen will bring, instead of the
Chamber and Lower Resistance temperatures, a
descripon of the alert.
In the adjacent example:
ALERT - THERMOSTAT (SENSOR OR PANEL) - TURN
OFF AND TURN ON THE OVEN.
Follow the orientaon as described on the screen. In
this case, turn off and turn on the oven again using
the panel buon:
When turning the oven back on, the screen that must
be displayed is:
In this case, just wait for the system to reset. Aer the
reset, the oven returns to operate normally.
ERRORS
In case of several unsuccessful reset aempts, the
alert will become an error, and it will be necessary to
contact Technical Assistance.
Refer to the table on the next screen to verify the
possible errors and alerts.
MEAL
FINISHING
TEX-MEX CHICKEN
WINGS
GRATIN
BREAKFAST
SANDWICH
PIZZASUBS BAKERY
GROUPS - page 1 CURRENT 210°C
SETTINGSFAVORITESTEST
MODE
ALERT - INVERTER
TURN OFF AND TURN ON THE OVEN
DAILY
CLEANING GUIDE
ALERT - INVERTER
TURN OFF AND TURN ON THE OVEN
DO NOT OPEN OVEN DOOR
ERROR - INVERTER
CONTACT TECHNICAL
ASSISTANCE
38

Inverter
more than ten
reset aempts
Chamber Sensor and IR
only
one inacve
Panel temperature
from 65 °C to 80 °C
exceeding 80 °C
for 10 minutes
Component Becomes Alert when:
Becomes Error when:
both inacve
ALERTS AND ERRORS TABLE8.3
Can Network
Communicaon
CLMG
Low Magnetron Current
-
-
-
thirty seconds without
reaching the current
cables disconnected
or faulty
39
INSTALLATION AND OPERATION MANUAL
You can call our technical assistance to provide feedback, offer suggesons,
or get assistance troubleshoong during normal business hours at: +1 214
299-7726.

8 CLEANING INSTRUCTIONS
8.1 Daily cleaning
The Kay Oven Cleaner is ready for use and efficient for the internal and
external cleaning of the Rocket Express oven.
The product is safe for handling, non-corrosive, being approved and
recommended by Práca.
Kay Oven Cleaner
Cloth An-abrasive sponge
Procedure
Turn off the oven
1
Apply in the oven at
194/356 ⁰F
3
Apply the
Kay Oven
Cleaner on the grids
2
4
Leave the product
applied in place de
for 5 to 10 minutes
6
Wipe the oven with
a wet cloth
-
Rub using the an
brasive sponge
5
40
NOTE
The Kay Oven Cleaner can be purchased through Ecolab distributors.
Dry it with paper
towels
7
Rub the grids and
holders
8
Reassemble the
oven
9
8.2 Cleaning the air filter
To access the catalyc converter, remove the baking stone, the rack, and the
boom jet-plate from the oven. Then remove the catalyst through a vercal
movement upwards, as shown in the following image.
Soak the catalyc converter in warm water with neutral detergent. Aer 15
minutes, rinse it thoroughly and put the catalyc converter back in the oven.
8.3 Cleaning the stone.
The stone should be cleaned with a cloth, sponge, a towel.
Note: DO NOT immerse the stone in water and don't use water to clean the
stone. If the stone is wet, let it dry completely before using it again.
41
INSTALLATION AND OPERATION MANUAL

42
9 CONCLUSION
We emphasize characteriscs necessary for the professionals that operate
these equipments: Responsibility, Iniave and Creavity.
Responsibility appears to be a tool that incorporates innovaon and
technology, and that is an investment that should give the return compable
with the needs of the instuon where both man and machine will work
together. Ovens must be operated with cauon and care to provide best
results.
Iniave is necessary when an opportunity is given to operate such a great
tool as a Práca oven. The operator can extract opmal equipment
performance and adapt to the oven.
Creavity must be possessed by the professionals who are willing to master
the oven as a tool. Nothing is beer than human creavity and those who
have it are beer prepared to develop their own skills and recipes. se who
have it are beer prepared to develop their own skills and recipes.

NOTES
43
INSTALLATION AND OPERATION MANUAL

44


CODE
032576
ROCKET EXRESS
INSTALLATION AND OPERATIONAL MANUAL
OCTOBER 2017 - REVISION 00
PRATICA PRODUCTS, INC.
USA
675 Town Square Blvb/Suite 200
Garland TX 75040
Phone: +1 214 299-7726
PRÁTICA KLIMAQUIP IND. E COM. S.A.
BRAZIL
RODOVIA BR 459, Km 101
37.550-000, Pouso Alegre-MG
Phone: +55 35 3449-1235
pratica@praticabr.com