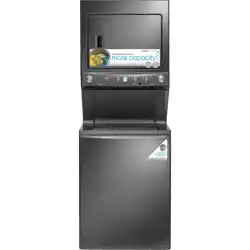
User Manual Kenmore 41761723510 Laundry
Washer Operating instructions

Washing Cycle Selection
Turn the cycle selector in either direction to the cycle desired.

To change the cycle after it has begun, push in or turn the cycle selector knob to pause the current running cycle. Make the new selection and push in the cycle selector knob again to start the new cycle.
Normal
Use this load for light to normally soiled cottons, linens, towels, shirts, denims and mixed loads.

Whites (on select models only)
Use this cycle for white fabrics and lightly colored clothing. Refer to fabric care label for use of liquid chlorine bleach. Hot water is recommended to ensure optimal bleach activation.
Heavy Duty
Use this cycle for heavily soiled, durable garments - ex. towels, sports gear, or fabric tote bags. For best soil and stain removal, use the hottest water safe for the fabrics being washed.
Dell cates
Use this cycle for lightly soiled knits and delicates which require gentle washing.
Towels (on select models only)
Select this cycle for a full load of towels and/or bath mats. Select a higher spin speed to reduce drying time.
Bedding
This cycle is designed for large items such as blankets, sheets, mattress pads, duvet covers and similar items.
Express Wash (on select models only)
Quickly wash a small, lightly soiled load in 25 minutes.

Rinse & Spin
Select Rinse & Spin for loads that need a cold water rinse or to add fabric softener that may have been omitted in a regular cycle.
Presoak
Use this cycle to soak heavily soiled and stained items before washing. Any temperature may be selected, but cold water is recommended with this cycle as warmer water may set some stains. Use the amount of detergent recommended for a normal wash cycle. If desired, use a bleach or a soaking agent safe for the fabric. The washer will continue on with a soil-loosening wash cycle immediately after the soak phase.
Casual
Use this cycle for poly blends with a permanent press or no-iron finish.
Washing Cycle Settings
Wash/Rinse Temperature
Turn the Ternp knob until the desired wash water tempera- ture is selected. Select a wash water temperature accord- ing to fiber content, colorfastness and soil level. To protect your fabrics, the temperature range of cold to hot settings may be different depending on cycle selected.

The water heater setting and its distance from the washer, water usage in other parts of the home, and seasonally low ground water temperature in some geographic areas can affect water temperature.
Hot
Use this setting for heavily soiled colorfast fabrics such as towels, bedding, and children's clothing.
Warm
Use this setting for normally soiled white or colorfast cot- tons and blends.
Cool (an select models)
Use this setting for normally soiled sheets, casual items and washable woolens.
Cold
Some warm water will automatically blend with cold tap supply to achieve a precise Auto Temp Cold. Use this set- ting for lightly soiled non-colorfast items, knits, delicates, and hand washables.
Tap Cold (on select models)
Wash and rinse temperatures are equivalent to tem-perature of cold tap supply. Use this selection for lightly soiled non-colorfast items, knits, delicates, and hand washables and other fabrics and colors that are prone to dye transfer. For use with cold water detergents.
Rinse Level (an select models)
Turn the Rinse Level knob to choose the amount of water used during the rinse portion of the cycle. To maximize the emciency of the cycle use the Auto setting.
Medium and High settings are recommended for heavily soiled loads to remove excess dirt and detergent or if household members have sensitive skin.
Fabric Softener (on select models)
If you wish to use fabric softener on your load, be sure the fabric softener switch is turned to 'On'. See Care and Cleaning for dispenser cleaning procedures.

Energy Saver (on select models)
The Energy Saver option reduces water temperature a few degrees to save energy, lowers water usage slightly and also extracts more water to reduce drying time.
Washing Procedures

1. Sort laundry into loads that can be washed together.

- Sort items by recommended cycle and water temperature.
- Separate white, light and colorfast items from dark and non-colorfast items.
- Separate items that shed lint from items that attract lint. Casual, synthetic, knit, and corduroy items will pick up lint from towels, rugs, and bedspreads.
- Separate heavily soiled items from lightly soiled items.
- Separate lacy, sheer, loosely knit, or delicate items from durable items.
- Do not machine wash items containing fiberglass. Small particles of fiberglass left in the drum may transfer to fabrics in other loads and cause skin ir- ritation and/or damage to fabrics.
2. Prepare items for washing.

- Brush off: lint and dirt. Shake out rugs and beach towels.
- Close zippers, fasten hooks, button buttons, tie strings and sashes, and remove non-washable trims and ornaments.
- Mend rips and tears to prevent further damage dur- ing washing.
- Turn knit items inside out to prevent pilling.
- Place delicate and small items such as bras, ho- siery and baby socks in a mesh bag.

3. Pretreat stains and heavy soil.
- See Stain Removal Guide in this guide for safe, successful stain re- moval instructions.

4. Add a measured amount of detergent to the wash tub before adding the laundry load.
- Follow detergent manufacturer's directions. The amount required depends on type of detergent, load size and soil level, and water hardness.
5. If desired, add liquid bleach to bleach dispenser.
- Before adding the wash load, add liquid bleach to bleach dispenser located in left front corner under the lid:

- Refer to bleach manufacturer's directions for quantity to add.
- Then add 1 cup (240 mi) water to flush the dispenser.
- Do not use powdered bleach in the bleach dispenser. Add powdered bleach to the empty tub.
6. Add laundry load to washer.
- Add items one at a time, each tightly bunched into its own "ball" to allow beneficial item interaction. Avoid loading items in a fiat/laid-out fashion.
- For best washing performance, dry load level should not be higher than the upper row of holes in the wash tub. Do not overload the washer.

- Combine large and small items in a load. Load small items first. Large items should not be more than half the total wash load.
- When washing a single heavy item, add I or 2 towels to balance the load.
7. If desired, add liquid fabric softener to fabric softener dispenser (available on some models).
For models wlfh built in dispenser:
- Add liquid softener to the dispenser, following fabric softener label directions. DO NOT use granular de- tergent in this dispenser.

- DO NOT fill above the maximum fill line.
- Turn fabric softener option on.
- Do not use bleach in this dispenser.
For models without a built=in fabric softener dispenser:
- Follow fabric softener label directions.
- Add diluted fabric softener to the final rinse. You may use a fabric softener dispensing bail.
Other Wash Products
- Water conditioner, detergent booster and enzyme products may be added with the detergent.
8. Select the appropriate cycle and settings for the [oad.

9. Start the washer.
- Close the washer lid. The washer will not operate with the lid open.
- Push in or turn the cycle selector knob or turn any option knob to "wake" the washer. You will hear three short beeps to indicate washer is ready to operate.
- After making your selections, push in the selector knob to start the cycle. You will one hear short beep and the washer lid will loci<.
- The washer will perform a dry load sensing proce- dure before adding water to the tub.
- To pause a running cycle, push in the cycle selector knob.
- To add a forgotten item to the wash tub, push in the cycle selector knob to pause the cycle as above. You will hear two beeps. After the loci< releases, lift the lid and add the item. Close the lid and push in the selector knob again_ continuing the current cycle.

- To cancel a running cycle, push in and hold the cycle selector until the washer discontinues running. You may have to perform a drain cycle to remove water left in the tub.
10. Remove items when the cycle is completed.
- For your safety, the lid is locked during the operation of the washer. It will unlock at the cycle end after the tub has come to a complete stop.

- To open the lid during cycle operation, push in the cycle selector [
- Place washed items in automatic dryer, line dry, or dry fiat as directed by fabric care label. Excess wrin-kIing, color transfer or odors may develop in items left in the washer after the cycle has ended.

Safe Stain Removal Procedures
To reduce the risk of fire or serious injury to persons or property, comply with the basic warnings listed below:
- Read and comply with all instructions on stain removal products.
- Keep stain removal products in their original labeled containers and out of children's reach.
- Thoroughly wash any utensils used.
- Do not combine stain removal products, especially ammonia and chlorine bleach. Dangerous fumes can result.
- Never wash items which have been previously cleaned in, washed in, soaked in or spotted with gasoline, dry cleaning solvents or other flammable or explosive sub- stances because the items give off: vapors that could ignite or explode.
- Never use highly flammable solvents, such as gasoline, inside the home. Vapors can explode on contact with flames or sparks.

For Successful Stain Removal:
- Treat stains promptly.
- Determine the kind of stain, then follow the recom- mended treatment in the stain removal chart on the next page.
- To pretreat stains, use a prewash product, liquid de- tergent, or a paste made from powder detergent and water.
- Use cold water on unknown stains as hot water can set stains.
- Consult care label instructions for treatments to avoid on specific fabrics.
- Check for colorfastness by testing stain remover prod- ucts on an inside seam.
- Rinse and wash items after stain removal.

Stain Removal Suggestions
Adhesive tape, chewing gum, rub-ber cement
- Apply ice. Scrape off excess. Place stain face down on paper towels. Saturate with prewash stain remover or nonflammable dry cleaning fluid.
Baby formula, dairy products, egg
- Use product containing enzymes to pretreat or soak stains. Soak for 30 minutes or more. Wash.
Beverages (coffee, tea,soda, juice, alcoholic beverages)
- Pretreat stain. Wash using cold water and bleach safe for fabric.
Blood
- Rinse with cold water. Rub with bar soap. Or, pretreat or soak with product containing enzymes. Wash using bleach safe for fabric.
Candle wax, crayon
- Scrape off surface wax. Place stain face down between paper towels. Press with warm iron until wax is absorbed. Replace paper towels frequently. Treat remaining stain with prewash stain remover or nonflammable dry cleaning fluid. Hand wash to remove solvent. Wash using bleach safe for fabric.
Chocolate
- Pretreat or soak in warm water using product containing enzymes. Wash using bleach safe for fa bric.
Collar or cuff soil, cosmetics
- Pretreat with prewash stain remover or rub with bar soap.
Dye transfer on white fabric
- Use packaged color remover. Wash using bleach safe for fabric.
Grass
- Pretreat or soak in warm water using product containing enzymes. Wash using bleach safe for fa bric.
Grease, oil, tar (butter, fats,dressing, cooking oils, car grease, salad motor oils)
- Scrape residue from fabric. Pretreat. Wash using hottest water safe for fabric. For heavy stains and tar, apply nonflammable dry cleaning fluid to back of stain. Replace towels under stain frequently. Rinse thoroughly. Wash using hottest water safe for fabric.
Ink
- Some inks may be impossible to remove. Washing may set some inks. Use prewash stain re-mover, denatured alcohol or nonflammable dry cleaning fluid.
Mildew, scorch
- Wash with chlorine bleach if safe for fabric. Or, soak in oxygen bleach and hot water before washing. Badly mildewed fabrics may be permanently damaged.
Mud
- Brush off dry mud. Pretreat or soak with product containing enzymes.
Mustard, tomato
- Pretreat with prewash stain remover. Wash using bleach safe for fabric.
Nail polish
- May be impossible to remove. Place stain face down on paper towels. Apply nail polish remov-er to back of stain. Repeat, replacing paper towels frequently. Do not use on acetate fabrics.
Paint, varnish
- WATER BASED: Rinse fabric in cool water while stain is wet. Wash. Once paint is dry, it cannot be removed. OIL BASED AND VARNISH: Use solvent recommended on can label. Rinse thor- oughly before washing.
Perspiration
- Use prewash stain remover or rub with bar soap. Rinse. Wash using nonchlorine bleach in hot- test water safe for fabric.
Rust, brown or yellow discoloration
- Use rust remover safe for fabric. Do not use chlorine bleach because it may intensify discolor- ation.
Shoe polish
- LIQUID: Pretreat with a paste of powder detergent and water. PASTE: Scrape residue from fabric. Pretreat with prewash stain remover or nonflammable dry cleaning fluid. Rinse. Rub detergent into dampened area. Wash using bleach safe for fabric.
Tomato
- Pretreat with prewash stain remover. Wash using bleach safe for fabric.
Urine, vomit, mucus, feces
- Pretreat or soak in product containing enzymes. Wash using bleach safe for fabric.
Wine
- Pretreat or soak in cold water. Wash in hottest water and bleach safe for fabric
Dryer Operating instructions

Drying Cycle Selection
Turn the cycle selector in either direction to the cycle desired.

To change the cycle after it has begun, push in or turn the cycle selector knob to pause the current running cycle. Make the new selection and push in the cycle selector knob again to start the new cycle.
Auto Dry Cycles
Auto Dry cycles take the guesswork out of selecting the correct drying time for each load. Moisture sensing bars in the front of the dryer drum sense the moisture level of the load as it tumbles through the heated air. With Auto Dry cycles, the load will automatically be dried at the selected temperature to a specific dryness level. Auto Dry cycles save time and energy and protect fabrics.
When the load has reached the dryness level, it will continue to tumble during a cool down period. This helps reduce wrinkling and makes items easier to handle during unloading.
Drying time varies depending on size and dampness of load and fabric type. If the load is too small or almost dry, the moisture sensing bars may not detect enough moisture to continue the cycle and the cycle may end after a few minutes. If this occurs, select a Timed Dry cycle.
Room temperature and humidity, type of installation and electrical voltage or gas pressure can also affect drying time.
Norrnal
Select this cycle to dry everyday fabrics including cot- tons, linens and sheets.
Heavy Duty
Select this Auto Dry cycle to dry durable fabrics such as work wear and overalls.
Dellcates
Select this cycle to dry knits and delicates.
Casual
Select this cycle to dry cottons, blends and permanent press items with a no-iron finish.
Cotton Towels (on select models)
Select this cycle to dry heavy loads such as towels and non-rubber-backed bath mats.
Timed Dry Cycles

Express Dry
Select this timed cycle to quickly dry a small load made up of just a few items. It provides approximately 20 min- utes of tumbling followed by a cool down period.
Refresh (on select models)
Select Refresh to help remove wrinldes from dean and dry items that were not taken from the dryer at the end of the cycle, have been stored in crowded closets or drawers, or unpacked from luggage following a trip. It provides approximately 10 minutes of tumbling followed by a 5-minute cool down period.
Time Dry
To manually select the drying time for any load, turn the knob to a numbered setting: 15 (on select models), 30, or 90 minutes. Moisture sensing bars (if equipped) are not active and dryer will continue to heat throughout the cycle until the final cool down period.
Drying Cycle Settings
Drying Temperature
Select the temperature setting most suitable for each load. To protect your fabrics, not all temperatures are available with every cycle. If an unavailable temperature setting is selected by the user, the nearest available temperature will be substituted.
The Air Dry setting can be used only in a timed cycle. Air Dry setting tumbles the load without heat. Use Air Dry to freshen clothing, pillows or blankets, or to dust draperies.
Chime
A signal will sound at the end of the cycle if selected.
Other Features
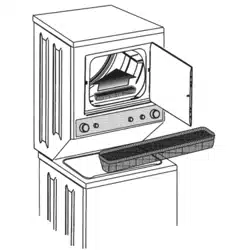
Drying Rack (some models)
Use the drying rack to dry items which should not be tumble dried.

- Open the dryer door and remove the lint screen.
- Insert drying rack into the dryer drum. Place the front bar under the lip of the lint screen opening.
- Place items to be dried on top of the rack. Weight should not exceed 10 Ibs. Leave space between items, but do not let items hang over the sides or through the grids. Do not tumble other items when using the drying rack.
- Select a timed cycle. If items to be dried contain plastic, foam rubber, rubber-like materials, feathers or down, then only use the Air Dry temperature setting.
- When items are dry, remove the rack and replace the lint screen. If lint screen is not in place, tumbling items could enter the exhaust system and cause damage to the dryer.
Common Drying Problems
Many drying problems involve poor cleaning results from washing including poor soil and stain removail residues of lint and scum, and fabric damage. For satisfactory drying results0 follow these suggestions provided by The Soap and Deter- gent Association.
Greasy, oily stains
- Rub fabric softener stains with bar soap. Rinse and rewash.
- Add a few bath towels to small loads for proper tumbling.
- Some "silk-like" fabrics should be air dried.
- Use proper drying temperature.
- Place fabric softener sheet on top of load before starting the dryer.
Lint
- Overloading.
- Overdrying causes static electricity.
- Lint screen not clean when cycle began.
- Lint "pills" clinging to fabric
- Reduce load size and rewash using liquid fabric softener in the final rinse.
- Or, add a fabric softener sheet and tumble without heat.
- Use lint brush or roller to remove lint.
- Do not overload dryer.
- Use fabric softener in washer or dryer to reduce static electricity.
- Remove items when they are slightly damp to avoid overdrying.
- Check that lint filter is clean and in place.
Pilling (Fibers break off, ball up and cling to fabric.)
- Use a lint brush or shaver to re- move lint pills.
- Use fabric softener to lubricate fibers.
- When ironing, use spray starch or fabric finish on collars and cuffs.
- Turn items inside out to reduce abrasion.
Shrinking
- Temperature too high.
- Overdrying.
- Irreversible condition.
- Follow fabric care label directions.
- If shrinking is a concern, check load often.
- Remove items while slightly damp and hang or lay fiat to complete drying.
- Block knits into shape.
Wrinkling
- Overloading.
- Leaving items in dryer after cycle ends.
- Reduce load size and tumble at medium or low heat for 5-10 minutes.
- Remove items immediately. Hang or fold.
- Do not overload dryer.
- Remove items as soon as cycle ends.
Operating Your Dryer

1. Prepare load for drying.
- Dry items of similar fabric, weight and construction in the same load.
- Separate dark items from light-colored items. Sepa- rate items that shed lint from those that attract lint.
- Check for stains which may not have been removed in washing. Repeat stain removal process and wash again before drying. Dryer heat may permanently set some stains.
- Place delicate or small items in a mesh bag.
- Be sure buckles, but- tons and trim are heat- proof and won't dam- age the drum finish. Close zippers, button buttons, fasten hooks and VeJcro®dike fasteners. Tie strings and sashes to prevent snagging and tangling.

2. Check that the lint filter is clean and in place.

3. Load the dryer and close the door.
- Load items loosely. The average wet load will fiil the drum 1/3 to 1/2 full. Items need room to tumble freely for even drying and less wrinkling.
- If desired, place a dryer fabric softener sheet on top of the load at the beginning of the cycle.
- To save energy and time and avoid uneven drying and wrinkling, do not overload the dryer.
- When drying large items, dry only two or three items at a time. Fiii out the load with small and medium sized items.
- For delicate or very small loads, add two or three similar items to improve tumbling action.

4. Select the appropriate cycle and settings for each load.
- See Dryer Operating Instructions on previous pages.
5. Start the dryer.
- Close the dryer door. The dryer will not operate with the door open.
- Push in or turn the cycle selector knob or turn any option knob to "wake" the dryer. You will hear three beeps to indicate dryer is ready to operate.
- After making your selections, push in the selector knob to start the cycle. You will hear one beep before the drum begins to rotate.
- To add or remove items when the dryer is running, push in the cycle selector knob to pause the cycle and open the door. Opening the door with a cycle running will also pause the cycle. You will hear two beeps. Allow the drum to come to a complete stop before reaching inside. Add or remove the item, close the door and push in the selector knob again, continuing the current cycle.
- To stop a running cycle, push in the cycle selector knob.

6. When the cycle ends, remove items immedi-ately and hang or fold.

Care and Cleaning

- Before cleaning the laundry center interior, unplug the electrical power cord to avoid electrical shock hazards.
- Do not use any type spray cleanser when cleaning the dryer infe- rior. Hazardous fumes or electrical shock could occur.
INSIDE DRYER

- Clean the lint filter after every load. Lint build-up on the filter restricts air flow, which causes longer drying times. The filter is located at the bottom of the door opening. Remove by pulling straight up. Remove the lint and replace the filter.
- Occasionally a waxy build-up may form on the lint filter and/ or moisture sensing bars from using dryer-added fabric softener sheets. To remove this build-up, wash them with warm, soapy wa- ter. Dry the filter thoroughly and replace. Do not operate the dryer without the lint filter in place.
- If the dryer drum becomes stained from noncolorfast fabrics, clean the drum with a damp cloth and a mild liquid household cleanser. Remove cleanser residue before drying the next load.
- Every 18 months an authorized servicer should clean the dryer cabinet interior and exhaust duct. These areas can collect lint and dust over time. An excessive amount of lint build-up could result in inemcient drying and possible fire hazard.

INSIDE WASHER
- Remove items from the washer as soon as the cycle ends. Excess wrinkling, color transfer, and odors may develop in items left in the washer.
- Dry the washer top, the area around the lid opening, and the underside of the lid. These areas should always be dry before the lid is closed.
- Before cleaning the washer interior, unplug the electrical power cord to avoid electrical shock hazards.
- When extremely soiled items have been washed, a dirty residue may remain on the tub. Remove this by wiping the tub with a non- abrasive household cleanser. Rinse thoroughly with water.
- The base plate or tub may become stained from fabric dye. Clean these parts with a nonabrasive household cleanser. This prevents dye transfer to future loads.

FABRIC SOFTENER DISPENSER
- Remove the dual chamber insert (a) from the bleach and fabric softener dispenser by pinching at the chamber divider and lifting upward. Also remove the siphon cap (b).
- Rinse the insert and cap with a combination of 31⁄4cup liquid chlo- rine bleach and 1 gallon hot tap water to remove any buildup. Large amounts of fabric softener residue may indicate improper dilution or more frequent cleaning is required. Rinse well with tap water.
- For the dispenser well, use a small brush to dean the recesses. Remove all residue.
- Replace the siphon cap and insert by pressing it in place until you hear a slight dick.

OUTSIDE

- When washing is completed, wipe top and sides of laundry center with a damp cloth. Turn water faucets off: to prevent pressure build-up in the hoses.
- Clean the cabinet with mild soap and water. Never use harsh, gritty or abrasive cleansers
- If the cabinet becomes stained, clean with diluted chlorine bleach (1 part bleach to 8 parts water). Rinse several times with clear water.
- When cleaning chrome parts, it is best to use only a damp cloth.
- Remove glue residue from tape or labels with a mixture of warm water and mild detergent. Or, touch residue with the sticky side of tape.
- Before moving the laundry center, place a strip of cardboard or thin fiberboard under the front leveling legs to prevent damage to the floor.

Winterizing instructions

- Turn off water supply faucets.
- Disconnect hoses from water supply and drain water from hoses.
- Hug electrical cord into a properly grounded electrical outlet.
- Add 1 gallon (3.8 L) nontoxic recreational vehicle (RV) antifreeze to empty wash drum. Close door.
- Select the Rinse & Spln cycle. Start the cycle and let the washer drain for 1 minute to drain out all the water. Not all of the RV antifreeze will be expelled.
- Stop the cycle, unplug electrical power cord, dry of tub interior and close the lid.
- Store laundry center in an upright position.
- To remove antifreeze from washer after storage, run empty washer through a complete cycle using detergent. Do not add wash load.

Avoid Service Checklist
NOISE
Ranting and clanking noise.
Foreign objects such as coins or safety pins may be in drum or pump
- Stop washer and check drum. If noise continues after washer is restarted, objects. Call a Sears or other qualified service dealer.
Belt buckdes and metal fasteners are hiring wash drum
- To prevent unnecessary noise and damage to tub, fasten fasten- ers and turn hems inside out
Thumping sound.
Heavy wash loads may produce a thumping sound. This is usually normal. If sound continues, washer is probably out of balance
- Stop washer and redistribute wash load.
Vibrating noise.
Washer is not resting firmly on floor
- Move washer so it rests firmly on floor Adjust leveling legs. See INSTALLATION INSTRUCTIONS for details
Wash load unevenly distributed in tub
- Stop washer and reanange wash load.
OPERATING
Washer does not start
Washer lid is open.
- Close wusher lid. The washer will not operate when the lid is open
Electrical power cord may not be plugged in or con nection may be loose.
- Make sure plug fits tightly in wall outlet
House fuse blown, circuit breaker tripped, or a power outage has occurred.
- Reset circuit breaker or replace fuse. Do not increase fuse capacity. If problem is a circult overload, have it corrected by a qualified electrician. If problem is a power outage, call local electric company
Water supply faucets are not turned on
- Tum on water supply foucers
Motor is overheated. Washer motor will stop if becomes overheated
- Wait for the motor to cool down before attempting to restart
Washer won't spin.
Lid is not completely closed.
- Close washer id. The washer will not operate when the lid is open
Residue left in drum.
Heavily solled items.
- Wipe a nenabrasive household cleanser, then inse. Shake or brush exc and sand from hems before washing plug fits tightly in wall ourlet
Dryer does not start.
Electrical power cord is not securely plugged iner plug may be loose.
- Make sure the plug fits tightly in wall outlet.
House fuse blown or circuit breaker tripped
- Reset circuit breaker replace fuse.
- Make sure electrical line is not overloaded.
Thermal limiter tripped
- Call authorised service person for replacement
Dryer runs but won't heat.
There are 2 house fuses in the dryer circuit if 1 of the fuses is blown, the drum may turn but the heater v not operate (electric models)
Gas supply valve is not open (gas models)
- Check to make sure supply valve is open See INSTALLATION INSTRUCTIONS for procedure.
Dryer does not have enough air supply to support the burner flame (gos models)
- See INSTALLATION INSTRUCTIONS
LP gas supply tank is empty or there has been a utit- ity interruption of natural gas (gas models),
Drying cycle takes too long, outside of the dryer fools too hot or smells hot.
Lint filter is clogged with lint.
- Make sure all lint has been removed from the dryer line fliser before starting each cycle
Exhaust duct requirements have not been met
- Exhaust duct must be at least 4 inches in diameter and mode of rigid or semi-rigid metal
Stop washer and check drum. If noise continues after washer is restarted, objects may be in pump. Call a Sears or other qualified service dealer
- When in place, the duct must have no more than four 90° bends and must not exceed length listed in INSTALLATION INSTRUCTIONS
Electric dryer is connected to a 208 volt circuit
- Drying time will be 20% longer than drying on a 240 volt circuit
Drying procedures have not been followed.
- See "Operating Instructions."
Outside exhaust hood or exhaust duct may be clogged or restricted.
- Clean out any obstruction
High humidity
- Use a dehumidifier near the dryer