instalEat_on instruct_ons
Pedestal
Forwasher, dryer, and combo
Kenmore27"
lnsttuccienes de malnstamaci6n
Pedestal
Lavadora,secadora y combo
Kenmorede 27" @,
IMPORTANT: Read and follow these instructions.
The installer must have electrical and mechanical training and acceptable knowledge in the
required work.
Safety is foremost---both your own and that of other
people. Many important safety instructions are provided
in this instruction and your appliance. Always read and
observe all safety instructions. '_*
Excessive Weight Hazard
Two or more people may be needed to install and
move the appliance and pedestal assembly.
Do not allow children to play on the drawer.
Do not step on the handle.
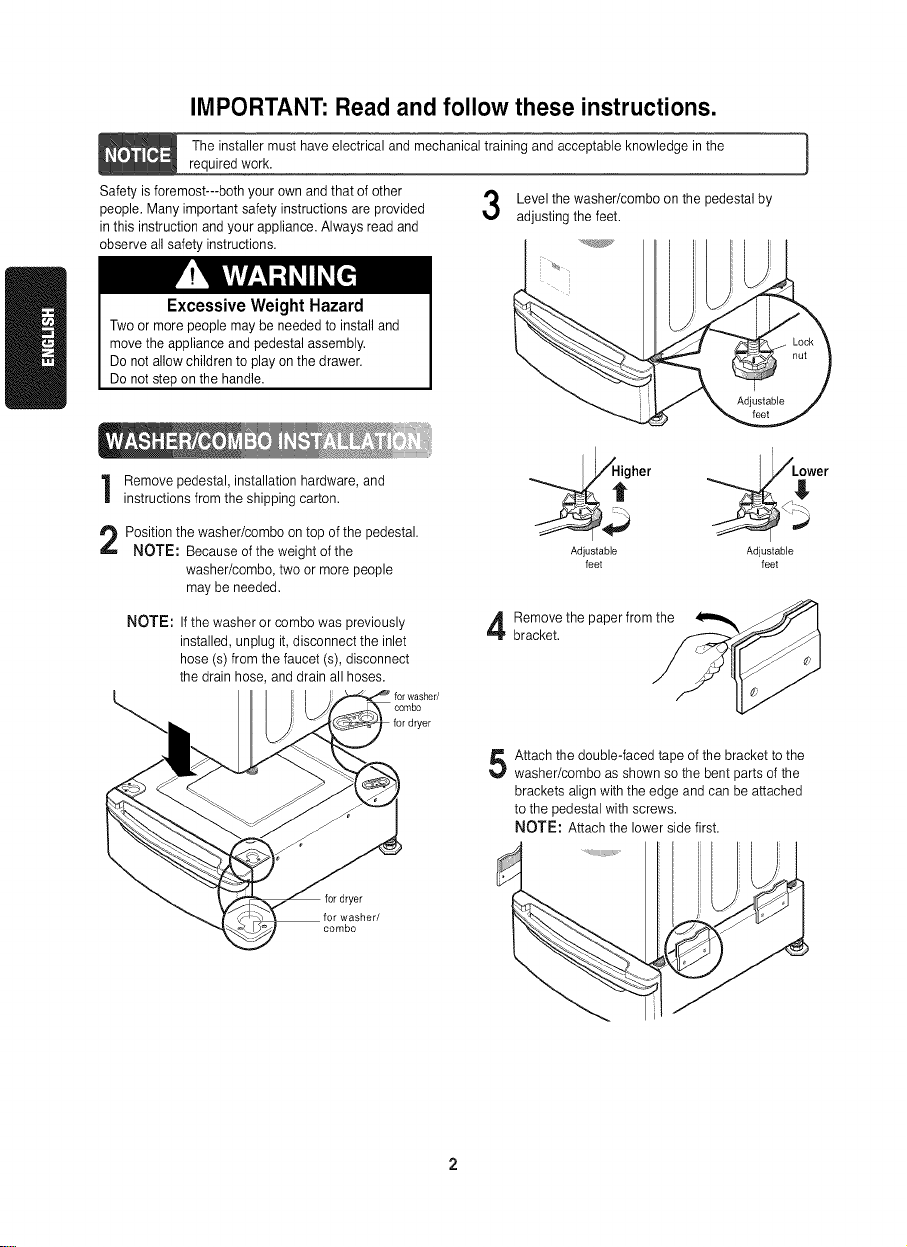
Level the washer/combo on the pedestal by
adjusting the feet.
Remove pedestal, installation hardware, and
instructions from the shipping carton.
Position the washer/combo on top of the pedestal.
NOTE: Because of the weight of the
washer/combo, two or more people
may be needed.
NOTE: If the washer or combo was previously
installed, unplug it, disconnect the inlet
hose (s) from the faucet (s), disconnect
the drain hose, and drain all hoses.
_.gher __wer
Adjustable Adjustable
feet feet
Remove the paper from the
bracket.
for dryer
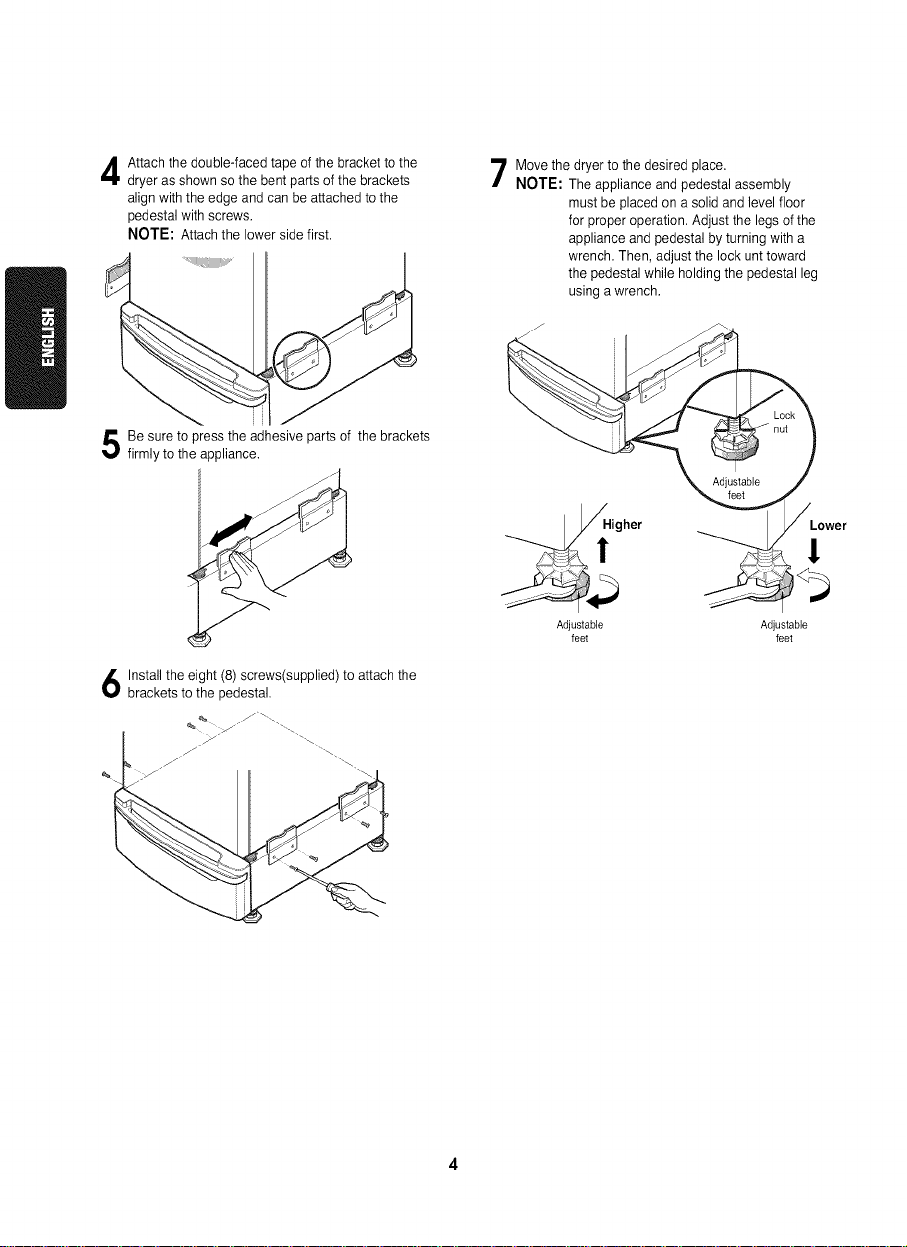
Attach the double-faced tape of the bracket to the
washer/combo as shown so the bent parts of the
brackets align with the edge and can be attached
to the pedestal with screws.
NOTE: Attach the lower side first,
for washer/
combo
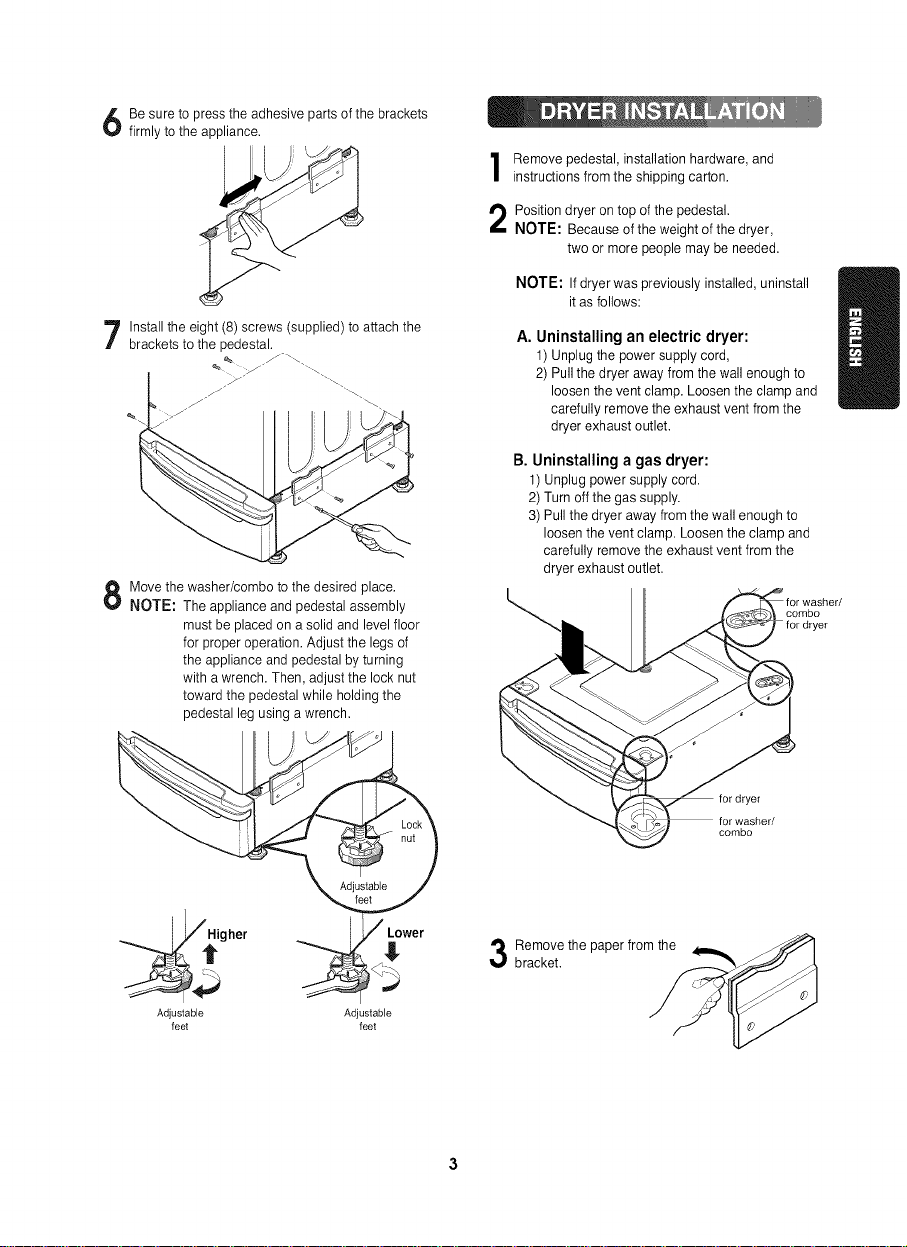
Be sure to press the adhesive parts of the brackets
firmly to the appliance.
Install the eight (8) screws (supplied) to attach the
brackets to the pedestal.
///"
Move the washer/combo to the desired place.
NOTE: The appliance and pedestal assembly
must be placed on a solid and level floor
for proper operation. Adjust the legs of
the appliance and pedestal by turning
with a wrench. Then, adjust the lock nut
toward the pedestal while holding the
pedestal leg using a wrench.
Remove pedestal, installation hardware, and
instructions from the shipping carton.
Position dryer on top of the pedestal.
NOTE: Because of the weight of the dryer,
two or more people may be needed.
NOTE: If dryer was previously installed, uninstall
it as follows:
A. Uninstallingan electric dryer:
1) Unplug the power supply cord,
2) Pull the dryer away from the wall enough to
loosen the vent clamp. Loosen the clamp and
carefully remove the exhaust vent from the
dryer exhaust outlet.
B. Uninstallinga gas dryer:
1) Unplug power supply cord.
2) Turn off the gas supply.
3) Pull the dryer away from the wall enough to
loosen the vent clamp. Loosen the clamp and
carefully remove the exhaust vent from the
dryer exhaust outlet.
combo
for dryer
-- for dryer
for washer/
combo
_lgher _,_wer
Adjustable Adjustable
feet feet
Remove the paper from the
bracket.
Attachthedouble-facedtapeofthebrackettothe
dryerasshownsothebentpartsofthebrackets
alignwiththeedgeandcanbeattachedtothe
pedestalwithscrews.
NOTE:Attachthelowersidefirst.
Besuretopresstheadhesivepartsofthebrackets
firmlytotheappliance.
Installtheeight(8)screws(supplied)toattachthe
bracketstothepedestal.
Movethedryertothedesiredplace.
NOTE:Theapplianceandpedestalassembly
mustbeplacedonasolidandlevelfloor
forproperoperation.Adjustthelegsofthe
applianceandpedestalbyturningwitha
wrench.Then,adjustthelockunttoward
thepedestalwhileholdingthepedestalleg
usingawrench.
Adjustable
Lower
!
Adjustable
feet
Adjustable
feet
kV_Vl.'_;].']r.,_l_IIi'd
(lOne-Year Limited Warranty
When installed, operated and maintained according to all instructions supplied with the product, if this
appliance fails due to a defect in material and workmanship within one year from the date of purchase, call
f-800-4-MY-HOME ° to arrange for free repair.
If this appliance is ever used for other than private family purposes, this warranty applies for only 90 days from
the date of purchase.
This warranty covers only defects in material and workmanship, Sears will NOT pay for:
1. Expendable items that can wear out from normal use, including but not limited to filters, belts, light bulbs,
and bags.
2. A service technician to instruct the user in correct product installation, operation or maintenance.
3. A service technician to clean or maintain this product.
4. Damage to or failure of this product if it is not installed, operated or maintained according to all the
instructions supplied with the product.
5. Damage to or failure of this product resulting from accident, abuse, misuse or use for other than its
intended purpose.
6. Damage to or failure of this product caused by the use of detergents, cleaners, chemicals or utensils
other than those recommended in all instructions supplied with the product.
7. Damage to or failure of parts or systems resulting from unauthorized modifications made to this product.
Disclaimer of implied warranties; limitation of remedies
Customer's sole and exclusive remedy under this limited warranty shall be product repair as provided herein.
Implied warranties, including warranties of merchantability or fitness for a particular purpose, are limited to one
year or the shortest period allowed by law. Sears shall not be liable for incidental or consequential damages.
Some states and provinces do not allow the exclusion or limitation of incidental or consequential damages, or
limitation on the duration of implied warranties of merchantability or fitness, so these exclusions or limitations
may not apply to you.
This warranty applies only while this appliance is used in the United States or Canada.
This warranty gives you specific legal rights, and you may also have other rights which vary from state to state.
Sears, Roebuck and Co., Hoffman Estates, IL 60179
Sears Canada Inc., Toronto, Ontario, Canada M5B 2B8
IMPORTANTE: Lea y siga estas instrucciones.
Quien vaya a instalar debe tener entrenamiento en electricidad, y mecanica tambi6n conocimiento
aceptable en el oficio.
La seguridad es pdmero --- tanto la suya como la de los
otros son muy importantes. Se han previsto muchos
mensajes de seguridad importantes en estas
instrucciones yen su aparato. Siempre lea y obedezca
todos los mensajes de seguridad. "_J_
Riesgo de Peso Excesivo
Pueden solicitar ayuda de dos o ma.spersonas para
mover e instalar la lavadora, combo y secadora con
los pedestales.
No permita a los nifios jugar en el tambor.
No se pare en el mango.
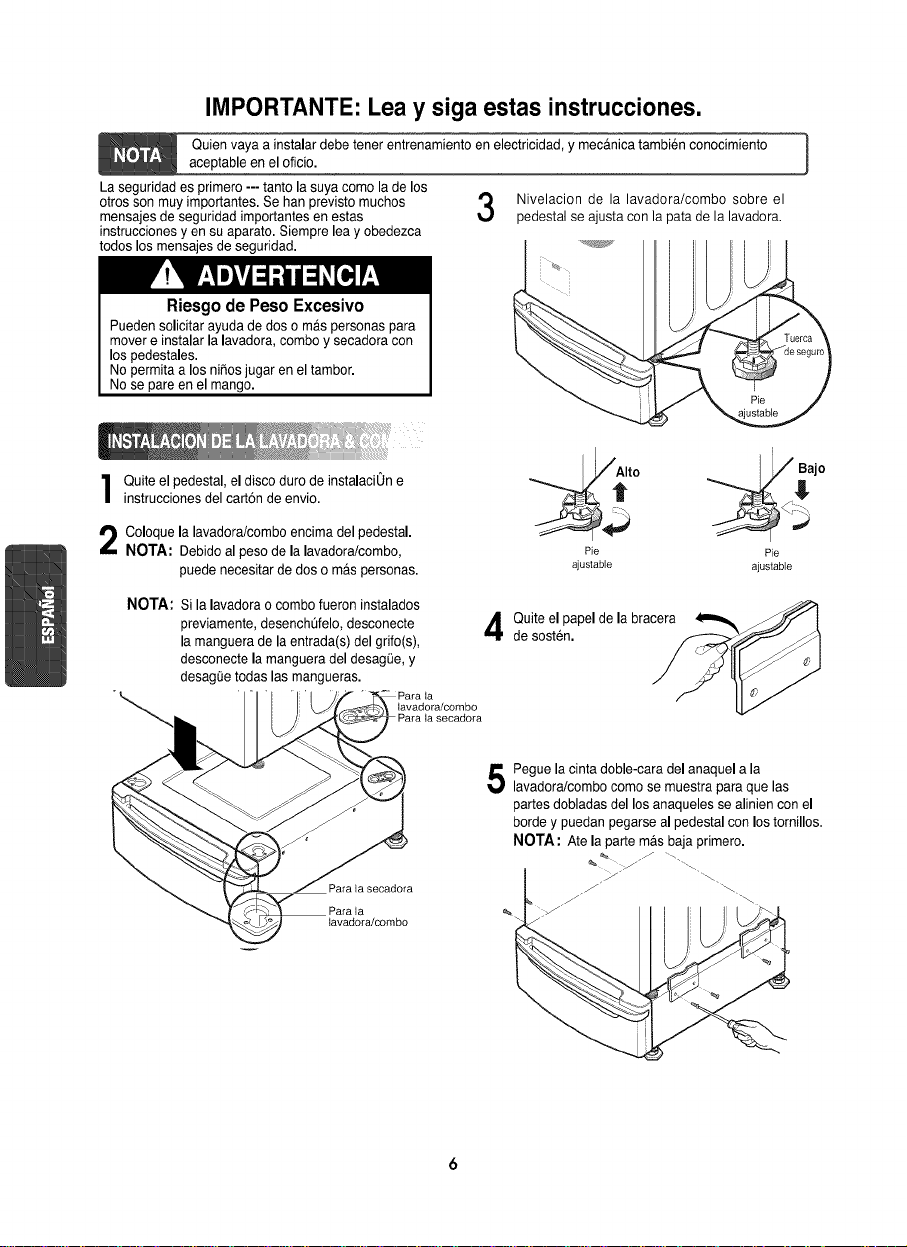
Nivelacion de la lavadora/combo sobre el
pedestal se ajusta con la pata de la lavadora.
}
I uite el pedestal, el disco duro de instalaci0n e
instrucciones del cart6n de envio.
Coloque la lavadora/combo encima del pedestal.
NOTA: Debido al peso de la lavadora/combo,
puede necesitar de dos o mas personas.
NOTA: Si la lavadora o combo fueron instalados
previamente, desenchQfelo, desconecte
la manguera de la entrada(s) del grifo(s),
desconecte la manguera del desag(Je, y
desagQe todas las mangueras.
Pie Pie
ajustable ajustable
Quite el papel de la bracera
de sosten.
tavadora/combo
Para ta
tavadora/combo
Pegue la cinta doble-cara del anaquel a la
lavadora/combo como se muestra para que las
partes dobladas del los anaqueles se alinien con el
borde y puedan pegarse al pedestal con los tornillos.
NOTA: Ate la parte mas baja primero.
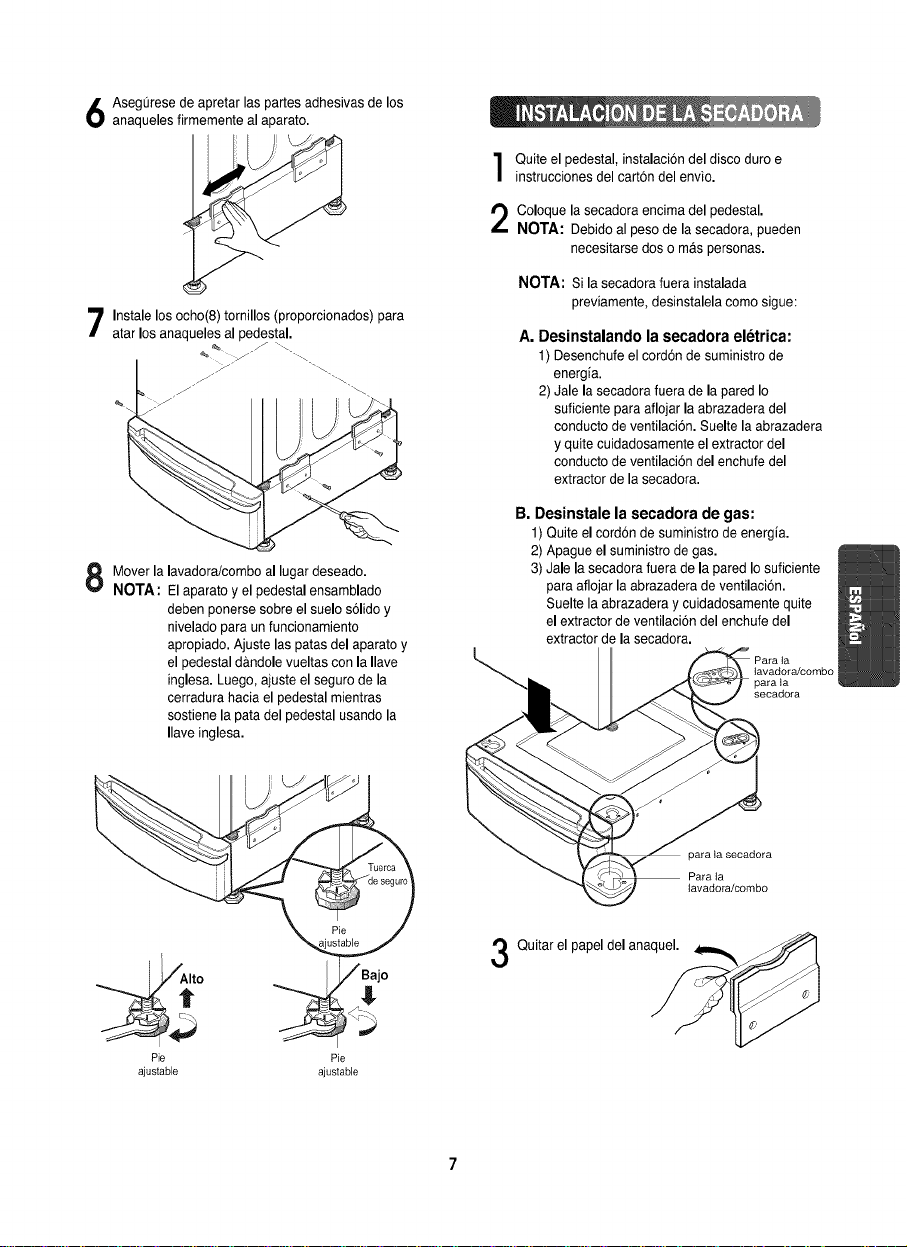
6 anaquelesASegQresede apretar las partes adhesivas deIoSfirmementeal aparato.
Instale los ocho(8) tomillos(proporcionadOS)atar los anaqueles al pedestal, para
M°verNOTA:lalavad°ra/c°mb°Eiaparato y el pedestalensambladoallugar desead°"
deben ponerse sobre el suelo s61ido y
nivelado para un funcionamiento
apropiado. Ajuste las patas del aparato y
el pedestal d&ndole vueltas con la Ilave
inglesa. Luego, ajuste el seguro de la
cerradura hacia el pedestal mientras
sostiene la pata del pedestal usando la
Ilave inglesa.
instrucciones del cart6n del envio.Quite el pedestal, instalaci6n del disco duro e
ColoquelaNOTA:Debido alSecad°rapesodeencima del pedestal.lasecadora, pueden
necesitarse dos o m_.spersonas.
NOTA: Si lasecadorafuerainstalada
previamente,desinstalelacomesigue:
A. Desinstalando la secadora eletdca:
1) Desenchufe el cord6n de suministro de
energia.
2) Jale la secadora fuera de la pared Io
suficiente para aflojar la abrazadera del
conducto de ventilaci6n. Suelte la abrazadera
y quite cuidadosamente el extractor del
conducto de ventilaci6n del enchufe del
extractor de la secadora.
B. Desinstale la secadora de gas:
1) Quite el cord6n de suministro de energia.
2) Apague el suministro de gas.
3) Jale la secadora fuera de la pared Iosuficiente
para aflojar la abrazadera de ventilacion.
Suelte la abrazadera y cuidadosamente quite
el extractor de ventilaciOn del enchufe del
extractor de la secadora.
tavadora/combo
para ta
secadora
para ia secadora
Para ia
tavadora/combo
Pie Pie
ajustable ajustable
Quitar el papel del anaquel.
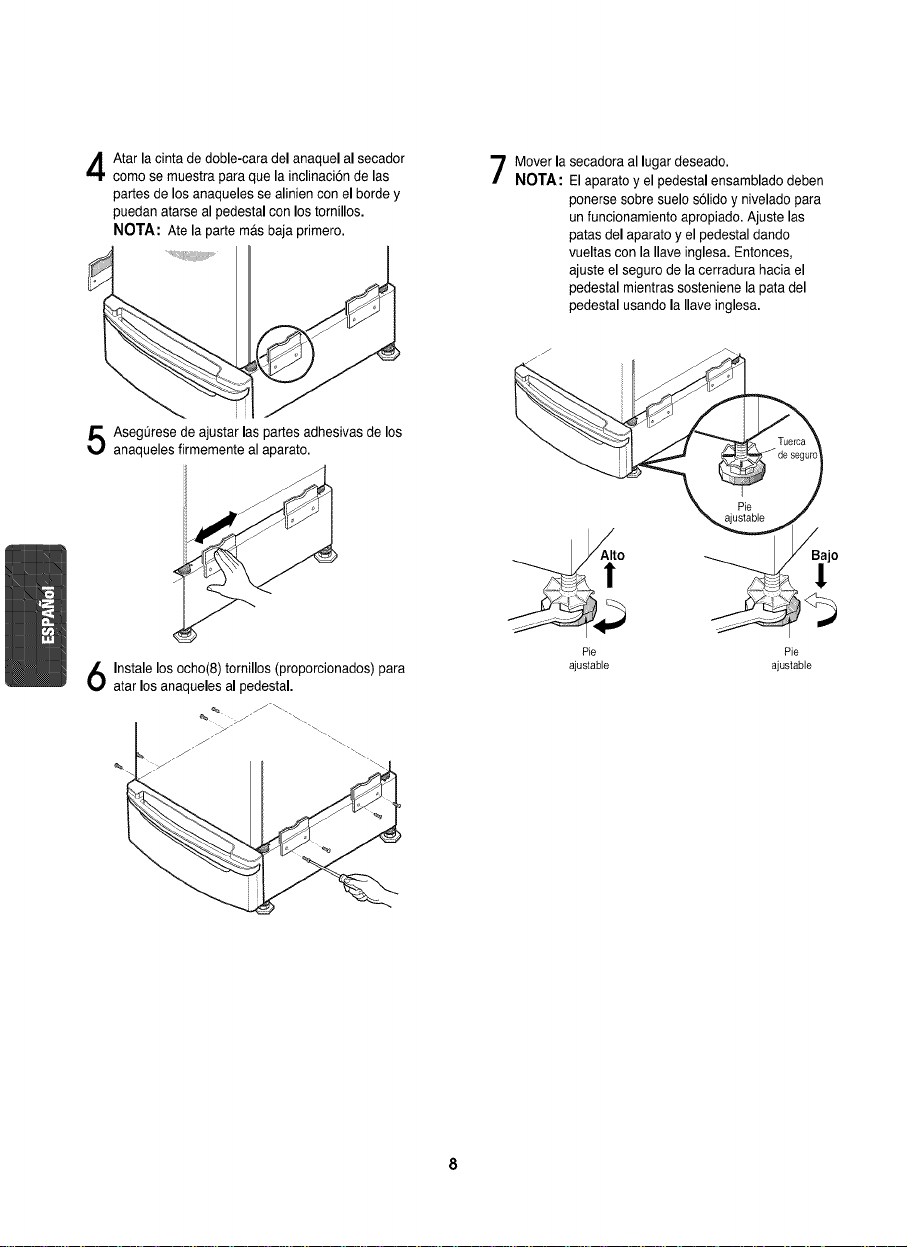
Atarlacintadedoble-caradelanaquelalsecador
comesemuestraparaquelainclinaci6ndelas
partesdelosanaquelessealinienconelbordey
puedanatarsealpedestalconlostornillos.
NOTA:Atelapartema.sbajaprimero.
Moverlasecadoraallugardeseado.
NOTA:Elaparatoyelpedestalensambladodeben
ponersesobresuelos61idoyniveladopara
unfuncionamientoapropiado.Ajustelas
patasdelaparatoyelpedestaldando
vueltasconlaIlaveinglesa.Entonces,
ajusteelsegurodelacerradurahaciael
pedestalmientrassostenienelapatadel
pedestalusandolaIlaveinglesa.
5 segQresedeajustarlaspartesadhesivasdelos
anaquelesfirmementealaparato.
Instalelosocho(8)tornillos(proporcionados)para
atarlosanaquelesalpedestal.
Pie
ajustable
Pie
ajustable
FGarantia Limitada de un Afio
Si este electrodomestico fallara debido a un defecto de materiales o mano de obra dentro del afio de la fecha de
compra, Ilame al 1-800-4-MY-HOME ® para solicitar su reparaci6n gratuita, siempre y cuando se instale, opere o
mantenga de acuerdo con todas las instrucciones suministradas con el producto.
Si este electrodom_stico alguna vez se usa con prop6sitos que exceden el uso familiar, esta garantia s61o tendrA
una vafidez de 90 dias desde la fecha de adquisici6n.
Esta garantia s61o cubre defectos de material y de mano de obra. Sears NO PAGARA:
1. Elementos prescindibles que pueden gastarse debido al uso normal, incluyendo pero sin limitarse a, filtros,
correas, bombitas de luz y sacos.
2. Un t6cnico que capacite al usuario sobre la instalaci6n de producto, operaci6n y mantenimiento correctos.
3. Un tecnico que limpie o mantenga este producto.
4. Dafios o fallas de este producto si no se instala, opera o mantiene de acuerdo con todas las instrucciones
suministradas con el producto.
5. Dafios o fallas de este producto como resultado de accidentes, abuso, uso inadecuado o uso diferente para
el que fue disefiado.
6. Dafios o fallas de este producto provocados por el uso de detergentes, limpiadores, quimicos o utensilios
diferentes de los recomendados en todas las instrucciones suministradas con el producto.
7. Dafios o fallas de piezas o sistemas como resultado de modificaciones sin autorizaci6n hechas a este
producto.
Descargo de responsabilidad de garantias implicitas; limitaci6n de acciones legales
Las t_nicas y exclusivas acciones legales del cliente bajo esta garantia limitada seran la reparacion del producto
como se sefiala aqu[. Las garantias implicitas, incluyendo garantias de comerciabilidad y aptitud para un
objetivo particular, se encuentran limitadas a un afio o al periodo mas corto permitido por la ley. Sears no set&
responsable de dafios incidentales o resultantes. Algunos estados no permiten la exclusi6n o limitaci6n de dafios
o limitaciones incidentales o resultantes, o limitaciones sobre la duraci6n de garantias implicitas o de
comerciabilidad o aptitud, por Io tanto las limitaciones o exclusiones anteriores pueden no aplicarse en su caso.
Esta garantia podra aplicarse s61o si este artefacto se utiliza en los EE. UU. o Canad&.
Esta garantia le otorga derechos legales especificos y usted puede contar con otros derechos, que pueden
variar de estado a estado.
\
Sears Roebuck and Co., Hoffman Estates, IL 60179
Sears Canada, Toronto, Ontario, Canada M5B 2B8
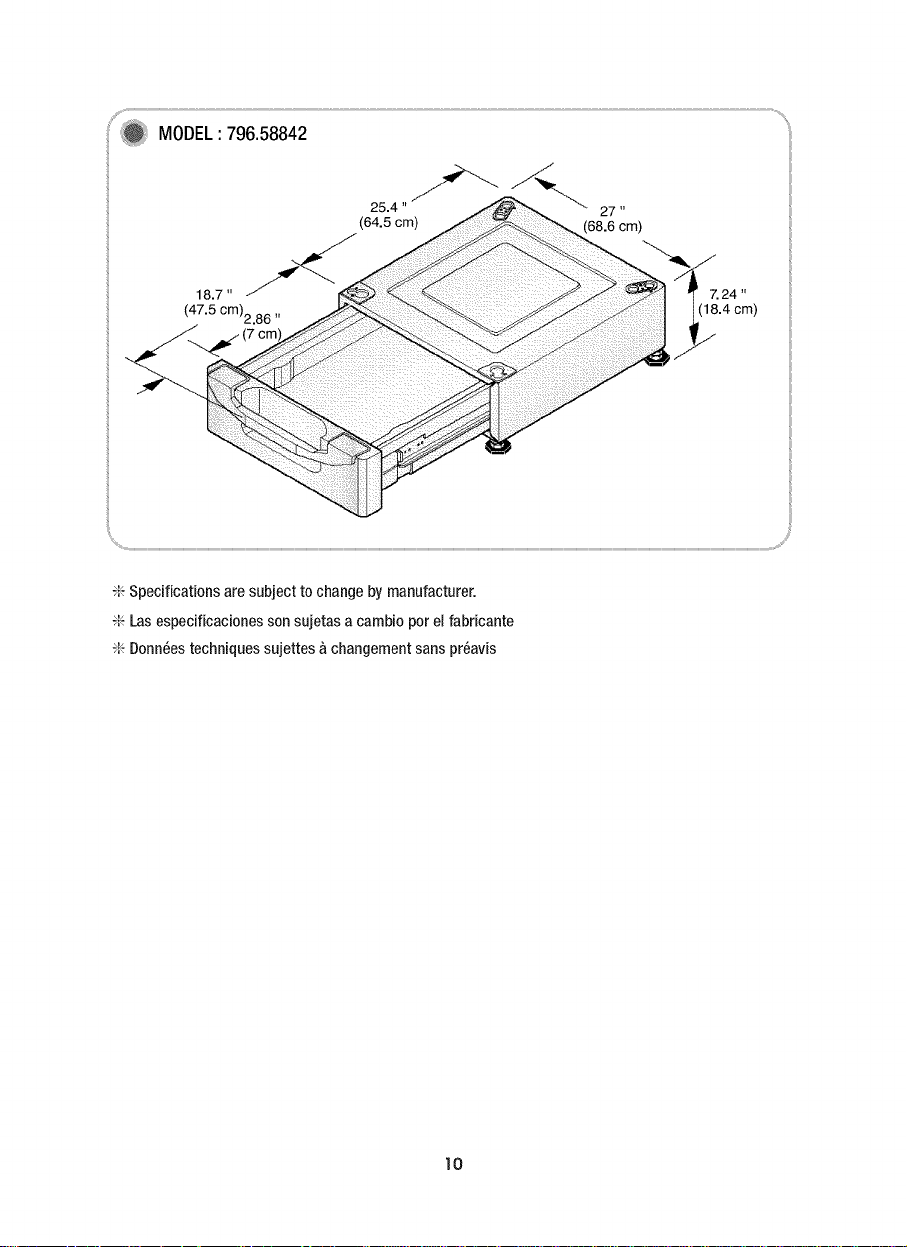
MODEL: 796.58842
27 "
(68.6 cm)
_I_Specifications are subject to change by manufacturer.
_I_Las especificaciones son sujetas a cambio per el fabricante
_I_Donn_estechniques sujettes &changement sans pr_avis
1o

11
P/NoI: 3828ER4001H