
THIS RANGE IS FOR RESIDENTIAL USE ONLY
SINGLE OVEN DUAL FUEL RANGE
Models: VDFSGE365..
USERS OPERATING INSTRUCTIONS
IMPORTANT - PLEASE READ AND FOLLOW
• Beforebeginning,pleasereadtheseinstructionscompletelyandcarefully.
• Donotremovepermanentlyaffixedlabels,warnings,orplatesfromtheproduct.Thismay
voidthewarranty.
• Pleaseobservealllocalandnationalcodesandordinances.
• Pleaseensurethatthisproductisproperlygrounded.
• The installer should leave these instructions with the consumer who should retain
for local inspector’s use and for future reference.
• INCANADA:Theelectricalplugshouldalwaysbeaccessible.
Installationmustconformwithlocalcodesorintheabsenceofcodes,theNationalFuelGas
Code ANSI Z223.1/NFPA 54 - Iatest edition. Electrical installation must be in accordance
with the National Electrical Code, ANSI/NFPA70 - latest edition and/or local codes. IN
CANADA: Installation must be in accordance with the current CAN/CGA-B149.1 National
GasInstallationCodeorCAN/CGA-B149.2,PropaneInstallationCodeand/orlocalcodes.
ElectricalinstallationmustbeinaccordancewiththecurrentCSAC22.1CanadianElectrical
CodesPart1and/orlocalcodes.
INSTALLATION IN MANUFACTURED (MOBILE) HOME: The installation must conform
with the Manufactured Home Construction and Safety Standard, Title 24 CFR, Part 3280
[formerly the Federal Standard for Mobile Home Construction and Safety, Title 24, HUD
(Part280)]or,whensuchstandardisnotapplicable,theStandardforManufacturedHome
Installations,ANSI/NCSBCSA225.1,orwithlocalcodeswhereapplicable.
INSTALLATIONINRECREATIONALPARKTRAILERS:Theinstallationmustconformwith
stateorother codesor,intheabsenceofsuchcodes,withtheStandardforRecreational
ParkTrailers,ANSIA119.5.
Installation of any gas-fired equipmentshouldbemadebya Iicensed plumber. A manual
shut-off valve must be installed in an accessible location in the gas line external to the
applianceforthepurposeofturningonorshuttingoffgastotheappliance(InMassachusetts
suchshutoffdevicesshouldbeapprovedbytheBoardofStateExaminersofPlumbers&
GasFitters).
Ifanexternalelectricalsourceisutilized,theappliance,wheninstalled,mustbeelectrically
groundedinaccordancewithlocalcodesor,intheabsenceoflocalcodes,withthenational
ElectricalCode,ANSI/NFPA70.
Some models are supplied with a protective lm on steel and aluminium
parts. This lm must be removed before installing/using the appliance.
2
– Do not store or use gasoline or other ammable vapors and
liquids in the vicinity of this or any other appliance.
– NEVER use this appliance as a space heater to heat or
warm the room. Doing so may result in carbon monoxide
poisoning and overheating of the appliance.
– WHAT TO DO IF YOU SMELL GAS:
• Do not try to light any appliance.
• Do not touch any electrical switch.
• Do not use any phone in your building.
• lmmediately call your gas supplier from a neighbor’s
phone. Follow the gas supplier’s instructions.
• lf you cannot reach your gas supplier, call the re
department.
– Installation and service must be performed by a qualied
installer, service agency, or the gas supplier.
If the information in this manual is not followed exactly,
a re or explosion may result causing property damage,
personal injury, or death.
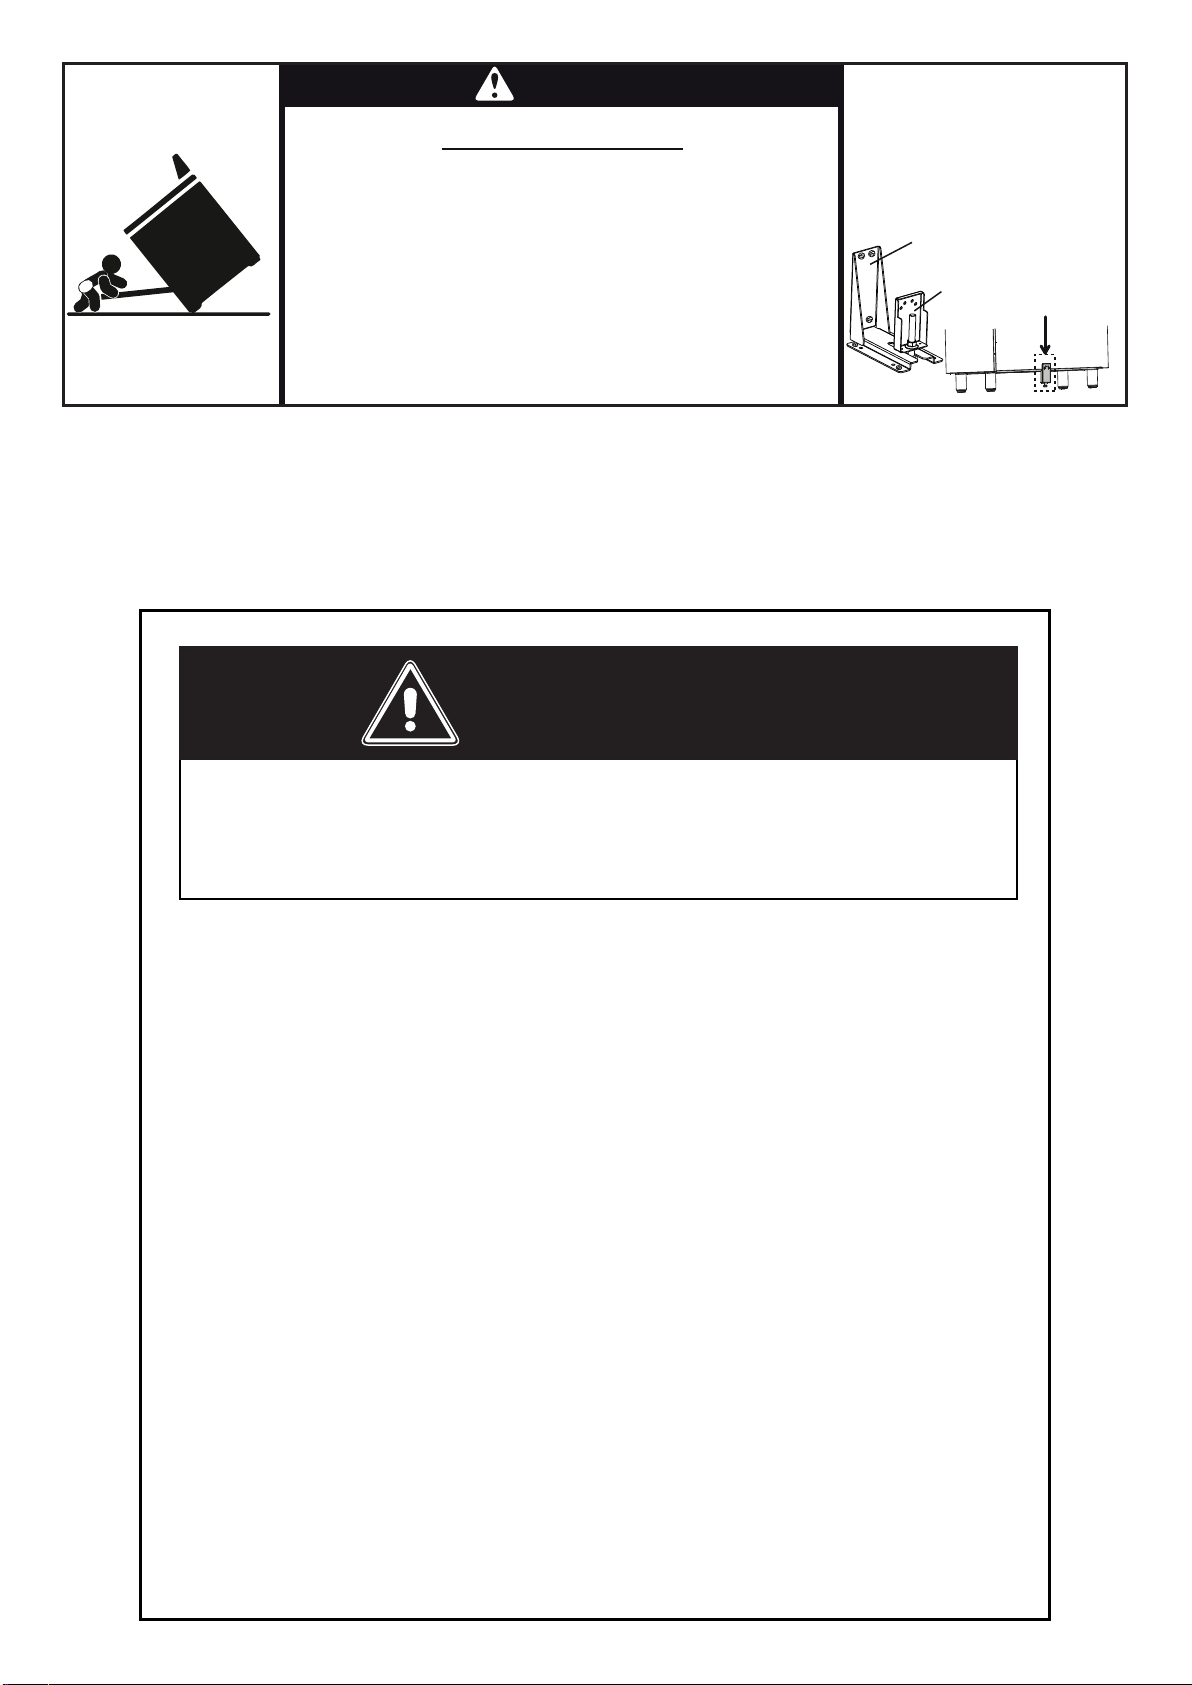
WARNING !
WARNING
See installation
instructions for details.
Tip-Over Hazard
Anti-tip bracket
Adjustable bracket
assembly to be xed to
the back of the range
A child or adult can tip the range and be killed.
Check installation of anti-tip device per installation
instructions.
Check engagement of anti-tip device if range
is moved per installation.
Failure to follow these instructions can result in
death or serious burns to children and adults.

3
Dear Customer,
Thank you for having purchased and given your preference to our
product.
The safety precautions and recommendations reported below are
for your own safety and that of others. They will also provide a means
by which to make full use of the features offered by your appliance.
Please preserve this booklet carefully. It may be useful in future,
either to yourself or to others in the event that doubts should arise
relating to its operation.
This appliance must be used only for the task it has explicitly been
designed for, that is for cooking foodstuffs. Any other form of usage
is to be considered as inappropriate and therefore dangerous.
The manufacturer declines all responsibility in the event of damage
caused by improper, incorrect or illogical use of the appliance.
This appliance is designed and manufactured solely for the cooking of domestic (household)
foodandinnotsuitableforanynonedomesticapplicationandthereforeshouldnotbeusedina
commercialenvironment.
Theappliancewarrantywillbevoidiftheapplianceisusedwithinanonedomesticenvironmenti.e.
asemicommercial,commercialorcommunalenvironment.
WARNING: This product can expose you to chemicals including
formaldehyde, which is known to the State of California to cause cancer,
and lead, which is known to the State of California to cause birth defects or other
reproductive harm. For more information go to www. P65Warnings.ca.gov.

4
USER INSTRUCTIONS
WARNING!!
ELECTRICAL GROUNDING INSTRUCTIONS
The range must be electrically grounded in accordance with
local codes or, in the absence of local codes, with the National
Electrical Code, ANSI/NFPA No. 70-latest edition, in Canada
Canadian Electrical Code.
Installation should be made by a Iicensed electrician.
FOR PERSONAL SAFETY, THIS APPLIANCE MUST BE
PROPERLY GROUNDED.
If an external electrical source is utilized, the installation must
be electrically grounded in accordance with local codes or, in
the absence of local codes, with the national Electrical Code,
ANSI/NFPA70.
IN CANADA: This appliance is equipped with a four-prong
groundingplug(NEMA14-50P)foryourprotectionagainstshock
hazardandshould be plugged directly intoaproperlygrounded
socket.
Do not under any circumstances cut or remove the fourth
(ground) prong from the power plug.
REPLACEMENT PARTS
Only authorized replacement parts may be used in performing
serviceontherange.Replacementpartsareavailablefromfactory
authorizedpartsdistributors.Contactthenearestpartsdistributor
inyourarea.
GENERAL INFORMATION
1. WARNING!!
This appliance shall not be used for space heating. This
information is based on safety considerations.
2. To eliminate risk of burns or re by reaching over heated
surfaceunits,cabinetstoragelocatedabovethesurfaceunits
shouldbeavoided.
3. AlIopeningsinthewallbehindtheapplianceandintheoor
undertheapplianceshallbesealed.
4. Keep appliance area clear and free from combustible
materials,gasoline,andotherammablevapors.
5. Donotobstructtheowofcombustionandventilationair.
6. Disconnect the electrical supply to the appliance before
servicing.
7. Whenremovingapplianceforcleaningand/orservice;
A. Shutoffgasatmainsupply.
B. DisconnectACpowersupply.
C. Disconnectgaslinetotheinletpipe.
D. Carefullyremovetherangebypullingoutward.
CAUTION:Rangeisheavy;usecareinhandling.
8. Electrical Requirement
Electrical installation should comply with national and local
codes.
9. Air Supply and Ventilation
Theinstallermustreferstolocal/nationalcodes.
10. Gas Manifold Pressure
Naturalgas-4.0”W.C.P.
LP/Propane-11.0”W.C.P.
11. Themisuseofovendoor(e.g.stepping,sitting,orleaningon
them)canresultinpotentialhazardsand/orinjuries.
12. Wheninstallingorremovingtherangeforservice,arollinglift
jackshouldbeused.Donotpushagainstanyoftheedgesof
therangeinanattempttoslideitintooroutoftheinstallation.
Pushingorpullingarange(ratherthanusingaliftjack)also
increases the possibility of bending the leg spindles or the
internalcouplingconnectors.

5
IMPORTANT PRECAUTIONS AND RECOMMENDATIONS FOR USE
OF ELECTRICAL APPLIANCES
Useofanyelectricalapplianceimpliesthenecessitytofollowaseriesoffundamentalrules.
Inparticular:
• Nevertouchtheappliancewithwethandsorfeet.
• Donotoperatetheappliancebarefooted.
• Donotallowchildrenordisabledpeopletousetheappliancewithoutyoursupervision.
Themanufacturercannotbeheldresponsibleforanydamagescausedbyimproper,incorrector
unreasonableuseoftheappliance.
IMPORTANT PRECAUTIONS AND RECOMMENDATIONS
Afterhavingunpackedtheappliance,checktoensurethatitisnotdamaged.
Incaseofdoubt,donotuseitandconsultyoursupplieroraprofessionallyqualifiedtechnician.
Packingelements(i.e.plasticbags,polystyrenefoam,nails,packingstraps,etc.)shouldnotbe
leftaroundwithineasyreachofchildren,asthesemaycauseseriousinjuries.
Thepackagingmaterialisrecyclableandismarkedwiththerecyclingsymbol
.
• Donotattempttomodifythetechnicalcharacteristicsoftheapplianceasthismaybecome
dangeroustouse.
• Do not carry out cleaning or maintenance operations on the appliance without having
previouslydisconnecteditfromtheelectricpowersupply.
• Afteruse,ensurethattheknobsarein
position.
• Donotallowchildrenorotherincapablepeopletousetheappliancewithoutsupervision.
• During and after use of the range, certain parts will become very hot. Do not touch hot
parts.
• Keepchildrenawayfromtherangewhenitisinuse.
• Thisrangeissuppliedwithaprotectivefilmonsteelandaluminiumparts.Thisfilmmustbe
removedbeforeinstalling/usingtheappliance.
• Fire risk!Donotstoreflammablematerialintheoven,andinthestoragecompartment.
• Makesurethatelectricalcablesconnectingotherappliances intheproximityoftherange
cannotcomeintocontactwiththehoborbecomeentrappedintheovendoor.
• Donotline the ovenwallswithaluminium foil. Donotplaceshelves, broiler pan,pansor
othercookingutensilsonthebaseoftheovenchamber.
• Themanufacturerdeclinesallliabilityforinjurytopersonsordamagetopropertycausedby
incorrectorimproperuseoftheappliance.
• Toavoidanypossiblehazard,theappliancemustbeinstalledbyqualifiedpersonnelonly.
Any repairs by unqualified persons may result in electric shock or short circuit. In order
toavoid possible injuries to your body or to theappliance,donotattempt any repairs by
yourself.Suchworkshouldbecarriedoutbyqualifiedservicepersonnelonly.
• Danger of burns! The oven and cooking accessories may become very hot during
operation.Makesure children are keptoutofreachand warn them accordingly.To avoid
burnsusekitchenclothesandgloveswhenhandlinghotpartsorutensils.
• Standawayfromtherangewhenopeningovendoor.Hotairorsteamwhichescapescan
causeburnstohands,face,and/oreyes.
• Never clean the range, oven and storage compartment with a high-pressure steam
cleaningdevice,asitmayprovokeashortcircuit.
• Inthecaseofaprolongedpowerfailure:
– thetopburnerscanbeusedwithnorestriction.Inthatcasefollowtheinstructionsinthe
chapter“Howtousethetopburners”.
– multifunction electric oven: DO NOT attempt to light the oven or broil during power
failure.
• Thisapplianceisintendedforuseinyourhousehold.Neverusetheapplianceforanyother
purpose!
• If you should decide not to use this appliance any longer (or decide to substitute an
lder model), before disposing of it, it is recommended that it be made inoperative in an
appropriate manner in accordance to health and environmental protection regulations,
ensuringinparticular that all potentially hazardouspartsbemadeharmless, especially in
relationtochildrenwhocouldplaywitholdappliances.
• Removethedoorandthestoragedrawerbeforedisposaltoprevententrapment.
6
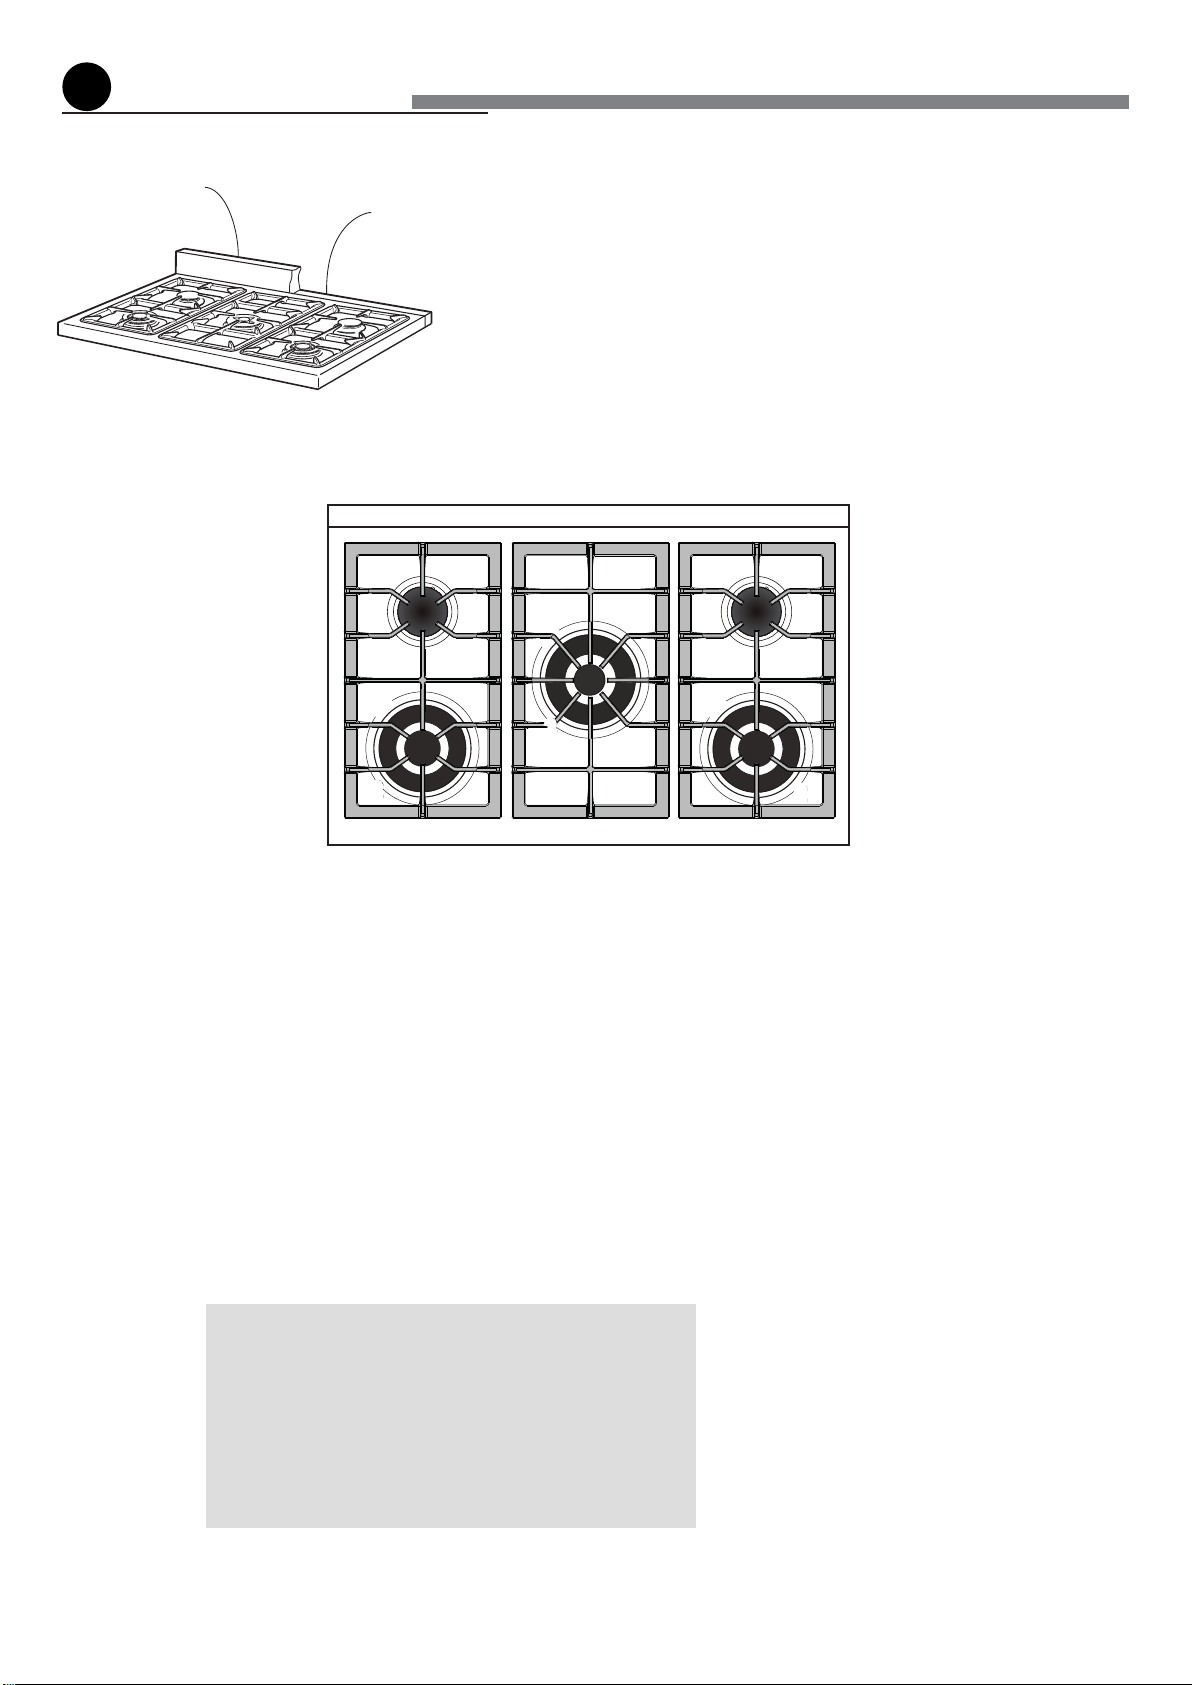
features
Backguard fitted
Island trim fitted
CAUTION:
If the burner is accidentally extinguished, turn the gas
off at the control knob and wait at least 1 minute before
attempting to relight.
CAUTION:
Gas appliances produce heat and humidity in the
environment in which they are installed.
Ensure that the cooking area is well ventilated following
national/local codes.
COOKING HOB
1. Semi-rapidburner(SR)-8000BTU/hr
2. Triple-ringburner(TR)-12000BTU/hr
3. Dualburner(D)-17000BTU/hr
Note:
• The electric gas-lighting device is incorporated into the
knobs.
• Theappliancehasasafetyvalvesystemfitted,theflow
of gas will be stopped if and when the flame should
accidentallygoout.
Fig.1.1
1 11 1
22
2
2
3
3
Islandtrim
(levelwithcooktop)
3”backguard
1
7
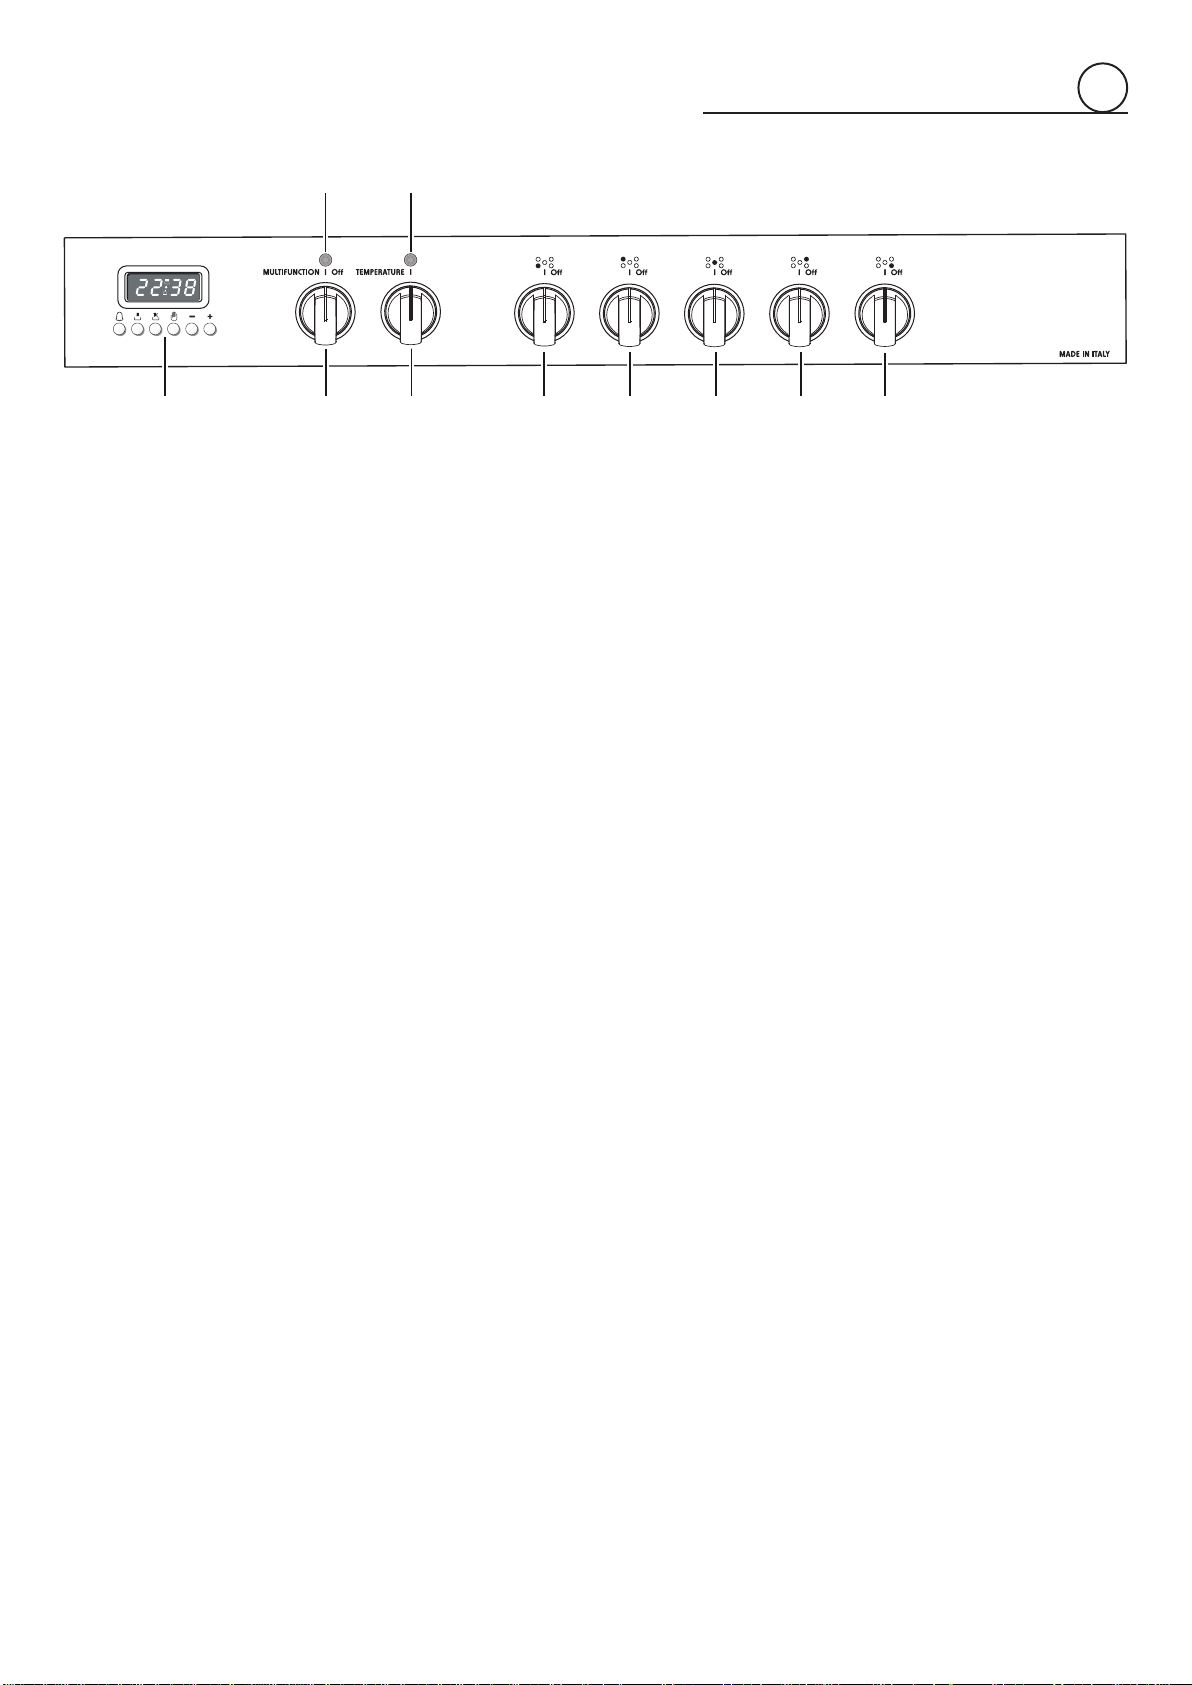
CONTROLS DESCRIPTION
1. Electronicprogrammer
2. Multifunctionovenswitchknob
3. Multifunctionoventhermostatknob
4. Frontleftburnercontrolknob
5. Rearleftburnercontrolknob
6. Centraldualburnercontrolknob
7. Rearrightburnercontrolknob
8. Frontrightburnercontrolknob
9. Ovenfunctionindicatorlight
10. Oventhermostatindicatorlight
Fig.1.2
1
5
6
7
4
8321
A
U
T
O
109
8
how to use the top burners
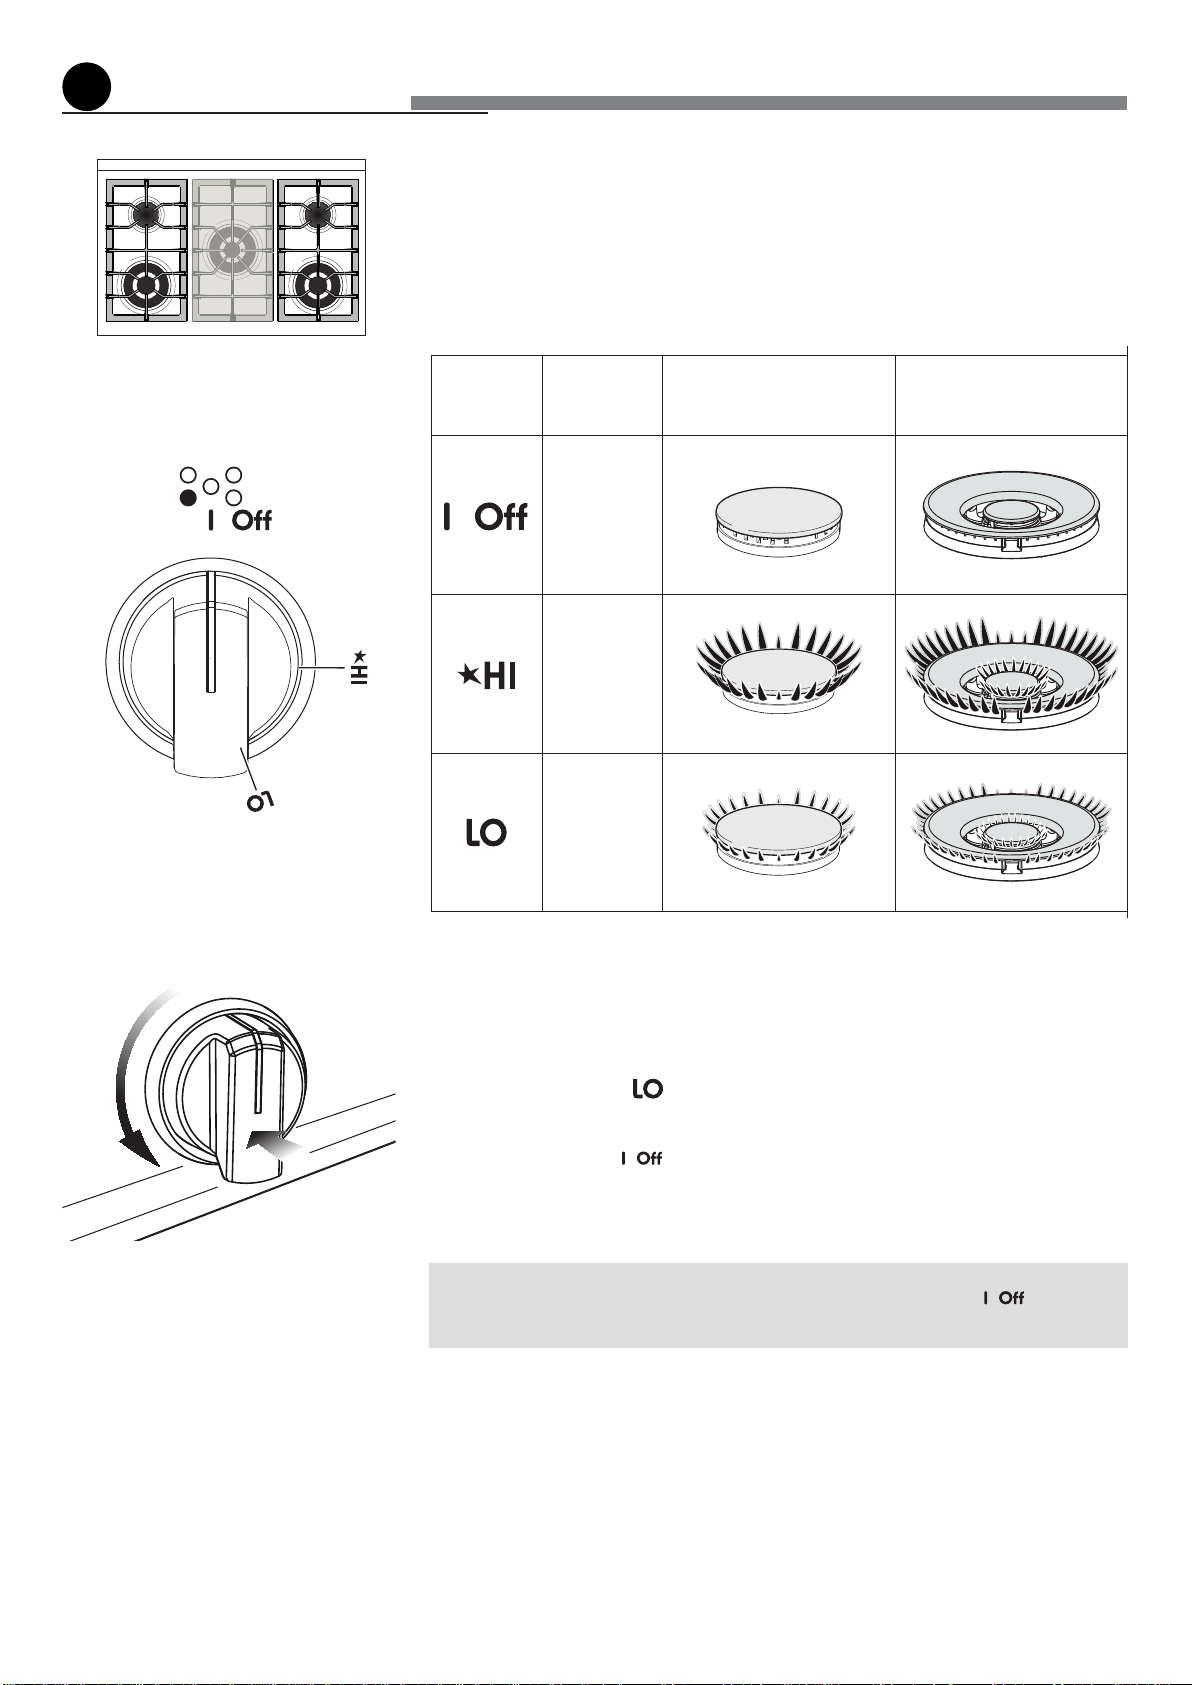
Fig.2.2
Fig.2.1
GAS BURNERS (Semi-rapid and triple ring)
Gas flow to the burners isadjusted by turning the knobs(illustratedin fig. 2.1) which
controlthevalves.
Turningtheknobsothatthesymbolsprintedonitselfpointtothesymbolprintedonthe
controlpanelachievesthefollowingfunctions:
Themaximumaperturepositionpermitsrapidboilingofliquids,whereastheminimum
aperture position allows simmer warming of food or maintaining boiling conditions of
liquids.
Toreducethe gasflowtominimum, rotatetheknob further counterclockwisetopoint
theindicatortowardsthe
position.
Otherintermediateoperatingadjustmentscanbeachievedbypositioningtheindicator
between the maximum and minimum aperture positions, and never between the
maximumapertureand
positions.
N.B. Whentherangeisnotbeingused,setthegasknobstotheir positions
andalsoclosethegasshut-offvalveplacedonthemaingassupplyline.
Knob
position
Function SEMI-RAPID burner TRIPLE-RING burner
closed
valve
maximum
rate
minimum
rate
2
9
2
Caution!
The range becomes very hot during operation.
Keep children well out of reach.
LIGHTING GAS BURNERS FITTED WITH FLAME FAILURE
SAFETY DEVICE
(Semi-rapid and triple ring)
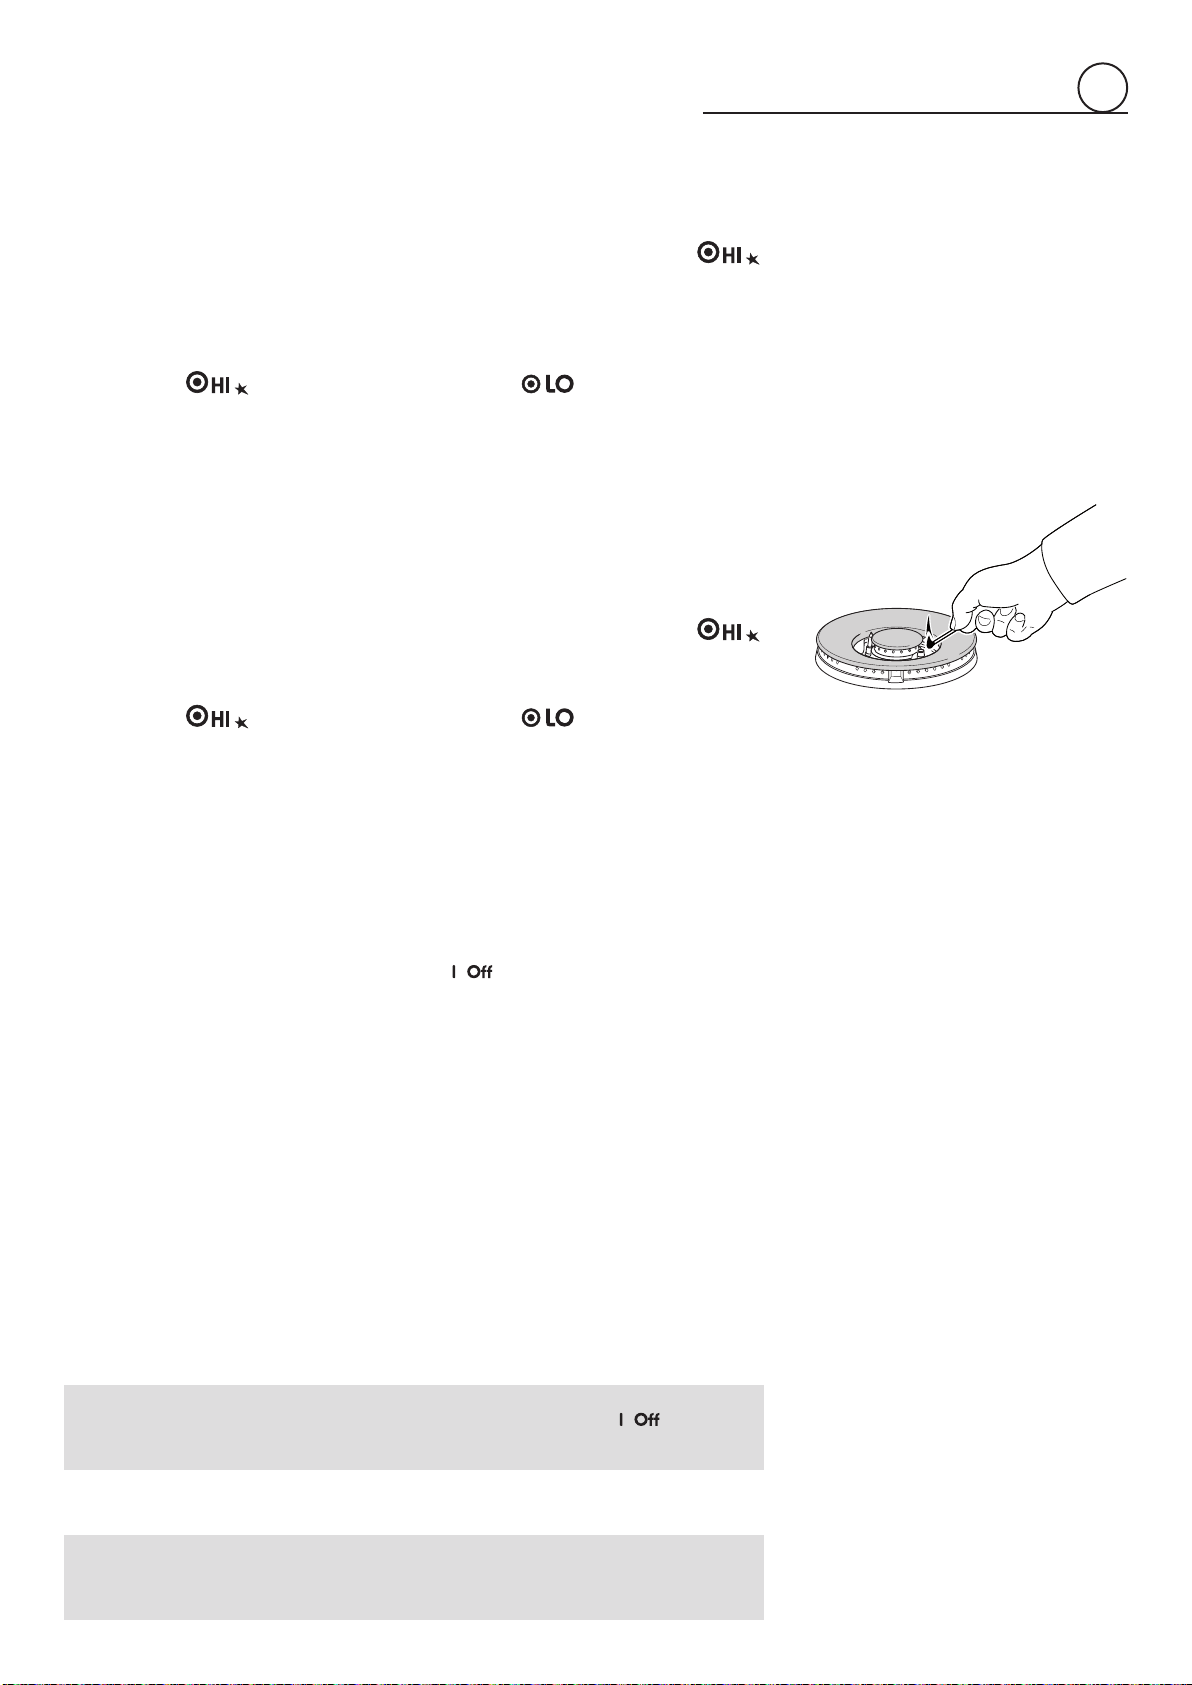
Inordertolighttheburner,youmust:
1– Pushandturntheknobinancounterclockwisedirectionuptothe
position
(maximumrate),pushinandholdtheknobuntiltheflamehasbeenlit(fig.2.2).
Thesparksproducedbythelightersituatedinsidetherelativeburnerwilllightthe
flame.
Intheeventthatthelocalgassupplyconditionsmakesitdifficulttolighttheburner
in
position,tryagainwiththeknobin position.
2– Waitforabouttensecondsafterthegasburnerhasbeenlitbeforelettinggothe
knob(safetydeviceactivationdelay).
3– Adjustthegasvalvetothedesiredposition.
Ifthereisnomainselectricalsupply,theburnerscanbeusedwithnorestriction.
Inthatcase,inordertolighttheburner,youmust:
1. Bringalightedmatchclosetotheburner(aspersidegure)andkeepitinplace
untiltheburnerhasbeenignited.
2. Pushandturnthedialinancounter-clockwisedirectionuptothe
position
(maximumrate),pushinandholdthedialuntiltheamehasbeenlit(g.2.2)
Intheeventthatthelocalgassupplyconditionsmakesitdifculttolighttheburner
in
position(maximumrate),tryagainwiththedialin
position(minimum
rate).
3. Waitforabouttensecondsafterthegasburnerhasbeenlitbeforelettinggothedial
(safetydeviceactivationdelay).
4. Adjustthegasvalvetothedesiredposition.
Ifthe burner flameshouldgoout forsomereason,the safetyvalvewillautomatically
stopthegasflow.
Tore-lighttheburner,returntheknobtotheclosed
position,wait for at least 1
minuteandthenrepeatthelightingprocedure.
Ifyourlocalgassupplymakesitdifficulttolighttheburnerwiththeknobsettomaximum,
settheknobtominimumandrepeattheoperation.
10
2
Fig.2.3
Fig.2.4
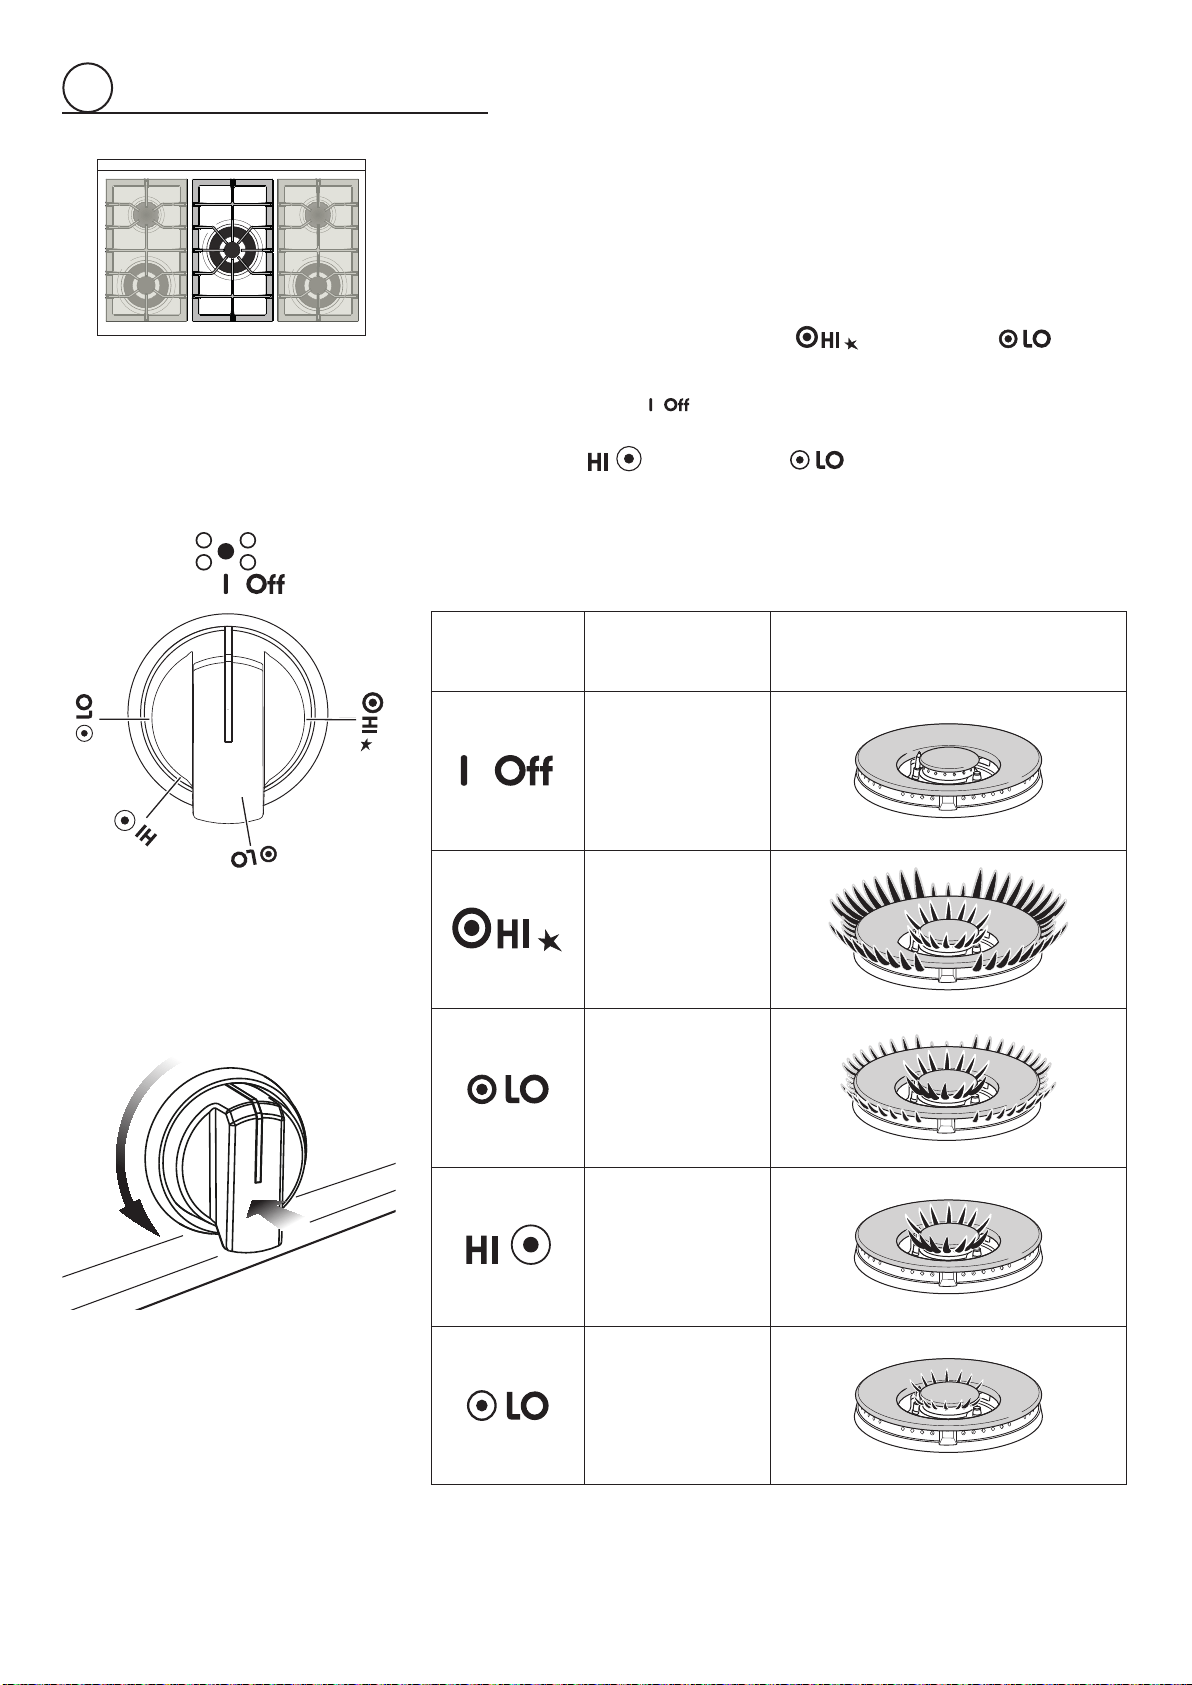
GAS BURNERS (Dual)
The Dual Burner is a very exible burner which allows different regulations for optimal
cooking.
It is composedby one inner and one outer crown; theame of the inner crown can be
regulatedseparatelyfromtheamesoftheoutercrown.
TheDualBurnercanbeused:
• Asahigh-powerburner(allamesproducedsimultaneouslybyinnerandoutercrown)
whichcanbeadjustedfromthemaximum(
)totheminimum( )position.
Intermediate operating adjustments can be achieved by positioning the indicator
between the maximum and minimum opening positions, and never between the
maximumopeningand
position.
• Asasmallburner(ameproducedonlybytheinnercrown)whichcanbeadjustedfrom
themaximum(
)totheminimum( )position.
Gasowtotheburnersisadjustedbyturningthedial(illustrateding.2.3)whichcontrols
thevalve.
Turningthedialsothatthesymbolsprintedonthedialpointtothemarkonthecontrol
panelachievesthefollowingfunctions:
Knob
position
Function DUAL burner
closed
valve
Maximumrateof
inner+outercrown
(insideandoutside
amesin
simultaneously
atthemaximum)
Minimumrateof
outercrownand
maximumrateof
innercrown
Maximumrate
ofinnercrown
(onlyinnerame
atthemaximum)
Minimumrate
ofinnercrown
(onlyinnerame
attheminimum)
11
2
N.B. Whentherangeisnotbeingused,setthegasknobstotheir positions
andalsoclosethegasshut-offvalveplacedonthemaingassupplyline.
CAUTION!
Therangebecomesveryhotduringoperation.Keepchildrenwelloutofreach.
LIGHTING GAS BURNERS FITTED WITH FLAME FAILURE
SAFETY DEVICE (Dual burner)
Inordertolighttheburner,youmust:
1. Pushandturnthedialinancounter-clockwisedirectionuptotheposition
(maximumrateofinner+outercrown);pushinandholdthedialuntiltheamehas
beenlit(g.2.4).
Thesparksproducedbythelightersituatedinsidetherelativeburnerwilllightthe
ame.
Intheeventthatthelocalgassupplyconditionsmakesitdifculttolighttheburner
inposition
,tryagainwiththedialinposition .
2. Waitforabouttensecondsafterthegasburnerhasbeenlitbeforelettinggothedial
(safetydeviceactivationdelay).
3. Adjustthegasvalvetothedesiredposition.
Ifthereisnomainselectricalsupply,theburnerscanbeusedwithnorestriction.
Inthatcase,inordertolighttheburner,youmust:
1. Bringalightedmatchclosetotheburner(aspersidegure)andkeepitinplaceuntil
theburnerhasbeenignited.
2. Pushandturnthedialinancounter-clockwisedirectionuptotheposition
(maximumrateofinner+outercrown);pushinandholdthedialuntiltheamehas
beenlit(g.2.4).
Intheeventthatthelocalgassupplyconditionsmakesitdifculttolighttheburner
inposition
,tryagainwiththedialinposition .
3. Waitforabouttensecondsafterthegasburnerhasbeenlitbeforelettinggothedial
(safetydeviceactivationdelay).
4. Adjustthegasvalvetothedesiredposition.
Iftheburnerameshouldgooutforsomereason,thesafetyvalvewillautomaticallystop
thegasow.
Tore-lighttheburner,returnthedialtotheclosed
position,waitforatleast1minute
andthenrepeatthelightingprocedure.
Ifyourlocalgassupplymakesitdifculttolighttheburnerwiththedialsettomaximum,
setthedialtominimumandrepeattheoperation.
12
2
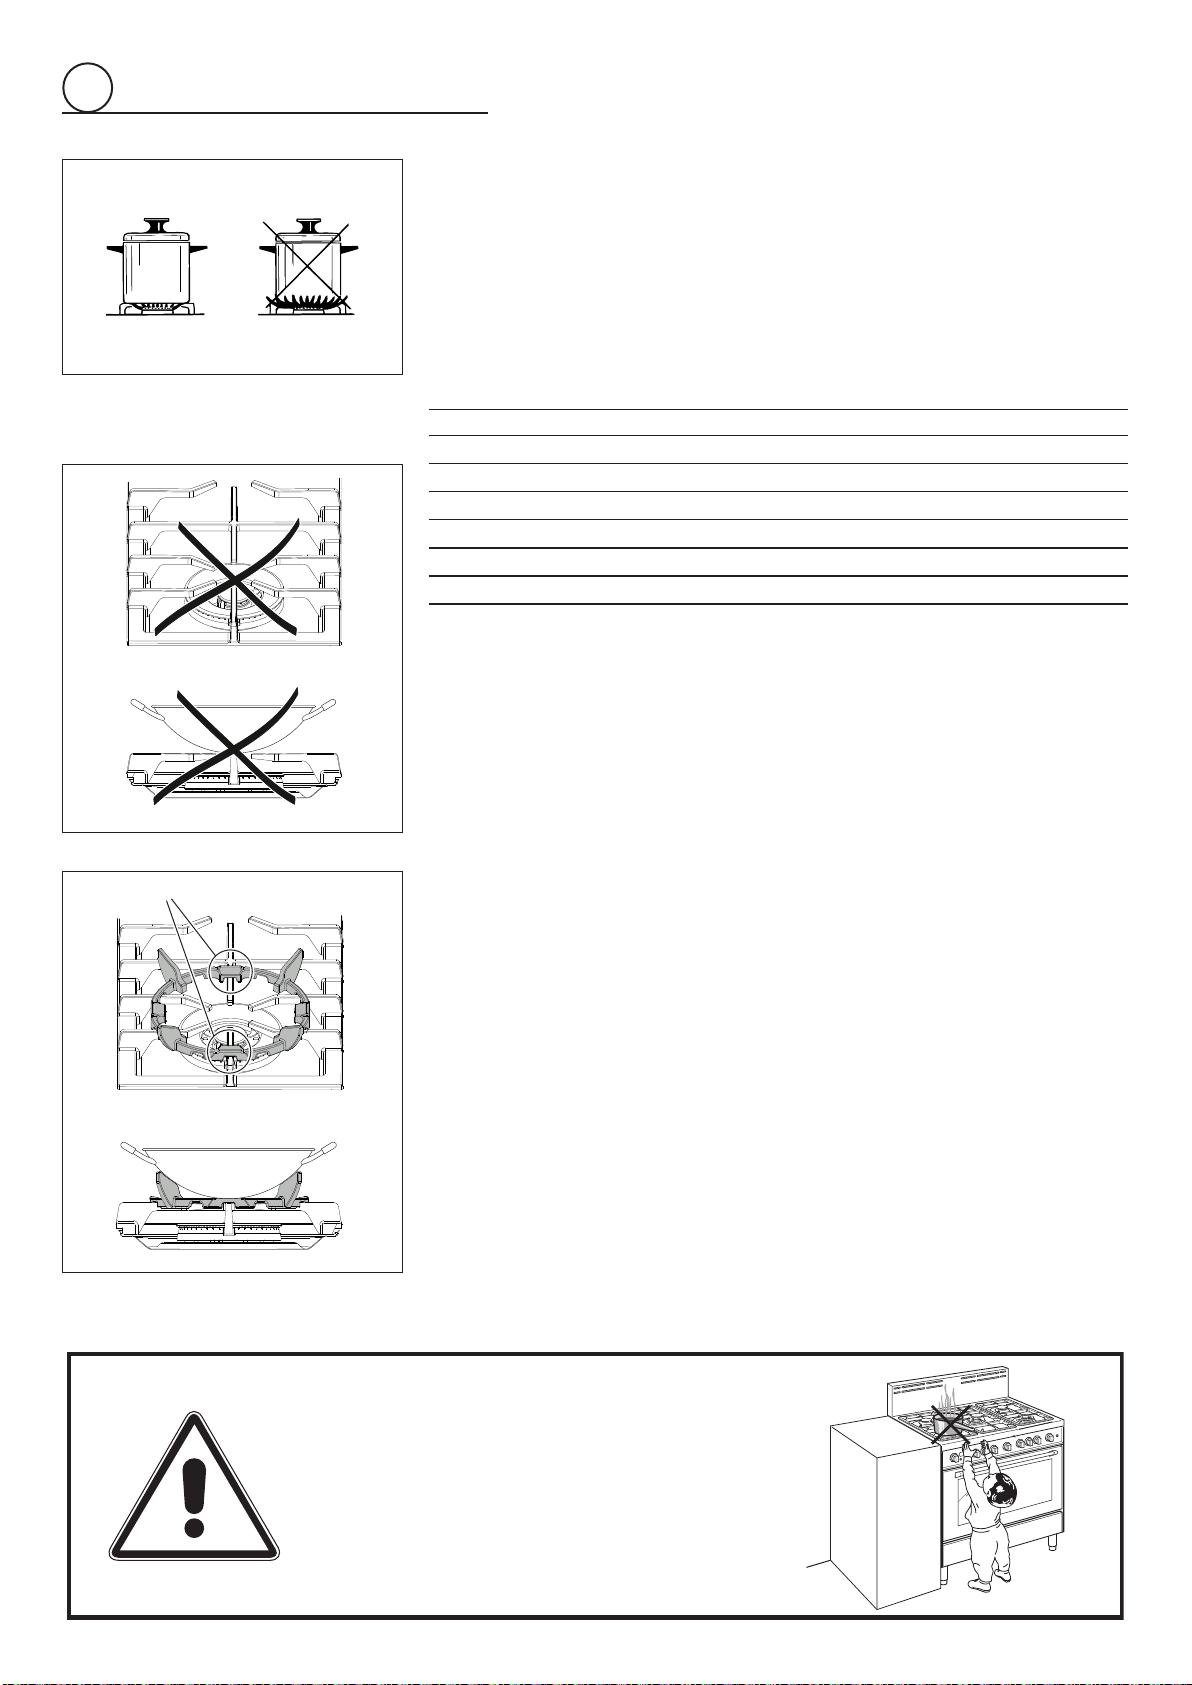
CORRECT USE OF THE TRIPLE RING AND DUAL BURNER
(figs.2.6a-2.6b)
Theflat-bottomedpansaretobeplaceddirectlyontothepan-support.
When using a WOKyou need to placethe supplied stand inthe burner to avoidany
faultyoperationofthetriple-ringanddualburner(figs.2.6a-2.6b).
WARNING: The wok stand MUST be correctly placed as indicated in figure 2.6b;
the bigger supporting areas “A” must be placed on the vertical prongs only (rear
and front).
When correctly positioned, it must sit flat and stable on the standard pan support
and must not rotate.
IMPORTANT:
Thespecialgrilleforwokpans(fig.2.6b)MUST BE PLACED ONLYoverthepan-rest
forthetripleringanddualburner.
CHOICE OF BURNER (fig.2.5)
The symbols printed on the panel above the gas knobs indicate the correspondence
betweentheknobandtheburner.
Themostsuitableburneristobechosenaccordingtothediameterandvolumecapacity
ofthecontainertobewarmed.
Itisimportantthatthediameterofthepotsorpanssuitablymatchtheheatingpotential
oftheburnersinordernottojeopardisetheefficiencyoftheburners,bringingabouta
wasteofgasfuel.
Asmalldiameterpotorpanplacedona largeburner doesnotnecessarilymeanthat
boilingconditionsarereachedquicker.
Fig.2.5
DIAMETERS OF PANS WHICH MAY BE USED ON THE HOB BURNERS
BURNER MINIMUM MAXIMUM
Semi-rapid 16cm(6”19/64) 24cm(9”7/16)
Triple-ring 26cm(10”3/16) 28cm(11”1/16)
Dual 26cm(10”3/16) 28cm(11”1/16)
Wok pans max 36 cm (14” 3/16)
Do not use pans with concave or convex bases
Make sure that the handles of
cookware do not stick out over the
edge of the range, to avoid them
being knocked over by accident.
This also makes it more difficult
for children to reach the cooking
vessels.
Fig.2.6a
Fig.2.6b
WRONG
CORRECT
A
13
OPERATING PRINCIPLES
Heatingandcookinginthemultifunctionoventakesplaceasfollows:
• by normal convection -
Theheatisproducedbytheupperandlowerheatingelements.
• by forced convection -
Theheatproducedbythecircularelementisdistributedthroughouttheovenbythe
fan.
• by semi-forced convection -
Theheatproducedbytheupperandlowerheatingelementsisdistributedthroughout
theovenbythefan.
• by radiation -
Theheatisradiatedbytheinfraredbroilelement.
• by radiation and fan -
Theradiatedheatfromtheinfraredbroilelementisdistributedthroughouttheoven
bythefan.
• by semi-forced convection from the top -
Theheatproducedbytheupperheatingelementisdistributedthroughouttheoven
bythefan.
• by ventilation -
Thefoodisdefrostedbyusingthefanonlyfunctionwithoutheat.
USING THE OVEN FOR THE FIRST TIME
• Putintheshelfandthetray.
• Switchtheovenonempty(onacookingfunction)atmaximumpowerforabout2
hourstoremovetracesofgreaseandsmellsfromthecomponents.
There will be a distinctive smell and a small amount of smoke during the
conditioning process as manufacturing residue is burnt off. This is normal,
but make sure the kitchen is well ventilated during the conditioning.
• Whentheovenhascooleddownandunpluggingtherange,cleantheinsideofthe
ovenwithaclothsoakedinwaterandneutraldetergentanddryitperfectly.
GENERAL FEATURES
Asitsnameindicates,thisisanoventhatpresentsparticularfeaturesfromanoperational
pointofview.
Infact,itispossibletoinsert7differentprogramstosatisfyeverycookingneed.
The7positions,thermostaticallycontrolled,areobtainedby4heatingelementswhich
are:
• Lowerheatingelement
• Upperheatingelement
• Broilheatingelement
• Circularheatingelement
VERY IMPORTANT
The oven shall be used always with
the door closed.
ATTENTION: the range becomes very
hot during operation.
ATTENTION: the oven door becomes
very hot during operation.
KEEP CHILDREN AWAY.
WARNING:
The door is hot, use the handle.
Fig.3.1
how to use the multifunction electric oven
3
1
5
4
3
2
6
7
14
OVEN LIGHT (this is not a cooking function)
Turningtheknobtothisposition,onlytheovenlamplightsup.
Thelampisalwaysoninallthecookingfunctions.
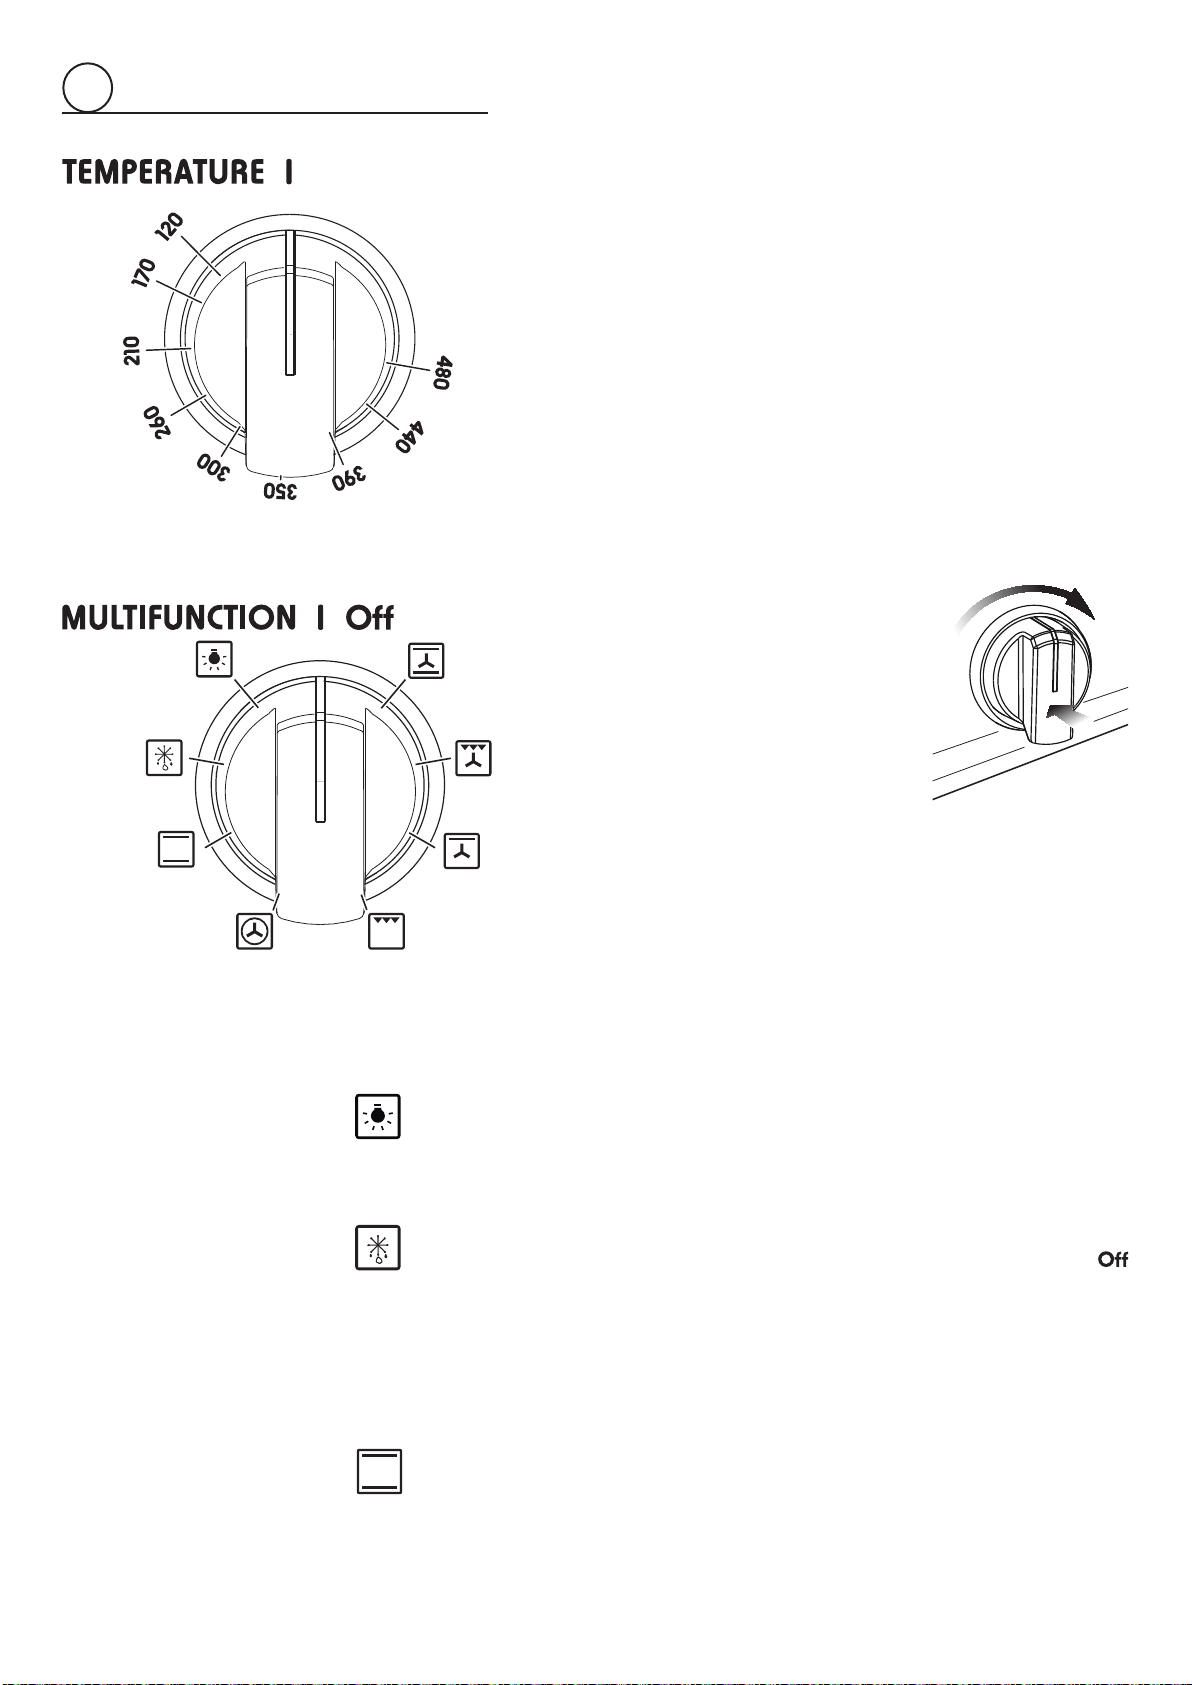
FUNCTION SELECTOR KNOB (g.
3.3)
VERY IMPORTANT: ALWAYS LIGHTLY PRESS
THE CONTROL KNOB WHEN TURNING THE
FUNCTION KNOB FROM THE OFF POSITION
(g.3.4).
Rotatetheknobclockwisetosettheoventoone
ofthefollowingfunctions:
DEFROSTING FROZEN FOODS (thisisnotacookingfunction)
Onlythefanandtheovenlampswitchon.Tobeusedwiththethermostatknobon
becausetheotherpositionshavenoeffect.
Defrostingtakesplacebyfan,withoutheating.
Recommended for:
Torapidlydefrostfrozenfoods;2.2lbs(1kg)requiresaboutonehour.
Thedefrostingtimesvaryaccordingtothequantityandtypeoffoodstobedefrosted.
TRADITIONAL CONVECTION COOKING
Theupperandlowerheatingelementsswitchon.
The heat is diffused by natural convection andthetemperature must be set between
120°F(50°C)and480°F(250°C)viathethermostatknob.
Recommended for:
Forfoodswhichrequirethesamecookingtemperaturebothinternallyandexternally,i.
e.roasts,spareribs,etc.
THERMOSTAT KNOB(g.3.2)
To turn on the heating elements of the oven, set the switch knob on the
desiredprogramandthethermostatknobontothedesiredtemperature.
Tosetthetemperature,itisnecessarytomakethechosennumber,printed
ontheknob,tomatchwiththecontrolpanelindicator.
The elements will turn ON or OFF automatically according to the energy
needwhichisdeterminedbythethermostat.
Theindicatorlightwillcycleonandoffduringcooking.
3
Fig.
3.4
Fig.
3.2
Fig.3.3

15
MAINTAINING TEMPERATURE AFTER COOKING OR SLOWLY
HEATING FOODS
Theupperelementandthefanareon.Theheatisdiffusedbyforcedconvectionwith
themostheatbeingproducedbytheupperelement.Thetemperaturemustberegulated
between120°F(50°C)and480°F(250°C)viathethermostatknob.
Recommended for:
Tokeepfoodshotaftercooking.Toslowlyheatalreadycookedfoods.
VENTILATED BROILING
The infrared heating element and the fan switch on. The heat is mainly diffused by
radiationandthefandistributesitinthewholeoven.
The temperature can be set between 120 °F (50 °C) and 480 °F (250 °C) via the
thermostatknob.
Forcorrectuseseethe“VENTILATEDBROILING”section.
Recommended for:
Forgrillcookingwhenafastoutsidebrowningisnecessarytokeepthejuicesin,i.e.veal
steak,steak,hamburger,
etc.
CONVECTION COOKING WITH VENTILATION
Theupperandlowerheatingelementsandthefanturnon.
The heat is dispersed by forced convection and the temperature can be regulated to
between120°F(50°C)and480°F(250°C)viathethermostatknob.
Recommended for:
For foods of large volume and quantity which require the same internal and external
degreeofcooking;forie:rolledroasts,turkey,legs,cakes,etc.
VENTILATED COOKING
Thecircularelementandfancomeon.
The heat is dispersed by forced convection and the temperature can be regulated to
between120°F(50°C)and480°F(250°C)viathethermostatknob.Theovendoesnot
requirepreheating.
Recommended for:
Foodwhichhastobewell-cookedoutsideandsoftorrosyinside,forexamplelasagne,
lamb,roastbeef,wholeshetc.
BROILING
Theinfraredheatingelementswitcheson.
Theheatisdiffusedbyradiation.Thetemperaturecanbesetbetween120°F(50°C)and
480°F(250°C)viathethermostatknob.
Forcorrectuseseethe“BROILING”section.
Recommended for:
Intensebroilingactionforcookingwiththebroiler;browning,crisping,toasting,etc.
3
16
COOKING DIFFERENT DISHES AT THE SAME TIME
TheMULTIFUNCTIONovenatpositions
or ofthefunctionselectorcancook
variousdifferentfoodsatthesametime.Fish,cakesandmeatcanbecookedtogether
withoutthesmellsandavoursmixing.
Theonlyprecautionsrequiredarethefollowing:
• Thecookingtemperaturesmustbeascloseaspossiblewithamaximumdifference
of70-80°F(20-25°C)betweenthedifferentfoods.
• Differentdishesmustbeplacedintheovenatdifferenttimesaccordingtothecooking
timerequiredforeachone.Thistypeofcookingobviouslyprovidesaconsiderable
savingontimeandenergy.
COOKING ADVICE
STERILIZATION
Sterilizationoffoodstobeconserved,infullandhermeticallysealedjars,isdoneinthe
followingway:
a. Turntheswitchtoposition
or .
b. Setthethermostatknobtoposition350°F(175°C)andpreheattheoven.
c. Fillthegrillpanwithhotwater.
d. Setthejarsintothegrillpanmakingsuretheydonottoucheachotherandthedoor
andsetthethermostatknobtoposition260°F(130°C).
Whensterilizationhasbegun,thatis,whenthecontentsofthejarsstarttobubble,turn
offtheovenandletcool.
VENTILATED BROILING
Ventilatedbroilingmaybedonebyselecting withthefunctionselectorknob;thehot
aircompletelyenvelopsthefoodthatistobecooked.
Introducethefoodtobecooked,positioningthegrillpanasclosetotheinfra-redelement
aspossible.
Closethedoorandlettheovenoperateuntilbroilingisdone.
Adding a few dabs of butter before the end of the cooking time gives the golden “au
gratin”effect.
Broiling with the oven door closed.
Important: Use always suitable protective gloves when inserting/removing the
broiling pan from the oven (see next page).
It is advisable to handle
the oven accessories
using oven gloves.
WARNING
VERY IMPORTANT
WARNING!!
REGENERATION
Turntheswitchtoposition
or andsetthetemperatureto300°F(150°C).
Breadbecomesfragrantagainifwetwithafewdropsofwaterandputintotheovenfor
about10minutes.
ROASTING
Toobtainclassicalroasting,itisnecessarytoremember:
• thepre-settemperatureshouldbemaintained.
• thatthecookingtimedependsonthequantityandthetypeoffoods.
3

17
WRONG
CORRECT
3
BROILING
Very important: the broil burner must always be used with
the oven door closed.
- Positiontheshelfonthefirstlevelfromthetop(fig.3.5).
- Turn on the broil burner, as explained in the preceding
paragraphsandletthebroilburnerpreheatforabout5minutes
withthedoorclosed.
- Placethefoodtobecookedabovethebroilingpan.
- Introduce the broiling pan in the oven (fig. 3.8). The broiling
panshouldbeplacedabovetheshelfanditshouldbecentered
withthebroilburner(fig.3.5).
Do not broil without using the broiling pan.
Important: Use always suitable protective gloves when
inserting/removing the broiling pan, shelves, pans or other
cooking utensils from the oven.
Fig.3.6
Fig.3.7
Fig.3.8
Fig.3.5
18
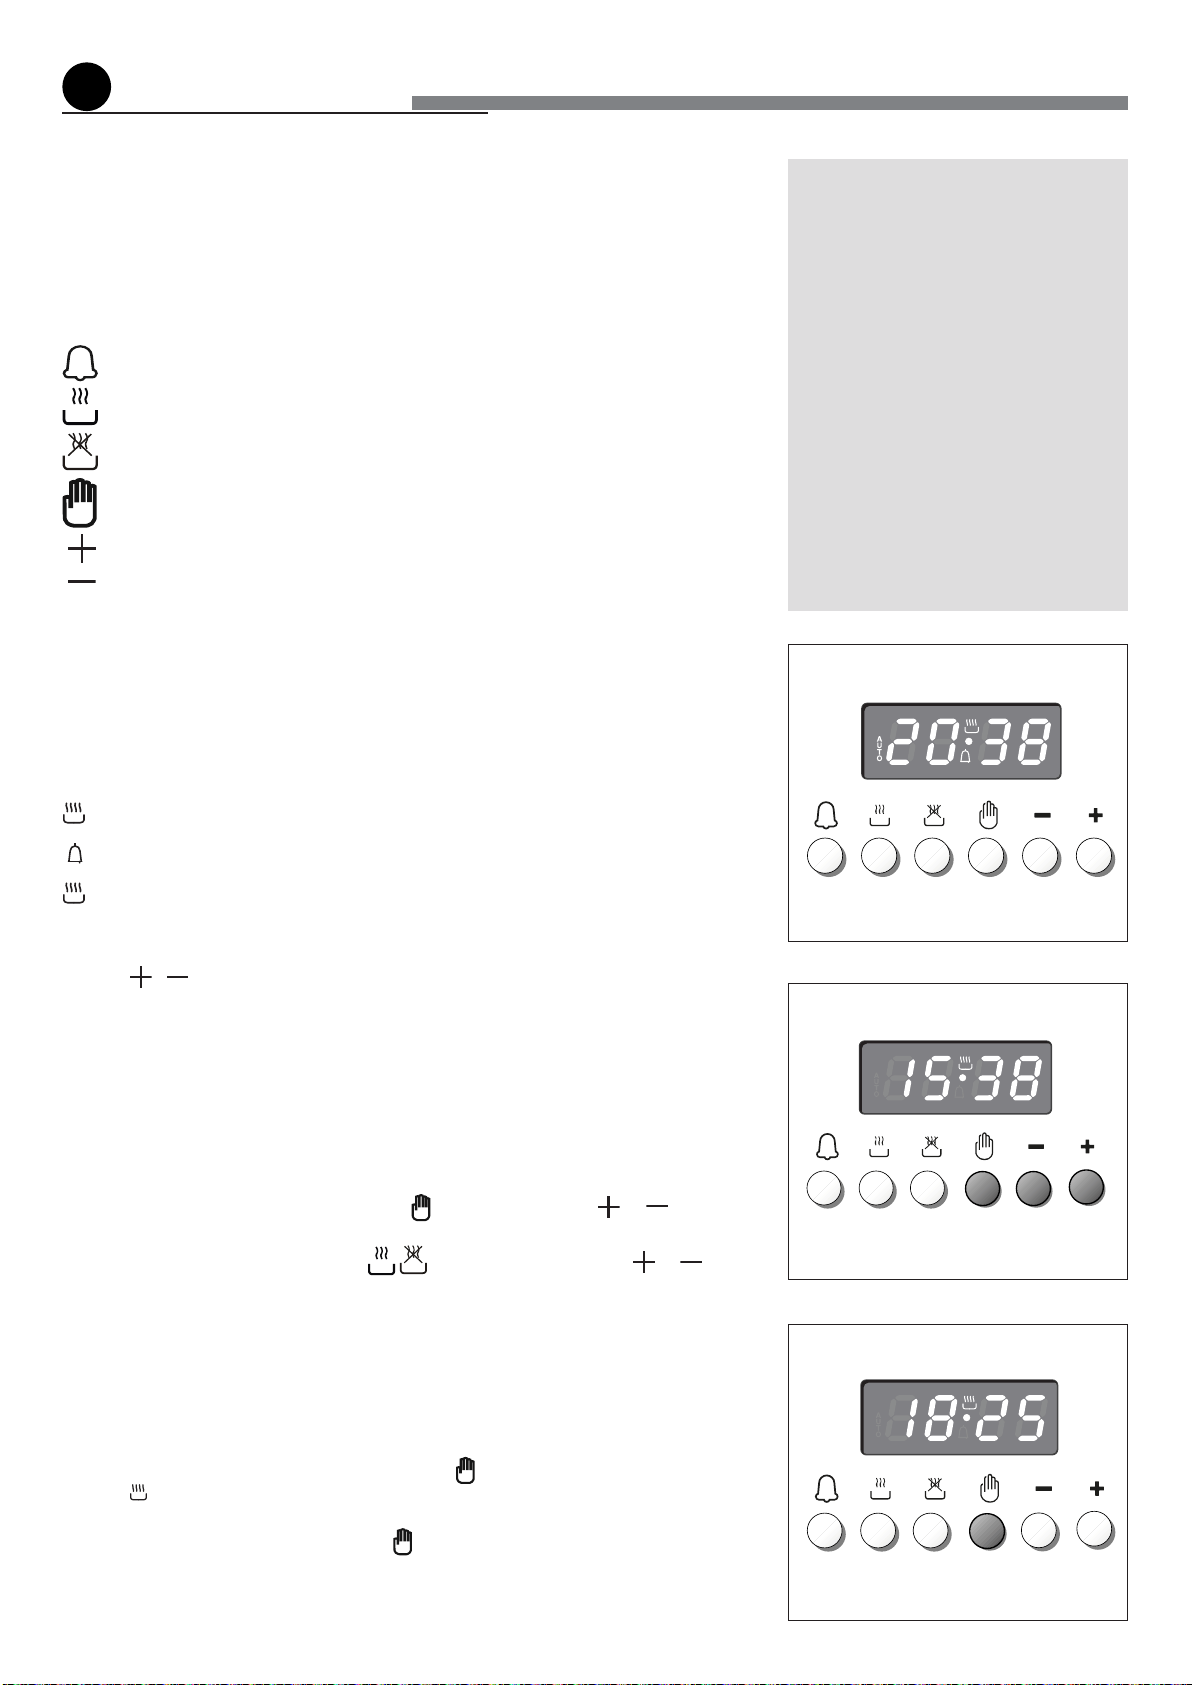
Description of the illuminated symbols:
AUTO flashing-Programmerinautomaticpositionbutnotprogrammed
AUTO alwayslighted-Programmerinautomaticpositionwithprogrammeinserted.
Automaticcookingtakingplaceoroveninmanualmode.
Timer in operation
and AUTO - flashing - Programme error.
(Thetimeofdayliesbetweenthecalculatedcookingstartandendtime).
Note:Selectafunctionbytherespectivebuttonand,in5seconds,settherequiredtime
withthe
/ buttons(“one-hand”operation).
Apowercutzeroestheclockandcancelsthesetprogrammes.
Theelectronicprogrammerisadevicewhichgroupstogetherthefollowingfunctions:
• 12hoursclockwithilluminateddisplay
• Timer(upto23hoursand59minutes)
• Programforautomaticovencooking
• Programforsemi-automaticovencooking
Description of the buttons:
Timer
Cookingtime
Endofcookingtime
Manualpositionandcancellationoftheinsertedcookingprogram
Toincreasethenumbersonthedigitaldisplay
Todecreasethenumbersonthedigitaldisplay.
ELECTRONIC CLOCK(fig.4.2)
The programmer is equipped with an electronic clock with lighted numbers which
indicatehoursandminutes.
Upon immediate connection of the oven or after a blackout, “12:00” will flash on the
programmerpanel.
Tosetthehouritisnecessarytopushthe
buttonandthenthe or
buttonuntil
youhavesettheexacthour(fig.4.2).
Alternatively,simultaneouslypushthe
twobuttonsandthenthe or
button.
Note:Settingtheclockdeletesanyprogramme.
NORMAL COOKING WITHOUT THE USE OF THE
PROGRAMMER
Tomanuallyusetheoven,thatis,withouttheaidoftheprogrammer,itisnecessaryto
canceltheflashingAUTObypushingthebutton
(AUTOwillbeswitchedoffandthe
symbol
willgoon-fig.4.3).
Attention:IftheAUTOisnotflashing(whichmeansacookingprogrammehasalready
been inserted), by pushing the button
you have cancelled the programme and
switchedtomanual.
Theovenshallbeswitchedoffmanually.
4
Fig.4.2
Fig.4.1
Fig.4.3
During a semi-automatic or
automatic oven cooking program,
once completed the programming
procedure the oven lamp/s will be lit
until the end of the cooking program.
This means that, in case of delayed
cooking start, the oven lamp/s will
remain always lit.
In addition, if a fan assisted semi-
automatic or automatic oven cooking
program is set, further to the oven
lamp/s also the oven fan motor (the
motor inside the oven cavity) may be
operating (together with the cooling
fan motor) before the start of the
cooking program; this is possible if
the oven or cooktop has been used
previously and the range is still hot/
warm.
how to use the electronic programmer
19
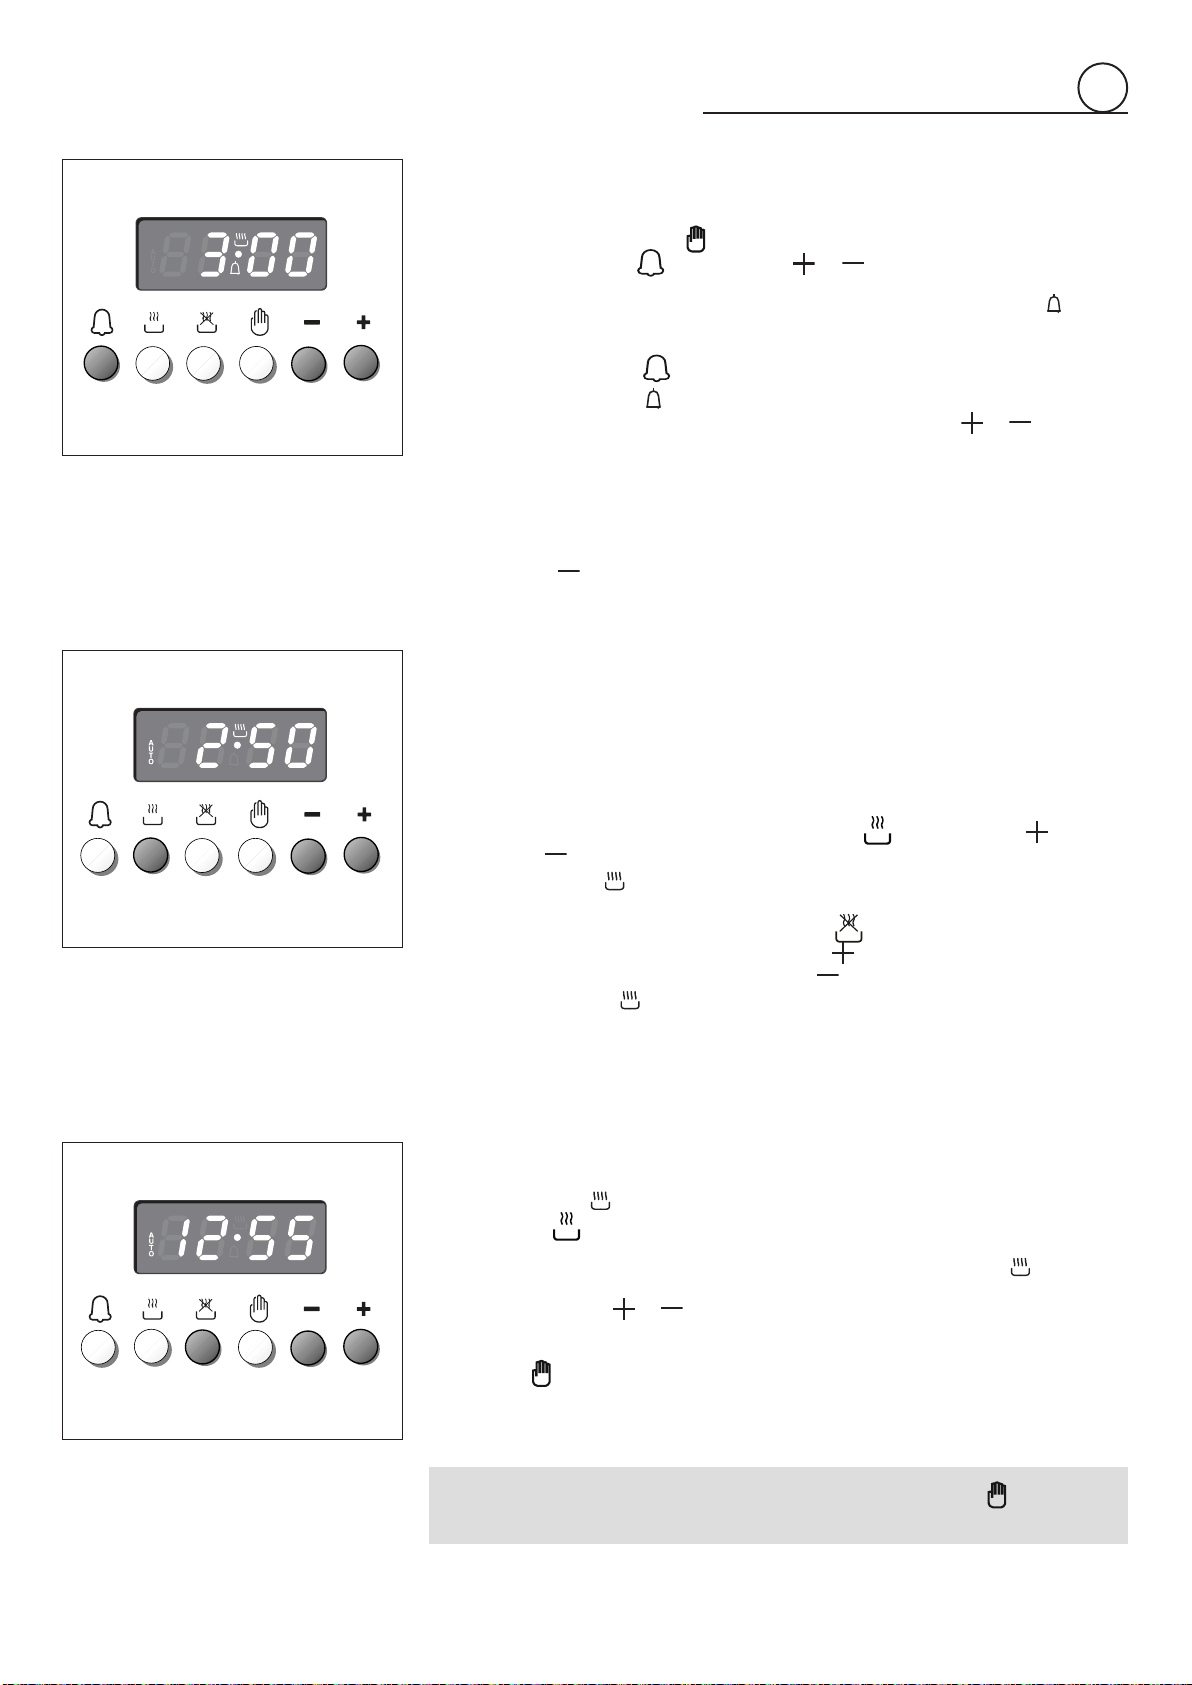
ELECTRONIC TIMER
Thetimerprogrammeconsistsonlyofabuzzerwhichmaybesetforamaximumperiod
of23hoursand59minutes.
Ifthe
AUTO
isflashingpushthe button.
Tosetthetime,pushthe
buttonandthe or
untilyouobtainthedesiredtime
(fig.4.4).
Havingfinishedthesetting,thenormaltimewillappearonthepanelandthe
symbol
willappear.
Thecountdownwillstartimmediatelyandmaybeseenatanymomentonthepanelby
simplypressingthebutton
.
Attheendofthetime,the symbolwillbeswitchedoffandanintermittentbuzzerwill
gooff;thiscanbestoppedbypressinganyoneofthebuttons(not
or
).
If the oven is switched on, you must switch off manually.
SETTING THE FREQUENCY OF THE AUDIBLE SIGNAL
Bypressingthe buttonyoucanchoosefromthreevariations.
AUTOMATIC OVEN COOKING
Tocookfoodautomaticallyintheoven,itisnecessaryto:
1. Setthelengthofthecookingtime
2. Settheendofthecookingtime
3. Setthetemperatureandtheovencookingprogramme.
Theseoperationsaredoneinthefollowingway:
1.Set the length of the cooking time by pushing the button and the
button to
advance,or
togobackifyouhavepassedthedesiredtime(fig.4.5).
TheAUTOandthe
symbolwillbeon.
2.Settheendofthecookingtimebypressingthe
button(thecookingtimealready
added to the clock time will appear), and the
button (fig. 4.6); if you pass the
desiredtimeyoumaygetbackbypushingthe
button.
Afterthissetting,the
symbolwillgooff.Ifafterthissetting,theAUTOflasheson
thepanelandabuzzergoesoff,itmeanstherewasanerrorintheprogramming.
Inthiscase,modifytheendofcookingtimeorthecookingtimeitselfbyfollowingthe
aboveinstructionsagain.
3.Setthetemperatureandthecookingprogrammebyusingtheswitchandthermostat
knobsoftheoven(seespecificchapters).
Nowtheovenisprogrammedandeverything will work automatically, that is the oven
willturnonattherightmomenttoendthecookingattheestablishedtime.
Duringcooking,the
symbolremainson.
Bypushingthe
buttonyoucanseethetimethatremainsuntiltheendofcooking.
Attheendofthecookingtimetheovenwillturnoffautomatically, the
symbolwill
turnoff,AUTOwillflashandabuzzerwillsound,whichcanbeturnedoffbypushing
anyofthebuttons(not
or
).
Turntheswitchandthermostatknobstozeroandputtheprogrammeronto“manual”by
pressingthe
button.
Attention:Apowercutmakestheclockgotozeroandcancelsthesetprogrammes.
Afterapowercut,“12:00”willflashonthepanel.
The cooking program may be cancelled at any time by pushing .
In this case the oven shall be switched off manually.
4
Fig.4.4
Fig.4.5
Fig.4.6
20
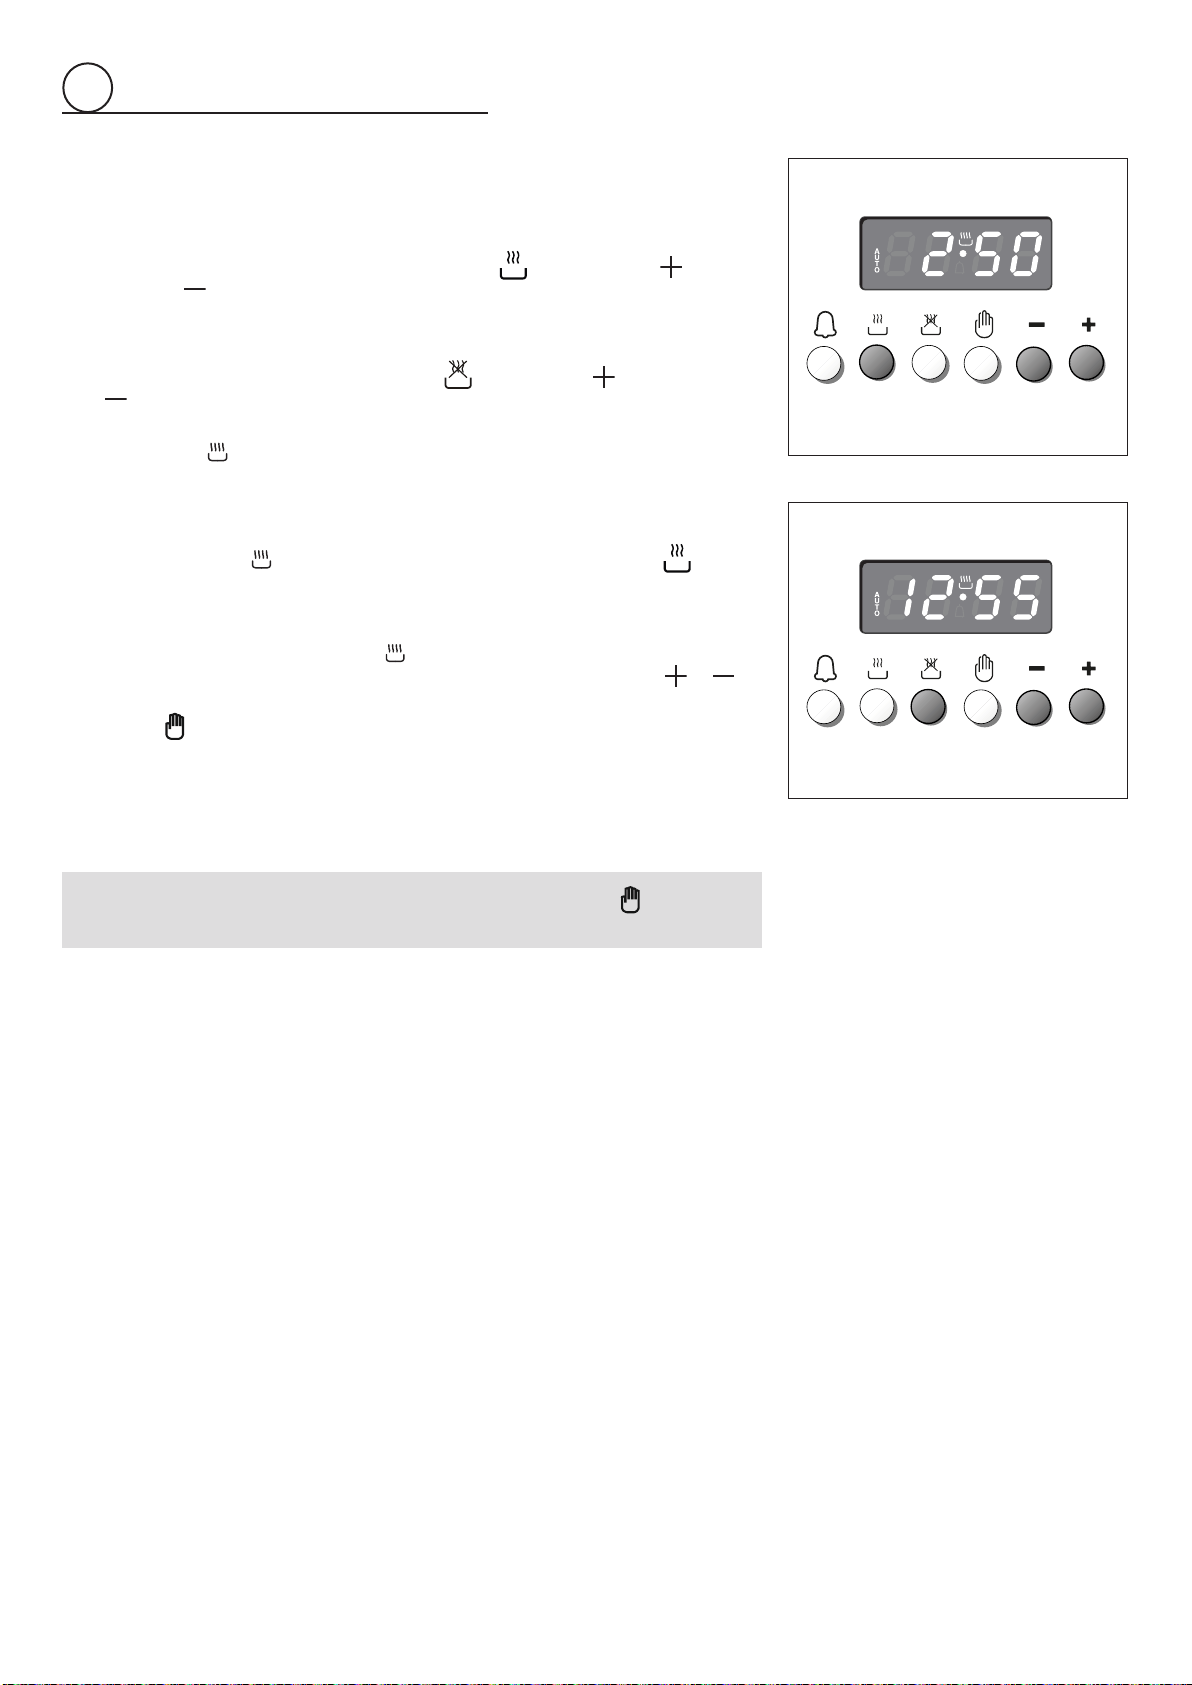
SEMI-AUTOMATIC COOKING
This is used to automatically switch off the oven after the desired cooking time has
elapsed.
Therearetwowaystosetyouroven:
1.Set the length of thecookingtime by pushing the
button and the button to
advance,or
togobackwardsifyouhavepassedthedesiredtime(fig.4.7).
or
2.
Settheendofthecookingtimebypushingthe buttonandthe buttontoadvance,
or
togobackwardsifyouhavepassedthedesiredtime(fig.4.8).
AUTOandthe symbolwillbeon.
Then set the temperature and the cooking programme using the oven switch and
thermostatknobs(seespecificchapters).
Theoven isswitched on and it willbe switched off automatically attheend of the
desiredtime.
Duringcooking,the
symbolremainsonandbypressingthebutton youcan
seethetimethatremainstilltheendofthecooking.
Attheendofcooking,theovenandthe
symbolwillturnoff,theAUTOwillflashand
abuzzerwillsound;thatcanbestoppedbypushinganyofthebuttons(not
or
).
Turntheswitchandthermostatknobstozeroandputtheprogrammeronto“manual”by
pressingthe
button.
Attention:Apowercutmakestheclockgotozeroandcancelsthesetprogrammes.
Afterapowercut,“12:00”willflashonthepanel.
The cooking program may be cancelled at any time by pushing .
In this case the oven shall be switched off manually.
4
Fig.4.8
Fig.4.7
21
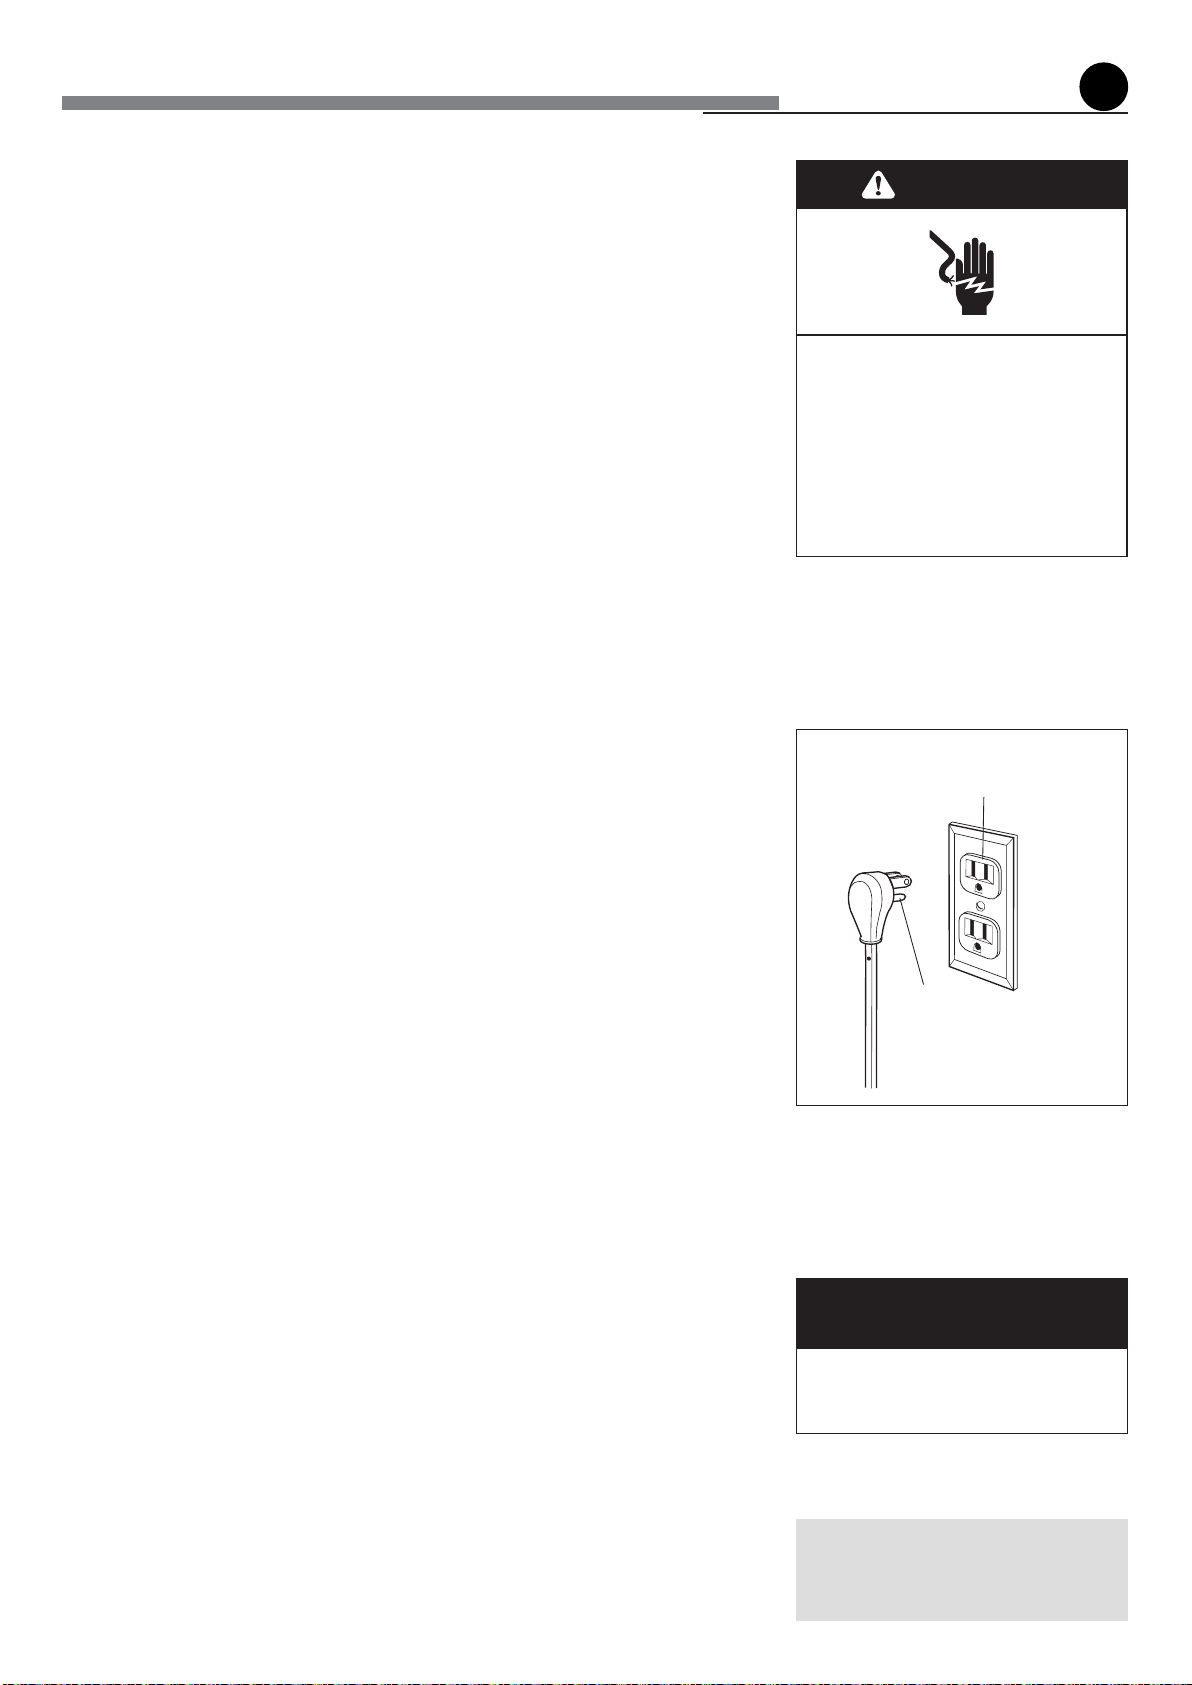
WARNING
Electrical Shock Hazard
Plug into a grounded 3-prong
outlet.
Do not remove ground prong.
Do not use an adapter.
Failure to follow these instructions
can result in death, fire, or electrical
shock.
3-prong polarized
ground-type outlet
ground
prong
GENERAL RECOMANDATION
• Important: Before any operation of cleaning and maintenance disconnect the
appliance from the electrical supply.
• Itisadvisabletocleanwhentheapplianceiscoldandespeciallyforcleaningthe
enamelledparts.
• Avoid leaving alkaline or acidic substances (lemon juice, vinegar, etc.) on the
surfaces.
• Avoidusingcleaningproductswithachlorineoracidicbase.
• The oven must always be cleaned after every use, using suitable products and
keeping in mind that its operation for 30 minutes on the highest temperature
eliminatesmostgrimereducingittoashes.
WARNING
When correctly installed, your product meets all safety requirements laid down
for this type of product category. However special care should be taken around
the rear or the underneath of the appliance as these areas are not designed or
intended to be touched and may contain sharp or rough edges, that may cause
injury.
ENAMELLED PARTS
• Alltheenamelledpartsmustbecleanedwithaspongeandsoapywaterorother
non-abrasiveproducts.
• Drypreferablywithamicrobreorsoftcloth.
• Acidic substances like lemon juice, tomato sauce, vinegar etc. can damage the
enameliflefttoolong.
PAINTED PARTS AND SILK-SCREEN PRINTED SURFACES
• Cleanusinganappropriateproduct.Alwaysdrythoroughly.
IMPORTANT: these parts must be cleaned very carefully to avoid scratching and
abrasion.Youareadvisedtouseasoftclothandneutralsoap.
STAINLESS STEEL ELEMENTS
• Stainlesssteelpartsmustberinsedwithwateranddriedwithasoftandcleancloth.
• Fordifcultdirt,useaspecicnon-abrasiveproductavailablecommerciallyoralittle
hotvinegar.
• Note: regular use could cause discolouring around the burners, because of
the high ame temperature.
INSIDE OF OVEN
Theovenshouldalwaysbecleanedafterusewhenithascooleddown.
Thecavityshouldbecleanedusingamilddetergentsolutionandwarmwater.
Suitable proprietary chemical cleaners may be used after first consulting with the
manufacturersrecommendationsandtestingasmallsampleoftheovencavity.
Abrasive cleaning agents or scouring pads/cloths should not be used on the cavity
surface.
NOTE: The manufacturers of this appliance will accept no responsibility for damage
causedbychemicalorabrasivecleaning.
Let the oven cool down and pay special attention no to touch the hot heating
elements inside the oven cavity.
cleaning and maintenance
Do not use steam jet cleaners
because the humidity could
infiltrate into the appliance making
it dangerous.
Before any operation of maintenance
disconnect the appliance from the
electrical mains supply.
WARNING
VERY IMPORTANT
5

22
Fig.5.2
Fig.5.1
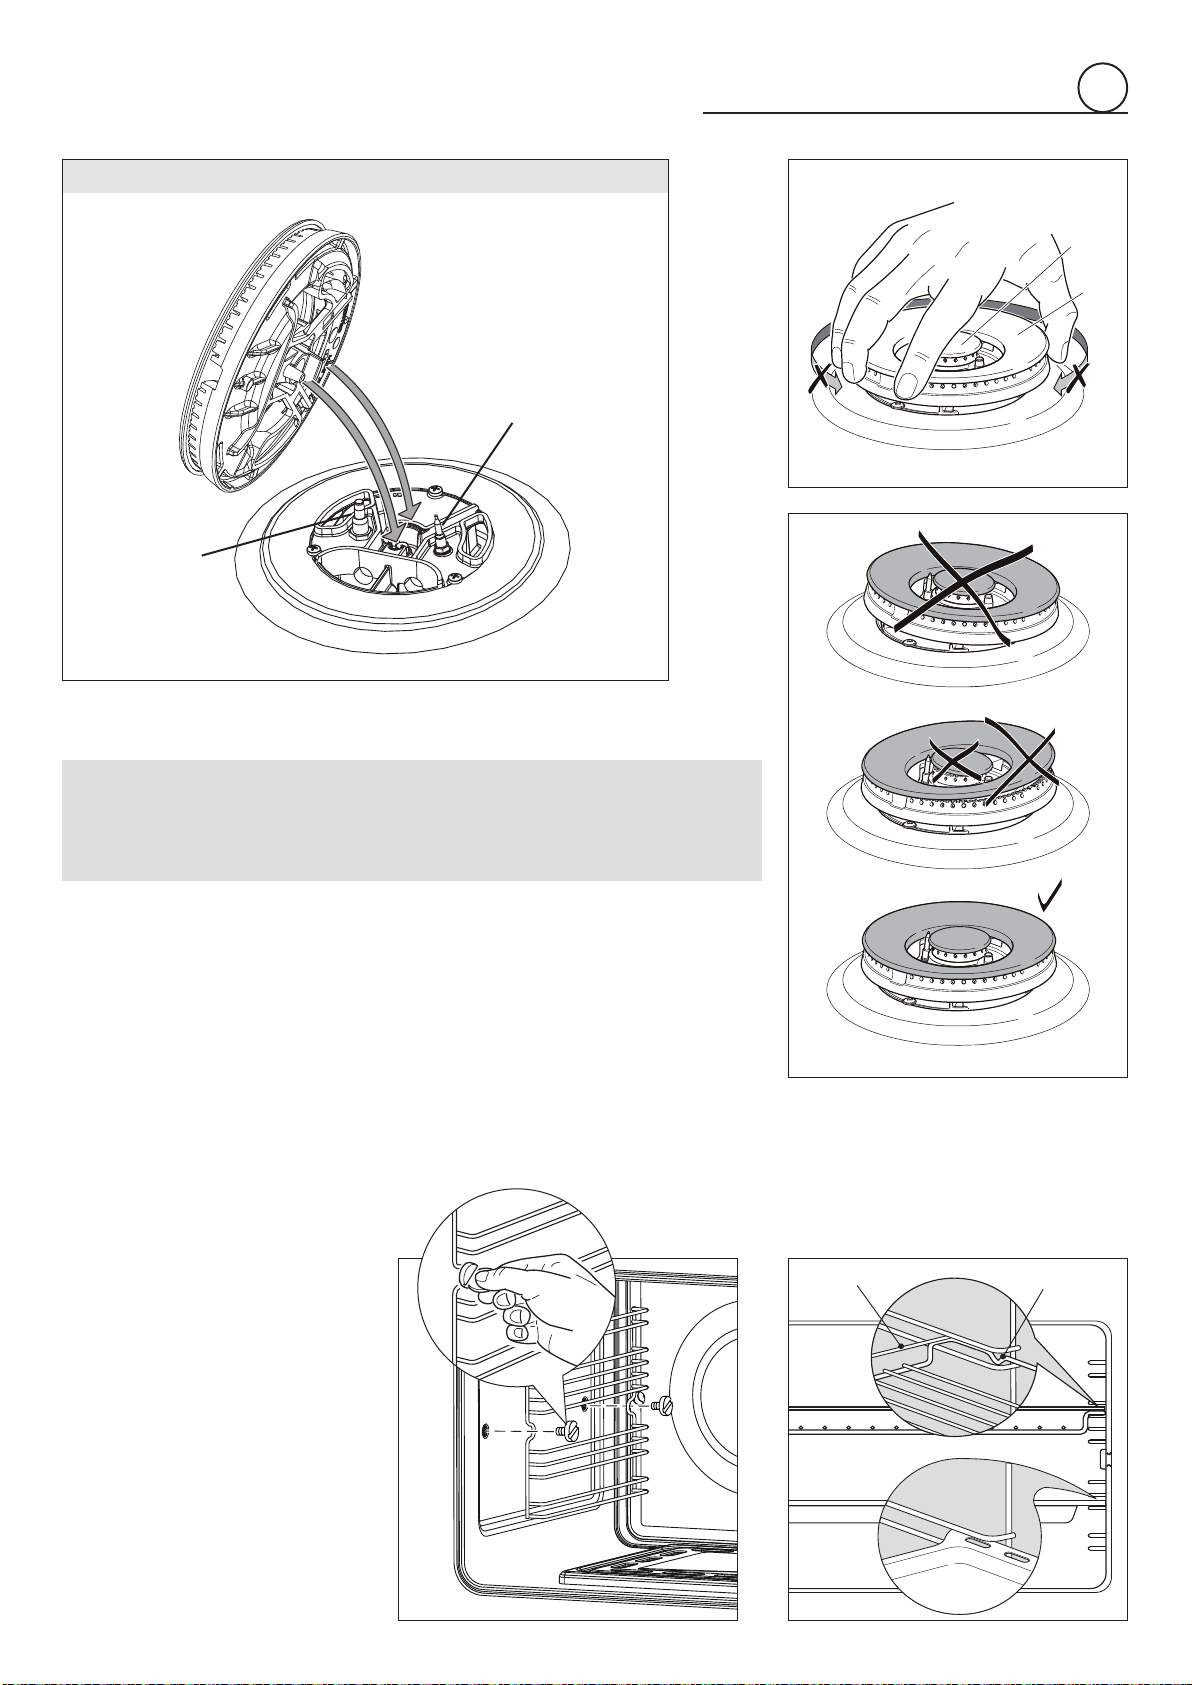
CORRECT REPLACEMENT
OF THE SEMI-RAPID
BURNERS
It is very important to check that the
burner flame spreader “F” and the cap
“C” have been correctly positioned (see
figs.5.1and5.2).
Failure to do so can cause serious
problems.
CORRECT POSITION OF
THE DUAL AND TRIPLE
RING BURNERS
The burner must be correctly positioned
(see figs. 5.3-5.4); the burner rib must
befittedintheirhousingasshownbythe
arrow.
Theburnercorrectlypositionedmustnot
rotate(fig.5.5).
Thenpositionthecap"A"andthering"B"
(figs.5.5-5.6).
Fig.5.3
BURNERS AND GRIDS
• These parts can be removed and
cleanedwithappropriateproducts.
• Aftercleaning,theburnersandtheir
amedistributorsmustbewelldried
andcorrectlyreplaced.
• It is very important to check that
the burner flame distributor and the
cap has been correctly positioned -
failure to do so can cause serious
problems.
• Check that the probe “T” (figs. 5.1-
5.3-5.4)nexttoeachburnerisalways
cleantoensure correct operationof
thesafetyvalves.
• Check that the electrode “S” (figs.
5.1-5.3-5.4) next to each burner is
always clean to ensure trouble-free
sparking.
• Note: To avoid damage to the
electric ignition do not use it when
the burners are not in place.
Both the probe and ignition plug must
be very carefully cleaned.
TRIPLE-RING BURNER
S
F
C
T
S
T
5
23
A
B
Fig. 5.6
Fig. 5.4
Fig. 5.5
S
DUAL BURNER
T
OVEN FITTING OUT
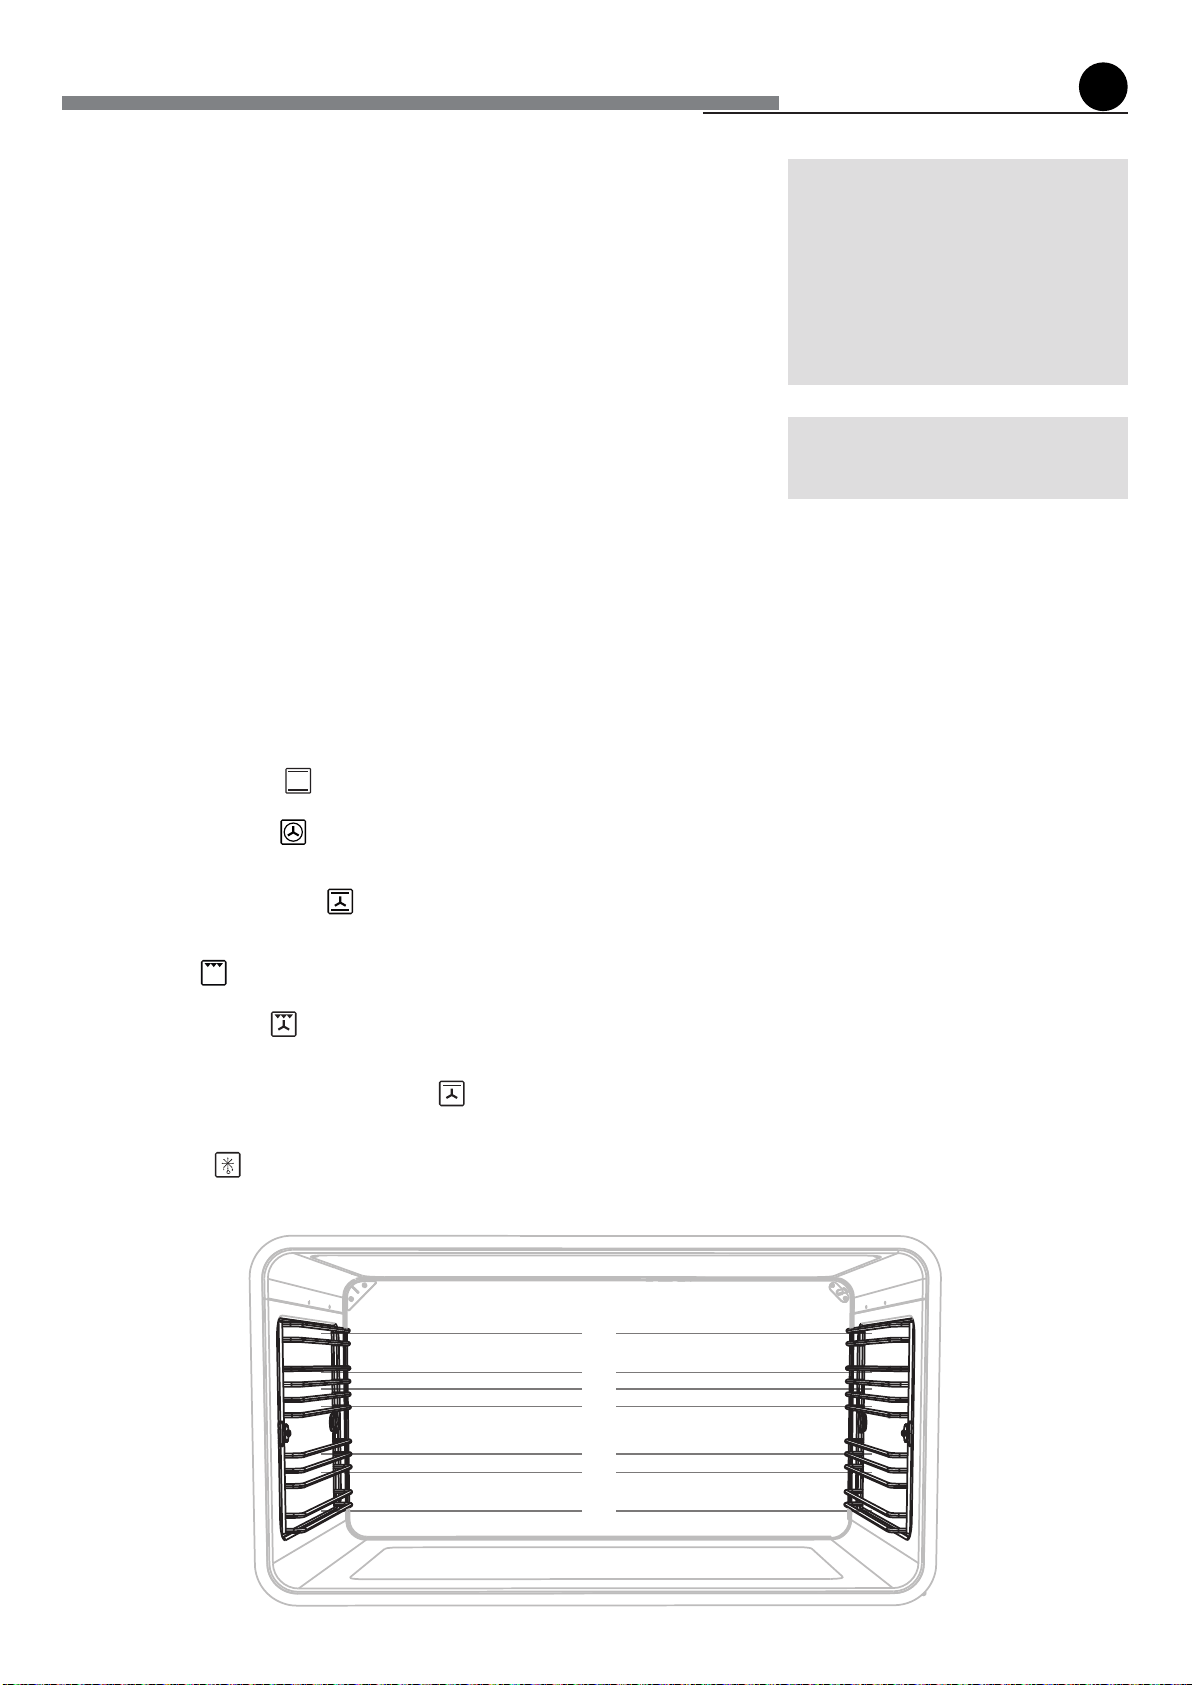
• Assemblethewirerackstotheovenwallsusingthe2screws(g.5.7a).
• Slidetherackintotherunners(g.5.7b).
Therackmustbettedsothatthesafetynotch,whichstopsitslidingout,facesthe
insideoftheoven;theguardrailshallbeattheback.
• Todismantle,operateinreverseorder.
Guardrail Stopnotch
Fig.5.7b
Fig.5.7a
5
Note: Continuous use may cause a change in the glaze around the burners
and grids, corresponding to the areas exposed to the heat. This is a natural
phenomenon and does not prevent the parts from working properly.
24
5
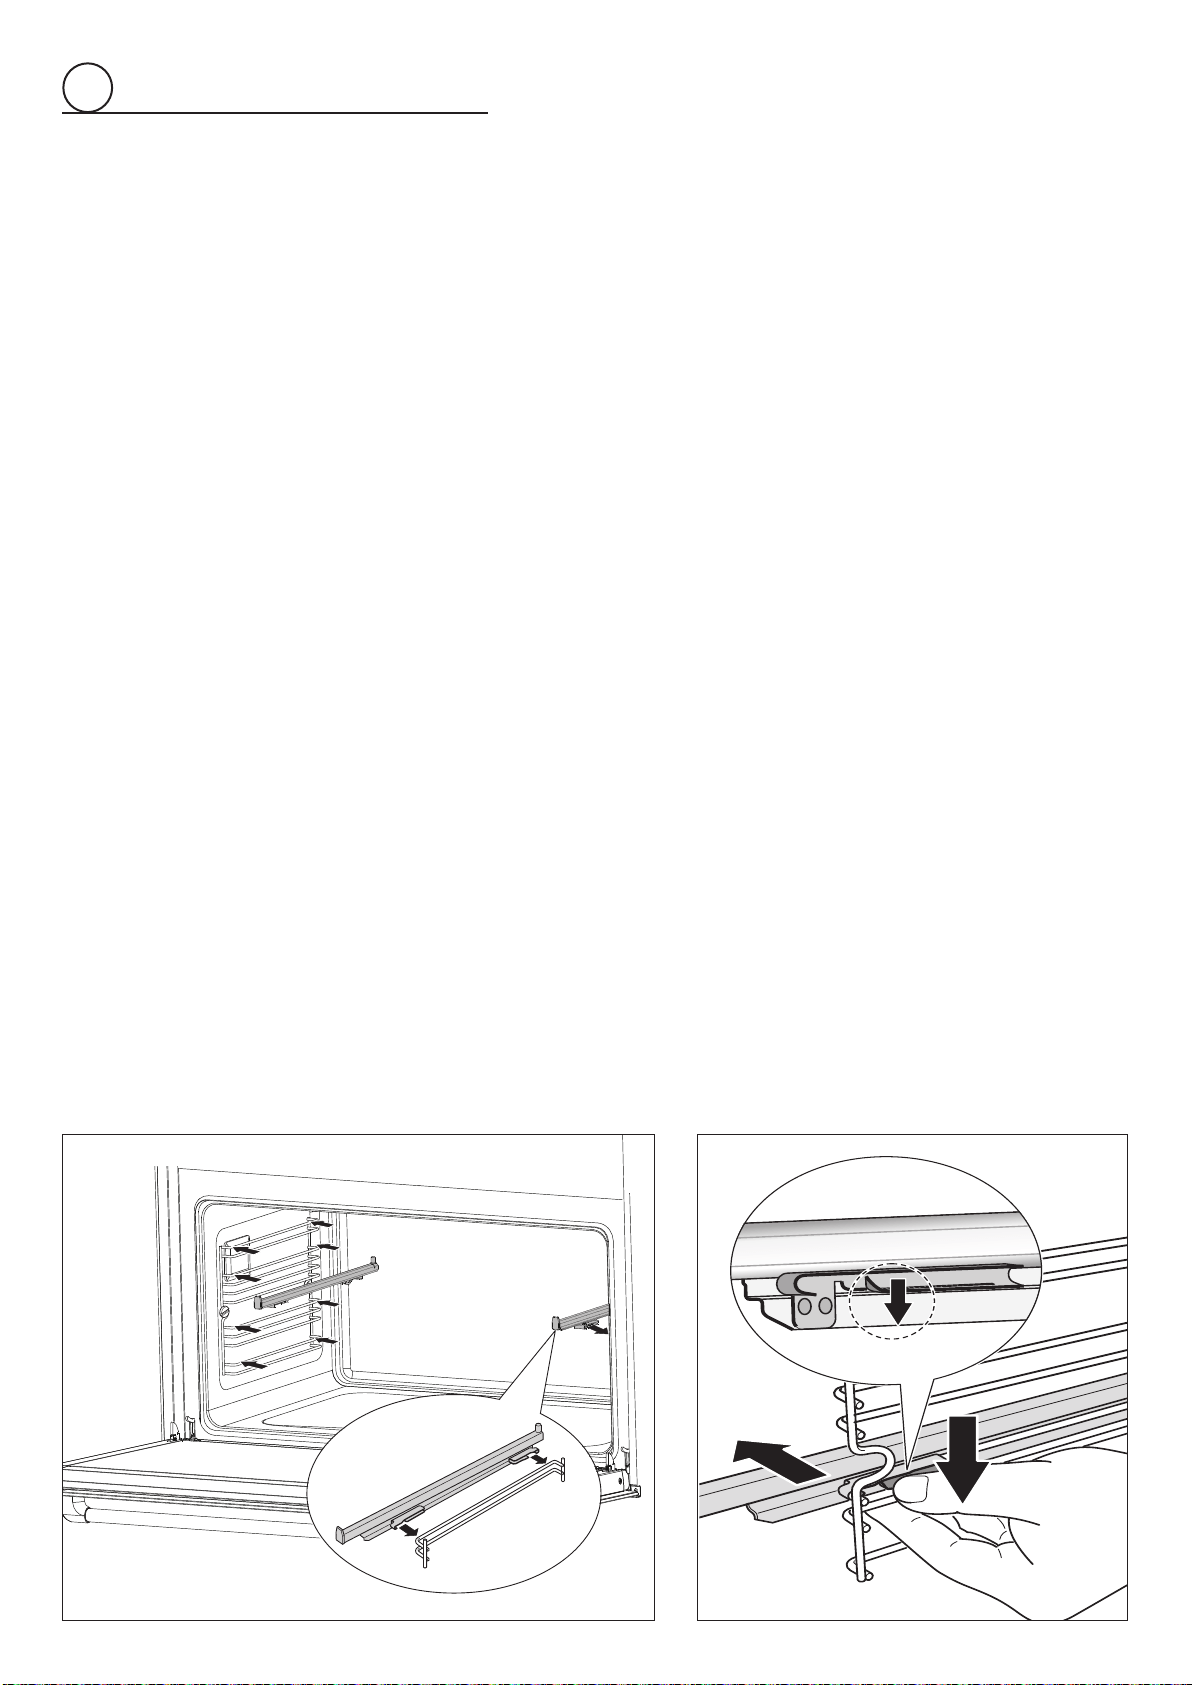
TELESCOPIC SLIDING SHELF SUPPORTS (SUPPLIED WITH SOME MODELS ONLY)
Thetelescopicslidingshelfsupportsmakeitsaferandeasiertoinsertandremovetheovenshelvesandtrays.They
stopwhentheyarepulledouttothemaximumposition.
Important!Whenttingtheslidingshelfsupports,makesurethatyout:
• Theslidestothetopwireofarack.Theydonottonthelowerwire.
• Theslidessothattheyrunouttowardstheovendoor.
• Bothsidesofeachpairofshelfslides.
• Bothsidesonthesamelevel.
Toxtheslidingshelfsupportsontothesideracks:
• Screwthesideracksontotheovenwall(g.5.7a).
• Fittheslidingshelfsupportsontothetopwireofarackandpress(g.5.8).Youwillhearaclickasthesafety
locksclipoverthewire.
Fig. 5.8
Toremovethetelescopicslidingshelfsupports:
• Removethesideracksbyunscrewingthexingscrews(g.5.7a).
• Laydowntheslidingshelfsupportandsideracks,withthetelescopicslidingshelfsupportunderneath.
• Findthesafetylocks.Thesearethetabsthatclipoverthewireofthesiderack(arrow“1” ing.5.9).
• Pullthesafetylocksawayfromthewiretoreleasethewire(arrow“2”ing.5.9).
Cleaningtheslidingshelfsupports:
• Wipethesupportswithadampclothandamilddetergentonly.
• Donotwashtheminthedishwasher,immersetheminsoapywater,oruseovencleaneronthem.
1
2
1
Fig. 5.9
25
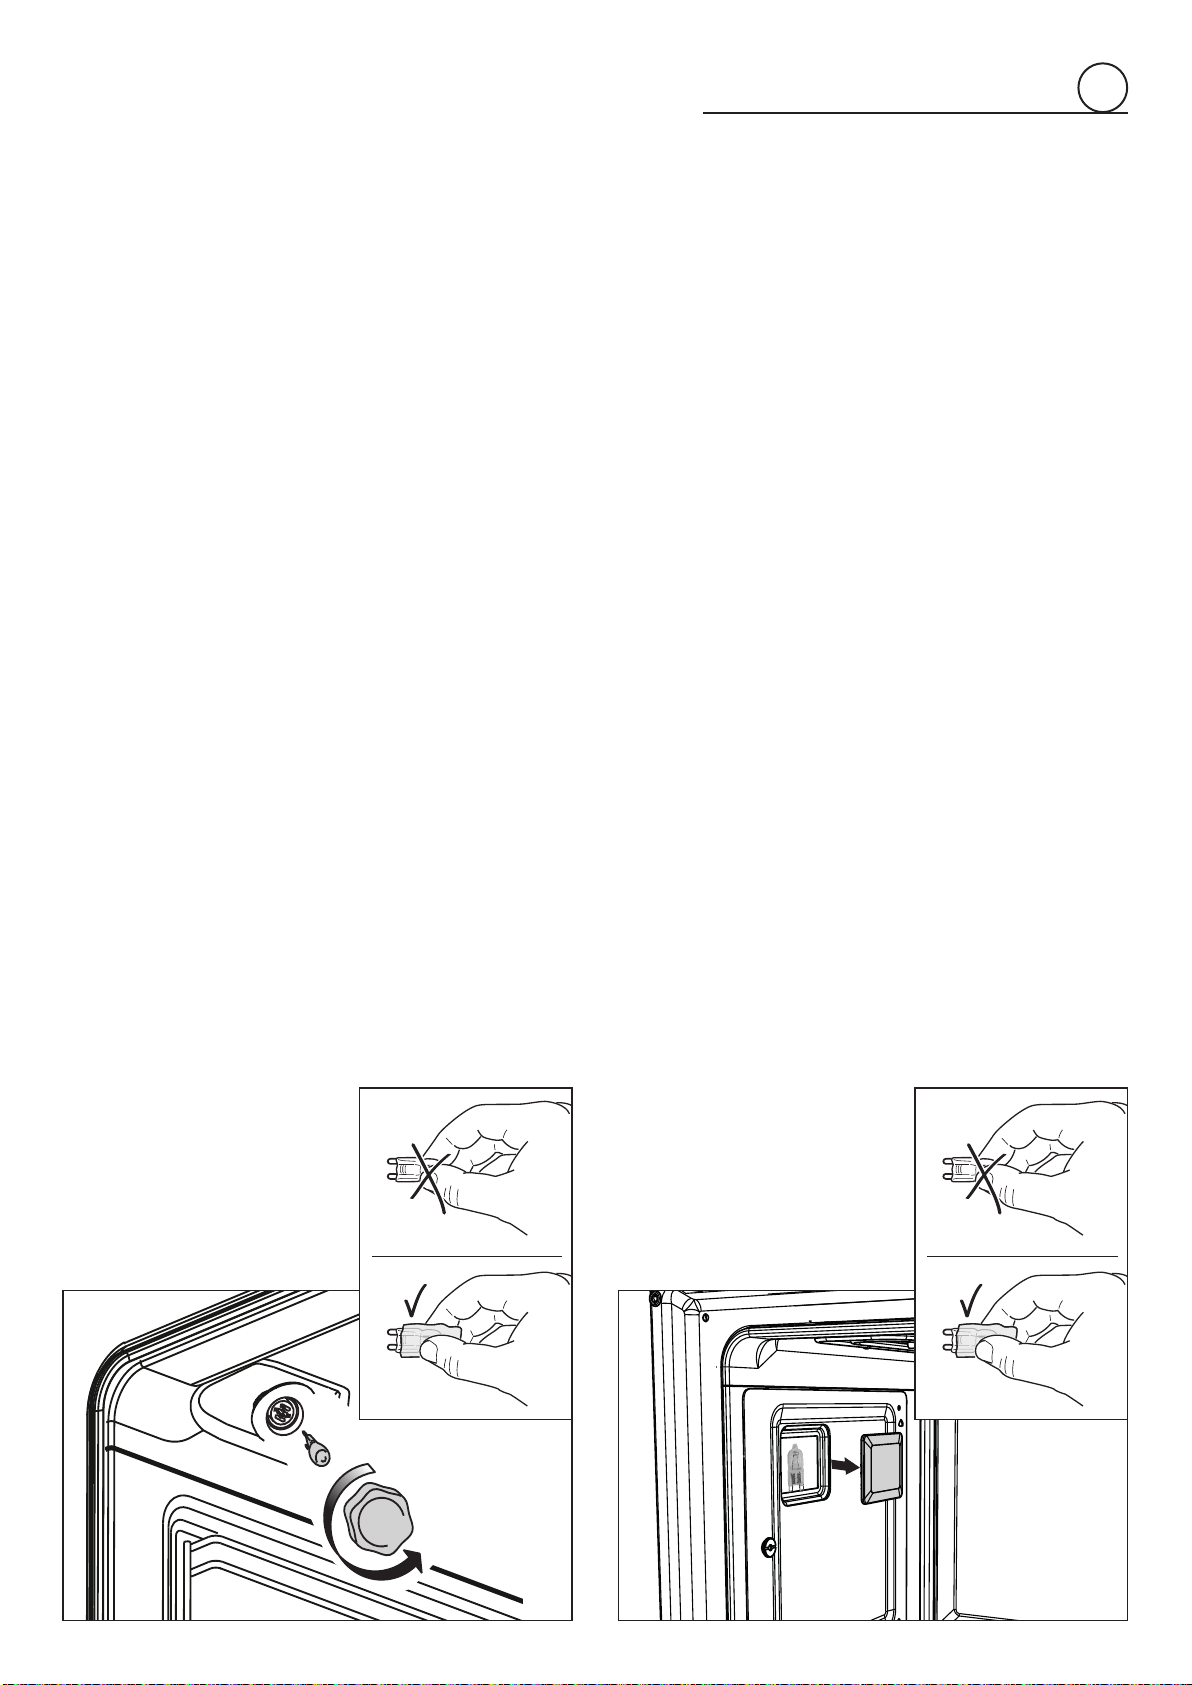
REPLACING THE OVEN LIGHTS
(NOTE: DEPENDING ON YOUR MODEL, YOUR OVEN MAY ONLY HAVE SOME OF THESE LIGHTS)
WARNING: Ensure the appliance is switched off before replacing the lamp to avoid the possibility of electric
shock.
• Lettheovencavityandtheheatingelementstocooldown.
• Switchofftheelectricalsupply.
• Removetheprotectivecover(gs.5.10a-5.10b).
• Replacethehalogenlampwithanewonesuitableforhightemperatureshavingthefollowingspecications:
120Vacandsamepower(checkwattpowerasstampedinthebulbitself)ofthereplacedlamp.
IMPORTANT WARNING: Never replace the lamp with bare hands; contamination from your ngers can
cause premature failure. Always use a clean cloth or gloves.
• Rettheprotectivecover.
NOTE:Ovenbulbreplacementisnotcoveredbyyourguarantee.
WRONG
CORRECT
WRONG
CORRECT
Fig.5.10b
Fig.5.10a
5
26
5
WARNING:
• Do not remove drawer while hot.
• Do not remove drawer during
• operation.
• Be sure drawer is empty before
removing.
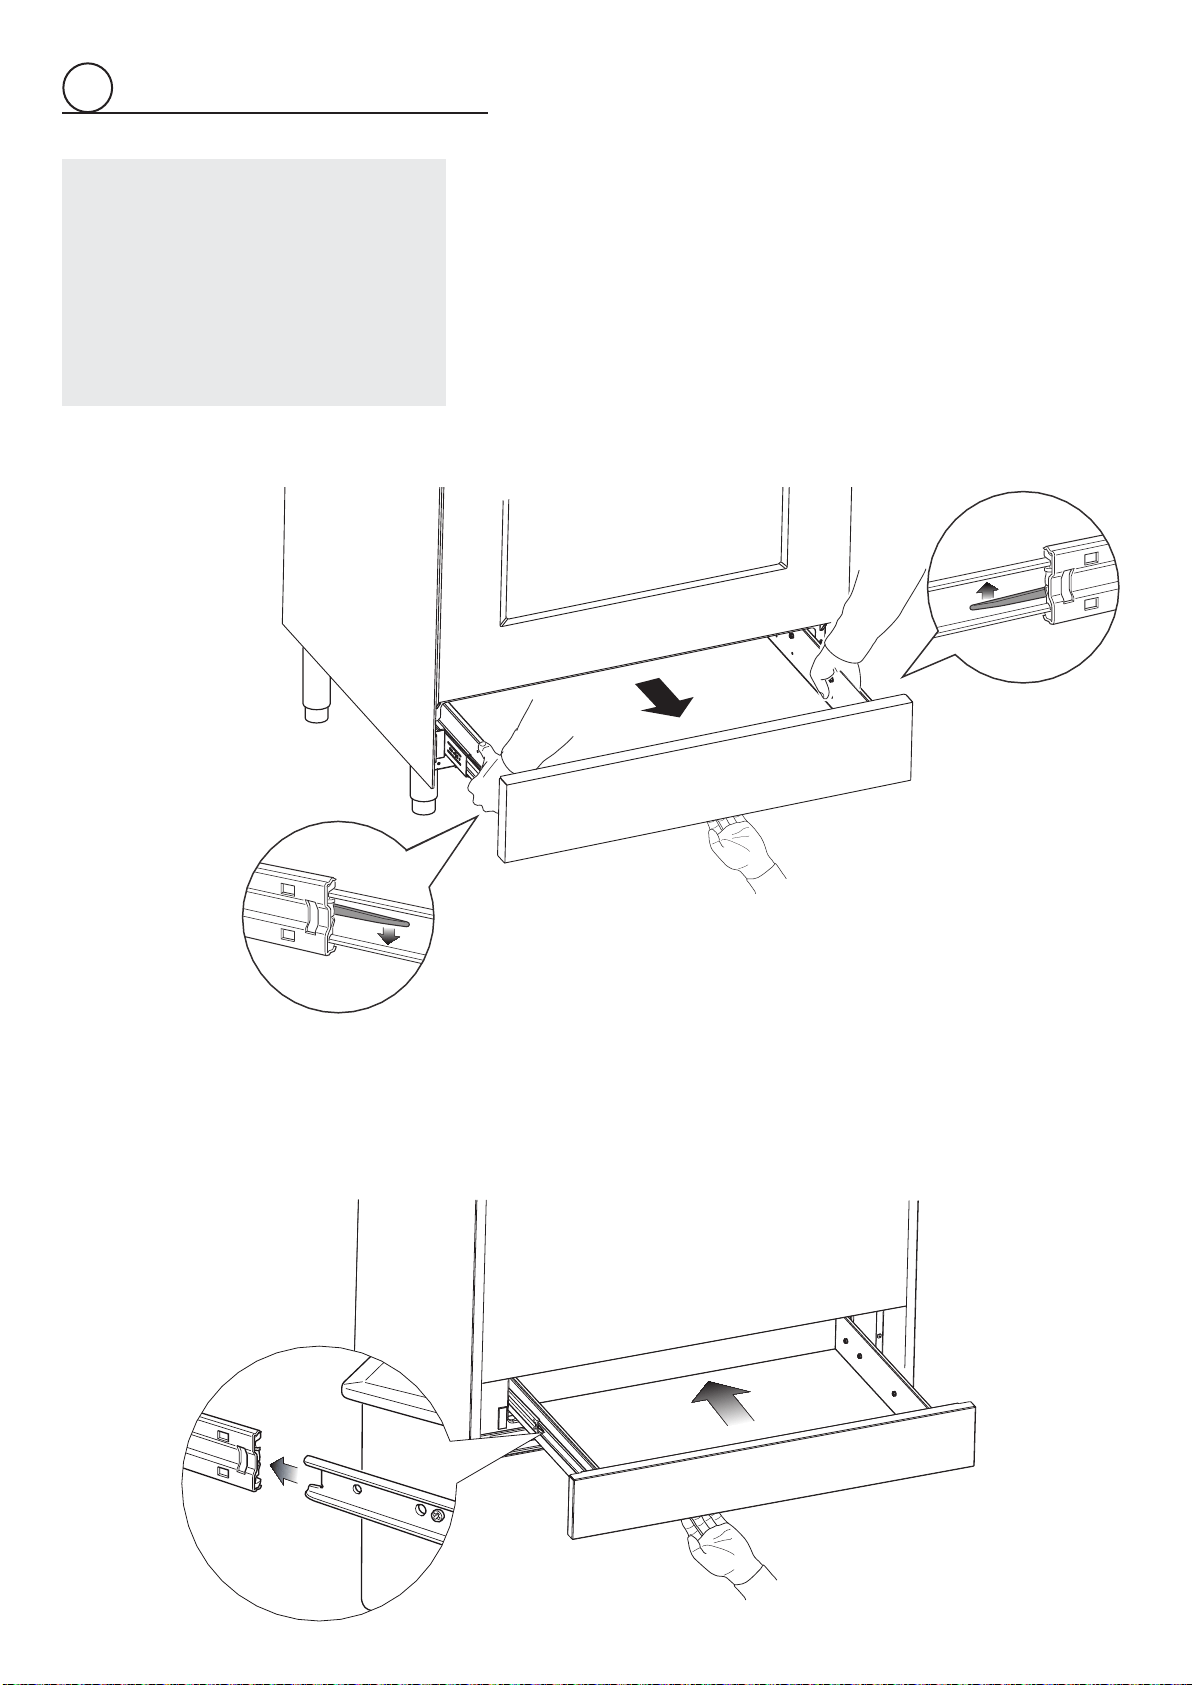
REMOVING THE STORAGE DRAWER
1. Openthedrawercompletely(g.5.11)
2. Movedowntheleverofleftguide(g.5.12)anduptheleverofrightguide
(g.5.13).
3. Removethedrawer;thelevershavetobekeptmoved(g.5.11).
REFIT THE STORAGE DRAWER
1. Insertthedrawerguidesintotherangeguides(g.5.14)
2. Gentlyclosethedrawercompletely;thesafetycatchswillbeautomatically
hooked.
Fig. 5.14
Fig. 5.11
Fig. 5.13
Fig. 5.12
27
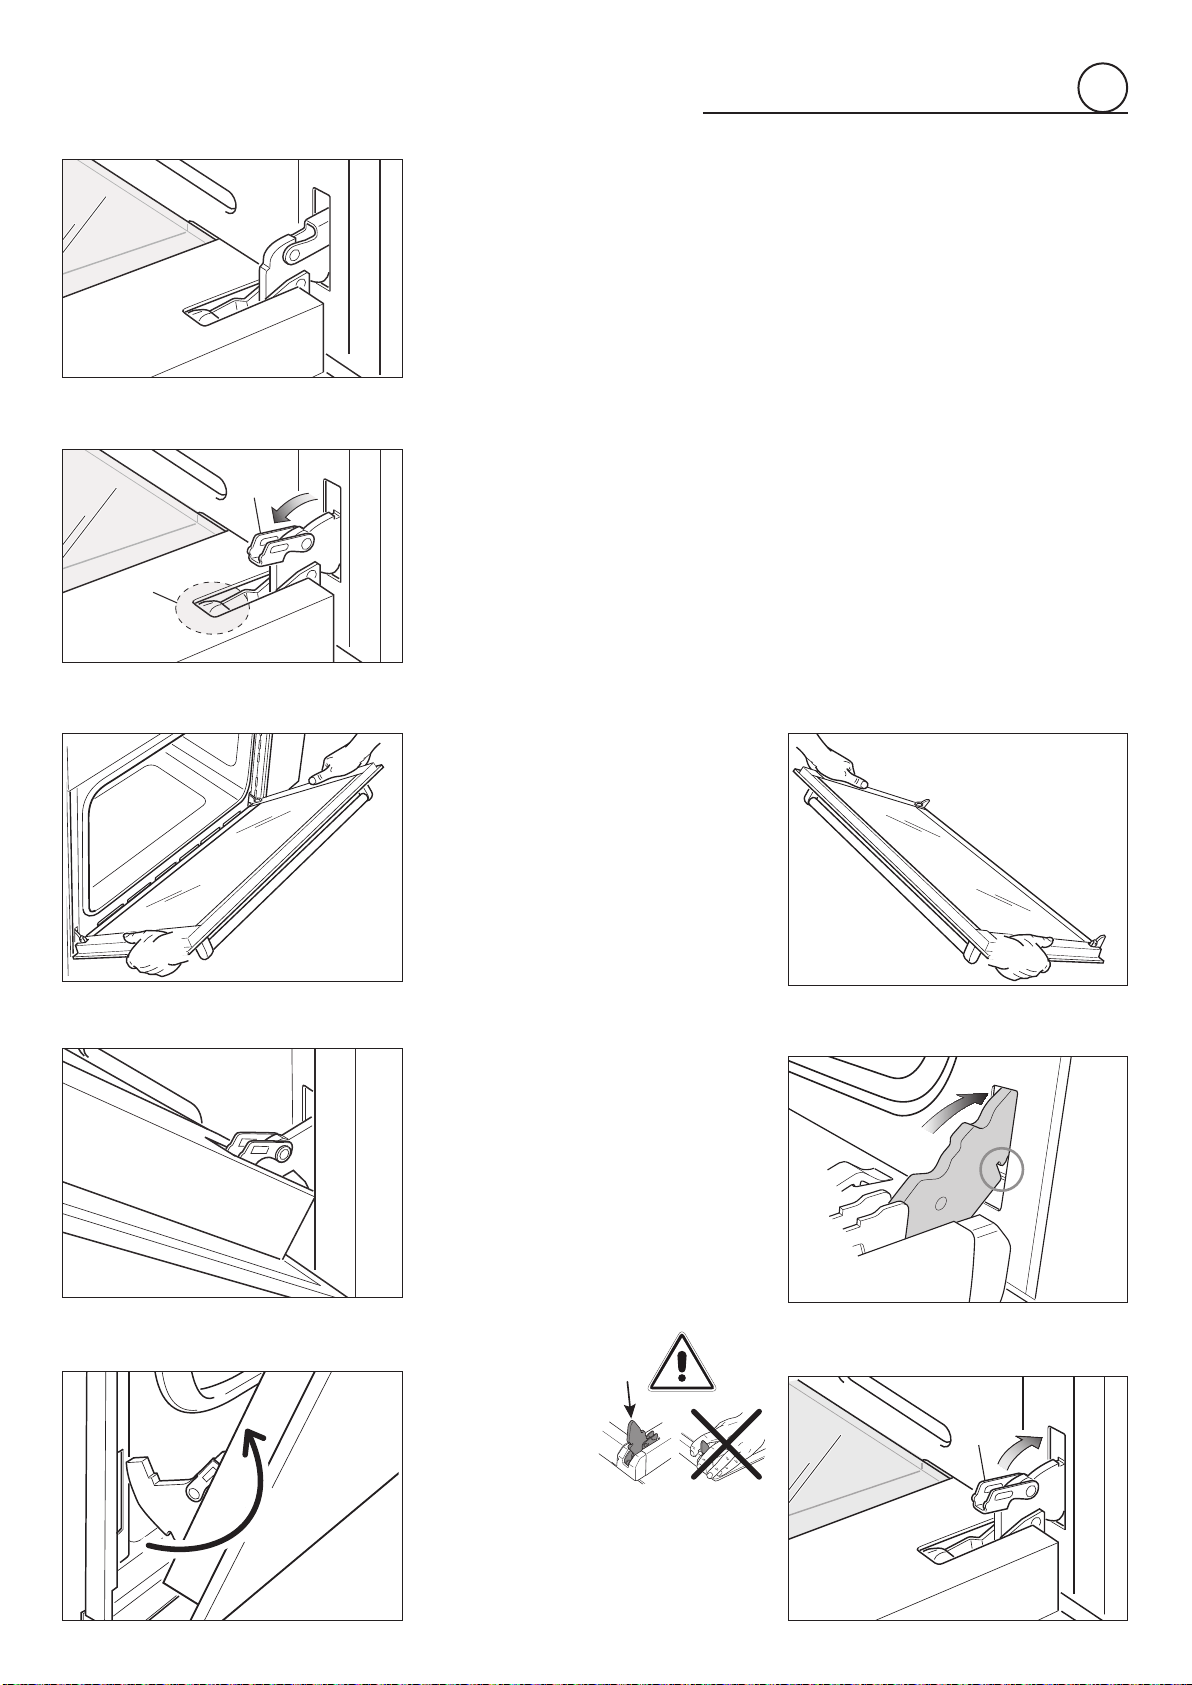
REMOVING THE OVEN DOOR
Theovendoorcaneasilyberemovedasfollows:
• Openthedoortothefullextent(g.5.15).
• Openthelever“A”completelyontheleftandrighthinges(g.5.16).
• Holdthedoorasshowning.5.17.
• Gentlyclosethedoor(g.5.18)untilleftandrighthingelevers“A”arehookedtopart
“B”ofthedoor(g.5.16).
• Withdrawthehingehooksfromtheirlocationfollowingarrow“C”(g.5.19).
• Restthedooronasoftsurface.
B
A
C
Fig.5.19
Fig.5.17
Fig.5.18
Fig.5.16
Fig.5.15
Important!
Alwayskeepasafedistancefromthedoor
hinges,payingspecialattentiontoposition
ofyourhands.
Ifthedoorhingesare
notcorrectlyhooked,
they could unhook
and close suddenly
and unexpectedly
withriskofinjury.
REFIT THE DOOR
1. Holdthedoorrmly(g.5.20).
2. Insertthehingetonguesintotheslots,makingsurethatthegroovedropsintoplace
asshowninthegure5.21.
3. Openthedoortoitsfullextent.
4. Fullyclosethelevers“A”ontheleftandrighthinges,asshowninthegure5.22.
5. Closethedoorandcheckthatitisproperlyinplace.
Fig.5.20
Fig.5.21
A
Fig.5.22
5

28
DO’S AND DO NOT’S
• Doalwaysusetheovenwiththedoorclosed.
• Doalwaysbroilwiththedoorclosed.
• Doreadtheuserinstructionscarefullybeforeusingtherangeforfirsttime.
• Do allow the ovento heat for abouttwo hours, before usingfor the first time,in
ordertoexpelanysmellfromthenewoveninsulation,withouttheintroductionof
food.
• Docleanyourovenregularly.
• Doremovespillsassoonastheyoccur.
• Doalwaysuseovengloveswhenremovingfoodshelvesandtraysfromtheoven.
• Donotallowchildrenneartherangewheninuse.
• Donotallowfatoroilstobuildupintheovenbase,orovenaccessories.
• Donotplacecookingutensilsorplatesdirectlyontotheovenbase.
• Donotplacehotenamelpartsinwater.Leavethemtocoolfirst.
• Do not allow vinegar, coffee, milk, saltwater, lemon or tomato juice to remain in
contactwithenamelparts(i.e.insidetheoven).
• Do not use abrasive cleaners or powders that will scratch the surface of the
stainlesssteelandtheenamel.
• Donotattempttorepairtheinternalworkingsofyourrange.
• Doremovetheprotectivefilmbeforethefirstuse.
• Fire risk! Do not store flammable material in the oven and in the storage
compartment.
• Donotusetheovenwiththeovendooropen.
• Donotusetheoventowarmorheataroom.
FOR YOUR SAFETY
Under no circumstances should any external covers be removed for servicing or
maintenanceexceptbysuitablyqualifiedpersonnel
5

29

30

31

Ref.L0335-ß0
The manufacturer cannot be held responsible for possible inaccuracies due to
printingortranscriptionerrorsinthepresentbooklet.
Themanufacturerreservestherighttomakeallmodicationstoitsproductsdeemed
necessaryformanufactureorcommercialreasonsatanymomentandwithoutprior
notice,withoutjeopardisingtheessentialfunctionalandsafetycharacteristicsofthe
appliances.