Owner's Manual
ICRAFTSMAWI
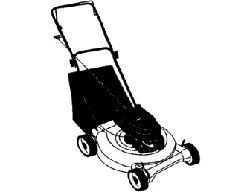
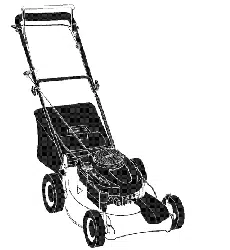
6.0 HORSEPOWER
21" REAR DISCHARGE
ROTARY LAWN MOWER
Model No.
917.388012
• Safety
• Assembly
• Operation
• Maintenance
• Espa_ol
• Repair Parts
CAUTION:
Read and follow all
Safety Rulesand Instructions
beforeoperatingthisequipment
Sears, Roebuck and Co., Hoffman Estates, IL 60179
Visit our Craftsmanwebsite: www.sears.com/craftsman
Warranty ................................................. 2 Product Specifications.......................... 11
Safety Rules ........................................ 2-4 Service and Adjustments ...................... 14
Assembly ................................................ 5 Storage ............................................ 15-16
Operation ............................................. 6-9 Troubleshooting .............................. 16-17
Maintenance Schedule ........................ 10 Repair Parts ..................................... 34-39
Maintenance .................................... 10-13 Parts Ordering ........................ Back Cover
LIMITED TWO YEAR WARRANTY ON CRAFTSMAN POWER MOWER
For two years from date of purchase, when this Craftsman Lawn Mower is maintained,
lubricated, and tuned up according to the operating and maintenance instructionsin
the owner's manual, Bears will repair free of charge any defect in material or work-
manship.
Ifthis Craftsman Lawn Mower is used for commercial or rental purposes, this warranty
applies for only 90 days from the date of purchase.
This Warranty does not cover:.
• Expendable items which become worn during normal use, such as rotary mower
blades, blade adapters, belts, air cleaners and spark plug.
• Repairs necessary because of operator abuse or negligence, includingbent
crankshafts and the failure to maintain the equipment according to the instructions
contained in the owner's manual.
Warranty service is available by returningthe Craftsman power mower to the nearest
Sears Service Center/Department in the United States. This warranty applies only
while thisproduct is in use in the United States.
This Warranty gives you specificlegal dghts, and you may also have other dghts
whichvary from state to state.
SEARS, ROEBUCK AND CO., [3/817 WA, HOFFMAN ESTATES, ILLINOIS 60179
IMPORTANT: This cutting machine iscapable of amputating hands and feet and
throwingobjects. Failure to observe the following safety instructionscouldresult in
serious injuryor death.
I. GENERAL OPERATION
• Read, understand, and follow all
instructionson the machine and in the
manual(s) before starting. Be thor-
oughly familiar with the controlsand
the proper use of the machine before
starting.
• Do not put hands or feel near or under
rotatingparts. Keep clear of the
discharge opening at all times.
• Only allow responsible individuals,
who are familiar with the instructions,to
operate the machine.
• Clear the area of objects such as
rocks,toys,wire, bones, sticks, etc.,
which could be picked up and thrown
by the blade.
• Be sure the area is clear of other
people before mowing.Stop machine if
anyone enters the area.
• Do not operate the mower when
barefoot or wearing open sandals.
Always wear substantial foot wear.
• Do not pull mower backwards unless
absolutely necessary. Always leek
down and behind before and while
moving backwards.
• Do not operate the mower without
proper guards, plates, grass catcher or
other safety protective devices in place.
• See manufacturer's instructionsfor
proper operation and installetion of
accessories. Only use accessories
approved by the manufacturer.
• Stoptheblade(s)whencrossinggravel
ddves,walks,ormarls.
• Stop the engine (motor) whenever you
leave the equipment, before cleaning
the mower or uncloggingthe chute.
• Shut the engine (motor) off and wait
untilthe blade comesto complete stop
before removing grass catcher.
• Mow only in daylight or good artificial
light.
• Do not operate the machine while
under the influence of alcohol or drugs.
• Never operate machine in wet grass.
Alwaysbe sure of your footing:keep a
firm hold on the handle and walk; never
run,
• Disengage the self-propelled mecha-
nism or drive clutchon mowers so
equipped before starting the engine
(motor).
• Ifthe equipment should start to vibrate
abnormally, stop the engine (motor)
and check immediately for the cause.
Vibration is generally a warning of
trouble.
• Always wear safety gngg_esor safety
glasses with side shields when
operating mower.
II. SLOPE OPERATION
Slopes are a majorfactor related to slip
and fall accidents which can result in
severe injury, All slopes require extra
caution. If you feel uneasy on a slope, do
not mow it.
DO:
• Mow across the face of slopes: never
up and down. Exercise extreme caution
when changing directionon slopes.
• Remove obstacles such as rocks, tree
limbs, etc.
• Watch for holes, ruts, or bumps.Tall
grass can hide obstacles,
DO NOT:
• Do not tdm near drop--offs,ditches or
embankments. The operator could lose
footing or balance.
• Do not tdm excessively steep slopes.
• Do not mow on wet grass. Reduced
footing could cause slipping.
III. CHILDREN
Tragic accidents can occur ifthe operator
isnot alert tothe presence of children.
Childrenare often attracted to the
machine and the mowing activity. Never
assume that children will remain where
you last saw them.
• Keep childrenOutof the tdmming area
and under the watchful care of another
reeponsible adult.
• Be alert and tum machine off if children
enter the area.
• Before and while walking backwards,
look behind and down for small
children.
• Never allow children to operate the
machine.
• Use extra care when approaching blind
comers, shrubs, trees, or other objects
that may obscure vision.
IV. SERVICE
• Use extra care in handling gasoline
and other fuels. They are flammable
and vapors are explosive.
- Use only an approved container.
- Never remove gas cap or add fuel
with the engine running. Allow
engine to cool before refueling. Do
not smoke.
- Never refuel the machine indoors.
-Never storethe machine or fuel
container inside where there is an
open flame, such as a water heater.
• Never run a machine inside a closed
area.
• Never make adjustments or repairs with
the engine (motor) running. Disconnect
the spark plug wire, and keep the wire
away from the plug to prevent acciden-
tal starting.
• Keep nuts and bolts, especially blade
attachment bolts, tight and keep
equipment in good condition.
• Never tamper with safety devices.
Check their proper operation regularly.
• Keep machine free of grass, leaves, or
other debds build-up. Clean oil or fuel
spillage. Allow machine to cool before
stodog.
• Stop and inspectthe equipment if you
stdke an object. Repair, if necessary,
before restarting.
• Never attempt to make wheel height
adjustments while the engine (motor) is
running.
• Grass catcher components are subject
to wear, damage, and detedoretion,
which couldexpose moving parts or
allow objects to be thrown. Frequently
check components and replace with
manufacturer's recommended parts,
when necessary.
• Mower blades are sharp and can cut.
Wrap the blade(s) or wear gloves, and
use extra caution when seTv_ng them.
• Do not change the engine governor
setting or overspeed the engine,
ALook for this symbol to point out
importantsafety precautions. It means
CAUTIONI!I BECOME ALERTI!I YOUR
SAFETY IS INVOLVED.
_, CAUTION: In order to prevent
accidental starting when setting up,
transporting, adjusting or making repairs,
always disconnect spark plug wire and
place wire where it cannot contact spark
plug.
AWARNING: Engine exhaust, some of its
constituents, and certain vehicle
componentscontain or emit chemicals
known to the State of California to cause
cancer and birth defects or other
reproductiveharm.
_.WARNING: Battery posts, terminals and
related accessories contain lead and
lead compounds, chemicals known to the
State of Califomia to cause cancer and
birthdefects or other reproductive harm.
Wash hands after handling.
A CAUTION: Muffler and other engine
parts become extremely hot during
operation and remain hot after engine
has stopped. To avoid severe burns on
contact, stay away from these areas.
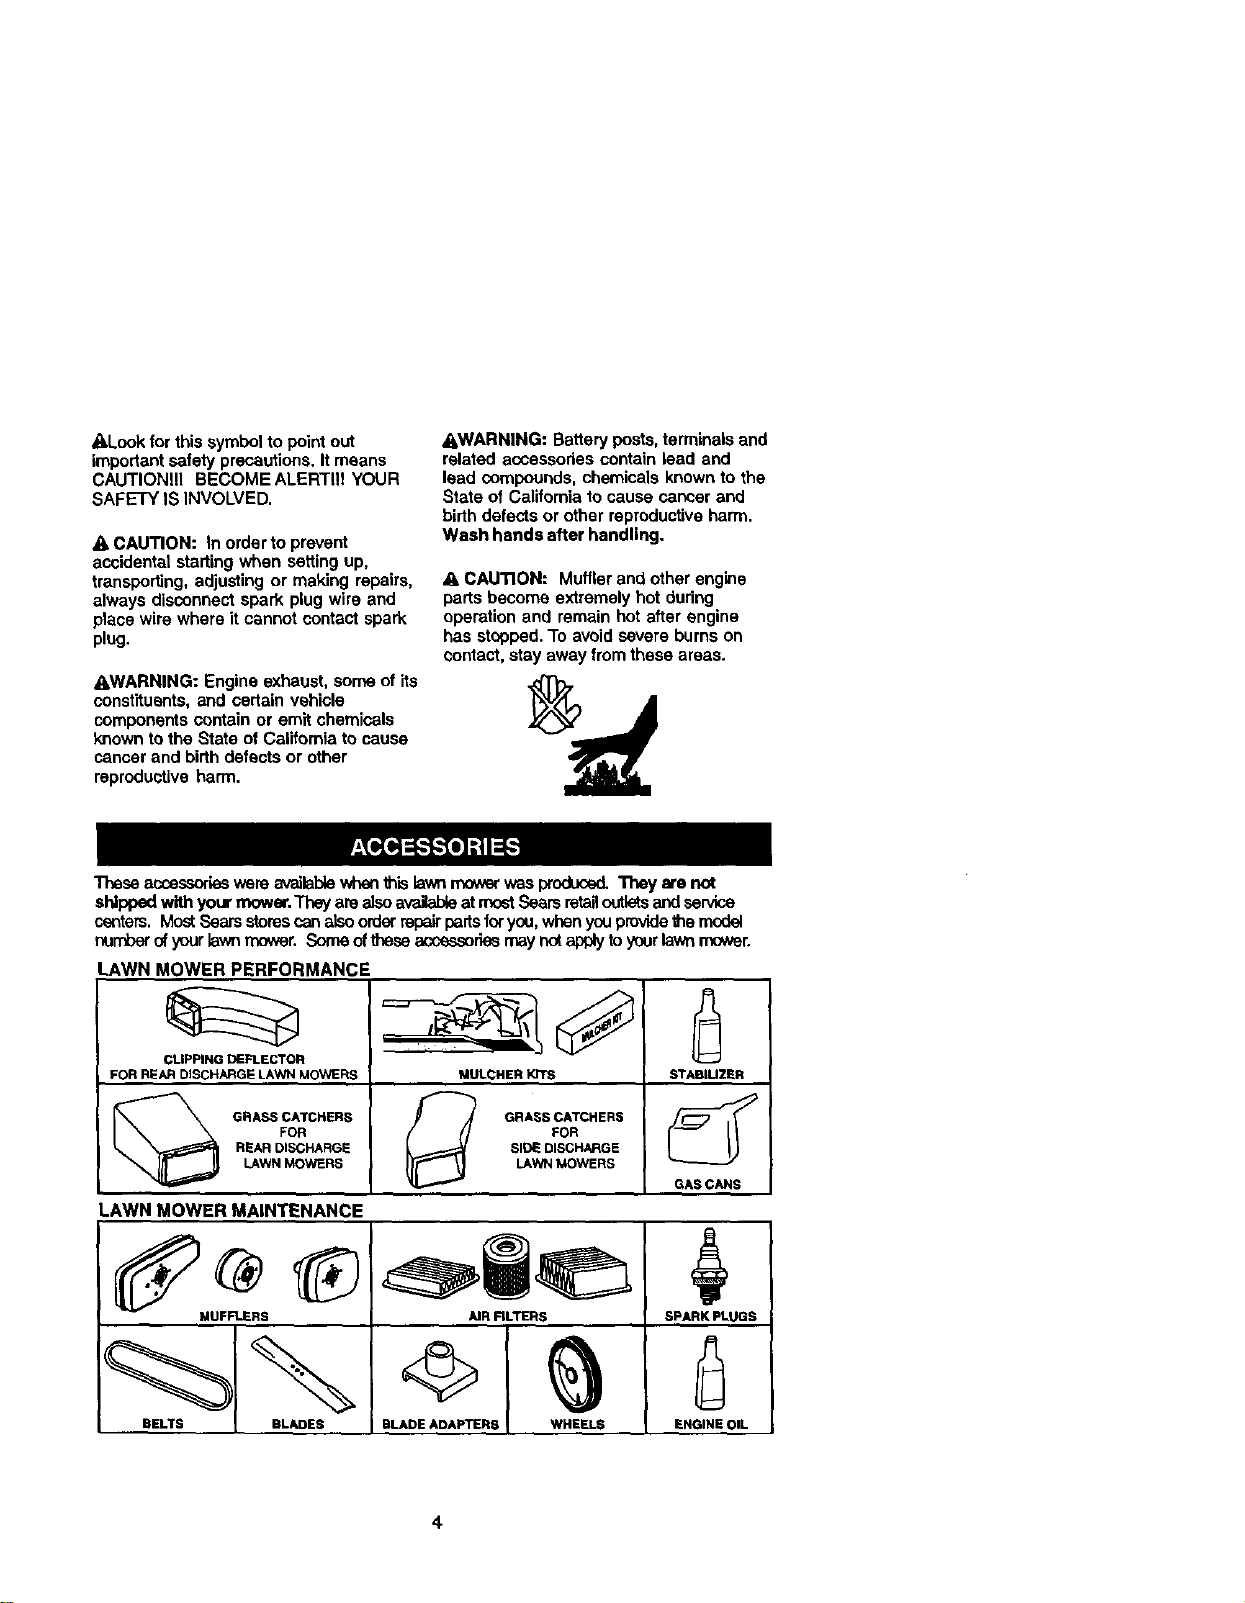
These accessoriesware availablewhenthislawa mowerwas produced,They are not
shipped with your mower._ are alsoevailabicat rnostSearsretanoutletsandservice
centers. MostSears storescan alsoorder repairpartsforyou,whenyouprovidethe model
oumber ofyour lawnrnower. Sorneoftheseaccessoriesrnaynotapply toyourlawnmower.
LAWN MOWER PERFORMANCE
CLIPPING DEFLECTOR
FOR REAR DISCHARGE:LAWN MOWERS
GRASS CATCHERS
FOR
REAR DISCHARGE
LAWN MOWERS
MULCHERKITS
GRASS CATCHERS
FOR
SIDI_DISCHARGE
LAWNMOWERS
STABIUZER
<Y
GAS CANS
LAWN MOWERMAINTENANCE
MUFFLERS
BELTS BLADES
AIR FILTERS
BLADE ADAPTERS WHEELS
SPARK PLUGS
ENGINE OIL
4
Read these instructionsand this manual
in its entirety before you attempt to
assemble or operate your new lawn
mower.
IMPORTANT: This lawn mower is
shippedWITHOUT OIL OR GASOLINE in
the engine.
Your new lawn mower has been as-
sembled at the factory with the exception
ofthose parts left unassembled for
shippingpurposes. All parts such as nuts,
washers, belts, etc., necessary to com-
plete the assembly have been placed in
the parts bag. To ensure safe and proper
operationof your lawn mower, all parts
and hardware you assemble must be
tightened securely. Use the correct tools
as necessary to ensure proper tightness.
TO REMOVE LAWN MOWER FROM
CARTON
1. Remove loose parts included with
mower.
2. Cut down two end comers of carton
and lay end panel down flat.
3. Remove all packing materials except
padding between upper and lower
handle and padding holding operator
presence control bar to upper handle.
4. Roll lawn mower out of carton and
check carton thorougly for additional
loose parts.
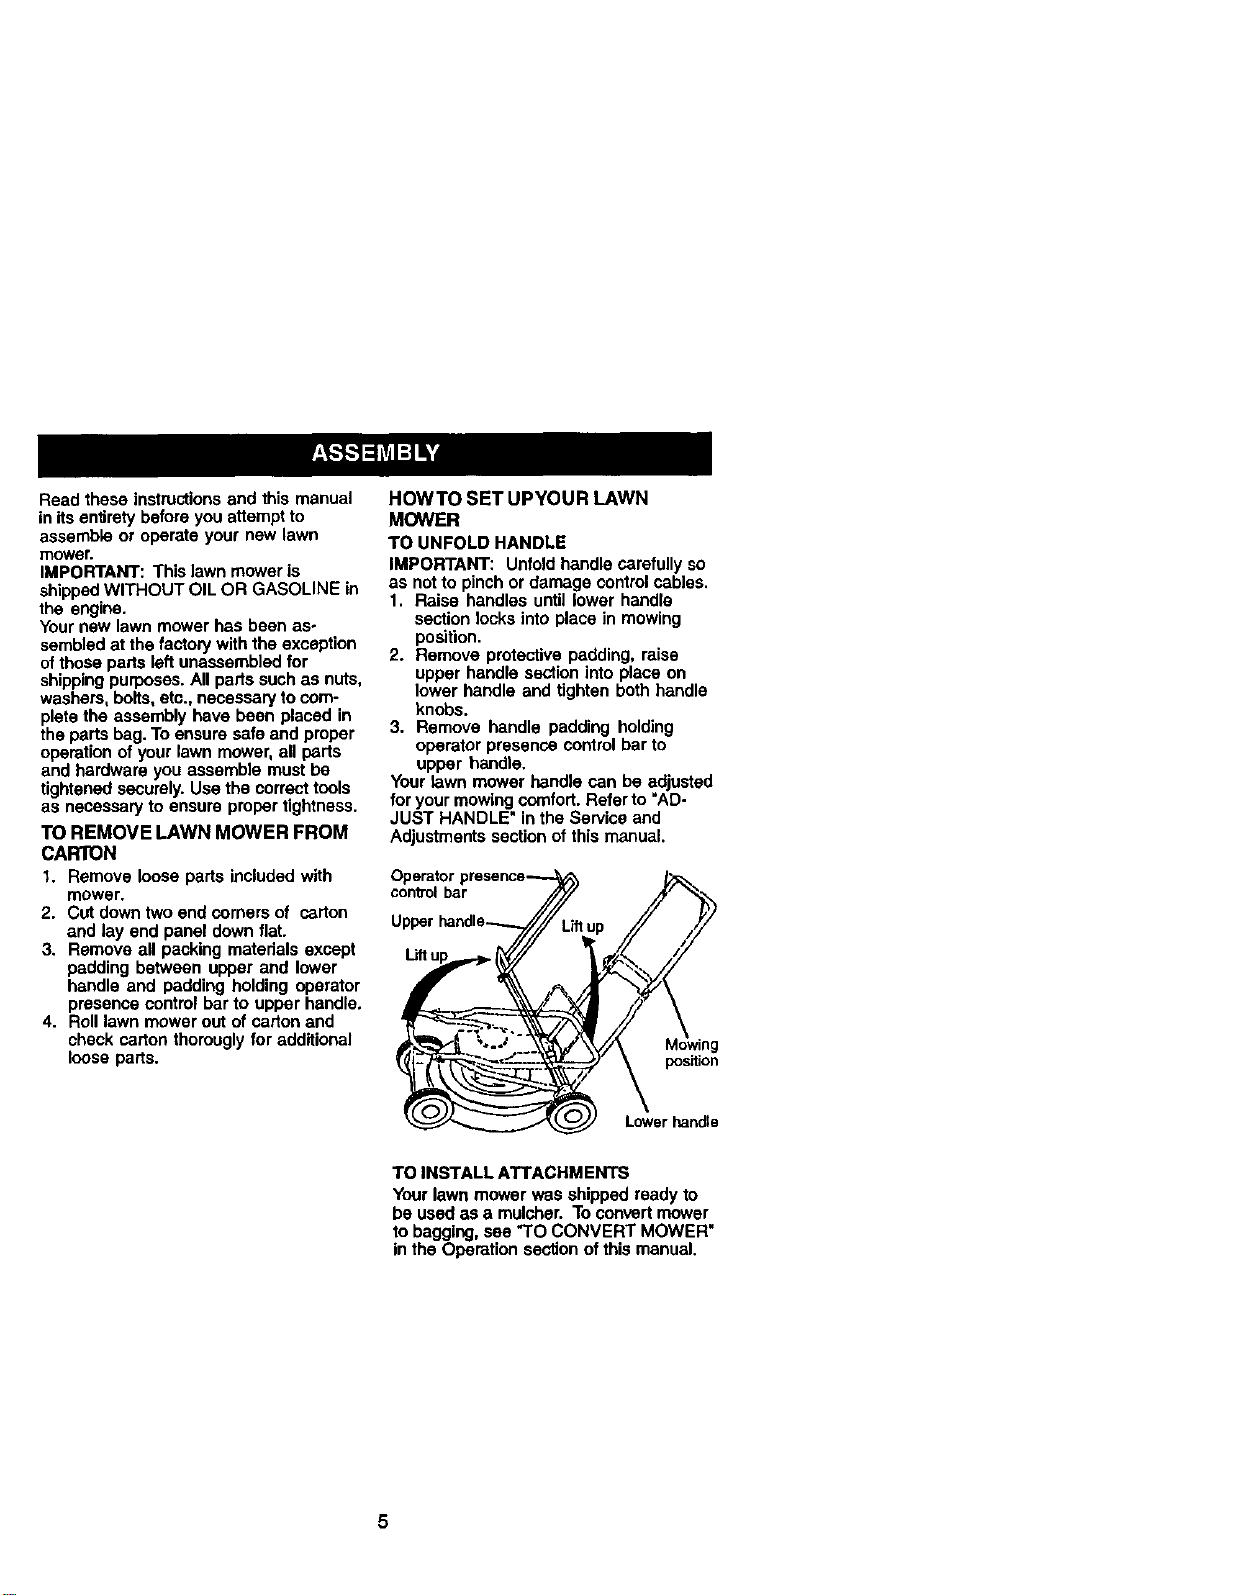
HOWTO SET UPYOUR LAWN
MOWER
TO UNFOLD HANDLE
IMPORTANT: Unfoldhandle carefully so
as not to pinch or damage controlcables.
1. Raise handles until lower handle
section locks into place in mowing
position.
2. Remove protective padding, raise
upper handle section into place on
lower handle and tighten both handle
knobs.
3. Remove handle padding holding
operator presence control bar to
upper handle.
Your lawn mower handle can be adjusted
foryour mowing comfort. Referto "AD-
JUST HANDLE" in the Service and
Adjustmentssection of this manual.
Operator
control bar
position
Lower handle
TO INSTALL ATTACHMENTS
Your lawn mower was shipped ready to
be used as a mulcher. To con,,_rtmower
to bagging, see "TO CONVERT MOWER"
in the Operation sectionof this manuel.
5
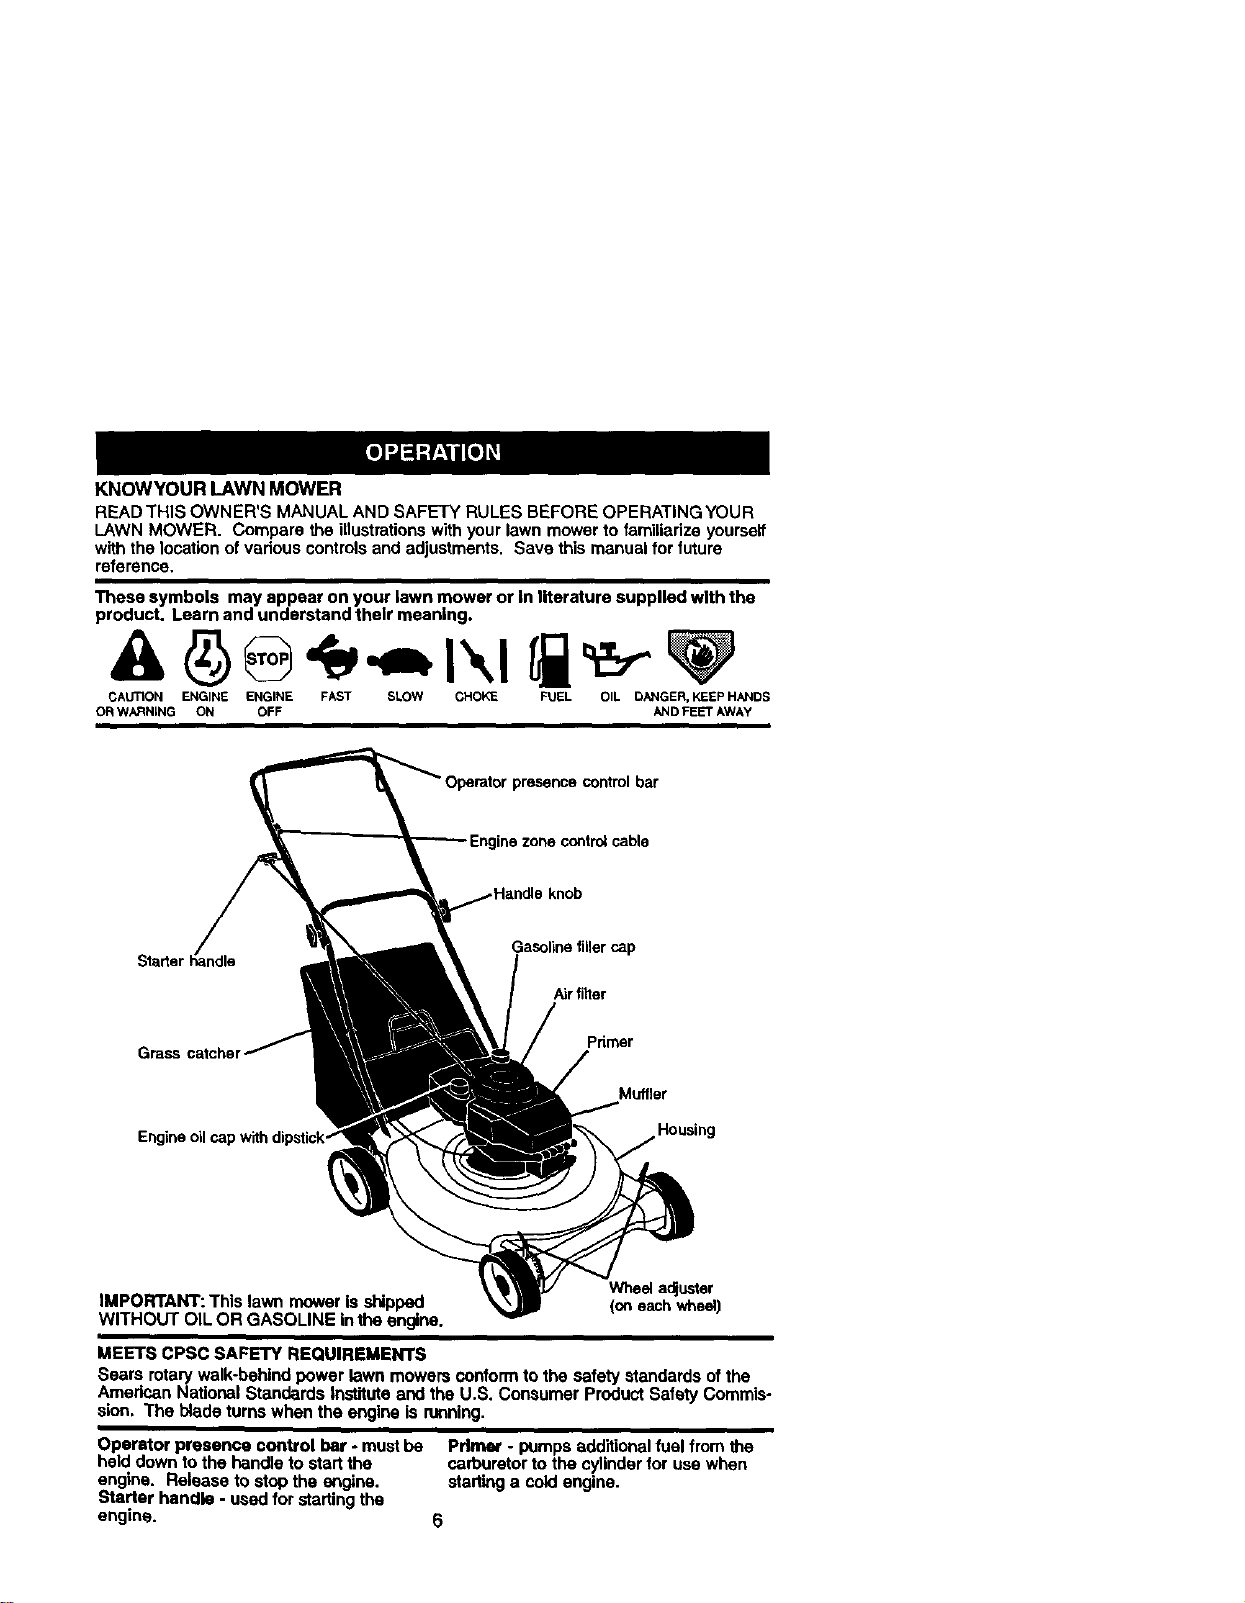
KNOW¥OUR LAWN MOWER
READ THIS OWNER'S MANUAL AND SAFETY RULES BEFORE OPERATING YOUR
LAWN MOWER. Compare the illustrationswith your lawn mower to familiarize yourself
with the location of vadous controls and adjustments. Save this manual for future
reference,
These symbols may appear on your lawn mower or In literature supplied with the
product. Learn and understand their meaning.
CAUTION ENGINE ENGINE FAST SLOW CHOKE FUEL OIL DANGER, KEEP HANDS
OR WARNING ON OFF AND FEET AWAY
presence control bar
knob
Gasoline filler cap
Air filter
Primer
Muffler
Housing
Wheeladjuster
IMPORTANT: This lawn mower is shipped (oneach wheel)
WITHOUT OIL OR GASOLINE inthe engine.
MEETS CPSC SAFETY REQUIREMENTS
Sears rotarywalk-behind power lawn mowers conform to the safety standards ofthe
American National Standards institute and the U.S. Consumer Product Safety Commis-
sion. The blade turns when the engine is running.
Operator presence control bar - mustbe Primer - pumps additionalfuel from the
held down to the handle to start the carburetor to the cylinderfor use when
engine. Release to stop the engine, starting a cok:lengine.
Starter handle - used for startingthe
engine. 6
Theoperationofanylawn
mowercanresultinforeign
objectsthrownintothe
eyes, whichcan result in
severe eye damage.
Alwayswear safety glasses or eye
shieldswhile operating your lawn mower
or performingany adjustments or repairs.
We recommend a wide vision safety
mask over spectacles or standard safety
glasses.
HOWTO USEYOUR LAWN MOWER
ENGINE SPEED
The engine speed was set at the factory
foroptimum performance. Speed is not
adjustable.
ENGINE ZONE CONTROL
ACAUTION: Federal regulations require
an engine controlto be installed on this
lawn mower in order to minimize the dsk
of blade contact injury.Do not under any
circumstancesattempt to defeat the
functionofthe operator control.The blade
turns when the engine is running.
• Your lawn mower is equipped with an
operator presence control bar which
requiresthe operator to be positioned
behind the lawn mower handle to start
and operate the lawn mower.
TO ADJUST CUTTING HEIGHT
Raise wheels for low cut and lower
wheels for high cut, adjust cuttingheight
to suityour requirements. Medium
positionis best for most lawns.
• To change cutting height, squeeze
adjuster lever toward wheel. Move
wheel up or down to suit your require-
ments. Be sure all wheels are in the
same setting.
NOTE: Adjuster is propedy positioned
when plate tab inserts intohole in lever.
Also, 9-position adjusters (it so equipped)
allow laver to be positionedbetween the
plate tabs.
LewerWheelsfor Hig/nCut pr._lste_
RaiseWheelsforLowCut Lever
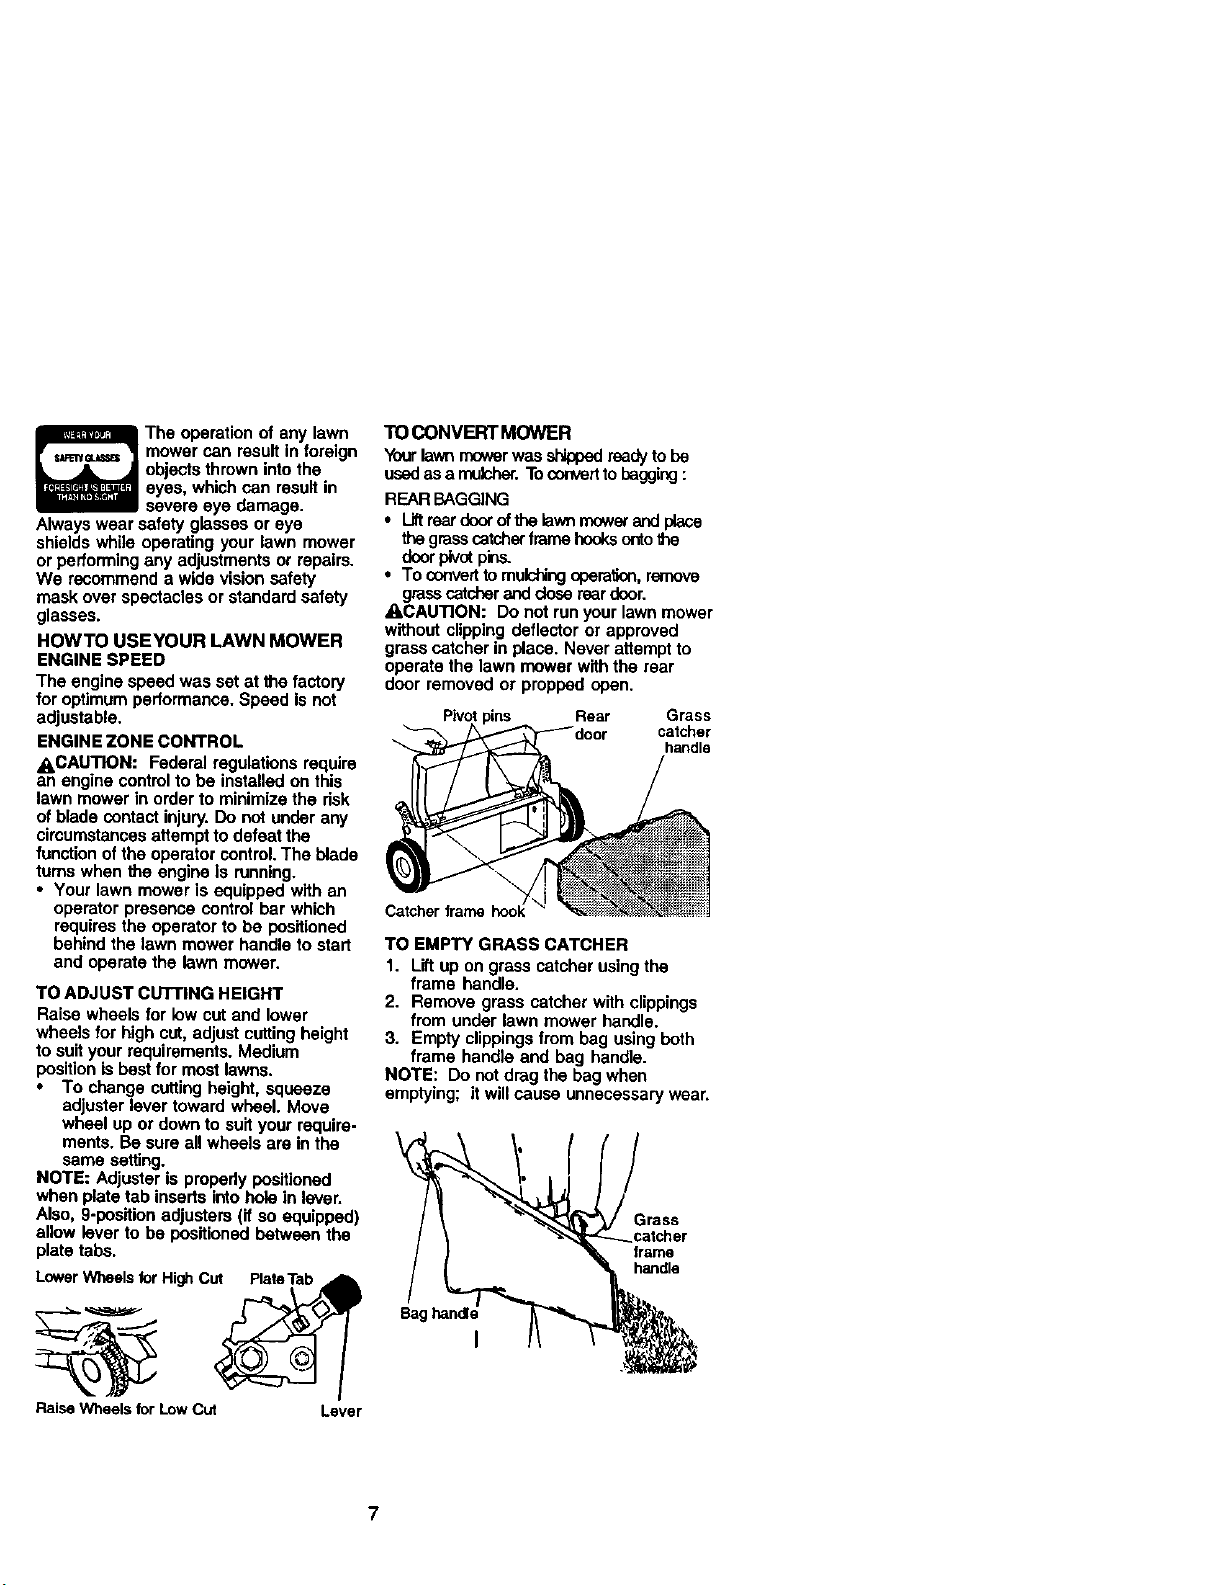
TO CONVERT MOWER
Yourlawn mower wsa _ rsadyto ba
usedas a rnulch_. Toconvert tobagging:
REAR BAGGING
• Liftrsar dnorofthe lawnmowerandplace
the grass catchorframe hooksontothe
doorpivotpins.
• To converttomulchingoperation,remove
grasscatcherand dose reardoor.
ACAUTION: Do notrun your lawnmower
without clippingdeflector or approved
grass catcher in place. Never attempt to
operate the lawn mower with the rear
door removed or propped open.
Pivot ' Rear Grass
catcher
handle
Catcher frame hook
TO EMPTY GRASS CATCHER
1. Lift up on grass catcher usingthe
frame handle.
2. Remove grass catcher with clippings
from under lawn mower handle.
3. Empty clippings from bag using beth
frame handle and bag handle.
NOTE: Do not drag the bag when
emptying; it will cause unnecessary wear.
/
Grass
catcher
frame
handle
Bag
I
7
BEFORE STARTING ENGINE
ADD OIL
Your lawnmower is shipped withoutoil in
the engine. Engine holds 20 oz. of oil.
Fortype and grade of oil to use, see
"ENGINE" in Maintenance section of this
manual.
1. Be sure lawnmower is level and area
around oil fill is clean.
2, Remove engine oil cap and fill to the
full line on the dipstick. Pour oil slowly.
Do notover fill.
NOTE: Allow oil to settle down into engine
for accurate reading. To read proper level,
tightenengine oil cap, then remove it to
read the dipstick.
3. Reinstall engine oil cap and tighten.
• Check oil level before each use. Add
oil if needed. Fillto full line on dipstick.
• Change the oil after every 25 hours of
operationor each season. You may
need to change the oil more often
under dusty, dirty conditions.
ADD GASOLINE
• Fill fuel tank. Usa fresh, clean, regular
unleaded gasoline with a minimum of
87 octane. Do not mix oil with gaso-
line. Purchase fuel in quantities that
can be used within 30 days to assure
fuel freshness.
_I_.WARNING: Experience indicatesthat
alcohol blended fuels (called gasohol or
using ethanol or methanol) can attract
moisture which leads to separation and
formation ofacids during storage. Acidic
gas can damage the fuel system of an
engine while in storage. To avoid engine
problems, the fuel system should be
emptied before storage of 30 days or
longer. Drain the gas tank, start the
engine and let it run untilthe fuel lines
and carburetor are empty. Use fresh fuel
next season. See Storage Instructionsfor
additional information. Never usa engine
or carburetor cleaner products in the fuel
tank or permanent damage may occur.
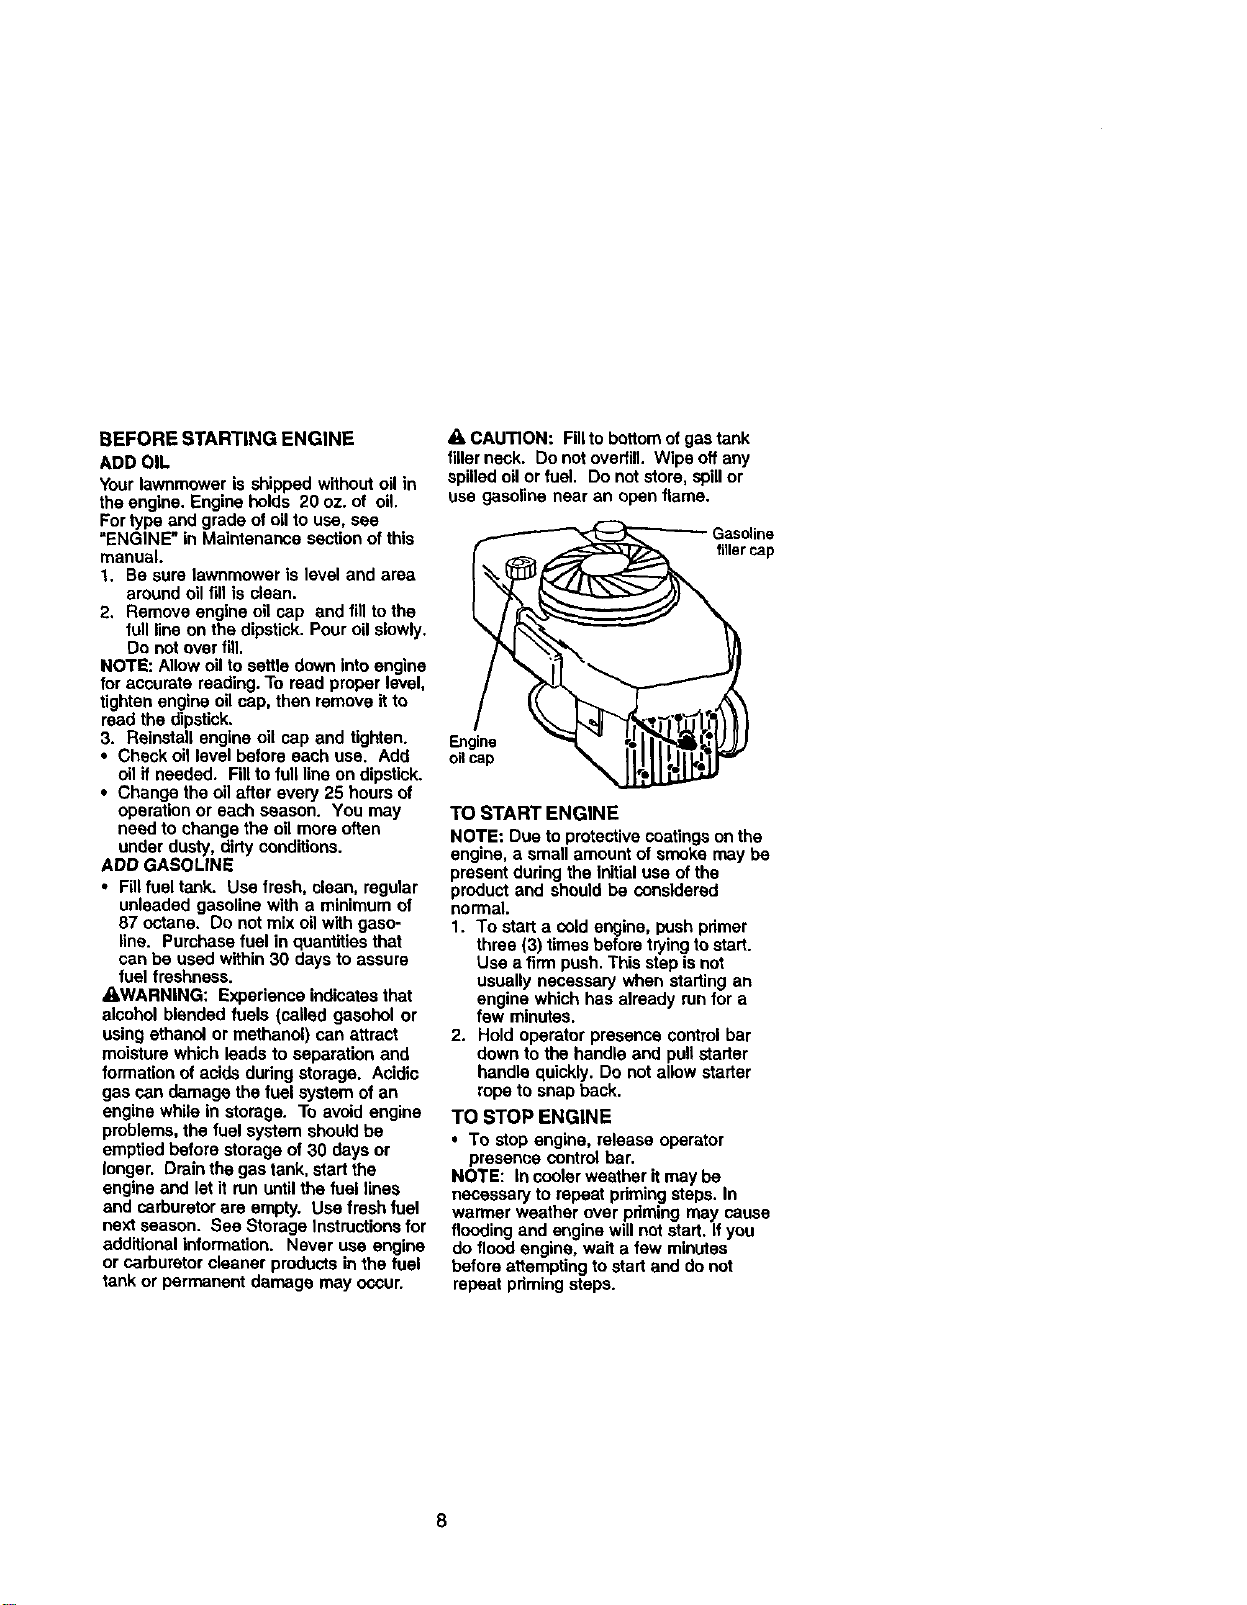
CAUTION: Fillto bottom ofgas tank
filler neck. Do not overfill. Wipe off any
spilled oil or fuel. Do not store, spillor
ass gasoline near an open flame.
Gas°lic_p
Engine _ - f'.i h,-'hl"I_t)3J
oilcap
TO START ENGINE
NOTE: Due to protective coatings on the
engine, a small amount of smoke may be
present during the initial use ofthe
product and should be considered
normal.
1. To start a cold engine, push pdmer
three (3) times before tPjing tostart.
Use a firm push.This step is not
usually necessary when starting an
engine which has already run for a
few minutes.
2. Hold operator presence control bar
down to the handle and pull starter
handle quickly. Do not allow starter
rope to snap back.
TO STOP ENGINE
• To stop engine, release operator
presence control bar.
NOTE: in cooler weather it may be
necessary to repeat pdmingsteps. In
warmer weather over pdming may cause
flooding and engine will not start. If you
do flood engine, wait a few minutes
before attempting to start and do not
repeat pdming steps.
8
MOWlNGTIPS
• Under certain conditions,such as very
tall grass, it may be necessary to raise
the height of cut to reduce pushing
effortand to keep from ovedoading the
engine and leaving clumps of grass
clippings. It may also be necessary to
reduce ground speed and/or run the
lawn mower over the area a second
time.
• For extremely heavy cutting, reduce the
width of cut by ovedapping previously
cut path and mow slowly.
• For better grass bagging and most
cutting conditions,the engine speed
should be set in the fast position.
• When using a rear discharge lawn
mower in moist, heavy grass, clumps of
cut grass may not enter the grass
catcher. Reduce ground speed
(pushingspeed) and/or run the lawn
mower over the area a second time.
• Ifa trailof clippingsis left on the dght
side of a rear discharge mower, mow in
a clockwise directionwith e small
ovedap to collect the clippingson the
next pass.
• Pores in cloth grass catchers can
become tilled with dirtand dust with
use and catchers willcollect less grass.
To prevent this, regularly hose catcher
off with water and let dry before using.
• Keep top of engine around starter clear
and clean of grass clippingsand chaff.
This will help engine air flow and
extend engine life.
MULCHING MOWlNGTIPS
IMPORTANT: For best performance,
keep mower housing free ut buitt-up
grass and trash. See "CLEANING" inthe
Maintenance section of this manual.
• The special mulching blade will recur
the grass clippingsmany times and
reduce them in size so that as they fall
onto the lawn they will disperse into the
grass and not be noticed. Also,the
mulched grass will biodegrade quickly
to provide nUtrientsfor the lawn.
Always mulch with your highest engine
(blade) speed as this will providethe
best recuttingaction of the blades.
• Avoid curlingyour lawn when it iswet.
Wet grasstends to form clumpsand
interferes with the mulching action.The
best time to mow your lawn is the early
afternoon. At this time the grass has
dded and the newly cut area willnot be
exposed to the direct sun.
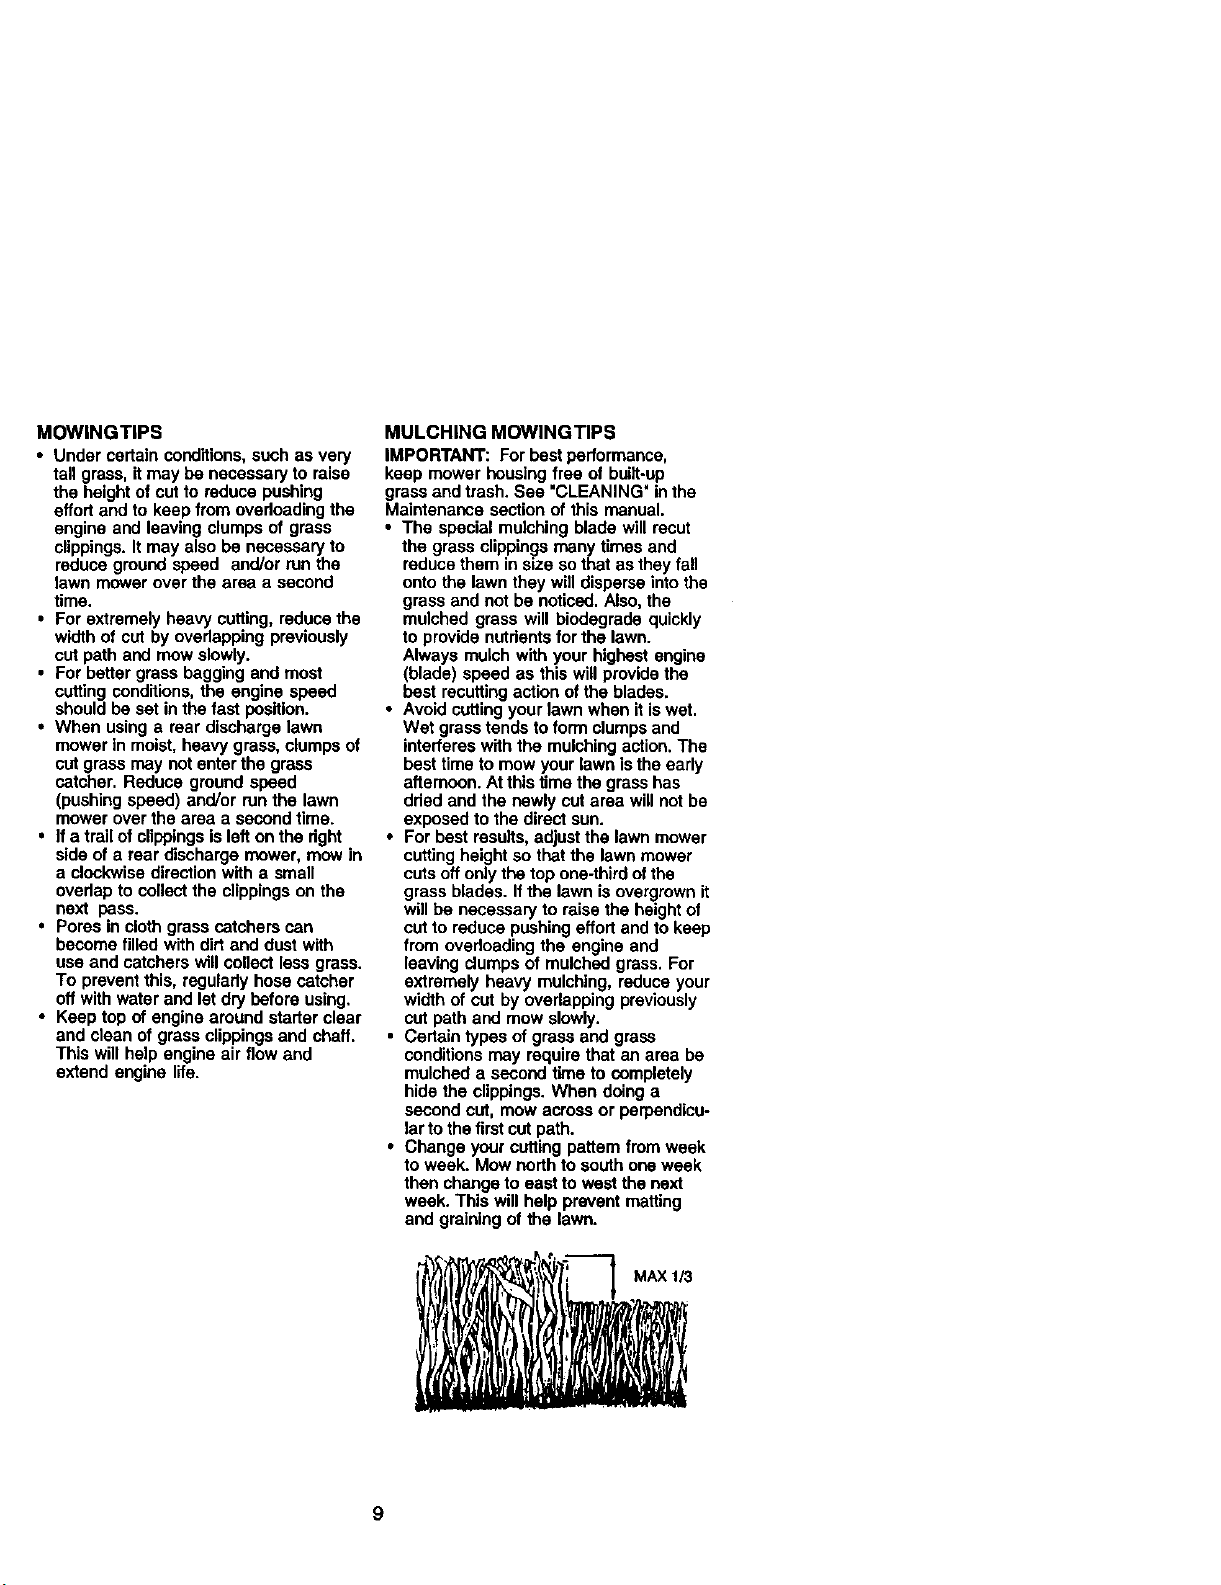
• For best results, adjustthe lawn mower
cutting height so that the lawn mower
cuts off only the top one-third dt the
grass blades. If the lawn isovergrown it
will be necessary to raise the height ol
cut to reduce pushing effortand to keep
from ovedoeding the engine and
leaving clumps of mulched grass. For
extremely heavy mulching, reduce your
width of cut by ovedapping previously
cut path and mow slowly.
• Certain types of grass and grass
conditionsmay require that an area be
mulched a second time to completely
hide the clippings. When doing a
second cut, mow across or perpendicu-
larto the first cut path.
• Change your cutting pattern from week
to week. Mow northto south one week
then change to east to west the next
week. This will help prevent matting
and graining o! the lawn.
9
MAINTENANCE SCHEDULE _fFILL IN DATES
AS YOU COMPLETE
REGLlt.AR SERVICE f SERVICE DATES
Check for Loose Fasteners _
Cteardlnspect Grass Catcher
(If Equipped) I1_ 11_ II_
M clean Lawn Mower I_/ I ;V/
O Clean Under Drive Cover
I
(Power-proF_lted Mowers) I_'
Check Give dew ulleys
RE ipower.Prope,_°Mowers) t_
Check/Sharpen/Replace Blade !/'_}
Lubrication Chart _
Clean Battew/Recha
Electd¢ Start Mowe_q_e I1_ it/4
I
E Check Engine 011Level _/
N Chan_eEngineOII b/t_
G Clean Air Filter Ip# :z
Inspect Muffler
N Clean or Reptace Spark Plug V /
E Replace Air Filter Paper Cartridge t//2
1 - Cl'ange reom o_ whe_ operating uqde¢s ha_ load orII1highan'ble_ temparaturu,
2 - Son/k_ morn onen *_d_nopecat_g in din'ye¢dL_y condi_ons.
s -Rep_ bladesrmreoe_mwhenmow_g_ _rdy aoM.
4. C_arge 48 houn_al end dm.
GENERAL RECOMMENDATIONS
The warranty on this lawn mower does
not cover items that have been subjected
to operatorabuse or negligence. To
receive full value from the warranty,
operator must maintain mower as
instructedin this manual.
Some adjustments will need to be made
periodicallyto properly maintain your
unit.
All a_ustrnents in the Service and
Adjustmentssection of this manual
should be checked at least once each
season.
• Once a year, replace the spark plug,
clean or replace air filter element and
check blade for wear. A new spark
plug and clean/new air filter element
assure proper air-fuel mixture and help
your engine tun better and last I_Jer.
• Follow the maintenance schedule in
this manual.
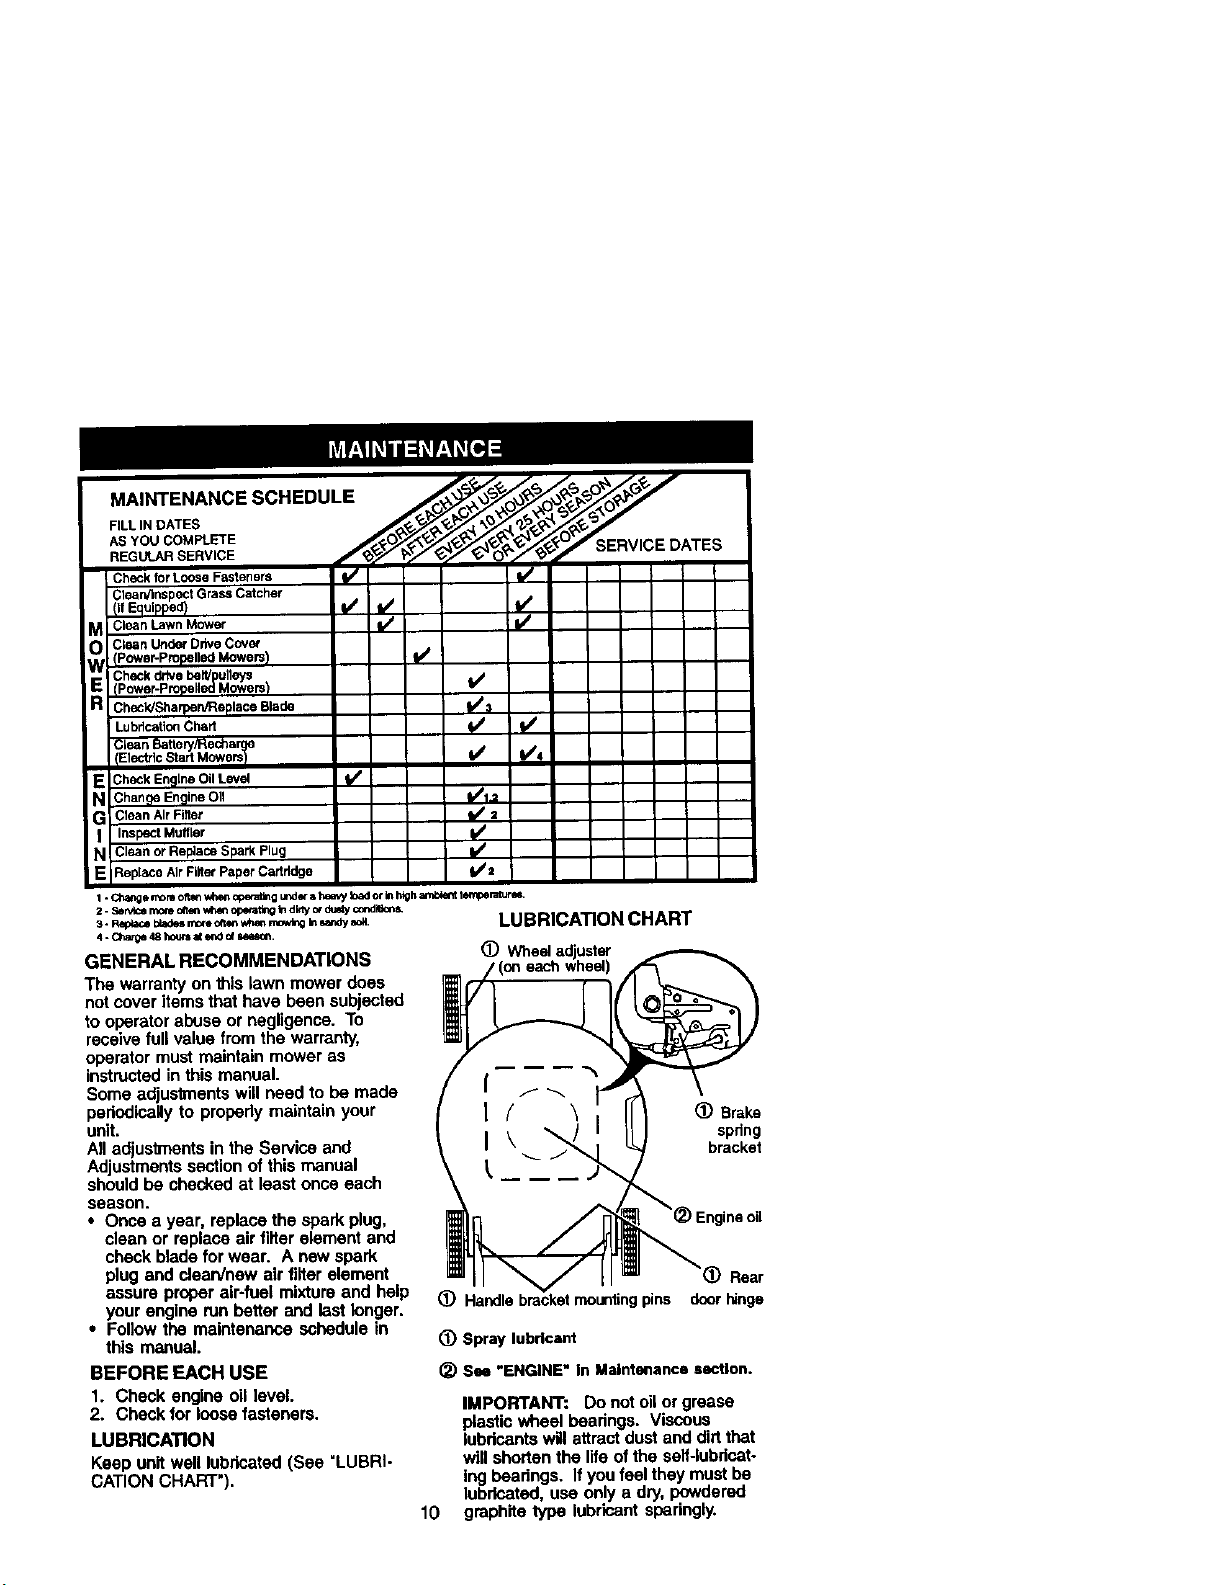
LUBRICATION CHART
(_) Brake
spring
bracket
ne oil
Rear
(_) Handle bracket mounting pins door hinge
(_) Spray lubricant
BEFORE EACH USE
1. Check engine oil level.
2. Check for loose fasteners.
LUBRICATION
Keep unit well lubdcated (See "LUBRI-
CATION CHART').
_) Su "ENGINE" In Maintenance section.
10
IMPORTANT: Donot oil or grease
plastic wheel bearings. Viscous
lubricants willattract dustand dirtthat
willshorten the life of the self-lubdcat-
Ing bearings, ifyoufeel they must be
lubricated, use only a dry, powdered
graphite type lubricant sparingly.
PRODUCT SPECIFICATIONS
SERIAL NUMBER:
DATE OF PURCHASE:
GASOLINE CAPACITY/TYPE: 1.5 QUARTS (UNLEADED REGULAR)
OILTYPE (API-SF-SJ): SAE 30 (ABOVE 32"F); SAE 5W-30 (BELOW 32_F
OIL CAPACITY: 20 OUNCES
SPARK PLUG (GAP: .045") CHAMPION RESISTOR TYPE RJ19LM4
BLADE BOLT TORQUE: 35-40 FT. LBS.
• The model and sedal numbers will be found on a decal on the rear of the mower
housing. Record both sedal number and date of purchase In space pmvldod above.
LAWN MOWER
Always observe safety nJleswhen perform-
ingany maintenance.
"nRES
• Keep tires free of gasoline, oil,or insect
controlchomicaiswhichcan harm rubber.
• Avoid stumps,stones,doep ruts,sharp
objectsandother hazards that may cause
tiredamage.
BLADE CARE
For best results,mower blade must be
kept sharp. Replace bent or damaged
blades.
TO REMOVE BLADE
1. Disconnect spark plug wire from spark
plug and place wire where it cannot
come in contact with spark plug.
2. Turn lawn mower on its side. Make
sure air filter and carburetor are up.
3. Use a wood block between blade and
mower housing to prevent blade from
turning when removing blade belt.
NOTE= Protect your hands with gloves
and/or wrap blade with heavy cloth.
4. Remove blade bolt by turning counter-
clockwise.
5. Remove blade and attaching hard-
ware (bolt, lock washer and hardened
washer).
NOTE: Remove the blade adopter and
check the key inside hub of blade
adapter. The key must be In good condi-
tion to work properly.Replace adopter it
damaged.
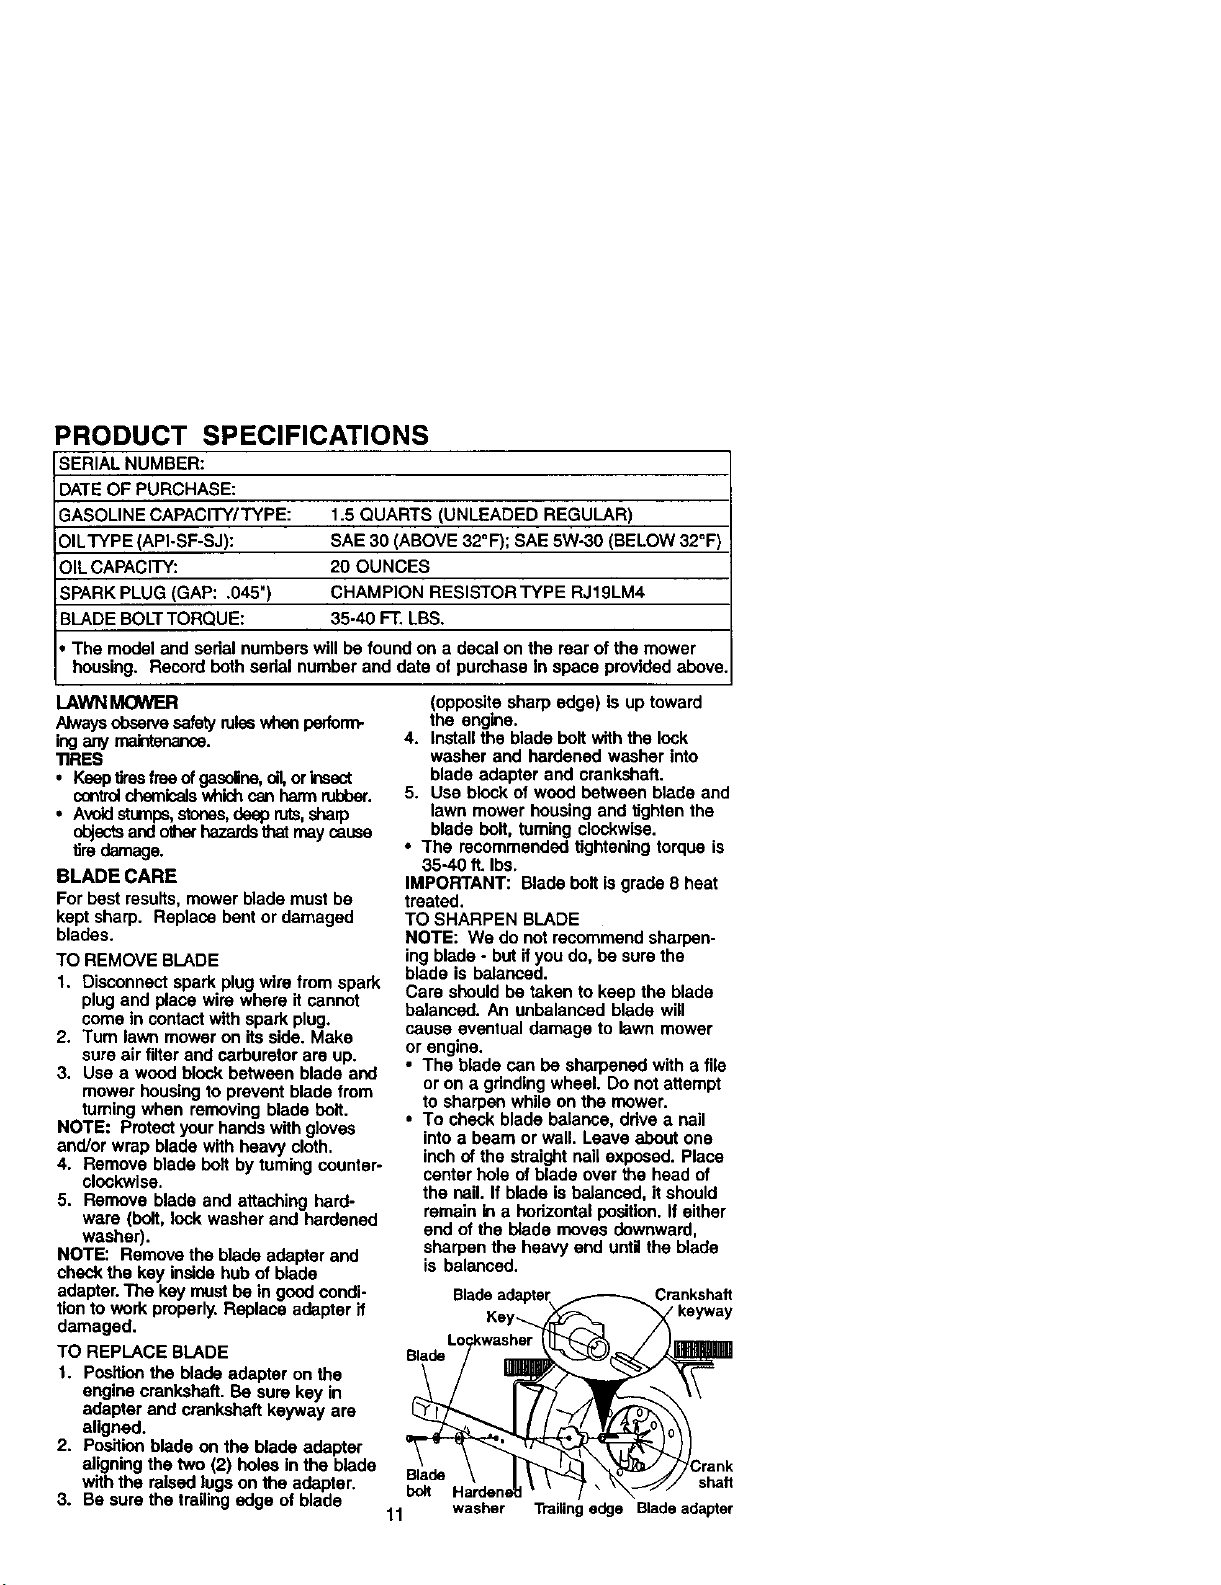
TO REPLACE BLADE
1. Positionthe blade adapter on the
engine crankshaft. Be sure key in
adopter and crankshaft keyway are
aligned.
2, Pos;tion blade on the blade adopter
aligningthe two (2) boles in the blade
with the raised lugs on the adopter.
3. Be sure the trailingedge of blade
(opposite sharp edge) Is up toward
the engine.
4. Install the blade bolt with the lock
washer and hardened washer into
blade adapter and crankshaft.
5. Use block of wood between blade and
lawn mower housing and tightenthe
blade bolt, turning clockwise.
• The recommended tightening torque is
35-40 ft. Ibs.
IMPORTANT: Blade bolt is grade 8 heat
treated.
TO SHARPEN BLADE
NOTE: We do not recommend sharpen-
ing blade - but ffyou do, be sure the
blade is balanced.
Care should be taken to keep the blade
balanced. An unbalanced blade will
cause eventual damage to lawn mower
or engine.
• The blade can be sharpened with a file
or on a gdnding wheel. Do not attempt
to sharpen while on the mower.
• To cheek blade balance, ddve a nail
into a beam or wall. Leave about one
inch of the straight nail exposed. Place
center hole of blade over the head of
the nail. If blade is balanced, it should
remain in a bodzontal position. If either
end of the blade moves downward,
sharpen the heavy end until the blade
is balanced.
Crankshaft
Key-_ _keyway
Blade shaft
bolt
11 washer TraiUngedge Blade adapter
GRASS CATCHER
• The grass catcher may be hosedwith
water, but must be drywhen used.
• Check your grass catcher often for
damage or detedoretion. Through
normal use itwill wear, If catcher needs
replacing, replace only with a manufac-
turer approved replacement catcher.
Give the lawn mower model number
when ordering.
ENGINE
LUBRICATION
Use only high quality detergent oil rated
withAPI service classificationSF-SJ.
Select the oil's SAE viscosity grade
according to your expected operating
temperature.
T_MpL_A_IJ RE RANG_ ANTIClPATE_ B_FOR_ NF_F OIL (_ tANGE I
NOTE: Although multi-viscosity oils
(5W30, 10W30 etc,) improve starting in
cold weather, these multi-viscosityoils
will result in increased oil consumption
when used above 32°F. Check your
engine oil level more frequently to avoid
possible engine damage from running
low on oil.
Change the oil after eveq/25 hours of
operationor at least once a year if the
lawn mower is not used for 25 hours in
one year.
Check the crankcase oil level before
startingthe engine and after each five (5)
hours of continuous use. Tighten oil plug
securely each time you check the oil
level.
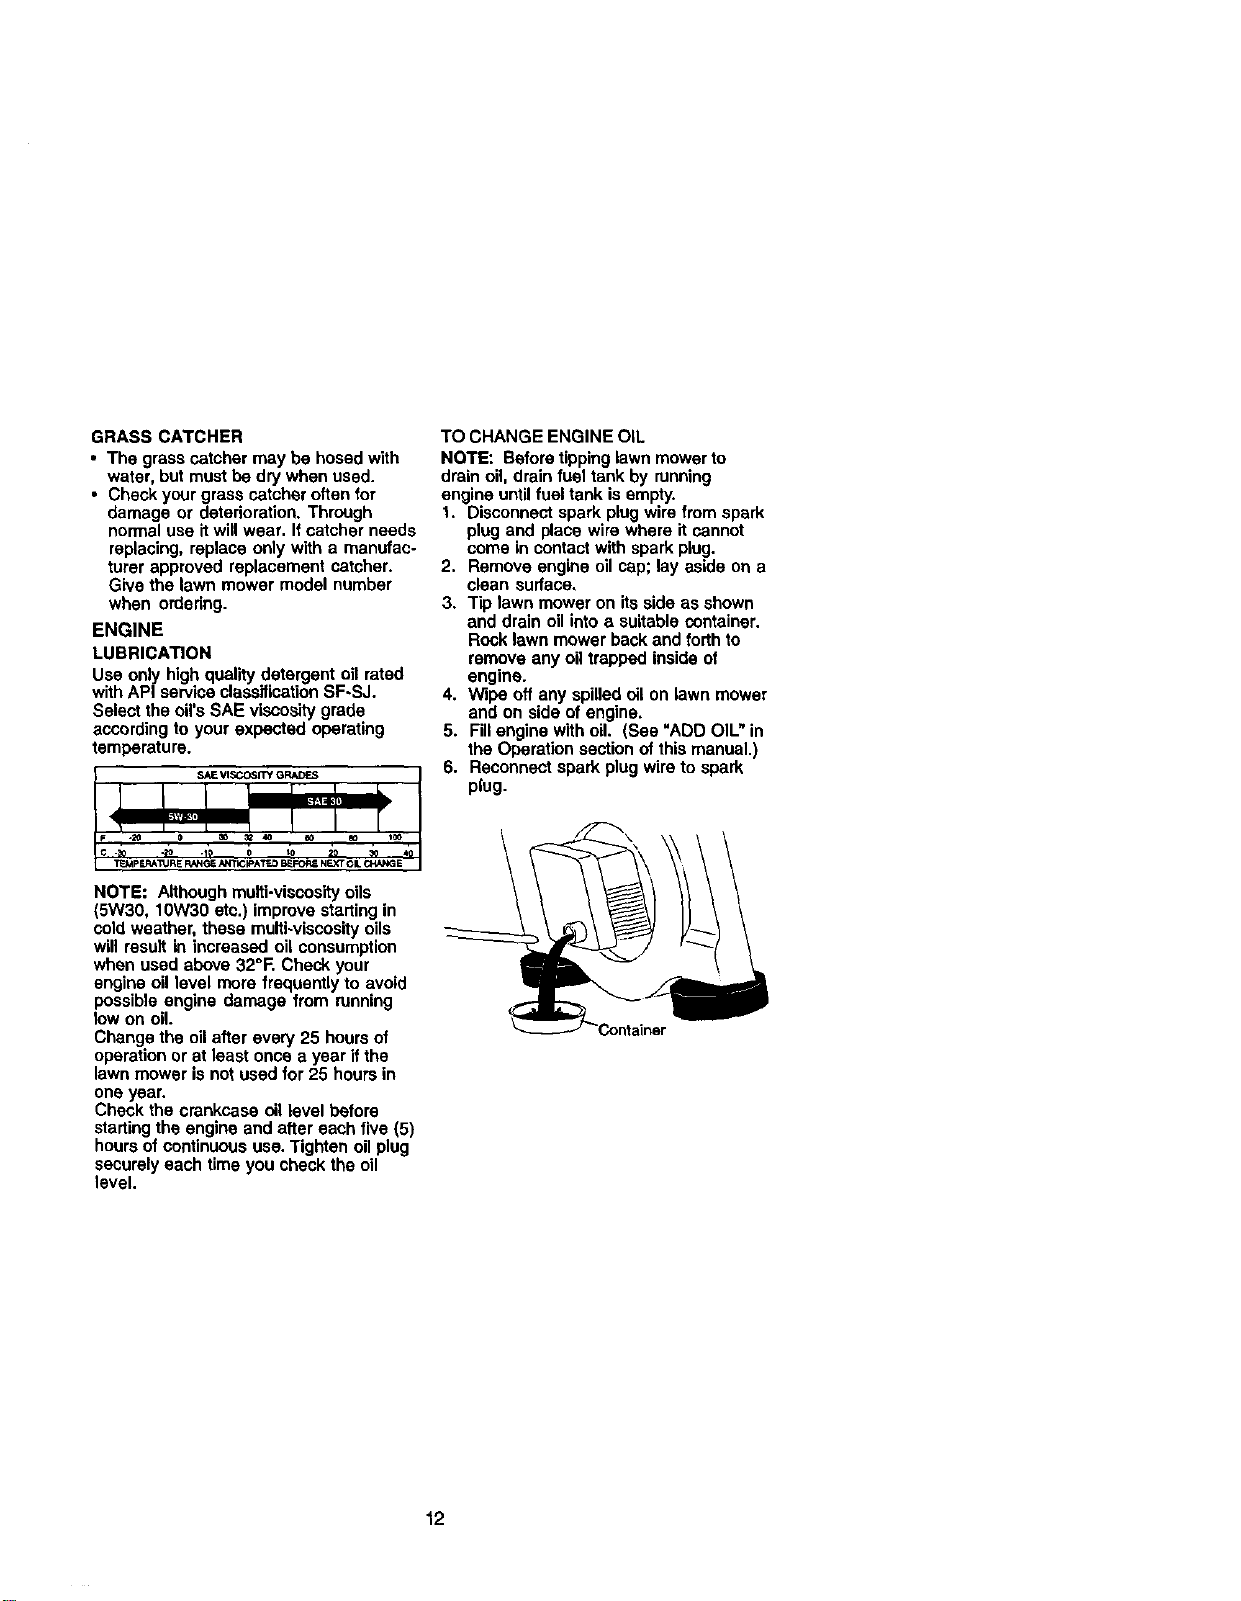
TO CHANGE ENGINE OIL
NOTE: Before tippinglawn mower to
drain oil. drain fuel tank by running
engine untilfuel tank is empty.
1. Disconnect spark plug wire from spark
plug and place wire where it cannot
come in contact with spark plug.
2. Remove engine oil cap; lay aside on a
clean surface,
3. Tip lawn mower on its side as shown
and drain oil into a suitable container.
Rock lawn mower back and forth to
remove any oil trapped inside of
engine.
4. Wipe off any spilled oil on lawn mower
and on side of engine.
5. Fillengine with oil. (See "ADD OIL" in
the Operation section of this manual.)
6. Reconnect spark plug wire to spark
plug.
12
AIR FILTER
Your engine will not run properly and may
be damaged by using a dirty air filter.
Replace the air filter every 100 hours of
operation or every season, whichever
occursfirst. Service air cleaner more
often under dustyconditions. Do not
wash air filter.
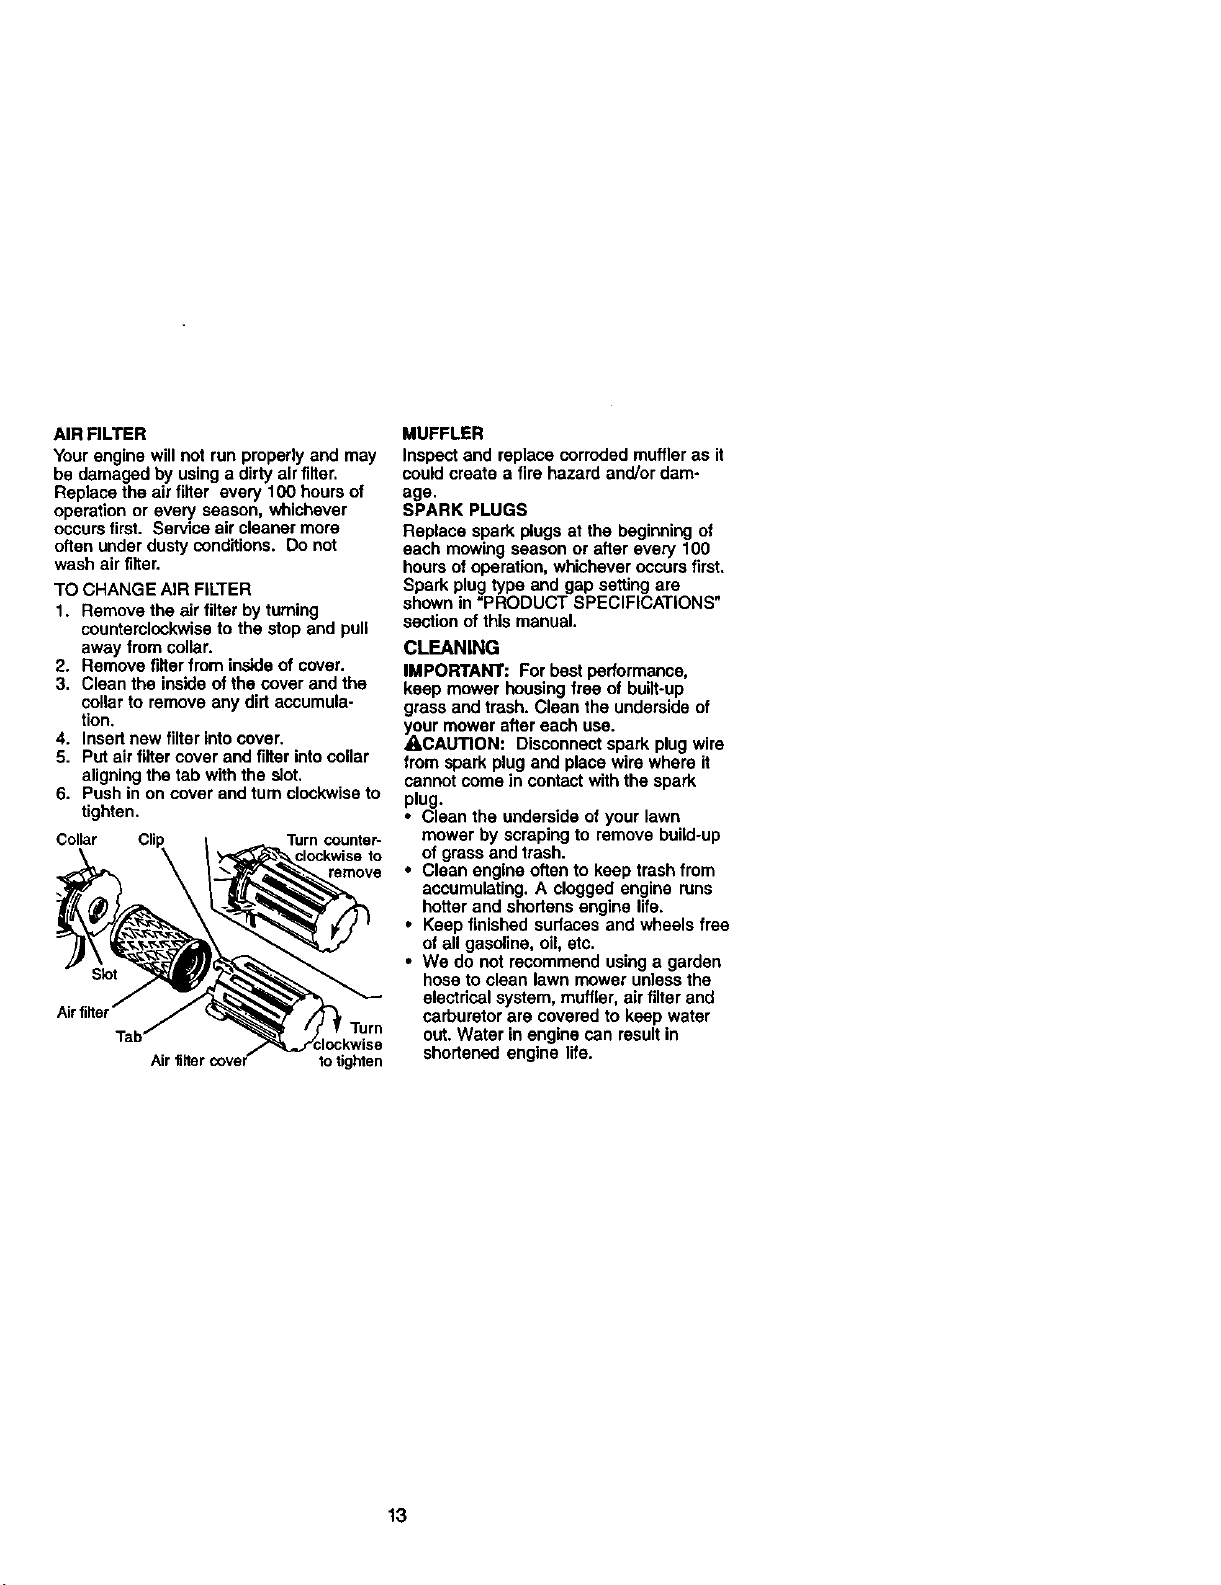
TO CHANGE AIR FILTER
1. Remove the air filter by turning
counterclockwise to the stop and pull
away from collar.
2. Remove filterfrom insideof cover.
3. Clean the insideof the cover and the
collar to remove any dirt accumula-
tion.
4. Insertnew filterintocover.
5. Put air filtercover and filter intocollar
aligningthe tab with the slot.
6. Push in on cover and turn clockwiseto
tighten.
Collar Turn counter-
clockwise to
Airfilter
Air ltlter cover to tighten
MUFFLER
Inspect and replace corroded muffler as it
could create a fire hazard and/or dam-
age.
SPARK PLUGS
Replace spark plugs at the beginning of
each mowing season or after every 100
hours of operation, whichever occursfirst.
Spark plug type and gap setting are
shown in =PRODUCT SPECIFICATIONS"
section of this manual.
CLEANING
IMPORTANT: For best performance,
keep mower housing free of built-up
grass and trash. Clean the underside of
your mower after each use.
_CAUTION: Disconnect spark plug wire
from spark plug and place wire where it
cannot come in contact withthe spark
plug.
• Clean the underside of your lawn
mower by scraping to remove build-up
of grass and trash.
• Clean engine often to keep trash from
accumulating. A clogged engine runs
hotter and shortens engine life.
• Keep finished surfaces and wheels free
of all gasoline, oil,etc.
• We do not recommend using a garden
hose to clean lawn mower unless the
electrical system, muffler, air filter and
carburetor are covered to keep water
out. Water in engine can resultin
shortened engine life.
13
_ILCAUTION: Before performing any
service or adjustments:
1. Release control bar and stop engine.
2. Make sure the blade and all moving
parts have completely stopped.
3. Disconnect spark plug wire from spark
plug and place where it cannot come
in contact with plug.
LAWN MOWER
TO ADJUST CUTTING HEIGHT
See "TO ADJUST CUTTING HEIGHT" in
the Operation section of this manual.
REAR DEFLECTOR
The rear deflector, attached between the
rear wheels of your mower, is provided to
minimize the possibilitythat objects will
be thrown out of the rear ofthe mower
intothe operator'smowing position. If the
deflector becomes damaged, it should be
replaced.
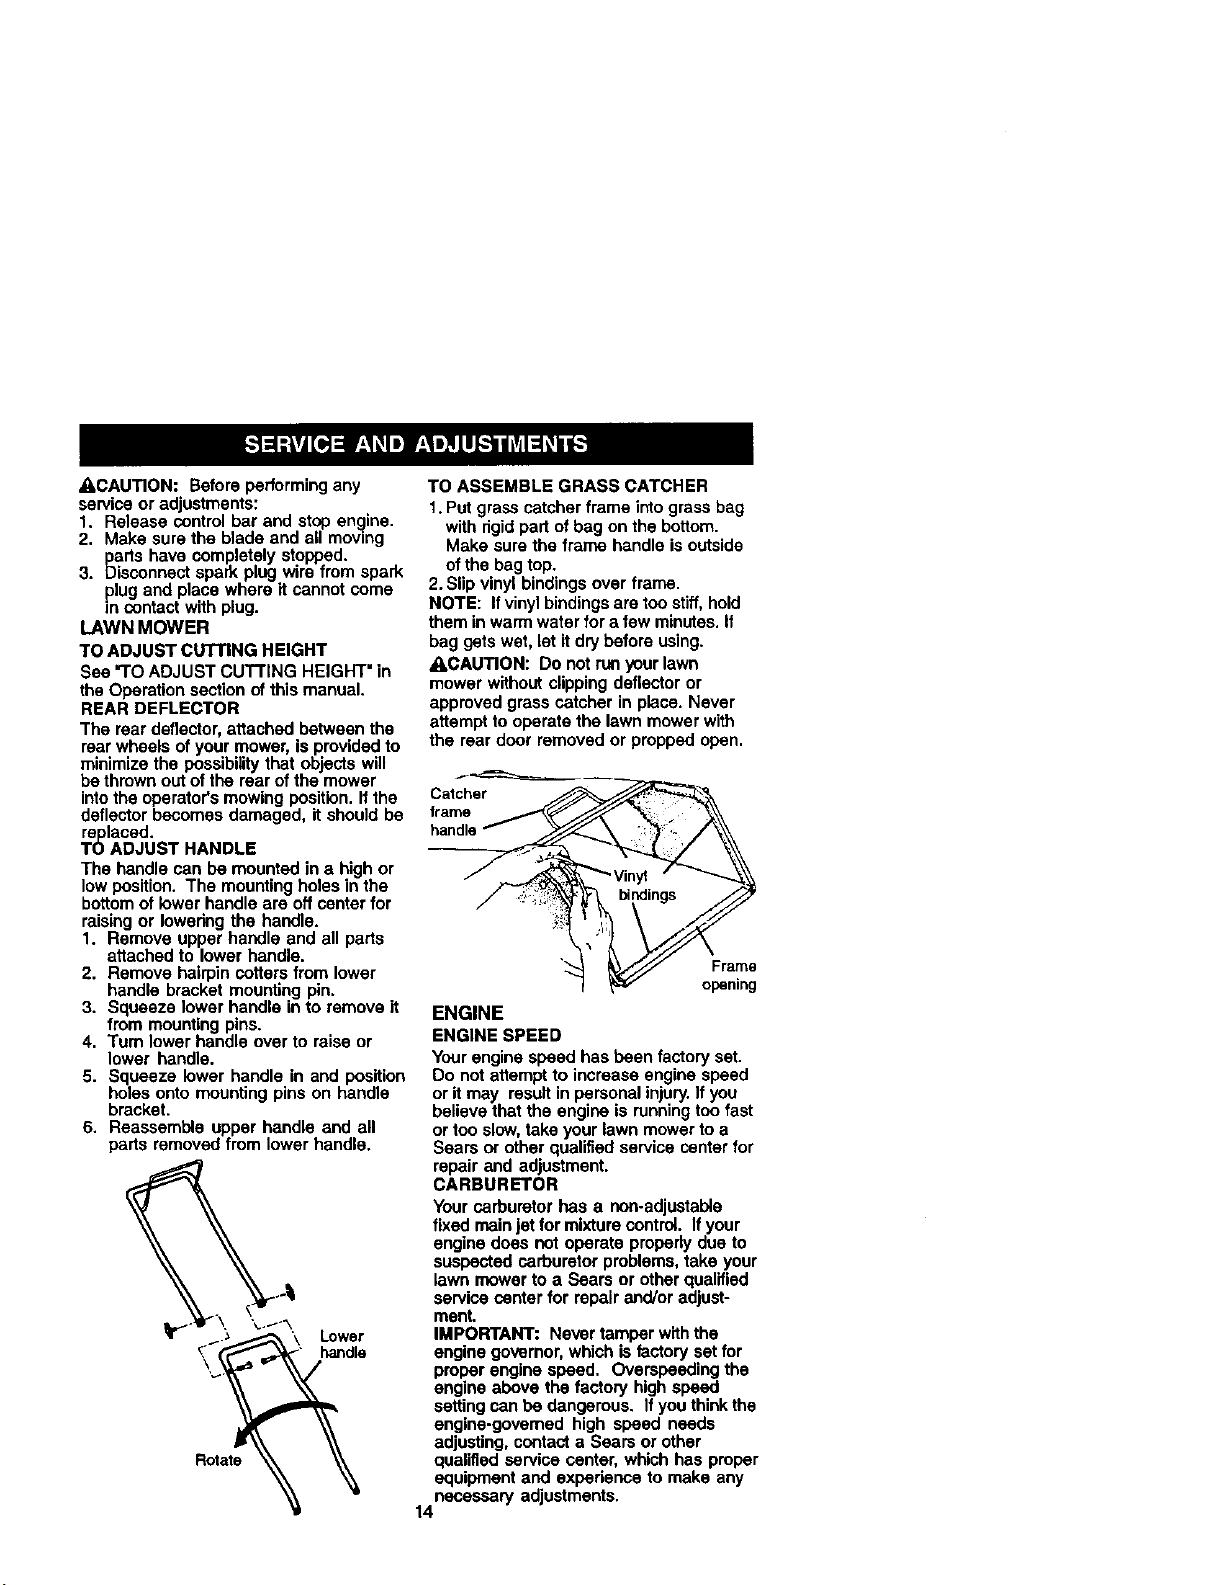
TO ADJUST HANDLE
The handle can be mounted in a high or
low position. The mounting boles in the
bottomof lower handle are off center for
raising or lowering the handle.
1. Remove upper handle and all parts
attached to lower handle.
2. Remove hairpin cotters from lower
handle bracket mounting pin.
3. Squeeze lower handle in to remove it
from mounting pins.
4. Turn lower handle over to raise or
lower handle.
5. Squeeze lower handle in and position
holes onto mounting pins on handle
bracket.
6. Reassemble upper handle and all
parts removed from lower handle.
Lower
handle
Rotate
TO ASSEMBLE GRASS CATCHER
1. Put grass catcher frame into grass bag
with rigidpart ofbag on the bottom.
Make sure the frame handle isoutside
of the bag top.
2. Slip vinyl bindingsover frame.
NOTE: If vinyl bindingsare too stiff, hold
them in warm water for a few minutes. If
bag gets wet, let it dry before using.
ACAUTION: Do not run your lawn
mower without clippingdeflector or
approved grass catcher in place. Never
attempt to operate the lawn mower with
the rear door removed or propped open.
".,_ Frame
ENGINE
ENGINE SPEED
Yourengine speed has been factory set.
Do notattempt to increase engine speed
or it may result in personal injury.If you
believe that the engine is runningtoo fast
or too slow,take your lawn mower to a
Sears or other qualified service center for
repair and adjustment.
CARBURETOR
Your carburetor has a non-adjustable
fixed mainjet for mixture control. If your
engine does not operate properlydue to
suspected carburetor problems, take your
lawn mower to a Sears or other qualified
service center for repair and/or adjust-
ment.
IMPORTANT: Never tamper withthe
engine governor, which is factory set for
proper engine speed. Overspeeding the
engine above the factory highspeed
setting can be dangerous. If you think the
engine-governed high speed needs
adjusting, contacta Sears or other
qualified service center, which has proper
equipment and experience to make any
necessary adjustments.
14
Immediatelyprepareyourlawnmowerfor
storageattheendoftheseasonorifthe
unitwillnotbeusedfor30daysormore.
LAWNMOWER
Whenlawnmoweristobe stored for a
period of time, clean itthoroughly, remove
all dirt, grease, leaves, etc. Store in a
clean, dryarea.
1. Clean entire lawn mower (See
"CLEANING" in the Maintenance
section ofthis manual).
2. Lubricate as shown in the Mainte-
nance section of this manual.
3. Be sure that all nuts, bolts, screws,
and pins are securelyfastened.
Inspect moving partsfor damage,
breakage and wear. Replace if
necessary.
4. Touch up all rested or chipped paint
surfaces; sand lightlybefore painting.
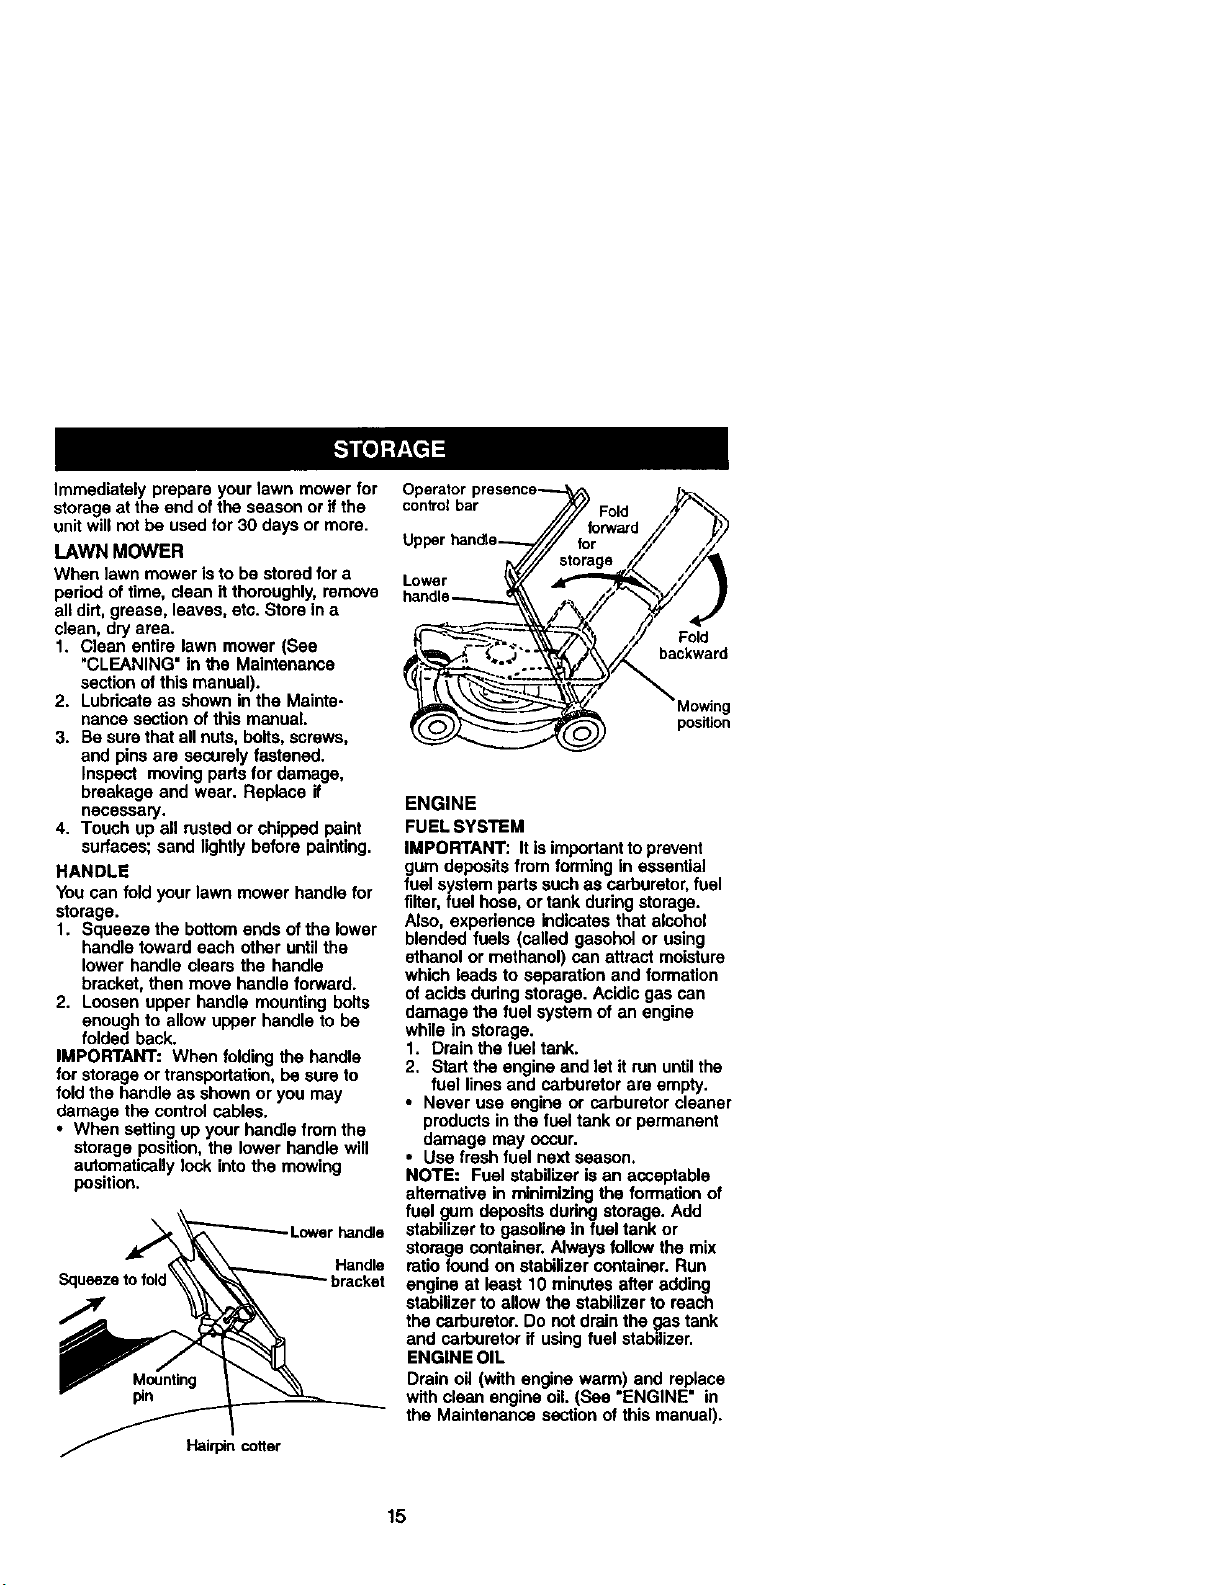
HANDLE
You can fold your lawn mower handle for
storage.
1. Squeeze the bottom ends of the lower
handle toward each other untilthe
lower handle clears the handle
bracket, then move handle forward.
2. Loosen upper handle mounting bolts
enough to allow upper handle to be
folded back.
IMPORTANT: When folding the handle
for storage or transportation,be sure to
foldthe handle as shown or you may
damage the control cables.
• When setting up your handle from the
storage position, the lower handle will
automatically lock intothe mowing
position.
Squeezetofold_
7
Lower handle
Handle
• bracket
Hairpin cotter
Operatorpresence--_ IP_.
controlbar -/)_/ Fold _f_'_
UPPerhandle----7/.,/r// for /_/ /,,_
t_// st°rags J/X/ ,*//'_
ENGINE
FUEL SYSTEM
IMPORTANT: It is importantto prevent
gum deposits from forming In essential
fuel system parts suchas carburetor,fuel
filter,fuel hose, or tank dudng storage.
Also, expeflence Indicates that alcohol
blended fuels (called gasohol or using
ethanol or methanol) can attract moisture
which leads to separation and formation
of acids dudng storage. Acidic gas can
damage the fuel system of an engine
while in storage.
1. Drainthe fuel tank.
2. Start the engine and let it ran untilthe
fuel lines and carburetor are empty.
• Never use engine or carburetor cleaner
products in the fuel tank or permanent
damage may occur.
• Use fresh fuel next season.
NOTE: Fuel stabilizer isan acceptable
alternative in minimizing the formation of
fuel gum deposits during storage. Add
stabilizer to gasoline In fuel tank or
storage container. Always follow the mix
ratio found on stabilizer container. Run
engine at least 10 minutes after adding
stabilizer to allow the stabilizer to reach
the carburetor. Do not drainthe gas tank
and carburetor if using fuel stabli-zer.
ENGINE OIL
Drain oil (with engine warm) and replace
with clean engine oil. (See "ENGINE" in
the Maintenance section of this manual).
15
CYLINDER
1. Remove spark plug.
2. Pour one ounce (29 ml) of oilthrough
spark plug hole into cylinder.
3. Pull starter handle slowly a few times
to distribute oil.
4. Replace with new spark plug.
OTHER
• Do not store gasoline from one season
to another.
• Replace your gasoline can if your can
startsto rust. Rust and/or dirt in your
gasoline will cause problems.
• If possible, store your unit indoors and
cover it to give protectionfrom dust and
dirt.
• Cover your unit with a suitable protec-
tive cover that does not retainmoisture.
Do notuse plastic. Plasticcannot
breathe, which allows condensation to
form end will cause your unitto rust.
IMPORTANT: Never cover mower while
engone and exhaust areas are stillwarm.
• , CAUTION:Never store the lawn mower
with gasoline in the tank inside a building
where fumes may reach an open flame or
spark. Allow the engine to cool before
stodng in any enclosure.
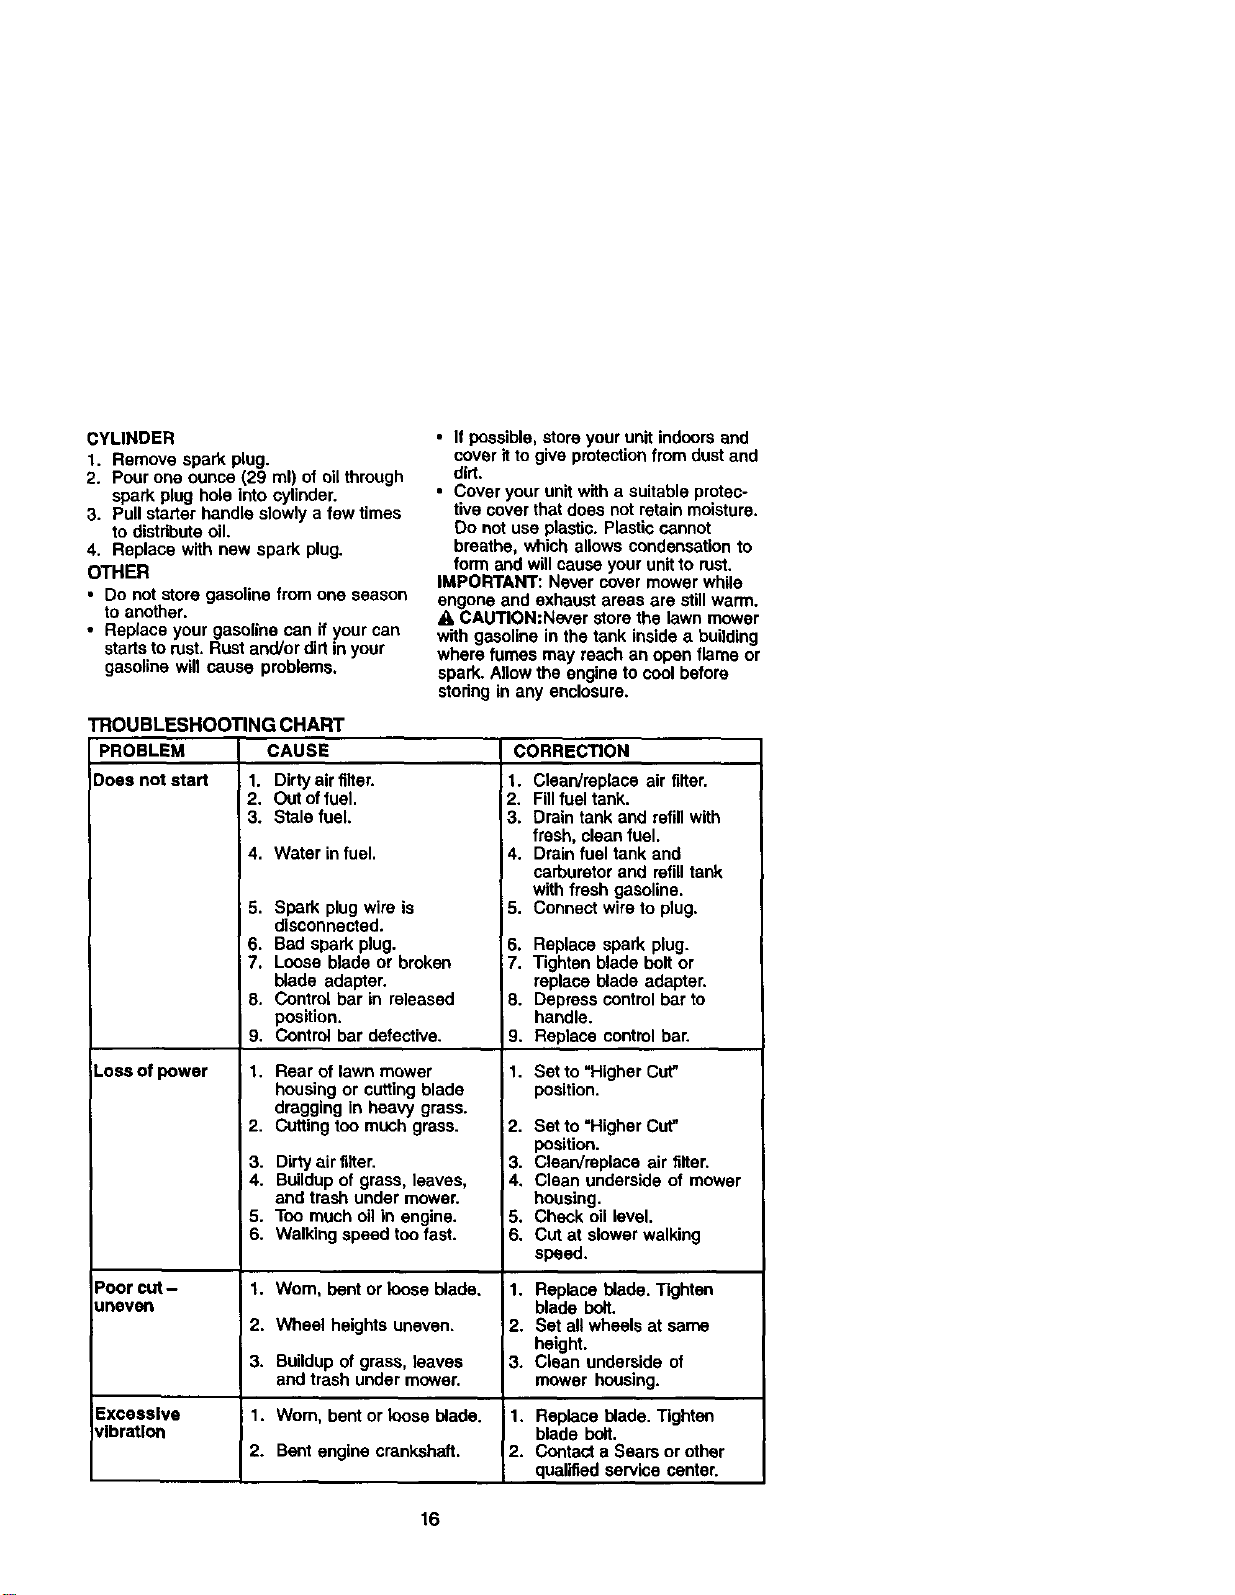
TROUBLESHOOTING CHART
PROBLEM CAUSE
Does not start 1. Dirty air filter.
2. Out of fuel,
3. Stale fuel.
4. Water infuel,
5. Spark plugwire is
disconnected.
6. Bad spark plug.
7. Loose blade or broken
blade adapter.
8. Control bar in released
position.
9. Control bar defective.
Loss of power 1. Rear of lawn mower
housing or cuttingblade
dragging in heavy grass.
2. Cutting ton much grass.
3. Dirty air filter.
4. Buildupof grass, leaves,
and trash under mower.
5. Ton much oil in engine.
6. Walking speed ton fast.
Poor cut- 1. Worn, bent or loose blade.
uneven
2. Wheel heights uneven.
3. Buildupof grass, leaves
and trash under mower.
Excessive ; 1. Wom, bent or loose blade.
ilbratlon
2. Bent engine crankshaft.
CORRECTION
1. Clean/rsplace air filter.
i2. Fill fuel tank.
3. Drain tank and refillwith
fresh, clean fuel.
4. Drainfuel tank and
carburetor and refilltank
with fresh gasoline.
5. Connect wire to plug.
6. Replace spark plug.
7. Tighten blade bolt or
replace blade adapter.
8. Depress control bar to
handle.
9. Replace controlbar.
1. Set to "Higher Cut"
position.
2. Set to "Higher Cut"
position.
3. Clean/replace air filter.
4, Clean underside of mower
housing.
5. Check oil level.
6. Cut at slower walking
speed.
1. Replace blade. Tighten
blade bolt.
2. Set all wheels at same
height.
3. Clean underside of
mower housing.
1. Replace blade. Tighten
blade bolt.
2. Contact a Sears or other
qualified service center.
16
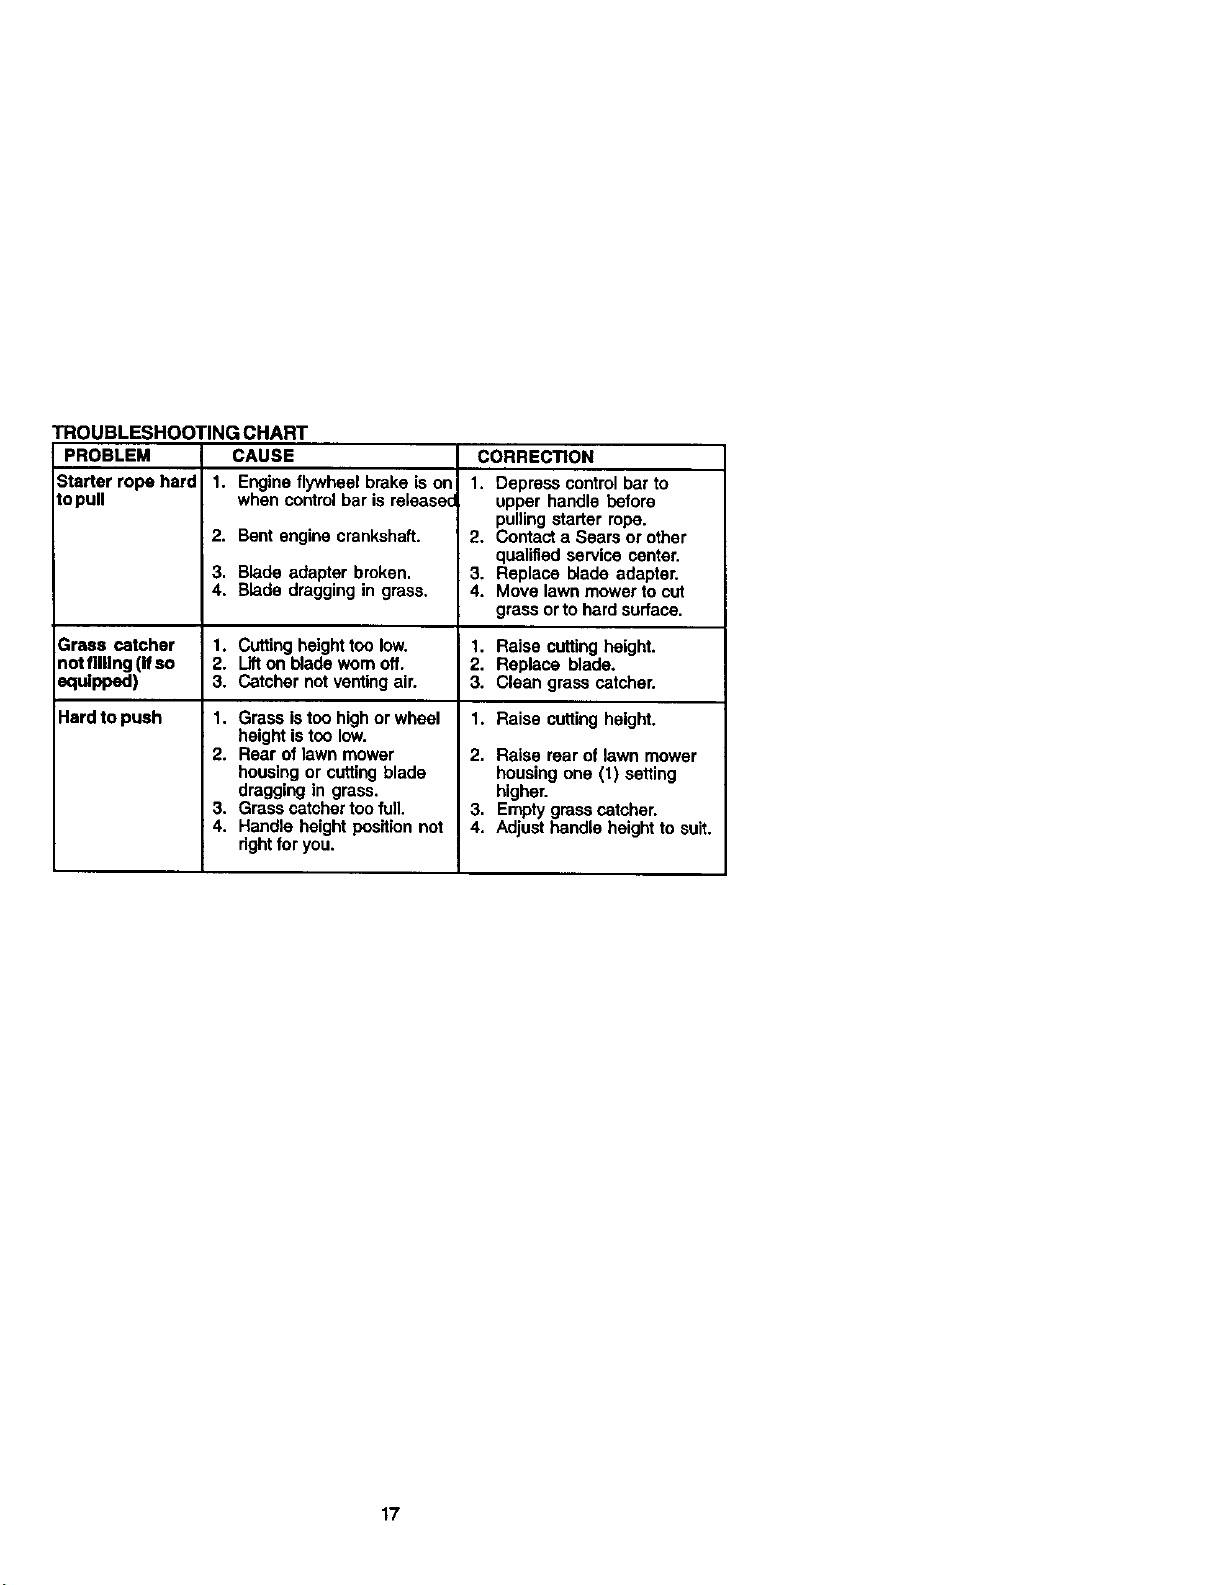
TROUBLESHOOTINGCHART
PROBLEM CAUSE CORRECTION
Starterropehard 1. Engineflywheelbrakeison 1. Depresscontrolbarto
topull whencontrolbarisreleased upperhandlebefore
pullingstarterrope.
2. Bentenginecrankshaft. 2. ContactaSearsorother
qualifiedservicecenter.
3, Blade adapter broken, 3. Replace blade adapter.
4. Blade dragging in grass. 4. Move lawn mower to cut
grass or to hard surface.
Grass catcher 1. Cutting heightton low. 1. Raise cutting height.
notf|lllng(Ifso 2. Lifton blade wom off. 2. Replace blade.
equipped) 3. Catcher notventing air. 3. Clean grass catcher.
Hard to push 1. Raise cutting height.1. Grass istoo highor wheel
height is ton low.
2. Rear of lawn mower
housing or cuttingblade
dragging in grass.
3. Grass catcher too full.
4. Handle height position not
dght for you.
2. Raise rear of lawn mower
housing one (t) setting
higher.
3, Empty grass catcher.
4. Adjust handle height to suit.
17
Garantfa ............................................... 18
Reglas de Segudded ..................... 16-20
Montaje ................................................ 21
Operacibn ....................................... 22-25
Mantenimlento ..................................... 26
Prograrna de Mantenimiento .......... 26-29
Especificaciones de1 Producto............ 27
Servicio y Adjustes .............................. 30
Almacenamiento ............................ 31-32
Identificack_nde problemas ........... 32-33
Partes de repuesto ........... Vea el manual
ingl6sdel due_o
Orden de Partes .................... Contratapa
GARANTIA LIMITADA DE DOS A_IOS PARA LA SEGADORA A MOTOR CRAFTSMAN
Pordos (2) aSos, a partir de la fecha de compra, cuando esta Segadora Craftsman se
mantenga, lubrique y afine seg,',n las ins_ruccionespare la operaclon y el mantenimiento en el
manual del dueho, Seamsreparar_ grafts todo detecto en el mateiial y la mano de obra.
SI la Segadora Craftsman se usa para fines comerciales o de ardendo, esta garantla s6lo se
aptica por noventa (90) dlas a partir de la fecha de compra.
Esta Garant{a no cubre:
• Arliculos que se desgastan durante el uso normal tales como las cuchillas segadoras
rotatorias, los adaptadores de la cuchilla, las correas, los fiifros de aimsy las bujlas.
• Repamclones necesadas debido al abuso o a la negligencia del opemdor, locluydrldose a los
cigOeSalesdoblados y a la falta de mantenimiento del equipo segOn las instrucciones que se
incluyen en el manual del due,_o.
EL BERVICIO DE GARANT{A ESTA DISPONIBLE al devolvar la segadora a motor Craftsrnan al
Centro/Departmento de Serviclo Sears mas cercano en los Estados Unidos. Esta garantia se
aplica solamente mientras el producto este en uso en _os Estados Unidos.
Esta Garantia Is otorga derechos legales especificos, y puede que tambidn tenga o_'os
darechos q_ var|an de estado a estado.
SEARS, ROEBUCK AND CO., D/817WA, HOFFMAN ESTATES, IL 60179 USA
IMPORTANTE: Esta maquina cortadaora es capaz de amputar las manos y los manos y los
pies y de lanzar objetos. Si no se observan las instrucclones de seguddad siguientes se pueden
producir lesiones graves o la muerte.
I. OPERACION
• Antes de empezar, debe famiUar_zarse
completarnente con los controles y el uso
correclo de la maquina. Para esto, dede leer
y comprender todas las lostrucciones que
aparecen en la maquina y en los manueles
de opemcibn.
• No ponga las mar,o_ o k_ pies cerca o
debajo de las partes rotatodas. Mant6ngase
siempre lejos de la abertum de la descarga.
• Perndla que solamente las personas
responsables que est_n _amiliadzadas con
las instrucdones opemn la mdquina.
• Despeje el _ea de objetos tales como
piedras, juguetes, alambres, huesos, palos,
etc. que pueden ser recogid_ y lanzados
por las cuchillas.
• Aseg0rese que el drea no se hallen
personas, antes de segar. Pare la mdquina
si algulen entra en el drea.
• No opera la maquina sin zapatos o con
sandellas abiertas. Pdegase alempre
zapatos sblidos,
• No tire de la segadora hacia atrds a menos
que sea absotutamente necesarlo. Mire
siempre hacia aba_oy hacia detr_s antes y
mientras que se rnueve hacia at_s.
• No opere la segadora sin los respectivos
resguard_, las placas, el recogedor de
c&sped u otros aditamentos dise ados para
su pmteccibn y segudded.
• Refi6rase a las Instrucciones del fabdcante
para el fut_lonamiento e instelack_nde
accesorios, Use 0nicamente accesorios
aprobados por el fabdcante.
• Detonga la cuchilla o las cuchilLascuando
cruce por celzadas, calles o camloos de
grava.
• Parar el motor cada vez que se abandona
el aparato, antes de limpiar la segadora o de
remover residuos del tubo,
• Apagar el motor y espemr h_sta que las
cuchillas est6n comspletamenteparades
antes de remover el receptor de hierba.
• Segar solarnente con loz del dla o con una
buena luz artificial.
18

• No opera la mdquina bajo la influencia del
alcohol o de las drogas.
• Nunca olire la maquina cuando la hierba
est6 roojada. Aseg0rese siempre de tener
buena tracci_ an sus pies; mantenga el
mango firmernente y carnine; nunca corm.
• Desconectar el mecanismo de pmpulsic_n
aut6noma o el ernbmgue de tmnsroisibn en
las segadoras qua to tienen antes de poner
en roarcha el rootor.
• Si el equili empezam a vibmr de una
manera anormal, pare el motor y revise de
inrnediato para ave{iguar la causa.
Generalroente la vibmci(Ynsusie indicar que
exists alguna averla.
• Sieropre use gabs de seguridad o anteojos
con protecok_nlateral cuando opera la
segadora.
II. OPERACION SOBRE LAS CUESTAS
Los accidentes ocurren con n_s frecuencia
en las cueslas. Estos acoidentes ocurren
debldo a resbatadas o caidas, las cuales
pueden resultar en graves lesiones. Olirar ta
recortadom en cuestas requiere mayor
concentracibn. Si se siente inseguro en una
cu_sta, no Ja recorte.
HACER:
• Puede recortar a tmv6s de la superticie de
la cuesta, nunca hacia arriba y hacia abajo.
Proceda con extrerna precauci6n cuande
carnbie de direcci6n en las cuestas.
• Renueva todos los objetos extmSos, 1ales
corno guijarros, ramas, etc.
• Debe prestar atenoi6n a hoyos, bachss o
pmtuborancias. Recuerde qua la hierba aha
puede esconder obstdculos.
NO HACER:
• No recorte cerca de pendientes, zanjas o
tenaplenes. El olirador puede perder la
traccibn en los pies o el equilibrio.
• No recorte cuestas demasiado inclinadas.
• No recorte en hierba mojada. I.a reduccibn
en la tracci(_nde la pisada puede causar
resbalones.
Ill.NIl;lOS
Se bueden producir accidentes tr_gicos si el
olirador no presta atencibn a la presencia de
los nifios. A menudo, los ni_os se sienten
atmfdos pot la mdquina y por la actividad de la
siega. Nunca suponga que los ni_os van a
permanecer en el roismo logar donde los vlo
p_ 01tiroavez.
• Mantenga a los nitrosalejados del drea de la
siega y bajo el cuidade estrinto de otto
persona aduha responsable.
• Est6 alerta y apague la n_quina si hay nirx)s
qua entran al _ea.
• Antes y cuando este retrocedlondo, rnim
hacia atrds y hacla abajo para verificar si
hay ni5os lique_os.
• Nunca perroita qua los nifios operen la
mdquina.
• Tenga un cuidado extra cuando se acorque
a esquinas donde no hay visibilidad, a los
arbuslos, _,rboles u otros objetos qua
pueden interferir con su llnea de visibn.
IV. SERVICIO
• Tenga cuidado e0dmal manejar ta gasolina
y los derods combustibles. Son inflamables
y tos gases son exploalvos.
- Use solamente un envase aprobado.
- Nunca remueva ta tall del deposito de
gasolina o agregue combustible con el
motor bnclonando, perndta qua el motor
se enfrle antes de volver a pone
combustible. No fume,
- Nunca vualva a porter combustible en la
m_qu_na an recintos cerrados.
. Nunca alroacene la ro_quina o el envase
dal combustible dentro de algdn logar an
donde haya una llama expuesta, tal como
la del calentador de agua.
• Nunca haga funcionar una m_quina dentro
de un drea cerrada.
• Nunca haga ajustes o reparaclones
roientras el motor estd en marcha.
Desconecte el cable de la bujla, y
mant6ngalo a cierta distancia de 6sta para
prevenir un arranque accidental.
• Mantenga las tuercas y los limos,
esliclalmente los limos del acoesorio de
la cuchilla, apretados y mantenga el equipo
en buenas condiciones.
• Nunca manipule de forma indebida los
dispositivos de seguridad. Controls
regularmente su funclonaroiento correcto.
• Mantenga la mdquina libra de hierba, hojas
u otras acuroulacloues de deslirdJclo.
Limpie los derrarnes de aceite o combus-
tible. Permita qua la rndqalna se enfrfe antes
de almacenada.
• Pare e insliccione el equipo si le liga a un
objeto. Repdrelo, si es necesado, antes de
hacedo arrancar.
• En ningt_ncaso hay qua regular la altura de
las ruedas mientras el motor est_ en
marcha.
• LOScomponentes del receptor de la blerba
van su_etosa desgasle, daSos y detedoro,
que pueden exliner las partes en
moviroiento o perr_tir que objetos sean
disparados. Contmlar trecuentemente y
cuando sea necesado sustituir con lirtes
aconsejadas por el fabricante.
• Las cuchillas de la segadora estdn afiladas
y pueden corlar. Cubrir las hojas o Ilevar
guantes, y utilizar precauciones especiales
cua_o se etectda mantenimiento sobm las
misroas.
• No cambie al ajuste dei regulador del motor
ni exceda su velocidad.
19

nes seg p_u_da. -
IIIATENCIC_)N!fllliESTE ALERTOffl SU
SEGURIDAD ESTA COMPROMETIDA.
_PRECAUCI(_I_: Siernpredesconecte *d
alamtxede la bujlay Ix_galo dondenopueda
enf_ _ contaclocon labujfa, para evitarel
arranopepot aocidente,_e h Ixeparack_, el
_nsp_te, el ajusteo cuandose hacen
repamciones.
,_M_VERTENCIA: B tt_o de escape delmotor,
;_j,n_ de sus constituyentesy algunos
compone_tesdel vehlcdo c_ttenen o
desprendenproductoscrJlmlcosconoddos sn el
EsJadocle CaLiforr_acornocausa de cdncery
defectosal nacimientou otros
reproductivos.
_b, DVERTENClA: Losbomes, terrdnales y
_v:cesodos relaWosde la bater_ _ plomo
o compuestosde ptomo,productosqui_
corxxidosen el Estadode Californiaccmo causa
de cdncery defectosal nacimientou ovos da,5os
reproductvos.Lava" las rnanos despuds de
manlpularlos.
_PRECAUC_N: El silenciador y otras piezas
del motor Ilegan a set extrernadarnente
c_lientes durante la opemci6n y siguen siendo
calientes despues de que el motor haya
parado. Para evitar quemaduras severas,
permanezca lejos de estas _eas.
Estosaccesonoseslab_ d_ cu_v_ se produjola segadom. No son fadlltados junto al
€ortacesped. Estdnd_les en la mayodade las_endas de Sears yen loscentms de selvicio.L_
rn_yodadelast_endasSeatstambidnpuede_ rnandarapedir partesde repuestopamusted, siles
pmpomionael n_-nem del modelode su segadora.Algunosde estosaccesodostalvez no se a_q_n a
susegad_a,
RENDIMIENTODE LA SEGADORA
DESVIADOR DE RECORTES
PARA SEGADORAS CON OESCARGA TRASERA
REOOREGOR
pAPA
SEGADORAS
CON DESCARGA
TRASERA
JUEOOS PARA LA ACOLCHADORA
RECOREDOR
PARA
SEGADO_AS
CON OESCARGA
LATERAL
ESTABIUZADORES
ENV_
liE O_!.._A
MANTENIMIENTO DE LA SEGADORA
SlLENClACORES
CORREAS CUCHILLA8
FILTROS DE AIRE
OE CUCHILLA RUEDAS
BU4(AS
ACUTE
DEL MOTOR
20
Lea estas instruccionesy el manual
completamente antes de tratar de montar u
oparar su segadora nueva.
IMPORTANTE: ESTE CORTACESPED VIENE
SIN ACEITE O GASOLINA EN EL MOTOR.
Su segadom nueva ha sido rnontada en la
fbbdca con la excepcibn de aqueltas partes
que se dejaron sin montar par razones de
envio. Todas las partes como las tuercas, las
arandelas, los pamos, etc., que son
necesadas pare comp_etarel montaje ban eldo
colcoadas an la bolsa de partes. Pare
asegurarse que su segadom funcione en
forma segom y adecuade, todas las partes y
los atllculos de ferreteda que se monten
tienen clue ser apretados segummente. Use
las herrarnientas correctas, corno sea
necesado, para asegurar que se aprleten
adecuadamenle.
PARA REMOVER LA SEGADORA DE
LA CAJA DE CART6N
1. Rernueva las partes sueltas que se
incluyen con la segadom.
2. Corte las dos esquinas de los extremos de
la caja de cartbn y tienda el panel del
extremo piano.
3. Remueva todo el materiel de empaque,
excepto la cu_a entre el mango superior y
_,1inferior,y la cuSa que sujnta la barra de
los control que exige la presencia del
opemdor junto con el mango superior.
4. Haga rodar la segadora hacia afuem de la
caja de cartdn y revfsela cuidadosamente
para verificar si todavia quedan partes
sueltas adicioneles.
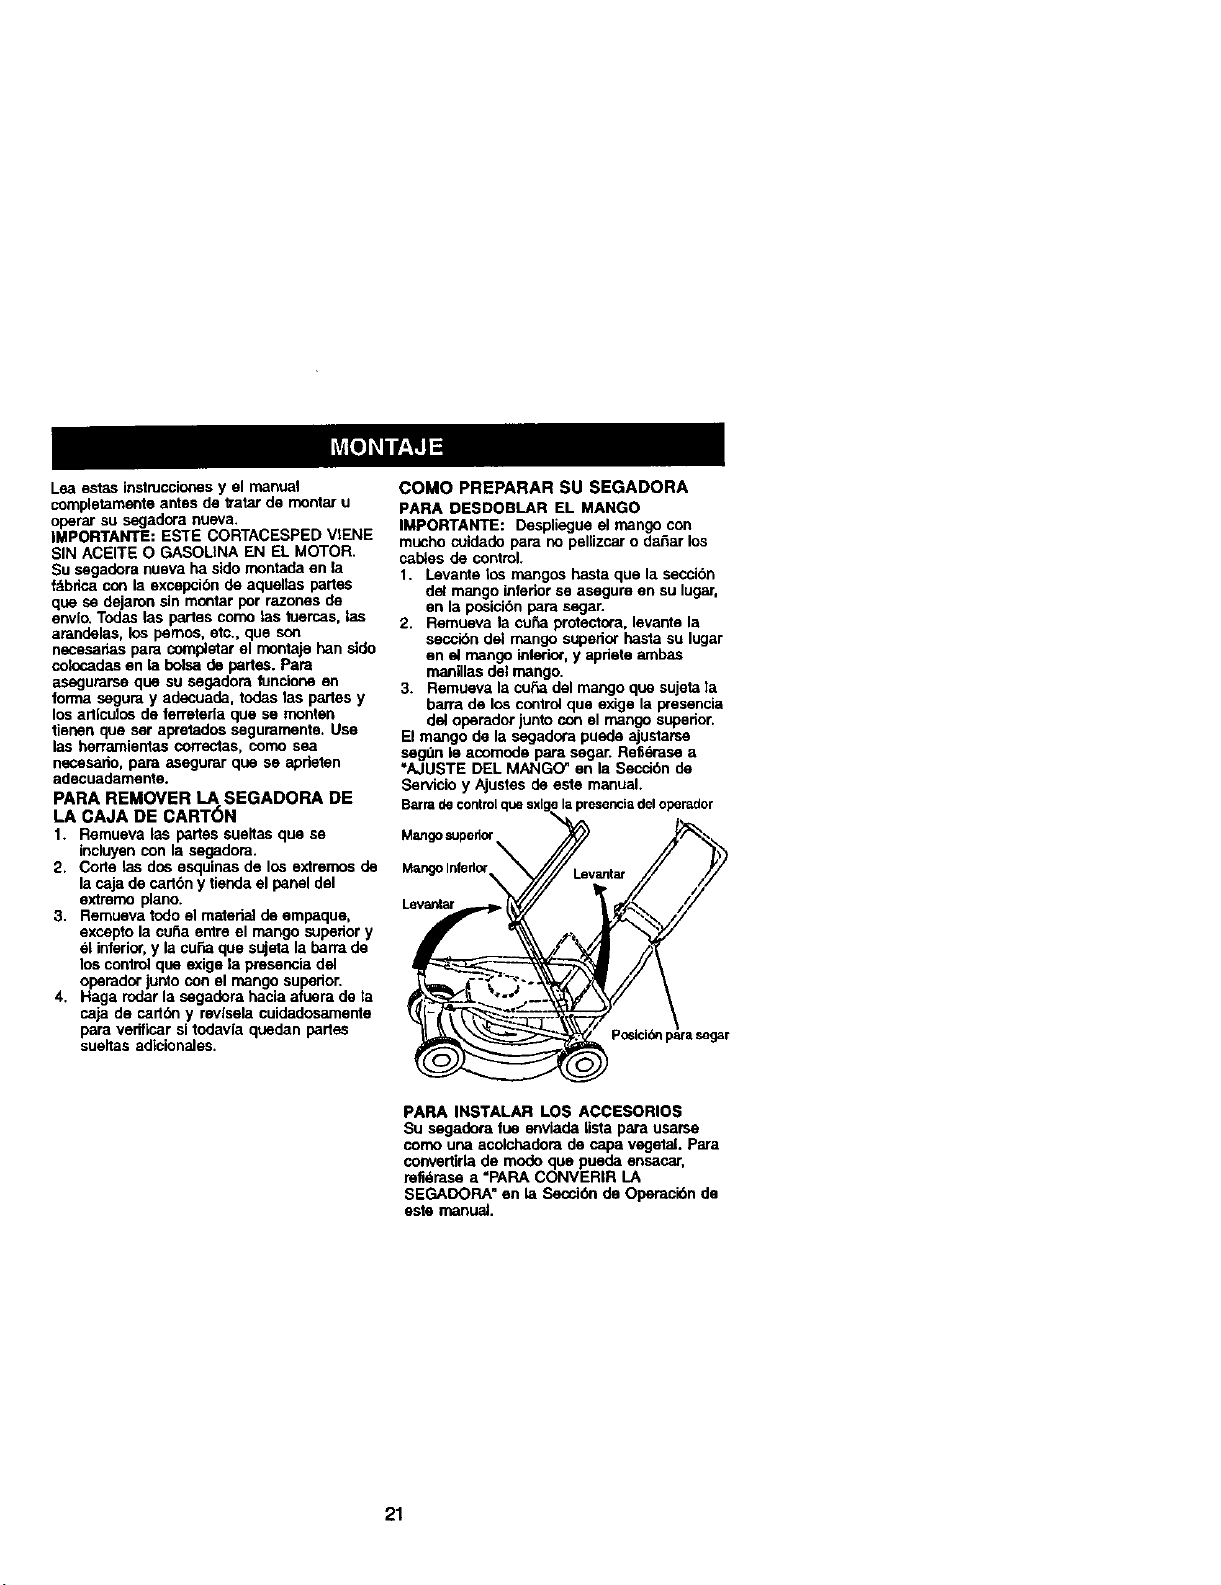
COMO PREPARAR SU SEGADORA
PARA DESDOBLAR EL MANGO
IMPORTANTE: Despliegue el mango con
mucho cuidado para no pellizcar o da_ar los
cables de control.
1. Levante los mangos hasta que la seccibn
dol mango inferiorse asegure en su lugar.
en la posicibn para segar.
2. Remueva la cuba protentora, levante la
secci6n del mango superior hasta su lugar
en el mango inlerior, y apdete ambas
manillas del mango.
3. Remueva la cu6a del mango que sujeta la
barra de los control que exige la presencla
del oparador junto con el mango superior.
El mango de la segadora puede ajustarse
segdn le acomode para segar. Refl_ase a
=AJUSTE DEL MANGO _en la Secci6n de
Servicio y Ajustes de este manual.
Barradecontrol,quesxigela pr_se_la delopemdor
Mangosupedo_ _."p
MangoInfedor Levantar /
Levantar //
Poslddnp_a segar-"_ -------"-'-
PARA INSTALAR LOS ACCESORIOS
Su segadora fue enviada Usta para usarse
como una acolchadom de capa vegetal, para
convertirla de mode que pueda ensacar,
refidmse a =PAPA CONVERIR LA
SEGADOPA" en la Seodbrt de Operac_n de
este manuel,
21

FAMILIARICESECONSUSEGADORA
LEAESTE MANUAL DEL DUENO Y LAS REGLAS DE SEGURIDAD ANTES DE OPARAR SU
SEGADOP_ Compare las il_ cor_su segadorapare farnilianzameconla ubicack_ de los
drversosoon'rolesy ajustes, Guarde es'_e_ para referenda en el futuro,
Estos sl'mbolos pueden apareser sobre su secJadora o en la Ilteratura proporclonada con
el producto. Aprenda y comprenda sus slgnlfleados.
ATTENCI_N 0 MOTOR MOTOR R._o_EX_ LENTO ESTRANGU COM- AGEITE PELfGRO, GUARDE LAS
_rIVf:_TFN_IA _l_V_Nr!!_r3 ApA_.rlt_ IAt_I_IN RIt_TIRIF _I_.N(3_VI_plP_I_t_
qlue exige la presencia del operador
Co_n lur_ador
Tapa del deposlto de la gasollna
Fillro de aim
Cebador
Tapa det deposito de aclete del
motor con varllla fndicadem de nivel
Silenciador
AJL,=_taderdelarueda
(oncadarueda)
IMPORTANTE: Este cortacdsped viene
SIN ACEITE O GASOLINA en el motor.
CUMPLE CON LOS REQUISITOS DE SEGURIDAD DE LA CPSC
I.as segadoms a motor, que se conducen desde haparte de arras, rotatodas, Sears, curnple_
con los est_ndaras de seguddad del American National Standards Institute y de la U.S. Con-
surner Product Safety Commission. La cuchilla gira cuando el motor estA funcionando.
Barra de €ontrol que exlge la pmsencla del
operador, tlene que sujetarse abajo, junto
con el mango, pard hacer anancar el motor.
Su61telapara parar el motor.
Corddn arrancador- se usa para hacer
arrancar el motor.
Cebador - bombea combustible adicional
desde el carbumdor at cilindro para uso
cuando se necesita hacer arrancar un motor
fdo.
22
La opemci_ de cualquier
segadora puede hacer que
satten objetos extraRos dentro
de sus ojc_s,lo que puede
producir da_os graves en dstos.
Siempre use anteojos de seguddad o
protecc_6n para los ojos mientras opera su
segadora o cuando haga ajustes o
repai_clones. Recomendamos una mascara
de seguddad de visibn amplia, pare uso
espejuelos o anteojos de segur_dad
estandarte.
COMO USAR SU SEGADORA
VELOCIDAD DEL MOTOR
La velocidad del motor se estableci6 en la
fdbdca para un rendimiento 6ptimo. La
velocidad no se puede ajustar.
CONTROL DE ZONA DEL MOTOR
_PRECAUCI(_N: Las regulaclones fedemles
ex_genque se instele un control para el motor
en esta segadora para reducir a u_ mlnimo el
riesgo de leslonarse debido el contacto con la
cuchill_L Por ningdn motivo irate de eliminar la
funci6n del controldel operador. La cuchilla
gira cuando el motor estd funclonando.
• Su segadora viene equipada con una barra
de controles que exigen la presencia del
operador, lo que requiere que el operador
est6 detrds del mango de la sngadora para
haceda arrancar y operada.
PARA AJUSTAR LA ALTURA DE
CORTE
Levante las ruedas para el corte bajo y baJe
las ruedas para el corte alto., ajuste la altura
de corte pare que se acomode a su_
requieltos. La posici6n del medlo es la mejor
para la mayorla de los c_spedes.
• PaPacambiar la altura de corte, empuje la
pelanca del ajustader hacia la ruede. Mueva
la nJeda hacia ardba o hacla abajo de modo
que se acomode a sus requisitos.
Asegdrese que todas las ruedas queden
igualmente ajustades.
AVISO: El ajustador esta correctamente
colocado cuande las orejas de la placa estdn
insertadas en el agujero del mango. Tambh_n,
los ajustes de 9 posiciones (si equipado)
permiten que el mango puede ser movido
entre las orejas de la placa.
Parauncodealto,baje las ruedas OmJasde _
la placa
Para uncodebajo,levantelasruedas Mango
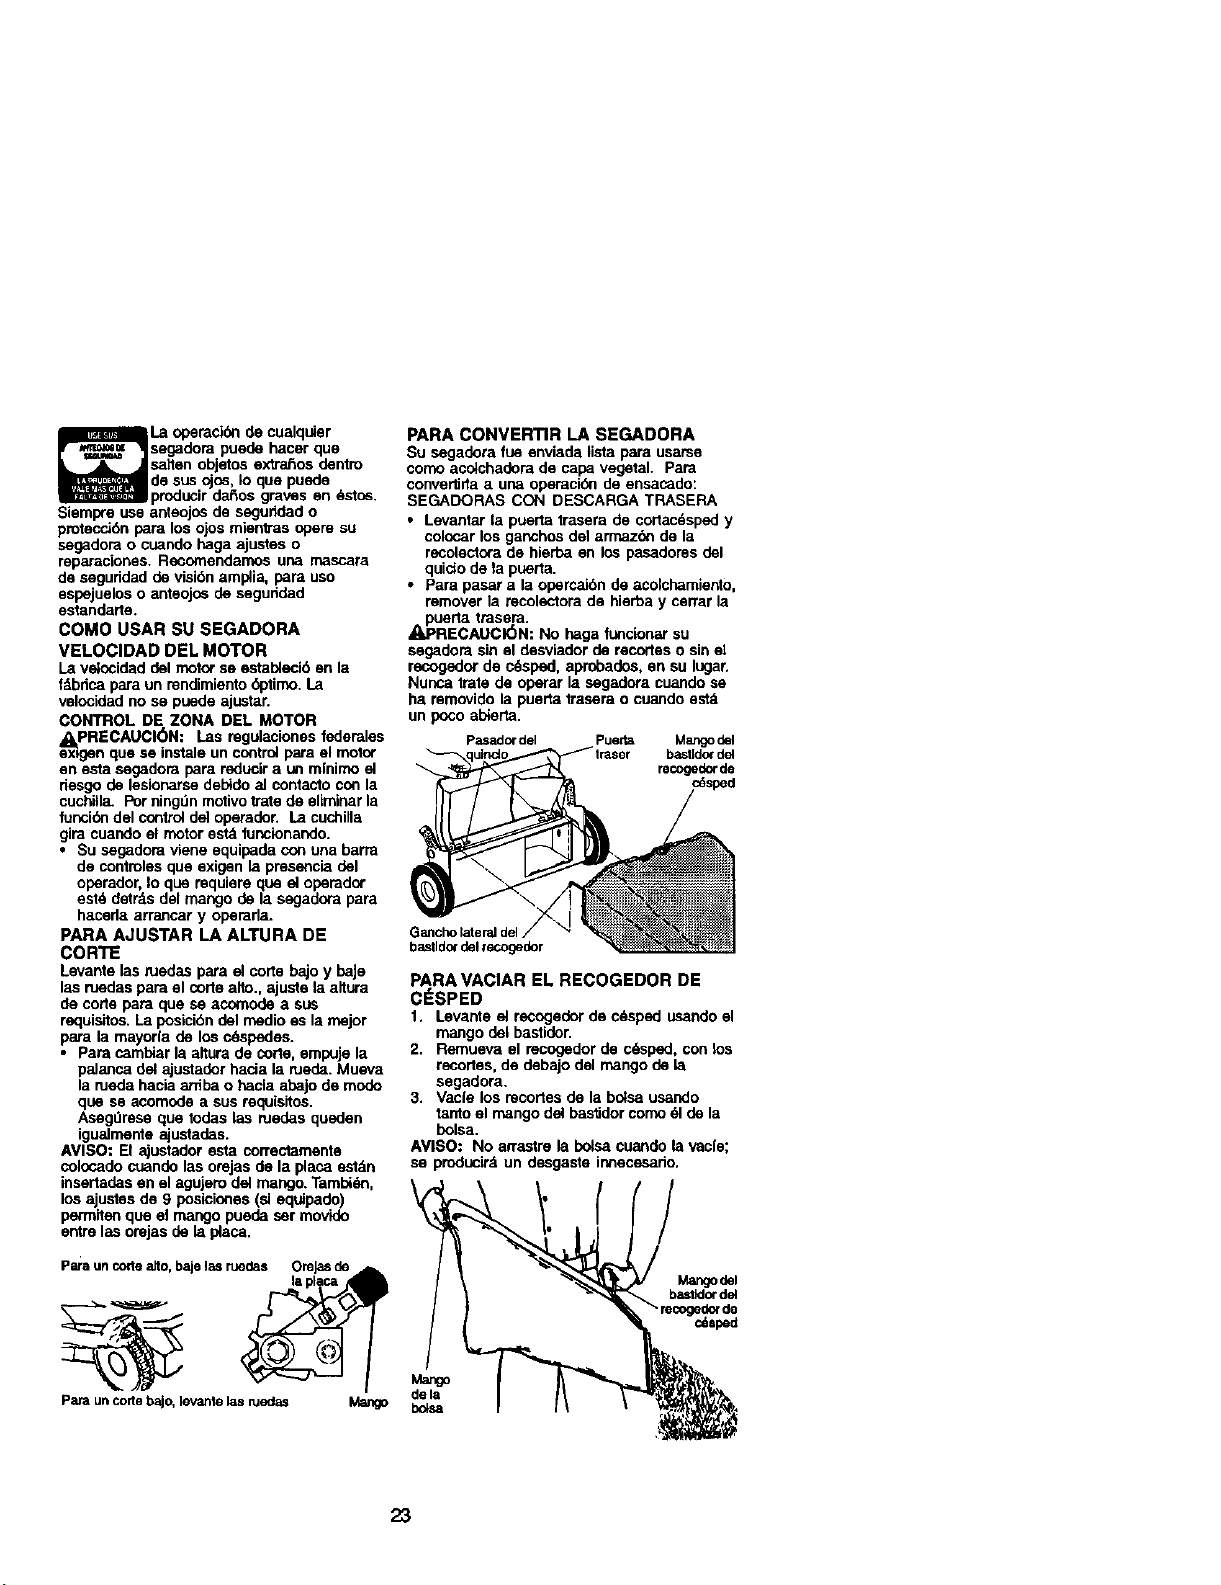
PARA CONVERTIR LA SEGADORA
Su segadora fue enviada lista para usarse
como acolchadora de capa vegetal. Para
convertide a una opemcide de ensacado:
SEGADORAS CON DESCARGA TRASERA
• Levantar la puerta trasem de cortacdspsd y
colocar los ganchos del armaz_ de la
recolectora de hierba en los pasadores del
quicio de la puerta.
• Para pasar a la opercai6n de acolchamiento,
remover la recolectora de hierba y cerrar la
puerta trasera.
_RECAUCI_N: No haga funclor_r su
segadora sin el desviador de recortes o sin el
recogedor de cdsped, aprobados, en su lugar.
Nunca tmte de operar la seg_lora cuande se
ha removido la puerta trasera o cuando estd
un poco ab_erta.
Pasadordel Puerta Mangodel
bast_do¢del
recogedorde
baslldm del recogedor
PARA VACIAR EL RECOGEDOR DE
ClaSPED
1. Levante el recogedor de c_sped usando el
mango del bas_idor.
2. Remueva el recogedor de c_spsd, con los
recortes, de debajo del mango de la
segadora.
3. Vacle los recortes de la belsa usando
tanto el mango del baslJdorcomo el de la
bolsa.
AVISO: No arrastre la bolsa cuando la vacie;
se producird un desgaste innecesado,
(
M_'_JOdel
bastldor del
recogedor de
cdsped
Mango
dela
boLsa
23
ANTES DE HACER ARRANCAR EL
MOTOR
AGREGUE ACEITE
Su segadom rue enviada sin aceite en el
motor. El motor puede contener 20 oz. de
aceite, para el tipa y la calidad yea "MOTOR"
en la secci6n de tas Mantenimento en este
manual.
1. AsegLlreseque ta segadora est6 nivelada
y que el drea alrededo_del depbsito de
ace_teest_ Utopia.
2. Remueva ta tBpa del depbsito de aceite del
motor y mllene hasta la IInea de Uenoen
dsta. Vacie el aceite lentamente. No lo llene
demasiado.
AVI$O: Permita que el aceite se aciente bien
en el motor para una leclura exaota. Para leer
el nival apropiado, apdete la tapa del relleno
del aceite de motor, remuevala para leer la
varille medidora del aceite.
3. Vuelva a instalar la tapa del depSsito del
ace'rley apridtela.
• Revise et nivel del acelte antes de cada uso.
Agregue aceite el es necesado. Llene hasta
la lloea de Ileno en la varilla indicadora de
niveL
• Camble el aceite despu_s de 25 horas de
operaci6n o una vez par temporada. Puede
necesitar camblar el acelte rnds a menudo
cuando las condlolones son polvorosas o
sucias.
AGREGUE GASOLINA
• Llene el estanque de combustible. Use
gasolina regular, sin plomo, nueva y limpia
con el mlnimo de 87 octanos. (El uso de
gasolina con plomo aurnentar_ los
depdeitos de bxido de plorno y carbonoy se
reducird la dumci_n de la vdlvula). No
mezcle el aceite con la gasolloa, para
asegumr que la gasotina utilizada sea
fresca compre estanques los cuales
puedan set utilizados durante los primeros
30 dlas.
_=ADVERTENCIA:La expedencia ha indicado
que los combustibles mezelades con alcohol
(conocidos como gasohol, o el uso de etanot o
metanel) pueden atraer la humeded, la que
conduce a la separaelbn y formaci6n de
dcidos dumnte el elmacenamlento. La gaselina
acidica puede daSar el sistema del combus-
tible de un motor derante el almacenamiento.
Pare evitar los problemas con el motor, se
debe vaciar el alstema del combustible antes
de guardado par un pedodo de 30 dias o m_ts.
Vade el estanque del combustible, haga
arrancar el motor y hdgalo funcionar hasta
que las llneas del combustible y el carburader
queden vaclos. La pr6xima temporada use
combustible nuevo. Vea les instnJcclones pare
El Alrnacenamlento para rods inforrnacibn.
Nunca use productos de limpieza para el
motor o pare el carburador en el estandue del
combustible pues se pueden producir dat3os
I_ermanentes.
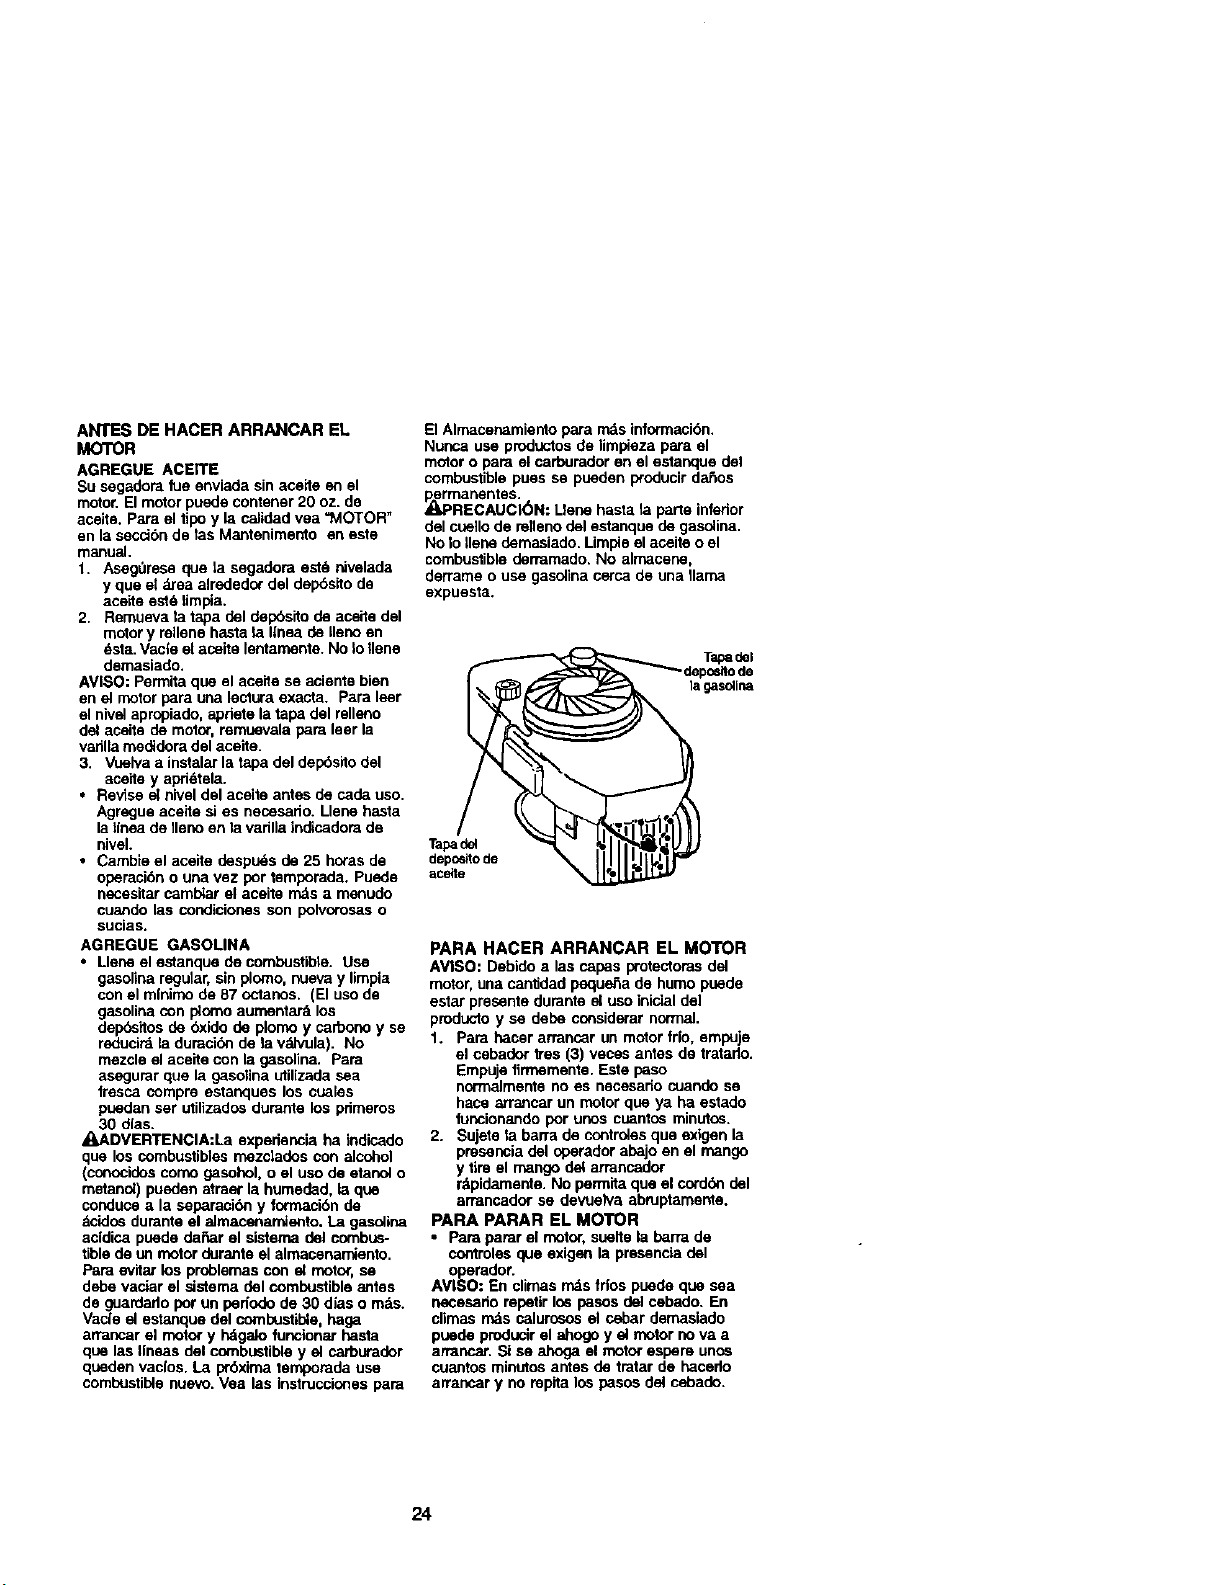
_PRECAUCI(SN: Llene hasta la pane inferior
del cuellode rellenodel estanque de gaselina.
No Io Uenedemasiado. Limpie el acelte o el
combuelible dermmado. No alrnacene,
derrame o use gaselina cerca de una llama
expuesta.
lagas_ina
Tapadd
depc_ttode
PARA HACER ARRANCAR EL MOTOR
AVISO: Debido a las capas proteotorasdel
motor, una canlidad paque_a de humo puede
estar presents dumnte el uso loicial del
pmducto y se debe considerar normal.
1. para hacer arrancar un motor frio, empaje
el cebador lres (3) veces antes de tratado.
Empuje firmemente. Este paso
norrnalmente no es necesario cuande se
hace arrancar un motor que ya ha estado
funclonando por unos cuantos minutos.
2. Sujete la barra de contreles que exigen la
presencia del operador apajo en el mango
y tim el mango del arrancador
r_tpidamente.No parmita que el cordbn del
armncador se devuelva abmptamente.
PARA PARAR EL MOTOR
• Pare parer el motor, suelte la barra de
co_troles que exigen la presenela del
A or der
: En climes rn_s frios puede que sea
necesario repatir los pasos del cebado. En
climas rnds calurosos el cebar demasiado
puede producir el ahogo y el motor nova a
arrancar. Si se ahoga el motor espare unos
cuantos minntos antes de tratar de hacedo
arranoar y no mpita los pasos del cebado.
24
CONSEJOS PARA SEGAR
• Bajo ciertas condiclones, tal corno c_sped
muy a_to,puede set necesario el elevar la
altura del corte pard reducir el esfuerzo
necesado para empujar la ssgadora y para
evitar sobrecargar el motor, dejando
montones de recortes de cdsped, puede
qua sea necesado reducir la velocided del
recorrido y/o haga funcionar la segadora
sobre el _rea per segunda vez,
• Para un corte muy pesado, reduzca el
ancho del corte pasando parcialmente pot
encima del lugar antedormente cortado y
siegue lentamente.
• Para un major ensacado del cdsped y peru
la rnayoda de las condiclones de coma, la
velocidad del motor debe ajustarse a la
pesid(_n de r_pido.
• Cuando use una segadora con descarga
trasera en cdsped h_rnedo y pesado, los
montones del cdsped cortado puede qua no
entren en el recogedor de cdsped. Reduzca
la velocidad del recorddo (veloctdad de
empuje) y/o haga tuncionar la segadora
sobre el drea pot segunda vez.
• Si quede una huella de cortes en el lade
derecho de una segadora con descarga
trasera, siegue en la direcd6n en qua giran
las manillas del reloj,solapando un peco
para recaudar los recortes an la prbxima
pasada.
• Los po_os en los recogedores de c6sped
de tela pueden tlenarse con mugre y pelvo
con el uso y los recogedores recaudar_b_
menos c_sped. Para evitar dste, rocfe el
recogedor con la manguera de agua
regularmente y dejelo secarse antes de
usal_o.
• Mantenga la parte superior del motor,
alrededor del arrancedor, despejada y sin
recortes de c_sped y paja. Esto ayudar_ el
flujodel aire del motor y extenderz_su
duracibn.
CONSEJOS PARA SEGAR Y
ACOLCHAR
IMPORTANTE: Pare obtener el mejor
rendimJentornantenga la caja de la segadora
sin acumulaclon de cesped y basura. Vea
=LIMPIF.ZA" in la secclon Mantenirniento de
este manuel.
• La cuchilla acolchadora especial va a volver
a cortar los re,cortes de cdsped muchas
veces, y los reduce en tamafio, de modo
qua si se caen en el cdsped se van a
dispersar entre dste y no se van a notar.
Tambien, el cesped acolchado sew a
deshacer r&pidamente entregando
substancias nulritivas para el clLsped.
Siempre acolche con la velocidad del motor
(cuchilla) rnds alta, pues asi se obtendrb la
major accibn de recorte de las cuchillas.
• Evite cortar el crisped cuando estd rnojado.
El c_sped mojado tiende a format montones
e interfiere con la acck_n de acolohado. La
major horn para segar el c_sped es
temprano en la tarde. A esa horn dste se ha
secado y el drea reci6n cortada no quedar=_
expuesta al so_directo,
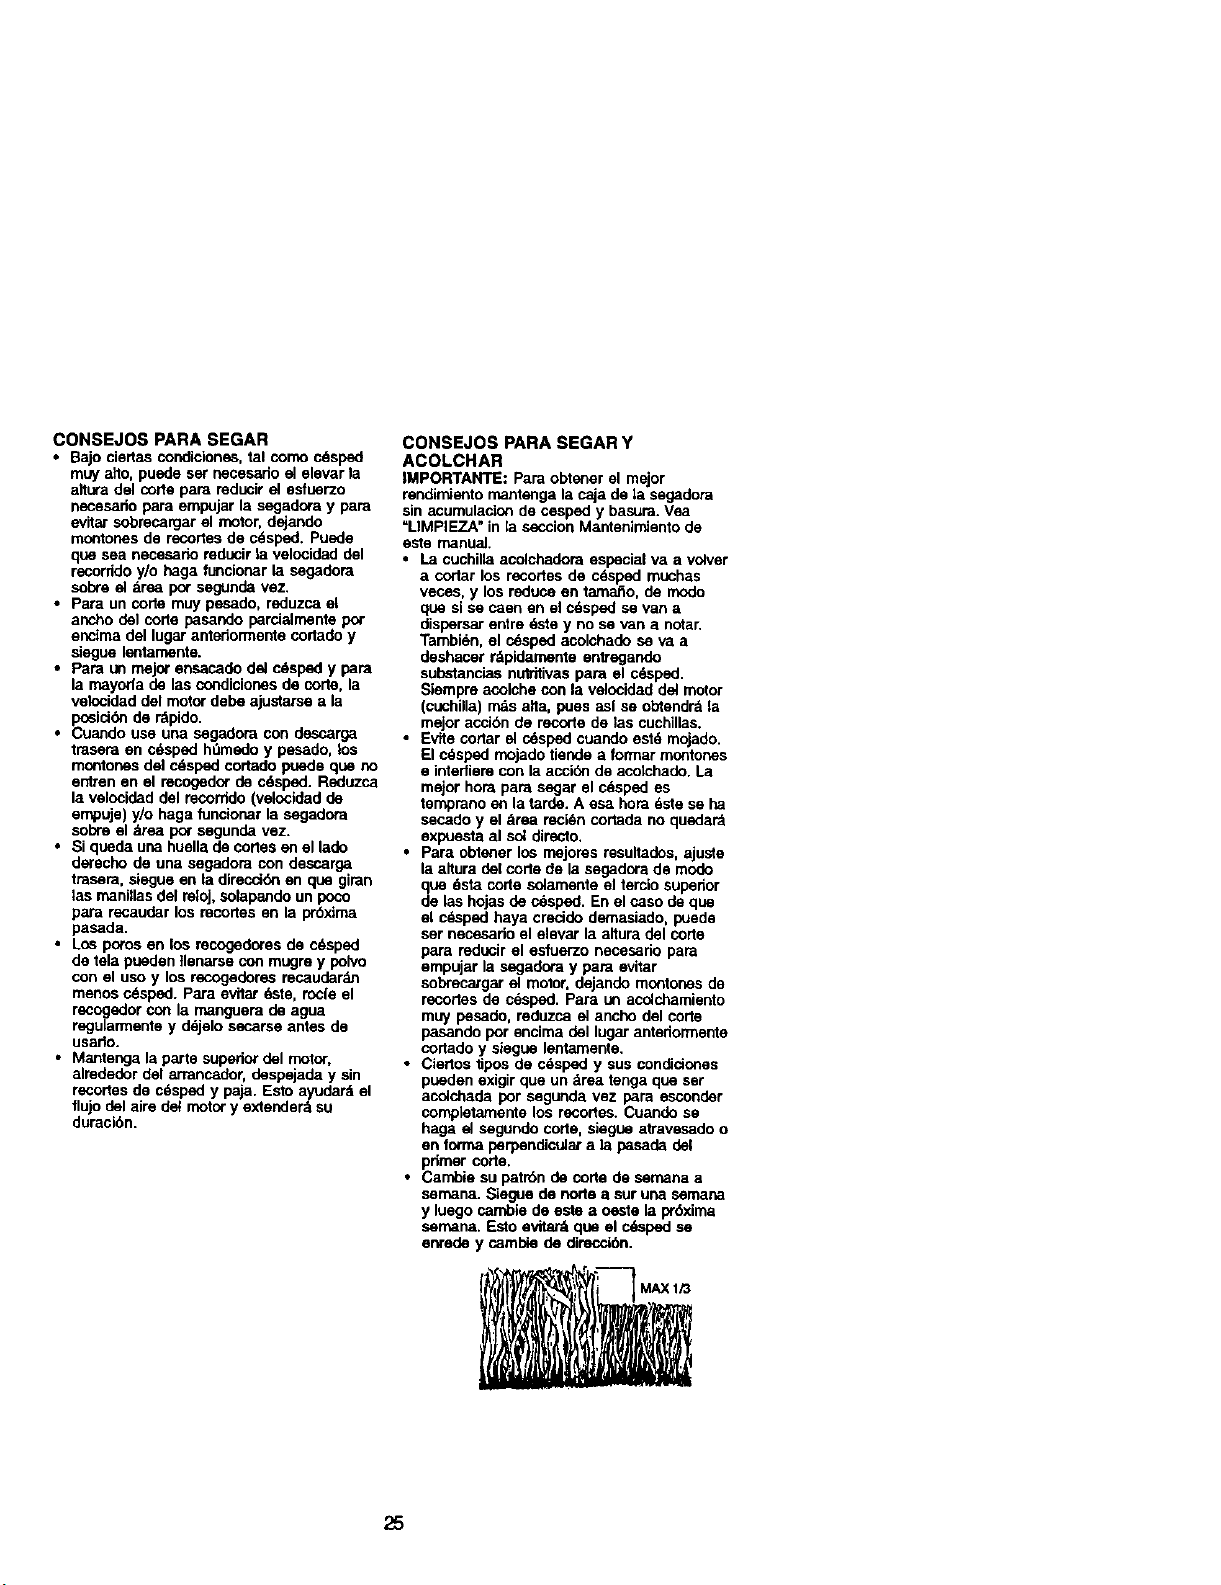
• Para obtener los rnejores resultados, ajuste
la altura del corte de la segadora de modo
qua _sta corte solamente el tercio superior
de las hojas de c_sped. En el caso de qua
el cdsped haya crecido demasiado, puede
ser necesado el elevar la altura del corte
para reducir el esfuerzo necesario pare
empujar la ssgadora y para evitar
sobrecargar el motor, dejando montones de
recortes de cesped. Para u_ acelchamiento
mW pesado, reduzca el ancha del corte
pasando per encima del lugar antedormente
cortado y siegue lentamente.
• Ciertos JJposde c_sped y sus condlolones
pueden exigirqua un drea tenga qua set
acolohada por segunda vez pera esconder
compLetamente los recortes. Cuande se
haga el segundo corte, elegue atravesado o
en forma perpendicular a la pasada del
pdmer corte.
• Cambie su patr6n de corta de semana a
sernan& Siegue de notre a sur una semana
y luego cambie de este a oeste la pr6xima
sernana,. Esto evitard qu_ el cdsped se
enrede y cambie de direccibn.
25
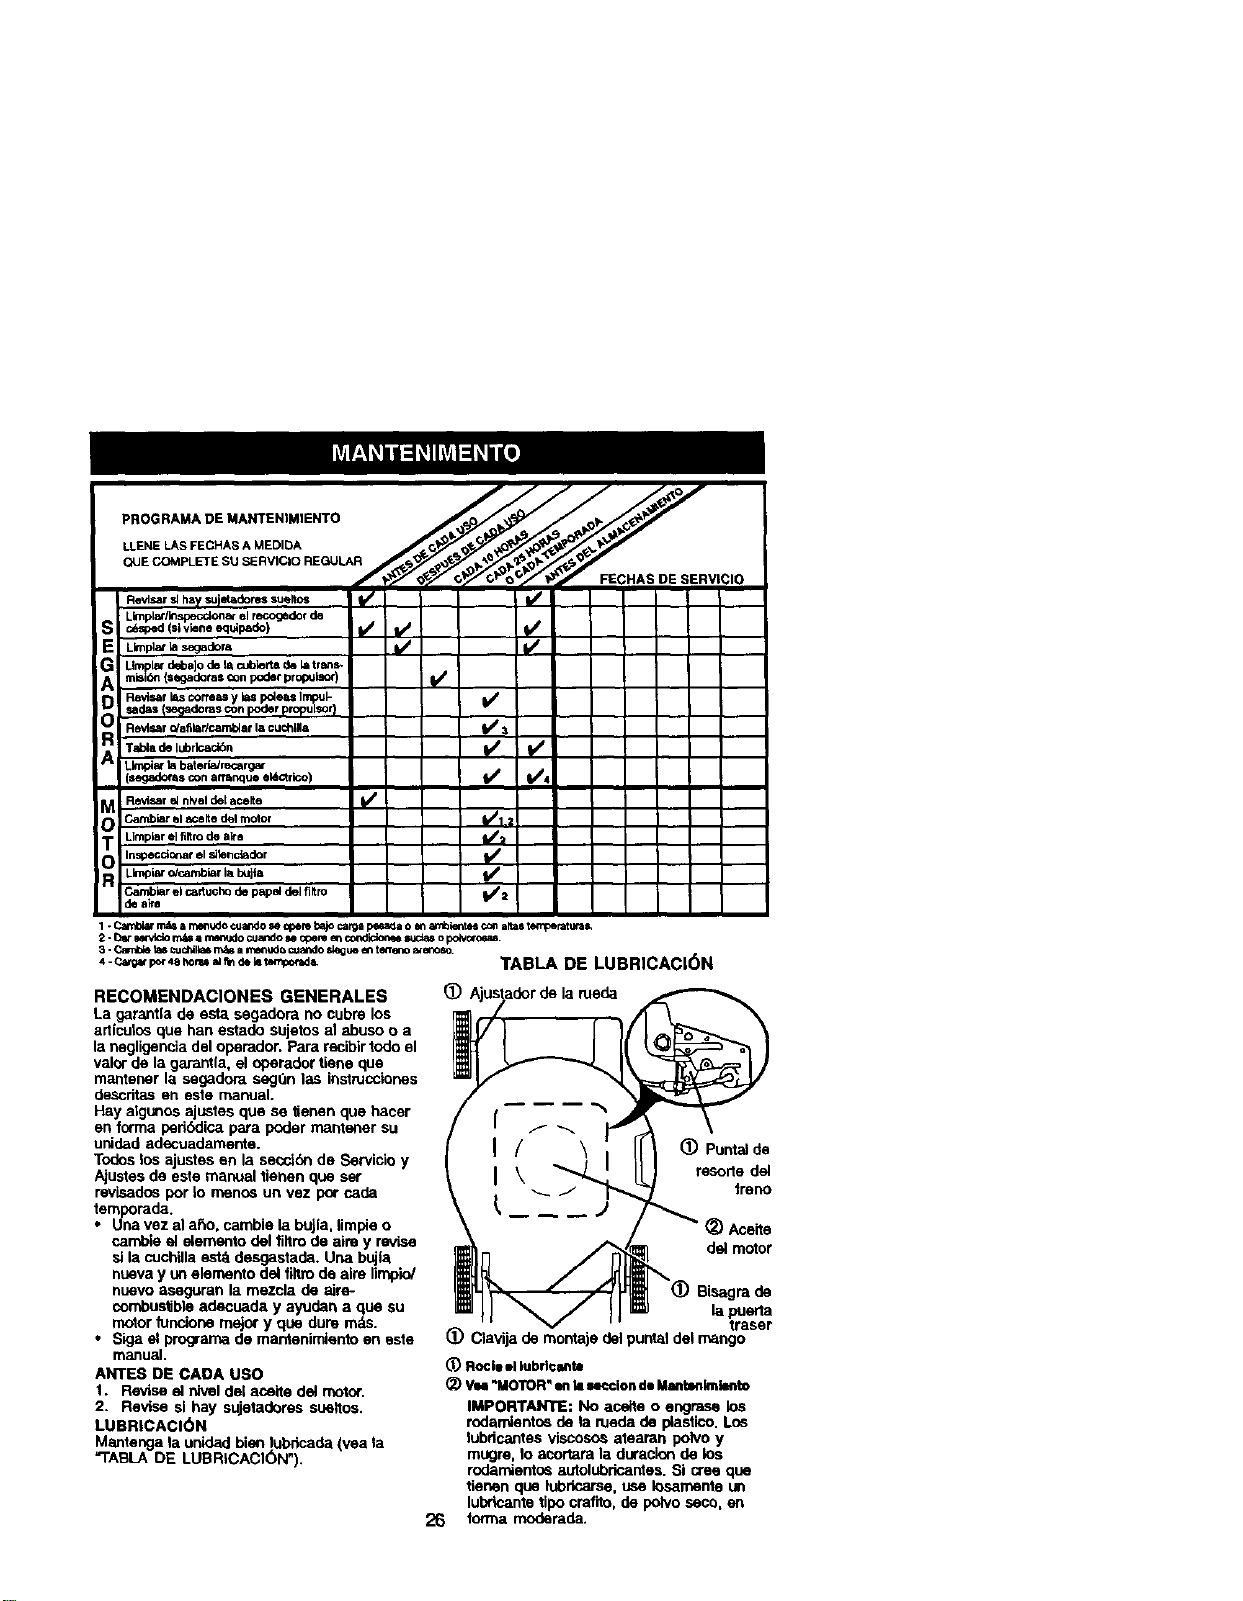
PROGRAMADEMANTENtM]ENTO
LLENELASFECHASA MEDIDA
QUECOMPLETESUSERVtCIOREGULAR
FECHASDESERVICIO
Revl_.!lrsl ha_/su_etadores sueltos _
LImpl_/klspecck:nar el _dor de
LImplatlassgadora I_ I/
mL_b_tlsrdd_aodela cuUert8do latrens-
=ega_as o_npoderpropubso_) i/'
Revtsarbscorl_ ytaspde_ Impul- I_
=,dis fsepdoras_n poderpropu_r)
Revl_mr c/afllarlcarnUer la cuchlll& _ 3
Tabla de iubrl¢_n _,_ _,_
Llmpiazlabated=drecargar
(segad_sconarmnqueel_ctrico) !,/ I/4
Revisar e_ rllvel de[ acelte
Carnbiar el acelte del motor VJl 2
Llmplar el flltrode air8 V_
In_d_r el s_lellc_dor
LImpla_o/camblaril bujia
CambiarelcartuchQdepap_delflltm I1_=t
1 - _ m_ s r_mudo cua_o se opere ba)o _rga pesada o In amblentes con arrasternperatutat,
2 - _,_ senddo m_ a ma_odo cuando N opera en ¢_ndk:to*_ suclas o pot4_xo_M.
3 -Cambie _ls micldll_smf_ a me_Jdc_cuando sk_ ue en te¢renom_noso,
4-c=_.po._o..=_t._. TABLA DE LUBRICACI(_N
RECOMENDACIONES GENERALES
La garanti_ de esta segadora no cubre los
articutos que h_n estado sujetos al abuso o a
la negligencia del operador. Para racibir todo el
valor de la garantia, el operador tiene que
mantener la segadora segOn las instrucc_nes
descritas en este manual.
Hay atgunos ajustes que se tienen que hacer
en forma pedbdica para poder mantener su
unidad adecuadamente.
Todos _os _justes en la seccidn de Servicio y
Ajustes de este manual tienen que ser
revisados por Io menos un vez pot cada
tempomda.
• Una vez al afro, cambie la bujia, Umpie o
camble el elemento del filtro de aim y revise
si la cuchilla est_ desgastada. Una buj|_
nueva y un elemento del fiitro de aim lirnp'_
nuevo aseguran I_ mezcla de abe-
combustible adecuad_ y ayudan a que su
motor1undone mejor y que dure mds.
• Siga el programa de mantenimiento en oste
manual.
ANTES DE CADA USO
1. Revise el nivel del acelte del motor.
2. Revise si hay sujetadores sueltos.
LUBRICACI(_N
Mantenga la unidad bien lubdcada (yea la
rrABLA DE LUBRICACI6N").
(_ Ajustadordelarueda
(_) Puntal de
resorte del
freno
(_) Aceite
del motor
Bisagm de
la puerta
traser
(_ Clavija de montaje del puntal del mango
(T_Rocil eliubflcante
_) Vel "MOTOR"In klMcCiOBde Manhmimkl_rRo
IMPORTANTE: No acelte o engrase los
rodamientos de la rueda de plastico. Los
lubdcantes viscosos ateamn polvo y
mugre, Io acortara la duracion de los
rod_ndentos autolubricantes. Si cree que
tienen que lubrlcarse, use Iosarnente un
lubrlcante tipo crafito, de polvo seco, en
26 forma moderada.

ESPEClFICAClONES DEL PRODUCTO
NUMERO DE SERIE:
FECHA DE COMPRA:
CAPACIDAD Y TIPO DE GASOLINA: 1.5 CUARTOS tREGULAR SIN PLOMO )
TIPO DE ACEITE (API-SF-SJ}: SAE 30 (sobre 32"F);SAE 5W-30 Ideba]o 32°F'_
CAPACIDAD DE ACEITE: 20 ONZAS
BUJIA IABERTURA: .045") CHAMPION RJ19LM4
TORSION DEL PERNO DE LA CUCHILLA: 35-40 FT. LBS.
• El num&m del nod=io y el de serie se encuentran en la calcomania adjunta a la parle trasera
de la caja de la segadora. Debe registrarlento el num_ro de serie come la fecha de compra y
mantengalos en un legar seguro para refencia en el tuturo.
SEGADORA
Siempre observe las reglas de seguddad
cuando haga el mantenimLenlo.
LLANTAS
• Mantenga las Ilantas sin gasolina, aceite o
substanclas quimicas para control de
losectos que pueden dafiar la goma.
• Evite los tocones, las piedras, las gdetas
profundas, los objetos afllados y otros
peligros que pueden daSar alas Ilantas.
CUIDADO DE LA CUCHILLA
Para obtener los mejores resultados, la
cuchilla de la segadora tienen que mantenerse
afilada. Cambie la cuchilladoblada o de_ada.
PARA REMOVER LA CUCHILLA
1. Desccnente el alambre de la bujfa y
p6ngalo en donde no pueda entrar en
contacto con dsta.
2. Haga descansar la segadora en su lade.
Asegdrese que el filtm de =ire y que el
carbumdar queden mirando hacia ardba.
3. Use un bloque de madera entre la cuchilla
y la caja de la segadora para evitar que la
cuchillagire cuando se le quite el perno.
AVISO: Prnteja sus manos con guantes y/o
envuetva la cuchilla con una tela gruesa.
4. Remueva el pemo de la cuchilla gi_ndolo
en el sentido contredo en que giran las
manillasdel reloj.
5. Remeeva la cuchilla y los art(culos de
ferreterla adjuntadares (el pemo, la
arandela de seguddad y la arandela
endurecida).
AVISO: Remueva el adaptader de la cuchilla y
revise el cubo interior de la ranura del
adeptador de la cuchilla. La ranura tiene que
estar en buenas cond_ones para que
funclone en forma adecuada. Cambie el
adaptador si est_ denado.
PARA CAMBIAR LA CUCHILLA
1. Ponga el adaptador de la cuchillaen el
cigueSal del motor. AsegOreseque la
ranura del adaptador y que el chevetero
del cigueSal est6n alineados.
2. Ponga la cuchiUaen el adeptador de 6sta
alineando los dos (2) agujoros en la
cuchilla con las salientes =ievadas en el
adaptador.
3. AsegOrese de que el borde de salida de la
cuchilla (opuesto al borde afilado) est_
hacia arriba hada el motor.
4. Instale el perno de la cucNIla con la
arandela de seguddad y la arandela
endurecida en el adaptador de la cuchilla y
el cigueSal.
5. Use un bloque de madera entre la cuchilla
y la caja de la segadora y apdete el pemo
de la cuchillagiF&ndoloen el sentido en
que giran las rnanillasdel reloj.
• La torsibn pare apretar recomendada es de
35 - 40 pies lib_as.
|MPORTANTE: El pemo de la cuchilla es
clase 8 tmtado a c=io.
PARA AFILAR LA CUCHLLLA
AVISO: No recomendamos el afllar la cuchilla
- pero silo hace, asegdrese de que quede
balanceada.
Se tiene que tener cuidado de rnantenerla
balanceada. Una cuchilla que no est_
balanceada va a producir eventu=imente clar3o
en la segadora o en el motor.
• La cuchilla puede afilarse con una lima o en
una rueda rectificadora. No trate de afilarla
mientras se encuentra en la segadora.
• Para revisar el balance de la cuchilla, clave
un clavo en una riga o en la pared. Oeje
alrededor de una pulgeda de un clavo recto
expuesto. Ponga el egujero central de la
cuchilla sobre la cabeza del clavo. Si la
cuchilla estd balanceade debe permanecer
en la posick_nhonzont=i. Si cualquiera de
los exlrernos de la cuchilla se mueve hacia
abajo, afile el extmmo pasado basra que
6sta quede b=ianceade.
Pemo Arandeb
dela ermlure_da
27 cuchilla Borde de sallda Adaptador de ]a ctchilla
RECOGEDOR DE ClaSPED
• El recogedor de c_sped puede set rociado
con el agua de la manguem pero liene que
ester seco cuande se vaya a user.
• Revise su recogedor de c6spsd a menudo
para verificar el estd da_ado o deteriorado.
Se Va a desgastar con el uso normal. Si se
necesita cambiar el recogedor, cambielo
solamente por uno qua sea aprobado por el
fabricante. Dd el ndmero del modelo de la
segadora cuando Io ordene.
MOTOR
LUBRICACl6N
Use solamente aceite de detergente de alta
calidad clasificado con la clasificacibn SF-SJ
de sewicio API. Seleccione la calidad de
viscosided SAE segOn su tempemtura de
oderacibn esperada.
AVISO: A pesar de que los aceites de
multiviscoeldad (5W30, 10W30, etc.) me}oran
el arranque en clima frlo, estos aceites de
multiviscosidad van ha aumentar el consumo
de aceite cuando se usan en temperatures
sobre 32° R Revise el nlvel del aceite del
motorm&s a menudo, para eVrtarun posible
daSo en el motor, debido a que no tiene
suficiente aceite.
Cambie el aceite despuds de 25 horas de
operad_ o por Io menos una vez al a_o si la
segadom se utiliza menos 25 horns el a_o.
Revise el nivel del aceite del cdrter antes de
arrancar el motor y de.spudsde cada cinco (5)
horas de use cootinuado. Apdete el tapdn del
acelte en forma segura cada vez que revise el
nivel del acelte.
PAPA CAMBIAR EL ACEITE DEL MOTOR
AV]SO: Antes de inclir_r la segadom pare
drenar el aceite, drene el tanque de combus-
tible haciendo correr el motor hasta clue el
tanque estd vacio.
1. Desconeote el elambre de la bujla y
pbngalo de modo que no pueda entrar en
contacto con dsta.
2. Remueva la t_bpadel dep6sito del aceite;
ddjela a un lado en una supedicie limpia.
3. tncline la cortadora de c_sped por este
cos_,do tal corno se muestra y purgue el
aseite en un mcipiente idbneo. Mueva la
segadora de arras para adelante p_'a
remover todo el aceite que se haya
quedado alrapade dentro del motor.
4. Umpie todo elaceite derramado en la
segadora y en el lade del motor.
5. Rellene el motor con acelte. (Vea "PARA
AGREGAR EL ACEITE" en la secci6n de
Operaci6n de este manuaL)
6. _hJelva a conectar et alambre de la bujia a
_sta.
Envase
28

FILTRO DE A|RE
Su motor puede sufrir averlas y funcionar de
manera incorrecta con un filtro del aire sucio.
Sustituir el papel del cartucho una vez al aP,o o
tras 100 horas de funcionarnlanto, rods a
menudo si se utiliza en condiciones de
suciedad y polvo parUculares. No lave el filtro
de alre.
PARA CAMBIAR EL FILTRO DE AIRE
1. Remueva el filtro de aire girdndo_oan el
sentido contrado en que giran las manillas
dal reloj, hasta el tope, y retirelo dal collar.
2. Remueva el flltm de la parte interiorde la
cubierta.
3. Limpie la parle interiorde la cublarta y el
collar para remover toda acumulacidn de
mugre.
4. Inserte el filtro nuevo an la cubierla,
5. Ponga la cubierla del lltro de aire dentro
dal collar alineando la oreja con la ranura.
6. Empuje la cublarta hacia adentro y glrela
en el sentido de las manillas del reloj pard
apretada.
Abrazadera Gire en el sentido
contrado alas
rnanlllas
del
Gire en et
las manlllas
de_reLoJpapaapretar
SILENCIADOR
Inspeccione y cambla el si;enciador si est_
corroldo puede producir un peligro de
incendio y/o da_o.
BUJ|AS
Cambie las bujlas al comienzo de cada
temporada de siega o despuds de cada 100
horas de operacibn, Io que suceda primem, El
tipo de bujla y el ajuste de la abertuta
aparecen an "ESPECIFICACIONES DEL
PRODUCTO" seccibn de este manual.
LIMPIEZA
IMPORTANTE: Para obtener el mejor
rendimiento, mantenga la caja de la segadora
sin acumulacion de cesped y basum. Limpin la
parte de abajo de su segadora despues de
cada uso.
_I,IPRECAUCK_N: Desconecte el alambre de
la bujla y i_ngalo en donde no pueda entrar
en contacto con dsta.
• Limpie la parte infedor de su segadora
raspdndola para remover la acumulaci6n de
c_sped y basura.
• Limpie el motor a menudo pare evitar que
se acumula la basura. Un motor tapado
funciona m_tsca]iente y se acorta su
duraci(_n,
• Mantenga las superficies pulidas y las
ruedas sin gasolina, aceite, etc.
• No recomendamos el uso de una manguera
de jardfn para limpiar la segadom a menos
que el sistema el_)ctrico,el silenclador, el
tiltro de aim y el carburador est*_ntapados
para evitar qua las entre el agua. El agua en
el motor puede acortar la dumci(_nde dste.
29

_,PRECAUCK_N: Antes de der calquier
sewico o de hacer ajustes:
1. Suelte la barra de conl_oly pare el motor.
2. Asegdrese que la cuchilta y que todas las
partes movibles se hayan detanido
completamennt.
3. Desconecte el alambre de la bujfa y
pbngalo en deride no pueda entrar en
contaoto con 6sta.
SEGADORA
PARA AJUSTAR LA ALTURA DE CORTE
Vea =PARA AJUSTAR LA ALTURA DE
CORTE" en ta sec_l_ de Operacibn de este
manual
DESVIADOR TRASERO
Se proporciona un desviador trasero, adjunto
entre las ruedas traseras de su segadora,
para reducir a un mfnimo la posibgidad que
objetos seen lanzados hacia afuera de la parle
trasera de la segadera, en la poelci6n en
donde se encuentm el operador. Si se daRa el
desviador debe cambiarse.
PARA AJUSTAR EL MANGO
El mango puede ser montado a una posicibn
alta o baja. Los agujems do montaje en el
mango inferi_ estz_ fuera del centre pare
levantar y bajar et mango.
1. Remueva el mango supedor y todas las
partes atadas al mango interior.
2. Remueva lascla,vi as de horquilla de la
cava de montaje de pontal de mango.
3. Apreite el mango inferior hacia dentro para
removerlo de las clavijas de mantaje.
4. Gire el mango inferior per encirna pare
levantar o bajar el mango.
5. _Jelva a montar las clavijas de horquiga
per encima de las clavijas de montaje.
6. _AJelvaa rnont_ el mango superior y todas
las partes remo,iidas del mango inferior.
\
Mango
PARA MONTAR Y ADJUNTAR EL
RECOGEDOR DE ClaSPED
1. Ponga el bastidor del recogedor de c_sped
en la bolsa del cdsped con la parte dgide
de la boise an la parte inferior.Aseg_'ese
que el mango del bastidor estd en el
exterior do ta pade superior de la boise.
2. Deslice los sujetaderes de vinilo sobre el
bastidor.
AVISO: Sl los sujetadores de vinile est_n rnuy
doros, mdtalos en agua catiente per elgunos
minutes. Si se moja ta bolsa, dejela que se
seque antes de usaria.
PRECAUCI(_N: No hag,_funcionar su
segadom sin el desv_adorBe recortes o sin el
recogedor de cdsped, aprobados, en su
lugar. Nunca tmte de operar [a segadora
cuando se ha removJdola puerta lrasera o
cuando est_ un poco abierte.
MOTOR _ _ de1b'_e_U_ra
VELOCIDAD DEL MOTOR
La velocidad del motor ha side ajustada on la
f_T=bdca.No irate de aurnentar la vetocidad del
motor pues se pueden pmducir lesiones
_es. Si cree que el motor estd
funcionando demasiado rdpidoo dernas[ado
lento, Ileve su segadora a contaoto con su
centre de enricio Sears e con un otro cen_o
de servicio cuelificado para repararia o
ajustaria.
CARBURAOOR
Su carborador tiene un chono prlncipelfijo no
ajustable pare controlar la mezcla. Si su motor
no est_ funcionando en lorma adecuade
debido a pmblemas que se sospecha vienen
del carl0urador, neve su segado_ a contacto
con su centre de servido Sears o con on otro
centre de serviclo cueliflcado pare reparada y/
o ajustarla.
IMPORTANTIE: Nunca manlpule el regulador
del motor,el que ha side ajustado en la fdbdca
pare la veloeldad del motoradecuada. Puede
ser peligroso hacer funck)nar el motor a un_
velodded per sobre el a|uste de alia velocidad
de la f_bdc_. Si cree que la veloddad alta
regulade del motor necesita ajuste,contacto
con su centre de servicio Sears o con on otto
centre de servicio cualificado, el que cuent_
con el equipo adecuado y la experienci_ para
_0hacer los ajustes necesar_os.

Inmediatamante prepare su segadora para el
almacenamiento al final de cada temporada o
si la unidad no se va a usar p(_ 30 dfas o
rods.
SEGADORA
Cuando se va a guardar la segadora por
cierto perlodo de tiempo, I|mplela
cuidadosaruante, remueva toda la mugre, la
grasa, las hojas, etc. Gudrdela en an _rea
[impiay seca.
1. Umple toda la segadom (Vea "LIMPIEZA"
en la secci6n de Mantantmento de este
manual).
2. Lubr[quala segdn se muestra en la
secci6n de Mantenimento de este manual.
3. Aseg,3rese de qua todas las tuercas y
clavijas y todos los pamos y tornillos est6n
apretados en forma segura. Inspacclone
las partes qua se muaven pare verificar si
est&n de,arias, quabmdas o desgostadas.
C6mblelas si es necesado.
4. Retoque todas las supedicles qua estdn
oxidadas o con la pintora picBda;use una
lija antes de pintar.
MANGO
Puede doblar el mango de su segadora para el
almacenamiento.
1. Apdete los extremos inferiores del mango
inferiorentre sl hasta qua el mango inferior
quede separado del puntal del mango,
luego mu_valo hacia adelante.
2. Suefie los pamos de montaje del mango
supedor lo suliclente como pare permitir
qua el mango superior se pueda doblar
hacia atr_s.
IMPORTANTE: Cuando doble el mango para
el almacenandento o el transporte, asngt_rese
qua lo doble seg_ se muestm o purde daRar
los cables de control.
• Cuando prepare sus mangos a parfir de la
posici6n de almacenamianto, el mango
inferior automdficamente se asegurard en la
pcsici(YnLoamsegar.
Apdstepara
dolY_r mango
Barradecontrolque
e3dgelapresenciadel_ A
M_m_ supedor ;
MangoInfedor
Posicl_nparasegar
MOTOR
SISTEMA DE COMBUSTIBLE
IMPORTANTE: Es importante evitar qua se
lormen depositos de coma an partes
tundamantales del elstema de combustible
tales como el carbumdor, el filtrodel combus-
tible, la manguara del combustible o en el
estanque dumnte el elmacanamiento, La
expadencia tarnbien indica que los combus-
tibles tamblen lod_caqua los combustibles
mezclados con alcoho_ (conocido como
gasohol o qua tienen etanol o metanol) pueden
atraer humedad, Io qua conduce a la
separacion y a la formacion de acidos dorante
el almacenamlanto. La gasolina acidica puede
danar el elstema de combustible de un motor
durante el periodo de almacenamlento.
1. Drane el estanque de combustible.
2. Haga arrancar el motor y dejelo funclonar
hasta qua las lineas del combustible y el
carburador estdn vaclos.
• Nunca use los produotos para Umpieza del
carburador o del motor en el estanqae de
combusfible puas se puadan producir
dafios parmanentes.
• Use combustible nuevo la prbxima
temporada.
AVlSO: El estabiUzador de combustible es una
altemetiva aceptable para mducir a un minimo
la formacibn de depbsitos de goma an el
combustible durante el perlodo de
almacenamiento. Agregue estabilizador a la
gasotina en el estanque de combusfibteo en el
envase para el almacena-miento. Siempre siga
la pmporcibn de mazda qua se encuantra an
el envase del estabiUzado¢.Haga luncionar el
motor por Io menos 10 minotos despu6s de
agregar el estabilizador, pare permifir qua este
Ilegua el carbumdor. No drene la gasotina del
estanque de gasotloa y el carburador si se
estd usando estabiUzador de combustible.
ACEITE DEL MOTOR
Drene el aceite (con el motor celleme) y
cdmbielo con aceite de motor limpio. (Vea
"MOTOR" e_ la secci6n de Mantenimlento de
este manual.)
31
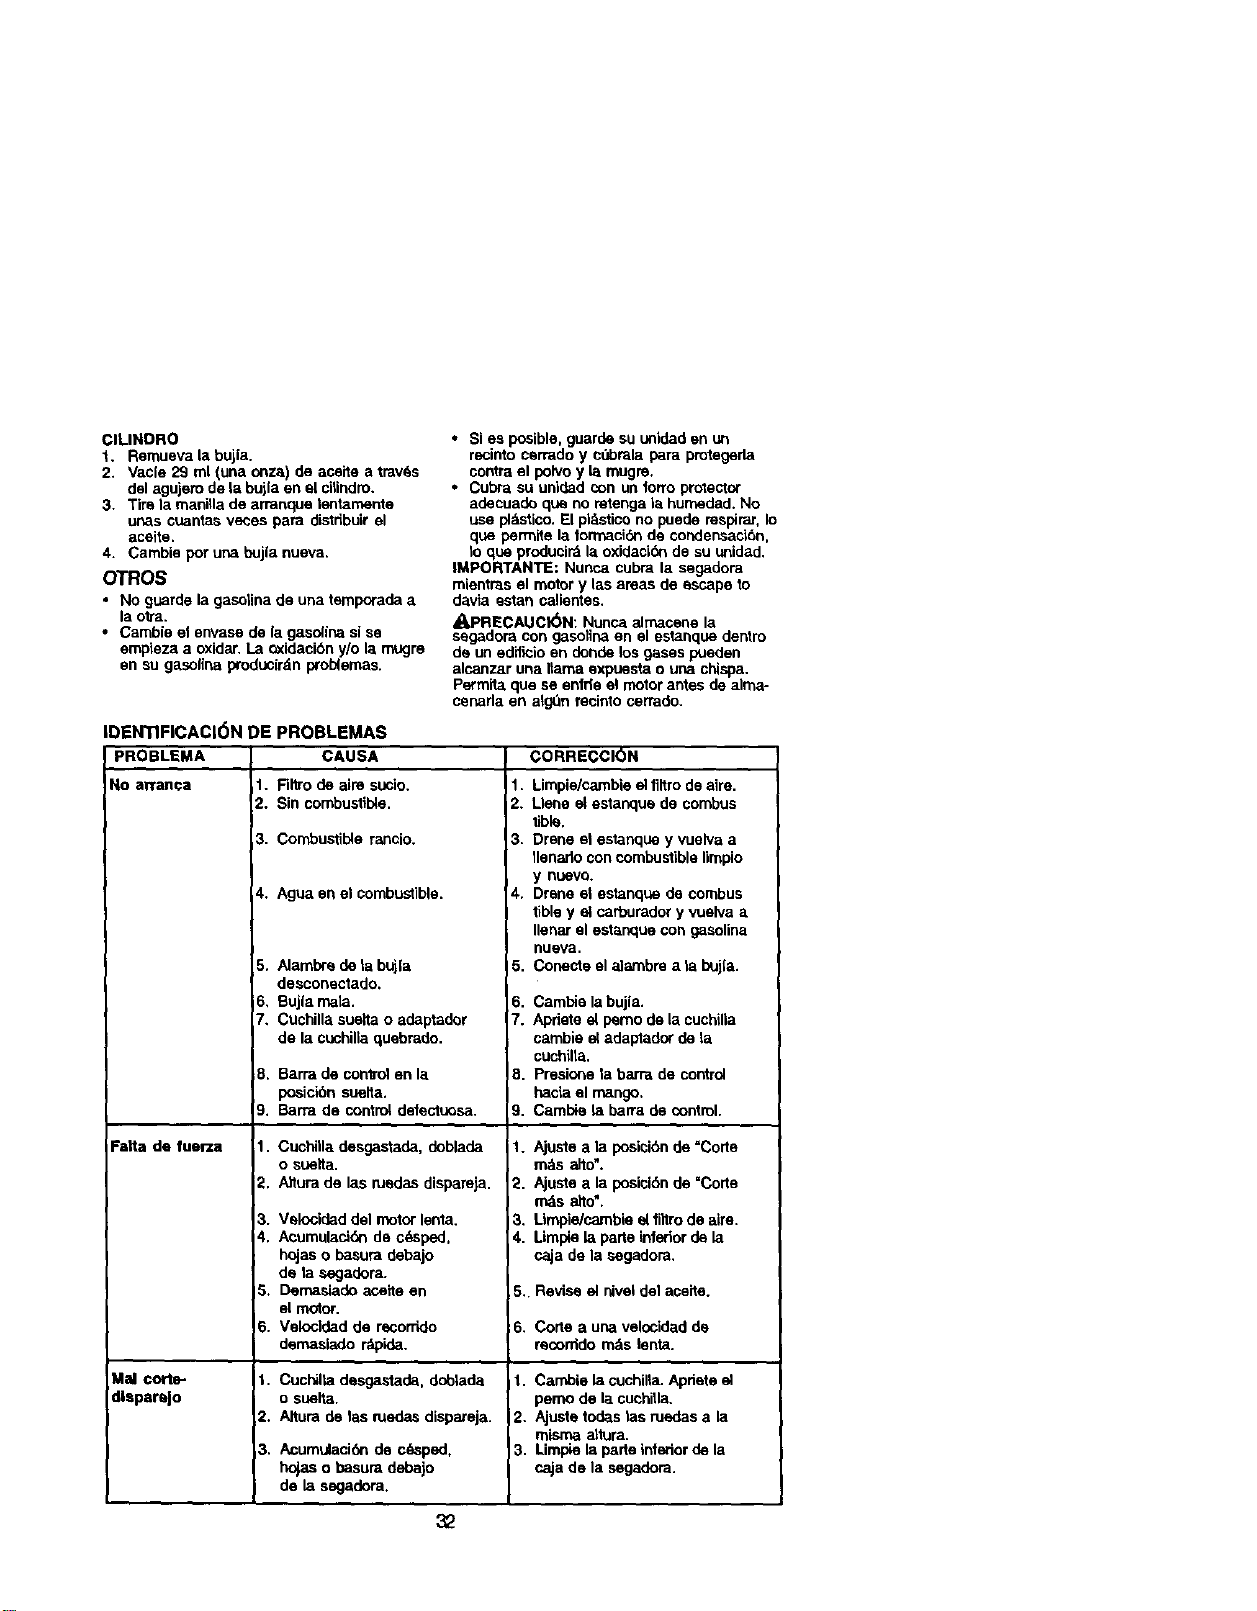
ClLINDRO
1. Remueva la bujia.
2. Vac[e 29 ml (una onza) de acelte a trav6s
del agujero de la bujla en el cilindm.
3. Tire la manHla de arranque tentarnente
ucas cuantas races pare distdbuir el
aceite.
4. Cambie per una bujla nueva.
OTROS
• NO 9carde la gasolina de una temporada a
la otra.
• Cambie el envase de la gasoline si se
empieza a oxidar. La oxidacibn y/o la mugre
en su gasoline produc[rdn problemas.
|DENTIFICACI(_N DE
PROBLEMA
No a_anca 1.
2.
3.
4.
5.
6,
7,
i8.
9.
Fatta de fuerza jl.
I
4.
B.
Mal cotte- t.
dlepareJo
2.
3.
PROBLEMAS
CAUSA
R_o _ aim s_io.
Sincombu_i_e,
Combustible ran_io.
Agua en elcombustible.
Alambre de la bujia
desconectado.
Bujia mata.
Cuchille,suelta o adeptador
de la cuchilla quebrado.
Barra de control en la
posici6n suelta.
Barra de control delectu_sa.
Cuchilla desgastada, doblada
o suelta.
AItura de las nJedas dispareja.
Velocidad del motor lenta.
Acumulacidn de c6spsd,
hojas o basura debajo
de la segadera.
Demasiado acelte en
el motor.
Velocldad de recorrido
demaslado r_pida.
Cuchilta desgastade, doblade
o suelta.
Altura de las ruedas dispareja.
Acumulacibn de c_sped,
hojas o basura debajo
de la segadera.
• Si es posible, guarde su unidad en un
recinto cerrado y cdbmla pare pmtegerla
centre el polvo y la mugre.
• Cubra su unided con un forro protector
adecaade qua no mtenga la hurnedad. No
use pl_,stico.El pl&sticono puede respirar, Io
que permite la fonnack_nde condensa_6n,
to que produci_ la oxideS=tinde su unidad.
IMPORTANTE: Nunca cubra la segadora
mientras el motor y las areas de escape to
davia estan calienfes.
• I,PRECAUCK_N: Nunca elmacene la
segadora con gasoline en el estanque dentro
de un edificio en deride los gases pueden
alcanzar una Itama expuesta o una chispa.
Permita que se enfde el motor antes de alma-
cenade en argon recinfo cerrado.
CORRECCION
1. Limpie/cambie el filtro de aire.
2. Uene el estanque de combus
tible.
3. Drene el estanque y vueiva a
Ilenado con combustible limpio
y nuave.
4. Drene el estanqLle de combus
tible y el car'bumdory vuelva a
Ilenar el estanque con gasoline
nueva.
J5. Conecte el alarnbrea la buj|a.
6. Cambie la bujla.
7. Apfiete el pemo de la cuchilla
cambie el adaptador de ta
cuchilta.
8. Presione ta barra de control
hacia el mango,
9. Cambie la barra de control.
1. Ajuste a la posici6n de "Corte
rods alto".
2. Ajuste a la posici6n de =Corte
mds elto',
3, Umpie/cambie el filtro de abe.
6. Limpie la parle inferior de la
caja de la segadora,
5. Revise el niveldel aceite.
6. Corle a una velocided de
recorrido rods lenta.
1. Cambie la cuchilla. Apdete el
pemo de la cuchitla.
2. Ajuste redes tas ruedas a la
misma altora.
3. Limpie la parte interiorde la
caja de la segadora.
32
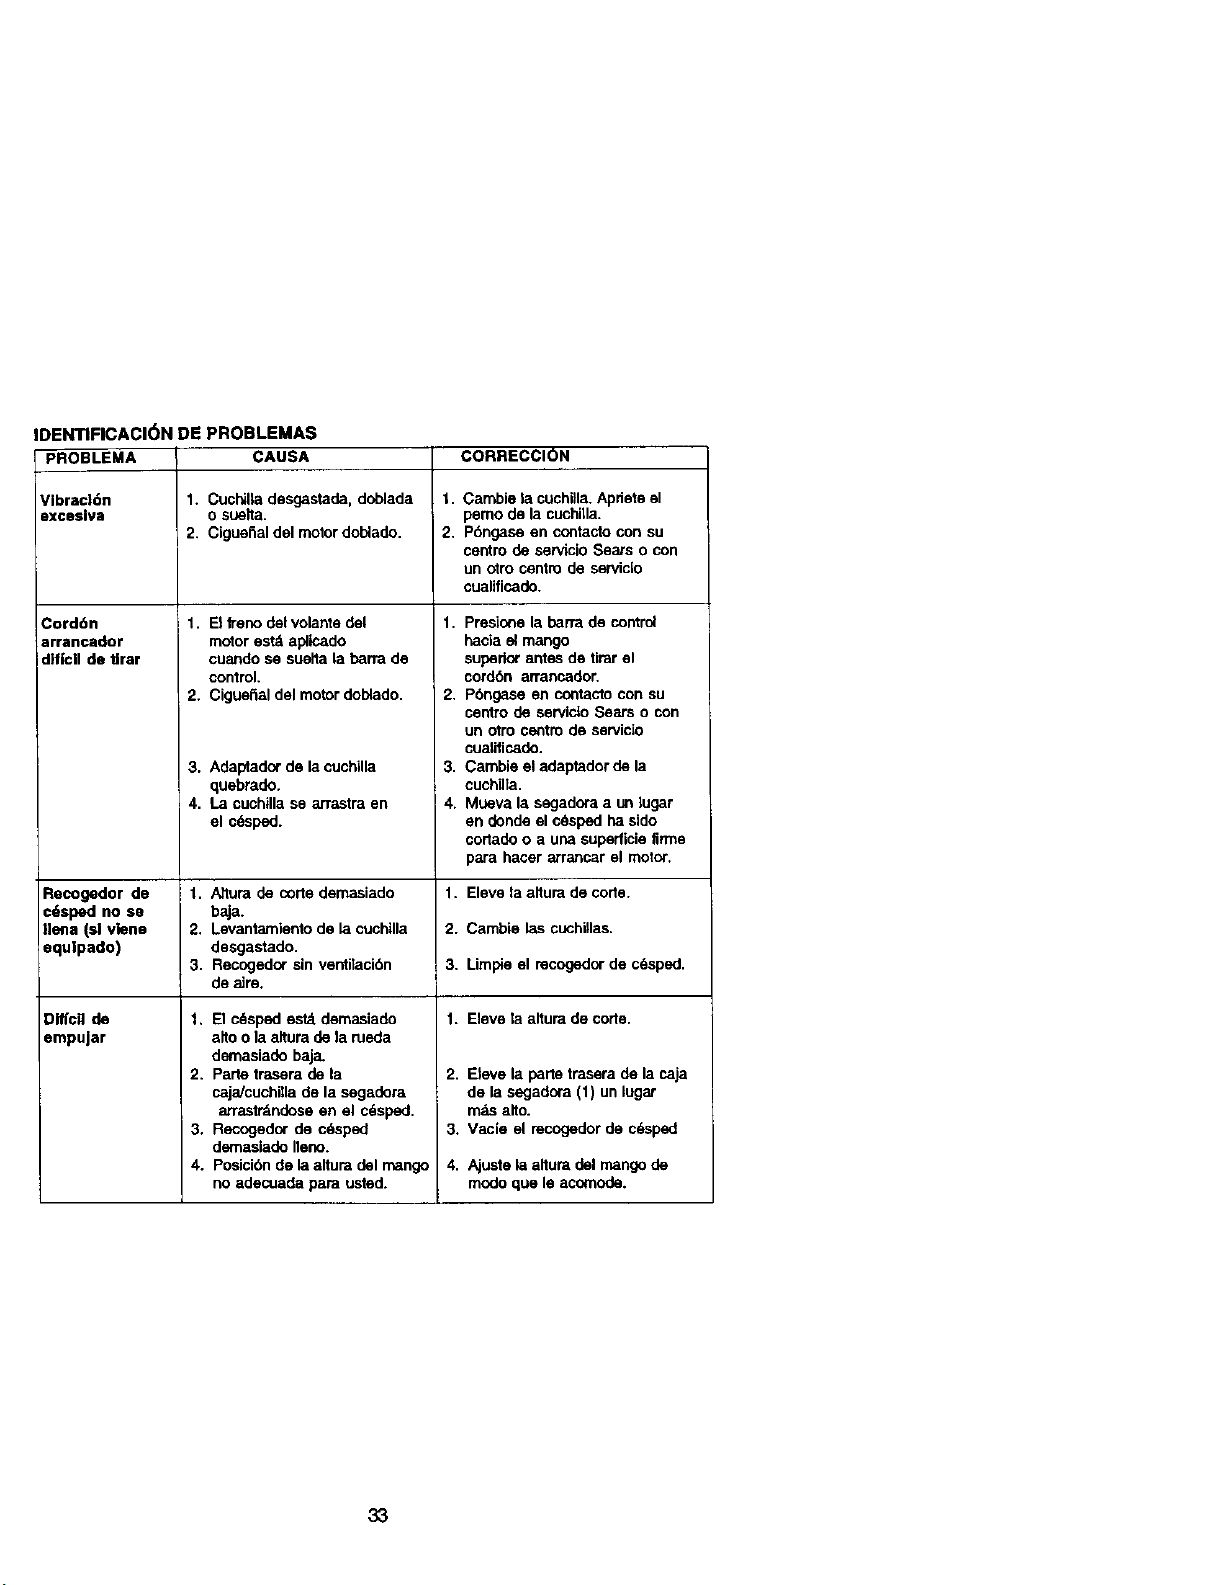
IDENTIFICACI(_N DE PROBLEMAS
PROBLEMA CAUSA CORRECClON
Vibracl6n 1. Cuchilla desgastada, doblada 1. Cambie la cuchilla. Apriete el
exceslva o suelta, pemo de la cuchilla.
2. Cigue6al del motor doblado. 2. Pdngase en contacto con su
centro de servicio Sears o con
un otro centro de serviclo
cualificado.
Cord6n
arrancador
dlf|cll de flrar
Recogedor de
c6spedno se
Ile_la(sl v_ne
equlpado)
Dlfic. de
empujar
1. El freno del volante del
motor est_ apltcado
cuando se suelta la barra de
control.
2. Cigue_al del motordoblado.
3. Adaptador de la cuchilla
quebrado.
4. La cuchilla se armstra en
el c6sped.
1. A]tura de corte demasiado
b_a.
2. Levantamiento de la cuchilla
desgastado.
3. Recogedor sin ventilaci6n
de aJre.
1, El c_sped estd demasiado
alto o la altura de la meda
demasiado baja.
2. Parle trasera de la
caja/cuchma de la segadora
arrastr_ndose en el cdspad.
3. Recogedor de c_sped
demaslado Ileno.
4. Posici6n de la altura del mango
no adecuada para ustod.
1. Presione la barra de contro_
hacia el mango
superior antes de tirar el
cord6n WTancador,
2, P6ngase en contacto con su
centro de servicto Sears o con
un otro centro de servicio
cualificado.
3. Cambie el adaptador de la
cuchilta.
4. Mueva la segadora a un lugar
en donde el c_sped ha side
cortado o a una superficie firrne
para hacer armncar el motor.
1. Eleve la altura de code.
2. Cambie las cuchillas.
3. Limpie el recogedor de cdsped.
1. Eleve la altura de corte.
2. Eleve la parle trasera de la caja
de la segadora (1) un lugar
m_Lsalto.
3. Vacie el recogedor de c6sped
4. Ajuste la altum del mango de
modo que le acocnode.
33
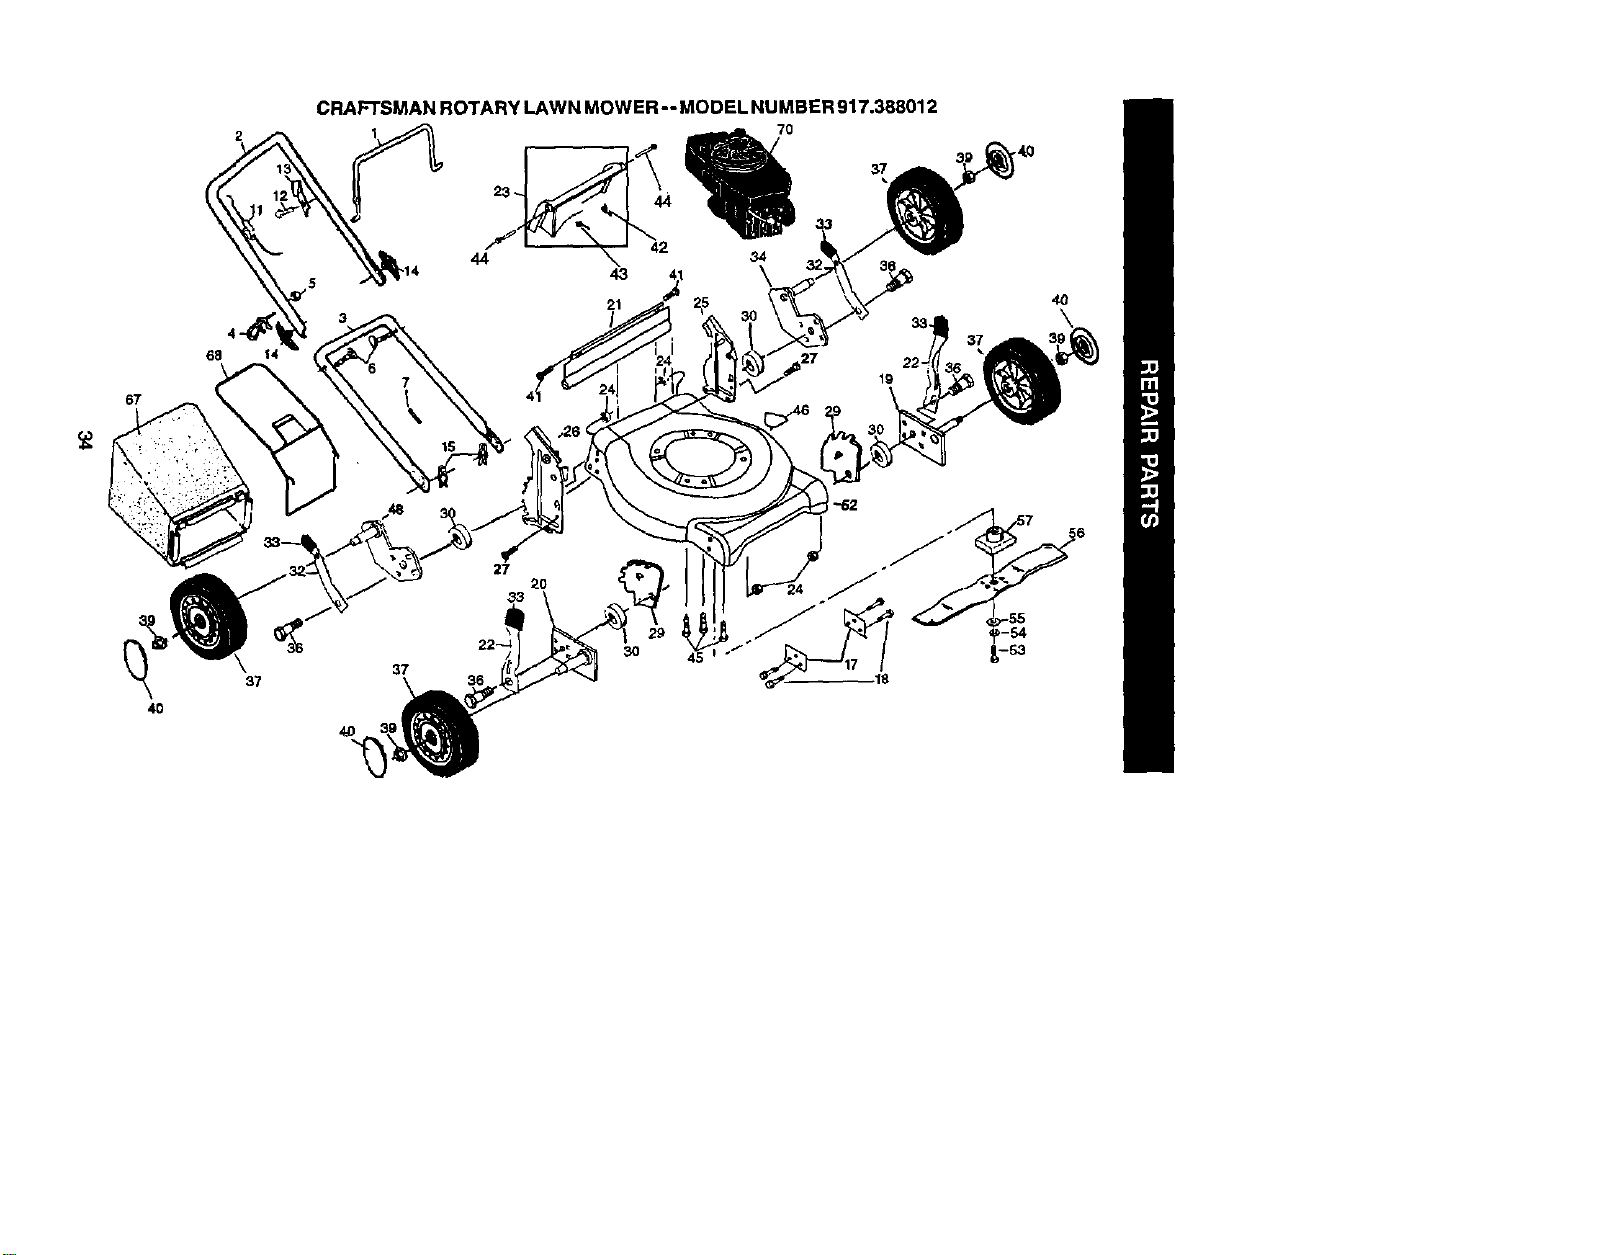
CRAFTSMANROTARYLAWNMOWER--MODELNUMBER917.388012
44
21
4O
68 14
67
4O
37
30
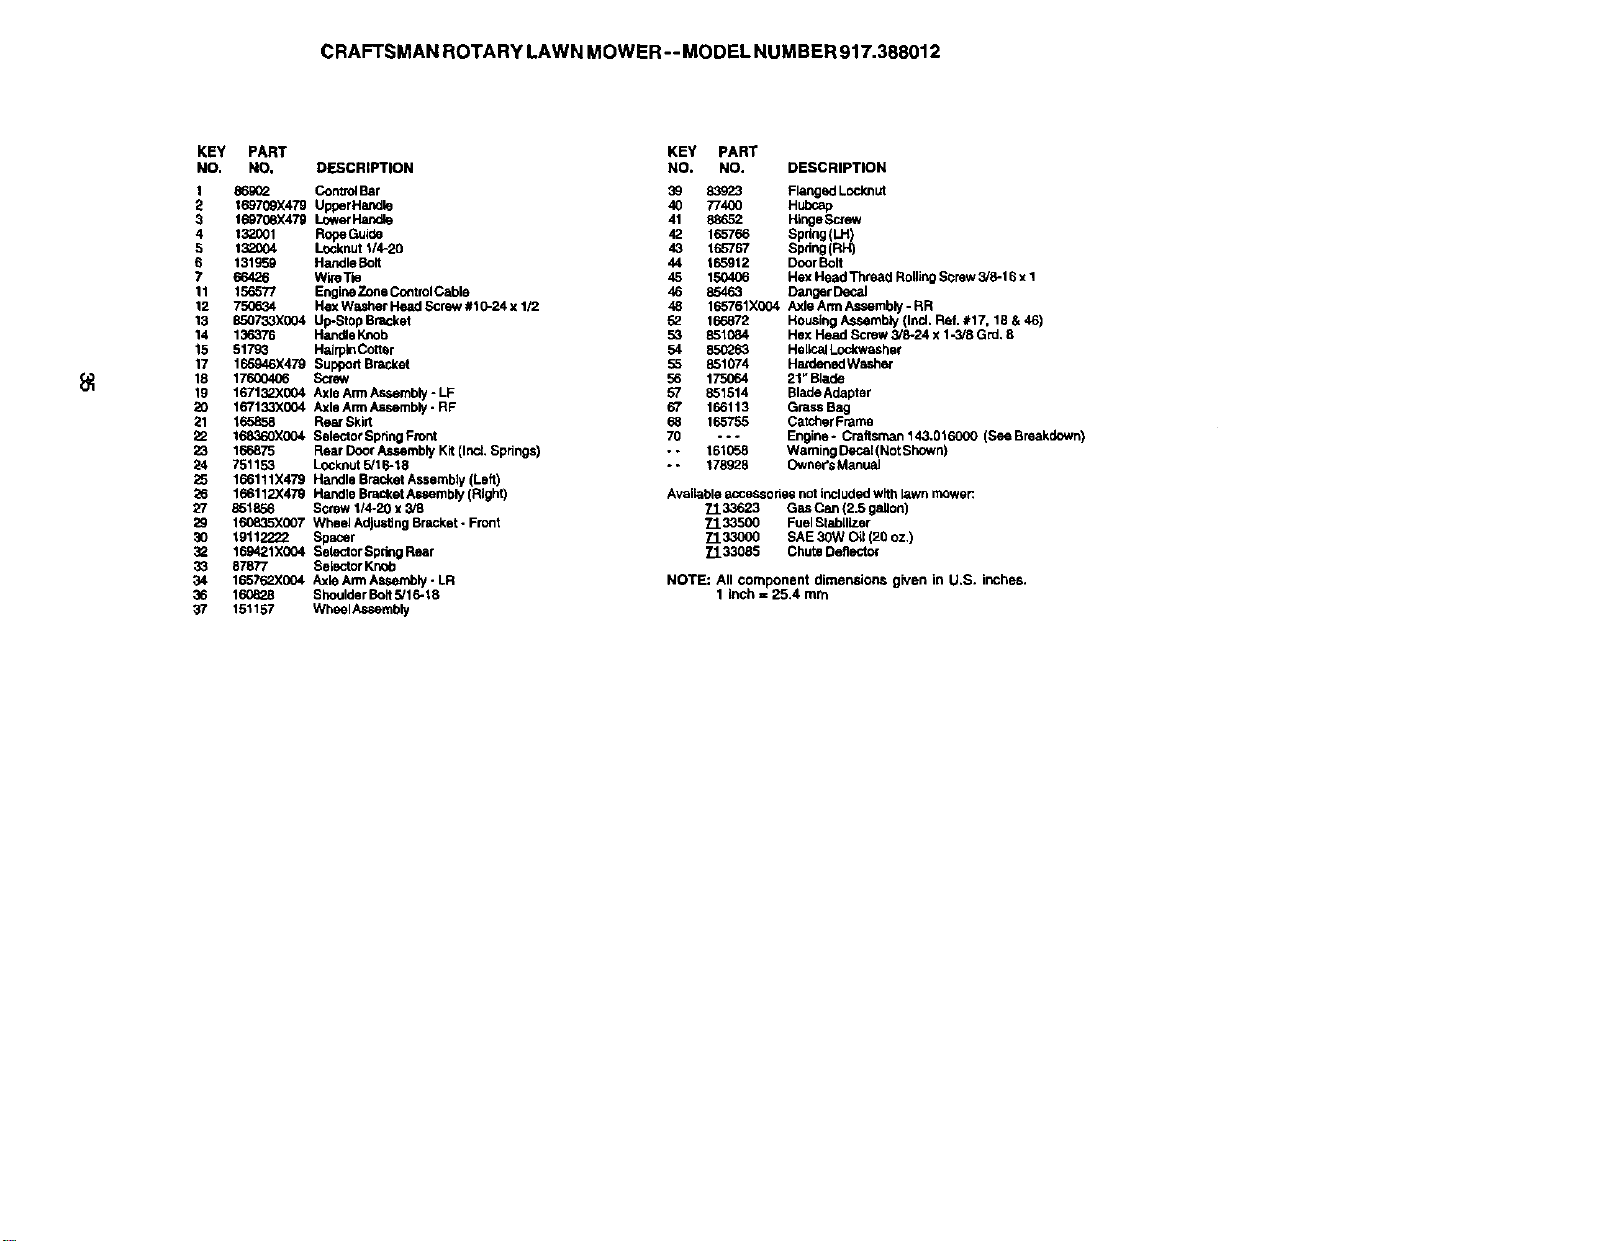
CRAFTSMAN ROTARY LAWN MOWER-- MODEL NUMBER 917.388012
KEY PART
NO. NO, DESCRIPTION
t 869(_ ConUol Bar
2 169709X47g Upper Handle
3 1697C6X47g Lower Haadle
4 132O01 RopeGu_de
5 132004 L_knut 1/4-20
6 131959 HandlaBolt
? 66426 WireTm
11 156577 EngineZone Co_trolCable
12 756634 Hex Washer Head Screw #t0-24 x 1/2
13 850733X004 UpStop Bracket
14 136376 HandleKnob
15 5179_ Halrp_ Cotlar
17 165946X479 Support Bracket
18 17600406 Screw
19 167132X004 Axla Arm Assembly - LF
20 167133X004 Axle Arm Assembly - RF
21 t65&58 Rear Skid
22 168360X004 Balactor Spr;ng Front
23 166875 Rear DoorAssembly Kit (IncL Springs)
24 751153 Locknut 5/1B-15
25 166111X479 Handle Bracket Assembly (Left)
_6 166112X479 Handle Bracket Assembly (Right)
27 851856 Screw 1/4-20 x 3/8
29 160835X007 Wheel Adjusting Bracket - Front
30 19112222 Spacer
3_ 169421X004 Selactor Spdng Rear
33 87877 8elactor Knob
34 165762X004 Axla ArmAssembly - LR
36 160628 Shoulder Boit 5/16-18
_" 151157 WheelAssembly
KEY PART
NO. NO. DESCRIPTION
39 83923 Flanged Lock,nut
40 774O0 Hubcap
41 88652 HingeScmw
42 165766 Spdng (LH)
43 165767 Swing(RH)
44 t65912 DoorBolt
45 150406 Hex Head Thread RoUJngScrew 3/8-16 x 1
46 85463 Danger Decal
48 165761X004 Axla Ar'mAssembly - RR
52 166872 Housing Ass4Jmbly(Incl. Ref. #17, 18 & 46)
53 851084 Hex Head Screw 3/8-24 x 1-3/8 Grd, 8
54 850263 HelP..alLockwasher
55 851074 Hardened Washeq
56 175064 21" Blade
57 851514 BledeAdapter
67 166113 Grass Bag
68 165755 Catcher Frarne
70 --- Engine* Craftsman 143.016000 (See Breakdown)
• - 161058 Waming Decal(Not Shown)
* - 178928 Owner's Manual
Available accessorlas not included with _wn mower:
7133623 Gas Can {2.5 gaiton)
71 33500 Fuel 8teb[tizer
7133000 SAE 30W Oil (20 oz,)
7133085 Chute Deflect.of
NOTE: All component dimensions given in U.S. inches.
1 inch = 25.4 mm
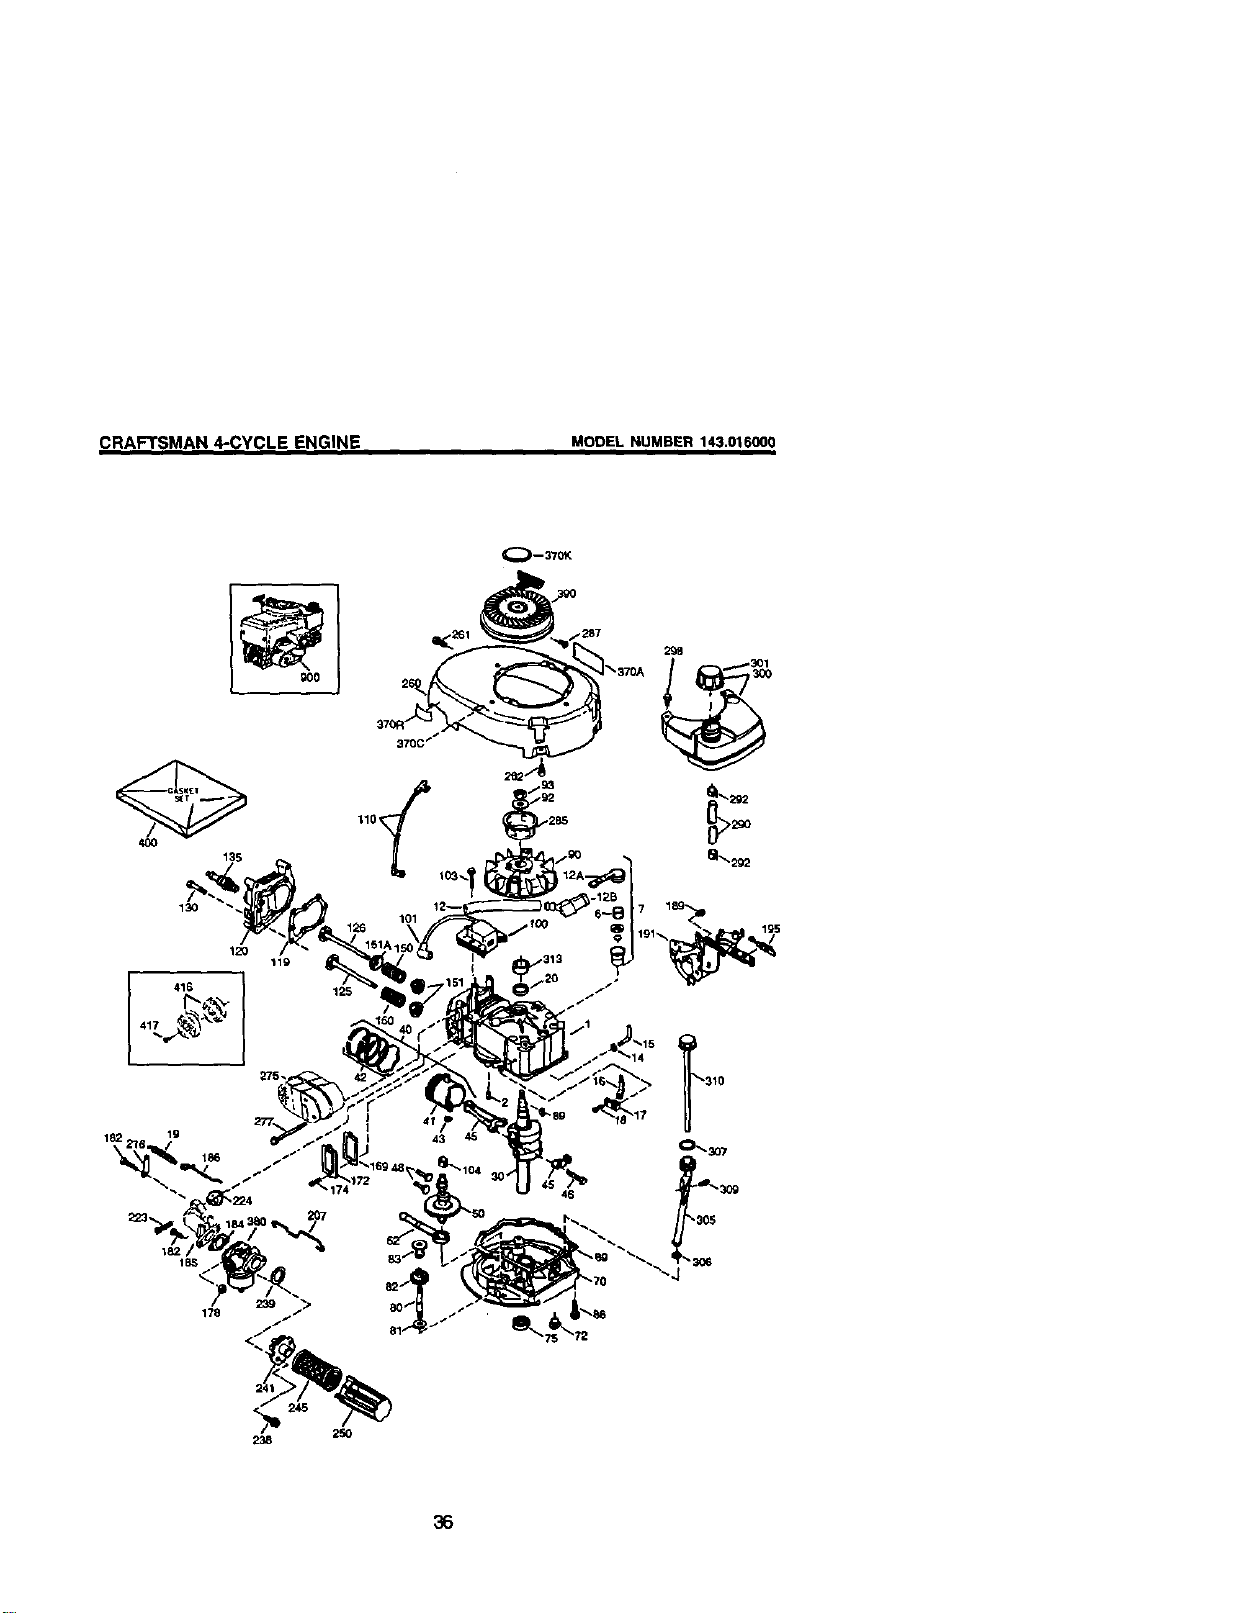
CRAFTSMAN 4-CYCLE ENGINE
MODEL NUMBER 143.016000
40O
130
120
119
416 125
178
Q-- 370!<
/<_ 25o
238
36
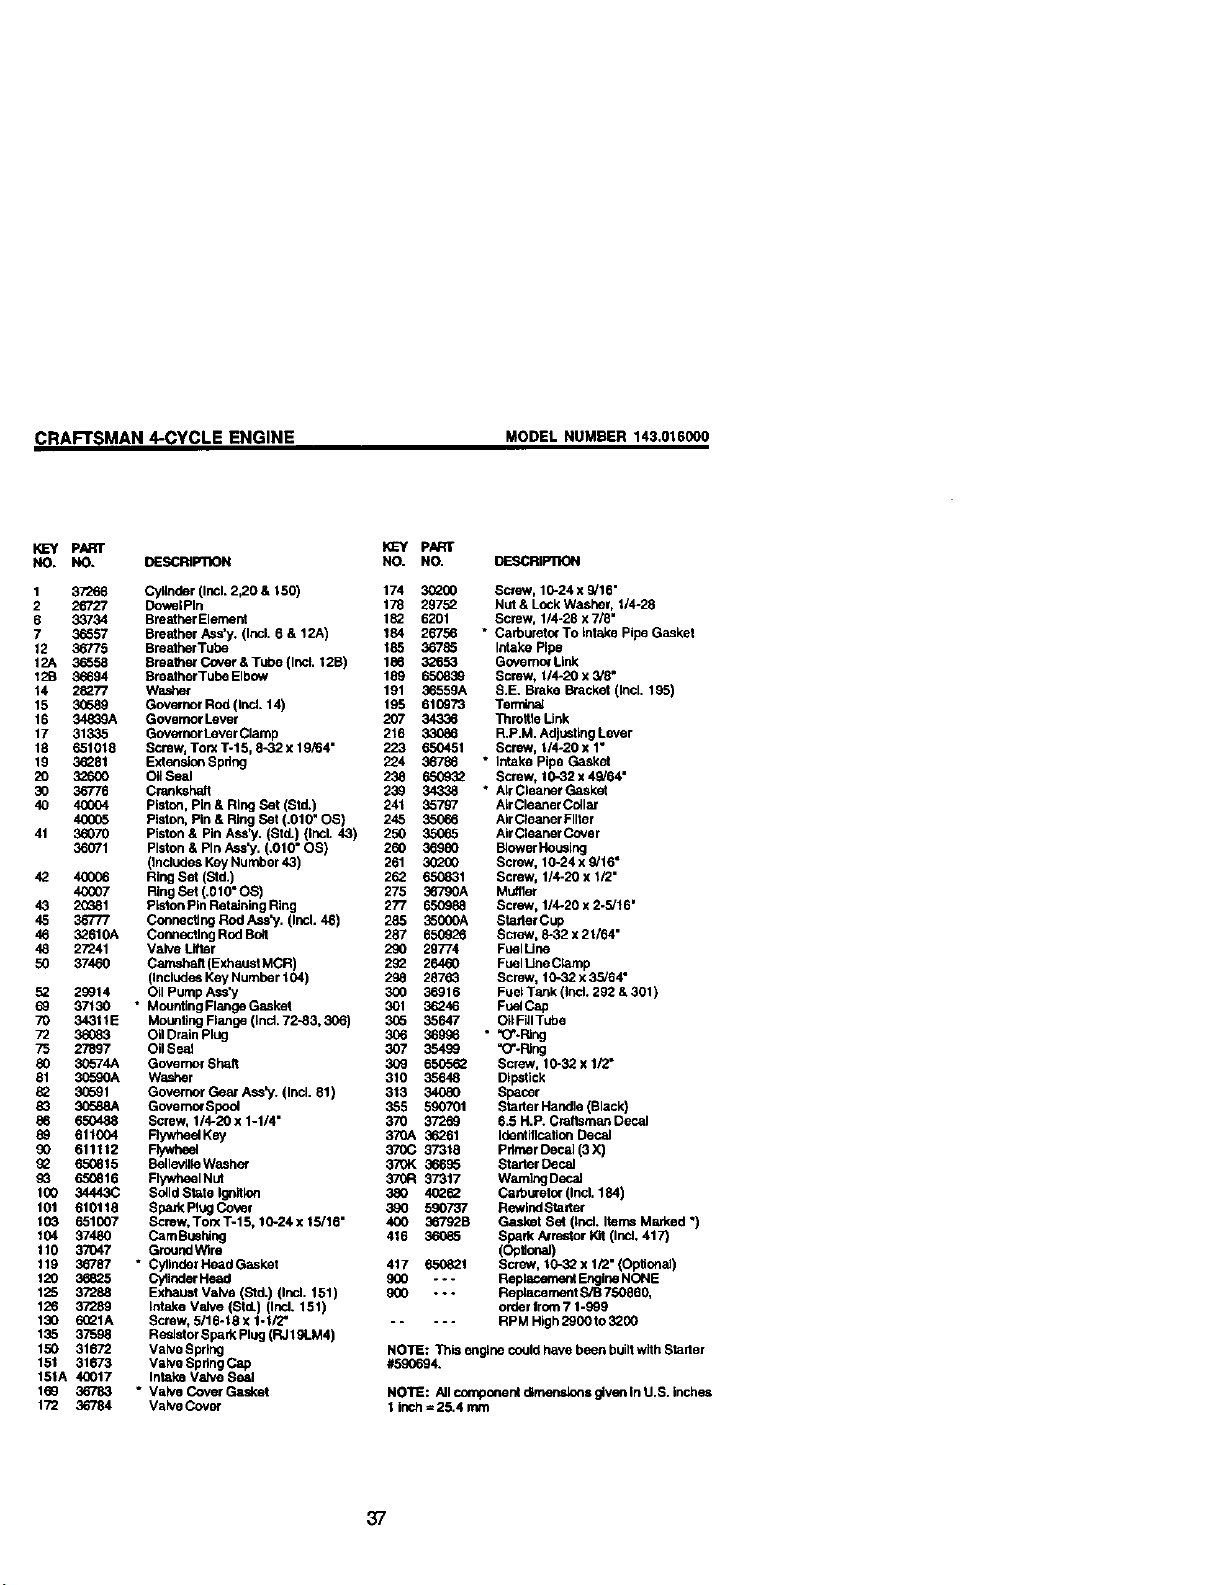
CRAFTSMAN 4-CYCLE ENGINE
MODEL NUMBER 143.016000
NO. NO. DESCRIPqlON
1 37266
2 26727
9 33734
7 36557
12 36775
12A 36558
125 36694
14 25277
15 30589
15 34839A
17 31335
18 651018
19 35281
20 32600
3O 36776
40 4OOO4
4OOO5
41 36070
36071
42 4OOO6
4OOO7
43 2O381
45 36777
46 32610A
48 27241
50 37460
52 29914
69 37130
70 34311E
72 36083
75 27897
8O 90574A
81 3_590A
82 90691
83 90590A
86 55O488
89 611004
90 611112
52 65(_15
9_ 650616
100 34443C
101 610118
103 651007
104 37480
110 37047
119 36787
120 36_.5
125 37288
126 37289
130 6521A
135 37598
150 31672
151 31673
151A 40017
169 36783
172 36784
Cylinder (Incl. 2,20 & 150)
Dov,_lPIn
Breather Element
Breather Ass'y. (Incl. 6 & 12A)
BreatherTube
Breaker Cover & Tube (IncL 12B)
BreatherTube Elbow
Washer
Governor Rod (Incl. 14)
Governor Lever
GovernorLever Clamp
Screw, Torx T-15, 8-32 x 19/64"
Extension Spring
OIISeal
Crankshaft
Piston, Pin & Ring Set (Std.)
Piston, Pin & Ring Set (.010" OS)
Piston & Pin Ass',/. (St(L) (Incl. 43)
Piston & Pin Ass_J.(.O10• OS)
(includes Key Number 43)
Ring Set (Std.)
Ring Set (.010" OS)
Piston Pin Retaining Ring
Connec'Jng Rod Ass_/. (ind. 46)
Connecting Rod Bolt
Valve Lifter
Cam.shag (Exhaust MCR)
(Includes Key Number 104)
Oil Pump Ass'y
•Mcunting Flange Gesket
Mounting Flange (ind. 72-83, 306)
Oil Drain plug
Oil Sesi
Governer Shatt
Washer
Governor Gear Ass_/. (Incl. 81)
Governor Spool
Screw, 1/4-20 x 1-1/4"
Rywheel Key
Rywhe¢
Selle,AIk5Washa_
Flywheel Nut
Solid State Ignition
Spa_ Plug Cover
Screw, TorxT-15,10-24 x 15/15"
CamBustdng
G_lnd Wire
• Cyitnder Head Gaskst
CytlnderHead
Exhaust Valve (Std.) (Ind. 151)
Intake Valve (Std.) (Ind. 151)
Screw, 5/10.18 x 1-Ii'Z'
Resistor Spark Plug (RJ lga-M4)
Valve Spring
Valve Spring Cap
Intake Vahle Seal
* Vah,e Cover Gasket
Valve Cover
KEY PARIF
NO. NO, DESCRIPTION
174 3_00 Screw, 10-24 x 3/16"
178 29752 Nut & LockWasher, 1/4-28
152 9201 Screw, 1/4-28 x 7/8"
184 26756 • Carburato¢ To intake Pipe Gasket
185 36785 Intake Pipe
188 32653 Governor Liak
189 550839 Screw, 114-20x 3/8"
191 36559A S.E. Brake Bracket (incl. 195)
195 910G73 Temitna_
207 34336 "l_roffie Link
216 33086 R,P.M. Adjusting Lever
223 650451 Screw, 1/4-20 x 1"
224 36786 • Intake Pipe Gasket
238 650932 Screw, 10-32 x 49/64 •
239 34338 * AlrCleanerGaaket
241 35797 AirCleaner Ccilar
245 35066 AirCleaner Filter
250 35065 AirCleaner Cover
260 36980 BlowerHousing
261 30200 Screw, 10-24 x 9/16"
262 650031 Screw, 1/4-20 x 1/2"
275 36790A Mu_flm
277 65098_ Screw, 1/4-20 x 2-5/t6"
285 3500OA Staffer Cup
287 650926 Screw, 8-32 x 21/64"
290 29774 FuelUne
252 26460 Fuel LineC_mp
298 28763 Screw, 10.32x33/64 •
300 36919 Fuel Tank (ind. 252 & 301)
901 36246 Fu_ Cap
3(_ 35647 OiJFiJITube
906 369_6 • _E:_'*PJng
307 35499 "O-Ring
309 9505_ Screw, 10-32 x 1/2"
310 35648 DIpatlck
313 34080 Spacer
355 590701 Starter Handle (Black)
370 37269 6.5 H.P. Craftsman Decal
370A 36261 Identification Decal
37OC 37315 Pdmer Decal (3X)
370K 36695 Starter Decal
370R 37317 warning Decal
380 45252 Corbureter (Incl, 184)
3_O 590737 Rewind Stinter
400 36792B Gasket Set (Ind. Items M_ked *)
416 36085 Spark Arrestor I_t (Ind. 417)
(OpUor_)
417 650821 Screw, 10-32 x 1/2" (Opitonal)
900 - * - Replacement EngineNON E
900 - - - Replace meritS/B 750890,
order from 7 1-999
RPM High290010 3200
NOTE: This engine couldhave been built with Stader
#59O694.
NOTE: All component dl_s given InU.S. inches
1 inch = 25.4 mm
37
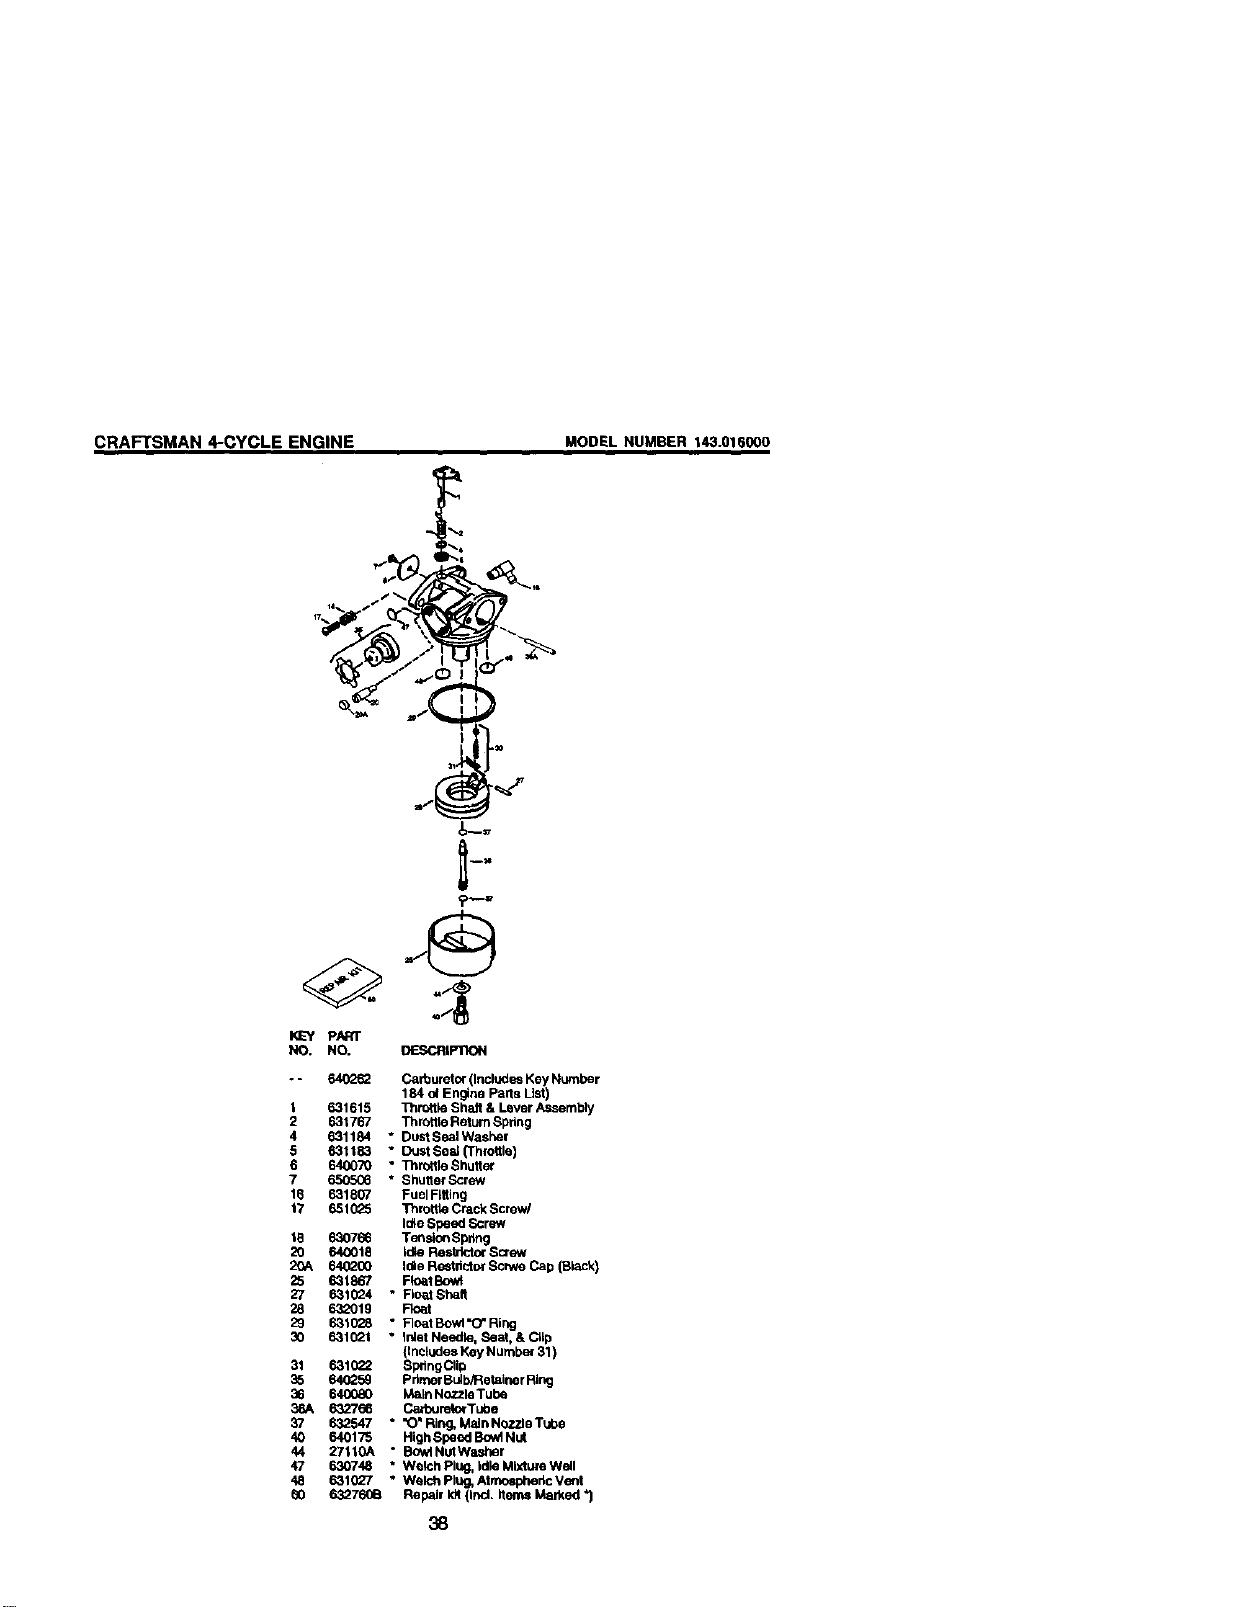
CRAFTSMAN 4-CYCLE ENGINE
K_E'Y pART
NO. NO.
MODEL NUMBER 143.016000
OESCRIPTION
o- 6402_ CaYourator (Inded_ Key Number
184 ol Engine Parts Uat)
t 631615 Thrattle Shaft & Lever Assembly
2 63t767 Throttle Relum Sprlng
4 631184 " DuatSealWasher
5 631t83 • Duatsc=Z(Throttle)
6 640070 • ThrattleShutter
7 _ * Shutter,Screw
16 631807 Fuel Fitting
t7 651_Z5 Thrattle Crack Screw/
Idle Speed Screw
IB 630766 Ter_slonSpdng
20 640018 Idle Resbtcto¢Screw
20A 640_00 101eRestdctor Scrwe Cap (Black)
25 631867 F!OalBov_
27 631024 * FIoatShalt
28 632O19
29 631028 * FloatBowl"O'Ring
30 6310_1 " Inlet Needle, Scat, & Ct_p
(tncludes Key Numbe* 31)
31 631(_2 Sp_ngClip
35 640259 prlmerBu_b/Retainer Ring
36 640080 Ma_nNozzleTube
36A 632766 Cad_urekxTube
37 632547 ° "O'Ring.MalnNozzleTube
40 640175 High Speed Bow1Nut
44 27_10A * Bo_NutWaatmr
47 630748 * WelchPlUg, ldleMIxtureWell
48 6310_7 * WelchPlug, Atmospt_ricVent
60 632760B Repair k_ (ind. items Marked _1
38
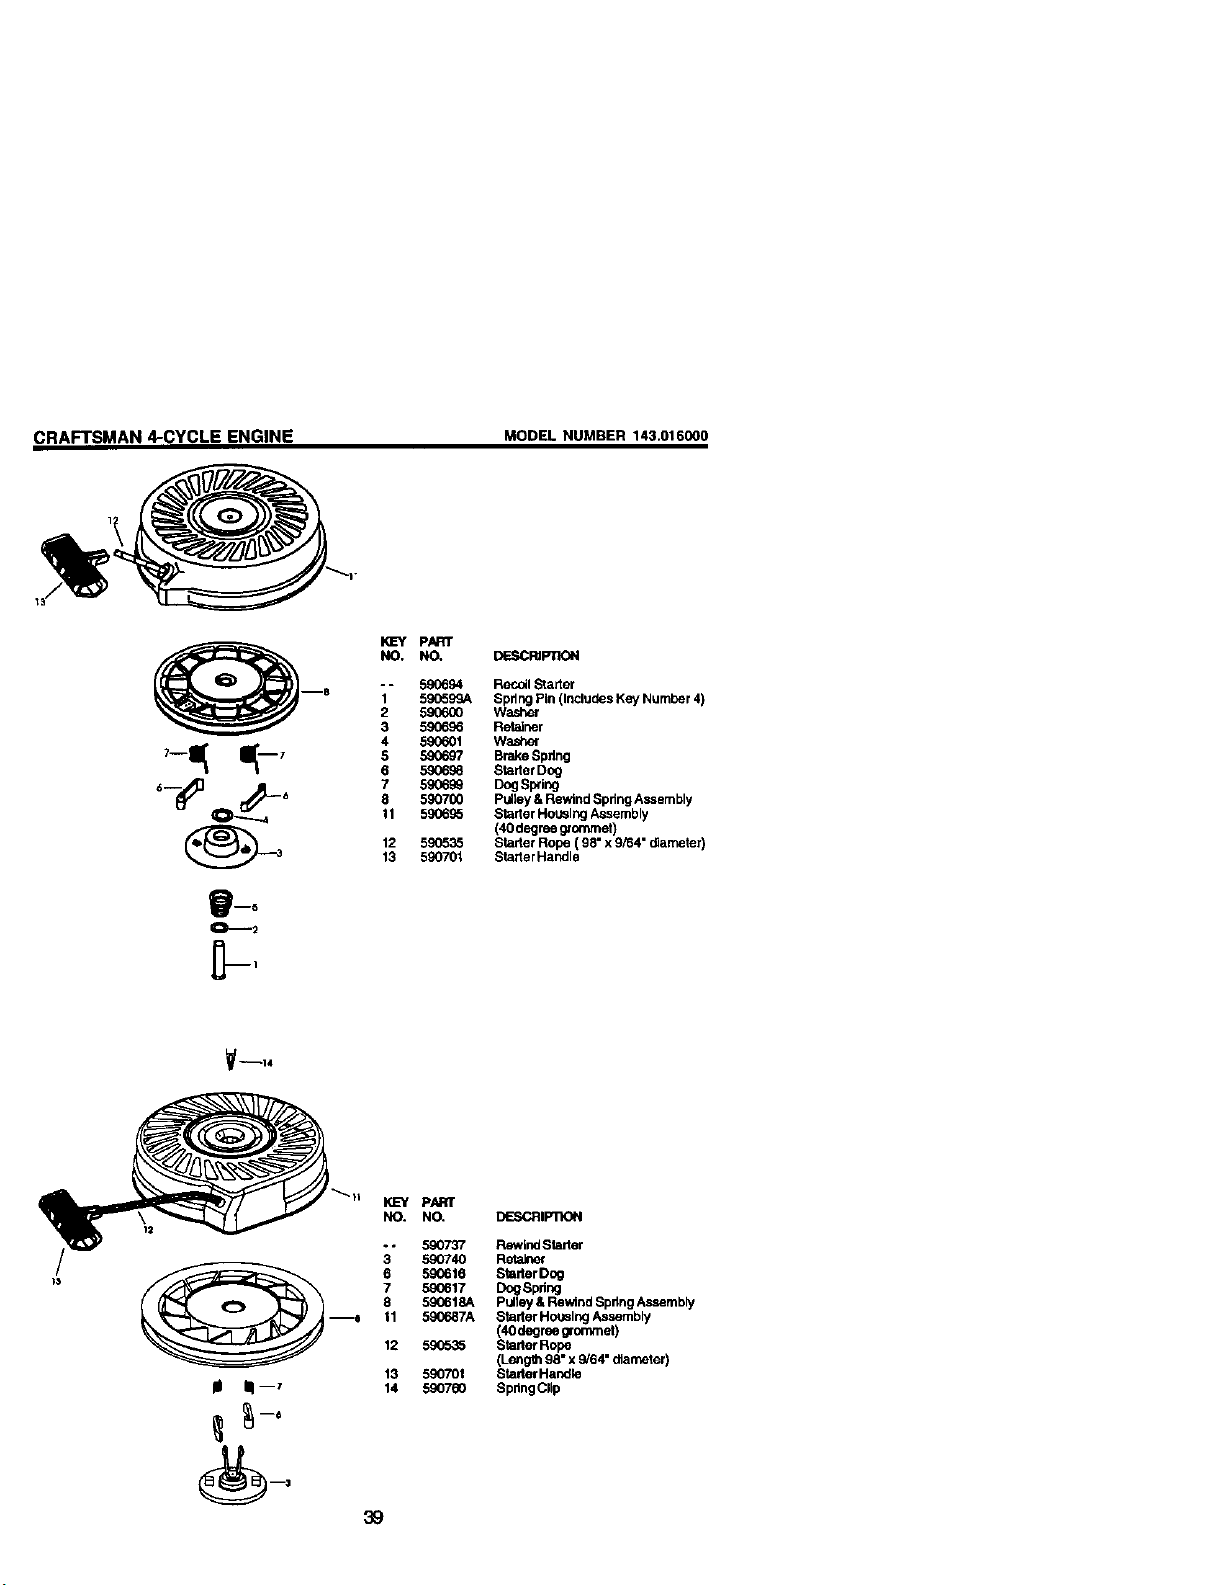
CRAFTSMAN 4-CYCLE ENGINE
MODEL NUMBER 143.016000
0
PART
NO, NO, DESCR_PnON
- - 590694 ReCOilStarter
1 59G599A Spring PLn(Includes Key Number 4)
2 590600 Washei"
3 5906_6 Retainer
4 5_601 Wa.s_er
5 590697 Brake Spdng
6 5S06Sfl Stinter Dog
7 5906_ Dog Sp_ing
8 590700 pulley & Rewind Spdng Assembly
11 5906_5 Starter Housing Assembly
(40 degree g/ommet)
12 590535 Starter Rope (98" x 9_4" diameter)
13 590701 Starter Handle
!ll El mz
39
I_W PART
NO. NO. DESCRIP]X)N
3" 5SO737 Rewind Starter
590740 Retainer
6 590616 StarterDog
7 590617 Dog Spring
8 590618A Pulley& Rewind Spdng Assembly
11 590687A Stader Housing Assembly
(40 degree grommet)
12 590535 Starter Rope
(Length 98" x 9/64" diameter)
13 590701 Starter Handle
14 590760 SpringCllp

Forrepairofmajorbrand ap_lances Inyour own home...
no matterwhomade it,no matterwhosold
1-800..4-MY-HOME _ AnyOne,day__
(1-Bm.469-4e_) (u.s.AandCanada)
Forrepairof carry-inproductslikevacuums,lawnequipment,and
electronics,callforthenearestSearsPartsand RepairCenter.
1-800-488-1222 An,/_me._ayorright(U.S.A.o'-_
_vw_com
Forthereplacementparts,accessoriesandowrler'smanuals
thatyouneedtodo-it-yourself,callSears PartsDirect_!
1-800-366-PART 6a.m.- 11 p.m., 7daysav_eek
(i_0-3_-/./78) (u,s._o_)
www_comtpartsclrect
To purchaseor inquireabouta SearsServiceAgreement
or SearsMaintenanceAgreement:
1-800-827-6655 (u.sA) 1-800-361-6665 (Canada)
7a.m.- 5 p.m.,CST, MorL- Sat. 9 a.m.- 8 p.n'LEST, M- F,4 p.m.Sat.
Parape_sel,id_demparad_a AuCanadapourse_ceenfran_
dom_J_o,y paraorden_ piezas: 1.SQ04_E.FOYERMC
1-888-S_AR TM (1-SCX)-533-6gGT)
(1_88-784-6427) www,sears.ca
O$ear_Roebu_a'_ Co. %
® Registered Trademark / TM Trademark / sMService Mark o_Sears, Roebuck and Co.
® Mama Reglstrada I "haMarca de Fdbrica / s_ Mama de Servicto de Sears, Roebuck and Co.
uc Marque de commerce I _,oMarque d6pos_e de Sears, Roebuck and Co.
178928 04.04.01 BY Printed in U.S.A.