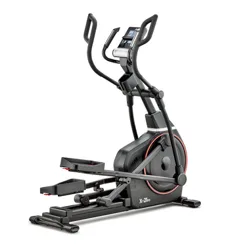
For use with BLUEFIN FITNESS CURV 2.0 Elliptical Trainer


Dear customer,
We are pleased that you have chosen a device from the BLUEFIN
FITNESS product range. BLUEFIN FITNESS sports equipment offers
you the highest quality and latest technology.
In order to take full advantage of the device‘s performance, and to
have many years of pleasure in your device, please read this manual
carefully before commissioning and starting the training and use
the device according to the instructions. The operational safety and
function of the device can only be guaranteed if the general safety and
accident prevention regulations of the legislator as well as the safety
instructions in this user manual are observed. We assume no liability
for damages caused by improper use or incorrect operation.
Please make sure that all persons using the device
have read and understood the user manual.

SAFETY PRECAUTIONS
This general safety information must be observed when using this
product. Read all instructions before using the product. Keep the user
manual in a safe place to be able to access it at any time if necessary.
Please keep this manual for future reference.
1. Before commencing assembly and use of your new equipment, carefully read
the instruction manual to understand the information provided. The correct
installation, maintenance and use of your enquipment is important to ensure you
get the safest and most effective fitness workout.
2. Please ensure the equipment has been assembled according to the assembly
manual.
3. If you are over 45 years old, have health or medical problems and/or this is
your first time exercising in over 12 months, please consult your local Doctor or
Medical Professional before use.
4. The maximum user weight is 120Kg.
5. Should you experience any of the following symptoms including: headache, chest
tightness, irregular heartbeat, shortness of breath, dizziness, nausea or any
sharp muscle or joint pain, immediately stop training and consult your Doctor or
Medical Professional.
6. Ensure that young children and pets are kept away from the equipment to prevent
injury, the equipment is for adult use only.
7. The equipment should be placed on a hard, flat surface and at least 0.6 meters
away from any obstacles.
8. Before using the equipment, please check all nuts and bolts of the equipment are
tightened securely.

SAFETY PRECAUTIONS (cont.)
9. Care must be taken when lifting, moving or stowing the equipment so as not to
injure your back. Always use proper lifting techniques and/or seek assistance if
necessary.
10. It is strongly recommended you wear appropriate clothing and footwear when
using your equipmentl for your own personal comfort.
11. The equipment is not suitable for use as a medical device.
BEFORE BEGINNING ANY EXERCISE PROGRAM, CONSULT YOUR
PHYSICIAN. THIS IS ESPECIALLY IMPORTANT FOR INDIVIDUALS
OVER THE AGE OF 45 OR PERSONS WITH PRE-EXISTING HEALTH
PROBLEMS. READ ALL INSTRUCTIONS BEFORE USING ANY FITNESS
EQUIPMENT. WE ASSUME NO RESPONSIBILITY FOR PERSONAL
INJURY OR PROPERTY DAMAGE SUSTAINED BY OR THROUGH THE
USE OF THIS PRODUCT.
SAVE THESE INSTRUCTIONS.
WARNING

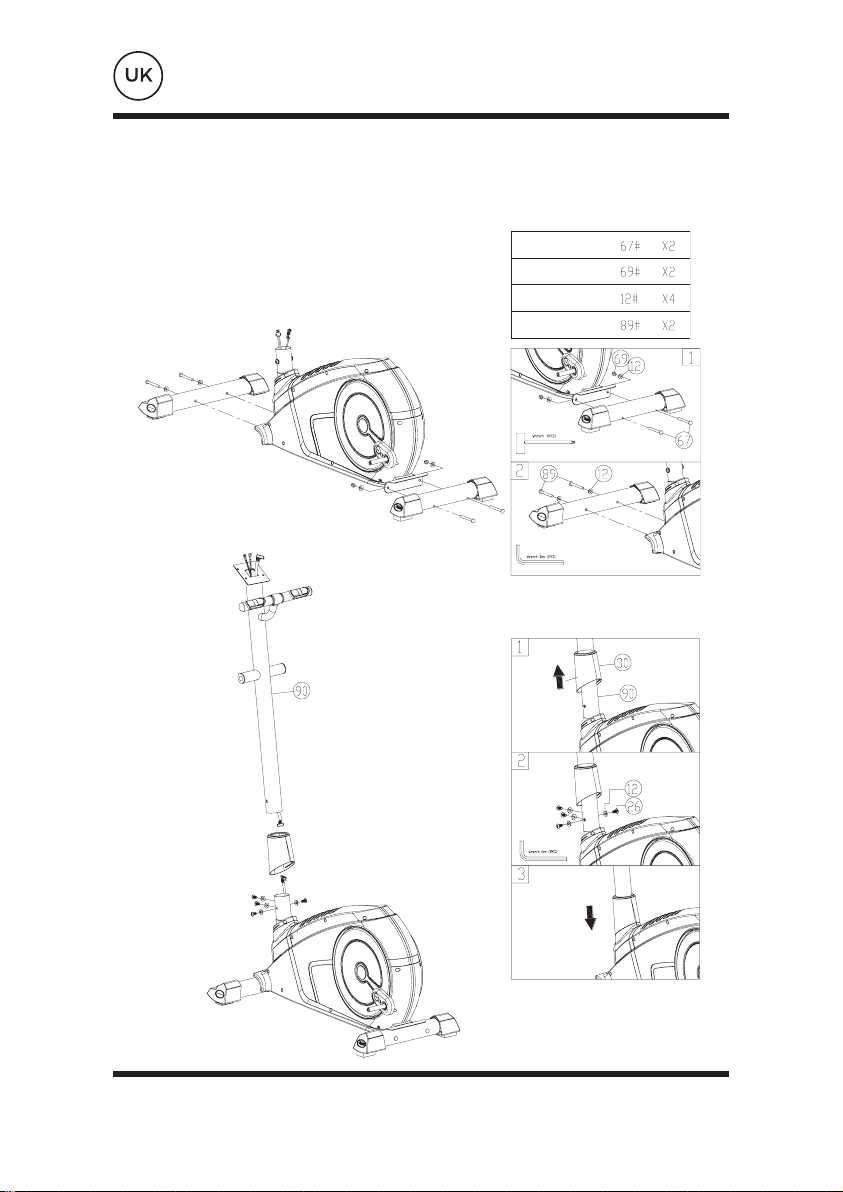
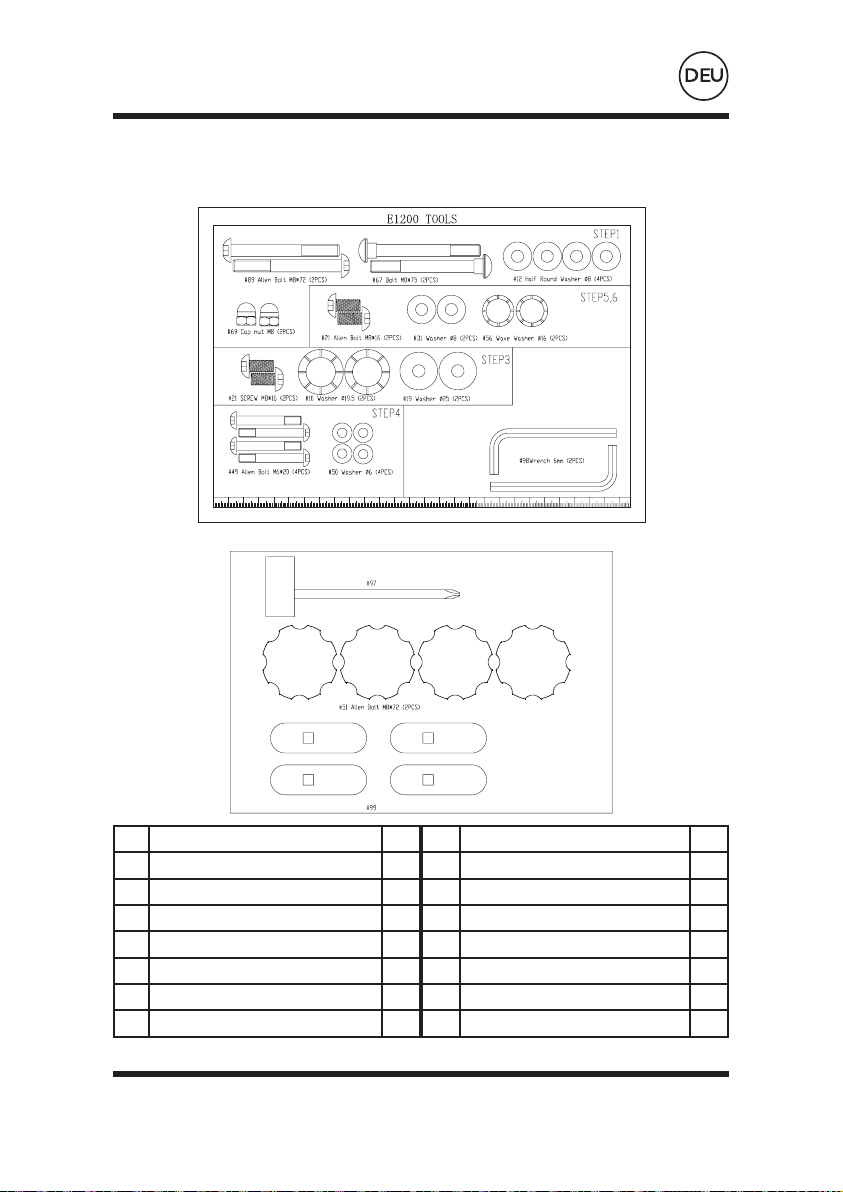
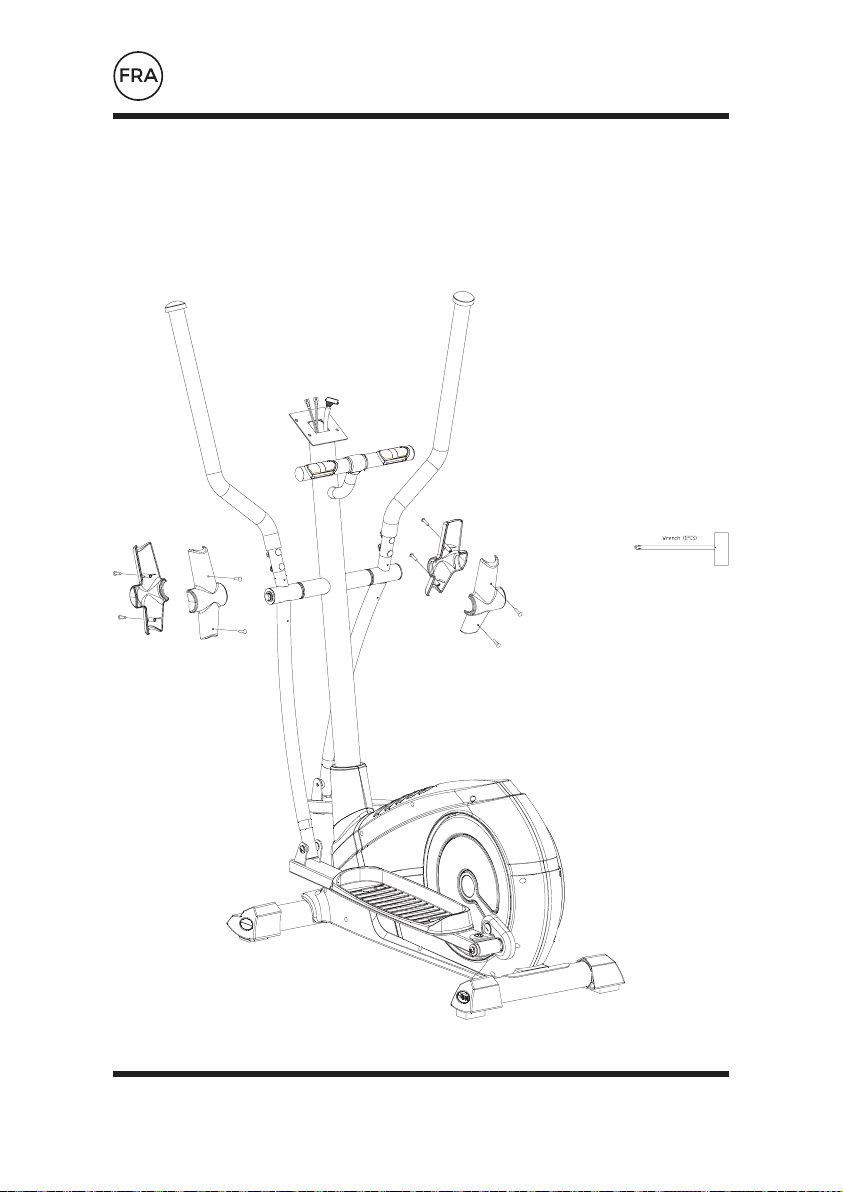
ASSEMBLY INSTRUCTION
Before you start installation inspect and prepare
all parts and screws featured in this manual. When
you open the carton, you will find the following
parts.
NB/ Some of the smaller components may be pre-fitted to
larger components.
68 1
NO NO
1 1
Qty Qty
REAR STABILISER COMPUTER
Description Description
FRAME HANDLE-LOWER
FRONT STABILISERHANDLE-UPPER
HANDLE TUBEHANDLE COVER
HANDLE COVERHANDLE TUBE COVER
ADAPTORPEDAL TUBE
PEDAL
70 11 1 2
88 14 1 2
90
22/23
2 2
94/95
105
30 1 1
45 1 2
48 2

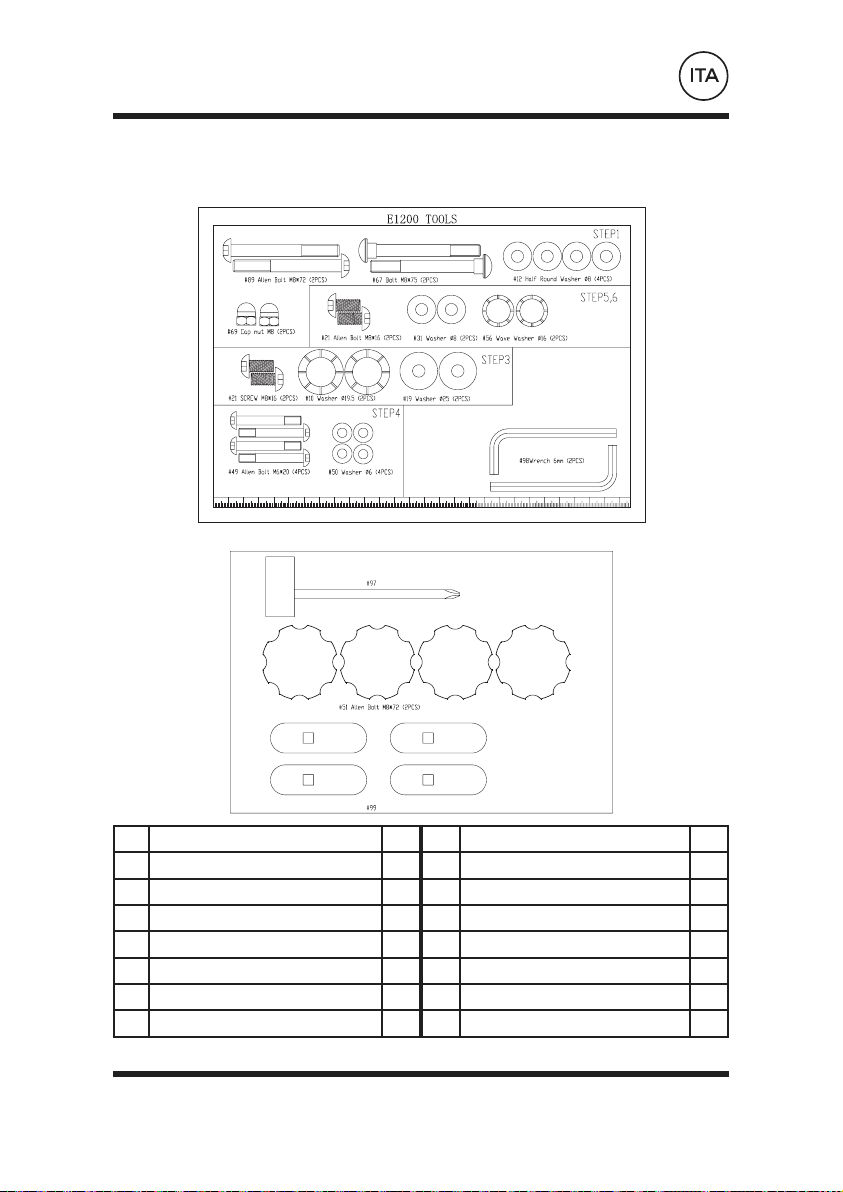
ASSEMBLY INSTRUCTION (cont.)
49
19
67
89
4
2
2
2
SCREW
FLAT WASHER
SCREW
SCREW
FLAT WASHER SEMI-CIRCLE WASHER
HEXAGON WRENCHCAPPING NUT
SOCKET SPANNERSCREW
PEDAL KNOBFLAT WASHER
PEDAL KNOB METAL PLATEWAVE WASHER
WAVE WASHER
50 12 4 4
98 69
21
2 2
97
51
99
1 4
31 4 2
56 4 2
10 2
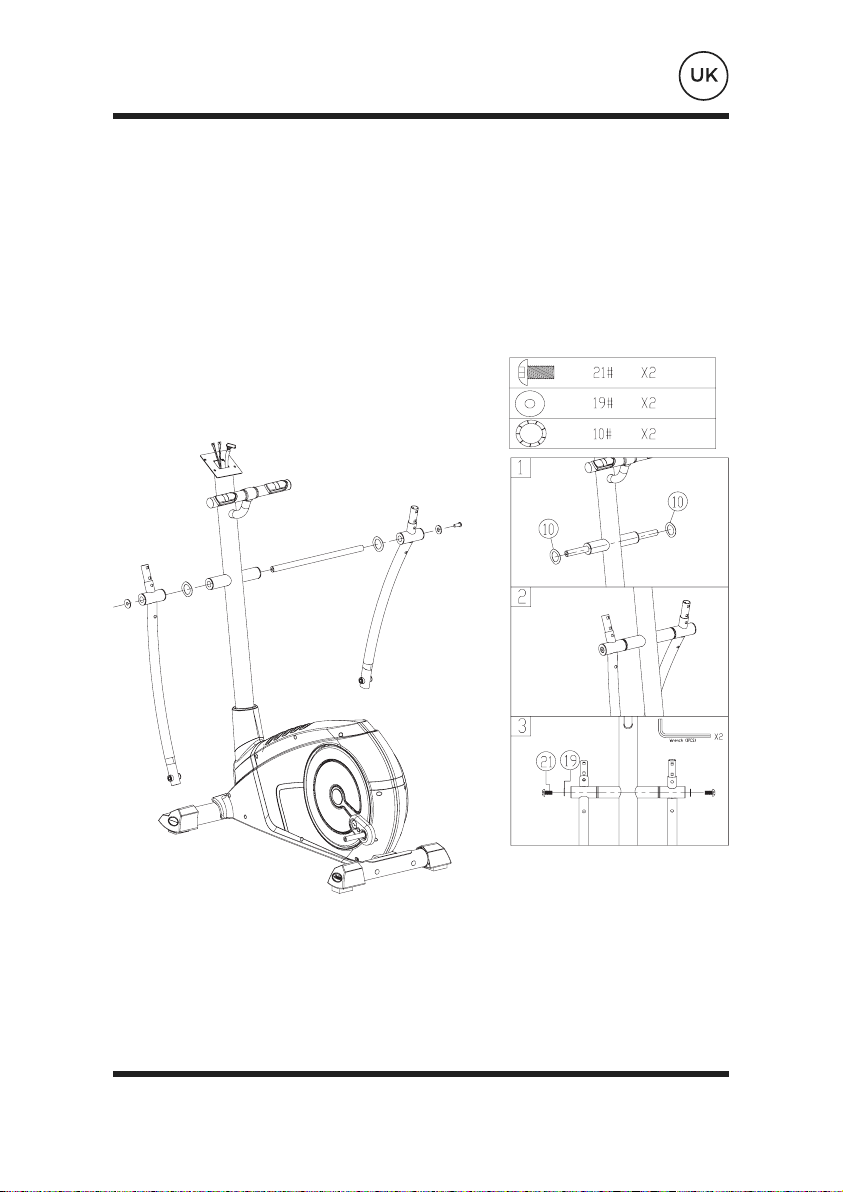
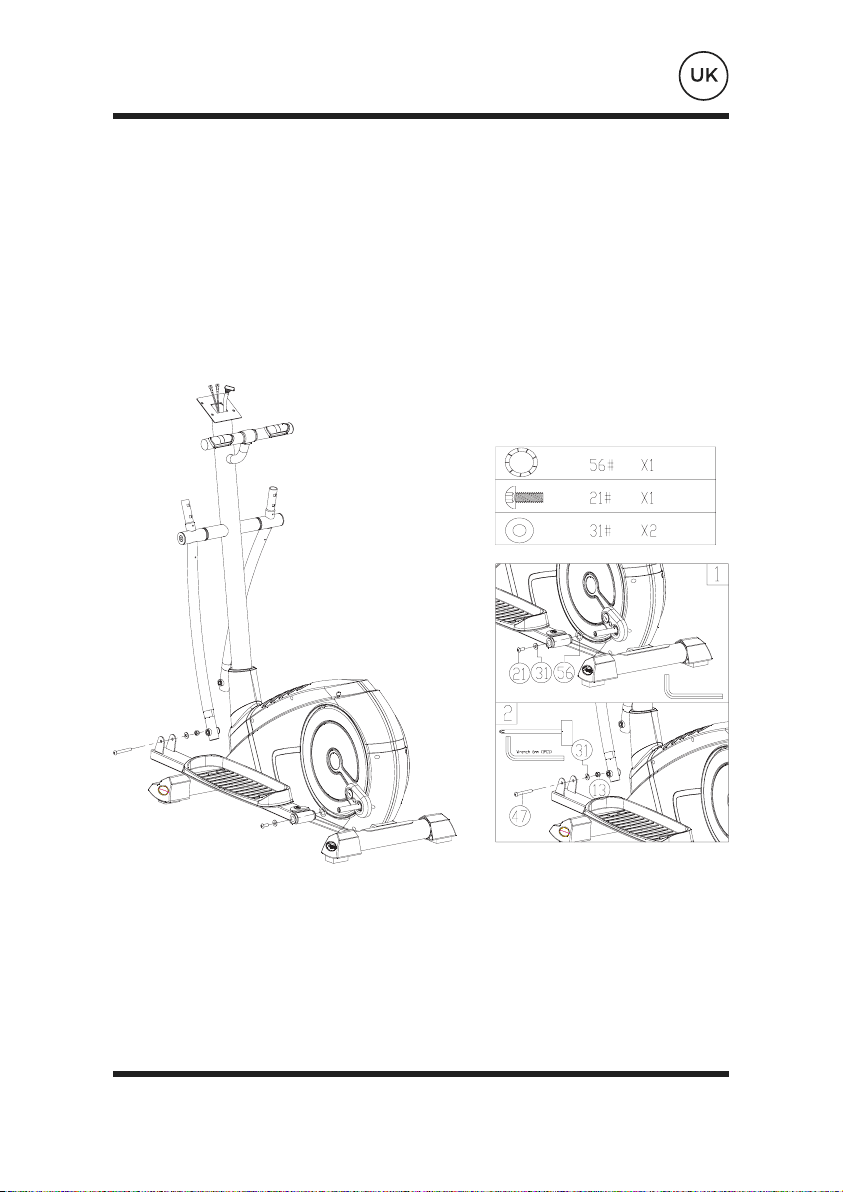
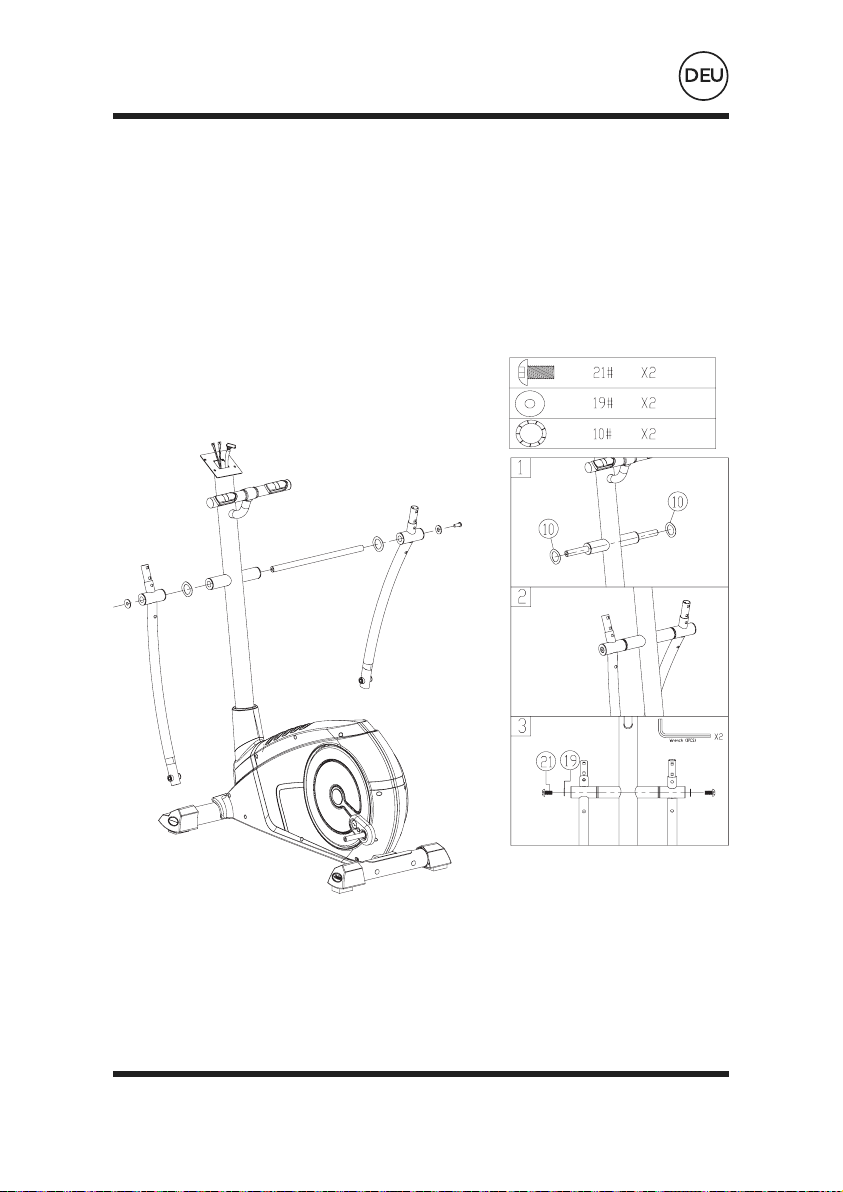
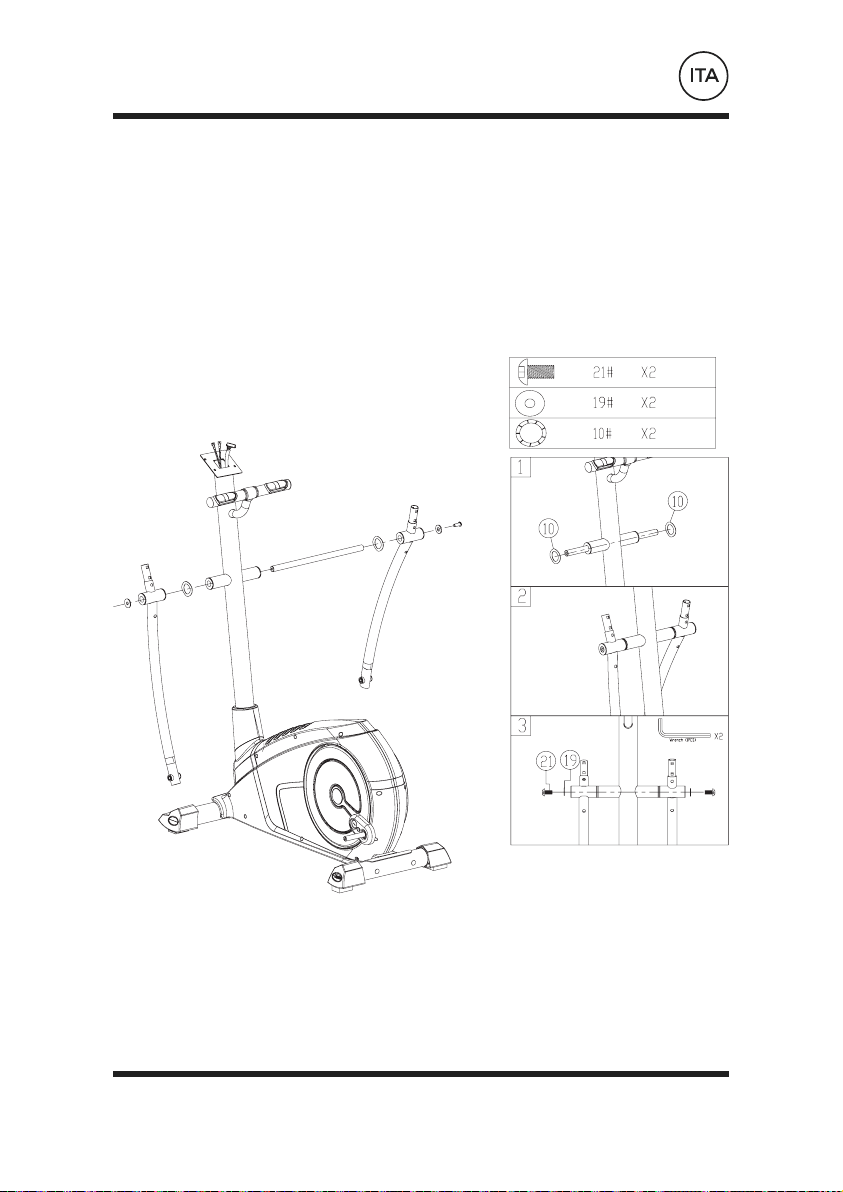
ASSEMBLY INSTRUCTION (cont.)
Step 1.
Step 2.
Step 3.
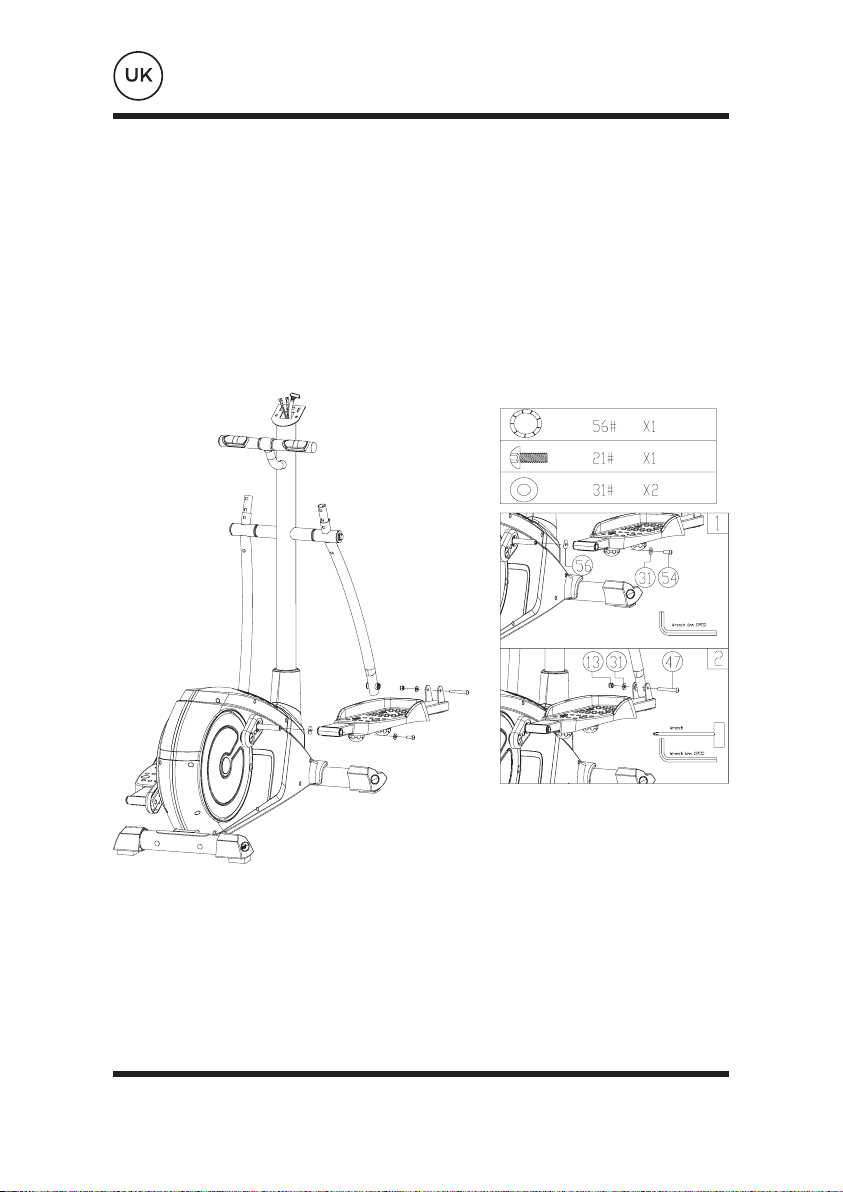
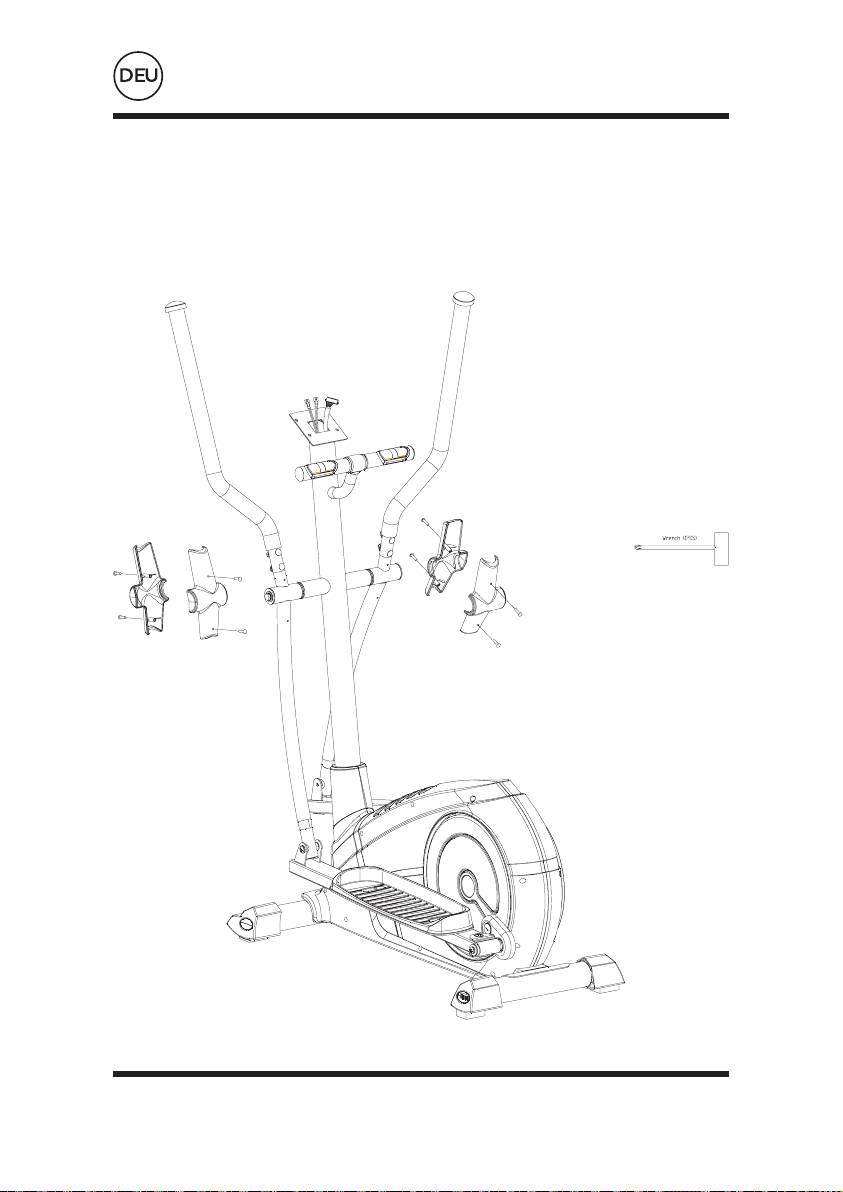
ASSEMBLY INSTRUCTION (cont.)
ASSEMBLY INSTRUCTION (cont.)
Step 4.
Step 5.
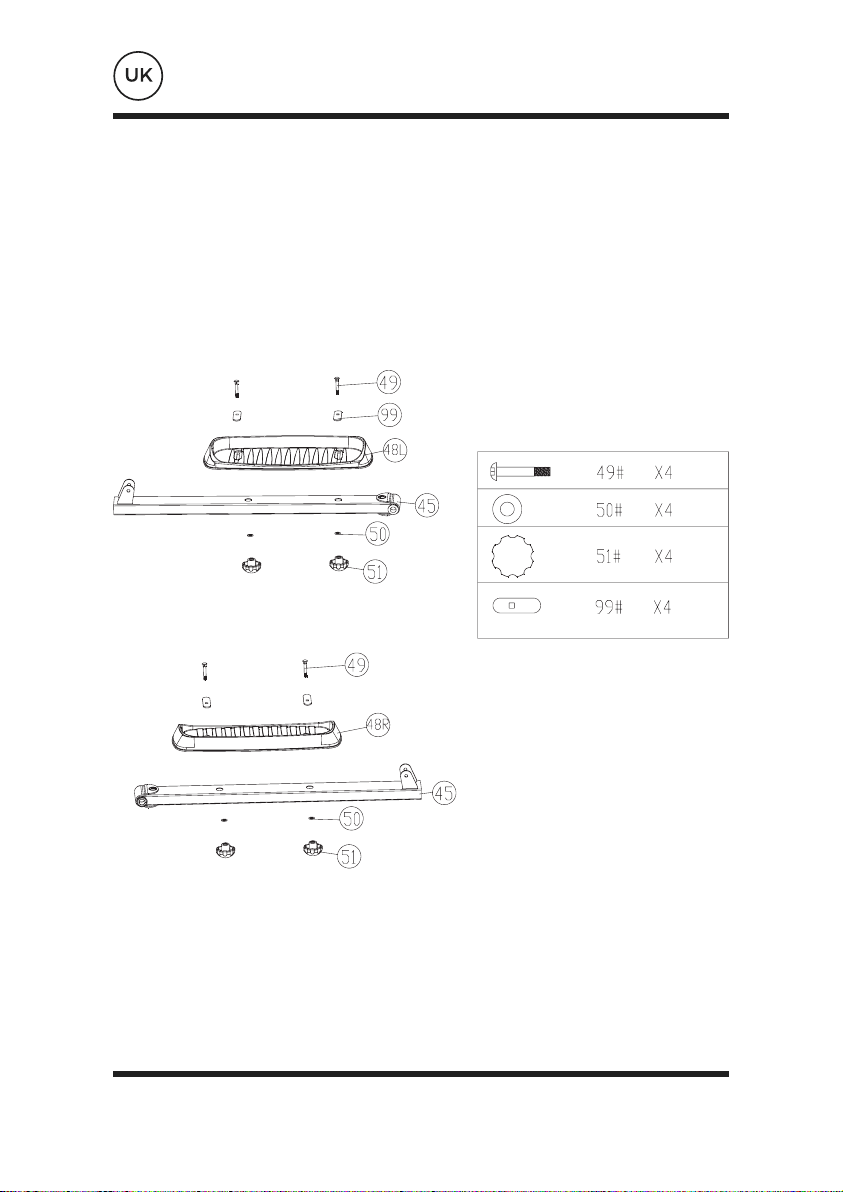
ASSEMBLY INSTRUCTION (cont.)
ASSEMBLY INSTRUCTION (cont.)
Step 6.
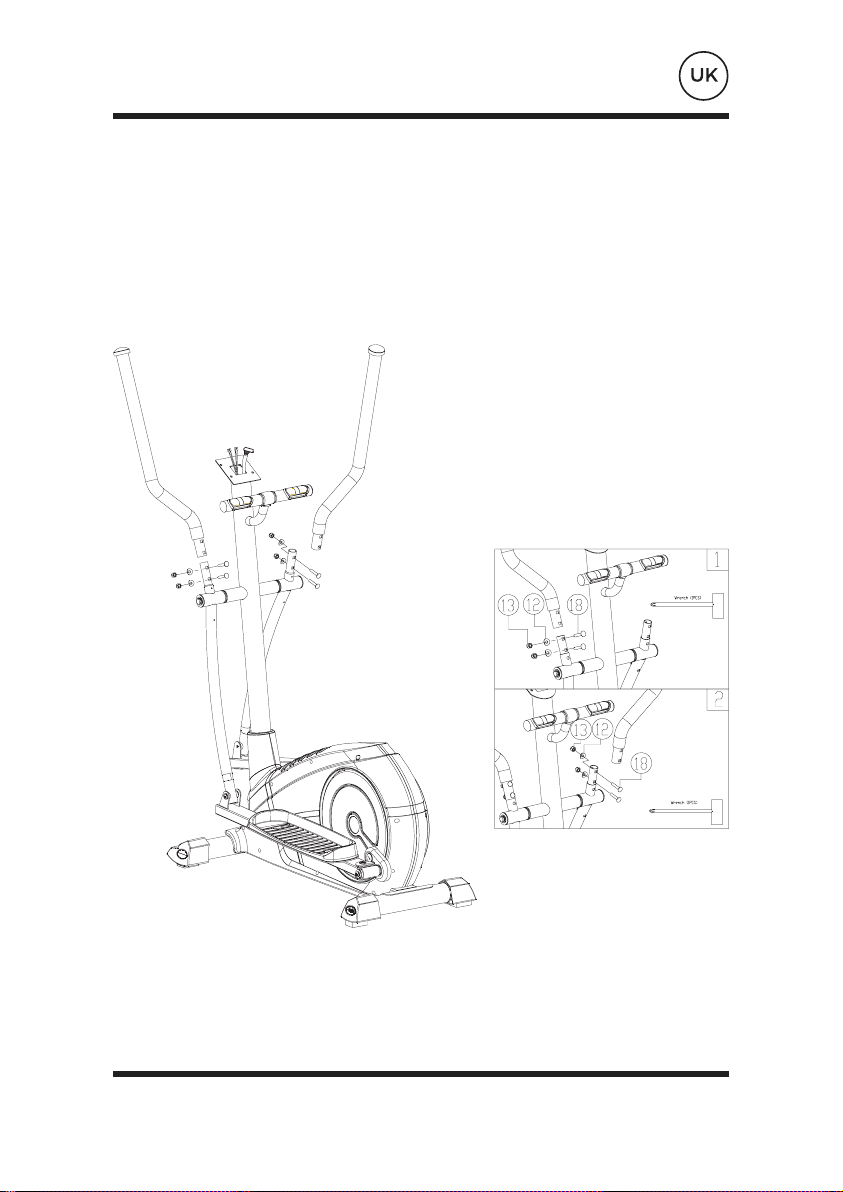
Step 7.
ASSEMBLY INSTRUCTION (cont.)

ASSEMBLY INSTRUCTION (cont.)
Step 8.

Step 9.
ASSEMBLY INSTRUCTION (cont.)

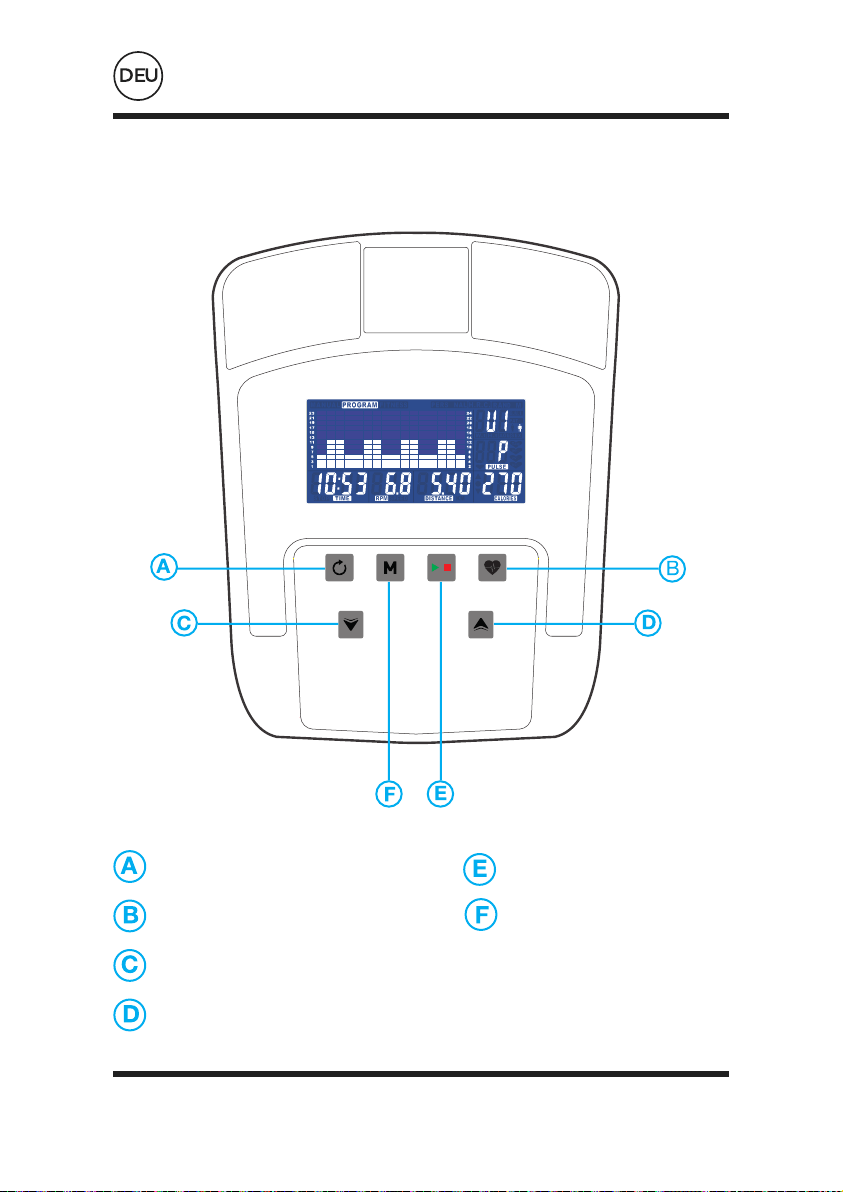
OPERATION INSTRUCTIONS
RESET START / STOP
RECOVERY MODE
DOWN
UP
Computer Functions

OPERATION INSTRUCTIONS (cont.)
RESET
MODE
START / STOP
RECOVERY
DOWN
UP
• This is used to reset all values.
• Confirm your selection.
• After your workout can be pressed to measure the
user’s recovery rate.
• Once complete can be pressed again to return to
the previous display.
• Press to make decreasing adjustments when
setting TIME, SPEED, DISTANCE and CALORIES or
the calendar/time.
• Press to make increasing adjustments when
setting TIME, SPEED, DISTANCE and CALORIES or
the calendar/time.

OPERATION INSTRUCTIONS (cont.)
Operation
When the power supply is connected to the machine the computer will power on with a long beep
sound.
The Main Menu will be displayed. The user can press START to begin immediately in the manual
mode. All values (SPEED, DISTANCE, TIME and CALORIES) will count up from zero. Resistance
level can be changed at any time during exercise by pressing UP/DOWN.
Before beginning the manual exercise the user can set the desired workout for TIME, DISTANCE,
CALORIES and PULSE.
Before beginning the manual exercise the user can set the desired workout for TIME, DISTANCE,
CALORIES and PULSE.
From Main Menu press UP/DOWN buttons to highlight MANUAL at the top of the screen.
Press MODE to highlight the required selection, use UP/DOWN to alter the setting. Press START
to begin when details have been inputted. The inputted data will now count down from the entered
information.
Program
• In main menu press UP/DOWN to highlight the program function.
• Press MODE, P1 will be displayed (After 2 seconds the program profile will be shown).
• Use UP/DOWN to select Program P1 – P12.
• Press MODE to enter the program.
• Use UP/DOWN to change the program level.
• Press START to begin.
H.R.C (Heart Rate Control)
• In main menu press UP/DOWN to highlight H.R.C.
• Press MODE to select.
• Age will be displayed, press UP/DOWN to change.
• Press MODE to move to next section.

OPERATION INSTRUCTIONS (cont.)
Maximum users heart rate is worked out as 220 – age = total TARGET HEART RATE. This is the
maximum your heart rate (MHR) should be. You can then work out at 55%, 75% or 90% of this. For
example: 220 – 25 (users age) = 195 MHR, from here you can work out at the desired %.
• Computer will record the TARGET HEART RATE and allow the user to work out within this.
The resistance level will automatically be changed.
• If no heart rate is being recorded the below will be displayed on the screen. In this instance
ensure that both hands are securely holding the pulse sensors.
Personal
• User can create own workout profile.
• In main menu press UP/DOWN to select USER.
• Press UP/DOWN to alter resistance level in the first segment of the profile.
• Press MODE to move to the next segment.
• Continue the above for all columns.
• Press START to begin exercise once complete.
Recovery
At any time during exercise the recovery button can be pressed. Once pressed the user must place
both hand securely on the pulse sensors, the computer will count down from 1 minute.
After the countdown has completed the users recovery level will be displayed, F1 – F6. The aim is to
improve this level over time which indicates the user’s fitness is improving.
Recovery Grade
F1 Excellent; F2 Very Good; F3 Good; F4 Satisfactory; F5 Below Average; F6 Poor
Notes
• If there is no movement detected for approximately 4 minutes the computer will switch off.
Press any button or begin pedaling to restart.
• When any preset value reaches zero the computer will beep 8 times to alert the user. To stop
this press any key.
• Speed and distance are preset to either Km or miles; It is not possible to switch between
miles and Kilometres.

COMPUTER OPERATION
Smartphone App
REQUIREMENTS
Bluetooth 4.0. iPhone 4S and above. IOS 7.1 and above. Android 4.3 and above.
APP DOWNLOAD
Download App from application store on smartphone. Search for ‘e-HEALTH (Shipeng
Tian)’ and select the App to download.
BLUETOOTH AUDIO
Please consult your smartphone manual for Bluetooth connection instructions, in
order to access Bluetooth Audio.

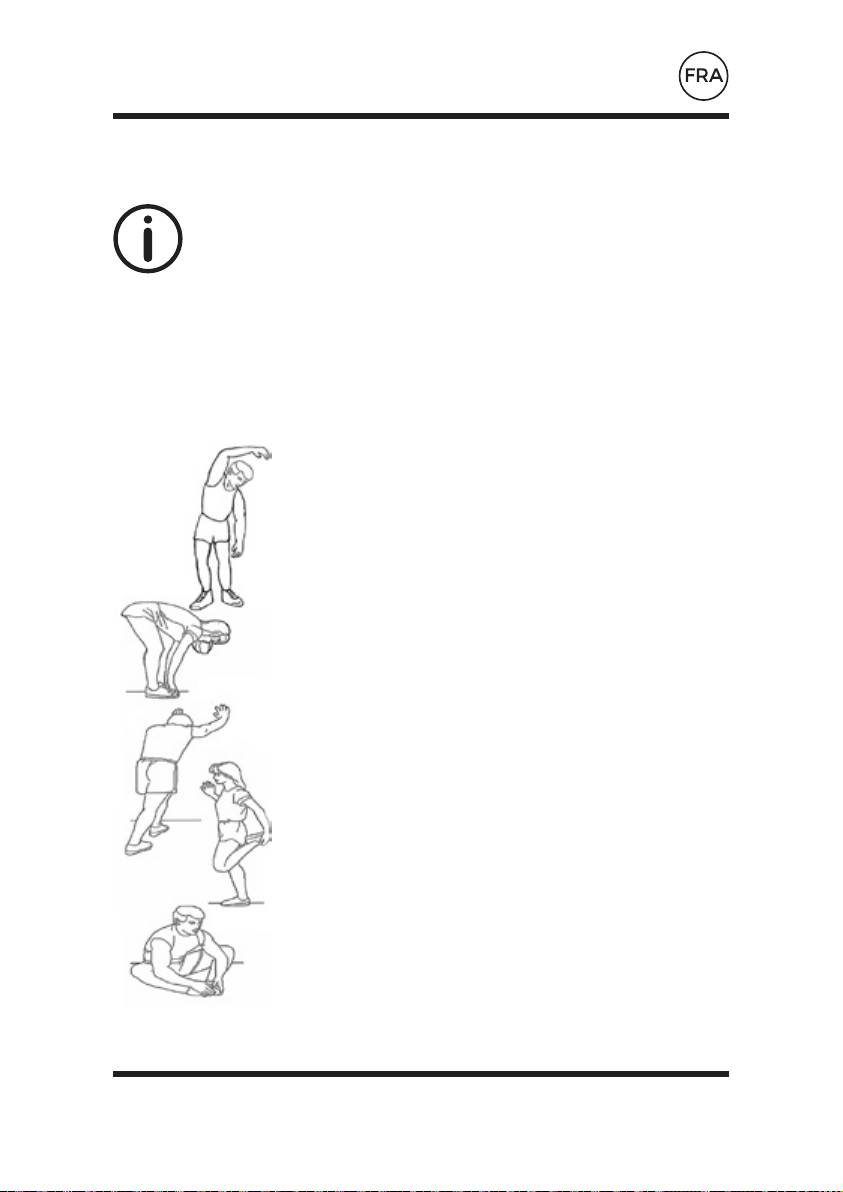
WARM UP & COOL DOWN!
To prevent injuries you should start with warm-up, cool-down and
stretching exercises before and after each workout.
No matter how you do sports, please do some stretch at first. The warm muscle will
extend easily. This reduces the risk of a spasm, or muscle injury, during exercise. To
warm up yourself we suggest the following stretch exercise as shown in the graphic:
Do not overstretch or pull your muscles.
IF IT HURTS, STOP IT!
Side bends
Pass the arm over your head and bend the upper body in the
same direction. Hold this position for 10 to 15 seconds and slowly
straighten up yourself. Repeat this 3 times for each side. (picture 1).
Toe Touch
Slow bend forward from your waist, letting your back and shoulders
relax as you stretch toward your toes, Reach down as far as you can
and hold for 15 counts. And then relax, repeat 3 times. (picture 2)
Calf-Achilles Stretch
Lean against a wall with your left leg in front of the right and your
arms forward, Keep your right leg straight and the left foot on the
floor, then bend the left leg and lean forward by moving your hips
toward the wall, Hold, then repeat on the other side for 15 counts.
Then relax and repeat 3 times for each leg. (picture 3)
Quadriceps stretch
With one hand against a wall for balance, reach behind you and pull
your right foot up .Bring your heel as close to your buttocks. hold for
10-15counts,relax.Repeat three times for each foot. (picture 4)
Inner Thigh Stretch
Sit with the soles of your feet together with your knees pointing
outward. Pull your feet as close into your groin as possible. Gently
push your knees towards the floor. Hold for 15 counts.Then relax
and repeat 3 times. (picture 5)
1
2
3
5
4


Lieber Kunde,
wir freuen uns sehr, dass Sie ein Gerät aus dem Produktportfolio
der Unternehmens BLUEFIN FITNESS erworben haben. Die Sport-
Ausrüstung von BLUEFIN FITNESS steht für höchste Qualität und
neueste Technologie.
Damit Sie voll und ganz von Ihrem Produktkauf profitieren können
und damit Sie noch sehr lange Freude an Ihrem Gerät haben,
lesen Sie sich bitte diese Anleitung vor dem Training gut durch und
benutzen Sie es gemäß der Gebrauchsanleitung.
Die Sicherheit und Funktionalität des Geräts kann nur dann
gewährleistet werden, wenn sowohl die allgemeinen Sicherheits-
und Unfallverhütungs-Regularien des Gesetzgebers als auch die
Sicherheitshinweise in dieser Bedienungsanleitung beachtet werden.
Wir übernehmen keine Verantwortung für Schäden, die aufgrund
einer unsachgemäßen Verwendung oder einer falschen Bedienung
dieses Geräts resultieren.
Bitte stellen Sie sicher, dass alle Personen, die
dieses Gerät verwenden, die Gebrauchsanleitung
gelesen und verstanden haben.

SICHERHEITSMASSNAHMEN
Diese allgemeinen Sicherheitsmaßnahmen müssen bei
Verwendung dieses Produkts beachtet werden. Lesen Sie sich
die Bedienungsanleitung vor Benutzung des Produkts gut durch.
Bewahren Sie es an einem sicheren Ort auf, um jederzeit darauf
zugreifen zu können, sollte dies notwendig sein.
Bitte bewahren Sie diese Bedienungsanleitung für zukünftige
Zwecke auf.
1. Bevor Sie mit dem Aufbau und dem Gebrauch Ihres neuen Produkts beginnen,
sollten Sie sich die Bedienungsanleitung sorgfältig durchlesen, um die darin
enthaltenen Informationen zu verstehen. Die korrekte Inbetriebnahme,
Instandhaltung und Verwendung Ihres Produkts ist wichtig, um Ihnen ein sicheres
und effektives Training zu ermöglichen.
2. Bitte achten Sie darauf, dass das Produkt korrekt gemäß der
Bedienungsanleitung zusammengebaut wurde.
3. Wenn Sie älter als 45 Jahre sind, gesundheitliche oder medizinische Probleme
haben und oder/wenn dies das erste Mal seit mehr als 12 Monaten ist, dass Sie
Sport treiben, sollten Sie vor dem Gebrauch dieses Gerät Ihren Arzt kontaktieren.
4. Das maximale Nutzungsgewicht beträgt 120 kg.
5. Sollten Sie eines der folgenden Symptome wie Kopfschmerzen, Brustschmerzen,
Herzrhythmusstörungen, Kurzatmigkeit, Schwindel, Übelkeit oder jedwede
starken Muskel- oder Gelenkschmerzen verspüren, sollten Sie sofort mit dem
Training aufhören und Ihren Arzt kontaktieren.
6. Stellen Sie sicher, dass jüngere Kinder und Haustiere von diesem Gerät
ferngehalten werden, um Verletzungen zu vermeiden. Dieses Gerät ist nur für
Erwachsene geeignet.
7. Das Gerät sollte auf einem harten und ebenen Untergrund stehen und sich
mindestens 0,6 m von sämtlichen Hindernissen entfernt befinden.

SICHERHEITSMASSNAHMEN (cont.)
8. Vor Gebrauch des Produkts sollten Sie überprüfen, ob alle Muttern und Bolzen
fest sitzen.
9. 9. Bitte seien Sie beim Anheben, Transportieren oder Verstauen des Geräts
vorsichtig, um Ihren Rücken nicht zu schädigen. Wenden Sie stets die richtige
Anhebe-Technik an und/oder holen Sie sich Hilfe, sollte dies nötig sein.
10. 10. Es wird empfohlen, dass Sie geeignete Kleidung und Schuhwerk tragen, wenn
Sie das Gerät benutzen.
11. 11. Das Gerät eignet sich nicht für medizinische Zwecke.
VOR BEGINN EINES JEDEN TRAININGSPROGRAMMS SOLLTEN
SIE RÜCKSPRACHE MIT IHREM ARZT HALTEN. DIES IST
BESONDERS FÜR PERSONEN WICHTIG, DIE ÄLTER ALS 45 JAHRE
SIND ODER FÜR PERSONEN, DIE BEREITS AN MEDIZINISCHEN
VORERKRANKUNGEN LEIDEN. LESEN DIE BEDIENUNGSANLEITUNG
VOLLSTÄNDIG DURCH, BEVOR SIE EIN FITNESS-GERÄT
BENUTZEN. WIR ÜBERNEHMEN KEINE VERANTWORTUNG FÜR
PRIVATE SCHÄDEN ODER EIGENTUMSSCHÄDEN, DIE DURCH DIE
VERWENDUNG DIESES PRODUKT VERURSACHT WURDEN.
BEWAHREN SIE DIESE BEDIENUNGSANLEITUNG GUT AUF.
WARNUNG

MONTAGE-ANLEITUNG
Bevor Sie mit der Montage beginnen, sollten Sie
sicherstellen, dass alle Elemente und Schrauben
gemäß der Anleitung vorhanden sind. Wenn Sie die
Geräteverpackung öffnen, finden Sie die folgenden
Elemente vor.
NB/ Einige der kleineren Elemente können bereits mit
größeren Elementen verbunden sein.
68 1
NO NO
1 1
Qty Qty
HINTERER STABILISATOR KONSOLE
Bezeichnung Bezeichnung
HAUPTBASIS GRIFF-UNTEN
VORDERER STABILISATORGRIFFOBER
GRIFFROHRGRIFFABDECKUNG
GRIFFABDECKUNGGRIFFROHRABDECKUNG
ADAPTERPEDALROHR
PEDAL
70 11 1 2
88 14 1 2
90
22/23
2 2
94/95
105
30 1 1
45 1 2
48 2
MONTAGE-ANLEITUNG (cont.)
49
19
67
89
4
2
2
2
SCREW
UNTERLEGSCHEIBE
SCHRAUBE
SCHRAUBE
UNTERLEGSCHEIBE UNTERLEGSCHEIBE
SECHSKANTSCHLÜSSELÜBERWURFMUTTER
BUCHSENSCHLÜSSELSCREW
PEDALKNOPFUNTERLEGSCHEIBE
PEDALKNOPF-METALLPLATTEUNTERLEGSCHEIBE
UNTERLEGSCHEIBE
50 12 4 4
98 69
21
2 2
97
51
99
1 4
31 4 2
56 4 2
10 2

MONTAGE-ANLEITUNG (cont.)
Schritt 1.
Schritt 2.
Schritt 3.
MONTAGE-ANLEITUNG (cont.)

MONTAGE-ANLEITUNG (cont.)
Schritt 4.

Schritt 5.
MONTAGE-ANLEITUNG (cont.)

MONTAGE-ANLEITUNG (cont.)
Schritt 6.

Schritt 7.
MONTAGE-ANLEITUNG (cont.)
MONTAGE-ANLEITUNG (cont.)
Schritt 8.

Schritt 9.
MONTAGE-ANLEITUNG (cont.)
BEDIENUNGSHINWEIS
ZURÜCKSETZEN START / STOP
ERHOLUNG MODUS
ABWÄRTS
AUFWÄRTS
Computer-Funktionen

BEDIENUNGSHINWEIS (cont.)
ZURÜCKSETZEN
MODUS
START / STOP
ERHOLUNG
ABWÄRTS
AUFWÄRTS
• Diese Taste wird verwendet, um alle Werte
zurückzusetzen.
• Drücken Sie diese Taste, um die
eingegebenen Werte zu bestätigen.
• Diese Taste kann nach dem Training
gedrückt werden, um die Erholungsrate
des Benutzers zu messen.
• Nach der vollständigen Erholung kann
die Taste erneut gedrückt werden, um zur
vorherigen Anzeige zurückzukehren.
• Drücken Sie diese Taste, um die
eingestellten Werte für ZEIT,
GESCHWINDIGKEIT, ENTFERNUNG und
KALORIEN oder das Datum und die Uhrzeit
zu verringern.
• Drücken Sie diese Taste, um die
eingestellten Werte für ZEIT,
GESCHWINDIGKEIT, ENTFERNUNG und
KALORIEN oder das Datum und die Uhrzeit
zu erhöhen.

BEDIENUNGSHINWEIS (cont.)
BETRIEB
Wenn das Netzteil an das Gerät angeschlossen wird, schaltet sich der Computer mit einem lauten
Piepen ein.
Das Hauptmenü wird eingeblendet. Sie können die START -Taste drücken, um sofort in den
manuellen Modus zu gelangen. Alle Werte (GESCHWINDIGKEIT, ENTFERNUNG, ZEIT) werden
von null ausgehend aufwärts gezählt. Der Widerstand kann während des Trainings jederzeit
mithilfe der AUFWÄRTS - und ABWÄRTS -Tasten geändert werden
Vor dem Beginn des manuellen Trainingsprogramms können Sie die gewünschten Werte für ZEIT,
ENTFERNUNG, KALORIEN und PULS eingeben.
Drücken Sie im Hauptmenü auf die AUFWÄRTS-/ABWÄRTS-Tasten, um die MANUELL-Option oben
im Bildschirm zu markieren. Drücken Sie die Modus-Taste, um die Auswahl zu markieren, und
ändern Sie die Einstellung mit den AUFWÄRTS-/ABWÄRTSTasten. Drücken Sie nach der Eingabe
aller Daten die START-Taste, um mit dem Training zu beginnen. Die eingegebenen Daten werden ab
den eingestellten Werten rückwärts gezählt.
Programm
• Drücken Sie im Hauptmenü die AUFWÄRTS-/ABWÄRTS-Taste, um die gewünschte
Programmfunktion zu markieren.
• Drücken Sie die MODUS-Taste. P1 wird angezeigt (nach 2 Sekunden wird das Programmprofil
eingeblendet).
• Verwenden Sie die AUFWÄRTS-/ABWÄRTS-Taste, um Programm P1 – P12 auszuwählen.
• Drücken Sie die MODUS-Taste, um das Programm zu öffnen.
• Verwenden Sie die AUFWÄRTS-/ABWÄRTS-Taste, um die Programmstufe zu ändern.
• Drücken Sie die START-Taste, um zu beginnen.
H.R.C
• Drücken Sie im Hauptmenü die AUFWÄRTS-/ABWÄRTS-Taste, um HRC ) zu markieren.
• Drücken Sie zur Auswahl die MODUS-Taste.
• Das Alter wird angezeigt. Drücken Sie die AUFWÄRTS-/ABWÄRTS-Taste, um den Wert zu
ändern.
• Drücken Sie die MODUS-Taste, um in den nächsten Abschnitt zu gelangen.

BEDIENUNGSHINWEIS (cont.)
Die maximale Herzfrequenz des Benutzers wird berechnet als 220-Alter = Summe
ZIELHERZFREQUENZ. Das sollte der maximale Wert für Ihre Herzfrequenz sein. Sie können dann
mit 55 %, 75 % oder 90 % von diesem Wert trainieren. Beispiel: 220-25 (Alter des Benutzers) = 195
MHF. Mit diesem Wert können Sie dann die gewünschten % verwenden.
• Der Computer misst den ZIELPULS und ermöglicht es dem Benutzer, bis zu diesem
Grenzwert zu trainieren. Der Widerstand wird automatisch geändert.
• Wenn kein Puls gemessen wird, erscheint die nachfolgend abgebildete Anzeige auf dem
Bildschirm. Achten Sie in diesem Fall darauf, die Pulsmesser mit beiden Händen fest zu
greifen.
Persönlich
• Der Benutzer kann ein eigenes Workoutprofil anlegen.
• Drücken Sie die AUFWÄRTS-/ABWÄRTS-Taste im Hauptmenü, um die BENUTZER-Option
auszuwählen.
• Drücken Sie die AUFWÄRTS-/ABWÄRTS-Taste, um den Widerstand im ersten Abschnitt des
Profils zu ändern.
• Drücken Sie die MODUS-Taste, um in den nächsten Abschnitt zu gelangen.
• Wiederholen Sie die vorgenannten Schritte für alle Spalten.
• Sobald Sie die Eingabe abgeschlossen haben, drücken Sie die START-Taste, um mit dem
Training zu beginnen
Erholung
Sie können die Erholungstaste jederzeit während des Trainings drücken. Wenn Sie die Taste
drücken, müssen Sie beide Hände fest auf die Pulsmesser legen. Der Computer zählt 60 Sekunden
rückwärts auf null.
Nach dem Ende des Countdowns wird der Erholungswert des Benutzers als F1 – F6 angezeigt. Das
Ziel besteht darin, den Erholungsgrad und damit die eigene Fitness im Lauf der Zeit zu verbessern.
Erholungsgrad
F1 Hervorragend; F2 Sehr gut; F3 Gut; F4 Zufriedenstellend; F5 Unterdurchschnittlich;
F6 Schlecht

COMPUTER-BEDIENUNG
Smartphone-App
VORAUSSETZUNGEN
Bluetooth 4.0. iPhone 4S und höher. IOS 7.1 und höher. Android 4.3 und höher.
APP-DOWNLOAD
LAden Sie die App aus dem App-Store Ihres Smartphones herunter. Suchen Sie nach
“E-HEALTH (Shipeng Tian)” und wählen Sie die App.

AUFWÄRM- UND ABKÜHL-PHASE!
Um Verletzungen zu vermeiden, sollte jede Trainingseinheit eine
Aufwärm- und Abkühlungsphase sowie einige Dehn-Übungen
beinhalten.
Egal wie häufig Sie Sport treiben, Sie sollten sich zu Beginn immer dehnen. Ein
aufgewärmter Muskel lässt sich leichter trainieren, was das Risiko für Muskel-
Krämpfe oder Muskelverletzungen senkt. Um sich aufzuwärmen empfehlen wir
Ihnen, einige der Dehnübungen zu absolvieren, die in der Abbildung dargestellt ist.
Überdehnen Sie jedoch Ihre Muskulatur nicht.
SOBALD SIE SCHMERZEN VERSPÜREN, SOLLTEN SIE AUFHÖREN!
Seitliche Drehung
Strecken Sie einen Arm über Ihren Kopf und lehnen Sie Ihren Oberkörper in
dieselbe Richtung. Halten Sie diese Position für 10 bis 15 Sekunden und richten
Sie sich danach langsam wieder auf. Wiederholen Sie diese Übung drei Mal pro
Seite. (Bild 1).
Zehen berühren
Beugen Sie sich langsam vorne über und entspannen Sie dabei Rücken und
Schultern, während Sie sich zu Ihren Zehen nach unten beugen. Strecken Sie
sich so weit wie möglich nach vorne und halte Sie diese Position für 15 Sekunden.
Entspannen Sie danach und wiederholen Sie die Übung drei Mal (Bild 2).
Dehnung der Wade und der Achillessehne
Lehnen Sie sich an eine Wand. Dabei befindet sich Ihr linkes Bein vor dem
rechten und Ihre Arme sind nach vorne ausgestreckt. Halten Sie nun Ihr
rechtes Bein ausgestreckt, Ihr linker Fuß befindet sich dabei auf dem Boden.
Beugen Sie nun das linke Bein und lehnen Sie sich nach vorne, indem sie Ihre
Hüften Richtung Wand bewegen. Halten Sie diese Position 15 Sekunden lang.
Wiederholen Sie nun die Übung jeweils drei Mal pro Bein (Bild 3).
Dehnung des Oberschenkels.
Halten Sie sich mit einer Hand an der Wand fest, um das Gleichgewicht zu halten.
Greifen Sie hinter sich und ziehen Sie Ihren Fuß nach oben. Bringen Sie Ihre
Ferse so nahe wie möglich an Ihr Gesäß. Halten Sie diese Position für 10 - 15
Sekunden und entspannen Sie sich dabei. Wiederholen Sie diese Übung jeweils
drei Mal pro Bein (Bild 4).
Dehnung des Innenschenkels
Setzen Sie sich im Schneidersitz auf den Boden, sodass sich Ihre Fußsohlen
berühren. Dabei zeigen Ihre Knie nach außen. Ziehen Sie nun Ihre Füße so weit in
Richtung Ihrer Hüfte wie möglich. Drücken Sie dabei Ihre Knie sanft in Richtung
Boden. Halten Sie diese Position für 15 Sekunden. Entspannen Sie danach und
wiederholen Sie diese Übung insgesamt drei Mal (Bild 5).
1
2
3
5
4


Querido cliente,
Estamos agradecidos de que hayas optado por un artículo de
nuestra gama de productos Bluefin Fitness. Los equipos deportivos
Bluefitness te ofrecen la mayor calidad y la última tecnología.
Para sacar provecho total del funcionamiento del artículo, y para
disfrutar de tu artículo por muchos años, por favor, lee este manual
con cuidado antes de decidir y comenzar un entrenamiento y usa
el artículo siguiendo las instrucciones. La seguridad en el uso y
funcionamiento sólo se puede garantizar si se siguen las normas de
prevención de accidentes y de seguridad generales de la legislación
y las instrucciones de seguridad de este manual del usuario. No nos
hacemos responsables de los daños causados por el uso inapropiado
o manejo incorrecto.
Por favor, asegúrate de que todas las personas
que usen este artículo hayan leido y entendido el
manual del usuario.

MEDIDAS DE SEGURIDAD
Debes obedecer estas normas generales de seguridad cuando uses
este producto. Lee todas las instrucciones antes de usar el producto.
Guarda el manual de usuario en un lugar seguro para poder
consultarlo en cualquier momento que lo necesites.
Por favor, guarda este manual para futuras consultas.
1. Antes de comenzar a montar y usar tu nuevo equipo, lee cuidadosamente el
manual de instrucciones para entender la información que se da. La correcta
instalación, mantenimiento y uso de tu equipo es importante para asegurarte de
que conseguirás el entrenamiento de fitness más seguro y efectivo.
2. Por favor, asegúrate de que el equipo se ha montado siguiendo el manual de
montaje.
3. Si tienes más de 45 años, tienes problemas de salud o médicos y/o esta es la
primera vez que haces ejercicio en 12 meses o más, por favor consulta con tu
doctor o un profesional médico antes de usarlo.
4. El peso máximo del usuario no debe exceder los 120kg.
5. Por favor, deja de entrenar inmediatamente y consulta con tu doctor o profesional
médico, si experimentas alguno de los siguientes síntomas: dolor de cabeza,
apretura de pecho, latidos irregulares, dificultad respiratoria, mareo, náuseas o
cualquier dolor agudo en músculos o articulaciones.
6. Asegúrate de que el equipo está fuera del alcance de niños y mascotas para evitar
accidentes. El equipo es sólo para adultos.
7. El equipo debe colocarse sobre una superficie plana y dura y a una distancia de al
menos 6 metros de cualquier obstáculo.
8. Antes de usar el equipo, por favor, comprueba que todas las tuercas y pernos del
equipo están bien ajustados.
MEDIDAS DE SEGURIDAD (cont.)
9. Debes tener cuidado al levantar, mover o guardar el equipo para no dañarte la
espalda. Siempre aplica las técnicas para levantar pesos apropiadas y/o busca
ayuda si lo necesitas.
10. Se recomienda encarecidamente que uses ropa y calzado apropiados cuando uses
tu equipo para tu comodidad personal.
11. El equipo no es adecuado para usarlo como artículo médico.
ANTES DE EMPEZAR UN PROGRAMA DE EJERCICIOS, CONSULTA A
TU MÉDICO. ESTO ES DE ESPECIAL IMPORTANCIA PARA INDIVIDUOS
DE MÁS DE 45 AÑOS O PARA PERSONAS CON PROBLEMAS DE
SALUD ANTERIORES. LEE TODAS LAS INSTRUCCIONES ANTES DE
USAR UN EQUIPO DE FITNESS. NO NOS HACEMOS RESPONSABLES
POR DAÑO PERSONAL O DAÑOS A LA PROPIEDAD DERIVADOS O
DEBIDOS AL USO DE ESTE PRODUCTO.
GUARDA ESTAS INSTRUCCIONES.
ADVERTENCIA

INSTRUCCIONES DE MONTAJE
Antes de comenzar el montaje, inspecciona y
prepara todas las piezas y tornillos que aparecen
en el manual. Cuando abras la caja, encontrarás
las siguientes piezas.
Nota: algunos de los componentes más pequeños han sido
ensamblados previamente en los componentes más grandes.
68 1
NO NO
1 1
Qty Qty
ESTABILIZADOR TRASERO CONSOLA
Descripción Descripción
BASE PRINCIPAL LA MANIJA MÁS BAJA
ESTABILIZADOR FRONTALMANIJA SUPERIOR
TUBO DE MANIJACUBIERTA DE LA MANIJA
CUBIERTA DE LA MANIJATAPA DEL TUBO DE MANIJA
ADAPTADORTUBO DE PEDAL
PEDAL
70 11 1 2
88 14 1 2
90
22/23
2 2
94/95
105
30 1 1
45 1 2
48 2

INSTRUCCIONES DE MONTAJE (cont.)
49
19
67
89
4
2
2
2
TORNILLO
JUNTA
TORNILLO
TORNILLO
JUNTA JUNTA
LLAVE DE HEXAGONOCAPPING NUT
SANDET SPANNERTORNILLO
PERILLA DE PEDALJUNTA
PEDAL PEDAL PLACA DE METALJUNTA
JUNTA
50 12 4 4
98 69
21
2 2
97
51
99
1 4
31 4 2
56 4 2
10 2

INSTRUCCIONES DE MONTAJE (cont.)
Paso 1.
Paso 2.

Paso 3.
INSTRUCCIONES DE MONTAJE (cont.)

INSTRUCCIONES DE MONTAJE (cont.)
Paso 4.

Paso 5.
INSTRUCCIONES DE MONTAJE (cont.)
INSTRUCCIONES DE MONTAJE (cont.)
Paso 6.

Paso 7.
INSTRUCCIONES DE MONTAJE (cont.)

INSTRUCCIONES DE MONTAJE (cont.)
Paso 8.
Paso 9.
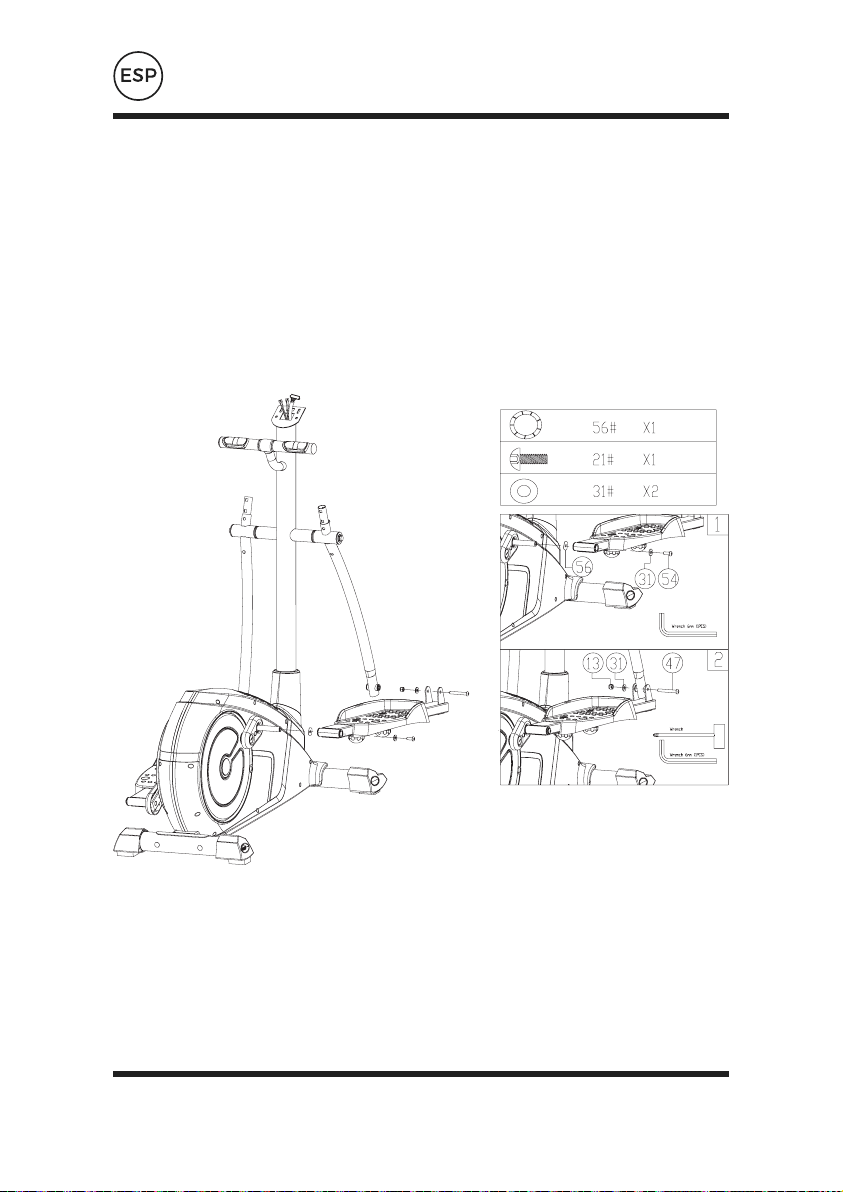
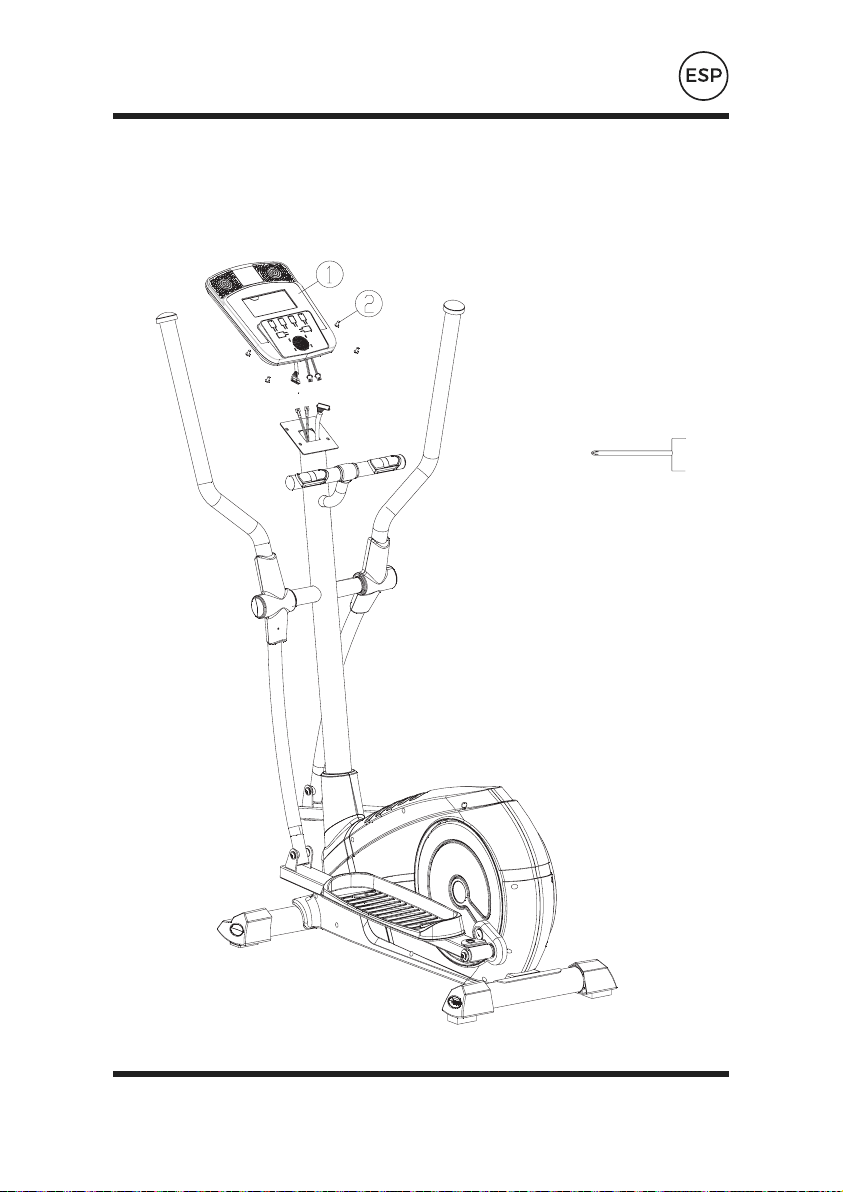
INSTRUCCIONES DE MONTAJE (cont.)

INSTRUCCIONES DE FUNCIONAMIENTO
RESTAURAR INICIAR/DETENER
RECUPERACIÓN MODO
ABAJO
ARRIBA
Funciones Del Ordenador

INSTRUCCIONES DE FUNCIONAMIENTO
(cont.)
RESTAURAR
MODO
INICIAR/DETENER
RECUPERACIÓN
ABAJO
ARRIBA
• Se utiliza para restaurar todos los valores.
• Para confirmar los ajustes introducidos.
• Tras el ejercicio, puede pulsarse para medir la
tasa de recuperación del usuario.
• Una vez completado, pulse de nuevo para
volver a la visualización anterior.
• Pulse para realizar ajustes disminuyendo al
configurar la HORA, VELOCIDAD, DISTANCIA y
CALORÍAS o la fecha/calendario.
• Pulse para realizar ajustes aumentando al
configurar TIEMPO, VELOCIDAD, DISTANCIA y
CALORÍAS o la fecha/calendario.

OPERACIÓN
Cuando la máquina se conecta a la alimentación eléctrica, se enciende el ordenador y se oye un
pitido largo.
Se mostrará el menú principal. El usuario puede pulsar START para empezar inmediatamente con
el modo manual. Todos los valores (SPEED, DISTANCE, TIME) empezarán a contar desde cero. El
nivel de resistencia puede cambiarse en cualquier momento durante el ejercicio pulsando UP o
DOWN.
Antes de empezar el ejercicio en modo manual, el usuario puede definir los valores de TIME
[TIEMPO], DISTANCE [DISTANCIA], CALORIES [CALORÍAS] y PULSE [PULSO].
Desde el menú principal pulse los botones UP/DOWN para resaltar MANUAL en la parte superior
de la pantalla. Pulse MODE para resaltar la selección deseada y utilice UP/DOWN para cambiar
la configuración. Pulse START para empezar cuando haya introducido los detalles. Los datos
introducidos iniciarán una cuenta atrás desde el valor introducido.
Programa
• En el menú principal pulse UP/DOWN para resaltar la función del programa.
• Pulse MODE, P1 se mostrará (una vez transcurridos 2 segundos, se mostrará el perfil de
programa).
• Utilice UP/DOWN para seleccionar el programa P1 – P12.
• Pulse MODE para introducir el programa.
• Utilice UP/DOWN para cambiar el nivel del programa.
• Pulse START para comenzar.
H.R.C (Control del ritmo cardíaco)
• En el menú principal pulse UP/DOWN para resaltar HRC.
• Pulse MODE para seleccionar.
• Se mostrará la edad, pulse UP/DOWN para modificarla.
• Pulse MODE para pasar a la siguiente sección.
INSTRUCCIONES DE FUNCIONAMIENTO
(cont.)

El ritmo cardíaco máximo se calcula como 220 - edad - TARGET HEART RATE [RITMO CARDÍACO
DE REFERENCIA] total. Este es el valor máximo que debe alcanzar su ritmo cardíaco (MHR). Usted
puede hacer el ejercicio al 55 %, 75 % o 90 % de este valor. Por ejemplo: 220 - 25 (edad del usuario)
= 195 MHR y a partir de este valor puede hacer el ejercicio al porcentaje que desee.
• El ordenador registrará el TARGET HEART RATE [RITMO CARDÍACO DE REFERENCIA] y
permitirá que el usuario haga el ejercicio de acuerdo con dicho valor. El nivel de resistencia
se modificará automáticamente.
• Si no se registra ningún valor, la pantalla se verá como aparece abajo. En ese caso,
compruebe que ambas manos estén sujetando los sensores de pulsaciones con firmeza.
Personal
• Cada usuario puede crear su propio perfil de ejercicio.
• En el menú principal pulse UP/DOWN para seleccionar USUARIO.
• Pulse UP/DOWN para cambiar el nivel de resistencia en el primer segmento de perfil.
• Pulse MODE para pasar al siguiente segmento.
• Repita los pasos anteriores para todas las columnas.
• Pulse START para comenzar el ejercicio una vez completado.
Recuperación
En cualquier momento durante el ejercicio puede pulsar el botón Recovery. Una vez pulsado, el
usuario debe colocar ambas manos firmemente sobre los sensores de pulso, el ordenador
iniciará una cuenta atrás de 1 minuto.
Una vez se haya completado la cuenta atrás, el nivel de recuperación del usuario se mostrará, F1 -
F6. El objetivo es mejorar este nivel con el tiempo lo cual indica que la forma física del usuario está
mejorando.
Grado de recuperación
F1 Excelente; F2 Muy bueno; F3 Bueno; F4 Satisfactorio; F5 Por debajo de la media;
F6 Pobre
INSTRUCCIONES DE FUNCIONAMIENTO
(cont.)

FUNCIONAMIENTO DE LA CONSOLA
Smartphone-App
REQUISITOS DE LA APP PARA EL SMARTPHONE:
Bluetooth 4.0. iPhone 4S o superior. IOS 7.1 o superior. Android 4.3 o superior.
COMO BAJAR LA APP:
Bajar la App de la Application Store del smartphone. Busca E-HEALTH (Shipeng Tian) y
selecciona la App.

CALENTAR Y RELAJAR
Para evitar lesiones deberías empezar con un calentamiento, relajación
y ejercicios de estiramientos antes y después de cada entrenamiento.
Independientemente de cómo hagas deporte, por favor, realiza algún estiramiento
primero. El músculo caliente se estira fácilmente. Esto reduce el riesgo de calambres
o lesiones musculares durante el entrenamiento. Para calentar te sugerimos el
siguiente ejercicio de estiramiento, como se muestra en el gráfico. No estires en
exceso ni fuerces tus músculos.
¡SI DUELE, PARA!
Estiramiento lateral.
Pasa el brazo sobre tu cabeza y dobla el tronco en la misma
dirección. Mantén esta posición durante 10 o 15 segundos y
lentamente vuelve a la posición recta. Repite este movimiento 3
veces por cada lado. (Imagen 1).
Tócate los dedos de los pies.
Lentamente dóblate hacia adelante desde la cintura, dejando que tu
espalda y hombros se relajen mientras te estiras hacia los dedos de
los pies. Dóblate todo lo que puedas y mantén la posición durante 15
segundos. Después relájate. Repite 3 veces. (Imagen 2).
Estiramiento de pantorrilla y Talón.
Apóyate contra una pared con tu pierna izquierda por delante de
la derecha y tus brazos hacia adelante. Mantén tu pierna izquierda
recta y el pie izquierdo plano sobre el suelo. Después dobla la pierna
izquierda e inclínate hacia adelante moviendo las caderas hacia
la pared. Mantente así y después repite en el otro lado durante 15
segundos. Relaja y repite 3 veces con cada pierna. (Imagen 3)
Estiramiento de cuádriceps.
Con una mano sobre una pared para mantener el equilibrio, agarra
el pie derecho y estira hacia arriba. Intenta tocar las nalgas con tu
talón. Mantén la posición durante 10-15 segundos y relaja. Repite 3
veces con cada pie. (Imagen 4)
Estiramiento de muslo.
Siéntate con la planta de los pies juntas con las rodillas mirando
hacia afuera. Tira de tus pies hacia tus ingles tanto como te sea
posible. Cuidadosamente empuja tus rodillas hacia el suelo. Mantén
la posición durante 15 segundos. Después relaja y repite 3 veces.
(Imagen 5)
1
2
3
5
4


Cher client,
Nous sommes heureux que vous ayez choisi un équipement de la
gamme BLUEFIN FITNESS. Les équipements sportifs BLUEFIN
FITNESS vous offrent la meilleure qualité et de la technologie dernier
cri.
Afin de bénéficier au maximum des performances de votre équipement,
et vous qu’il vous satisfasse durant des années, veuillez svp lire le
guide d’utilisation de manière précautioneuse avant de commencer
à l’utiliser et à vous entraîner. La sécurité et le fonctionnement de
l’équipement ne peuvent être garantis que si vous respectez les bonnes
pratiques d’utilisation et de sécurité telles que définies dans ce guide
d’utilisation. Nous ne pouvons être tenus pour responsable en cas de
dégats causés par une utilisation incorrecte de l’équipement.
Veuillez vous assurer que toutes les personnes qui
utilisent cet équipement ont lu et comprennent le
manuel d’utilisation.

PRÉCAUTIONS D’UTILISATION
Les informations générales de sécurité doivent être respectées
lorsque vous utilisez ce produit. Veuillez lire toutes les instructions
avant d’utiliser le produit. Gardez le manuel d’utilisation dans un
endroit sécurisé afin d’y avoir accès quand nécessaire.
Conservez le guide d’utilisation pour de futures utilisations.
1. 1. Avant de commencer à monter et d’utiliser l’équipement, veuillez lire
attentivement le guide d’utilisation afin de comprendre les informations fournies.
L’instlalation correcte, la maintenance et l’utilisation de votre équipement est
important afin de s’assurer que vous obtenez des entraînements de qualité et
parfaitement sécurisés.
2. Veuillez vous assurer que l’équipement a été monté selon le guide d’utilisation.
3. Si vous avez plus de 45 ans, que vous avez un problème de santé ou médical, et/
ou votre premier entraînement depuis plus de 12 mois, veuillez consulter un
médecin ou un professionnel de la santé avant utilisation.
4. Le poids maximal de l’utilisateur est 120 kg.
5. Si vous ressentez l’un de ces symptomes: mal de tête, pression pectorale,
arythmie cardiaque, souffle coupé, nausées, douleurs musculaires ou
articulaires, arrêtez-vous immédiatement et consultez un médecin ou un
professionnel de la santé.
6. Assurez-vous que les jeunes enfants et les animaux sont loins de matériel qui
pourrait les blesser, l’équipement étant seulement pour les adultes.
7. L’équipement doit être placé sur une surface dure et plate, et à au moins 0.6
mètre de tout obstacle.
8. Avant d’utiliser l’équipement, veuillez vérifier que tous les écrous et boulons sont
serrés de manière sécurisée.

PRÉCAUTIONS D’UTILISATION (cont.)
9. Faites attention lorsque vous soulevez, bougez ou rangez l’équipement afin de ne
pas blesser votre dos. Utilisez toujours de bonnes techniques afin de soulever et/
ou demandez de l’aide si nécessaire.
10. Il est fortement recommandé que vous portiez des vêtements et chaussures
adaptés lorsque vous utilisez l’équipement pour votre propre confort personnel.
11. L’équipement n’est pas adapté à une utilisation en tant que matériel médical.
AVANT DE COMMENCER TOUT PROGRAMME D’ENTRAÎNEMENT,
CONSULTEZ UN SPÉCIALISTE DE LA SANTÉ. C’EST
PARTICULIÈREMENT IMPORTANT POUR LES INDIVIDUS ÂGÉS DE
PLUS DE 45 ANS OU LES PERSONNES AYANT DES PROBLÈMES DE
SANTÉ PRÉ-EXISTANTS. LISEZ TOUTES LES INSTRUCTIONS AVANT
D’UTILISER LES ÉQUIPEMENTS. NOUS NE POUVONS ÊTRE TENUS
POUR RESPONSABLE DE TOUTE BLESSURE OU DÉGAT CAUSÉ PAR
OU VIA L’UTILISATION DE CE PRODUIT.
SAUVEGARDEZ CES INSTRUCTIONS.
ATTENTION
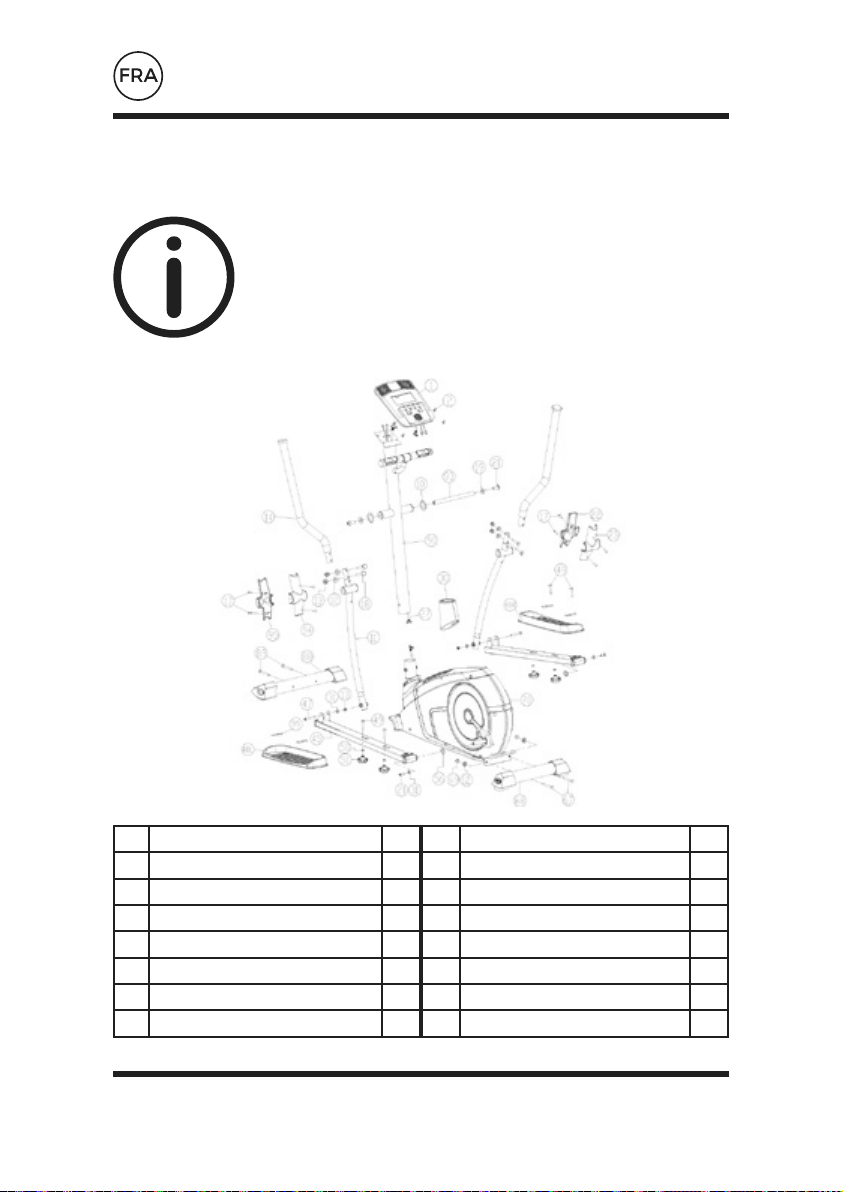
INSTRUCTIONS D’ASSEMBLAGE
Avant que vous commenciez l’installation,
inspectez et préparez toutes les parties et vis
indiqués dans ce manuel. Vous trouverez les
parties suivantes lorsque vous ouvrirez le carton.
NB/ Certaines des petites parties peuvent être pré-installées
sur de plus grandes parties.
68 1
NO NO
1 1
Qty Qty
STABILISATEUR ARRIÈRE CONSOLE
La description La description
BASE PRINCIPALE POIGNEE INFERIEURE
STABILISATEUR AVANTPOIGNEE SUPERIEURE
TUBE DE MANCHECOUVERCLE DE LA POIGNEE
COUVERCLE DE LA POIGNEECOUVERCLE DU TUBE
ADAPTATEURTUBE DE PÉDALE
PÉDALE
70 11 1 2
88 14 1 2
90
22/23
2 2
94/95
105
30 1 1
45 1 2
48 2

INSTRUCTIONS D’ASSEMBLAGE
(cont.)
49
19
67
89
4
2
2
2
VIS
RONDELLE
VIS
VIS
RONDELLE RONDELLE
CLÉ À HEXAGONEÉcrou
SPANNER DE DOUILLEVIS
BOUTON DE PEDALERONDELLE
PLAQUE METALLIQUE DE BOUTON DE PEDALERONDELLE
RONDELLE
50 12 4 4
98 69
21
2 2
97
51
99
1 4
31 4 2
56 4 2
10 2

INSTRUCTIONS D’ASSEMBLAGE
(cont.)
Étape 1.
Étape 2.

Étape 3.
INSTRUCTIONS D’ASSEMBLAGE
(cont.)

INSTRUCTIONS D’ASSEMBLAGE
(cont.)
Étape 4.
Étape 5.
INSTRUCTIONS D’ASSEMBLAGE
(cont.)

Étape 6.
INSTRUCTIONS D’ASSEMBLAGE
(cont.)

Étape 7.
INSTRUCTIONS D’ASSEMBLAGE
(cont.)
Étape 8.
INSTRUCTIONS D’ASSEMBLAGE
(cont.)

Étape 9.
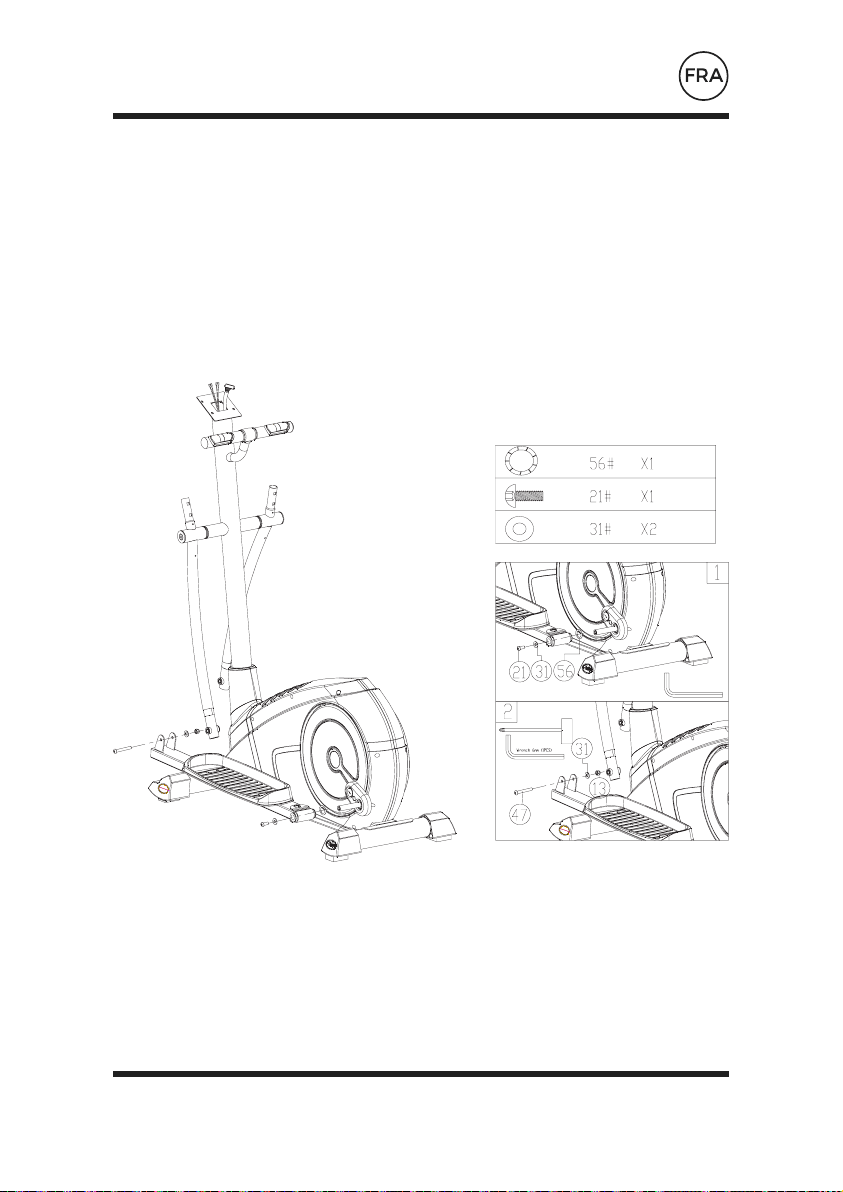
INSTRUCTIONS D’ASSEMBLAGE
(cont.)

INSTRUCTIONS DE FONCTIONNEMENT
RÉINITIALISATION DÉMARRAGE/ARRÊT
RÉCUPÉRATION MODE
BAS
HAUT
Fonctions de L’ordinateur

INSTRUCTIONS DE FONCTIONNEMENT
(cont.)
RÉINITIALISATION
MODE
DÉMARRAGE/ARRÊT
RÉCUPÉRATION
BAS
HAUT
• Permet de réinitialiser toutes les valeurs.
• Pour confirmer les réglages effectués.
• après une séance d’entraînement,
l’utilisateur peut appuyer sur cette touche
pour mesurer son taux de récupération ;
• après utilisation, il suffit d’appuyer à
nouveau pour revenir à l’écran précédent.
• Appuyer pour procéder à des ajustements
décroissants lors du réglage des fonctions
DURÉE, VITESSE, DISTANCE et CALORIES ou
du calendrier/de l’horloge.
• Appuyer pour procéder à des ajustements
croissants lors du réglage des fonctions
DURÉE, VITESSE, DISTANCE et CALORIES ou
du calendrier/de l’horloge.

INSTRUCTIONS DE FONCTIONNEMENT
(cont.)
FONCTIONNEMENT
Lorsque le bloc d’alimentation est branché à l’appareil, l’ordinateur se met sous tension en
émettant un long signal sonore.
Le menu principal s’ache à l’écran. L’utilisateur peut appuyer sur DÉMARRAGE pour commencer
immédiatement en mode manuel. Les calculs de toutes les valeurs (VITESSE, DISTANCE, DURÉE)
commenceront à zéro. Le niveau de résistance peut être modifié à tout moment durant la séance
d’entraînement en appuyant sur HAUT ou BAS.
Avant de commencer l’entraînement en mode manuel, l’utilisateur peut régler les valeurs de
DURÉE, DISTANCE, CALORIES et RYTHME CARDIAQUE souhaitées.
À partir du menu principal, appuyer sur les touches HAUT/BAS pour afficher MANUEL en haut de
l’écran. Appuyer sur Mode pour mettre en évidence la sélection requise, utiliser HAUT/BAS pour
modifier le réglage. Appuyer sur DÉMARRAGE pour commencer une fois les données saisies. Le
compte à rebours partira des données saisies.
Programme
• dans le menu principal, appuyer sur HAUT/BAS pour mettre en évidence la fonction
Programme ;
• appuyer sur MODE, P1 s’affiche (après 2 secondes, le profil du programme apparaît) ;
• appuyer sur HAUT/BAS pour sélectionner les programmes P1 à P12 ;
• appuyer sur MODE pour valider le programme choisi ;
• appuyer sur HAUT/BAS pour modifier le niveau du programme ;
• appuyer sur DÉMARRAGE pour commencer.
H.R.C (Contrôle du rythme cardiaque)
• dans le menu principal, appuyer sur HAUT/BAS pour mettre en évidence « HRC »
• (OBJECTIF RYTHME CARDIAQUE) ;
• appuyer sur MODE pour sélectionner ;
• l’âge est affiché, appuyer sur HAUT/BAS pour le modifier ;
• appuyer sur MODE pour passer à la section suivante.

INSTRUCTIONS DE FONCTIONNEMENT
(cont.)
Le rythme cardiaque maximal (RCM) est calculé ainsi : 220 – âge = OBJECTIF DE RYTHME
CARDIAQUE total. Il s’agit du niveau maximal que votre rythme cardiaque ne doit pas dépasser.
Vous pouvez ensuite vous entraîner en choisissant un pourcentage de ce rythme cardiaque maximal
(55, 75 ou 90 %). Par exemple : 220 – 25 (âge de l’utilisateur) = 195 RCM, niveau à partir duquel vous
pouvez vous entraîner au pourcentage souhaité.
• l’ordinateur enregistrera l’OBJECTIF DE RYTHME CARDIAQUE pour permettre à l’utilisateur
de s’entraîner dans cette limite. Le niveau de résistance sera automatiquement modifié ;
• si aucun rythme cardiaque n’est enregistré, l’écran ci-dessous s’affichera. Dans ce cas,
veillez à placer soigneusement les deux mains sur les capteurs cardiaques.
Personnel
• L’utilisateur peut créer son propre profil d’entraînement.
• dans le menu principal, appuyer sur HAUT/BAS pour sélectionner UTILISATEUR ;
• le profil du programme sera affiché comme ci-dessous.
• appuyer sur HAUT/BAS pour modifier le niveau de résistance dans le premier segment du
profil ;
• appuyer sur MODE pour passer au segment suivant ;
• poursuivre la même procédure pour chaque colonne ;
• appuyer sur DÉMARRAGE pour commencer l’entraînement une fois les réglages terminés.
Récupération
À tout moment durant la séance d’entraînement, l’utilisateur peut appuyer sur la touche
Récupération, puis placer soigneusement les deux mains sur les capteurs cardiaques. L’ordinateur
procédera à un compte à rebours d’une minute.
Une fois le compte à rebours terminé, le taux de récupération de l’utilisateur est affiché, de F1 à
F6. L’objectif pour l’utilisateur est d’améliorer ce taux au fil du temps, signe d’amélioration de sa
condition physique.
Classement des taux de récupération
F1 Excellent; F2 Très bon; F3 Bon; F4 Satisfaisant; F5 Inférieur à la moyenne;
F6 Mauvais

FONCTION DE L’ORDINATEUR
Smartphone-App
PRÉREQUIS DE L’APPLICATION POUR SMARTPHONE
Bluetooth 4.0. iPhone 4S ou plus. iOS 7.1 ou plus. Android 4.3 ou plus.
TÉLÉCHARGEMENT DE L’APPLI
Téléchargez l’appli depuis le store pour smartphones. Cherchez ‘e-HEALTH (Shipeng
Tian)’ et sélectionnez l’application.
RÉCHAUFFEZ & REFROIDISSEZ !
Pour éviter les blessures, vous devez commencer avec un échauffement,
un refroidissement et des étirements avant et après chaque
entraînement.
Peu important comment vous faites du sport, veuillez faire quelques étirements
dans un premier temps. Les muscles chauds s’étendront plus facilement. Cela
réduira le risque de spasmes et de blessures musculaires pendant l’effort. Afin de
vous échauffer, nous vous suggérons d’effectuer les exercices d’étirement tels que
présentés dans le graphique: n’étirez ou de tirez pas trop vos muscles.
SI CELA VOUS FAIT MAL, ARRÊTEZ !
Coudes latéraux
Passez le bras par-dessus votre tête et la partie supérieure de votre
corps dans la même direction. Maintenez cette position de 10 à 15
secondes, et étirez-vous lentement. Répétez l’action 3 fois pour
chaque côté. (image 1)
Toucher des pieds
Baissez-vous lentement vers l’avant, tout en laissant votre dos et
épaules relâchés pendant que vous vous étirez vers vos pieds. Allez
aussi loin que possible et tenez pendant 15 comptes. Puis relâchez,
et répétez l’action 3 fois. (image 2)
Étirement du Mollet
Mettez-vous face à un mur avec votre jambe gauche en face de votre
jambe droite et vos bras vers l’avant. Gardez votre jambe droite étirée
et le pieds gauche sur le sol, puis pliez la jambe gauche et étirez-
vous vers l’avant en bougeant vos hanches vers le mur. Maintenez,
puis répétez avec l’autre côté pendant 15 comptes. Puis relâchez et
répétez l’action 3 fois pour chaque jambe. (image 3)
Étirement des Quadriceps
Avec une main contre un mur pour l’équilibre, essayez d’attraper
derrière vous et tirez votre pieds droit vers le haut. Amenez votre
talon le plus près possible de vos fesses. Conservez la position
pendant 10-15 comptes, puis relâchez. Répétez trois fois pour
chaque pieds. (image 4)
Étirement des Cuisses Intérieures
Asseyez-vous avec la plante de vos pieds ensemble et vos genoux
pointant vers l’extérieur. Tirez votre pieds aussi près de votre aine que
possible. Poussez légèrement vos genoux vers le sol. Maintenant
pendant 15 comptes. Puis relâchez, et répétez 3 fois. (image 5)
1
2
3
5
4


Gentili Clienti,
Siamo felici che abbiate scelto un prodotto della linea BLUEFIN
FITNESS. L’attrezzatura sportiva BLUEFIN FITNESS vi offre il
massimo della qualità e le tecnologie più moderne.
Per poter sfruttare al meglio le capacità di questo attrezzo e
per poter godere di esso per anni a venire, si prega di leggere
attentamente questo manuale prima di cominciare l’allenamento. So
consiglia di utilizzare l’attrezzo seguendo le indicazioni qui riportate.
La sicurezza e il corretto funzionamento possono essere assicurati
solo se verranno osservati i regolamenti di sicurezza generale e di
prevenzione degli incidenti stabiliti dal legislatore e dalle istruzioni di
sicurezza contenute in questo manuale. Non ci assumiamo nessuna
responsabilità per danni causati dall’uso improprio o scorretto di
questo apparecchio.
Assicuratevi che tutte le persone che utilizzeranno
questo attrezzo abbiano letto e compreso il
manuale dell’utente

PRECAUZIONI DI SICUREZZA
Queste informazioni sulla sicurezza generale devono essere
osservate quando si utilizza questo prodotto. Leggere tutte le
istruzioni prima di utilizzare il prodotto. Tenere il manuale d’uso
in un luogo sicuro per potervi accedere in qualsiasi momento, se
necessario.
Si prega di conservare questo manuale per poterlo consultare in
futuro.
1. Prima di cominciare a montare e ad utilizzare il vostro nuovo attrezzo, leggete
attentamente il manuale di istruzioni per comprendere le informazioni fornite.
Sono importanti un montaggio, manutenzione ed un uso corretti della vostra
attrezzatura per assicurare l’allenamento più sicuro ed efficiente possibile.
2. Assicurarsi che l’attrezzo sia stato montato seguendo le istruzioni contenute nel
manuale di assemblaggio.
3. Se avete più di 45 anni, avete problemi medici o di salute e/o questa è la vostra
prima sessione di allenamento negli ultimi 12 mesi, si prega di consultare il
Medico curante o un Professionista Medico prima dell’utilizzo.
4. Il peso massimo degli utilizzatori è di 120Kg.
5. Se doveste percepire uno dei seguenti sintomi, che includono: mal di testa,
pressione sul torace, battito irregolare, respiro corto, vertigini, nausea o
qualsiasi dolore acuto a muscoli o articolazioni, interrompere immediatamente
l’allenamento e consultare il vostro Medico curante o un Professionista
6. Assicurarsi che neonati e animali da compagnia vengano tenuti lontani dal
macchinario per evitare lesioni, l’apparecchio è destinato all’uso dei soli adulti.
7. L’apparecchio dovrebbe essere posizionato su una superficie stabile e piana, ad
almeno 0.6 metri da qualsiasi ostacolo.
8. Prima di utilizzare il macchinario si prega di controllare che tutti i dadi e i bulloni
siano stretti a sufficienza.

PRECAUZIONI DI SICUREZZA (cont.)
9. Bisogna fare attenzione quando si solleva, sposta o ripone l’apparecchio
per evitare di lesionare la schiena. Utilizzare sempre le corrette tecniche di
sollevamento e richiedere assistenza se necessario.
10. È fortemente raccomandato indossare vestiario e calzature appropriati quando si
utilizza il macchinario, per ragioni di comfort personale.
11. L’attrezzatura non è idonea per l’utilizzo come dispositivo medico.
PRIMA DI COMINCIARE UN PROGRAMMA DI ESERCIZI, CONSULTARE
IL VOSTRO MEDICO CURANTE. QUESTO È SPECIALMENTE
IMPORTANTE PER INDIVIDUI OLTRE I 45 ANNI O PERSONE CON
PROBLEMI DI SALUTE PREGRESSI. LEGGERE TUTTE LE ISTRUZIONI
PRIMA DI USARE QUALSIASI ATTREZZATURA DA FITNESS. NON
CI ASSUMEREMO NESSUNA RESPONSABILITÁ PER LESIONI
PERSONALI O DANNI ALLA PROPRIETÁ SUBITI A CAUSA O
DURANTE L’USO DI QUESTO PRODOTTO.
CONSERVATE QUESTE ISTRUZIONI.
ATTENZIONE

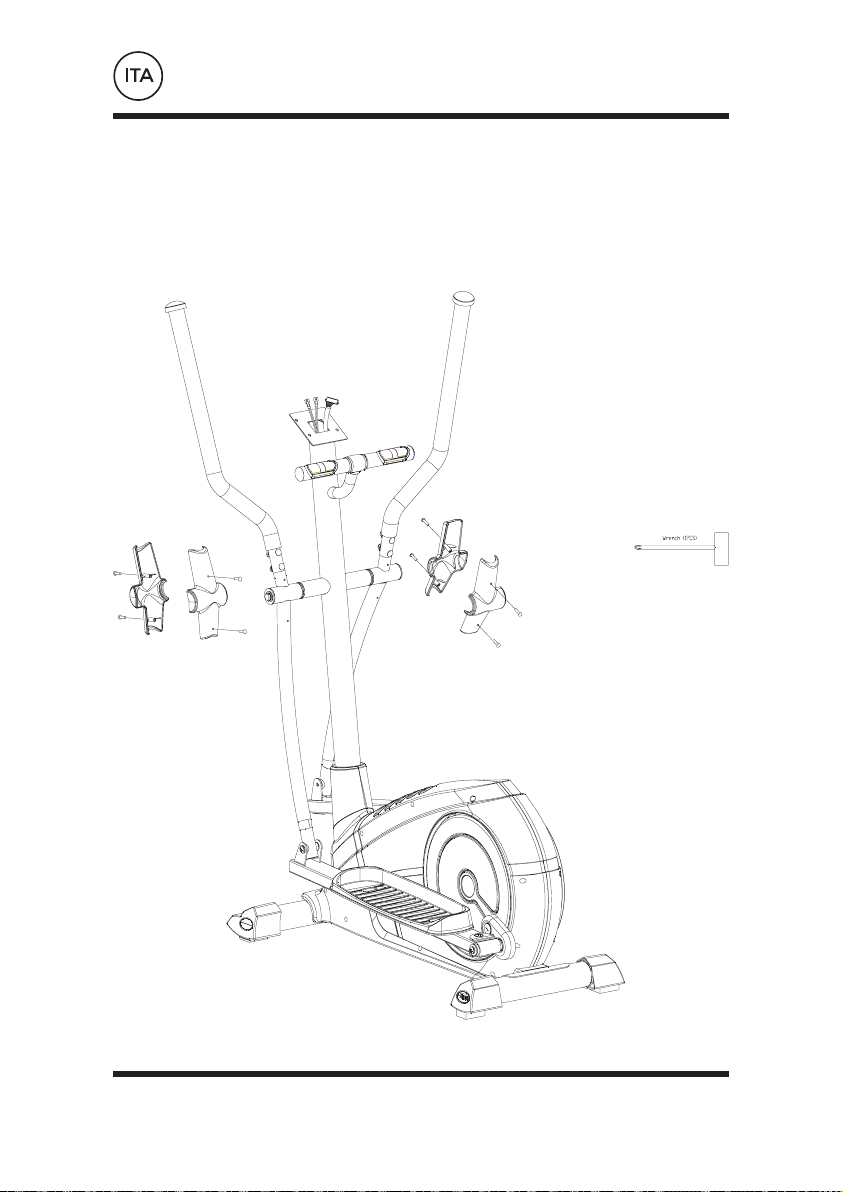
ISTRUZIONI DI ASSEMBLAGGIO
Prima di cominciare l’assemblaggio, ispezionare e
preparare tutte le parti e le viti mostrate in questo
manuale. Quando aprirete la scatola troverete le
seguenti parti.
NB/ Alcune delle parti più piccole potrebbero essere pre-
montate su componenti più grandi.
68 1
NO NO
1 1
Qty Qty
STABILIZZATORE POSTERIORECONSOLE
Descrizione Descrizione
BASE PRINCIPALE MANICO-INFERIORE
STABILIZZATORE ANTERIOREMANICO-SUPERIORE
TUBO DI MANIGLIACOPERCHIO MANIGLIA
COPERCHIO MANIGLIACOPRI TUBO DI MANIGLIA
ADATTATORETUBO PEDALE
PEDALE
70 11 1 2
88 14 1 2
90
22/23
2 2
94/95
105
30 1 1
45 1 2
48 2
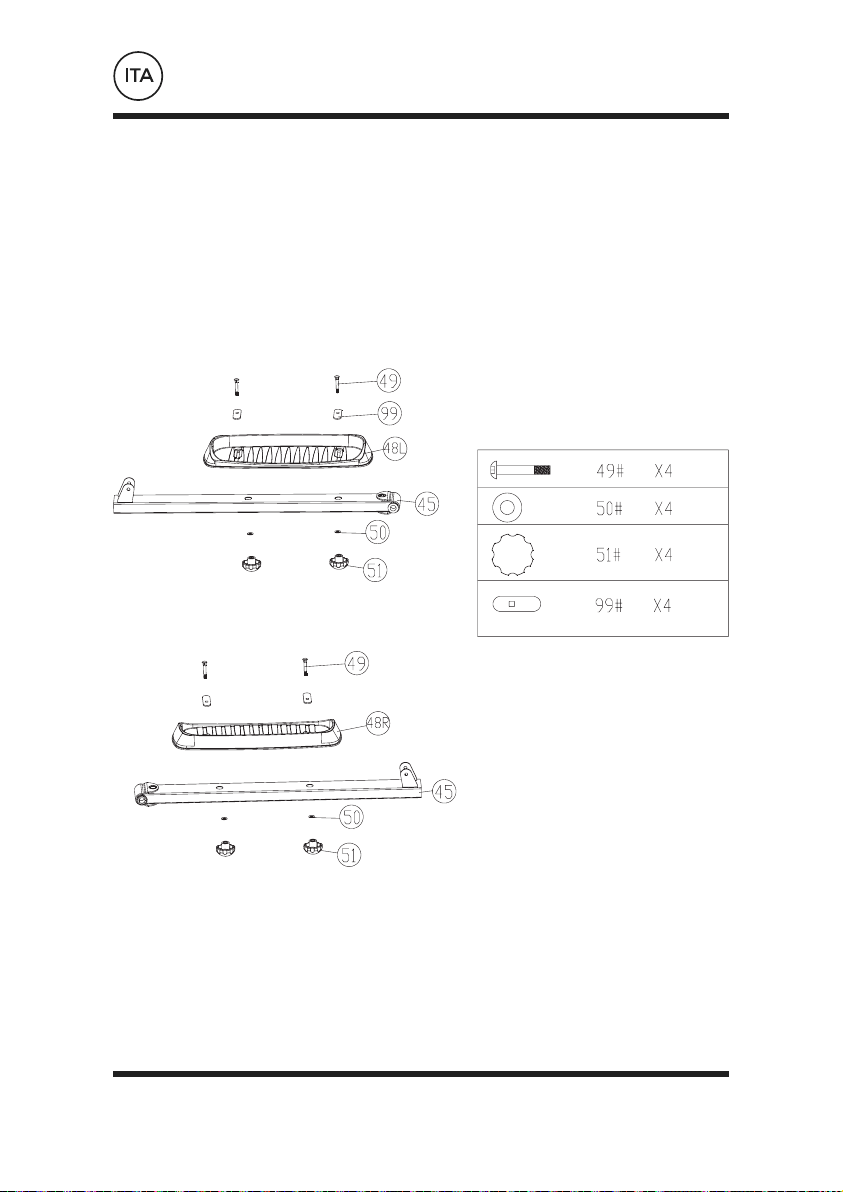
ISTRUZIONI DI ASSEMBLAGGIO
(cont.)
49
19
67
89
4
2
2
2
VITE
RONDELLA
VITE
VITE
RONDELLA RONDELLA
CHIAVE ESAGONALECAPPELLO
CHIAVE A SCATTOVITE
MANOPOLA PEDALERONDELLA
PIASTRA DELLA MANOPOLA DEL PEDALERONDELLA
RONDELLA
50 12 4 4
98 69
21
2 2
97
51
99
1 4
31 4 2
56 4 2
10 2

ISTRUZIONI DI ASSEMBLAGGIO
(cont.)
Passaggio 1.
Passaggio 2.
ISTRUZIONI DI ASSEMBLAGGIO
(cont.)
Passaggio 3.
ISTRUZIONI DI ASSEMBLAGGIO
(cont.)
Passaggio 4.

ISTRUZIONI DI ASSEMBLAGGIO
(cont.)
Passaggio 5.

ISTRUZIONI DI ASSEMBLAGGIO
(cont.)
Passaggio 6.

ISTRUZIONI DI ASSEMBLAGGIO
(cont.)
Passaggio 7.
ISTRUZIONI DI ASSEMBLAGGIO
(cont.)
Passaggio 8.

ISTRUZIONI DI ASSEMBLAGGIO
(cont.)
Passaggio 9.

ISTRUZIONI D’USO
RESET AVVIO/ARRESTO
RECUPERO MODALITÀ
DIMINUZIONE
AUMENTO
Funzioni del computer
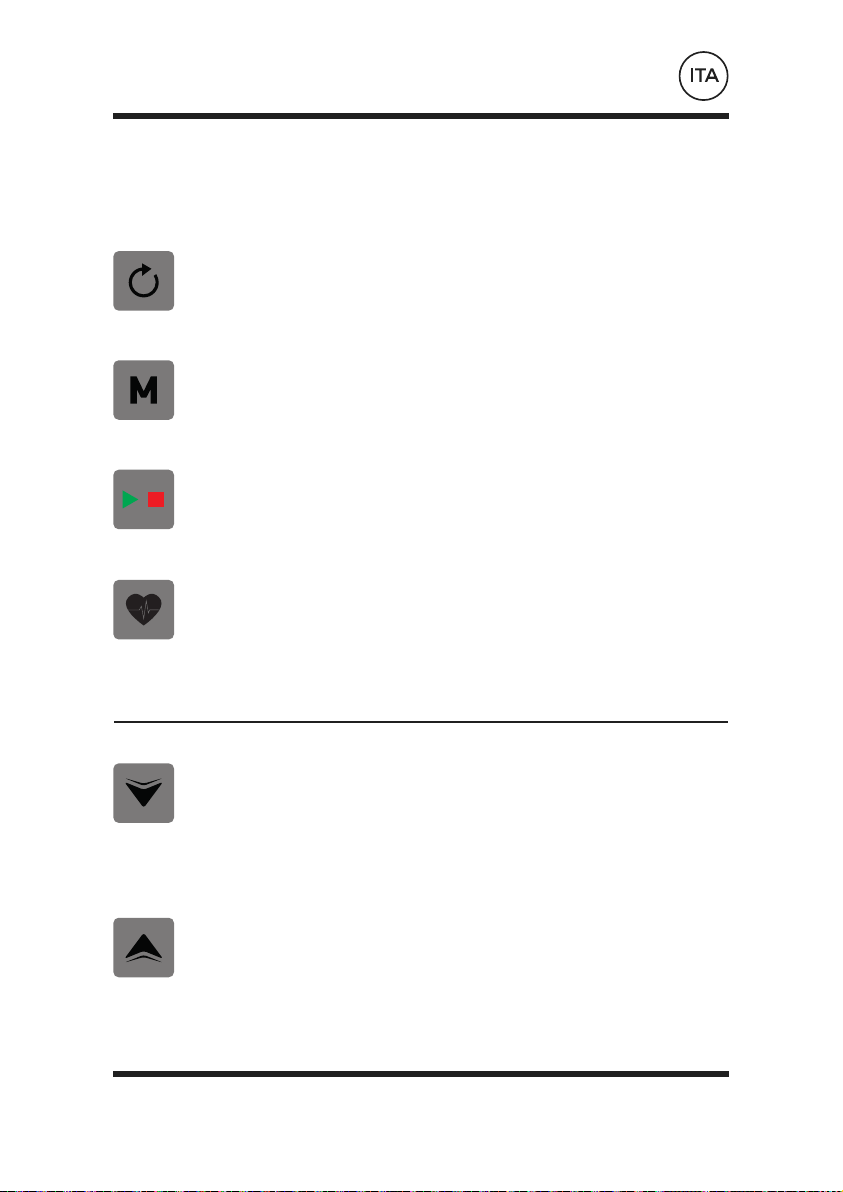
ISTRUZIONI D’USO (cont.)
RESET
MODALITÀ
AVVIO/ARRESTO
RECUPERO
DIMINUZIONE
AUMENTO
• Questo comando viene usato per azzerare tutti i
valori.
• Serve a confermare le impostazioni immesse.
• Si può premere dopo una seduta di allenamento
per misurare la velocità di recupero dell’utente.
• Una volta completato il recupero, si può
premere ancora per tornare alla visualizzazione
precedente
• Premere per effettuare la regolazione in
diminuzione quando si fissano TEMPO,
VELOCITÀ, DISTANZA e CALORIE oppure il
calendario/ora.
• Premere per effettuare la regolazione in
aumento quando si fissano TEMPO, VELOCITÀ,
DISTANZA e CALORIE oppure il calendario/ora.

ISTRUZIONI D’USO (cont.)
FUNZIONAMENTO
Quando la macchina viene collegata alla rete di alimentazione, il computer si accende ed emette un
lungo beep. Tutti i segmenti del display.
Verrà visualizzato il menu principale. L’utente può premere il pulsante START per cominciar
immediatamente in modalità manuale. Tutti i valori (VELOCITÀ, DISTANZA, TEMPO) cominceranno
ad essere conteggiati a partire da zero. Il livello di resistenza può essere cambiato in qualsiasi
momento nel corso dell’esercizio premendo i tasti UP o DOWN.
Prima di iniziare l’esercizio manuale, l’utente può impostare il TEMPO, la DISTANZA, le CALORIE e
la PULSAZIONE richiesti per la seduta di allenamento.
Dal menu principale premere i pulsanti UP/DOWN per evidenziare MANUAL nella parte superiore
dello schermo. Premere MODE per evidenziare la selezione richiesta e usare UP/ DOWN per
modificare l’impostazione. Premere START per cominciare, dopo aver immesso tutti i dati; ora inizia
il conto alla rovescia dei dati immessi.
Programma
• Nel menu principale premere UP/DOWN per evidenziare la funzione del programma.
• Premendo MODE, verrà visualizzato P1 (dopo 2 secondi verrà mostrato il profilo del
programma).
• Usare UP/DOWN per selezionare il programma da P1 a P12.
• Premere MODE per immettere il programma.
• Usare UP/DOWN per modificare il livello del programma.
• Premere START per cominciare.
H.R.C
• Nel menu principale premere UP/DOWN per evidenziare H.R.C.
• Premere MODE per effettuare la selezione.
• Verrà visualizzata l’età; premere UP/DOWN per cambiarla.
• Premere MODE per passare alla sezione successiva.

ISTRUZIONI D’USO (cont.)
La frequenza cardiaca massima dell’utente nel corso dell’esercizio è pari a 220 – l’età =
FREQUENZA CARDIACA OBIETTIVO totale. Questo valore rappresenta la frequenza cardiaca
massima (MHR). Quindi è possibile allenarsi a una percentuale pari al 55%, 75% o 90% di questo
valore massimo. Ad esempio: 220 – 25 anni (l’età dell’utente) = 195 MHR, e partendo da questo
valore è possibile allenarsi alla percentuale desiderata.
• Il computer registrerà la FREQUENZA CARDIACA OBIETTIVO e consentirà all’utente
di allenarsi entro questo valore. Il livello di resistenza applicato verrà cambiato
automaticamente.
• Se non si registra alcuna frequenza cardiaca, sullo schermo apparirà la visualizzazione
indicata qui sotto. In tal caso, assicurarsi di afferrare saldamente i sensori di pulsazione con
entrambe le mani.
Personale
• L’utente può creare il proprio profilo d’allenamento.
• Nel menu principale premere UP/DOWN e poi selezionare USER.
• Premere UP/DOWN per modificare il livello di resistenza nel primo segmento del profilo.
• Premere MODE per passare al segmento successivo.
• Continuare la stessa procedura per tutte le colonne.
• Dopo aver completato la procedura, premere START per cominciare l’esercizio.
Recupero
In qualsiasi momento durante l’esercizio, si può premere il pulsante di recupero. Una volta premuto
il pulsante, l’utente deve posizionare saldamente entrambe le mani sui sensori della pulsazione e il
computer procederà al conteggio alla rovescia a partire da 1 minuto.
Dopo il completamento del conteggio alla rovescia, verrà visualizzato il livello di recupero
dell’utente, da F1 a F6. Lo scopo della misura è quello di migliorare tale livello nel corso del tempo,
il che indica che la forma fisica dell’utente sta migliorando.
Livello di recupero
F1 Eccellente; F2 Ottimo; F3 Buono; F4 Soddisfacente; F5 Al di sotto della media;
F6 Scarso

UTILIZZO DEL COMPUTER
Smartphone App
REQUISITI
Bluetooth 4.0. iPhone 4S o superiore. IOS 7.1 o superiore. Android 4.3 o superiore.
DOWNLOAD APP
Scaricare l’App dal negozio delle applicazioni sullo smartphone. Cercare ‘e-HEALTH
(Shipeng Tian)’ e selezionare l’App.

RISCALDAMENTO & DEFATICAMENTO!
Per evitare lesioni è consigliato cominciare con un riscaldamento,
defaticamento e stretching prima e dopo ogni sessione di allenamento.
Non importa come fate sport, è sempre raccomandato fare stretching prima di
esercitarsi. I muscoli riscaldati si distenderanno con più facilità. Ciò riduce il rischio di
spasmi o lesioni muscolari durante l’allenamento. Per fare riscaldamento consigliamo
il seguente esercizio di stretching, come mostrato nella grafica: Non distendere o
tirare eccessivamente i muscoli.
SE SENTITE DOLORE, FERMATEVI!
Piegamenti laterali
Fate passare il braccio sopra alla vostra testa e piegate la parte
superiore del vostro corpo nella stessa direzione. Mantenete questa
posizione per 10 - 15 secondi, quindi raddrizzatevi lentamente.
Ripetete 3 volte per ciascun lato. (figura 1).
Toccare le dita dei piedi
Piegate lentamente in avanti il busto, lasciando che la schiena e
le spalle si rilassino mentre vi distendete verso le dita dei piedi.
Distendetevi il più possibile e contate fino a 15. Quindi rilassatevi e
ripetete per 3 volte. (figura 2)
Distensione del Tendine d’Achille-Polpaccio
Appoggiatevi ad un muro con la gamba sinistra posizionata di fronte
a quella destra e con le braccia rivolte in avanti. Mantenete la gamba
destra dritta e il piede sinistro piatto sul suolo, quindi piegate la
gamba sinistra e inclinatevi in avanti spostando i fianchi verso il muro.
Mantenete la posizione quindi ripetete per il lato opposto contando
fino a 15. Rilassatevi e ripetete 3 volte per gamba. (figura 3)
Distensione dei Quadricipiti
Con una mano appoggiata al muro per bilanciarsi, raggiungete e
sollevate il piede destro verso l’alto. Portate il tallone il più vicino
possibile ai glutei. Mantenete la posizione contando fino a 10-15,
rilassatevi. Ripetete 3 volte per ogni piede. (figura 4)
Distensione dell’Interno Coscia
Sedetevi con le suole delle scarpe che si toccano e con le ginocchia
rivolte verso l’esterno. Portate i piedi il più vicino possibile all’inguine.
Spingete i vostri ginocchi con gentilezzaverso il pavimento.
Mantenete la posizione contando fino a 15. Rilassatevi e ripetete per
3 volte. (figura 5)
1
2
3
5
4


support@bluefintrading.co.uk
www.bluefinfitness.com