Loading ...
Loading ...
Loading ...
27
OPERATIONS MANUAL
REACH-INS & ROLL-INS
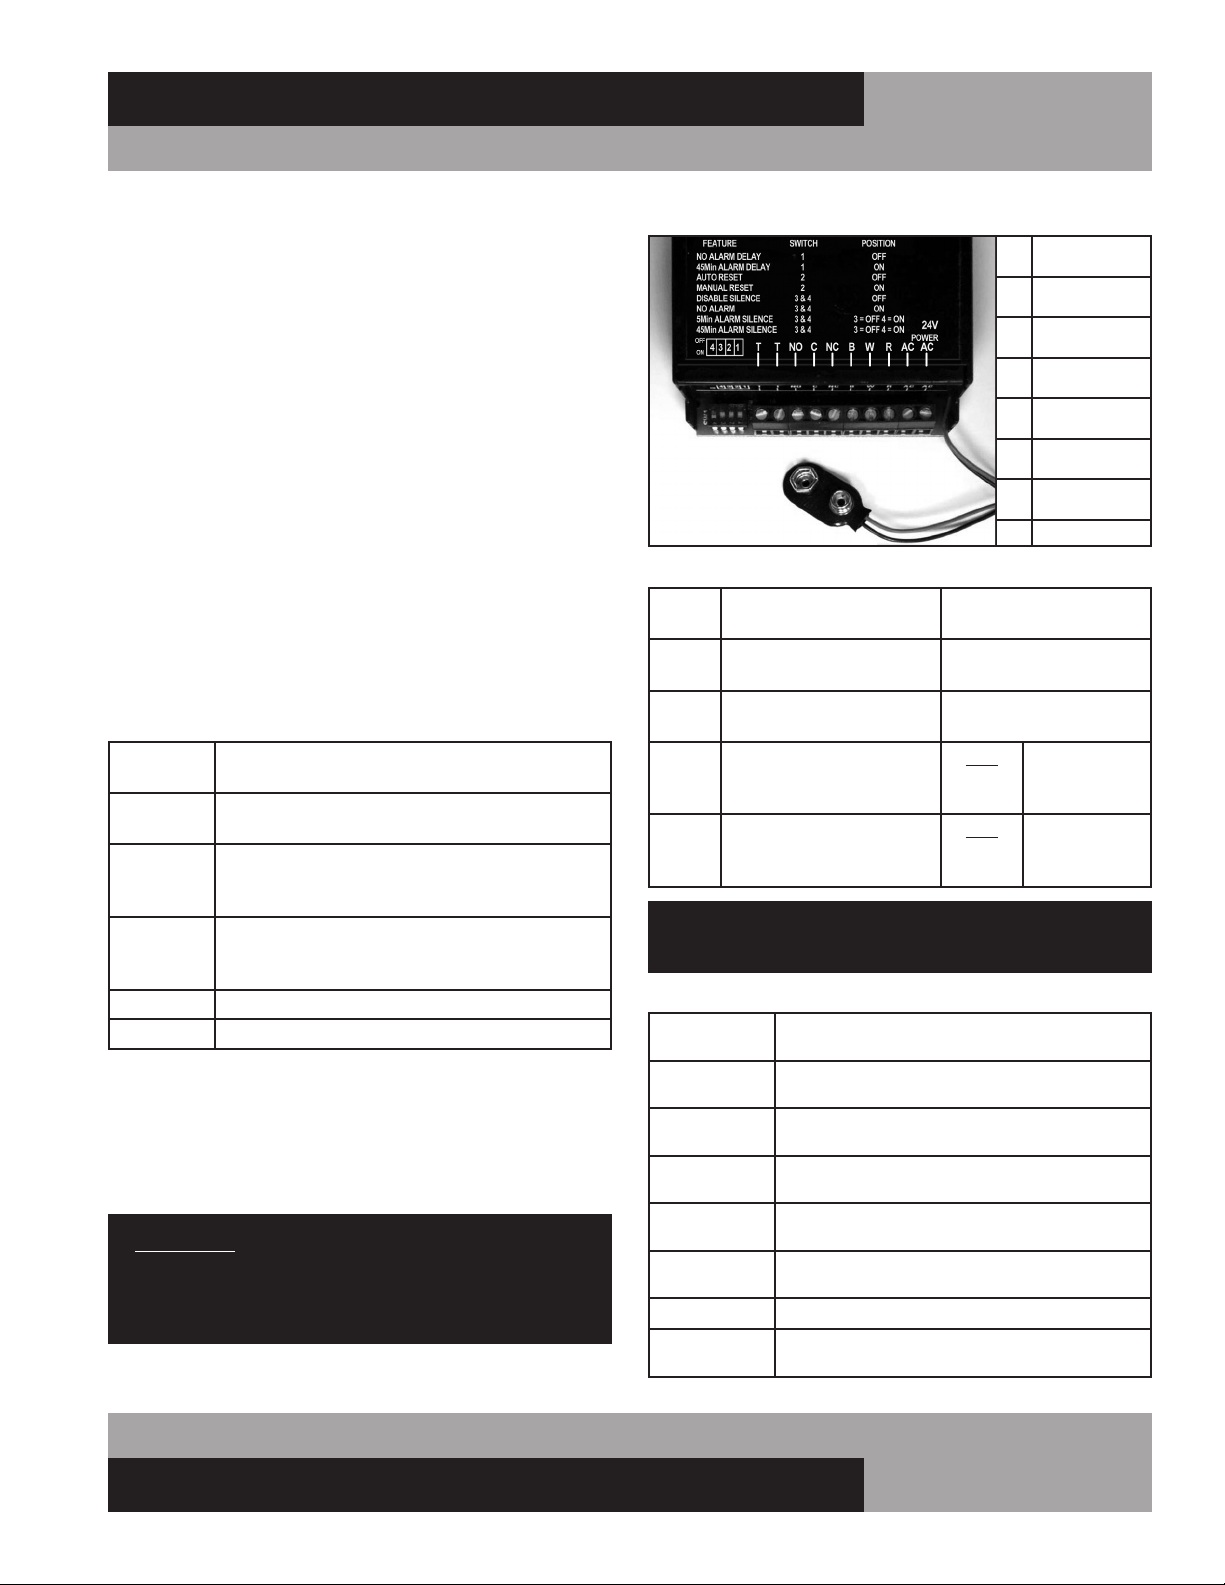
WIRE CONNECTIONS
T
= Output voltage
(for audible alarm)
NO
= Normally open
relay contact
C
= Common
relay contact
NC
= Normally closed
relay contact
B
= Black sensor
wire (ground)
W
= White sensor
wire (signal)
R
= Red sensor
wire (+5)
AC = Power supply
DIP SWITCH SETTINGS
Switch
1
OFF =
No alarm delay
ON = 45 minute
alarm delay
Switch
2
OFF =
Automatic alarm reset
ON = Manual alarm
reset required
Switch
3 & 4
OFF =
No alarm silencing
ON = No alarm
Switch
3 OFF
AND
Switch 4
ON = Alarm
silenced after
5 minutes
Switch
4 OFF
AND
Switch 3
ON = Alarm
silenced after
45 minutes
IMPORTANT: All dip switch functions should be set
before powering the unit on.
DEFINITIONS
Alarm
Delay
Alarm activates immediately, or after time
interval, when temp. exceeds set point
Alarm Silencer
Press “Reset” switch to silence
the audible alarm
Alarm Silence
Time
Number of minutes that will elapse until
audible alarm automatically silences
Automatic
Reset
Alarm will automatically stop after
temperature returns within normal settings
Battery
Indicator
Three dots light up on bottom of front
display when battery is low or not installed
Manual Reset
“Reset” must be pressed to stop audible/
visual alarm, even if temp returns to normal
No Alarm
Audio and visual alarm functions disabled
Power out
display
If power is lost, press “Reset” to display
temperature and sound audible alarm
While in transit, your cabinet is subjected to more jarring and
vibration than at any other time, and the display may require
some adjustment at start-up. Refrigerators are designed to
maintain 38° to 40°F (3.3° to 4.4°C) and Freezers -2° to 0°F
(-19° to -18°C). During periods of heavy use, when doors
are opened repeatedly or remain open for extended period,
or if warm product is loaded in the cabinet, the temperature
displayed may temporarily exceed the “normal” range. This is
common, as warm air outside the cabinet mixes with cold air
inside. If your thermometer continues to display temperature
above “normal” range, close the doors, make sure they seal
tight and keep them closed for at least 30 minutes. If a high
temperature is still displayed, check the thermometer by plac-
ing a pre-calibrated temperature sensing device in the center
of the refrigerated compartment and keep the doors closed for
at least 15 minutes. The thermometer should display the same
temperature as the sensing device, within +/-2°F (+/-1°C). If
it does not, follow instructions below for calibration mode to
adjust the offset.
ADJUSTING PROGRAM SETTINGS
Press ‘SET’ on front to display settings in this order:
HSP
-40 to 199
= High Alarm Set Point
= High Set Point value*
LSP
-40 to 199
= Low Alarm Set Point
= Low Set Point value*
HI
-40 to 199
= High temperature log
= Highest temperature recorded since reset last
pressed (Press Reset to clear value)
LO
-40 to 199
= Low temperature log
= Lowest temperature recorded since Reset last
pressed (Press Reset to clear value.)
CAL
= Calibration Mode
-30 to 30 = Calibration temperature display offset value*
Calibration example: If sensing device in cabinet reads 38° and thermometer
displays 41°, press ‘SET’ 10 times, to display temperature offset value. Then
press down arrow three times, to decrease offset by 3°. (If original offset value
displayed was “0”, then “-3” will appear).
*To adjust value, press up or down arrow until desired setting is
displayed. Then press ‘SET’ to save.
IMPORTANT: If sequence is interrupted for more than 15
seconds, or not completed to where the display flashes
once, unit will automatically revert back to temperature
mode, WITHOUT saving new values (tamper resistant).
If you need additional help, please contact the factory.
Loading ...
Loading ...
Loading ...