Loading ...
Loading ...
Loading ...
5
the event that the Wall Switch Remote Control does not
work properly with the receiver due to interference from
additional wireless signals, this function will allow the RF
code to be changed.
To enable this function, press 9 and 12 together. “CODE”
will appear on the display for ve (5) seconds and the
RF code will change automatically. Repeat procedure as
needed to nd a code that operates the replace without
interference.
Re-initialization of the Wall Switch Remote Control will
need to take place with receiver after a new code has been
activated. See initialization instructions.
14. Low Battery Indicator
When displayed, the indicator will signal that the batteries
are low and should be replaced. To further extend battery
life, the LED backlighting is turned off when the Low Battery
Indicator is displayed.
Other Functions
6 Hour Sleep Timer - This feature ensures all functions are
turned off six hours after any last button has been pressed.
To turn this feature on and off press 9, 11, 10, and 8
sequentially.
When activated, “6 Hr” will display for 5 seconds while the
rest of the LCD remains blank. For the duration of the 6
hour delay, all functions remain working until the 6 hour
time delay runs out. The Set Temperature and Room
Temperature icons will alternately display their settings and
1
3
5
2
4
6 7
9
11
8
10
12
13
14
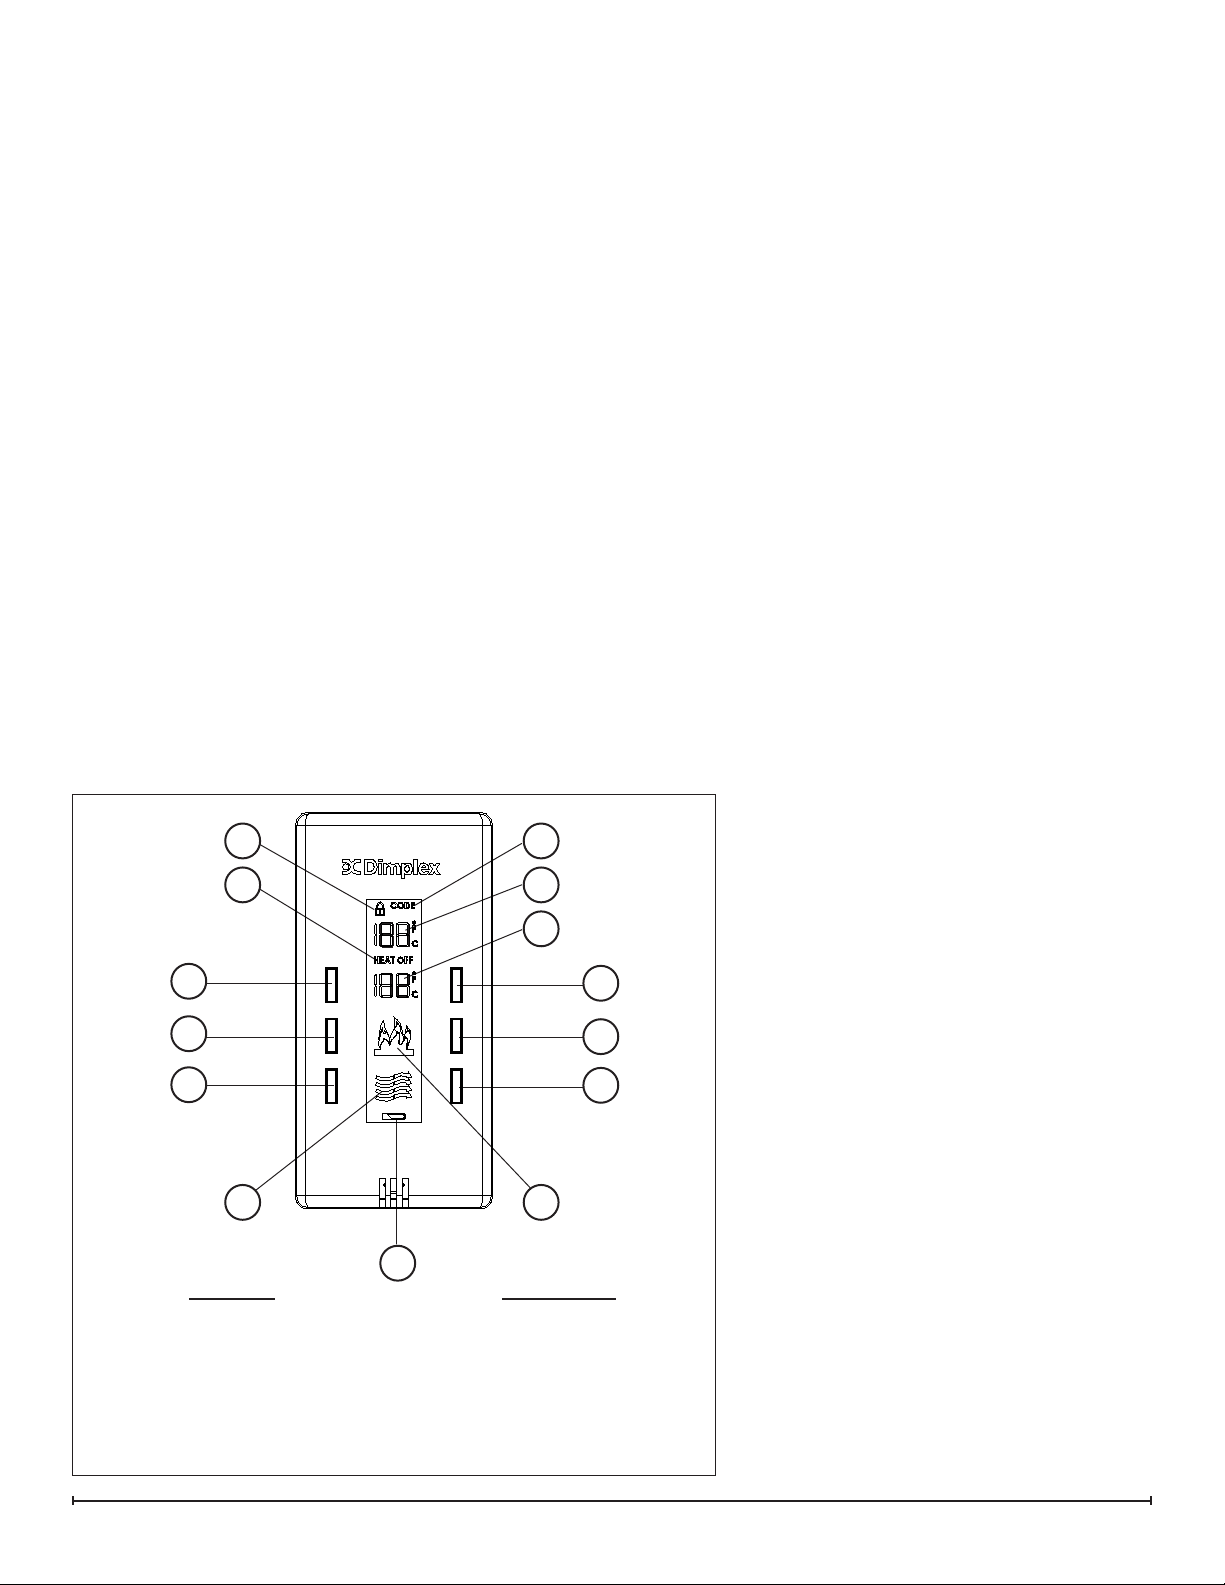
1. Room Temperature
2. Set Temperature
3. Flame Effect
4. Purire™
5. Heat Off Indicator
6. Function Lock Indicator
7. RF Code Function Indicator
8. Set Temperature Down
9. Set Temperature Up
10. Flame Off
11. Flame On
12. Purire™ Off
13. Purire™ On
14. Low Battery Indicator
Display Operation
the “6 Hr” icon display. After 6 hours have passed and all
functions are turned off, “6 Hr” will ash until any button is
pressed.
!
NOTE: If any button is pressed while this function is
enabled, the 6 hour timer will start over for another 6
hour period.
If / when deactivated (pressing the same sequence of
buttons again), “- Hr” will display for ve (5) seconds.
Battery Replacement
To replace the battery:
Remove the decora cover from the electrical box 1.
and press the wall remote inward until the push-lock
releases from the mounting box.
Remove the wall remote from the mounting box and 1.
slide battery cover open.
Install two (2) 1.5V (AAA) battery in the battery holder.2.
Close the battery cover.3.
Reinstall the wall control into mounting box.4.
Additional Optional Wall Mounted
Controls
The replace can be installed with wall-mounted
controls. These controls include wall switches
and thermostats. (See installation guide for
specic installation details)
A. Wall Mounted Switches
This model may be installed such that a wall-
mounted switch activates the ame effect and a
wall mounted heater switch activates the heater.
A wall-mounted switch can also be installed to
operate the heater independent of the ame.
B. Wall Mounted Thermostat
This unit may be installed with a wall-
mounted thermostat which can adjust the heat
temperature to your individual requirements.
Turn the thermostat control clockwise all the way
to turn on the heater. When the room reaches
the desired temperature, turn the thermostat
knob counter clockwise until you hear a click.
Leave in this position to maintain the room
temperature at this setting. For additional heat,
turn the thermostat clockwise until you hear
the click again and the heater will turn on. To
turn the heater off, turn the thermostat counter
clockwise all the way, and/or turn the manual
heater switch on the unit to the OFF position,
“O”.
Figure 4
Loading ...
Loading ...
Loading ...