Loading ...
Loading ...
INSTALLATION
INSTRUCTIONS
BEFORE
INSTALLING
PEDESTAL
IMPORTANT:
If
your
washer
and
dryer
are
already
installed,
they
must
be
uninstalled.
Uninstalling
your
washer
To
avoid
possible
damage
to
the
washer,
the
transport
bolts
on
the
back
of
the
washer
must
be
in
place
before
installing
the
pedestal.
For
more
information
on
transport
bolts,
see
“Remove
Transport
System”
in
washer
Use
and
Care
Guide.
ree
fe
Excessive
Weight
Hazard
Use
two
or
more
people
to
move
and
uninstall
washer.
Failure
to
do
so
can
result
in
back
or
other
injury.
NOTE:
If
the
washer
is
to
be
transported,
call
your
local
service
center.
To
avoid
suspension
and
structural
damage,
your
washer
must
be
properly
set
up
for
relocation
by
a
certified
technician.
1.
2.
3.
Turn
off
the hot
and
cold
water
faucets.
Unplug
the
power
supply
cord.
Slowly
loosen
the
fill
hoses
at
the
faucets
to
relieve
the
water
pressure.
Use
a
sponge
or
towel
to
absorb
the
released
water.
.
Remove
the
“HOT”
and
“COLD”
fill
hoses
from
the
back
of
the
washer.
Drain
the
water
from
the
hoses
into
a
bucket.
.
Remove
the
drain
hose
from
the
standpipe
or
laundry
tub
and
drain
any
water
remaining
in
the
hose
into
a
bucket.
.
Pull
the
washer away
from
the
wail
so
it
can
be
tipped
on
its
back.
.
To
avoid
floor
damage
and
ease
installation
and
handling,
unfold
the
empty
pedestal
box
flat
and
place
it
next
to
the
washer.
Lay
the
washer
on
its
back
(make
sure
that
the
power
supply
cord
is
not
under
the
washer)
so
that
the
cardboard
is
under
the
entire
lower
back
edge
of
the
washer.
.
An
additional
smail
amount
of
water
will
drain
out
of
the
washer
when
it
is
tipped
back.
Go
to
“Installing
the
Pedestal”.
Uninstalling
your
electric
dryer
A
WARNING
Excessive
Weight
Hazard
Use
two
or
more
people
to
move
and
uninstall
dryer.
Failure
to
do
so
can
result
in
back
or
other
injury.
mp
=
.
Unplug
the
power
supply
cord.
.
Pull
the
dryer
away
from
the
wall
enough
to
loosen
the
vent
clamp.
Loosen
the
clamp
and
gently
remove
the
exhaust
vent
from
the
dryer
exhaust
outlet.
.
Pull
the
dryer
away
from
the
wail
so
that
it
can
be
tipped
on
its
back.
.
To
avoid
floor
damage
and
ease
installation
and
handling,
unfold
the
empty
pedestal
box
flat
and
place
it
next
to
the
dryer.
Lay
the
dryer
on
its
back
(make
sure
that
the
power
supply
cord
is
not
under
the
dryer)
so
that
the
cardboard
is
under
the
entire
lower
back
edge
of
the
dryer.
Go
to
“Installing
the
Pedestal”.
Uninstalling
your
gas dryer
A
WARNING
Excessive
Weight
Hazard
Use
two
or
more
people
to
move
and
uninstall
dryer.
Failure
to
do
so
can
result
in
back
or
other
injury.
1.
Unplug
the
power
supply
cord.
2.
Turn
off
the
gas supply.
3.
Pull
the
dryer
away
from
the
wall
enough
to
loosen
the
vent
clamp.
Loosen
the
clamp
and
genily
remove
the
exhaust
vent
from
the
dryer
exhaust
outlet.
4.
Disconnect
the
flexible
gas
supply
line
from
the
dryer.
Put
a
piece
of
tape
over
the
open
ends
of
the
gas
line
connection
fittings.
5.
Pull
the
dryer
away
from
the
wail
so
that
it
can
be
tipped
on
its
back.
6.
To
avoid
floor
damage
and
ease
installation
and
handling,
unfold
the
empty
pedestal
box
flat
and
place
it
next
to
the
dryer.
Lay
the
dryer
on
its
back
(make
sure
that
the
power
supply
cord
is
not
under
the
dryer)
so
that
the
cardboard
is
under
the
entire
lower
back
edge
of
the
dryer.
Go
to
“Installing
the
Pedestai”.
installation
of
new
washer/dryer
A
WARNING
Excessive
Weight
Hazard
Use
two
or
more
people
to
move
and
install
washer/dryer.
Failure
to
do
so
can
result
in
back
or
other
injury.
if
your
washer/dryer
is
still
in
the
packaging:
(
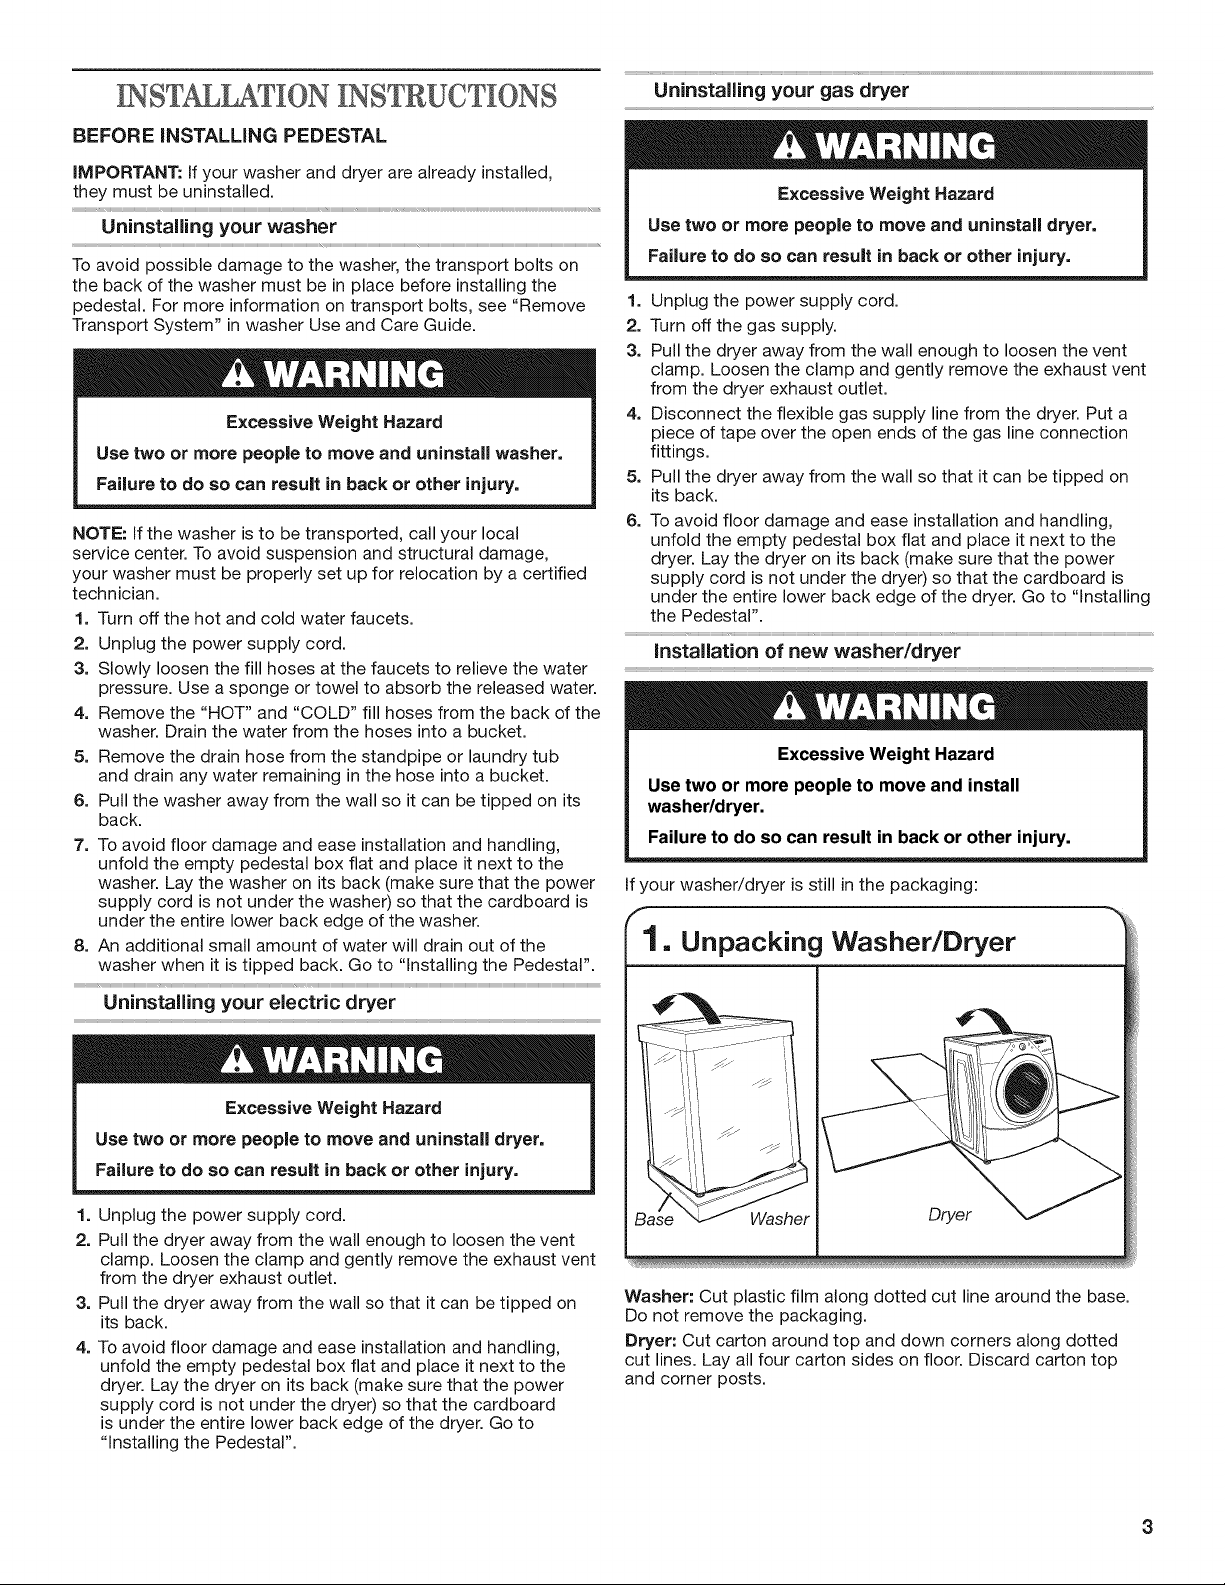
1.
Unpacking
Washer/Dryer
Washer:
Cut
plastic
film
along
dotted
cut
line
around
the
base.
Do
not
remove
the
packaging.
Dryer:
Cut
carton
around
top
and
down
corners
along
dotted
cut
lines.
Lay
ail
four
carton
sides
on
floor.
Discard
carton
top
and
corner
posts.
Loading ...
Loading ...
Loading ...