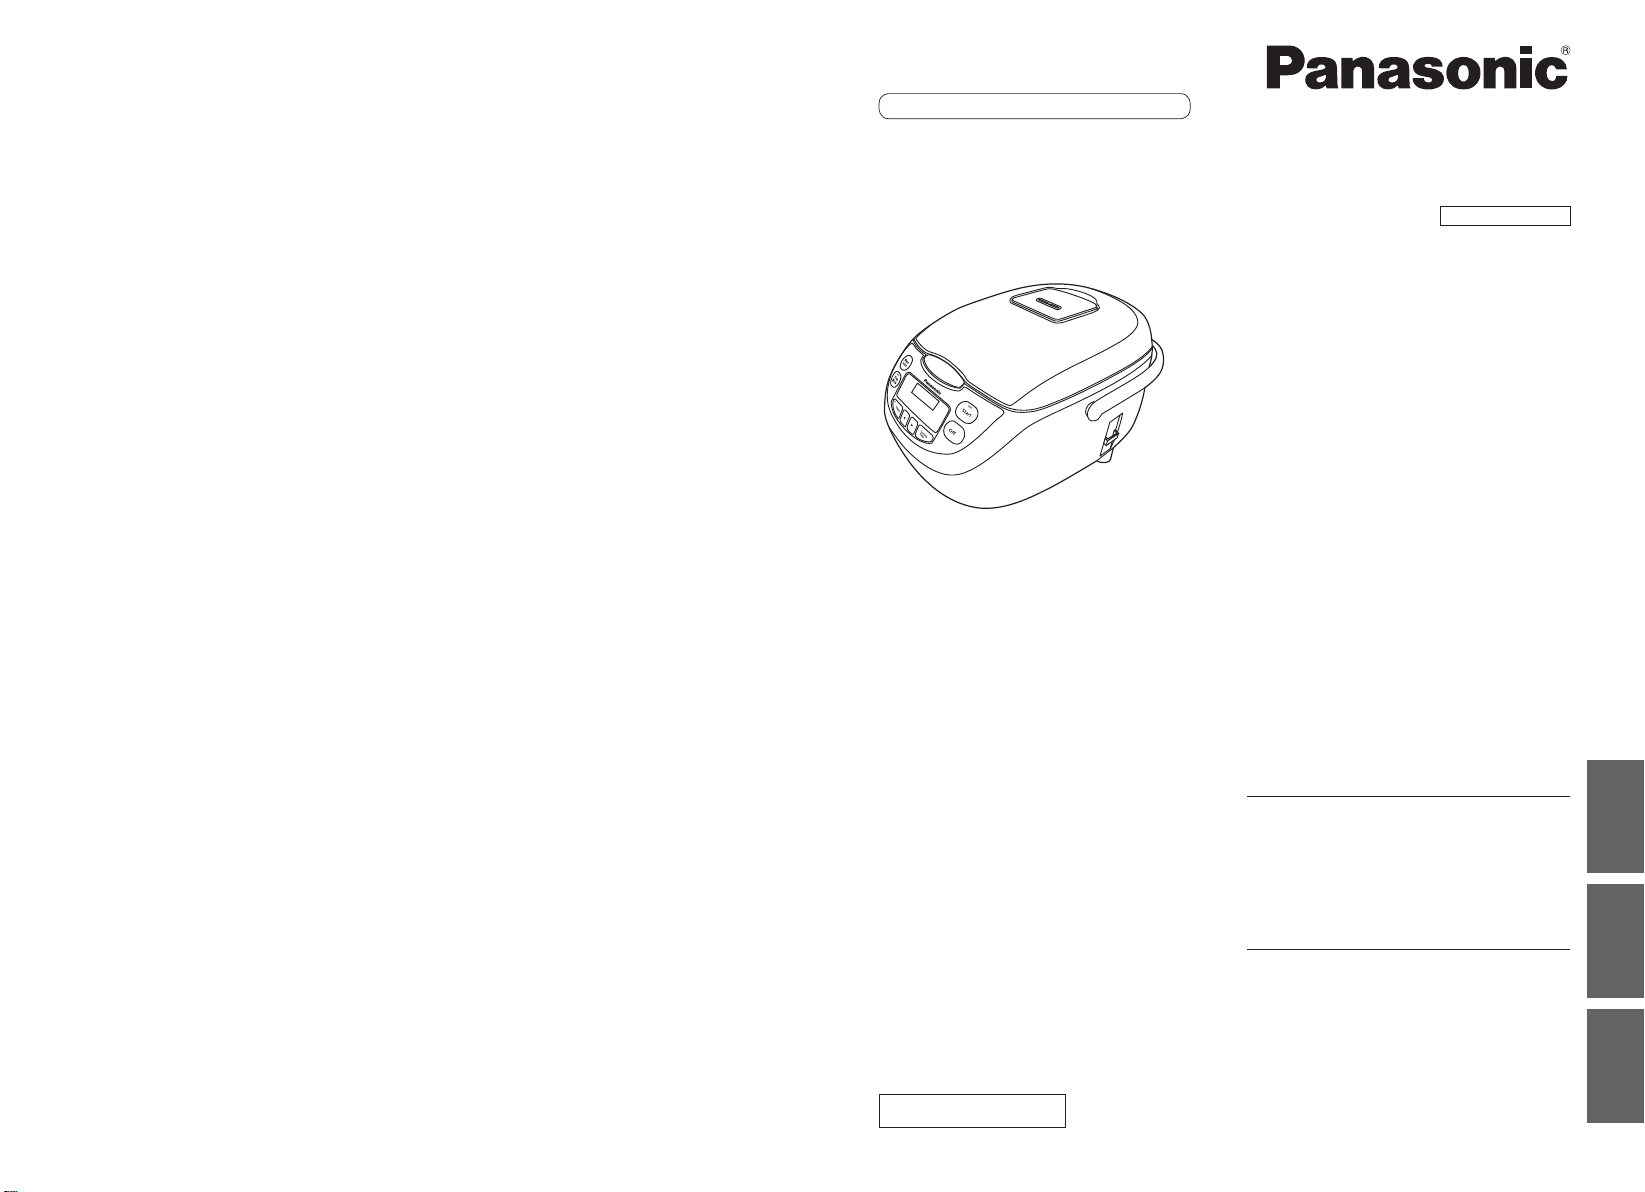
Operating Instructions
Electronic Rice Cooker / Warmer
Household Use
1.0 L model
Model No.
SR-CX108
SR-CN108
1.8 L model
Model No.
SR-CX188
SR-CP188
SR-CN188
Thank you for purchasing this
Panasonic product.
OOThis product is intended for
household use only.
OOPlease read the operating
instructions carefully to ensure
safe and correct operation
before use.
OOBefore use, be sure to read
“Safety Precautions”
(Pages 2–4).
OOKeep the operating instructions
and the warranty for future use.
Warranty appended
Contents
Safety Precautions............2
Notes on Use
.................5
Part Names/Accessories . . . . . . .6
Cooking Rice
.................8
Using the Settings Correctly
...10
Using Different Settings
.......11
OOTimer
Cleaning
...................12
Troubleshooting
.............14
OOError Indications
Specications
...............18
MAL/SIN (DBD)/SIN (RBD)/AST/NZ
Panasonic Corporation
Web Site: http://www.panasonic.com
© Panasonic Corporation 2018
Printed in China
RZ19MK83
F1018T0
Illustrations of the SR-CX108
are used throughout this
Operating Instructions.
中文
English Melayu

2 3
English
WARNING
Failure to follow these instructions may cause death or serious injury.
• This appliance is not intended for use by persons (including children)
with reduced physical, sensory or mental capabilities, or lack of
experience and knowledge, unless they have been given supervision or
instruction concerning use of the appliance by a person responsible
for their safety.
Children should be supervised to ensure that they do not play with the
appliance.
• This appliance is intended to be used in household and similar
applications such as: -staff kitchen areas in shops, offices and other
working environments; -farm houses; -by clients in hotels, motels and
other residential type environments; -bed and breakfast type
environments.
• If the supply cord is damaged, it must be replaced by a special cord or
assembly available from the manufacture or its service agent.
• Do not spill water or other liquid on the connector such as the
instrument plug to avoid electric shock, or fire caused by short circuit.
• Never use this appliance to cook any food that may jam the Steam Vent:
Foliaceous food (e.g. laver, Chinese cabbage) or strip food (e.g. kelp) and
fragmentary foods (e.g. corn grit), as this may cause accidents or damage to
the appliance.
• During operation, never have your face or hands close to the Steam
Vent in order to avoid burn.
• Please use an individual earthed power outlet of 10 A rated current, and
joint use of the same power outlet with other appliance may cause fire.
• No reconstruction
Any person other than a repair technician is not allowed to dismantle
or repair the appliance to avoid fire, electric shock or injury.
• Make sure the voltage indicated on the label of the appliance is the
same as your local supply. Never use a damaged power cord.
• Do not do any of the following to avoid fire and electric shock due to
damaged power cords.
Modifying, forcefully bending, placing near heating elements, bundling,
putting heavy objects on top, etc.
• Any dust in the power plug must be cleaned in a timely manner to
avoid fire.
• The instrument plug and power plug must be inserted into the socket
and power outlet thoroughly to avoid fire, electric shock or short circuit.
• When the power cord or power plug is damaged or the power plug is
loosely connected to the power outlet, never use the appliance to avoid
fire, electric shock or short circuit.
• Never pull off the power plug with a wet hand to avoid electric shock
and injury.
• During operation, do not move or shake the appliance.
• Do not let a child operate the appliance unattended. Put it out of the
reach of babies to avoid electric shock, burn and other dangerous
accidents.
• Do not place the appliance on a location which is unstable or wet or
approaches to fire or heat source, otherwise this may cause damage or
accident.
• Never soak or dip the appliance in water.
• Never insert a pin, wire or other object into Intake Vent, Exhaust Vent or
gaps on the bottom of the appliance to avoid electric shock.
• Discontinue using the appliance immediately and unplug when
abnormality or breaking down occurs to avoid smoking, fire or electric
shock.
e.g. for abnormality or breaking down: The power plug and the power cord
become abnormally hot; The power cord is damaged or power failure
happens when the power cord is touched; The main body is deformed or is
abnormally hot; Smoke emanates from the main body or a burning odour is
detected; The main body is cracked, is loose or rattles.
• Close the Outer Lid slowly and firmly until it clicks to prevent burn or
injury by steam leaking or the opening of the Outer Lid.
• Keep the power cord out of the reach of children.
Do not let the power cord hang over the edge of the table or countertop.
Pulling on the power cord may result in the appliance falling from the table or
countertop, causing injury.
• Be careful not to trip over or become entangled with the power cord
while in use to avoid injury, or the damaged power cord causing fire or
electric shock.
• Do not use the appliance for any purpose other than those described in
these instructions to avoid fire, burn, injury or electric shock.
Panasonic will not accept any liability if the appliance is subject to improper
use, or failure to comply with these instructions.
Safety Precautions

4 5
English
CAUTION
Failure to follow these instructions may cause injury or property damage.
• The appliance must match the supplied Inner Pan to avoid overheat or
abnormal circumstance.
• During use or immediately after use, do not touch the Inner Pan with
hands to avoid burn due to high-temperature.
• Do not use the cord set (for an instrument plug and power plug) that is
not specified for use with this appliance also do not transfer it to avoid
electric shock, electrical leakage or fire.
• Be sure to hold the power plug or the instrument plug when
unplugging the power plug or the instrument plug to avoid electric
shock, or fire caused by short circuit.
• Always switch off and unplug the appliance from the power outlet
when it is not in use or before removing the Inner Pan to avoid burn,
injury, or electric shock or fire caused by short circuit due to the
insulation deterioration.
• Unplug and allow the appliance to cool down fully before cleaning and
storing it to avoid burn.
Do not move the appliance while it is hot.
Safety Precautions
• Before the Rice Cooker works, check the Inner Pan and Steam Cap for in
place to avoid any malfunction.
• During use, the Rice Cooker may generate tiny sound of “click” or “sizz”,
which is a normal sound of operation, and do not panic.
• Never have the Rice Cooker to operate again immediately after cooking.
Wait at least for 15 minutes so as to have the heating plate cool down.
• Never cook rice with hot water as this may affect the temperature judgment
by the thermostat thus degrade cooking effect.
• In operation, never cover the top of the Rice Cooker with a cloth, as this may
cause accidents or damage to the Rice Cooker.
• Do not have the Inner Pan to fall off, which may cause deformation.
• Do not hit the Inner Pan with a hard object to avoid deformation.
• Before the Rice Cooker works, be sure to wipe away the water outside the
Inner Pan to avoid any fault.
• Before the Rice Cooker works, please remove water drops and rice grains
between the Inner Pan and heating plate to avoid any malfunction.
• The coating on the bottom of the Inner Pan may wear off depending on
usage frequency, but this does not affect performance.
• Hold the Handle when moving the Rice Cooker.
• Do not use the Rice Cooker outdoors.
Notes on Use
6 7
English
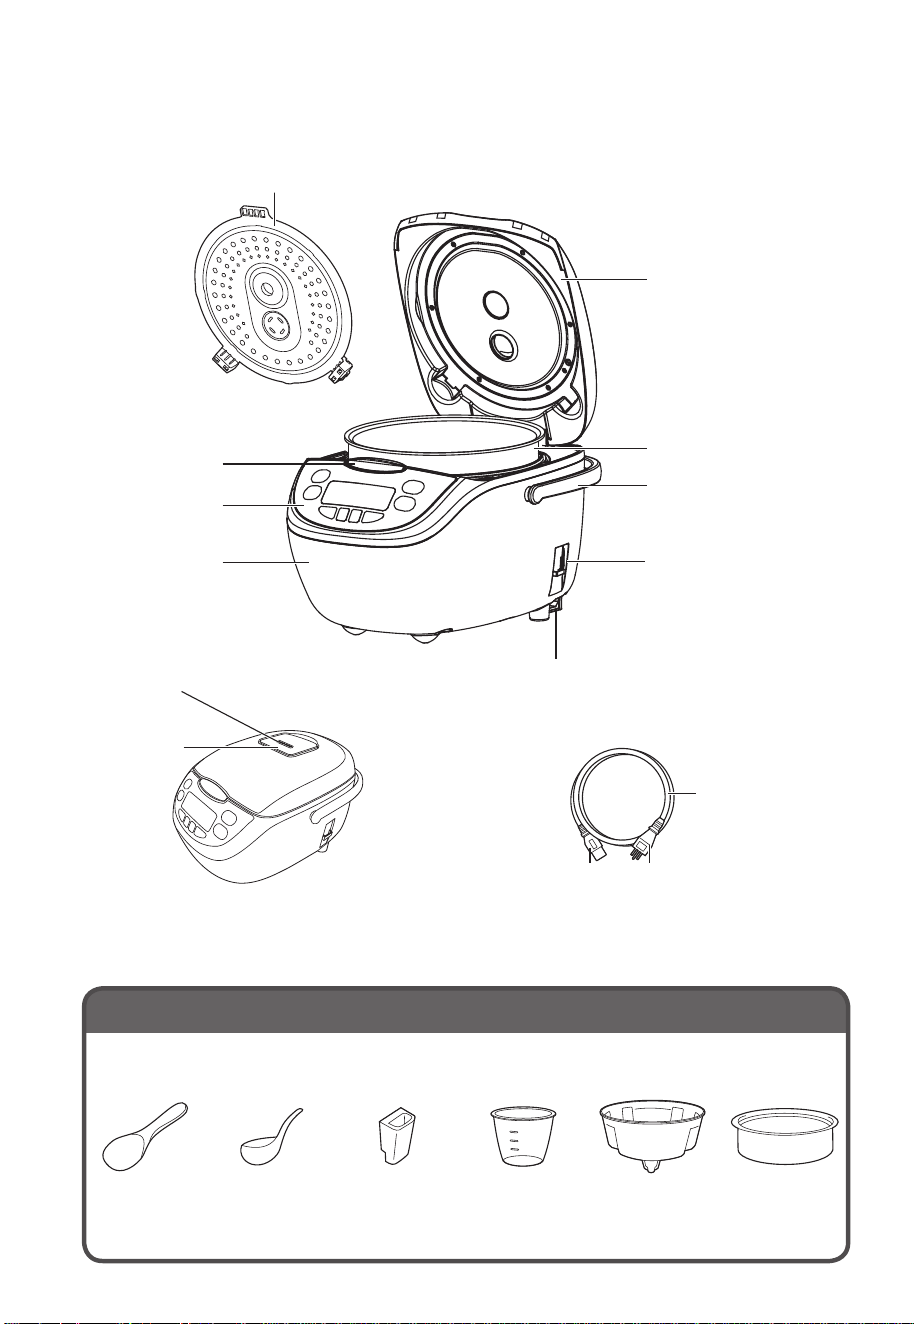
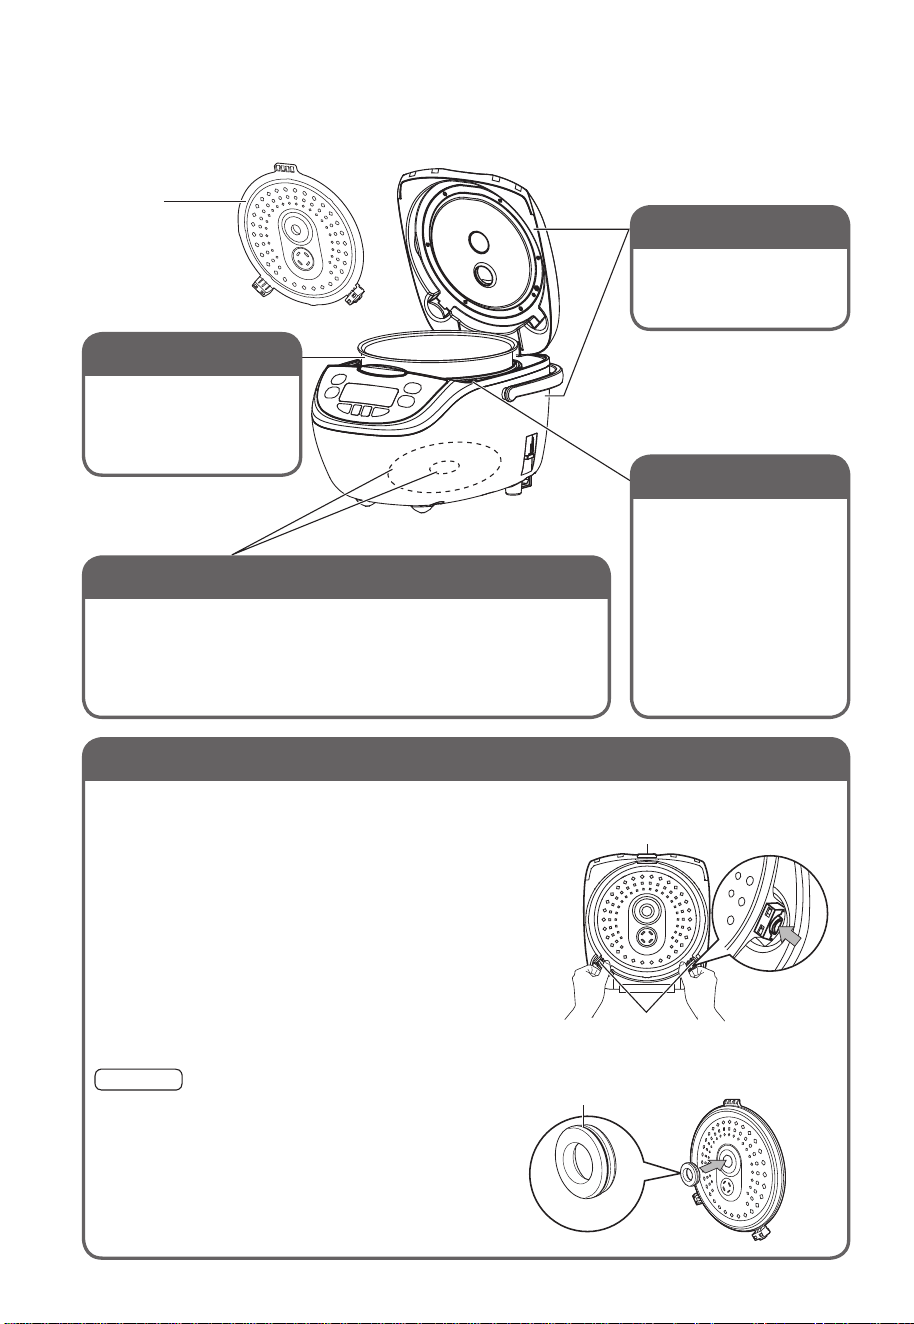
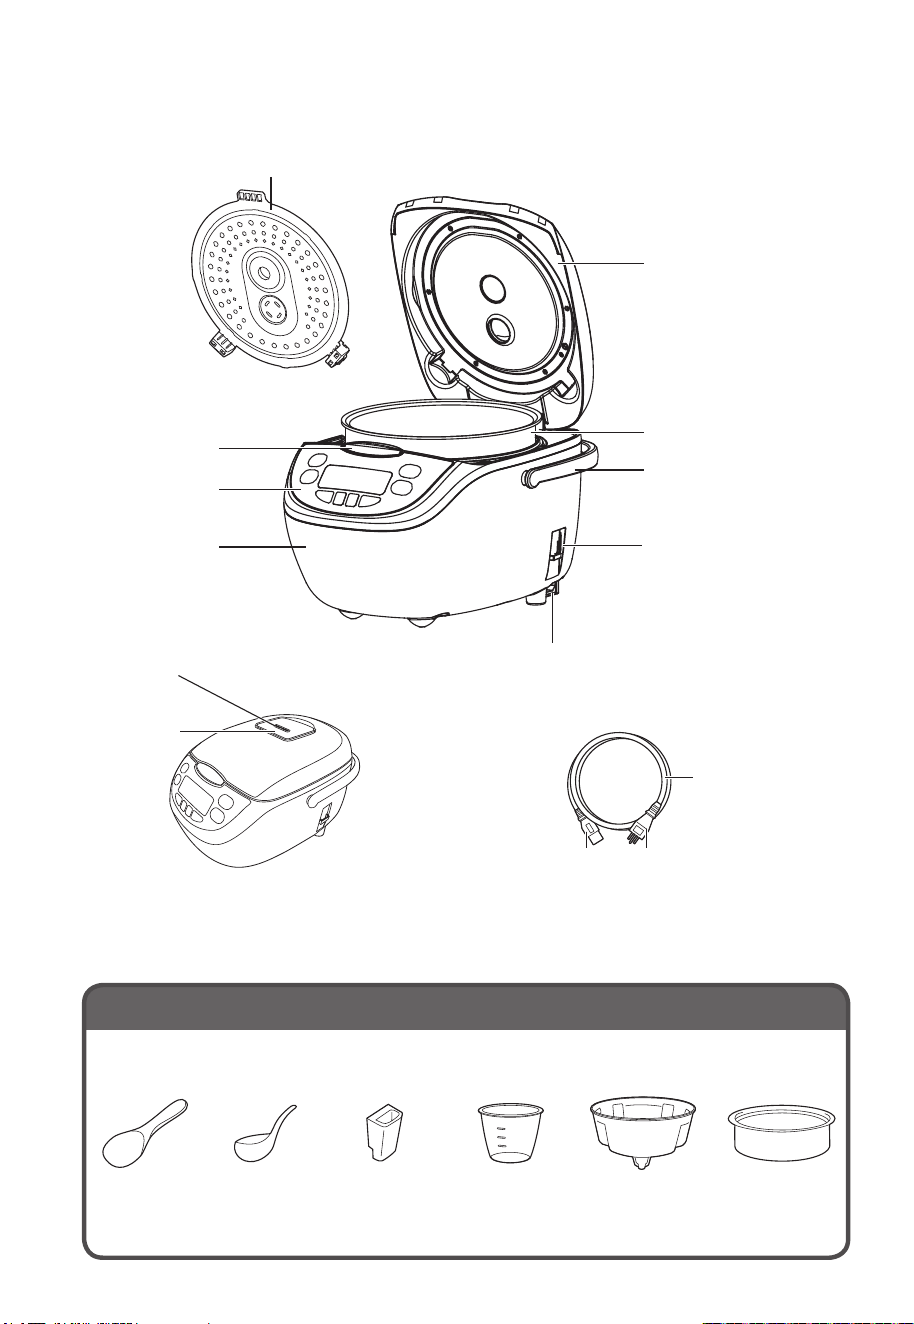
Part Names/Accessories
Q Paper located between the Inner Pan and the Heating Plate should be removed
before use.
Outer Lid
Inner Lid
Inner Pan
Body
Control Panel
Hook Button
Handle
Position for
installing the Rice
Scoop Holder
Socket
Steam Vent
Power Plug*Instrument Plug
Power Cord
Cord Set
Steam Cap
* The shape of Power Plug may be different
from illustration.
Accessories
Rice Scoop
(1)
Ladle (1)
Rice Scoop
Holder (1)
Measuring
Cup (1)
Steaming Basket (1)
( Approx.
180 mL)
For SR-CX108
SR-CX188
SR-CP188
For
SR-CN108
SR-CN188
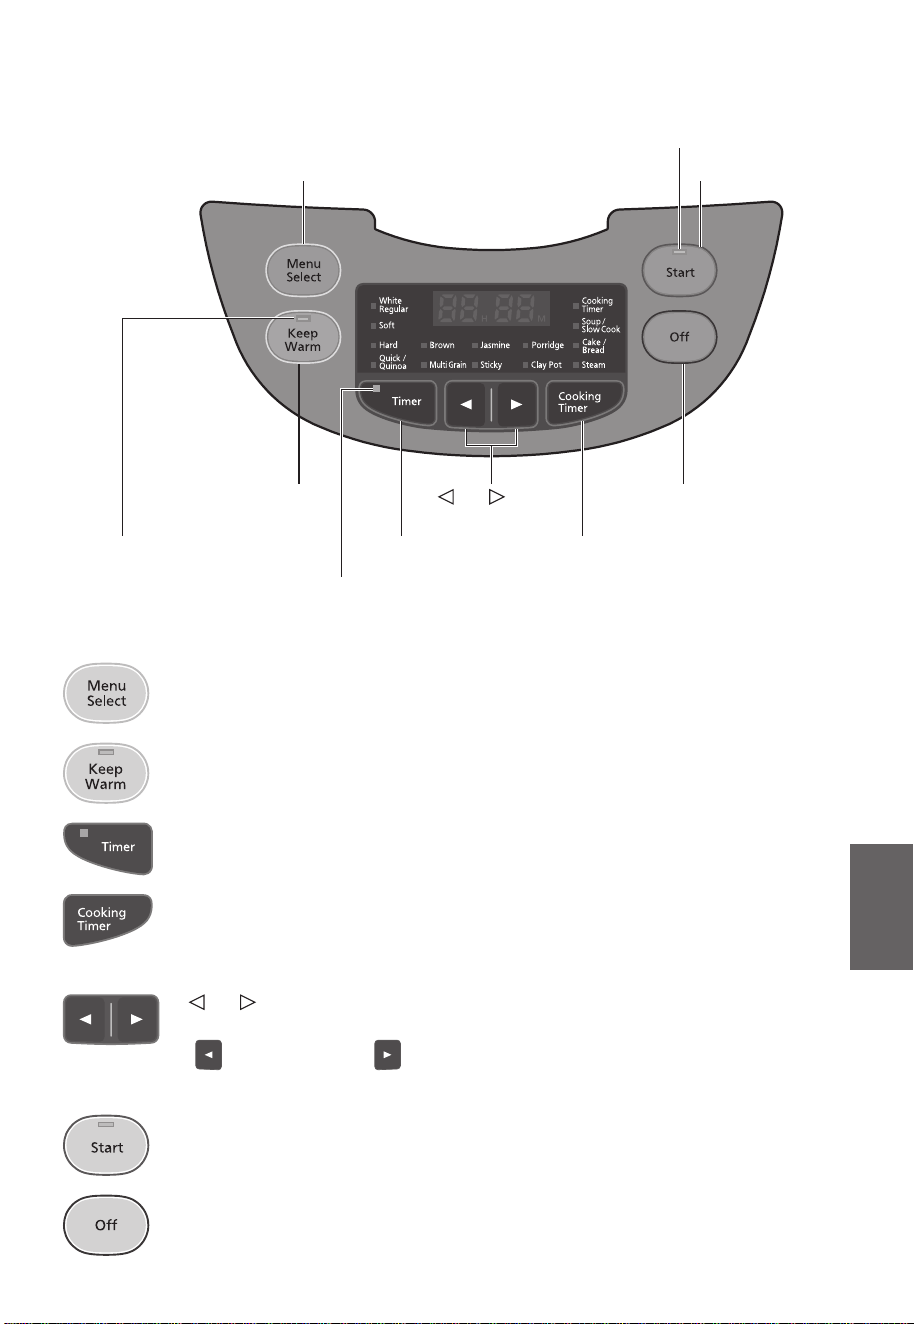
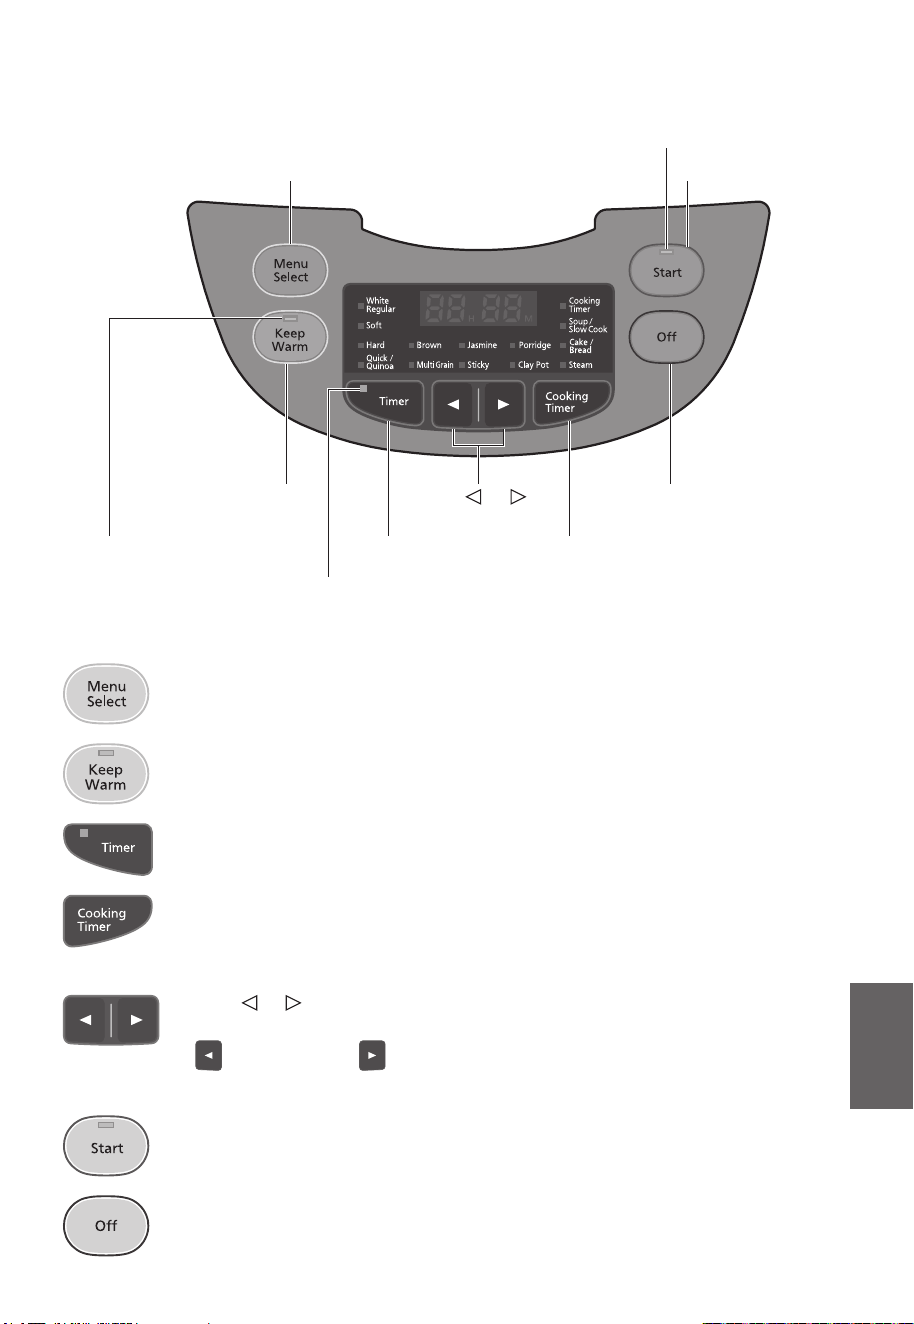
“Off” button
“
”, “ ” button
“Keep Warm” button
“Menu Select” button “Start” button
“Start” indicator
“Cooking Timer” button“Timer” button“Keep Warm” indicator
“Timer” indicator
“Menu Select” button
OO This button is used to select the desired menu.
“Keep Warm” button
OO After cooking, the “Keep Warm” indicator automatically turns on.
OO This button is used to start the keep warm function.
“Timer” button
OO This button is used to set the timer.
“Cooking Timer” button
OO When selecting “Porridge”, this button is used after pressing the “Timer”
button to go back to set the cooking time.
OO This button is used to conrm the cooking time in timer status.
“ ”, “ ” button
OO
These buttons are used to set the time.
: Decreasing : Increasing
OO Press and hold this button to quickly add or subtract time.
“Start” button
OO This button is used to start cooking.
OO This button is used to end the setting of the timer.
“Off” button
OO This button is used to cancel incorrect operation.
OO This button is used to turn off the keep warm function.
6 7
English
Part Names/Accessories
Q Paper located between the Inner Pan and the Heating Plate should be removed
before use.
Outer Lid
Inner Lid
Inner Pan
Body
Control Panel
Hook Button
Handle
Position for
installing the Rice
Scoop Holder
Socket
Steam Vent
Power Plug*Instrument Plug
Power Cord
Cord Set
Steam Cap
* The shape of Power Plug may be different
from illustration.
Accessories
Rice Scoop
(1)
Ladle (1)
Rice Scoop
Holder (1)
Measuring
Cup (1)
Steaming Basket (1)
( Approx.
180 mL)
For SR-CX108
SR-CX188
SR-CP188
For
SR-CN108
SR-CN188
“Off” button
“
”, “ ” button
“Keep Warm” button
“Menu Select” button “Start” button
“Start” indicator
“Cooking Timer” button“Timer” button“Keep Warm” indicator
“Timer” indicator
“Menu Select” button
OO This button is used to select the desired menu.
“Keep Warm” button
OO After cooking, the “Keep Warm” indicator automatically turns on.
OO This button is used to start the keep warm function.
“Timer” button
OO This button is used to set the timer.
“Cooking Timer” button
OO When selecting “Porridge”, this button is used after pressing the “Timer”
button to go back to set the cooking time.
OO This button is used to conrm the cooking time in timer status.
“ ”, “ ” button
OO
These buttons are used to set the time.
: Decreasing : Increasing
OO Press and hold this button to quickly add or subtract time.
“Start” button
OO This button is used to start cooking.
OO This button is used to end the setting of the timer.
“Off” button
OO This button is used to cancel incorrect operation.
OO This button is used to turn off the keep warm function.
8 9
English
Cooking Rice
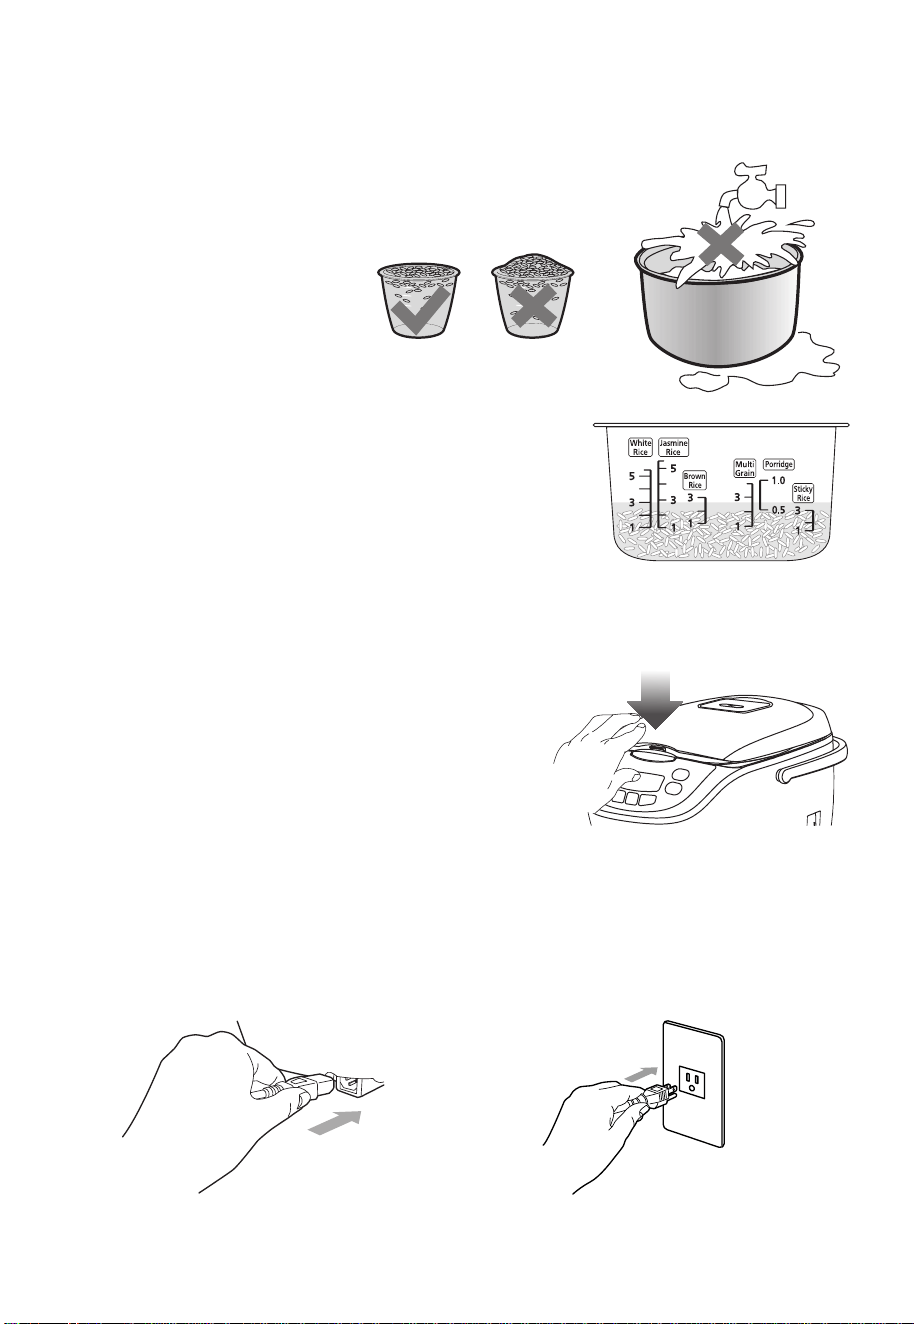
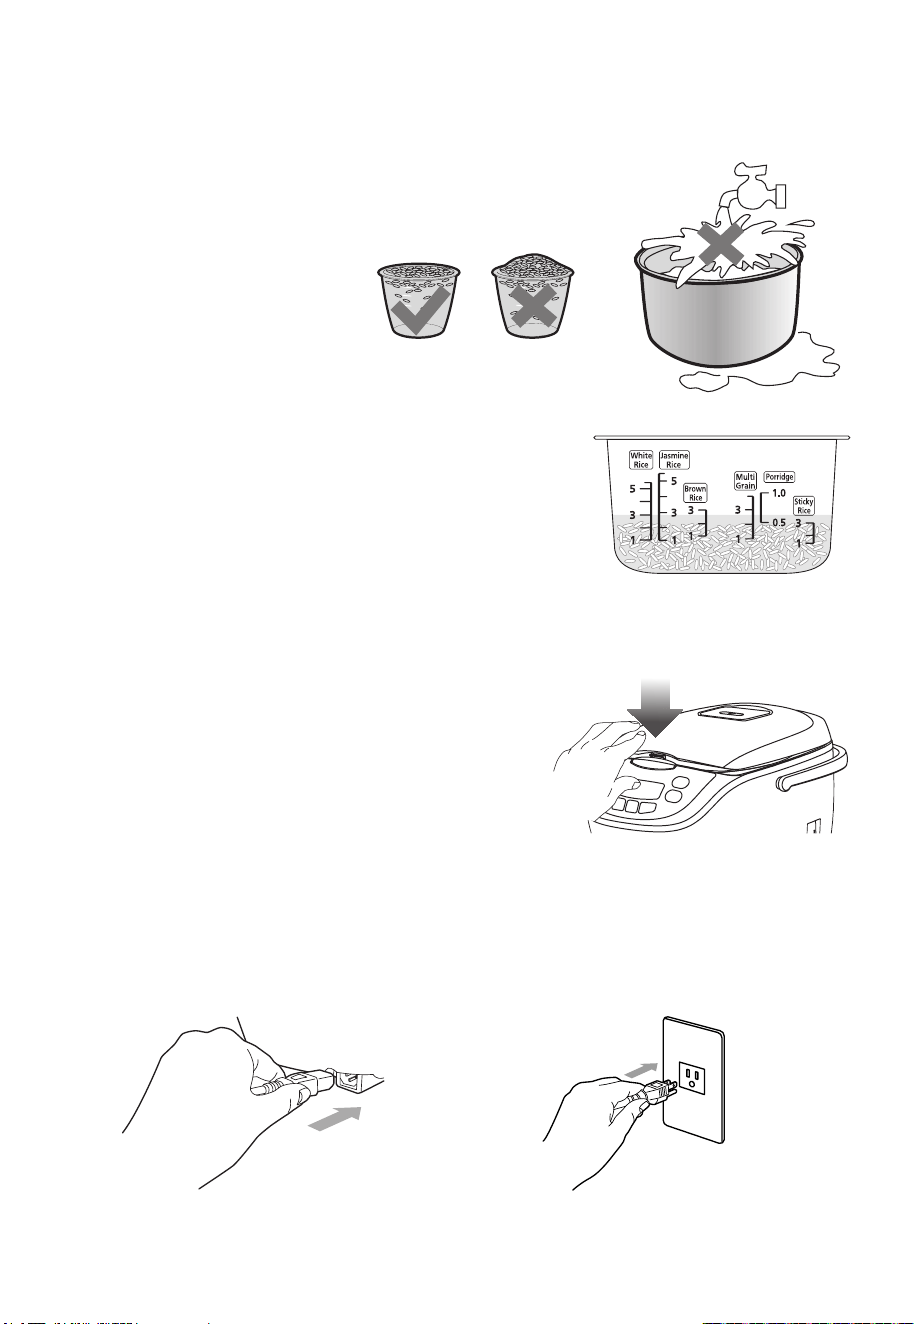
1
Weigh out required rice (A measuring cup of rice is about 150 g);
OO Wash rice in another
container and make sure
to wash it clean.
OO It is better not to wash rice
directly inside the Inner
Pan in order to avoid
scufng the Inner Pan.
2
Put the cleaned rice into the Inner Pan and
fill it with water to a corresponding water
level (e.g. if cooking 3 cups of white rice,
water should be added to Mark 3 of the
Water Level (White Rice)). The water
quantity can be increased or decreased
reasonably according to personal
preference.
OO Never exceed the highest Water Level.
3
Wipe up the external surface of Inner
Pan with dry cloth, putting it into the
Rice Cooker. Then press down the
Outer Lid until a sound of “click” is
heard.
OO Never heat the Inner Pan on other stoves to
avoid deformation caused by high
temperatures; it is not allowed to use any
other container, instead of the Inner Pan, on
the Heating Plate.
4
Connect the Instrument Plug to the body first and then connect the
Power Plug.
OO Make sure that both plugs are rmly connected.
①
②
The Inner Pan in the
illustration is the 1.0 L
model.
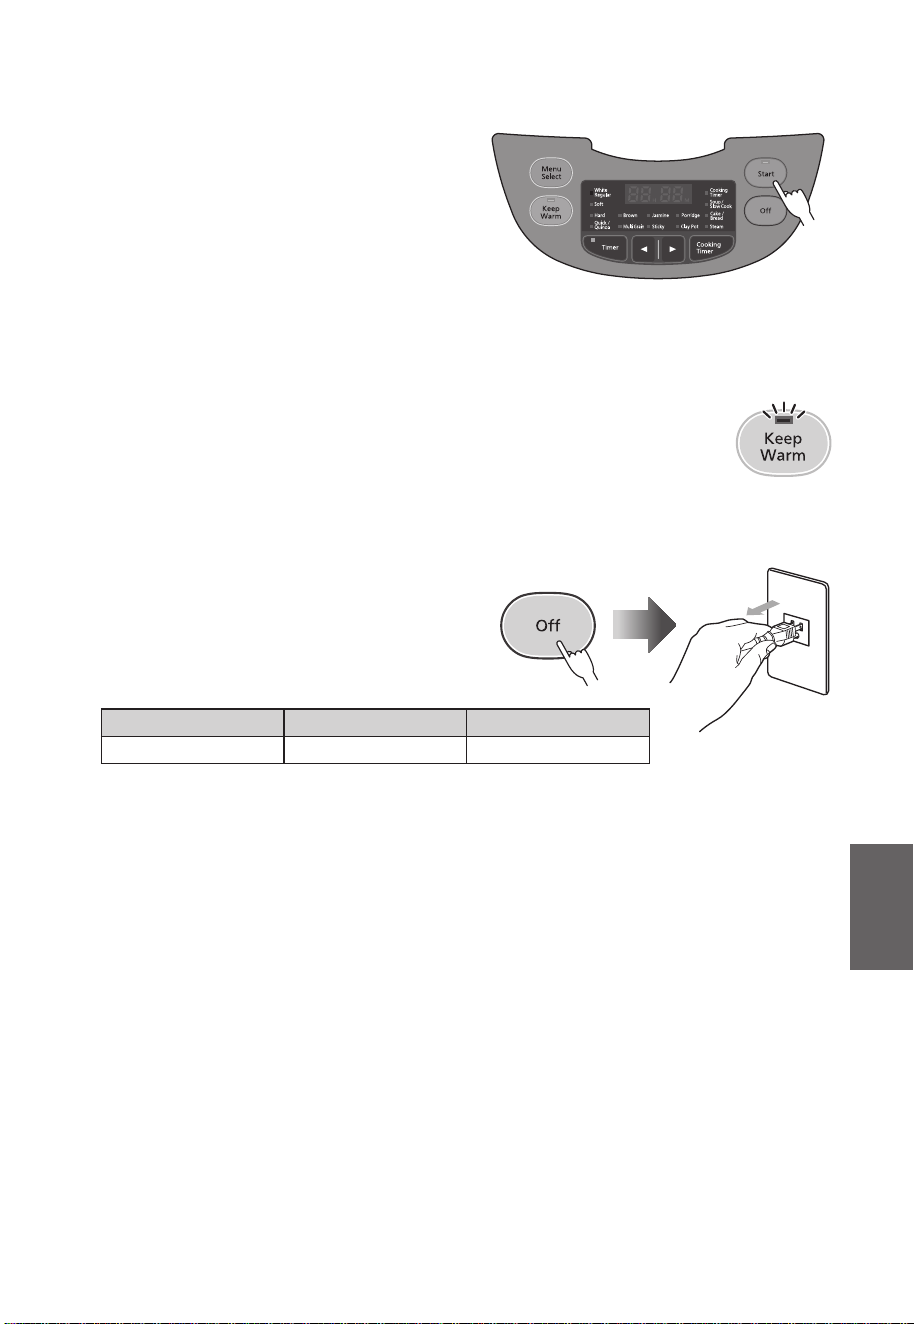
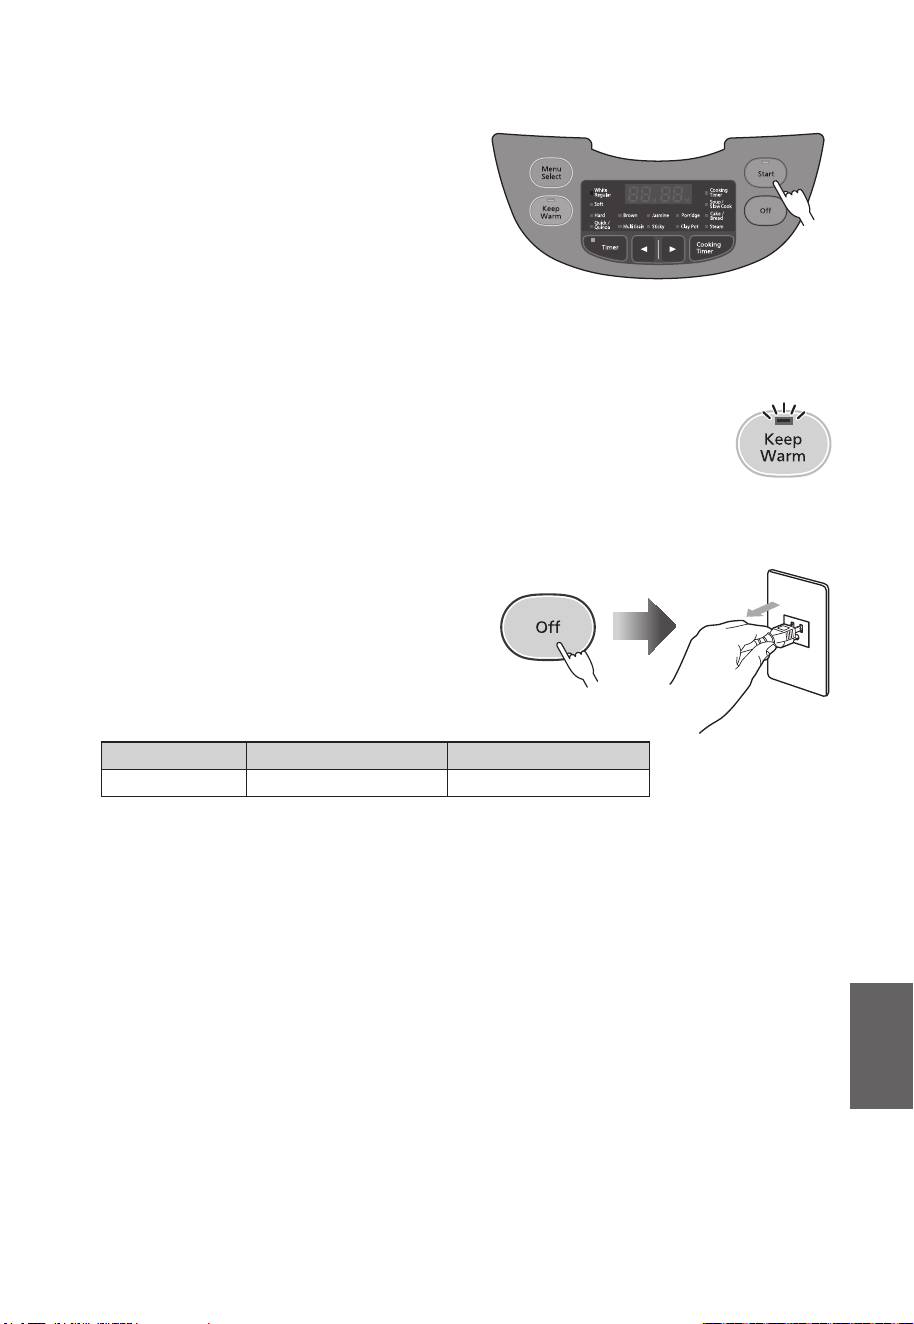
5
Press the “Start” button to enter the
working process of a corresponding
menu. The “Start” indicator lights
up.
OO By default, “White Regular” is selected.
When changing it, see page 11.
OO When using the timer, see page 11.
OO Entering state of stewing rice. The display
shows remaining stewing time in countdown.
OO According to the judgment of rice and water quantity by the computer program
during cooking rice, the stewing time is automatically set to 5 min or 10 min.
6
After cooking, automatically switches to the keep warm
function.
OO To prevent the rice from sticking together and reducing its
taste, it is best to loosen the rice immediately.
OO Please use the attached Rice Scoop to ll rice instead of metal spoon which
may cause scratch to the Inner Pan.
7
After the use, press the “Off” button to
enter state of standby, and then
unplug the Rice Cooker.
Periods of cooking rice for various functions
(only for reference):
Function “Soft” cooking “Quick” cooking
Time (min) Approx. 50 Approx. 30
The cooking time in the above table may vary with different voltage, water quantity,
rice quantity, water temperature and rice quality.
8 9
English
Cooking Rice
1
Weigh out required rice (A measuring cup of rice is about 150 g);
OO Wash rice in another
container and make sure
to wash it clean.
OO It is better not to wash rice
directly inside the Inner
Pan in order to avoid
scufng the Inner Pan.
2
Put the cleaned rice into the Inner Pan and
fill it with water to a corresponding water
level (e.g. if cooking 3 cups of white rice,
water should be added to Mark 3 of the
Water Level (White Rice)). The water
quantity can be increased or decreased
reasonably according to personal
preference.
OO Never exceed the highest Water Level.
3
Wipe up the external surface of Inner
Pan with dry cloth, putting it into the
Rice Cooker. Then press down the
Outer Lid until a sound of “click” is
heard.
OO Never heat the Inner Pan on other stoves to
avoid deformation caused by high
temperatures; it is not allowed to use any
other container, instead of the Inner Pan, on
the Heating Plate.
4
Connect the Instrument Plug to the body first and then connect the
Power Plug.
OO Make sure that both plugs are rmly connected.
①
②
The Inner Pan in the
illustration is the 1.0 L
model.
5
Press the “Start” button to enter the
working process of a corresponding
menu. The “Start” indicator lights
up.
OO By default, “White Regular” is selected.
When changing it, see page 11.
OO When using the timer, see page 11.
OO Entering state of stewing rice. The display
shows remaining stewing time in countdown.
OO According to the judgment of rice and water quantity by the computer program
during cooking rice, the stewing time is automatically set to 5 min or 10 min.
6
After cooking, automatically switches to the keep warm
function.
OO To prevent the rice from sticking together and reducing its
taste, it is best to loosen the rice immediately.
OO Please use the attached Rice Scoop to ll rice instead of metal spoon which
may cause scratch to the Inner Pan.
7
After the use, press the “Off” button to
enter state of standby, and then
unplug the Rice Cooker.
Periods of cooking rice for various functions
(only for reference):
Function “Soft” cooking “Quick” cooking
Time (min) Approx. 50 Approx. 30
The cooking time in the above table may vary with different voltage, water quantity,
rice quantity, water temperature and rice quality.
10 11
English
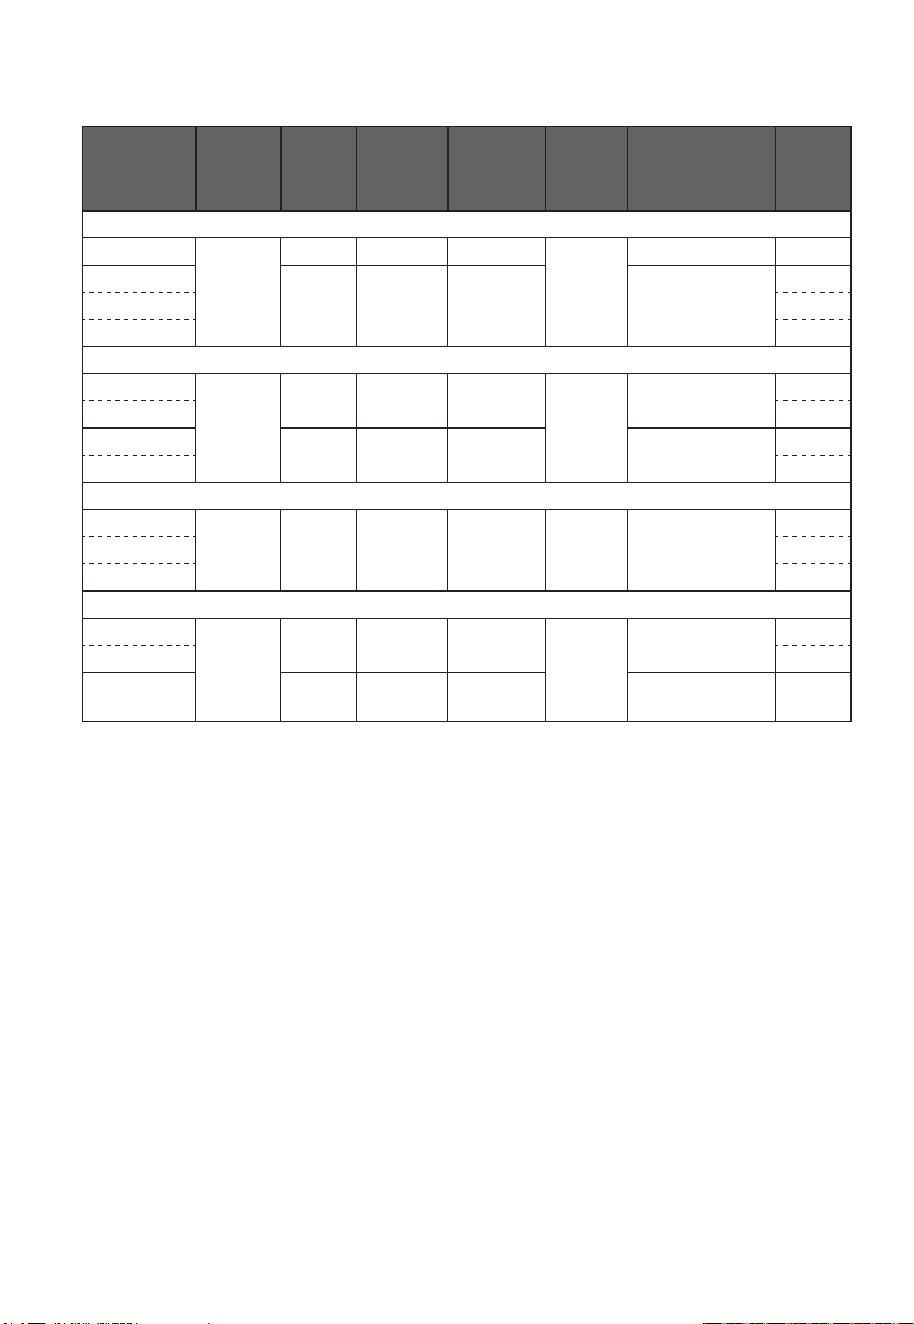
Using the Settings Correctly Using Different Settings
1
Select a menu.
Press the “Menu Select” button to select a menu.
The menu with the indicator on is selected.
OO When selecting “Porridge”, “Soup/Slow Cook”, “Cake/Bread” or “Steam”, set the
cooking timer.
Press the “
” or “ ” button to set the desired cooking time.
Menu Default setting Allowable timer setting Unit
Porridge 1 h 00 min 1 h 00 min – 4 h 00 min 30 min
Soup/Slow Cook 1 h 00 min 1 h 00 min – 12 h 00 min 30 min
Cake/Bread 40 min 20 min – 65 min 5 min
Steam* 10 min 1 min – 60 min 1 min
* Countdown of the steam setting time begins when the Rice Cooker starts
releasing steam.
2
Press the “Start” button.
OO Once the rice is cooked, the program switches to the keep warm function
automatically.
OO Using the keep warm function is not recommended for “Quinoa”, “Brown”, “Multi
Grain”, “Sticky”, “Porridge”, “Clay Pot”, “Soup/Slow Cook”, “Cake/Bread” or
“Steam”.
Please press the “Off” button to turn off the keep warm function.
Timer
1
Press the “Menu Select” button to select a menu.
OO When “Porridge” is selected, set the cooking time.
2
Press the “Timer” button to set preset mode.
3
Press the “ ” or “ ” button to adjust the desired time.
OO Timer can be set in 10 minute units between the start of timer setting to
24 h 00 min.
OO Preset time is the working completing time.
OO The “Timer” button also works the same as the “
” button in preset mode.
4
Press the “Start” button to start presetting mode.
OO When the preset mode is started, the indicator of a menu and the “Timer”
indicator turn on.
OO When the Rice Cooker starts cooking, the “Timer” indicator turns off and the
“Start” indicator turns on.
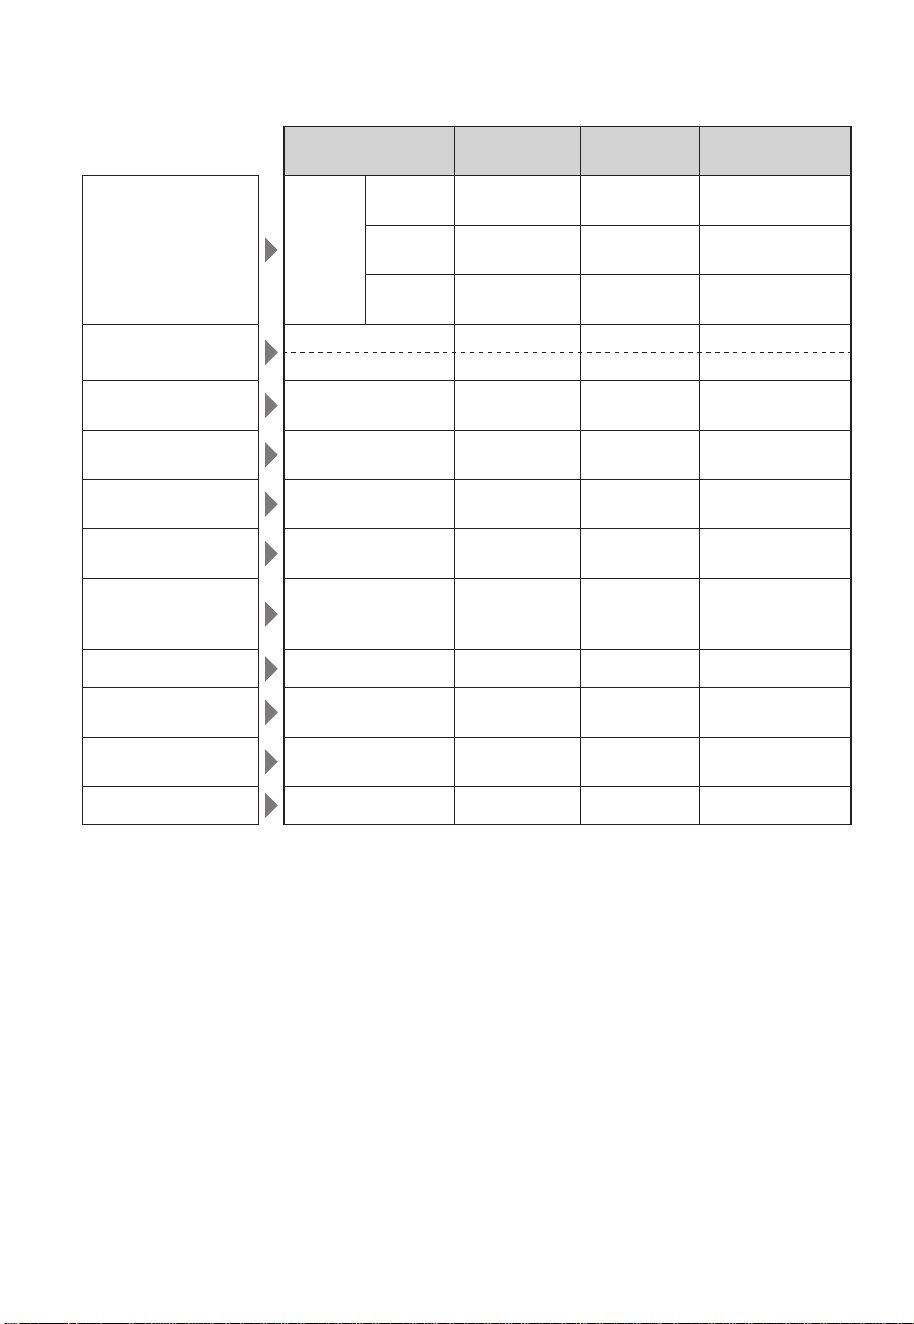
Menu
Water Level
of Inner Pan
Keep Warm
Function*
1
Timer Setting
Restriction*
2
Cook white rice in
different textures
White
Regular White Rice
○
From 60 min
before done
Soft White Rice
○
From 60 min
before done
Hard White Rice
○
From 60 min
before done
Quick cooking or
cook quinoa
Quick/ White Rice
○
―
Quinoa —*
3
×
―
Cook brown rice
Brown Brown Rice
×
From 180 min
before done
Cook rice of
various grains
Multi Grain Multi Grain
×
From 60 min
before done
Cook jasmine rice
Jasmine
Jasmine
Rice
○
From 60 min
before done
Cook sticky rice
Sticky Sticky Rice
×
From 60 min
before done
Cook porridge
Porridge Porridge
×
Cooking time +
10 min or more
before done
Cook clay pot rice
Clay Pot White Rice
×
—
Cook soup or
slow cooking
Soup/Slow Cook —*
4
×
—
Bake a cake or
bread
Cake/Bread —*
5
×
—
Steam
Steam —*
6
×
—
*
1
● With “×”, the Rice Cooker will switch automatically to the keep warm function, but
we do not recommend this.
● Do not use the keep warm function for more than 12 hours.
● A keep warm time of up to 23 hours is displayed in 1 hour units (“0” is displayed for
times of less than 1 hour).
The keep warm function will continue for more than 24 hours.
*
2
Timer Setting is not available for menus marked with “—”.
*
3
One cup of quinoa requires two cups of water. Quinoa can only be cooked one cup
at a time. Use the supplied Measuring Cup.
*
4
The total amount of ingredients and water shall not exceed the maximum water level
for “White Rice”.
*
5
The maximum allowable weight (total weight of the ingredients) is 500 g.
*
6
Use the supplied Measuring Cup and fill with 3 cups of water for 1.0 L model, 4 cups
of water for 1.8 L model.

10 11
English
Using the Settings Correctly Using Different Settings
1
Select a menu.
Press the “Menu Select” button to select a menu.
The menu with the indicator on is selected.
OO When selecting “Porridge”, “Soup/Slow Cook”, “Cake/Bread” or “Steam”, set the
cooking timer.
Press the “
” or “ ” button to set the desired cooking time.
Menu Default setting Allowable timer setting Unit
Porridge 1 h 00 min 1 h 00 min – 4 h 00 min 30 min
Soup/Slow Cook 1 h 00 min 1 h 00 min – 12 h 00 min 30 min
Cake/Bread 40 min 20 min – 65 min 5 min
Steam* 10 min 1 min – 60 min 1 min
* Countdown of the steam setting time begins when the Rice Cooker starts
releasing steam.
2
Press the “Start” button.
OO Once the rice is cooked, the program switches to the keep warm function
automatically.
OO Using the keep warm function is not recommended for “Quinoa”, “Brown”, “Multi
Grain”, “Sticky”, “Porridge”, “Clay Pot”, “Soup/Slow Cook”, “Cake/Bread” or
“Steam”.
Please press the “Off” button to turn off the keep warm function.
Timer
1
Press the “Menu Select” button to select a menu.
OO When “Porridge” is selected, set the cooking time.
2
Press the “Timer” button to set preset mode.
3
Press the “ ” or “ ” button to adjust the desired time.
OO Timer can be set in 10 minute units between the start of timer setting to
24 h 00 min.
OO Preset time is the working completing time.
OO The “Timer” button also works the same as the “
” button in preset mode.
4
Press the “Start” button to start presetting mode.
OO When the preset mode is started, the indicator of a menu and the “Timer”
indicator turn on.
OO When the Rice Cooker starts cooking, the “Timer” indicator turns off and the
“Start” indicator turns on.
Menu
Water Level
of Inner Pan
Keep Warm
Function*
1
Timer Setting
Restriction*
2
Cook white rice in
different textures
White
Regular White Rice
○
From 60 min
before done
Soft White Rice
○
From 60 min
before done
Hard White Rice
○
From 60 min
before done
Quick cooking or
cook quinoa
Quick/ White Rice
○
―
Quinoa —*
3
×
―
Cook brown rice
Brown Brown Rice
×
From 180 min
before done
Cook rice of
various grains
Multi Grain Multi Grain
×
From 60 min
before done
Cook jasmine rice
Jasmine
Jasmine
Rice
○
From 60 min
before done
Cook sticky rice
Sticky Sticky Rice
×
From 60 min
before done
Cook porridge
Porridge Porridge
×
Cooking time +
10 min or more
before done
Cook clay pot rice
Clay Pot White Rice
×
—
Cook soup or
slow cooking
Soup/Slow Cook —*
4
×
—
Bake a cake or
bread
Cake/Bread —*
5
×
—
Steam
Steam —*
6
×
—
*
1
● With “×”, the Rice Cooker will switch automatically to the keep warm function, but
we do not recommend this.
● Do not use the keep warm function for more than 12 hours.
● A keep warm time of up to 23 hours is displayed in 1 hour units (“0” is displayed for
times of less than 1 hour).
The keep warm function will continue for more than 24 hours.
*
2
Timer Setting is not available for menus marked with “—”.
*
3
One cup of quinoa requires two cups of water. Quinoa can only be cooked one cup
at a time. Use the supplied Measuring Cup.
*
4
The total amount of ingredients and water shall not exceed the maximum water level
for “White Rice”.
*
5
The maximum allowable weight (total weight of the ingredients) is 500 g.
*
6
Use the supplied Measuring Cup and fill with 3 cups of water for 1.0 L model, 4 cups
of water for 1.8 L model.
12 13
English
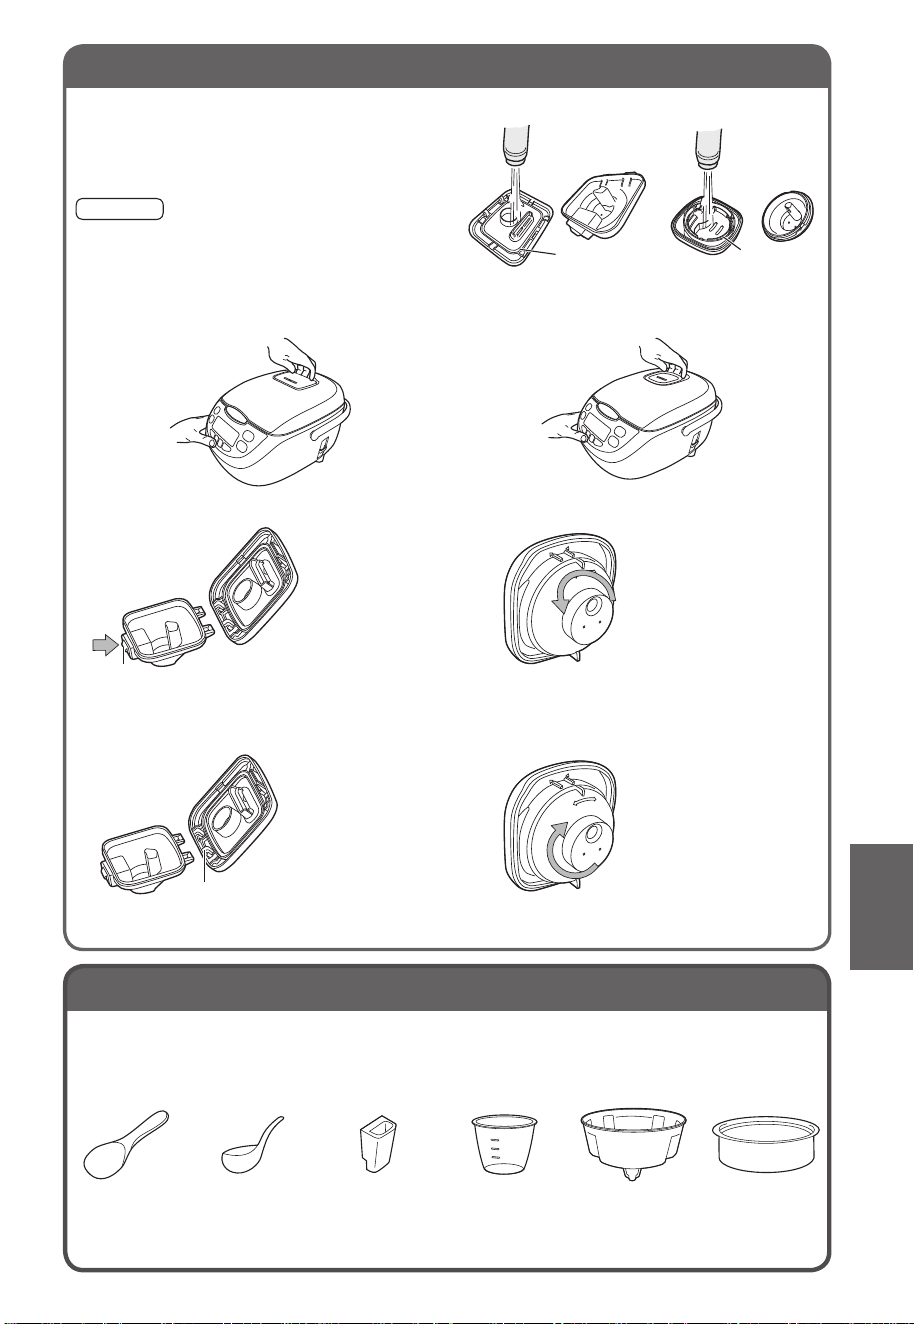
Cleaning
Q Unplug before cleaning and ensure that body has cooled down.
Inner Lid
Remove and wash with a mild washing-up liquid.
OQRemoving
Hold the two tabs, then pull them towards you.
OQAttaching
① Insert the protruding part into the latch on the
Outer Lid in a tilted way.
② Press the tabs (both sides) inwards the Outer Lid
side until the click sound is heard.
Notes
OO Do not remove the Packing.
OO If the Packing came off, please reattach it.
Protruding part
Tabs
Push this groove
into the Inner Lid.
Packing
Steam Cap*
*Steam Cap is different according to the model of Rice Cooker.
Remove and rinse.
OO Please wash it after every use.
Notes
OO Do not remove the Packing.
OO If the Packing came off, please reattach it.
OQRemoving
① Pull up to remove.
② Open it.
Button
Open while pressing
the button.
OPEN
CLOSE
Turn it in the
direction of the arrow
and pull it.
OQAttaching (In the reverse order to removing.)
① Close it.
Shaft
Insert the shaft and
close firmly until it
clicks.
OPEN
CLOSE
Fold and press it
firmly. When a clear
sound is heard, it
indicates completion
of assembly.
② Attach on the Outer Lid.
Packing
Packing
Accessories
Wash with a mild washing-up liquid.
Rice Scoop Ladle
Rice Scoop
Holder
Measuring
Cup
Steaming Basket*
* Steaming Basket is
different according to the
model of Rice Cooker.
Inner Lid
Inner Pan
Wash with a
mild washing-up
liquid.
Outer Lid/Body
Wipe with a
well-wrung cloth.
Upper Frame
Wipe with a
well-wrung cloth.
OO Do not pour water
directly on the
Upper Frame.
OO Rice grains can be
removed with a
toothpick.
Pan Sensor/Heating Plate
Wipe with a well-wrung cloth.
OO If an object has become stuck to the Pan Sensor/
Heating Plate, slightly polish it off using ne sandpaper
(of about #600) or steel wool.
12 13
English
Cleaning
Q Unplug before cleaning and ensure that body has cooled down.
Inner Lid
Remove and wash with a mild washing-up liquid.
OQRemoving
Hold the two tabs, then pull them towards you.
OQAttaching
① Insert the protruding part into the latch on the
Outer Lid in a tilted way.
② Press the tabs (both sides) inwards the Outer Lid
side until the click sound is heard.
Notes
OO Do not remove the Packing.
OO If the Packing came off, please reattach it.
Protruding part
Tabs
Push this groove
into the Inner Lid.
Packing
Steam Cap*
*Steam Cap is different according to the model of Rice Cooker.
Remove and rinse.
OO Please wash it after every use.
Notes
OO Do not remove the Packing.
OO If the Packing came off, please reattach it.
OQRemoving
① Pull up to remove.
② Open it.
Button
Open while pressing
the button.
OPEN
CLOSE
Turn it in the
direction of the arrow
and pull it.
OQAttaching (In the reverse order to removing.)
① Close it.
Shaft
Insert the shaft and
close firmly until it
clicks.
OPEN
CLOSE
Fold and press it
firmly. When a clear
sound is heard, it
indicates completion
of assembly.
② Attach on the Outer Lid.
Packing
Packing
Accessories
Wash with a mild washing-up liquid.
Rice Scoop Ladle
Rice Scoop
Holder
Measuring
Cup
Steaming Basket*
* Steaming Basket is
different according to the
model of Rice Cooker.
Inner Lid
Inner Pan
Wash with a
mild washing-up
liquid.
Outer Lid/Body
Wipe with a
well-wrung cloth.
Upper Frame
Wipe with a
well-wrung cloth.
OO Do not pour water
directly on the
Upper Frame.
OO Rice grains can be
removed with a
toothpick.
Pan Sensor/Heating Plate
Wipe with a well-wrung cloth.
OO If an object has become stuck to the Pan Sensor/
Heating Plate, slightly polish it off using ne sandpaper
(of about #600) or steel wool.

14 15
English
Troubleshooting
When you found the cooking is in any abnormal conditions, please check the root
cause of the failure.
Rice Cooking
Symptom
Probable cause
Cooking rice problem Keep warm problem
Too Hard
Too soft
Not cooked rice
No smell
Rice sticked in
Inner Pan
Rice crust,
Rice burnt
Overflow
Too thick
Lack of boiling
Don’t keep warm
Smell of
Colour
Rice too dry
Water drips
Rice and water volume
is not correct.
O O O O O O O O
Exceeds the maximum
amount.
O O O O O O O
Whether the function
was chosen correctly.
O O O O O O O O
Whether any distortion
on the Inner Pan and
uneven on the bottom.
O O O O O O
Cooking with hot water
or cooking continuously
without cooling down.
O O O O O
Whether grains of rice
or foreign objects are
on the Inner Pan base,
heating plate and
Control Panel.
O O O O O O O O O O O
Whether power cut off.
O O O O O O O O O O O
The rice was not
loosened after cooking
was completed.
O O O O O
Whether the Steam Cap
has been fixed properly.
O O O
Excessive long hours
on preset timer.
O O O O
Whether the Outer Lid
has been closed
properly.
O O O O O O
Did not wash the rice
fully.
O O O O O O O
Grain of rice or foreign
objects stayed at the
Packing & Inner Pan
border areas.
O O O
Excessive long hours
on keep warm function.
O O O O O
Symptom
Probable cause
Cooking rice problem Keep warm problem
Too Hard
Too soft
Not cooked rice
No smell
Rice sticked in
Inner Pan
Rice crust,
Rice burnt
Overflow
Too thick
Lack of boiling
Don’t keep warm
Smell of
Colour
Rice too dry
Water drips
Did not set keep warm
but rice kept in the Inner
Pan for long hours.
O O O O O
Did not clean the Inner
Pan.
O O
Placing the Rice Scoop
in the Inner Pan.
O O O O
Mixture of water and
rice are uneven.
O
Please send to an authorised service centre for repair if the unit is found to be
defective after the inspection carried out on the table above.

16 17
English
Cake / Bread Baking
Symptom
Probable cause
Baking cake / bread problem
Undone cake /
bread
Undercooked
cake / bread
Wet cake / bread
The cake /
bread sticks to the
base of the Inner Pan
Bottom of the cake /
bread burnt
Not fluffed
Crumbly
Too much dough.
O O
Not enough mixing before baking.
O O O
Used with incompatible cake mix.
O O O O
Used with cake mix that contains too
much chocolate, sugar or fruit
ingredients.
O O O O
Outer Lid not close while cooking.
O O O
Foreign matters between the Inner
Pan and Heating Plate.
O O O O O
Not enough butter or cooking oil
applied to the bottom of the Inner Pan.
O
Cake / bread left in the Inner Pan too
long.
O O
Inadequate mixing or mixed too long.
O O
Wrong ingredient quantity.
O O O O
Please send to an authorised service centre for repair if the unit is found to be
defective after the inspection carried out on the table above.
Troubleshooting
Others
Symptom Probable cause
Strange sound occurs
Sound occurs because of water that has stuck to the Inner
Pan.
No power Pull out the Power Plug and check the power outlet.
Please send to an authorised service centre for repair if the unit is found to be
defective after the inspection carried out on the table above.
Error Indications
Indication Probable cause
U14
Has the keep warm function been in use for more than
96 hours?
→ Press the “Off” button.
H01
H02
H31
Please consult an authorised service centre and inform the
error code (the two-digit number after the “H”).
18
Specifications
Model
Rated
Voltage
Rated
Power
(W)
Cooking
Capacity
(L)
Rice
Quantity
(Cup)
Heating
Model
L × W × H
(mm)
Weight
(kg)
Malaysia
SR-CX108
240 V ~
50 Hz
765 1.0 5.5
Direct
Heating
352
×
251
×
214
3.5
SR-CX188
910 1.8 10
387
×
284
×
249
4.5
SR-CP188 4.4
SR-CN188 3.8
Singapore (Domestic)
SR-CX108
230 V ~
50 Hz
700 1.0 5.5
Direct
Heating
352
×
251
×
214
3.5
SR-CN108 3.0
SR-CX188
835 1.8 10
387
×
284
×
249
4.5
SR-CN188 3.8
Singapore (Re-export)
SR-CX188
220 V ~
50 Hz
765 1.8 10
Direct
Heating
387
×
284
×
249
4.5
SR-CP188 4.4
SR-CN188 3.8
Australia / New Zealand
SR-CX108
220–
240 V ~
50 Hz
640–
765
1.0 5.5
Direct
Heating
352
×
251
×
214
3.5
SR-CN108 3.0
SR-CN188
765–
910
1.8 10
387
×
284
×
249
3.8

Melayu
Arahan Pengendalian
Periuk Nasi Elektronik / Pemanas
Kegunaan Rumah
Model 1.0 L
No. Model
SR-CX108
SR-CN108
Model 1.8 L
No. Model
SR-CX188
SR-CP188
SR-CN188
Terima kasih kerana membeli produk
Panasonic ini.
OO
Produk ini bertujuan untuk kegunaan
rumah sahaja.
OO
Sila baca arahan pengendalian dengan
teliti untuk memastikan pengendalian
yang selamat dan betul sebelum
digunakan.
OO
Sebelum penggunaan, sila membaca
“Langkah Pencegahan Keselamatan”
(Halaman 2-4).
OO
Simpan arahan pengendalian dan
jaminan untuk kegunaan masa akan
datang.
Jaminan dilampirkan
Kandungan
Langkah Pencegahan Keselamatan .....2
Nota mengenai Penggunaan
...........5
Nama Bahagian/Aksesori
.............6
Memasak Nasi
.......................8
Menggunakan Tetapan Dengan Betul
...10
Menggunakan Tetapan Berlainan
......11
OO
Pemasa
Membersih
.........................12
Penyelesaian Masalah . . . . . . . . . . . . . . . 14
OO
Petunjuk Ralat
Spesikasi
.........................18
MAL/SIN (DBD)/SIN (RBD)/AST/NZ
Ilustrasi dari SR-CX108 digunakan di
seluruh Arahan Pengendalian ini.

2 3
Melayu
AMARAN
Kegagalan mematuhi arahan ini boleh menyebabkan kematian atau kecederaan serius.
• Perkakas ini bukan ditujukan untuk kegunaan oleh orang (termasuk kanak-kanak) dengan
kekurangan fizikal, deria atau keupayaan mental atau kekurangan pengalaman dan
pengetahuan, melainkan mereka diselia atau diberikan arahan mengenai penggunaan
perkakas oleh orang yang bertanggungjawab terhadap keselamatan mereka.
Kanak-kanak perlu diselia untuk memastikan mereka tidak bermain dengan perkakas.
• Perkakas ini dimaksudkan untuk digunakan dalam rumah dan aplikasi yang sama
seperti: -dapur pekerja di kedai, pejabat dan persekitaran kerja yang lain; -rumah ladang;
-oleh pelanggan di Hotel, Motel dan persekitaran kediaman jenis lain; -persekitaran jenis
katil and saparan pagi.
• Jika kord bekalan rosak, gantikan dengan kord khas atau sambungan yang tersedia
daripada pengilang atau ejen servisnya.
• Jangan tumpah air atau cecair lain pada peyambung seperti palam instrumen untuk
mengelakkan kejutan elektrik atau kebakaran yang disebabkan oleh litar pintas.
• Jangan gunakan perkakas ini untuk memasak apa-apa makanan yang akan meyesak
Lubang Wap:
Makanan Foliaceous (contohnya laver, kubis Cina) atau mengambil makanan (contohnya kelp)
dan fragmentary makanan (contohnya jagung kersik), kerana ini mungkin menyebabkan
kemalangan atau kerosakan pada perkakas.
• Semasa pengendalian, jangan menghampirakan muka atau tangan anda pada Lubang
Wap untuk mengelakkan melecur.
• Sila gunakan saluran elektrik dibumikan individu untuk undian semasa 10 A, dan
bersama penggunaan salur keluar kuasa sama dengan perkakas lain boleh menyebabkan
kebakaran.
• Tiada pembinaan semula
Mana-mana orang selain daripada seorang juruteknik pembaikan tidak dibenarkan untuk
hapus atau membaiki perkakas untuk mengelakkan kebakaran, kejutan elektrik atau
kecederaan.
• Pastikan voltan yang ditunjukkan pada label perkakas sama dengan bekalan setempat
anda. Jangan gunakan kord kuasa yang rosak.
• Jangan gunakan kaedah berikut beroperasi untuk mengelakkan kebakaran dan kejutan
elektrik akibat kord kuasa yang rosak.
Kord kuasa diproses, terpaksa dibengkokkan, pendekatan suhu tinggi, mengikat, sekeping
objek berat, dan sebagainya.
• Sebarang habuk di palam kuasa mesti sentiasa dibersihkan untuk mengelakkan
kebakaran.
• Palam Instrumen dan palam kuasa mesti dimasukkan ke dalam soket dan salur keluar
kuasa dengan sempurna untuk mengelakkan kebakaran, kejutan elektrik atau litar pintas.
• Jangan gunakan perkakas apabila kord kuasa atau palam kuasa rosak atau palam kuasa
longgar disambung ke salur keluar kuasa, untuk mengelakkan kebakaran, kejutan
elektrik atau litar pintas.
• Jangan tarik palam kuasa dengan tangan yang basah untuk mengelakkan kejutan elektrik
atau kecederaan.
• Semasa pengendalian, jangan gerakkan atau goncang perkakas.
• Jangan biarkan kanak-kanak mengendalikan perkakas tanpa dijaga. Meletakkannya dari
capaian bayi untuk mengelakkan kejutan elektrik, melecur dan lain-lain kemalangan yang
berbahaya.
• Jangan letakkan perkakas di lokasi yang tidak stabil atau basah atau pendekatan api atau
sumber haba, sebaliknya ini boleh menyebabkan kerosakan atau kemalangan.
• Jangan rendam atau celup perkakas ke dalam air.
• Jangan masukkan pin, dawai atau lain-lain objek ke dalam Lubang Pengambilan, Lubang
Ekzos atau jurang di bahagian bawah perkakas untuk mengelakkan kejutan elektrik.
• Hentikan penggunaan perkakas serta-merta dan tanggalkannya apabila sesuatu tidak
normal atau kerosakan berlaku untuk mengelakkan asap, kebakaran atau kejutan
elektrik.
cth. tidak normal atau kerosakan: Palam kuasa dan kord kuasa menjadi panas secara tidak
normal; Kord kuasa rosak atau kuasa gagal apabila disentuh; Badan utama berubah bentuk
atau sangat panas; Asap berasal daripada badan utama atau bau terbakar dikesan; Badan
utama retak, longgar atau bergetar.
• Tutup Penutup Luar dengan perlahan dan ketat sehingga berbunyi klik untuk mencegah
melecur atau kecederaan yang disebabkan oleh stim yang keluar atau bukaan Penutup
Luar.
• Jauhkan kord kuasa daripada capaian kanak-kanak.
Jangan biarkan kord kuasa tergantung pada hujung meja atau countertop. Menarik kord kuasa
boleh menyebabkan perkakas terjatuh daripada meja atau countertop dan menyebabkan
kecederaan.
• Berhati-hati agar tidak tersadung atau terjebak pada kord kuasa semasa
menggunakannya untuk mengelakkan kecederaan, atau kerosakan pada kord kuasa
boleh menyebabkan kebakaran atau kejutan elektrik.
• Jangan gunakan perkakas bagi sebarang tujuan selain daripada yang dijelaskan dalam
arahan ini untuk mengelakkan kebakaran, melecur, kecederaan atau kejutan elektrik.
Panasonic tidak akan menerima sebarang liabiliti jika perkakas tertakluk kepada penggunaan
tidak wajar atau gagal mematuhi arahan ini.
Langkah Pencegahan Keselamatan

4 5
Melayu
AWAS
Kegagalan mematuhi arahan ini boleh menyebabkan kecederaan atau kerosakan harta benda.
• Perkakas mesti sepadan dengan Panci Dalam yang dibekalkan untuk mengelakkan
mengalami panas lampau atau keadaan tidak normal.
• Semasa menguna atau serta-merta selepas digunakan, jangan sentuh Panci Dalam
dengan tangan untuk mengelakkan melecur disebabkan oleh suhu tinggi.
• Jangan gunakan set kord (untuk palam instrumen dan palam kuasa) yang tidak
dikhususkan untuk kegunaan bersama perkakas ini jangan pindahkannya untuk
mengelakkan kejutan elektrik, kebocoran elektrik atau kebakaran.
• Pastikan untuk memegang palam kuasa atau palam instrumen apabila membuka palam
kuasa atau palam instrumen untuk mengelakkan kejutan elektrik, atau kebakaran yang
disebabkan oleh litar pintas.
• Sentiasa matikan dan tanggalkan perkakas daripada salur keluar kuasa apabila tidak
digunakan atau sebelum mengeluarkan Panci Dalam daripadanya untuk mengelakkan
melecur, kecederaan, atau kejutan elektrik atau kebakaran yang disebabkan oleh litar
pintas kerana kerosakan penebatan.
• Tanggalkan dan benarkan perkakas untuk menyejuk sepenuhnya sebelum membersih
dan menyimpannya untuk mengelakkan melecur.
Jangan alihkan perkakas semasa panas.
Langkah Pencegahan Keselamatan
• Sebelum Periuk Nasi berfungsi, semakkan Panci Dalam dan Penutup Wap di tempat untuk
mengelakkan apa-apa kerosakan.
• Semasa menggunakan, Periuk Nasi akan menghasilkan bunyi yang kecil “klik” atau “sizz”, itulah
bunyi biasa operasi dan tidak perlu panik.
• Jangan beroperasi semula Periuk Nasi dengan serta-merta selepas memasak. Menunggu
sekurang-kurangnya 15 minit supaya aliran pemanas menyejuk.
• Jangan masak nasi dengan air panas kerana ini boleh menjejaskan penghakiman suhu oleh
termostat sekali gus merendahkan memasak kesan.
• Semasa beroperasi, jangan tutup bahagian atas periuk nasi dengan kain, kerana ini mungkin
menyebabkan kemalangan atau kerosakan pada periuk nasi.
• Jangan menjatuhkan Panci Dalam, supaya akan menyebabkan kecacatan.
• Jangan memukul Panci Dalam dengan objek keras untuk mengelakkan kecacatan.
• Sebelum Periuk Nasi berfungsi, pastikan anda lapkan air di luar Panci Dalam untuk
mengelakkan apa-apa kerosakan.
• Sebelum Periuk Nasi bekerja, keluarkan titisan air dan bijirin beras antara Panci Dalam dan
Aliran Pemanas untuk mengelakkan apa-apa kerosakan.
• Salutan pada bahagian bawah Panci Dalam boleh memakai bergantung kepada kekerapan
penggunaan, tetapi ini tidak menjejaskan prestasi.
• Pegang pemegang apabila bergerak Periuk Nasi.
• Jangan gunakan Periuk Nasi di luar.
Nota mengenai Penggunaan
6 7
Melayu
Nama Bahagian/Aksesori
Q
Kertas yang terletak di antara Panci Dalam dan Aliran Pemanas mesti diambil sebelum digunakan.
Penutup Luar
Penutup Dalam
Panci Dalam
Badan
Panel Kawalan
Butang Cangguk
Pemegang
Kedudukan untuk
memasang Pemegang
Senduk Nasi
Soket
Lubang Wap
Palam Kuasa*Palam Instrumen
Kord Kuasa
Set Kord
Penutup Wap
* Bentuk Palam Kuasa mungkin berbeza daripada
ilustrasi.
Aksesori
Senduk Nasi
(1)
Senduk (1)
Pemegang
Senduk Nasi (1)
Cawan
Penyukat (1)
Bekas Kukusan (1)
( Anggaran
180 mL)
Untuk SR-CX108
SR-CX188
SR-CP188
Untuk
SR-CN108
SR-CN188
Butang “Off (Tutup)”
Butang “
”, “ ”
Butang “Keep Warm
(Kekal Hangat)”
Butang “Menu Select (Pilih Menu)”
Butang “Start (Mula)”
Penunjuk “Start (Mula)”
Butang “Cooking Timer
(Pemasa Memasak)”
Butang “Timer (Pemasa)”Penunjuk “Keep Warm
(Kekal Hangat)”
Penunjuk “Timer (Pemasa)”
Butang “Menu Select (Pilih Menu)”
OO
Butang ini digunakan untuk memilih menu yang dikehendaki.
Butang “Keep Warm (Kekal Hangat)”
OO
Selepas masak, penunjuk “Keep Warm (Kekal Hangat)” dihidupkan secara automatik.
OO
Butang ini digunakan untuk memulakan fungsi kekal hangat.
Butang “Timer (Pemasa)”
OO
Butang ini digunakan untuk menetapkan pemasa.
Butang “Cooking Timer (Pemasa Memasak)”
OO
Apabila memilih “Porridge (Bubur)”, butang ini digunakan selepas menekan “Timer
(Pemasa)” untuk balik menetapkan masa memasak.
OO
Butang ini digunakan untuk mengesahkan masa memasak dalam status pemasa.
Butang “ ”, “ ”
OO
Butang ini digunakan untuk menetapkan masa.
: Pengurangan : Peningkatan
OO
Tekan butang ini dan tahan lama untuk cepat tambah atau tolak masa.
Butang “Start (Mula)”
OO
Butang ini digunakan untuk mula memasak.
OO
Butang ini digunakan untuk menamatkan ketetapan pemasa.
Butang “Off (Tutup)”
OO
Butang ini digunakan untuk membatalkan operasi yang salah.
OO
Butang ini digunakan untuk mematikan fungsi kekal hangat.
8 9
Melayu
Memasak Nasi
1
Timbangkan beras yang diperlukan (cawan penyukat beras adalah sekira 150 g);
OO
Basuh beras di dalam bekas
yang lain dan pastikan anda
basuh bersih.
OO
Lebih baik jangan terus mencuci
beras di dalam Panci Dalam
untuk mengelakkan gam pada
Panci Dalam.
2
Masukkan beras yang dibersihkan ke dalam Panci
Dalam dan isi dengan air ke tahap air yang sama
(contohnya jika memasak 3 cawan nasi putih, air perlu
ditambah kepada 3 tanda Paras Air (White Rice)).
Kuantiti air boleh meningkat atau menurun menurut
amalan peribadi.
OO
Air tidak melebihi paras air tertinggi.
3
Lap permukaan luar Panci Dalam dengan
menggunakan kain kering, memasukkannya ke
dalam Periuk Nasi. Kemudian tekan ke bawah
Penutup Luar sehingga mendengar bunyi “klik”.
OO
Jangan memanaskan Panci Dalam atas dapur lain untuk
mengelakkan kecacatan yang disebabkan oleh suhu yang
tinggi; Tidak dibenarkan untuk menggunakan mana-mana
bekas yang lain, bukan Panci Dalam, pada Aliran
Pemanas.
4
Sambungkan Palam Instrumen ke badan terlebih dahulu dan kemudian sambungkan
Palam Kuasa.
OO
Pastikan bahawa kedua-dua palam disambungkan tegas.
①
②
Panci Dalam di ilustrasi adalah
model 1.0 L.
5
Tekan butang "Start (Mula)" untuk memasuki
proses kerja menu yang sepadan. Penunjuk
"Start (Mula)" menyala.
OO
Secara lalai, “White (Beras Putih) Regular (Biasa)”
dipilih. Untuk menggubahnya, lihat halaman 11.
OO
Apabila mengunakan Pemasa, lihat halaman 11.
OO
Memasuki keadaan merebus nasi. Paparan
menunjukkan baki masa merebus.
OO
Menurut hukum kuantiti beras dan air oleh atur cara komputer semasa memasak nasi, semasa
merebus secara automatik disetkan kepada 5 minit atau 10 minit.
6
Selepas masak, bertukar ke fungsi kekal hangat secara automatik.
OO
Untuk mengelakkan nasi dari pemeluwapan dan mengurangkan rasanya,
amatlah digalakkan supaya gemburkan nasi dengan serta-merta.
OO
Apabila mengisi mangkuk dengan nasi, perlu mengunakkan senduk nasi yang
dilampirkan, bukan sudu logam, untuk mengelakkan scufng Panci Dalam.
7
Selepas penggunaan, tekan butang “Off
(Tutup)” untuk memasuki keadaan siap sedia
dan kemudian cabut palam Periuk Nasi.
Tempoh memasak nasi untuk pelbagai majlis (hanya
untuk rujukan):
Fungsi Memasak “Soft (Lembut)” Memasak “Quick (Cepat)”
Masa (minit) Anggaran 50 Anggaran 30
Masa memasak dalam jadual di atas mungkin berbeza-beza dengan voltan berbeza, kuantiti air,
kuantiti beras, suhu air dan beras berkualiti.
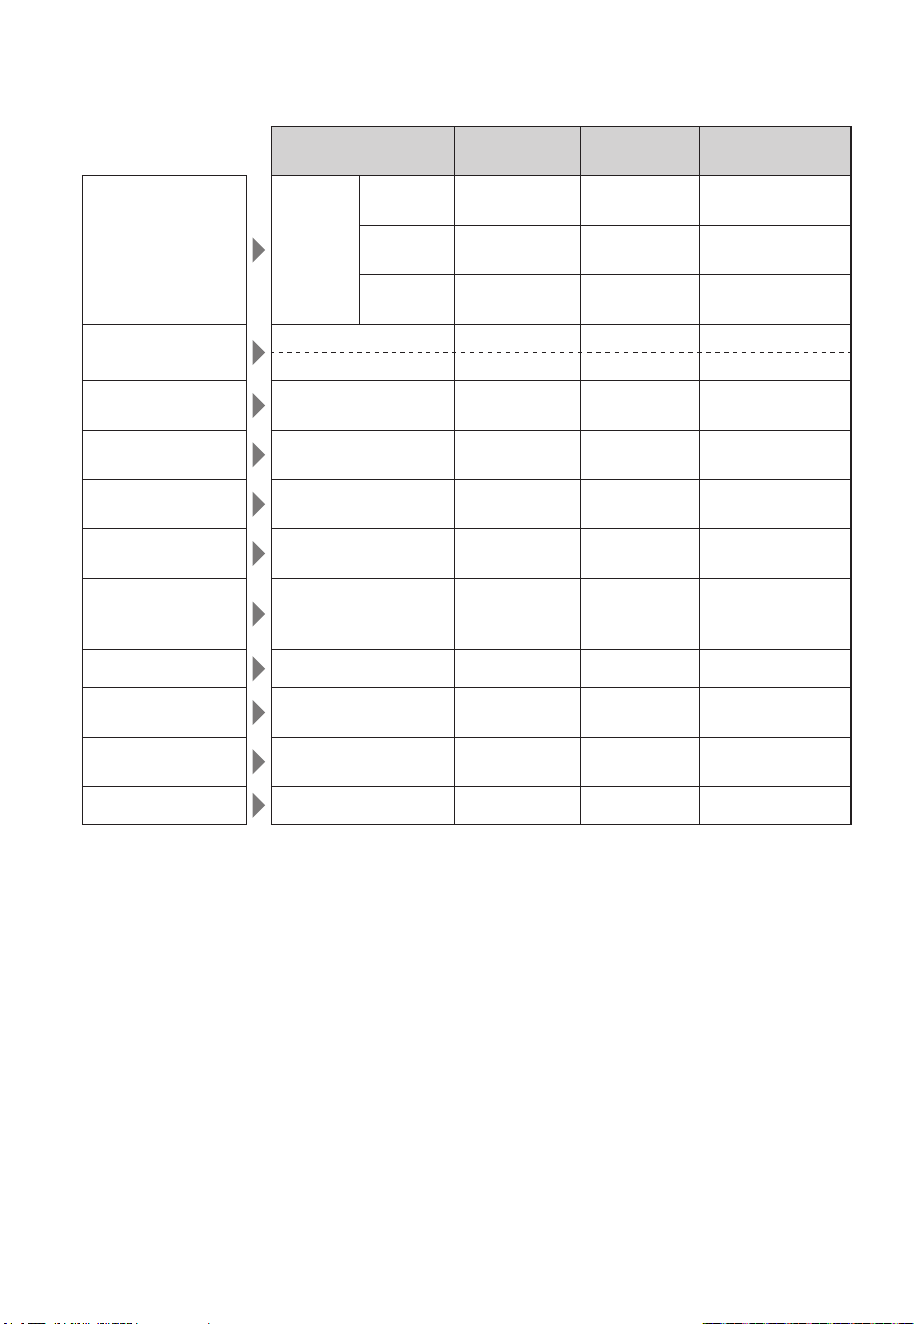
10 11
Melayu
Menggunakan Tetapan Dengan Betul
Menggunakan Tetapan Berlainan
1
Pilih menu.
Tekan butang “Menu Select (Pilih Menu)” untuk memilih menu.
Penunjuk akan menyala dengan menu yang dipilih.
OO
Apabila memilih “Porridge (Bubur)”, “Soup/Slow Cook (Sup/Masak Perlahan)”, “Cake/Bread (Kek/
Roti)” atau “Steam (Stim)” menetapkan pemasa memasak.
Tekan “
” atau “ ” butang untuk melaraskan masa memasak dikehendaki.
Menu Tetapan lalai Tetapan pemasa yang dibenarkan Unit
Porridge (Bubur) 1 jam 00 minit 1 jam 00 minit – 4 jam 00 minit 30 minit
Soup/Slow Cook
(Sup/Masak Perlahan)
1 jam 00 minit 1 jam 00 minit – 12 jam 00 minit 30 minit
Cake/Bread (Kek/Roti) 40 minit 20 minit – 65 minit 5 minit
Steam (Stim)* 10 minit 1 minit – 60 minit 1 minit
* Kira detik masa tetapan Stim bermula apabila Periuk Nasi mula melepaskan stim.
2
Tekan butang “Start (Mula)”.
OO
Sebaik sahaja nasi dimasak, program bertukar secara automatik ke fungsi kekal hangat.
OO
Menggunakan fungsi kekal hangat tidak disyorkan untuk “Quinoa (Quinoa)”, “Brown (Beras
Perang)”, “Multi Grain (Beras Pelbagai Bijirin)”, “Sticky (Beras Pulut)”, “Porridge (Bubur)”, “Clay Pot
(Nasi Claypot)”, “Soup/Slow Cook (Sup/Masak Perlahan)”, “Cake/Bread (Kek/roti)” atau “Steam
(Stim)”.
Sila tekan butang “Off (Tutup)” untuk mematikan fungsi kekal hangat.
Pemasa
1
Tekan butang “Menu Select (Pilih Menu)” untuk memilih menu.
OO
Apabila “Porridge (Bubur)” dipilih, tetapkan masa memasak.
2
Tekan butang “Timer (Pemasa)” untuk menetapkan mod pratetap.
3
Tekan “ ” atau “ ” butang untuk melaraskan masa yang dikehendaki.
OO
Pemasa boleh diatur dalam unit-unit 10 minit antara permulaan pemasa tatacara untuk 24 jam
00 minit.
OO
Masa pratetap ialah kerja mengisi masa.
OO
Butang “Timer (Pemasa)” juga berfungsi seperti “ ” butang di mod pratetap.
4
Tekan butang “Start (Mula)” untuk memulakan mod pratetap.
OO
Apabila mod pratetap dimulakan, penunjuk menu dan penunjuk “Timer (Pemasa) ” hidupkan.
OO
Apabila Periuk Nasi mula memasak, penunjuk “Timer (Pemasa)” dimatikan dan menghidupkan
penunjuk “Start (Mula)”.
Menu
Paras Air Panci
Dalam
Fungsi Kekal
Hangat*
1
Larangan Tetapan
Pemasa*
2
Masak nasi putih
kepada pelbagai
tekstur
White
(Beras
Putih)
Regular
(Biasa)
White Rice
○
Daripada 60 minit
sebelum selesai
Soft
(Lembut)
White Rice
○
Daripada 60 minit
sebelum selesai
Hard
(Keras)
White Rice
○
Daripada 60 minit
sebelum selesai
Memasak cepat atau
masak quinoa
Quick (Cepat)/ White Rice
○
―
Quinoa (Quinoa) —*
3
×
―
Masak beras rerang
Brown
(Beras Perang)
Brown Rice
×
Daripada 180 minit
sebelum selesai
Masak nasi daripada
pelbagai bijian
Multi Grain
(Beras Pelbagai Bijirin)
Multi Grain
×
Daripada 60 minit
sebelum selesai
Masak beras jasmine
Jasmine (Jasmine) Jasmine Rice
○
Daripada 60 minit
sebelum selesai
Masak beras pulut
Sticky (Beras Pulut) Sticky Rice
×
Daripada 60 minit
sebelum selesai
Masak bubur
Porridge (Bubur) Porridge
×
Masa memasak +
10 minit atau lebih
sebelum selesai
Masak nasi claypot
Clay Pot (Nasi Claypot) White Rice
×
—
Masak sup atau
masak perlahan
Soup/Slow Cook
(Sup/Masak Perlahan)
—*
4
×
—
Membakar kek atau
roti
Cake/Bread (Kek/Roti) —*
5
×
—
Stim
Steam (Stim) —*
6
×
—
*
1
●
Dengan “
×
”, Periuk Nasi akan bertukar secara automatik untuk menjalankan fungsi kekal hangat, tetapi
kami tidak mensarankan ini.
●
Jangan gunakan fungsi kekal hangat melebihi 12 jam.
●
Masa kekal hangat sehingga 23 jam dipaparkan dalam unit 1 jam (“0” dipaparkan untuk masa kurang
daripada 1 jam).
Fungsi kekal hangat akan terus lebih daripada 24 jam.
*
2
Pemasa tatacara ini tidak tersedia untuk menu yang bertanda “—”.
*
3
Satu cawan quinoa memerlukan dua cawan air. Quinoa hanya boleh dimasak secawan pada satu masa.
Gunakan Cawan Penyukat yang dibekalkan.
*
4
Jumlah bahan-bahan dan air tidak melebihi Paras Air maksimum untuk “White Rice”.
*
5
Berat maksimum dibenarkan (Jumlah berat bahan-bahan) adalah 500 g.
*
6
Gunakan Cawan Penyukat yang dibekalkan dan mengisi 3 cawan air untuk model 1.0 L, 4 cawan air
untuk model 1.8 L.

12 13
Melayu
Membersih
Q
Cabut sebelum membersih dan memastikan bahawa badan telah sejuk.
Penutup Dalam
Tanggalkan dan basuh dengan cecair pencuci lembut.
OQ
Menanggalkan
Memegang dua tab, selepas itu menarik tab kepada anda.
OQ
Memasang
①
Masukkan bahagian terkemuka ke dalam persalinan pada
Penutup Luar dengan cara yang condong.
②
Tekan tab (kedua-dua belah) ke belah dalam Penutup Luar
sehingga mendengar bunyi klik itu.
Nota
OO
Jangan tanggalkan Pembungkusan.
OO
Jika Pembungkusan tertanggal, sila pasang semula itu.
Bahagian terkemuka
Tab
Tolak alur ini ke dalam
Penutup Dalam.
Pembungkusan
Penutup Wap*
*Penutup Wap akan berbeza mengikut model Periuk Nasi.
Tanggalkan dan bilas.
OO
Sila basuh selepas setiap penggunaan.
Nota
OO
Jangan tanggalkan Pembungkusan.
OO
Jika Pembungkusan tertanggal,
sila pasang semula itu.
OQ
Menanggalkan
①
Tarik ke atas untuk menanggalkan.
②
Bukanya.
Butang
Buka semasa menekan
butang.
OPEN
CLOSE
Berpaling ke arah anak
panah dan menariknya.
OQ
Memasang (Dalam turutan terbalik untuk menanggalkan.)
①
Tutupnya.
Syaf
Masukkan syaf dan
menutup dengan rapi
sehingganya klik.
OPEN
CLOSE
Lipat dan menekannya
dengan rapi. Apabila bunyi
jelas didengar, ia
menunjukkan selesai
pemasangan.
②
Pasangkan pada Penutup Luar.
Pembungkusan
Pembungkusan
Aksesori
Basuh dengan cecair pencuci lembut.
Senduk Nasi Senduk
Pemegang
Senduk Nasi
Cawan
Penyukat
Bekas Kukusan*
* Bekas Kukusan akan berbeza
mengikut model Periuk Nasi.
Penutup
Dalam
Panci Dalam
Basuh dengan
cecair pencuci
lembut.
Penutup Luar/Badan
Lap dengan kain
terpakai.
Bingkai atas
Lap dengan kain
terpakai.
OO
Jangan terus tuang air
pada Bingkai atas.
OO
Bijirin beras boleh
dikeluarkan dengan
tusuk gigi.
Dulang Sensor/Aliran Pemanas
Lap dengan kain terpakai.
OO
Sekiranya objek menjadi tersesak pada Dulang Sensor/Aliran
Pemanas, mengilap sedikit dengan menggunakan kertas pasir halus
(daripada kira-kira #600) atau sabut keluli.
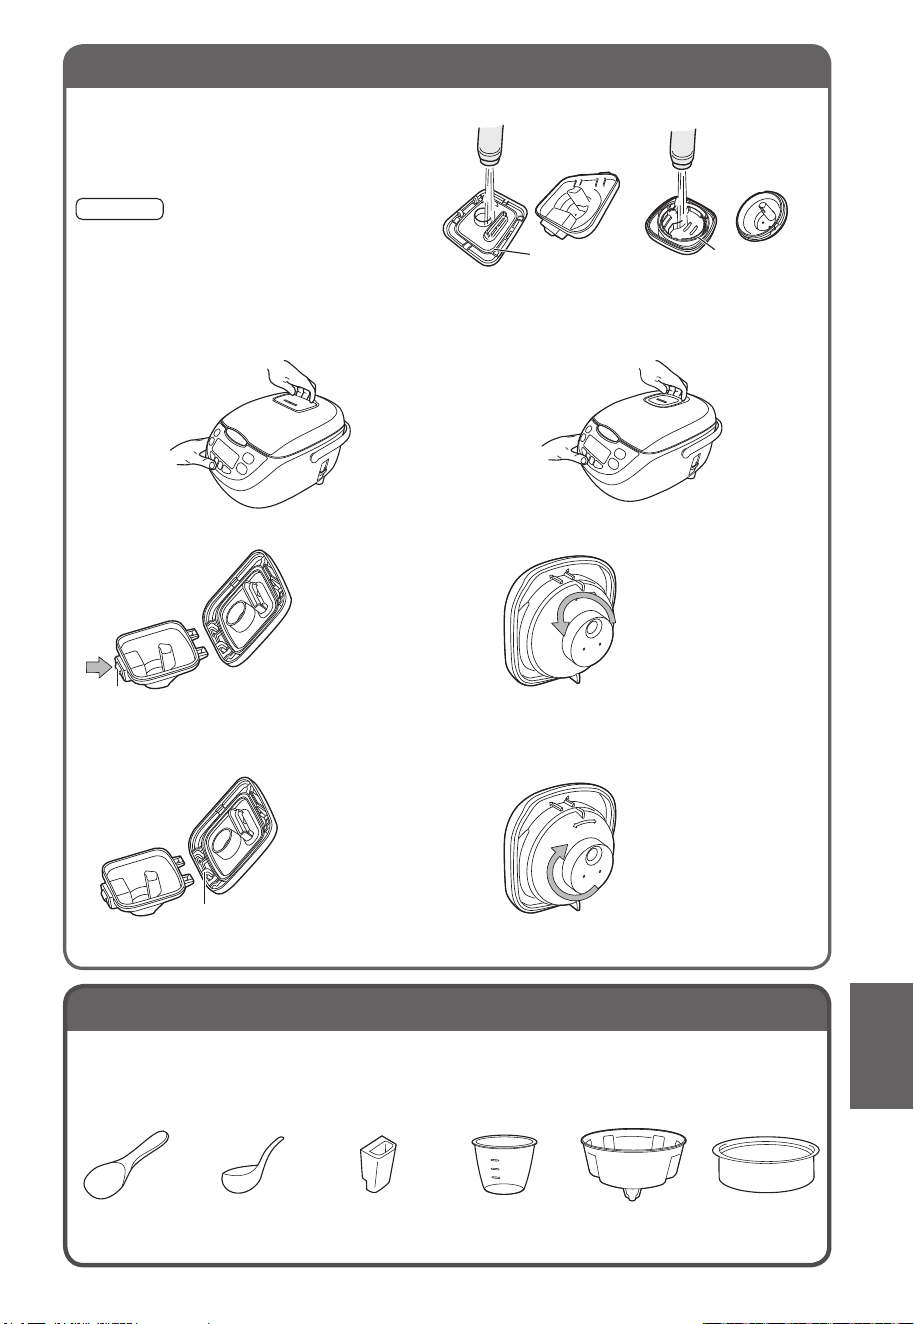

14 15
Melayu
Penyelesaian Masalah
Apabila anda mengetahui memasakkan ada mana-mana keadaan yang luar biasa, sila semak punca
kegagalan.
Memasak Nasi
Simptom
Sebab berkemungkinan
Masalah memasak nasi Masalah kekal hangat
Terlalu keras
Terlalu lembut
Nasi tidak dimasakkan
Tiada bau
Nasi terlekat pada Panci
Dalam
Kerak nasi, Nasi dibakar
Limpahan
Terlalu tebal
Kekurangan mendidih
Jangan kekal hangat
Berbau
Warna
Nasi terlalu kering
Menitis air
Kelantangan beras dan air itu
tidak betul.
O O O O O O O O
Melebihi amaun maksimum.
O O O O O O O
Sama ada pilihan fungsi
adalah betul.
O O O O O O O O
Sama ada apa-apa gangguan
di Panci Dalam dan tidak
sekata pada bahagian bawah.
O O O O O O
Memasak dengan air panas
atau masak makanan secara
berterusan tanpa menyejuk.
O O O O O
Sama ada apa-apa butir beras
atau objek asing di Panci
Dalam, Aliran Pemanas dan
Panel Kawalan.
O O O O O O O O O O O
Sama ada kuasa terputus.
O O O O O O O O O O O
Nasi telah tidak dikacau
selepas selesai memasak.
O O O O O
Sama ada Penutup Wap telah
ditetapkan dengan betul.
O O O
Berlebihan berjam-jam pada
pemasa pratetap.
O O O O
Sama ada Penutup Luar telah
ditutup dengan betul.
O O O O O O
Jangan basuh beras
sepenuhnya.
O O O O O O O
Bijirin beras atau objek asing
tinggal di kawasan sempadan
Pembungkusan & Panci
Dalam.
O O O
Berlebihan berjam-jam di
fungsi kekal hangat.
O O O O O
Simptom
Sebab berkemungkinan
Masalah memasak nasi Masalah kekal hangat
Terlalu keras
Terlalu lembut
Nasi tidak dimasakkan
Tiada bau
Nasi terlekat pada Panci
Dalam
Kerak nasi, Nasi dibakar
Limpahan
Terlalu tebal
Kekurangan mendidih
Jangan kekal hangat
Berbau
Warna
Nasi terlalu kering
Menitis air
Jangan menetap kekal hangat
tetapi nasi disimpan dalam
Panci Dalam untuk berjam-
jam.
O O O O O
Jangan membersihkan Panci
Dalam.
O O
Letakkan Senduk Nasi dalam
Panci Dalam.
O O O O
Campuran air dan beras
adalah tidak sekata.
O
Sila hantar ke pusat perkhidmatan berdaftar untuk pembaikan jika unit didapati menjadi rosak selepas
pemeriksaan yang dijalankan pada jadual di atas.

16 17
Melayu
Membakar Kek / Roti
Simptom
Sebab berkemungkinan
Masalah penaik kek / roti
Kek / roti belum siap
Kek / roti kurang masak
Kek / roti basah
Kek / roti melekat pada
asar Panci Dalam
Bahagian bawah kek /
roti terbakar
Tidak lembut
Rapuh
Terlalu banyak doh.
O O
Tidak cukup mencampurkan sebelum penaik.
O O O
Digunakan dengan campuran kek yang sesuai.
O O O O
Digunakan dengan campuran kek yang
mengandungi terlalu banyak bahan coklat, gula
atau buah-buahan.
O O O O
Jangan Penutup Luar menutup semasa
memasak.
O O O
Perkara-perkara asing antara Panci Dalam dan
Aliran Pemanas.
O O O O O
Tidak cukup mentega atau minyak masak yang
digunakan di bawah Panci Dalam.
O
Kek / roti ditinggalkan terlalu lama dalam Panci
Dalam.
O O
Tidak mencukupi mencampurkan atau
bercampur terlalu lama.
O O
Kuantiti bahan yang salah.
O O O O
Sila hantar ke pusat perkhidmatan berdaftar untuk pembaikan jika unit didapati menjadi rosak selepas
pemeriksaan yang dijalankan pada jadual di atas.
Penyelesaian Masalah
Lain-lain
Simptom Sebab berkemungkinan
Bunyi aneh berlaku Bunyi berlaku kerana air yang melekat di Panci Dalam.
Tiada kuasa Tarikkan Palam Kuasa dan periksa salur keluar kuasa.
Sila hantar ke pusat perkhidmatan berdaftar untuk pembaikan jika unit didapati menjadi rosak selepas
pemeriksaan yang dijalankan pada jadual di atas.
Petunjuk Ralat
Petunjuk Sebab berkemungkinan
U14
Adakah fungsi kekal hangat telah digunakan selama lebih daripada
96 jam?
→ Tekan butang “Off (Tutup)”.
H01
H02
H31
Sila rujuk kepada pusat perkhidmatan berdaftar dan maklumkan kod ralat
(nombor dua digit selepas “H”).
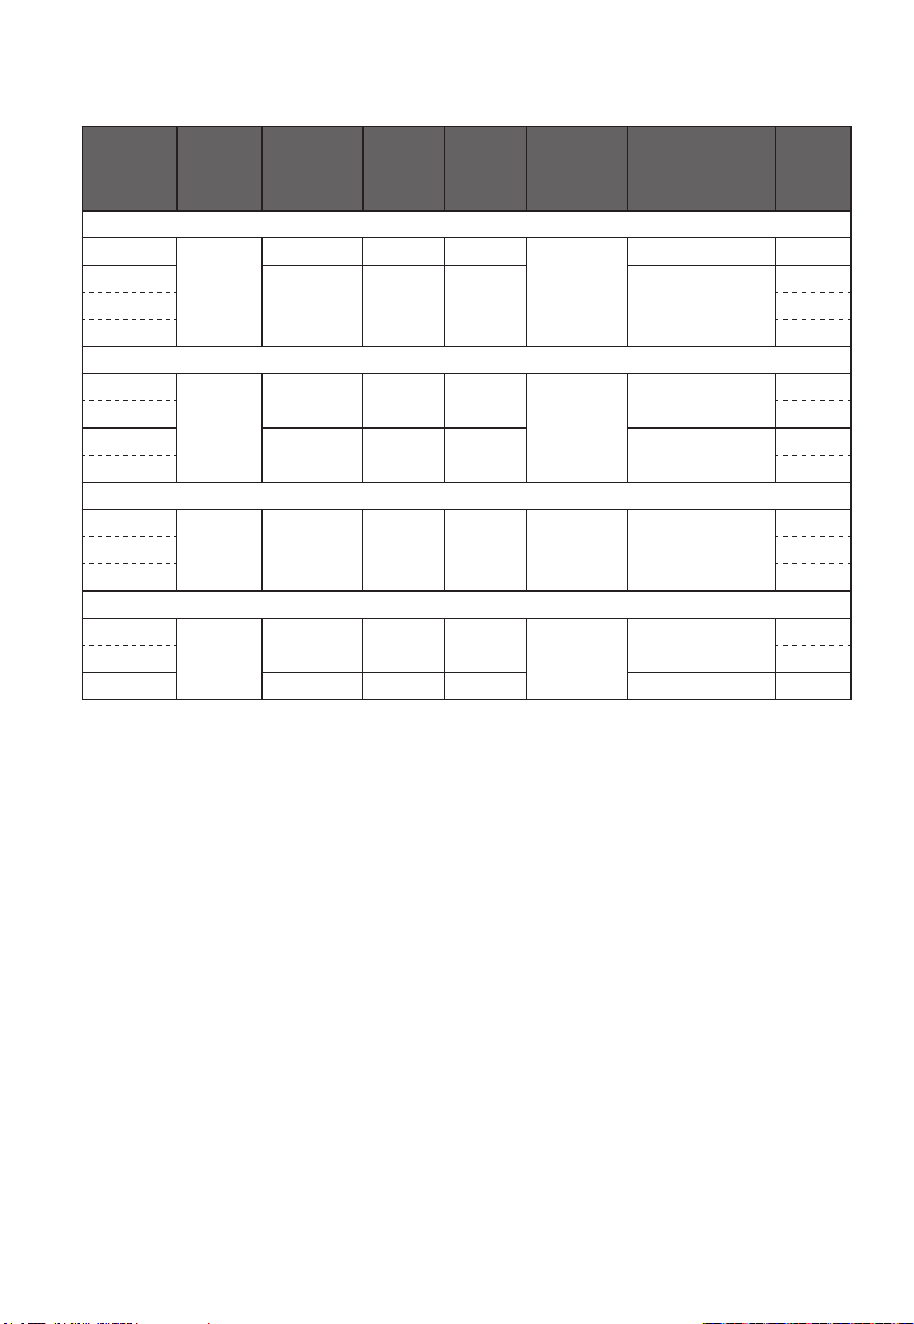
18
Spesifikasi
Model
Voltan
yang
disyorkan
Kuasa yang
disyorkan
(W)
Kapasiti
Memasak
(L)
Kuantiti
Beras
(Cawan)
Pemanas
Model
P × L × T (mm)
Berat
(kg)
Malaysia
SR-CX108
240 V ~
50 Hz
765 1.0 5.5
Pemanasan
Langsung
352 × 251 × 214 3.5
SR-CX188
910 1.8 10 387 × 284 × 249
4.5
SR-CP188 4.4
SR-CN188 3.8
Singapura (Domestik)
SR-CX108
230 V ~
50 Hz
700 1.0 5.5
Pemanasan
Langsung
352 × 251 × 214
3.5
SR-CN108 3.0
SR-CX188
835 1.8 10 387 × 284 × 249
4.5
SR-CN188 3.8
Singapura (Eksport semula)
SR-CX188
220 V ~
50 Hz
765 1.8 10
Pemanasan
Langsung
387 × 284 × 249
4.5
SR-CP188 4.4
SR-CN188 3.8
Australia / New Zealand
SR-CX108
220–
240 V ~
50 Hz
640–765 1.0 5.5
Pemanasan
Langsung
352 × 251 × 214
3.5
SR-CN108 3.0
SR-CN188 765–910 1.8 10 387 × 284 × 249 3.8
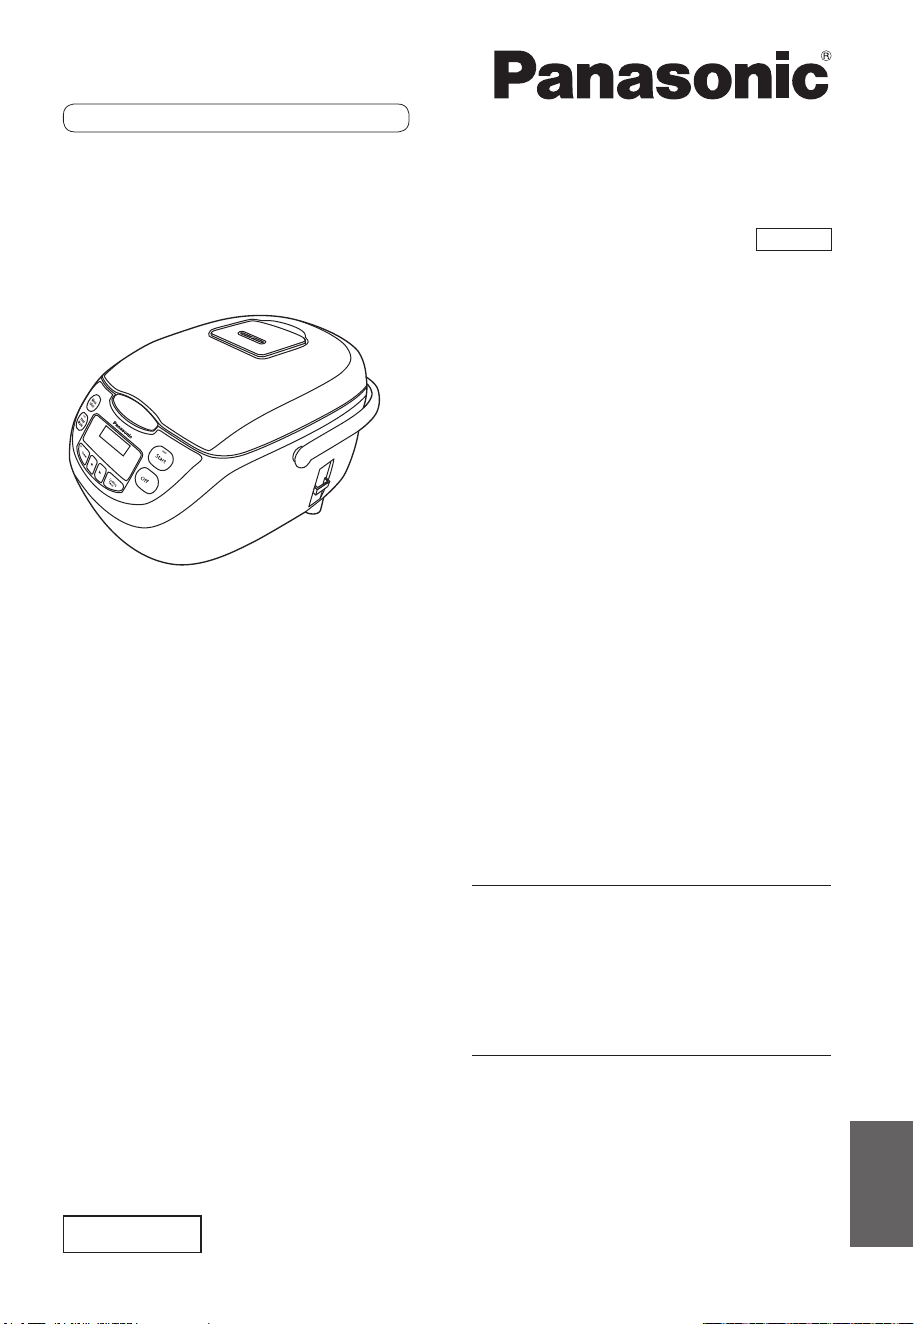
中文
使用说明书
电磁 加 热 电饭 煲/电 热 锅
家庭用
1.0 L
型号
SR-CX108
SR-CN108
1.8 L
型号
SR-CX188
SR-CP188
SR-CN188
非常感谢您购买
Panasonic
产品。
OO
本产品只限于家庭使用。
OO
使用产品前请仔细阅读本使用说
明书,以确保正确安全使用本产品。
OO
特别要留意“ 安 全 注 意 事 项 ”( 第
2
~
4
页)再使用。
OO
请将保修证与本使用说明书一起
妥善保管。
另附保修证
目次
安全注意事项
.................2
使用注意事项
.................5
零件名称/附件
................6
煮饭
........................8
正确使用程序
................10
使用不同程序
................11
OO
预约
清洗
.......................12
故障排除
....................14
OO
错误讯息显示
规格
.......................18
MAL/SIN (DBD)/SIN (RBD)/AST/NZ
本使用说明书中的图片均以
SR-CX108
为例。

中文
使用说明书
电磁 加 热 电饭 煲/电 热 锅
家庭用
1.0 L
型号
SR-CX108
SR-CN108
1.8 L
型号
SR-CX188
SR-CP188
SR-CN188
非常感谢您购买
Panasonic
产品。
OO
本产品只限于家庭使用。
OO
使用产品前请仔细阅读本使用说
明书,以确保正确安全使用本产品。
OO
特别要留意“ 安 全 注 意 事 项 ”( 第
2
~
4
页)再使用。
OO
请将保修证与本使用说明书一起
妥善 保管。
另附保修证
目次
安全注意事项
.................2
使用注意事项
.................5
零件 名称/附件
................6
煮饭
........................8
正确使用程序
................10
使用不同程序
................11
OO
预约
清洗
.......................12
故障排除
....................14
OO
错误讯息显示
规格
.......................18
MAL/SIN (DBD)/SIN (RBD)/AST/NZ
本使用说明书中的图片均以
SR-CX108
为例。

2 3
中文
警告
不遵守本说明书可能造成严重的人身伤害甚至死亡。
•
本产品不适合供下列人士(包括孩童)使用:身体官能或心智能力退化者,或是经
验与使用知识缺乏者,除非有负责他们安全的人员在旁监督或指导,方可使用。
请注意避免让孩童戏玩本产品。
•
本产品设计用于家用或类似应用,如:
-
商
店、办公室和其他工作环境的员工厨房
间
;
-
农舍;
-
酒店、汽车旅馆和其他居住环境的客房;
-
住宿和餐饮环境。
•
如果电源线损坏,必须用专用电源线或从制造厂或维修部买到的专用组件来更换。
•
请勿将水等液体滴在本体插头等连接器上,以免引起触电或因短路导致火灾。
•
切勿使用本产品烹调可能喷出堵塞蒸汽口的食品:
叶片状食品(例如,紫菜和大白菜)或条状食品(例如,海带)及零碎食品(例如,
玉 米 渣 ),否 则 可 能 造 成 意 外 或 损 伤 产 品 。
•
为避免烧伤,本产品运行期间切勿允许面部和双手靠近蒸汽口。
•
请使用
10 A
额定电流的单独接地电源插座,如与其他电器共用电源插座可能引
起火灾。
•
不可重新拼装
除维修技工外,任何人均不得拆解或维修本产品,以免引起火灾、触电或人身伤害。
•
确保产品标签上标明的电压与您当地的电源相同。切勿使用破损的电源线。
•
为避免因电源线损坏而引起火灾和触电,切勿在以下状态下运行。
电源线加工、强行弯曲、接近高温、扎成束或承载重物等。
•
为避免火灾,但凡电源插头之中存有灰尘,都必须及时清理掉。
•
务必将本体插头和电源插头完全插入插座和电源插座,以免引起火灾、触电或短路。
•
当电源线或电源插头损坏或电源插头松散连接在电源插座上时,切勿使用本产品,
以 免 引 起 火 灾 、触 电 或 短 路 。
•
请 勿 湿 手 插 拔 掉 电 源 插 头 ,以 免 引 起 触 电 和 受 伤 。
•
本产品运行期间,请勿移动或晃动。
•
请勿允许儿童在无人看管的情况下操作本产品。请将本产品放在婴儿触及范围之
外 ,以 免 引 起 触 电 、烧 伤 或 其 他 危 险 事 故 。
•
请勿将本产品置于不平稳、潮湿、接近明火或热源的地点,否则可能引起损坏或事
故。
•
切勿将本产品浸入水中。
•
切勿将针、金属丝或其他异物插入吸气口、排气口或本产品底部的缝隙中,以免造
成触电。
•
发生异常或故障时,请立即停止使用本产品并拔掉电源插头,以免引起冒烟、火灾
或触电。
异常
·
故
障例:电源插头及电源线异常发热;电源线已损坏或碰到电源线后发生间
歇 性 断 电 ;主 体 变 形 或 异 常 发 热 ;主 体 冒 烟 或 发 出 焦 味 ;主 体 破 裂 、松 动 或 发 出 异
响。
•
慢慢闭合外盖直至“喀哒”一声,以免因蒸汽泄漏或外盖打开导致烫伤或受伤。
•
请将电源线远离小孩。
请勿将电源线悬挂在产品放置的餐桌或料理台边缘。拖拽电源线可能导致产品从
餐桌或工作台上掉下而导致受伤。
•
使用产品时请小心放置电源线以免绊倒,以免引起受伤或损坏电源线而引起火灾
或触电。
•
请勿将产品用于使用说明书记载以外的任何用途,以免引起火灾、烧伤、受伤或
触电。
对于使用不当或未能遵守使用说明书而导致的情况,
P
anasonic
将不承担任何责
任。
安全注意事项

4 5
中文
注意
不遵守本说明可能造成人身伤害或财产损失。
•
本产品必须与随附的内锅配套使用,以免引起过热或异常状况。
•
使用过程中或刚刚使用后,请勿用手触碰内锅,以免高温烧伤。
•
请勿使用非本产品专用的电源线组件(即指本体插头及电源插头),并禁止将本产
品的电源线转用至他处,以免引起触电、漏电或火灾。
•
拔掉电源插头或本体插头时,请确保握住电源插头或本体插头,切勿拉拽电源线,
以免引起触电或因短路而引起火灾。
•
取出内锅前或不使用产品时,切记关掉电源并拔下电源插头,以免烧伤、受伤、因
绝缘老化而导致触电或短路从而导致火灾。
•
拔掉电源插头,在产品完全冷却后再进行清洗及保存,以免烧伤。
产品未冷却前请勿移动。
安全注意事项
•
电饭煲启动前,请检查内锅和保湿装置是否正确安装,以免引起故障。
•
在使用过程中,电饭煲可能发出细微的“喀哒”或“嘶嘶”声,这属于正常工作声响,
不必惊慌。
•
烹饪后,切勿立即再次运行电饭煲。请至少等待
15
分 钟 ,等 待 加 热 板 冷 却 。
•
切勿用热水煮饭,因为这会影响恒温器判定温度,造成烹调效果下降。
•
电饭煲运行时,切勿用布盖住电饭煲,否则可能造成电饭煲出现意外或损坏。
•
请勿让内锅跌落,否则可能引起变形。
•
请勿用锐物敲击内锅,以免其变形。
•
使用电饭煲前,务必擦去内锅外壁的水,以免引起任何故障。
•
使用电饭煲前,请清理掉内锅和加热板之间的水滴和米粒,以免造成任何故障。
•
内锅底部涂层可能因使用频率而出现不同程度的磨损,但不会因此影响性能。
•
移 动 电 饭 煲 时 ,请 抓 住 把 手 。
•
请勿在户外使用本电饭煲。
使用注意事项
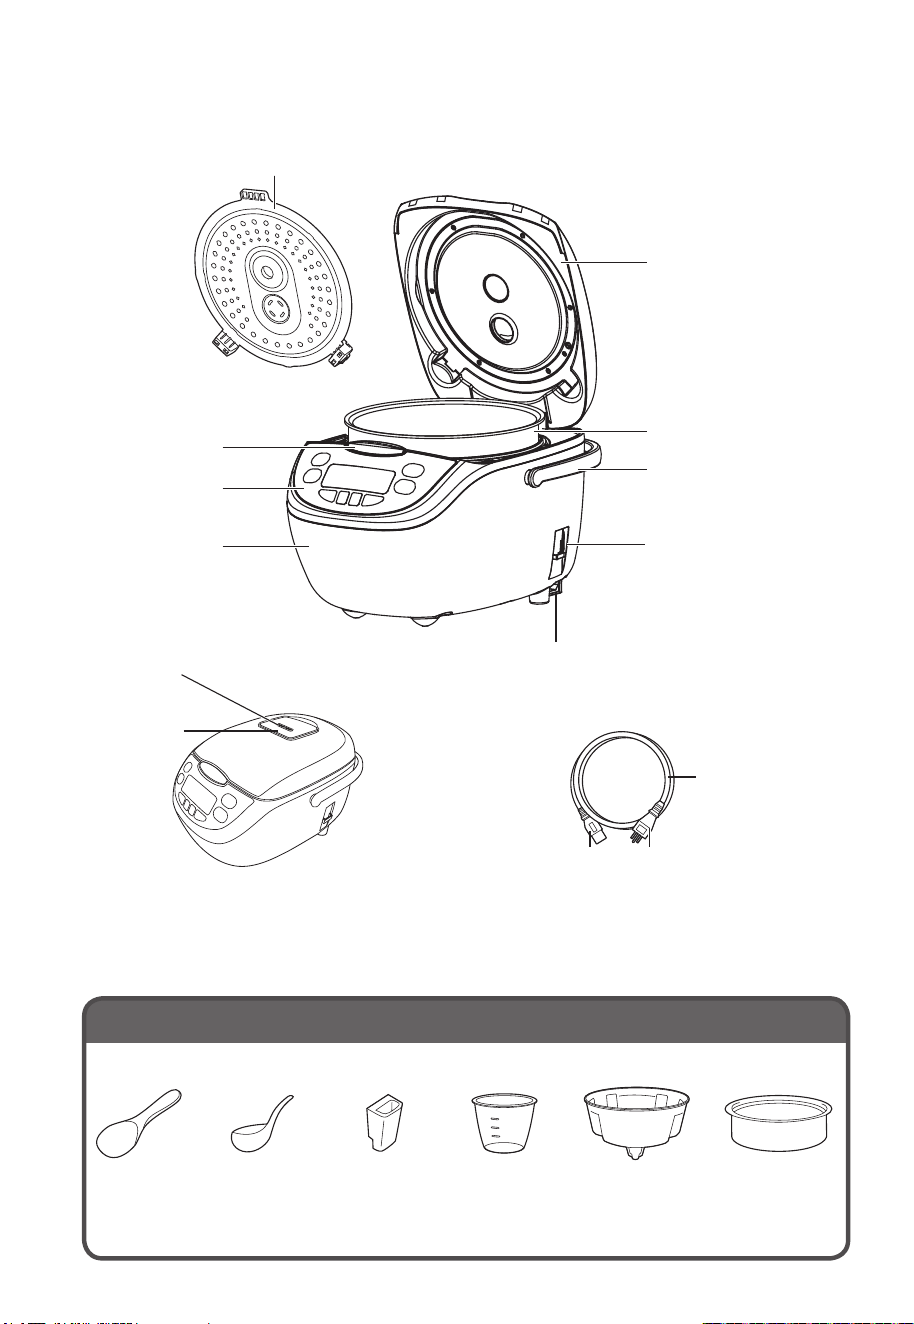
6 7
中文
零件 名称/附件
Q
使用前,请取下内锅和加热板之间的纸片。
外盖
内盖
内锅
主体
控制面板
开盖按钮
把手
安装饭勺架的位置
插座
蒸汽口
电源插头
*
本体插头
电源线
电源线组件
保湿装置
*
电源插头的形状可能与图示不同。
附件
饭 勺(
1
) 粥[ 汤 ]勺(
1
) 饭 勺 架(
1
) 量 杯(
1
) 蒸 笼(
1
)
(约
180 mL
)
对于
SR-CX108
SR-CX188
SR-CP188
对于
S
R-CN108
SR-CN188
“
Off
( 关 )” 键“ ”、“ ”键
“
Keep Warm
( 保 温 )” 键
“
Menu Select
( 功 能 选 择 )” 键 “
Start
( 开 )” 键
“
Start
( 开 )” 指 示 灯
“
Cooking Timer
(烹调时间)”键“
Timer
( 预 约 )” 键“
Keep Warm
( 保 温 )” 指 示 灯
“
Timer
( 预 约 )” 指 示 灯
“
Menu Select
(功能选择)”键
OO
此键用于选择功能。
“
Keep Warm
( 保 温 )” 键
OO
煮饭之后,“
K
eep Warm
(保温)”指示灯自动点亮。
OO
此键用于开启保温功能。
“
Timer
( 预 约 )” 键
OO
此键用于设置预约。
“
Cooking Timer
(烹调时间)”键
OO
选 择“
Po
rridge
( 粥 )” 时 , 按 下 “
Timer
( 预 约 )” 键 后 此 键 用 于 回 到 设 定 烹 调
时间。
OO
此键用于确认预约状态的烹调时间。
“ ”、“ ”键
OO
此类键用于设定时间。
:
减少
:
增加
OO
按住此键可快速增减时间。
“
Start
( 开 )” 键
OO
此键用于开启烹调。
OO
此键用于结束预约设 置。
“
Off
( 关 )” 键
OO
此键用于取消操作。
OO
此键用于关闭保温功能。
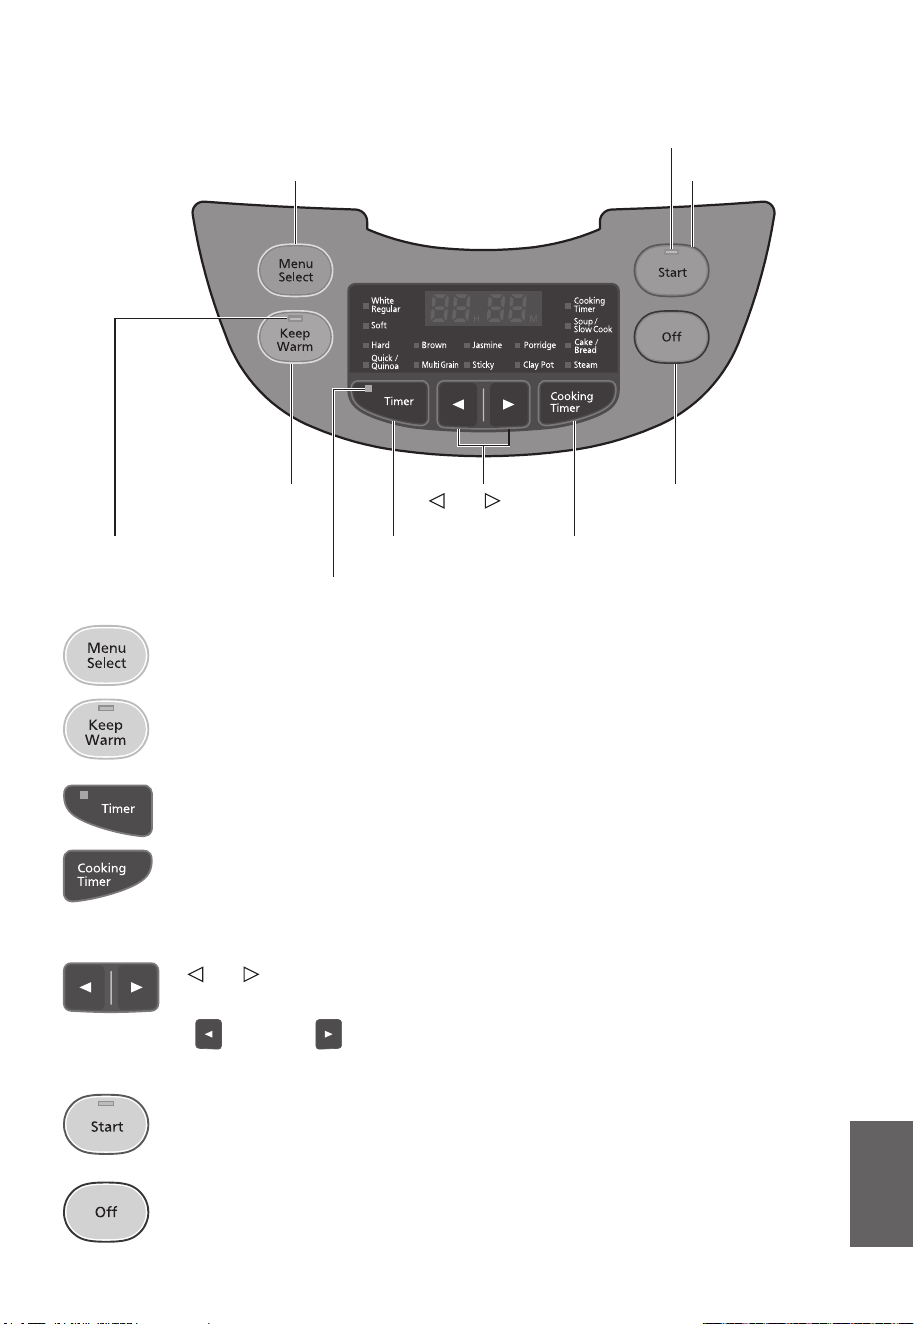
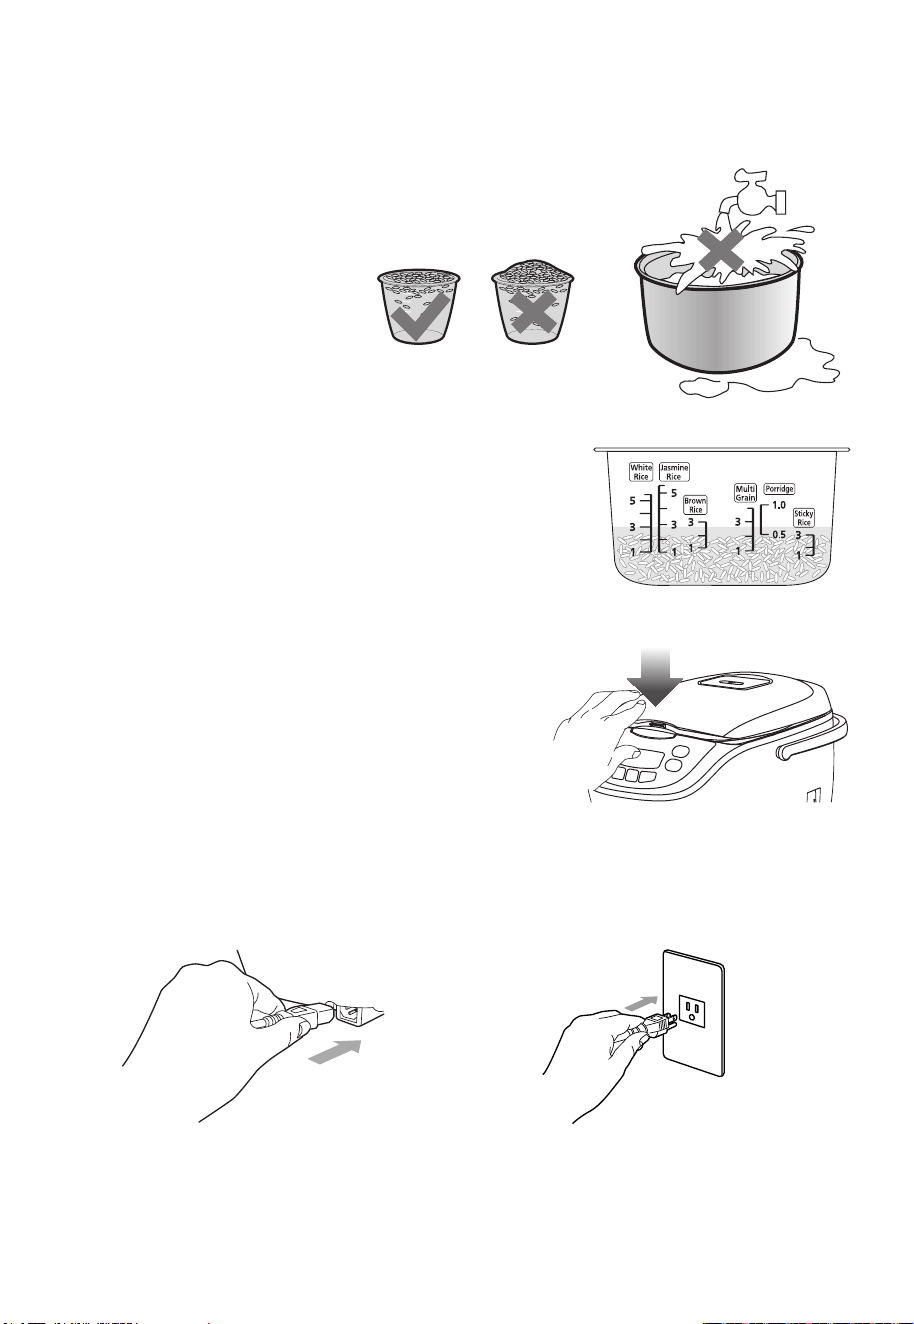
8 9
中文
煮饭
1
量 取 所 需 数 量 的 米( 一 量 杯 大 约
150
g
);
OO
用 另 一 容 器 淘 米 ,确 保 淘 洗
干净。
OO
为避免损伤涂层,最好不要
直接在内锅中淘米。
2
将 洗 净 的 米 倒 入 内 锅 ,加 水 至 相 应 的 水 位( 例 如 ,
如烹调
3
量 杯 白 米 ,则 应 加 水 至 水 位 线(
White
Rice
)的 刻 度
3
处)。水量可依个人习惯合理增减。
OO
请勿让水量超过最高水位线。
3
用干布擦拭内锅外壁,然后将其放入电饭煲。
随后按下外盖,直至听到“喀哒”声。
OO
切勿在其他炉具上加热内锅,以免其因高温变
形;不可在加热板上使用除内锅以外的其他容器。
4
首先将本体插头插到主体上,然后再插入电源插头。
OO
确认这两个插头均已插接牢靠。
①
②
图示内锅为
1.0 L
型号。
5
按“
Start
(开)”键进入对应功能的工作
流程。“
Start
(开)”指示灯随即点亮。
OO
系统默认选择“
W
hite
(白米)
Regular
(标
准 )” 更改方法请参阅第
11
页。
OO
使用预约的方法请参阅第
11
页。
OO
进入焖饭状态。系统显示屏将以倒计时的
形式显示剩余的焖饭时间。
OO
根据煮饭时电脑程序判定的米种和水量,焖饭时间自动设为
5
或
10
分钟。
6
烹 调 完 成 后 ,自 动 切 换 至 保 温 功 能 。
OO
为防止米粒黏聚、降低口感,最好立即翻松米饭。
OO
盛饭时,为避免刮擦内锅,应采用随附的饭勺,而不是金属饭勺。
7
使用后,请按“
Off
(关)”键进入待机状态,
然后再拔下电源插头。
不同功能的煮饭时间(仅作参考):
功能 “
Soft
( 软 )” 烹 调 “
Quick
( 超 快 速 )” 烹 调
时间(分) 大约
50
大约
30
上 表 中 的 烹 调 时 间 因 不 同 的 电 压 、水 量 、米 量 、水 温 和 米 种 质 量 而 发 生 变 化 。
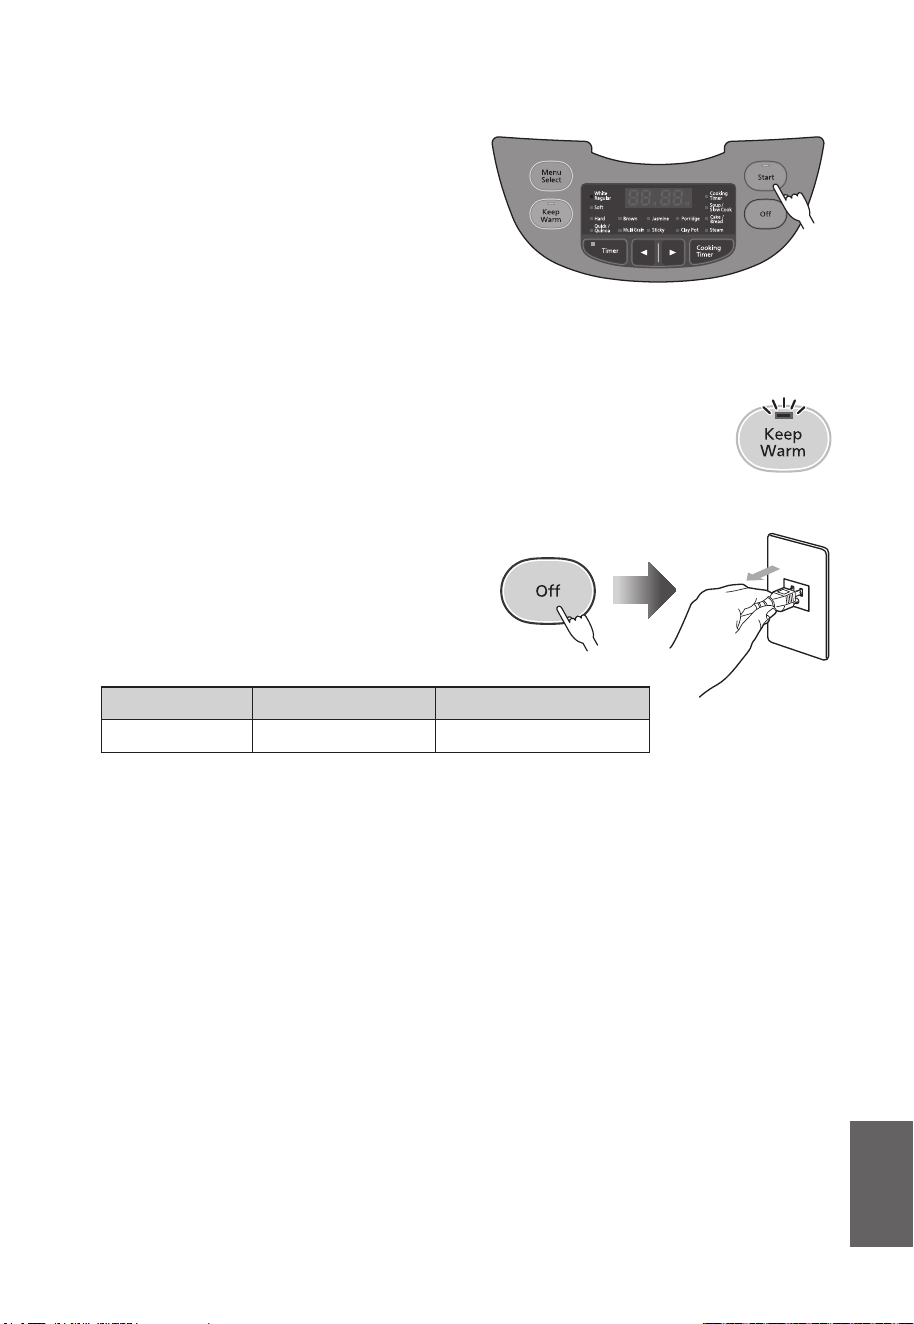
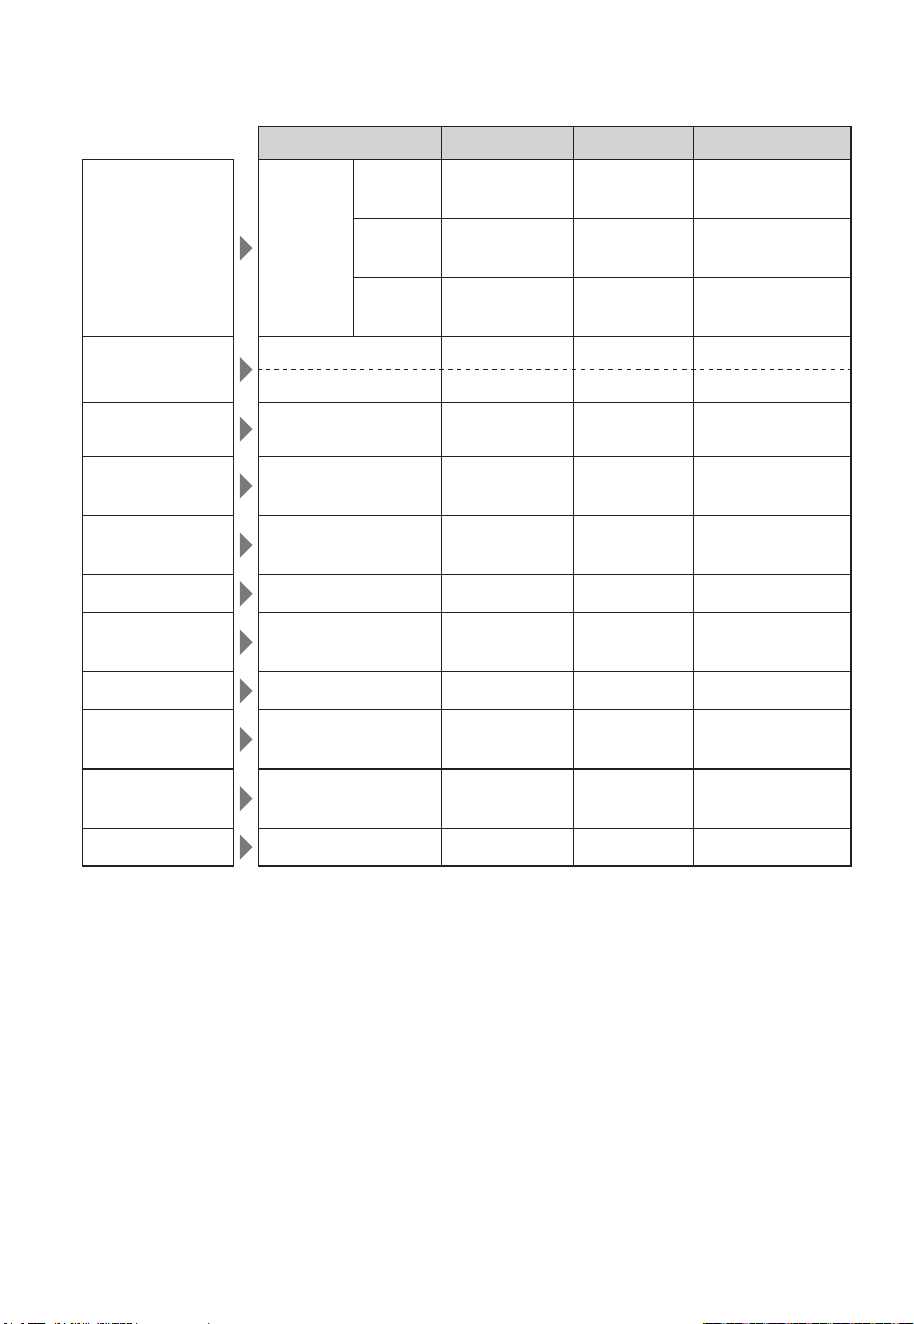
10 11
中文
正确使用程序 使用不同程序
1
选择功能。
按“
Menu Select
(功能选择)”键,选择功能。
指示灯点亮的功能为所选中的功能。
OO
选择“
Po
rridge
(粥)”、“
Soup/Slow Cook
( 汤 / 慢 煮 )” 、
“
C
ake/Bread
(蛋糕/面包)”或“
Steam
(蒸煮)”时 ,请 设 置 烹 调 时 间 。
按“
”或“ ”键设置所需的烹调时间。
功能 默认值 烹调时间的设定范围 设定单位
Porridge
(
粥)
1
小时
00
分钟
1
小时
00
分钟
–4
小时
00
分钟
30
分钟
Soup/Slow Cook
(汤/慢 煮 )
1
小时
00
分钟
1
小时
00
分钟
–
12
小时
00
分钟
30
分钟
Cake/Bread
(蛋糕/面包)
40
分钟
20
分钟
–
65
分钟
5
分钟
Steam
(蒸
煮)
* 10
分钟
1
分钟
–60
分钟
1
分钟
*
蒸
煮的设定时间在水沸腾后开始递减。
2
按“
Start
( 开 )” 键 。
OO
完成烹调后,所有功能随即自动转换为保温功能。
OO
“
Q
uinoa
( 藜 麦 )” 、“
Brown
( 糙 米 )” 、“
Multi Grain
( 杂 粮 米 )” 、“
Sticky
( 糯 米 )” 、
“
Po
rridge
( 粥 )” 、“
Clay Pot
( 煲 仔 饭 )” 、“
Soup/Slow Cook
( 汤 / 慢 煮 )” 、
“
C
ake/Bread
(蛋糕/面包)”或“
Steam
(蒸煮)”功能不建议使用保温功能。
请按“
O
ff
(关)”键关闭保温功能。
预约
1
按“
Menu Select
(功能选择)”键 ,选择功能。
OO
选择“
Po
rridge
(粥)”时 ,请 设 置 烹 调 时 间 。
2
按“
Timer
(预约)”键 ,设 置 预 设 模 式 。
3
按“ ”或“ ”键 ,调 整 所 需 的 时 间 。
OO
预约可设为预约设置开始后
10
分
钟至
24
小时
00
分钟。
OO
预设时间为加工完成时间。
OO
“
T
imer
(预约)”键还具有与预设模式“ ”键 相 同 的 功 能 。
4
按“
Start
(开)”键开始预设模式。
OO
预设模式开后,功能指示灯和“
T
imer
(预约)”指示灯均点亮。
OO
电饭 煲开始烹调时,“
T
imer
(预约)”指示灯熄灭,“
Start
(开)”指示灯点亮。
功能 内锅的水位线 保温功能
*
1
预约设定的限制
*
2
将白米烹调出不
同质感
White
(白米)
Regular
(标准)
White Rice
○
60
分以
上
Soft
(软)
White Rice
○
60
分以
上
Hard
(硬)
White Rice
○
60
分以
上
快速烹调米饭
或烹调藜麦
Quick
(超快速)/
White Rice
○
—
Quinoa
(藜
麦) —
*
3
×
—
烹调糙米
Brown
(糙米)
Brown Rice
×
180
分以上
烹调杂粮米
Multi Grain
(杂粮米)
Multi Grain
×
60
分以
上
烹调泰国香米
Jasmine
(泰国香米)
Jasmine
Rice
○
60
分以
上
烹调糯米
Sticky
(糯米)
Sticky Rice
×
60
分以上
烹调粥
Porridge
(粥)
Porridgee
×
烹调时间
+
10
分
钟以上
烹调煲仔饭
Clay Pot
(煲仔饭)
White Rice
×
—
烹调汤或炖煮
Soup/Slow Cook
(汤/慢 煮 )
—
*
4
×
—
烘烤蛋糕或面包
Cake/Bread
(蛋糕/面包)
—
*
5
×
—
蒸
Steam
(蒸煮) —
*
6
×
—
*
1
●
“×”符号代表电饭煲将自动转换成保温功能,但不建议使用。
●
请勿使用保温功能超过
12
小时。
●
保温时间将以
1
小 时 为 单 位 显 示 ,直 至
23
小 时 为 止( 显 示“
0
”即 代 表 小 于
1
小 时 )。超
过
24
小
时后仍然继续保温。
*
2
预约设置不可用于标有“—”的功能项。
*
3
一杯藜麦需要加两杯水。藜麦仅可一次烹调一杯。请使用随附的量杯。
*
4
食材和水的总量不要超过“
White Rice
”的最大水位线。
*
5
允许的最大重量(食材总重量)为
500
g
。
*
6
请使用随附的量杯量取。
1.0 L
机型时加
3
量杯水,
1.8 L
机型时加
4
量杯水。
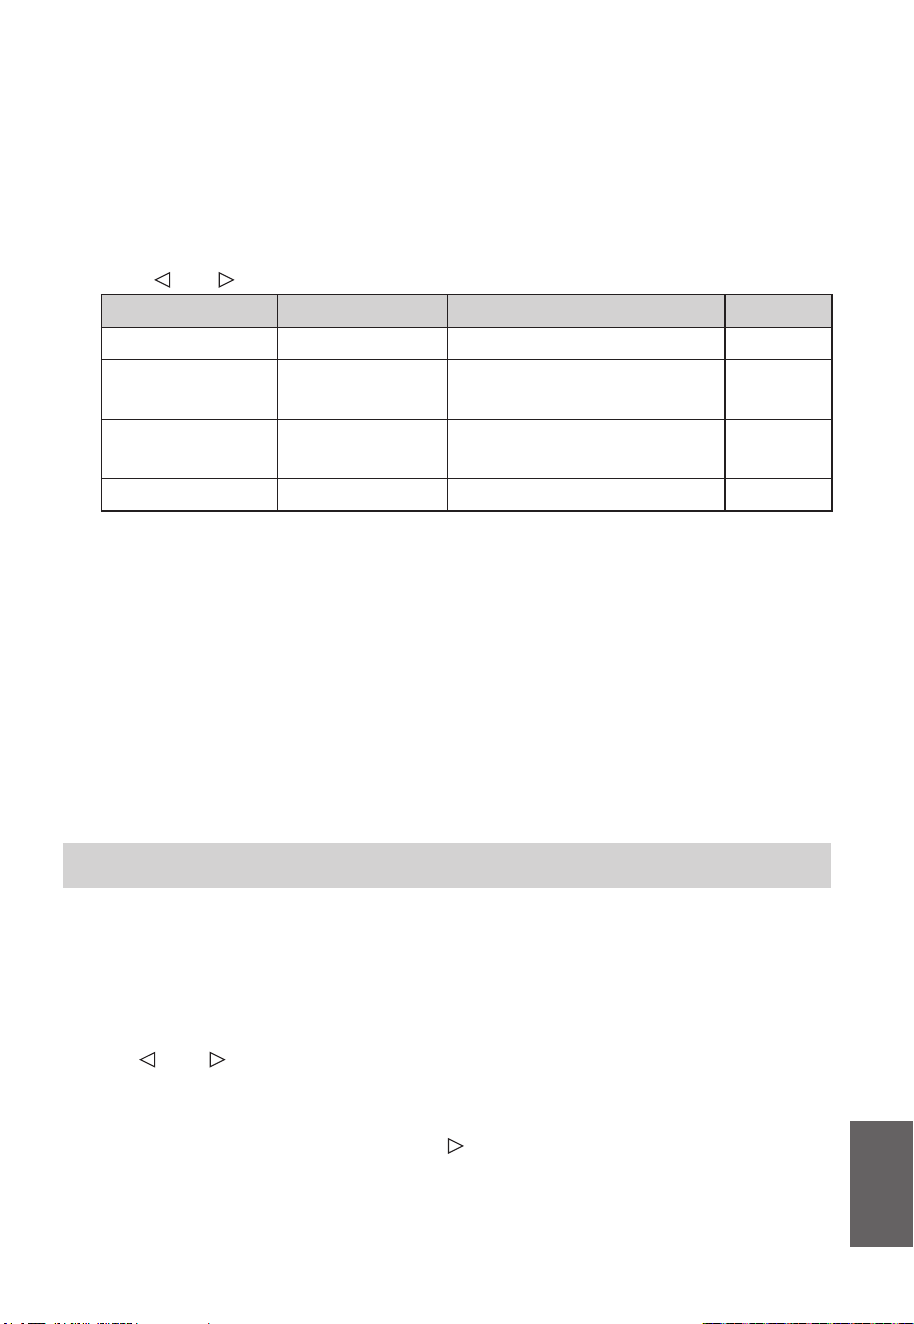
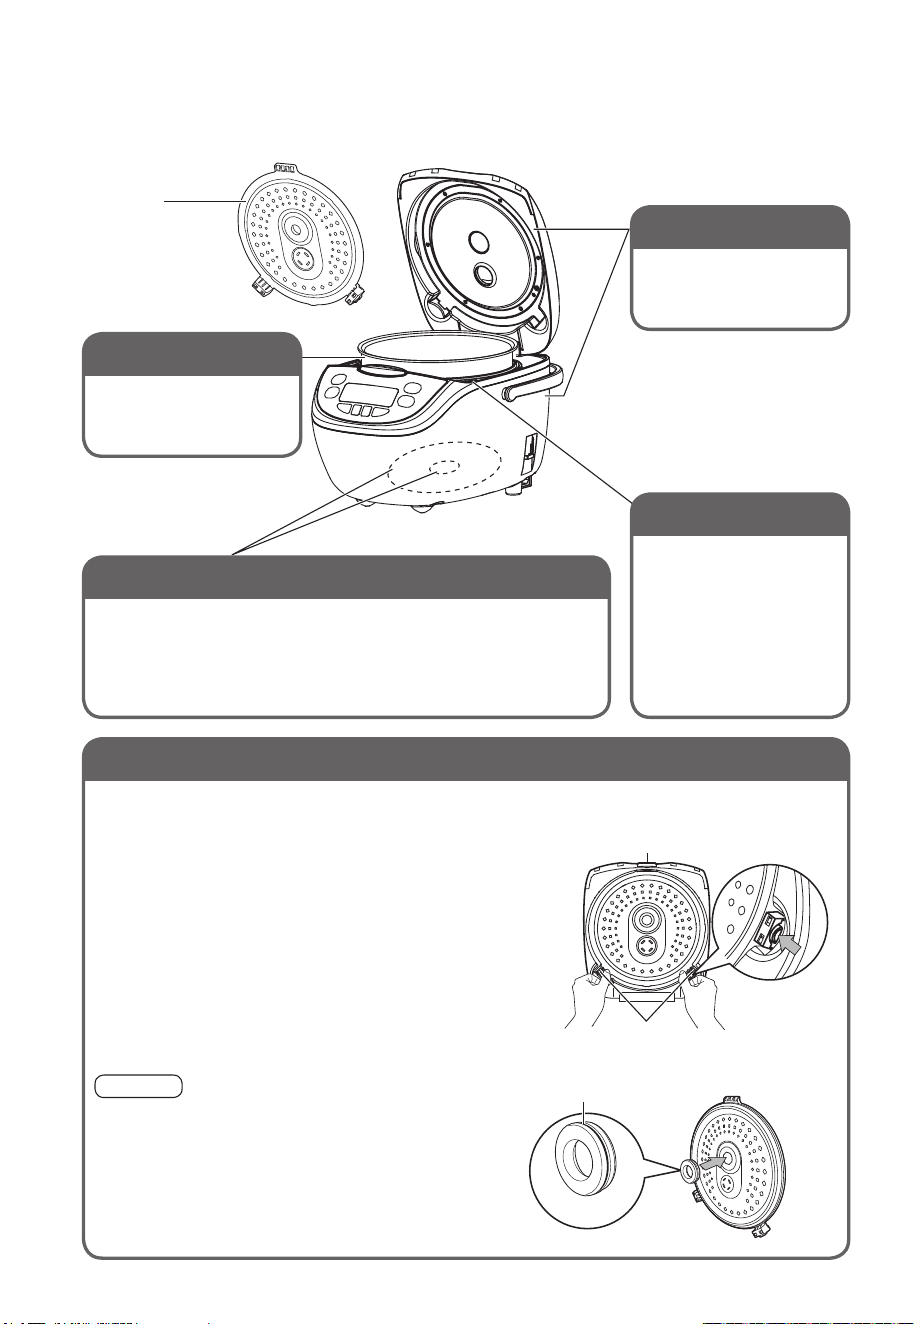
12 13
中文
清洗
Q
清 洗 前 ,拔 掉 电 源 插 头 ,确 认 主 体 已 冷 却 。
内盖
拆下,使用厨房专用中性洗涤剂清洗。
OQ
拆除时
抓 住 两 个 卡 扣 ,向 自 己 身 体 方 向 拉 。
OQ
安装时
①
将凸出部分斜插入外盖的锁定圈中。
②
将( 两 侧 )卡 扣 朝 外 盖 内 侧 按 ,直 至 听 到“喀哒”声。
提示
OO
请不要拆下垫圈。
OO
若垫圈 脱落,请将其重新装上。
突出部分
卡扣
将这一垫圈推入内盖。
垫圈
保湿装置
*
*
保湿装置因电饭煲型号而异。
拆下并冲洗。
OO
每次使用后请用水冲洗。
提示
OO
请不要拆下垫圈。
OO
若垫圈 脱落,请将其重新装上。
OQ
拆除时
①
提起取出。
②
先打开。
按钮
长按按钮可打开。
OPEN
CLOSE
沿 着 箭 头 方 向 旋 转 ,将
其拉出。
OQ
安装时
(按和拆除时相反的顺序。)
①
然后关闭。
轴
插入轴,盖严,直到
发 出“ 咔 嗒 ”声 。
OPEN
CLOSE
将 其 折 叠 按 牢 。听 到
清晰干脆的声音,即表
示组装完成。
②
压入外盖。
垫圈
垫圈
附件
使用厨房专用中性洗涤剂清洗。
饭勺
粥[ 汤 ]勺
饭勺架 量杯 蒸笼
*
*
蒸笼因电饭煲型号而异。
内盖
内锅
使用厨房专用中性
洗涤剂清洗。
外 盖/主体
用拧干的湿毛巾擦
拭。
上框
用拧干的湿毛巾擦
拭。
OO
请勿将水直接浇在
上框上。
OO
可用牙签挑出米粒。
底传感器/加 热 板
用拧干的湿毛巾擦拭。
OO
如 果 有 异 物 黏 在 锅 底 传 感 器 / 加 热 板 上 ,使 用 细 砂 纸( 约
#600
规 格 )或 钢 丝 球 轻 轻 擦 拭 清 除 。

14 15
中文
故障排除
发现烹调存在任何异常状况时,请检查故障根源。
烹调米饭
症状
可能的原因
烹调米饭问题 保温问题
太硬
太软
米夹生
没有米饭气味
米饭粘黏内锅
米饭煮焦
溢锅
太稠
不沸腾
不保温
有异味
色
米太干
滴水
米量和水位不正确。
O O O O O O O O
超过最大水位线。
O O O O O O O
所选功能是否正确。
O O O O O O O O
内锅是否存在变形,底部
是否均匀。
O O O O O O
热水烹调或未冷却即连
续烹调。
O O O O O
内 锅 底 座 、加 热 板 和 控 制
面板上是否存在任何米
粒或异物。
O O O O O O O O O O O
电源是否切断。
O O O O O O O O O O O
烹调完成后是否翻松了
米饭。
O O O O O
保湿装置是否正确固定。
O O O
预约时间过长。
O O O O
外盖是否正确扣紧。
O O O O O O
米未洗净。
O O O O O O O
垫圈和内锅边缘区域留
有米粒或异物。
O O O
保温功能持续时间过长。
O O O O O
症状
可能的原因
烹调米饭问题 保温问题
太硬
太软
米夹生
没有米饭气味
米饭粘黏内锅
米饭煮焦
溢锅
太稠
不沸腾
不保温
有异味
色
米太干
滴水
未设置保温但米饭留在
内锅中的时间过长。
O O O O O
未清洗内锅。
O O
将饭勺放在内锅中。
O O O O
米/水 混 合 物 不 均 匀。
O
如果按照上表检查后发现本产品存在缺陷,则请发往授权服务中心进行维修。

16 17
中文
烘烤蛋糕/面包
症状
可能的原因
烘烤蛋糕/面包问题
蛋糕/面包未完成
蛋糕/面包不熟
蛋糕/面包湿漉漉
蛋糕/面包黏在内锅
底座上
蛋糕/面包底部烧焦
不松软
太焦
面团过多。
O O
烘焙前未充分混合。
O O O
使用不相容的蛋糕混料。
O O O O
使用了含太多巧克力、糖或水果成分的
蛋糕混料。
O O O O
烹调期间外盖未盖上。
O O O
内锅和加热板间存在异物。
O O O O O
内锅底部涂的黄油或食用油不足。
O
蛋糕/面包在内锅中停留的时间过长。
O O
未充分混合或混合时间过久。
O O
食材量错误。
O O O O
如果按照上表检查后发现本产品存在缺陷,则请发往授权服务中心进行维修。
故障排除
其他问题
症状 可能的原因
出现异响 由于水沾在内锅上而发出异响。
不通电 拔出电源插头,检查电源插座。
如果按照上表检查后发现本产品存在缺陷,则请发往授权服务中心进行维修。
错误讯息显示
显示 可能的原因
U14
是否连续使用保温功能
96
小
时或更长时间?
→
按“
O
ff
( 关 )” 键 。
H01
H02
H31
请咨询授权服务中心并告知错误代码(“
H
”
后 的 两 位 数 )。
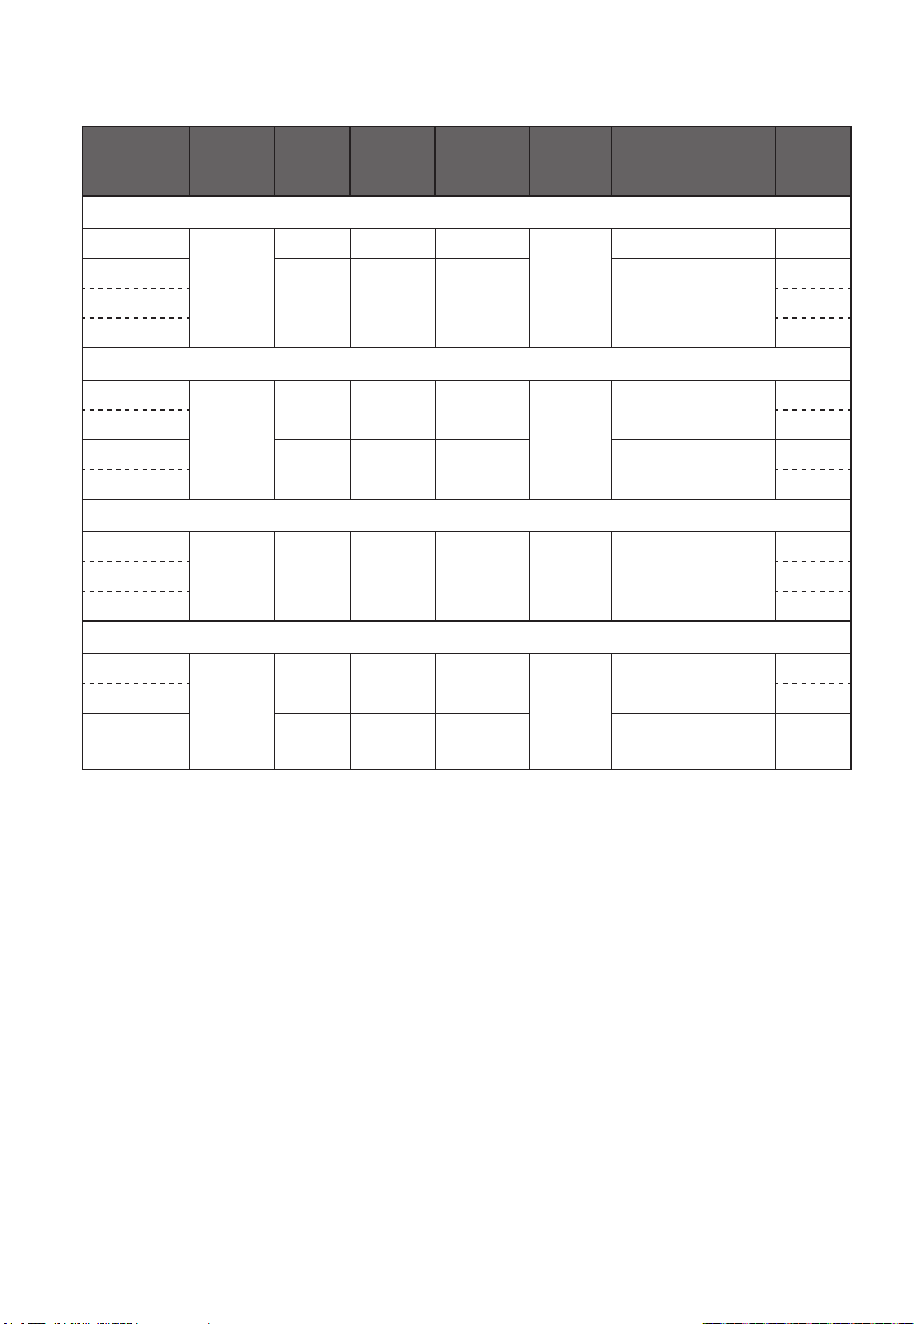
18
规格
型号
额定电压
额定功率
(
W
)
烹调容量
(
L
)
米量
(量杯)
加热
模式
长×宽×高
(
mm
)
产品重量
(
k
g
)
马来西亚
SR-CX108
240 V ~
50 Hz
765 1.0 5.5
直接
加热
352
×
251
×
214
3.5
SR-CX188
910 1.8 10
387
×
284
×
249
4.5
SR-CP188 4.4
SR-CN188 3.8
新 加 坡( 国 内 )
SR-CX108
230 V ~
50 Hz
700 1.0 5.5
直接
加热
352
×
251
×
214
3.5
SR-CN108 3.0
SR-CX188
835 1.8 10
387
×
284
×
249
4.5
SR-CN188 3.8
新 加 坡( 再 出 口 )
SR-CX188
220 V ~
50 Hz
765 1.8 10
直接
加热
387
×
284
×
249
4.5
SR-CP188 4.4
SR-CN188 3.8
澳 大 利 亚/新 西兰
SR-CX108
220–
240 V ~
50 Hz
640–
765
1.0 5.5
直接
加热
352
×
251
×
214
3.5
SR-CN108 3.0
SR-CN188
765–
910
1.8 10
387
×
284
×
249
3.8

Operating Instructions
Electronic Rice Cooker / Warmer
Household Use
1.0 L model
Model No.
SR-CX108
SR-CN108
1.8 L model
Model No.
SR-CX188
SR-CP188
SR-CN188
Thank you for purchasing this
Panasonic product.
OOThis product is intended for
household use only.
OOPlease read the operating
instructions carefully to ensure
safe and correct operation
before use.
OOBefore use, be sure to read
“Safety Precautions”
(Pages 2–4).
OOKeep the operating instructions
and the warranty for future use.
Warranty appended
Contents
Safety Precautions............2
Notes on Use
.................5
Part Names/Accessories . . . . . . .6
Cooking Rice
.................8
Using the Settings Correctly
...10
Using Different Settings
.......11
OOTimer
Cleaning
...................12
Troubleshooting
.............14
OOError Indications
Specications
...............18
MAL/SIN (DBD)/SIN (RBD)/AST/NZ
Panasonic Corporation
Web Site: http://www.panasonic.com
© Panasonic Corporation 2018
Printed in China
RZ19MK83
F1018T0
Illustrations of the SR-CX108
are used throughout this
Operating Instructions.
中文
English Melayu