User’s Manual
FLASH GLUCOSE MONITORING SYSTEM
.224”
.257”
4.6”4.6”

Your Name _________________________________________________
.224”
.257”
4.6” 4.6”

Contents
Reader Symbols .........................................1
Important Safety Information........................... 3
Indications for Use........................................ 3
Contraindications ........................................4
Getting to Know Your System . . . . . . . . . . . . . . . . . . . . . . . . . . . 8
Reader Kit . . . . . . . . . . . . . . . . . . . . . . . . . . . . . . . . . . . . . . . . . . . . . . . 9
Sensor Kit ...............................................10
FreeStyle Libre Software . . . . . . . . . . . . . . . . . . . . . . . . . . . . . . . . . 13
Setting up Your Reader for the First Time . . . . . . . . . . . . . . 14
Using Your Sensor ......................................17
Applying Your Sensor....................................18
Starting Your Sensor .....................................22
Checking Your Glucose . . . . . . . . . . . . . . . . . . . . . . . . . . . . . . . . . . 23
Adding Notes...........................................29

Reviewing Your History . . . . . . . . . . . . . . . . . . . . . . . . . . . . . . . . 31
Logbook . . . . . . . . . . . . . . . . . . . . . . . . . . . . . . . . . . . . . . . . . . . . . . . . 33
Daily Graph .............................................34
Other History Options . . . . . . . . . . . . . . . . . . . . . . . . . . . . . . . . . . . 35
Removing Your Sensor .................................37
Replacing Your Sensor .................................38
Using Reminders . . . . . . . . . . . . . . . . . . . . . . . . . . . . . . . . . . . . . . . 39
Using the Built-in Meter................................41
Blood Glucose Testing . . . . . . . . . . . . . . . . . . . . . . . . . . . . . . . . . . . 43
Blood Ketone Testing . . . . . . . . . . . . . . . . . . . . . . . . . . . . . . . . . . . . 47
Control Solution Testing .................................52
Charging the Reader . . . . . . . . . . . . . . . . . . . . . . . . . . . . . . . . . . . 56
Changing the Reader Settings .........................57
Living With Your FreeStyle Libre System . . . . . . . . . . . . . . . 60

Maintenance and Disposal .............................62
Troubleshooting . . . . . . . . . . . . . . . . . . . . . . . . . . . . . . . . . . . . . . . 63
Reader Does Not Power On . . . . . . . . . . . . . . . . . . . . . . . . . . . . . . 63
Problems at the Sensor Application Site ..................64
Problems Starting Your Sensor or Receiving
Sensor Readings.........................................65
Blood Glucose or Ketone Error Messages .................68
Problems Checking Your Blood Glucose or Ketone ........72
Perform a Reader Test....................................74
Customer Service . . . . . . . . . . . . . . . . . . . . . . . . . . . . . . . . . . . . . . . 74
System Specications . . . . . . . . . . . . . . . . . . . . . . . . . . . . . . . . . . 75
Labelling Symbols......................................79
Electromagnetic Compatibility.........................80
Warranty Statement....................................91
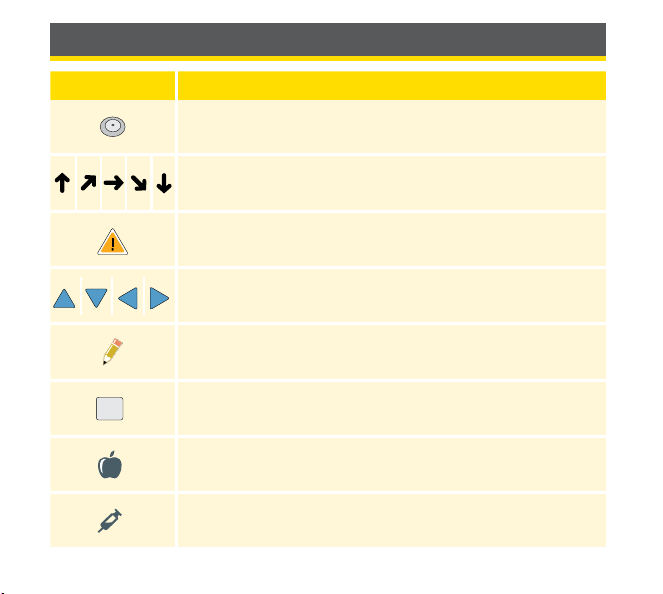
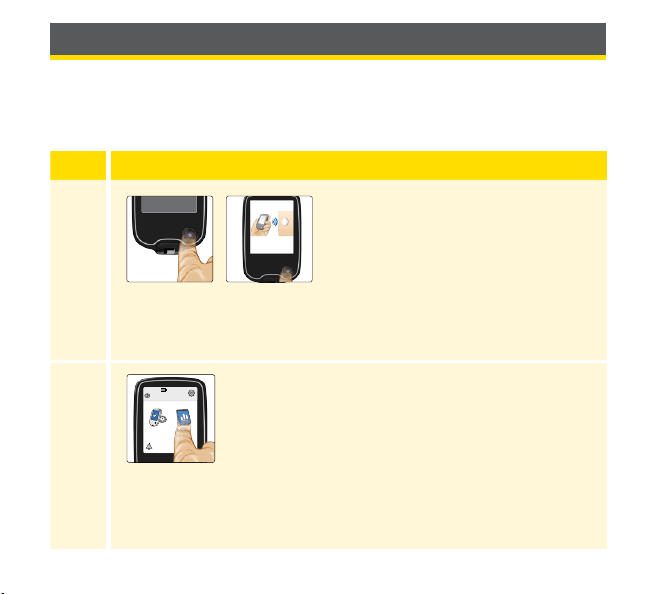
Reader Symbols
Symbol What It Means
Active Sensor
Direction your glucose is going. See Checking Your
Glucose section for more information
Caution
View previous/next screen
Notes
+
Add more information to notes
Food note
Rapid-acting insulin note
1
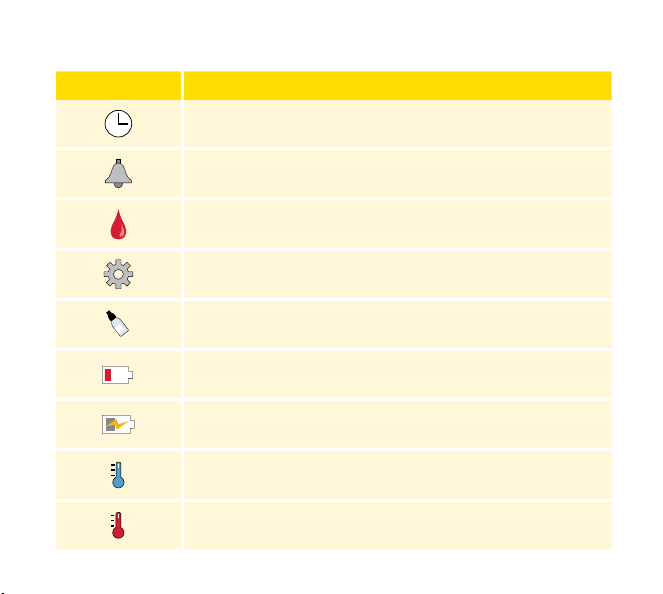
Symbol What It Means
Time changed on Reader
Reminders
Blood glucose or ketone test
Settings
Control solution test result
Low battery
Battery charging
Sensor too cold
Sensor too hot
2

Important Safety Information
Indications for Use
The FreeStyle Libre Flash Glucose Monitoring System is indicated for
measuring interstitial uid glucose levels in people (age 4 and older) with
diabetes mellitus. The indication for children (age 4 - 17) is limited to those
who are supervised by a caregiver who is at least 18 years of age. The
caregiver is responsible for managing or assisting the child to manage the
FreeStyle Libre Flash Glucose Monitoring System and also for interpreting
or assisting the child to interpret FreeStyle Libre readings. It is designed to
replace blood glucose testing in the self-management of diabetes with the
exceptions listed below.
Under the following circumstances, use a blood glucose meter
to check the current glucose readings from the FreeStyle Libre Flash
Glucose Monitoring System Sensor:
• During times of rapidly changing glucose levels, interstitial glucose
levels as measured by the Sensor and reported as current may not
accurately reect blood glucose levels. When glucose levels are falling
rapidly, glucose readings from the Sensor may be higher than blood
glucose levels. Conversely when glucose levels are rising rapidly, glucose
readings from the Sensor may be lower than blood glucose levels.
• In order to conrm hypoglycaemia or impending hypoglycaemia as
reported by the Sensor.
• If symptoms do not match the FreeStyle Libre Flash Glucose Monitoring
System reading. Do not ignore symptoms that may be due to low blood
glucose or high blood glucose.
3

Contraindications
The FreeStyle Libre Flash Glucose Monitoring System must be removed
prior to Magnetic Resonance Imaging (MRI).
WARNING:
• The FreeStyle Libre Flash Glucose Monitoring System contains
small parts that may be dangerous if swallowed.
• During times of rapidly changing glucose (more than 0.1 mmol/L
per minute), interstitial uid glucose levels as measured by the
FreeStyle Libre Flash Glucose Monitoring System Sensor may not
accurately reect blood glucose levels. Under these circumstances,
check the Sensor glucose readings by conducting a ngerstick test
using a blood glucose meter.
• In order to conrm hypoglycaemia or impending hypoglycaemia
as reported by the FreeStyle Libre Flash Glucose Monitoring
System Sensor, conduct a ngerstick test using a blood glucose
meter.
• Do not ignore symptoms that may be due to low or high blood
glucose. If you have symptoms that do not match the FreeStyle
Libre Flash Glucose Monitoring System reading or suspect that
your reading may be inaccurate, check the reading by conducting
a ngerstick test using a blood glucose meter. If you are
experiencing symptoms that are not consistent with your glucose
readings, consult your health care professional.
4

CAUTION:
• On rare occasions, you may get inaccurate Sensor glucose
readings. If you believe your glucose readings are not correct
or are inconsistent with how you feel, perform a blood
glucose test on your nger to conrm your glucose. If the
problem continues, remove the current Sensor and apply a
new one.
• Performance of the System when used with other implanted
medical devices, such as pacemakers, has not been
evaluated.
• The Reader is for use by a single person. It must not be used
on more than one person including other family members
due to the risk of spreading infection. All parts of the Reader
are considered biohazardous and can potentially transmit
infectious diseases, even after performing the cleaning
procedure.
• Some individuals may be sensitive to the adhesive that keeps
the Sensor attached to the skin. If you notice signicant
skin irritation around or under your Sensor, remove the
Sensor and stop using the FreeStyle Libre system. Contact
your health care professional before continuing to use the
FreeStyle Libre system.
5

System-Related Information
• The FreeStyle Libre Flash Glucose Monitoring System is designed to be
used only with FreeStyle Optium blood glucose and blood ketone test
strips and MediSense control solution.
• Avoid getting dust, dirt, blood, control solution, water or other
substances in the Reader’s USB and test strip ports.
• Physiologic dierences between the interstitial uid and capillary blood
may result in dierences in glucose readings. Dierences in glucose
readings between interstitial uid and capillary blood may be observed
during times of rapid change in blood glucose, such as after eating,
dosing insulin or exercising.
• Severe dehydration and excessive water loss may cause inaccurate
results. If you believe you are suering from dehydration, consult your
health care professional immediately.
• Interfering Substances: Taking ascorbic acid while wearing the Sensor
may falsely raise your Sensor glucose readings. Taking salicylic acid may
slightly lower your Sensor glucose readings. The level of inaccuracy
depends on the amount of the interfering substance active in your
body.
• Store the Sensor Kit between 4°C - 25°C. While you don’t need to keep
your Sensor Kit in a refrigerator, you can as long as the refrigerator is
between 4°C - 25°C.
6

• If you have a medical appointment that includes strong magnetic
or electromagnetic radiation, for example an X-ray, MRI (Magnetic
Resonance Imaging) or CT (Computed Tomography) scan, remove the
Sensor you are wearing and apply a new one after the appointment.
The eect of these types of procedures on the performance of the
system has not been evaluated.
• The FreeStyle Libre Flash Glucose Monitoring System has not been
evaluated for use in pregnant women, persons on dialysis, or people
less than 4 years of age.
7

Getting to Know Your System
The FreeStyle Libre Flash Glucose Monitoring System has two main parts: a
handheld Reader and a disposable Sensor, which you wear on your body.
You use the Reader to wirelessly scan the Sensor and get your glucose
readings. The Reader also has a built-in blood glucose and ketone meter,
which works with FreeStyle Optium blood glucose and blood ketone test
strips.
Your System comes in a Reader Kit and a Sensor Kit. When opening your
kits, check that the contents are undamaged and that you have all parts
listed. If any parts are missing or damaged, contact Customer Service.
IMPORTANT: Safety information about the
System is in this User’s Manual. Read all of
the information in the User’s Manual and the
FreeStyle Optium blood glucose and ketone
test strip instructions for use before using your
System.
8
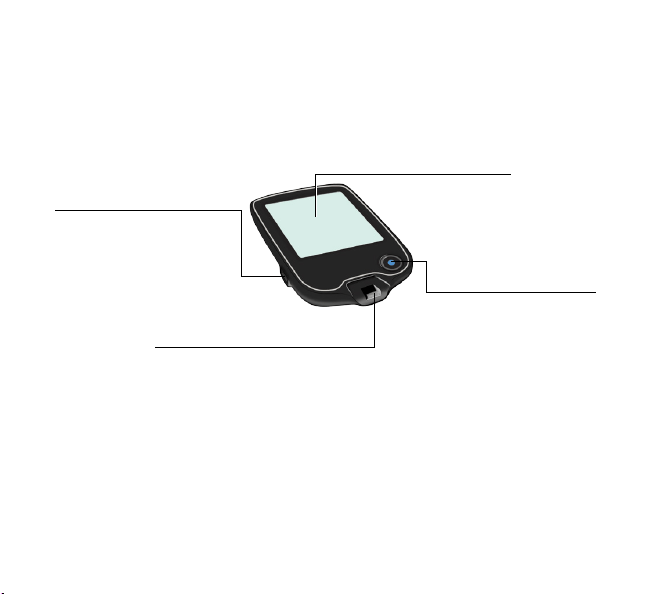
Reader Kit
The Reader Kit includes:
• FreeStyle Libre Reader
• USB Cable
• Power Adapter
• User’s Manual
• Quick Start Guide
The Reader is used to get glucose readings from your Sensor. It can store
approximately 90-days of glucose history and notes you enter about
activities, such as taking insulin, eating food, or exercising. This information
can help you understand how these activities aect your glucose.
USB Port
Used to charge the Reader
and connect it to a computer.
Test Strip Port
Insert a test strip here to use
the built-in meter.
Touchscreen
Home Button
Turns the Reader on/o
and takes you to the
Home screen from any
other screen.
9

Sensor Kit
The Sensor Kit includes:
• Sensor Pack
• Sensor Applicator
• Product insert
• Alcohol wipe
Sensor Pack
Used with the Sensor Applicator to
prepare the Sensor for use.
Sensor Applicator
Applies the Sensor to your body.
The Sensor measures and stores glucose readings when worn on your
body. It initially comes in two parts: one part is in the Sensor Pack and
the other part is in the Sensor Applicator. By following the instructions,
you prepare and apply the Sensor on the back of your
upper arm. The Sensor has a small, exible tip that is
inserted just under the skin. The Sensor can be worn
for up to 14 days.
Sensor
Measures your glucose while on your
body (only visible after applied).
10
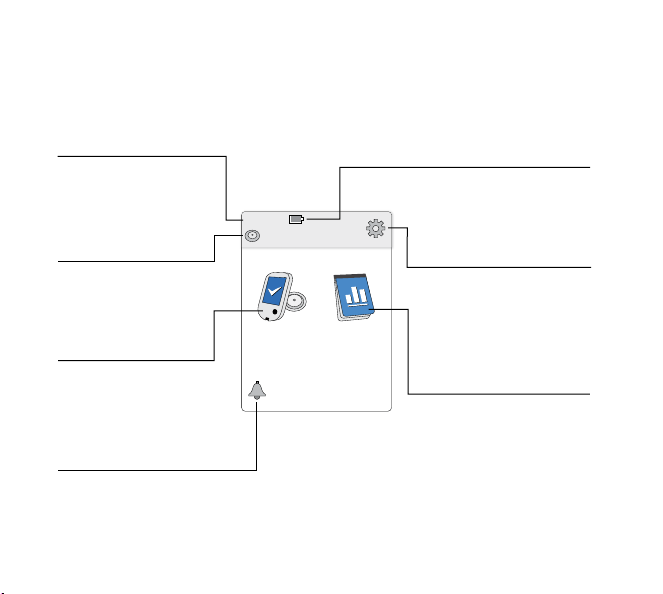
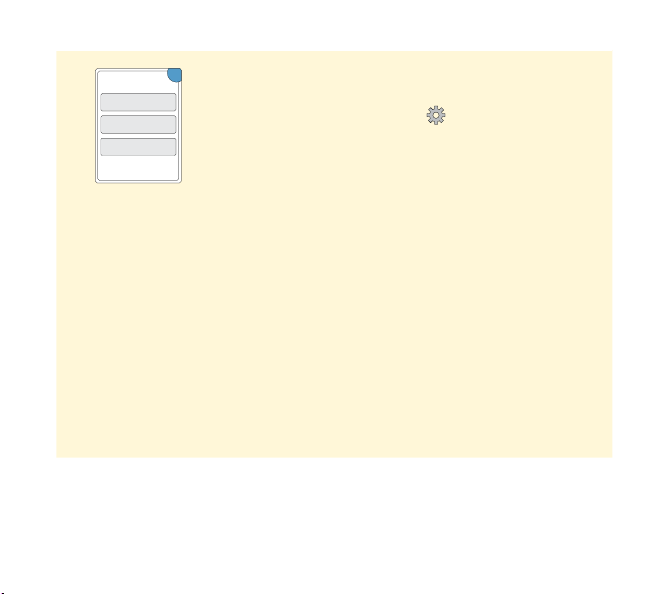
The Reader Home Screen provides access to information about your
glucose and the System. You can press the Home Button to get to the
Home Screen.
Home Screen
Ends in 14 days
22:23
Check
Glucose
Review
History
Time
Current time set on
the Reader.
Sensor Status
Information about your
current Sensor.
Battery Level
Battery charge remaining.
Settings
Touch to change the
Reader’s settings.
Review History
Touch to review information
about your past glucose
readings.
Check Glucose
Touch to check your
Sensor glucose.
Reminder
Touch to set or change
reminders.
11
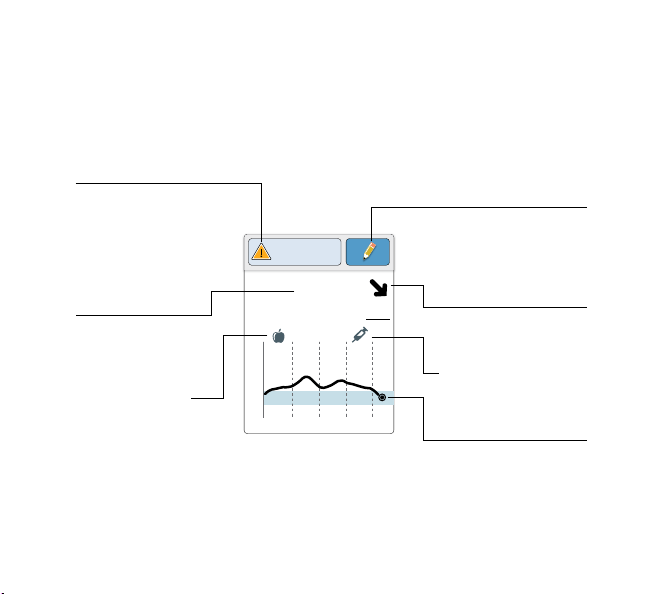
The Sensor Glucose Readings screen appears after you use the Reader
to scan your Sensor. Your Reading includes your Current Glucose, a
Glucose Trend Arrow indicating which way your glucose is going, and a
graph of your current and stored glucose readings.
Sensor Glucose Readings
21
15
9
3
14:00 18:00 22:00
4.0
mmol
L
Glucose Going
Low
Rapid-Acting
Insulin Note
Message
Touch for more
information.
Add Notes
Touch to add notes to the
glucose reading.
Food Note
Current Glucose
Glucose from your
latest scan.
Glucose Trend Arrow
Direction your
glucose is going.
Glucose Graph
Graph of your current
and stored glucose
readings.
12

FreeStyle Libre Software
FreeStyle Libre software can be used to view reports and change Reader
settings. The software is compatible with most Windows and Mac
operating systems. Go to www.FreeStyleLibre.com and follow onscreen
instructions to download and install the software.
INTENDED USE
FreeStyle Libre software is intended for use by individuals and
health care professionals to aid in the review, analysis and
evaluation of information such as Sensor glucose readings,
blood glucose test results, blood ketone test results, and
other data uploaded from the FreeStyle Libre Flash Glucose
Monitoring System, in support of an eective diabetes health
management program.
FreeStyle Libre software is not intended for the diagnosis of
or screening for diabetes mellitus. Users should be aware that
FreeStyle Libre software is merely an information management
tool and it is therefore not intended to substitute for the
support of a health care professional. Individuals should always
consult their health care professional if they have any queries or
concerns about diabetes management.
13
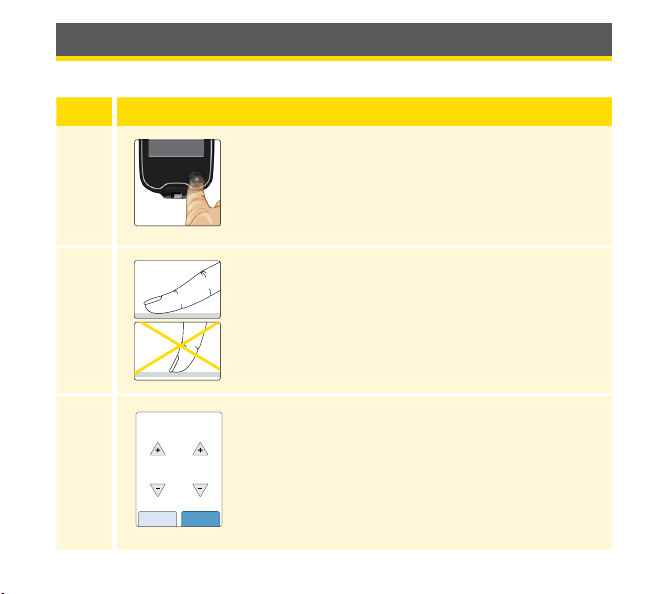
Setting up Your Reader for the First Time
Before using the System for the rst time, the Reader must be set up.
Step Action
1
Press the Home Button to turn on the Reader.
2
If prompted, use the touchscreen to select your
preferred language for the Reader. Touch OK to
continue.
Note: Use the pad of your nger. Do NOT use
your ngernail or any other object on the screen.
3
Set the Current Date using the arrows on the
touchscreen. Touch next to continue.
14
back next
Current Date
June
2017
14
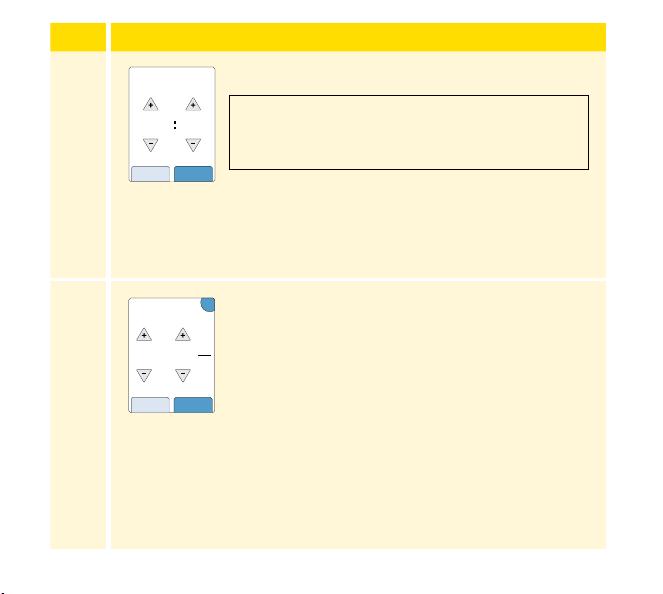
Step Action
4
Set the Current Time. Touch next to continue.
5
Set your Target Glucose Range. Work with your
health care professional to determine your Target
Glucose Range. Touch next to continue.
Note: Your Target Glucose Range is displayed
on glucose graphs on the Reader and used to
calculate your Time In Target.
12 00
back next
Current Time
CAUTION: It is very important to set the time
and date correctly. These values aect the
Reader data and settings.
mmol
L
4.4
to
7.8
back next
Target Glucose
Range
?
15
Step Action
6
The Reader now displays important information about two key
topics to help you use the system:
• How to understand the Glucose Trend Arrow included on
the Glucose Reading screen.
• How to return to the Home Screen from any other screen.
Touch next to move to the
next topic. At the end of the
Reader setup, touch done to
go to the Home Screen.
Note: Charge the Reader if the battery level is low. Only use the USB cable
and power adapter included with the System.
nextback
When you scan your Sensor
an arrow will indicate your
recent glucose trend:
Rising quickly
Rising
Changing slowly
Falling
Falling quickly
doneback
While using the Reader, press
the Home button to return to
the Home screen.
16
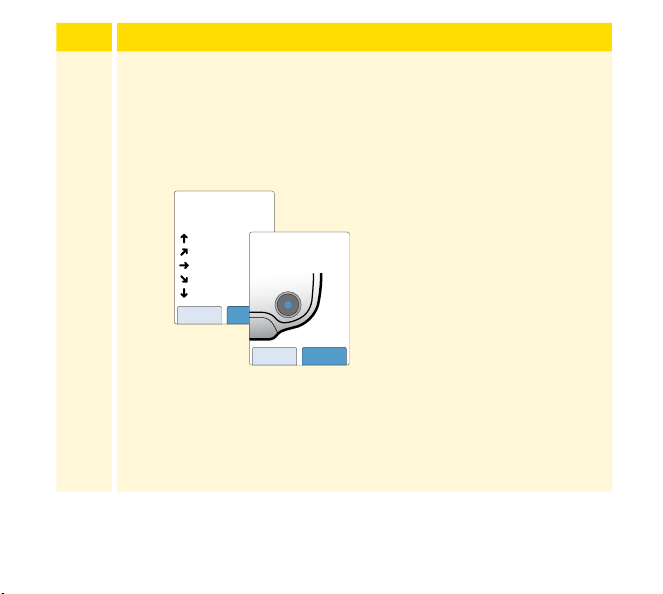
Using Your Sensor
CAUTIONS:
• The Sensor Pack and Sensor Applicator are packaged as a
set (separately from the Reader) and have the same Sensor
code. Check that the Sensor codes match
before using your Sensor Pack and Sensor
Applicator. Sensor Packs and Sensor
Applicators with the same Sensor code
should be used together, or your Sensor
glucose readings may be incorrect.
• Intense exercise may cause your Sensor to loosen due to
sweat or movement of the Sensor. If your Sensor comes
loose, you may get no readings or unreliable readings,
which may not match how you feel. Follow the instructions
to select an appropriate application site.
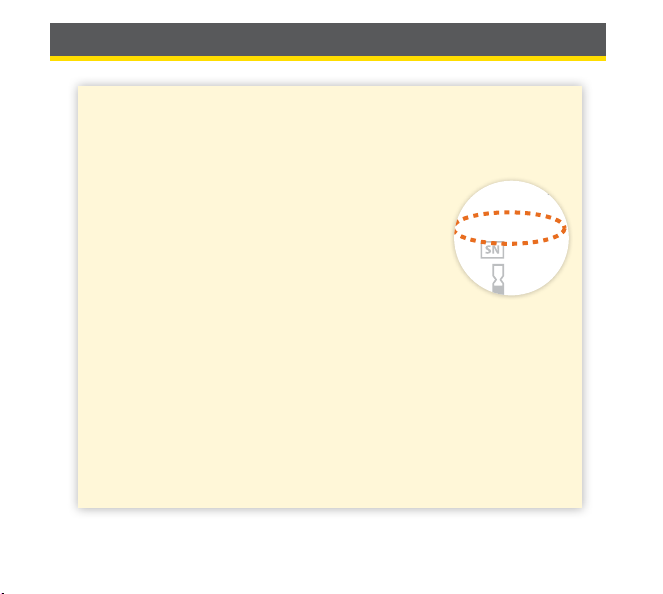
CODE
XXXXXXXXXXX
XXX
YYYY-MM-DD
A
b
b
o
t
t
D
i
a
b
e
t
e
s
C
a
r
e
L
t
d
.
R
a
n
g
e
R
o
a
d
,
W
i
t
n
e
y
,
O
x
o
n
,
O
X
2
9
0
Y
L
,
U
K
D
O
C
3
0
3
9
1
R
e
v
.
E
0
4
/
1
5
Sensor Pack
F
r
e
e
S
t
y
l
e
L
i
b
r
e
17
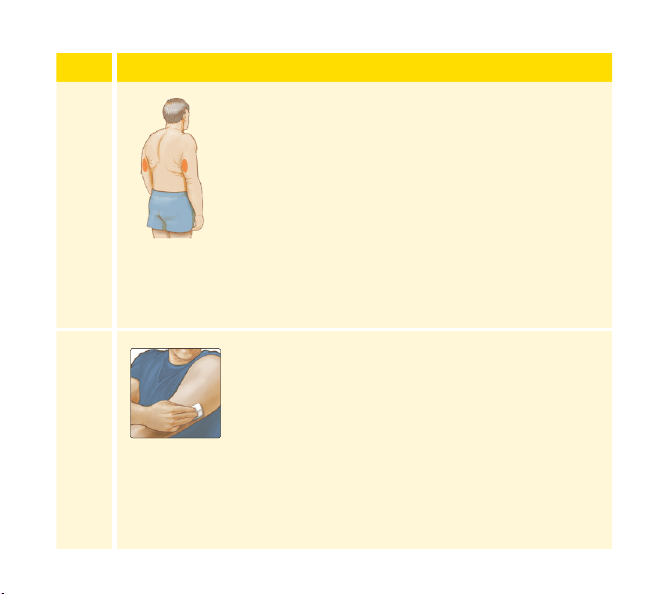
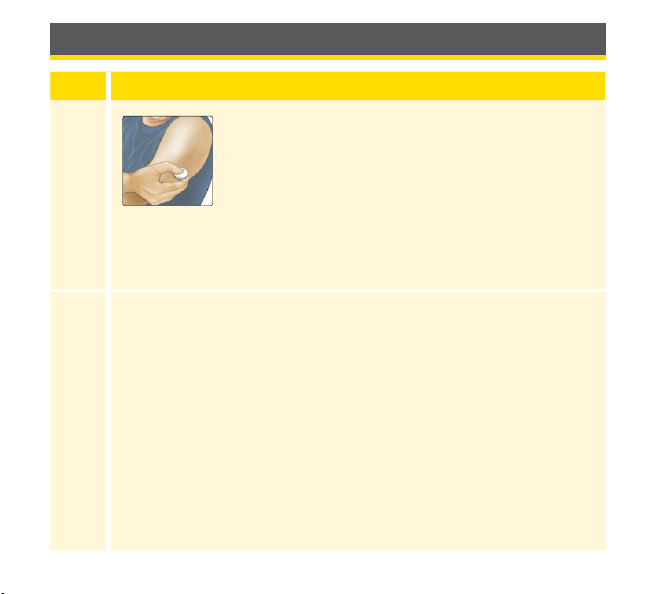
Applying Your Sensor
Step
Action
1
Apply Sensors only on the back of your upper
arm. Avoid areas with scars, moles, stretch marks
or lumps.
Select an area of skin that generally stays at
during your normal daily activities (no bending
or folding). Choose a site that is at least 2.5 cm
(1 inch) away from an insulin injection site. To
prevent discomfort or skin irritation, you should
select a dierent site other than the one most
recently used.
2
Clean application site with an alcohol wipe and
allow site to dry before proceeding. This helps
the Sensor stay attached to your body.
Note: The area MUST be clean and dry, or the
Sensor may not stick to the site.
18
Step
Action
3
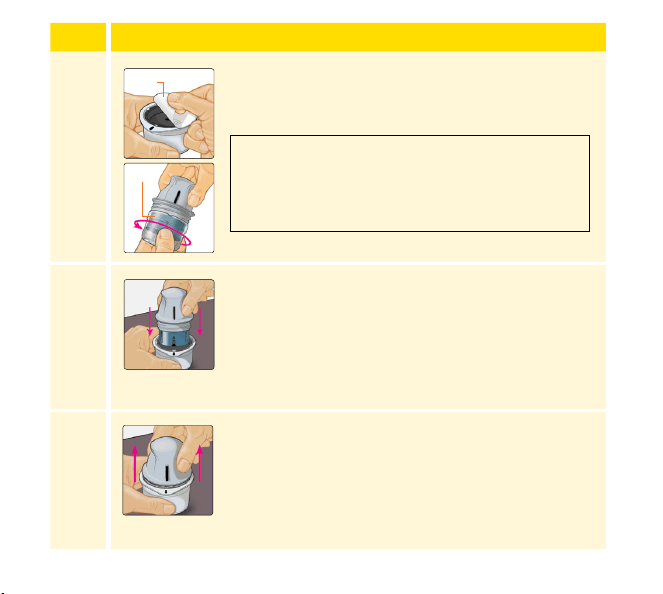
Open the Sensor Pack by peeling the lid o
completely. Unscrew the cap from the Sensor
Applicator and set the cap aside.
4
Line up the dark mark on the Sensor Applicator
with the dark mark on the Sensor Pack. On a
hard surface, press rmly down on the Sensor
Applicator until it comes to a stop.
5
Lift the Sensor Applicator out of the Sensor Pack.
Lid
Cap
CAUTION: Do NOT use if the Sensor Pack or
the Sensor Applicator seem to be damaged
or already opened. Do NOT use if past expiry
date.
19
Step
Action
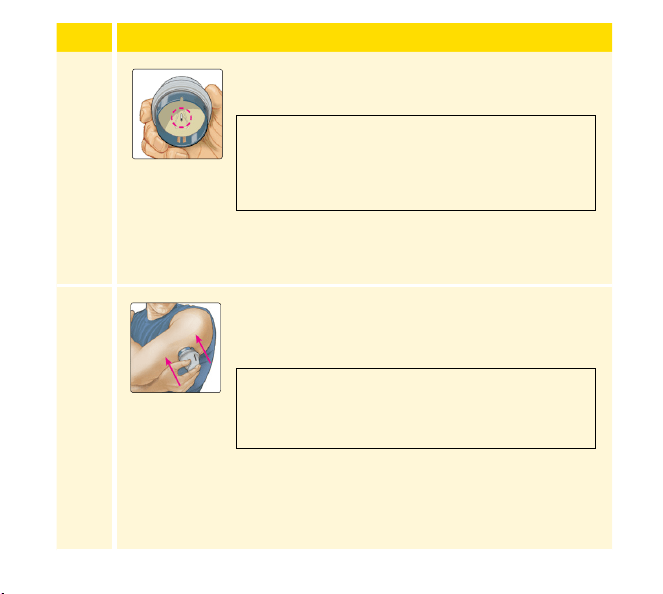
6
The Sensor Applicator is prepared and ready to
apply the Sensor.
7
Place the Sensor Applicator over the prepared
site and push down rmly to apply the Sensor to
your body.
CAUTION: The Sensor Applicator now
contains a needle. Do NOT touch inside the
Sensor Applicator or put it back into the
Sensor Pack.
CAUTION: Do NOT push down on the Sensor
Applicator until placed over prepared site to
prevent unintended results or injury.
20
Step
Action
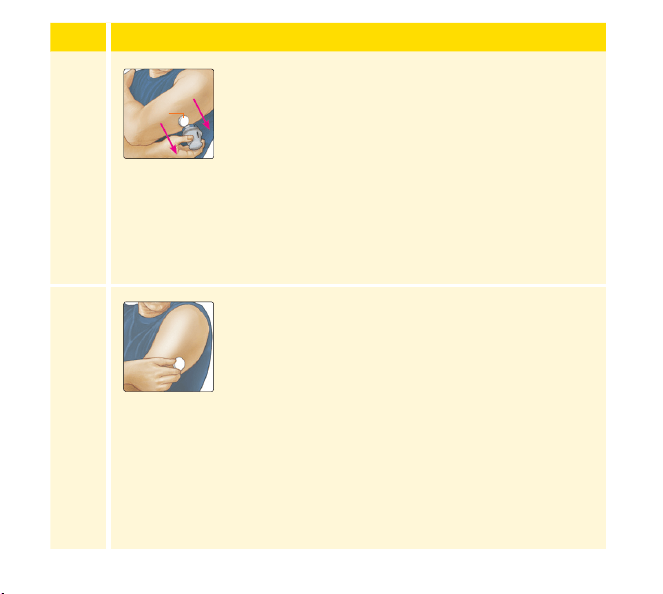
8
Gently pull the Sensor Applicator away from your
body. The Sensor should now be attached to your
skin.
Note: Applying the Sensor may cause bruising
or bleeding. If there is bleeding that does not
stop, remove the Sensor, and apply a new one at
a dierent site.
9
Make sure the Sensor is secure after application.
Put the cap back on the Sensor Applicator.
Discard the used Sensor Pack and Sensor
Applicator according to local regulations.
Sensor
21
Starting Your Sensor
Step
Action
1
Press the Home Button to turn on the Reader.
2
Touch Start New Sensor.
3
Hold the Reader within 4 cm (1.5 inches) of the
Sensor to scan it. This starts your Sensor. If sounds
are turned on, the Reader beeps when the Sensor
has been successfully activated. The Sensor can
be used to check your glucose after 60 minutes.
Note: If the Sensor is not successfully scanned
within 15 seconds, the Reader displays a prompt
to scan the Sensor again. Touch OK to return to
the Home Screen and touch Start New Sensor
to scan your Sensor.
No Active Sensor
22:23
Start New
Sensor
Review
History
minutes
OK
New Sensor
Starting Up
60
Sensor can be used in:
22
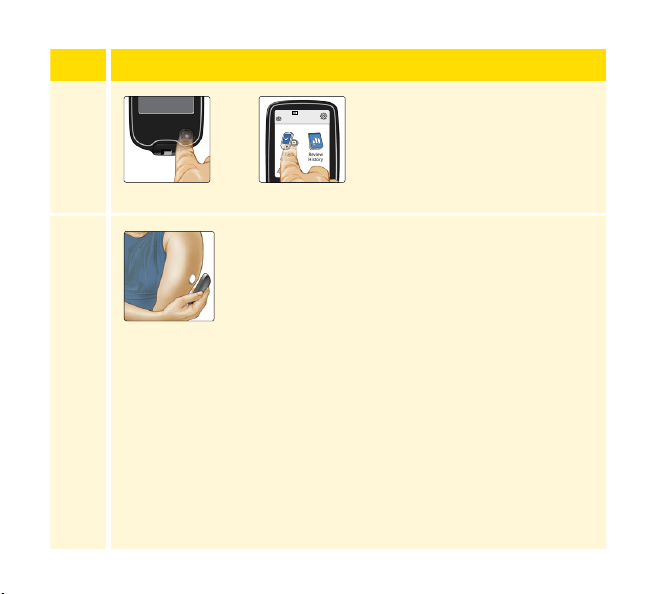
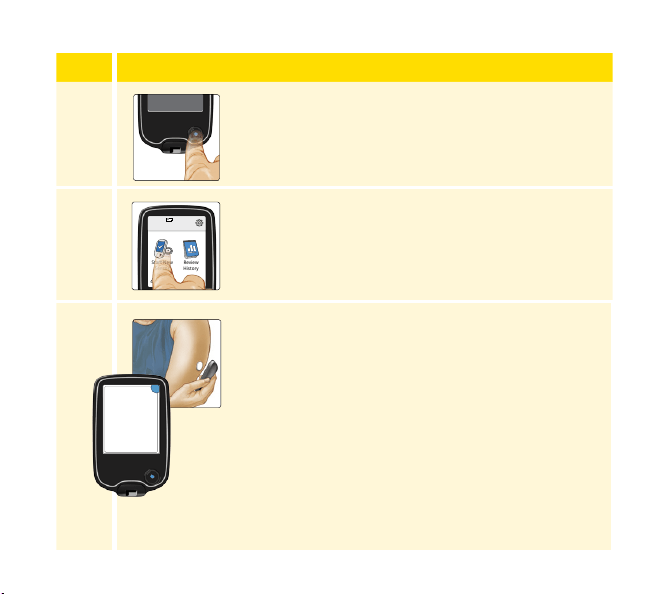
Checking Your Glucose
Step Action
1
Turn the Reader on by pressing
the Home Button, or touch
Check Glucose from the Home
Screen.
2
Hold the Reader within 4 cm (1.5 inches) of your
Sensor to scan it. Your Sensor wirelessly sends
glucose readings to the Reader. If sounds are
turned on, the Reader beeps when the Sensor
has been successfully scanned.
Note: If the Sensor is not successfully scanned within 15
seconds, the Reader displays a prompt to scan the Sensor
again. Touch OK to return to the Home Screen and touch
Check Glucose to scan your Sensor.
22:23
Check
Glucose
Review
History
Ends in 14 days
OR
23
Step Action
3
The Reader displays your current glucose reading
along with your glucose graph and an arrow
indicating the direction your glucose is going.
21
15
9
3
mmol
L
Glucose Going
Low
14:00 18:00 22:00
4.0
24
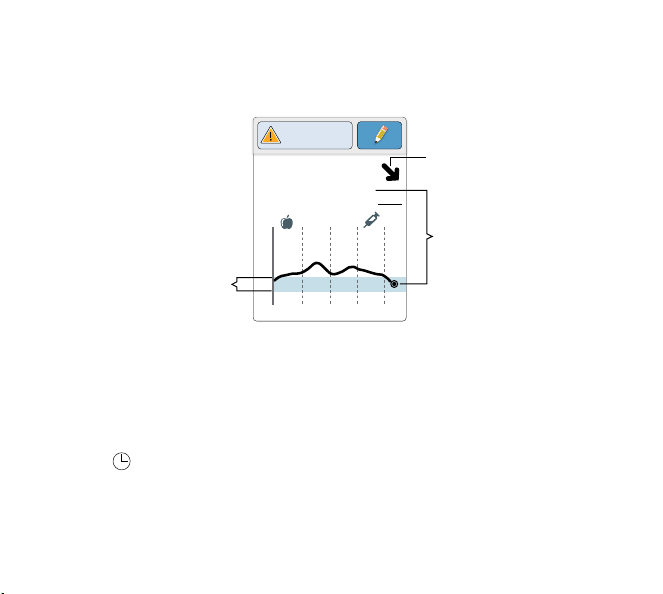
Sensor Glucose Readings
Notes:
• The graph displays glucose readings up to 21 mmol/L. Glucose
readings above 21 mmol/L are displayed at 21 mmol/L.
• The symbol may appear, indicating the Reader time was changed.
Gaps in the graph may result or glucose readings may be hidden.
21
15
9
3
14:00 18:00 22:00
Glucose Going
Low
4.0
mmol
L
Glucose Trend Arrow
Current Glucose
Target Glucose Range
25
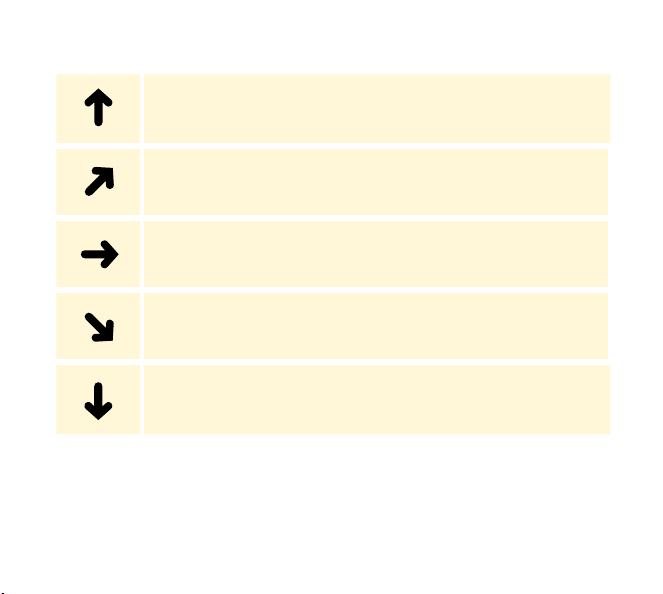
The Glucose Trend Arrow gives you an indication of the direction your
glucose is going.
Glucose is rising quickly
(more than 0.1 mmol/L per minute)
Glucose is rising
(between 0.06 mmol/L and 0.1 mmol/L per minute)
Glucose is changing slowly
(less than 0.06 mmol/L per minute)
Glucose is falling
(between 0.06 mmol/L and 0.1 mmol/L per minute)
Glucose is falling quickly
(more than 0.1 mmol/L per minute)
Note: The Glucose Trend Arrow may not always appear with your reading.
26
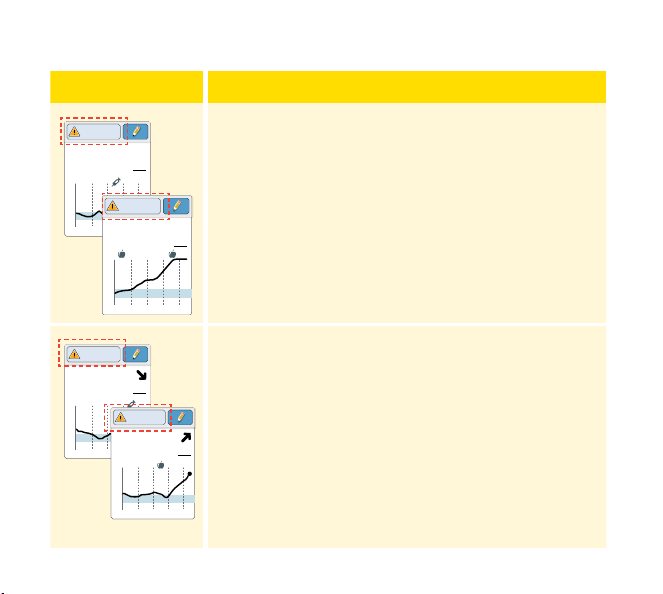
The following table shows messages you may see with your glucose
readings.
Display What To Do
21
15
9
3
14:00 18:00 22:00
mmol
L
Low Glucose
LO
21
15
9
3
14:00 18:00 22:00
mmol
L
High Glucose
HI
If LO appears on the Reader, your reading is lower
than 2.2 mmol/L. If HI appears on the Reader, your
reading is higher than 27.8 mmol/L. You can touch
the message button for more information. Check
your blood glucose on your nger with a test strip.
If you get a second LO or HI result, contact your
health care professional immediately.
21
15
9
3
14:00 18:00 22:00
3.5
mmol
L
Low Glucose
21
15
9
3
14:00 18:00 22:00
16.1
mmol
L
High Glucose
If your glucose is higher than 13.3 mmol/L or
lower than 3.9 mmol/L, you will see a message
on the screen. You can touch the message button
for more information and set a reminder to check
your glucose.
27
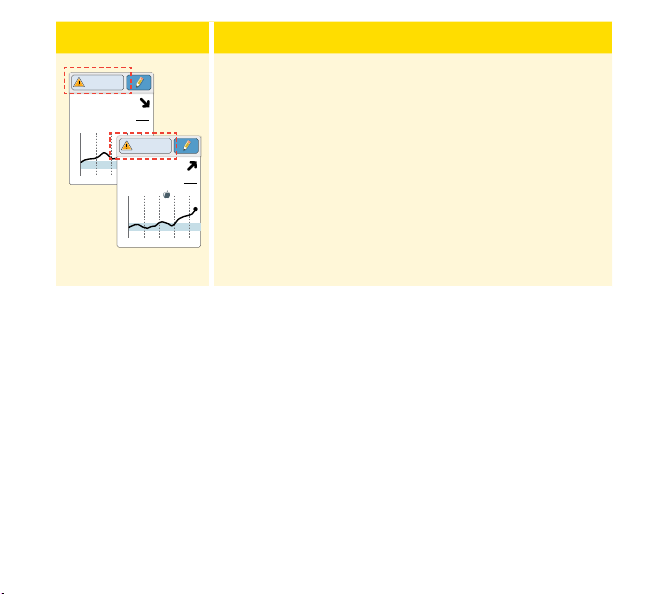
Display What To Do
21
15
9
3
14:00 18:00 22:00
4.0
mmol
L
Glucose Going
Low
21
15
9
3
14:00 18:00 22:00
13.2
mmol
L
Glucose Going
High
If your glucose is projected to be higher than
13.3 mmol/L or lower than 3.9 mmol/L within 15
minutes, you will see a message on the screen.
You can touch the message button for more
information and set a reminder to check your
glucose.
Note: If you are not sure about a message or reading, contact your
health care professional before you do anything.
28
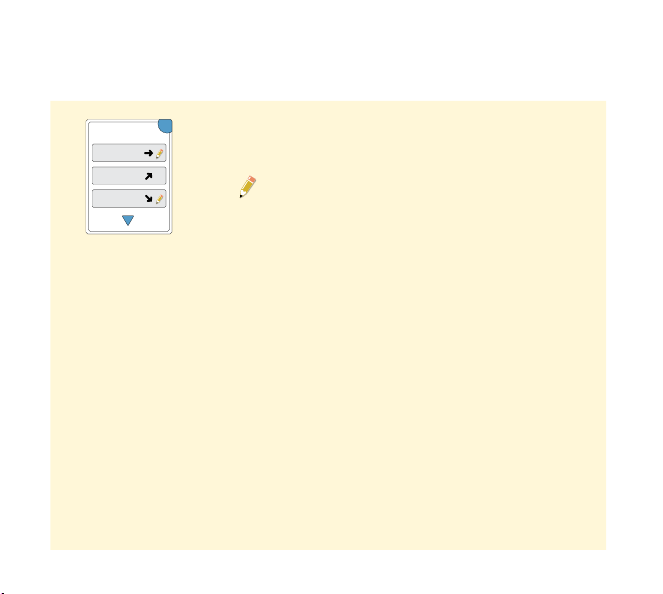
Adding Notes
Notes can be saved with your glucose readings. You can add a note at
the time of your glucose reading or within 15 minutes after your reading
was obtained. You can track food, insulin, exercise and any medication
you take.
Step Action
1
From the Glucose Reading screen, add notes
by touching the
symbol in the upper right
corner of the touchscreen. If you do not want to
add notes, you can press the Home Button to go
to the Home Screen or hold the Home Button to
turn the Reader o.
2
Select the tickbox next to the notes you would
like to add. Touch the down arrow to view other
Note options.
21
15
9
3
14:00 18:00 22:00
Glucose Going
Low
4.0
mmol
L
OK
Add Notes
1 / 4
Rapid-Acting
Insulin
Long-Acting
Insulin
Food
29

Step Action
3
After you tick the box for food and
insulin notes, the
+
symbol appears
to the right of the Note. You can touch
it to add more specic information to
your note. Then touch OK.
• Insulin notes: Enter the number of
units taken.
• Food notes: Enter grams or
carbohydrate portion information.
Note: Food
and rapid-acting insulin notes are shown
on your glucose graphs and in your Logbook as symbols.
4
Touch OK to save your Notes.
You can review your Notes from the Logbook. See Reviewing Your History
section for more information.
+
+
+
OK
Add Notes
1 / 4
Rapid-Acting
Insulin
Long-Acting
Insulin
Food
units
Enter Rapid-Acting
Insulin
OK
+
+
+
OK
Add Notes
1 / 4
Rapid-Acting
Insulin
Long-Acting
Insulin
Food
30
Reviewing Your History
Reviewing and understanding your glucose history can be an important
tool for improving your glucose control. The Reader stores about 90 days
of information and has several ways to review your past glucose readings,
notes and other information.
Step Action
1
Press the Home Button to turn on
the Reader. Press the Home Button
again to go to the Home Screen.
2
Touch the Review History icon.
Check Glucose
Scan Sensor to check
glucose.
22:23
Check
Glucose
Review
History
Ends in 14 days
31
Step Action
3
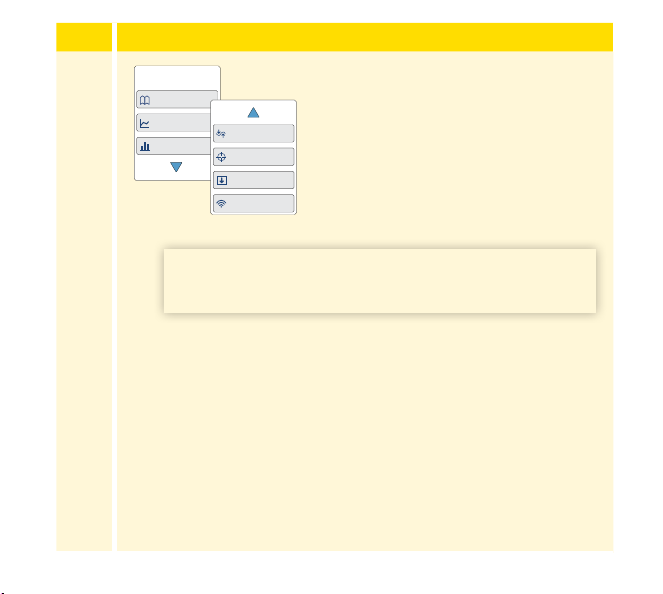
Use the arrows to view the available options.
Logbook
Daily Graph
Average Glucose
Review History
1 / 2
Daily Patterns
Time In Target
Low Glucose Events
Sensor Usage
IMPORTANT: Work with your health care professional
to understand your glucose history.
32
The Logbook and Daily Graph show detailed information, while other
history options show summaries of information over a number of days.
Logbook
Entries for each time you scanned your Sensor
or performed a blood glucose or ketone test.
If you entered Notes with a glucose reading,
the
symbol appears in that row. For more
information about the symbols, see Reader Symbols
section.
Touch the entry to review the detailed information,
including any Notes you entered. You can add or
edit (change) Notes for the most recent Logbook
entry, provided your glucose reading was within
the last 15 minutes and you have not used
FreeStyle Libre software to create reports.
OK
Logbook
23 Feb
10:23
23 Feb
06:37
22 Feb
23:09
7.9
5.4
6.0
mmol/L
33
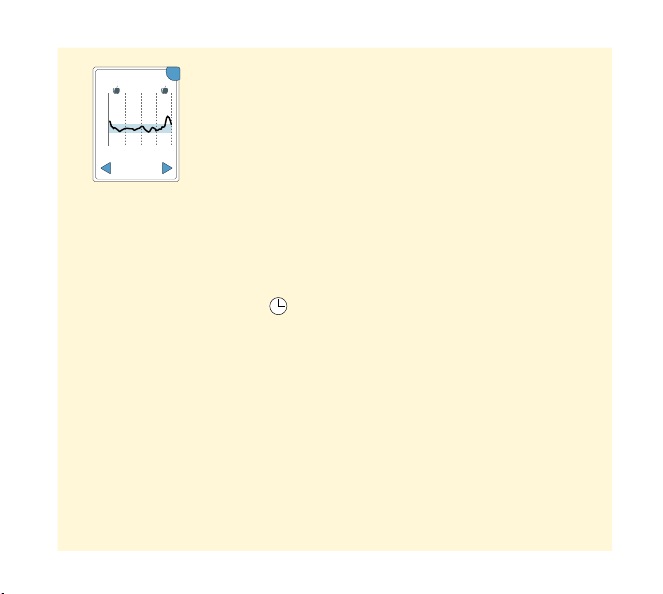
Daily Graph
A graph of your Sensor glucose readings by day.
The graph shows your Target Glucose Range and
symbols for food or rapid-acting insulin notes you
have entered.
Notes:
• The graph displays glucose readings up to
21 mmol/L. Glucose readings above 21 mmol/L
are displayed at 21 mmol/L.
• You might see gaps in the graph during
times when you have not scanned at least
once in 8 hours.
• The symbol may appear indicating the
Reader time was changed. Gaps in the graph
may result or glucose readings may be hidden.
21
15
9
3
00:00 12:00 24:00
OK
Daily Graph
(mmol/L)
22 Feb
Wednesday
34
Other History Options
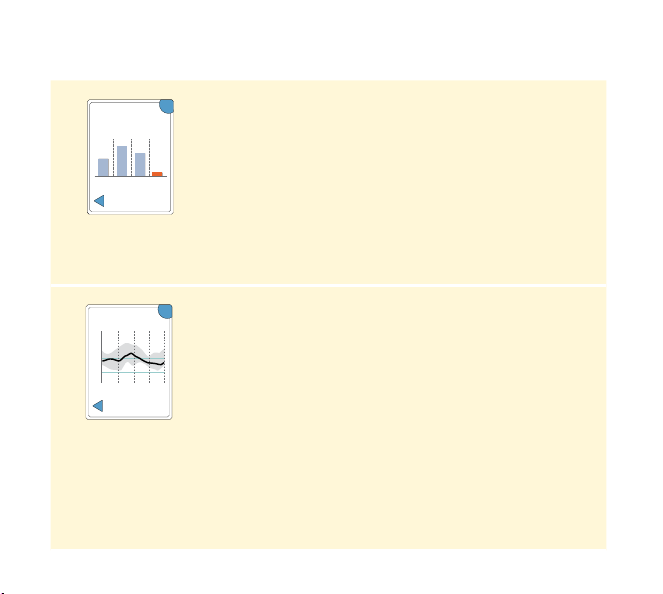
Use the arrows to view information about your last 7, 14, 30 or 90 days.
Average Glucose
Information about the average of your Sensor
glucose readings. The overall average for the time
is displayed above the graph. The average is also
shown for four dierent 6-hour periods of the day.
Readings above or below your Target Glucose
Range are orange, while readings in range are blue.
Daily Patterns
A graph showing the pattern and variability of your
Sensor glucose over a typical day. The thick black
line shows the median (midpoint) of your glucose
readings. The gray shading represents a range
(10-90 percentiles) of your Sensor readings.
Note: Daily Patterns needs at least 5 days of
glucose data.
OK
Last 7 Days
6.
7
8.4
7.4
Average: 6.6 mmol/L
3.8
Average Glucose
00:00 12:00 24:00
21
15
9
3
00:00 12:00 24:00
OK
Daily Patterns
(mmol/L)
Last 7 Days
35
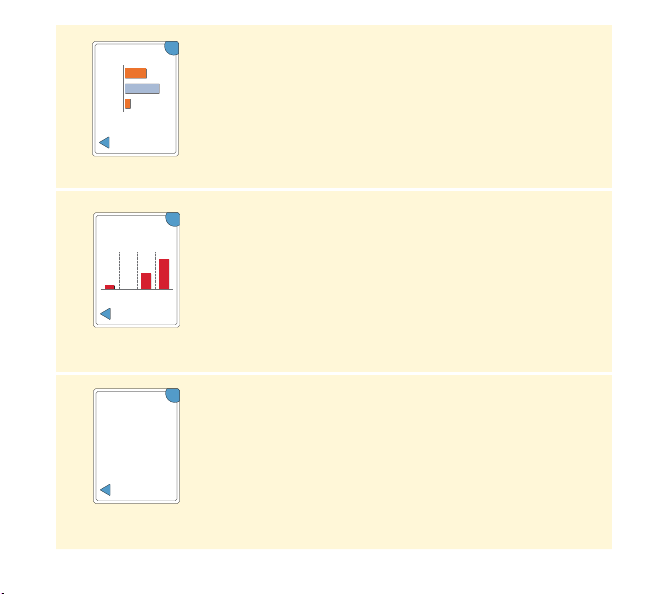
Time In Target
A graph showing the percentage of time your
Sensor glucose readings were above, below or
within your Target Glucose Range.
Low Glucose Events
Information about the number of low glucose
events measured by your Sensor. A low glucose
event is recorded when your Sensor glucose
reading is lower than 3.9 mmol/L for longer
than 15 minutes. The total number of events
is displayed above the graph. The bar graph
displays the low glucose events in four dierent
6-hour periods of the day.
Sensor Usage
Information about how often you scan your Sensor.
The Reader reports an average of how many
times you scanned your Sensor each day, and the
percentage of possible Sensor data the Reader
recorded from your scans.
OK
34%
54%
12%
Time In Target
Above
In Target
Below
Target Range
4.4-10.0 mmol/L
Last 7 Days
OK
Last 7 Days
1
0
Total Events:
10
3
6
Low Glucose
Events
24:0012:0000:00
OK
100%
5
Scans Per
Day
Sensor data
captured
Sensor Usage
Last 7 Days
36
Removing Your Sensor
Step Action
1
Pull up the edge of the adhesive that keeps your
Sensor attached to your skin. Slowly peel away
from your skin in one motion.
Note: Any remaining adhesive residue on the
skin can be removed with warm soapy water or
isopropyl alcohol.
2
Discard the used Sensor according to local regulations. See
Maintenance and Disposal section.
When you are ready to apply a new Sensor, follow the
instructions in the Applying Your Sensor and Starting Your Sensor
sections. If you removed your last Sensor before 14 days of use,
you will be prompted to conrm that you would like to start a
new Sensor when you rst scan it.
37
Replacing Your Sensor
Your Sensor automatically stops working after 14 days of wear and
must be replaced. You should also replace your Sensor if you notice any
irritation or discomfort at the application site or if the Reader reports a
problem with the Sensor currently in use. Taking action early can keep
small problems from turning into larger ones.
CAUTION: If the glucose readings from the FreeStyle Libre Flash
Glucose Monitoring System do NOT seem to match with how
you feel, check to make sure that your Sensor has not come
loose. If the Sensor tip has come out of your skin, or your Sensor
is coming loose, remove the Sensor and apply a new one.
38
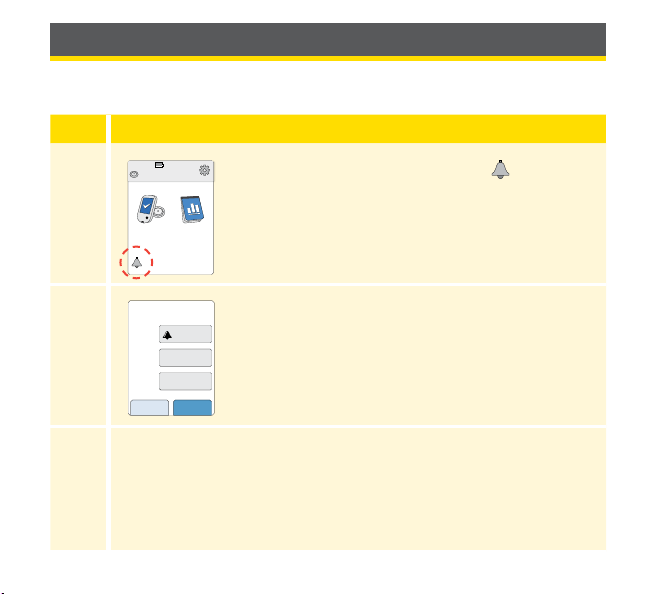
Using Reminders
You can use Reminders to help you remember to check your glucose, take
insulin, or as a general alarm.
Step
Action
1
From the Home Screen, touch the symbol.
2
Touch to select which Type of reminder you want
to set: Check Glucose, Take Insulin, or Alarm.
3
Touch to select how often you want the reminder to Repeat:
Once, Daily or Timer.
Note: You can set the reminders for a specic time (e.g. 08:30)
or as a timer (e.g. 3 hours from the current time).
Ends in 14 days
22:23
Check
Glucose
Review
History
cancel save
Set Reminder
Alarm
Daily
XX:XX
Type
Repeat
Time
39
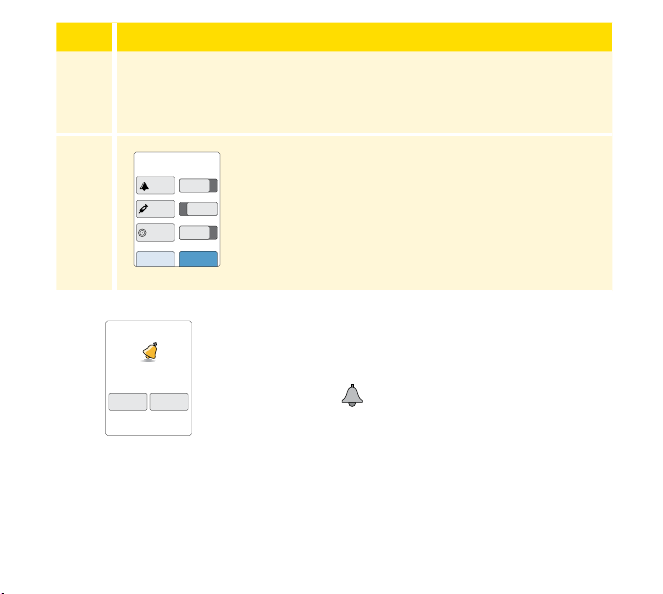
Step
Action
4
Set the reminder Time using the arrows on the touchscreen.
Touch save.
5
From the Reminders screen, you can turn the
reminder On/O or add new reminders.
Touch done to return to the Home Screen.
When reminders are On, the next reminder time
appears next to the reminder symbol on the
Home Screen.
For example,
08:30
Your reminder comes on even if the Reader is
turned o. Touch OK to dismiss your reminder or
snooze to be reminded again in 15 minutes.
Note: Reminders will not appear if the Reader is
connected to a computer.
add new done
Reminders
08:30
12:30
00:00:00
On
On
Off
08:30
Alarm
Reminder
snooze
15 min
OK
40
Using the Built-in Meter
The Reader has a built-in meter that can be used to test your blood
glucose and blood ketone, or to test the meter and strips with control
solution.
WARNING: Do NOT use the built-in meter while the Reader is
connected to an electrical outlet or a computer.
41
IMPORTANT:
• Use the Reader within the test strip operating temperature
range as blood glucose and ketone results obtained outside
the range may be less accurate.
• Use only FreeStyle Optium test strips.
• Use a test strip immediately after removing from its foil
packet.
• Only use a test strip once.
• Do not use expired test strips as they may cause inaccurate
results.
• Do not use a wet, bent, scratched or damaged test strip.
• Do not use the test strip if the foil packet has a hole or is torn.
• Results from the built-in meter are shown only in your
Logbook and not in other history options.
• Refer to your lancing device instructions for use for how to
use your lancing device.
42
Blood Glucose Testing
You can use the built-in meter to check your blood glucose, whether you
are wearing a Sensor or not. You can perform a blood glucose test on
your ngertip or approved alternate site. Be sure to read the test strip
instructions for use prior to using the built-in meter.
Step Action
1
Wash your hands and the test site with warm,
soapy water for accurate results. Thoroughly dry
your hands and the test site. To warm the site,
apply a warm, dry pad or rub vigorously for a few
seconds.
Note: Avoid areas near bones and areas with
lots of hair. If a bruise forms, consider selecting
another site.
CAUTION: If you think you have low
glucose (hypoglycaemia) or you suer from
hypoglycaemia unawareness, test on your
ngers.
43
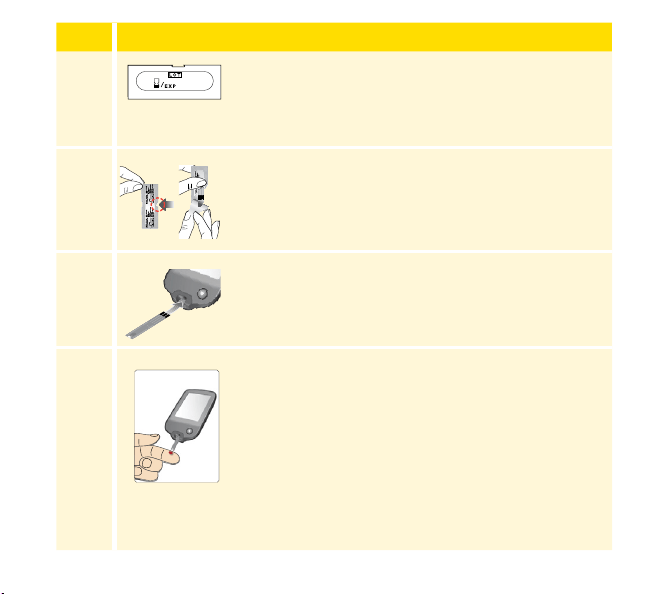
Step Action
2
Check the test strip expiry date.
3
Open the foil test strip packet at the notch and
tear down to remove the test strip. Use the test
strip immediately after removing from the foil
packet.
4
Insert the test strip with the three black lines at
the end facing up. Push the strip in until it stops.
5
Use your lancing device to obtain a blood drop
and apply blood to the white area at the end of
the test strip.
If sounds are turned on, the Reader beeps once
to let you know you have applied enough blood.
Note: See test strip instructions for use for
re-application instructions.
E.g. Expiry date:
2016 March 31
D5
2016/03
13758
Abbott Diabetes Care Ltd.
Range Road
Witney, Oxon, OX29 0YL
Made in UK.
Blood Glucose
Sensor Electrode
Abbott Diabetes Care Ltd.
Range Road
Witney, Oxon, OX29 0YL
Made in UK.
4˚C
Apply Blood
44
Step Action
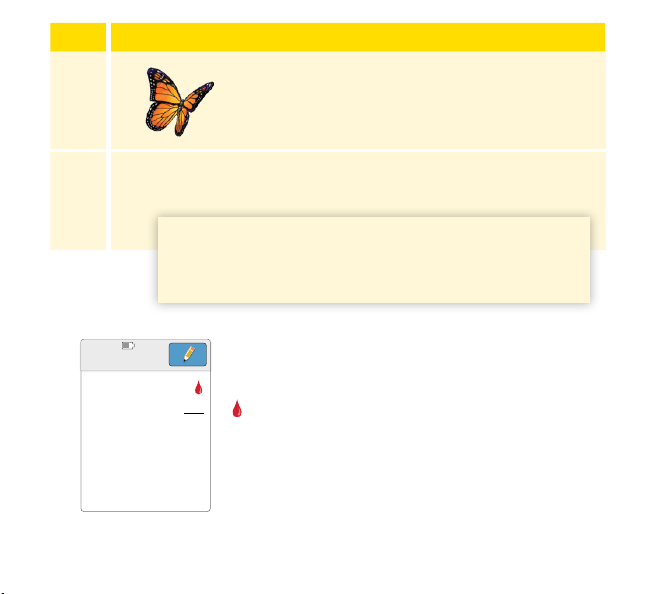
You will see a buttery on the screen while you
wait for your result. If sounds are turned on, the
Reader beeps once when your result is ready.
6
After reviewing your result, remove and discard the used test
strip according to local regulations.
Your Blood Glucose Results
Blood glucose results are marked on the
results screen and in the Logbook with the
symbol.
Note: Contact your health care professional
if you have symptoms that do not match your
test results.
IMPORTANT: After performing a blood glucose test,
wash your hands and the test site with soap and water
and thoroughly dry them.
7.9
mmol
L
22:23
45
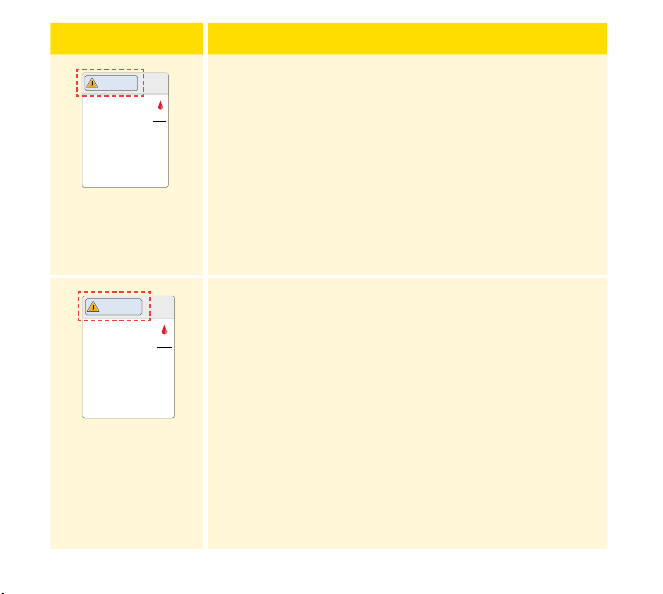
Display What To Do
mmol
L
Low Glucose
LO
mmol
L
High Glucose
HI
If LO appears on the Reader, your result is lower
than 1.1 mmol/L. If HI appears on the Reader, your
result is higher than 27.8 mmol/L. You can touch
the message button for more information. Check
your blood glucose again with a test strip. If you
get a second LO or HI result, contact your health
care professional immediately.
3.5
mmol
L
Low Glucose
16.1
mmol
L
High Glucose
If your glucose is higher than 13.3 mmol/L or
lower than 3.9 mmol/L, you will see a message
on the screen. You can touch the message button
for more information and set a reminder to check
your glucose.
46
After you get your blood glucose result, you can add Notes by touching
the
symbol. If you do not want to add a Note, press the Home Button
to go to the Home Screen or hold the Home Button to turn the Reader o.
Blood Ketone Testing
You can use the built-in meter to check your blood ketone
(β-hydroxybutyrate). It is important to consider doing this when:
• You are sick
• Your glucose is higher than 13.3 mmol/L
• You and your health care professional decide you should
Note: Be sure to read the test strip instructions for use prior to
performing a ketone test.
Step
Action
1
Wash your hands with warm, soapy water for
accurate results. Thoroughly dry your hands.
To warm the site, apply a warm, dry pad or rub
vigorously for a few seconds.
Note: Use only ngertip samples for blood
ketone testing.
47
Step
Action
2
Check the test strip expiry date.
3
Open the foil test strip packet at the notch and
tear down to remove the test strip. Use the test
strip immediately after removing from the foil
packet.
4
Note: Use only blood ketone test strips. Do not
put urine on the test strip.
Insert the test strip with the three black lines
facing up. Push the strip in until it stops.
E.g. Expiry date:
2016 March 31
D5
2016/03
13758
Abbott Diabetes Care Ltd.
Range Road
Witney, Oxon, OX29 0YL
Made in UK.
Blood Glucose
Sensor Electrode
Abbott Diabetes Care Ltd.
Range Road
Witney, Oxon, OX29 0YL
Made in UK.
4˚C
48
Step
Action
5
Use your lancing device to obtain a blood drop
and apply blood to the white area at the end of
the test strip.
If sounds are turned on, the Reader beeps once
to let you know you have applied enough blood.
Note: See test strip instructions for use for
re-application instructions.
You will see a buttery on the screen while you
wait for your result. If sounds are turned on, the
Reader beeps once when your result is ready.
6
After reviewing your result, remove and discard the used test
strip according to local regulations.
Ketone Test
Apply Blood
IMPORTANT: After performing a blood ketone test,
wash your hands with soap and water and thoroughly
dry them.
49
Your Blood Ketone Results
Blood ketone results are marked on the results
screen and in the Logbook with the word Ketone.
Notes:
• Blood ketone is expected to be lower than 0.6 mmol/L.
• Blood ketone may be higher when you are sick, fasting, have
exercised hard, or if glucose levels are not controlled.
• If your blood ketone result remains high or becomes higher than
1.5 mmol/L, contact your health care professional immediately.
22:23
0.4
mmol
L
Ketone Test
50
Display What To Do
If your blood ketone is high, you will see a
message on the screen. You can touch the
message button for more information.
High Ketone
HI
mmol
L
Ketone Test
If HI appears on the Reader, your ketone result is
higher than 8 mmol/L. You can touch the message
button for more information. Repeat the ketone
test with a new test strip. If you get a second
HI result, contact your health care professional
immediately.
1.7
mmol
L
Ketone Test
High Ketone
51
Control Solution Testing
You should do a control solution test when you are not sure of your test
strip results and want to check that your Reader and test strips are working
properly. You can do a control solution test with a blood glucose or ketone
test strip.
IMPORTANT:
• Control solution results should fall within the control
solution range printed on the test strip instructions for use.
• Do NOT use control solution past the expiry date. Discard
control solution 3 months after opening.
• The control solution range is a target range for control
solution only, not for your blood glucose or ketone results.
• The control solution test does not reect your blood glucose
or ketone levels.
• Use only MediSense glucose and ketone control solution.
• Check that the LOT number printed on the test strip foil
packet and instructions for use match.
• Replace the cap securely on the bottle immediately after use.
• Do NOT add water or other liquid to the control solution.
• Contact Customer Service for information on how to obtain
control solution.
52
Step
Action
1
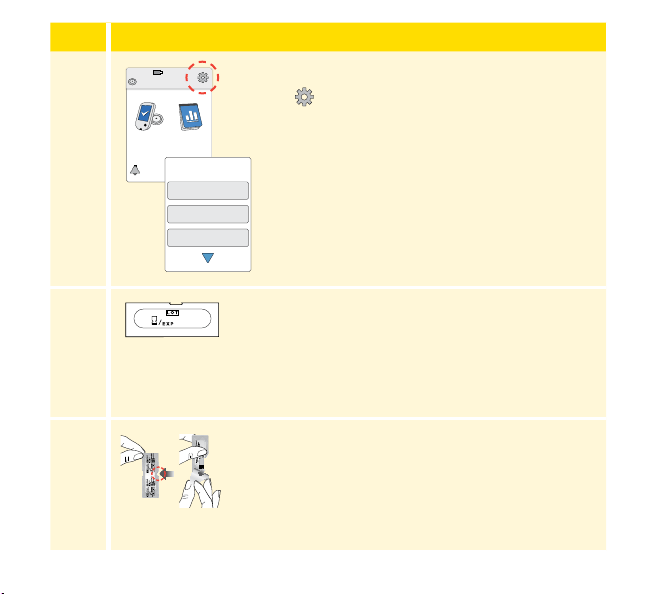
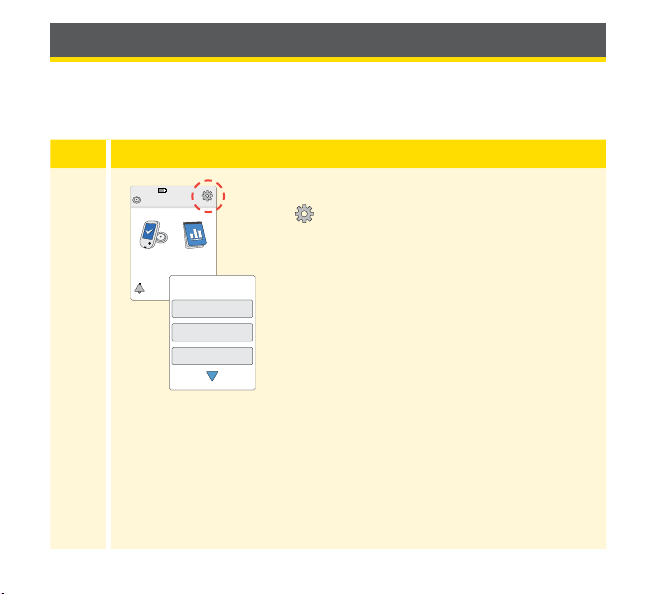
From the Home Screen, touch the Settings
symbol
. Touch Control Solution Test to do
a control solution test.
2
Check the test strip expiry date.
3
Open the foil test strip packet at the notch and
tear down to remove the test strip.
Ends in 14 days
22:23
Check
Glucose
Review
History
Sounds
Target Range
Control Solution Test
Settings
1 / 3
E.g. Expiry date:
2016 March 31
D5
2016/03
13758
Abbott Diabetes Care Ltd.
Range Road
Witney, Oxon, OX29 0YL
Made in UK.
Blood Glucose
Sensor Electrode
Abbott Diabetes Care Ltd.
Range Road
Witney, Oxon, OX29 0YL
Made in UK.
4˚C
53
Step
Action
4
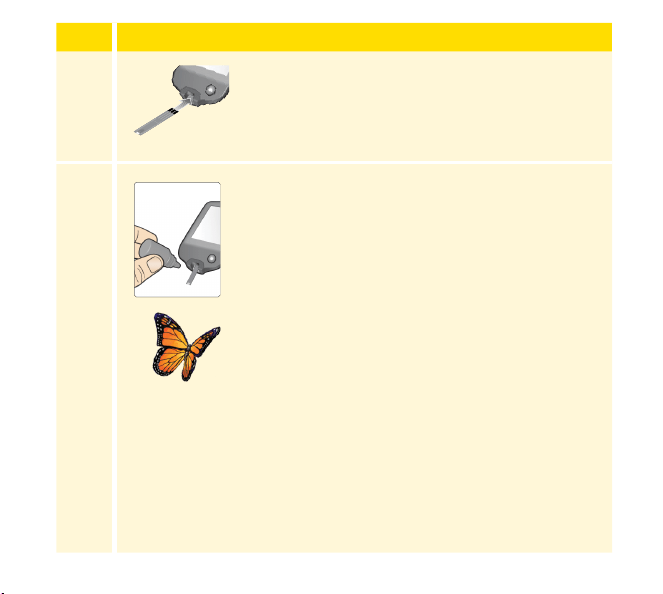
Insert the test strip with the three black lines
facing up. Push the strip until it stops.
5
Shake the control solution bottle to mix the
solution. Apply a drop of control solution to the
white area at the end of the test strip.
If sounds are turned on, the Reader beeps once
to let you know that you have applied enough
control solution.
You will see a buttery on the screen while you
wait for the result. If sounds are turned on, the
Reader beeps once when the result is ready.
Apply Control Solution
54
Blood Glucose Control
Solution Test
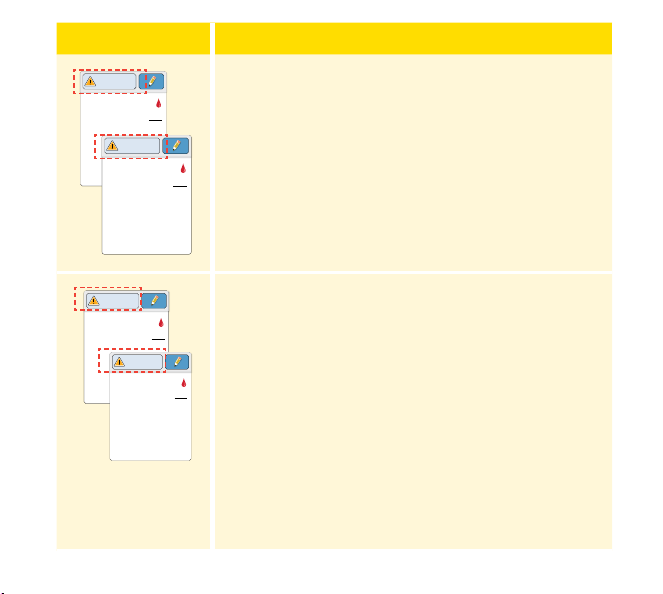
Control Solution Results
Compare the control solution result to the
range printed on the test strip instructions
for use. The result on your screen should be
in this range.
Control solution results are marked on
the results screen and in the Logbook
with a
symbol.
Note: Repeat the control solution test if the
results are outside of the range printed on
the test strip instructions for use. Stop using
the built-in meter if the control solution
results are repeatedly outside of the printed
range. Contact Customer Service.
Ketone Control Solution Test
5.6
mmol
L
22:23
Control Solution Test
0.4
mmol
L
22:23
Ketone Control
Solution Test
55

Charging the Reader
A fully charged Reader battery should last up to 7 days. Your battery
life may vary depending on your usage. A Low Battery message
accompanies your result when you have enough charge remaining for
about one day of use.
Plug the included USB cable into an electrical
outlet using the included power adapter. Then,
plug the other end of the USB cable into the USB
port on the Reader.
Notes:
• You must charge the Reader when the battery
is low
to keep using the Reader.
• To fully charge the battery, charge the Reader
for at least 3 hours.
• Only use the USB cable and power adapter
included with the system.
• Fully charge your Reader before storing it for
more than 3 months.
OK
Please charge the Reader to
continue using it.
Low Battery
Charging
CAUTION: Be sure to select a location for
charging that allows the power adapter to be
easily unplugged.
56
Changing the Reader Settings
You can go to the Settings menu to change many settings on the Reader,
like Time & Date or Sounds. The Settings menu is also where you go to do
a Control Solution Test or to check the System Status.
Step
Action
1
To get to the Settings menu, touch the Settings
symbol
on the Home Screen.
Ends in 14 days
22:23
Check
Glucose
Review
History
Sounds
Target Range
Control Solution Test
Settings
1 / 3
57

Step
Action
2
Touch the setting you want to change:
Sounds – Set tones and vibrations
Target Range – Set range displayed on Reader
glucose graphs
Control Solution Test – Perform a Control Solution test
Time & Date – Change the Time or Date
Language – Change the language on the Reader (option only
available on Readers with multiple languages)
System Status – Check Reader information and performance
• View System Information: The Reader will display information
about your System including:
- Current Sensor end date and time
- Reader serial number and version number
- Serial numbers of most recent Sensors (up to three)
- Sensor version for most recent Sensor
- Number of Sensors that have been used with Reader
- Number of tests that have been performed using test strips
58

Step
Action
2
(cont.)
• View Event Logs: A list of events recorded by the
Reader, which may be used by Customer Service to help
troubleshoot your System
• Perform a Reader Test: The Reader Test will perform internal
diagnostics and allow you to check that the Display is
showing all pixels, Sounds (including both tones and
vibrations) are working, and the Touchscreen is responding
when touched
Reader Basics – Review the information screens shown
during the Reader setup
Dose Increment – You can set the insulin dose increment to
either 1.0 or 0.5 units for use with insulin notes
Touch OK when you are done.
59
Living With Your FreeStyle Libre System
Your FreeStyle Libre Flash Glucose Monitoring System can be used during
a wide variety of activities.
Activity What You Need To Know
Bathing,
Showering and
Swimming
The Reader is not water-resistant and should
NEVER be submerged in water or other liquid.
Your Sensor is water-resistant and can be worn
while bathing, showering or swimming.
Note: Do NOT take your Sensor deeper than
1 metre (3 feet) or immerse it longer than 30
minutes in water.
Sleeping Your Sensor should not interfere with your sleep.
It is recommended that you scan your Sensor
before going to sleep and when you wake up
because your Sensor holds 8 hours of data at a
time.
If you have reminders set to go o while you are
sleeping, place the Reader nearby.
60
Activity What You Need To Know
Travelling by Air Check with the airline prior to departure as rules
and regulations may change without notice.
Follow these guidelines when travelling:
• Notify security personnel of the presence of the
device when going through security systems.
• Do not scan your Sensor or power on the Reader
using the Home Button while ying, if restricted
by ight regulations. You may insert a strip to
perform a blood glucose or ketone test.
Note: If you are changing time zones, you can
change the time and date settings on the Reader
by touching the Settings symbol
from the
Home Screen, then Time & Date. Changing
the time and date aects the graphs, statistics
and settings programmed by time of day. The
symbol may appear on your glucose graph
indicating the Reader time was changed. Gaps in
the graph may result or glucose readings may be
hidden.
61
Maintenance and Disposal
Cleaning
You may clean the Reader using a cloth dampened with a mixture of
1 part household bleach to 9 parts water. Gently wipe the exterior of
the Reader and allow to air dry.
Maintenance
The FreeStyle Libre Flash Glucose Monitoring System has no serviceable
parts.
Disposal
This product should be disposed of in accordance with all applicable local
regulations related to the disposal of electronic equipment, batteries,
sharps and materials potentially exposed to body uids.
Contact Customer Service for further information on the appropriate
disposal of system components.
CAUTION: Do NOT place the Reader in water or other liquids.
Avoid getting dust, dirt, blood, control solution, water or any
other substance in the test strip or USB ports.
62
Troubleshooting
This section lists problems or observations that you may have, the possible
cause(s), and recommended actions. If the Reader experiences an error, a
message will appear on the screen with directions to resolve the error.
Reader Does Not Power On
Problem What It May Mean What To Do
Reader does not
power on after
you press the
Home Button or
insert a test strip.
Reader battery is
too low.
Charge the Reader.
Reader is outside
of its operating
temperature range.
Move the Reader to a
temperature between
10 °C and 45 °C and then
try to power it on.
If the Reader still does not power on after trying these steps, contact
Customer Service.
63

Problems at the Sensor Application Site
Problem What It May Mean What To Do
The Sensor is
not sticking
to your skin.
The site is not free
of dirt, oil, hair or
sweat.
1. Remove the Sensor.
2. Consider shaving and/or
cleaning the site with soap
and water.
3. Follow the instructions in
Applying and Starting Your
Sensor sections.
Skin irritation
at the Sensor
application
site.
Seams or other
constrictive clothing
or accessories
causing friction at
the site.
Ensure that nothing rubs on the
site.
You may be sensitive
to the adhesive
material.
If the irritation is where the
adhesive touches skin, contact
your health care professional to
identify the best solution.
64

Problems Starting Your Sensor or Receiving Sensor
Readings
Display What It May Mean What To Do
New Sensor
Starting Up
Sensor is not ready
to read glucose.
Wait until the 60-minute Sensor
start-up period has completed.
Scan
Timeout
The Reader is not
held close enough
to the Sensor.
Hold the Reader within
4 cm (1.5 inches) of the Sensor.
Bring the screen of the Reader
close to the Sensor.
Sensor
Ended
The Sensor life has
ended.
Apply and start a new Sensor.
65

Display What It May Mean What To Do
New Sensor
Found
You scanned a new
Sensor before your
previous Sensor
ended.
Your Reader can only be used
with one Sensor at a time. If
you start a new Sensor, you will
no longer be able to scan your
old Sensor. If you would like to
begin using the new Sensor,
select “Yes”.
Scan Error The Reader
was unable to
communicate with
the Sensor.
Try scanning again.
Note: You may need to move
away from potential sources of
electromagnetic interference.
Sensor Error The System is
unable to provide a
glucose reading.
Scan again in 10 minutes.
66
Display What It May Mean What To Do
Glucose
Reading
Unavailable
Your Sensor is too
hot or too cold.
Move to a location where the
temperature is appropriate and
scan again in a few minutes.
Sensor
Already in
Use
The Sensor was
started by another
Reader.
A Sensor can only be scanned
by the Reader that started it.
Scan the Sensor again with the
Reader that started it. Or, apply
and start a new Sensor.
Check Sensor The Sensor tip may
not be under your
skin.
Try to start your Sensor again. If
Reader displays “Check Sensor”
again, your Sensor was not
applied properly. Apply and
start a new Sensor.
Replace
Sensor
The System has
detected a problem
with your Sensor.
Apply and start a new Sensor.
67

Blood Glucose or Ketone Error Messages
Error
Message
What It May Mean What To Do
E-1
The temperature is
too hot or too cold
for the Reader to
work correctly.
1. Move the Reader and test
strips to a location where the
temperature is within the test
strip operating range. (See
test strip instructions for use
for the appropriate range).
2. Wait for the Reader and test
strips to adjust to the new
temperature.
3. Repeat the test using a new
test strip.
4. If the error reappears, contact
Customer Service.
E-2
Reader error. 1. Turn o the Reader.
2. Repeat the test using a new
test strip.
3. If the error reappears, contact
Customer Service.
68

Error
Message
What It May Mean What To Do
E-3
Blood drop is too
small.
or
Incorrect test
procedure.
or
There may be a
problem with the test
strip.
1. Review the testing
instructions.
2. Repeat the test using a new
test strip.
3. If the error reappears, contact
Customer Service.
E-4
The blood glucose
level may be too high
to be read by the
system.
or
There may be a
problem with the test
strip.
1. Repeat the test using a new
test strip.
2. If the error reappears, contact
your health care professional
immediately.
69

Error
Message
What It May Mean What To Do
E-5
Blood was applied
to the test strip too
soon.
1. Review the testing
instructions.
2. Repeat the test using a new
test strip.
3. If the error reappears, contact
Customer Service.
E-6
The test strip may not
be compatible with
the Reader.
1. Check that you are using
the correct test strip for
the Reader. (See test strip
instructions for use to verify
your strip is compatible with
the Reader).
2. Repeat the test using a test
strip for use with your Reader.
3. If the error reappears, contact
Customer Service.
70

Error
Message
What It May Mean What To Do
E-7
Test strip may be
damaged, used, or
the Reader does not
recognise it.
1. Check that you are using
the correct test strip for
the Reader. (See test strip
instructions for use to verify
your strip is compatible with
the Reader).
2. Repeat the test using a test
strip for use with your Reader.
3. If the error reappears, contact
Customer Service.
E-9
Reader error. 1. Turn o the Reader.
2. Repeat the test using a new
test strip.
3. If the error reappears, contact
Customer Service.
71
Problems Checking Your Blood Glucose or Ketone
Problem What It May Mean What To Do
The Reader
does not
start a
test after
inserting a
test strip.
Test strip is not
inserted correctly
or not inserted fully
into the strip port.
1. With the 3 black lines facing
up, insert the test strip into
the strip port until it stops.
2. If the Reader still does not
start a test, contact Customer
Service.
Reader battery is too
low.
Charge the Reader.
The test strip is
damaged, used or
unrecognisable by
the Reader.
Insert a new FreeStyle Optium
test strip.
Reader is outside
of its operating
temperature range.
Move the Reader to a
temperature between 10 °C and
45 °C and then try to power it
on.
Reader is in a power
saving mode.
Press the Home Button then
insert a test strip.
72

Problem What It May Mean What To Do
The test
does not
start after
applying
the blood
sample.
Blood sample is too
small.
1. See test strip instructions
for use for re-application
instructions.
2. Repeat the test using a new
test strip.
3. If the test still does not start,
contact Customer Service.
Sample applied after
the Reader turned
off.
1. Review the testing
instructions.
2. Repeat the test using a new
test strip.
3. If the test still does not start,
contact Customer Service.
Problem with
Reader or test strip.
1. Repeat the test using a new
test strip.
2. If the test still does not start,
contact Customer Service.
73
Perform a Reader Test
If you think the Reader is not working properly, you
can check the Reader by performing a Reader Test.
Touch the Settings symbol
from the Home
Screen, select System Status and then select
Reader Test.
Note: The Reader Test will perform internal
diagnostics and will allow you to check that the
display, sounds and touchscreen are working
properly.
Customer Service
Customer Service is available to answer any questions you may have about
your FreeStyle Libre Flash Glucose Monitoring System. Please go to the
back cover of this manual for your Customer Service phone number.
System Info
Reader Test
Event Log
System Status
OK
74
System Specifications
See test strip and control solution instructions for use for additional
specications.
Sensor Specifications
Sensor glucose assay
method
Amperometric electrochemical sensor
Sensor glucose reading
range
2.2 to 27.8 mmol/L
Sensor size 5 mm height and 35 mm diameter
Sensor weight 5 grams
Sensor power source One silver oxide battery
75
Sensor life Up to 14 days
Sensor memory
8 hours (glucose readings stored every
15 minutes)
Operating temperature 10 °C to 45 °C
Sensor Applicator and
Sensor Pack storage
temperature
4 °C to 25 °C
Operating and storage
relative humidity
10-90%, non-condensing
Sensor water resistance
IP27: Can withstand immersion into
one metre (3 ft) of water for up to 30
minutes
Operating and storage
altitude
-381 metres (-1,250 ft) to 3,048 metres
(10,000 ft)
76
Reader Specifications
Blood glucose assay
range
1.1 to 27.8 mmol/L
Blood ketone assay range 0.0 to 8.0 mmol/L
Reader size 95 mm x 60 mm x 16 mm
Reader weight 65 grams
Reader power source One lithium-ion rechargeable battery
Reader battery life 7 days of typical use
Reader memory 90 days of typical use
Reader operating
temperature
10 °C to 45 °C
Reader storage
temperature
-20 °C to 60 °C
77
Operating and storage
relative humidity
10-90%, non-condensing
Reader moisture
protection
Keep dry
Operating and storage
altitude
-381 metres (-1,250 ft) to 3,048 metres
(10,000 ft)
Reader display timeout
60 seconds (120 seconds when test
strip is inserted)
Radio Frequency
13.56 MHz RFID; ASK Modulation;
124 dBuV/m
Data port Micro USB
Minimum Computer
Requirements
System must only be used with
EN60950-1 rated computers
Mean service life 3 years of typical use
Power Adapter
Abbott Diabetes Care PRT25612
Operating temperature: 10 °C to 40 °C
USB Cable
Abbott Diabetes Care PRT21373
Length: 94 cm (37 inches)
78

Labelling Symbols
Consult instructions for
use
Use-by date
Temperature limit Catalogue number
Manufacturer Serial number
CE Mark Keep dry
Batch code Non-ionizing radiation
Type BF applied part Caution
CODE
Sensor code
Sterilised using
irradiation
Do not re-use Humidity limitation
Do not use if package is damaged
79
This product must not be disposed of via standard waste
collection. Separate collection for electrical and electronic
equipment waste per Directive 2012/19/EC in the European
Union is required. Contact the manufacturer for details.
Electromagnetic Compatibility
• The System needs special precautions regarding EMC and needs to be installed and put into service
according to the EMC information provided in this manual.
• Portable and mobile RF communications equipment can aect the System.
• The use of accessories, transducers and cables other than those specied by Abbott Diabetes Care
may result in increased EMISSIONS or decreased IMMUNITY of the System.
• The System should not be used adjacent to or stacked with other equipment and if adjacent
or stacked use is necessary, the System should be observed to verify normal operation in the
conguration in which it will be used.
80

Guidance and manufacturer’s declaration –
electromagnetic emissions
The System is intended for use in the electromagnetic environment specied below. The customer or
the user of the System should assure that it is used in such an environment.
Emissions test Compliance
Electromagnetic
environment – guidance
RF emissions
CISPR 11
Group 1 The System uses RF energy
only for its internal function.
Therefore, its RF emissions are
very low and are not likely to
cause any interference in nearby
electronic equipment.
RF emissions
CISPR 11
Class B The System is suitable for use
in all establishments, including
domestic establishments and
those directly connected to the
public low voltage power supply
network that supplies buildings
used for domestic purposes.
Harmonic emissions
IEC 61000-3-2
Class A
Voltage fluctuations /
flicker emissions
IEC 61000-3-3
Complies
81

Guidance and manufacturer’s declaration –
electromagnetic immunity
The System is intended for use in the electromagnetic environment specied below. The customer or
the user of the System should assure that it is used in such an environment.
IMMUNITY
test
IEC 60601
test level
Compliance
Level
Electromagnetic
environment – guidance
Electrostatic
discharge (ESD)
IEC 61000-4-2
± 6 kV contact
± 8 kV air
± 6 kV contact
± 8 kV air
Floors should be wood, concrete or
ceramic tile. If floors are covered
with synthetic material, the relative
humidity should be at least 30 %.
Electrical fast
transient/burst
IEC 61000-4-4
± 2 kV for
power supply
lines
± 1 kV for input/
output lines
± 2 kV for
power supply
lines
± 1 kV for input/
output lines
Mains power quality should be that
of a typical domestic, commercial or
hospital environment.
82
IMMUNITY
test
IEC 60601
test level
Compliance
Level
Electromagnetic
environment – guidance
Surge
IEC 61000-4-5
±1 kV
differential
mode
±2 kV common
mode
±1 kV
differential
mode
±2 kV common
mode
Mains power quality should be that
of a typical domestic, commercial or
hospital environment.
Voltage
dips, short
interruptions and
voltage variations
on power supply
input lines
IEC 61000-4-11
<5 % U
T
(>95 % dip in
U
T
) for 0.5 cycle
40 % U
T
(60 % dip in U
T
)
for 5 cycles
70 % U
T
(30 % dip in U
T
)
for 25 cycles
<5 % U
T
(>95 % dip
in U
T
) for 5
seconds
<5 % U
T
(>95 % dip in
U
T
) for 0.5 cycle
40 % U
T
(60 % dip in U
T
)
for 5 cycles
70 % U
T
(30 % dip in U
T
)
for 25 cycles
<5 % U
T
(>95 % dip
in U
T
) for 5
seconds
Mains power quality should be that
of a typical domestic, commercial
or hospital environment. If the user
of the System requires continued
operation during power mains
interruptions, it is recommended
that the System be powered from
an uninterruptible power supply or
a battery.
83
IMMUNITY
test
IEC 60601
test level
Compliance
Level
Electromagnetic
environment – guidance
Power frequency
(50/60 Hz)
magnetic field
IEC 61000-4-8
3 A/m 3 A/m Power frequency magnetic fields
should be at levels characteristic
of a typical location in a typical
domestic, commercial or hospital
environment.
NOTE U
T
is the a.c. mains voltage prior to application of the test level.
84
IMMUNITY
test
IEC 60601
test level
Compliance
Level
Electromagnetic
environment – guidance
Conducted RF
IEC 61000-4-6
3 Vrms
150 kHz to
80 MHz
3 Vrms Portable and mobile RF
communications equipment should
be used no closer to any part of the
System, including cables, than the
recommended separation distance
calculated from the equation
applicable to the frequency of the
transmitter.
Recommended separation
distance
=
1.2
d
85
IMMUNITY
test
IEC 60601
test level
Compliance
Level
Electromagnetic
environment – guidance
Radiated RF
IEC 61000-4-3
3 V/m
80 MHz to
2.5 GHz
3 V/m Recommended separation
distance
80 MHz to 800 MHz
800 MHz to 2.5 GHz
P is the maximum output power rating of the transmitter in watts (W) according to the transmitter
manufacturer and d is the recommended separation distance in metres (m).
Field strengths from fixed RF transmitters, as determined by an electromagnetic site survey,
a
should
be less than the compliance level in each frequency range.
b
Interference may occur in the vicinity of equipment marked with the following symbol:
NOTE 1 At 80 MHz and 800 MHz, the higher frequency range applies.
NOTE 2 These guidelines may not apply in all situations. Electromagnetic propagation is affected by
absorption and reflection from structures, objects and people.
=
1.2
d
=
2.3
d
86

a
Field strengths from fixed transmitters, such as base stations for radio (cellular/cordless)
telephones and land mobile radios, amateur radio, AM and FM radio broadcast and TV broadcast
cannot be predicted theoretically with accuracy. To assess the electromagnetic environment due
to fixed RF transmitters, an electromagnetic site survey should be considered. If the measured
field strength in the location in which the System is used exceeds the applicable RF compliance
level above, the System should be observed to verify normal operation. If abnormal performance
is observed, additional measures may be necessary, such as re-orienting or relocating the System.
b
Over the frequency range 150 kHz to 80 MHz, field strengths should be less than 3 V/m.
87

Recommended separation distances between portable
and mobile RF communications equipment and the
System
The System is intended for use in an electromagnetic environment in which radiated RF disturbances
are controlled. The customer or the user of the System can help prevent electromagnetic interference
by maintaining a minimum distance between portable and mobile RF communications equipment
(transmitters) and the System as recommended below, according to the maximum output power of
the communications equipment.
Rated maximum
output power of
transmitter
W
Separation distance according to frequency of transmitter
m
150 kHz to
80 MHz
80 MHz to
800 MHz
800 MHz to
2.5 GHz
0.01 0.12 0.12 0.23
0.1 0.38 0.38 0.73
1 1.2 1.2 2.3
10 3.8 3.8 7.3
100 12 12 23
=
1.2
d
=
1.2
d
=
2.3
d
88

For transmitters rated at a maximum output power not listed above, the recommended separation
distance d in metres (m) can be estimated using the equation applicable to the frequency of the
transmitter, where P is the maximum output power rating of the transmitter in watts (W) according
to the transmitter manufacturer.
NOTE 1 At 80 MHz and 800 MHz, the separation distance for the higher frequency range applies.
NOTE 2 These guidelines may not apply in all situations. Electromagnetic propagation is affected by
absorption and reflection from structures, objects and people.
89

Hereby, Abbott Diabetes Care Ltd, declares that the FreeStyle Libre Flash Glucose
Monitoring System is in compliance with the essential requirements and other
relevant provisions of the R&TTE Directive. A copy of the original declaration of
conformity may be obtained from Abbott Diabetes Care Ltd., Range Road, Witney,
Oxon, OX29 0YL, UK.
Font Licence
©2013 Abbott
Licensed under the Apache Licence, Version 2.0 (the “Licence”); you may
not use this le except in compliance with the Licence. You may obtain a
copy of the Licence at: http://www.apache.org/licenses/LICENSE-2.0
Unless required by applicable law or agreed to in writing, software
distributed under the Licence is distributed on an “AS IS” BASIS,
WITHOUT WARRANTIES OR CONDITIONS OF ANY KIND, either express
or implied. See the Licence for the specic language governing
permissions and limitations under the Licence.
90

Warranty Statement
Limited Warranty
Abbott Diabetes Care (“Abbott”) warrants that the FreeStyle Libre Reader (“Reader”)
shall be free from defects in material and workmanship and shall be of satisfactory
quality for a period of two (2) years from the original date of purchase provided it
is not modied, altered or misused. This Limited Warranty is valid if the Reader is
defective in material or workmanship, and it has been used only in accordance with
the User‘s Manual. Abbott’s sole obligation is to replace the Reader, free of charge,
with a same or alternative meter as determined by Abbott in its sole discretion.
Your replacement may be a dierent model or type. This Warranty covers only
the Reader, does not cover disposable accessories, extends only to the original
purchaser, and is not assignable or transferable. This warranty does not aect or
preclude any other rights which you may have by law.
For warranty service, contact Customer Service for assistance and/or instructions
for obtaining a replacement Reader. Please go to the back cover of this manual
for your Customer Service phone number. Abbott may require as a condition to
obtaining warranty service that you return your Reader, postage prepaid, to an
address specified by Customer Service.
TO THE EXTENT POSSIBLE UNDER LAW, THE FOREGOING ARE ABBOTT’S ONLY
WARRANTIES FOR THE READER AND STATE YOUR EXCLUSIVE REMEDIES. ABBOTT
MAKES NO OTHER WARRANTIES, EXPRESS OR IMPLIED, AND ABBOTT EXCLUDES
AND DISCLAIMS ANY OTHER WARRANTIES INCLUDING, BUT NOT LIMITED TO,
IMPLIED WARRANTIES OF MERCHANTABILITY AND FITNESS FOR A PARTICULAR
PURPOSE. ABBOTT DOES NOT WARRANT THAT OPERATION OF THE READER
WILL BE UNINTERRUPTED OR ERROR FREE AND ABBOTT WILL NOT BE LIABLE
FOR ANY INCIDENTAL OR CONSEQUENTIAL DAMAGES RESULTING DIRECTLY OR
INDIRECTLY FROM USE OF THE READER OR FAILURE OF THE READER TO PERFORM
IN ACCORDANCE WITH SPECIFICATIONS.
91

Abbott Diabetes Care Ltd.
Range Road
Witney, Oxon
OX29 0YL, UK
©2016 Abbott ART34745-107 Rev. A 12/16
FreeStyle and related brand marks are trademarks of Abbott Diabetes Care Inc. in
various jurisdictions.
Patent: https://www.abbott.com/patents
Distributed by:
Local Responsible Person
Abbott Laboratories Limited,
Abbott Diabetes Care
20/F, AIA Tower, 183 Electric Road,
North Point, Hong Kong
Tel: 5808-4196
Abbott Laboratories (Singapore) Pte Ltd
Abbott Diabetes Care
3 Fraser Street #23-28
DUO Tower
Singapore 189352
1800-272-2881
.224”
.257”
4.6”4.6”