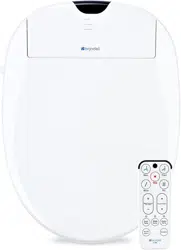
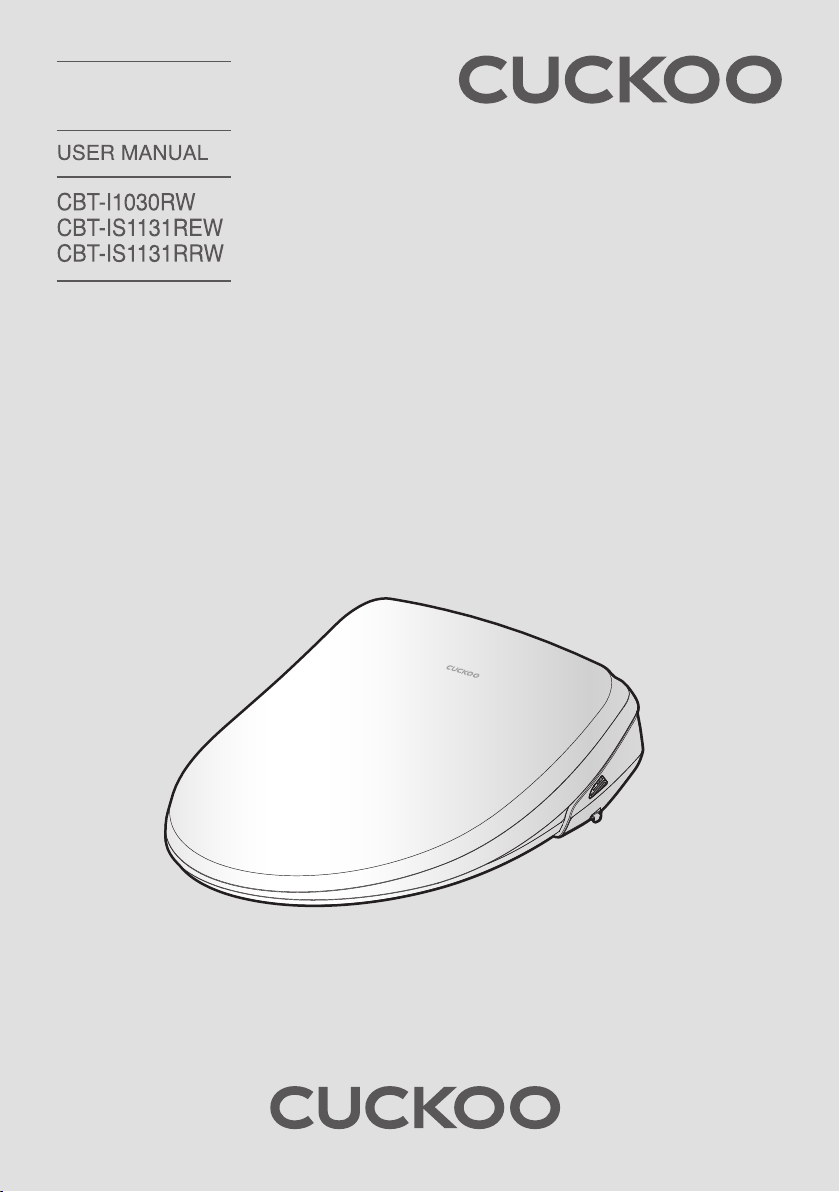
ELECTRONIC
TOILET SEAT
Bidet in consideration of children(CBT-I1030RW)
Thank you for purchasing your CUCKOO
Electronic Toilet Seat! This manual will detail
operational instructions as well as any troubleshooting
should any issues arise.
Product Benefits
Strong bidet
It is a bidet made to be used for a long period without minor malfunctions.
Everyday waterproof (IPX5 grade) structure
The product can be used safely and cleanly thanks to the IPX5-grade structure.
Convenience in cleaning
Bidet installation and separation can be done using the one-touch method,
which adds convenience to cleaning.
It is a bidet that children can use safely thanks to a button exclusively
usable by them.
Extended nozzle length
The length of the nozzle is increased to broaden the range of nozzle position
selection by body shape.
Bidet that saves electricity bills
ECO function helps you save electricity bills.
Stainless nozzle
It is sanitary as stainless is applied to the nozzle, which reduces the amount of
pollutants stained on it.
Remote control
A detachable remote control enables anyone to use the bidet easily and conveniently.
Deodorize function(CBT-IS1131REW, CBT-IS1131RRW)
It eliminates unpleasant odors of a bathroom for comfortable use.

BEFORE USING
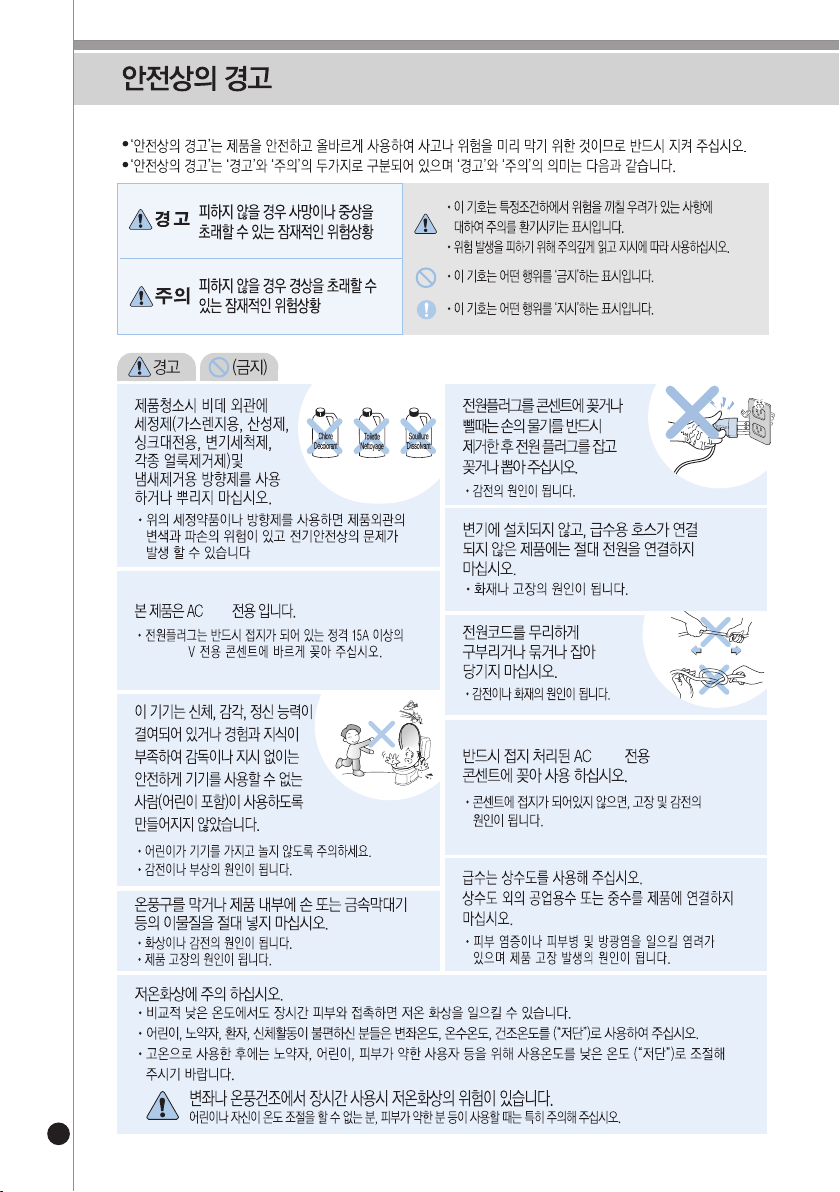
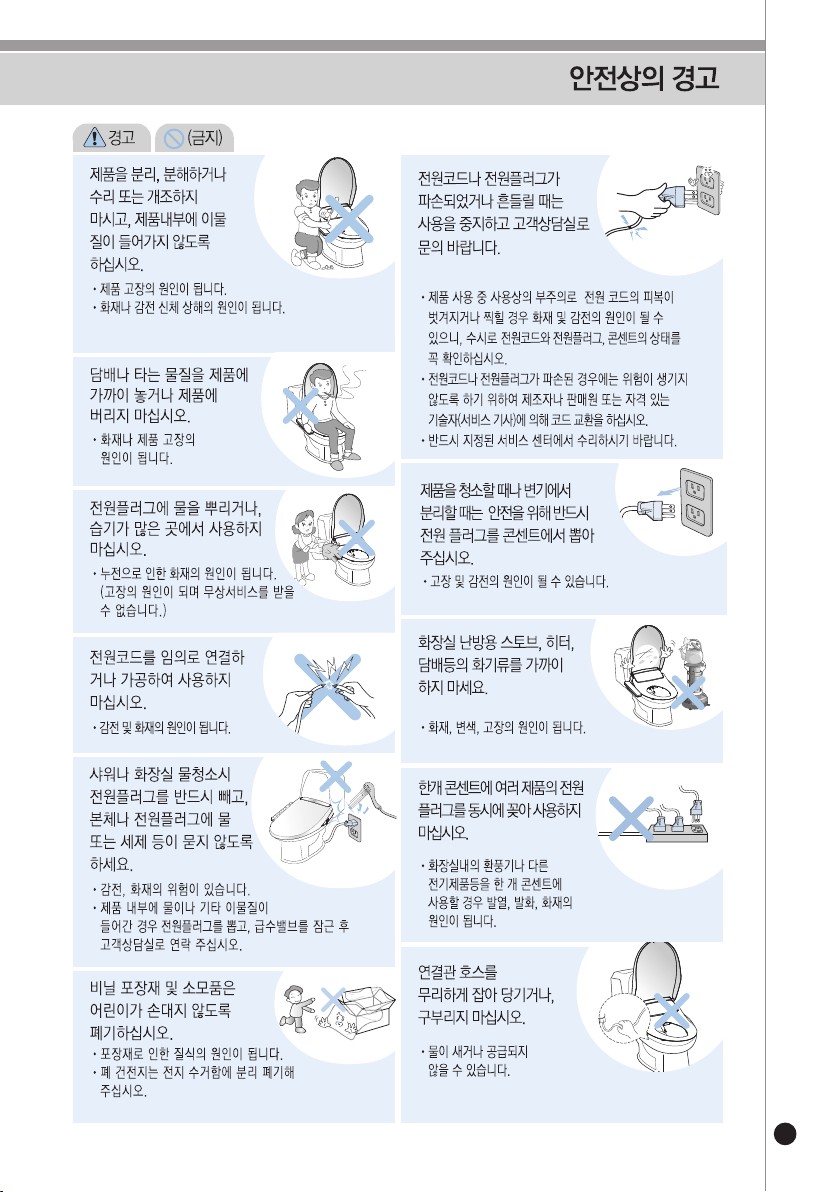
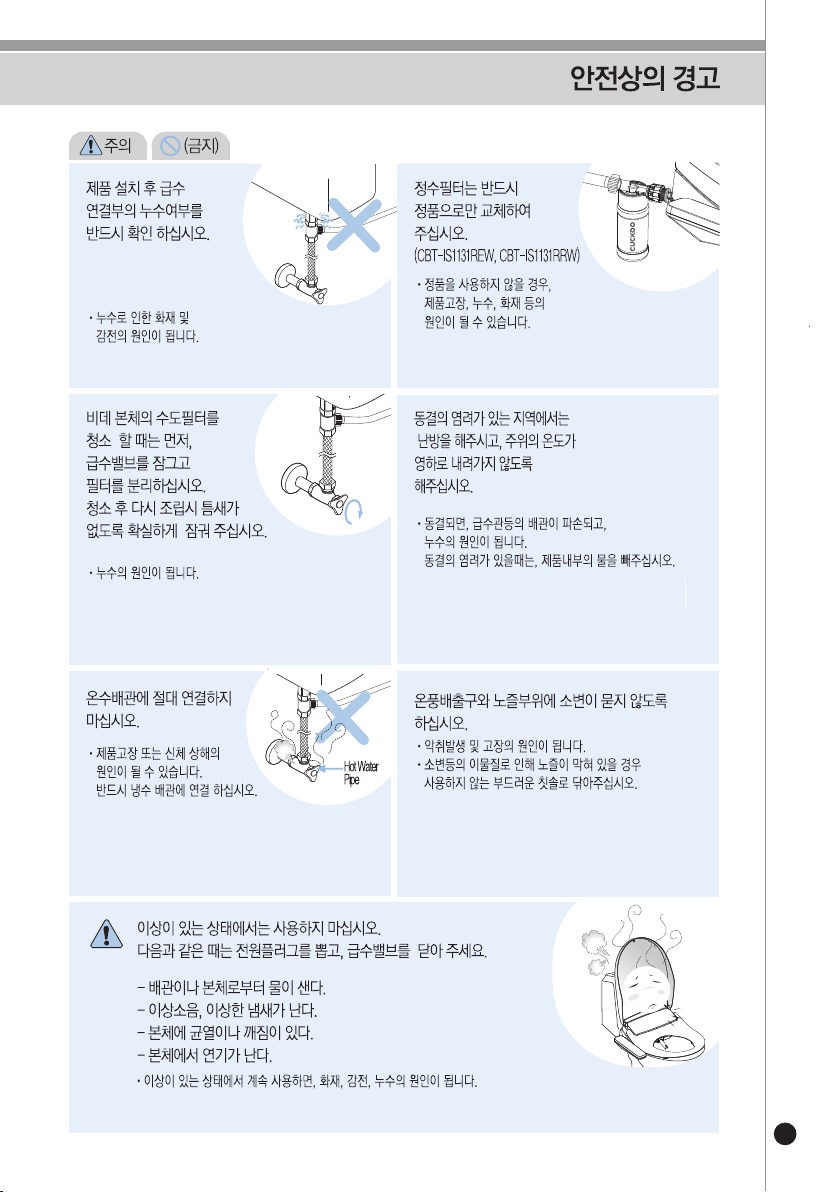
Safety Warnings
Troubleshooting
WHEN USING
BEFORE ASKING
FOR SERVICE
SERVICE GUIDE
Before Installation
How to Install
After Installing
Before Use
Explanation of functions of Control Panel
How to Use
How to Use Each Functions
How to Clean
How to Disassemble the Product & Store
Product Specifications
Parts & Accessories
4-15
34
17
18-22
23
24
25-26
27
28-30
31-32
33
35
16
www.cukooamerica.com

www.cukooamerica.com
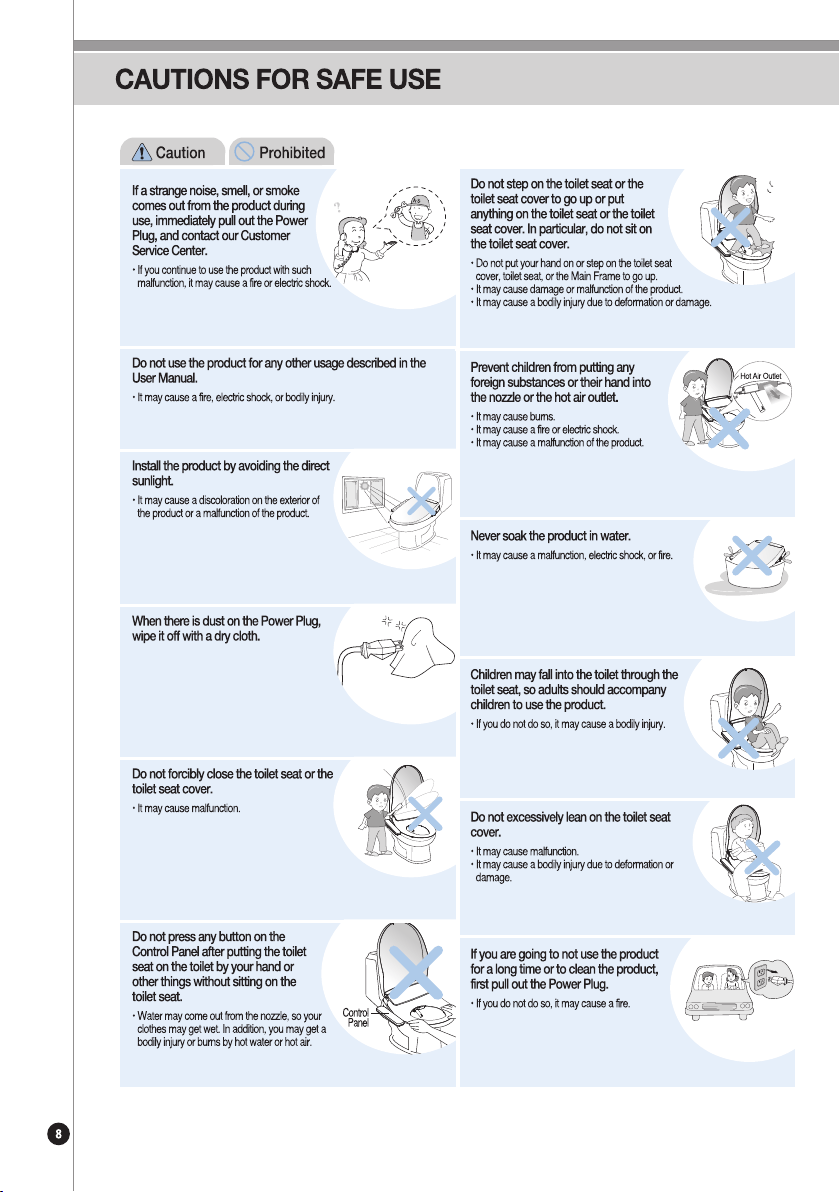
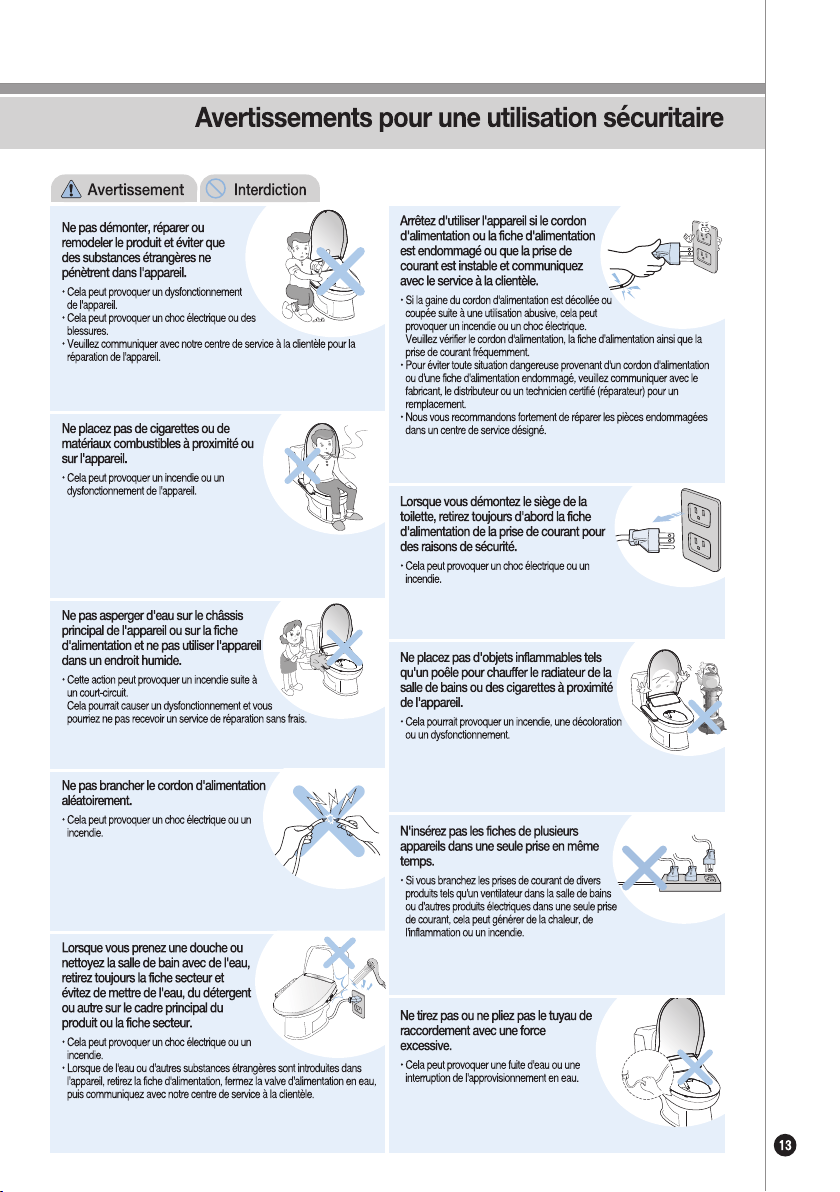
CAUTIONS FOR SAFE USE
www.cukooamerica.com
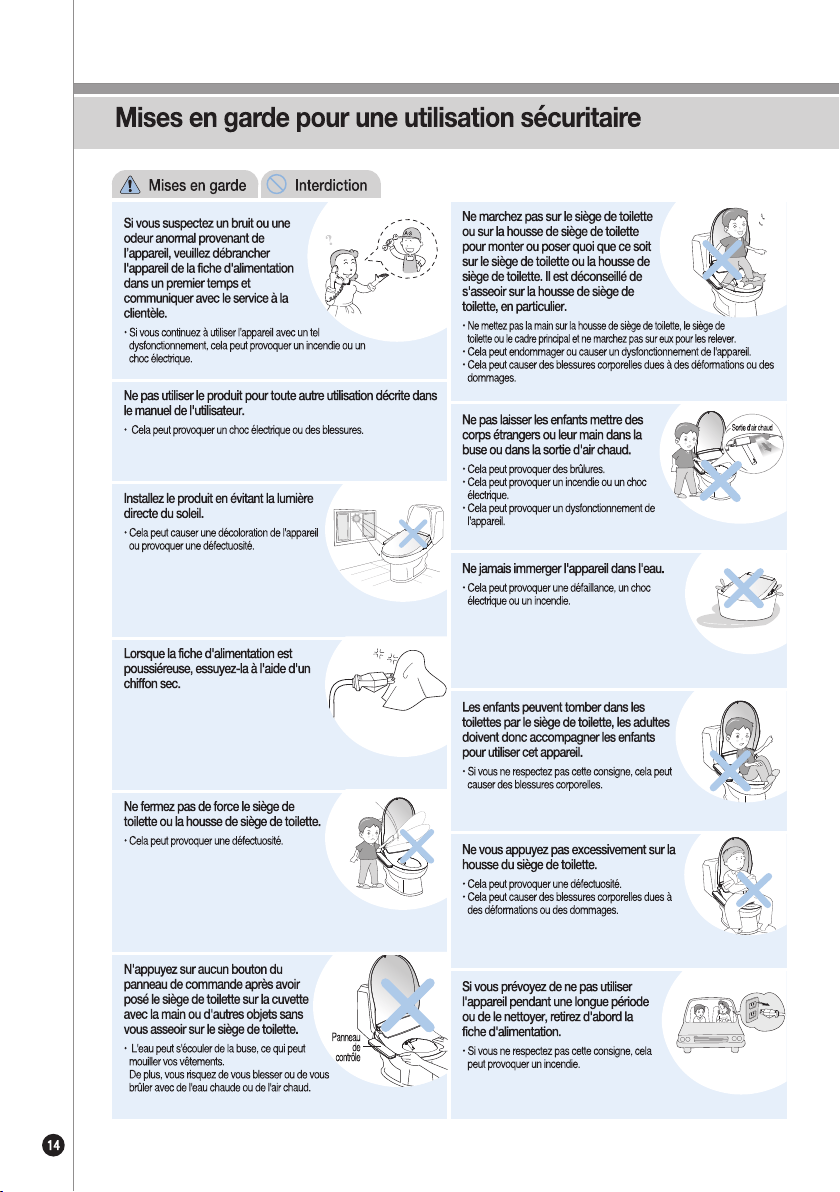
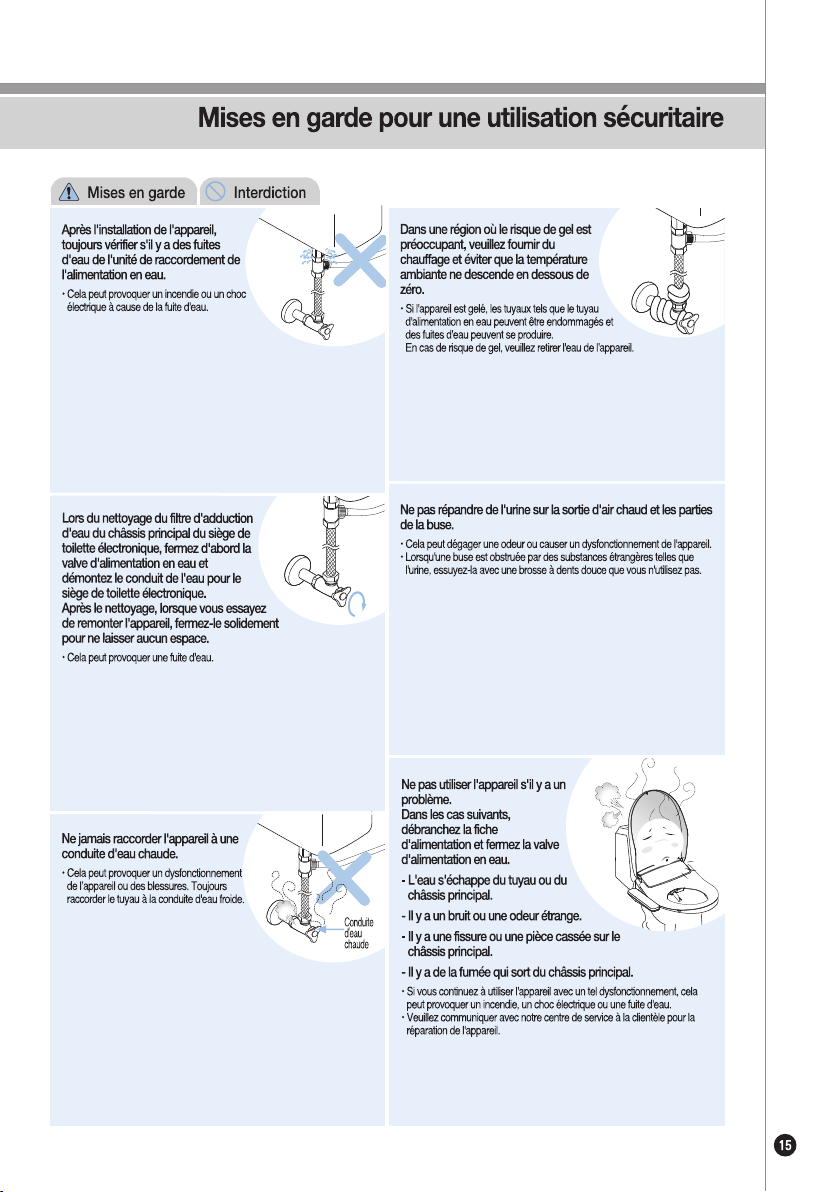
CAUTIONS FOR SAFE USE

www.cukooamerica.com
www.cukooamerica.com
www.cukooamerica.com
www.cukooamerica.com
Rubber nut (2)
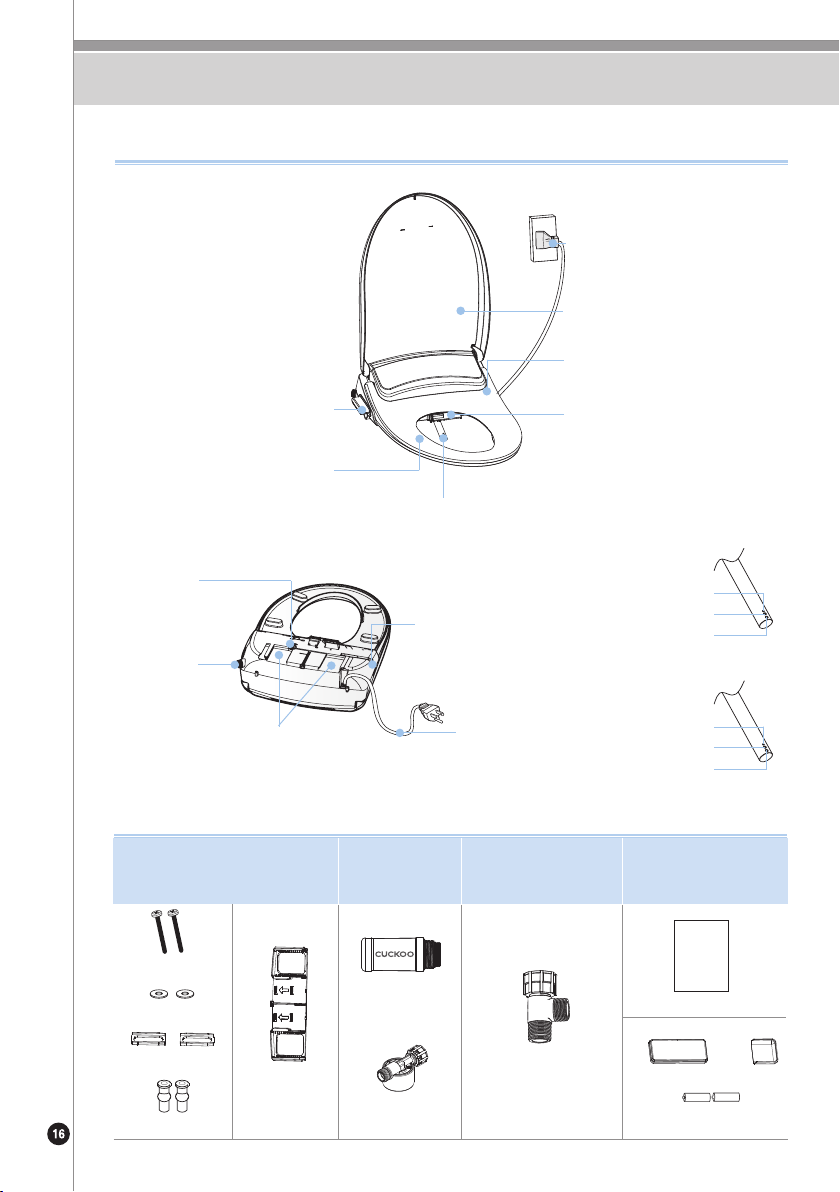
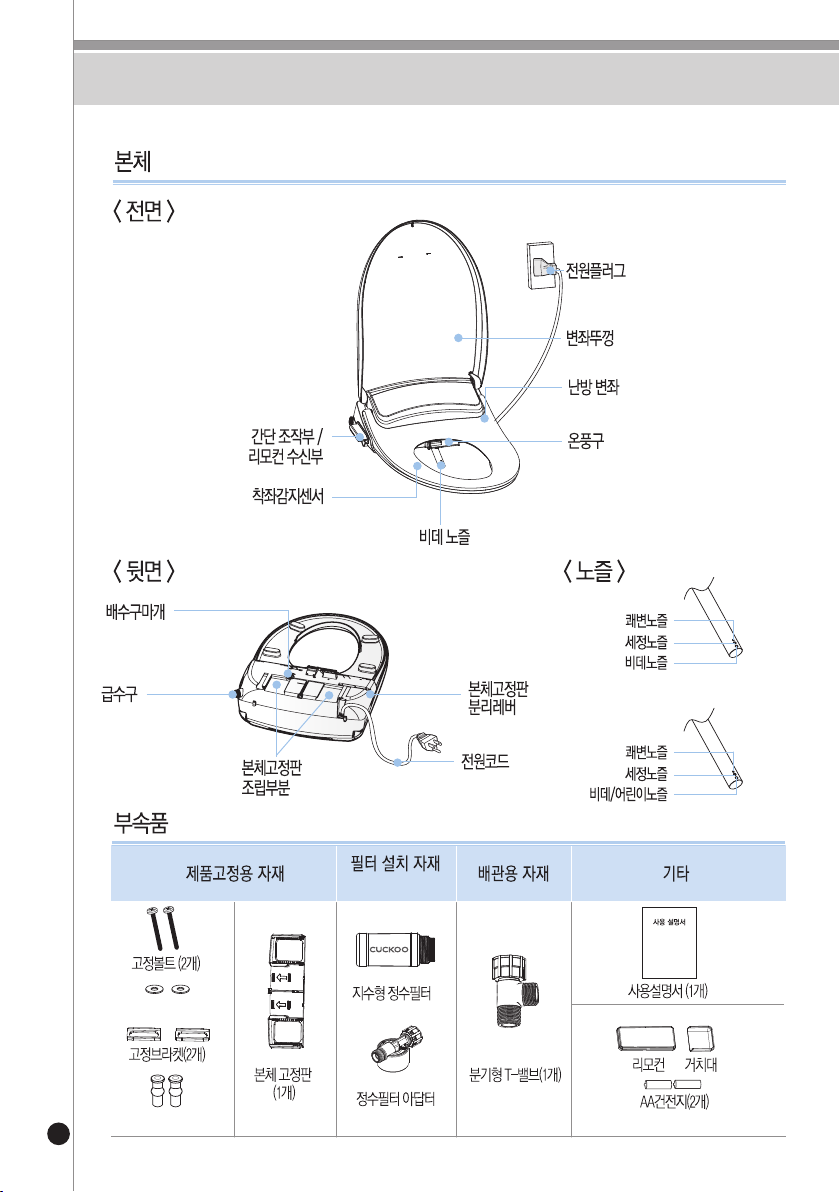
PARTS & ACCESSORIES
Power plug
Toilet seat cover
Heated toilet seat
Hot air inlet
Main frame
fixing plate
separation lever
Materials to fix product
Installation
materials
Fixing bolts (2)
Fixing brackets (2)
Main frame
fixing plate (1)
Branched T-valve (1)
User manual (1)
Remote control
AA batteries (2)
Mount
User manual
Materials for piping Others
Power cord
Bidet nozzle
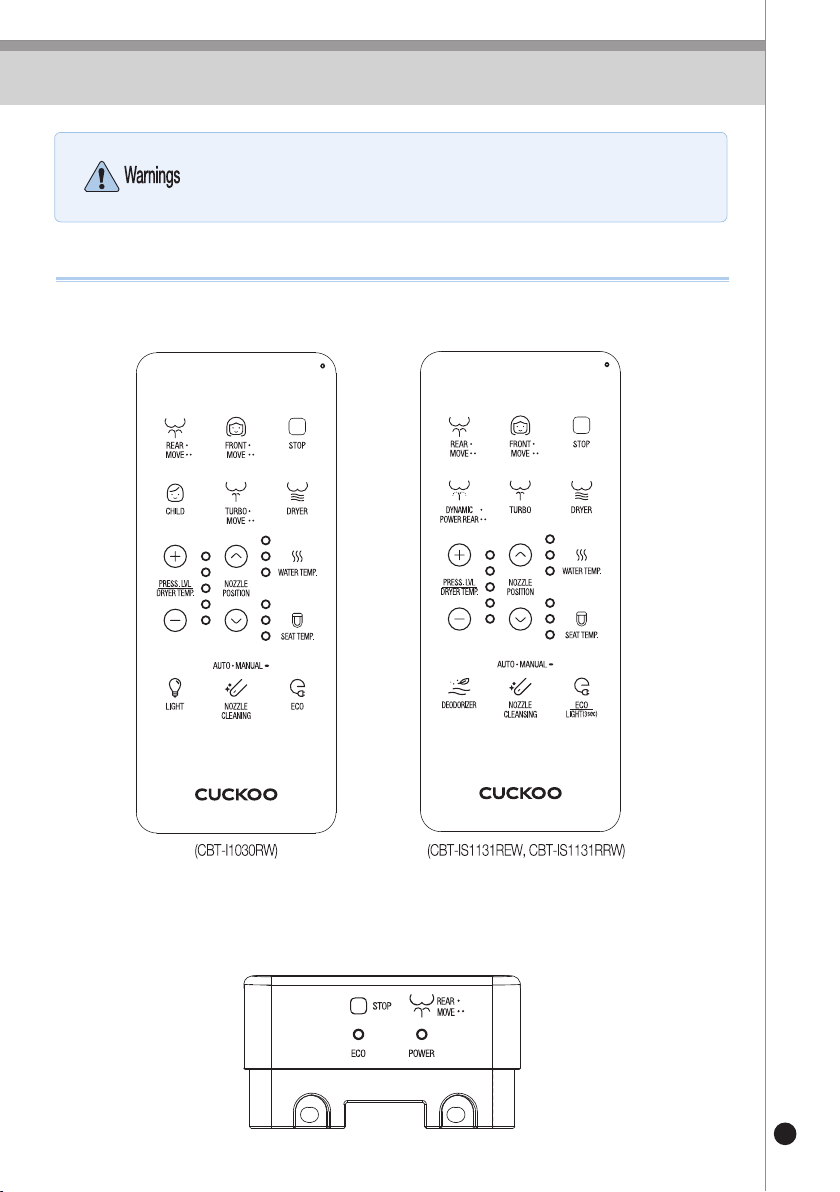
Simple control panel /
Remote reception panel
<FRONT>
Main Frame
Accessories
<BACK> <NOZZLE>
TURBO nozzle
CLEAN nozzle
BIDET nozzle
TURBO nozzle
CLEAN nozzle
BIDET/CHILD nozzle
Seating sensor
Drain
stopper
Water
supply inlet
Main frame fixing
plate assembly section
Waterworks
filter
Adapter
(CBT-I1030RW)
(CBT-IS1131REW, CBT-IS1131RRW)
Fixing washer (2)
(CBT-IS1131REW,
CBT-IS1131RRW)
www.cukooamerica.com
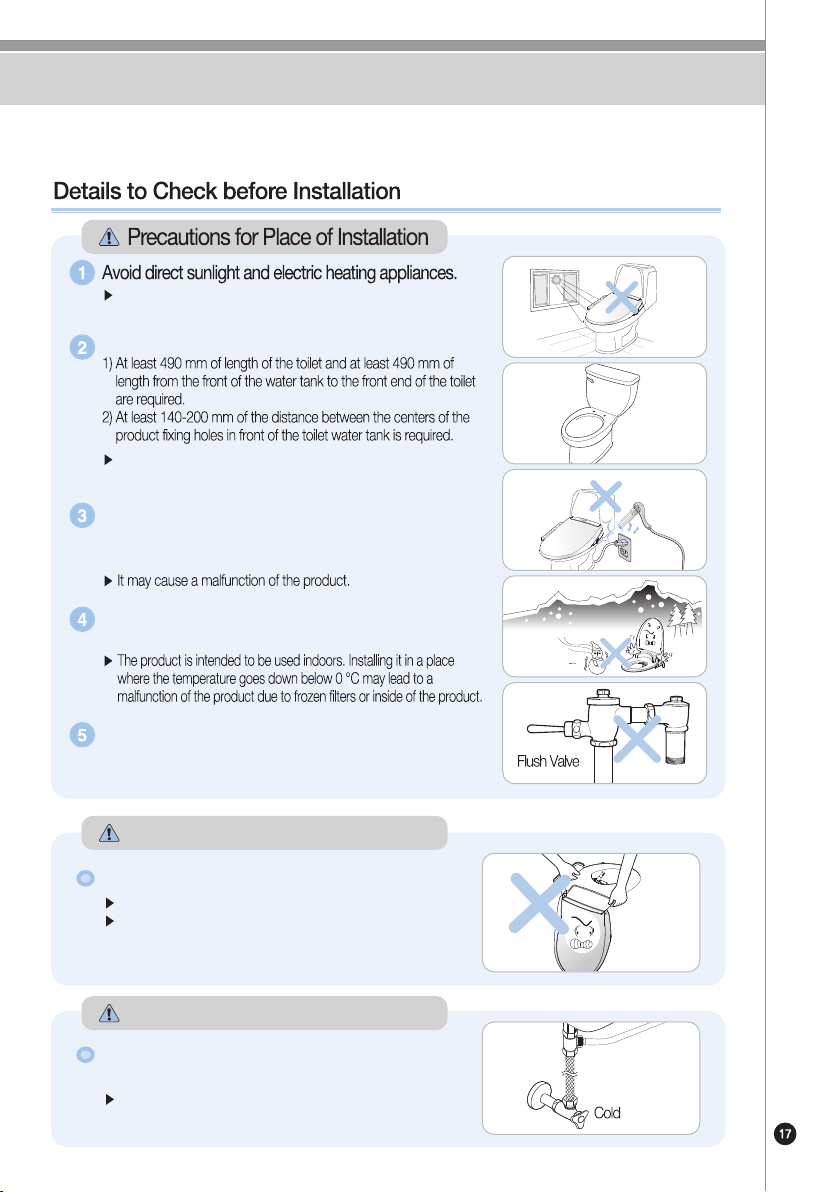
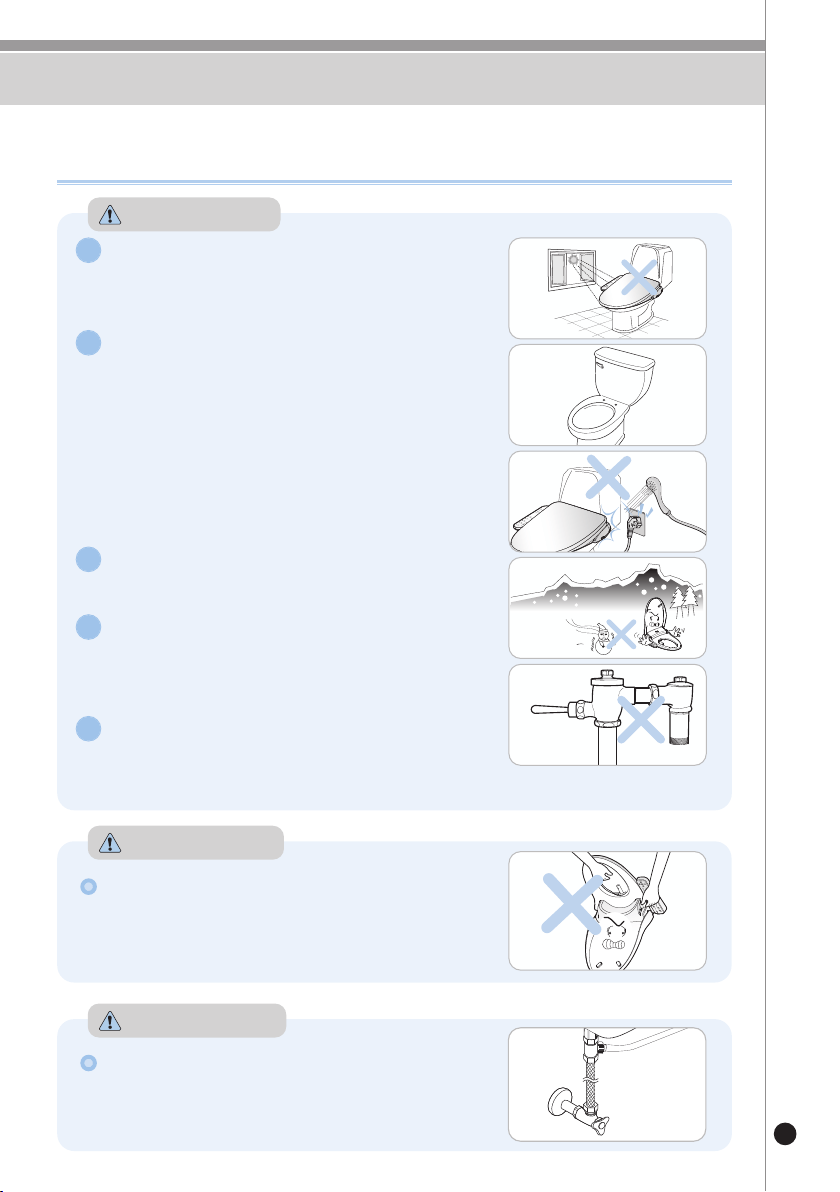
BEFORE INSTALLATION
Avoid contact with direct sunlight and electric heating appliances
as they may cause fire, damage, or discoloration of the unit.
Check the size of your toilet.
Do not install where the product may be exposed to
moisture, excessive dust, or splashing water as this
may cause the product to malfunction.
Avoid installing in areas where the temperature will
drop to freezing temperatures.
The product may not be able to be installed if the water
supply valve is a flush valve. Check the valve status
before installation.
Always use caution when moving the product.
This product may not be compatible with imported toilets
due to ill-fitting sizes.
Never place the product upside down.
Ensure the water supply valve is connected to the
cold water pipe.
Connecting the product to the hot water pipe may cause burns or
a product malfunction.
Always remove the power plug before attempting to
move the product.
Precautions for Moving the Product
Precautions for Connecting Pipes
Fixing bolts
Fixing washer
Fixing brackets
Main frame fixing plate
Rubber nut
Button
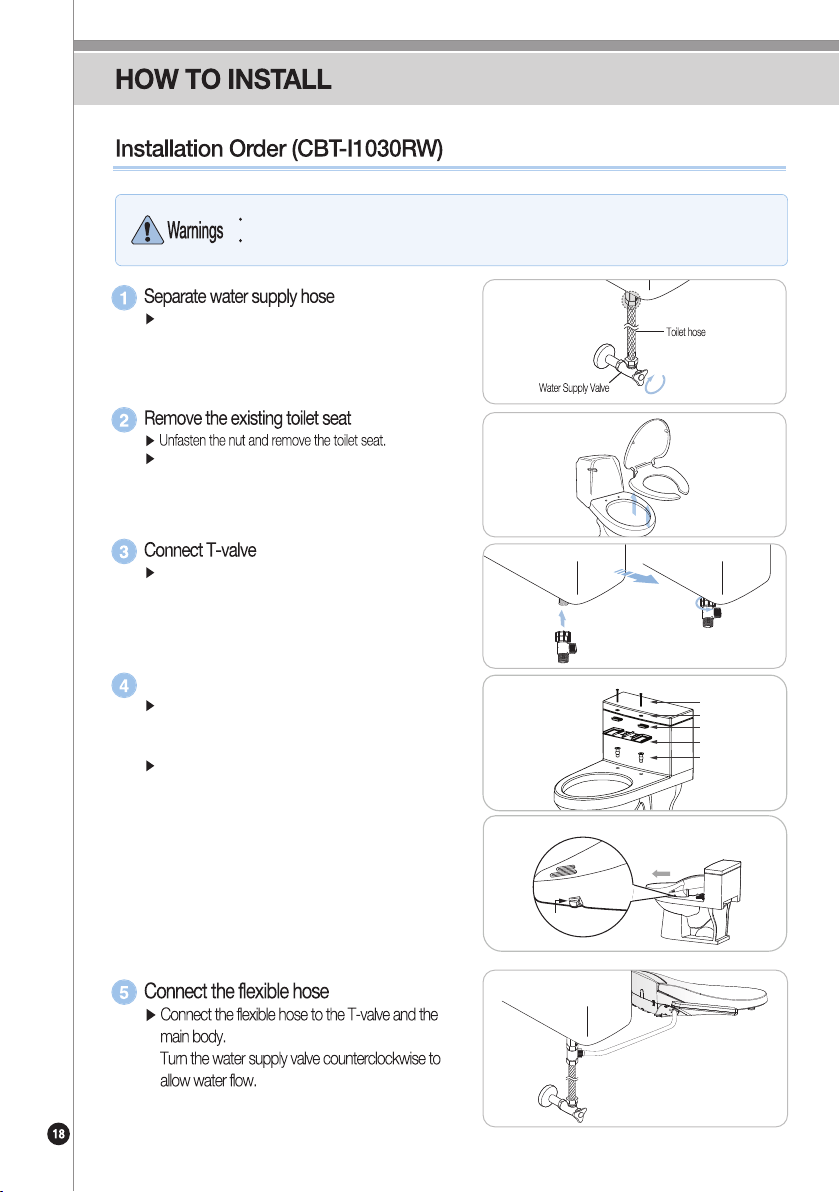
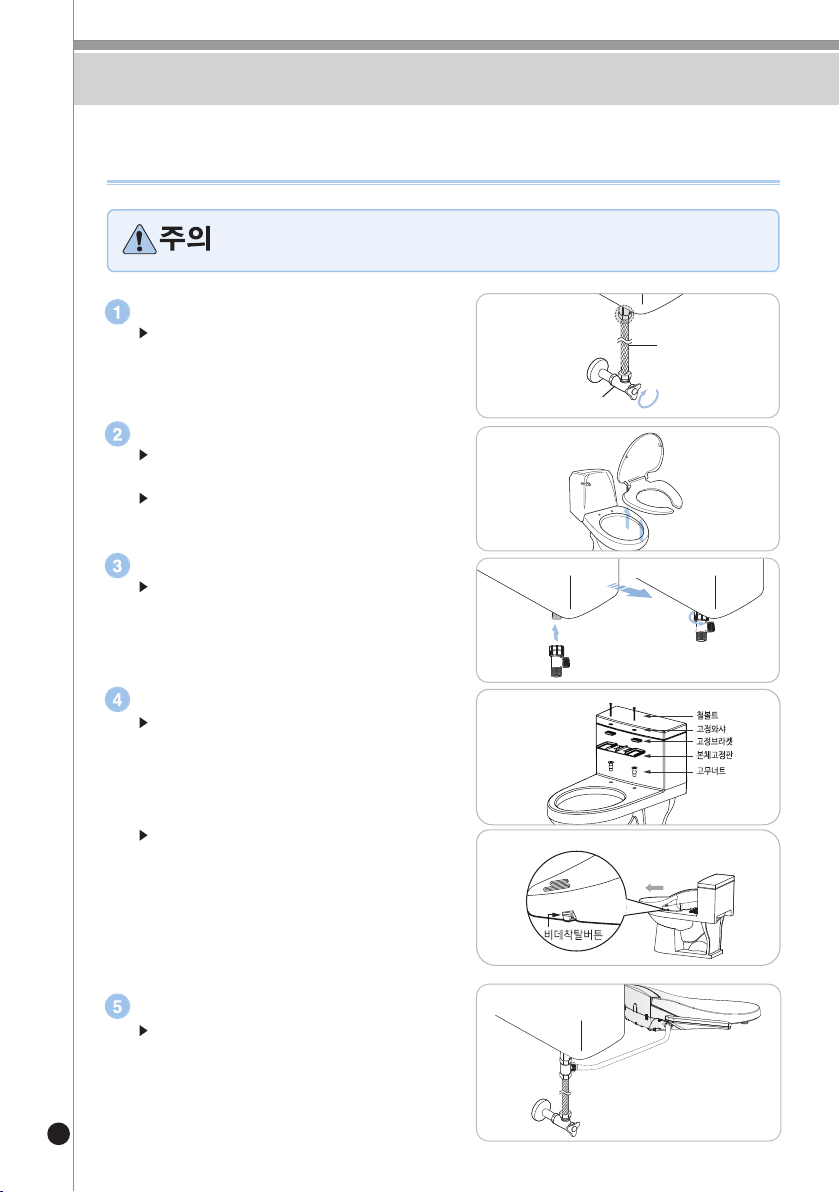
Use only with a properly grounded 120V AC power outlet with a rating of at least 15A.
Do not plug in the power cord before and while installing.
Turn the water supply valve clockwise to lock, then separate
the toilet hose using a spanner.
Set the old toilet lid and nuts aside for future re-installation.
Install the T-valve as shown in the image.
Install the body.
Place the main frame fixing plate on the toilet and affix the
fixing bolts on the main frame fixing plate as shown
in the image.
The location at which the Main Frame Fixing Plate is
secured determines the location where the product is
installed. Considering the size of the product and toilet,
fix the Main Frame Fixing Plate in a suitable position.
If the position of Main Frame Fixing Plate is improper,
the seat will not be properly positioned in relation
to the toilet.
Toilet
seat
Nut
Toilet
Rubber washer
Water supply hose
on the toilet side
Water supply valve
HOW TO INSTALL
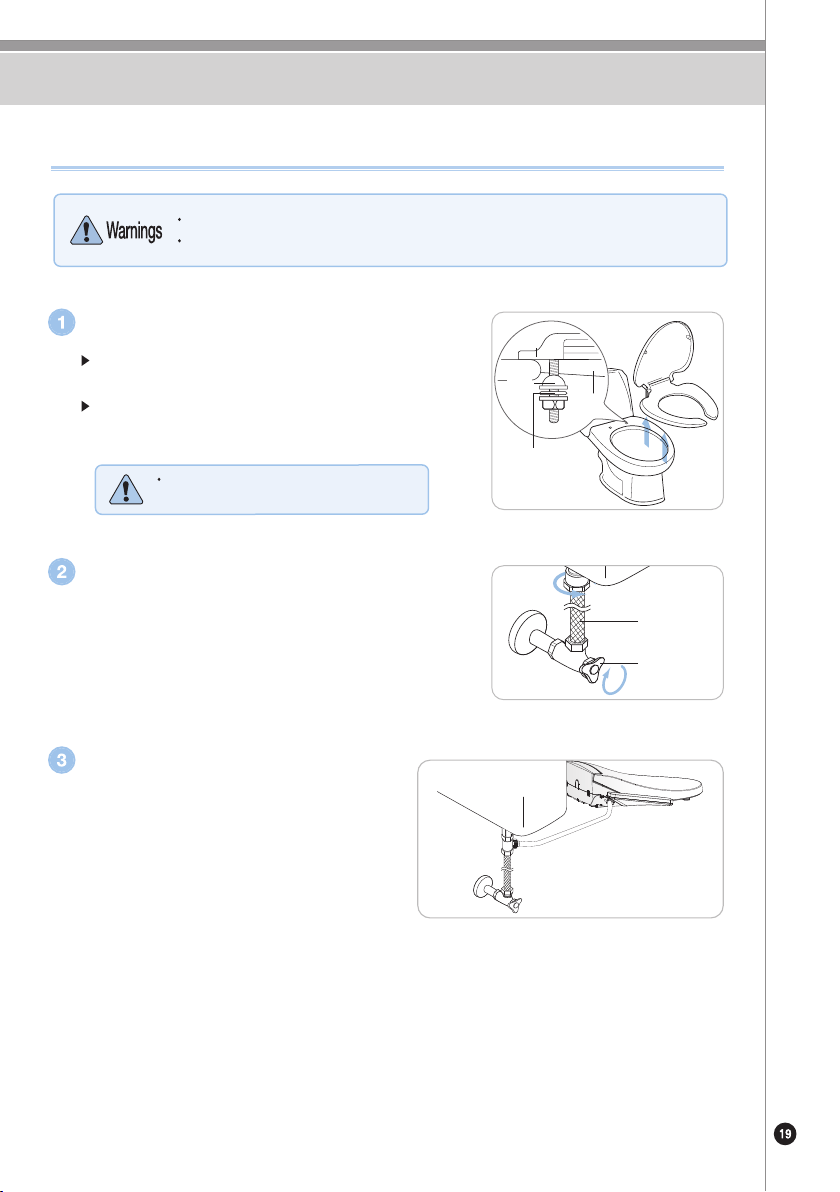
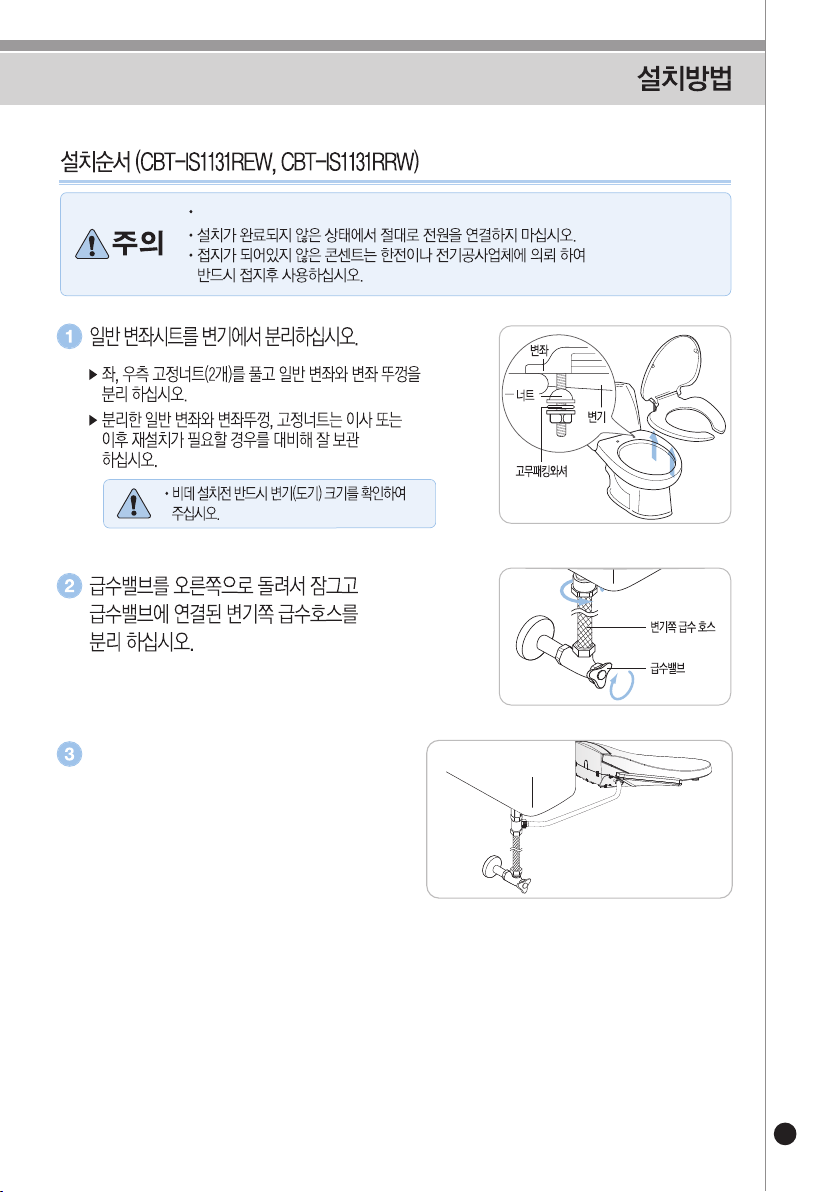
Order of installation (CBT-IS1131REW, CBT-IS1131RRW)
Separate the original seat from the toilet.
Turn the water supply valve clockwise to lock it and then
separate the water supply hose on the toilet side
connected to the water supply valve.
Install a T-valve from where the water supply
hose has been separated.
Unfasten the fixing nuts (2) on left and right sides and then separate the
original seat and the seat cover.
Store the detached original seat, seat cover and fixing nuts in a secure
place in case of moving or re-installation in the future.
Before installing the bidet, check the size of the
toilet (porcelain).
www.cukooamerica.com
Use only with a properly grounded 120V AC power outlet with a rating of at least 15A.
Do not plug in the power cord before and while installing.
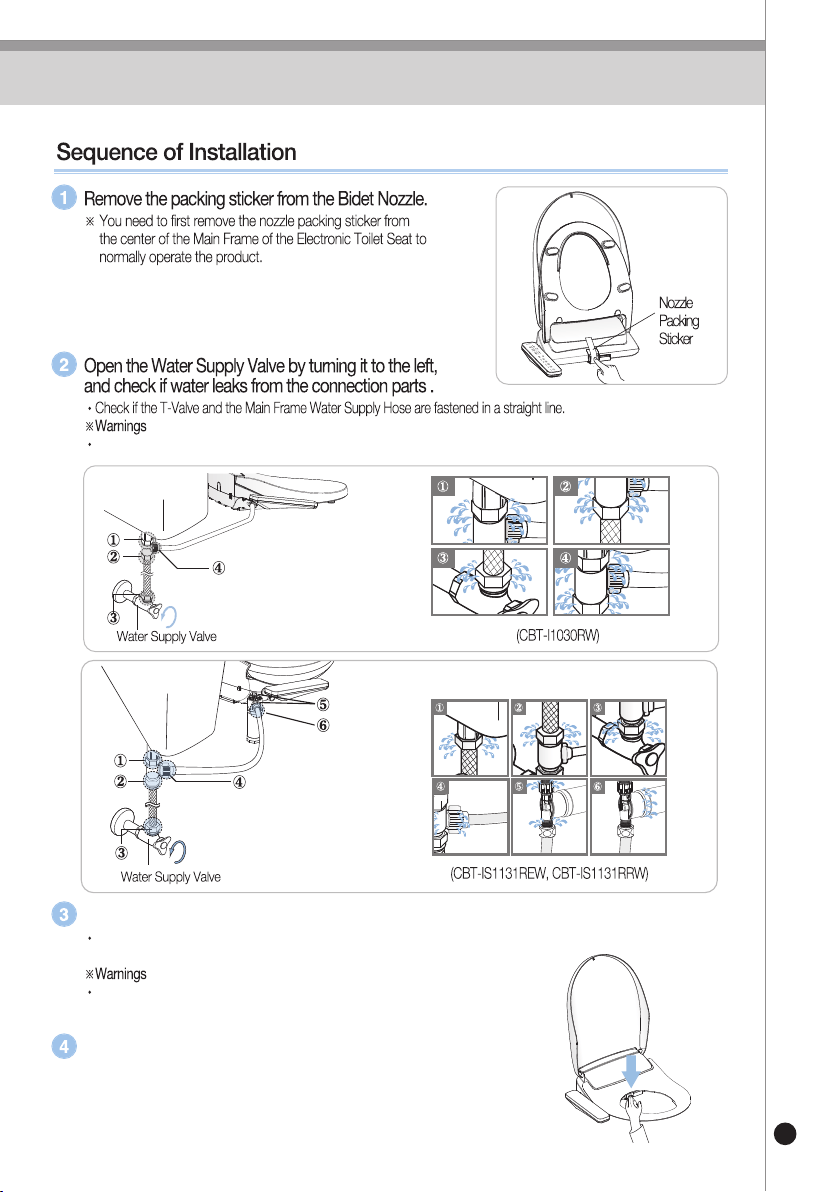
▶
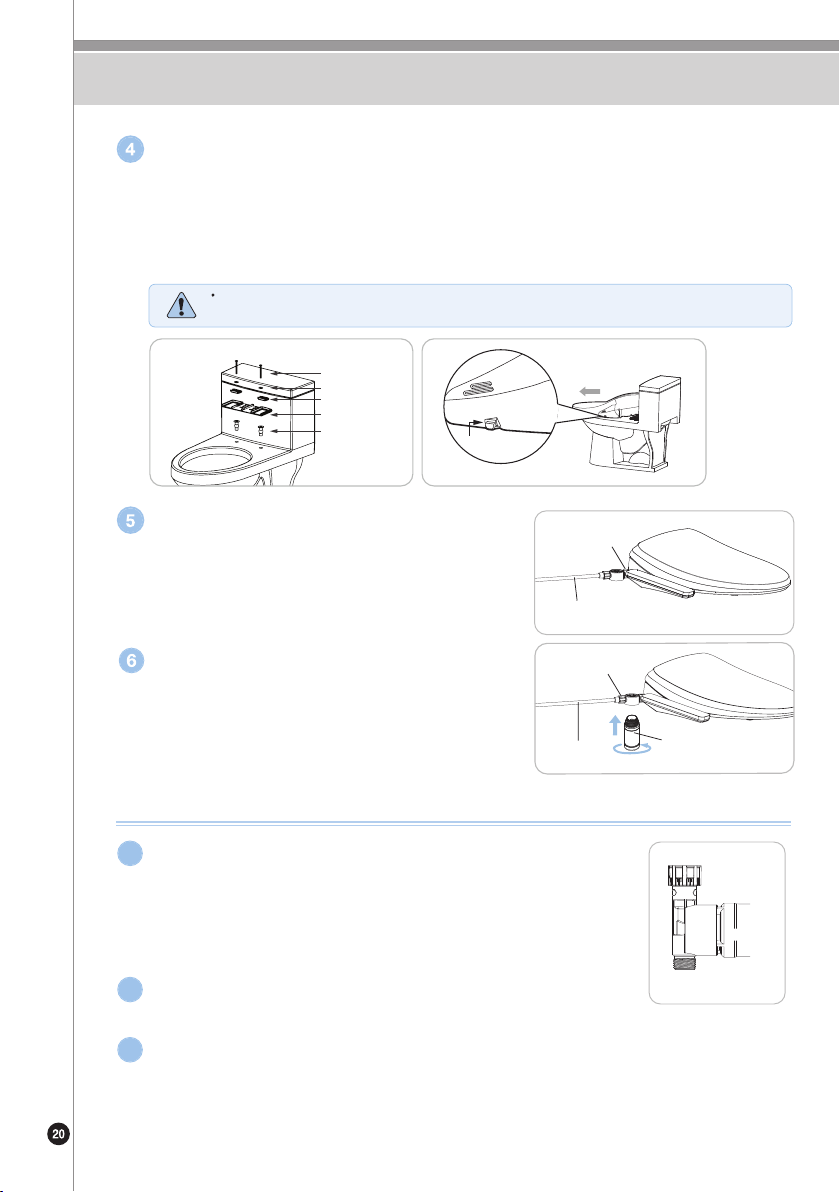
As shown in the image, place the Main Frame Fixing Plate on the toilet and affix the fixing bolts on the
Main Frame Fixing Plate to fix it onto the toilet.
At this time, secure it firmly by using a tool, etc. so that the Main Frame Fixing Plate does not shake.
▶
The location at which the Main Frame Fixing Plate is secured determines the location where the product is installed.
Considering the size of the product and toilet, fix the Main Frame Fixing Plate in a suitable position.
If the position of Main Frame Fixing Plate is improper, the seat will be too forward or backward compared to the toilet.
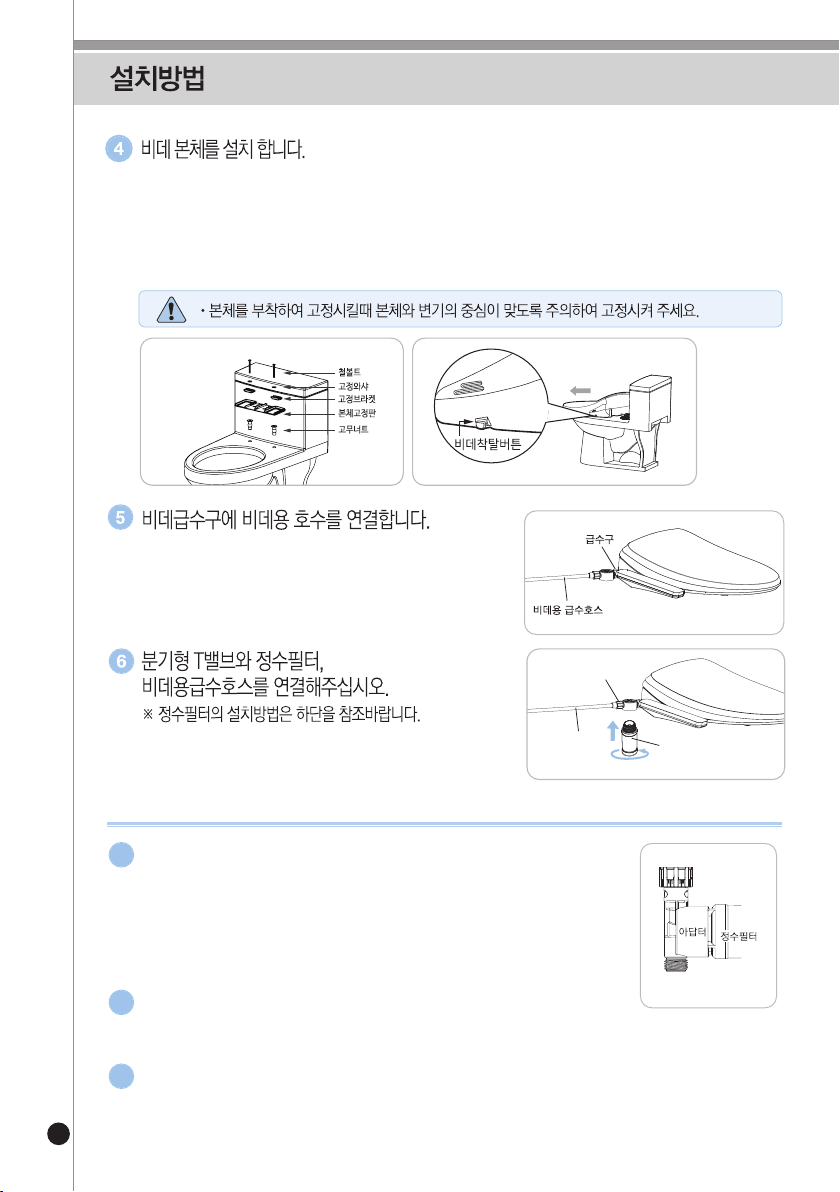
When attaching and fixing the main frame, fix it carefully so that the centers of the main frame and
toilet are aligned.
Install the main frame of the bidet.
HOW TO INSTALL
Connect the hose for the bidet to the bidet's
water supply inlet.
Connect the branched T-valve, waterworks
filter and water supply hose for the bidet.
※ Refer to below for installation of a waterworks filter.
Water supply inlet
Water supply hose for the bidet
Fixing bolts
Fixing washer
Fixing brackets
Main frame fixing plate
Rubber nut
Button
4
How to Install the Filter
Check for leaks (hose connection/filter connection).
2
Water pressure may be affected if the filter is filled with
contaminants or if the filter is used past its lifespan. In this case,
please change the filter.
3
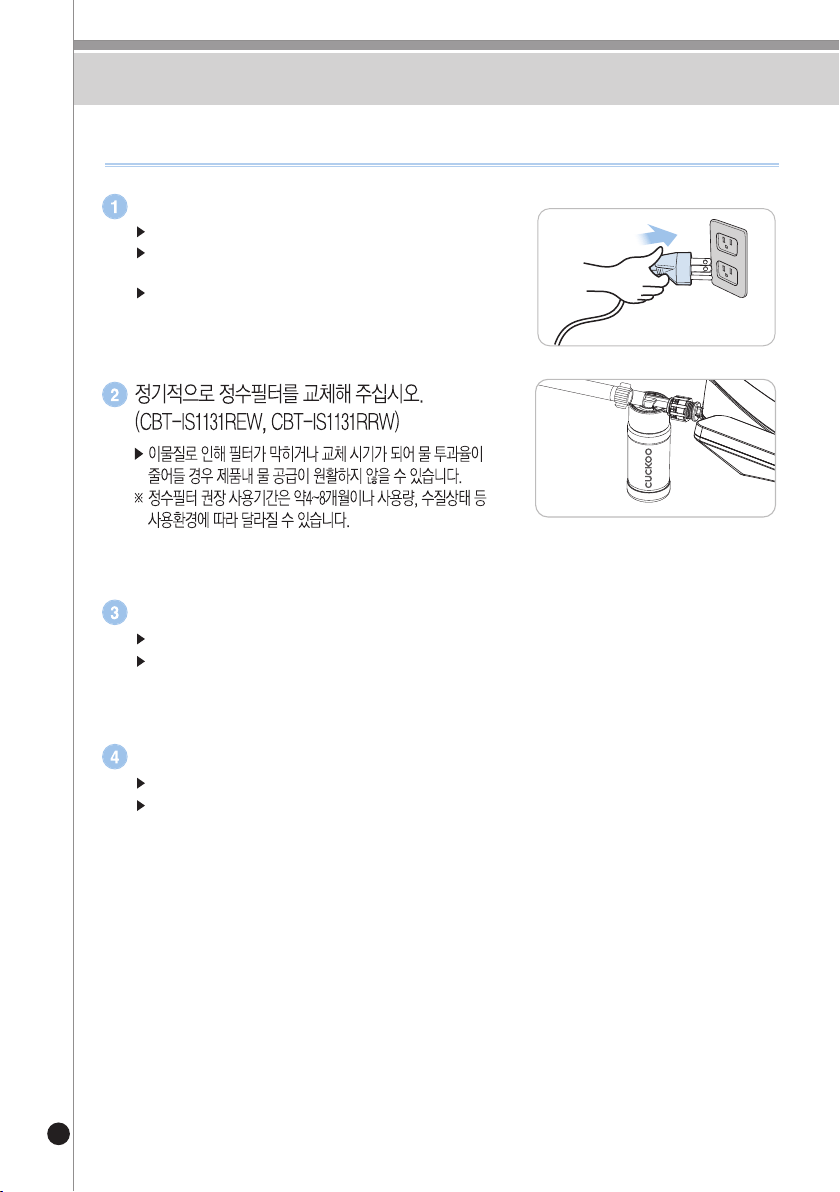
Connect the filter to the adapter.
※ (Hold the adapter in place when connecting to the filter)
※ Check the rubber sealing when connecting the filter
※ After connecting the filter to the adapter, twist to close. Twist another ¼ of a
full rotation after the filter becomes difficult to twist.
(Leaks may occur if the filter has not been connected properly.)
1
Adapter
Waterworks filter
Water supply hose
for the bidet
Adapter
Waterworks filter
21
HOW TO INSTALL
How to Install the Remote Control
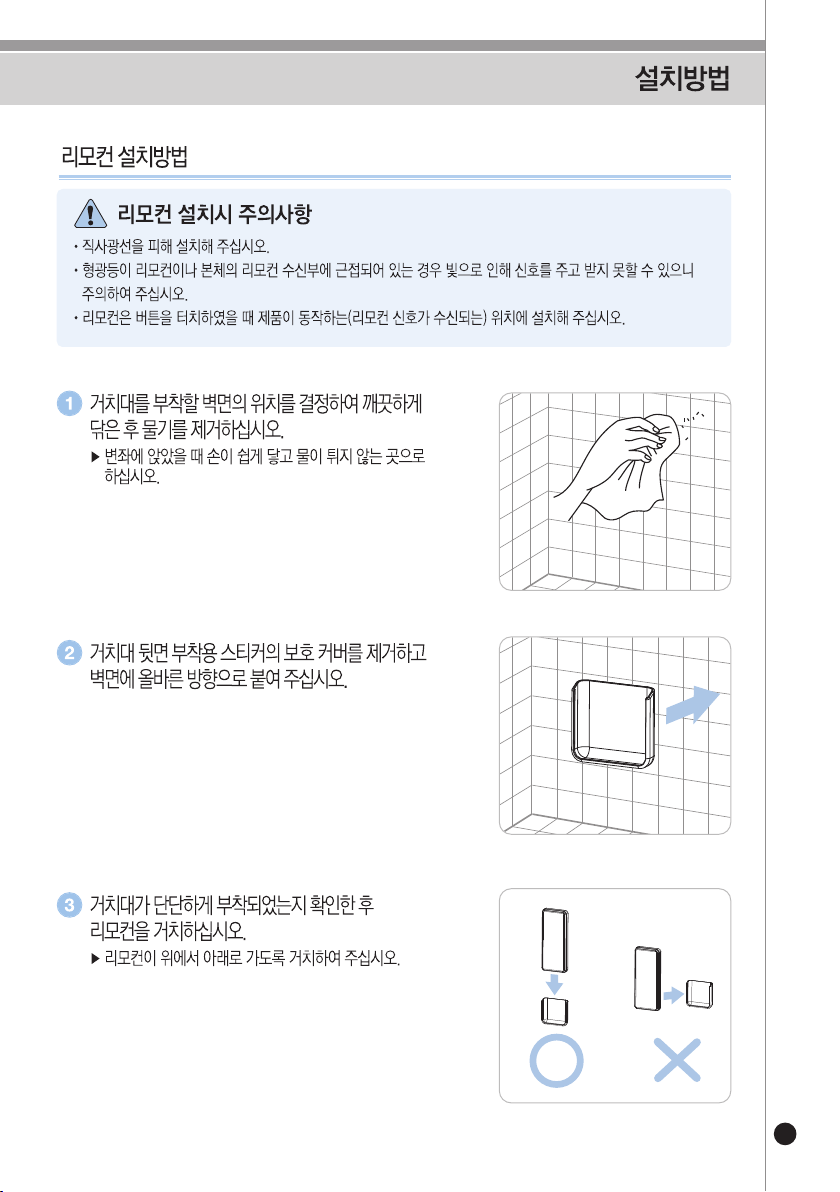
Avoid direct sunlight during installation.
If a fluorescent light is in the proximity of the remote control or the remote control reception panel on the main frame,
be careful as transmission of signals may be interfered with due to the light.
Install the remote control in a location where the product is able to be operated as soon as you press the buttons
(where the signals from the remote control can be received).
Precautions for Installing the Remote Control
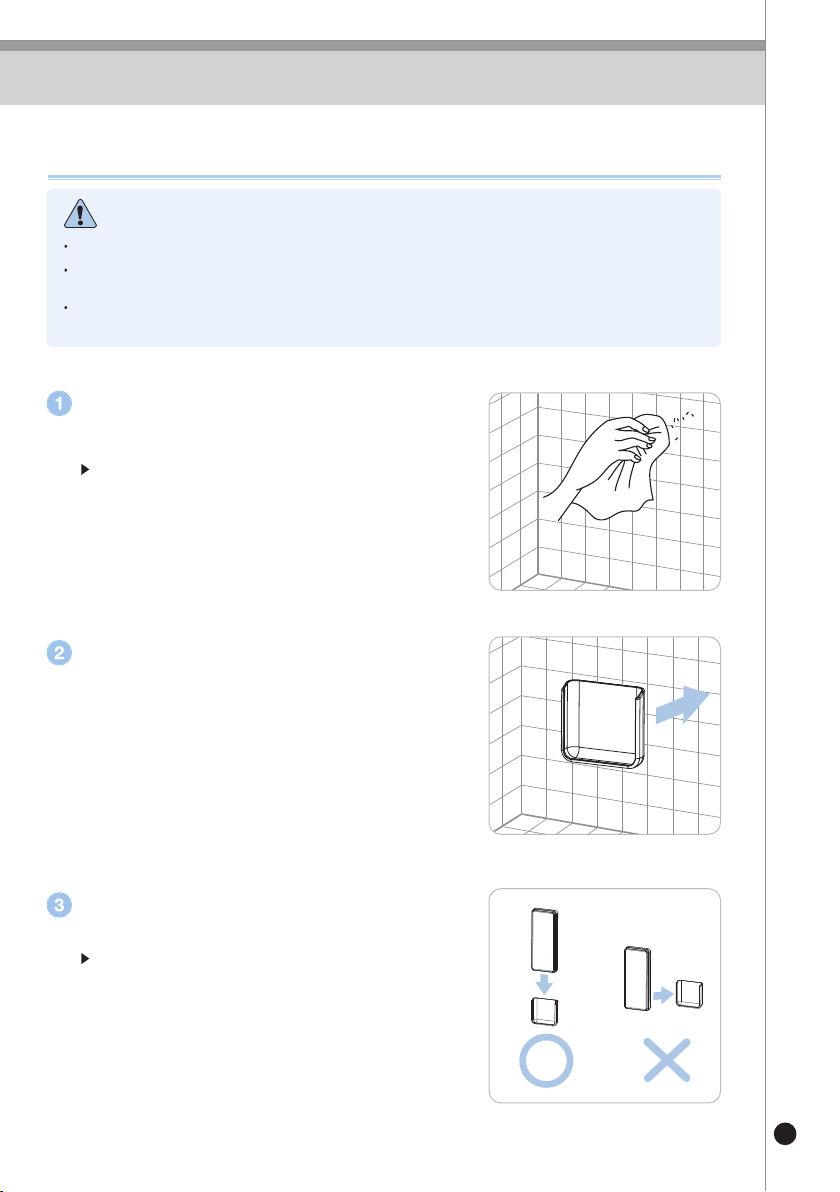
Determine the location on the wall where the
mount is to be attached and wipe the area cleanly
to remove any water or residue.
Remove the protective cover of the adhesive sticker
on the back of the mount and firmly press it on a
wall in the correct orientation.
Ensure the mount is securely attached to the wall,
then place the remote control inside.
Install in a location that is easily reachable when sat on the toilet
seat and where water is not splashed.
Install the mount in a position that allows the remote control
to be inserted from top to bottom.
www.cukooamerica.com
22
HOW TO INSTALL
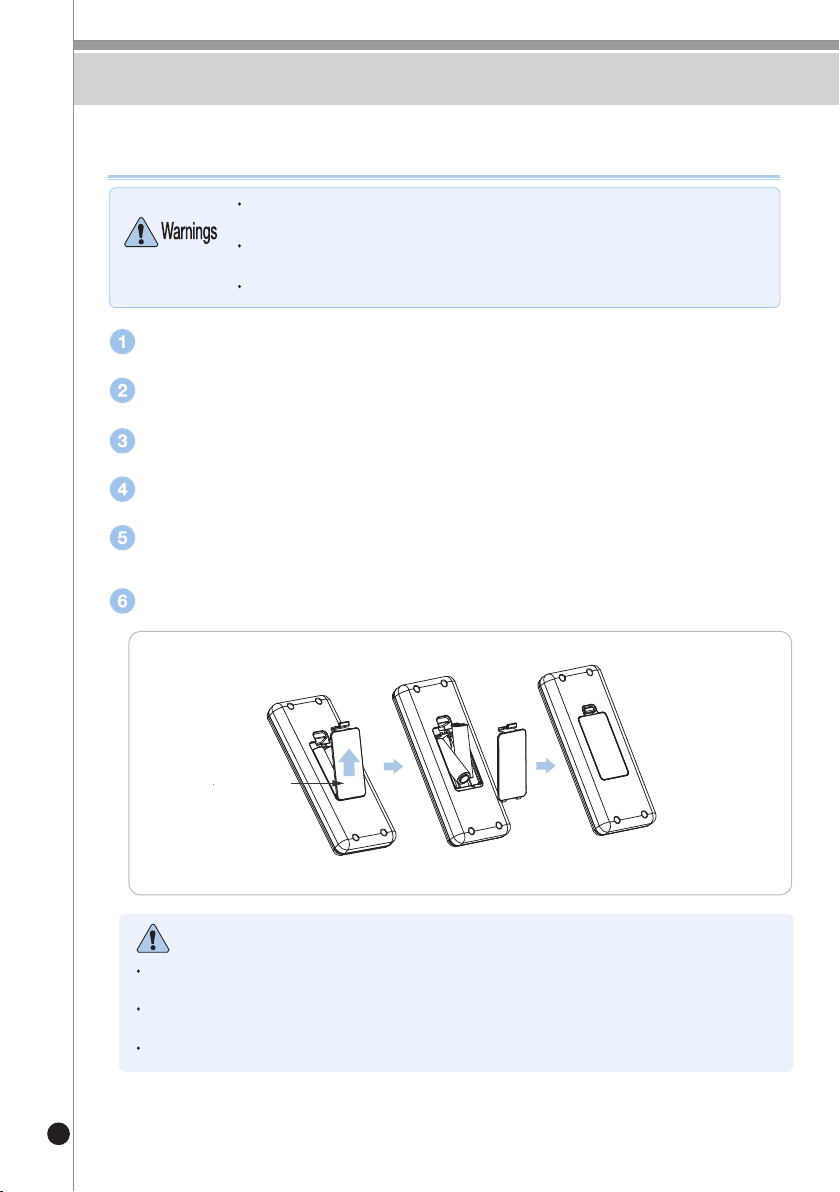
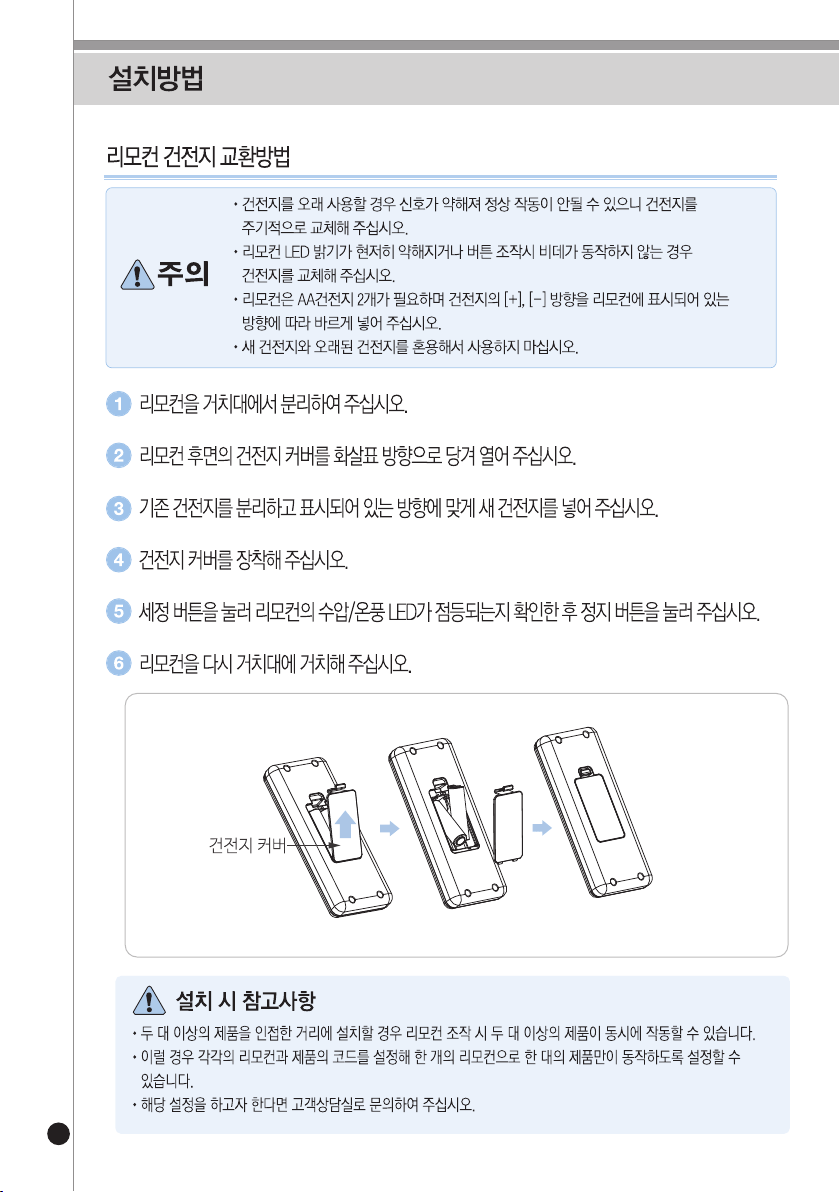
How to Replace Remote Control Batteries
If the remote control appears to have its signal weakened during operation, this signifies the
batteries need to be replaced soon.
The remote control requires two AA batteries. Always ensure they are placed correctly
inside the remote.
Do not use a new battery together with an old battery.
Remove the remote control from the mount.
Lift the battery cover on the back of the remote control in the direction of the arrow to open it.
Take out existing batteries and insert new batteries according to the direction marked.
Replace the battery cover to the back of the remote control.
To check if the batteries have been successfully replaced, press the CLEAN button.
Press the STOP button once the LED screen on the remote illuminates.
Reinsert the remote control into the mount.
Battery Cover
Check List for Installation
When operating a remote control while two or more products are installed at a close distance to each other,
multiple products may be activated simultaneously.
In such cases, it is possible to configure the code of each product and its remote control so that a single remote
control can activate a single product only.
If you wish to apply this setting, please contact our Customer Service Center.
23
AFTER INSTALLATION
ChECkliST bEfOrE uSE
www.cukooamerica.com
All parts throughout the manual need to be formatted the same--either Sentence Case or all lowercase
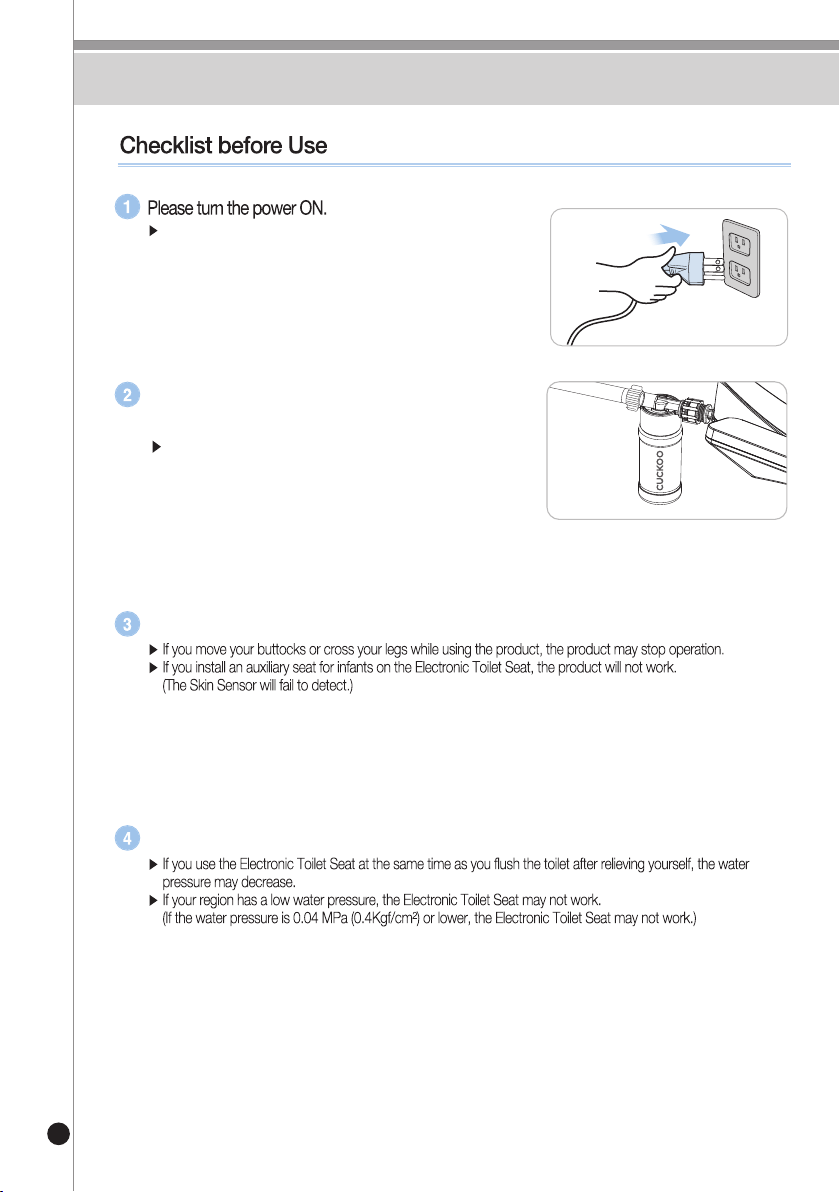
If the power supply lamp is not turned on after plugging in the power cord,
press any button on the control panel found on the main frame.
When power is supplied to the main frame, do not turn or move the main
frame as this may cause product malfunction.
Plug in the power cord to an available power outlet.
With your right hand in contact with the Seating Sensor Unit (with
the Seating Sensor Unit operating), press the Clean or the Bidet
button to check if the Nozzle works and water is sprayed. Here,
Cover the clean nozzle with your left hand to prevent
water from splashing.
24
BEFORE USE
Replace the waterworks filter et on a regular basis.
(CBT-IS1131REW, CBT-IS1131RRW)
Always sit on the center of the toilet seat. Never perch on the outer edge.
Ensure the water pressure is appropriate for use.
If the filter is blocked by foreign substances or the water
penetration rate is reduced as it nears the replacement
period, water supply into the product may not be active.
Plug the power cord into an available 120V AC outlet.
25
EXPLANATION OF FUNCTIONS OF CONTROL PANEL
www.cukooamerica.com
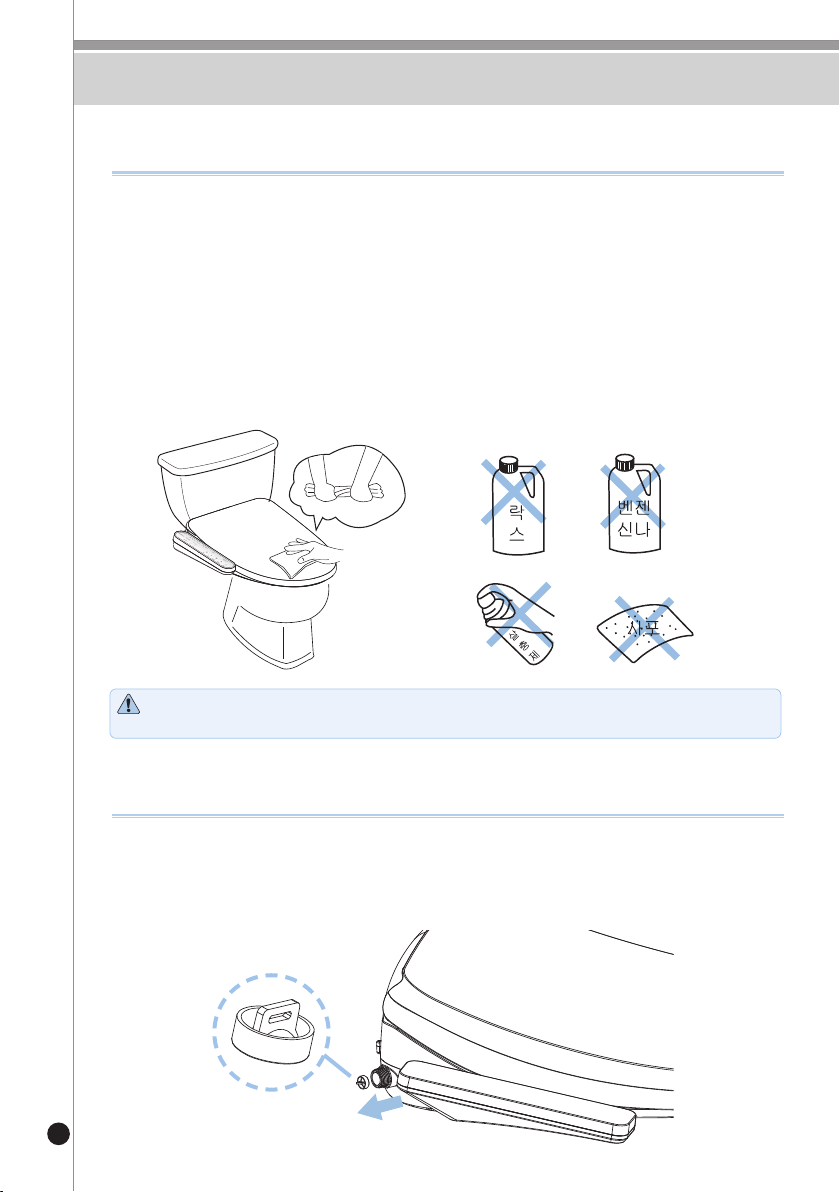
Always unplug the power cord before attempting to clean the bidet.
While cleaning, use a slightly damp cloth to wipe down. Do not use a dishwashing sponge,
benzene, thinner or any other harmful substances that could cause damage to the product.
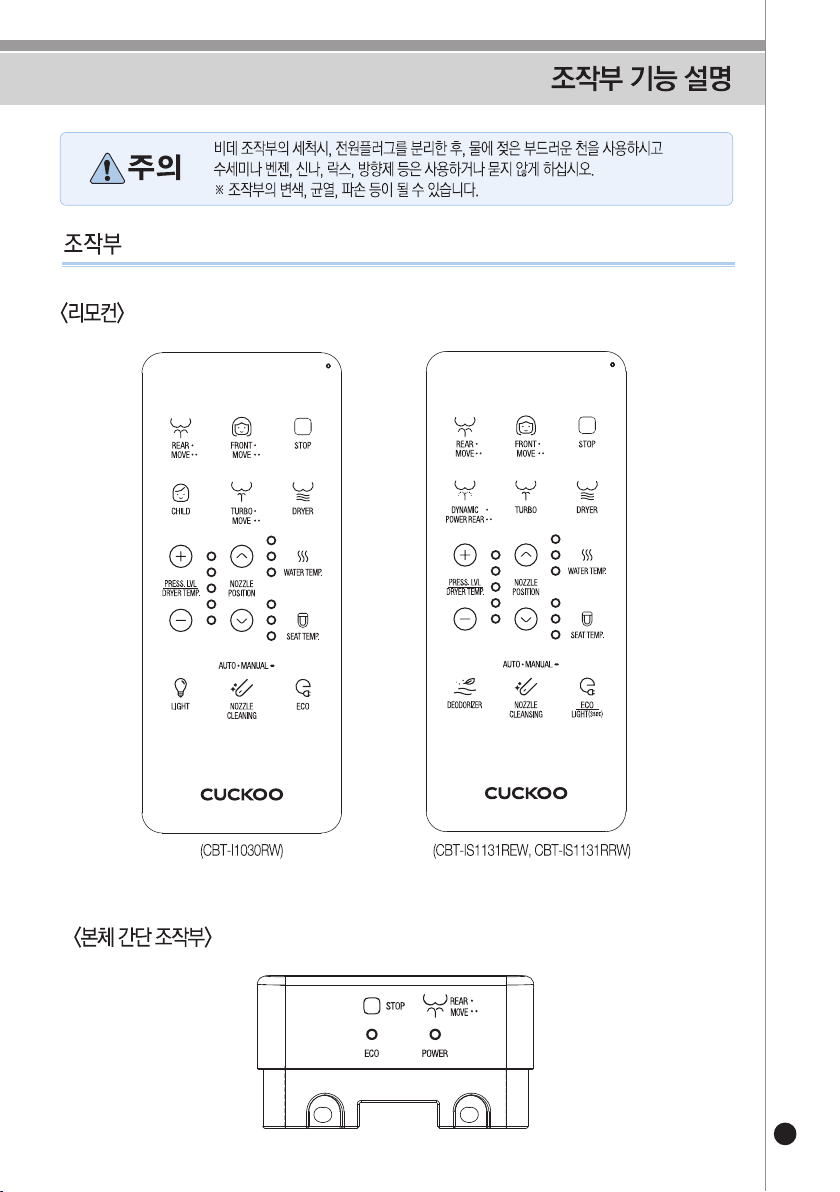
Control panel
< REMOTE CONTROL >
< CONTROL PANEL ON MAIN FRAME >
26
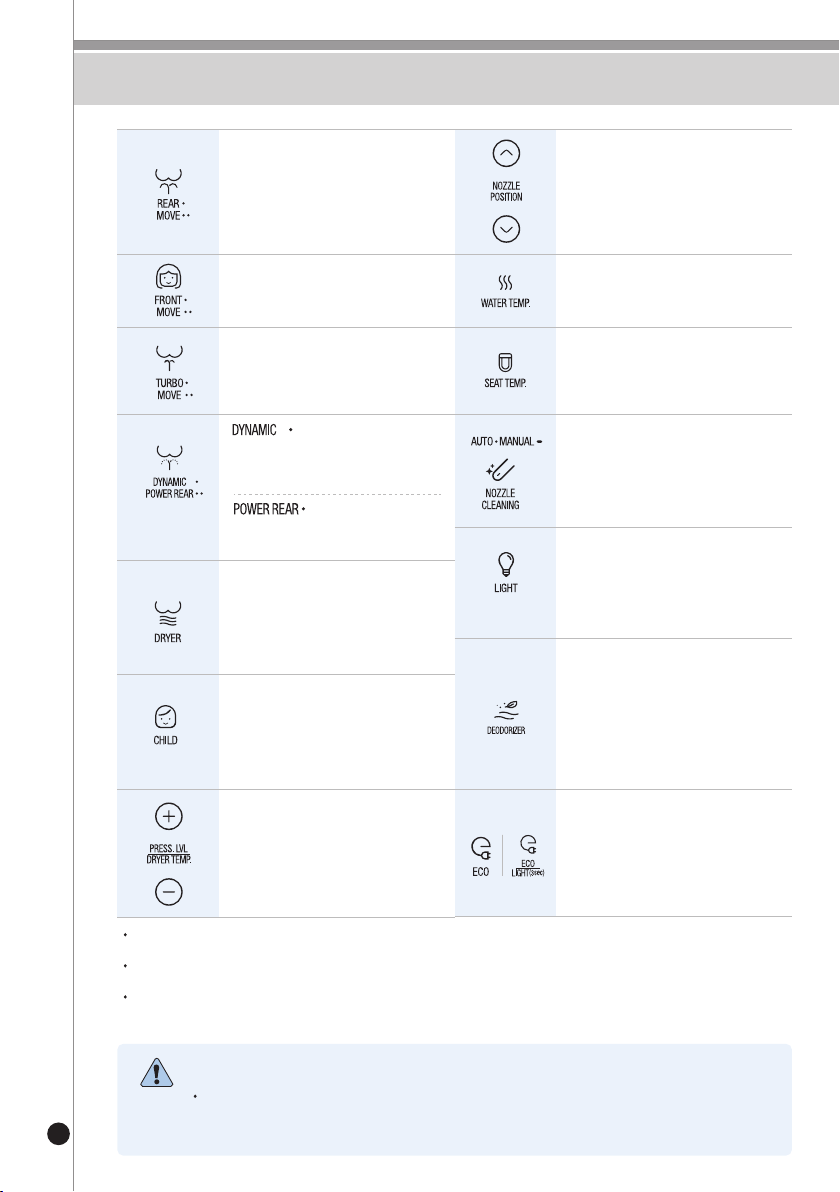
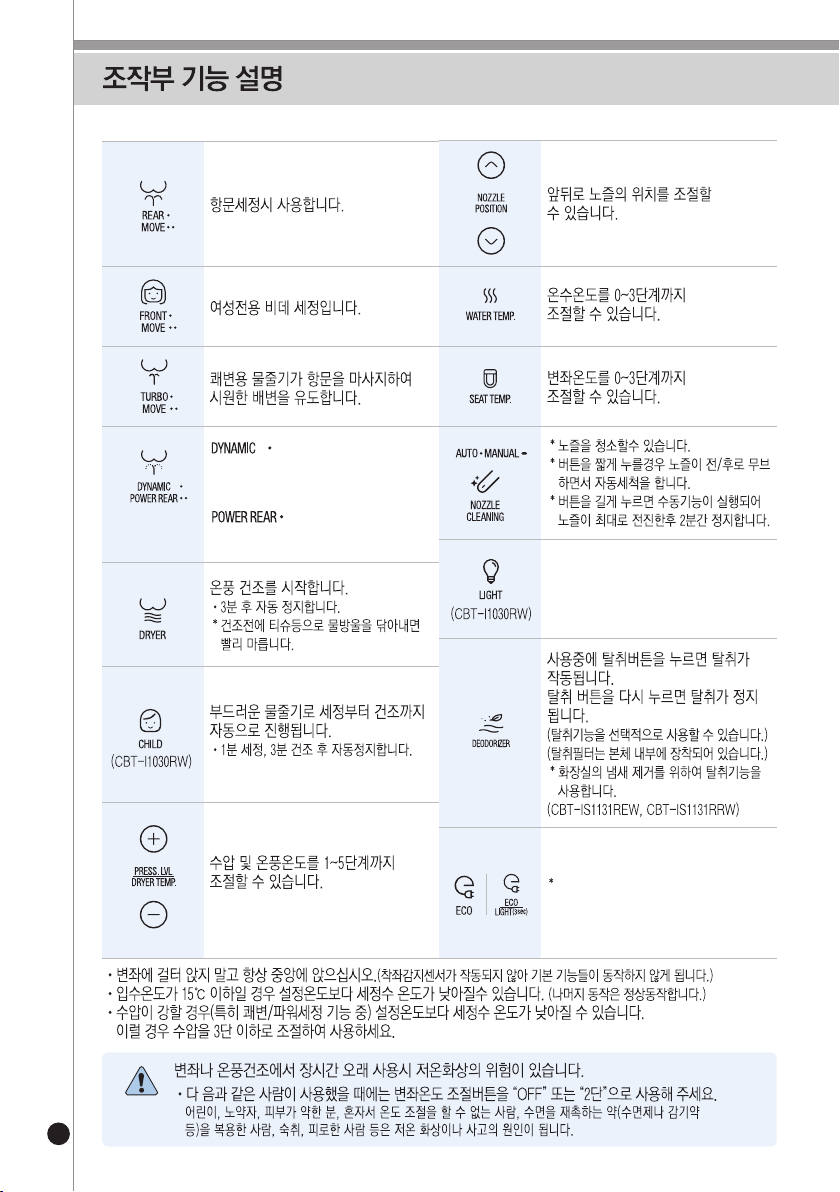
FUNCTIONS
Used when cleaning the anus
Always sit in the center of the toilet seat. Never perch or sit on the edge of the seat as the seating sensor will not be
activated properly.
If the water entry temperature is 15℃ or lower, the temperature of the cleaning water may become lower than the set
temperature (other operations work normally).
If the water pressure is strong (especially while using TURBO or POWER CLEAN function), the temperature of the
cleaning water may become lower than the set temperature.
In such cases, adjust the water pressure level to 3 or below for use.
If you stay seated on the seat or use the product in the hot air dry mode for a long time, you may get a
low-temperature burn.
When used by the following persons, please set the SEAT TEMP. button to "OFF" or "Level 2" for use.
When used by children, senior citizens, those with vulnerable skin, those who are unable to control their own body
temperatures, those who have taken sleep-inducing drugs (sleeping pills or cold medicine), those who are hungover
or fatigued, it may cause a low-temperature burn or an accident.
Cleaning for women
Turbo water streams massage the
anus to induce active and satisfying
bowel movements.
This mode is more powerful than
the default rinse mode.
This mode uses varied water pressure
and an effective sequence of settings
to ensure a deep clean.
Adjusts the seat temperature from
Level 0 to Level 3
Turns the mood lamp on when
pressed once.
Turns off the mood lamp with a
second press.
(differentiated by sound)
If the Deodorize button is pressed during
use, the deodorization function is activated.
Press while the bidet is in use to deodorize
Press once more to cease deodorization.
(The Deodorize function can be used selectively.)
(A deodorization filter is installed inside the main frame.)
* The Deodorize function is used to eliminate
bathroom odors.
(CBT-IS1131REW, CBT-IS1131RRW)
Press the button once to turn ON/OFF
the Power Save function. The ECO
function can be used by pressing the
button briefly.
*Press and hold the button for 3 seconds to use the
mood lamp function. If you press and hold the button
for 3 seconds once more, the mood lamp function is
canceled.(CBT-IS1131REW, CBT-IS1131RRW)
* Cleans the nozzle
* To move the nozzle back and forth for
automatic cleaning, press the
button briefly
* To move the nozzle all the way forward
for 2 minutes, press and hold the button
Adjusts the water temperature from
Level 0 to Level 3
Adjusts the nozzle's position from
front to rear
Initiates hot air drying
• Automatically shuts off after 3 minute
* Dries quicker if you wipe off the
waterdrops with a tissue,
etc. before drying.
Emits soft water streams to
automatically proceed from
cleaning to drying
• Automatically stops after 1 minute of
cleaning and 3 minutes of drying
(CBT-I1030RW)
Adjusts the water pressure and
hot air temperature from
Level 1 to Level 5
(CBT-IS1131REW,
CBT-IS1131RRW)
(CBT-I1030RW)
27
HOW TO USE
www.cukooamerica.com
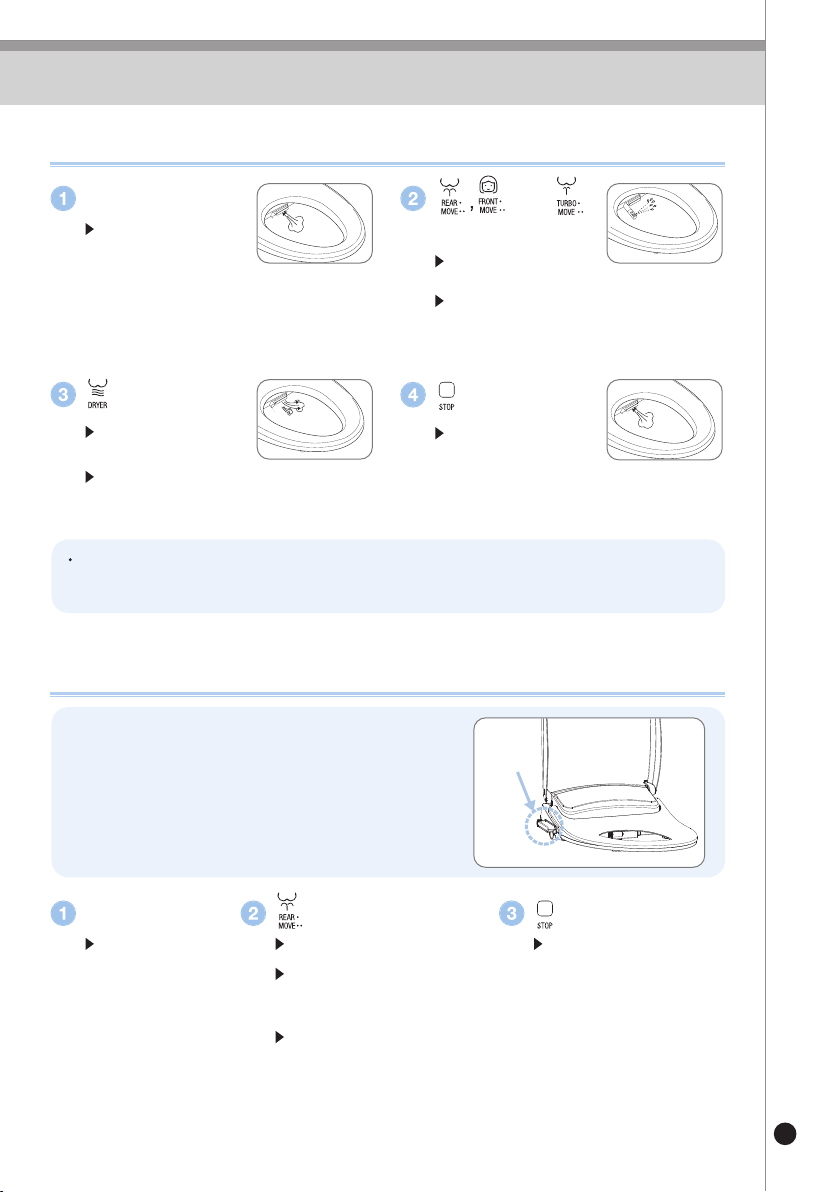
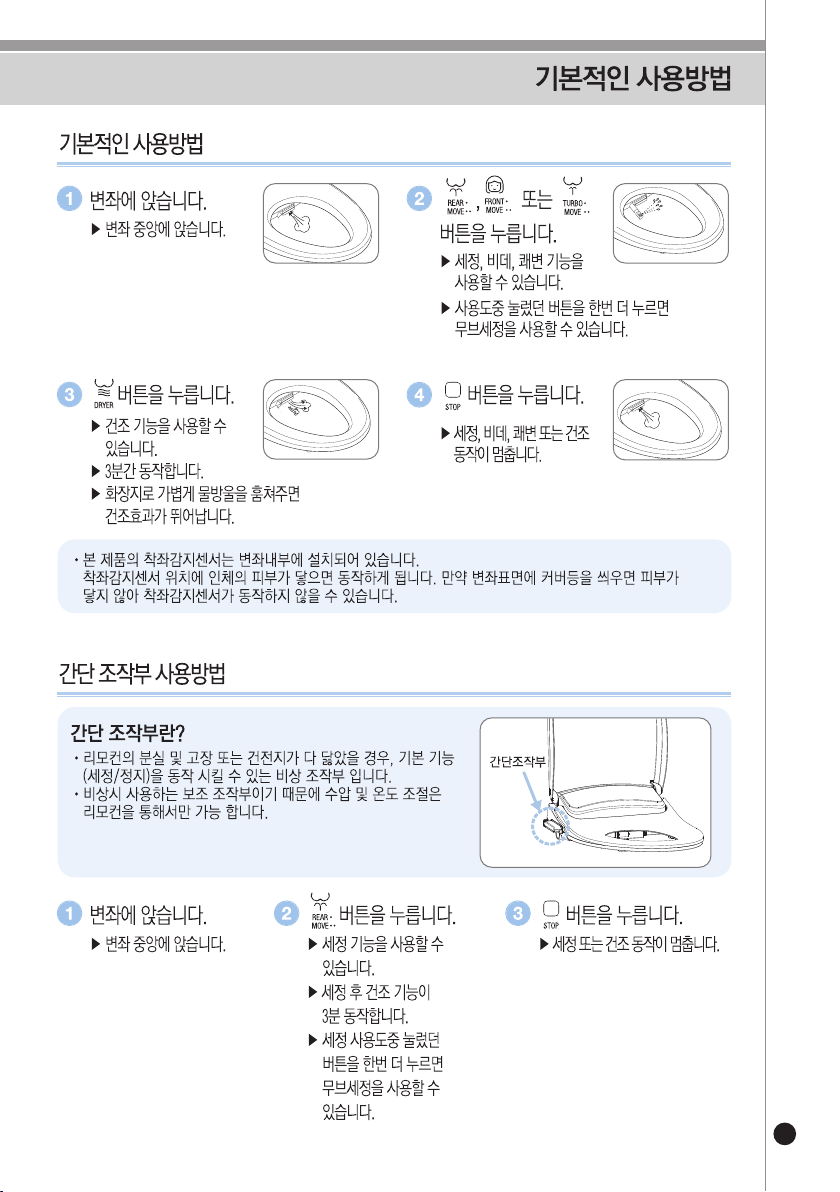
Basic method of use
SIMPLE CONTROL PANEL ON THE MAIN FRAME
Sit on the seat.
Press the button.
Press the STOP
button.
Sit in the center of the toilet
seat to activate the sensor.
Press the DRYER button to
begin drying.
Sit on the seat.
Sit on the center of the
toilet seat.
Press the CLEAN button. Press the STOP button.
CLEAN function can be used. CLEAN or DRYER operation stops.
After cleaning, the bidet
will automatically begin the DRYER
function for 3 minutes then shut off.
If the button that was pressed
during CLEAN is pressed one
more time, MOVE CLEAN can
be used.
• The simple control panel can activate basic functions (CLEAN/STOP) in the
case that the remote control is lost, broken, or the batteries have been
depleted.
• Due to its limited functions, the temperature control and water pressure
cannot be adjusted using the simple control panel.
Simple
Control Panel
The seating sensor of this product is installed inside the seat.
It activates as soon as your skin comes in contact with the seat at the location of the seating sensor. If a cover, etc. is
applied over the surface of the seat, the skin will not touch the seat, which may not activate the seating sensor.
The initiated function
will stop.
The bidet will carry out the function for 3 minutes
before automatically shutting off.
Press the button.
or
Press the desired button to
initiate the cleaning function.
If the button that was pressed during use is pressed
one more time, MOVE CLEAN can be used.

28
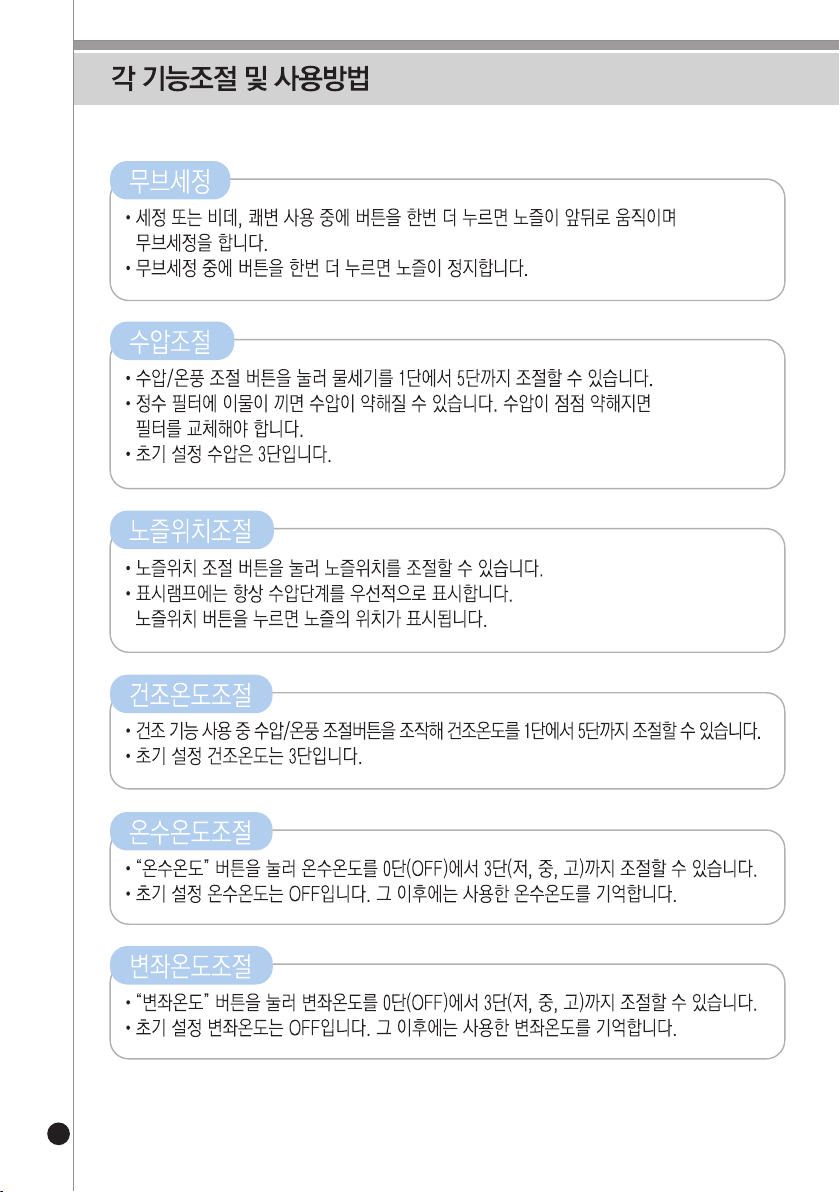
HOW TO USE EACH FUNCTION
MOVE CLEAN
• If the button is pressed one more time while CLEAN, BIDET or TURBO is in use, the nozzle
moves back and forth to perform MOVE CLEAN.
• If the button is pressed one more time during MOVE CLEAN, the nozzle stops.
WATER PRESSURE CONTROL
• You may change the strength of the water stream from Level 1 to 5 by pressing the PRESS.
LVL/DRYER TEMP. button.
• If foreign substances become stuck on the waterworks filter, the water pressure may
become weak. If the water pressure continues to weaken, the filter needs to be replaced.
• The default water pressure level is Level 3.
NOZZLE POSITION CONTROL
• You can change the nozzle position by pressing the NOZZLE POSITION button.
• The display lamp preferentially shows the water pressure level at all times.
• When the NOZZLE POSITION button is pressed, the position of the nozzle is displayed.
DRYER TEMPERATURE CONTROL
• You may change the drying temperature from Level 1 to 5 by pressing the PRESS.
LVL/DRYER TEMP. button while the DRYER function is in use.
• The default drying temperature level is Level 3.
HOT WATER TEMPERATURE CONTROL
• You may change the hot water temperature from Level 0 (OFF) to the three levels
(Low, Medium, High) by pressing the "WATER TEMP." button.
• The default hot water temperature level is set to OFF. After the hot temperature has been
set once, the chosen level will then be automatically set as the default temperature.
SEAT TEMPERATURE CONTROL
• You may change the seat temperature from Level 0 (OFF) to the three levels
(Low, Medium, High) by pressing the "SEAT TEMP." button.
• The default seat temperature level is set to OFF. After the seat temperature has been
set once, the chosen level will then be automatically set as the default temperature.
29
HOW TO CONTROL AND USE EACH FUNCTION
www.cukooamerica.com
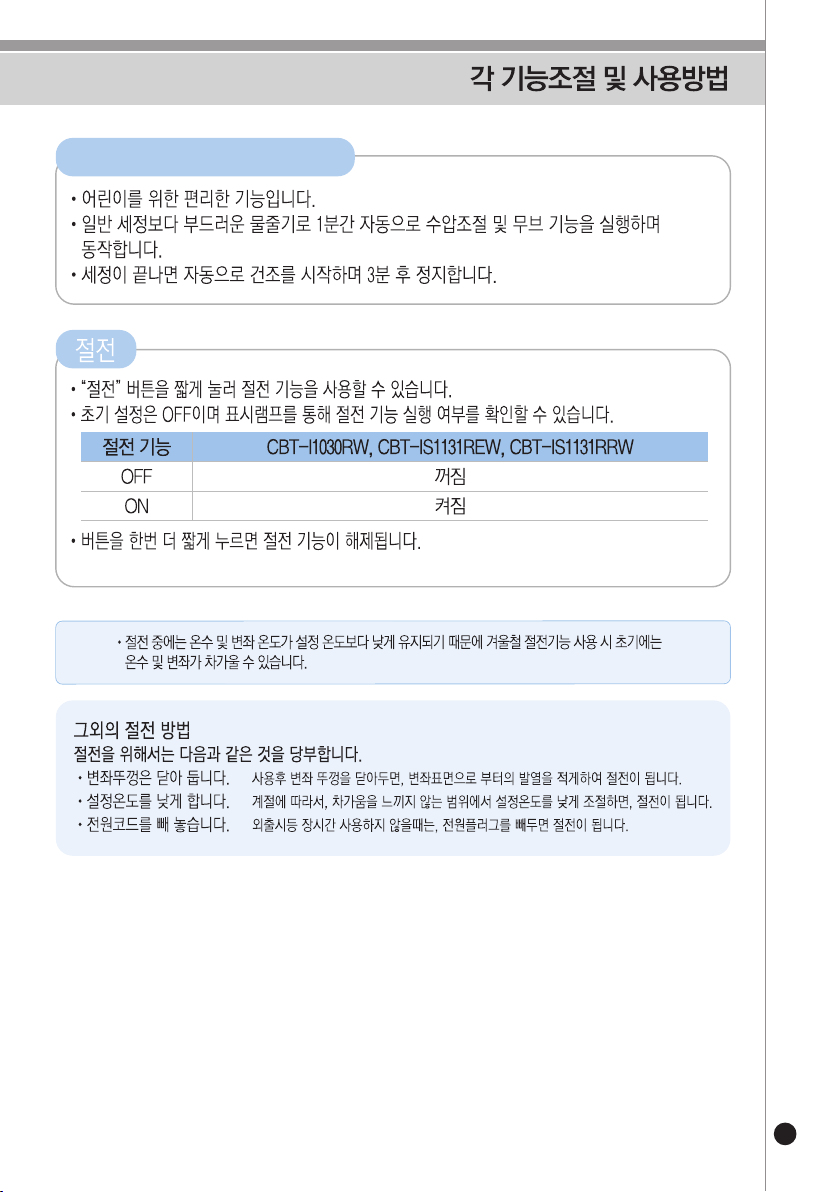
CHILD (CBT-I1030RW)
• This is a convenient function for children.
• It emits softer water streams than typical cleaning and is activated for 1 minute during w
hich it executes automatic water pressure control and MOVE function.
• Once cleaning is complete, it automatically starts drying and stops it after 3 minutes.
ECO
• The ECO function can be used by pressing the "ECO" button briefly.
• The initial setting is in OFF and you can check whether or not the ECO function is activated
through the display lamp.
Other power-saving measures
To save power, the following are recommended.
• Keep the seat cover closed. If the seat cover is closed after use, less heat is generated from the surface
of the seat to save power.
• Set a low temperature. It saves power if the temperature is set as low depending on the season and
to the extent that you do not feel cold.
• Keep the power cord unplugged. When you go out or do not plan to use the product for a long period,
unplugging the power plug saves power.
• In the ECO mode, the hot water and seat temperatures are maintained lower than the set
temperature so, when using the ECO mode in wintertime, the water and seat may be cold at first.
• If you press the button briefly one more time, the ECO function is deactivated.
30
HOW TO CONTROL AND USE EACH FUNCTION
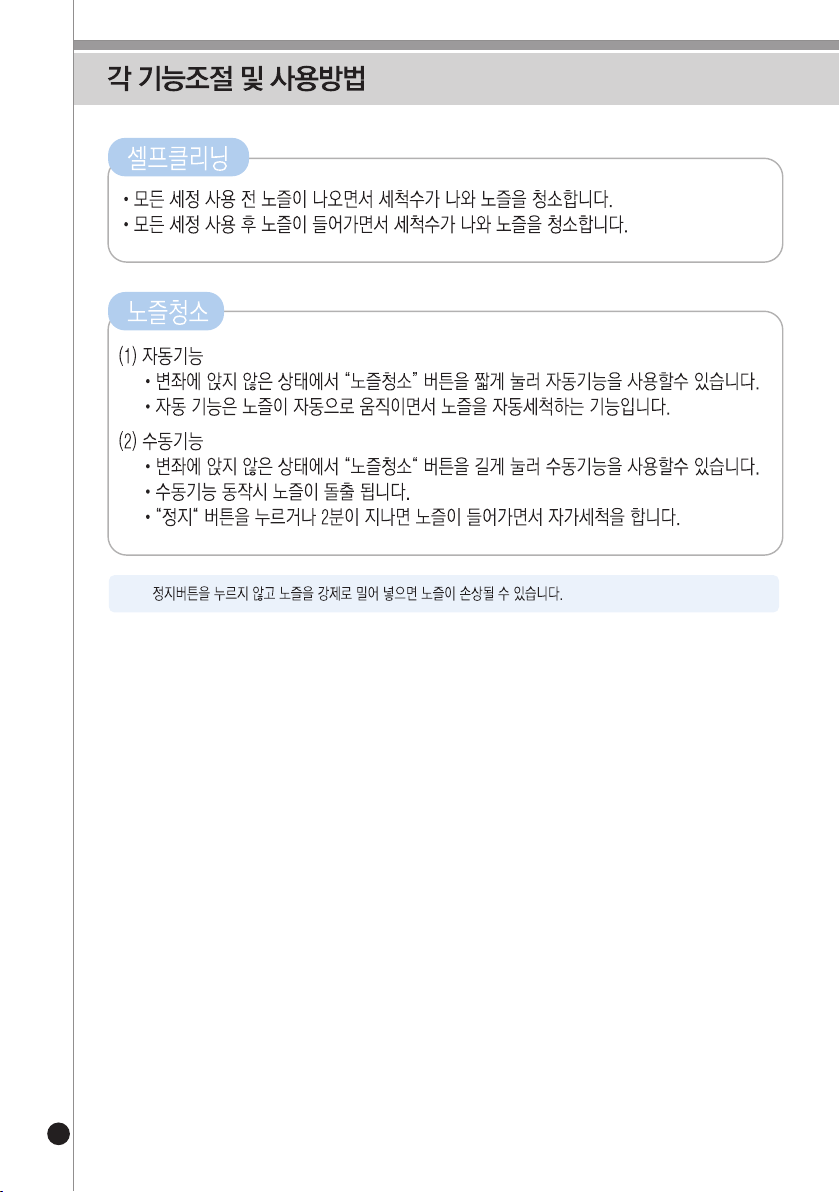
SELF-CLEANING
• Before every use of cleaning, the nozzle comes out and cleaning water is emitted to
clean the nozzle.
• After every use of cleaning, the nozzle goes in and cleaning water is emitted to
clean the nozzle.
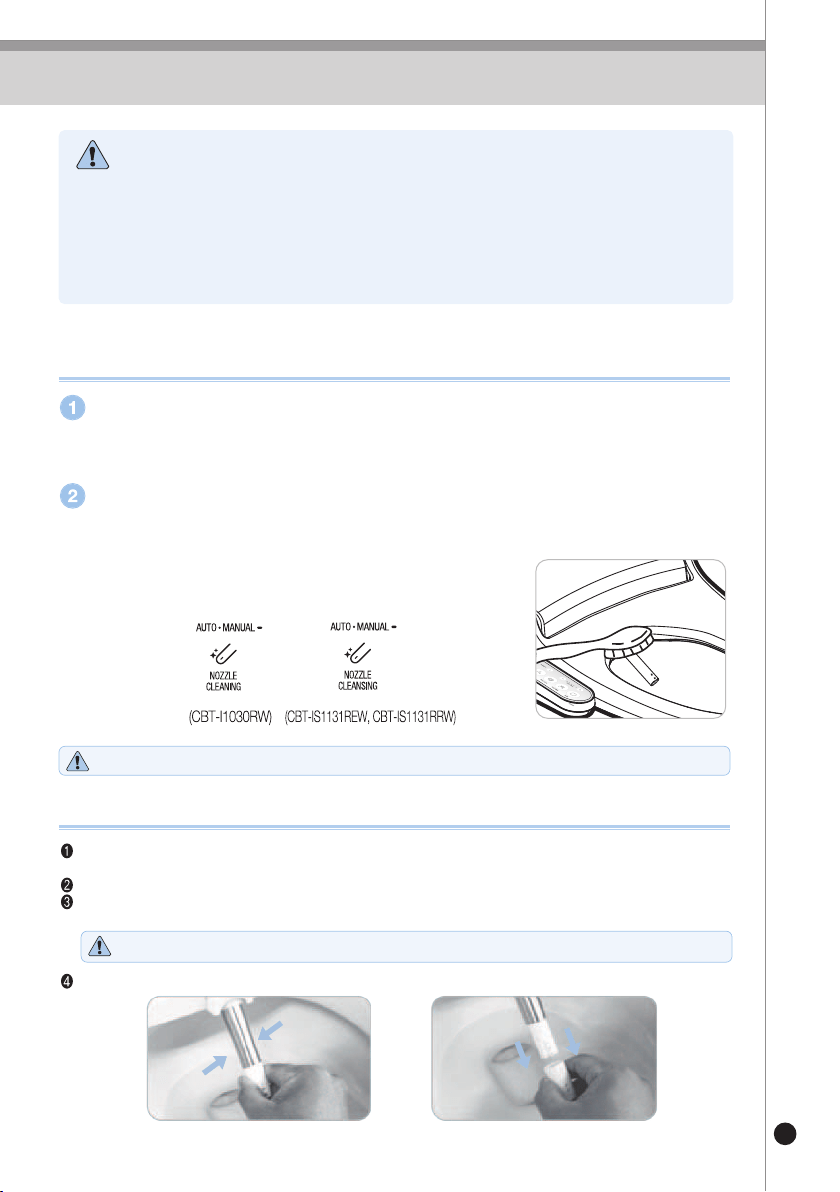
NOZZLE CLEANING
(1) Automatic function
• While you are not seated on the seat, press the ""NOZZLE CLEANING"" button briefly
to use the automatic function.
• In the automatic function, the nozzle automatically moves for automatic cleaning
of the nozzle.
(2) Manual function
• While you are not seated on the seat, press and hold the "NOZZLE CLEANING" button
to use the manual function.
• When the manual function is activated, the nozzle comes out.
• Once the "STOP" button is pressed or 2 minutes pass by, the nozzle goes in
for self-cleaning.
Pushing the nozzle in by force without pressing the STOP button may damage the nozzle.
31
HOW TO CLEAN
www.cukooamerica.com
•Use of a sharp brush or a coarse dishwashing sponge for cleaning may cause scratches and/or damage to the product.
•Do not use sharp brushes or coarse dishwashing sponges to clean the bidet in order to prevent scratches or
damage to the product.
•Refrain from spraying water on the nozzle and hot air inlet as this may cause electrical shock or product malfunction.
•Do not use a dishwashing sponge, benzene, thinner or other harmful detergents when cleaning the control panel.
Always ensure the power plug is removed from the outlet before attempting to clean.
Cleaning Precautions
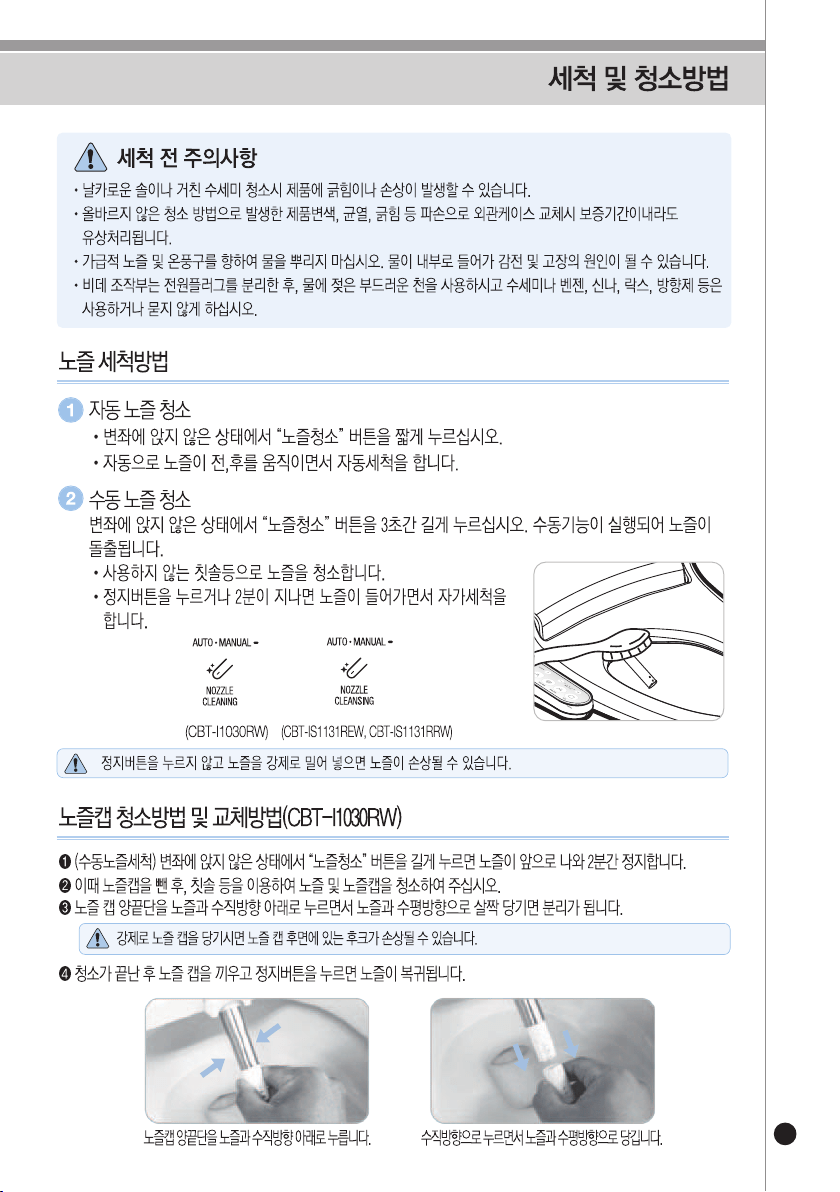
How to Clean the Nozzle
How to Clean & Replace Nozzle Cap (CBT-I1030RW)
Automatic nozzle cleaning
• While you are not seated on the seat, press the "NOZZLE CLEANING" button briefly.
• The nozzle automatically moves back and forth for automatic cleaning.
The nozzle will automatically move back and forth for automatic cleaning
While you are not seated on the seat, press and hold the "NOZZLE CLEANING" button for 3 seconds.
The manual function will be activated to protrude the nozzle.
• Clean the nozzle with a toothbrush, etc. you do not use.
• Once the STOP button is pressed or 2 minutes elapses,
the nozzle goes in for self-cleaning.
(Manual nozzle cleaning) If you press and hold the "NOZZLE CLEANING" button without sitting on the seat,
the nozzle moves forward and stops for 2 minutes.
At this time, take out the nozzle cap and use a toothbrush, etc. to clean both the nozzle and nozzle cap.
The nozzle cap will be separated from the nozzle if you press both of its ends and the nozzle downward in the
vertical direction and then pull the cap slightly in the horizontal direction of the nozzle.
After cleaning, insert the nozzle cap and press the STOP button to return the nozzle.
Press both ends of the nozzle cap and the
nozzle downward in the vertical direction.
While pressing them down, pull the cap
in the horizontal direction of the nozzle.
Pushing the nozzle in by force without pressing the STOP button may damage the nozzle.
If you pull the nozzle cap by force, the hook located on the rear of the nozzle cap may be damaged.
32
HOW TO CLEAN
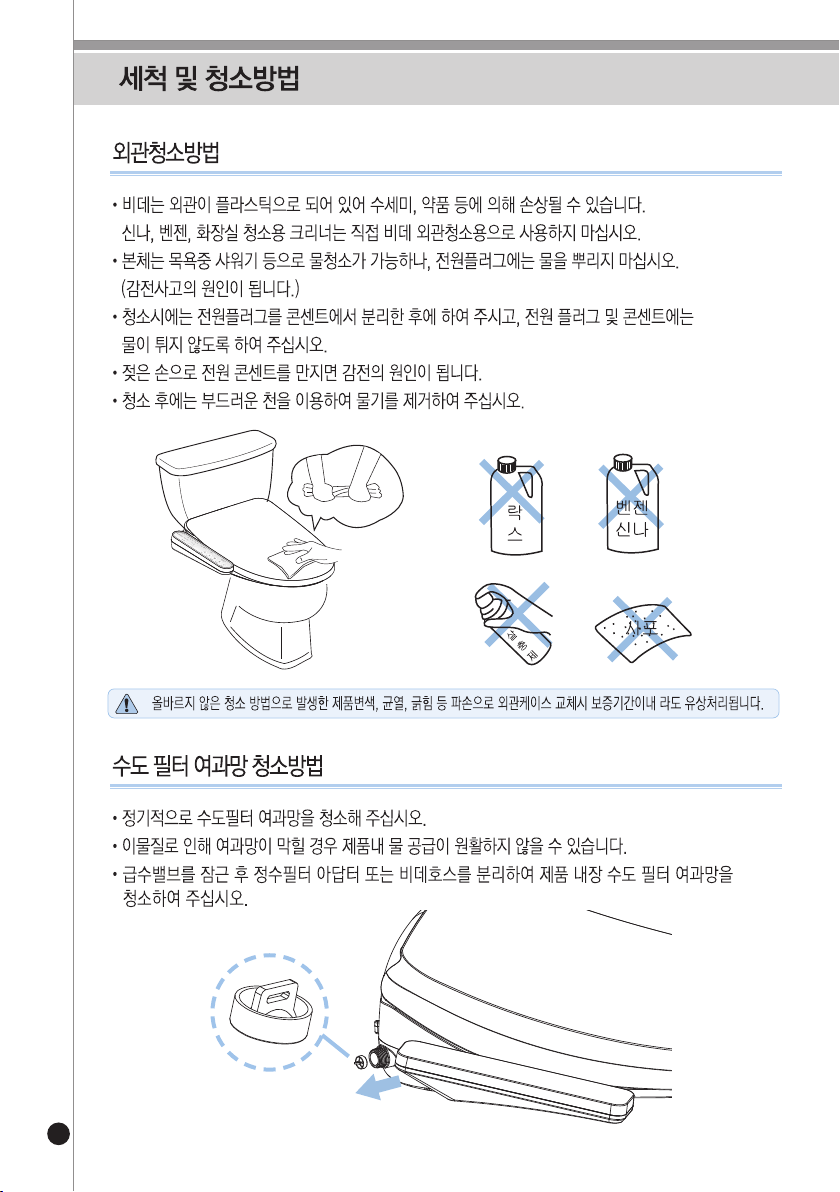
How to Clean the Exterior
• To prevent damage to the bidet, do not clean with a dishwashing sponge or harmful
cleaning detergents.
Do not use a thinner, benzene and other cleaners for bathrooms to clean the exterior
of the bidet directly.
• The main frame can be cleaned with water, for instance, through a shower head during a
shower or bath Ensure the power plug does not come into contact with water or liquid to
avoid electrical shock.
• Always ensure the power plug has been removed from the outlet before attempting to clean.
• Touching a power outlet with wet hands may cause electric shock.
• After cleaning, use a soft cloth to remove the water.
How to Clean Waterworks Filter Net
• Clean the filter on a regular basis with regular use.
• Lock the water supply valve and separate the waterworks filter adater or bidet hose to clean the
waterworks filter net installed in the product.
Damage including discoloration, crack and scratch on the exterior case caused by an incorrect cleaning method
will incur a paid replacement even if the warranty period has not expired yet.
33
HOW TO DISASSEMBLE THE PRODUCT & STORE
www.cukooamerica.com
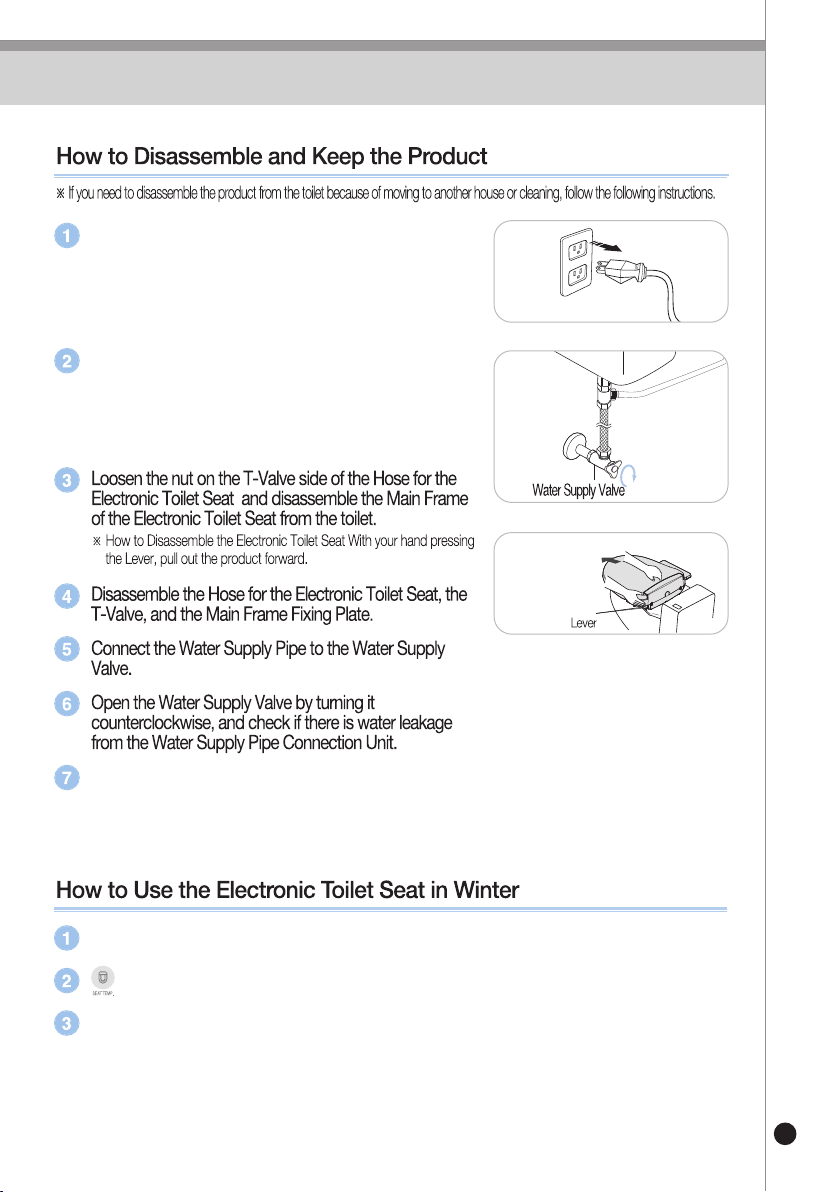
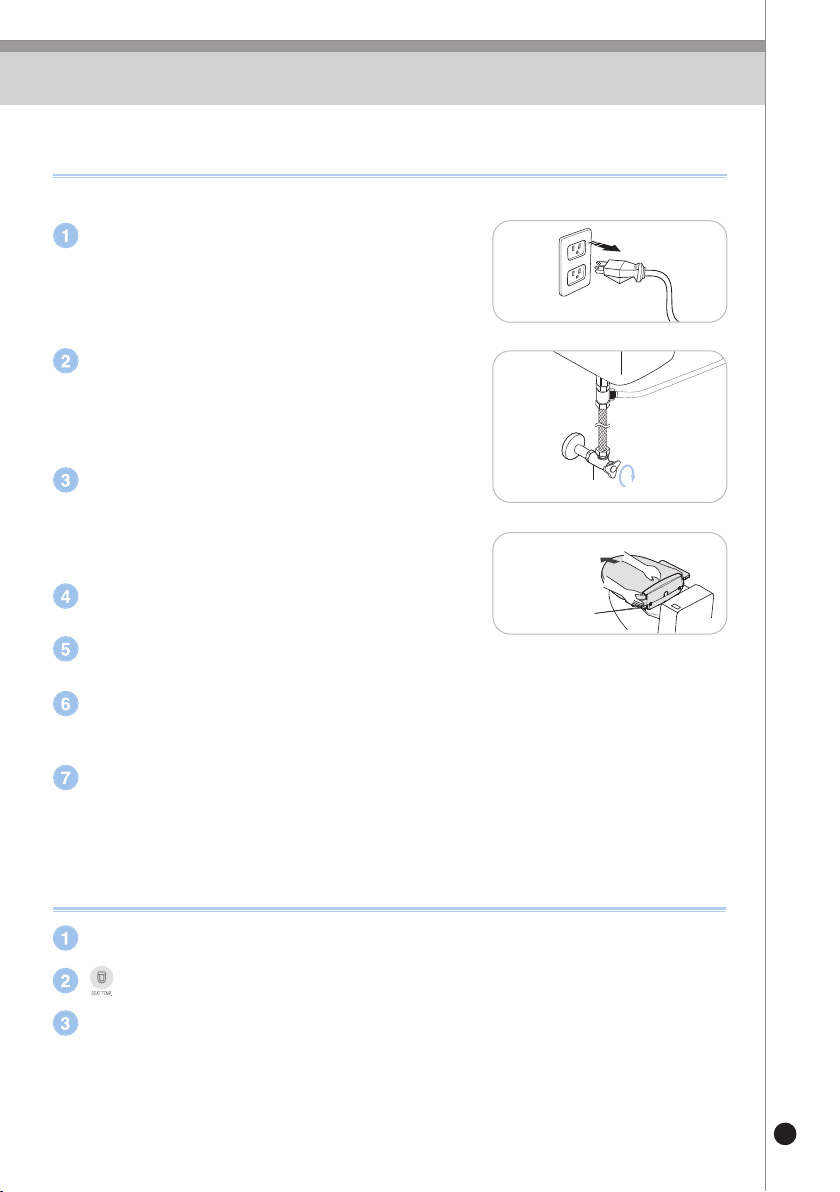
Remove the power plug from the outlet.
Close the water supply valve by turning it clockwise
until loose.
Replace the old toilet seat onto the toilet with the saved nuts.
Plug the power cord into an available 120V AC outlet.
If storing the bidet during winter, do not store the bidet outside and be sure to keep in a warm,
dry area.
Set the SEAT TEMP. to "Low"
② Pull forward
① Press the lever

TROUBLESHOOTING
34
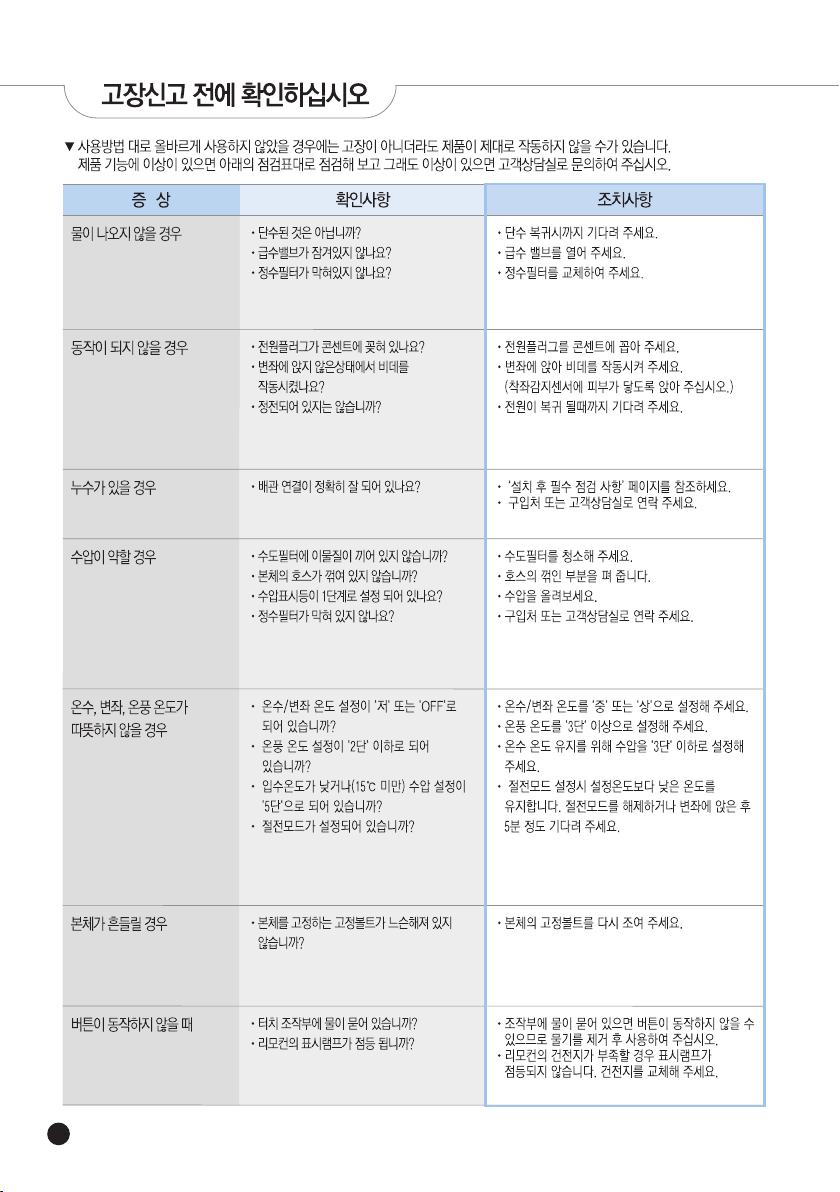
If you're running into any issues while using your bidet, refer to the below troubleshooting chart to properly assess
and correct the problem.
If the problem perists, contact our Customer Service Center.
Problem
Water is not being sprayed
out when the bidet is
plugged in and a function
is initiated
• Is the water flow shut off?
• Is the water supply valve locked?
• Is the waterworks filter blocked?
• Wait until the water flow shut-off process ends.
• Open the water supply valve.
• Replace the waterworks filter.
The bidet is not operating
properly/turning on
• Is the power plug plugged into a
working outlet?
• Was the bidet activated while you are
not sitting down on the seat?
• Has there been a blackout?
• Plug the power cord into an available
120V AC outlet.
• Sit on the center of the toilet seat to activate the
seating sensor. The bidet will not function if the
sensor cannot detect you.Wait to operate the
bidet until the blackout ceases.
• Please wait until the power is recovered.
There is a water leakage
• Is the pipe connection properly made? • Refer to "Before Installation" to ensure the water
supply was connected to the bidet properly.
• Contact the location of purchase or our
Customer Service Center.
The water pressure is
too weak
• Are foreign substances stuck on the
waterworks filter?
• Is the hose of the main frame bent?
• Is the water pressure display lamp set to
Level 1?
• Is the waterworks filter blocked?
• Clean the waterworks filter.
• Smooth out the bent part of the hose.
• Try raising the water pressure.
• Contact the location of purchase or our
Customer Service Center.
The water temperature,
the seat temperature,
or air temperature are
not warm enough
• Is the hot water or seat temperature set to
"Low" or "OFF"?
• Is the hot air temperature set to
"Level 2" or below?
• Is the water entry temperature low
(below 15℃) or the water pressure
set to "Level 5"?
• Is the ECO mode turned on?
• Set the hot water or seat temperature to either
"Medium" or "High".
• Set the hot air temperature to
"Level 3" or higher.
• To maintain the temperature of hot water,
set the water pressure to "Level 3" or below.
• In the ECO mode, the temperature is
maintained lower than the set temperature.
Either deactivate the ECO mode or sit on the
seat and wait for about 5 minutes.
The main frame shakes
while in use
• Are the fixing bolts that fix the main
frame loose?
Re-fasten the fixing bolts of the main frame.
The buttons do not
operate when pressed
• Is there any water on the touch
control panel?
• Is the display lamp of the remote
control lit?
• If any water gets onto the control panel,
buttons may not work so be sure to remove
any water first before use.
• If the batteries of the remote control are too low,
the display lamp will not be lit.
Please replace the batteries.
Possible Issues Corrective Action

35
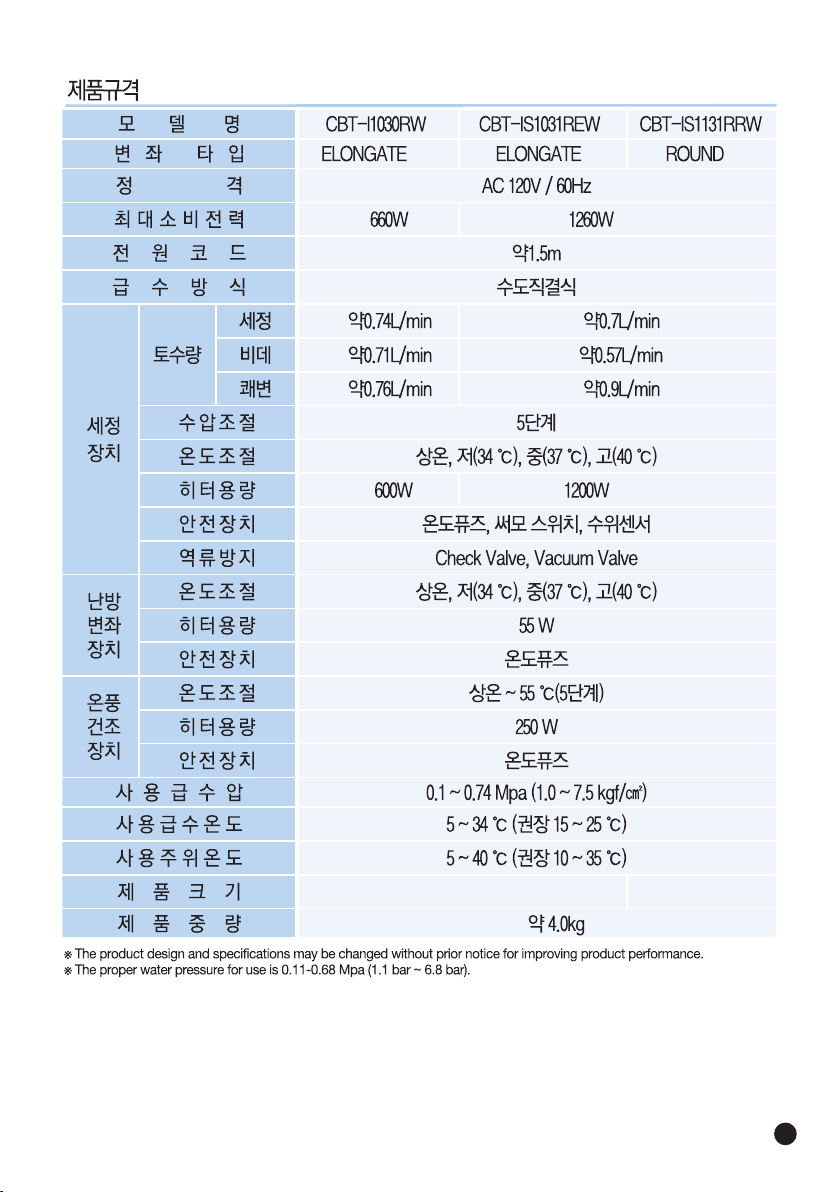
Model name
CBT-I1030RW CBT-IS1031REW CBT-IS1131RRW
ELONGATED ELONGATED ROUND
Seat type
Rating 120V AC / 60Hz
Maximum power consumption 660W 1,260W
Power cord
Water supply method Direct connection water supply
Cleaning
device
Water
volume
CLEAN
About 0.74L/min
About 1.5m
About 0.7L/min
BIDET
About 0.71L/min About 0.57L/min
TURBO About 0.76L/min About 0.9L/min
Water pressure control
5 levels
Temperature control
Room temperature, Low (93.2°F / 34 ℃), Medium (98.6°F / 37℃), High (104F / 40 ℃)
Heater capacity
600W 1,200W
Safety device
Temperature fuse, thermo switch, water level sensor
Reverse-current prevention
Check Valve, Vacuum Valve
Seat
heating
device
Temperature control
Room temperature, Low (93.2°F / 34 ℃), Medium(98.6°F / 37℃). High(104F / 40 ℃)
,
Heater capacity
55W
Safety device
Temperature fuse
Hot air
drying
device
Temperature control
Room temperature - 131°F / 55 ℃ ( 5 levels)
Heater capacity
250W
Safety device
Temperature fuse
Water supply pressure used 0.1 ~ 0.74Mpa (1.0 ~ 7.5 kgf/㎠)
Water supply temperature used
41 - 93.2 °F (recommendation: 59 - 77 °F) / 5 - 34 ℃ (recommendation: 15 - 25 ℃)
Ambient temperature usage
41 - 104 °F (recommendation: 50 - 95 °F) / 5 - 34 ℃ (recommendation: 15 - 25 ℃)
Product size
16.9 × 21 × 6.4 Inch /
430.5 × 534 × 162mm
16.9 x 19.4 x 6.4 inch /
430.5 x 493.9 x 162mm
Product weight About 8.8 lbs / 4.0kg
※ The product design and specifications may be changed without prior notice for improving product performance.
※ The proper water pressure for use is 0.11-0.68 Mpa (1.1 bar ~ 6.8 bar).
Product Specifications
어린이를 생각하는 비데(CBT-I1030RW)

www.cukooamerica.com
37
사용하기전에
안전상의 경고
각 부분의 명칭 / 부속품 안내
38~41
42
사용할때
설치 전 확인 사항
설치방법
설치 후 필수 점검 사항
사용 전 확인 사항
조작부 기능 설명
기본적인 사용방법
각 기능조절 및 사용방법
세척 및 청소방법
제품 분리방법 및 보관방법/겨울철 비데 사용방법
43
44~48
49
50
51~52
53
54~56
57~58
59
고장신고전에
고장신고 전에 확인하십시오
60
서비스안내
제품 규격
61
CONTENTS(목차)
38
120V
교류 120
120V
39
www.cukooamerica.com

40
41
www.cukooamerica.com
42
고무너트 (2개)
각 부분의 명칭 / 부속품 안내
고정와샤 (2)
(CBT-IS1131REW,
CBT-IS1131RRW)
(CBT-I1030RW)
(CBT-IS1131REW, CBT-IS1131RRW)
43
설치 전 확인사항
직사광선이나 전열 기구를 피해 주십시오.
▶ 화재 및 제품 변색이 발생 할 수 있습니다.
▶ 직사광선으로 인해 리모컨 조작이 원활하지 않을 수
있습니다.
1
변기의 크기를 확인해 주십시오.
1) 변기 길이 490mm 이상
물탱크 앞부터 변기 앞 끝까지의 길이가 최소 490mm 이상
필요합니다.
2) 제품 고정 홀 중심거리 140~200mm
변기 물탱크 앞 제품 고정 홀 중심간의 거리가 140~200mm
이어야 합니다.
※ 국내 표준 제품 고정 홀 중심거리는 140mm 입니다
▶ 일부 수입 변기의 경우 비데와 크기가 맞지 않아 설치되지
않을 수 있습니다.
2
습기, 먼지가 많은곳, 물이 직접 튀는 곳 등은 피해 주십시오.
▶ 제품 고장의 원인이 됩니다.
3
4
온도가 0℃이하로 내려가는 곳은 피해 주
십시오
.
▶ 본 제품은 옥내용으로 온도가 0℃이하로 내려가는
곳에 설치할 경우 필터 및 제품 내부의 결빙으로
제품 고장이 발생 할 수 있습니다.
5
변기의 급수밸브가 후레쉬밸브 등일 경우 비데가
설치되지 않을 수 있습니다.
설치전에 확인하시기 바랍니다.
설치장소의 주의
제품 이동시 주의해 주십시오.
▶ 제품을 절대 뒤집어서 옮기지 마십시오.
▶ 제품을 옮기기 전에는 반드시 전원플러그를 뽑고,
비데 본체내의 물을 빼신 후 이동하십시오.
위치 이동시 주의
냉수 배관에 연결해 주십시오.
▶ 온수 배관에 연결할 경우 화상 및 제품 고장의 원인이
될 수 있습니다.
배관 연결시 주의
후레쉬밸브
냉수
설치 전 확인사항
www.cukooamerica.com
44
그림과 같이 본체고정판을 양변기 위에 올려놓고,
본체고정판에 고정볼트를 결합하여 양변기에
고정시킵니다.
이때 본체고정판이 흔들리지 않도록 공구등을
이용하여 견고하게 고정하십시오.
본체고정판의 고정위치에 따라, 제품이 설치되는
위치가 결정됩니다. 제품과 양변기의 크기를 고려하여
본체 고정판을 적당한 위치로 고정하여 주십시오.
본체고정판의 위치가 적당하지 않으면 시트가
변기보다 앞으로 나오거나 뒤로 들어가게 됩니다.
•
본 제품은 AC120V 전용 제품입니다.
•
설치가 완료되지 않은 상태에서 절대로 전원을 연결하지 마십시오.
설치순서(CBT-I1030RW)
급수밸브를 오른쪽으로 돌려서 잠그고 급수밸브에
연결된 변기쪽 호스를 분리 하십시오.
급수호수를 분리 하십시오.
좌, 우측 고정너트(2개)를 풀고 일반 변좌와
변좌 뚜껑을 분리 하십시오.
분리한 일반 변좌와 변좌뚜껑, 고정너트는 이사 또는
이후 재설치가 필요할 경우를 대비해 잘 보관하십시오
일반 변좌시트를 변기에서 분리하십시오.
T 밸브를 보이는것처럼 설치하십시오.
T 밸브를 설치하십시오.
비데를 설치하십시오.
T 밸브와 비데에 호스를 연결해주십시오.
급수밸브를 왼쪽으로 돌려서 물을 공급해주십시오.
비데용 호스를 연결해주십시오.
변기쪽 급수 호스
급수밸브
설치방법
45
www.cukooamerica.com
본 제품은 AC120V 전용 제품입니다.
급수 호스를 분리한 곳에 T밸브를
설치하십시오.
46
▶ 그림과 같이 본체고정판을 양변기 위에 올려놓고, 본체고정판에 고정볼트를 결합하여 양변기에 고정시킵니다.
이때 본체고정판이 흔들리지 않도록 공구등을 이용하여 견고하게 고정하십시오.
▶ 본체고정판의 고정위치에 따라, 제품이 설치되는 위치가 결정됩니다. 제품과 양변기의 크기를 고려하여
본체 고정판을 적당한 위치로 고정하여 주십시오. 본체고정판의 위치가 적당하지 않으면 시트가 변기보다
앞으로 나오거나 뒤로 들어가게 됩니다.
정수필터 아답터
정수필터
비데용
급수호스
정수필터 설치방법
호스 연결부위 및 정수필터의 연결부위에 누수가 없는지
확인하여 주십시오.
2
이물질로 인해 정수필터가 막히거나 교체시기가 되어 물 투과율이 줄어들 경우
제품내 물공급이 원활하지 않을 수 있습니다. 이 경우 정수필터를 반드시 교체해주십시오.
※
정수필터 권장 사용기간은 약 4~8개월이나 사용량, 수질상태 등 사용환경에 따라 달라질 수 있습니다.
3
정수필터를 아답터에 연결합니다.
※ (정수필터 연결시 정수필터 아답터를 손으로 고정시키고 연결합니다)
※ 정수필터 체결시 고무실링을 꼭 확인하세요.
※ 정수필터를 아답터에 삽입후 자연스럽게 오른쪽 방향으로 돌리면 걸림이
발생합니다. 그지점에서 1/4회전 이상 돌려 주십시오.
(체결량이 적을시 누수의 원인이 됩니다. 누수를 반드시 확인하여 주십시오.)
1
www.cukooamerica.com
47
48

49
설치 후 필수 점검 사항
설치 후 필수 점검 사항
비데 노즐의 포장 스티커를 제거하여 주십시오.
급수밸브를 왼쪽으로 돌려 열어 주시고, 연결부위에서
누수가 없는지 확인합니다.
전원플러그를 콘센트에 꽂아 주십시오.
※ 비데 본체 중심부의 노즐 포장 스티커를 제거하여야
제품이 정상 동작합니다
※ 경고 : 정수필터가 과도하게 체결되거나 느슨하게 체결되어 있으면
누수의 원인이 됩니다.
※ 경고 : 본체에 전원이 들어간 상태에서는 본체를 뒤집거나 움직이지 마십시오.
고장의 원인이 됩니다.
자동으로 탱크에 물이 채워집니다.
물이 채워지는 동안 “삐-익"하는 부저음이 연속적으로 납니다.
물이 다 채워지면 알림소리와 함께 부저음이 멈춥니다.
4
왼손으로 착좌감지센서부를 접촉한 상태에서 (착좌감지센서를 동작시킨
상태에서) 세정 또는 비데버튼을 눌러 노즐동작 물이 분사되는지를 확인합니다.
이때, 세정노즐부위를 오른손으로 가려 물이 밖으로 튀지 않도록 하십시오.
(확인 후, 착좌감지센서부에서 왼손을 때면 분사가 멈춥니다.)
5
노즐 포장
스티커
www.cukooamerica.com
급수밸브
50
사용 전 확인 사항
비데 사용전 확인 사항
본 제품은 AC120V 전용 제품입니다.
전원플러그는 반드시 접지된 AC120V 전용 콘센트에
꽂아 주십시오.
전원이 연결되고 물이 공급되어야 비데가 정상적으로
작동합니다.
전원을 연결한 후, 급수밸브를 열어주십시오.
사용중 엉덩이를 움직이거나, 다리를 꼬고 앉아서 사용시 비데가 동작을 멈출 수 있습니다.
비데의 변좌 위에 유아용 보조시트를 설치하시면 비데가 동작하지 않습니다. (착좌감지센서 인식 안 됨)
변좌에 걸터 앉지 말고 항상 중앙에 앉으십시오.
용변을 마치신 후 변기의 물내림과 동시에 비데를 사용하시면 수압이 약해질 수 있습니다.
수압이 약한 지역일 경우 비데가 동작하지 않을 수 있습니다.
(수압 0.04 MPa (0.4Kgf/cm²)이하일 경우 비데가 동작하지 않을 수 있습니다.)
비데수압이 약할 경우
www.cukooamerica.com
51
52
일반 세정보다 강력한 세정입니다.
수압과 세정방식이 변화하여
다이나믹한 세정을 할 수 있습니다.
버튼을 누르면 무드등이 ON 상태가 됩니다.
버튼을 다시 누르면 무드등이 OFF 상태가
됩니다.
(소리 구분)
버튼을 짧게 눌러 절전 기능을 사용할 수
있습니다.
버튼을 3초간 길게 누르면 무드등 기능을
사용할 수 있습니다.
버튼을 한번 더 3초간 길게 누르면 무드등
기능이 해제됩니다.
(CBT-IS1131REW, CBT-IS1131RRW)
(CBT-IS1131REW,
CBT-IS1131RRW)
www.cukooamerica.com
53
54
어린이 기능(CBT-I1030RW)
55
어린이 기능(CBT-I1030RW)
www.cukooamerica.com
56
www.cukooamerica.com
57
58
제품 분리 방법 및 보관방법
겨울철 비데 사용법
※ 이사 및 청소등으로 제품을 변기에서 분리하실 때에는 다음과 같이 하십시오.
전원 플러그를 콘센트에서 뽑아 주십시오.
급수밸브를 시계방향으로 돌려 잠그어 주십시오.
비데용 급수호스의 정수필터와 T밸브측의 너트를 풀고
비데 본체를 변기로부터 분리하십시오.
비데본체 밑면의 배수구 마개를 분리하여 온수탱크의
물을 완전히 배수시켜 주십시오.
급수관을 급수밸브에 연결하십시오.
급수밸브를 반시계방향으로 돌려 열고 급수관 연결부에서 누수가 없는지 확인하여 주십시오.
전원플러그를 콘센트에 꽂아 주시고 본체에 전원이 공급되는지 확인하여 주십시오.
장시간 사용하지 않을 경우에는 온수탱크의 물을 완전히 배수시켜 주십시오.
온수온도 버튼을 눌러 온수온도를 완전히 끄지 마시고 “약”이상으로 설정하여 주십시오.
비데 설치시 분리하였던 변기시트, 커버를 변기에 조립하여 주십시오.
※ 비데분리방법
레버를 누른 상태에서 제품을 앞으로 당깁니다
급수밸브
① 누르십시오.
② 앞쪽으로 당기십시오.
레버
59
제품 분리 방법 및 보관방법 / 겨울철 비데 사용방법
www.cukooamerica.com
60
430.5 x 493.9 x 162 mm430.5 x 534 x 162 mm
61

62
MEMO

63
MEMO
www.cukooamerica.com

www.cuckooamerica.com / www.cuckoorental.com