1
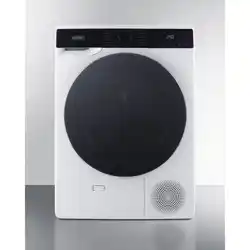
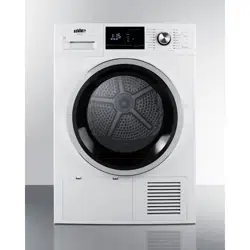
DRYER
User Manual
Model:
SLD242W
LDHP24
BEFORE USE, PLEASE READ AND FOLLOW ALL SAFETY RULED AND OPERATING
INSTRUCTIONS
Summit Appliance
Division of Felix Storch, Inc.
An ISO 9001:2015 registered company
770 Garrison Avenue
Bronx, NY 10474
www.summitappliance.com
Write Model and Serial Numbers
here:
Model:
Serial No.:

2
TABLE OF CONTENTS
Safety Precautions
3-4
Location of Parts
5
Technical Information
5
Installation and Connection
6-8
Location Requirements
6
Dryer Placement
7
Opening the Dryer
7
Leveling the Dryer
7
Attaching the Drain Hose
8
Connecting the Power Supply
8
Proper Usage
9-16
Turning on the Dryer
9
Selecting the Dryer Cycle
9
Preparing for the Drying Cycle
9-10
Laundry Warning Labels
10
Dryer Cycle Table
11
Using a Dryer Basket
12
Selecting Extra Functions
13-14
Extra Function Table
15
End of the Drying Cycle
15
Drying Cycle Interruptions
15-16
Changing the Drying Cycle/Functions
16
Adding Laundry After the Drying Cycle Starts
16
Personal Settings Menu
16-17
Low Standby Mode
17
Maintenance and Cleaning
17-20
Cleaning the Net Filter
17
Cleaning the Heat Pump Filter
18-19
Cleaning the Heat Exchanger
19
Emptying the Condensation Tank
20
Cleaning the Dryer
20
Troubleshooting
21-23
Economic Drying
24
Disposal
24
Limited Warranty
28

3
SAFETY PRECAUTIONS
Your safety and the safety of others is very important.
This manual contains imporatant information on the installation, use, and care of your appliance.
Read the instructions for use carefully before using the dryer to prevent injury and property
damage. Please, do not use the dryer without reading and understanding these instructions or
use first.
NOTE: These instructions for use are supplied with different types or models of dryers.
Therefore, they may include descriptions of settings or equipment that are not available
in your dryer.
Failure to observe the instructions for use or inappropriate use of the dryer may
result in damage to the laundry or the appliance, or injury to the user. Keep the
instruction manual handy, near the dryer.
Your dryer is intended solely for household use. If the dryer is used for professional, for-profit
purposes or purposes exceeding normal use in a household, or if the dryer is used by a
person who is not a consumer, the warranty period shall be equal to the shortest warranty
period required by relevant legislation.
Connection to water and power supply has to be executed by an adequately trained
technician or expert.
Any repair and maintenance pertaining to safety or performance should be done by trained
experts.
To avoid danger, a damaged power cord may only be replaced by the manufacturer, a
service technician, or an authorized person.
Before connecting the dryer to the power mains, wait for at least 2 hours until it reaches room
temperature.
In case of a defect, only use approved spare parts by authorized manufacturers.
In case of incorrect dryer connection, incorrect use, or servicing by an unauthorized person,
the user shall bear the cost of any damage as such damage shall not be covered by
warranty.
The dryer may not be connected to the power mains using an extension cord.
Do not connect the dryer to power mains using an external switching device such as a
program timer, or connect it to power mains that is regularly switched on and off by the power
supply provider.
Do not connect the dryer to an electrical outlet intended for an electric shaver or hair dryer.
Certain internal parts are intentionally not grounded and may present a risk of electric shock
only during servicing. Service Personnel - Do not contact the following parts while the
appliance is energized: Motor, Pump and Control unit.
Do not install the dryer in a room where the temperature can drop to below 41°F (5°C), as
dryer parts may be damaged in case of water freezing.
Place the dryer on a level and stable solid (concrete) base.
If the dryer is placed on an elevated stable base, the dryer has to be additionally secured
against tipping.
Do not use this dryer to heat dry items containing foam rubber or simiarly textured rubber-like
materials.
Clean lint screen after each load.
Keep the area around the exhaust opening and adjacent surrounding areas free from the
accumulation of lint, dust, and dirt.

4
Do not place items exposed to cooking oils in your dryer. Items contaminated with
cooking oils may contribute to a chemical reaction that could cause a load to catch fire.
To reduce the risk of fire due to contaminated loads, the final part of a tumble dryer
cycle occurs without heat (cool down period). Avoid stopping a tumble dryer before the
end of the drying cycle unless all items are quickly removed and spread out so that the
heat is dissipated.
Never stop the drying process before it is completed; if you do interrupt the cycle
for any reason, be careful when removing the laundry from the drum as it is very
hot. Quickly remove the laundry from the drum and spread it to allow it to cool
down as quickly as possible.
Only use the dryer to dry laundry that was washed with water. Do not dry any laundry
that was washed or cleaned with flammable cleaners or substances (such as gasoline,
trichloroethylene etc.) as this may result in an explosion.
NOTE: If you have cleaned your clothes with industrial cleaners or chemical
substances, DO NOT dry them in the dryer.
Risk of child entrapment!
Child entrapment and suffocation are not problems of the past. Junked or abandoned
appliances are still dangerous, even if they will “just sit in the garage a few days.”
Make sure there is nothing except laundry in the dryer drum before running the drying cycle.
Do not let children younger than three years old near the dryer, unless constantly supervised.
Children eight years old and older may operate the dryer under appropriate adult supervision.
NOTE: Before discarding your old dryer:
o Take off the doors
o Leave the shelves in place so that children may not easily climb inside
– SAVE THESE INSTRUCTIONS –

5
LOCATION OF PARTS
FRONT BACK
1. Condensate Tank 2. ON/OFF Button
3. Drying Cycle Selector Knob 4. START/PAUSE Button
5. Control Unit 6. Door
7. Net Filter 8. Air Vent
9. Heat Pump Filter 10. Rating Plate
11. Power Cord 12. Condensate Discharge Hose
13. Adjustable Feet
TECHNICAL INFORMATION
Power Supply
208-240V, 60Hz
Rated Current
15 A
Drying Capacity
17.6 lbs
Refrigerant
R134a, 10.6oz
Water Pressure
0.05-0.8Mpa (7.25 -115psi)
Maximum Power
800 W
Dimensions (WxHxD)
23 ½” x 33 ½” x 25 ½”
Depth with Door Open
44 ½”
1 2
3 4 5
10
8 7
11
12
13

6
INSTALLATION AND CONNECTION
CAUTION: Installation of this dryer should be performed by a qualified installation specialist.
1.
Before using your dryer, remove the exterior and interior packaging.
2.
Place the dryer on a clean, dry concrete floor strong enough to support the machine. DO
NOT place the dryer on a carpet with long fibers, as it may impede air circulation.
3.
Let the dryer stand for at least 24 before first using the appliance.
Location Requirements
The dryer must not contact with a wall or adjacent furniture to prevent the dryer from overheating.
The vents on the back wall and the air exhaust opening on the front side of the dryer should
never be obstructed. Use the clearances outlined below for optimum dryer operation:
Install the dryer in a properly lit, ventilated room, with an ambient temperature between 50°F
(10°C) and 77°F (25°C). Using the dryer in a room colder than 50°F degrees may result in water
accumulating inside the dryer or water in the condensate tank and pump freezing, which may
damage the dryer.
Do not place the dryer a small room, as the drying process may take longer due to a
limited amount of available ambient air.
NOTE: Install the dryer in a location where the door can be freely opened without coming in
contact with any walls or doors.
4" (10 cm)
2" (5 cm)
4" (10 cm)
7
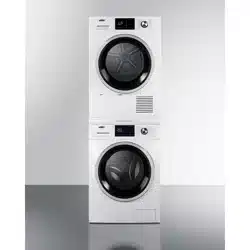
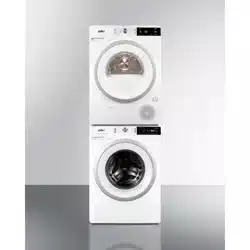
Dryer Placement
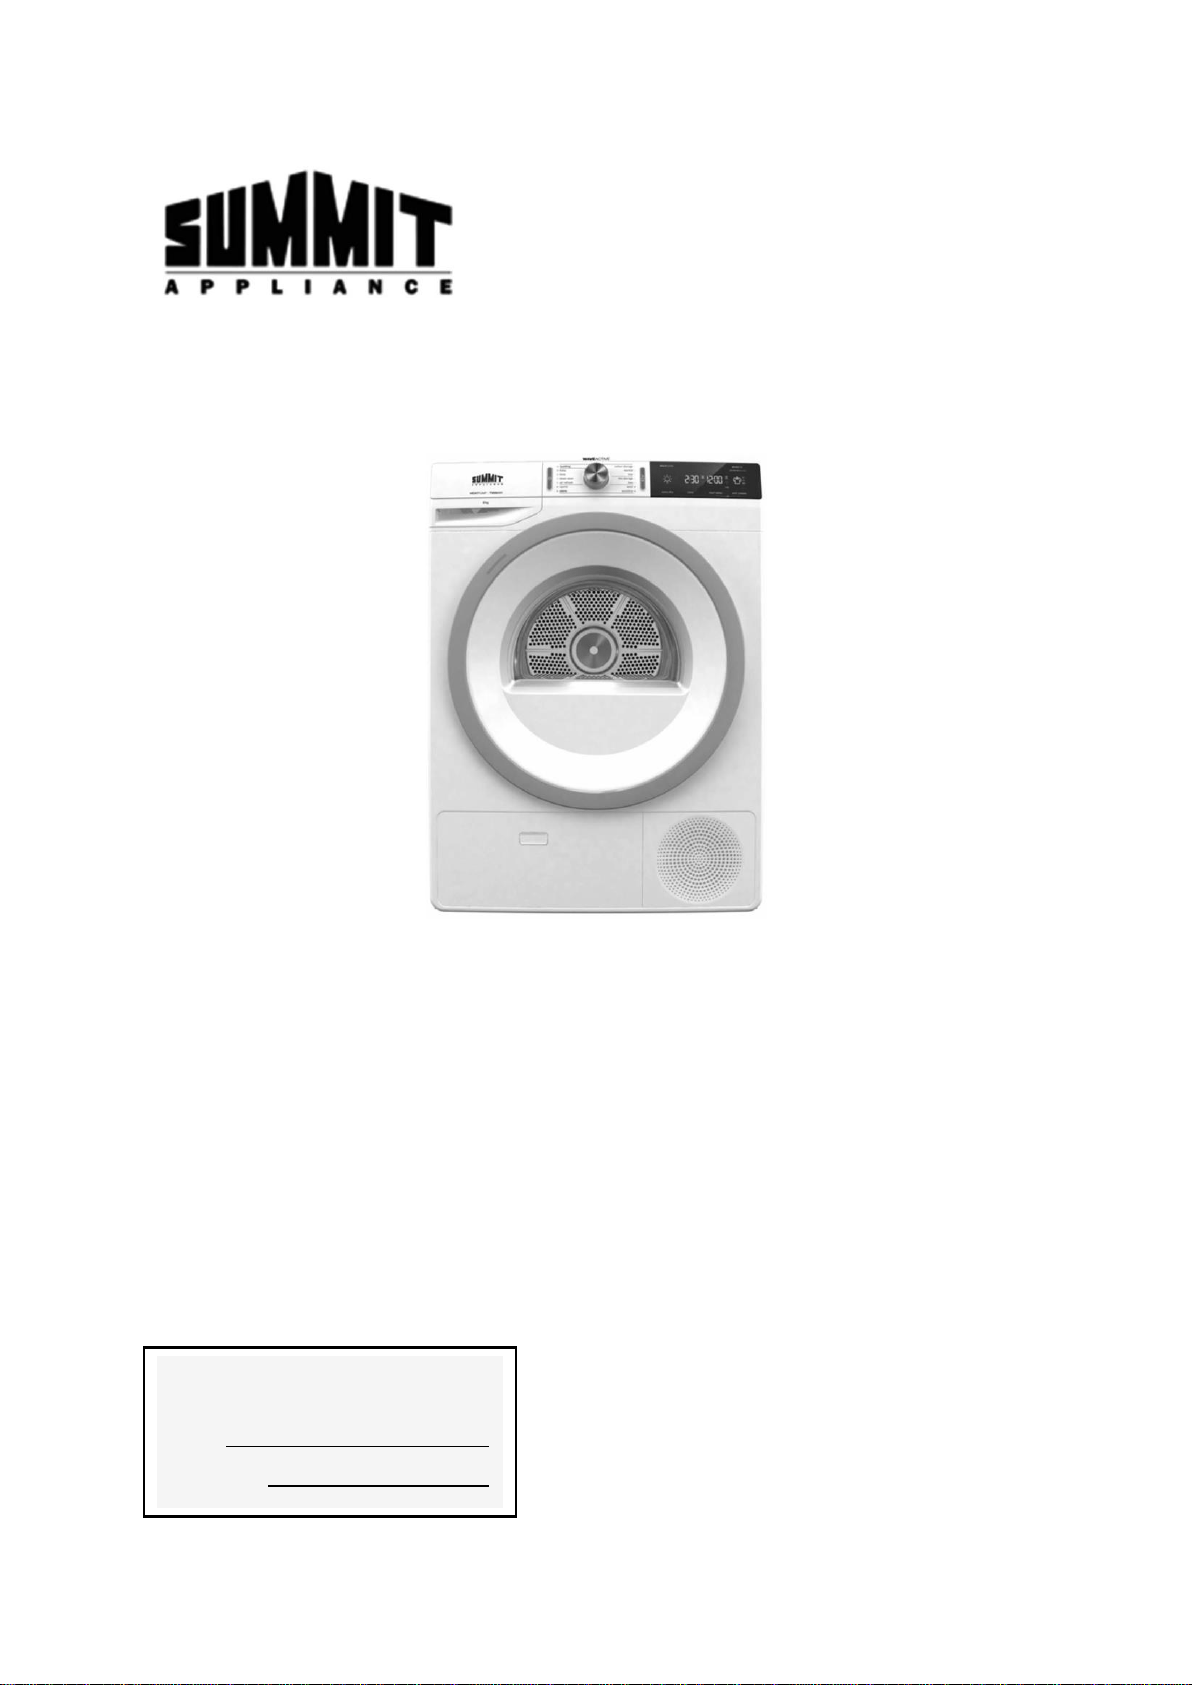
A dryer with the same dimensions as a washer can be placed on top of the washing machine as
long as the vacuum feet are used on the dryer (Fig. 1). Alternatively, the dryer can be placed
next to the washing machine (Fig. 3).
If your washing machine is smaller (minimum depth 21½" (545 mm)) than your dryer, then a
dryer support must be purchased separately (Fig. 2). The supplied vacuum feet must be
used, and they are designed to prevent the dryer from slipping.
Additional equipment (dryer support (a) and vacuum feet (b) if they are not supplied) is
available for purchase at the service units.
The surface on which the appliance is placed must be clean and level.
The washing machine onto which you intend to place the dryer should be able to hold the
weight of the dryer (see Technical information).
Opening the Dryer Door
a = 24½" (625 mm)
b = 44½" (1134 mm)
NOTE: Do not place the dryer behind a lockable or sliding door, or a door with a hinge on the
opposite side of the dryer door hinge. Install the dryer in such way that the door can
always be freely opened.
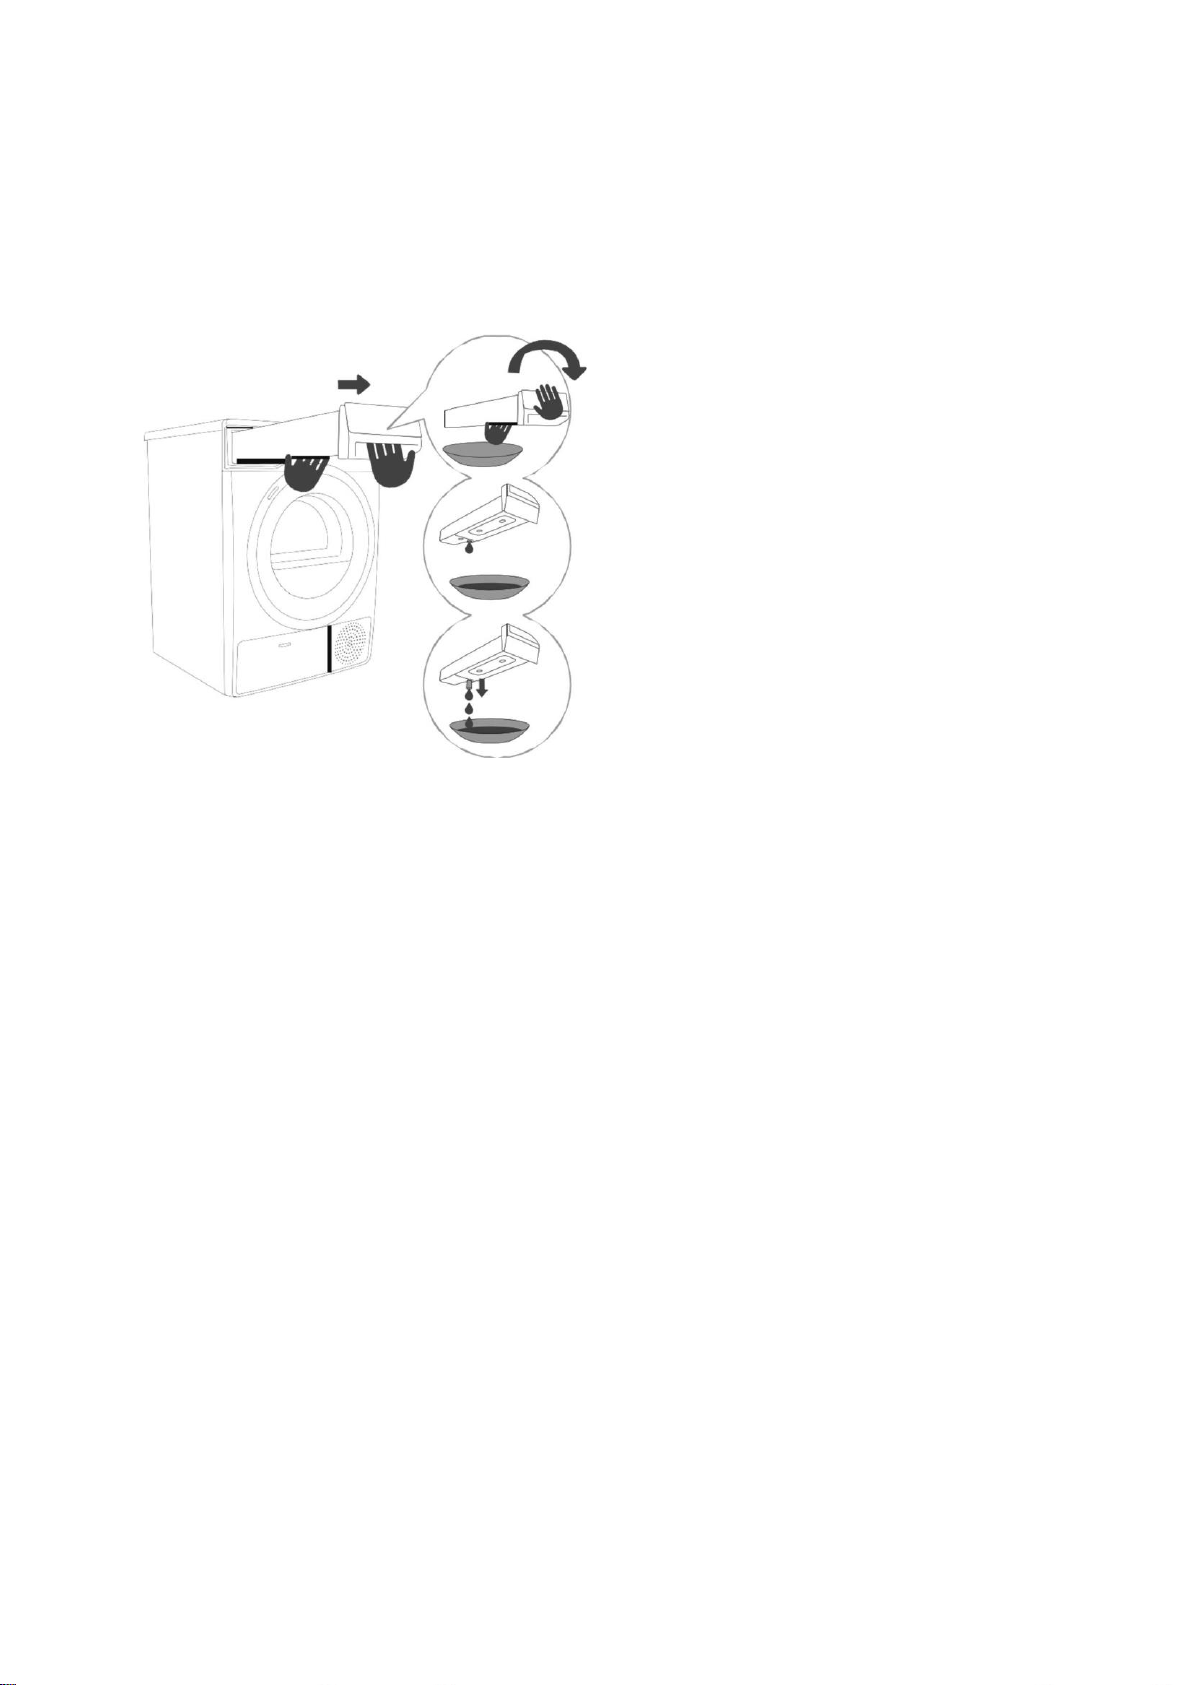
Leveling the Dryer
Level the dryer using the adjustable feet, located on the bottom corner of the appliance, using a
number 22 wrench.
8
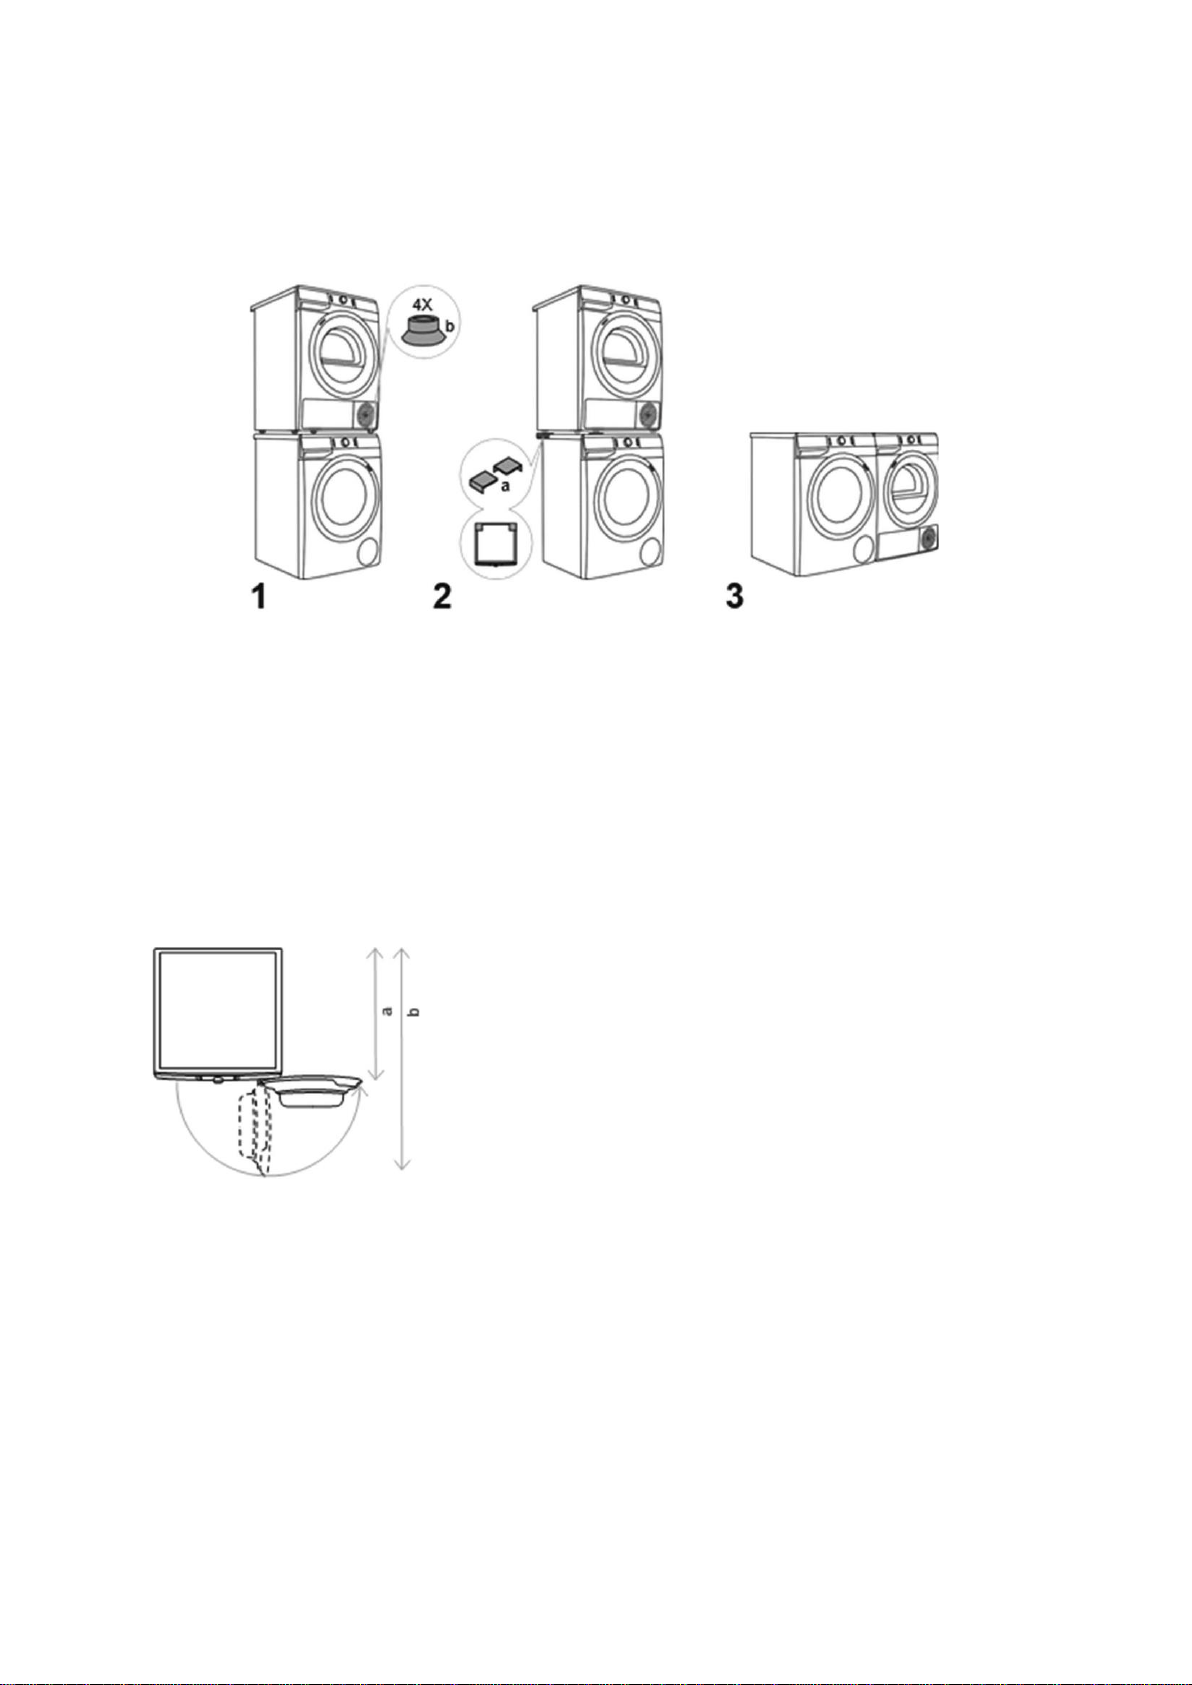
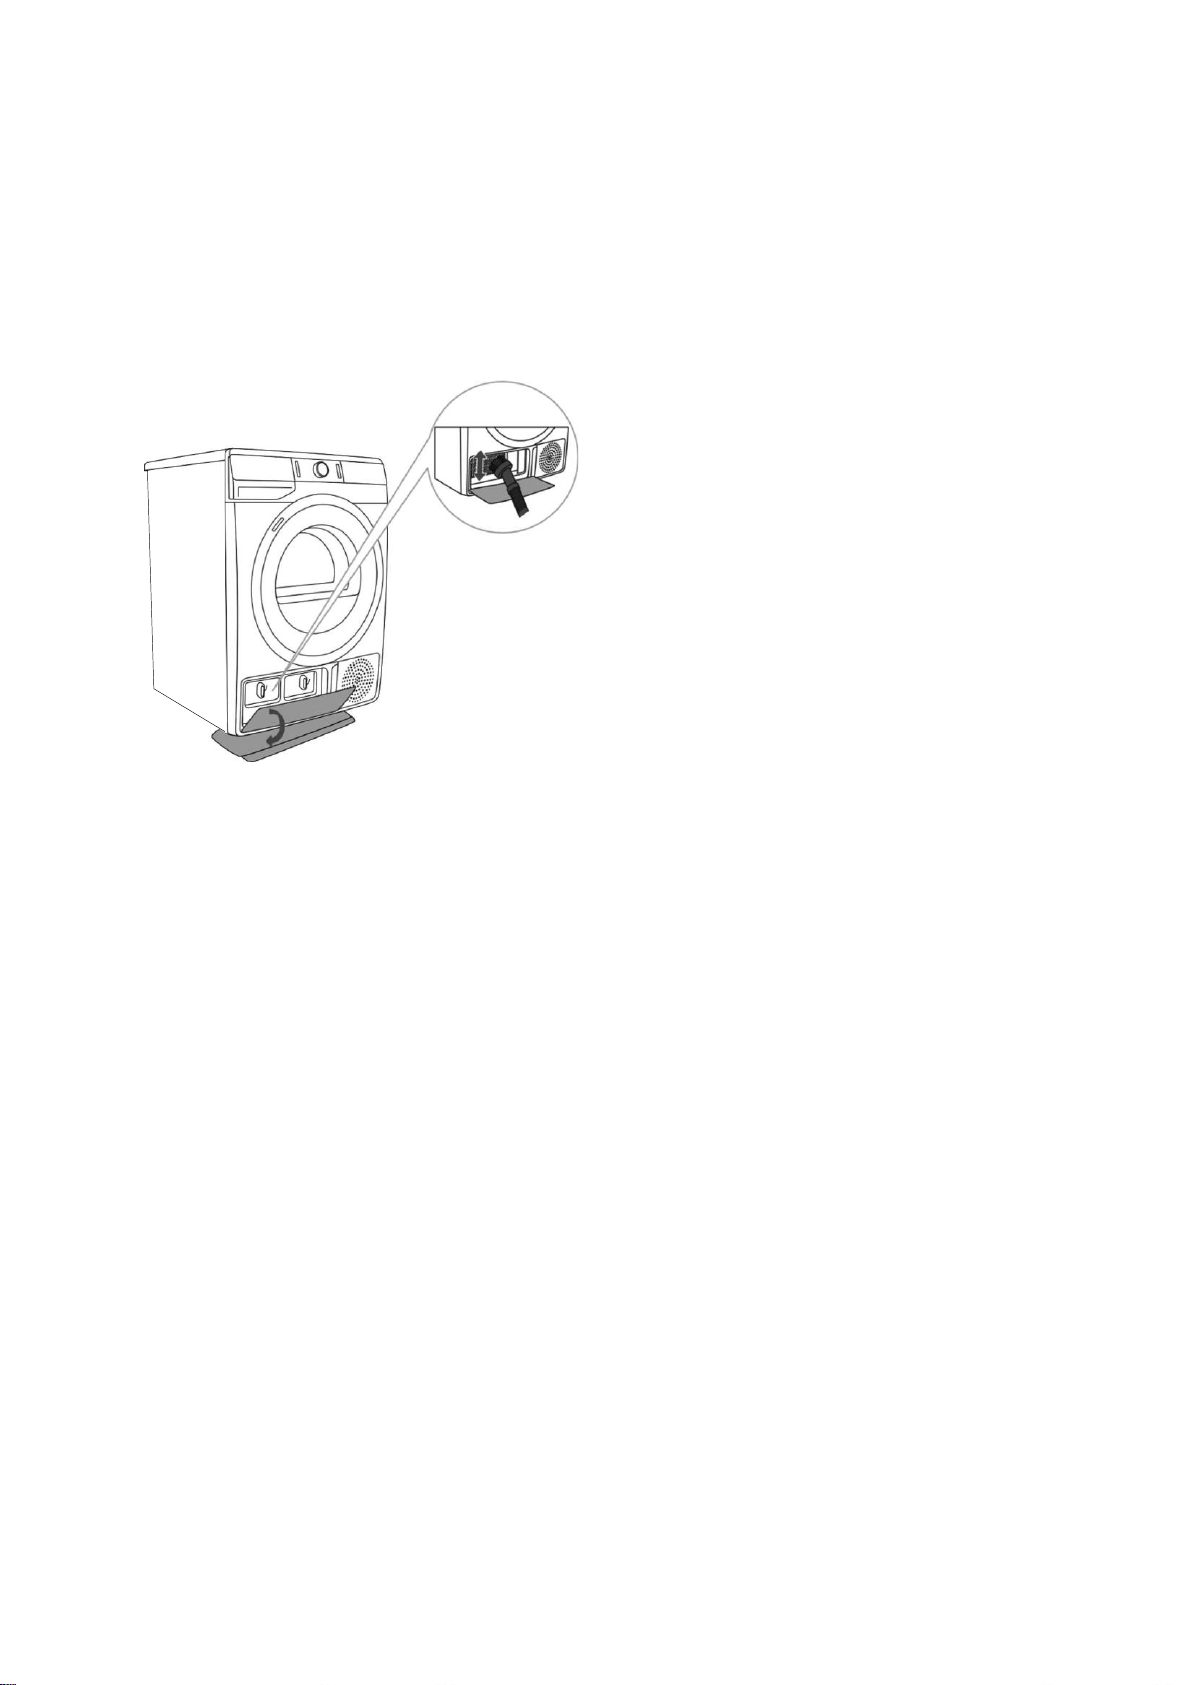
Attaching the Drain Hose
This dryer needs to be connected to a drain to dispel the water collected during the drying cycle.
A drain hose is supplied with the appliance, and simply needs to be attached to an outer drain
before use. To attach the drain hose:
1.
Remove the drain hose
from the holder on the
back wall of the dryer,
located on the left hand
side, below the top cover.
2.
Attach the hose into a
drain no more than 31”
(80cm) from the floor.
Connecting the Appliance to the Power Supply
Before connecting the dryer to the power supply, wait for a least two hours for the appliance
to reach room temperature.
Connect the dryer to a grounded power outlet, which should be freely accessible after
installation.
DO NOT connect the dryer using an extension cord.
A damaged power cord may only be replaced by an authorized repair person.
NOTE: Use over-voltage protection to protect the appliance in case of a lightning strike.
9
PROPER USAGE
NOTE: Before using the dryer, clean the dryer drum using a soft, damp cotton cloth and water.
DO NOT use any solvents or cleaning products, which could damage the dryer.
Turning on the Dryer
Once the dryer is properly placed, cleaned, and ready for use, press the ON/OFF switch (1).
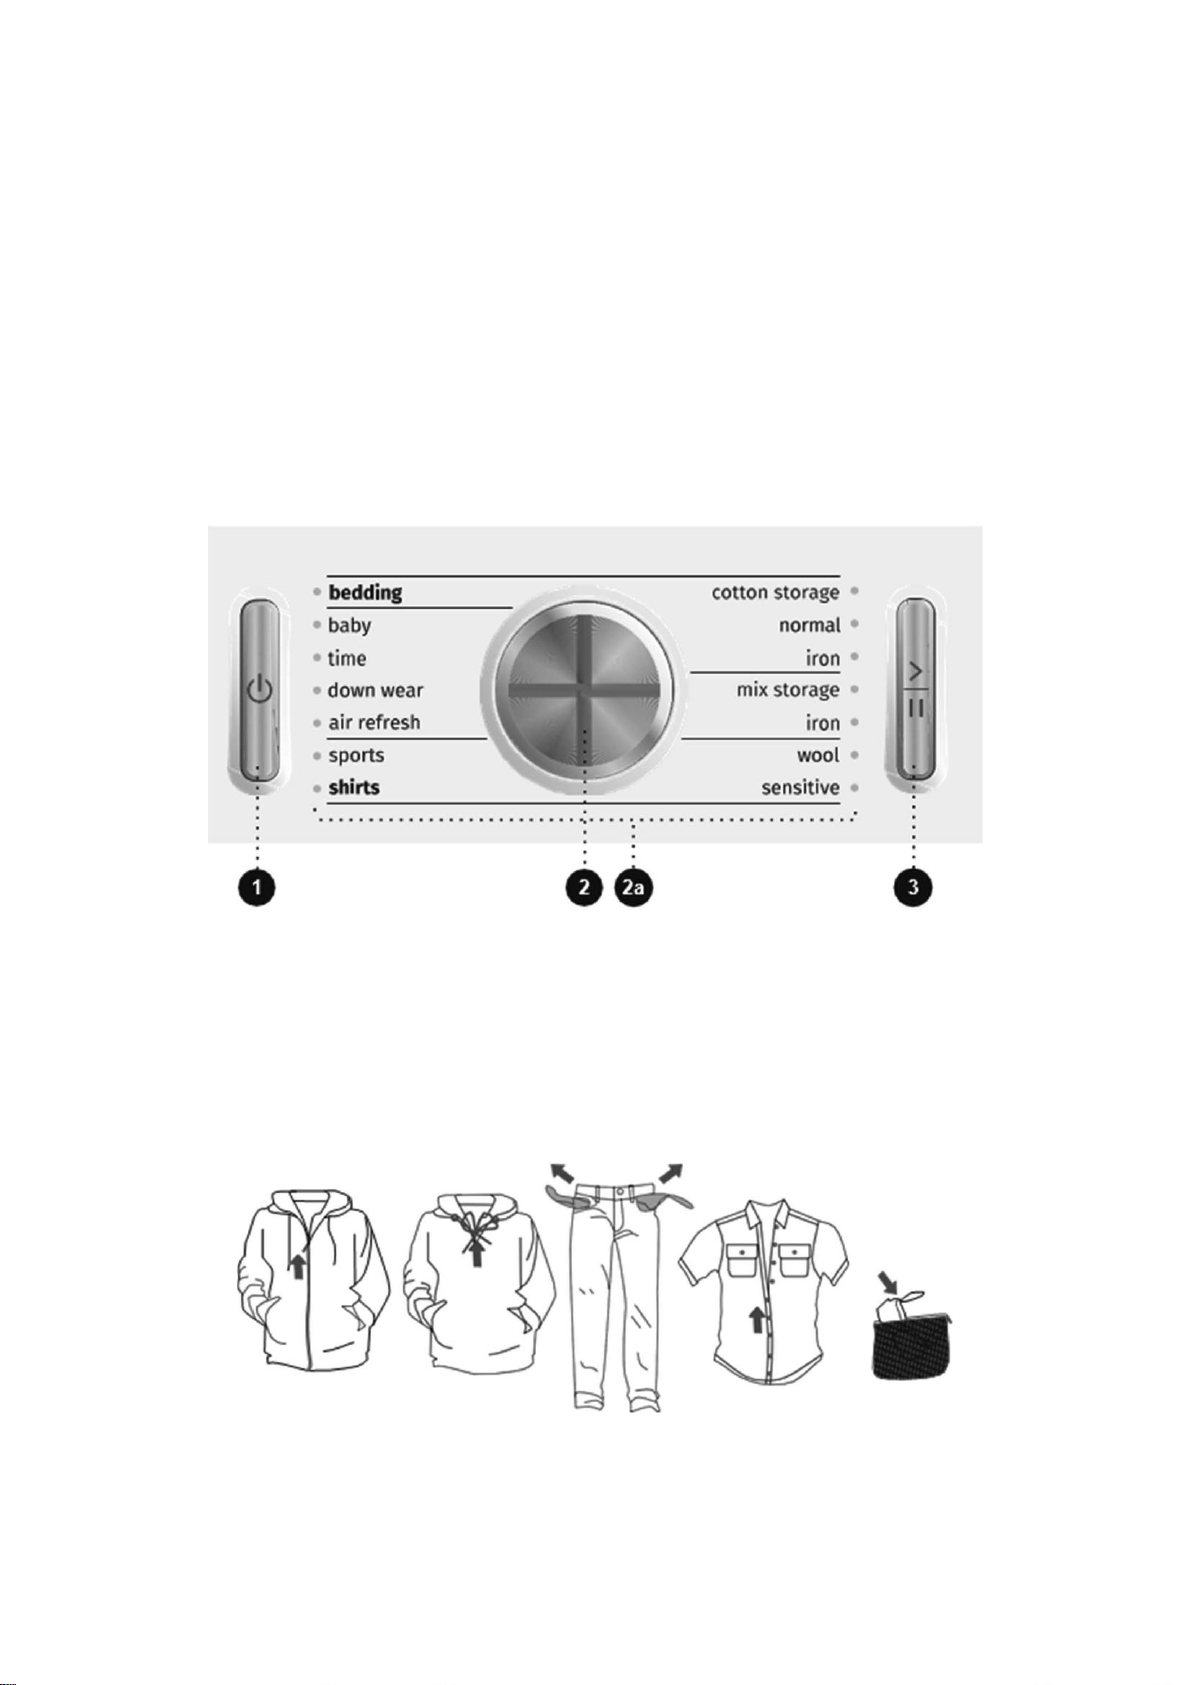
Selecting a Dryer Cycle
Rotate the cycle selector knob (2) to the left or right to choose the appropriate drying cycle for
your clothes. An indicator light will be illuminated next to the drying cycle you have selected (2a).
See the dryer cycle table below if you are unsure which drying cycle is correct.
The START/PAUSE button (3) will flash when the drying cycle begins, or when it is paused. The
START/PAUSE button will be lit continuously when the drying cycle starts or is in progress.
Preparing for the Drying Cycle
1.
Sort the laundry by type and thickness of the fabric (see PROGRAM TABLE).
2.
Close the buttons and zippers, tie any ribbons, and turn the pockets inside out.
3.
Place very sensitive clothes in a special-purpose laundry bag.
(The special-purpose laundry bag is available as an optional accessory.)
10
Drying laundry made of particularly delicate fabrics, which may be deformed during the
drying process, is not recommended. The following types of laundry may not be dried in
the dryer as this may cause your garments to deform:
Leather garments and other leather products
Garments that are waxed or treated in any other way
Garments with major wooden, plastic, or metal parts
Garments with spangles
Garments with metal parts subject to rusting.
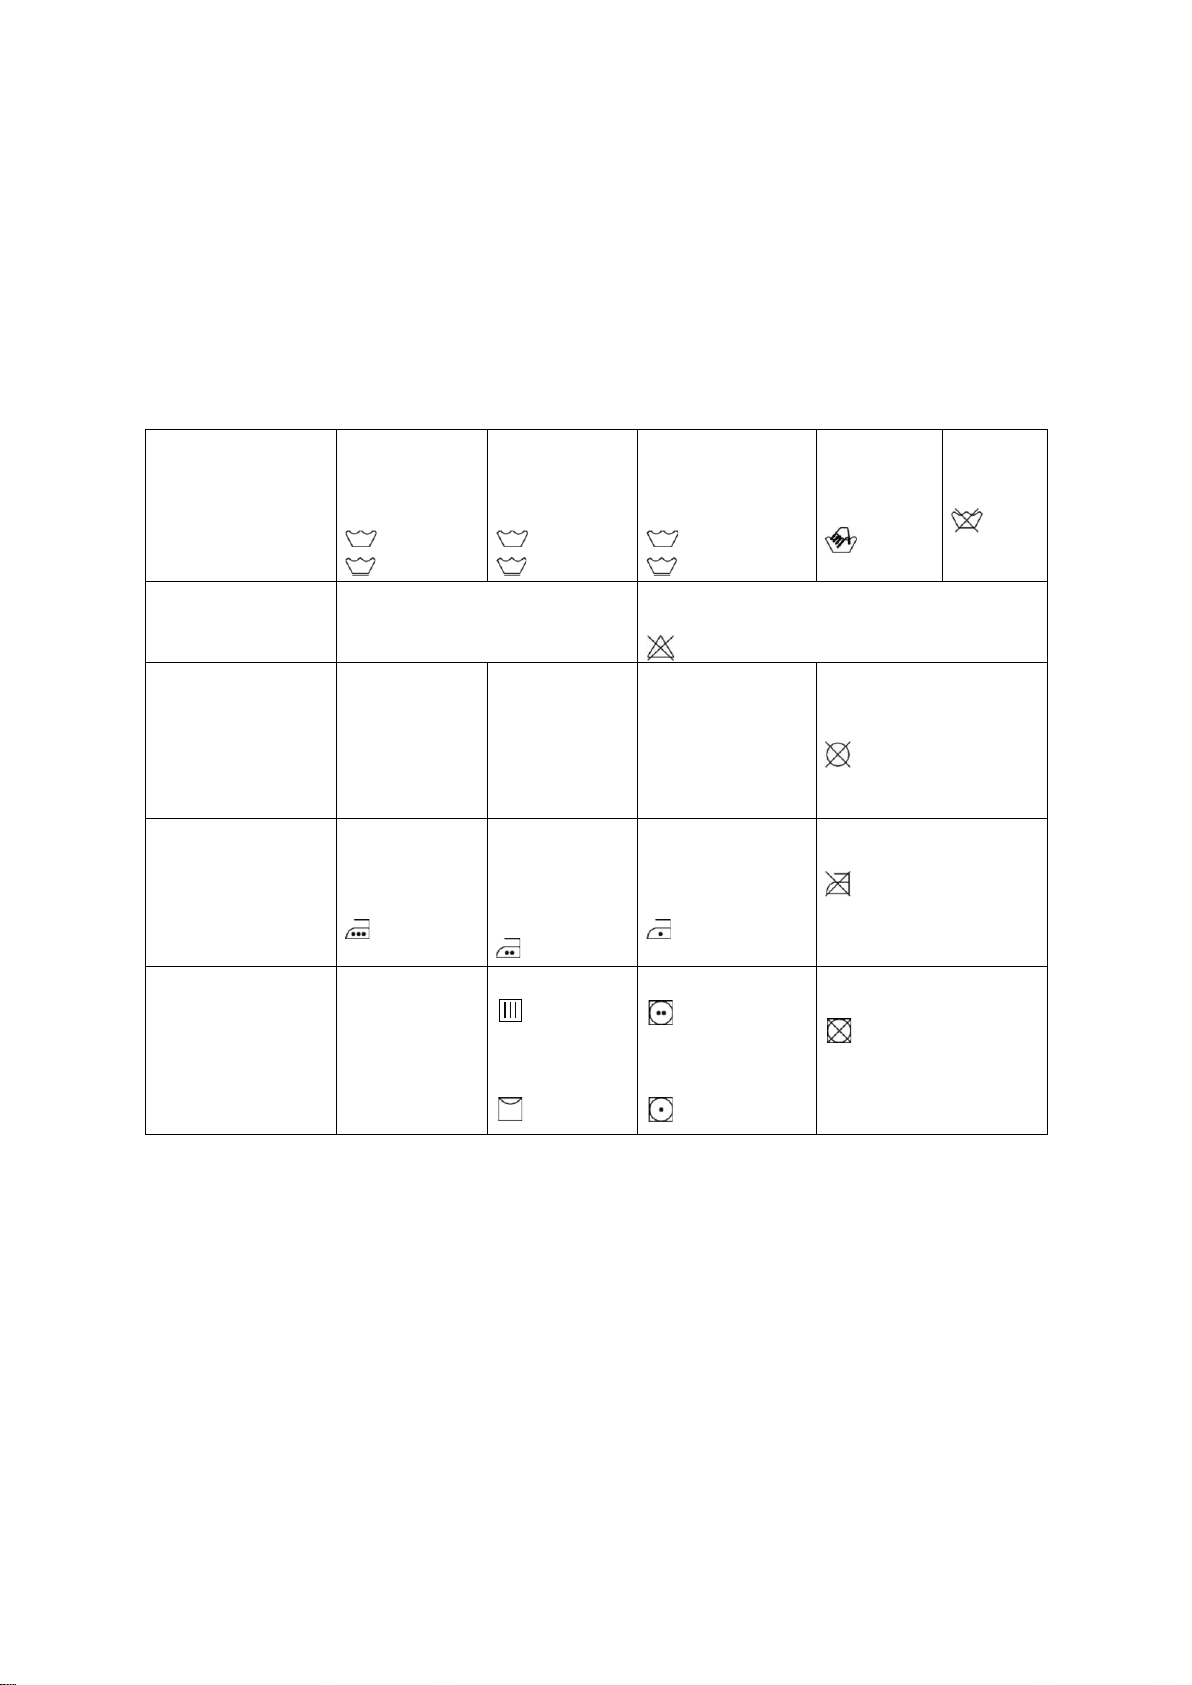
Laundry Warning Labels
Normal wash;
Sensitive
laundry
Max. washing
temperature
EXTRA HOT
Max. washing
temperature
HOT
Max. washing
temperature
WARM
Hand wash
only
COLD
Do not
wash
Bleaching
Bleaching in cool water
c1
Bleaching not allowed
Dry cleaning
Dry cleaning
with all agents
A
Petroleum
solvent
R11, R113
P
Dry cleaning in
kerosene, pure
alcohol, and in
R113
F
Dry cleaning not
allowed
Ironing
Hot ironing,
max. HIGH
temperature
Hot ironing,
max.
MEDIUM
temperature
Hot ironing,
max. LOW
temperature
Ironing not allowed
Drying
Dry flat (place
on a flat
surface)
Drip dry
Line dry
High temperature
Low temperature
Do not tumble dry
11
Dryer Cycle Table
Program
Dryness levels
Max.
load
Program description
Cotton
Storage (Closet)
17.6 lb
(8 kg)
Use this program for thicker, non-sensitive cotton
laundry. After drying, it will be dry and ready to be
stored in a closet.
Normal*
17.6 lb
(8 kg)
Use this program for thicker, non-sensitive cotton
laundry of approximately the same thickness.
Iron
(Moist for ironing)
17.6 lb
(8 kg)
Use this program for non-sensitive, cotton laundry.
After drying, it will be ready for ironing.
Mix (Mixed laundry/Synthetics)
Storage (Closet)
7.7 lb
(3.5 kg)
Use this program for sensitive laundry made of a
mixture of synthetic and cotton fibers. After the drying
cycle, the laundry will be ready to be stored in a
closet.
Iron
(Moist for ironing)
7.7 lb
(3.5 kg)
Use this program for sensitive laundry made of a
mixture of synthetic and cotton fibers. After drying,
the laundry will be slightly moist.
Wool
4.4 lb
(2 kg)
This short program is intended for softening or
fluffing of clothes made of wool and silk, which have
to be dried thoroughly according to manufacturer s
instructions.
Sensitive
2.2 lb
(1 kg)
Use this program to dry highly delicate laundry made
of synthetic fibers, which may be slightly moist after
the drying process. We recommend using a special-
purpose laundry bag.
Shirts
4.4 lb
(2 kg)
Use this program to dry shirts and blouses. An
adjusted drum rotation prevents the laundry from
creasing.
Sports
(Sportswear)
6.6 lb
(3 kg)
Use this program for clothing with a membrane, for
sportswear made of mixed materials, and for
breathable fabrics.
Air refresh
4.4 lb
(2 kg)
During this program, the heater is switched off.
The program is suitable for refreshing your
laundry.
Down wear
3.3 lb
(1.5 kg)
Use this program to dry textiles stuffed or padded with
down (pillows, duvets, jackets etc.). Dry large items
separately, and use the EXTRA DRY function or the
Time Program, if necessary.
Time
(Timed drying program)
8.8 lb
(4 kg)
Use this program for non-sensitive laundry that is still
slightly moist and has to be thoroughly dried. In the
time program, remaining moisture is not detected
automatically. If the laundry is still damp after the
program is complete, repeat the program; if it is too
dry and therefore creased and rough to touch, the
drying time you selected was too long.
Baby
(Baby clothes)
8.8 lb
(4 kg)
Use this program to dry baby clothes. Clothes dried
with this program are usually normally dry.
12
Bedding
11 lb
(5 kg)
Use this program for larger items. When the program
is complete, they will be thoroughly dry. An adjusted
drum rotation prevents the laundry from tangling.
NOTE: The Cotton Normal program is intended for drying wet cotton laundry. It is the most
energy-efficient program for drying cotton laundry. The energy usage data is determined
using the Cotton Normal program cycle setting and medium dryness setting per
CAN/CSA-C361-16 Standard and DOE test procedure methods specified at 10 CFR 430,
Subpart B, Appendix D2.
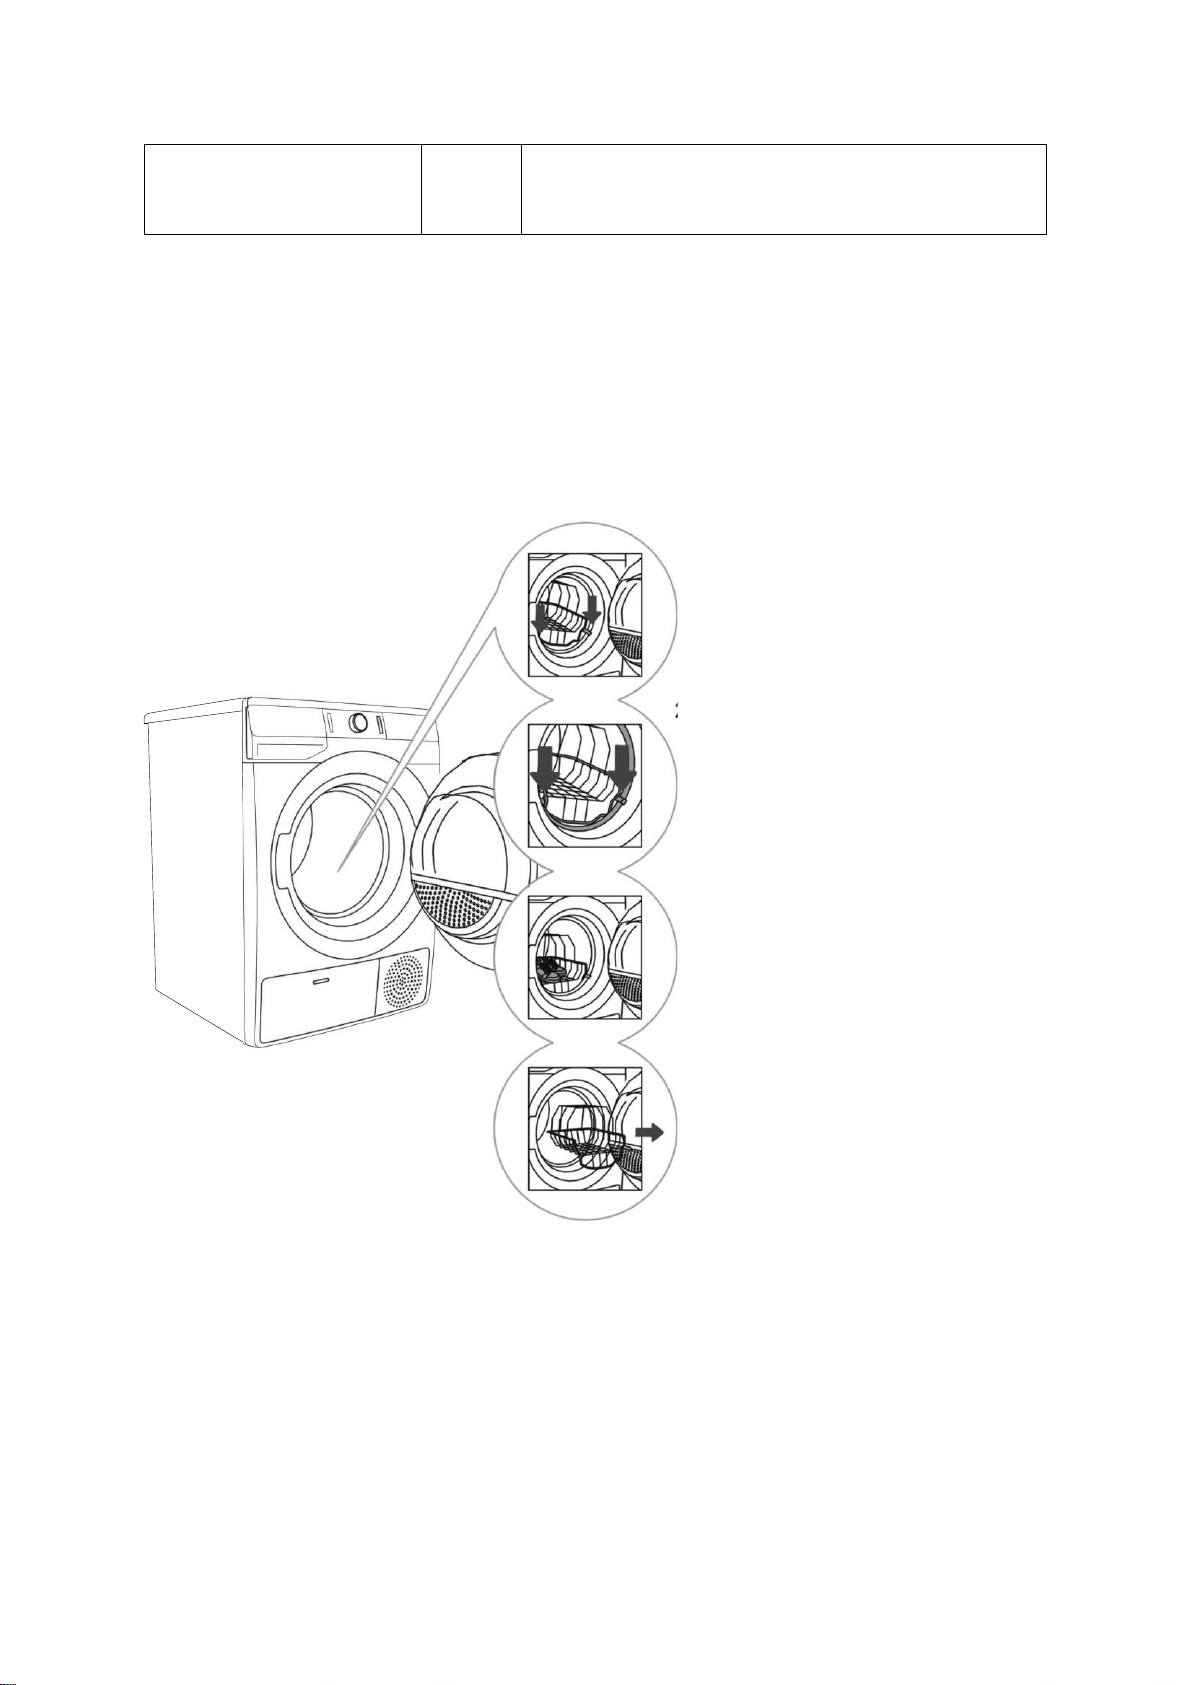
Using a Dryer Basket
Depending on the model, a dryer basket may be used in the dryer. Laundry may only be dried in
the basket when using the timed drying program.
1.
Open the dryer
door and insert the
laundry.
2.
Insert the drying
basket by
securing it to the
door gasket, as
shown to the left.
3.
The basket can be
used for the drying of
sports shoes, slippers,
or any other item you
do not wish to be
tumbled around the
dryer drum during the
drying process. (Max
load 5.5lb (2.5kg)).
4.
After the drying
process, remove the
drying basket, and
close the dryer door.
Only dry clean sports shoes or slippers, which have been wrung out just enough to prevent water
from dripping from them.
As the drum rotates, the laundry basket will be still. Therefore, make sure the items you are
drying in the basket are not in contact with the drum, as this could result in damage to the item
and the dryer.
13
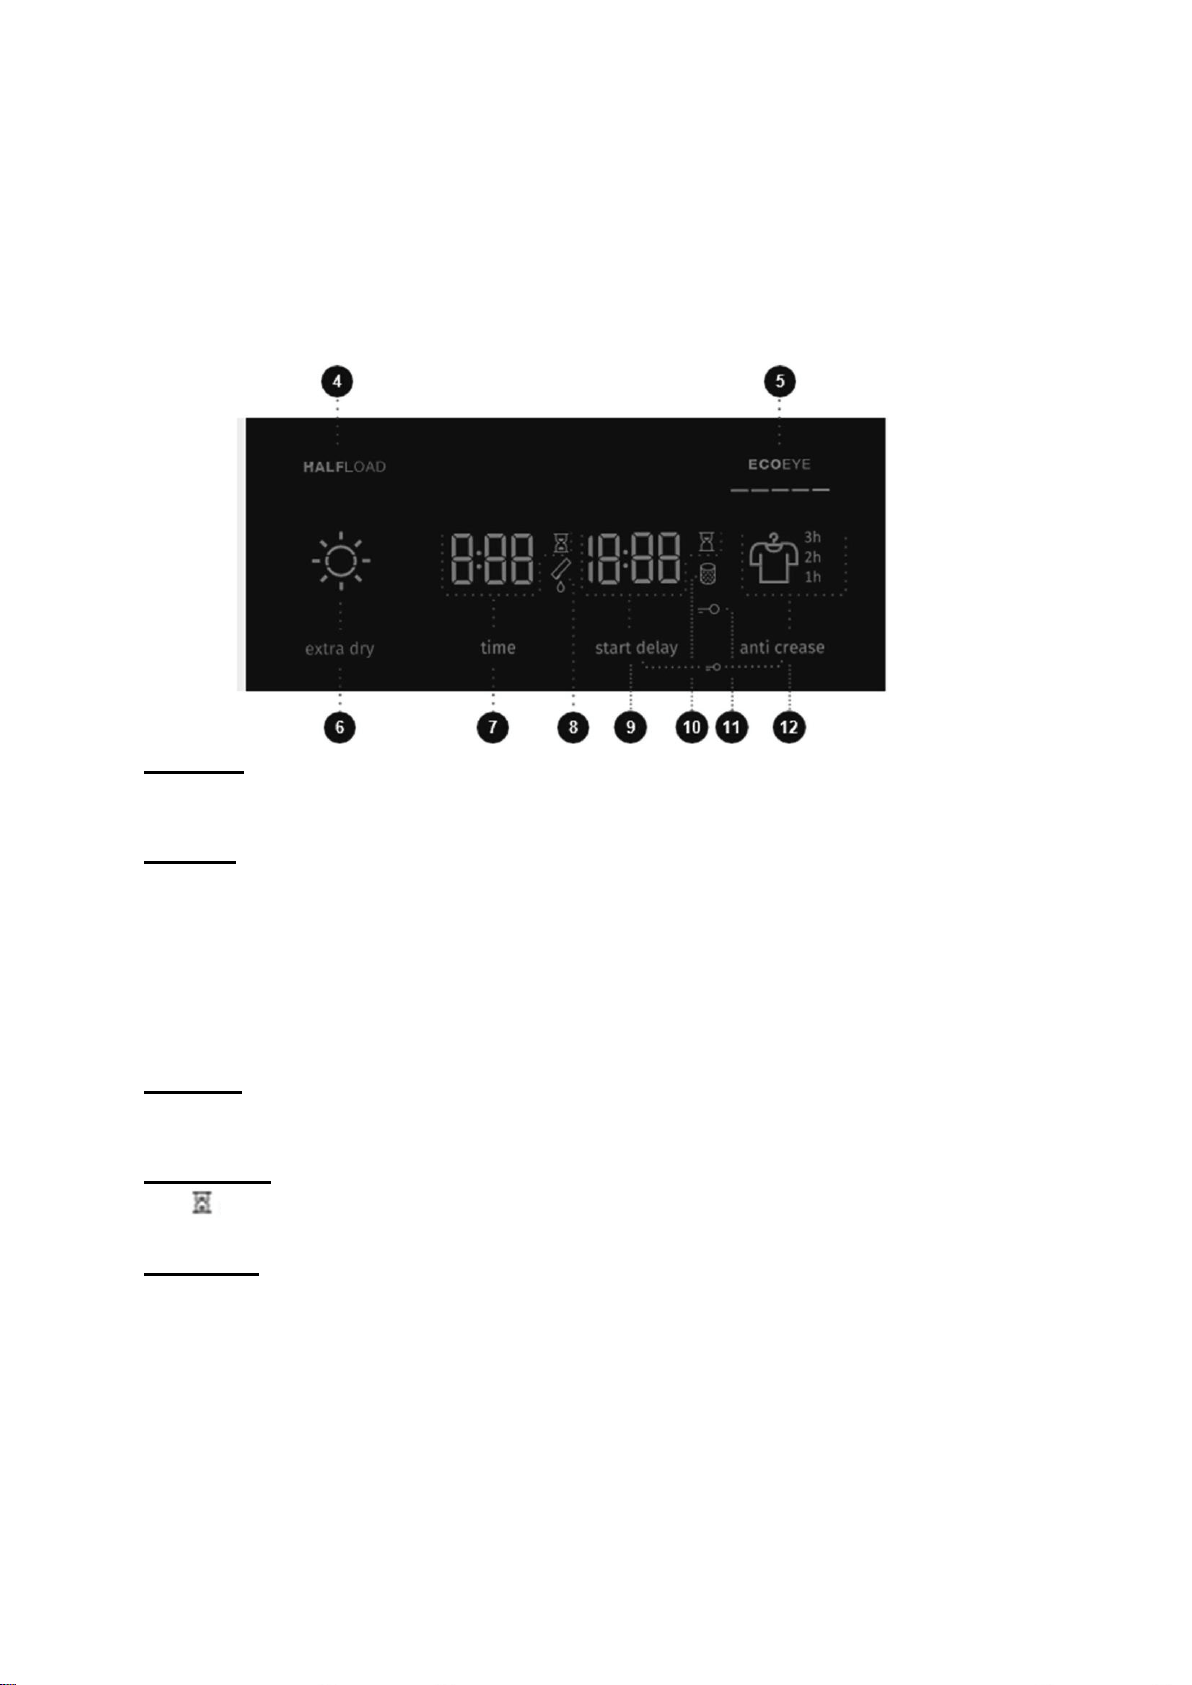
Selecting Extra Functions
Many drying cycles feature specific, extra functions, which can be adjusted by pressing the
relevant functional buttons before staring the drying cycle. Activate and deactivate any setting by
pressing the desired function before pressing the START/PAUSE button (3).
Functions on the machine display, which are fully lit, are the basic or preset settings.
Dimmed or partially lit functions can be adjusted.
Unlit functions cannot be changed during that particular washing program.
Half Load
Press the Half Load button (4) when you only need to dry a half-sized load of clothes.
ECOEYE
This indicator (5) displays how economical your dryer setting is, based on the power
consumption of your selected drying cycle and any extra functions or settings.
The more the symbol is lit, the more economical the drying cycle and the lower the power
consumption.
The less the symbol is lit, the less economical the drying cycle and the higher the power
consumption.
Extra Dry
Press the Extra Dry button (6) to lengthen the drying cycle by five minutes.
Drying Time
The
symbol will illuminate when the drying time (7) is in progress/counting down.
Start Delay
The Start Delay setting allows you to set a specific time when the drying cycle should start.
o Press the Start Delay button to choose from 0-6, in 30 minute increments, and from 6-24
in 1-hour increments.
o Once the input amount of time has expired, the drying cycle will begin automatically.
To deactivate the Start Delay function, press and hold the Start Delay button (9) for three
seconds.

14
NOTE: If a power failure occurs during the Start Delay time period, press the START/PAUSE
button to resume the countdown.
The symbol will illuminate when the Start Delay setting is selected.
Anti-Crease
Use the Anti-Crease setting if you do not intend or cannot remove laundry from the dryer
immediately after the drying cycle finishes.
Press the Anti-Crease button (12) to choose a between one, two, or three hour setting. The
specific time setting will be indicated on the right side of the display.
Once the dryer door is opened, the Anti-Crease setting will be deactivated.
Child Lock
To activate and deactivate the Child Lock, press and hold the (9) and (12) buttons at the
same time, for at least three seconds, until the key symbol (11) lights up or turns off,
respectively.
When the child lock is activated, the dryer cycle or additional functions cannot be changed.
The child lock remains active even after the dryer is turned off. It must be deactivated before
a new drying cycle can be selected. It can also be deactivated during the drying cycle.
NOTE: Disconnecting the dryer from the power source will deactivate all settings, and the dryer
will reset to its default factory settings except for the signal loudness, anti-crease, and
child lock settings.
15
Extra Function Table
Program
HALFLOAD
EXTRA
DRY
START
DELAY
ANTI
CREASE
TIME
(DRYING
TIME)
Cotton
Storage (Closet)
•
•
•
•
Normal
•
•
•
•
Iron
(Moist for ironing)
•
•
•
•
Mix (Mixed laundry/Synthetics)
Storage (Closet)
•
•
•
Iron
(Moist for ironing)
•
•
•
Wool
Sensitive
•
•
•
Shirts
•
•
•
Sports (Sportswear)
•
•
•
Air refresh
Down wear
•
•
•
Time (Timed drying program)
•
•
Baby (Baby clothes)
•
•
•
Bedding
•
•
•
•
• Extra functions can be used
End of the Drying Cycle
The word END will appear on the dryer display, two red indicator lights will illuminate, and the
START/PAUSE button and the Anti-Crease time indicator, if activated, will flash.
Drying Cycle Interruptions
Press the START/PAUSE button to pause/resume a drying cycle.
To stop and cancel the drying cycle, press the START/PAUSE button and hold it for
3 seconds. The selected drying cycle will stop, and the dryer will start to cool down.
Cooling time depends on the selected cycle. After this process, the drying cycle can
be selected and started again.
Open door
If the dryer door is opened during the drying process, the drying cycle will be interrupted.
When the door is again closed, press the START/PAUSE button to resume the
drying cycle from the point at which it was interrupted.
NOTE: The dryer door will heat up during the drying process. Make sure you do not burn
yourself when opening the dryer door.

16
Full Condensation Tank
When the condensate tank is full, the symbol will illuminate, and the drying cycle will pause.
Empty the condensate tank, and then press the START/PAUSE button to resume the
drying cycle from the point at which it was interrupted.
Power supply failure
After a power supply interruption, and the power supply is resumed, the signal light
on the START/PAUSE button will flash. Press the START/PAUSE button to
resume the drying process.
Changing the Drying Program/Functions
1.
Press the ON/OFF button to switch off the dryer, then press the ON/OFF button to
switch it on again.
2.
Rotate the program selector knob to the desired drying cycle, or choose extra
functions.
3.
Select another drying cycle/function, and press the START/PAUSE button to start the new
drying cycle.
Adding Laundry After the Drying Cycle Starts
CAUTION: When loading the laundry, make sure you do not burn yourself when you open
the dryer door.
1.
Open the dryer door and press the START/PAUSE button.
2.
Insert the laundry and press the button START/PAUSE button to resume the
drying cycle.
NOTE: The drying time may be extended if addtional items are added to the unti after the drying
cycle has started.
Personal Settings Menu
1.
Press the ON/OFF button.
2.
Simultaneously press the positions EXTRA DRY and START DELAY buttons, and
hold them for 3 seconds. The START DELAY, DRYING TIME, FILTER, and
CONDENSATE TANK symbols will illuminate.
3.
Number 1 will appear on the LED display, indicating the settings function.
4.
Rotate the program selector knob to the left or to the right to choose the function to
change.
5.
Press on the TIME button to confirm the desired functions.
6.
Press the EXTRA DRY button to go back one step. If the desired settings are not
selected in 20 seconds, the program will automatically return to main menu.
NOTE: Number 1 indicates the Acoustic signal volume setting. Acoustic signal volume
can be set at four levels (0 means the sound is off; 1 means that the button sound
is activated; 2 means low volume, and 3 means high volume). Choose the volume
level by rotating the program selector knob to the left or to the right. Number 2
indicates reset of Personal program settings to factory defaults.
17
Saving Personal Settings
1.
When the proper drying cycle and additional functions are selected, you may store
these setttings by pressing the START/PAUSE button and holding it for five seconds.
An indicator light on the START/PAUSE button and an acoustic signal will confirm
your selection.
2.
SC (settings changed) will be displayed briefly on the display.
3.
Press the START/PAUSE button to start the drying process.
NOTE: The changed combination will appear every time you switch on the dryer. Follow the
same procedure to change a previously saved combination.
Low Standby Mode
The dryer will switch off automatically after 5 minutes to save energy, if you do not run a
drying cycle or do anything else after switching on the dryer. The indicator light on the
START/PAUSE button will flash.
Rotate the program selector knob or press the ON/ OFF button or open the dryer door to
reactivate the display. If you do not do anything for 5 minutes after the end of the program,
the display unit will be switched off as well. Indicator light on the START/PAUSE button will
flash.
P o = weighted power when off [W]
< 0.5
P I = weighted power when in standby [W]
< 0.5
T I = standby time [min]
5
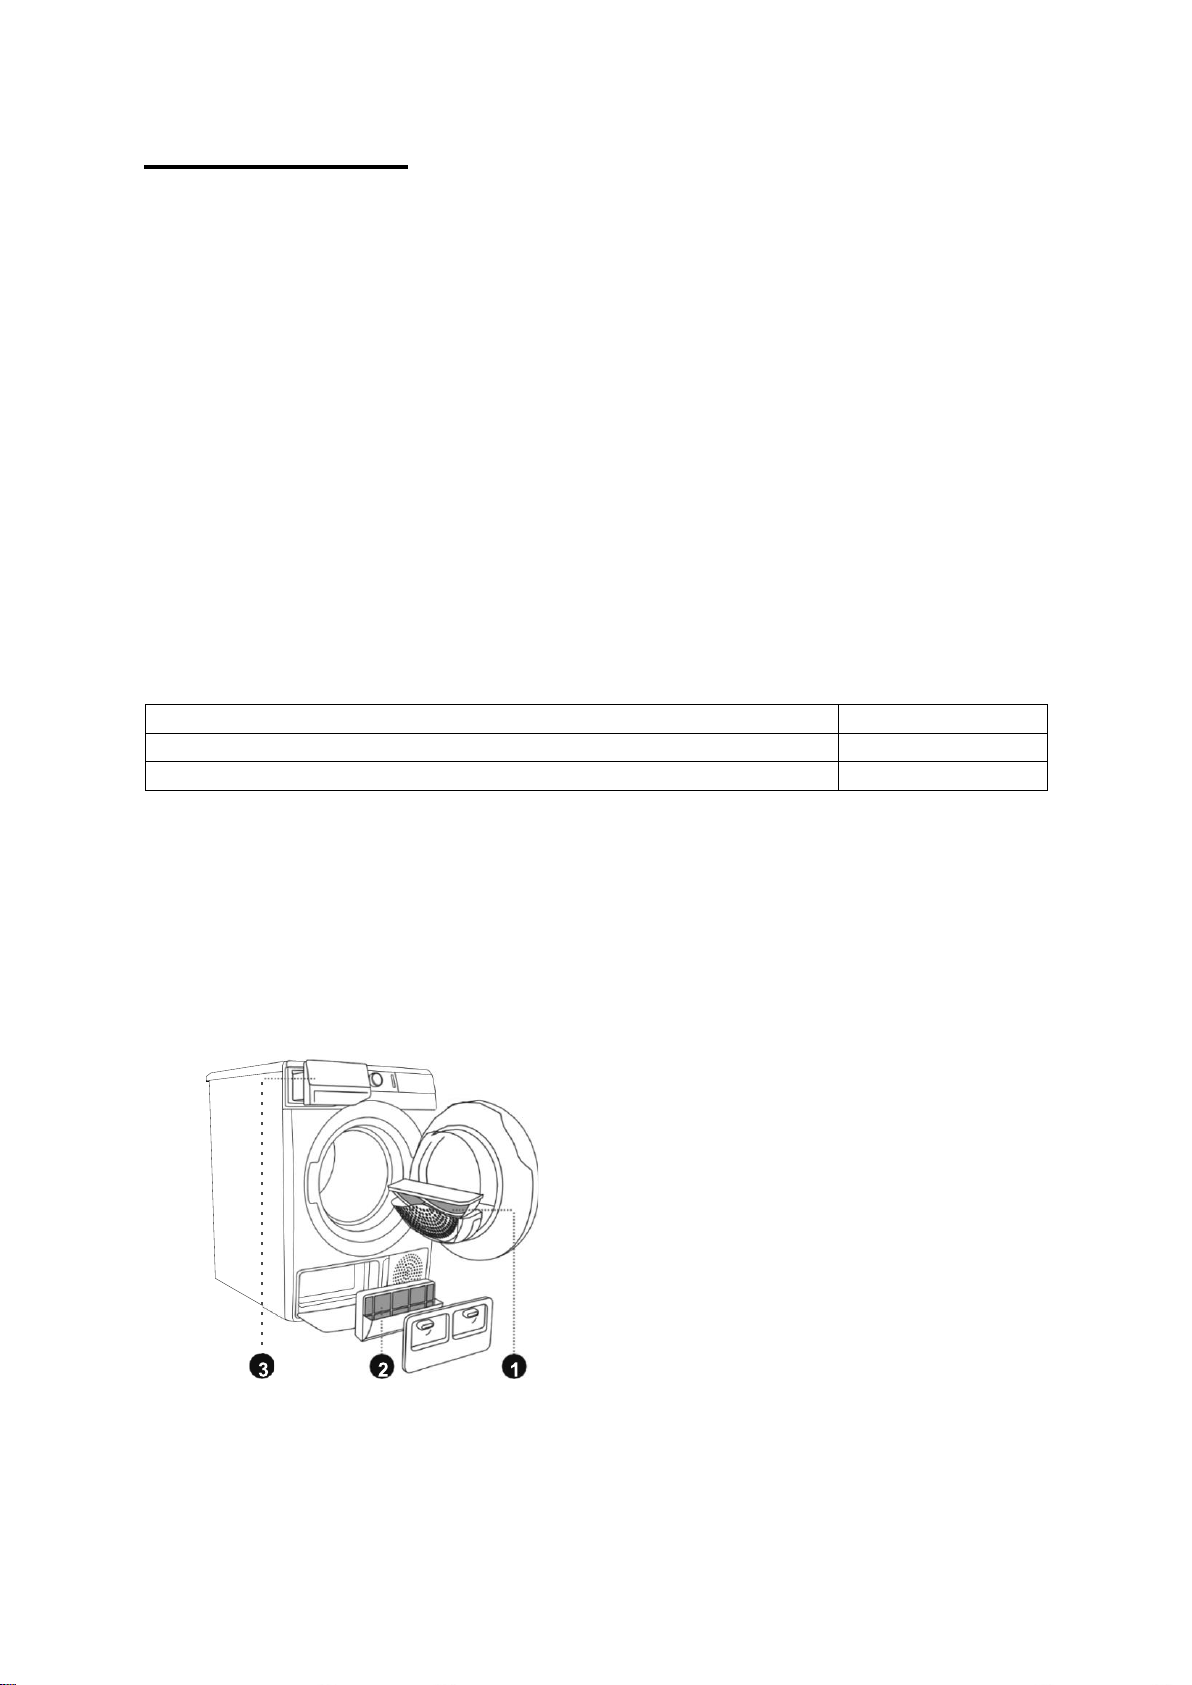
MAINTENANCE AND CLEANING
CAUTION: Before cleaning, make sure to switch off the dryer, and unplug the power cord from
the outlet.
The dryer is fitted with a filtering system consisting of several filters that prevent any debris from
entering the heat exchanger system.
1.
Net filter
2.
Heat pump filter
3.
Condensation tank
NOTE: The dryer may never be operated without the filters in place or with damaged filters, as
an excessive amount of accumulated fibers from the fabric could cause malfunction or
failure of the dryer.
18
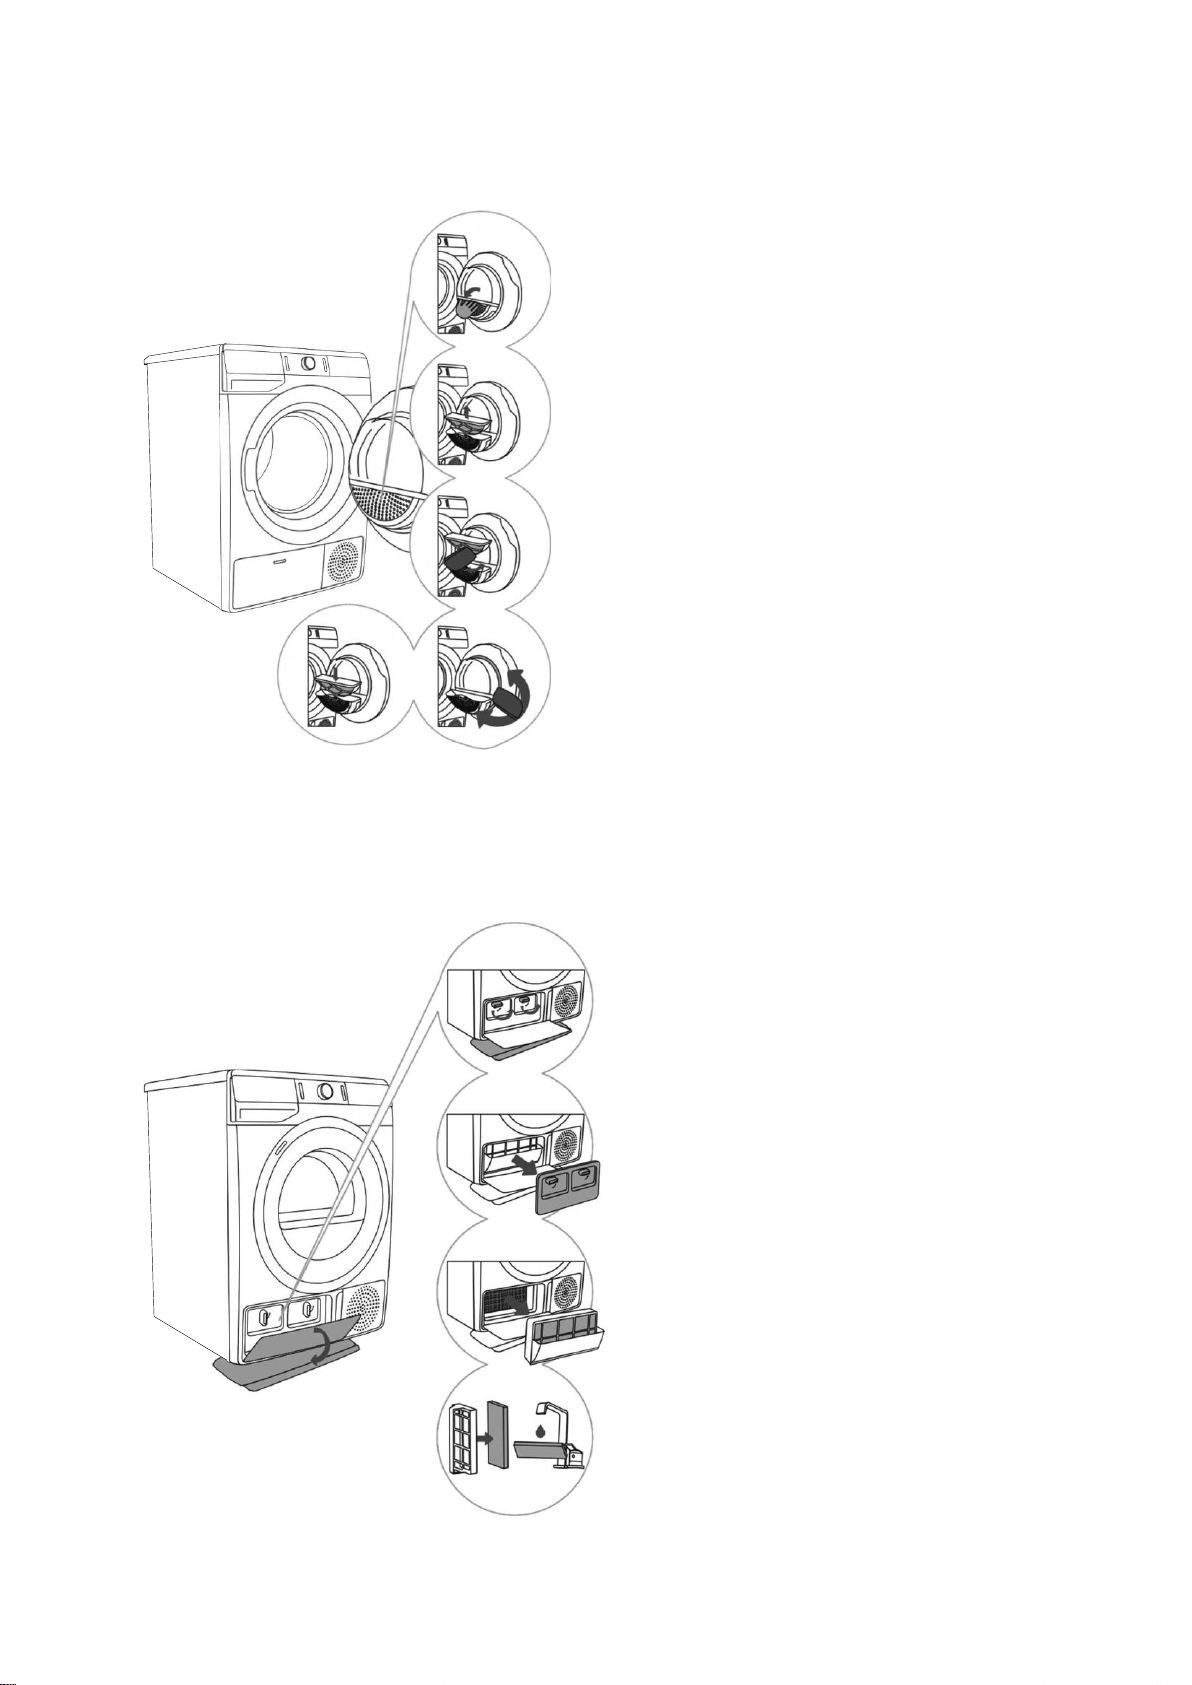
Cleaning the Net Filter
1.
Open the filter housing.
2.
Remove the net filter.
3.
Gently scrape the filter to remove any lint with
your hand or with a soft cloth.
4.
Clean the filter housing and door gasket as
well, if necessary.
5.
Insert the net filter, and close the filter
housing.
Cleaning the Heat Pump Filter
CAUTION: Some water may be spilled during the cleaning process. It is recommended that you
place an absorbent cloth on the floor.
1.
Open the outer cover. Hold the levers on
the inside cover, and rotate them
upwards. Remove the inside cover.
2.
Use the handle to pull out the heat pump
filter.
3.
Push the foam part of the filer from the
housing. Use a damp cloth to clean the
heat pump filter housing.
4.
Wash the foam filter under running water,
and dry it before replacing it in the filter
housing.
5.
Insert the heat pump foam filter into the
filter housing, and close the outer cover.
19
The heat pump filter has to be correctly inserted into its slot, otherwise, the heat exchanger
installed inside the dryer may be clogged or damaged.
NOTE: Clean the foam filter after every five drying cycles, at least.
Cleaning the Heat Exchanger
CAUTION: Do not touch the inner metal parts of the heat exchanger with bare hands to prevent
injury. Use appropriate protective gloves when cleaning the heat exchanger.
The dust and dirt in the metal fins of
the heat exchanger can be cleaned
with a vacuum cleaner and a soft
brush attachment.
Access to the heat exchanger is
possible, when the heat pump filter
is removed as is described in the
Cleaning the Heat Pump Filter
section.
Without pressing down, gently move
the brush attachment only in the
direction of the metal fins from top to
bottom. Too much pressure can
damage or bend the metal fins of the
heat exchanger.
NOTE: Clean the heat exchanger once every twelve months, at least.
20
Emptying the Condensation Tank
Empty the condensation tank after every drying cycle.
It is not necessary to empty the condensate tank if the drain hose is connected directly to a
drain.
NOTE: Never add chemicals or fragrances to the condensation tank.
1.
Pull out the condensation tank from the
dryer using both hands, as shown to the
left.
2.
Empty the condensation tank.
Cleaning the Dryer
3.
Pull out the spout at the opening for
easier emptying. Replace the
condensation tank.
CAUTION:
Always disconnect the dryer from the power mains before cleaning.
Clean the dryer exterior using a soft damp cotton cloth.
Do not use any solvents or cleaning agents that could damage the dryer (please observe the
recommendations and warnings provided by the manufacturers of the cleaning agents).
Wipe all parts of the dryer with a soft cloth until dry.
21
TROUBLESHOOTING
If any irregularities occur during normal operations, turn the dryer off, and wait one minute. Turn
the dryer back on, and repeat the drying program. Most errors can be solved by trying the
suggestions below:
Problem/error
Cause
What to do?
The machine will
not start.
•
The dryer is not turned
on.
•
Check whether the main power switch
is on.
•
There is no voltage in the
power outlet.
•
Check the fuse.
•
Check if the power cord plug is
correctly inserted into the power outlet.
There is voltage in
the outlet, but the
drum does not
spin and the
appliance does not
work.
•
The door is not shut.
•
Check if the door is closed properly.
•
The condensation tank is full.
•
Empty the condensate tank.
See the CLEANING AND
MAINTENANCE section.
•
The START DELAY
function was set.
•
Program was not started in
accordance with the
instructions.
•
To deactivate the start delay option,
press the (8) START DELAY button
and hold for 3 seconds.
•
Re-read the instructions for use again.
The appliance
stops heating
completely during
a program.
•
The net filter may be
clogged. As a result, the
temperature in the dryer
rises, which causes
overheating, and therefore
heating is switched off.
•
Clean the net filter. See the CLEANING
AND MAINTENANCE section.
•
Wait for the appliance to cool down,
and try running it again. If the dryer
still fails to start, call a service
technician.
A slight hitting
noise appears.
•
If the dryer is out of use for
a long period of time, the
support elements are under
stress at the same point.
•
The noise will subside without any
intervention.
The door opens
during drying.
•
There is too much laundry
in the drum.
•
Remove some amount of laundry.
Unevenly dried
laundry.
•
Laundry of varying types
and thickness was dried at
the same time, or there was
an excessive amount of
laundry dried in one load.
•
Make sure you have sorted the
laundry by type and thickness,
whether you have added a suitable
amount of laundry to the drum, and
whether you have selected a suitable
program. See the PROGRAM TABLE
section.
Laundry not
dried or drying
takes too long
•
Filters are not clean.
•
Clean the filters. See the CLEANING
AND MAINTENANCE section.
•
The dryer is placed in a
closed room, the room is
too small, or the room is too
cold. The ambient air
overheats as a result.
•
Make sure there is adequate supply of
fresh air to the dryer. For example,
open the door and/or window.
•
Check if the temperature in the room
where the dryer is installed is too
high or too low.

22
•
Laundry was not sufficiently
wrung or spun.
•
If the laundry is still wet after the
drying cycle, repeat the drying and
select an appropriate drying program
(after cleaning the filters).
•
The amount of laundry
dried in the appliance is too
large or insufficient.
•
Use a suitable program or extra
functions.
•
Laundry (such as bedding)
gets tangled into large balls.
•
Fasten the buttons or close the
zippers on the laundry before
drying. Select a suitable program
(e.g. the program Bedding).
•
After the drying process, loosen the
laundry and select an additional
drying program (e.g. Time (Timed
drying program).
Drum lighting
error
•
There is no lighting when the
dryer door is opened.
•
Disconnect the dryer from the power
mains and call an authorized service
unit.
If your appliance shows other symptoms than those described above, or if you have checked all
items listed as the cause and the problem still exists, then call Summit Appliance Customer
Service at 1-800-932-4267.
Repairs may only be carried out by an adequately trained technician.
Repair or any warranty claim resulting from incorrect connection or use of the dryer shall not
be covered by the warranty. In such cases, the costs of repair shall be charged to the user.
NOTE: If contacting a service technician, please provide your washing machine’s model number,
type, and serial number, located on the unit’s rating label.
23
Error Display Meanings
Errors indicated on the display unit may include the following:
Error Display
Indication on the display
unit and description of error
What to do?
E0
Control unit failure
Call the service center.
E1
Temperature sensor failure
Call the service center.
E2
Communication error
Call the service center.
E3
Pump error
Call the service center.
E4
System overheating
Clean the filter. See the CLEANING
AND MAINTENANCE/Cleaning the
net filter in the door section, or call a
service technician.
E6, E7, E8
Control unit failure
Disconnect the tumble dryer from the
power supply.
Call the service center.
Warning Display Meanings
Warnings indicated on the display unit may include the following:
Warning
Indication on the display
unit and description of
warning
What to do?
Condensate tank warning
Empty the condensate tank before
resuming the program see the
CLEANING AND MAINTENANCE
Emptying the condensate tank section.
PF
Power supply failure warning
Drying interrupted due to power supply
failure.
Press the (3) START/PAUSE button to
restart or resume the drying program.
Sounds
In the initial drying stage or during drying, the compressor and the heat pump produces various
sounds, which do not effect the drying cycle.
Humming sound: This is the compressor unit. The level of noise depends on the program
and the drying stage.
Whirring sound: Produced when the compressor unit is ventilated.
Pumping sound: The pump is pumping the condensate into the condensation tank.
Clicking sound: Rroduced by automatic cleaning of the heat exchanger (compressor).
Rattling sound: Produced during drying if laundry has any hard parts (buttons, zippers etc.).

24
ECONOMIC DRYING
Dry the recommended amount of laundry in each load (see PROGRAM TABLE).
Drying laundry made of particularly delicate fabrics that may be deformed is not
recommended.
The use of conditioner in the washing cycle is not necessary, as the laundry is soft and
smooth after drying in the dryer. The drying time will be shorter and the power consumption
will be lower if the garments are thoroughly wrung or spun before drying. By selecting the
appropriate drying program, you will avoid over-drying your laundry and problems with
ironing or shrinkage of fabric.
Regular cleaning of the filters will lead to optimum drying time and minimum power
consumption.
When drying smaller amounts of laundry or individual garments, the sensor may not detect
the actual level of moisture in the laundry. In such cases, it is recommended to dry smaller
items or amounts with programs for drier laundry or with the timed program.
DISPOSAL
Packaging is made of environmentally friendly materials that can be recycled, disposed of, or
destroyed without any hazard to the environment. To this end, packaging materials are labelled
appropriately.
The symbol on the product or its packaging indicates that the product should not be
treated as normal household waste. Take the product to an authorized collection center
for waste electric and electronic equipment processing.
When disposing of the dryer at the end of its useful life, remove all power cords, and destroy the
door latch and switch to prevent the door from locking or latching (child safety).
Correct disposal of the product will help prevent any negative effects on the environment and
health of people, which could occur in case of incorrect product removal. For detailed information
on removal and processing of the product, please contact the relevant municipal body in charge
of waste management, your waste disposal service, or the store where you bought the product.

25
NOTES

26
NOTES

27
NOTES
LIMITED WARRANTY
ONE-YEAR LIMITED WARRANTY
Within the 48 contiguous United States, for one year from the date of purchase, when this appliance is
operated and maintained according to instructions attached to or furnished with the product, warrantor will
pay for factory-specified parts and repair labor to correct defects in materials or workmanship. Service
must be provided by a designated service company. Outside the 48 states, all parts are warranted for one
year from manufacturing defects. Plastic parts, shelves and cabinets are warranted to be manufactured to
commercially acceptable standards, and are not covered from damage during handling or breakage.
ITEMS WARRANTOR WILL NOT PAY FOR:
1.
Service calls to correct the installation of your appliance, to instruct you how to use your appliance,
to replace or repair fuses or to correct wiring or plumbing.
2.
Service calls to repair or replace appliance light bulbs or broken shelves. Consumable parts (such
as filters) are excluded from warranty coverage.
3.
Damage resulting from accident, alteration, misuse, abuse, fire, flood, acts of God, improper
installation, installation not in accordance with electrical or plumbing codes, or use of products not
approved by warrantor.
4.
Replacement parts or repair labor costs for units operated outside the United States.
5.
Repairs to parts or systems resulting from unauthorized modifications made to the appliance.
6.
The removal and reinstallation of your appliance if it is installed in an inaccessible location or is not
installed in accordance with published installation instructions.
DISCLAIMER OF IMPLIED WARRANTIES – LIMITATION OF REMEDIES
CUSTOMER'S SOLE AND EXCLUSIVE REMEDY UNDER THIS LIMITED WARRANTY SHALL BE PRODUCT
REPAIR AS PROVIDED HEREIN. IMPLIED WARRANTIES, INCLUDING WARRANTIES OF MERCHANTABILITY OR
FITNESS FOR A PARTICULAR PURPOSE, ARE LIMITED TO ONE YEAR. WARRANTOR SHALL NOT BE LIABLE
FOR INCIDENTAL OR CONSEQUENTIAL DAMAGES. SOME STATES DO NOT ALLOW THE EXCLUSION OR
LIMITATION OF INCIDENTAL OR CONSEQUENTIAL DAMAGES, OR LIMITATIONS ON THE DURATION OF
IMPLIED WARRANTIES OF MERCHANTABILITY OR FITNESS, SO THESE EXCLUSIONS OR LIMITATIONS MAY
NOT APPLY TO YOU. THIS WARRANTY GIVES YOU SPECIFIC LEGAL RIGHTS AND YOU MAY ALSO HAVE
OTHER RIGHTS, WHICH VARY FROM STATE TO STATE.
Summit Appliance
Division of Felix Storch, Inc.
An ISO 9001:2015 registered company
770 Garrison Avenue
Bronx, NY 10474
www.summitappliance.com
For parts and accessory ordering,
troubleshooting and helpful hints, visit:
www.summitappliance.com/support
SP15 L1 ADVANCED HP ND US SUM
801693 en (08-20)