ge.com
L9
U
I
0
Safety Instructions ...... 2-7
Operating Instructions
Aluminum Foil ................ 1:3
Clock and Timer ............... 16
Oven ...................... i0-19
Baking and Roasting ........ 13
Broiling ...................... 14
Broiling Guide ............... 15
Oven Control ............ 10,11
Power Outage ............... 12
Preheating ................... 13
Sabbath Feature ............ 19
Special Features ............. 18
Surface Cooking ............. 8,9
Thermostat Adjustment ....... 17
Care and Cleaning
Air Vents ...................... 25
Burner Assemblies ........ 20-21
Burner Caps and Heads ...... 22
Burner Grates ................. 21
Control Panel and Knobs ..... 25
Cooktop Surface .............. 23
Drip Pans ..................... 20
Lift-Off Oven Door ............ 24
Lift-Up Cooktop ............... 23
Oven Bottom ................. 24
Oven Interior .................. 26
Removable Broiler Drawer .... 25
Shelves ........................ 26
Stainless SteelSurfaces ....... 23
Installation
Instructions ............ 27-42
Anti-Tip Device ........ 31,41, 42
Connect the Range
to Gas ..................... 32135
Convert to LPGas ............. 42
Dimensions and
Clearances .................... 30
Electrical Connections .... 36-37
Level the Range ............... 41
Light the Pilots ............ 37-40
Troubleshooting
Tips ...................... 43-45
Accessories ................ 49
Consumer Support
Consumer
Support .............. Back Cover
Product Registration ...... 47, 48
Warrantq for Customers
in Canada ..................... 51
Warrantq for Customers
in the U.S.A.................... 50
Standard-Clean
Models:
JGBS04 JGBS19
JGBS07 JGBS23
JGBSI8 JGSS05
Write the model and serial
numbers here:
Model #
Serial #
You can find them on a label on the
front of the range behind the kick
panel or broiler drawer.
183D5580P228 49-85146 05-08JR
IMPORTANTSAFETYINFORMATION.
READALL INSTRUCTIONSBEFOREUSING.
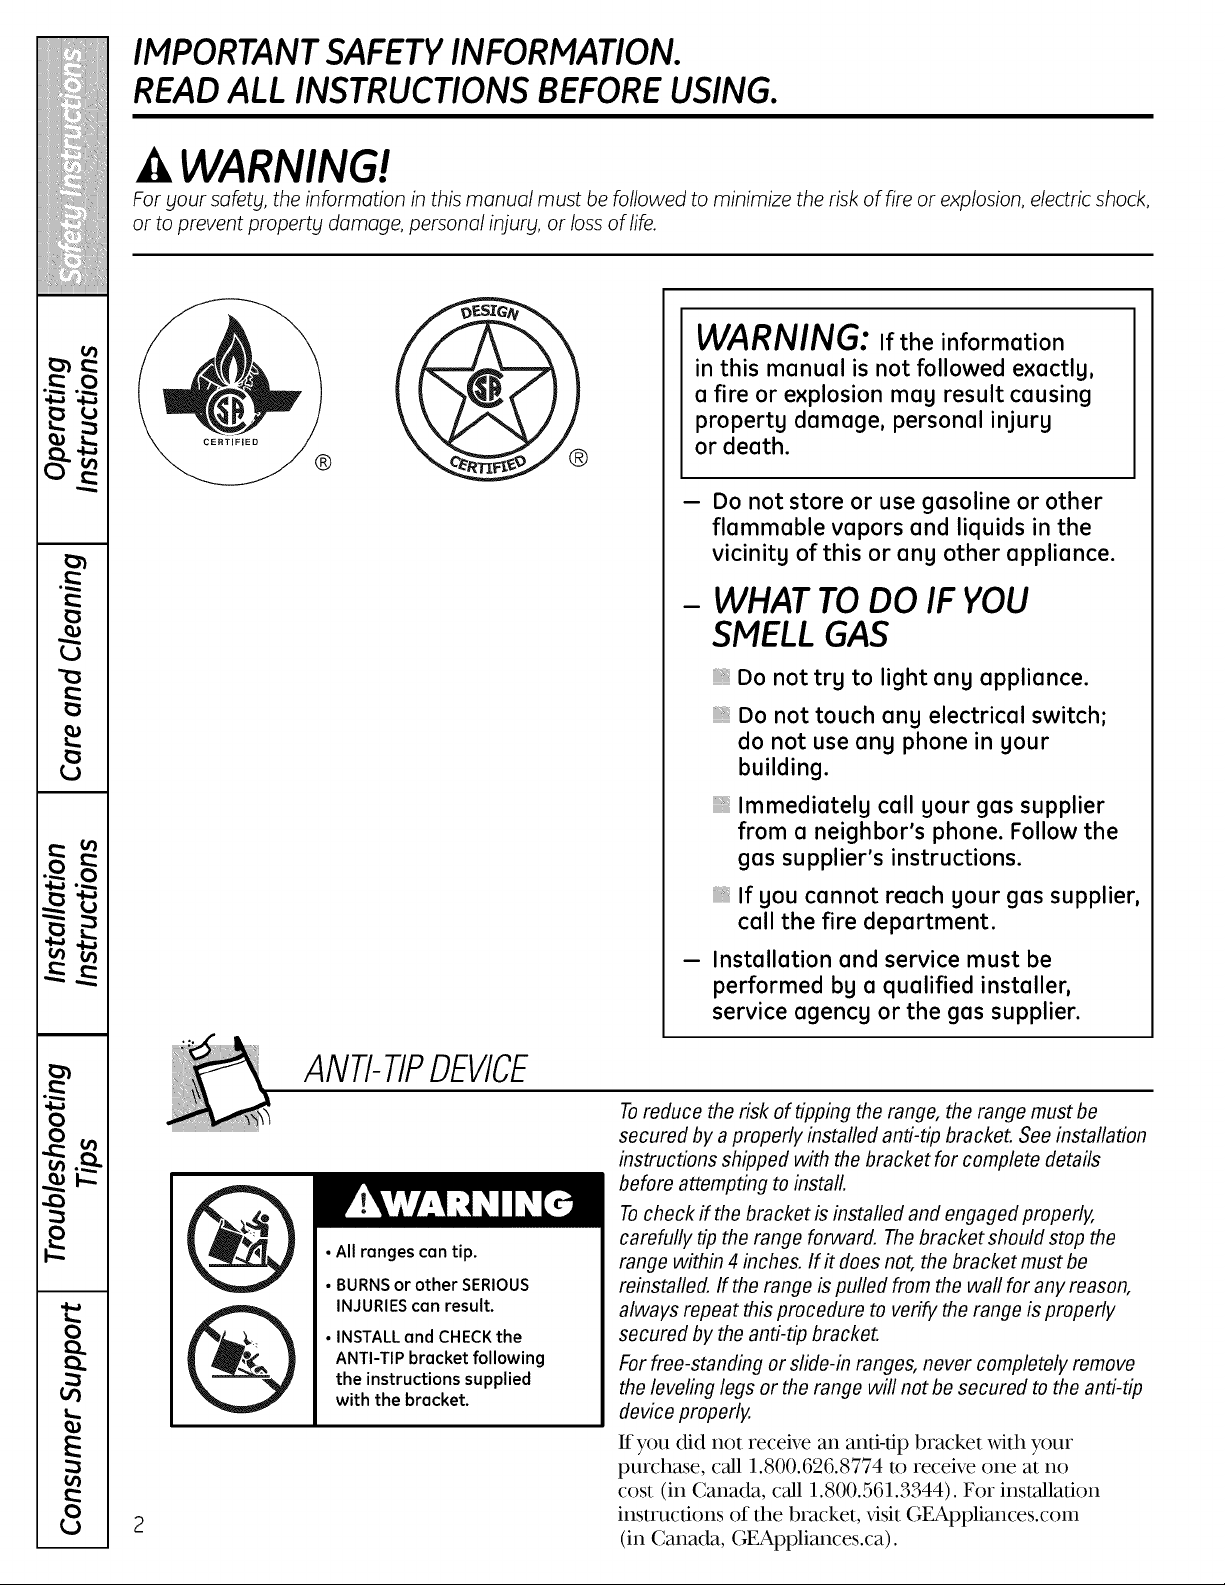
WARNING!
Foryour safety, the information in this manual must be followed to minimize the risk of fire or explosion, electric shock,
or toprevent property damage, personal injury, or loss of life.
2
®
WARNING: If the information
in this manual is not followed exactlg,
a fire or explosion mag result causing
propertg damage, personal in]urg
or death.
-- Do not store or use gasoline or other
flammable vapors and liquids in the
vicinitg of this or ang other appliance.
- WHAT TO DO IF YOU
SMELLGAS
iiiiiiillDo not trg to light ang appliance.
Do not touch ang electrical switch;
do not use ang phone in gour
building.
Immed iat el g ca II g ou r g a s su p pl ier
from a neighbor's phone. Follow the
gas supplier's instructions.
If gou cannot reach gour gas supplier,
call the fire department.
- Installation and service must be
performed bg a qualified installer,
service agencg or the gas supplier.
ANTI-TIPDEVICE
•All ranges can tip.
• BURNS or other SERIOUS
INJURIES can result.
• INSTALL and CHECK the
ANTI-TIP bracket following
the instructions supplied
with the bracket.
Toreduce the risk of tipping the range, the rangemust be
secured bya properly installed anti-tip bracket. See installation
instructions shipped with thebracket for complete details
before attempting toinstall.
Tocheck ff thebracket is installed and engaged properly,
carefully tipthe range forward. The bracket should stop the
range within 4 inches. If it does not, thebracket must be
reinstalled. If therange ispulled from the wall for any reason,
always repeat this procedure to verify the range isproperly
secured bythe anti-tip bracket.
Forfree-standing or slide-in ranges, never completely remove
theleveling legs or the range will notbe secured totheanti-tip
device properly.
If you did not receive an anti-tip bracket with your
purchase, call 1.800.626.8774 m receive one at no
cost (in Canada, call 1.800.561.3344). For installation
instructions of the bracket, x,isit GEAppliances.com
(in Canada, GEAppliances.ca).
ge.com
WARNING!
IMPORTANT SAFETY NOTICE
TheCalifornia Safe Drinking Water and Toxic Enforcement Act requires the Governor of California to
publish a list ofsubstances known to thestate to cause birth defects or other reproductive harm, and
requires businesses to warn customers ofpotential exposure to such substances.
Gasappliances can cause minor exposure to four of these substances, namely benzene, carbon
monoxide, formaldehyde and soot, caused primarily by the incomplete combustion of natural gas
or LPfuels. Properly adjusted burners, indicated by a bluish rather than a yellow flame, will minimize
incomplete combustion. Exposure to these substances can be minimized by venting with an open
window or using a ventilation fan or hood.
SAFETY PRECAUTIONS
Have the installer show you the location of the range gas shut-off valve and how to shut itoff if
necessary.
Have your range installed and properly
grounded bya qualified installer,in
accordance with the Installation Instructions.
Anyadjustment and service should be
performed onlyby qualified gasrange
installersor service technicians.
Do notattempttorepairor replaceany
partofyour rangeunlessitisspecifically
recommended inthismanual.Allotherservice
shouldbe referredto a qualifiedtechnician.
iiiiiiiiiiiii!
Plug your range into a 120-volt grounded
outlet only. Donot remove the round
grounding prong from the plug. If in doubt
about the grounding of the home electrical
system, it isyour personal responsibility and
obligation to have an ungrounded outlet
replaced with a properly grounded,
three-prong outlet in accordance with
the National Electrical Code. Donot use
an extension cord with this appliance.
WARNING:NEVERusethis
appliance as a space heater to heat or
warm the room. Doing so may result
in carbon monoxide poisoning and
overheating of the oven.
IMPORTANTSAFETYINFORMATION.
READALL INSTRUCTIONS BEFOREUSING.
4
SAFETY PRECAUTIONS
Locate the range out of kitchen traffic path
and out of draftg locations to prevent pilot
outage (on standing pilot models) and poor
air circulation.
Be sure all packaging materials are
removed from the range before operating
itto prevent fire or smoke damage should
the packaging material ignite.
Be sure gour range iscorrectlg adjusted bg
a qualified service technician or installer for
the tgpe of gas (natural or LP)that isto be
used. Your range can be converted for use
with either tgpe of gas. See the Installation
of the range section.
WARNING:These adjustments must
be made bg o qualified service technician
in accordance with the manufacturer's
instructions and all codes and requirements
of the authoritg having jurisdiction. Failure
to follow these instructions could result in
serious injurg or propertg damage. The
qualified agencg performing this work
assumes responsibilitg for the conversion.
Be careful when gou clean the cooktop
because the area over the pilot (on standing
pilot models) will be hot.
After prolonged use of a range, high floor
temperatures mag result and mang floor
coverings will not withstand this kind of use.
Never install the range over vingl tile or
linoleum that cannot withstand such tgpe
of use. Never install itdirectlg over interior
kitchen carpeting.
Donot leave children alone or unattended
where a range ishot or in operation. Theg
could be seriouslg burned.
Donot allow angone to climb, stand or hang
on the oven door, broiler drawer or cooktop.
Theg could damage the range and even tip it
over, causing severe personal injurg.
CAUTION: Items of interest to children
should not be stored in cabinets above a
range or on the bocksplosh of o range-
children climbing on the range to reach
items could be seriouslg injured.
Clean onlg parts listed in this Owner's Manual.
iiiiiiiiiiiii!
Never wear loose fitting or hanging garments
while using the appliance. Be careful when
reaching for items stored in cabinets over the
range. Flammable material could be ignited
ifbrought in contact with flame or hot oven
surfaces and mog cause severe burns.
Donot store flammable materials in an oven,
a range broiler or near a cooktop.
Donot store or use combustible materials,
gasoline or other flammable vapors and
liquids in the vicinitg ofthis or ang other
appliance.
Donot let cooking grease or other flammable
materials accumulate in or near the range.
Donot use water on grease fires. Never
pick up a flaming pan. Turn the controls off.
Smother o flaming pan on o surface burner
bg covering the pan completelg with o
well-fitting lid, cookie sheet or flat trog.
Use o multi-purpose drg chemical or
foam-tgpe fire extinguisher.
Flaming grease outside a pan can be put out
by covering itwith baking soda or, if available,
bg using a multi-purpose drg chemical or
foam-tgpe fire extinguisher.
Flame in the oven can be smothered
completelg bg closing the oven door and
turning the control to off or bg using a
multi-purpose drg chemical or foam-tgpe
fire extinguisher.
Letthe burner grates and other surfaces cool
before touching them or leaving them where
children con reach them.
Never block the vents (air openings) of the
range. Theg provide the air inlet and outlet
that ore necessorg for the range to operate
properlg with correct combustion. Air openings
ore located at the rear ofthe cooktop, at the
top and bottom of the oven door,and at the
bottom of the range under the broiler drawer.
Large scratches or impacts to glass doors
can lead to broken or shattered glass.
ge.com
COOK MEATAND POULTRY'THOROUGHLY'...
Cook meat and poultry thoroughlg-meat to at least an INTERNAL temperature of 160°F and poultrg to
at least an INTERNALtemperature ofl 80°K Cooking to these temperatures usually protects against
foodbome illness.
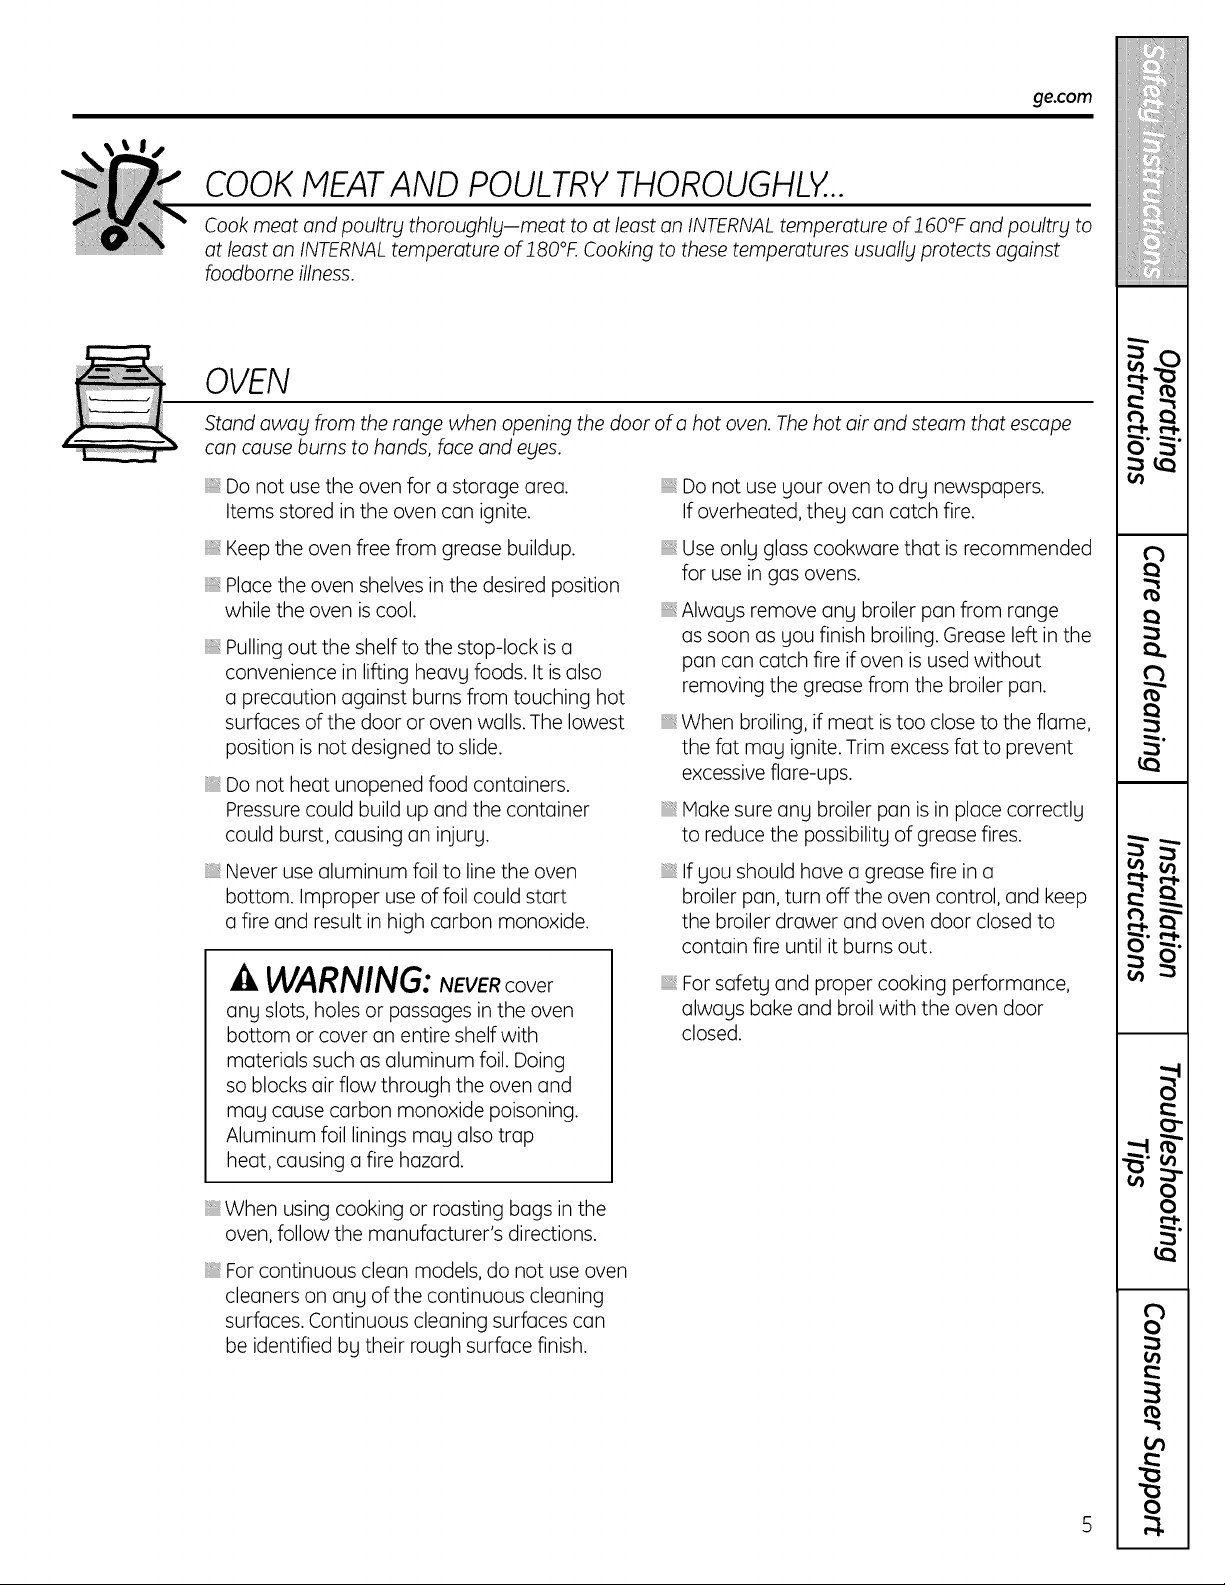
OVEN
Stand awag from the range when opening the door ofa hot oven. Thehot air and steam that escape
can cause burns to hands, face and eges.
Donot use the oven for a storage area.
Items stored in the oven can ignite.
Keep the oven free from grease buildup.
Placethe oven shelves in the desired position
while the oven is cool.
Pulling out the shelf to the stop-lock isa
convenience in lifting heavy foods. It is also
a precaution against burns from touching hot
surfaces of the door or oven walls. The lowest
position isnot designed to slide.
Donot heat unopened food containers.
Pressure could build up and the container
could burst, causing an injury.
Never use aluminum foil to line the oven
bottom. Improper use of foil could start
a fire and result in high carbon monoxide.
WARNING:NEVERcover
ang slots, holes or passages in the oven
bottom or cover an entire shelf with
materials such asaluminum foil. Doing
so blocks air flow through the oven and
mag cause carbon monoxide poisoning.
Aluminum foil linings mag also trap
heat, causing a fire hazard.
iiiiiiiiiiiii!
iiiiiiiiiiiii!
iiiiiiiiiiiii!
iiiiiiiiiiiii!
Donot use gour oven to drg newspapers.
If overheated, theg can catch fire.
Use onlg glass cookware that isrecommended
for use in gas ovens.
Alwogs remove ong broiler pan from range
as soon as gou finish broiling. Grease left in the
pan can catch fire if oven isused without
removing the grease from the broiler pan.
When broiling, ifmeat is too close to the flame,
the fat mag ignite. Trim excess fat to prevent
excessive flare-ups.
Make sure ang broiler pan is in place correctlg
to reduce the possibilitg of grease fires.
If gou should have o grease fire in o
broiler pan, turn off the oven control, and keep
the broiler drawer and oven door closed to
contain fire until it burns out.
Forsafetg and proper cooking performance,
alwags bake and broil with the oven door
closed.
When using cooking or roasting bags in the
oven, follow the manufacturer's directions.
Forcontinuous clean models, do not use oven
cleaners on ong of the continuous cleaning
surfaces. Continuous cleaning surfaces con
be identified bg their rough surface finish.
IMPORTANTSAFETYINFORMATION.
READALL INSTRUCTIONS BEFOREUSING.
WARNING!
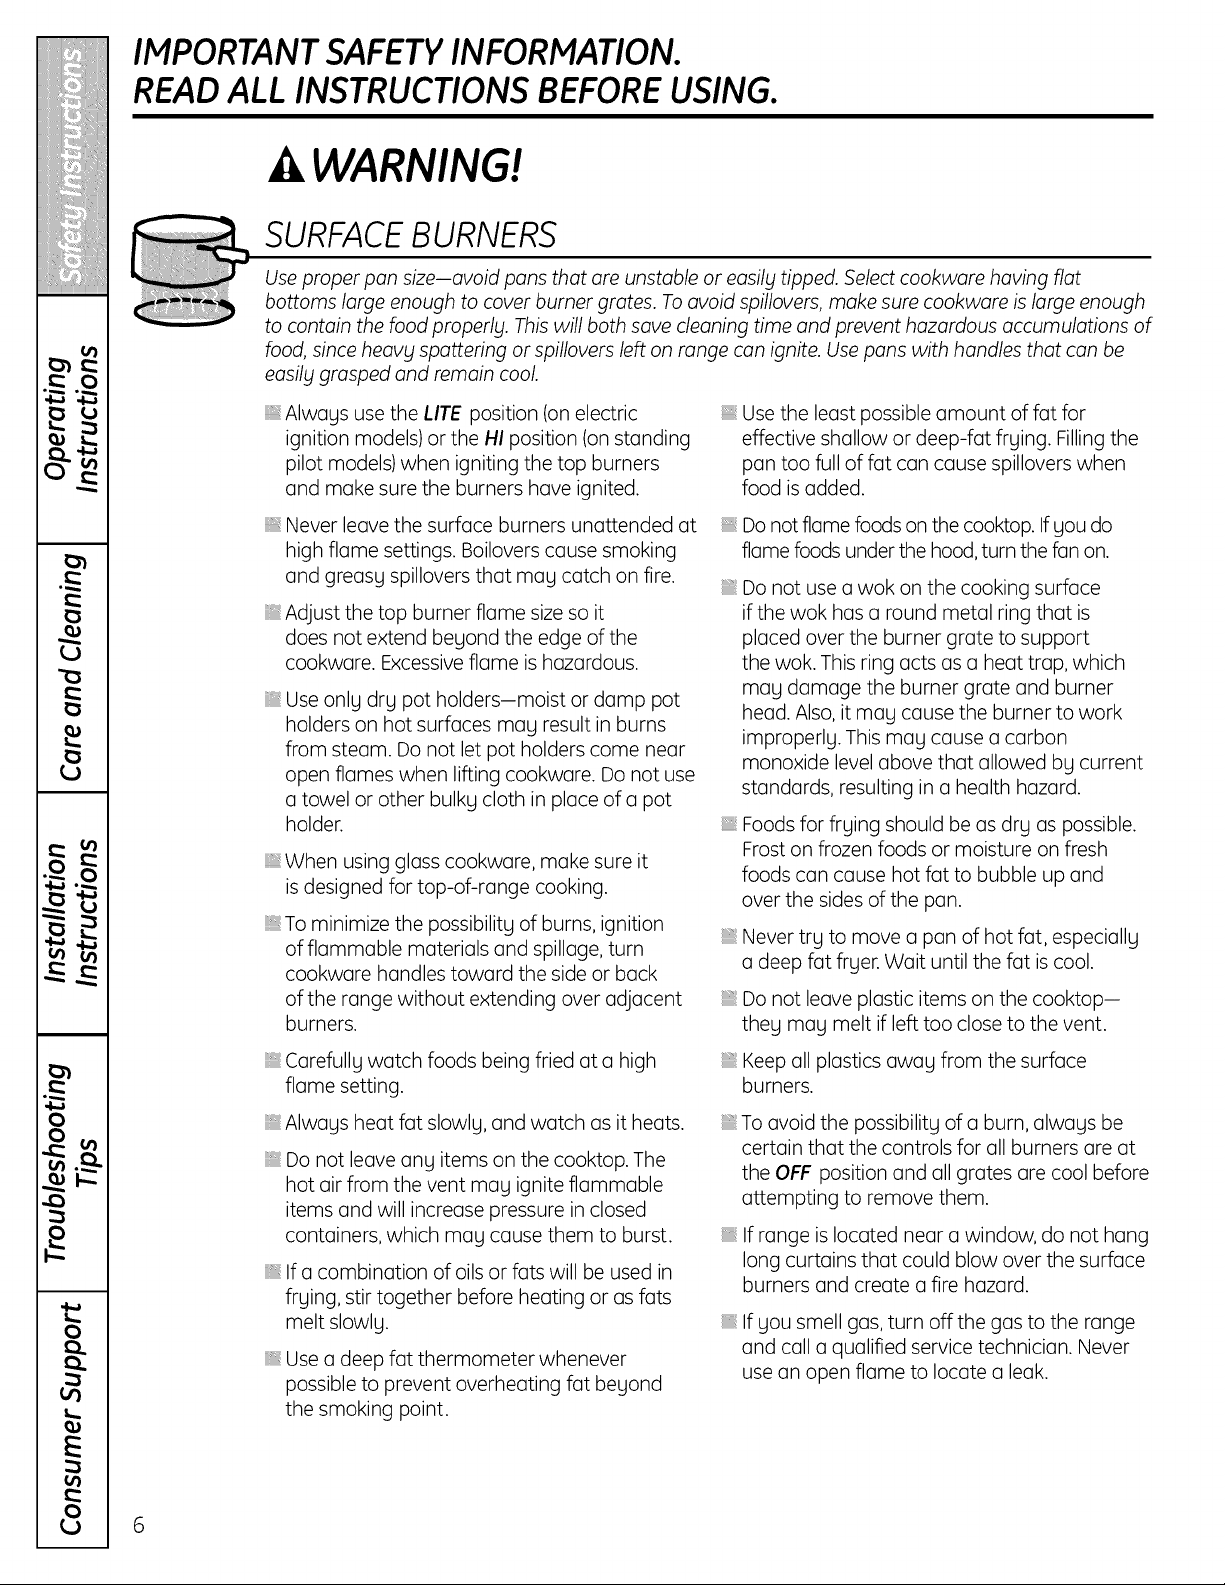
SURFACEBURNERS
Use proper pan s/zeJavoid pans that are unstable or easily tipped. Select cookware having fiat
bottoms large enough to cover burner grates. To avoid spillovers, make sure cookware islarge enough
to contain the food properly. This will both save cleaning time and prevent hazardous accumulations of
food, since heavy spattering or spillovers left on range can ignite. Use pans with handles that can be
easil_l grasped and remain cool.
Always usethe LITE position (on electric
ignition models) or the HI position (on standing
pilot models) when igniting the top burners
and make sure the burners have ignited.
Never leave the surface burners unattended at
high flame settings. Boilovers cause smoking
and greasy spillovers that may catch on fire.
Adjust the top burner flame size so it
does not extend beyond the edge of the
cookware. Excessive flame ishazardous.
Use only dry pot holders-moist or damp pot
holders on hot surfaces may result in burns
from steam. Do not let pot holders come near
open flames when lifting cookware. Do not use
a towel or other bulky cloth in place of a pot
holder.
When using glass cookware, make sure it
is designed for top-of-range cooking.
Tominimize the possibility of burns, ignition
of flammable materials and spillage, turn
cookware handles toward the side or back
of the range without extending over adjacent
burners.
Carefully watch foods being fried at a high
flame setting.
Always heat fat slowly, and watch as itheats.
Donot leave any items on the cooktop. The
hot air from the vent may ignite flammable
items and will increase pressure in closed
containers, which may cause them to burst.
If a combination of oils or fats will be used in
frying, stir together before heating or as fats
melt slowly.
Use a deep fat thermometer whenever
possible to prevent overheating fat beyond
the smoking point.
Use the least possible amount of fat for
effective shallow or deep-fat frying. Fillingthe
pan too full of fat can cause spillovers when
food isadded.
iiiiiiiiiiiii!
Donotflame foods on the cooktop. If you do
flame foods under the hood,turn the fan on.
Donot use a wok on the cooking surface
ifthe wok has a round metal ring that is
placed over the burner grate to support
the wok. This ring acts as a heat trap, which
may damage the burner grate and burner
head. Also, itmay cause the burner to work
improperly. This may cause a carbon
monoxide levelabove that allowed by current
standards, resulting in a health hazard.
Foods for frying should be as dry as possible.
Frost on frozen foods or moisture on fresh
foods can cause hot fat to bubble up and
over the sides of the pan.
Never try to move a pan of hot fat, especially
a deep fat fryer. Wait until the fat iscool.
Donot leave plastic items on the cooktop-
they may melt ifleft too close to the vent.
Keep all plastics away from the surface
burners.
Toavoid the possibility of a burn, always be
certain that the controls for all burners are at
the OFF position and all grates are cool before
attempting to remove them.
If range islocated near a window, do not hang
long curtains that could blow over the surface
burners and create a fire hazard.
If you smell gas, turn off the gas to the range
and call a qualified service technician. Never
usean open flame to locate a leak.
6

ge.com
SURFACEBURNERS(cont.)
Always turn the surface burner controls off
before removing cookware.
Donot lift the cooktop on sealed burner
models. Lifting the cooktop can lead to
damage and improper operation of the range.
When a pilot goes out (on standing pilot
models), you will detect a faint odor of gas
as your signal to relight the pilot. When
relighting the pilot, make sure burner controls
are in the off position, and follow instructions
in this book to relight.
If you smell gas, and you have already made
sure pilots are lit (on standing pilot models),
turn offthe gas to the range and call a
qualified service technician. Never use
an open flame to locate a leak.
Donot place or store items that can melt
or catch fire on the grates, even when the
cooktop isnot being used.
Keeprangecleanand freeofaccumulations
ofgrease orspillovers,which may ignite.
READ AND FOLLOW THIS SAFETY INFORMATION
CAREFULLY.
SAVETHESE INSTRUCTIONS
Usingthe gas surface burners.
Throughout this manual,features and appearance may vary from your model.
Before Lighting o Gas Burner
If drip pansare suppliedwith gour range,
theg shouldbe used at all times.
Makesureall burnersare in place.
Makesureall grates on the range are
properlyplacedbeforeusingany burner.
After Lighting a Gas Burner
Do notoperate theburner foran extended
period oftime without cookware on the
grate. The finish on thegrate may chip
without cookwaretoabsorbthe heat.
Besure the burnersand grates are cool
beforegou placegour hand, a pot holder,
cleaningclothsor other materialson them.
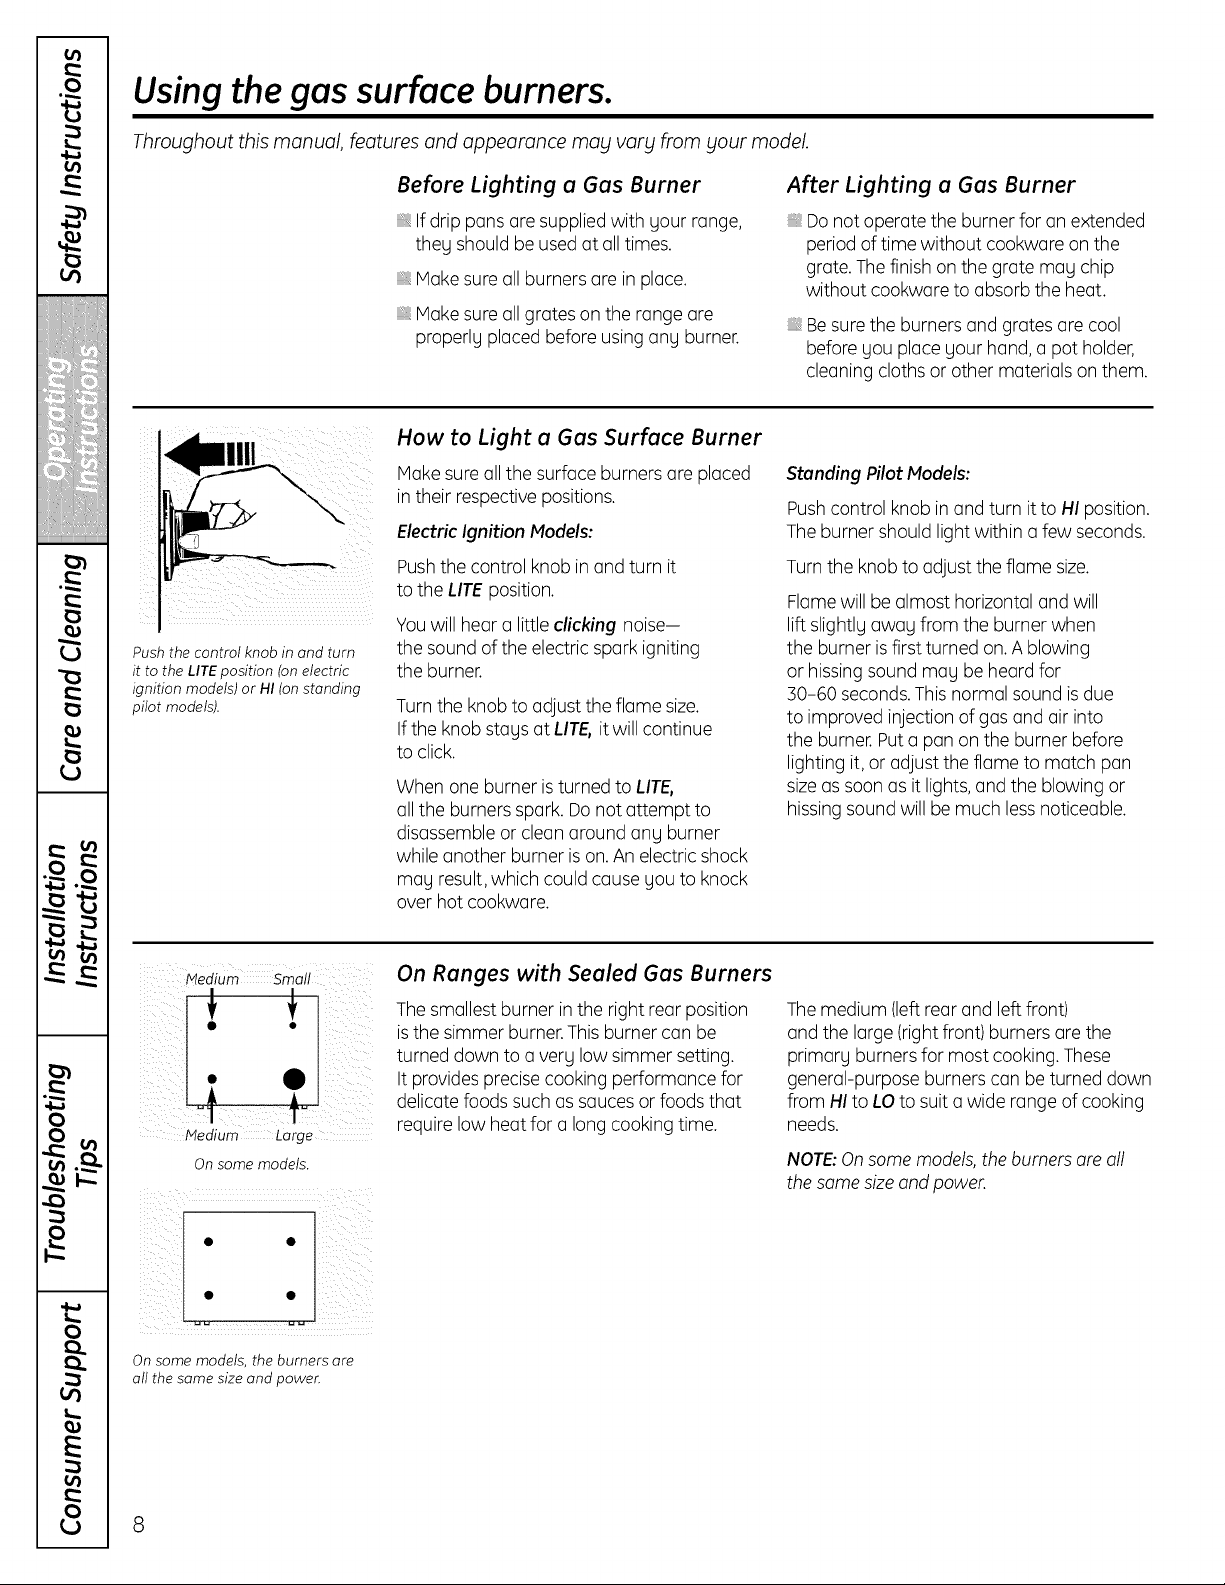
i i ilI i i iiiiill
Pushthe control knob in and turn
it to the LITE position (on electric
ignition models)or HI(onstanding
pilot models).
How to Light o Gas Surface Burner
Hake sure allthe surface burners are placed
in their respectivepositions.
ElectricIgnition Models:
Push thecontrol knobin and turn it
totheLITE position.
Youwillhear a little clicking noise-
thesoundoftheelectricspark igniting
theburner.
Turn the knob to adjust theflame size.
If the knob stays atLITE, itwillcontinue
toclick.
Whenone burner is turned to LITE,
all the burners spark.Do notattempt to
disassemble or cleanaround ang burner
whileanother burner is on. An electricshock
mag result, which couldcause gou to knock
overhotcookware.
Standing Pilot Models:
Push control knobin and turn it to HI position.
Theburner shouldlight within a few seconds.
Turnthe knob to adjust theflame size.
Flame willbe almost horizontal and will
lift slightlg awagfrom theburner when
theburner is firstturned on. A blowing
or hissingsound magbe heard for
30-60 seconds.This normal soundis due
toimproved injection ofgasand air into
theburner. Put a pan on the burner before
lightingit, or adjust theflame to match pan
sizeassoon asitlights, and the blowing or
hissing soundwillbe much less noticeable.
Medium Large
On some models.
On Ranges with Sealed Gas Burners
The smallest burner in the rightrear position
is the simmerburner.This burner can be
turned downto a verglow simmersetting.
It providesprecise cooking performance for
delicate foods such assauces or foods that
require low heat for a long cooking time.
The medium (left rear and left front)
and thelarge (right front) burnersare the
primarg burnersfor mostcooking. These
general-purpose burnerscanbe turned down
from HI to LOtosuit a widerange ofcooking
needs.
NOTE:Onsome models, the burners ore oll
the some size and power.
On some models, the burners are
att the same size and power.
8
ge.com
How to Select Flame Size
For safe handling ofcookware,never letthe
flamesextendup the sides of thecookware.
Watch theflame,notthe knob, asyou reduce
heat. Whenfastheating is desired,the flame
sizeon a gasburner shouldmatch the
cookware youare using.
Flameslargerthan the bottom ofthe
cookwarewill notresult in faster heating
ofthecookware and could be hazardous.
Top-of-Range Cookwure
Aluminum: Medium-weight cookware is
recommended because itheats quickly
and evenly. Mostfoods brownevenly in an
aluminum skillet. Usesaucepans with tight-
fitting lids when cooking with minimum
amounts ofwater.
Cast-Iron: If heatedslowly, mostskilletswill
givesatisfactory results.
Enamelware: Under some conditions, the
enamelofsome cookwaremay melt. Follow
cookware manufacturer's recommendations
forcooking methods.
Glass: There are two types ofglass
cookware-those forovenuse only and those
fortop-of-range cooking (saucepans,coffee
and teapots).Glass conducts heatvery
slowly.
HeatproofGlass Ceramic: Canbe used for
eithersurfaceor oven cooking.It conducts
heatvery slowly and coolsvery slowly. Check
cookware manufacturer's directionsto be
sureitcanbe used on gasranges.
StainlessSteel: This metal alone haspoor
heating properties and is usually combined
with copper,aluminum or other metals for
improved heatdistribution. Combination
metal skilletsusually work satisfactorily if
they are used with medium heatasthe
manufacturer recommends.
Stove Top Grills Ionmodels with sealed burners)
Donotuse stovetopgrillson yoursealed gas
burners. If you use thestovetopgrill on the
sealed gasburner, it willcause incomplete
combustion and can result in exposure to
carbon monoxide levelsaboveallowable
standards.
Thiscan be hazardous toyour health,
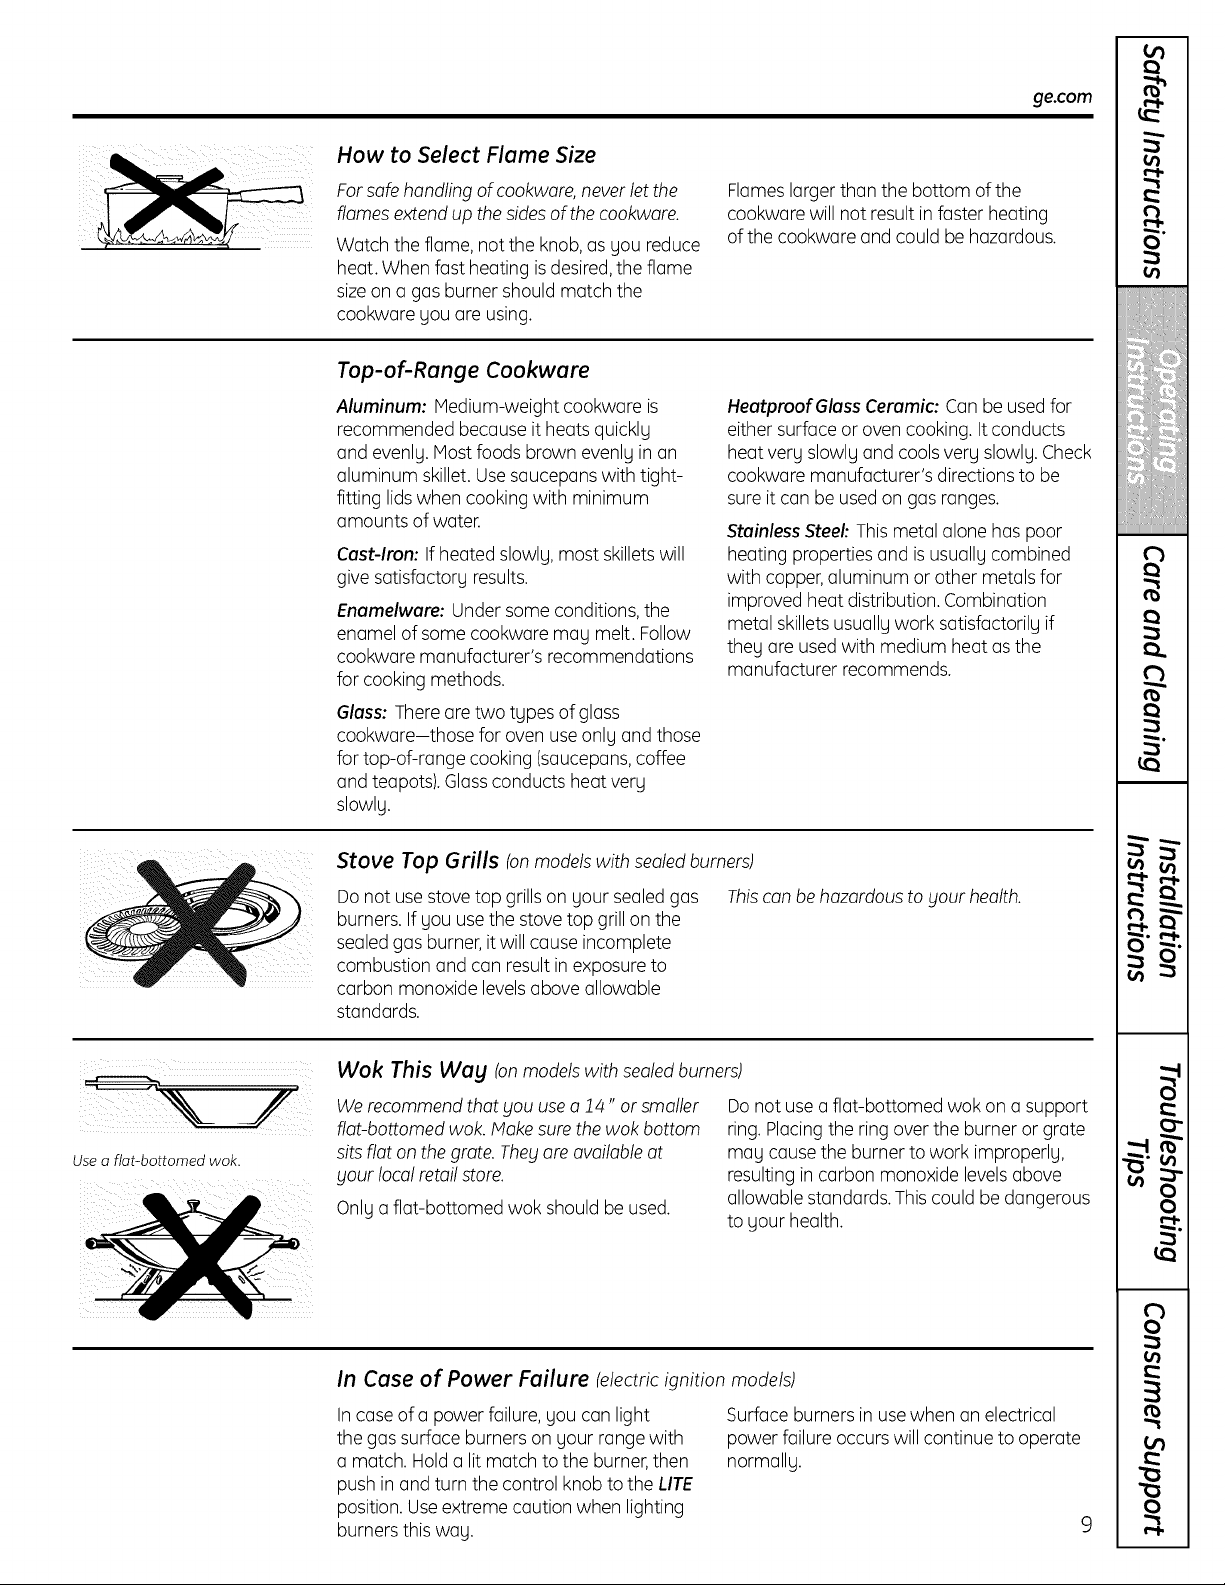
ii :i ?i
Use a flat-bottomed wok.
I
Wok This Way (onmodels with sealed burners)
We recommendthat you usea 14" or smaller
flat-bottomed wok.Make surethe wok bottom
sits flat on thegrate. They ore available at
your local retail store.
Onlya flat-bottomed wok shouldbe used.
Do notuse a flat-bottomed wok on a support
ring.Placingthe ring overtheburner or grate
may cause theburner towork improperly,
resulting in carbon monoxide levelsabove
allowablestandards. Thiscouldbe dangerous
toyour health.
In Case of Power Failure (electricignition models)
Incaseof a power failure, youcanlight
thegassurfaceburnerson your range with
a match. Hold a litmatchto theburner, then
pushin and turnthe control knobtothe LITE
position.Useextremecaution when lighting
burnersthis way.
Surface burnersin use when an electrical
powerfailure occurs willcontinue to operate
normally.
m
0
iiiiiiiiil_!%J!iiilliiii!iiiiiiiitlii_iiiiiii!iiii
m
---- .,.j
r'_r. t.
v
_" (.n
o
¢b
o
(J)
(.f)
o
Usingthe oven controls.
Throughout this manual, features and appearance mabl varblfrom blour model.
O_venContrails
• /
L_- ;J k o.J
Temp Recall
0
Li -) LUghU
o;ff
o :
Thne Cant s
e /
_tcheq _CJock-" }
On/Off
Oven Control, Clockand Timer Features andSettings Consomemode sJ
Bake/Temp Recoil Pad @
Touch this pad to select the bake function.
BakeLight
Flasheswhile in edit mode-gou can change the
oven temperature atthis point. Glowswhenthe
oven is in bake mode.
Start/On Pad
Must be touchedto start ang cookingfunction.
O Display
Showsthetime ofdag, oventemperature,
whether the ovenis in thebakeor broil mode
and the timesset forthetimer. The displag will
show PREwhilepreheating. Whentheoven
reaches theselected temperature, the oven
control willbeep and thedisplagwillshow the
oventemperature.
If "F-and a numberor letter" flash in thedisplag and
theoven control signals, this indicates a functionerror
code.
Thetime ofdog willflash in thedisplag whentherehas
been a poweroutage. Resetthe clock.
Touch the Clear/Off pad.Allow theoven tocool
forone hour. Put theoven back intooperation. If the
functionerror code repeats, disconnect thepower
totherange and call forservice.
0
0
Kitchen Timer On/Off Pad
Touch this pad to select thetimer feature.Then
pressthe + and - padstoadjust thetimer.
Kitchen Timer Light
Flasheswhile in edit mode-gou can change the
settime at this point.Glowswhenthetimer has
beenactivated. Flashesagain whenthe time has
run outuntil thecontrol is reset.
ClockPad
To set the clock, press this pad twice and then
pressthe + and - pads. Thetime ofdag will
flash inthe displag when theovenis first
turned on.
OvenLight Pad (on some models
Touch this pad toturntheovenlight on or off.
- Pad
Short taps tothis pad willdecrease thetime or
temperature bg smallamounts.Touch and hold
thepad todecrease thetime or temperature bg
larger amounts.
+ Pad
Short taps tothis pad will increase thetime or
temperature bg smallamounts.Touch and hold
thepad toincrease thetime or temperature bg
larger amounts.
10
ge.com
Oven Control, Clock and Timer Features and SettingsConsomemode_s;
o lear/OffPad
Touch this pad to cancel ALL oven operations
except the clockand timer.
O Broil Hi/Lo Pad
Touch this pad to select thebroil function.
Broil Light
Flasheswhilein edit mode-gou canswitchfrom
Hi toLo Broil atthis point. Glowswhen theoven
is in broil mode.
Indicator Lights (on some pads)
Edit mode lasts severalsecondsafter thelast
pad press.
Oven Control Knob (onsome models)
Off OvenControl Turn the OVEN CONTROLknob to the setting gou want.
warm/
Zone /
200
o
250 450
e
300• 350 - 400
Appearance may vary.
11
m
U't
0
iiiiiiiiil_}%_i;iilliiii!iiiiiiiiiiii_iiiiiii!iiii
m
t_
---- .,.j
r'_r. t.
v
_" (.n
o
0
(._
0
U'I
O
U'I
m
"o
"0
w A
w • .
v
o
U'I ._
£
0
8
Using the oven.
Toavoid possible burns, place the shelves in the desired position before you turn the oven on.
Theoven has 5 shelfpositions.
Before You Begin...
The shelves have stop-locks, so that when
placedcorrectly on theshelf supports
(Athrough E),they will stop before
coming completely out, and will nottilt.
Whenplacingand removing cookware,
pull theshelf out tothe bumpon the
shelf support.
To remove a shelf, pull ittoward you, tilt the
front end up and pull it out.
To replace, place the end oftheshelf
(stop-locks)on thesupport, tilt up the
front and pushtheshelf in.
NOTE:Theshelf is notdesigned toslide outat
thespeciallowshelf (R)position.
Italso has a special tow shelf
position (R)for extra large items,
such as a large turkey.
Oven Control
Yourovenis controlled by a single OVEN
CONTROLknob.
It will normally take 30-90 seconds before
theflame comeson. After the ovenreaches
theselected temperature, the ovenburner
cycles-off completely,then on with a
full flame-to maintain theselected
temperature.
L
Plastic items on the cooktop may
melt if teft too close to the vent.
Vent appearance and location vary.
Oven Vent
Yourovenis vented through ductsatthe rear
oftherange.Do not block these ductswhen
cooking in theoven-it isimportant that the
flow ofhot air from theovenand fresh air
totheoven burner be uninterrupted.
Avoid touching the vent openingsor
nearbu surfaces during ovenor broiler
operation-they may become hot.
_,Handles of pots and panson thecooktop
mag becomehot if left tooclosetothevent.
_,Donotleaveplasticor flammableitems on
thecooktop-theg magmelt or igniteifleft
too closeto the vent.
_,Donotleave closedcontainers on the
cooktop. Thepressurein closed containers
mag increase,which magcause them to
burst.
_,Metal itemswillbecome verg hot if thegare
left on thecooktop,and could cause burns.
Power Outage (electric ignition models)
^,.,CAUTION:oonotmakeanu
attempt tooperate theelectric ignitionoven
during on electrical powerfailure.
The ovenor broiler cannot be litduring
a powerfailure. Gaswillnot flow unless
theglow bar is hot.
Iftheoven is in use when a powerfailure
occurs,the ovenburner shuts off and cannot
be re-lituntilpowerisrestored.Thisis
because theflow of gas is automatically
stopped and will notresume when power
isrestored until the glowbar hasreached
operating temperature.
12
Oven Light (on some models)
Usethe switch on thelower control panel to
turnthe lighton or off.

ge.com
Theoven has a special tow shelf(R)
position ]ust above the oven
bottom. Useit when extra cooking
space is needed, for example, when
cooking alarge turkey. Theshetfis
not designed to slide out at this
position.
How to Set the Oven for Baking or Roasting
Youroven is not designedforopen-door
cooking.
NOTE:On models with an OVENCONTROL
knob,turn ittothedesiredtemperature.
[] Touchthe Bake pad.
[] Touch the + or - padsuntilthedesired
temperature isdisplayed.
[_] Touch theStart/On pad.
The oven will startautomaticallu. The displau
willshow PREwhile preheating. Whenthe
ovenreaches theselected temperature, the
ovencontrol willbeep several timesand the
display will show theoventemperature.
Type of Food Shelf Position
Frozenpies(oncookiesheet) Bor C
Angel food cake, B
bundtorpoundcakes
Biscuits, muffins, brownies, C
cookies,cupcakes,
layercakes,pies
Casseroles BorC
Roasting Ror A
To change theoven temperatureduring Bake
c_Icle,touch the Bakepad and thenthe+ or -
padsto get the newtemperature.
[] Check foodfordoneness at minimum
time on recipe.Cook longer ifnecessary.
j_j Touch the Clear/Off pad when bakingis
finished and thenremove thefoodfrom
theoven.
Preheating and Pan Placement
Preheat theoven if the recipe callsfor it.
Topreheat, set the ovenatthecorrect
temperature. Preheating is necessary for
good results when bakingcakes,cookies,
pastry and breads.
For ovens without a preheatindicator lightor
tone,preheat10 minutes.
Baking resultswill be better ifbakingpans
are centered in theovenasmuch aspossible.
Pansshouldnottouch eachother or thewalls
oftheoven. If you need touse two shelves,
stagger thepansso one is notdirectly above
theother,and leaveapproximately 1W'
between pans, from thefront, back and
sidesofthewall.
Aluminum Foil
Do not use aluminum foilon thebottom of
theoven.
Never entirely cover a shelfwith aluminum
foil.This willdisturb the heatcirculationand
result in poor baking.
A smaller sheet offoilmay be used to catch a
spillover byplacingiton a lowershelf several
inches belowthefood.
Oven Moisture
As your ovenheats up, thetemperature
changeofthe air in the ovenmay cause
water droplets to form on thedoor glass.
These droplets are harmless and will
evaporate as the ovencontinues to
heat up.
13
m
U')
0
¢n
iiiiiiiii)_}%_)iiilliiii!i)iiiiiii)ii_iii)iii!iiii
m
rb
q
q
tt_
=--- .,.j
r'_r. t.
v
_o (.n
0
r'l-
('b
o
(J)
(.t)
o
Using the oven.
Broiling
Broiling is cooking food by direct heatfrom
abovethefood. Most fish and tendercutsof
meat can be broiled. Follow these directions
to keep spatteringand smokingto a
minimum.
Yourrange hasa compartment belowthe
ovenforbroiling.
Both theovenund broiler comportment
doors must be CLOSEDduring broiling.
Turn mostfoods onceduring cooking (the
exceptionis thinfilletsoffish; oil one side,
placethat side down on broiler grid and cook
without turning untildone).Time foods for
about one-halfthetotal cooking time,turn
food, thencontinue to cook to preferred
doneness.
%
[]
%
Youcanchangethe distanceof the food
from theheatsource bypositioning a
broiler pan and grid on one ofthreeshelf
positionsinthe broiler compartment-
A(bottom ofbroiler compartment), B
(middle)and C (top).
Preheating thebroiler or ovenis not
necessarg and canproduce poor results.
If meat hasfat or gristle around the edge,
cut vertical slashesthrough bothabout
2" apart. If desired,thefat mag be
trimmed, leavinga lager about 1/8" thick.
[]
Arrange thefood on thegrid and position
the broiler pan on the appropriate shelf
in theovenor broiling compartment.
Placing foodcloser totheflame
increases exterior browning ofthe
food, butalsoincreases spattering
and the possibilitg offatsand meat
juices igniting.
[_ Closethe ovenand broilercompartment
door.
NOTE:On models with an OVEN
CONTROLknob,turnittoBroil,
[_] Touch theBroil Hi/Lo pad once for
HiBroil.
To changetoLo Broil, touch the
Broil Hi/Lo pad again,
UseLo Broil to cook foods such as
poultrg or thickcutsof meat thoroughlg
without over-browning them.
[_ Touch the Start/On pad,
When broiling isfinished, touch the
Cleer/Off pa d.
Removethe broiler pan from the
broiler compartment and serve thefood
immediatelg. Leavethe pan outside the
range to cool.
14
ge.com
Broiling Guide
The oven and broiler comportmentdoors
must beclosedduring broiling.
Always use a broiler pan and grid.It is
designedto minimize smokingand
spattering by trappingjuices in the
shieldedlowerpart of the pan.
Forsteaks and chops, slash fat evenly
around the outside edgesof the meat.To
slash, cut crosswise through theouterfat
surface just totheedge of the meat. Use
tongs toturn themeat over to prevent
piercing the meat and losingjuices.
Ifdesired, marinate meats or chicken
beforebroiling.Or brushwith barbecue
sauce last 5 to 10 minutesonly.
Whenarranging thefoodon the pan, do
notlet fatty edges hang overthesides
becausedripping fat could soil theoven.
Thebroilercompartment doesnotneed to
be preheated. However,for very thinfoods,
or toincrease browning, preheatifdesired.
Frozensteaks can be broiled by positioning
the shelfat thenext lowestshelf position
and increasing the cooking time givenin
this guide 1V2times per side.
The size,weight, thickness,
starting temperature and Food
your preference ofdoneness
willaffect broiling times. This Bacon
guide is basedon meatsat
refrigerator temperature.
1-The U.S. Deportment of Agriculture
says "Rare beef is popular, but you Beef Steaks
should know that cooking it to only Raret
140°F means some food poisoning Medium
organisms may survive." (Source: Well Done
Safe Food Book Your Kitchen
Guid% USDA Re_ June 1985.)
Theoven has 5 shelfpositions.
Ground Beef
Well Done
Raret
Medium
WellDone
Chicken
Lobster Tails
Fish Fillets
Ham Slices
(precooked)
Pork Chops
Well Done
Lamb Chops
Medium
Well Done
Medium
Well Done
Wieners
Similar Precooked
Sausages,
Bratwurst
Quantitg and/ Shelf* First Side
or Thickness Position Time (min.)
1/2 lb. C
(about 8 thin slices)
1 lb.(4 patties) C
1/2 to 3/4"thick
1" thick
1to lY21bs.
1Vi' thick
2to 2Y2Ibs.
1whole
2to 2Y2Ibs.,
split lengthwise
4bone-in breasts
2-4
6to 8 oz.each
1lb. fillets
1/4 to 1/2" thick
1" thick
1/2" thick
2 (1/2" thick)
2 (1" thick) about 1 lb.
2(1"thick) about
10 to 12 oz.
2(1%" thick)
about 1lb.
1 lb. pkg. (10)
c
c
B
c
c
B
B
B
A
B
B
B
B
B
B
B
B
lO
9
12
13
10
12-15
25
30-35
25-30
13-16
8
6
10
13
8
10
10
17
Second Side
Time (min.)
7-10
7
5-6
8-9
6-7
10-12
16-18
15
10-15
Do not
turn
over
8
6
4-5
9-12
4-7
10
4-6
12-14
1-2
Comments
Arrange in single layer
Space evenly. Up to
8 patties take about
the same time.
Steaks lessthan 1"thick
cook through before
browning. Pan frging is
recommended.
Slash fat.
Brush each side with
melted butter. Broil
skin-side-down first.
Cutthrough back of
shell. Spread open. Brusk
with melted butter before
broiling and after half
of broiling time.
Handle and turn very
carefully. Brush with
lemon butter before
and during cooking, if
desired. Preheat broiler
to increase browning.
Slosh fat.
Slosh fat.
Ifdesired, split sausages
in half lengthwise; cut
into 5- to 6-inch pieces.
*See illustration for description of shelf positions.
15
m
O
iiiiiiiiil_?]::!ii)liiiii]i#ii[tlii_iiiiiii]iiii
m
vl in
v
-. A
o
0
0
Usingthe clockand timer.
Not all features are on all models.
¢--sto q
LonJ
lake sure the clock is set to the
correct time of day,
To Set the Clock
E_] Touch the Clock pad twice.
[] Touch the + or - pads.
If the+or - padsare nottouched within one
minute after youtouch theClock pad, the
display reverts to theoriginal setting. If this
happens, touch theClock pad twiceand
reenterthetime ofday.
[] Touch theStart/On pad untilthetime of
dag showsin the displag.This enters the
time and starts theclock.
Tocheck the time ofdog whenthe displogis
showing otherinformation, simplg touch the
Clock pod.Thetime of day shows until
another pod is touched.
To Turn Off the Clock Display
If Uou haveseveralclocks in uour kitchen,
you magwish toturn off thetime ofday
clockdisplau on uour range.
%
Touchthe Clockpad oncetoturn off the
time ofdau displau.Although Uouwill
not be able toseeit, theclockmaintains
thecorrecttime ofday.
[] Touch theClockpad twiceto recall the
clock displag.
To Set the Timer
_rKJtche4
k Tmet_
On/Off
I Stort
L. °n J
The timer is o minute timer only.
The Clear/Off pod does not affect
the timer.
The timer does notcontrol ovenoperations.
The maximum settingon thetimer is9 hours
and 59 minutes.
%
Touchthe Kitchen Timer On/Off pad.
Touch the +or - padsuntiltheamount
oftime you want shows inthe display.
Themaximum time that can be entered
in minutes is 59.Timesmorethan
59 minutesshouldbe changedto
hoursand minutes.
If youmake a mistake,touch theKitchen
Timer On/Offpad and begin again.
@
Touch theStart/Onpad.The time will
startcounting down, although the
display doesnotchange untilone
minute haspassed.
Whenthe timer reaches :00othe control
will beep 3 timesfollowed by one beep
every 6 secondsuntiltheKitchen Timer
On/Off pad is touched.
To Reset the Timer
If thedisplay is still showing thetime
remaining, youmay changeitby touching
theKitchen Timer On/Off pad, thentouch the
+or - padsuntil thetime youwant appears
in thedisplay.
Ifthe remainingtime is not in thedisplay
(clock is in thedisplay), recall the remaining
time bytouching theKitchen Timer On/Off
pad and then touching the + or - padsto
enterthe new time youwant.
To Cancel the Timer
Touchthe Kitchen Timer On/Off pad twice.
16
Power Outage
If a flashing time is in thedispla_l,_lou hove
experiencedo powerfailure. Resettheclock.
To reset the clock,touch the Clockpad.Enter
thecorrecttime of day bytouching the + or -
pads.Touch theStart/On pad.
Adjust the oven thermostat--Do it yourself!
ge.com
You may find that your new oven cooks differently than the one it replaced. Use your new oven for a few weeks to
become more familiar with it. If blOUstill think your new oven istoo hot or too cold, you can adjust the thermostat
blourself.
Do not usethermometers, such asthose found in grocerbl stores, to check the temperature setting Of blour oven.
These thermometers mabl varb120-40 degrees.
NOTE:This adjustment will not affect the broiling temperatures.
To Adjust the Thermostat (on models with touch pods)
Temp Recol Hi/ Lo
o
GokO
Temp Recall r-_
Touch the Bakeand Broil Hi/Lo pads
atthe same time for2 seconds untilthe
display shows SK
Touch the Bake pad. Atwo digitnumber
showsin thedisplay.
Theoven temperature canbe adjusted
up to (+)35°Fhotter or (-) 35°F cooler.
Touch the +pad to increase the
temperature in I degree increments.
r_ Whenyou havemadetheadjustment,
touch theStart/On pad to go back to
thetime ofday display.Useyour oven
asyouwould normally.
NOTE:This adjustment willnot affect broiling
temperatures. It will be retained in memory
after o power failure.
Touch the - pad to decreasethe
temperature in I degree increments.
(Appearance may vary)
To Adjust the Thermostat (on models with on Oven Control Knob)
%
PulltheOVENCONTROLknoboff
therange and lookattheback side.
To make an adjustment, loosen
(approximately one turn), butdo not
completely remove, thetwo screws
on the back ofthe knob.
Eachclick will changetheoventemperature
approximately 10°E (Rangeis _+60°E from
thearrow.)Wesuggest that youmake the
adjustment one click from theoriginal setting
and check ovenperformance before making
any additionaladjustments.
[]
With the back ofthe knobfacing you,
hold the outeredge ofthe knobwith one
hand and turnthefront oftheknobwith
theother hand.
To raise theoventemperature, move the
topscrewtoward theright. You'll hear a
click for eachnotch you move the knob.
@
After theadjustment is made, retighten
screws so they are snug, but be careful
notto overtighten.
[] Re-install knob on range and check
performa nce.
To lowerthetemperature, move thetop
screwtoward the left.
The type of margarine will affect baking performance!
Most recipes for baking have been developed using high fat products such as butter or margarine (80% fat).If blOU
decrease the fat, the recipe may not give the same results as with a higher fat product.
Recipe failure can result if cakes, pies, pastries, cookies or candies are made with low fat spreads. The lower the fat
content of a spread product, the more noticeable these differences become.
Federal standardsrequire products labeled "margarine" to contain at least 80% fat byweight. Low fat spreads,on the
other hand, contain lessfat and more water. Thehigh moisture contentofthese spreads affectsthetextureand flavor
ofbakedgoods. For best results with yourold favorite recipes,use margarine, butter or stick spreads containing at least
70% vegetable oil.
17
m
O
m
:--- .,.j
r'_r. t.
v
_o (.n
o
0
(._
0
Special features of gour oven control.
Your new touch pad control has additional features that you may choose to use. Thefollowing are the features and
how you may activate them.
Thespecial feature modes can only be activated while the display isshowing the time ofd%l. They remain in the
control's memorbl until the steps are repeated.
When the display shows your choice, touch the Start/On pad. The special features will remain in memory after
a power failure.
NOTE:TheSabbath feature and the Thermostat Adjustment feature are also Special Features, but theblare addressed
separately in their own sections.
]2 Hour Shut-Off
_Bake,_ _-B l_ the oven on, the control will automatically tu m
toil With this feature,should blouforget and leave []
TempReco, ._/_o OFFtheoven after 12 hours during baking
functions or after 3 hours during a broil
function.
l°cO I-3-1
If you wish to turn OFF this feature,follow the
stepsbelow.
[] Touch the Bakeand Broil Hi/Lo padsat
thesame time for 3 secondsuntilthe
displagshows SF.
Touchthe Clock pad.Thedisplau will
show On (12hour shut-off). Touch the
Clockpad repeatedluuntilthedisplag
showsOff(no shut-off).
TouchtheStart/On pad to activate the
no shut-off and leave thecontrol set in
this special featuresmode.
18
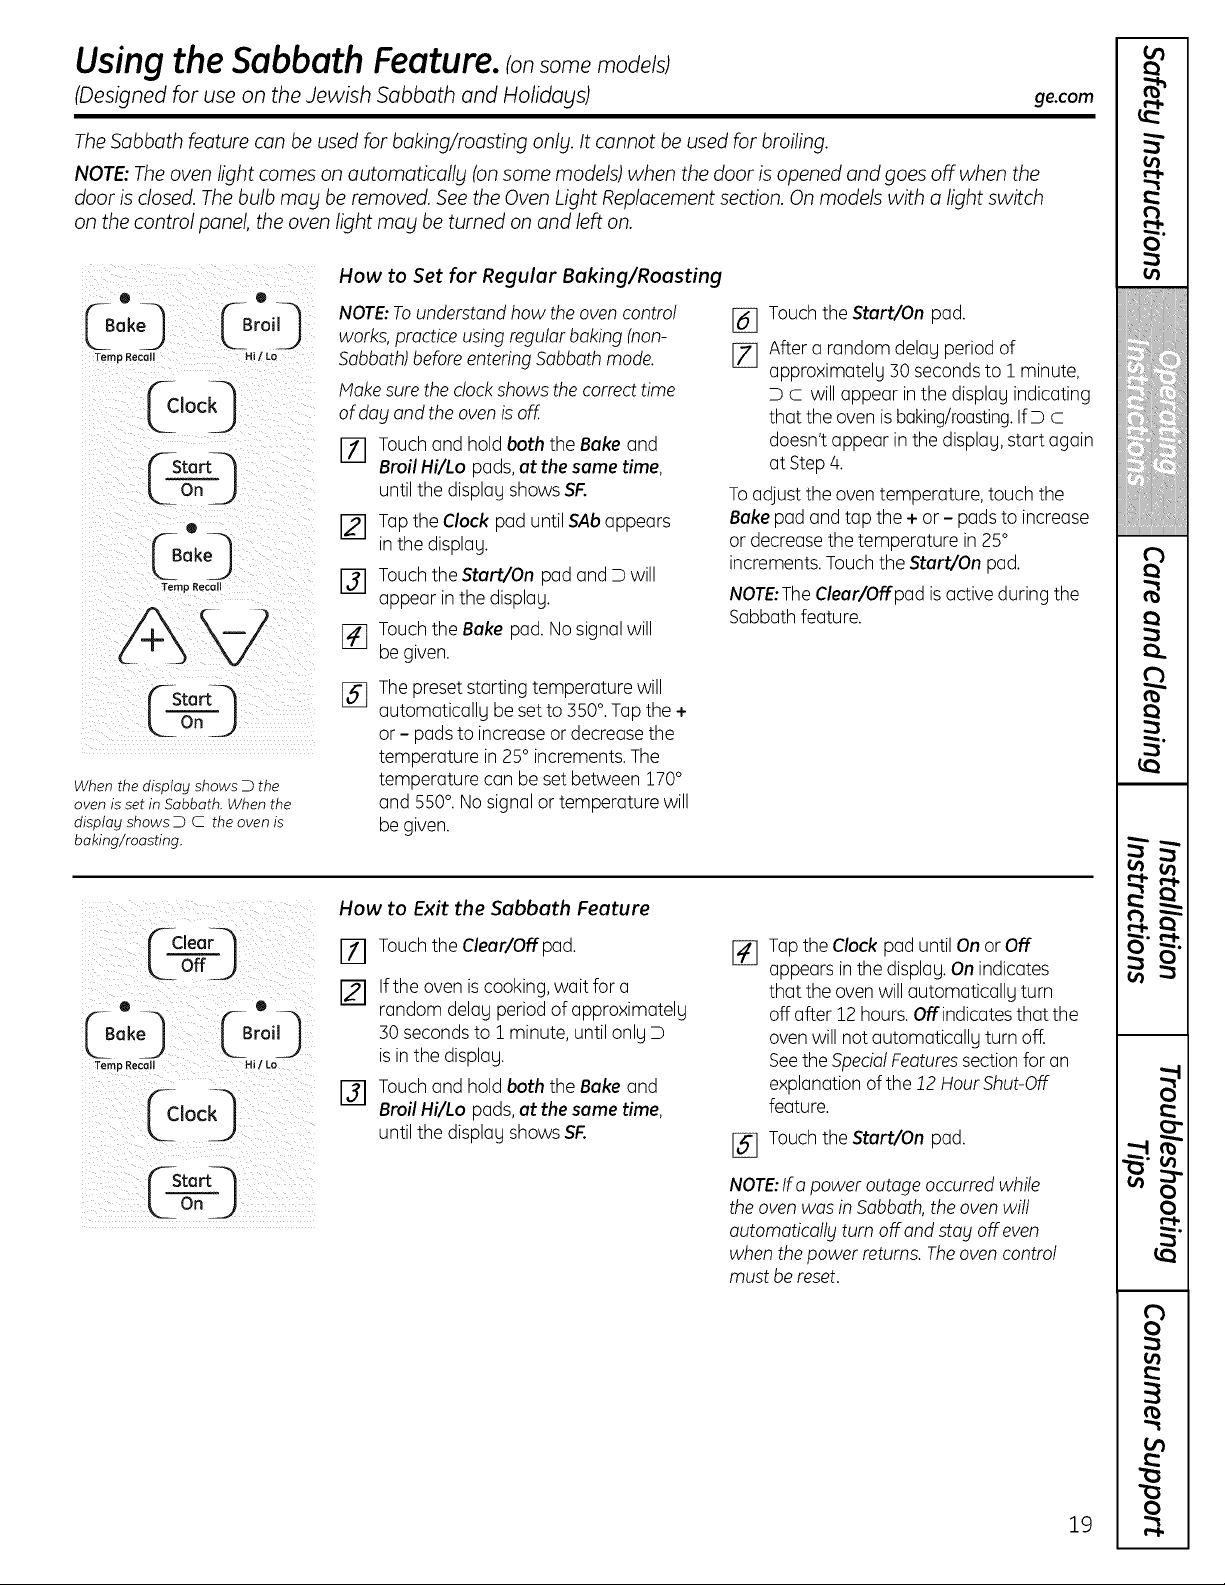
'°'-usingthe Sabbath Feature. somemode/sJ
(Designed for use on the Jewish Sabbath and Holidays) ge.com
TheSabbath feature can be used for baking/roasting only. It cannot be used for broiling.
NOTE:Theoven light comes on automatically (on some models) when the door isopened and goes off when the
door isclosed. Thebulb mag be removed. See the Oven Light Replacement section. On models with a light switch
on the control panel, the oven light mag be turned on and left on.
®
Gok.
Temp RecQIJ
Looj
3°:O
Ternp Recoil
0 _
r°O
Hi/Lo
When the display shows D the
oven isset in Sabbath. When the
display shows D C the oven is
baking/roasting.
How to Set for Regular Baking/Roasting
NOTE:To understand how the ovencontrol [_
works, practiceusing regular baking(non-
Sabbath)before entering Sabbathmode. [_]
Makesure theclock showsthecorrect time
ofdog and theoven is off.
_-I Touch and hold both theBake and
Broil Hi/Lo pads,at thesame time,
untilthedisplay showsSF.
[] Tap theClock pad until SAb appears
in the display.
r3] TouchtheStart/On pad and D will
appear in the display.
r4] Touch the Bake pad. Nosignal will
be given.
%
The preset startingtemperature will
automatically be set to 550°.Tap the+
or - pads to increase or decrease the
temperature in 25° increments.The
temperature can be set between 170°
and 550°.No signalor temperature will
be given.
TouchtheStart/On pad.
After a random delag period of
approximatelg 30 secondsto 1 minute,
D c willappear in thedisplagindicating
that the ovenis baking/roasting.IfD c
doesn'tappearin the displag,start again
atStep/4.
To adjust theoventemperature, touch the
Bakepad and tapthe + or - padstoincrease
or decreasethetemperature in 25°
increments. Touch theStart/On pad.
NOTE:TheClear/Off pad is activeduring the
Sabbathfeature.
How to Exit the Sabbath Feature
@
Touchthe Clear/Off pad.
Iftheovenis cooking, wait fora
random delag period ofapproximatelg
30 seconds to J_minute, untilonlg D
isinthe displag.
Touch and hold both theBake and
Broil Hi/Lo pads,at thesame time,
untilthedisplagshowsSF.
[]
Tap theClockpad untilOn or OFF
appearsin thedisplag.On indicates
that theoven willautomaticallg turn
off after 12 hours.Off indicates that the
oven willnotautomaticallg turnoff.
SeetheSpecialFeaturessectionforan
explanation ofthe12 Hour Shut-Off
feature.
[_ Touch theStart/On pad.
NOTE:Ifo power outageoccurred while
theoven was in Sabbath,the ovenwill
outomaticollg turn off ond stag off even
whenthepower returns. Theoven control
mustbe reset.
19
i
t_
0
¢n
iiiiiiiiil_}_]!;iilliiii]iiiiiiiit;ii_iiiiiii]iiii
i
rb
tt_
i
=--- .,.j
.=..=
v
(3"
_" (.n
_J3
0
r-.I.
LQ
('3
0
u)
(._
0
Care and cleaning of the range.
Be sure electrical power isoff and all surfaces are cool before cleaning ang part of the range.
If gour range isremoved for cleaning, servicing or ang reason, be sure the anti-tip
device isre-engaged properlg when the range isreplaced. Failure to take this
precaution could result in tipping of the range and cause injurg.
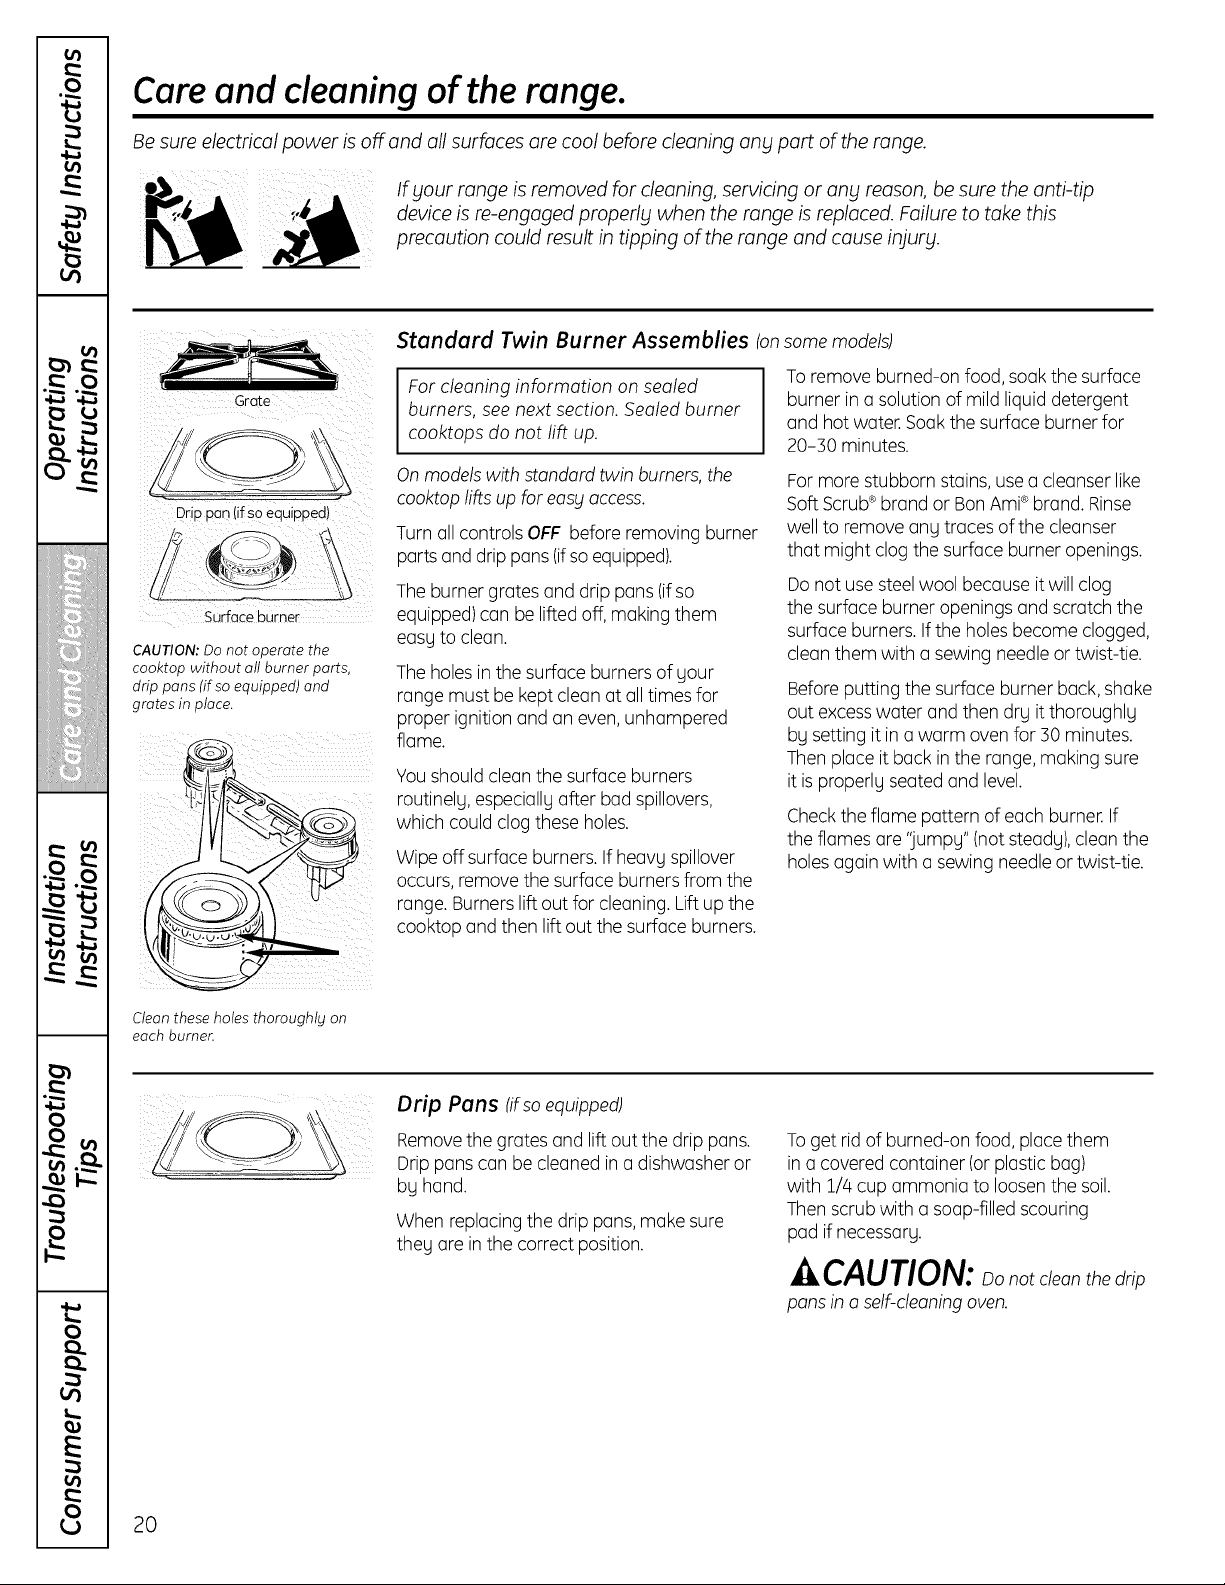
Grate
Drip pan (if SOequipped)
Surfaceburner
CAUTION: Do not operate the
cooktop without all burner parts,
drip pans (ifso equipped) and
grates in place.
Standard Twin Burner Assemblies Ion
Forcleaning information on sealed
burners, seenext section. Sealed burner
cooktops do not lift up.
On modelswith standard twin burners, the
cooktoplifts up foreasg access.
Turn all controlsOFF beforeremoving burner
parts and drip pans (ifsoequipped).
The burner grates and drip pans(ifso
equipped) canbe lifted off,making them
easg to clean.
The holes in the surfaceburnersofgour
range mustbe kept cleanatall timesfor
proper ignitionand an even, unhampered
flame.
Youshouldclean the surfaceburners
routinelg, especiallg after bad spillovers,
which couldclogthese holes.
Wipeoff surfaceburners. If heavgspillover
occurs, remove thesurface burners from the
range.Burners lift out forcleaning. Lift up the
cooktop and then lift out thesurfaceburners.
some models)
Toremove burned-on food, soak thesurface
burner in a solution of mildliquid detergent
and hotwater. Soak thesurface burner for
20-30 minutes.
For more stubborn stains, use a cleanser like
Soft Scrub®brand or BanAmPbrand.Rinse
welltoremove anytracesofthe cleanser
that might clogthesurface burner openings.
Do notuse steel wool because it will clog
thesurface burner openingsand scratch the
surfaceburners. If theholesbecome clogged,
cleanthem with a sewing needleor twist-tie.
Beforeputting thesurfaceburner back,shake
outexcesswater and then drg itthoroughlg
bg settingitin a warm ovenfor30 minutes.
Then placeitback inthe range,making sure
itis properlg seated and level.
Check theflame pattern ofeachburner. If
theflamesare %mpg" (notsteadg),clean the
holes again with a sewing needle or twist-tie.
Cleanthese holes thoroughly on
each burner.
Drip Pans (ifsoequipped)
Remove thegrates and lift outthe drip pans.
Drippanscanbe cleanedin a dishwasheror
bg hand.
Whenreplacingthedrip pans, make sure
thegare in thecorrect position.
To getrid of burned-on food, placethem
in a covered container (or plasticbag)
with 1/4cupammonia to loosen thesoil.
Then scrub with a soap-filled scouring
pad ifnecessarg.
CAUTION: notcleanthedrip
pans in a self-cleaning oven.
20
ge.com
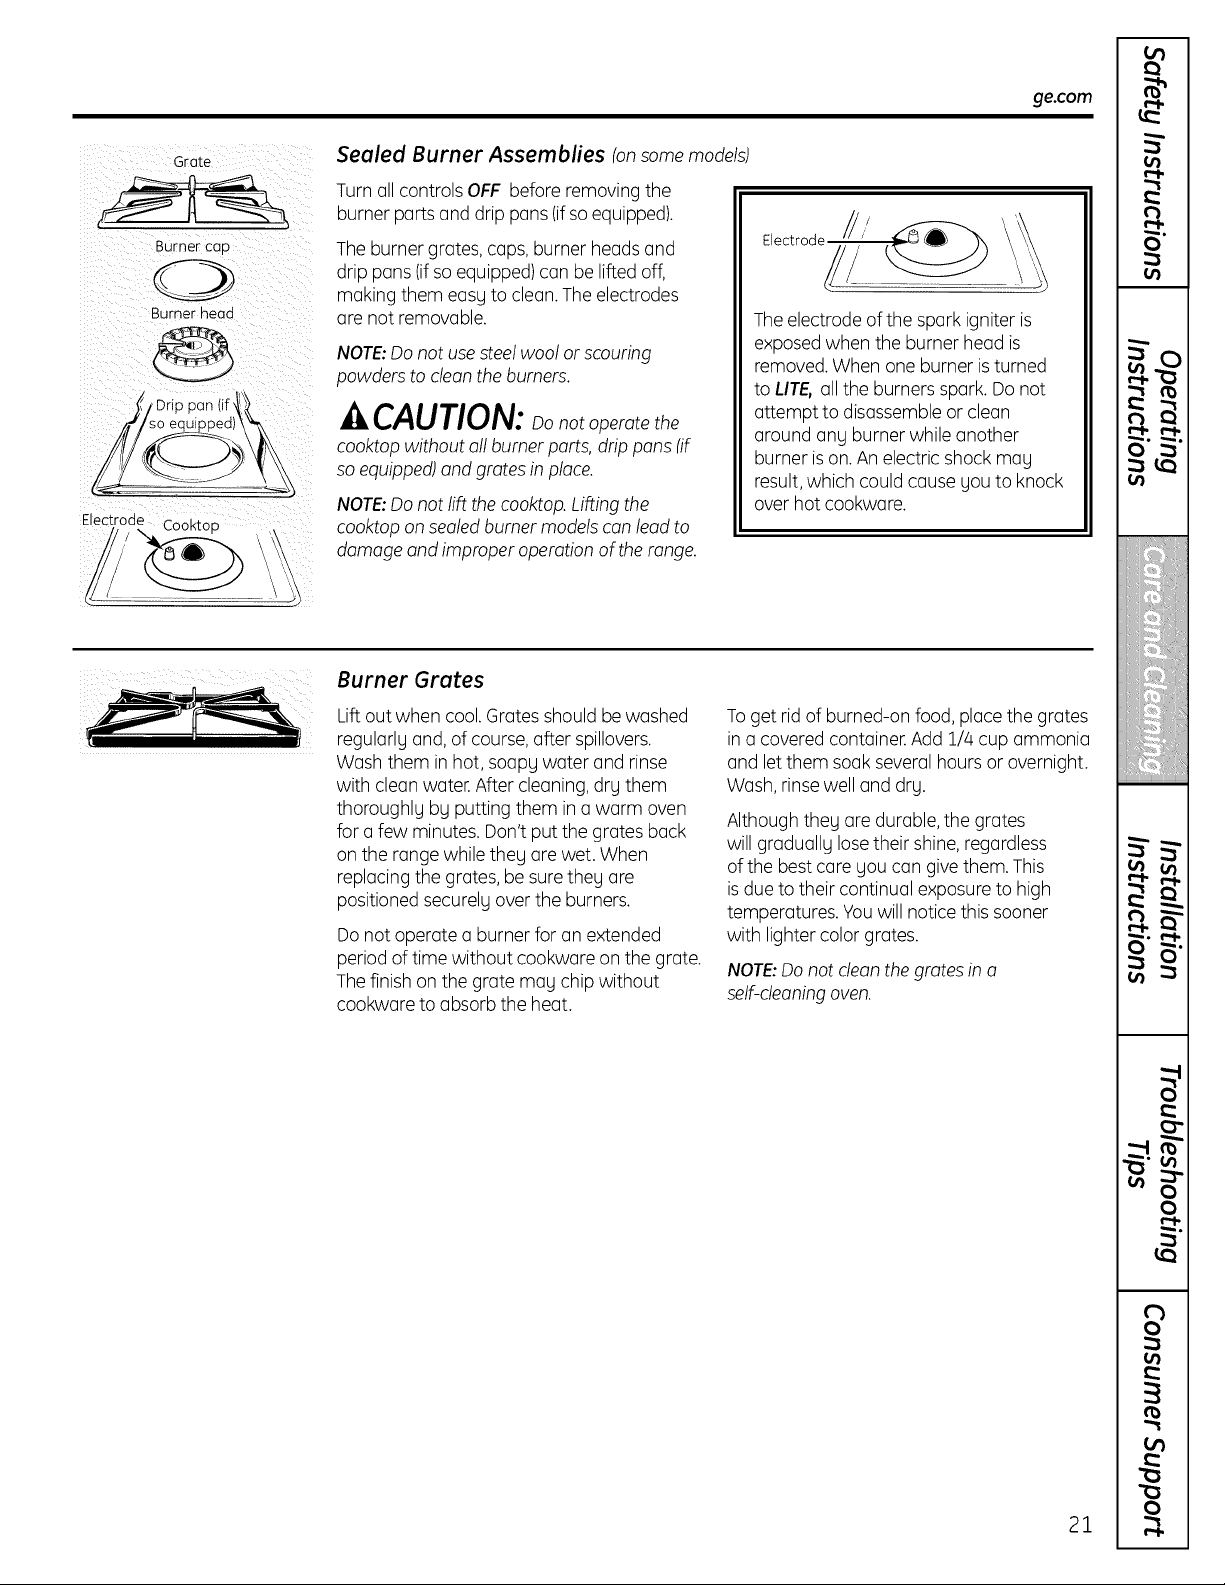
Grace
Burner CaD
Burrer head
_,_/SO equ_) \'_\
Electrode Cooktop
Sealed Burner Assemblies tonsomemodels)
Turn all controlsOFF beforeremoving the
burner parts and drip pans(ifso equipped).
The burner grates, caps, burner headsand
drip pans(ifsoequipped)can be lifted off,
making them easgtoclean.Theelectrodes
are notremovable.
NOTE:Do notuse steel woolor scouring
powders to cleon theburners.
-&CAUTION: oonotoperatethe
cooktopwithout oil burner ports,drip pans(if
so equipped)and grates in place.
NOTE:Do notlift thecooktop.Lifting the
cooktopon sealed burner models conleadto
damageand improperoperationofthe range.
The electrode ofthe spark igniter is
exposedwhen theburner head is
removed. Whenone burner is turned
to LIT& all theburnersspark.Do not
attempt to disassemble or clean
around ang burner whileanother
burner is on. An electricshockmay
result, which couldcause gou to knock
over hot cookware.
Burner Grates
Lift outwhen cool. Grates shouldbe washed
regularlg and, ofcourse, after spillovers.
Wash them in hot, soapy water and rinse
with cleanwater. After cleaning, dry them
thoroughlg bg putting them in a warm oven
fora few minutes. Don'tputthe grates back
on the range whilethey are wet. When
replacingthegrates,be sure they are
positioned securelyovertheburners.
Donotoperatea burner foran extended
period of time without cookwareon thegrate.
The finish on the gratemag chipwithout
cookwareto absorbtheheat.
To getrid of burned-on food, placethegrates
in a covered container. Add 1/4cupammonia
and let them soak several hoursor overnight.
Wash, rinse welland drg.
Althoughtheg are durable, the grates
willgraduallg lose theirshine, regardless
ofthe best caregou cangivethem. This
is due to theircontinual exposure to high
temperatures.Youwillnotice this sooner
with lighter color grates.
NOTE:Do not clean the grates in o
self-cleaningoven.
21

Care and cleaning of the range.
Burner Cops and Heeds (onsealed burners onlg)
NOTE:Before removing the burner caps
and heads, remember their size and
location. Replace them in the some
location offer cleaning.
Replacement
Replaceburner headsover theelectrodes
on the cooktop, in thecorrect locations
according totheir size.
Use a sewing needle or twist-tie
to unclog the small hole in the
burner head.
Burner caps
Lift off whencool. Wash burner caps
in hot, soapy water and rinse with clean
water. Youmay scour with a plasticscouring
pad toremove burned-on food particles.
Burner heads
For proper ignition, make sure thesmall
hole in the section that fitsover the electrode
is kept open. A sewing needle or wiretwist-tie
workswelltounclog it.
Theslits inthe burner heads must be kept
cleon at all times for on even, unhampered
flame.
Cloggedor dirty burner ports or electrodeswill
notallow the burnerto operateproperly.
Anyspill on or around an electrode must
be carefully cleaned.Take careto nothit
an electrode with anything hard or itcould
be damaged.
Youshouldclean the burner caps and
burner headsroutinely,especially after bad
spillovers,which could clog the openings
in the burner heads.Lift off when cool.
To remove burned-on food, soak theburner
headsin a solution ofmild liquid detergent
and hotwater for 20-30 minutes. For more
stubborn stains, use a toothbrush.
After cleaning
Before putting theburner caps and heads
back,shakeout excess water and then dry
them thoroughly bysetting in a warm oven
for30 minutes.
NOTE: Do not use steel wool or scouring
powders to cleon the burners.
Medium head Large head
Hake sure the slot in theburner head is
positioned over the electrode.
8 ¸¸¸ ¸¸ ¸¸ ¸¸ i
Replacethematching size caps ontothe
heads.There is one small, two medium and
one large cap.Sizes are stamped intothe
bottom of the caps.
Medk Small cap
)
Front of range ....
Mediurn cap Large cap
Hake sure that theheadsand caps are
replacedin thecorrect locations.
NOTE:Onsome models, the burners are all
the same size and power.
22
ge.com
Cooktop Surface
To avoiddamaging theporcelainenamel
surfaceofthecooktop and to prevent it
from becoming dull, clean up spills right
away. Foodswith a lotofacid(tomatoes,
sauerkraut, fruit juices, etc.)or foods with
high sugarcontent couldcause a dull spot
ifallowedtoset.
Whenthesurfacehascooled,wash and
rinse. Forother spillssuch as fat spatterings,
etc.,wash with soapand water oncethe
surfacehascooled.Thenrinse and polish
with a drycloth.
Becareful when youcleanthecooktop
because thearea over the pilotwillbe hot
(on models with standing pilots).
NOTE:Donot store flammable materials
in an oven ornear the cooktop. Do not
store or use combustible materials,
gasoline orother flammable vapors and
liquidsinthe vicinity ofthis or any other
appliance.
NOTE: Do not liftthe cooktop on sealed
burner models. Lifting the cooktop can lead to
damage and improper operation of the range.
Stainless Steel Surfaces ton some models)
Donot usea steel wool pad;it will scratch
thesurface.
Toclean the stainlesssteel surface,
use warm sudsywater or a stainless steel
cleaneror polish.Alwayswipe thesurfacein
thedirection ofthegrain.Followthe cleaner
instructionsfor cleaning the stainlesssteel
surface.
To inquire about purchasing stainlesssteel
appliancecleaneror polish,or tofind the
location ofa dealer nearest you, please call
our toll-free number:
National Parts Center 800.626.2002(U.S.)
888.26:l.3055(Canada)
ge.com (U.S.]
www.GEAppliances.ca (Canada)
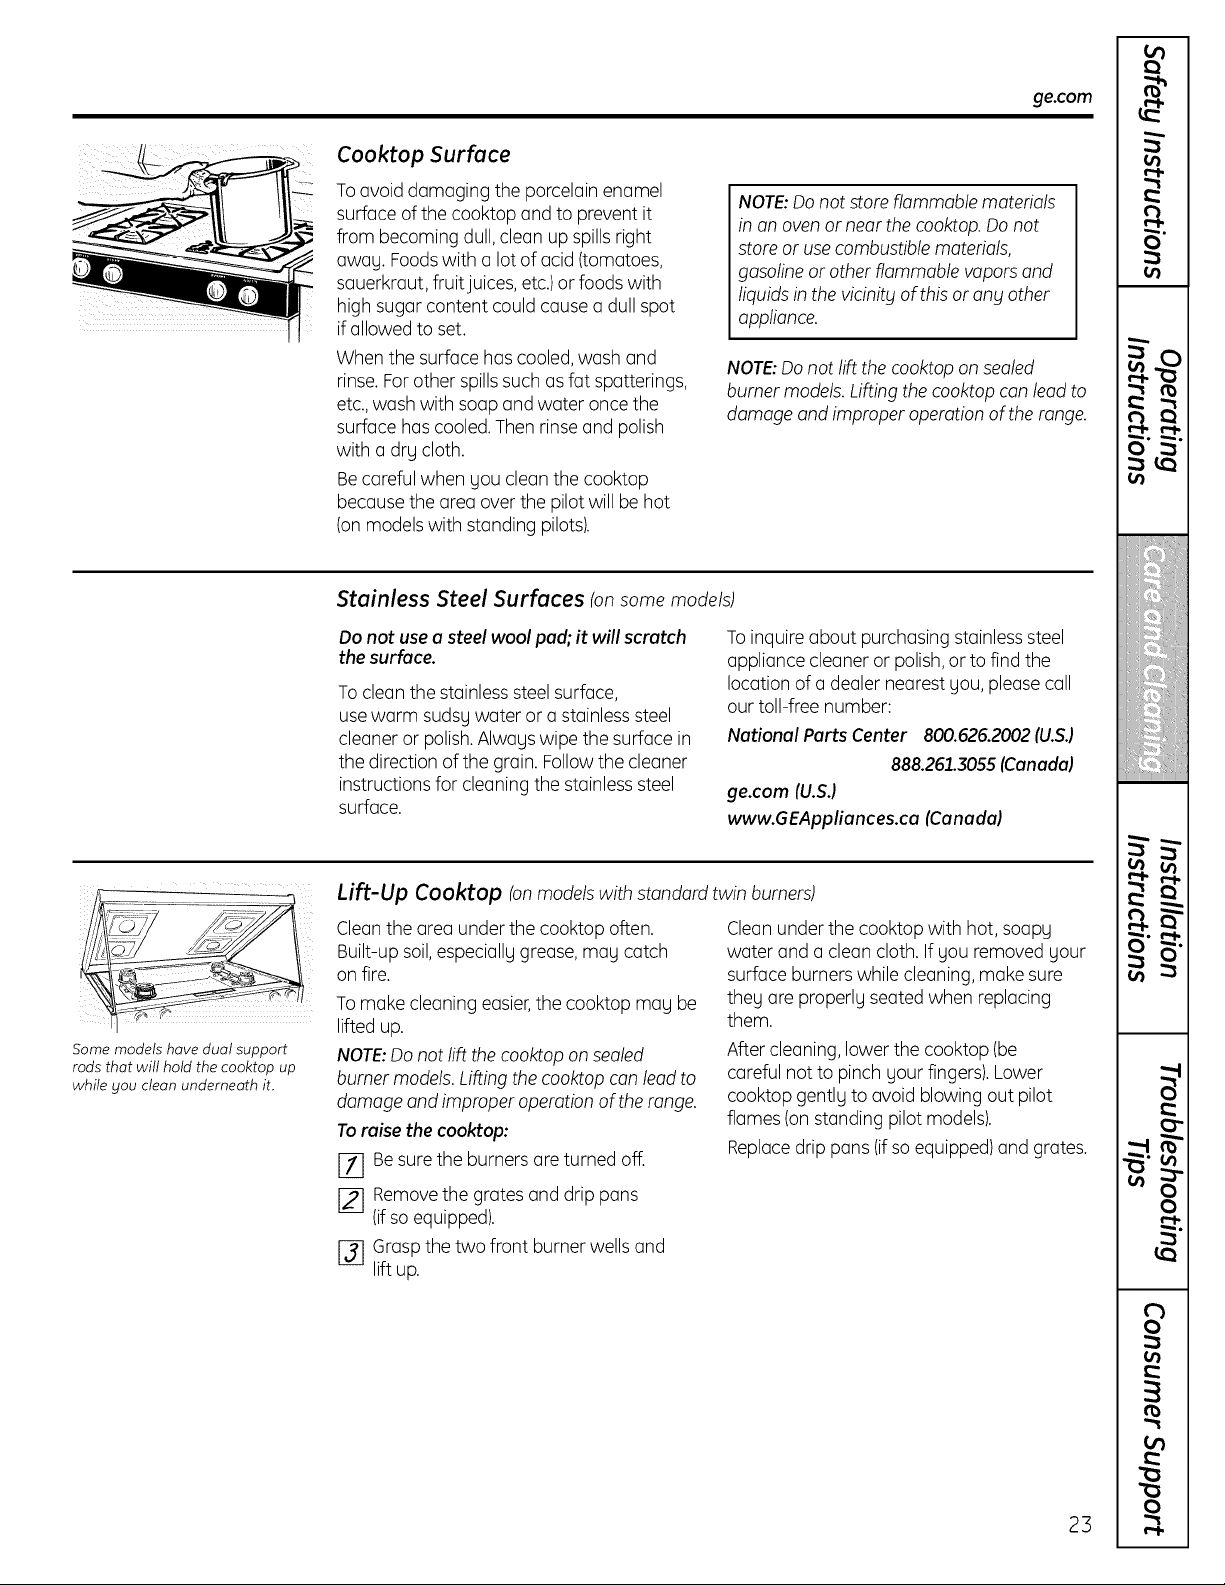
Some models hove duot support
rods that wilt hold thecooktop up
while you cleon underneath it.
Lift-Up Cooktop tonmodels with standard twin burners)
Cleanthe area under the cooktopoften.
Built-upsoil,especially grease, may catch
on fire.
To make cleaningeasier,thecooktop may be
lifted up.
NOTE:Do notlift thecooktopon sealed
burner models. Lifting the cooktopcanlead to
damageand improperoperationofthe range.
To raise thecooktop:
E_ Besuretheburnersare turned off.
[_ Remove thegrates and drip pans
(if so equipped).
[] Grasp thetwo front burner wells and
lift up.
Clean under the cooktopwith hot, soapy
water and a cleancloth.Ifyou removed your
surfaceburnerswhilecleaning, make sure
they are properlyseated when replacing
them.
After cleaning, lowerthe cooktop(be
careful notto pinchyourfingers). Lower
cooktop gently toavoid blowingout pilot
flames(on standing pilotmodels).
Replacedrip pans(ifsoequipped)and grates.
23
Care and cleaning of the range.
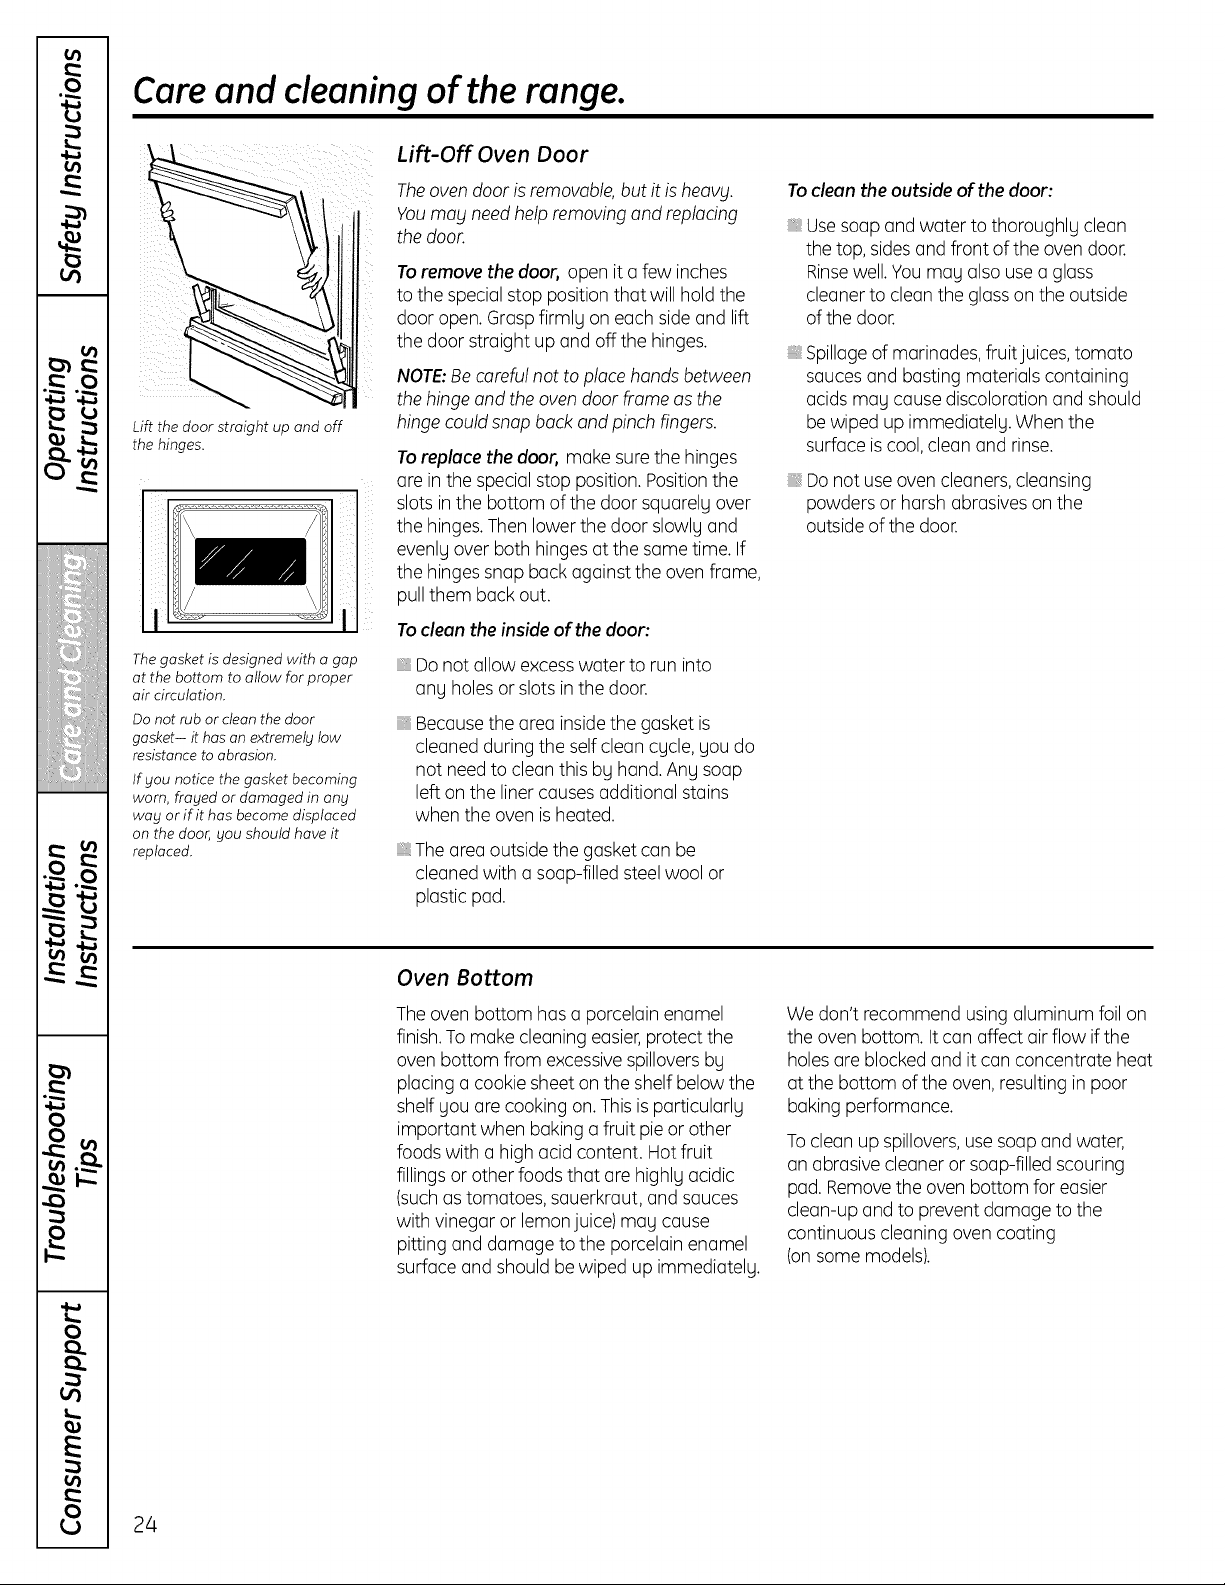
Lift the door straight up and off
the hinges.
Lift-Off Oven Door
Theovendoor is removable, butitis heovbl.
Youmoblneed help removing and replacing
thedoor.
To remove thedoor, open ita few inches
tothespecial stop position that will hold the
door open. Grasp firmlg on eachside and lift
thedoor straight up and off thehinges.
NOTE:Be careful nottoplacehands between
thehinge and theoven door frame asthe
hinge could snapback and pinchfingers.
To replace thedoor, make sure the hinges
are inthe special stop position. Positionthe
I slotsinthe bottom ofthe door squarely over
thehinges.Thenlower the door slowlg and
evenly overbothhingesatthesame time. If
thehingessnapback against theovenframe,
pull them back out.
Thegasket isdesigned with a gap
atthe bottom to allow for proper
air circulation.
Donot rubor clean the door
gasket- it hasan extremely tow
resistanceto abrasion.
Ifyou notice the gasket becoming
worn, frayed or damaged in any
wag or if it has become displaced
on the door, you should have it
replaced.
To cleanthe insideof thedoor:
Do notallow excesswater to run into
ang holesor slotsinthe door.
Becausethearea inside the gasketis
cleanedduring theself cleancgcle, gou do
notneed tocleanthis byhand.Anysoap
left on the liner causes additional stains
when theovenis heated.
The area outside thegasketcanbe
cleanedwith a soap-filled steel wool or
plastic pad.
To clean the outside of the door:
Usesoapand water tothoroughly clean
thetop, sidesand front oftheovendoor.
Rinsewell.You magalsouse a glass
cleanertocleanthe glass on theoutside
ofthe door.
Spillageof marinades, fruit juices, tomato
saucesand basting materials containing
acids magcause discoloration and should
bewiped up immediately.Whenthe
surface is cool, cleanand rinse.
Do not use ovencleaners,cleansing
powders or harshabrasives on the
outside ofthedoor.
Oven Bottom
The ovenbottom hasa porcelain enamel
finish.Tomake cleaningeasier,protectthe
ovenbottom from excessivespillovers bg
placinga cookie sheet on the shelf belowthe
shelf gou are cooking on. This is particularlg
important when bakinga fruit pie or other
foods with a high acidcontent. Hot fruit
fillings or otherfoods that are highlg acidic
(suchastomatoes,sauerkraut, and sauces
with vinegaror lemon juice)may cause
pitting and damage tothe porcelain enamel
surfaceand shouldbe wiped up immediately.
Wedon't recommend usingaluminum foil on
theovenbottom. It canaffect air flow if the
holes are blocked and itcanconcentrate heat
atthe bottom oftheoven, resulting in poor
bakingperformance.
To cleanupspillovers,usesoapandwater,
an abrasivecleanerorsoap-filledscouring
pad.Remove theoven bottomforeasier
clean-upandtopreventdamage tothe
continuouscleaningovencoating
(onsome models).
2/4
ge.com
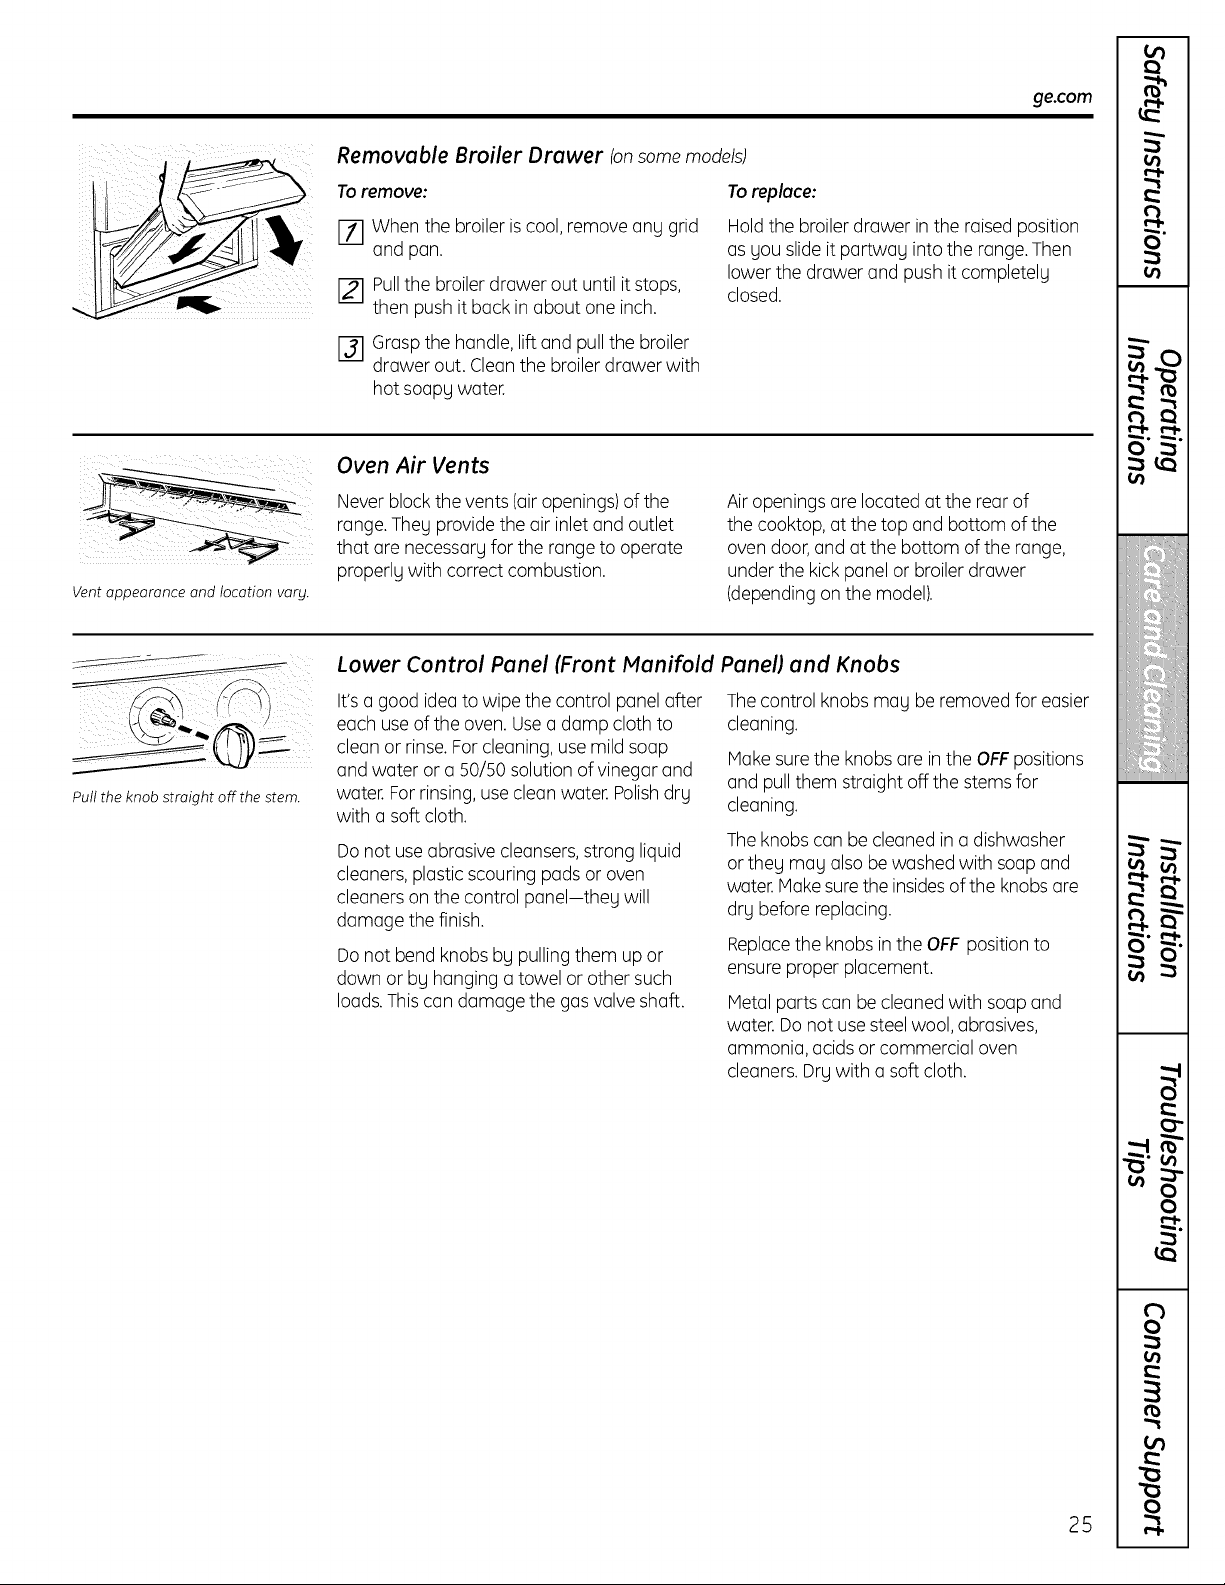
Removable Broiler Drawer (onsomemodels)
To remove:
[] Whenthebroiler iscool, remove ang grid
and pan.
[] Pull thebroiler drawer out untilitstops,
then push itback in about one inch.
[] Grasp thehandle,lift and pull thebroiler
drawer out. Cleanthe broiler drawerwith
hotsoapgwater.
Toreplace:
Hold thebroiler drawer in the raised position
asgou slideitpartwag intotherange, Then
lowerthedrawer and pushitcompletelg
closed.
Vent appearance and location vary.
Oven Air Vents
Never block thevents(airopenings) ofthe
range. Thegprovide theair inletand outlet
that are necessarg forthe range to operate
properlg with correctcombustion.
Air openings are located attherear of
thecooktop, at thetop and bottom ofthe
ovendoor, and atthe bottom ofthe range,
under thekickpanel or broiler drawer
(depending on the model).
Putt the knob straight off the stem.
Lower Control Panel (Front Manifold Panel) and Knobs
It's a good idea to wipethecontrol panel after
eachuse ofthe oven. Usea damp cloth to
cleanor rinse.For cleaning, use mildsoap
and water or a 50/50 solution ofvinegarand
water.For rinsing, use cleanwater.Polishdrg
with a softcloth.
Donotuse abrasive cleansers,strong liquid
cleaners, plasticscouring padsor oven
cleaners on the control panel-theg will
damage thefinish.
Donotbend knobs bg pulling them up or
down or bg hanging a towel or other such
loads.This candamage the gas valve shaft.
The control knobs mag be removed foreasier
cleaning,
Hake sure the knobs are in the OFFpositions
and pull them straight off thestems for
cleaning.
The knobs canbe cleaned in a dishwasher
or theg mag also be washed with soap and
water. Hake sure theinsidesofthe knobs are
drg beforereplacing.
Replacetheknobs in the OFF position to
ensureproper placement.
Metal parts can be cleanedwith soapand
water.Do notuse steel wool, abrasives,
ammonia, acids or commercial oven
cleaners. Drg with a softcloth.
25
Care and cleaning of the range.
Oven Shelves
Cleonthe shelveswith an abrasive cleanser
or scouring pad. After cleaning, rinse the
shelveswith cleonwater and drywith a
cleancloth.
Porcelain Oven Interior
With proper core,the porcelain enamel
interiorwillretain itsattractive finish for many
years.
Soap and water willnormally do the job.
Heavyspattering or spilloversmay require
cleaningwith a mildabrasive cleanser.
Soap-filled scouring podsmay alsobe used.
Donotallowfood spills with a high sugaror
acidcontent (such as tomatoes, sauerkraut,
fruit juices or piefilling) toremainon the
surface.They may cause dull spotseven
after cleaning.
Household ammonia may make the
cleaning job easier. Place 1/2cupammonia
in a shallow glass pan and leave in a cold
ovenovernight.The ammonia fumeswill
help loosentheburned-on grease and food.
Whennecessary, you may use a commercial
ovencleaner.Follow the package directions.
Cautions about using sprag-on oven
cleaners:
Becareful wherethe ovencleaneris
sprayed.
Do notspray ovencleaneron the electrical
controls and switches(onsome models)
because it could cause a short circuitand
result in sparking or fire.
Do notallow a film from thecleanerto
remainon thetemperature sensing bulb-
it couldcause the oven to heat improperly.
(Thebulb is located attherear of the oven.)
Carefullywipethebulb cleanafter each
ovencleaning, being careful notto move
the bulb asa change in its position could
affect howtheovenbakes.
Do notspray any ovencleaneron the
outside ovendoor,handlesor anyexterior
surfaceofthe oven, cabinet or painted
surfaces. The cleanercandamage these
surfaces.
26
Installation
Instructions
Range
I If gou have questions, call 800.GE.CARES or visit our Website at: ge.com I
IN THE COMMONWEALTH OF
MASSACHUSETTS
• This product must be installed by a licensed
plumber or gas fitter.
• When using ball-type gas shut-off valves, they
shall be the T-handle type.
• A flexible gas connector, when used, must not
exceed 3 feet.
BEFORE YOU BEGIN
Read these instructions completely and
carefully.
Installation of this range must conform with
local codes, or in the absence of local codes,
with the National Fuel Gas Code, ANSI
Z223.1/NFPA.54, latest edition. In Canada,
installation must conform with the current
Natural Gas Installation Code, CAN/CGA-B149.1
or the current Propane Installation Code,
CAN/CGA-B149.2, and with local codes where
applicable. This range has been design-certified
bg CSA International according to ANSI Z21.1,
latest edition and Canadian Gas Association
according to CAN/CGA-I.1 latest edition.
As with any appliance using gas and generating
heat, there are certain safety precautions you
should follow. You will find these precautions in the
Important Safety Information section in the front
of this manual. Read them carefully.
IMPORTANT - Savetheseinstructions
for local inspector's use.
IMPORTANT - Observe allgoverning
codes and ordinances.
• Note to Installer- Be sure to leave these
instructions with the Consumer.
• Note to Consumer - Keep these instructions for
future reference.
Note - This appliance must be properly
grounded.
• Servicer - The electrical diagram isin an
envelope attached to the back of the range.
• Skill Level -Installation of this appliance
requires basic mechanical skills.
• Proper installation is the responsibility of the
installer.
• Product failure due to improper installation isnot
covered under the Warranty.
27
Installation Instructions
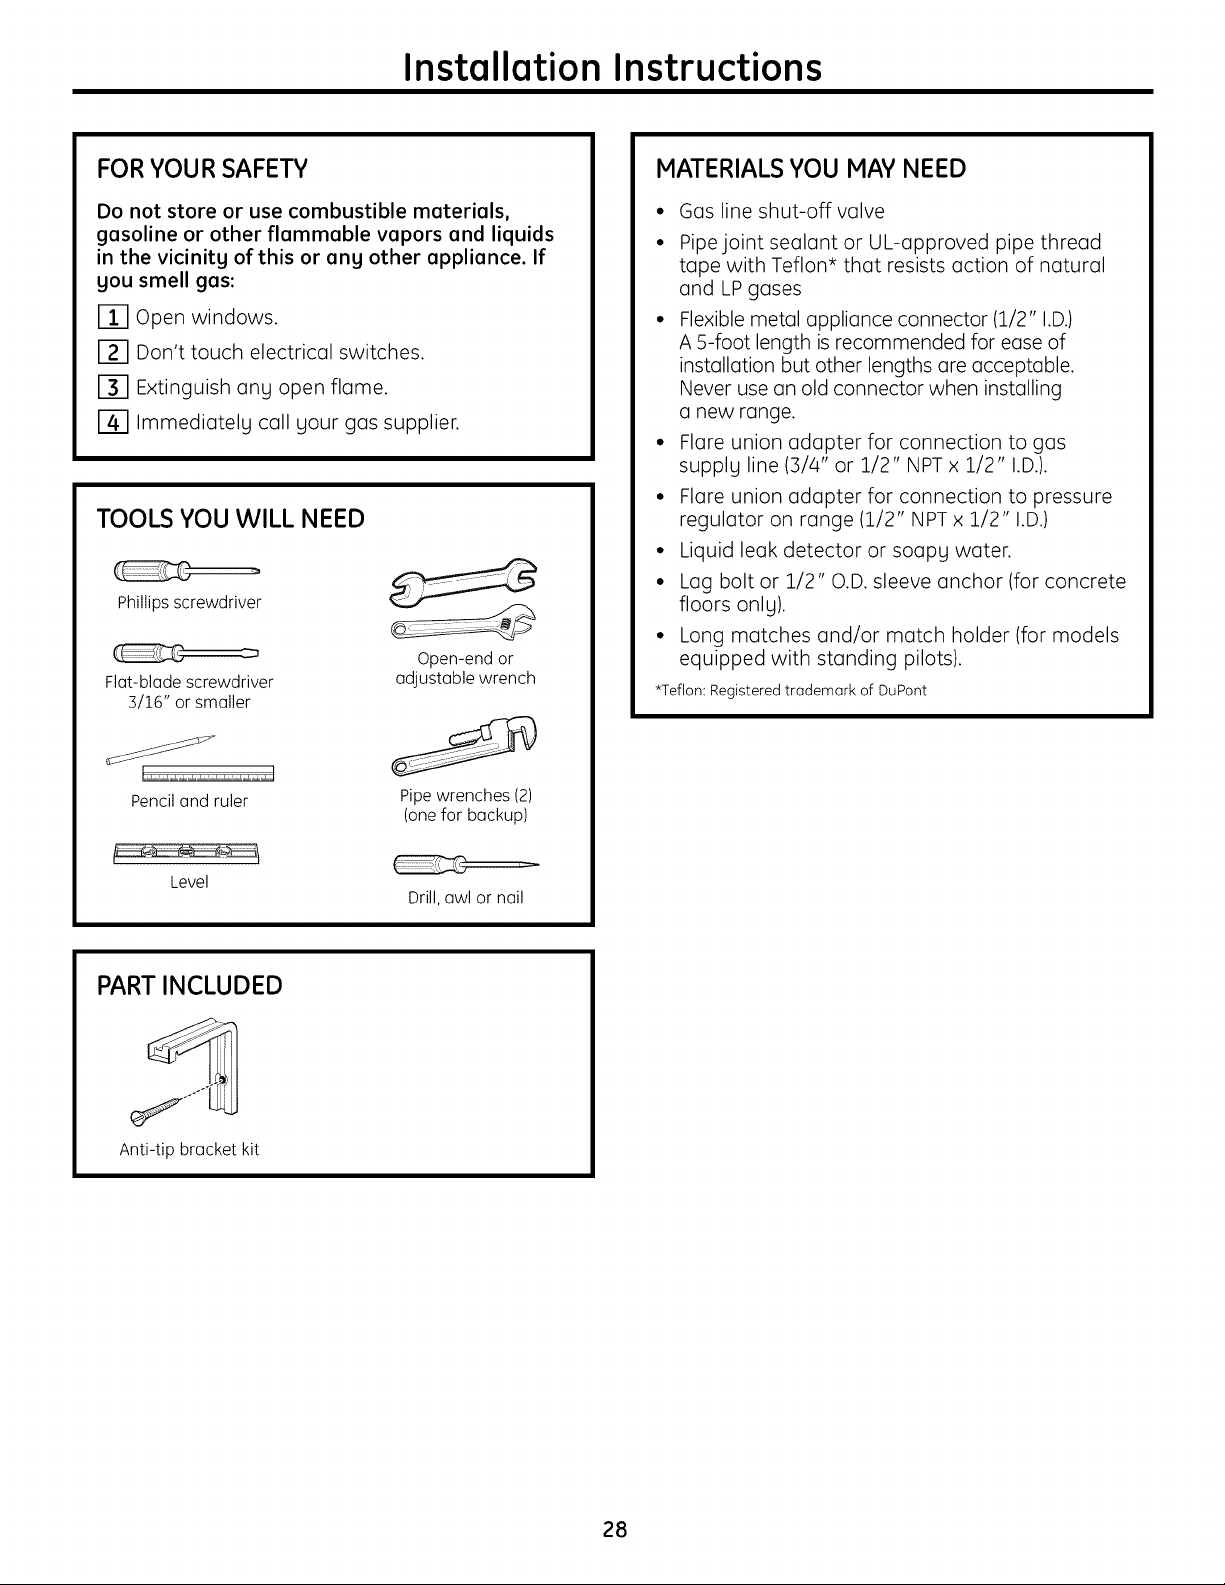
FOR YOUR SAFETY
Do not store or use combustible materials,
gasoline or other flammable vapors and liquids
in the vicinitg of this or ang other appliance. If
gou smell gas:
[_ Open windows.
E_ Don't touch electrical switches.
E_ Extinguish any open flame.
[] Immediately call your gas supplier.
TOOLS YOU WILL NEED
Phillips screwdriver
Fl(_t-blQdescrewdriver
3/16" or smQIler
Penciland ruler
Open-end or
QdjustQblewrench
Pipewrenches (2)
(onefor bQckup)
Level
Drill,owl or nQil
MATERIALS YOU MAY NEED
• Gas line shut-off valve
• Pipe joint se(_lant or UL-approved pipe thread
tape with Teflon* that resists action of natural
and LP gases
• Flexible metal appliance connector (1/2" I.D.)
A 5-foot length isrecommended for ease of
install(_tion but other lengths (]re acceptable.
Never use an old connector when installing
(_new range.
• Flare union adapter for connection to gas
supply line (3/4" or 1/2" NPT x 1/2" I.D.).
• Flare union adapter for connection to pressure
regulator on range (1/2" NPT x 1/2" I.D.)
• Liquid leak detector or soapy water.
• Lag bolt or 1/2" O.D.sleeve anchor (for concrete
floors only).
• Long matches and/or match holder (for models
equipped with standing pilots).
*Teflon: Registered tr(_demark of DuPont
PART INCLUDED
Anti-tip brQcketkit
28
Installation Instructions
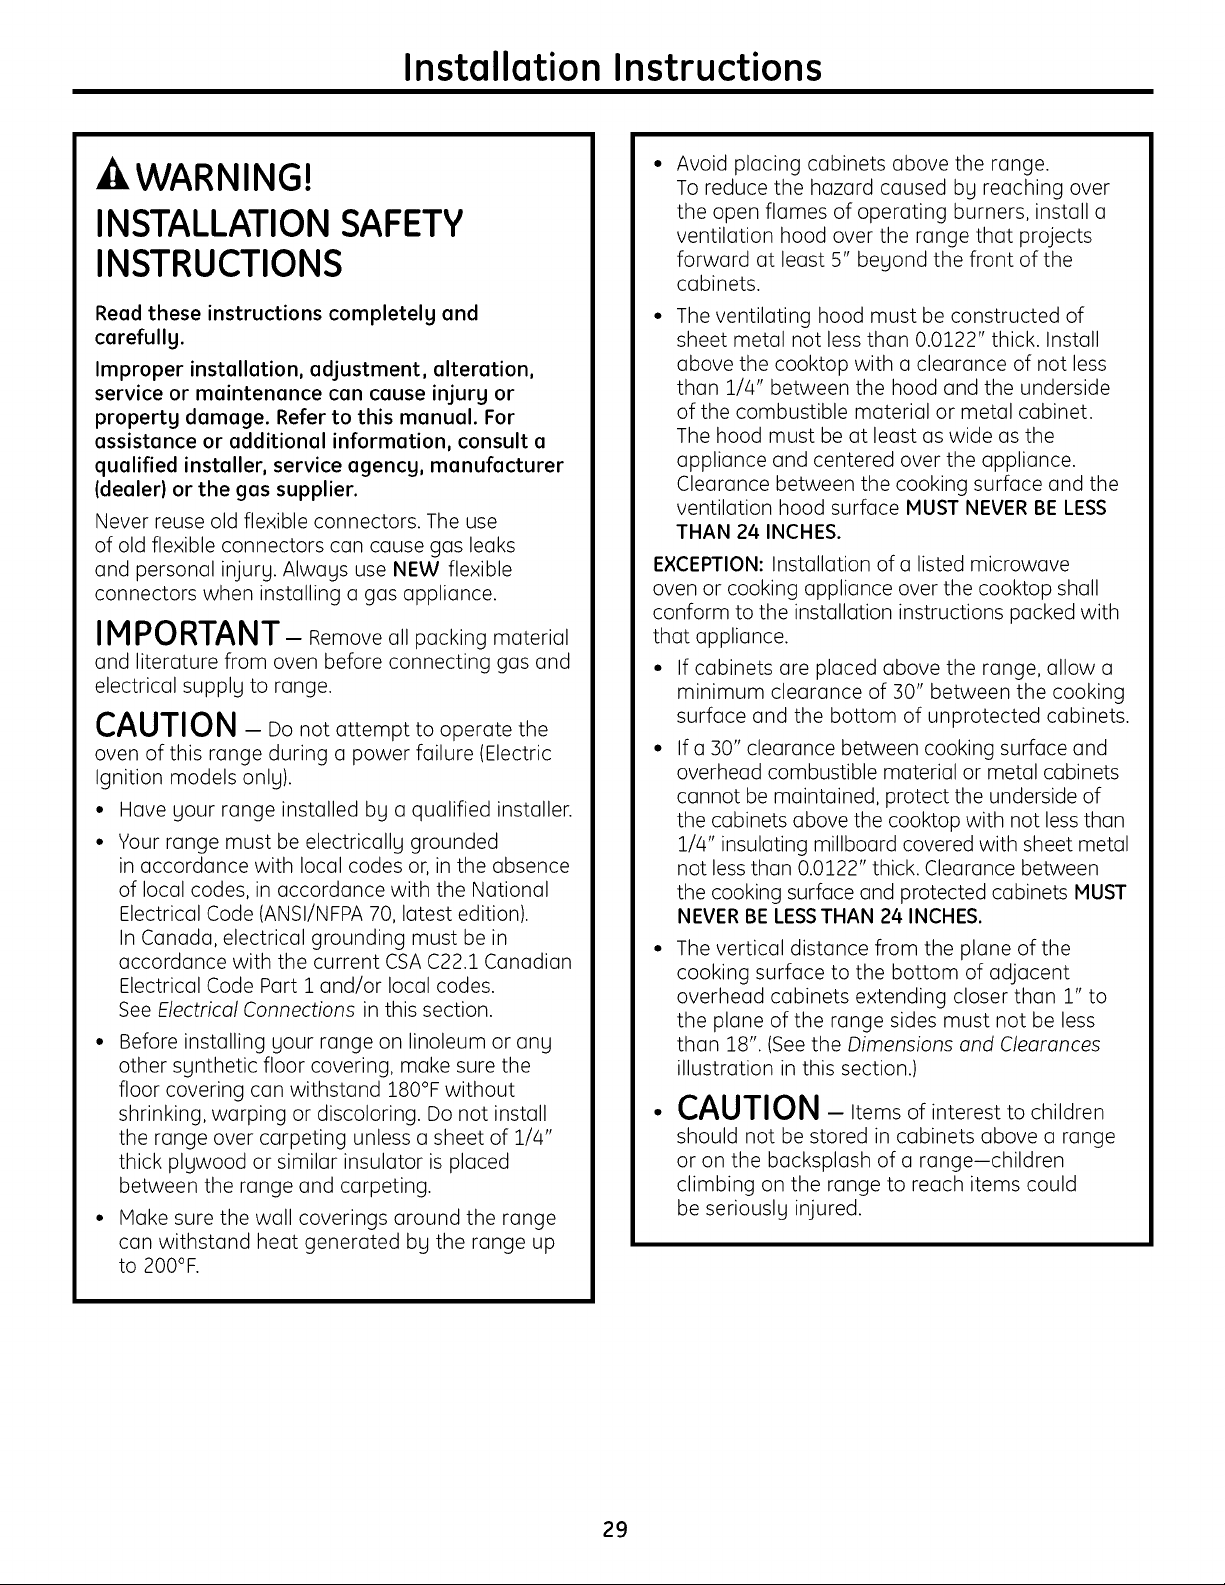
-A WARNING!
INSTALLATION SAFETY
INSTRUCTIONS
Read these instructions completely and
carefully.
Improper installation, adjustment, alteration,
service or maintenance can cause injury or
property damage. Refer to this manual. For
assistance or additional information, consult a
qualified installer, service agency, manufacturer
(dealer) or the gas supplier.
Never reuse old flexible connectors. The use
of old flexible connectors con cause gas leaks
and personal injury. Always use NEW flexible
connectors when installing o gas appliance.
IMPORTANT- Remove olipocking moteriol
ond literoturefrom oven beforeconnectinggos ond
electricolsupplyto ronge.
CAUTION - Do not attempt to operate the
oven of this range during o power failure (Electric
Ignition models only).
• Hove your range installed by o qualified installer.
Your range must be electrically grounded
in accordance with local codes or,in the absence
of local codes, in accordance with the Notional
Electrical Code (ANSI/NFPA 70, latest edition).
InCanada, electrical grounding must be in
accordance with the current CSAC22.1 Canadian
Electrical Code Port 1 and/or local codes.
See Electrical Connections in this section.
Before installing your range on linoleum or onu
other synthetic floor covering, make sure the
floor covering con withstand 180°F without
shrinking, warping or discoloring. Do not install
the range over carpeting unless o sheet of 1//4"
thick plywood or similar insulator is placed
between the range and carpeting.
Make sure the wall coverings around the range
con withstand heat generated by the range up
to 200°F.
Avoid placing cabinets above the range.
To reduce the hazard caused by reaching over
the open flames of operating burners, install o
ventilation hood over the range that projects
forward at least 5" beyond the front of the
cabinets.
The ventilating hood must be constructed of
sheet metal not less than 0.0122" thick. Install
above the cooktop with o clearance of not less
than 1//4" between the hood and the underside
of the combustible material or metal cabinet.
The hood must be at least as wide as the
appliance and centered over the appliance.
Clearance between the cooking surface and the
ventilation hood surface MUST NEVER BE LESS
THAN 24 INCHES.
EXCEPTION: Installation of o listed microwave
oven or cooking appliance over the cooktop shall
conform to the installation instructions pocked with
that appliance.
• If cabinets ore placed above the range, allow o
minimum clearance of 30" between the cooking
surface and the bottom of unprotected cabinets.
• If o 30" clearance between cooking surface and
overhead combustible material or metal cabinets
cannot be maintained, protect the underside of
the cabinets above the cooktop with not less than
1//4" insulating millboord covered with sheet metal
not less than 0.0122" thick. Clearance between
the cooking surface and protected cabinets MUST
NEVER BE LESSTHAN 24 INCHES.
The vertical distance from the plane of the
cooking surface to the bottom of adjacent
overhead cabinets extending closer than 1" to
the plane of the range sides must not be less
than 18". (See the Dimensions and Clearances
illustration in this section.)
CAUTION -Items of interest to children
should not be stored in cabinets above o range
or on the bocksplosh of o rongeichildren
climbing on the range to reach items could
be seriously injured.
29
Installation Instructions
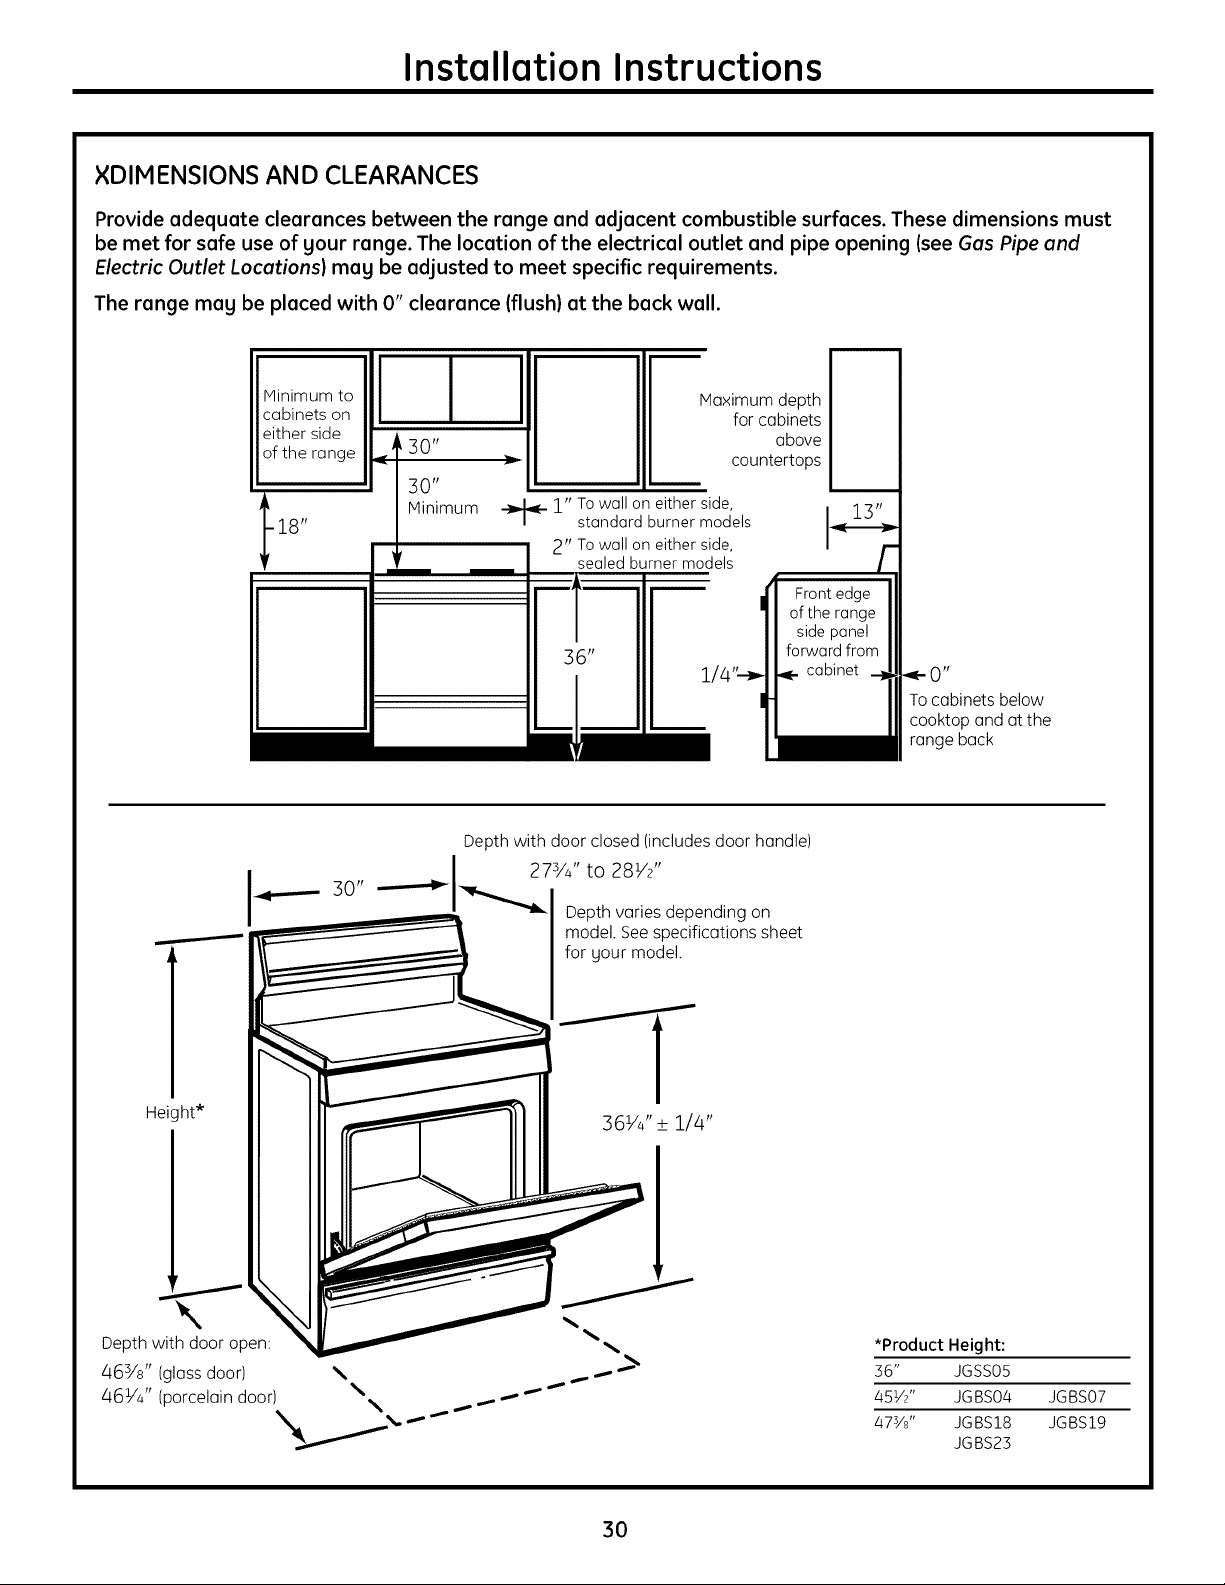
×DIMENSIONS AND CLEARANCES
Provide adequate clearances between the range and adjacent combustible surfaces. These dimensions must
be met for safe use of your range. The location of the electrical outlet and pipe opening (see Gas Pipe and
Electric Outlet Locations) may be adjusted to meet specific requirements.
The range mag be placed with O" clearance (flush) at the back wall.
Minimum to
cabinets on
either side
of the range
1
30"
II 30,,
Maximum depth [
for cabinets
above
countertops
18"
II
Minimum
_-- 1" To wall on either side,
standard burner models
2" To wall on either side,
sealed burner mo(
36"
t_
Tocabinetsbelow
cooktop and at the
rangeback
30"
Depthwith door closed (includesdoor handle)
273/4'' to 28VY'
Depth varies depending on
model. See specifications sheet
for your model.
Height*
Depth with door open:
463/8" (glass door)
46V4" (porcelain door)
*Product Height:
36" JGSS05
451/2" JGBS04
47Ys" JGBS18
JGBS23
JGBS07
JGBS19
3O
Installation Instructions
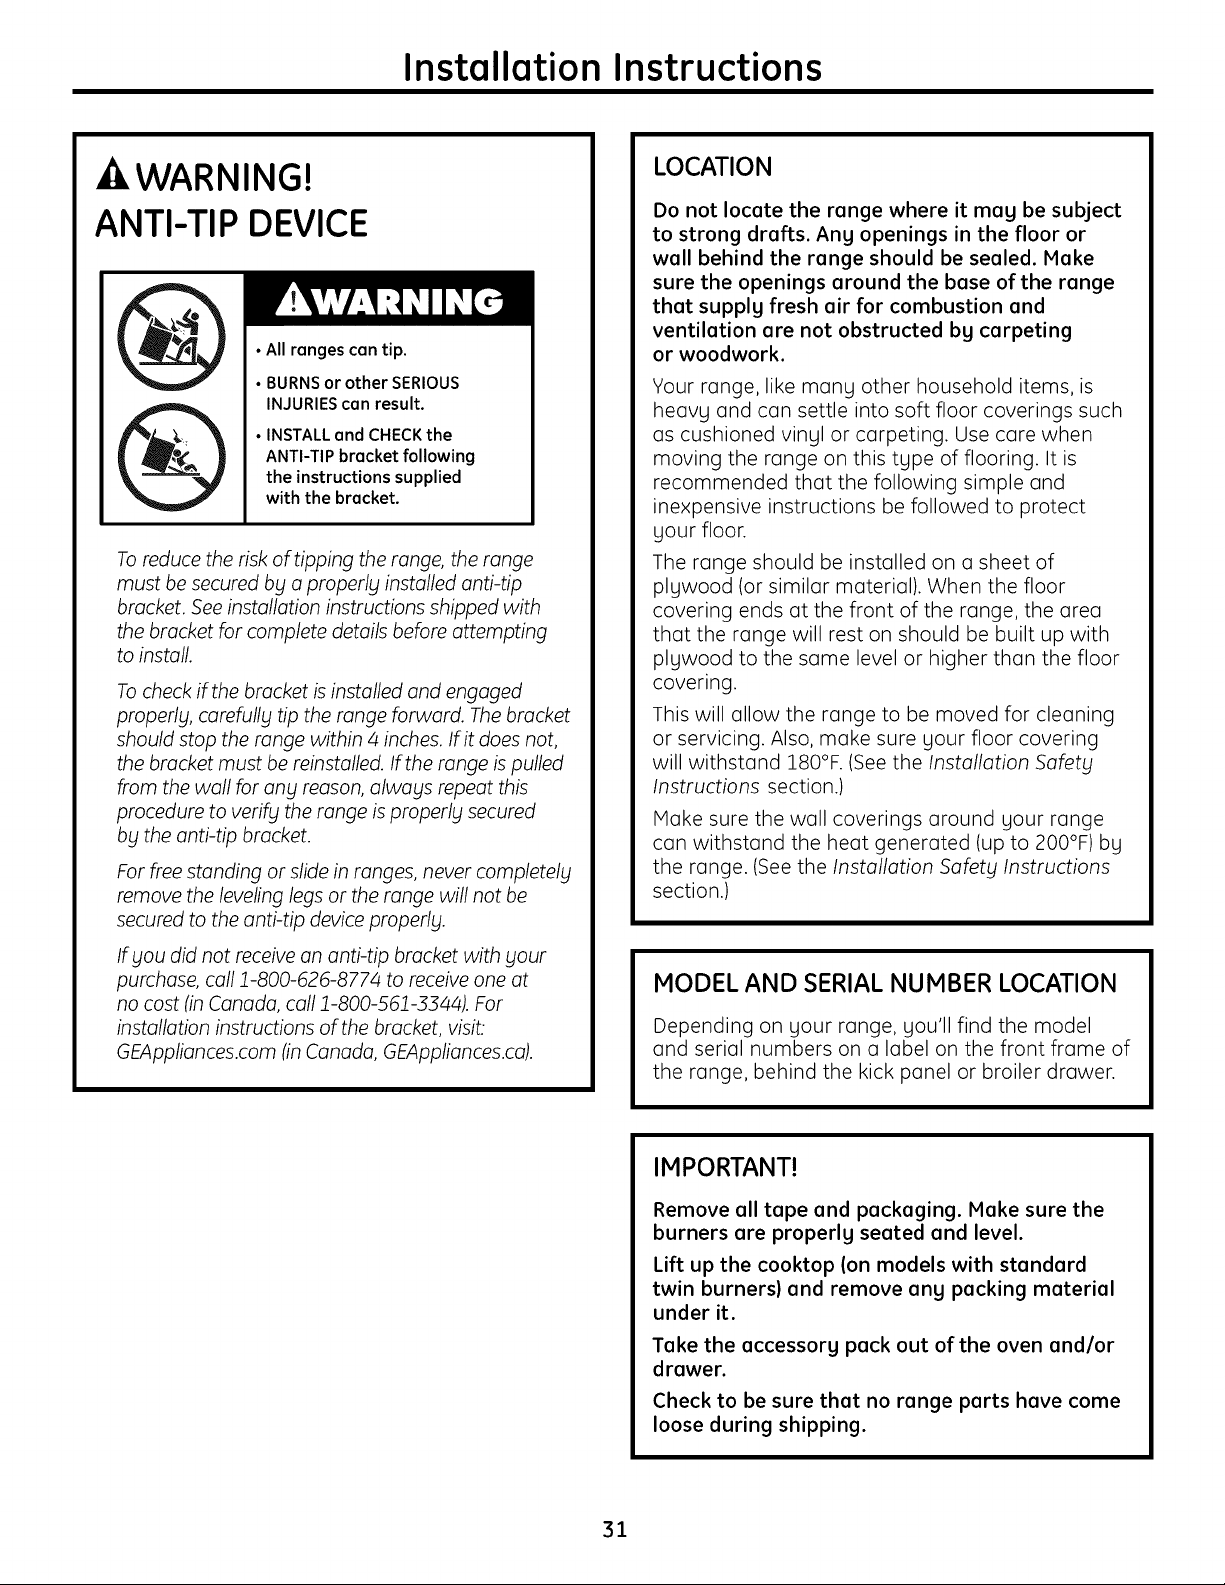
-A WARNING!
ANTI-TIP DEVICE
•All ranges can tip.
• BURNSor other SERIOUS
INJURIEScan result.
• INSTALL and CHECKthe
ANTI-TIP bracket following
the instructions supplied
with the bracket.
Toreduce the risk of tipping the range, the range
must be secured by a properly installed anti-tip
bracket. See installation instructions shipped with
the bracket for complete details before attempting
to install.
Tocheck ifthe bracket isinstalled and engaged
properly, carefull_j tip the range forward. Thebracket
should stop the range within 4 inches. If it does not,
the bracket must be reinstalled. If the range ispulled
from the wall for an_t reason, alwa_tsrepeat this
procedure to verif_j the range is properlbl secured
bbl the anti-tip bracket.
Forfree standing or slide in ranges, never completely
remove the leveling legs or the range will not be
secured to the anti-tip device properly.
If blou did not receive an anti-tip bracket with your
purchase, call 1-800-626-8774 to receive one at
no cost (in Canada, call 1-800-561-3344). For
installation instructions of the bracket, visit:
GEAppliances.com (in Canada, GEAppliances.ca).
LOCATION
Do not locate the range where it may be subject
to strong drafts. Any openings in the floor or
wall behind the range should be sealed. Make
sure the openings around the base of the range
that supply fresh air for combustion and
ventilation are not obstructed by carpeting
or woodwork.
Your range, like many other household items, is
heavy and can settle into soft floor coverings such
as cushioned vinyl or carpeting. Use care when
moving the range on this type of flooring. It is
recommended that the following simple and
inexpensive instructions be followed to protect
your floor.
The range should be installed on a sheet of
plywood (or similar material). When the floor
covering ends at the front of the range, the area
that the range will rest on should be built up with
plywood to the same level or higher than the floor
covering.
This will allow the range to be moved for cleaning
or servicing. Also, make sure your floor covering
will withstand 180°F. (See the Installation Safety
Instructions section.)
Make sure the wall coverings around your range
can withstand the heat generated (up to 200°F) by
the range. (See the Installation Safety Instructions
section.)
MODEL AND SERIAL NUMBER LOCATION
Depending on your range, you'll find the model
and serial numbers on a label on the front frame of
the range, behind the kick panel or broiler drawer.
IMPORTANT!
Remove all tape and packaging. Make sure the
burners are properly seated and level.
Lift up the cooktop (on models with standard
twin burners) and remove any packing material
under it.
Take the accessory pack out of the oven and/or
drawer.
Check to be sure that no range parts have come
loose during shipping.
31
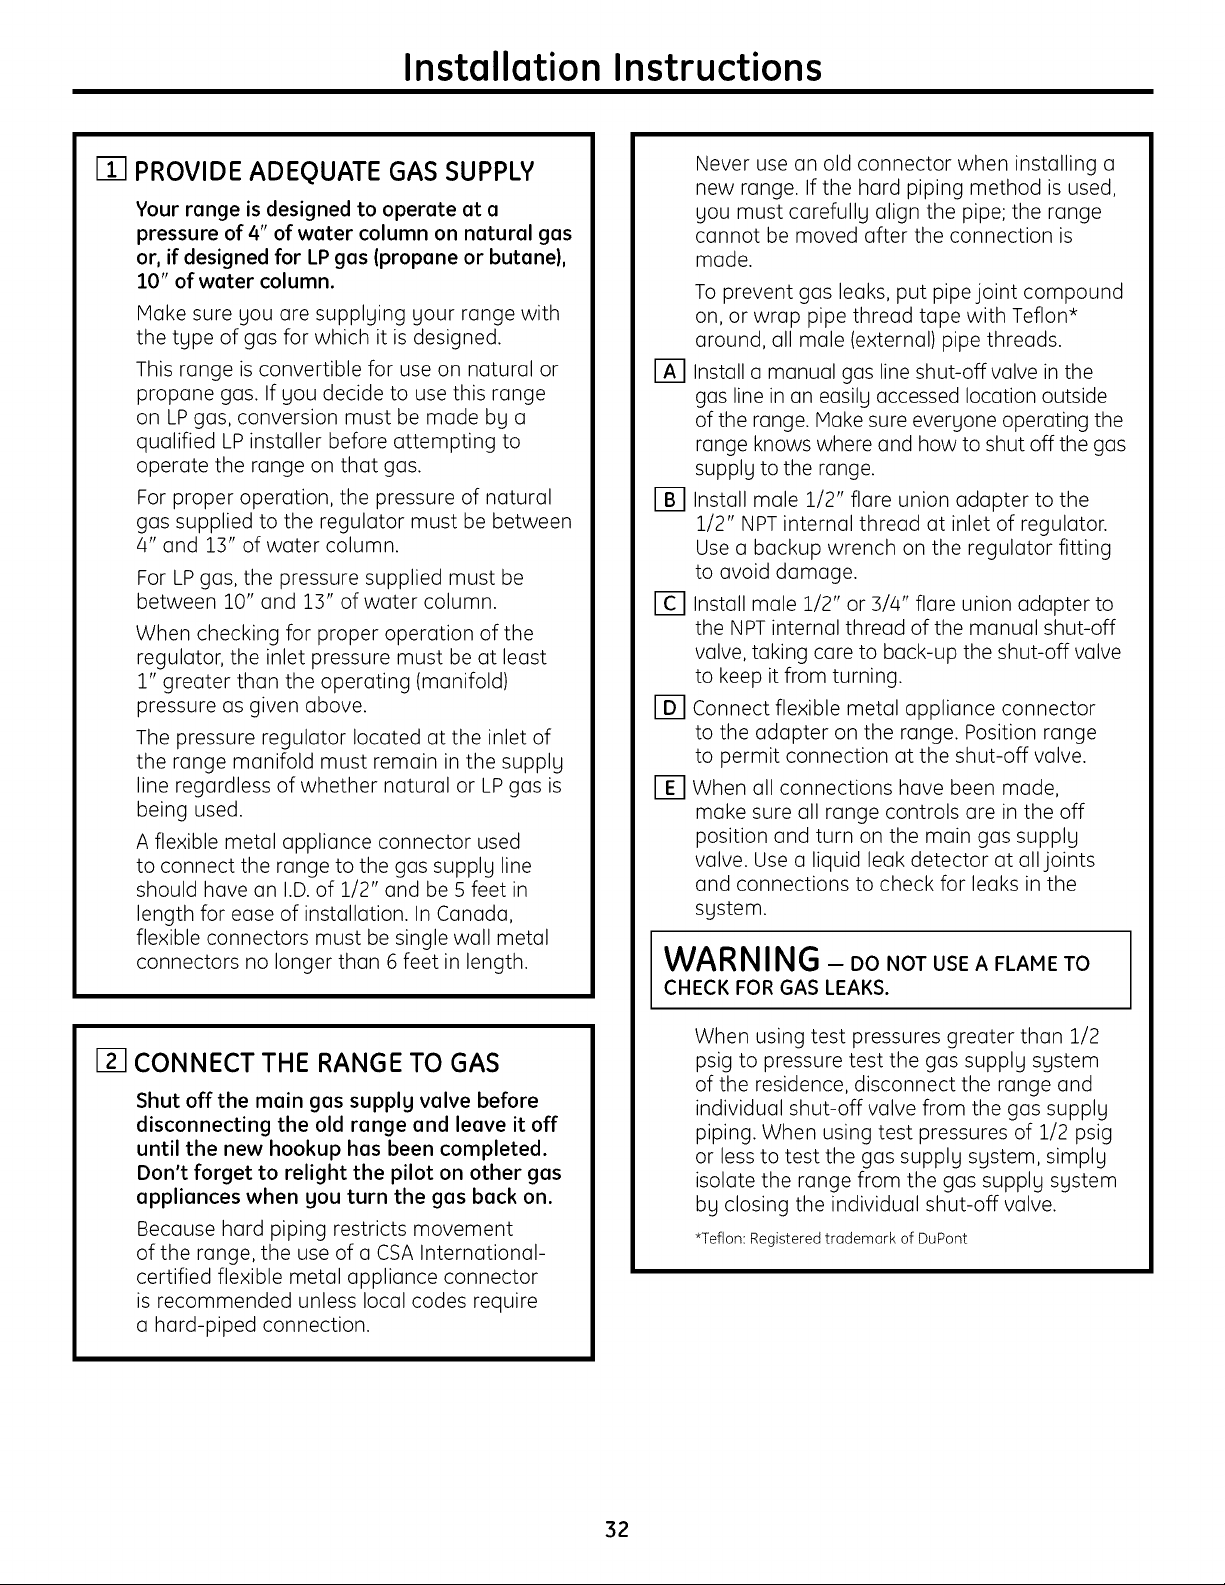
Installation Instructions
m PROVIDE ADEQUATE GAS SUPPLY
Your renge is designed to operete et e
pressure of 4" of weter column on neturel gas
or, if designed for LP gas (propane or butane),
10" of water column.
Hake sure you are supplying your range with
the type of gas for which it is designed.
This range isconvertible for use on natural or
propane gas. If you decide to use this range
on LP gas, conversion must be made by a
qualified LP installer before attempting to
operate the range on that gas.
For proper operation, the pressure of natural
gas supplied to the regulator must be between
4" and 13" of water column.
For LP gas, the pressure supplied must be
between 10" and 13" of water column.
When checking for proper operation of the
regulator, the inlet pressure must be at least
1" greater than the operating (manifold)
pressure as given above.
The pressure regulator located at the inlet of
the range manifold must remain in the supply
line regardless of whether natural or LP gas is
being used.
A flexible metal appliance connector used
to connect the range to the gas supply line
should have an I.D.of 1/2" and be 5 feet in
length for ease of installation. In Canada,
flexible connectors must be single wall metal
connectors no longer than 6 feet in length.
[]_]CONNECT THE RANGE TO GAS
Shut off the main gas supply valve before
disconnecting the old range end leave it off
until the new hookup has been completed.
Don't forget to relight the pilot on other gas
appliances when you turn the gas beck on.
Because hard piping restricts movement
of the range, the use of a CSA International-
certified flexible metal appliance connector
is recommended unless local codes require
a hard-piped connection.
Never use an old connector when installing a
new range. If the hard piping method is used,
you must carefully align the pipe; the range
cannot be moved after the connection is
made.
To prevent gas leaks, put pipe joint compound
on, or wrap pipe thread tape with Teflon*
around, all male (external) pipe threads.
E_ Install a manual gas line shut-offvalve in the
gas line in an easily accessed location outside
of the range. Hake sure everyone operating the
range knows where and how to shut off the gas
supply to the range.
i-_ Install male 1/2" flare union adapter to the
1/2" NPT internal thread at inlet of regulator.
Use a backup wrench on the regulator fitting
to avoid damage.
F-_ Install male 1/2" or 3/4" flare union adapter to
the NPT internal thread of the manual shut-off
valve, taking care to back-up the shut-off valve
to keep itfrom turning.
[] Connect flexible metal appliance connector
to the adapter on the range. Position range
to permit connection at the shut-off valve.
EDWhen all connections have been made,
make sure all range controls are in the off
position and turn on the main gas supply
valve. Use a liquid leak detector at all joints
and connections to check for leaks in the
system.
WARNING - DO NOT USE A FLAME TO
CHECK FOR GAS LEAKS.
When using test pressures greater than 1/2
psig to pressure test the gas supply system
of the residence, disconnect the range and
individual shut-off valve from the gas supply
piping. When using test pressures of 1/2 psig
or less to test the gas supply system, simply
isolate the range from the gas supply system
by closing the individual shut-off valve.
*Teflon: Registered trademark of DuPont
32
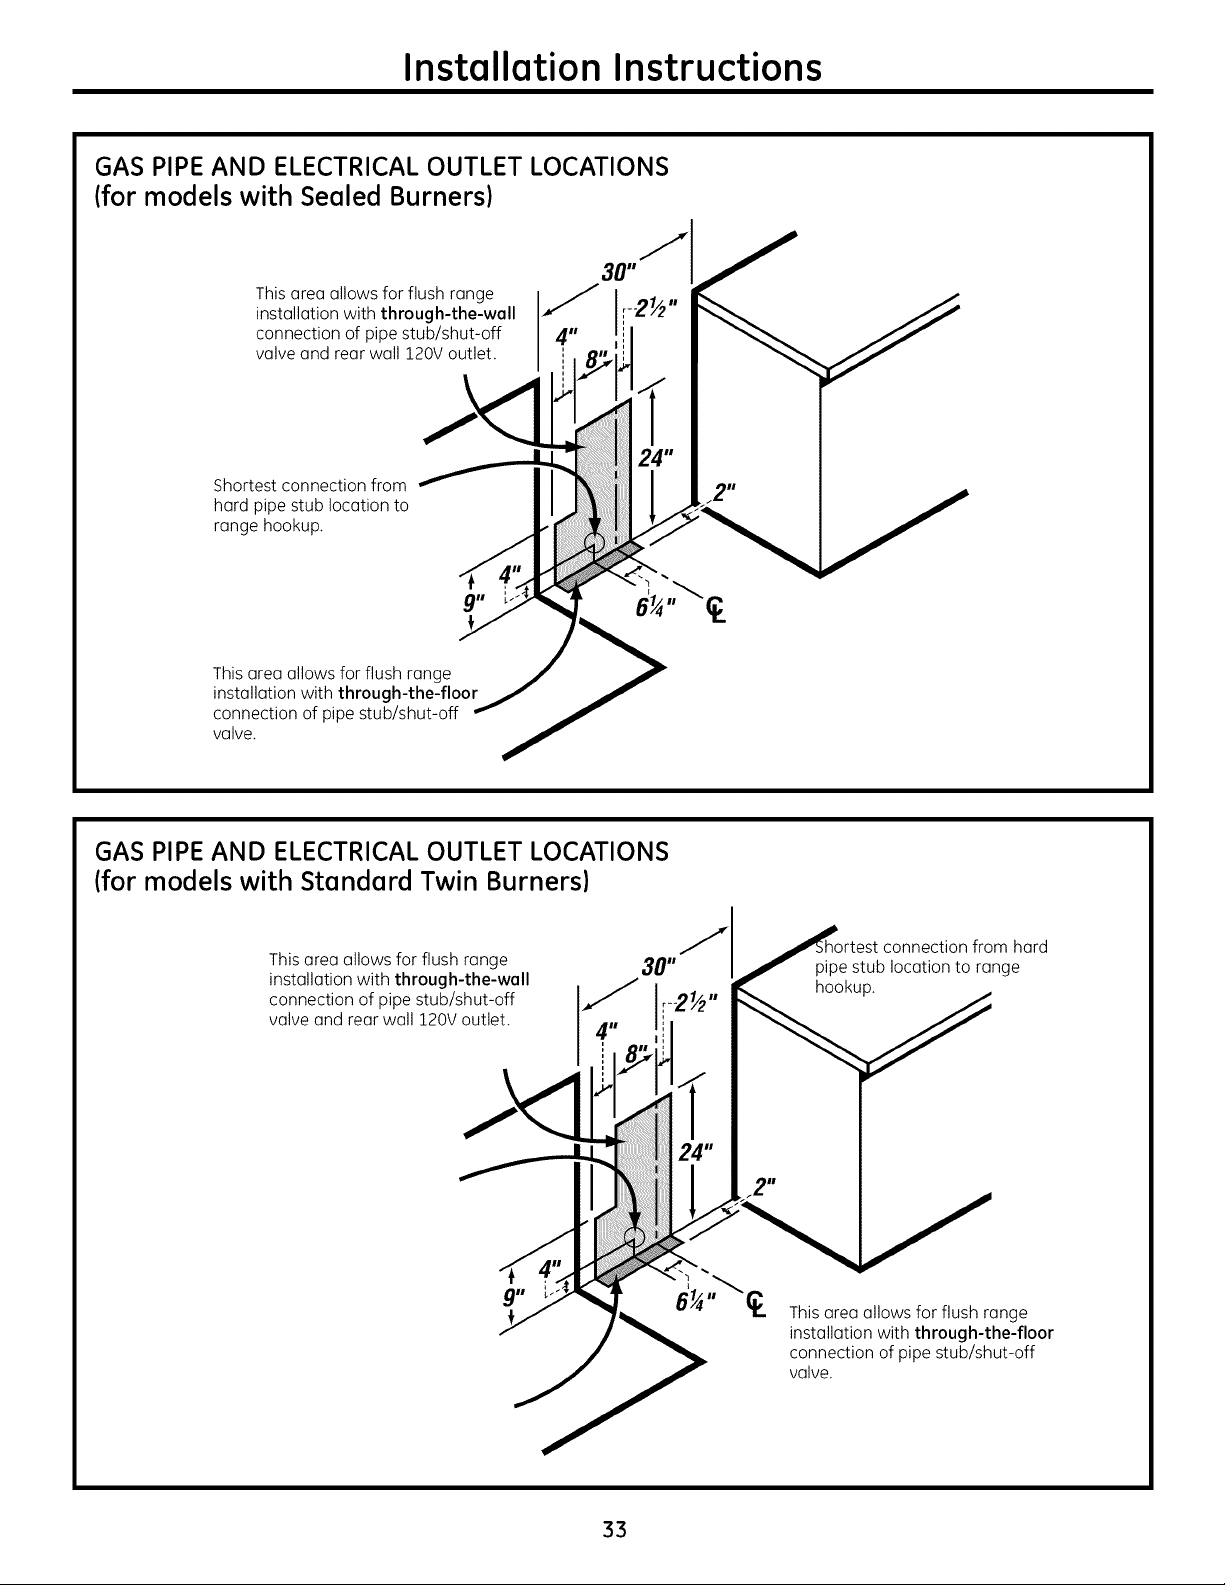
Installation Instructions
GAS PIPE AND ELECTRICAL OUTLET LOCATIONS
(for models with Sealed Burners)
This area allows for flush range
installation with through-the-well
connection of pipe stub/shut-off
valve and rear wall 220V outlet.
\
Shortest connection from
hard pipe stub location to
range hookup.
This area allows for flush range
installation with through-the-floor
connection of pipe stub/shut-off
valve.
GAS PIPE AND ELECTRICAL OUTLET LOCATIONS
(for models with Standard Twin Burners)
This area allows for flush range
installation with through-the-well
connection of pipe stub/shut-off
valve and rear wall 220Voutlet.
from hard
pipe stub location to range
hookup.
This area allows for flush range
installation with through-the-floor
connection of pipe stub/shut-off
valve.
33
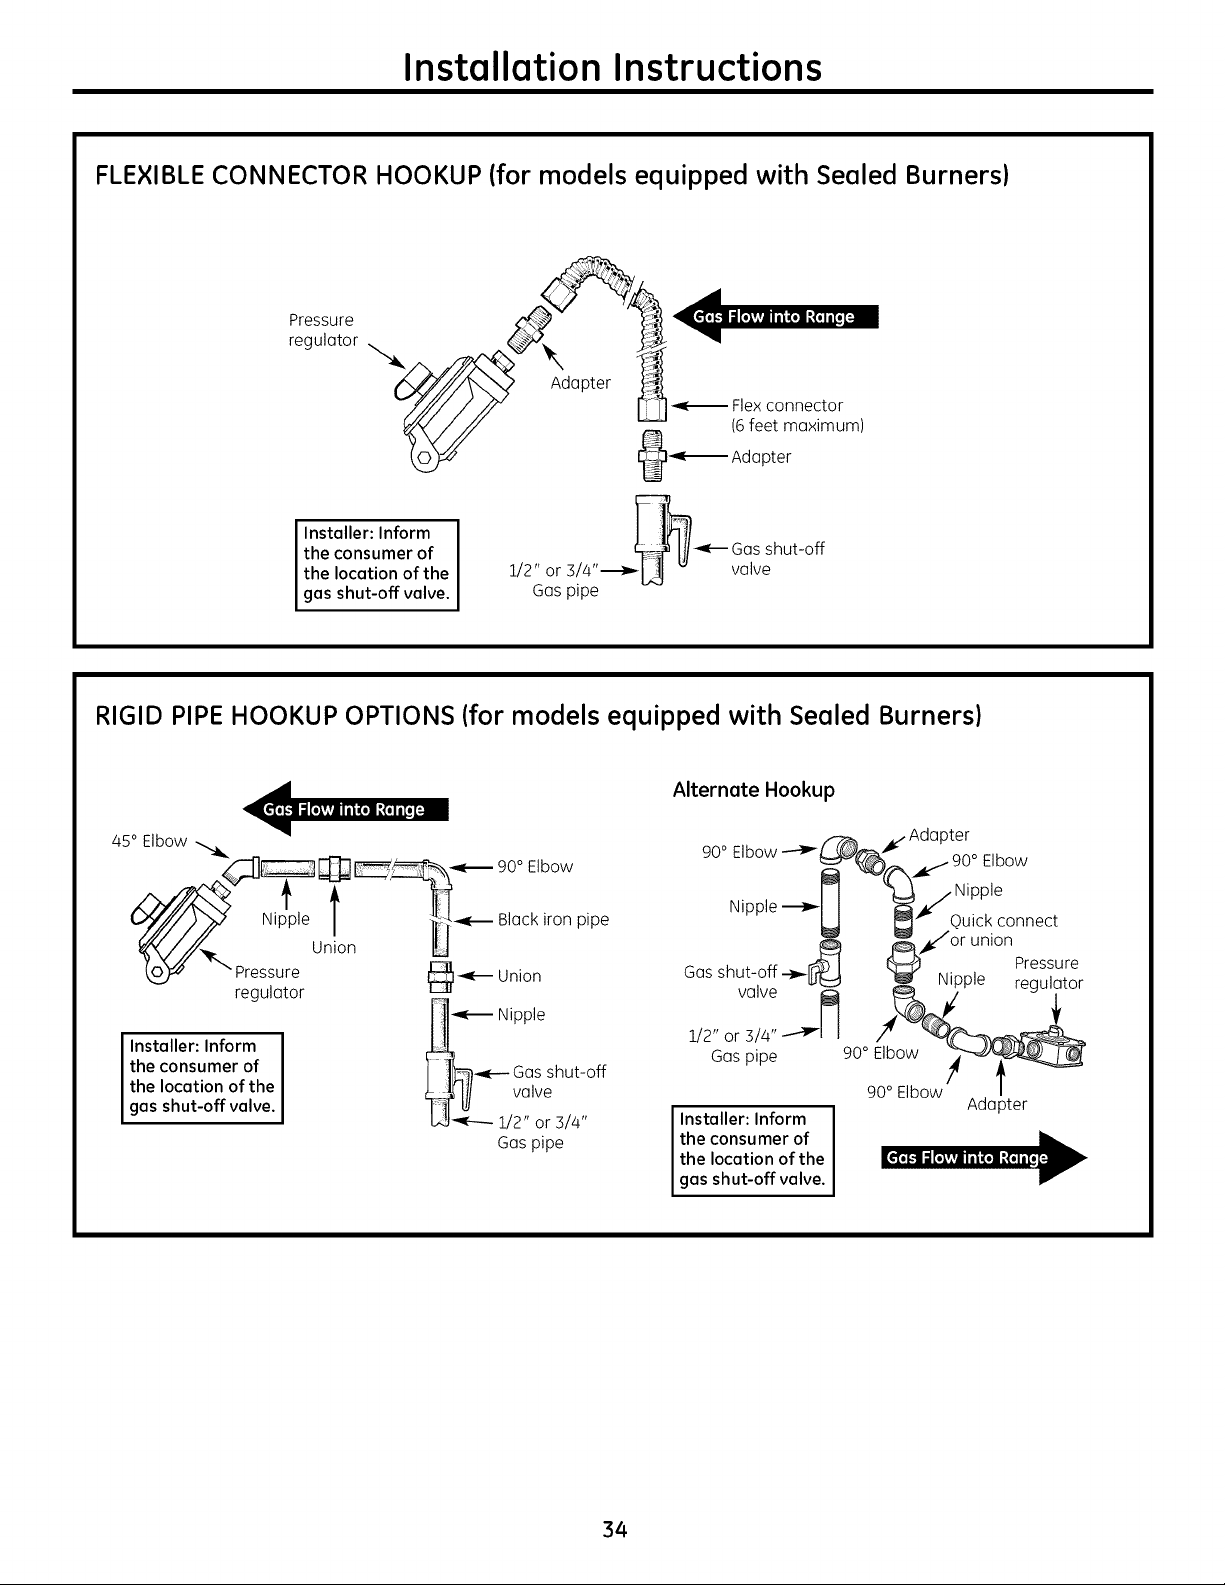
Installation Instructions
FLEXIBLE CONNECTOR HOOKUP (for models equipped with Sealed Burners}
Adapter _ _ _5_ectr_%e_tmOrm )
o%_ @ Adapter
Installer: Inform
the consumer of
the location of the
gas shut-off valve.
_--- Gasshut-off
1/2" or 3/4"--_L_ '_ valve
Gaspipe
RIGID PIPE HOOKUP OPTIONS (for models equipped with Sealed Burners}
I Installer: Inform
the consumer of
the location of the
gas shut-off valve.
/45° Elbow
__ _ 90°Elbow
Nipple
_ [_._ Black iron pipe
_1,///',,_
Union
0_ \Pressure _-_ Union
regulator
______ Nipple
Gasshut-off
Gaspipe
Alternate Hookup
o _ j Adapter
90 Elbow_%_, _ 90 ° Elbow
Nipple'--_ _ _ _jNipple
LJ _'- Quick connect
l_,/or union
Gasshut-off-_[_ _ NicHe Press,u,re
valve _, PP regulator
Adapter
Installer: Inform
the consumer of
the location of the
gas shut-offva ve.
34

Installation Instructions
FLEXIBLE CONNECTOR HOOKUP
(for models equipped with Standard Twin Burners)
Pressure
regulator
Manifold ---_ @
Flex connector "--_'_,.t
(6feet maximum) Q
Adapter -----_@
Installer: Inform
the consumer of
the location of the
gas shut-off valve.
Adapter
.___ Gasshut-off
1/2" or 3/4" valve
Gaspipe
RIGID PIPE HOOKUP (for models equipped with Standard Twin Burners)
Pressure
regulator
Manifold -__
pipe
Installer: Inform
the consumer of
the location of the
gas shut-off valve.
_ _ 90 ° Elbow
Nipple Union 1[_'_ Black iron
_ Union
_ Nipple
J I¢il/_-- Gas shut-off
1/2" or 3/4"---_[]_ _ valve
Gaspipe
bd
pipe
35
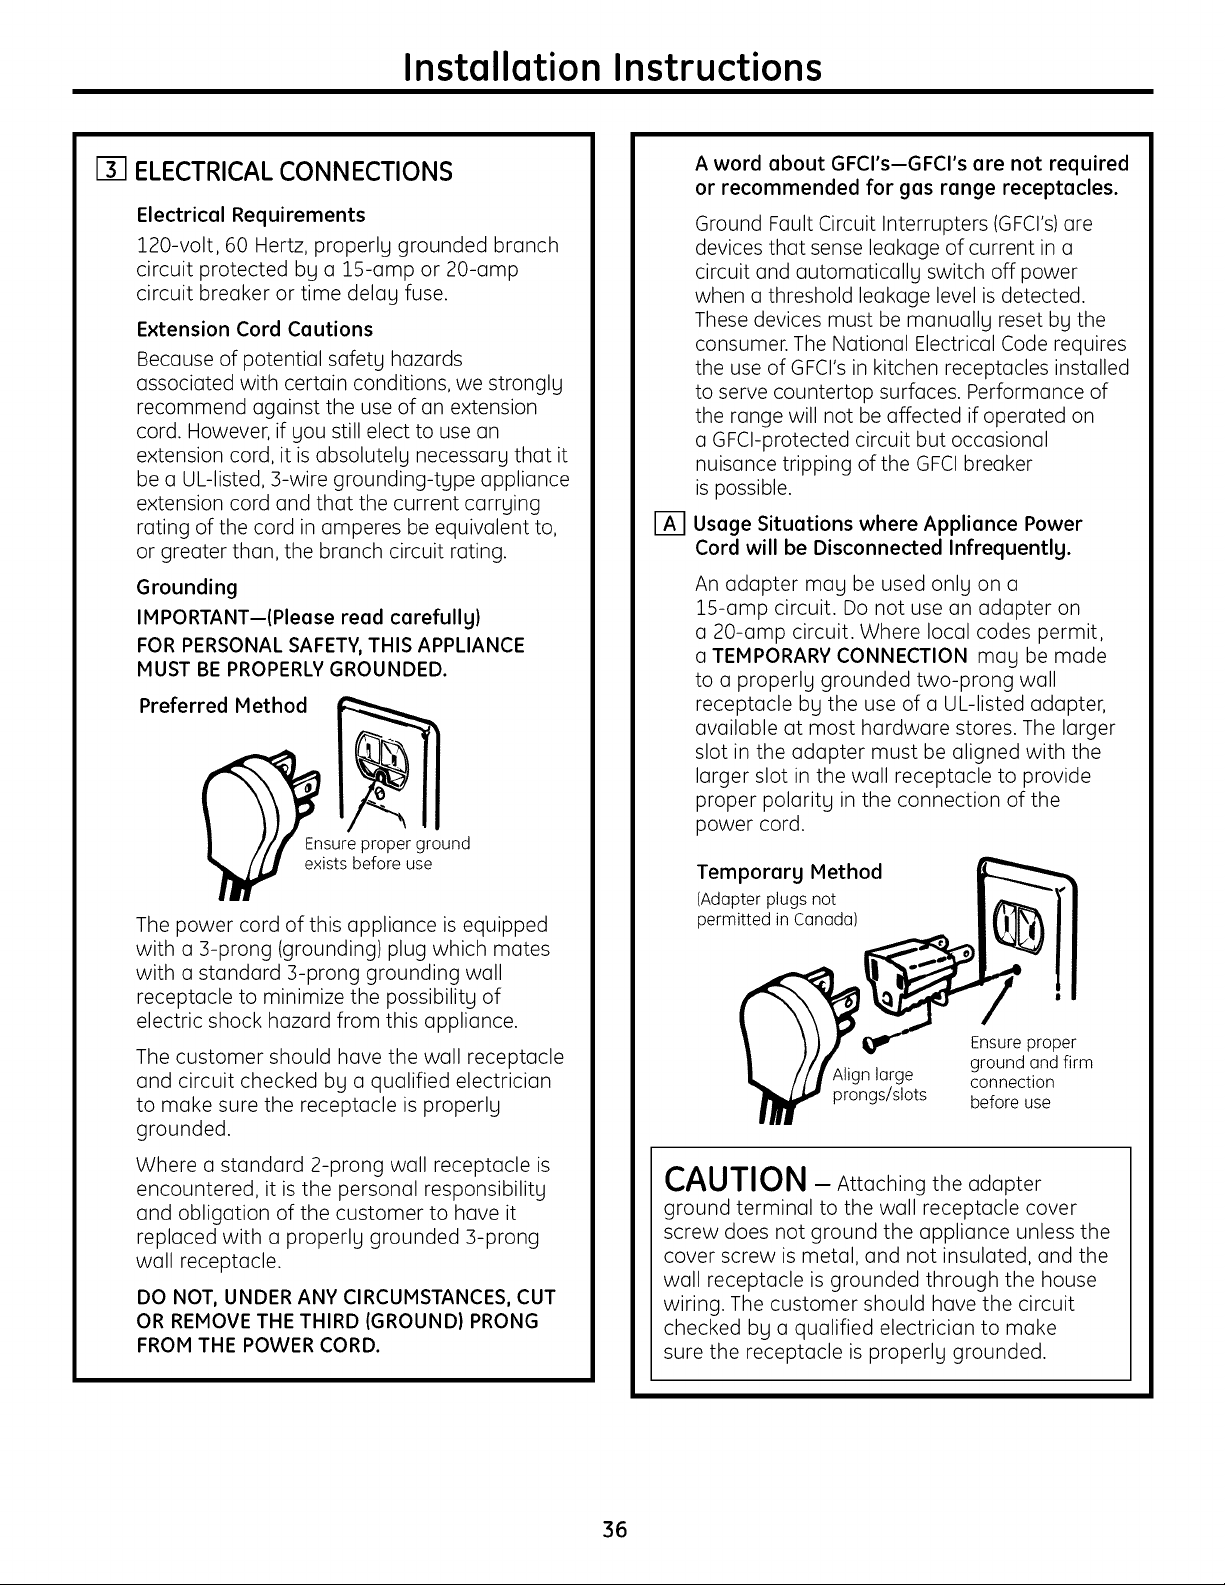
Installation Instructions
I-B-1ELECTRICAL CONN ECTIONS
Electrical Requirements
220-volt, 60 Hertz, properly grounded branch
circuit protected by a 15-amp or 20-amp
circuit breaker or time delay fuse.
Extension Cord Cautions
Because of potential safety hazards
associated with certain conditions, we strongly
recommend against the use of an extension
cord. However, if you still elect to use an
extension cord, it isabsolutely necessary that it
be a UL-listed, 3-wire grounding-type appliance
extension cord and that the current carrying
rating of the cord in amperes be equivalent to,
or greater than, the branch circuit rating.
Grounding
IMPORTANT--(Please read carefullg)
FOR PERSONAL SAFETY,THIS APPLIANCE
MUST BE PROPERLY GROUNDED.
Preferred Method
_nsure proper ground
exists before use
The power cord of this appliance is equipped
with a 3-prong (grounding) plug which mates
with a standard 3-prong grounding wall
receptacle to minimize the possibility of
electric shock hazard from this appliance.
The customer should have the wall receptacle
and circuit checked by a qualified electrician
to make sure the receptacle is properly
grounded.
Where a standard 2-prong wall receptacle is
encountered, it isthe personal responsibility
and obligation of the customer to have it
replaced with a properly grounded 3-prong
wall receptacle.
DO NOT, UNDER ANY CIRCUMSTANCES, CUT
OR REMOVE THE THIRD (GROUND) PRONG
FROM THE POWER CORD.
A word about GFCI's--GFCI's are not required
or recommended for gas range receptacles.
Ground Fault Circuit Interrupters (GFCrs)are
devices that sense leakage of current in a
circuit and automatically switch off power
when a threshold leakage level isdetected.
These devices must be manually reset by the
consumer. The National Electrical Code requires
the use of GFCrs in kitchen receptacles installed
to serve countertop surfaces. Performance of
the range will not be affected if operated on
a GFCI-protected circuit but occasional
nuisance tripping of the GFCIbreaker
is possible.
I-_ Usage Situations where Appliance Power
Cord will be Disconnected Infrequentlg.
An adapter may be used only on a
15-amp circuit. Do not use an adapter on
a 20-amp circuit. Where local codes permit,
a TEMPORARY CONNECTION may be made
to a properly grounded two-prong wall
receptacle by the use of a UL-listed adapter,
available at most hardware stores. The larger
slot in the adapter must be aligned with the
larger slot in the wall receptacle to provide
proper polarity inthe connection of the
power cord.
Temporarg Method
(Adapter plugs not
permitted in Canada)
Ensure proper
ground and firm
Align large connection
prongs/slots before use
CAUTION - Attaching the adapter
ground terminal to the wall receptacle cover
screw does not ground the appliance unless the
cover screw is metal, and not insulated, and the
wall receptacle isgrounded through the house
wiring. The customer should have the circuit
checked by a qualified electrician to make
sure the receptacle is properly grounded.
36
Instollotion Instructions
I-[I ELECTRICAL CONNECTIONS (cont.)
When disconnecting the power cord from the
adapter, always hold the adapter with one
hand. If this isnot done, the adapter ground
terminal isvery likely to break with repeated
use. Should this happen, DO NOT USE the
appliance until a proper ground has again
been established.
I-_ Usage Situations where Appliance Power
Cord will be Disconnected Frequentlg.
Do not use an adapter plug in these situations
because disconnecting of the power cord
places undue strain on the adapter and leads
to eventual failure of the adapter ground
terminal. The customer should have the
2-prong wall receptacle replaced with a
three-prong (grounding) receptacle by a
qualified electrician before using the
appliance.
The installation of appliances designed for
mobile home installation must conform with
the Manufactured Home Construction and
Safety Standard, Title 24 CFR, Part 3280
(formerly the Federal Standard for Mobile
Home Construction and Safety, Title 2/4, HUD,
Part 280) or,when such standard is not
applicable, the Standard for Manufactured
Home Installations, latest edition
(Manufactured Home Sites, Communities and
Set-Ups), ANSI A225.1, latest edition, or with
local codes. In Canada, mobile home
installation must be in accordance with the
current CAN/CSA Z240/IVlH Mobile Home
Installation Code.
Electric Disconnect
• Locate disconnect plug on the range back.
• Pinch sides of connector and pull out of
range back.
[] SEALTHE OPENINGS
Seal any openings in the wall behind the
range and in the floor under the range when
hookups are completed.
[] LIGHT THE PILOTS
(For models equipped with standing pilots.
If the range is an electric ignition model, the
burners are ignited by electric ignition which
eliminates the need for standing pilot lights.)
The range should be installed in its permanent
position before any pilots are lit or adjusted.
CAUTION - Makesurethesurfaceburner
control knobs are in the OFF position before
attempting to light the pilots.
E_] Light the Surface Burner Pilots
1. Raise the cooktop.
2. Light both pilots with a match.
3. To avoid pilot outage, use caution when
closing cooktop after lighting pilots.
NOTE: Do not leove stonding pilot lit in
u newly constructed or remodeled home or
apartment that will be unoccupied for more
than a month.
Each pilot flame was adjusted at the factory
to be approximately 5/16" tall. A tinge of yellow
appearing at the upper tip is normal. If you
find pilot adjustment is necessary, follow
instructions in Step B.
37
Installation Instructions
13-1LIGHT THE PILOTSIcont.}
[] Adjust the Surface Burner Pilots if Necessary
CAUTION - Makesurethesurfaceburner
control knobs ore in the OFF position before
attempting to adjust the pilots.
1. Raise the cooktop.
2.
,
Locate the pilot adjustment screw. It can
be accessed through the small hole near
the center of the manifold panel.
To adjust, use a blade-tLlpe screwdriver
with a shaft diameter of less than or equal
to 3/16". Turn pilot adjustment screw until
pilot flame is 5/16" high. Do not reduce the
flame to less than 5/16" or pilot outage
mall occur. A pilot flame burning higher than
recommended mall generate soot (carbon
black) on the bottom of your cooktop.
F-_ Light the Oven Pilot
1. Ensure the top burners are lit before
attempting to light the oven pilot (turn them
off after you have lit the oven pilot).
2. Remove the oven door. See Lift-Off Oven
Door in the Care and cleaning of range
section.
3. Remove the oven shelves.
[] Light the Oven Pilot Icont.}
4. Remove the oven bottom. To remove:
• Remove knurled screws holding down
rear of oven bottom.
• Grasp oven bottom at finger slots on
each side.
• Lift rear of oven bottom enough to clear
the lip of range frame, then pull out.
Oven
bottom
5. Locate the pilot in the back of the oven
bottom. The pilot is attached to the left side
of the oven burner.
Shield
Consome
models)
Pilot
6. To light the oven pilot, push in and hold the
oven control knob while lighting the pilot
with a long match or match holder. Once
the oven pilot is lit, continue holding the
oven control knob for one minute before
releasing.
No adjustments are required for natural
gas. If the range is connected to LP gas,
contact the person who installed your
range or made the conversion. If pilot
flame does not stall lit, repeat this step.
38
Installation Instructions
[] LIGHT THE PILOTS Icont.)
[] Check Ignition of Oven Burner
Theoven isdesigned to operate quietly and
automatically. Tooperate the oven, turn the
OVENCONTROL knob to a setting above 260°F.
After 30-90 seconds, the oven burner will ignite
and burn until the set temperature isreached.
Theoven burner will continue to cycle on and
off as necessary to maintain the oven at the
temperature indicated by the OVENCONTROL
knob.
Electric ignition models require electrical power
to operate. Incase of a power outage, the oven
burners on these models cannot be lit manually
with a match. Gaswill not flow unless the glow
bar is hot.
If the oven isin use when a power outage occurs,
the burner will shut off and cannot be re-lit until
power isrestored.
I-_ Adjust Broil Burner Air Adjustment
Shutter on Models with a Broiler Drawer,
if Necessarg
Determine ifthe bottom burner flames are
burning properly.
With the oven bottom removed, properly
adjusted flames should have approximately
1" blue cones and, if range is supplied with
natural gas, should burn with no yellow
tipping. (With most LP gas, small yellow
tips at the end of outer cones are normal.)
Flames should not lift off burner ports. If lifting
is observed, gradually reduce air shutter
opening until flames are stabilized.
The shutter for the oven burner is near the
back wall of the oven and behind the broiler
drawer.
[]
Adjust Broil Burner Air Adjustment
Shutter on Models with a Broiler Drawer,
if Necessarg (cont.)
To Remove the Broiler Drawer:
1. Pull the drawer out until it stops, then push
it back in about one inch.
2. Grasp handle, lift and pull broiler
drawer out.
Loosen
adjustment
Metal shield
(onsome models)
On some models, remove the metal shield at
the rear of the cavity.
To adjust the flow of air to the burner, loosen
the Phillips-head screw and rotate the shutter
to allow more or less air into the burner tube.
39
Installation Instructions
[] LIGHT THE PILOTS (cont.)
[] Check Ignition of Surface Burners
Operation of all cooktop and oven burners should
be checked after pilots have been lighted (on
some models) and the range and gas supply
lines have been carefully checked for leaks.
Standing Pilot Models
Select a top burner knob and simultaneously
push in and turn to HI position. The burner should
light within a few seconds. Try each burner in
succession until all burners have been checked.
Electric Ignition Models
Select a top burner knob and simultaneously push
in and turn to LITE position. You will hear a clicking
sound indicating proper operation of the spark
module. Oncethe air has been purged from the
supply lines, burners should light within 4 seconds.
After burner lights, rotate knob out of the LITE
position. Try each burner in succession until all
burners have been checked.
Quality of Flames
Thecombustion quality of burner flames needs
to be determined visually.
(A) Yellow flames--
Call for service
(B) Yellow tips on
outer cones--
Normal for LP gas
(C)Soft blue
flumes--Normal for
natural gas
If burner flames look like (A), call for service.
Normal burner flames should look like (B)or (C),
depending on the tgpe of gas gou use.
With LPgas, some yellow tipping on outer cones
is normal.
_-I Replace Oven Parts
After all adjustments are made, replace
the broiler drawer, oven bottom, shelves and
oven door.
4O
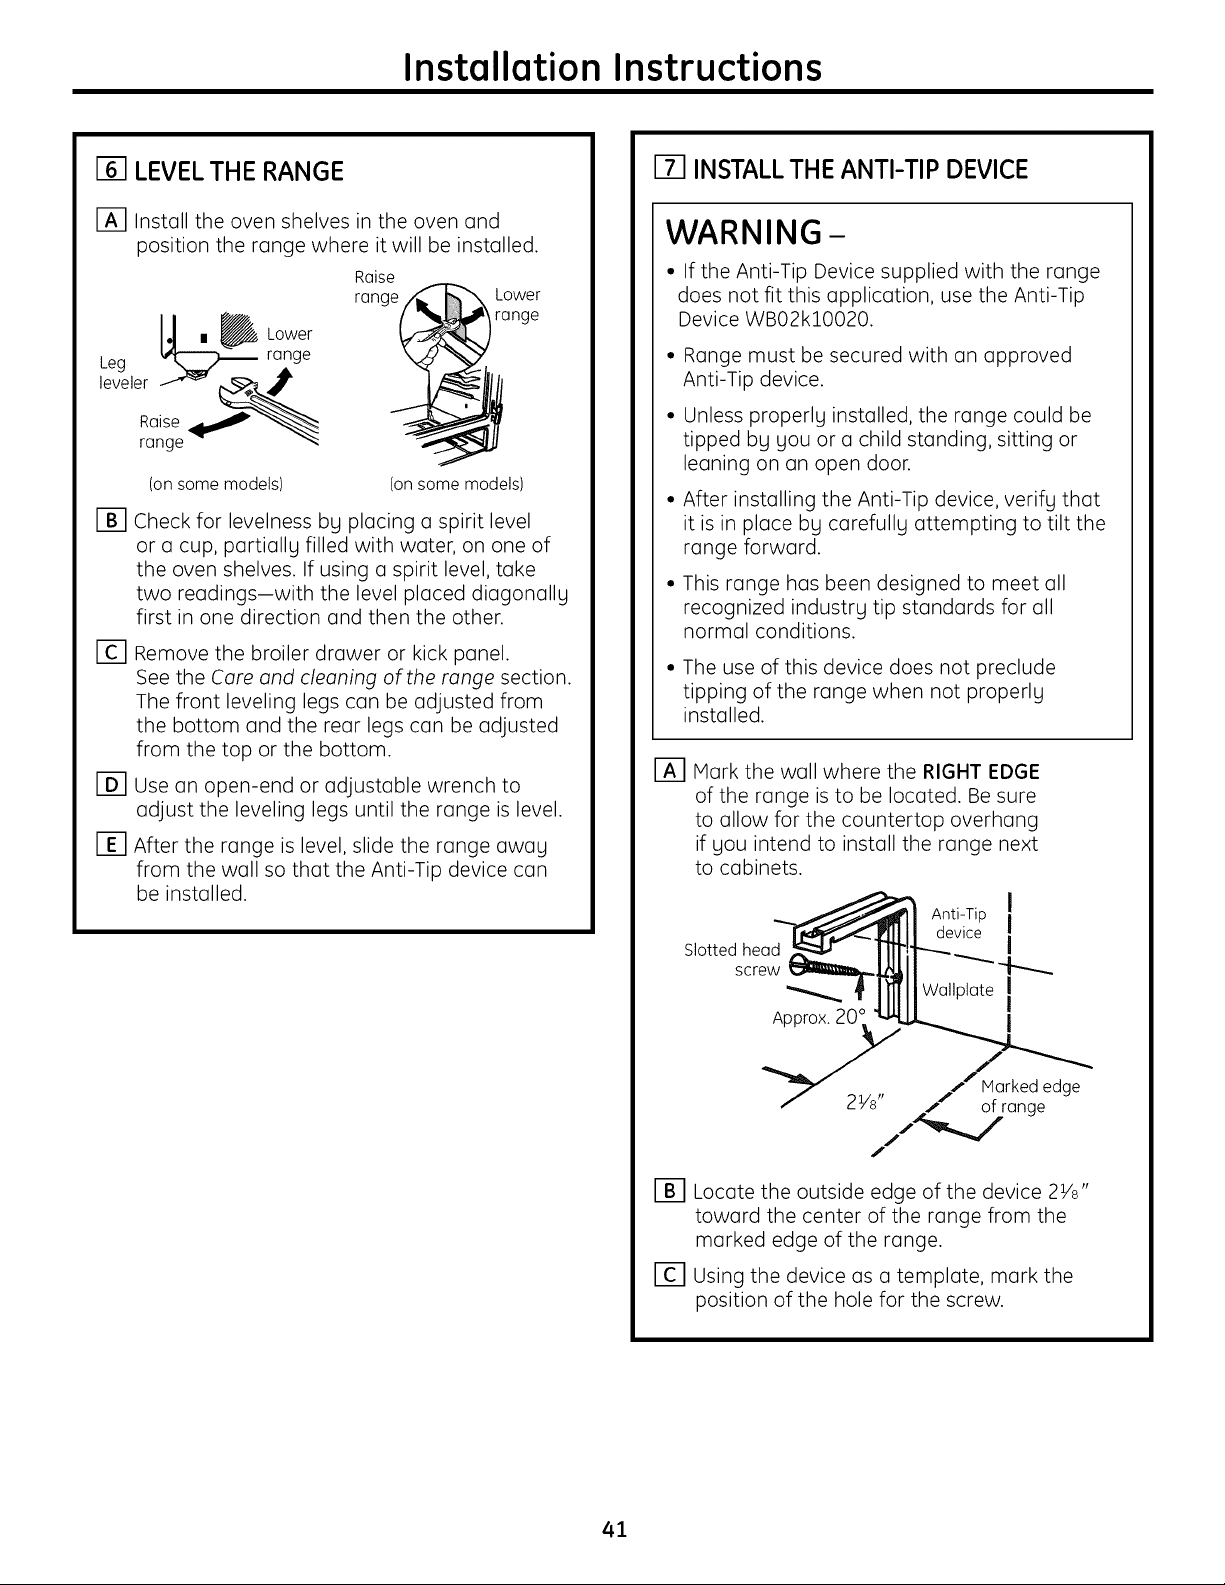
Installation Instructions
[] LEVELTHE RANGE
rA] Install the oven shelves in the oven and
position the range where it will be installed.
J m_ Lower
Leg _ range
IevellrRoo__
Raise
range Lower
range
(onsome models) (on some models)
FB] Check for levelness bg placing a spirit level
or a cup, partiallg filled with water, on one of
the oven shelves. If using a spirit level, take
two readings-with the level placed diagonallg
first in one direction and then the other.
r-_ Remove the broiler drawer or kick panel.
See the Care and cleaning of the range section.
The front leveling legs can be adjusted from
the bottom and the rear legs can be adjusted
from the top or the bottom.
r-_ use an open-end or adjustable wrench to
adjust the leveling legs until the range is level.
r_ After the range is level, slide the range awag
from the wall so that the Anti-Tip device can
be installed.
[] INSTALL THE ANTI-TIP DEVICE
WARNING -
• If the Anti-Tip Device supplied with the range
does not fit this application, use the Anti-Tip
Device WB02kl0020.
Range must be secured with an approved
Anti-Tip device.
Unless properlg installed, the range could be
tipped bg gou or a child standing, sitting or
leaning on an open door.
After installing the Anti-Tip device, verifg that
it is in place bg carefullg attempting to tilt the
range forward.
This range has been designed to meet all
recognized industrg tip standards for all
normal conditions.
• The use of this device does not preclude
tipping of the range when not properlg
installed.
[] Mark the wall where the RIGHT EDGE
of the range is to be located. Be sure
to allow for the countertop overhang
if gou intend to install the range next
to cabinets.
Slotted head
screw
Approx. 20'
Anti-Tip I
device I
I
WallplateI
!
edge
of range
J
E_] Locate the outside edge of the device 2V8"
toward the center of the range from the
marked edge of the range.
r-_ using the device as a template, mark the
position of the hole for the screw.
41
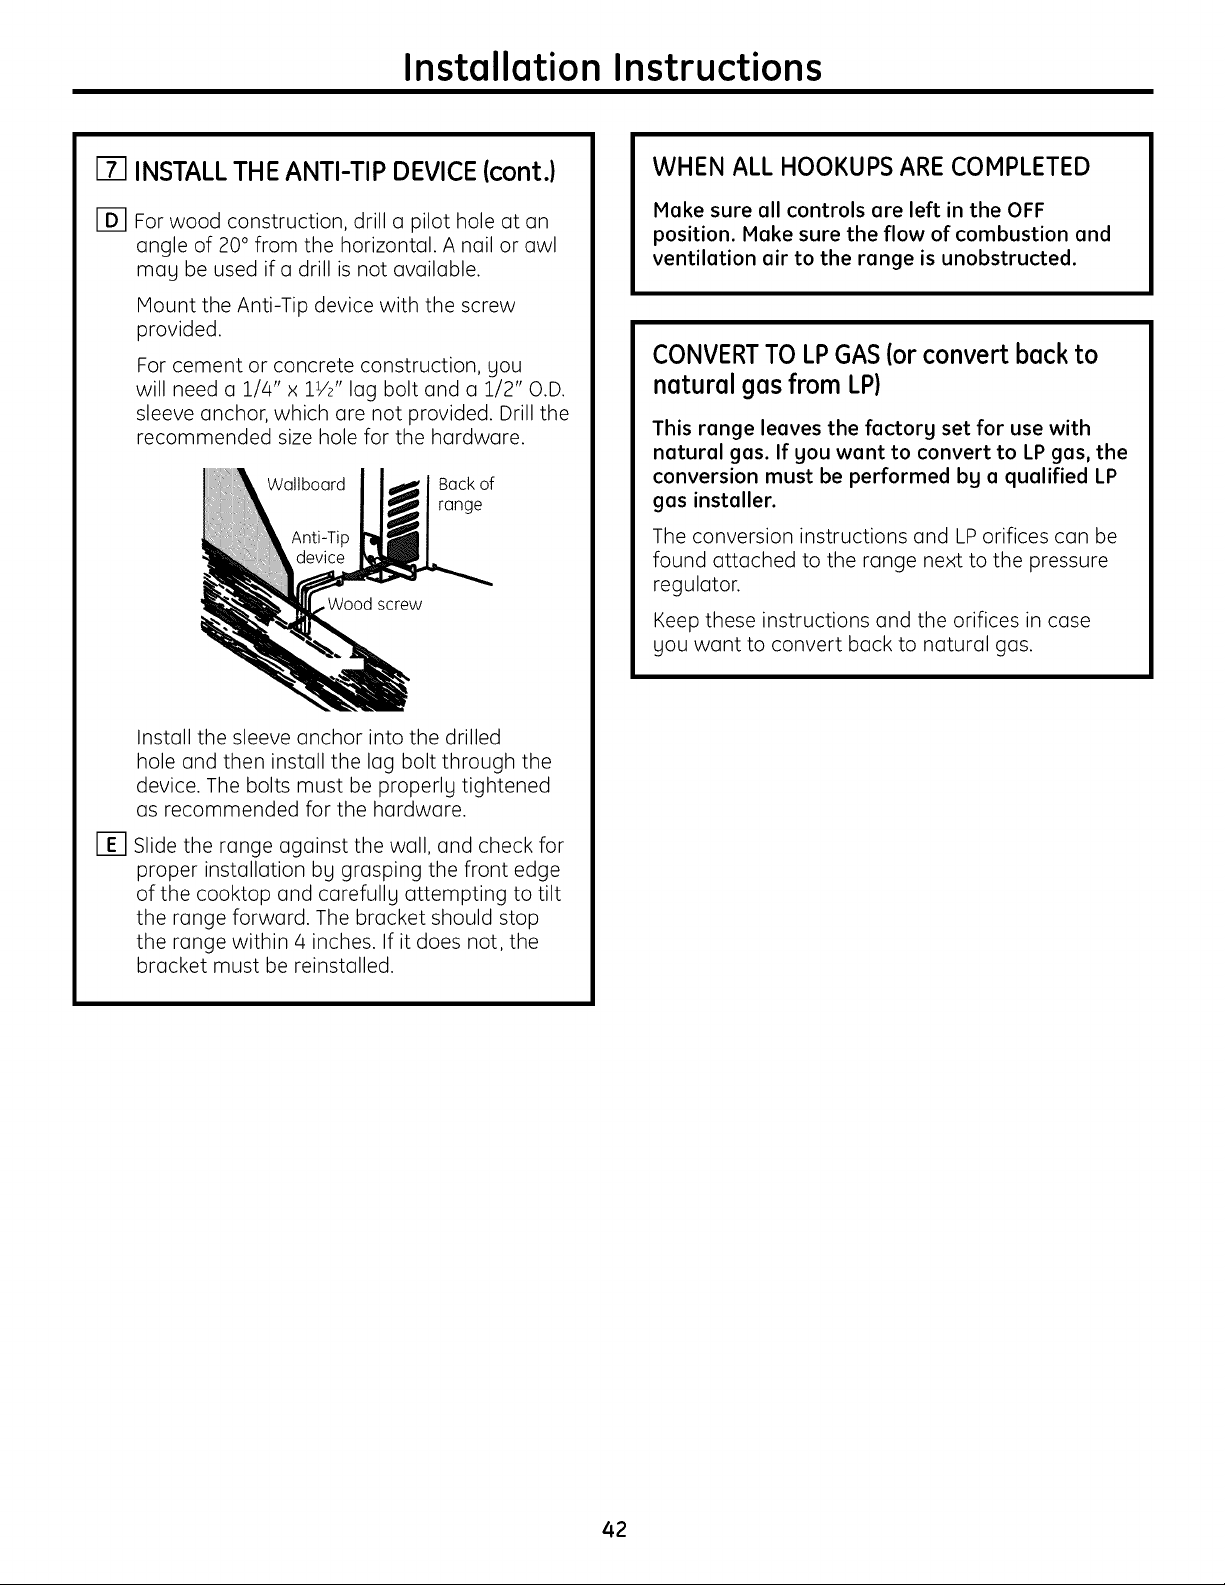
Installation Instructions
I-T1INSTALL THE ANTI-TIP DEVICE (cont.)
[] For wood construction, drill a pilot hole at an
angle of 20° from the horizontal. A nail or awl
may be used if a drill is not available.
Mount the Anti-Tip device with the screw
provided.
For cement or concrete construction, you
will need a 1/4" x 1V2" lag bolt and a 1/2" O.D.
sleeve anchor, which are not provided. Drill the
recommended size hole for the hardware.
Wallboard Backof
range
screw
Install the sleeve anchor into the drilled
hole and then install the lag bolt through the
device. The bolts must be properly tightened
as recommended for the hardware.
i-_ Slide the range against the wall, and check for
proper installation by grasping the front edge
of the cooktop and carefully attempting to tilt
the range forward. The bracket should stop
the range within/4 inches. If it does not, the
bracket must be reinstalled.
WHEN ALL HOOKUPS ARE COMPLETED
Hake sure all controls are left in the OFF
position. Make sure the flow of combustion and
ventilation air to the range is unobstructed.
CONVERTTO LPGAS(orconvert back to
natural gasfrom LP)
This range leaves the factory set for use with
natural gas. If you want to convert to LP gas, the
conversion must be performed by a qualified LP
gas installer.
The conversion instructions and LP orifices can be
found attached to the range next to the pressure
regulator.
Keep these instructions and the orifices in case
you want to convert back to natural gas.
42
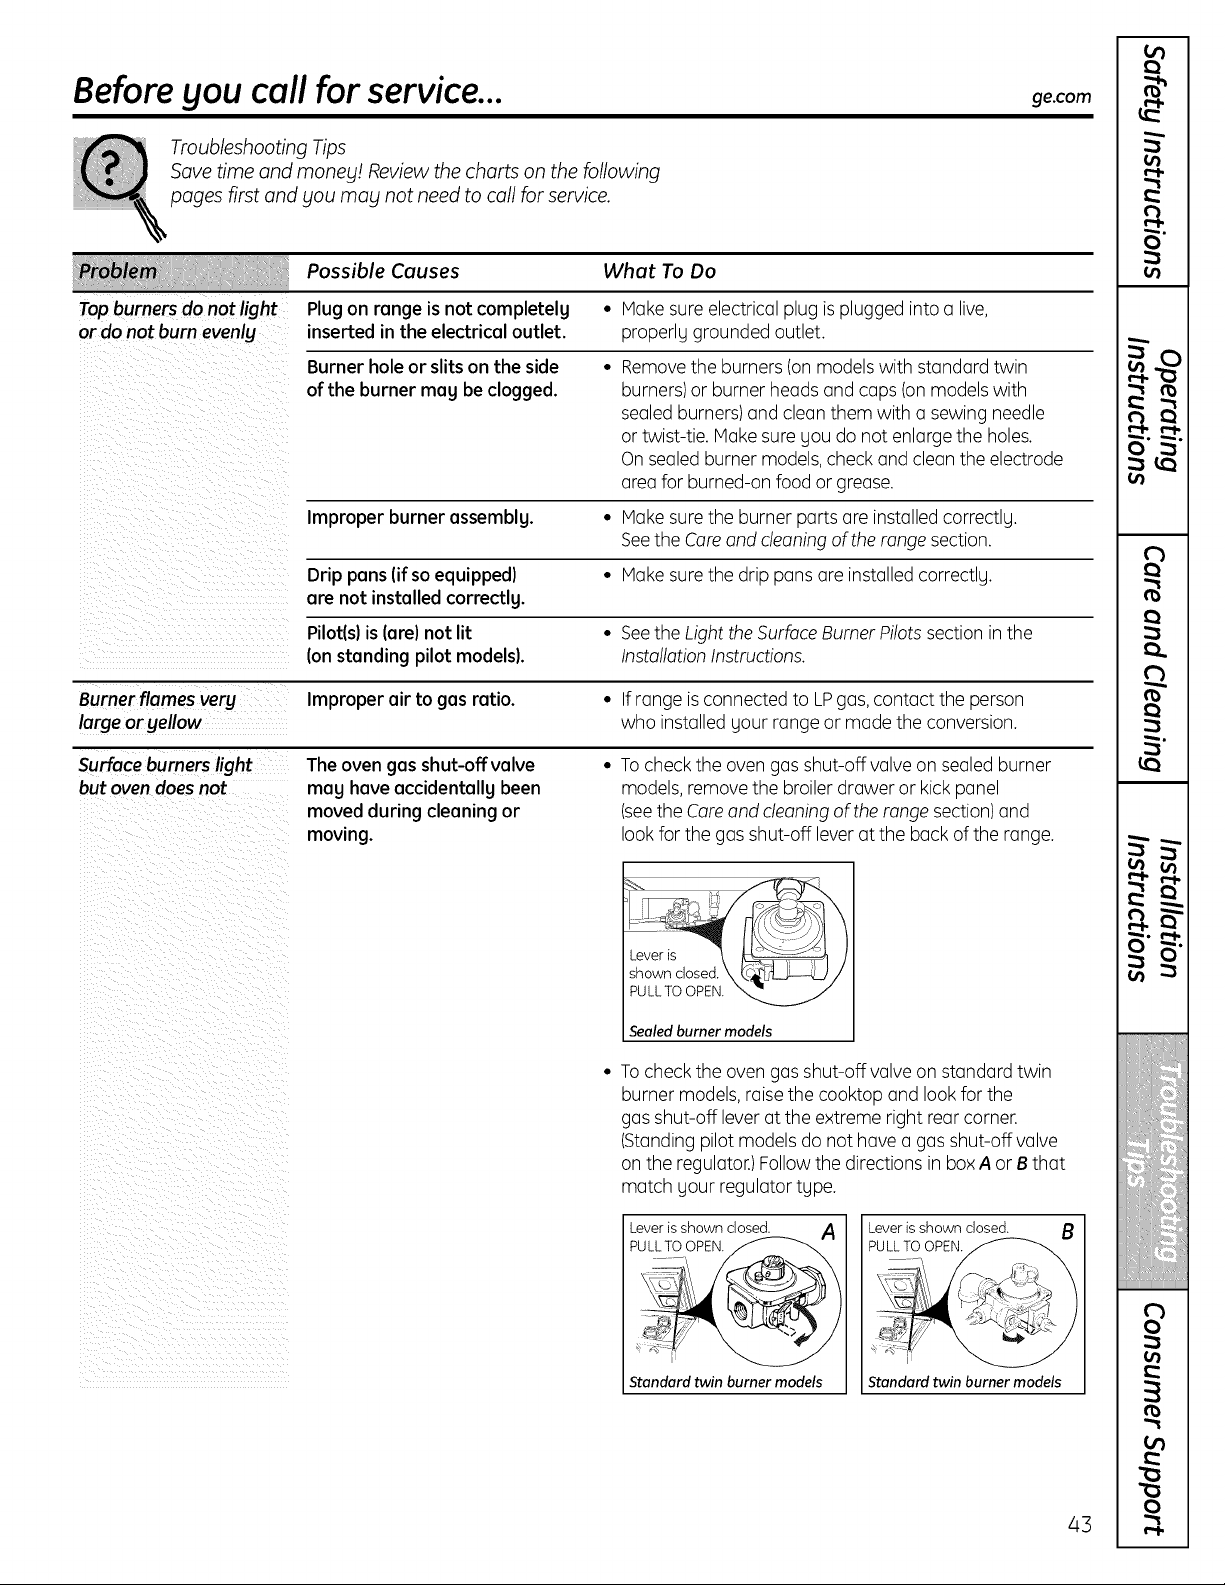
Before you call for service...
Troubleshooting Tips
Savetime and money! Reviewthe charts on the following
pages first and you may not need to call forservice.
What To Do
Top burners do not light • Hake sureelectrical plug is plugged intoa live,
or do not burn evenl§' properly grounded outlet.
ge.com
• Removetheburners(on models with standard twin
burners) or burner headsand caps (on models with
sealed burners) and clean them with a sewing needle
or twist-tie. Hake sureyoudo notenlarge the holes.
On sealed burner models, check and clean theelectrode
area forburned-on foodor grease.
Possible Causes
Plug on rangeisnot completelg
inserted in the electricaloutlet.
Burner hole or slitson the side
of the burner meg be clogged.
Improper burner assemblg. • Make sure the burner parts are installed correctly.
Seethe Careand cleaning oftherange section.
Drip puns(ifsoequipped} • Hake sure the drip pansare installed correctly.
arenot installed correctly.
Pilotis) islure} not lit • Seethe Lightthe SurfaceBurner Pilots sectionin the
Ionstanding pilot models). Installation Instructions.
Burner flames very Improper air to gas ratio. • Ifrange is connected to LPgas, contact theperson
large oryellow who installed your range or madethe conversion.
Surface burners light The oven gasshut-off valve • To check the oven gasshut-off valve on sealed burner
but ovendoesnot mag have accidentallg been models, remove the broiler drawer or kick panel
moved during cleaningor (seetheCoreand cleaning oftherange section) and
moving, lookforthegasshut-off lever atthe back oftherange.
i _-d,J
L
shown closed. \ _]_.. lt_J----d_) /
PULLTO OPEN. _
Sealed burner models
• To check the oven gasshut-off valve on standard twin
burner models, raise the cooktopand lookforthe
gasshut-off leverattheextreme rightrear corner.
(Standing pilotmodels do nothavea gasshut-off valve
on the regulator.)Follow thedirectionsin box A or B that
match your regulatortype.
Lever isshown closed. A
PULL_TOOPEN_ '
/
Standard twin burner models Standard twin burner models
43
m
,}
t
b
I-
|
|
I-
!
|
i-
m,
|
i
|
0
t
I
t
|
L
t
|
mo
|
I
iiiii_i,i,iiiiii_i_i;iii
iii_ii_ilIii_i
|
|
)
I
)
I
.}
|
|
|
v
C
4
v
C_
,l.,a
Q,
m
E
0
iliiiiHll! iii
¢
C
C
L
E
Before you call for service...
Troubleshooting Tips
Possible Causes What To Do
Clock doesnot work Plugon range isnot completelg • Hake sureelectrical plug is plugged intoa live,
inserted in the electrical outlet, properly grounded outlet.
A fuse in your home may be • Replacethefuse or reset the circuitbreaker.
blown or thecircuit breaker
tripped.
Ovencontrols improperly set. • Seethe Usingtheclock and timer section.
Food doesnot bake Ovencontrols improperly set. • Seethe Using the ovensection.
or roast properly Shelfposition is incorrect. • Seethe Using the ovensection.
Incorrect cookware or cookware • See the Usingthe ovensection.
of improper size being used.
Oventhermostat needs • SeetheAdjusttheoven thermostat Do ityourself! section.
adjustment.
Clocknot set correctly. • See the Usingthe clock and timer section.
Aluminum foil usedimproperly • SeetheCare and cleaning oftherange section.
in the oven.
Ovenbottom not securely • See theInstallation oftherange section.
seatedin position.
Food doesnot Ovencontrols improperly set. • See the Usingthe ovensection.
broil properly Ovendoor and/or broiler drawer • SeetheBroiling section.
not closed.
Improper shelfposition • See theBroiling guide.
being used.
Foodbeing cooked in a hot pan. • Forbest results,use a pan designed forbroiling.
Makesureitis cool.
Cookware not suited for broiling. • Forbest results,use a pan designed forbroiling.
Ovenbottom not securely • See theInstallation oftherange section.
seatedin position.
Oven temperature Oventhermostat • See theAdjust theoven thermostat Do ityourself! section.
too hot or too cold needsadjustment.
Oven light doesnot work Light bulb isloose or defective. • Tighten or replace the bulb.
Plugon range isnot completelg • Hake sureelectricalplug isplugged intoa live,properly
inserted in the electrical outlet, grounded outlet.
Oven not heating up Pilot is not lit(on standing • See theLighttheOvenPilot sectionin theInstallation
pilot models). Instructions.
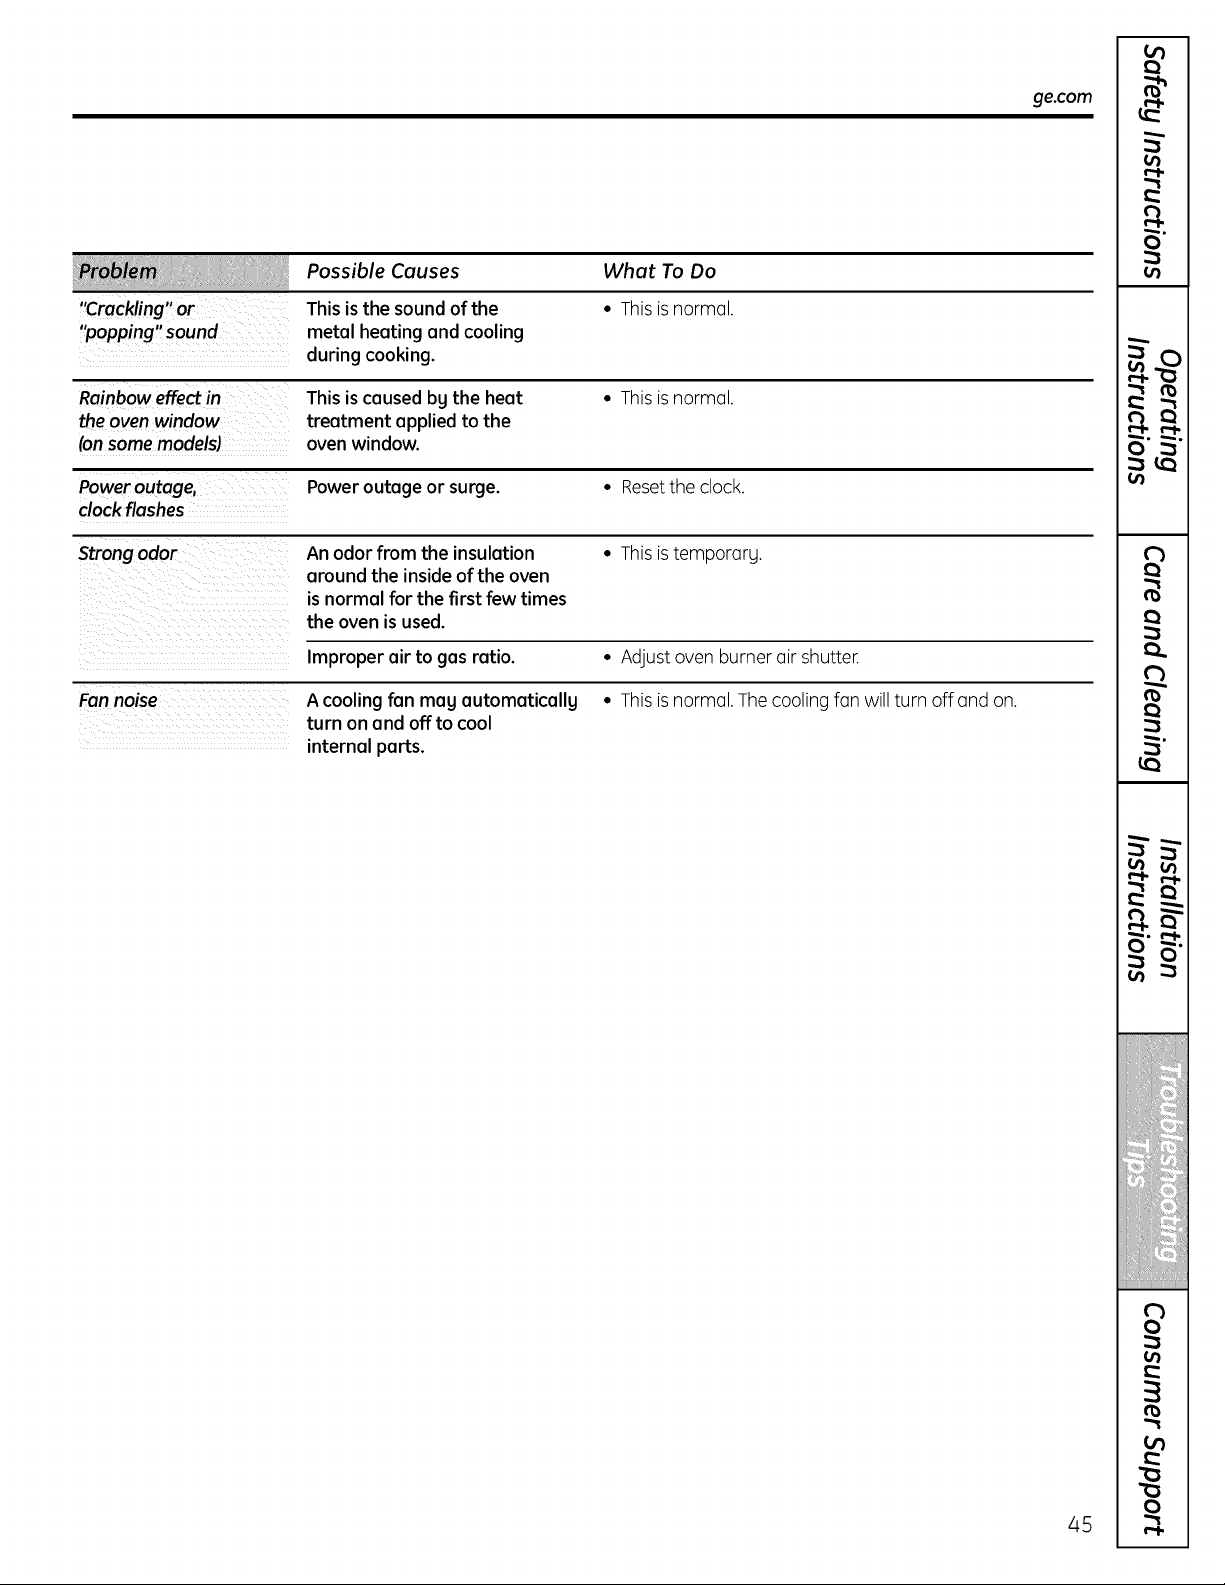
"Crackling" or
"popping" sound
Possible Causes
Thisis thesoundofthe
metal heatingand cooling
duringcooking.
What To Do
• This is normal.
Rainbow effect in Thisiscausedb9 the heat • Thisisnormal.
the oven window treatment applied to the
(onsome modelsJ oven window.
Poweroutage, Poweroutage or surge. • Resettheclock.
clockflashes
Strongodor An odor from the insulation • Thisis temporary.
around the inside ofthe oven
isnormal for the first few times
the oven is used.
Improper air to gas ratio. • Adjust ovenburner oir shutter.
Fan noise A cooling fan magautomaticallg • Thisis normol. The coolingfon will turn off ond on.
turn on and offto cool
internal parts.
ge.com
45
m
.)
t
b
I-
|
|
I-
|
I-
m,
)
i
|
0
_3
a
t
|
t
|
L
t
|
|
I
ZIIIIIII:I_Z
iii ii ilIii i
|
|
I
I
)
|
|
|
|
r_
m
n
v
w
vJ I_
. L
t_
0
_3
0
L.
Notes.
46
GE Service Protection Plus'"
GE,a name recognized worldwide for quality and dependability, offers you
Service Protection PlusT"--comprehensive protection on all your appliances-
No Matter What Brand!
Benefits Include:
• Backed bg GE
• All brands covered
• Unlimited service calls
• All parts and labor costs included
• No out-of-pocket expenses
• No hidden deductibles
• One 800 number to call
We'll Cover Ang
Appliance. Angwhere.
Angtime.*
You will be completely satisfied with our service protection or you may request your money back
on the remaining value of your contract. No questions asked.It's that simple.
Protect your refrigerator, dishwasher, washer and dryer, range,TV, VCRand much more-any brand!
Plus there's no extra charge for emergency service and low monthly financing is available. Evenicemaker
coverage and food spoilage protection isoffered. You can rest easy, knowing that all your valuable household
)roducts are protected against expensive repairs.
Placeyour confidence in GE and call usin the U.S.toll-free at 800.626.2224
for more information.
*All brands covered, up to 20 years old, in the continental U.S.
........... _,,,_ Cut here
Please place in envelope and mail to:
General Electric Compang
Warrantg Registration Department
RO. Box32150
Louisville, KY40232-2150
47
Consumer Product Ownership Registration
Dear Customer:
Thank you for purchasing our product and thank you for placing your confidence in us.
We are proud to have you as a customer!
Follow these three steps to protect your new appliance investment:
Complete and mail
your Consumer
Product Ownership
Registration today.
Have the peace of
mind ofknowing we
can contact you in
the unlikely event of a
safety modification.
After mailing the
registration below,
store this document
in a safe place. Itcontains
information you will need
should you require
service. Our service
number is800.GECARES
(800.432.2737).
Read your Owner's
Manual carefully.
Itwill help you
operate your new
appliance properly.
Model Number
,,,,, ,,,,,11,
Serial Number
I I I I I I
Important: If you did not get a registration card with your
product, detach and return the form below to
ensure that your product is registered, or register
online at ge.com.
___,,___ Cut here
Consumer Product Ownership Registration
Model Number
,,,,, ,,,,,II,
Serial Number
I I I I I I
Mr.] Ms.} Mrs. Miss]
First j
Name I I I I I I
I I I LastName I I I
I I I I I I I
Street I
Address I I I
I I I I I I I I I I I
Apt. # I I I I
E-mail Address*
City l I I
Date Placed
laUse I I
Month I
I I I I I I
oayl, I Yearl, I
,, I statek, I zipCode l I I I
Phone
Numberl I, I-I,, I-I , ,
GEConsumer & Industrial
Appliances
General Electric Company
Louisville, KY/40225
ge.com
* Please provide your e-mail address to receive, via e-mail, discounts, special offers and other
important communications from GE Appliances (GEA).
Check here if you do not want to receive communications from GEA's carefullg selected
partners.
FAILURETO COMPLETE AND RETURN THIS CARD DOES NOT DIMINISH YOUR WARRANTY RIGHTS.
For information about GEA's privacy and data usage policy, go to ge.com and click on
"Privacy Policy" or call 800.626.2224.
48
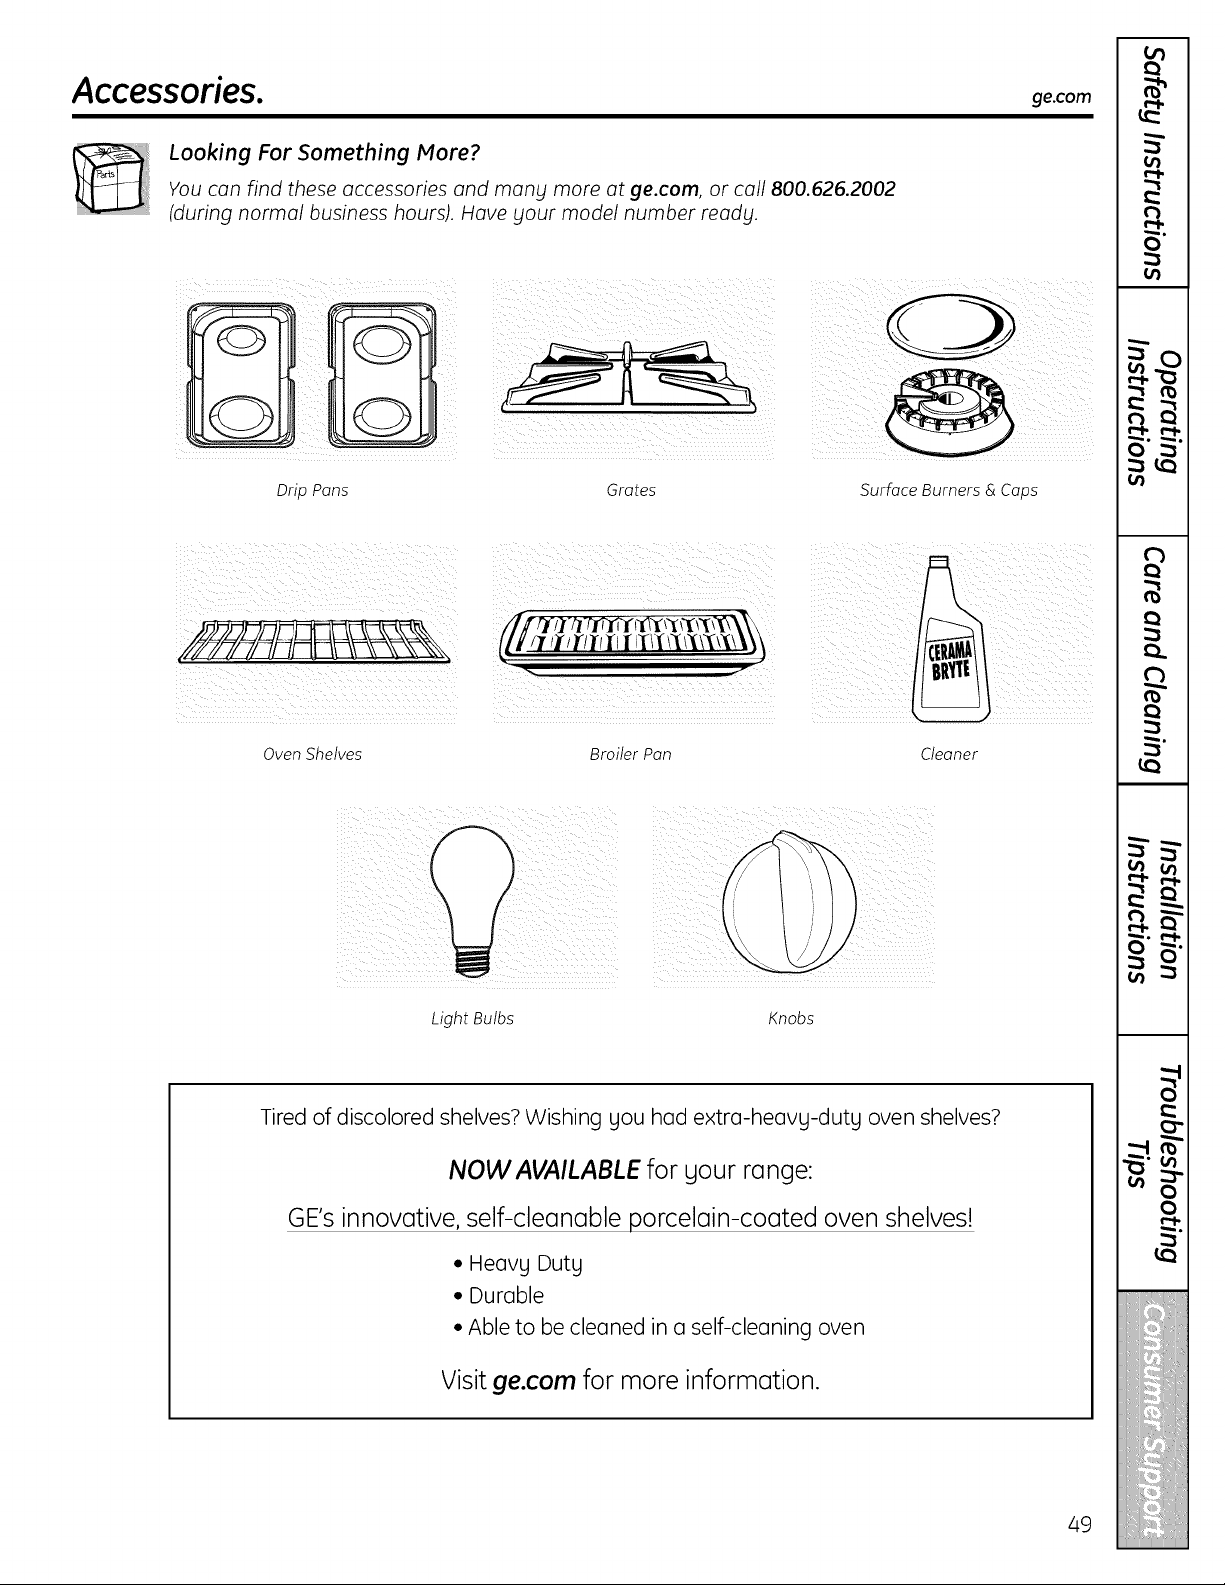
Drip Pans
Grates
Surface Burners & Caps
Oven Shelves Broiler Pan Cleaner
i _ i ¸ ! 0 ¸¸
Light Bulbs Knobs
Tired of discolored shelves? Wishing you had extra-heavy-duty oven shelves?
NOW AVAILABLE for your range:
GE's innovative, self-cleanable porcelain-coated oven shelves!
• Heavy Duty
• Durable
• Able to be cleaned in a self-cleaning oven
Visit ge.com for more information.
49
GE Gas Range Warrantg.iForcustomerstheunitedstores)
All warranty service provided by our Factory Service Centers,
or on authorized Customer Core ®technician. To schedule
service, on-line, visit us at go.cam, or call 800.GE.CARES
(800.432.2737). Pleasehave serial number and model number
available when calling for service.
Staple Four receipt here.
Proofof the original purchase
date isneeded to obtain service
under the warrant F.
OneYear
Fromthe dote ofthe
origina! purchase
GE Will Replace:
Ang part of the range which foils due to o defectin materialsor workmanship. During this
limited one-gear warrantg, GEwillalsoprovide, freeofcharge, oil lobar and in-home service
to replace thedefective port.
Service trips to gour hometo teach gou howto use
the product.
Improper installation, deliverg or maintenance.
Failureofthe product if itisabused, misused,
or used for other than the intended purpose or
used commerciallg.
Replacement of housefusesor resetting of circuit
breakers.
Damage to the product caused bg accident, fire, floods
or actsof God.
Incidental or consequential damage caused bg possible
defects with this appliance.
Damage caused after deliverg.
Product notaccessible to provide required service.
EXCLUSION OF IMPLIED WARRANTIES--Your sole and exclusive remedy is product repair as
provided in this Limited Warranty. Any implied warranties, including the implied warranties of
merchantability or fitness for a particular purpose, are limited to one gear or the shortest period
allowed by law.
This warrantg is extended to the original purchaser and ang succeeding owner for products purchased
for home use within the USA. If the product islocated in on area where service bg a GE Authorized Servicer
is not available, gou mag be responsible for a trip charge or gou mag be required to bring the product to on
Authorized GE Service Location for service. InAlaska, the warrantg excludes the cost of shipping or service
calls to _lour home.
Some states do not allow the exclusion or limitation of incidental or consequential damages. This warrantg
gives gou specific legal rights, and gou mag also hove other rights which varg from state to state. Toknow
what Four legal rights ore, consult Four local or state consumer affairs office or Four state's Attorneg General.
Warrantor: General Electric Compang. Louisville, KY 40225
50
Service trips to gour home to teach gou how to use
the product.
installation,deliverg or maintenance.
Failureof the product ifit isabused, misused,
or usedfor other than the intended purpose or
usedcommerciallg.
Replacement of housefusesor resetting ofcircuit
breakers.
Damage to the product caused bg accident, fire, floods
or acts of God.
Incidental or consequential damage caused bg possible
defects with th is a pplia nce.
Damage caused afterdeliverg.
Product not accessibleto provide required service.
EXCLUSION OF IMPLIED WARRANTIES--Your sole and exclusive remedy is product repair as
provided in this Limited Warranty. Any implied warranties, including the implied warranties of
merchantability or fitness for a particular purpose, are limited to one year or the shortest period
allowed by law.
I WARRANTOR ISNOT RESPONSIBLE FOR CONSEQUENTIAL DAMMAGES. I
J Warrantor: MABE CANADA INC. I
51

Consumer Support.
GEAppliances Website
Have a question or need assistance with gour appliance? TrgtheGEAppliances Website24 hoursa dag,
ang dag of the gear!For greaterconvenienceand fasterservice, gou cannowdownload Owner'sManuals,
order parts or even schedule serviceon-line.
ge.com
Schedule Service
ge.com
Expert GErepair serviceis onlg one step awag from gour door. Get on-line and schedule gour service at
gour convenienceang dog ofthe gear! Or call800.GE.CARES(800.432.2737)during normal business hours. In
Canada, call1.800.561.]]44.
Real Life Design Studio ge.com
GEsupportsthe Universal Designconcept-products, services and environments that canbe used bg
people ofall ages, sizesand capabilities.Werecognize the need todesignfora wide range of phgsical and
mental abilities and impairments. For details ofGE'sUniversal Designapplications, includingkitchendesignideas
forpeople with disabilities,checkout our Websitetodag. Forthe hearing impaired, please call800.TDD.GEAC
(800.833.4322).In Canada, contact:Hanager, ConsumerRelations,Habe CanadaInc., 1 FactorgLane,Suite 310,
Honcton, N.B.,EIC 9H3.
Extended Warranties
Purchasea GEextended warrantg and learn about special discounts that are availablewhilegour warrantg
is still in effect.You canpurchase iton-line angtime,or call800.626.2224during normalbusiness hours.
GEConsumerHome Serviceswillstill be thereafter gour warrantg expires. In Canada, call1.800.461.3636.
ge.com
Parts and Accessories
ge.com
Individuals qualifiedto service theirown appliances canhaveparts or accessoriessent directlg totheir homes
(VISA,HasterCard and Discovercards are accepted). Orderon-line todag, 24 hoursevergdag or bg phone at
800.626.2002during normal business hours.
Instructions contoined in this munuul coverprocedures tobe performed by uny user. Otherservicing
generully should be referred toquulified servicepersonnel. Cuution must be exercised,since improper
servicing mugcuuseunsofe operation. In Cunudu, pleuseconsult your yellow pogesfor your Iocul
Mubenumber.
Contact Us
ge.com
If gou are not satisfiedwith theservicegou receive from GE,contact us on our Websitewith all thedetails
includinggour phone number,or write to: General Hanager, Customer Relations,GEAppliances,Appliance Park,
Louisville,KY40225. InCanada, to: Hanager, ConsumerRelations,Habe CanadaInc.,1 FactorgLane,Suite 310,
Honcton, N.B.,EIC 9H3.
Register Your Appliance
Register gour newappliance on-line--at gour convenience! Timelg product registrationwillallowfor
enhancedcommunication and prompt service under thetermsof gour warrantg, shouldthe needarise.
Youmag also mail in the pre-printed registrationcard includedinthe packing material,or detach and use
theform in theOwner's Hanual.
ge.com
Printed in Mexico
Thisbook isprinted on recycled paper.

