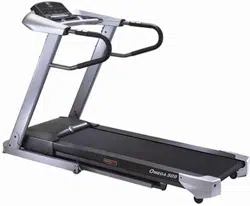
TREADMILLASSEMBLY
& USER'S GUIDE
RCT7.6 Rev.l.4.indd 1 7/17/06 4:50:26PM

CONGRATULATIONSand THANKYOUforyour purchaseof this HorizonFitnesstreadmill!
Whetheryour goal is to win races or simply enjoy a ruder, healthier lifestyle, a Horizon Fitness treadmill
can help you attain it- adding club-quafity performance toyour at-home workouts, with the ergonomics
and innovative features you need to get stronger and healthier, faster. Because we're committed to
designing fitness equipment from the inside out, we use only the highest quafity components. It's a
commitment we back with one of the strongest frame-to-motor warranty packages in the industry.
Youwant exerciseequipmentthat offers the most comfort, the best reliability and the highest quality
in its class.
Horizon Fitnessdelivers.
%_ __,_
Important Precautions
Assembly 6
Before YouBegin J2
Treadmill Operation 15
Conditioning Guidelines 22
Troubleshooting & Maintenance 28
Limited Warranty 31
CONTACT INFORMATION Back Cover
RGT7.6 Rev.l.4.indd 2-3 7/17/06 4:50:26 PM ]
I
il_ i_ ii
H
I RCT7.6 Rev.l.4.indd 4-6
SAVETHESEINSTRUCtiONS
Read all instructions before using this treadmill. Whenusing an electrical product, basic precautions
should alwaysbe followed,including the following: Readaft instructions beforeusing this treadmill It is the
responsibilityof the ownerto ensurethat all usersof this treadmill are adequatelyreformedof aft warnings
and precautions.If you haveany questionsafter readingthis manual,contact Searsat the number fisted on
the backcoverof this manual
GROUNDINGINSTRUCtiONS
Thisproduct must begrounded.If a treadmill should malfunction or breakdown,groundingprovidesa path
of least resistance for electrical currentto reducethe risk of electrical shock. Thisproduct is equippedwith
a cord havingan equipment-groundingconductorand a groundingplug. Theplug must beplugged into an
appropriate outlet that is properlyinstalled and groundedin accordancewith local codesand ordinances.
' improperconnectiOnOftheeq,¢ment:gro,, ingCon ,ctorcanresuitinariskof
dectric shock.Checkwith a qualified electricianor servicemanif you are in doubt
as to whether the product is properlygrounded.Donot modify the p!ug provided
with the product.!f it wi/! not fit the outlet, have a properoutlet installed by
qua!ified e!ectrician
This product is for use on a nominal 110-volt circuit
and has a grounding plug that looks like the illustration
to the right. This product must be used on a dedicated
circuit. To determine if you are on a dedicated circuit,
shut off the power to that circuit and observe if any other
devices lose power. If so, move devices to a different
circuit. Note: There are usually multiple ouflets on one
circuit. It is recommended that the treadmifl be used
with a 20 amp circuit for optimal performance.
3-Pole Grounded Outlet
i....................................................................................................................................................................................................................................................................................................................................................................................................................................................................................................................................................................
o Neveruse the treadmill beforesecuring thesafety tether clip toyour clothing.
o If youexperienceanykind of pain, including but not limited to chestpains, nausea,dizziness,orshortness
of breath,stop exercisingimmediatelyand consult your physicianbeforecontinuing.
o Do not wearclothes that might catch on anypart of the treadmill.
o Alwayswear athletic shoeswhile using this equipment.
o Do not jump on the treadmill.
o Keeppowercord awayfrom heated surfaces.
o Do not insert or drop anyobject into any opening.
o Unplugtreadmill beforemovingor cleaningit. Toclean, wipesurfaces down with soapand slightly damp
cloth only:neverusesolvents. (SeeMAINTENANCE)
o At no time shouldmore than oneperson beon treadmill whilein operation.
o Thetreadmill should not beusedby personsweighingmorethan 300 pounds.Failure to complywill void
the warranty.
o Thetreadmill is intended for in-homeuseonly.Donot usethis treadmill in anycommercial,rental, school
or institutional setting. Failure to complywill voidthe warranty.
o Donot usetreadmill in anylocation that is not temperaturecontrolled,such as but not limited to garages,
porches,pool rooms,bathrooms,car ports or outdoors.Failure to comply may void the warranty.
• Use the treadmill onlyas describedin this manual.
At NOtime ShOuldpets Orchiidrenunder the ageof J2 bedoser io_iii ireadmitl than ]o ieit.
At No time should ChildrenUndertheage Of !2 usethe treadmil!.
age °( !2 sh°u!dn°t usethe treadmi//with°ut adu!t supervisi°n:
OTHERSAFETYTIPSFORYOURTREADMILL
.....................................................................................................................i oN- ¸¸5¸¸¸¸¸¸ i?; 55 : !
ToredUcetheriskofdamagi,gimpo antcomPo,entsO,you treadmiH,itisstrongly
i reCommendedthatyourtreadmillis piuggedinto a dedicated20 amp circuit, without
the USeof an additional extensioncord and/orpowerstrip. Failureto complymay void
arra
i it is essentia!that your treadmiii is used Onlyindoors,in a climate cOntroltedroOm:if yourtreadmifl has been
i exposedto colder temperaturesor high moisture climates, it is strongly recommendedthat thetreadmifl iS
i warmedup to roomtemperaturebefore first time UselFailure to doso may Causepremature electronicfai!ure;
I
%_ _,4
7/17/06 4:50:26 PM I
I
m
RCT7.6 Rev.l.4.indd 6-7
IMPORTANT..READTHESESAFETYINSTRUCtiONSBEFOREUSE!
During the assemblyprocessof the treadmill there are severalareas that special attention must be paid.
It is veryimportant to follow the assembly instructions correctly and to make sure all parts are firmly
tightened. If theassemblyinstructions arenot followedcorrectly,thetreadmill couldhave frameparts that
are not tightenedand will seemlooseand may causeirritating noises.Thereshouldbe no side-to=sideplay
in the consolemasts or any forward and back play in the consoleassemblyor handlebars.If thereis any
play in theseareas, the treadmill has not beenproper!vassembled.Topreventdamageto the treadmill, the
assemblyinstructions must bereviewedand correctiveactions should be taken.
UNPACKING
Placethe treadmill cartonon a level flat surface.It is recommendedthat youplace a protectivecoveringon
your floor. TakeCAUTIONwhenhandling and transporting this unit. Neveropenbox whenit is on its side.
Oncethe banding straps have beenremoved,donot rift or transport this unit unless it is fully assembled
and in the upright folded position, with the lock latch secure.Unpackthe unit whereit will be used.Never
grab hold of anyportion of theincline frame and attempt to rift or movethe treadmill FAILURETOFOLLOW
THESEINSTRUCTIONSCOULDRESULTIN INJURY!
/ ; ¸
Beforeproceeding,findyo"rtre"dmZlr_seriai'"mbe_
and modelnamelocated under the deckon the frame
crossbarand enterit in the spaceprovidedbelow.
ENTERYOURSERIALNUMBER
MOBELNAMEIN THEBOXESBELOW
SERIALNUMBER:
MODELNAME:
.............................................. .....................................................................................................
* Referto theSERIALNUMBERand MODELNAMEwhencalfing for service.
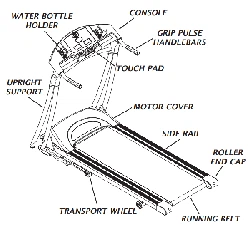
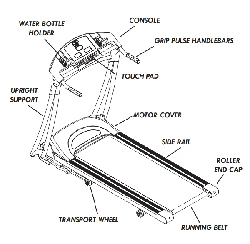
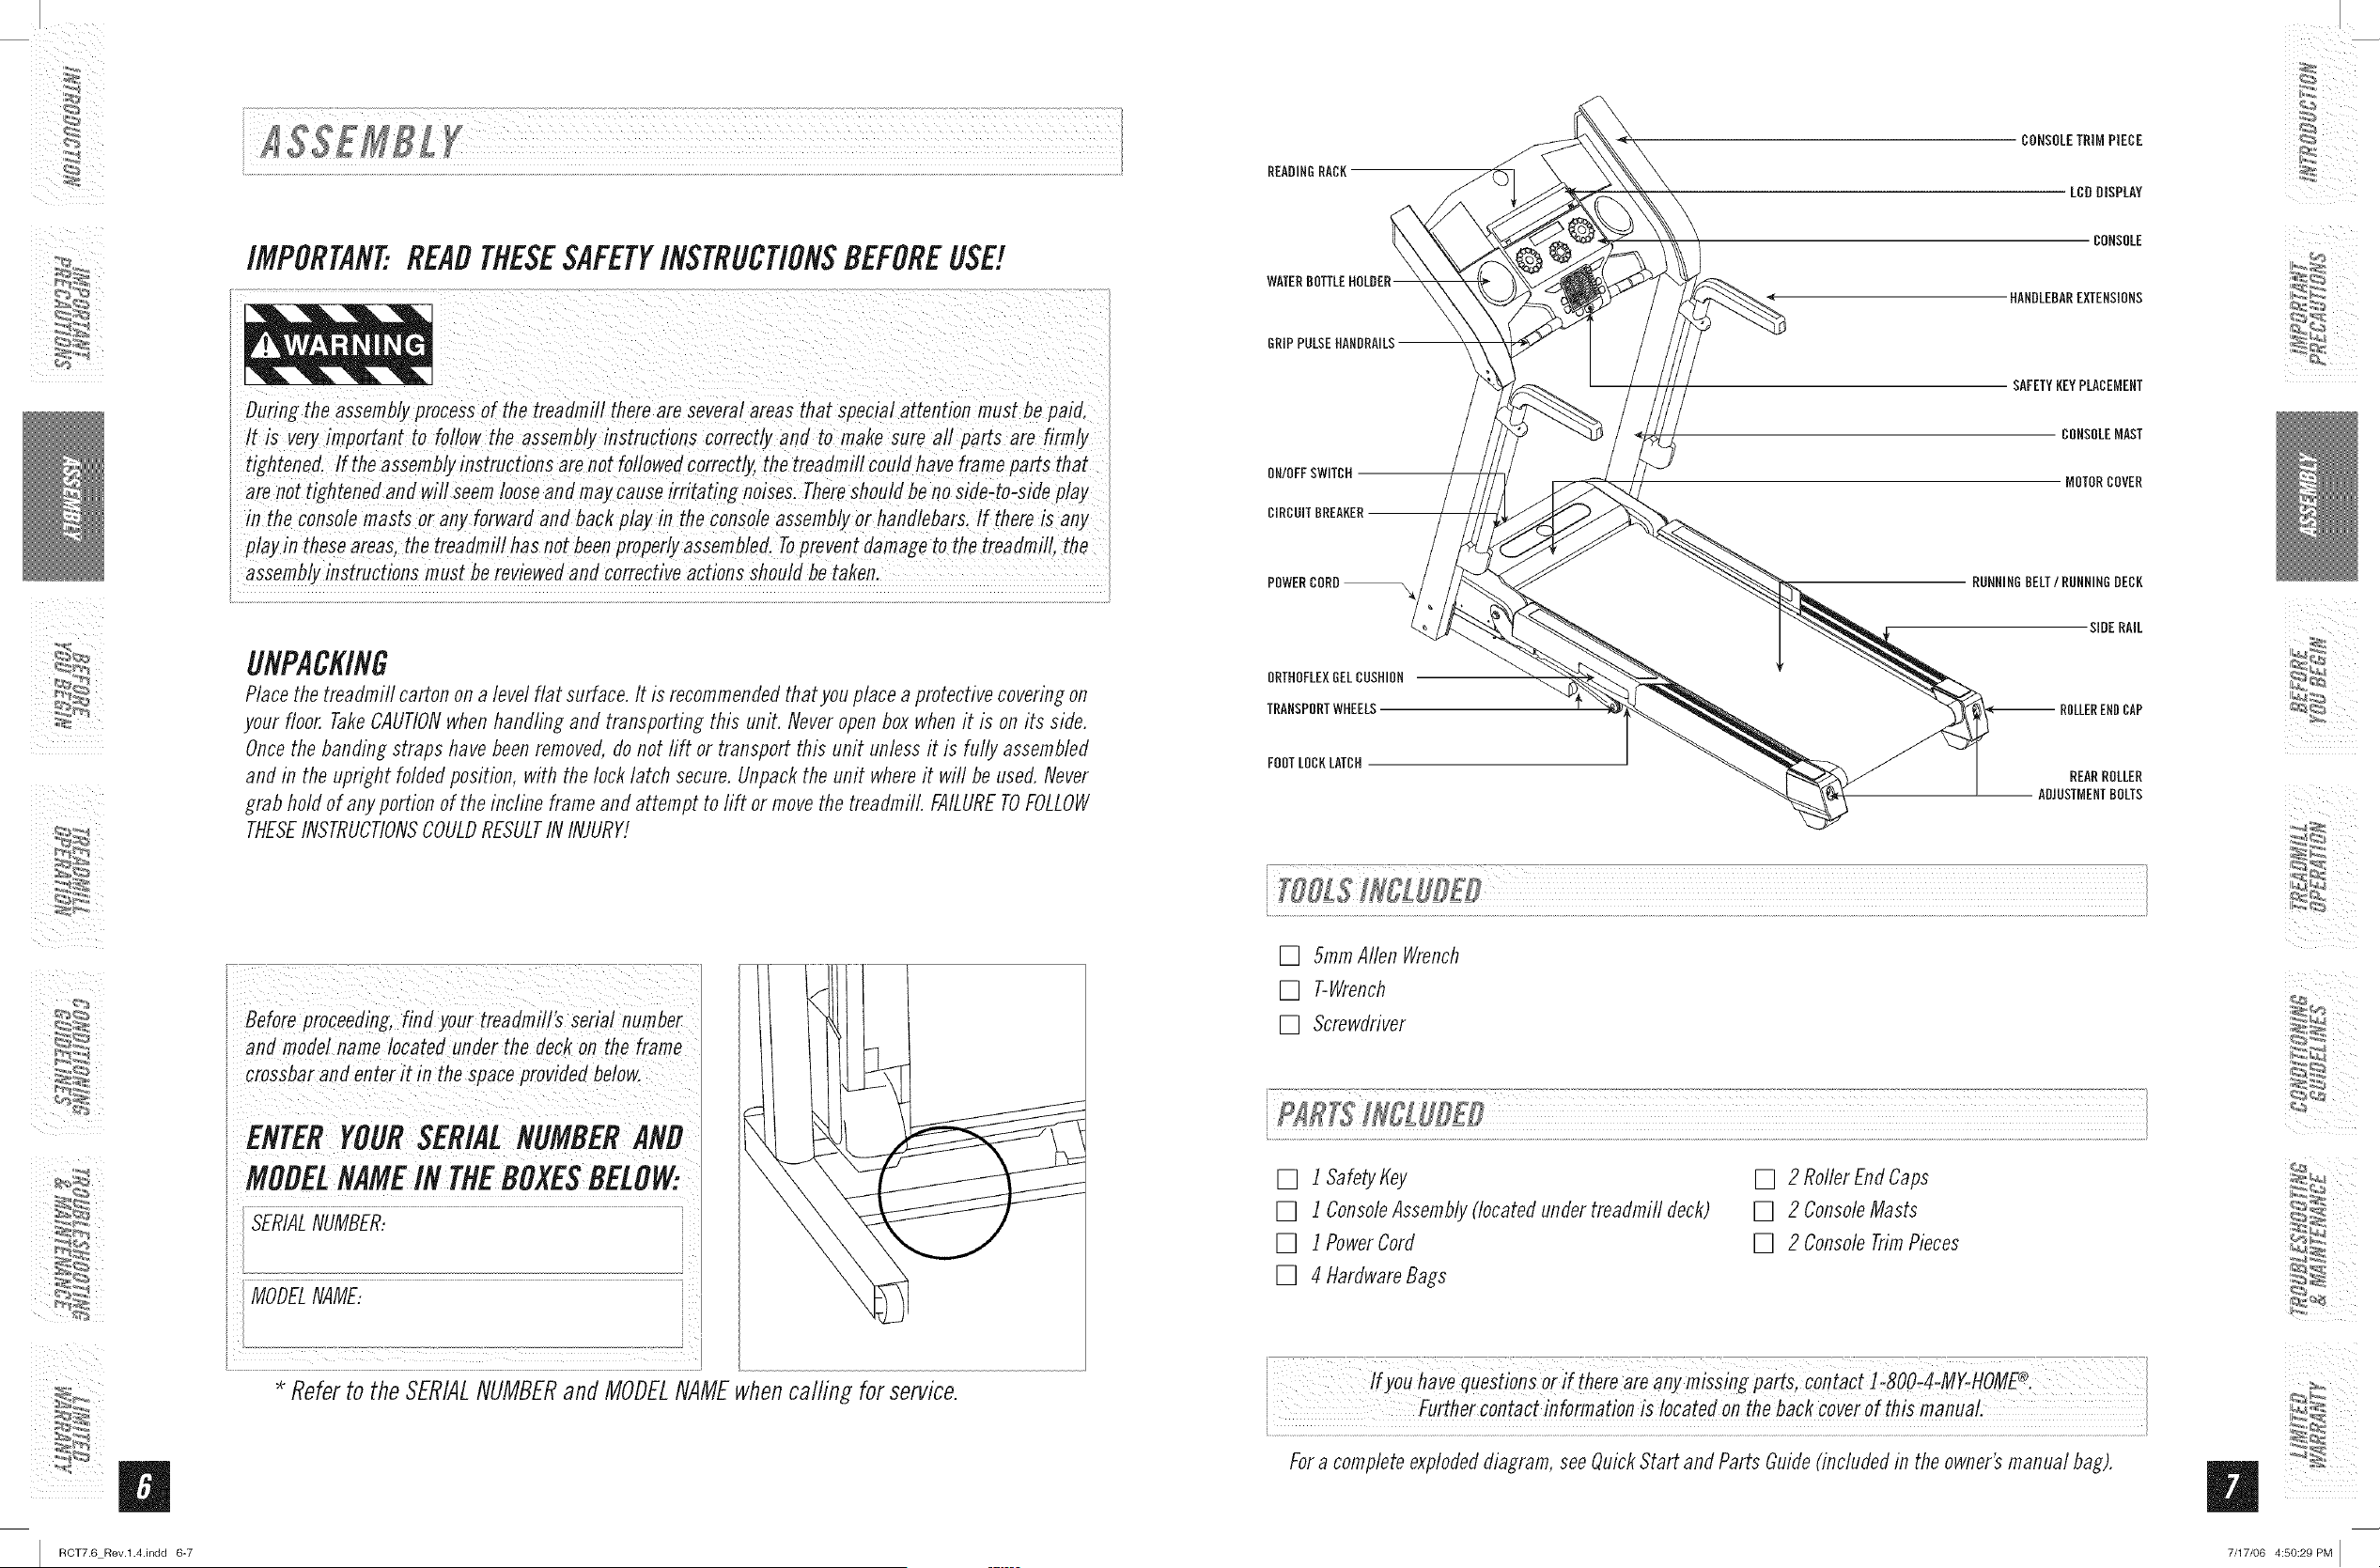
READINGRACK
CONSOLETRiMPIECE
LCDDISPLAY
CONSOLE
HANDLEBAREXTENSIONS
ONIOFFSWITOH
CIRCUITBREAKER
SAFETYKEYPLACEMENT
CONSOLEMAST
MOTORCOVER
POWEROORD_
ORTHOFLEXGELCUSHION
TRANSPORTWHEELS
FOOTLOCKLMOH
RUNNINGBELT/RUNNINGDECK
SIDERAIL
ENDCAP
REARROLLER
ADJUSTMENTBOLTS
[] 5ramAllen Wrench
[] T-Wrench
[] Screwdriver
[] i safety_ey
[] 1 ConsoleAssembly(locatedunder treadmifl deck)
[] 1 PowerCord
[] 4 HardwareBags
[] 2 RollerEnd Caps
[] 2 ConsoleMasts
[] 2 ConsoleTrimPieces
!fyo,have __800_4:MY-HOML_.
in bickcOveiofth!S
Fora completeexplodeddiagram,seeQuickStart and Parts Guide(includedin the owner'smanual bag).
%_ _,4
7/17/06 4:50:29 PM [
I
I RCT7.6 Rev.l.4.indd 8-9
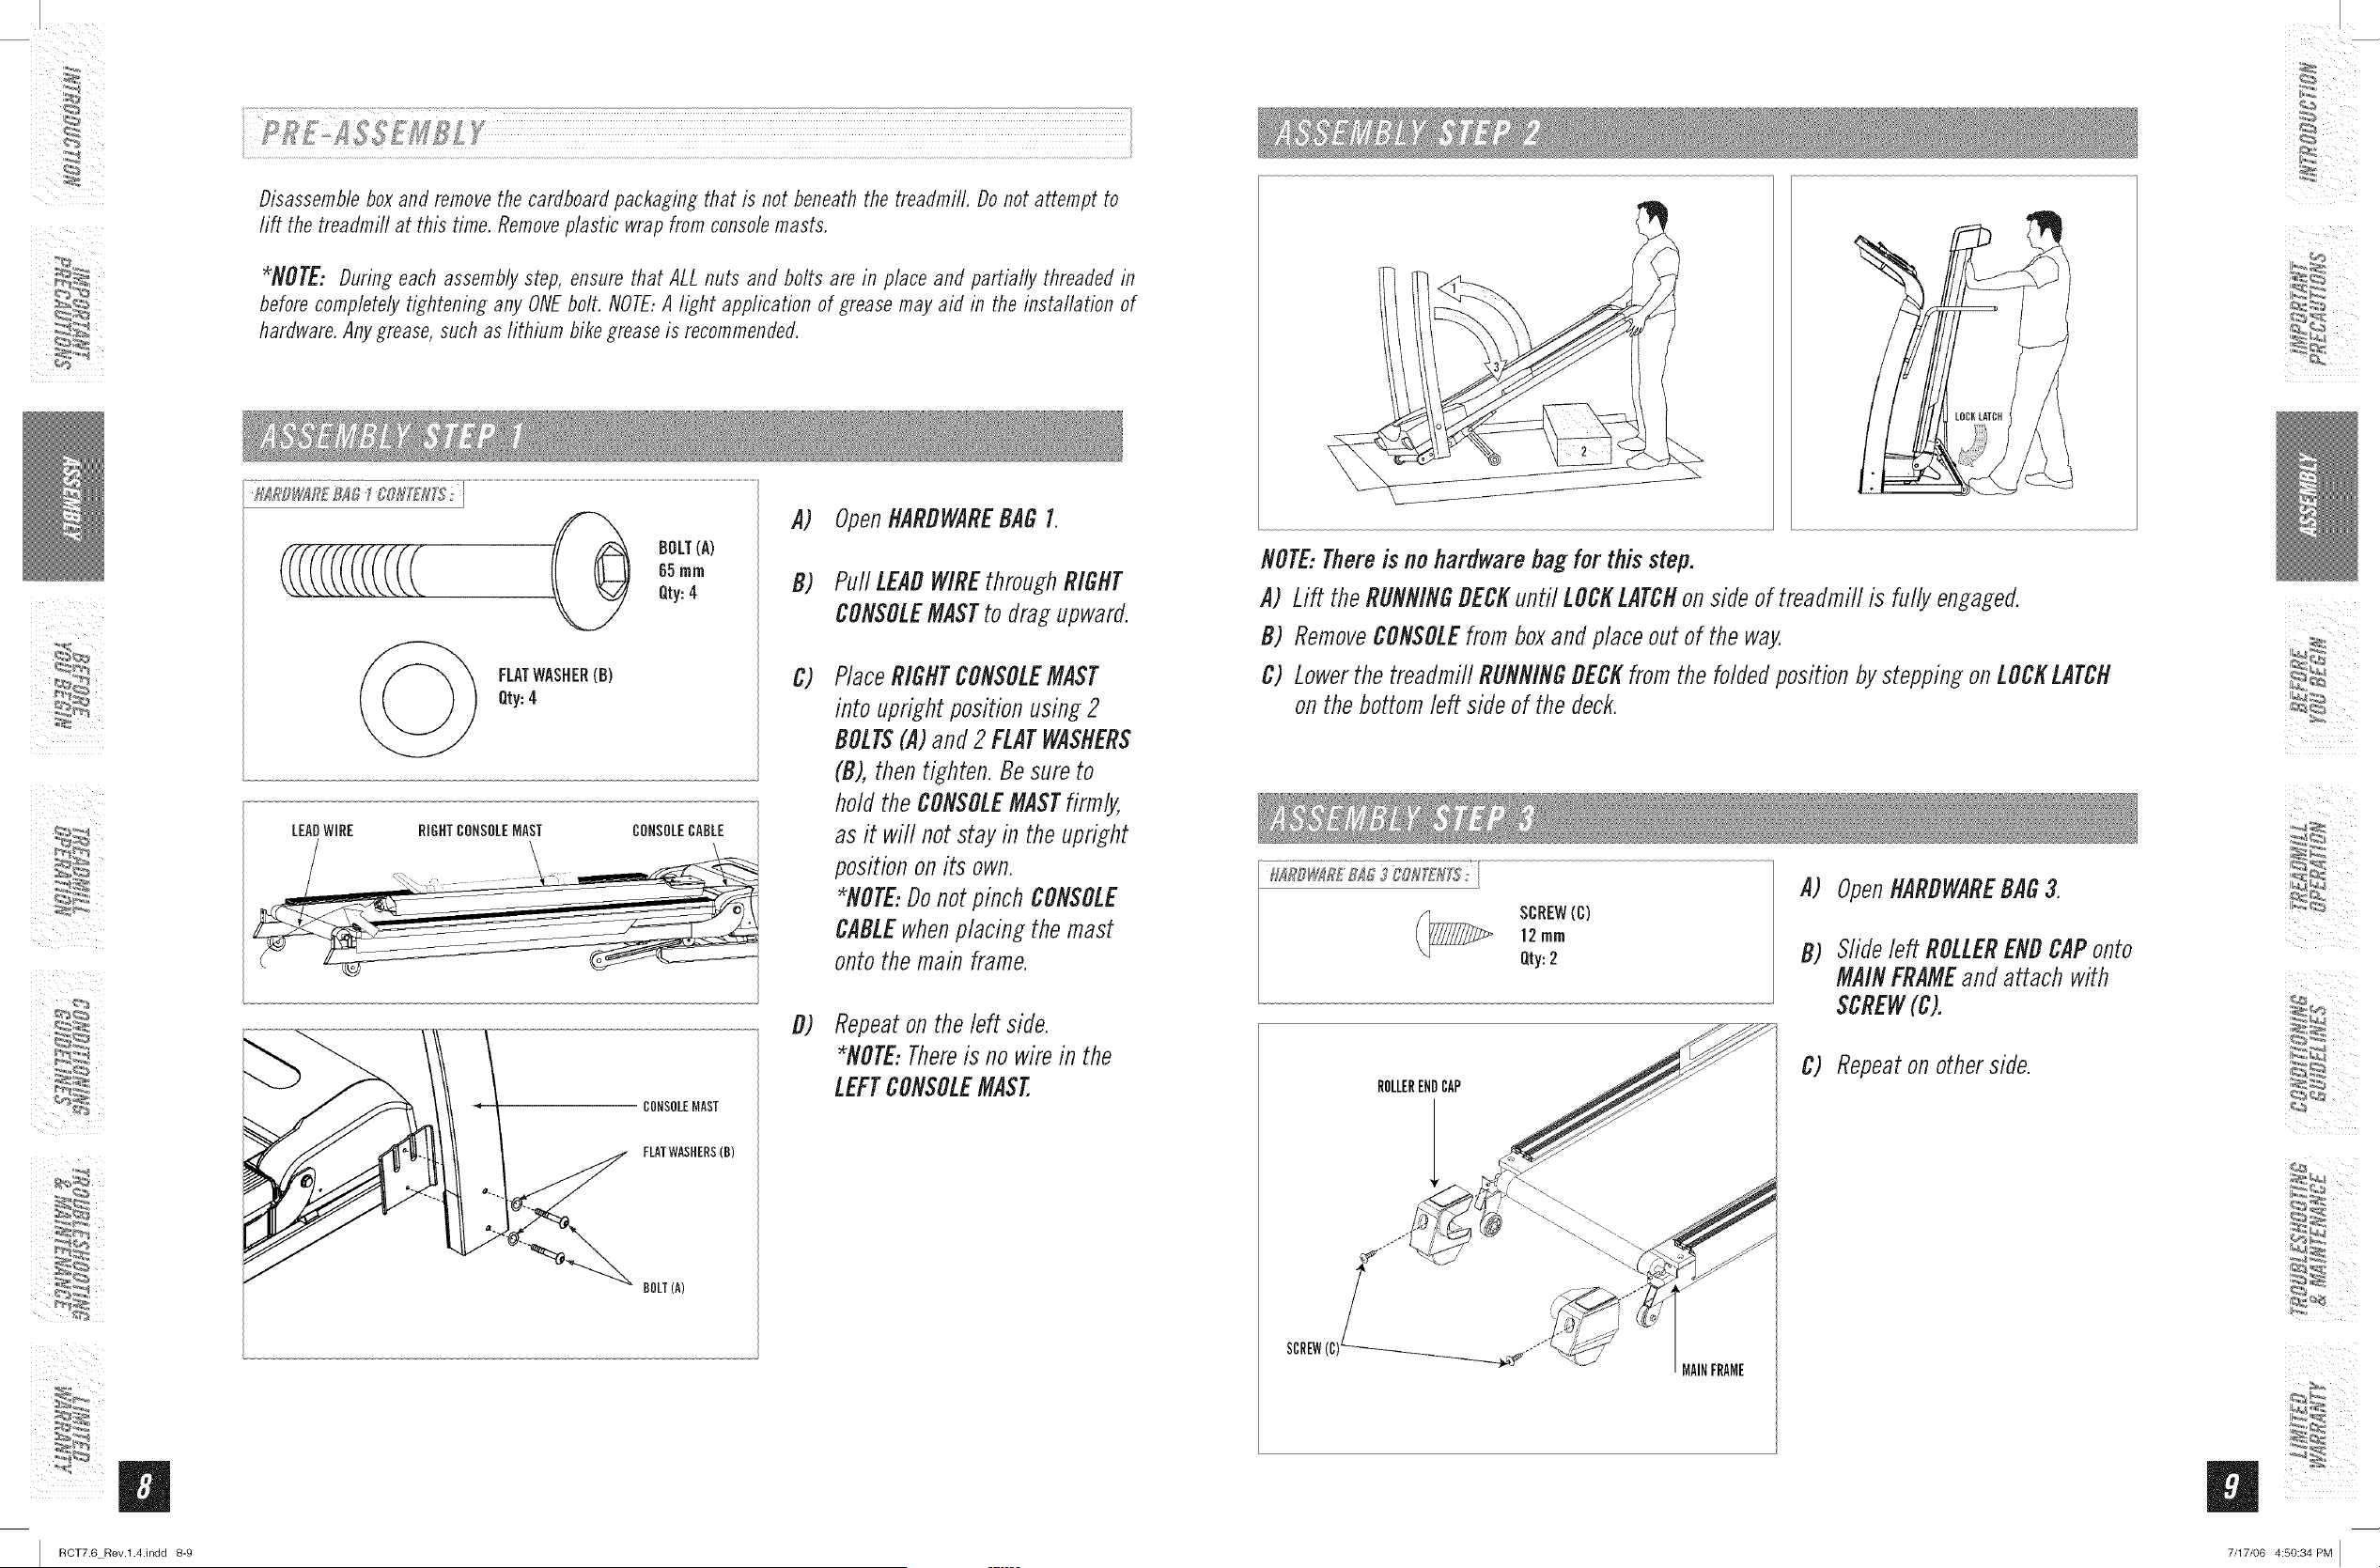
Disassembleboxand removethe cardboardpackaging that is not beneaththe treadmill. Do not attempt to
lift the treadmill at this time. Removeplastic wrap from consolemasts.
*NOTE: During each assemblystep, ensurethat ALLnuts and bolts are in place and partially threaded in
beforecompletelytightening any ONEbolt. NOTE-A light application of grease may aid in the installation of
hardware.Anygrease,such as lithium bikegreaseis recommended.
__ BOLT(A)
65mm
Qty:4
FLATWASHER(B)
Qty:4
LEADWIRE RIGHTCONSOLEMAST CONSOLECABLE
A) OpenHARDWAREBAG I.
B) Pull LEADWIREthroughRIGHT
CONSOLEMASTto drag upward.
c)
PlaceRIGHTCONSOLEMAST
into upright position using2
DOLTS(A)and 2 FLATWASHERS
(B), then tighten. Be sureto
hold the CONSOLEMASTfirmly,
as it will not stay in the upright
positionon its own.
*NOTE:Donotpinch CONSOLE
CABLEwhenplacing the mast
onto themain frame.
CONSOLEMAST
FLATWASHERS(B)
BOLT(A)
d) Repeaton the left side.
*NOTE:Thereis no wirein the
LEFTCONSOLEMAST.
NOTE:Thereis nohardwarebagfor this step.
A) Lift theRUNNINGDECKuntil LOCKLATCHonside of treadmill is fully engaged.
B) RemoveCONSOLEfrom boxand placeout of the way.
C) Lowerthe treadmill RUNNINGDECKfrom the foldedposition by steppingon LOCKLATCH
on the bottomleft side of the deck.
SCREW(C)
12rnrn
Qty:2
A)
D)
OpenHARDWAREBAG3.
Slideleft ROLLERENDCAPonto
MAINFRAMEand attach with
SCREW(C).
ROLLERENDCAP
SCREW(C)__.-
MAINFRAME
C) Repeaton otherside.
%_ _,4
7/17/06 4:50:34 PM I
I
ii _
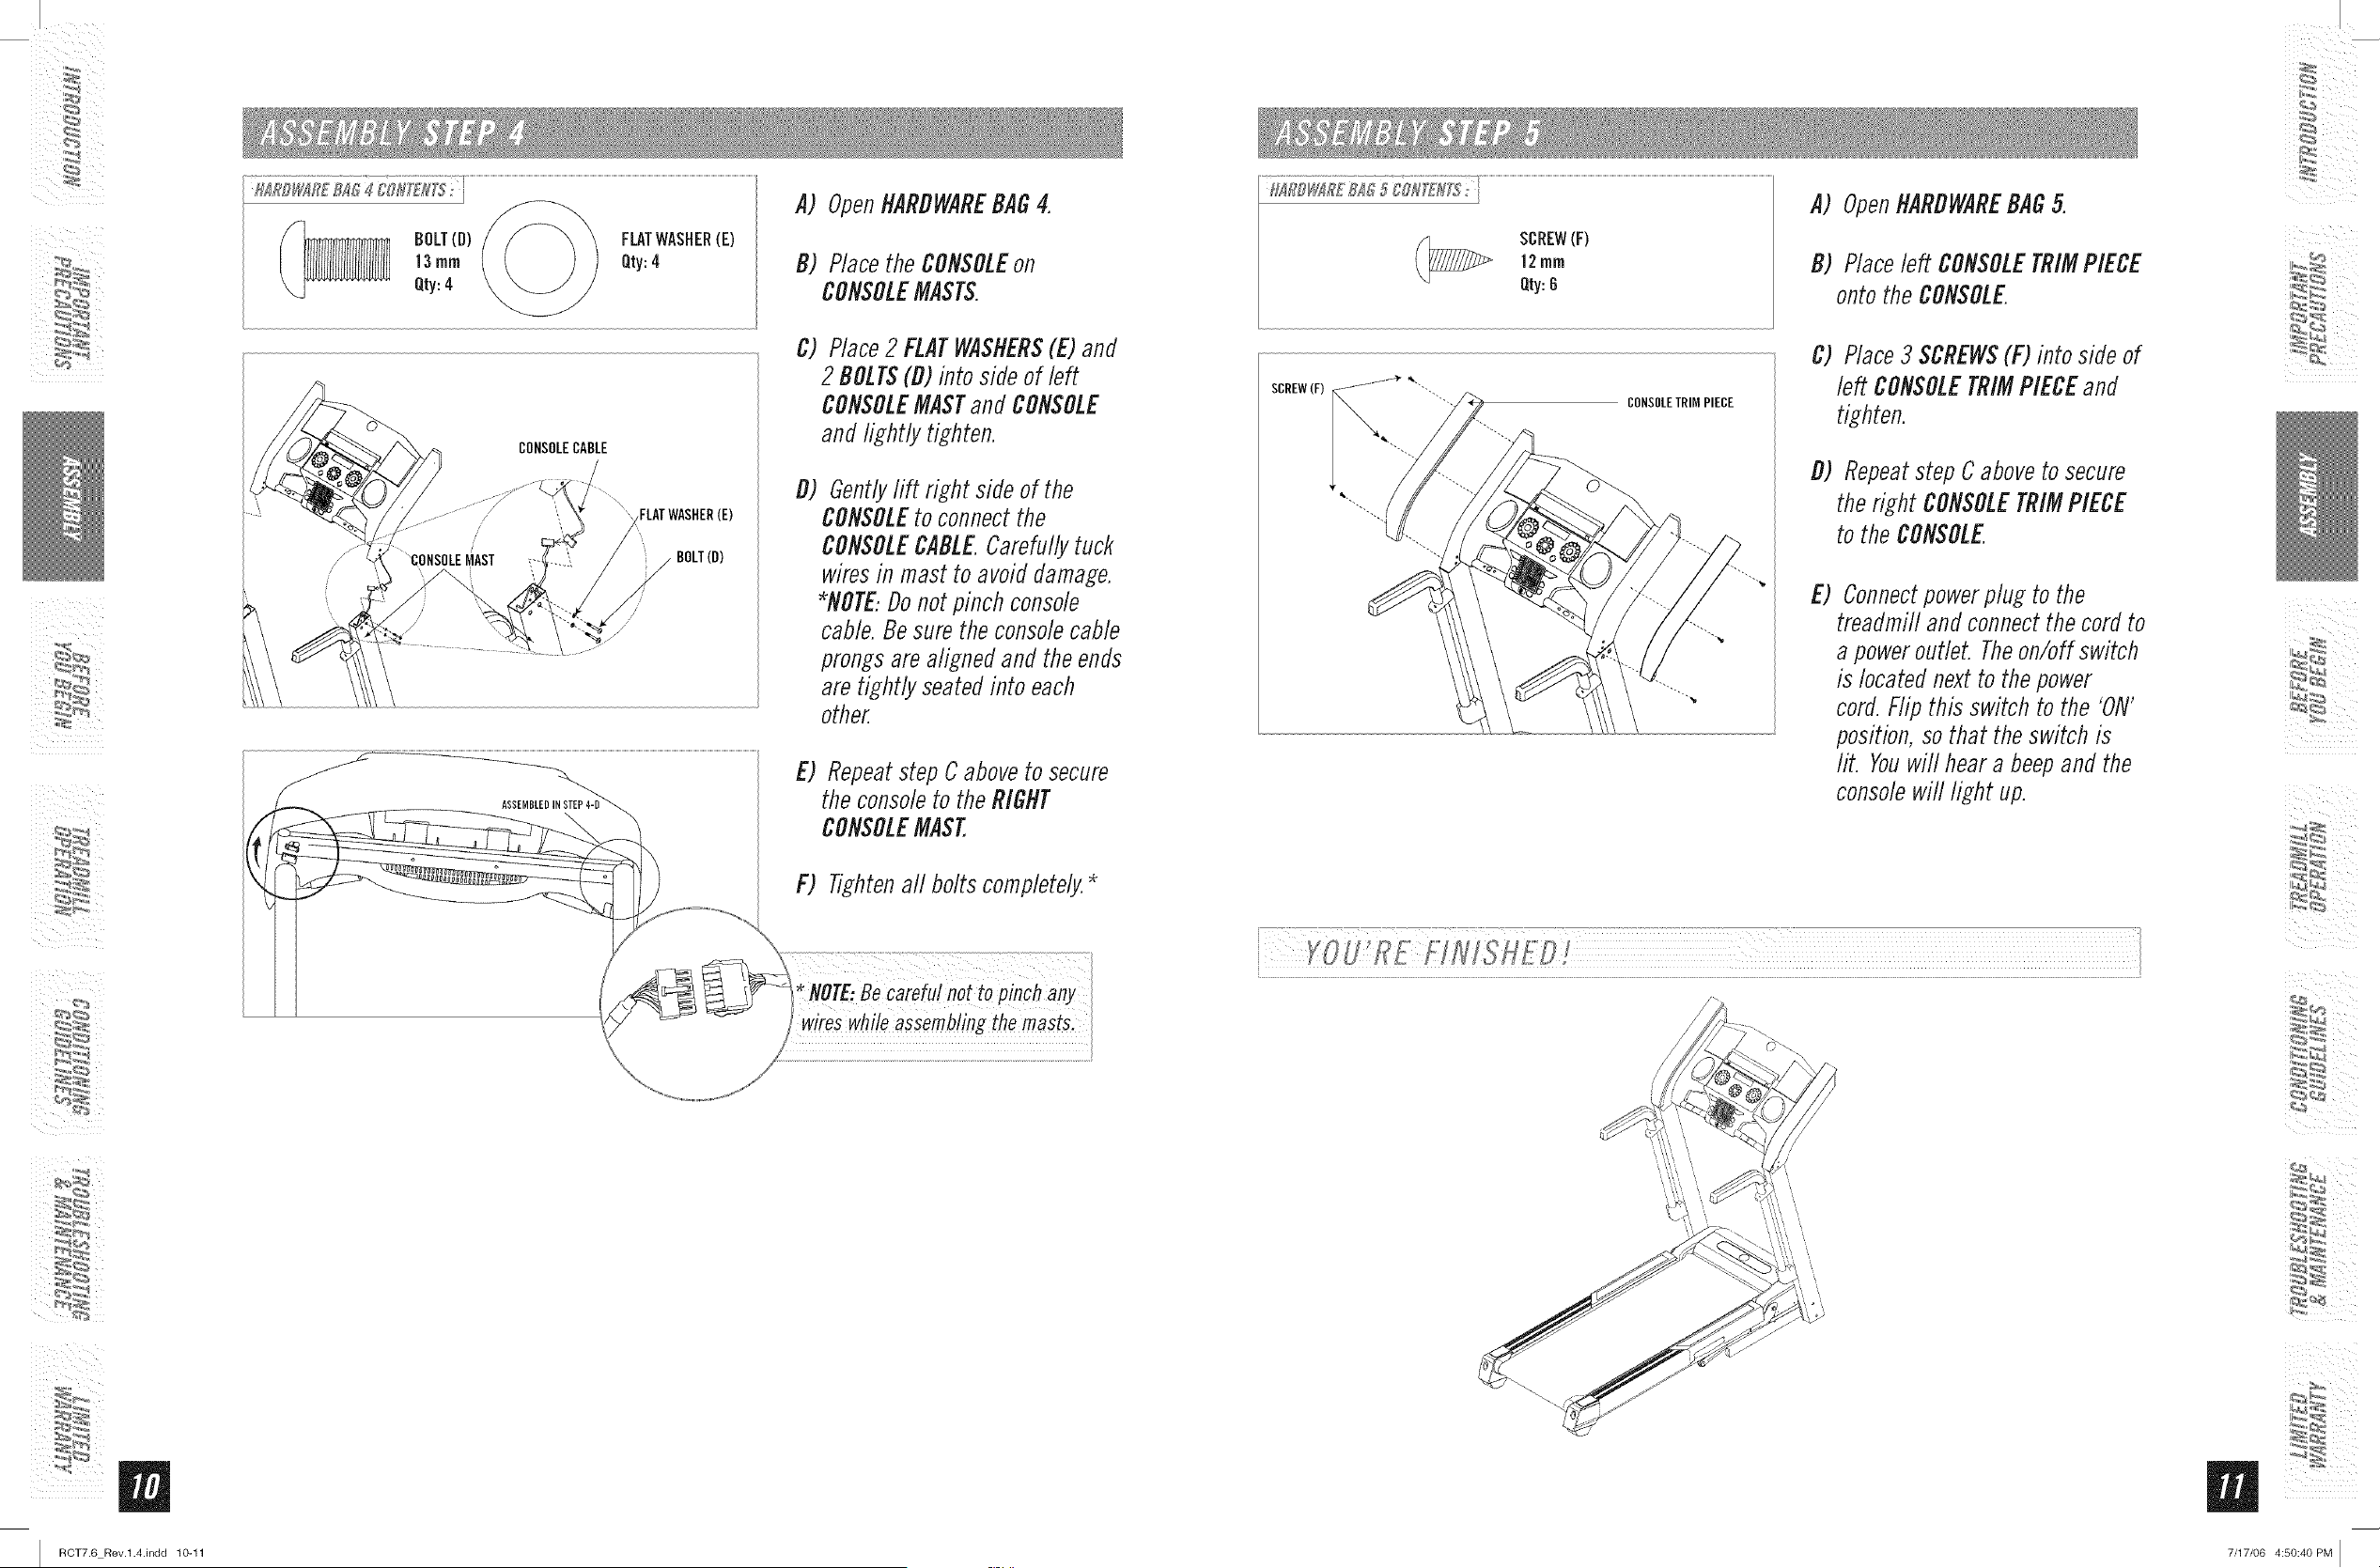
BOLT{D)
]3 rnrn
Qty:4
CONSOLECABLE
FLATWASHER(E)
BOLT(O)
/
/
ASSEMBLE]
A) OpenHARDWAREBAG4.
D) Placethe CONSOLEon
CONSOLEMASTS.
C) Place2 FLATWASHERS(E)and
2 DOLTS(D) into side of left
CONSOLEMASTand CONSOLE
and lightly tighten.
D) Gentlylift right side of the
CONSOLEto connectthe
CONSOLECABLE Carefullytuck
waresin mast to avoiddamage.
*NOTE.Donot pinch console
cable.Be sure the consolecable
prongsare alignedand the ends
are tightly,seatedinto each
other.
E) Repeatstep Caboveto secure
the consoleto theRIGHT
CONSOLEMAST.
F) Tightenall bolts completely.*
(_ SCREW(F)
12ram
Qty:8
A) OpenHARDWAREBAG5.
D) Placeleft CONSOLETRIMPIECE
onto the CONSOLE
CONSOLETRIMPIECE
C) Place3 SCREWS(F) into side of
left CONSOLETRIMPIECEand
tighten.
D) Repeatstep Caboveto secure
the right CONSOLETRIMPIECE
to the CONSOLE
E) Connectpowerplug to the
treadmill and connectthe cordto
a poweroutlet. Theon/off switch
is locatednextto thepower
cord.Flip this switch to the 'ON'
position,so that the switch is
lit. Youwill hear a beepand the
consolewill light up.
I
ROT7.6 Rev.l.4.indd 1@11
I
I
m
RCT7.6 Rev.l.4.indd 12-13
i¸ !!!!!!!!!!!!!!!!!!!!
CONGRATULATIONS!onchoosingyour treadmill. You'vetaken an important stepin developingand
sustaining an exerciseprogram! Yourtreadmill is a tremendouslyeffective tool for achievingyour personal
fitness goals. Regularuse of your treadmill can improvethe quality of your life in so many ways.
HEREAREJUSTA FEWOFTHEHEALTHBENEFITSOFEXERCISE
+ WeightLoss
A HealthierHeart
+ ImprovedMuscleTone
+ IncreasedDaily EnergyLevels
The key to reaping these benefits is to develop an exercise habiL Yournew treadmill wifl help you eliminate
obstacles that prevent you from exercising. Inclement weather and darkness won't interfere with your
workout when you use your treadmill in the comfort of your home. This guide provides you with basic
information for using and enjoying your new machine.
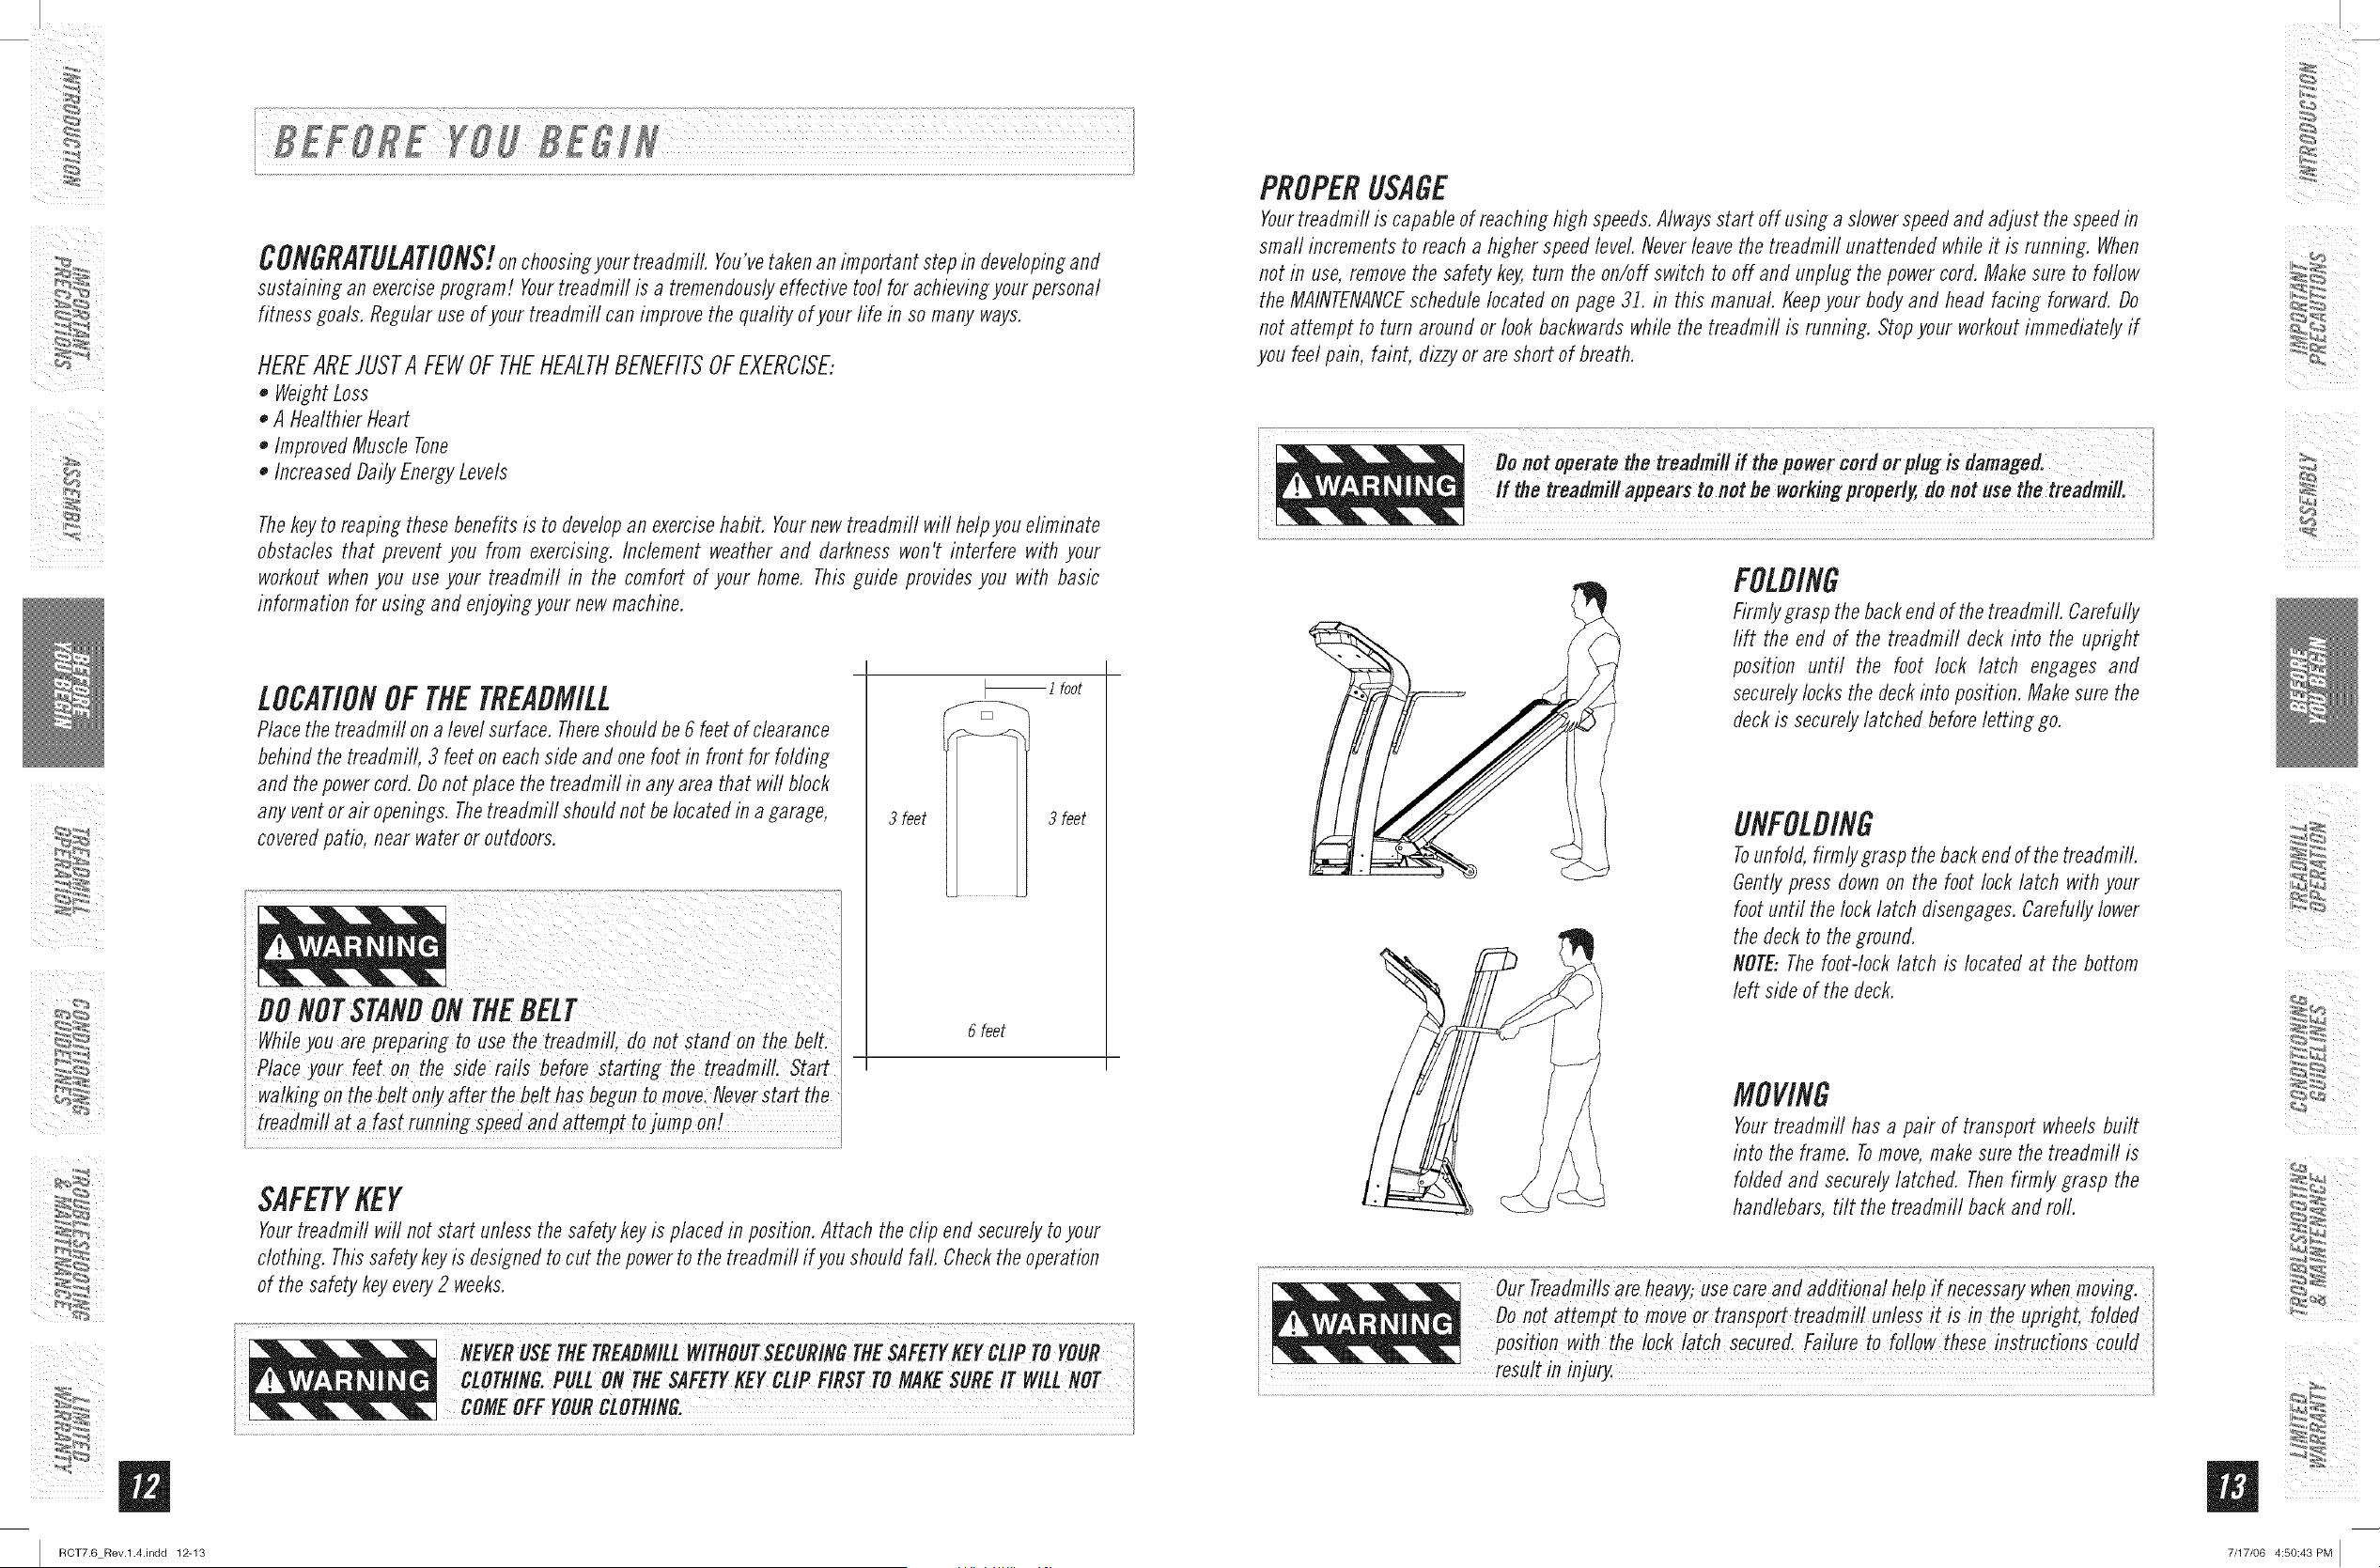
LOCAtiONOFTHETREADMILL
Placethe treadmill ona level surface. Thereshouldbe 6 feetof clearance
behindthe treadmill 3 feet on eachside and one footin front for folding
and thepowercord.Donot placethe treadmill in anyarea that will Mock
any ventor air openings.Thetreadmifl shouldnot belocated in a garage,
coveredpatio, near wateror outdoors.
_1 foot
3 feet 3 feet
6 feet
SAFETYKEY
Yourtreadmill will not start unlessthe safety keyis placed in position.Attach the clip end securelytoyour
clothing. Thissafety keyis designedto cut the powerto the treadmill if you should fall. Checktheoperation
of the safety keyevery2 weeks.
CLOTttlNB.PULLON TttESAFETYKEYCLIP FIRSTTOMAKESLIREIT WILLNOT
COMEOFF 'OURCLOTMING.
PROPERUSAGE
Yourtreadmill is capableof reachinghigh speeds.Alwaysstart off using a slowerspeedand adjust thespeedin
small incrementsto reach a higher speedlevel Neverleave the treadmifl unattendedwhileit is running. When
not in use,removethe safety key,turn the on/off switch to off and unplug the powercord. Makesure to bflow
the MAINTENANCEschedulelocated on page 3]. in this manual, tfeepyour body and head facing forward. Do
not attempt to turn around or look backwardswhile the treadmifl is running. Stopyour workoutimmediatelyif
you feel pain, faint, dizzyor are short of breath.
,"'=+",+!+,!' =
FOLDING
Firmlygrasp thebackend of thetreadmill. Carefully
rift the end of the treadmill deck into the upright
position until the foot lock latch engages and
securelylocks the deckinto position. Makesure the
deckis securelylatched beforeletting go.
UNFOLDING
Tounfold,firmly graspthe backendof thetreadmill.
Gentlypress downon the foot lock latch with your
foot until thelock latch disengages.Carefully lower
the deckto the ground.
NOTE:Thefoot-lock latch is located at the bottom
left side of the deck.
MOVING
Yourtreadmill has a pair of transport wheelsbuilt
into the frame. Tomove,make sure the treadmifl is
folded and securelylatched. Thenfirmly grasp the
handlebars, tilt the treadmill backand rod.
+? ....................... .}
Our Treadm!fls are hea + use care and addif!ona! help !f necessary when +ovinb
Donot attempt to moveortransport treadmill unlessit iSin the upright, bided +
__ i_i_IIII_i
7/17/06 4:50:43 PM [
I
/
m
I RCT7.6 Rev.l.4.indd 14-15
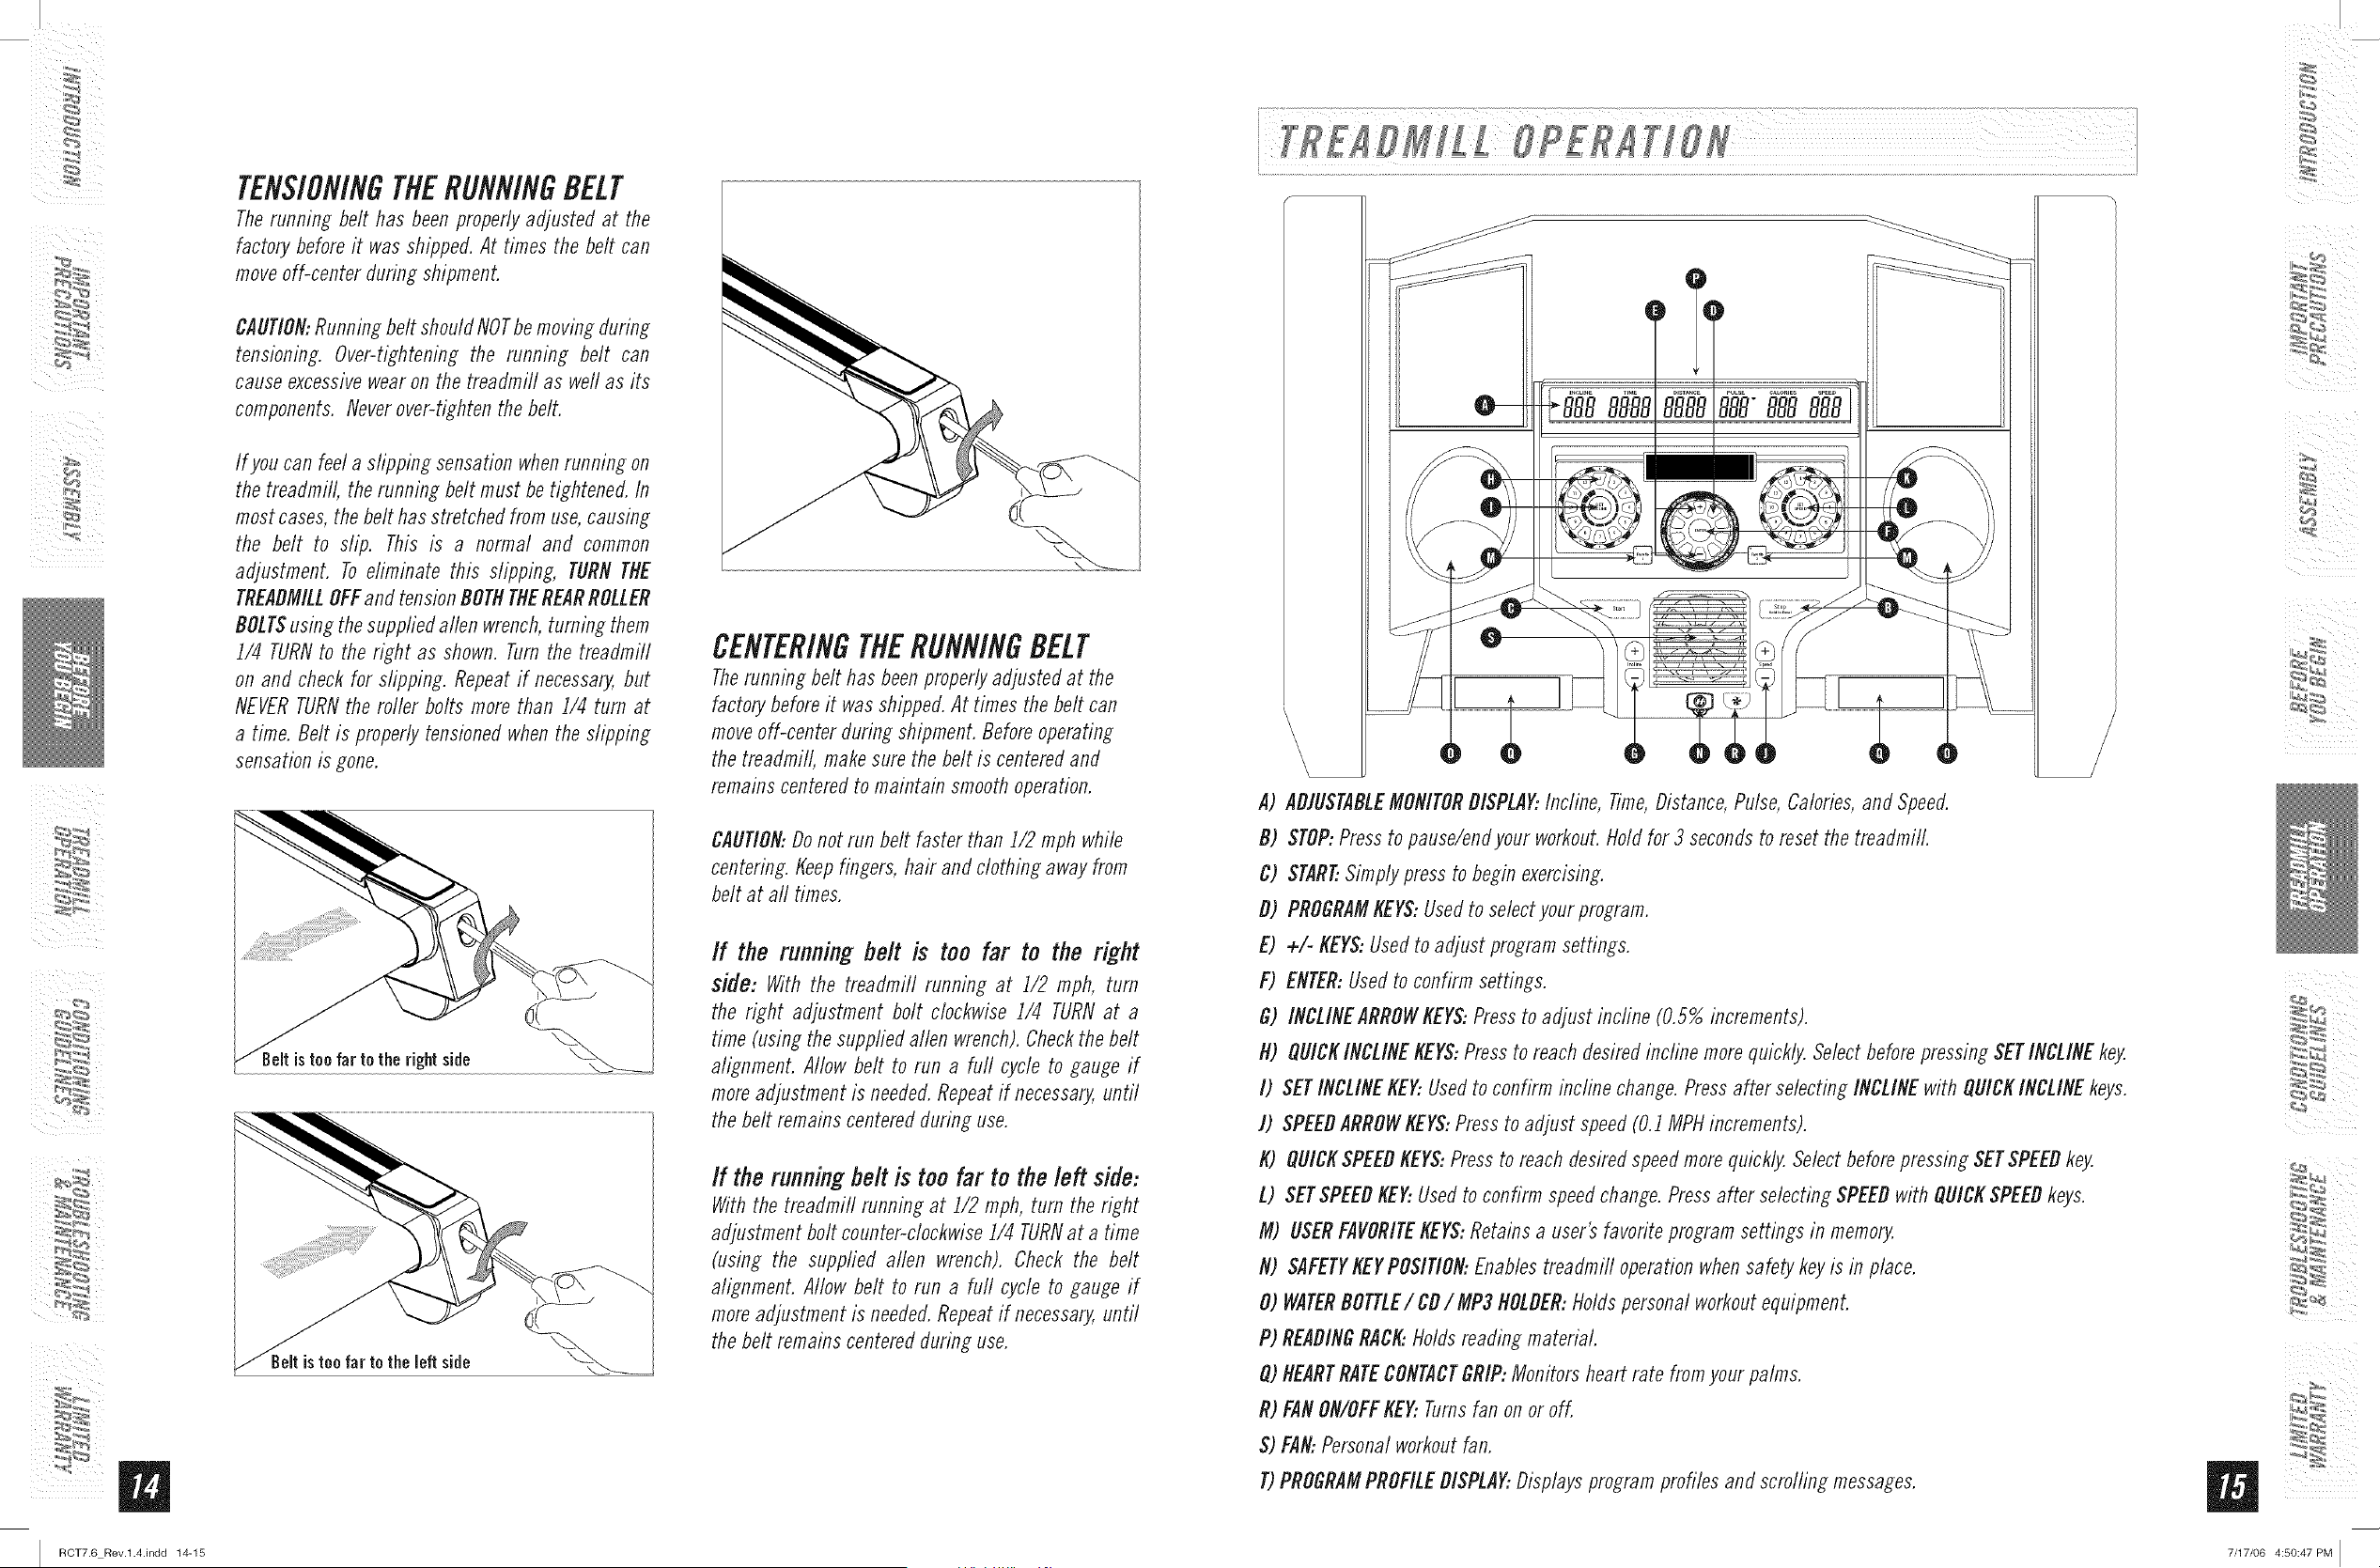
TENSIONINGTHERUNNINGBELT
Therunning belt has beenproperlyadjusted at the
factory beforeit was shipped.At times the belt can
moveoff-center during shipment.
CAUTION:Runningbelt should NOTbemovingduring
tensioning. Over-tightening the running belt can
cause excessivewearon the treadmill as weftas its
components. Neverover-tightenthe belt.
If you can feel a dipping sensation when running on
the treadmill, the running belt must be tightened. In
most cases, the belt has stretched from use, causing
the belt to slip. This is a normal and common
adjustment. To eliminate this slipping, TURN THE
TREADMILLOFFand tension BOTHTHEREARROLLER
BOLTSusing the suppfied allen wrench, turning them
1/4 TURNto the right as shown. Turn the treadmill
on and check for slipping. Repeat if necessary, but
NEVER TURN the roller bolts more than i/4 turn at
a time. Belt is properly tensioned when the slipping
sensation is gone.
istee far te the right side
istee far te the left side
CENTERINGTHERUNNINGBELT
Therunning belt has beenproperlyadjusted at the
factory beforeit wasshipped.At times the belt can
moveoff-center during shipment. Beforeoperating
the treadmill, makesure the belt is centeredand
remains centeredto maintain smoothoperation.
CAUtiON:Donot run belt faster than 1/2 mph while
centering.Keepfingers, hair and clothing away from
belt at all times.
If the running belt is too far to the right
side: With the treadmill running at i/2 mph, turn
the right adjustment bolt clockwise 1/4 TURNat a
time (using the suppfiedallen wrench).Checkthe belt
alignment. Allow belt to run a furl cycle to gauge if
moreadjustment is needed.Repeatif necessary,until
the belt remains centeredduring use.
If the runningbelt is too far to thebfl side:
Withthe treadmill running at i/2 mph, turn the right
adjustment bolt counter-clockwisei/4 TURNat a time
(using the suppfied allen wrench). Check the belt
alignment. Allow belt to run a furl cycle to gauge if
moreadjustment is needed.Repeatif necessary,until
the belt remains centeredduring use.
i...............................................................................................................................................................................................................................................................................................................................................................................................................................................................................................................................
A) ADJUSTABLEMONITORDISPLAY:Incline, Time,Distance,Pulse,Calories,and Speed.
D) STOP:Pressto pause/endyour workout,field for 3 secondsto reset the treadmill.
C) START..Simplypress to begin exereising.
D) PROGRAMKEYS:Usedto selectyour program.
E) +/- KEYS:Usedto adjust program settings.
F) ENTER:Usedto confirm settings.
G) INCUNEARROWKEY$:Pressto adjust incfine (0.5% increments).
N) QUICKINCLINEKEYS:Pressto reach desiredincline morequickly.SelectbeforepressingSETINCLINEkey,
I) SETINCLINEKEY..Usedto confirm incline change. Pressafter selecting INCLINEwith QUICKINCLINEkeys.
J) SPEEDARROWKEYS:Pressto adjust speed(0.J MPHincrements).
K) QUICKSPEEDKEYS:Pressto reachdesiredspeedmorequickly,Select beforepressing SETSPEEDkey.
L) SETSPEEDKEY..Usedto confirm speedchange.Pressafter selecting SPEEDwith QUICKSPEEDkeys.
M) USERFAVORITEKEYS:Retainsa user's favorite programsettings in memory,
N) SAFETYKEYPOSItiON:Enablestreadmill operationwhensafety keyis in place.
O) WATERDOTTLE/ CD/ MP3NOLDER:Holdspersonal workoutequipment.
P) READINGRACK:Holdsreading material.
Q)HEARTRATECONTACTGRIP:Monitorsheart rate fromyour palms.
R) FANON/OFFKEY..Turnsfan on or off.
S) FAN:Personalworkoutfan.
T)PROGRAMPROFILEDISPLAY..Displaysprogram profiles and scrolling messages.
%_ _,_
7/17/06 4:50:47 PM ]
m
I RCT7.6 Rev.l.4.indd 16-17
........ * .................................................... " t
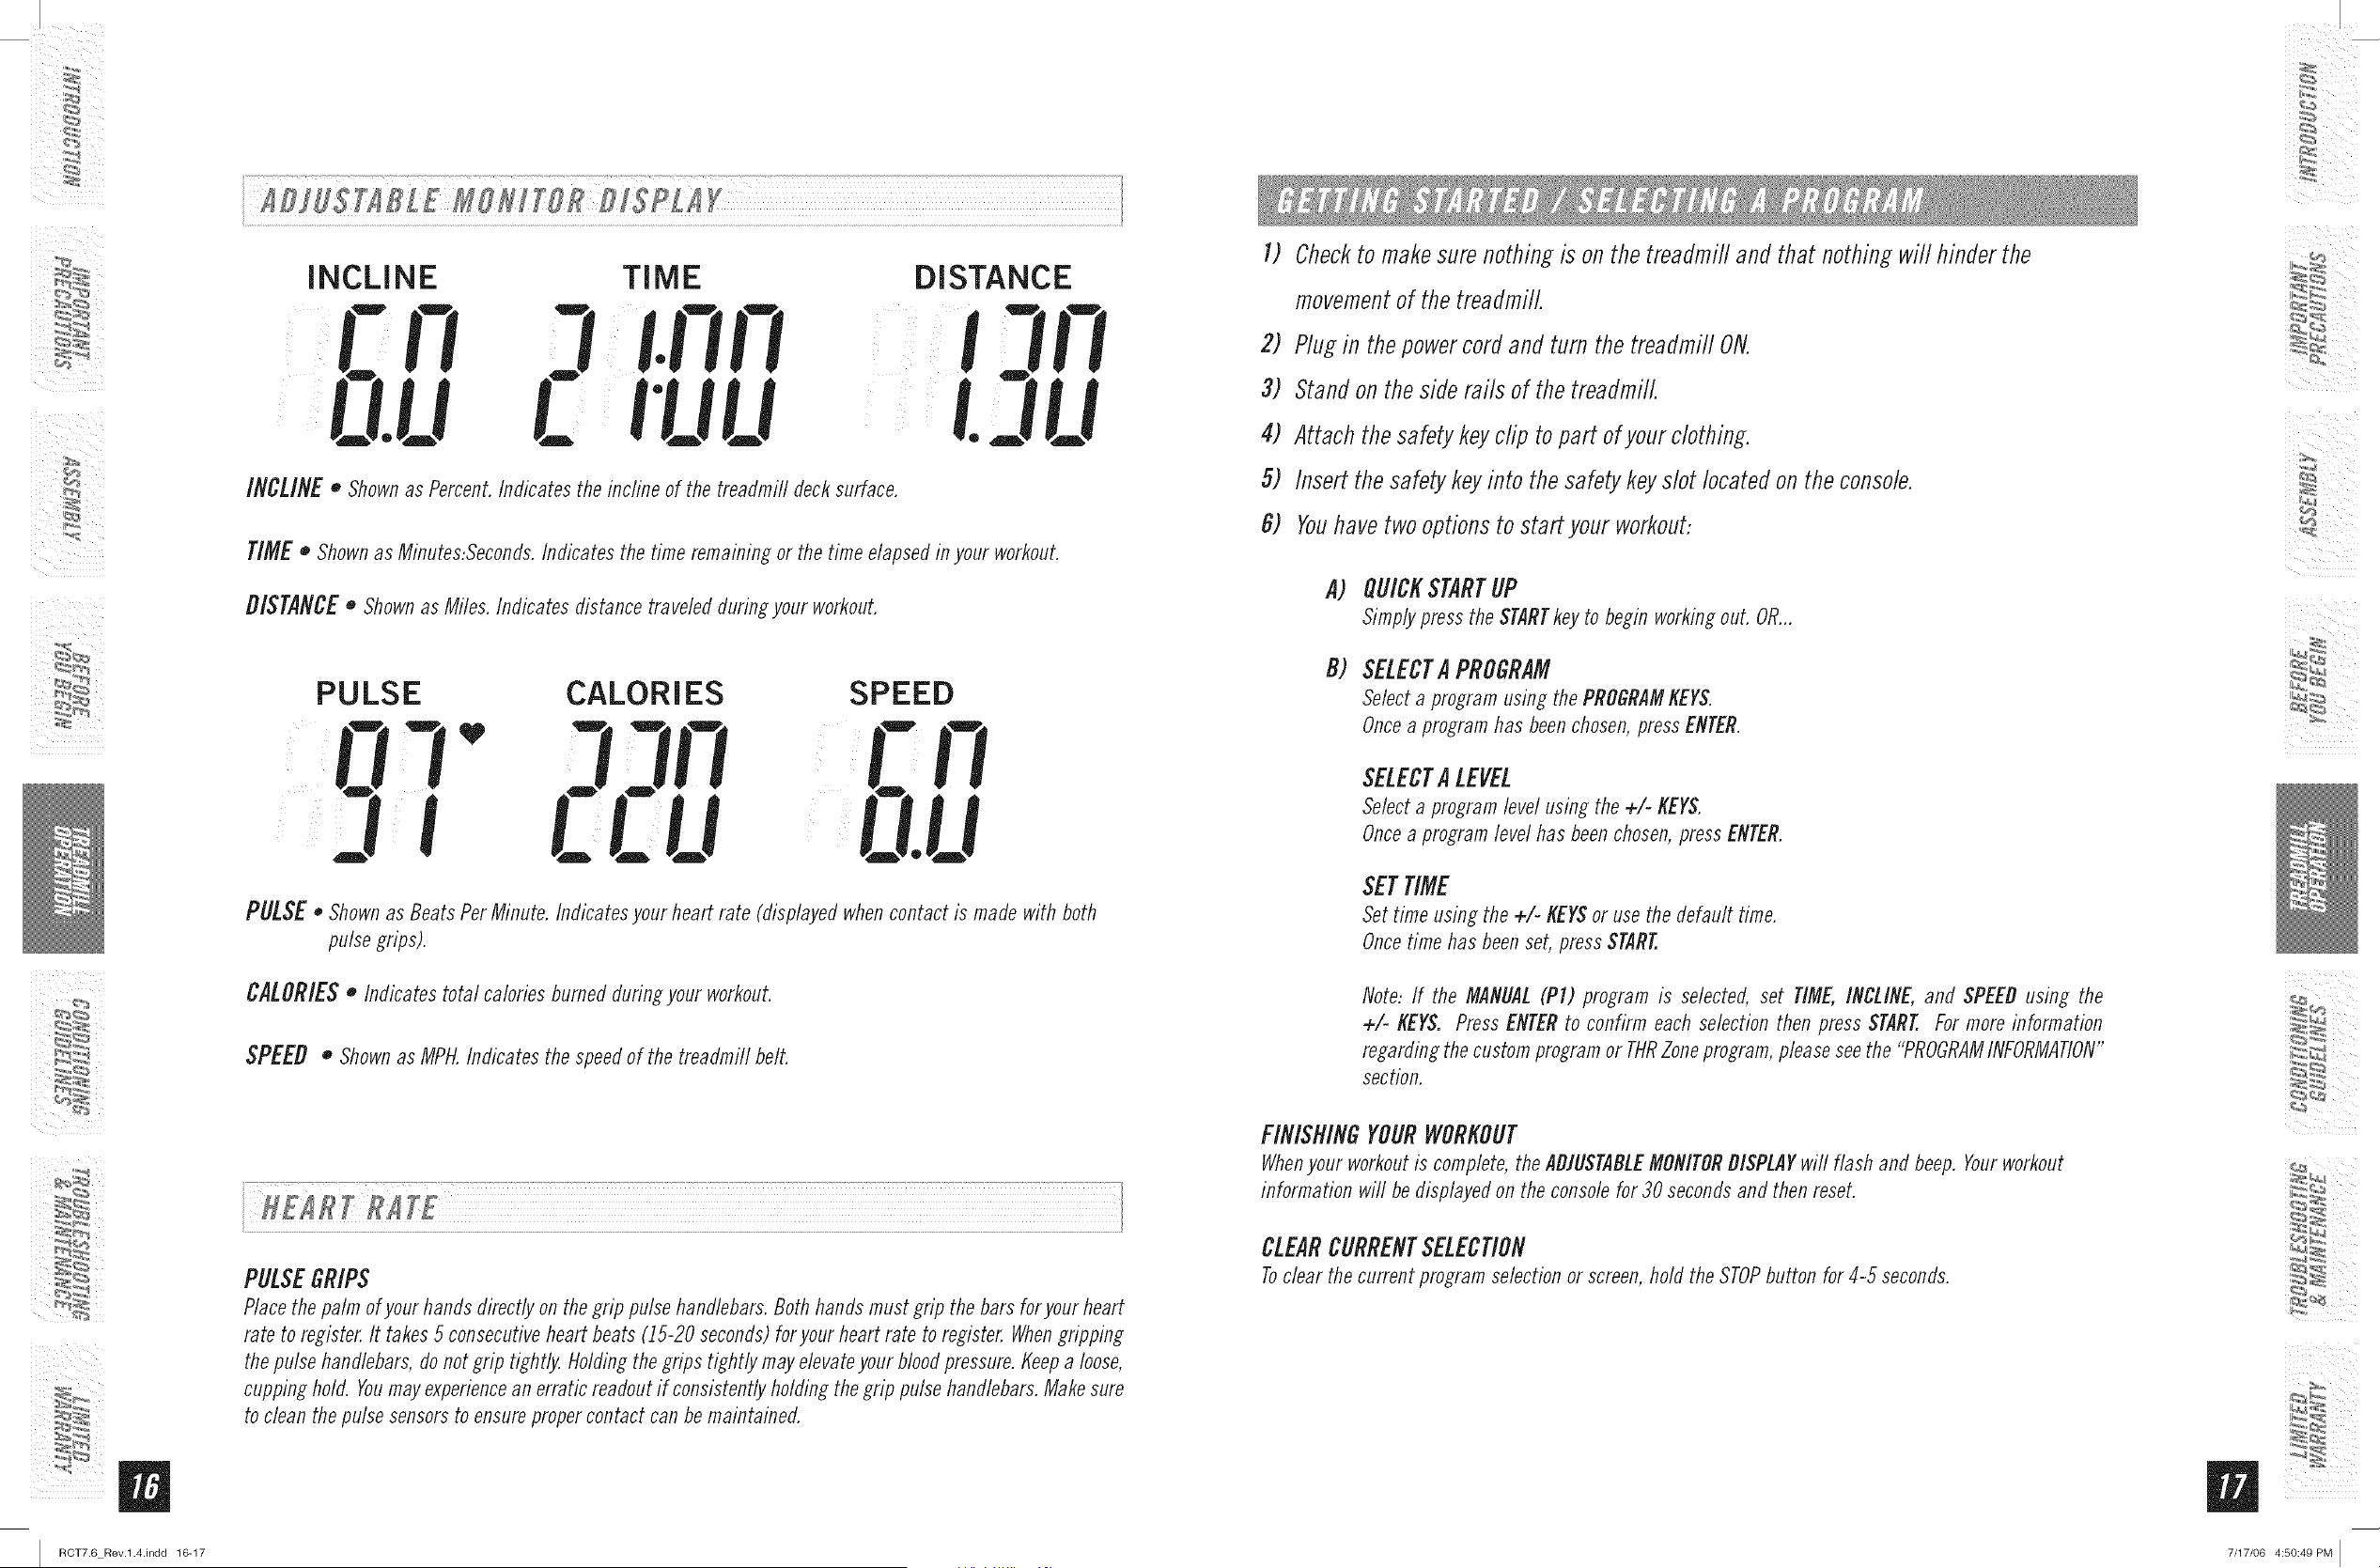
i IB}IS[IBL £ USHIFSR BISPLI Y
INCLINE TIME
IUU
DISTANCE
INCLINE o Shownas Percent.Indicates the incline of the treadmill decksurface.
TIME • Shownas Minutes:Seconds.Indicates the time remaining or the time elapsedm your workout.
DISTANCE • Shownas Miles. Indicates distance traveledduring your workout.
PULSE CALORIES
n
U
SPEED
C FI
IU
PULSE o Shownas BeatsPerMinute. Indicatesyour heart rate (displayedwhencontact is made with both
pulse grips).
CALORIESo Indicates total calories burnedduring your workout.
SPEED,, Shownas MPH.Indicates the speedof the treadmill bell
PULSEGRIPS
Placethe palm of your hands directlyon the grip pulsehandlebars.Both hands must grip the bars for your heart
rate to register.It takes5 consecutiveheart beats (15-20 seconds)for your heart rate to register.Whengripping
thepulse handlebars,donot grip tightly. Holdingthe grips tightly mayelevateyour bloodpressure.Keepa loose,
cupping hold. Youmayexperiencean erratic readoutif consistentlyholdingthe grip pulsehandlebars.Makesure
to clean thepulse sensorsto ensurepropercontact can bemaintained.
I) Checkto makesure nothing is on the treadmifland that nothing will hinder the
movementof the treadmill.
2) Plug in the powercordand turn the treadmill ON.
3) Standon the side rails of the treadmill.
4) Attach the safetykeyclip topart ofyour clothing.
5) Insertthe safetykeyinto the safetykeyslot locatedon theconsole.
B) Youhavetwo optionsto start your workout:
A)
B)
QUICESTARTUP
Simplypress the $TARTkeyto begin workingout. OR...
SELECTA PROGRAM
Selecta program using the PROGRAMKEYS.
Oncea programhas beenchosen,pressENTER.
$ELECTA LEVEL
Selecta programlevel using the +/- KEYS.
Oncea programlevel has beenchosen,press ENTER.
SETTIME
Set time using the +/- KEYSor usethe default time.
Oncetime has beenset, press START.
Note: ff the MANUAL(PI) program is selected, set TIME,INCLINE,and SPEEDusing the
+/- KEYS. Press ENTERto confirm eachselection then press START.Formore information
regarding the customprogramor TftRZoneprogram,pleaseseethe "PROGRAMINFORMATION"
section.
FINISHINGYOURWORKOUT
Whenyour workoutis complete,theADJUSTABLEMONITORDISPLAYwill flash and beep. Yourworkout
information will be displayedon the consolefor 30 secondsand then reset.
CLEARCURRENTSELECTION
Toclear the current programselectionor screen,hold the STOPbutton for 4-5 seconds.
%_ _,4
7/17/06 4:50:49 PM I
m
I RCT7.6 Rev.l.4.indd 18-19
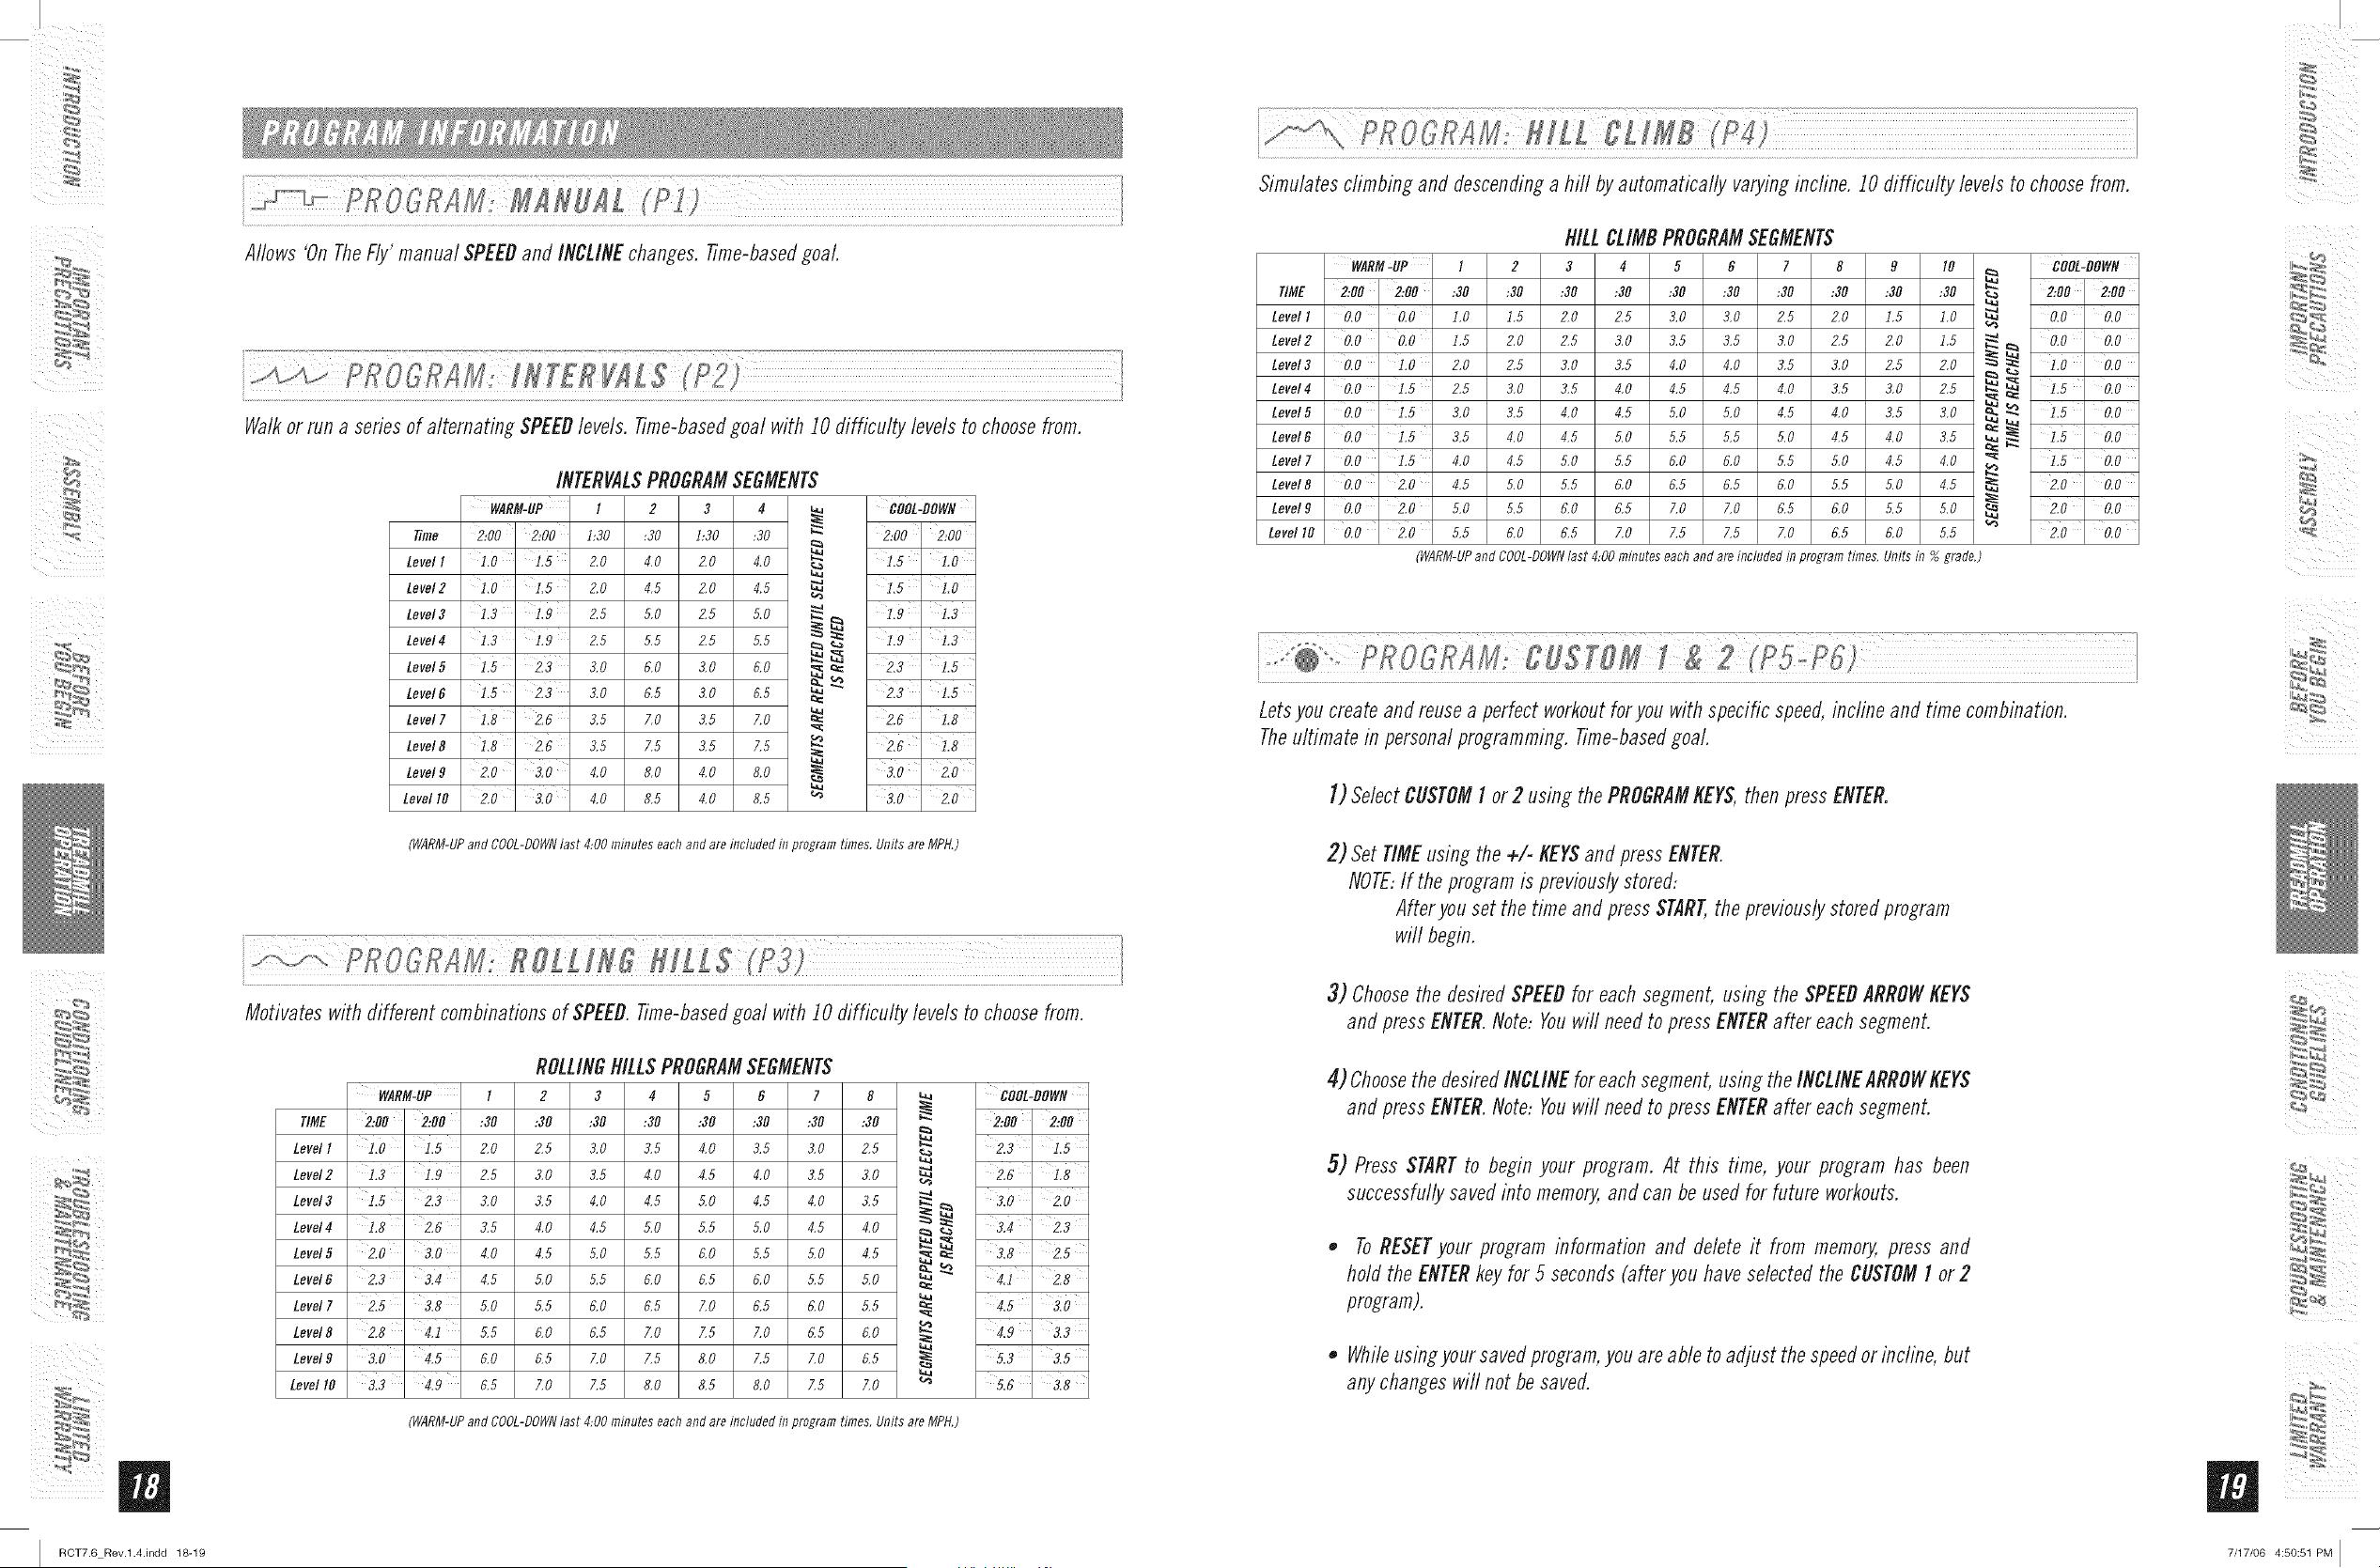
ii P[IO ]RAII: MIRIILT".........................................................I (P]}
Allows 'On TheFly' manual SPEEDand INCLINEchanges, time-basedgoal.
i ................................]] ] ....... >
Walkor run a series of alternating SPEEDlevels, time-basedgoal with 10 difficulty levels to choosefrom.
INTERVALSPROGRAMSEGMENTS
WARM-UP I 2 3 4 _ DOOL-DOWN
Tune 2:00' 2:00 1:30 ,30 1:30 :30 _" 2:00' 2:00
1.5 ' 1.0
=
Level 1 1,0 1.5 2.0 4.0 2.0 4.0
Level2 1,0 1.5 2.0 4.5 ZO 4.5 _ 1,5 ' LO
Level3 1,3 1.9 2.5 5.0 Z5 5.0 _ _ 1,9 1.3
Level4 13 1.9 2.5 5.5 2.5 5.5 _ _ 1,9 1.3
Level5 1.5 ' 2.3 3.0 6.0 3.0 6.0 __ _ 2.3 ' 1.5
Level6 J._ 2.3 3.o 0.5 3.0 6.5 _ _ 2.3 I._
m:
Level7 1,8 ' 2.6 3.5 7.0 3.5 7.0 _= 2.6 ' 1.8
Level8 1,8' 2,6 3.5 7.5 3.5 7.5 _ 2,6 1.8
Level9 2,0 ' 3.0 4.0 8.0 4.0 8.0 i 3,0 ' 2,0
Level I0 2.0 3.0 4.0 8.5 4.0 8.5 _ 3.0 2.0
(WARM-UPand COOL-DOWNlast 4:00 minuteseachand areincludedinprogramtimes,Unitsare MPH,)
i
Motivates with different combinationsof SPEED.time-basedgoal with 10 difficulty levels to choosefrom.
ROLLINGHILLSPROGRAMSEGMENTS
WARM:UP I 2 3 4 5 6 7 8 _ COOL:DOWN
lIME 2:00 2:00 :30 :30 :30 :30 :30 :30 :30 :30 _ 2:00 ' 2:00
Level1 1.0 ' 1.5 2.0 2.5 3.0 3.5 4.0 3.5 3.0 2.5
Level2 1,3 ' 1,9 2.5 3.0 3.5 4.0 4.5 4.0 3.5 3.0 _ 2.6 ' i.8
" 3.0 2.o
Level3 1,5 2,3 3.0 3.5 4.0 4.5 5.0 4.5 4.0 3.5 I _
Level4 IB ' 2.6 3.5 4.0 4.5 5.0 5.5 5.0 4.5 4.0 _ _ 3.4 2.3
Level5 2.0 ' 3.0 4.0 4.5 5.0 5.5 6.0 5.5 5.0 4.5 I _ 3.8 ' 2.5
Level6 2.3 3.4 4.5 5.0 5.5 6.0 6.5 6.0 5.5 5.0 _ _
:= 4.1 2.8
Level7 215 3,8 5.0 5.5 6.0 6.5 7.0 6.5 6.0 5.5 _= 4.5 ' 3.0
Level8 2.8 4.1 5.5 6.0 6.5 7.0 7.5 7.0 6.5 6.0 _ 4.9 ' 3,3
Level9 3.0 ' 4.5 6.0 6.5 7.0 7.5 8.0 7.5 7.0 6.5 i 5.3 3.5
Level 10 313 ' 4,9 6.5 7.0 7.5 8.0 8.5 8.0 Z5 7.0 _ 5.6 ' 318
(WARM-UPand COOL-DOWNlast 4:00 minuteseachand areincludedinprogramtimes,Unitsare MPH,)
Simulatesclimbing and descendinga hill byautomatically varyingincline. 10 difficulty levels to choosefrom.
HILLCLIMBPROGRAMSEGMENTS
WARM-UP I 2 3 4 5 6 7 8 9 I0 _ COOL-DOWN
b;
lIME 2:00' 2:00 :30 :30 :30 :30 :30 :30 :30 :30 :30 :30
2:00 2:00
Level 1 0.0 ' 0,0 1.0 1.5 2.0 2.,5 3.0 3.0 2.,5 2.0 1.5 1.0 _ 0,0 0,0
Level2 0,0 ' 0,0 1.5 2.0 2.5 3.0 3.5 3.5 3.0 2.5 2.0 1.5 _ 0,0 0,0
Level3 0.0 ' 1.0 2.0 2.5 3.0 3.5 4.0 4.0 3.5 3.0 2.5 2.0 _ _: 1.0 0.0
Level4 0,0 i,5 2.5 3.0 3.5 4.0 4.5 4.5 4.0 3.5 3.0 2.5 __ __ 1,5 ' 0,0
Level 0.0 3.0 3.5 4.0 4.5 4.5 4.0 3.5 3.0 0.0
Level_ 0.0 i.5 3.5 4.0 4.5 5.0 5.5 5.5 5.0 4.5 4.0 3.5
1.5
I
o.o
Level 7 0.0 i.5 4.0 4.5 5.0 5.5 6.0 6.0 5.5 5.0 4.5 4.0 "_ i.5 ' 0.0
Level8 0.0 ' 2.0 4.5 5.0 5.5 6.0 6.5 6.5 6.0 5.5 5.0 4.5 _ 2.0 ' 0,0
Level9 0.0 ' 2.0 5.0 5.5 6.0 6,5 7.0 7.0 6,5 6.0 5.5 5.0 _ 2.0 ' 0,0
Level lO 0.0' 210 5.5 6.0 6.5 7.0 7.5 7.5 7.0 6.5 6.0 5.5 "_ 210' 0.0
(WARM-UPand COOL-DOWNlast 4:00 minuteseachand areincludedinprogramtimes, Unitsin % grade.)
Letsyou create andreusea perfect workoutfor you with specific speed,incline and time combination.
Theultimate in personalprogramming, time-based goal.
I) SelectCUSTOMI or 2 using the PROGRAMKEYS,then press ENTER.
2) Set TIMEusing the +/- KEYSand press ENTER.
NOTE,If the programis previouslystored,
Afteryou set the time and pressSTART,the previouslystored program
will begin.
3) Choosethe desired SPEEDfor each segment,using the SPEEDARROWKEYS
and press ENTER.Note, Youwill needto pressENTERafter eachsegment.
4) ChoosethedesiredINCLINEfor eachsegment,using theINCLINEARROWKEYS
and press ENTER.Note, Youwill needto pressENTERafter eachsegment.
5) Press STARTto begin your program. At this time, your program has been
successfullysaved into memory,and can be used for future workouts.
• ToRESETyour program information and delete it from memory,press and
hold the ENTERkey for 5 seconds(after you have selectedthe CUSTOMI or 2
program).
• Whileusingyour savedprogram,you are able to adjust the speedorincline, but
any changeswill not be saved.
%__,4
7/17/06 4:50:51 PM I

m
I RCT7.6 Rev.l.4.indd 20-21
Automatically adjusts incline to maintain your TargetHeart Rate. Perfect for simulating the intensity of your
favoritesport or everydayactivity. Time-basedgoal.
I) Select THRZONEI or 2 using PROGRAMKEYS,then pressENTER.
2) Choosea TARGETHEARTRATEusing the +/- KEYSand press ENTER.
Note: Usethe chart providedin this guide to determineyour target heart rate (page
24).
3) SetTIMEusing the +!- KEYSand press ENTER.
4) PressSTARTto beginyour program.
• At this time,yourprogram has beensuccessfullysaved into memory,and can beused
for future workouts.
• ToRESETyourprograminformation and deleteit from memory,pressand holclthe
ENTERkey for 5 seconds(afler you have selectedthe THRZONEI or2 program).
After the warm-up period, the INCLINElevel will increasegradually to get you to the entered TARGETHEART
RATEZONE.Onceyouare at the TARGETHEARTRATEZONE(plus or minus 5 beatsper minute) the INCLINElevel
will remain until you rise aboveor drop belewyour TARGETHEARTRATEZONEat which time the incline would
adjust accordingly.It there is no heart rate detected,the incline wit not change. If your heart rate is 25 beats
overyour target zonethe program wit shut down. Thereis a cool downat the end of the program.At this time,
the program will gradually decreasethe incline level to give youa smoothcool down.
60% OF MAX HEART RATE: Usedfor beginners and longer workouts.Lowerintensity and longer duration
helps burn fat more efficiently.
65% OF MAX HEARTRATE: Usedfor beginnerto intermediate usersand mid to long range workouts.Lower
intensity and longer durationhelps burn fat moreefficiently.
70% OFMAXHEARTRATE:Usedfor intermediate users anclmid range cardio workouts.Whilethis range
burns fat it really challengesthe cardiovascularsystemand helps strengthenthe heart.
75% OFMAXHEARTRATE:Usedfor advancedusers and short to mid range cardio workouts.Bums fat,
tonesmuscles and challenges the heart.
80% OF MAX HEARTRATE: Usedfor advancedusers and short workouts.Burns fat, strengthensand tones
muscles, and challengesthe entire cardiovascularsystem.
Theuser favorite keysallow up to two programsand program settings to be savedinto memo_ Using a
favoritekey enablesyou to beginyour favoriteprogram quickly. Toset a user FAVORITEKEY,follow the steps
as listed in the "SETTINGFAVORITEKEYS"section.
SETTINGFAVORITEKEYS:
I) Pressand holclthe FAVORITEI or FAVORITE2 keyfor five secondsuntil you
hear three beeps.TheLEDinside the FAVORITEKEYwill be flashing.
*NOTE:TheFAVORITEKEYScan not be programmedif you are already in a
program.
2) Selectpreferredprogram using the PROGRAMtrEYSand press ENTER.
*NOTE:TheCUSTOMI and 2 PROGRAMS(PS-P6)and THRZONEI and 2
PROGRAMS(P7-PS)can not besaved into a FAVORITEKEY
3) ForP], set TIME,INCLINE,and SPEEDusing the +1- KEYSand press ENTER
after setting each value. ForprogramsP2 through P4,set LEVELand TIME
using the +/- KEYSand press ENTERafter setting each value.
4) Afteryou have selectedyour settings, press the FAVORITEKEYto save
the settings or press STARTto beginyour programandyour settings will
automatically besaved.
USINGA FAVORITEtrEY..
Afteryou have programmeda FAVORITEKEYas listed in the "SETTING
FAVORITEKEYS"section,you may use the favorite key.Pressthe desired
FAVORITEI or FAVORITE2 key then pressSTARTto begin the program.
*NOTE:TheFAVORITEI and FAVORITE2 keysmayonly be usec/beforestarting
a program. Thekeyswill not function while in a program.
%_ _,4
7/17/06 4:50:51 PM I
/
m
I RCT7.6 Rev.l.4.indd 22-23
ALWAYSCONSULTYOURPHYSICIANBEFOREBEGINNINGANEXERCISEPROGRAM.
NOWOFTEN?(Frequencyof Workouts)
The American Heart Association recommends that you exercise at least 3 to 4 days per week to maintain
cardiovascular fitness. If you have other goals such as weight or fat loss, you will achieve your goal faster with
more frequent exercise. Whether it's 3 days or 6 days, remember that your ultimate goal should be to make
exercise a fifetime habit. Many people are successful staying with a fitness program if they set aside a specific
time of day to exercise. It doesn't matter whether it's in the morning before breakfast, during lunch hour or while
watching the evening news. What's more important is that it's a time that allows you to keep a schedule, and a
time when you won't be interrupted. Tobe successful with your fitness program, you have to make it a priority in
your life. So decide on a time, puff out your day planner and pencil in your exercise times for the next month!
HOWLONG?(Durationof Workouts)
For aerobic exercise benefits, it's recommended that you exercise from between 24 and 60 minutes per session.
But start slowly and gradually increase your exercise times. If you've been sedentary during the past year, it may
be a good idea to keep your exercise times to as tithe as five minutes initially. Yourbody will need time to adjust
to the new activity. If your goal is weight loss, a longer exercise session at lower intensities has been found to
be most effective. A workout time of 48 minutes or more is recommended for best weight loss results.
NOWNARD?(Intensityof Workouts)
flow hard you workout is also determined by your goals. If you use your treadmill to prepare for a 5tf run, you
will probably work out at a higher intensity than if your goal is general fitness. Regardless of your long term
goals, always begin an exercise program at low intensity. Aerobic exercise does not have to be painful to be
beneficial! Thereare two ways to measure your exercise intensity. Thefirst is by monitoring your heart rate (using
the grip pulse handlebars), and the second is by evaluating your perceived exertion level (this is simpler than
it sounds!).
PERCEIVEDEXERtiONLEVEL
A simple way to gauge your exercise intensity is to evaluate your perceived exertion level. While exercising, if you
are too winded to maintain a conversation without gasping, you are working out too hard. A good rule of thumb
is to work to the point of exhilaration, not exhaustion. If you cannot catch your breath, it's time to slow down.
Always be aware of these warning signs of overexertion.
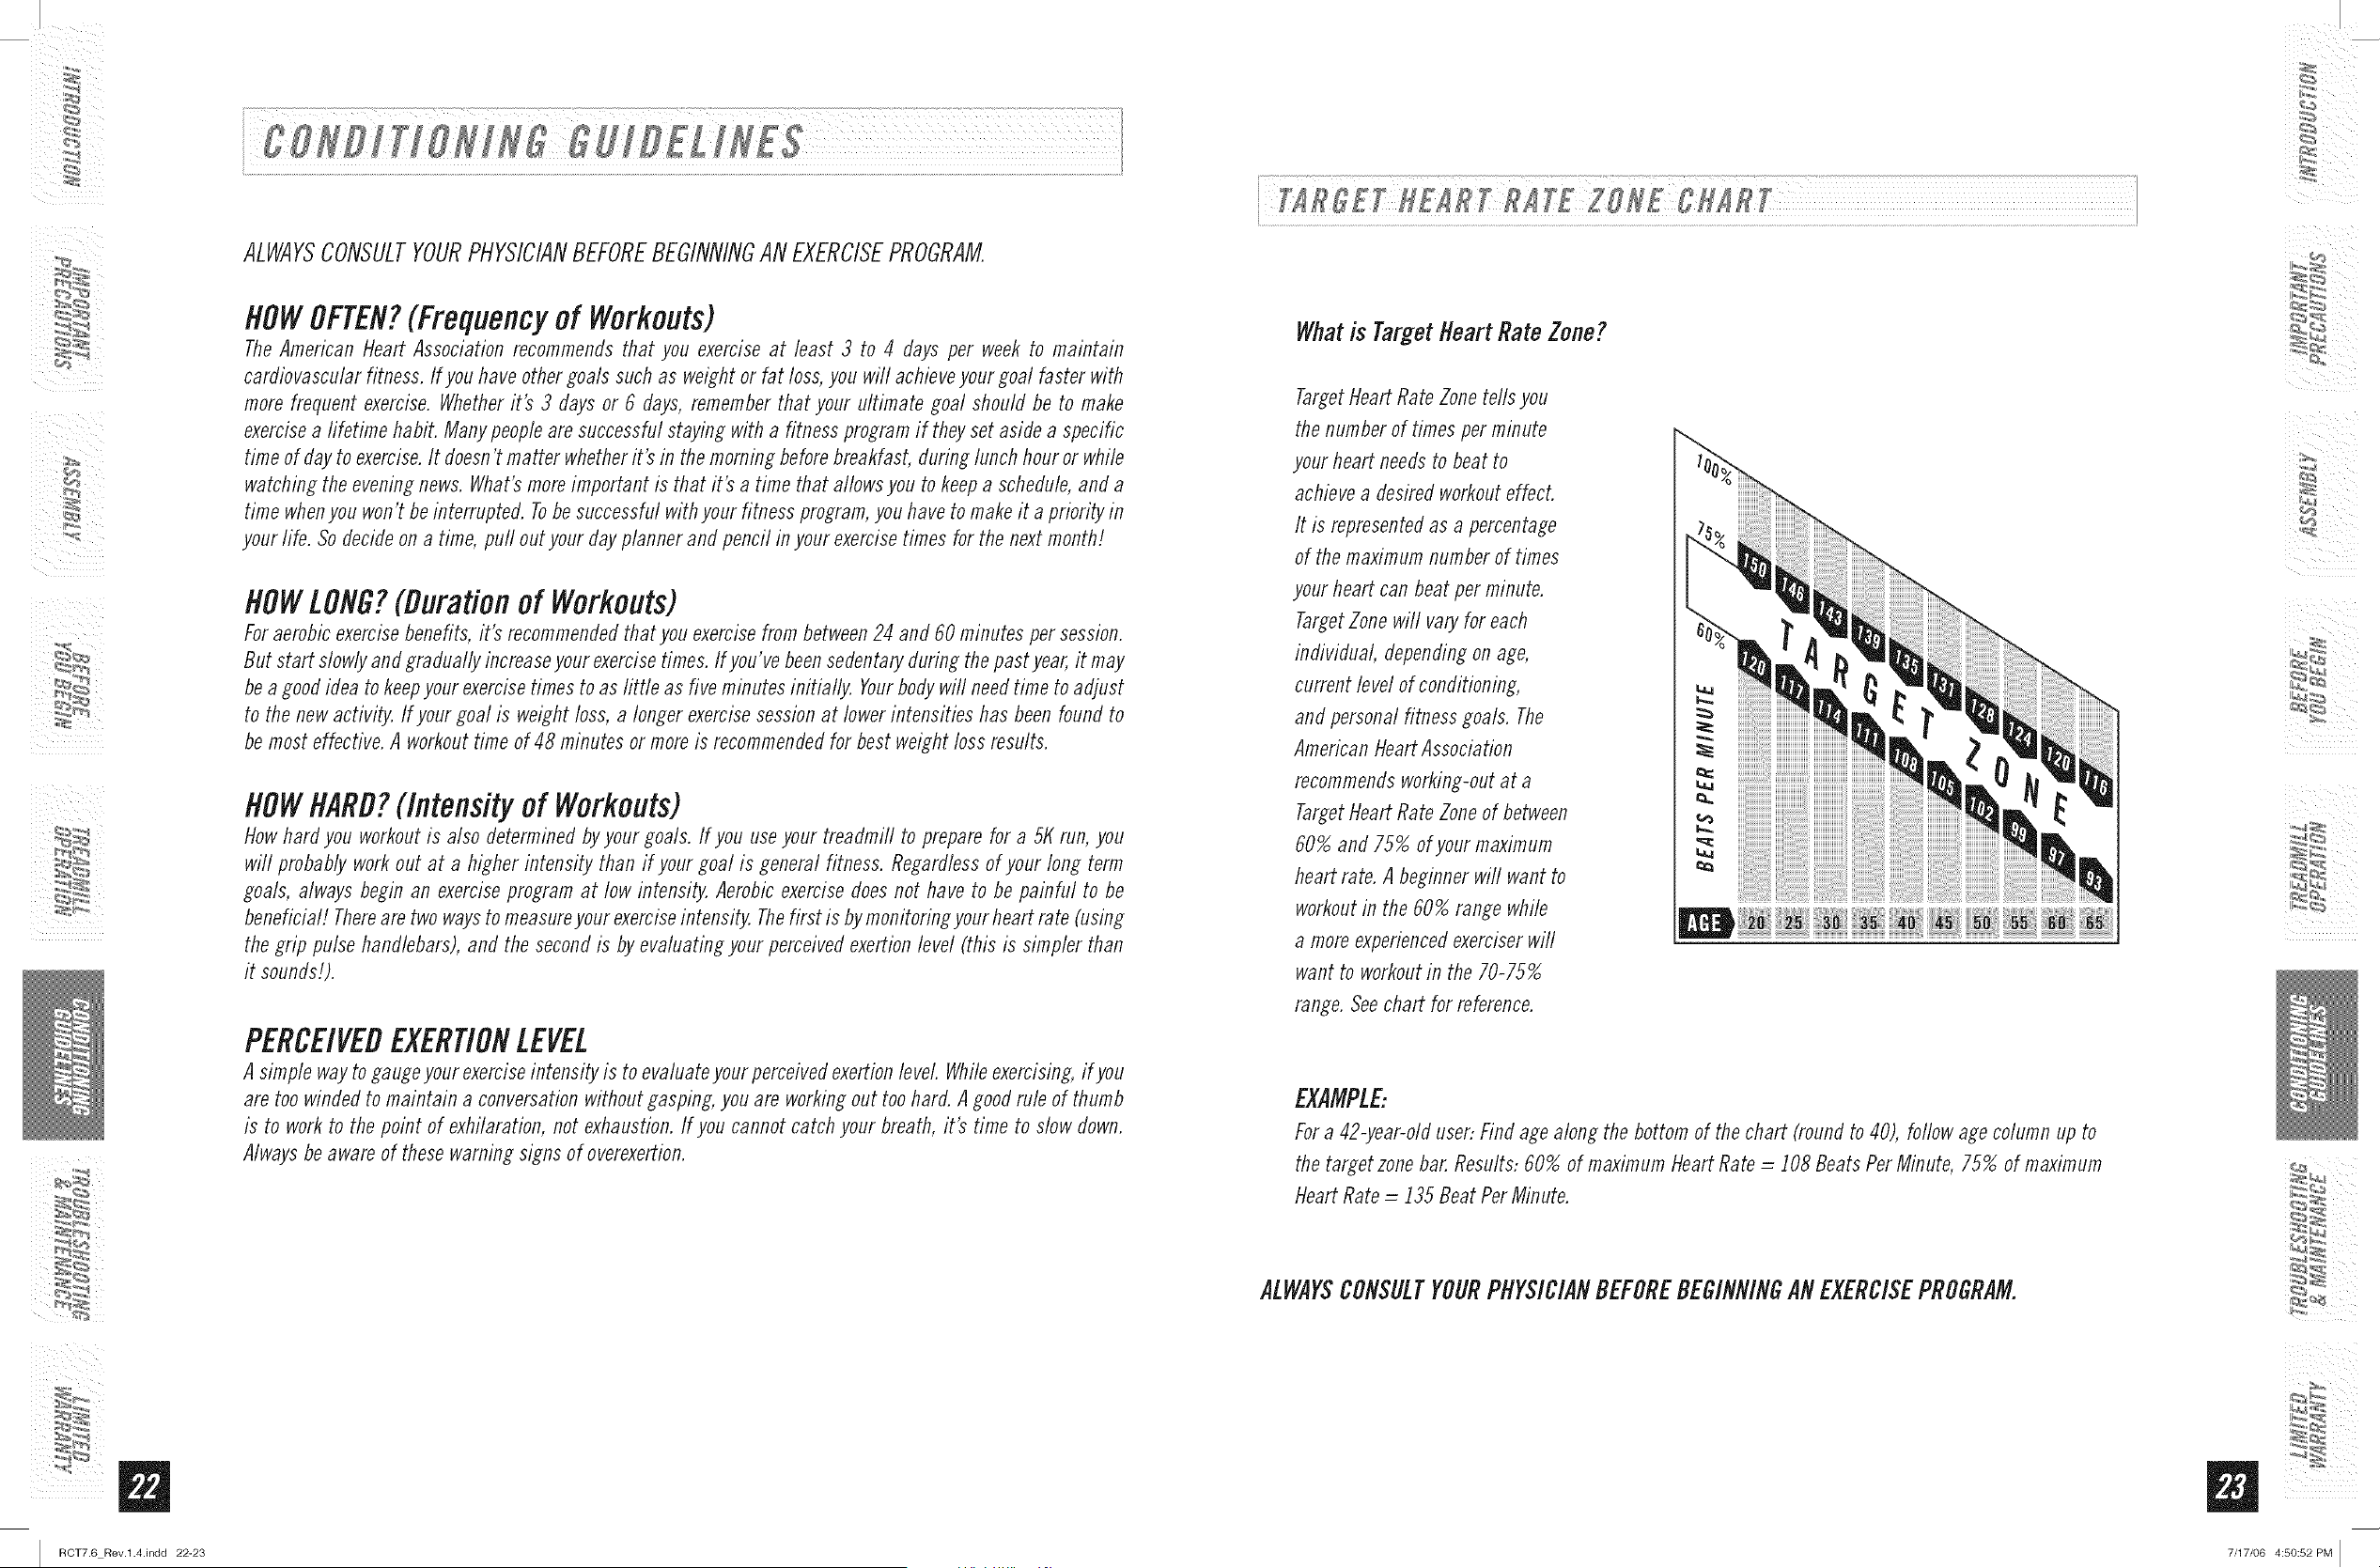
Whatis Target tteart Rate Zone?
Target Heart Rate Zone tells you
the number of times per minute
your heart needs to beat to
achieve a desired workout effect.
It is represented as a percentage
of the maximum number of times
your heart can beat per minute.
Target Zone will vary for each
individual depending on age,
current level of conditioning,
and personal fitness goals. The
American Heart Association
recommends working-out at a
Target Heart Rate Zone of between
60% and 75% of your maximum
heart rate. A beginner will want to
workout in the 60% range while
a more experienced exerciser will
want to workout in the 70-75%
range. See chart for reference.
EXAMPLE:
For a 42-year-old user: Find age along the bottom of the chart (round to 40), follow age column up to
the target zone bar. Results: 60% of maximum Heart Rate _i 108 Beats Per Minute, 75% of maximum
Heart Rate = 135 Beat Per Minute.
ALWAYSCONSULTYOURPHYSICIANBEFOREBEGINNINGANEXERCISEPROGRAM.
%_ _,4
7/17/06 4:50:52 PM I
/
m
I RCT7.6 Rev.l.4.indd 24-25
: :
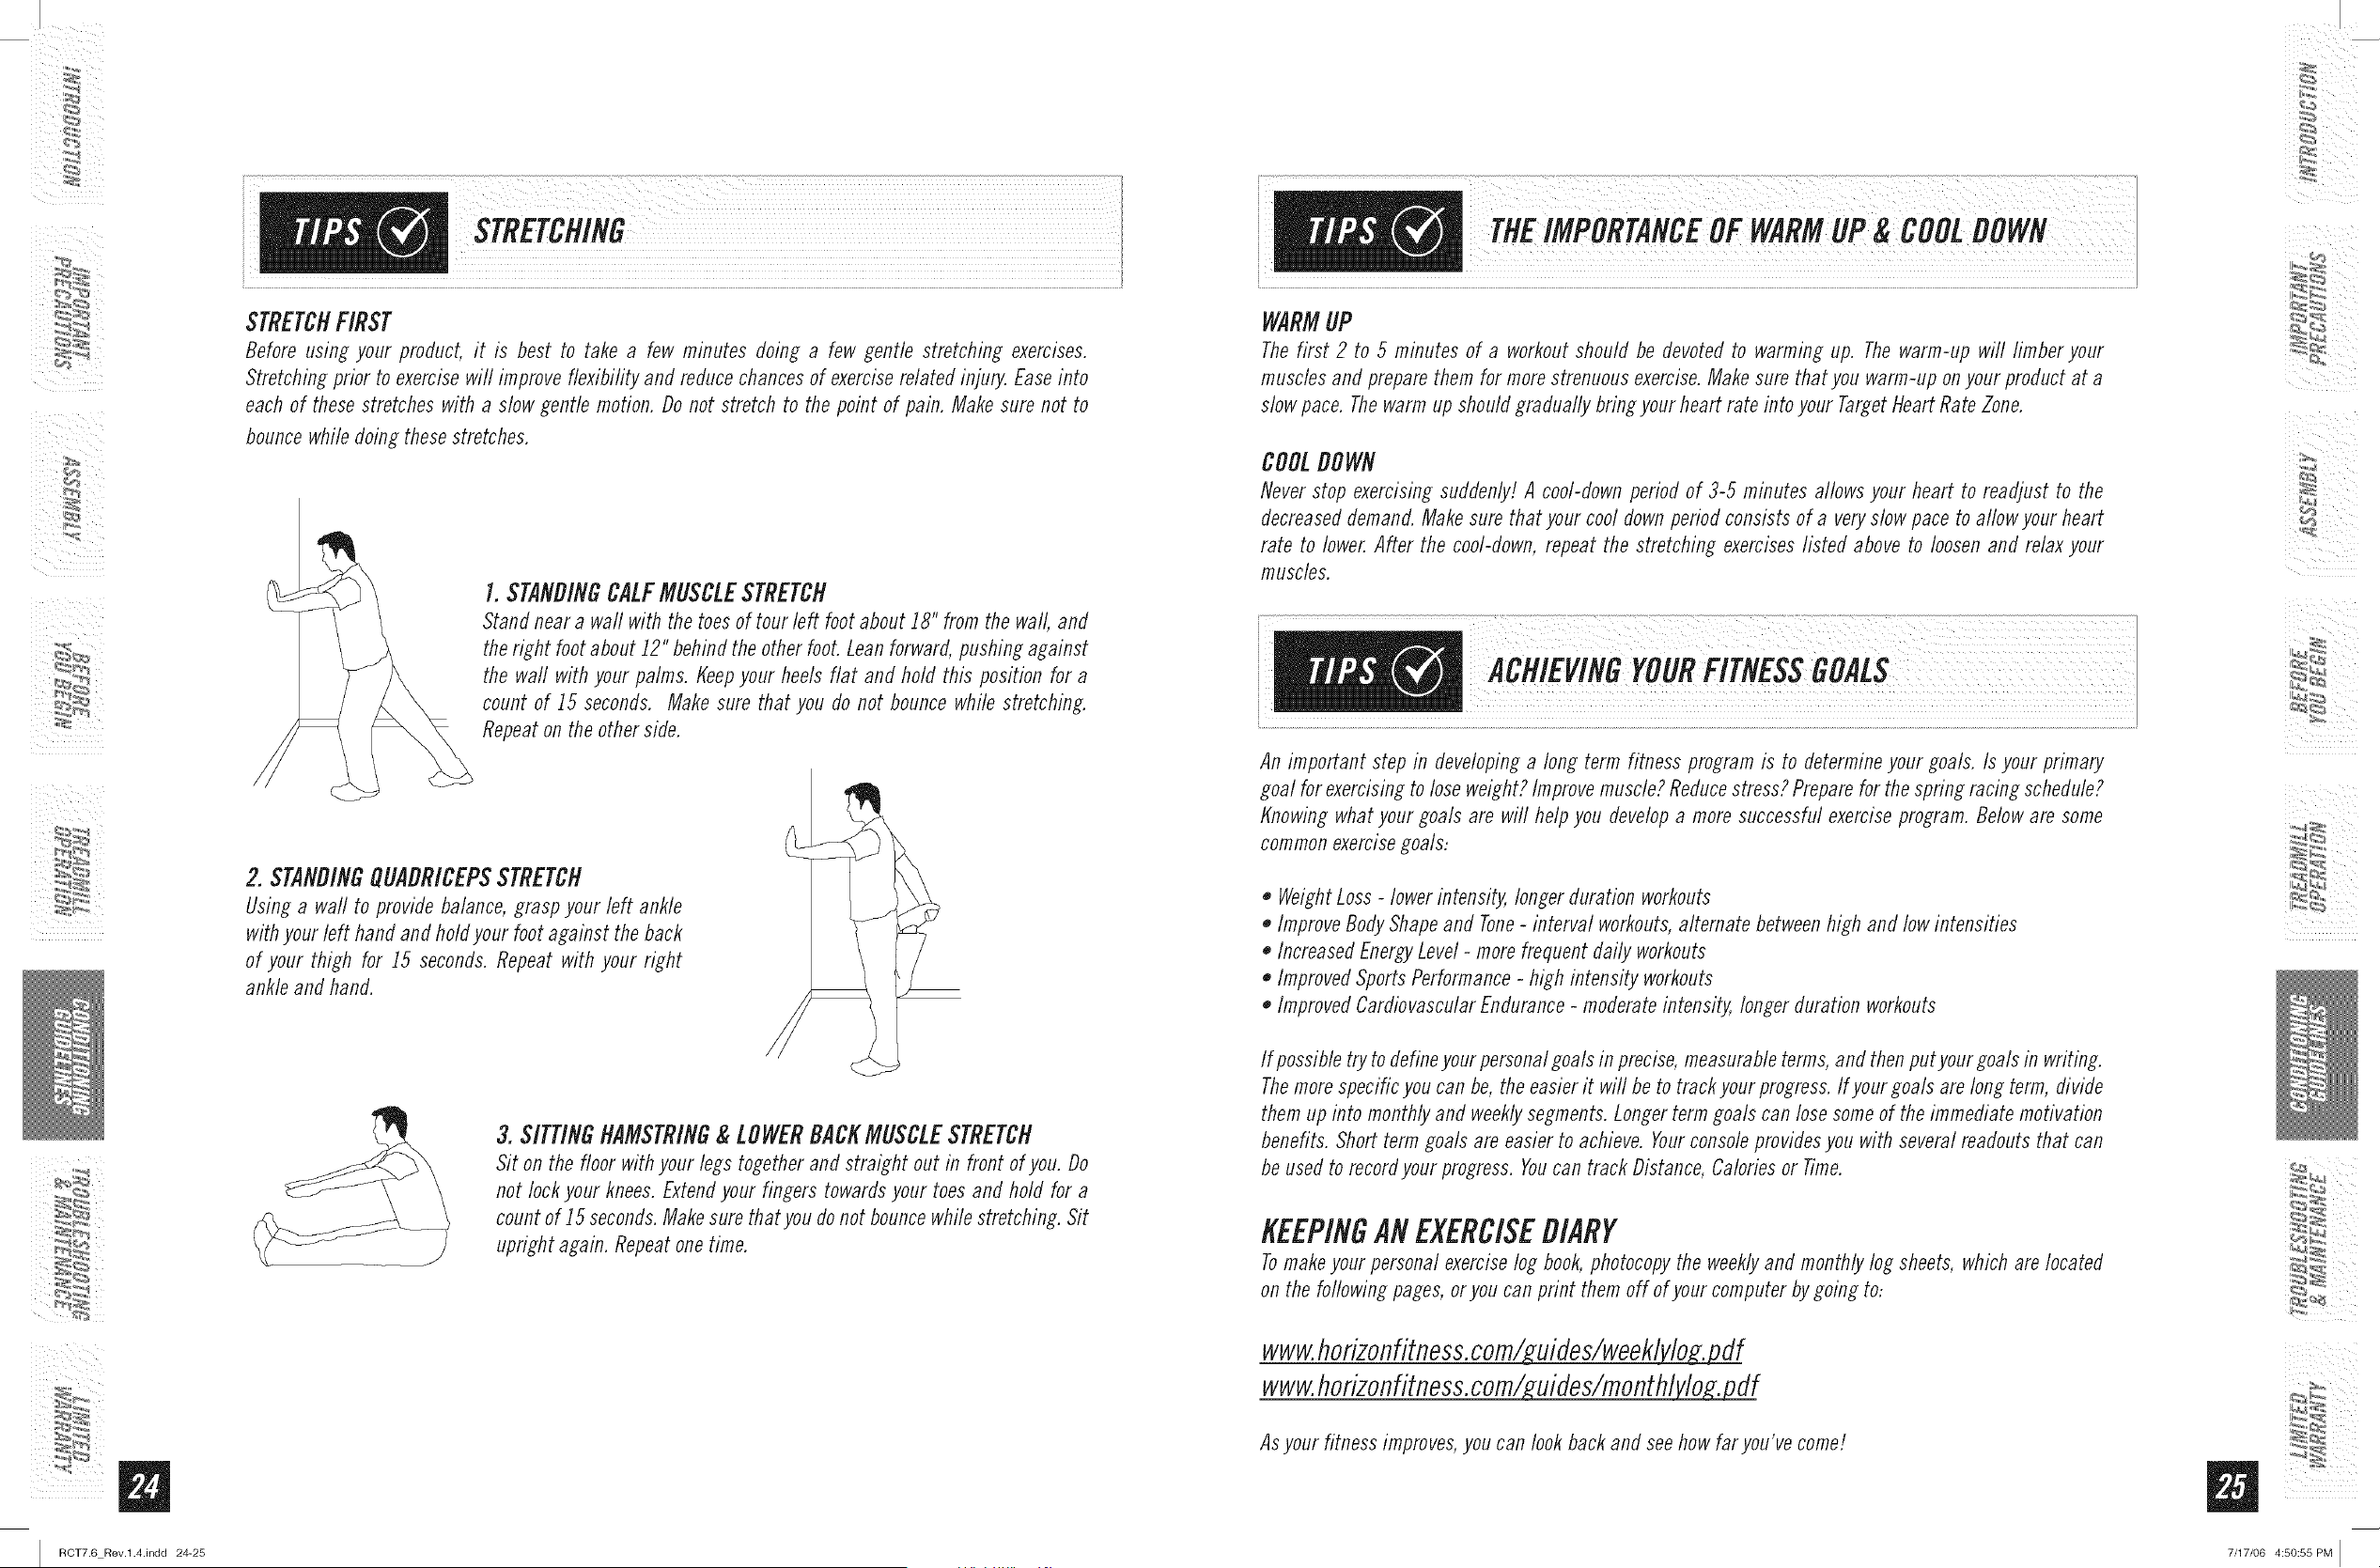
STRETCHFIRST
Before using your product, it is best to take a few minutes doing a few gentle stretching exercises.
Stretching prior to exercisewin improve flexibifity and reducechancesof exerciserelated injury. Easeinto
each of these stretches with a slow gentle motion. Do not stretch to the point of pain. Make sure not to
bouncewhile doing thesestretches.
I. STANDINGCALFMUSCLESTRETCH
Stanfl neara wall with the toesof tour left foot about 18" from the wall, and
theright foot about 12" behindthe other foot. Leanforward,pushingagainst
the waft with your palms. Keepyour heels flat and hold this position for a
count of 15 seconds. Make sure that you do not bounce while stretching.
Repeaton the other side.
2. STANDINGOUADRICEPSSTRETCH
Using a wall to provide balance, grasp your left ankle
withyour left hand and holdyour foot against the back
of your thigh for 15 seconds.Repeat with your right
ankle and hand.
3. SITTINGHAMSTRING& LOWERBACKMUSCLESTRETCH
Sit on the floor with your legs together and straight out in front of you. Do
not lock your knees.Extendyour fingers towardsyour toes and hold for a
count of 15 seconds.Makesure that you donot bouncewhile stretching. Sit
upright again. Repeatonetime.
WARMUP
Thefirst 2 to 5 minutes of a workoutshould be devoted to warming up. Thewarm-up will limber your
muscles and preparethem for morestrenuousexercise.Makesure that you warm-up onyour product at a
slow pace. Thewarm up should gradually bringyour heart rate into your TargetHeartRate Zone.
COOLDOWN
Never stop exercisingsuddenly! A cool-downperiod of 3-5 minutes allows your heart to readjust to the
decreaseddemand.Makesure that your cool downperiodconsists of a veryslowpace to al/owyour heart
rate to lower.After the cool-down, repeat the stretching exerciseslisted above to loosenand relax your
muscles.
An important step in developing a long term fitness program is to determine your goals. Is your primary
goal for exercising to lose weight? Improve muscle? Reduce stress? Prepare for the spring racing schedule?
Knowing what your goals are will help you develop a more successful exercise program. Below are some
common exercise goals:
o Weight Loss - lower intensity, longer duration workouts
o Improve Body Shape and Tone- interval workouts, alternate between high and low intensities
o Increased Energy Level - more frequent daily workouts
o Improved Sports Performance - high intensity workouts
o Improved Cardiovascular Endurance - moderate intensity, longer duration workouts
If possible try to define your personal goals in precise, measurable terms, and then putyour goals in writing.
The more specific you can be, the easier it will be to track your progress. If your goa/s are long term, divide
them up into monthly and weekly segments. Longer term goals can lose some of the immediate motivation
benefits. Short term goals are easier to achieve. Your console provides you with several readouts that can
be used to record your progress. Youcan track Distance, Calories or Time.
KEEPINGANEXERCISEDIARY
Tomakeyour personal exerciselog book,photocopythe weeklyand monthly log sheets, which are located
on the following pages,oryou can print them off of your computer bygoing to:
www.horizonfitness.corn/ uifles/weekMo.b_2 flf
www.horizonfitness,corn/guifles/monthl f
Asyour fitness improves,you can look backand seehow far you've come!
%_ _,4
7/17/06 4:50:55 PM I
WEEK# WEEKLYGOAL
DAY DATE DISTANCE CALORIES TIME COMMENTS
$UNDAY
MONDAY
TUESDAY
WEDNE$DAY
THURSDAY
FRIDAY
SATURDAY
WEEKLY TOTAL$ :
WEEK# WEEKLYGOAL
DAY DATE DISTANCE CALORIES TIME COMMENTS
SUNDAY
MONDAY
TUESDAY
WEDNESDAY
THUR$DAY
FRIDA Y
SATURDAY
WEEKLY TOTAL$ :
WEEK# WEEKLY GOAL
DAY DATE DISTANCE CALORIES TIME COMMENTS
SUNDAY
MONDAY
TUESDAY
WEDNESDAY
THUR$DAY
FRIDA Y
SATURDAY
WEEKLY TOTAL$ :
m
RCT7.6 Rev.l.4.indd 26-27
MONTH MONTHLY GOAL
WEEK # DIS TANCE CALOEIES TIME
MONTHLY TOTALS:
MONTH MONTHLY GOAL
WEEK # DIS TANCE CALOEIES TIME
MONTHLY TOTALS:
%_ __,4
MONTH MONTHLY GOAL
WEEK # DIS TANCE CALOEIES TIME
MONTHLY TOTALS:
_ii_ii_i!iii_iI_II
7/17/06 4:50:56 PM [
i_i i I
ii_ i i
m
I RCT7.6 Rev.l.4.indd 28-29
COMMONPRODUCTQUESTIONS
ARETHESOUNDSMYTREADMILLMAKESNORMAL?
All treadmills make a certain type of thumping noise due to the belt riding over the rollers, especially new
treadmifls. This noise will diminish over time, although may not totally go away. Over time, the belt will stretch,
causing the belt to ride smoother over the rollers.
WHYIS THETREADMILLI PURCHASEDLOUDERTHANTHEONEAT THESTORE?
All fitness products seem quieter in a large store showroom because there is generally more background noise
than in your home. Also, there wifl be less reverberation on a carpeted concrete floor than on a wood overlay floor,
Sometimes a heavy rubber mat wifl help reduce reverberation through the floor, If a fitness product is placed close
to a wall, there wifl be more reflected noise.
WHENSHOULDI BE WORRIEDABOUTA NOISE?
As long as the soundsyour treadmill makesare no louder than a normal conversationaltone of voice,it is
considered normal noise.
TROUBLESHOOTING-TREADMILL
Your treadmill is designed to be reliable and easy to use. However, if you experience a problem, please reference the
troubleshooting guide listed below.
PROBLEM: Theconsoledoes not light up and/or the belt does not move,
SOLUTION:Verifythe following:
DOESTHEREDLIGHTONTHEOH/OFFSWITCHLIGHTUP?
IF YES:
• Double check that all connectionsare secure, especially the consolecable, Unplug and reconnect the console
cable to verify.
• Make sure the console cable is not pinched or damagedin any way.
Turnthe poweroff, Lmplugthe powercable and wait 60 seconds,Removemotorcover, Waituntil aft red LEDlights
have gone off on the motor control board before proceeding,Next, verify that none of the wires connected to the
lower board are looseor disconnected.
IF NO"
Verifythat the outlet the machine is plugged into is functional, Doublecheck that the breakerhas not tripped, it is
on a dedicated 20-amp circuit, it is not on a GFCIequippedoutlet, and it is not plugged into a powerstrip/surge
protector or extensioncord.
• Thepower cord is not pinched ordamaged and is properlyplugged into the outlet ANDthe machine,
• Thepower switch is turned to the ONposition,
PROBLEM:Thetreadmill circuit breakertrips during a workouL
SOLUTIdlI:Verifythe foflowing:
e Make sure the treadmill is plugged into a dedicated 20-amp cirouiL
• Verifythatyou do not have the machine on an extension cord orsurge protectd:
• Confirm that the machine is not plugged into a GFCI-equipped outlet or on a circuit that has a GFCI-equippefloutlet on
it.
PROBLEM:Therunning belt does not staycentered during a workouL
SOLUTJON:Verifythe following:
• Make sure the treadmill is on a level surface.
• Verifythat the belt is properly tightened and centered (Refer to the Adjustment section for detailed directions).
PROBLEM:Operating speed appears inaccurate.
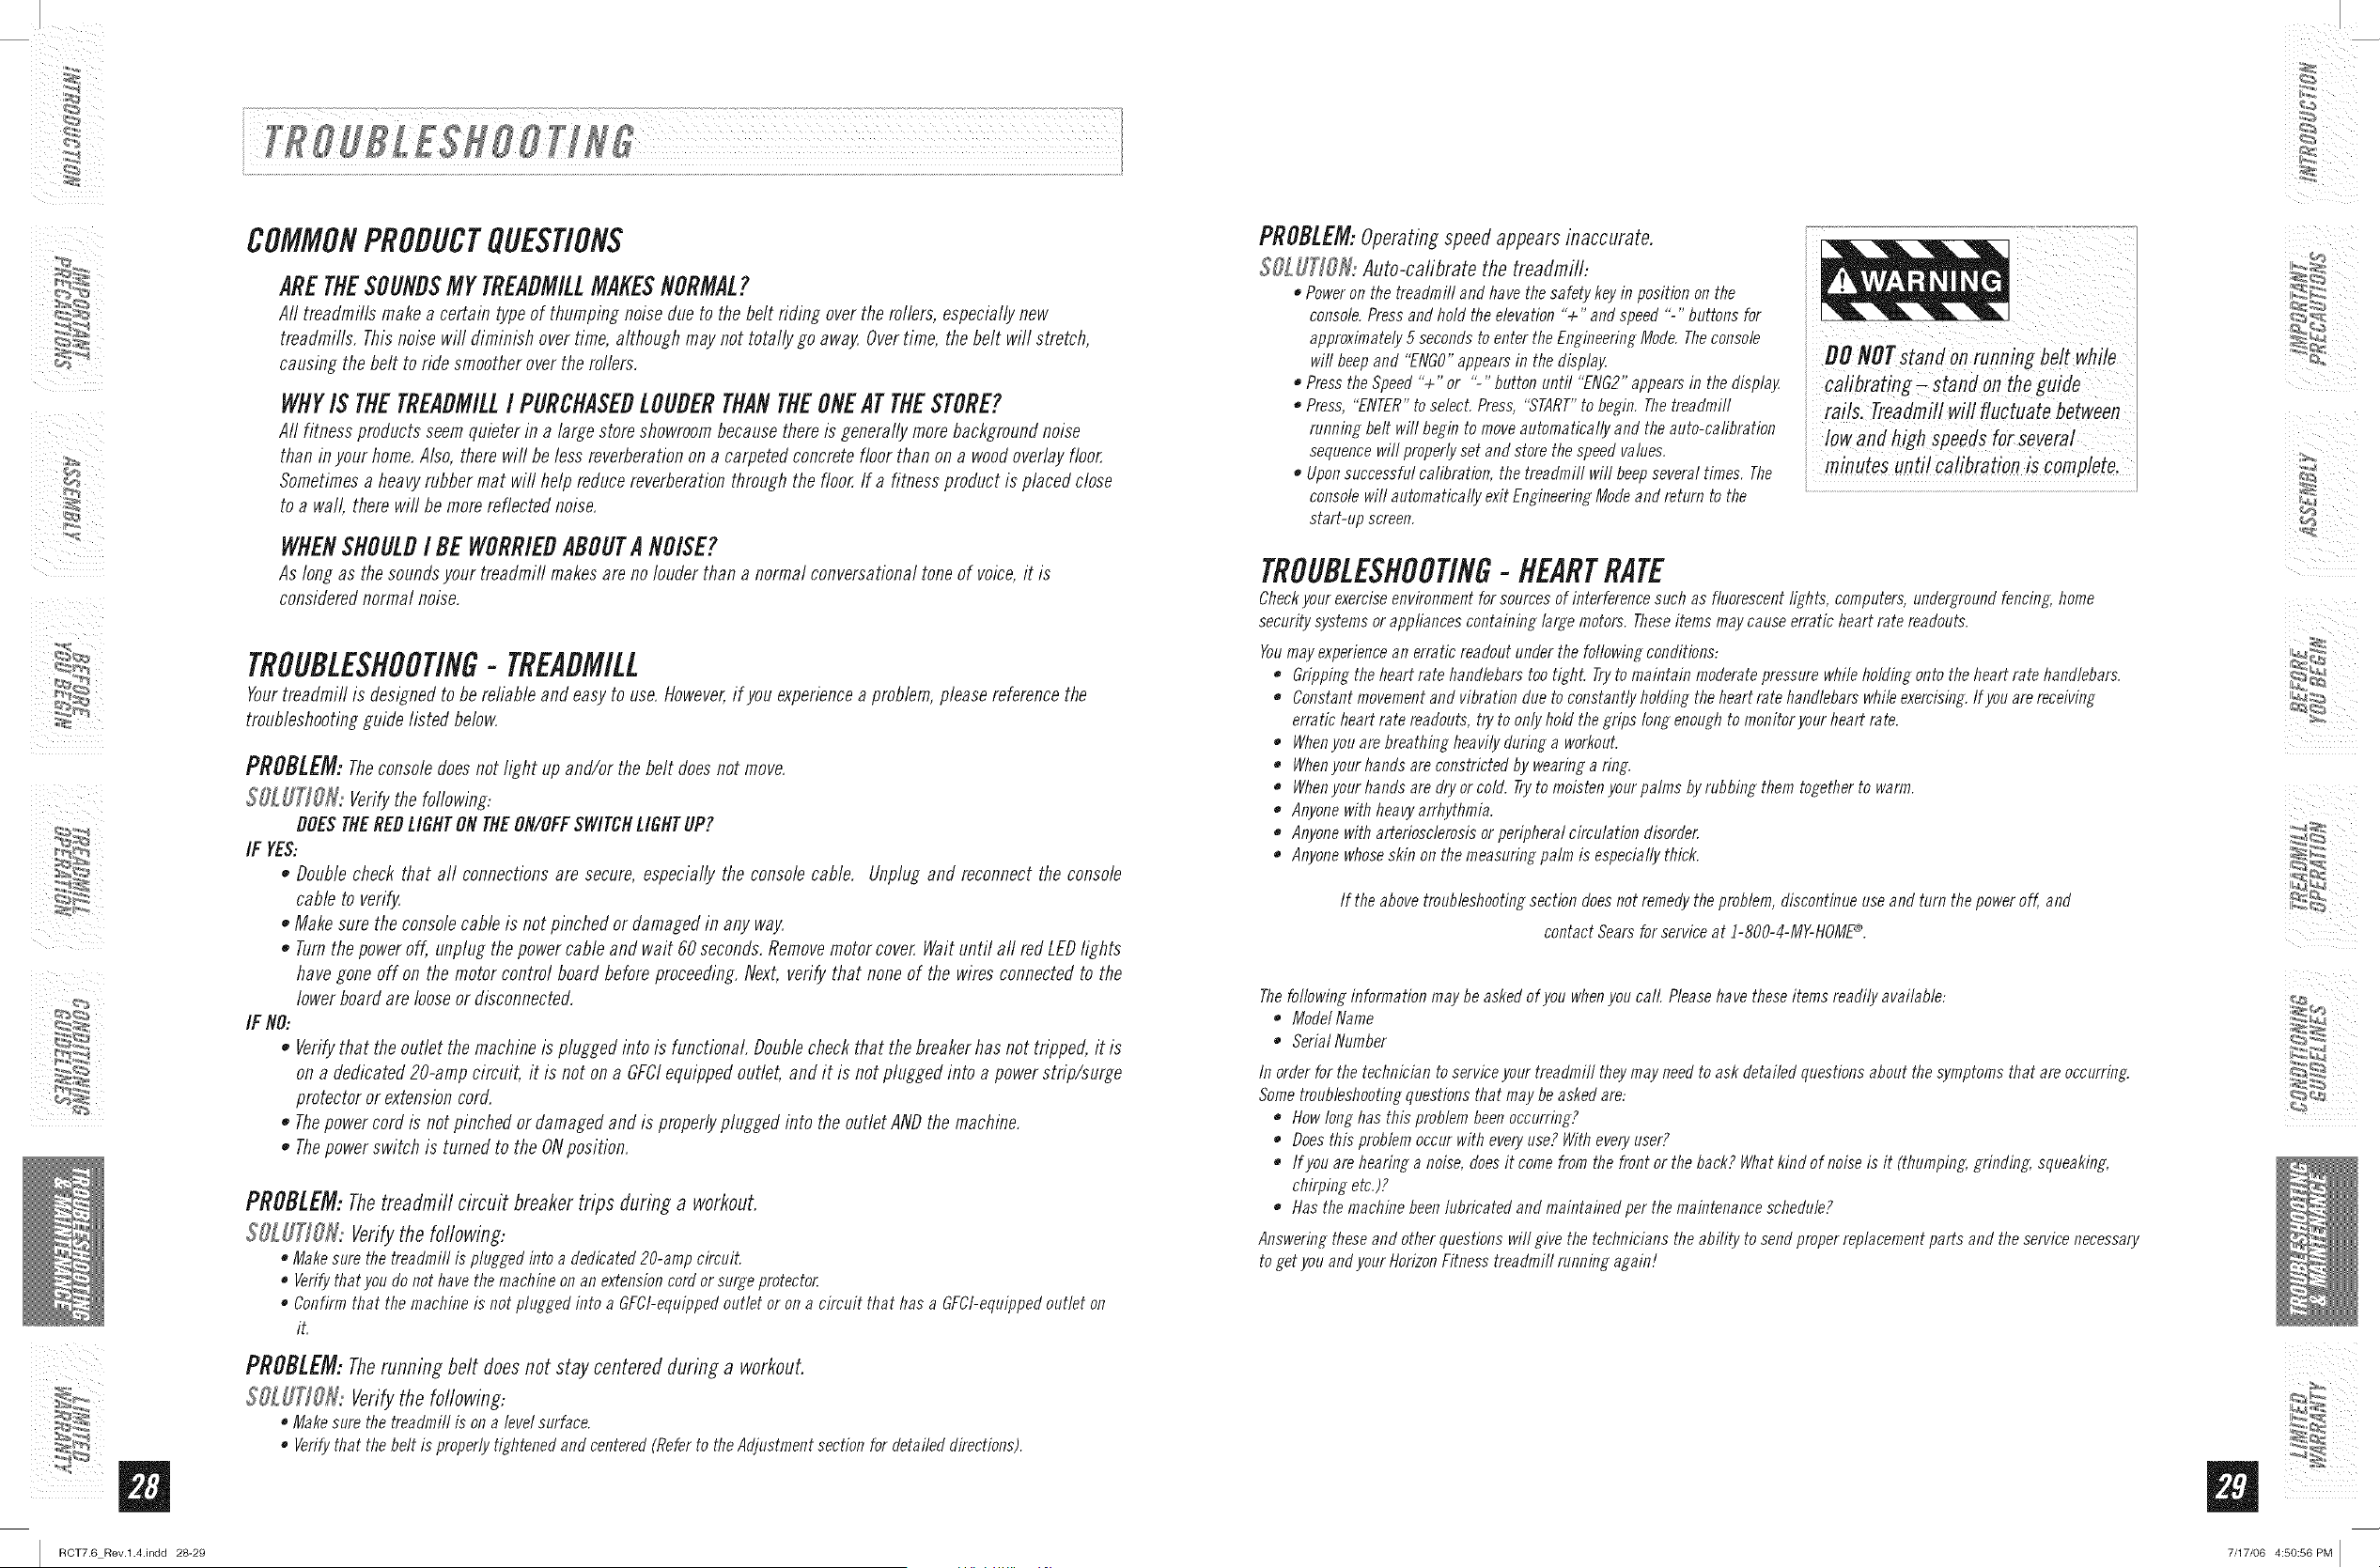
$OLUT]SN: Auto-cafibrate the treadmill:
• Poweron the treadmill and have the safety keyin position on the
console. Press and hold the elevation "+" and speed "-" buttons for
approximately 5 seconds to enter the Engineering Mode. Theconsole
will beep and "ENGO"appears in the display.
• Press the Speed "+" or "-" button until "ENG2" appears in the display.
• Press, "ENTER"to select. Press, "START"to begin. Thetreadmill
running belt will begin to move automatically and the auto-calibration
sequence wilt properly set and store the speed values.
e Upon successful calibration, the treadmill wilt beep several times. The
console will automatically exit Engineering Mode and return to the
start-up screen.
iii
DONOrsiandonru'ningbeit hiie
ca!ibrating- stand on the guide
rails. Treadmillwifl fluctuate between
a,ihighSpee sfor=evera!
minutesunti! Calibrationis complete,
TROUBLESHOOTING- HEARTRATE
Checkyour exerciseenvironment for sources of interference such as fluorescent lights, computers, undergroundfencing, home
security systems or appliances containing large motors. Theseitems may cause erratic heart rate readouts.
Youmay experiencean erratic readout under the following conditions:
e Gripping the heart rate handlebars tootighL Tryto maintain moderate pressure while holding onto the heart rate handlebars.
e Constant movementand vibration due to constantly holding the heart rate handlebars while exercising.If you are receiving
erratic heart rate readouts, try to only hold the grips tong enough to monitor your heart rate.
• Whenyou are breathing heavily during a workout.
• Whenyour hands are constricted by wearing a ring.
• Whenyour hands are dry or cold. Tryto moisten your palms byrubbing them together to warm.
e Anyone with heavyarrhythmia.
e Anyone with arteriosclerosis or peripheral circulation disorder
• Anyonewhoseskin on the measuring palm is especially thick.
If the above tmubbshooting sectbn doesnot remedy the problem, discontinue use and turn the power off, and
contact Sears for service at !-800-4-MY-HOME®.
Thefotbwing information may be asked of you whenyou call Pleasehave these items readily available..
• MofletName
• SeriatNumber
In order for the technician to serviceyour treadmill theymay need to ask detailed questions about the symptoms that are occurring.
Some troubleshooting questions that may beasked are..
e How tong has this problem been occurring?
• Does this problem occur with everyuse? With everyuser?
If you are hearing a noise, does it come from the front or the back? What kind of noise is it (thumping. grinding, squeaking,
chirping etc.)?
e Has the machine been lubricated and maintained per the maintenance schedule?
Answering these and other questions will give the technicians the ability to send proper replacement parts and the service necessary
to get you and your HorizonFitness treadmill running again!
%_ _,4
i i
7/17/06 4:50:56 PM [

i_i i I
ii_ i i
Cleanliness of your treadmill and its operation environment will keep maintenance problems and service calls to a
minimum, For this reason, werecommendthat the following preventive maintenanceschedulebe followed,
AFTEREACHUSE(BMLY)
Cleanand inspect, following these steps:
• Turnoff the treadmill with the on/off switch, then unphig the powercord at the waft outlet.
• Wipedown the running belt, deck, motor cover,and console casing with a damp cloth, Never use solvents, as they
can cause damage to the treadmill
• Inspect the power cord.Replacethe power cord if damaged.
• Make sure the power cord is not underneaththe treadmifl or in anyother area whereit can becomepinched or cut.
• Checkthe tension and alignment of the running belt. Make sure that the treadmill belt will not damage any other
componentson the treadmifl by being misaligned.
EVERYWEEK
Cleanunderneath the treadmill followiM these steps:
Turnoff the treadmill with the on/off switch, then unphlg the powercord at the waft outlet.
Fold the treadmifl into the upright position, making sure that the lock latch is secure,
• Move the treadmill to a remotelocation,
• Wipeorvacuum anydustparticles orotherobjects thatmayhave accumulatedunderneaththe treadmill.
Return the treadmifl to its previous position,
i Turnoff the treadmi!! withthe on/offswitc h,then unplug the powerCordat the wa!! outlet;
i "lnspecta!!assemblyb°!tsofthemachinef°rPropertigfitness'
Turnoff the treadmill and wait 6Oseconds,
Removethein io CoVe Wait"niilALLLfDiightst rnoff.
' clean the motoranfl!ower board areatoe!iminateany tint or dust partMes that maybaveaccumu/atefl, Failure to
dOso mayresu!t in premature fai!ure of key eiectfica/ Components,
,Vacuum and wipe down the beit with a damfi Cloth, VaCuumany biaCk/wMtePartic!es that may accumulate around
i theunit, Theseparticlesmayaccumulatefromnormaltreafimilluse,
EVERY6 MONTHSOR 150MILES
It is necessaryto lubricate your treadmifl running deck everysix months
or ]50 miles to maintain optimal performanceof your treadmill Oncethe
treadmifl reaches]50 miles, the console wifl prompt you to hlbricate the
treadmifl, Onlyuselubricant designatedfor treadrnifls; available bycalfing
Searsat ]-800-4-MY-HOME®,
TURNOFF THE TREADMILLwith the on/off switch, then unphig the
power cord at the wall outlet.
Loosenboth the rear ruderbolts, (Forbest results, place tworemovable
marks on both sides of the frame and note roller position), Once
the belt is loosened,take the bottle of hlbricant and apply it to the
entire top surface of the running deck, Tightenboth rear ruder bolts
(matching tip the marks for properposifion) to original position, After
you have applied lubricant, phig in the power cord, insert the safety
key,start the treaflmifl and walk on the belt for two minutes to spread
the lubricant.
Lubricate the air shocks with Teflonbased spray,
• Oncelubrication is complete, resetthe consoleby pressingand holding
'STOP'and SpeedV' buttons for 5 seconds.
NOTE: The Treadmill will not operate whenthe message is showing.
Youmay holdSTOPfor 5 secondsto suspendmessage for 5 miles.
RUNNINGBELT
RUNNINGBECK
OneFearLimited Warranty
Whenassembled,operatedand maintained accordingto all instructions supplied with the product, if this
Treadmillfails due to a defect in material or workmanshipwithin oneyear from the date of purchase,call
]-800-4-MY-dOME® to arrange for freerepair.
AdditionalLimited Warrantyon Specific Parts
From the date of purchase for the time periods listed below,the following specific parts will be supplied
free of charge if they fail due to a defect in material or workmanship.After the first year from the date of
purchase,youpay for labor to have them installed.
o Twelve Years:Motor
o Lifetime: Frame
All warrantycoverageis voidif this product is ever usedfor other than private householdpurposes.
Thiswarranty givesyou specific legal rights, and you may also have other rights which vary from state to
state.
Sears,Roebuckand Co.,ttoffman Estates,IL60179
%_ _,4
RCT7.6 Rev.l.4.indd 30-31 7/17/06 4:50:57 PM ]

Your Home
For repair-in your home-of all major brand appliances,
lawn and garden equipment, or heating and cooling systems,
no matter who made it, no matter who sold it!
For the replacement parts, accessories and
owner's manuals that you need to do-it-yourself.
For Sears professional installation of home appliances
and items like garage door openers and water heaters.
1-800-4-MY-HOME ® (1-800-469-4663)
Call anytime, day or night(U.S.A, and Canada)
Our Home
For repair of carry-in items like vacuums, lawn equipment,
and electronics, call or go on-line for the location of your nearest
iiiiiiiiiiiiiiiii Sears Parts & Repair Service Center
iiiiiiiiiiiiiiiii 1-800-488-1222
iiiiiiiiiiiiiiiii Call anytime, day or night (U.S.A. only)
iiiiiiiiiiiiiiiii www.sears.com
iiiiiiiiiiiiiiiii
iiiiiiiiiiiiiiiii To purchase a protection agreement (U.S.A.)
iiiiiiiiiiiiiiiiior maintenance agreement (Canada)on a product serviced by Sears:
iiiiiiiiiiiiiiiii 1-800-82"7=6655 (U.S.A.) 1-800-361-6665 (Canada)
Parapedirserviciodereparacidn AuCanadapourserviceenfrangais:
_iiiii a domicilio, y para ordenar piezas: 1-800-LE-FOYER M°
(1-800-533-6937)
www.sears.ca
¸¸¸¸?¸?¸?¸¸;¸;¸;¸;¸;¸;¸;¸;¸;¸;¸;¸2¸¸¸
1-888-SU -HOGAR ®
(1-888-784-6427)
Sears
TM
® Registered Trademark / ' Trademark / sM Service Mark of Sears Brands, LLC
SM
® Marca Registrada / TM Marca de Fabrica / Marca de Servicio de Sears Brands, LLC
_# Marque de commerce / M_Marque d_posee de Sears Brands, LLC
RCTZ6Rev.1.4 I © 2006 HorizonFitnessProductsI Designed& Engineeredin the U.S,A.I Madein China
© Sears Brands, LLC
I RCT7.6 Rev.l.4.indd 32 7/17/06 4:50:57 PM I