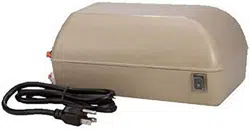
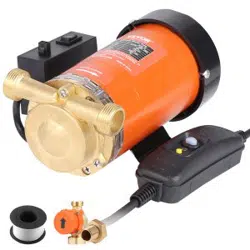
USER MANUAL Orbit 92100 Arizona Mist Booster Pump
USER'S GUIDE
WARNING: Read all instructions carefully before installing
Thank you for selecting the quality of Orbit® and the Misting Booster Pump. This pump works with your ⅜-in mist cooling system, increasing the line pressure up to 160 PS
WARNINGS
- THIS PUMP IS NON-SUBMERSIBLE
- Risk of electric shock. This pump is supplied with a grounding conductor and grounding type attachment plug. To reduce the risk of electric shock, be certain that it is connected only to a properly grounded, grounding type receptacle.
- This pump is for use indoors or outdoors with cold water only.
NOTE: Orbit® mist systems are for outdoor use only.
CAUTIONS
- Optimal water inlet pressure is 40 PSI
- Maximum working pressure is 160 PSI
- Install with all electrical components above ground and with the properly grounded electrical outlets.
- Unplug the pump before servicing this unit
- Do not use with flammable liquids
- This pump has been evaluated for use with cold water only
- A pressure reducer is strongly recommended if your standard hose faucet pressure is greater than 40 PSI
INSTALLATION
1. Determine the location of the pump before proceeding. Consider your water and power locations and locate the pump within range of both resources
NOTE: This pump should be securely fastened to a fixed post or wall. Be sure to use appropriate wall anchors when fastening to a stucco wall.
2. Remove the clips on each port. 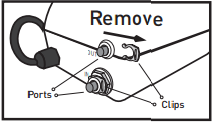
3. Press down on the inner ring and pull out the temporary plug. 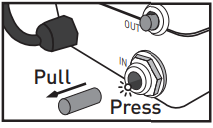
NOTE: Plug shapes may differ from that shown in the illustration
4. Insert the appropriate supply line into each port.
NOTE: The inlet and outlet ports are clearly marked to ensure the lines are installed correctly.
5. Connect the other end of the inlet line to your water source.
NOTE: For optimal performance, install a calcium inhibitor filter (Model 10109W) between the pump and the water source. Run water through the filter for at least 2 minutes before connecting to the pump. This will flush any debris that may be in the filter.
6. Turn on the water source to ensure water pressure to the pump.
7. Connect the pump to the power supply.
8. Switch the pump to the ON position.
NOTE: The power switch is located on the side of the housing.
OPERATING TIPS
- Before operating the system, be sure the outlet pressure (mist line) is relieved to prime the pump.
- The booster pump is not equipped with an automatic valve. When shutting down the system, the water source must be turned off to keep the system from running at line pressure.
NOTE: This pump is fitted with a thermal protection switch that will prevent the unit from damage due to overheating. This switch is automated and will shut the pump off prior to any internal damage to the unit. Operation will typically resume within one hour of automatic shut-off.
- Test the Ground Fault Circuit Interrupt plug before each use
- Plug into receptacle
- Press RESET button: Indicator should be ON
- Press TEST button: Indicator should be OFF
- Press RESET button for use. Do not use if test fails
WARRANTY AND STATEMENT
Orbit® Irrigation Products, Inc. warrants to its customers that its Orbit® products will be free from defects in materials and workmanship for a period of four years from the date of purchase. We will replace, free of charge, the defective part or parts found to be defective under normal use and service for a period of up to four years after purchase (proof of purchase required). We reserve the right to inspect the defective part prior to replacement. Orbit® Irrigation Products, Inc. will not be responsible for consequential or incidental cost or damage caused by the product failure. Orbit® liability under this warranty is limited solely to the replacement or repair of defective parts.
Questions please call: 1-800-488-6156 or 1-801-299-5555 www.orbitonline.com
GUÌA DEL USUARIO
ADVERTENCIA: Lea todas las instrucciones atentamente antes instalar.
Gracias por elegir la calidad de Orbit® y el Bomba Auxiliar de Nebulización. Esta bomba trabaja con su sistema de nebulización refrescante de ⅜ in, aumentando la presión de la tubería a 160 PSI.
ADVERTENCIA
- ESTA BOMBA NO ES SUMERGIBLE.
- Riesgo de electrocución. Esta bomba incluye un conductor a tierra y una toma con bajada a tierra. Para reducir el riesgo de electrocución, asegúrese de que la bomba está conectada a una toma apropiada con cable a tierra.
- Esta bomba es para uso exclusivo en la intemperie o interior y con agua fría.
NOTA: Los sistemas de nebulización de Orbit® son para uso en exteriores únicamente.
PRECAUCIONES
- La presión de entrada de agua óptima es 2,8 bar.
- La máxima presión de trabajo es 160 PSI
- Instalar con todas las partes eléctricas sobre la tierra y con tomas eléctricas con bajada a tierra apropiada.
- Desenchufar el equipo antes de realizar un mantenimiento.
- No utilizar líquidos inflamables.
- Esta bomba ha sido evaluada para uso con agua fría exclusivamente.
- Se recomienda fuertemente un reductor de presión si la presión del grifo de su manguera estándar es mayor a 2,8 bar
INSTALACIÓN
1. Decidir la ubicación de la bomba antes de proceder. Considerar la ubicación del agua y la electricidad y colocar la bomba dentro del alcance de ambas fuentes.
NOTA: Esta bomba debe ser asegurada a un poste fijo o una pared. Para sujetarla a una pared de estuco, utilice el tipo adecuado de ancla de pared.
2. Retire el sujetador de cada puerto.
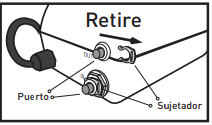
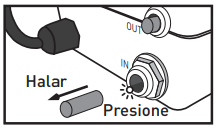
3. Presione hacia abajo el aro interno, hale el tapón temporal.
NOTA: La forma de los tapones puede ser diferente de la que se muestra en la ilustración.
4. Inserte la tubería de suministro adecuada en cada puerto.
NOTA: Los puertos de entrada y salida están marcados claramente para asegurar la correcta instalación.
5. Conecte el otro extremo de la tubería de entrada a su toma de agua.
NOTA: Para un desempeño óptimo, instale un filtro para inhibir calcio (Modelo 10109W) entre la bomba y la toma de agua. Deje pasar agua a través del filtro durante al menos 2 minutos antes de conectar a la bomba. Esto purgará cualquier desecho que pudiera encontrarse en el filtro.
6. Abra el suministro de agua en la toma para proporcionar presión de agua en la bomba.
7. Conecte la bomba a la toma de electricidad.
8. Colocar la bomba en la posición ON.
NOTA: El interruptor de corriente se encuentra en el costado de la carcasa.
CONSEJOS PRÁCTICOS PARA EL FUNCIONAMIENTO
- Verificar que la presión de salida sea liberada para cebar el bombeo.
- La bomba de refuerzo no cuenta con una válvula automática. Cerrar la fuente de agua al apagar el sistema para evitar que siga funcionando a presión de línea.
NOTA: Esta bomba está equipada con un interruptor de protección térmica que impide que la unidad se dañe por sobrecalentamiento. Dicho interruptor es automático y cierra la alimentación de la bomba antes de que se produzca cualquier daño interno a la unidad. En general, la operación se reanuda dentro del lapso de una hora a partir del apagado automático.
- Pruebe el tapón del interruptor de circuito por falla de conexión a tierra antes de cada uso.
- . Enchufe en el receptáculo.
- Presione el botón RESET (reinicio). El indicador debe estar en ON (encendido).
- Presione el botón en TEST (prueba). El indicador debe estar en OFF (apagado.
- Presione el botón RESET (reinicio) para usar. No utilice si la prueba no es satisfactoria.
GARANTÍA Y DECLARACIÓN
Orbit® Irrigation Products, Inc. garantiza a sus clientes que sus productos Orbit® no tendrán defectos en los materiales ni en la mano de obra durante un período de cuatro años a partir de la fecha de compra. Reemplazaremos, sin cargo, la(s) pieza(s) defectuosa(s) en condiciones de uso y servicio normales durante un período de hasta cuatro años después de la compra (se requiere comprobante de compra). Nos reservamos el derecho de inspeccionar la pieza defectuosa antes de reemplazarla. Orbit® Irrigation Products, Inc. no se responsabilizará por los daños o costos accidentales o resultantes ocasionados por la falla del producto. La responsabilidad de Orbit® en virtud de esta garantía se limita únicamente al reemplazo o reparación de las piezas defectuosas.
Si tiene preguntas, llame al: 1-800-488-6156 o 1-801-299-5555 www.orbitonline.com