®
DRYER
Use & Care Guide
SECADORA
Manual de Uso & Mantenim lento
Ill
Z
63
r'-
03
:3::
IT!
O3
Z_
O
r-
Sears, Roebuck and Co., Hoffman Estates, IL 60t 79 U.S.A.
www.sears,oom
PIN 13t 823700 (990t)
Table of Contents
Product Record ..................................................;........................2
Dryer Warranty .................................................................................2
Sears Maintenance Agreement .........................................2
IMPORTANT SAFETY INSTRUCTIONS ......................3-4
Drying Procedures ......................................................5-6
Common Drying Problems ...................................................6
Care and Cleaning .............................................................7
Avoid Service Checklist .............................................. 8
EspaSol ............................................................................. 9
Service ..................................................................Back Cover'
Product Record
In the space below, rec0rd the date of purchase, model
and serial number of your' producL You wil! find the
model and serial number printed on an identification plate
located on the left side of the door opening.
417.
Model No,
Date of Purchase__
Serial No.
Save these instructions and your sales receipt for future
reference.
Dryer Warranty
Full One Year Warranty on Mechanical and Electrical Parts
For one year' from the date of purchase, if this Dryer is installed and operated according to the instructions in the Use
and Care Guide, Operating Instructions, and Installation Instructions, Sears will repair or replace any of its mechanical
or' electrical parts if they are defective in material or workrnanship..
Warranty Restriction
If this Dryer is used for any purpose other-than Private Family Use, all warranty coverage is effective for only 90 days.
Warranty Service
Warranty service is available by contacting your nearest Sears Service Center in the United States.
This warranty applies only while this Dryer is in use in the United States.
This warranty gives you specific legal rights, and you may also have other rights which vary from state to state.
Sears, Roebuck and Co., Dept. 817WA, Hoffman Estates, IL 60179
Sears Maintenance Agreement
"We Service What We Sell" is our assurance to you that you can depend on Sears for service. Your' Kenmore appliance
has added value when you consider that Sears has service units nationwide, staffed with professional technicians trained
on all appliances Sears sells. They have the knowledge and skills, tools, parts and equipment to ensure our pledge to you
that "We Service What We Sell.,"
Maintain the value of your purchase with a Sears Maintenance Agreement, Kenmore appliances are designed,
manufactured, and tested for years of dependable operation Yet any major home appliance may require service from
time to time. The Seats Maintenance Agreement offers you an outstanding service program for your product.
The Sears Maintenance Agreement:
- Is your way to buy tomorrow's service at today's prices.
- Eliminates repair bills resulting from normal use.
• Allows for' as many service calls as you need
• Provides,,an annual Preventive Maintenance Check at your request
to keep your Kenmore Appliance in proper running condition.
For more infomation, call 1-800-827-6655.
_ _:_r- _-_-,_,_,.'* -_........ r'_: ..... _-_ _ '-""-_'_±'_ _ _-*_'_ _'1_'T_r_"7"*_*_ ........ ,m_"_,,,_t,,,_,:_'--_,m_'_'*'_,_"_ .......... __
For your safety, the information in this manual must be followed to minimize the risk of fire or
explosion or to prevent property damage, personal injury or loss of life.
- Do not store or use gasoline or' other flammable vapors and liquids in the vicinity of this or any other appliance.
WHAT TO DO IF YOU SMELL GAS'
• Do not try to light any appliance.
• Do not touch any electrical switch; do not use any phone in your building°
• Clear the room, building or area of al! occupants.
• Immediately call your gas supplier from a neighbor's phone. Foliow the gas supplier's instructions.
• If you cannot reach your gas supplier, call the fire departmenL
Installation and service must be performed by a qualified installer, service agency or the gas supplier,.
Your safety and the safety of
others is very important.
We have provided many important
safety messages in the Use and
Care Guide, Operating Instructions,
Installation Instructions and on your
appliance. Always read and obey all
safety messages.
'This is the safety aiert symbol.
This symbol alerts you to hazards
that can ldfl or hurt you or others. All
safely messages will be preceded by
the safety alert symbol and the word
"DANGER" or "WARNING". These
words mean:
You wil! be killed or
seriously injured if you don't follow
instructions.
You can be killed or
seriously injured if you don't follow
instructions.
All safety messages will identify
the hazard, tell you how to reduce
the chance of injury, and tell you
what can happen lfthe
instructions are not followed.
Important Safety instructions
Read all instructions before using this dryer.
To reduce the risk of fire, electrical shock, Orinjury to persons
when using this dryer, comply with the basic warnings listed below°
Failure to comply with these warnings Could result in serious personal
injuries.
Prevent Fire
_Z_ Do not dry items that have been previously cleaned in, soaked
in, or spotted with gasoline, cleaning solvents, kerosene, cooking oils, waxes,
etc Do not store these items on or near the dryen Tt_ese substances give off
vapors that could ignite or explode.
To prevent fire, do not use heat to dry items containing plastic,
foam rubber or similarly textured rubber-like materials, or'items containing
feathers or down. Use Air Fluff (No Heat) only.
_ Clean the lint screen before or after each load. The interior of
the dryer, lint screen housing and exhaust duct should be cleaned
approximate!y every 18 months by qualified service personnel. An excessive
amount of lint buitGup in these areas could result in inefficient drying and
possible fire..See Cme and Cleaning, page 7..
Do not operate the.dryer if the lint screen is blocked, damaged
or missing. Fire hazard, overheating and damage 1ofabrics can occur, Ifyour
dryer has a drying rack, always replace the lint screen when finished using the
drying rack.
Keep area around the exhaust opening and surroundin_ areas
free from the accumulation of lint, dust and dirt.
Do not obstruct the flow of ventilating air. Do not stack or place
laundry or throw rugs against the front or back of the dryer.
Do not spray any type of aerosot into, on or near dryer at any
time.
Do not use fabric softeners or products to eliminate static
unless recommended by the manufacturer of the fabric softener or product.
Failure to comply with these warnings could result in fire, explosion,
serious bodily injury and/or damage to the rubber or plastic parts of the dryer.
Printed in USA.
3
ITI
Z
I"
u
Co
This Use and Care Guide provides
general operating instructions for your
dryer'..It also contains information
about features for several other
models. Your dryer may not have
every feature included.
Use the dryer only as instructed in
this Use &Care Guide and the
Operating Instructions included with
you_dryer.
Avoid fire hazard or
electrical shock. Do not use an
adaptor' plug or extension cord or'
remove grounding prong from
electrical power cord° Failure to
follow this warning can cause
serious injury, fire dr death,,
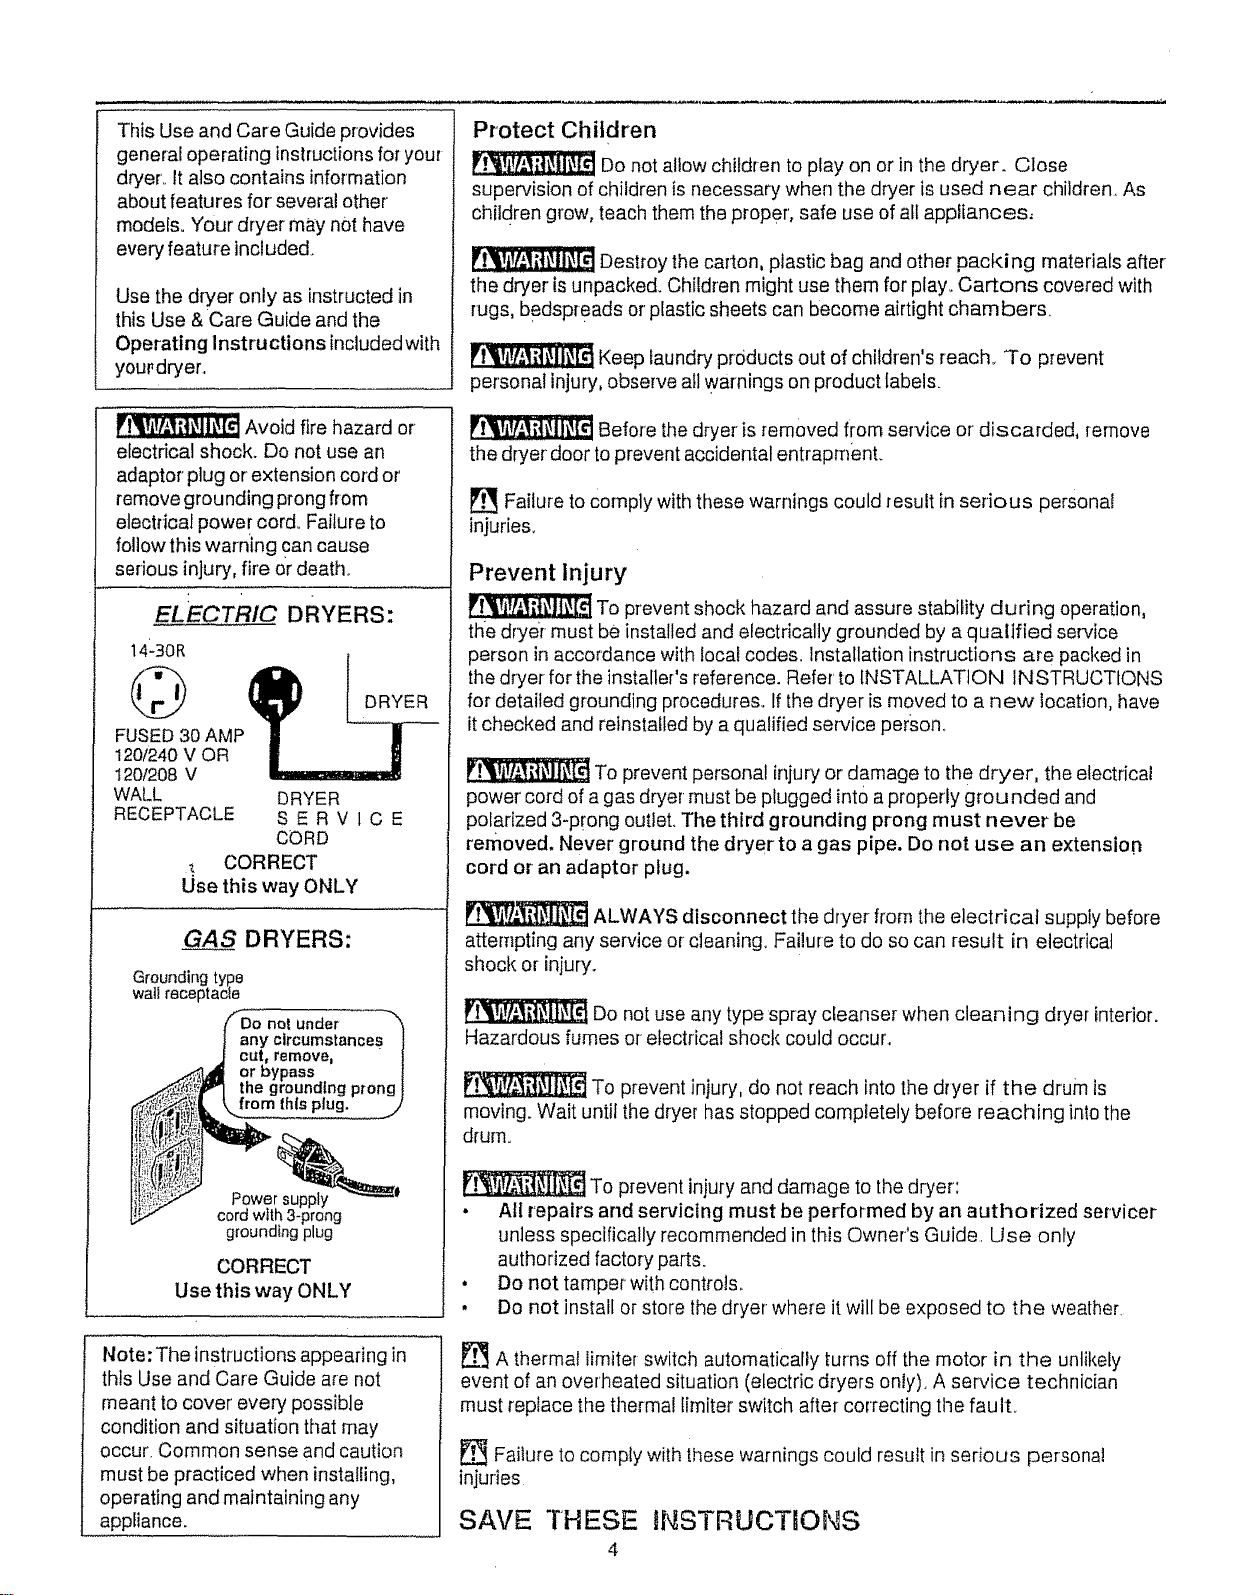
ELECTRi_____CDRYERS:
14L30R
FUSED30 AMP
120/240V OR
I20/208 V
WALL DRYER
RECEPTACLE S E R V 1 C E
CQRD
_. CORRECT
Use this way ONLY
GAS DRYERS:
Grounding type
wallreceptacle
0 not under "_
ny circumstances |
ut, remove, "1
r bypass 1
he grounding prong I
rorn Ibis plug. ............,/
h 3-prong
grounding plug
CORRECT
Use this way ONLY
Note: The instructions appearing in
this Use and Care Guide are not
meant to cover' every possible
condition and situation that may
occur. Common sense and caution
must be practiced when installing,
operating and maintaining any
appliance.
Protect Children
Do not allow children to play on or in the dryer. Close
supervision of children is necessary when the dryer is used near children, As
children grow, teach them the proper', safe use of all appliances,
Destroy the carton, plastic bag and other packing materials after
the dryer is unpacked. Children might use them for play. Cartons covered with
rugs, bedspreads or plastic sheets can become airtight chambers.
Keep laundry products out of children's reach,. To prevent
personal injury, observe all warnings on product labels.
Before the dryer is removed from service or discarded, remove
the dryer' door to prevent accidental entrapment.
[] Failure toComply with these warnings could resultin serious personal
injuries,
Prevent Injury
To prevent shock hazard and assure stability during operation,
the dryer must be installed and electrically grounded by a qualified service
person in accordance with local codes. Installation instructions are packed in
the dryer for the installer's reference. Refer to INSTALLATION INSTRUCTIONS
for detailed grounding procedures. If the dryer is moved to a new location, have
itchecked and reinstalled by a qualified service person,,
To prevent personal injury or damage to the dryer, the electrical
power' cord of agas dryer must be plugged into a properly grounded and
polarized 3-prong outlet. The third grounding prong must never be
removed, Never ground the drYer to a gas pipe, Do not use an extension
cord or an adaptor plug.
ALWAYS disconnect the dryer from the electrical supply before
attempting any service or cleaning, Failure to do so can result in electrical
shock or injury.
Do not use any type spray cleanser when cleaning dryer interior.
Hazardous fumes or electrical shock could occur.
To prevent injury, do not reach into the dryer if the drum is
moving. Wait until the dryer has stopped completely before reaching into the
drum.
To prevent injury and damage to the dryer:
• All repairs and servicing must be performed by an authorized servicer
unless specifically recommended in this Owner's Guide, Use only
authorized factory parts.
. Do not tamper with controts,,
• Do not install or store the dryer where it will be exposed to the weather,
E_ A thermal limiter switch automatically turns off the motor in the unlikely
event of an overheated situation (electric dryers only), A service technician
must replace the thermal fimiter switch after correcting the faulL
Failure to comply with these warnings could result in serious persona!
injuries
SAVE THESE tNSTRUCTRONS
Drying Procedures
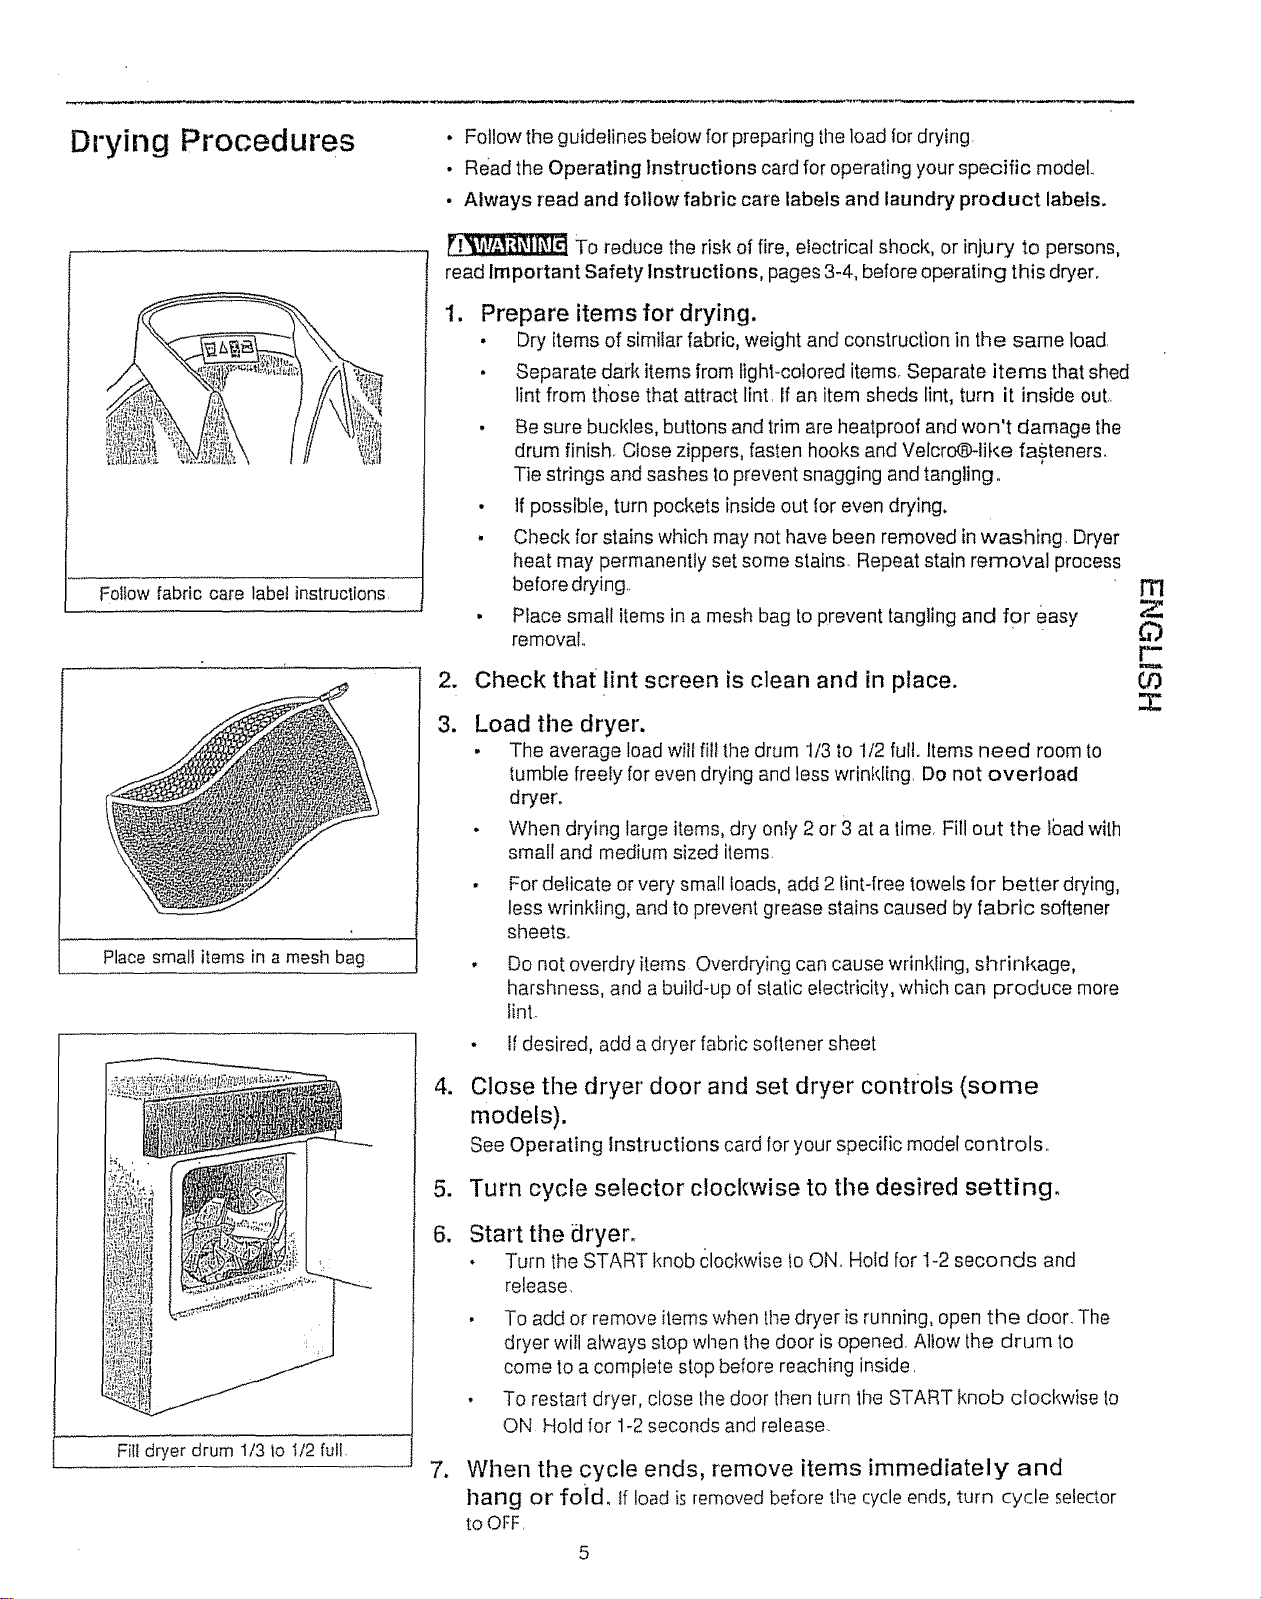
Fol}ow fabric care label instructions
Place smali items in a mesh bag
Fill dryer drum 1/3 lo It2 full,
An
3.
4_
.
6.
. Follow the guidelines below for preparing the load ior drying
• Read the Operating Instructions card for operating your specific model
• Always read and follow fabric care labels and laundry product labels.
To reduce the risk of fire, electrical shock, or injury to persons,
read Important Safety Instructions, pages 3-4, before operating this dryer.
Prepare items for drying.
• Dry items of similar fabric, weight and construction in the same load.
• Separate dark items from fight-colored items° Separate items that shed
lint from those that attract lint If an item sheds lint, turn it inside out.
• Be sure buckles, buttons and trim are heatproof and won't damage the
drum finish_ Close zippers, fasten hooks and Velcro_like fa_teners_
Tie strings and sashes to prevent snagging and tangling_
• If possible, turn pockets inside out lor even drying.
• Check for stains which may not have been removed in washing Dryer
heat may permanently set some stains_ Repeat stain removal process
before drying..
• Place small items in a mesh bag to prevent tangling and for easy
removal..
Check that lint screen is clean and in place.
Load the dryer.
- The average load wilt fill the drum 1/3 _o1/2 full. Items need room to
tumble freety for even drying and less wrinkling Do not overload
dryer,
• When drying large items, dry only 2 or 3 at a lime, Fill out the lbad with
small and medium sized items
For delicate or very small loads, add 2 lint-free towels for better drying,
less wrinkling, and to prevent grease stains caused by fabric softener
sheets.
Do net overdry items Overdrying can cause wrinkling, shrinkage,
harshness, and a build-up of static electricity, which can produce more
linL
If desired, add a dryer fabric softener sheet
Close the dryer door and set dryer controls (some
models).
See Operating Instructions card for your specific model controls
Turn cycle selector clockwise to the desired setting.
Start the dryer.
• Turn the START knob clockwise _oON Hold for 1-2 seconds and
release
• To add or remove items when tile dryer is running, open the door. The
dryer will always stop when tile door is opened, Allow the drum to
come to a comptete stop before reaching inside.
• To rested dryer, close the door then turn the START knob clockwise to
ON Hold for 1-2 seconds and release.
7. When the cycle ends, remove items immediately and
hang or foid, If load isremoved before the cycle ends, turn cycle selector
to OFF
rrl
C)
r-
O3
3::
Features
Cycle Signal Control (some models)
When the Cycle Signal Control is ON, a signal wi]l sound at the end of each
cycle and during the WRINKLE-RID setting (some models), The volume is
adjustable on some models_
L
t'e
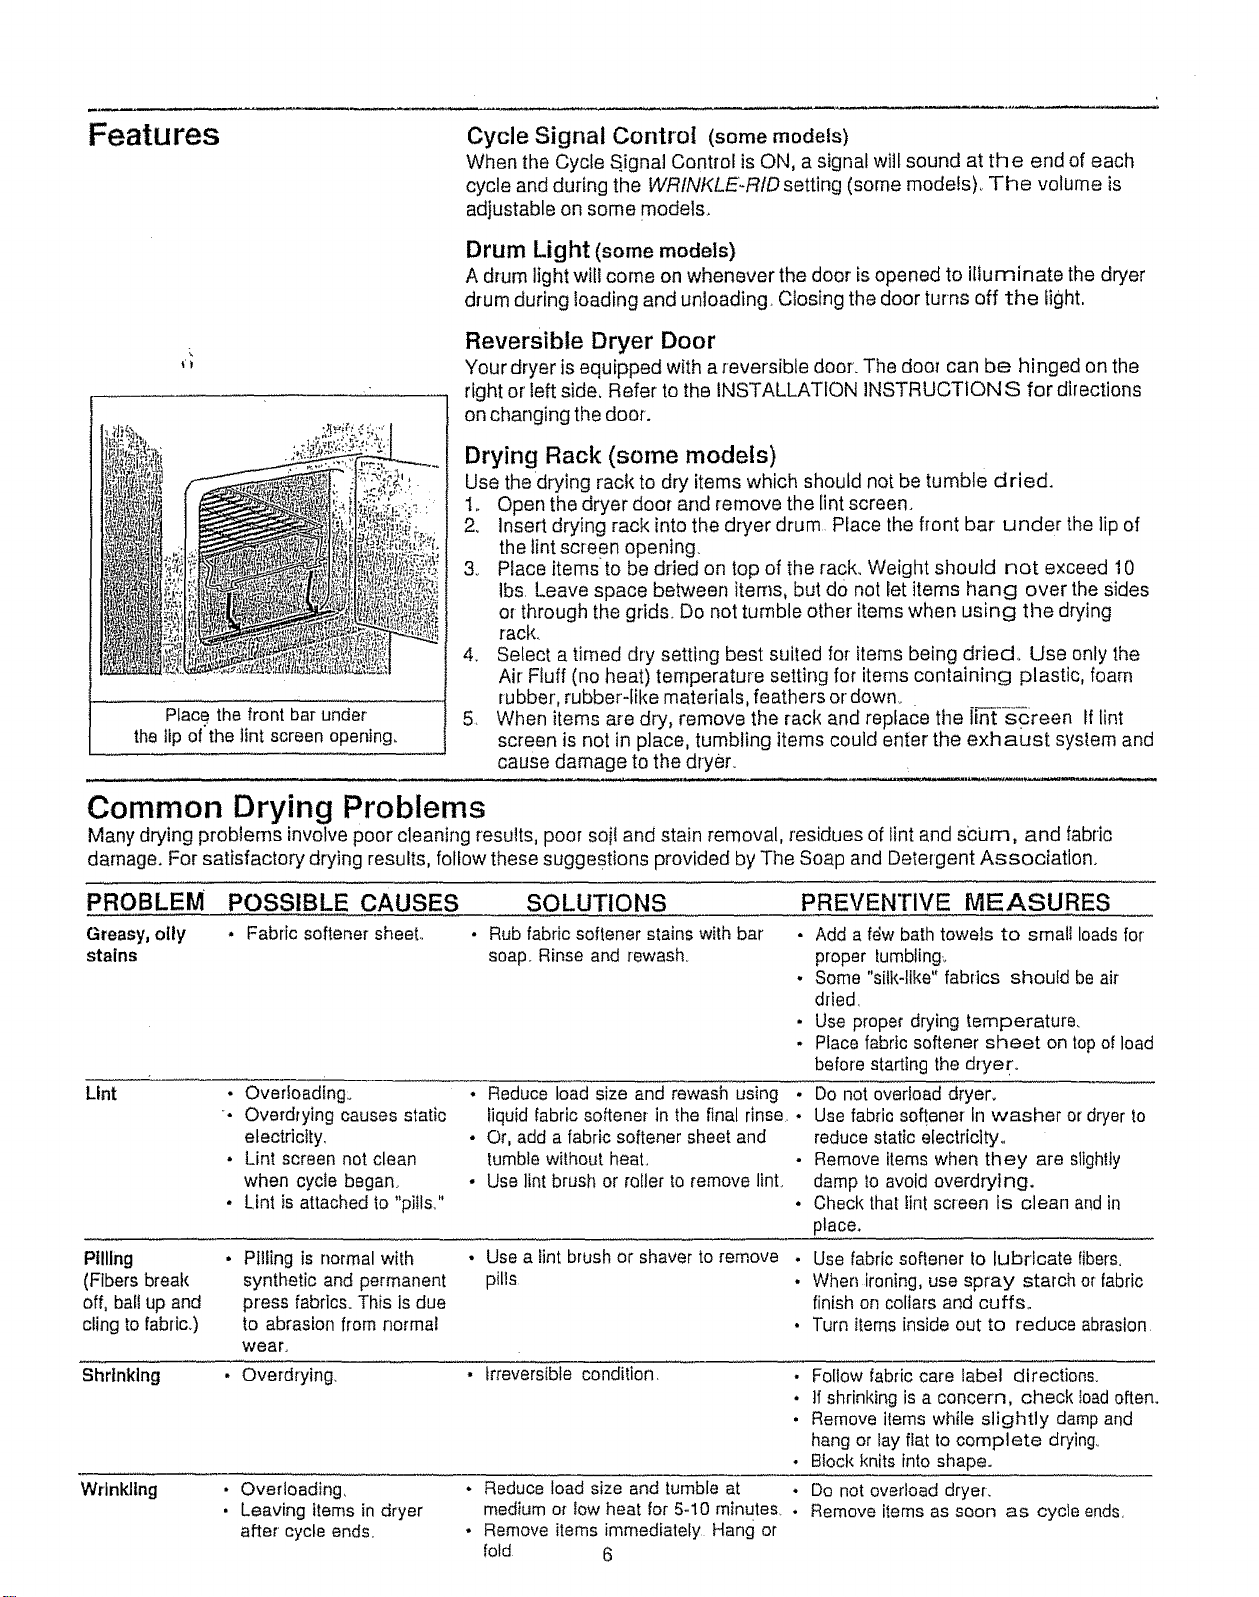
Pace the front bar under
the lip of the tint screen opening,
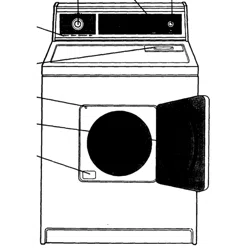
Drum Light (some models)
A drum light will come on whenever the door is opened to illuminate the dryer
drum during loading and unloading Closing the door turns off the light.
Reversible Dryer Door
Your dryer is equipped with a reversible door. The door can be hinged on the
right or left side, Refer to the INSTALLATION iNSTRUCTIONS for directions
on changing the door.
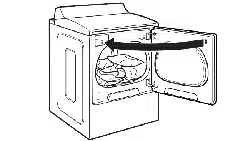
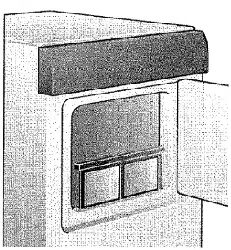
Drying Rack (some models)
Use the drying rack to dry items which should not be tumble dried.
1° Open the dryer door and remove the tintscreen.
2. insert drying rack into the dryer drum Pface the front bar under the lip of
the lint screen opening.
& Place items to be dried on top of the rack. Weight should not exceed 10
lbs. Leave space between items, but do not let items hang over the sides
or through the grids. Do not tumble other items when using the drying
rack.
4. Select a timed dry setting best suited for items being dried. Use only the
Air Fluff (no heat) temperature setting for items containing plastic, foam
rubber, rubber-like materials, feathers or down_.
5. When items are dry, remove the rack and replace the ii_screen If lint
screen is not in place, tumbling items could enter the exhaust system and
cause damage to the dryer.
Common Drying Problems
Many drying problems involve poor cleaning results, poor soil and stain removal, residues of lint and scum, and fabric
damage. For satisfactory drying results, follow these suggestions provided by The Soap and Detergent Association.
PROBLEM
Greasy,oily
stains
Lint
Pilling
(Fibers break
off, bali up and
cling to fabric.)
Shrinking
Wrinkling
POSSIBLE CAUSES SOLUTIONS PREVENTIVE MEASURES
• Fabric softener sheet,, . Rubfabric softener stains with bar • Add a f6w bath towels to small loadsfor
soap. Rinse and rewash, proper tumbling..
J,
Overloading:
Overdi'ying causes static
etectrictfy,
Lint screen not clean
when cycle began,
Lint is attached to "pills,"
- Some "silk-like" fabrics should be air
dried,
• Use proper drying temperature,
• Place fabric softener sheet on top of load
before starting the dryer.
Do not overload dryer,
Use fabric softener In washer or dryer to
reduce static electricity°
Remove items when they are slightly
damp to avoid overdrytng.
Check that fint screen is clean and in
place.
• Reduce toad size and rewash using •
liquid fabric softener in the final rinse. •
• Or, add a fabric softener sheet and
tumble without heat.
• Use lint brush or roller to remove lint.
Pilling is normal with
synthetic and permanent
press fabrics. This is due
to abrasion from normal
wear,
• Use a lint brush or shaver to remove
pills
• Use fabric softener to lubricate fibers,
• Whenironing, use spray starch or fabric
finish on collars and cuffs,,
• Turn items inside out to reduce abrasion
• Overdrying.
• Overloading,
• Leaving items in dryer
after cycle ends,
• Irreversible condition.
• Follow fabric care label directions.
• tf shrinking is a concern, check toad often.
• Remove items while slightly damp and
hang or lay fiat to complete drying_
• Block knits into shape.
• Reduce load size and tumble at
medium of low heat for 5-10 minutes, •
• Remove items immediately Hang or
fold 6
Do not overload dryer.
Remove items as soon as cycle ends,
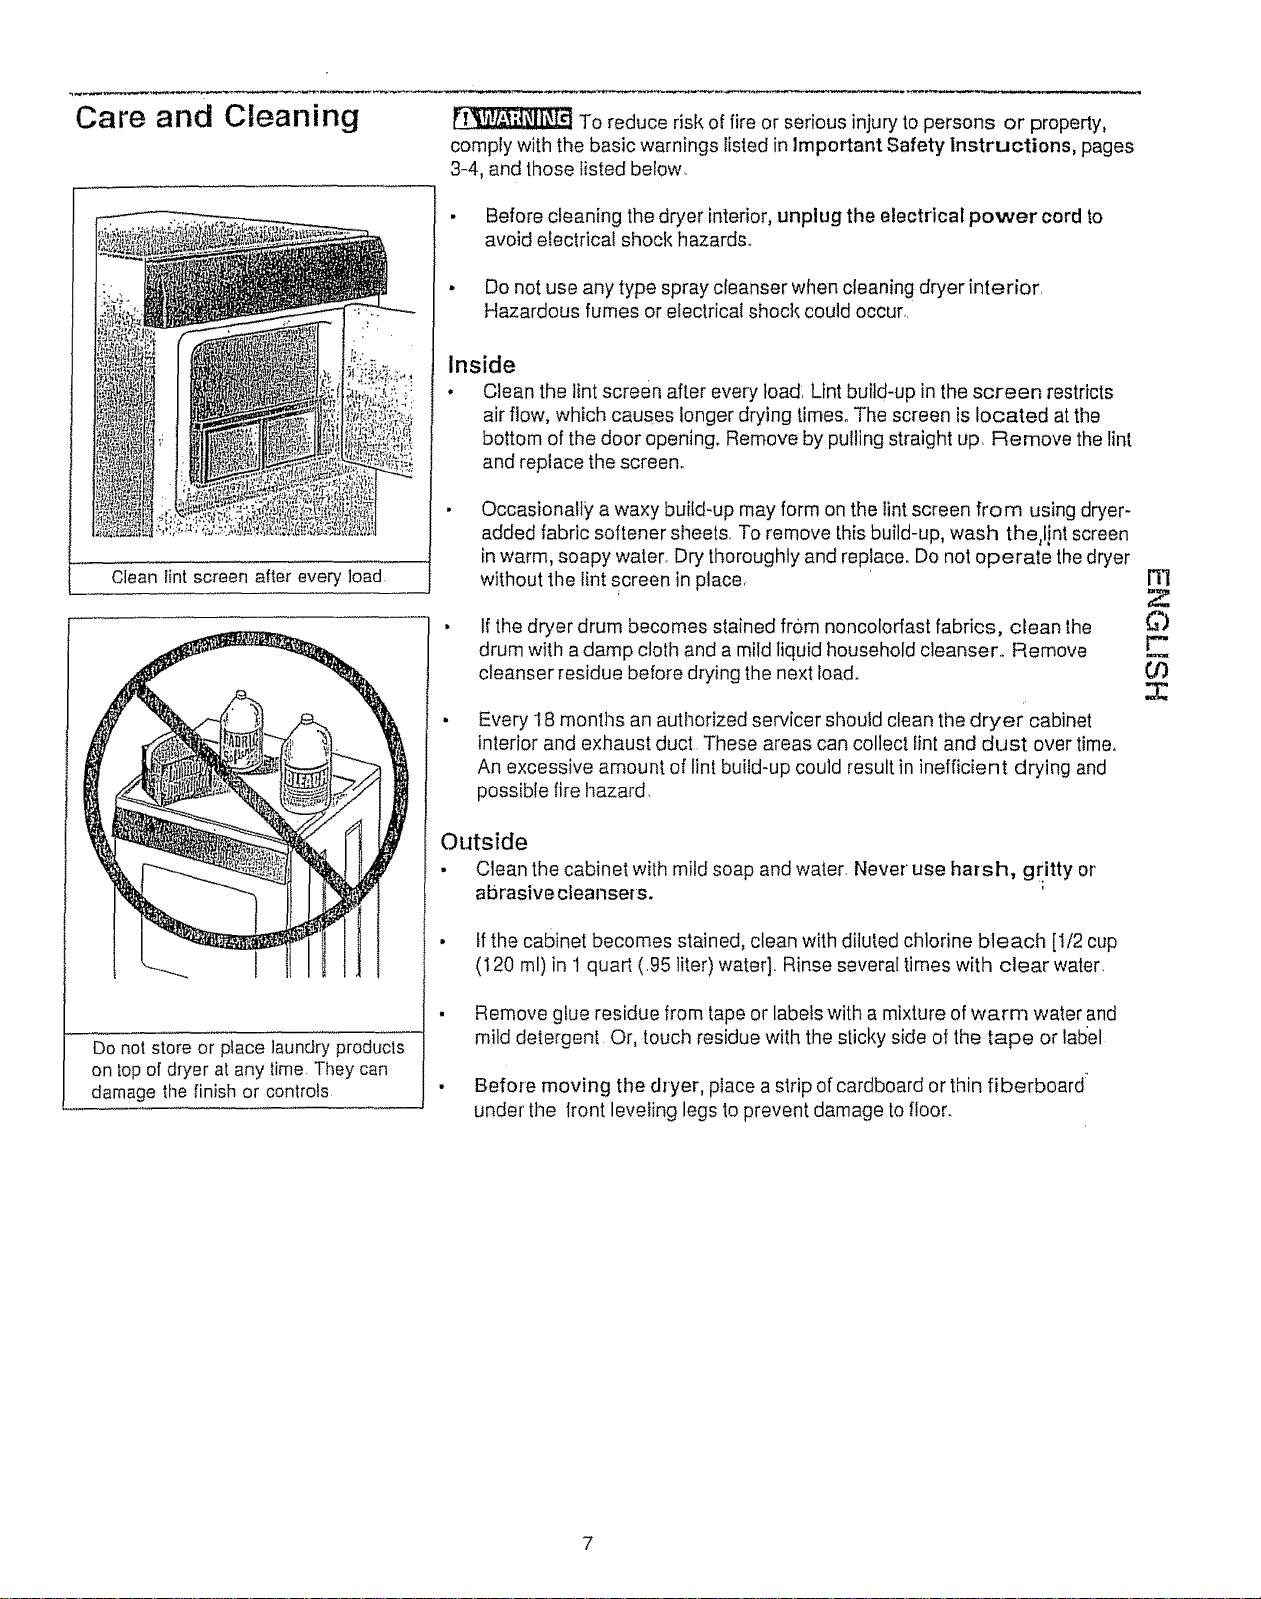
Care and Cleaning
Clean Fintscreen after ever,/load
Do not store or place laundry products
on lop of dryer at any time. They can
damage the finish or controls
To reduce risk of fire or serious injury to persons or property,
comply with the basic warnings listed in Important Safety Instructions, pages
3-4, and those listed below.
• Before cleaning the dryer interior, unplug the electrical power cord to
avoid electrical shock hazards..
. Do not use any type spray cleanser when cleaning dryer interior.
Hazardous fumes or electrical shock could occur,.
Inside
• Clean the lint screen after every load: Lint build-up in the screen restricts
air flow, which causes longer drying times. The screen is located atthe
bottom of the door opening, Remove by pulling straight up, Remove the lint
and replace the screen°
Occasionally a waxy build-up may form on the tint screen from using dryer-
added fabric softener sheets. To remove this build-up, wash the,lint screen
in warm, soapy water_ Dry thoroughly and replace. Do not operate the dryer
without the lint screen in place.
• If the dryer drum becomes stained from noncolorfast fabrics, clean the
drum with adamp cloth and a mild liquid household cleanser° Remove
cleanser residue before drying the next load.
Every 't8 months an authorized servicer should clean the dryer cabinet
interior and exhaust duct These areas can collect lint and dust over timer
An excessive amount of linl build-up could result in inefficient drying and
possible fire hazard.
Outside
• Clean the cabinet with mild soap and water, Never use harsh, gritty or
abrasive cleansers.
If the cabinet becomes stained, clean with diluted chlorine bleach [1/2 cup
(120 ml) in 1 quart (95 liter) water]., Rinse several times with clear water.
• Remove glue residue from tape or labels with a mixture of warm water and
mild detergent Or, touch residue with the sticky side of the tape or label
• Before moving the dryer, place a strip of cardboard orthin fiberboard'
under the front leveling legs to prevent damage to floor.
m
Z
O
m
03
2::
7
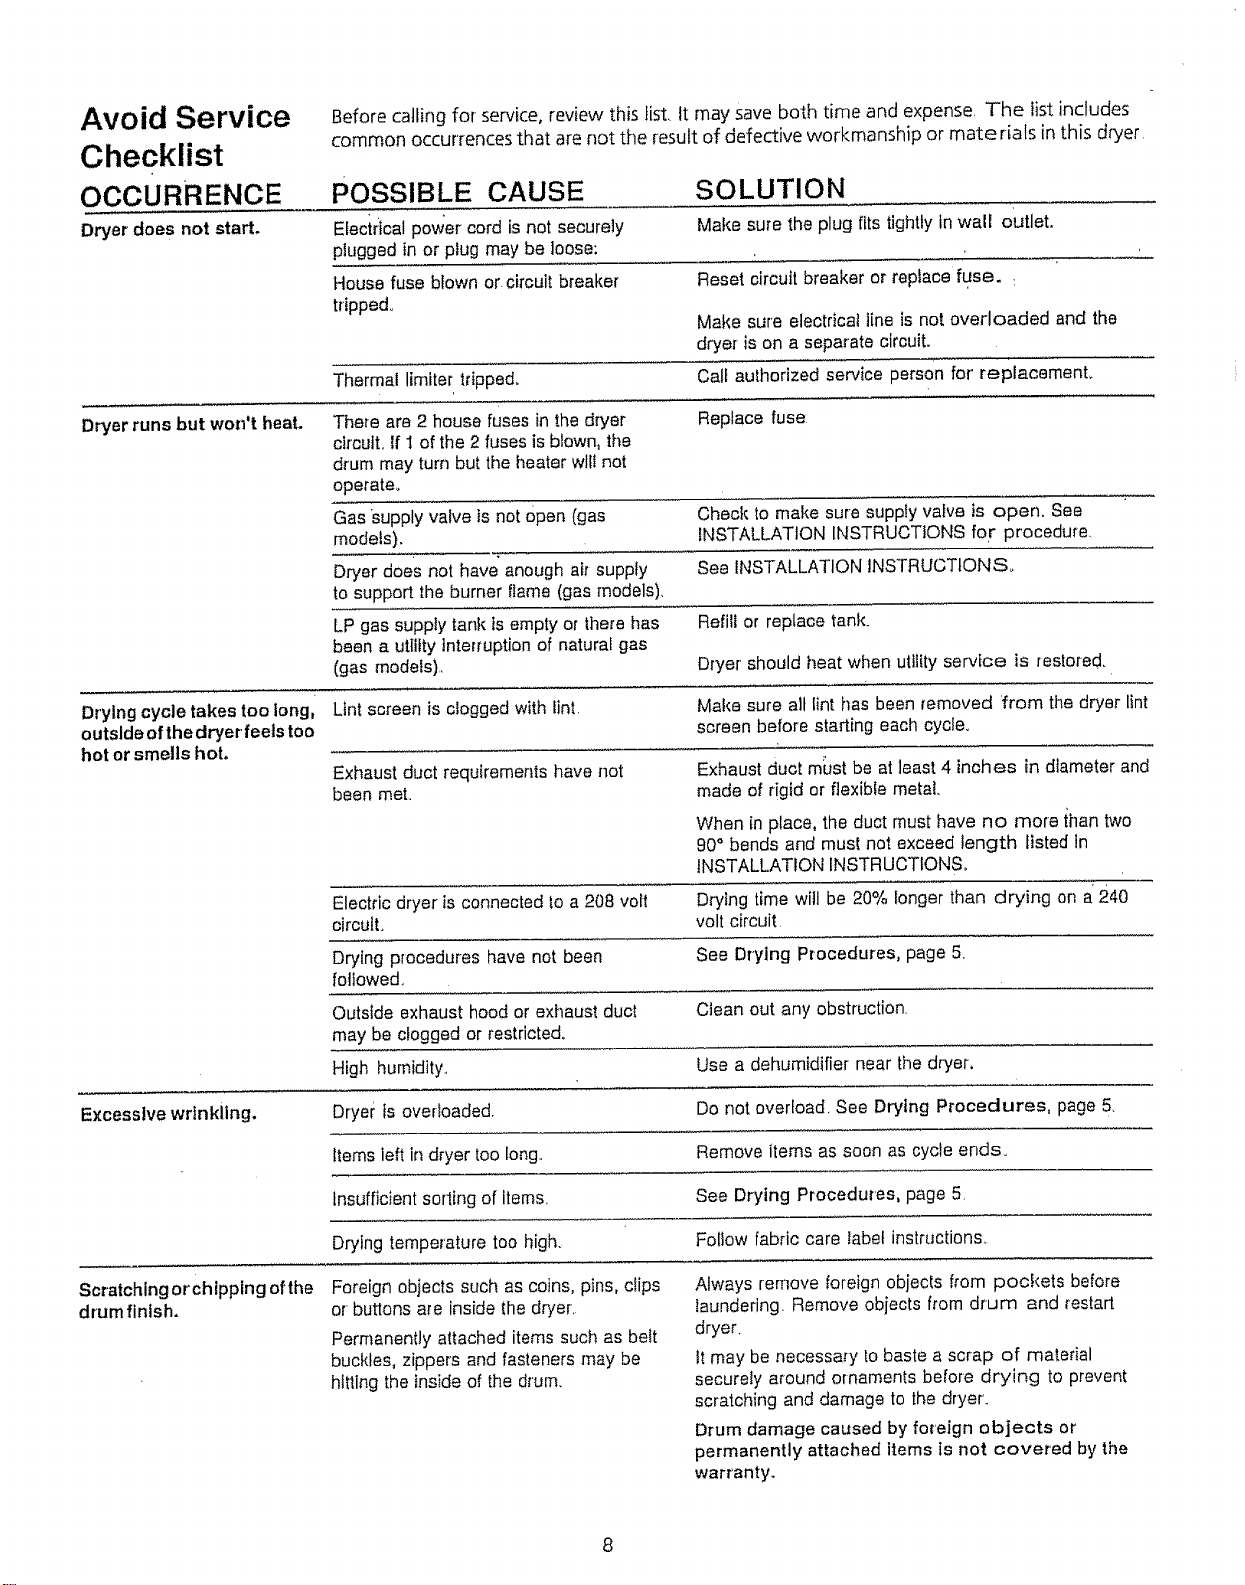
Beforecallingforservice,reviewthisfist,Itmaysavebothtimeandexpense,Thelistincludes
commonoccurrencesthatarenottheresultofdefectiveworkmanshipormater[atsinthisdryer
Avoid Service
Checklist
OCCURRENCE POSSIBLE CAUSE SOLUTION
Dryer does not start. Efeciflcat power cord is not securely Make sure the plug fits tightly in wall Outlet.
plugged in or plug may be loose:
House fuse blown or.circuit breaker" Reset circuit breaker or replace fuse..
tripped_ Make sure electrical i[ne is not overloaded and the
dryer is on a separate circuit.
Thermal limiter tripped. Calf authorized service person for' replacement
Dryer runs but won't heat. The_e are 2 house fuses in the dryer Replace fuse
circuit, If I of the 2 fuses is blown, the
drum may turn but the heater wtlt not
operate.
Gas Supply valve is not Open (gas Check to make sure supply vafve is open. See
modets). INSTALLATION INSTRUCTIONS for procedure.
Dryer does not have enough air suppry See iNSTALLATION ]NSTRUCTtONS_
to support the burner flame (gas models),
LP gas supply tank is empty or there has Refill or replace tank.
been a uttiity interruption of natural gas
(gas models),, Dryer should heat when utiltty service is restored.
Drying cycle takes too long, Lint screen is clogged with lint. Make sure all lint has been removed from the dryer lint
outsldeofthedryerfeetstoo screen before starting each cycle.
hot or smells hot. Exhaust ducl must be at least 4 inches in diameter and
Exhaust duct requirements have not
been met.
made of rigid or flexible metal.
When in place, the duct must have no more ihan two
90° bends and must not exceed length ftsted in
INSTALLATION INSTRUCTIONS.
Drytng time will be 20% longer than drying on a_240
volt circuit
Electric dryer is connected to a 208 volt
circutt.
Drying procedures have not been See Drying Procedures, page 5.
followed.
Outside exhaust hood or exhaust duct Clean out any obstruction,
may be clogged or restricte&
High humidity. Use a dehumidifier near the dryer,
Excessive wrinkling. Dryer Is overloaded Do not overfoad, See Drying Procedures, page 5.
Items left in dryer too long,, Remove items as soon as cycle ends_
insufficient sorling of items See Drying Procedures, page 5,
Drying temperature too high. Follow fabric care labet instructions,
Scratching orchtpplng of the
drum finish.
Foreign obiects such as coins, pins, clips
or buttons are inside the dryer.
Permanently attached items such as belt
buckles, zippers and fasteners may be
httting the inside of the drum_
Always remove foreign objects from pockets before
laundering. Remove obiects from drum and restart
dryer.
It may be necessary to baste a scrap of material
securely around ornaments before drying to prevent
scratching and damage to the dryer.
Drum damage caused by foreign objects or
permanently attached items is not covered by the
warranty.
8
r
Indice
English ...........................................................................................................2_8
Registro de producto .....................................................................................9
Garantfa para la secadora .....................................................................9
Contrato de mantenimiento Sears ...............................................9
]NSTRUCCiONES IMPORTANTES
PARA LA SEGURtDAD .........................................................I0-11
Procedimientos para el secado .................................................I2
Caracteristicas ...........................................................................I3
Probtemas comunes del secado ..................................................t3
Cuidado y limpieza .........................................................................!4
Evitar Ilamadas de servicio ..........................................................15
Servicio ................................................................................Cubierta
Registro de producto
Regislre en taparte reservada a continuaci6nJa fecha de
compra, el nOmero de modelo y el n_mero de'serie de su
etectrodom6stico.Et nt)mero de modelo y el numero de
serie est&n inscribidos sobre una placa de idenfificaci6n
ubicada en taparte izquierda de ta abertura de la puerta,
N0merode modelo: 417.
Fecha de compra:
Nodeserie:
Guarde estas instrucciones y su boleta de compra para
futuras referencias..
Garantfa para la secadora
Garantia completa de un aSo para las piezas mec&nicas y el_ctricas
Per un aSo desde la fecha de compra original, siesta secadora se instala y opera de acuerdo con las fnstrucciones del
Manual de Use y Mantenimiento, las Instrucciones para la OperaciSn y las fnstrucciones para la Instaiaci6n, Sears
reparar6 o reemplazarA cualesquiera de sus piezas mec#.nicas o el6ctricas en case de que etlas est_.ndefectuosas debido
a material o a mane de obra.
Restricci6n de la garantia
Si se opera esta secadora para un use distinto at use dom_sfico de una sela familia, teda la cobertura de la garant[a es
efectiva para solamento 90 dtas
Servicio bajo la garantia
Para obtener servicio bajo lagarant[a pongase en contacte con el m&scercano Centre de Servicie Sears en los Estados
Unidos.
Esta garanti a se aptica t]nicamente mientras esta secadora est6 siendo usado en los Estados Unidos.
Esta garantia teotorga derechos legales espectficos, y usted tambi6n puede tener otros derechos que varfan de un
estado a otroo
rn
Sears, Roebuck and Co. Dept. 817WA, Hoffman Estates, IL 60179 U)
Contrado de mantenimiento Sears
"MANTENEMOS TODO LO QUE VENDEMOS" Esta patabra es nuestra seguridad que Ud va a contar con S'ears para
todo servicio de mantenimiento o de reparaci6n. Su ei6ctrodomestico Kenmore 'deneadicional valor cuando considere
que Sears tiene agentes de servicios a tray, s de los Eslados Unidos, y t_cnicos profesionales que tienen_adiestramiento
con todos los aparatos que vende Sears. Los t6cnicos tienen el conocimiento y las habilidades, los herramientos, las
piezas yet equipo para asegurar nuestra promesa a Usled que "Mantenemos todo io que vendemos".
Mantenga el valor de su adquisici6n con e! servicio de mantenimiento Sears. Los aparalos Kenmore han side cencebidos,
fabricados y probados para asegurar touches a5os de.seguro funcionamienlo. Pero rode electrodom_stico puede necesitar
mantenimienlo de vez en cuando E1centrato de mantenimiento Sears le ot'rece a Usled una programa de servicio
excepcional para su aparato.
El Servicio de Mantenimiento Sears
©
F"
• Es su manera de comprar el servicio de manaSa al precio de hey
• Efimina las facturas de raparaci6nes que resultan del use normal
• Permite todas las llamadas de servicio necesarias
Provee una Verificaci6n de Manlenimiento Preventiva anual a su
demanda, para mantene_ su eletrodom_stico Kenrnore en buena marclqa
Para obtener m_s informaciones llame al 1-800-827-6655.
Para su seguridad, siga ta informaci6n contenida en este manual para minimizar el riesgo de
incendio o explosi6n o para evitar daSos materiales, lesiones persona]es o ]a muerte.
- No guarde ni utilice gasolina ni ob"os vapores y liquidos inflamables en las cercanias de este o cualquier otto
electrodom6stic&
. QUE HACER SI NOTA UN OLOR A GAS:
• 1'4otrate de encender ning_n et,ectrodom6stico_
No toque ningd=n interrupter electrico; no use ning_Jn tel6fono de su edificio.
Haga que todo et mundo satga de1 cuarto, edificio o #,rea.
. Llame inmediatamente al proveedor del gas desde et tel6fono de un vecino. Siga las instrucciones del
proveedor det gas.
• S1no puede ponerse en contacto con et proveedor del gas, llame a los bomberos.
La instalaci6n y el servicio deben set hechos per un instalador capacitado, una agencia de servicios oe!proveedor del gas.
instrucciones importantes para la seguridad
Su segurtdad y la seguridad de
terceros son muy importanteso
Heroes proporcionado touches
mensajes importantes para la
seguridad en tas lnstruccIones de
Operaci6n det Manual de Use y
Mantenimiento, tas tnst;ucciones de
tnstalaciSn yen el mismo aparato_
Siempre lea y obedezca lodes los
mensajes pata seguridad.
[]Este simboto significa alerta. Este
simbolo to aferia aoerca de peligros
que pueden matar o teslonar, tanto a
usted come a otras personas. Todos los
mensajes de' seguddad ser&n
precedidos per el sfmbolo de aterta
para su segUridad y la palabra
"DANGER" o "WARNING" (PELtGRO O
ADVERTENClA). Estas palabras
stgnifican:
DANGER (PELIGRO)
Usted mor#_, o resultar_ seriamente
lesionado s{ no sigue las instrucciones
siguientes.
WARNING
(ADVERTENClA) Usted puede rnorir o
resuttar seriamente Iesionado si no
sigue las instrucciones siguientes.
Todos los mensajes de seguridad
ldentlficar,_n el pe!Igro, le dlr,_n a
usted c6mo reductr la poslbllidad de
lesl6n y tambl_n quc_ puede suceder
si no se stguen las tnstrucclones.
Lea todas las instrucciones antes de utilizar esta secadora.
Para reducir el riesgo de incendio, descargas ei6ctricas o
]esiones alas personas durante el use de esta secadora, oumpla con las adve_tencias
b_sicas que se enumeran a continuaci6n.
El incumplimiento de estas advertenctas puede causar lesiones personales
graves.
Evite el incendio
_i_ No seque ninguna prenda que haya side lirnpiada, rernojada o
rnanchada previamente con gasolina, solventes de limpleza, kerosene, acettes de
coclna, ceras, etc_No guarde estos productos sobre ni cerca de la secadora Estas
substanclas emiten vapores que pueden encenderse o explotar
Para prevenir el incendio, no use calor para secar prendas que
contengan pl,_sttco, goma espuma o materiafes lipo caucho, ni prendas que
contengan plumas o plum6n Use fa graduaci6n de "Ai[ Fluff" (sin calor) solarnente.
Limpie la rejil!a para pelusas antes o despueLs de cada carga de
ropa. El interior de ta secadora, el reciptente que alberga la rejtlia para pelusas y el
conducto de salida deben set limpiados aproximadamente cada 18 meses per un
t_cnico de servicio capacitado_ Una cantidad excesiva de pelusas en estas #,reas
puede causar un secado deficients y un posible incendio. Vea Cuidado y Iimpieza en
la pb,gina 14.
No ponga la secadora en funcionamlento si la reji!!a para
pelusas est_ bloqueada, dafiada o si no est_ colocada Puede ocuirrir un rJesgo de
incendlo, un sob_ecalentamiento o daSes alas prendas Si su secadora tiene un
estante para secado, vuelva siempre a coloca_ la rejilla para pelusas cuando termine
de usar el estante para secade.
_i_ Mantenga el Area alreded0r de ia abertura de salida y tas _,[eas
adyacenies libres de acumulaci6n de pelusas, polvo y suciedad
No obstruya e! paso del aire de ventilaci6n. No apile ni coloque
ropa e aifombras contra la parts delantera o trase_a de la secadora.
_t_ No rocle ningQn ripe de aerosol dentro, sobre o cerca de la
secadora en ning,3n momento_
Impreso en los EEUU..
No use suavizantes ni productos para etiminar la electricidad
estAtica a menos que Io recomiende el fabricante del suavizante o del producto.
_F_EI incumptimiento de estas advertencias puede t_aer come consecuencia un
incendio, una explosi6n, lesiones corporales graves y/o daSos alas piezas de caucho
o de pl_s_ico de la secadora.
I0
Este Manual de Use y Mantenimiento le
ofrece instrucciones generales pare la
utilizaci6n de su secadorao Tambi6n
contiene informaci6n sobre ]as
caracteristicas de otros modefos. Puede
set que su secadora no tenga redes las
caractedsticas que se incluyen aquf.
Use la secadora solamente come se
indba en el Manual de Use y
Mantenimtento y la t&trjeta de
Instrucciones para el Funcionamiento
que se incluye con la secadora.
Evite los riesgos
de Incendto o las descargas el_ctricas.
No use un adaptador oun cable de
extensiSn nt saquela clavija de tome
de tierra del cable el_ctrico. El no
seguir esta advertencta puede causer
lesiones graves, incendio o la muede..
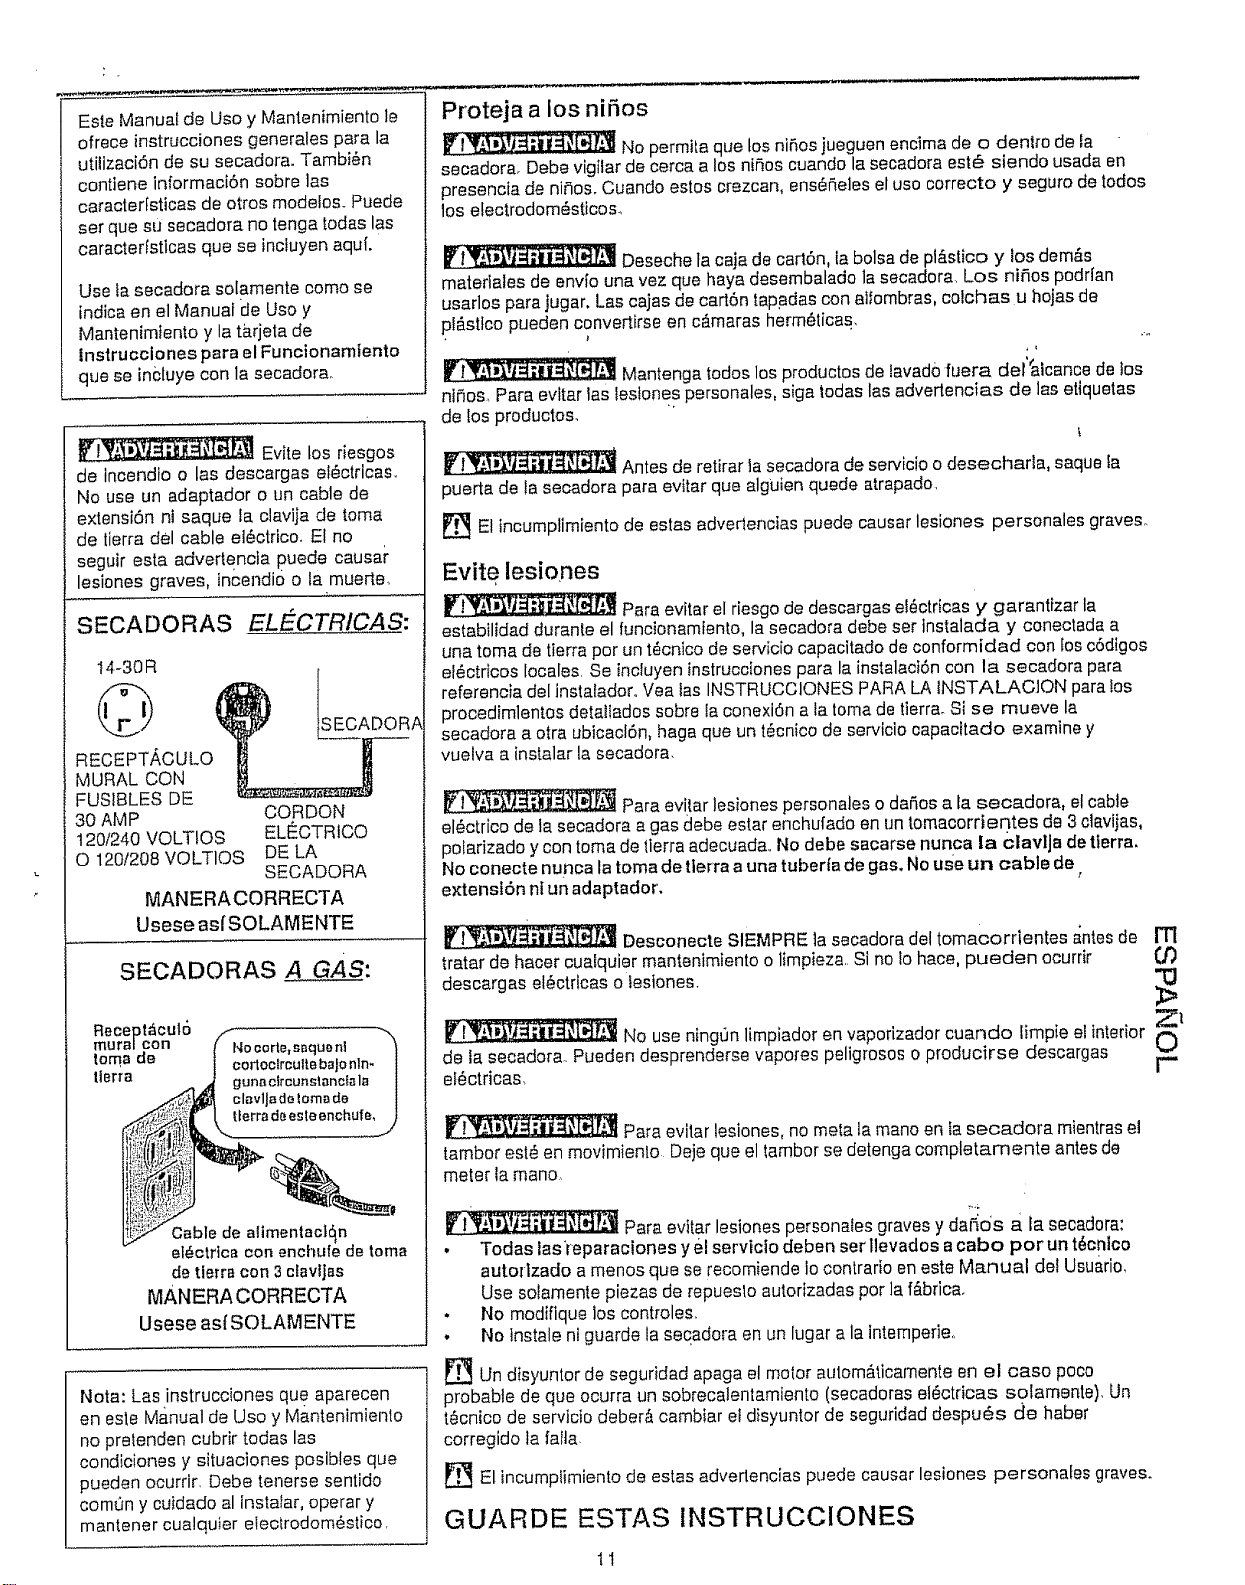
SECADORAS EL =ZCTRICAS:
I4-30R
RECEPTikCULO
MURAL CON
FUSIBLES DE
30 AMP
120/240 VOLTIOS
O 120!208 VOLT1OS
SECADORA
CORDON
EL_CTRICO
DELA
SECADORA
MANERACORRECTA
Usese asfSOLAMENTE
SECADORAS A GAS:
Recept_cul6
murmcon Sl.io oorle,s,qugnl ""_
toma de J cortoclrcultebaJonln- |
tlerra _ gunacfmunstanctala |
clavlJadotoma de |
__(__lterra deesteenchufe,
i!til_i.
Cable de allmentacl_n
et_ctrica con enchule de toma
de tlerra con 3clavljes
MANERA CORRECTA
Usese asiSOLAMENTE
Nora: Las instrucciones que aparecen
en este Manual de Use y Mantenimiento
no prelenden cubrir todas las
condiciones y situaciones posibles que
pueden ocurrir. Debe tenerse sentido
comQn y cuidado al instatar, operar y
mantener cualquier electrodom_stico.
Proteja a los niSos
No permila que los niRos jueguen encima de o dentro de la
secadorar Debe vigilar de cerca a los niSos cuando la secadora est_ siendo usada en
presencia de niSos. Cuando estos crezcan, ens_r_e]es el use correcto y seguro de todos
los electrodom_.,sticos_
_.L_'f__T -;_fjDeseche la caja de cart6n, la bolsa de pib,stico y los dem&s
materiales de envio una vez que haya desembalado la secadora. Los niSos podrian
usarlos para jugar. Las cajas de cart6n tap adas con alfombras, colchas u hojas de
pl_.stfco pueden convertirse en c_.maras herm6ticas, .....
_L[__ Mantenga todos los productos de lavad0 fuera, del'&lcance de los
ntSos, Para evttar 1asleslones personales, siga todas las advertencias de ]as etiquetas
de los productos,
|'_,[_:'_!_i_'[i_J_'_ Antes de retirar la secadora de servicio o desecharla, saque fa
puerta de la secadora para evitar que alguien quede atrapado_
_EI lncumplimiento de estas advedencias puede causar lesiones personales graves°
Evite lesiones
__'r'_[_ Pare evitar el riesgo de descargas el_ctricas y garantizar la
estabilidad durante el funcionamtento, la secadora debe ser instalada y conectada a
una tome de tierra per un t_cnico de servicio capacitado de conformidad con los c6digos
et6ctricos locales. Se incluyen instrucciones pare la instalact6n con la secadora para
referencia del instatadoro Vea tas INSTRUCCIONES PARA LA INSTALAC]ON para los
procedimlentos detatlados sobre la conexi6n ala toma de tierrao Si se mueve la
secadora a otra ubicacl6n, haga que un t_cnico de servicio capacttado examine y
vuelva a instalar la secadora.
Pare evitar lesiones personales o daSos a la secadora, el cable
el_ctrico de la secadora a gas debe estar enchufado en un tomacorrientes de 3 clavijas,
pofarizado y con toma de tierra adecuada.. No debe sacarse nunca la €iavlja de tlerra.
No conecte nunca la toma de tlerra a una tuberia de gas. No use un cable de
t
extenst6n nt un adaptador.
Desconecte SIEMPRE la secadora del tomacorrientes antes de rrl
tratar de haoer cualquier mantenimiento o limpieza.. Si no Io hace, pueden ocurrir 0')
descargas el_ctrlcas o fesiones.
Zl
No use ningt]n limpiador en vaporizador cuando limpie el interior O
de ta secadora. Pueden desprenderse vapores peligrosos o producirse descargas r
el_ctricas,
_Para evitar lesiones, no meta la mane en fa secadora mientras el
tambor est_ en movimienlo Deje que el lamber se detenga completamente antes de
meter la mane.
_i _-;_'_j'fj_4_ii'=l_'F*jr-;_Pare evttarlesiones personales graves y dai'_'Osa fa secadora:
• Todas las'reparaciones ye!servicto deben ser llevados acabo per un t_cnico
autorlzado a menos que serecomiende io contrario en este Manual del Usuario,
Use so!amentepiezas de repueslo autorizadas per ]af_.bfica.
• No modifique los controles,
, No lnstale ni guarde la secadora en un lugar ala intemperie,,
_Un disyuntor de seguridad apaga el motor aulom&tlcamente en el case poco
probable de que ocurra un sobrecalentamiento (secadoras el_ctricas solamente), Un
t_cnice de servicio deber,_ cambiar el disyuntor de seguridad despu_s de haber
corregido la falta
_EI incumplimiento de estas advertencias puede causer lesiones personafes graves.
GUARDE ESTAS INSTRUCClONES
11

Procedirnientos para el - siga los pesos q.ue se indican a continuaciSn para preparar la ca.rga de rope pa,a
secado e_ secede.
• Lea la tarjeta de lnstrucciones pare el Functonamiento pare uti|izar su modefo
espec[fico.
• Lea y siga siempre tas ettquetas pare el cuidado y secede de sus prendas,
Siga las instmcciones de ta
etiqueta de la prenda.
Coloque ias prendas peque_as
en un saco de •alia.
Pare reduclr el riesgo de incendie, desca{gas et#ctricas o
tesiones personales, lea lax lnstrucciones tmportantes para ta Segur'tdad en ]as
p,_ginas 10 y 11 antes de poner la seoadora en marcha,
N
Prepare la ropa para el secado,
• Seque las prefldas de tejtdos, pesos y confecciones simitares en la mtsma
cargao
, Separe las prendas oscuras de las prendas claras. Separe las prendas que
sueltan pelusa de tas que atraen petusa. Siuna prenda suelta pelusa,
col6queta af rev6s.
• Aseg_rese de qua las hebltles, los botones y los adornos seen resistentes
ai calor y no daiien el acabade def lamber. Cierre las cremalleras, los
ganehos y los ciertes de ripe Vefcro_o Anude los lazes y tas cintas pare
evita_"que se enganchen y se enreden
° Si es posible, saque los belsilles para que se sequen tambi6n.
• Examine las prendas para ver si hay manchas que ne fueron efiminadas
con el tavado. El calor de la secadora puede asentar pe_manentemente
algunas manchas. Replta el proceso de eliminaci6n de manchas antes del
secede.
- Coloque las prendas pequeSas en un saco de •alia para evitar que se
enreden y para sacarlas con m,_s _acilidad
•
Compruebe que ta rejilla para pelusas est6 limpia y
colocada en su lugar.
3. Llene la secadora.
• La carga ptomedio llenar_ el tambor a un tercto o [a mitad Las prendas
necesttan espaclo para rnoverse ltbremente pare ebtener un secede
unlforme y •enos arrugas, No sobrecargue la secadora.
• Cuando seque prendas grandee, seque s61o 2 6 3 a ta vez. Complete ta
carga con prendas pequeSas y medianas.
• Pare cargas delicadas o muy pequeSas, aSada 2 toallas sin pelueas para
obtener un mejo_ secede, •enos anugas y papa evitar las manches de
grasa causadas per tas hojas de suavtzante,
• No seque la mpa excesivamente. El secede exeesivo puede causer
arrugas, encogimiento, aspereza y una acumutaciSn de electric_dad
est_,ttca que puede producir m_,spelusas.
- Silo desea, ahada una hoja de suavizante
Llene el _ambor de la secadora
de un tercio ala mltad.
41
5_
6.
,
Cierre la puerta de la secadora y co]oque los contro]es
de ta secadora (algunos modeios).
Vea la tarjeta de Instruceiones para el funcionamlento para los contteles
especlficos de su modele.
Gire la perilla del programador hasta [a posici6n deseada.
Ponga la secadora en marcha.
• Gire fa peritta de puesta en marcha en senfido de las agujas del reloj hasta
la posiciSn de encendido (ON) Mantenga dufante t 6 2 segundos y suette.
• Pare a_adir o sacar prendas cuando fa secadora est_ funcionando, abra la
puerta. La secadora se detendr_ siempre cuando la puerta est_ abierta
Deie que ei tambor se detenga per complete antes de meier la mane
dentro.
o Pare velvet a poner la secadora en marcha, cterre la puerta y gire la perilla
de puesta an marcha haste la posiciSn de encendido (ON), Mantenga
durante t 5 2 segundos y suelte,
Cuando se termine el ciclo, saque ias prendas inmediata-
mente y cu_lguelas o d6blelas, si sacala carga antes de que
termine el ciclo, gire la perilfa del programador haste la posici6n de apagado
(OFF).
12
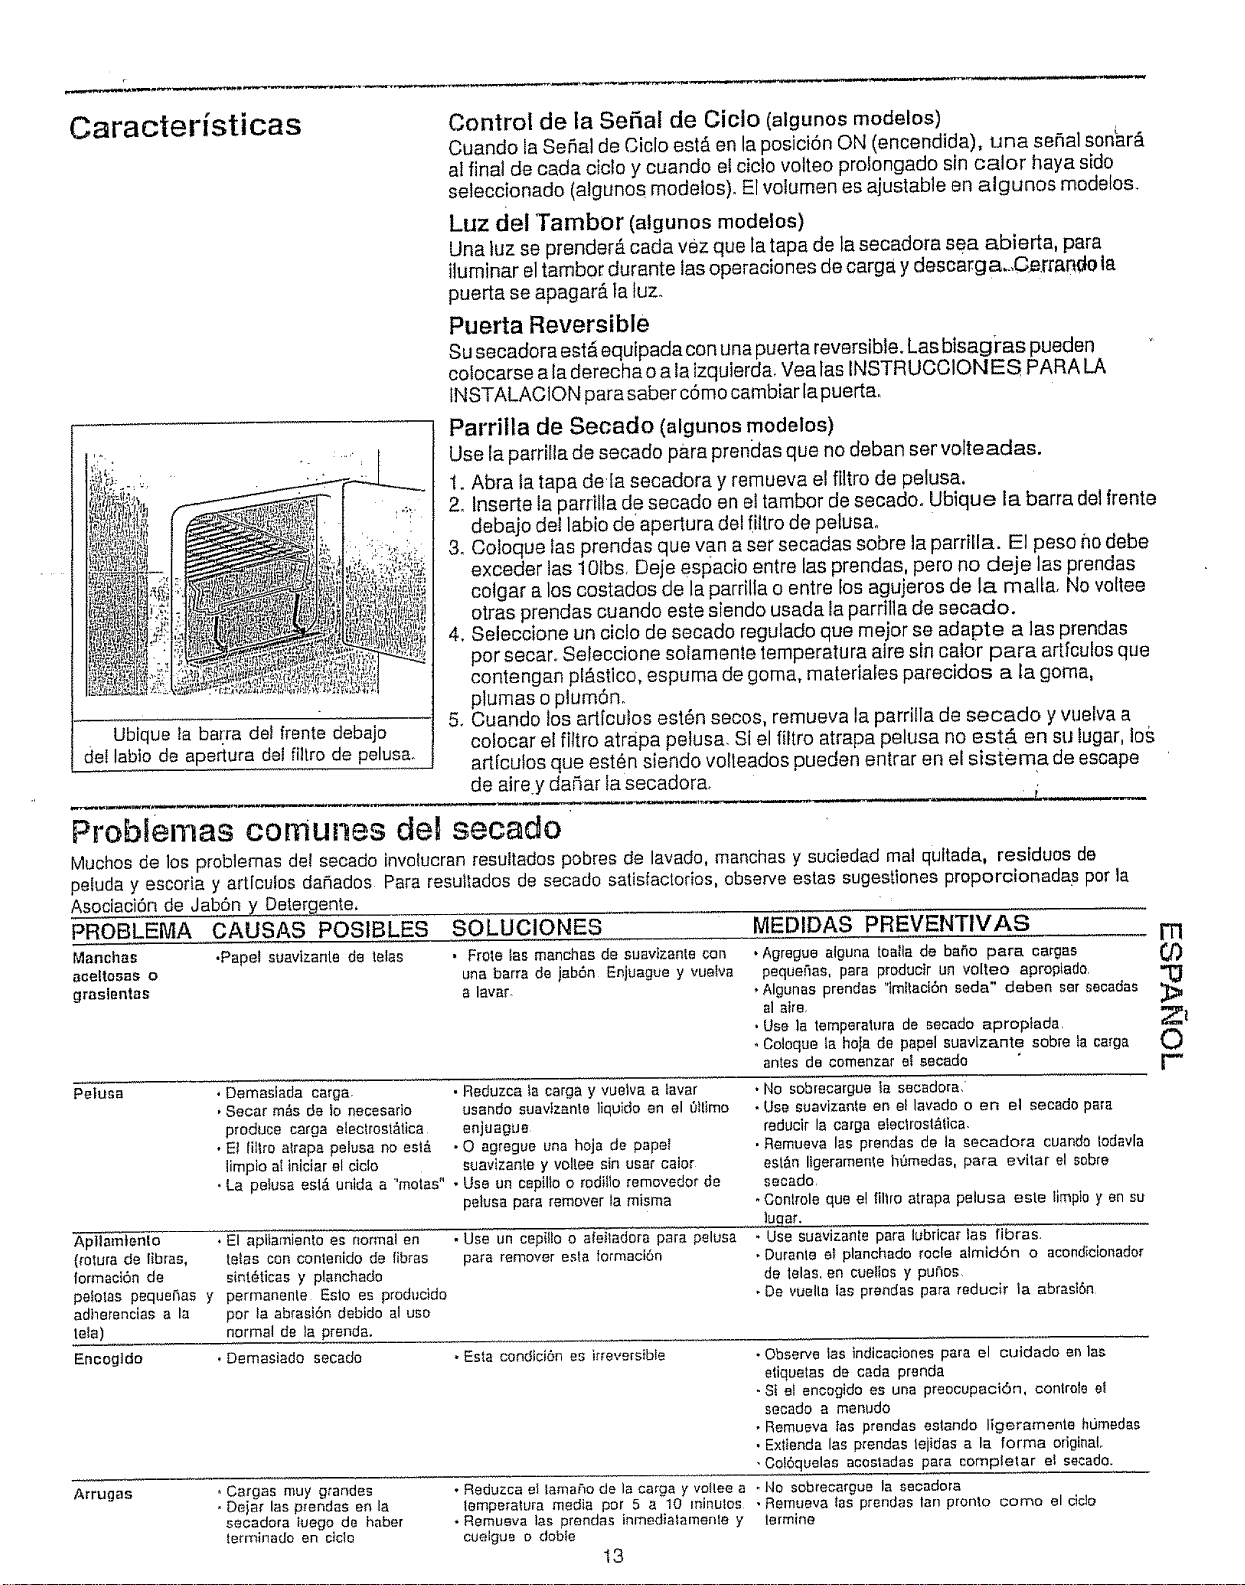
Caracteristicas
Control de la Serial de Cicio (algunos modelos)
Cuando la Seiral de Ciclo est,, en la posici6n ON (encendida), una serial son'ar_.
al final de cada ciclo y cuando el ciclo volteo prolongado sin calor haya side
seleccionado (algunos modelos). El volumen es ajustable en algunos modelos_
Luz del Tambor (atgunos modelos)
Una luz se prender_, cada vez queta tapa de ta secadora sea a.bierta, para
iluminar el tambor durante las operaciones de carga y descarga,.,Ger.ran_e la
puerta se apagar_, ta luz.
Puerta Reversible
su secadora est_ equipada con una puerta reversible, Las btsagl'as pueden
cofocarse ala derecha o ala izquierda. Vea fas INSTRUCC1ONES PARA LA
fNSTALACION para saber c6mo cambiar lapuerta.
Parrilla de Secado (algunos modelos)
Use la parrilta de secede pare prendas que no deban ser volteadas.
t. Abra ta tape de fa secadora y remueva el filtro de pelusa.
.... 2. lnserte la parriffa de secede en el tambor de secado. Ubique la barra de1frente
debajo del labia de aperture del [iltro de pelusa.
3. Coioque tas prendas que van a ser secadas sabre la parriEla. El peso no debe
exceder tas 10lbs, Deje espacio entre las prendas, pero no deje las prendas
colgar a los costados de la parrilla o entre los aguieros de la malta, No voltee
otras prendas cuando este siendo usada la pardlla de secede.
4. Seleccione un ciclo de secede regulado qua major se adapte alas prendas
per secaro Seteccione solamen_e temperature aire sin cater para artfculos que
contengan plb,stico, espuma de game, materiales parecidos ala game,
plumes o plumrn.
Ublque Ia barra det frente debajo 5. Cuando los art[culos est6n secos, remueva la parrilla de secede y vuelva a
cotocar el filtro atrapa petusa. Si el filtro atrapa pelusa no est,€, en su lugar, 1o_,
deI labia de aperture del filtro de pelusa, art[cafes que est6n siendo vo/leados pueden entrar en el sisterna de escape
de airey daBar la secadora, ,,,,,,,,,,,,i.....
Problemas cornunes de1 secede
Muchos de los problemas de! secado involucran resultados pobres de lavado, manchas y suciedad real quttada, restduos de
peluda y escoria y articufos daSados Pare resuttados de secado satisfactorios, observe estas sugesttones proporcionadas per la
Asociacidn de Jab6n y Detergente,
PROBLEIVIA CAUSAS POSIBLES SOLUCIONES MEDIDAS PREVENTIVAS
Manchas
aeettosas o
graslentas
Pe;_a
.Papal suavtzante do tales
, Frote tas manchas de suavIzanle con
una barra de jab6n Enjuague y vuelva
a laver
m
• Agregue alguna toalla de bafio pare cargas _)")
pequei_as, pare pmduclr un volteo aproplado "TI
• Algunas prendas 'Imllactrn soda" deben set secedes
al atre,
•Use ]a temperalura de secede apropiada _
. Coloque la hoja de papel suavlzante sabre ta carga O
antes de comenzar et secede r"
Aptlamtenlo
(rotura de fibraa,
formaci6n de
adherancias ata
tale)
Encogtdo
. Demaslada carga
, Secar m6s de Io necesarto
produce carga electrost_lica
• Et tillro atrapa pelusa no eel&
iimpio aI iniciar el ciclo
, La pebsa esl_ unida a "moles"
• El apltamiento es normal en
totes con conlenido de fibres
sint6ticas y planchado
petotas pequei_as y permanente Eslo es producido
per ia abrasi6n debido al use
normal de la prenda.
• Demasiado secado
Arrugas oCargas muy gt'andes
. Deiar las p_endas en la
secadora Iuego de haber
terminado en cicle
• Reduzca la carga y"vuetva a tavar
usande suavtzante ]iquide an el 01lime
onjuague
• Q agregue una hoja de paper
_uavizante y voltee sin user calor
• Usa un cepillo o rodilto removedor de
pelusa pare remover la misma
. Use un cepi!!o o aleitadara pare pelusa
pare remover asia {ormaci_,n
, fqo sobrecargua ;a secadora,
• Use suavizante en el lavade o en et secede pare
reducir la carga etectrost_tica,
• Remueva las prendas de la secadora cuando todavla
est&n ligeramenle hOmedas, para evitar el sabre
secado
. Controle qua e! lillro atrapa pelusa este limpb yen su
!u_a_'_ ,_
. Use suavizante para lubriea_ tas fibres,
.Durante el planchade rocfe almiddn o acondicionader
de lelas, en cueltos y puf'_os,
, De vuella ias prendas para reducir la abrastSn
• Esta condicidn es ir_eversibfe • Observe ias indicaciones pare el cuidado on las
efiqualas do cada prenda
-St el encegido es una preecupaci6n, contrel_ el
secado a menudo
, Remueva [as prendas eslando ligeramente h_Jmedas
, Exttenda las prendas tejidas a la farina original,
• Col6quelas acos_adas pare completar el secede.
• Reduzca el tama_'_ode la carga y voltee a oIqo sebrecargue la secadora
temperature media per 5 a 10 minufos • Rernueva las prendas fan pron_,o come el ciclo
, Remueva las prendas inmedialamente y lermine
cuelgua o dobte
I3
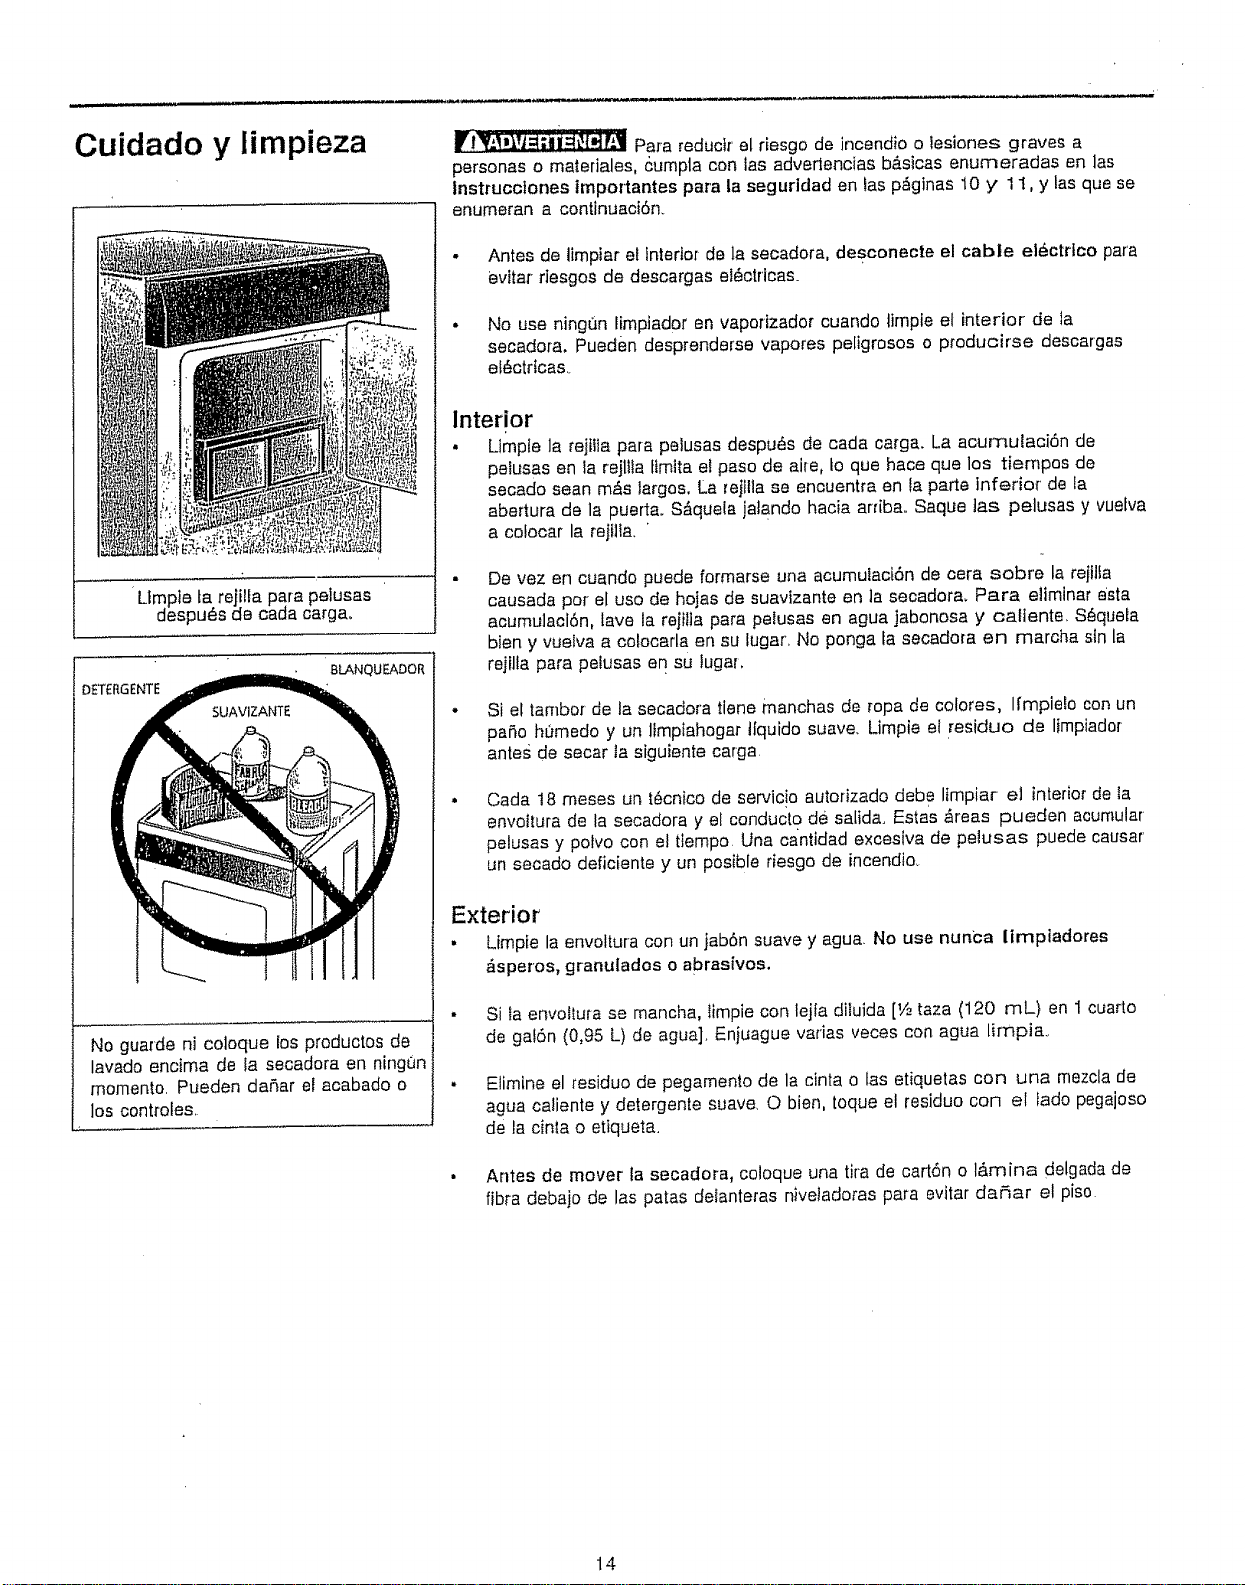
Cuidado y limpieza
Ltmple Jate}iJIa pare pelusas
despu6s de coda carga.
BLANQUEADOR
DETE_GENTE
No guarde ni coloque los produetos de
lavada encima de la secadora en ning_n
momenta. Pueden daSar eJ acabado o
los controles,
Para reductr el riesgo de incendio o tesiones graves a
personas o matefiales, cumpta con 1as adveflencias b_.sicas enurneradas en ]as
tnstrucctones importantes parala segurldad en fas p=Sginas10 y 11, y las que se
enumeran a continuaci6n.
o Antes de limpiar el interior de la secadora, desconecte el cable el_ctrtco pare
evftar riesgos de desoargas el_ctricas.
o No use ning(_n limpiador en vaportzador cuando timpie et interior" de la
secadora, Pueden desprenderse vapores peligrosos o producirse descargas
el_ctdcas.
Interior
• Limple la reitlia pare pelusas despu_s de cada carga. La acumulaci6n de
petusas en la rejlIla ltmita el paso de ai[e, to que hace que los tiempes de
secado sean m_s largos. La relilla se encuent_a en la porte infer'ior de ta
abertura de la puer% S&quela ja]ando hacia ardbao Saque tas pelusas y vuelva
a celocar la rejllla, '
De vez en cuando puede formarse una acumulaci6n de eera sabre la rejllfa
causerie par et usa de bolas de suavtzante en ta seoadora_ Pare e/tminar este
acumulacl6n, lave la rejtlla pare pelusas en agua jabonosa y oaltente_ S_queLa
bten y vueiva a cotocarla en su lugar_ No ponga [a secadora en marcha sin la
rejllla pare peiusas en su tugar,
• Si el tambor de la secadora tlene manchas de rope de colores, Ifmpielo con un
paso humedo y un lfmplahegar tlquido suave, Limpie el residue de ltmpiador
antes de secar la siguiente carga,
Cada t8 meses un t6cnlco de servicio autortzado debe Itmpiar e] interior de ta
envoltura de [a secadora y el conduclo de safida. Estas _reas pueden acumufar
pelusas y polvo con el tiempo. Una ca'ntidad excestva de pelusas puede causer'
un secede deficiente y un posible riesge de incendio_
Exterior
• Limpie la envoltura con un jab6n suave y agua. No use nunca limpiadores
&spares, granulados o abrasives.
• Si la envollura se mancha, Iimpie con lejfa diluida [V2taza (120 mL) en 1 cuarto
de gal6n (0,95 L) de agua]. Eniuague varies veces con agua limpiao
. Elimine el residue de pegamento de la cinta o los etiquetas con una mezcla de
ague caliente y detergente suave, 0 bien, toque el residue con el tado pegajoso
de la cinla o etiqueta.
• Antes de mover la secadora, coloque una tira de cart6n o I&mina delgada de
fibre debajo de los paras delanteras niveIadoras pare evitar da_ar el piso
14
Evitar llamadas de servicio
Antes de ltamar para obtener servicio, examine esta Iista.. Puede ahorrade fiempo y dinero Esta lista incluye los problemas comunes
que no son el resultado de una fabficaci6n o matefiates defectuosos de esla secadora.
PROBLEMA CAUSA POSIBLE SOLUClON
La secadora no se pone El cable el6ctrfco no esl_ blen enchu_ado o el Asag0rese de qua el enchufe est6 bien encaj ado en el
en marcha enchufe puede ester flojo, tomacordentes de la pared.
Etfusible de ta casa se ha tundido o e(dtsyuntor Prenda el disyunlor a cambte el fusible.
se ha disparado,
Asegt_rese de qua Ia l,_neael_ctr}ca no est_ _obrecargada yde
qua ta secadora eat6 en un circutto separado,.
Ef disyuntor de seguddad para la temperature Llama al t_cnlco autodzado de servicio pai'a qua Io cambfe.
se ha disparado
La seeadora se pone en Hay 2 luslMes dom_sticos en el eircuRo de ta Cambie et tusibla.
marcha pero no caIJenta, seaadora. St I de Ioa 2 fuslbles se ha fundido, el
tambor puede girar pero el catentador no
funciona.
La v&lvula de entrada de gas no est_ ablada Compmebe qua la v&lvula de entrada eat6 ablertao Vea las
(mode!as de gas) /NSTRUCCIONES PARA LA INSTALACION para saber c6mo
hacerlo.
La secadora no llene una eantidad suflcfente Vea tas INSTRUCCIONES PARA LA INSTALACION.
de atre de entrada para et quemador de ta llama
(modefes de gas).
La bombona de gas esl_ vacia o ha habido un Uene o camble la bombona
code en et uminfstro de gas na!ural (modelos
de gas).
La seeadora deber#, eecar cuando regrase ef sumtnistro de gas,
El cicle de secede es La rejllla pare pelusas est_ obs/rutda con AsegOrese de haber qullado las peiusas de la rejttla pare pelusas
demastado lento, el exterior pelusas, de fa secadora antes de comenzar cada ciclo,,
de la secadera est,_
demaslado calfente o huele No se han cumpttdo Ios requisites para el El conduoto de saltda debe tenet coma m|nimo 10 cm (4
calten!e., conducto de satida, puigadas) de di_metro y debe eslar hecho de metal rigide o
flexible
La secado_-ael_ctrica est#.conectada a un
ctrcutto de 208 verbs,
No se hen seguido Iasprocedimientos de
secede,
La campana de salida exterior o ei conducto de
salida pueden es_,artaponados o semi
obslruidos.
Una vez colocado, el conducto de salida no debe loner m&s de
dos dobleces de 90_y no debe sobrepasar ]a longltud lndicada en
las tNSTRUCCIONES PARA LA INSTALACION.
E] tiempo de secado ser& un 20% m_,s Fargo que el secado boche
con un ctrcutto de 240 rallies.
Vea los Procedtmlentos pare el secede en la p&gina 12
Umple la obstrucci6n
Mucha humedad. Use un deshumidilicador cerca de fa secadora,.
Arrugas excesfvas. La secadora est#, sobrecalentada.. No la sobrecargue. Yea los Proeedlmlentos pare el secado en
la p_glna 12.-
Las prendas se hen dejado demasiado tiempo Saque las prendas fan pronto coma termine el cicio..
en la secadora
Distribuci6n insuiicienle de las prendas,
Temperature de secede demaslado alia,
Vaa los Procedtmfentes pare el secede en ta pAgina 12.
Slga tas lnstrucciones de la etiquela de ta prenda,
Ara#azos o descascarflfado
del acabado del tamboro
Objetos exlrai'ios coma monedas, aiflleres,
pinzas o bolones dentro de ta secadora.
Accesorios permanenles como hablllas de
cinturones0 cremalleras y cferres pueden ester
golpeande el interior del lamber.
Saque stempre los ebjetos extrafios de los bolsillos antes de laver
la pranda Saque los objelos de! tambor y ponga la sBcadora en
marcha de nuevo,
Puede set necesario envolver bien un pedazo sobrante de tela
alrededor de lot adornes antes del secado para evttar los
ara_azos y da,%s a la secadora.
Los dares al tambor causados por objetos extraSos o
accesorlos permanenles no est_n cublertos par ta garantla.
Iml
03
0
r-
15
For in-home major brand repair service:
Call 24 hours a day, 7 days a week
1-800-4- MY-H0 ME'_(1-800-4.69-4663)
Para pedir servicio de reparaci6n a domicillio - 1-800-676-581 1
in Canada for all your service and parts needs call
Au Canada pour tout le service ou les pi_ces
- 1-800-665-4455
For the repair or replacement parts you need:
Call 6 am - 11 pm CS'I'; 7 days a week
PartsDirect '"
1-800-366-PART (1-800-366-7278)
Para ordenar piezas con entrega a domicilio - 1-800-659-7084
For the location of a Sears Parts and Repair Center in your area:
Call 24 hours a day, 7 days a week
1-800-488-1222
For information on purchasing a Sears Maintenance Agreement
or to inquire about an existing Agreement:
Call 9 am - 5 pro, Monday - Saturday
1-800-827-6655
H0meCentraF
TheService,Sideof Sears7