30" Radiant
Self-Cleaning Convection
Electric Free-Standing Range
Estufa El_ctrica
30" Radiante a Convecci6n Tipo
"lndependiente" con Autolimpieza
Models, Modelos 911.95982, 95987, 95989
II1
I"
Zl
0
229c4020P251
(SR-10453)
Sears, Roebuck and Co.,
Hoffman Estates, IL 60179 U.S.A. www, sears.com
RADIANTSELF-CLEANING
FREE-STANDINGRANGE
Tableof Contents
Range Safety ........................ 3-8
Anti-Tip Bracket .................... 3, 4
Protecting the Cooktop ............ 8
Features of Your Range .......... 9
Removal of Packaging Tape .... 9
Cooking Zones ........................ 10
Hot Cooktop Indicator Lights ..... 10
Cooking Utensils and Woks ... 10
Home Canning Tips ................. 11
Checking Your Cookware ...... 1 1
Cookware Performance .......... 11
Radiant Coils ....................... 1 t
Temperature Limiter ............... 11
Control Settings ..................... 12
Dual Cooking Zones ........... 12
Warmer Zone ....................... 12
Oven Control, Clock, Timer.._ 13
Contro! Display ....................... 14
Clock ........................................ 15
Kitchen Timer ......................... 15
Tones ..................................... 16
F Code ................................... 16
Oven Cooking Tips .......... I7-19
Baking With Margarine ........... I8
Baking .................................... 20
Convection Baking Tips ......... 21
Convection Roasting Tips ... 22-23
Convection Baking and
Roasting ................................. 24
Broiling .............................. 25-26
Setting Special Features ._ 27-28
Self-Cleaning Cycle .......... 29-30
Glass-Ceramic Cooktop. 31-32
Control Panel ......................... 32
Broiler Pan and Grid .............. 32
Self-Clean Oven Interior .......... 32
Drawer and Sides of Range., 32
Oven Door Glass .................... 32
Door Vent Trim ........................ 32
Surface Control Knobs .......... 33
Oven Light Bulb .................... 33
Oven Racks ......................... 34
Oven Door ...................... 34-35
Storage Drawer ...................... 36
Storage Drawer Liner .............. 36
Before Calling for
Service ............................. 37-39
Temperature
Adjustment ..................... 19, 40
Warranty ............................... 42
Consumer Service
Numbers .............................. 84
For your convenience and future reference, please write down your model
and serial numbers in the space provided. They are located on the front
frame behind the storage drawer.
MODEL NUMBER:
SERIAL NUMBER:
© Sears, Roebuck and Co
2
IMPORTANTSAFETY
INSTRUCTIONS
SAVE THESE INSTRUCTIONS
Read all instructions before using this appliance. When using gas
or electrical appliances, basic safety precautions should be followed,
including the following:
All Ranges Can Tip
Injury to Persons
Could Result
Install Anti-Tip
Device Packed
With Range
See Installation
: Instructions
These ANTI-TIP bracket installation
instructions are for wood or concrete
floors and walls Any other type of
construction may require special
installation techniques to provide
adequate fastening of the ANTI-TIP
bracket to the floor and wall
The use of this bracket does not
prevent tipping of the range when
bracket is not properly installed,
NOTE: The installation of the
ANTI-TIP bracket must meet all
local codes for securing appliance
Step 1
Locating the bracket
A. Locate the bracket against the rear
wall and either the right or left
cabinet If the countertop
overhangs the cabinet, offset the
bracket from the cabinet by the
amount of overhang If there is no
adjacent cabinet, position the edge
of the bracket at the desired
location of the range side panel
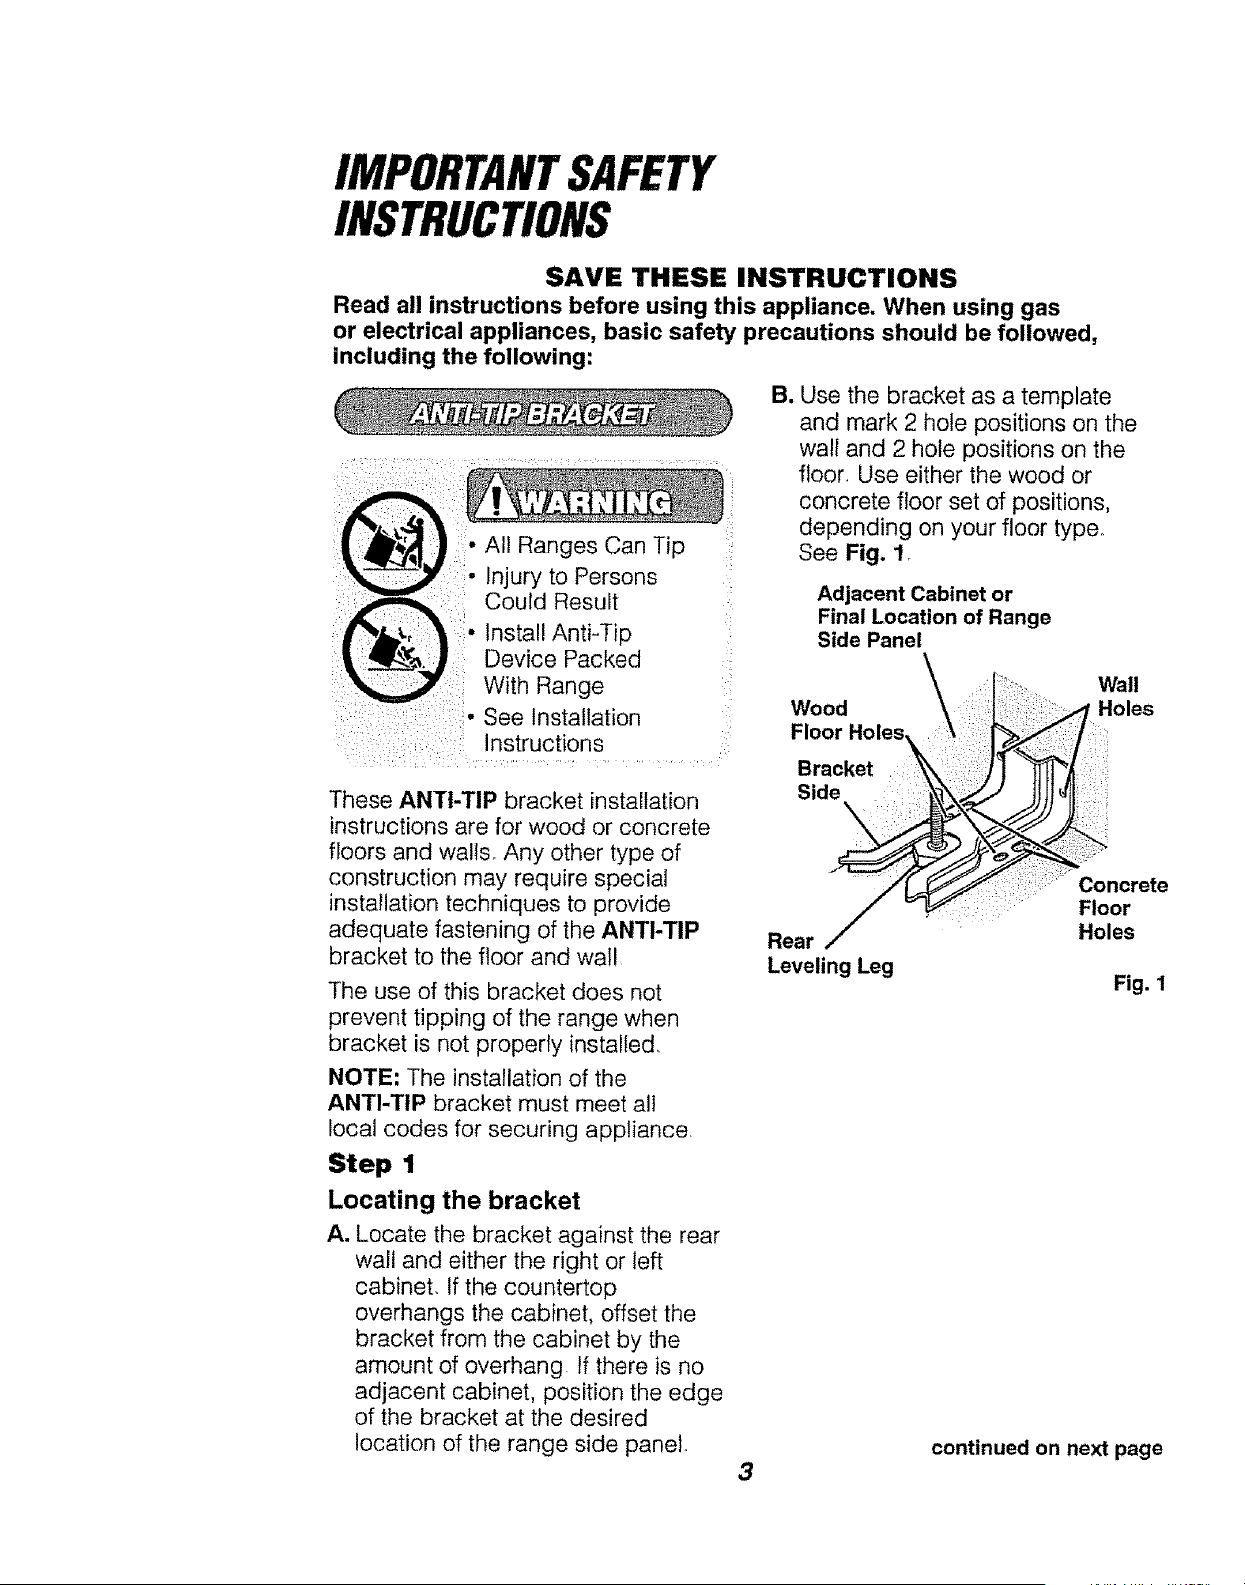
B. Use the bracket as a template
and mark 2 hole positions on the
walt and 2 hole positions on the
floor. Use either the wood or
concrete floor set of positions,
depending on your floor type.
See Fig. 1,
Adjacent Cabinet or
Final Location of Range
Side Panel
Wood
Floor
Bracket
Side
\
Wall
Holes
; i
Rear
Leveling Leg
Concrete
Floor
Holes
Fig. 1
3
continued on next page
IMPORTANTSAFETY
INSTRUCTIONS
Anti-Tip Bracket (contd.)
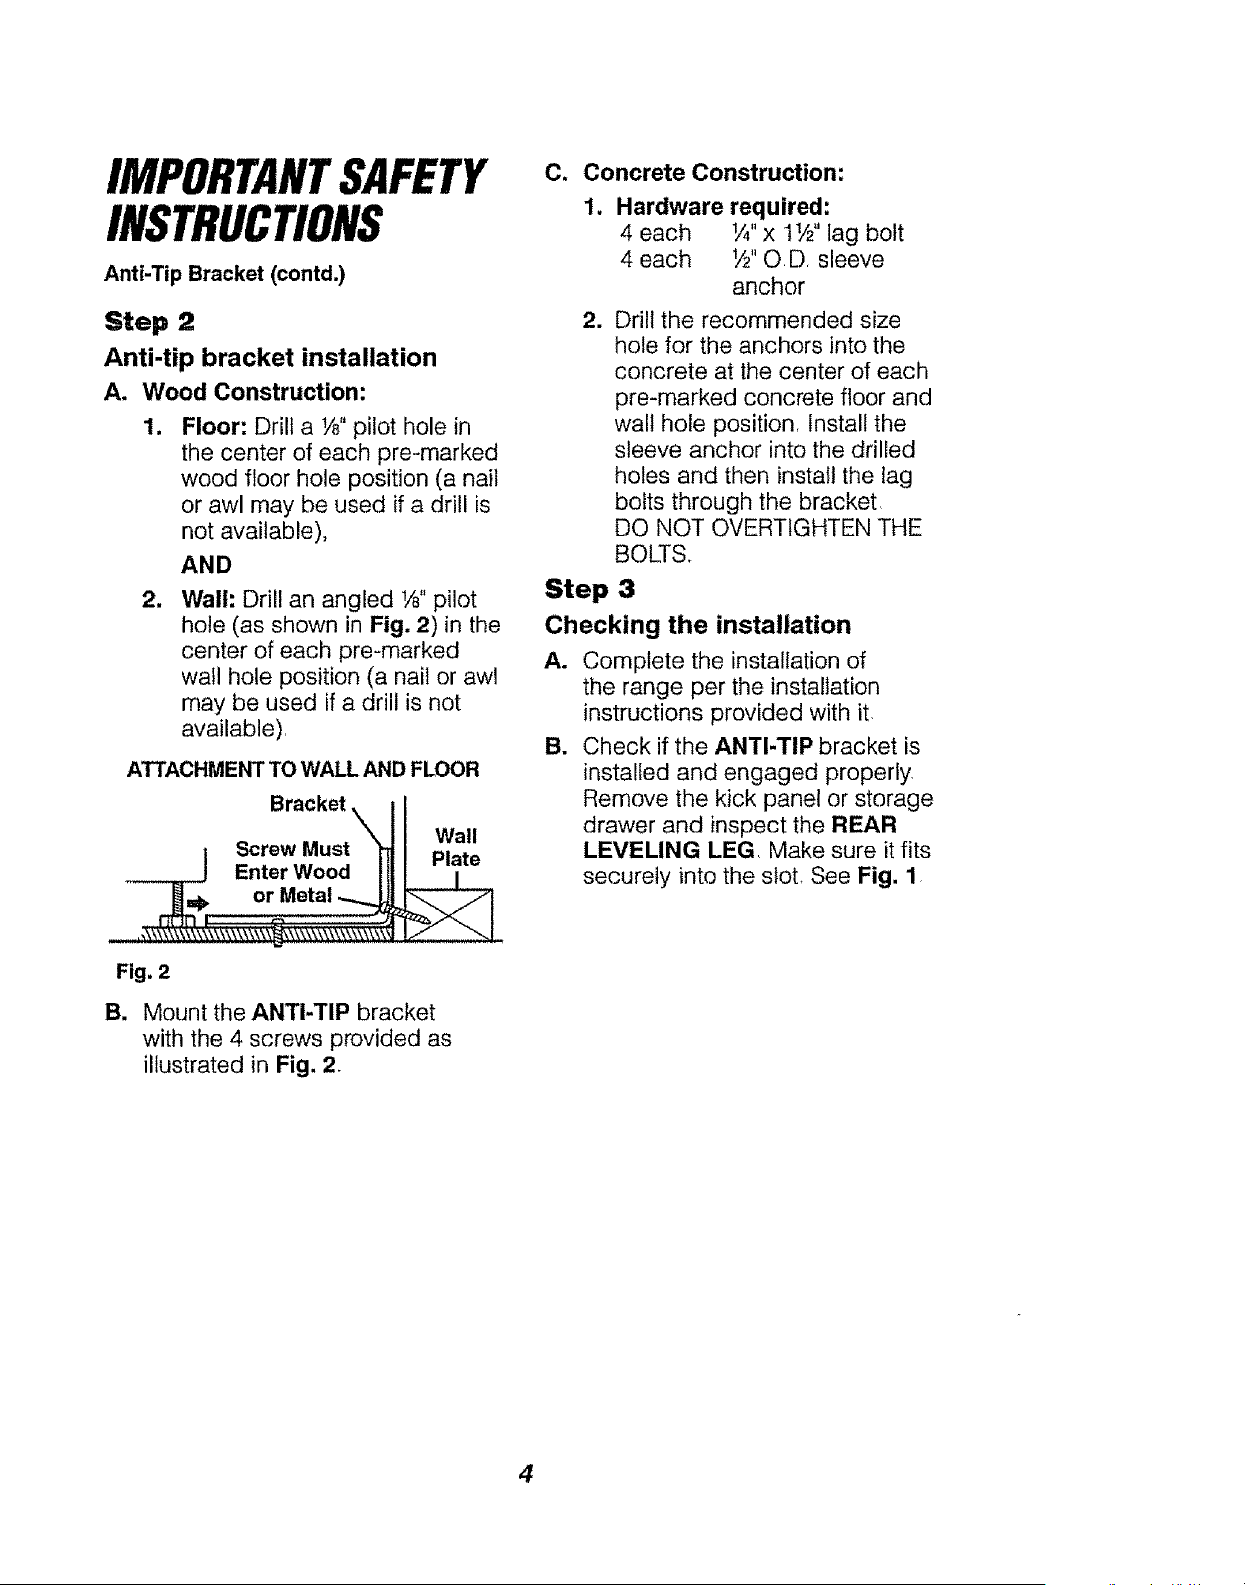
Step 2
Anti-tip bracket installation
A. Wood Construction:
lJ
Floor: Drill a Vd' pilot hole in
the center of each pre-marked
wood floor hole position (a nail
or awl may be used if a drill is
not available),
AND
2_
Wall; Drill an angled 1/8"pilot
hole (as shown in Fig. 2) in the
center of each pre-marked
wall hole position (a nail or awl
may be used if a drill is not
available)r
ATTACHMENT TO WALL AND FLOOR
Bracket XI
i ScrewMust_
Enter Wood Ill
&.., o
.,\\\\\\\i_\'_\\x\\\\\\\\_
Fig. 2
Wall
Plate
B. Mount the ANTI-TIP bracket
with the 4 screws provided as
illustrated in Fig. 2
C. Concrete Construction:
Hardware required:
4 each W'x 1W' lag bolt
4 each 1W'O D sleeve
anchor
. Drill the recommended size
hole for the anchors into the
concrete at the center of each
pre-marked concrete floor and
wall hole position Install the
sleeve anchor into the drilled
holes and then install the lag
bolts through the bracket
DO NOT OVERTtGHTEN THE
BOLTS.
Step 3
Checking the installation
A. Complete the installation of
the range per the installation
instructions provided with it
B. Check if the ANTI-TIP bracket is
installed and engaged properly
Remove the kick panel or storage
drawer and inspect the REAR
LEVELING LEG Make sure it fits
securely into the sloL See Fig. 1
4
IMPORTANTSAFETY
INSTRUCTIONS
_ ARNING! To prevent
accidental tipping of the
range from abnormal use,
including excessive loading of
the oven door, attach the range
to the wall or floor by installing
the Anti-Tip device supplied, if
the range is moved for cleaning,
servicing or any reason, be
sure the Anti-Tip device is
re-engaged properly when
the range is slid back in the
opening. Failure to do so could
result in the range tipping and
may cause personal injury. To
inspect the Anti-Tip device,
remove the storage drawer and
look to see if the rear leg leveler
fully engages the slot in the
bracket.
Important: To ensure safety for yourself,
family, and home, piease read your
Owner's Manual carefully. Keep it
handy for reference Pay close attention
to Safety Sections BE SURE your
appliance is installed and grounded by a
qualified technician.
• DO NOT leave children alone or
unattended near an appliance in use
• TEACH CHILDREN not to play with
controls or any part of the appliance,
and not to sit, climb or stand on the
door, or any other part of the appliance.
• CAUTION: NEVER STORE items of
interest to children on the backguard
or in cabinets above the appliance.
Q
Children climbing on the appliance
could be seriously injured,
KEEP THIS book for later use,
NEVER USE your appliance for
warming or heating the room.
• NEVER TRY to repair or replace
any part of the appliance unless
instructions are given in this manual.
All other work should be done by a
qualified technician,
• ALWAYS KEEP combustible wall
coverings, curtains, dishcloths, towels,
potholders, and other linens a safe
distance from the appliance,
• NEVER HEAT unopened food
containers. Pressure buildup can
cause the container to burst and
cause injury
• NEVER LEAVE containers of fat or
drippings in your oven.
• ALWAYS KEEP the oven and surface
unit areas free from things that will
burn, Food, wooden utensils, and
grease buildup could catch fire
Plastic utensils could melt and
canned foods could explode. Your
appliance should never be used as
a storage area
• ALWAYS KEEP your appliance clear
of things that will burn (gasoline and
other flammable vapors or liquids).
• NEVER TRY to clean a hot surface.
Some cleaners produce noxious
fumes, and wet cloths or sponges
could cause steam burns.
NEVER WEAR loose-fitting clothing
when using your appliance.
NEVER USE a towel or other bulky
cloth as a potholder, Make sure the
potholder is dry. Moist potholders and
wet cloths or sponges could cause
steam burns DO NOT let potholders
touch hot heating elements.
5
IMPORTANTSAFETY
INSTRUCTIONS
• DO NOT touch cooking zones,
surfaces near them, or interior oven
surfaces_ These may be hot enough
to cause burns even though they are
dark in color. During and after use,
do not touch or let clothing or
flammable material contact the
zones or hot surfaces until they have
had time to coot. Other surfaces
near the oven vent openings, oven
door and window, and cooktop
surfaces may also be hot enough to
cause burns.
• NEVER LEAVE cooking zones
unattended at high settings.
Boilovers result in smoking or
greasy spills which could catch fire.
• NEVER cook on a broken cooktop;
cleaning solutions and spillage could
penetrate it and create the risk of
electrical shock or fire. Contact a
qualified technician for repairs.
. ALWAYS TURN utensil handles
inward and away from other cooking
zones to reduce the risk of burns,
ignition, unintended contact, and
spillage.
• WHEN PREPARING flaming foods
under the vent hood, turn the fan on.
• ONLY certain kinds of glass or
ceramic cookware can be used for
cooktop cooking, Make sure the
cookware you choose to use is
designed for cooktop cooking
without breaking due to the sudden
temperature change.
- ALWAYS USE care when
touching cooking zones. They will
retain heat after the range has been
turned off,
• NEVER BLOCK the oven air vent
behind the right rear cooktop
cooking zone.
• COOKWARE USED for
cooktop cooking should be flat on
the bottom and large enough to
cover the heating zone being used.
Undersized utensils expose the
heating zone and may result in
direct contact or ignition of clothing,
The proper size utensil will also
improve efficiency.
PLACE OVEN RACKS in the
desired position while the oven is
cool. if racks must be moved while
oven is hot, do not let potholder
contact the hot oven element.
• AFTER BROILING, always take the
broiler pan and grid out of the oven
and clean them Leftover grease in
the broiler pan could catch fire the
next time you use your oven.
• ALWAYS USE care when opening
the oven door. Let hot air and steam
escape before moving foods.
• NEVER USE aluminum foil to line
the oven bottom. Improper use of
foil could start a fire, or electrical
shock could result.
6
IMPORTANTSAFETY
INSTRUCTIONS
• CLEAN ONLYthe parts listed in this
manual. Follow all cleaning
instructions. Be sure to remove broiler
pan and grid before the self-clean
cycle.
• NEVER RUB, move, clean, or
damage the door gasket on
self-cleaning ranges. It is essential
for a good seal.
o NEVER TRY to clean utensils,
cookware, removable parts, or broiler
pan and grid in the self-clean cycle,
• DO NOT USE oven cleaners - No
commercial oven cleaner or protective
coating of any kind should be used in
or around any part of the oven,
• IF THE SELF-CLEANING mode
malfunctions, turn the oven off and
disconnect the power supply, Have it
serviced by a qualified technician
iMPORTANT SAFETY
NOTICE!
The California Safe Drinking Water
and Toxic Enforcement Act requires
the governor of California to
publish a list of substances known
to the state to cause birth defects or
other reproductive harm and
requires businesses to warn their
customers of potential exposure to
such substances. The fiberglass
insulation in a self-cleaning oven
will give off a very small amount
of carbon monoxide during the
cleaning cycle. Exposure can be
minimized by venting with an
open door or window or using a
ventilation fan or hood.
IMPORTANT: The health of
some birds is extremely
sensitive to the fumes given off
during the self-cleaning cycle of
any range. Move birds to another
well-ventilated room.
READ AND UNDERSTAND
THIS INFORMATION NOW!
Be sure everyone in your home
knows what to do in case of fire.
Never use water on a grease fire;
it will only spread the flames.
COOKTOP GREASE FIRE:
Never pick up a flaming pan...
1. Turn off the surface elements
2. Smother the flame with a tightly
fitting lid, use baking soda, or
use a dry chemical, foam, or
halon-type extinguisher,
OVEN FIRE:
Do not try to move the pan!
1. Close the oven door and turn
controls off
21
If fire continues, carefully open the
door, throw baking soda on the
fire, or use a dry chemical, foam,
or halon-type extinguisher.
OPERATION
Protecting the Cooktop
• DO NOT slide cookware across your
cooktop
• DO NOT use a dishtowel or sponge
to clean or wipe your cooktop,,
• DO NOT use scouring powders or
plastic, nylon, or metal cleaning
pads on your cooktop.
. DO NOT apply your cooktop
cleaning creme to the cooktop
surface if the surface is hot,
° READ the instruction label on the
cooktop cleaning creme bottle
before attempting to clean the
surface of your cooktop
• AFTER cleaning the cooktop
surface, be sure to wipe off any
residue that may be left from the
creme with a dry paper towel.
• FOR MAJOR spills, turn the surface
control knob to OFF, Use a dry
paper towel to wipe up spill, then
use a razor scraper (held with a
potholder) at a 45 ° angle against
the surface of the cooktop to
scrape remaining spill from the
hot cooking zone.
• DO NOT cook directly on the
surface of the glass.
• DO NOT use the cooktop as a
cutting board.
• DO NOT use a knife or any sharp
object on the cooktop seal around
the outer edge of the glass because
it will cut or damage it.
:== .q
F
_ CAUTION: When the
surface controls are turned
off, the Hot Surface
Indicator light will remain lit until
the cooktop surface has cooled to
approximately 150°F. The glass-
ceramic surface will retain heat
after the indicator light goes out.
Use caution until the cooktop
surface has had time to cool.
Sugar spills (such as jellies, fudge,
candy syrups) or melted plastic can
cause pitting of the cooktop surface
unless the spill is removed while it is
still hot Special care should be taken
when removing hot substances
Follow these instructions carefully and
remove soil while spill is hot.
1. Turn off the cooking zone affected
by the spill Remove the utensils,
2. Wearing an oven mitt, hold the
razor scraper at a 45 ° angle
against the cooktop and scrape
hot spill to a cool area outside the
cooking zone.
3. With the spill in a cool area, use
a dry paper towel to remove the
spil!over. Any spill remaining
should be left until the surface of
the cooktop has cooled. Do not
continue to use the soiled cooking
zone until all of the spill has been
removed. Follow the steps under
Heavy Soil to continue the
cleaning process
8
OPERATION
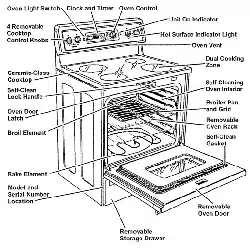
FEATURESOF YOURRANGE
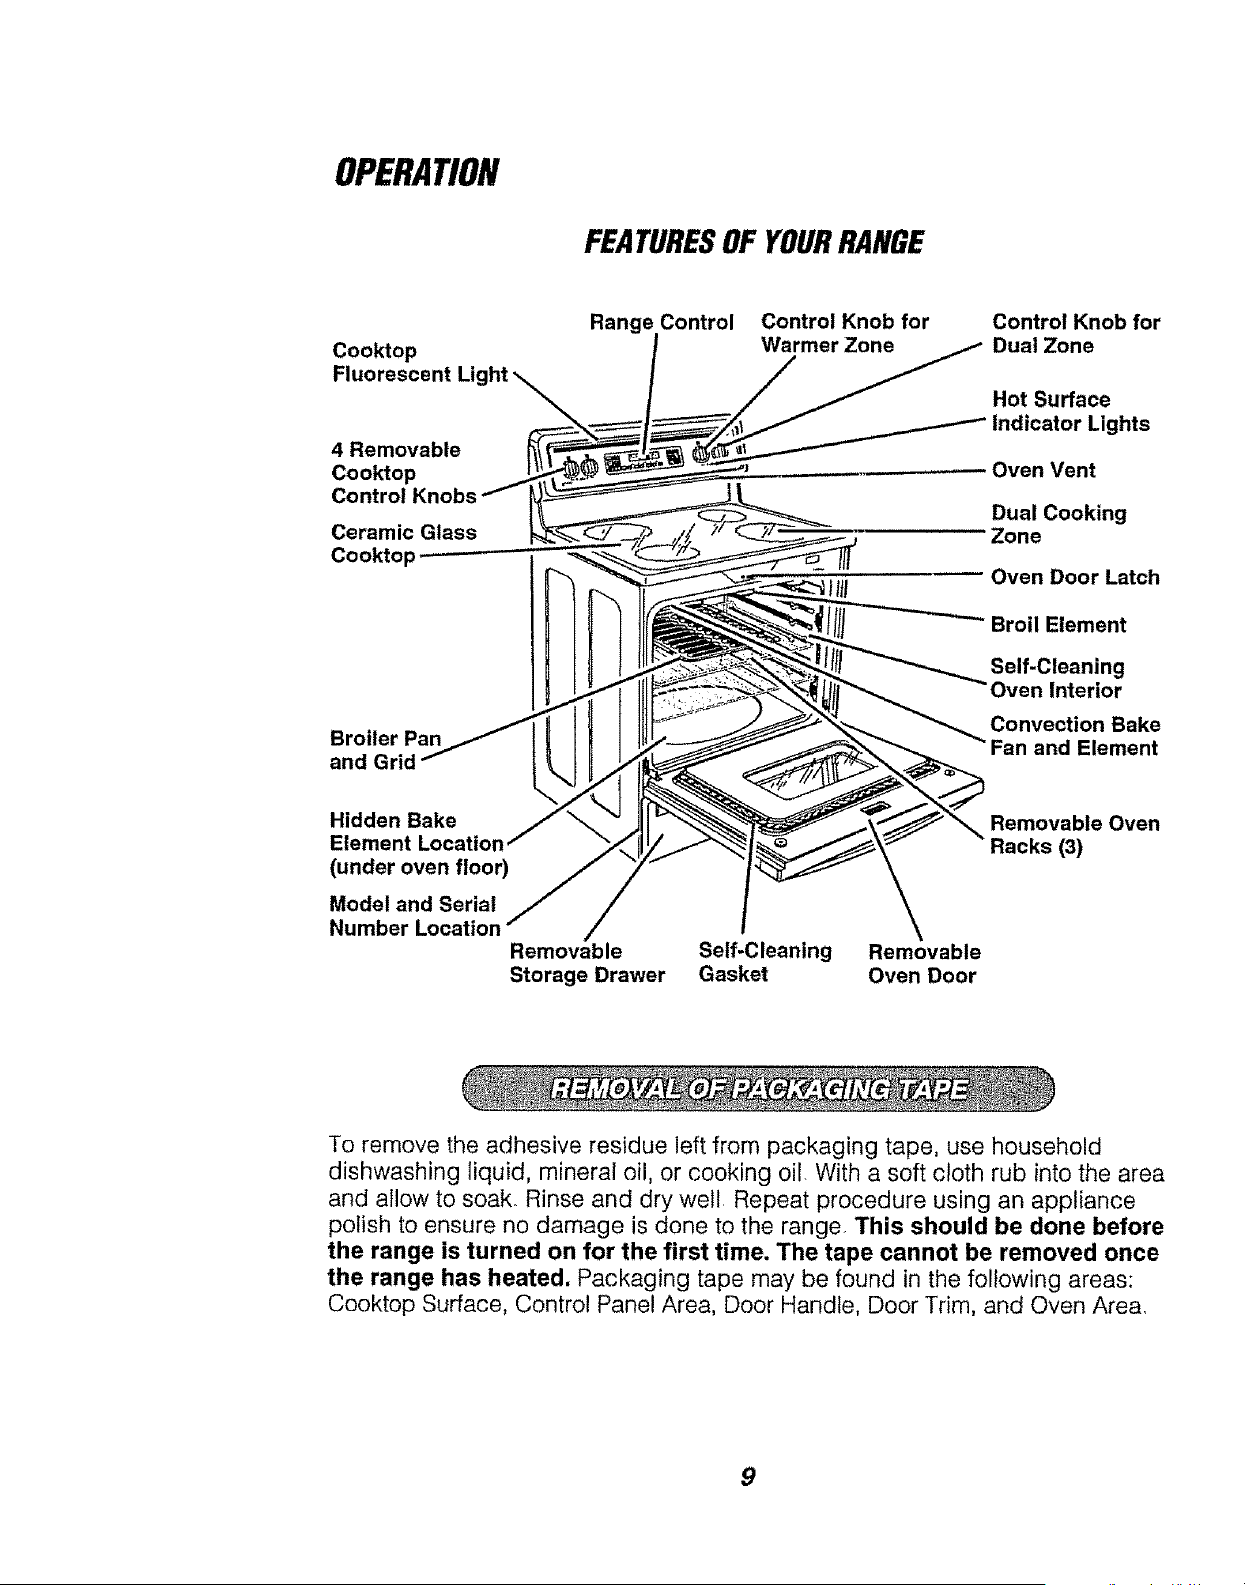
Cooktop
Fluorescent
4 Removable
Cooktop
Control
Ceramic Glass
Cooktop
Broiler Pan
and Grid
Range Control
Control Knob for
Warmer Zone
Control Knob for
Dual Zone
Hot Surface
Indicator Lights
Oven Vent
Dual Cooking
Zone
Oven Door Latch
Broil Element
Self-Cleaning
Oven Interior
Convection Bake
Fan and Element
Hidden Bake
Element Location
(under oven floor)
Model and Serial
Number
Removable
Storage Drawer
\
Self-Cleaning Removable
Gasket Oven Door
Removable Oven
Racks (3)
To remove the adhesive residue left from packaging tape, use household
dishwashing liquid, mineral oil, or cooking oir With a soft cloth rub into the area
and allow to soak. Rinse and dry well. Repeat procedure using an appliance
polish to ensure no damage is done to the range. This should be done before
the range is turned on for the first time. The tape cannot be removed once
the range has heated. Packaging tape may be found in the following areas:
Cooktop Surface, Control Panel Area, Door Handle, Door Trim, and Oven Area.
9

OPERATION
Radiant CooktopCooking
Before using your new radiant
cooktop, clean it with the Cooktop
Cleaning Creme e. This will leave a
protective coating.
The cooking zones are shown by the
outline on the glass. The sign below
each control knob shows you which
radiant zone is turned on by that knob
O0 ®0 O0
Left Left Right
Rear Front Front
Use pans and woks that are flat on
the bottom. The size of the pan should
be the same size as the zone used
when cooking
[ Size of
Bottom Of t I Cooking
Pan __mBi_ -<---- Zone
Pans should be flat on bottom.
Wok Cooking
We recommend that you use only a
flat-bottomed wok They are available
at your local retail store.
Do not use woks that have support
rings. Use of these types of woks, with
or without the ring in place, can be
dangerous.
Placing the ring over the surface unit
wilt cause a buildup of heat that will
damage the porcelain cooktop. Do
not try to use such woks without the
ring° You could be seriously burned if
the wok is tipped over.
A Hot Cooktop Indicator Light will
glow when any radiant element is
turned on, and will remain on until the
surface has cooled to approximately
150°F,
"%__//'
Use only fiat-bottomed woks,
10
OPERATION
RadiantCooktopCooking
(cont.)
1. Be sure the canner is centered
over the zones
2. Make sure the canner is flat on the
bottom
3. Use recipes and procedures from
reputable sources These are
available from manufacturers such
as BalP and Kerr e, and the
Department of Agriculture
Extension Service.
4. Use caution, while canning, to
prevent burns from steam or heat
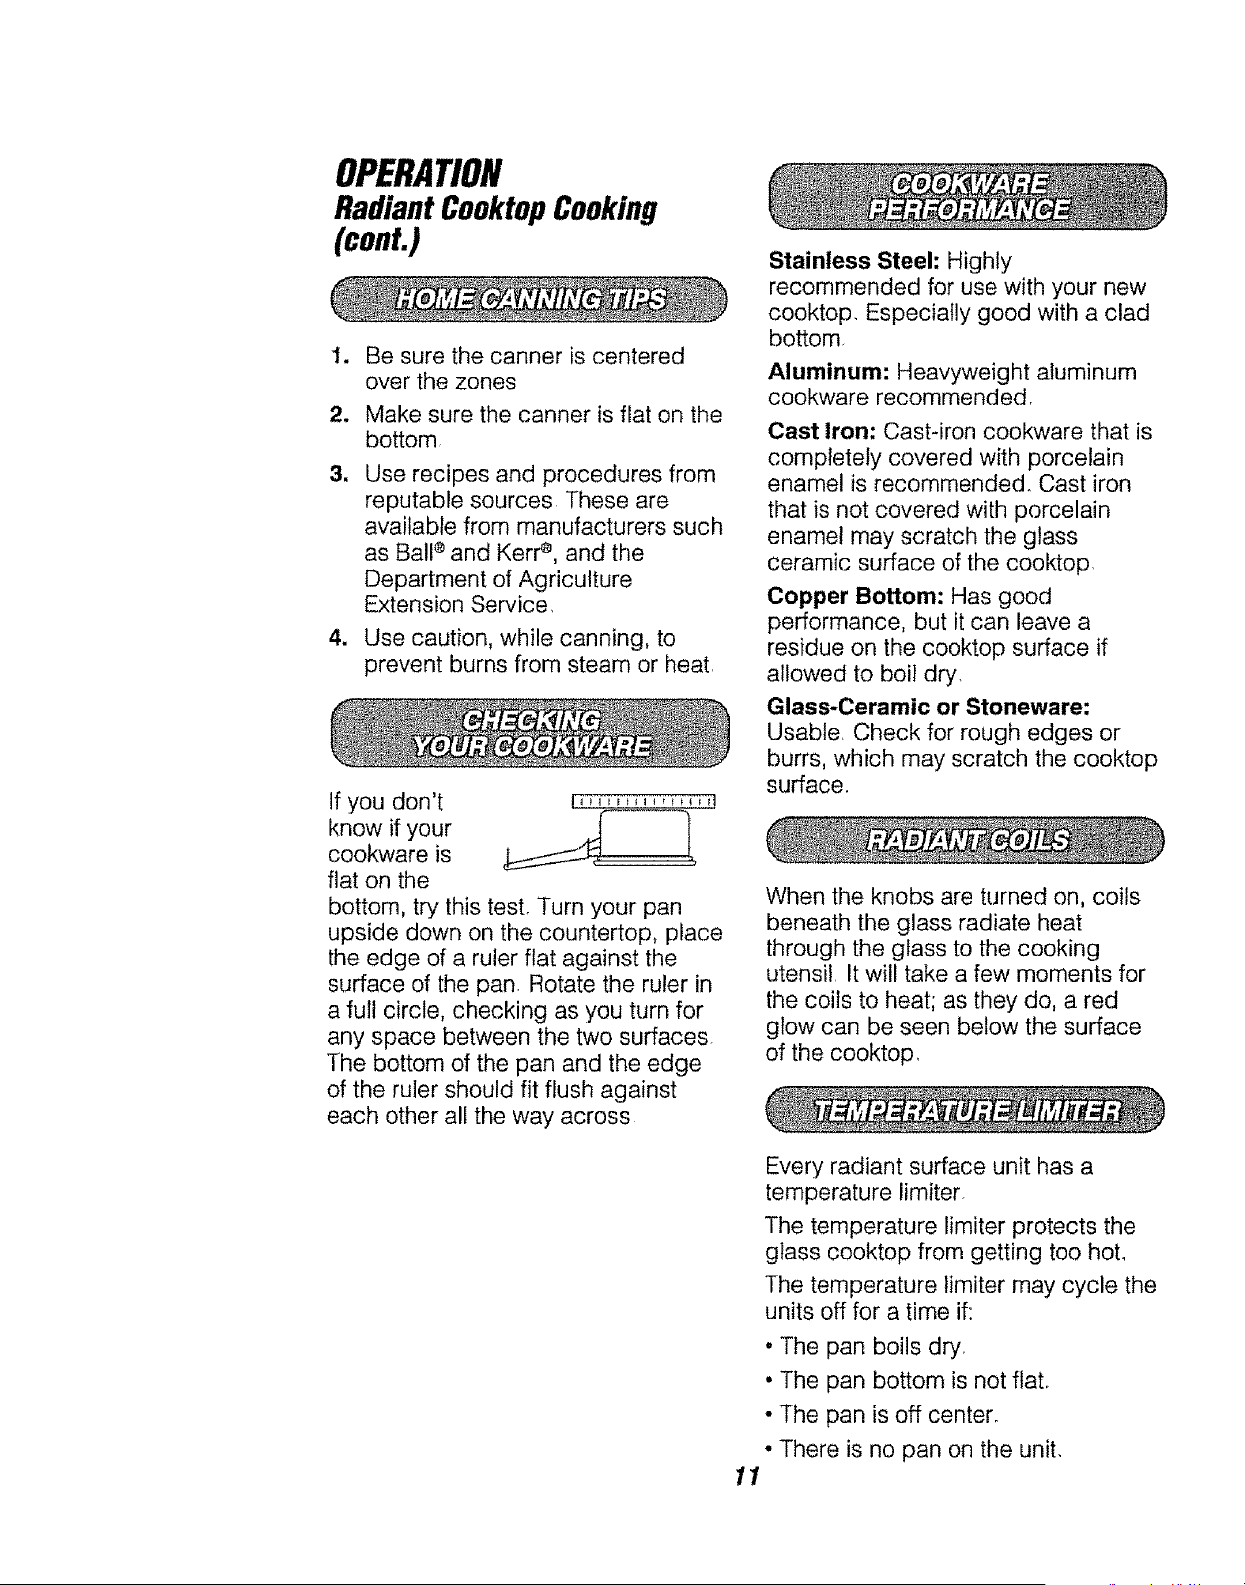
If you don't [,,,,,,,,,,, ,,-Tn
know if your .j
cookware is _.. ,,
flat on the
bottom, try this test. Turn your pan
upside down on the countertop, place
the edge of a ruler flat against the
surface of the pan. Rotate the ruler in
a full circle, checking as you turn for
any space between the two surfaces.
The bottom of the pan and the edge
of the ruler should fit flush against
each other all the way across
Stainless Steel: Highly
recommended for use with your new
cooktop, Especially good with a clad
bottom,
Aluminum: Heavyweight aluminum
cookware recommended,
Cast Iron: Cast-iron cookware that is
completely covered with porcelain
enamel is recommended. Cast iron
that is not covered with porcelain
enamel may scratch the glass
ceramic surface of the cooktop.
Copper Bottom: Has good
performance, but it can leave a
residue on the cooktop surface if
allowed to boil dry.
Glass-Ceramic or Stoneware:
Usable Check for rough edges or
burrs, which may scratch the cooktop
surface.
When the knobs are turned on, coils
beneath the glass radiate heat
through the glass to the cooking
utensil It will take a few moments for
the coils to heat; as they do, a red
glow can be seen below the surface
of the cooktop.
Every radiant surface unit has a
temperature limiter
The temperature limiter protects the
glass cooktop from getting too hot.
The temperature limiter may cycle the
units off for a time if:
• The pan boils dry.
• The pan bottom is not flat.
• The pan is off center.
° There is no pan on the unit.
11
OPERATION
RadiantCooktopCooking
(cont.)
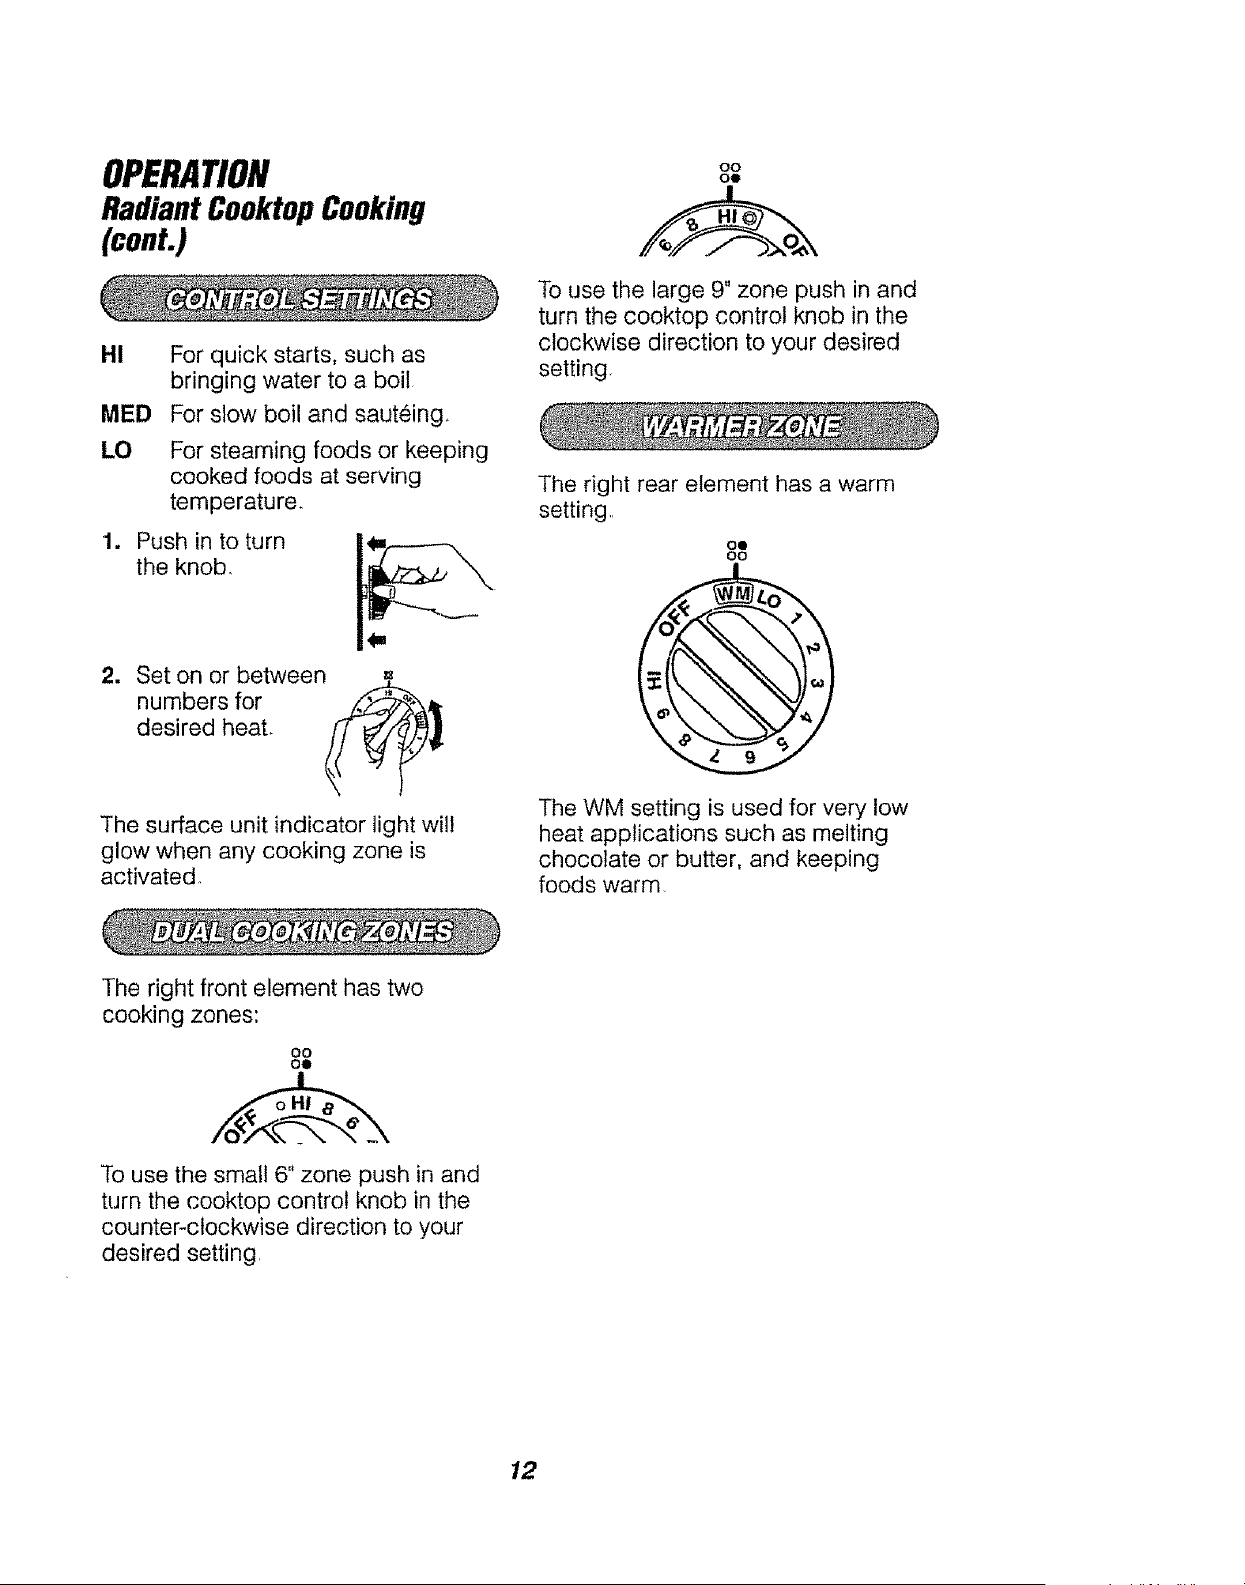
H!
MED
LO
For quick starts, such as
bringing water to a boil
For slow boil and sauteing,
For steaming foods or keeping
cooked foods at serving
temperature.
Push in to turn
the knob,
2. Set on or between =
numbers for
desired heat.
The surface unit indicator light wil!
glow when any cooking zone is
activated
The right front element has two
cooking zones:
O0
o@
To use the large 9" zone push in and
turn the cooktop control knob in the
clockwise direction to your desired
setting,
The right rear element has a warm
setting.
ol
oo
The WM setting is used for very low
heat applications such as melting
chocolate or butter, and keeping
foods warm
OO
OO
To use the small 6" zone push in and
turn the cooktop control knob in the
counter-clockwise direction to your
desired setting,
12
OPERATION
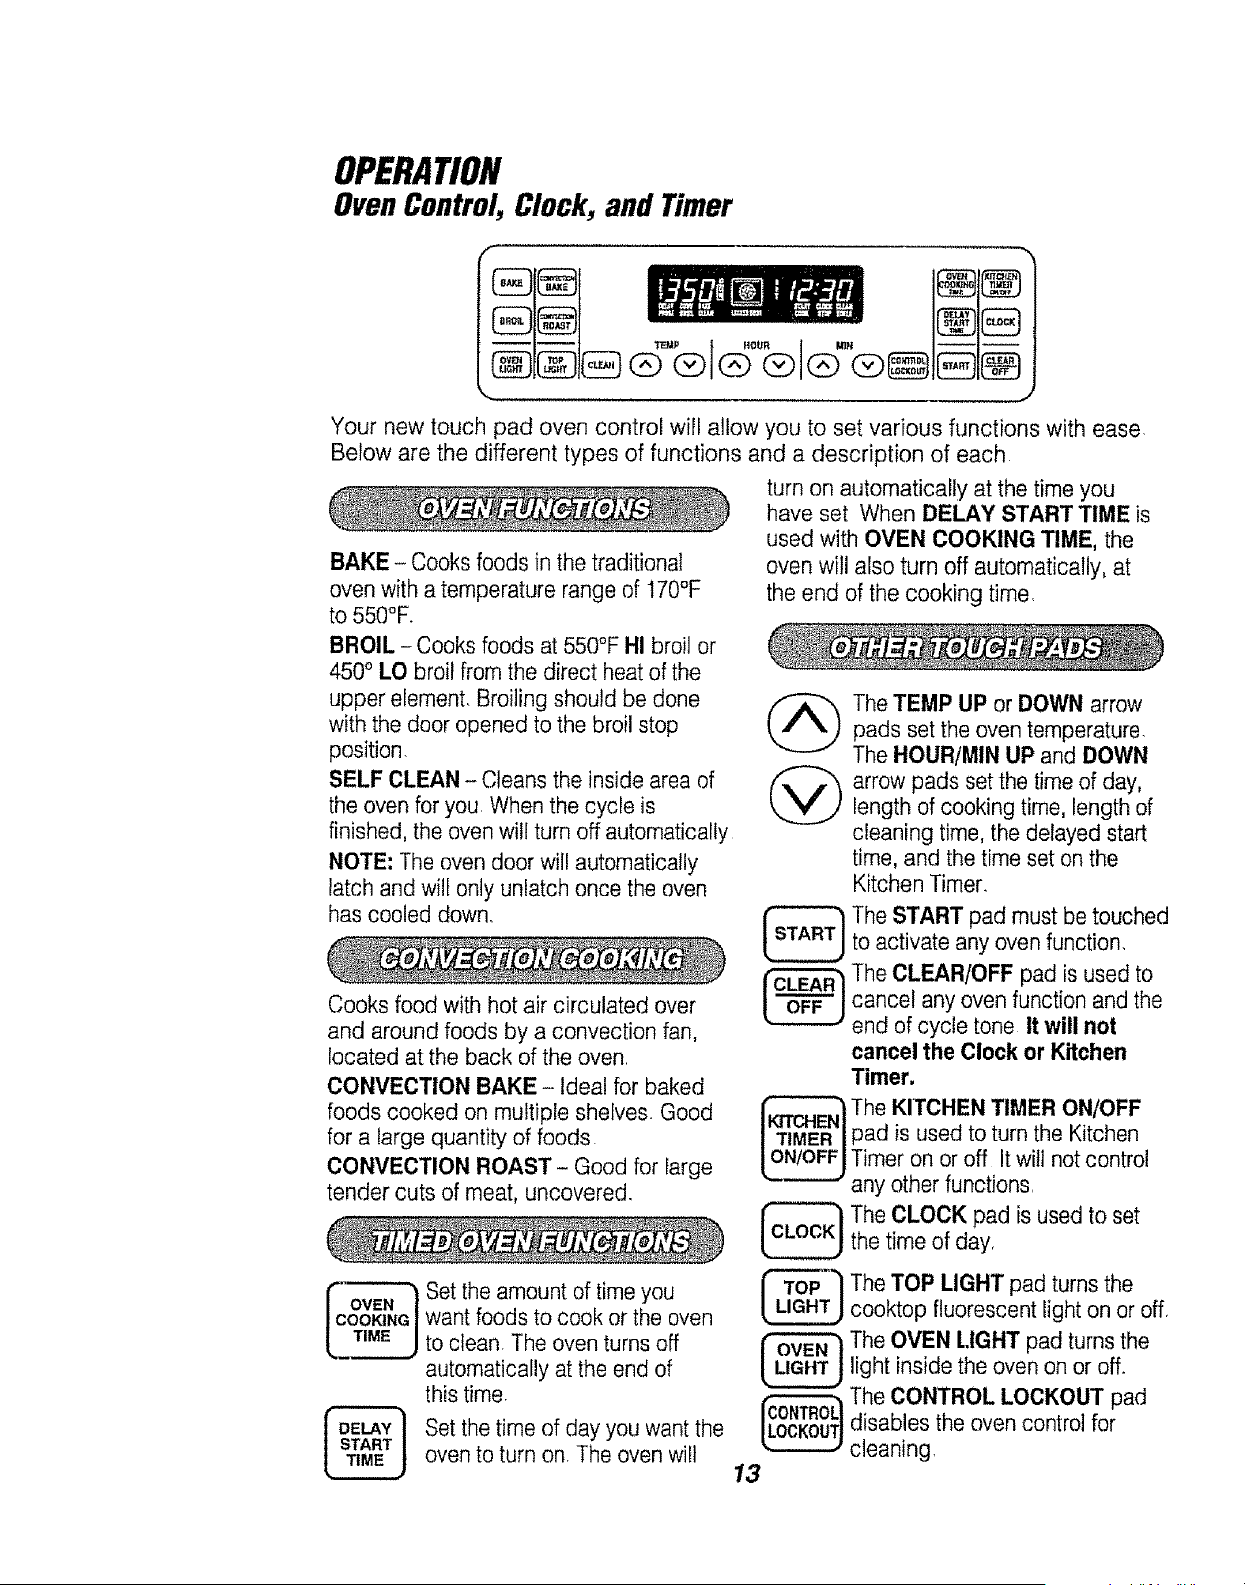
OvenControl, Clock, and Timer
Your new touch pad oven control will allow you to set various functions with ease,
Below are the different types of functions and a description of each
turn on automatically at the time you
have set When DELAY START TIME is
used with OVEN COOKING TIME, the
oven will also turn off automatically, at
the end of the cooking time,
BAKE - Cooks foods in the traditional
oven with a temperature range of 170°F
to 550°F.
BROIL - Cooks foods at 550°F HI broil or
450 ° LO broil from the direct heat of the
upper element. Broiling should be done
with the door opened to the broil stop
position.
SELF CLEAN - Cleans the inside area of
the oven for you When the cycle is
finished, the oven will turn off automatically
NOTE: The oven door will automatically
latch and wilt only unlatch once the oven
has cooled down,
Cooks food with hot air circulated over
and around foods by a convection fan,
located at the back of the oven
CONVECTION BAKE - Ideal for baked
foods cooked on multiple shelves. Good
for a large quantity of foods
CONVECTION ROAST - Good for large
tender cuts of meat, uncovered.
Set the amount of time you
want foods to cook or the oven
to clean. The oven turns off
automatically at the end of
this time
Set the time of day you want the
oven to turn on. The oven will
Fov,- .
IcOOmNG I
The TEMP UP or DOWN arrow
pads set the oven temperature.
The HOUR/MIN UP and DOWN
arrow pads set the time of day,
length of cooking time, length of
cleaning time, the delayed start
time, and the time set on the
Kitchen Timer.
The START pad must be touched
to activate any oven function,
The CLEAR/OFF pad is used to
I _ I cancel any oven function and the
"-------J end of cycle tone It will not
cancel the Clock or Kitchen
Timer.
The KITCHEN TIMER ON/OFF
pad is used to turn the Kitchen
Timer on or off It will not control
any other functions,
The CLOCK pad is used to set
the time of day,
13
The TOP LIGHT pad turns the
cooktop fluorescent light on or off.
The OVEN LIGHT pad turns the
light inside the oven on or off.
The CONTROL LOCKOUT pad
disables the oven control for
cleaning.
OPERATION
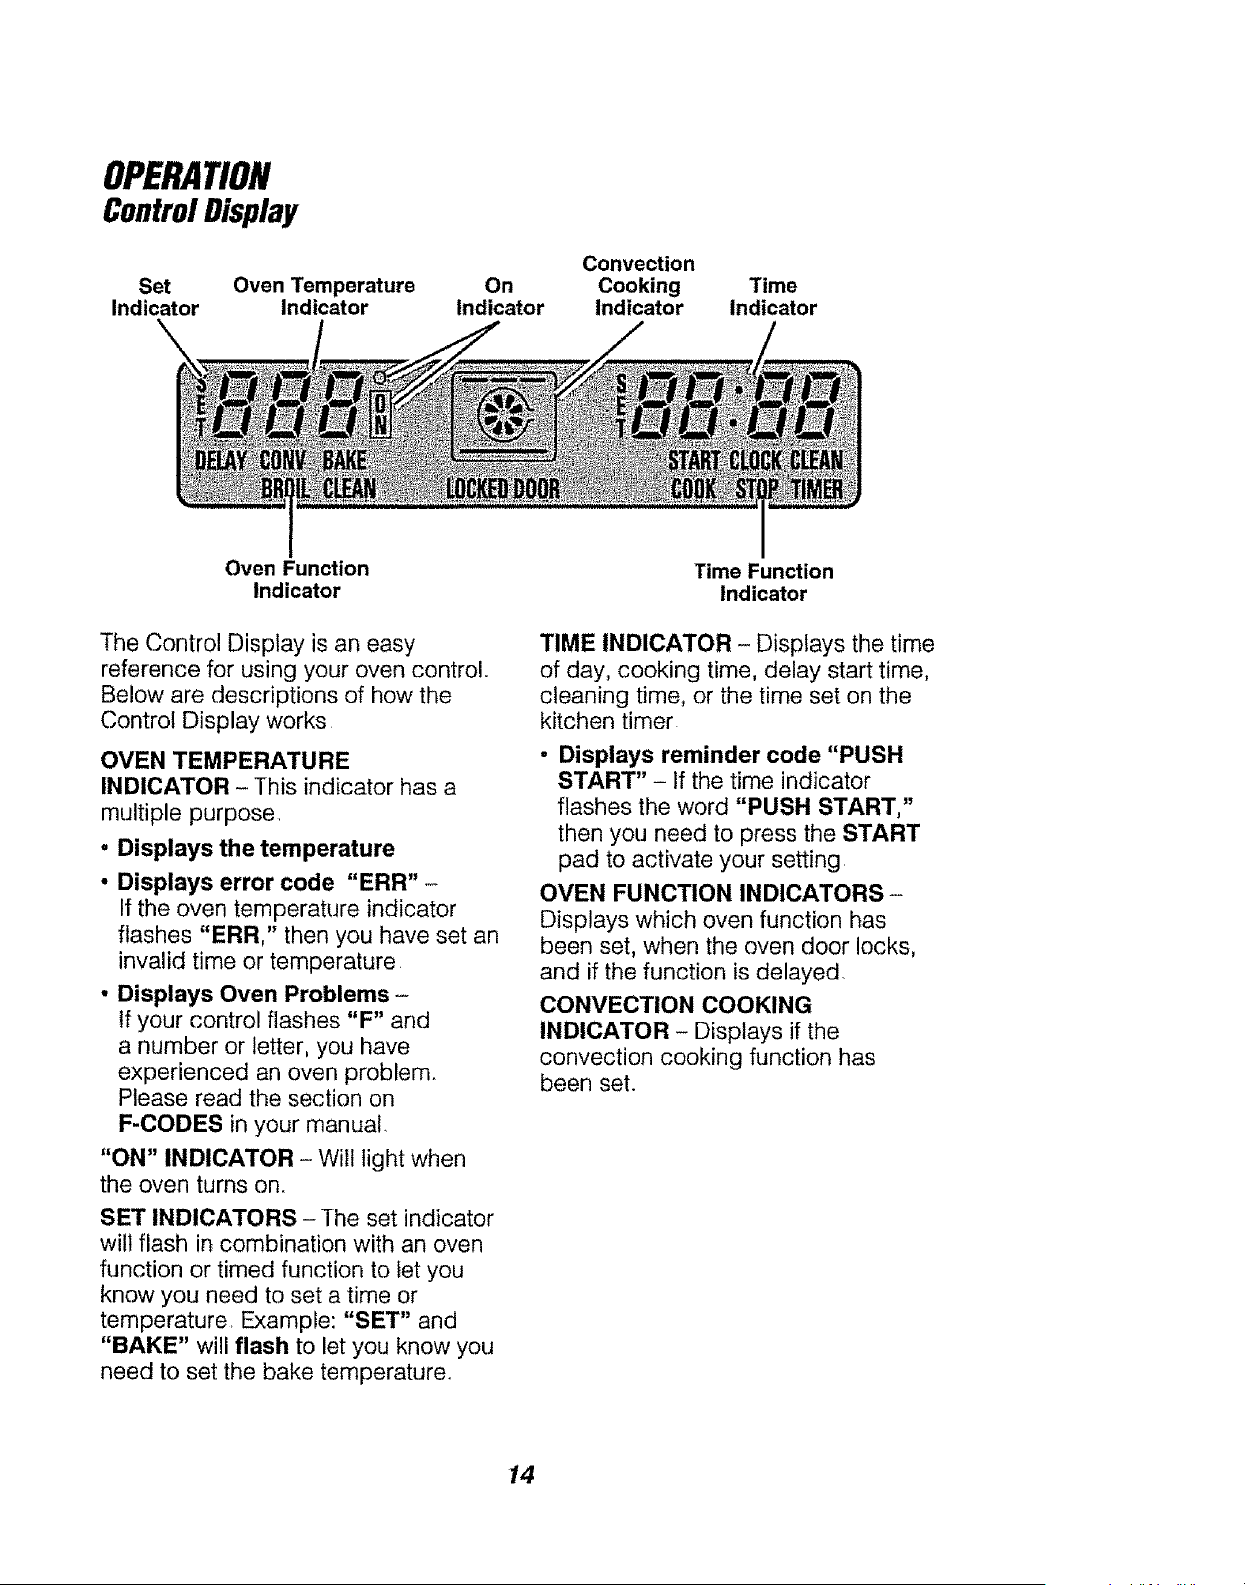
ControlDisplay
Set Oven Temperature On
Indicator Indicator Indicator
Convection
Cooking
Indicator
Time
Indicator
Oven Function
Indicator
The Control Display is an easy
reference for using your oven control.
Below are descriptions of how the
Control Display works
OVEN TEMPERATURE
INDICATOR - This indicator has a
multiple purpose1
, Displays the temperature
• Displays error code "ERR" -
If the oven temperature indicator
flashes "ERR," then you have set an
invalid time or temperature.
• Displays Oven Problems -
If your control flashes "F" and
a number or letter, you have
experienced an oven problem.
Please read the section on
F-CODES in your manual.
"ON" INDICATOR - Will light when
the oven turns on.
SET INDICATORS -The set indicator
will flash in combination with an oven
function or timed function to iet you
know you need to set a time or
temperature, Example: "SET" and
"BAKE" will flash to let you know you
need to set the bake temperature.
Time Function
Indicator
TIME INDICATOR - Displays the time
of day, cooking time, delay start time,
cleaning time, or the time set on the
kitchen timer
- Displays reminder code "PUSH
START" - If the time indicator
flashes the word "PUSH START,"
then you need to press the START
pad to activate your setting.
OVEN FUNCTION INDICATORS-
Displays which oven function has
been set, when the oven door locks,
and if the function is delayed.
CONVECTION COOKING
INDICATOR - Displays if the
convection cooking function has
been set.
14
OPERATION
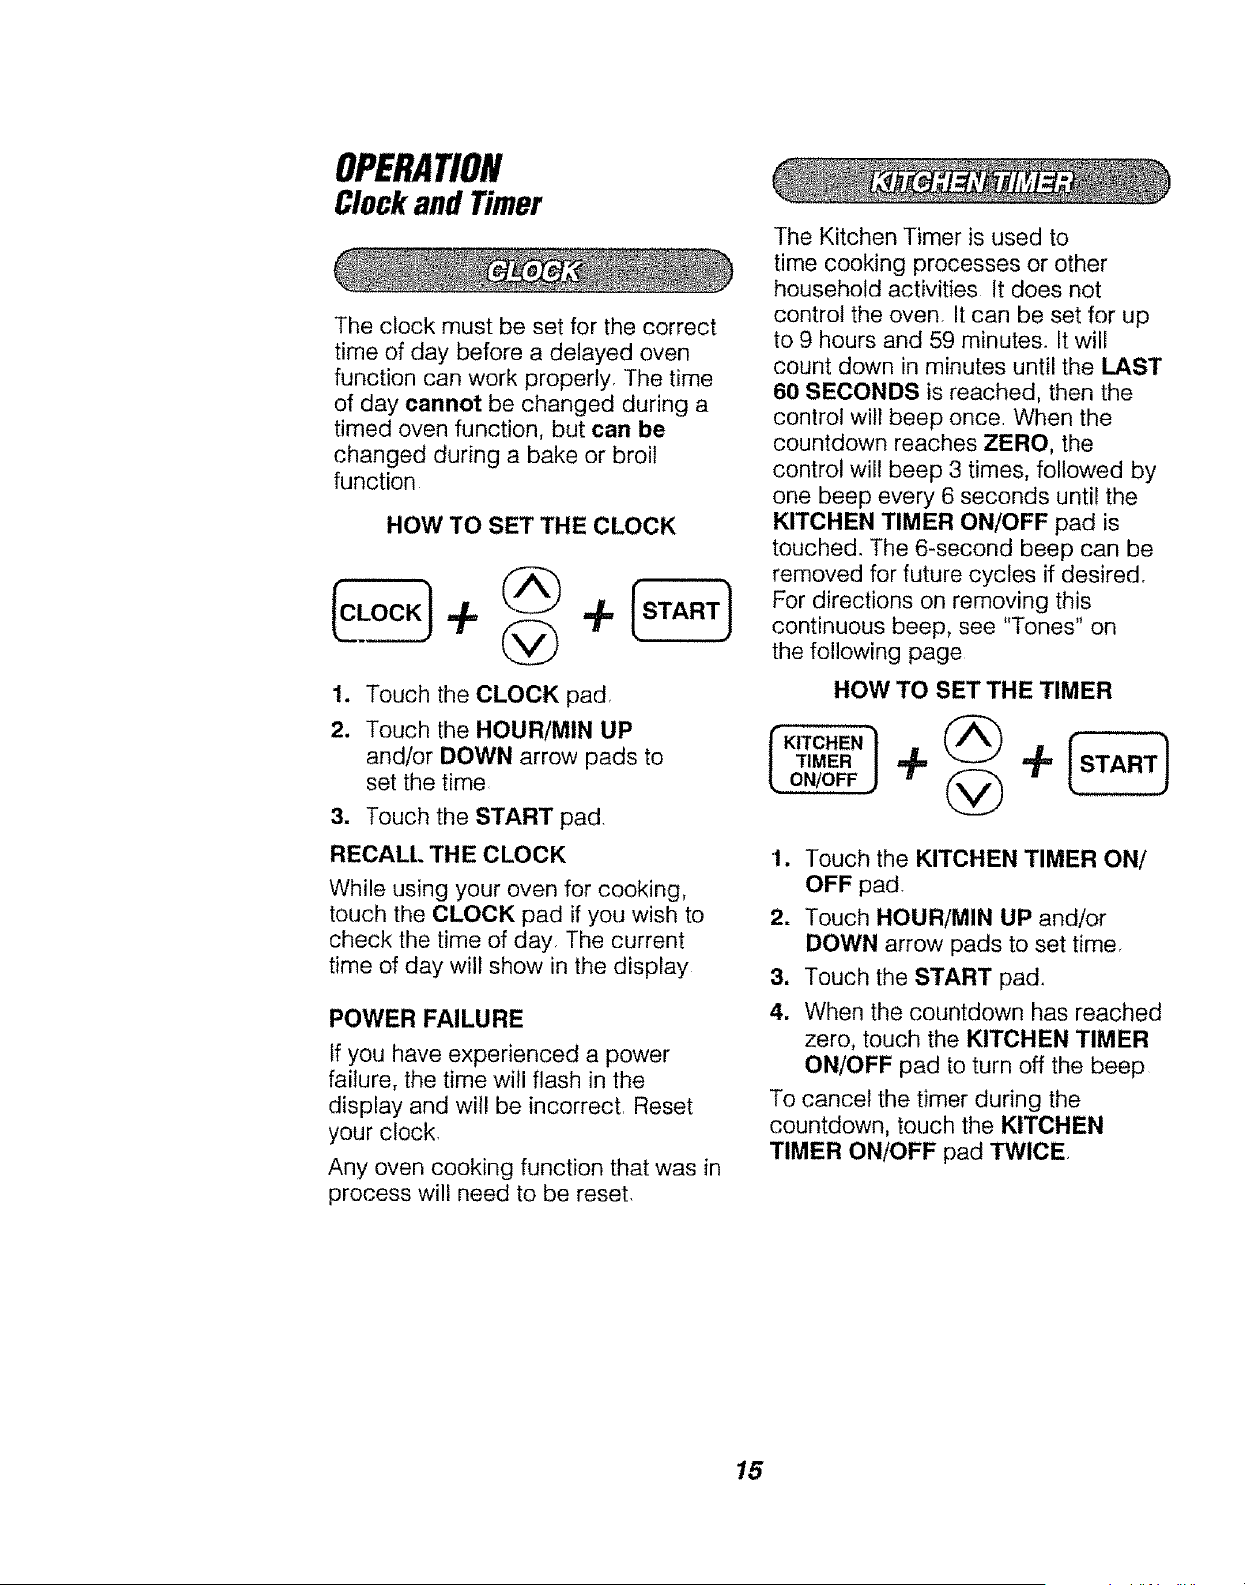
Clockand Timer
The clock must be set for the correct
time of day before a delayed oven
function can work properly, The time
of day cannot be changed during a
timed oven function, but can be
changed during a bake or broil
function
HOW TO SET THE CLOCK
2.
Touch the CLOCK pad,
Touch the HOUR/MIN UP
and/or DOWN arrow pads to
set the time
3. Touch the START pad.
RECALl. THE CLOCK
While using your oven for cooking,
touch the CLOCK pad if you wish to
check the time of day. The current
time of day will show in the display
POWER FAILURE
If you have experienced a power
failure, the time will flash in the
display and will be incorrect, Reset
your clock,
Any oven cooking function that was in
process will need to be reset,
The Kitchen Timer is used to
time cooking processes or other
household activities It does not
control the oven. It can be set for up
to 9 hours and 59 minutes. It will
count down in minutes until the LAST
60 SECONDS is reached, then the
control will beep once, When the
countdown reaches ZERO, the
control will beep 3 times, followed by
one beep every 6 seconds until the
KITCHEN TIMER ON/OFF pad is
touched. The 6-second beep can be
removed for future cycles if desired.
For directions on removing this
continuous beep, see "Tones" on
the following page
HOW TO SET THE TIMER
ON/OFF @
1. Touch the KITCHEN TIMER ON/
OFF pad.
2. Touch HOUR!MIN UP and/or
DOWN arrow pads to set time,
3. Touch the START pad.
4. When the countdown has reached
zero, touch the KITCHEN TIMER
ON/OFF pad to turn off the beep
To cancel the timer during the
countdown, touch the KITCHEN
TIMER ON/OFF pad TWICE,
15
OPERATION
OvenControl, Clockand Timer
Your new control has a series of
tones that will sound at different times,
These tones may sound while you set
the control for an oven function, or at
the end of the oven function, It will
also alert you that there may be a
problem with the functions. Below
are the types of tones and a brief
description of each,
TONES WHILE SETTING THE
CONTROL - When you touch a pad,
you will hear a beep. This beep will let
you know that the pad has been
activated, (The arrow pads do not
beeF)
END OF TIMED CYCLE TONE - At
the end of a timed cooking function,
you wilt hear 3 short beeps followed
by 1 beep every 6 seconds, This
beep will continue to sound every 6
seconds until the CLEAR/OFF pad is
touched or you may select the special
feature to cancel this 6-second beep
from sounding at the end of future
cycles.
TO CANCEL THE 6-SECOND BEEP
li Touch and hold the BAKE and
BROIL pads, at the same time
for 3 seconds, until the display
shows "SF"
2, Touch the KITCHEN TIMER ON/
OFF pad, The display will show
"CON BEEP" (continuous beep),
3, Touch the KITCHEN TIMER ON/
OFF pad again, The display will
show "BEEP" (beep canceled)
4. Touch the START pad to cancel
the 6-second beep and leave the
special feature mode,
If you would like to return the
6-second beep, repeat steps above
until the display shows your choice
and touch the START pad.
ATTENTION TONE - This tone will
sound if you make an error or an
oversight is made while setting an
oven function,
Examples would be:
a. Setting a clean cycle and the oven
door is not properly closed
b. Setting function and not pressing
the START pad.
c. Touching an additional function
pad without first setting a
temperature or time,
d, "ERR" will flash if you set an
invalid temperature. Touch the
CLEAR/OFF pad to clear the
control and reset your oven
function.
Any of these can be quickly identified
by watching the display.
PREHEAT TONE - When you
set an oven temperature, the oven
automatically starts to heat, When the
temperature inside the oven reaches
the temperature you have set, a tone
will sound to let you know the oven is
ready for baking,
If you set an oven function and the
control beeps while the display is
flashing "F" and a number or letter
such as "F-4" or "FI," there may be
a problem with the control or oven,
Touch the CLEAR/OFF pad. If the
function code repeats, disconnect
all power to the range for at least
30 seconds and then reconnect the
power. Try setting the function again
If the code repeats again, write down
the flashing code and call for service.
Tell the technician what code was
flashing
16
OPERATION
OvenCookingTips
It is normal to have some odor when
using your oven for the first time, To
help eliminate this odor, ventilate the
room by opening a window or using
a vent hood,
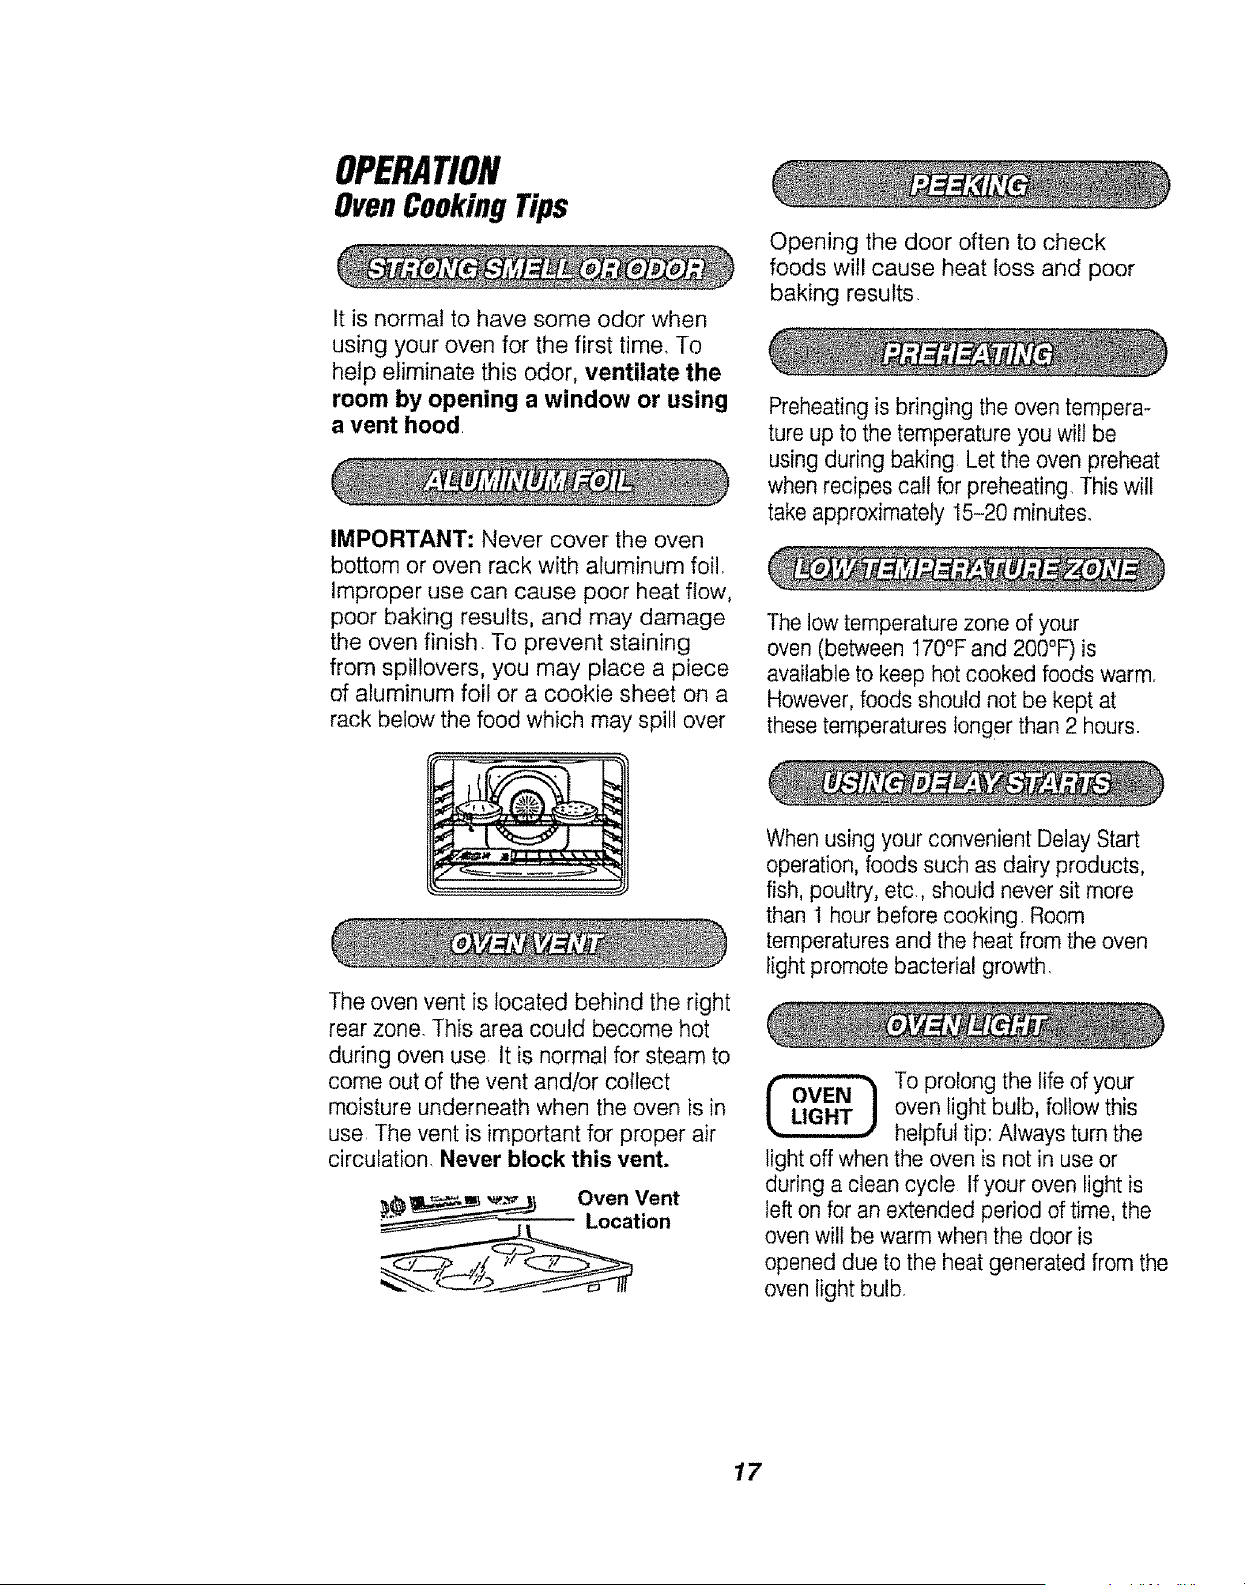
IMPORTANT: Never cover the oven
bottom or oven rack with aluminum foil.
Improper use can cause poor heat flow,
poor baking results, and may damage
the oven finish. To prevent staining
from spillovers, you may place a piece
of aluminum foil or a cookie sheet on a
rack below the food which may spill over
Opening the door often to check
foods will cause heat loss and poor
baking results.
Preheating is bringing the oven tempera-
ture up to the temperature you wilt be
using during baking Let the oven preheat
when recipes call for preheating. This will
take approximately 15-20 minutes.
The low temperature zone of your
oven (between 170°F and 200°F)is
available to keep hot cooked foods warm,
However, foods should not be kept at
these temperatures longer than 2 hours.
The oven vent is located behind the right
rear zone. This area could become hot
during oven use It is normal for steam to
come out of the vent and!or collect
moisture underneath when the oven is in
use The vent is important for proper air
circulation, Never block this vent.
Oven Vent
When using your convenient Delay Start
operation, foods such as dairy products,
fish, poultry, etc, should never sit more
than I hour before cooking. Room
temperatures and the heat from the oven
light promote bacterial growth.
OVEN '_ To prolong the life of your
LIGHT J oven light bulb, follow this
helpful tip: Always turn the
light off when the oven is not in use or
during a clean cycle If your oven light is
left on for an extended period of time, the
oven will be warm when the door is
opened due to the heat generated from the
oven light bulb,
17
OPERATION
OvenCookingTips(cont.)
Most recipes for baking have been
developed using high-fat products such
as butter or margarine (80% fat by
weight--the federal requirement for
products labeled "margarine"). You will
get poor results if cakes, pies, pastries,
cookies, or candies are made with low-fat
spreads. Low-fat spreads contain less fat
and more water. The high moisture
content of these spreads affects the
texture and flavor of favorite baked
recipes. The lower the fat content of a
spread product, the more noticeable
these differences become. To ensure
best results, use margarine, butter, or
stick spreads containing at least 70%
vegetable oil.
The bake element is under the oven floor.
Do not place food on the oven bottom for
cooking.
The Oven Temperature Sensor at the back
of the oven continuously senses and
controls the temperature inside the oven.
To keep a constant set temperature, the
elements will cycle (turn on and off during
cooking),
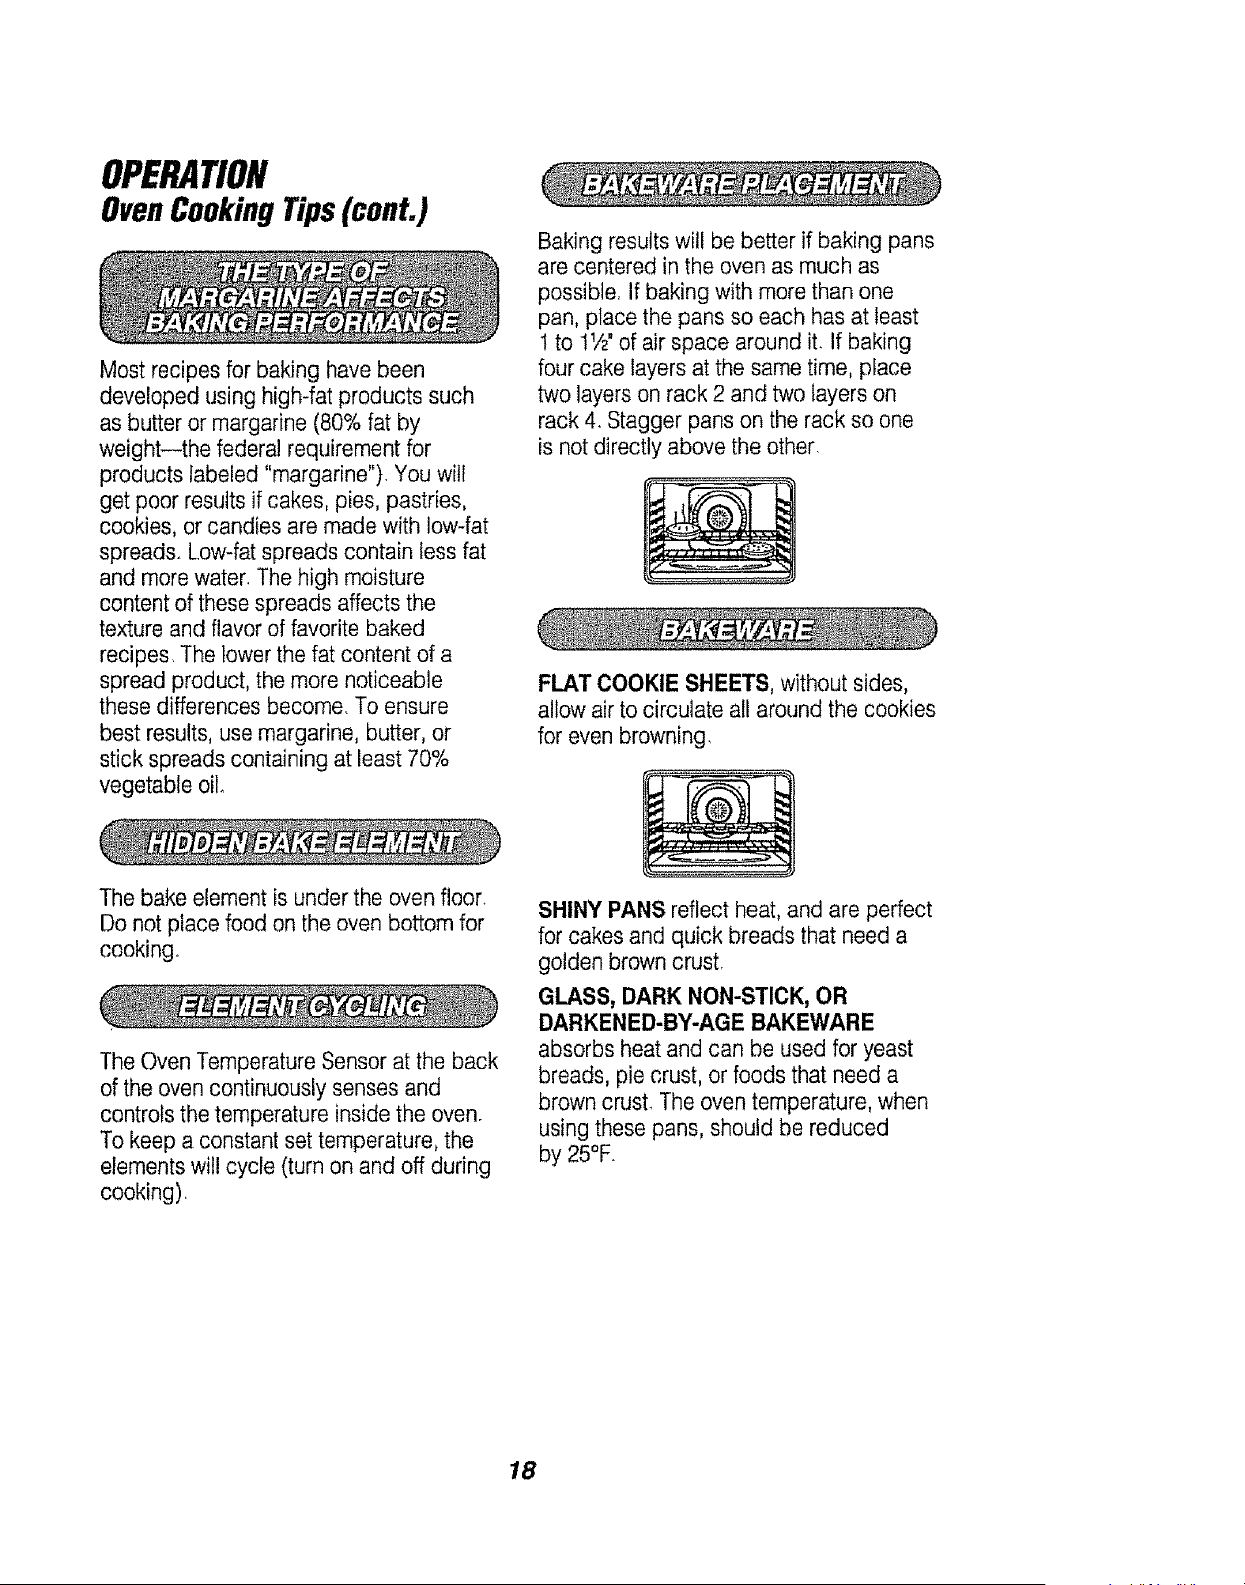
Baking results will be better if baking pans
are centered in the oven as much as
possible, If baking with more than one
pan, place the pans so each has at least
1 to tl/2" of air space around it. If baking
four cake layers at the same time, place
two layers on rack 2 and two layers on
rack 4. Stagger pans on the rack so one
is not directly above the other
FLAT COOKIE SHEETS, without sides,
allow air to circulate all around the cookies
for even browning
SHINY PANS reflect heat, and are perfect
for cakes and quick breads that need a
golden brown crust.
GLASS, DARK NON-STICK, OR
DARKENED-BY-AGE BAKEWARE
absorbs heat and can be used for yeast
breads, pie crust, or foods that need a
brown crust. The oven temperature, when
using these pans, should be reduced
by 25°F.
18
OPERATION
OvenCookingTips(cont.)
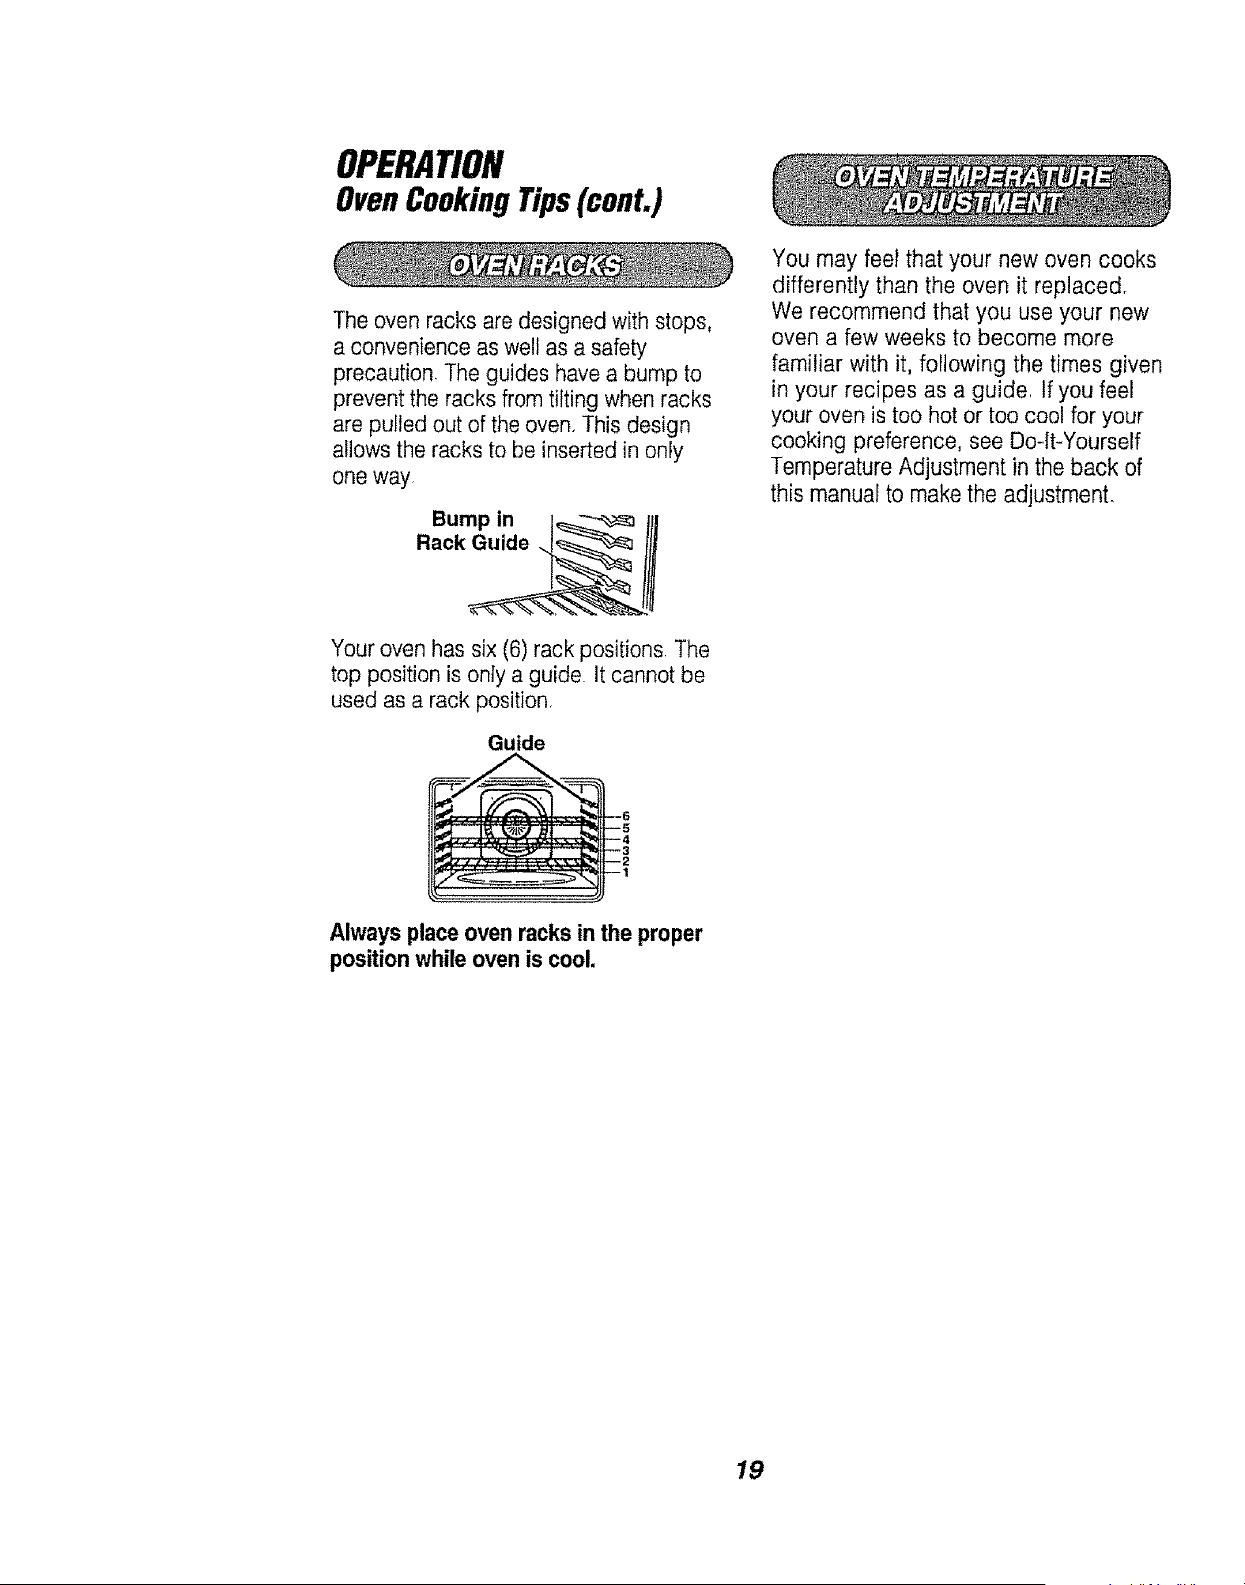
The oven racks are designed with stops,
a convenience as well as a safety
precaution. The guides have a bump to
prevent the racks from tilting when racks
are pulled out of the oven, This design
allows the racks to be inserted in only
one way
Bump in I_ _---'_ ttl
Rack Guide _,,_,,_,,_,,_,,_,,_
Your oven has six (6) rack positions The
top position is only a guide it cannot be
used as a rack position,
Guide
You may feel that your new oven cooks
differently than the oven it replaced,
We recommend that you use your new
oven a few weeks to become more
familiar with it. following the times given
in your recipes as a guide. If you feel
your oven is too hot or too coo! for your
cooking preference, see Do-It-Yourself
Temperature Adjustment in the back of
this manual to make the adjustment.
Alwaysplaceoven racksin the proper
positionwhile ovenis cool.
19
OPERATION
Baking
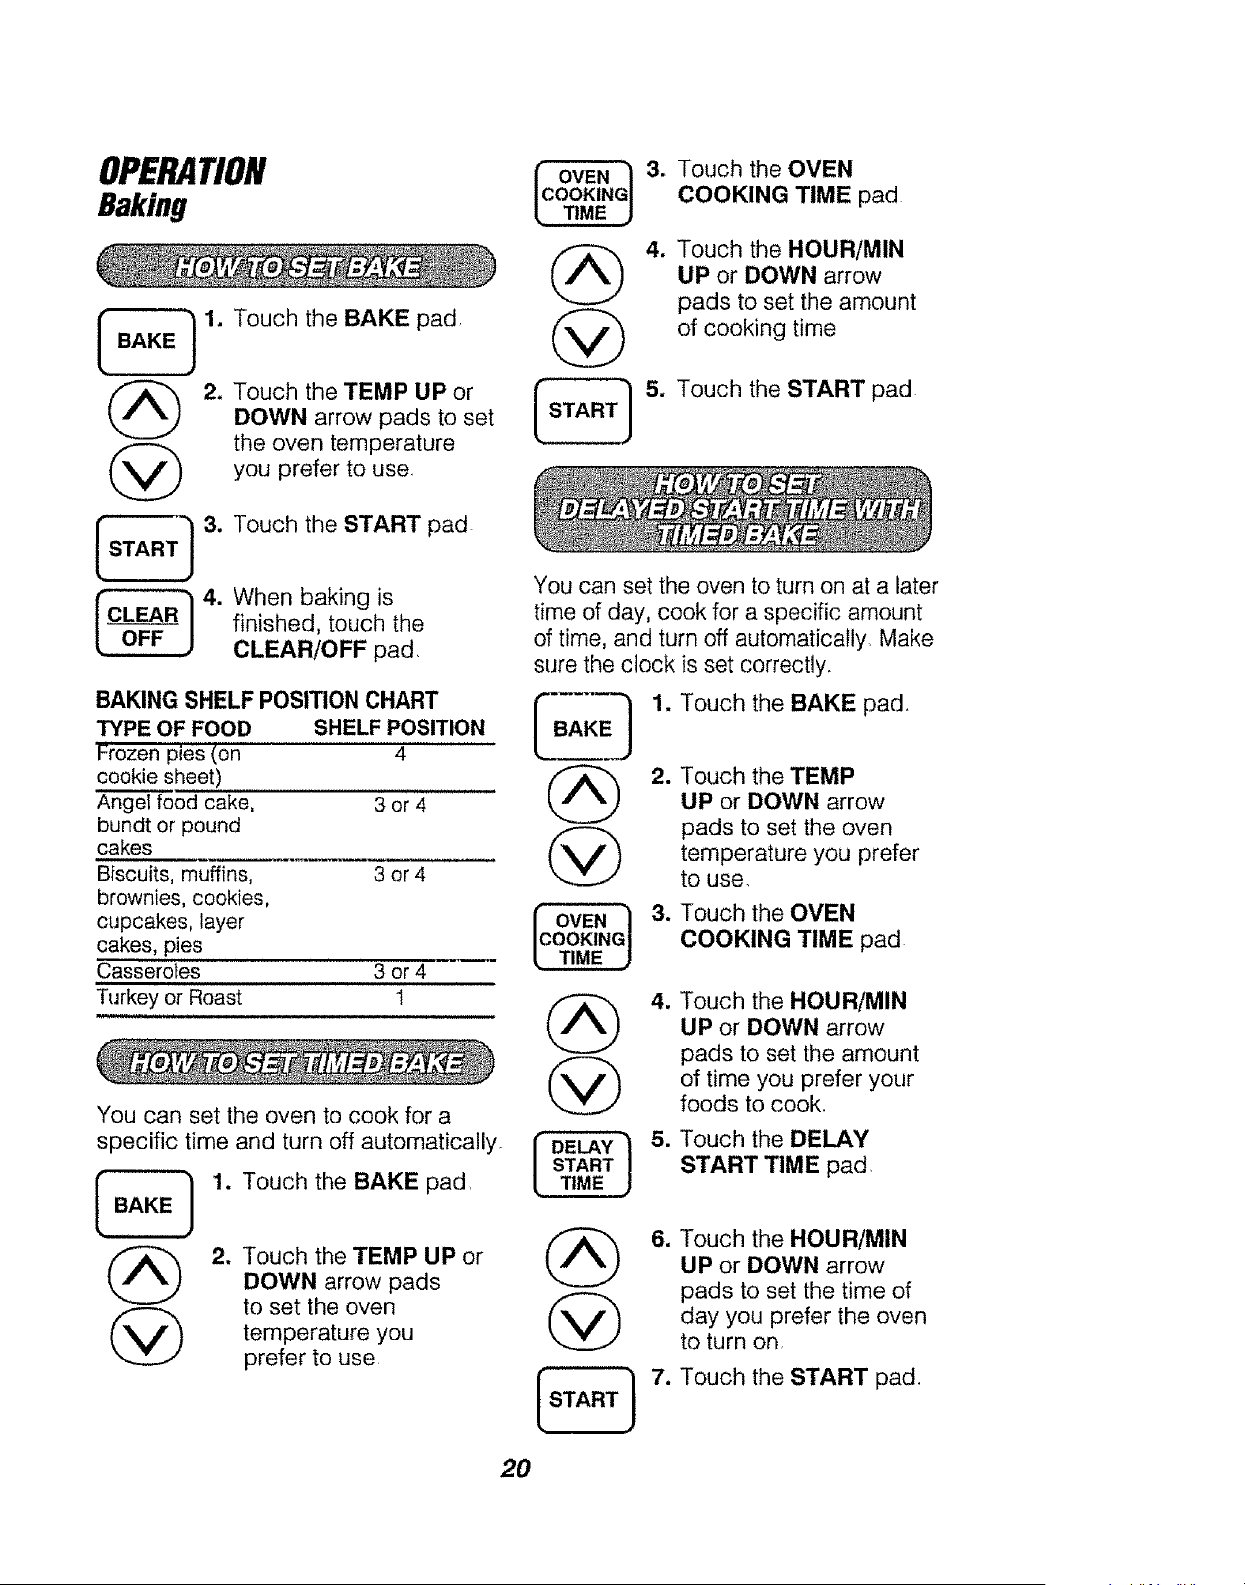
1 1. Touch the BAKE pad
BAKE
@
@
2. Touch the TEMP UP or
DOWN arrow pads to set
the oven temperature
you prefer to use
CLEAR ] "
Touch the START pad
When baking is
finished, touch the
CLEAR!OFF pad,
BAKING SHELF POSITION CHART
TYPE OF FOOD SHELF POSITION
Frozen pies (on 4
cookie sheet)
Angel food cake, 3 or 4
bundt or pound
cakes
Biscuits, muffins, 3 or 4
brownies, cookies,
cupcakes, layer
cakes, pies
Casseroles 3 or 4
Turkey or Roast !
You can set the oven to cook for a
specific time and turn off automatically
I BAKE._
@
@
1. Touch the BAKE pad,
2. Touch the TEMP UP or
DOWN arrow pads
to set the oven
temperature you
prefer to use
@
@
[sTA.T]
3. Touch the OVEN
COOKING TIME pad
4. Touch the HOUR/MIN
UP or DOWN arrow
pads to set the amount
of cooking time
5. Touch the START pad
You can set the oven to turn on at a later
time of day, cook for a specific amount
of time, and turn off automatically Make
sure the clock is set correctlyo
BAAKE_ 1. Touch the BAKE pad.
ICOOKING
2. Touch the TEMP
UP or DOWN arrow
pads to set the oven
temperature you prefer
to use.
3. Touch the OVEN
COOKING TIME pad
w
I ELAY ) 5.
START
TIME
Touch the HOUR/MIN
UP or DOWN arrow
pads to set the amount
of time you prefer your
foods to cook
Touch the DELAY
START TIME pad
6.
@
Touch the HOUR/MIN
UP or DOWN arrow
pads to set the time of
day you prefer the oven
to turn on
Touch the START pad.
20
OPERATION
ConvectionBaking Tips
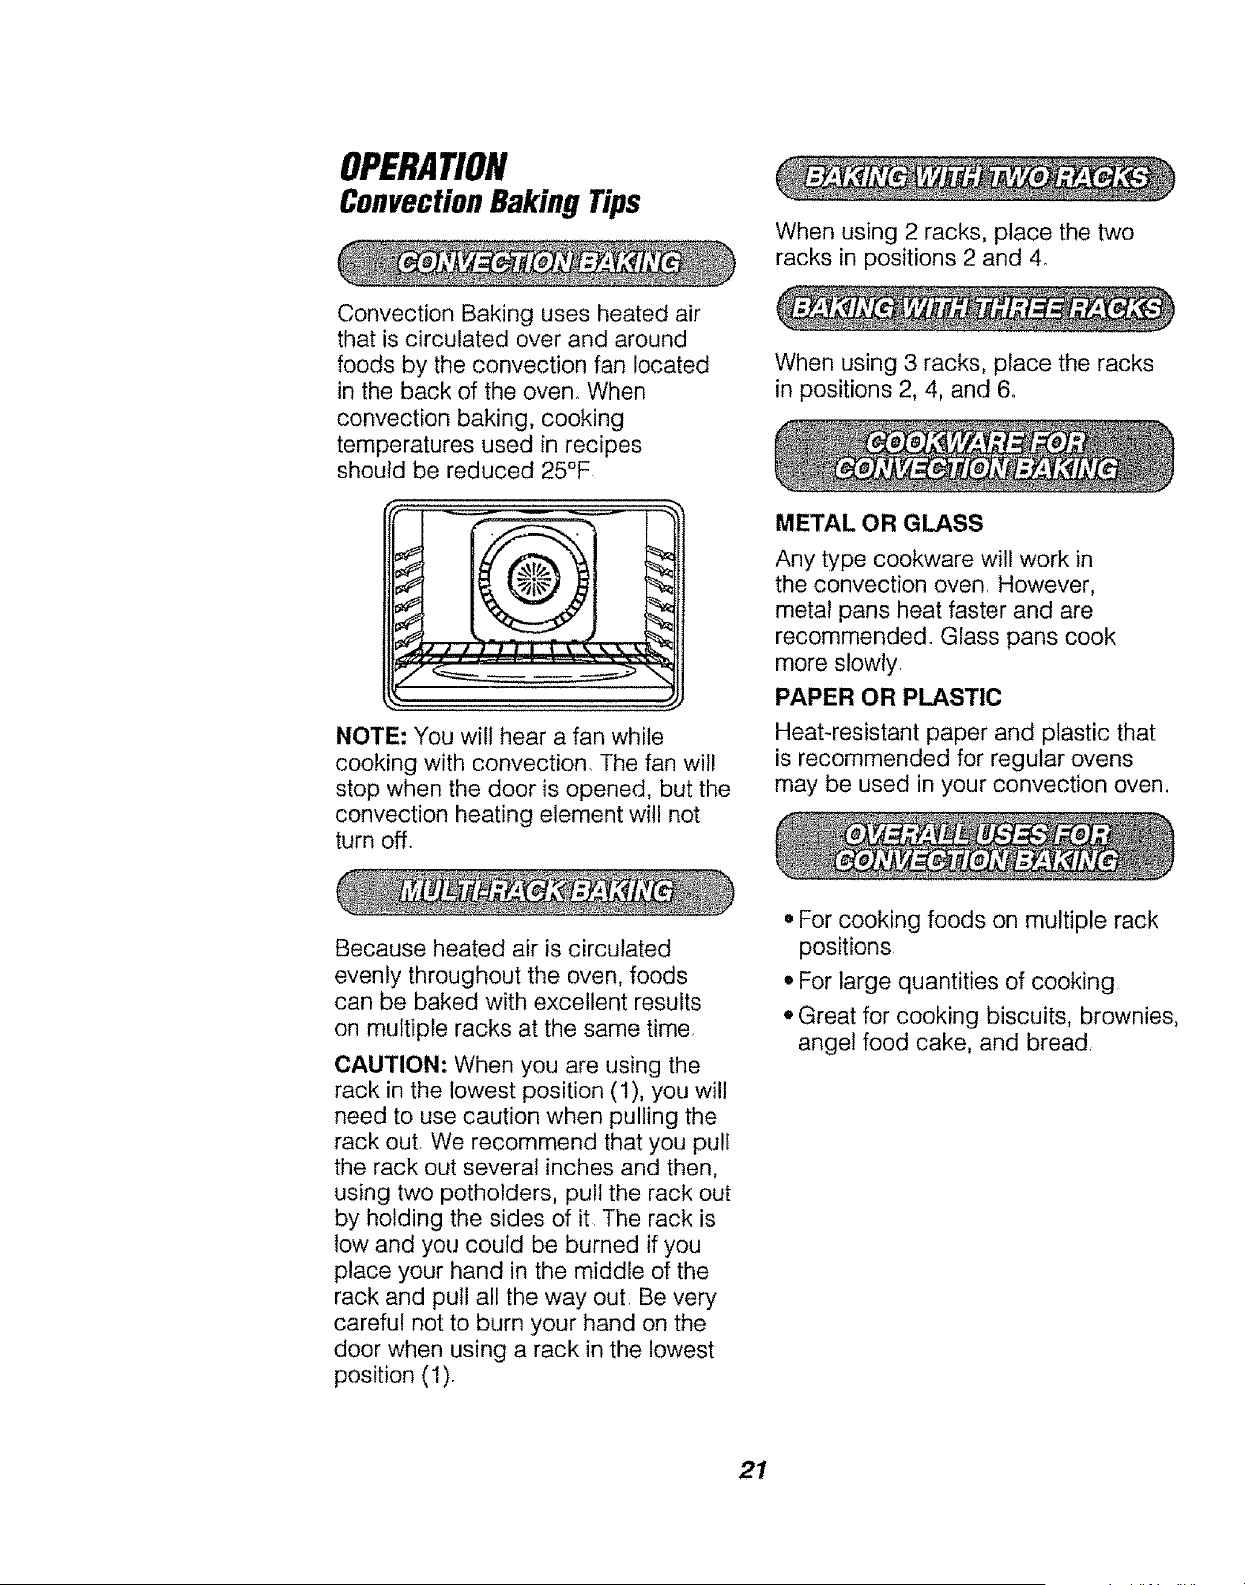
Convection Baking uses heated air
that is circulated over and around
foods by the convection fan located
in the back of the oven.. When
convection baking, cooking
temperatures used in recipes
should be reduced 25°F
NOTE: You will hear a fan while
cooking with convection. The fan wil!
stop when the door is opened, but the
convection heating element will not
turn off.
When using 2 racks, place the two
racks in positions 2 and 4o
When using 3 racks, place the racks
in positions 2, 4, and 6.
METAL OR GLASS
Any type cookware will work in
the convection oven. However,
metal pans heat faster and are
recommended. Glass pans cook
more slowly.
PAPER OR PLASTIC
Heat-resistant paper and plastic that
is recommended for regular ovens
may be used in your convection oven.
Because heated air is circulated
evenly throughout the oven, foods
can be baked with excellent results
on muitiple racks at the same time.
CAUTION: When you are using the
rack in the lowest position (1), you will
need to use caution when pulling the
rack out. We recommend that you pull
the rack out several inches and then,
using two potholders, pull the rack out
by holding the sides of it The rack is
low and you could be burned if you
place your hand in the middle of the
rack and pull all the way out. Be very
careful not to burn your hand on the
door when using a rack in the lowest
position (1).
* For cooking foods on multiple rack
positions
, For large quantities of cooking
° Great for cooking biscuits, brownies,
angel food cake, and bread
21
OPERATION
ConvectionRoastingTips
During Convection Roasting, heat
comes from the top element. The
convection fan circulates the heat
evenly around the food
Meats cooked in a convection oven
are dark brown on the outside and
tender and juicy on the inside. In most
cases cooking time will be less when
using the Convection Roast feature.
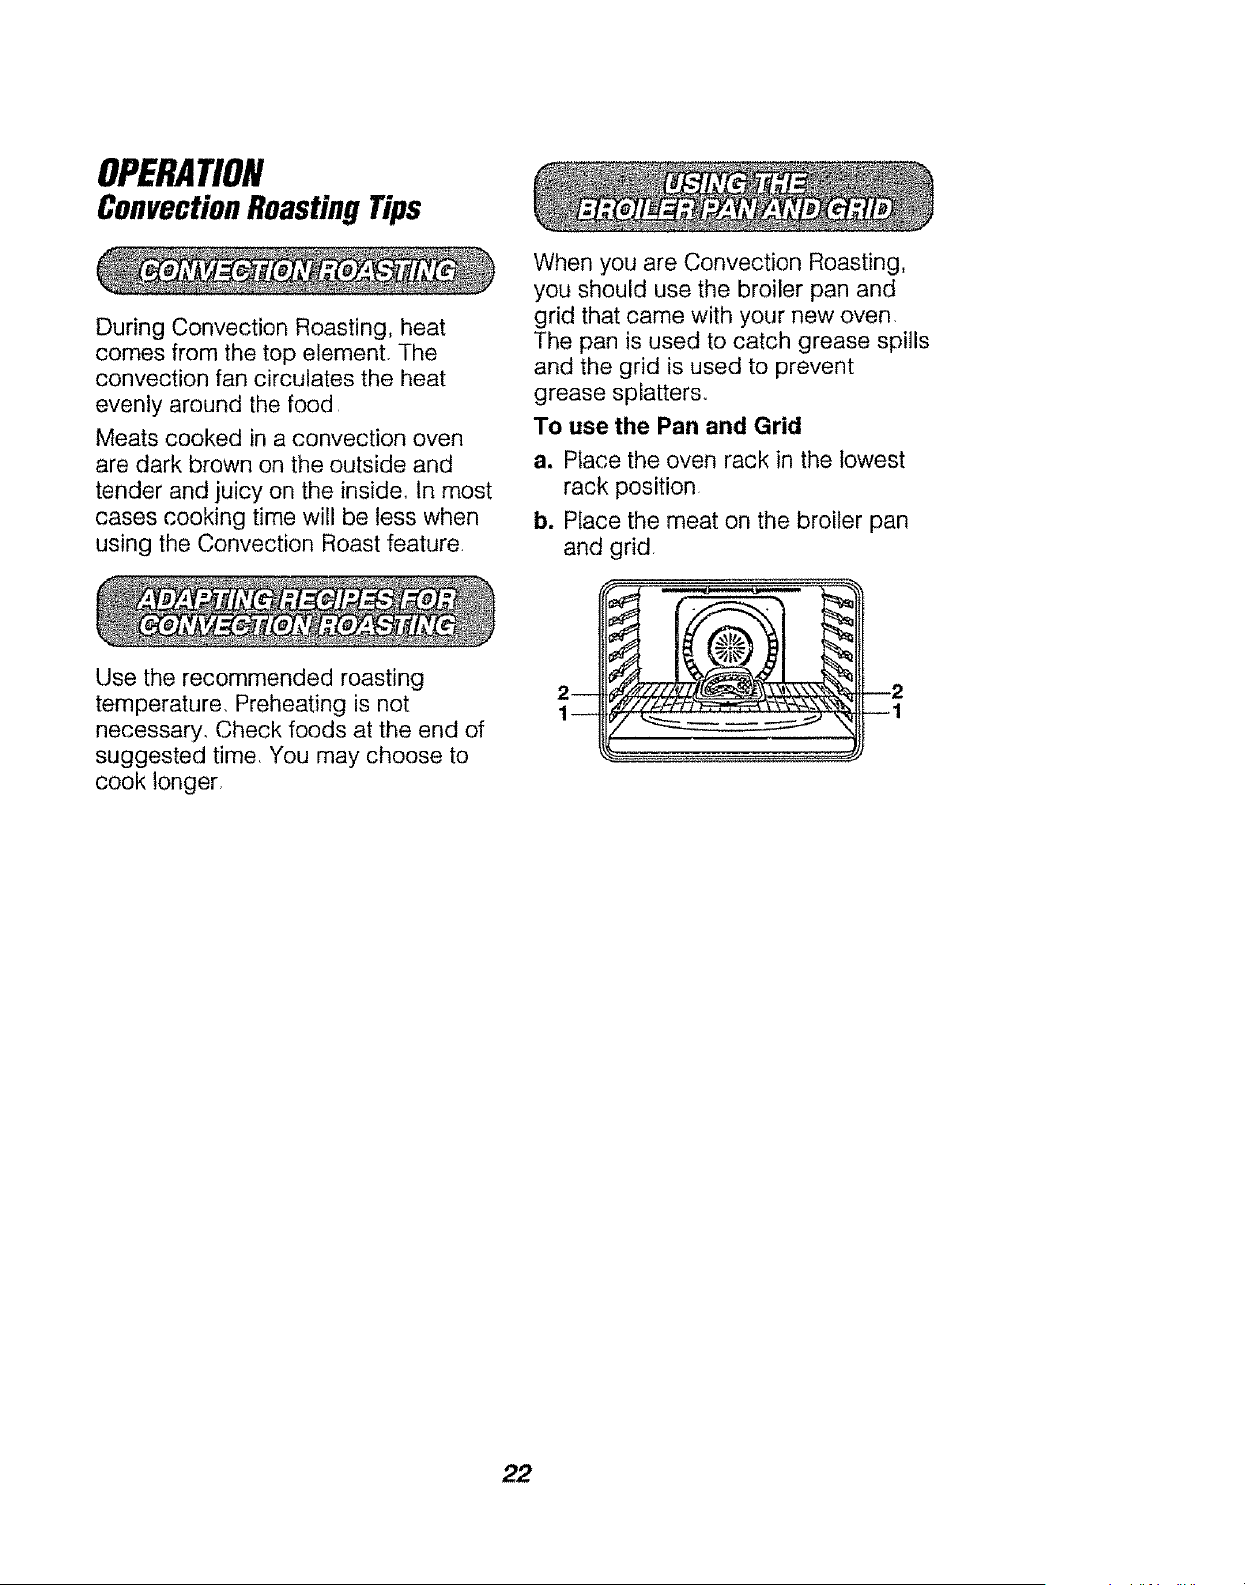
When you are Convection Roasting,
you should use the broiler pan and
grid that came with your new oven.
The pan is used to catch grease spills
and the grid is used to prevent
grease splatterso
To use the Pan and Grid
a. Place the oven rack in the lowest
rack position,
b. Place the meat on the broiler pan
and grid.
Use the recommended roasting
temperature, Preheating is not
necessary, Check foods at the end of
suggested time, You may choose to
cook longer,
22
OPERATION
ConvectionRoastingTips(cont,)
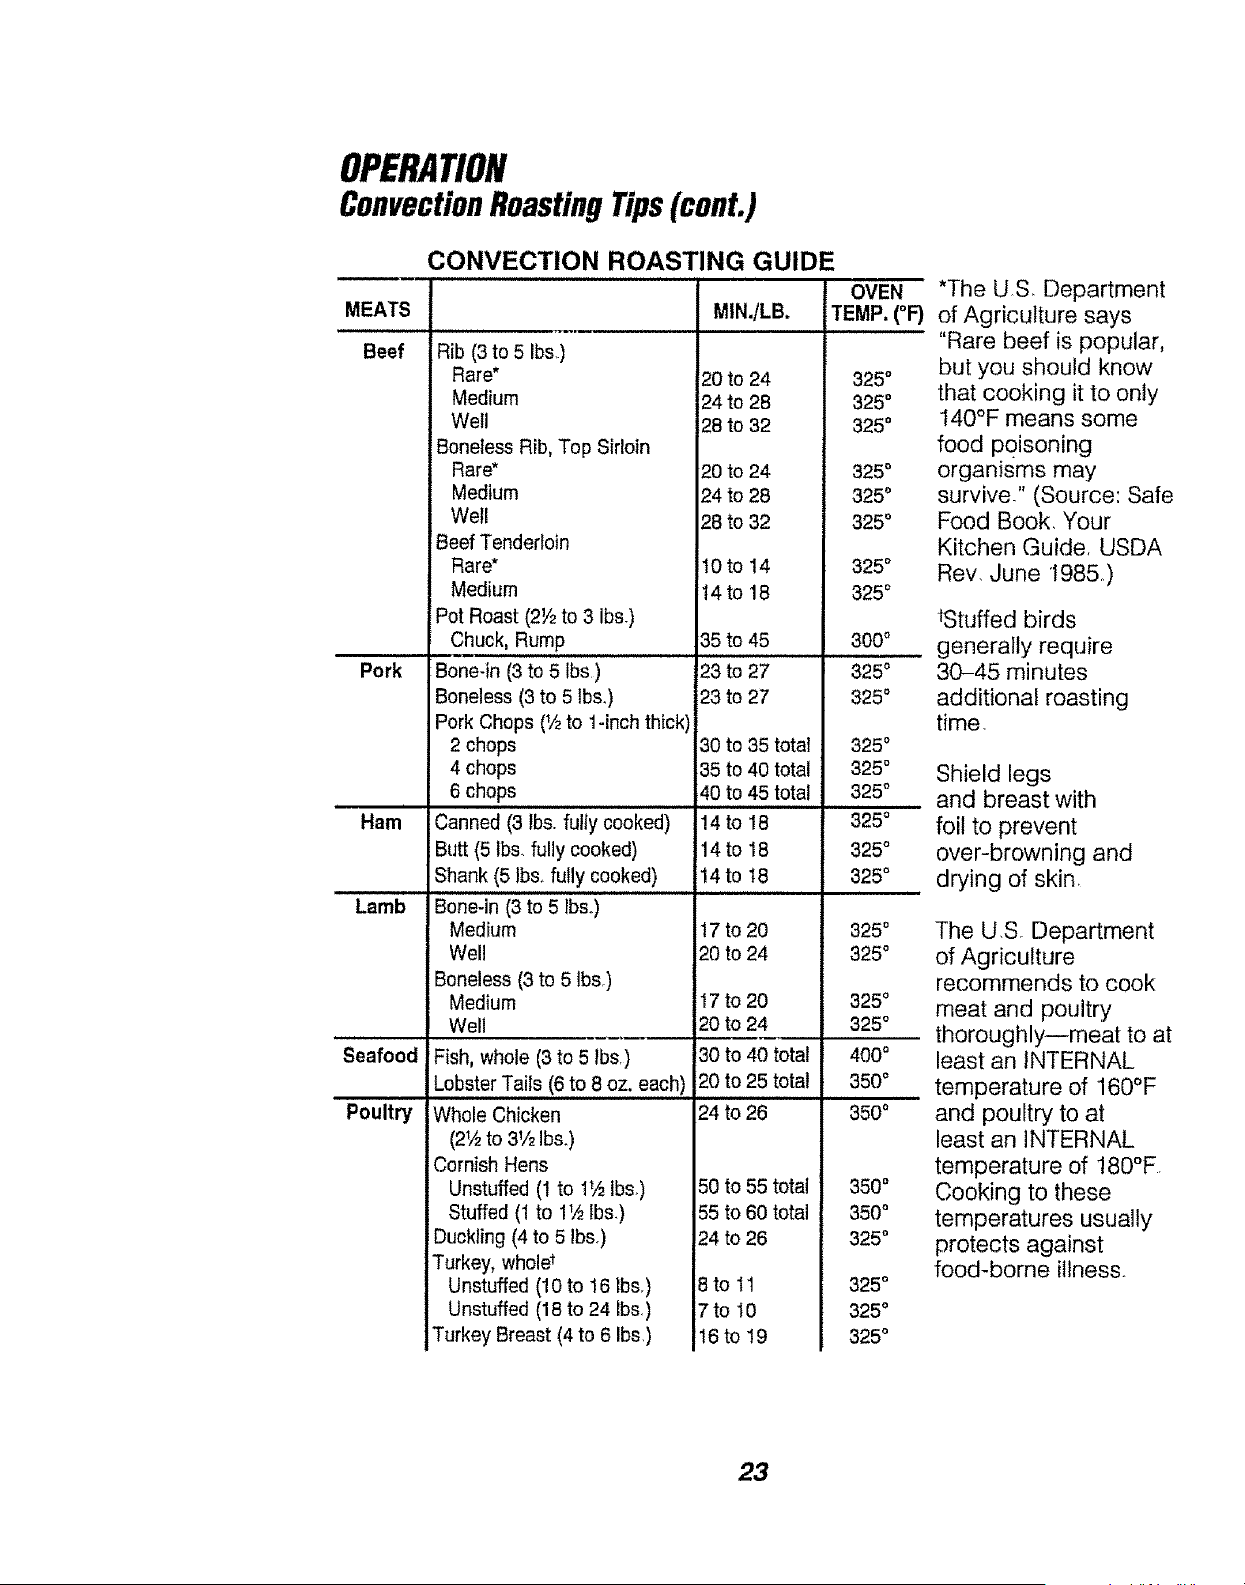
CONVECTION ROASTING GUIDE
MEATS
Beef Rib (3 to 5 ibs)
Rare*
Medium
Well
MIN.ILB.
20to 24
_)4to 28
28 to 32
Pork
Ham
Lamb
Seafood
Poultry
Boneless Rib, Top Sirloin
Rare*
Medium
Well
Beef Tenderloin
Rare*
Medium
Pot Roast (2Y_to 3 Ibs)
Chuck, Rump 35 to 45
Bone-in (3 to 5 ibs) 23 to 27
Boneless (3 to 5 lbs,) i23 to 27
Pork Chops (_/_to 1-inch thick)
2 chops 30 to 35 total
4 chops 35 to 40 total
6 chops 40 to 45 total
Canned (3 lbs. fully cooked) !4 to 18
Butt (5 Ibs. fully cooked) 14 to 18
Shank (5 Ibs, fully cooked) 14 to 18
Bone-in (3 to 5 lbs.)
Medium
Well
Boneless (3 to 5 lbs.)
Medium 17 to 20
Well 20 to 24
Fish, whole (3 to 5 lbs.) 30 to 40 total
Lobster Tails (6 to 8 oz, each) 20 to 25 total
Whole Chicken 24 to 26
(21,_to 31/2Ibs.)
Cornish Hens
Unstuffed (1 to I_A Ibs.)
Stuffed (1 to 1_,_tbs.)
Duckling (4 to 5 ibso)
Turkey, wholet
Unstuffed (10 to 16 lbs.)
Unstuffed (18 to 24 lbs.)
Turkey Breast (4 to 6 ibs,)
OVEN
TEMP. (°F)
325°
325°
3250
20 to 24 325 °
24 to 28 3250
28 to 32 325 °
I0 to t4 325 °
14 to 18 325 °
300°
325°
325°
325°
325°
325°
325°
325°
325°
17to 20 325 °
20to 24 3250
3250
325°
400°
3500
3500
50to 55totat 350 °
55to 60total 350°
24 to 26 325°
8toll 325°
7to10 325o
!5 to 19 325°
*The US, Department
of Agriculture says
"Rare beef is popular,
but you should know
that cooking it to only
140°F means some
food poisoning
organisms may
survive." (Source: Safe
Food Book, Your
Kitchen Guide. USDA
Rev, June 1985)
_Stuffed birds
generally require
30-45 minutes
additional roasting
time
Shield legs
and breast with
foil to prevent
over-browning and
drying of skin,
The U,S, Department
of Agriculture
recommends to cook
meat and poultry
thoroughly--meat to at
least an INTERNAL
temperature of 160°F
and poultry to at
least an iNTERNAL
temperature of 180°F
Cooking to these
temperatures usually
protects against
food-borne illness.
23
OPERATION
ConvectionBakingand
Roasting
BAKE J
@,.
@
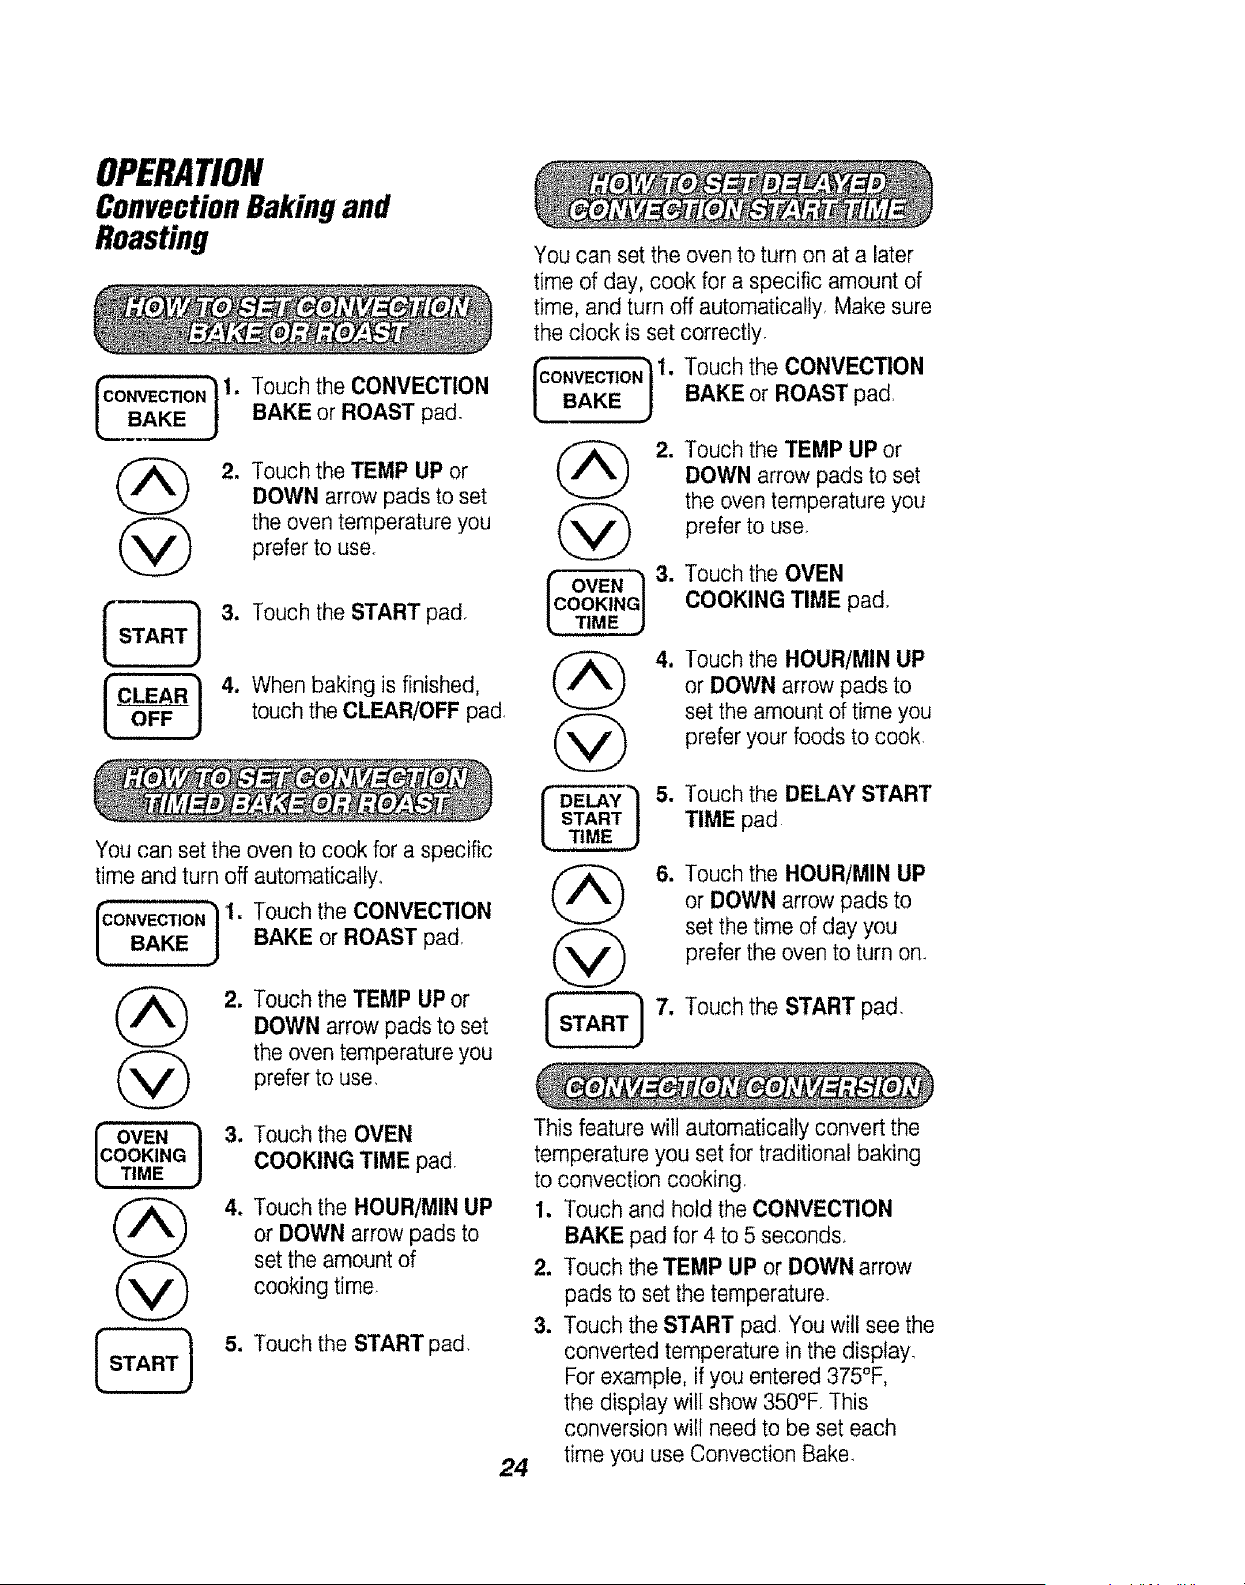
Touch the CONVECTION
BAKE or ROAST pad,
Touch the TEMP UP or
DOWN arrow pads to set
the oven temperature you
prefer to use.
Touch the START pad
When baking is finished,
touch the CLEAR/OFF pad,
You can set the oven to cook for a specific
time and turn off automatically.
C0NVECTJON]1. Touch the CONVECTION
BAKE J BAKE or ROAST pad,
@
@
C OVEN
OOKING
TIME
@
@
2_
3_
4_
Touch the TEMP UP or
DOWN arrow pads to set
the oven temperature you
prefer to use_
Touch the OVEN
COOKING TIME pad,
Touch the HOUR/MIN UP
or DOWN arrow pads to
set the amount of
cooking time,
5. Touch the START pad.
You can set the oven to turn on at a later
time of day, cook for a specific amount of
time, and turn off automatically Make sure
the c!ock is set correctly
rjoN/1. Touch the CONVECTION
BAKE J BAKE or ROAST pad,
2.
@
r DELAY / 5.
/ START /
@
Touch the TEMP UP or
DOWN arrow pads to set
the oven temperature you
prefer to use.
Touch the OVEN
COOKING TIME pad.
Touch the HOUR/MIN UP
or DOWN arrow pads to
set the amount of time you
prefer your foods to cook,
Touch the DELAY START
TIME pad
Touch the HOUR/MIN UP
or DOWN arrow pads to
set the time of day you
prefer the oven to turn on.
Touch the START pad,
24
This feature will automatically convert the
temperature you set for traditional baking
to convection cooking
1. Touch and hold the CONVECTION
BAKE pad for 4 to 5 seconds.
2. Touch the TEMP UP or DOWN arrow
pads to set the temperature.
3. Touch the START pad You will see the
converted temperature in the display
For example, if you entered 375°F,
the disp!ay will show 350°F This
conversion will need to be set each
time you use Convection Bake
OPERATION
Broiling
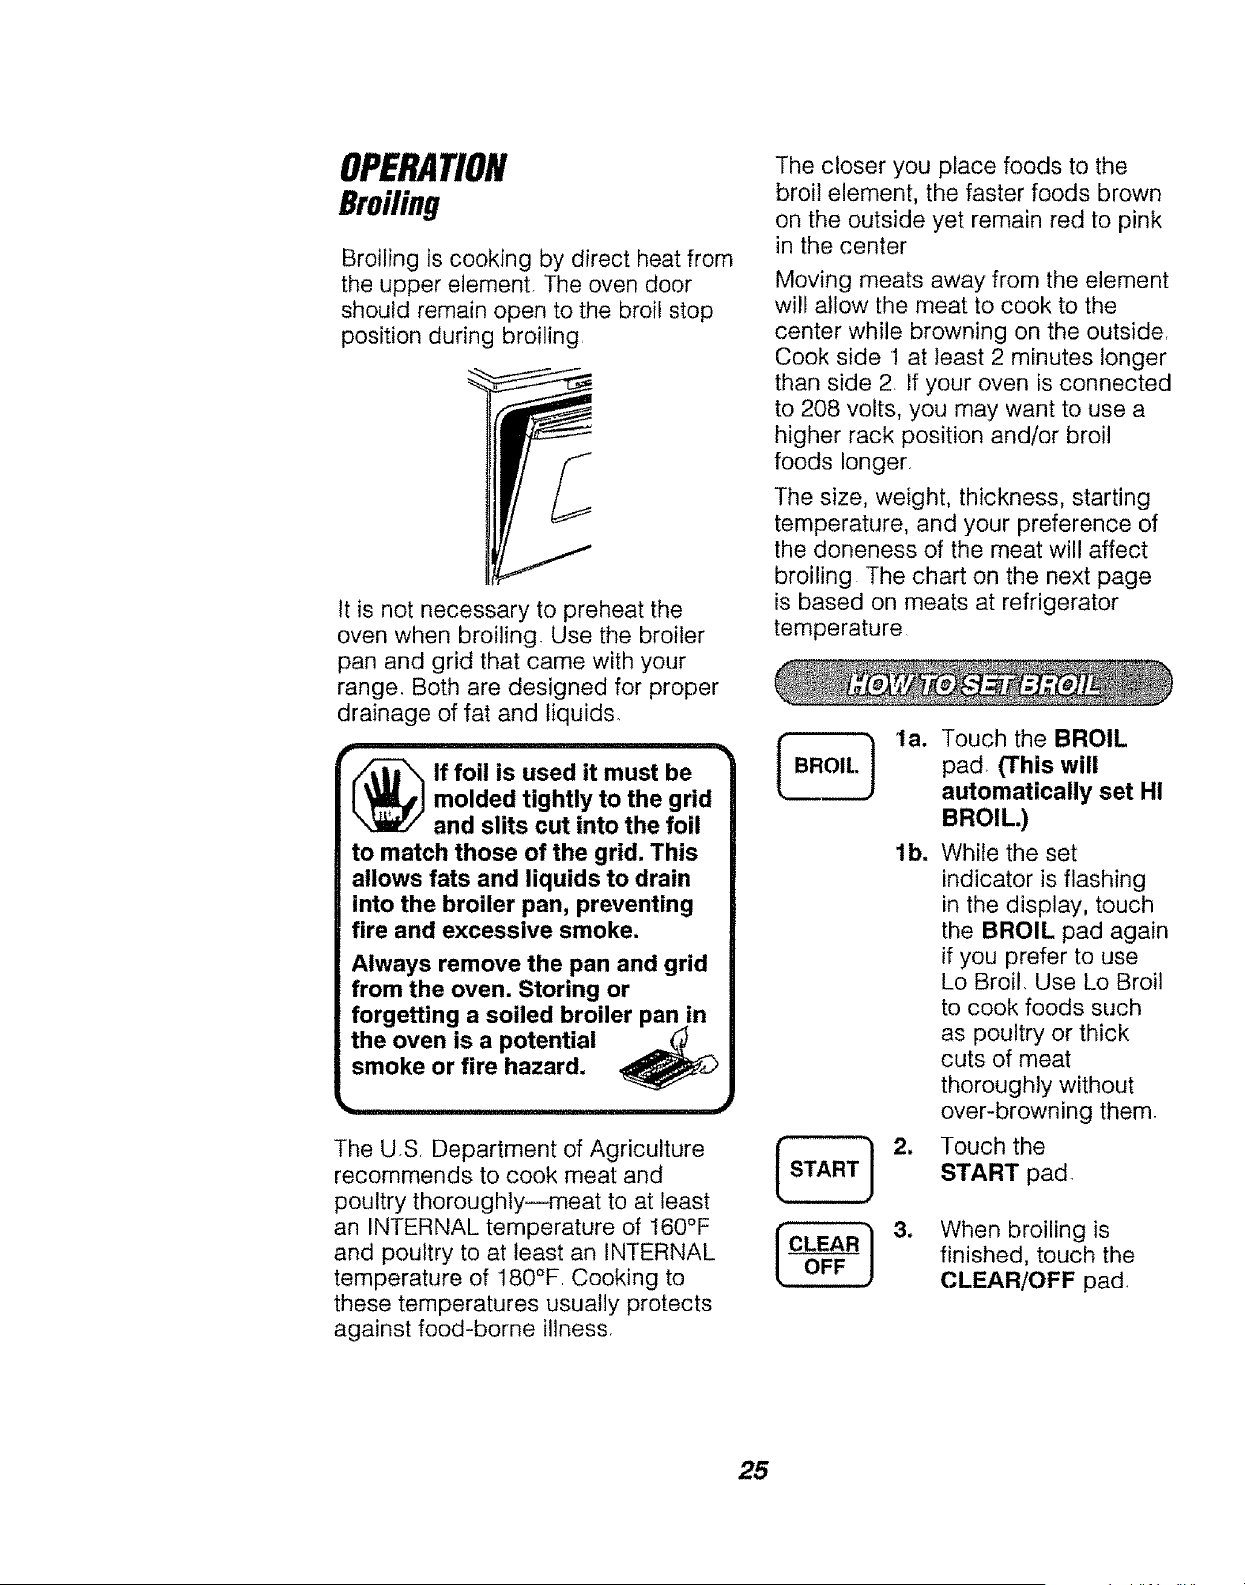
Broiling is cooking by direct heat from
the upper element. The oven door
should remain open to the broil stop
position during broiling
It is not necessary to preheat the
oven when broiling. Use the broiler
pan and grid that came with your
range. Both are designed for proper
drainage of fat and liquids.
If foil is used it must be
molded tightly to the grid
and slits cut into the foil
to match those of the grid. This
allows fats and liquids to drain
into the broiler pan, preventing
fire and excessive smoke.
Always remove the pan and grid
from the oven. Storing or
forgetting a soiled broiler panin
the oven is a potential _ _
smoke or fire hazard. _P
_,,, ,_
The US, Department of Agriculture
recommends to cook meat and
poultry thoroughly--meat to at least
an INTERNAL temperature of t60°F
and poultry to at least an INTERNAL
temperature of 180°F. Cooking to
these temperatures usually protects
against food-borne illness.
The closer you place foods to the
broil element, the faster foods brown
on the outside yet remain red to pink
in the center
Moving meats away from the element
will allow the meat to cook to the
center while browning on the outside,
Cook side 1 at least 2 minutes longer
than side 2 If your oven is connected
to 208 volts, you may want to use a
higher rack position and!or broil
foods longer.
The size, weight, thickness, starting
temperature, and your preference of
the doneness of the meat wil! affect
broiling The chart on the next page
is based on meats at refrigerator
temperature
I BROIL }
la. Touch the BROIL
pad (This will
automatically set HI
BROIL.)
lb. While the set
indicator is flashing
in the display, touch
the BROIL pad again
if you prefer to use
Lo Broil. Use Lo Broil
to cook foods such
as poultry or thick
cuts of meat
thoroughly without
over-browning them.
2. Touch the
START pad.
3_
When broiling is
finished, touch the
CLEAR/OFF pad.
25
OPERATION
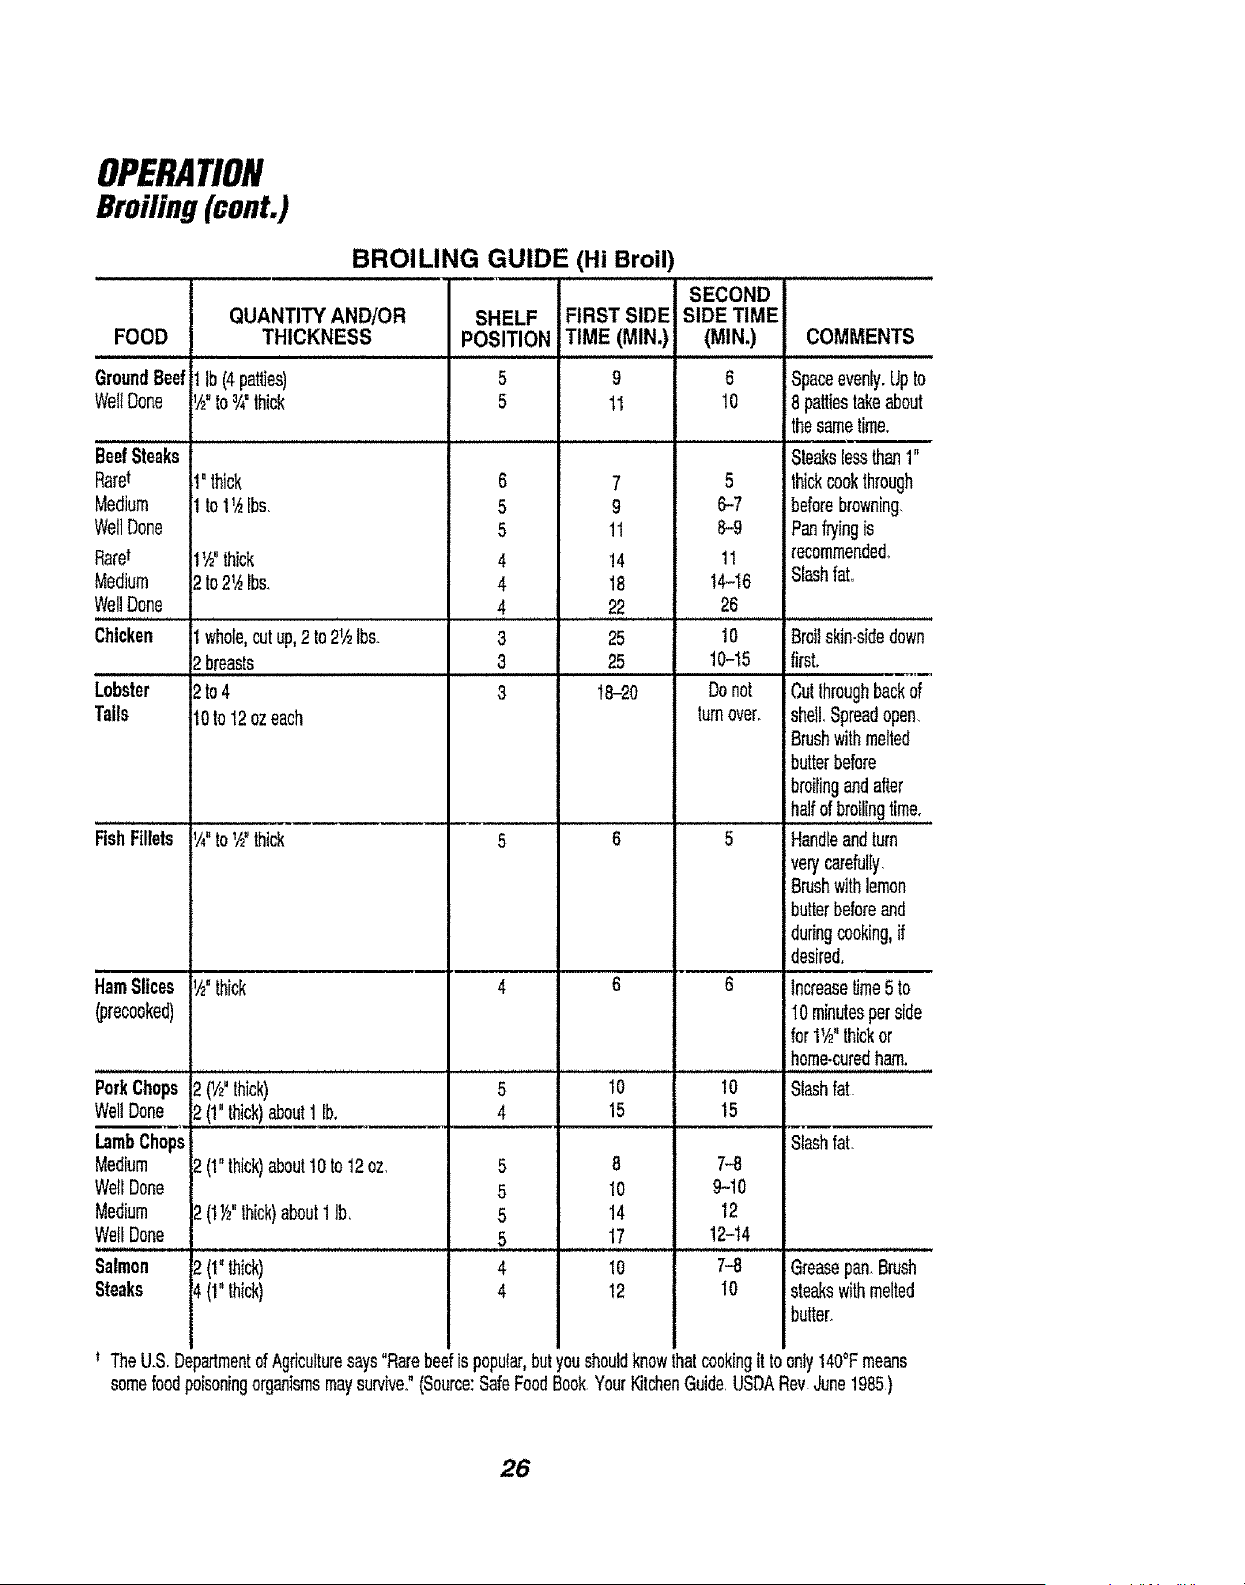
Broiling (cont.)
FOOD
GroundBeef
_VellDone
BeefSteaks
Rarer
Medium
&'ellDone
Rarer
_4edium
NellDone
Chicken
Lobster
rails
BROILING GUIDE (Hi Broil)
SECOND
QUANTITY AND/OR SHELF FIRST SIDE SIDE TIME
THICKNESS POSITION TIME (MIN,) (MIN.) COMMENTS
1lb (4patties)
_h° toY?thick
5
5
9
11
FishFillets
HamSlices
(precooked)
PorkChops
_VellDone
whole,cutup,2to214Ibs
2breasts
2to4
10to12ozeach
V?to1/?thick
V2° thick
6
5
5
4
4
4
3
3
3
9
11
!4
18
22
6
10
5
6-7
8-9
11
14-16
26
Spaceevenly,Upto
8 pottiestakeabout
thesametime
Steakslessthan1"
thickcookthrough
beforebrowning
Pan_ing is
recommended,
Sloshfat
25 10 Broilskin-sidedown
25 10-15 first.
18-20 Donot Cutthroughbackof
turnover. shell Spreadopen
Brushwithmelted
butterbefore
broilingandafter
halfof broilingtime.
6 5 Handleandturn
verycarefully
Brushwithlemon
butterbeforeand
duringcooking,if
desired.
i
6 6 increasetime5 to
10minutesperside
for1V2"thickor
home-curedham.
LambChops
Medium
We{IDone
Medium
WellDone
Salmon
Steaks
2 (1/2"thick)
2 (1"thick)aboutI lb.
2 (1"thick)about10to12oz
2 (lY2"thick)about1 lb
2 (1°thick)
4 (1"thick)
5
4
5
5
5
5
4
4
I0
15
8
10
14
17
10
12
1o
15
7-8
9-10
12
12-14
7-8
10
Slashfat
Slashfat,
Greasepan.Brush
steakswithmelted
butter.
TheUS De=_mentofAgriculturesays"Rarebeefis popular,butyoushouldknowthatcookingit to onlyI40°Fmeans
somefoodpoisoningorganismsmaysurvive."(Source:SafeFoodBookYourKitchenGuide USDARev June1985)
26
OPERATION
Setting Special Features
Your new touch pad control has
additional features that you may
choose to use. After making your
selection, if you want to change that
setting, follow the steps until the
display shows your choice,
2. (a) Touch the BROIL pad, The
control display will show the
degree sign and "F°. ''
(b) Touch the BROIL pad again.
This will change F° (Fahrenheit) to
O° (Celsius),
3. Touch the START pad.
The control is set to automatically
turn off the oven after 12 hours
baking or 3 hours broiling should you
forget and leave the oven on. If you
want to remove this feature:
1
Touch and hold, at the same
time, the BAKE and BROIL pads
for 3 seconds, until the display
shows "SF"
2. Touch the DELAY START TIME
pad The display shows
"12Shdn" (12 hour shutoff).
Touch the DELAY START TIME
pad again The display will show
"no Shdn" (no shutoff).
3. Touch the START pad.
Your oven control is set for Fahrenheit
temperature selections. Most recipes
are given using Fahrenheit scale You
can change this to use Celsius
selections
Touch and hold, at the same
time, the BAKE and BROIL pads
for 3 seconds, until the display
shows "SF"
Your control is set to use the 12-hour
clock if you prefer to use the 24-hour
Military Time clock or black out the
display:
1. Touch and hold, at the same time.
the BAKE and BROIL pads for 3
seconds, until the display shows
"SF"
2_
(a) Touch the CLOCK pad.
The display shows "12hr."
if this is your choice, touch the
START pad.
or
(b) Touch the CLOCK pad again.
The display will show "24hr"
Example: 5:00 on the 12-hour
clock will show 17:00 hours on the
military clock. If this is your choice,
touch the START pad.
or
(e) Touch the CLOCK pad again.
The display will show "OFF," tf this
is your choice, touch START_ The
display will not show time, (The
Delay Start Time feature will not
operate.)
27
OPERATION
Setting Special Features (cont.)
2. To unlock the control, touch the
CONTROL LOCKOUT pad for 3
seconds until the control beeps
twice, and LOC will be removed
from the display.
Your control wilt allow you to lock
the touch pads so they cannot be
activated when pressed. If you're
worried about leaving the oven
unsupervised, activate this feature.
1. Touch and hold, at the same time,
the BAKE and BROIL pads for 3
seconds, until the display shows
"SF/'
2. (a) Touch the CLEAN pad The
display shows "LOC OFF"
(lockout off)
(b) Touch the CLEAN pad again
The display will show "LOC ON"
(lockout on)
3. Touch the START pad
This feature can only be set when
the oven is not in use.
When this feature is on, the display
will show "LOC," if a touch pad is
pressed (This feature will not affect
the Clock, Timer, Top light, or Oven
light pads.)
Your control will allow you to lock out
the touch pads so they cannot be
activated when touched for setting
or cleaning.
To activate this feature:
1. Touch the CONTROL LOCKOUT
pad for 3 seconds until the control
beeps twice. The display wilt show
LOC continuously, and the time of
day if not blacked out
NOTE: All cooking and timing
functions will be cancelled when
locking out the control,
Your new control has a cook and
hold feature for timed cooking only
that will keep hot cooked foods warm up
to 3 hours after the timed cooking
is finished. To activate this feature:
1. Touch and hold, at the same time,
the BAKE and BROIL pads for 3
seconds, until the display shows
"SF"
2, (a) Touch the OVEN COOKING
TIME pad. The display will show
"HLd OFF/'
(b) Touch the OVEN COOKING
TIME pad again to activate the
feature. The display will show
"HLd ON."
3. Touch the START pad
This special feature will allow you to
change the speed; #1 means speed of
change is slow, up to #5 which means
speed of change is fast, To set the
speed you prefer, follow these steps:
1. Touch and hold, at the same time,
the BAKE and BROIL pads for 3
seconds, until the display shows
"SF°"
2. Touch the HOUR UP arrow pad
The display will show the current
set speed
3. Touch the HOUR UP arrow pad
to increase the speed up to the
number 5 - or -
Touch the HOUR DOWN arrow pad
to decrease the speed down to the
number 1,
Touch the START pad
1
28
CAREANDCLEANING
Self-CleaningCycle
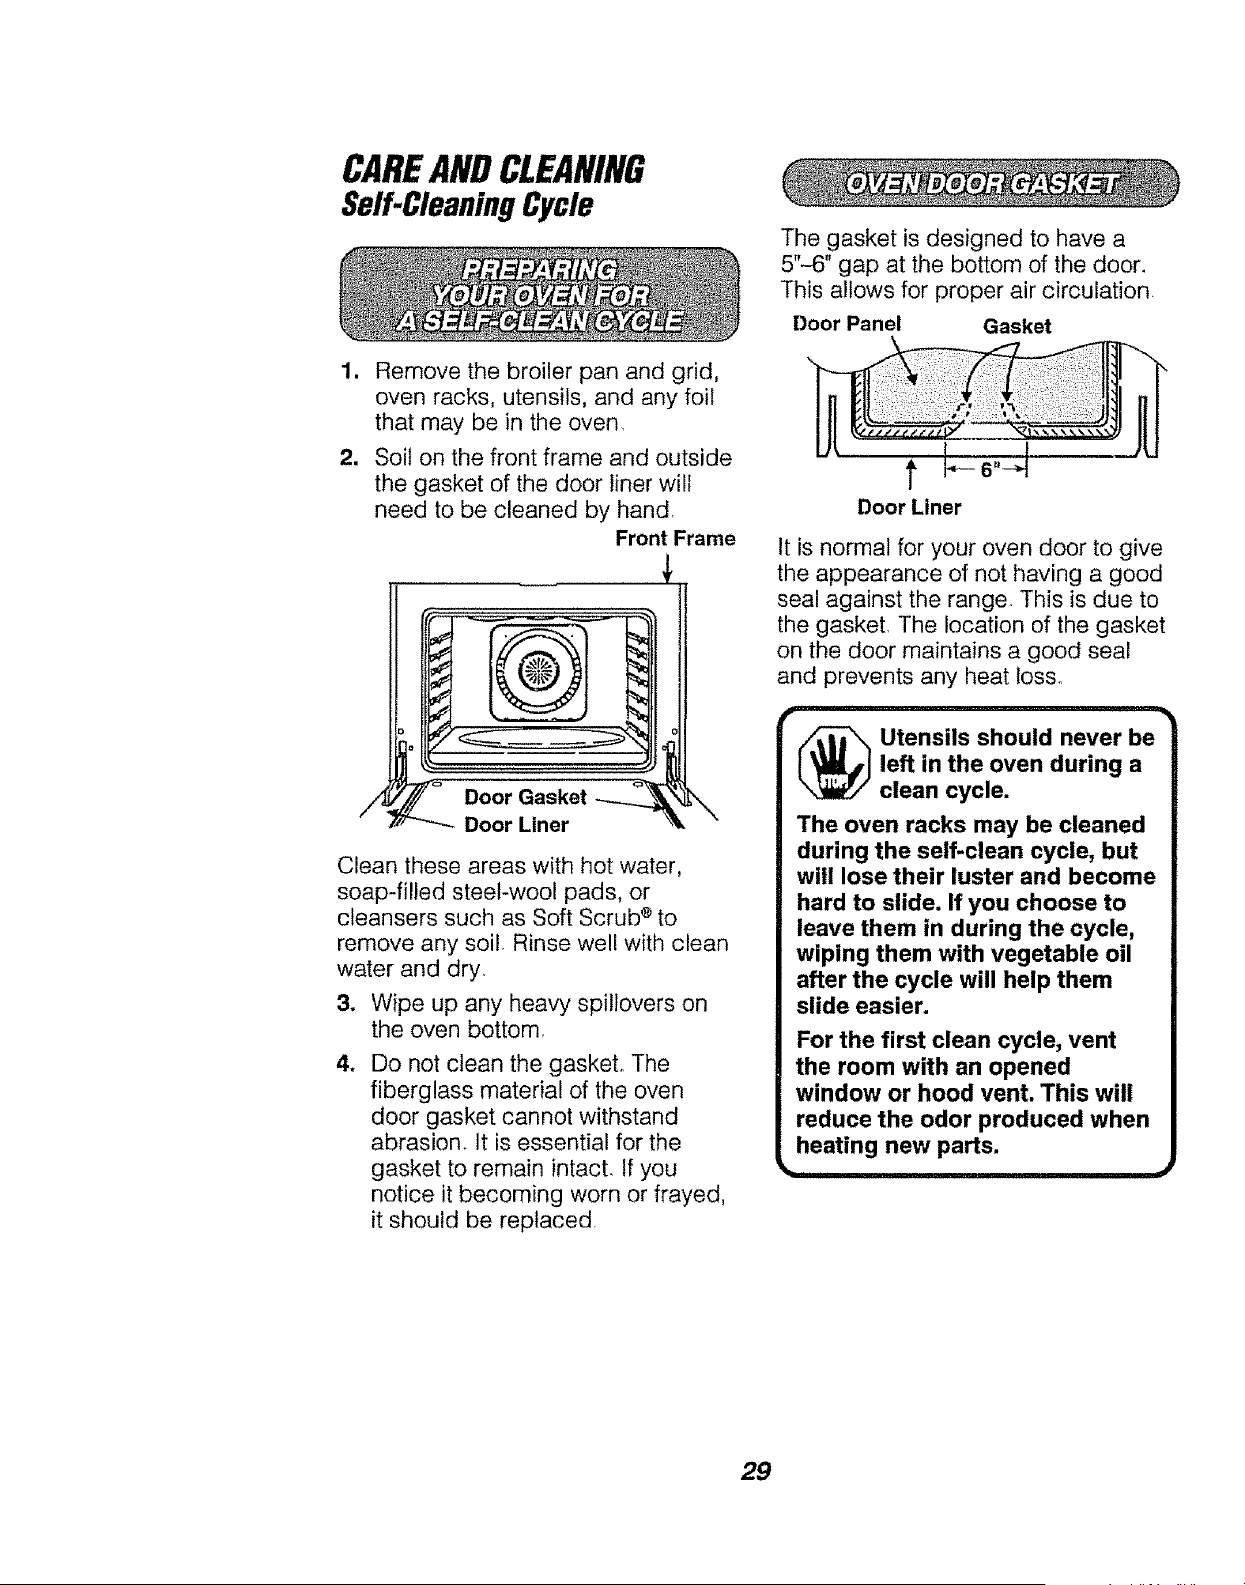
1
N
Remove the broiler pan and grid,
oven racks, utensils, and any foil
that may be in the oven
Soil on the front frame and outside
the gasket of the door liner will
need to be cleaned by hand,
Front Frame
/4
Door Gasket -_
Door Liner
\
Clean these areas with hot water,
soap-filled steel-wool pads, or
cleansers such as Soft Scrub e to
remove any soil, Rinse well with clean
water and dry.
3. Wipe up any heavy spillovers on
the oven bottom,
.
Do not clean the gasket. The
fiberglass material of the oven
door gasket cannot withstand
abrasion. It is essential for the
gasket to remain intact. If you
notice it becoming worn or frayed,
it should be replaced.
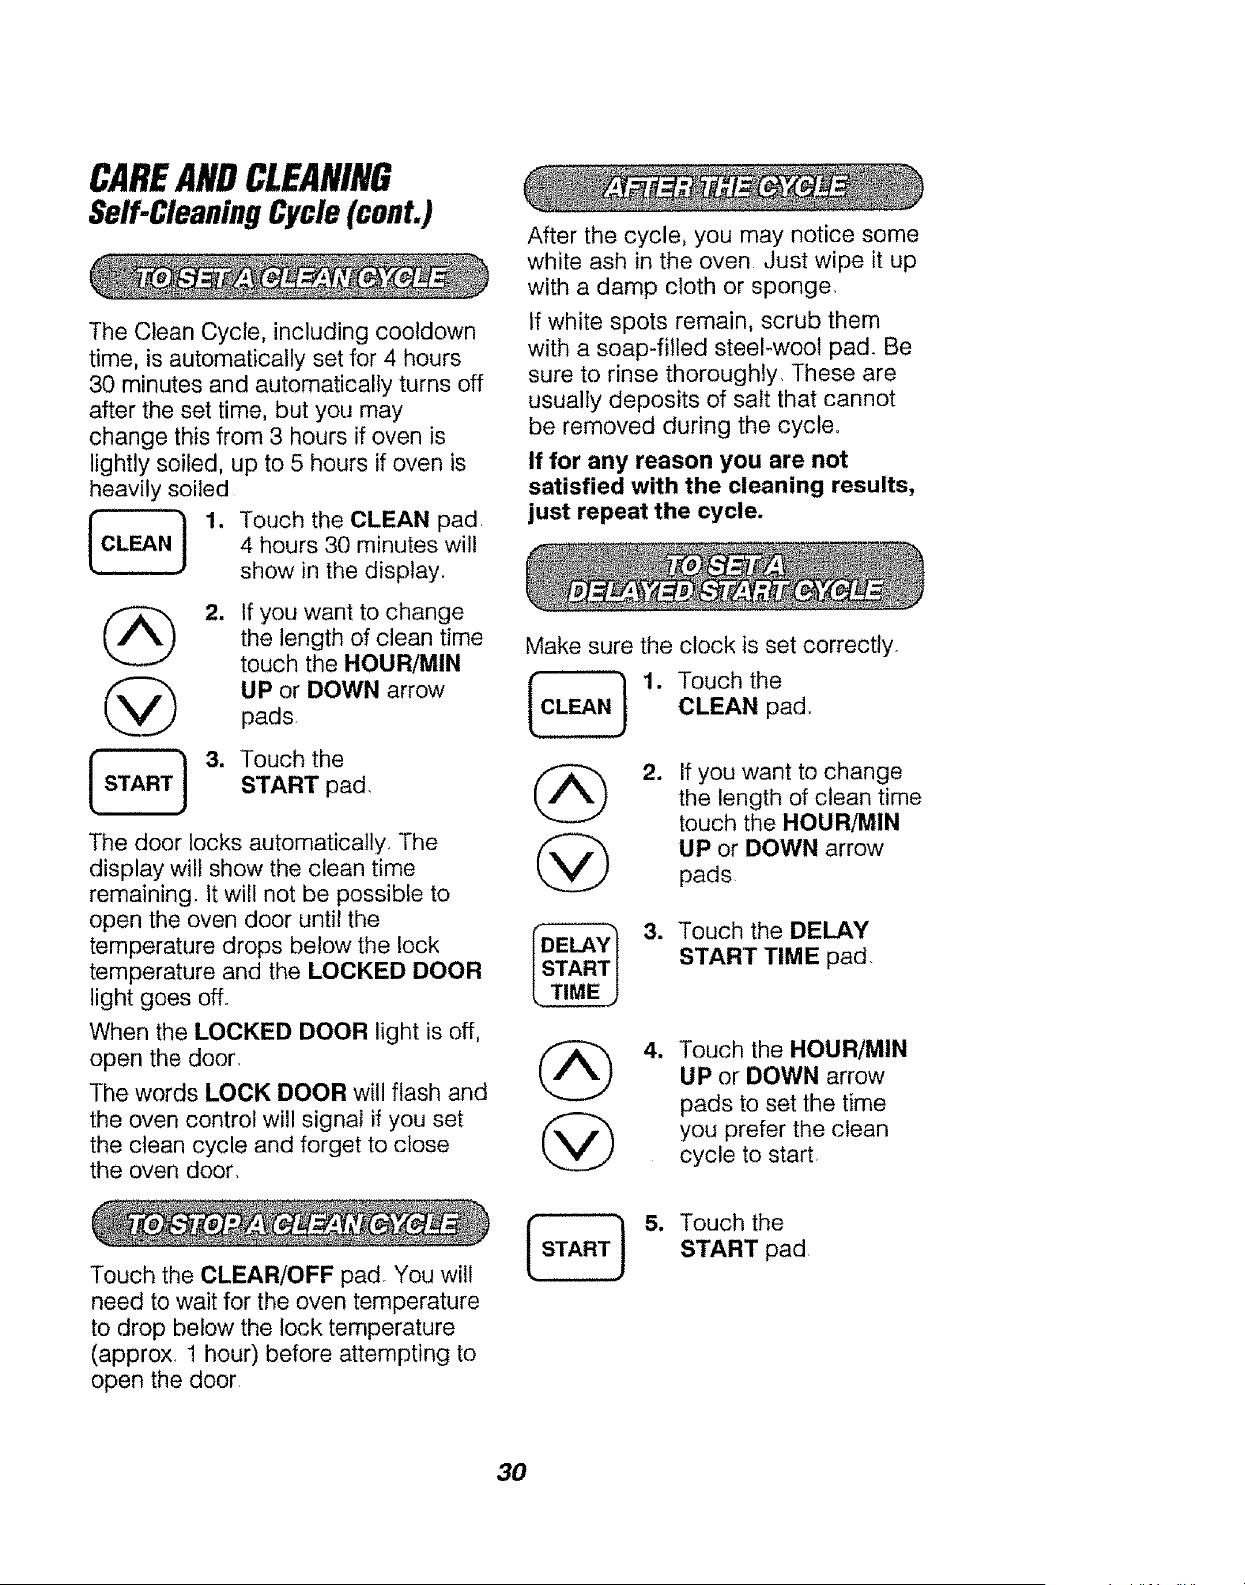
The gasket is designed to have a
5"-6" gap at the bottom of the door.
This allows for proper air circulation.
Door Panel Gasket
Door Liner
It is normal for your oven door to give
the appearance of not having a good
seal against the range. This is due to
the gasket, The location of the gasket
on the door maintains a good seal
and prevents any heat loss.
r •
_ tensils should never be
left in the oven during a
clean cycle.
The oven racks may be cleaned
during the self-clean cycle, but
will lose their luster and become
hard to slide. If you choose to
leave them in during the cycle,
wiping them with vegetable oil
after the cycle will help them
slide easier.
For the first clean cycle, vent
the room with an opened
window or hood vent. This will
reduce the odor produced when
heating new parts.
29
CAREANDCLEANING
Self-CleaningCycle (cont.)
The Clean Cycle, including cooldown
time, is automatically set for 4 hours
30 minutes and automatically turns off
after the set time, but you may
change this from 3 hours if oven is
lightly soiled, up to 5 hours if oven is
heavily soiled
1. Touch the CLEAN pad.
4 hours 30 minutes wil!
show in the display.
(_ 2,
@
If you want to change
the length of clean time
touch the HOUR/MIN
UP or DOWN arrow
pads,
Touch the
START pad,
The door locks automatically. The
display will show the clean time
remaining. It will not be possible to
open the oven door until the
temperature drops below the lock
temperature and the LOCKED DOOR
light goes off.
When the LOCKED DOOR light is off,
open the door.
The words LOCK DOOR will flash and
the oven control will signal if you set
the clean cycle and forget to close
the oven door.
Touch the CLEAR/OFF pad, You wilt
need to wait for the oven temperature
to drop below the lock temperature
(approx, 1 hour) before attempting to
open the door,
After the cycle, you may notice some
white ash in the oven Just wipe it up
with a damp cloth or sponge.
If white spots remain, scrub them
with a soap-fitted steel-wool pad. Be
sure to rinse thoroughly. These are
usually deposits of salt that cannot
be removed during the cycle°
If for any reason you are not
satisfied with the cleaning results,
just repeat the cycle.
Make sure the
@ "
@
clock is set correctly.
Touch the
CLEAN pad.
If you want to change
the length of clean time
touch the HOUR/M1N
UP or DOWN arrow
pads
Touch the DELAY
START TIME pad.
Touch the HOUR/MIN
UP or DOWN arrow
pads to set the time
you prefer the clean
cycle to start,
[_ 5. Touch the
START pad
3O
CAREANDCLEANING
Glass-CeramicCooktop
Cleaning
Cleaning a glass-ceramic cooktop is
different from cleaning a standard
porcelain cooktop To maintain and
protect your glass-ceramic cooktop
follow these basic steps
i
_ MPORTANT: Using a
razor scraper will not
damage the surface if the
45 ° angle is maintained. Do not
use a dull or nicked razor blade
on your cooktop. Store the razor
scraper out of reach of children.
•
Use only Cooktop Cleaning Creme ®
on glass-ceramic
For normal, light soil:
1. Using a damp paper towel, rub a
few drops of creme onto soiled
area Wipe until all soil and creme
are removed
.
Clean surface with creme after
each cooktop use Frequent
cleaning is essential in preventing
scratches and abrasions,
For heavy, burned-on soil:
1. Apply a few drops of cleaning
creme to the cool, soiled area
Spread the creme across the
entire soiled area
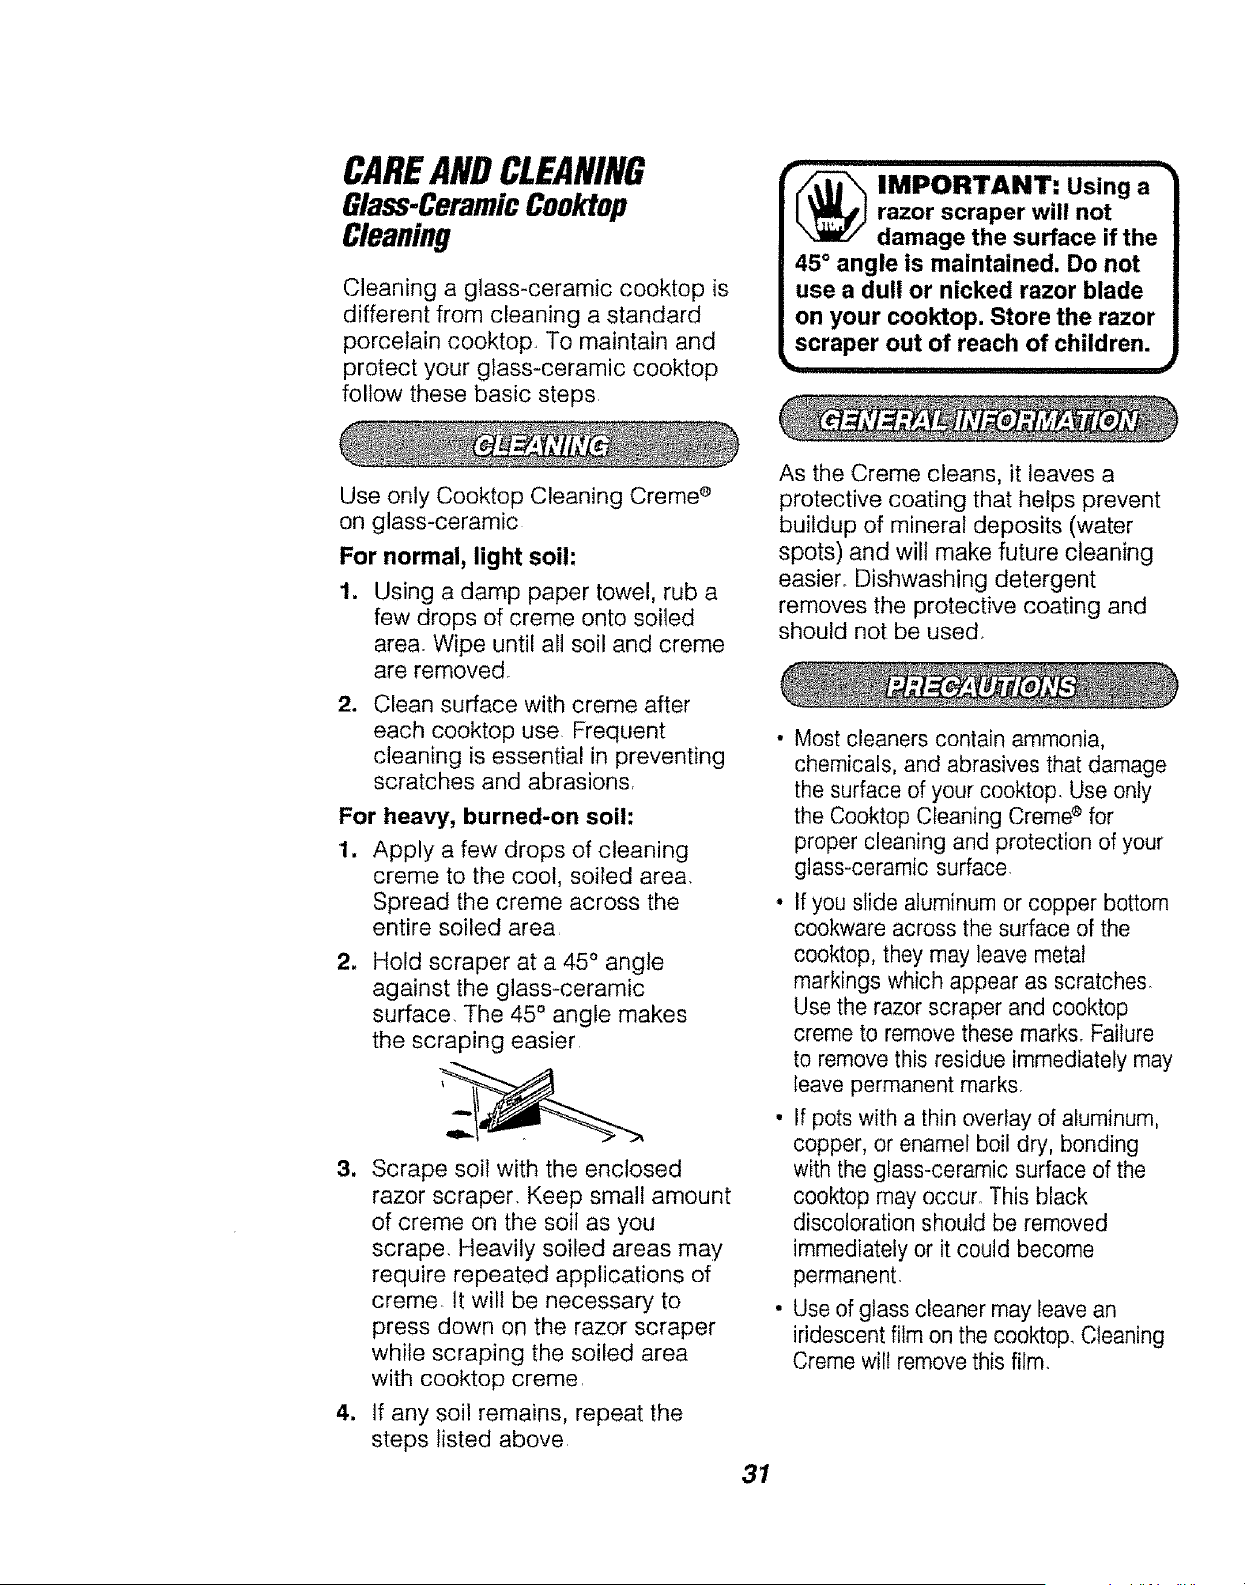
2_
Hold scraper at a 45 ° angle
against the glass-ceramic
surface The 45 ° angle makes
the scraping easier
3. Scrape soil with the enclosed
razor scraper Keep small amount
of creme on the soil as you
scrape Heavily soiled areas may
require repeated applications of
creme It will be necessary to
press down on the razor scraper
while scraping the soiled area
with cooktop creme
4. If any soil remains, repeat the
steps listed above
As the Creme cleans, it leaves a
protective coating that helps prevent
buildup of mineral deposits (water
spots) and will make future cleaning
easier. Dishwashing detergent
removes the protective coating and
should not be used.
• Most cleaners contain ammonia,
chemicals, and abrasives that damage
the surface of your cooktop Use only
the Cooktop Cleaning Creme_ for
proper cleaning and protection of your
glass-ceramic surface
• If you slide aluminum or copper bottom
cookware across the surface of the
cooktop, they may leave metal
markings which appear as scratches
Use the razor scraper and cooktop
creme to remove these marks. Failure
to remove this residue immediately may
leave permanent marks
• If pots with a thin overlay of aluminum,
copper, or enamel boil dry, bonding
with the glass-ceramic surface of the
cooktop may occur. This black
discoloration should be removed
immediately or it could become
permanent
• Use of glass cleaner may leave an
iridescent film on the cooktop. Cleaning
Creme will remove this film
31
CAREANDCLEANING
Cleaning
o Water stains (mineral deposits) are
removable using the creme or full
strength white vinegar.
• Do not use a dull or nicked razor
blade on your cooktop.
• Do not use abrasive cleaners or
abrasive scouring pads on your
cooktop.
° Plastic mesh pads, such as Dobie e,
may be used.
To order additional Cooktop Cleaning
Creme ®, call your nearest Sears
Service Center or Retail Store and ask
for Stock No. 40079.
CLEANING MATERIALS
• Dishwashing detergent
° Warm water
° Soft cloth
Do not use abrasive cleaners,
industrial cleaners, or bleach.
CLEANING MATERIALS
• Dishwashing detergent
• Warm water
• Soap-filled scouring pad
• Commercial oven cleaner
TO CLEAN
Allow the pan to soak. Sprinkle the
grid with dishwashing detergent and
cover with a damp cloth or paper
towel. Rinse and dry well Scour as
needed. You may also place both the
pan and grid in the dishwasher
Clean only as touch-up between
clean cycles. Use dishwashing
liquid, warm water, or a soap-filled
steel-wool pad Rinse well after
cleaning and dry.
NEVER USE OVEN CLEANERS IN
OR AROUND ANY PART OF THE
OVEN.
When cleaning, be sure not to bend
or displace the temperature sensor
located on the back wall of the oven.
CLEANING MATERIALS
° Dishwashing detergent
• Warm water
• Paper towels
TO CLEAN
Do not use oven cleaners, cleansing
powder, or harsh abrasives, tf
marinades, tomato sauce, basting
materials, etc. should spill, wipe up as
much as possible. When surfaces
have cooled, thoroughly clean
painted areas,
TO CLEAN
For everyday cleaning, use glass
cleaner and a paper towel. For
stubborn soil, use paste of baking
soda and water. Rinse thoroughly,
CLEANING MATERIALS
• Soft abrasive cleaner
. Sponge-scrubber
Do not use hard abrasive cleaners,
industrial cleaners, or bleach.
32
CAREANDCLEANING
RemovableParts
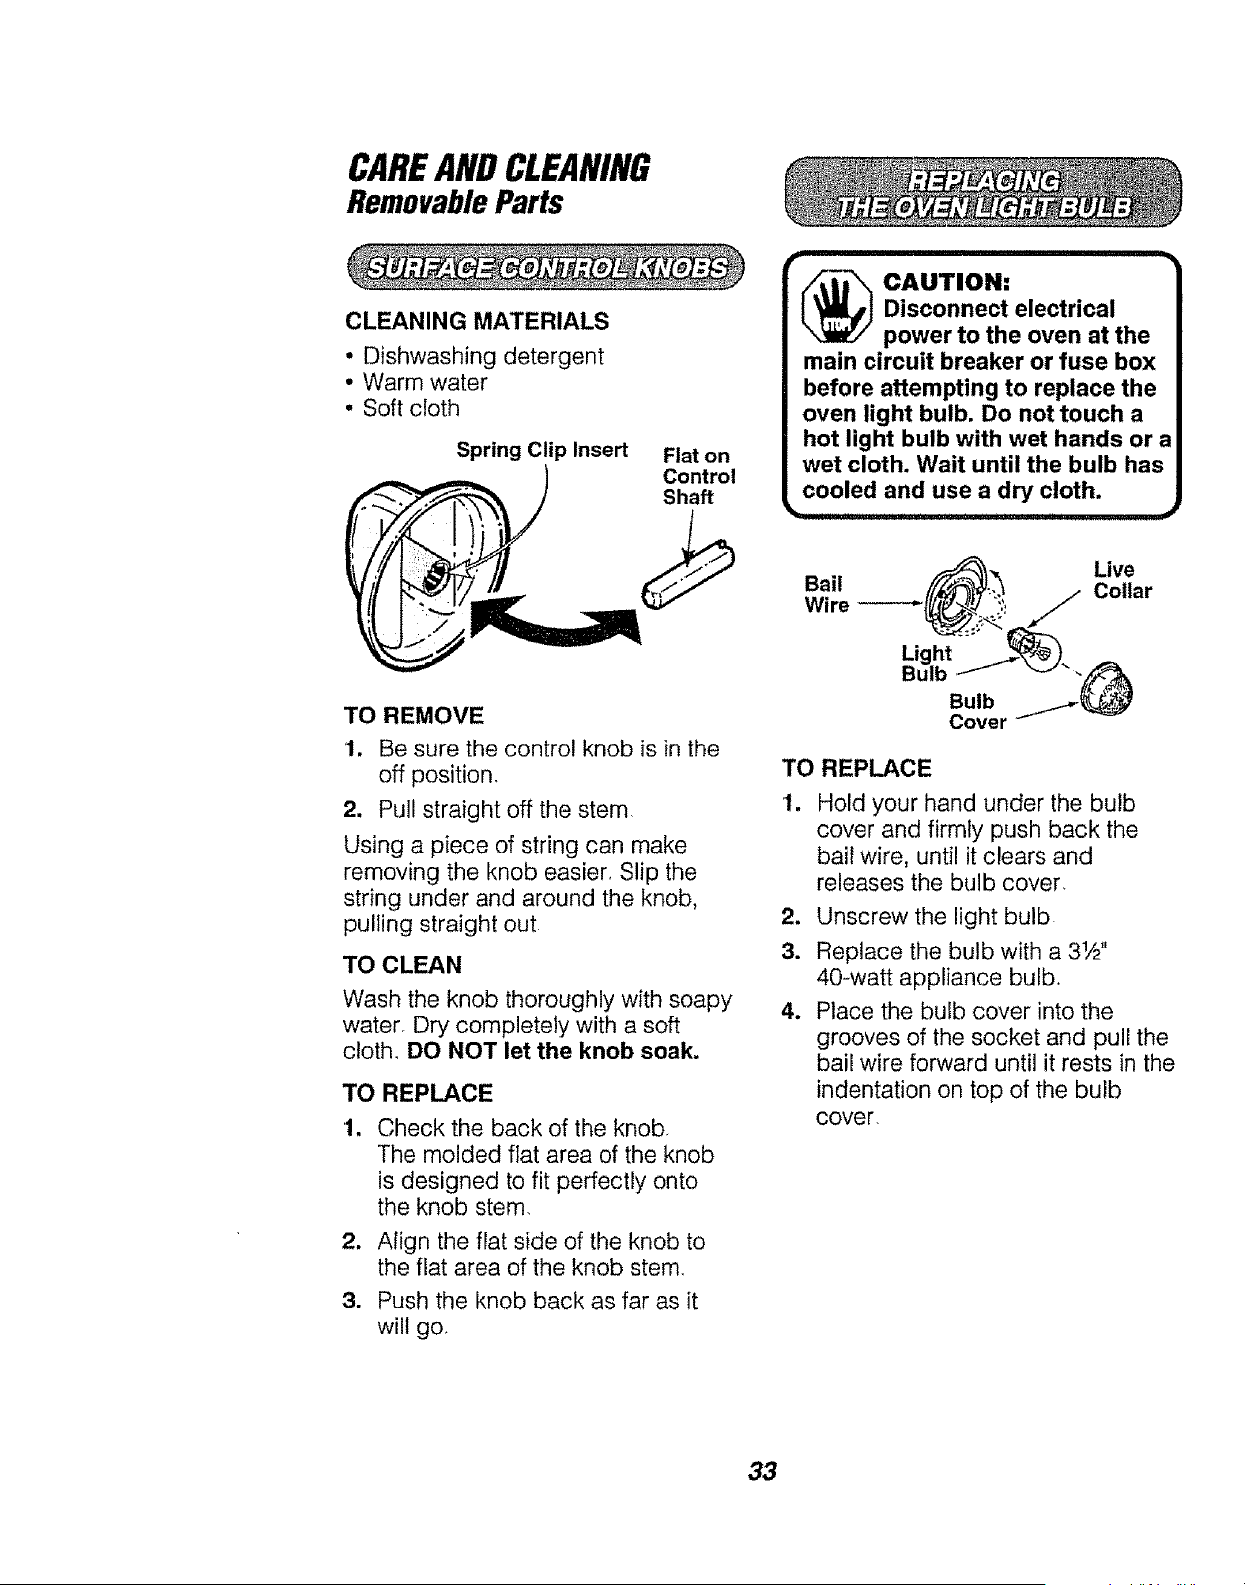
CLEANING MATERIALS
• Dishwashing detergent
• Warm water
, Soft cloth
Spring Clip Insert Flat on
/ Control
) Sho.
TO REMOVE
1, Be sure the control knob is in the
off position.
2. Pull straight off the stem
Using a piece of string can make
removing the knob easier, Slip the
string under and around the knob,
pulling straight out
TO CLEAN
Wash the knob thoroughly with soapy
water Dry completely with a soft
cloth, DO NOT let the knob soak.
TO REPLACE
1. Check the back of the knob
The molded flat area of the knob
is designed to fit perfectly onto
the knob stem,
2. Align the flat side of the knob to
the flat area of the knob stem
3. Push the knob back as far as it
will go
_ AUTION:
Disconnect electrical
power to the oven at the
main circuit breaker or fuse box
before attempting to replace the
oven light bulb. Do not touch a
hot light bulb with wet hands or a
wet cloth. Wait until the bulb has
cooled and use a dry cloth.
B.. ,,--/_--_-,, Live
all _..____/'_'t_;'-'_ /- Collar
=re l_,_';_j. ".: j/
Light '::7_.
Bulb Jf v ._/_
Bulb j._-_,_
Cover _'_ --
TO REPLACE
.
Hold your hand under the bulb
cover and firmly push back the
bait wire, until it clears and
releases the bulb cover
2, Unscrew the light bulb
3. Replace the bulb with a 3W'
40-watt appliance bulb.
4. Place the bulb cover into the
grooves of the socket and pull the
bail wire forward until it rests in the
indentation on top of the bulb
cover.
33
CAREANDCLEANING
RemovableParts (cont.)
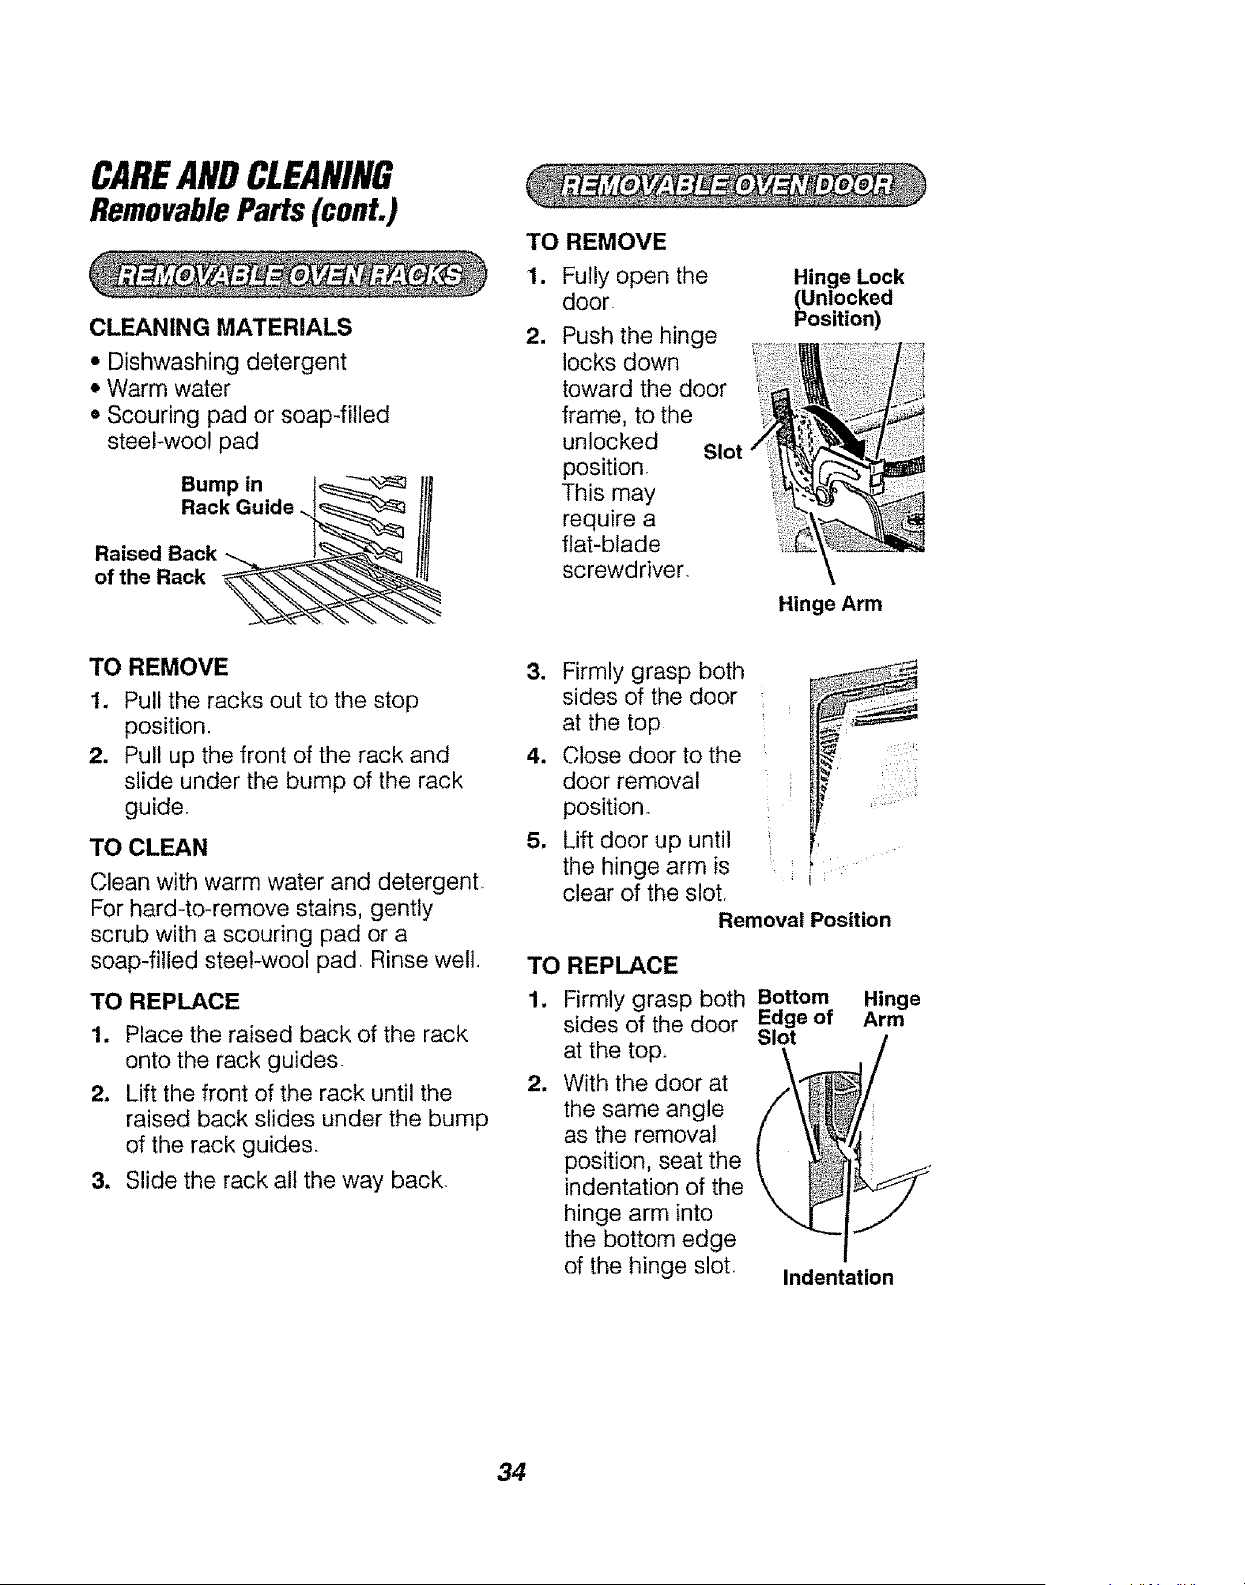
CLEANING MATERIALS
* Dishwashing detergent
o Warm water
o Scouring pad or soap-filled
steel-wool pad
Bump in i_
Rack Guide ..t_
Raised Back
of the Rack
TO REMOVE
1. Pull the racks out to the stop
position.
2. Pull up the front of the rack and
slide under the bump of the rack
guide.
TO CLEAN
Clean with warm water and detergenL
For hard-to-remove stains, gently
scrub with a scouring pad or a
soap-filled steel-wool pad, Rinse well.
TO REMOVE
1. Fully open the
door.
2. Push the hinge
locks down
toward the door
frame, to the
unlocked Slot
position,
This may
require a
flat=blade
screwdriver.
.
Hinge Lock
(Unlocked
Position)
w
Sl
Hinge Arm
Firmly grasp both
sides of the door
at the top
Close door to the ' _:
i
door removal .....
position°
Lift door up until
the hinge arm is (:
clear of the slot,
Removal Position
TO REPLACE
TO REPLACE 1.
1. Place the raised back of the rack
onto the rack guides
2. Lift the front of the rack until the 2.
raised back slides under the bump
of the rack guides.
3. Slide the rack all the way back.
Firmly grasp both Bottom Hinge
sides of the door Edge of Arm
Slot
at the top. \ ,//
With the door at
the same angle
as the removal t\_i,_lJ,
position, seat the
indentation of the
hinge arm into
the bottom edge
of the hinge slot. Indentation
34
CAREANDCLEANING
RemovableParts (cont.)
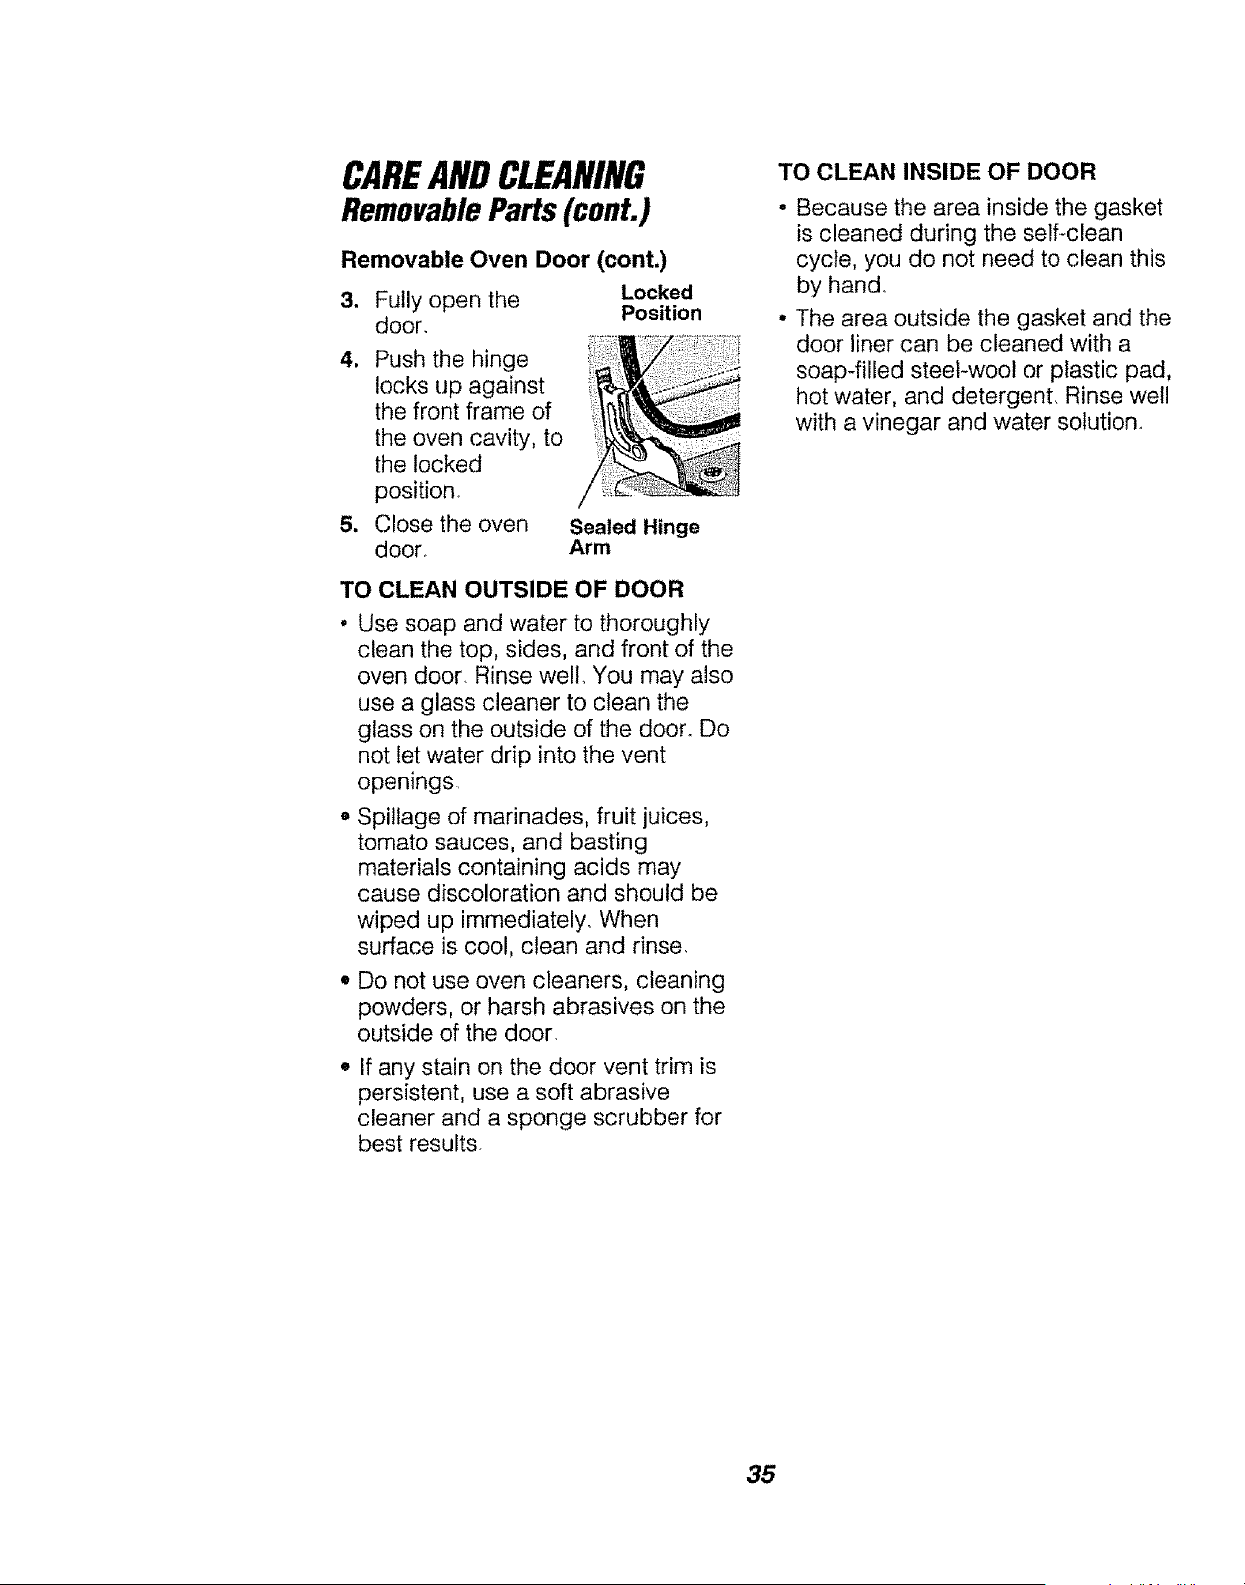
Removable Oven Door (cont.)
3. Fully open the Locked
Position
door,
4, Push the hinge
locks up against
the front frame of
the oven cavity, to
the locked
position.
5. Close the oven
door.
Sealed Hinge
Arm
TO CLEAN OUTSIDE OF DOOR
• Use soap and water to thoroughly
clean the top, sides, and front of the
oven door. Rinse welt. You may also
use a glass cleaner to clean the
glass on the outside of the door. Do
not let water drip into the vent
openings
• Spillage of marinades, fruit juices,
tomato sauces, and basting
materials containing acids may
cause discoloration and should be
wiped up immediately. When
surface is coo!, clean and rinse.
• Do not use oven cleaners, cleaning
powders, or harsh abrasives on the
outside of the door_
° If any stain on the door vent trim is
persistent, use a soft abrasive
cleaner and a sponge scrubber for
best results.
TO CLEAN INSIDE OF DOOR
. Because the area inside the gasket
is cleaned during the self-clean
cycle, you do not need to clean this
by hand.
° The area outside the gasket and the
door liner can be cleaned with a
soap4illed steel-wool or plastic pad,
hot water, and detergent. Rinse well
with a vinegar and water solution.
35
CAREANDCLEANING
RemovableParts (cont.)
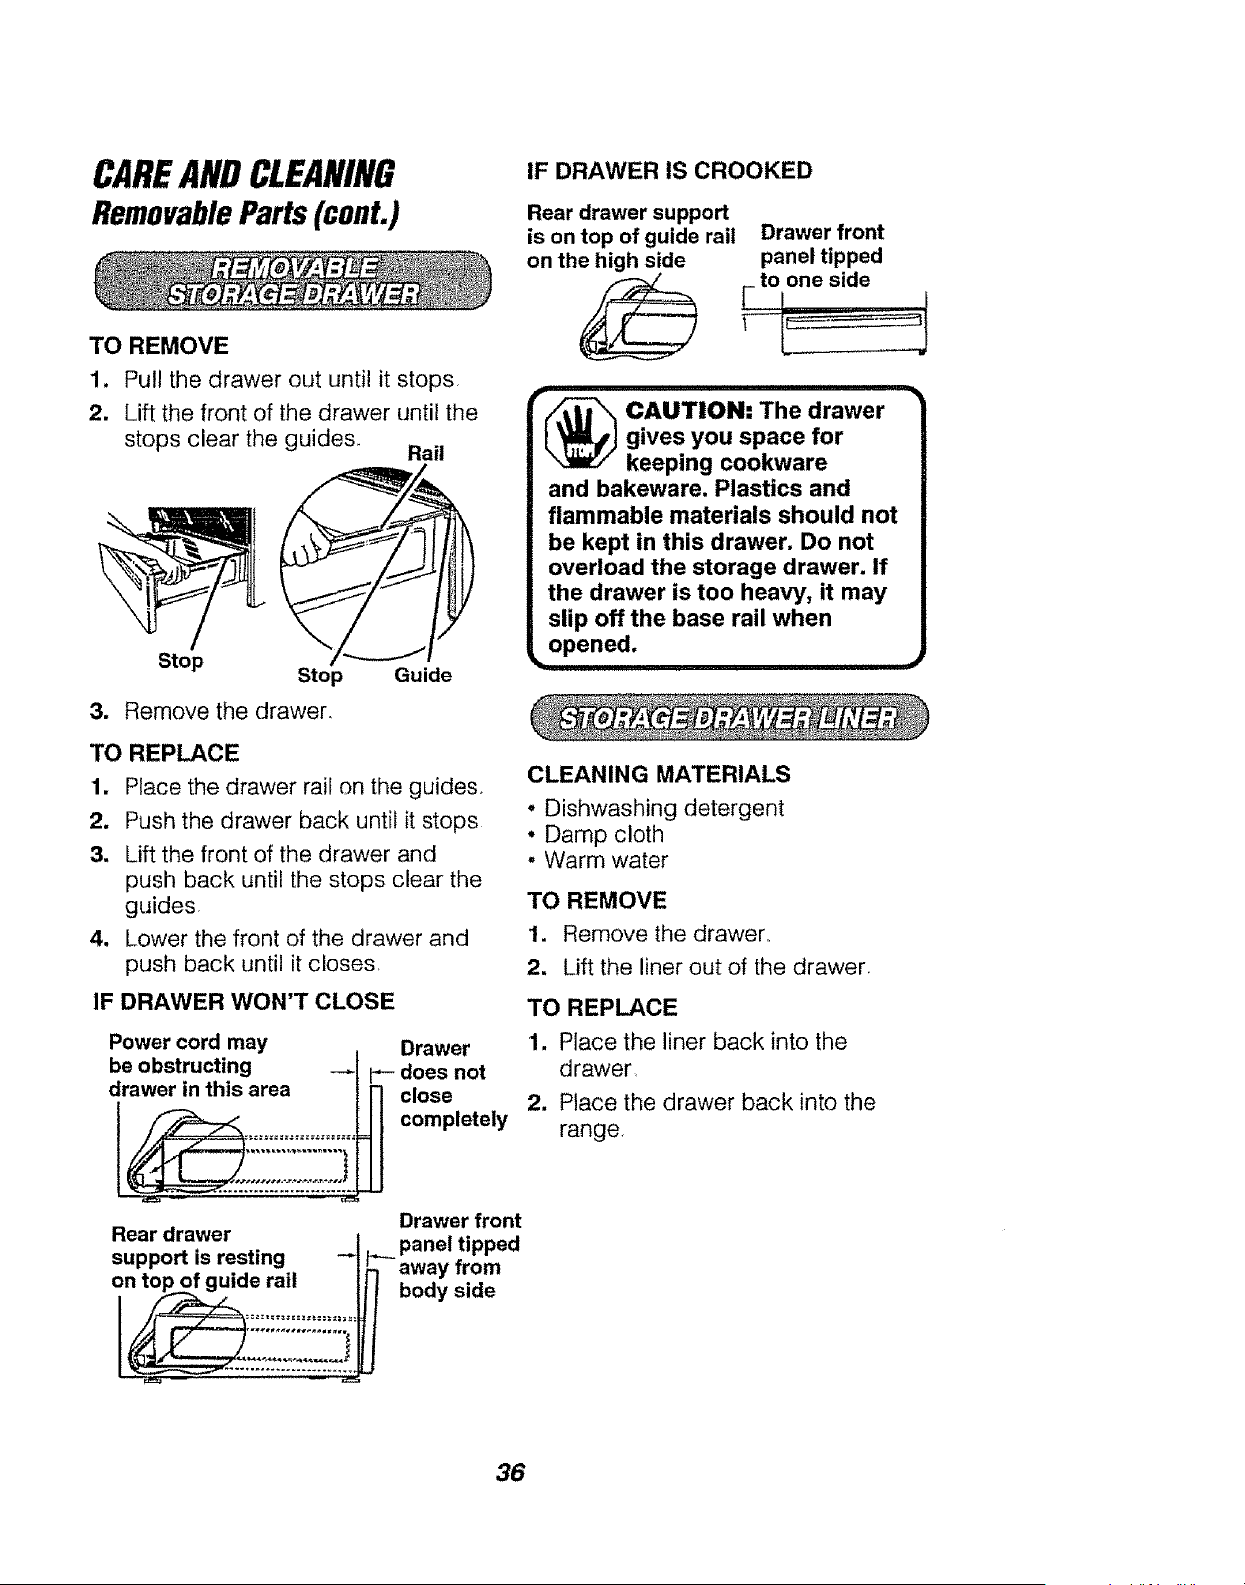
TO REMOVE
1,
2.
Pul! the drawer out until it stops,
Lift the front of the drawer until the
stops clear the guides_ Rail
Stop
Stop Guide
3. Remove the drawer,
TO REPLACE
1. Place the drawer rail on the guides,
2. Push the drawer back until it stops
3. Lift the front of the drawer and
push back until the stops clear the
guides
4. Lower the front of the drawer and
push back until it closes
IF DRAWER WON'T CLOSE
Power cord may
be obstructing __
drawer in this area
Drawer
p_- does not
_ close
completely
Rear drawer
Drawer front
__. panel tipped
support is resting -_ haway from
on top of guide rail II body side
IF DRAWER IS CROOKED
Rear drawer support
is on top of guide rail
on the high side
Drawer front
panel tipped
-i
_ AUTION: The drawer
gives you space for
keeping cookware
and bakeware. Plastics and
flammable materials should not
be kept in this drawer. Do not
overload the storage drawer. If
the drawer is too heavy, it may
slip off the base rail when
opened.
CLEANING MATERIALS
• Dishwashing detergent
° Damp cloth
, Warm water
TO REMOVE
1. Remove the drawer,,
2. Lift the liner out of the drawer.
TO REPLACE
1. Place the liner back into the
drawer
2. Place the drawer back into the
range,
36
BEFORECALLINGFORSERVICE
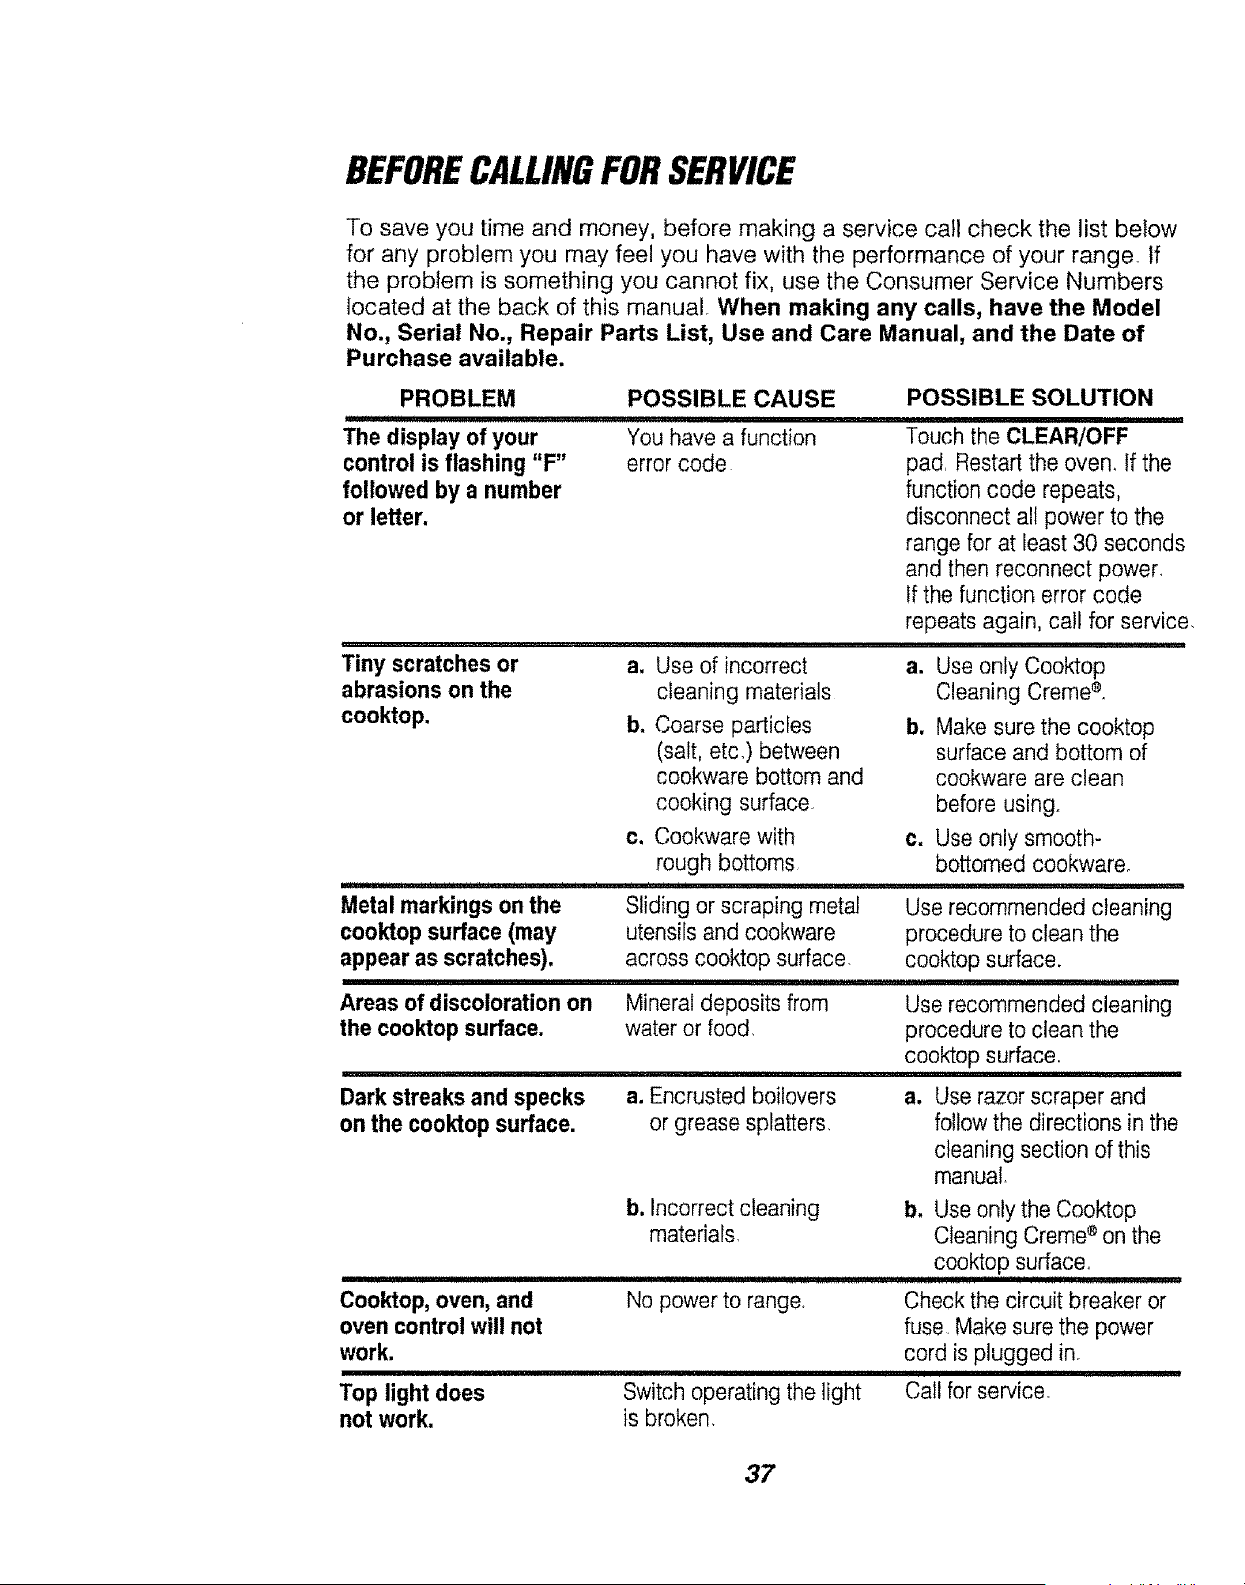
To save you time and money, before making a service call check the list below
for any problem you may fee! you have with the performance of your range If
the problem is something you cannot fix, use the Consumer Service Numbers
located at the back of this manual, When making any calls, have the Model
No., Serial No., Repair Parts List, Use and Care Manual, and the Date of
Purchase available.
PROBLEM
I1' I '' '11
The display of your
control is flashing "F"
followed by a number
or letter.
POSSIBLE CAUSE
You have a function
error code
POSSIBLE SOLUTION
Touch the CLEAR/OFF
pad Restart the oven. If the
function code repeats,
disconnect all power to the
range for at least 30 seconds
and then reconnect power,
If the function error code
repeats again, call for service,
Tiny scratches or
abrasions on the
cooktop.
a. Use of incorrect
cleaning materials
b. Coarse particles
(salt, etc.) between
cookware bottom and
cooking surface
c. Cookware with
rough bottoms
i , i II
Sliding or scraping metal
utensils and cookware
across cooktop surface
"2 .............. " III '1' I ' ' '
Metal markings on the
cooktop surface (may
appear as scratches).
Areas of discoloration on
the cooktop surface.
Mineral deposits from
water or food,
a. Use only Cooktop
Cleaning Creme e.
b. Make sure the cooktop
surface and bottom of
cookware are clean
before using.
c. Use only smooth-
bottomed cookwareo
Use recommended cleaning
procedure to clean the
cooktop surface.
Use recommended cleaning
procedure to clean the
cooktop surface.
Dark streaks and specks a. Encrusted boilovers a. Use razor scraper and
on the cooktop surface, or grease splatters, follow the directions in the
cleaning section of this
manual,
b. Incorrect cleaning b, Use only the Cooktop
materials Cleaning Creme ®on the
cooktop surface°
Cooktop, oven, and No power to range, Check the circuit breaker or
oven control will not fuse Make sure the power
work. cord is plugged in.
Top light does
not work.
Switch operating the light
is broken.
Call for service
37
BEFORECALLINGFORSERVICE
PROBLEM
Cooktop cooking
zones work, but oven
will not turn on.
I
Surface units will not
maintain a rolling boil or
cooking is not
fast enough.
POSSIBLE CAUSE POSSIBLE SOLUTION
I I I'l 2 ! ! ................. lUIII"NIIIIIIIIIIIIIIII'II
Oven controls set Check the operation section
incorrectty, on setting the oven control
correctly°
Improper cookware
being used
Use pans which are flat and
match the diameter of the
surface unit setected
Oven temperature seems Oven control calibration
inaccurate.
Oven will not
unlock.
See the temperature
adjustment instructions
following this section.
I I J IJ II !!!'"7!! .....................
Clean cycle is not finished Oven temperature must drop
below the lock temperature
before the door will unlock.
Oven light does
not work.
Oven did not clean or
results were poor.
Oven smokes.
a. Light switch in off a. Check oven light switch
position° on the control panel.
b. Oven light bulb loose b. Check the oven
or burned out light bulb
, ,,,,,,,,,, ,, ,, ,,,,,
a. Controls were not set a, Check the self-cleaning
properly, section of this manual
b. Oven was soiled b. Heavy spillovers should
heavily be removed before the
cycle is set You can also
repeat the cycle
c. Clean cycle was c, The normal clean cycle
interrupted, should last 4 hours,
30 minutes.
a. Dirty oven, a. Check for heavy spi!lover_
b. Improper use of b. Use of foil not
aluminum foil recommended,
Cl
Oven emits odor.
Broiler pan c. Clean pan and grid after
containing grease each use
left in the oven.
a. Oven insulation may
emit odor during the
first few usages.
b, Failure to wipe out
excess soil
a. Put oven through
self-clean cycle to speed
up process of odor
"wearing off."
b. Wipe excess soi!
off before using oven
38
BEFORECALLINGFORSERVICE
PROBLEM POSSIBLE CAUSE POSSIBLE SOLUTION
a. Oven was not a,
preheated long enough
b. Improper rack or pan b.
placemenL
c. Oven vent blocked or c.
covered
d. Improper use of foil
e_
Foods do not bake
properly.
g_
h.
Be sure to preheat
when recipe calls for it.
Maintain uniform air
space around pans
and utensils; see oven
cooking tips section
Keep vent clear,
d. Use of foi! not
recommended on
racks or oven bottom,
Improper
temperature setting
for utensil used
Oven temperature
needs adjustment.
Range and oven rack
not level
Oven controls
improperly set
e. Reduce temperature
25 degrees for glass
or dull/darkened pans
f. Check oven
temperature
adjustment section,
g. Check the installation
for leveling
h, See the baking section
Foods do not broil
properly.
a. Improper rack
position
b. Oven preheated,
c, Improper use of foil
d. Oven door closed
during broiling
e. Low voltage (208)
f, Improper
broiling time
g. Oven controls
improperly set,
a. Check broil pan
placement; see
broiling section.
b. Do not preheat when
broiling
e, Do not let foil cover
slits in the grid; this
will prevent grease
drainage
d. Open door to broil
stop position; see
broiling section
e. Use higher rack
position,
f. Check broiling chart in
broiling section
g, See the baking
section
39
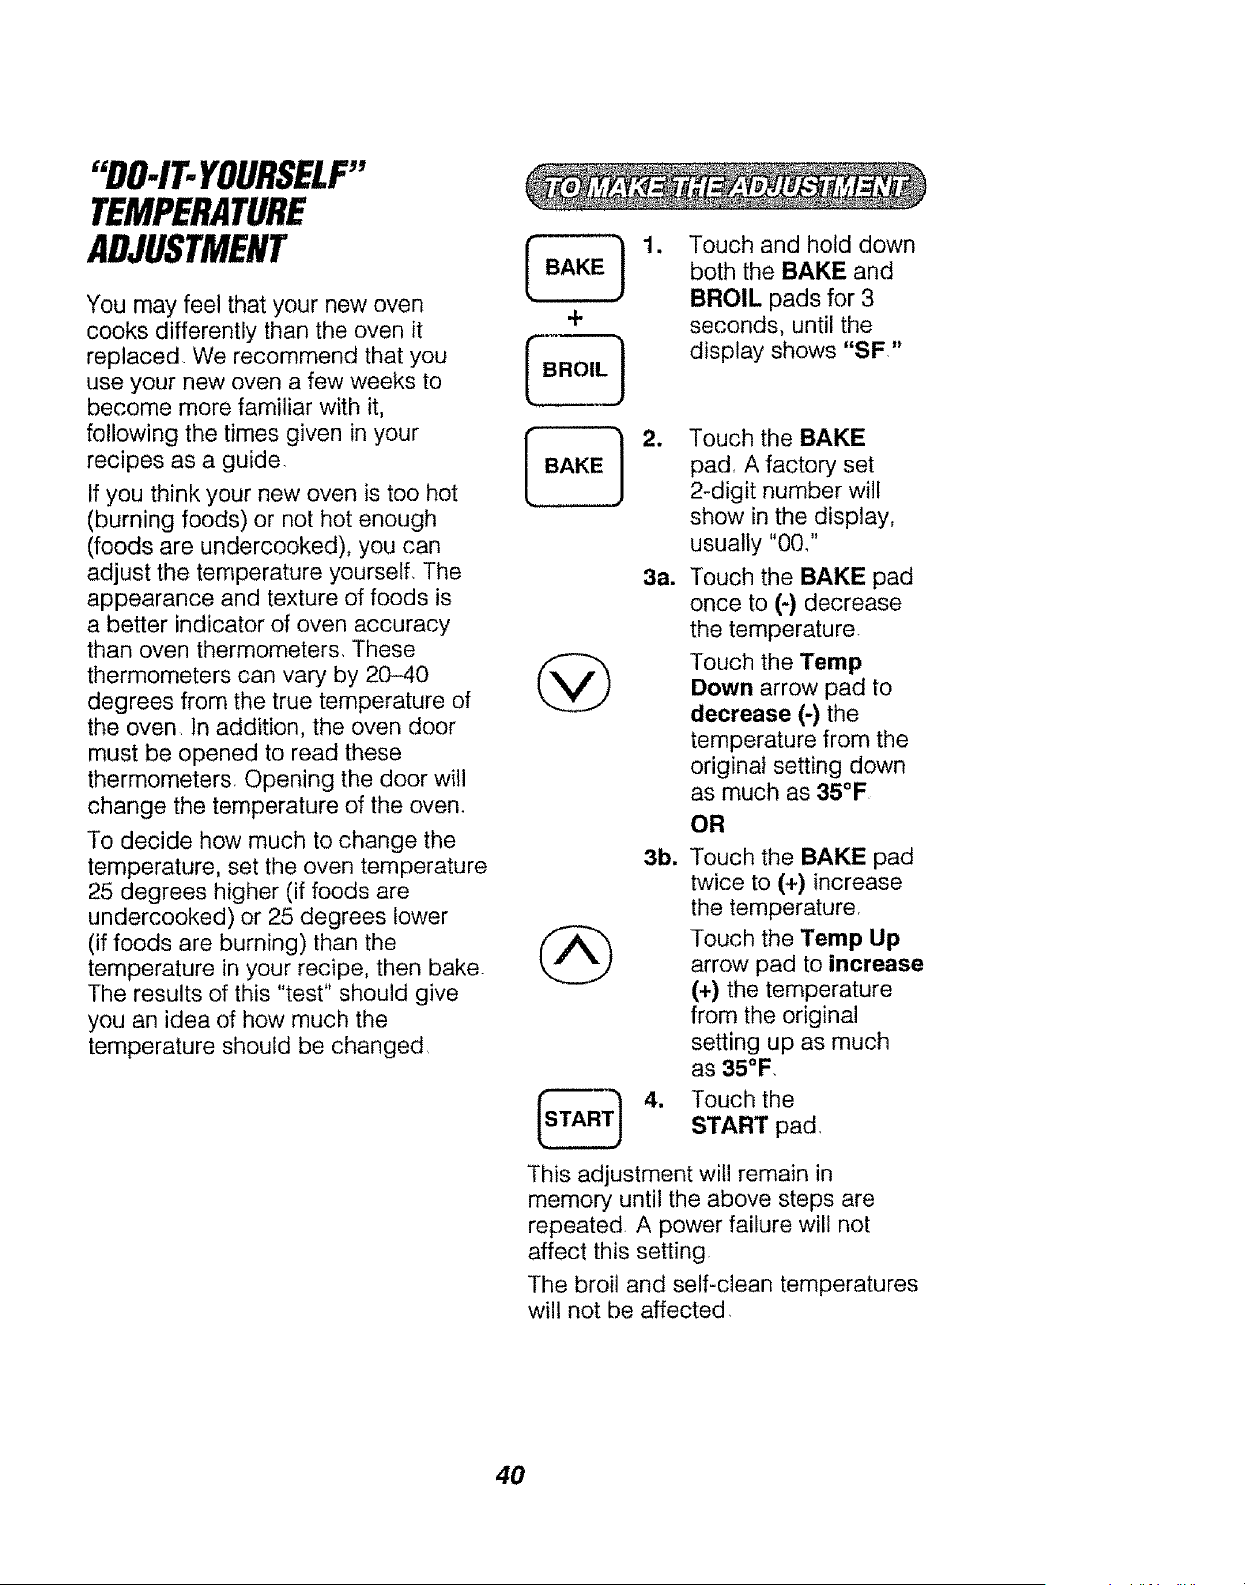
"DO-IT-YOURSELF"
TEMPERATURE
ADJUSTMENT
You may feel that your new oven
cooks differently than the oven it
replaced. We recommend that you
use your new oven a few weeks to
become more familiar with it,
following the times given in your
recipes as a guide.
If you think your new oven is too hot
(burning foods) or not hot enough
(foods are undercooked), you can
adjust the temperature yourself, The
appearance and texture of foods is
a better indicator of oven accuracy
than oven thermometers, These
thermometers can vary by 20-40
degrees from the true temperature of
the oven In addition, the oven door
must be opened to read these
thermometers, Opening the door will
change the temperature of the oven.
To decide how much to change the
temperature, set the oven temperature
25 degrees higher (if foods are
undercooked) or 25 degrees lower
(if foods are burning) than the
temperature in your recipe, then bake.
The results of this "test" should give
you an idea of how much the
temperature should be changed,
F:q
+
[ BROIL 1
= Touch and hold down
both the BAKE and
BROIL pads for 3
seconds, until the
display shows "SF"
@
2.
3a.
Touch the BAKE
pad A factory set
2-digit number will
show in the display,
usually "00,"
Touch the BAKE pad
once to (-) decrease
the temperature
Touch the Temp
Down arrow pad to
decrease (-) the
temperature from the
original setting down
as much as 35°F
OR
3b.
Touch the BAKE pad
twice to (+) increase
the temperature
Touch the Temp Up
arrow pad to increase
(+) the temperature
from the original
setting up as much
as 35°F,
Touch the
START pad
This adjustment will remain in
memory until the above steps are
repeated. A power failure will not
affect this setting
The broil and self-clean temperatures
will not be affected.
4O

NOTES
41
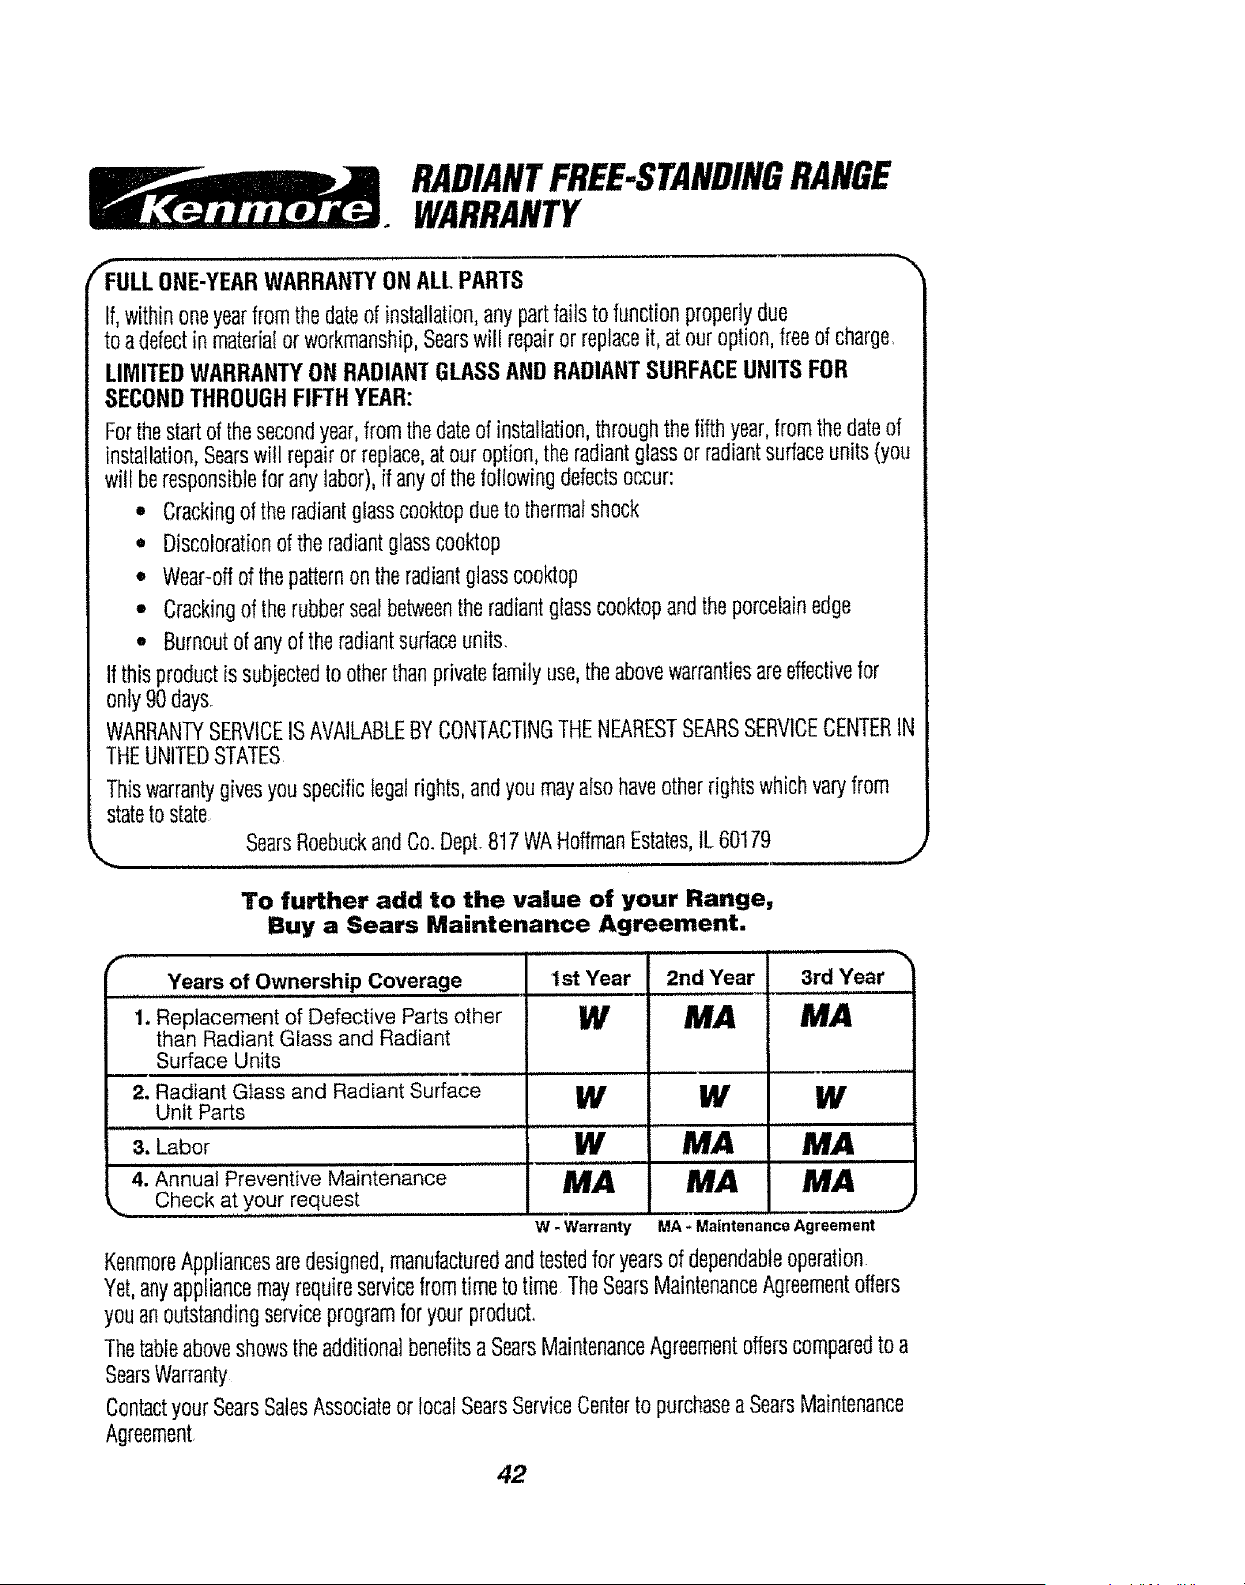
RADIANTFREE-STANDINGRANGE
WARRANTY
fF_uLL ONE-YEARWARRANTY ON ALL PARTS
If, within oneyearfrom the dateof installation,any partfailsto functionproperlydue
to a defectin materia!or workmanship,Searswili repairor replaceit, at our option,freeof charge,
LIMITED WARRANTYON RADIANTGLASSAND RADIANTSURFACEUNITS FOR
SECONDTHROUGHFIFTH YEAR:
Forthestartof thesecondyear,from thedateof installation,throughthefifthyear,fromthe dateof
installation,Searswill repairor replace,at our option,the radiantglassor radiantsurfaceunits(you
will beresponsiblefor anylabor),if anyof thefollowingdefectsoccur:
• Crackingof theradiantglasscooktopdueto thermalshock
• Discolorationof the radiantglasscooktop
• Wear-offof thepatternon theradiantglasscooktop
° Crackingof the rubbersealbetweenthe radiantglasscooktopandthe porcelainedge
- Burnoutof anyof theradiantsurfaceunits.
If this productis subjectedto otherthanprivatefamily use,theabovewarrantiesareeffectivefor
only 90days.
WARRANTYSERVICEISAVAILABLEBYCONTACTINGTHENEARESTSEARSSERVICECENTERIN
THEUNITEDSTATES
Thiswarrantygivesyou specificlegalrights,andyou mayalso haveotherrightswhich varyfrom
stateto state
SearsRoebuckandCo. DepL817 WAHoffmanEstates,tL 60179
To further add to the value of your Range,
Buy a Sears Maintenance Agreement.
f
...........years of Ownershi p Coverage
1. Replacement of Defective Parts other
than Radiant Glass and Radiant
Surface Units
2. Radiant Glass and Radiant Surface
Unit Parts
3. Labor
4. Annual Preventive Maintenance
Check at your request
1st Year
W
W
i i ii,,, i,l,, , i,,,,,,,i
W
..............MA
W - Warranty
2nd Year
MA MA
W W
MA MA
MA MA
MA - Maintenance Agreement
3rd Year
KenmoreAppliancesaredesigned,manufacturedandtestedfor yearsof dependableoperation.
Yet,anyappliancemayrequireservicefromtimeto time TheSearsMaintenanceAgreementoffers
youan outstandingserviceprogramforyour product.
Thetableaboveshowstheadditionalbenefitsa SearsMaintenanceAgreementofferscomparedto a
SearsWarranty
Contactyour SearsSalesAssociateor localSearsServiceCenterto purchasea SearsMaintenance
Agreement.
42
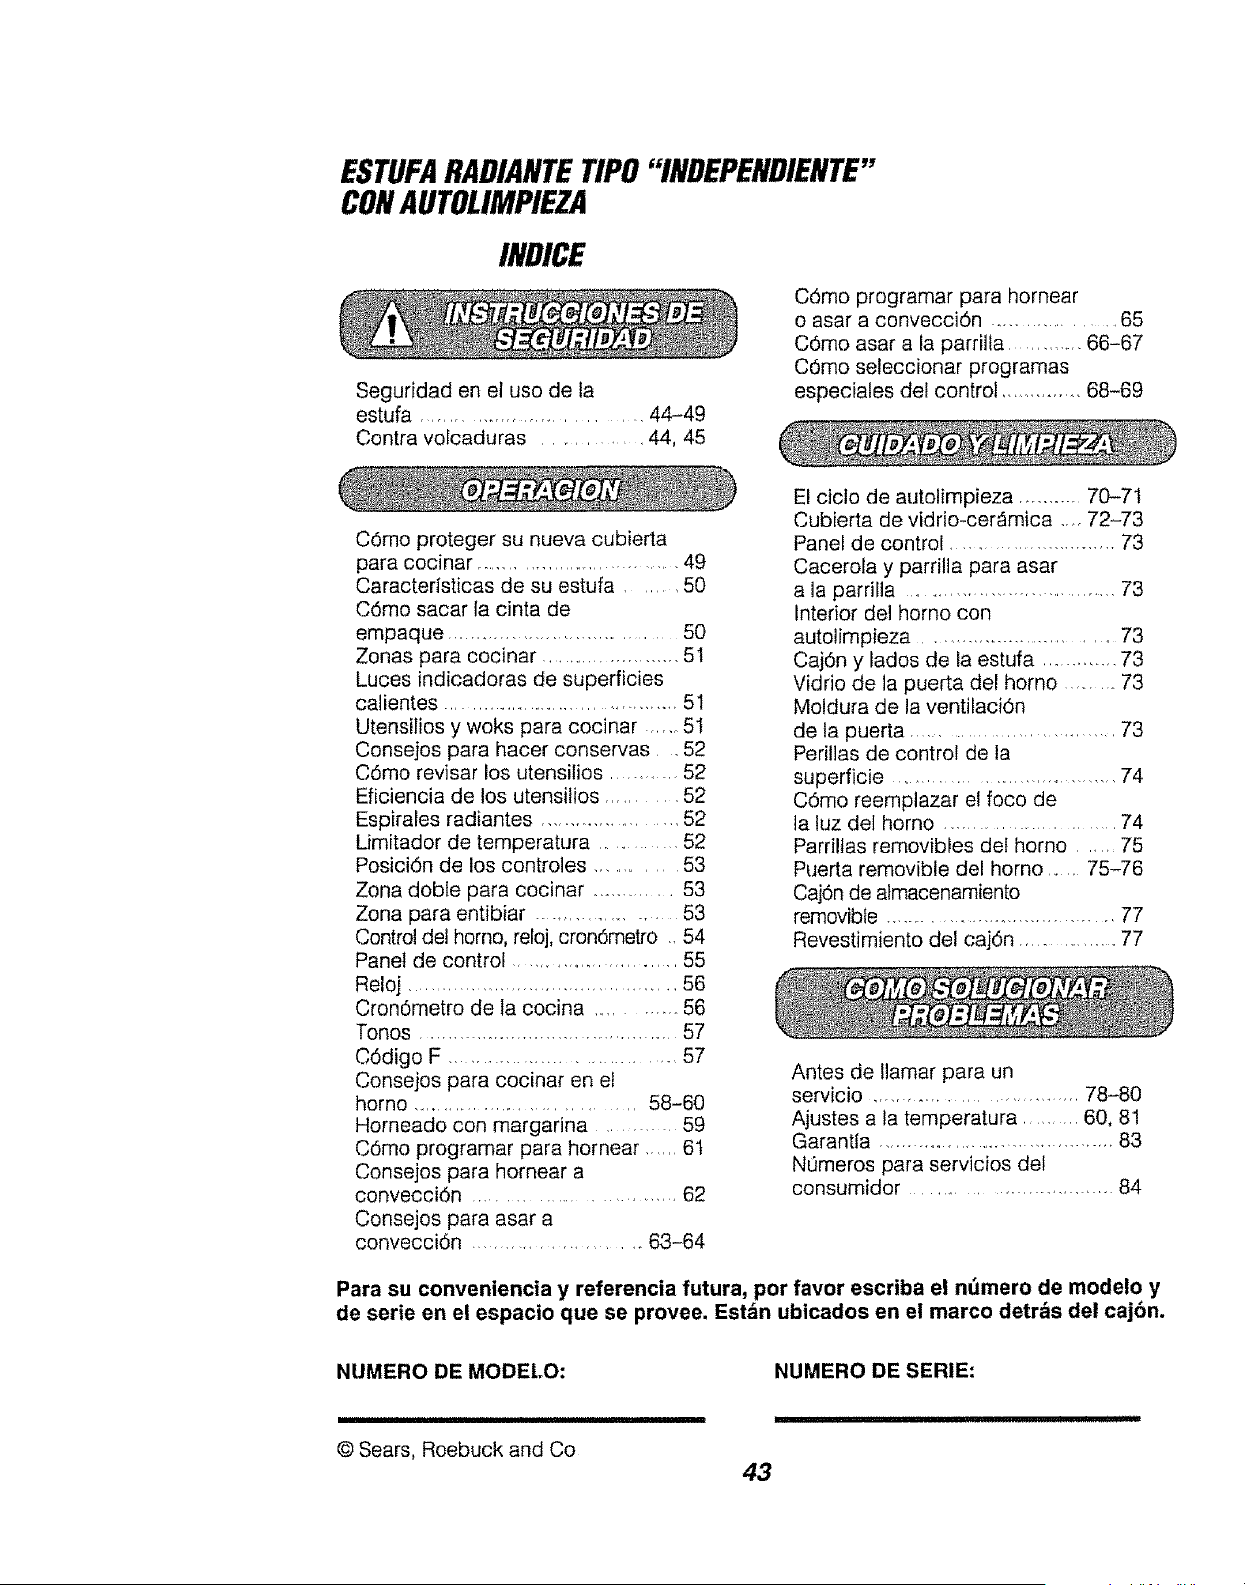
ESTUFARADIANTETIPO"INDEPENDIENTE"
CONAUTOLIMPIEZA
INDICE
Seguridad en el uso de la
estufa .............................. 44-49
Contra volcaduras ......... 44, 45
C6mo programar para hornear
o asar a convecci6n ................. 65
C6mo asar a la parriNa ............. 66-67
C6mo seleccionar programas
especiales del control ............... 68-69
Cdmo proteger su nueva cubierta
para cocinar ................................... 49
Caracterfsticas de su estufa ...... 50
C6mo sacar la cinta de
empaque ....................................... 50
Zonas para cocinar ........................ 51
Luces indicadoras de superficies
calientes ...................................... 51
Utensilios y woks para cocinar ...... 5I
Consejos para hacer conservas ,52
C6mo revisar los utensilios ............ 52
Eficiencia de los utensitios ........... 52
Espirales radiantes ........................ 52
Limitador de temperatura ........... 52
Posici6n de los controles ............ 53
Zona dobte para cocinar ............ 53
Zona para entibiar ................... 53
Control del homo, reloj, cron6metro ,, 54
Panel de control ........................ 55
Reloj ............................................... 56
Cron6metro de la cocina ............. 56
Tonos .......................................... 57
C6digo F .................................. 57
Consejos para cocinar en el
homo ................................. 58-60
Homeado con margarina .......... 59
C6mo programar para hornear ...... 61
Consejos para hornear a
convecci6n .............................. 62
Consejos para asar a
convecci6n .................... 63-64
El ciclo de autolimpieza ........... 70-71
Cubierta de vidrio-cer_mica .... 72-73
Panel de control ........................... 73
Cacerola y parrilla para asar
a la parrilla ...................................... 73
Interior del homo con
autolimpieza ............................. 73
Caj6n y lados de la estufa ............. 73
Vidrio de la puerta del homo .......... 73
Moldura de la ventilaci6n
de ta puerta ................................ 73
Peritlas de control de ta
superficie ..................................... 74
C6mo reemplazar el foco de
ta luz del homo ........................... 74
Parri!tas removibles del homo ...... 75
Puerta removible del homo ..... 75-76
CajOn de almacenamiento
removible ...................................... 77
Revestimiento del cajOn ............... 77
Antes de Ilamar para un
servicio ............................. 78-80
Ajustes a la temperatura .......... 60, 81
Garantia ........................................ 83
NOmeros para servicios det
consumidor ............................ 84
Para su conveniencia y referencia futura, por favor escriba el n(lmero de modelo y
de serie en el espacio que se provee. Estdn ubicados en el marco detrbs del cajbn.
NUMERO DE MODELO: NUMERO DE SERIE:
I iii ill
@ Sears, Roebuck and Co
43
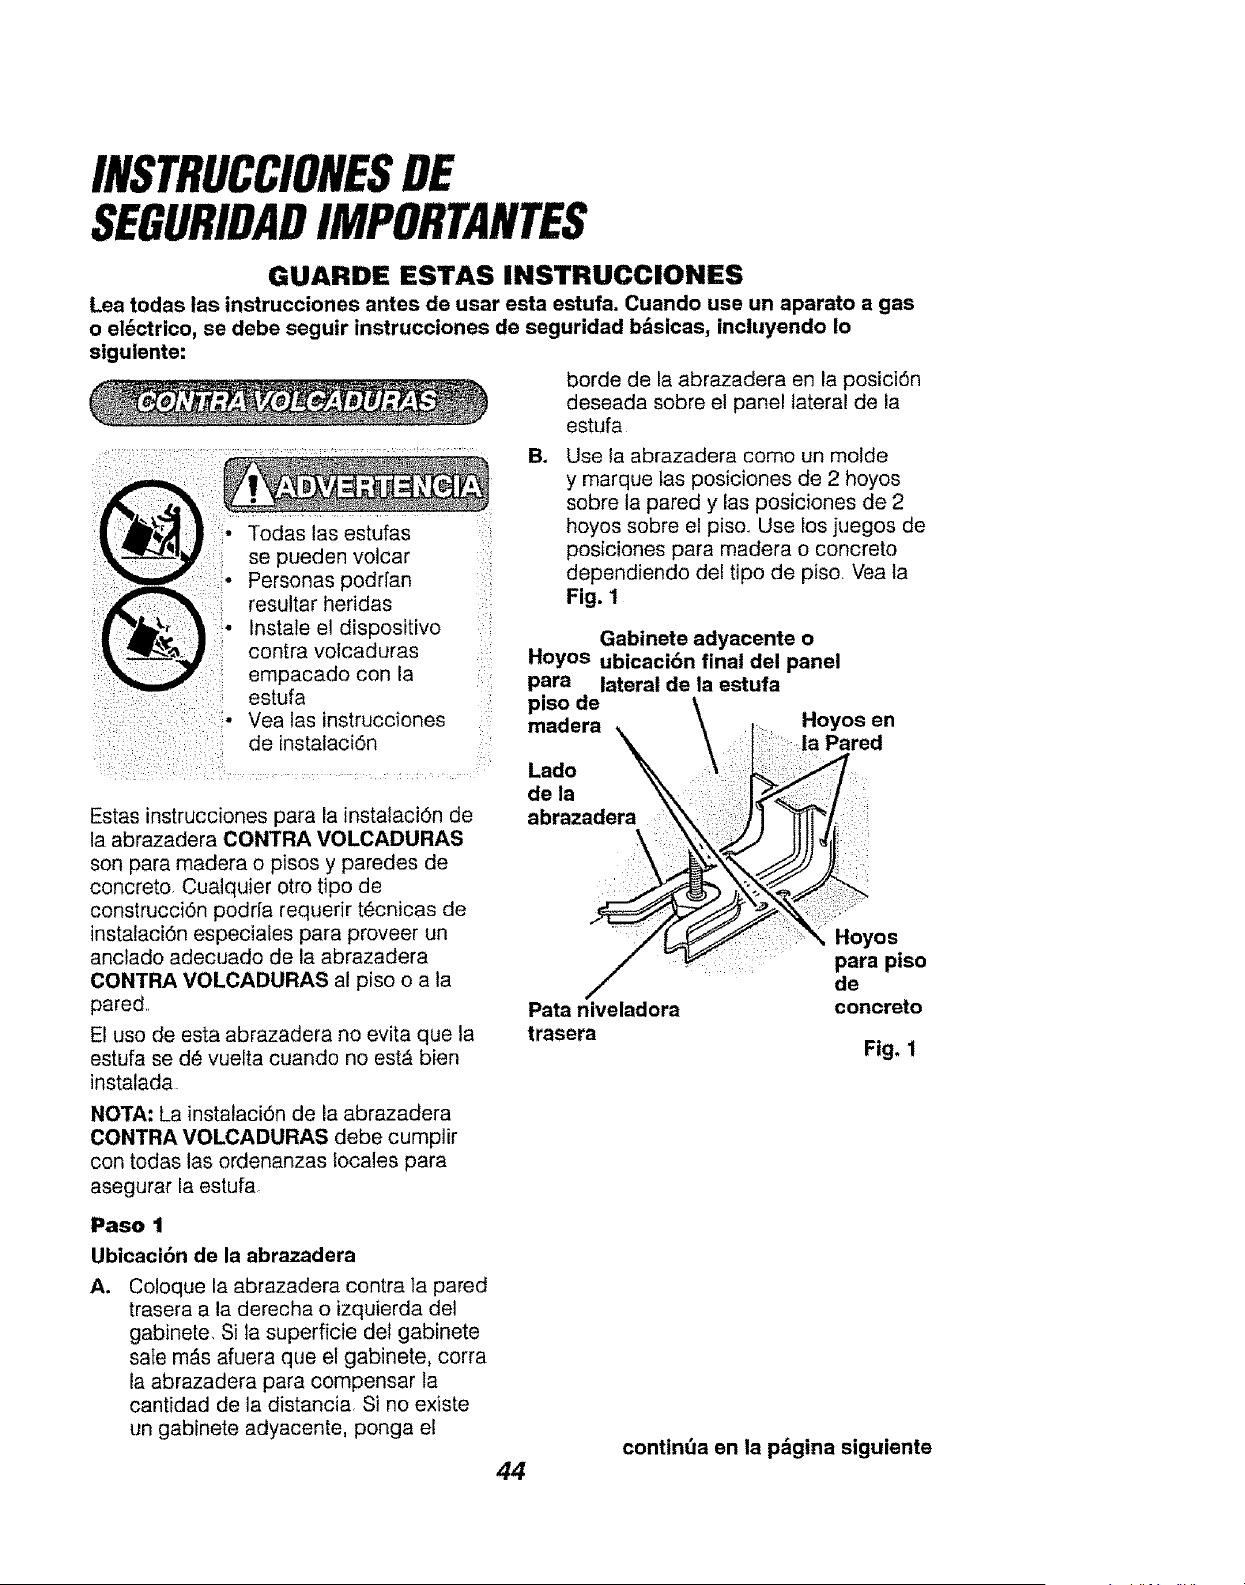
INSTRUCCIONESDE
SEGURIDADIMPORTANTES
GUARDE ESTAS INSTRUCCIONES
Lea todas las instrucciones antes de usar esta estufa. Cuando use un aparato a gas
o el6ctrico, se debe seguir instrucciones de seguridad b_sicas, incluyendo Io
sigulente:
borde de la abrazadera en la posici6n
deseada sobre el panel lateral de la
estufa
...................._ ............................... B.
se pueden volcar
: Personas podrfan
........... resultar heridas :,
Instale e! dispositivo
contra volcaduras =::
empacado con la
::= ':: estufa
i:: [:
=:: :: : :_:, Yea las instrucciones :
de instalaci6n
Estas instrucciones para la instalaciOn de
la abrazadera CONTRA VOLCADURAS
son para madera o pisos y paredes de
concreto, Cua]quier otto tipo de
construcci6n podda requerir t6cnicas de
instalaci6n especiales para proveer un
anclado adecuado de la abrazadera
CONTRA VOLCADURAS al piso o a la
pared,,
El uso de esta abrazadera no evita que la
estufa se de vuelta cuando no est_ bien
instalada
Use la abrazadera como un molde
y marque tas posiciones de 2 hoyos
sobre la pared y las posiciones de 2
hoyos sobre el piso., Use los juegos de
posiciones para madera o concreto
dependiendo de! tipo de piso. Vea la
Fig. 1
Gabinete adyacente o
Hoyos ubicacibn final del panel
para lateral de la estufa
piso
de
\
Hoyos en
madera
|a Pared
Lado
de la
abrazadera
Pata niveladora
trasera
Hoyos
para piso
de
concreto
Fig. 1
NOTA: La instalaci6n de la abrazadera
CONTRA VOLCADURAS debe cumplir
con todas las ordenanzas locales para
asegurar la estufa
Paso 1
Ubicaci6n de la abrazadera
A. Coloque la abrazadera contra ta pared
trasera a la derecha o izquierda del
gabinete, Si la superficie del gabinete
sate m_s afuera que el gabinete, corra
la abrazadera para compensar la
cantidad de la distancia Si no existe
un gabinete adyacente, ponga eE
44
continda en ia pdgina siguiente
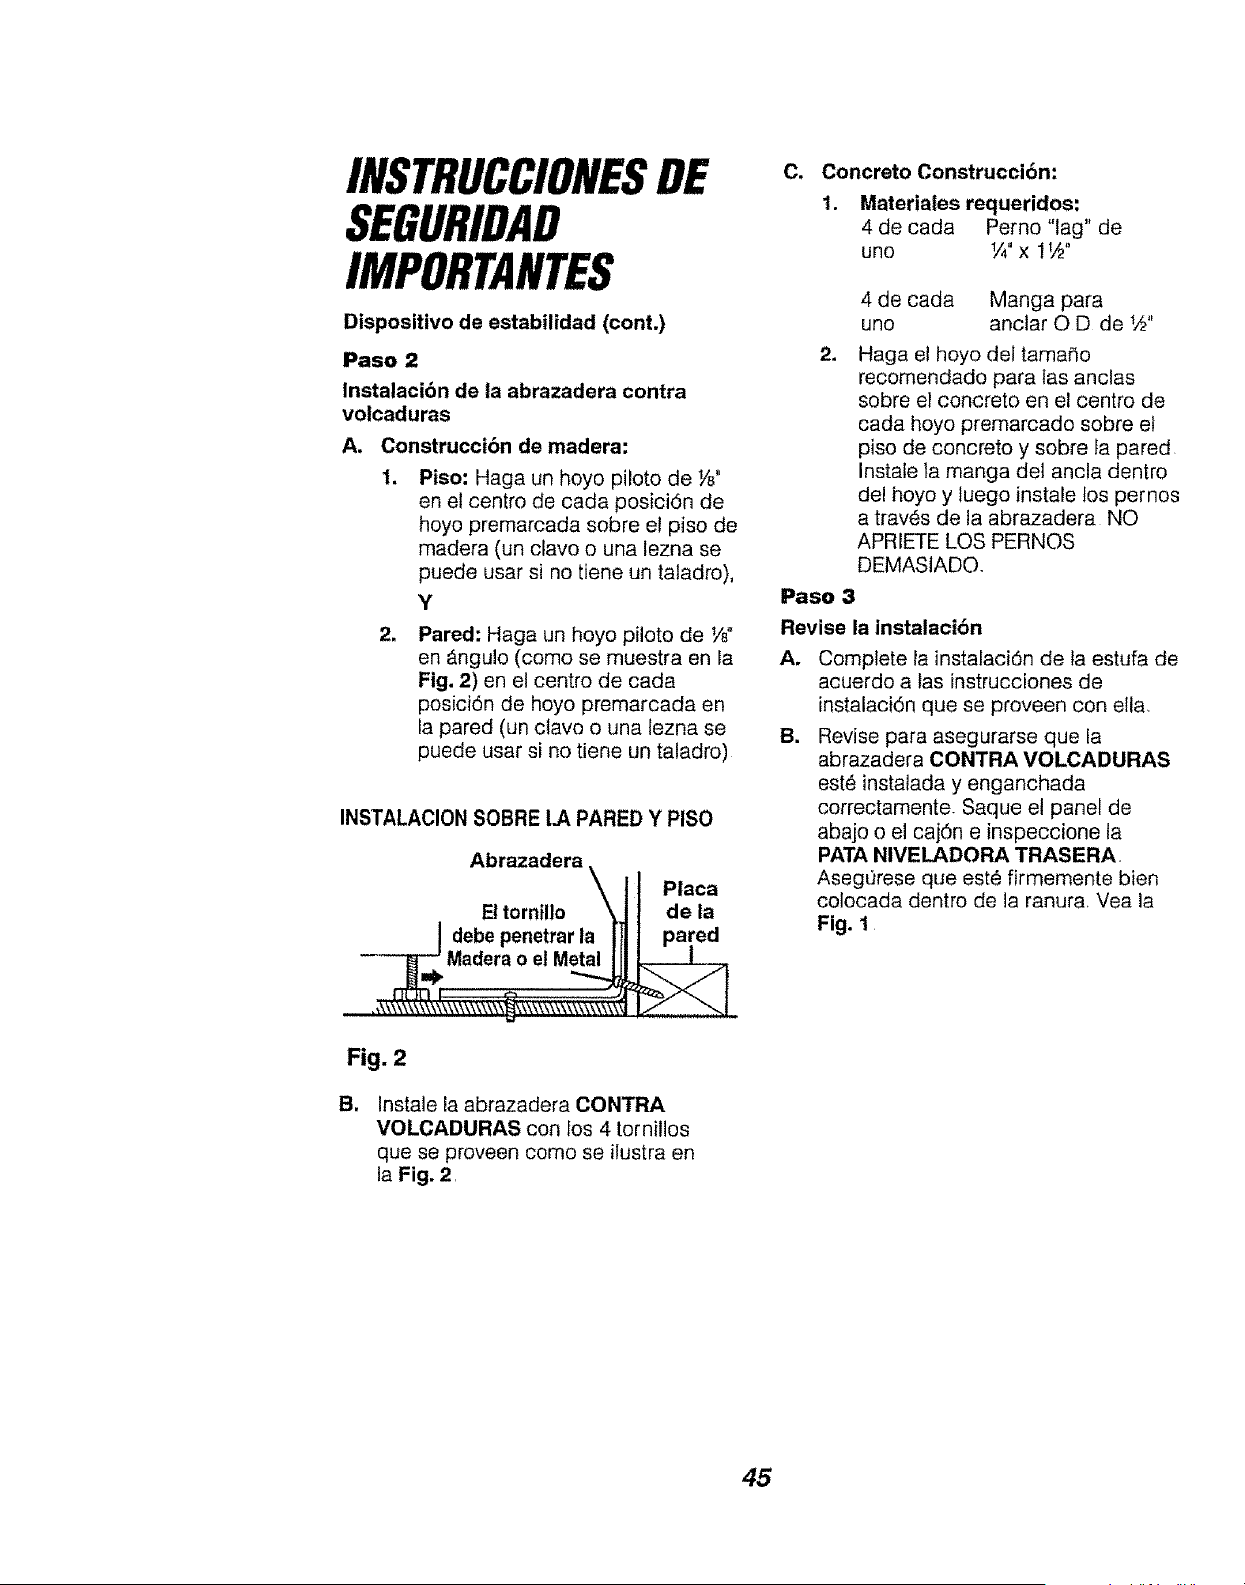
INSTRUCCIONESDE
SEGURIDAD
IMPORTANTES
Dispositivo de estabilidad (cont.)
Paso 2
Instalacibn de la abrazadera contra
volcaduras
A. Construcci6n de madera:
Piso: Haga un hoyo piloto de Yd'
en el centro de cada posici6n de
hoyo premsrcada sobre el piso de
madera (un clavo o una lezna se
puede usar si no tiene un taladro),
Y
.
Pared: Haga un hoyo piloto de Vs"
en Angulo (como se muestra en la
Fig. 2) en el centro de cads
posici6n de hoyo premarcada en
la pared (un clavo o una lezna se
puede usar si no tiene un taladro)
INSTALACION SOBRE LA PARED Y PISO
| debe penetrar la
--'_ Madera o el Met_al
Fig. 2
B.
Ptaca
de ia
pared
Instsle la abrazadera CONTRA
VOLCADURAS con los 4 tornillos
que se proveen como se ilustra en
la Fig. 2,
C. Concreto Construcci6n:
1. Materiales requeridos:
4 de cada Perno "lag" de
uno Y4"x 1l_o
4 de cada Manga para
uno anclar O D de _,,_"
24
Haga el hoyo del tamsSo
recomendado para tas anclss
sobre el concrete en el centro de
cada hoyo premarcado sobre et
piso de concreto y sobre fa pared
Instale la manga del ancla dentro
del hoyo y luego instale los pernos
a trav6s de la abrazadera NO
APRIETE LOS PERNOS
DEMAS1ADOo
Paso 3
Revise la instalaci6n
A,
B=
Complete Is instalaci6n de ta estufa de
acuerdo a tas instrucciones de
instalaci6n que se proveen con ella,
Revise para asegurarse que la
abrazadera CONTRA VOLCADURAS
est6 instalada y enganchada
correctamente. Saque el panel de
abajo o el caj6n e inspeccione la
PATA NIVELADORA TRASERA.
Asegurese que est_ firmemente bien
colocada dentro de Is ranura. Ves la
Fig. 1
45

INSTRUCCIONESDE
SEGURIDAD
IMPORTANTES
i iiil!,l_ll
_ DVERTENCIA:
Para preventr que la estufa
se vuelque accidentalmente
debido a un uso anormal, incluyendo
una carga excesiva sobre la puerta,
eng_nche la estufa a la pared o al
suelo instalando el dispositivo contra
volcaduras que se provee. Si la estufa
se mueve para limpiarla, para hacerle
servicio o cualquier raz6n, asegdrese
que el dispositivo contra volcaduras
sea enganchado nuevamente cuando
la estufa se coloque de vuelta en la
abertura. No hacerlo podria resultar
en que la estufa se vuelque y podria
eausar heridas personales. Para
inspeccionar el dispositivo contra
volcaduras, saque el cajon de
almacenamiento removible y mire para
asegurarse que el nivelador de is pata
trasero est_ bien enganchado en la
ranura de la abrazaderao
I I!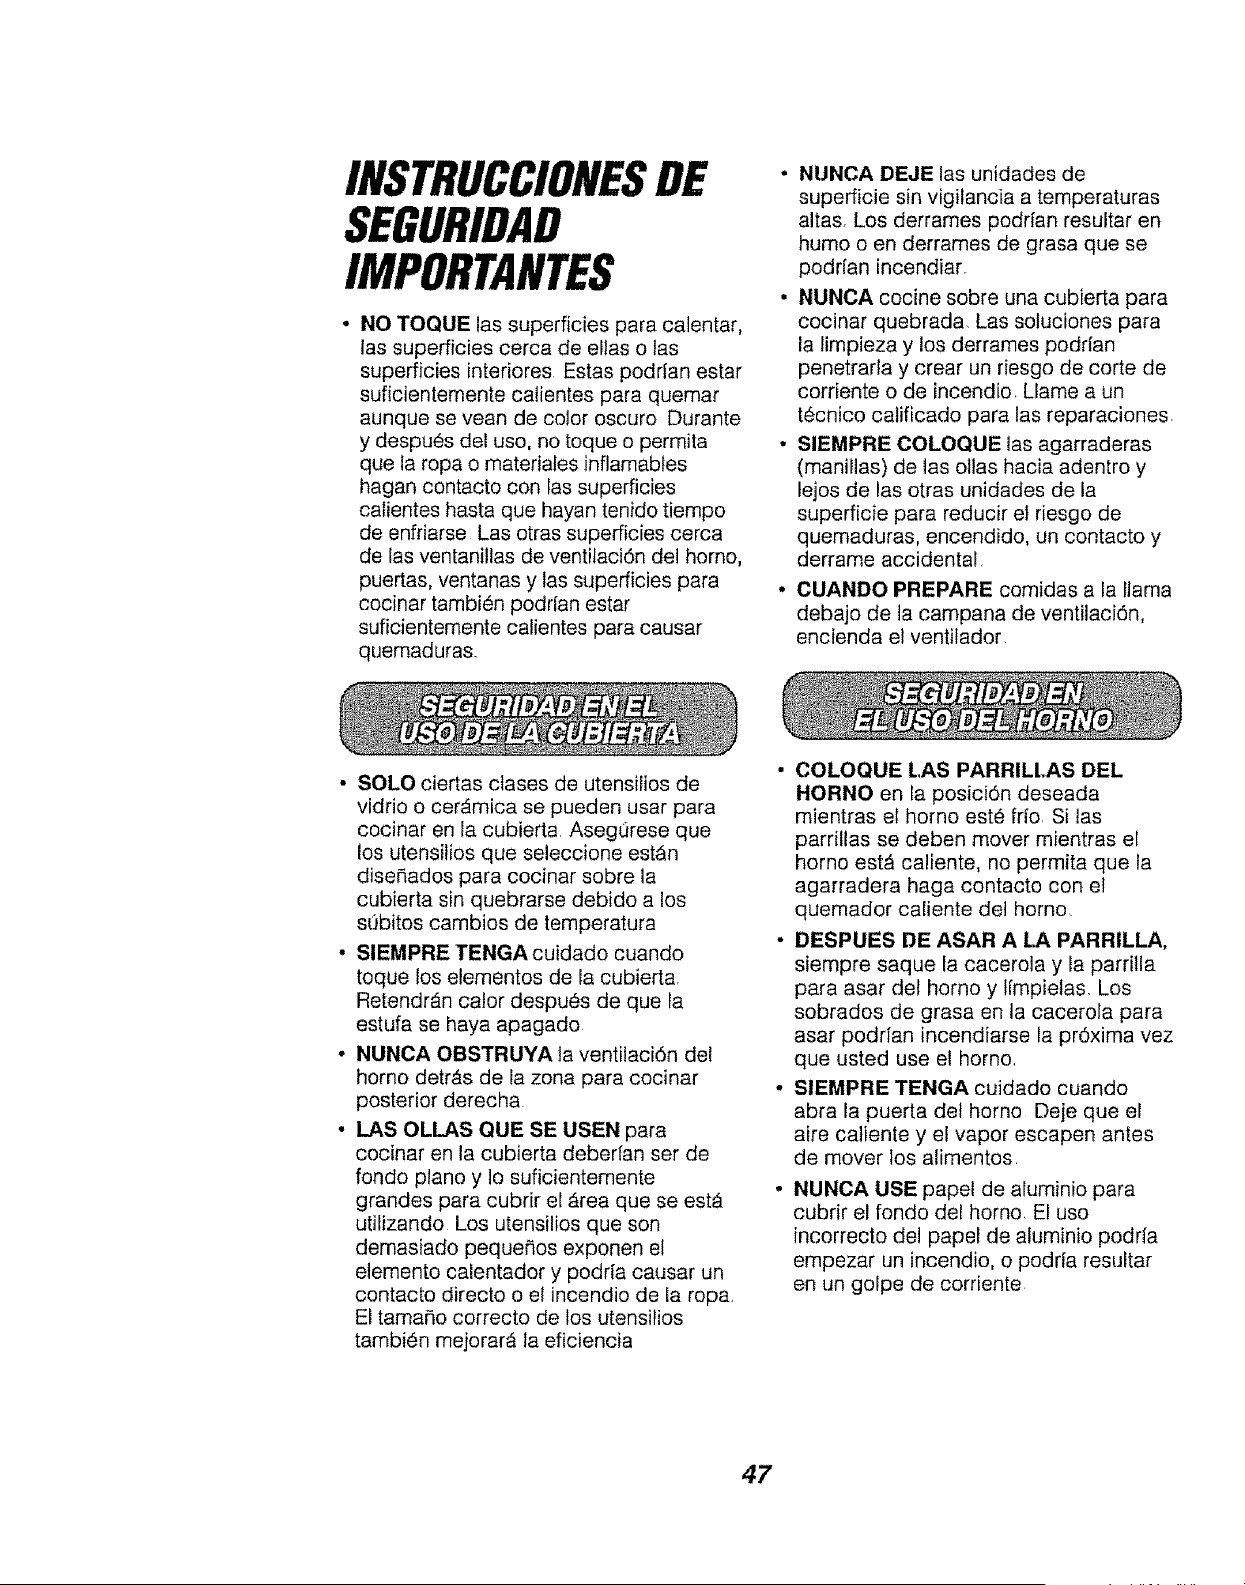
INSTRUCCIONESDE
SEGURIDAD
IMPORTANTES
• NO TOQUE las superficies para calentar,
las superficies cerca de elias o las
superficies interiores Estas poddan estar
suficientemente calientes para quemar
aunque se vean de color oscuro Durante
y despues del uso, no toque o permita
que la ropa o materiates inflamables
hagan contacto con las superficies
calientes hasta que hayan tenido tiempo
de enfriarse Las otras superficies cerca
de ias ventanillas de ventitaci6n del homo,
puertas, ventanas y las superficies para
cocinar tambien poddan estar
suficientemente calientes para causar
quemaduras..
• NUNCA DEJE las unidades de
superficie sin vigilancia a temperaturas
altas, Los derrames podrfan resultar en
humo o en derrames de grasa que se
podrian incendiar.
• NUNCA cocine sobre una cubierta para
cocinar quebrada. Las soluciones para
la fimpieza y los derrames podrian
penetrarla y crear un riesgo de corte de
corriente o de incendio, Llame a un
tecnico catificado para las reparaciones.
• SIEMPRE COLOQUE las agarraderas
(manilias) de las otlas hacia adentro y
lejos de las otras unidades de la
superficie para reducir el riesgo de
quemaduras, encendido, un contacto y
derrame accidental
CUANDO PREPARE comidas a la llama
debajo de la campana de ventilaci6n,
encienda el ventilador
• SOLO ciertas clases de utensilios de
vidrio o cer_mica se pueden usar para
cocinar en la cubierta Asegt3rese que
los utensilios que seleccione est_n
diseRados para cocinar sobre la
cubierta sin quebrarse debido a los
s0bitos cambios de temperatura
• SIEMPRE TENGA cuidado cuando
toque los elementos de la cubiertar
Retendr_.n calor despu_s de que la
estufa se haya apagado
• NUNCA OBSTRUYA la ventilaci6n del
homo detr&s de la zona para cocinar
posterior derecha
• I_AS OLLAS QUE SE USEN para
cocinar en la cubierta deberfan ser de
fondo piano y 1o suficientemente
grandes para cubrir el Area que se est_
utilizando Los utensilios que son
demasiado pequer_os exponen el
elemento calentador y podr[a causar un
contacto directo o ef incendio de la ropa,
El tama_o correcto de los utensifios
tambi_n mejorar_ la eficiencia
• COLOQUE LAS PARRILLAS DEL
HORNO en la posici6n deseada
mientras el homo est_ fr[o, Si Ias
parrillas se deben mover mientras el
homo est_ caliente, no permita que la
agarradera haga contacto con el
quemador caliente del homo
• DESPUES DE ASAR A LA PARRILLA,
siempre saque la cacerola y la parrilla
para asar del homo y l[mpielas, Los
sobrados de grasa en ta cacerora para
asar poddan incendiarse la prOxima vez
que usted use el homo,
• SIEMPRE TENGA cuidado cuando
abra la puerta det homo Deje que el
aire caliente y el vapor escapen antes
de mover los alimentos
NUNCA USE papel de aluminio para
cubrir el rondo del homo El uso
incorrecto del papel de aluminio podrla
empezar un incendio, o podrfa resuitar
en un golpe de corriente
47
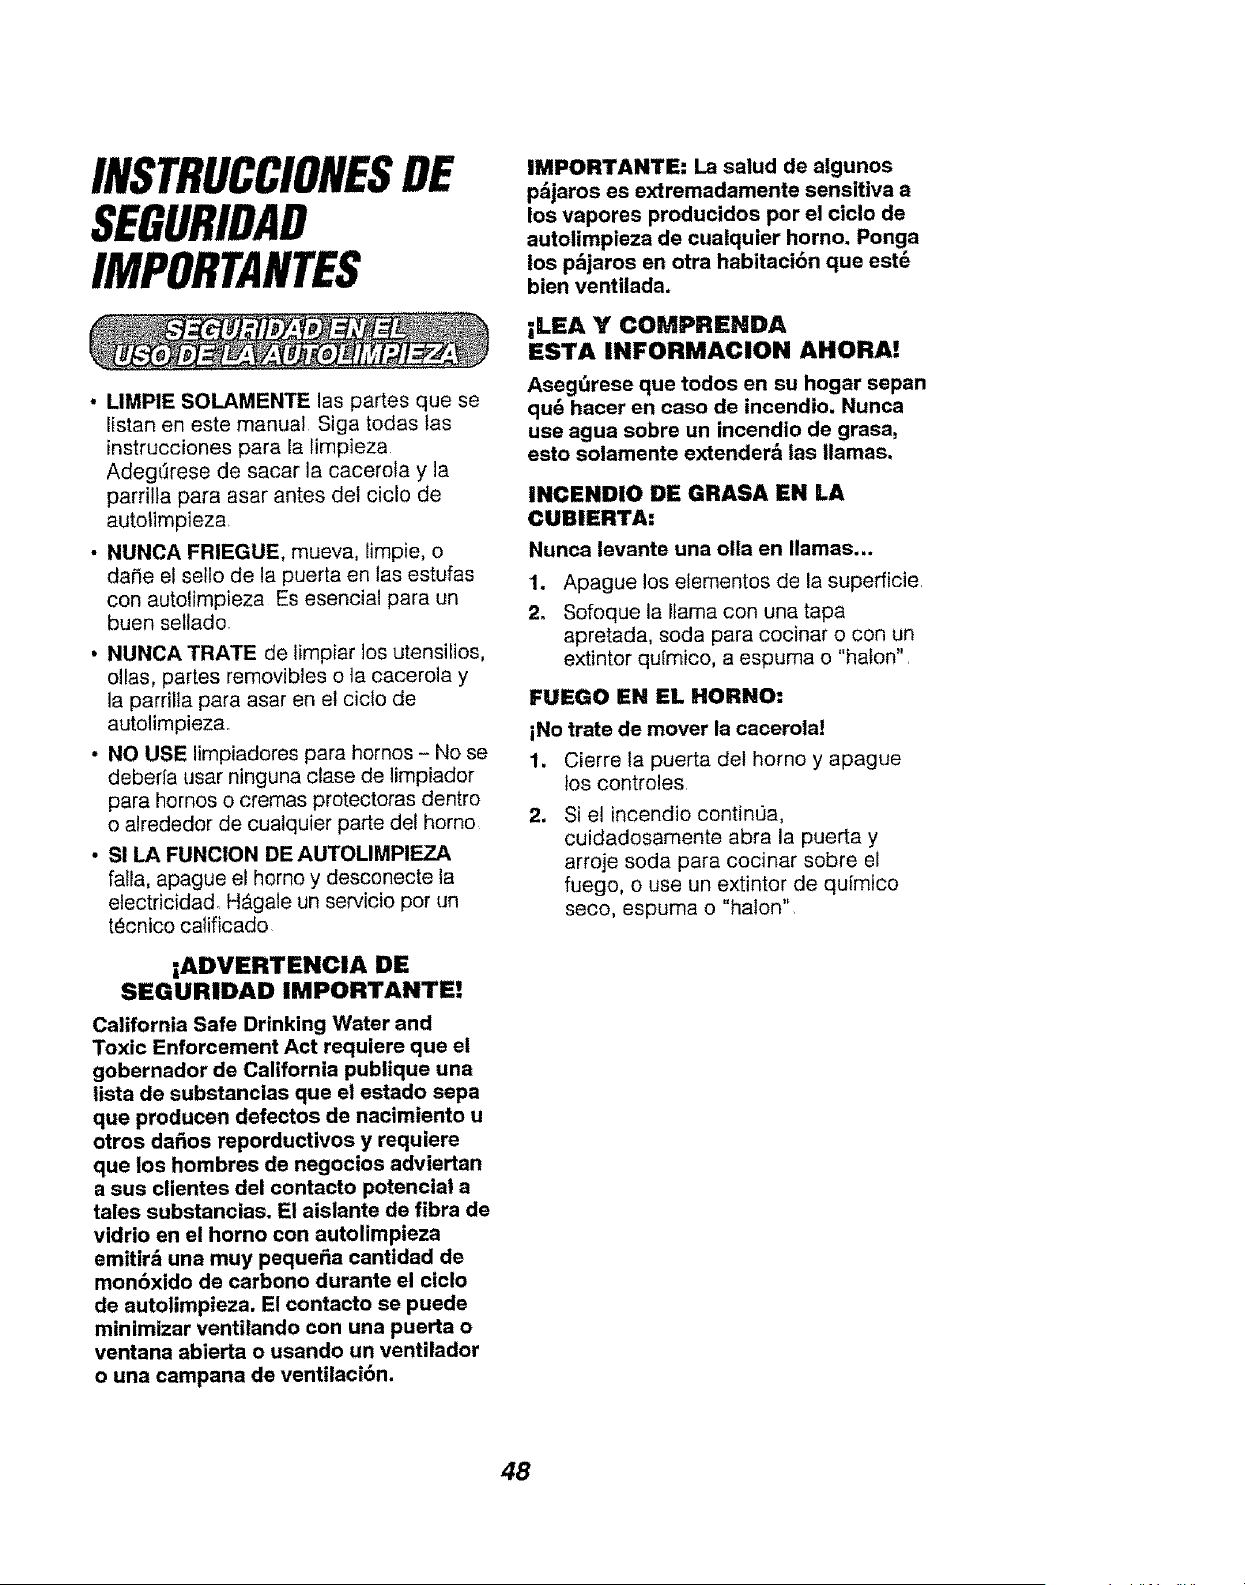
INSTRUCCiONESDE
SEGURIDAD
IMPORTANTES
• UMPIE SOLAMENTE las partes que se
listan en este manual Siga todas tas
instrucciones para la limpieza
Adeg_rese de sacar la cacerola y la
parrilla para asar antes del ciclo de
auto_impieza,
- NUNCA FRIEGUE, mueva, limpie, o
da_e el sello de la puerta en Ias estufas
con autolimpieza Es esencial para un
buen sellado,
• NUNCA TRATE de limpiar los utensilios,
elias, partes removibles ota caceroia y
la parrilla para asar en el ciclo de
autolirnpieza,.
• NO USE limpiadores para hornos- No se
deberla usar ninguna clase de ]impiador
para homes o crernas protectoras dentro
o alrededor de cuatquier parte del homo
• S! LA FUNCION DE AUTOLIMPIEZA
fatla, apague el homo y desconecte la
electricidado H_gale un servicio per un
tecnico calificado
;ADVERTENCIA DE
SEGURIDAD IMPORTANTE!
California Safe Drinking Water and
Toxic Enforcement Act requiem que el
gobernador de California publique una
lista de substancias que el estado sepa
que producen defectos de nacimiento u
otros dafios reporductivos y requiem
que los hombres de negocios adviertan
a sus clientes del contacto potenciai a
tales substancias. E! aislante de libra de
vidrio en el homo con autolimpieza
emitir& una muy peque_a cantidad de
mon6xido de carbono durante el ciclo
de autolimpieza. El contacto se puede
minimizar ventilando con una puerta o
ventana abierta o usando un ventilador
o una campana de ventilaci6n.
IMPORTANTE: La salud de algunos
p_jaros es extremadamente sensitiva a
los vapoms producidos per el ciclo de
autolimpieza de cualquier horno. Ponga
los p_jaros en otra habitaci6n que est6
bien ventilada.
;LEA Y COMPRENDA
ESTA INFORMACION AHORA!
Asegt3rese que todos en su hogar sepan
qu6 hacer en case de incendio. Nunca
use agua sabre un incendio de grasa,
esto solamente extender& las llamas.
INCENDIO DE GRASA EN LA
CUBIERTA:
Nunca levante una ella en llamas...
1, Apague los elementos de la superficie,
2o Sofoque la llama con una tapa
apretada, soda para cocinar o con un
extintor quimico, a espuma o "hafon",
FUEGO EN EL HORNO:
iNo trate de mover la cacerola!
1, Cierre la puerta det homo y apague
los controles
. Si e! incendio contint]a,
cuidadesamente abra la puerta y
arroje soda para cocinar sobre el
fuego, o use un extintor de quimico
seco, espuma o "halon",
48

OPERACION
CGmoProtegerSuNueva
CubiertaPara Cocinar
• NO ARRASTRE !os utensilios sobre la
cubierta
• NO USE una toalla o esponja para platos
para limpiar la cubierta.
. NO USE poivos para fregar, o lanillas de
pl_stico o de metal sobre la cubierta
• NO APLIQUE crema para limpiar sobre
la cubierta si la superficie est,. caliente
• LEA las instrucciones en la etiqueta de
la botella de crema para limpiar la
cubierta antes de tratar de limpiar la
superficie de la cubierta
• DESPUES de limpiar la superficie de ta
cubierta, asegOrese de sacar todo e!
residuo de ta crema que podrfa quedar
con una toalla de papel seca.
• PARA DERRAMES GRANDES, haga
girar la perilla de control de la superficie
a la posici6n de APAGADO (OFF) Utilice
una toalla de pape! seca para limpiar el
derrame, luego use un raspador a hoja
(sujetado con una agarradera) en un
dtnguto de 45 grados sobre la superficie
de la cubierta para raspar e! resto del
derrame de la zona para cocinar
caliente
• NO COCINE directamente sobre ta
superficie del vidrio
• NO USE la superficie como tabla para
cortar
. NO USE un cuchillo o un objeto afilado
sobre el selto de la cubierta atrededor
del borde exterior del vidrio porque Io
podrfa cortar o da_ar.
r ¸
PRECAUCION:
Cuando los controles de la
superficie se apaguen, ia luz
lndicadora de Calor de la Superficie
permanecerb encendida hasta que
la superficie se haya enfriado hasta
aproximadamente 150 grados F,
La superficie de vidrio-cer&mica
retendr_ calor despu6s que la luz
indicadora se haya apagado. Tenga
cuidado hasta que la superficie de
la cubierta haya tenido tiempo de
enfriarse.
Los derrames de aztJcares (tales como
jaleas, chocolate, y jarabes) o el pt_stico
derretido puede causar hoyos en la
cubierta a menos que el derrame se
saque mientras todavia est6 caliente
Se debe usar un cuidado especial cuando
se limpian sustancias calientes
Siga estas instrucciones cuidadosamente
y limpie la suciedad mientras el derrame
est_ caliente
,
2.
.
Apague la zona para cocinaf afectada
por el derrame. Saque los utensilios
Usando un guante para homo, sujete
el raspador en un b.ngulo de 45 grados
sobre la cubierta y raspe et derrame
caliente hacia un _rea ffla fuera de la
zona para cocinar
Con el derrame en un _rea frra, use
una toatla de papel seca para limpiar
la suciedad. Cuatquier derrame que
permanezca se deberfa dejar solo
hasta que la superficie de la cubierta
se haya enfriado, NO contin[Je
utilizando la zona para cocinar sucia
hasta que todo et derrame haya sido
limpiado. Siga los pasos bajo
Suciedad Pesada para continuar et
proceso de limpieza.
49
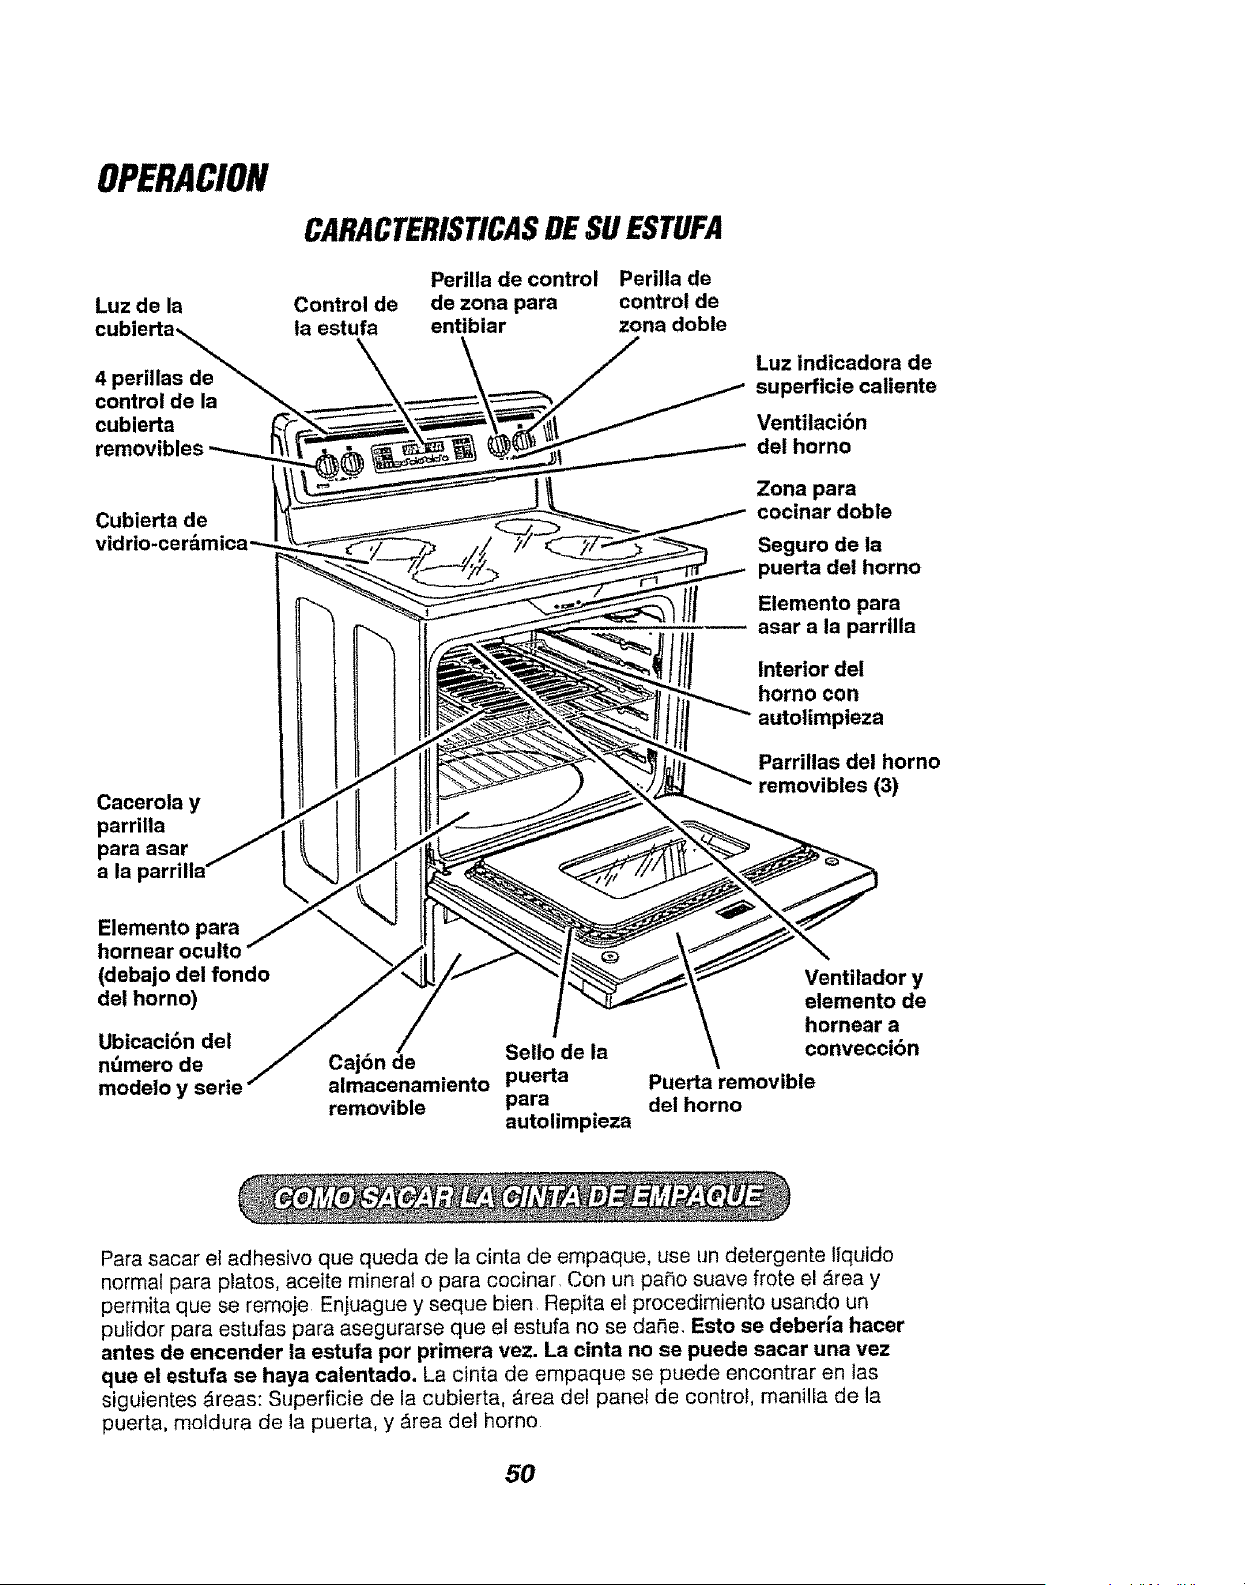
OPERACION
Luz de la
4 perillas de
control de la
cubierta
Cubierta de
Cacerola y
parrilla
para asar
a la parrilla'
CARACTERISTICASDESUESTUFA
Perilla de control Perilla de
Control de de zona para control de
la estufa entibiar zona doble
Luz indicadora de
superficie caliente
Ventilaci6n
del horno
Zona para
cocinar doble
Seguro de la
puerta del horno
Elemento para
asar a la parrilla
Interior del
homo con
autolimpieza
Parrillas del horno
removibles (3)
Elemento para
hornear oculte
(debajo del fondo
del horno)
Ubicaci6n del
nOmero de
modelo y serie
Caj6n de Selio de la
almacenamiento puerta
removible para
autolimpieza
Ventilador y
elemento de
hornear a
convecci6n
Puerta removible
del horno
Para sacar el adhesive que queda de la cinta de empaque, use un detergente liquido
normal para plates, aceite mineral o para cocinar, Con un pane suave frote el Area y
permita que se remoje Enjuague y seque bien Repita el procedimiento usando un
pulidor para estufas para asegurarse que el estufa no se da_e, Esto se deberia haeer
antes de encender la estufa per primera vez. La cinta no se puede sacar una vez
que et estufa se haya calentado, La cinta de empaque se puede encontrar en las
siguientes _reas: Superficie de la cubierta, _rea de! panef de control, manilla de la
puerta, motdura de la puerta, y &rea del homo
50
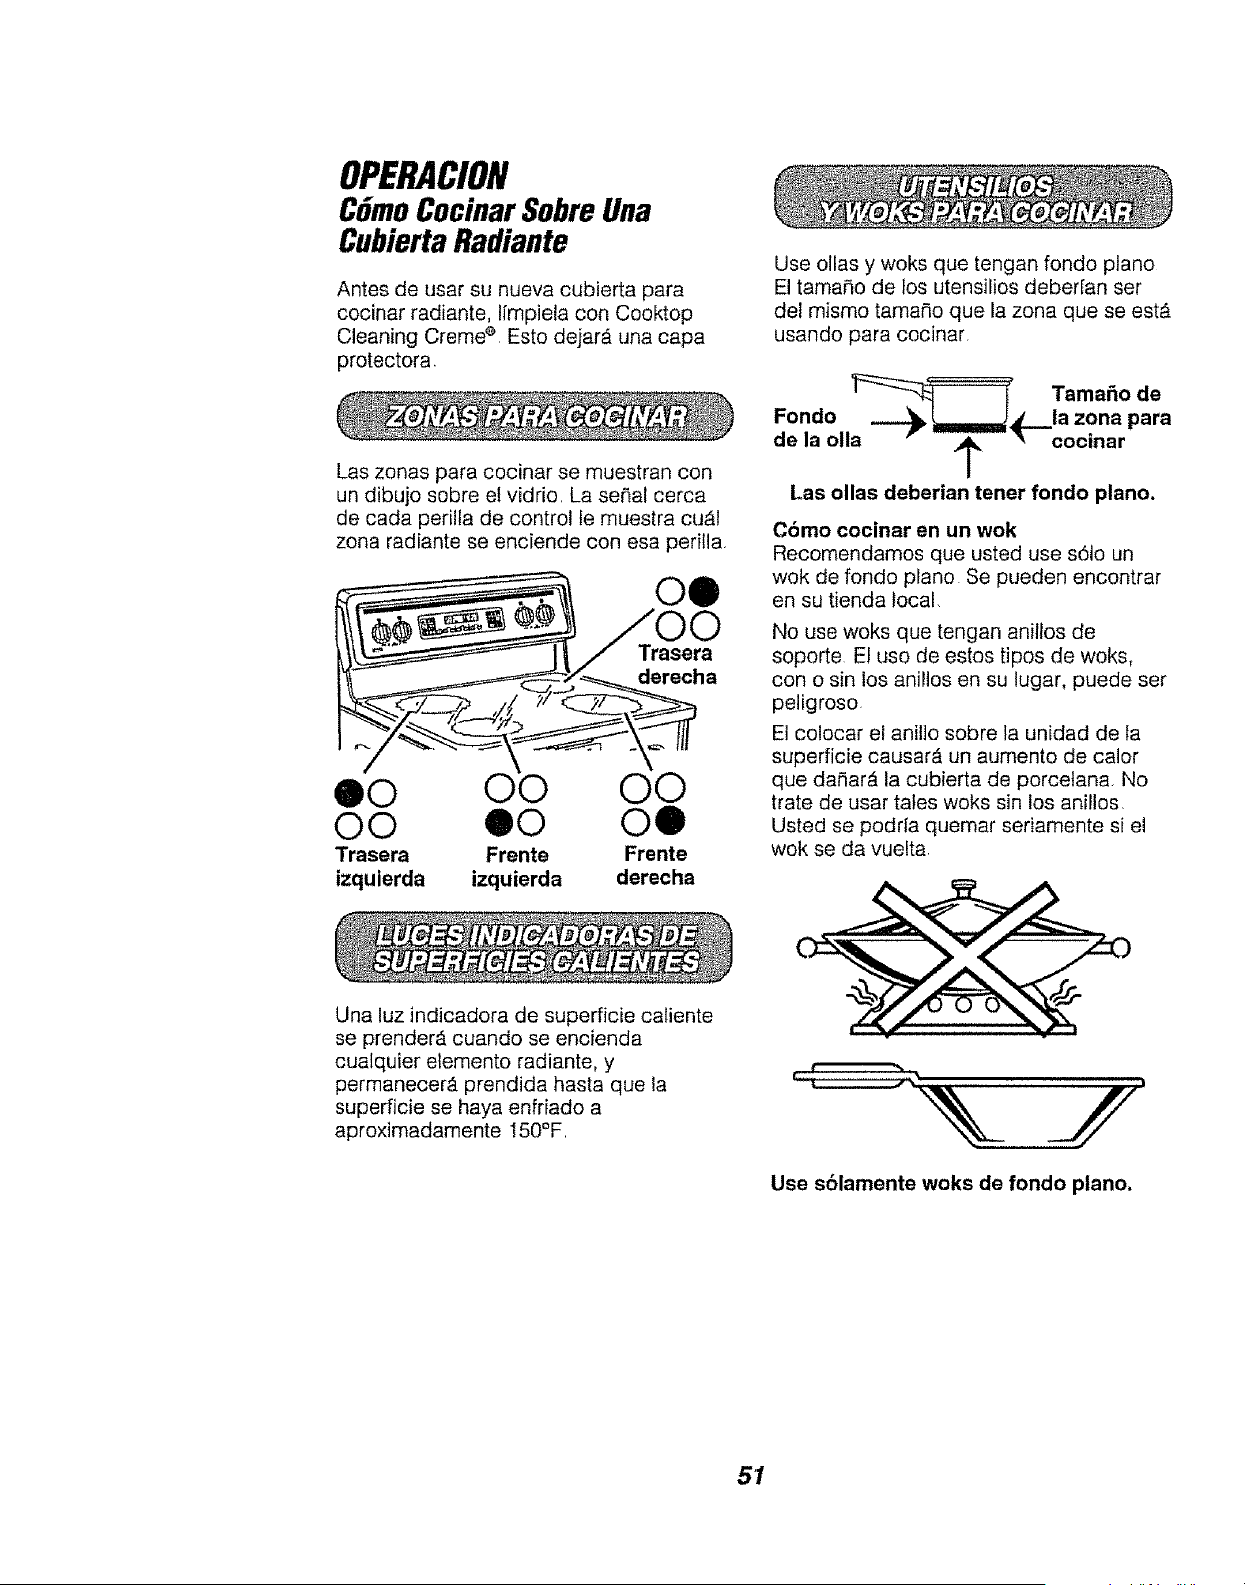
OPERACiON
CGmoCocinarSobreUna
CubiertaRadiante
Antes de usar su nueva cubierta para
cocinar radiante, Ifmpiela con Cooktop
Cleaning Creme _ Esto dejarA una capa
protectora.
Las zonas para cocinar se muestran con
un dibujo sobre e! vidrio. La seSal cerca
de cada periila de control fe muestra cu_il
zona radiante se enciende con esa perilla.
O0 O0 O0
Trasera Frente Frente
izquierda izquierda derecha
Use ollas y woks que tengan fondo piano
El tama_o de los utensilios deber[an ser
del mismo tama_o que la zona que se estA
usando para cocinar.
Tama_o de
Fondo _ _==_4(._._ia zona para
de la olla _ _-- _ cocinar
/
Las ollas deberian tener fondo plane.
C6mo cocinar en un wok
Recomendamos que usted use s61o un
wok de fondo piano Se pueden encontrar
en su tienda local,
No use woks que tengan anillos de
soporte El uso de estos tipos de woks,
con o sin los anillos en su lugar, puede ser
peligroso
El colocar el anillo sobre la unidad de la
superficie causarA un aumento de calor
que daSar& la cubierta de porcetana No
trate de usar tales woks sin los anillos
Usted se podrfa quemar seriamente si el
wok se da vuelta
Una luz indicadora de superficie caliente
se prender_, cuando se encienda
cualquier elemento radiante, y
permanecer_, prendida hasta que la
supedicie se haya enfriado a
aproximadamente 150°F.
Use s61amente woks de fondo piano,
51
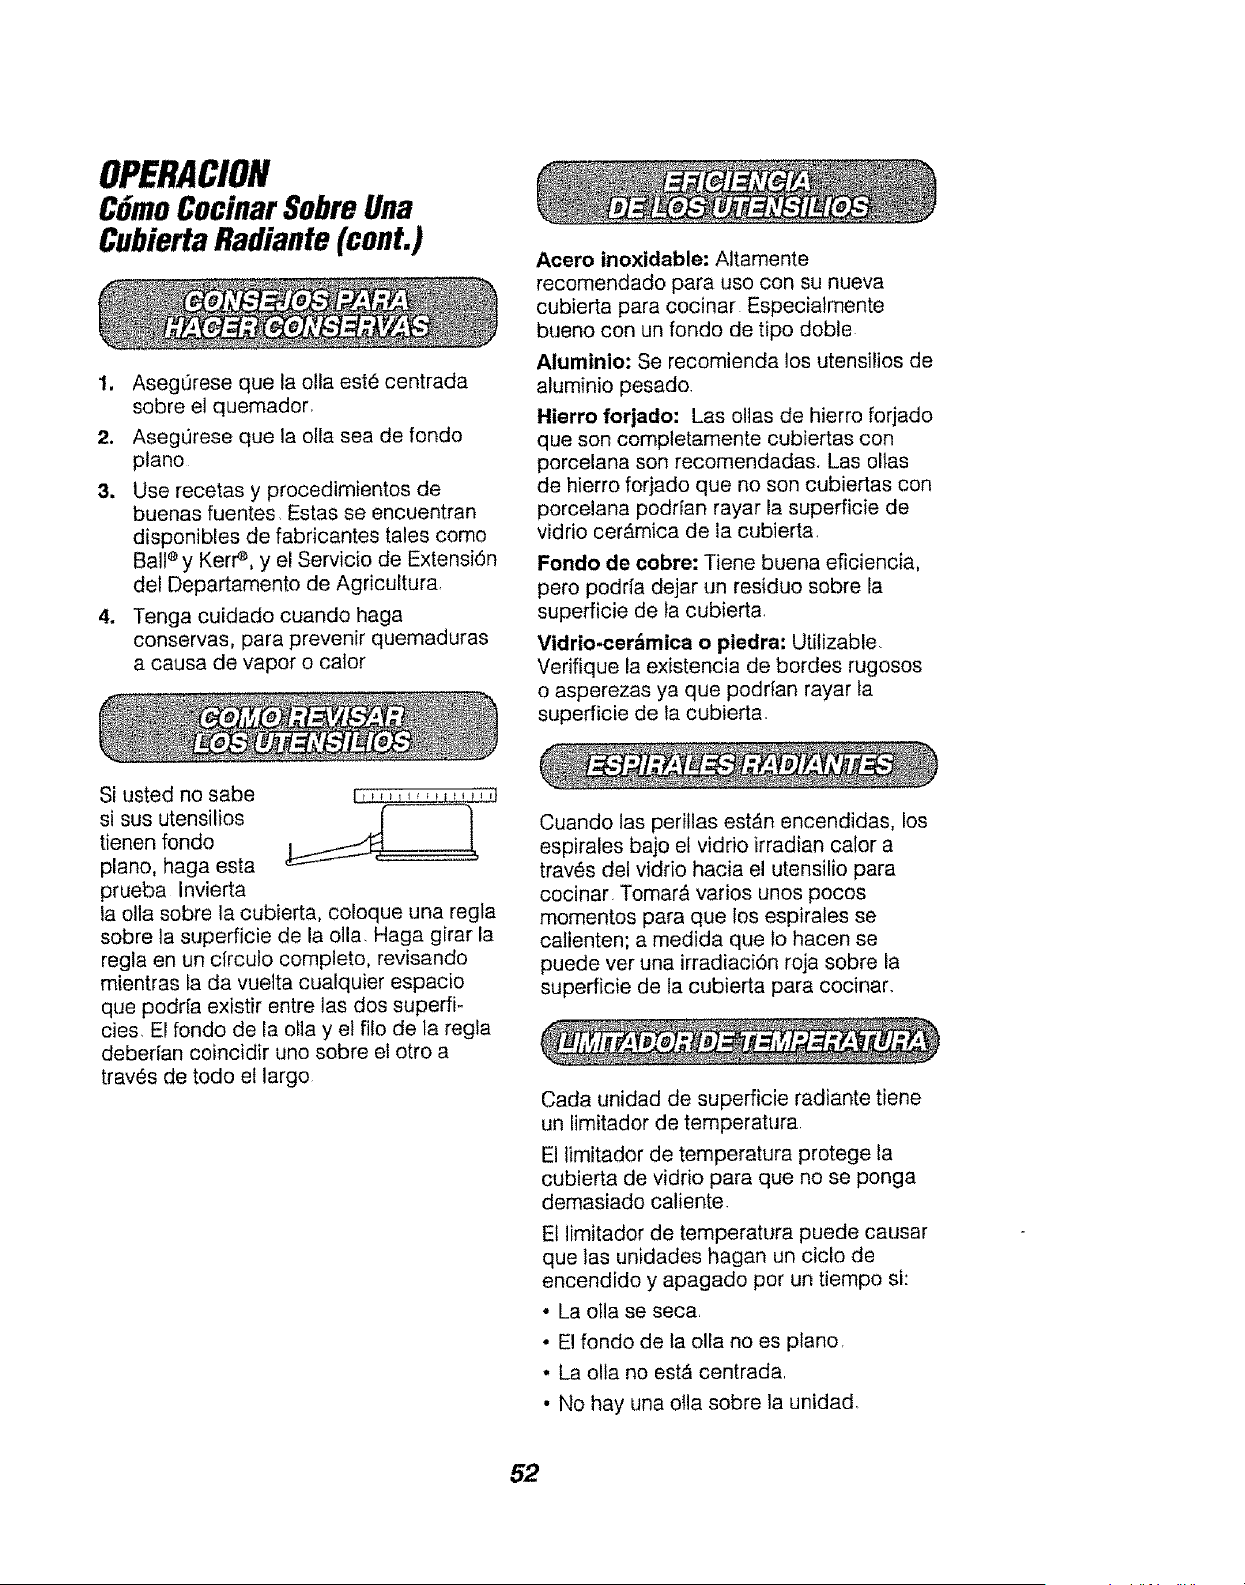
OPERACION
CGmoCocinarSobreUna
CubiertaRadiante (cont.)
1. AsegL]rese que la olla est6 centrada
sobre el quemador,
2. AsegL_rese que la olla sea de fondo
piano
& Use recetas y procedimientos de
buenas fuentes, Estas se encuentran
disponibles de fabricantes tales como
Ball e y Kerr e, y el Servicio de Extensi6n
del Departamento de Agricultura,
4, Tenga cuidado cuando haga
conservas, para prevenir quemaduras
a causa de vapor o calor
Acero inoxidable: Altamente
recomendado para uso con su nueva
cubierta para cocinar Especialmente
bueno con un fondo de tipo doble
Aluminio: Se recomienda los utensilios de
aluminio pesado.
Hierro forjado: Las ollas de hierro forjado
que son completamente cubiertas con
porcelana son recomendadas. Las ollas
de hierro forjado que no son cubiertas con
porcelana podrfan rayar la superficie de
vidrio cer_mica de la cubierta,
Fondo de cobre: Tiene buena eficiencia,
pero podda dejar un residuo sobre la
superficie de la cubierta
Vidrio-cer_mica o piedra: Utilizable,
Verifique la existencia de bordes rugosos
o asperezas ya que podrian rayar la
superficie de ta cubierta,
Si usted no sabe I,,,,,,,,F_
si sus utensilios
tienen fondo
piano, haga esta
prueba Invierta
ia olla sobre la cubierta, coloque una regla
sobre la superficie de la olla, Haga girar la
regla en un clrculo completo, revisando
mientras la da vuetta cualquier espacio
que podr[a existir entre las dos superfi-
cies, El fondo de la otla y el fi!o de la regla
debedan coincidir uno sobre el otto a
trav6s de todo el largo
Cuando las perillas est_n encendidas, los
espirales bajo el vidrio irradian calor a
traves del vidrio hacia el utensilio para
cocinar. Tomar& varios unos pocos
momentos para que los espirales se
caiienten; a medida que Io hacen se
puede ver una irradiacidn roja sobre la
superficie de la cubierta para cocinar.
Cada unidad de superficie radiante tiene
un limitador de temperatura
El limitador de temperatura protege la
cubierta de vidrio para que no se ponga
demasiado caliente
El limitador de temperatura puede causar
que tas unidades hagan un ciclo de
encendido y apagado por un tiempo si:
• La otla se seca,
• E! fondo de la olla no es planor
• La olla no est_ centrada,
• No hay una o{la sobre la unidad,
52
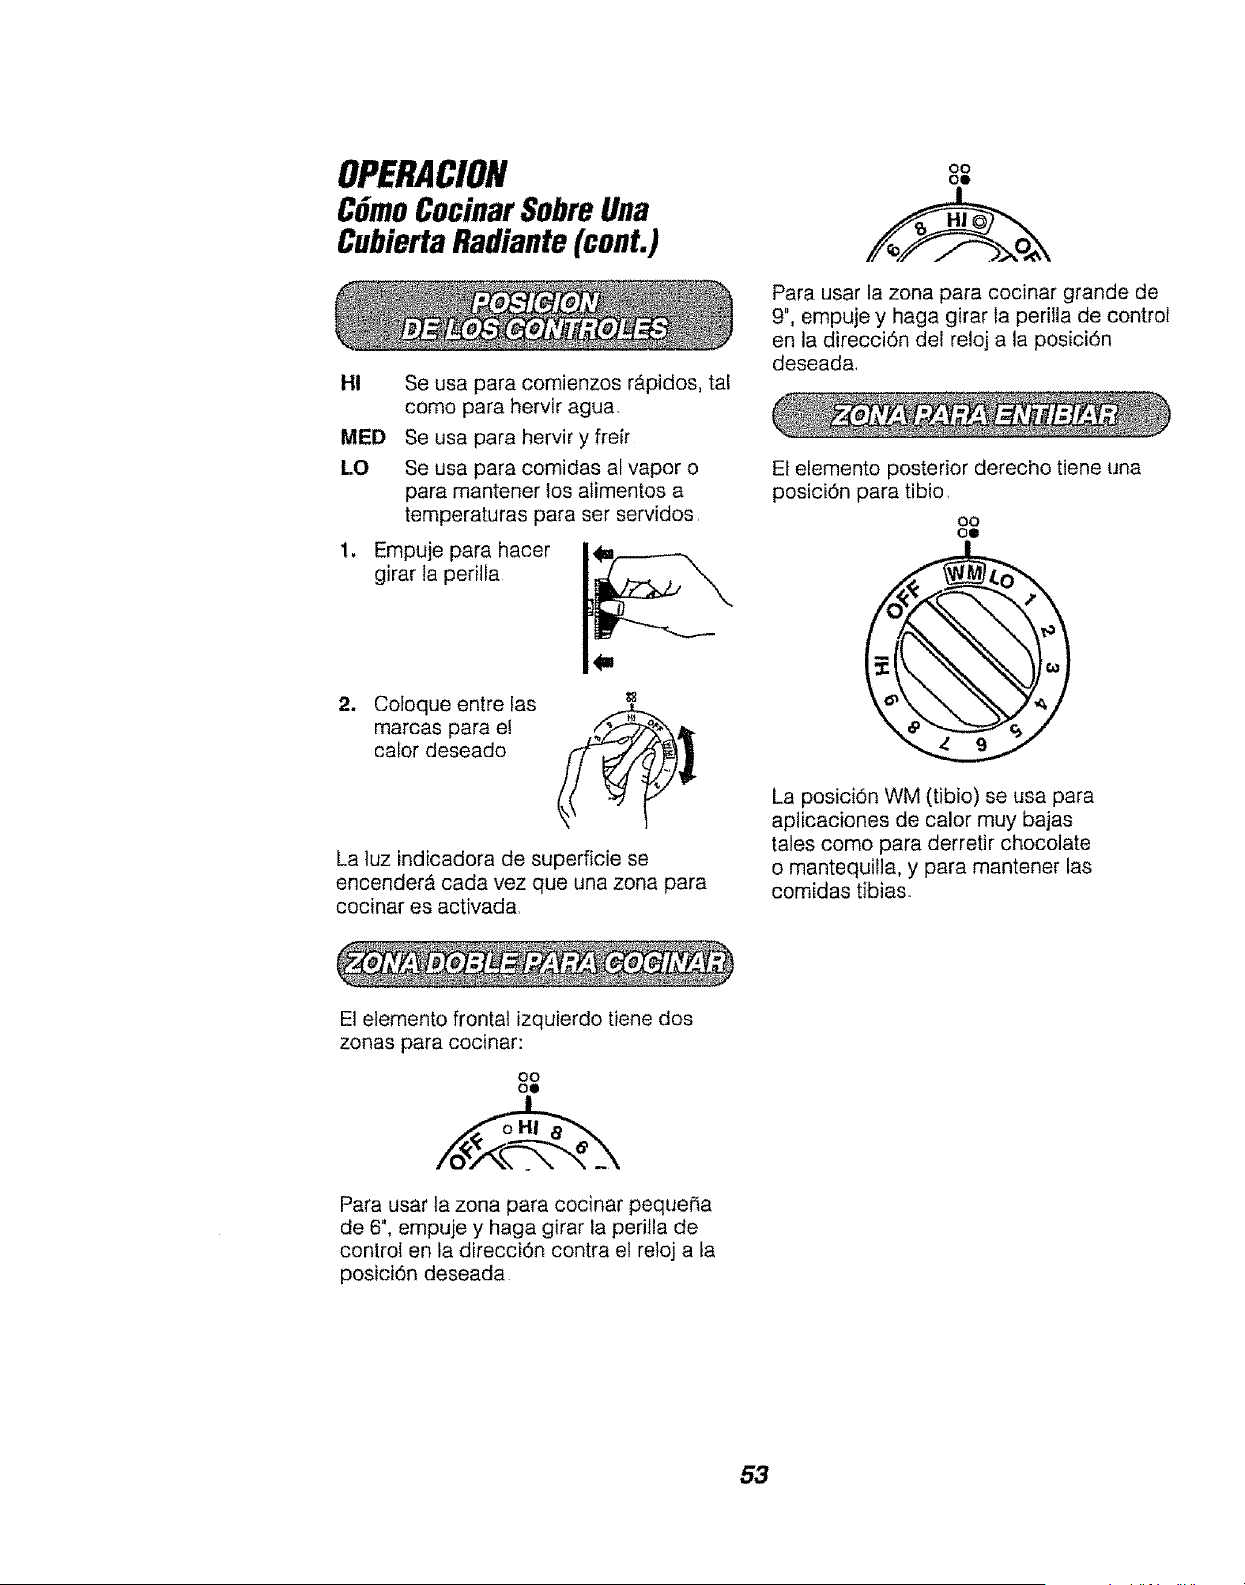
OPERACION
CGmoCocinarSobreUna
CubiertaRadiante(cont.)
Hi Se usa para comienzos r_pidos, tal
como para hervir agua.
MEO Se usa para hervir y frefr
LO Se usa para comidas al vapor o
para mantener los alimentos a
temperaturas para set servidos
1. Empuje para hacer
girar ta perilla
.
Coloque entre las
marcas para e!
calor deseado
La luz indicadora de superficie se
encender_ cada vez que una zona para
cocinar es activada,
O0
OI
Para usar la zona para cocinar grande de
9", empuje y haga girar la perilla de control
en la direcci6n dei reloj a la posici6n
deseada
Et elemento posterior derecho tiene una
posici6n para tibio,
O0
OID
La posici6n WM (tibio) se usa para
aplicaciones de calor muy bajas
tales como para derretir chocolate
o mantequilla, y para mantener las
comidas tibias_
E1elemento frontal izquierdo tiene dos
zonas para cocinar:
O0
o0
Para usar ta zona para cocinar peque_a
de 6", empuje y haga girar la perilla de
control en la direcci6n contra el reloj a ta
posicidn deseada
53

OPERACION
Control Del Homo, Reloj,
y CronGmetroDe La Cocina
Su nuevo control de homo a botones le permitir_ programar las varias funcionesdel homo
con facilidad M_s abajo est_n los diferentes tipos de funciones y la descripcidn de cada uno
se use ta HORA DE COMIENZO DEMORADO
con el TIEMPO PARA COCtNAR EN EL
HORNO, el homo tambi6n se apagar_
autom_ticamente al final de ia cantidad de
tiempo para cocinar
HORNEAR - Cocina los alimentos en el homo
tradicionaI a una temperatura que varfa de
170°F a 550°F
ASAR A LA PARRILLA- Asa los alimentos
en ALTO a 550°F o en BAJO a 450°F a calor
directo del elemento superior El asado a la
parrilta se debe hacer con la puerta abierta
en la posici6n de tope para asar a la parrilla
LIMPIEZA - Limpia el area interior del homo
pot usted. Cuando el ciclo termina, el homo
se apagarA automAticamente
NOTA: La puerta del homo se cerrar_ con
cerrojo autom_ticamente y el cerrojo se abrirg.
s6to cuando el homo se haya enfriado
@
Los botones con las flechas para
SUBIR y BAJAR TEMP programan
la temperatura del homo Los
botones con las ffechas para SUBIR
y BAJAR las HORAS/MINUTOS
programan la hora del diM,la
cantidad de tiempo para cocinar, la
cantidad de tiempo para timpiar, la
hora para un comienzo demorado,
la temperatura del homo y la hora
del cron0metro de la cocina
EI bot6n START debe ser tocado
para activar cualquier funci6n del
homo
Hornear con Mirecalentado que es circulado
sobre y alrededor de los alimentos por el
ventilador de convecci6n ubicado en ta parte
trasera del homo
HORNEAR A CONVECCION - Ideal para
atimentos horneados sobre parritlas mt_ltiples
Bueno para grandes cantidades de comida
ASAR A CONVECClON - Bueno para pedazos
de came grandes y blandos, descubiertos
Programa la cantidad de tiempo
COOKiNGI en que usted desea cocinar los
TIME Jalimentos o en que el homo se
limpie. El homo se apaga
autom_tticamente al final de esta
cantidad de tiempo
Seleccione ta hora del dfa en la
cua{ desea que el homo se
encienda El homo se encender_
autom_ticamente a la hora que
usted haya seleccionado Cuando
EI bot6n CLEAR/OFF se usa para
cancetar cualquier funci6n del homo
y el tono de fin de ciclo No
cancelar& el Reloj o el Cronbmetro
de ta Cocina.
_H"-'_ El bot6n KITCHEN TIMER ON/OFF
i "l'il_'l_R" ! (ENCENDIDO! APAGADO) se usa
_para encender o apagar el
Cron6metro de la Cocina. No
controlar_, ninguna otra funci6n
del homo.
El bot6n del "CLOCK" se usa para
poner la hora del diM.
El bot6n "TOP LIGHT" enciende
y apaga la tuz fluorescente de la
cubierta
El bot6n "OVEN LIGHT" enciende
y apaga la luz interiorde{ homo
El bot6n "CONTROL LOCKOUT"
deactiva el control del homo para
la limpieza
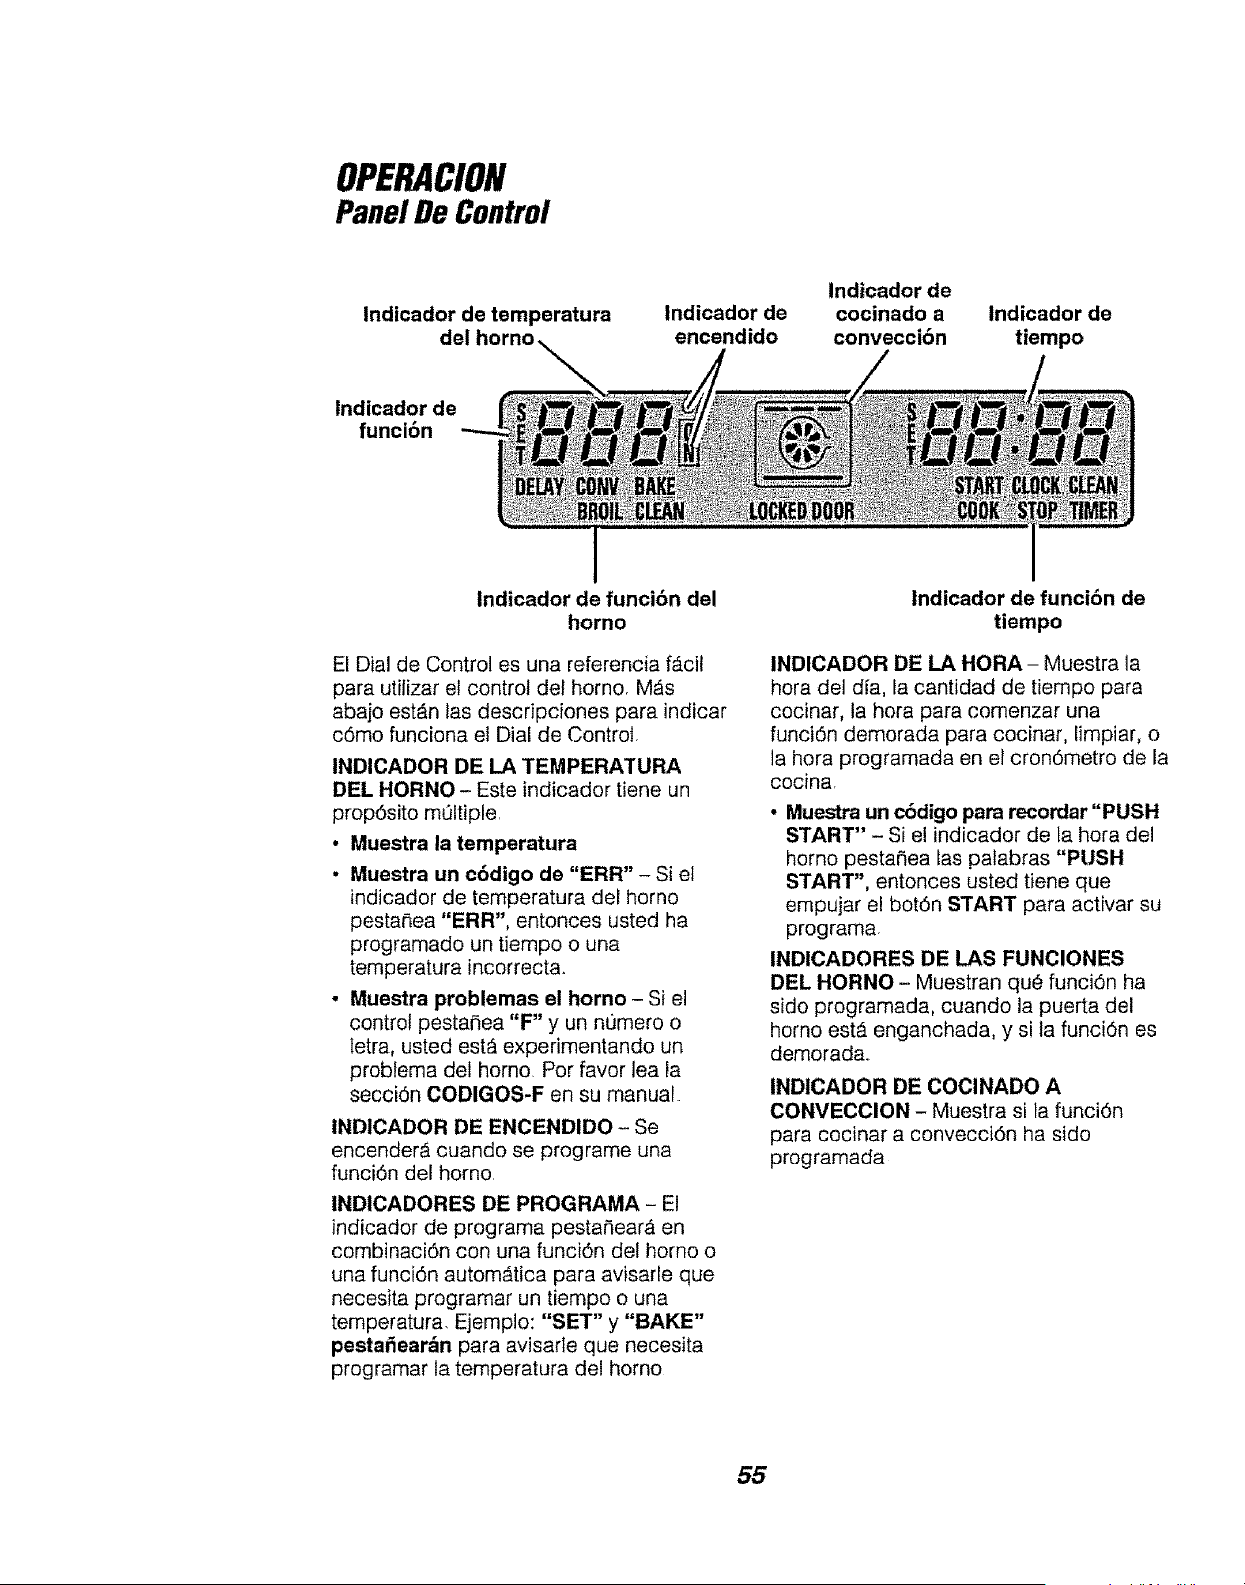
OPERACION
PanelDe Control
lndicador de temperatura
del
Indicador de
encendido
Indicador de
cocinado a Indicador de
convecci6n tiempo
lndicador de
funci6n
lndicador de funci6n del
horno
El Dial de Control es una referencia fd,cil
para utilizar el control del homo M_s
abajo estdn las descripciones para indicar
c6mo funciona el Dial de Control,
INDICADOR DE LA TEMPERATURA
DEL HORNO- Este indicador tiene un
prop6sito m01tiple,
• Muestra la temperatura
• Muestra un c6digo de "ERR" - Si el
indicador de temperatura del homo
pestaSea "ERR", entonces usted ha
programado un tiempo o una
temperatura incorrect&
• Muestra problemas el horno - Si el
control pesta_ea "F" y un n0mero o
tetra, usted est,_ experimentando un
problema del homo Por favor lea la
secci6n CODIGOS-F en su manual
INDICADOR DE ENCENDIDO - Se
encender_ cuando se programe una
funci6n del homo
INDICADORES DE PROGRAMA - El
indicador de programa pesta_ear,_ en
combinaci6n con una funci6n del homo o
una funci6n autom_tica para avisarle que
necesita programar un tiempo o una
temperatura, Ejemplo: "SET" y "BAKE"
pesta_ear_n para avisarle que necesita
programar la temperatura del homo
lndicador de funci6n de
tiempo
INDICADOR DE LA HORA- Muestra la
hora del dfa, la cantidad de tiempo para
cocinar, la hora para comenzar una
funci6n demorada para cocinar, limpiar, o
la hora prograrnada en el cron6metro de la
cocina
• Muestra un c6digo para recordar "PUSH
START" - Si el indicador de ta hora del
homo pestar3ea las palabras "PUSH
START", entonces usted tiene que
empujar el bot6n START para activar su
programa,
INDICADORES DE LAS FUNClONES
DEL HORNO - Muestran qu_ funci6n ha
sido programada, cuando la puerta del
homo est_ enganchada, y si la funci6n es
demorad&
INDtCADOR DE COClNADO A
CONVECCION - Muestra si la funci6n
para cocinar a convecci6n ha sido
programada
55
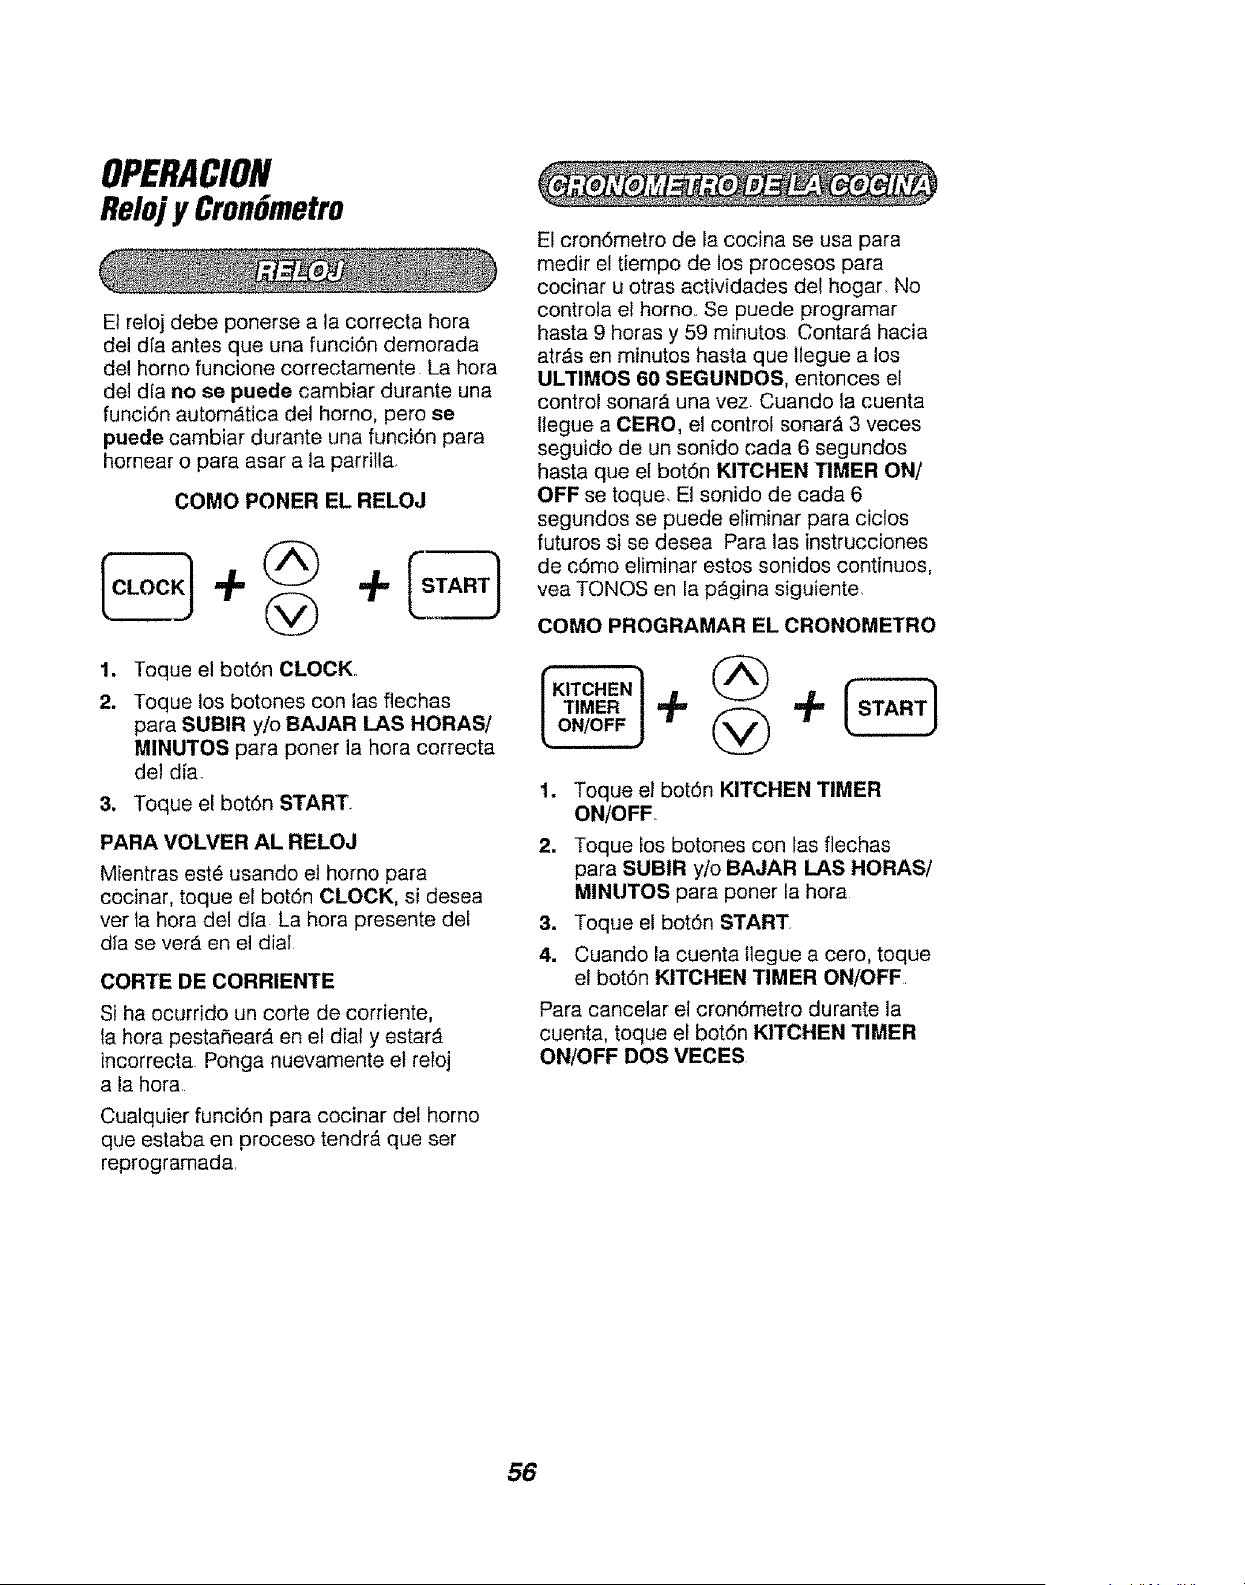
OPERACION
Reloj y CronGmetro
Et reloj debe ponerse a la correcta hora
del d[a antes que una funcidn demorada
de! homo funcione correctamente La hora
del dfa no se puede cambiar durante una
funcidn autom_tica del homo, pere se
puede cambiar durante una funci6n para
hornear o para asar a la parrilla.
COMO PONER EL RELOJ
+
@
1
2.
Toque el bot6n CLOCK..
Toque los botones con las flechas
para SUBIR y/o BAJAR LAS HORAS/
MINUTOS para poner la hora correcta
del dfa,
3. Toque el bot6n START,
PARA VOLVER AL RELOJ
Mientras est6 usando el homo para
cocinar, toque el bot6n CLOCK, si desea
ver la hora del d[a La hora presente del
dfa se ver_. en el dial
CORTE DE CORRIENTE
Si ha ocurrido un corte de corriente,
la hera pestaSear_ en el dial y estar_
incorrecta Ponga nuevamente el reloj
a la hora
Cualquier funci6n para cocinar det homo
que estaba en proceso tendr_, que ser
reprogramada,
El cron6metro de la cocina se usa para
medir el tiempo de los procesos para
cocinar u otras actividades del hogar, No
controla el homo. Se puede programar
hasta 9 horas y 59 minutos ContarA hacia
atr_s en minutos hasta que tlegue a los
UL'I'IMOS 60 SEGUNDOS, entonces el
control sonar_ una vez Cuando la cuenta
llegue a CERO. el control sonar_ 3 veces
seguido de un sonido cada 6 segundos
hasta que el bot6n KITCHEN TIMER ON/
OFF se toque, El senide de cada 6
segundos se puede eliminar para cictos
futuros si se desea Para las instrucciones
de c6mo eliminar estos sonidos continuos,
vea TONOS en la p_gina siguiente,
COMO PROGRAMAR EL CRONOMETRO
TIMER +
ON/OFF @
1. Toque et bot6n KITCHEN TIMER
ON/OFF.
2. Toque los botches con las flechas
para SUBIR y/o BAJAR LAS HORAS/
MINUTOS para poner la hora
3. Toque el bot6n START.
4. Cuando la cuenta ilegue a cero, toque
el bot6n KITCHEN TIMER ON/OFF
Para cancelar el cron6rnetro durante la
cuenta, toque el bot6n KITCHEN TIMER
ON/OFF DOS VECES
56
OPERACION
ControlDel Homo, Reloj
y CronGmetro
El nuevo control tiene una serie de tonos
que sonar_n a tiempos diferentes Estos
tonos pueden sonar mientras usted
programa una funci6n del homo, o al final
de una funci6n del homo, Tambi_,n le
avisar_, si existe un problema con una de
las funciones. M_s abajo est_n los tipos
de tonos y una breve descripci6n de
cada uno.
SONIDOS MIENTRAS SELECCIONA EL
CONTROL - Cuando usted toque un
bot6n oyer_ un sonido Este tono le har_
saber que el bot6n ha sido activado (Los
botches con las flechas no hacen un
sonido)+
TONO AL FINAL DE UN ClCLO
AUTOMATiCO - Despues de una funci6n
para cocinar autom_.tica, usted escuchar_
tres tonos cortos seguidos por un tono
carla 6 segundoso El tono de carla 6
segundos seguir_ sonando hasta que
toque el bot6n CLEAR/OFF ousted
decida seleccionar et programa especial
para cancelar y evitar que el tono de 6
segundos suene at final de un ciclo futuro
COMO CANCELAR EL. TONO
DE 6 SEGUNDOS
Toque y sujete los botones
BAKE y BROIL., a ta misma vez por 3
segundos, hasta que el dial muestre
"SF".
2. Toque el bot6n KITCHEN TIMER
ON/OFF El dial mostrar_ "CON
BEEP" (tono continuo),
3. Toque el bot6n KITCHEN TIMER
ON/OFF nuevamente El dial mostrarA
"BEEP" (tono cancelado)
4, Toque el bot6n START, para cancelar
el tono y salir de este m6dulo especial
Si desea regresar a los tonos de 6
segundos, repita los pasos de arriba hasta
que el dial muestre su selecci6n y empuje
el bot6n para et comienzo (START)
TONO DE ATENCION - Este tono sonarA
si hace un error u omite algo mientras
programa una funci6n del homo,
Unos ejempios serfan:
a. Programar un cic]o de limpieza y la
puerta del homo no estA bien cerrada
b. Programar una func[6n y no empujar el
bot6n START
c. Toque un bot6n para una funci6n
adicional sin programar pr[mero la
temperatura o el tiempo
d. "ERR" pestaP,ear_ si usted programa
una temperatura inv_lida Toque el
bot6n CLEAR/OFF para poner el dial
en blanco y reprogramar ]a funci6n del
homo
Cualquiera de estos se puede identificar
r_ipidamente con mirar el dial.
TONO DE PRECALENTAMIENTO-
Cuando programa una temperatura en el
homo, el homo empieza a calentarse
autom_ticamente Cuando la temperatura
dentro del homo Ifega a la temperatura
que usted program6, sonar_ un tono para
avisarle que el homo est_ listo para
hornear
Si usted programa una funci6n del horno
y el control suena mientras el dial hace
pestaNear una "F" y un nQmero o letra tal
como "F-4" o "FI," es posible que exista
un problema con et control o con el homo
Simplemente empuje el bot6n CLEAR/
OFF y espere una hora Si se repite ta
funci6n de los c6digos, desconecte toda
la electricidad al aparato pot to menus
30 segundos y entonces reconecte la
corriente Trate de programar esa funci6n
nuevamente S[ e! c6digo se repite
nuevamente, escriba el c6digo que
pestanea y Ilame para un servicio
D[gale at tecnico que c6digo estaba
pestaneando
57
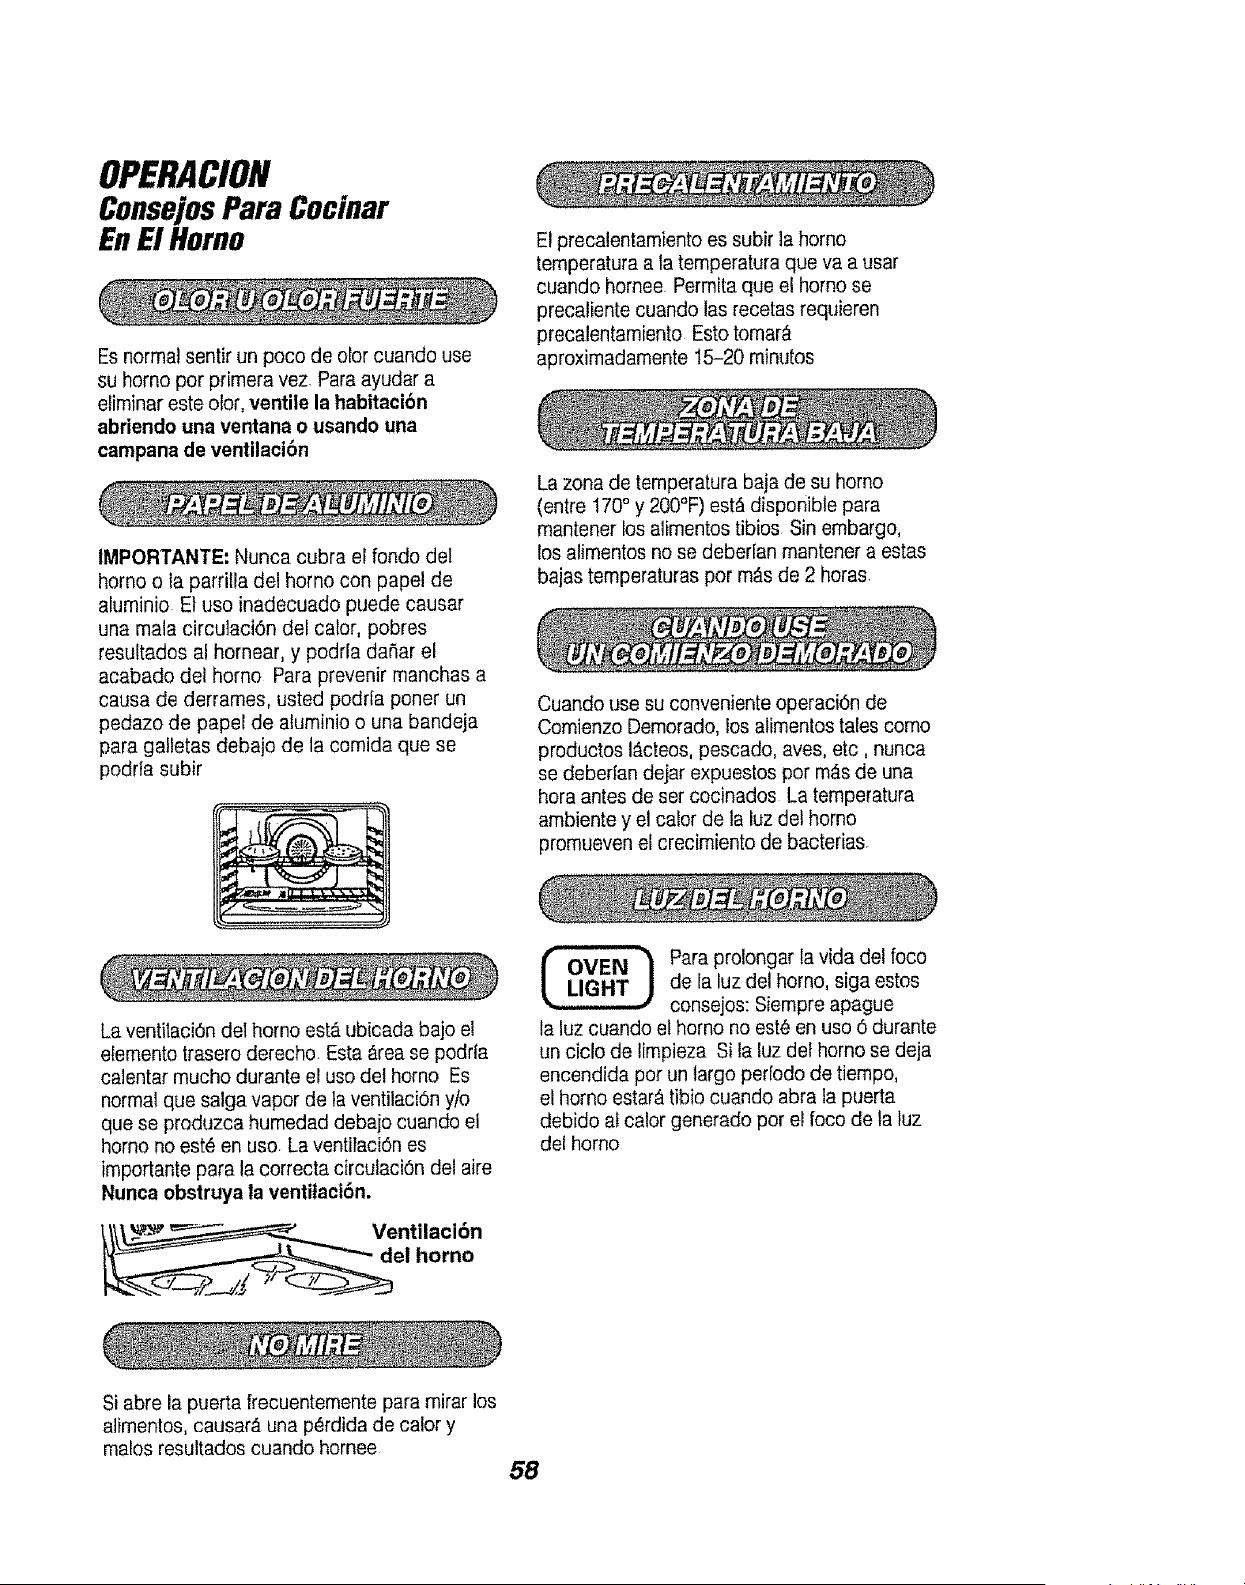
OPERACION
ConsejosPara Cocinar
EnE1Homo
Es normal sentir un poco de olor cuando use
su homo por primera vez. Para ayudar a
eliminar este olor, ventile la habitaci6n
abriendo una ventana e usando una
campana de ventilaci6n
IMPORTANTE: Nunca cubra el fondo del
homo o la parrilla del homo con papel de
aluminio El uso inadecuado puede causar
una mala circulaci6n del cafor, pobres
resultados al hornear, y podrfa daSar el
acabado del homo Para prevenir manchas a
causa de derrames, usted podria poner un
pedazo de papel de aluminio o una bandeja
para galletas debajo de la comida que se
podrla subir
E! precalentamiento es subir la homo
temperatura a la temperatura que va a usar
cuando hornee Permita que el homo se
precaliente cuando las recetas requieren
precalentamiento Esto tomar_
aproximadamente 15-20 minutos
La zona de temperatura baja de su homo
(entre 170° y 200°F) est_ disporiibte para
mantener ios alimentos tibios Sin embargo,
los alimentos no se deberian mantener a estas
bajas temperaturas pot m_s de 2 horas
Cuando use su conveniente operaci6n de
Comienzo Demorado, los alimentos tales como
productos I_.cteos,pescado, aves, etc, nunca
se deberlan dejar expuestos pot m_s de una
hora antes de set cocinados La temperatura
ambiente y el calor de la luz det homo
promueven el crecimiento de bacterias.
La ventitaci6n del homo est& ubicada bajo el
elemento trasero derecho Esta Area se podrfa
calentar mucho durante el uso del homo Es
normal que salga vapor de ta ventilaci6n y/o
que se produzca humedad debajo cuando el
homo no est_ en use La ventilaci6n es
importante para la cerrecta circulaci6n del aire
Nunca obstruya la ventilaci6n.
Para prolongar la vida del foco
de la luz del homo, siga estos
consejos: Siempre apague
la luz cuando el homo no est6 en uso 6 durante
un ciclo de limpieza Si la luz del homo se deja
encendida pot un largo perfodo de tiempo,
el homo estar& tibio cuando abra la puerta
debido af calor generado per el foco de la luz
del homo
Si abre la puerta frecuentemente para rnirar los
alimentos, causar_, una perdida de calory
malos resultados cuando hornee
58
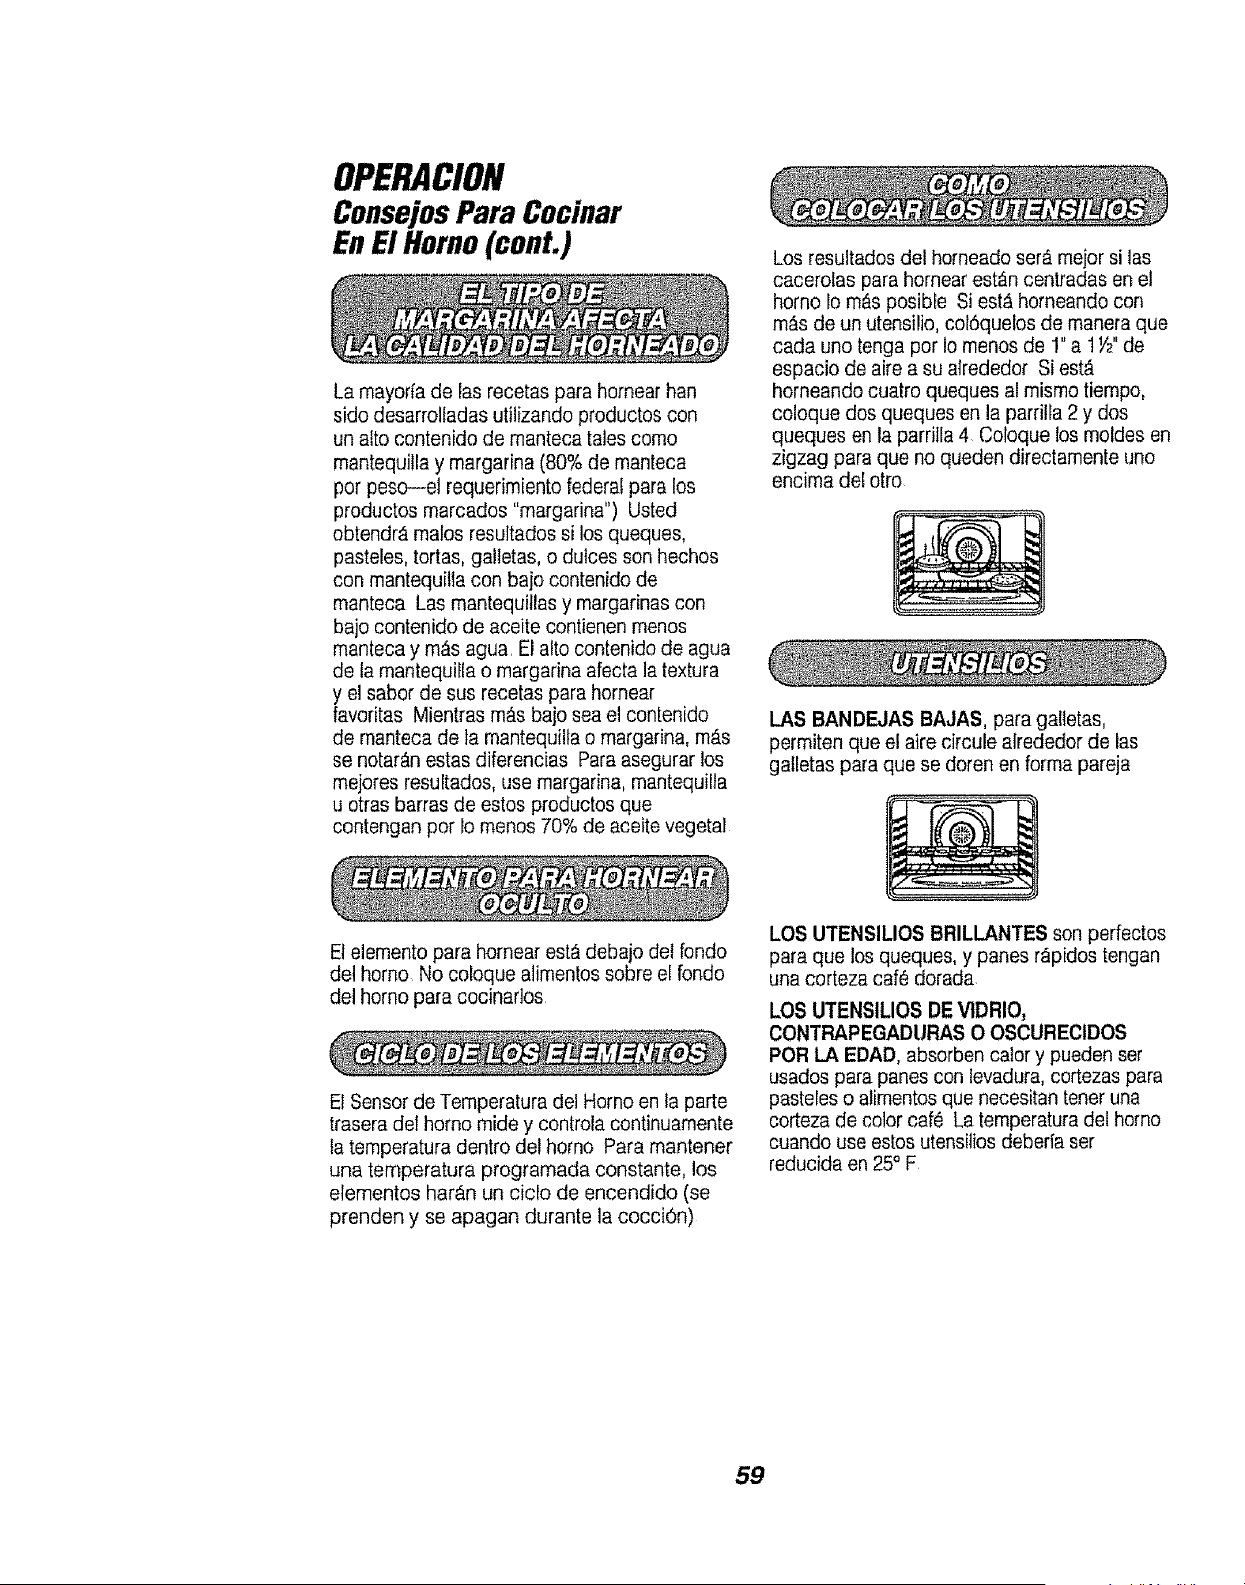
OPERACION
Consejos Para Cocinar
EnElHomo(cont.)
La rnayofia de las recetas para homear han
sido desarrolladas utilizando productos con
un alto contenido de manteca tales como
mantequilla y margarina (80% de manteca
por peso--el requerimiento federal para los
productos marcados "margarina") Usted
obtendr_ malos resultados si los queques,
pasteles, tortas, galletas, o dulces son hechos
con mantequilla con bajo contenido de
manteca Las mantequittas y margarinas con
bajo contenido de aceite contienen menos
manteca y m_s agua. El alto contenido de agua
de la mantequiFla o margarina afecta la textura
y el sabor de sus recetas para hornear
favoritas Mientras m_.sbajo sea el contenido
de manteca de la mantequiila o margarina, mAs
se notar_n estas diferencias Para asegurar los
mejores resultados, use margarina, mantequilta
u otras barras de estos productos que
contengan pot Io menos 70% de aceite vegetal
El elemento para homear est_ debajo del rondo
dei horno No coloque alimentos sobre ei fondo
del homo para cocinarlos
El Sensor de Temperatura del Homo en ta parte
trasera del homo mide y controla continuamente
la temperatura dentro det homo Para mantener
una temperatura programada constante, los
elementos har&n un ciclo de encendido (se
prenden y se apagan durante la cocciOn)
Los resultados del homeado ser_. mejor si las
cacerofas para hornear est_n centradas en el
homo 1om&s posible Si est_ horneando con
m_s de un utensilio, col6quelos de manera que
cada uno tenga pot Io menos de 1" a 1W' de
espacio de aire a su alrededor Si est,.
homeando cuatro queques al mismo tiempo,
coloque dos queques en la parrilla 2 y dos
queques en la parrilla 4 Coloque los moldes en
zigzag para que no queden directamente uno
encima del otto
I_AS BANDEJAS BAJAS, para gaUetas,
permiten que el aire circule afrededor de las
galletas para que se doren en forma pareja
LOS UTENSILIOS BRILLANTES son perfectos
para que los queques, y panes r_pidos tengan
una corteza caf6 dorada
LOS UTENSILIOS DE VtDRIO,
CONTRAPEGADURAS O OSCURECIDOS
POR LA EDAD, absorben cafory pueden ser
usados para panes con levadura, cortezas para
pasteles o alimentos que necesitan tener una
corteza de color caf6 La temperatura del homo
cuando use estos utensitbs debeda ser
reducida en 25° F
59
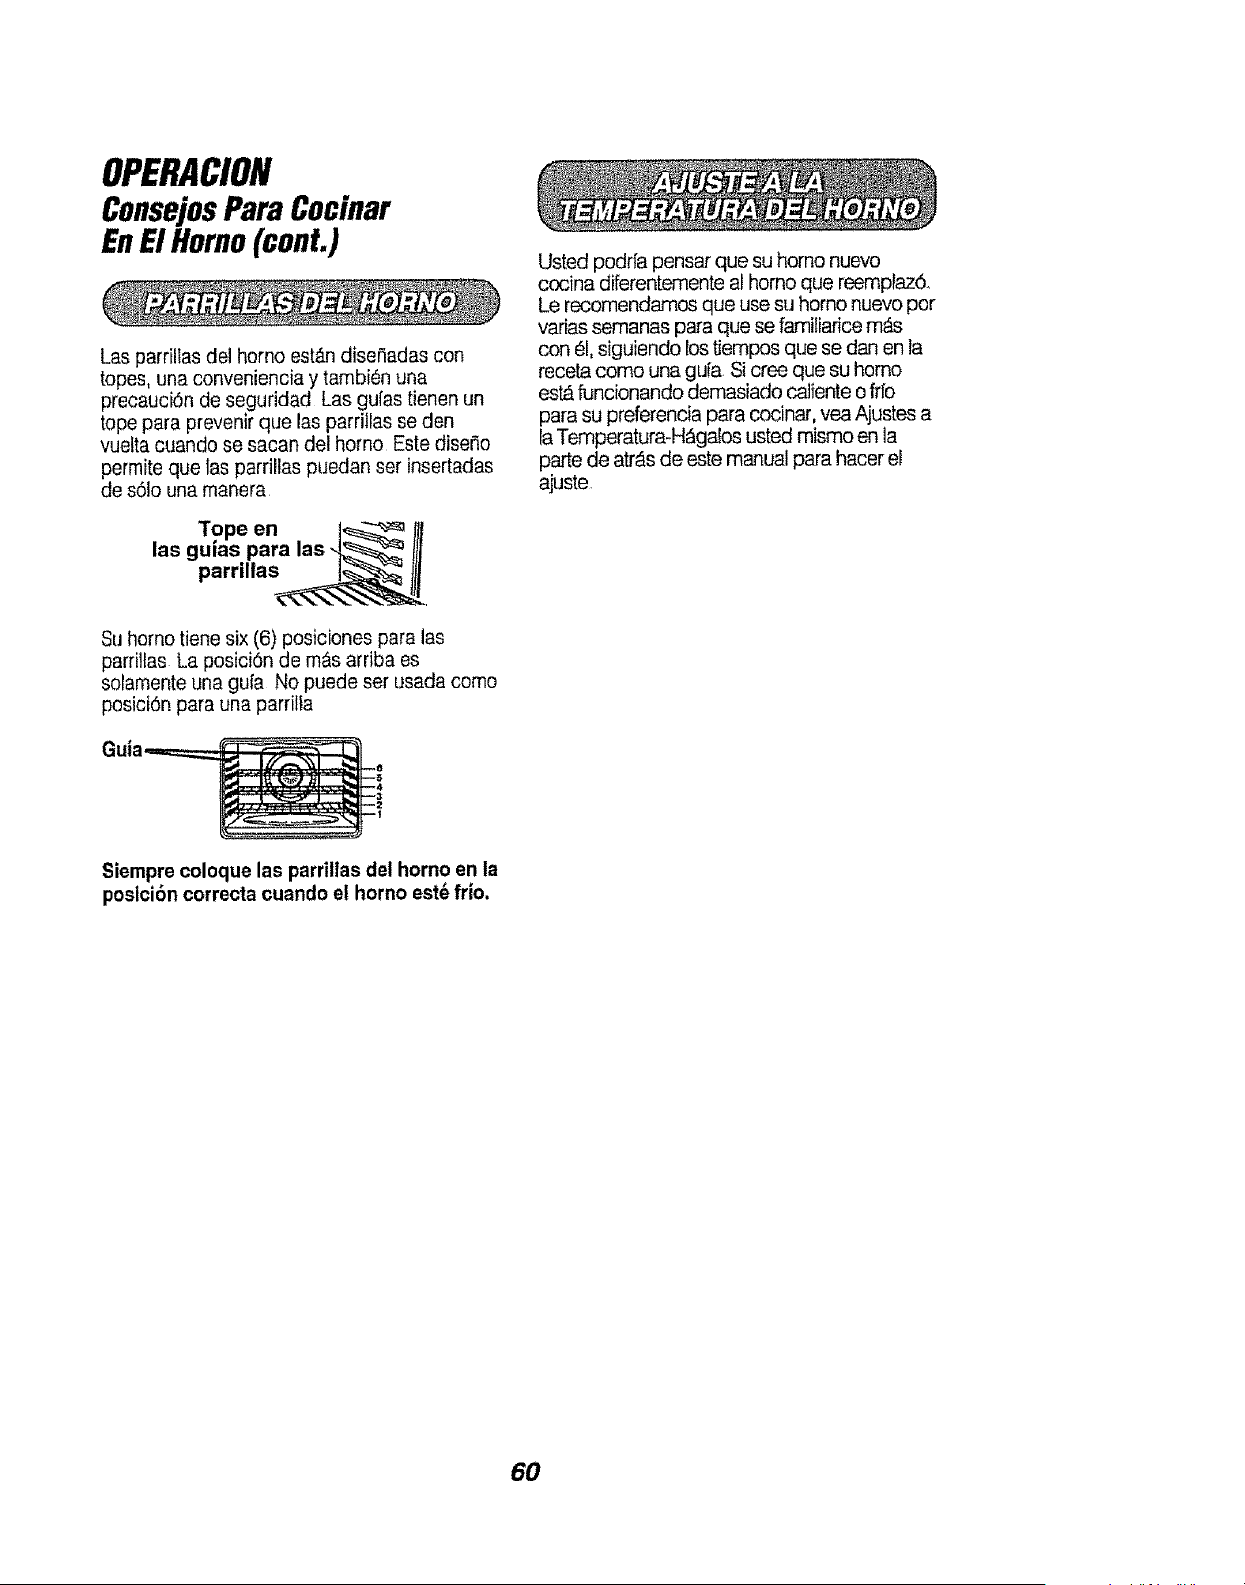
OPERACION
ConsejosPara Cocinar
EnE1Homo(conL)
Las parrillas del homo esl_n dise,_adas con
topes, una conveniencia y tambien una
precauci6n de seguridad Las gufas tienen un
tope para prevenir que las parrillas se den
vuetta cuando se sacan del homo Este dise_o
permite que las parrillas puedan ser insertadas
de s61ouna manera
Tope en .1_ Ill
las guias para las -_ Ill
parriltas_,
$u homo tiene six (6) posiciones para las
parrillas. La posici6n de m&s arriba es
sotamente una gufa No puede ser usada como
posici6n para una parrilla
Usted podrfa pensar que su homo nuevo
cocina diferenternente al homo que reemplaz6.
Le recomendamos que use su homo nuevo por
varias semanas para que se familiarice m_s
con el, siguiendo los tiempos que se dan en la
receta como una gu[a Si cree que su homo
est_ funcionando demasiado caiiente ofrfo
para su preferencia para cocinar, yea Ajustes a
la Temperatura-H_galos usted mismo en ia
parte de atrAs de este manual para hacer el
ajuste
Siempre coloque las parrillas del homo en la
poslci6n correcta cuando el homo est_ frio,
60
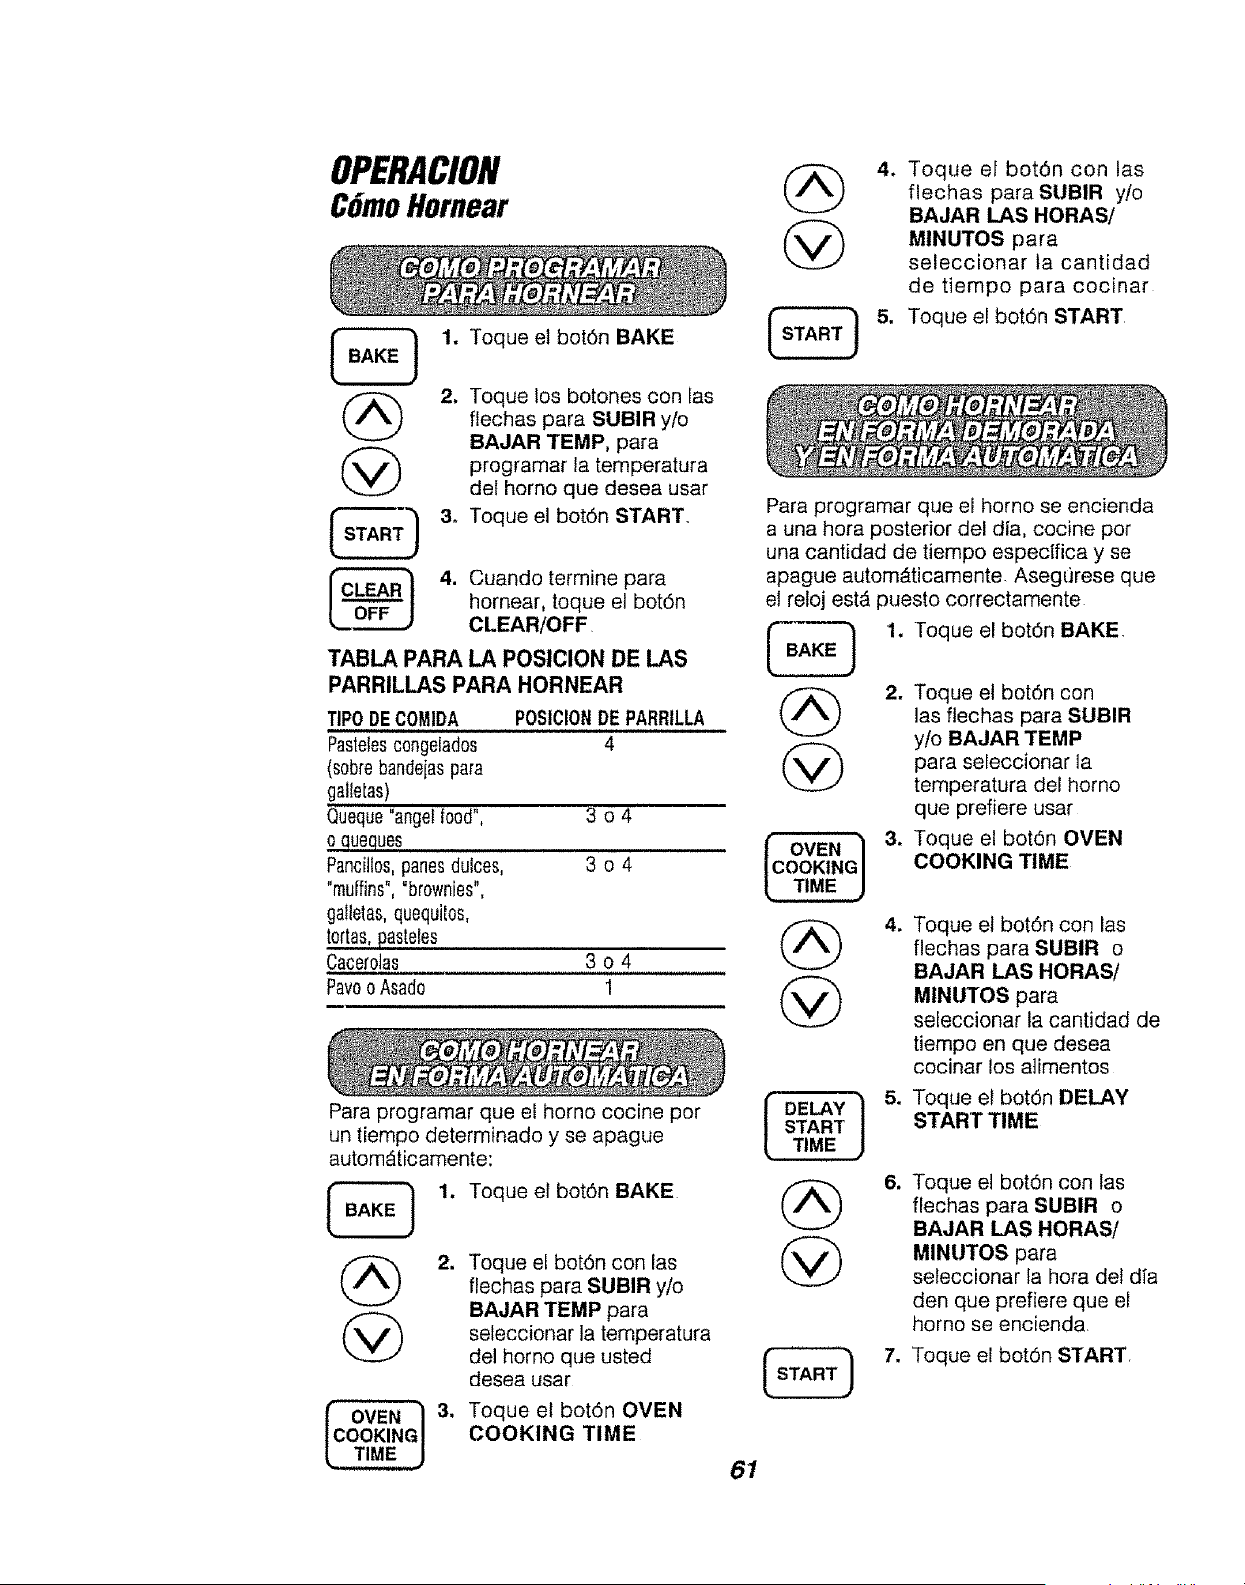
OPERACION
CGmoHornear
@
@
1. Toque el bot6n BAKE
2, Toque los botones con las
flechas para SUBIR y/o
BAJAR TEMP, para
programar la temperatura
del homo que desea usar
3. Toque el bot6n START,,
4. Cuando termine para
hornear, toque el bot6n
CLEAR/OFF
TABLA PARA LA POSICION DE LAS
PARRILLAS PARA HORNEAR
TIPODECOMIDA POSICIONDE PARRILLA
Pastelescongelados 4
(sobrebandejaspara
galletas)
Queque"angelfood", 3 o 4
o queques
Pancillos,panesdulces, 3 o 4
"muffins","brownies",
galletas,quequilos,
tortas,pasteles
Cacerolas 3 o 4
Pavoo Asado 1
Para programar que el homo cocine por
un tiempo determinado y se apague
autom_ticamente:
1. Toque el bot6n BAKE
1
=
Toque el bot6n con las
flechas para SUBIR y/o
BAJAR TEMP para
seleccionar la temperatura
del homo que usted
desea usar
Toque el bot6n OVEN
COOKING TIME
4. Toque el bot6n con las
flechas paraSUBIR y/o
BAJAR LAS HORAS/
MINUTOS para
seleccionar ta cantidad
de tiempo para cocinar
Toque el bot6n START
Para programar que el homo se encienda
a una hora posterior del dfa, cocine pot
una cantidad de tiempo especifica y se
apague autom&ticamente- Asegt]rese que
el reloj estA puesto correctamente
'1. Toque el bot6n BAKE.
.
Toque el bot6n con
las flechas para SUBIR
y/o BAJAR TEMP
para seleccionar la
temperatura del homo
que prefiere usar
Toque el bot6n OVEN
COOKING TIME
@
4_
Toque et bot6n con las
flechas para SUBIR o
BAJAR LAS HORAS/
MINUTOS para
seleccionar la cantidad de
tiempo en que desea
cocinar los a]imentos
(
DELAY
START
TIME
@
)
5. Toque el bot6n DELAY
START TIME
61
Toque el bot6n con las
flechas para SUBIR o
BAJAR LAS HORAS!
MINUTOS para
seleccionar la hora del dfa
den que prefiere que el
homo se encienda
7. Toque el bot6n START
61
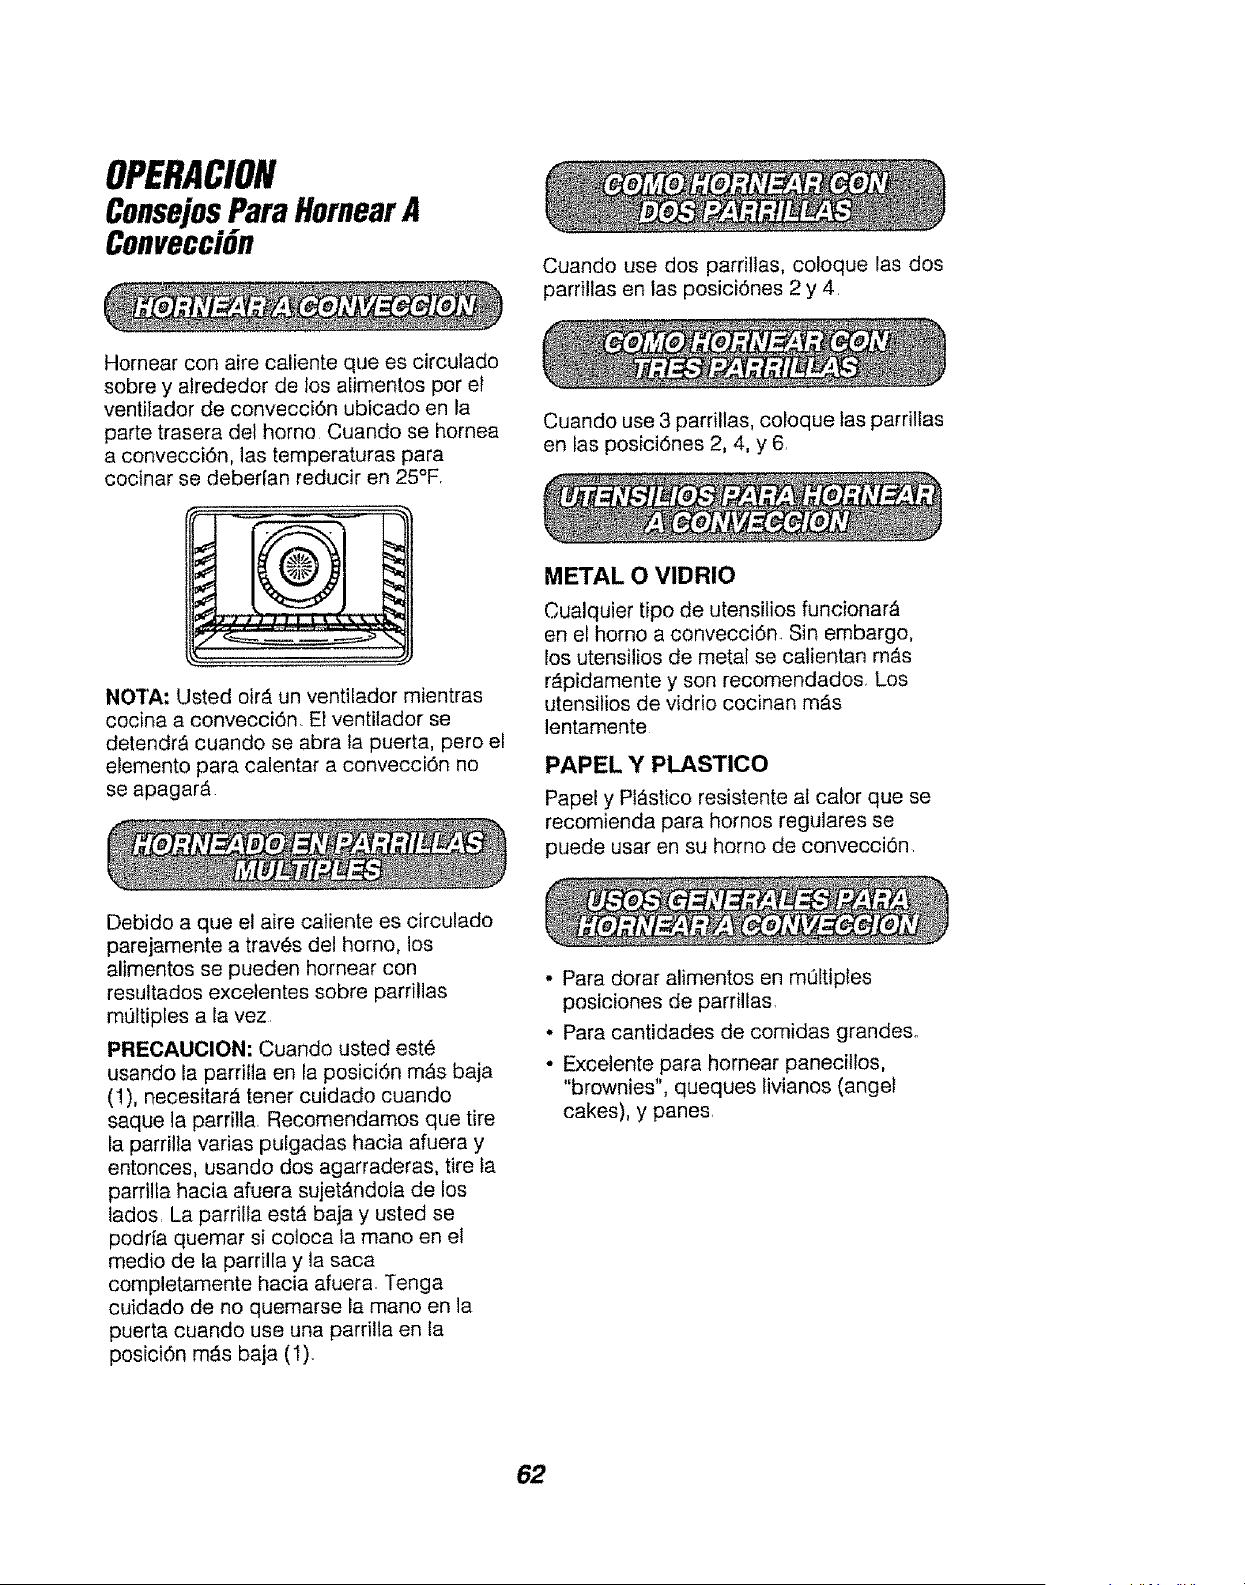
OPERACION
ConsejosPara HornearA
ConvecciGn
Cuando use dos parrillas, coloque las dos
parrillas en las posici6nes 2 y 4.
Hornear con aire caliente que es circulado
sobre y alrededor de los alimentos por el
ventilador de conveccidn ubicado en la
parte trasera del homo Cuando se hornea
a conveccidn, los temperaturas para
cocinar se deberian reducir en 25°F.
NO'I"A: Usted oirA un ventilador mientras
cocina a convecci6n, El ventiiador se
detendr_ cuando se abra ta puerto, pero el
elemento para calentar a convecci6n no
se apagar_
Cuando use 3 parrillas, coloque las parriltas
en las poslci6nes 2, 4, y 6,
METAL O VIDRIO
Cualquier tipo de utensilios funcionar_
en el homo a convecci6n. Sin embargo,
los utensilios de metal se calientan m_s
r_pidamente y son recomendados. Los
utensilios de vidrio cocinan mAs
lentamente
PAPEL Y PLASTICO
Papel y Pl_stico resistente al calor que se
recomienda para hornos regulares se
puede usar en su homo de convecci6n
Debido a que el aire caliente es circulado
parejamente a traves del homo, los
alimentos se pueden hornear con
resultados excelentes sobre parri!las
m01tiples a la vez
PRECAUCION: Cuando usted este
usando la parrilla en la posici6n m_s baja
(1), necesitar_ toner cuidado cuando
saque la parrilla. Recomendamos que tire
la parrilla varias pulgadas hacia afuera y
entonces, usando dos agarraderas, tire la
parrilta hacia afuera sujet_ndola de los
lados, La parrilla est_ baja y usted se
podr[a quemar si coloca la mano en el
medio de la parrilla y la saca
cempletamente hacia afuera. Tenga
cuidado de no quemarse fa mano en la
puerto cuando use una parrilla en la
posicidn mAs baja (1)
- Para do{ar alimentos en mQItiples
posiciones de parrillas
• Para cantidades de comidas grandeso
o Excelente para hornear panecitlos,
"brownies", queques livianos (angel
cakes), y panes.
62
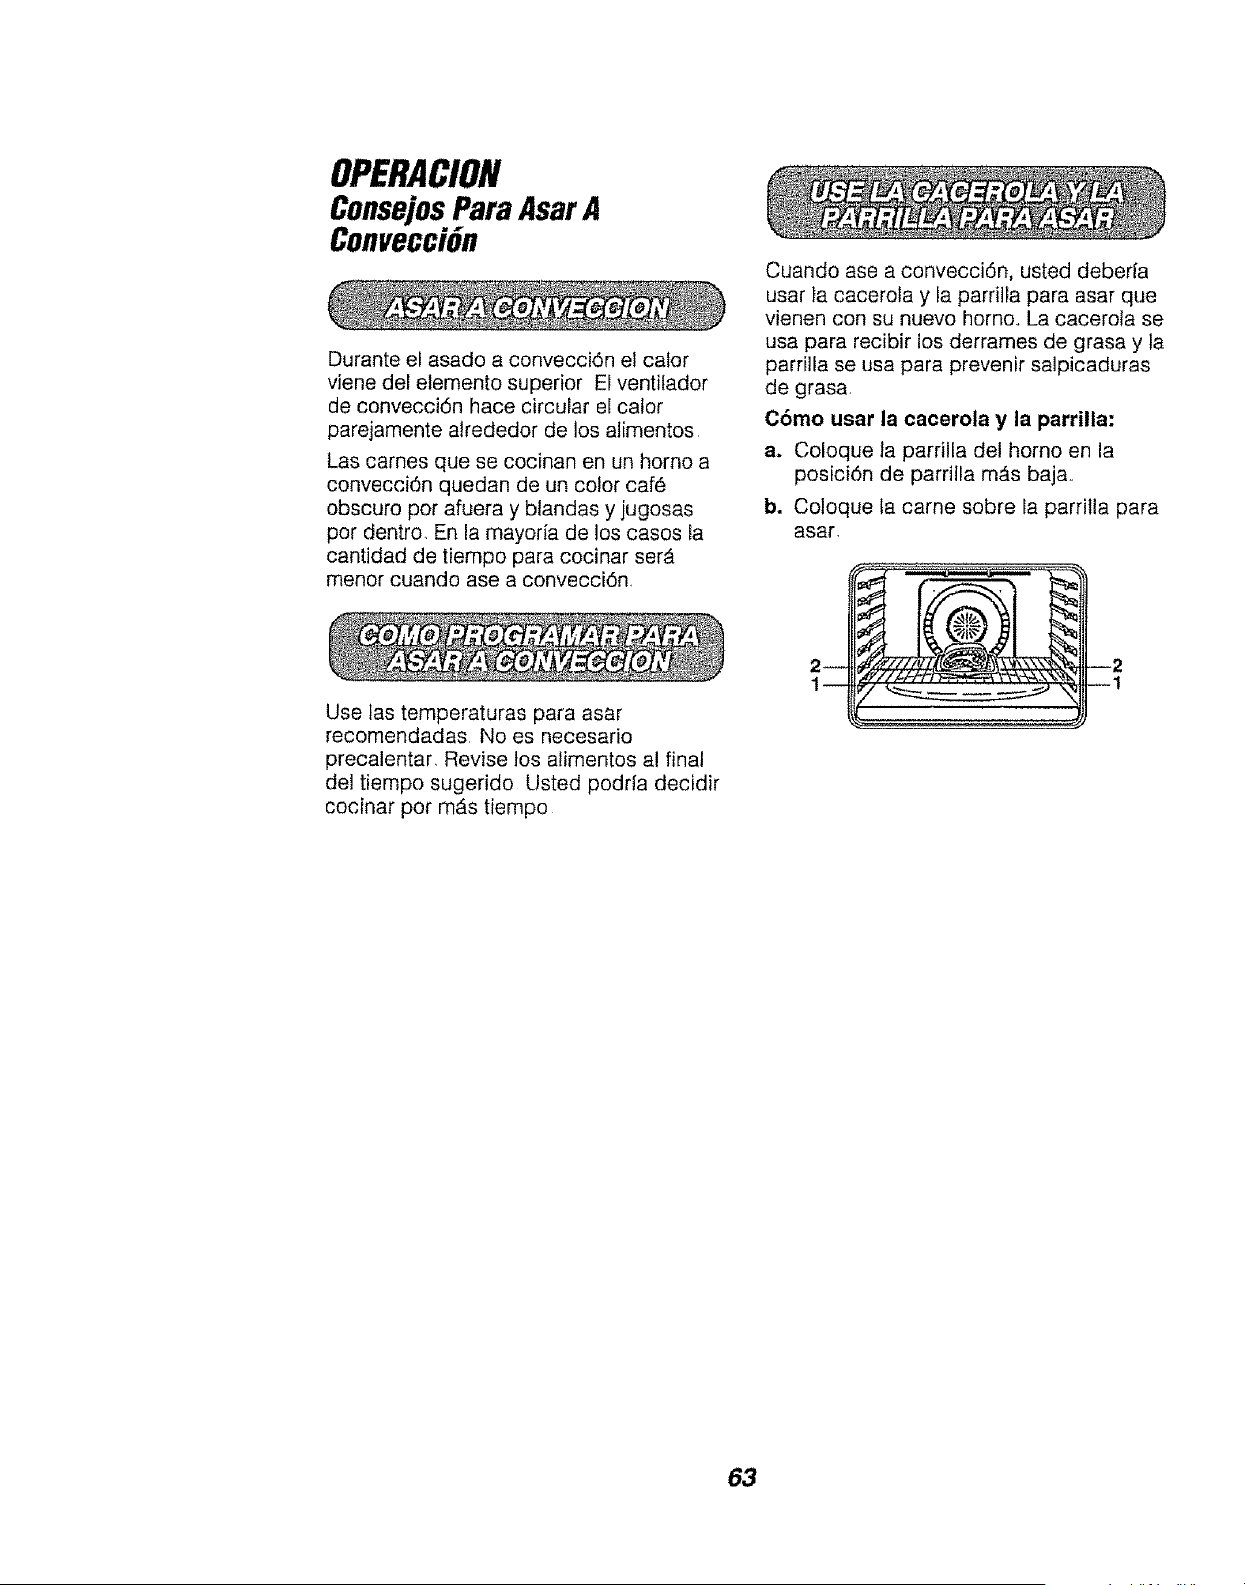
OPERACION
ConsejosPara AsarA
ConvecciGn
Durante el asado a convecci6n el cator
viene del etemento superior El ventifador
de convecci6n hace circular el calor
parejamente alrededor de los alimentos
Las carnes que se cocinan en un homo a
convecci6n quedan de un color caf_
obscuro por afuera y blandas y jugosas
por dentro En la mayoria de los casos ta
cantidad de tiempo para cocinar ser_
menor cuando ase a convecci6n.
Cuando ase a convecci6n, usted deberfa
usar la cacerofa y la parrilla para asar que
vienen con su nuevo homo.. La cacerola se
usa para recibir los derrames de grasa y la
parrilla se usa para prevenir salpicaduras
de grasa.
Cbmo usar la cacerota y la parrilla:
a, Coloque la parrilla del homo en la
posici6n de parrilla m#,s baja..
b. Coloque la came sobre la parrilla para
asar.
Use las temperaturas para asar
recomendadas No es necesario
precalentar. Revise los alimentos a! final
del tiempo sugerido Usted podrfa decidir
cocinar por mAs tiempo
63
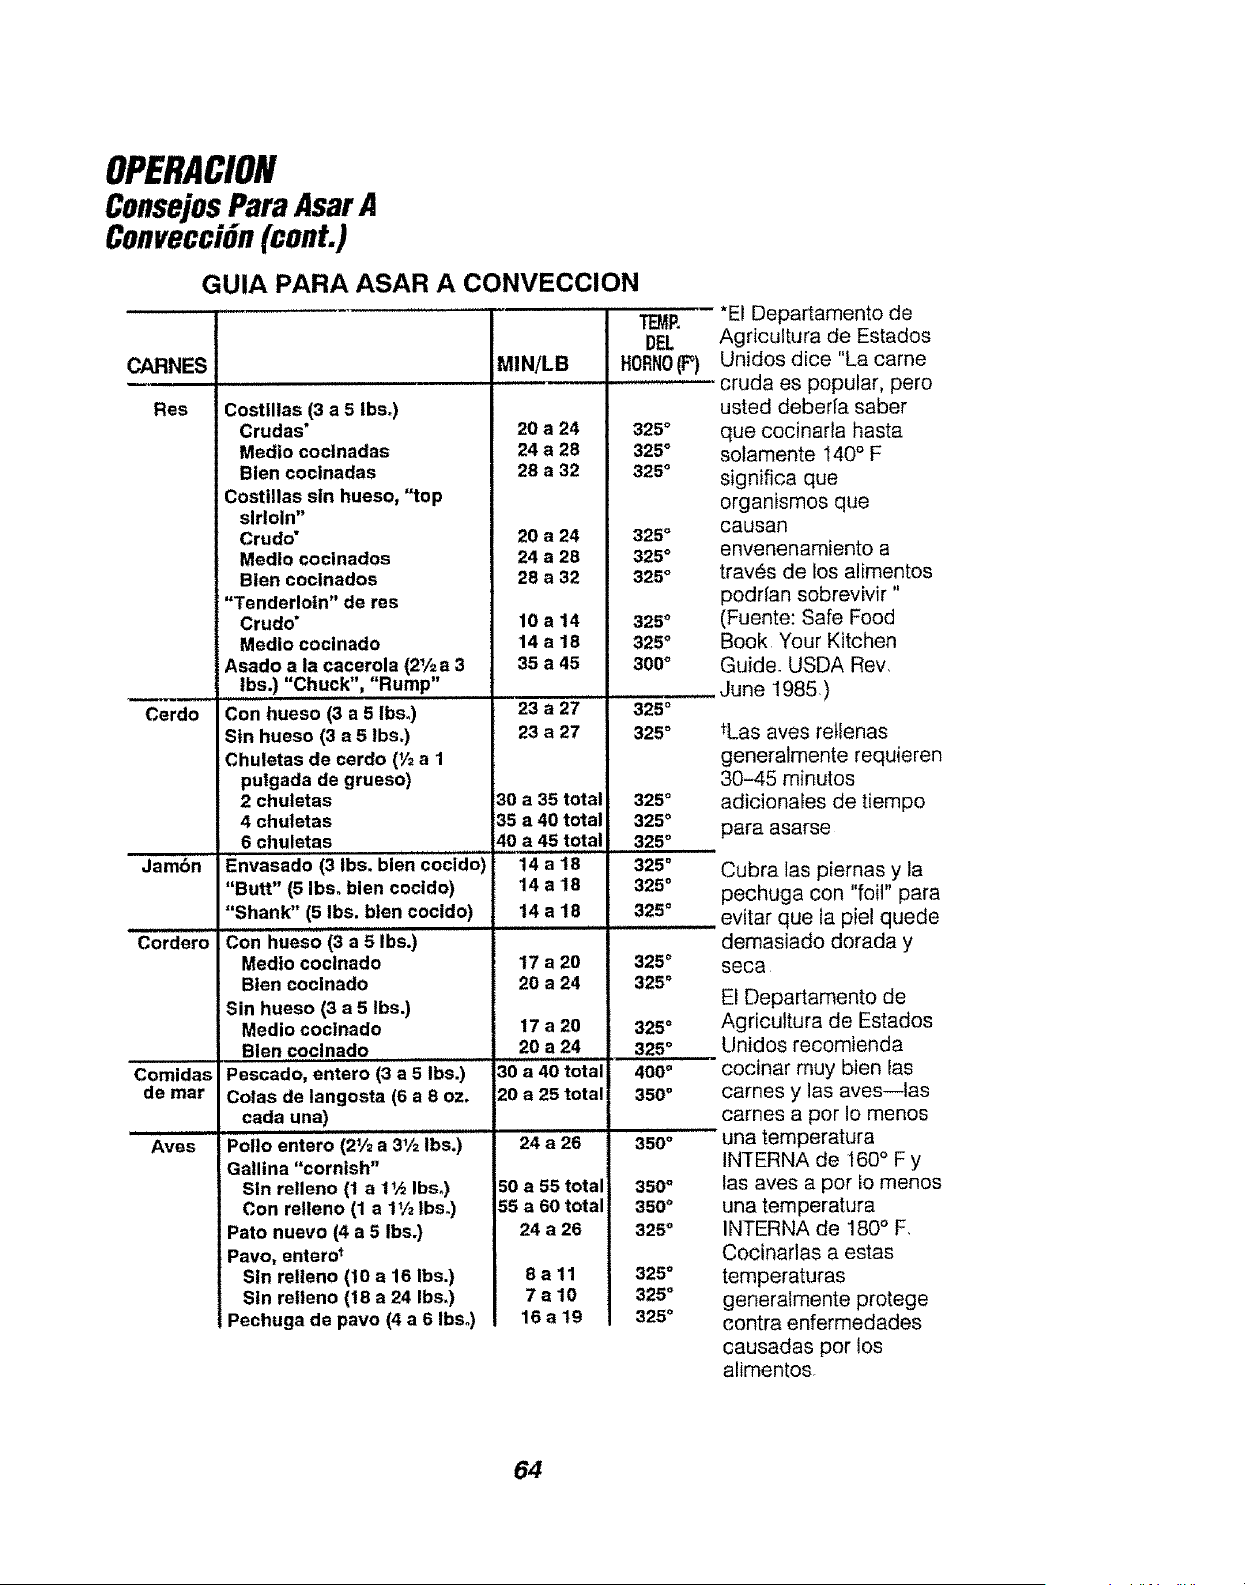
OPERACION
ConsejosParaAsarA
ConvecciGn(cont.)
GUIA PARA ASAR A CONVECCION
CARNES MINiLB
,i
Res
Cerdo
Jam6n
Cordero
Comidas
de mar
Ayes
Costtllas (3 a 5 tbs.)
Crudas*
Med|o coclnadas
Blen cocinadas
Costillas sin hueso, "top
sirloin"
Crudo*
Medio coclnados
Blen cocinados
"Tenderloin" de res
Crudo"
Medlo cocinado
Asado a la cacerola (21/=a 3
lbs.) "Chuck", "Rump"
Con hueso (3 a 5 lbso)
Sin hueso (3 a 5 Ibs.)
Chuletas de cerdo (V2a 1
puigada de grueso)
2 chuletas
4 chuletas
6 chuletas
Envasado (3 lbs. blen cocido)
"Butt" (5 Ibs. blen cocido)
='Shank" (5 Ibs. b|en cocido)
Con hueso (3 a 5 Ibs.)
Medio coclnado
Bten cocinado
Sin hueso (3 a 5 Ibs.)
Medio coclnado
Blen cocinado
Pescado, entero (3 a 5 Ibs.)
Colas de langosta (6 a 8 oz.
cada una)
Polio entero (21/=a 31/2Ibs.)
Gallina "cornish"
Sin rellerto (1 a 11_ Ibs.)
Con relleno (1 a 11/2lbs.)
Pato nuevo (4 a 5 Ibs.)
Pavo, entero*
Sin relleno (10 a 16 Ibs,)
Sin retleno (!8 a 24 Ibs,)
Pechuga de pavo (4 a 6 lbs°)
20 a 24
24 a 28
28 a 32
20 a 24
24 a 28
28 a 32
10a14
14a18
35 a 45
23 a 27
23 a 27
130a 35 total
35 a 40 total
40 a 45 total
14a18
14a18
14a18
17 a 20
20 a 24
17 a 20
20 a 24
30 a 40 total
20 a 25 total
24 a 26
50 a 55 total
55 a 60 total
24 a 26
8all
7a10
16 a 19
TEMP, *El Departamento de
DEL Agricultura de Estados
HORNO(P) Unidos dice "La came
cruda es popular, pero
usted deberfa saber
325° que cocinarla hasta
325° solamente 140° F
325° significa que
organismos que
325 ° causan
325° envenenamiento a
325o tray,s de los alimentos
podrian sobrevivir"
325 ° (Fuente: Safe Food
325 ° Book "Your Kitchen
300 ° Guide. USDA Rev,
June 1985)
325 °
325 °
325 °
325 °
325 °
325 °
325 °
325 °
i i | ,,,,, ,,
325 _
325 °
325 °
325 °
400 °
350 °
350 °
350 °
350 °
325 °
325 °
325 °
325 °
tLas ayes rellenas
generalmente requieren
30-45 minutos
adicionales de tiempo
para asarse
Cubra las piemas y la
pechuga con "foil" para
ue la piel quede
demasiado dorada y
seca
El Departamento de
Agricuitura de Estados
Unidos recomienda
cocinar muy bien las
carnes y las aves--las
carnes a por Io rnenos
una temperatura
INTERNA de 160° F y
las aves a pot io menos
una tem peratura
INTERNA de 180° F,
Cocinarlas a estas
temperaturas
generaimente protege
contra enfermedades
causadas por los
alimentos
64
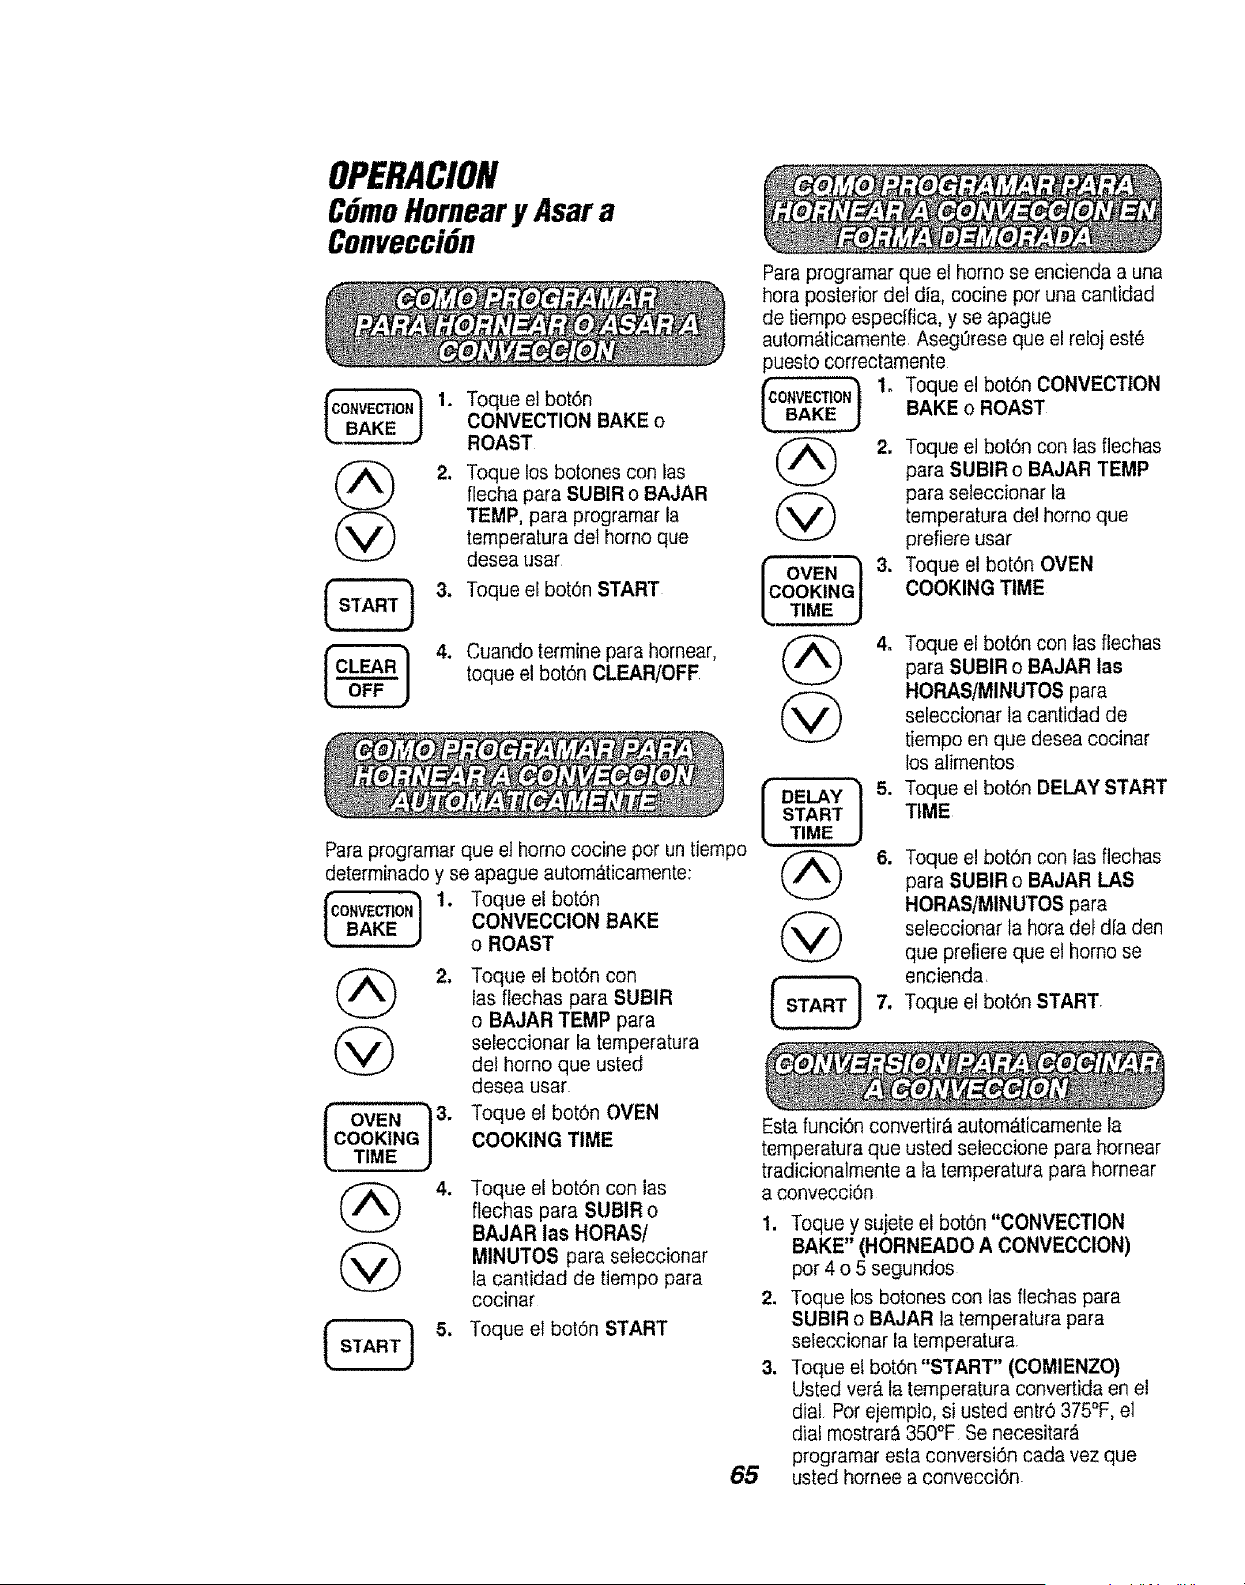
OPERACION
CGmoHorneary Asara
ConvecciGn
1. Toque el bot6n
CONVECTION BAKE o
ROAST
(_ 2, Toque los botones con las
flecha para SUBIR o BAJAR
TEMP, para programar la
temperatura det homo que
desea usar
} 3. Toque el botOn START
4. Cuando termine para hornear,
toque el botOn CLF-AR/OFF
Para programar que et homo cocine por un tiempo
determinado y se apague autom,_ticamente:
1, Toque el botOn
CONVECCION BAKE
o ROAST
2_
OVEN13-
COOKING/
@ "
@
Toque el botOn con
las flechas para SUBIR
o BAJAR TEMP para
seleccionar la temperatura
del homo que usted
desea usar
Toque el botOn OVEN
COOKING TIME
Toque el boron con ias
flechas para SUBIR o
BAJAR las HORAS/
MINUTOS para seleccionar
la cantidad de tiempo para
cocinar
Toque el botOn START
Para programar que el homo se encienda a una
hora posterior del dia, cocine por una cantidad
de tiempo especifica, y se apague
autom&ticamente AsegOrese que el reloj est6
puesto correctamente
1o Toque el botOn CONVECTION
BAKE o ROAST
COOKING
TIME
@
DELAY )
START
TIME
2. Toque el botOn con las flechas
para SUBIR o BAJAR TEMP
para seleccionar la
temperatura del homo que
prefiere usar
3. Toque el botOn OVEN
COOKING TIME
4. Toque el botOn con las flechas
para SUBIR o BAJAR las
HORAS/MINUTOS para
seleccionar la cantidad de
tiempo en que desea cocinar
los alimentos
5. Toque el botOn DELAY START
TIME
6. Toque el boron con las flechas
para SUBIR o BAJAR I.AS
HORAS/MINUTOS para
seleccionar ta hora def dfa den
que prefiere que el homo se
encienda
7, Toque el botOn START
Esta funciOn convertir_ autom_ticamente la
temperatura que usted seleccione para homear
tradicionalmente a la temperatura para homear
a convecci0n
1. Toque y suiete el bot6n "CONVECTION
BAKE" (HORNEADO A CONVECCION)
por 4 o 5 segundos
2. Toque los botones con las flechas para
SUBIR o BAJAR la temperatura para
seleccionar la temperatura
3. Toque el botOn"START" (COMIENZO}
Usted ver_ la temperatura convertida en el
dial Pot ejemp!o, si usted entr6 375% el
dial mostrar_ 350°F Se necesitar_
programar esta conversion cada vez que
usted hornee a convecciOn
65
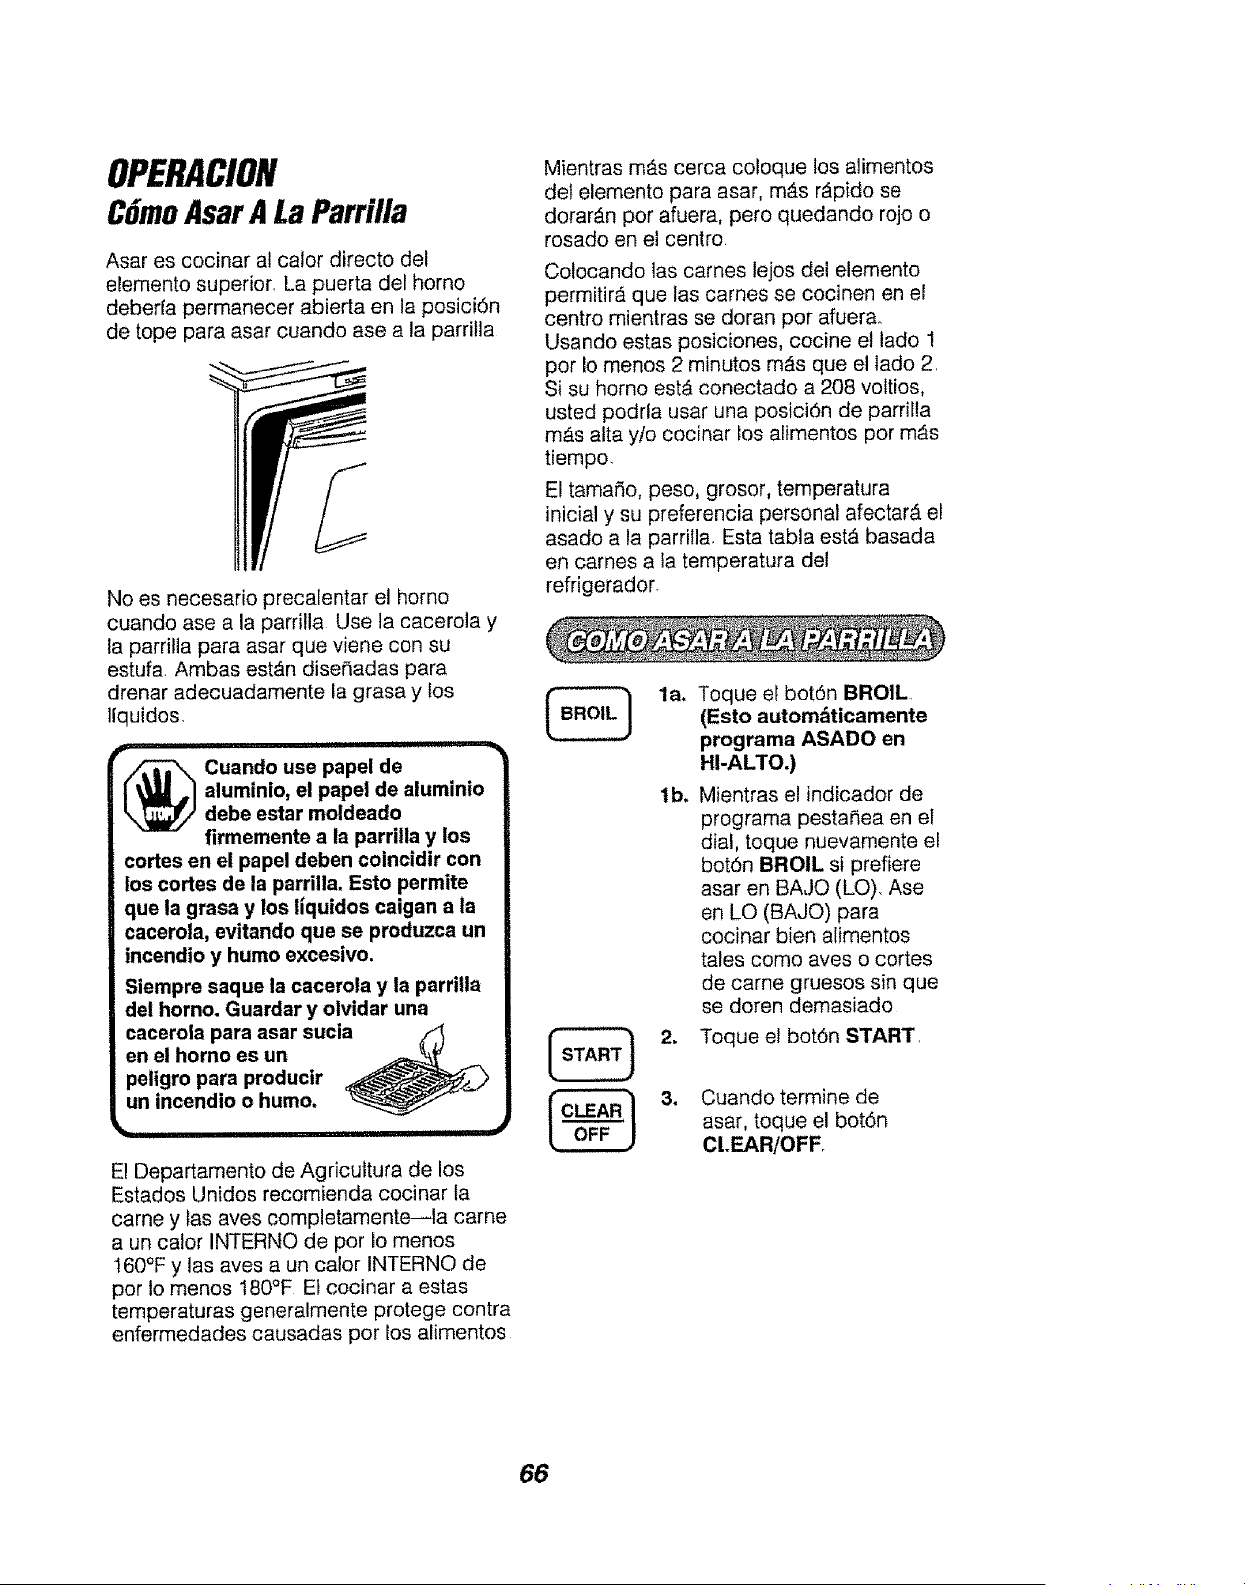
OPERACION
CGmoAsar A La Parrilla
Asar es cocinar al calor directo del
elemento superior, La puerta del homo
deberfa permanecer abierta en la posici6n
de tope para asar cuando ase a la parritla
No es necesario precalentar el homo
cuando ase a la parrilla Use la caceroia y
la parrilla para asar que viene con su
estufa Ambas est_n diseNadas para
drenar adecuadamente la grasa y los
llquidos,
Cuando use papel de
aluminio, el papel de aluminio
debe estar moldeado
firmemente a la parrilla y los
cortes en el papel deben coincidir con
los cortes de la parrilla. Esto permite
que la grasa y los iiquidos caigan a la
eacerola, evitando que se produzca un
incendio y humo excesivo.
Siempre saque la cacerola y la parrilla
del homo. Guardar y olvidar una
cacerola para asar sucia z_
en el horno es un _ _,
peligro para producir __.__,)
un incendio o humo, _-
_1_ i Hill IIII
El Departamento de Agricuttura de los
Estados Unidos recomienda cocinar la
came y las aves completamente--la came
a un calor INTERNO de por 1omenos
160°F y las ayes a un calor INTERNO de
por 1omenos 180°F El cocinar a estas
temperaturas generalmente protege contra
enfermedades causadas por los alimentos
Mientras mAs cerca coloque los alimentos
del elemento para asar, m_s r_pido se
dorar_n por afuera, pero quedando rojo o
rosado en el centro
Colocando las carnes lejos del elemento
permitirA que las carnes se cocinen en el
centro mientras se doran pot afuera.
Usando estas posiciones, cocine el lado 1
por Io rnenos 2 minutos m_s que el lado 2.
Si su homo est_ conectado a 208 voltios,
usted podrla usar una posici6n de parrilla
mAs alta y!o cocinar los alimentos por m&s
tiempo.
El tamafio, peso, grosor, temperatura
inicial y su preferencia personal afectarA el
asado a la parrilla. Esta tabla estA basada
en carnes a la temperatura del
refrigerador.
la.
lb.
2,
3,
Toque el bot6n BROIL
(Esto autom&ticamente
programa ASADO en
HI-ALTO.)
Mientras el indicador de
programa pestanea en el
dial, toque nuevamente el
bot6n BROIL si prefiere
asar en BAJO (LO). Ase
en LO (BAJO) para
cocinar bien alimentos
tales como aves o cortes
de came gruesos sin que
se doren demasiado
Toque et bot6n START
Cuando termine de
asar, toque el bot6n
CL.EAR/OFF,
66
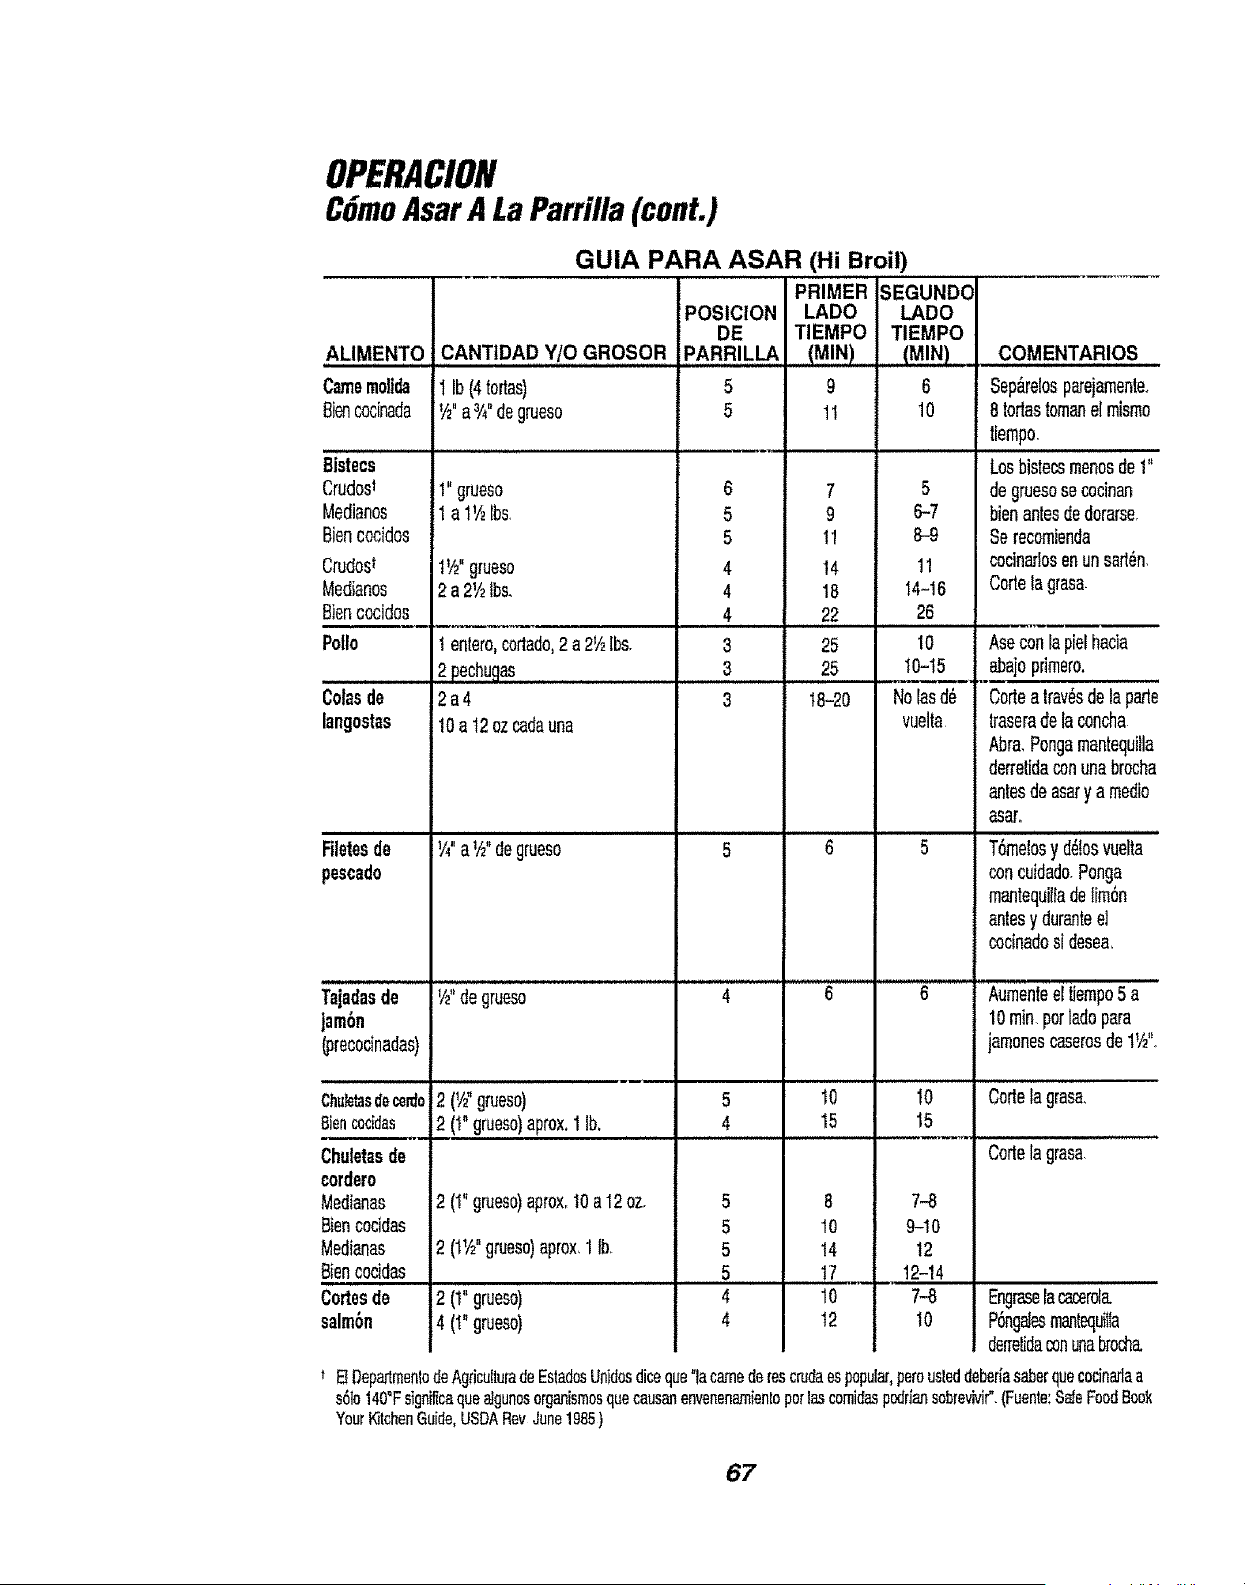
OPERACION
CGmoAsar A LaParrilla (cont.)
ALIMENTO
C_,memolida
8iencocinada
Bistecs
Crudosl
Medianos
Biencocidos
Crudost
Medianos
Biencocides
Polio
Colasde
langostas
Rletesde
tescado
GUIA PARA ASAR (Hi Broil)
;huletasdoce_lo
Biencocidas
Chuletasde
cordero
Medianas
Biencecidas
Medianas
Biencecidas
Cortesde
salm6n
PRIMER
POSICION LADe
DE TIEMPO
CANTtDAD Y/O GROSOR PARR!LLA (M!N)
_1Ib(4tortas)
V2"a3/4"degrueso
1"grLleSo
:la 1V2lbs
1entero,codado,2a 2V2[bs.
2 pechugas
2a4
10a t2 ozcadauna
W' aW'degrueso
SEGUNDO
LADO
TIEMPO
(M!N)
6
10
5
6-7
8-9
11
14-16
26
10
10-15
Nolasd_
vuelta
5 9
5 11
6 7
5 9
5 11
4 14
4 18
4 22
3 25
3 25
3 t8-20
5 6
4 6
5 10
4 15
5 8
5 10
5 14
5 17
4 10
4 12
COMENTAR!OS
Sep_relosparejamante.
8 todastomanel mismo
tiempo,
Losbistecsmenosde1"
degruesosecocinan
bienantesdedorarse.
Serecomienda
cocina,'losenunsart_n,
Corteta grasa
Aseconlapielhacia
abajoprimero.
Cortea tray,sdela parte
lraseradelaconcha
Abra,Pongamantequilla
derretidaconunabrocha
antesde asary a medio
asar.
T6melosy d_losvuelta
concuidado,Ponga
mantequilfadelim6n
antesy duranteel
cocinadosi desea.
lrajadasde V2"degrueso 6 Aumenteeltiempo5 a
_m6n 10min perladepara
[precocinadas) jamenescaserosde1V2'L
2 (V_"gmeso) 10 Codelagrasa.
2 (I" grueso)aprox,1 Ib, 15
Codelagrasa.
7-8
9-10
t2
12-14
7-8
t0
2 (1"grueso)aprox,10a 12oz.
2 (1V2"gruese)aprox,1lb.
2 (1"grueso)
4 (1"grueso)
Eng_ lacacerola.
P_gaJesmanlequiIla
den'elidaconunabrocha.
t B DepalmenlodeAgriculturade EstadosUn'_osdiceque'la camede rescrudaespopular,poreus_eddeberiasaberquecocinarlaa
s61o140°FsignfficaquoaJgunosorganismosquocausanenvenenamion_opo_lascomidasp_irian sobrevivir".(Fuento:SafeFoodBook
YourKitchenGuido,USDARovJune1985)
67
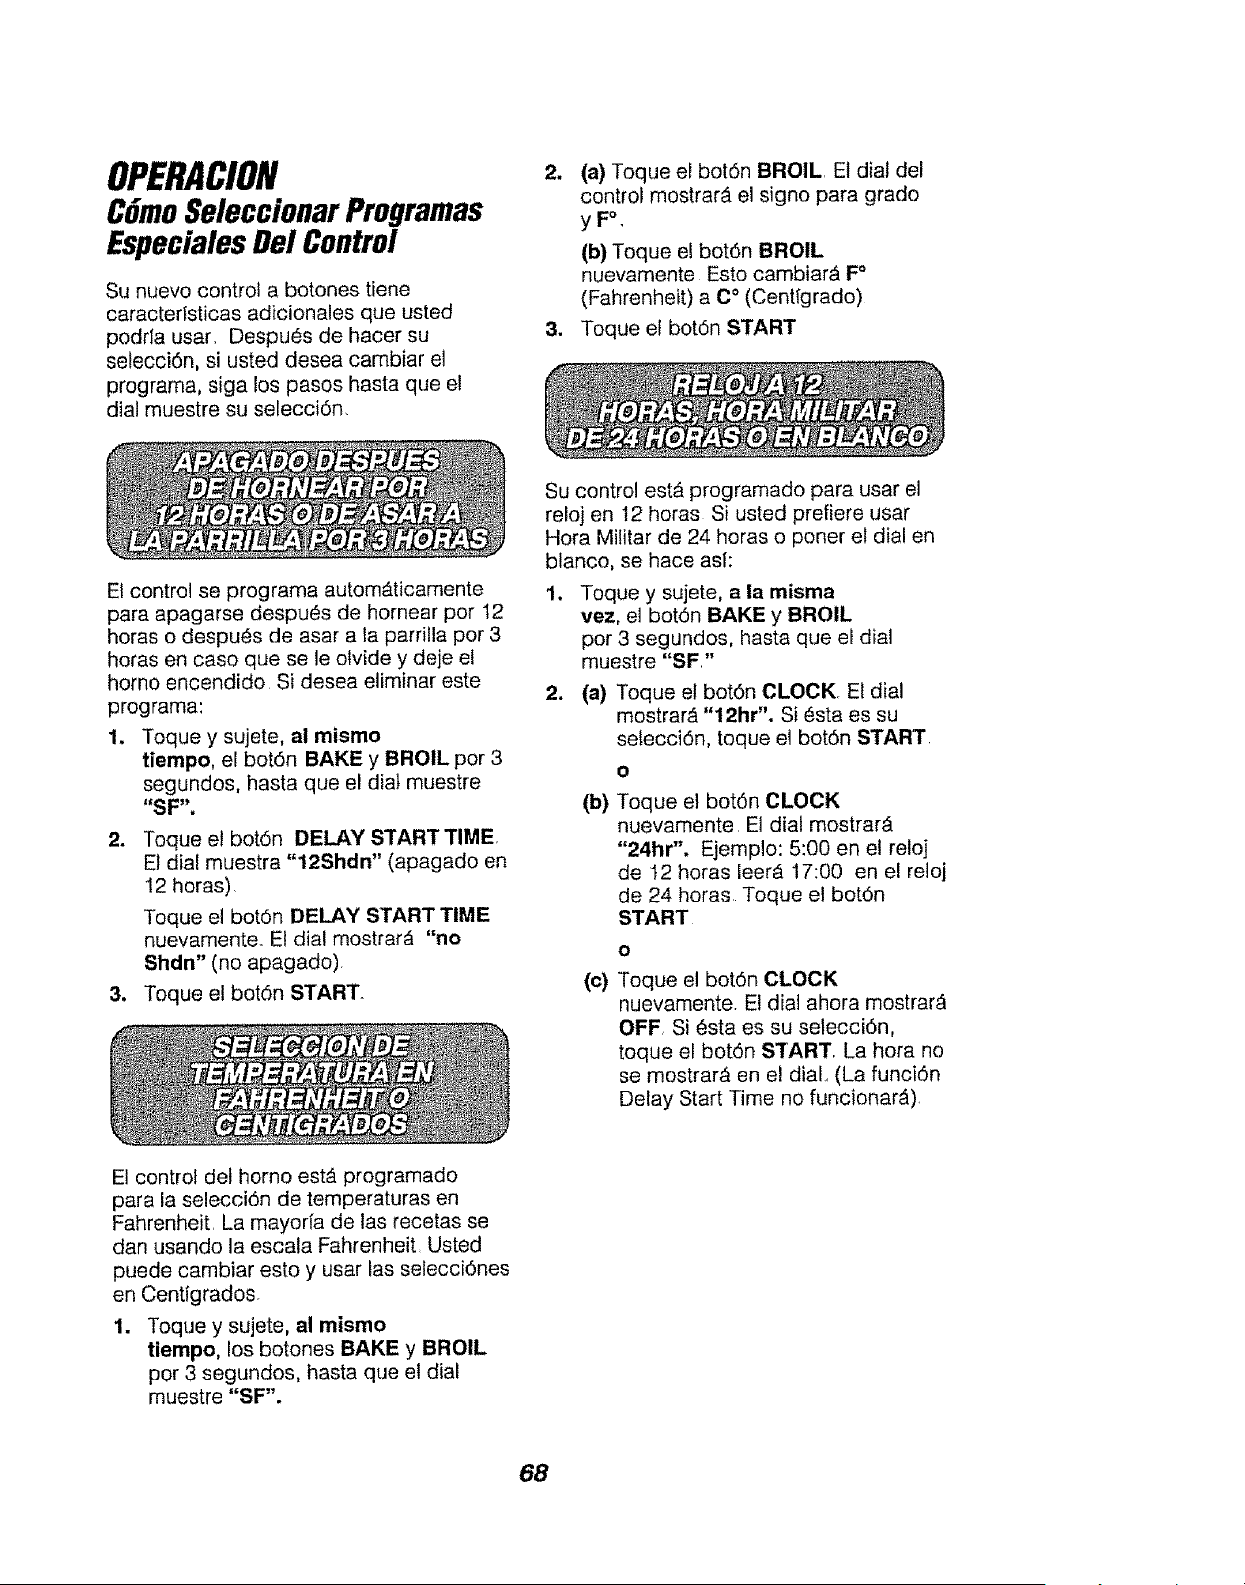
OPERACION
CGmoSeleccionarProgramas
EspecialesDel Control
Su nuevo control a botones tiene
caractertsticas adicionales que usted
podrla usar, Despues de hacer su
selecci6n, si usted desea cambiar el
program& siga los pasos hasta que el
dial muestre su selecci6n,
2. (a) Toque el bot6n BROIL. El dial del
control mostrar_ el signo para grado
y I=°,
(b) Toque el bot6n BROIL
nuevamente Esto cambiarA F °
(Fahrenheit) a C ° (Centlgrado)
3. Toque el bot6n START
El control se programa autom_ticamente
para apagarse despues de hornear por 12
horas o despues de asar a la parrilla pot 3
horas en caso que se le olvide y deje el
homo encendido Si desea eliminar este
programa:
1. Toque y sujete, al mismo
tiempo, el bot6n BAKE y BROIL por 3
segundos, hasta que el diat muestre
"SF".
2. Toque el bot6n DELAY START TIME,
Et dial muestra "12Shdn" (apagado en
12 horas)
Toque el bot6n DELAY START TIME
nuevamente. El dial mostrar_ "no
Shdn" (no apagado),
3. Toque el bot6n START.
Su control est_ programado para usar el
reloj en 12 horas Si usted prefiere usar
Hora Militar de 24 horas o porter el dial en
blanco, se hace asl:
1. Toque y sujete, a la misma
vez, el bot6n BAKE y BROIL
por 3 segundos, basra que el dial
muestre "SF"
2. (a) Toque el bot6n CLOCK Et dial
mostrar_ "12hr". Siesta es su
setecci6n, toque el bot6n START
O
(b)Toque el bot6n CLOCK
nuevamente, El dial mostrar_t
"24hr", Ejemplo: 5:00 en el reloj
de 12 horas leer_ 17:00 en e! reloj
de 24 horas Toque el bot6n
START
Toque e! bot6n CLOCK
nuevamente. El dial ahora mostrarA
OFF, Si 6sta es su selecci6n,
toque el bot6n S'[ART, La hora no
se mostrar_ en el dial,, (La funci6n
Delay Start Time no funcionarA),
El control del homo est_ programado
para la selecci6n de temperaturas en
Fahrenheit. La mayorfa de las recetas se
dan usando la escala Fahrenheit Usted
puede cambiar esto y usar las selecci6nes
en Centigrados.
1. Toque y sujete, al mismo
tiempo, los botones BAKE y BROIL
por 3 segundos, hasta que et dial
muestre "SF".
68
OPERACION
CGmoSeleccionarProgramas
EspecialesDel Control(cont.)
1
Para activar el control, toque et bot6n
CONTROL LOCKOUT pot 3 segundos
hasta que el control suene dos veces, y
LOC desaparezca del dial
Et control le permitir& cerrar los botones de
manera que no se puedan activar cuando
los empuje Si se preocupa de dejar el homo
sin supervisi6n, active este programa
1. Toque y sujete, a la misma
vez por 3 segundos,el bot6n
BAKE y BROIL, hasta que el dial
muestre "SF".
2. (a) Toque el bot6n CLEAN, Et dial
muestra "LOC OFF" (cierre inactivo)
(b) Toque el bot6n CLEAN nuevamente
El dial mostrar_ "LOC ON" (cierre
activado)
3o Toque el bot6n START
Este programa se puede seleceionar
solamente cuando el homo no estb en
USO,
Cuando este programa este activado, el
control sonar_ y el dial mostrar_ "LOC," si
se toque un bot6n. Los botones Clock, Timer
o Oven Light no son afectados
El control fe permitir_ deactivar los botones
para que no puedan ser activados cuando
se toquen para programar o limpiar
Para activar esta funci6n:
1,
Toque el bot6n CONTROL LOCKOUT
por 3 segundos hasta que el control
haga dos sonidos. El dial mostrarb,
"LOC" continuamente, y fa hora del dta
no desaparecer_
NOTA" Todas tas funciones para cocinar
y de tiempo ser&n canceladas cuando
se deactiva el control
Su nuevo control tiene una funci6n para
cocinar y mantener la temperatura para
cocinar autom_.ticamente solamente que
mantendr_ los alimentos tibios hasta 3 horas
despu6s que el cocinado autom_tico haya
terminado Para activar esta funci6n:
t.
Toque y sujete, a la rnisma
vez, los botones BAKE y BROIL
por 3 segundos, hasta que el dial
muestre "SF".
2. (a) Toque el botOn OVEN COOKING
TIME, El dial mostrar_ "HLd OFFr "
,
(b) Toque el bot6n OVEN COOKING
TIME nuevamente para activar este
programa. El dia! mostrar_ "Hl..d ON".
Toque el bot6n START.
Este Programa Especial te permitir_
cambiar la velocidad, #t significa que el
cambio de velocidad es lento hasta #5
que significa que el cambio de velocidad
es r_,pido. Para seleccionar la ve!ocidad
que prefiere, siga estos pasos:
1. Toque y sujete, a la misma
vez, los botones BAKE y BROIL
por 3 segundos, hasta que el dial
muestre "SF".
2. Toque el bot6n con la flecha para
SUBIR LA HORA El dial ie mostrar_
una posici6n de velocidad entre 1 y 5.
3. Toque la flecha para SUBIR LA HORA
para aumentar la velocidad hasta el
numero 5
,
O
Toque el bot6n con la flecha para
BAJAR LA HORA para disminuir ta
velocidad hasta el nt]mero 1
Toque el botdn START.
69
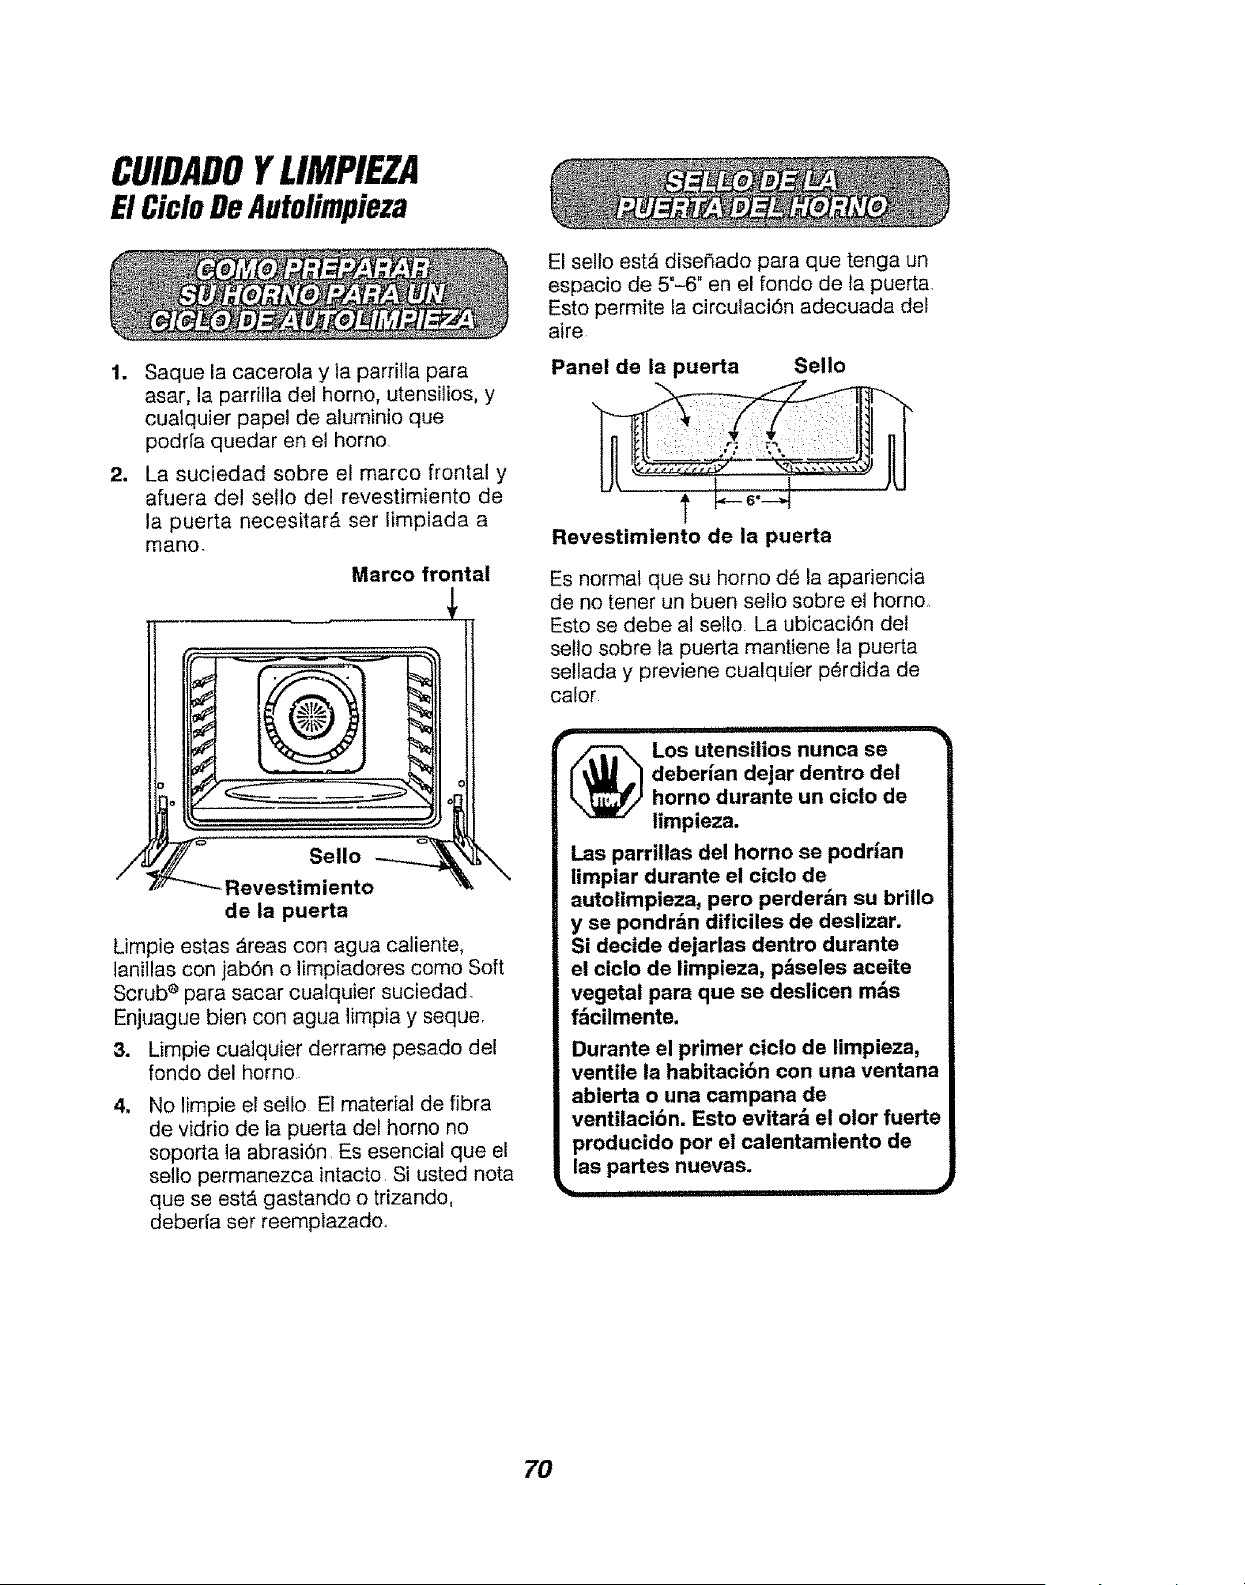
CUIDADOYLIMPIEZA
El CicloDeAutolimpieza
=
2_
Saque la cacerola y la parrilla para
asar, la parrilla del homo, utensilios, y
cualquier papel de aluminio que
podrfa quedar en el homo
La suciedad sobre el marco frontal y
afuera del sello del revestimiento de
la puerta necesitar_ ser iimpiada a
mano.
Marco frontal
Sello
Revestimiento
de la puerta
Limpie estas Areas con agua caliente,
lanillas con jabdn o limpiadores como Soft
Scrub e para sacar cualquier suciedad,
Enjuague bien con agua limpia y seque
3. Limpie cualquier derrame pesado del
fondo del homo
4_
No limpie el sello El material de fibra
de vidrio de la puerta del homo no
soporta la abrasidn, Es esencial que el
sello permanezca intacto Si usted nora
que se est_ gastando o trizando,
deberla set reemptazado_
El sello estA diseSado para que tenga un
espacio de 5"-6" en el rondo de la puerta,
Esto permite la circulaci6n adecuada del
aire
Panel de la puerta Sello
Revestimiento de la puerta
Es normal que su homo d6 la apariencia
de no tenet un buen sello sobre el horno_
Esto se debe al setlo. La ubicaci6n del
sello sobre la puerta mantiene la puerta
setlada y previene cualquier perdida de
calor
,,, ,i,ii, iii
Los utensilios nunca se
deberian dejar dentro del
horno durante un ciclo de
limpieza.
Las parrillas del homo se podrlan
timpiar durante el ctclo de
autolimpieza, pero perder_n su brillo
y se pondrdn dificiles de deslizar.
Si decide dejarlas dentro durante
el ciclo de limpieza, p_seles aceite
vegetal para que se deslicen m_s
f_cilmente.
Durante el primer ciclo de limpieza,
ventile la habitaci6n con una ventana
abierta o una campana de
ventilaci6n. Esto evitarb et olor fuerte
producido por el calentamiento de
las partes nuevas.
i_ i .................................. ..a
70

CUIDADOYLIMPIEZA
El CicloDeAutolimpieza(cont,)
Et Ciclo de Limpieza, incfuyendo el tiempo
de la cuenta hacia atr#., se programa
automAticamente por 4 horas y 30 minutos
y se apaga autom_ticamente despu6s del
tiempo prograrnado, pero usted puede
cambiar esto de 3 horas si el homo est&
levemente sucio, hasta 5 horas si el homo
est_ muy sucio.
1. Toque el bot6n CLEAN
4 horas 30 minutos se
mostrar&n en el dial
@
2. Si usted desea cambiar la
cantidad de tiempo para
limpiar, toque los botones
con ias flechas para SUBIR
o BAJAR las HORAS/
MINUTOS
3. Toque el bot6n START
La puerta se cierra con cerrojo
autom_.ticamente.. El dial mostrar_ el tiempo
de limpieza que queda No ser_ posible abrir
la puerta del homo hasta que la temperatura
caiga m,Csabajo de la temperatura de cierre
y la tuz de LOCKED DOOR (PUERTA CON
CERROJO) se apague.
Cuando la luz de LOCKED DOOR se
apague, abra la puerta
Las patabras LOCK DOOR pestaNear,_n y el
control del homo dar_ una sepal si usted
programa el oiclo de limpieza y se olvida de
cerrar la puerta del homo.
Toque el bot6n CLEAR/OFF Usted necesitar_
esperar a que la temperatura del homo baje
m_s que la temperatura de enganche (aprox
1 hora) antes de tratar de abrir la puerta
Despues de! ciclo usted podda notar un
poco de cenizas blancas en el homo
Simplemente limpielas con un paso o
esponja ht_meda.
Si algunas manchas btancas persisten,
frieguelas con una lanilla de acero con
jab6n+ Aseg0rese de enjuagar bien. Estas
son generalmente dep6sitos de sal que no
se pueden sacar durante el ciclo.
Si per alguna raz6n usted no queda
satisfecho con los resultados de la
limpieza, simplemente repita el ciclo,
AsegQrese que et retoj este puesto
correctamente.
@
@
1. Toque el bot6n CLEAN
2_
DELAY I 3.
START
TIME
Si usted desea cambiar la
cantidad de tiempo para
limpiar, toque tos botones
con tas fiechas para
SUBIR o BAJAR las
NORAS/MINUTOS
Toque el bot6n DELAY
START TIME
Toque los botones con
tas flechas para SUBIR o
BAJAR las HORASi
MINUTOS para
seleccionar ia hera del
dia en que prefiere que el
ciclo de timpieza
empiece.
Toque el bot6n START
71
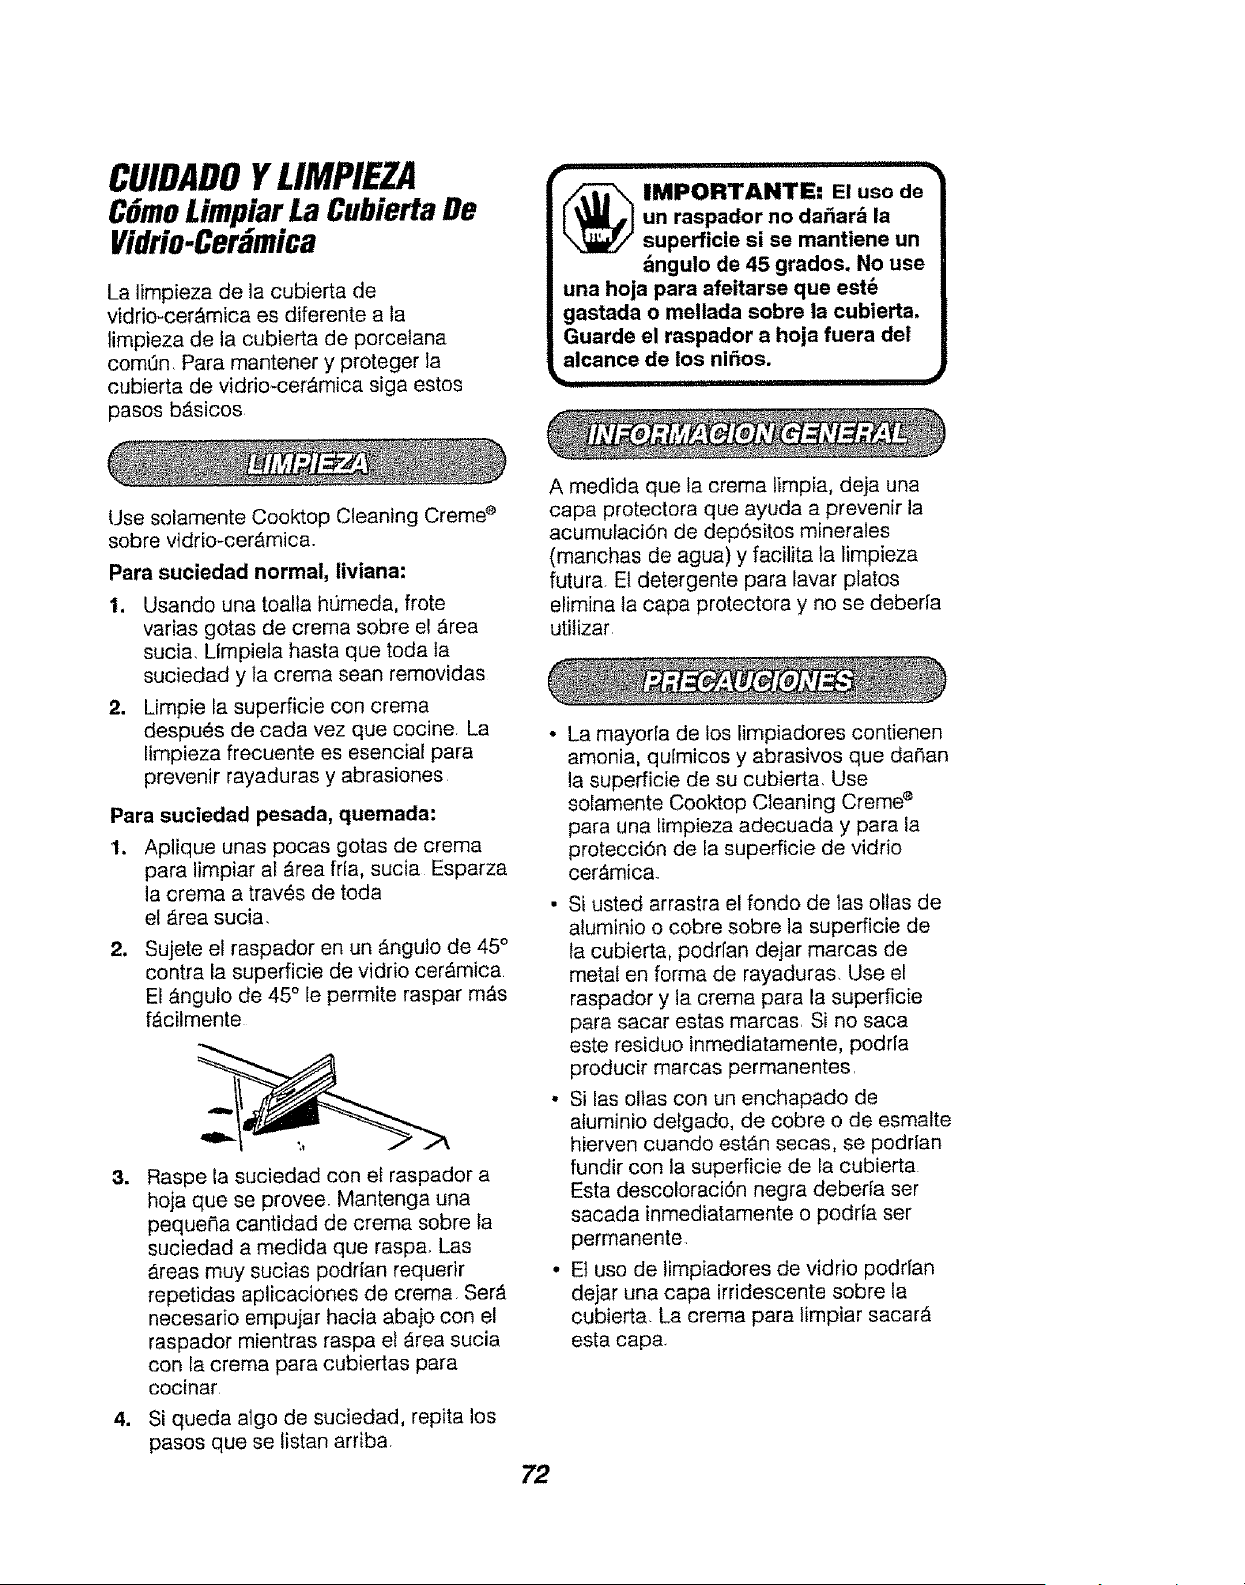
CUIDADOY LIMPIEZA
CGmoLimpiarLa CubiertaDe
Vidrio-Cer mica
La limpieza de la cubierta de
vidrio-cerAmica es diferente a la
limpieza de la cubierta de porcelana
comt3n Para mantener y proteger la
cubierta de vidrio-cerAmica siga estos
pasos bAsicos
II ii iiiiiiiiilUl
_ MPORTANTE: E! uso de
un raspador no da_ar_ la
superficie si se mantiene un
bngulo de 45 grados. No use
una hoja para afeitarse que est_
gastada o mellada sobre ia cubierta,
Guarde el raspador a hoja fuera del
alcance de los ni_os.
Use solamente Cooktop Cleaning Creme e
sobre vidrio-cerAmica,
Para suciedad normal, liviana:
1. Usando una toalla ht]meda, frote
varias gotas de crema sobre el Area
sucia, Llmpiela hasta que toda la
suciedad y la crema sean removidas
2. Limpie la superficie con crema
despues de cada vez que cocine La
limpieza frecuente es esencial para
prevenir rayaduras y abrasiones
Para suciedad pesada, quemada:
1. Aplique unas pocas gotas de crema
para limpiar aI Area frla, sucia Esparza
la crema a traves de toda
el Area sucia,
,
Sujete el raspador en un Angulo de 45°
contra la superficie de vidrio cerAmica
El Angulo de 45 ° le permite raspar mAs
fAcilmente
=
,
Raspe la suciedad con el raspador a
hoja que se provee Mantenga una
pequeSa cantidad de crema sobre la
suciedad a medida que rasp& Las
Areas muy sucias podrfan requerir
repetidas aplicaciones de crema SerA
necesario empujar hacia abajo con el
raspador mientras raspa el _rea sucia
con la crema para cubiertas para
cocinar
Si queda algo de suciedad, repita los
pasos que se listan arriba
A medida que la crema limpia, deja una
capa protectora que ayuda a prevenir la
acumulacidn de dep6sitos minerales
(manchas de agua) y facilita la limpieza
futura, El detergente para lavar platos
elimina la capa protectora y no se deberfa
utilizar
La mayoria de los limpiadores contienen
amonia, qulmicos y abrasivos que daSan
la superficie de su cubierta Use
solamente Cooktop Cleaning Creme e
para una limpieza adecuada y para la
protecci6n de la superficie de vidrio
ceramic&
Si usted arrastra el fondo de las ollas de
aluminio o cobre sobre la superficie de
ta cubierta, podrfan dejar marcas de
metal en forma de rayaduras, Use el
raspador y la crema para la superficie
para sacar estas marcas Si no saca
este residuo inmediatamente, podrfa
producir marcas permanentesr
Si las ollas con un enchapado de
afuminio defgado, de cobre o de esmalte
hierven cuando est_n secas, se poddan
fundir con la superficie de la cubierta
Esta descoloraci6n negra deberfa ser
sacada inmediatamente o podrfa ser
permanente
Et uso de limpiadores de vidrio podrfan
dejar una capa irridescente sobre la
cubierta, La crema para limpiar sacarA
esta cap&
72
CUIDADOYLIMPIEZA
CGmoLimpiar
• Las manchas de agua (dep6sitos
minerales) son removibles usando crema
y vinagre blanco a toda fuerza.
• No use un raspador con una hoja
gastada o meltada sobre la cubierta
• No use limpiadores abrasivos o lanillas
abrasivas sobre la cubierta.
• Se puede usar tanillas de pl_stico tal
como Dobie _,
Para ordenar Cooktop Cleaning Creme s
adicional, Ilame a su Centro de Servicio o
tienda Sears mAs cercana, pida el Stock
No 40079.
Limpie solamente para retocarlas entre
ciclos de limpieza Use detergentes
liquidos para platos, agua tibia, o tanillas
de acero con jab6n Enjuague bien
despues de limpiar y seque
NUNCA USE LtMPIADORES PARA
HORNOS DENTRO 0 ALREDEDOR DE
CUALQUIER PAR'IrE DEL HORNO.
Cuando limpie, asegtJrese de no dobtar o
mover el sensor de la temperatura
ubicado en la pared trasera del homo
MATERIALES DE LIMPIEZA
• Detergente liquido para plates.
• Agua tibia.
• Pa_o suave
No use limpiadores abrasives,
limpiadores industriales, o
blanquedores (cloro).
MATERIALES DE LIMPIEZA
• Detergente lfquido para platos
• Agua tibia
• Lanilfas de acero con jab6n.
• Limpiador comercial para hornos
COMO LIMPIAR
Permita que la cacerola se remoje Ponga
detergente para platos sobre la parrilta y
cubra con un paho o una toalla htJmeda
por un rato. Friegue a medida que sea
necesario Lave, enjuague, y seque bien.
Usted tambien podria poner la cacerola y
la parrilla en la lavadora de platos
MATERIALES DE LIMPIEZA
• Detergente liquido para platos
• Agua tibia
• Toallas de papel
COMO MMPIAR
No use limpiadores para hornos, poivos
para limpiar, o abrasivos fuertes Si salsas
para sasonar, salsa de tomates, materiates
para batidos, etc., se derraman, limpielos
1om_s posible Cuando las superficies se
enfrien limpie bien las superficies
pintadas.
PARA LIMPIAR
Para timpieza diaria, use un limpiador
para vidrios y una toalta de papel Para
suciedad pesada, use una pasta de soda
para hornear y agua Enjuague bien
MA'fERIALES DE LIMPIEZA
• Limpiador abrasivo suave
• Esponja4regador
No use iimpiadores abrasives fuertes,
limpiadores industriales, o cloro,
73

CUIDADOYLIMPIEZA
Partes Removibles
MATERIALES DE LIMPIEZA
• Detergente para platos
• Agua tibia
• PaSo suave
Injerto de resorte
para enganche
Lado plano en el
eje de control
COMOSACAR
1. Asegt:_rese que la perilla est6 en
posici6n de apagado.
2. Tire derecho hacia afuera del talio
Usando un pedazo de cuerda podrla
facilitar el sacado de la perilla Ponga la
cuerda debajo y alrededor de la perilla,
y tire derecho hacia afuera
PARA LIMPIAR
Lave bien la perilla con agua con jab6n
Seque completamente con un pa5o suave.
No permita que la perilla se remoje.
PARA COLOCARLANUEVAMENTE
1. Mire la parte trasera de la perilia. La
Area plana moldeada de la perilla est,_
dise_ado para quedar perfectamente
ajustado en el tallo de la perilla
2. Coloque el lado ptano de la perilla en
tfnea con la Area plana en el talto de
la perilla
3. Empuje la peri!la hasta Io mAs atr_.s
posible
p,. i_11 ' ' ,_
_ RECAUCION: Desconecte
el poder el6ctrico hacia el
homo en la caja del circuito
principal o en la caja de los
fusibtes antes de tratar de reemplazar
el foco de la luz del homo. No toque
un foco de la luz caliente con las
manos mojadas o con un paso
hOmedo. Espere a que el foeo se
enfHe y use un pa_o seco.
_1 !!!tJ II Iltll
S.. - Collar con
uletaaor _ . .
..... l--_J--,__, electriciaad
oel_vlarlo/f/_.%'____,;
Foco
Cubierta _..__
de vidrio I_
PARA REEMPLAZAR
'1.
Coloque ta mano bajo la cubierta y
empuje el alambre sujetador
firrnemente hacia atrAs, hasta que
pase por encima y suelte la cubierta
del foco,
2. Desatornitle ef foco de ia luz
3. Reemplace el foco con un foco para
homos de 40 watts de 31/2_
4. Tire el alambre suietador hacia
adetante hasta que caiga en la
indenci6n sobre la cubierta del foco.
74
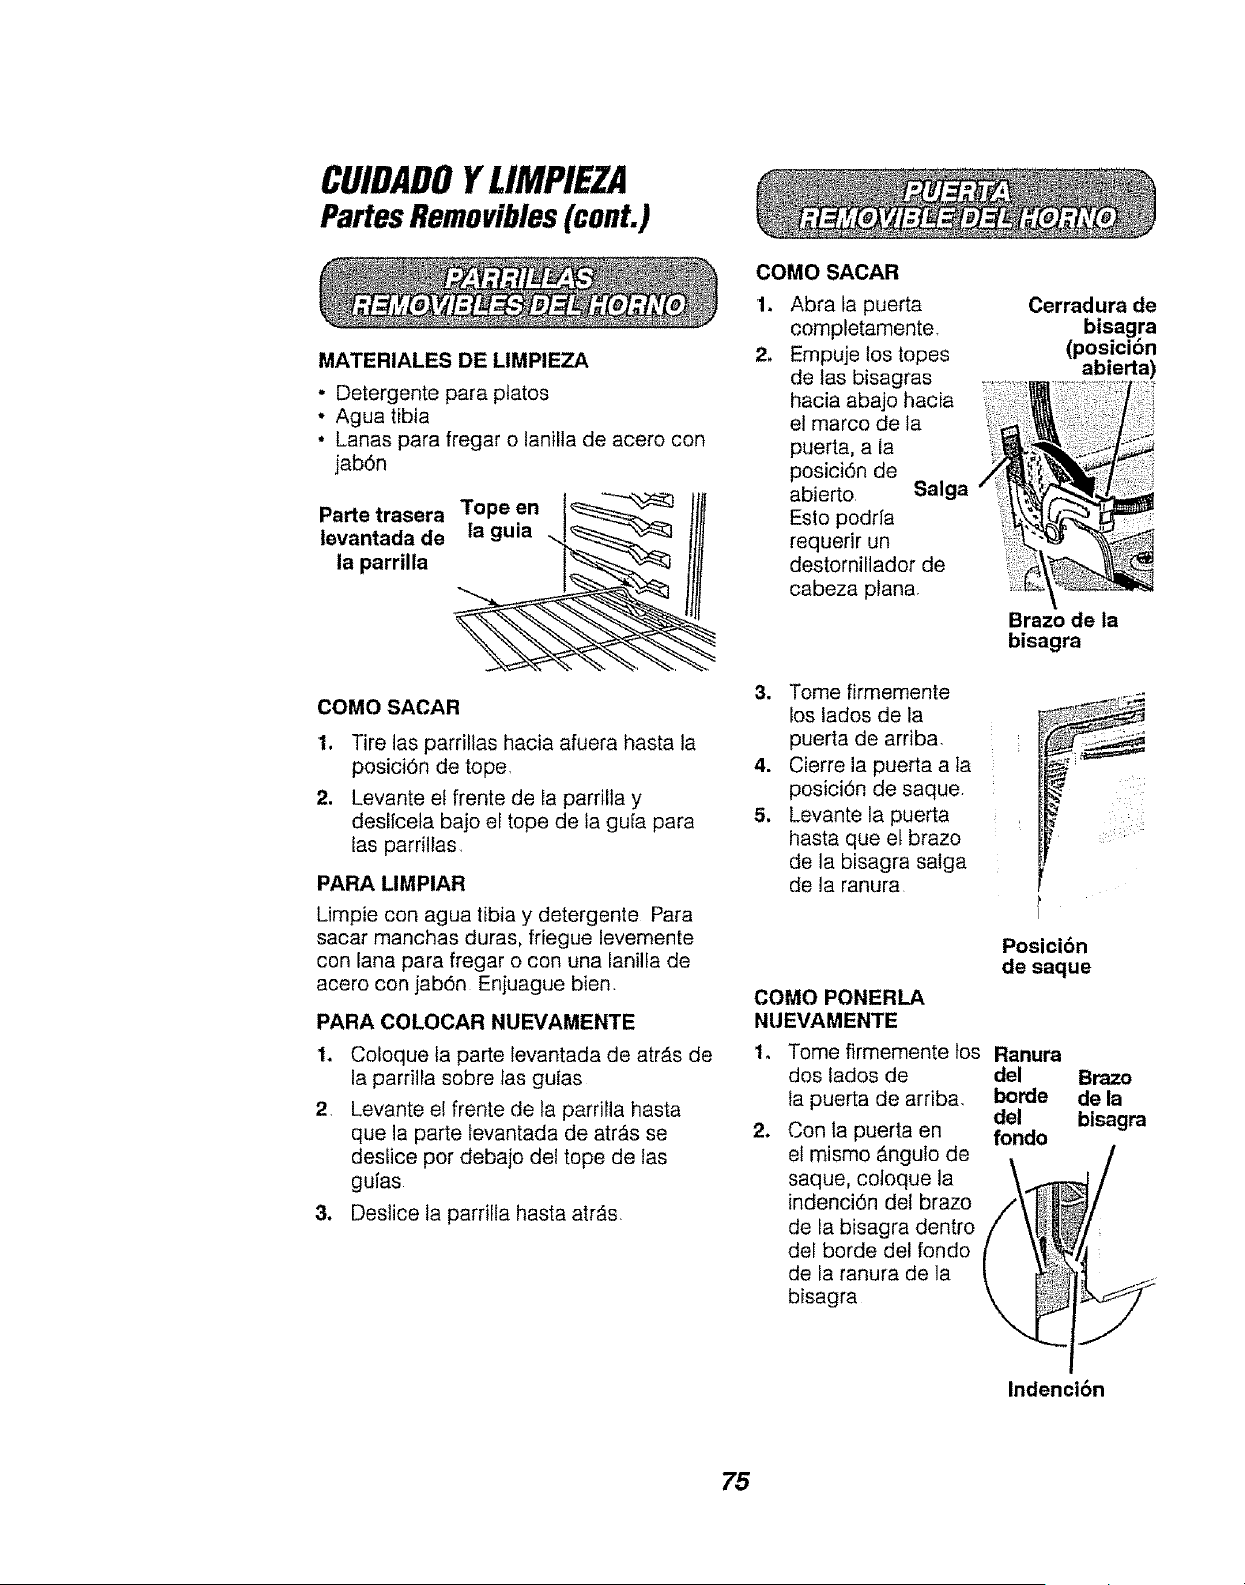
CUIDADOYLIMPIEZA
Partes Removibles(cont.)
MATERIALES DE LIMPIEZA
- Detergente para ptatos
, Agua tibia
* Lanas para fregar o lanilla de acero con
jab6n
Parte trasera Tope en
levantada de la guia
la parrilla
COMO SACAR
1. Abrala puerta
completamente.
2, Empuje los topes
de las bisagras
hacia abajo hacia
el marco de ta
puerta, a la
posici6n de
abierto Salga
Esto podrfa
requerir un
destornillador de
cabeza plana
Cerradura de
bisagra
(posicion
abierta)
Brazo de la
bisagra
COMO SACAR
1. Tire las parrillas hacia afuera hasta la
posiciOn de tope
2. Levante el frente de la parrilla y
deslfcela bajo el tope de la gufa para
las parrillas
PARA LIMPIAR
Limpie con agua tibia y detergente Para
sacar manchas duras, friegue levemente
con lana para fregar o con una lanilfa de
acero con jab6n Enjuague bien
PARA COLOCAR NUEVAMENTE
1. Coloque la parte tevantada de atrAs de
la parrilia sobre las guias
21 Levante el frente de la parrilla hasta
que la parte levantada de atr_s se
deslice por debajo del tope de las
gufas
3. Deslice la parrilla hasta atr_s
3. Tome firmemente
los lados de la
puerta de arriba,
4. Cierre la puerta a ta
posici6n de saque.
5, Levante la puerta
hasta que el brazo
de la bisagra salga
de la ranura
Posicibn
de saque
COMO PONERLA
NUEVAMENTE
1. Tome firmemente los Ranura
dos lados de del
ia puerta de arriba, borde
del
2, fondo
Con {a puerta en
el mismo _ngulo de
saque, cotoque Ja
indenci6n del brazo
de la bisagra dentro
del borde del rondo
de la ranura de la
bisagra
arszo
de la
bisagra
/
Indencibn
75
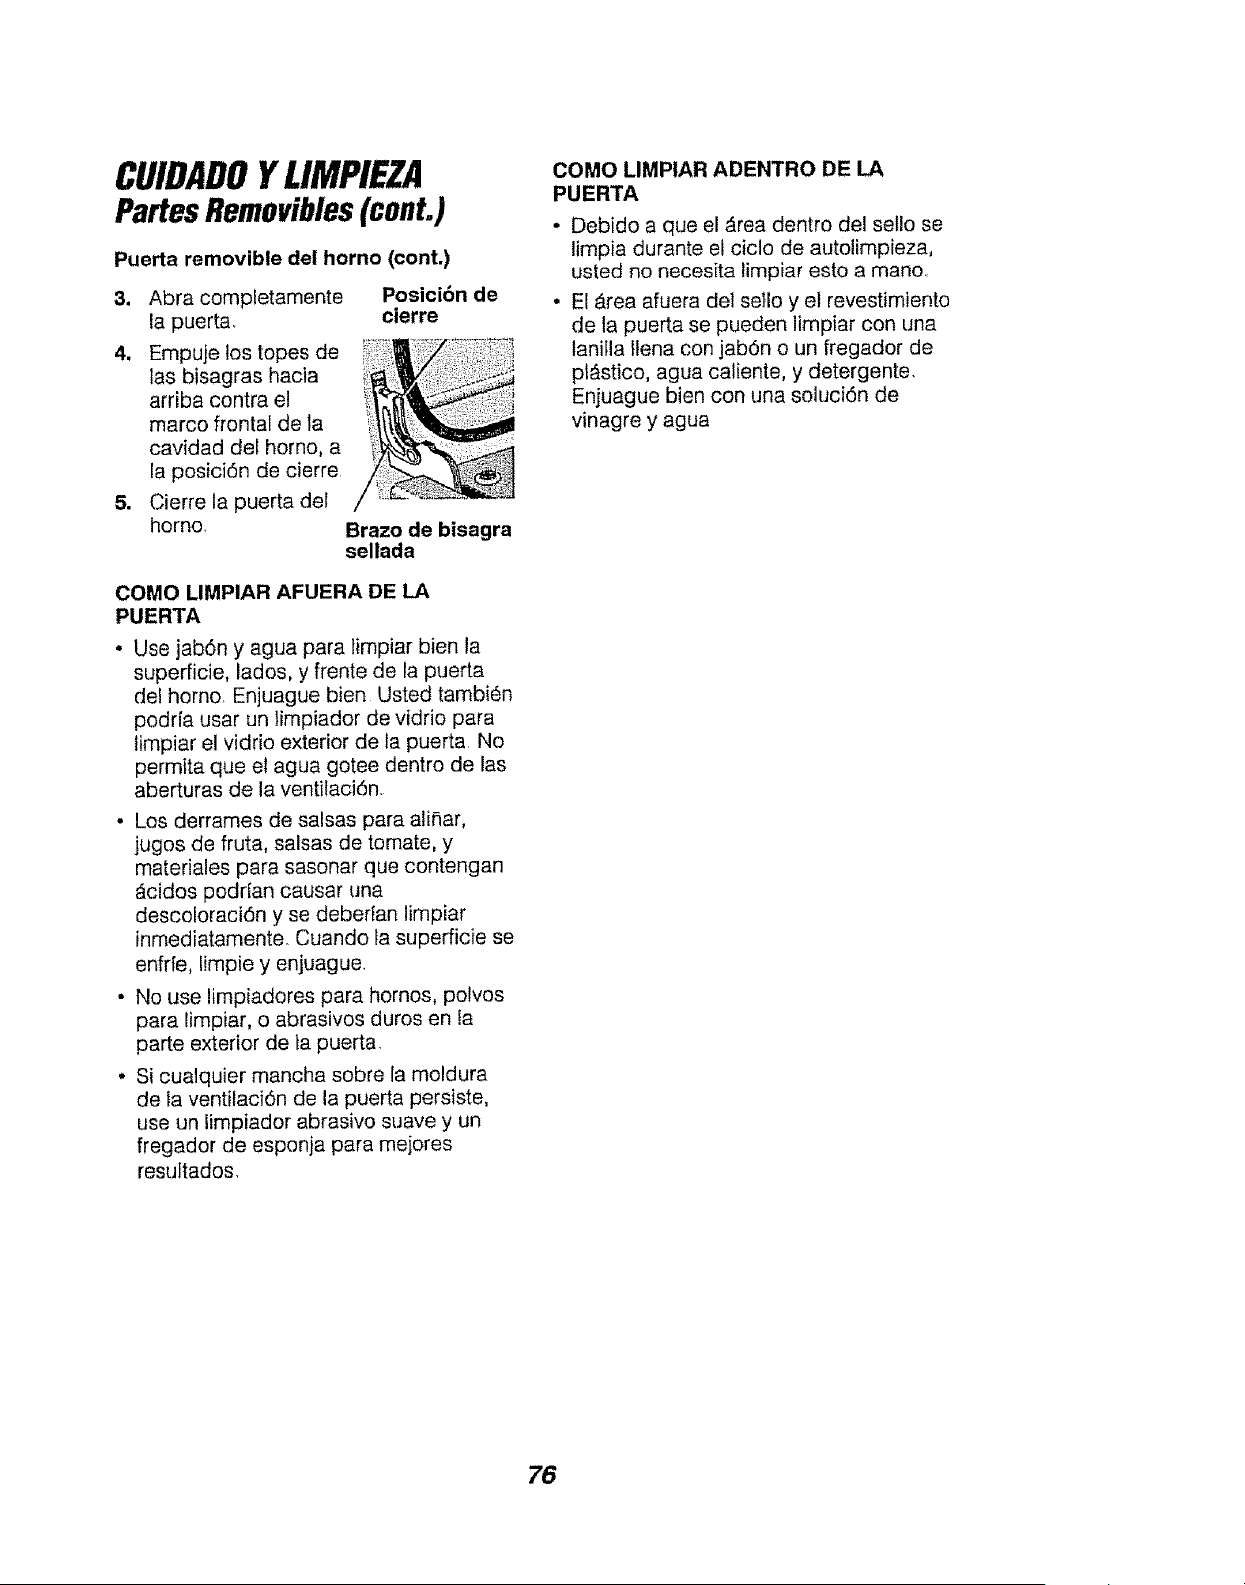
CUIDADOYLIMPIEZA
PartesRemovibles(cont.)
Puerta removible dei horno (cont.)
3. Abra completamente Posici6n de
la puerta, cierre
4. Empuje los topes de
las bisagras hacia
arriba contra el
marco frontal de la
cavidad del homo, a
la posici6n de cierre
5. Cierre la puerta del
homo+
Brazo de bisagra
sellada
COMO LIMPIAR AFUERA DE LA
PUERTA
• Use jab6n y agua para limpiar bien la
superficie, lados, y frente de la puerta
del homo. Enjuague bien Usted tambien
podrfa usar un limpiador de vidrio para
iimpiar el vidrio exterior de la puerta No
permita que el agua gotee dentro de las
aberturas de la ventilaci6n.
• Los derrames de salsas para alifiar,
jugos de fruta, salsas de tomate, y
materiales para sasonar que contengan
_cidos poddan causar una
descoloraci6n y se deberfan limpiar
inmediatamente. Cuando la superficie se
enfrfe, limpie y enjuague
• No use limpiadores para hornos, polvos
para limpiar, o abrasivos duros en la
parte exterior de la puerta.
• Si cualquier mancha sobre la moldura
de la ventilaci6n de la puerta persiste,
use un lirnpiador abrasivo suave y un
fregador de esponja para mejores
resuftados.
COMO LIMPIAR ADENTRO DE LA
PUERTA
° Debido a que el ,_rea dentro del setlo se
limpia durante el ciclo de autolimpieza,
usted no necesita limpiar esto a mano..
° El Area afuera del sello y et revestimiento
de la puerta se pueden limpiar con una
lanitla Ilena con jab6n o un fregador de
pl_stico, agua caliente, y detergente
Enjuague bien con una soluci6n de
vinagre y agua
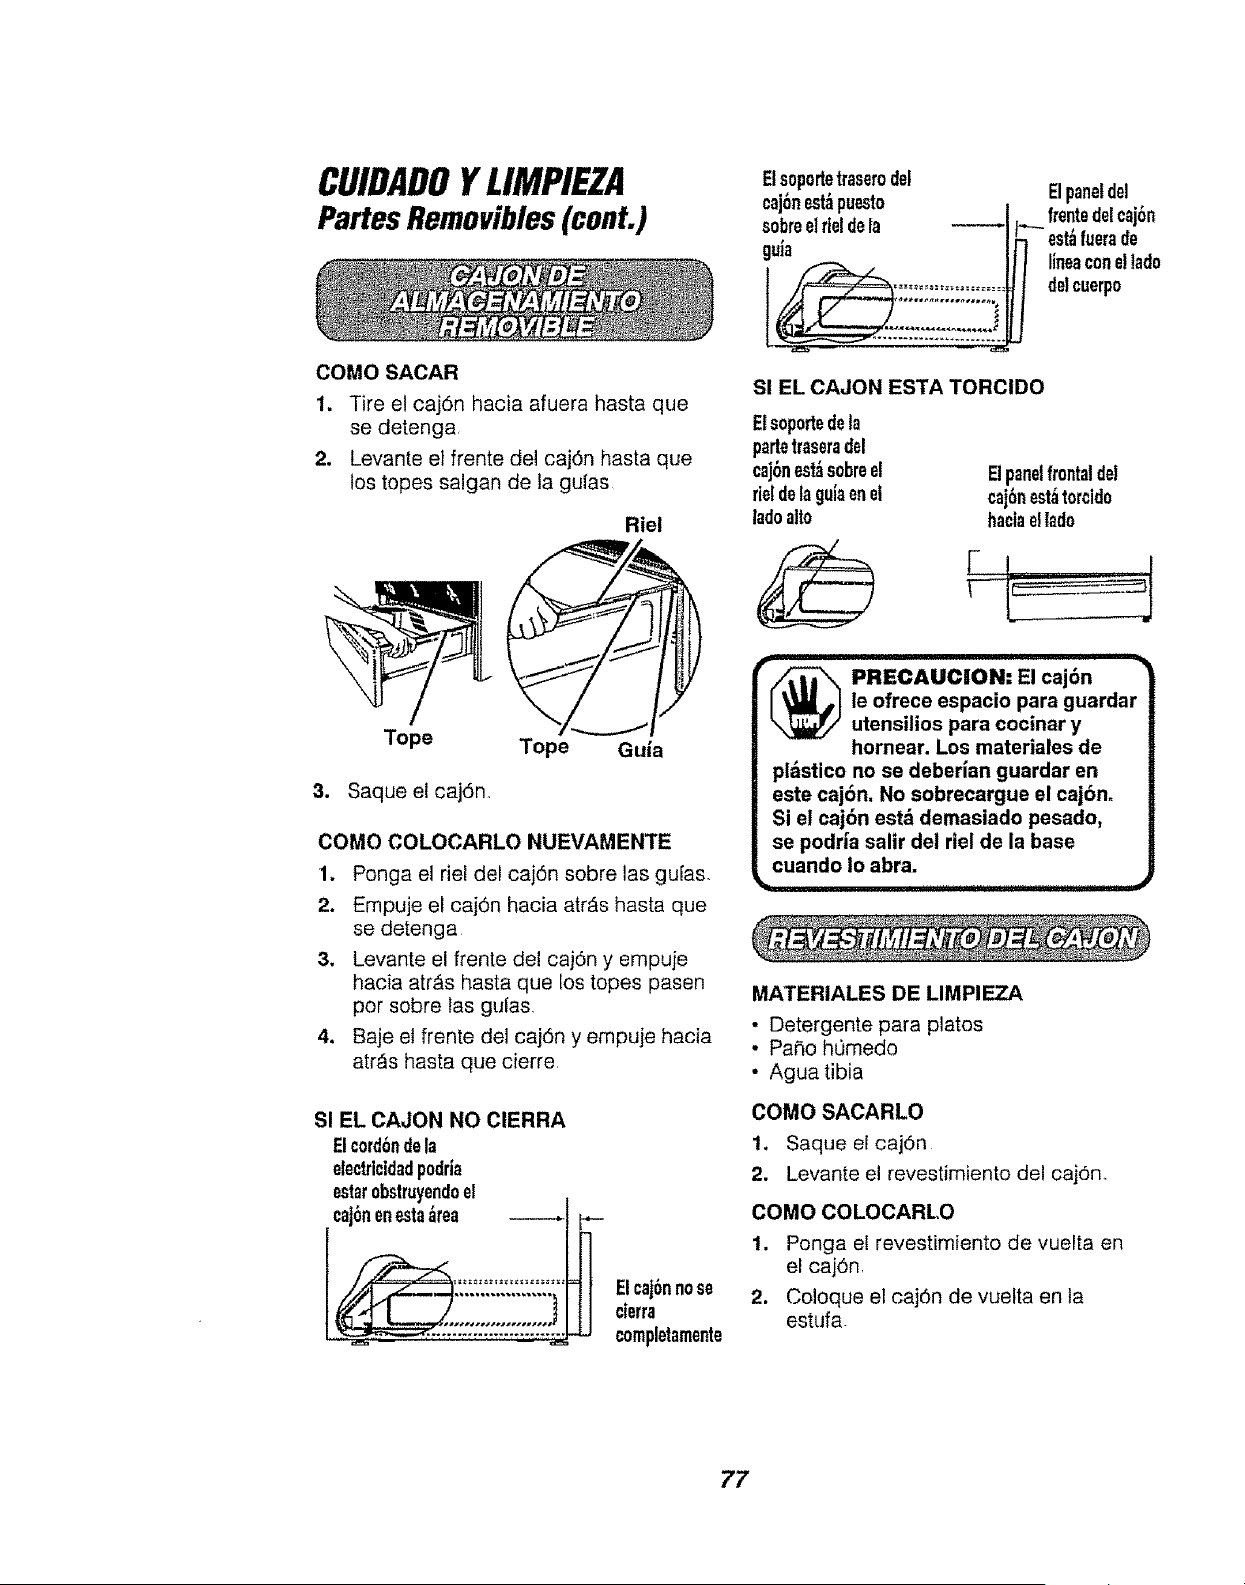
CUIDADOYLIMPIEZA
Partes Removibles(cont.)
Elsoportetraserodel
eaj6nestbpuesto
sobreelrieldela
gula
Elpaneldel
frentedelcaj6n
est_fuerade
lineaconetlade
delcuerpo
COMe SACAR SI EL CAJON ESTA TORCIDO
1. Tire el ¢aj6n hacia afuera hasta que
se detenga Elsoportedeta
partetraseradel
2. Levante el frente del caj6n hasta que caj6nest_sobree! Etpanelfrontaldel
los topes saigan de la gufas rid delaguiaenel caj6nest,itorddo
Riel ladealto hacfaellade
Tope Guia
Tope
3. Saque el caj6n,,
COMO COLOCARLO NUEVAMENTE
1, Ponga el riel del caj6n sobre las gu[as.
2, Empuje el caj6n hacia atr_is hasta que
se detenga
3, Levante el frente de! caj6n y empuje
hacia atr_.s hasta que los topes pasen
por sobre las gufas.
4, Baje el frente del caj6n y empuje hacia
arras hasta que cierre
ElcajGnnose
cierra
completamente
SI EL CAJON NO CIERRA
Elcord6ndela
eleetricldadpodria
estar0bstruyendoe!
caj6nenestaarea
_ RECAUCiON: El caj6n •
le ofrece espacio para guardar
utensilios para cocinar y
hornear. Los materiales de
pl=_sticono se deberian guardar en
este caj6n, No sobrecargue el caj6no
Si el caj6n est_ demasiado pesado,
se podr|a salir dei riel de la base
cuando io abra.
MATERIALES DE LIMPIEZA
. Detergente para platos
• PaSo h0rnedo
• Agua tibia
COMe SACARLO
1. Saque el caj6n
2, Levante el revestimiento del cajOn,
COMO COLOCARLO
1. Ponga el revestimiento de vuelta en
el caj6nr
2. Coloque el caj6n de vuelta en la
estufa.
77
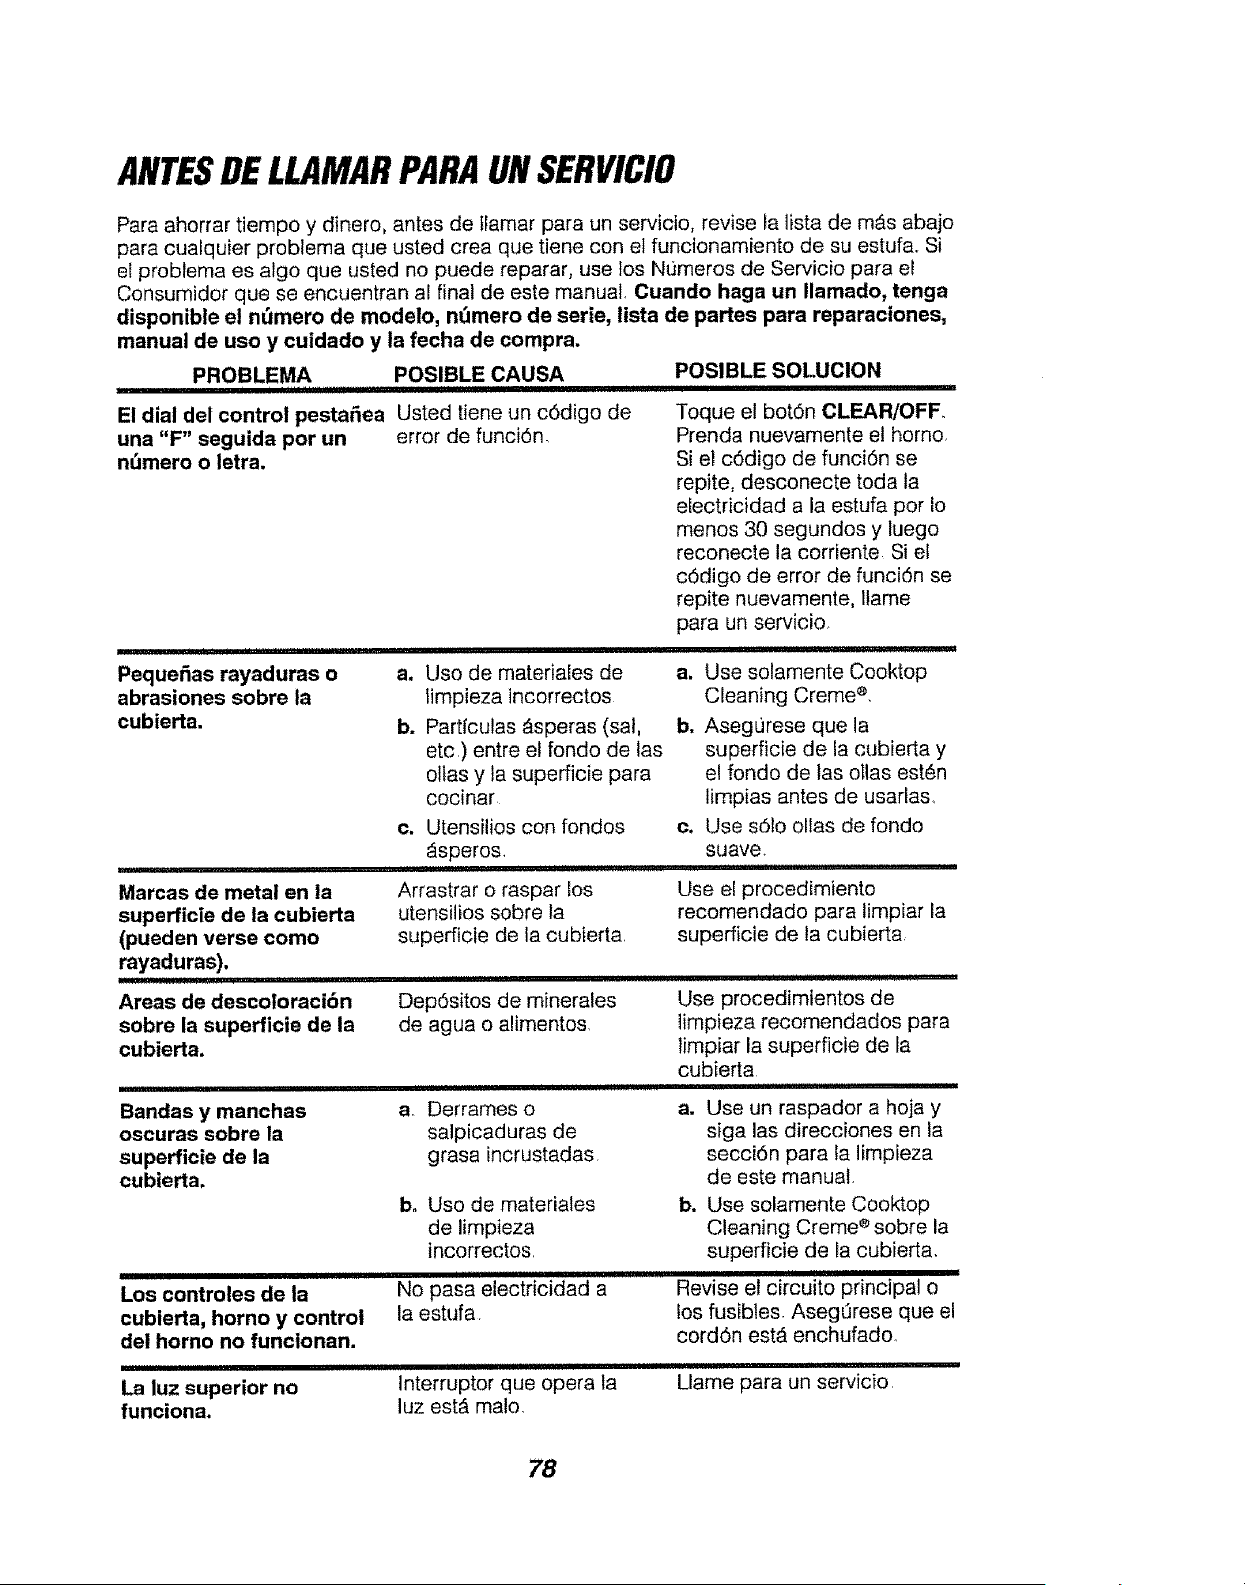
ANTESDELLAMARPARAUNSERVICIO
Para ahorrar tiempo y dinero, antes de tlamar para un servicio, revise la lista de mAs abajo
para cualquier problema que usted crea que tiene con et funcionamiento de su estufa,, Si
el problema es algo que usted no puede reparar, use los Numeros de Servicio para el
Consumidor que se encuentran al final de este manual, Ouando haga un Ilamado, tenga
disponible el nt_mero de modelo, nt_mero de serie, lista de partes para reparaciones,
manual de uso y cuidado y la fecha de compra.
PROBLEMA POSIBLE CAUSA
I I III IIII II I IJlIIIIG q III II I I '[I !l!'lll'[qll
El dial del control pestafiea Usted tiene un c6digo de
una "F" seguida pot un error de funci6n
n_mero o letra.
a. Uso de rnateriales de
limpieza incorrectos
b. Partfculas _speras (sal,
etc,) entre el rondo de las
elias y la superficie para
cocinar
c. Utensilios con rondos
_speros.
, i I i ,i,i, i,,11/i ij ii1,,i
Arrastrar o raspar los
utensilios sobre la
superficie de la cubierta.
i [ [ I ii iiii,
Pequefias rayaduras o
abrasiones sobre la
cubierta.
Dep6sitos de minerales
de agua o alimentos
i
Marcas de metal en la
superficle de ia cubierta
(pueden verse como
rayaduras).
[11 , i ii, i i Gill iii1,1
Areas de descoloraci6n
sobre la superficie de la
cubierta,
a_
iii
Bandas y manchas
oscuras sobre la
superficie de la
cubierta,
b_
Los controles de la
cubierta, homo y control
dei horno no functonan.
ii I i, ,i iiiiiiii i1,1,1
Derrames o
salpicaduras de
grasa incrustadas.
Uso de materiates
de limpieza
incorrectos
I IIII IIIII IIIIII
i1,111_,11111[111[111,1111111111111
No pasa electricidad a
la estufa
POSIBLE SOLUCION
Toque el bot6n CLEAR/OFF
Prenda nuevamente et homo.
Si el c6digo de funci6n se
repite, desconecte toda ta
electricidad a la estufa por Io
menos 30 segundos y luego
reconecte la corriente Si el
c6digo de error de funci6n se
repite nuevamente, llame
para un servicio.
, ii II .......................... i I
a, Use solamente Cooktop
Cleaning Creme ®.
b, AsegL_rese que la
superficie de la cubierta y
el rondo de las ollas est6n
limpias antes de usarlas.
c, Use s61o ollas de fondo
suave.
Use el procedimiento
recomendado para limpiar la
superficie de la cubierta
Use procedimientos de
limpieza recomendados para
limpiar la superficie de fa
cubierta
a. Use un raspador a hoja y
siga las direcciones en la
secci6n para la limpieza
de este manual.
b, Use solamente Cooktop
Cleaning Creme e sobre la
superficie de la cubierta.
Revise el circuito principal o
los fusibtes Aseg_rese que el
corddn estA enchufado.
La luz superior no
funciona.
i iiiiiiiii!±1111 i, iiii1,111111
Interruptor que OPera ta Llame para un servicio
luz est_ malo.
78
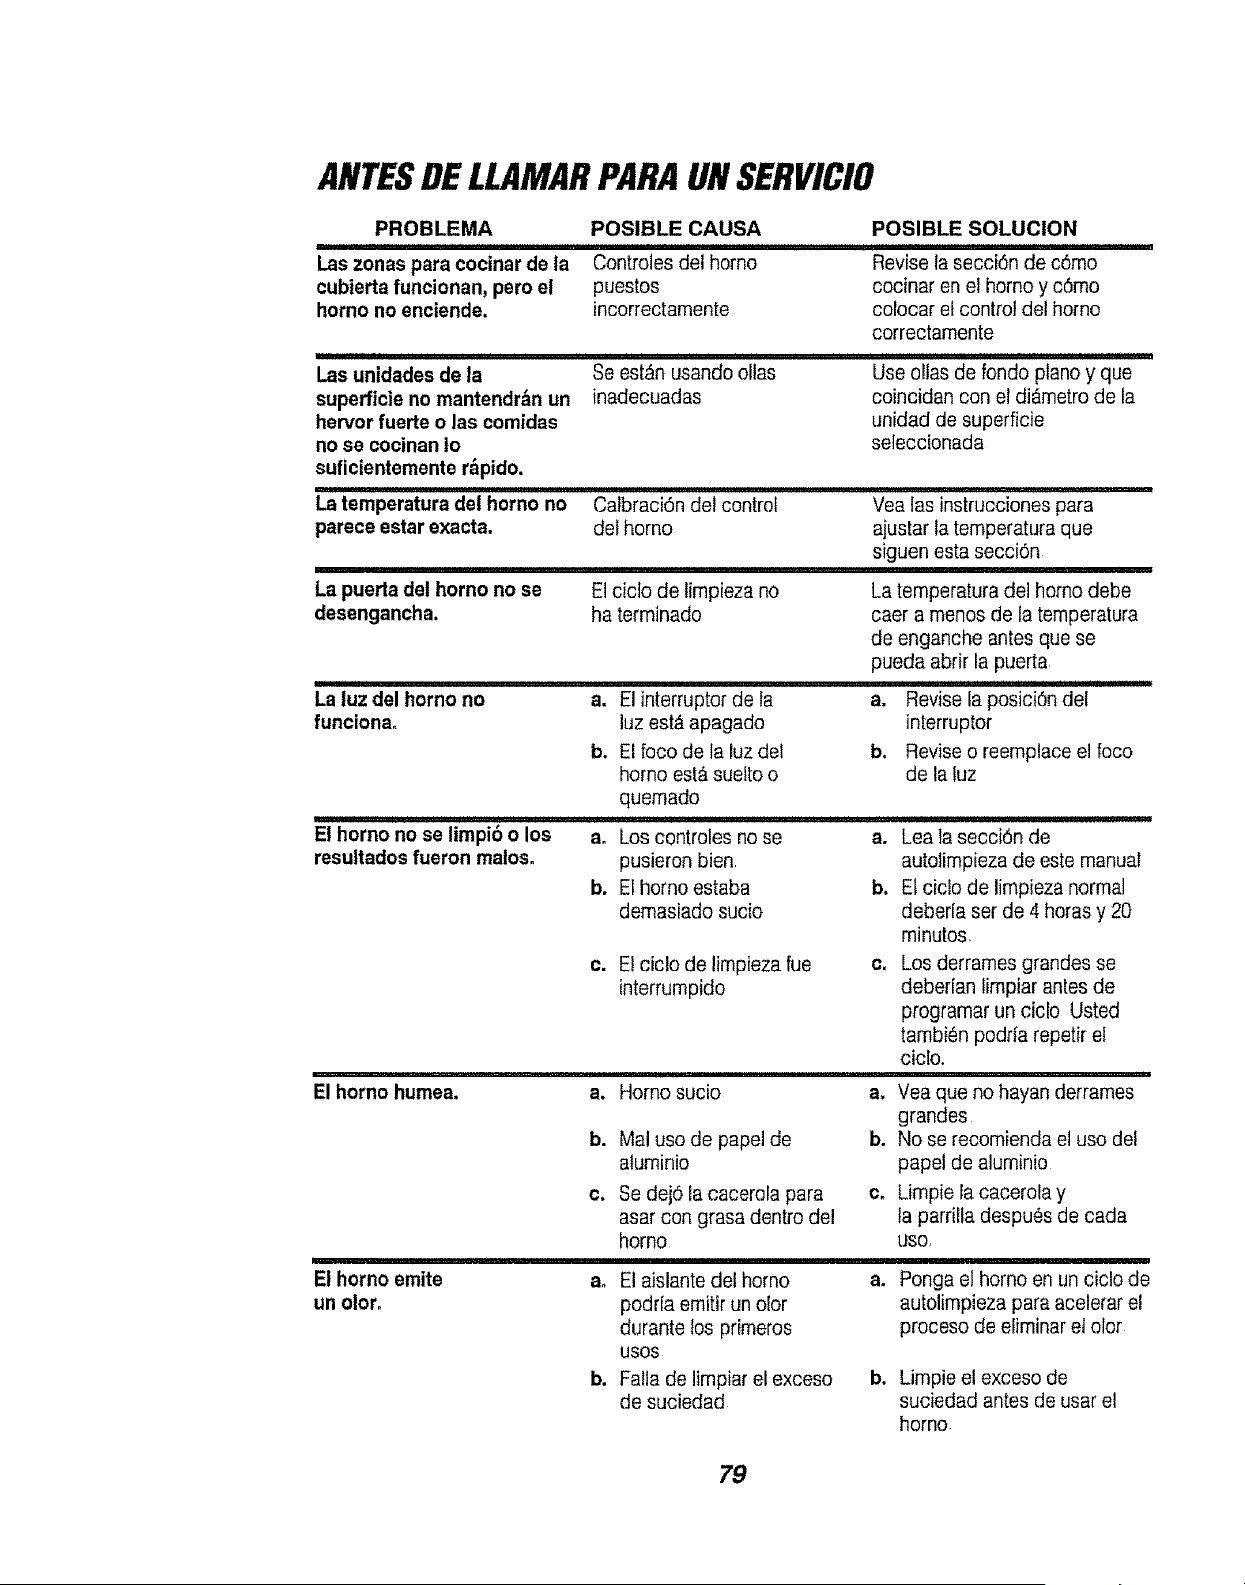
ANTESDELLAMARPARAUNSERVICIO
PROBLEMA POSIBLE CAUSA POSIBLE SOLUCION
Las zonas para cocinar de la Controles del homo Revise la secci6n de c6mo
cublerta funcionan, pero el puestos cocinar en el homo y c6mo
homo no enciende, incorrectamente colocar el control del homo
correctamente
Las unidades de la Se est_n usando ollas Use oilas de rondo piano y que
superficie no mantendr_n un inadecuadas coincidan con el diAmetro de la
hervor fuerte o las comidas unidad de superficie
no se cocinan Io seteccionada
suficientemente r,_pido.
La temperatura de! homo no Calbraci6n del control Vea las instrucciones para
parece estar exacta, del homo ajustar la temperatura que
siguen esta secci6n
La puerta del horno no se El ciclo de limp[eza no La temperatura del homo debe
desengancha, ha terminado caer a menos de la temperatura
de enganche antes que se
pueda abrir la puerta
La luz del homo no a, El interruptorde la a. Revise ia posici6n del
funciona° luz est_ apagado interruptor
b. El foco de la luz del b. Revise o reemplace el foco
homo est& suefte o de la fuz
quemado
E! homo no se limpi6 o los a. Los controles no se a. Lea la secci6n de
resultados fueron malos, pusieron bien autolimpieza de este manual
b, El homo estaba b. El ciclo de limpieza normal
demasiado sucio deberla ser de 4 horas y 20
minutos
c. El ciclo de limpieza rue c. Los derrames grandes se
interrumpido deberian limpiar antes de
programar un ciclo Usted
tambi6n podria repetir el
c,iclo.
El homo humea, a, Homo sucio a, Vea que no hayan derrames
grandes
b. Mal uso de papel de b. No se recomienda el uso del
aluminio papel de aluminio
c. Se dej6 ia cacereia para c, Limpie la cacerola y
asar con grasa dentro del la parrilla despu_s de cada
horno uso,
El homo emite ao El aislante del homo a, Ponga el homo en un ciclo de
un olor. podrla emitir un olor autolimpieza para acelerar el
durante los primeros proceso de eliminar ei olor
USOS
b. Falla de limpiar el exceso
de suciedad
b, Limpie el exceso de
suciedad antes de usar el
home
79
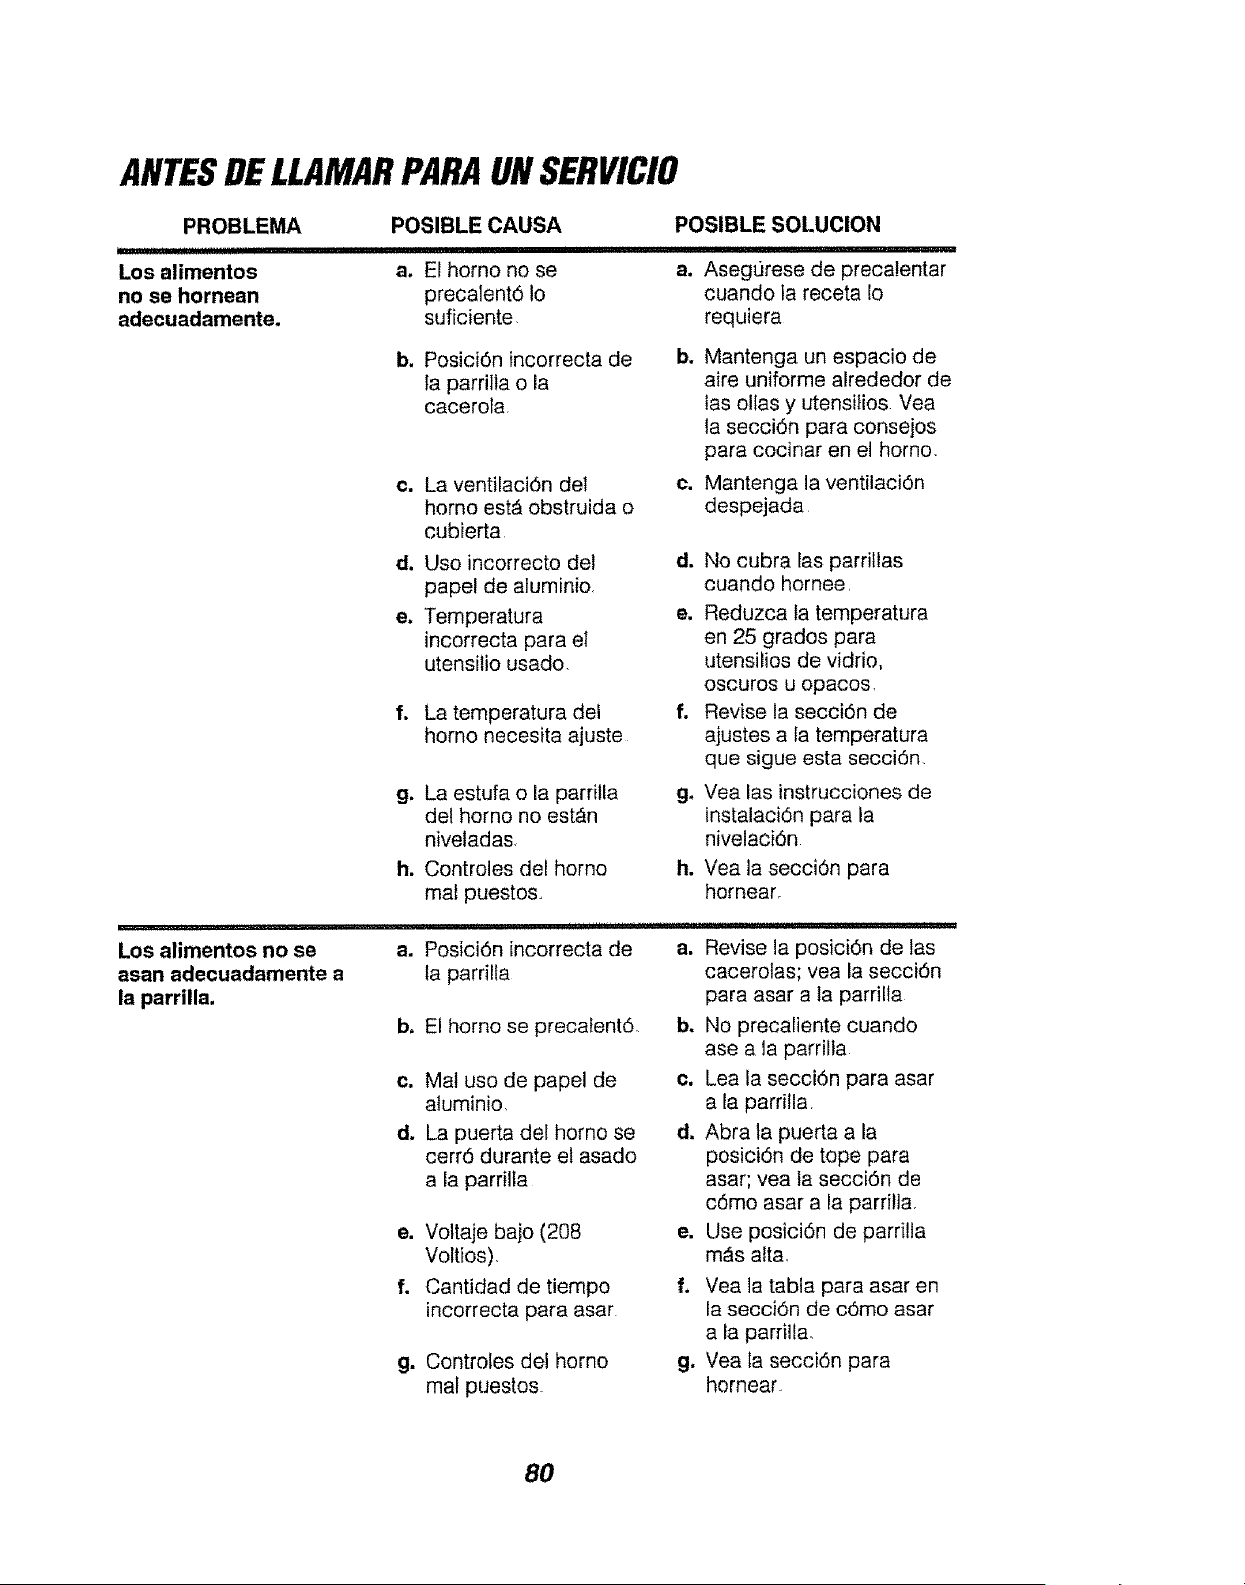
ANTESDELLAMARPARAUNSERVICIO
PROBLEMA
Los alimentos
no se homean
adecuadamente.
POSIBLE CAUSA
a. El homo no se
precalent6 Io
suficiente
POSIBLE SOLUCION
a. Aseg0rese de precatentar
cuando la receta Io
requiera
b. Posici6n incorrecta de
la parrilla o la
cacerola
c. La ventilaci6n del
homo est_ obstruida o
cubierta
d. Uso incorrecto del
papel de aluminio
e, Temperatura
incorrecta para el
utensilio usado,
f=
La temperatura del
homo necesita ajuste
g, La estufa o la parrilla
del homo no est,_n
niveladas
h. Controles del homo
mat puestoso
b,
O.
Mantenga un espacio de
aire uniforme alrededor de
tas olIas y utensitios Vea
la seccidn para consejos
para cocinar en el homo
Mantenga la ventilaci6n
despejada
d. No cubra las parrillas
cuando hornee
e. Reduzca la temperatura
en 25 grados para
utensilios de vidrio,
oscuros u opacos
f, Revise la secciOn de
ajustes a la temperatura
que sigue esta secci6n
g, Vea las instrucciones de
instalaci6n para la
nivelaci6n
h. Vea la secciOn para
homear,
Los alimentos no se
asan adecuadamente a
la parrilla.
a. Posici6n incorrecta de
la parrilla
b, El homo se precalent6,
c. Mat uso de papel de
aluminio
d, La puerta del homo se
cerr6 durante et asado
a la parrilla
e. Voltaje ba)o (208
Voltios)
f. Cantidad de tiempo
incorrecta para asar
g. Controtes del homo
maf puestos
[!!lJ
a. Revise la posici6n de tas
cacerolas; yea la secci6n
para asar a la parrilla
b, No precaliente cuando
ase a la parrilla
¢. Lea ia secci6n para asar
a la parrilla
d. Abra la puerta a la
posici6n de tope para
asar; yea la secci6n de
c6mo asar a la parrilla,
e. Use posici6n de parrilta
m_s alta
f.
gl
Yea la tabla para asar en
la secci6n de c6mo asar
a la parrilla,
Vea la secci6n para
hornear
80
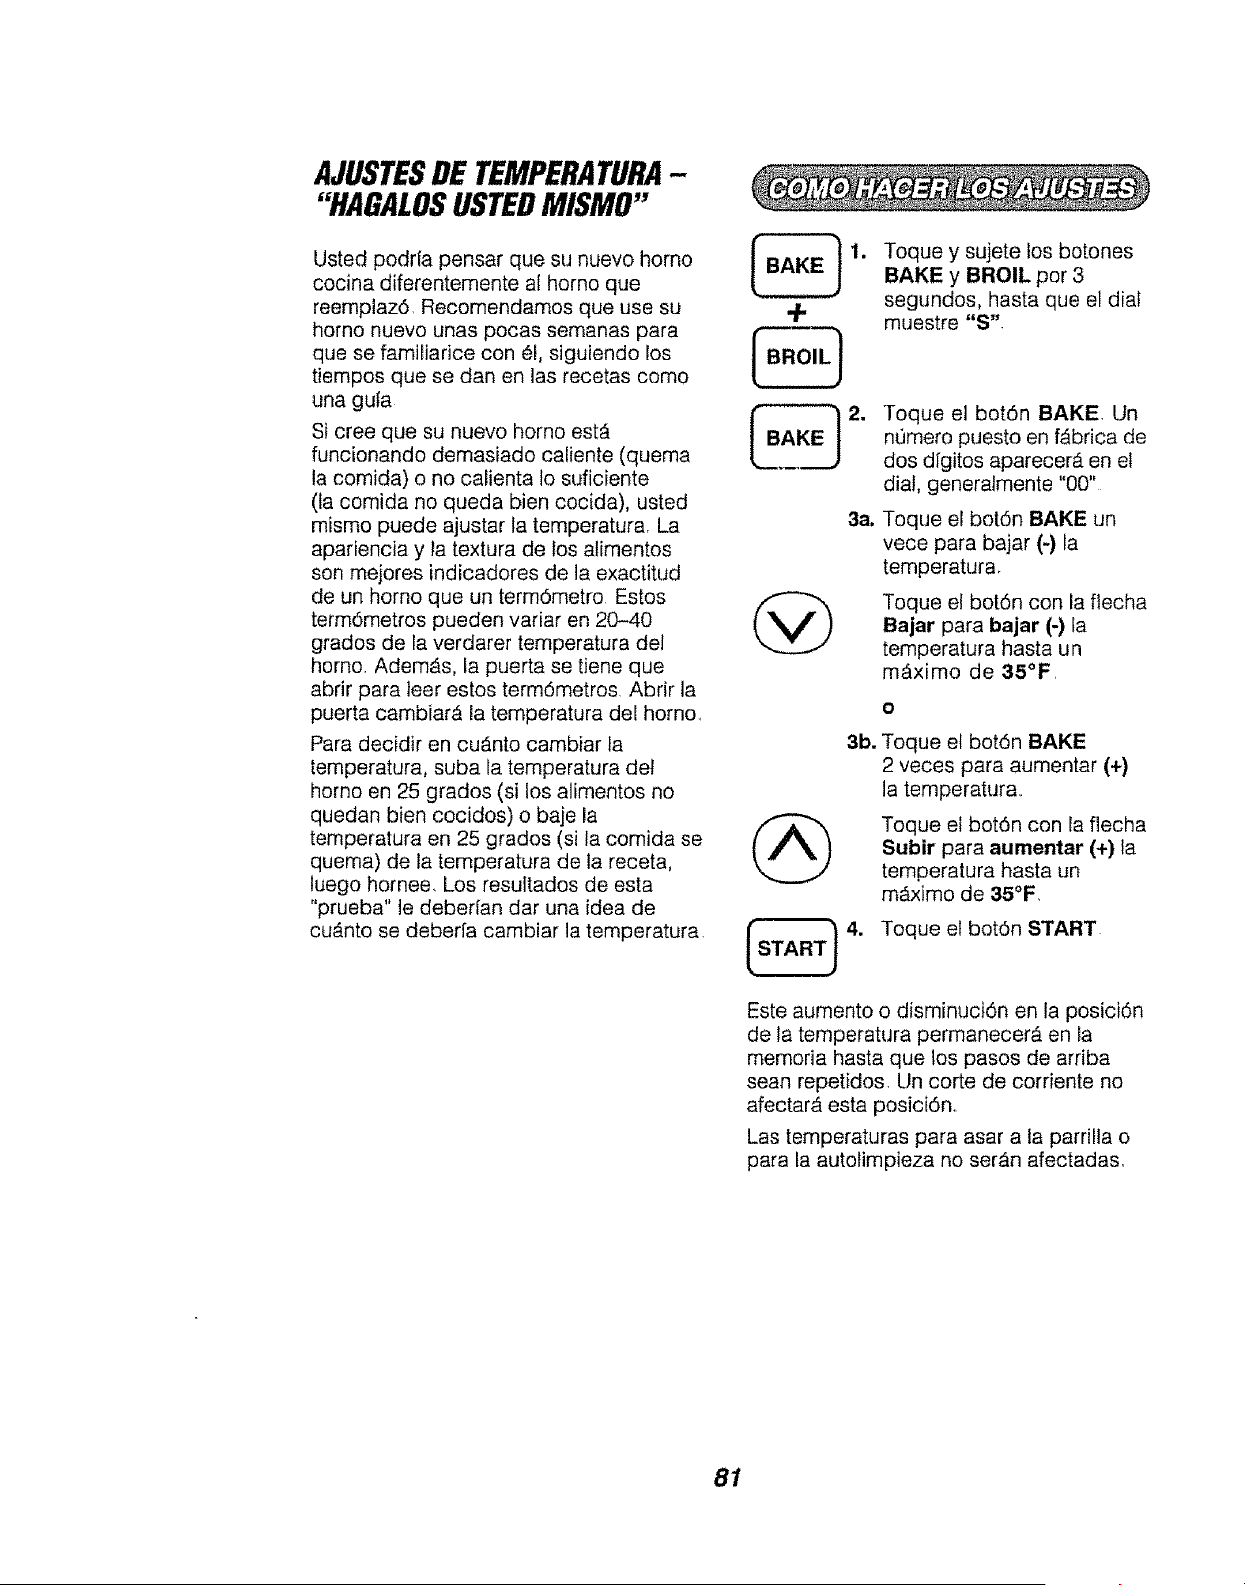
AJUSTESDE TEMPERATURA-
"HAGALOSUSTEDMISMO"
Usted podr{a pensar que su nuevo homo
cocina diferentemente al homo que
reemplaz6. Recomendamos que use su
homo nuevo unas pocas semanas para
que se familiarice con el, siguiendo los
tiempos que se dan en las recetas come
una guta
Si cree que su nuevo homo estA
funcionando demasiado caliente (quema
la comida) o no calienta Io suficiente
(la comida no queda bien cocida), usted
mismo puede ajustar la temperatura, La
apariencia y la textura de los atimentos
son rnejores indicadores de la exactitud
de un homo que un term6metro Estos
termdmetros pueden variar en 20-40
grades de la verdarer temperatura del
homo. Adem&s, la puerta se tiene que
abrir para leer estos term6metros. Abrir la
puerta cambiar,_ la temperatura del homo.
Para decidir en cu_nto cambiar la
temperatura, suba la temperatura del
homo en 25 grades (si los alimentos no
quedan bien cocidos) o baje la
temperatura en 25 grades (si la comida se
quema) de la temperatura de la receta,
luego hornee, Los resultados de esta
"prueba" le deberian dar una idea de
cu_.nto se deberfa cambiar la temperatura.
Toque y sujete los botones
BAKE y BROIL per 3
segundos, hasta que el dial
muestre "S".
38.
Toque el bot6n BAKE, Un
n0mero puesto en fAbrica de
dos dfgitos aparecer_ en el
dial, generalmente "00"
Toque el bot6n BAKE un
vece para bajar (-) la
temperatura,
Toque el botdn con la flecha
Bajar para bajar (-) la
temperatura hasta un
mAximo de 35°F
3b.
Toque el bot6n BAKE
2 veces para aumentar (+)
la temperatura..
Toque el bot6n con la flecha
Subir para aumentar (+) la
temperatura hasta un
m_ximo de 35°F,
Toque el bot6n START
Este aumento o disminuci6n en la posici6n
de la temperatura permanecer_ en la
memoria hasta que los pasos de arriba
sean repetidos, Un corte de corriente no
afectarb, esta posici6n.
Las temperaturas para asar a la parrilla o
para la autotimpieza no ser_.n afectadas.
81

NOTAS
82
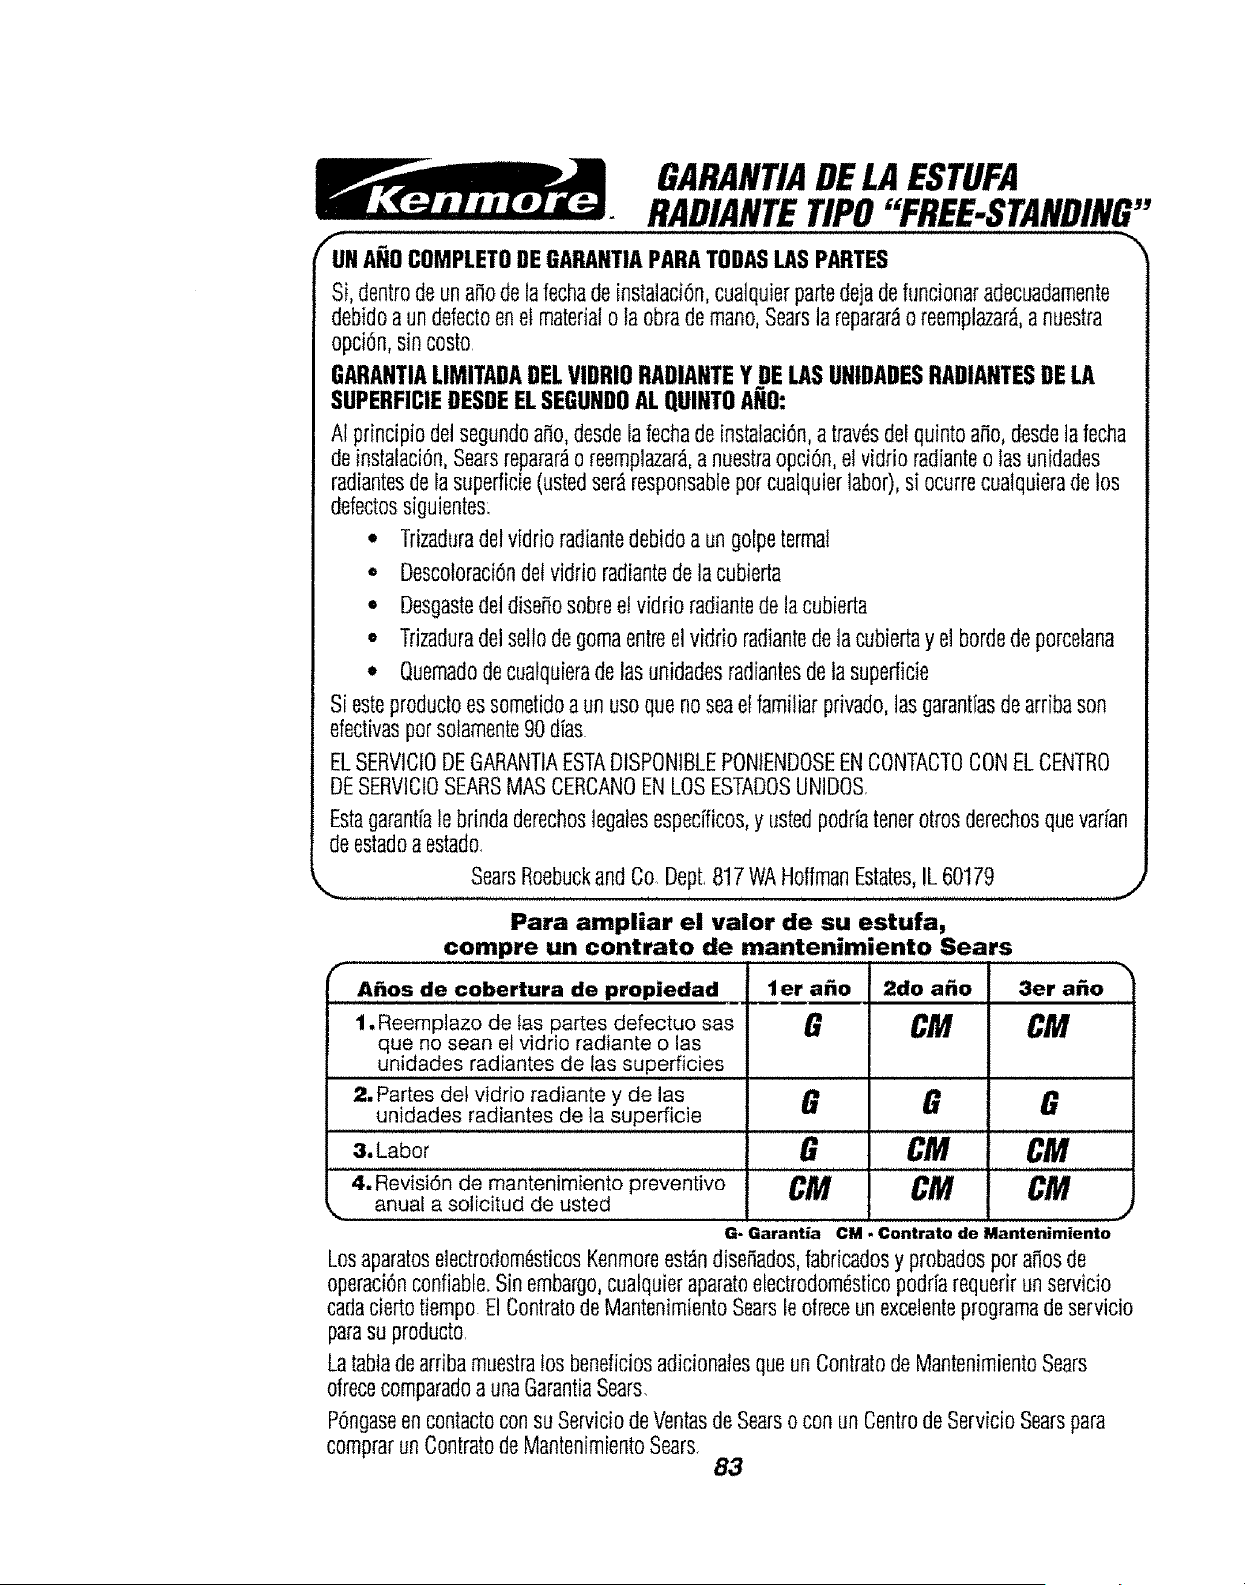
GARANTIADELAESTUFA
RADIANTETIPO"FREE-STANDING"
UN ANOCOMPLETODE GARANTIAPARATODASLASPARTES
Si, dentrode una_ode la fechade instalacitin,cualquierpartedejadefuncionaradecuadamente
debidoa undefedo enel materialo ta obrademano,Searsla reparar_o reemplazar&a nuestra
opci6n,sin costo
GARANTIALIMITADADELVIDRIO RADIANTEY DELASUNtDADESRADIANTESDE LA
SUPERFICIEDESDEEL SEGUNDOAL QUINTOANO:
AI principio delsegundoa_o,desdelafechade instalaci6n,a tray,sdeiquinto a_o,desdela fecha
deinstalaci6n,Searsreparar_o reempiazar&anuestraopci6n,el vidrio radianteo fasunidades
radiantesde la superficie(ustedser_responsablepot cualquierlabor),si ocurrecualquierade los
defectossiguientes:
° Trizaduradel vidrioradiantedebidoa un golpeterma!
• Descoloraci6ndetvidrio radiantedela cubierta
° Desgastedel dise_osobreel vidrio radiantedela cubierta
. Trizaduradel setlode gomaentreel vidrio radiantede lacubiertay e] bordede porcelana
. Quemadodecualquieradelas unidadesradiantesdela superficie
Siesteproductoes sometidoa un uso que noseael familiarprivado,las garantiasde arribason
efectivaspot sotamente90 dfas
ELSERVlCtODEGARANTIAESTADtSPONIBLEPONfENDOSEENCONTACTOCONELCENTRO
DESERVlCIOSEARSMASCERCANOENLOSESTADOSUNIDOS,
Estagarantiale brindaderechoslegalesespecificos,y ustedpodriatenerotrosderechosquevar[an
de estadoa estado.
SearsRoebuckand Co Dept,817 WAHoffmanEstates,IL 60179
Para ampliar el valor de su estufa,
compre un contrato de mantenimiento Sears
r
, ,A_o s de, cobertura de propiedad let a_o 2do a_o 3er a_o
1. Reemplazo de las partes defectuo sas G C_f'_ CM
que no sean et vidrio radiante o las
unidades radiantes de las superficies
2. Partes del vidrio radiante y de las G _P G
unidades radiantes de la superficie
z
3.L bor G CM CM
7
4, Revisi6n de mantenimiento preventivo C_t_ CM CM
anua[ a solicitud de usted
G- Garant_a CM. Contrato de Mantenimiento
Losaparatoseiectrodom_sticosKenmoreest_ndise_ados,fabricadosy probadospor amosde
operaci6nconfiabte.Sin embargo,cualquieraparatoelectrodomesticopodriarequerirun servicio
cadaciertotiempo El ContratodeMantenimientoSearsle ofreceun excelenteprogramadeservicio
parasu producto,
Latabladearribamuestra!os beneficiosadicionalesque un ContratodeMantenimientoSears
ofrececomparadoa unaGarantiaSears.
P6ngaseen contactoconsu ServiciodeVentasdeSearso con unCentrodeServicio Searspara
comprarun ContratodeMantenimientoSears,
83

Get it fixed, at your home or ours!
For repair of major brand appliances in your own home...
no matter who made it, no matter who sold it!
1-800-4-MY-HOME sMAnytime, day or night
(1-800-469-4663)
www.sears.com
To bring in products such as vacuums,
lawn equipment and electronics for repair, call for
the location of your nearest Sears Parts & Repair Center.
1-800-488-1222 Anytime, day or night
www.sears.com
For the replacement parts, accessories and owner's manuals
that you need to do-it-yourself, call Sears PartsDirect sM!
1-800-366-PART 8a,m,-1!p.r..csT,
(1-800-366-7278) 7 days a week
www.sears.com/partsdirect
To purchase or inquire about a Sears Service Agreement:
1-800-827-6655
7 a m. - 5 p.rn. CST, Mon..- Sat
Para pedir servicio de reparaci6n a domicilio,
y para ordenar piezas con entrega a domicilio:
1-888-SU-HOGAR sM
(14388-784-6427'
HomeCentraF
Au Canada pour service en fran_ais:
1-877-LE-FOYER S=
(1-877-533-6937)
Part No 229C4020P251
© Seers, Roebuck and Co
® Registered Trademark / _M Trademark of Sears, Roebuck and Co.
® Marca Regtstrada I _*_Marca de F#,brica de Seers, Roebuck and Co..
84