I Precautions When Displaying a Still image
A still image may cause permanent damage to the TV screen.
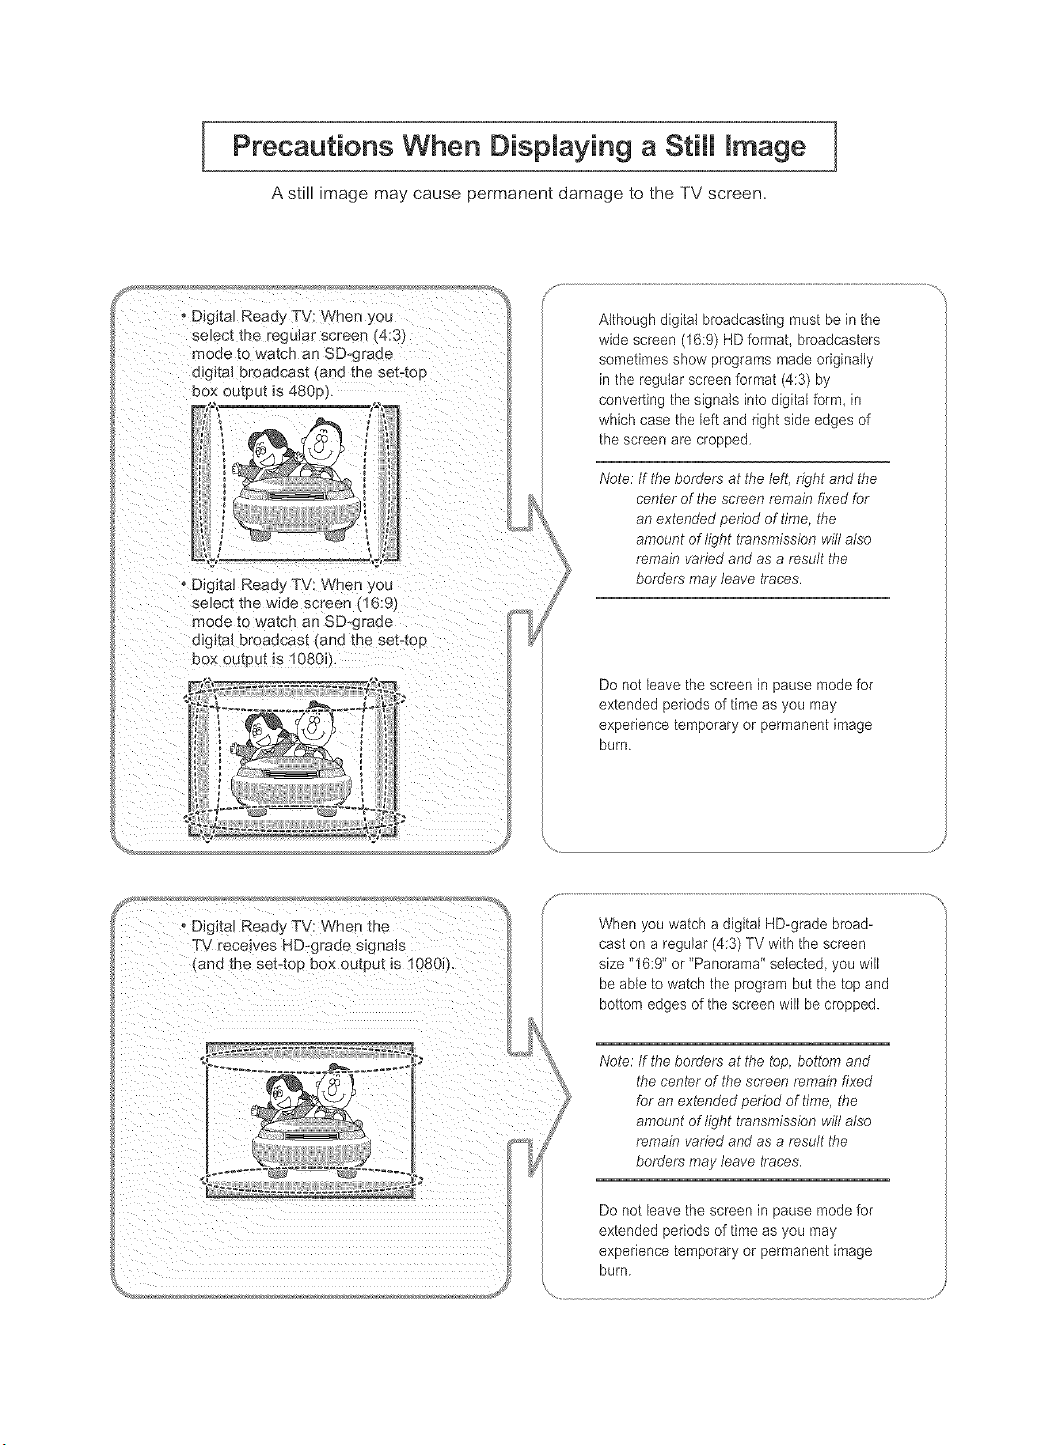
Digital Ready TV: When you
select _ne reguJar screen _'4:3
mo(_e _o watch an SD-graae
d_g_al Droaacast _an(__ne sel_oD
pox ou[pu( is 480p).
• Digital Ready TV: V_nen you
select the wide screen (16:9'_
noae [a watch an SD-graae
digital broadcast _and the set4o[
sex outeut is 1080J
Although digital broadcasting must be in the
wide screen (16:9) HD format, broadcasters
sometimes show programs made originally
in the regular screen format (4:3) by
converting the signals into digital form, in
which case the left and right side edges of
the screen are cropped.
Note: tf the borders at the left. right and the
center of the screen remain fixed for
an extended period of time, the
amount of light transmission will also
remain varied and as a result the
borders may leave traces.
Do not leave the screen in pause mode for
extended periods of time as you may
experience temporary or permanent image
burn,
TV receives HD-grade signals
When you watch a digital HD-grade broad-
cast on a regular (4:3) TV with the screen
size "16:9" or "Panorama" selected, you wild
be able to watch the program but the top and
bottom edges of the screen will be cropped.
Note: If the borders at the top, bottom and
the center of the screen remain fixed
for an extended period of time, the
amount of light transmission will also
remain varied and as a result the
borders may leave traces.
Do not leave the screen in pause mode for
extended periods of time as you may
experience temporary or permanent image
burn.
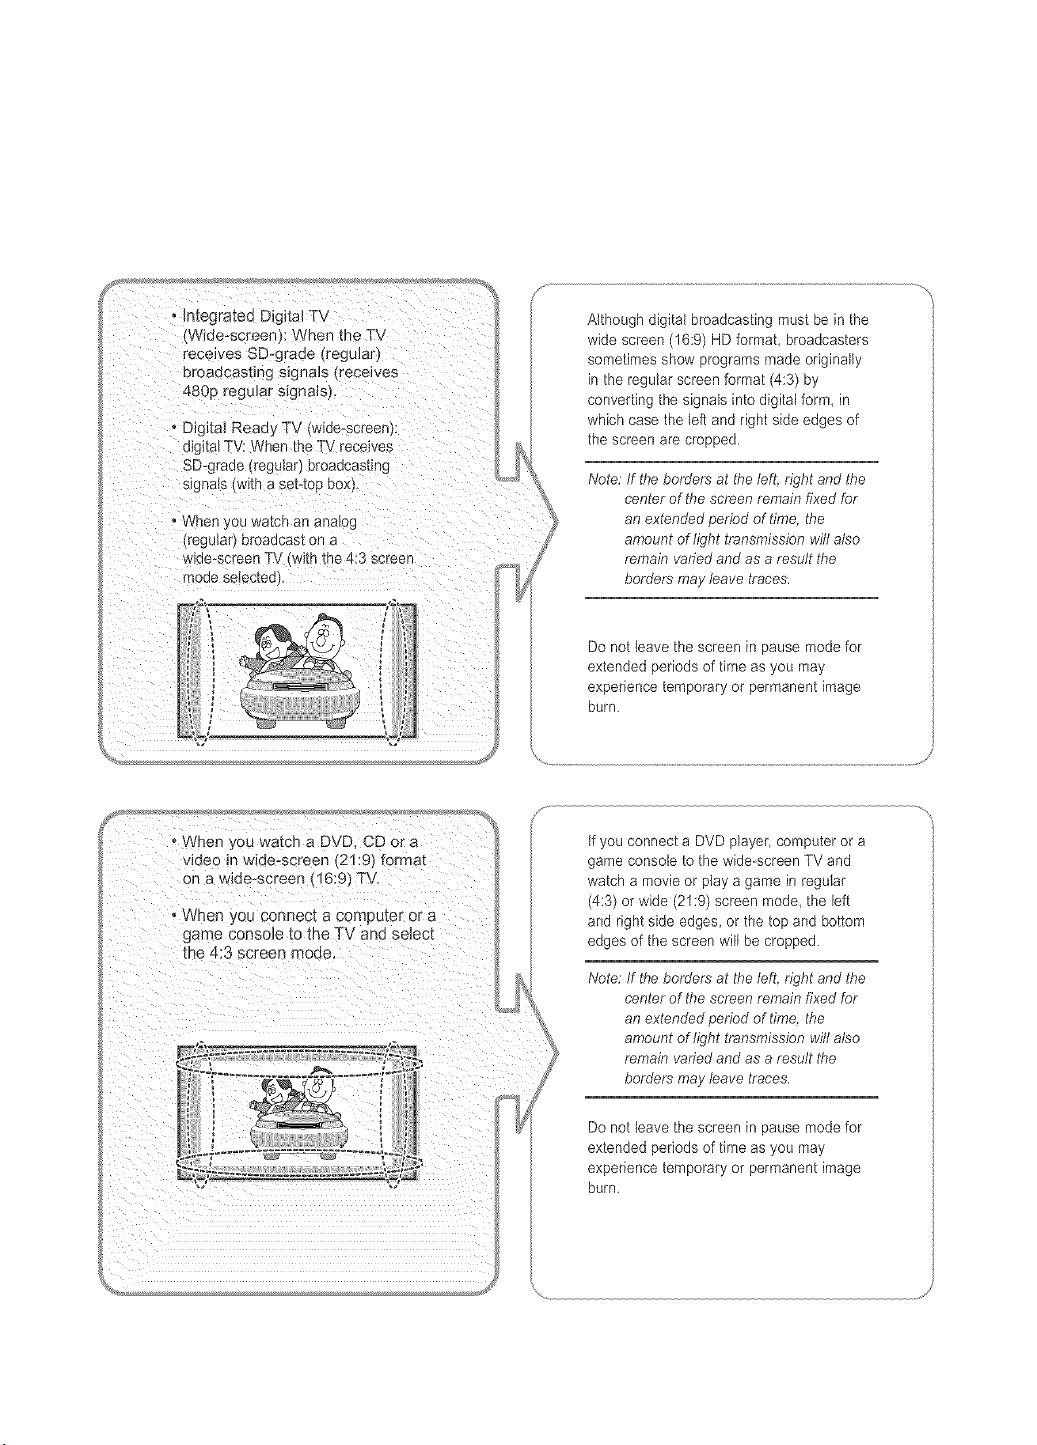
- IntegratedDigitalTV
Wide-screen}:WhentheTV
receivesSD-c.aaetregular
broadcastings_gna_s(recewes
480pregularsignals).
DigitalRead,.TV(wide-screer
alol[alTV:WhentheTVreceives
SDgraaetregu_ar_oroaacas[lng
sgnais/l_na sel.-toDBox L
" JV(ler _ou wa[cn an an£1og
[regu_arj eroaacas[ on a
w_oe-screer TV t_[n[he 4:3 screen
mo_e seteczeu
Although digital broadcasting must be in the
wide screen (16:9) H D format, broadcasters
sometimes show programs made originally
in the regular screen format (4:3) by
converting the signals into digital form, in
which case the left and right side edges of
the screen are cropped.
Note: If tire borders at the left. right and the
center of the screen remain fixed for
an extended period of time, the
amount of tight transmission will also
remain varied and as a result tire
borders may leave traces.
Do not leave the screen in pause mode for
extended periods of time as you may
experience temporary or permanent image
burn.
tfyou connect a DVD player, computer or a
game console to the wide-screen TV and
watch a movie or play a game in regular
(4:3) or wide (21:9) screen mode, the left
and right side edges, or the top and bottom
edges of the screen will be cropped.
Note: If the borders at tire left. right and the
center of the screen remain fixed for
an extended period of time, the
amount of tight transmission will also
remain varied and as a result the
borders may leave traces.
Do not leave the screen in pause mode for
extended periods of time as you may
experience temporary or permanent image
burn.
i CONTENTS
Chapter
Chapter
Chapter
1: General Information
List of Features ........................................ l
List of Parts ........................................... I
Familiarizing Yourself with Your New TV .................... 2
Buttons on the Lower-Right Part of the Panel ............... 2
Rear Pane! Jacks ..................................... 3
Remote Contro! ...................................... 4
Installing Batteries in the Remote Control ..................... 6
If the remote contro! doesn't work ........................... 6
2: Connections
Connecting VHF and UHF Antennas ........................ 7
Antennas with 300-ohm Flat Twin Leads .................. 7
Antennas with 75-ohm Round Leads ...................... 8
Separate VHF and UHF Antennas ........................ 8
Connecting Cab]e TV ................................... 9
Cable without a Cable Box ........................... 9
Connecting to a Cable Box that Descrambles All Channels ..... 9
Connecting to a Cable Box that Descrambles Some Channels . . . 9
Connecting a VCR ..................................... I1
Connecting an S-VHS VCR .............................. 13
Connecting a DVD Player ............................... 14
Connecting a Digital TV Set-top box ....................... 15
Connecting an Amplifier/DVD Home Theater ................ 15
Connecth_g a DVD/Set-top box via DV] ..................... 16
Connecting a DVD/Set-top box via HDMI ................... 17
Connecting a PC ....................................... l 8
3: Operation
Turning the TV On and Off ............................... 19
Changing Channels ..................................... 19
Using the Channe! Buttons ............................ 19
Using the Number Buttons ............................ 19
Using the PRE-CH Button to select the Previous Channel ..... 19
Ac[justing the Volume ................................... 2(i)
Using Mute ........................................ 20
Viewing the Display . ................................... 21
Viewing the Metals ..................................... 21
Plu_ & Play Feature .................................... 22
Memorizing the Channels ................................ 24
Selecting the Video Signa!-source ....................... 24
Storing Channels in Memory (Automatic Method) .......... 25
Adding and Erasing Channels (Manual Method) ............ 26
_[1_Select the Source .................................... 27
_[1/Edit the _nput Source Name ............................ 28
Chapter 4: Picture Control
Usin_ Automatic Picture Settings .......................... 29
Customizing the Picture ................................. 30
Adjusting the Color Tone ................................ 31
Changing the Screen Size ................................ 32
Zoom ............................................ 33
Freezing the Picture .................................... 34
Digita! Noise Reduction ................................. 34
DN]{e(Digital Natura! image engine) ....................... 35
My Color Contro! ...................................... 36
Easy Contro! ....................................... 36
Detail Control ...................................... 37
Dynamic Contrast ...................................... 38
Brightness Sensor ...................................... 39
( ontents-
CONTENTS
Chapter
Viewing Picture-in-Picture ............................... 40
Activating Picture-in-Picture ........................... 4{)
Selecting a Signal Source (External A/V) R)r PIP ........... 41
Swapping the Contents of the PIP and Main image .......... 41
Changing the PIP Channel ............................. 41
Changing the Size of the PIP Window .................... 42
Changing the Position of the PIP Window ................. 42
PIP Settings ....................................... 42
5: Sound ControU
Using Automatic Sound Settings .......................... 43
Customizing the Sound .................................. 44
Setting the TruSmTound XT (SRS TSXT) .................... 45
Choosing a Multi-Channe! Sound (MTS) Soundtrack ........... 46
Automatic volume control ............................... 47
Selecting the Internal Mute ............................... 48
Selecting the Main or Sub (PIP) Sound ...................... 49
Chapter 6: Channel Contro[
Fine Tuning Channels .................................. 50
Chapter 7: PC DispUay
Using Your TV as a Computer (PC) Display .................. 51
Setting Up Your PC Software (Based on Windows XP) ....... 51
How to Auto Adjust ................................. 52
Adjusting the Screen Quality ........................... 53
Changing the Screen Position .......................... 54
Initializing the Screen Position or Color: Settings ............ 55
Chapter 8: Time Setting
Setting the Clock .................................... 56
Setting the Sleep Timer .................................. 57
Setting the On/Off Timer ................................ 58
Chapter 9: Function Description
Selectino, a Menu Language ............................... 60
Using the V-Chip ...................................... 61
Setting Up Your Personal ID Number (PIN) ............... 61
How to Enable/Disable the V-Chip ....................... 63
How to Set up Restrictions Using the 'TV Parental Guidelines' . 64
How to Set up Restrictions Using the MPAA Ratings:
G, PG, PG-13, R, NC- 17, X, NR ........................ 67
How to Reset the TV at'ter the V-Chip
Blocks a Channel ('Emergency Escape') .................. 68
How to Set up Restrictions Using the 'Canadian English' . .... 69
How to Set up Restrictions Using the 'Canadian French' . ..... 70
Viewing Closed Captions ................................ 71
Setting the Blue Screen Mode ............................. 73
Selecting the Melody ................................... 74
Chapter 10: TroubUeshooting
Identifying Pr0b]ems ................................... 75
Appendix
Installing the stand ..................................... 77
Disconnecting the stand ................................. 77
Installing the 'Wal! Mount Kit (LN R238W/ LN_R268W/ LN R2668W) . 7g
Installing the Wal! Mount Kit (LN R328W/ LN R3228W) .......... 79
Using the Anti-Theti Kensington Lock ...................... g0
Using Your TV in Another Count U ........................ g0
Specifications ......................................... g1
Display Modes ........................................ 83
Contents-2
GENERAL INFORMATION
List of Features
e Excellent Picture Quality
- DN][e technology provides life-like clear images.
- My Color Control: Colors can be set to your preference by ac[justing pink,blue and green.
- Dynamic Contrast: Automatically detects the input visual signa! and adjusts to create
optimum contrast.
- Brightness Sensor: Adjusts the screen brightness automatica!ly depending on the
brightness of the surrounding environment.
®SRS TruSurround XT
- SRS %:uSurround XT provides a virtual Dolby surround system.
®Convenience
- The TV utilizes the HDMI system to implement perfect digital sound and picture quality.
- The Anynet system enables you to easily control Samsung audio-video (AV) devices from
tMs TV.
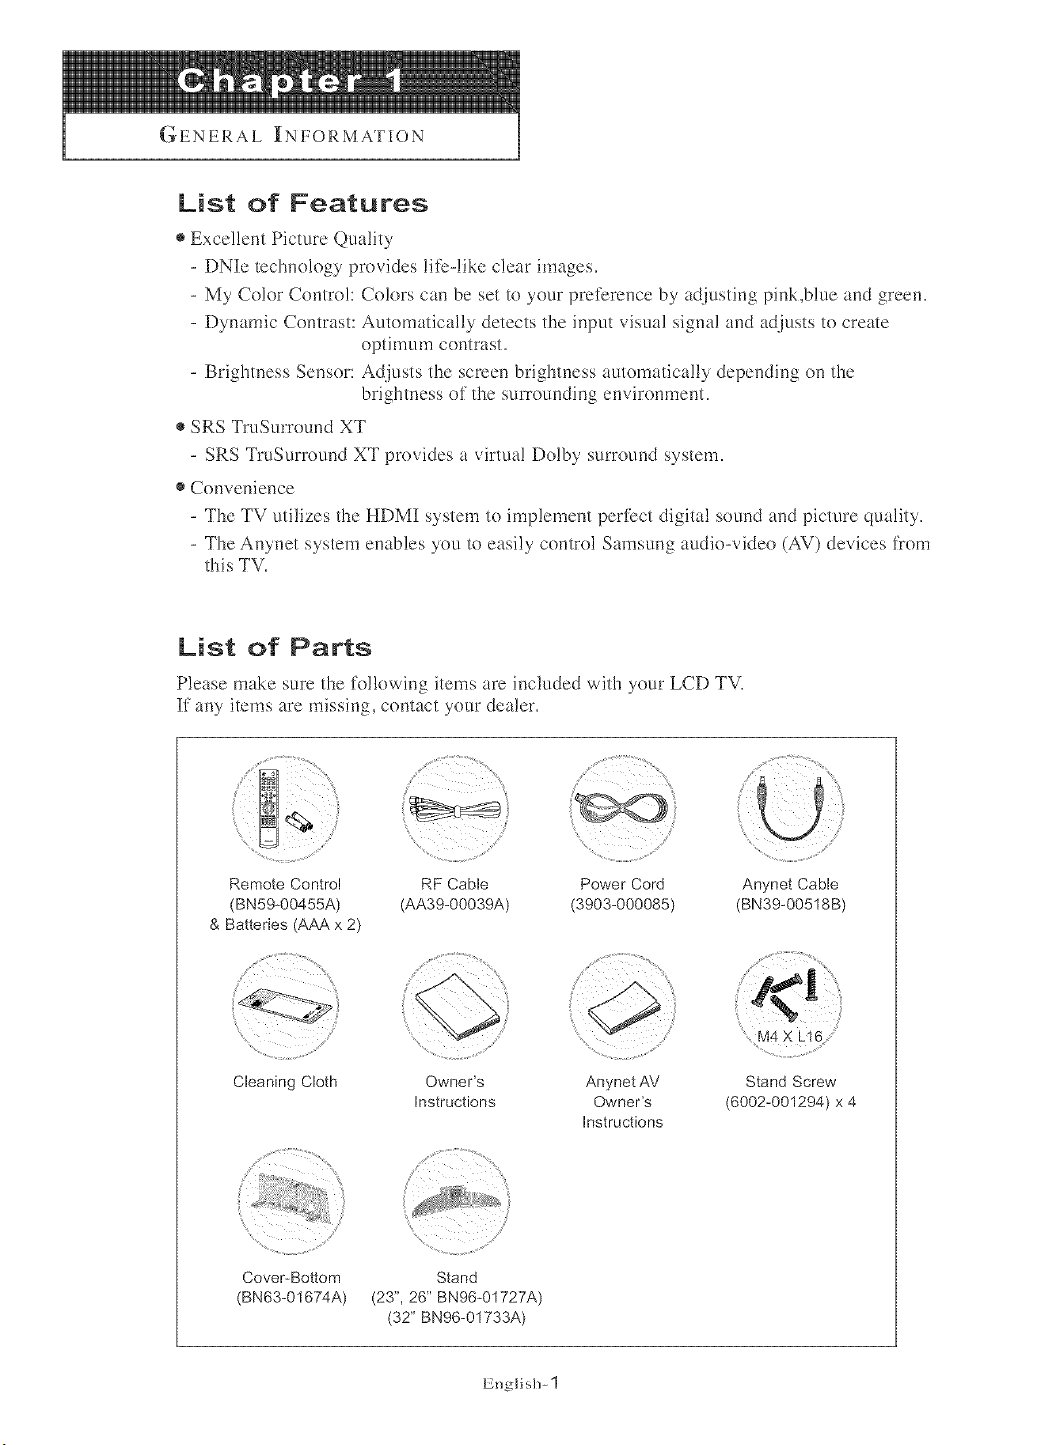
List of Parts
Please make sure the following items are included with your LCD TV,
If any items are missing, contact your dealer.
Remote Control RF Cable Power Cord
(BN59@0455A) (AA39-00039A) (3903-000085)
& Batteries (AAA x 2)
,,,......,_w_d.....................,....... /_<> .........ii_!i:iYli¸!'!_>i'!:.....
Cleaning Cloth Owner's Anynet AV
Instructions Owner's
Instructions
.....¸¸¸¸¸(77¸!77:¸'¸,....... /i!:///7_i!_!_},,_,....
{:
a
Cover_Bottom Stand
(BN63-01674A) (23", 26" BN96@1727A)
(32" BN96-01733A)
Anynet Cable
(BN39-00518B)
M4 X
Stand Screw
(6002@01294) x 4
English- 1
GENERAL INFORMATION
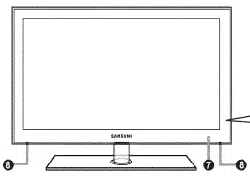
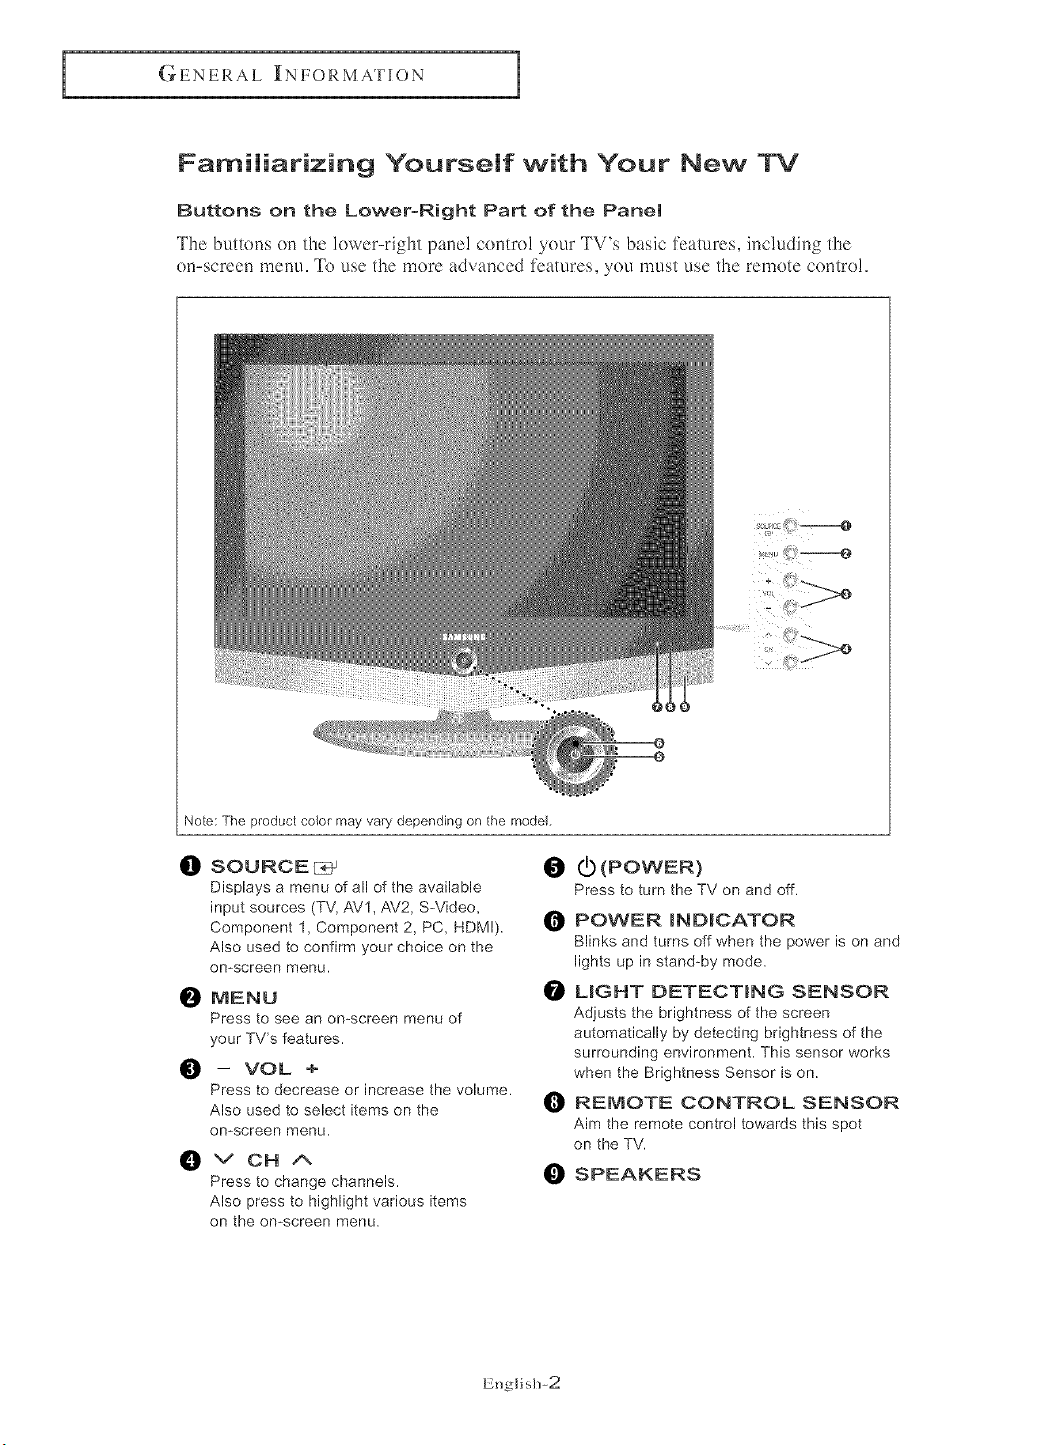
Familiarizing Yourself with Your New WV
Buttons on the Lower-Right Part of the Panel
The buttons on the lower-right pane! contro! 2r'ourTV's basic features, inch.tding the
on-screen menu. _[k) use the more advanced features, you mglst use the remote control,
Note: The product color may vary depending on the model,
!!I
SOURCE E:__ I_
Displays a menu of all of the available
input sources (TV, AV1, AV2, SWideo,
Component 1, Component 2, PC, HDMI). O
Also used to confirm your choice on the
omscreen menu.
NENU
Press to see an omscreen menu of
your TV's features.
_1 -- VOL +
Press to decrease or increase the volume.
Also used to select items on the
on-screen menu,
0
VOHA
Press to change channels.
Also press to highlight various items
on the on-screen menu.
(L) (POWER)
Press to turn the TV on and off.
POWER _ND_CATOR
Blinks and turns off when the power is on and
lights up in stand-by mode.
O LIGHT DETECTING SENSOR
Adjusts the brightness of the screen
automatically by detecting brightness of the
surrounding environment. This sensor works
when the Brightness Sensor is on.
I_1 REMOTE CONTROL SENSOR
Aim the remote control towards this spot
on the TV.
SPEAKERS
English-2
GE N Elfi:AL INFORMATION
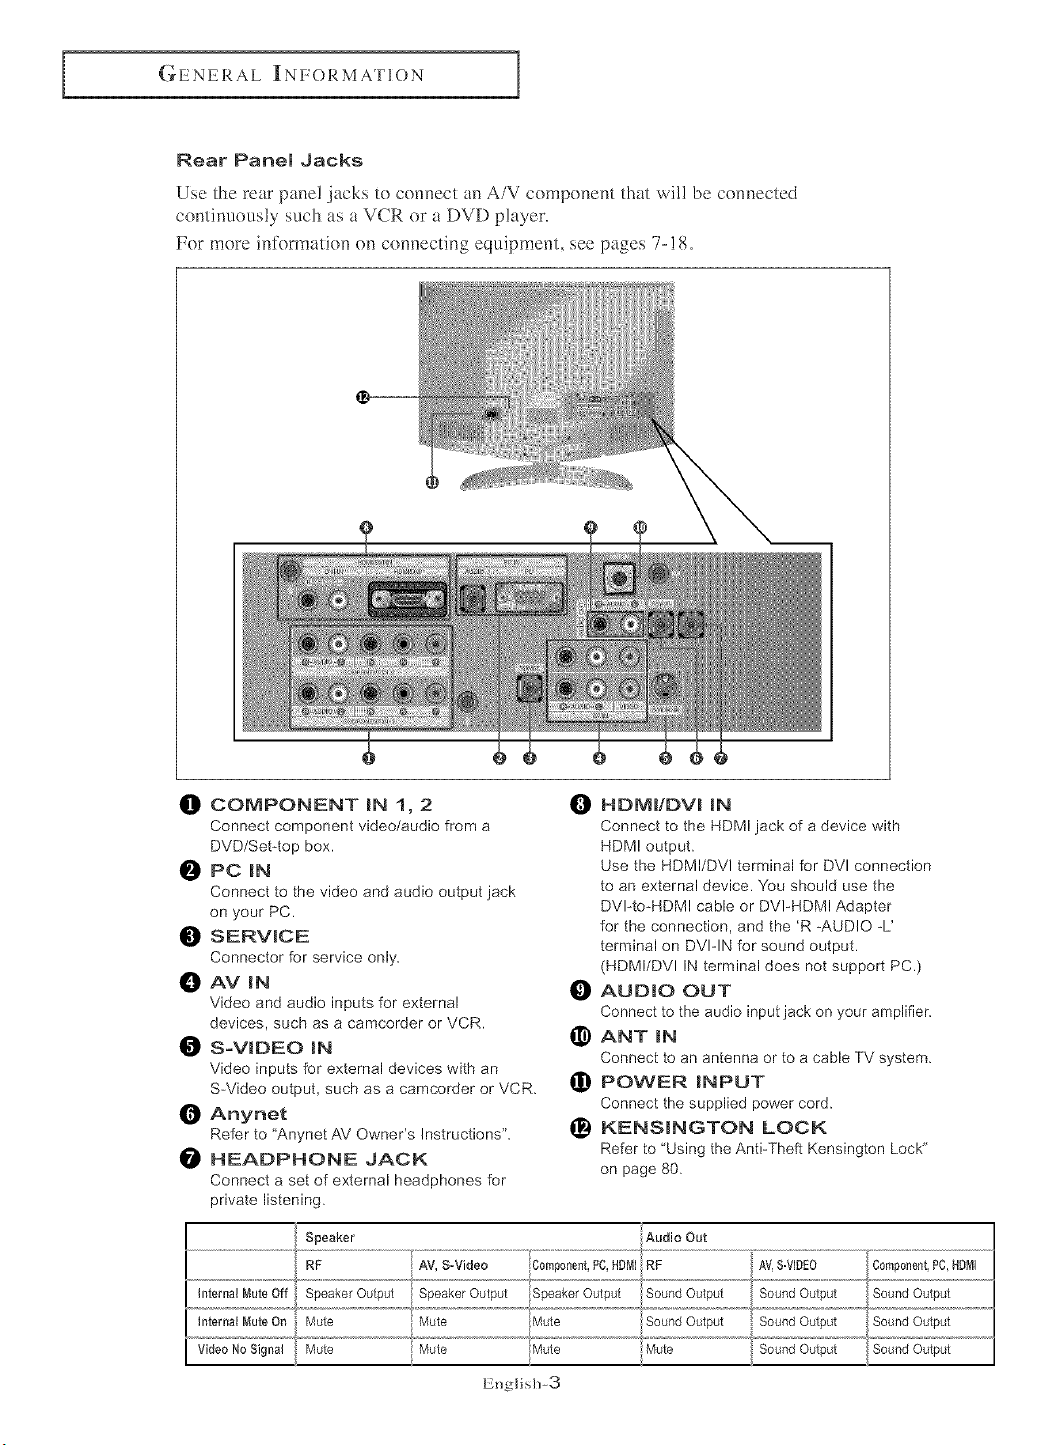
Rear Panel Jacks
Use the rear pane! jacks to connect an A/V compone,_t that wil! be connected
contimlously such as a VCR or a DVD player,
For more information on connecting equipment, see pages 7-!8,
it]) COMPONENT IN I, 2
Connect component video/audio from a
DVD/Set4op box.
PC IN
Connect to the video and audio output jack
on your PC.
_]) SERVICE
Connector for service only.
AV IN
Video and audio inputs for external
devices, such as a camcorder or VCR.
S-VIDEO IN
Video inputs for external devices with an
S-Video output, such as a camcorder or VCR.
Anynet
Refer to "Anynet AV Owner's Instructions".
HEADPHONE JACK
Connect a set of external headphones for
private listening.
O HDMI/DVI IN
Connect to the HDMI jack of a device with
HDM! output.
Use the HDMI/DVI terminal for DVI connection
to an external device. You should use the
DVIqo-HDMI cable or DVFHDMI Adapter
for the connection, and the 'R :AUDIO :L'
terminal on DVIqN for sound output.
(HDMI/DVI IN terminal does not support PC.)
AUDIO OUT
Connect to the audio input jack on your amplifier.
_) ANT IN
Connect to an antenna or to a cable TV system.
POWER INPUT
Connect the supplied power cord.
_) KENSINGTON LOCK
Refer to 'Using the AntPTheft Kensington Lock"
on page 80.
RF AV, S-Video Component, PC, HDM] RF
Internal Mute Off Speaker Output Speaker Output Speaker Output Sound Output
InternalI_uteOn Mute Mute Mute SoundOutput SoundOutput
VideoNoSignal Mute Mute
English-3
SoundOutput
GENERAL INFORMATION
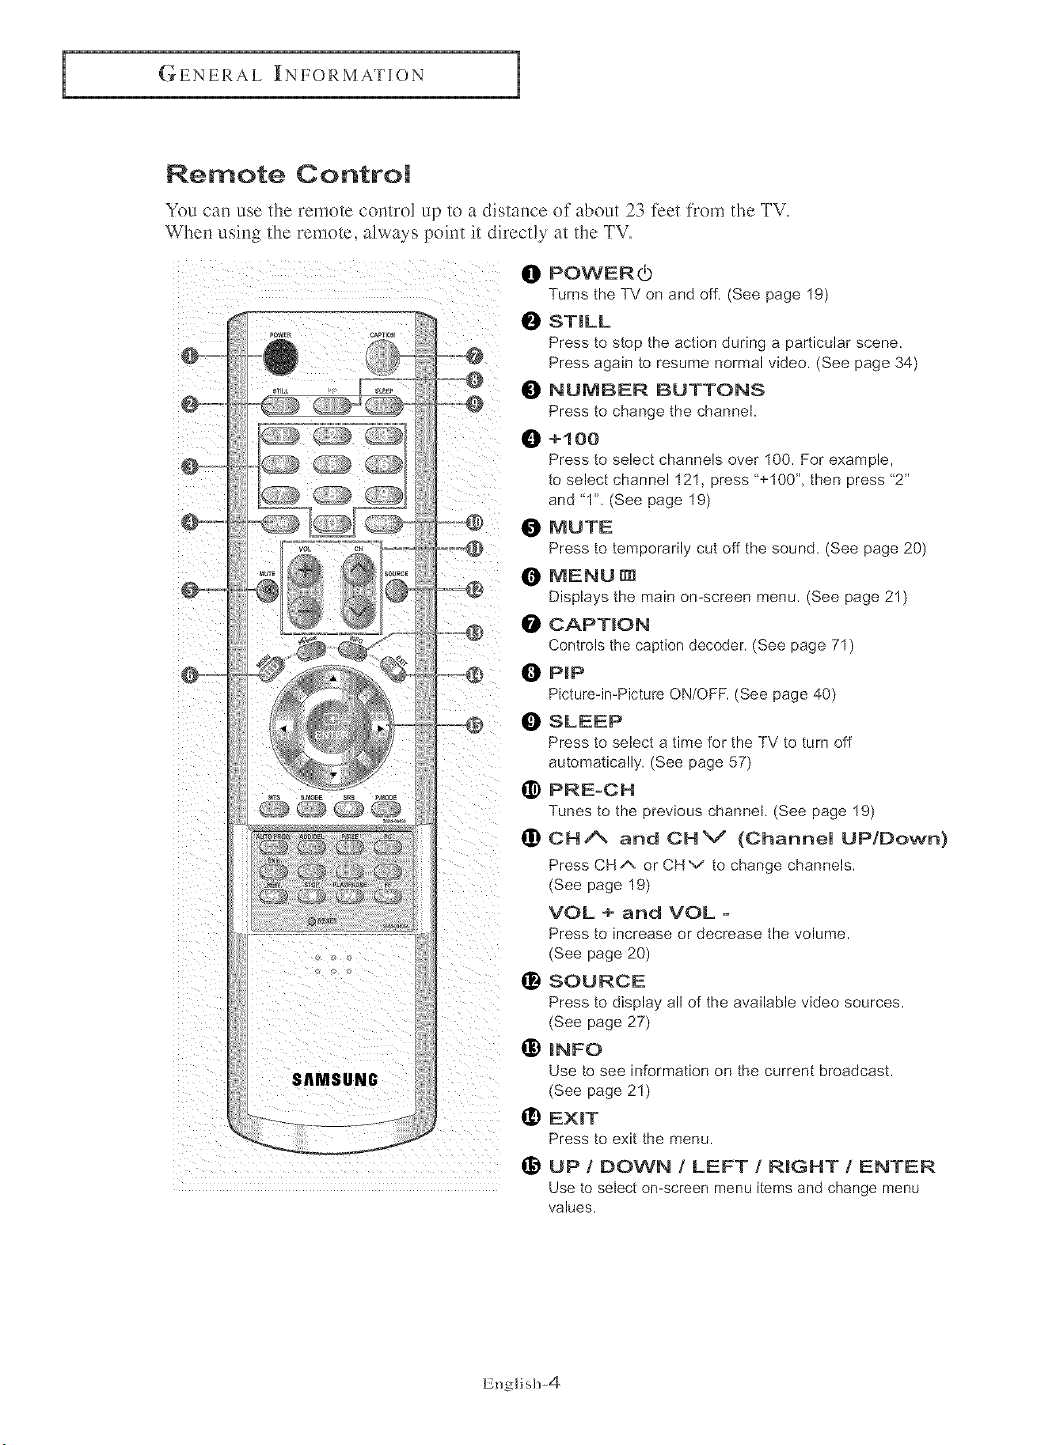
Remote Control
You can use the remote control up to a distance of about 23 feet from the TV.
When using the remote, always point it directly at the TV.
@
D _ts_
SAMSUNG
.....
......
@
@
POWER_
Turns the TV on and off. (See page 19)
ST_LL
Press to stop the action during a particular scene.
Press again to resume normal video. (See page 34)
NUIV|BER BUTTONS
Press to change the channel.
0 +1 co
Press to select channels over 100. For example,
to select channel 121, press '+100", then press '2"
and "1". (See page 19)
O MUTE
Press to temporarily cut off the sound. (See page 20)
0 MENU
Displays the main on-screen menu. (See page 21 )
CAPTJJON
Controls the caption decoder. (See page 71)
0 PiP
PicturedmPicture ON/OFF. (See page 40)
SLEEP
Press to select a time for the TV to turn off
automatically. (See page 57)
_) PRE-CH
Tunes to the previous channel. (See page 19)
_) CHA and CHV (Channel UP/Down)
Press CHA or CHv to change channels.
(See page 19)
VOL + and VOL -
Press to increase or decrease the volume.
(See page 20)
@ SOURCE
Press to display all of the available video sources,
(See page 27)
_) INFO
Use to see information on the current broadcast.
(See page 21)
EmT
Press to exit the menu.
l_ UP / DOWN / LEFT / R|GHT / ENTER
Use to select on-screen menu items and change menu
values.
English-4
GENERAL INFORMATION
SAMSUNG
@
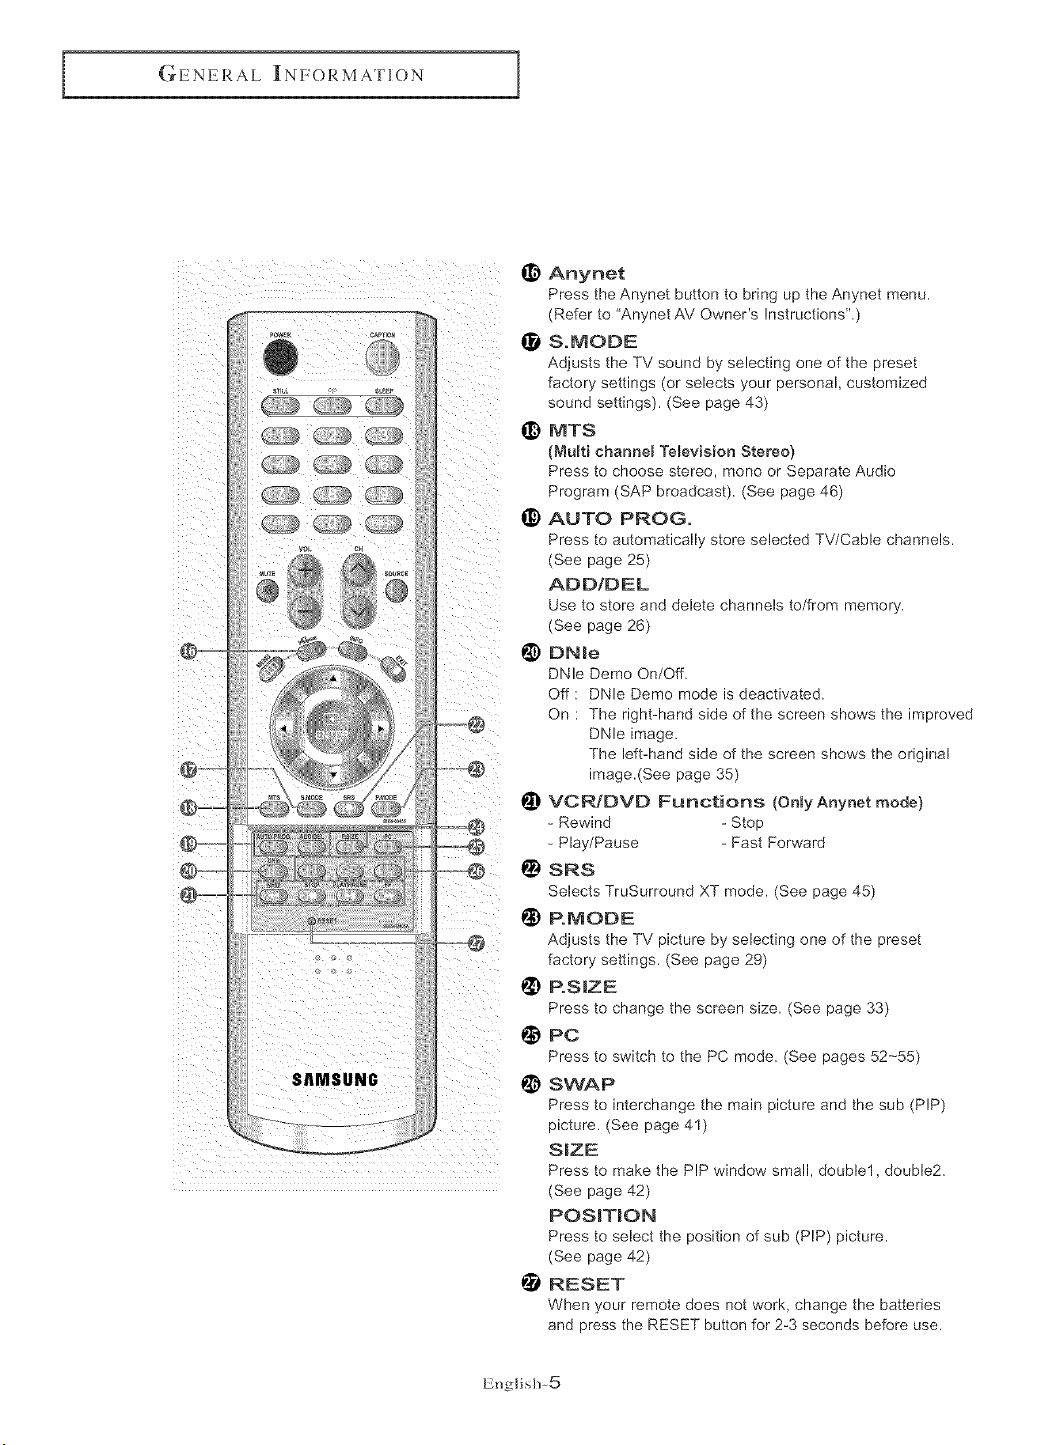
_) Anynet
Press the Anynet button to bring up the Anynet menu.
(Refer to "Anynet AV Owner's Instructions".)
I!1 S.MODE
Adjusts the TV sound by selecting one of the preset
factory settings (or selects your personal, customized
sound settings). (See page 43)
@ MTS
(Multi channel TeleviMon Stereo)
Press to choose stereo, mono or Separate Audio
Program (SAP broadcast). (See page 46)
_) AUTO PROG.
Press to automatically store selected TV/Cable channels.
(See page 25)
ADD/DEL
Use to store and delete channels to/from memory.
(See page 26)
@ DN e
DNle Demo On/Off.
Off : DNle Demo mode is deactivated.
On : The right-hand side of the screen shows the improved
DNle image.
The left-hand side of the screen shows the original
image.(See page 35)
I_ VCRJDVD Functions (OnlyAnynet mode)
- Rewind - Stop
- Play/Pause - Fast Forward
@ SRS
SelectsTruSurround XT mode. (See page 45)
P.MODE
Adjusts the TV picture by selecting one of the preset
factory settings, (See page 29)
1_) P.SIZE
Press to change the screen size. (See page 33)
@ PC
Press to switch to the PC mode. (See pages 52--55)
!_ SWAP
Press to interchange the main picture and the sub (PIP)
picture, (See page 41)
S|ZE
Press to make the PIP window small, double1, double2.
(See page 42)
POS_T_ON
Press to select the position of sub (PIP) picture,
(See page 42)
RESET
When your remote does not work, change the batteries
and press the RESET button for 2-3 seconds before use.
English-5
GENERAL INFORMATION
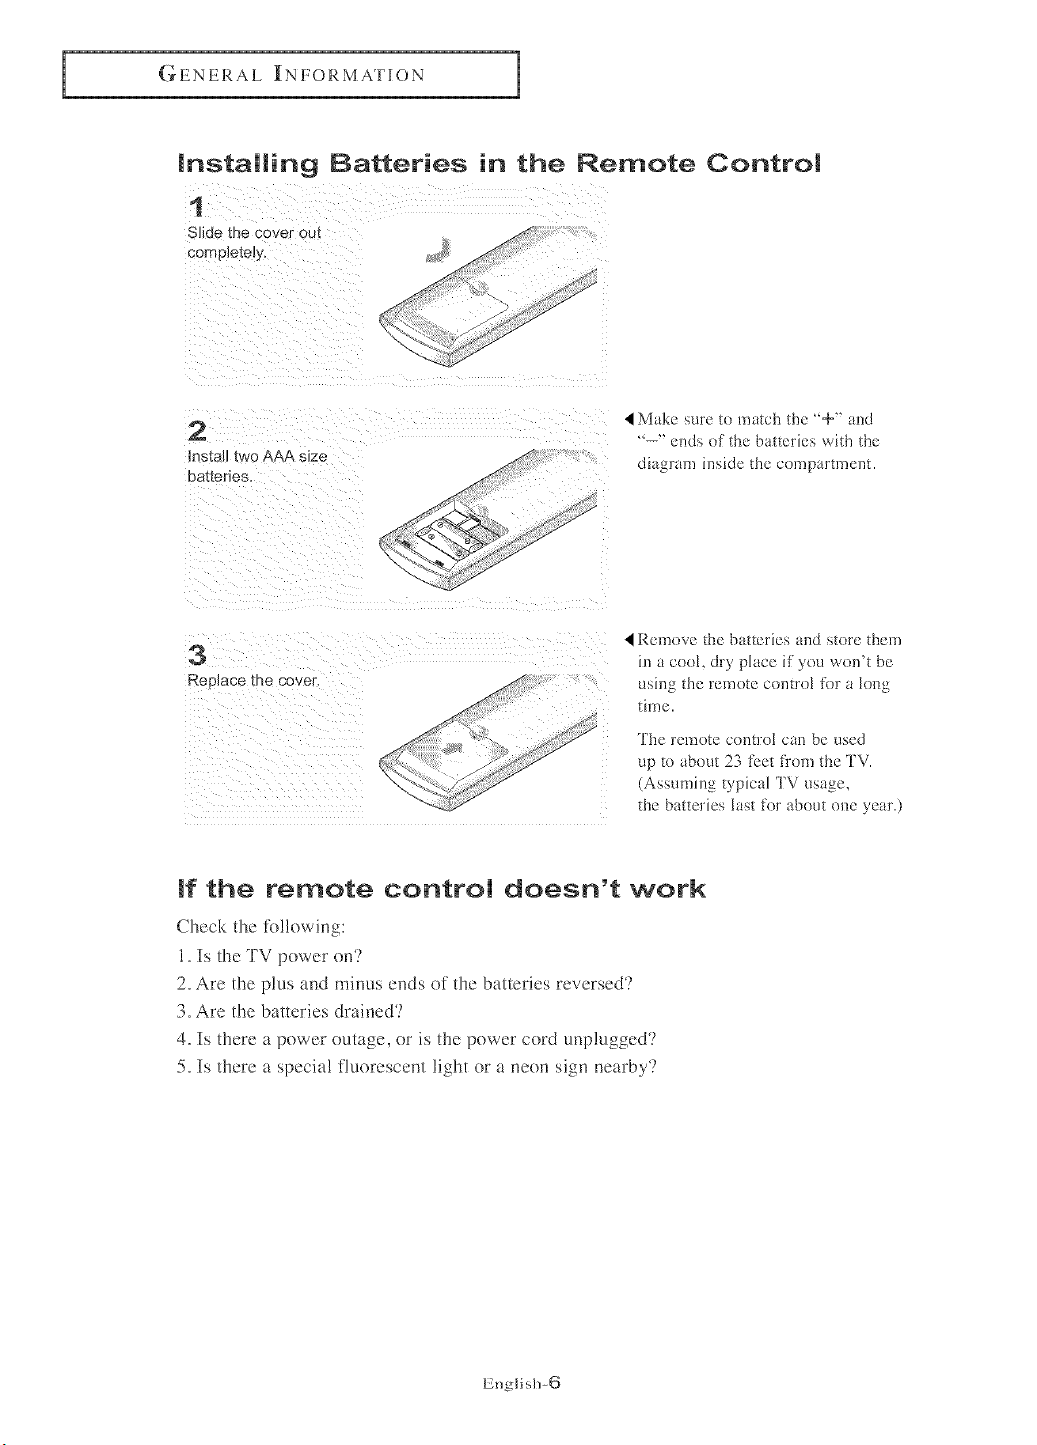
installing Batteries in the Remote Control
1
Slide :ne cover out
comp]etely.
2
Install two AAA s{ze
batteries.
Make sure to match the '+" and
'--" ends of the batteries with the
diagram inside the compartment.
3
Replace the cove_
Remove the batteries and store them
in a cool, dry place if you won't be
using the remote control for a long
time.
The remote control can be used
up to about 23 fbct fl:om the TV.
(Assuming typical TV usage,
the batteries last for about one year.)
If the remote control doesn't work
Check the tb!!owing:
1, Is the TV power on'?
2, Are the plus and minus ends of the batteries reversed'?
3, Are the batteries drained'?
4, Is there a power outage, or is the power cord unplugged'?
5, Is there a special fluorescent light or a neon sign nearby?
English-6
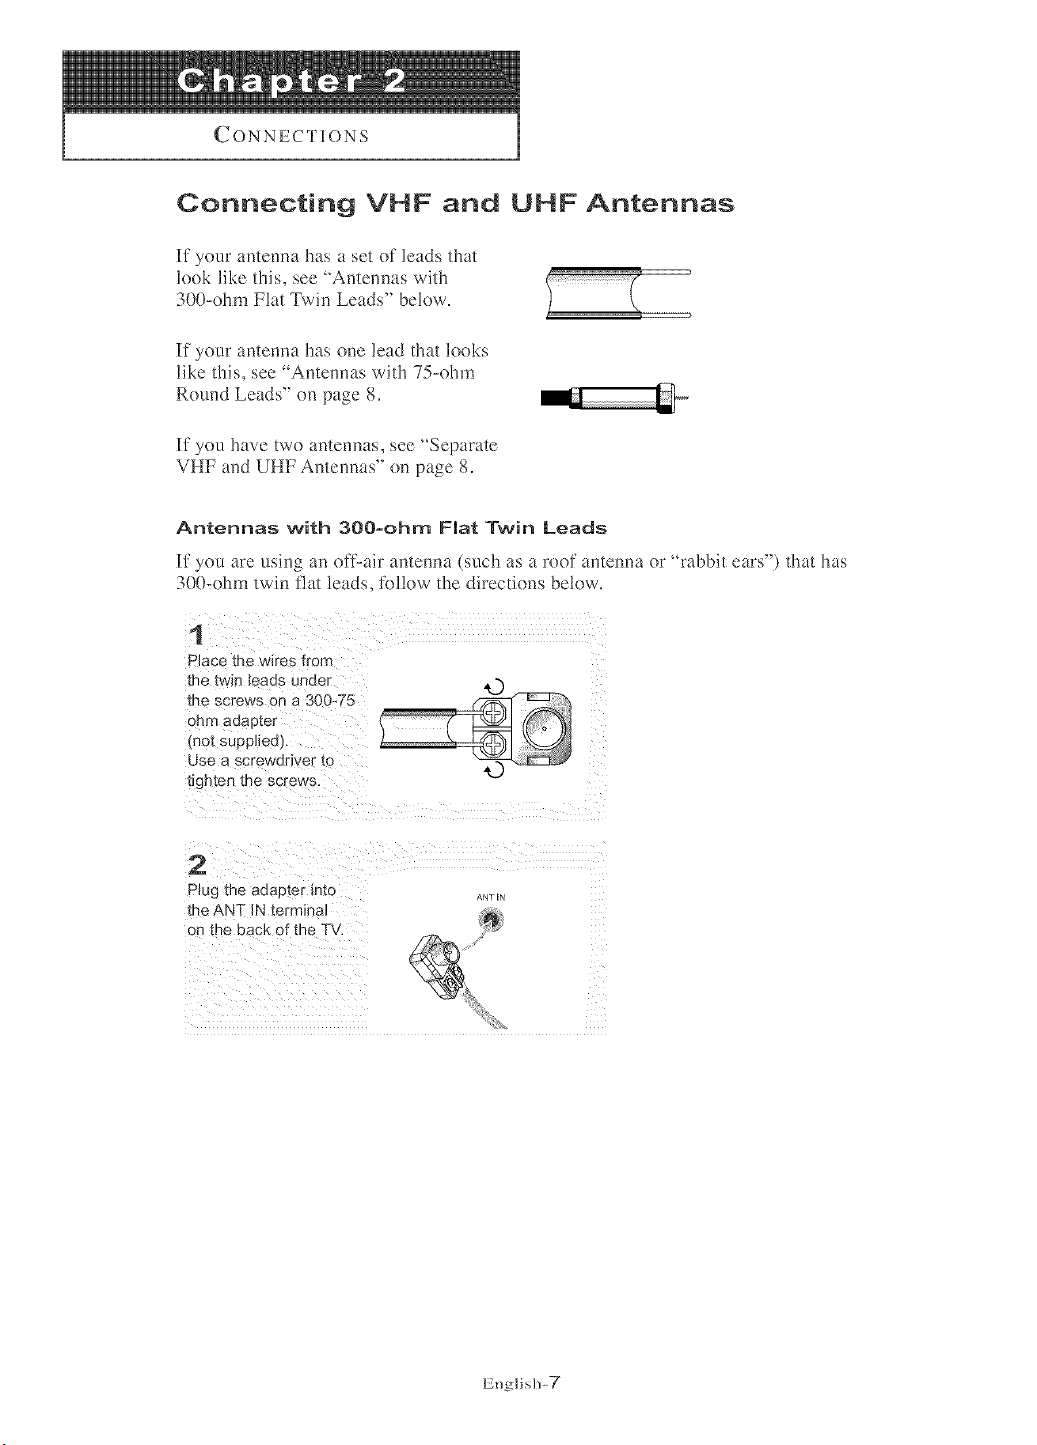
Connecting VHF and UHF Antennas
It your antenna has a set of leads flint
look like this, see 'Antennas with ...............................................
300-ohm Flat Twin Leads" below,
If your antenna has one lead that looks
like this, see 'Antennas with 75-ohm
Rotund Leads" on page 8.
It you have two antennas, see "Separate
VHF and UHF Antennas" on page 8,
Antennas with 300-ohm Fiat Twin Leads
It you are using an off-air ame*ma (such as a roof amenna or "rabbit ears") that has
300-ohm twin flat leads, follow the directions below.
1
P ace the wires from
the twin leaos unoer 4,.)
me screws on a 300W5
onto aoap[er
mo_ suaplled
Use a scr_; Ndriver _c
t_ghten the screws.
2
Plug the adapter into ANTIN
the ANT IN tern- inal
on me pack of the TV.
English-7
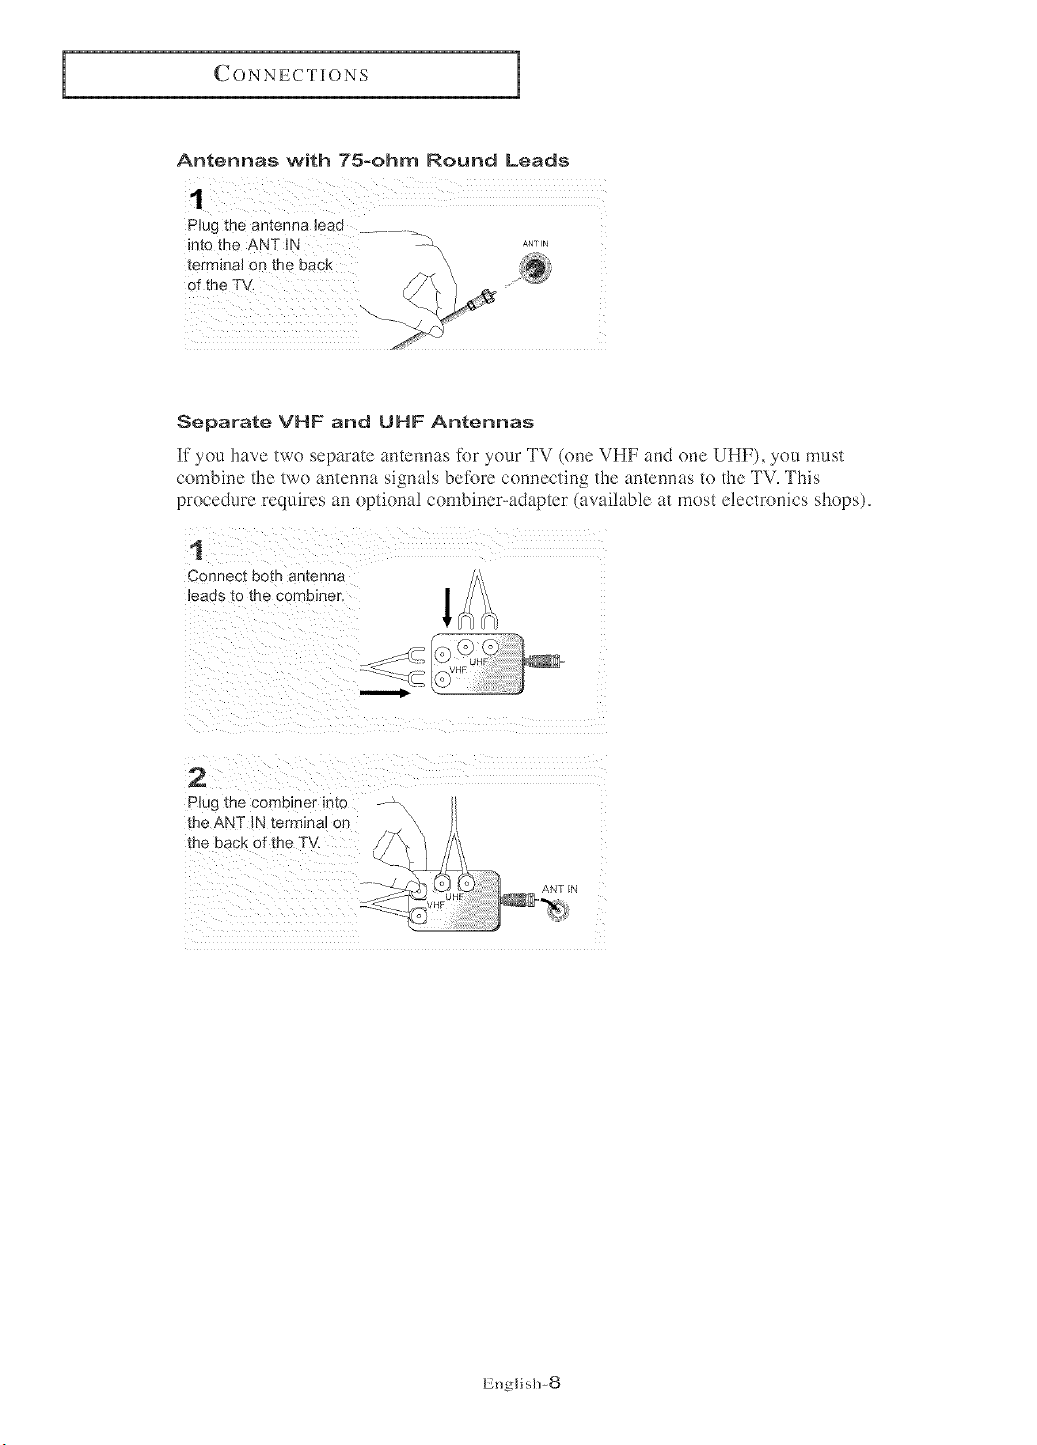
Antennas with 75-ohm Round Leads
PJug the antenna lead .............._
into the ANT_N Z\
ANT IN
termhal on the back _ _;
Separate VHF and UHF Antennas
If you have two separate antennas for your TV (one VHF and one UHF), you must
combine the two antenna signals betore connecting the antennas to the TV, This
procedure requires an optional combiner-adapter (available at most electronics shops),
1
Connec[ Dora antenna
leaos [o me combiner.
2
Plug the combiner _nto
the ANT iN termJnN on
tr_e back of the TV.
UHF ANT N
VHF
English-8
I
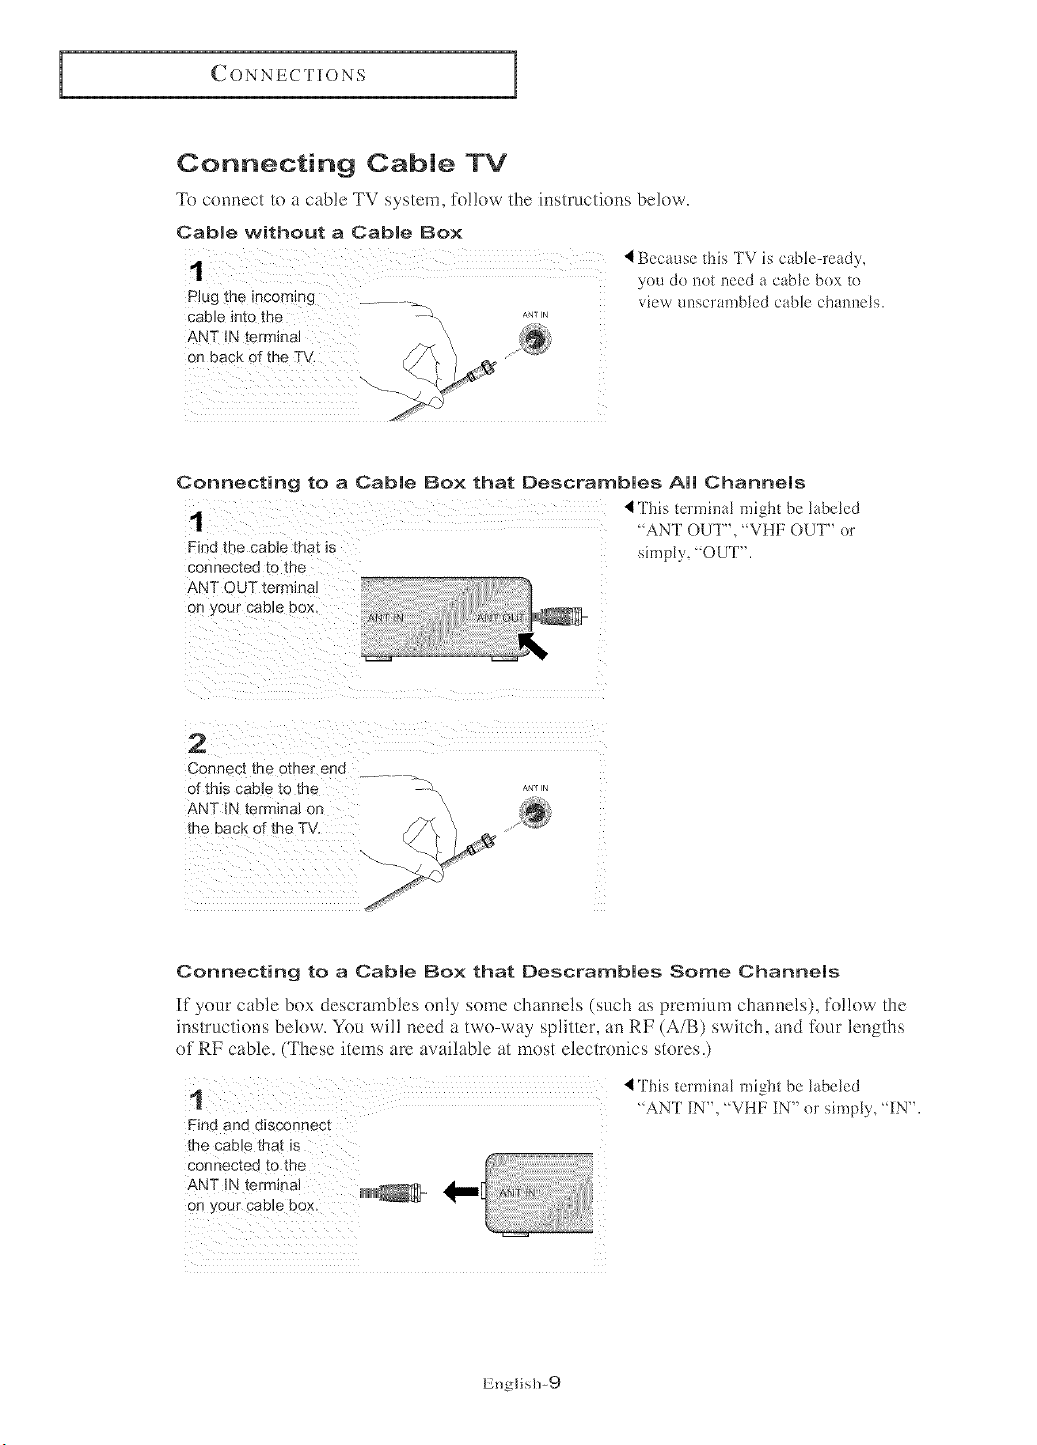
Connecting Cable TV
7k) connect to a cable TV system, follow the instructions below.
Cabme without a Cabme Box
P!ug the incom!ng ................__
cable into the -<x
ANT IN terminal \
on back of the TV.
ANT I_
'i Because this TV is cable-ready,
yeu do notneed a cable bex te
viewunscrambledcablechannels.
Connecting to a Cable Box that Descrambles All Channels
"AN] OUT", "VHF OUT" er
Find the cable that is
connected to the simply, OUT".
ANT OUT termieN
Connect the other end ......... =._
of this cable to the -_x *._,.
ANT _N terminal on \
the back of the TV.
Connecting to a Cable Box that [)escrambles Some Channels
If your cable box descrambles only some channels (such as premium channels), tk)!low the
instructions below. You wil! need a two-way splitter, an RF (A/B) switch, and tkmr lengths
of RF cable. (These items am available at most electronics stores.)
This termhmL might be labeled
"ANT IN", "VHF IN" or simply, "IN".
Find and disconnect
the cable that is
connected to the
English-9

2
Connect this cane
[o a _wo-way splmer.
3
Connect a_qRF cane
eetween an OUTPUT
terrr na on tee sol_tter
and the JN termmal on
the cable box
ncon
cable
5oJgter
CaNe Box
4
Connect an RF cabJe
between the ANT OUT
terminal on tne cable
pox and the B-IN
terrnma] on the AIB
swatch.
7com q
caol_
Cable Box
RF(A/a)
Switch
5
Connec[ anomer
cane between me
omer OUT terminal on
the sehtter and the
AMN termmN on the
RF (A/B) switch.
7commq
caole
Sr_lltte
RF (A/B)
CaNeBox Switch
6
Coneect [ne las[
RF ca_ _e ee_weee tee
OUT tern _ea_or me _ ._ ANT_N
RF (A/B SWitch and
the ANT iN terminal on _mmg TV Rear
;able
the rear of the TV 5olgter RF (A/B)
Cable Bo Switch
After you've made this connection, set the A/B switch to the _A" position for norma!
viewing. Set the A/B switch to the _B" position to view scrambled channels.
(When you set the A/B switch to _B", you will need to tm_e your TV to the cable box's
output channel, which is usually channel 3 or 4.)
English- 10
I
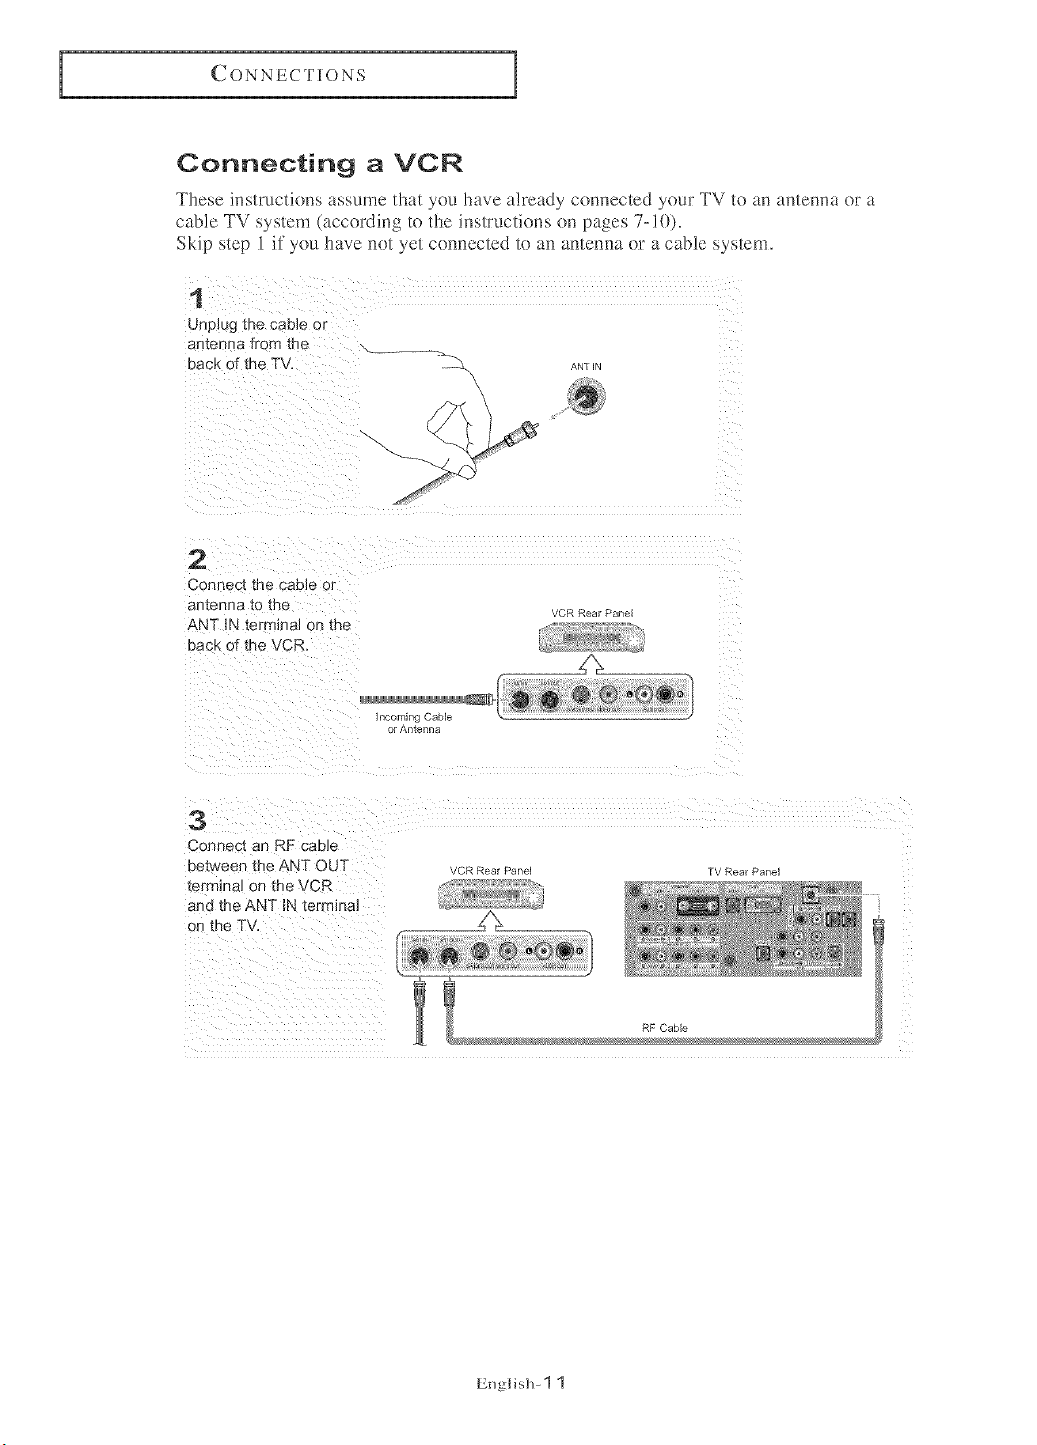
Connecting a VCR
These instructi(ms assume that you have already connected your TV to an antenna or a
cable TV system (according to the instructions (m pages 7-1()).
Skip step 1 if you have no_ yet com_ected 1o a,_ arlterma or a cable system.
1
Unplug the car)_eor
Bn'[enna "Item the
Pack of the TV,
ANIlN
L
Z
2
Con }ec{ [ne CaDle or
BntennEt [o [no
ANT IN terminal on the
Pack of the VCR.
3
Connect an RF cable
between me ANT OU'I
_erminalon the VCR
and the ANT iN terminal
an the,,TV
;ommg Cable
or Antenna
VCR Rear Panel
_CR Rear Panel TV Rear Panel
RF Cable
English- 1 1
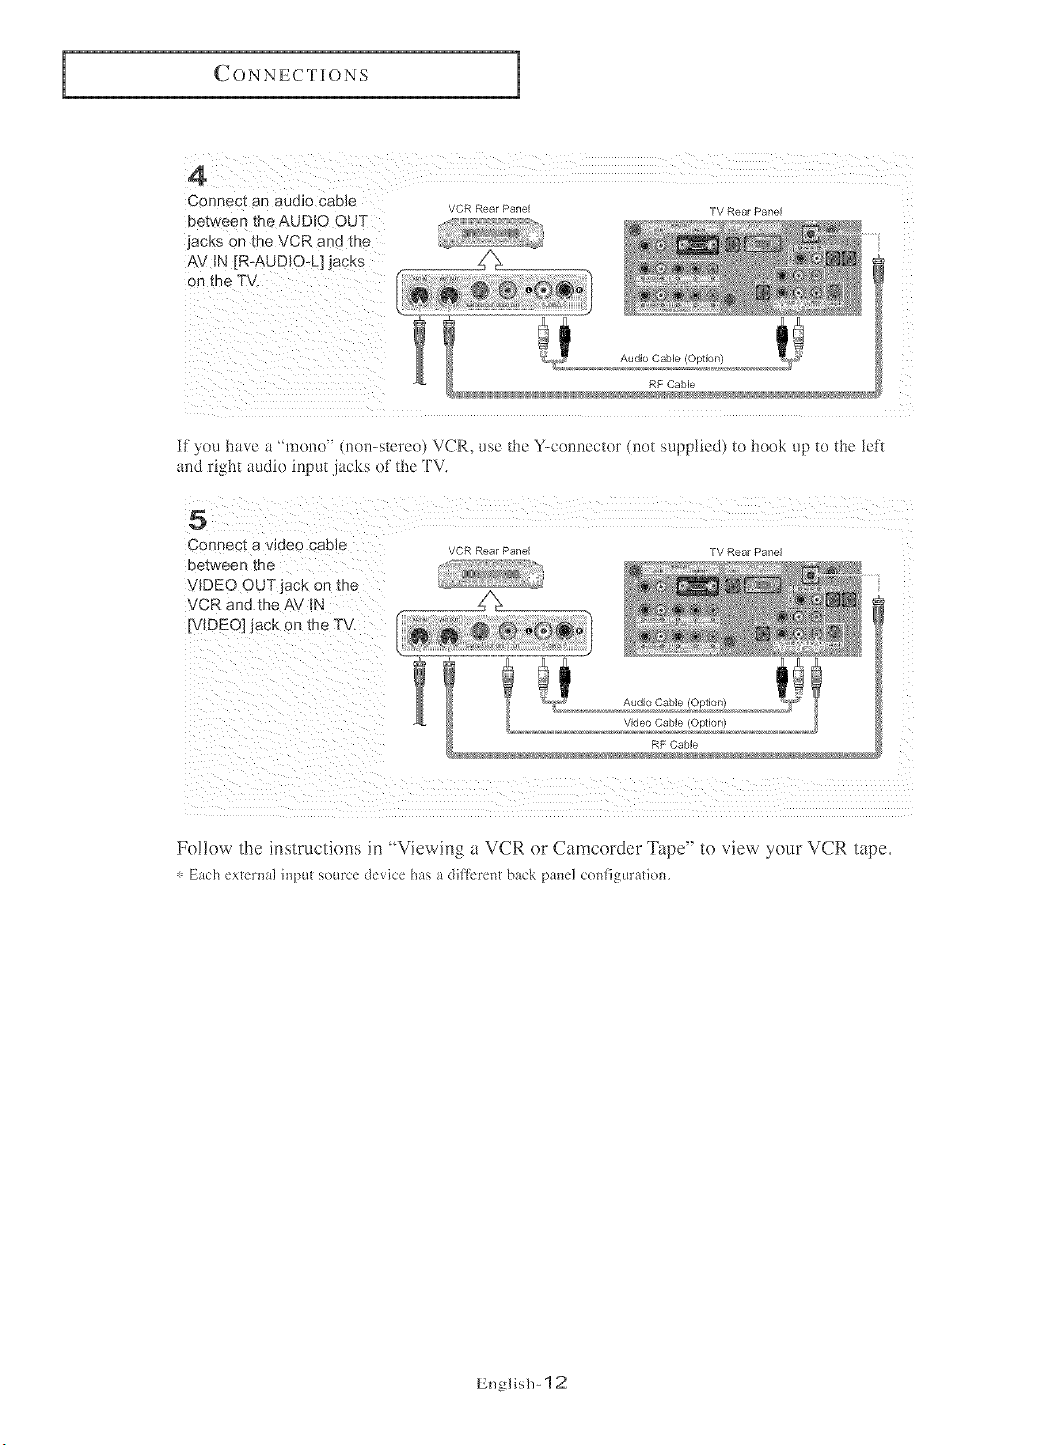
Connect an audio Cable
between the AUDIO OUT
jacks on the VCR and th e
VCR Rear Panel
TV Rear Panel
Z
5
Connect a waeo caD]e
Detween me
VIDEO OUTjack on tr_e
VCR and the AV IN
[VIDEO] jack on the TV,
If you have a "'mono'" (mm-s_creo) VCR. use the Y-comlccrer (]_et supplied) _e book up te the _eft
_md right audio input jacks of lhe 'FV,
Ca Rear Pan_ |V Rear Pane
Video Gable Ootlon
RF Gable
Fol!ow the instrnctions in "Viewing a VCR or Camcorder Tape" to view your VCR tape.
, Etch exter_]aliI?l')Ut source de_ice hasI dillerent btck pmel conligur ttiom
English- 12
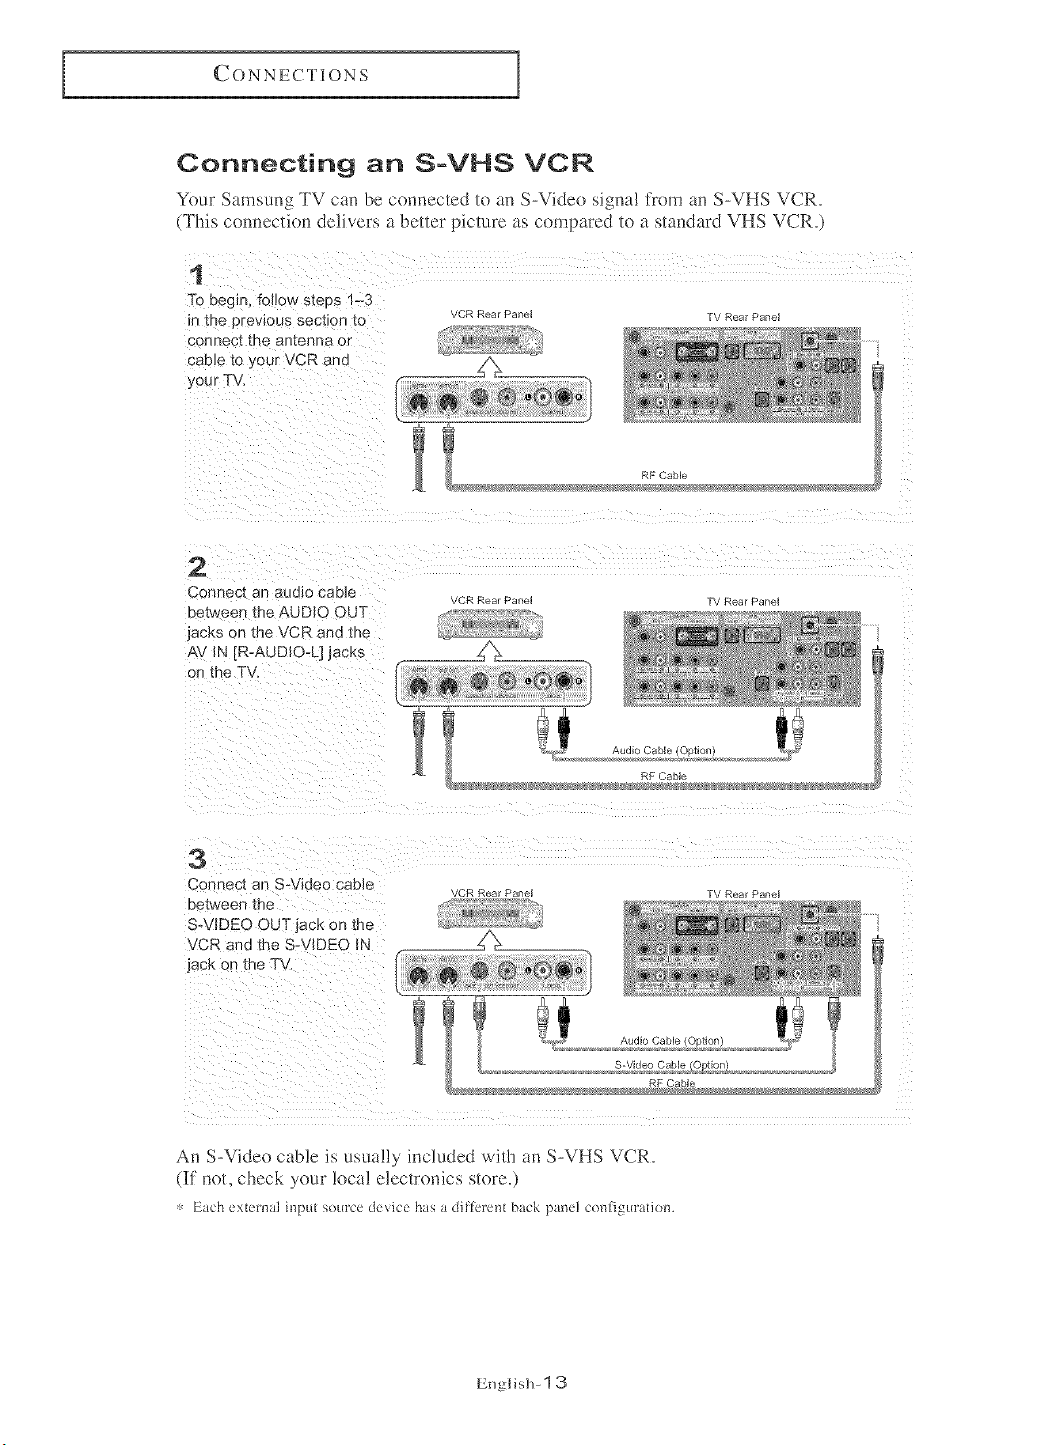
Connecting an S°VHS VCR
Your Samsung TV can be connected to an S-Video sigmd from an S-VHS VCR.
(This connection delivers a better picture as compared to a standard VHS VCR.)
•
To beg_1_follow steps "-3
m the orewous sect{on 1o
connec[ me amenna o[
cable to/our VCR and
your TV
VCR Rear Pane TV Rear Panel
RF Cable
2
Cor)nect an audio caDle
between the AUDIO OUT
jacks on the VCR and the
AV IN "R-AUDIO-L] jacks
on the TV,
3
Connec_ an S-Video cable
oe_[w_er} [_e
S-VIDEO OUT jack on the
VCR and _he S- JIDEO IN
jack on the T'_
VCR Rear Pane TV Rear Panel
RF Cable
VCR Rear Pane TV Rear Panel
/ "_,/t Audio Cable (Option) :_' _: !
S-Video Cable /OotJor
RF Cable
An S-Video cable is usua!l:y included with an S-VHS VCR.
(If not, check your local electronics store.)
: Etch external h_put source device has a dillerm_t btck pine] conligur ttio_l.
EnglislP 1 3
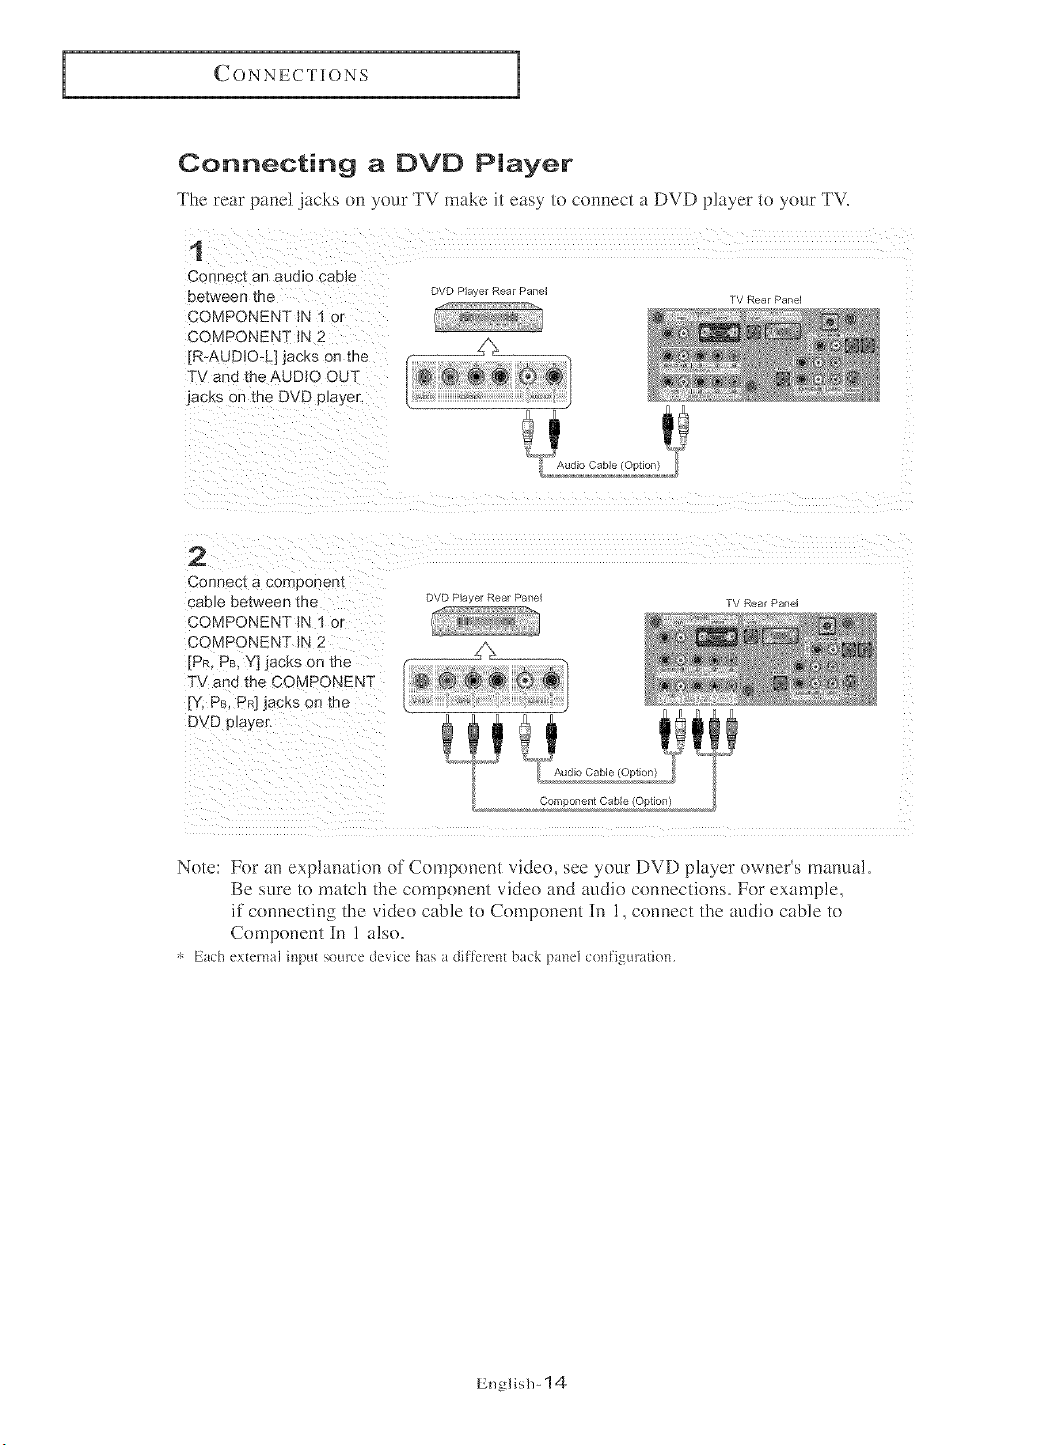
Connecting a DVD Player
The rear panel jacks on your TV make it easy to connect a DVD player to your TV.
1
Connect an audio ca[ Ic
between the
COMPONENT IN 1 or
COMPONENT iN 2
jR-AUDIO-L] jaCKS on me
TV and the AUDIO OUT
jaCKS on the DVD p{ayer,
JVD Pla, er Rear Pane
Audio Cable IOohonl
IV Rear Pan_
2
Connect a corr_Donen_
caeJe between me
COMPONENT IN 1 or
COMPONENT IN 2
[PR, PB, Y] jacks on the
F\ and the COMPONENT
[Y, PB, Pal JacKs on tr_e
DVD o_ayen
DVD Pla, er Rear Pane
IV Rear Panel
'°ILvocab,°,oo.oo
Comnonent Cable/OotK
Note: For an explanation of Component video, see your DVD player owneFs manua!.
Be sure to match the component video and audio connections. For example,
if connectinf,, the video cable to Component In 1, connect the audio cable to
Component In 1 also.
_, Each extelnal input source device has a dillk'rent back panel configuration.
English- 14
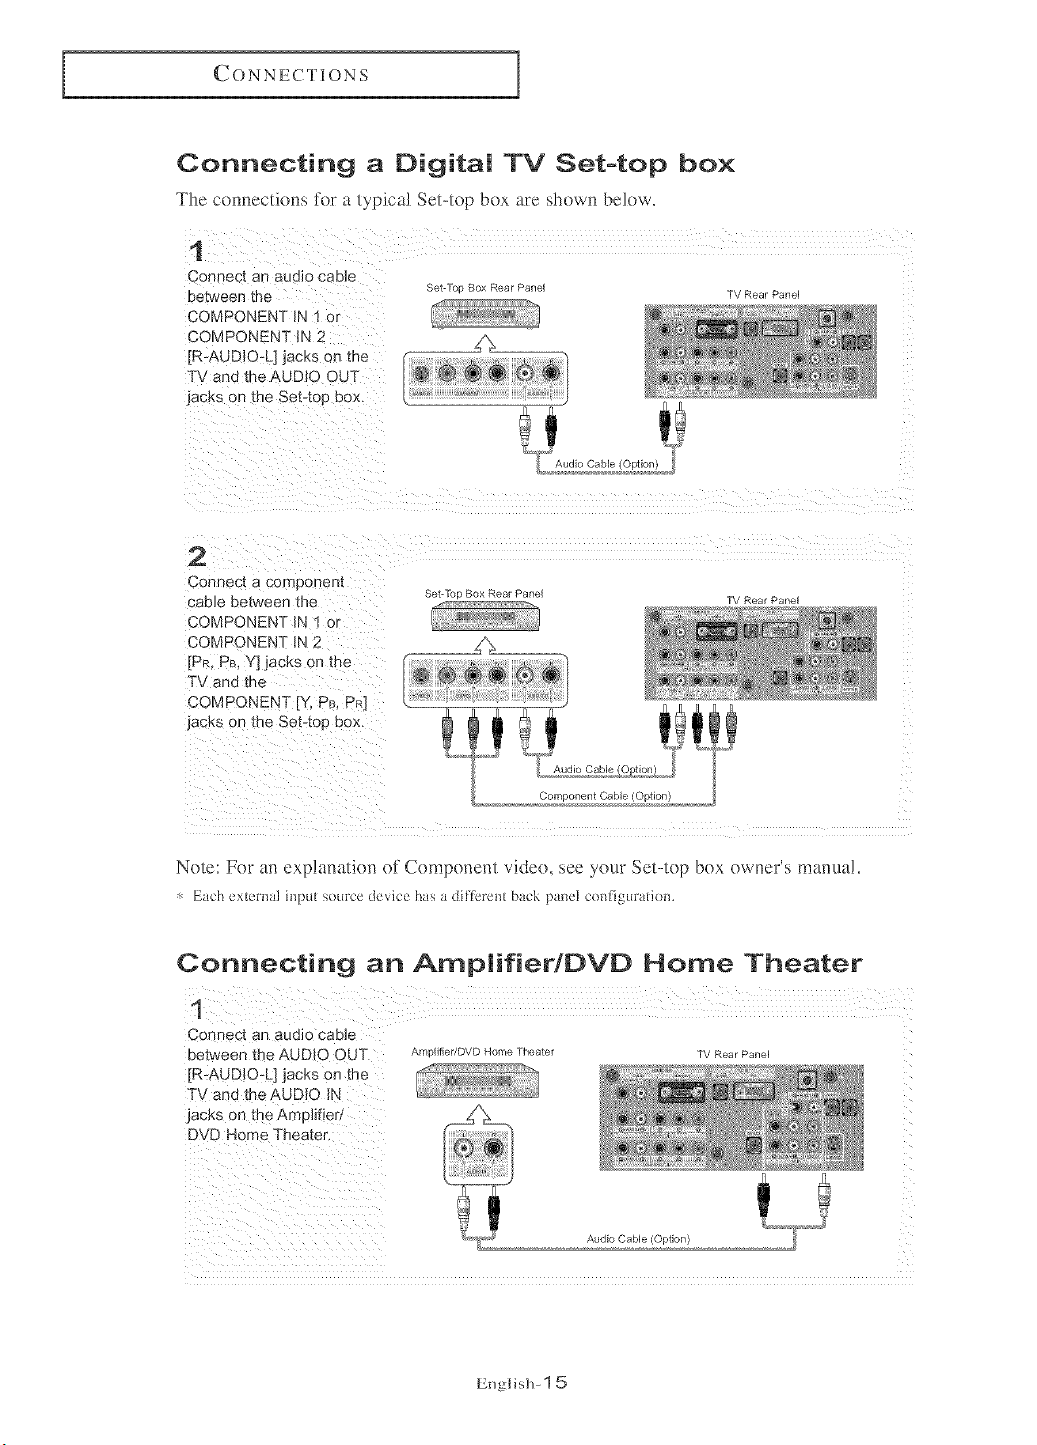
Connecting a Digital TV Set-top box
The com_ectio_s for a typical Set-top box are shown below.
1
Connect an audio cable
De_weerl me
COMPONENT IN ! or
COMPONENT IN 2
jR-AUDiO-L] jacks on me
TV and the AUDIO OUT
jacks on me Set-tog 9ox,
2
Cori]}ec[ a Lx_m )oneR[
:;able between the
COMPONENT IN 1 or
COMPONENT tN 2
[PR, PB,Y] jacks on me
TV and the
COMPONENT [Y, PR, PR]
jacks on the Set-toe DOX,
3et-/c Box Rear Panel
Set- [uc Box Rear Pailel
TV Rear Panel
TV Rear Pailel
Audio Cable
Component Cable (Option)
Note: For an explanatkm of Component vide(), see your Set-top box owner's manua!.
g_c'h external input source deGc'e has a dillerent b_ck pmel co_flig:uratiom
Connecting an Amplifier/l::)VD Home Theater
Connect an audio cable
between the AUDIO OUT
[R:AUD!O-L] jacks on the
TV and the AUDIO IN
jacks on the Amplifier/
Amplifier/DVD Home Theater
Audio Cable (Option)
TV Rear Panel
gnglislP 1 5
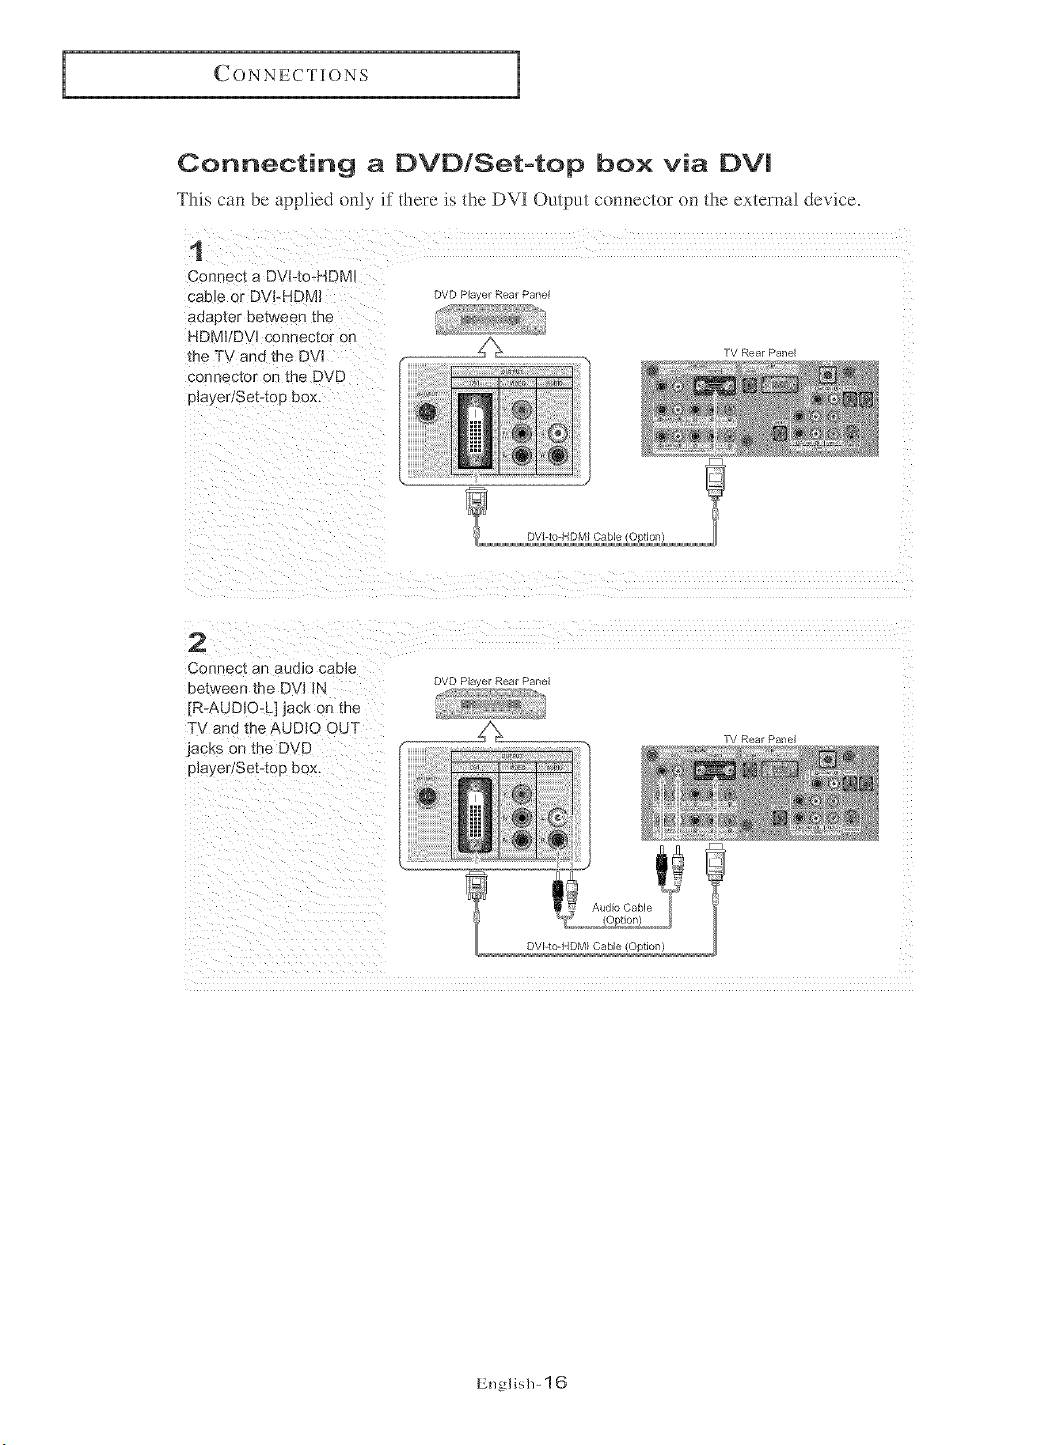
Connecting a DVD/Set-top box via DV!
This car_ be applied only if there Js the DVI Output com-_ector on the external device.
1
Connect a DVFto+HDMJ
caele or DVFHDMI
aaapter between me
HDM}/Dvl cant ector on
the TV and the DVl
connector on the DVD
playeriSet4ou pox.
DVD PI_: _er Rear Panel
TV Rear Panel
8
DVI-Io-HDMI Cable )Dtlonl
2
Conn@c[ an aUOlO CaelC
between the DV+ IN
[R-AUD_O-L] jack on the
TV and me._UDIO OUT
jacks on the DVD
player/Set4oo cox.
DVD PI_ _er Rear Panel
English+ 16
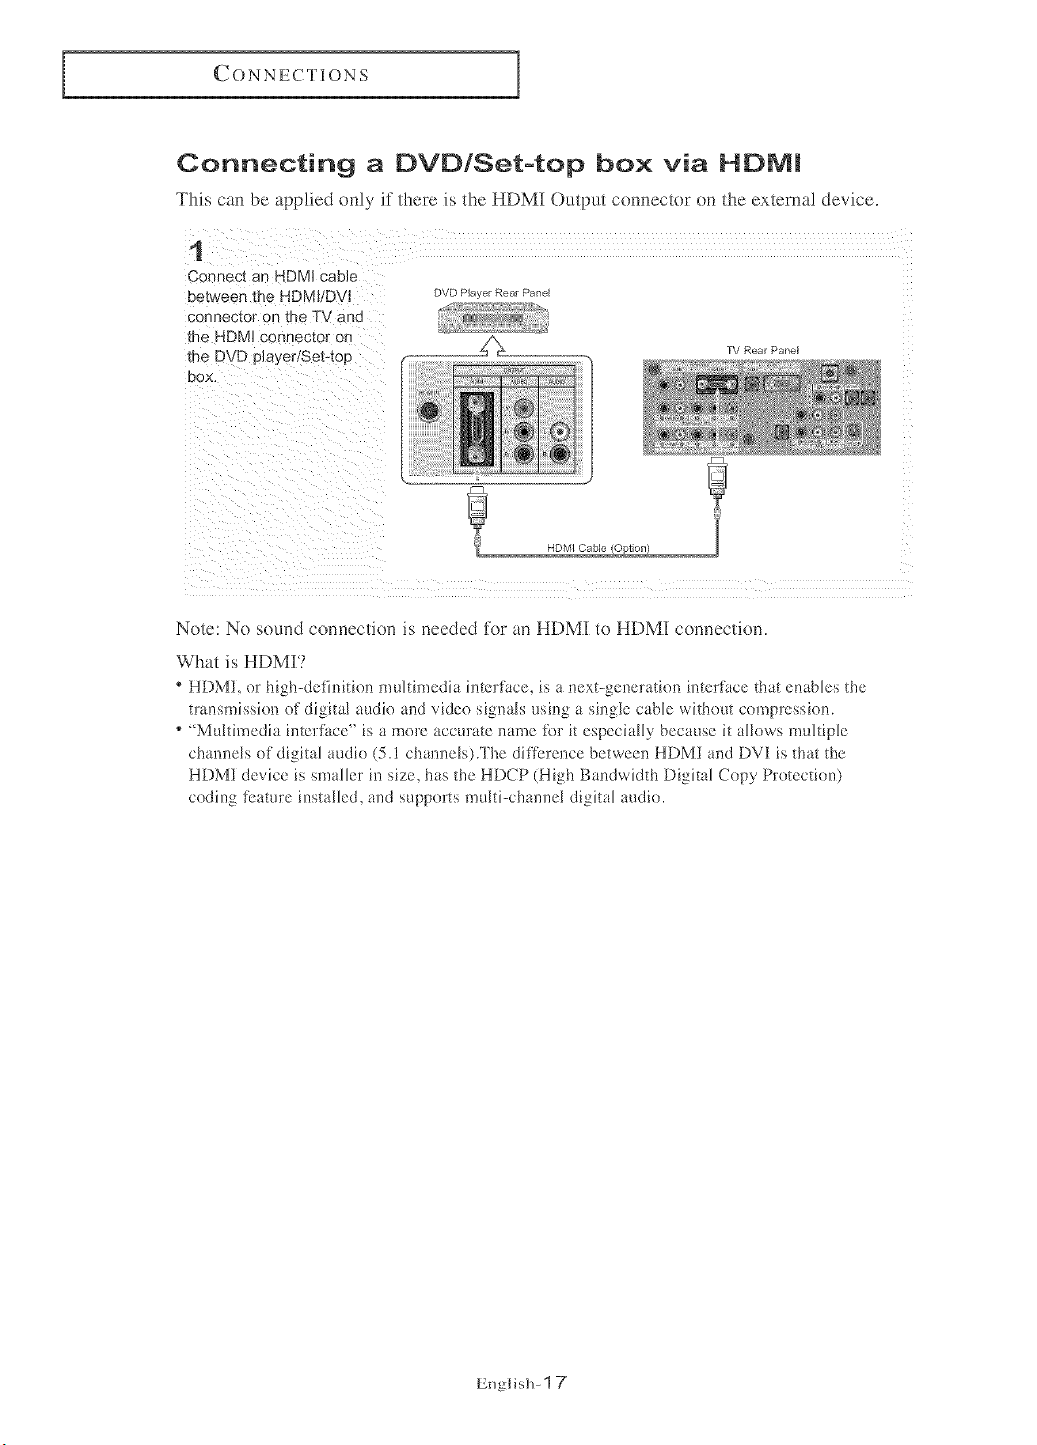
Connecting a DVD/Setotop box via HE)M!
This can be applied only it there is the HDMI Output connector on the external device,
1
Connect an -IDMJcable
between the HDMI/DVI
connector on tr e TV anc
me HDMJ connector or
the D !D player/Set-top
OOX.
DVD Player Rear Panel
TV Rear Panel
Note: No sound connection is needed for an HDMI to HDMI connection.
What is HDMI?
HDMI, or high-definition multimedia interfi_ce, is a next-generation intert_tce that euables the
transmission of digital audk) and video signals using a single cane without compression.
"Multimedia interface" is a more accurate name fi)r it especially because it allows multiple
channels of digital audio (5.1 channelsl.The diflbrence between HDMI and DVI is that the
HDMI device is smaller in size, has the HDCP (High Bandwidth Digital Copy Protection)
coding tbature installed, and supports multi-channel digkal audio.
EnglislP 1 7
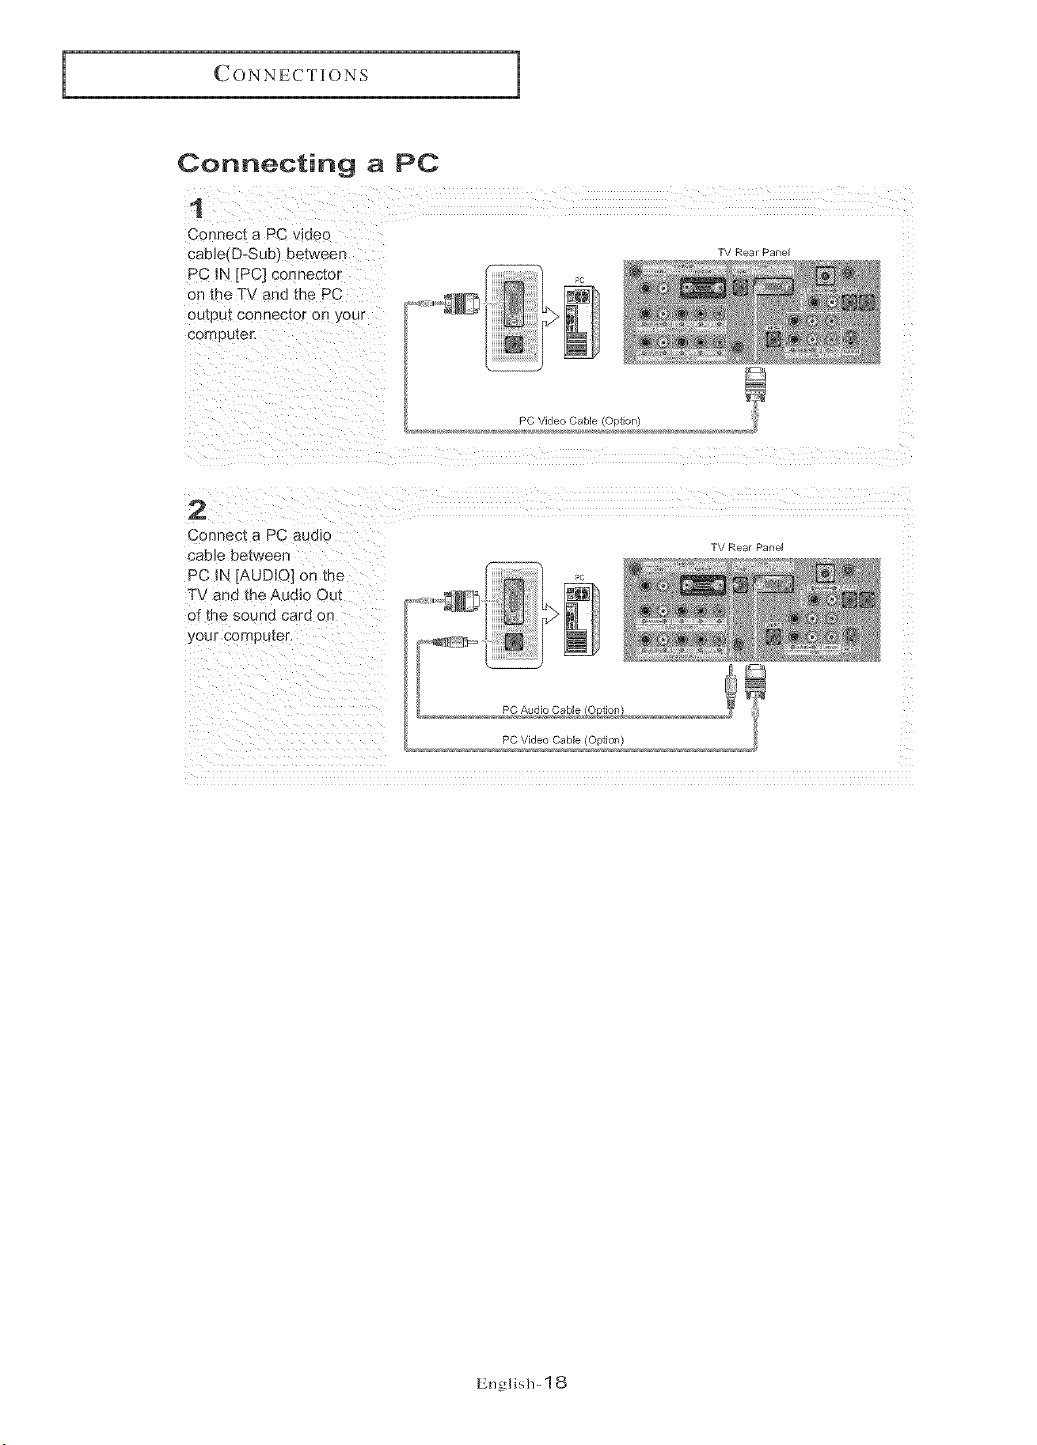
Connecting a PC
i
Connect a PC v_deo
caeJe(D-Sub} between
PC IN [PC] connec_o_
on _n6 TV and the PC
:)u_eu_connector on you_
con pu[er.
2
Connect a PC audio
CabJe between
PC IN [AUDIO] on _ne
TV ano the Audic Out
of the souno cara or
your _7ameuter,
TV Rear Panel
PC Video Cable (Option)
PC Audio Cable/oDtionl
PC Video Cable (Option)
TV Rear Pailel
English- 18
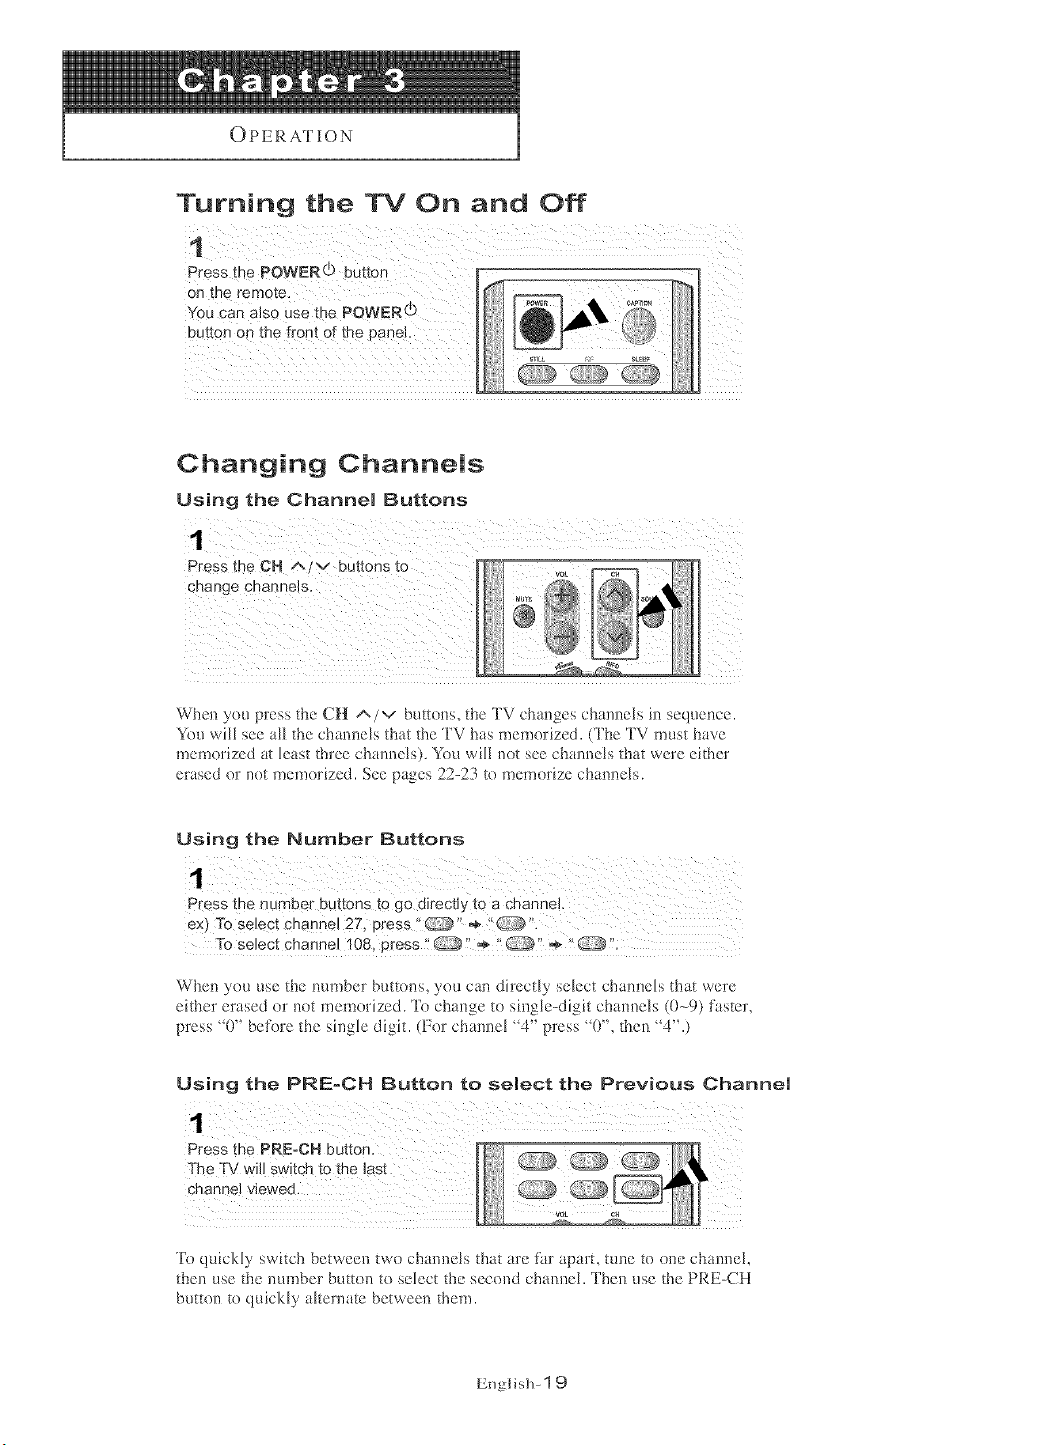
OPEP, ATION
Turning the TV On and Off
P essthePOWEO button r ! i
0n the rem0te lif_[ _
You Canalso Usethe POWERdj
button Onthefront Ofthe panel.
Changing Channels
Using the Channel Buttons
Press the CH _/v buttons to
When you press the CH A/v buttons, the TV changes channels in sequence.
You will see all the channels that the TV has memorized. (Tl_e TV must have
memorized at least three channels). You will not see channels that were either
erased or not memorized. See pages 22-23 to memorize channels.
Using the Number Buttons
ex) To seJect channel 2Z, Press" '_ ÷ t'_ ".
When you use the number buttons, you can directly select channels that were
either erased or not memorized. To change to single-digit channels (()-_9)faster,
press "0" before the single digit. (For channel "4" press "0", then "4".)
Using the PRE-CH Button to select the Previous Channel
Press the PRE-CH button,
The TV will switch to the last
channel viewed.
To quickly switch between two chamlels that are thr apart, tune to one channel,
then use the number button to select the second cbanneh Then use the PRE-CH
button to quickly akernate between them.
English- 1 9
OPERATION
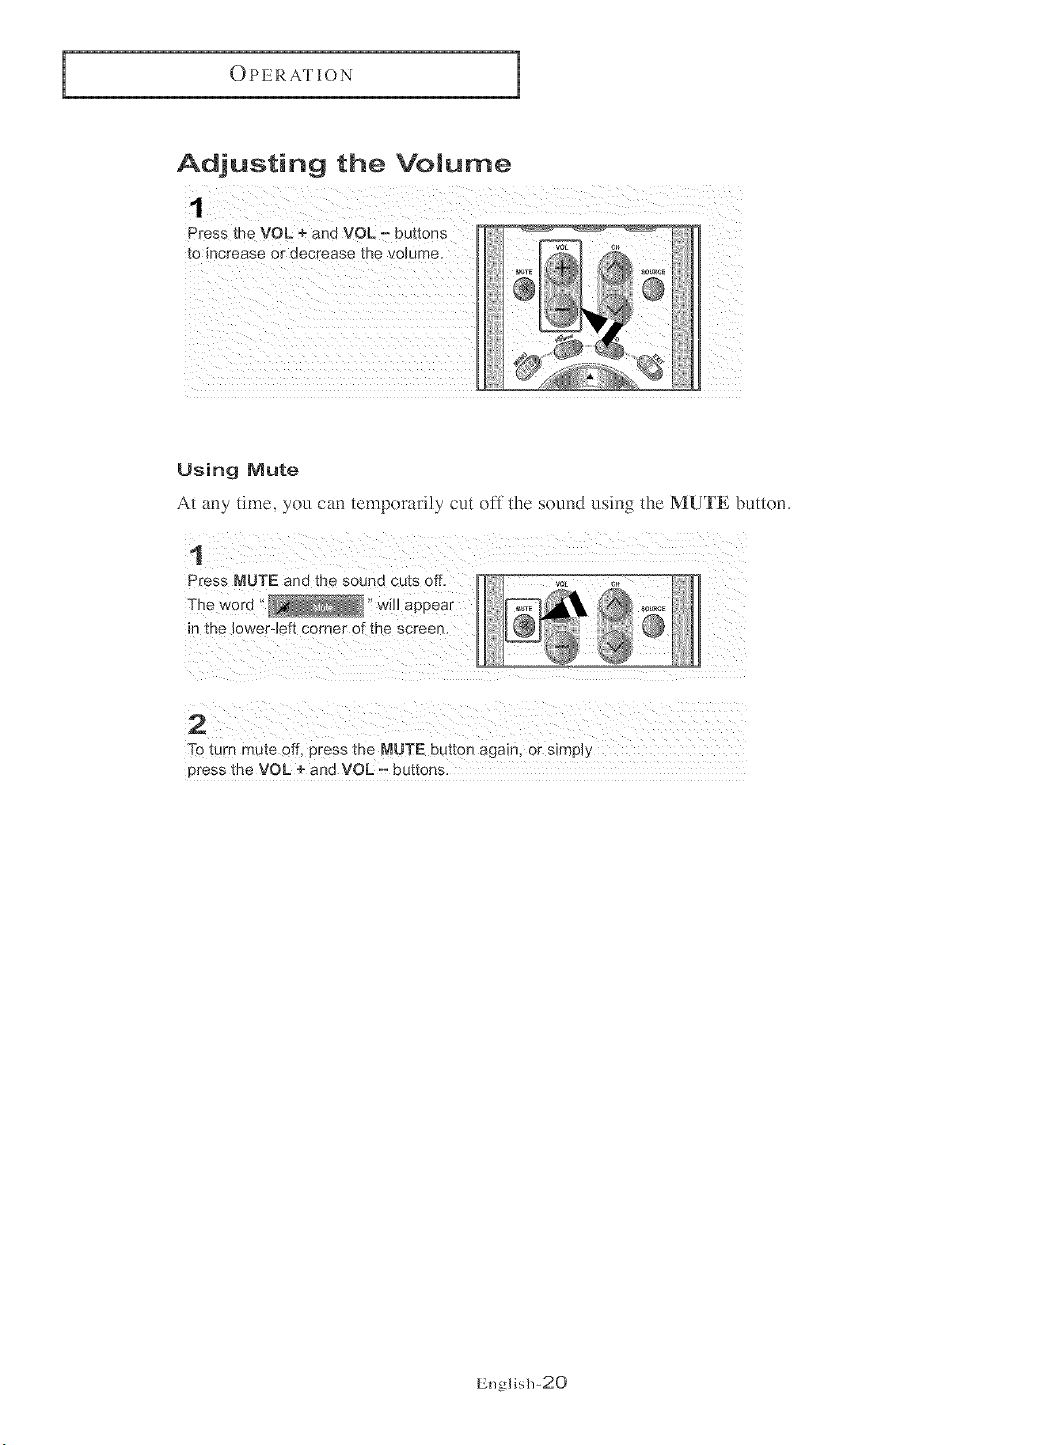
Adjusting the VoJume
i_ilili!li!il
Using Mute
At any time. you can temporarily cut off the sound using the MUTE butt<m,
1
Press MUTE and the sound cuts off,
The word _ will
appear
_ntne lower-left corner ol [he screer
2
"['oturn mute off. Dress the MUTE button again, or simply
press the VOL + and VOL - buttons
English-20
OPERATION
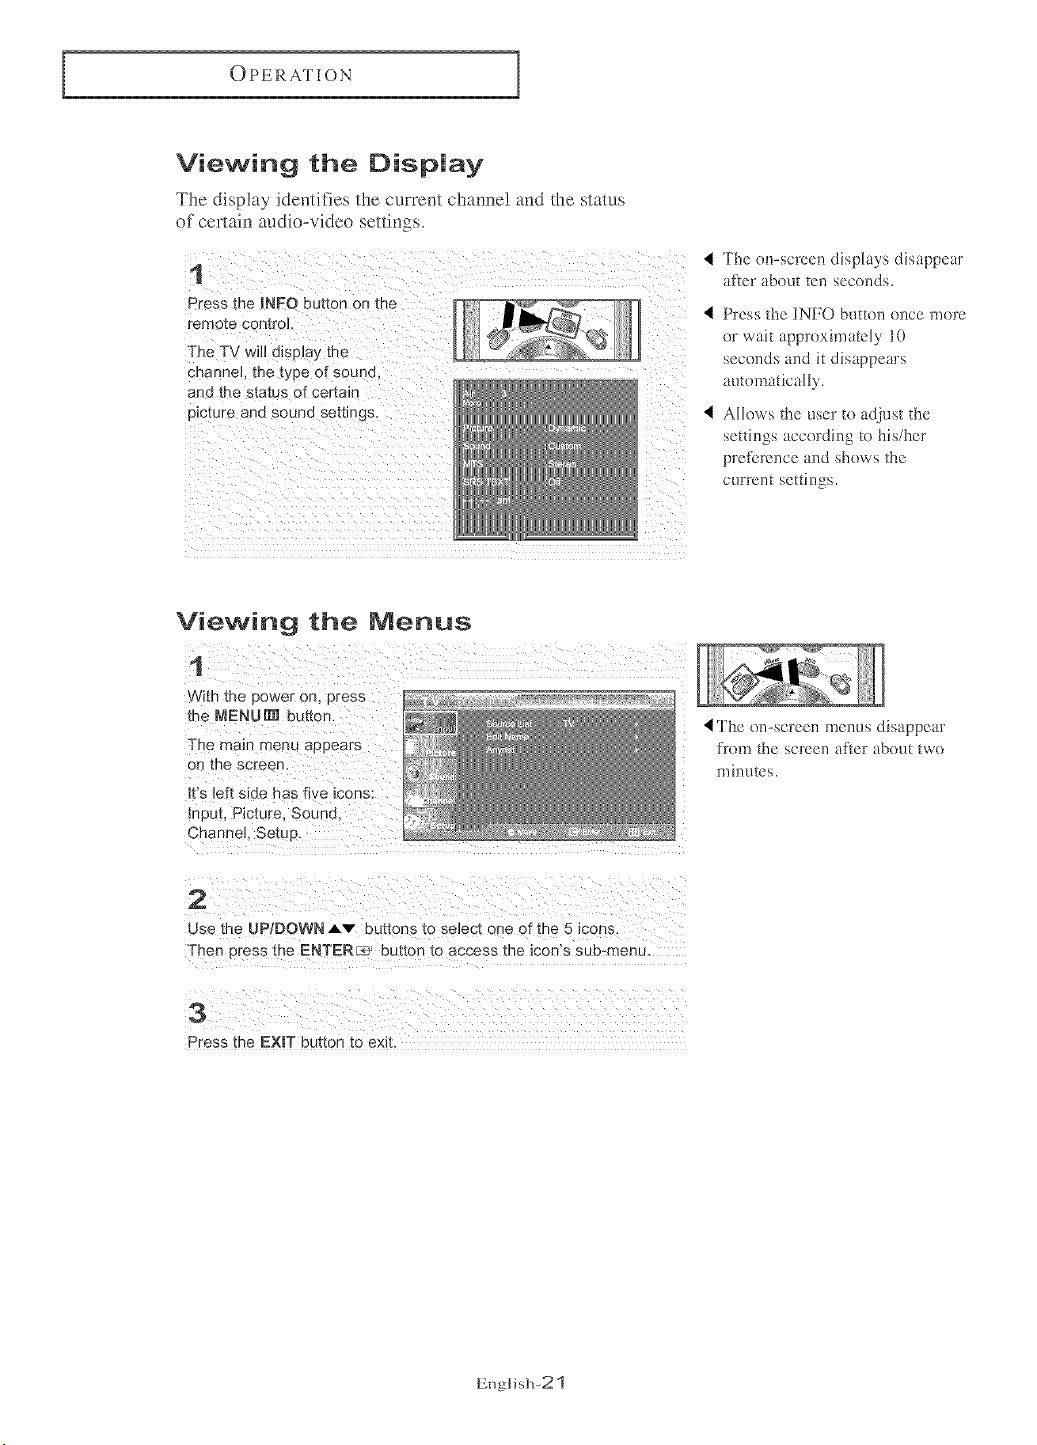
Viewing the Display
The display identifies the current channe! and the status
of cer*aJn audio-video settings.
1
Press the INFO button on tne
remote con_:ro_.
The TV will disD_a} me
channeL the type o[ souno.
and the status of certain
picture and sound settings.
4 The (m-screen displays disappear
after about ten seconds.
4 Press the INFO butt<m once ruore
or wait approximately 10
seconds and it disappears
automatically.
4 Allows the user to adjust the
settings according to his/her
preference and shows the
current setth)gs.
Viewing the Menus
With the power on, press
the MENURII button.
Input, Picture, Sound,
4 The (m-screen metals disappear
from the screen after about two
mh_utes.
Use the UP/DOWN Av buttons to select one of the 5 icons.
Press the EXBT button to exit.
English-21
OPERATION
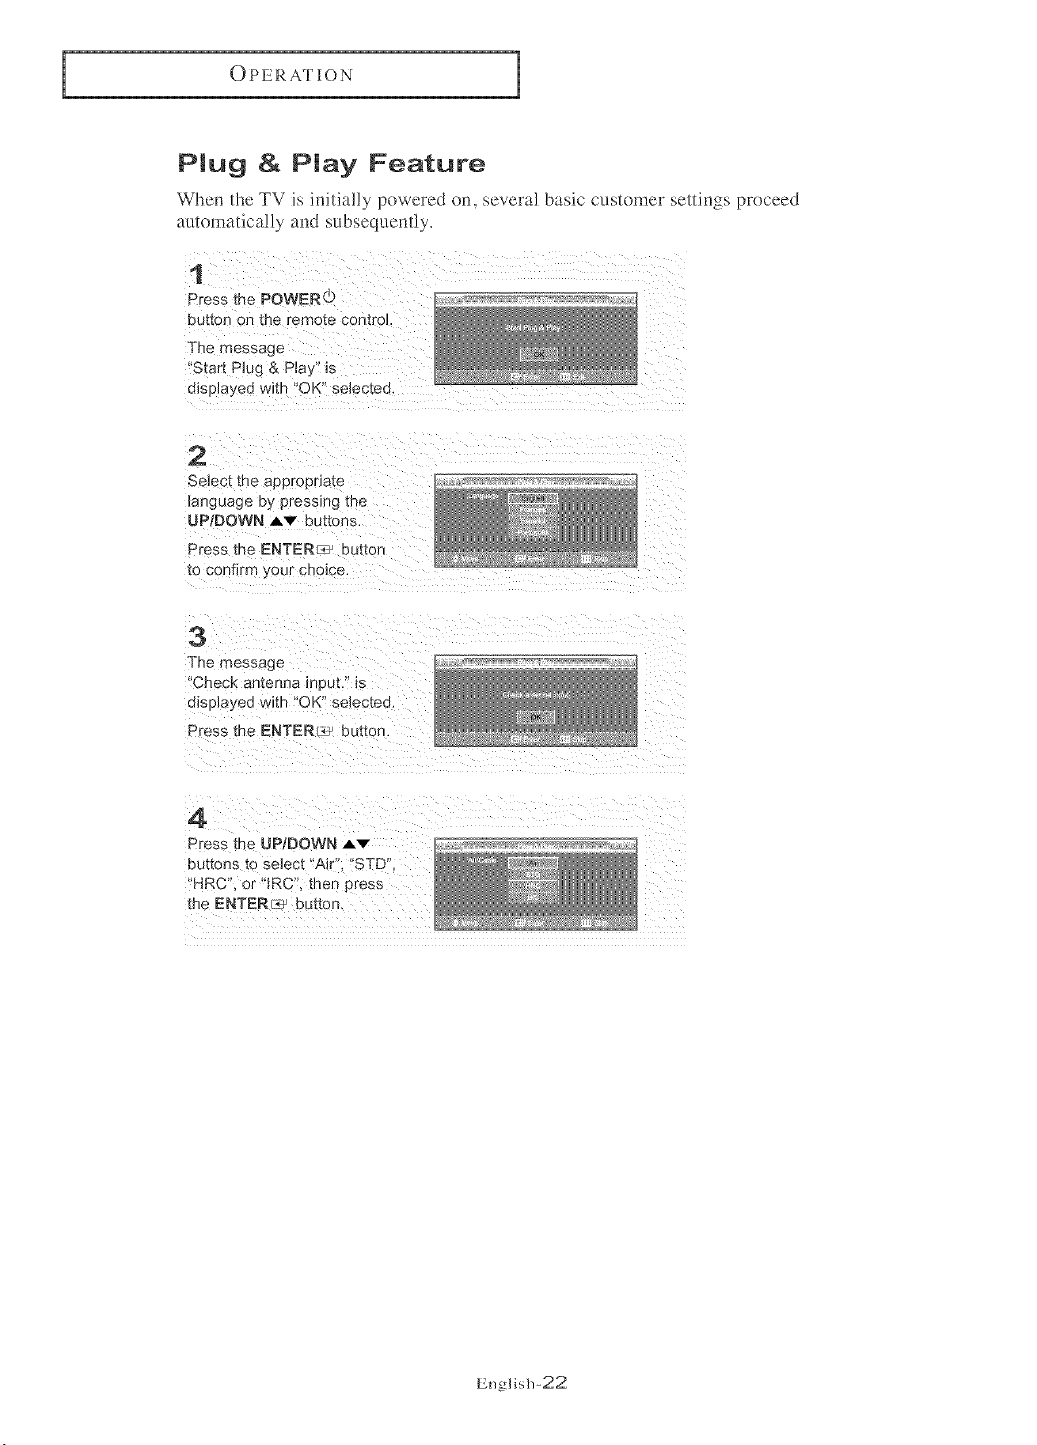
PMug & Play Feature
Whe,_ the TV is initially powered on, several basic customer settings proceed
automatically and subsequently.
1
Press the POWER©
button on the remote control
The message
'Start P_ug & P_ay" is
disuJayed with "OK" seiec[eo.
2
Select me aeDroeHate
_anguage by pressing me
UP/DOWN AV buttons,
Press me ENTER_ button
to confirm your choice.
3
The message
Check antenna meut." _s
disel_.yeu with "OK" selec[eo,
Press the ENTER_ button,
4
Press the UP/DOWN Av
buttons [o select "Air'. "STD"
HRC or"JRC', tber Dress
the ENTER___ button.
English-22
OPERATION
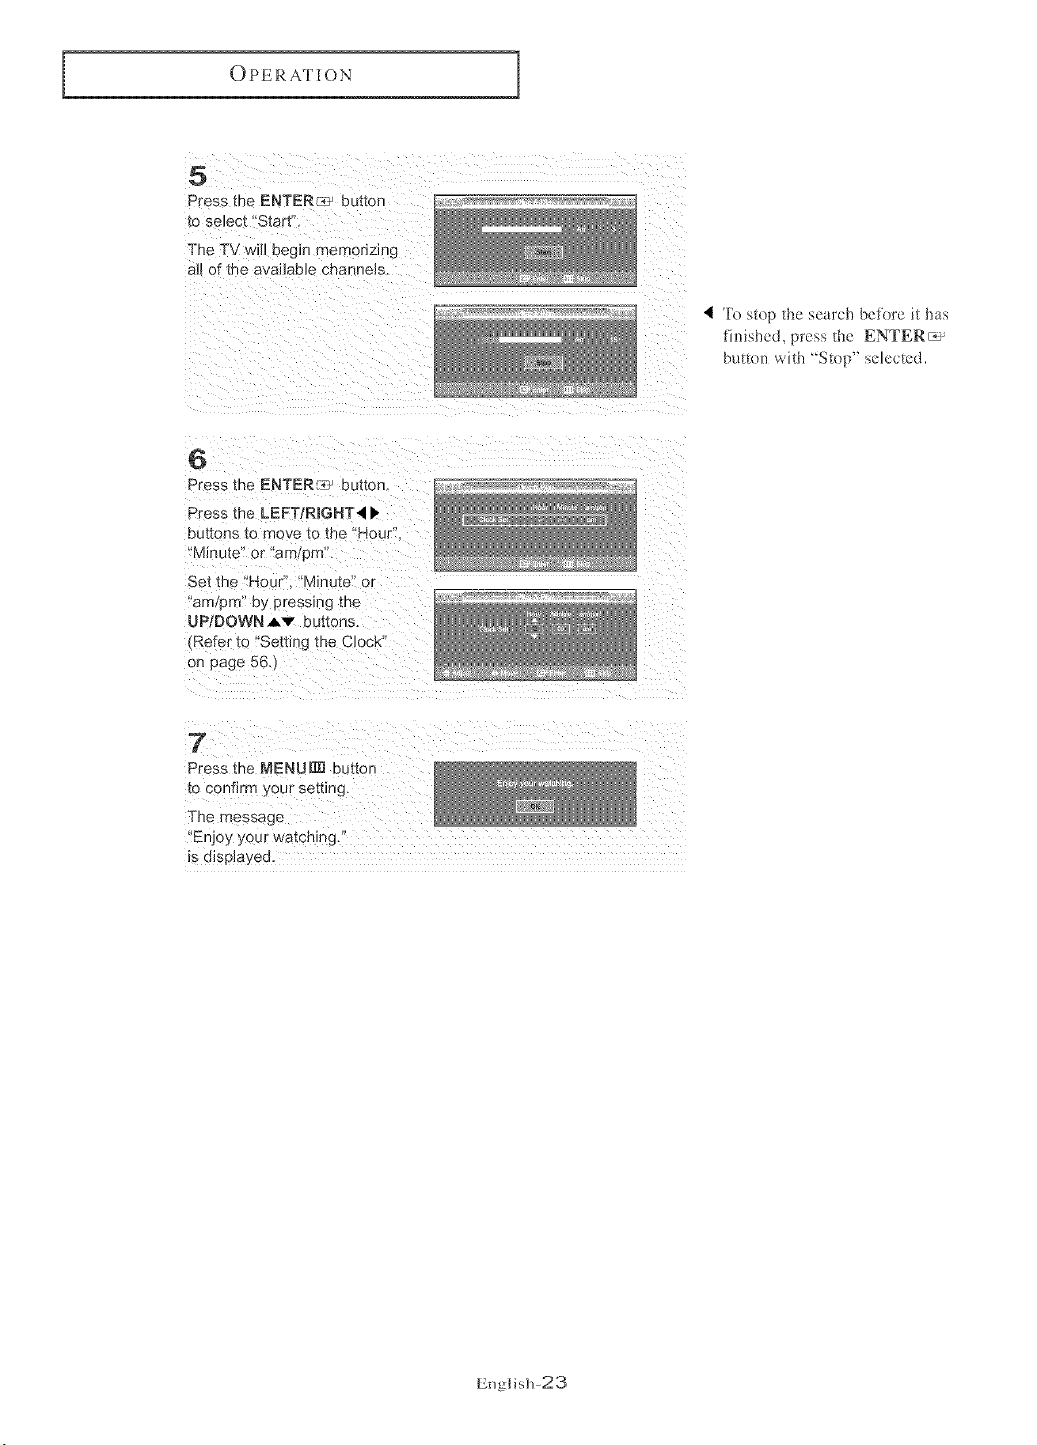
5
Press the ENTERr_], buttor
_o se_ect Start".
The TV will begin memorizing
aJ_of the available channels
4 To stop the search befl)re it has
finished, press the ENTER_
button with 'Stop" selected.
6
Press the ENTER:_ _ button
Press the LEFTIRIGHT4 l,
buttons to move to the 'Hour".
'Min Jte or -am/pro
Set the Mc JK'. "Minute" or
art 9m e¥ p_essmg the
UPtDOWN AV buttons.
Refer to 'Setting the Clock"
on cage 56.
7
Press the MENUIRI button
[o confirm ?,our setting.
The message
'Enjoy your watching.
_sdJsplayea.
English-23
OPERATION
Memorizing the Channels
Your TV can memorize and store al! of the available channels for both 'off-air" (antenna)
and cable channels, At'[er the available channels are memorized, use the CH A and CH v
buttons to scan tbrou_b the channels This elimim_tes the need to change channels by
entering the channe! digits, There are three steps R)r memorizing channels: selecting a
broadcast source, memorizing the channels (automatic) and adding and deleting channels
(manua!).
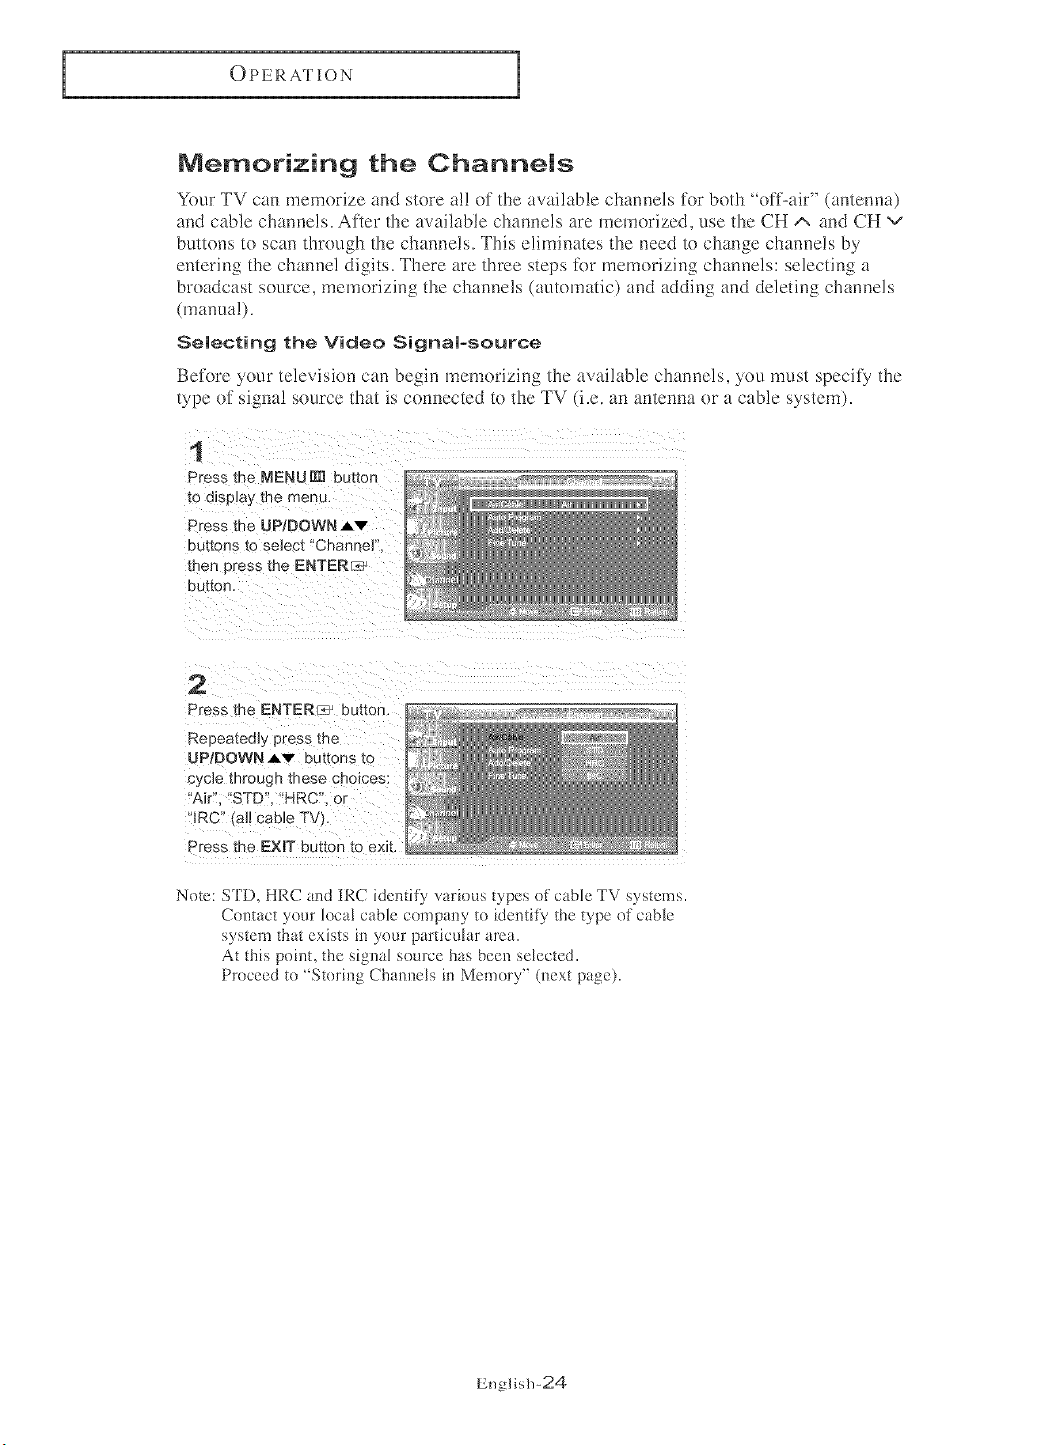
8emecting the Video Signam-source
Before yotlr television can begin memorizing the available channels, you must specify the
type of signal source that is connected to the TV (i.e. an antenna or a cable system).
1
Press the NENU[N button
_o d_splaytr_emenu.
Press the UP/DOWNAv
Dm_onsto select "Channel
men "?ressthe ENTENc:_
button,
2
Press the ENTER_ button.
Repeatedly press me
UPIDOWN_,v buttons to
cycle mrougn tbese choices:
Air. "STD", "HRC", or
IRC tal_ cable TV)
Press the EXIT button to exit
Note: STD HRC and IRC idemif_ var_eus rx pc_ f cable TV svs*ems
Contact, m tocat cable compan 3 _o iden_iB me _ype of cable
",ys_ela tha_ exists tll your par[lcutar are_
At this point, the signal source has been selected.
Proceed ta "Starhlg Chamlels in Memory" 01ext page).
English-24
OPERATION
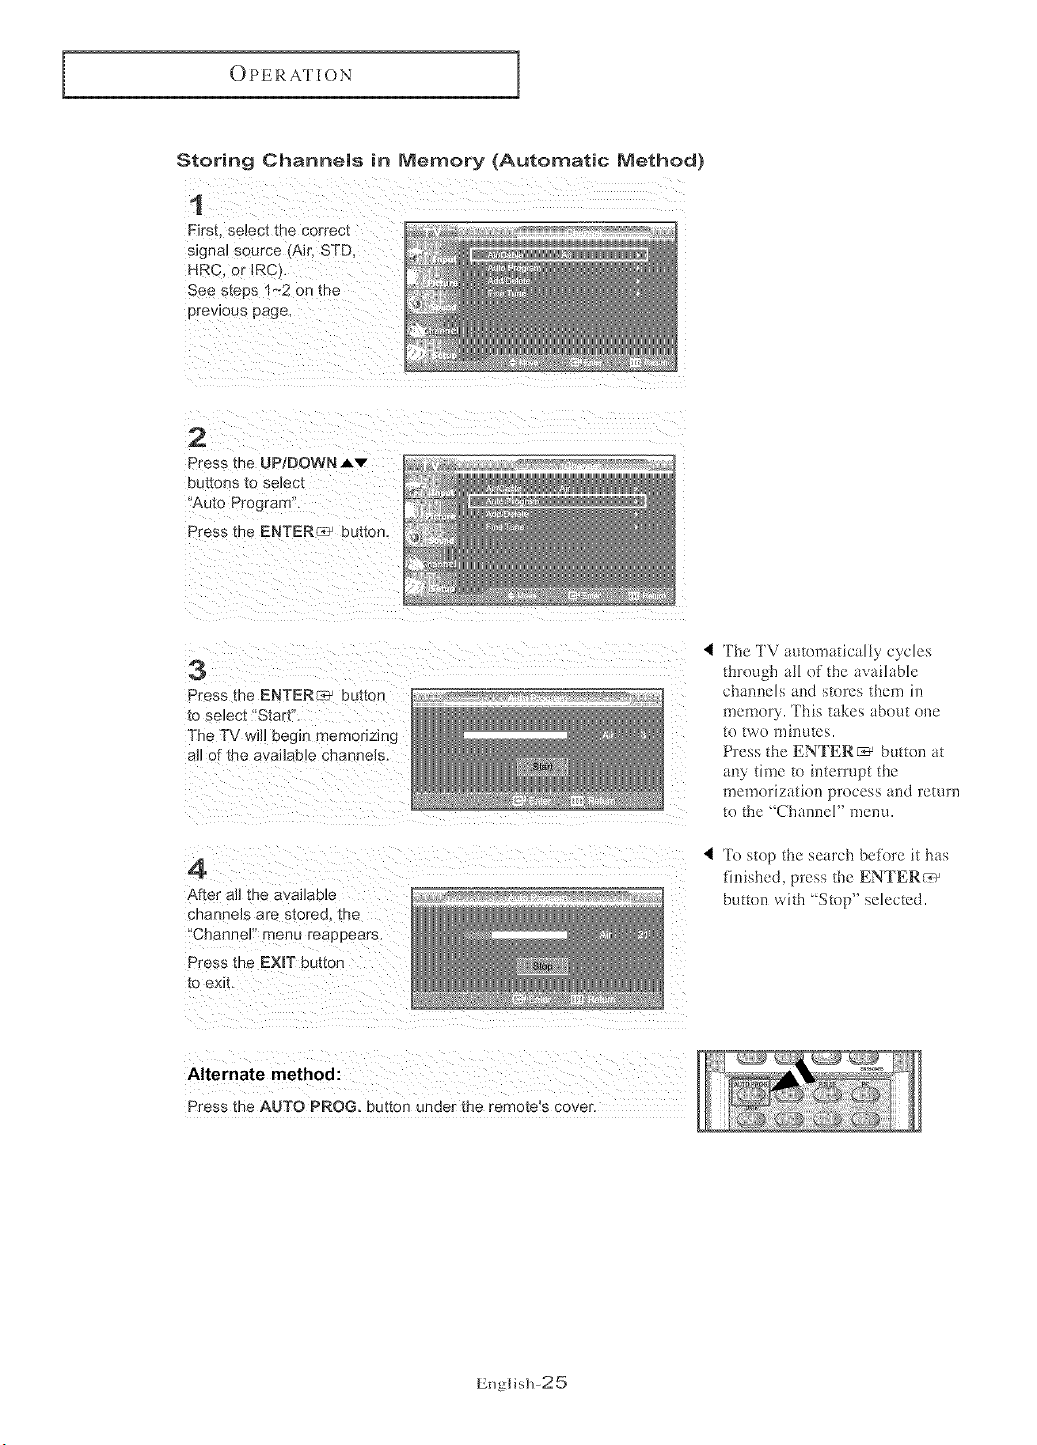
Storing Channems in Memory (Automatic Method)
1
Firs{ select the correc_
s_gnal source (Air'. STD.
HRC. or IRC
See s_eps 1~2 on me
prewous page.
2
Press the UP;DOWN _.v
but[ons _o select
Auto Program.
Press the ENTER :2, buttor
3
Press the ENTERC_ butte r
to select "Start".
The TV wb eeg_n memonzmg
aft of the available channels
4
After all the availabe
cnannels are stored, the
'Channel" menu reappears.
Press the EXIT button
to exit
The TV automatically cycles
throu_llaH of the available
channels and stores them in
memory. This takes about one
to two minutes.
Press the ENTER_ button at
any time to interrupt the
memorization process and return
to the "Channel" menu.
< To stop the search befure it has
finished, press the ENTER_ _
button with Stop" selected.
Alternate method:
Press the AUTO PROG. button under the remote's cover.
English-25
OPERATION
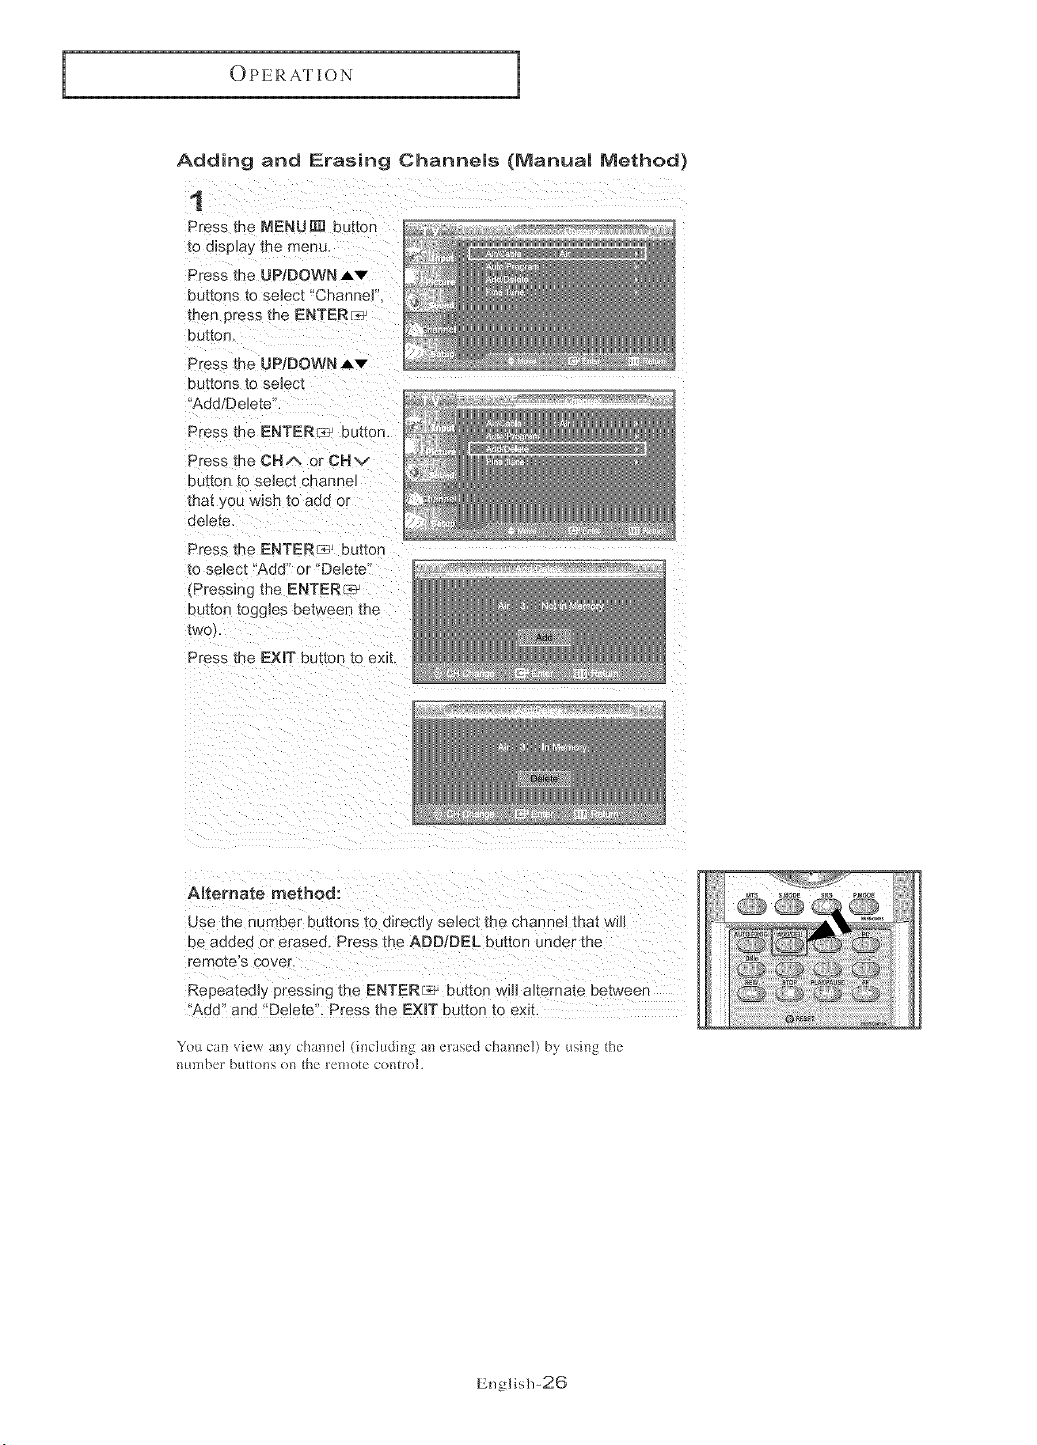
Adding and Erasing Channems (Manua| Method)
1
Press the NENUI_ button
to display me menu,
Press the UP/DOWN,_,v
buttons _o select "Channe
tr_en press the ENTERP _
button.
Press the UP/DOWN ,l,v
Du[[ons [o seJect
Add Delete.
Press the ENTER _r_.button.
Dress the OHm, or CHv
ou[_on to 3eject clqanneJ
that ¢ou wish to atd or
de]ete,
Press me ENTER_ euzton
to se]ect Add" or' "De]etd
_'Pressing the ENTER_ze_
button toggles between me
[wo
Press the EXiT button to exit.
Alternate method:
use the nL nber buttons to direct],, select tRe cnanneJ that w_
De _dded or eraseu Press the ADD/eEL button under the
remote s cower.
Repeated]y pressing me ENTER_ De[ton w_ alternate between
Add" and "Delete". Press the EXIT button to exit.
You can view rely charmel tincl,di_g an erased ch;mne]) by using the
number but[ons on the re_llote control
English-26
OPERATION
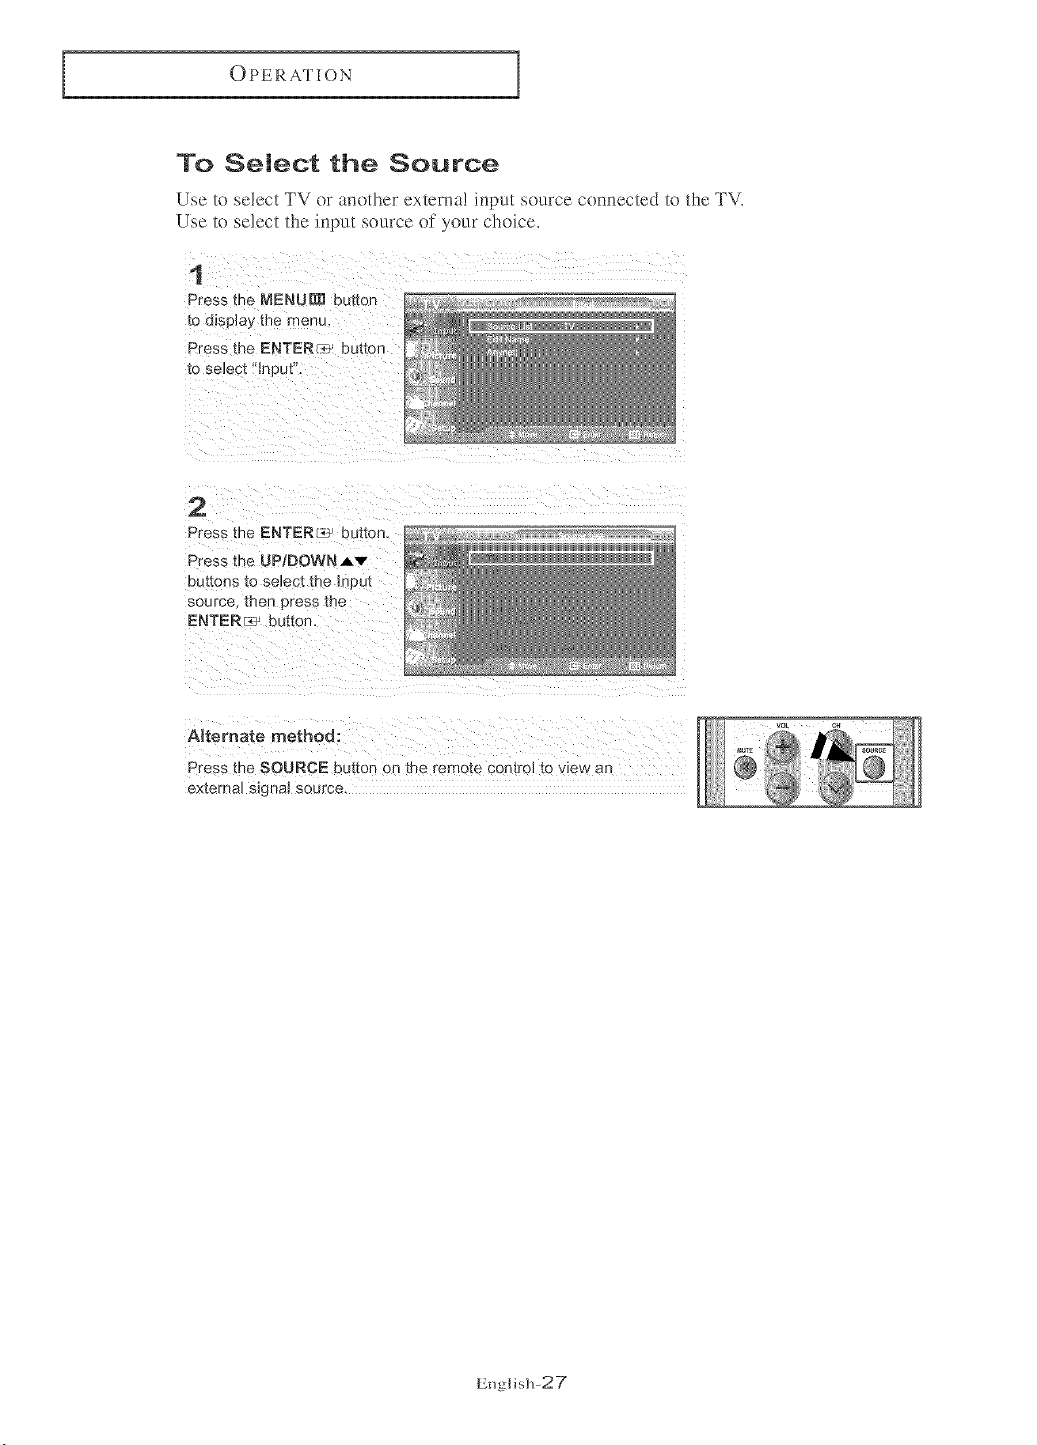
To Select the Source
Use to select TV or another extema! input source connected to the TV_
Use to select the input source of your choice,
1
Press me MENU_ burton
to d_splay me menu.
Press the ENTER_ buttor
lo select heut',
2
Press the ENTER _c_ bt t[on
Press the UP/DOWN,Av
buttons to select the InPut
source men press me
ENTERF_, button,
A_temate method:
Press the SOURCE button Re the remote control to view an
externaJ slgna source,
English-27
OPERATION
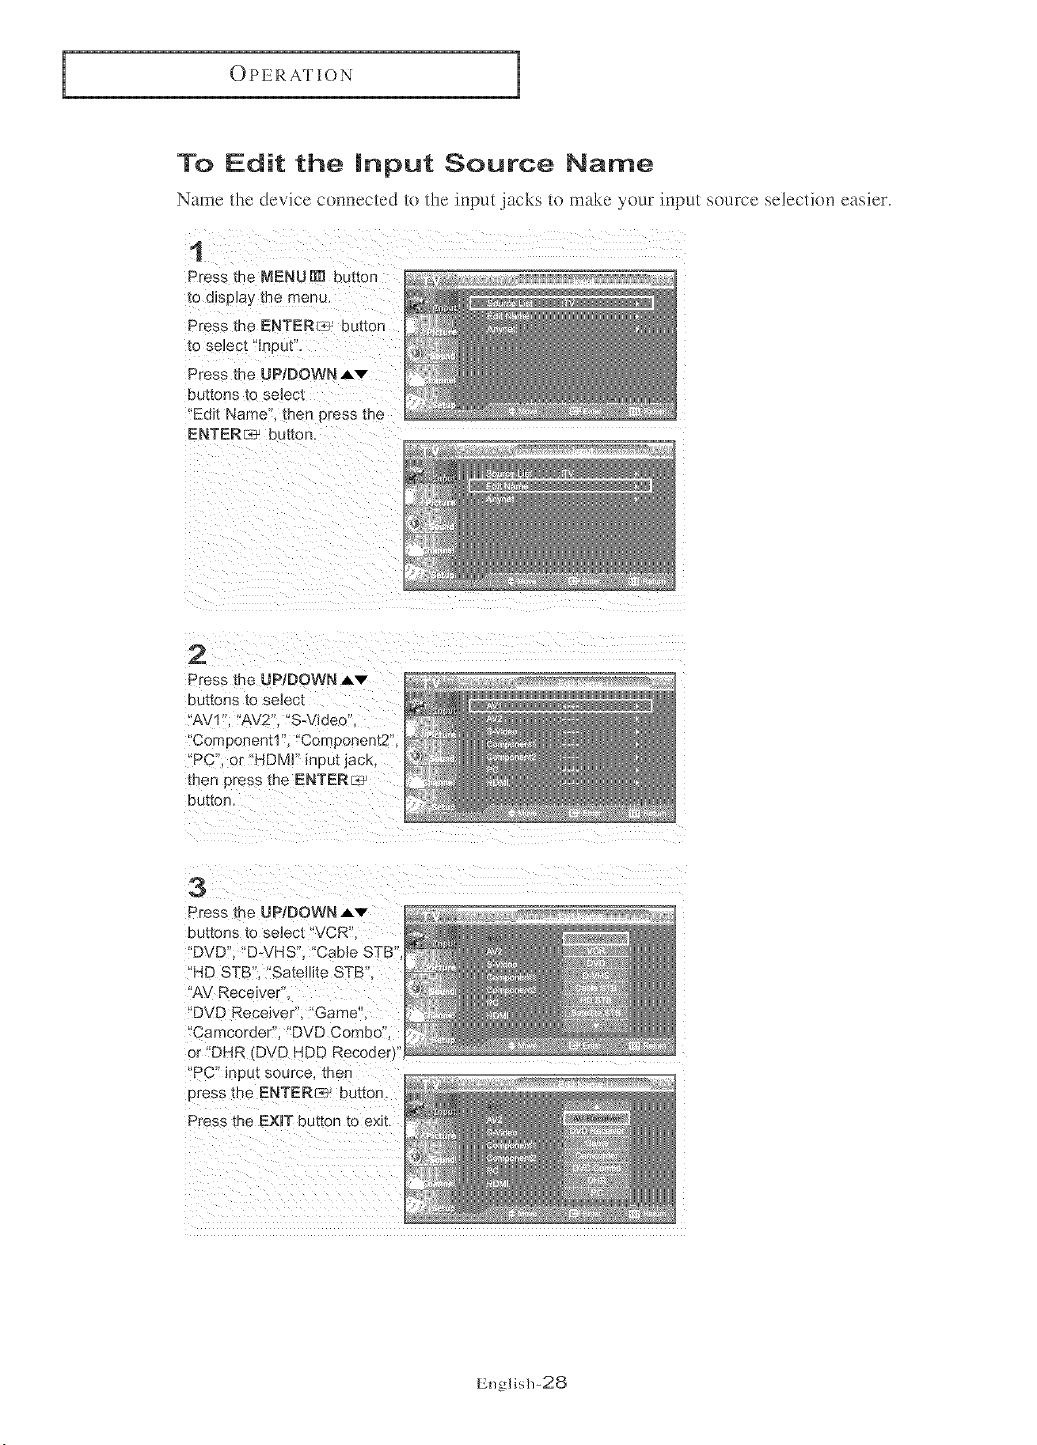
To Edit the input Source Name
Name the device connected to the input.jacks to make your input source selection easier.
1
Press the MENU[m button
to d_sp]ay me menu.
Press the ENTERI_ button
[o seJect 'ln_ ut'.
Press me UP/DOWN A'v
buttons to se ._ct
'Edt Name. _]en nress me
ENTER_ button.
2
Press [he UP/DOWN A'v"
buttons to seJect
'AV1 . "AV2'L "SWiaeo
Component1 ". "Component2'
'PC' or "HDMI" inputjack,
men press the ENTER_
button.
3
Press me UPtDOWN Av
buttons to select "VCR'
'DVD'L "DWHS' 'Cable STB'
HD STB". "Sate]lte STB".
'AV Recewe °
DVD Receiver'. "Game'
'Camcorder" "DVD Combo
ar "DHR _DVD HDD Recode_
PC" input source, ther
Dress the ENTERr_> button.
Press me EXIT button to exit.
English-28
PICTUP.E CONTP.OL
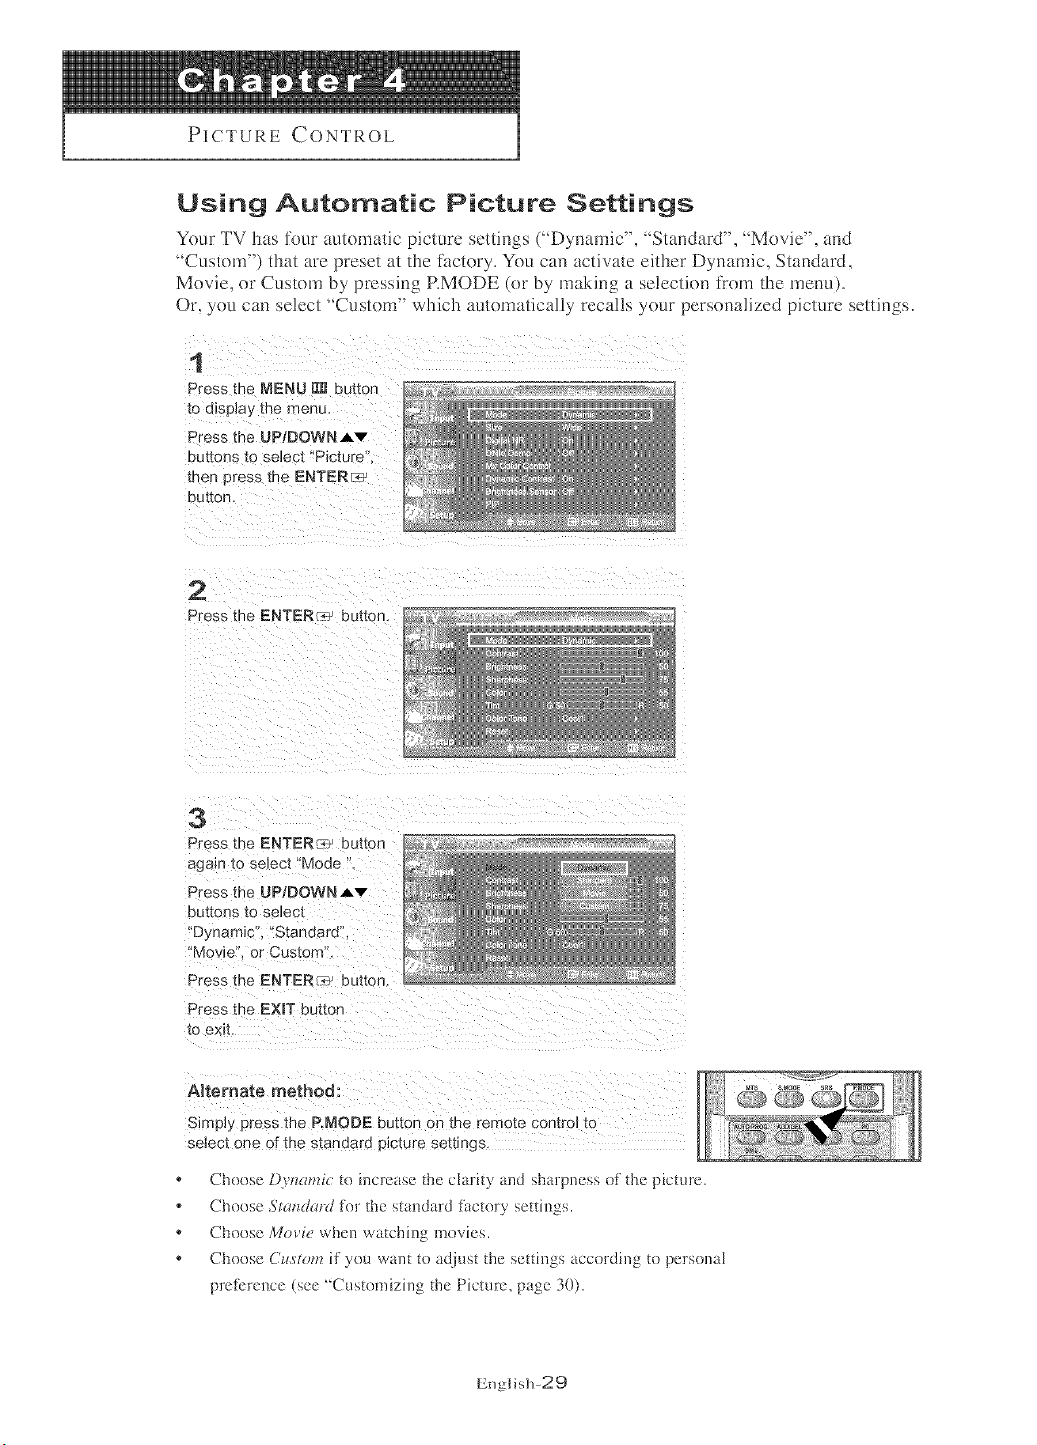
Using Automatic Picture Settings
Your TV has %ur automatic picture settings ("Dynamic", "Standard", "Movie", and
"Custom") that are preset at the fi_ctory. You can activate either Dynamic_ Standard,
Movie, or Custom by pressing RMODE (or by making a selection from the menu).
Or, you can select "Custom" which automatically recalls your personalized picture settings.
1
Press the MENU _ bu_ton
to display the menu,
Press the UPtDOWN A_
DuEons [O selec[ "Picture
men press tl" e ENTER_
button,
2
Press the ENTER _: butter
3
Press the ENTERr_J mu_on
again to select "Mode
Press the UP/DOWN Av
buttons to select
'D_namic'. 'Standar¢
Movie or Custom
Press the ENTER _: butK n
Press the EXIT button
to exit.
ARemate method:
Simply press the RMODE eutton on me remote control to
select one o[ the standard picture settings,
* Cheose Dvnm_fiv e) increase the darhy and sharpness of the picture.
* Choose 51o/zd{_rdfl)r _he s_andard fi_c_orysenings.
* Choose Movie when wa_ehh]g mevies.
* Choose CzLrtom if you warn to adjns_ the setfing_ according to persona[
preIbrence (see "'Customizing the Picture. page 30).
English-29

PICTURE CONTROL
Customizing the Picture
You can use the on-screen menus to change the contrast, brightness, sharpness,
color, and tint according to personal preference.
(Alternatively, yon can use one ol the 'automatic" settings. See the previous page.)
t
Press the NKNUR_ button
[O o_spla_, _ne menu,
Press the UPIDOWN Av
Buttons [o select "Picture'
met Dress the ENTERcvq-
button.
2
Press the ENTER_ button,
3
Press the UP/DOWN,_v
Du[Dn [O select a Darilcular
_tem(Contrast, Brightness,
Sharpness. Color. or Tinl
then Dress me ENTERr;!J
button,
4
Press the LEFT/RIGHT_I
nu[[ons [o aecrease or
qcrease me vau
Darhcular _tem
For example, # you select
"Contrast, pressing the
RmGHT_ eutton increases it....
Press the EXIT button [o exit,
I You can select the option
(Contrast, Brightness, Sharpness,
Color, or Tin[) to be adfltsted
by pressing file UP/DOWN Av
button.
English-30
PICTURE CONTROL
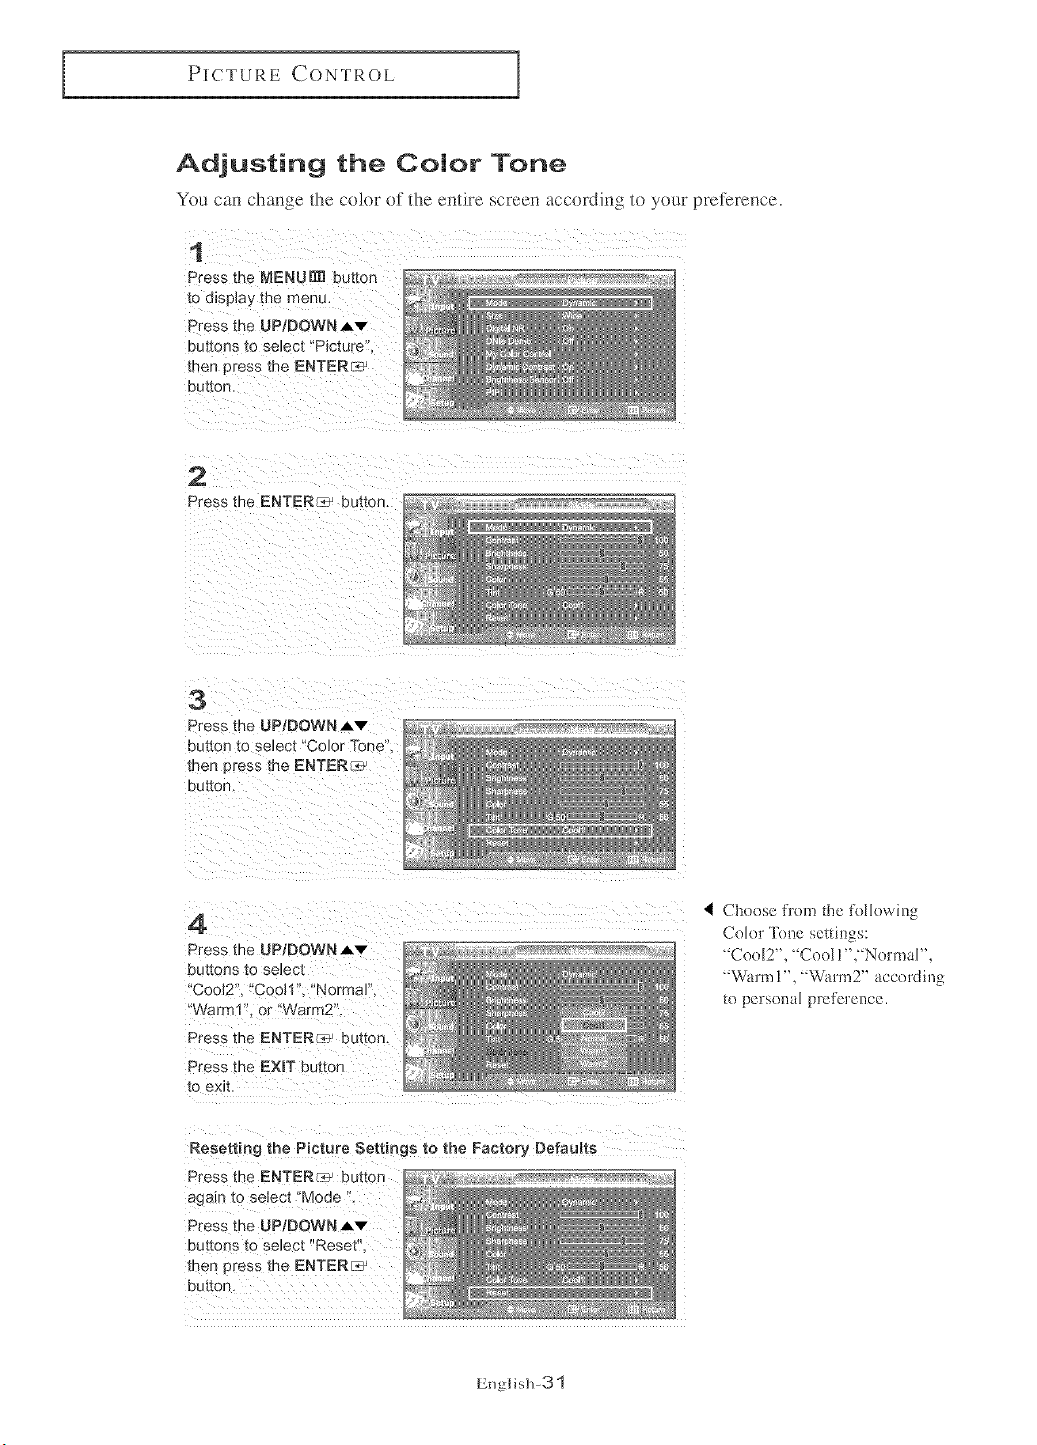
Adjusting the Color Tone
You can change the color of the entire screen according to your preference.
t
Press the MENU_ button
to d_sp_aythe menu.
Dress me UP/DOWN Av
buttons to select "Picture
men press the ENTER/:_
euIton.
2
Press the ENTER_ buttor
3
Press me UP/DOWNAv
button [o select "Color Tone'
men eress tne ENTER_
DUttO[t.
4
Press the UPIDOWN Av
butl _es to select
'Cool2. "CooH'. "Normal".
'Warn" . or "Warm2
Press the ENTER _ button
Press the EXIT buttor
[O exit
Cheese from the %llowing
Color Tenc settings:
' Cool2", 'Cool l"j Normal',
' Wamlt 1", _W_rm2" accerding
to personal preference.
Resetting the Picture Settings to the Factory Defaults
Press the ENTER_ button
again to select "Mode ".
Press the UP/DOWN Av
Dut[ons to select "Reset'
men _ress me ENTER_
button,
English-31
PICTURECONTROL
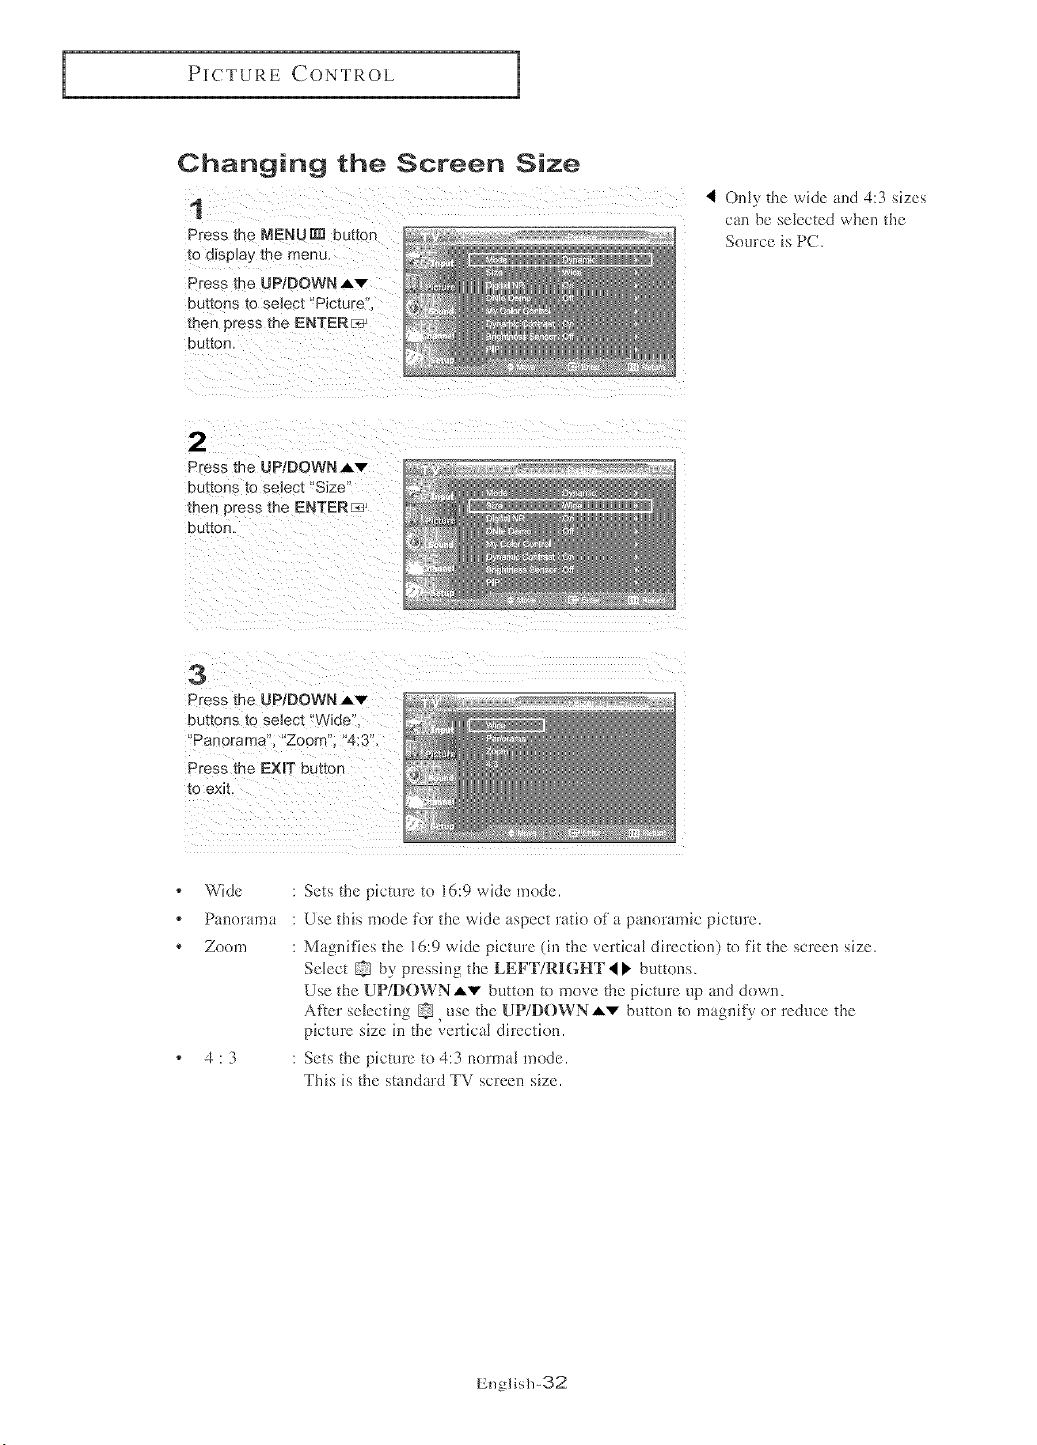
Changing the Screen Size
1
Press the NENUm] button
to display me menu.
Press me JP/DOWN,_v
buttons to seJect"Picture.
men press the ENTER_
button.
4 Only the wide al_d 4:3 sizes
can be selected when the
Source is PC.
2
Press the UP/DOWN _'v"
DU_ZOnS IO seJec[ "Size"
men press me ENTER_
button.
3
Press the UPIDOWN Av
buttons to select "Wide".
'Panorama". "Zoom", "4:3",
Press the EXIT button
to emt.
Wide
Pal]erafn a
Zoem
4:3
Sets the picture to 16:9 wide mode.
Use this mode R}r the wide aspect ratio of a panoramic picture.
Magnifies the 16:9 wide picture (in the vertical direction) to fit the screen size.
Select by pressing tbe LEFT/RIGHT 4 _ buttons.
Use the UP/DOWNAv buttol_ to move the picture up and down.
After selecting , use the UP/DOWNAv button to magnify or reduce the
picture size in the vertical direction.
Sets the picture to 4:3 normal mode.
This is the standard TV screen size.
English-32
PICTURE CONTROL
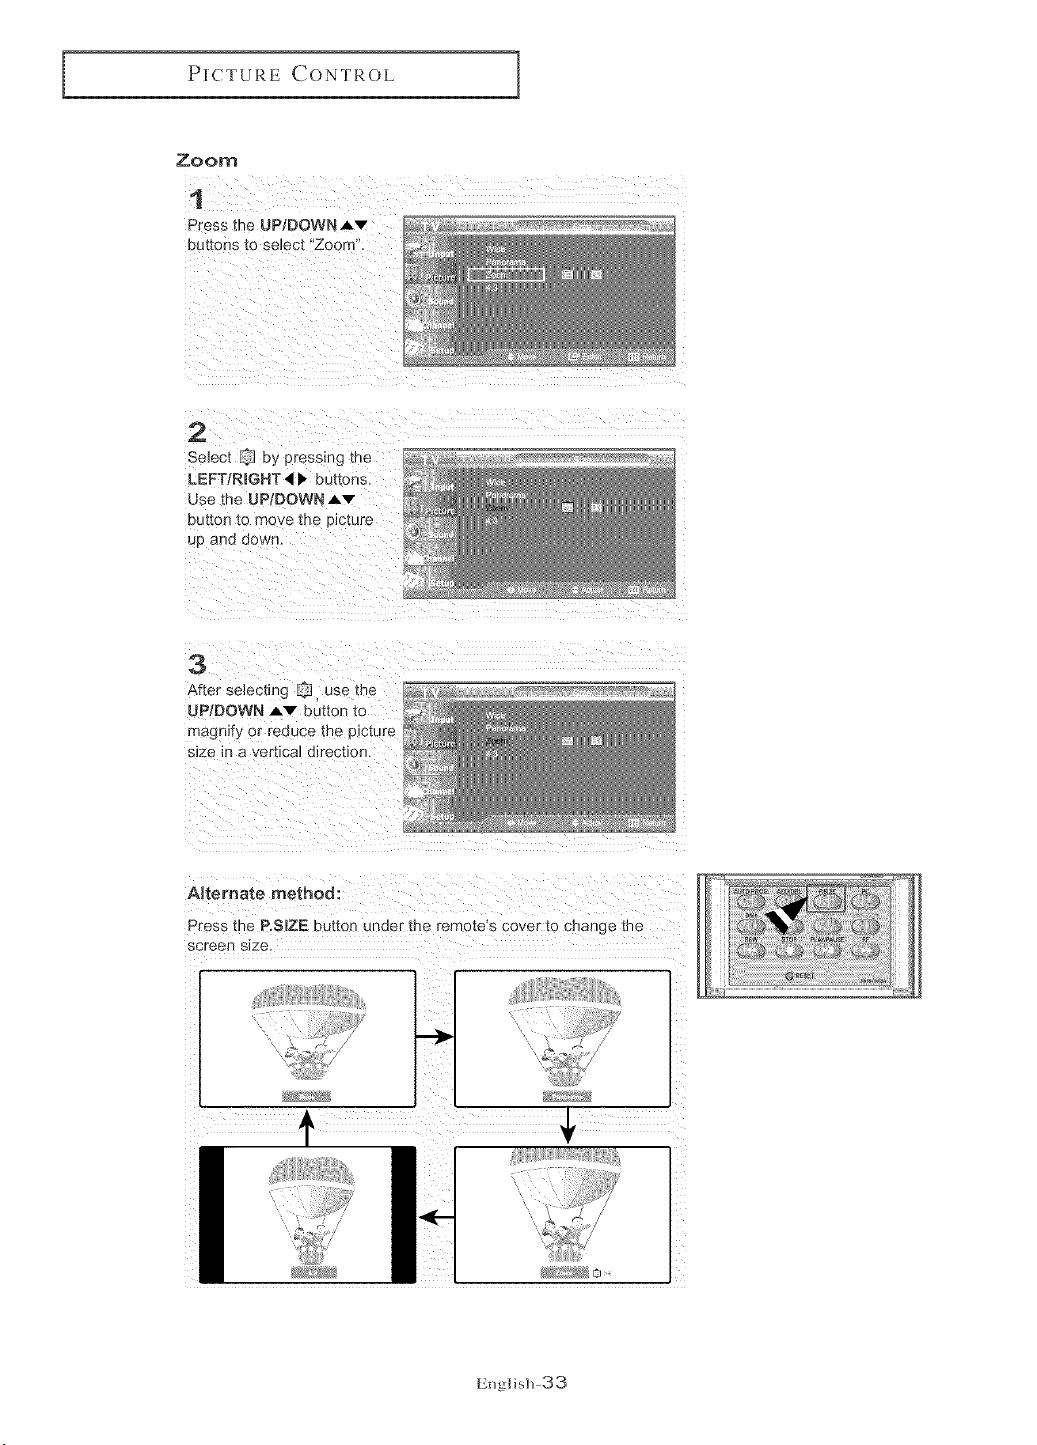
Zoom
1
Press me UP/DOWN Av
buttons to seJect Zoom".
2
LEFT/RmGHT,I • buttons.
Use the UP[DOWN Av
DU_On_0 too', e the picture
Up anu OOWl"
3
After selecting _ use the
UP/DOWN _ Du[ton to
magnify or reduce the p_cture
size m a verhca] direction.
Alternate method:
Press the P.SmZEbutton under the remote_s cover to change me
screen size.
!
,:::l: _ i_!_i_iiiiiiii!_¸
I
English-33
PICTURE CONTROL
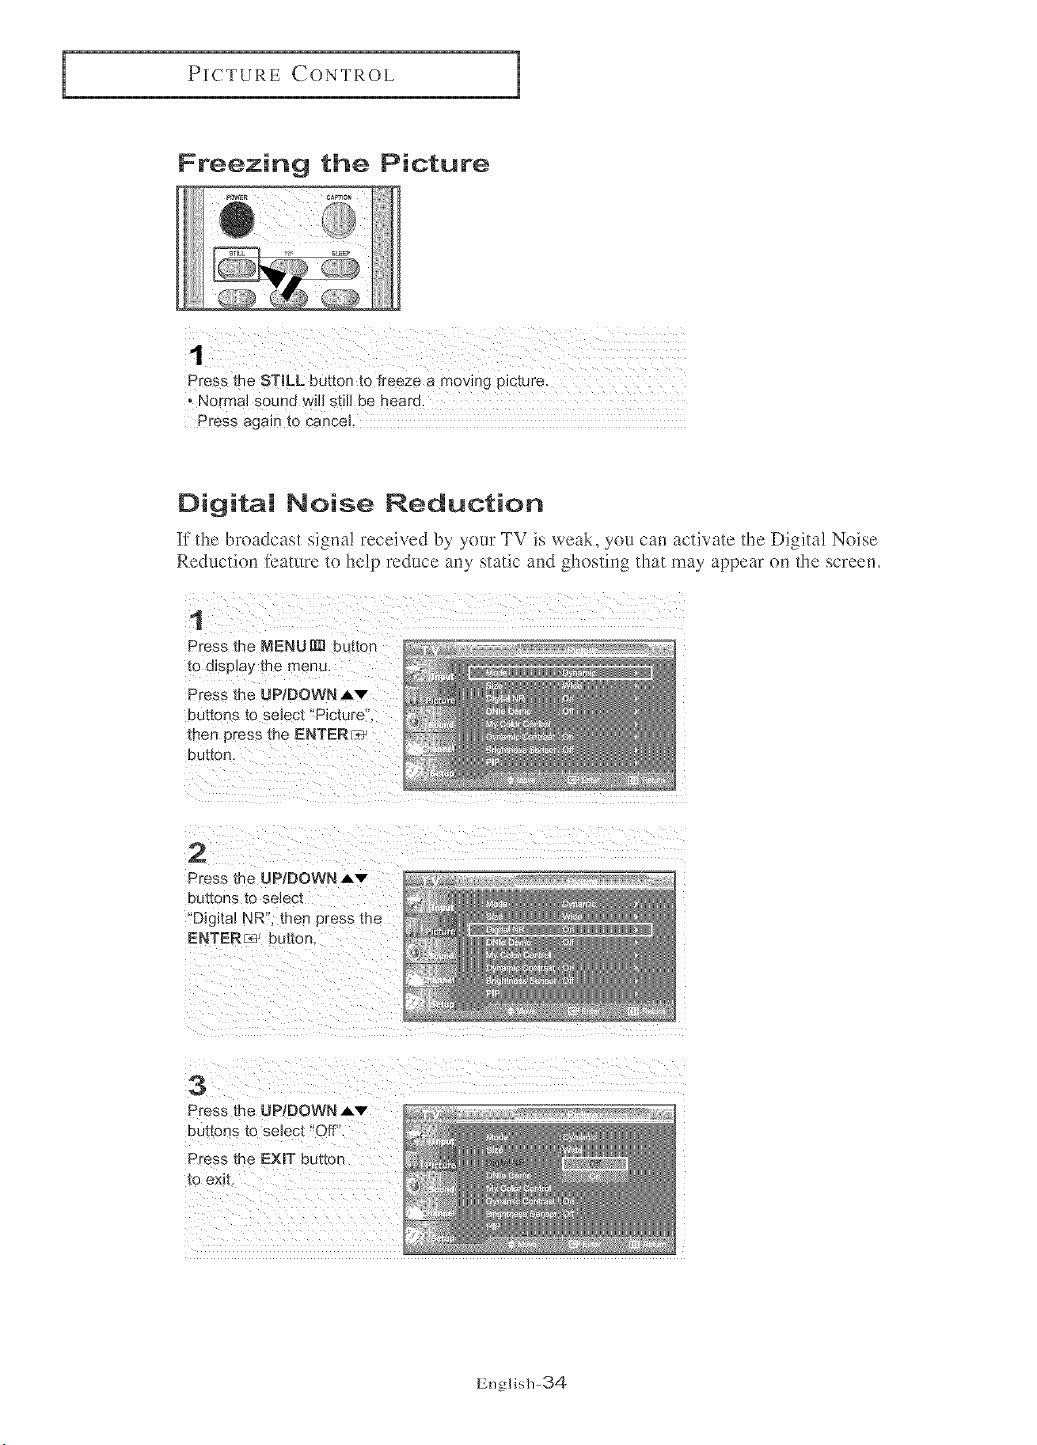
press the STroLL button to freeze a m0vjog p!cture.
NormN Sound W!!! still be heard,
Press again to cancel
Digital Noise Reduction
If the broadcast signa! received by your TV is weal<, you can activate the [)igita! Noise
Reduction teature to help reduce any static and ghosting that may appear (m the screem
1
Press me I_ENUm] bud:Ion
re a_sp_aythe menu.
Press me UP/DOWN Av
buttons [o ;e_ec["Picture
men press me ENTER_
button
2
Press _ne UP/DOWN Av
DU[rOnS _0 select:
'Digital NRL then press me
ENTERs' bu[ton.
3
Press the UP/DOWN J,v
buttons re select "Off".
Press me EXmTbutton
to exit.
English-34
PICTURE CONTROL
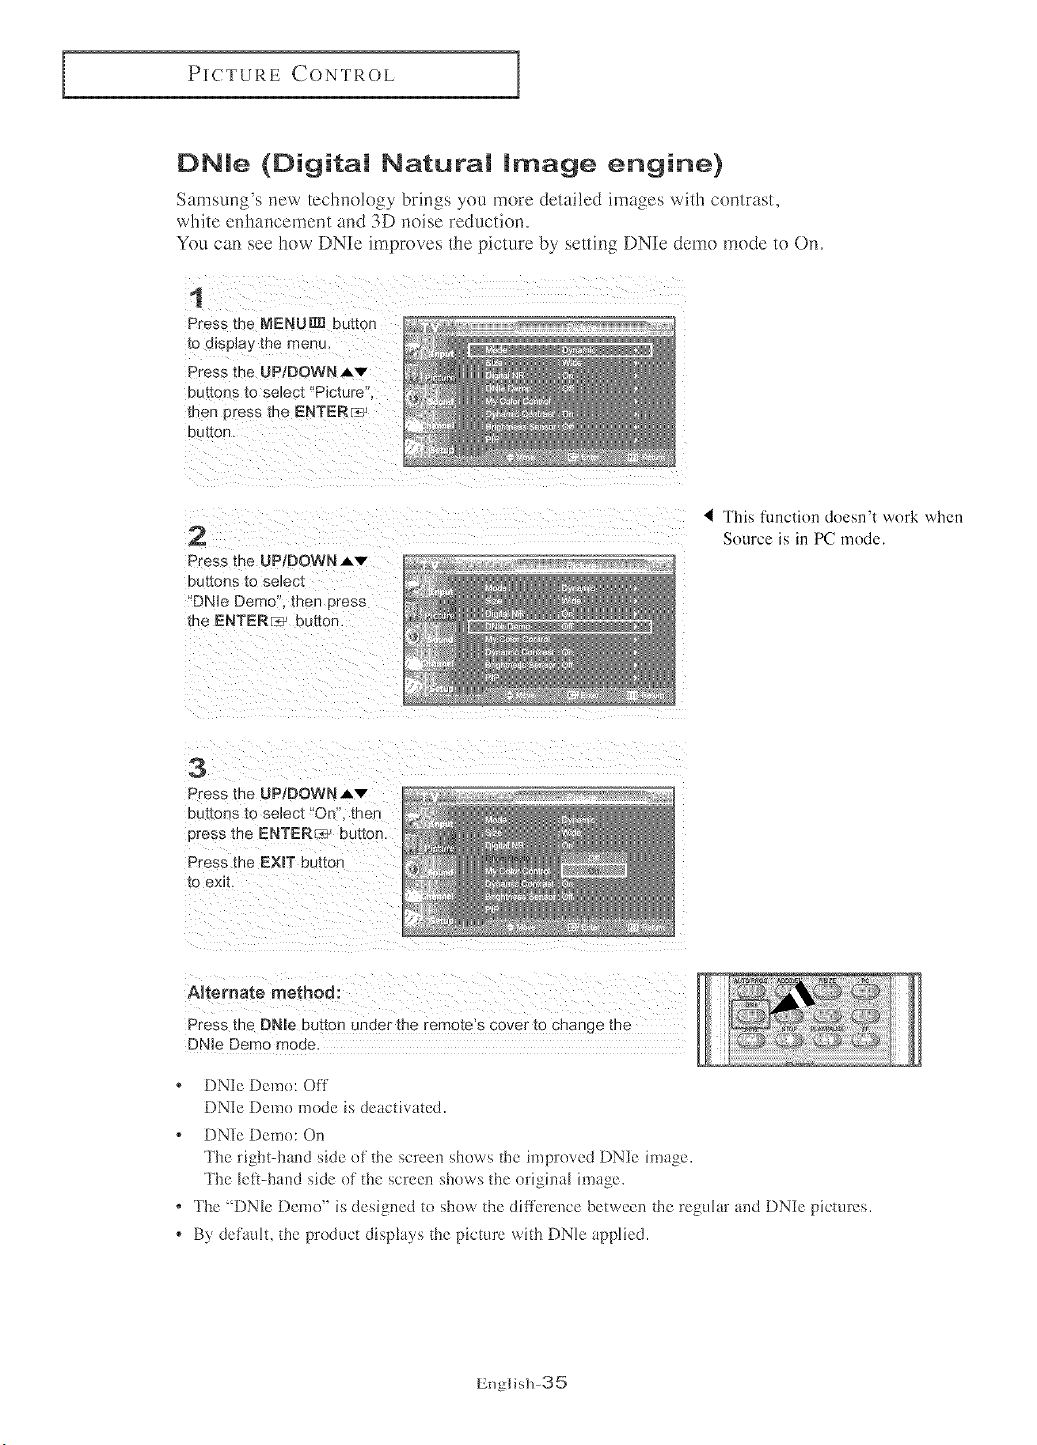
DNle (Digital Natural image engine)
Samsung's new teclmolegy brings you more detailed images with contrast,
white enhancement and 3D noise reducti(m.
You can see hew DNIe improves the picture by setting DNIe deme mode to On.
t
Press the MENU_ button
to d_sp_a_/the menu,
Press the UP/DOWN.,Lv
buttons to selec_"Picture".
men pre _sthe ENTERr_-_
button.
2
Press me UP/DOWNAv
DU[[ORS [O selec[
"DNle Demo then press
the ENTERr_ btmon.
_I This function doesn't work when
Source is in PC mode.
3
Press the UP;DOWN Av
c Jttons [o select "On. men
Dress [he ENTEREd:button.
Press the EXmTbutton
to exit.
ARemate method:
Press me DNle button under the remo[e s cover [o change me
DNle Demo mode
* DNIe Deme: Off
DNIe Deme mode is deactivated.
* DNIe Demo: On
The right-hand side ef the screen shows the improved DNIe image.
The left-hand side ef the screen shows the original hnage.
* The "DNle Demo" is designed te show the difflzrence between the regular and DNIe pictures.
* By defitult, the predNct displays the picture with DNle applied.
Englis]l-35
PICTURE CONTROL
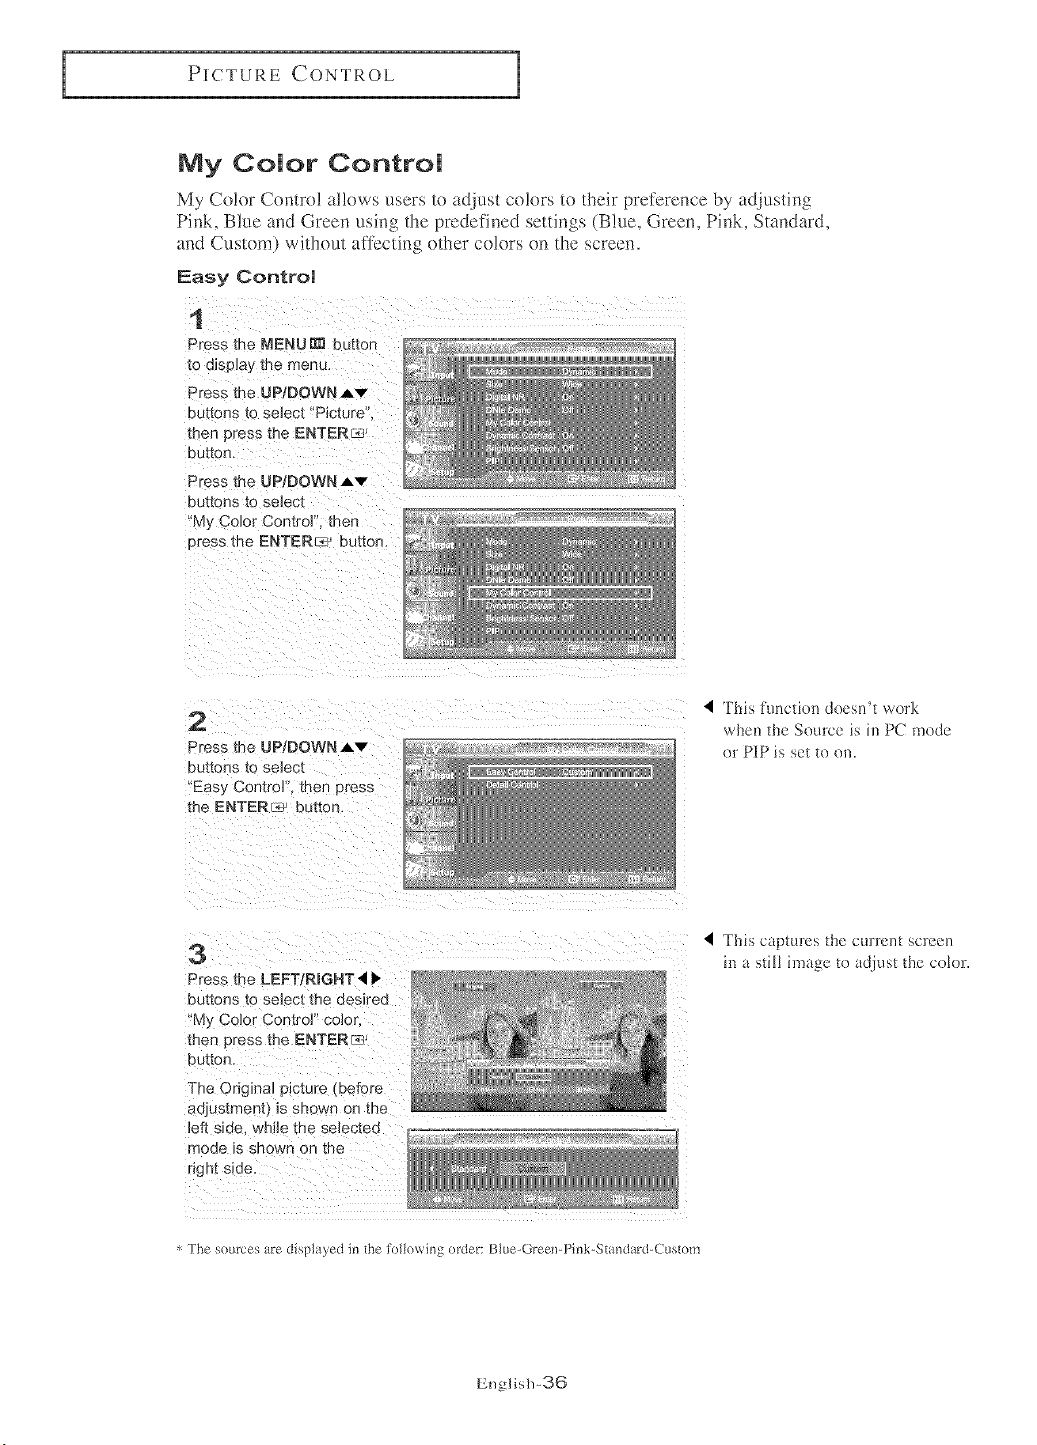
Ny Color Control
My Co!or Contro! allows users to adjust co!ors to their preference by adjusting
Pink, Blue and Green using the predefined settings (Blue, Green, Pink, Standard,
and Custom) without affecting other co!ors on the screen.
Easy Centre!
1
Press the NENU_ button
to dlSe]ay me menu.
Press Ne UP/DOWN Aw
buttons [o select "Picture"
tBee press the ENTEN_
DulleR.
Press me UP/DOWN Aw
buttons to select
My Color Control. then
Dress the ENTER_ button.
2
Press the UPtDOWN J,'v"
DUt[OnS tO select
'Eas?_Coetror', then press
the ENTER_ button.
4 This function doesn't work
when the Source is in PC mode
nr PIP is set to on.
3
Press me LEFTIRmGHT41'
buttons _o select the desired
'My Color Control" color
men Dress me ENTER_
nut[on
The Original picture (before
adlustmer [} IS snowe on tne
_efl side, whe me selectee
mode is shown on tile
r_ght side,
4 ]'his captures the current screen
in a still image to adjust the colnr.
4 The _ources are displ tyed in the folk)wing order: Blue-Greenq ink-Standar&Custom
English-36
PICTURE CONTROL
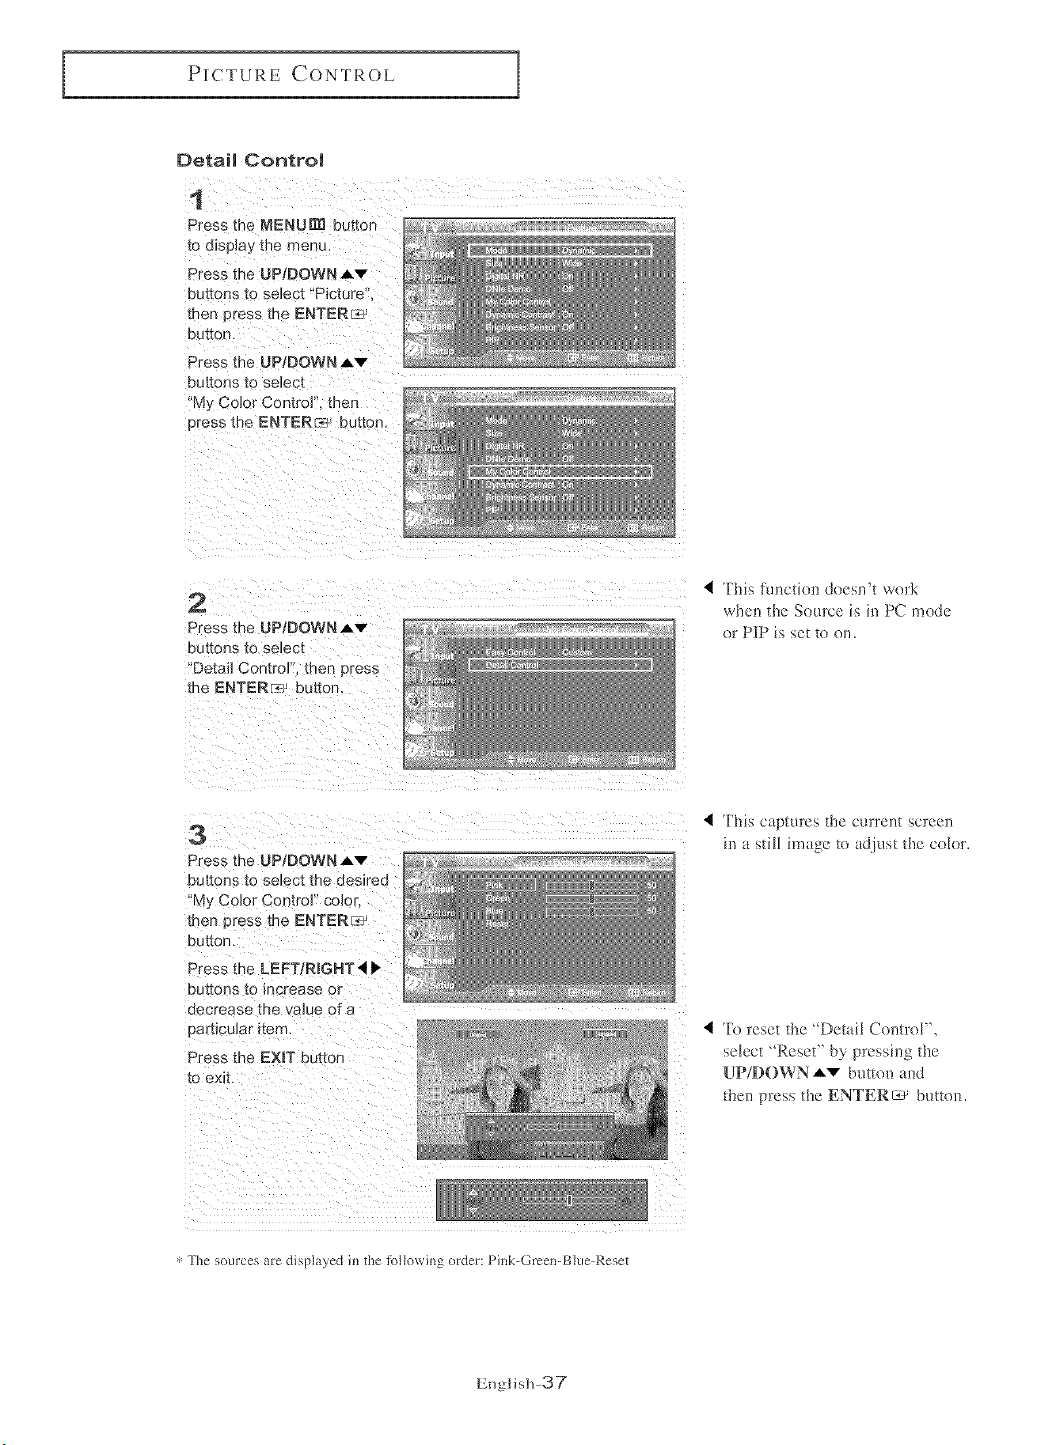
Detail Contro!
1
Press the MENU_ button
to d]spJay me menu.
Press the UP/DOWN,_v
buttons [o select *'Picture
then Press me ENTER_
DU[_O['L
Press the UP/DOWN Av
buttons to se_,3c[
'My Co]or Contro] then
oress the ENTER__b button.
2
Press the UP/DOWN A,v
bUttOnS to select
"Detai] ControP'. men press
me ENTERF_:3j buttor
4 This fuactine deesn't work
when the Source is in PC mnde
or PIP is set to oil.
3
Press the UP!DOWNAv
but{ 3ns lo select the desJrea
'My Co]or Contro_ o:)_o_
men press the ENTERE_
DU[[OD.
Press the LEFT/RIGHT _ •
buttons to increase o[
decrease the value of a
oar[{cular ]terr
Press the EXIT battor
to exit.
This captures the current scree_
in a still image to adjust the colnr.
4 To reset the "Detail Control",
select "Reset" by pressing the
UP/DOWN "_ button and
then press the ENTERs' button.
4 The sources are displ _yed in the lollowing order: I ink-Green-Blueq_eset
English-37
PICTURECONTROL
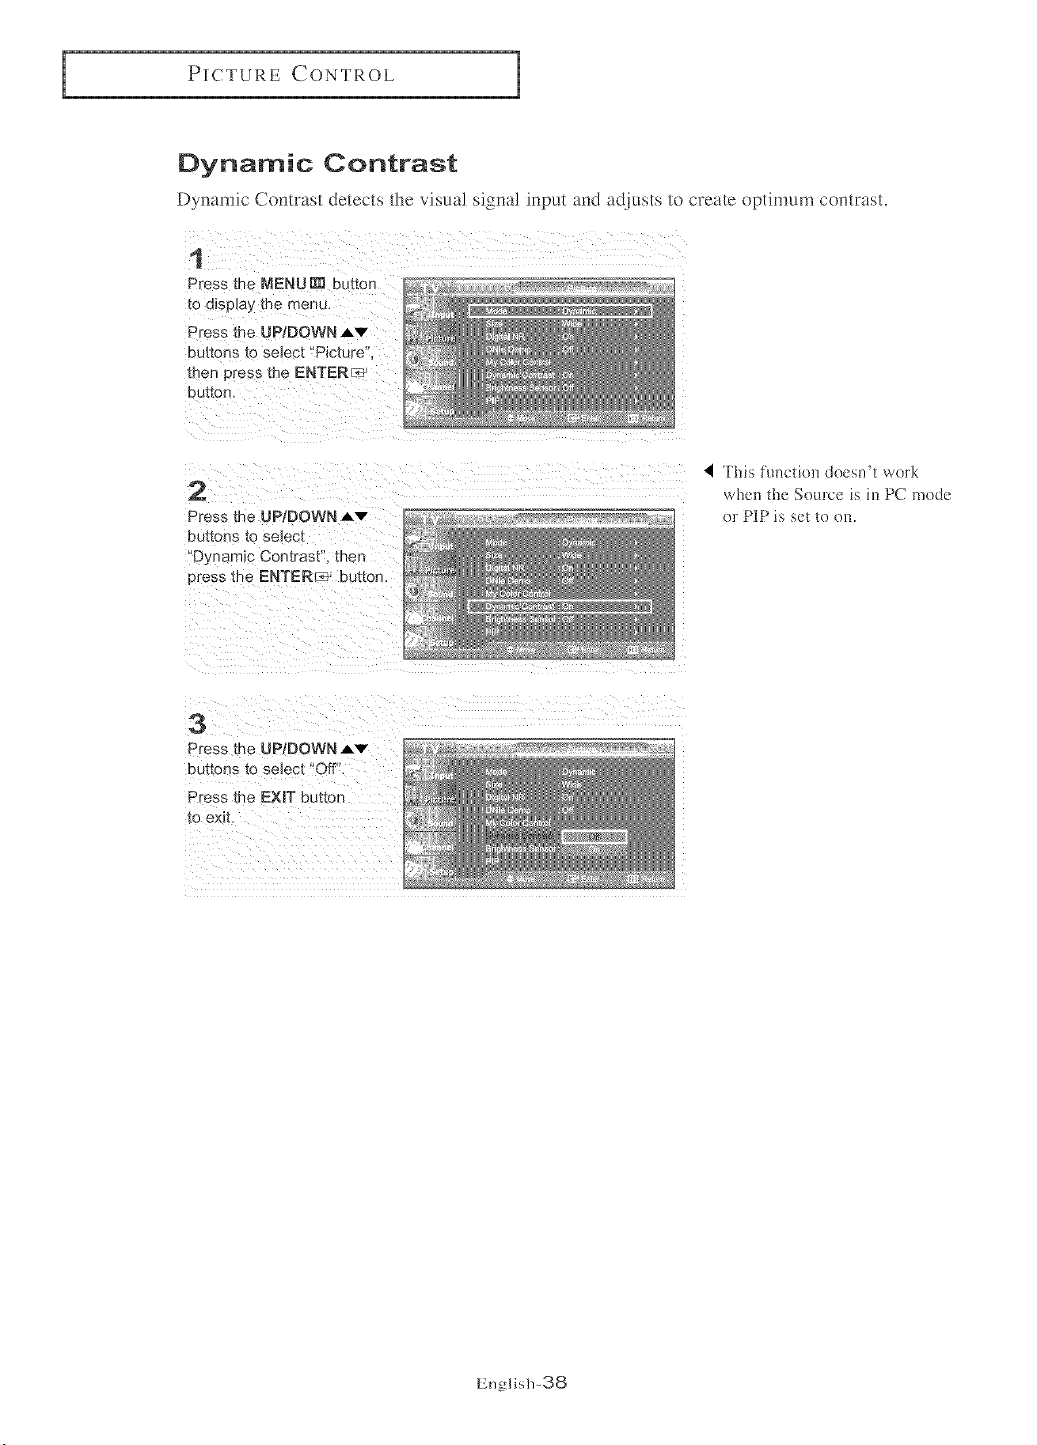
Dynamic Contrast
Dymm_ic Contrast detects the visual signal input and adjusts to create optimum contrast.
1
Press the MENU N_ btmon
to display me menu.
Press the UP/DOWN Av
buttons to seJect "Picture'
men Dress me ENTERIc7
button.
2
Press the UP/DOWN A'v"
DU[tOnS l:O select
Dynamic Contrast' men
c tess me ENTER :e: button,
4 This functien deesn2 work
when the Source is in PC mode
or PIP is set te on.
3
Press the UP/DOWN Av
buttons to select "Off".
Press me EXIT button
to exit,
English-38
PICTURE CONTROL
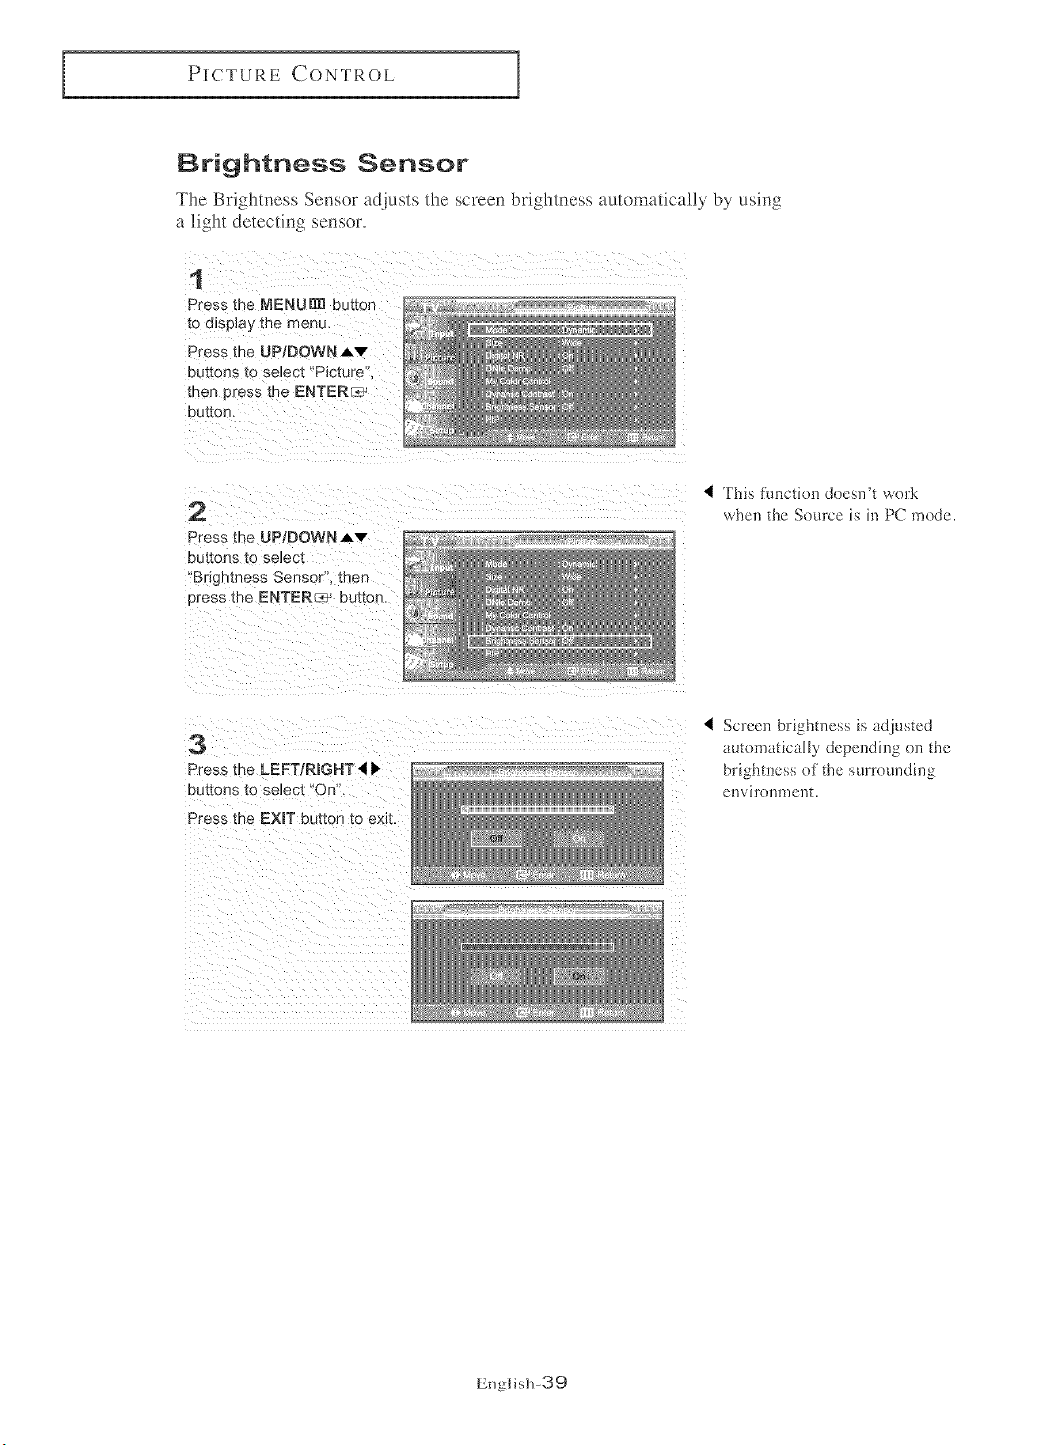
Brightness Sensor
The Brightness Sensor adjusts the screen brightness automatica!l? by using
a light detecting sensor.
1
Press the MENUI_ button _,_z,_
tO e_spla_ '[Fie m@eu,
Dress the UP/DOWN Av
buttons [o select "Picture
men press`the ENTER_ _ _
2
Press the UP/DOWN Av
buttons to se_ec'[
'Brighmess Sensor. men
Dress the ENTER_:_ button.
TMs ftmctiDD doesn't work
when the Source is in PC mode.
3
Press me LEFT/RIGHT'I •
buttons `to select "On'.
Press the EXIT button to exit.
I ScreeD bfightDess is adjusted
automatically dcpendiDg o1'[the
brighmcss of the surroundh`[g
eIIViTOI`[U) el`[t.
English-39
PICTURE CONTROL
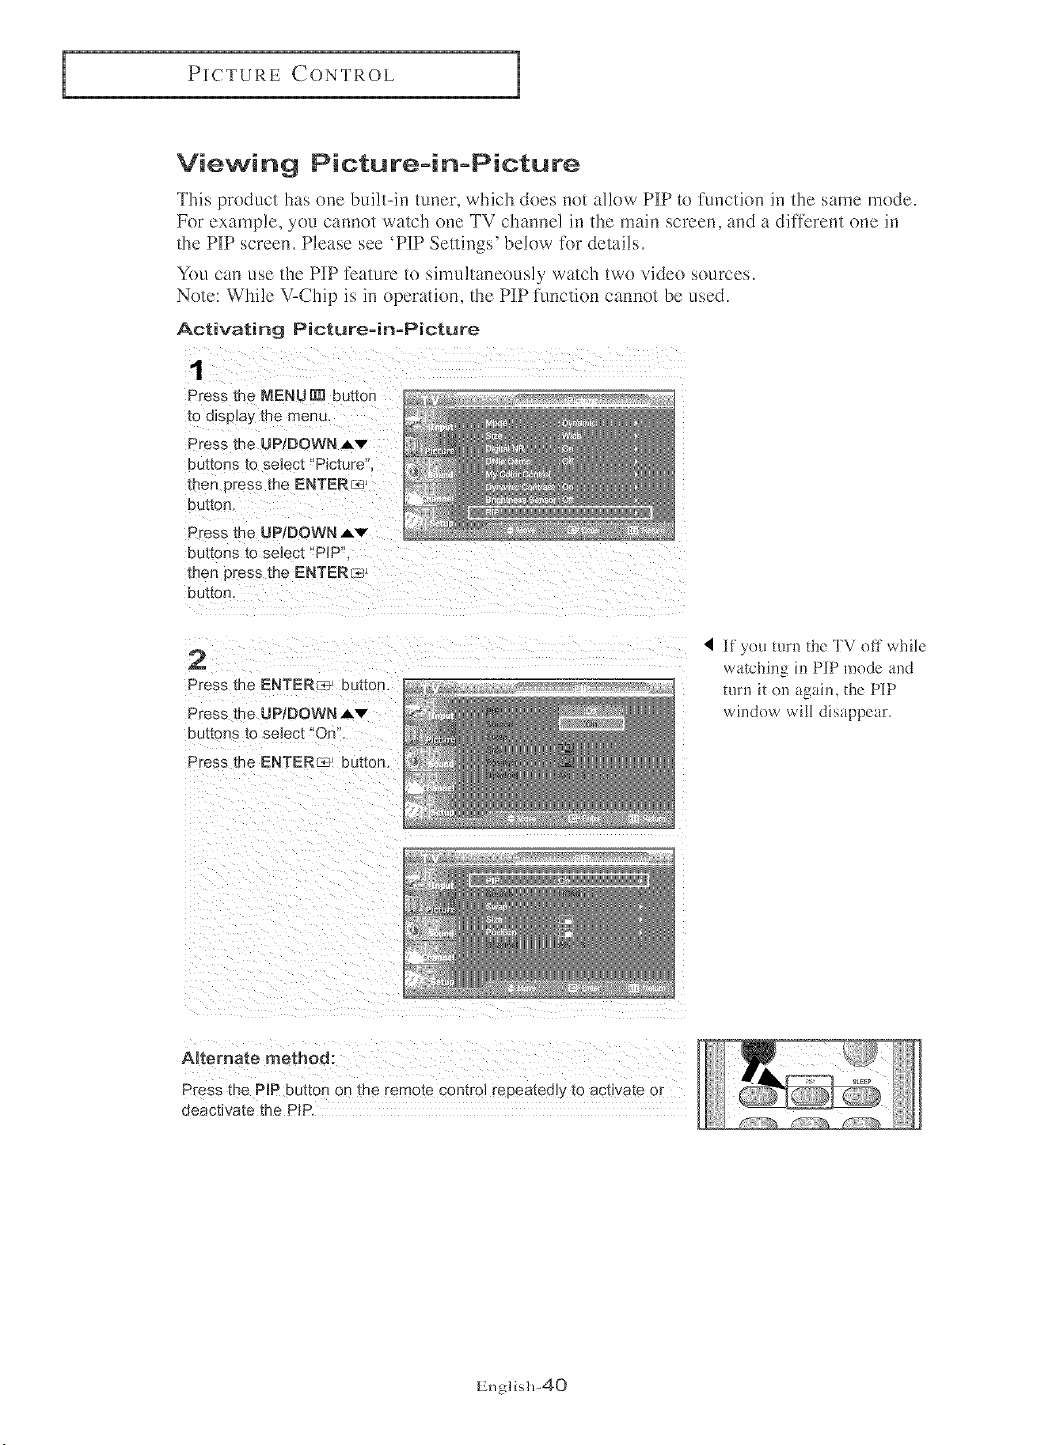
Viewing Picture=in=Picture
This product has one built-in tuner, which does not allow PIP to function in the same mode.
For example, you callFlot watch one TV channel in the main screen, and a difl_rent one in
the PIP screen. Please see 'PIP Set|in_s" below %r details.
You can use the PIP feature to simultaneously watch two video sources.
Note: WM!e V-Chip is in operation, the P][Pfunction canno/be used.
Activating Picture-in-Picture
1
Press me NENU_ buttor
to d_sp_ayme menu,
Press the UP/DOWN AV
su[[ons to select "Picture
men _re _s me ENTER_
DUKOR
Press the UP/DOWN _v
buttons to select "PIP
men press the ENTERr_)
button,
2
Press the ENTER _- button.
Press the UP/DOWN,_v
DU[[ORS [O select _*Or}",
Press the ENTER_ button.
if you turn the TV off while
watchi!_g in PIP mode and
turn it on agaim the PIP
window will disappear.
Alternate method:
Press the PIP button on the remote control repeatedly to actwate or
deactivate the PiP.
English-40
PICTURE CONTROL
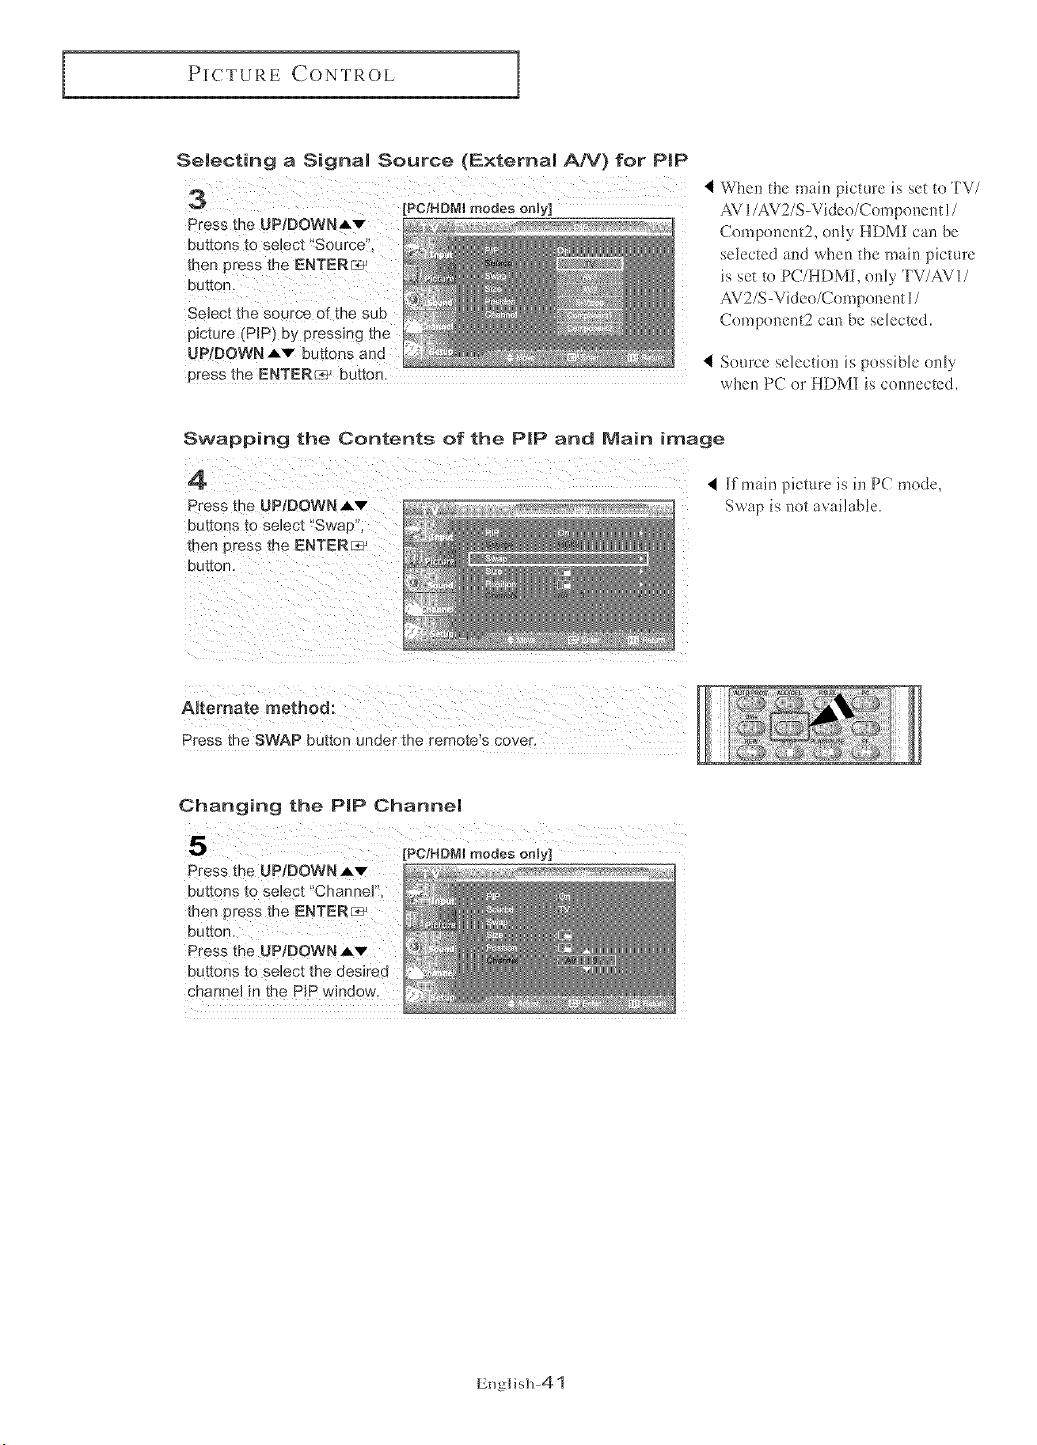
Selecting a Signal Source (External A/V) for PiP
press the UP/DOWNAy :
Select _hesource of the sub
picture (PIP) by pressing the
UP/DOWN Av buttons and 4
press the ENTER_ button.
When the main picture is set to TV/
AV 1/AV2/S-Videe/Component 1/
Component2, only HDMI can be
selected and when the main picture
is set to PC/HDMI, only TV/AV 1/
AV2/S-Video/Component 1/
Component2 can be selected.
Source selection is pDssible enly
when PC or HDM] is connected.
Swapping the Contents of the PiP and Main image
4
Press the UPiDOWNAv _z_
DUt[OnStOselect "Swap", .....
then DreSSthe ENTER_
button,
4 Rfmain picture is in PC mode,
Swap is not availab_e_
ARemate method:
Press the SWAP button under the remote s cover
Changing the PiP Channel
press the UP/DOWN Av
buttons to select _'Channel'i,
Press the UP/DOWNAv
channel in the PIP window,
English-41

PICTURE CONTROL
Changing the Size of the PIP Window
Press the UP/DOWN A'v"
buttons to select 'Size:', then
4 This flmction doese't work
•ahen the Source is iD PC mode.
Press the UP/DOWN Av
buttons to select the desked
Press the ENTER_ button.
Press the SBZE button under the remote's cover.
Changing the Position of the P|P Window
Press the UP/DOWN Av
buttons _o select "Positio[
then Dress the ENTEnte3
bUttOn.
Press me UPIDOWN Av
buttons to seJect the desJree
PIP /vJndo_ position.
Press the ENTER_ buttor
Press the EXmTbutton to exit
ARemate method:
Press the POSITION button under the remote's cover,
P_P Settings
x x x
x x x
x x x
x x x
x x x
x x x
o o o
o o o
O : PIP operates
X : PIP doesn't operate
x
x
x
x
x
x
x
x
,
x x x
x x x
x x x
x x x
x x x
x x x
o o o
o o o
o
o
o
o
o
o
x
x
* Whe!_ the PC is in eDergy saviDg mode, you cromer choose the PiP optiom
* Yo_,may notice that the picture in the PIP window becomes slightly mllDatural when you use
the main screen to view a game or karaoke.
* You can adjust picture position only by using the F=_ size menu.
English-42
SOUNDCONTROL
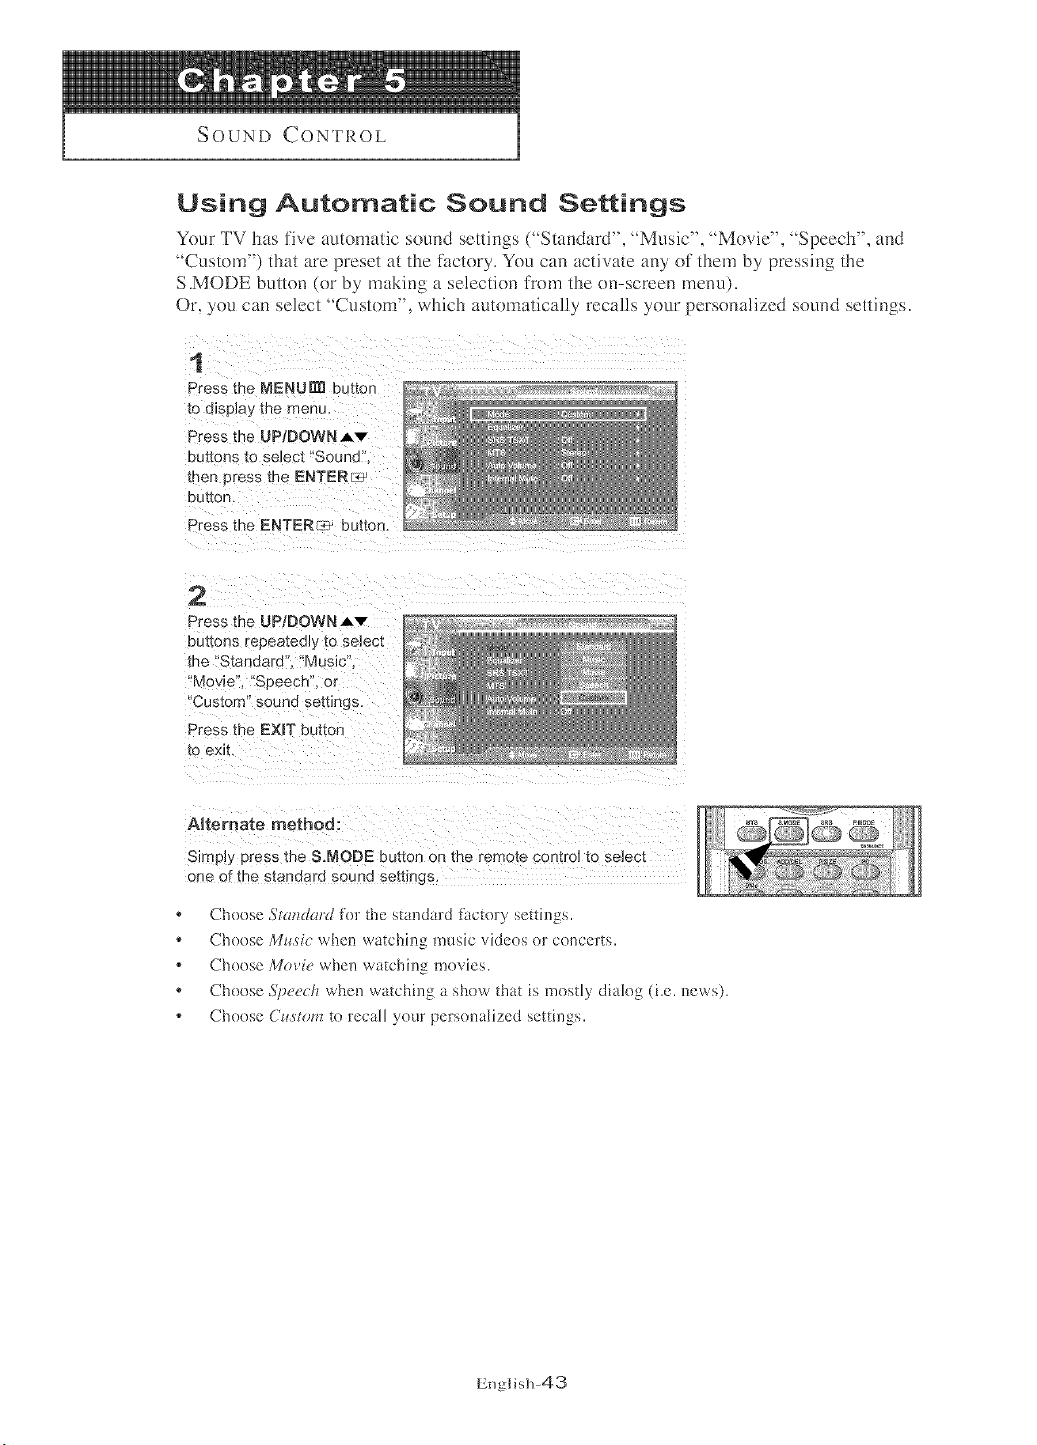
Using Automatic Sound Settings
Your TV has five automatic sound settings ("Standard", "Music", "Movie", "Speech", and
"Custom") that are preset at the factory, You can activate any of them by pressing the
S.MODE button (or by' making a selection from the on-screen menu).
Or, you can select 'Custom", which automatically recalls your personalized sound settings.
t
Press the MENU_[_ button
_o a]spiay the menu,
Press the UP/DOWN Av
DU[LOnS _0 selec[ *'Sound'
men oress the ENTERL_
eU[[On,
Press the ENTER{_ button
2
Press the UP/DOWN Av
buttons repeatedly to selecl
the Standard". "Music
"Mevie". "SDeecn. o_
"Custom" sound settings.
Press the EXIT button
_o exit.
ARemate method:
SimeJy press the S.MODE button on the remo_ecomro__o seJec_
one of the standard sound settings.
Choose _'l¢_tzduF([tot _hestandard fi_c_oryseHings.
* Choose Mus'ic when watching music videos or concer_s.
* Choose MoYie when watching movies.
* Choose ,*;peech when watching a show rha_ is runs@ dialog (i.e. news).
* Choose Custom to recall your personnIized settings.
EnglislP43
SOUNDCONTROL
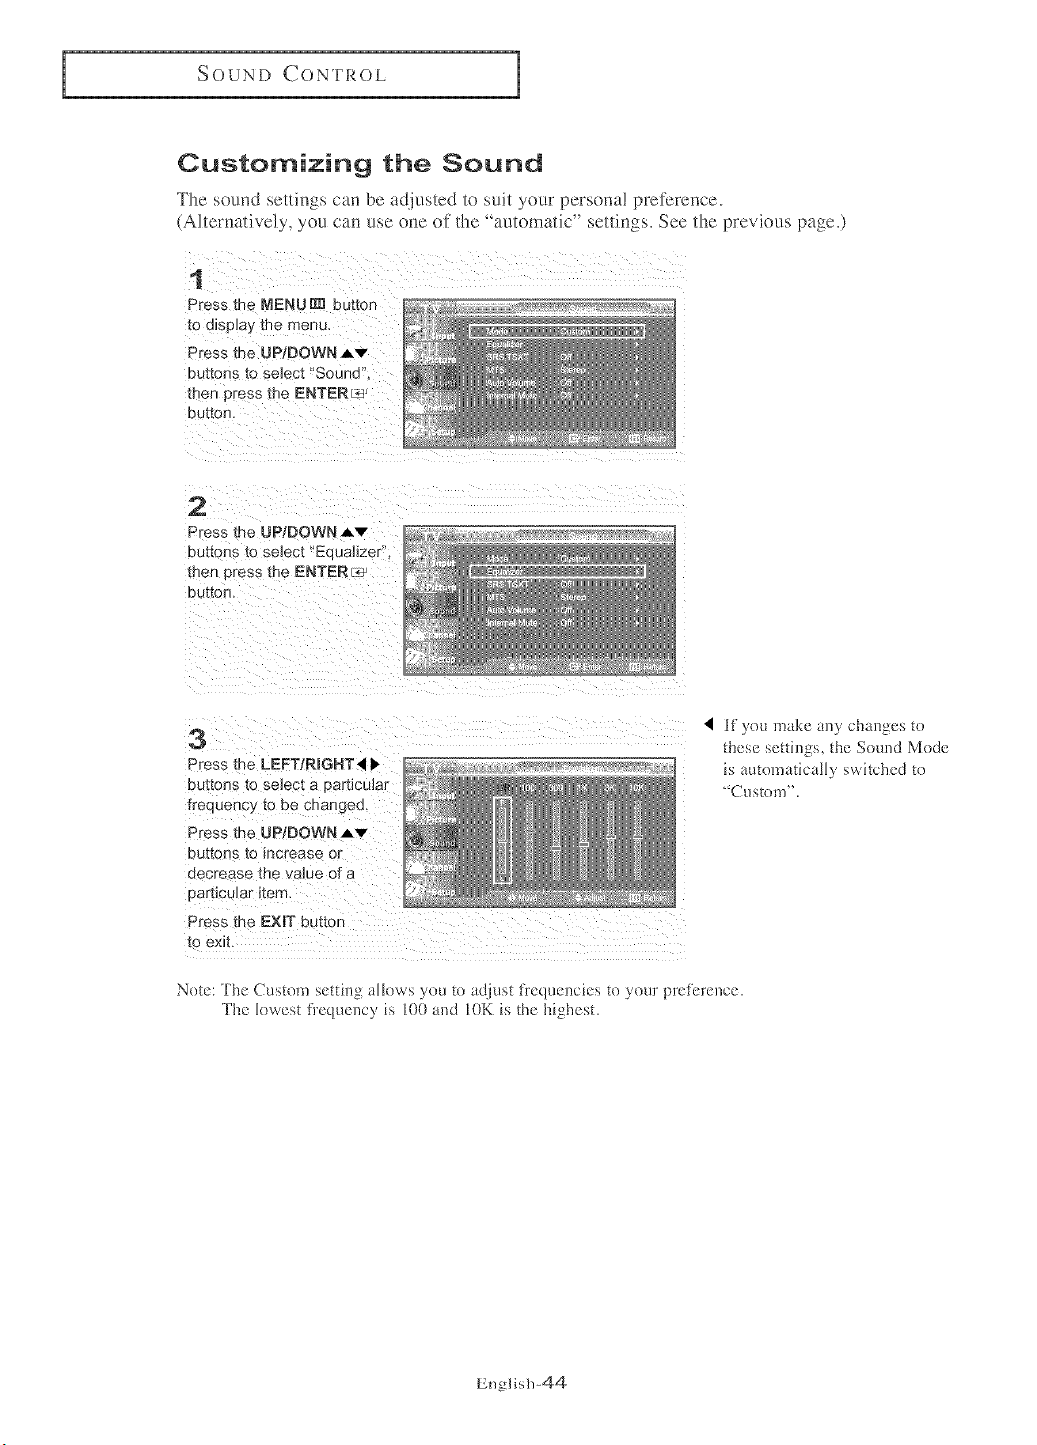
Customizing the Sound
The sound settings can be at[lusted to suit your persona! preference.
(Alternatively, you can use oue of the 'automatic" settings. See the previous page.)
1
Press the NENUNI button
to display the menu,
Press the UP/DOWN _,v
buttons io se_ecx "Sound'
men press me ENTER_
DU[tOn,
2
Press the UP/DOWN Aw
buttons to select "EQualizer
men 3tess the ENTER_
button.
3
Press me LEFT/RIGHT 41I_
buttons to select a particular
Ireauency to be changed.
Press the UP/DOWN Aw
buttons co increase or
decrease me va]ue of a
oaytlcu]ar _mrr
Press the EXIT bt tton
I0 exl[.
< if you make any changes to
these settings, the Sound Mode
is automatically switched to
_CtlgtOnl".
Note: The Custom setting allows you to adjust ti"eque]_cies to your preference.
The lowest frequency is lO0 and IOK is the highest.
English-44
SOUND CONTROL
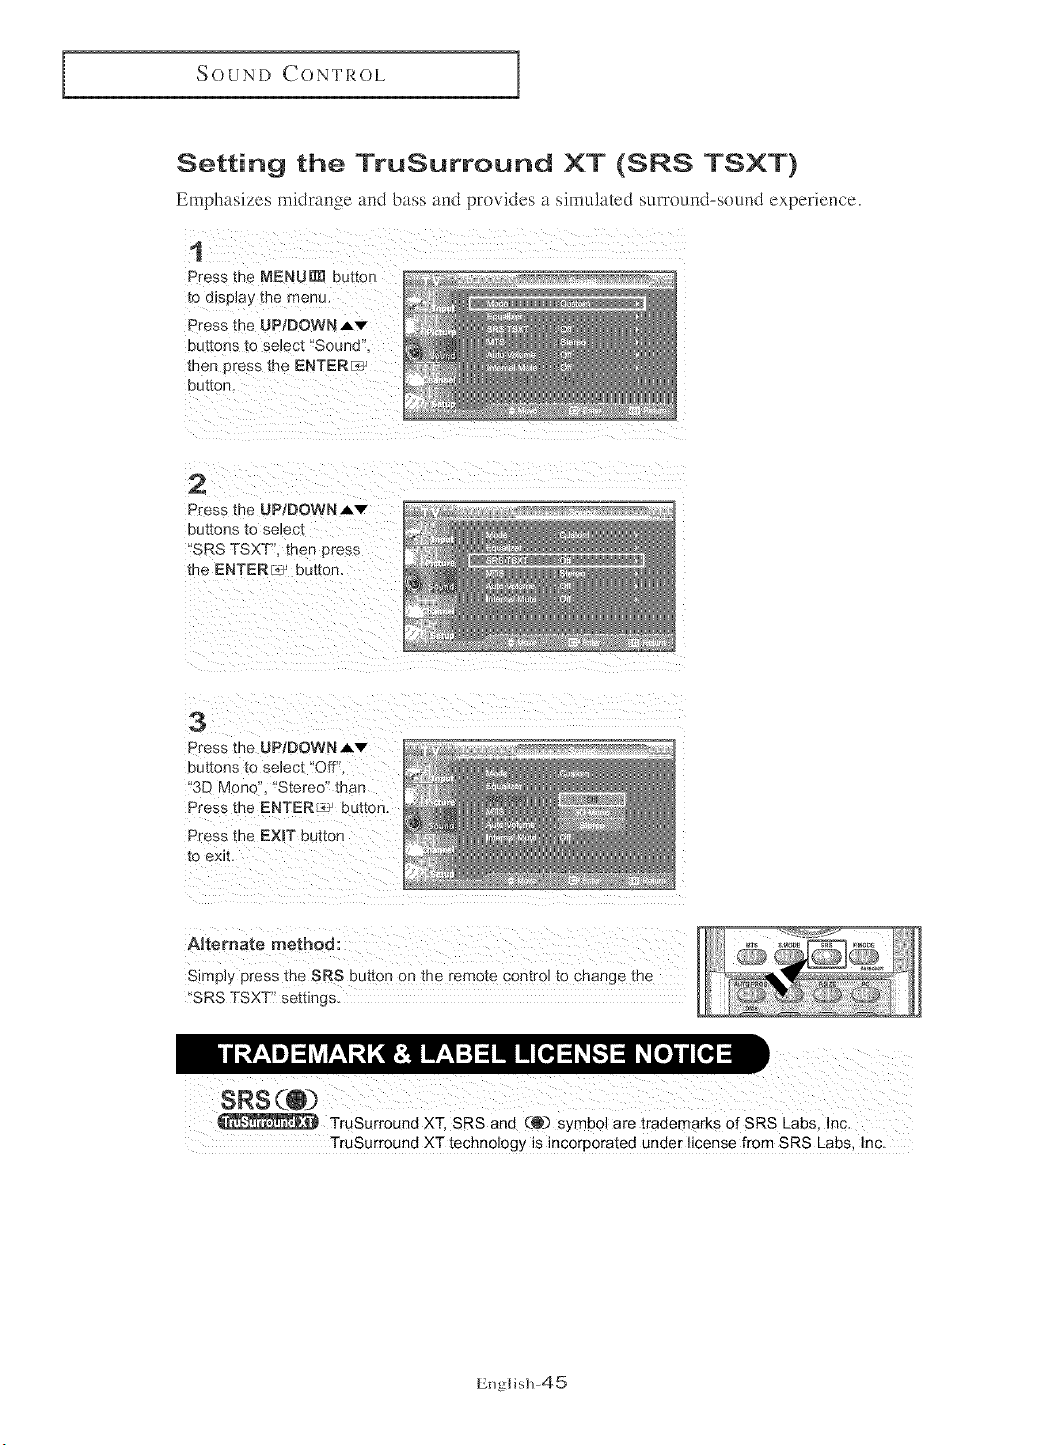
Setting the TruSurround XT (SRS TSXT}
Emphasizes midrange and bass and provides a simulated su_Tound-seund experie,_ce.
1
Press the MENU _ buttor
[o ct_sp_ayme menu.
Press the UP/DOWN J.v
Du_[ons _o select "Sound'
[nen eress me ENTERf_: ]
button.
2
Press the UP;DOWNAv
Dm[oes to select
SRS TSXT. men press
Lhe ERTERc_ button.
3
Press the UP/DOWN Av
buttons to seJect "Off".
'3D Mooo "Stereo" than
Press me ENTER,c# ou_ton
Press the EXmTbutton
to exit.
ARemate method:
Simply press the SRS button on the remo[e control to change me
'SRS TSXT" settings.
TruSurround XT, SRS and (@) symb01 are trademarks of SRS Labs, Inc.
TruSurround XT technology is incorporated under license from SRS Labs, Inc.
Englis]l-45
SOUND CONTROL
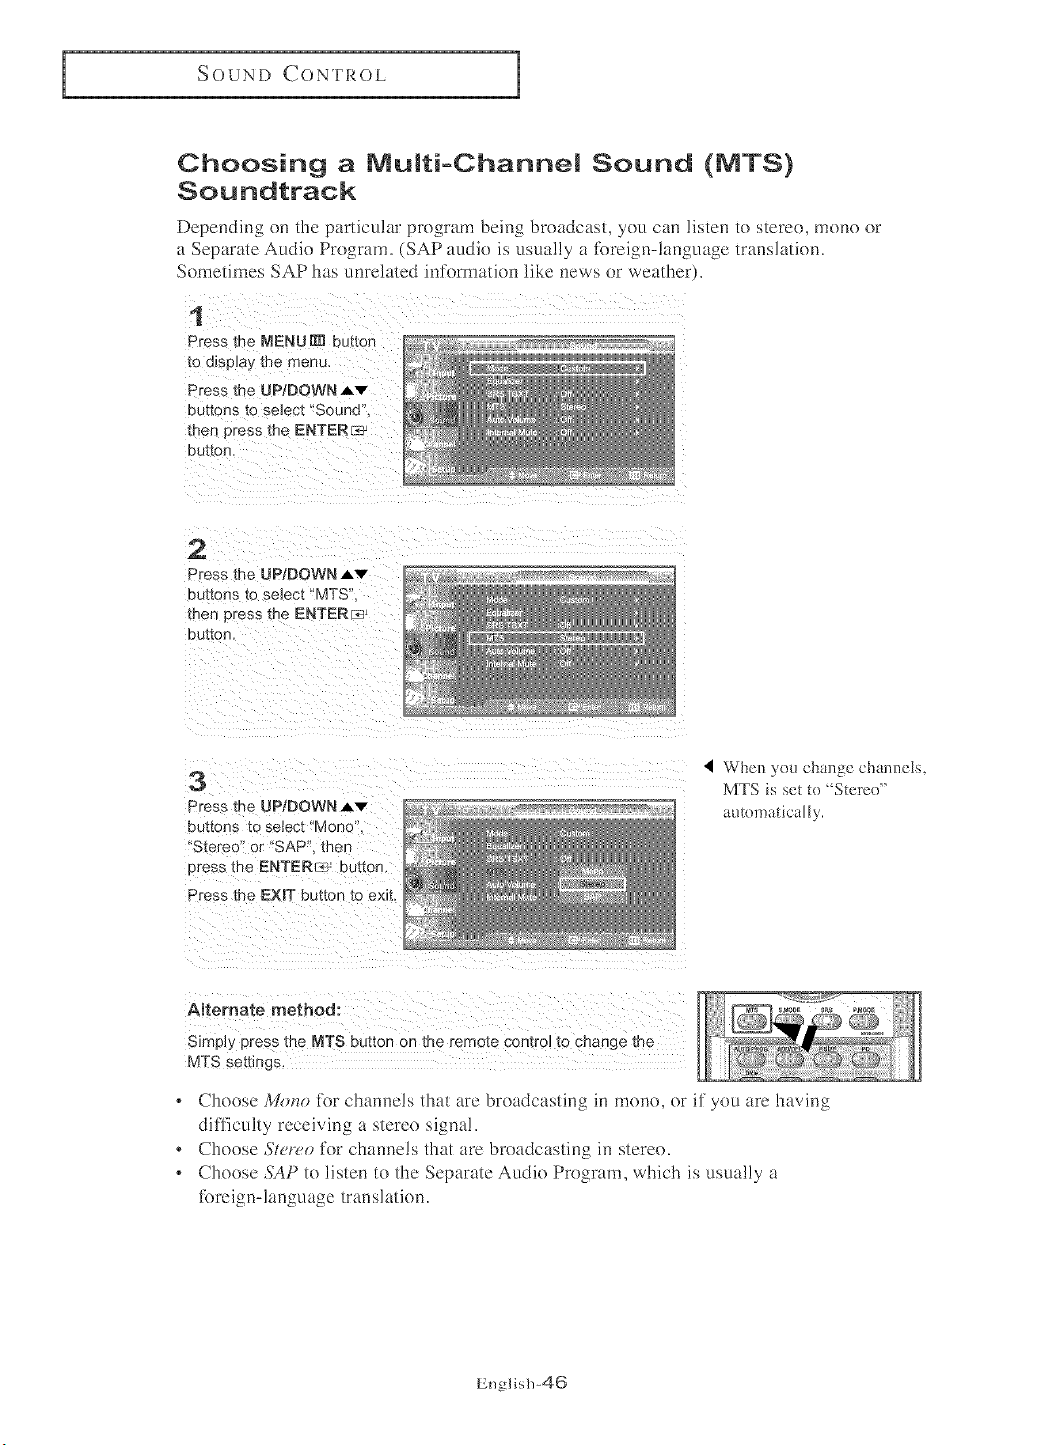
Choosing a NuMti=Channel Sound (NTS)
Soundtrack
Depending on the particular program being broadcast, you can listen to stereo, mono or
a Separate Audio Program. (SAP audio is usually a R)reign-hmguage translation.
Sometimes SAP has unrelated information like news or weather).
1
Press the MENU [] button
[D Cl]Sp_a_ _ne rnenu.
Press the UP;DOWN AV
DU[[OnS tO select "Sound'
then 3tess the ENTERI_:_
DU[IOn,
2
Press the UP;DOWN Av
buttons _o select "MTS'
men Dress me ENTERr_J
button,
3
Press me UP/DOWN A_"
auttons to select "Monc.
'Stereo" or "SAP' met-
Dress the ENTERs, button.
Press me EXIT button to exit.
4 When )'D_! ch_mge chamlels.
MTS is set to "'Steree"
amDma_ically.
Affemate method:
SimpJy press the MTS button on the remote CDn[rD_to cnange me
MTS settings,
, Choose M_)no for channels that are broadcasting in mono, or if you are having
ditTiculty receiving a stereo signal.
Choose St('r(,o tk)r channels that are broadcasting in stereo.
* Choose ,S_P to listen to the Separate Audio Program, which is usually a
toreign-language translation.
English-46

SOUND CONTROL
Automatic volume control
Reduces the differences in volume ]eve] among broadcasters.
1
Press me MENU_[_ button
to display me menu,
Press the UP/DOWN Av
Du_ons [o se_ec[ "Sound'
men eress [he ENTERE_
our[on.
2
Press the UP/DOWNAv
buttons to se,ec[
"Auto Volume'. men press
the ENTER_ button.
3
Press the UP/DOWN _v
buttonS [0 se_
,_mo Vo]__rne "On",
Press the EXIT button
to exit.
English-47
SOUNDCONTROL
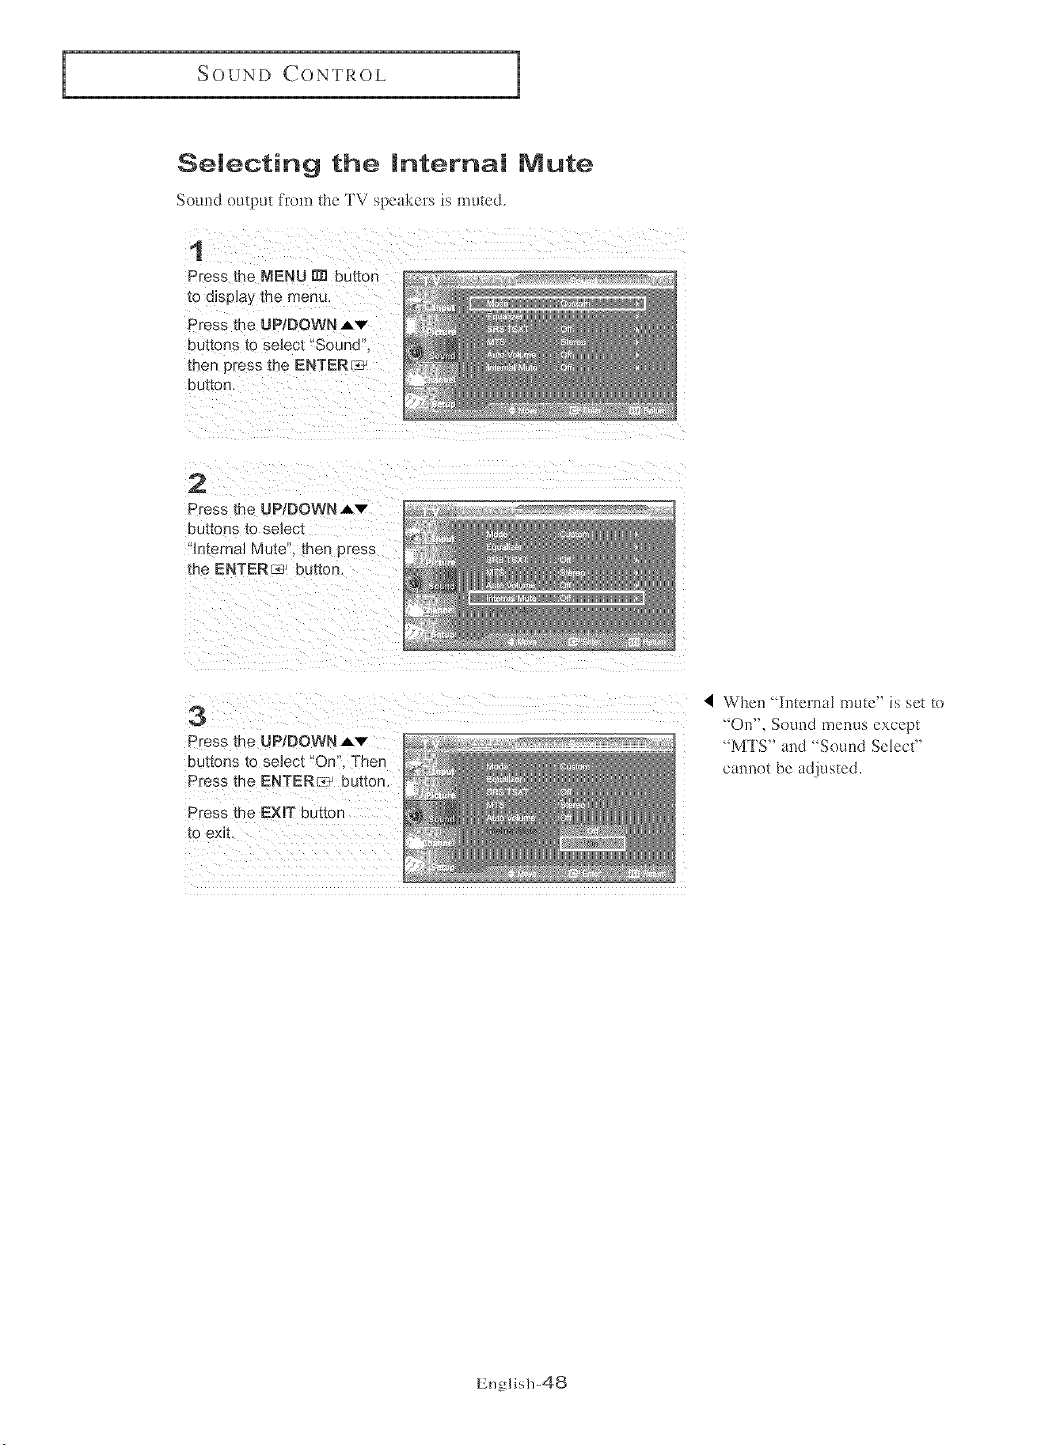
Selecting the Internal Mute
Somld output from the TV speakels is mutecL
1
Press the MENU _ button
to d_sp_ayme menu.
Press me UPiDOWN,Av
buttons [o select "Sound'
then 3tess _he ENTER/_J
button.
2
Press the UP/DOWN,_v
DUttOP_S tO se]ect
m_erna] Mute'. men press
me ENTERs' button.
3
Press the UP/DOWN Av
Press the EXIT button
[o ex_L
4 When "Internal mute" is set to
_On", Sound menus except
_MTS" and _Sound Select"
cannot be adjusted.
English-48

SOUND CONTROL
Selecting the Main or Sub (PIP) Sound
YOu can select either Main or Sub sound when PIP is On,
1
Press the MENU_ button
10 (_I]SDIa_ [ne menu,
Press _he UPIDOWN A_"
buttons _o select "Sound'
men press the ENTER_
button,
2
Press the UPtDOWN _v
buttons to select
"Sound Select". then bress **_ "_
me ENTERs.' button.
3
Press the UPtDOWNAv
buttons to select "Mair or
'SuB ,
Select '1/lain" to hear the
main TV sound and se_ec_
Sub _o hear the PiP
winoow sounu
Press the EXIT button
[0 exit
English-49

CHANNEL CONTROL
Fine Tuning Channels
Use fine tuning to manually adjust a particular cham_e] for optimal reception.
1
Press me _ENUNl button
to display the menu.
Press the UPiDOWNAv
buttons [o select "Channe]'
men press me ENTER_
eu[tOn.
2
Press the UP/DOWN,_v
buttons to select
Fine Tune' mep oress
the: ENTERs' button
3
Press the LEFTIRmGHT _ ),
buttons to adjust _:ne
fine tumng
if you do not store the fh_e-tuued
chancel i1_memory, adjustments
are not saved.
4
7b store the fine tuning
settmg in the TV's memory
eress me ENTER_ button.
Press the EXIT outton to exit.
Fi]_e tuned channels that have
been saved are marked with ae
asterisk _':_" on the right-hand
side of the channel number in the
channel bamer.
I Press the UP/DOWNAv button
to select "Reset", than press the
ENTER _ button.
English-50
PC DISPLAY
Using Your TV as a Computer (PC) Display
Setting Up Your PC Software (Based on Windows XP)
'Rhe Windows display-settings for a typical computer are shown below. "The actual screens on your PC
will probably be different, depending upon your particular version of Windows and your particular video
card. However, even if your actual screens look different, the same basic set-up information will apply it/
almost all cases. {if not, contact your computer manufacturer or Samsung Dealer.)
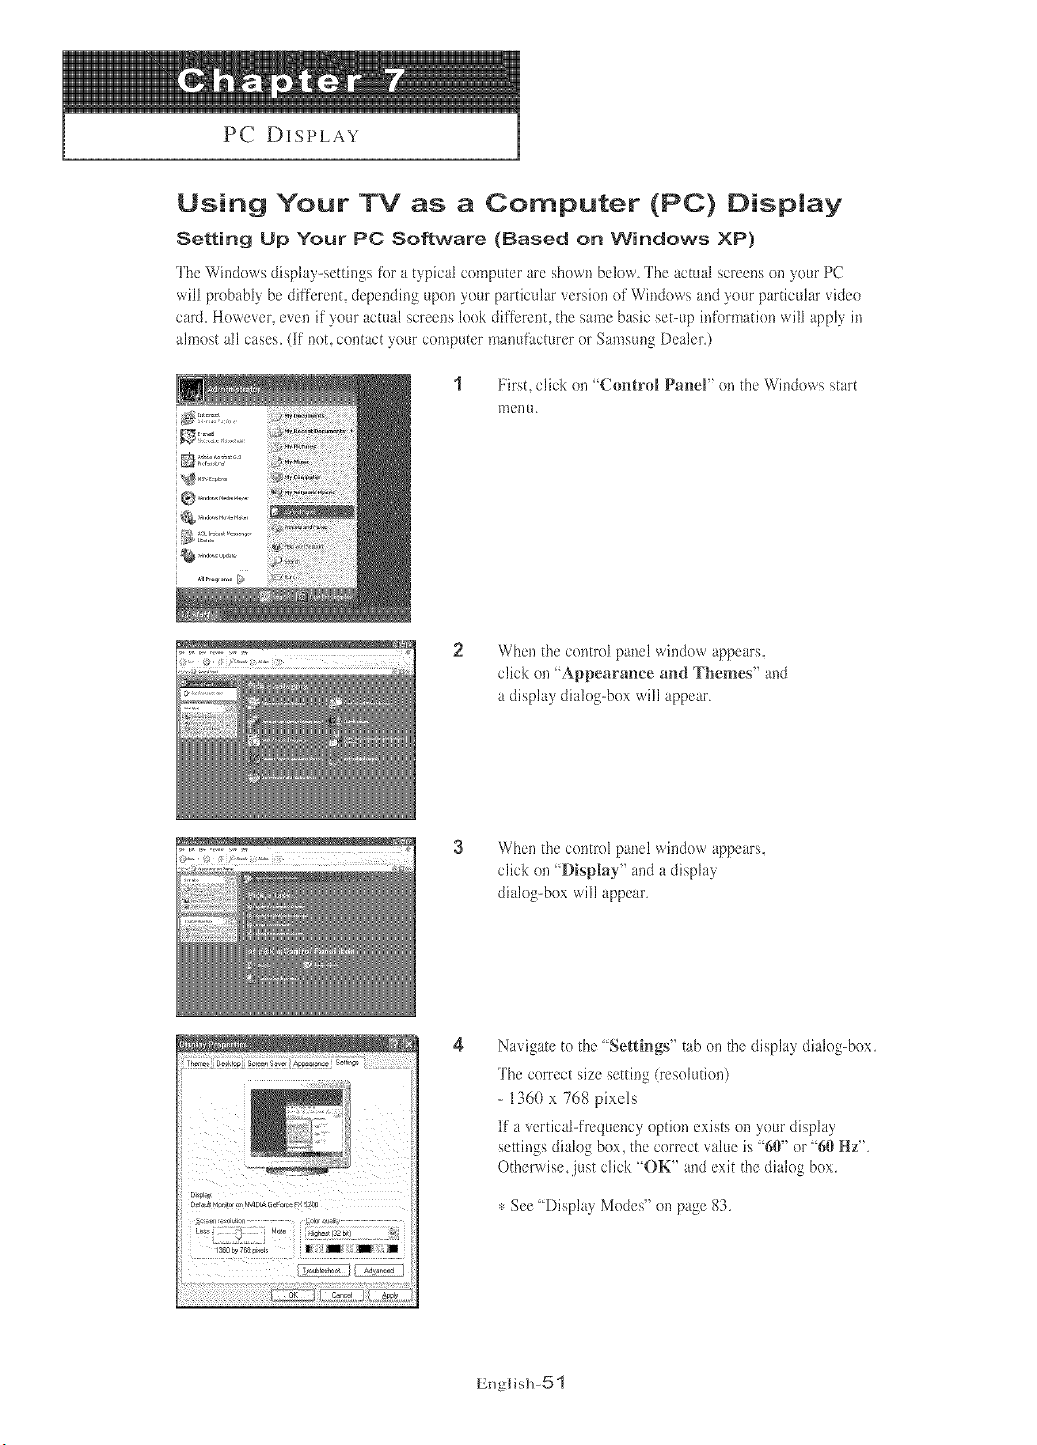
First, click on "Control Panel" oil the Windows start
menu
2 When the control panel window appears.
click oil "Appearance and Themes" and
a display dialog-box will appear
3 When the control panel window appears.
click on "Display" and a display
dialog-box will appear
Navigate to the "Settings" tab on the display dialog-box
The correct size setting (resolution)
- 13(50x 768 pixols
If a vertical-frequency option exists on your display
settb/gs dialog box, the correct value is "6W or "6{)Hz"
Otherwise, just click "OK" and exit the dialog box
,_:See "Display Modes" on page 83,
Englis]l-5 _
PC DISPLAY
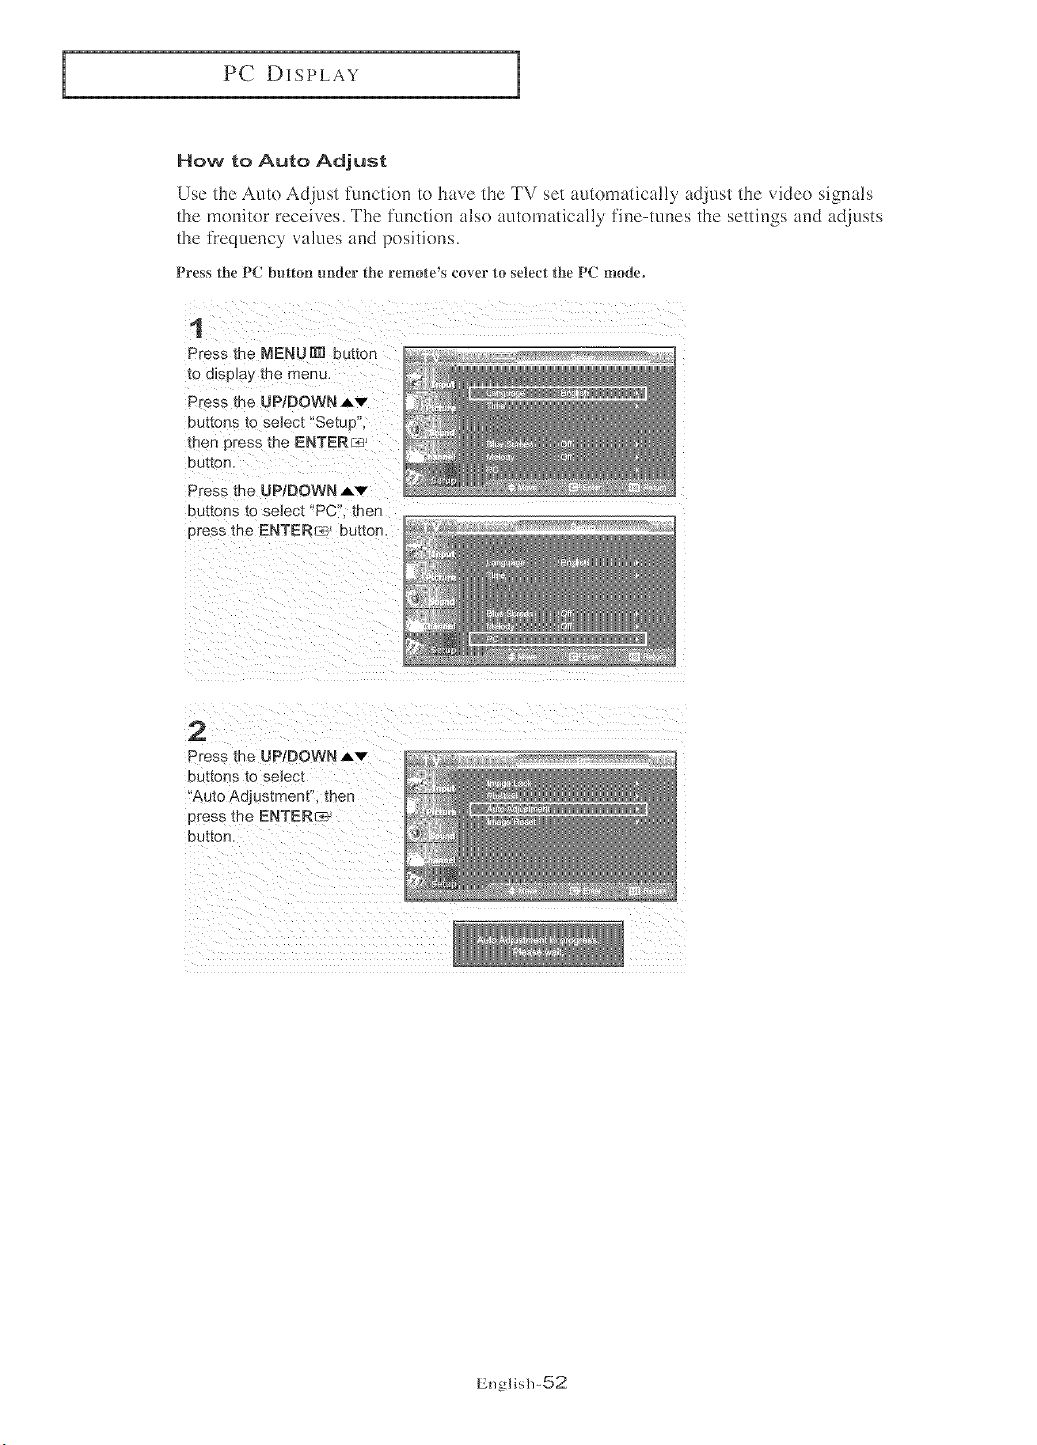
How to Auto Adjust
Use the Auto Adjust fnnction to have the TV set automatically adjust the video sigm_ls
the monitor receives, The function also automatica!ly fine-tunes the settings and adjusts
the i]'equency values and positions.
Press the PC button under the remote's cover _o setect the PC mode°
1
Press the NENUN1 button
to display the menu. _ _
Press the UP/DOWN A'v"
buttons [o select "Setu 3"
men cress the ENTER_ ® :_
button,
Press me UP/DOWN _v
buttons to select "PC". then
Dross the ENTERr_ bUttOn,
2
Press the UP/DOWN Av
buttons to select
'Auto Adjustment'L then
Dress the ENTER_
button.
English-52
PC DISPLAY
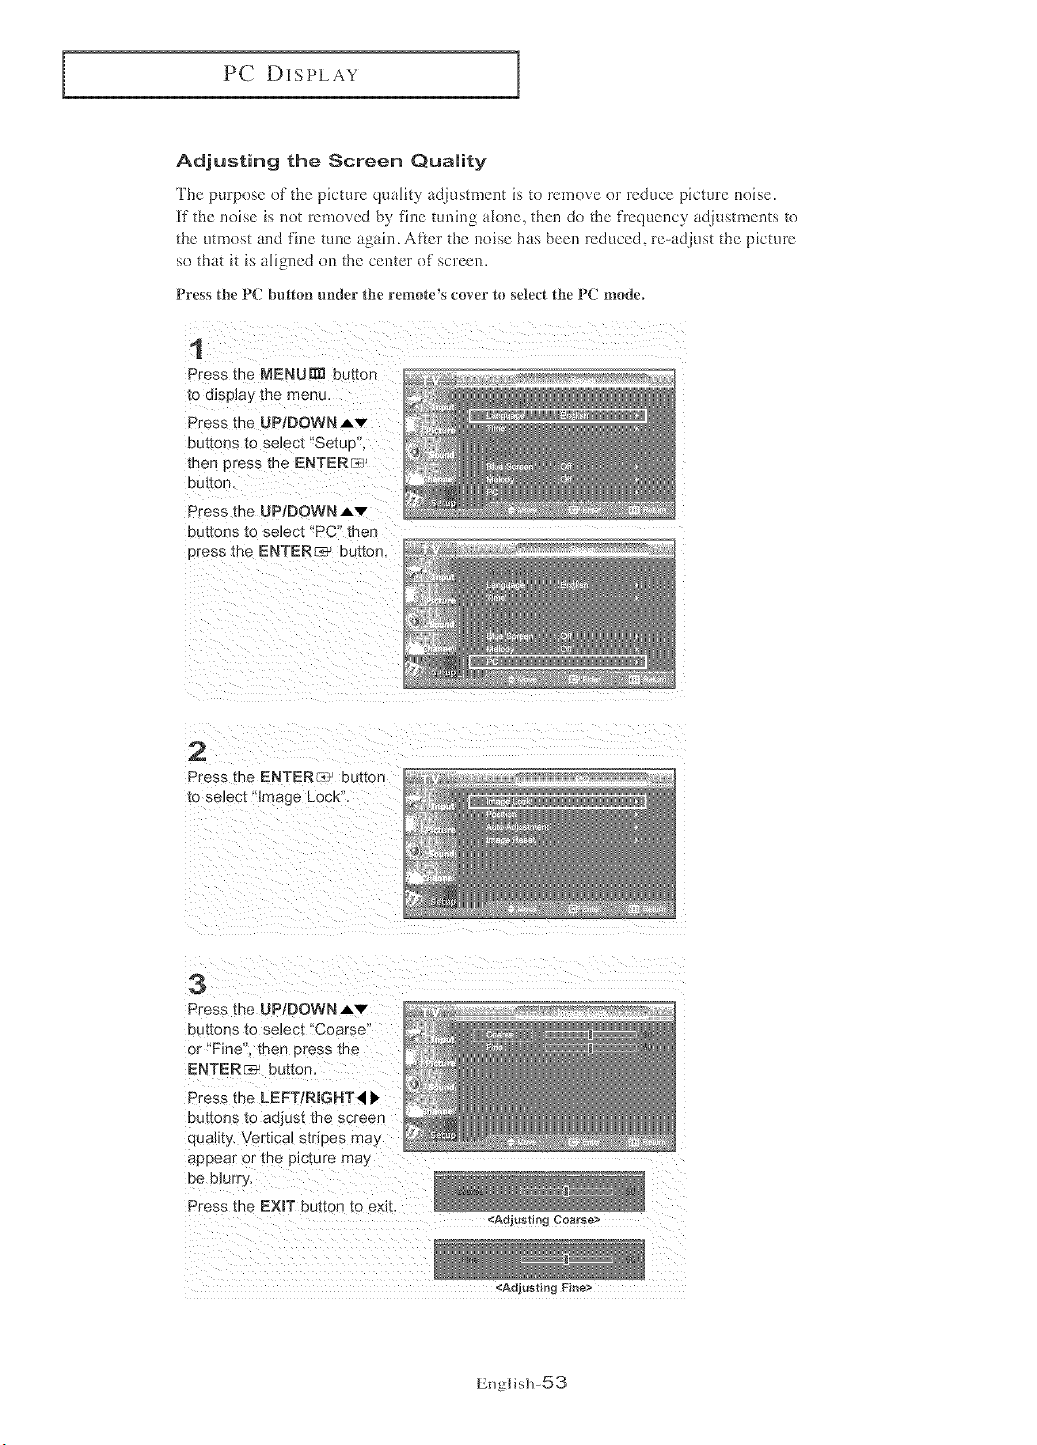
Adjusting the Screen Quality
The puq)ose of the picture q_mlky _4jHstment is toremove or ]educe pbture noise.
[f the noise is not removed by fine tuning alone, then do the fl'equency adjustments to
the utmost and fine tune again. After the noise has been reduced, re-adjust the picture
so that it is aligned on the center of screen.
Press the PC button under _he remote's cover to seled the PC mode,
1
Press the MENUml button
to display tr_e menu,
Press me UP!DOWNAv
buttons to seJect "Setue'
men press the ENTERF__
button.
Press the UP/DOWN Av
euttons t.o select "PC" men
Dres _ the ENTER_ button.
2
3
Press the UP/DOWN Av
c Jttons to select "Coarse'
3r "Fine". ther Dress me
ENTER __. button.
Press the LEFT/RmGHT,41 _
buttons to adjust the screer
quality. Vertical stripes may
aeDear :)r the picture rna)
be blurr,_
Press the EXmTbutton to emt.
_AQlustm_j Coarse>
<Adjusting Fine>
EnglislP53
PC DISPLAY
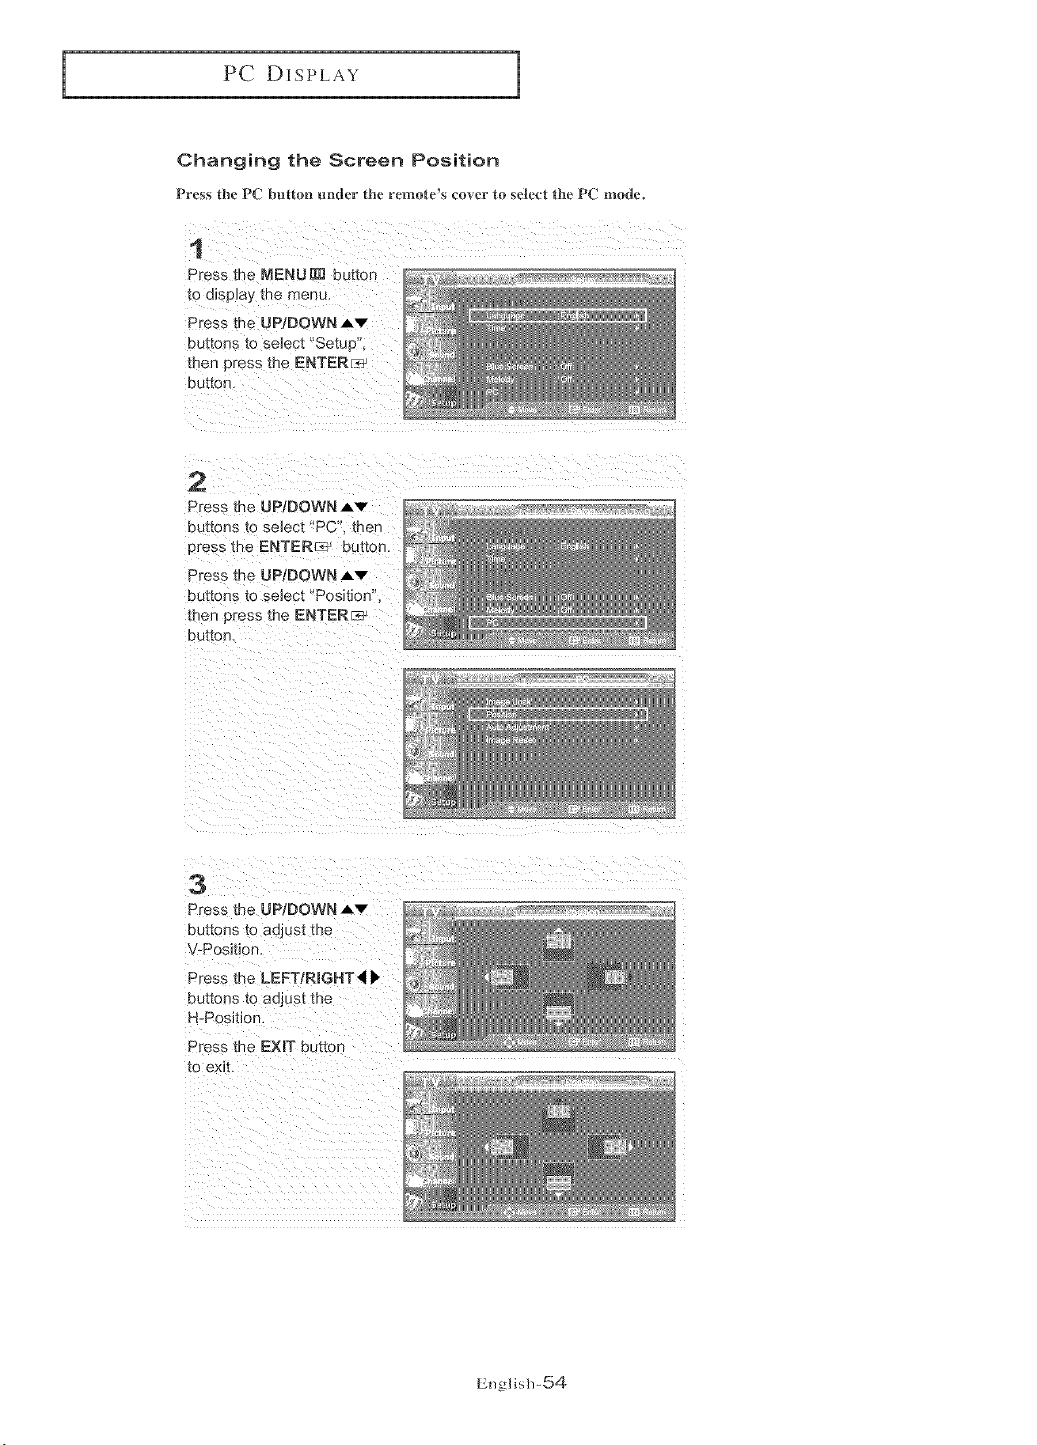
Changing the Screen Position
Press the IPC button ender the remote_s cover to selec_ the PC mode°
1
Press En_MENU[:£_ button
to dlSD]OV [ne men_,
Press [he UPIDOWN Av
buttons _o se]ec[ "Setup
men 3ress the ENTER_
DU[[OR
2
Press the UP/DOWN Av
bE_.tons to select "PC. men
ores _ the ENTERF_> button.
Press the UPtDOWN Av
buttons to seJect "Positior
men Dress the ENTER_
DOt[On,
3
Press the JP/DOWN Av
eu[[ons to adjust the
-Position.
Press the LEFT/R[GHT_II 1'
DU[_OnS [0 OQJUSt the
H-Position
Press the EXIT button
tO exit.
English-54
PC DISPLAY
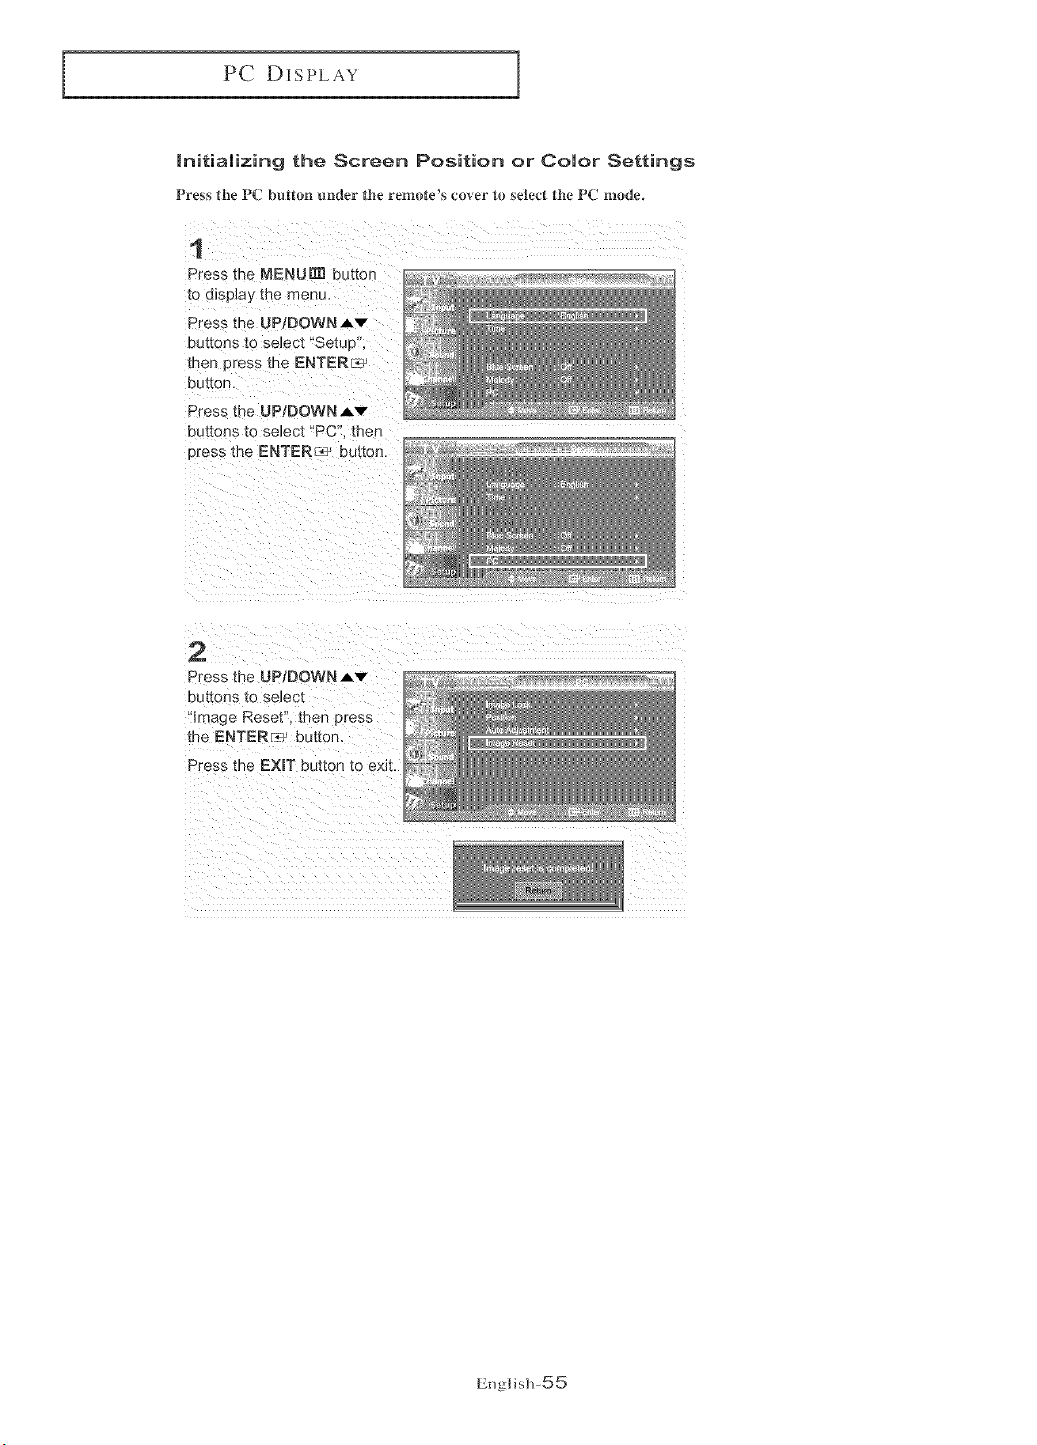
Initializing the Screen Position or Color Settings
Press the PC button _mder the remetCs cover t0 seled the PC mode.
1
Press the MENU[] button
to disDay me menu.
Press the UP/DOWN A'v"
Dt._E[onsto seJec'_"Setup ,
_nen press the ENTER_
button.
Press the UP/DOWN,6,v
buttons to se_ec_"PC" thee
Dress the ENTER _L_2button.
2
Press the UPIDOWN Av
DU_[OnS to select
Image Reset". t_-an press
me ENTER-_? button.
Press the EXIT button to exit.
Eng]isIP55
TIME SETTING
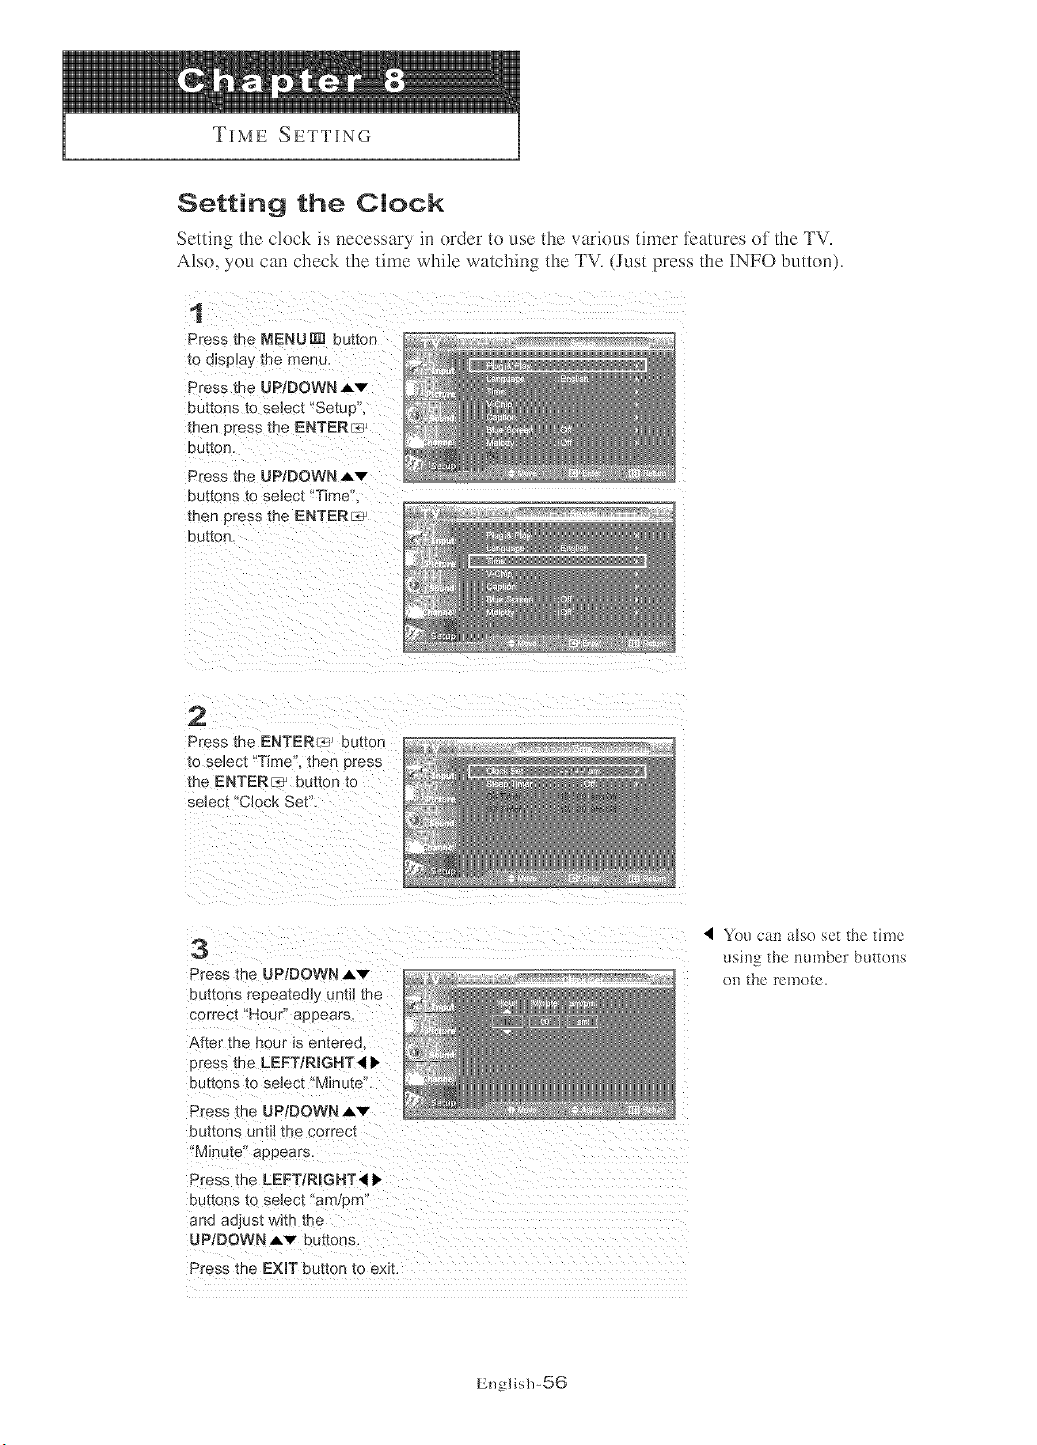
Setting the Clock
Settin_ /llC clock is necessary m oroer to use the vttilOUS timer l_;atures of the TV.
Also. } ou can cnecl< the lime while watching the TV. (JLlsI Dress the ]NFO bLltlon).
1
Press the MENU[] button ' -
12o display/ [ne (Tlenu, _
Press the UP/DOWN Av
buttons to select "Setup",
then press me ENTERr_2 >_ _,:_
button.
Press the UP/DOWN ,,Lv
buttons to se_ec_"Time
men _ress the ENTER_
button.
2
Press the ENTERla_ b_ tton
_o select"Time' men press
me ENTER_ POtiOn[0
select 'Clock Set".
3
Press the UP[]OWN Av
buttons repea_eob until me _' _
conect "HOUr' _ppears. _ _
After _n@ FlOOr IS entered _ _
press the LEFT/RmGNT4 _,
buttons to select "Minute".
Press me UP[]OWN Av
buttons until the correct
"Minute appears.
Press the LEFT/R[]NT ,,I I_
DU[(O[3S tO selec[ a_TI )rr/
ana ad Jst with the
UP/DOWN Av buttons.
Press the EXIT button to exit.
4 YOUcan a[se set the time
usuvJ'_ the number buttons
en the remote.
English-56
TIME SE'I TING
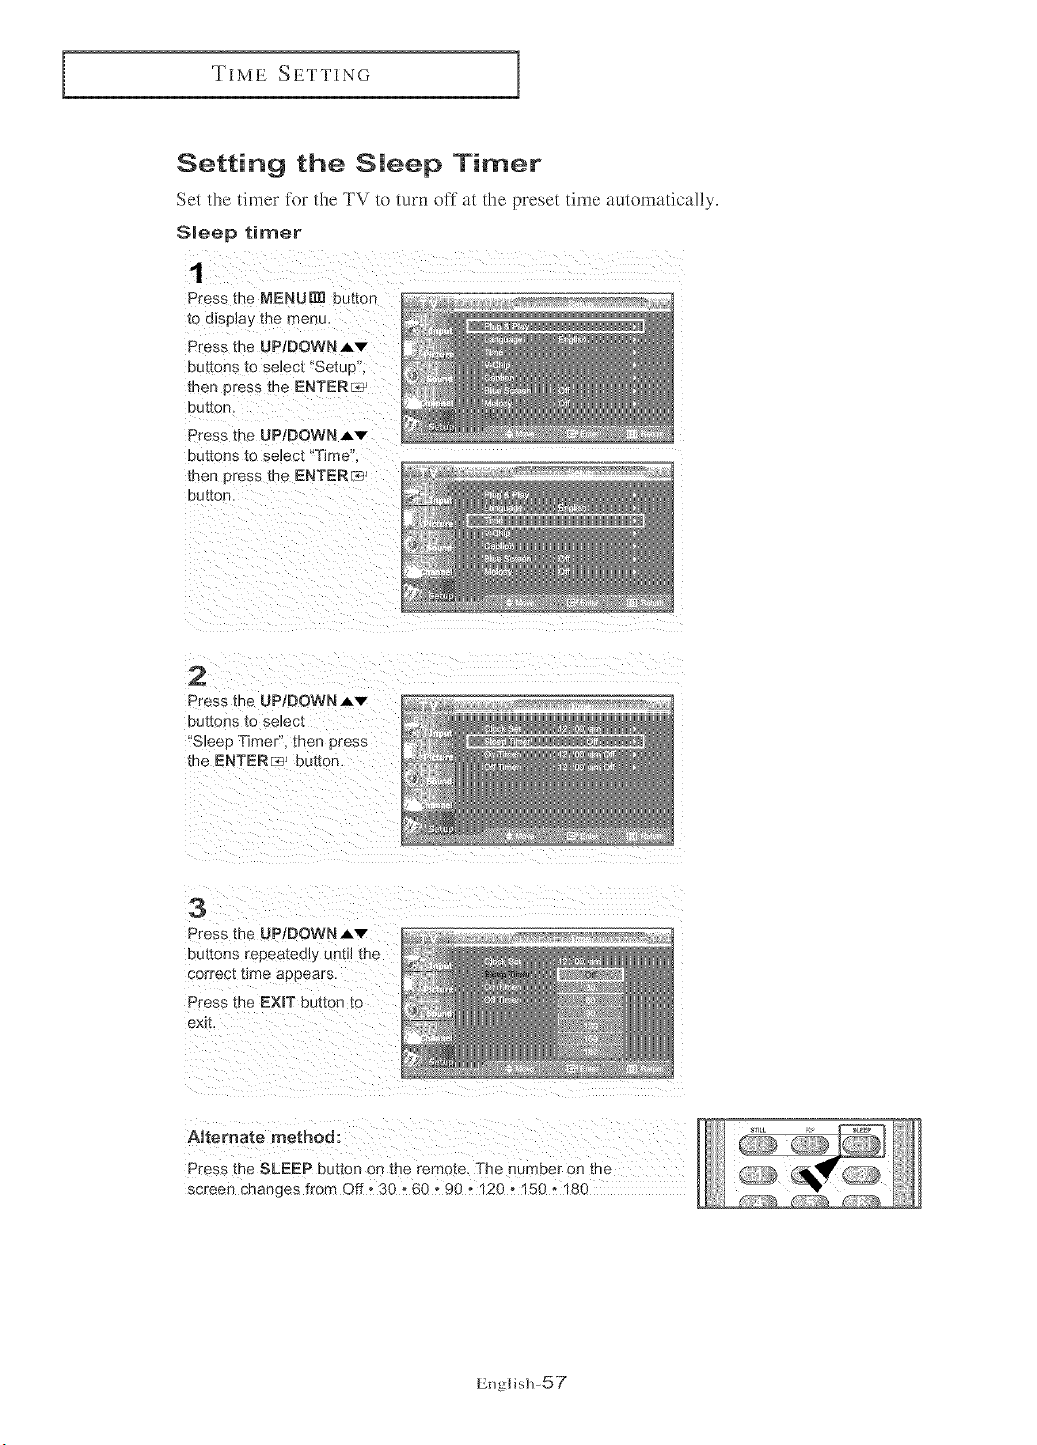
Setting the Sleep Timer
Set tl_xe timer for the TV/o turn off at the preset time automatically.
SHeep timer
1
Press the NENUml button
to display me menL
Press the UP/DOWNAv
eu[[ons to select "SetuD
men Dress me ENTERL_
button.
Press the UPtDOWN Av
Du[[ons to seJec[ "Time"
men press the ENTER[_
button.
2
Press me UP/DOWN J,v
buttons [o select
'S]ee[ Timer". then Dress
the ENTERr_J button.
3
Press the UP/DOWN _,v
buttons repeatedly untJJ me
correct time appears.
Press me EXIT button [o
exit
AJtemate method:
Press me SLEEP button on the remote, The number on me
screen changes from Off o 30 o 60 o 90 o 120 o 150 o 180
English-57
TIME SETTING
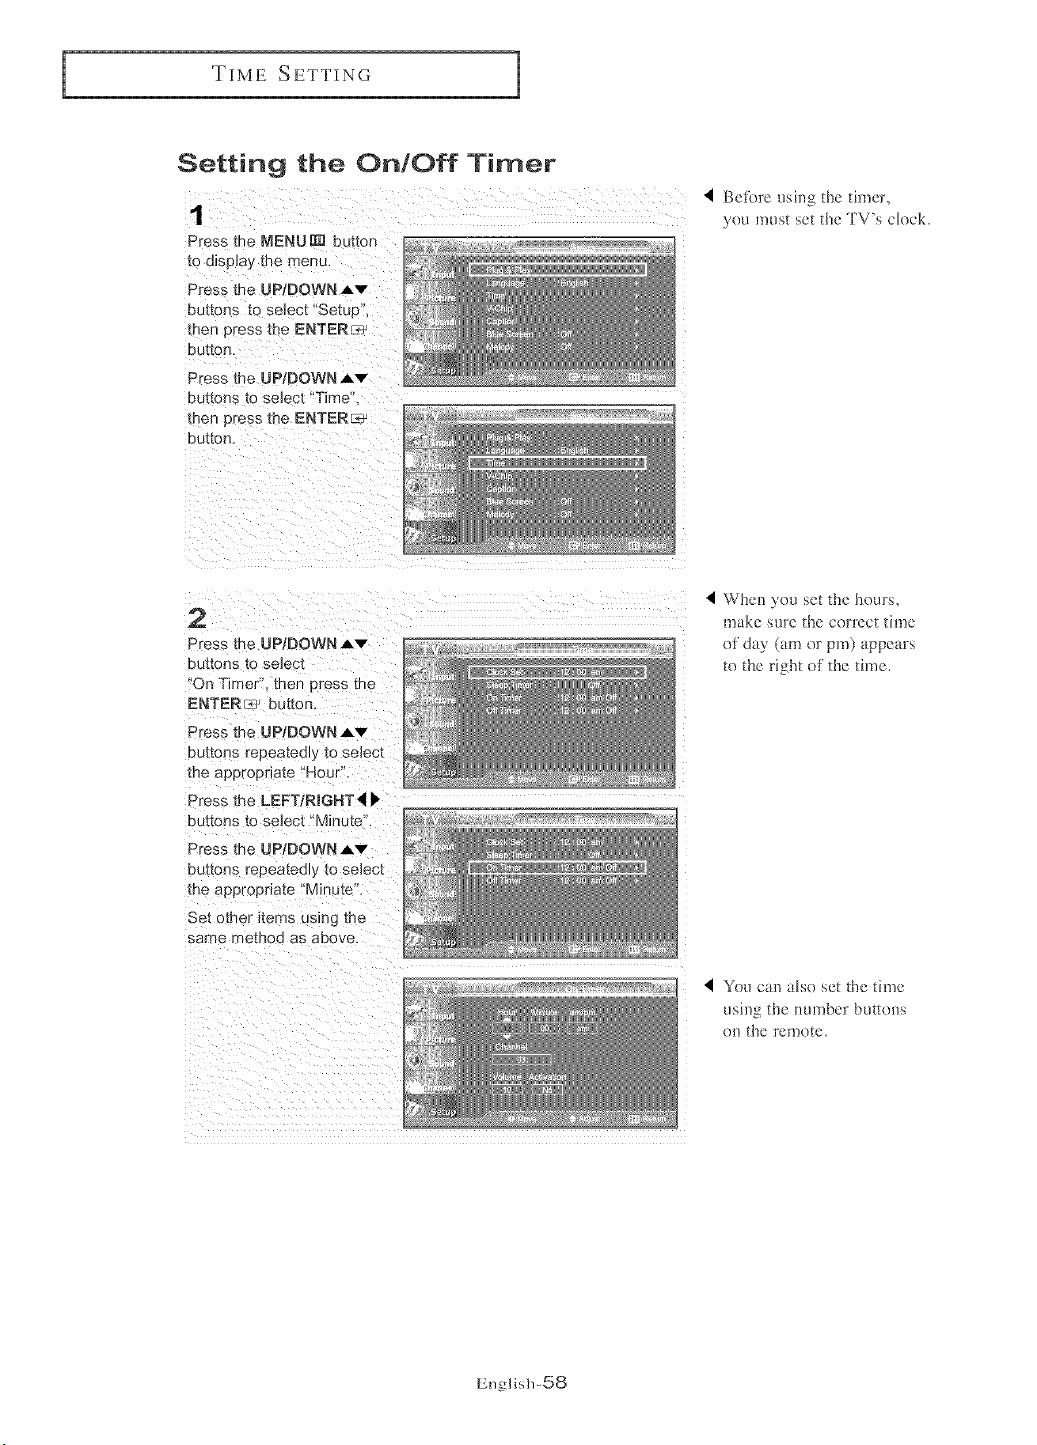
Setting the On/Off Timer
1
Press the MENUR_ button
to display the menu.
Press the UPIDOWN,,Lv
3u1[ons to select "SetuP",
[Den Dress the ENTERFTe
button.
C'_essthe UP/DOWN Av
buttons to select "Time".
[Den press me ENTERC÷
button
4 Befbre using the timer,
you must set tile TV's ok)ok.
2
Press the UP/DOWN _,v
buttons to select
"On Timer" men ,)tess the
ENTER_ Dtmon.
Press me UP/DOWN,_v
buttons repeated], to select
the a 3proDnate "Hour.
Press the LEFTIRmGHT 41 _
buttons to select "Minute.
Press me UP/DOWN Av
bU_OnS _'epeatedly to selec_
the appropriate "Minute.
Set omer _tems using the
same memor as above.
When you set the hours,
make sure the correct time
of day (am or pro) appears
to the right of the time.
You CaDaLseset the time
usm_Z' _ the tmrnber buttons
on tile remote.
English-58
TIME SETTING
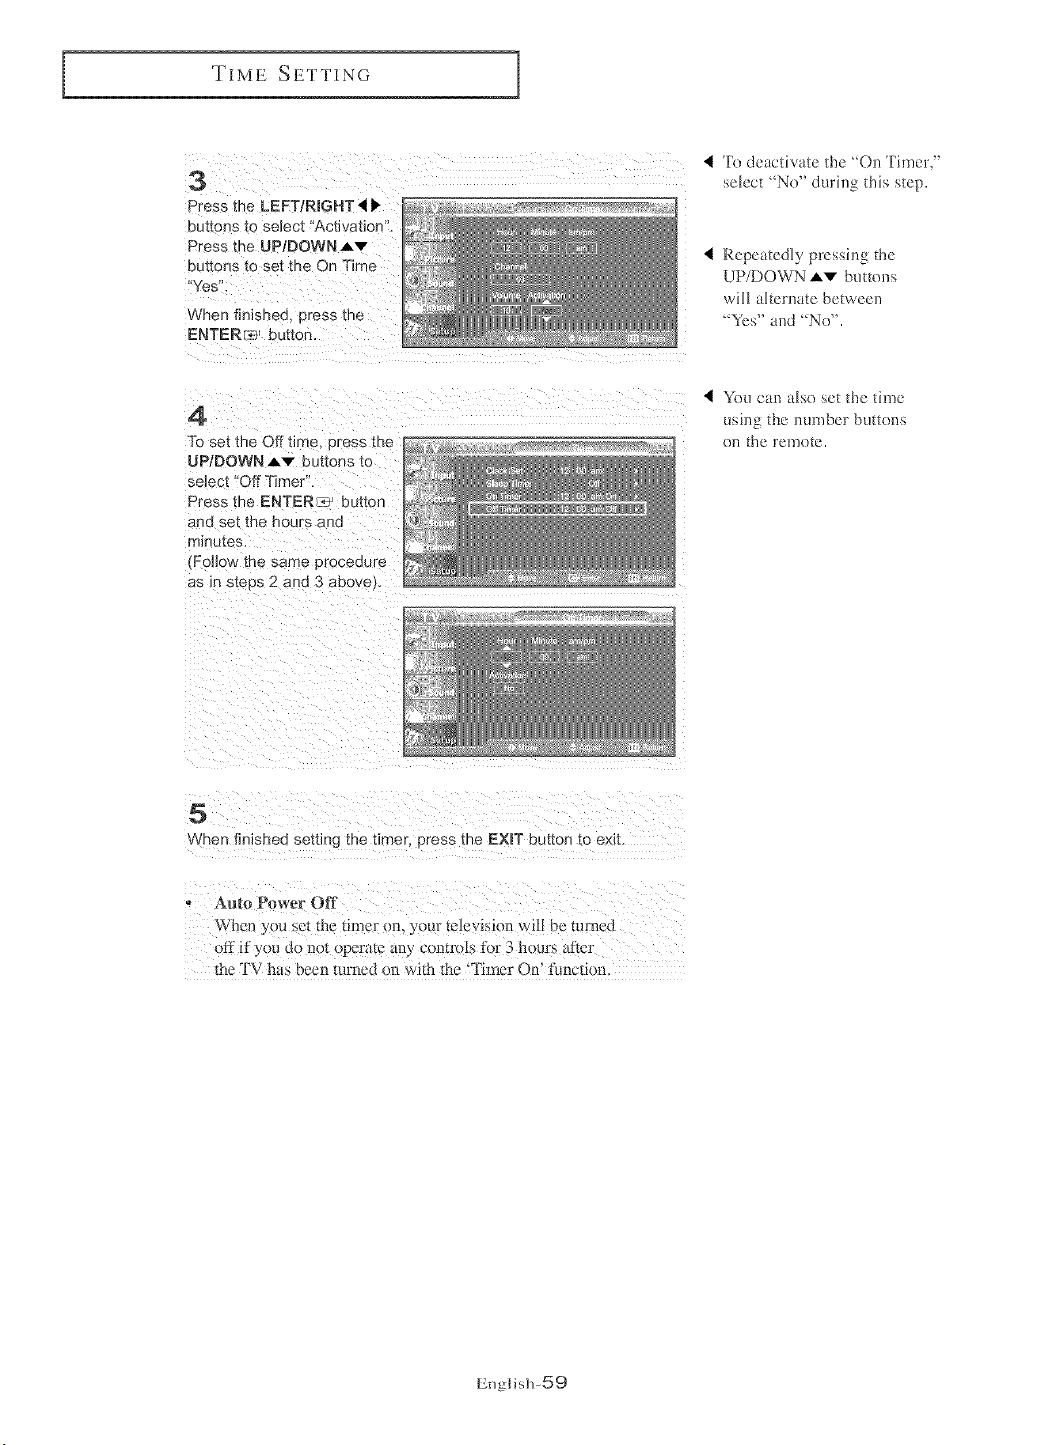
3
Press the LEFTiRmGHT 4 •
buttons [o select "ActJ/atJon',
Press the UP/DOWN_v
buttons to set the On Time
Yes'
When finished Dress me
ENTERed? j button.
4 'ib deactivate the 'On Timer,"
select "No" during tMs step.
RepeatedLy pressing the
UP/DOWN Av buttom_
will alternate between
"Yes" and "No".
4
To set the Off tin e press me _ _r_
UP/DOWN Av buttons to "':_
select "Off Timer". _'
Press the ENTERc_ butter :'
and !_etthe hol rs and
minutes.
(Fol_ow me same proceeure
as in steps 2 and 3 above/. _.
You can also set the time
using the number butt(ms
on the remote.
5
When finished setting the t_mer, press the EXIT button 1) emt
Aura P*_wer Olg
When y_ ,u _, die timer eL your teJ[evist, m will be mrnec
off if you do not _,peram an) con_ro[s tor 3 hours after
tile 3"V has been turned on with the q'imer On' function
English-59
FUNCTION DESCRIPTION
Selecting a Menu Language
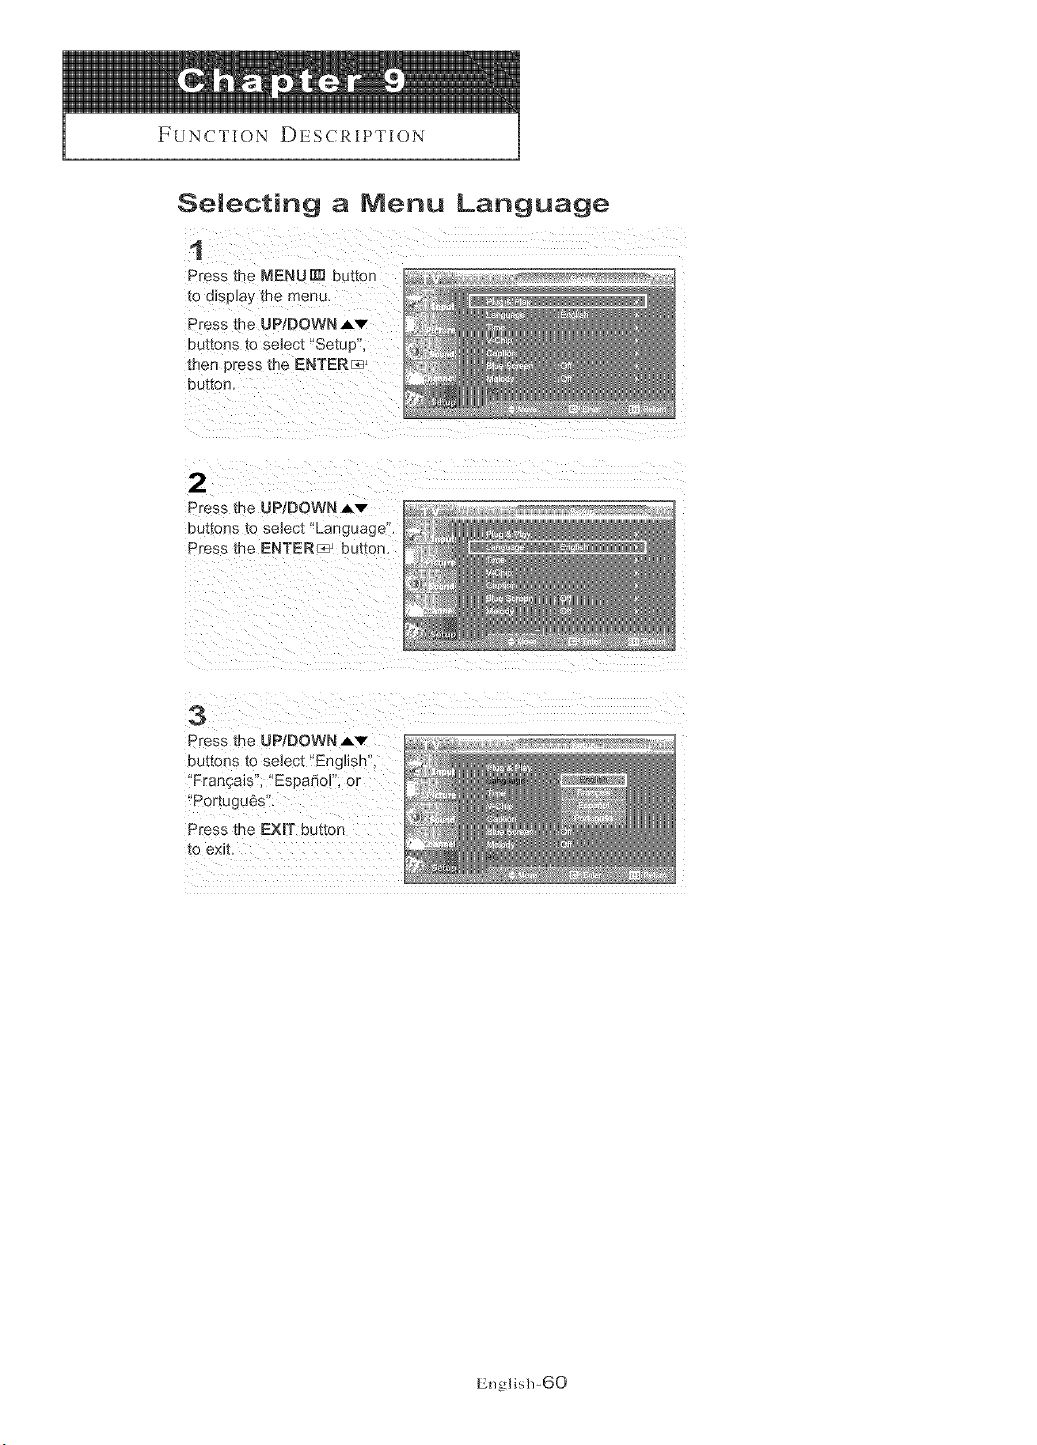
1
Press the MENUR_ button
to d_sp_ay :he menu.
Press the UP/DOWN AV
Du[[ons [o selec[ "Setu 3
men press the ENTERr_
but[on.
2
Press the UP/DOWN Av
buttons [o se]ec[ 'Language".
Press the ENTER _ uu_ton.
3
Press the UP/DOWN Av
outtons to select "English",
'Fran_:ais", "EspadoF. or
PortuguSs".
Press the EXmTbutton
to exit.
English-60
FUNCTION DESCRIPTION
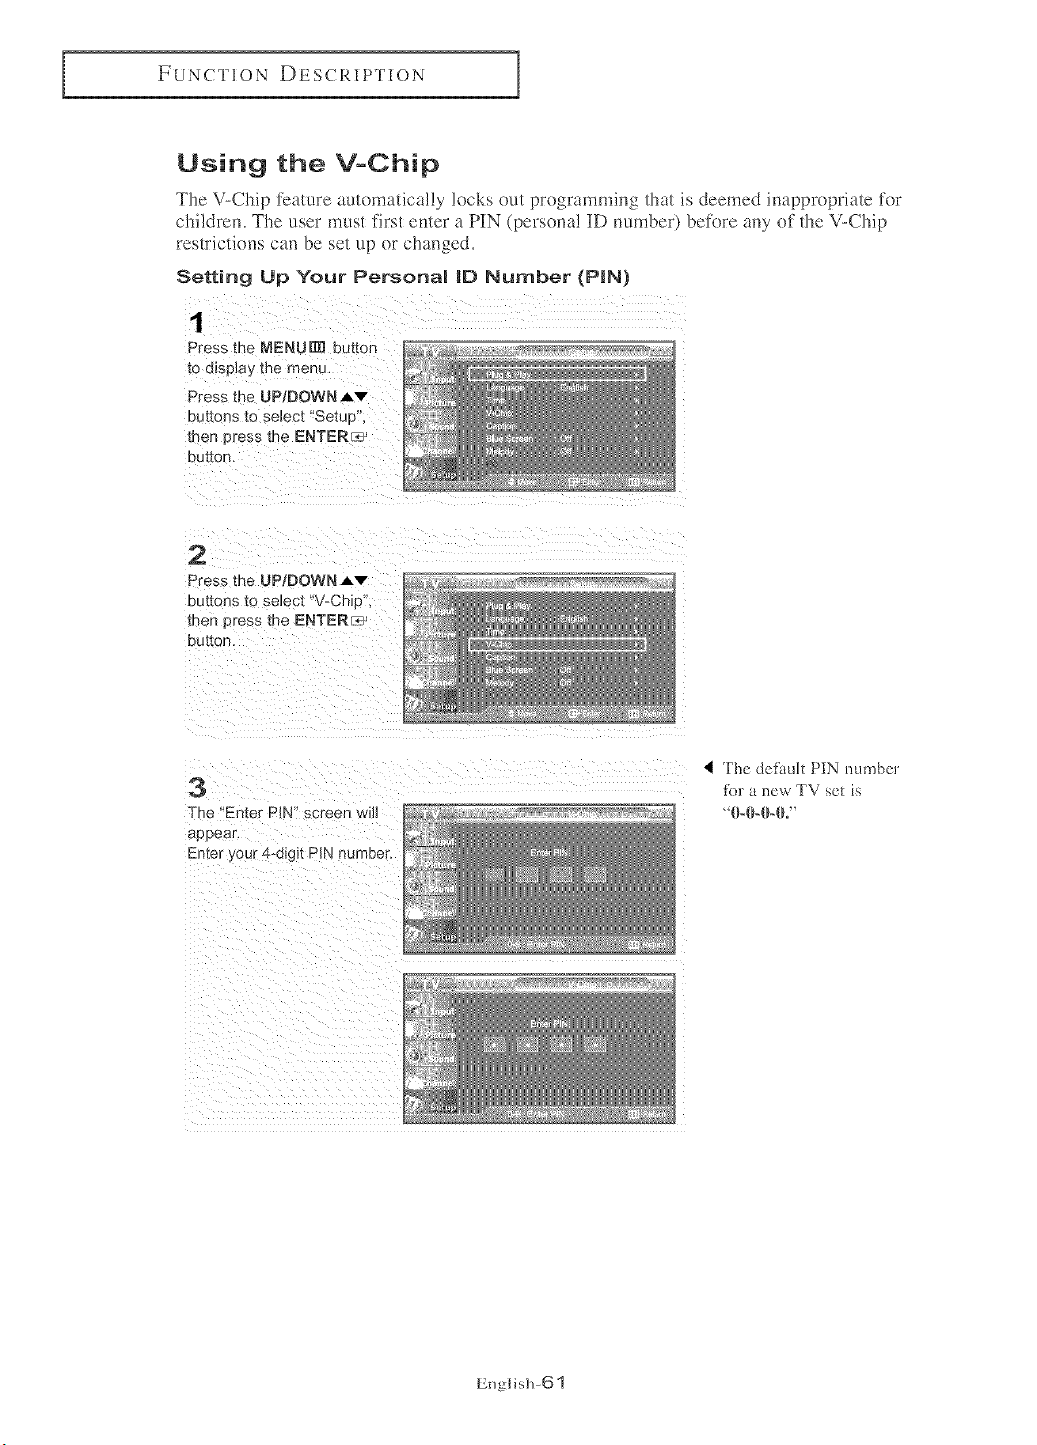
Using the V-Chip
The V-Chip feature automatically locks out programming that is deemed imq)propriate ti)r
children, The user must first enter a PIN (persona! ID number) before any of the V-Chip
restrictions can be set up or changed,
Setting Up Your Personam |D Number (P|N)
1
Press the NENUIIll button
to displa,€ the menu.
Press t! _eUP/DOWNAv
but191}8 _0 selec[ "Setuu
men press [re ENTER_
DU[[OrL
2
Press the UP/DOWN Av
buttons t( seJec[ "V_Ohie ".
men press _r e ENTER_
button,
3
The "Enter PIN" screen will
appear.
Enter your 4-digit PIN number.
I The defimlt PiN number
for a new TV set is
' 0-04ML"
English-61
FUNCTION DESCRIPTION
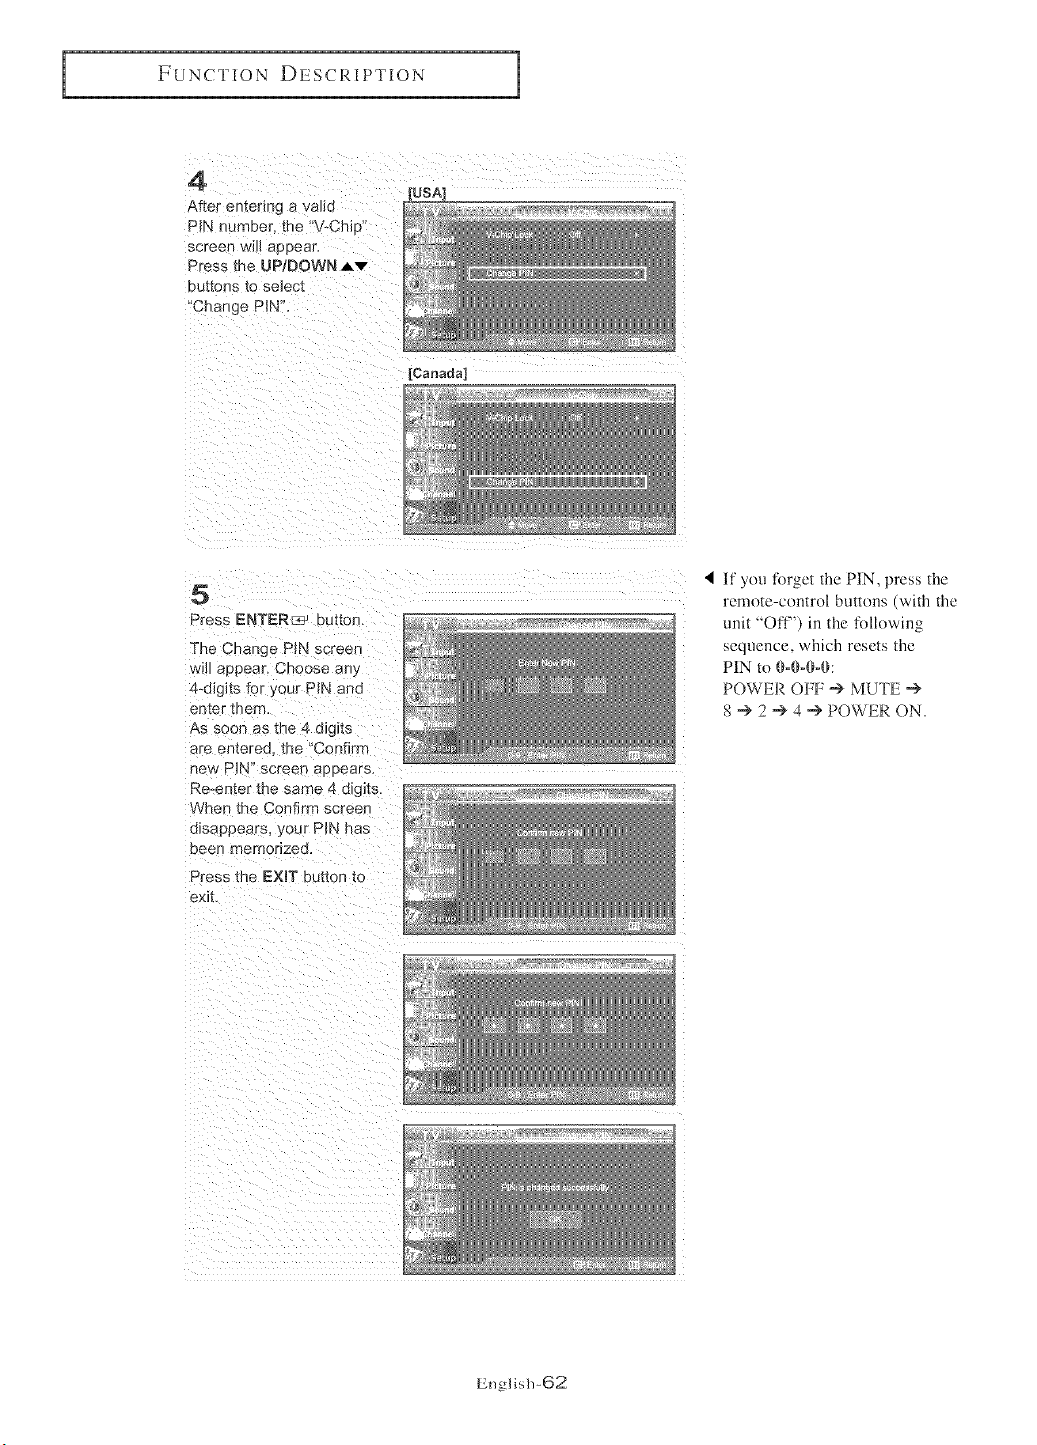
4
After entenng a vahd
PIN numeer, me 'V-Chi_c
screen wHI aeeear
Press the UP, DOWN A'_"
DU_OnS [O se_ec_
"Change PIN".
[USA]
[Canada]
5
Press ENTER_ button.
The Change PIN screen
will appear. Choose at.,
4-d_g_tslot your PIN and
enter roam
As soon as the 4 digits
are entered, the "Confirm
new P_N' _creen aeeears.
Re-enmr -me same 4 d g_ts
Nhen the Confirm screer
disappears your PiN has
eeen memorized.
Press the EXiT button to
exit
If you forget the PIN, press the
remote-control buttons (with the
unit "Off") in the following
sequence, which resets the
PIN to 0-04Mk
POWER OFF -'> MUTE "+
8 -> 2 -'> 4 --> POWER ON.
English-62
FUNCTIONDESCRIPTION
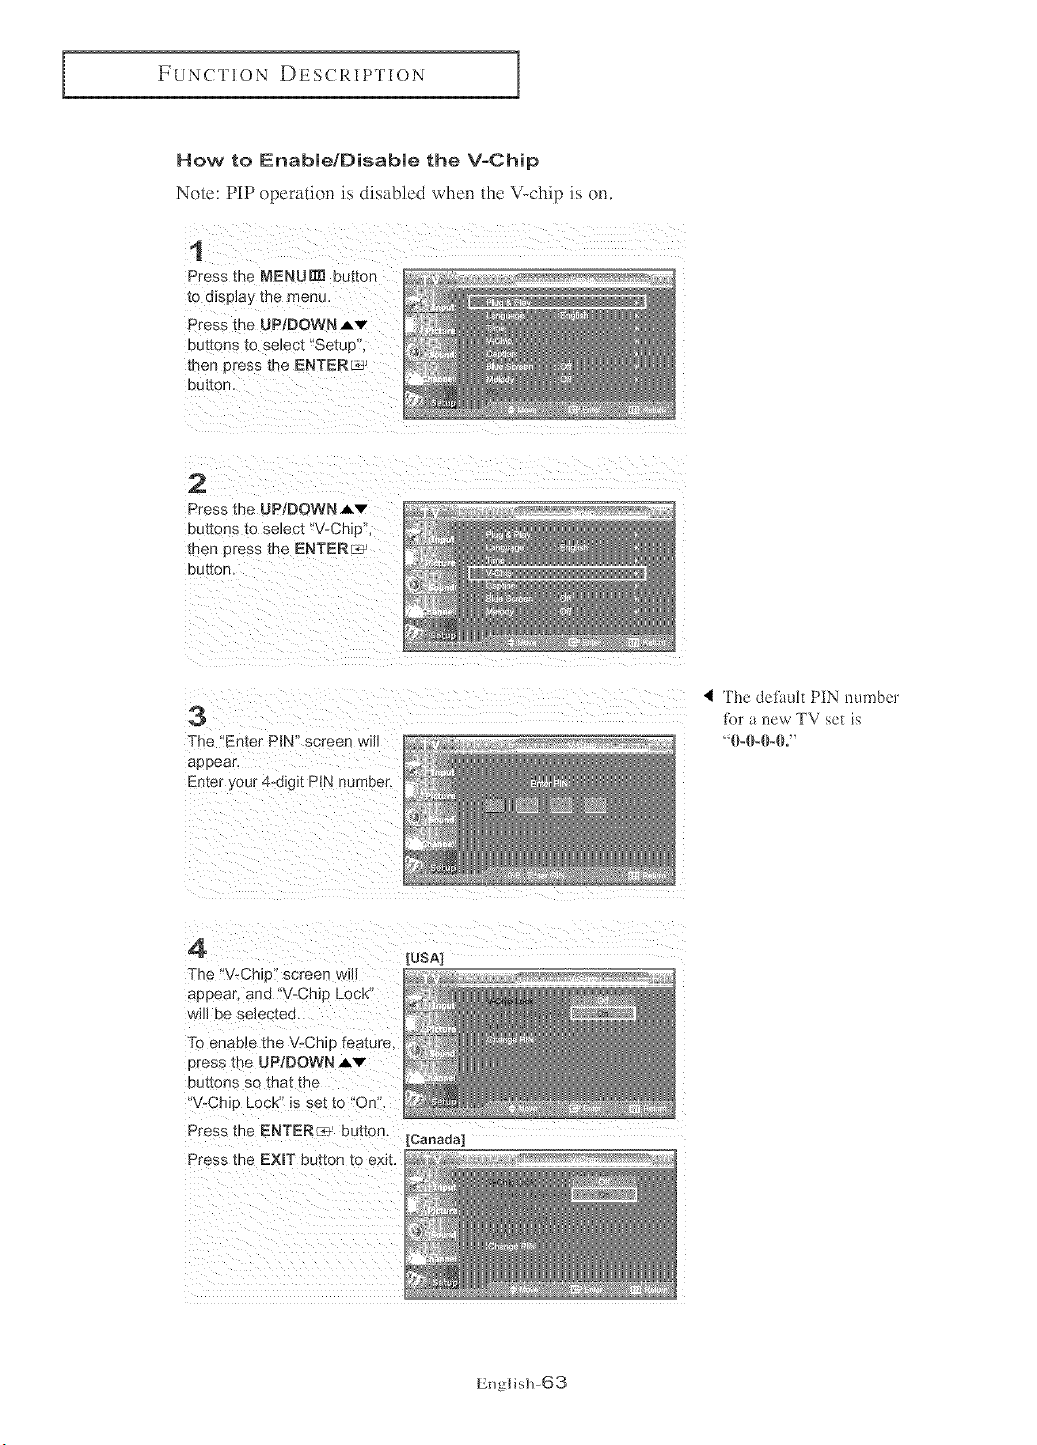
How to Enabie/Disabie the V-Chip
Note: PiP operation is disabled when the V-chip is (m.
1
Press the MENU_ button
to dispJay the menL.
Press the UPtDOWN ,_.v
buttons [o select "Setup,
men Dress the ENTERL*J
button.
2
Press the UP/DOWN,&v
buttons to select "V-Chip"
[Den Dress the ENTER_
button.
3
The "Enter PIN" screer will
BE 9ear,
Enter your 4-digit PtN number.
4 The defimk PiN number
tbr a new TV set is
"0-0-0-0."
4
"[he "V-Chip screen will
aeeear, and "V-Chip Lock
will be se_ec[ed.
To enae_e the V-Chip feature.
Dress the UP/DOWN Av
Du_mns so that ne
"V-Chip Lock" is set to "On.
Press the ENTER _ button
Press the EXIT button to exit.
[USA]
[Canada]
English-63
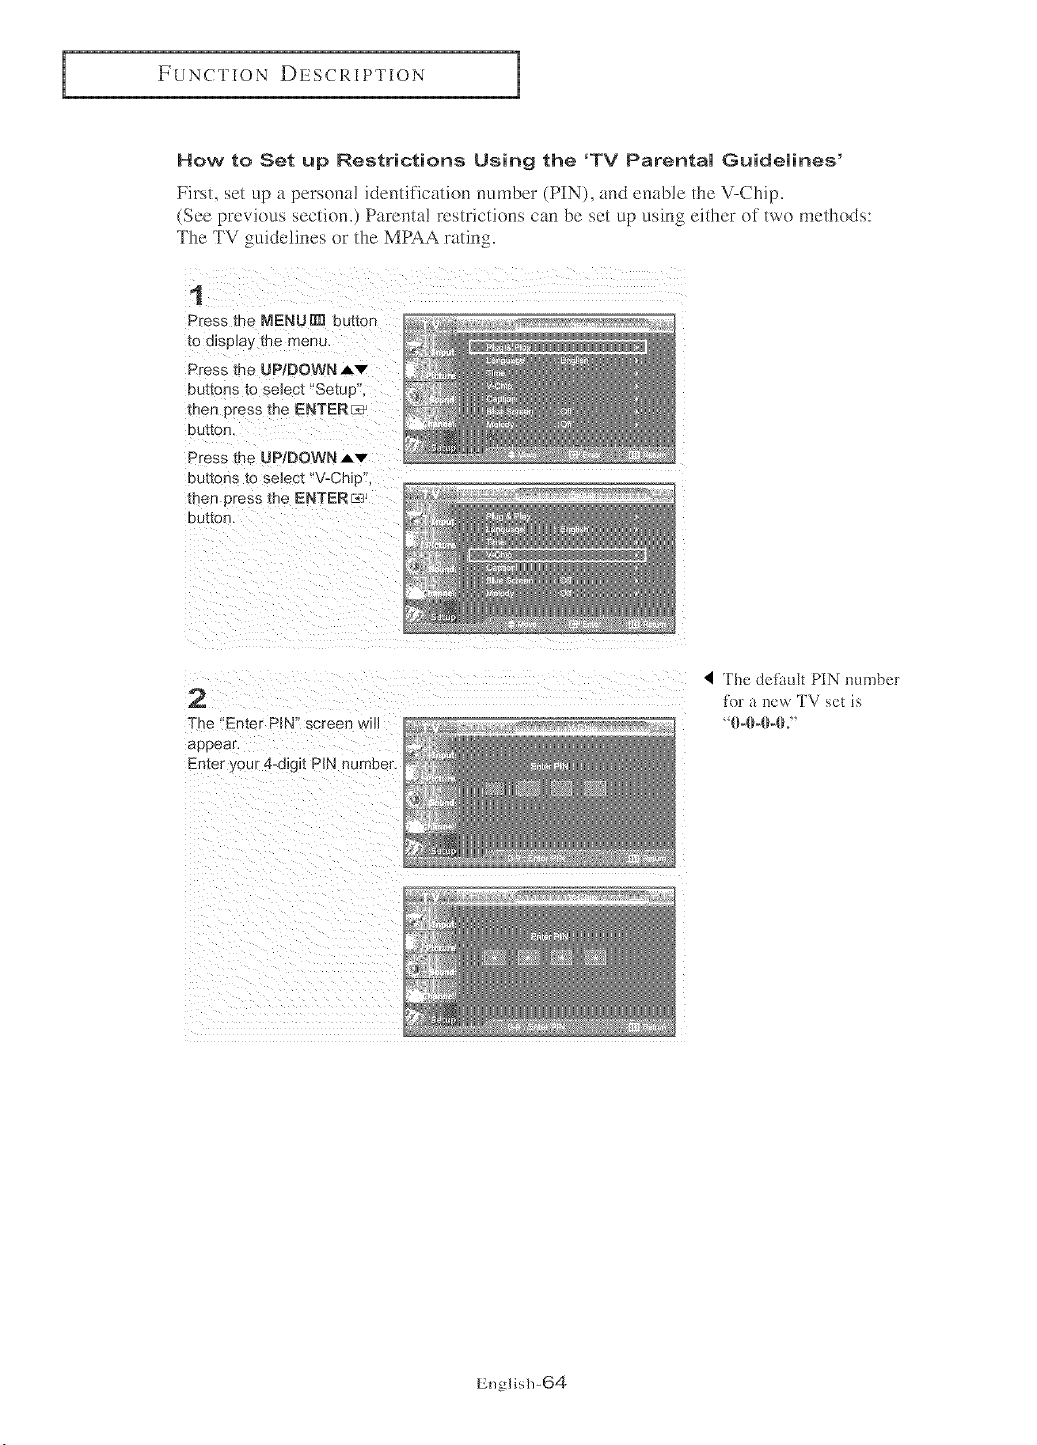
FUNCTION DESCRIPTION
How to Set up Restrictions Using the 'TV Parentam Guidemines'
First, set up a persona! identification number (PIN), and em_ble the V-Chip.
(See previous section.) Parental restrictions can be set up using either of two methods:
The TV guidelines or the MPAA rating
1
Press the MENUR_ Du[ton
to display the menu,
Press me UP/DOWN,_v
Du[[ons to seJect "Setu 3
men 3tess me ENTER!_
button.
Press th_ UP/DOWN Av
DUF[ons K) select "V-Chip"
men ")tess me ENTER_.]
button.
2
The "En[er PIN" screen wi
appeal
Enter your 4-digit PIN number,
The defimk PIN mm_ber
for a new TV set is
"0°0°0°0°"
English-64
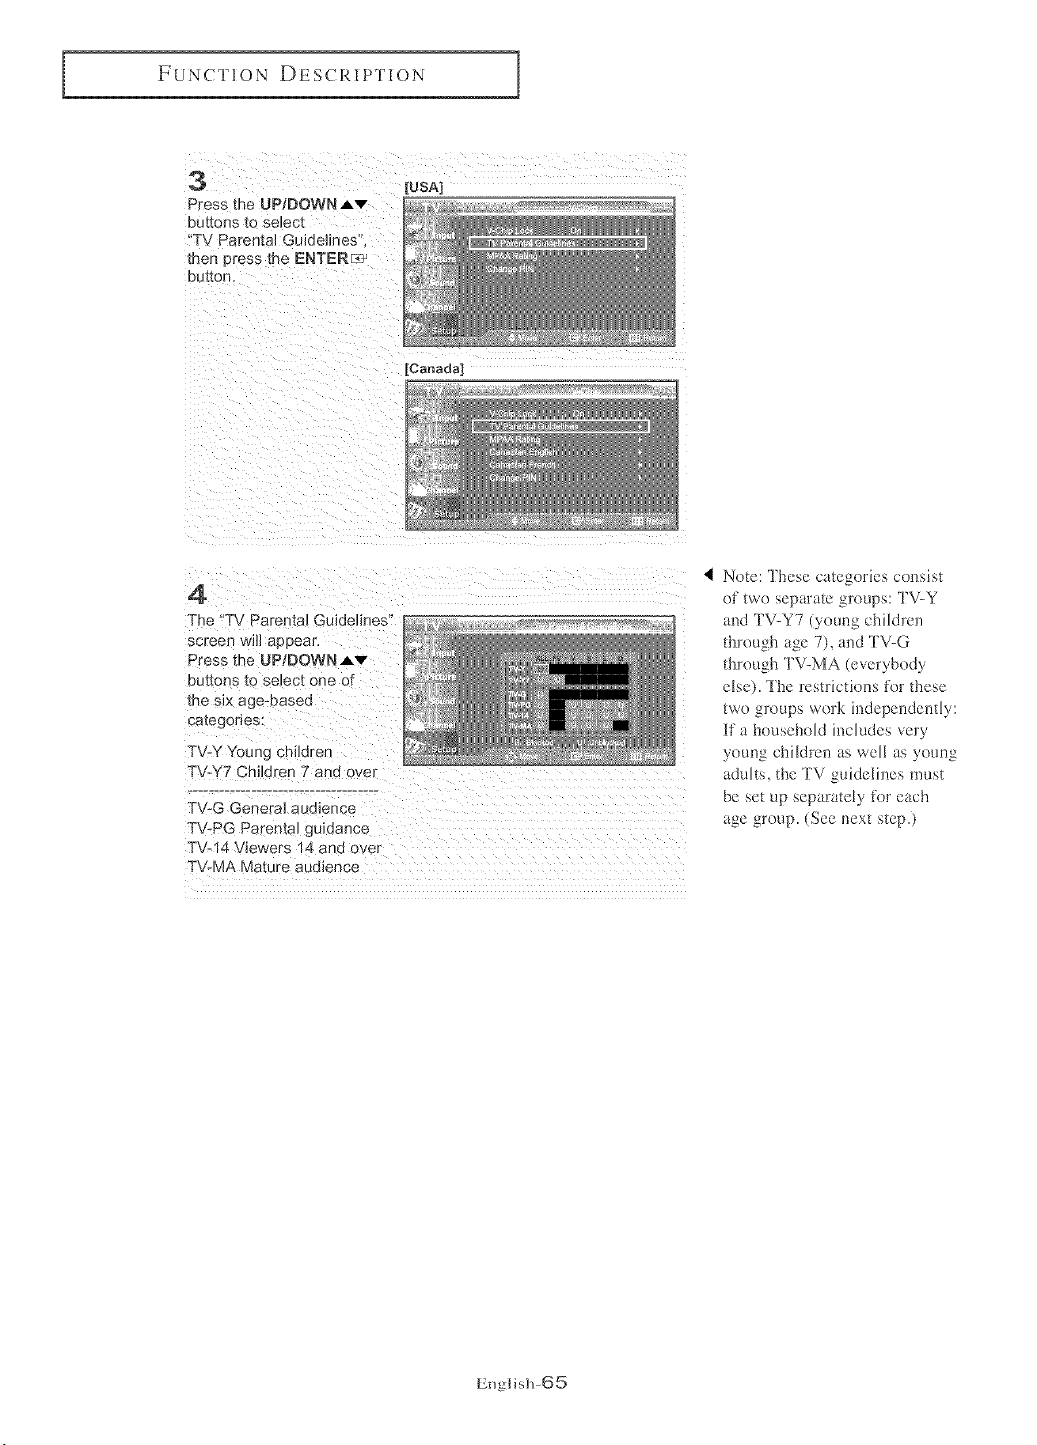
FUNCTION DESCRIPTION
3 [USAI
Press the UP/DOWNAv _;_
DUKOOS tO select _' _÷
'TV Parental Guidelines' _ _÷
men oress me ENTERra': _ _,._
eUtt0n,
[Canada]
4
Th_ T\/ Parental Guidelines
screen will appear
Press the UP/DOWNJ,v
buttons _o select one of
the six age-easee
ca[egones:
TV-Y Youn{ children
TV&'7 Children 7 and over
TV-G Genera_audience
TV-PG ParemaJguidance
T\/-14 Viewers 14 and over
TV-MA Mature audience
Nete: These categories consist
of twe separate groups: TV-Y
and TV-Y7 (young children
through age 7), and TV-G
through TV-MA (everybedy
else). The restrictiens ti)r these
two groups werk independently:
if a household includes very
young children as well as young
adults, the TV guidelines must
be set up separately for each
age greup. (See next step.)
English-65

FUNCTION DESCRIPTION
5
At this point one of the TV-Ratings is selected.
Depending on your existing setup the letter "U" or "B" will be highhghted {cnangeo to ye{_o_ _
{U = UnblocKeo B= BIockec,
When T.ne U" or "B" is h_ghhghted, press me ENTER_ button to block or unbJocK me camgary.
To select a different TV-Rating, press the UPiDOWNAv buttons ana men reeeat the orocess.
To EXIT t lls screen, press me MENURI] b Jttons
again.
Note 1: The TV-Y7 TV-PG. TV-14 and TV-M/-,, nave add_bona] out_ons.
See me next step to change any of the following sub-ratings:
FV: Fantasy Violence
D : Sexua! suggestive Dialog
L :Adult Language
S : Sexual situaboe
V : Violence
Note 2: The V-Ch_D w_]l automabcaily b_ock certain categories that are more restncbve.
For exameJe, if you block "TV-Y" catego_y, then TV-Y7 will automabca/l_ ee nlocKea.
Sir: uany, _]you block the TV-G category, teen a_ me categories m the 'young adult'
group _v_llbe blocked "['V-G TV-PG. TV-14 and I%LMA,. The sub-ratings tL). h S. V_
work together similarl'> See next secbon.
6
Ho_ to set the FM D. L. S and V sub-ratings
Firs[. select one of these TV-Ratings: TV-Y7. TV-PG. TV-14 or TV-MA _See Stee 4, on prewous page).
Next while the TV Rating _sselected, repeatedly press the LEFT or RmGHT buttons
This will cycle mrough the avalJan_e sub-ratings FML S. D or v
A h_ghhghted _ette[ U" or "B'/ will be dise_ayed for eacq suboraung. While the "U or 'B" is
highlighted, press me ENTERr_J natron to change the sub-rating.
Press the MENU R_ buttons once to save the T'_ guidelines
To seJec[ a different TV-Rating, Dress me UP/DOWN Av nuttons add teen repeat the erocess.
To exit this screen nress the MENU _ buttons once again.
Note: The V-chip will automaticaH, block certain categories that are "More restrictive.
For exame_e, if you block tee "L sub-rating _nTV-PG. then the "U' sub-rabngs in TV-14
and TV-MA will autorr _bcalJy De DlocKea.
7
Rress the EXIT button to exit.
(Or proceed to the next secben, ana sm up additional restrictions based on the MPAA codesj
English-66
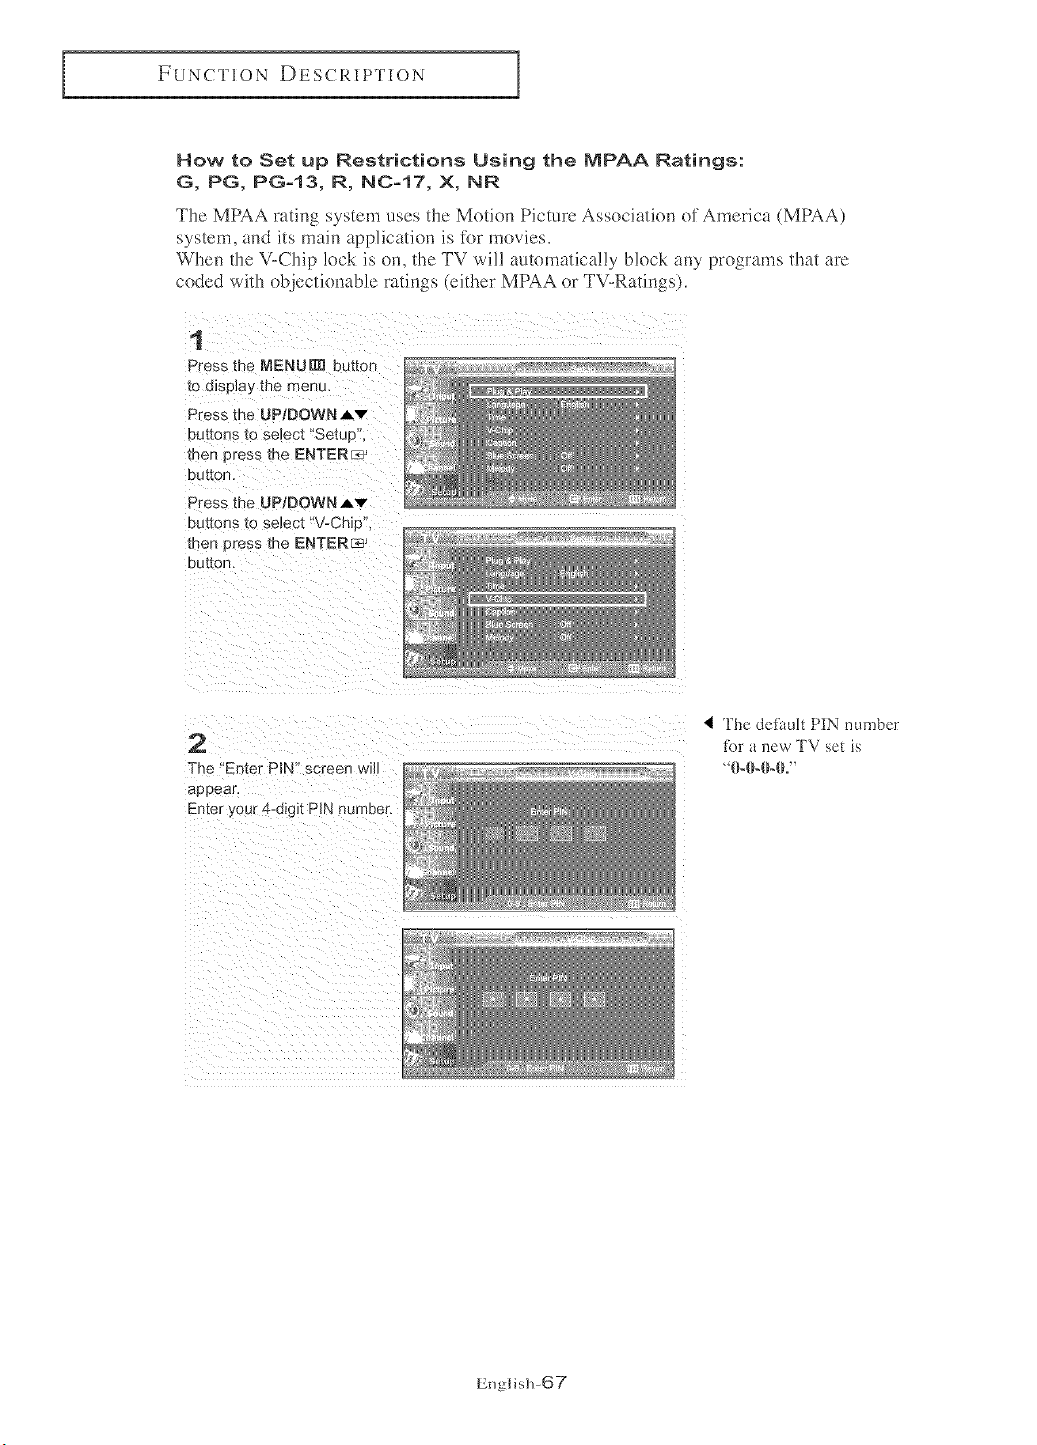
FUNCTION DESCRIPTION
How to Set up Restrictions Using the MPAA Ratings:
G, PG, PG=13, R, NC=17, X, NR
The MPAA rating system uses the Motion Picture Association of America (MPAA)
system, and its main application is tk)r movies,
When the V-Chip !ock is om the TV will automatic!lly block any programs that are
coded with objectionable ratings (either MPAA or TV-Ratings).
1
Press the MENURD button
to display the menu.
Press the UP/DOWN Av
buttons _o seJect "Set_ _p,
then Dress me ENTERc@
button.
Press the UP/DOWN A'v"
uuu )ns _o ae_ec[ "V-Chip.
men Dress me ENTER_
button.
2
The "Enter PIN" screen will
appear.
Enter your f+-digit PIN number.
< !be defimlt PIN number
_br a l_ew TV set is
_0-1)-I}-IL"
English-@7
FUNCTION DESCRIPTION
3 [USA]
Press the UPtDOWN Av
eut[oes _0 selec_ _ _
"MPAA Rating, men press _.....
the ENTERF_-Jj ba[_on. *_....
[Canada]
4
Repeatedly press me
UPIDOWN Av buttons
to select a c articular
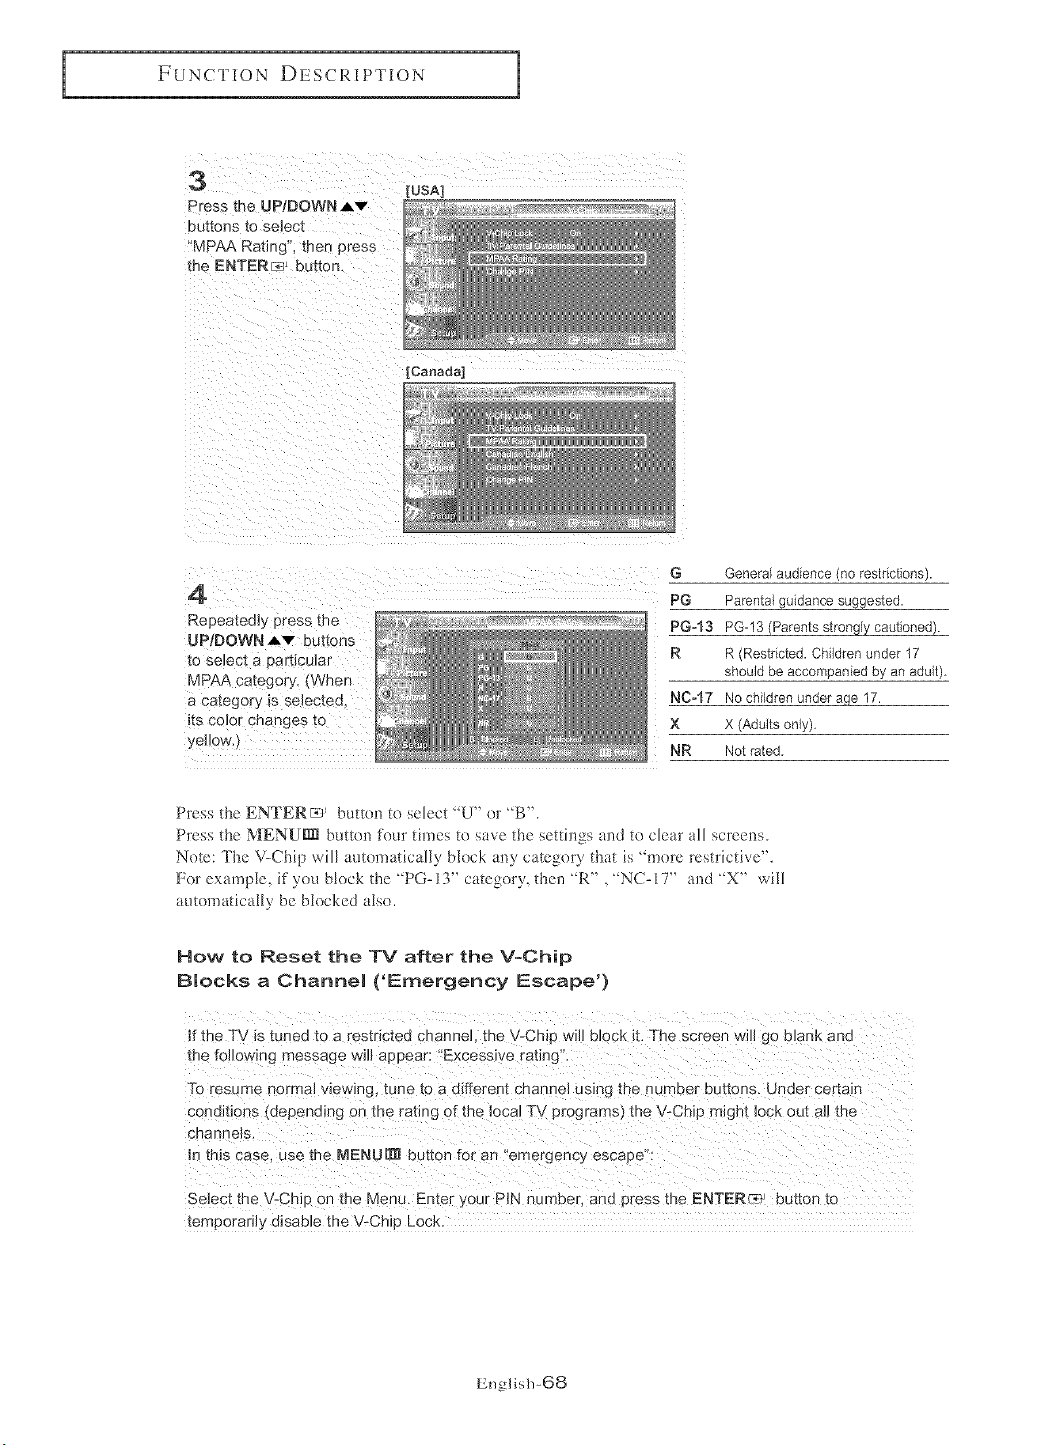
MPAA catego_ v. (When
a category _s selecteQ
_ts color changes to
veHow,_
G General audience no restnct_ons).
PG Parental gu;aance suggested
PG-13 PG-I3 Parents strongly cauuoneo).
R o Restricted. Children under 17
ShOUld De accori 3anted oy an ec_ul[
NC-17 No cn_uren unuer aqe 17.
X X (Adults only),
NR Not rated
Press the ENTER_ _ button to select "U" or "B".
Press the MENUrm button i%ur times te save the setti]_gs and te clear all screens.
Note: The V-Chip will autematically block any category that is "more restrictive".
For example, if you block the "PG-13" category, then "R", "NC-I 7" and "X" will
automatically be blocked also.
How to Reset the TV after the V-Chip
Blocks a Channel ('Emergency Escape')
If the TV is tuned to a restricted channel, the V-Chip wil{ bl0ck it, The screen Willgo blank and
To resume normai view!ng; tune to a d!fferent chancel Using the number buttons. Under certain
conditions (depending on the rating oi:the local TV programs) the V-Chip miglht lock out a]] the
select the V-Chip on the Menu. Enter your PiN number, and press the ENTER:a} * button to
temporad]y disable the V, Chip Lock.
English-68
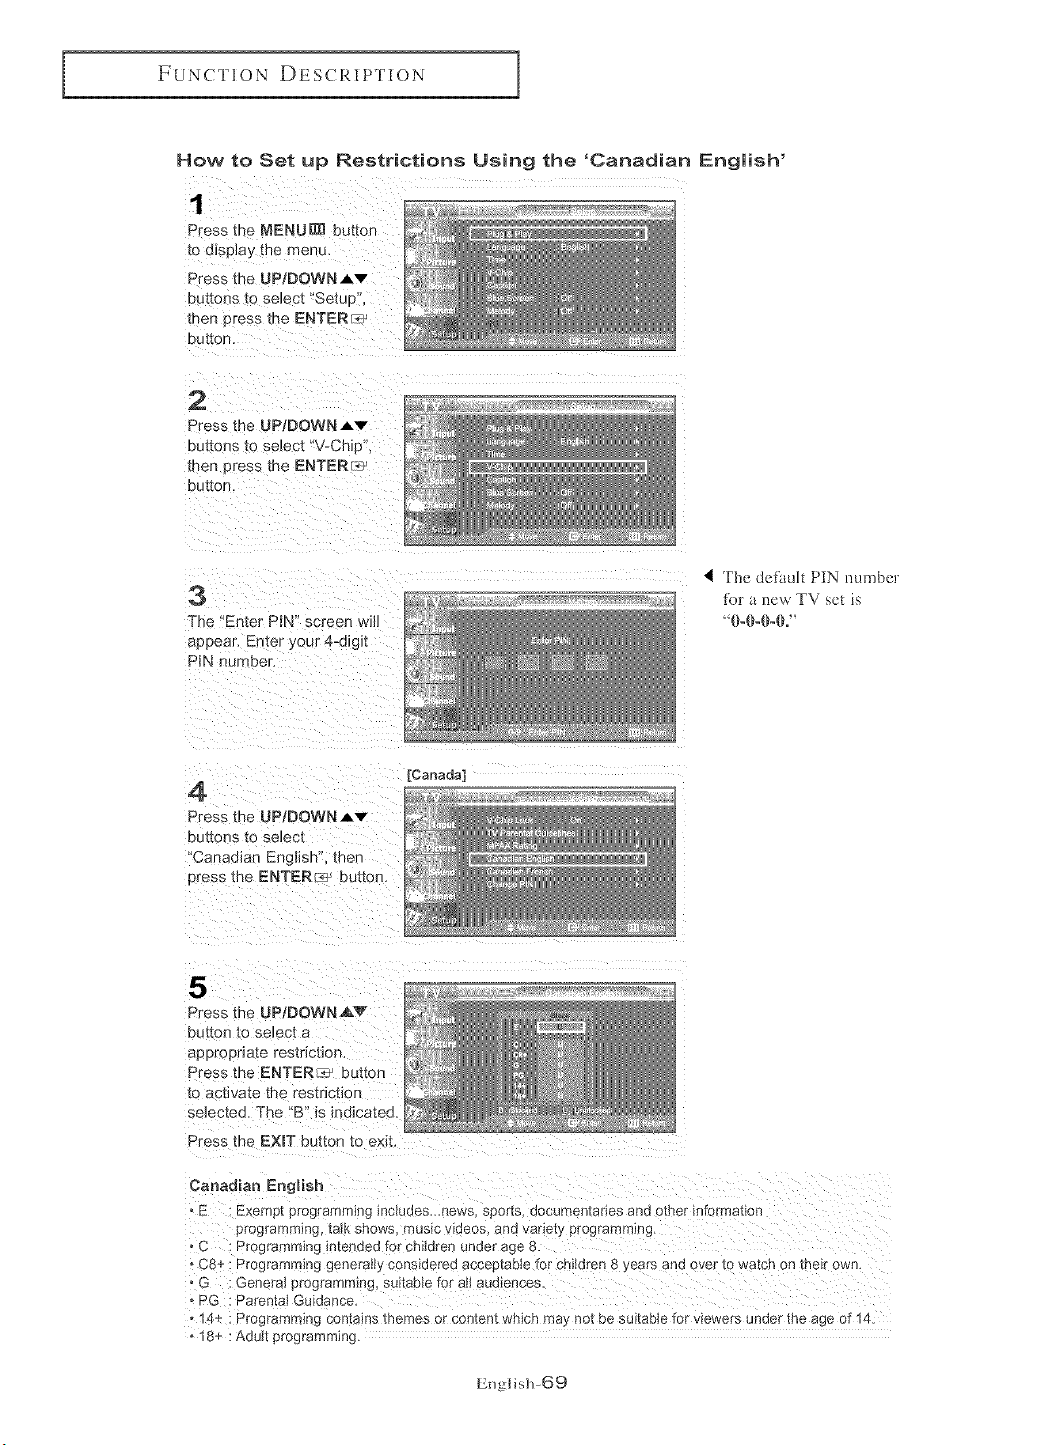
FUNCTION DESCRIPTION
How to Set up Restrictions Using the 'Canadian English'
1
Press me MENU_ button
to d_sDJay the menu,
Press the UP;DOWN Av
buttons to seJec[ "Setue
men press me ENTER_
DU[[O[1,
2
Press the UP/DOWNAv
bu_onsto select"V-Chip',
then Dress the ENTERr_'
buYeR.
The "Enter PIN" screen wi14 ........
appear. Enter your 4-digit _.......
PIN n Hnber. _'_ *÷:
4 The dei-ituh PIN numbcr
tbr u i_cw TV sc_ _s
4
Press me UPIDOWN _v
buttons tO select
Canadian English". then
Dress the ENTER _--_ Dt_t[on.
[Canada]
5
Press the U P/DOWN _&V
button to select a
appropriate restriction
Press the ENTER ::_ button
to a sfivate the restriction
selected. The "B" is indicated
Press the EXIT button to exit,
Canadian English
• E Exempt programm]nci inciuraes__news sfJor[s, eocumentades and othe_ information
proqfamming La_ snows music wueos, ano variety programming.
• C : Programming inter Jed for children unaer acie 8
- C8+ : Programming generally considered acceptable for children 8 years and over to watch OR [ne_r own.
• G : General programmeR#, sunable fer aH audiences.
- PG Parental G[ lance.
14+ : Programm{n¢l contains memes or content which ma not be suitable for viewers under the age of 14.
- 18+ : Adu_ pro.qfammmq.
English-69
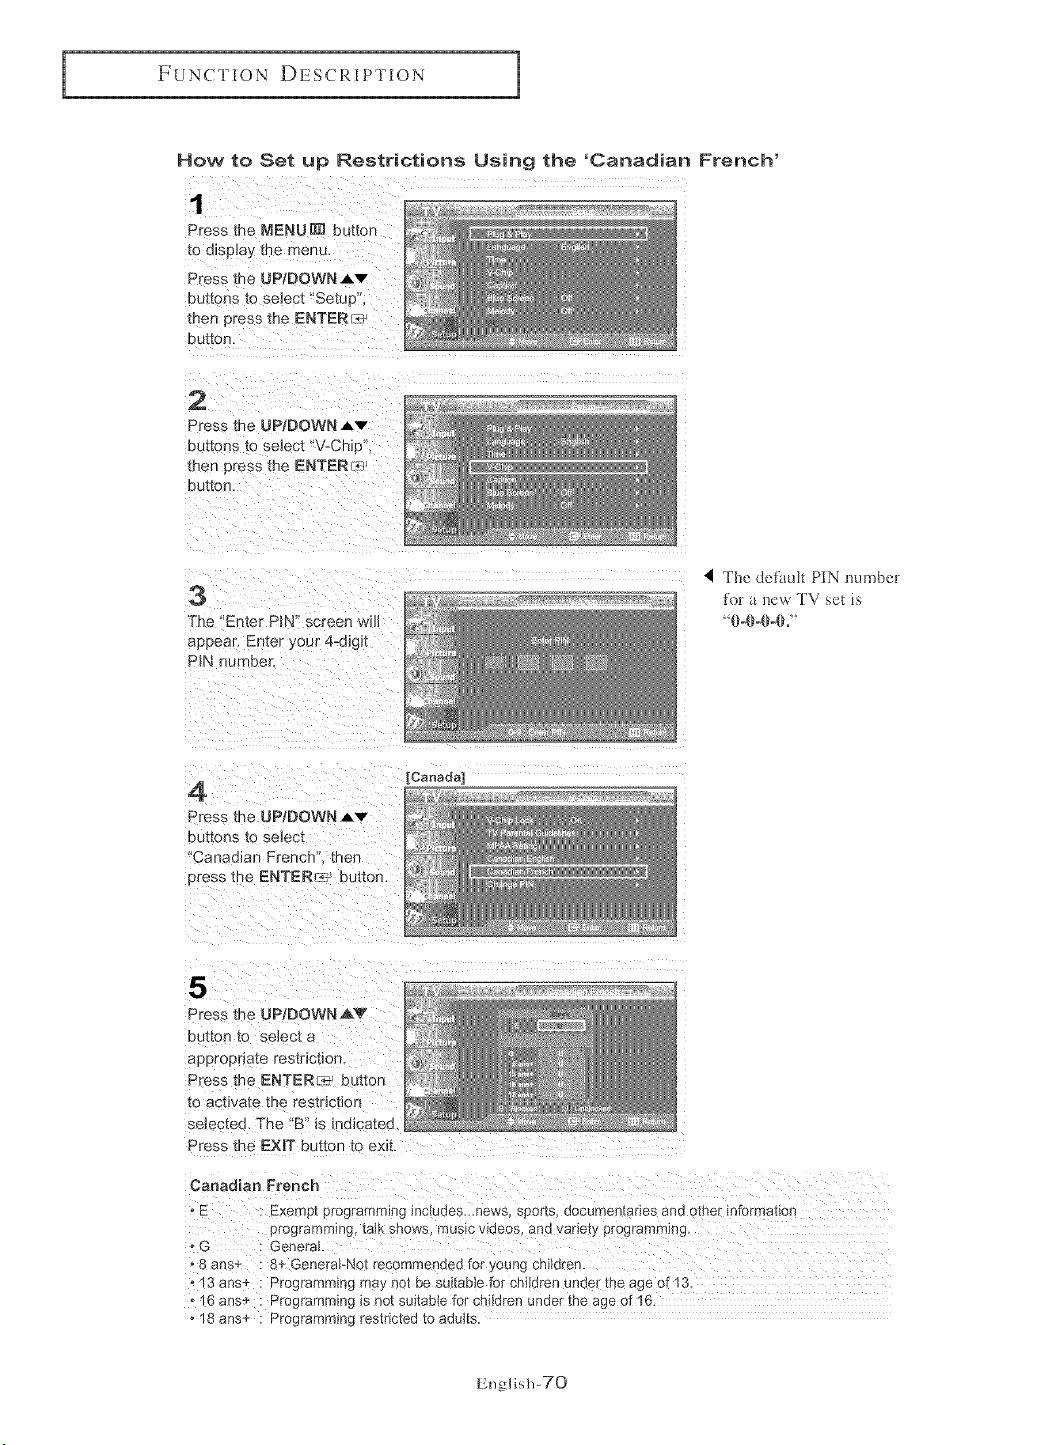
FUNCTION DESCRIPTION
How to Set up Restrictions Using the 'Canadian French'
1
Press the MENU_ button
_o d_sp]ay tne menu,
Press me UPIDOWN Ai,v
buttons to seJect "Setup",
then press the ENTER_-_
OUr(On.
2
Press the UP/DOWN Av
buttons _o select "V-Chip",
men Dress the ENTERr_
button.
3
The 'Enter Pin" screen wdl
aeeear. Er :er your 4-digit
Pin number.
4 The defimh Pin numbeT
for a new TV sol _s
4
Press me UP/DOWN Av
buttons to select
Canadian French _ _hen
aress the ENTER_ button.
[Canada]
5
Press the UP/DOWN AV
button to se_ec_a
aepropnate restriction.
Press me ENTERic; button
_o acuvare the restnctJon
._elecmu The "B" is indicated
Press the EXIT b _tton to exit.
Canadian French
" E : Exemb[ programrrllF _ lIacJuctes,_news SOOitS. gooumen[al-ies ann other information
proc]_ammmq ta*Ksnows mus*cwaeos ana variety pro_qrammmg
oG : General
- 8 ans÷ : 8+ GeneraFNot recommended for ,/oung children.
- 13 arts+ : Programrn_nqmay not oe suitable for chik_renunaer me age ol 3
• 6 ans÷: Programming s no[ suitaole for children under the age of 16
• 8 ans+: Pro_qramminqresmc_ea[o aauns
English-70
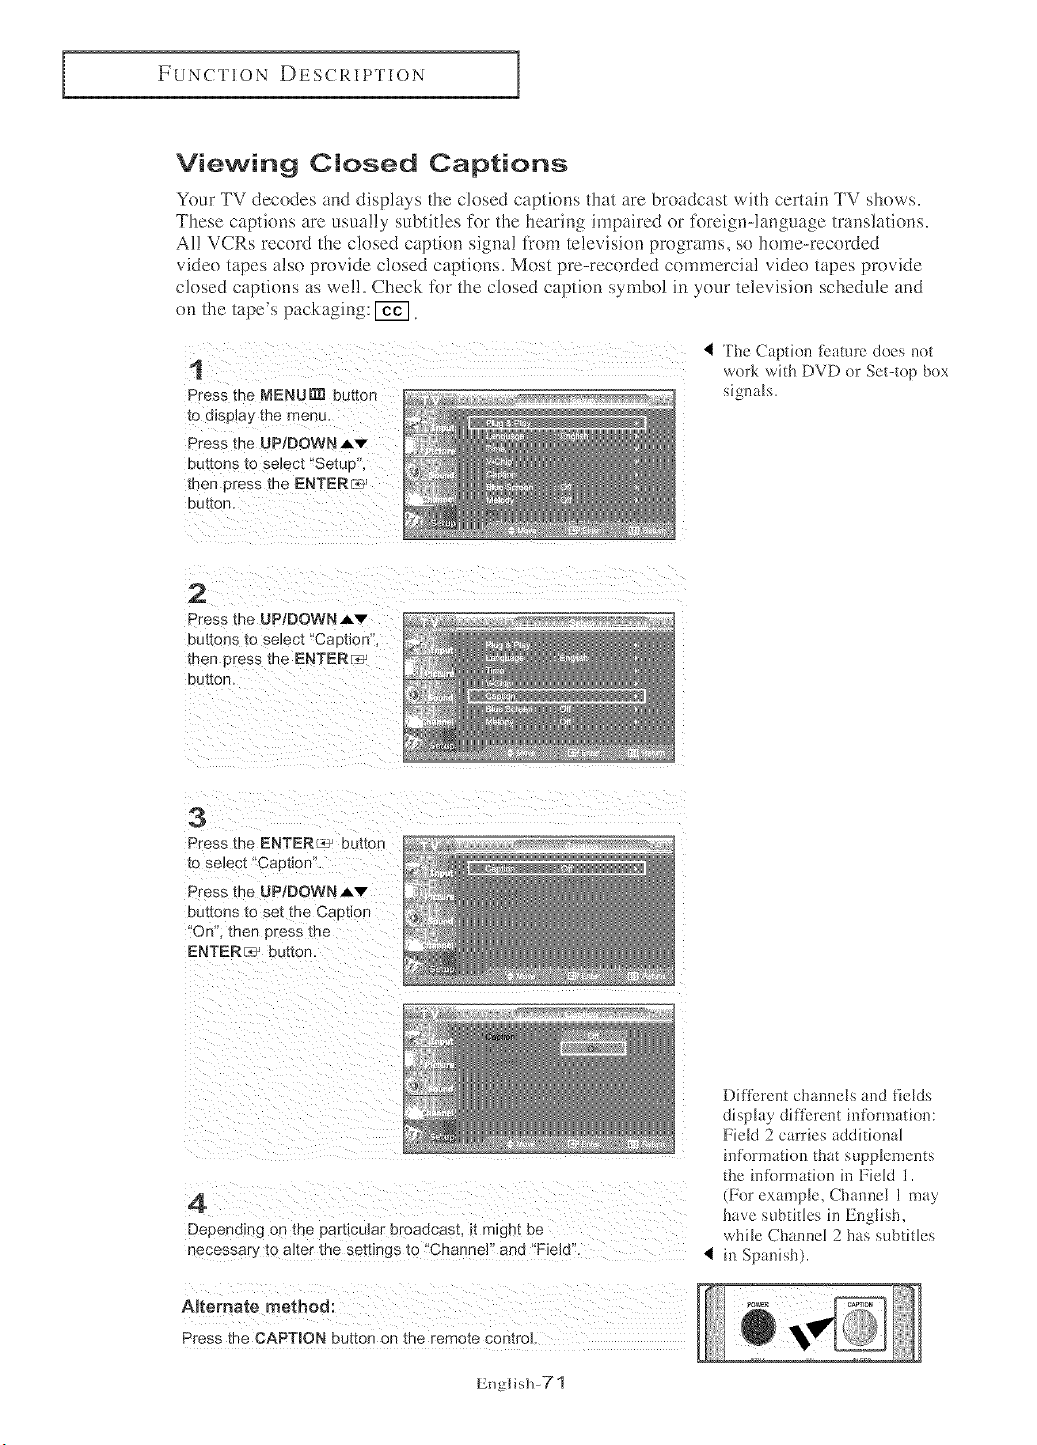
FUNCTION DESCRIPTION
Viewing Closed Captions
Your TV decodes and displays the closed captions that are broadcast with certain TV shows.
These captions are usually subtitles for the hearing impaired or tk)reign-language translations.
Al! VCRs record the closed caption signal Ii'om television programs, so home-recorded
video tapes also provide closed captions. Most pre-recorded commercial video tapes provide
closed captions as wel!. Check tk)r the closed caption symbol in your television schedule and
on the tape's packaging: [_.
1
Press the NENU_ bu[ton
to d_sp_avme menu,
Press the UP/DOWN Av
DUr[QnS [0 select "Setun
men press the ENTER_ _
button,
4 The Caption i-bature does net
work with DVD or Set-top bnx
signals.
2
Press me UP/DOWNAv
buttons ro select "CaPtion".
men press the ENTERR_
button.
3
Press the ENTER/,__ button
[o select "Caption".
Press the UP/DOWNAv
Du[[ons [o se[ me Caetiof
"On' men press me
ENTERE_ bu_mn.
4
Depending on me oart_cu_areroaecast, _tm_ghtbe
necessar, _oalter me setting _to "Channel" and 'Field",
ARemate method:
Press the CAPTION button on the remote control
Diflbrent cham_els aed fields
display different intbrmation:
Field 2 carries additional
information that supplements
the inR)rmation in Field 1.
(For example, Channel 1 may
have subtitles ill English,
while Cham_el 2 has subtitles
in Spanish).
English-71
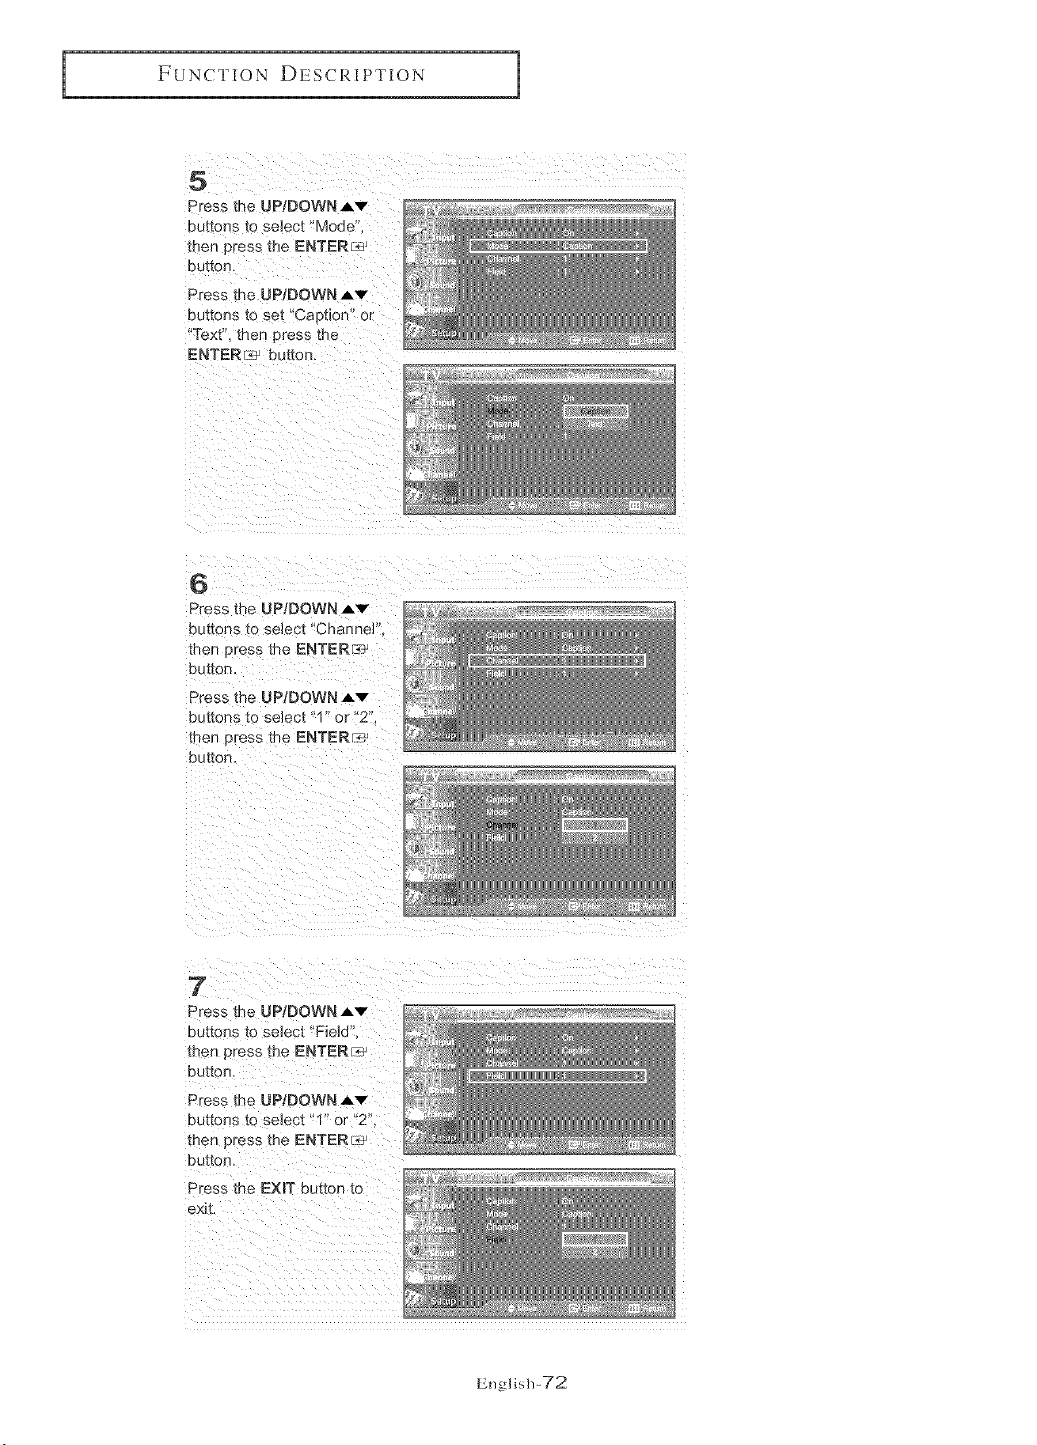
FUNCTION DESCRIPTION
5
Press the UP/DOWN Av
DUt[OnS [0 select _Mode"
then Dress the ENTER_
button.
Press _he UP/DOWN Av
DU_[ODS[O set "Caption" or
'Text". men press the
ENTERI._ button.
6
Press me UPIDOWN Av
buttons to select "Channel
thee Dress me ENTER[<
DOtteD
Press [he UP/DOWN Av
buttons [o seJect "1" or "2".
me[ press [De ENTER__,j
DUt[on
7
Dress the UP/DOWN ,Av
DUt[ODS_o select "Field"
men press [De ENTERF_
button.
Press mr_ UP/DOWN Av
buttons to select "1" or "2",
then press the ENTER_
button.
Press the EXIT button to
_.xit.
English-72
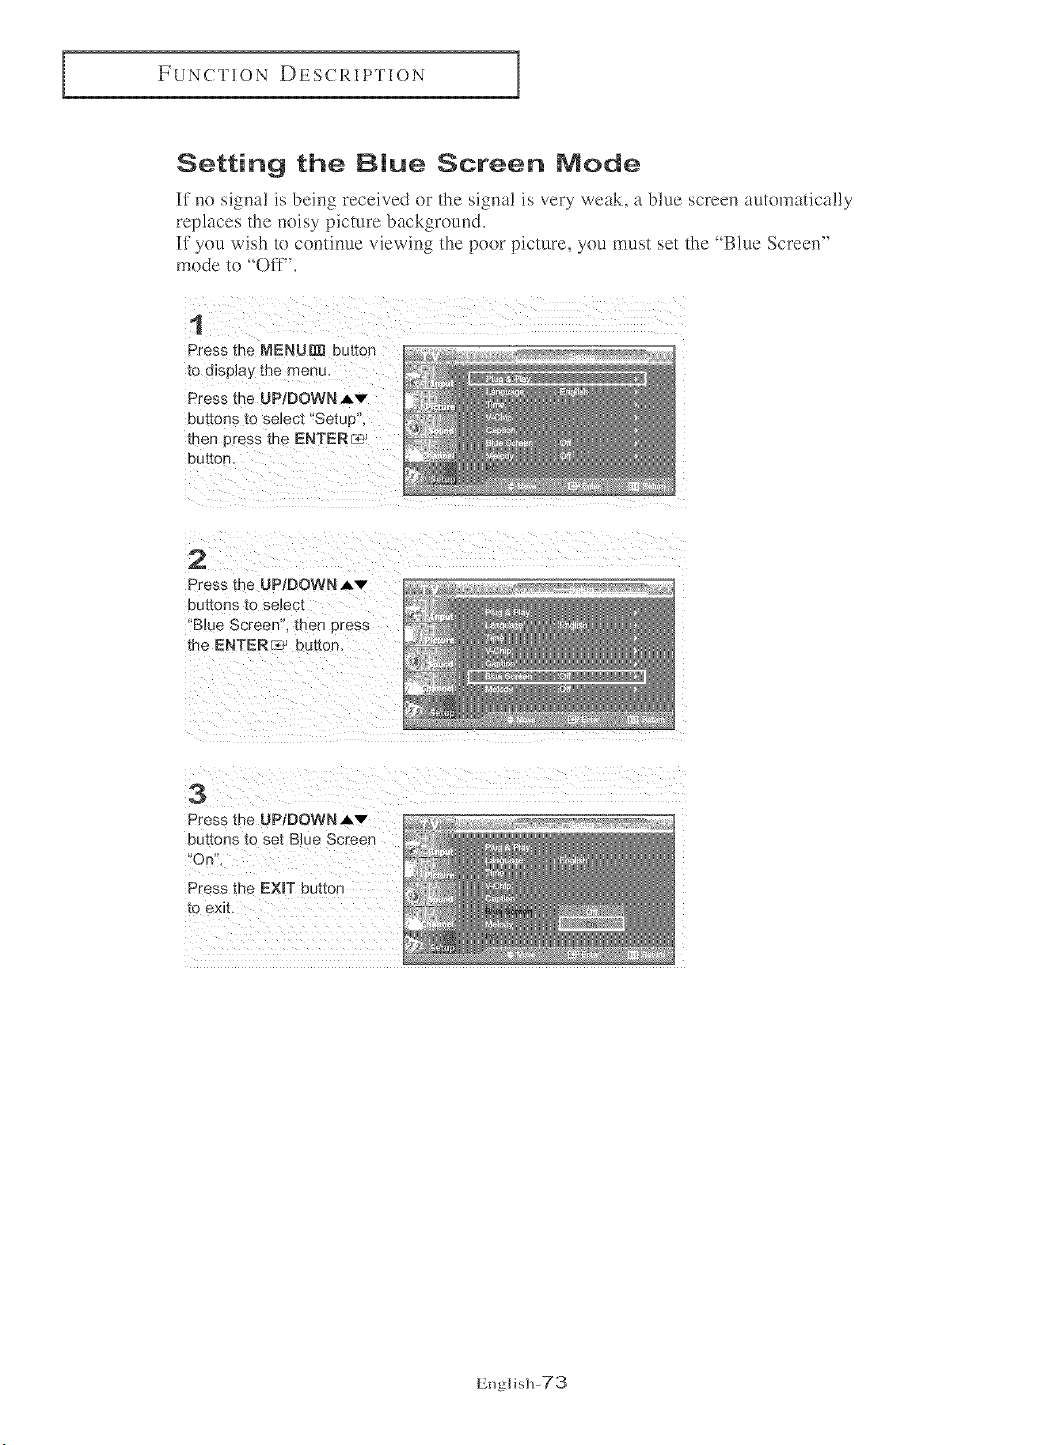
FUNCTION DESCRIPTION
Setting the Blue Screen Node
If no signa! is being received or the signa! is very weak, a blue screen automatically
replaces the noisy picture background.
If you wish to continue viewing the poor picture, you must set the _Blue Screen"
mode to 'Ofif'.
1
Press the MENUDI_buttor
to display me menu,
Press the UP]DOWN Av
buttons to select "Setup",
then _ress me ENTER_
button,
2
Press the UP/DOWNAv
euttons tO select
'Blue Screen. then c tess
the ENTER 7}_ buttor
3
Press the UPtDOWNJ,v
Dut[ons [o set Blue Screen
*On'
Press the EXiT buttor
[0 exit.
English-73

FUNCTION DESCRIPTION
Selecting the Melody
You can hear a melody sound when the televisi(m is powered on or off'.
1
Press the NENU[m button
to d_spJay me menu
Press me UP/DOWN J,'v"
buttons [o se_ec[ "Setup,
men 3ress the ENTERL_
button.
2
Press the UP/DOWN Av
buttons to se_ec[ "Meloay
men cress the ENTERr_
button,
3
Press the UP/DOWN A'v"
buttons [o select "On
Press the EXIT bu[[on
to exit.
English-74
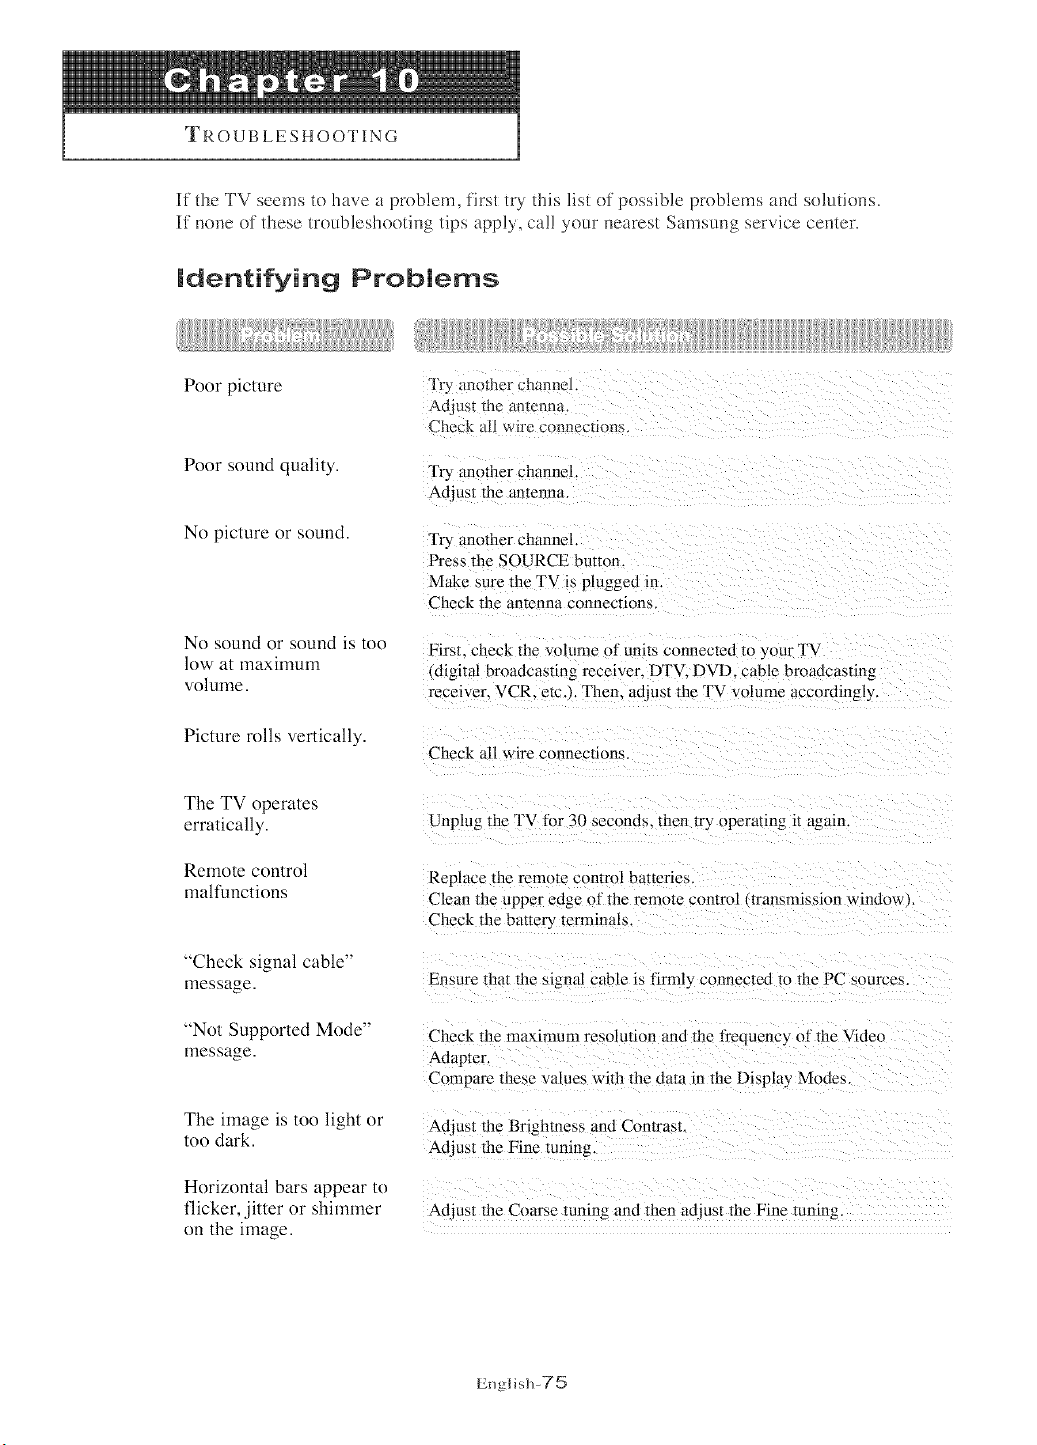
TROUBLESHOOTING
If the TV seems to have a problem, first tU this list of possible problems and solutions.
If none of these troubleshooting tips apply, cal! your nearest Samsung service center.
Poor picture
Identifying Problems
Try ; nother channel
Ad us_ tile antenna
Check M1 wre connection,s.
Poor sound quality.
No picture or sound.
Try another channel.
Adjust the antenna.
Try another channel.
Press the SOURCE bumm.
Make sure the TV is plugged in.
Check the antenna connections.
No sound or sound is to()
low at maximum
volume.
First. check the w}lume of units connected to your TV
(digital broadcasting receiver. DTV. DVD. cable broadcasting
receiver. VCR. etc.}. Then. ad}ust the TV volume accordingly.
Picture rolls vertically.
Check all wire connections.
The TV operates
erratically.
Remote control
malfunctions
"Check signal cable"
message.
"Not Supported Mode"
message.
The image is too light or
too dark.
Horizontal bars appear to
flicker, jitter or shimmer
on the image.
Unplug the TV fi}r 30 seconds, then try operating it again.
Replace tile remote control "}atteries.
Cleanthe upper edge of the remote control transmission window}.
Check the battery terminals.
Ensure that the signal cable is firmly connected to tile PC sources.
Check the maxinmm resolution and the frequency of the Video
Adapter.
Compare ttlese values with the dam in the Display Modes.
Adjusl the Brighmess and Contrast.
Adjust tile Fine tuning.
Ad:iust the Coarse tuning and then acliust the Fine tuning
English-75
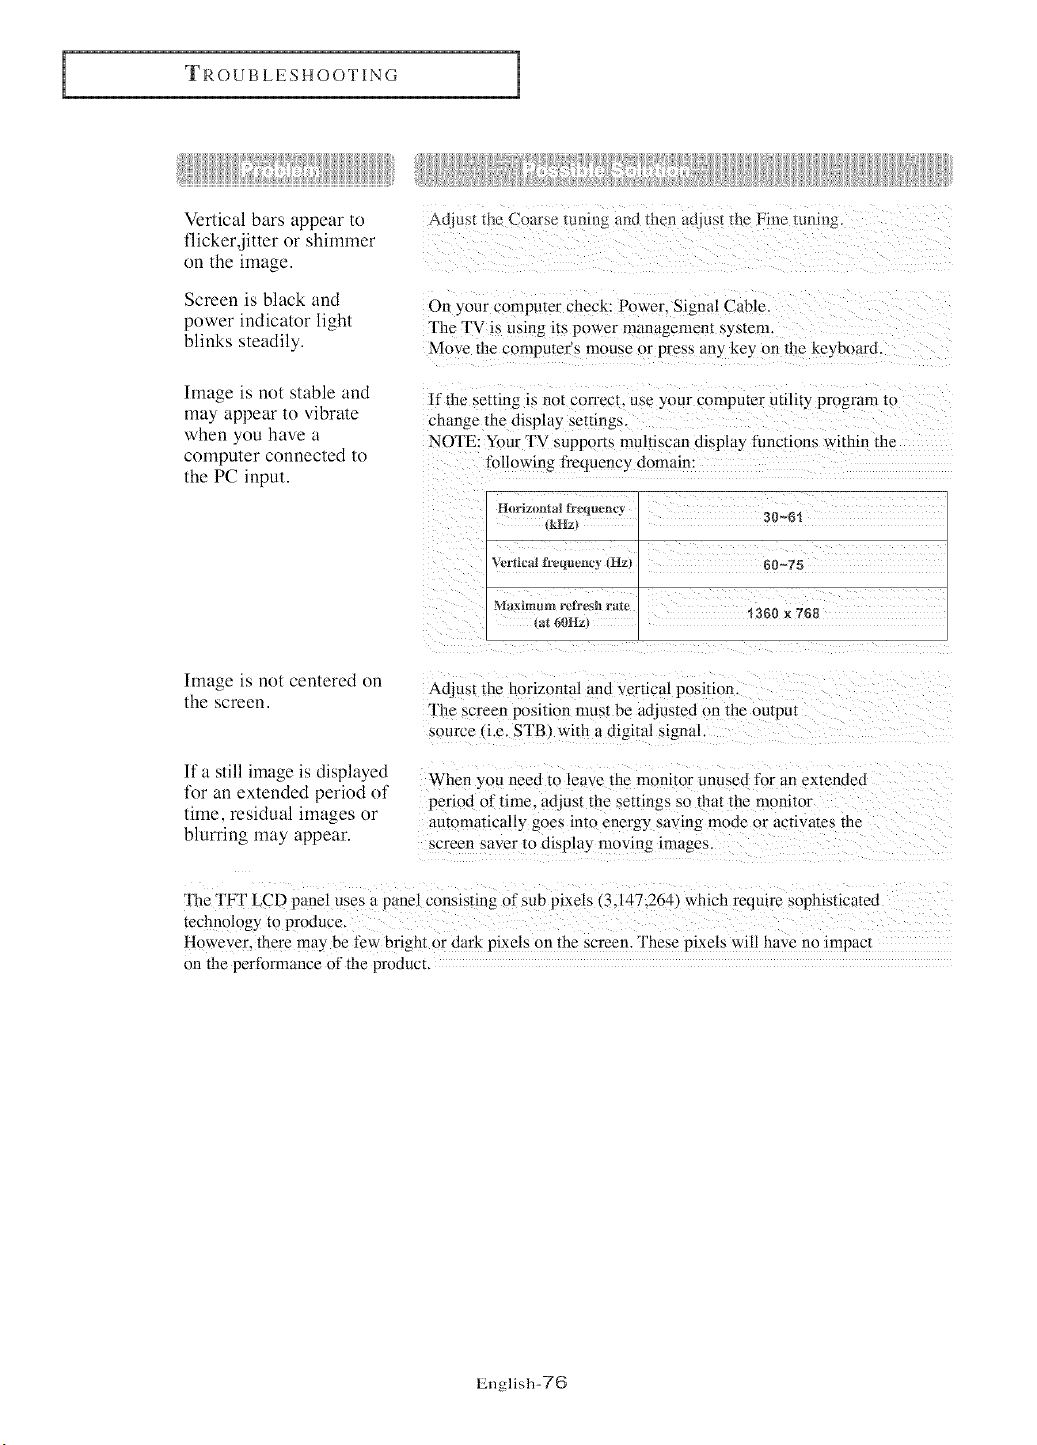
TROUBLESHOOTING
Verlical bars appear io
flickerdiuer or shimmer
on lhe image.
Screen is black and
power indicalor lighl
blinks sleadily.
Image is no_ slable and
may appear 1o vibrale
when you have a
computer connecled _o
the PC inpm.
Auras[ _iie Coarse mnmg and then adjust the Free tuning.
On your computer check: Power, Signal Cable.
The TV is using its power management system.
Move the computer's mouse or press any key on the keyboard,
If the setting is not correct, use your computer utility program m
change the display settings,
NOTE: Your TV supports nmltiscan display functions within the
fifllowing frequency domain:
(kHz_
Vcrlicai fl'equencv tllz} 60~75
tat 60Hz) '_360 x 768
hnage is nol cenlered on
the screen.
Ifa still image is displayed
h)r an exlended period of
time. residual images or
blurring may appear.
Adjust the horizontal and vertical position,
The screen position nmst be adjusted on the outpm
source _i.e. STB'_ with a digital signal.
When you need to leave tile monitor unuseo fl)r an extended
period (ff time, adjust the settings so that the monitor
automaticMly goes into energy saving mode or actiwttes the
screen saver to display moving images.
The TPT LCD panel uses a panel consisting of sub pixels (3.147.26a_ which require sophisticated
teclmology m produce.
However. there may be few bright or dark pixels on the screen. These pixels will have no impacl
on the perfimnance of the prnduct.
English-TG
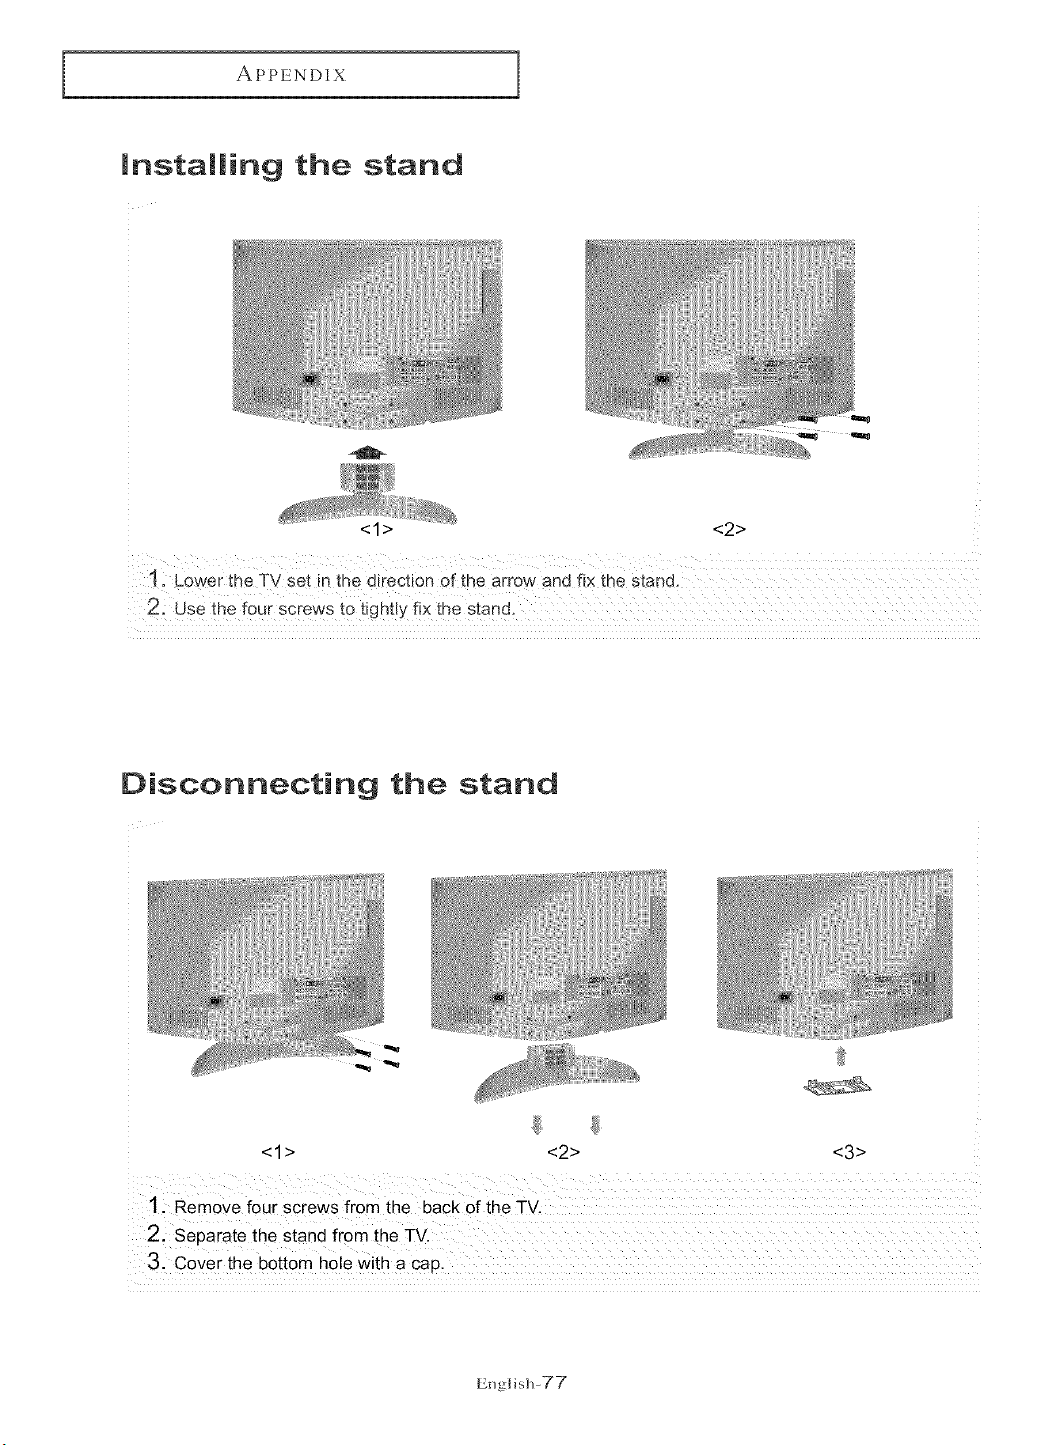
APPENDIX
Installing the stand
<1> <2>
Disconnecting the stand
<1> <2> <3>
1. Remove four screws from the back of the TV.
2. Separate the stand from the TV.
3. Cover the bottom hole with a cap,
English-77
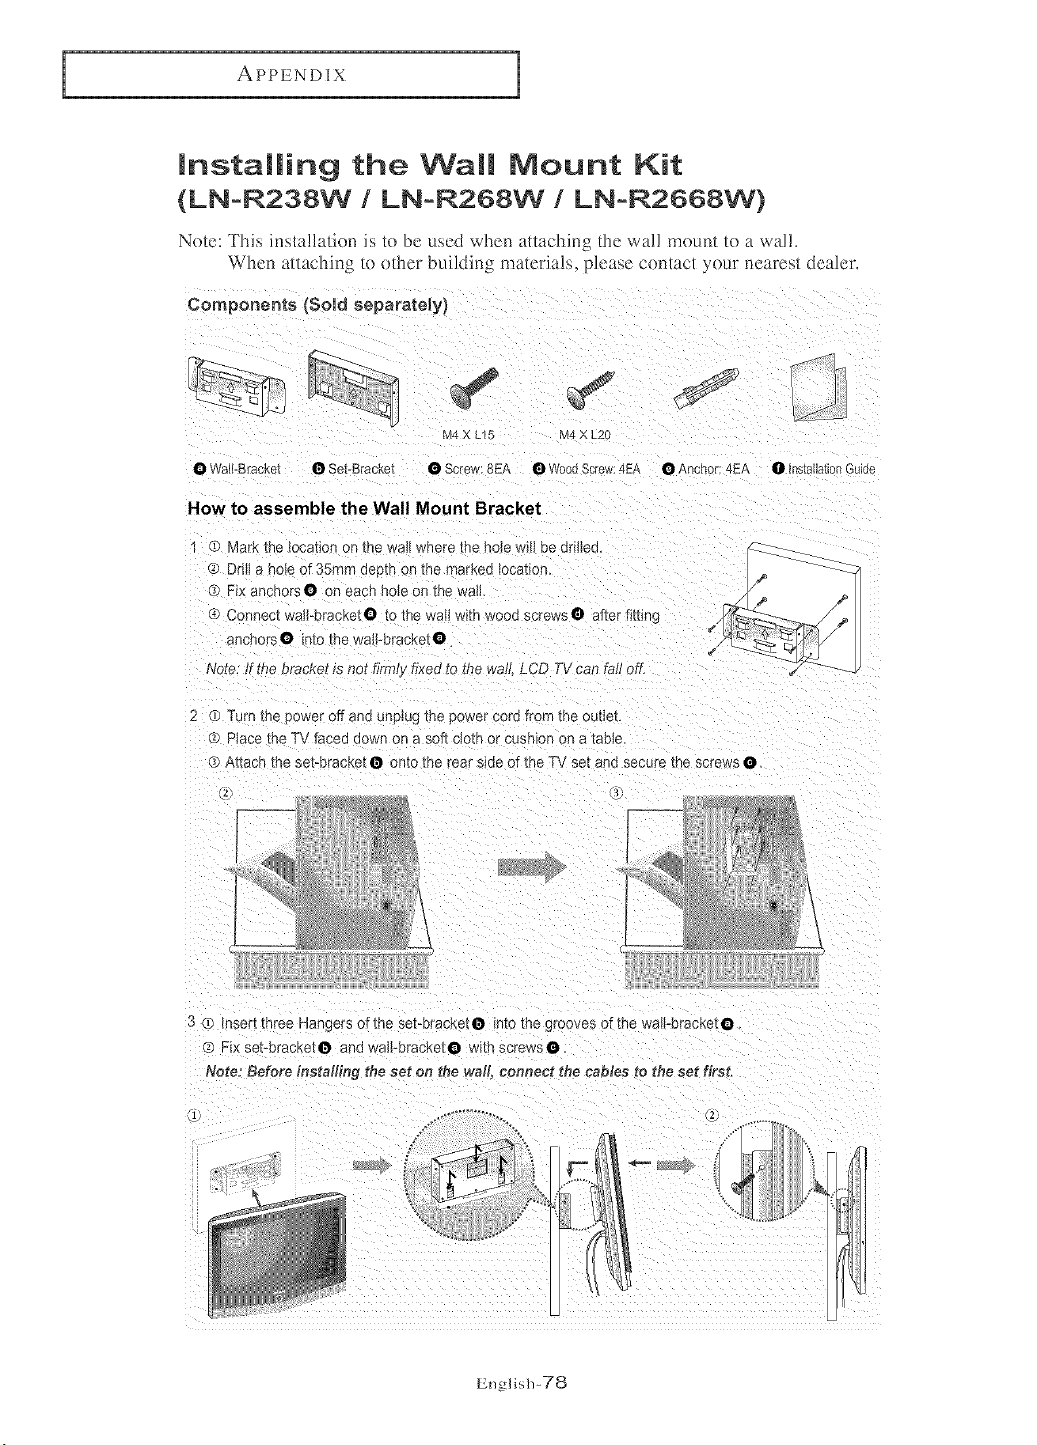
APPENDIX
mnstalling the Wall Mount Kit
(LN-R238W / LN-R268W / LN-R2668W}
Note: "]['l'fis insta!latkm is in be used when attaching the wal! mount tn a wal!.
When atlaehJn_ In other buildJn_ materials, i_lease contact yoar ncares_ dealer
Components {Said separately)
M4 X [-15 M4 X L2C
@ Wall-Bracket @ Set-Bracket • Screw:8EA @ WoodScrew:4EA
HOW to assemble the Wall Mount Bracket
1 Q Mark the _oca_anon me wall where me no_ewHIbe drHleo_
C Drill a hole of 35ram deem on me r _ae<ea[ocation_
Fix anchors@ on each hole or me wail
Connect wail_hracket@ to me wail with wood s ;rews@ alter fitting
ancnc _s@ ir E@me wail-bracket@
€'
Noze:It the bracket is not firm,_ fixed to the wall LCD TV can faJ oft:
2 (9 TLrn me cower off one unplug _nepower cord from the outleL
Uiace the TV faced down on a soft cloth or cushion _na EaDle_
(9 A_acn me se_-r_racketO onto the rear side of the TV set and secure the screws @_
@ Anchor: 4EA @ InstallationGo[de
3 (9 insert mree Mangers of the set-bracket@ into me grooves of the wa_-orac_e[@
(9 Fix set-BracKet@ ano waii_eracKe[@ wll:n sc[ews@
Note: Before Jnsta#fn 9 the set on the wall, connect the cabtes to the set fir,_t.
English-78

APPENDIX
mnstalming the Wamm Mount Kit
(LN=R328W / LN=R3228W)
Note: This installati(m is tn be lsed when attaching the wa!! mnum/n a walh
When attachini_ t{) n_her building materials, nlease cnnmc_ your nearest dealer.
Components (Sold separately)
M[ A L_'_ M4 X L25 M4 X L_
@VVall-Bracke[ @Set-Bracket @Screw:SEA OWoodSerew: @Aechor:7EA @Screw:3EA @Installation
7EP Guide
How to assemble the Wall Mount Bracket
1 ® Mark the tocation on the wail where me no_ewill be dniiea.
G Drill a nole of 35ram aeem on me marKea loca[ion
Fix anchors@ on each hole or me wa_
® Connect waJFbracketO to the wail with wood screws O after fitting
ancnorsO into the wail-bracket@
Note: ff the bracket is not firrrHyfixed to the wall LCD TV can fall off.
Turn the 3@wetoff and unplug [rs cower cord from the outlet
Place me TV faced down on a soft cloth or cushion on a ladle,
® At[ace me set-bracket@ @meme rear side of the TV sat aria secure the screws @
3 C _rse[_three Hangers of the set-orac_e[O intothegroovesofthewalFbra;ketO_
FIx sebbracKetO aria waH-oracKetO w_thscrews@
Note: Before installing the set on the wall connect the tames to the set first_
L
English-79
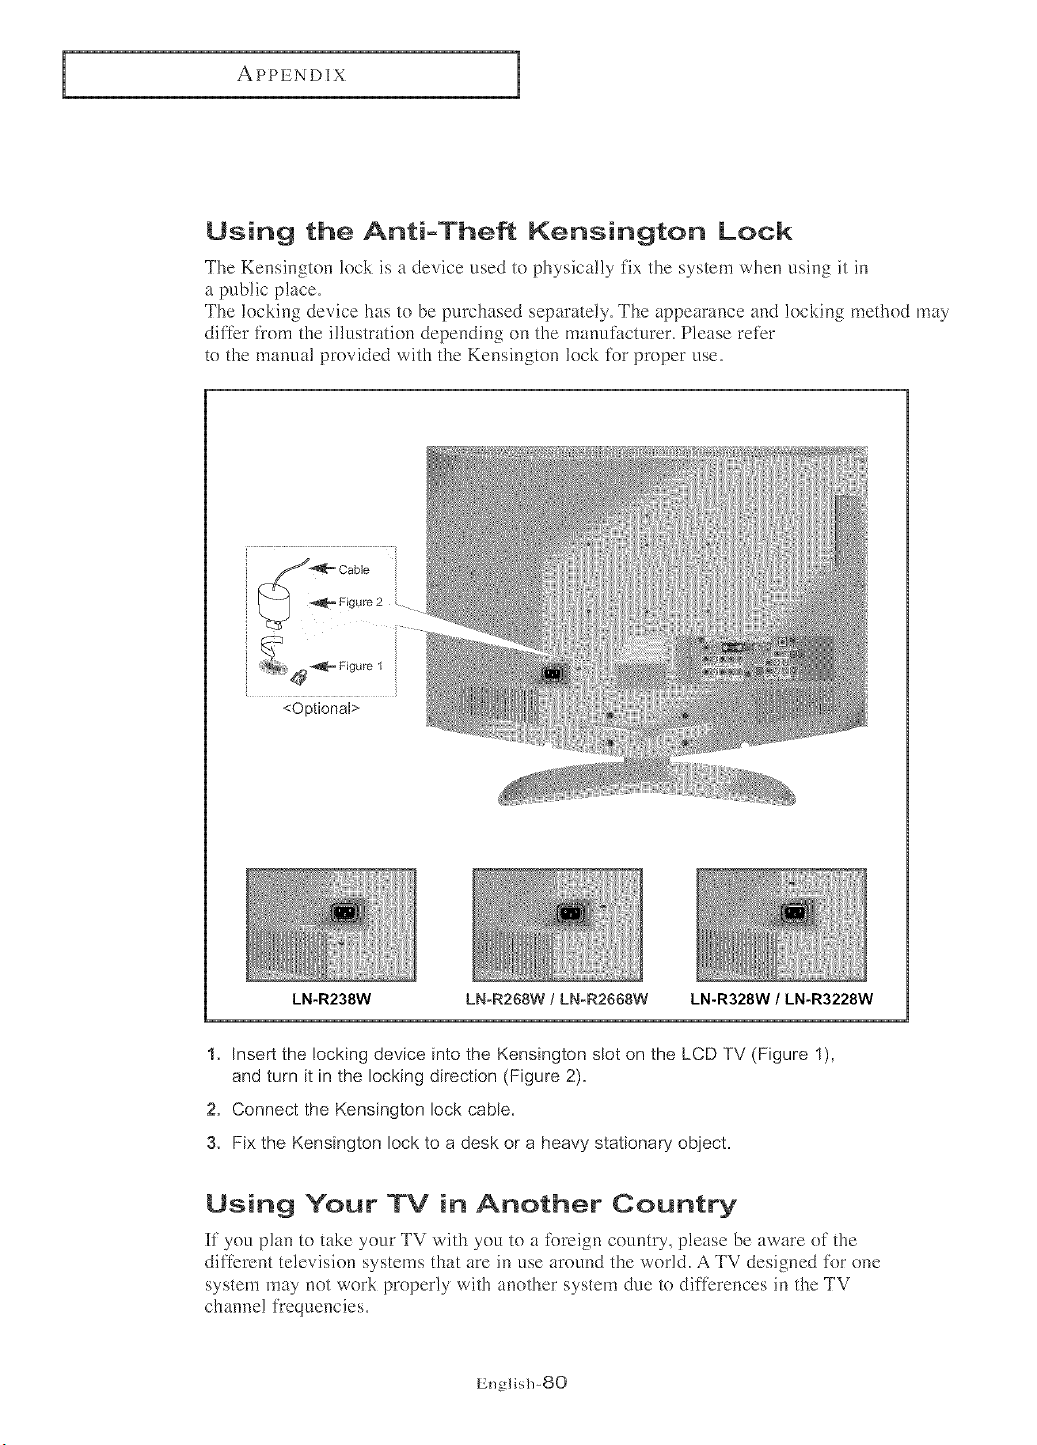
APPENDIX
Using the Anti-Theft Kensington Lock
The Kensington lock is a device used to physically fix the system when using it in
a public place,
The locking device has to be purchased separately, The appearance and locking method may
differ Kom the illustration depending on the manufacturer, Please refer
to the manual provided with the Kensington lock %r proper use.
.................................................................7i
e'= Cable
_2_ _= Figure 2 .
<Optional>
LN-R238W LN-R268W / LN-R2668W LN-R328W / LN-R3228W
1. Insert the Eocking device into the Kensington slot on the LCD TV (Figure 1),
and turn it in the locking direction (Figure 2).
2. Connect the Kensington lock cable.
3. Fix the Kensington lock to a desk or a heavy stationary object.
Using Your TV in Another Country
If you plan to take your TV with you to a ibreign country, please be aware of the
different television systems that are in use around the world, A TV designed %r one
system may not work properly with another system due to differences in the TV
channel fl'equencies,
English-80
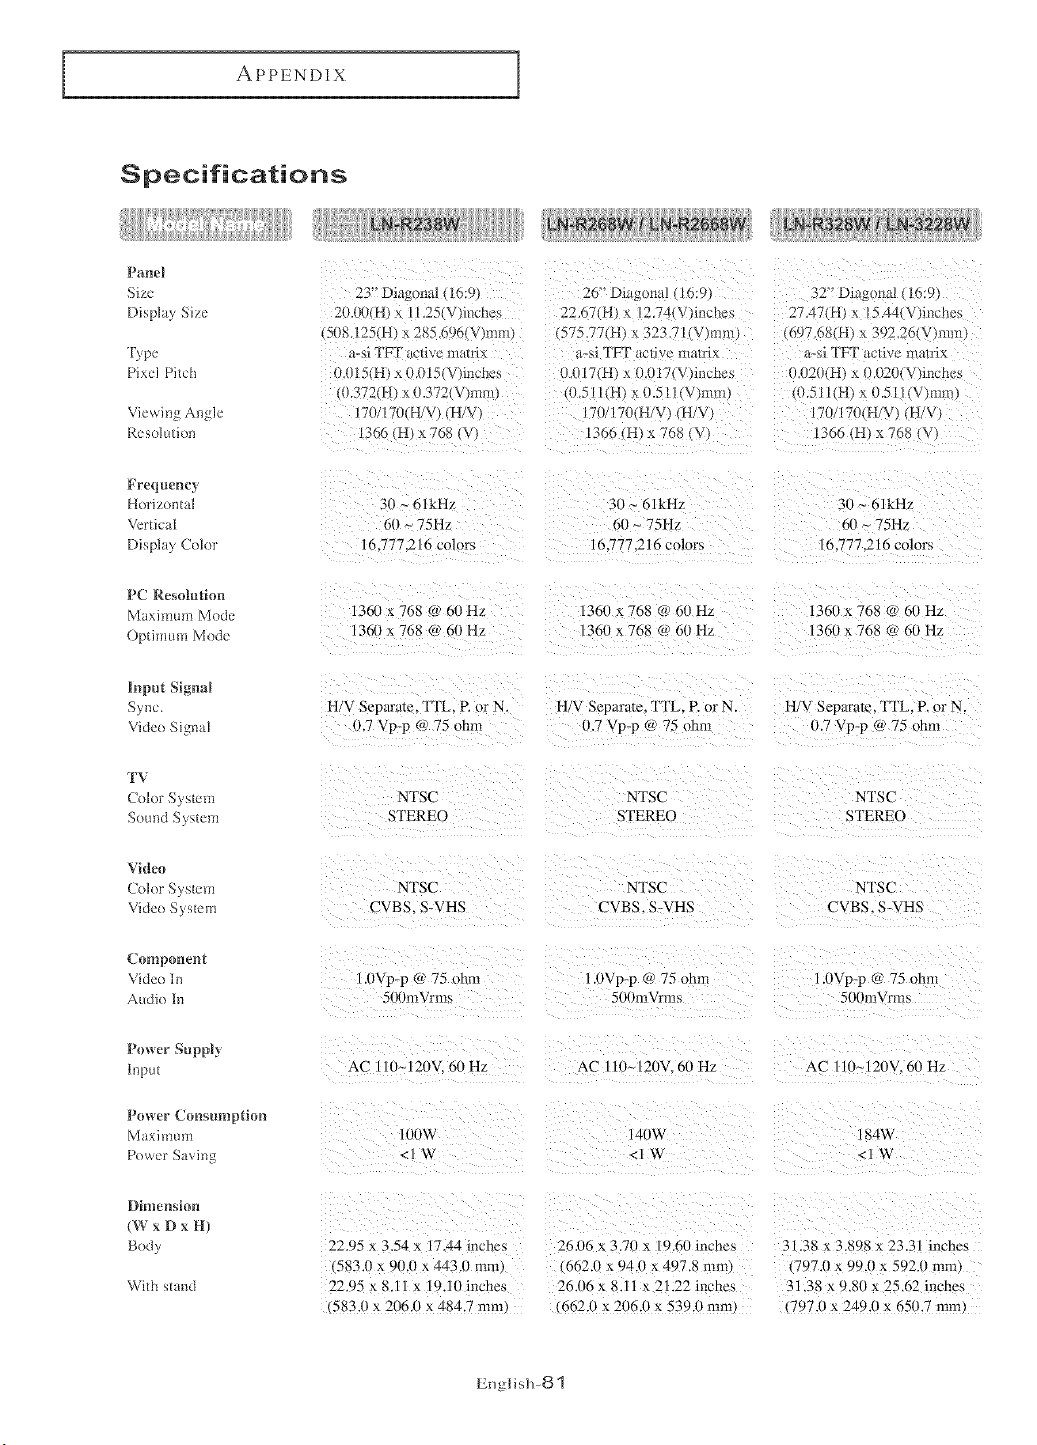
APPENDIX
Specifications
Panel
Size
Display Size
Type
Pixcl Pitch
Viewing Angle
Resolution
23" Dia;ona_ { m:v
2{H_0{H} x 1 251V_it_che
(508.125(H} x 285 6961V}mm
_-si TFT t_fiv_ matrix
0015(H} x 0.015_V _inches
0.372(H } x 0.372(V}mm
170/r_ H V_ (H/V
1366 (HI x 768 (V
26" Diagona* _/0:9
22.67(H} x I254 V)inche_,
(575 77(H} x 323 "_ It _ mm
a-:,,i "IFT acli a [ilalrlx
O.0171H} x { .{H7(V {aches
(11511(H x 0.51 l(V_nm,,
7(}/170(H/¥ H/V
13(16 (H} x 768 {\
32' Di_ g{ma! (16:9_
27 49 H I x 15.44( V _}inches
{(19%68(H} x 392.26(V_[mn
a-si TFT ac/ive ma_ri_
u.u2( {Ht x 0.020{V}inches
...5I I{H} x {}.5i l(V_mm_
170/170(H/V} (H/V_
1366 (HI x 768, v
Frequency
Horizontal
Vertical
Display Color
PC Resolution
Maximum Mode
Optimum Mode
lr_put Signal
Sync.
Vide() Signal
TV
Col{)*"Sys/em
Sound System
Video
Color System
Vide() System
Con|potent
Video In
Audio In
Power SuppJy
Input
Power { onsumption
Maximum
Power Saving
Dimension
(W x D x H)
Body
With stand
30 _ 61kHz
t,i_~ 75Hz
16.7772 to colors
1360 x 768 @ 60H2
136(1 x 768 O r_(}Hz
H/V Sepan]le. ITL. P. ,:}r N
0.7 Vp-p @ 75 ohm
NTSC
STEREO
NTSC
CVBS. S-VHS
1.(}Vp-p @ 75 ohm
5{X}mVrms
AC 111}~120V. N_ Hz
IIR}xA
<lW
22.95 x 3.54 x 17.44 inches
(583.1} x 90.0 x 443.0 mm,
22.95 x 8.11 x 19.111 mches
•583.0 x 206.0 x 484.7 mm
3 }_ 61kHz
"111~ 75Hz
16.777.216 colors
1360 x -68 @ 60 Hz
1360 x 768 @ 60 Hz
H/V Separate. 1TL P. or N.
,3.7 Vp-p @ 75 ohm
NTSC
STEREO
NTSC
CVBS. S-VHS
1.{}Vp-p @ 75 ohm
500mVrms
AC 110_121)¥ 60 Hz
14t _W
<1 W
26116 x 3.70 x 19.60 inches
(662.11 x 94.(} x 497.8 mm}
26.06 x 8.11 x 21.22 inches
662.0 x 206.0 x 539.0 ram.
30 _ 61kHz
6(} _ 75H2
16.777.216 colors
1360 x 768 @ 60 Hz
136,0 x 768 @ 611 Hz
H/V Separate. ITL. P. or N.
0.7 Vp-F @ 75 ohm
NTSC
STERE{)
NTSC
CVBS. S-VHS
1.0Vp-p (ri,75 ohm
50 }mVrms
AC [ 1(}~120V. 6{} Hz
184w
<lW
31.38 x 3.898 x 23.31 inches
{797.(} x 99.0 * 592.1 ram.
31.38 x 9.80 x 25.62 inches
• 797.0 x 249.0 x 650.7 mm.
Engl i s]]-8 "1
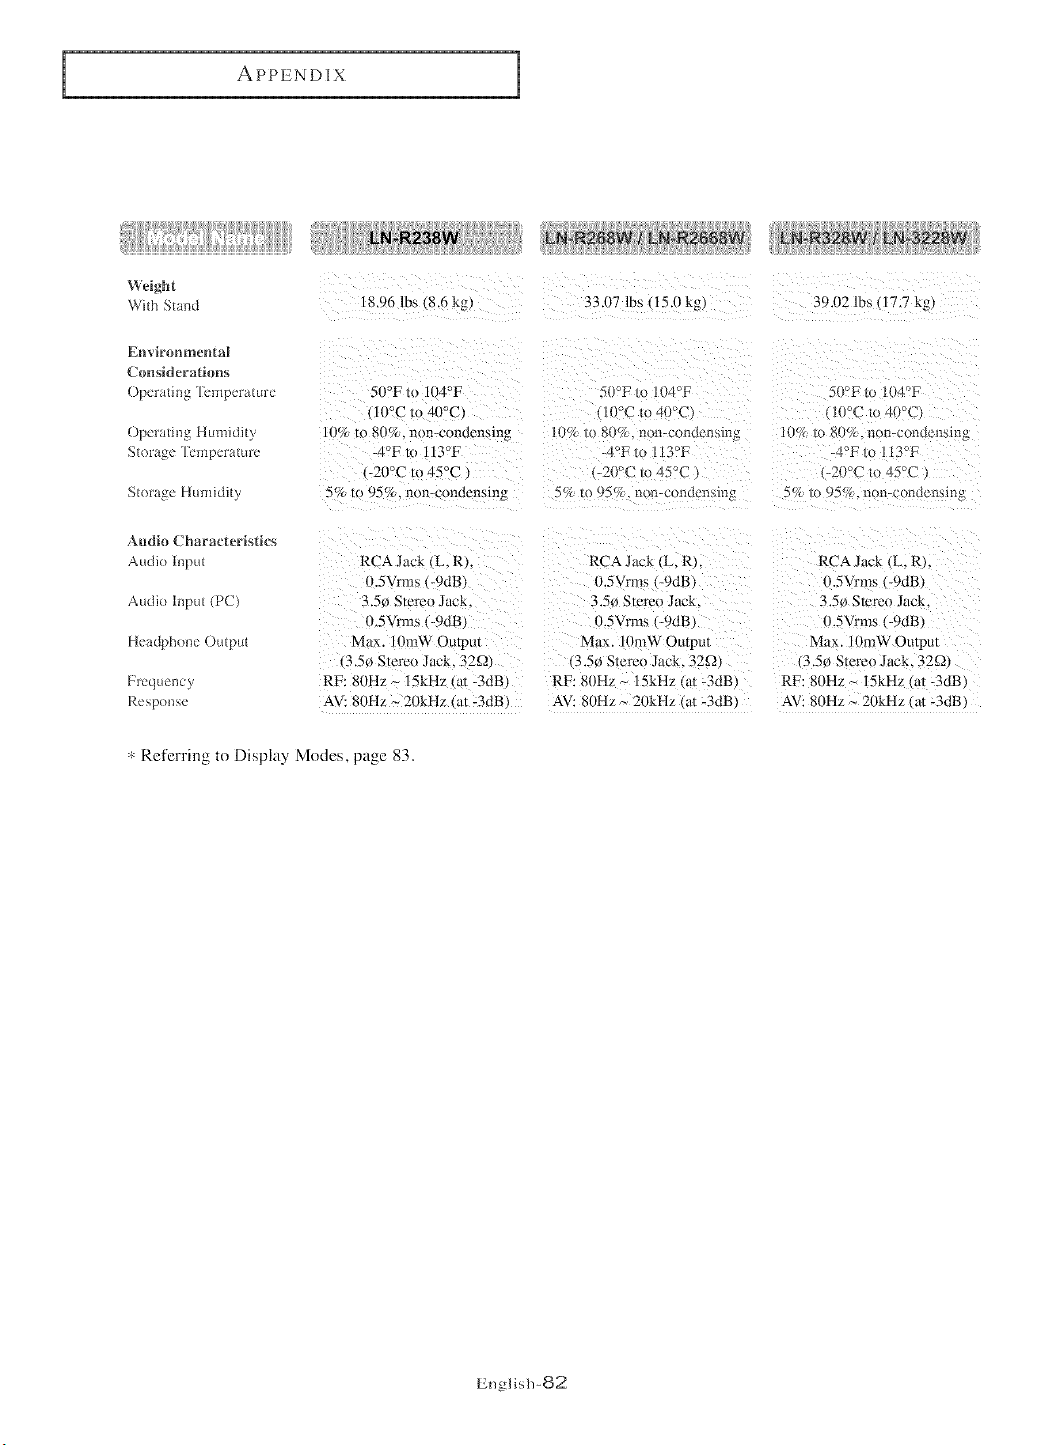
i APPENDIX
Weight
With Sta_}d 18.96 lbs 8.6 kg} 33.07 lbs 115.0 kg) 39.112 lbs • 17.7 kg.
Environmental
Ctmsideratitms
Operatir_g ri'emperature
()perati_g Humidity
Storage Temperature
Storage Humidity
511°Fto 1114°I_
111°Cto 411°C)
111%1o NI%. non-condensing
4°E 1o l13°F
-21}°Cm 45°C •
5% to 95%. non-condensing
50°F to 104°F
1111°Cto 4( %2
_/_ to i,;,{tv_. [i iI-cotldtttiYdtla
--°F to 113°F
-20°C m 45°{
%_ to 95{7{.ram-condensible,,
50_'F i_ [114°F
( [0°C _o 41%2/
10_ lo 811_/, n _-condPnsi_lg
_4OF _ ?of
-20°C _o 45%2
5% lo _ 5%. non-c{mdcr_sing
Audio Characteristics
Audio input
Audio I_put (PC)
Headpho_e Output
Frequency
Re po_se
RCA Jack (L. R). RCA Jack (L. R).
0.5Vrms (-9dB) i).5Vrm_,, 9dB)
3.5¢ Slereo Jack. 3.514 Stereo Jack.
0.5Vrms (-gdB) 0.5Vrms (-gdB)
Max. liImW Outpm Mt]x. lomW Output
3.5_) Stereo Jack. _2Q) ,3.5¢} Stereo Jack. 32£2)
RF: 81}Hz ~ 15kHz tat -3dB) RF: 811Hz ~ 15kHz (at -3dB
AV: 8(JHz ~ 20kHz Cat -3dB) AV: 80Hz ~ 211kHz at -3dB
RCA Jack L.R).
0.5Vrms (-9riB)
3.5_}Stereo Jack.
o.5Vrms (-9riB)
Max. 10roW Output
13.5e} Stereo Jack. 32£_}
RF: 80Hz _ 15kHz l a_-3dB)
AV: 81}Hz_ 21}kHz Iat -3dB)
* Referring to Display Modes, page 83.
English-82
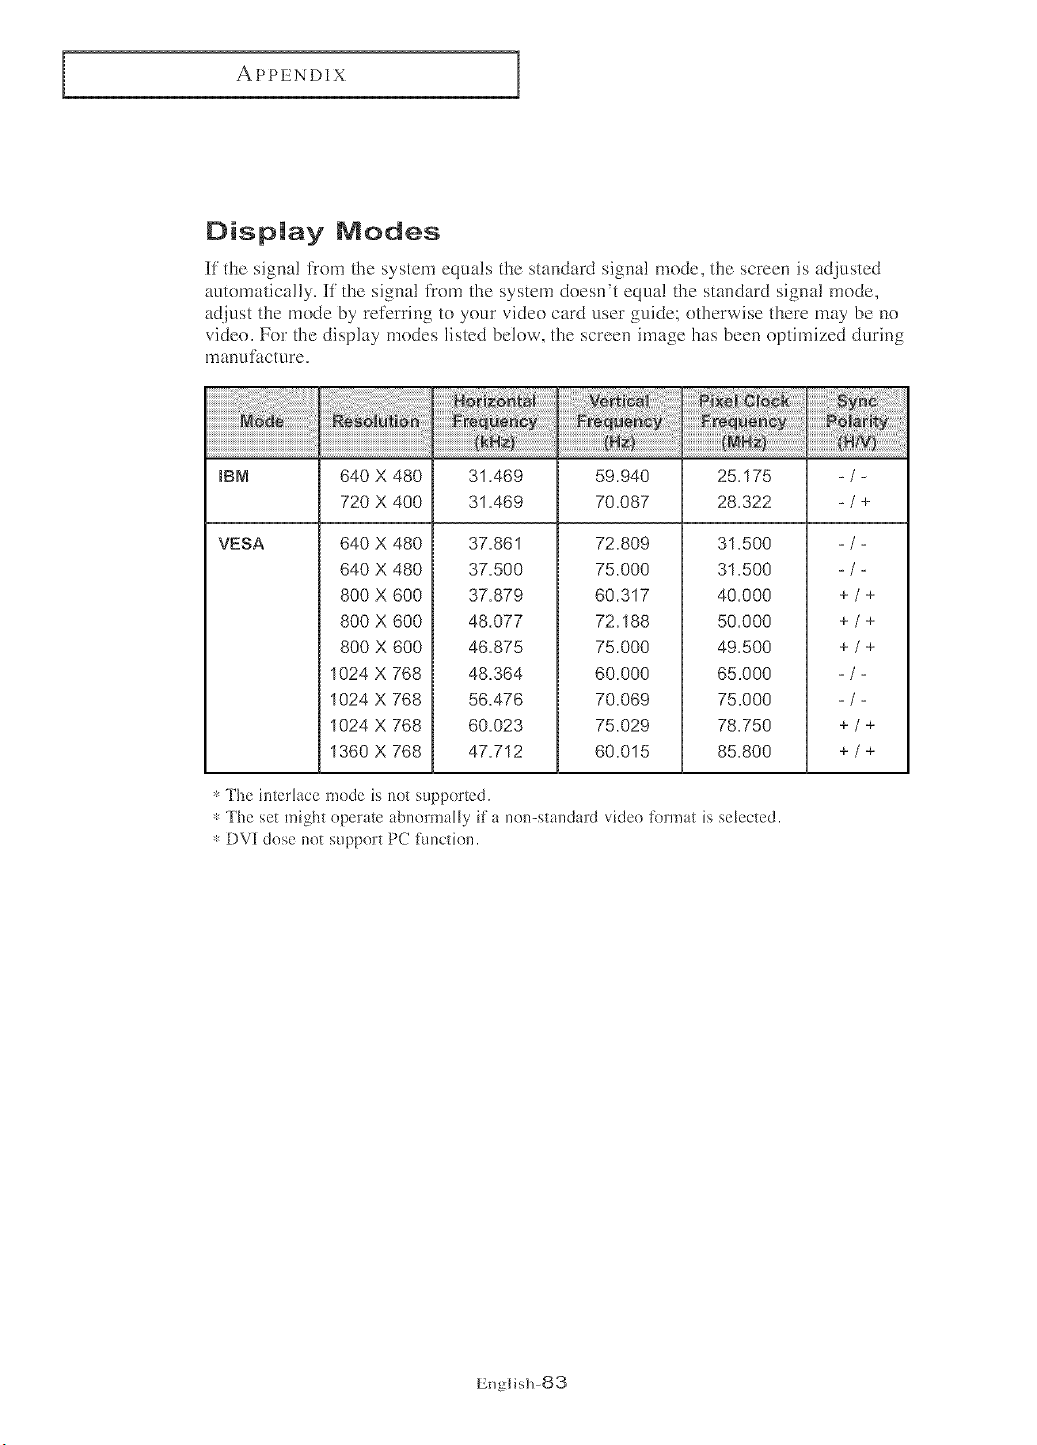
APPENDIX
Display Modes
_f the signa! from the system equals the standard signa! mode, the screen is adjusted
automatically. _f'the signal from the system doesn't equal the standard signal mode,
adjust the mode by reR:rring to your video card user guide; otherwise there may be no
video. For the display modes listed below, the screen image has been optimized during
manut_cture.
IBM 640 X 480 31.469 59.940 25.175 -/-
720 X 400 31.469 70.087 28.322 -/+
VESA 640 X 480
640 X 480
800 X 600
800 X 600
800 X 600
1024 X 768
1024 X 768
1024 X 768
1360 X 768
37.861
37.500
37.879
48.077
46.875
48.364
56.476
60.023
47.712
72.809
75.000
60.317
72.188
75.000
60.000
70.069
75.029
60.015
31.500
31.500
40.000
50.000
49.500
65.000
75.000
78.750
85.800
* The interlace mode is not supported.
* The set might operate abuormaHy if a no]l-standard video fk)rmat is selected.
* DV[ dose not support PC functiol].
-/-
+/+
+/+
+/+
+/+
+/+
English-83