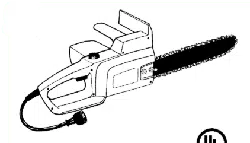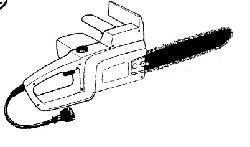

IMPORTANT MANUAL
operator's
manual
• Assembly
• Operation
• Maintenance
• Repair Parts
MODEL NO.
358.34120" 2.0/12"
358.34150 - 2.0/14"
2.0114" P.S.
AkWAR N! NG:
read and follow
Safety Rules, PreQautions
and Operating "lnstruc.
tions. Failure to do so can
result in serious personal
injury.
DoNot Throw Away
°
@/____,_S/ CRI:1FTSMRN®
.2.0/12".. 2.0/14" 2.0/14"-ES.
ELECTRICCHAIN SAWS
, u i . ,ll,
Record in the space provided below the Model No. and Serial No. of
your saw. These numbers are located on the starting instructions
decal.
Model No. Serial No.
Retain these numbers for future reference.
530.067381-3-21088
Sears, Roebuck and Co.,Chicago, Ill 60684 U.S.A.
• -_©S_'slko_b.ck_a Coi_1988
FULL 1 YEAR-WARRANTY ON ELECTRIC CHAIN SAW
(Excluding Bar & Chain)
Forone yearfrom date of purchase,Sears w_ltrepairdefects inmaterialor wo_manshtp in _is 2X)ElectricChain Saw at no charge,
This warrantyexCludesb_r &chain, whic_hare expendablepartsand become wornduringnormaluse.
Ifthis2J0 EfectdcChain Sawisusedforcommerciai orrentalpurposes,thiswarrantyappliesforonly30 daysfromdateofpurch ase_WARRANTY
SERV{CE ISAVAI/_ABLEBYRETUR NING THE CHAIN SAWTOTHE NEAREST SEARSSERVICEC ENTER/DEPARTMENT INTHE UNITED
STATES.
Th_Swarrantygivesyou specificlegal dghts,and youmay also haVeother rightswhichvary from stateto state.
Sears, Roebuck and Co., Sears Tower, Dept.698/731A, Ctdcago,IL60684
TABLE OF CONTENTS
Specifications ............................... 2
SPECIAL SAFETY SECTION .................... 5
Know Your Chain Saw ........................ 6
Preparing Your Saw For Use ................... 7
A. Getting Ready ............... . ........... 7
B. Power Source and Extension Cord--... -::: .... 7
C. Attaching the Bar and Chain ................ 8
D. Chain Tension ............ : .............. 8
E. Bar and Chain Lubricant..................... 9
Using Your Saw ............................. 10
A, Control Devices .......................... 10
B. Pre-Operation Checks .... "............. ... 10
C. Starting and Stopping the Saw ............. 10
Using the Power Sharp _ System ............... 11
Types of Cutting ............................ 13
A. BasicCutting Technique .................. 13
B. Tree Felling Techniqqes-. ................. 13
C. Bucking ............................... 15
D. Debranching and Pruning ............. ,. ,... 16
Maintenance ............................... 17
A. Cleaning the Saw ............ : .......... 17
B. Guide Bar and Chain .................... 17
C. Sprocket .............................. 19
D. Storage ............................... 20
E. Maintenance Accessor'_s ................. 20
F. Trouble Shooting Chart ................... 21
Repair PartsList ............................. 22
Quick Reference Page ....................... 27
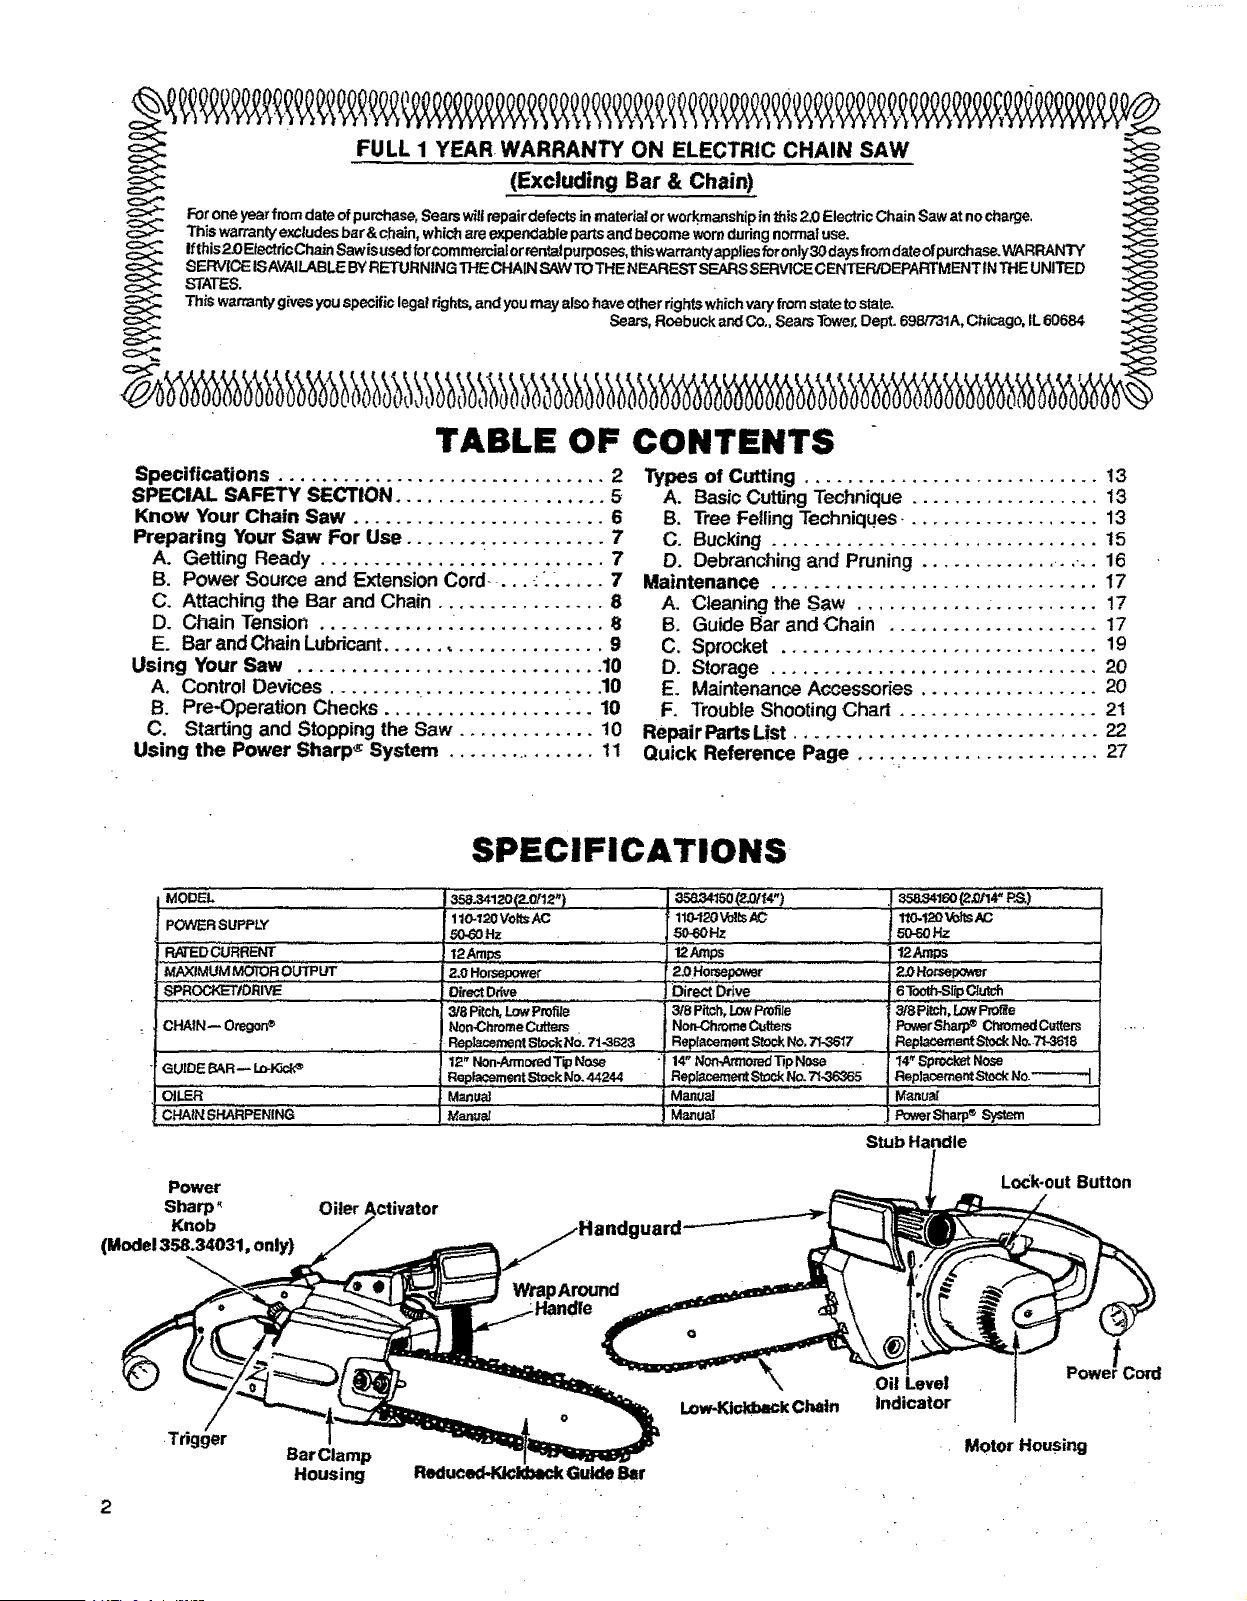
SPECIFICATIONS
MODEL ............
POWER SUPPLY
I,. -EDCu.R
MAXIMUM MOTOR OUTPUT
;SPROCKETiDRrv_
CHNN-- Oregon®
GUIDE BAR-- LO-K3C{_
OILER
CHAtN SHARPENING
....._._.#120(__0/1_,) _,_4Is0(_.o/t4,)
110-120Vo_AC 110-120Vo!_sAC
_Hz 50-60 HZ
2.0 Horsepower _ .......................2.0Hopepower
0irectDdve Direct Ddve
.......................3i8P_ch, LowProfile 3/8 Pitch, LowP_fi|e
Non-ChromeCuttem. Non,ChromeC_l_rs
_1"t0.120Vo_tSAC
50-60Hz
2,0 Horsepower
........... 6 Tooth-SlipCJutch
3/8 Pitch, LowPmt_e
PowerSharp _ Chromed Cutters
Rep_tcemer_tStockNo. 71,_;23 Replacement Stock No, 71-36'/7 Repla_e,'TmntStock No..7/-3618
12" Non-Armored T_ Nose 14" Notl-ArmomdTip Nose t4 • Sprocket Nose
Replacement Stock No.r44244 Rep_._t '_0_ No. 7t -36365 Repl_ceme_ Stock NO.
M_nual Manual Manual
ManueJ ................:Manua! ......] PowerSharp® System
Stub Handle
Power
Sharp. Oiler Activator
=OilLevel
Indicator
Lock-out Button
Powe!Cord
Motor Housing
i " i iiii iiiiiiiiiii ii i ii i J I ii i, iiii i iiiiiiiiiiiiiiiiiii iiiiiii iiiiiii i IIIIIIIII i IIII i : L_, k ,,
SPECIAL SAFETY SECTION
'i ................ I11 IIIH Ill II IIIIIIIIIIIIIIIIIIIIIIIII I I I I I I III III
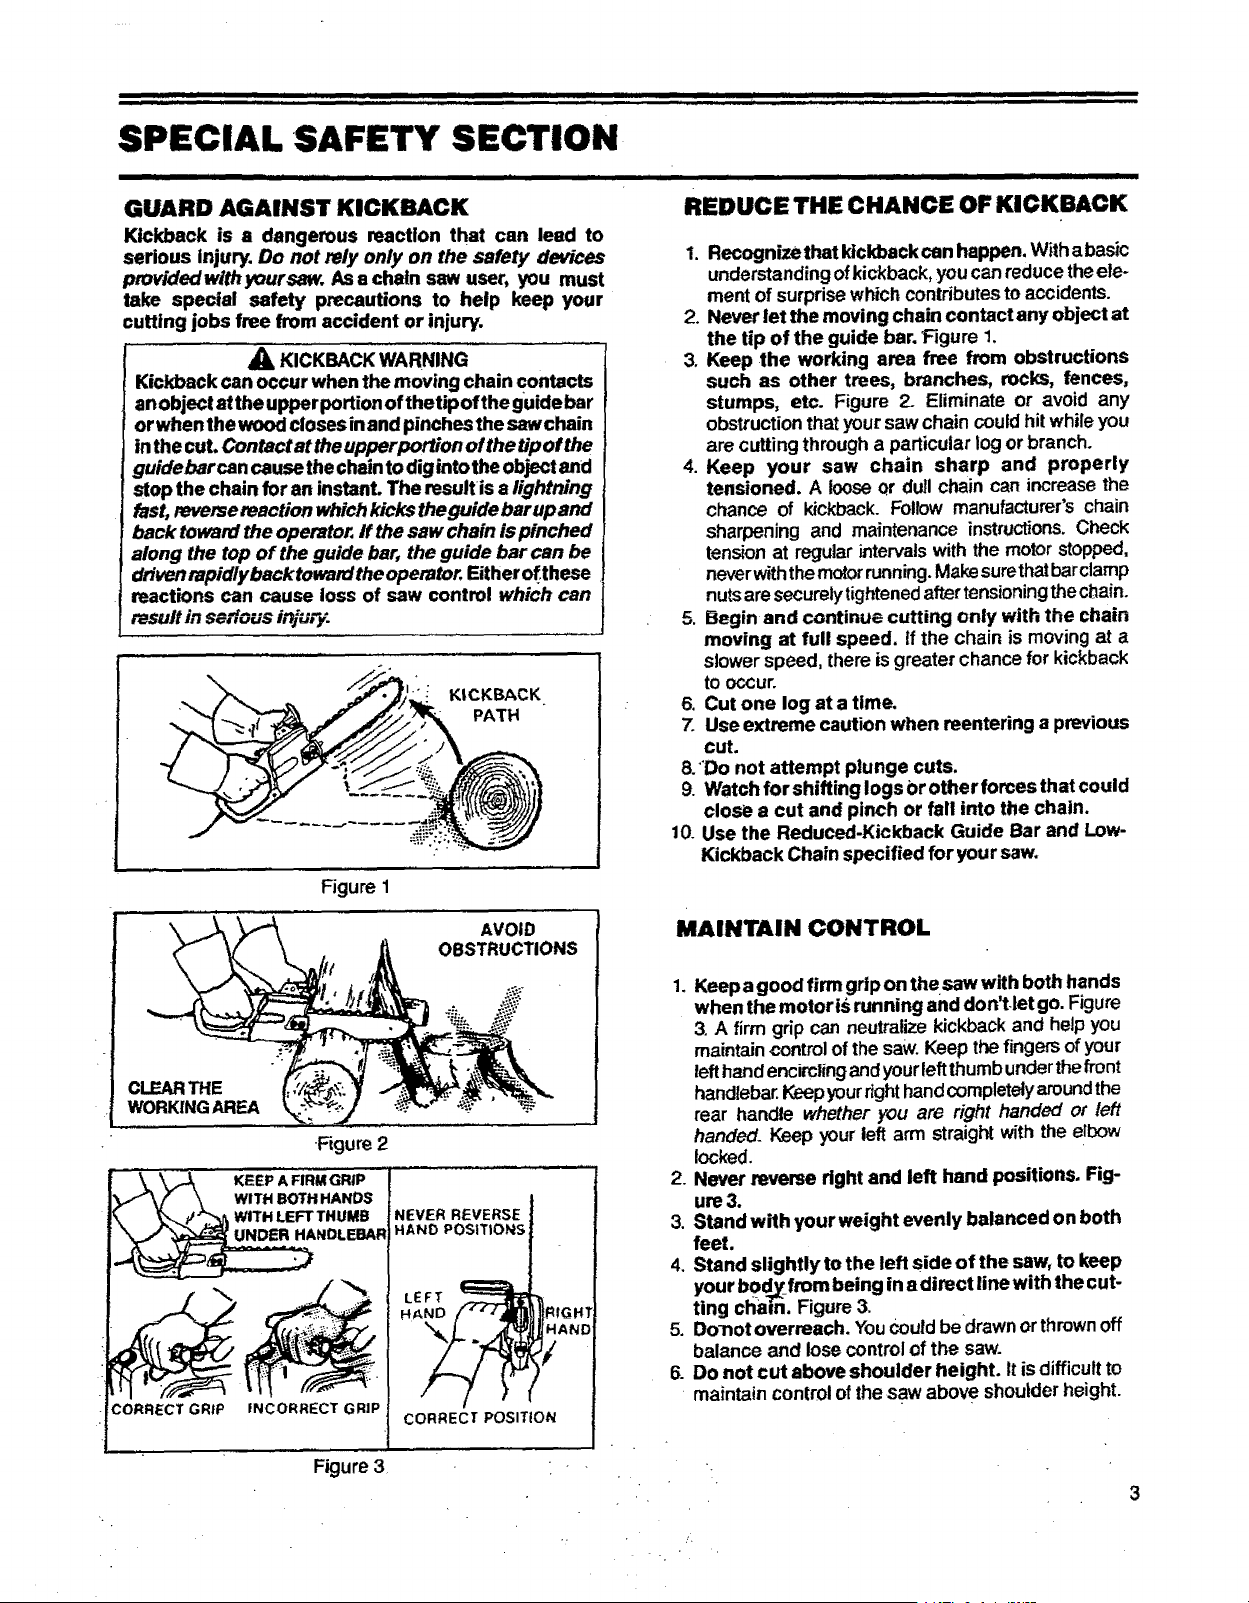
GUARD AGAINST KICKBACK
Kickback is a dangerous reaction that can lead to
serious injury. Do not rely only on the safety devices
provided wtthyoursaw. Asa chin saw user, you must
take special safety precautions to help keep your
cutting jobs free from accident or injury.
_k KICKBACK WARNING
Kickback can occur when the moving chain contacts
anobject atthe upper portionofthetip ofthe guide bar
or when the woodclosesinand pinches the saw chain
in the cut. Contactattheupperportionofthetipofthe
guidebarcan cause thechainto digintothe objectand
stop the chain for an instant. The result is a h'ghtning
fast, reversereaction which kickstheguide bar upand
back toward the operator, ff the saw chain ispinched
along the top of the guide bar, the guide bar can be
dttvenrapidlyback towardtheoperator. Either ol_these
reactions can cause loss of saw control which can
resultin se,'lous injurj.
KICKBACK
PATH
Figure 1
1. Recognize that kickbackcan happen. With abasic
understandingofkickback,youcanreduce theele-
mentof surprisewhichcontributestoaccidents.
2. Never let the moving chain contact any object at
the tip of the guide bar.Figure 1.
3. Keep the working area free from obstructions
such as other trees, branches, rocks, fences,
stumps, etc. Figure 2. Eliminate or avoid any
obstructionthatyoursaw chain couldhit whileyou
are cutting through a particular logor branch.
4. Keep your saw chain sharp and properly
tensioned. A loose or dull chain can increase the
chance of kickback. Follow manufacturer's chain
sharpening and maintenance instructions.Check
tensionat regularintervals with the motorstopped,
neverwiththemotor running.Makesurethatbarclamp
nuts are securelytightenedaftertensioningthechain.
5, Begin and continue cutting only with the chain
moving at full speed. Ifthe chain is moving at a
slowerspeed, there isgreater chance forkickback
to o_ur.
6. Cut one log at a time.
7. Use extreme caution when reentering a previous
cut.
8."Do not attempt plunge cuts.
9. Watchfor shiffing logs Orother forces that could
close a cut and pinch or fall into the chain.
10. Use the Reduced-Kickback Guide Bar and Low-
Kickback Chain specified for yoursaw.
.5
CLEARTHE
WORKINGAREA
•Figure 2
KEEP A RRMGRIP
WITH BOTH HANDS
WITH LEFT THUMB
CORRECT GRIP INCORRECT GRIP
AVOID
OBSTRUCTIONS
CORRECT POSITION
MAINTAIN CONTROL
1. Keepa good firm grip on thesaw with both hands
when the motoris running and don't let go.Figure
3. A firmgrip can neutralize kickbackand helpyou
maintain controlof thesaw.Keep the fingersofyour
lefthandencirclingandyourleftthumbunderthefront
handlebar.Keepyourrighthandcompletelyaroundthe
rear handle whetheryou are right handed or left
handed_Keep your leftarm straightwith the elbow
locked.
2. Never reverse right and left hand positions. Fig-
ure3.
3. Stand with your weight evenly balanced on both
feet.
4. Stand slightly tothe left side of the saw, to keep
your bod_ frombeing in a direct line with the cut-
ting chain. Figure3.
5. Do-notoverreach. YouCouldbedrawn orthrownoff
balance and lose controlofthe saw.
6. Do not cut above shoulder height. Itis difficultto
maintain controlofthesaw above shoulder height.
Figure3
/,
• . iii i iiiiii , i iiiiiiiiiiiiiiiiiiii i i i I i ii i iiiiiii i m i i m i i ,i i IH,HIH ,11 II tll IIIIIII
SPECIAL SAFETY SECTION (continued)
,1111 I i i i mm,wml,,i ml,II I I i H iml=l, i= i. ill ,mHIml .H " I
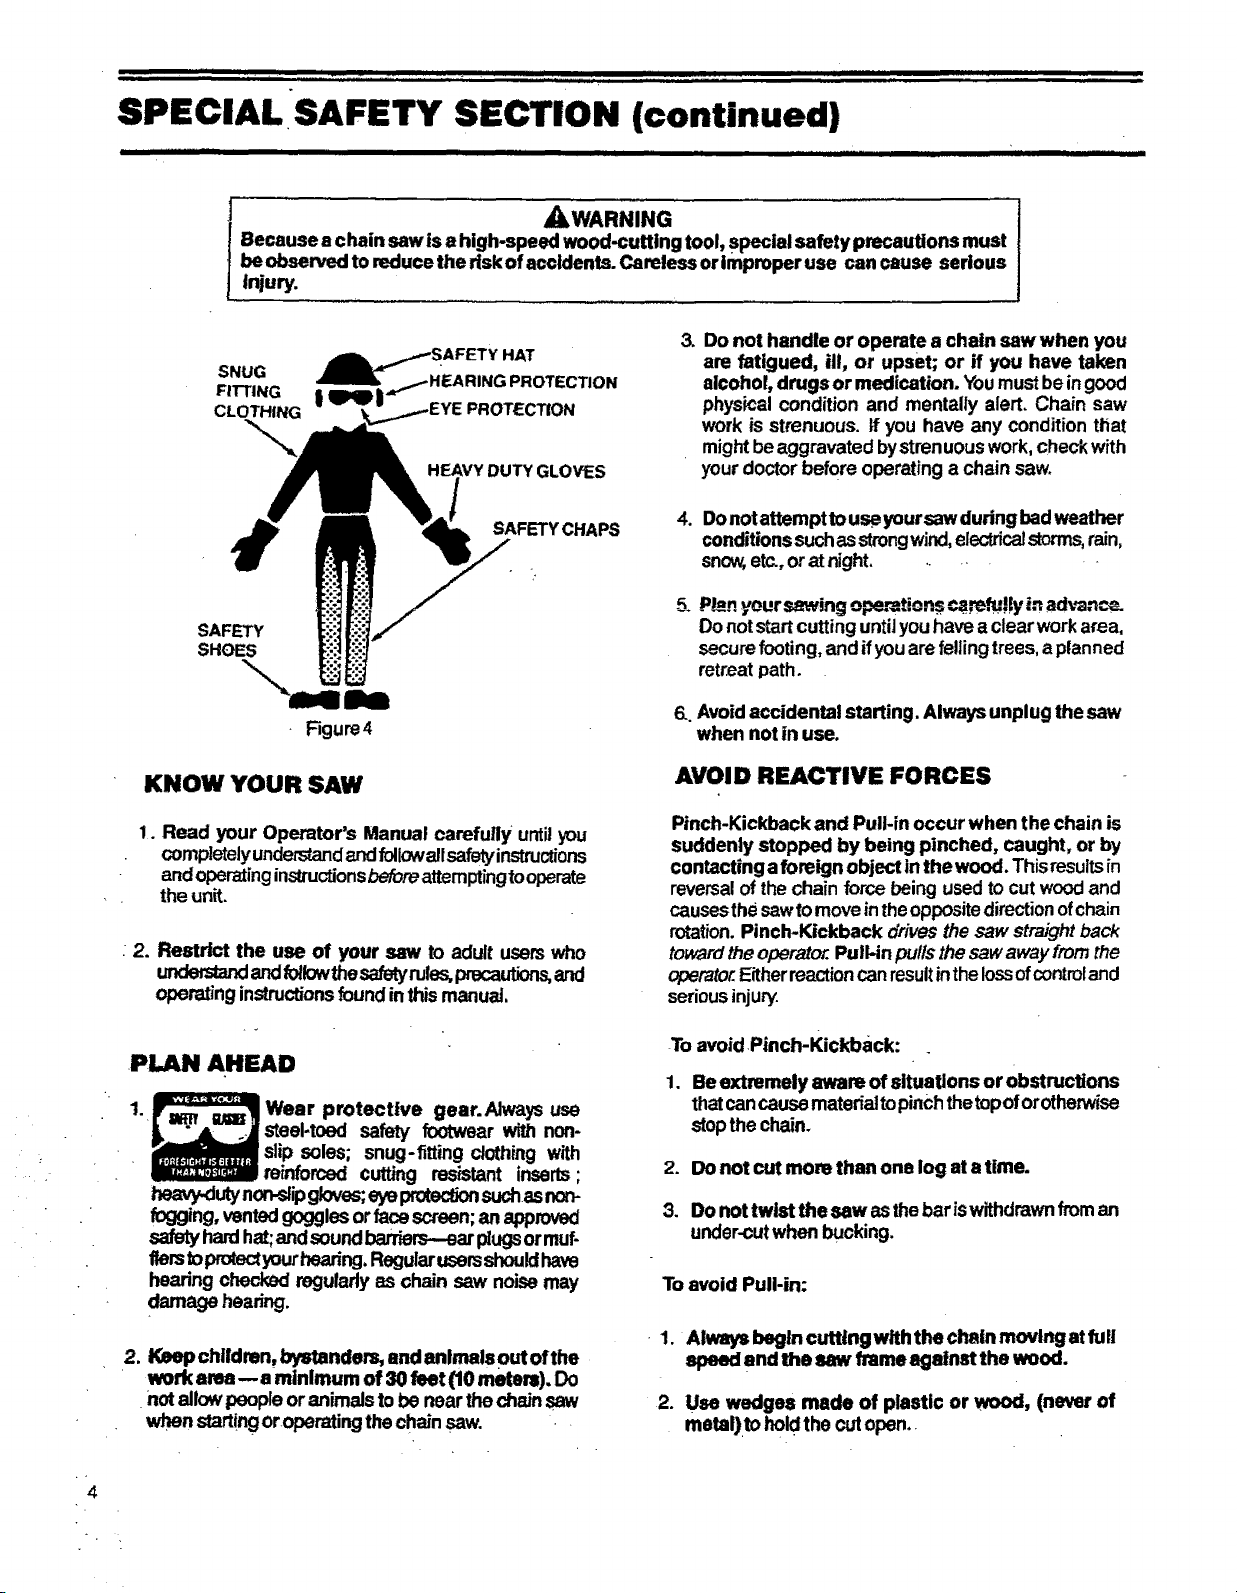
_kWARNING
Because a chain saw is a high-speed wood-cutting tool, Specialsafety precautions must
beobserved to reduce the rlskof accidents. Careless orImproper use can cause serious
injury.
SNUG
FITTING
CL_
DUTY GLOVES
:t
Do not handle or operate a chain saw when you
are fatigued, ill, or upset; or if you have taken
alcohol, drugs or medication. Youmust beingood
physical condition and mentally alert. Chain saw
work is strenuous. If you have any conditionthat
mightbeaggravated bystrenuouswork,checkwith
yourdoctor before operating achain saw.
SAFETY
SHOES
""\m!l lie
Figure4
SAFETYCHAPS
.
Donotattempt touseyoursaw during badweather
conditions suchasstrongwind,electricarstorms,rain,
snow,etc.,or at night.....
.
P_n yoursewing opemtions c_l!y in advance.
Do notstartcutting until youhavea clearworkarea,
securefooting, and ifyouarefelling trees,a planned
retreat path.
6..Avoidaccidental starting. Always unplug the saw
when not in use.
KNOW YOUR SAW
1. Read your Operator's Manual carefully untilyou
completelyunders_ndandfollowallsafetyinstructions
andoperatingins_nJctionsbeforeattemptingtooperate
the unit.
2. Restrict the use of your saw to adult userswho
underaandand_k_vthesef_rule_ _ and
operating instructionsfoundinthis manual
PLAN AHEAD
1. Wear protective gear.Always use
steel-toed safety footwear with non-
slip soles; snug-fitting clothing with
Jm_rorcod cutting resistant inserts;
heawAuty non-slipgloves;eyeproCecfJonsuch.asnon-
fogging, vented gogglesorface screen;an approved
safetyhardhat;and soundbarriers--ear p_ugsormuf-
fte_ toprotectyourhearing,Regularusersshouldhave
hearing checked regularlyas chain saw noisemay
damage hearing.
2. Keep children, bystandem, and animals out ofthe
work area-- aminlmum of 30 feet (10 meters). Do
not allowpeople or animalstobe near thechainsaw
when startingoroperating thechainsaw.
AVOID REACTIVE FORCES
Pinch-Kickback and Pull-in occur when the chain is
suddenly stopped by being pinched, caught, or by
contacting a foreign object in thewood. Thisresultsin
reversalofthe chainforce being used tocut woodand
causesthesawtomoveintheopposite directionofchain
rotation.Pinch-Kickback drivesthe saw straightback
towardtheoperator.Pull-in pullsthesaw awayfromthe
operator.Eitherreactioncanresultinthelossofcontroland
sedousinjury.
To avoidPinch-Kickback:
,
.
3.
Be extremely aware of situations or obstructions
thatcancause matedaltopinchthetopoforotherwise
stopthe chain.
Do not cutmore than one log at a time.
Do nottwist the saw asthebariswithdrawn froman
under-cutwhen bucking.
To avoid Pull-in:
• 1. Alwa_beglncutt/ngwlththecl_inmovl_3atfull
speed and the saw frame against the wood.
2. Use wedges made of plastic or wood, (never of
metal)to holdthecutopen.
4
SPECIAL SAFETY SECTION (continued)
...... III . . I II II I II I m I IIIII I I El I I II IIIIIIIII
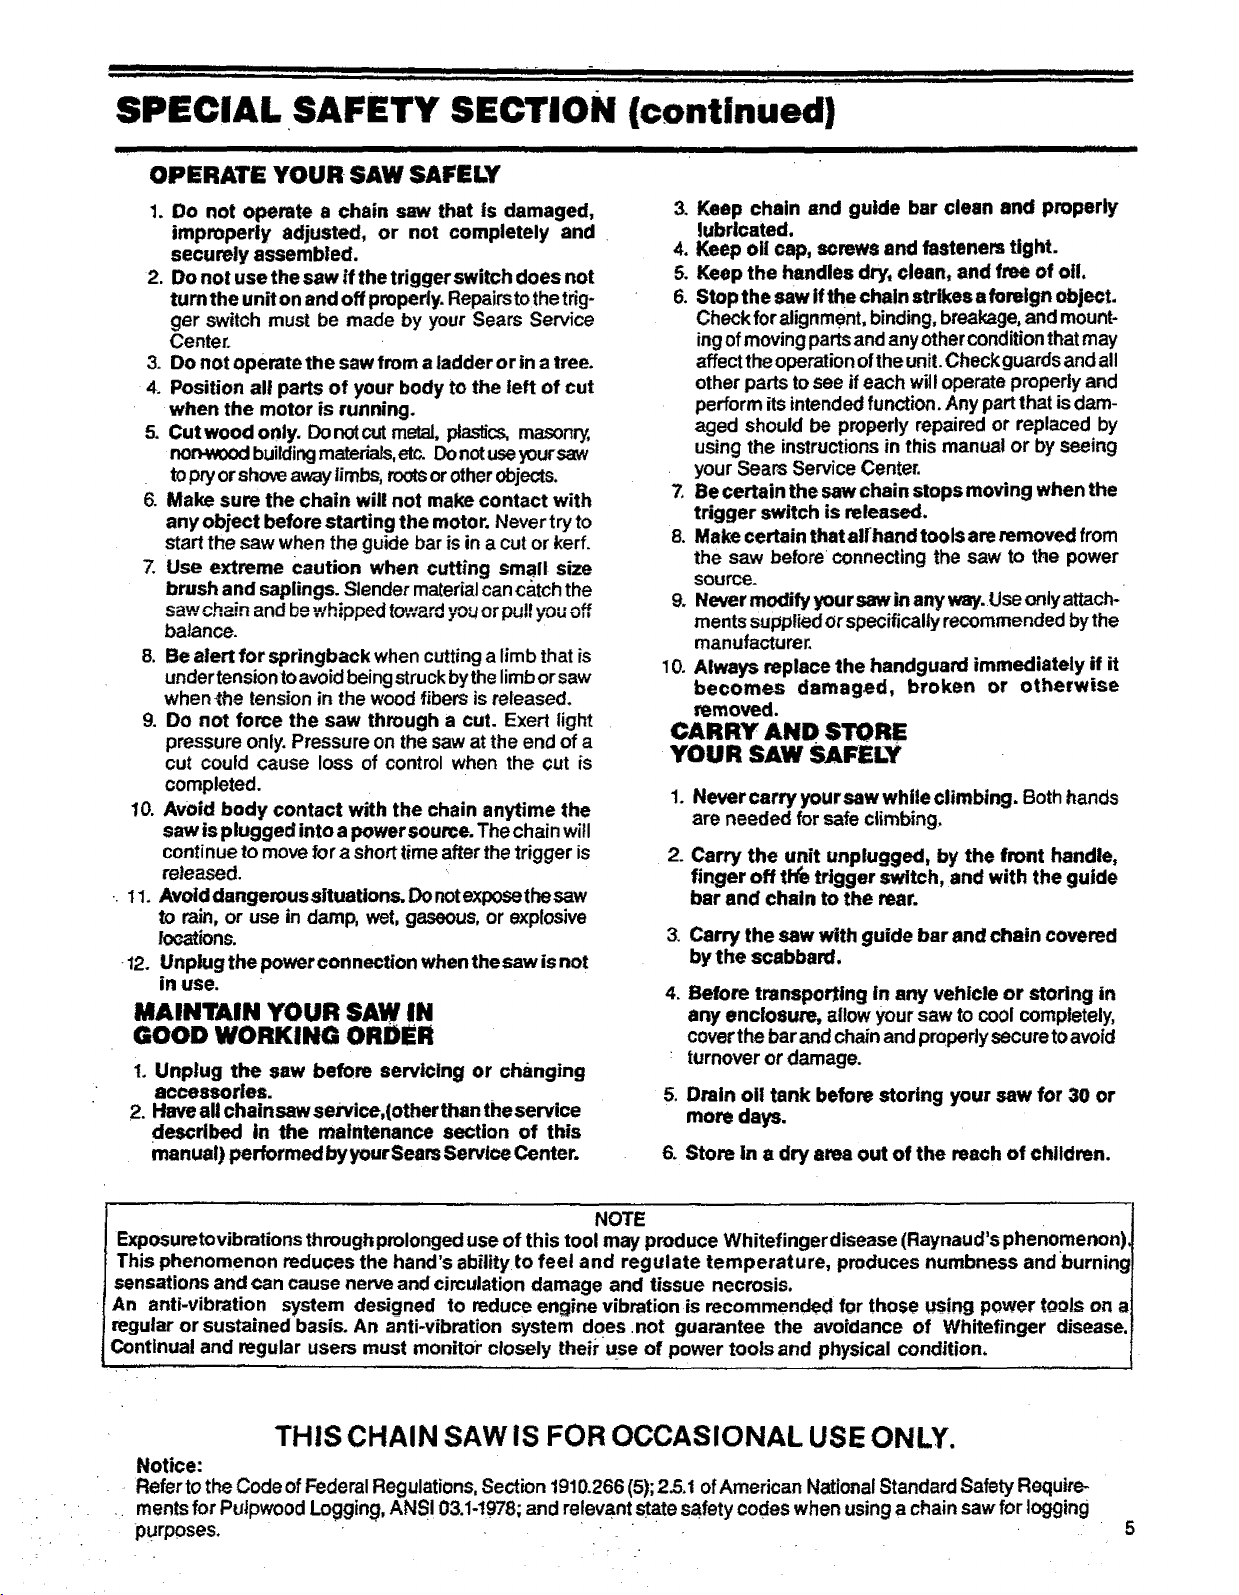
OPERATE YOUR SAW SAFELY
1. Do not operate a chain saw that is damaged,
improperly adjusted, or not completely and
securely assembled.
2. Do not use the saw if the trigger switch does not
turn the uniton andoff properly.Repairstothetrig-
ger switch must be made by your Sears Service
Center.
3. Do not operate the saw from a ladder or in a tree.
4. Position all parts of your body to the left of cut
when the motor is running.
5. Cut wood only. Donotcutmetal, plastics,masonry,
non.vKx_buildingmaterials,etc. Donotuseyoursaw
topryor shoveawaylimbs,rootsorotherobjects.
6. Make sure the chain will not make contact with
any object before starting the motor. Never tryto
start the saw when the guide bar isin a cutor kerf.
7. Use extreme Caution when cutting small size
brush and saplings. Slender materialcancatchthe
saw chain and be whippedtov;ardyouor pul!youoff
balance.
8. Be alert for springback when cuttinga limb that is
undertensionto avoid being struck bythe limbor saw
when"the tension in the woodfibers is released.
9. Do not force the saw through a cut. Exert light
pressure only.Pressure on the sawat the end of a
cut could cause loss of control when the Cut is
completed.
Avoid body contact with the chain anytime the
saw isplugged into a power source. The chainwill
continueto movefora shorttime afterthe trigger is
released.
Avoid dangerous situations. Donotexposethesaw
to rain,or use in damp, wet, gaseous, or explosive
locations.
Unplug the powerconnection when the saw isnot
in use.
10.
11.
I2.
MAINTAIN YOUR SAW IN
GOOD WORKING ORDER
I. Unplug the saw before servicing or changing
accessories.
2. Haveall chainsawservice,(other than theservice
described in the maintenance section of this
manual) performed byyour Sears Service Center.
3, Keep chain and guide bar clean and properly
lubricated.
4. Keep oii cap, screws and fasteners tight.
5. Keep the handles dry, clean, and free of oil
6. Stop the saw ifthe chain strikesa foreign object.
Checkforalignment,binding,breakage,and mount-
ingofmoving partsand anyotherconditionthatmay
affecttheoperationoftheunit.Check guardsand all
other pads tosee ifeach willoperate properlyand
perform itsintendedfunction. Any partthat isdam-
aged should be properly repaired or replaced by
using the instructionsin this manual or by seeing
yourSears Service Center.
7 Be certain the saw chain stops moving when the
trigger switch is released.
8. Make certain thatalrhand toolsare removed from
the saw before connecting the saw to the power
source.
9. Nevermodify yoursawin any way.Use onlyattach.=
ments suppliedor specificallyrecommendedbythe
manufacturer.
Always replace the handguard immediately if it
becomes damaged, broken or otherwise
removed.
CARRY AND SI"ORE
YOUR SAW SAFELY
10.
o
.
3.
Never carry yoursaw while climbing. Bothhands
are needed for safe climbing,
Carry the unit unplugged, by the front handle,
finger off tWetrigger switch, and with the guide
bar and chain to the rear.
4.
5.
Carry the saw with guide bar and chain covered
by the scabbard.
Before transporting in any vehicle or storing in
any enclosure, allow yoursaw to cool completely,
coverthe barandchainand propedysecuretoavoid
turnover or damage.
Drain oil tank before storing your saw for 30 or
more days.
6. Store in a dry area out of the reach of children.
NOTE
Exposuretovibrationsthroughprolonged use of this tool may produce Whitefingerdisease (Raynaud's phenomenon)
This phenomenon reduces the hand's ability to feel and regulate temperature, produces numbness and burning
sensations and can cause nerve and circulation damage and tissue necrosis.
An anti-vibration system designed to reduce engine vibration is recommended for those using power tools on a
regular or sustained basis. An anti-vibration system does not guarantee the avoidance of Whitefinger disease,
Continual and regular users must monitor closely theii-use of power tools and physical condition.
THIS CHAIN SAW IS FOR OCCASIONAL USE ONLY.
Notice:
Refer tothe CodeofFederal Regulations,Section 1910.266(5);2.5.1 ofAmerican NationalStandard Safety Require-
mentsfor Pulpwood Logging,ANSI 03.1-t978; and relevantstate safety codes when usinga chainsaw for logging
• • . . • • . , . , •
purposes.
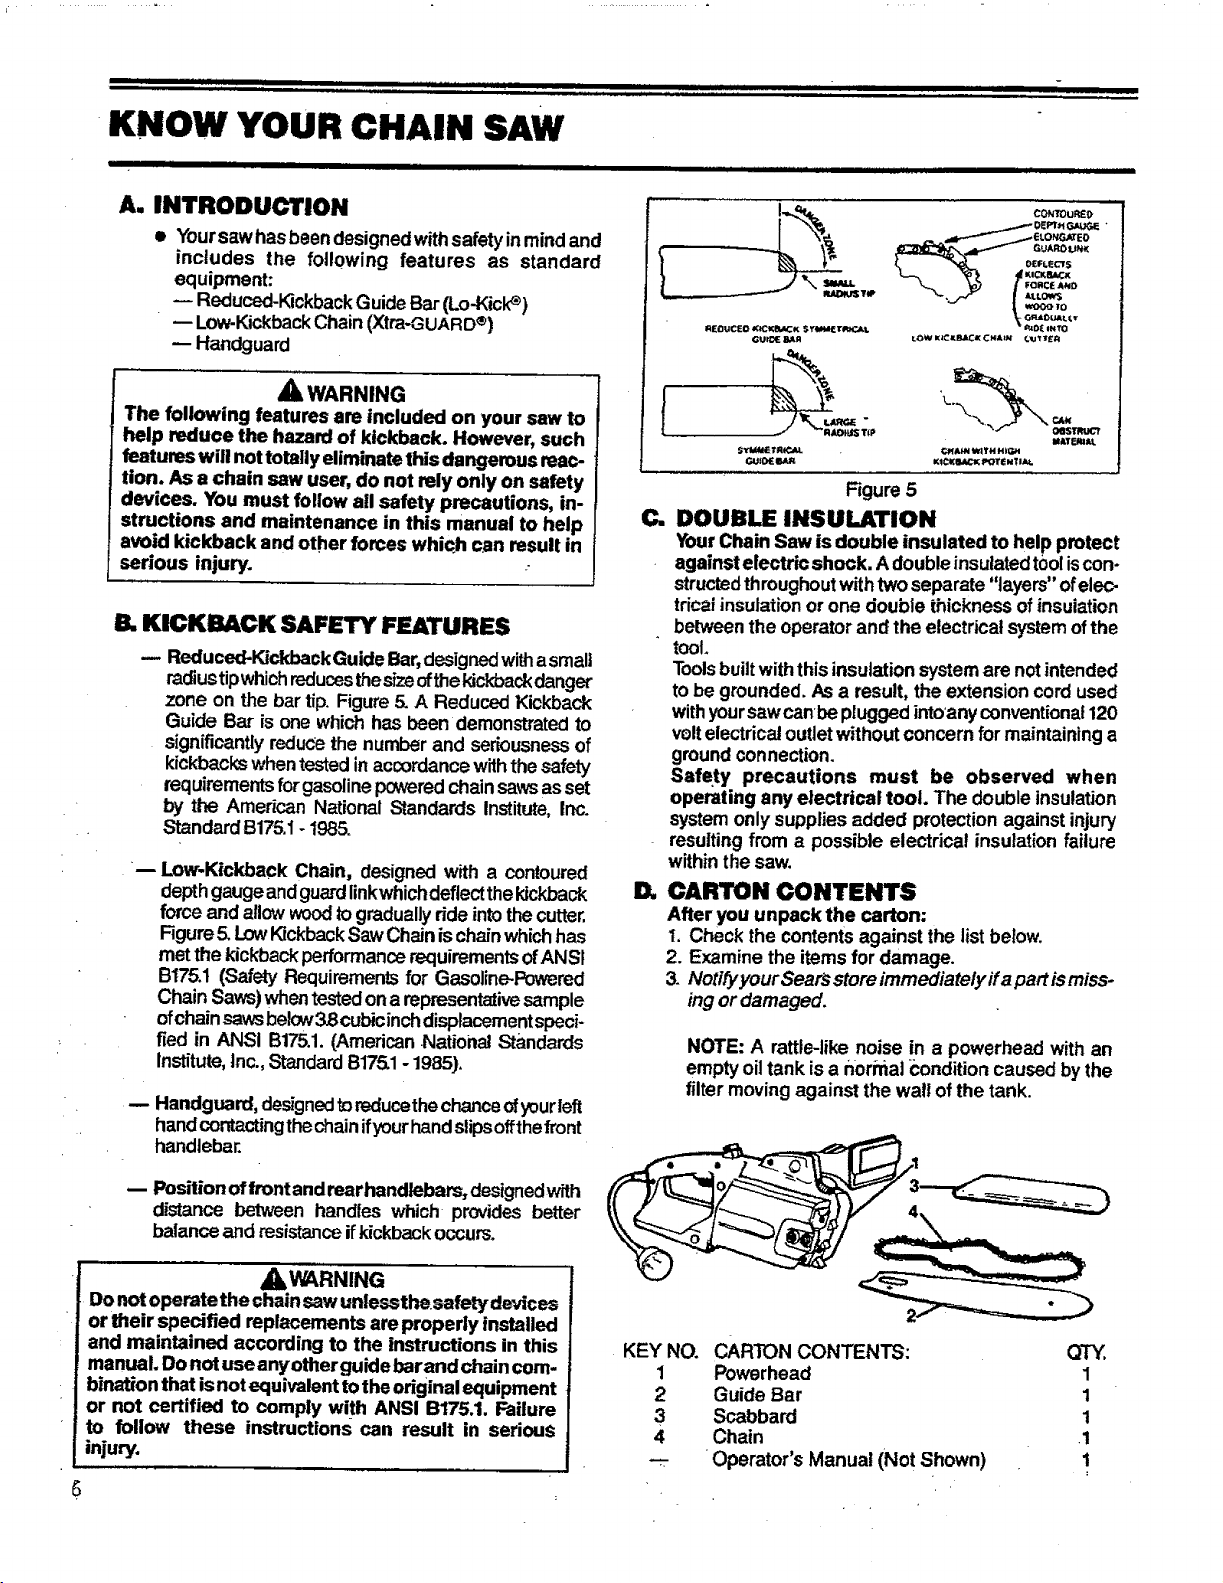
KNOW YOUR CHAIN SAW
A. INTRODUCTION
• Yoursaw hasbeendesignedwithsafetyin mind and
includes the following features as standard
equipment:
Reduced-KickbackGuideBar (Lo-Kick_)
m Low-KickbackChain (Xtra-GUARD®)
Handguard
AWARNING
The following features are included on your saw to
help reduce the hazard of kickback. However, such
features will not totally eliminate this dangerous mac-
tion. As a chain saw user, do not rely only on safety
devices. You must follow all safety precautions, in-
structions and maintenance in this manual to help
avoid kickback and other forces which can result in
serious injury.
B. KICKBACK SAFETY' FEATURES
-- Reduced-KJckbackGuideBar,designedwithasmal|
radiustipwhichreducesthesfzeofthekickbackdanger
zone on the bar tip. Figure5.A Reduced Kickback
Guide Bar isone whichhas been demonstratedto
significantlyredu(/ethe number and seriousnessof
kickbacks whentestedinaccordancewiththesafety
requirementsfor gasolinepoweredchainsawsas set
by the American National Standards Institute,Inc.
Standard B175.1- 1985.
_--Low-Kickback Chain, designedwith a contoured
depthgaugeandguardlinkwhichdeflectthekickback
force and allowwood_ograduallyride intothe cutter,
Figure5.LowKickback SawChain ischainwhichhas
met thekickbackperformancerequirementsofANSI
B175.1(Safety Requirementsfor Gasoline-Powered
Chain Saws)whentestedona representativesample
ofchainsawsbelow38 cubicinchdisplacementspeci-
fied in ANSI B175.1.(American.NationalStandards
In_tute, inc.,StandardBi75.1- 1985).
-- Handguard, designedtoreducethechanceofyourleft
handcontactingthechainifyourhandslipsoffthefront
handlebar.
-- Position offrontandrear handlebars,designedwith
distance between handles which provides better
balanceand resistanceifkickbackoccurs.
_kWARNING
Do not operate the chainsaw unlessthesafety devices
or their specified replacements areproperly installed
and maintained according to the instructions in this
manual. Do not useanyotherguide barand chaincom-
bination that isnot equivalenttothe original equipment
or not certified to comply with ANSI B175.1. Failure
to follow these instructions can result in serious
injury.
,,L .......... _ , ,,,,,
Figure 5
C, DOUBLE INSULATION
YourChain Saw is double insulated to help protect
against electric shock. Adoubleinsulatedt0oliscon-
strucl_dthroughoutwithtwoseparate "layers" ofelec-
trical insulationor one double thicknessof insulation
between the operatorand the electrical systemofthe
toot.
Toolsbuiltwith thisinsulationsystemare notintended
tobe grounded. As a result, the extensioncord used
withyoursawcanbe pluggedintoanyconventional 120
voltelectricaloutletwithout concern for maintaining a
groundconnection.
Safety precautions must be observed when
operating any electrical tool. The doubleinsulation
systemonly suppliesadded protectionagainstinjury
resultingfrom a possible electrical insulationfailure
withinthe saw.
D. CARTON CONTENTS
After you unpack the carton:
1. Check the contentsagainst the list below.
2. Examine the itemsfor damage.
3. Notifyyour Searsstoreimmediately ffa part ismiss-
ingor damaged.
NOTE: A rattle-likenoise in a powerhead with an
empty oiltank is a nori-nal_ondition caused bythe
filtermoving against the wall of the tank.
KEY NO.
1
2
3
4
CARTON CONTENTS: QTY,
Powerhead 1
Guide Bar 1
Scabbard 1
Chain 1
Operator's Manual (Not Shown) 1
i i im ii " ....I............
i; , .... ,,,, ,,,ll i
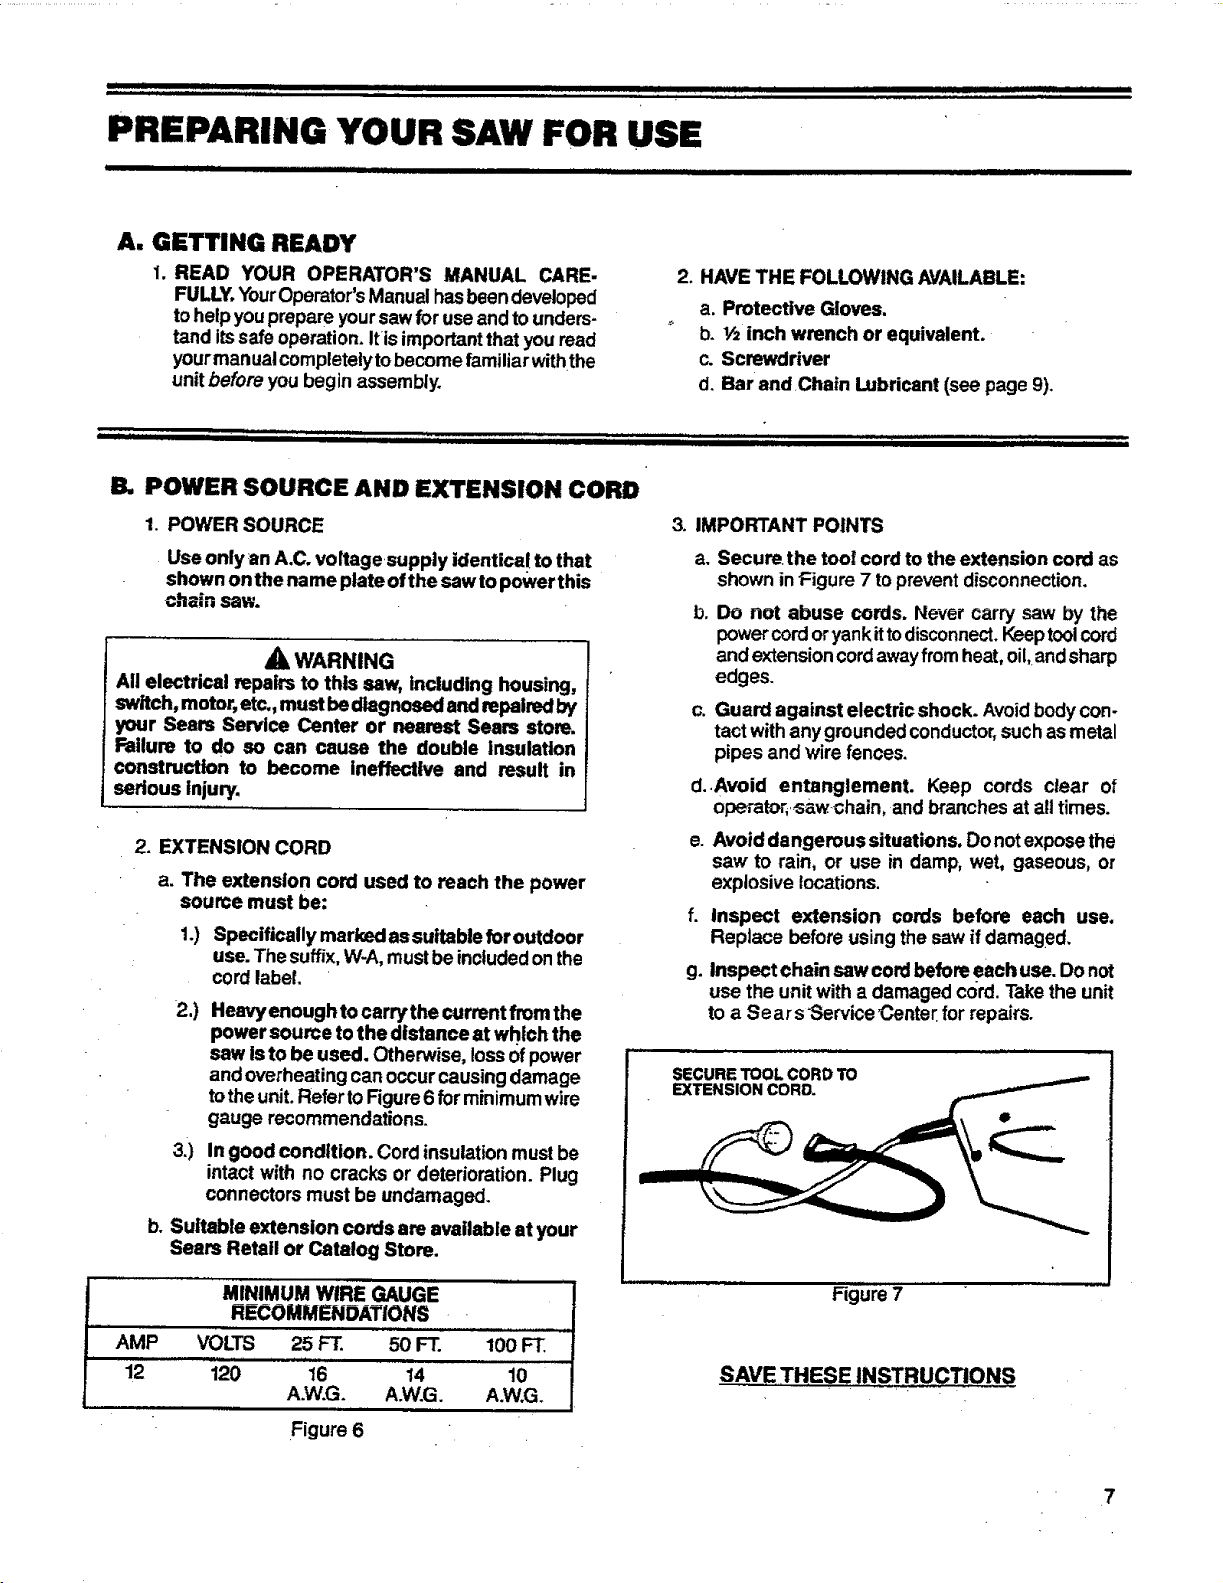
PREPARING YOUR SAW FOR USE
iiiiiiiiiiii
A. GETTING READY
I. READ YOUR OPERATOR'S MANUAL CARE-
FULLY.YourOperator'sManualhasbeendeveloped
tohelpyouprepare yoursawfor useand to unders-
tand itssafeoperation. Iris importantthat you read
yourmanuat completelytobecome familiarwiththe
unitbefore you begin assembly.
2. HAVE THE FOLLOWING AVAILABLE:
a. Protective Gloves.
b. ½ inch wrench or equivalent.
c. Screwdriver
d. Bar and Chain Lubricant (see page 9).
....... J,,_,,,,,ii illl iii ill i ill
ii ,,,,,,,,,,,,,,,
• ii iiii II i iii ii iii
B. POWER SOURCE AND EXTENSION CORD
1. POWER SOURCE
Use only an A.C. voftagesupply identica! tothat
shown onthe name plate ofthe saw topower this
chain saw.
_k WARNING
All elactdcal repairs to this saw, including housing,
switch, motor,etc., must bediagnosed andrepairedby
your Sears Service Center or nearest Sears store.
Failure to do so can cause the double insulation
construction to become ineffective and result in
serious injury.
2. EXTENSION CORD
a. The extension cord used to reach the power
source must be:
1.) Specifically marked as suitable for outdoor
use. The suffix,W-A,mustbeincludedon the
cordlabel.
2,) Heavyenough to carry'the current from the
power source to the distance at which the
saw isto be used. Otherwise, lossofpower
and overheating canoccur causingdamage
totheunit. RefertoFigure6 forminimum wire
gauge recommendations.
3.) In good condition. Cord insulationmustbe
intact with no cracks or deterioration. Plug
connectors must be undamaged.
b. Suitable extension cords are available at your
Seam Retail or Catalog Store.
MINIMUM WIRE GAUGE I
RECOMMENDATIONS
i
AMP VOLTS 25 FT. 50 FT. 100 F_. ]
r
12 120 16 14 10
A.W.G. A.W.G. A.W.G.
Figure 6
3. IMPORTANT POINTS
a. Secure, the tool cord to the extension cord as
shown inFigure 7 topreventdisconnection,
b,
Do not abuse cords. Never carry saw by the
powercordoryankittodisconnect,Keeptoolcord
and extensioncordawayfrom heat,oil,andsharp
edges.
c. Guard against electric shock. Avoidbodycon-
tact withanygroundedconductor,suchas metal
pipes and wire fences.
d. Avoid entanglement. Keep cords clear of
operator,sawchain, and branches at all times.
e. Avoid dangerous situations, Donorexposethe
saw to rain, or use in damp, wet, gaseous, or
explosive locations.
f. inspect extension cords before each use.
Replace before using thesaw if damaged,
g, Inspect chain saw cordbefore .eachuse. Do not
use the unitwith a damaged cord. Takethe unit
to a Sears Service Center.for repairs.
SECURE TOOL CORD TO
EXTENSION CORD._
. t
Figure 7
SAVE THESE INSTRUCTIONS
7
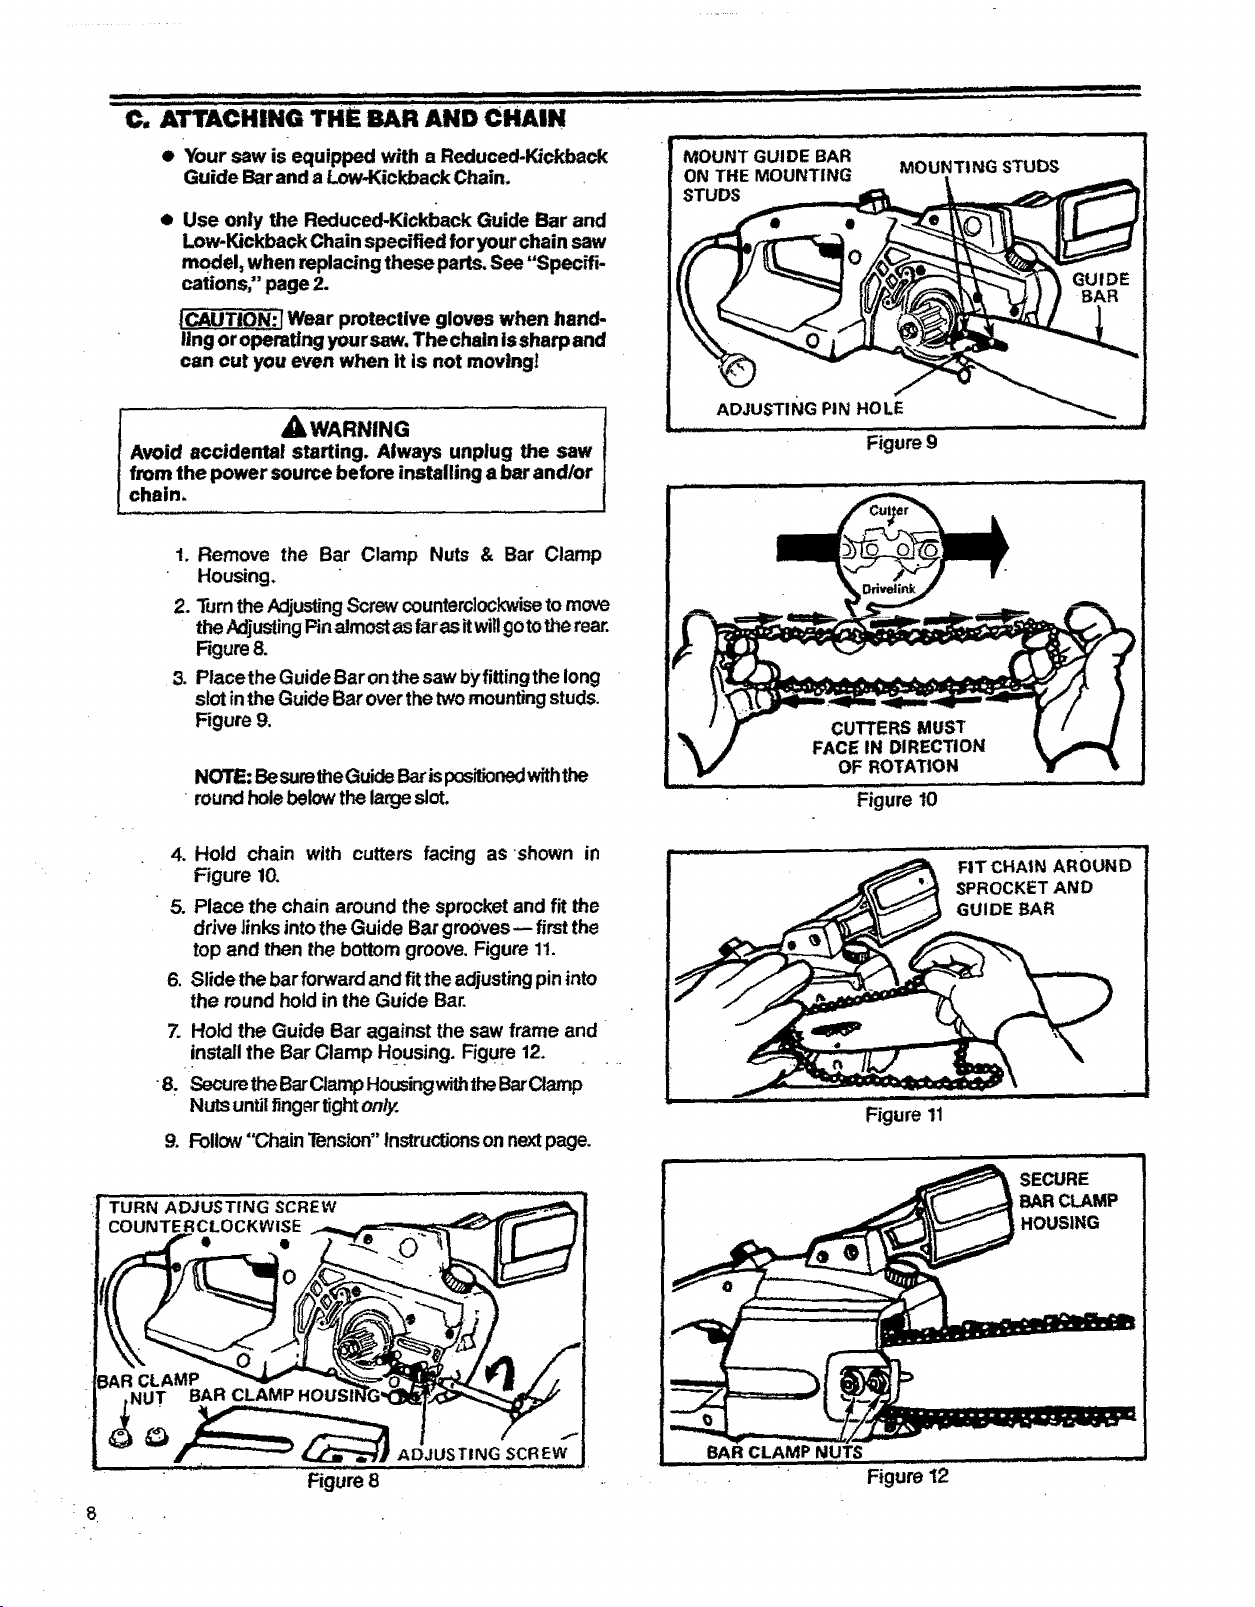
¢, ATTACHING THE BAR AND CHAIN
• Your saw is equipped with a Reduced-Kickback
Guide Barand a Low-Kickback Chain.
e
Use only the Reduced.Kickback Guide Bar and
Low-Kickback Chainspecified for yourchain saw
model: when replacing these parts, See "Specifi-
cations;' page 2.
|CAUTION._ Wear protective gloves when hand-
ling or operating yoursaw,Thechain issharp and
can cut you even when it is not moving!
l AWARNING
Avoid accidental starting. Always unplug the saw
from the power source before installing a bar and/or
chain.
1, Remove the Bar Clamp Nuts & Bar Clamp
Housing,
2. TurntheAdjustingScrewcounterclockwisetomove
theAdjustingPinalmostasParasitwillgotothe rear.
Figure8.
3 Placethe GuideBar on thesawbyfittingthe long
slotintheGuide Baroverthetwomountingstuds.
Figure 9,
NOTE: BesuretheGuideBarispositionedwiththe
• roundholebelowthe largeslot,
4. Hold chain with cutters facing as shown in
Figure 10.
5. Place the chain around the sprocketand fit the
drive JinksintotheGuide Bargrooves-- first the
top and then the bottomgroove.Figure 11.
6. Slide thebar forward and fitthe adjustingpininto
the roundhold in the Guide Bar.
7. Hold the Guide Bar against the saw frame and
installthe Bar Clamp Housing. Figure 12. . ..
8, 'SecuretheBarClampHousingwiththeBarClamp
Nuts untilfingertighton/y.
9. Follow"Chain Tension"Instructionsonnextpage.
TURN ADJUSTING SCREW
COUNTE
• Figure 8
Figureg
CUTTERSMUST
FACE IN DIRECTION
OF ROTATION
Figure 10
FIT CHAIN AROUND
SPROCKET AND
GUIDE BAR
Figure 11
,jr
SECURE
BARCLAMP
HOUSING
......BARCLAMP N_U.1"S , r _ ...... -
0 Figure 12
f
............. _! IIIIFIIIIIIII _IIIIILI II I I III _llili II I LIIIII I i III il I
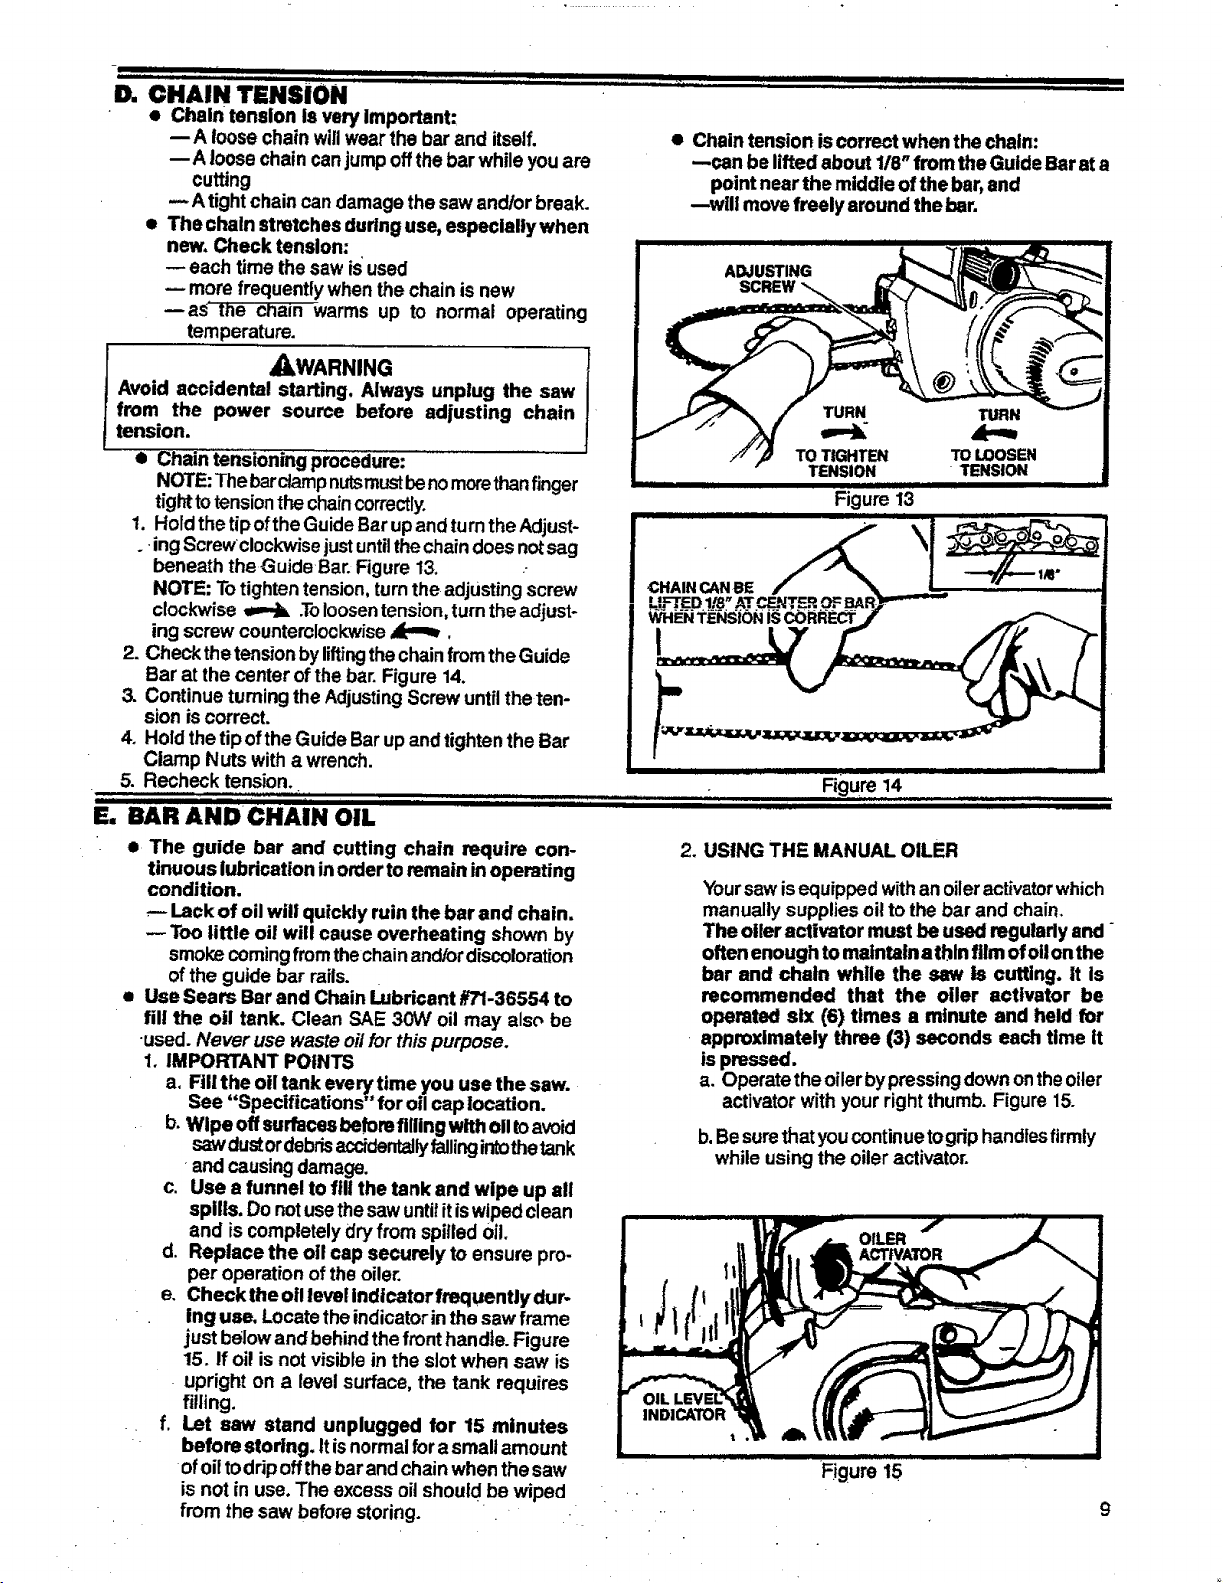
D. CHAIN TtNSi0N
* Chain tension Is very important:
--A loose chainwillwearthe bar and itself.
--A loosechain canjumpoffthe bar whileyou are
cutting
-- Atightchain candamage the saw andlorbreak.
e The chain stretches dudng use, especlallywhen
new. Check tension:
-- each time thesaw is'used
-- more frequently when the chainis new
--as' the chain warms up to normal operating
temperature.
_WARNING
Avoid accidental starting. Always unplug the saw
from the power source before adjusting chain
tension.
• Chain tensioning procedure:
NOTE:Thebardamp nutsmustbenomorethanfinger
tighttotensionthe chaincorrectly.
1. Holdthe tipofthe GuideBar upand turntheAdjust-
. ingScrewclockwise just untilthechaindoesnotsag
beneath theGuide Bar.Figure 13. .-
NOTE: Totighten tension,turnthe adjustingscrew
clockwise _ .Toloosentension,turntheadjust-
ing screw counterclockwise_.
2. Checkthetensionbyliftingthechainfrom theGuide
Bar at the center of the bar.Figure 14.
3. Continue turning the AdjustingScrew untiltheten-
sion iscorrect.
4. Hold thetip ofthe Guide Barup andtightenthe Bar
Clamp Nuts with a wrench.
5. Recheck tension.
E' BAR ANDCHAIN OIL
II III II III'1 I
Iipjiiiiiiiiiii Iiiiiiiiiiiiiii I II iiiii i iiiiiiiiiii *1 I i iiiiii
i , , , , i,
• Chain tension iscorrect when the chain:
--can be lifted about 118"from the Guide Bar ata
point near the middle of the bar,and
--will movefreely around the bar.
Figure 13
CHAIN, CAN BE t
Figure 14 ....
i i i [ i i ii
• The guide bar and cutting chain require con-
tinuous lubrication inorderto remainin operating
condition.
--- Lack of oil will quickly ruin the bar and chain.
-- Too little oil will cause overheating shown by
smokecomingfrom thechainand/ordiscoloration
ofthe guide bar rails.
• Use Sears Bar and Chain Lubricant #71-36554 to
fill the oil tank. Clean SAE 30W oil may also be
-used. Never use waste oi/for thispurpose.
1. IMPORTANT POINTS
a. RI! the oil tank every time you use the saw.
See "Specifications" for oilcap location.
b. Wipe offsurfacesbe_reflliing with oiltoavoid
sawdust ordebrisaccidentallyfallingintothetank
•andcausingdamage.
c. Use a funnel to fill the tank and wipe up all
spills. Do notusethesawuntilitiswipedclean
and iscompletely dry from spilled oil.
d. Replace the oil cap securely to ensure pro-
per operation ofthe oiler.
e. Check the otl level indicator frequentJydur-
ing use. Locatetheindicatorinthe sawframe
just belowand behindthe front handte. Figure
15. If oil is not visible in the slot when saw is
upright on a level surface, the tank requires
filling.
f. Let saw stand unplugged for 15 minutes
before storing, Itisnormal fora small amount
ofoiltodripoffthebarand chainwhen thesaw
is not {n use. The excess oil should be wiped
from thesaw beforestoring.
2. USING THE MANUAL OILER
Yoursaw isequipped withanoileractivatorwhich
manually supplies oilto the bar and chain.
The oiler activator must be used regularly and-
often enough to maintain athin film ofoilon the
bar and chatn whlle the saw Is cutting. It is
recommended that the oiler activator be
operated six {6) times a minute and held for
approximately three (3) seconds each time It
is pressed.
a. Operate the oilerbypressingdownontheoiler
activator with your rightthumb. Figure 15.
b. Besurethatyoucontinuetogrip handlesfirmly
while using the oiler activator.
Figure 15

• " i i ,i = "'=' " '_1 ,......., i iii a • , I IIIII II =_1 II
USING YOUR SAW
A. CONTROL DEVICES
Understanding the control devices on your saw is
an Important part of learning how to properly and
safely operate the unit. Figure 16.
OIL
FRONT HANDLE ACTIVATOR LOCKJOUT
OIL REAR
LEVEL HANDLE
INDICATOR
J J JU:L_L__ __
,
.
3_
The Trigger Switch startsor stopsthe motorand is
located in the rear handle. The Trigger Switch is
designed tobe used with the LockoutButton.
The Lockout Button isa controlfeaturedesignedto
prevent the motor from being accidently started.
Whentherear handle isgripped ina normalcutting
position,theLockoutButtoncan bepushedinbythe
thumb permitting the index finger to squeeze the
Trigger.Itis not necessary to maintainpressureon
the Lockout button once the Trigger has been
engaged.
The Front and Rear handles arethesupportswhich
allowyoutogripthesaw inthe normalcutting position.
Yourgriponthehandles,ismostimportantbecausepro-
pergripgivesyoumaximum abilitytocontrolthesawfor
safeoperation.See Figure3 for propergrip.
B. PRE-OPERATION CHECKS
Before operating your unit always:
1. ,-Check over safety rules and precautions in
this manual. Make certain you completely
understand and follow each one.
2. ,--'Checkpersonal protective gear. Alwaysuseeye,
hearing,andheadprotectiondevices;safetyfootwe_
protectivegloves,andsnugtiffingclothing.
3. ,.- Checkthe workama. Keep children,bystanders,
and animalsasafedistanceawayfrom theworkarea
when startingor operatingthe saw -- a minimumof
30 feet.
4. ,,,,Check weather conditions. Do not use your
•saw inbad weather,suchas strongwind, electrical
storms,rain,snow,etc.,orat night.
5, .,,-Check the unit for loose bolts, nuts or fit-
tings. Tighten, repair, or replace parts as
necessary.
6. _ Check tool cord and extension cord. In-
spectall wire insulationwith care. Do notoperate
with cracked or deteriorated insulation.Take the
saw toyour Sears Service Center forallelectrical
repairs
7. ,.,Check the saw chain. The chain Should be
sharp and at the correct tension.
8. ,.-Check the oil tank. The tank should be.filled
each time the saw is used.
9. ,.-Check the handles. Handles should be dry
and free of oil.
IIIIII1[11 IIIII II ,lib I
C. STARTING AND STOPPING THE SAW
1.Connect the saw to a proper electric power
source.
2. Start the saw by pushing the Lockout Button
with your right thumb and squeezing the Trig-
ger Switch with your right index finger.
NOTE It is not necessary to continue pressing
the Lockout Button once the Trigger Switch
can be operated,
3. Stop the saw by releasing the Trigger Switch.
, " ' '" =,,,
4. Unplug the connection to the power source.
ICAUTION---_.Danmge to the trigger switch can
occur tfthe switch is turned on and off while the
saw Is cuffing. Operate the trigger with firm and
decisive action. The saw must be running at ful!
speed before _rtlng the cut and turned off only
after leavingthe matedsi to avoid damage.
0 • .
" i / IIII i HI i I
uSiNG THE POWER SHARP ® SYSTEM
(MODEL 358.34160 ONLY)
-- IIIIIIUIIIIIII I I II I I I I I
II III I I IIII!I II | II Ii I I
Modet358,34160isequippedwithaPowerSharp® Systemthat
willperformappro_Jma_ly80%ofthesharpeningnecessaPjfor
thesaw chain.The PowerSharp® Systemusesa built+ingrin-
dingstonetosharpenthecuttertopplatesandsetdepthgauges.
Asthebuilt-insharpenerisused,thecuttersideplatesgraduaity
will bealtered.Aboutevery3rd to5thtimethe PowerSharp®
Systemisused,handfilingisrequiredtocorrectthecutterside
platesanddepthgauges+
• Replace the sharpening Stone when a new
Power Sharp+ chain is installed, The sharpen-
ing stone willwear tothe shape oftheworn chain
and willcause excessiveweartoa newchainifnot
replaced. Replacement Power Sharp_+Chain,
Stock No. 71-3618, comes suppliedwith a Shar-
pening Stone Replacement. Referto replacement
instructionsinthissection.
tCAUTIONilAIways wear gloves when handling
the chain. The chain is sharp and can cut
you easily, even when it is not moving.
e Sharpen the saw chain when:
--wood chips become small and powdery.
Wood chips made by the chain should be
about the size of the teeth of the chain.
--saw cuts to one side.
--saw has to be forced through the cut.
• Removethe sharpeningstone ifastandard orcon-
ventional, chisel-type chain issubstituted for the
PowerSha_ ®Chain. See inst.j._Jonsfor,_moving
thesharpeningstonebelow.Useareplacementchain,
StockNo.71-361ZFoliowstandard chainsharpening
instructionsintheMaintenanceSection.
iiiiiiiiiii i iiiiiiiiiiiiiiiiiiiiiii
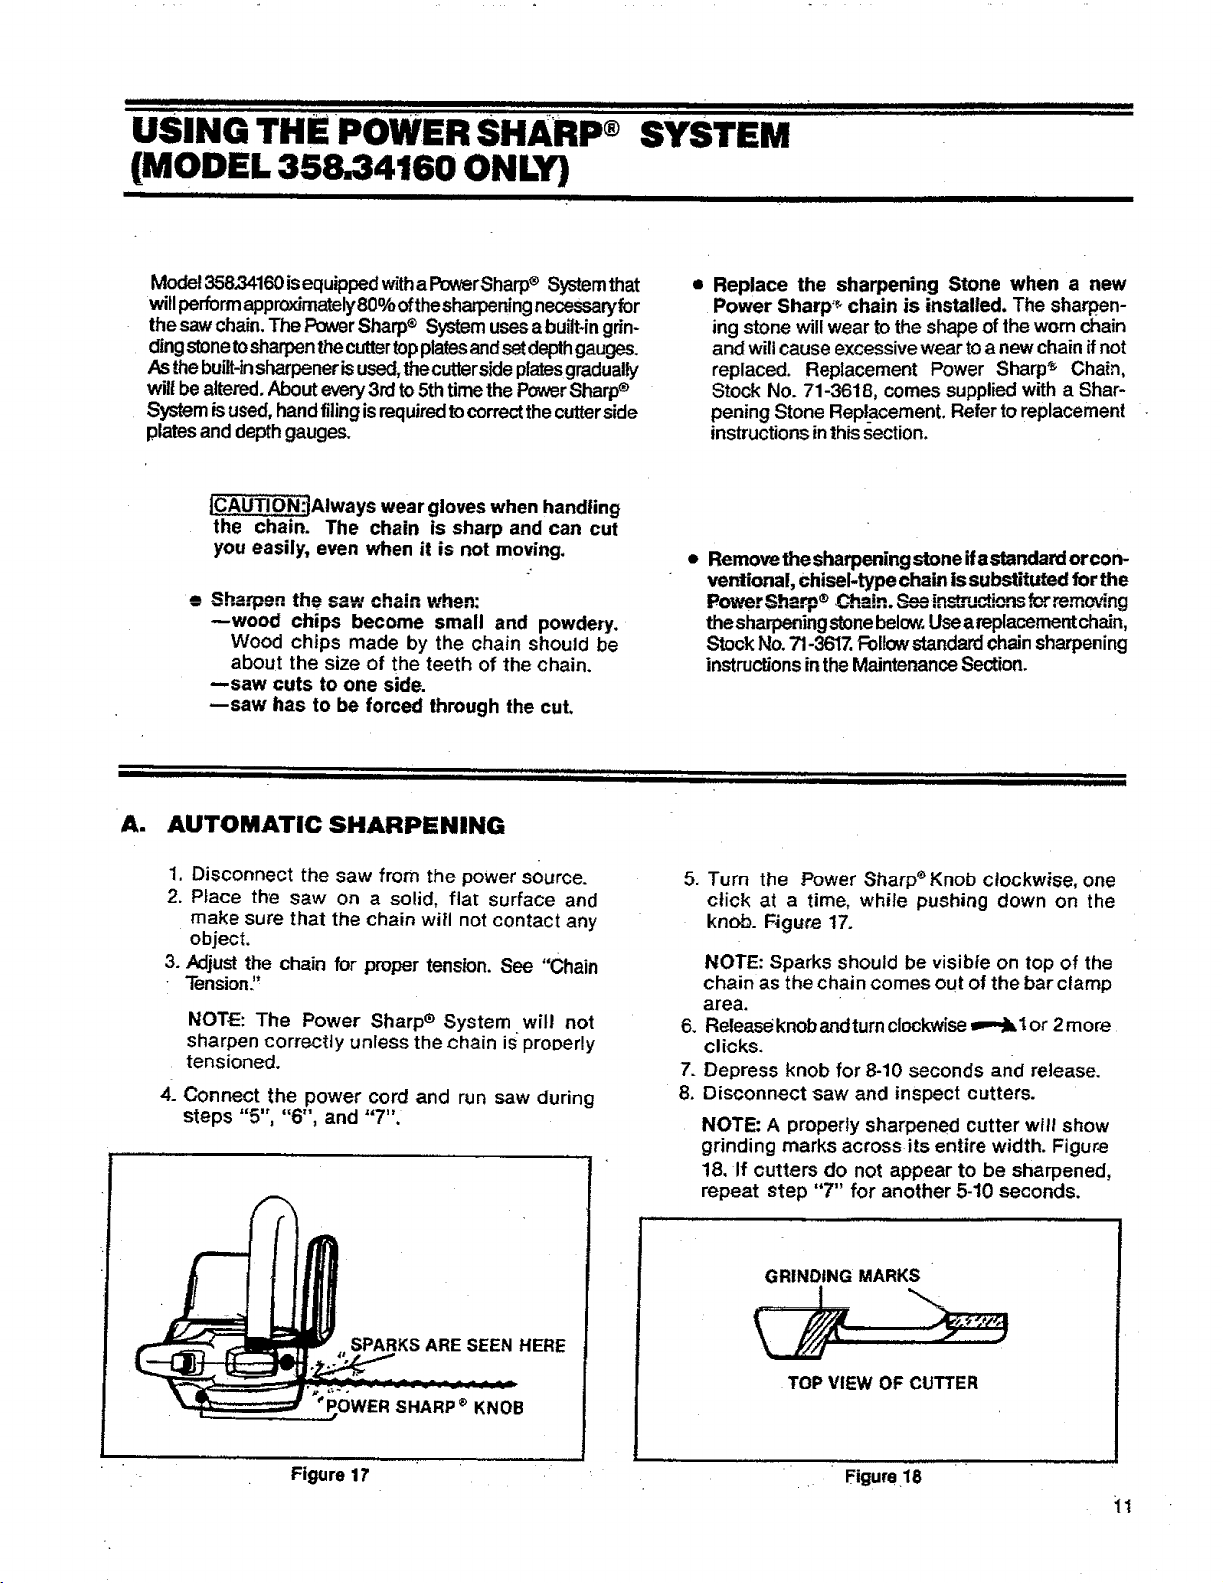
A. AUTOMATIC SHARPENING
1. Disconnect the saw from the power source.
2. Place the saw on a solid, flat surface and
make sure that the chain will not contact any
object.
3. Adjust the chain for proper tension. See "Chain
Tension."
NOTE: The Power Sharpe System will not
sharpen correctly unless the chain is properly
tensioned.
4. Connect the power cord and run saw during
steps "5", "6", and "7".
SPARKS ARE SEEN HERE
'PC)WER SHARP _ KNOB
Figure 17
.
.
7+
8.
, JllJ i
II II III IIIIIIII II I " .l + II III !
Turn the Power Sharp +Knob clockwise, one
click at a time, while pushing down on the
knob. F4gut_ 17.
NOTE: Sparks should be visible on top of the
chain as the chain comes out of the bar clamp
area.
Release knobandturnclockwise _ 1or 2more
clicks.
Depress knob for 8-10 seconds and release.
Disconnect saw and inspect cutters.
NOTE: A properly sharpened cutter will show
grinding marks across its entire width. Figure
18. If cutters do not appear to be sharpened,
repeat step "7" for another 5-10 seconds.
GRINDING MARKS
TOP VIEW OF CUTTER
, ,+,, • L,
Figure.18
I I II I • I I i i i IIIIIIIIIIIIIII[ . . . n JllllllllllllllllllI I I I II I I. I I II I • I I /
S_
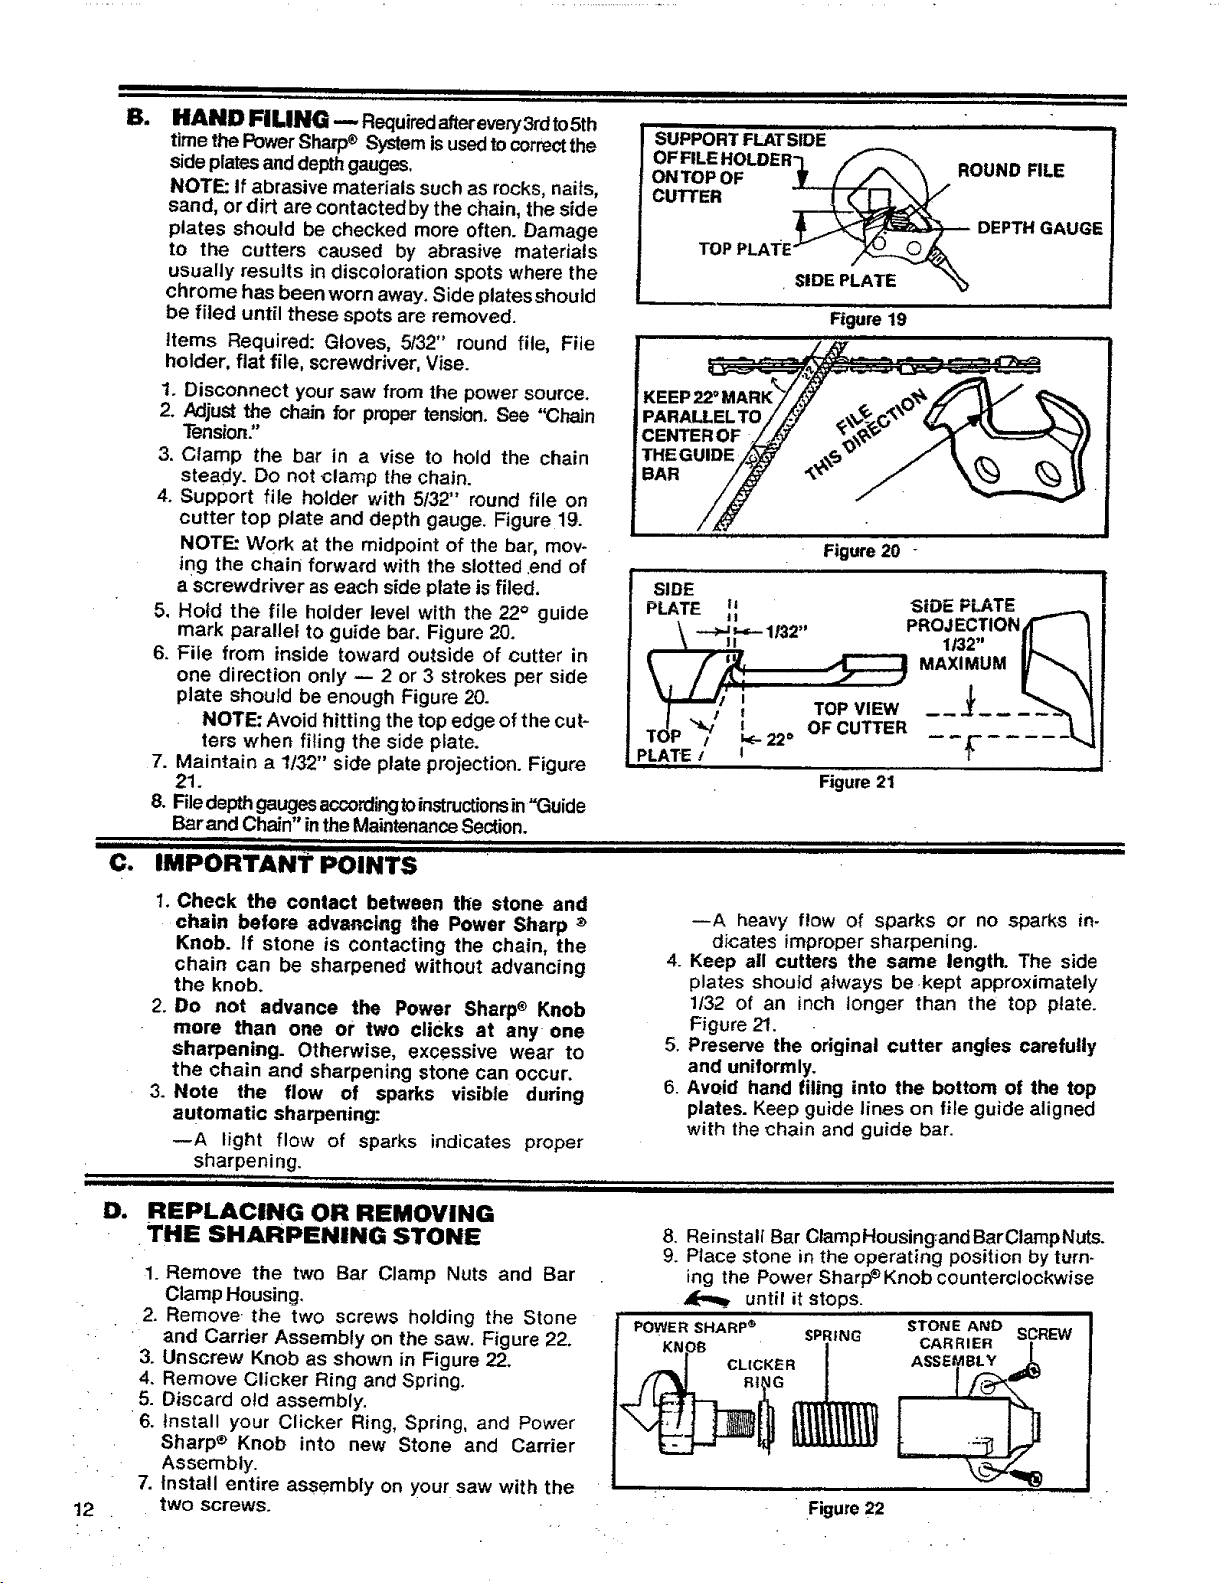
HAND FILING--, Requiredafterevery3rdto5th
time the PowerSharp® Systemisusedtocorrectthe
side platesanddepthgauges,
NOTE: tf abrasive materials such as rocks, naits,
sand, or dirt are contactedby the chain, the side
plates should be checked more often. Damage
to the cutters caused by abrasive materials
usually results in discoloration spots where the
chrome has been worn away. Side plates should
OFFILEHOLDER"I_ _ aOUND FILE
ONTOPOF ____'_ _t ,,.'"
CUTTER
pLATE_ DEPTH GAUGE
TOP
SIDE PLATE "_
Ill=
be filed until these spots are removed.
Items Required: Gloves, 5/32" round file, Fite
holder, flat file, screwdriver, Vise.
1. Disconnect your saw from the power source.
2. Adjustthe chain for propertension. See "Chain
Tension:'
3, Clamp the bar in a vise to hold the chain
steady. Do not clamp the chain.
4. Support file holder with 5/32" round file on
cutter top plate and depth gauge. Figure 19.
NOTE: Work at the midpoint of the bar, mov-
ing the chain forward with the slotted ,end of
a screwdriver as each side plate is filed,
5, Hofd the file holder level with the 22° guide
mark parallel to guide bar. Figure 20.
6. File from inside toward outside of cutter in
one direction only -- 2 or 3 strokes per side
plate should be enough Figure 20.
NOTE: Avoid hitting the top edge of the cut-
ters when filing the side p_ate.
7. Maintain a 1132" side plate projection. Figure
21.
8. Filedepth gaugesaccordingtoinstructionsin"Guide
Barand Chain" in the MaintenanceSection.
C. IMPORTANT POINTS
ii ii iiill i iiii i
DI
,
12
1. Check the contact between the stone and
chain before advancing the Power Sharp _
Knob. If stone is contacting the chain, the
chain can be sharpened without advancing
the knob.
2. Do not advance the Power Sharp® Knob
more than one or two clicks at any one
sharpening. Otherwise, excessive wear to
the chain and sharpening stone can occur.
3. Note the flow of sparks visible during
automatic sharpening:
_A light flow of sparks indicates proper
sharpening.
--A heavy flow Of sparks or no sparks in-
dicates improper sharpening.
4. Keep all cutters the same length. The side
plates shou}d always bekept approximately
1132 of an inch longer than the top plate.
Figure 21.
5. Preserve the original cutter angles carefully
and uniformly.
6. Avoid hand filing into the bottom of the top
plates. Keep guide lines on file guide aligned
with the chain and guide bar.
." _':,'_ ' .._ - . -_ _,",I,, ; -
REPLACING OR REMOVING
THE SHARPENING STONE
I. Remove the two Bar Clamp Nuts and Bar
Clamp Housing.
2. Remove • the two screws holding the Stone
• and Carrier Assembly on the saw. Figure 22.
3. Unscrew Knob as shown in Figure 22.
4. Remove Clicker Ring and Spring.
5. Discard old assembly.
6. Install your Clicker Ring, Spring, anc! Power
Sharp ® Knob into new Stone and Carrier
Assembly.
Install entire assembly on your saw with the
two screws.
,
9.
POWER SHARP ®
KNOB
J CLICKER
Reinstal! Bar ClampHousing:andBarClampNuts.
Place stone in the operating position by turn-
ing the Power Sharp _ Knob counterclockwise
until it stops.
STONE ANO SCREW
SPRING
CARRIER l
ASSEMBLY ,L,
Figure 22
TYPES OF CUTTING
I IIIIIIIIIIIIIIII IIIIIII I IIIIIIIIIIIIIIIIIIIIIIIII lJ . II I IIIIIIIIIIIIIII II I IIIIIIIIIWIIIIJ III I
, , ,!
A. BASIC CUTTING TECHNIQUE
1. IMPORTANT POINTS
a, Cut wood only. Do not cut metal, plastics,
masonry,non-woodbuildingmaterials,etc.Donot
useyoursawtopryorshoveawaylimbs,rootsor
otherobjects+
b. Stop the saw if the chain strikes a foreign
object. Inspecttheunitandrepairorreplaceparts
as necesary+
c. Keep the chain out of dirt and sand. Even a
small amountofdirtwillquickly dull a chain and
thus, increasethe possibilityof kickback.
A KICKBACKWARNING
Kickback can occur when the moving chain contacts
an object atthe upperportionofthetipof theguidebar
orwhen the woodcloses inand pinches thesawochain
in the cut. Contact at the upperportion ofthetip ofthe
guide barcan caLU+Sethe chaintod{gintothe object and
stop the chain foPan instant. The result is a lightning
fast, reversereaction whichkicksthe guide bar up and
back toward theoperator, ff the saw chain is pinched
along the top of the guide bar,+the guide bar can be
drivenrapid/ybacktowardthe operator..Eitherofthese
remmtionscan cause loss of saw control which can
result inserious injury.
2. UNDERSTAND REACTIVE FORCES
Pinch-Kickback and Pull-in occur when the chain
is suddenly stopped by being pinched, caught,
or bycontacting aforeignobject in therWOOd.This
results in a reversalof the chain force used tocut
wood and causes the sawto move in the opposite
directionofchainrotation.Eitherreactioncan result
inlossofcontrolandpossibleseriousinjury+
* Pinch-Kickback:
-- occurswhenthechain, ontopofthe bar,issud-
denlystoppedwhen the topof the bar isused
for cutting.
_drives thesawstraightbacktowardtheoperator.
* Pull-in:
-- occurswhenthechainonthe bottomofthebar
is suddenlystopped
--pulls thesawforward.
I t I I, ++'_ _
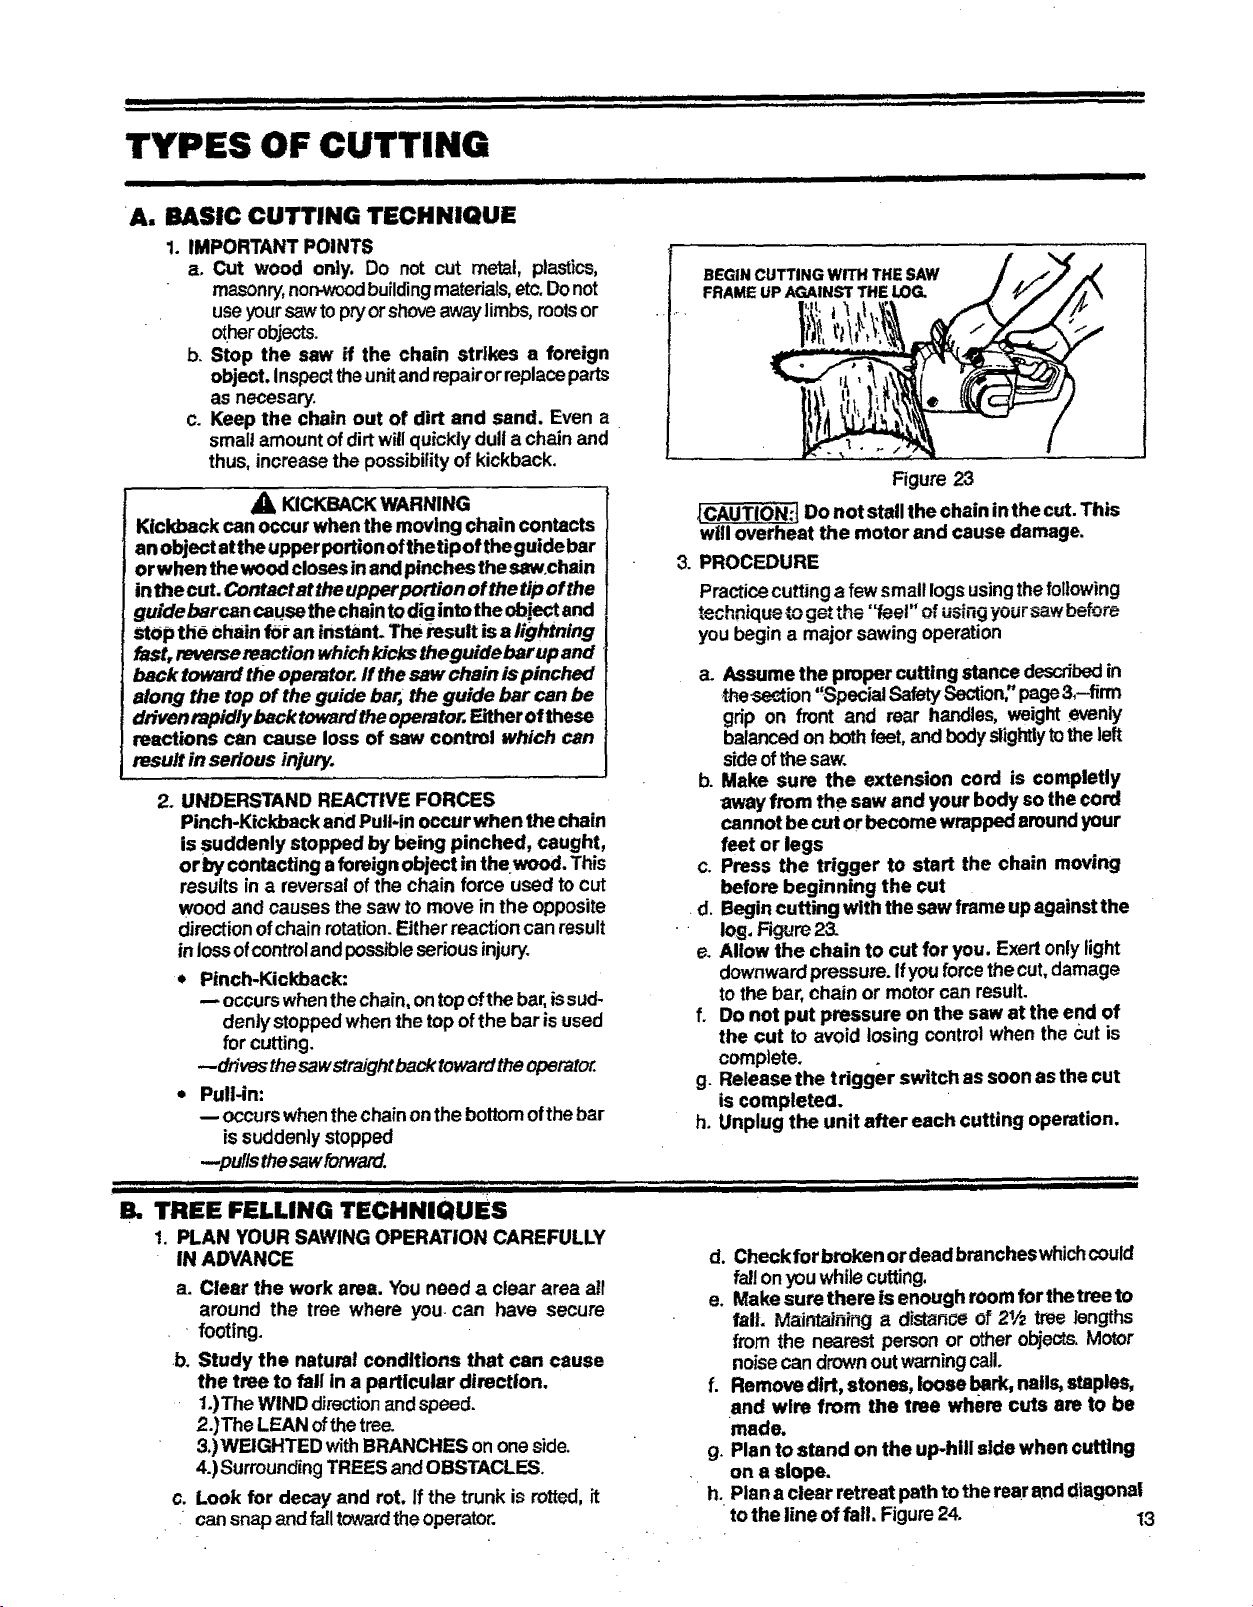
BEGIN CUTTING WITH THE SAW
FRAME UP AGAINST THE LOG.
Figure 23
J_CAUT!0"N:tDo not stall the chain in the cut. This
will overheat the motor and cause damage.
3. PROCEDURE
Practicecutting a few small logs usingthefollowing
f ,.,i-, " _+.+_,..t 4+÷
te,.,,nlque _ _e, ,h_ '_eel" of using yoursaw before
you begin a majorsawing operation
a. Assume the proper cutting stance describedin
.thesect+ion"Special SafetySection"page&-firm
grip on front and rear handles, weight+evenly
balancedonbothfeet,and bodyslightlytotheleft
sideofthesaw.
b+Make sure the extension cord is completly
away from the saw and your body so the cord
cannot becut or become wrapped around your
feet or legs
c+Press the trigger to start the chain moving
before beginning the cut
•d. Begin cutting with the saw frame up againstthe
• log, Fig,jre 23.
e+Allow the chain to cut for you. Exertonlylight
downwardpressure.If youforcethe cut,damage
to the bar, chain or motorcan result+
f. Do not put pressure on the saw at the end of
the cut to avoid losing controlwhen the Cutis
complete.
g. Release the trigger switch as soon as the cut
is complete(].
h. Unplug the unit after each cutting operation.
i • • i
111111111i i
B. TREE FELLING TECHNIQUES
1. PLAN YOUR SAWING OPERATION CAREFULLY
IN ADVANCE
a. Clear the work area. You need a clear area all
around the tree where you+can have secure
footing+
+b+Study the natural conditions that can cause
the tree to fall in a particular direction,
1.)The WIND directionand speed+
2.)The LEAN ofthetree.
&)WEIGHTED withBRANCHES on one side.
4.) SurroundingTREES and OBSTACLES.
c. Look for decay and rot. If the trunk is rotted, it
• cansnap and falltowardtheoperator.
d. Check for broken or dead brancheswhichcould
fallonyouwhilecutting,
e. Make sure there is enough room for thetree to
fall. Maintaining a distance of 21/2tree lengths
from the nearest person or otherobjects.Motor
noisecan drownoutwarningcall.
f. Remove dirt, stones, loose bark, nails, staples,
and wire from the tree where cuts are to be
made.
g. Plan to stand on the up-hill side when cuffing
on a slope.
h. Plan a clear retreat path to the rearand diagonal
tothe line of fall. Figure24. 13
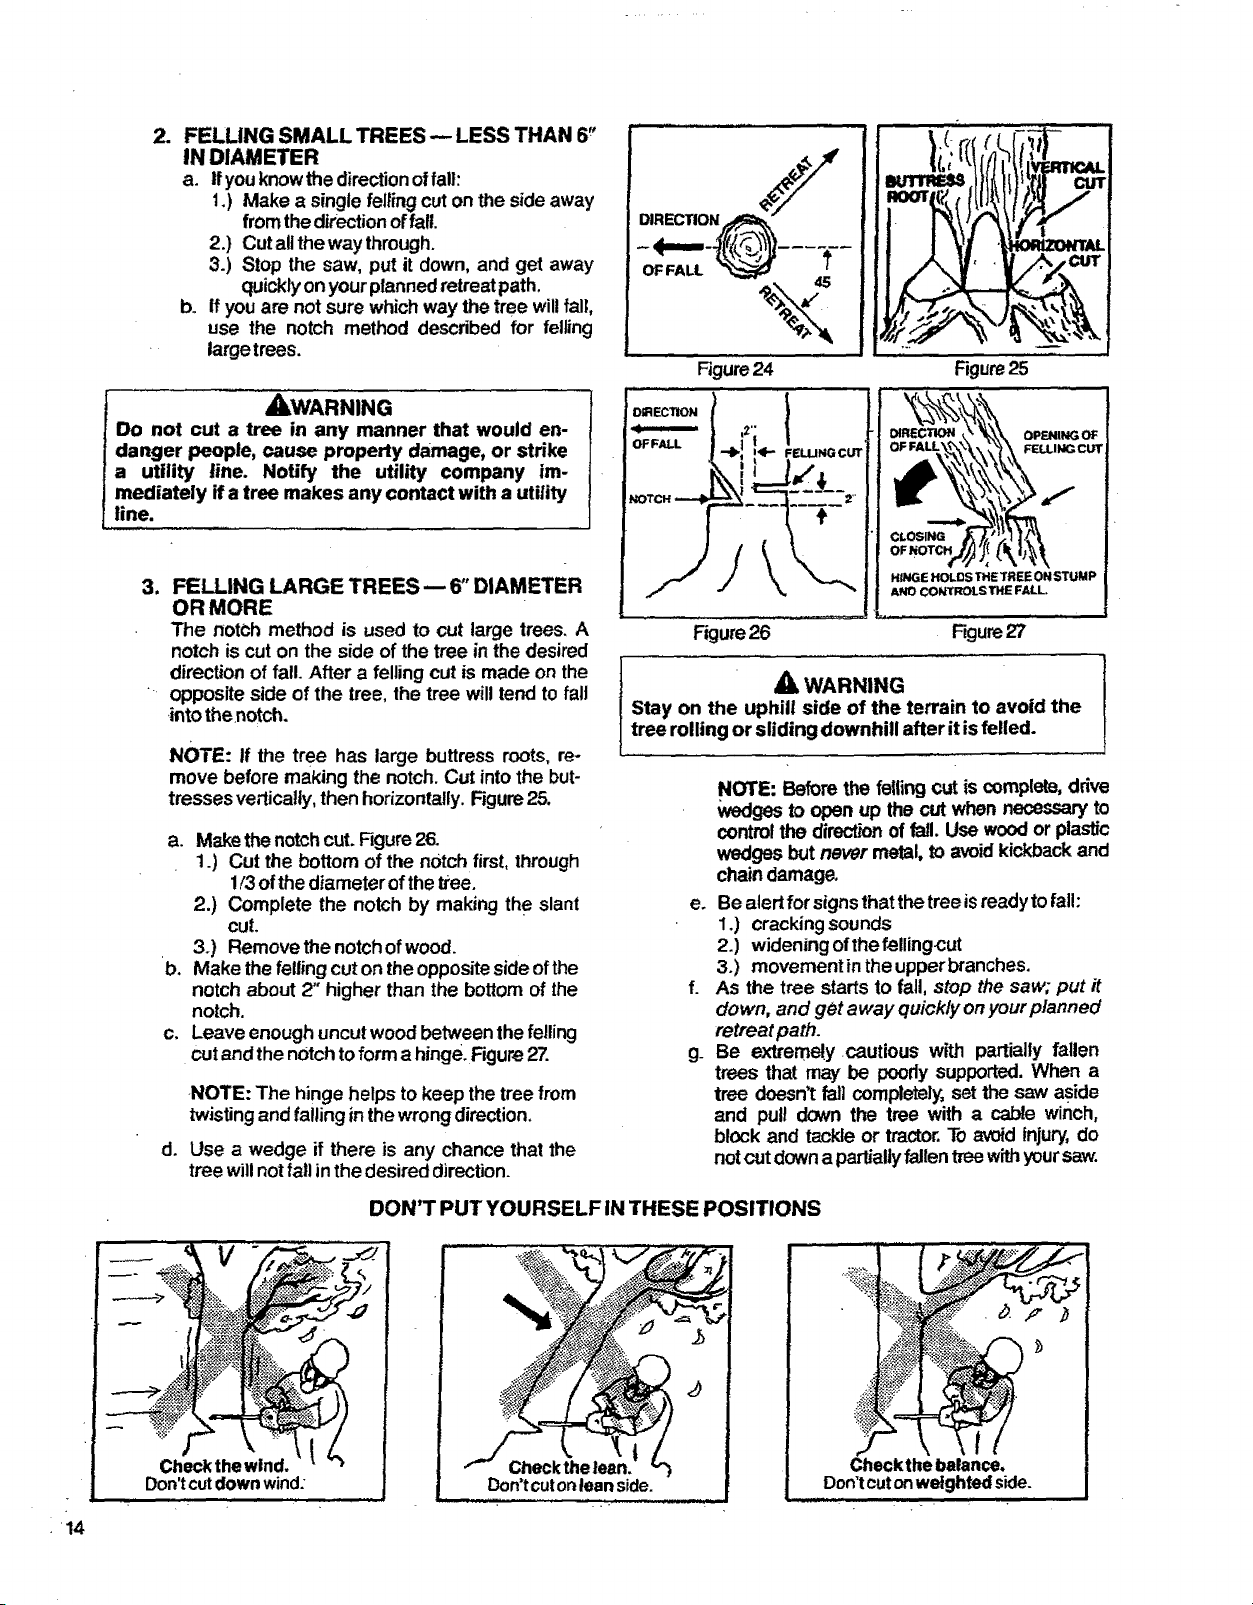
g FELLING SMALL TREES _ LESS THAN 6_'
IN DIAMETER
a. Ifyouknowthe directionoffall:
1.) Make a single felting cuton the sideaway
from the directionoffall
2.) Cut all the way through.
3.) Stop the saw, put it down, and get away
quickly on your planned retreat path.
b. If you are not sure whichway thetree willfall,
use the notch method described for felling
large trees.
AWARNING
Do not cut a tree in any manner that would en-
danger people, cause property damage, or strike
a utility line. Notify the utility company im-
mediately if a tree makes any contact with a utility
line.
,_, 4s
Figure24 Figure25
3. FELLING LARGE TREES-- 6" DIAMETER
OR MORE
The notch method is used to cut large trees, A
notch is cut on the side of the tree in the desired
direction of fall. After a felling cut is made on the
opposite side of the tree, the tree will tend to fall
into thenotch.
NOTE: if the tree has large buttress roots, re-
move before making the notch Cut intothe but-
tressesve,_calty, then horizontally Figure25.
a. Makethenotchcut. Figure26.
1) Cut the bottom of the n0tch first,through
1/3ofthe diameterof thetree.
2.) Complete the notch by making the slant
cut.
3.) Remove the notchof wood.
b, Make the feiling cuton theopposite side ofthe
notch about 2" higher than the bottom of the
notch.
c. Leave enough uncut wood between thefelling
cutand the notch to form a hinge. Figure 27.
d,
NOTE: The hinge helps to keep the treefrom
twistingand failinginthewrong direction.
Use a wedge if there is any chance that the
tree wil!notfall inthe desired direction
HINGE HOLDS THE TREE ON STUMP
ANO CONTROLS THE FALL.
Figure26 F_jure27
A WARNING
Stay on the uphill side of the terrain to avoid the
tree rolling or sliding downhill after itisfelled.
e_
g_
NOTE: Beforethe fellingcut is complete,drive
wedges to open up the cut when necessaryto
controlthe directionoffall. Use woodor plastic
wedges but never metal, toavoidkickbackand
chaindamage,
Bealert for signsthatthetree isreadytofall:
1.) cracking sounds
2.) widening ofthefelling<:ut
3.) movement intheupperbranches.
As the tree starts to fall, stop the saw; put it
down, and get away quickly onyour planned
retreat path.
Be extreme!y cautious with partially fallen
trees that may be poody supported.When a
tree doesn'tfall completely, set the saw aside
and pull down the tree with a cable winch,
block and tackle or tractor.To _oid injury,do
notcutdowna partiallyfallentreewithyoursaw.
DON'T PUT YOURSELF IN THESE POSITIONS
Checkthewind.
Don'tcutdownwind:
i 14
Check the lean.
Don'tcut onlean side.
Checkthebalance.
Don't cutonweighted side.
iiiii i iii I ii,,,,,,,,,,,,,,,,,j ii i IIIIIIIIH
C. BUCKING
Bucking is the term used for cuffing a fallen
tree to the desired logsize.
1. IMPORTANT POIN_
a. Cutonlyone log ata time,
b. Cut shattered wood very carefully. Sharp
pieces of wood could be flung toward the
operator.
c. Use a sawhorse to cut small logs. Never
allow another personto holdthe logwhilecut-
tingand never holdthelogwithyourlegortoot.
d. Do not cut in an area where logs, limbs and
roots are tangled such as in a blown down
area. Dragthe logsintoa cleararea beforecut-
ting by pulling out exposed and cleared logs
first.
e. Make the first bucking cut 1/3 of the way
through the logand finish with a.2/3 cut on
the opposite side. As the logis being cut, it
will tend to bend. The saw can become
pinched or hung in the log if you make the first
cutdeeper than 1/3ofthe diameter of thelog.
f. "Give special attention to logs under strain
to prevent the saw from pinching, Make the
first cut on the pressure side to relieve the
stresson thelog. Figure28,
2. TYPES OF CUTTING USED (Rgure 29)
-- Overcutting - beginon the top sideof thelog
with the bottom of the saw against the log;
exert lightpressuredownward.
---Undercutting - beginon the underside ofthe
log withthe topofthesaw againstthelog;exert
light pressure upward. During undercutting,
the saw will tend topushback at you. Be pre-
pared for this reaction•and holdthe sawfirmly
tomaintain control.
1STCUTPRESSURESIDE
---t <---.
•o w ,... - _,_.J,, _ __-_ .__4,._L.___ _-___; "-'__mm¢_
2NDCUT
2ND CUT
4---
_t 1STCtrr PRESSURESIDE
"_a___.;__4. _ __'._. _ .
.......... Figure28
Figure29
Figure30
_WARNING
Never turn the saw upside down to undercut. The
saw cannot be controlled in this position.
,£kWARNING
If saw becomes pinched or hung in a log, don't try to
force it out. Youcould lose control ofthe saw resulting
in personal injury and/or damage to the saw.Stop the
sawanddrivea wedge ofplasticor woodintothec_until
saw can be removed eastly, Figure 30. Restart the saw
and carefully reenter the cut. To avoid kickback and
chaindamage, donot usea metalwedge.Donot attempt
to restart your saw when it ispinched or hung ina log.
3, BUCKING_WITHOUTA SUPPORT
a. Overcut with a 1/3diametercut.
• b. Roll logoverand finishwithanovercuL
1ST
CUT
tST
CUT
i _ i i,
Figure32
15
1
t
BUCKING-- USING ANOTHER LOG AS A
SUPPORT(Figure 31):
a. In areaA:
1.) Undercut 1/3oftheway throughthelog.
2.) Finishwith anovercut.
b. in areaB:
1.) Overcut, 1/3 ofthewaythroughthetog.
2.) Finishwithan undercut.
BUCKING-- USING A STAND (Figure 32):
a. inareaA:
t .) Undercut1/3 ofthewaythroughthelog.
2.) Rnish withan overcut.
b. Inarea B:
1.) Overcut 1i3ofthewaythroughthe log._
2.) Finishwithan undercut.
,_WARNING " •
Do not stand on the log being cut. Any portion can roll
causing Jossoffooting and control,
MAINTAIN SECURE FOOTING
i iiiiiiiiiii i i i _ i
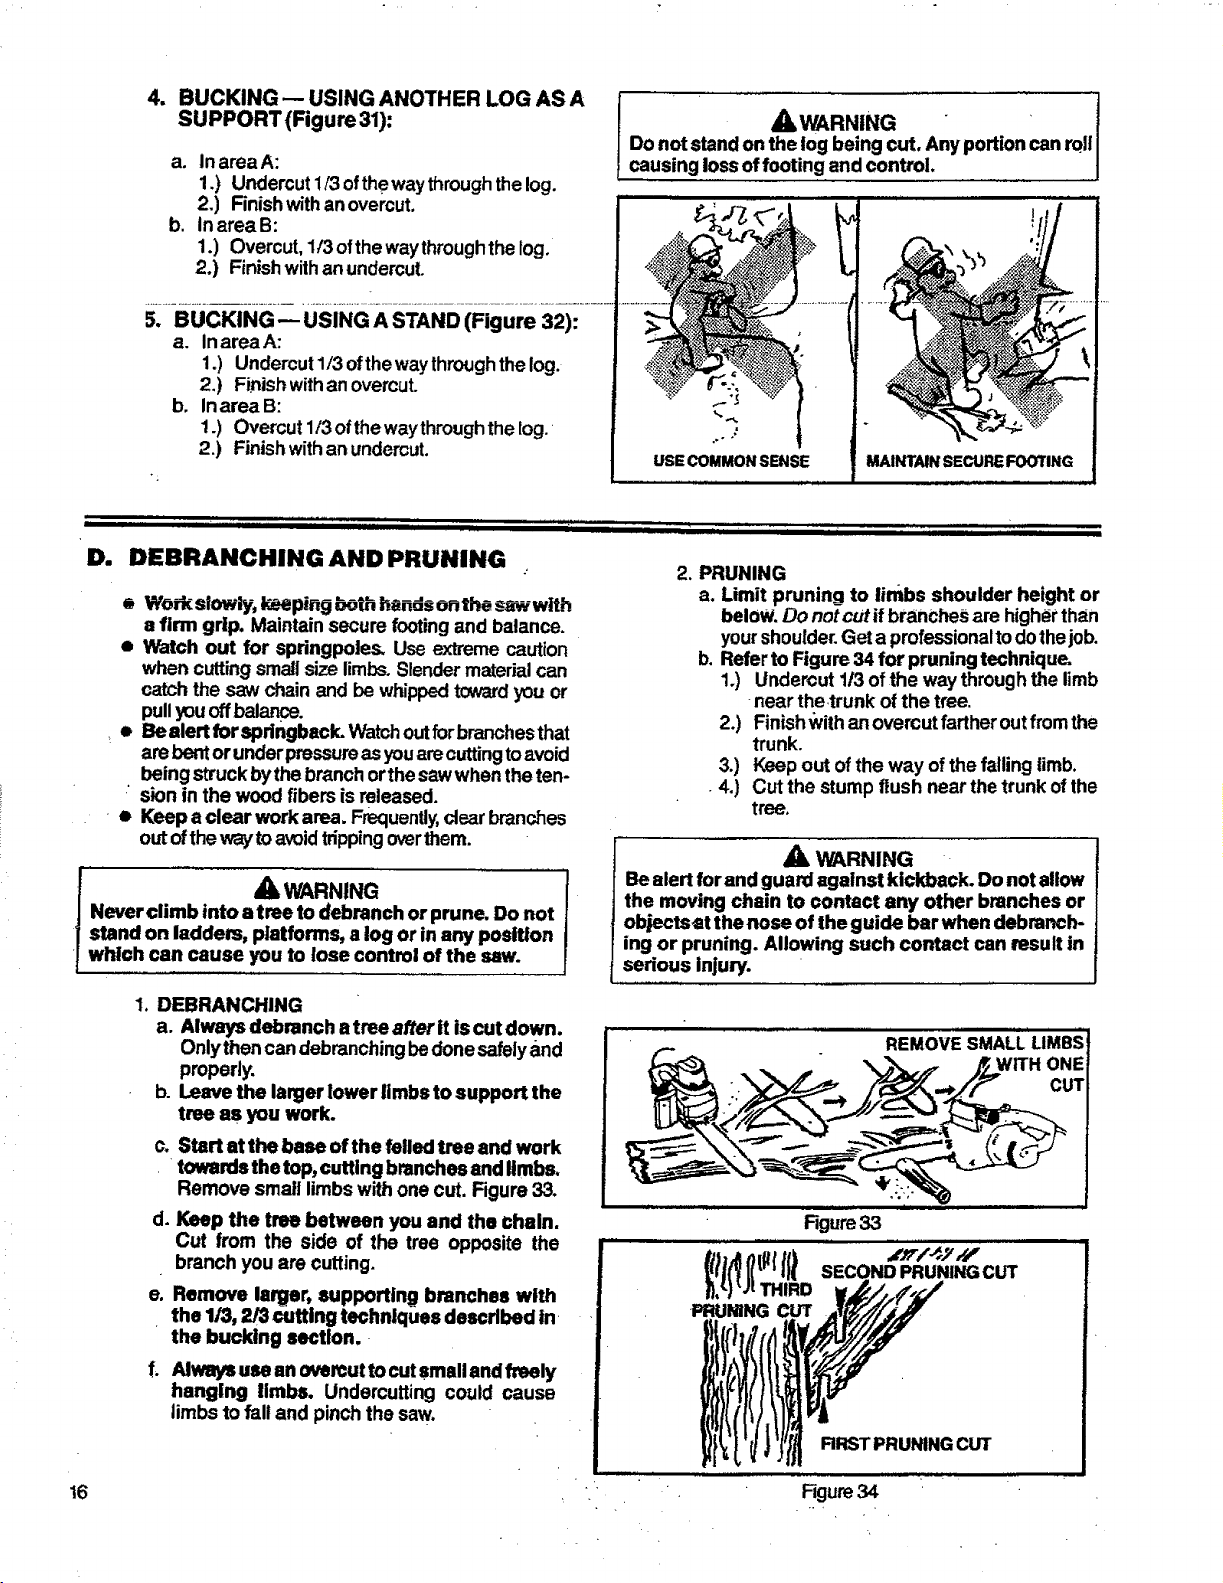
D. DEBRANCHING AND PRUNING
iiJ,uLi"
I
• Work slowly, keeping both hands onthe sawwith
a firm grip. Maintain secure footingand balance.
• Watch out for spdngpoles. Use extremecaution
when cutting smallsize limbs.Slendermatedal can
catch the saw chainand be whippedtowardyou or
pullyouoffbalance.
• Be alert for spdngbsck. Watchoutforbranchesthat
arebent orunderpressureasyouarecuttingtoavoid
being struck bythe branchorthe saw when theten-
sion in the wood fibers isreleased.
• Keep a clear work area. Frequently,dear branches
out oftheway_oavoidtrippingoverthem.
WARNING
Never climb into a tree to debranch or prune. Do not
stand on laddem, platforms, a log or in any posltTon
which can cause you to lose control of the saw.
k
i ii ' i i I II I | i I ii
2. PRUNING
a. Limit pruning to limbs shoulder height or
below. Do notcut ifbranches are higherthan
yourshoulder.Get a professionaltodothejob.
b. Refer to Figure 34 for pruning technique.
1.) Undercut 1/3of the way throughthe limb
near thetrunk of the tree.
2.) Finish_vithanovercut fartheroutfromthe
trunk.
3.) Keep out ofthe way of the fallinglimb.
4.) Cut the stump flush near thetrunkof the
tree.
A WARNING
Be alert forand guard against kickback. Do not allow
the moving chain to contact any other branches or
ob_=ctset the nose of the guide bar when debmnch-
ing or pruning. Allowing such contact can result in
serious Injury.
16
1. DEBRANCHING
a. Always debranch a tree after It iscut down.
Onlythen candebranchingbedonesafelyand
properly.
b. Leave the langerlower limbs to support the
tree as you work.
c. Start at the base of the felled tree and work
towards the top,cutting branches and limbs.
Remove small limbswith one cut. Figure33.
d. Keep the tree between you and the chain.
Cut from the side of the tree opposite the
branch you are cutting.
e. Remove larger, supporting branches with
the 1/3, 2/3 cutting techniques deecdhed in
the bucking section.
f. Always use anovemuttocutsmallandfreely
hanging limbs. Undercutting could cause
limbs tofall and pinch the saw.
REMOVE SMALL LIMBSi
ONE
CUT
Figure33
SECONDPRUNINGCUT
I),%1"J[THIRD
PRUNING CUT
RRSTPRUNINGCUT
Figure34
L
iiiiiiiii I [i i i. i i i i ,i ,, ,,,,,i, i ill i ii : iiiii . i iiii ii iiiiii i _ iiiiiiiiiiiii
MAINTENANCE
I IIIIIIIIIIIIIIIIIIIIIIII II IIII IIII11111 IIIIII I II lJllllllII IIIIIIIII I III III I I IIIIIIIIIII
e
A good maintenance program of regular inspec-
tion and care will increase the service life and
help to maintain the safety and performance of
your saw.
41_WARNiNG
All electrical mpeim to this saw, including housing,
switch, motor, eta, mustbediagnosed andserviced by
your Sears Service Center or nearest Seam store.
Failure to do so can cause the double insulation
construction to become ineffective and result in
serious Injury.
• Inspect all wire insulation carefully before each
period of use. Do not operate or try to-repair the
saw if w._reinsu!ation is cracked or deteriorat-
ed. Take the unit to your Sears Service Center
for repair.
• Check the saw for loose bolts, screws, nuts, and
fittings daily when the saw is in use. Loose
fasteners can cause an unsafe condition as wet!
as damage to your saw. Tighten, repair, or
replace as necessary.
¸_I¸-'_ - _ ..... _ iiii.i....
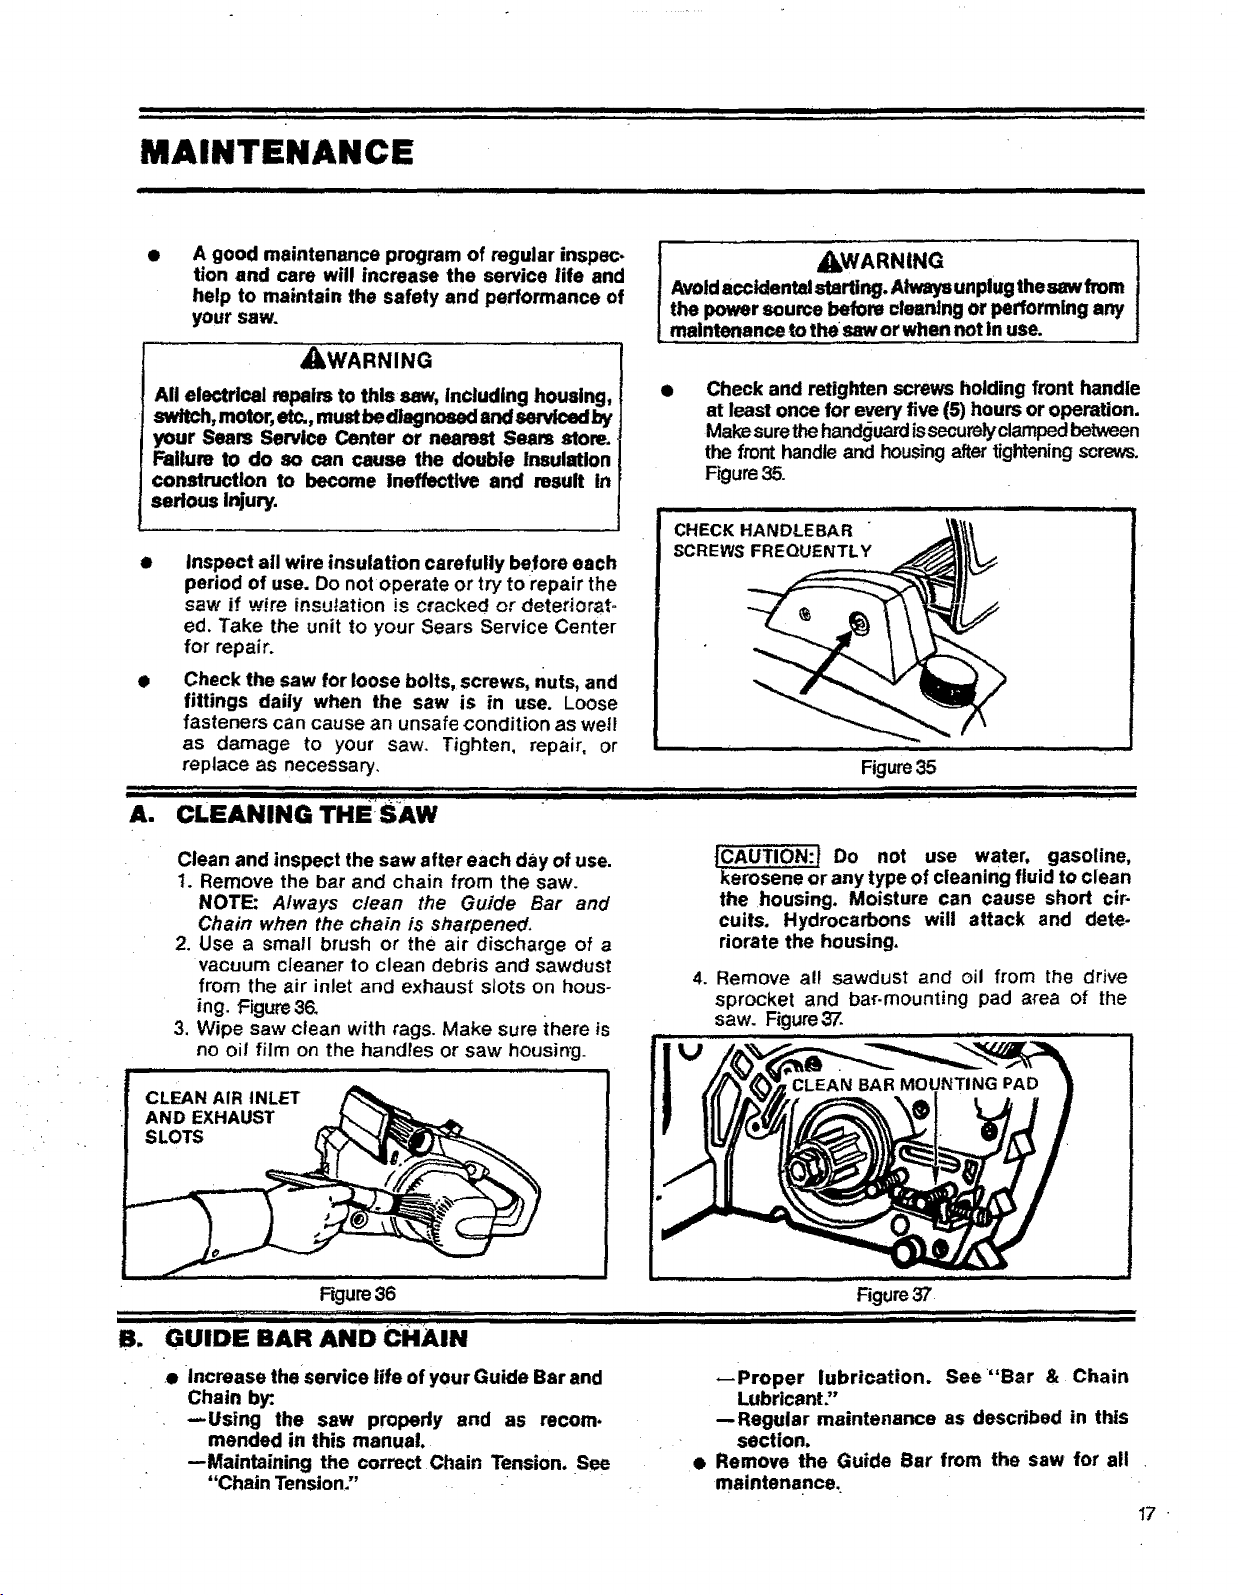
A. CLEANING THE SAW
_WARNING
Avoidaccidental starting. Alwaysunpiug thesewfrom
the power source before cleaning or performing any
maintenance tothesaw or when notin use.
e
i iiii iiii m ii ,ll i- i
Check and retighten screws holding front handle
at least once for every five (5) hours or operation.
Makesurethehandguardissecurelyclampedbetween
the fronthandle and housingaftertighteningscrews,
Figure35.
,, ,.................. .... i
CHECK HANDLEBAR
SCREWS FREQUENTLY
, ,r , ,,,,,,,,, , I ........
Figure35
llll| H ,,,,,,HHHI ___ I . .
Clean and inspect the saw after each day of use.
1. Remove the bar and chain from the saw.
NOTE: Always clean the Guide Bar and
Chain when the chain is sharpened.
2. Use a small brush or the air discharge of a
vacuum cteaner to clean debris and sawdust
from the air inlet and exhaust sfots on hous-
ing. Figure36.
3. Wipe saw clean with rags. Make sure there is
no oil film on the handtes or saw housing.
.
JCAUTION:] Do not use water, gasoline,
kerosene or any type of cleaning fluid to clean
the housing. Moisture can cause short cir-
cults. Hydrocarbons will attack and dete-
riorate the housing.
Remove all sawdust and oil from the drive
sprocket and bar-mounting pad area of the
saw. Figure 3Z
iii
B.
Figure36
II ,- -_ I i MiHH"
GUIDE BAR AND CHAIN
,'..m,,.. .,,,,I f , ,... I Ill'
Figure37
ill
.e increase theservice life of your Guide Bar and
Chain by:.
--Using the saw propedy and as recom.
mended in this manual.
--Maintaining the correct Chain Tension. See
"Chain Tension:'
--Proper lubrication. See"'Bar & Chain
Lubricant"
--Regular maintenance as described in this
section.
• Remove the Guide Bar from the saw for all
maintenance.
17.
18
JCAUTION:! Always weargloveswhen handling the
chain. The chain issharp enough to cut you even
though itistoo dull tocut wood.
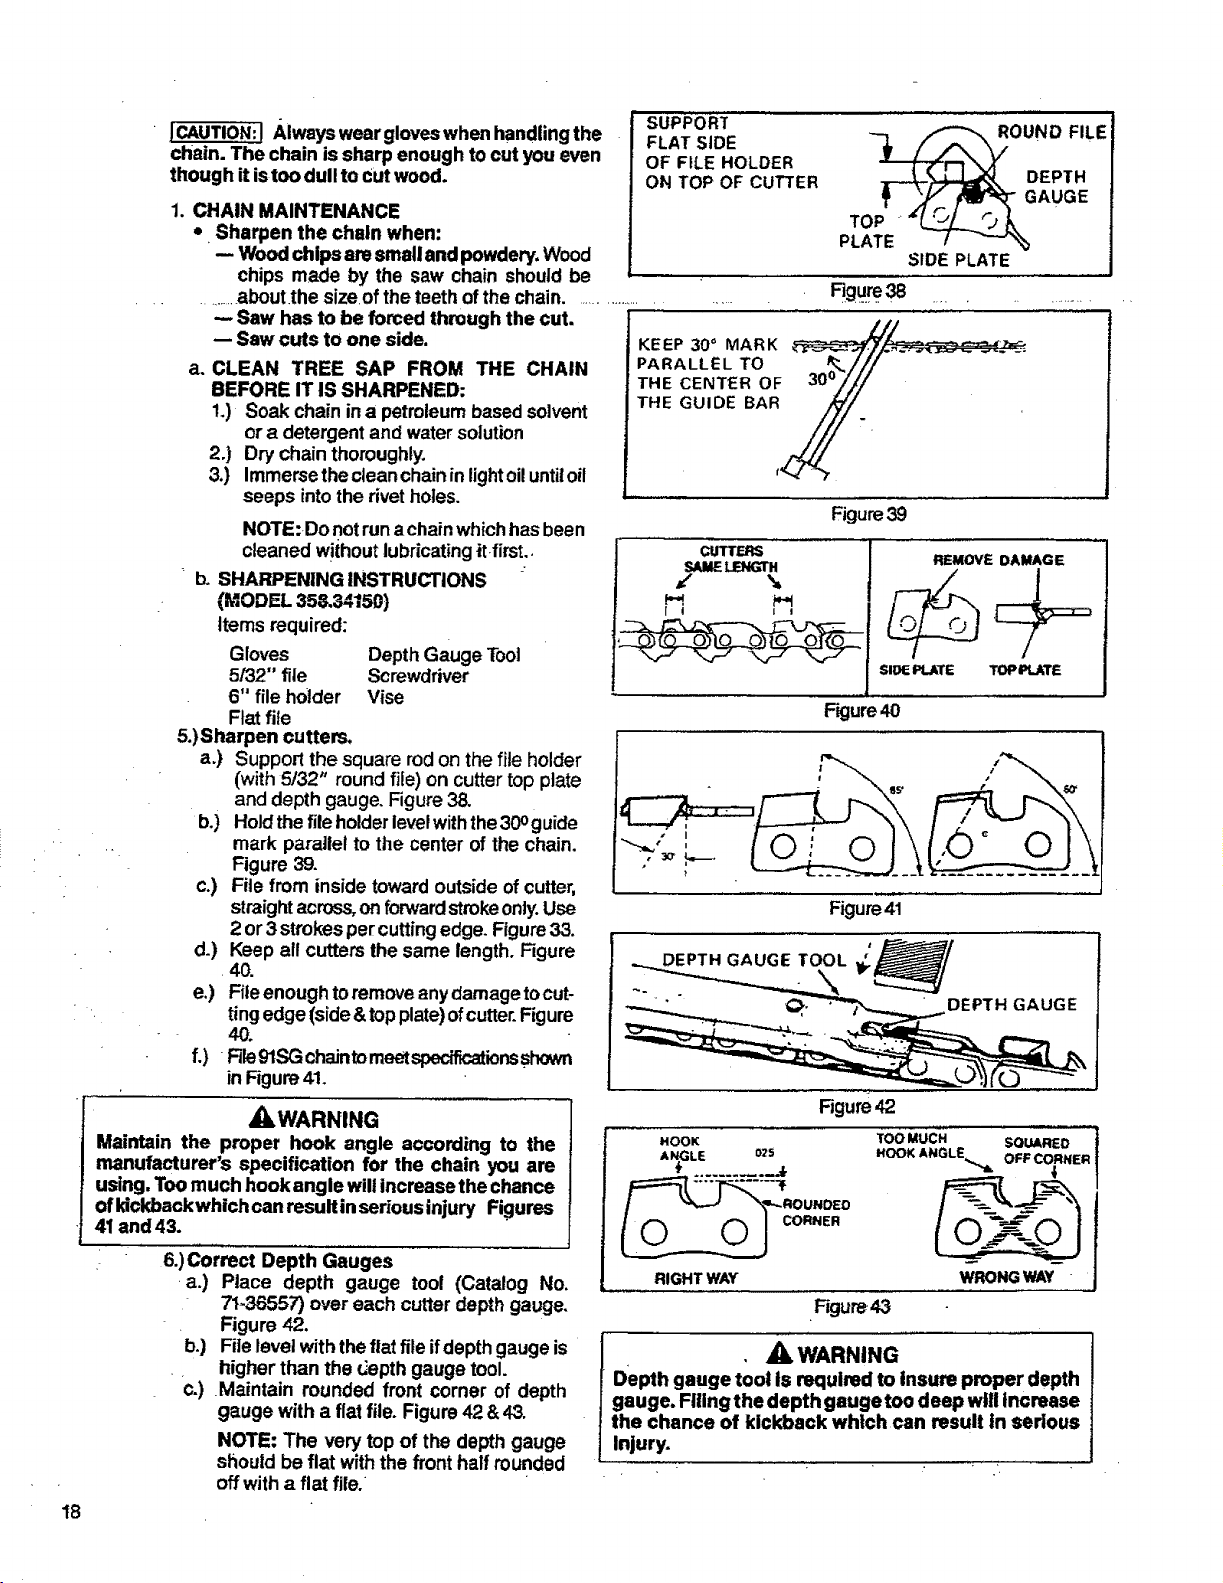
SUPPORT
FLAT SIDE
OF FILE HOLDER
ON TOP OF CUTTER
1. CHAIN MAINTENANCE
* Sharpen the chain when:
-- Wood chips aresmall andpowdery,Wood
chips made by the saw chain should be
..........about,thesizeof the teeth ofthe chain....................
-- Saw has to be forced through the cut.
-- Saw cuts to one side.
a. CLEAN TREE SAP FROM THE CHAIN
BEFORE IT IS SHARPENED:
1.) Soak chain ina petroleumbased solvent
or a detergent and watersolution
2.) Dry chain thoroughly.
3.) Immersetheclean chainin lightoiluntiloit
seeps intothe rivetholes.
NOTE:Do notruna chainwhichhasbeen
cleaned w!thoutlubricatingitfirst,.
SHARPENING INSTRUCTIONS :
(MODEL 358.34150)
DepthGauge Tool
Screwdriver
Vise
b.
Support the square rod on the file holder
(with 5/32" round file) on cutter top plate
and depth gauge. Figure 38.
b.) Holdthe file holder levelwiththe30oguide
mark parallel to the center of the chain.
Figure 39.
c.) File from inside toward outside of cutter,
straight across, on forward strokeonly.Use
2 or3 strokes per cuttingedge. Figure 33.
d.) Keep all cutters the same length. Figure
40.
e,) File enough to remove any damage tocut-
ting edge (side & top plate)ofcutter.Figure
40.
f.) File9tSG chaintomeetspecificationsshovm
in Figure41.
Items required:
Gloves
5/32" file
6" file holder
Flat file
5.)Sharpen cutters.
a.)
! LILWARNING
Maintain the proper hook angle according to the
manufacturer's specification for the chain you are
using. Toomuch hook angle will increasethe chance
ofkickbaekwhich can resultin serious injury Figures
41 and 43.
6.)Correct Depth Gauges
a.) Place depth gauge tool (Catalog No.
71_-36557)over each cutter depth gauge.
Figure 42.
b.) Filelevel with theflat fileifdepthgauge is
higher than the _epth gauge tool.
€.) =Maintain rounded front corner of depth
gauge with a flat file. Figure 42 &43.
NOTE: The very top of the depth gauge
should be flat withthe fronthalf rounded
offwith a flat file.
OUND FILE
DEPTH
AUGE
TOP
PLATE
SIDE PLATE
Figure39
CUTTERS
__H
I i
REMOVE DAMAGE
+
SiDEPLATE TOPPATE
Figure40
Figure41
DEPTH GAUGE TOOL
DEPTH GAUGE
Rgure42
HOOK
AN_LE 025
RIGHT WAY
•Figure-4,3
TOO MUCH SOUARED
HOOK ANGLE.... OFF CORNER
WRONG WAY "
I _WARNING
Depth gauge tool Is requlred to Insure proper depth
gauge. Flilng the depth gauge too deep will Increase
the chance of klcld)ack which can result In serious
Injury.
C;CHAINREPLACEMENT
1) Use on,f the Low-Kick Chainspecified
• for yoursawin "Specifications," for
replacement chain.
2) Replace the chain when cutters or
links break.
3) See your Sears Service Center to
rep]aceand sharpen individual cutters
for matching your chain.
4) Alwayshave awom sprocket replaced
by your Sears Service Center when
installing a new chain to avoid "
excessive wear tothe chain.
Ca
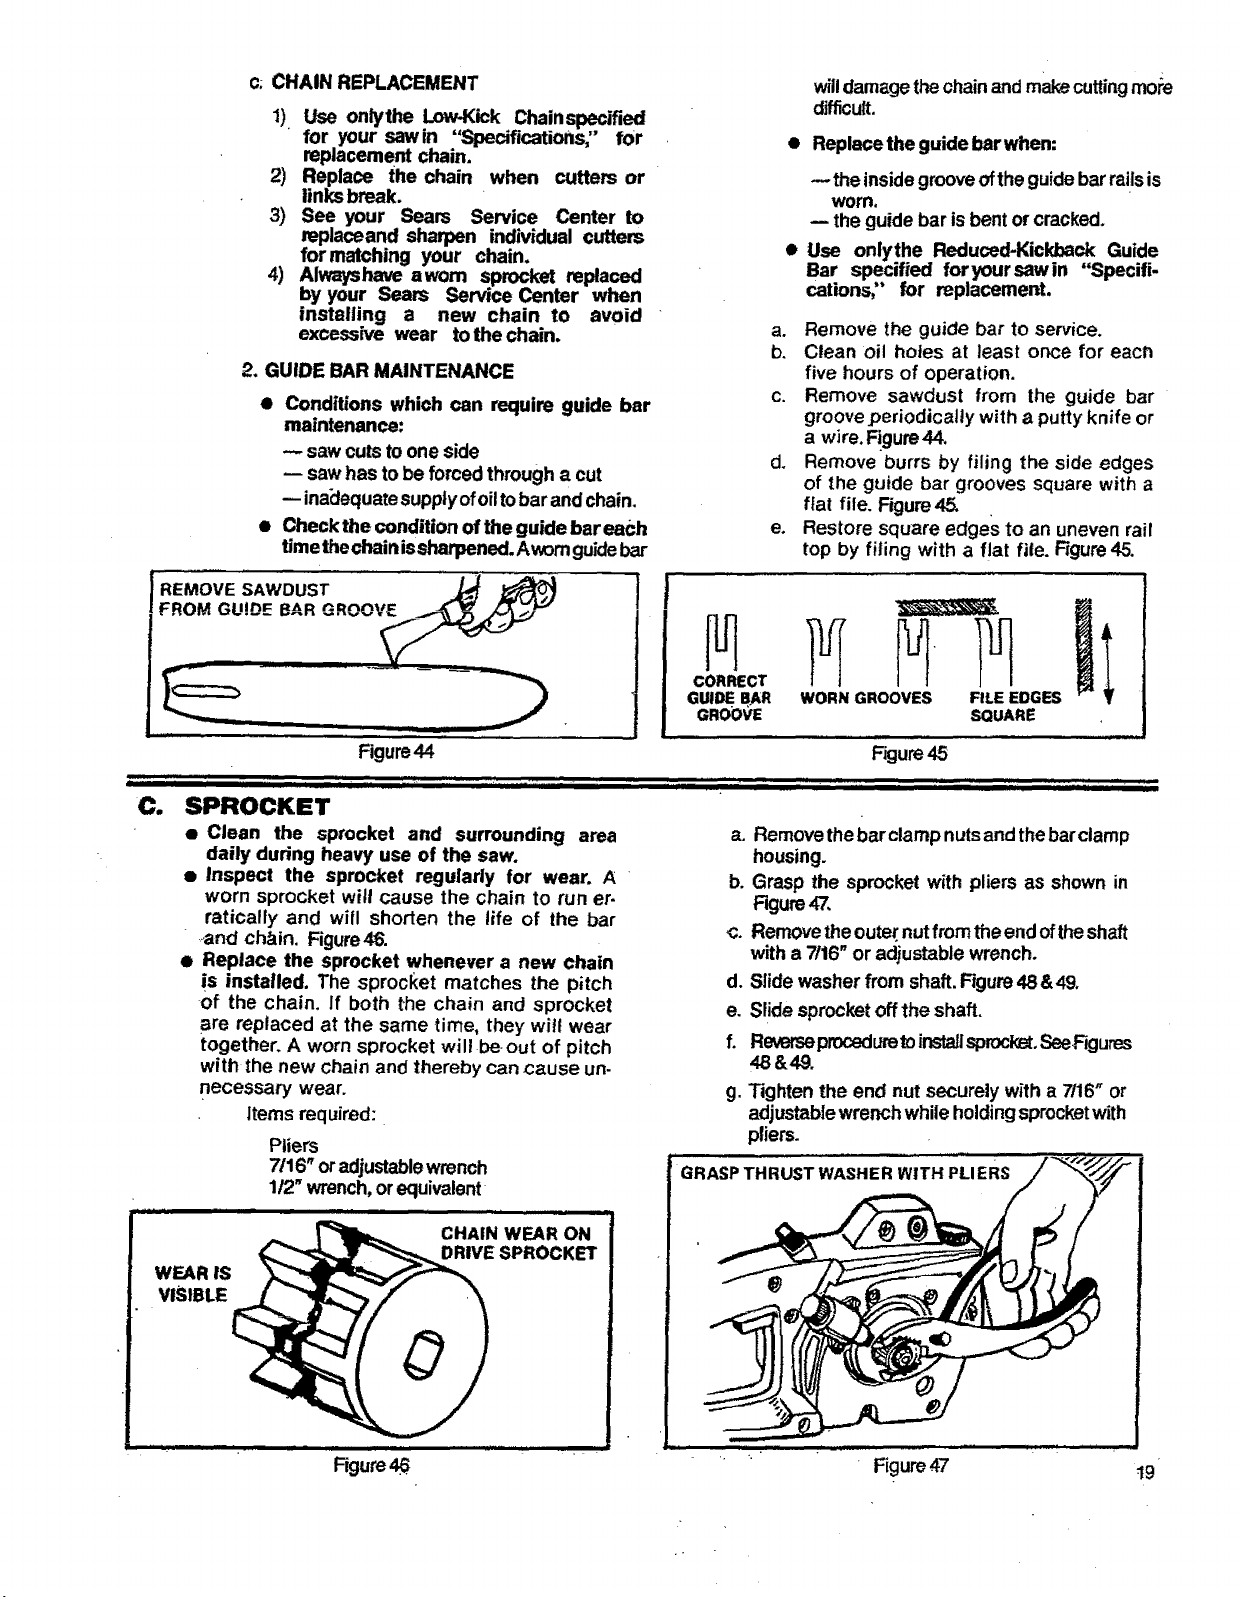
2, GUIDE BAR MAINTENANCE
• Conditions which can require guide bar
maintenance:
.-,-saw cutsto one side
-- saw has to be forced through a cut
inadequatesupplyofoil tobar and chain.
• Checkthe condition of the guide bar each
time thechainissharpened. Avx_mguidebar
Figure44
WEAR IS
VISIBLE
willdamagethechainand makecuttingmope
difficult.
• Replace the guide barwhen:
--the insidegrooveofthe guidebarrailsis
worn,
-- the guide bar is bent orcracked.
Use onlythe Reduced-Kickback Guide
Bar specified foryoursawin Specifi-
cations,' for replacement.
a. Remove the guide bar to service.
b, Clean oil holes at least once for each
five hours of operation.
c. Remove sawdust from the guide bar
groove periodically with a putty knife or
a wire. Figure44.
d. Remove burrs by filing the side edges
of the guide bar grooves square with a
flat file. Figure45.
e. Restore square edges to an uneven rail
top by filing with a fiat file. Figure45.
CORRECT
GUli)eBAR
GROOVE
WORN GROOVES FILE EDGES
SQUARE
Figure45
;;.: ........._ ...._, _, ,,, ;
SPROCKET
• Clean the sprocket and surrounding area
daily during heavy use of the saw.
• Inspect the sprocket regularly for wear. A
worn sprocket will cause the chain to run er.
raticatly and will shorten the life of the bar
and chain. Figure46.
• Replace the sprocket whenever a new chain
is installed. The sprocket matches the pitch
of the chain. If both the chain and sprocket
are replaced at the same time, they wilt wear
together. A worn sprocket will be out of pitch
with the new chain and thereby can cause un-
necessary wear.
Items required:
Pliers
7116"oradjustablewrench
112"wrench,or equivalent
i
CHAIN WEAR ON
_ SPROCKet
a. Removethebar clamp nutsandthe barclamp
housing.
b. Grasp the sprocket with pliers as shown in
Rgure 47.
c. Remove theouternutfromtheendoftheshaft
with a 7116"or adjustablewrench.
d. Slide washer from shaft.Figure48 &49o
e. Slide sprocketoffthe shaft.
f. Reverseproceduret0instaJlsprock_,SeeFigures
hgure
i,i ,i,,i,i, i i
48 &49.
g. Tighten the end nut securely wffh a 7/16" or
adjustablewrenchwhileholdingsprocketwith
pliers.
GRASPTHRUSTWASHERWITH PLIERS
Figure47
t9
D.
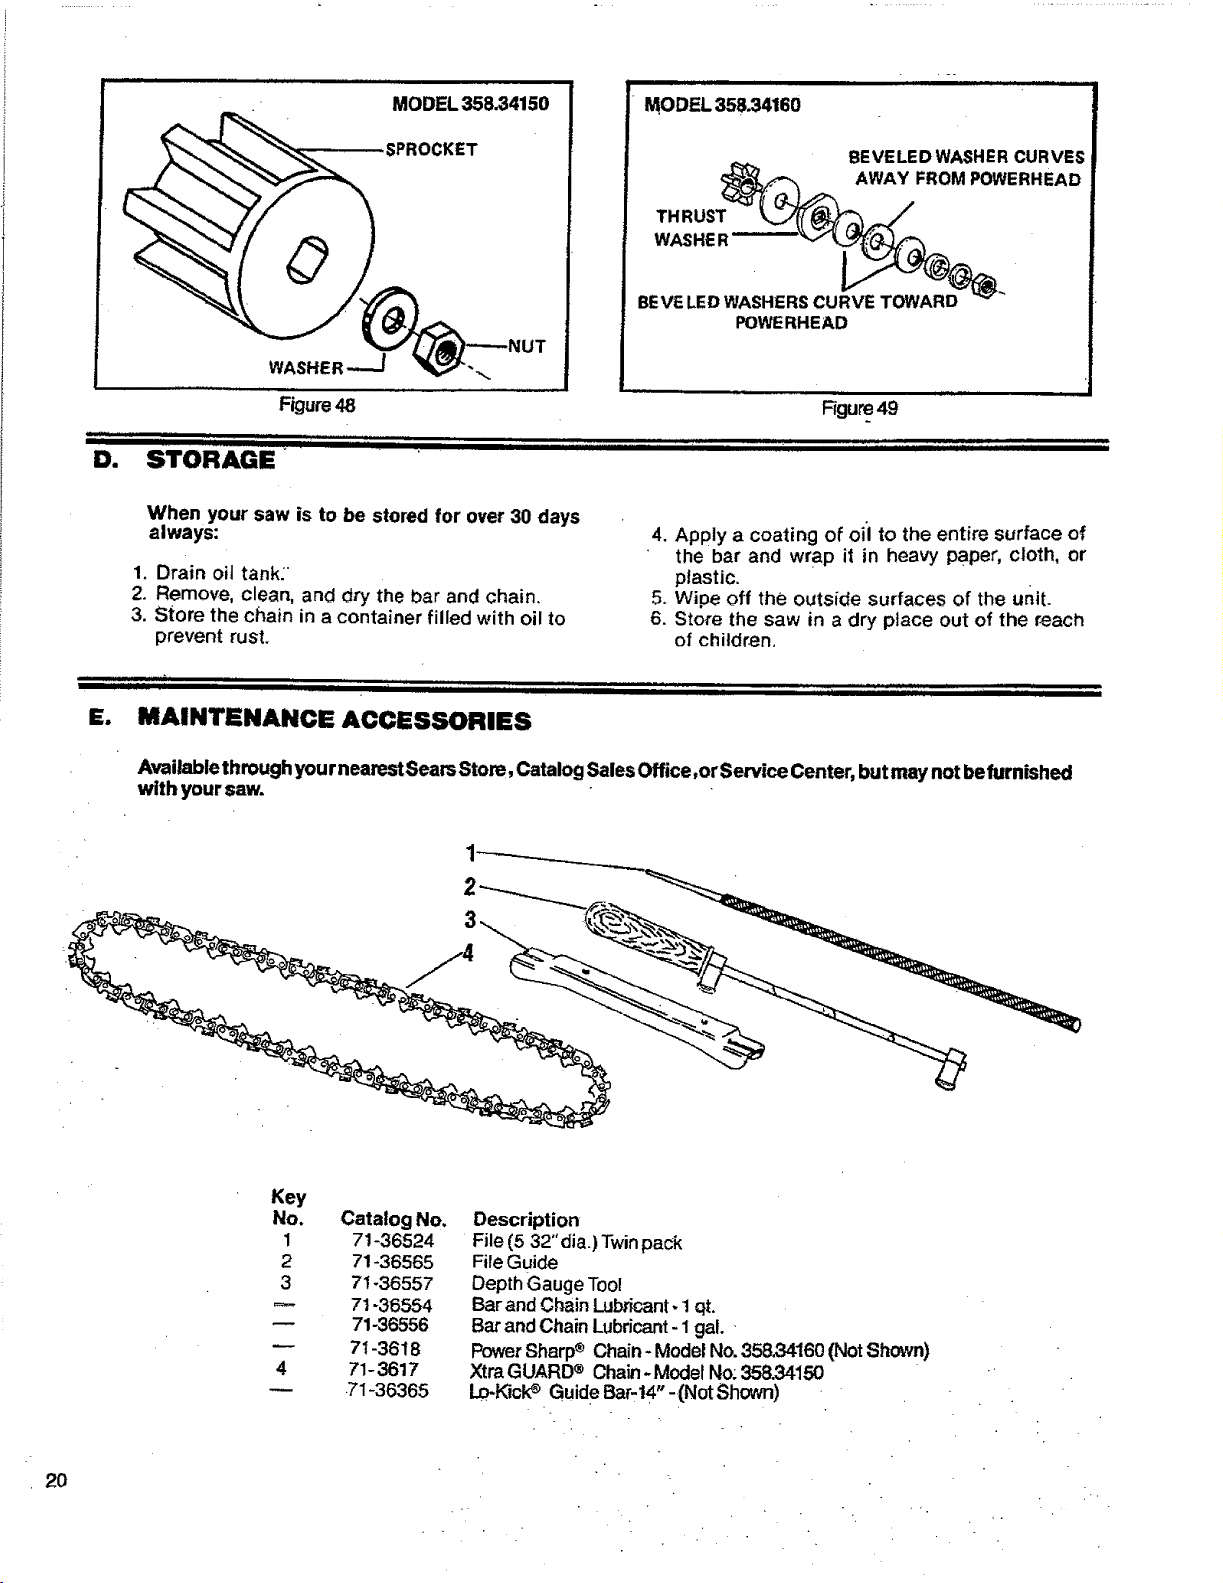
MODEL 358.34150
SPROCKET
.Lii,ui, i,,,,,,, i i
MODEL 358.34160
THRUST
WASHER
BEVE LED WASHER CURVES
AWAY FROM POWERHEAD
BEVE LED WASHERS CURVE TOWARD
POWERHEAD
,_, ,,,,,,,,,,,,,,,,,,,,,,,,,,,,,,,,,,,,,,,,,,j _, .... ii,l,,,
When your saw is to be stored for over 30 days
always:
1. Drain oit tank:
2. Remove, clean, and dry the bar and chain.
3. Store the chain in a container filled with oil to
prevent rust.
4. Apply a coating of oi'l to the entire surface of
the bar and wrap it in heavy paPer, cloth, or
plastic.
5. Wipe off the outside surfaces of the unit.
6. Store the saw in a dry place out of the reach
of children.
i i_,,,j _ ill i Lii i
E. MAINTENANCE ACCESSORIES
Available through yournearestSears Store, Catalog SalesOffice,or Service Center, but may not befurnished
with your saw.
20
Key
No.
1
2
3
4
Catalog No.
71-36524
71-36565
71-36557
71-36554
71-36556
71-3618
71-3617
.71-36365
Description
File (5 32"dia.) Twin pack
FileGuide
Depth Gauge Tool
Bar and Chain Lubricant, 1 qt.
Bar and Chain Lubricant- 1gal. •
PowerSharp® Chain- ModelNo. 35834160 (NotShown)
XtraGUARD® Chain- Model No;358.34150
Lp-.KiQk_ GuideBar-14"-.(NotShown)
.... i ............t '.....................'" , ,,i' "I"'_I_,' '_"':"""'"'i................... , ....,,,,i...........
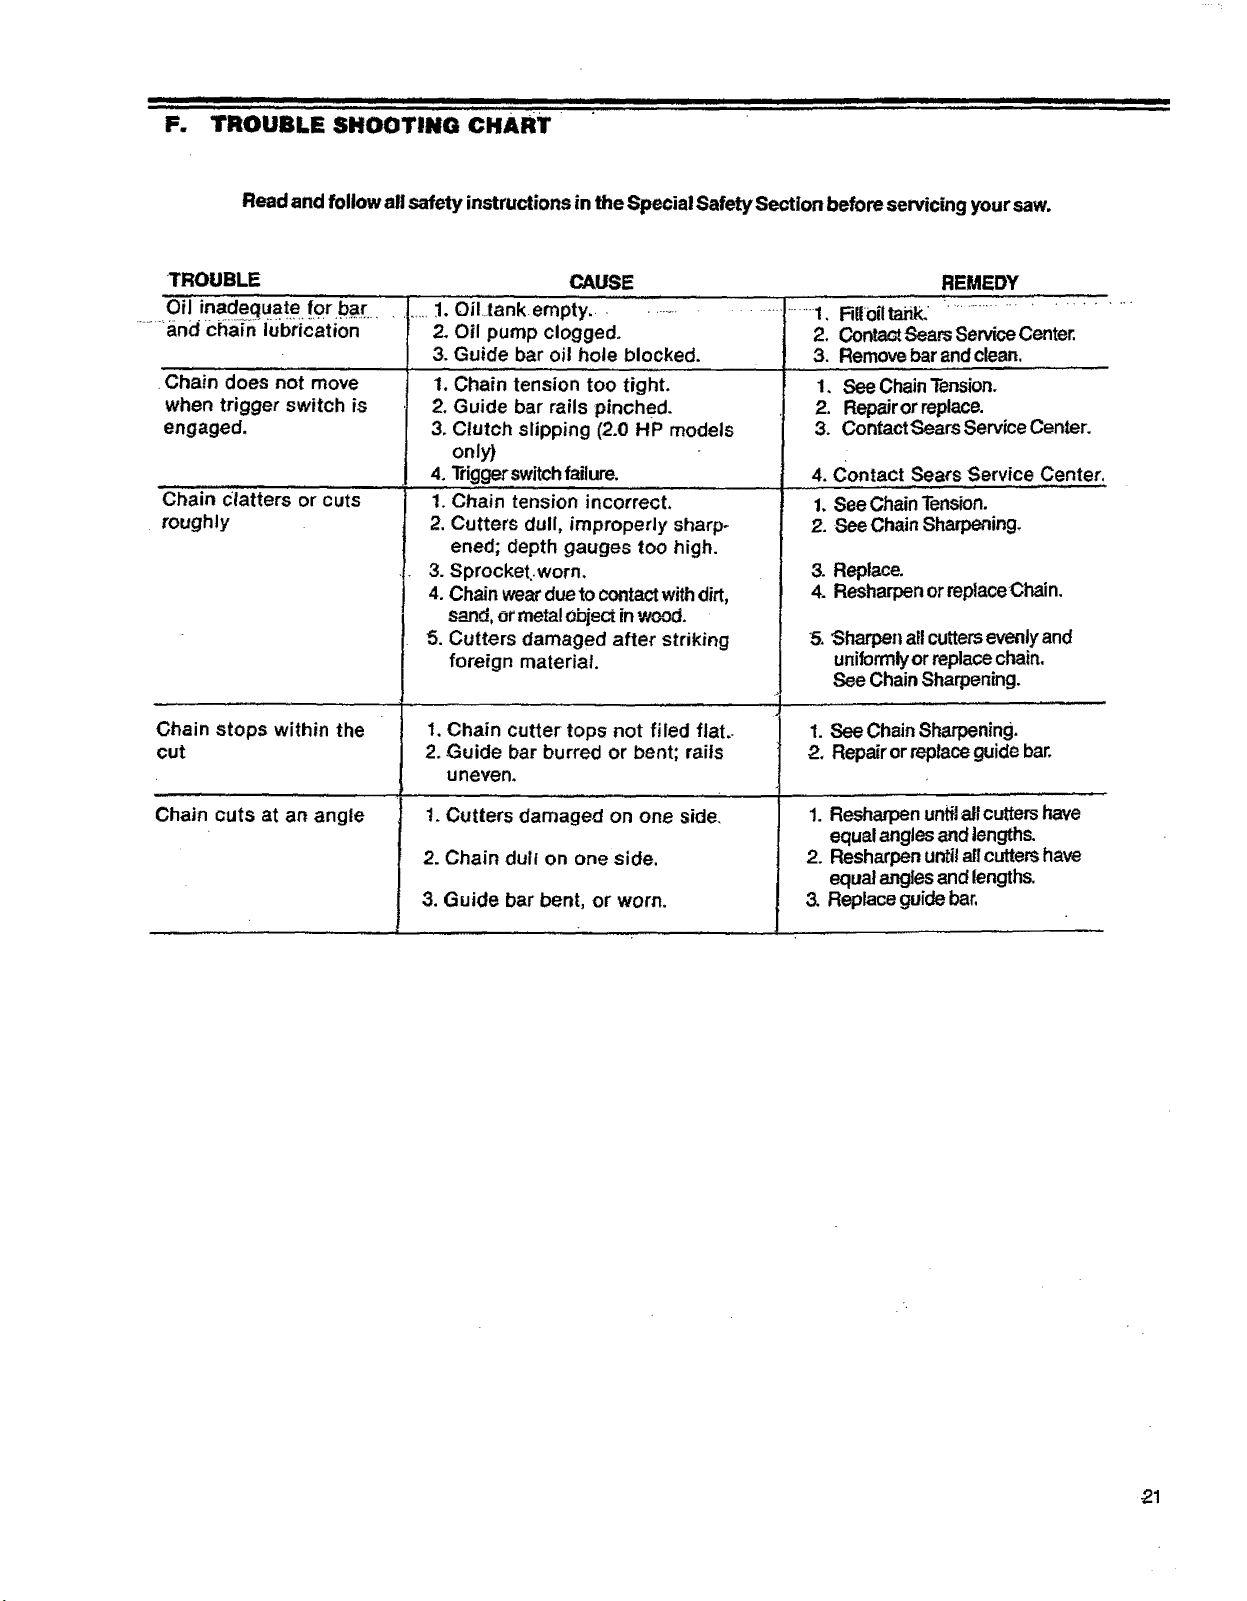
F. I"ROUBI.E SHOOTING CHART
Read and follow all safety instructions in the Special Safety Section before servicing yoursaw.
TROUBLE
Oil inadequate for bar,,
..........and cfla_rt_lu_brication
CAUSE
Chain does not move
when trigger switch is
engaged.
Chain Clatters or cuts
roughly
Chain stops within the
cut
Chain cuts at an angle
.....1. Ofllank empty ...........
2. Oil pump clogged.
3. Guide bar oil hole blocked.
1. Chain tension too tight.
2. Guide bar rails pinched.
3. Clutch slipping (2.0 HP models
only)
4. Triggerswitchfailure.
1.Chain tension incorrect.
2. Cutters dull, improperly sharp*
ened; depth gauges too high.
3. Sprocket..worn.
4. Chain wearduetocontactwithdirt,
sand,ormetalobjectinwDod.
5. Cutters damaged after striking
foreign material.
REMEDY
........1. Rlloiltank. *..........................
2. ContactSearsServiceCenter.
3. Remove bar and clean,
1. See Chain Tension.
2. Repairor replace.
3. ContactSears Service Center.
4. Contact Sears Service Center,
1.see Chain Tension.
2. SeeChain Sharpening.
3. Replace.
4. Resharpen orreplaceChain.
5. Sharpenall cuttersevenlyand
uniformlyor replacechain.
See ChainSharpening.
1. Chain cutter tops not filed flat.. 1.
2. Guide bar burred or bent; rails 2.
uneven.
1.Cutters damaged on one side.
2. Chain dull on one side.
3. Guide bar bent, or worn.
See ChainSharpening.
Repairor replaceguidebar.
1. Resharpenun_ all cuttershave
equalanglesand lengths.
2. Resharpen untilall cuttershave
equal anglesand lengths.
3. Replace guidebar,
21

SEARS CHAIN SAW REPAIR PARTS LIST - MODEL NO. 358.341-20-2.0/12;'
358.34150-2.0/14"
358.34160-2.0/14" PS
8-- 3
MODEL 358.34124) &
358.34150
17
28
_29
32
MODEL 358.34160
ONLY
_47
L', /48
25
26
MODEL 358.34160 ONLY
MODEL 358.34120 &
358.34150
105
42
43
37 44
MODEL 358.34160 ONLY
103
23
102
22
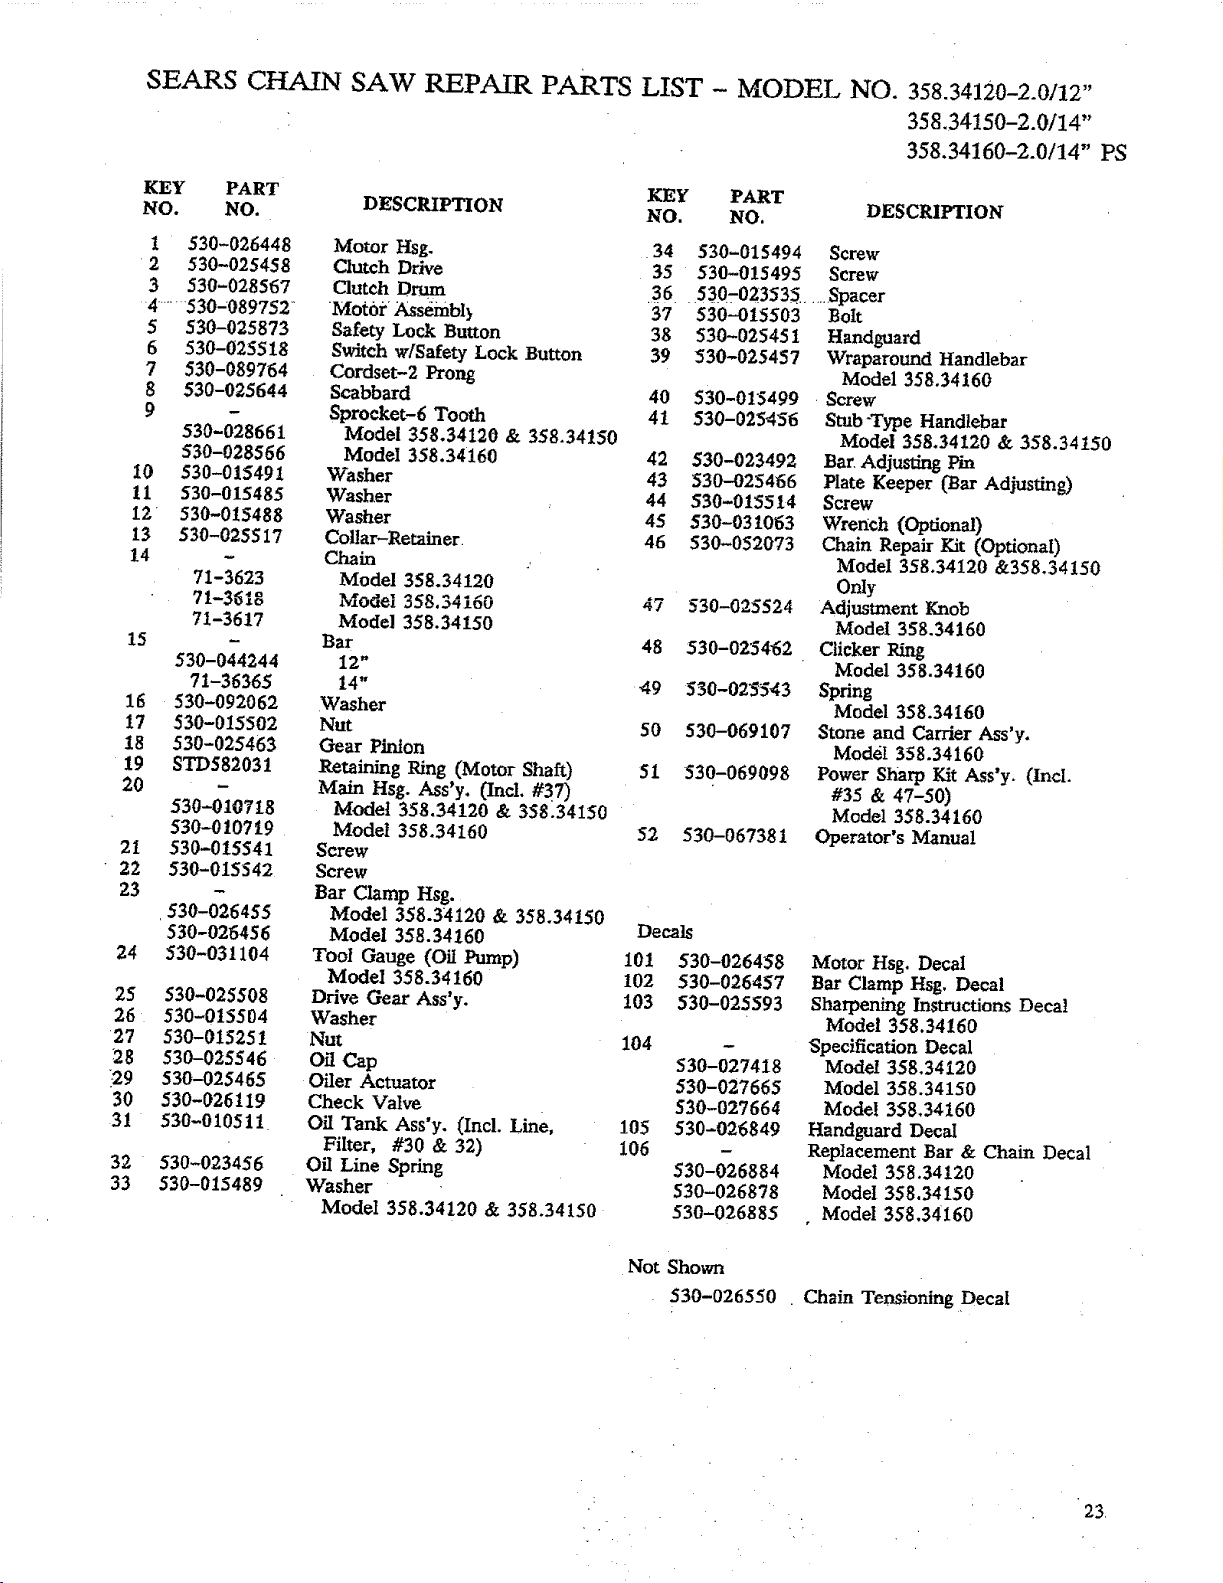
SEARS CHAIN SAW REPAIR PARTS LIST - MODEL NO. 358.34120-2.0/12"
358.34150-2.0/14"
358.34160-2.0/14" PS
KEY PART KEY PART
NO. NO. DESCRIPTION NO. NO. DESCRIPTION
I 530-026448
2 530-025458
3 530-028567
4........530=089752 .`
5 530-025873
6 530-025518
7 530-089764
8 530-025644
9
530-028661
530-028566
10 530-015491
11 530-015485
12 530-015488
13 530-025517
14
71-3623
71-3618
71-3617
15
530-044244
71-36365
16 530-092062
17 530-015502
18 530-025463
19 STD582031
20
530-0107t8
530-010719
21 530-015541
22 530-015542
23
530-026455
530-026456
24 530-031104
25 530-025508
26 530-015504
27 530-015251
28 530-025546
29 530-025465
30 530-026119
31 530-010511
32 530-023456
33 530-015489
Motor Hsg, 34 530-015494
Clutch Drive 35 530-015495
Clutch Drum 36 530-023535
Mof0i"_sembl_ 37 530-015503
Safety Lock Button 38 530-02545 i
Switch w/Safety Lock Button 39 530-025457
Cordset-2 Prong
Scabbard 40 530-015499
Sprocket-6 Tooth 41 530-025456
Model 358.34120 & 358,34150
Model 358.34160 42 530-023492
Washer 43 530-025466
Washer 44 530-015514
Washer 45 530-031063
Collar-Retainer 46 530-052073
Chain
Model 358.34120
Model 358,34160 47 530-025524
Model 358.34150
Bar 48 530-0254"62
12"
14" 49 550-02"5543
Washer
Nut 50 530--069107
Gear Pinion
Retaining Ring (Motor Shaft) 51 530-069098
Main Hsg. Ass'y. 0nd. #3.7)
Model 358,34120 & 358.34150
Model 358.34160 52 530-067381
Screw
Screw
Bar Clamp Hsg.
Model 358.34120 & 358.34150
Model 358.34160 Decals
Tool Gauge (Oil Pump) 101 530-026458
Model 358.34160 102 530-026457
Drive Gear Ass'y. !03 530-025593
Washer
Nut 104 -
Oil Cap 530-027418
Oiler Actuator 530-027665
Check Valve 530-027664
Oil Tank Ass'y. (Incl. Line, 105 530-026849
Filter, #30 & 32) 106 -
Oil Line Spring 530-026884
Washer 530-026878
Model 358,34120 & 358.34150 530-026885
Screw
Screw
....,_pacer
Bolt
Handguard
Wraparound Handlebar
Model 358,34160
Screw
Stub-Type Handlebar
Model 358.34120 & 358,34150
Bar.Adjusting Pin
Plate Keeper (Bar Adjusting)
Screw
Wrench (Optional)
Chain Repair Kit (Optional)
Model 358.34120 &358.34150
Only
Adjustment Knob
Model 358,34160
Clicker Ring
Model 358,34160
Spring
Model 358.34160
Stone and Carrier Ass'y.
Model 358.34160
Power Sharp Kit Ass'y. (Incl.
#35 & 47-50)
Model 358.34160
Operator's Manua!
Motor Hsg. Decal
Bar Clamp Hsg, Decal
Sharpening Instructions Decal
Model 358.34160
Specification Decal
Modd 358.34120
Model 358.34150
Model 358.34160
Handguard Decal
Replacement Bar & Chain Decal
Mode! 358.34120
Model 358,34150
Model 358.34160
Not Shown
530-026550 Chain TenSioning Decal
: 23

NOTES
24

NOTES
.25

NOTES
"26
QUICK REFERENCE PAGE
Read and follow all Safety Rules, Precautions and Operating instructions.
Failure to do so can result in serious personal iniury.
page
SAFETY RULES AND PRECAUTIONS ....... . .................................... 3-4
PREPARATION ............................................................... 5
1. Wear persona] protectivegear-gloves; safety footwear;snug fitting clothing;and eye, hearing and
head protection.
2. Checkfor worn,lose, ordamagedpartsandrepairor repJacebeforeusingthesaw,
& Checkthe chainfor sharpnessand tension.
4, Keepchildren, bystanders,andanimalsa minimun of3Ofeet awayfrom theworkarea.
5. Ran your sawingoperationcarefullyinadvance.
BAR AND CHAIN OIL .......................................................... 9
1. Filltheoiltankwithcreanoileachtimethesaw isused.
2. Use afunnel tofittthetankand wipeupallspilts.
3. Replacethe oilcap securely.
4. Operate theoileractivatorsixtimesa minute and holddownfor approximatelythreesecondseachtimethe
activator is pressed,
OPERATING THE SAW ..... ................... .................................. 10
1. Connect the saw to a proper power source.
2. Make sure the extension cord is completely, away from the saw and cannot be cut.
3. Start the saw by pushing the lockout button and squeezing the trigger before entering the cut.
4. Begin cutting with the saw frame against the log.
5, Allow the chain to cut for you; exert only light downward pressure.
6. Release- the trigger switch as soon as the cut is,complete d.
7. Unplug the unit after each cutting operation.
MAINTENANCE ............................................................ !7
1. Take your saw to a Sears Service Center for all electrical related repairs.
2. Check and retighten screws holding front handle at least once for each five hours of operation.
3. Check the guide bar for wear each time the chain is sharpened.
r4. tnsta/l a new sprocket each time a new chain is installed.
5. Let saw stand unplugged for 15 minutes and wipe oil from saw and bar before storing.
6. Store saw in a dry pJace out of the reach of children.
COMMON CHAIN SAW TERMS
12.
: 13.
14.
1. Front Handle _ The Support handle located at or toward the front of the chain saw.
2. Rear Handle _ The support handle located at or toward the rear of the saw.
3. Trigger Switch _ A device that when operated will complete or ir_terruptan electrical power cir.
_uit to the motor of the chain saw.
4. Lockout Button m A movable stop that prevents the unintentiona/operation.of the switch until
manually actuated.
5: Oiler Activator -- A system for oiting the guide bar and saw _chain.
6. Guide Bar -- A solid, railed structure that supports and guides the saw chain.
7. Saw Chain -- A loop of chain having cutting teeth (that cut the wood) that isdriven by the motor
and supported by the guide bar.
8. Sprocket -- The toothed part that drives the saw chain.
9. Clutch _ A mechanism for connecting and disconnecting a driven member to and from a
rotating source of power.
10. Spiked Bumper (Spike) -- The pointed tooth or teeth for use when felling or bucking to pivot the
saw and maintain position while sawing.
1t. Kickback _ The backward and!or upward motion of the guide bar occuring when the saw chain
near the nose of the top ares of the guide bar contacts any object such as another log or
branch, or when the wood closes in and pinches the saw chain in the cut.
Normal Cutting Position m The position assumed in performing the bucking and felling cuts.
Felling -- The process of cutting down a tree.
•Notch Cut _ A-notch cul in a tree that directs the fail of the tree.
Felling Cut--The final cut in a tree felling operation made on the opposite side of the tree from
the notch cut.
_6. Bucking -- The process of cross-cutting a felled tree or log into lengths.
• 17. Boring _ The process involved incuttingwith the saw chain at the nose (tip) of theguide bar, in order
to make a hole.41]I,WARNING: Sears does not recommend performing plunge or boring cuts due
to the dangers of kickback.
operator's
manual
MODEL NO.
358.34120 - 2.0112"
358.34150 - 2.0/14"
358.34160 - 2.0114" P.S.
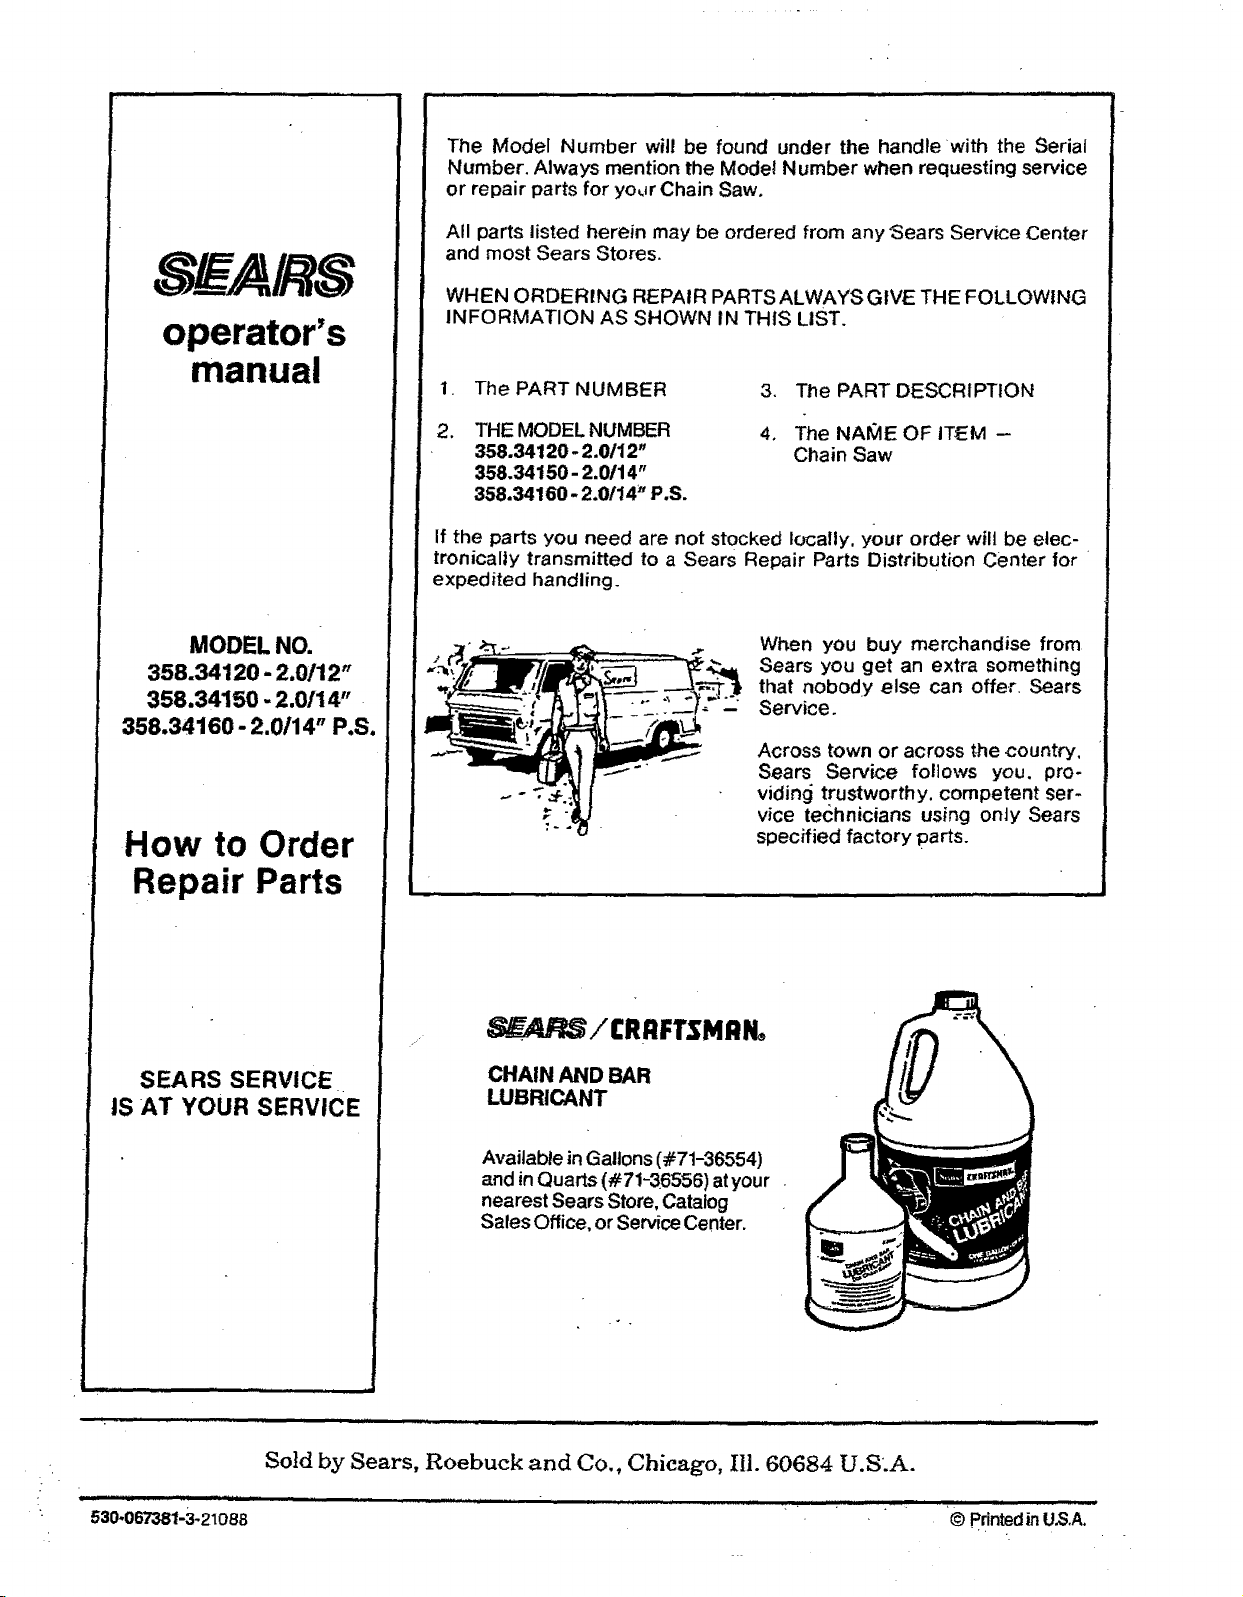
How to Order
Repair Parts
SEARS SERVICE .
IS AT YOUR SERVICE
The Model Number will be found under the handle with the Serial
Number. Always mention the Model Number when requesting service
or repair parts for yo_Jr Chain Saw.
All parts listed herein may be ordered from any 'Sears Service Center
and most Sears Stores.
WHEN ORDERING REPAIR PARTS ALWAYS GIVE THE FOLLOWING
INFORMATION AS SHOWN IN THIS LIST.
1, The PART NUMBER
3. The PART DESCRIPTION
2. THE MODEL NUMBER 4, The NAIV1EOF ITEM --
358.34120- 2.0112" Chain Saw
358.34150 - 2.0/14"
358.34160- 2.0114_P.S.
If the parts you need are not stocked locally, your order will be etec-
tronicaljy transmitted to a Sears Repair Parts Distribution Center for
expedited handling.
When you buy merchandise from
Sears you get an extra something
that nobody else can offer, Sears
Service.
Across town or across the country.
Sears Service follows you. pro-
viding trustworthy, competent ser-
vice te(_hnicians using onJy Sears
specified factory pa rts.
_ / CRRFTSMRI_
CHAIN AND BAR
LUBRICANT
Available in Gallons(#71-36554)
and inQuarts (#71-36556) atyour
nearest Sears Store, Catalog
Sales Office, or Service Center.
Sold by Sears, Roebuck and Co., Chicago, Ill. 60684 U.S.A.
530-067381-3-21088 © PrintedinU.S.A.