Operator's Manual
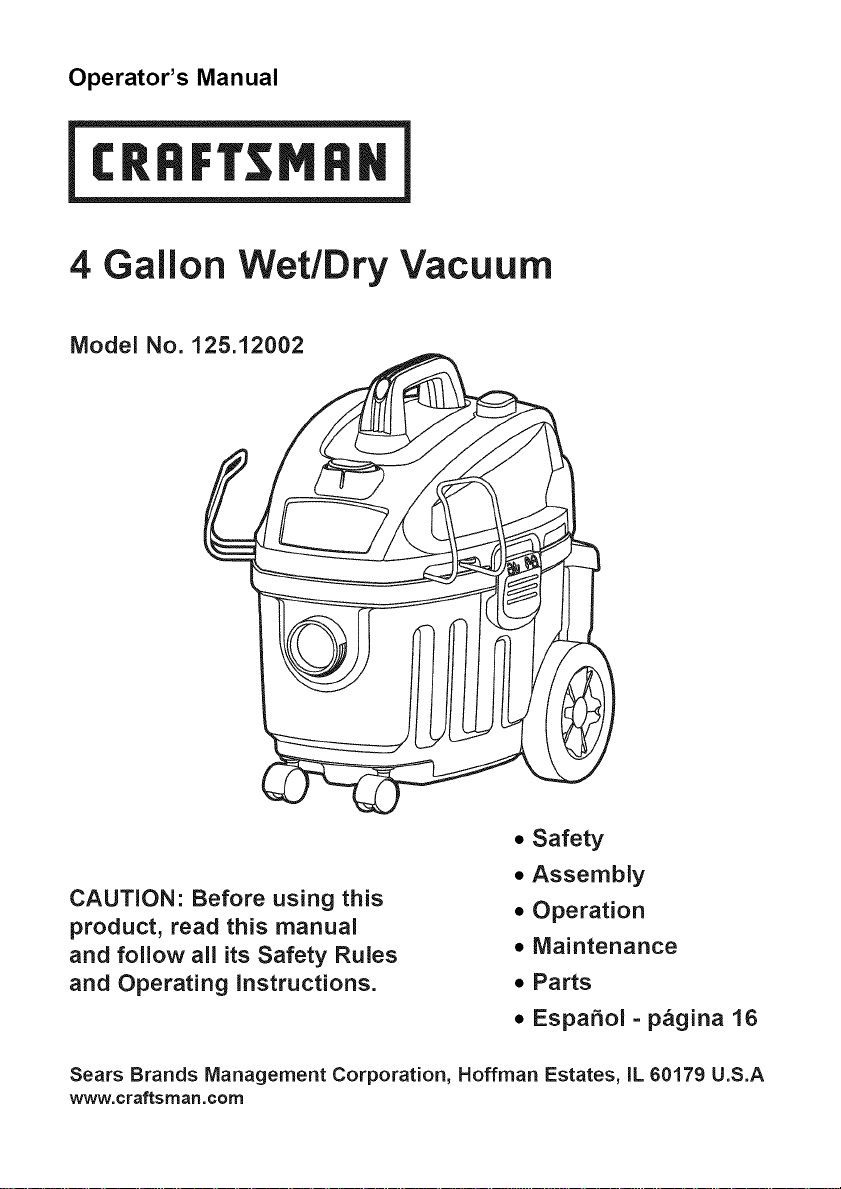
4 Gallon Wet/Dry Vacuum
Model No. 125.12002
CAUTION: Before using this
product, read this manual
and follow all its Safety Rules
and Operating instructions.
• Safety
• Assembly
• Operation
• Maintenance
• Parts
• Espahol - p&gina 16
Sears Brands Management Corporation, Hoffman Estates, IL 60179 U.S.A
www.craftsman.com

Warranty
CRAFTSMAN ONE YEAR FULL WARRANTY
FOR ONE YEAR from the date of purchase, this product is warranted against
defects in material or workmanship. A defective product will be replaced free of
charge.
For warranty coverage details to obtain free replacement, visit the web page:
www. craftsman.com/warranty
This warranty does not cover bags, filters, hose or attachments, which are
expendable partsthat can wear outfrom normal use within the warranty period.
This ONE YEAR warranty is void if this product is ever used while providing
commercial services or if rented to another person. For 90 DAY commercial and
rental use terms, see the Craftsman warranty web page.
Thiswarranty gives you specific legal rights, and you may also have other rights
which vary from state to state.
Sears BrandsManagement Corporation, Hoffman Estates, JL60179
iMPORTANTSAFETY
READ AND UNDERSTANDALL
iNSTRUCTiONS BEFORE USING THiS
VACUUM
Read and understand this operator's
manual and all labels on the Wet/Dry
Vacuum cleaner before operating. Safety is
a combination of common sense, staying
alert and knowing how your vacuum works.
Use this Wet/Dry Vac only as described in
this manual. To reduce the risk of personal
injury or damage to your Wet/Dry Vac, use
only Craftsman recommended accessories.
Household Type
SAVETHiSMANUAL
FOR FUTURE REFERENCE.
When using an electrical appliance,
basic precautions should always be
followed includingthe following:
WARI!IING: o
THE RISK OF FIRE, ELECTRIC
SHOCK OR iNJURY:
, Do not run vac unattended.
•Do not vacuum, or use this Wet/Dry Vac
near flammable liquids, gases, or explosive
vapors like gasoline or other fuels,
lighter fluids, cleaners, oil-based paints,
natural gas, hydrogen, or explosive dusts
like coal dust, magnesium dust, grain
dust, or gun power. Sparks inside the
iNSTRUCTiONS
motor can ignite flammable vapors or
dust.
* Do not vacuum anything that is burning
or smoking, such as cigarettes, matches,
or hot ashes.
* Keep cord away from heated surfaces.
* Do not expose to rain. Store indoors.
, Do not unplug by pulling on cord. To
unplug, grasp the plug, not the cord.
* Do not use with damaged cord, plug or
other parts.
* If vac is not working as it should, has
been dropped, damaged, left outdoors,
or dropped into water, take it to a service
dealer for inspection and repair before
using it again.
, Do not pull or carry by cord, use cord as
handle, close a door on cord, or pull
cord around sharp edges or corners.
, Do not run Wet/Dry Vac over cord.
* Do not handle plug or the Wet/Dry Vac
with wet hands.
* Toreduce the risk of health hazards
from vapors or dusts, do not vacuum
toxic materials.
* Do not store near hazardous materials.
* Do not use this Wet/Dry Vac with a torn
filter or without the filter installed except
when vacuuming liquids as described in
the operation section of this manual.
* Do not allow to be used as a toy. Close
attention is necessary when used by or
near children.
*To reduce the risk of injury from accidental

starting,unplugpowercordbefore
changingorcleaningfilter.
• Do not leave Wet/Dry Vac unattended
when plugged in. Unplug from outlet
when not in use and before servicing.
• Turn off Wet/Dry Vac before unplugging.
• Do not put any object into ventilation
openings. Do not vacuum with any
ventilation openings blocked; keep free
of dust, lint, hair or anything that may
reduce air flow.
• Keep hair, loose clothing, fingers, and
all parts of body away from openings
and moving parts.
• To reduce the risk of falls, use extra
care when cleaning on stairs.
Polarized Plug
To reduce the risk of electrical shock, this
appliance has a polarized plug (one with
the blade wider than the other). This plug
will fit in a polarized outlet only one way.
If the plug does not fit fully in the outlet,
reverse the plug. If it still does not fit,
contact a qualified electrician to install the
proper outlet. Do not change the plug in
any way. Double insulation [] eliminates
the need for the three wire grounded
power cord and grounded power supply
system.
Observe the followingwarnings that
appear on the motorhousing of your Vac:
'_ OUBLE INSULATED
GROUNDING NOT REQUIRED.
WHEN SERVICING USE ONLY
IDENTICAL REPLACEMENT PARTS.
A WARNING
= For your own safety, read and
understand owner's manual.
oDo not allow unit to be in operation if
unattended.
Do not pick up hot ashes, coals,
toxic, flammable or other hazardous
materials.
. Do not use around explosive liquids
_or vapors, j
WARNING: To reduce the risk of i
electric shock =do not expose to rain =
1store indoors.
Extension Cords
When using an extension cord with your Wet/Dry Vac refer to the following table to
determine the required A.W.G. (American Wire Gauge) wire size. Before using
Wet/Dry Vac, make sure it is in good working condition, including power cord.
Also, make sure extension cord is in good working condition prior to use. Make
repairs or replacements before using the vacuum cleaner. Only use extension cords
that are rated for outdoor use.
110V-120V
Amps
0-6
7-10
Length of Extension Cord
25 Feet 50 Feet 100 Feet 150 Feet
7.5 Meters 15.25 Meters 30.5 Meters 45.7 Meters
A.W.G Wire Size
16 16
16 14
18
18
14
12
11-12 16 16 14 12
13-16 14 12 Notrecommended
Introduction
This Wet/Dry Vac is intended for
household use. It may be used for
vacuuming of use. it may be used for
vacuuming of blower.
Read this operator's manual to
familiarize yourself with the product
features and to understand the specific
usage of your new Wet/Dry Vac.
Table of Contents
Section Page
Warranty ................................................. 2
important Safety instructions ........... 2
Polarized Plug .................................... 3
Extension Cords ..................................... 3
introduction ............................................ 4
Table of Contents ................................... 4
Assembly ................................................ 5
Carton Contents List ......................... 5
Unpacking Your Wet/Dry Vacuum
& General Assembly .......................... 6
Operation ................................................ 8
Vacuuming Dry Materials .................. 8
Vacuuming Liquids ............................ 9
Section Page
Maintenance ......................................... 10
Emptying the Collection Tank ........ 10
Installing & Cleaning
The Cartridge Filter......................... 10
installing & Cleaning
Foam Sleeve Filter .......................... 11
Installing and Cleaning
HEPA Filter....................................... 11
Cleaning & Disinfecting
the Wet/Dry Vac .............................. 12
Storage ............................................ 12
Troubleshooting ................................... 13
Repair Parts .......................................... 14
Assembly
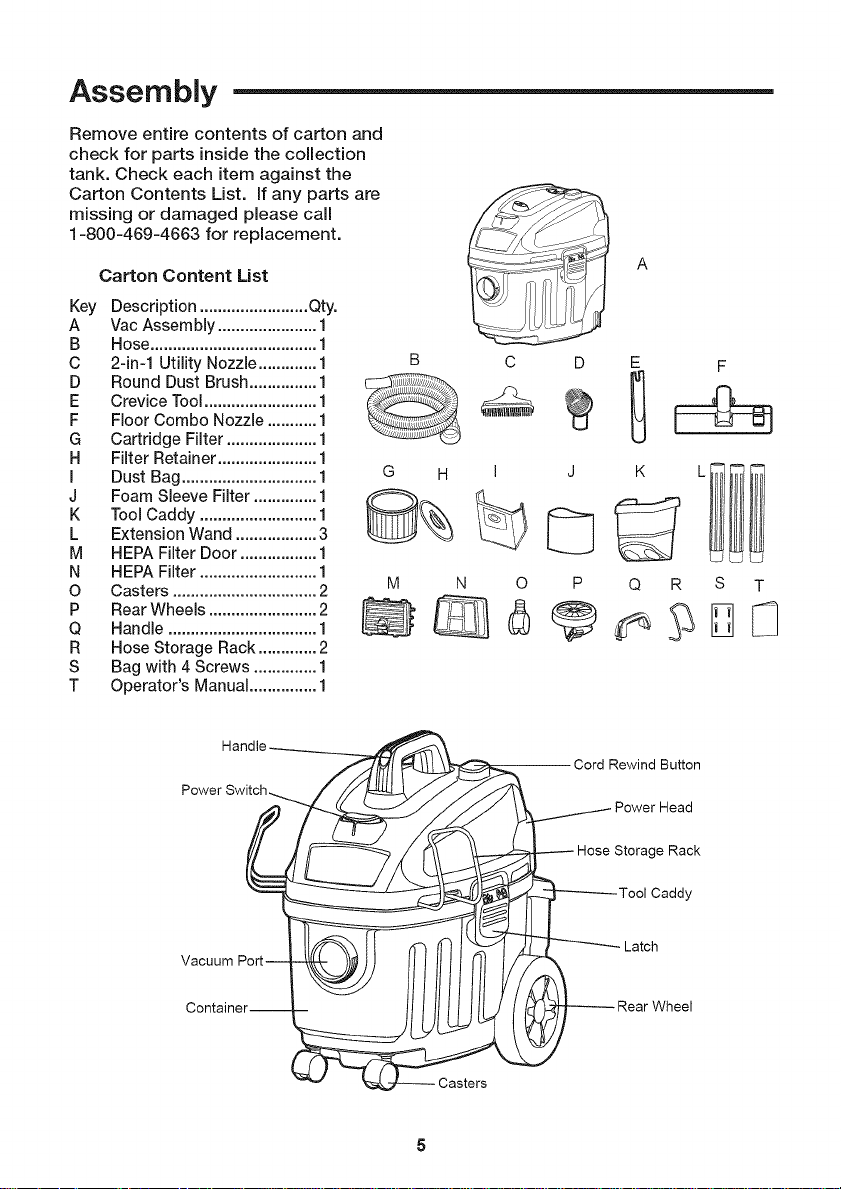
Remove entire contents of carton and
check for parts inside the collection
tank. Check each item against the
Carton Contents List. If any parts are
missing or damaged please call
1-800-469-4663 for replacement.
Carton Content List
Key Description ........................Qty.
A Vac Assembly ...................... 1
B Hose..................................... 1
C 2-in-1 Utility Nozzle .............1
D Round Dust Brush...............1
E Crevice Tool.........................1
F Floor Combo Nozzle ...........1
G Cartridge Filter .................... 1
H Filter Retainer...................... 1
I Dust Bag.............................. 1
J Foam Sleeve Filter .............. 1
K Tool Caddy ..........................1
L Extension Wand ..................3
M HEPA Filter Door .................1
N HEPA Filter ..........................1
O Casters ................................ 2
P Rear Wheels ........................ 2
Q Handle .................................1
R Hose Storage Rack .............2
S Bag with 4 Screws .............. 1
T Operator's Manual............... 1
M
c D E
F
I J K
N O P Q R S
T
Cord Rewind Button
Power Head
Rack
Caddy
Assembly (continued)
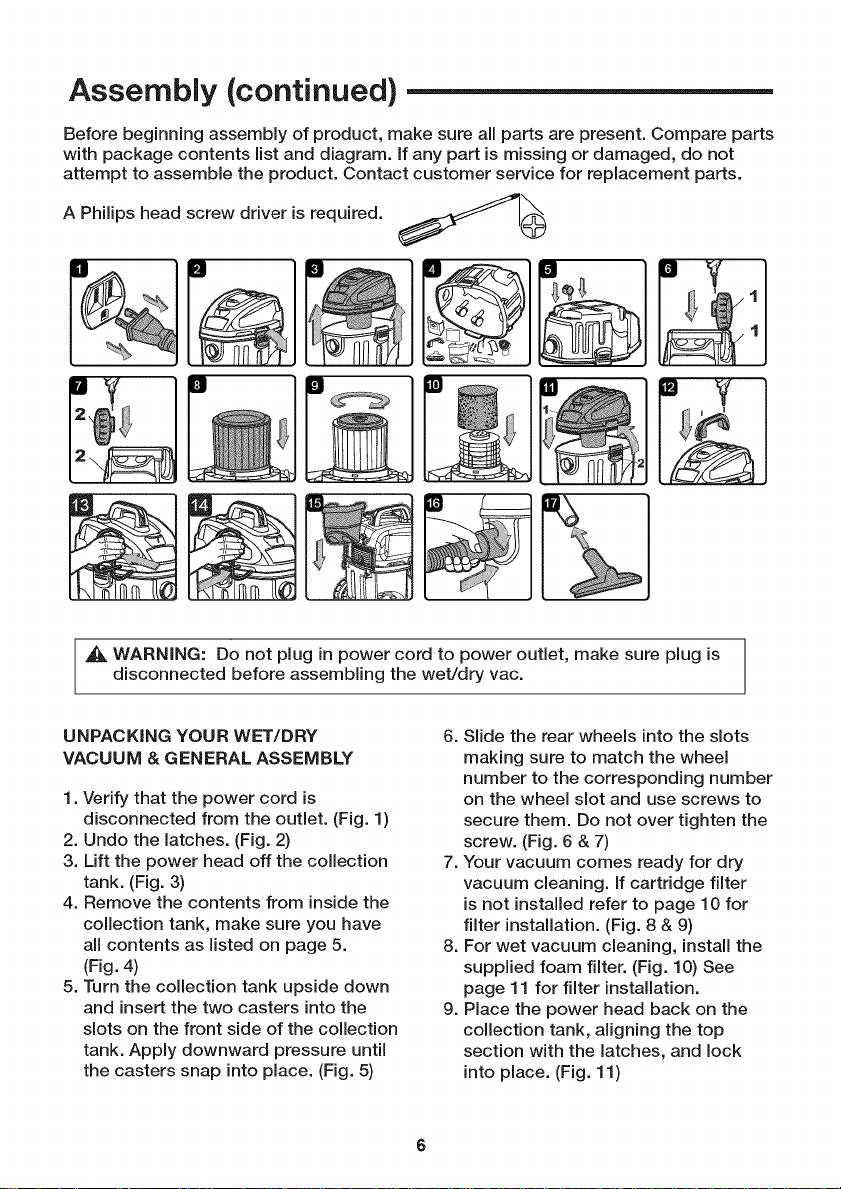
Before beginning assembly of product, make sure all parts are present. Compare parts
with package contents list and diagram, if any part is missing or damaged, do not
attempt to assemble the product. Contact customer service for replacement parts.
A Philips head screw driver is required.
,_ WARNING: Do not plug in power cord to power outlet, make sure plug is
disconnected before assembling the wet/dry vac.
UNPACKING YOUR WET/DRY
VACUUM & GENERAL ASSEMBLY
1. Verify that the power cord is
disconnected from the outlet. (Fig. 1)
2. Undo the latches. (Fig. 2)
3. Lift the power head off the collection
tank. (Fig. 3)
4. Remove the contents from inside the
collection tank, make sure you have
all contents as listed on page 5.
(Fig. 4)
5. Turn the collection tank upside down
and insert the two casters into the
slots on the front side of the collection
tank. Apply downward pressure until
the casters snap into place. (Fig. 5)
6. Slide the rear wheels into the slots
making sure to match the wheel
number to the corresponding number
on the wheel slot and use screws to
secure them. Do not over tighten the
screw. (Fig. 6 & 7)
7. Your vacuum comes ready for dry
vacuum cleaning, if cartridge filter
is not installed refer to page 10 for
filter installation. (Fig. 8 & 9)
8. For wet vacuum cleaning, install the
supplied foam filter. (Fig. 10) See
page 11 for filter installation.
9. Place the power head back on the
collection tank, aligning the top
section with the latches, and lock
into place. (Fig. 11)
10.Insertthehandleintotheslots
locatedonthetopofthepower
headandsecureitwiththescrews
provided.Donotovertightenthe
screw.(Fig.12)
11.Positionthehosestoragerack
asillustrated,insertonesideofthe
rackintothechannelmakingsure
itissecuredinplace.Squeezein
theotherendandinsertitintothe
correspondingchannelmakingsure
itissecured.(Fig.13&Fig.14)
12.Hangthetoolcaddytothehooks
ontherearofthevacuum.(Fig.15)
13.Securethelargeendofthehose
ontothevacuumportonthe
collectiontankandscrewinto
place.(Fig.16)
14.Choosethedesiredaccessories
andextensionwandsandpush
ontothehose.(Fig.17)
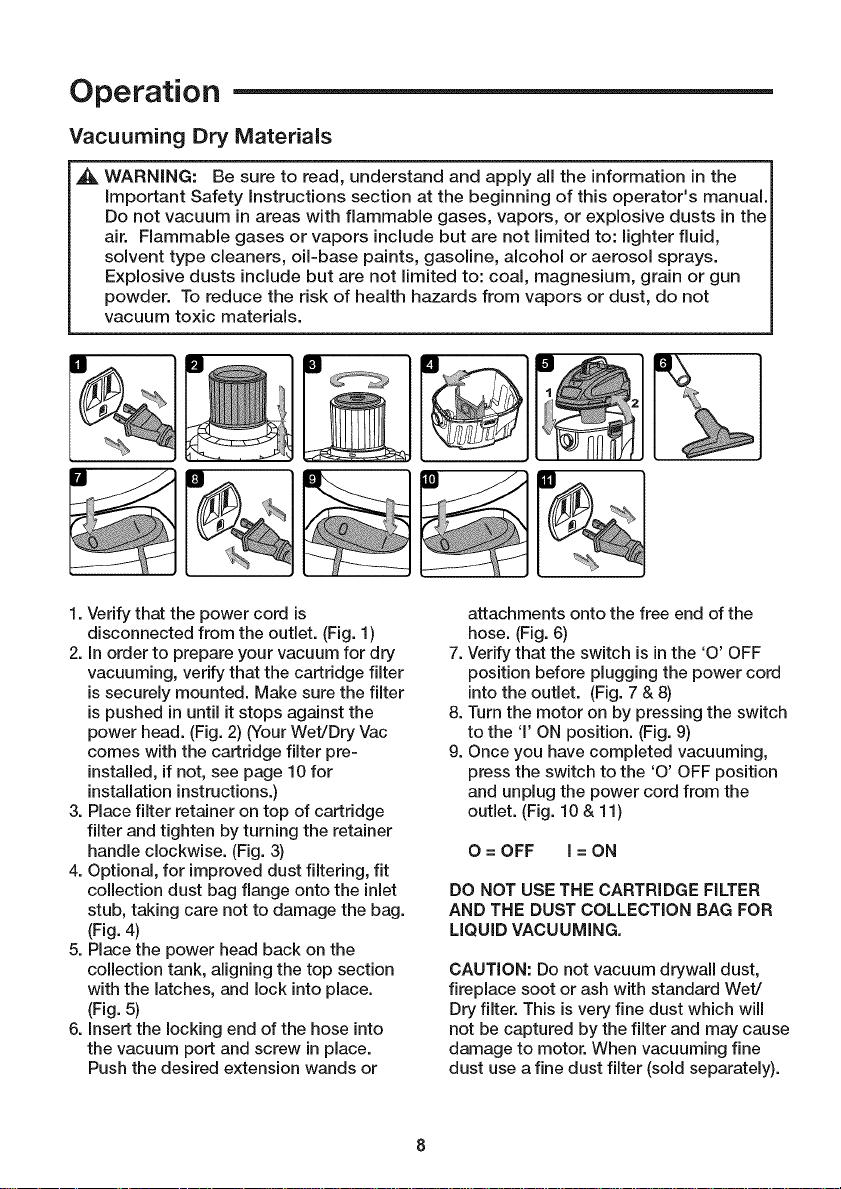
Operation
Vacuuming Dry Materials
WARNING: Be sure to read, understand and apply all the information in the
important Safety instructions section at the beginning of this operator's manual.
Do not vacuum in areas with flammable gases, vapors, or explosive dusts in the
air. Flammable gases or vapors include but are not limited to: lighter fluid,
solvent type cleaners, oil=base paints, gasoline, alcohol or aerosol sprays.
Explosive dusts include but are not limited to: coal, magnesium, grain or gun
powder. To reduce the risk of health hazards from vapors or dust, do not
vacuum toxic materials.
1. Verify that the power cord is
disconnected from the outlet. (Fig. 1)
2. In order to prepare your vacuum for dry
vacuuming, verify that the cartridge filter
issecurely mounted. Make sure the filter
ispushed in until it stops against the
power head. (Fig. 2)(Your Wet/Dry Vac
comes with the cartridge filter pre=
installed, if not, see page 10 for
installation instructions.)
3. Place filter retainer on top of cartridge
filter and tighten by turning the retainer
handle clockwise. (Fig. 3)
4. Optional, for improved dust filtering, fit
collection dust bag flange onto the inlet
stub, taking care not to damage the bag.
(Fig. 4)
5. Place the power head back on the
collection tank, aligning the top section
with the latches, and lock into place.
(Fig. 5)
6. insert the locking end of the hose into
the vacuum port and screw in place.
Push the desired extension wands or
attachments onto the free end of the
hose. (Fig. 6)
7. Verify that the switch is in the 'O' OFF
position before plugging the power cord
intothe outlet. (Fig. 7 & 8)
8. Turn the motor on by pressing the switch
to the 'l' ON position. (Fig. 9)
9. Once you have completed vacuuming,
press the switch to the 'O' OFF position
and unplug the power cord from the
outlet. (Fig. 10 & 11)
0 = OFF I = ON
DO NOT USE THE CARTRIDGE FILTER
AND THE DUST COLLECTION BAG FOR
LIQUID VACUUMING.
CAUTION: Do not vacuum drywall dust,
fireplace soot or ash with standard Wet/
Dry filter. This isvery fine dust which will
not be captured by the filter and may cause
damage to motor. When vacuuming fine
dust use a fine dust filter (sold separately).
Operation (continued)
Vacuuming Liquids
WARNING: Be sure to read, understand and apply all the information in the
important Safety instructions section at the beginning of this operator's manual.
Do not vacuum in areas with flammable gases, vapors, or explosive dusts in the
air. Flammable gases or vapors include but are not limited to: lighter fluid,
solvent type cleaners, oil=base paints, gasoline, alcohol or aerosol sprays.
Explosive dusts include but are not limited to: coal, magnesium, grain or gun
powder. To reduce the risk of health hazards from vapors or dust, do not
vacuum toxic materials.
,_ WARNING: Do not plug in power cord to power outlet, make sure plug is
disconnected before assembling the Wet/Dry Vac.
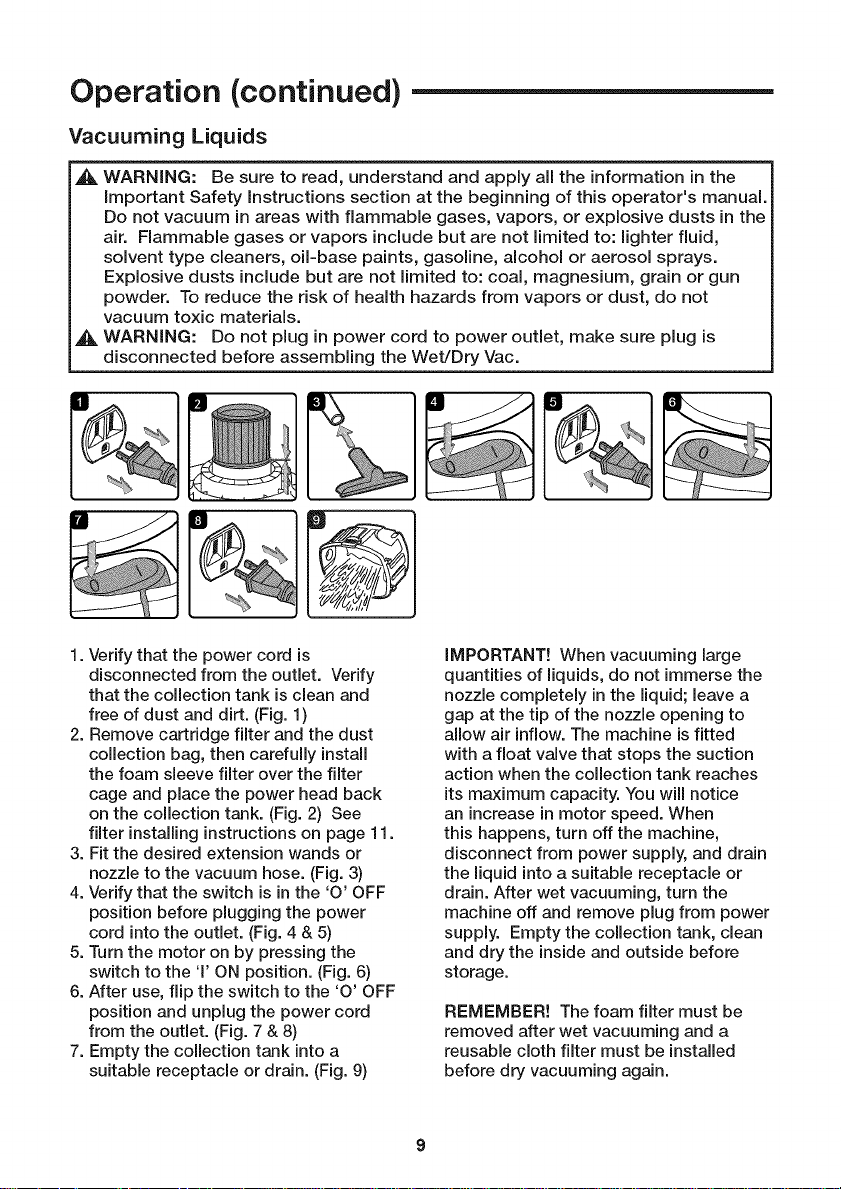
1. Verify that the power cord is
disconnected from the outlet. Verify
that the collection tank is clean and
free of dust and dirt. (Fig. 1)
2. Remove cartridge filter and the dust
collection bag, then carefully install
the foam sleeve filter over the filter
cage and place the power head back
on the collection tank. (Fig. 2) See
filter installing instructions on page 11.
3. Fit the desired extension wands or
nozzle to the vacuum hose. (Fig. 3)
4. Verify that the switch is in the 'O' OFF
position before plugging the power
cord intothe outlet. (Fig. 4 & 5)
5. Turn the motor on by pressing the
switch to the 'l' ON position. (Fig. 6)
6. After use, flip the switch to the 'O' OFF
position and unplug the power cord
from the outlet. (Fig. 7 & 8)
7. Empty the collection tank into a
suitable receptacle or drain. (Fig. 9)
iMPORTANT! When vacuuming large
quantities of liquids, do not immerse the
nozzle completely in the liquid; leave a
gap at the tip of the nozzle opening to
allow air inflow. The machine isfitted
with a float valve that stops the suction
action when the collection tank reaches
its maximum capacity. You will notice
an increase in motor speed. When
this happens, turn off the machine,
disconnect from power supply, and drain
the liquid into a suitable receptacle or
drain. After wet vacuuming, turn the
machine off and remove plug from power
supply. Empty the collection tank, clean
and dry the inside and outside before
storage.
REMEMBER! The foam filter must be
removed after wet vacuuming and a
reusable cloth filter must be installed
before dry vacuuming again.
Maintenance
Emptying the Collection Tank
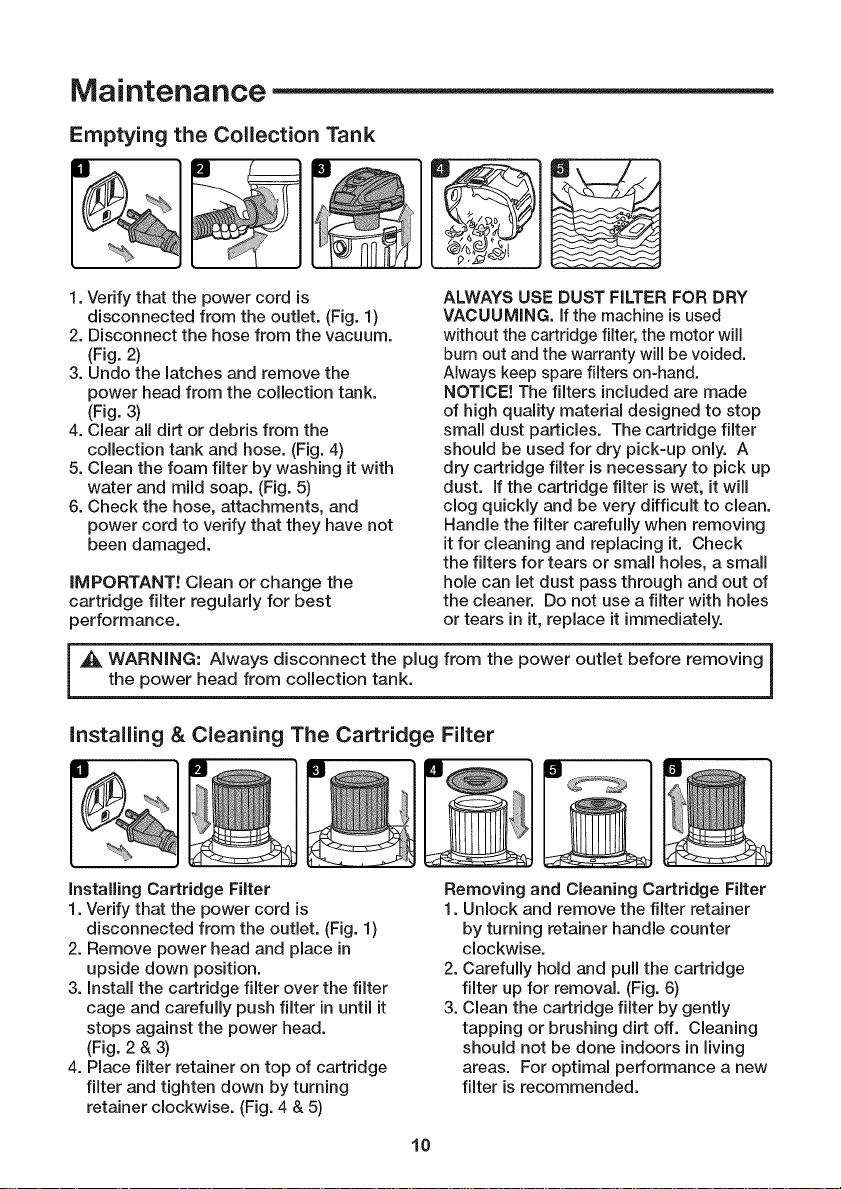
1. Verify that the power cord is
disconnected from the outlet. (Fig. 1)
2. Disconnect the hose from the vacuum.
(Fig. 2)
3. Undo the latches and remove the
power head from the collection tank.
(Fig. 3)
4. Clear all dirt or debris from the
collection tank and hose. (Fig. 4)
5. Clean the foam filter by washing it with
water and mild soap. (Fig. 5)
6. Check the hose, attachments, and
power cord to verify that they have not
been damaged.
IMPORTANT! Clean or change the
cartridge filter regularly for best
performance.
ALWAYS USE DUST FILTER FOR DRY
VACUUMING. If the machine isused
without the cartridge filter, the motor will
burn out and the warranty will be voided.
Always keep spare filters on-hand.
NOTICE! The filters included are made
of high quality material designed to stop
small dust particles. The cartridge filter
should be used for dry pick-up only. A
dry cartridge filter is necessary to pick up
dust. If the cartridge filter is wet, it will
clog quickly and be very difficult to clean.
Handle the filter carefully when removing
it for cleaning and replacing it. Check
the filters for tears or small holes, a small
hole can let dust pass through and out of
the cleaner. Do not use a filter with holes
or tears in it, replace it immediately.
[_ WARNING: Always disconnect the plug from the power outlet before removing
i
the power head from collection tank.
!
Installing & Cleaning The Cartridge Filter
Instafling Cartridge Filter
1. Verify that the power cord is
disconnected from the outlet. (Fig. 1)
2. Remove power head and place in
upside down position.
3. Install the cartridge filter over the filter
cage and carefully push filter in until it
stops against the power head.
(Fig. 2 & 3)
4. Place filter retainer on top of cartridge
filter and tighten down by turning
retainer clockwise. (Fig. 4 & 5)
Removing and Cleaning Cartridge Filter
1. Unlock and remove the filter retainer
by turning retainer handle counter
clockwise.
2. Carefully hold and pull the cartridge
filter up for removal. (Fig. 6)
3. Clean the cartridge filter by gently
tapping or brushing dirt off. Cleaning
should not be done indoors in living
areas. For optimal performance a new
filter is recommended.
10
Maintenance (continued)
Installing & Cleaning Foam Sleeve Filter
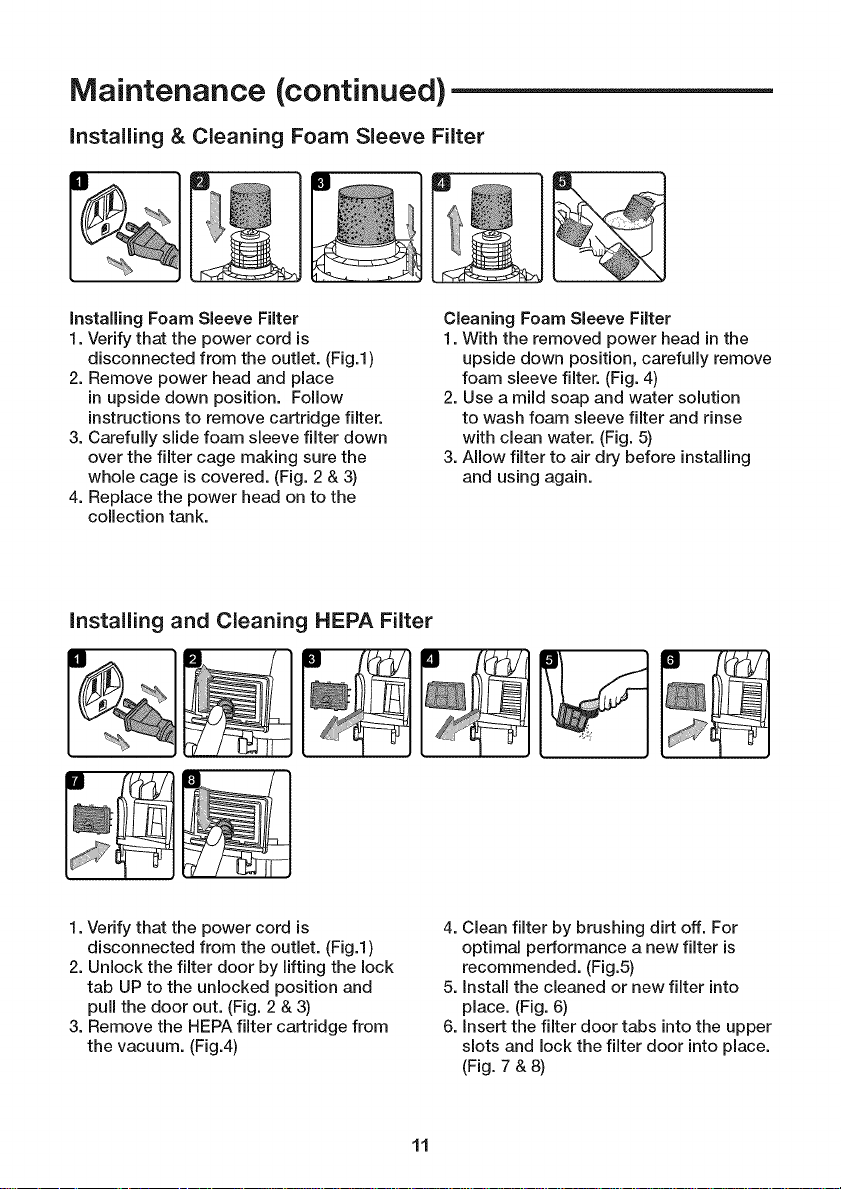
Installing Foam Sleeve Filter
1. Verify that the power cord is
disconnected from the outlet. (Fig.l)
2. Remove power head and place
in upside down position. Follow
instructions to remove cartridge filter.
3. Carefully slide foam sleeve filter down
over the filter cage making sure the
whole cage is covered. (Fig. 2 & 3)
4. Replace the power head on to the
collection tank.
Cleaning Foam Sleeve Filter
1. With the removed power head in the
upside down position, carefully remove
foam sleeve filter. (Fig. 4)
2. Use a mild soap and water solution
to wash foam sleeve filter and rinse
with clean water. (Fig. 5)
3. Mow filter to air dry before installing
and using again.
InstaJling and Cleaning HEPA Filter
1. Verify that the power cord is
disconnected from the outlet. (Fig.l)
2. Unlock the filter door by lifting the lock
tab UP to the unlocked position and
pull the door out. (Fig. 2 & 3)
3. Remove the HEPA filter cartridge from
the vacuum. (Fig.4)
4. Clean filter by brushing dirt off. For
optimal performance a new filter is
recommended. (Fig.5)
5. Install the cleaned or new filter into
place. (Fig. 6)
6. Insert the filter door tabs into the upper
slots and lock the filter door into place.
(Fig. 7 & 8)
11
Maintenance (continued)
Cleaning and Disinfecting the Wet/Dry Vac
Tokeep your Wet/Dry Vac looking its best,
clean the outside with a cloth dampened
with warm water and mild soap.
Toclean the collection tank:
1. Dump debris out.
2. Wash collection tank thoroughly with
warm water and mild soap.
3. Wipe out with dry cloth.
Before prolonged storage or as needed
(i.e.after waste water pick up)the
collection tank should be disinfected.
Todisinfect the collection tank:
1. Pour 1 gallon of water and 1 teaspoon
chlorine bleach intothe collection tank.
2. Let solution stand for 20 minutes,
carefully swishing every few minutes,
making sure to wet all insidesurfaces
of the collection tank.
3. Empty drum after 20 minutes. Rinse
with water until bleach smell isgone.
Allow drum to dry completely before
sealing the motor on the collection tank.
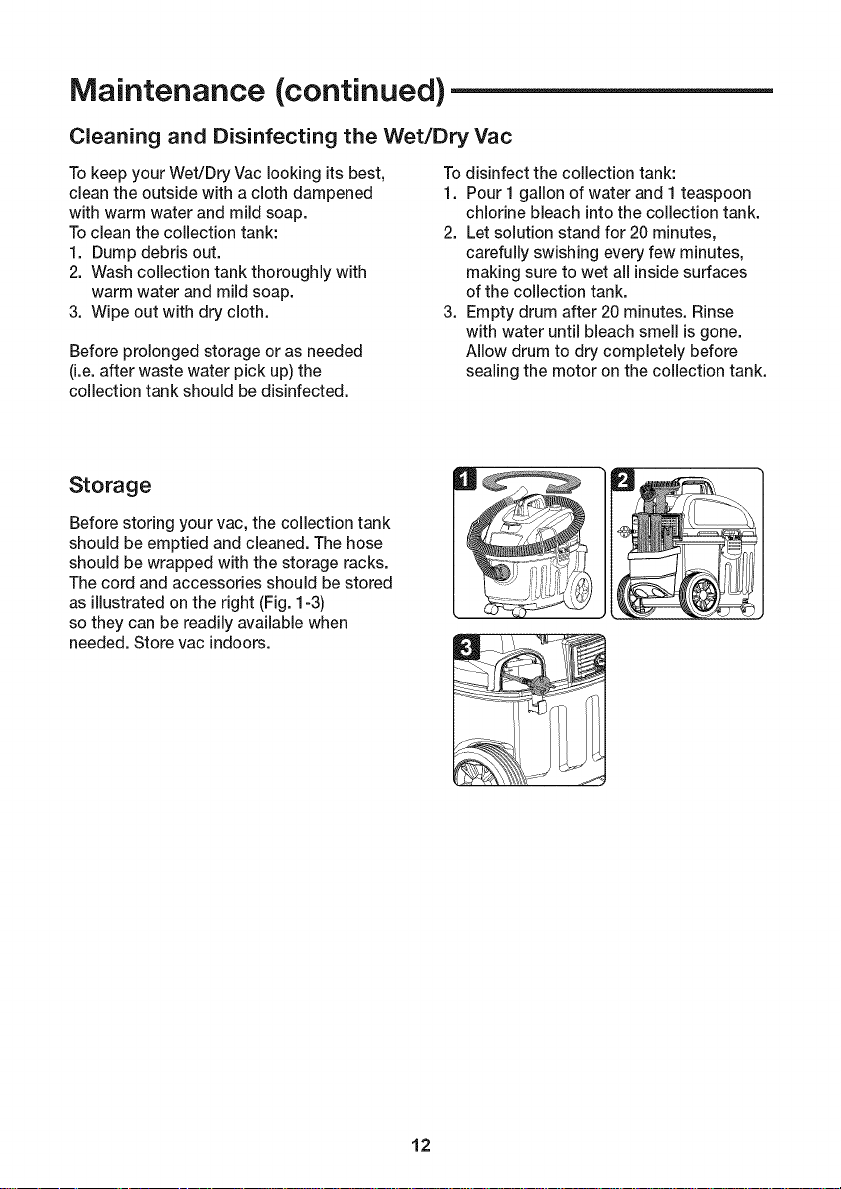
Storage
Before storing your vac, the collection tank
should be emptied and cleaned. The hose
should be wrapped with the storage racks.
The cord and accessories should be stored
as illustratedon the right(Fig. 1-3)
so they can be readilyavailable when
needed. Store vac indoors.
12
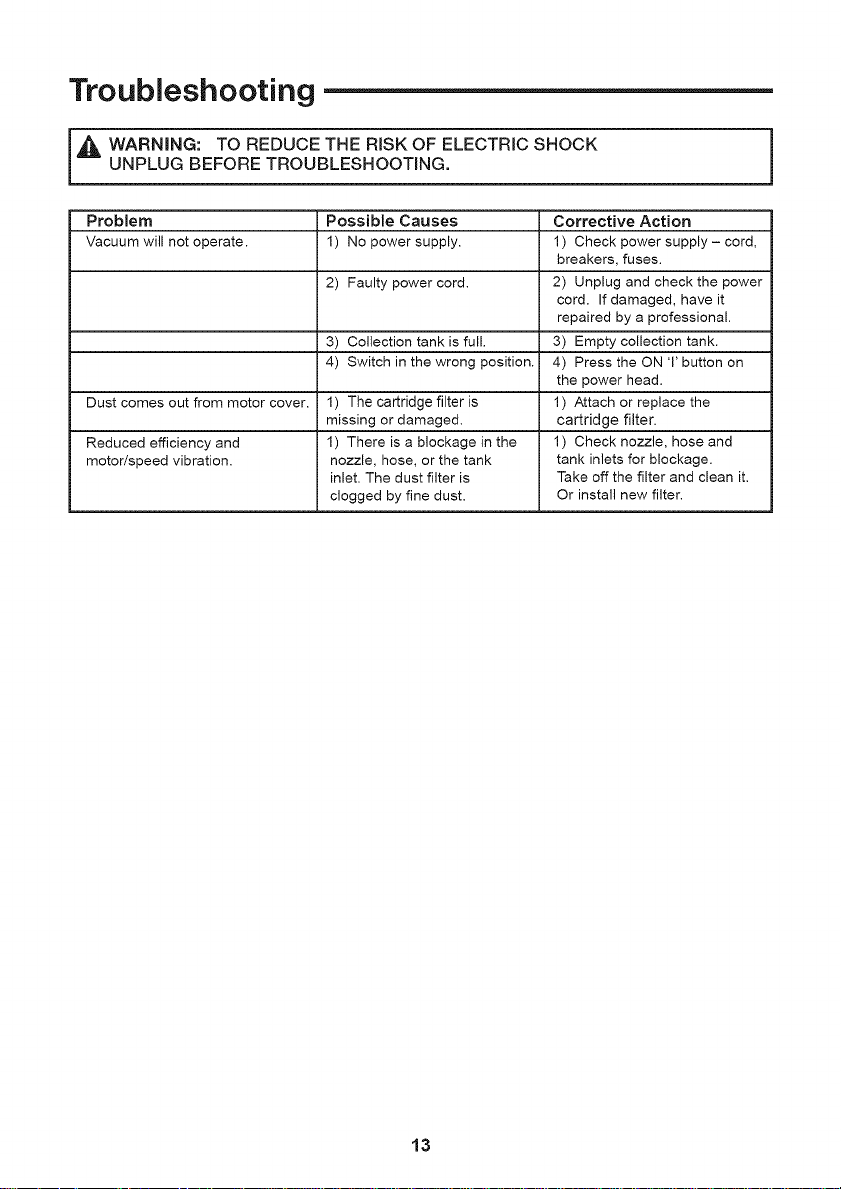
Troubleshooting
i_ ARNING: TO REDUCE THE RISK OF ELECTRIC SHOCK
UNPLUG BEFORE TROUBLESHOOTING.
Problem Possible Causes Corrective Action
Vacuum will not operate. 1) No power supply. 1) Check power supply - cord,
breakers, fuses.
2) Faulty power cord. 2) Unplug and check the power
cord. If damaged, have it
repaired by a professional.
3) Collection tank is full. 3) Empty collection tank.
4) Switch in the wrong position. 4) Press the ON 1' button on
the power head.
Dust comes out from motor cover. 1) The cartridge filter is 1) Attach or replace the
missing or damaged, cartridge filter.
Reduced efficiency and 1) There is a blockage in the 1) Check nozzle, hose and
motor/speed vibration, nozzle, hose, or the tank tank inlets for blockage.
inlet. The dust filter is Take off the filter and clean it.
clogged by fine dust. Or install new filter.
13
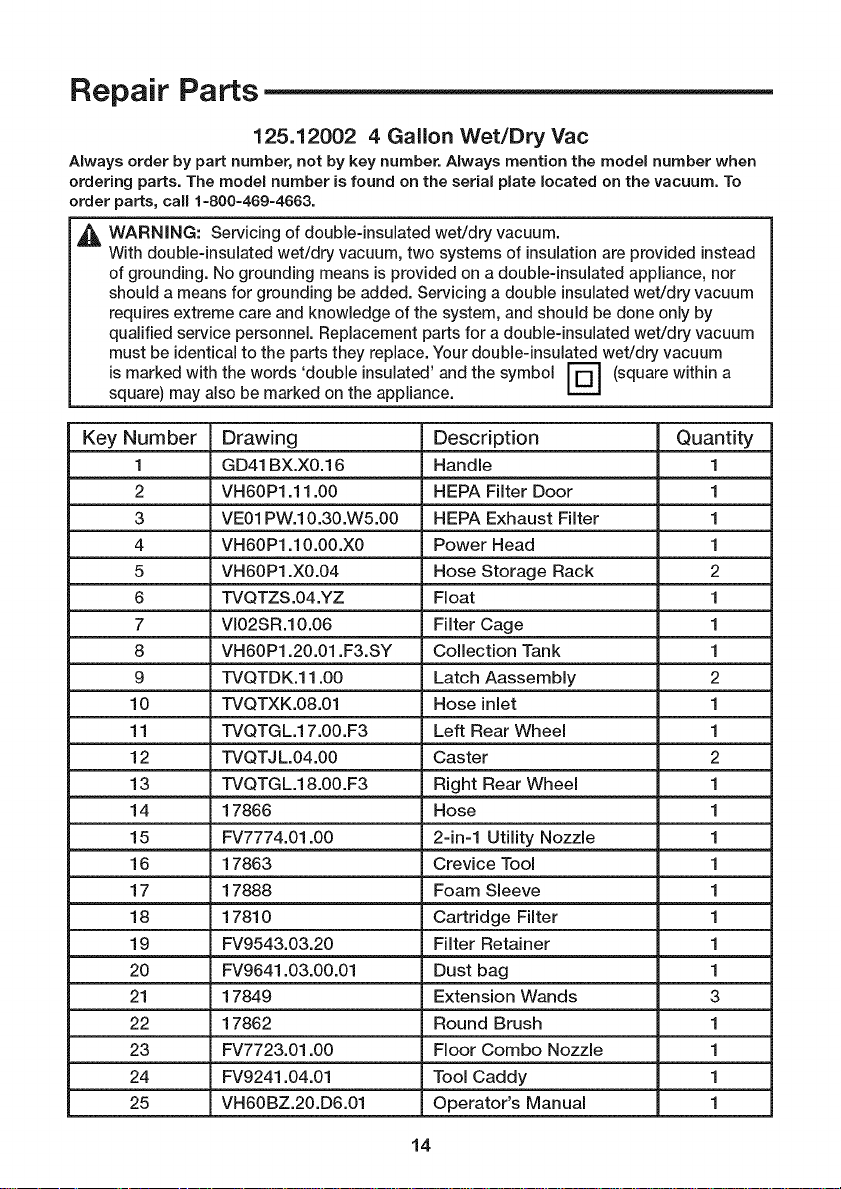
Repair Parts
125.12002 4 Gallon Wet/Dry Vac
Always order by part number, not by key number. Always mention the model number when
ordering parts. The model number isfound on the serial plate located on the vacuum. To
order parts, call 1-800-469-4663.
_l_ WARNING: Servicing of double-insulated wet/dry vacuum.
With double-insulated wet/dry vacuum, two systems of insulationare provided instead
of grounding. No grounding means is provided on a double-insulated appliance, nor
should a means for grounding be added. Servicing a double insulatedwet/dry vacuum
requiresextreme care and knowledge of the system, and should be done only by
qualified service personnel. Replacement partsfor a double-insulated wet/dry vacuum
must be identicalto the parts they replace. Your double-insulated wet/dry vacuum
is marked with the words 'double insulated' and the symbol r_ (square within a
square) may also be marked on the appliance.
i.-.i
Key Number Drawing Description Quantity
1 GD41 BX.X0.16 Handle 1
2 VH60P1.11.00 HEPA Filter Door 1
3 VE01 PW.10.30.W5.00 HEPA Exhaust Filter 1
4 VH60P1.10.00.X0 Power Head 1
5 VH60P1.X0.04 Hose Storage Rack 2
6 TVQTZS.04.YZ Float 1
7 VI02SR.10.06 Filter Cage 1
8 VH60P1.20.01 .F3.SY Collection Tank 1
9 TVQTDK.11.00 Latch Aassembly 2
10 TVQTXK.08.01 Hose inlet 1
11 TVQTGL.17.00.F3 Left Rear Wheel 1
12 TVQTJ L.04.00 Caster 2
13 TVQTGL.18.00.F3 Right Rear Wheel 1
14 17866 Hose 1
15 FV7774.01.00 2-in-1 Utility Nozzle 1
16 17863 Crevice Tool 1
17 17888 Foam Sleeve 1
18 17810 Cartridge Filter 1
19 FV9543.03.20 Filter Retainer 1
20 FV9641.03.00.01 Dust bag 1
21 17849 Extension Wands 3
22 17862 Round Brush 1
23 FV7723.01.00 Floor Combo Nozzle 1
24 FV9241.04.01 Tool Caddy 1
25 VH60BZ.20.D6.01 Operator's Manual 1
14

Repair Parts (Continued)
4 Gallon Wet/Dry Vac
JJ
15
17
15
I8
19
i
15
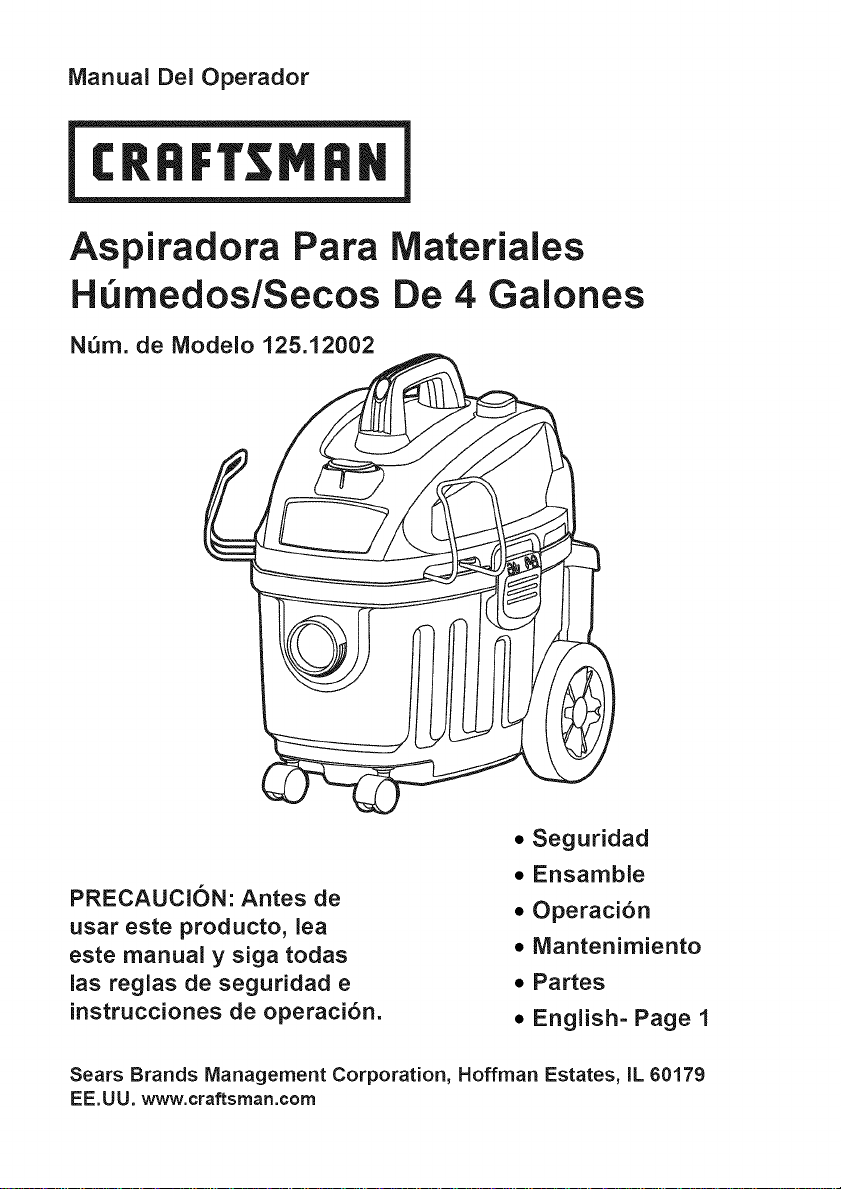
Manual Del Operador
Aspiradora Para Materiales
H_medos/Secos De 4 Gaiones
N_m. de Modelo 125.12002
PRECAUCION: Antes de
usar este producto, lea
este manual y siga todas
las reglas de seguridad e
instrucciones de operaci6n.
• Seguridad
• Ensamble
• Operaci6n
• IVlantenimiento
• Partes
• English= Page 1
Sears Brands Management Corporation, Hoffman Estates, IL 60179
EE.UU. www.craftsman.com
Garantia
GARANTJA TOTAL DE UN ANO DE CRAFTSMAN
DURANTE UN ANO a partir de la fecha de cornpra, este producto est_ garantizado
contra defectos de material o rnano de obra. Un producto defectuoso ser_
reernplazado sin ningQn costo.
Para detalles sobre la cobertura de la garantia para obtener un reernplazo gratuito,
visite la p_gina web: www.craftsrnan.cornlwarranty. Esta garantia no cubre bolsas de
cubierta, filtros, rnangueras o accesorios, que son partes consurnibles que pueden
desgastarse pot el uso normal dentro del periodo de la garantia. Esta garantia de UN
ANO es inv_lida si este producto alguna vez se usa para servicios cornerciales o si
se renta a otra persona. Para obtener los t_rrninos de uso cornercial y de renta por
90 DiAS, consulte la p_gina web de la garantia de Craftsman.
Esta garantia le ofrece derechos legales especificos y tarnbi_n puede tener otros
derechos que varian de estado a estado.
Sears Brands Management Corporation, Hoffrnan Estates IL 60179
INSTRUCCIONESDESEGURJDADJMPORTANTES
LEA Y COMPRENDA TODAS LAS
INSTRUCCIONES ANTES DE USAR ESTA
ASPIRADORA.
Lea y entienda este manual del operador y
todas las etiquetas de la aspiradora de material
hQmedo/seco antes de operarla. La seguridad es
una combinaci6n de sentido comQn, mantenerse
alerta y saber c6mo funciona su aspiradora.
Use esta aspiradora de material hQmedo/seco
Qnicamente como se describe en este manual.
Para reducir el riesgo de lesiones personales o
dafios a la aspiradora de material hQmedo/seco,
use Qnicamente los accesorios recomendados
de Craftsman.
Tipo dom_stico
6UARDEESTEMANUAL
PARA CONSULTA FUTURA.
A! utilizar un electrodom6stico, siempre se
deben seguir las precauciones b&sicas,
incluyendo las siguientes:
ADVERTENCJA:
PARA REDUC]R EL RJESGODE
INCENDIOS, DESCARGA ELECTRICA
0 LESIONES:
• No deje aaaspiradora desatendida.
• No aspire ni use esta aspiradora de material
hOmedo/seco cerca de liquidos inflamables,
gases o vapores explosivos como gasolina u
otros combustibles, liquidos encendedores,
limpiadores, pinturas con base de aceite, gas
natural, hidr6geno o polvos explosivos como
polvo de carb6n, polvo de magnesio, polvo
de granos o p61vora. Las chispas dentro del
motor pueden encender vapores o polvos
inflamables.
• No aspire nada que se este quemando o
emitiendo humo, como cigarrillos, cerillos
o cenizas calientes.
• Mantenga el cable alejado de superficies
calientes.
• No laexponga a la Iluvia.AImacenela en
interiores.
• No desconecte jalando el cable de corriente.
Para desconectar, sujete el enchufe y no el
cable.
• No la use con el cable, enchufe u otras partes
dafiadas.
• Si la aspiradora no esta funcionando como
deberia, se ha dejado caer, esta dafiada, se
dej6 a la intemperie o cay6 en agua, 116velaa un
distribuidor de servicio para que la inspeccione y
repare antes de usarla de nuevo.
• No lajale ni cargue por el cable, ni use el cable
como agarradera, no cierre una puerta sobre
el cable ni jale el cable por bordes _osos ni
esquinas.
• No pase la aspiradora de material hOmedo/seco
por encima del cable.
• No maneje el enchufe ni la aspiradora de
material hQmedo/seco con manos hQmedas.
• Para reducir el riesgo de peligros a la salud
debido a vapores o polvos, no aspire materiales
t6xicos.
• No almacene la aspiradora cerca de materiales
peligrosos.
• No use esta aspiradora de material hOmedo/
seco con un filtro rasgado o sin el filtro instalado,
excepto cuando se aspiren los liquidos que se
describen en la secci6n de operaci6n de este
manual.
• No permita que se use como un juguete. Se
necesita poner mucha atenci6n cuando se usa
cerca de nifios.
• Para reducir el riesgo de una lesi6n por un
encendido accidental, desconecte el cable
incomplete corriente antes de cambiar o limpiar
el filtro.
17
• No deje la aspiradora de material hOmedo/seco
desatendida cuando la conecte. Desconectela
del tomacorriente cuando no esta en uso y antes
de realizar el servicio.
• Apague la aspiradora de material hOmedo/seco
antes de desconectarla.
• No coloque ningQn objeto en las aberturas
de ventilaci6n. No aspire con ninguna de
las aberturas de ventilaci6n bloqueadas;
mantengala libre de polvo, pelusa, cabello o
cualquier objeto que pudiera reducir el fiujo de
aire.
• Mantenga el cabello, ropa holgada, dedos y
todas las partes del cuerpo lejos de las aberturas
y partes m6viles.
• Para reducir el riesgo de caidas, tenga mucho
cuidado al limpiar escaleras.
Enchufe polarizado
Para reducir el riesgo de una descarga
electrica, este electrodomestico tiene un
enchufe polarizado (uno con un contacto mas
ancho que el otro). Este enchufe entrara en un
tomacorriente polarizado solo de una manera.
Si el enchufe no entra per complete en el
tomacorriente, invierta el enchufe. Si aOn no
entra, comuniquese con un electricista calificado
para instalar el tomacorriente adecuado. No
modifique el enchufe de ninguna manera. El
doble aislamiento [] elimina la necesidad de
una extension de tres contactos con conexion a
tierra y un sistema de suministro de energia con
conexi6n a tierra.
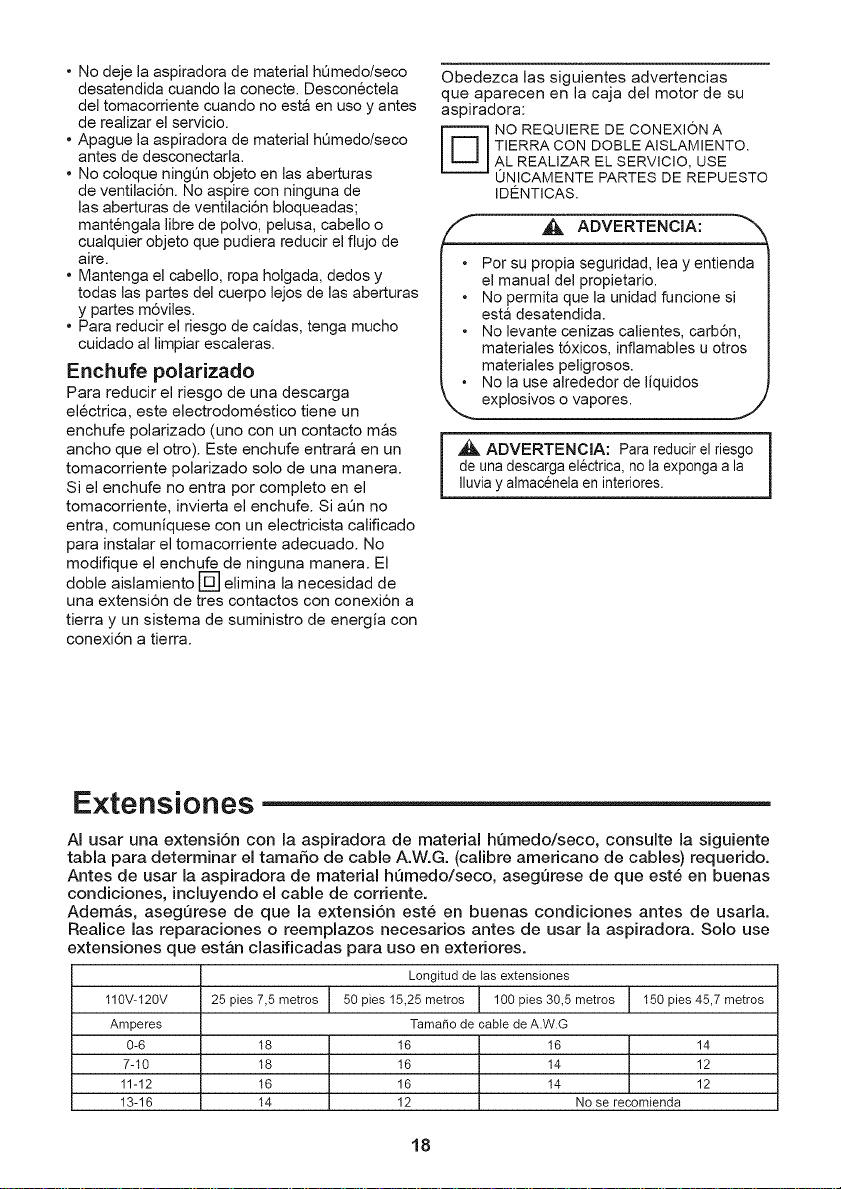
Obedezca las siguientes advertencias
que aparecen en la caja del motor de su
aspiradora:
NO REQUIERE DE CONEXION A
TIERRA CON DOBLE AISLAMIENTO.
AL REALIZAR EL SERVICIO, USE
UNICAMENTE PARTES DE REPUESTO
IDENTICAS.
f _ ADVERTENCIA:
• Por su propia seguridad, lea y entienda
el manual del propietario
• No permita que la unidad funcione si
esta desatendida
• No levante cenizas calientes, carb6n,
materiales t6xicos, inflamables u otros
materiales peligrosos
• No la use alrededor de liquidos
explosivos o vapores _/
,_ ADVERTENClA: Para reducir el riesgo
de una descarga el_ctrica, no la exponga a la
Iluvia y almacenela eninteriores.
Extensiones
AI usar una extensi6n con la aspiradora de material humedo/seco, consulte la siguiente
tabla para determinar el tamaSo de cable A.W.G. (calibre americano de cables) requerido.
Antes de usar la aspiradora de material humedo/seco, asegurese de que est6 en buenas
condiciones, incluyendo el cable de corriente.
Adem&s, asegurese de que la extensi6n est6 en buenas condiciones antes de usarla.
Realice las reparaciones o reemplazos necesarios antes de usar la aspiradora. Solo use
extensiones que est&n clasificadas para uso en exteriores.
Longitud de tas extensiones
110V-120V 25 pies 7,5 metros 50 pies 15,25 metros 100 pies 30,5 metros 150 pies 45,7 metros
Amperes Tamale de cable deA.W.G
0-6 18 16 16 14
7-10 18 16 14 12
11-12 16 16 14 12
13-16 14 12 No se recomienda
18

Introducci6n
Esta aspiradora de material humedo/seco
est& diseSada para aspirar materiales
humedos y secos, ademAs puede usarse
como un soplador.
Lea este manual del operador para
familiarizarse con las caracteristicas
del producto y para entender el uso
especffico de su nueva aspiradora de
material humedo/seco.
indice
Secci6n P&gina
Garantia .................................................... 17
Secci6n P&gina
Mantenimiento ......................................... 25
Instrucciones de seguridad
importantes .......................................... 17
CSmo vaciar el tanque de
recolecci6n ......................................... 25
Enchufe poladzado .............................. 1 8
Extensiones .............................................. 1 8
Introducci6n ............................................. 1 9
indice ........................................................ 1 9
Ensamble .................................................. 20
Lista del contenido de la caja ............. 20
Desempaque de la aspiradora de
matedal humedo/seco y ensamble
general .................................................. 21
Operaci6n ................................................. 23
Aspiraci6n de matedales secos ......... 23
InstalaciSn y limpieza del filtro de
cartucho .............................................. 25
InstalaciSn y limpieza del filtro de
manga de espuma ............................. 26
Instalaci6n y limpieza del
filtro HEPA ........................................... 26
Limpieza y desinfecci6n de la
aspiradora de material
humedo/seco ...................................... 27
AImacenamiento ................................ 27
Resoluci6n de problemas ........................ 28
Partes de repuesto .................................. 29
Aspiraci6n de I{quidos ......................... 24
19
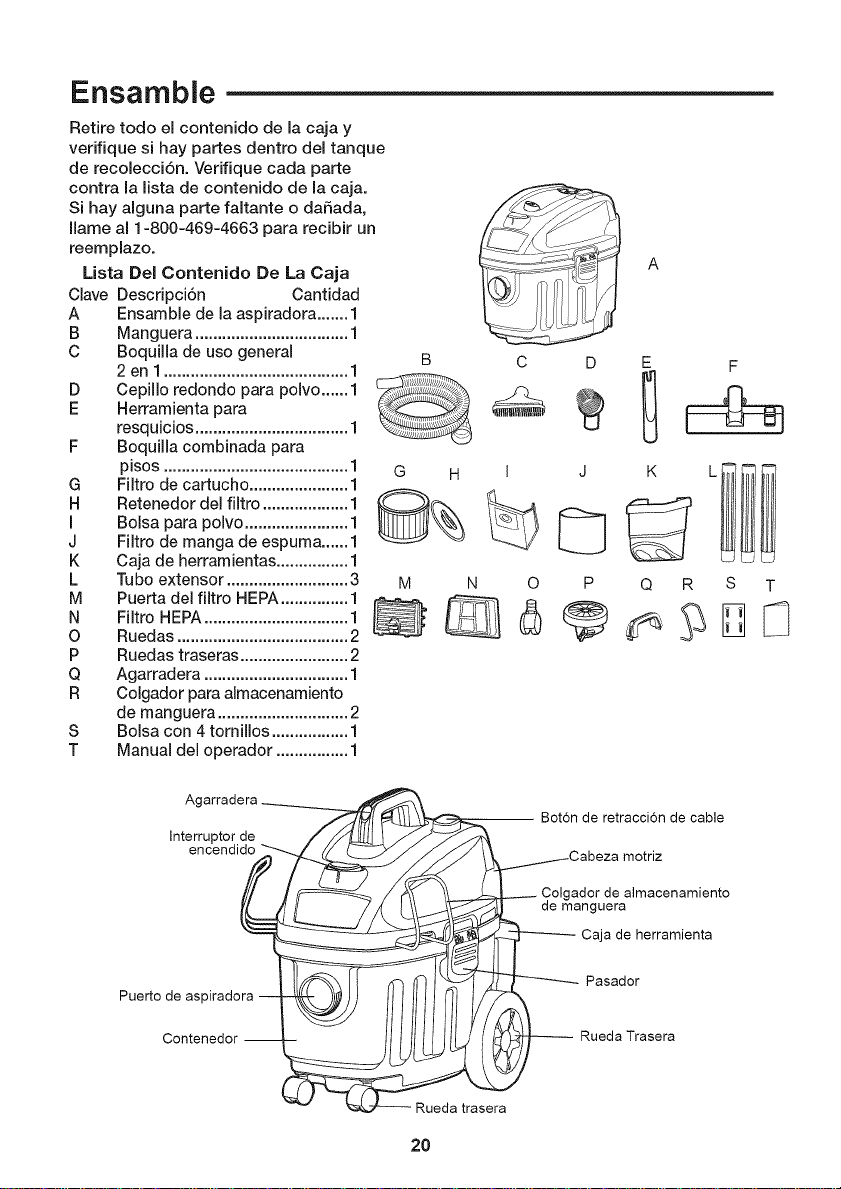
Ensamble
Retire todo el contenido de la caja y
vedfique si hay partes dentro del tanque
de recolecci6n. Vedfique cada parte
contra la lista de contenido de la caja.
Si hay alguna parte faltante o da_ada,
Ilame al 1-800-469-4663 para recibir un
reemplazo.
Usta Del Contenido De La Caja
Clave Descdpci6n Cantidad
A
B
C
D
E
G
H
I
J
K
L
M
N
O
P
Q
R
S
T
Ensamble de la aspiradora .......1
Manguera .................................. 1
Boquilla de uso general
2en 1......................................... 1
Cepillo redondo para polvo ......1
Herramienta para
resquicios .................................. 1
Boquilla combinada para
pisos ......................................... I
Filtro de cartucho ...................... I
Retenedor del filtro ................... I
Bolsa para polvo ....................... 1
Filtro de manga de espuma......1
Caja de herramientas ................1
Tubo extensor ...........................3
Puerta de! filtro HEPA...............1
Filtro HEPA................................ 1
Ruedas ...................................... 2
Ruedas traseras ........................2
Agarradera ................................ 1
Colgador para almacenamiento
de manguera ............................. 2
Bolsa con 4 tornillos .................1
Manual cteloperador ................1
A
c D E
M N 0
J K
P Q
F
R S T
Agarradera
/''-/_/ _ _ aot6n de retracci6n de cable
Interruptor.de _ / f_ J/'_ f-_
encend,do _ _' _Jf / /\ JCabeza motriz
Y ,__/K(_ __CColgador de almacenamiento
(_===_..__ _:: _ de manguera
_ _ _------- Caja de herramienta
I ll_X I I (Tq _] I _/I _/ _-------- Pasador
Puertodeaspiradora_ /I/I/I/ _-_/i i
Contenedor _ L_._ Rueda Trasera
20
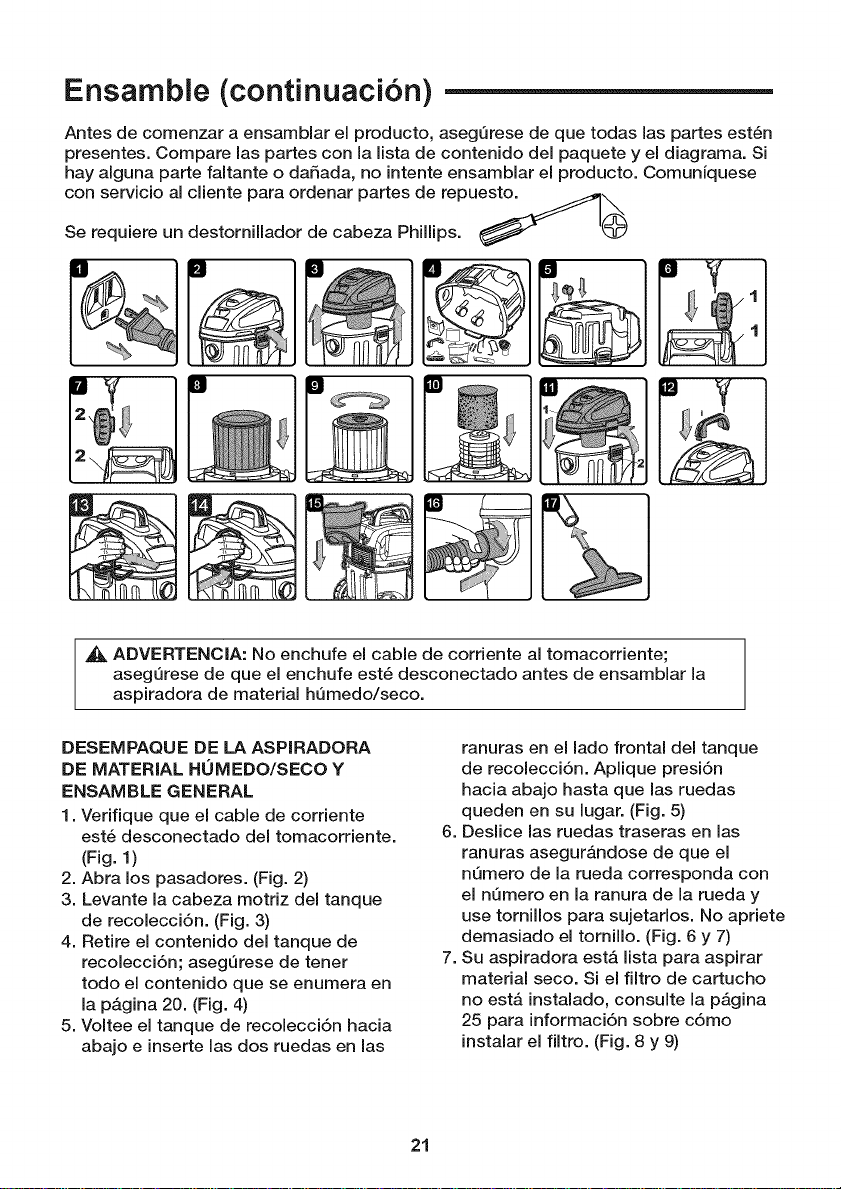
Ensamble (continuacion)
Antes de comenzar a ensamblar el producto, asegQrese de que todas las partes est6n
presentes. Compare las partes con la lista de contenido del paquete y el diagrama. Si
hay alguna parte faltante o da5ada, no intente ensamblar el producto. Comuniquese
con servicio al cliente para ordenar partes de repuesto.
Se requiere un destornillador de cabeza Phillips.
,_ ADVERTENCIA: No enchufe el cable de corriente al tomacorriente;
asegQrese de que el enchufe est6 desconectado antes de ensamblar la
aspiradora de material hQmedo/seco.
DESEMPAQUE DE LA ASPIRADORA
DE MATERIAL HUMEDO/SECO Y
ENSAMBLE GENERAL
1. Verifique que el cable de corriente
est6 desconectado del tomacorriente.
(Fig. 1)
2. Abra los pasadores. (Fig. 2)
3. Levante la cabeza motriz del tanque
de recolecci6n. (Fig. 3)
4. Retire el contenido del tanque de
recolecci6n; asegQrese de tener
todo el contenido que se enumera en
la pAgina 20. (Fig. 4)
5. Voltee el tanque de recolecci6n hacia
abajo e inserte las dos ruedas en las
6.
7.
ranuras en el lado frontal del tanque
de recolecci6n. Aplique presi6n
hacia abajo hasta que las ruedas
queden en su lugar. (Fig. 5)
Deslice las ruedas traseras en las
ranuras asegurAndose de que el
nQmero de la rueda corresponda con
el nQmero en la ranura de la rueda y
use tornillos para sujetarlos. No apriete
demasiado el tornillo. (Fig. 6 y 7)
Su aspiradora estA lista para aspirar
material seco. Si el filtro de cartucho
no estA instalado, consulte la pAgina
25 para informaci6n sobre c6mo
instalar el filtro. (Fig. 8 y 9)
21
8. ParalimpiarmaterialeshQmedos
conJaaspiradora,instaleeJfiltrode
espumaqueseproporciona.
(Fig.10)ConsuJteJap&gJna26para
verc6moinstalarelfiltro.
9.CoJoquelacabezamotrizdenuevo
sobreeltanquederecolecci6n
alineandolasecci6nsuperiorcon
Jospasadoresycerr&ndoJoshasta
trabarJos.(Fig.11)
10.JnsertelaagarraderaenJasranuras
ubicadasenlapartesuperiorde
JacabezamotrizyasegQreJacon
Jostorniflosqueseproporcionan.
NoaprietedemasiadoeJtornilJo.
(Fig.12)
11.CoJoqueeJcolgadorde
almacenamientodeJamanguera
comoseilustra.JnserteunJadodeJ
colgadorenelcanalasegQrandose
dequequedesujetado.AprieteeJ
otroextremoeins6rteJoeneJcanaJ
correspondJenteasegur&ndosede
quequedefijo.(Fig.13yFig.14)
12.CueJgueJacajadeherramientasen
JosganchosdeJapartetraserade
Jaaspiradora.(Fig.15)
13.AsegureeJextremograndede
JamangueraenelpuertodeJa
aspiradoraeneltanquede
recolecci6nyatornJJJeJopara
sujetarlo.(Fig.16)
14.SeJeccioneJosaccesoriosytubos
extensoresdeseadosyempQjeJos
sobreJamanguera.(Fig.17)
22
Operacion
Aspiracion de Materiales Secos
ADVERTENCIA: Asegurese de leer, entender y aplicar toda la informaci6n de
la secci6n de instrucciones de seguridad importantes que est& al inicio de este
manual de operaciones. No aspire en &teas con gases infiamables, vapores o polvos
explosivos en el aire. Los gases o vapores inflamables incluyen, entre otros: liquidos
encendedores, limpiadores de tipo solvente, pinturas con base de aceite, gasolina,
alcohol o aerosoles. Los polvos explosivos incluyen, entre otros: carb6n, magnesio,
granos o p61vora. Para reducir el riesgo de peligros a la salud debido a vapores o
polvos, no aspire materiales t6xicos.
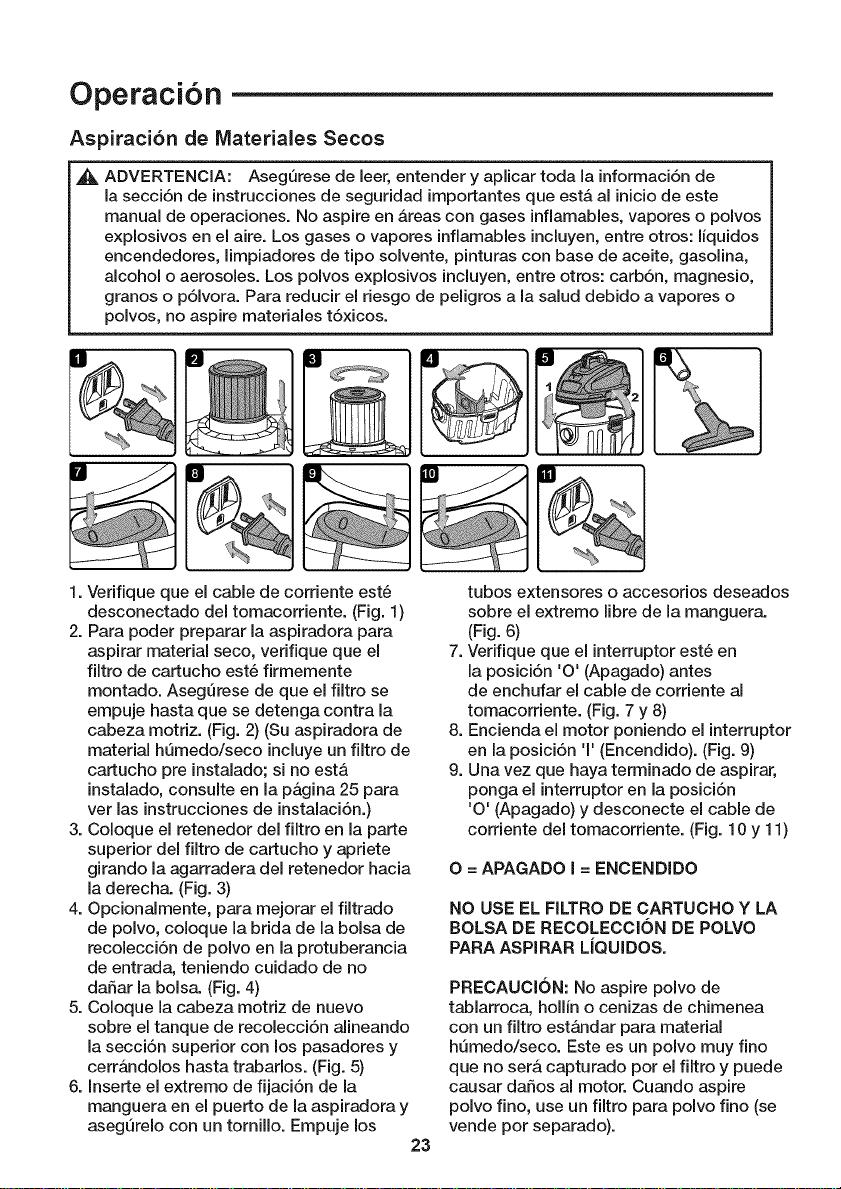
1. Vedfique que el cable de corriente est6
desconectado del tomacorriente. (Fig. 1)
2. Para poder preparar la aspiradora para
aspirar material seco, verifique que el
filtro de cartucho est6 firmemente
montado. Aseg_rese de que el filtro se
empuje hasta que se detenga contra la
cabeza motriz. (Fig. 2) (Su aspiradora de
material h_medo/seco incluye un filtro de
cartucho pre instalado; si no est&
instalado, consulte en la p&gina 25 para
ver las instrucciones de instalaci6n.)
3. Coloque el retenedor del filtro en la parte
superior del filtro de cartucho y apriete
girando laagarradera del retenedor hacia
la derecha. (Fig. 3)
4. Opcionalmente, para mejorar el filtrado
de polvo, coloque la brida de la bolsa de
recolecciSn de polvo en la protuberancia
de entrada, teniendo cuidado de no
daSar la bolsa. (Fig. 4)
5. Coloque la cabeza motriz de nuevo
sobre el tanque de recolecci6n alineando
la secci6n superior con los pasadores y
cerr&ndolos hasta trabarlos. (Fig. 5)
6. Inserte el extremo de fijaci6n de la
manguera en el puerto de la aspiradora y
aseg_relo con un tornillo. Empuje los
23
tubos extensores o accesorios deseados
sobre el extremo libre de la manguera.
(Fig. 6)
7. Verifique que el interruptor est6 en
la posiciSn 'O' (Apagado) antes
de enchufar el cable de corriente al
tomacorriente. (Fig. 7 y 8)
8. Encienda el motor poniendo el interruptor
en la posiciSn '1' (Encendido). (Fig. 9)
9. Una vez que haya terminado de aspirar,
ponga el interruptor en la posiciSn
'O' (Apagado) y desconecte el cable de
corriente del tomacorriente. (Fig. 10 y 11)
O = APAGADO I = ENCENDJDO
NO USE EL FILTRO DE CARTUCHO Y LA
BOLSA DE RECOLECCION DE POLVO
PARA ASPIRAR LJQUIDOS.
PRECAUCJON: No aspire polvo de
tablarroca, hollfn o cenizas de chimenea
con un filtro est&ndar para material
hQmedo/seco. Este es un polvo muy fino
que no set& capturado pot el filtro y puede
causar dafios al motor. Cuando aspire
polvo fino, use un filtro para polvo fino (se
vende por separado).
Operacion (continuacion)
Aspiracion de Liquidos
A ADVERTENCIA: Asegurese de leer, entender y aplicar toda la informaciSn de
la secciSn de instrucciones de seguridad importantes que est& al inicio de este
manual de operaciones. No aspire en &teas con gases infiamables, vapores o polvos
explosivos en el aire. Los gases o vapores inflamables incluyen, entre otros: liquidos
encendedores, limpiadores de tipo solvente, pinturas con base de aceite, gasolina,
alcohol o aerosoles. Los polvos explosivos incluyen, entre otros: carbSn, magnesio,
granos o pSIvora. Para reducir el riesgo de peligros a la salud debido a vapores o
polvos, no aspire materiales tSxicos.
ADVERTENClA: No enchufe el cable de corriente al tomacorriente; asegurese de
que el enchufe est6 desconectado antes de ensamblar la aspiradora de material
humedo/seco.
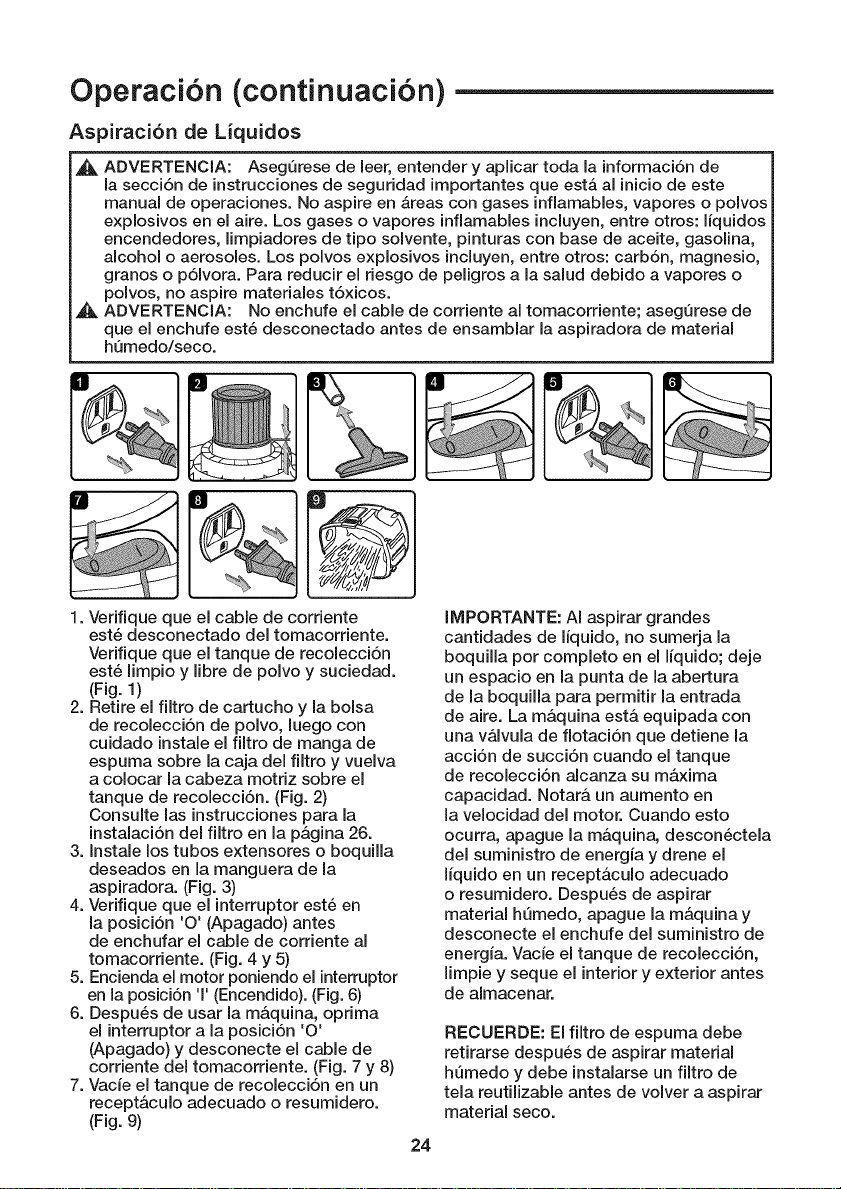
1. Verifique que el cable de corriente
est6 desconectado del tomacorriente.
Verifique que el tanque de recolecci6n
est6 limpio y libre de polvo y suciedad.
(Fig. 1)
2. Retire el filtro de cartucho y la bolsa
de recolecciSn de polvo, luego con
cuidado instale el filtro de manga de
espuma sobre la caja del filtro y vuelva
a colocar la cabeza motriz sobre el
tanque de recolecciSn. (Fig. 2)
Consulte las instrucciones para la
instalaci6n del filtro en la p&gina 26.
3. Instale los tubos extensores o boquilla
deseados en la manguera de la
aspiradora. (Fig. 3)
4. Verifique que el interruptor est6 en
la posici6n 'O' (Apagado) antes
de enchufar el cable de corriente al
tomacorriente. (Fig. 4 y 5)
5. Encienda el motor poniendo el interruptor
en la posiciSn '1'(Encendido). (Fig. 6)
6. Despu6s de usar la m&quina, optima
el interruptor a la posiciSn 'O'
(Apagado) y desconecte el cable de
corriente del tomacorriente. (Fig. 7 y 8)
7. Vacie el tanque de recolecciSn en un
recept&culo adecuado o resumidero.
(Fig. 9)
24
IMPORTANTE: AI aspirar grandes
cantidades de liquido, no sumerja la
boquilla pot completo en el liquido; deje
un espacio en la punta de la abertura
de la boquilla para permitir la entrada
de aire. La m&quina est& equipada con
una v&lvula de fiotaci6n que detiene la
acciSn de succiSn cuando el tanque
de recolecciSn alcanza su m&xima
capacidad. Notar& un aumento en
la velocidad del motor. Cuando esto
ocurra, apague la m&quina, descon6ctela
del suministro de energfa y drene el
Ifquido en un recept&culo adecuado
o resumidero. Despu6s de aspirar
material h_medo, apague la m&quina y
desconecte el enchufe del suministro de
energfa. Vacfe el tanque de recolecciSn,
limpie y seque el interior y exterior antes
de almacenar.
RECUERDE: El filtro de espuma debe
retirarse despu6s de aspirar material
hQmedo y debe instalarse un filtro de
tela reutilizable antes de volver a aspirar
material seco.
Mantenirniento
Como Vaciar el Tanque de Recoleccion
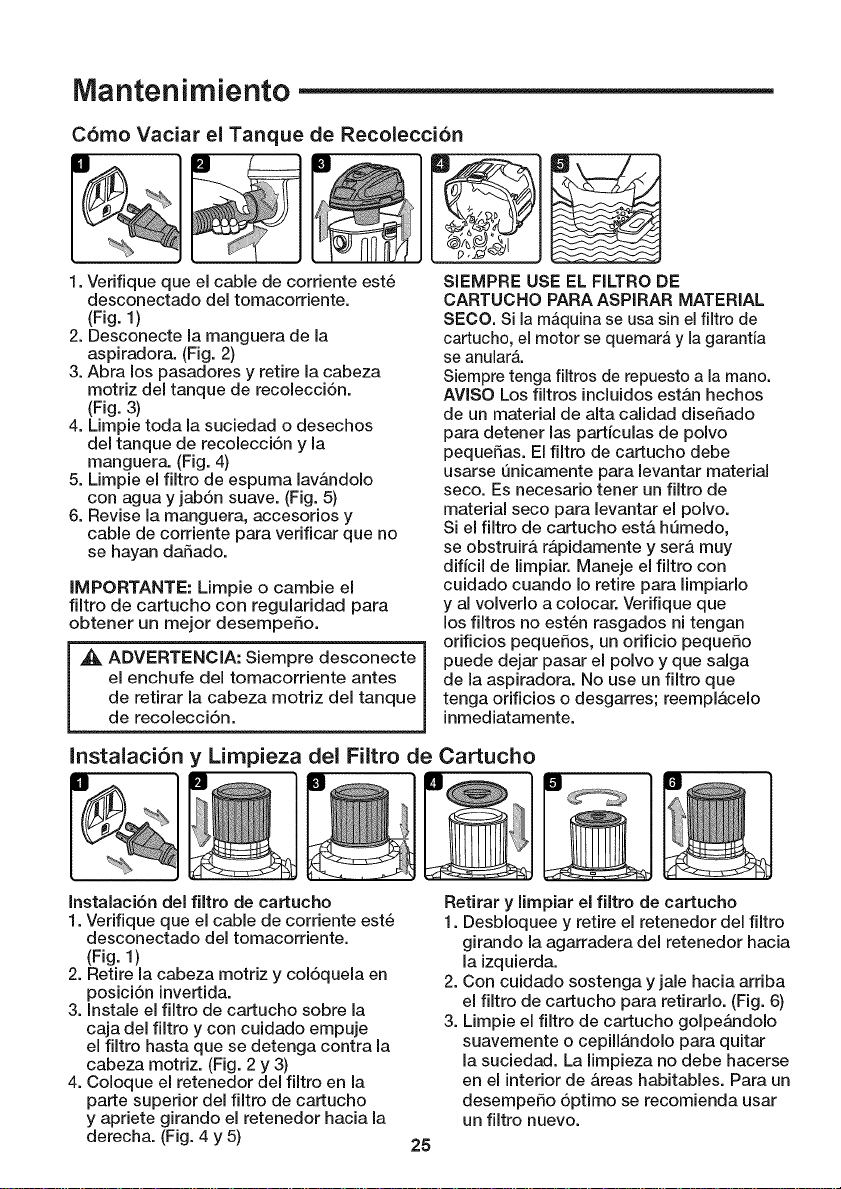
1. Verifique que el cable de corriente est6
desconectado del tomacorriente.
(Fig. 1)
2. Desconecte la manguera de la
aspiradora. (Fig. 2)
3. Abra los pasadores y retire la cabeza
motriz del tanque de recolecci6n.
(Fig. 3)
4. Limpie toda la suciedad o desechos
del tanque de recolecci6n y la
manguera. (Fig. 4)
5. Limpie el filtro de espuma lav&ndolo
con agua y jab6n suave. (Fig. 5)
6. Revise la manguera, accesorios y
cable de corriente para verificar que no
se hayan daSado.
IMPORTANTE: Limpie o cambie el
filtro de cartucho con regularidad para
obtener un mejor desempeSo.
,_k ADVERTENCIA: Siempre desconecte
el enchufe del tomacorriente antes
de retirar la cabeza motriz del tanque
de recolecci6n.
SIEMPRE USE EL FILTRO DE
CARTUCHO PARA ASPIRAR MATERIAL
SECO. Si la m_quina se usa sin el filtro de
cartucho, el motor se quemarA y la garantia
se anular&
Siempre tenga filtros de repuesto a la mano.
AVISO Los filtros incluidos est&n hechos
de un material de alta calidad diseSado
para detener las partfculas de polvo
pequeSas. El filtro de cartucho debe
usarse _nicamente para levantar material
seco. Es necesario tenet un filtro de
material seco para levantar el polvo.
Si el filtro de cartucho est& h_medo,
se obstruir& r&pidamente y set& muy
diffcil de limpiar. Maneje el filtro con
cuidado cuando Io retire para limpiarlo
y al volverlo a colocar. Verifique que
los filtros no est6n rasgados ni tengan
orificios pequeSos, un orificio pequeSo
puede dejar pasar el polvo y que salga
de la aspiradora. No use un filtro que
tenga orificios o desgarres; reempl&celo
inmediatamente.
Instalaci6n y Limpieza del Filtro de Cartucho
Instalaci6n del filtro de cartucho
1. Verifique que el cable de corriente est6
desconectado del tomacorriente.
(Fig. 1)
2. Retire la cabeza motriz y col6quela en
posici6n invertida.
3. Instale el filtro de cartucho sobre la
caja del filtro y con cuidado empuje
el filtro hasta que se detenga contra la
cabeza motriz. (Fig. 2 y 3)
4. Coloque el retenedor del filtro en la
parte superior del filtro de cartucho
y apriete girando el retenedor hacia la
derecha. (Fig. 4 y 5)
25
Retirar y limpiar el filtro de cartucho
1. Desbloquee y retire el retenedor del filtro
girando la agarradera del retenedor hacia
la izquierda.
2. Con cuidado sostenga y jale hacia arriba
el filtro de cartucho para retirarlo. (Fig. 6)
3. Limpie el filtro de cartucho golpe&ndolo
suavemente o cepill&ndolo para quitar
la suciedad. La limpieza no debe hacerse
en el interior de &teas habitables. Para un
desempeSo 6primo se recomienda usar
un filtro nuevo.
Mantenimiento (continuacion)
Instalaci6n y Limpieza del Filtro de Manga de Espuma
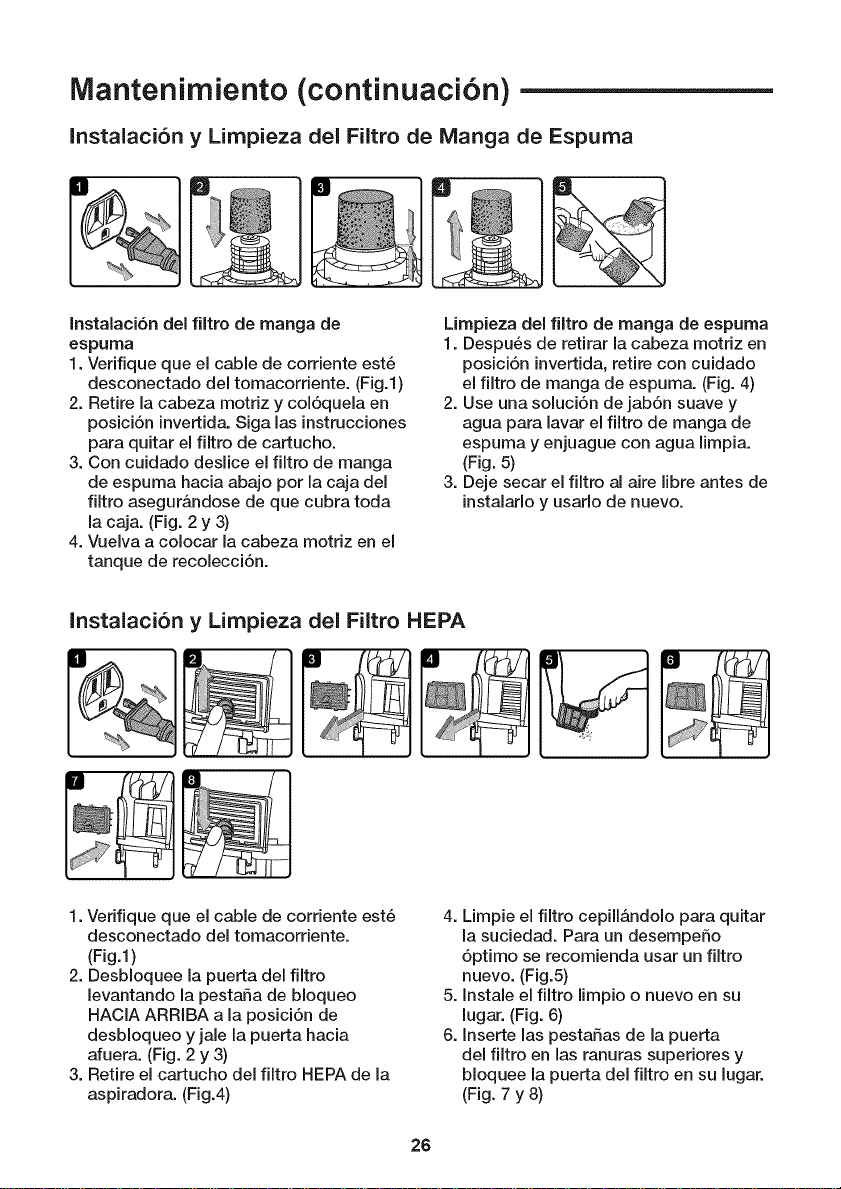
Instalaci6n del filtro de manga de
espuma
1. Verifique que el cable de corriente est6
desconectado del tomacorriente. (Fig.l)
2. Retire la cabeza motriz y col6quela en
posici6n invertida. Siga las instrucciones
para quitar el filtro de cartucho.
3. Con cuidado deslice el filtro de manga
de espuma hacia abajo por la caja del
filtro asegur&ndose de que cubra toda
la caja. (Fig. 2y 3)
4. Vuelva a colocar la cabeza motriz en el
tanque de recolecci6n.
Limpieza del filtro de manga de espuma
1. Despu6s de retirar la cabeza motriz en
posici6n invertida, retire con cuidado
el filtro de manga de espuma. (Fig. 4)
2. Use una soluci6n de jab6n suave y
agua para lavar el filtro de manga de
espuma y enjuague con agua limpia.
(Fig. 5)
3. Deje secar el filtro al aire libre antes de
instalarlo y usarlo de nuevo.
Instalaci6n y Limpieza del Filtro HEPA
1. Verifique que el cable de corriente est6
desconectado del tomacorriente.
(Fig.l)
2. Desbloquee la puerta del filtro
levantando la pestaSa de bloqueo
HACIA ARRIBA a la posici6n de
desbloqueo y jale la puerta hacia
afuera. (Fig. 2y 3)
3. Retire el cartucho del filtro HEPA de la
aspiradora. (Fig.4)
4. Limpie el filtro cepill&ndolo para quitar
la suciedad. Para un desempeSo
6ptimo se recomienda usar un filtro
nuevo. (Fig.5)
5. Instale el filtro limpio o nuevo en su
lugar. (Fig. 6)
6. Inserte las pestaSas de la puerta
del filtro en las ranuras supedores y
bloquee la puerta del filtro en su lugar.
(Fig. 7 y 8)
26
Mantenimiento (continuaci6n)
Limpieza y Desinfecci6n de la Aspiradora de Material
Humedo/Seco
Para mantener su aspiradora de material
hQmedo/seco en las mejores condiciones,
limpie el exterior con un paso hQmedo con
agua tibia y jab6n suave. Para limpiar el
tanque de recolecci6n:
1. Tire losdesechos.
2. Lave el tanque de recolecci6n a rondo
con agua tibia y un jab6n suave.
3. Limpie con un paso seco.
Eltanque de recolecci6n debe desinfectarse
antes de un almacenamiento prolongado o
segQnsea necesario (esdecir, despu6s de
levantar agua de desecho).
Para desinfectar eltanque de recolecci6n:
1. Vierta 1 gal6n de agua y 1cucharadita de
blanqueador en el tanque de recolecci6n.
2. Dejeremojando en la soluci6n durante 20
minutos, agitando suavemente despu6s
de unos minutos, asegurAndose de
humedecer todas las superficies
interiores del tanque de recolecci6n.
3. Vacie el tambor despu6s de 20 minutos.
Enjuague con agua hasta que
desaparezca el olor a blanqueador. Deje
que el tambor se seque por completo
antes de colocar el motor sobre el tanque
de recolecci6n.
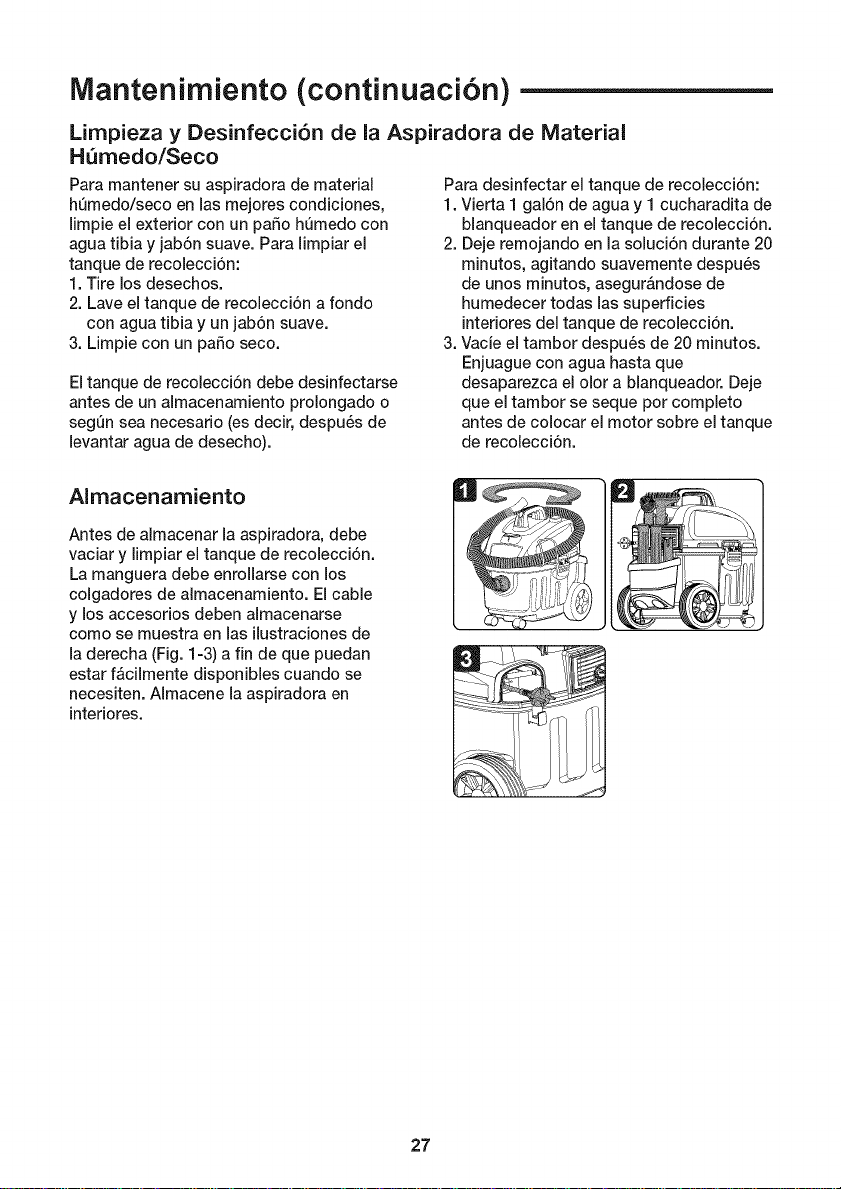
AImacenamiento
Antes de almacenar la aspiradora, debe
vaciar y limpiar eltanque de recolecci6n.
La manguera debe enrollarse con los
colgadores de almacenamiento. El cable
y los accesorios deben almacenarse
como se muestra en las ilustraciones de
la derecha (Fig. 1-3) a fin de que puedan
estar fAcilmente disponibles cuando se
necesiten. AImacene la aspiradora en
interiores.
27
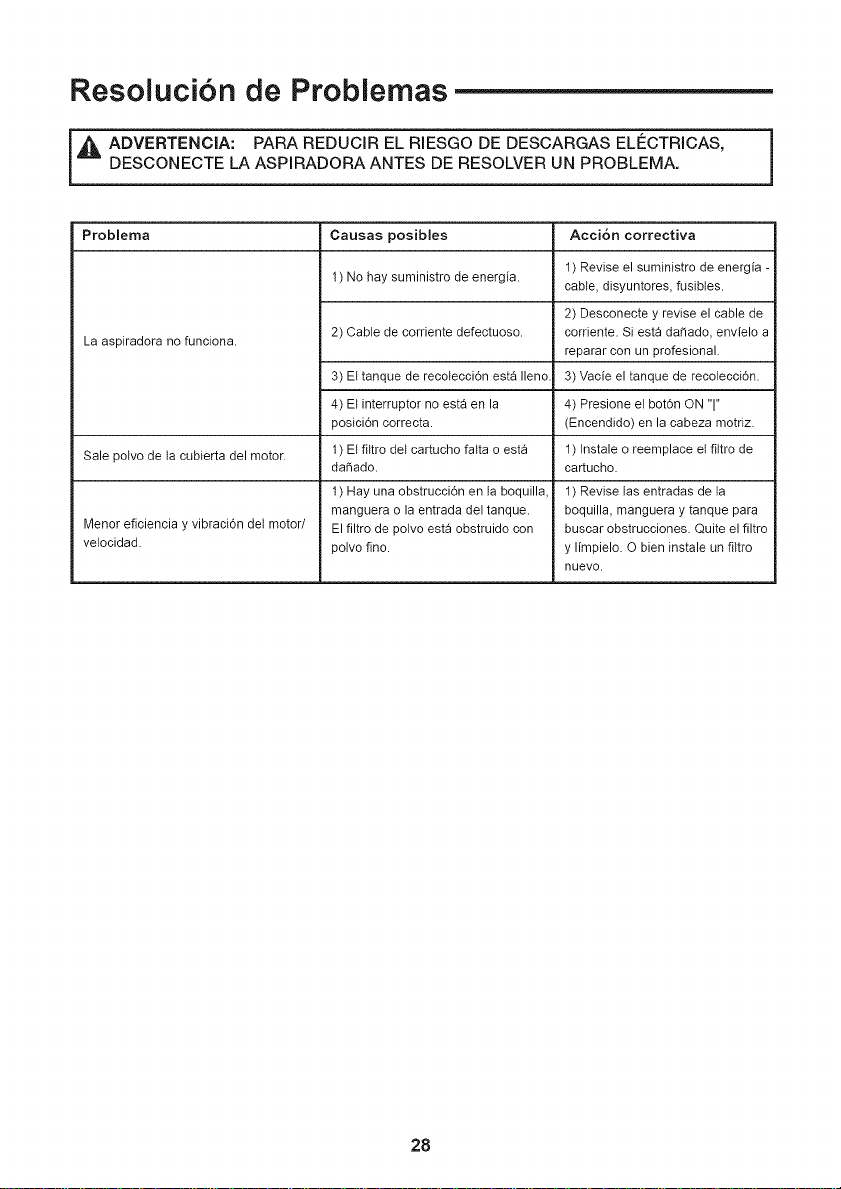
Resoluci6n de Problemas
,_ ADVERTENCIA: PARA REDUCIR EL RIESGO DE DESCARGAS ELECTRICAS,
DESCONECTE LA ASPIRADORA ANTES DE RESOLVER UN PROBLEMA.
Problema Acci6n correctiva
La aspiradora no funciona.
Sale polvo de tacubierta del motor.
Menor eficiencia y vibraci6n det motor/
vetocidad.
Causas posibles
1) No hay suministro de energia.
1) Revise el suministro de energia -
cable, disyuntores, fusibtes.
2) Desconecte y revise el cable de
2) Cable decorriente defectuoso, corriente. Siesta da_ado, envielo a
reparar con un profesional.
3) El tanque de recolecci6n esta Ileno 3) Vacie el tanque de recolecci6n.
4) El interruptor no esta en la
posici6n correcta.
1) El filtro det cartucho falta o esta
da_ado.
1) Hay una obstrucci6n en la boquilla,
manguera o la entrada del tanque.
El filtro de polvo esta obstruido con
polvo fino.
4) Presione el bot6n ON "1"
(Encendido) en la cabeza motriz.
1) Instale o reemplace etfiltro de
cartucho.
1) Revise las entradas de la
boquilla, manguera y tanque para
buscar obstrucciones. Quite el filtro
y limpielo. O bien instale un filtro
nuevo.
28
Partes de Repuesto
125.12002 Aspiradora De Material Humedo/Seco De 4 Galones
Siempre ordene por n_mero de parte y no por n_mero de clave. Siempre mencione el n_mero
del modelo cuando ordene partes. El n_mero de modelo se encuentra en la plata de serie que se
encuentra en la aspiradora. Para ordenar partes, Ilarne al 1-800-469-4663.
,_ ADVERTENCIA: Como dar servicio a una aspiradora de material h_medo/seco de doble
aislamiento.
Con la aspiradora de material h_medo/seco de doble aislamiento, se proporcionan dos
sistemas de aislamiento en vez de una conexi6n a tierra. En un aparato con doble
aislamiento no se provee un medio de conexiSn a tierra, ni se debe aSadir un medio de
conexiSn a tierra. E!servicio a una aspiradora de material h_medo/seco con doble
aislamiento requiere de mucha atenci6n y conocimiento del sistema y debe set realizado
_nicamente por personal calificado para el servicio. Las partes de reemplazo para una
aspiradora de material h_medo/seco de doble aislamiento deben set identicas alas partes
que reemplazan. Su aspiradora de material hemedo/seco con doble aislamiento est&
marcada con las palabras "double insulated" (doble aislamiento" y el simbolo _ (cuadrado
dentro de un cuadrado) tambien puede estar marcado en el aparato.
L_J
N_merode dave Dibujo DescripciSn Cantidad
1 GD41 BX.X0.16 Agarradera 1
2 VH60P1.11.00 Puerta del filtro HEPA 1
3 VE01 PW.10.30.W5.00 Filtro de extracciSn HEPA 1
4 VH60P1.1 0.00.X0 Cabeza motriz 1
5 VH60P1 .X0.04 iColgador para almacenamiento de anguera 2
6 TVQTZS.04.YZ i Flotador 1
7 Vl02SR.10.06 ICaja del filtro 1
8 VH60P1.20.01.F3.SY i Tanque de recolecciSn 1
9 TVQTDKol 1.00 Ensamble de pasadores 2
10 TVQTXKo08.01 iEntrada de la manguera 1
11 TVQTG Lol 7.00.F3 Rueda trasera izquierda 1
12 TVQTJ Lo04.00 i Rueda 2
13 TVQTGLo18.00.F3 Rueda trasera derecha 1
14 17866 iManguera 1
15 FV7774.01.00 Boquilla de uso general 2 en 1 1
16 17863 Herramienta para resquicios 1
17 17888 iFiltro de espuma 1
18 17810 Filtro de cartucho 1
19 FV9543.03.20 Retenedor del filtro 1
20 FV9641.03.00.01 iBolsa protectora 1
21 17849 Tubos extensores 3
22 17862 ICepillo redondo 1
23 FV7723.01.00 IBoquilla combinada para pisos 1
24 FV9241.04.01 i Caja de herramientas 1
25 VH60BZ.20.D6.01 Manual del operador 1
29
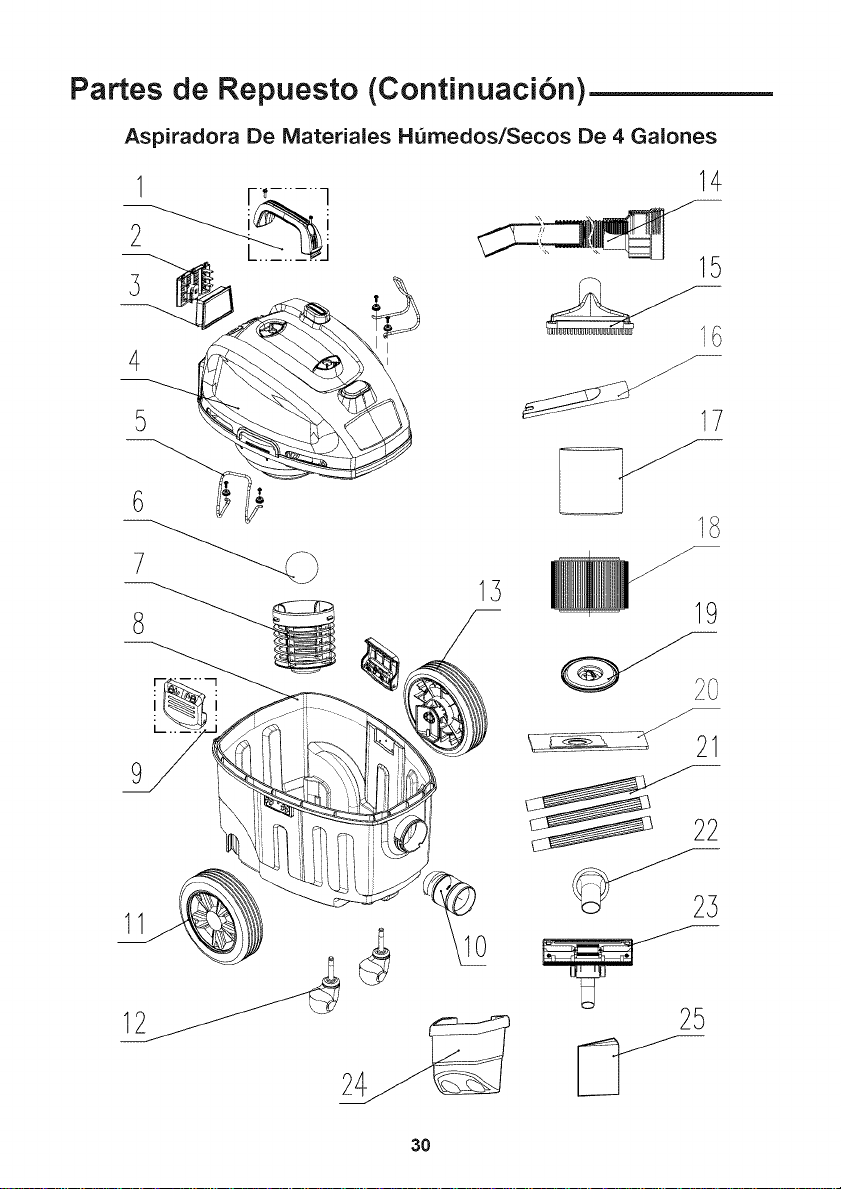
Partes de Repuesto (Continuaci6n)
Aspiradora De Materiaies Humedos/Secos De 4 Galones
3
4
13
14
15
I8
19
L..
9
21
30