Use & Care Guide
Manual de Uso Y Cuidado
English / Espa_ol
i
}# ]:,?C
',;3 00L)Z( '( OS " ,i_, ,':<; y(
; ] "<=" ..... " _"_" D;}[,;}_ ' • "........ ;_, AY} .:, I-[ 8VI(lO 81
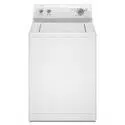
Model/Modelo: 796.4128#31#
I<e
IC c
@
QU_I_OFF_Q =CQ de
ca a
%
P/N MF:L67737656
Sears Brand Management Corporation
Hoffman Estates, IL 60179 U.S.A.
www.kenmore.com
www.sears.com
IMPORTANT SAFETY INSTRUCTIONS .............................. 3=5
GROUNDING REQUIREMENTS ............................................. 5
FEATURES AND BENEFITS
Key Parts and Components ................................................. 6
Included Accessories ........................................................ 6
Optional Accessories ........................................................ 6
iNSTALLATiON REQUIREMENTS
Key Dimensions and Specifications ................................... 7
Choose the Proper Location ............................................... 7
Flooring .................................................................................. 7
Clearances ............................................................................ 7
INSTALLATION INSTRUCTIONS
Unpacking and Removing Shipping Bolts ......................... 8
Connecting the Water Lines ................................................ 9
Connecting the Drain Hose ............................................... 10
Connect to the Power Supply ............................................. 10
Leveling the Washer ........................................................... 11
Installation of Non-Skid Pads (optional) .......................... 11
HOW TO USE
Control Panel Features ........................................................ 12
Operating the Washer ......................................................... 13
Cycle Guide .................................................................... 14-15
Sorting Wash Loads ............................................................ 16
About the Dispenser Drawer .............................................. 17
Detergent and Dispenser Use............................................. 18
Time and Status Display .................................................... 19
Cycle Modifier Buttons ....................................................... 20
Steam Cycles and Options ................................................. 21
Steam Treat Option ......................................................... 21
Option Buttons .................................................................... 22
Delay Start ....................................................................... 22
Extra Rinse ....................................................................... 22
Pre Wash .......................................................................... 22
Special Functions ................................................................. 23
Control Lock ..................................................................... 23
Clean Washer .................................................................. 23
MyCycle ............................................................................ 23
Auto Soak .......................................................................... 23
Stay Fresh .......................................................................... 23
CARE AND CLEANING
Regular Cleaning .......................................................... 24-25
Cleaning the Exterior ...................................................... 24
Care and Cleaning of the Interior ................................ 24
Clean Washer .................................................................. 24
Door Seal and Glass Cleaning ..................................... 24
Removinc_ Mineral Buildup ............................................. 24
Storing tne Washer ......................................................... 25
Cleaning the Dispenser .................................................. 25
Maintenance ................................................................. 26-27
Cleaning the Water Inlet Filters .................................... 26
Cleaning the Drain Pump Filter ..................................... 27
KENMORE CONNECT TM System ........................................ 28
TROUBLESHOOTING GUIDE
Normal Sounds You May Hear ......................................... 29
Before Calling for Service ........................................... 29-31
WARRANTY ............................................................................ 32
in the space below, record the date of purchase, model,
and serial number of your product. You will find the
model and seriat number printed on an identification
plate located inside the washer lid. Have these items of
information available whenever you contact Sears
concerning your product.
Model No.
Date of Purchase
Serial No.
Save these instructions and your sales receipt for future
reference.
Master Protection Agreements
Congratulations on making a smart purchase. Your new
Kenmore ® product is designed and manufactured for
years of dependable operation. But like all products, it
may require preventive maintenance or repair from time
to time. That's when having a Master Protection
Agreement can save you money and aggravation.
The Master Protection Agreement atso helps extend the
life of your new product. Here's what the
Agreement s includes:
* Parts and labor needed to help keep products operating
properly under normal use, not just defects. Our coverage
goes well beyond the product warranty. No deductible, no
functional failure excluded from coverage - real protection.
* Expert service by a force of more than 10,000 authorized
Sears service technicians, which means someone you can
trust will be working on your product.
* Unlimited service caffs and nationwide service, as often as
you want us, whenever you want us.
* "No=lemon" guarantee - replacement of your covered
product if four or more product failures occur within twelve
months.
* Product replacement if your covered product can not
be fixed.
* Annual Preventive Maintenance Check at your request - no
extra charge.
* Fast help by phone - we call it Rapid Resolution. Phone
support from a Sears representative on all products. Think of us
as a "talking owner's manual."
* Power surge protection against electric damage due to
power fluctuations.
* $250 food loss protection annuaffy for any food spoilage
that is the result of mechanical failure of any covered
refrigerator or freezer.
* Rental reimbursement if repair of your covered product
takes longer than promised.
* 10% discount off the regular price of any non-covered repair
service and related instafled parts.
Once you purchase the Agreement, a simple phone
call is all that it takes for you to schedule service. You
can call at any time day or night or schedule a service
appointment online.
The Master Protection Agreement is a risk-free purchase.
If you cancel for any reason during the product
warranty period, we will provide a full refund, or a
prorated refund any time after the product warranty
period expires. Purchase your Master Protection
Agreement today!
Some limitations and exclusions apply.
For prices and addltlonal information in the U.S.A.
call 1=800=827=6655.
_Coverage in Canada varies on some items.
For full detalls call Sears Canada at 1=800=361=6665.
Sears Installaflon Service
For Sears professional installation of home appliances,
garage door openers, water heaters, and other major
home items, in the U.S.A. or Canada call:
1-800-4-MY-HOME ®.
Thereare manyimportantsafety messages in this manual and on your appliance. Always read and obey
all safety messages.
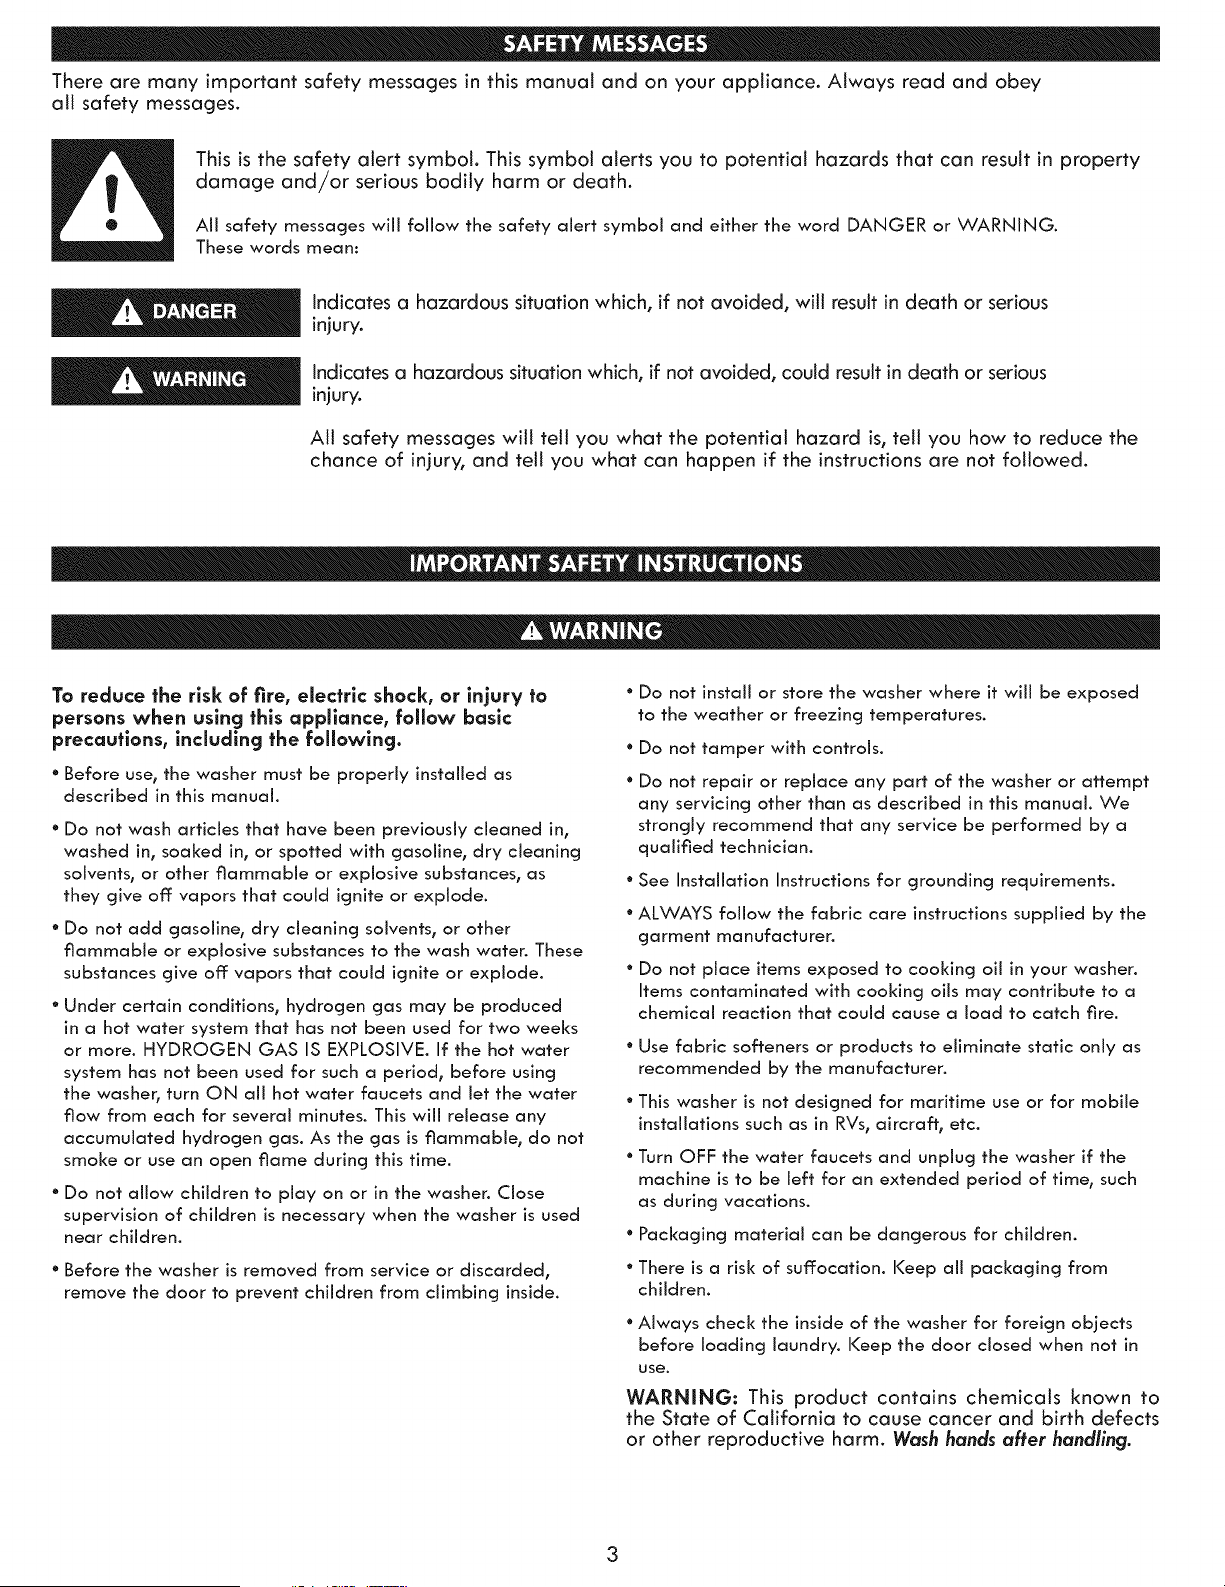
This is the safety alert symbol. This symbol alerts you to potential hazards that can result in property
damage and/or serious bodily harm or death.
Aii safety messages wiii follow the safety alert symbol and either the word DANGER or WARNING.
These words mean:
Indicates a hazardous situation which, if not avoided, will result in death or serious
injury.
Indicates a hazardous situation which, if not avoided, could result in death or serious
injury.
All safety messages will tell you what the potential hazard is, tell you how to reduce the
chance of injury, and tell you what can happen if the instructions are not followed.
To reduce the risk of fire, electric shock, or injury to
persons when using this appliance, follow basic
precautions, including the following.
° Before use, the washer must be properly installed as
described in this manual.
° Do not wash articles that have been previously cleaned in,
washed in, soaked in, or spotted with gasoline, dry cleaning
solvents, or other flammable or explosive substances, as
they give off vapors that could ignite or explode.
° Do not add gasoline, dry cleaning solvents, or other
flammable or explosive substances to the wash water. These
substances give off vapors that could ignite or explode.
° Under certain conditions, hydrogen gas may be produced
in a hot water system that has not been used for two weeks
or more. HYDROGEN GAS IS EXPLOSIVE. If the hot water
system has not been used for such a period, before using
the washer, turn ON aii hot water faucets and let the water
flow from each for several minutes. This wiii release any
accumulated hydrogen gas. As the gas is flammable, do not
smoke or use an open flame during this time.
° Do not allow children to play on or in the washer. Close
supervision of children is necessary when the washer is used
near children.
° Before the washer is removed from service or discarded,
remove the door to prevent children from climbing inside.
° Do not install or store the washer where it will be exposed
to the weather or freezing temperatures.
° Do not tamper with controls.
° Do not repair or replace any part of the washer or attempt
any servicing other than as described in this manual. We
strongly recommend that any service be performed by a
qualified technician.
* See Installation Instructions for grounding requirements.
° ALWAYS follow the fabric care instructions supplied by the
garment manufacturer.
* Do not place items exposed to cooking oil in your washer.
Items contaminated with cooking oils may contribute to a
chemical reaction that could cause a load to catch fire.
° Use fabric softeners or products to eliminate static only as
recommended by the manufacturen
° This washer is not designed for maritime use or for mobile
installations such as in RVs, aircraft, etc.
° Turn OFF the water faucets and unplug the washer if the
machine is to be left for an extended period of time, such
as during vacations.
° Packaging material can be dangerous for children.
° There is a risk of suffocation. Keep aii packaging from
children.
• Always check the inside of the washer for foreign objects
before loading laundry. Keep the door closed when not in
use.
WARNING: This product contains chemicals known to
the State of California to cause cancer and birth defects
or other reproductive harm. Wash hands after handling.
To reduce the risk of fire, electric shock, or injury to
persons when using this appllance, follow basic
precautions, includlng the followlng.
° Unplug the washer before cleaning to avoid the risk of
electric shock.
• Never use harsh chemicals, abrasive cleaners, or solvents
to clean the washer. They will damage the finish.
° Do not put oily or greasy rags or clothing on tap of the
washer. These substances give off vapors that could ignite the
materials.
• Do nat wash items that are sailed with vegetable or
cooking oil. These items may contain some oil after laundering
and may catch fire.
• Disconnect this appliance from the power supply before
attempting any user maintenance. Turning the controls to
the OFF position does not disconnect this appliance from
the power supply. Failure to follow this warning can cause
serious iniury, fire, electric shock, or death.
° Do not combine detergents, fabric softeners, and/or other
laundry products from different manufacturers for use in a
load, unless specified on the fabric label
° Do not mix chlorlne bleach with ammonia or acids such
as vinegar. Faffaw package directions when using laundry
products. Incorrect usage can produce poisonous gas, resulting
in serious injury or death.
* Do not reach into the washer while parts are moving.
Before Ioadlng, unloadlng, or adding items, push in the
cycle selector knob and affow the drum to coast to a
complete stop before reaching inside. Failure to follow this
warning can cause serious injury, fire, electric shock or death.
° Refer to INSTALLATION iNSTRUCTiONS far detailed
grounding procedures. Installation instructionsare packed
in the washer for the installer_s reference. If the washer is
moved to a new location, have it checked and reinstalled by a
qualified service technician. Failure to fallow this warning can
cause serious iniury, fire, electric shock, or death.
° Do not, under any circumstances, cut or remove the third
(ground) prong from the power cord. Failure to follow this
warning can cause serious injury, fire, electric shock, or death.
° For personal safety, this appfiance must be properly
grounded. Failure ta fallow this warning can cause serious
injury, fire, electric shock, or death.
* The power cord of this appfiance is equipped with a
3-prong (grounding) plug which mates with a standard
3-prong (grounding) waft autJet to minimize the possibility of
electric shock hazard from this appliance.
° This washer must be plugged into a 120VAC, 60Nz
grounded outJet. Failure to fallow this warning can cause
serious iniury, fire, electric shock, or death.
* Nave the waft ouffet and circuit checked by a quafffied
eJectrlclan to make sure the ouffet is properly grounded.
Failure to fallow this warning can cause serious injury, fire,
electric shock, or death.
* Where a standard 2-prong waft ouffet is encountered, it
is your personal responsibility and abffgatlon to have it
replaced with a properly grounded 3-prong waft outlet.
Failure ta fallow this warning can cause serious injury, fire,
electric shock, ar death.
* Do nat instaff an carpet. Instaff the washer on a soffd floor.
Failure to fallow this warning can cause serious leak damage.
° Do nat remove grounding prong. Do nat use an adapter or
extension cord. Plug into a grounded 3-prong auffet. Failure
to fallow these warnings can cause serious injury, fire, electric
shock, or death.
° The washer should always be plugged into its own
indivldual electrlcal outlet which has a voffage rating
that matches the rating plate. This provides the best
performance and also prevents overloading house wiring
circuits which could cause a fire hazard from overheated
wires.
° Never unplug your washer by pulling on the power
cord. Always grip plug firmly and pull straight out from the
outlet. Failure to fallow this warning can cause serious iniury,
fire, electric shock, or death.
° Immediately repair or replace all power cords that have
become frayed or otherwise damaged. Do nat use a cord
that shows cracks or abrasion damage along its length
or at either end. Consult with a qualified service technician.
Failure to fallow this warning can cause serious iniury, fire,
electric shock, or death.
° When installing or moving the washer, be careful not to
pinch, crush, or damage the power cord. Failure to follow
this warning can cause serious injury, fire, electric shack, or
death.
° The washer must be installed and electrlcaffy grounded
by a quafffied service technician in accordance with local
codes to prevent shock hazard and assure stability during
operation.
° The washer is heavy. Two or more people may be
needed to instaff and move the appffance. Failure to do
so can result in damage to property or serious bodily injury.
° Store and install the washer where it will nat be exposed
to temperatures below freezing or exposed to outdoor
weather conditions. Failure to follow this warning can
cause serious leak damage.
° To reduce the risk of electric shock, do nat install the
washer in humid spaces. Failure to follow this warning can
cause serious injury, fire, electric shock, or death.
4

*Do notallowchildrento play onor in the washer.
Closesupervision of children is necessary when the
washer is used near children. As children grow, teach
them the proper, safe use of all appliances. Failure
to comply with these warnings could result in serious
personal injury.
* Destroy the carton, plastic bag, and other packing
materials after the washer is unpacked. Children
might use them for play. Cartons covered with rugs,
bedspreads, or plastic sheets can become airtight
chambers. Failure to comply with these warnings could
result in serious personal injury.
* Keep laundry products out of children's reach. To
prevent personal injury, observe all warnings on
product labels. Failure to comply with these warnings
could result in serious personal injury.
• Before your washer is removed from service or
discarded, remove the lid to the washing compartment to
avoid the danger of children or small animals getting
trapped inside. Failure to do so can result in serious
personal injury or death.
IMPORTANT: Please read carefully.
TO CONNECT ELECTRICITY
Improper connection of the equipment-grounding
conductor can result in risk of electric shock. Check
with a qualified electrician or service technician
if you are in doubt as to whether the appliance
is properly grounded. Do not modify the plug
provided with the appliance. If it does not fit the
outlet, have a proper outlet installed by a qualified
electrician. Failure to follow these warnings can
cause serious injury, fire, electric shock, or death.
GROUNDING INSTRUCTIONS
This appliance must be grounded. In the event of
malfunction or breakdown, grounding will reduce the
risk of electric shock by providing a path of least
resistance for electric current. This appliance is equipped
with a cord having an equipment-grounding conductor
and grounding plug. The plug must be plugged into
an appropriate outlet that is properly installed and
grounded in accordance with all local codes
and ordinances.
3-prong
grounding type
3-prong
grounding
plug
"Ensure proper
ground exists
before use.
KEY PARTS AND COMPONENTS
O
Q
O
O
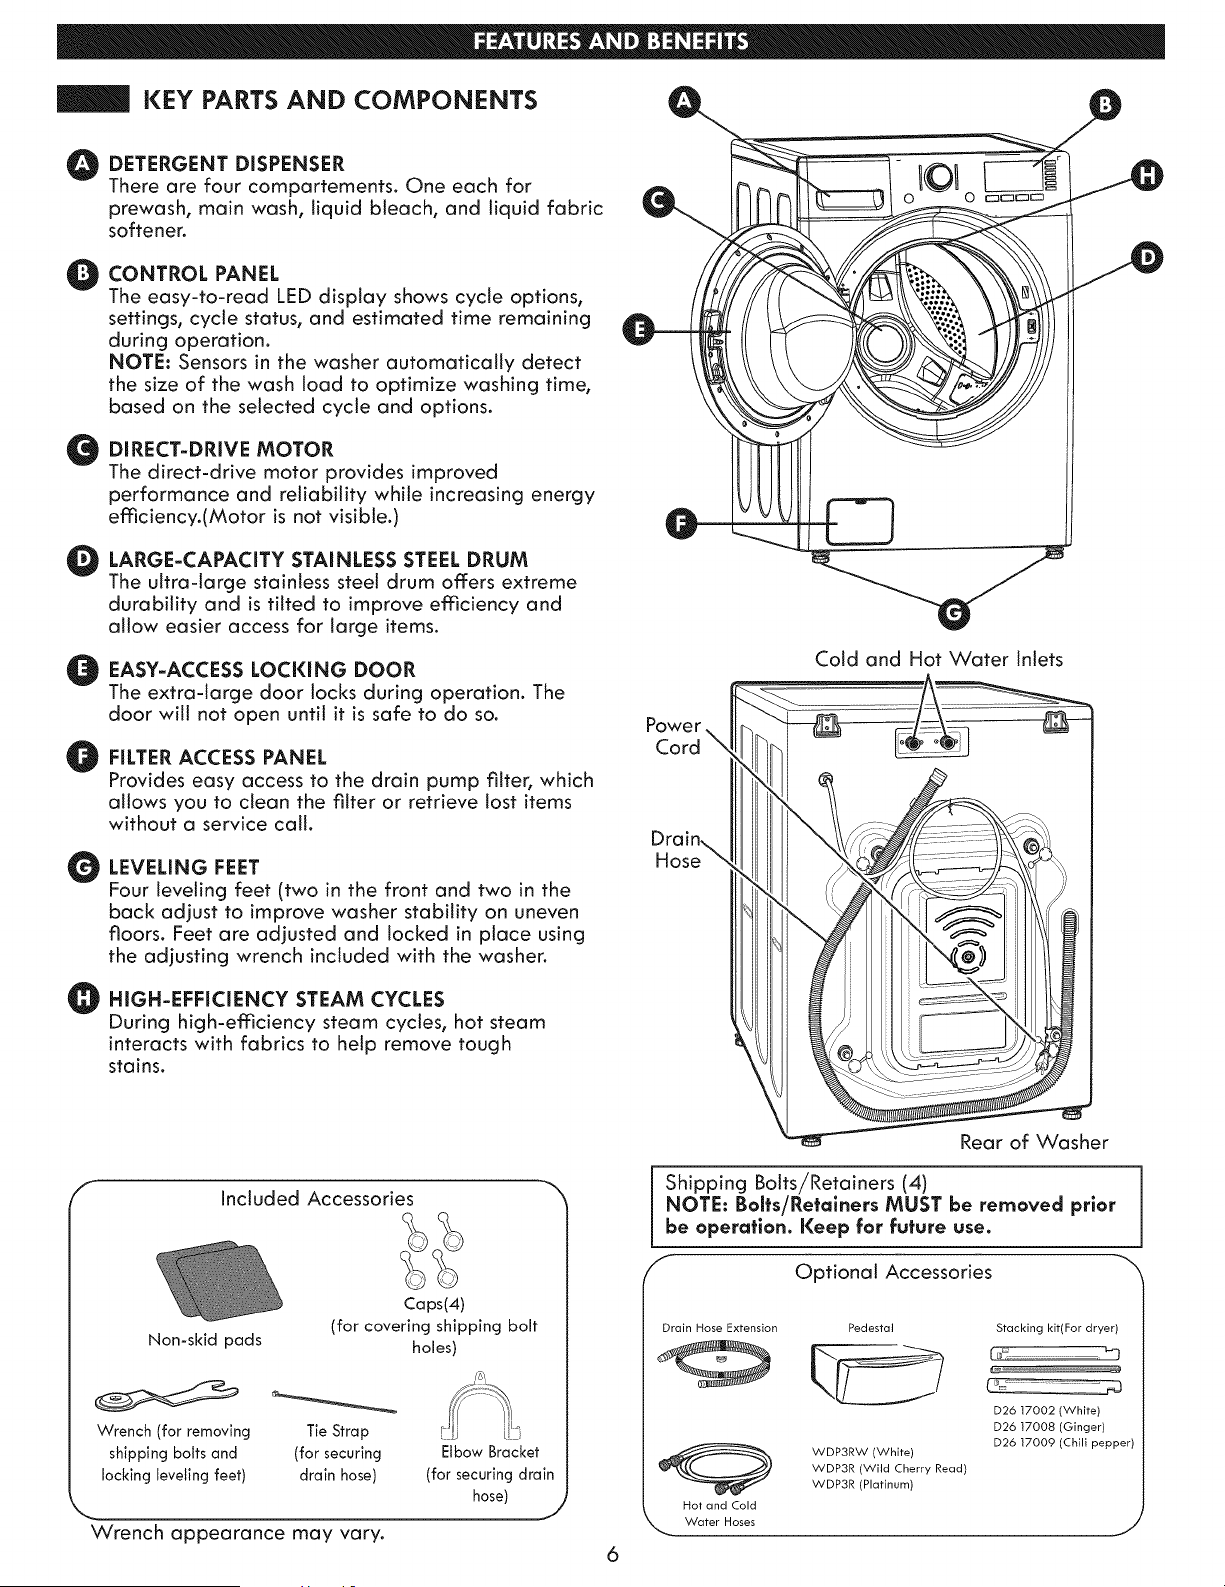
DETERGENT DISPENSER
There are four compartements. One each for
prewash, main wash, liquid bleach, and liquid fabric
softener.
CONTROL PANEL
The easy-to-read LED display shows cycle options,
settings, cycle status, and estimated time remaining
during operation.
NOTE: Sensors in the washer automatically detect
the size of the wash toad to optimize washing time,
based on the selected cycle and options.
DIRECT-DRIVE MOTOR
The direct-drive motor provides improved
performance and reliability while increasing energy
emciency.(Motor is not visible.)
LARGE-CAPACITY STAINLESS STEEL DRUM
The ultra-large stainless steel drum offers extreme
durability and is tilted to improve efficiency and
allow easier access for large items.
O ASY-ACCESS LOCKING DOOR
The extradarge door locks during operation. The
door will not open until it is safe to do so.
O
O
O
FILTER ACCESS PANEL
Provides easy access to the drain pump filter, which
allows you to clean the filter or retrieve lost items
without a service call.
LEVELING FEET
Four leveling feet (two in the front and two in the
back adjust to improve washer stability on uneven
floors. Feet are adjusted and locked in place using
the adjusting wrench included with the washer.
HIGH-EFFICIENCY STEAM CYCLES
During high-efficiency steam cycles, hot steam
interacts with fabrics to help remove tough
stains.
Power,
Cord
Cold and Hot Water Inlets
f
Non-skid pads
included Accessories
Caps(4)
(for covering shipping bolt
holes)
Wrench (for removing
shipping bolts and
locking leveling feet)
Tie Strap
(for securing
drain hose)
Elbow Bracket
(for securing drain
hose)
t
Rear of Washer
Shipping Botts/Retainers (4)
NOTE: Bolts/Retainers MUST be removed prior
be operation. Keep for future use.
f Optional Accessories _-"
Drain Hose Extension Pedestal
kt ,
WDP3RW (White)
WDP3R (Wild Cherry Read)
WDP3R (Platinum)
Hot and Cold
Water Hoses
Stacking kit(For dryer)
D26 17002 (White)
D26 17008 (Ginger)
D26 17009 (Chili pepper)
Wrench appearance may vary.
6
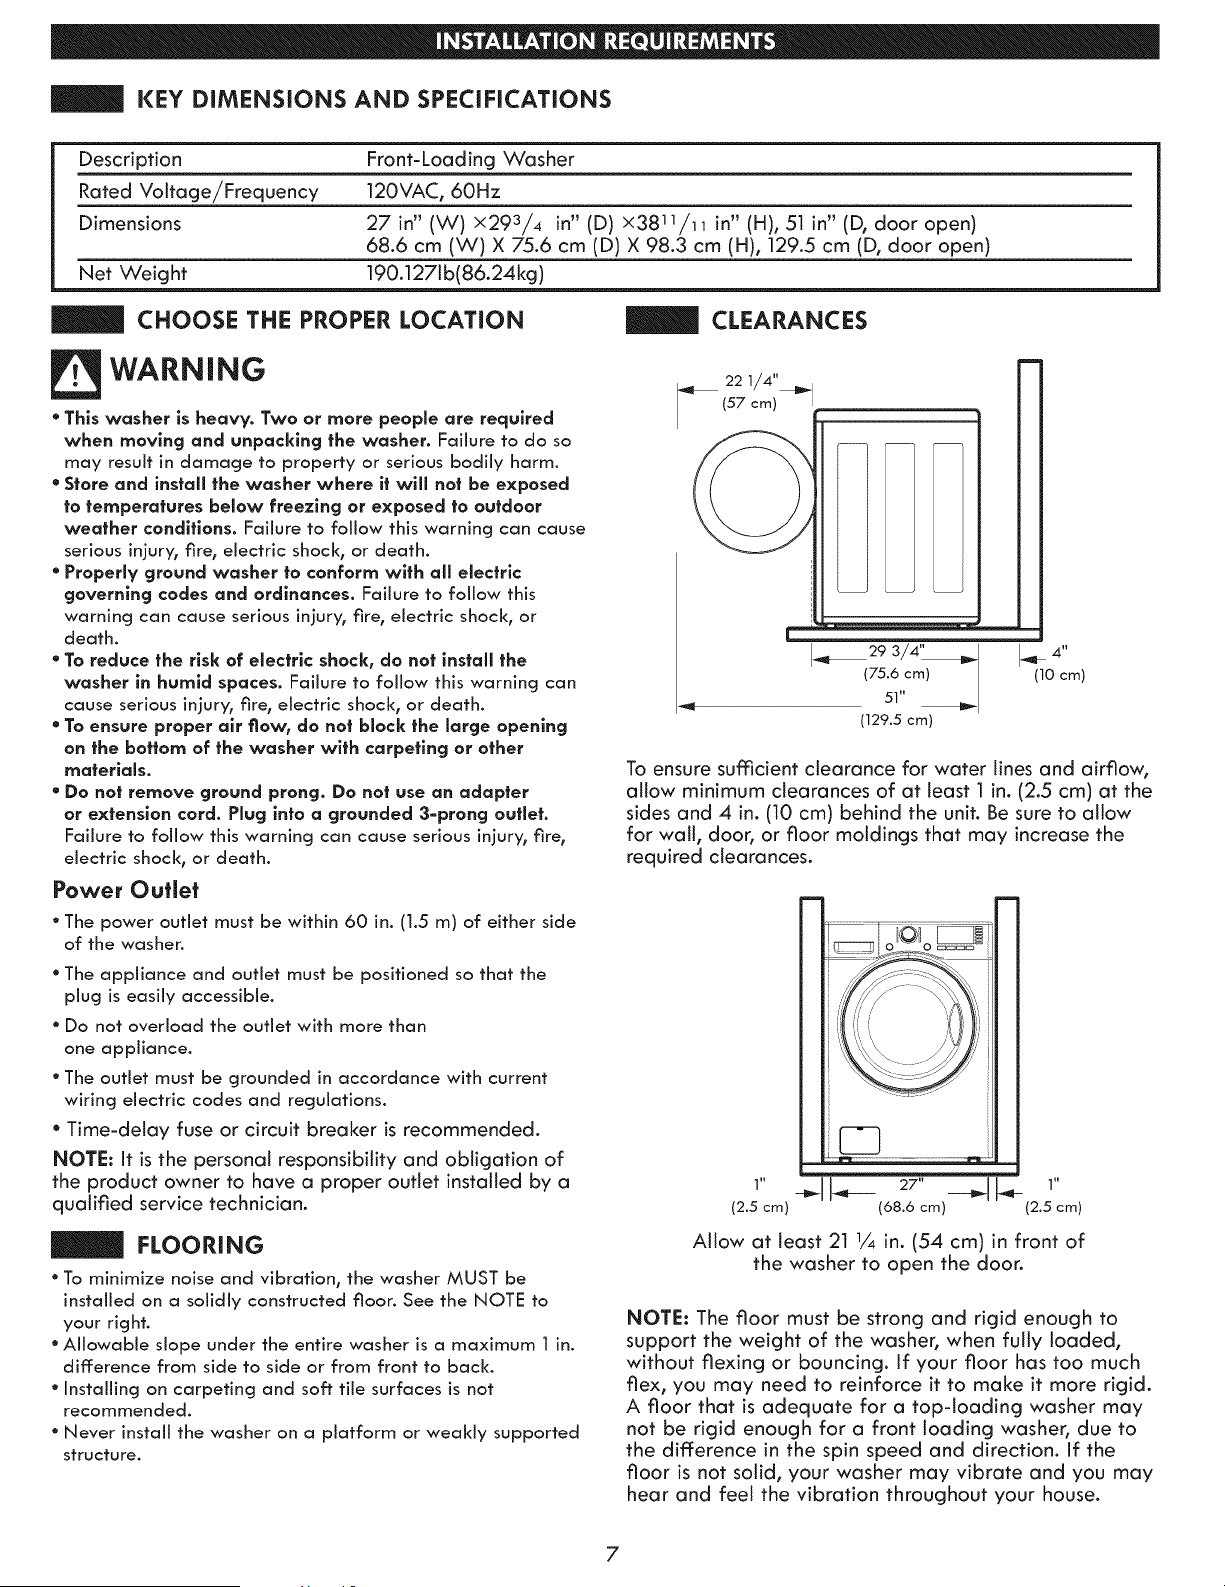
KEY DiMENSiONS AND SPECiFiCATiONS
Description Front-Loading Washer
Rated Voltage/Frequency 120VAC, 60Hz
Dimensions 27 in" (W) x293/4 in" (D) ×3811/11 in" (H), 51 in" (D, door open)
68.6 cm (W) X 75.6 cm (D) X 98.3 cm (H), 129.5 cm (D, door open)
Net Weight 190.1271b(86.24kg)
CHOOSE THE PROPER LOCATION
WARNING
* This washer is heavy. Two or more people are required
when moving and unpacking the washer. Failure to do so
may result in damage to property or serious bodily harm.
* Store and install the washer where it will not be exposed
to temperatures below freezing or exposed to outdoor
weather conditions. Failure to follow this warning can cause
serious injury, fire, electric shock, or death.
* Properly ground washer to conform with all electrlc
governing codes and ordinances. Failure to follow this
warning can cause serious injury, fire, electric shock, or
death.
* To reduce the risk of electric shock, do not install the
washer in humid spaces. Failure to follow this warning can
cause serious injury, fire, electric shock, or death.
* To ensure proper air flow, do not block the large opening
on the bottom of the washer with carpeting or other
materials.
* Do not remove ground prong. Do not use an adapter
or extension cord. Plug into a grounded 3=prong outlet.
Failure to follow this warning can cause serious injury, fire,
electric shock, or death.
Power Outlet
° The power outlet must be within 60 in. (1.5 m) of either side
of the washer.
* The appliance and outlet must be positioned so that the
plug is easily accessible.
° Do not overload the outlet with more than
one appliance.
° The outlet must be grounded in accordance with current
wiring electric codes and regulations.
* Time-delay fuse or circuit breaker is recommended.
NOTE: It is the personal responsibility and obligation of
the product owner to have a proper outlet installed by a
qualified service technician.
FLOORING
° To minimize noise and vibration, the washer MUST be
installed on a solidly constructed floor. See the NOTE to
your right.
° Allowable slope under the entire washer is a maximum 1 in.
difference from side to side or from front to back.
° Installing on carpeting and soft tile surfaces is not
recommended.
° Never install the washer on a platform or weakly supported
structure.
CLEARANCES
22 1/4"
(57 cm)
I..,9! 29 3/4'_ _ I_ 4"
(75.6 cm) (10 cm)
51"
(129.5 cm)
To ensure sufficient clearance for water lines and airflow,
allow minimum clearances of at least 1 in. (2.5 cm) at the
sides and 4 in. (10 cm) behind the unit. Be sure to allow
for wall, door, or floor moldings that may increase the
required clearances.
1, 1,
(2.5 cm) (68.6 cm) (2.5 cm)
Allow at least 21 1/4 in. (54 cm) in front of
the washer to open the door.
NOTE: The floor must be strong and rigid enough to
support the weight of the washer, when fully loaded,
without flexing or bouncing. If your floor has too much
flex, you may need to reinforce it to make it more rigid.
A floor that is adequate for a top-loading washer may
not be rigid enough for a front loading washer, due to
the difference in the spin speed and direction. If the
floor is not solid, your washer may vibrate and you may
hear and feel the vibration throughout your house.
7
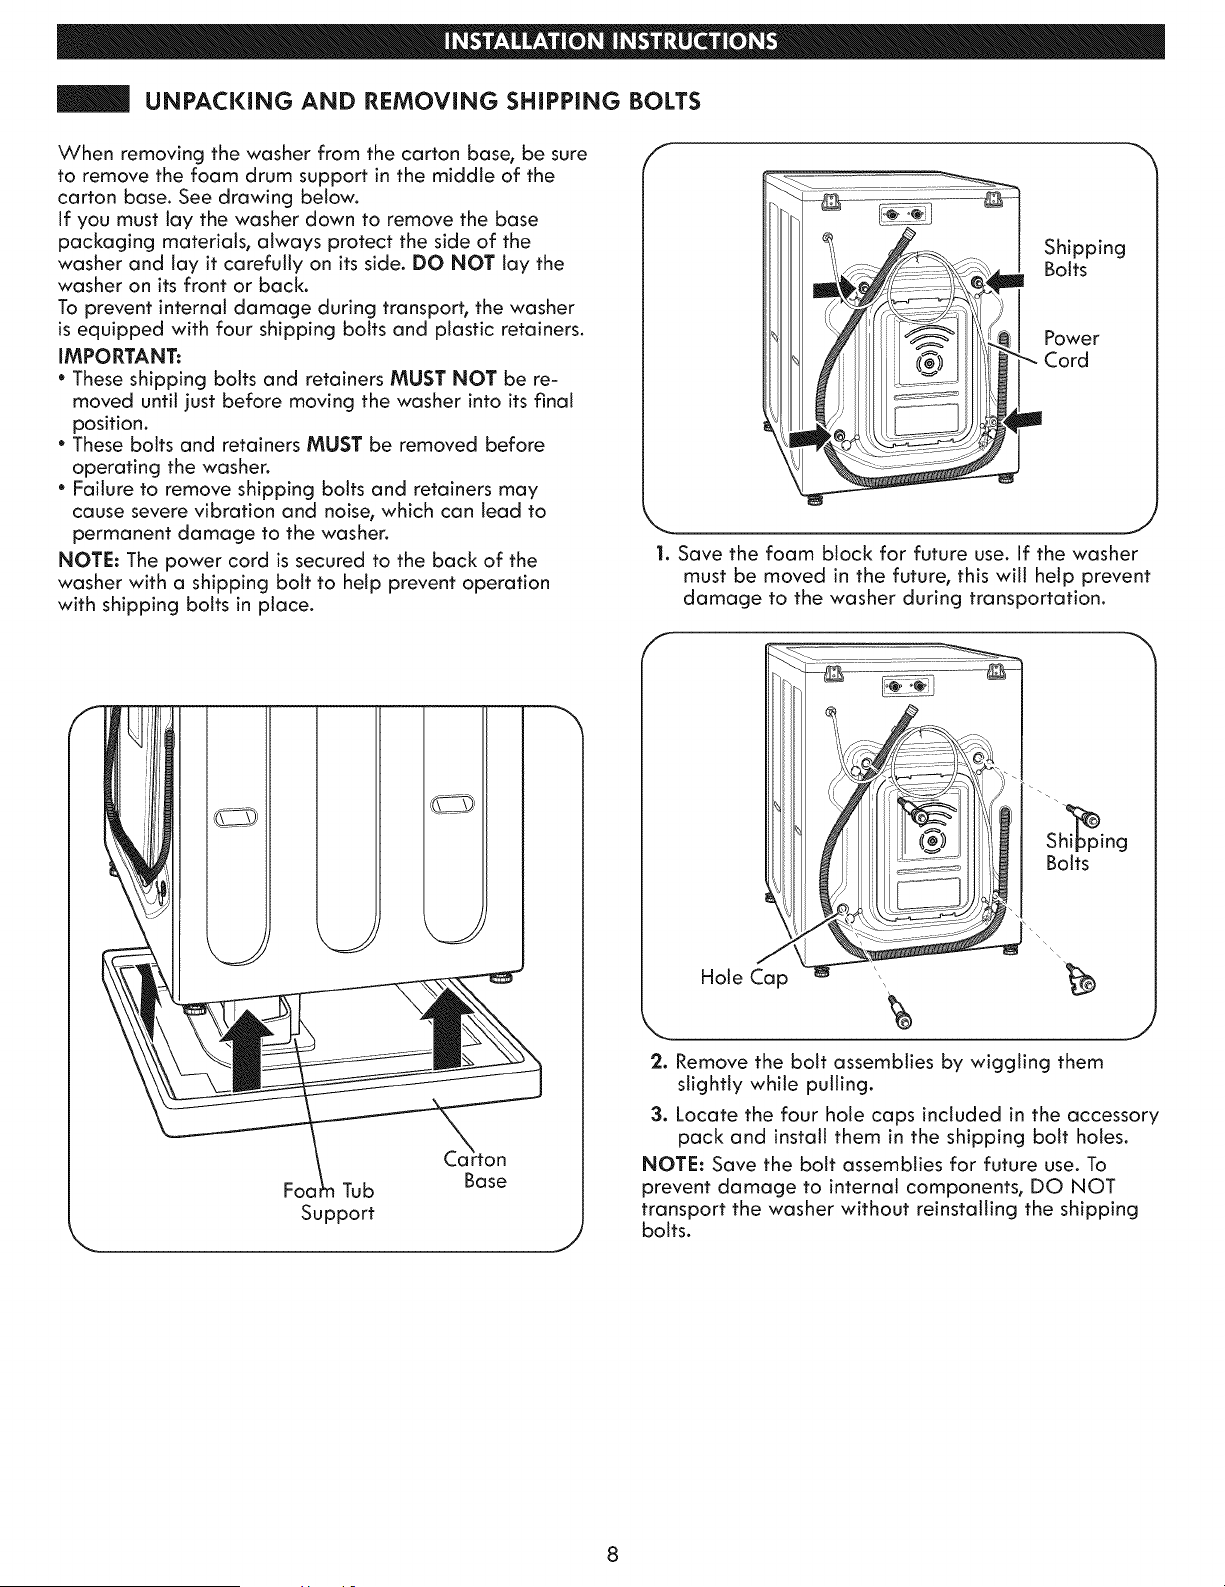
UNPACKING AND REMOVING SHiPPiNG BOLTS
When removing the washer from the carton base, be sure
to remove the foam drum support in the middle of the
carton base° See drawing below°
if you must lay the washer down to remove the base
packaging materials, always protect the side of the
washer and lay it carefully on its side. DO NOT lay the
washer on its front or back°
To prevent internat damage during transport, the washer
is equipped with four shipping bolts and plastic retainers.
iMPORTANT:
* These shipping bolts and retainers MUST NOT be re-
moved until just before moving the washer into its final
position°
* These bolts and retainers MUST be removed before
operating the washer°
Failure to remove shipping bolts and retainers may
cause severe vibration and noise, which can lead to
permanent damage to the washer.
NOTE: The power cord is secured to the back of the
washer with a shipping bolt to help prevent operation
with shipping bolts in place.
_-J ShiPPing
Bolts
__ Power
1. Save the foam block for future use. If the washer
must be moved in the future, this will help prevent
damage to the washer during transportation.
Tub
Support
Base
J
ShiPping
Bolts
2. Remove the bolt assemblies by wiggling them
slightly while pulling.
3. Locate the four hote caps included in the accessory
pack and install them in the shipping bolt holes.
NOTE: Save the bolt assemblies for future use. To
prevent damage to internal components, DO NOT
transport the washer without reinstalling the shipping
bolts.
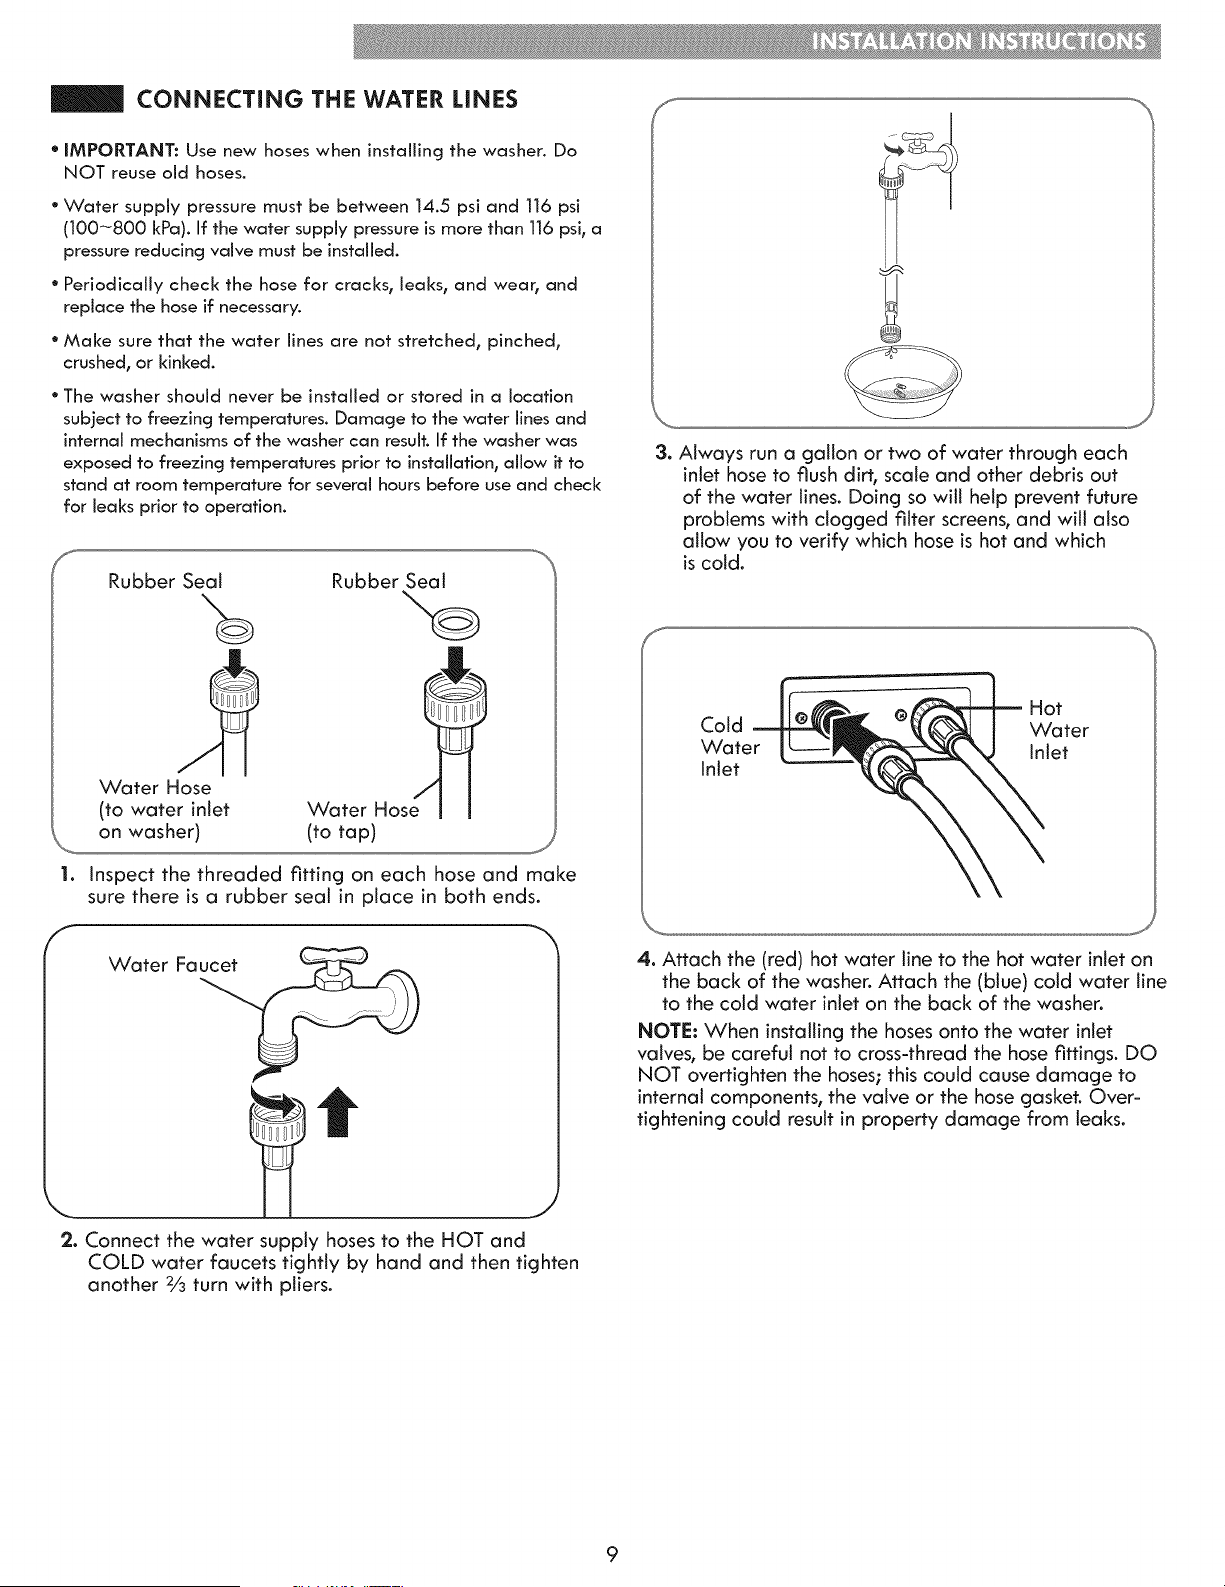
CONNECTING THE WATER LINES
* IMPORTANT: Use new hoses when installing the washer. Do
NOT reuse old hoses.
* Water supply pressure must be between 14.5 psi and 116 psi
(100-800 kPa). If the water supply pressure is more than 116 psi, a
pressure reducing valve must be installed.
* Periodically check the hose for cracks, leaks, and wear, and
replace the hose if necessary.
* Make sure that the water lines are not stretched, pinched,
crushed, or kinked.
* The washer should never be installed or stored in a location
subject to freezing temperatures. Damage to the water lines and
internal mechanisms of the washer can result. If the washer was
exposed to freezing temperatures prior to installation, allow it to
stand at room temperature for several hours before use and check
for leaks prior to operation.
Rubber Seat
%
Water Hose
(to water inlet
Rubber Seat
/
Water Hose
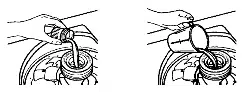
1. Inspect the threaded fitting on each hose and make
sure there is a rubber seal in place in both ends.
Water Fa_
2. Connect the water supply hoses to the HOT and
COLD water faucets tightly by hand and then tighten
another 2/3turn with pliers.
3. Always run a gallon or two of water through each
inlet hose to flush dirt, scale and other debris out
of the water lines. Doing so will help prevent future
problems with clogged filter screens, and will also
allow you to verify which hose is hot and which
is cold.
f_
Hot
Cold Water
Water Inlet
Inlet
J
4. Attach the (red) hot water line to the hot water inlet on
the back of the washer. Attach the (btue) cotd water line
to the cold water inlet on the back of the washer.
NOTE: When installing the hoses onto the water inlet
valves, be careful not to cross-thread the hose fittings. DO
NOT overtighten the hoses; this could cause damage to
internal components, the valve or the hose gasket. Over-
tightening could result in property damage from leaks.
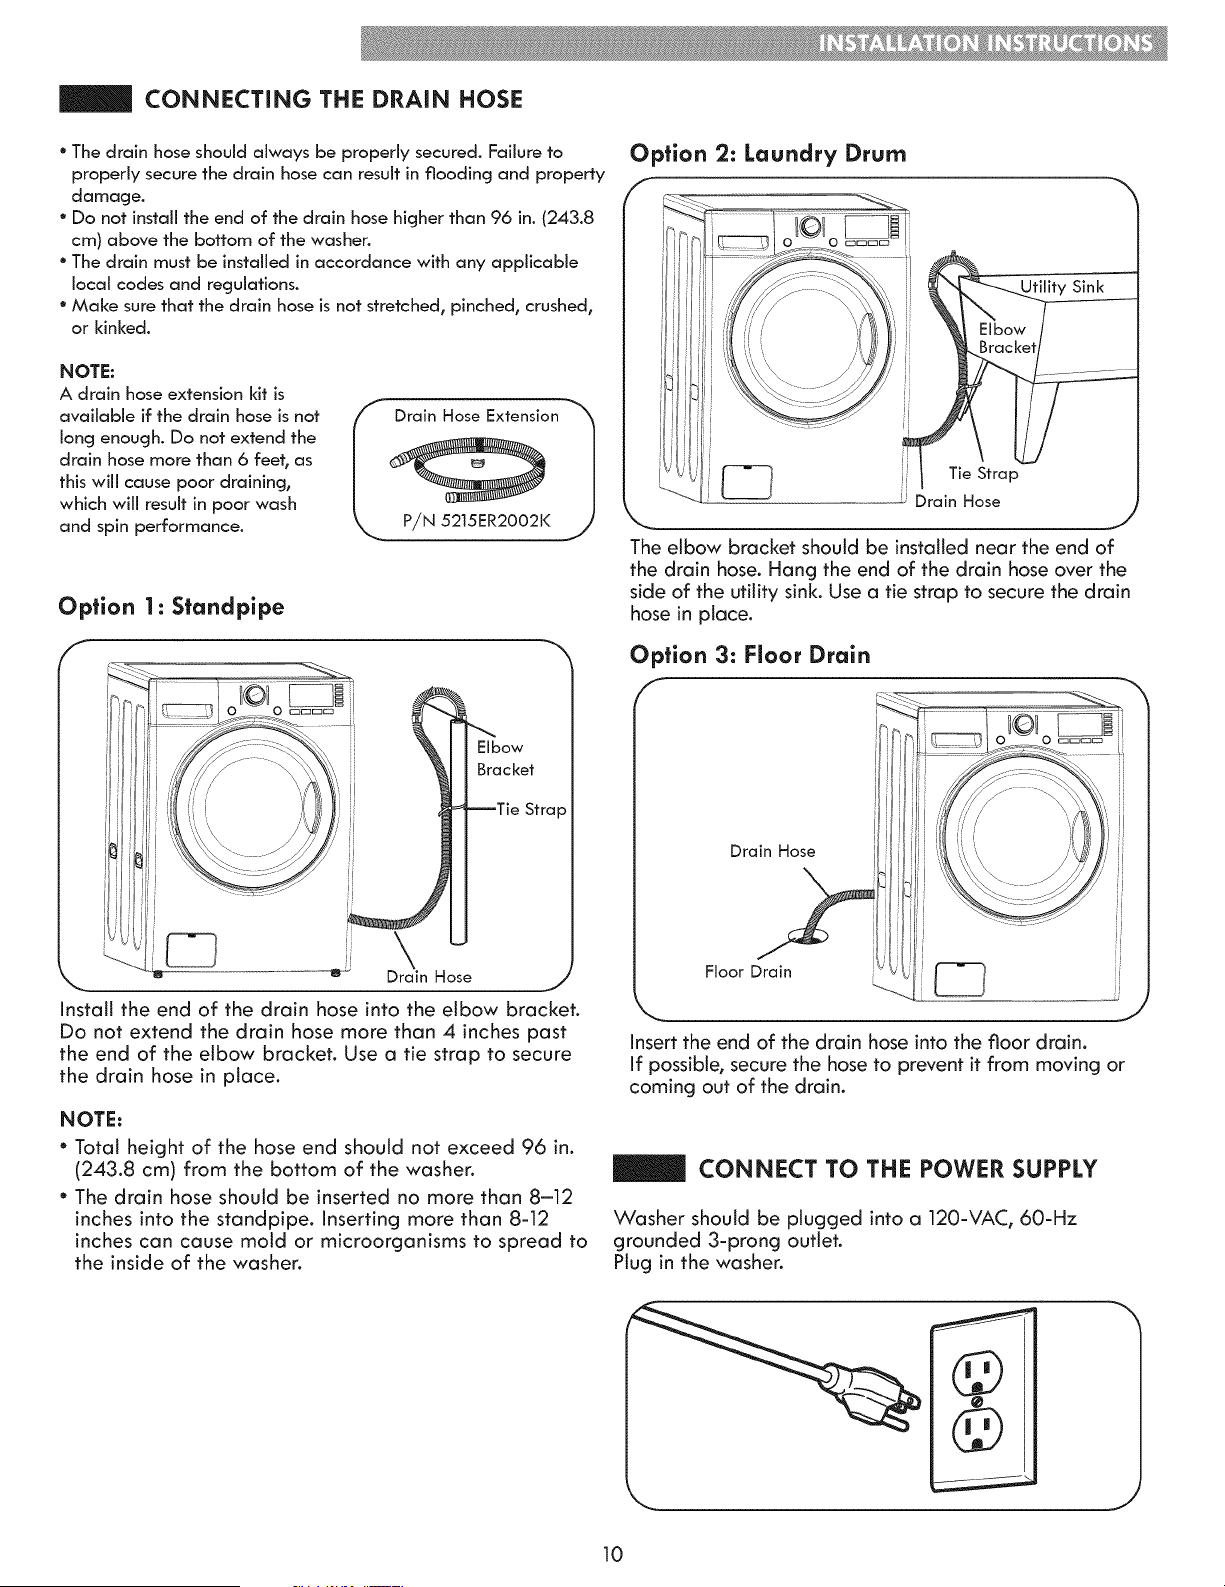
CONNECTING THE DRAIN HOSE
° The drain hose should always be properly secured. Failure to
properly secure the drain hose can result in flooding and property
damage.
° Do not install the end of the drain hose higher than 96 in. (243.8
cm) above the bottom of the washer.
° The drain must be installed in accordance with any applicable
local codes and regulations.
° Make sure that the drain hose is not stretched, pinched, crushed,
or kinked.
NOTE:
A drain hose extension kit is
available if the drain hose is not
long enough. Do not extend the
drain hose more than 6 feeh as
this will cause poor draining,
which will result in poor wash
and spin performance.
Option 1 : Standpipe
Elbow
Bracket
Strap
\
84: Drain Hose _,/
Install the end of the drain hose into the elbow bracket.
Do not extend the drain hose more than 4 inches past
the end of the elbow bracket. Use a tie strap to secure
the drain hose in place.
NOTE:
* Total height of the hose end should not exceed 96 in.
(243.8 cm) from the bottom of the washer.
* The drain hose should be inserted no more than 8-12
inches into the standpipe. Inserting more than 8-12
inches can cause mold or microorganisms to spread to
the inside of the washer.
Option :2: Laundry Drum
Tie Strap
Drain Hose
The elbow bracket should be installed near the end of
the drain hose. Hang the end of the drain hose over the
side of the utility sink. Use a tie strap to secure the drain
hose in place.
Option 3: Floor Drain
Drain Hose
\
Floor Drain
Insert the end of the drain hose into the floor drain.
If possible, secure the hose to prevent it from moving or
coming out of the drain.
CONNECT TO THE POWER SUPPLY
Washer should be plugged into a 120-VAC, 60-Hz
grounded 3-prong outlet.
Plug in the washer.
J
10
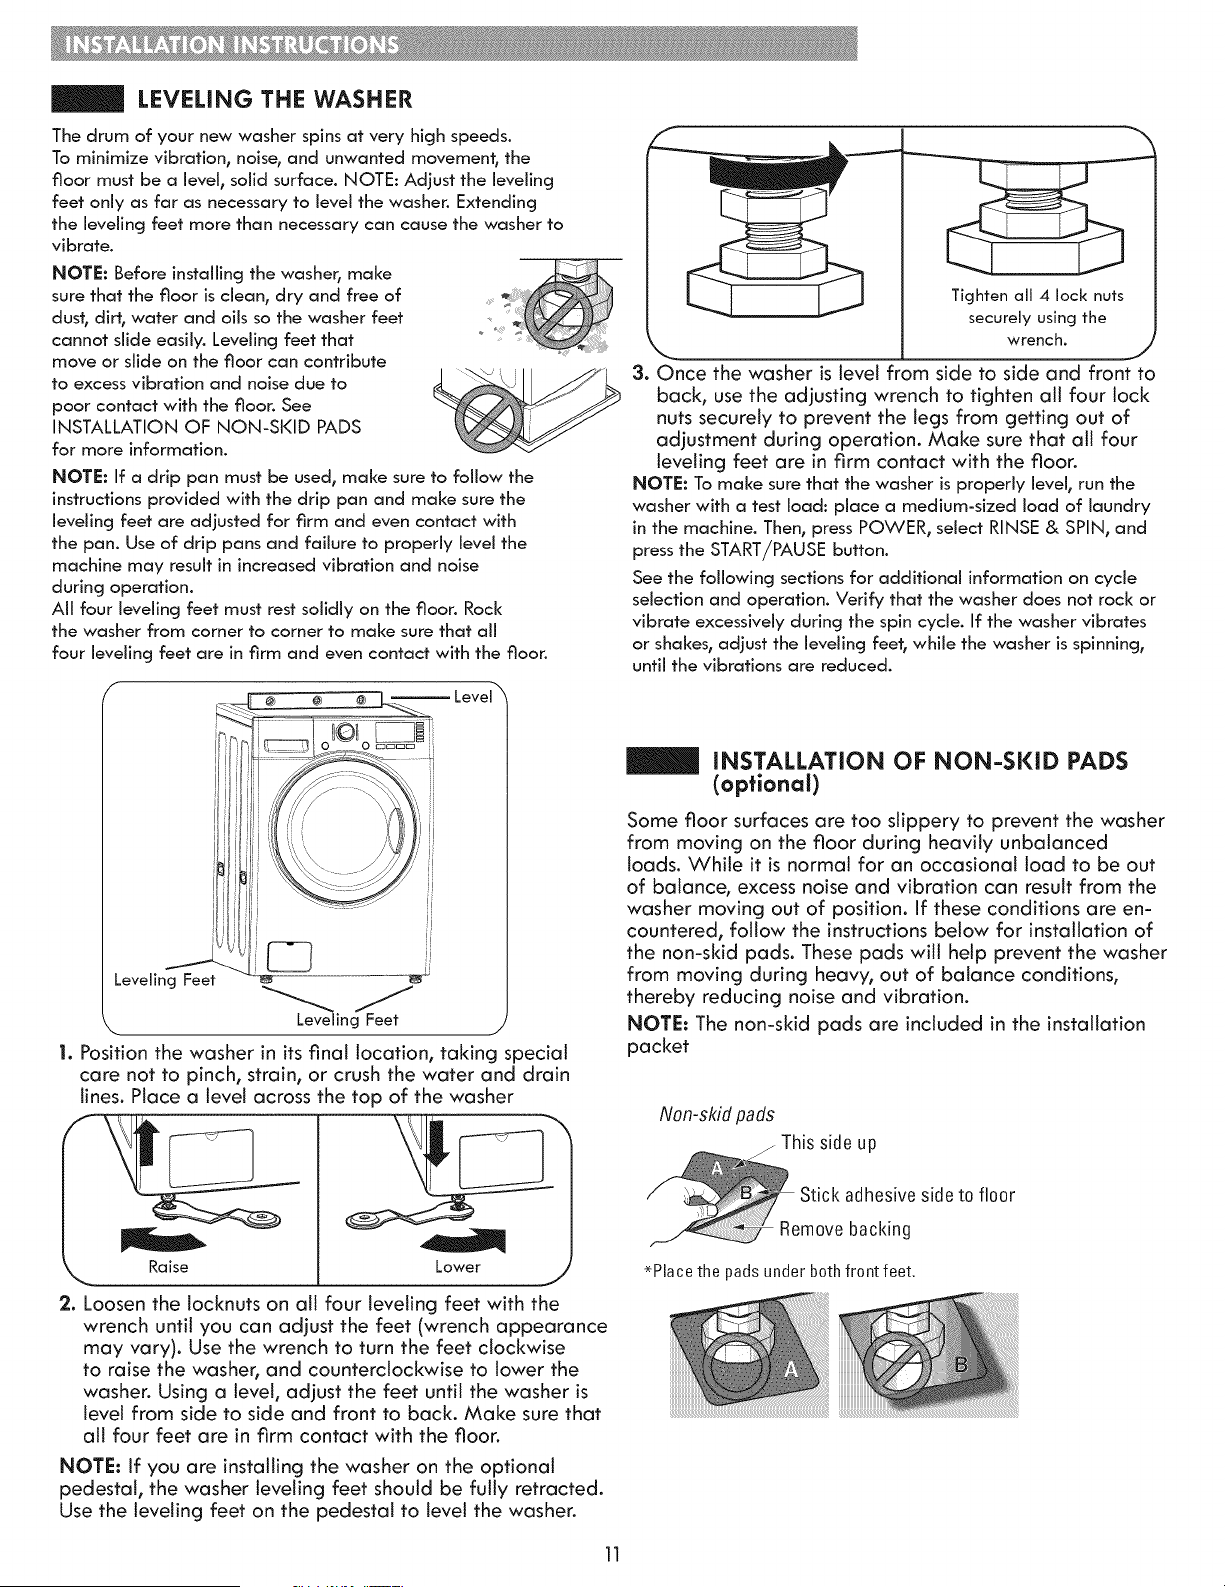
LEVELING THE WASHER
The drum of your new washer spins at very high speeds.
To minimize vibration, noise, and unwanted movement_ the
floor must be a level, solid surface. NOTE: Adjust the ieveiincj
feet only as far as necessary to level the washer. Extending
the ievelincj feet more than necessary can cause the washer to
vibrate.
NOTE: Before instaiiincj the washer, make
sure that the floor is clean, dry and free of
dush dirt, water and oils so the washer feet
cannot slide easily. Levelincj feet that
move or slide on the floor can contribute
to excess vibration and noise due to
poor contact with the floor. See
INSTALLATION OF NON-SKID PADS
for more information.
NOTE: If a drip pan must be used, make sure to follow the
instructions provided with the drip pan and make sure the
leveiincj feet are adjusted for firm and even contact with
the pan. Use of drip pans and failure to properly level the
machine may result in increased vibration and noise
during operation.
All four levelincj feet must rest solidly on the floor. Rock
the washer from corner to corner to make sure that ail
four leveiincj feet are in firm and even contact with the floor.
Leveling Feet
_. Leveling Feet
J
1. Position the washer in its final location, taking speciat
care not to pinch, strain, or crush the water and drain
lines. Place a level across the top of the washer
2. Loosen the tocknuts on all four leveling feet with the
wrench until you can adjust the feet (wrench appearance
may vary). Use the wrench to turn the feet clockwise
to raise the washer, and counterclockwise to lower the
washer. Using a level, adjust the feet until the washer is
level from side to side and front to back. Make sure that
atl four feet are in firm contact with the floor.
NOTE: If you are installing the washer on the optional
pedestal, the washer leveling feet should be fully retracted.
Use the leveling feet on the pedestal to level the washer.
securely using the
wrench.
3. Once the washer is level from side to side and front to
back, use the adjusting wrench to tighten all four lock
nuts securely to prevent the legs from getting out of
adjustment during operation. Make sure that all four
leveling feet are in firm contact with the floor.
NOTE: To make sure that the washer is properly level, run the
washer with a test load: place a medium-sized load of laundry
in the machine. Then, press POWER, select RINSE & SPIN, and
press the START/PAUSE button.
See the foilowincj sections for additional information on cycle
selection and operation. Verify that the washer does not rock or
vibrate excessively during the spin cycle. If the washer vibrates
or shakes, adjust the ieveiincj feet_ while the washer is spinnincj,
until the vibrations are reduced.
INSTALLATION OF NON-SKID PADS
(optional)
Some floor surfaces are too slippery to prevent the washer
from moving on the floor during heavily unbalanced
loads. While it is normal for an occasional toad to be out
of balance, excess noise and vibration can result from the
washer moving out of position. If these conditions are en-
countered, follow the instructions below for installation of
the non-skid pads. These pads will help prevent the washer
from moving during heavy, out of balance conditions,
thereby reducing noise and vibration.
NOTE: The non-skid pads are included in the installation
packet
Non-skid pads
his side up
Stick adhesive side to floor
move backing
*Phce the pads under both front feet,
11

WARNING: To reduce the risk of electric shock, or injury to persons, read and fallow this
entire Use & Care Guide, inciudlng the important Safety instructions, before operating this washer.
CONTROL PANEL FEATURES
Normal [ Casual
Bulky I Bedding
Heavy Duty
Whitest Whites
POWER
START [ PAUSE
Sanitize
Express Wash
Cold Clean
Delicates
@
All Cold RLnses
O POWER (ON/OFF) BUTTON
Press to turn the washer ON or OFF.
O
NOTE: Pressing the POWER button during a
cycle will cancel that cycle and any toad settings
will be lost. The door will unlock after a brief
pause, unless the water level or temperature is
too high.
CYCLE SELECTOR [(NOB
Turn this knob to select the desired cycle. Once the
desired cycle has been selected, the standard presets
will appear in the display. These settings can be
adjusted using the cycle setting buttons anytime
before starting the cycle.
O YCLE MODIFIER BUTTONS
Use these buttons to adjust the settings for the
selected cycle. The settings light up above the
buttons to show the current selection.
O PECIAL CYCLE AND OPTION BUTTONS
These buttons allow your to select special cycles
or options.
O
O START/PAUSE BUTTON O
Pressthis button to start the selected cycle.
If the washer is running, use this button to pause the
cycle without losing the current settings.
NOTE: If you do not press the START/PAUSE button
within four minutes of selecting a cycle, the washer auto-
matically turns OFF.
TIME AND STATUS DISPLAY
The display shows the cycle status and estimated
time remaining.
STEAM TREAT BUTTON
Select the STEAM TREAT button to add steam to
the selected cycle for added cleaning power.
NOTE: The steam option is not available on all
cycles.
NOTE: To protect your clothing, not all settings are available on all cycle selections.
12

OPERATING THE WASHER
POWER
SORT LAUNDRY AND LOAD WASHER
Sort laundry by fabric type, soil level, color and load size, as
needed. Open the door and load the items into the washer.
O
TURN ON THE WASHER
Press the POWER button to turn ON the washer. The lights
around the cycle selector knob will illuminate and a chime will
sound.
Normal I Casual
Bumky I Bedding
Heavy Duty
Whitest Whites
Sanitize
Express Wash
Cold Clean
Delicates
O
SELECT A CYCLE
Turn the cycle selector knob in either direction to select the
desired cycle. The preset Wash Temperature, Spin Speed, Soil
Level, and Option settings for that cycle will be shown.
O
O
SELECT CYCLE MODIFIERS & OPTIONS
Default settings for the selected cycle can now be changed if
desired. Use the cycle modifier buttons.
NOTE: To protect your fabrics, not all modifiers are available
on all cycles. Cycle options can also be added by using the
option buttons.
NOTE: Not all options are available on all cycles. A different
chime will sound and the LED will not come on if the selection
is not allowed.
ADD DETERGENT
Add High-Efficiency (HE) detergent to the detergent dispenser
drawer. For proper wash performance, always measure the
detergent using the measurements provided by the detergent
manufacturer.
START I PAUSE
O EGIN CYCLE
Press the START/PAUSE button to begin the cycle. The door will
lock, and the washer will briefly tumble the toad without water
to measure its weight. Once the weight of the load is measure,
the washer will begin the selected wash cycle.
TO PAUSE THE CYCLE
To pause the washer during a cycle, press the START/PAUSE
button. To resume the cycle, press the START/PAUSE button
again.
O RESUME CYCLE
Press the START/PAUSE button to resume the wash cycle.
13

CYCLE GUIDE
The cycle guide below shows the default settings, available options and recommended fabric types _ = Available Option
for each cycle. Allowable modifier adjustments are shown below the default setting for each cycle. : Default Setting
Normal/
Casual
Bulky/
Bedding
Heavy
Duty
Sanitize
Whitest
Whites
Cotton_ linen_
towels_ shirts_
sheets_jeans_
mixed loads
Large items
suchas
blankets and
comforters
Heavy
soiled
cotton fabrics
Heavily
soiled items_
such as work
clothes_
diapers_ etc.
Heavily to
normally
soiled white
cottons
Hot
Tap Cold
Cold
Hot
Tap Cold
Cold
Hot
Tap Cold
Cold
Tap Cold
Cold
Wa r m
Extra High
No Spin
Low
Medium
No Spin
Low
No Spin
Low
Medium
High
ExtraHigh
No Spin
Low
Medium
Extra High
No Spin
Low
Medium
Heavy
Light
Heavy
Light
Light
Normal
Heavy
Light
Heavy
Light
NOTE:
* To protectyour garments, not every wash temperature,spinspeed, soillevel,or option isavailablewith every cycle.
A chime willsound and the LED willnot lightifthe selectionisnot allowed.
* The washer automaticallyadjuststhe wash time forthe amount of laundry,water pressure,water heatingtime and
other operating conditions.
* These cycles use various wash motions to enhance cleaning and/or fabric care performance. The wash motions
may sound different at different stages of the wash cycle. This is normal.
* The recommended load size for the Sanitize cycle is 10 lbs.
14
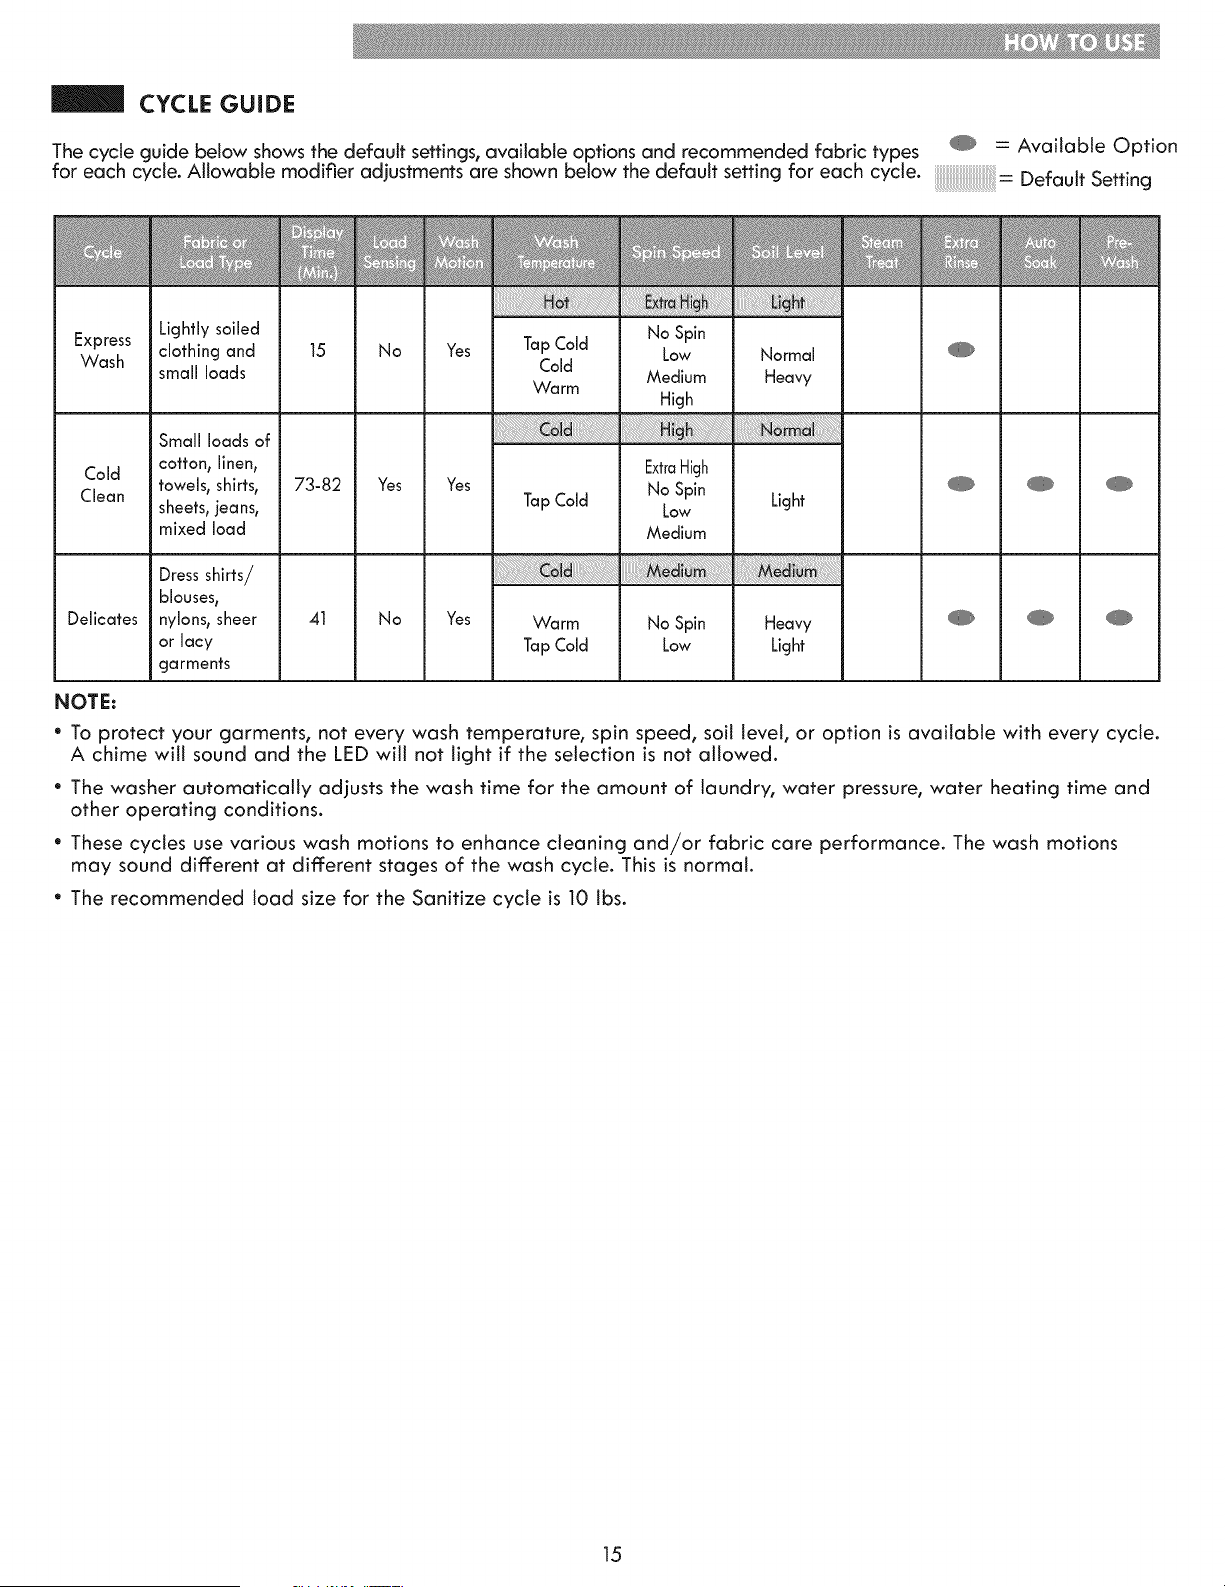
CYCLE GUIDE
The cycle guide below shows the default settings, available options and recommended fabric types
for each cycle. Allowable modifler adjustments are shown below the default setting for each cycle.
= Available Option
: Default Setting
Express
Wash
Cold
Clean
Delicates
Lightly soiled
clothing and
small loads
Small loads of
cotton, linen,
towels, shirts,
sheets, jeans,
mixed load
Dress shirts/
blouses,
nylons, sheer
or lacy
garments
Tap Cold
Cold
Warm
Tap Cold
Warm
Tap Cold
No Spin
Low
Medium
High
ExtraHigh
No Spin
Low
Medium
No Spin
Low
Normal
Heavy
Light
Heavy
Light
NOTE:
* To protect your garments, not every wash temperature, spin speed, soil level, or option is available with every cycle.
A chime will sound and the LED will not light if the selection is not allowed.
* The washer automatically adjusts the wash time for the amount of laundry, water pressure, water heating time and
other operating conditions.
* These cycles use various wash motions to enhance cleaning and/or fabric care performance. The wash motions
may sound different at different stages of the wash cycle. This is normal.
* The recommended load size for the Sanitize cycle is 10 lbs.
15
SORTING WASH LOADS
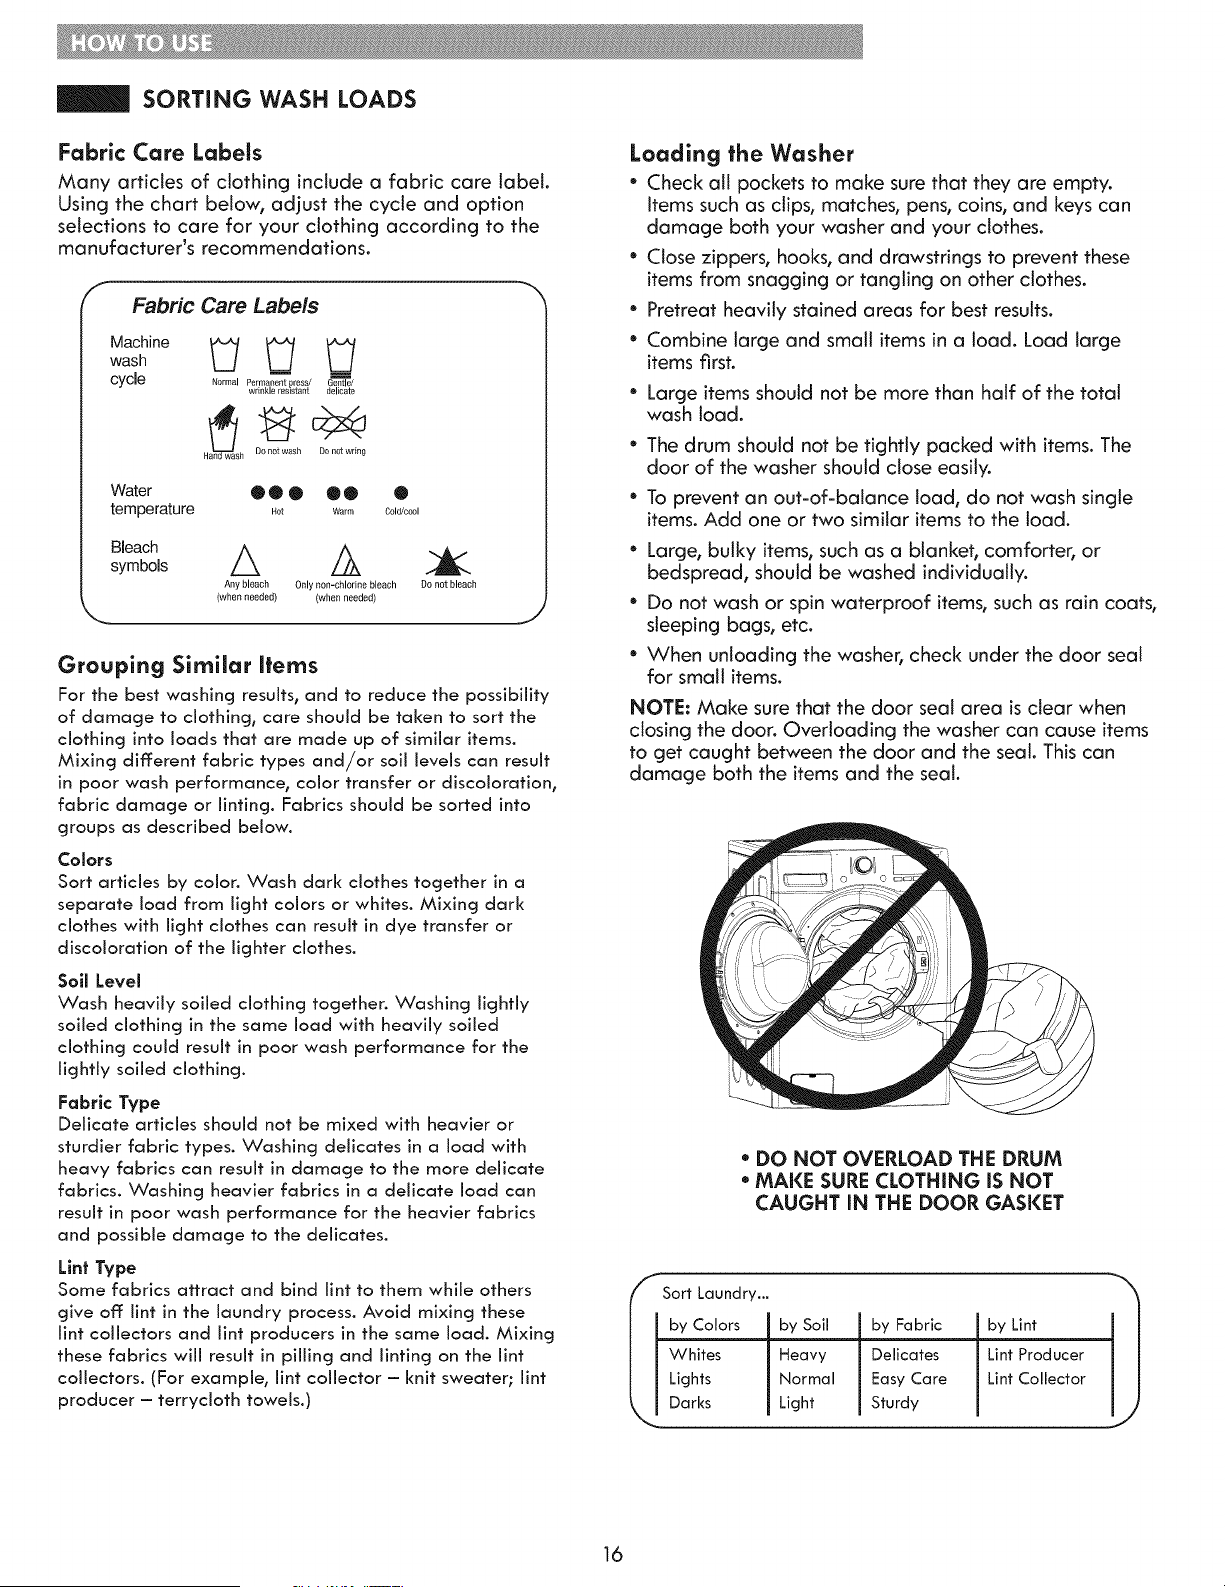
Fabric Care Labels
Many articles of ctothing include a fabric care label.
Using the chart below, adjust the cycle and option
selections to care for your clothing according to the
manufacturer's recommendations.
f
Fabric Care Labels
Machine
wash,., _1 _ _
cycle Normal Permanent gress/ Gentle/
wrinkle resistant delicate
H h DOnot wash Do not wring
Water • Q • • • •
temperature ,0t Warm C01d/c001
Bleach
symbo,s A Z_ .4_
Any bleach Only n0n-chl0rine bleach O0 not bleach
(when needed) (when needed)
Grouping Similar Items
For the best washing resuits_ and to reduce the possibility
of damage to clothing, care should be taken to sort the
clothing into loads that are made up of similar items.
Mixing different fabric types and/or soil levels can result
in poor wash performance_ color transfer or discoioration_
fabric damage or linting. Fabrics should be sorted into
groups as described below.
Co_ors
Sort articles by color. Wash dark clothes together in a
separate load from light colors or whites. Mixing dark
clothes with light clothes can result in dye transfer or
discoloration of the lighter clothes.
Sell Level
Wash heavily soiled clothing together. Washing lightly
soiled clothing in the same load with heavily soiled
clothing could result in poor wash performance for the
lightly soiled clothing.
Fabric Type
Delicate articles should not be mixed with heavier or
sturdier fabric types. Washing delicates in a load with
heavy fabrics can result in damage to the more delicate
fabrics. Washing heavier fabrics in a delicate load can
result in poor wash performance for the heavier fabrics
and possible damage to the delicates.
Lint Type
Some fabrics attract and bind lint to them while others
give off lint in the laundry process. Avoid mixing these
lint collectors and lint producers in the same iced. Mixing
these fabrics will result in pilling and linting on the lint
collectors. (For example r lint collector - knit sweater; lint
producer - terrycloth towels.)
Loading the Washer
* Check all pockets to make sure that they are empty.
Items such as clips, matches, pens, coins, and keys can
damage both your washer and your clothes.
* Close zippers, hooks, and drawstrings to prevent these
items from snagging or tangling on other clothes.
* Pretreat heavily stained areas for best results.
* Combine large and small items in a load. Load large
items first.
* Large items should not be more than half of the total
wash load.
The drum should not be tightly packed with items. The
door of the washer should close easily.
To prevent an out-of-balance load, do not wash single
items. Add one or two similar items to the load.
* Large, bulky items, such as a blanket, comforter, or
bedspread, should be washed individually.
* Do not wash or spin waterproof items, such as rain coats,
sleeping bags, etc.
* When unloading the washer, check under the door seal
for small items.
NOTE: Make sure that the door seal area is clear when
closing the door. Overloading the washer can cause items
to get caught between the door and the seal. This can
damage both the items and the seal.
* DO NOT OVERLOAD THE DRUM
* MAKE SURE CLOTHING IS NOT
CAUGHT IN THE DOOR GASKET
f Sort Laundry...
by Colors
Whites
Lights
Darks
by Soil
Heavy
Normal
Light
by Fabric
Delicates
Easy Care
Sturdy
by Lint
Lint Producer
Lint Collector
1
16
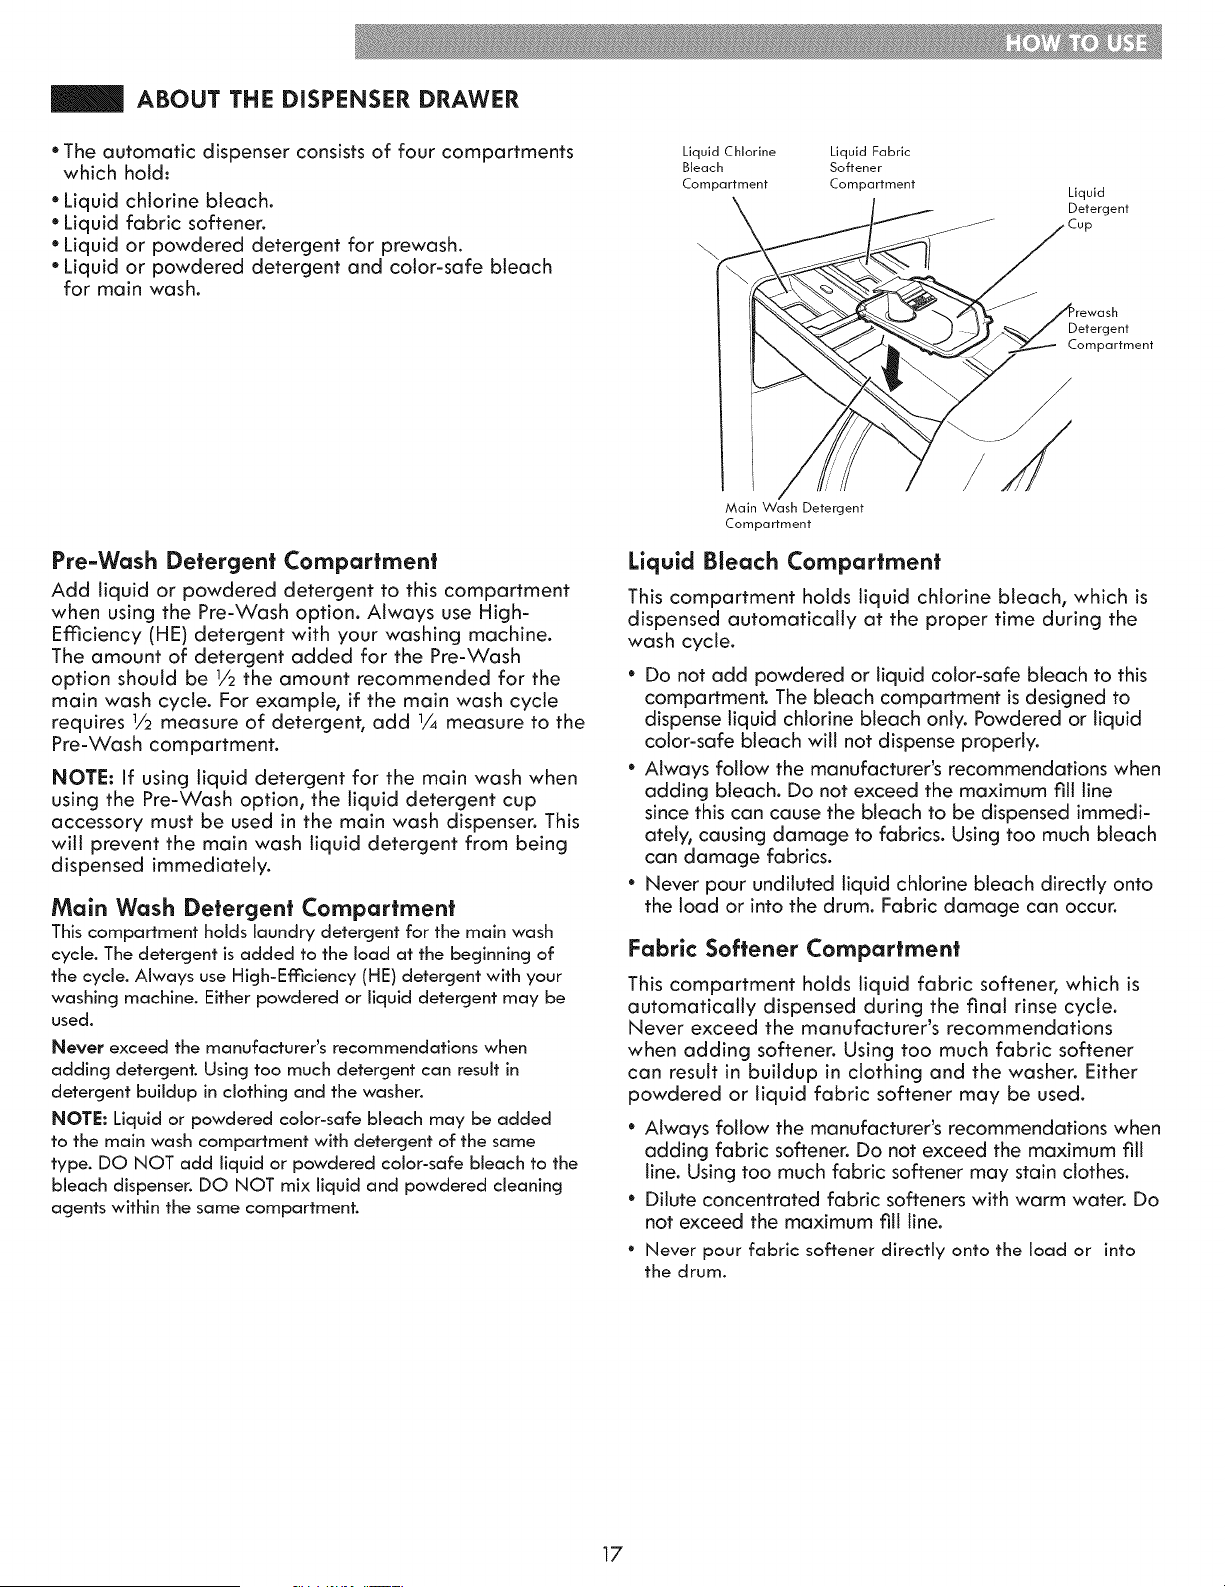
ABOUT THE DISPENSER DRAWER
* The automatic dispenser consists of four compartments
which hold.
* Liquid chlorine bleach.
* Liquid fabric softener.
* Liquid or powdered detergent for prewash.
* Liquid or powdered detergent and color-safe bleach
for main wash.
Pre-Wash Detergent Compartment
Add liquid or powdered detergent to this compartment
when using the Pre-Wash option. Always use High-
Efficiency (HE) detergent with your washing machine.
The amount of detergent added for the Pre-Wash
option should be 1/2the amount recommended for the
main wash cycle. For example, if the main wash cycle
requires 1/2 measure of detergent, add 1/4 measure to the
Pre-Wash compartment.
NOTE: If using liquid detergent for the main wash when
using the Pre-Wash option, the liquid detergent cup
accessory must be used in the main wash dispenser. This
will prevent the main wash liquid detergent from being
dispensed immediately.
Main Wash Detergent Compartment
This compartment holds laundry detergent for the main wash
cycle. The detergent is added to the load at the beginning of
the cycle. Always use High-Efficiency (HE) detergent with your
washing machine. Either powdered or liquid detergent may be
used.
Never exceed the manufacturer's recommendations when
adding detergent. Using too much detergent can result in
detergent buildup in clothing and the washer.
NOTE: Liquid or powdered color-safe bleach may be added
to the main wash compartment with detergent of the same
type. DO NOT add liquid or powdered color-safe bleach to the
bleach dispenser. DO NOT mix liquid and powdered cleaning
agents within the same compartment.
Liquid Chlorine
Bleach
Compartment
Liquid Fabric
Softener
Compartment
Main Wash Detergent
Compartment
/
/
Liquid
Detergent
Cup
Detergent
Compartment
Liquid Bleach Compartment
This compartment holds liquid chlorine bleach, which is
dispensed automatically at the proper time during the
wash cycle.
* Do not add powdered or liquid color-safe bleach to this
compartment. The bleach compartment is designed to
dispense liquid chlorine bleach only. Powdered or liquid
color-safe bleach will not dispense properly.
* Always follow the manufacturer's recommendations when
adding bleach. Do not exceed the maximum fill line
since this can cause the bleach to be dispensed immedi-
ately, causing damage to fabrics. Using too much bleach
can damage fabrics.
Never pour undiluted liquid chlorine bleach directly onto
the load or into the drum. Fabric damage can occur.
Fabric Softener Compartment
This compartment holds liquid fabric softener, which is
automatically dispensed during the final rinse cycle.
Never exceed the manufacturer's recommendations
when adding softener. Using too much fabric softener
can result in buildup in clothing and the washer. Either
powdered or liquid fabric softener may be used.
Always follow the manufacturer's recommendations when
adding fabric softener. Do not exceed the maximum fill
line. Using too much fabric softener may stain clothes.
Dilute concentrated fabric softeners with warm water. Do
not exceed the maximum fill line.
° Never pour fabric softener directly onto the load or into
the drum.
17
DETERGENT AND DISPENSER USE
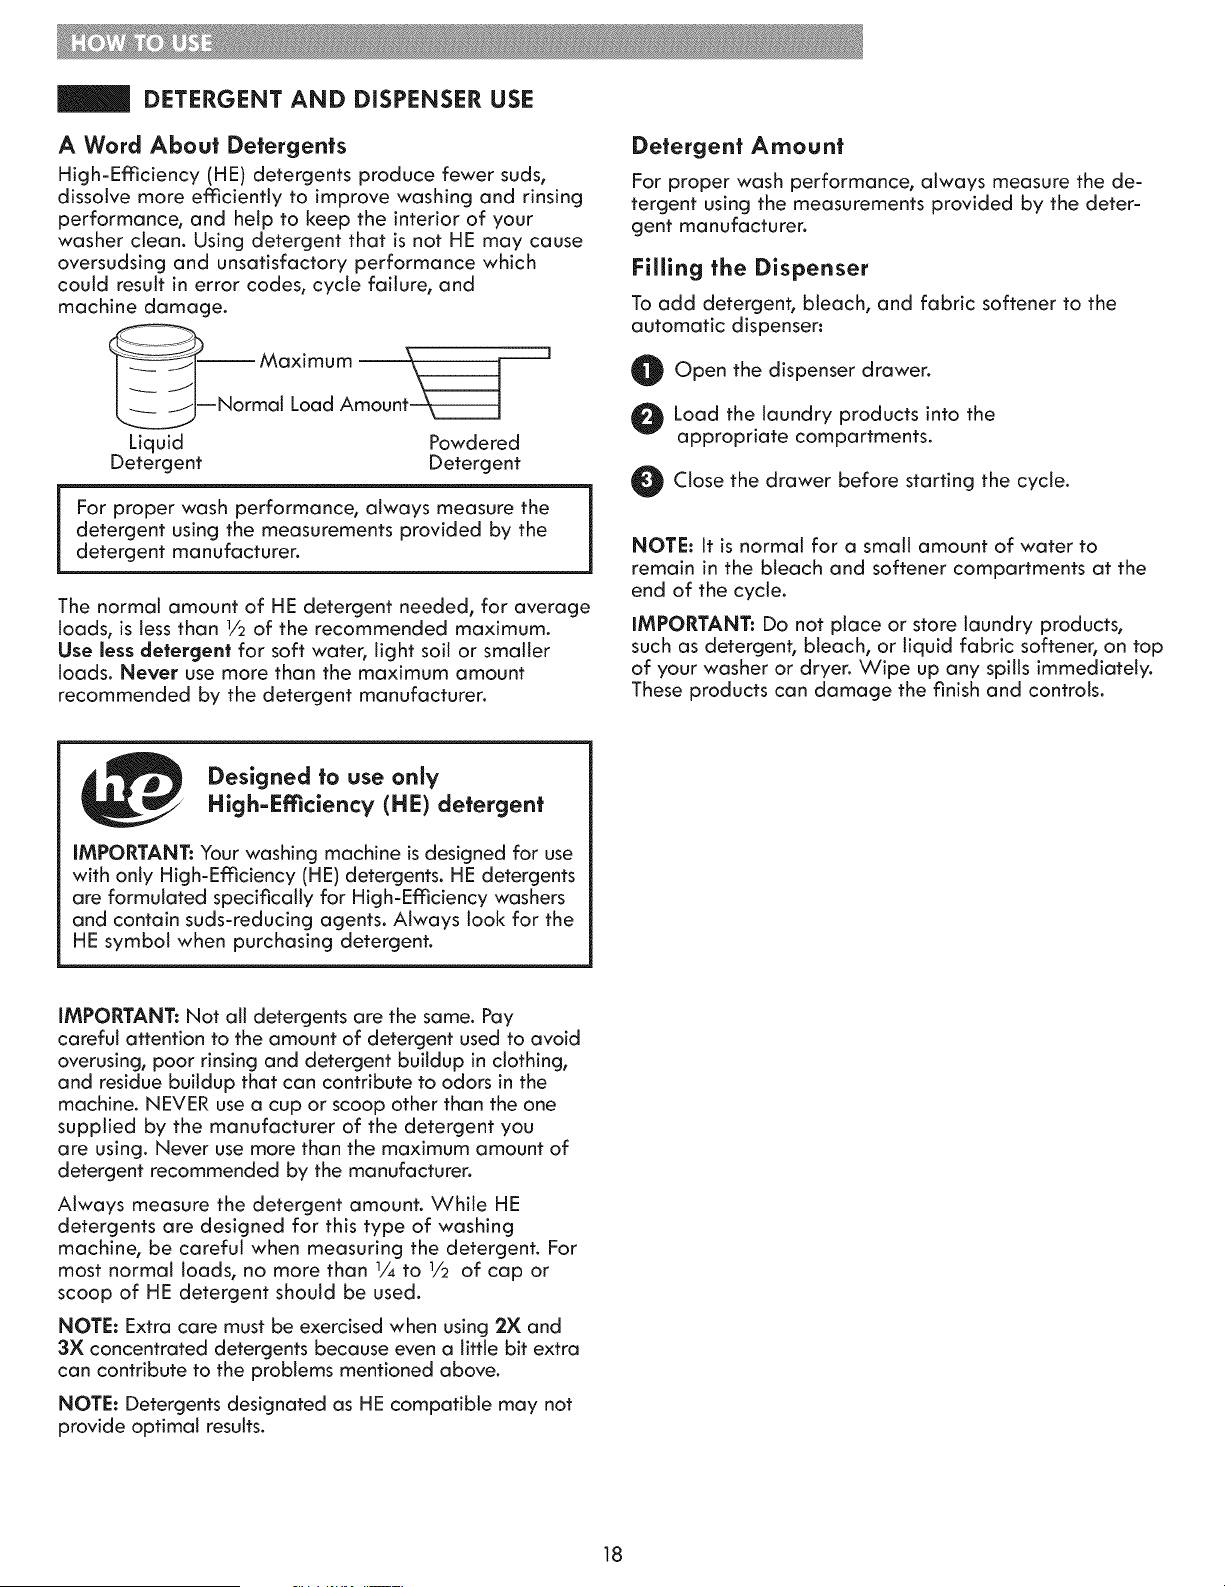
A Word About Detergents
High-Efficiency (HE) detergents produce fewer suds,
dissolve more efficiently to improve washing and rinsing
performance, and help to keep the interior of your
washer clean. Using detergent that is not HE may cause
oversudsing and unsatisfactory performance which
could result in error codes, cycle failure, and
machine damage.
Maximum _ ___s
___--Normal Load Amount___j
Liquid Powdered
Detergent Detergent
For proper wash performance, always measure the
detergent using the measurements provided by the
detergent manufacturer.
The normal amount of HE detergent needed, for average
loads, is tess than 1/2of the recommended maximum.
Use less detergent for soft water, light soil or smaller
loads. Never use more than the maximum amount
recommended by the detergent manufacturer.
Detergent Amount
For proper wash performance, always measure the de-
tergent using the measurements provided by the deter-
gent manufacturer.
Filling the Dispenser
To add detergent, bleach, and fabric softener to the
automatic dispenser:
O Open the drawer.
dispenser
O oad the laundry products into the
appropriate compartments.
O Close the drawer before the cycle.
starting
NOTE: It is normal for a small amount of water to
remain in the bleach and softener compartments at the
end of the cycle.
IMPORTANT: Do not place or store laundry products,
such as detergent, bleach, or liquid fabric softener, on top
of your washer or dryer. Wipe up any spills immediately.
These products can damage the finish and controls.
Designed to use only
High-Efficiencv (HE) detergent
IMPORTANT: Your washing machine is designed for use
with only High-Efficiency (HE) detergents. HE detergents
are formulated specifically for High-Efficiency washers
and contain suds-reducing agents. Always look for the
HE symbol when purchasing detergent.
IMPORTANT: Not all detergents are the same. Pay
careful attention to the amount of detergent used to avoid
overusing, poor rinsing and detergent buildup in clothing,
and residue buildup that can contribute to odors in the
machine. NEVER use a cup or scoop other than the one
supplied by the manufacturer of the detergent you
are using. Never use more than the maximum amount of
detergent recommended by the manufacturer.
Always measure the detergent amount. While HE
detergents are designed for this type of washing
machine, be careful when measuring the detergent. For
most normal loads, no more than 1/4to 1/2 of cap or
scoop of HE detergent should be used.
NOTE: Extra care must be exercised when using 2X and
3X concentrated detergents because even a little bit extra
can contribute to the problems mentioned above.
NOTE: Detergents designated as HE compatible may not
provide optimal results.
18
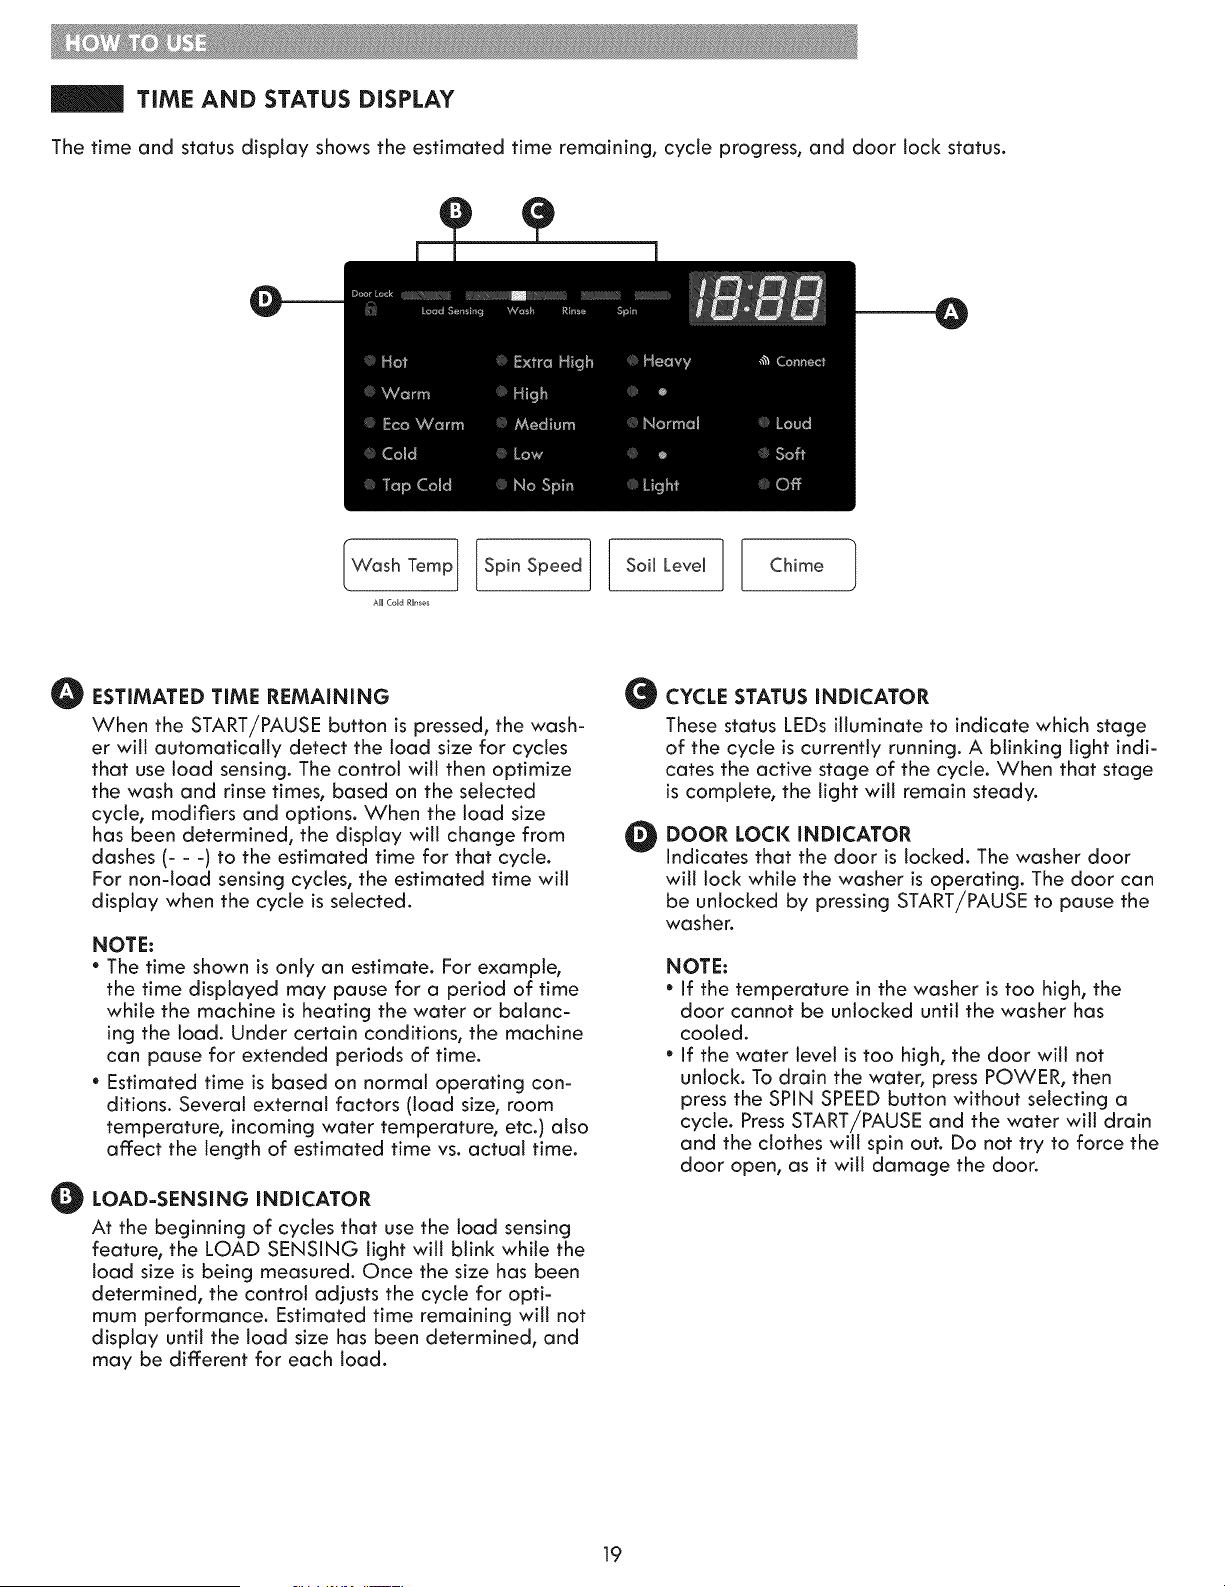
TIME AND STATUS DISPLAY
The time and status display shows the estimated time remaining, cycle progress, and door lock status.
IWoshTom0ISPioSPoo }SoiLovo[Chinol
All Cold Rlnsos
O ESTIMATED TIME REMAINING
When the START/PAUSE button is pressed, the wash-
er win automatically detect the load size for cycles
that use load sensing. The control will then optimize
the wash and rinse times, based on the selected
cycle, modifiers and options. When the load size
has been determined, the display will change from
dashes (- - -) to the estimated time for that cycle.
For non-load sensing cycles, the estimated time will
display when the cycle is selected.
NOTE:
• The time shown is only an estimate. For example,
the time displayed may pause for a period of time
while the machine is heating the water or balanc-
ing the load. Under certain conditions, the machine
can pause for extended periods of time.
• Estimated time is based on normal operating con-
ditions. Several external factors (load size, room
temperature, incoming water temperature, etc.) also
affect the length of estimated time vs. actual time.
O LOAD-SENSING INDICATOR
At the beginning of cycles that use the load sensing
feature, the LOAD SENSING light will blink while the
load size is being measured. Once the size has been
determined, the control adjusts the cycle for opti-
mum performance. Estimated time remaining will not
display until the toad size has been determined, and
may be different for each load.
O
O
CYCLE STATUS INDICATOR
These status LEDs illuminate to indicate which stage
of the cycle is currently running. A blinking light indi-
cates the active stage of the cycle. When that stage
is complete, the light wilt remain steady.
DOOR LOCI( INDICATOR
Indicates that the door is locked. The washer door
will lock while the washer is operating. The door can
be unlocked by pressing START/PAUSE to pause the
washer.
NOTE:
• If the temperature in the washer is too high, the
door cannot be unlocked until the washer has
cooled.
• If the water level is too high, the door will not
unlock. To drain the water, press POWER, then
press the SPIN SPEED button without selecting a
cycle. Press START/PAUSE and the water will drain
and the clothes will spin out. Do not try to force the
door open, as it will damage the door.
19
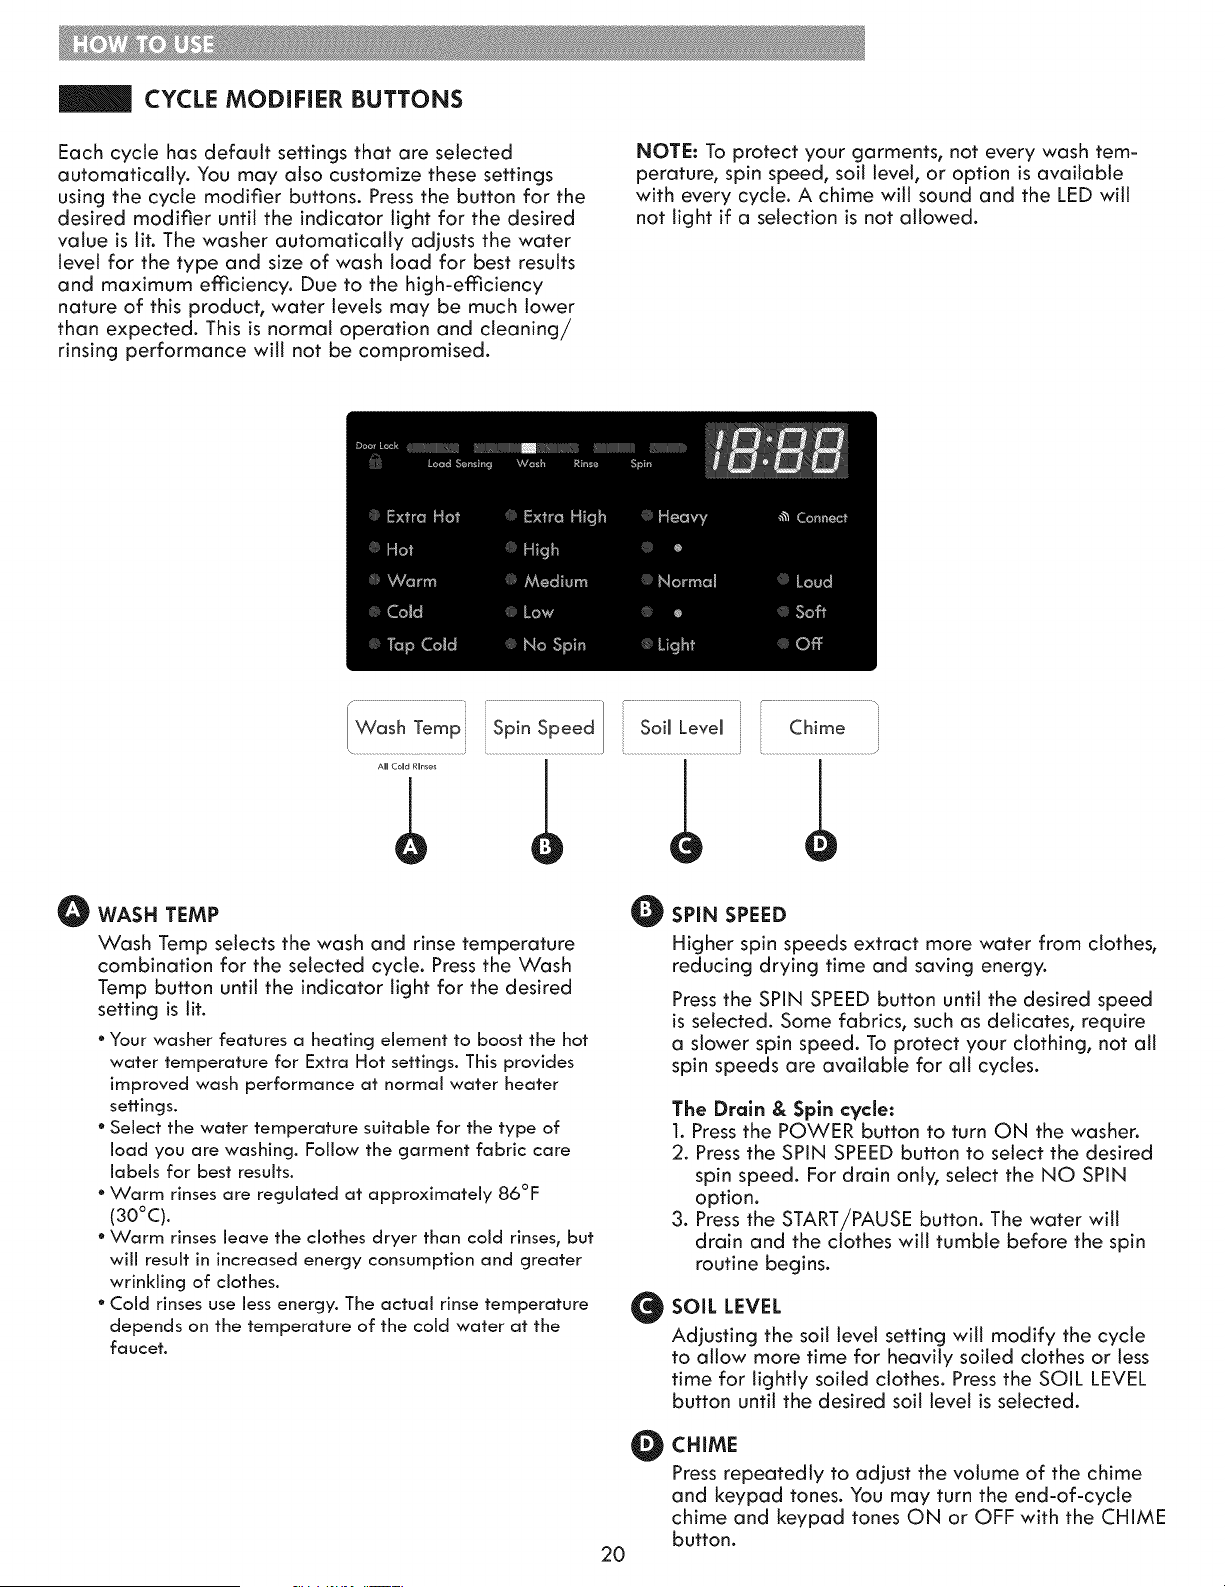
CYCLE MODiFiER BUTTONS
Each cycle has default settings that are selected
automatically. You may also customize these settings
using the cycle modifier buttons. Press the button for the
desired modifier until the indicator light for the desired
value is lit. The washer automatically adjusts the water
level for the type and size of wash toad for best results
and maximum emciency. Due to the high-emciency
nature of this product, water levels may be much lower
than expected. This is normal operation and cleaning/
rinsing performance will not be compromised.
NOTE: To protect your garments, not every wash tem-
perature, spin speed, soil level, or option is available
with every cycle. A chime will sound and the LED will
not light if a selection is not allowed.
O
WASH TEMP
Wash Temp selects the wash and rinse temperature
combination for the selected cycle. Press the Wash
Temp button until the indicator light for the desired
setting is lit.
° Your washer features a heating element to boost the hot
water temperature for Extra Hot settings. This provides
improved wash performance at normal water heater
settings.
° Select the water temperature suitable for the type of
load you are washing. Follow the garment fabric care
labels for best results.
° Warm rinses are regulated at approximately 86°F
(30°C).
° Warm rinses leave the clothes dryer than cold rinses_ but
will result in increased energy consumption and greater
wrinkling of clothes.
° Cold rinses use Jessenergy. The actual rinse temperature
depends on the temperature of the cold water at the
faucet.
O SPIN SPEED
O
O
2O
Higher spin speeds extract more water from clothes,
reducing drying time and saving energy.
Press the SPIN SPEED button until the desired speed
is selected. Some fabrics, such as delicates, require
a slower spin speed. To protect your clothing, not all
spin speeds are available for all cycles.
The Drain & Spln cycle:
1. Press the POWER button to turn ON the washen
2. Press the SPIN SPEED button to select the desired
spin speed. For drain only, select the NO SPIN
option.
3. Press the START/PAUSE button. The water will
drain and the clothes will tumble before the spin
routine begins.
SOIL LEVEL
Adjusting the soil level setting will modify the cycle
to allow more time for heavily soiled clothes or tess
time for lightly soiled clothes. Press the SOIL LEVEL
button until the desired soil level is selected.
CHIME
Press repeatedly to adjust the volume of the chime
and keypad tones. You may turn the end-of-cycle
chime and keypad tones ON or OFF with the CHIME
button.

STEAM CYCLES AND OPTIONS
STEAM TREAT Option
STEAM cycles include Normal/Casual, Bulky!Bedding, Heavy
Duty, Sanitize and Whitest Whites. Adding steam to these
cycles helps provide improved cleaning performance. By
creating steam, fabrics get the benefit of a deep clean.
To add steam to a cycle:
O Turn ON the washer and turn the cycle selector
knob to select a cycle that allows the steam option.
O Press the STEAM TREAT button. The washer will
automatically adjust the cycle settings.
O Set any other desired options.
O Press the START/PAUSE button to start the cycle.
CAUTION:
The door may be very warm during steam cycles. Thisis nor-
mal.
Do not attempt to override the door lock mechanism or reach
into the washer during a steam cycle. Steam can cause severe
burns.
IMPORTANT NOTES ABOUT STEAM CYCLES:
* Steam may not be visible during the steam cycles. This is
normal.
" Do not use steam with delicate fabrics such as wool, silk, or
easily discolored fabrics.
21
OPTION BUTTONS
Your washing machine features several additional cycle
options that customize cycles to meet your individual needs.
_Turn ON the washer and turn the cycle selector knob to
select the desired cycle.
Use the cycle modifier buttons to adjust the settings for
O that cycle.
Pressthe cycle option button(s) for the option(s) you
O would like to add. The button will light when that is
option
selected. For secondary functions, press and hold the but-
ton for five seconds. The LED will blink when the second-
ary option is selected. Both options cannot be selected
together.
Oil the selected option is not allowed for the setected cycle,
the chime will sound twice to alert you and the LED will
not illuminate.
Pressthe START/PAUSE button to start the cycle. After a
brief delay, the door will lock and the cycle witl begin.
NOTE: To protect your garments, not every option is available
with every cycle.
NOTE: If the START/PAUSEbutton is not pressed within four
minutes, the control will shut off and the settings will be lost.
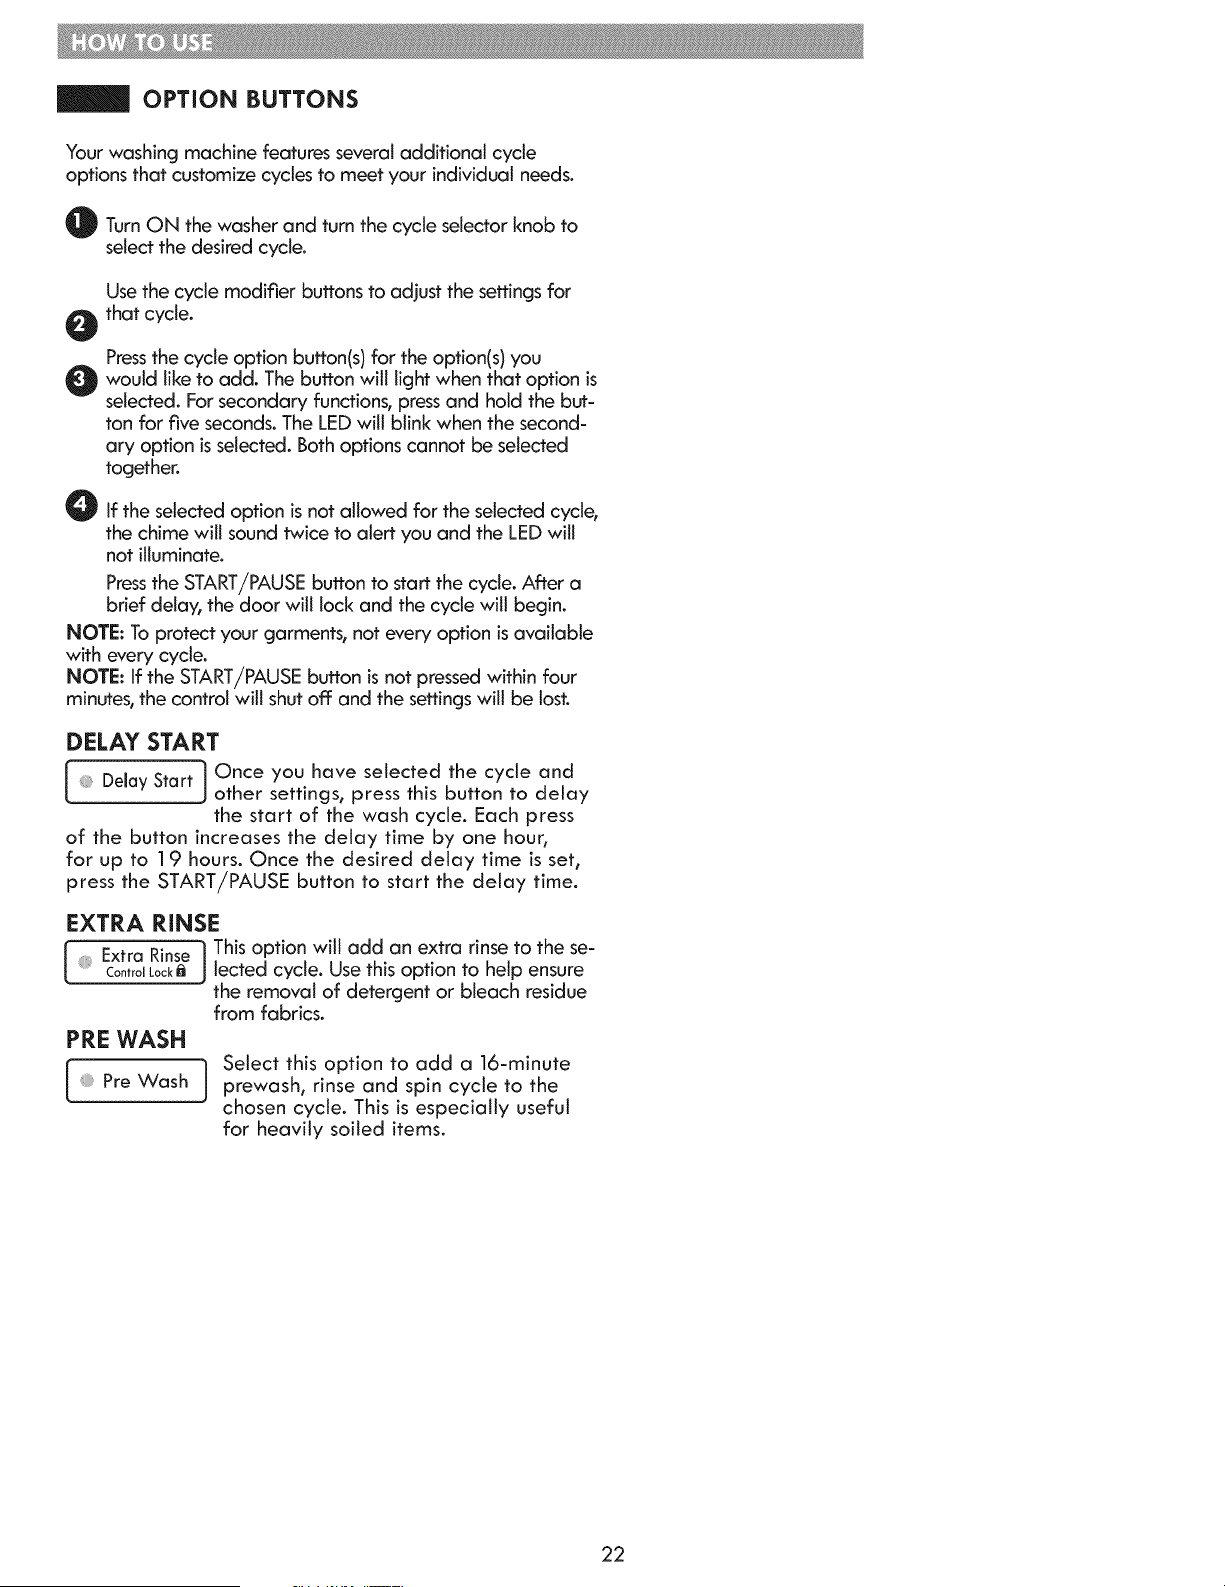
DELAY START
Start I Once you have selected the cycle and
Delay
J other settings, press this button to delay
the start of the wash cycle. Each press
of the button increases the delay time by one hour,
for up to 19 hours. Once the desired delay time is set,
press the START/PAUSE button to start the delay time.
EXTRA RINSE
Extra Rinse | This option will add an extra rinse to the se-
Contro_Lo0k_ _ lected cycle. Use this option to help ensure
the removal of detergent or bleach residue
from fabrics.
PRE WASH
Select this option to add a 16-minute
prewash, rinse and spin cycle to the
chosen cycte. This is especially usefut
for heavily soiled items.
22
SPECIAL FUNCTIONS
CONTR OL LOCK
Extra Rinse | Use this option to disable the controls.
Coo,_olLo0ki_J The washer can only be locked during a
cycle. This feature can prevent children
from changing cycles or operating the machine. Once
set, the controls remain locked and must be turned OFF
before the controls can be used again. Once the washer
has shut off, the power button wilt allow the machine
to be turned ON, but the controls will still be locked.
When the controls are locked, the Control Lock LED wilt
illuminate and "CL" will display alternately with the
estimated time remaining.
To activate the control lock, press and hold the EXTRA RINSE
button for five seconds.
CLEAN WASHER
Clean| Detergent residue can build up in the wash
StayF_eshJ drum over time and can lead to a mildewy
or musty smell. The Clean Washer cycle is
specially designed to remove this buildup using bleach or
another cleaner designed specifically for cleaning front load
washers. Run the Clean Washer cycle once a month, or more
often under heavy use conditions or if odor is present. See
complete instructions in the CARE AND CLEANING section.
@
O
Turn ON the washer and press the CLEAN WASHER
button. Selecting any other cycle after Clean
Washer has been selected will cancel the Clean
Washer cycle.
Fill the bleach dispenser to the MAX line with liquid
chlorine bleach. Do not overfill the bleach dispenser.
Overfilling will cause the bleach to dispense
immediately.
NOTE: For other drum cleaning products, follow
the cleaner manufacturer's instructions and
recommendations. For powdered cleaning products,
add the cleaner to the main wash compartment of
the dispenser drawer. Place tablet cleaners directly
into the drum.
Press the START/PAUSE button to start the cycle.
After the cycle has ended, secure the door slightly
ajar with the door magnet. This will promote air
circulation and allow the interior of the machine to
dry. To use this feature, close the door just until it
contacts the door magnet.
NOTE: Do NOT use this cycte with clothes, and do
NOT add detergent or fabric softenen
MY CYCLE
1 Cycle 1 MY CYCLE allows you to store a
My
customized wash cycle for future use. It
J
allows you to save favorite temperature,
spin speed, soil level, and other options for a cycle, and
then recall them at the touch of a button.
NOTE: You can only save a setting for one cycle at a
time. Pressing and holding the MY CYCLE button will
overwrite any previously saved cycle.
To save a MY CYCLE:
O Press the POWER button to turn on the washer.
O urn the cycle selector knob to select the desired
cycle.
Press the CYCLE MODIFIER button to change the
desired setting.
Press the CYCLE OPTION button to add the desired
options.
O Press and hold the MY CYCLE button.
To recall a MY CYCLE:
O Press the POWER button to turn on the washer.
0
Press the MY CYCLE button. The stored settings will
be displayed.
O Press the START/PAUSE button to start the cycle.
NOTE: MY CYCLE can be adjusted the same as any
other cycle. However, once any other button is pressed,
the LED will turn o_ indicating that the settings are no
longer those of your saved cycle.
AUTO SOAK
t_;i":_/_" /_ _i| Use the Auto Soak option to presoak
A_toSookj garments to help remove difficult spots
or stains on fabric. This option provides
a 30 minute presoak prior to the start of the selected
cycle. At the end of the presoak time, the selected cycle
will use the same water.
To use the AUTO SOAK feature, press and hold the
STEAM TREAT button for five seconds.
STAY FRESH
Clean Washer] The Stay Fresh option helps keep
StayFresh J wrinkles from setting in clothes.
To select the Stay Fresh option,
press and hold the CLEAN WASHER button for
approximately five seconds.
23
WARNING: To reduce the risk of nre,electric shock, or injury to persons, read and follow fhls
entire Use & Care Guide, including the important Safety instructions, before operating this washer.
* Unplug the washer before cleanlng to avoid the risk of electric shock. Failure to follow this warning can
cause serious injury, fire, electric shock, or death.
* Never use harsh chemicals, abraslve cleaners, or solvents to clean the washer. They will damage the finish.
REGULAR CLEANING
Cleaning the Exterior
Proper care of your washer can extend its life. The outside of
the machine can be cleaned with warm water and a mild,
nonabrasive household detergent.
Immediately wipe off any spills with a soft, damp cloth.
IMPORTANT: Do not use solvents, cleaning alcohols, or
similar products. Never use steel wool or abrasive cleaners
because they can damage the surface.
Care and Cleaning of the Interior
Use a towel or soft cloth to wipe around the washer door
opening, door seal, and door glass. These areas should be
kept clean to ensure a watertight seal. Be sure to wipe
under the inside rubber seal to remove any moisture or soil.
Always remove items from the washer as soon as the cycle
is complete. Leaving damp items in the washer can cause
wrinkling, color transfer, and odor. Run the CLEAN WASHER
cycle once a month, or more often if needed, to remove
detergent buildup and other residue.
Clean Washer
tO Remove any clothing in the drum.
O Open the dispenser drawer.
O Add liquid chlorine bleach or another drum cleaner
designed specifically for cleaning front load
washers.
- If using liquid chlorine bleach
Add liquid chlorine bleach to the bleach
compartment of the drawer. (NOTE : Do not
exceed the maximum fill line and do not pour
undiluted liquid bleach directly into the wash
drum.)
- If using powder cleaner
Remove the liquid detergent cup and add powder
cleaner to the main wash compartment of the
dispenser drawer.
- If using tablet cleaner
Add tablet cleaner directly to the wash drum.
NOTE:
° Do not add tablet cleaner to the dispenser drawer.
° Do not add any laundry detergent or fabric softener to the
drawer when using CLEAN WASHER.
O Turn ON the washer and press and hold the
EXTRA RINSE button for five seconds, and the LED
will blink. Selecting any other cycle after Clean Washer
has been selected will cancel the Clean Washer cycle.
Door Seal and Glass Cleaning
Door Seat and Glass Cleaning
Due to the location and nature of the door seal, some
detergent and soil residue may build up on the door glass
and seal. Periodic cleaning with a bleach solution can help
remove buildup and stains, and can help sanitize the seal to
prevent odors.
NOTE: Wear rubber gloves and eye protection while
performing the following procedure:
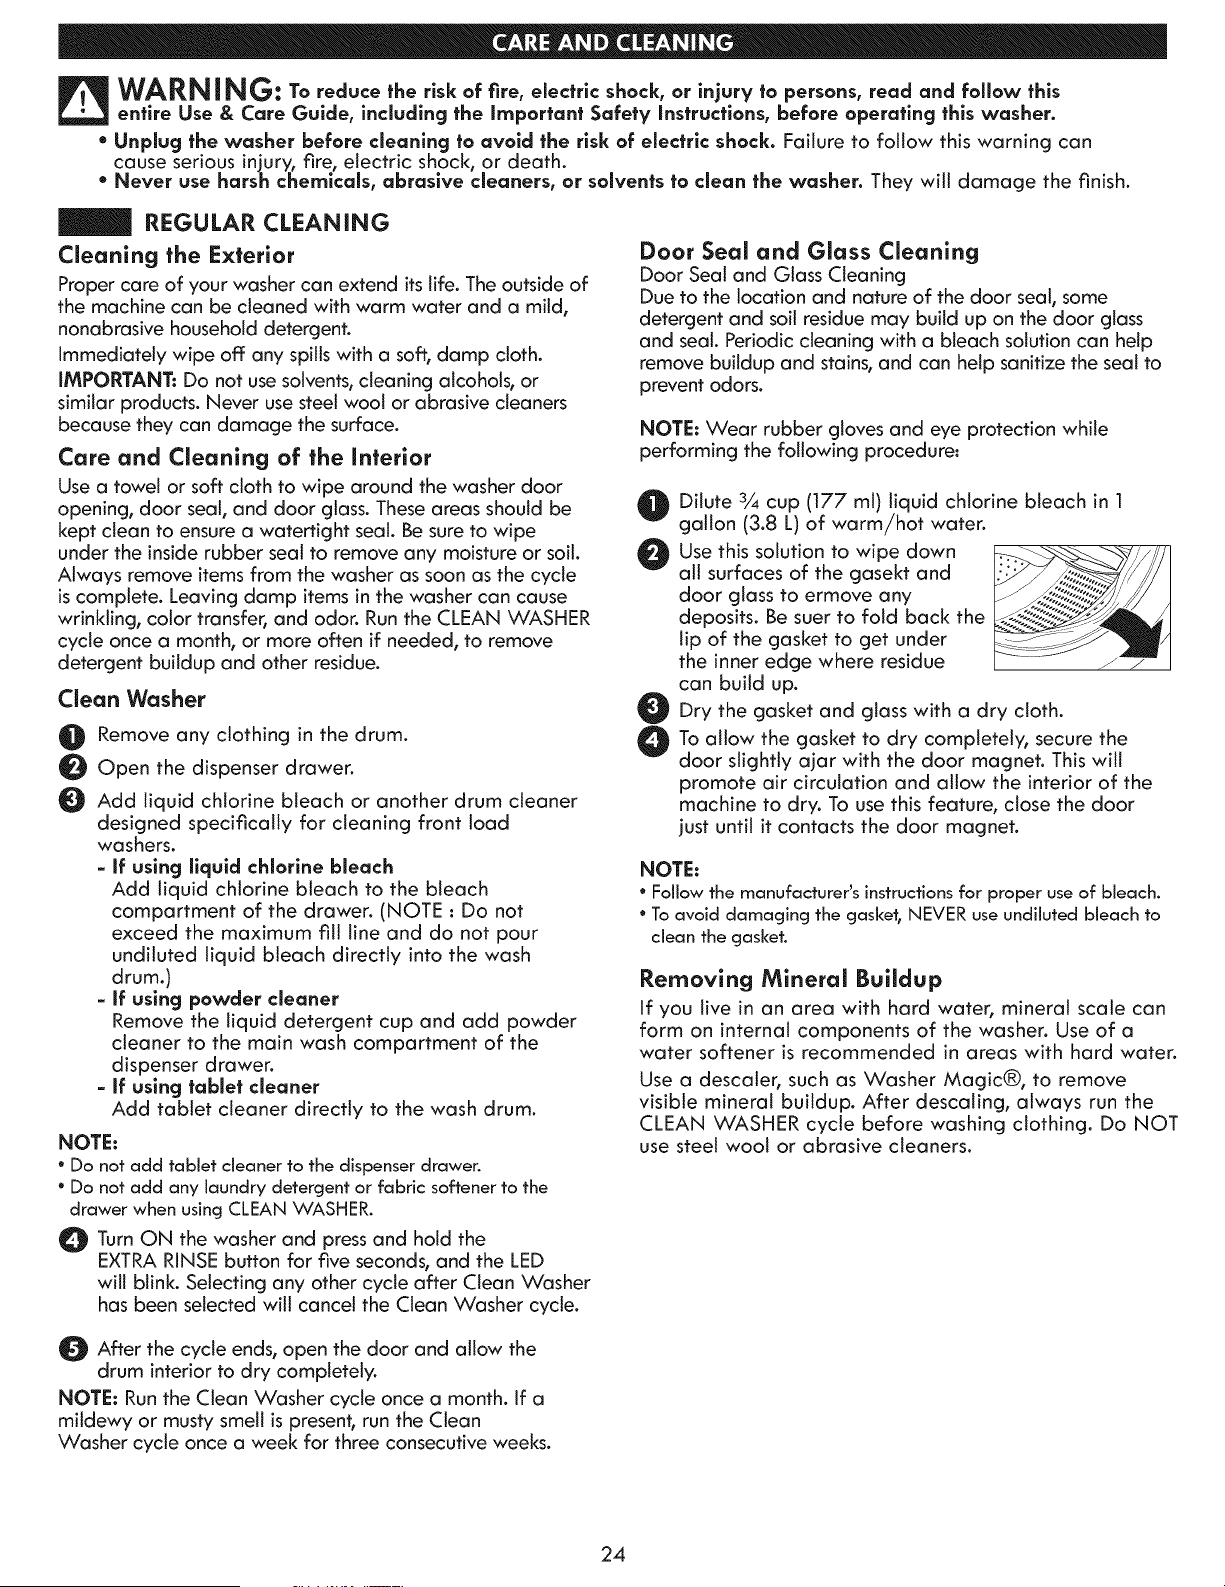
Dilute 3¼ cup (177 ml) liquid chlorine bleach in 1
gallon (3.8 L) of warm/hot water.
Use this solution to wipe down
all surfaces of the gasekt and
door glass to ermove any
deposits. Be suer to fold back the
lip of the gasket to get under
the inner edge where residue
can build up.
Dry the gasket and glass with a dry cloth.
To allow the gasket to dry completely, secure the
door slightly ajar with the door magnet. This will
promote air circulation and allow the interior of the
machine to dry. To use this feature, close the door
just until it contacts the door magnet.
NOTE:
* Follow the manufacturer's instructions for proper use of bleach.
° To avoid damaging the gasket, NEVER use undiluted bleach to
clean the gasket.
Removing Mineral Buildup
If you live in an area with hard water, mineral scale can
form on internal components of the washer. Use of a
water softener is recommended in areas with hard water.
Use a descaler, such as Washer Magic®, to remove
visible mineral buildup. After descating, always run the
CLEAN WASHER cycle before washing clothing. Do NOT
use steel wool or abrasive cleaners.
After the cycle ends, open the door and allow the
drum interior to dry completely.
NOTE: Run the Clean Washer cycle once a month. If a
mildewy or musty smell is present, run the Clean
Washer cycle once a week for three consecutive weeks.
24
REGULAR CLEANING (continued)
Storing the Washer
if the washer will not be used for an extended period of
time and is in an area that could be exposed to freezing
temperatures, perform the following steps to protect the
washer from damage.
O Turn OFF the water supply.
O isconnect hoses from water supply and drain water
from hoses.
Plug the power cord into a properly grounded
electrical outlet.
O Add 1 gallon of nontoxic recreational vehicle (RV)
antifreeze to the empty wash drum and close the door
O ress the POWER button, then press the SPiN SPEED
button without selecting a cycle. Press the START/
PAUSE button to activate the drain pump. This will
expel some of the antifereze, leaving enough to pro-
tect the washer from damage.
0
Unplug the power cord, dry the drum interior with a
soft cloth, and close the doo.r
O Refer the instructions below clean and the
to to dry
dispenser drawer.
O Store the washer in an upright position.
O o remove the antifreeze from the washer after
storage, run the EXPRESS WASH cycle. Do not add
laundry to this cycle.
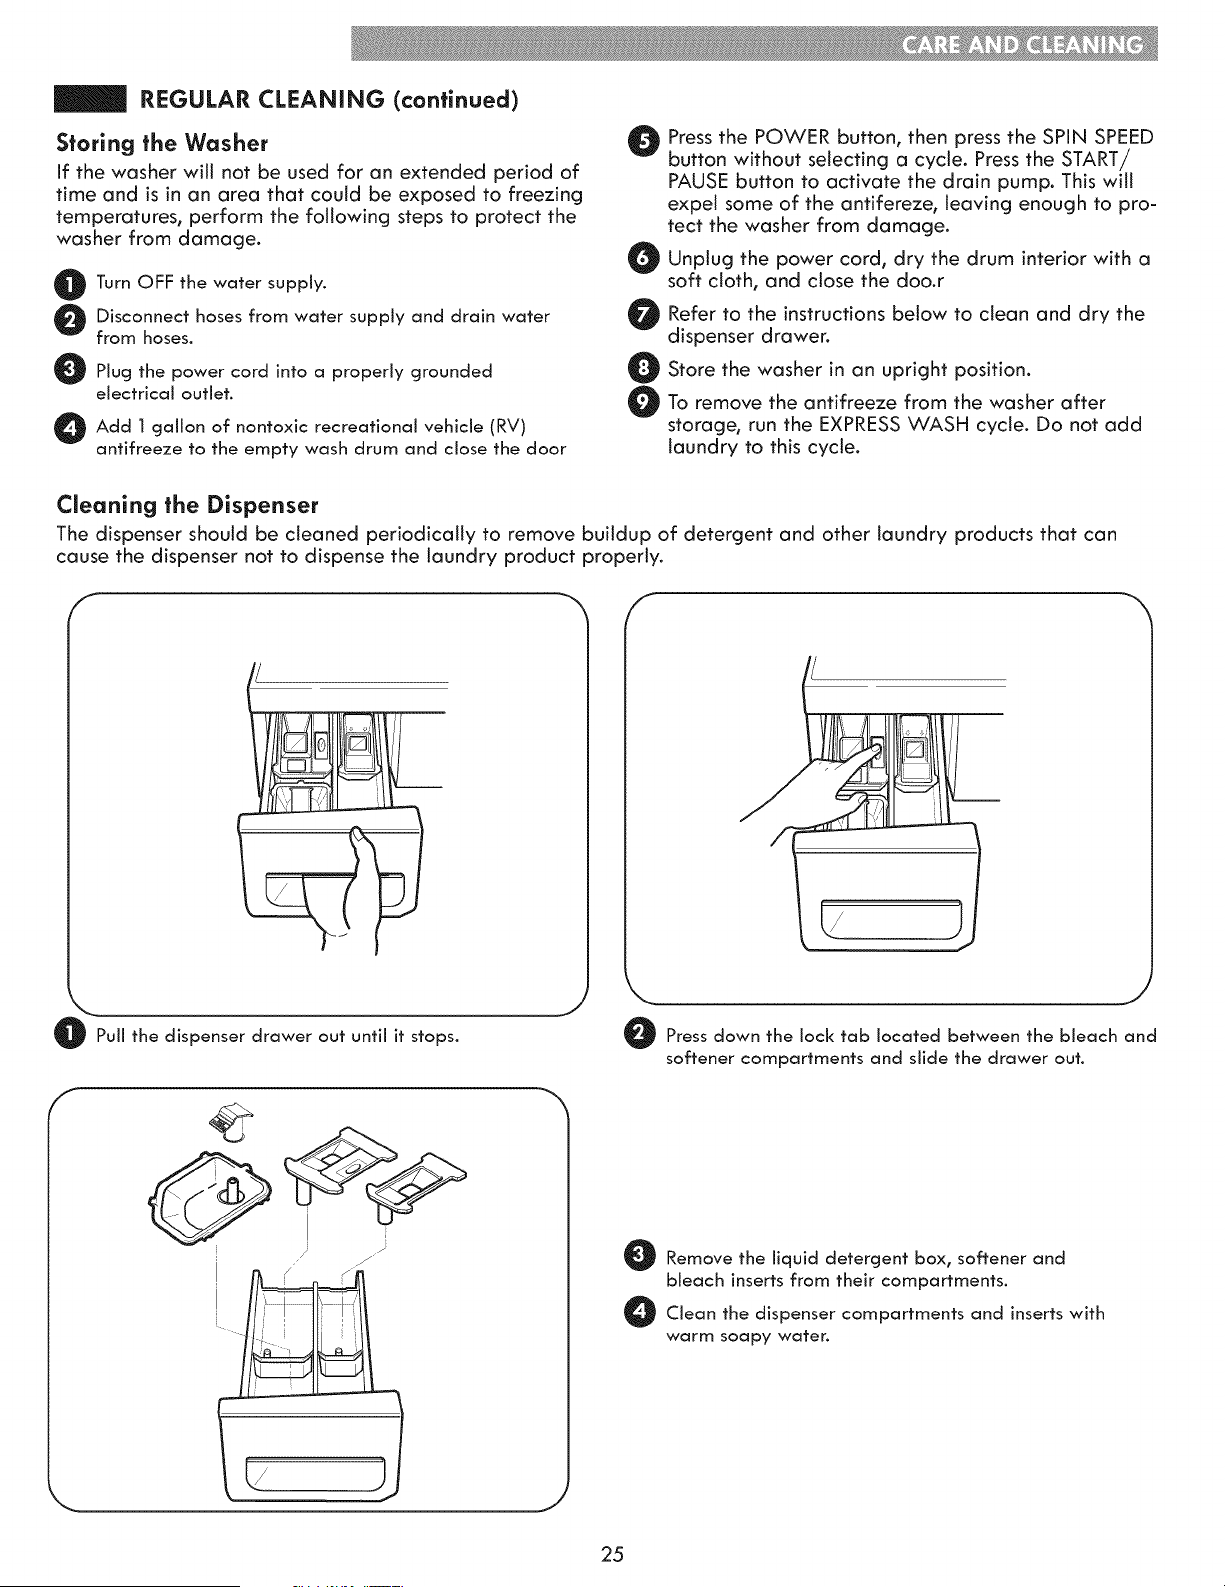
Cleaning the Dispenser
The dispenser should be cleaned periodically to remove buildup of detergent and other laundry products that can
cause the dispenser not to dispense the laundry product properly.
J
O Pull the dispenser drawer out until it stops.
f
J
S y
7
J
Pressdown the lock tab located between the bleach and
softener compartments and slide the drawer out.
O Remove the liquid detergent box_ softener and
bleach inserts from their compartments.
O lean the dispenser compartments and inserts with
warm soapy water.
25
MAINTENANCE
Cleaning the Water Inlet Filters
If the washer does not fitt properly, an error message
will show on the display. The inlet valve filter screens
could be plugged by hard water scale, sediment in the
water supply, or other debris.
NOTE: The inlet screens protect the delicate parts of the
inlet valve from being damaged by particles that could
enter the valves with the water supply. Operating the
washer with these filters removed could cause a valve to
fail to open, resulting in flooding and/or property
damage.
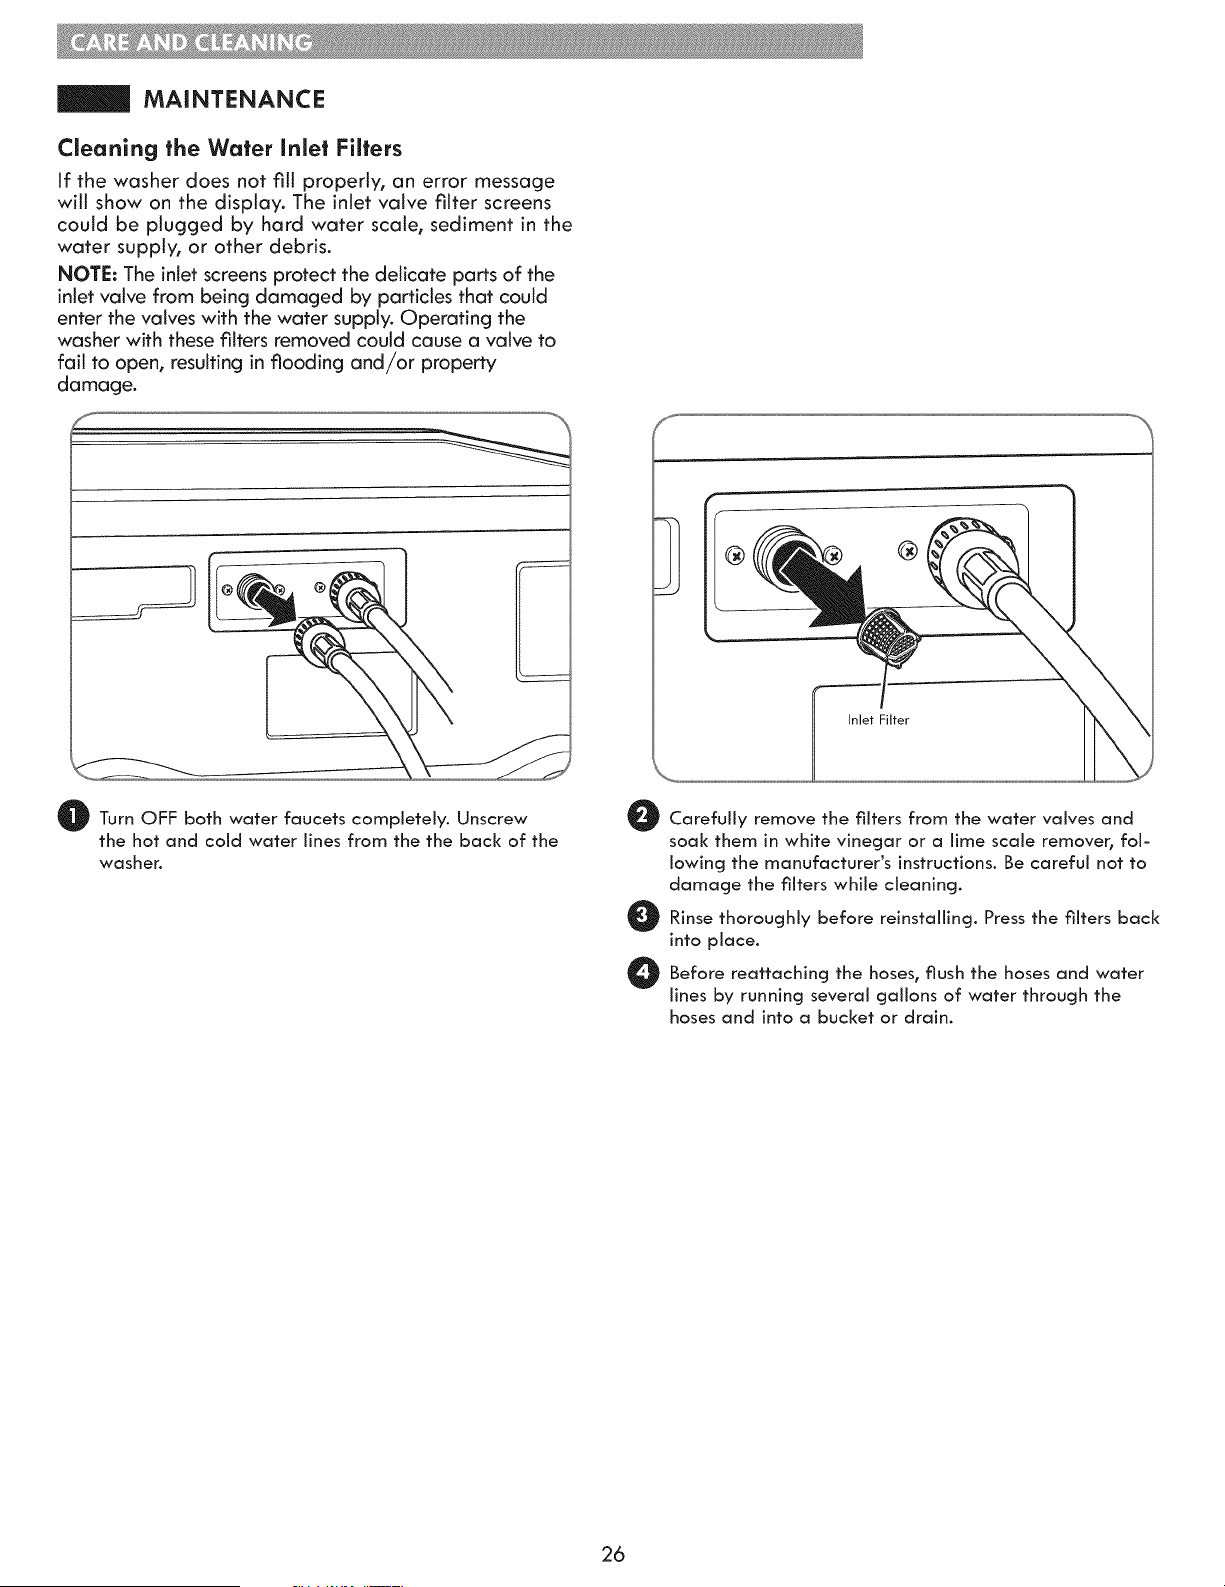
@ @
Inlet Filter
O Turn OFF both water faucets completely. Unscrew
the hot and cold water lines from the the back of the
washer.
Carefully remove the filters from the water valves and
soak them in white vinegar or a lime scale remover, fol-
lowing the manufacturer's instructions. Be careful not to
damage the filters while cleaning.
O inse thoroughly before reinstalling. Press the filters back
into place.
O Before the flush the hoses and
reattaching hoses,
water
lines by running several gallons of water through the
hoses and into a bucket or drain.
26
MAIN'rENANCE (continued)
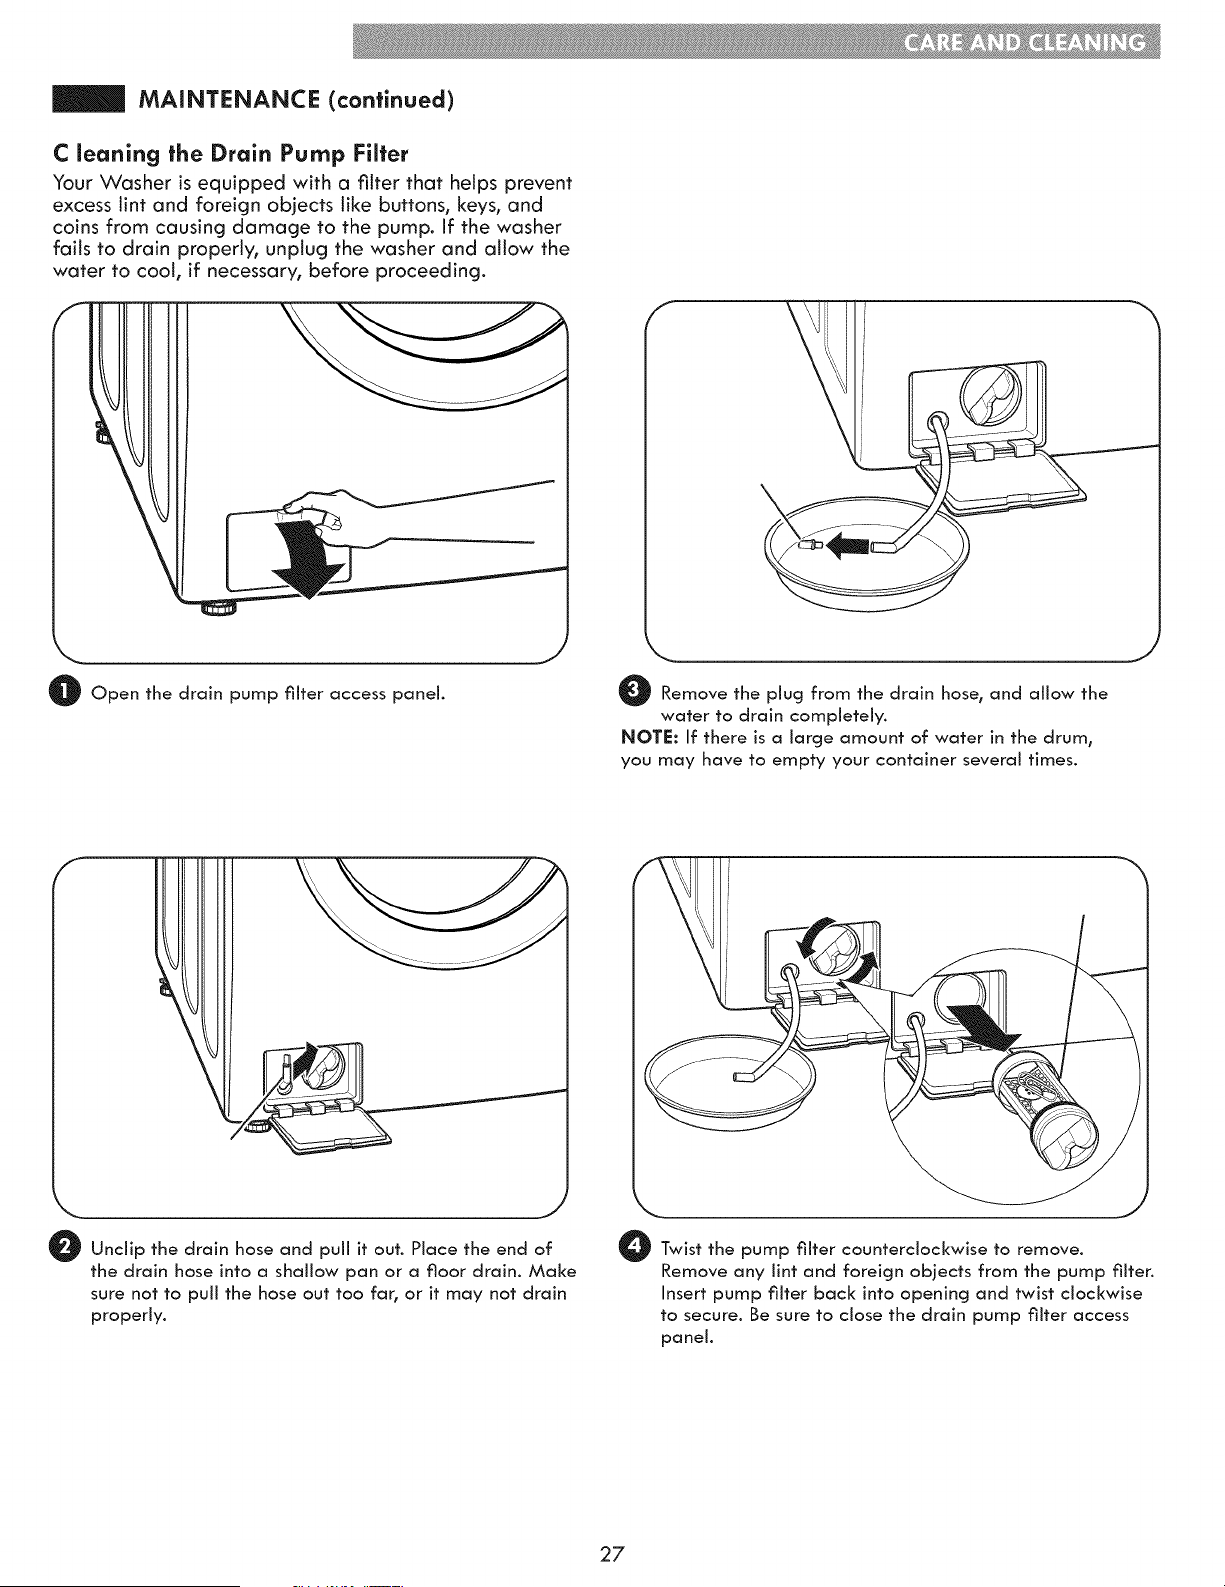
C leaning the Drain Pump Filter
Your Washer is equipped with a filter that helps prevent
excess lint and foreign objects like buttons, keys, and
coins from causing damage to the pump. if the washer
fails to drain properly, unplug the washer and allow the
water to coot, if necessary, before proceeding.
Open the drain pump filter access panel.
J
O Remove the plug from the drain hose, and allow the
water to drain completely.
NOTE: If there is a large amount of water in the drum,
you may have to empty your container several times.
J
Unclip the drain hose and puii it out. Place the end of
the drain hose into a shallow pan or a floor drain. Make
sure not to pull the hose out too far, or it may not drain
properly.
O Twist the pump filter counterclockwise to remove.
Remove any lint and foreign objects from the pump fiJten
Insert pump filter back into opening and twist clockwise
to secure. Be sure to close the drain pump filter access
panel.
27
Should you experience any problems with your
washing machine, it has the capability of transmitting
data via your telephone to the Kenmore Connect
Team. This gives you the capability of speaking
directly to our specially trained technicians. The
technician records the data transmitted from your
machine and uses it to analyze the issue, providing a
fast and effective diagnosis.
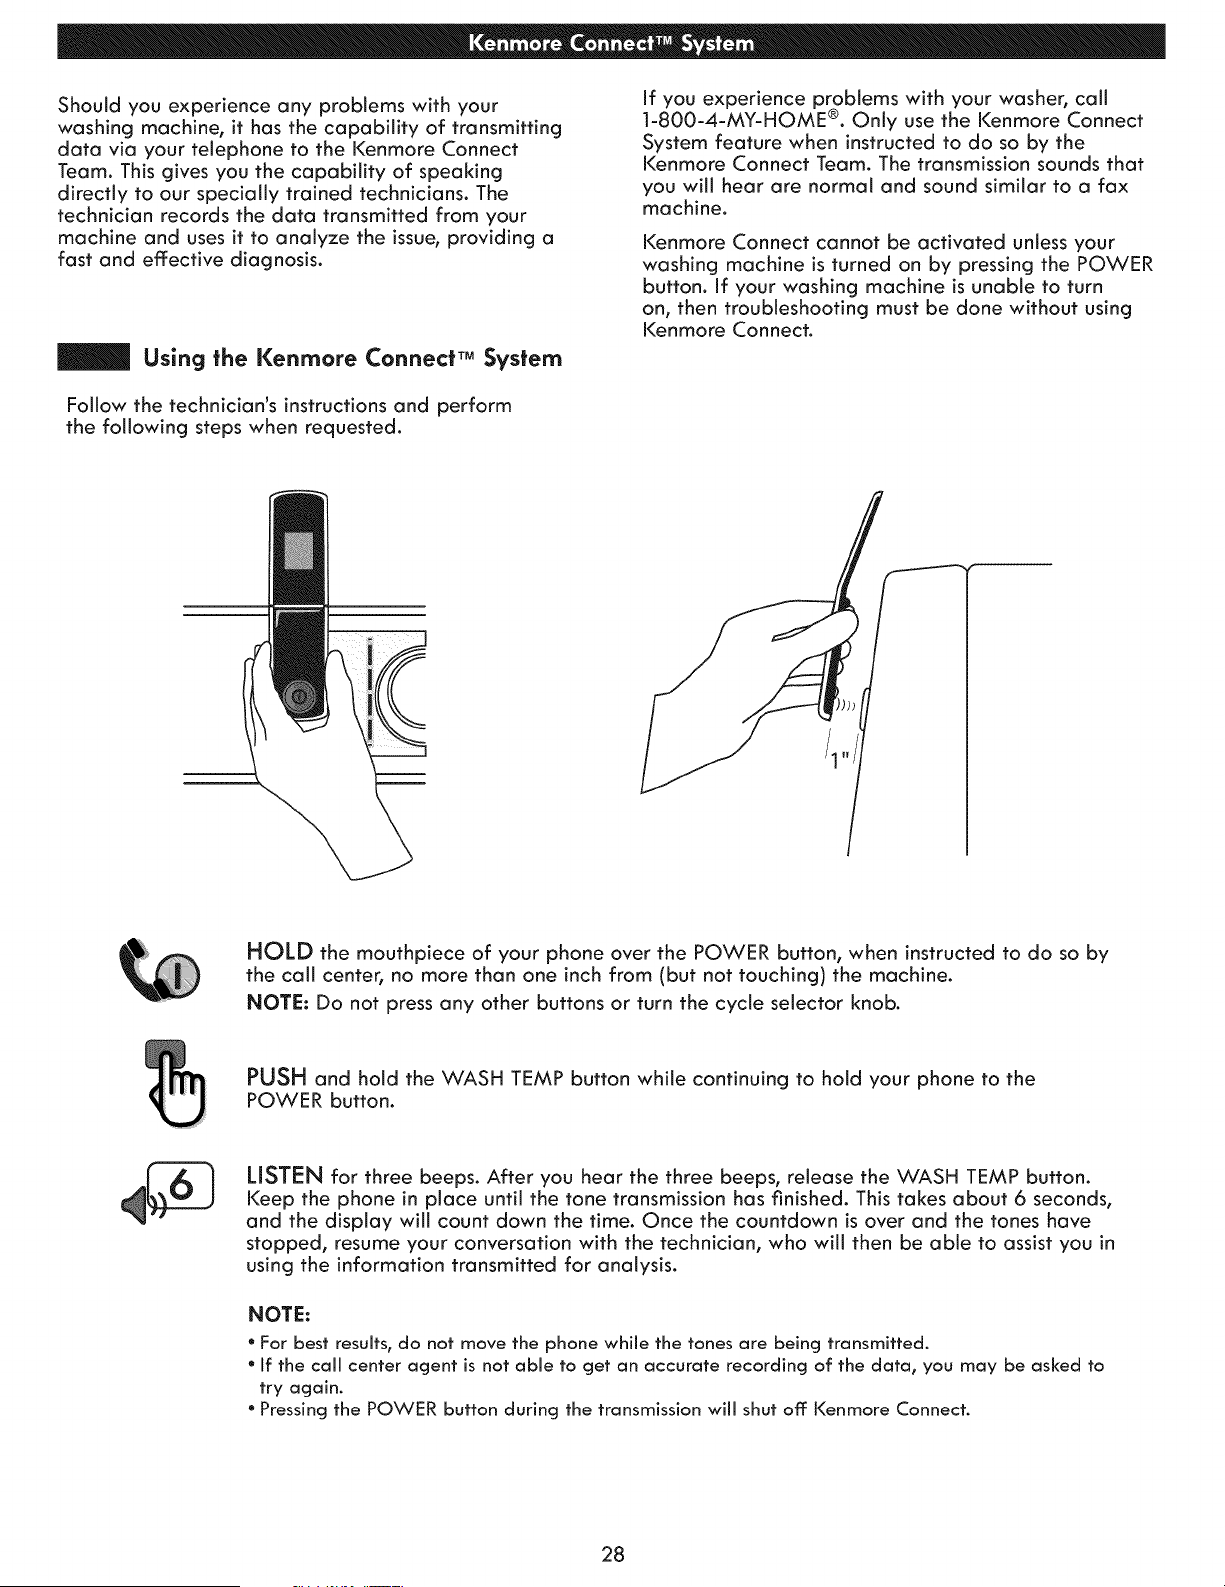
Using the Kenmore Connect TM System
Follow the technician's instructions and perform
the following steps when requested.
If you experience problems with your washer, call
1-800-4-MY-HOME ®. Only use the Kenmore Connect
System feature when instructed to do so by the
Kenmore Connect Team. The transmission sounds that
you will hear are normal and sound similar to a fax
machine.
Kenmore Connect cannot be activated unless your
washing machine is turned on by pressing the POWER
button. If your washing machine is unable to turn
on, then troubleshooting must be done without using
Kenmore Connect.
HOLD the mouthpiece of your phone over the POWER button, when instructed to do so by
the call center, no more than one inch from (but not touching) the machine.
NOTE: Do not press any other buttons or turn the cycle selector knob.
PUSH and hold the WASH TEMP button while continuing to hold your phone to the
POWER button.
LISTEN for three beeps. After you hear the three beeps, release the WASH TEMP button.
Keep the phone in place until the tone transmission has finished. This takes about 6 seconds,
and the display will count down the time. Once the countdown is over and the tones have
stopped, resume your conversation with the technician, who will then be able to assist you in
using the information transmitted for analysis.
NOTE:
* For best results_ do not move the phone whiie the tones are being transmitted.
" If the caii center agent is not abie to get an accurate recording of the data_ you may be asked to
try again.
. Pressing the POWER button during the transmission wiii shut off: Kenmore Connect.
28
NORMAL SOUNDS YOU MAY HEAR
The following sounds may be heard while the washer is
operating. They are normal.
Clicking:
Door locking mechanism clicks when the door locks and
unlocks.
Humming or gurgling:
Drain pump is pumping water from the washer at times
during a cycle.
Spraying or hissing:
Water spraying or circulating during the cycle.
Splashing:
Clothes tumbling in the drum during the wash and rinse
cycles.
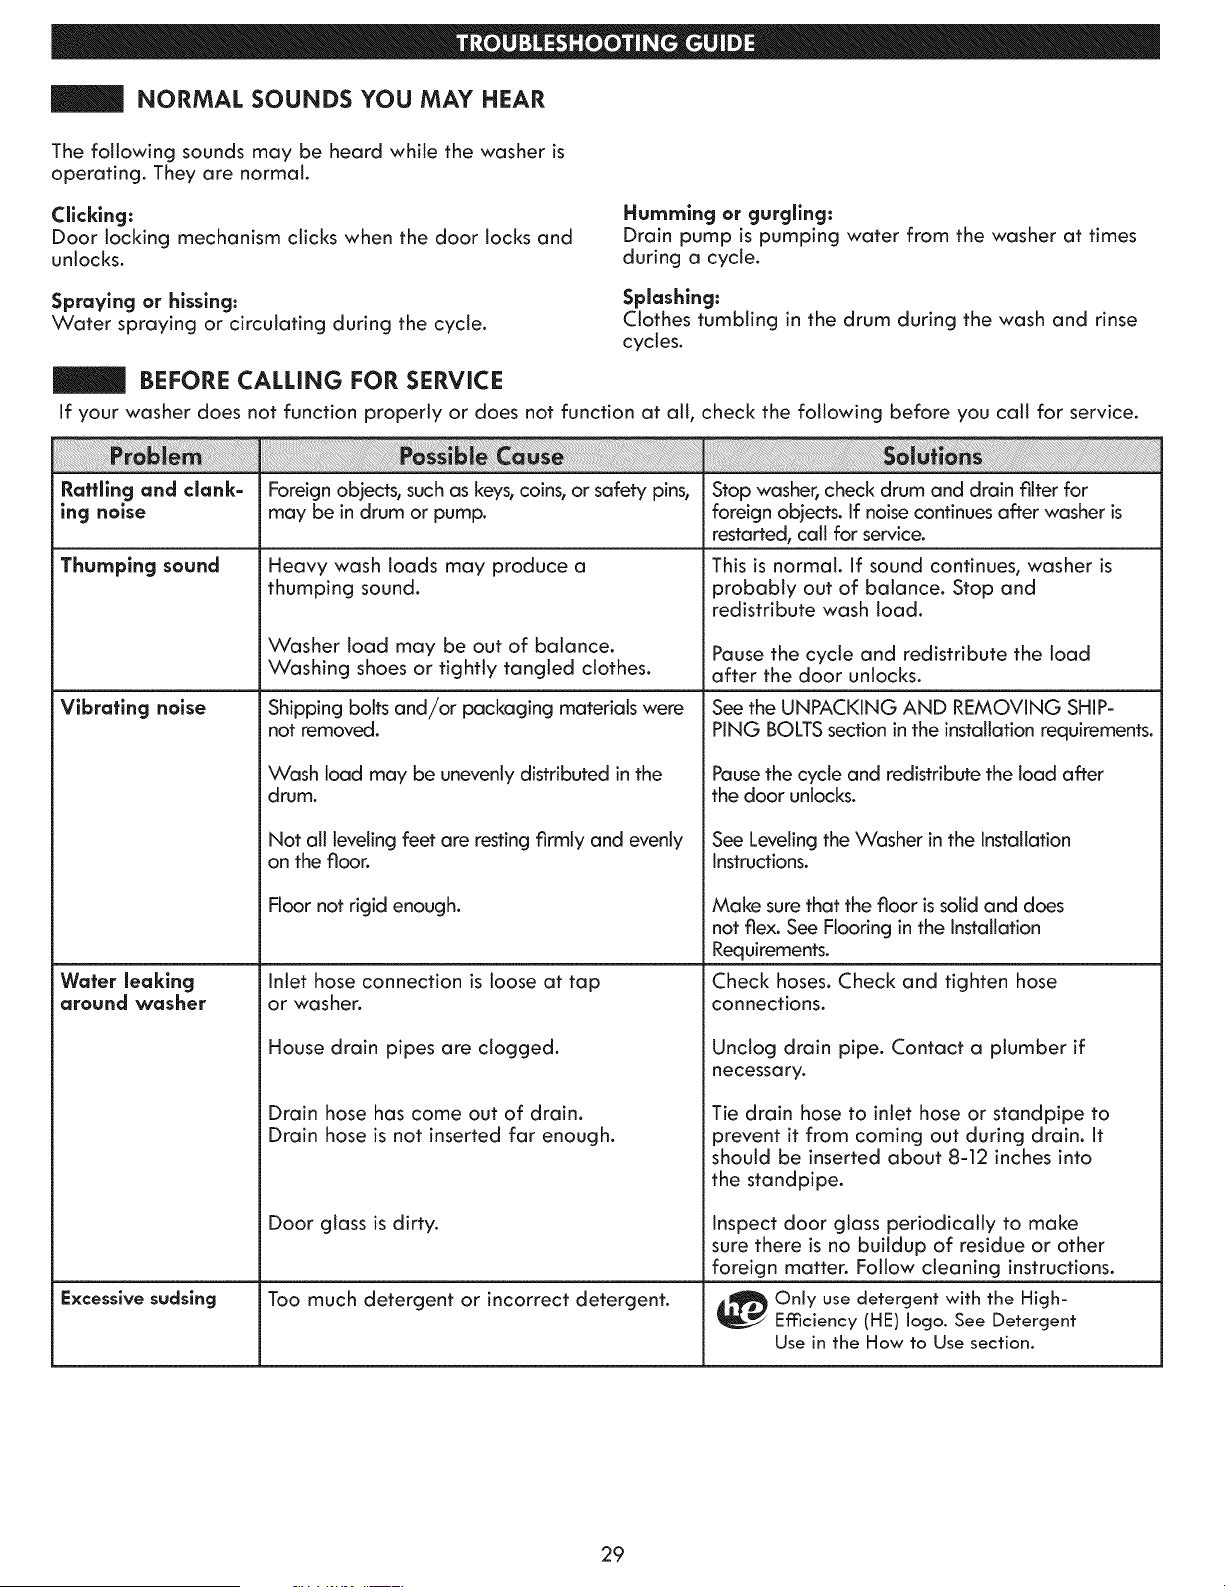
BEFORE CALLING FOR SERVICE
If your washer does not function properly or does not function at all, check the following before you call for service.
Rattling and clank- Foreign objects, such as keys,coins, or safety pins, Stop washer, check drum and drain filter for
mg noise may be in drum or pump. foreign objects. If noise continues after washer is
restarted, call for service.
Thumping sound
Vibrating noise
Water leaking
around washer
Excessive sudsing
Heavy wash loads may produce a
thumping sound.
Washer load may be out of balance.
Washing shoes or tightly tangled clothes.
Shipping bolts and/or packaging materials were
not removed.
Wash load may be unevenly distributed in the
drum.
Not all leveling feet are resting firmly and evenly
on the floor.
Floor not rigid enough.
Inlet hose connection is loose at tap
or washer.
House drain pipes are clogged.
Drain hose has come out of drain.
Drain hose is not inserted far enough.
Door glass is dirty.
Too much detergent or incorrect detergent.
This is normal. If sound continues, washer is
probably out of balance. Stop and
redistribute wash load.
Pause the cycle and redistribute the load
after the door unlocks.
See the UNPACKING AND REMOVING SHIP-
PING BOLTS section in the installation requirements.
Pausethe cycle and redistribute the load after
the door unlocks.
See Leveling the Washer in the installation
instructions.
Make sure that the floor issolid and does
not flex. See Flooring in the Installation
Requirements.
Check hoses. Check and tighten hose
connections.
Unclog drain pipe. Contact a plumber if
necessary.
Tie drain hose to inlet hose or standpipe to
prevent it from coming out during drain. It
should be inserted about 8-12 inches into
the standpipe.
Inspect door glass periodically to make
sure there is no buildup of residue or other
foreign matter. Follow cleaning instructions.
Only use detergent with the High-
Efficiency (HE) logo. See Detergent
Use in the How to Use section.
29
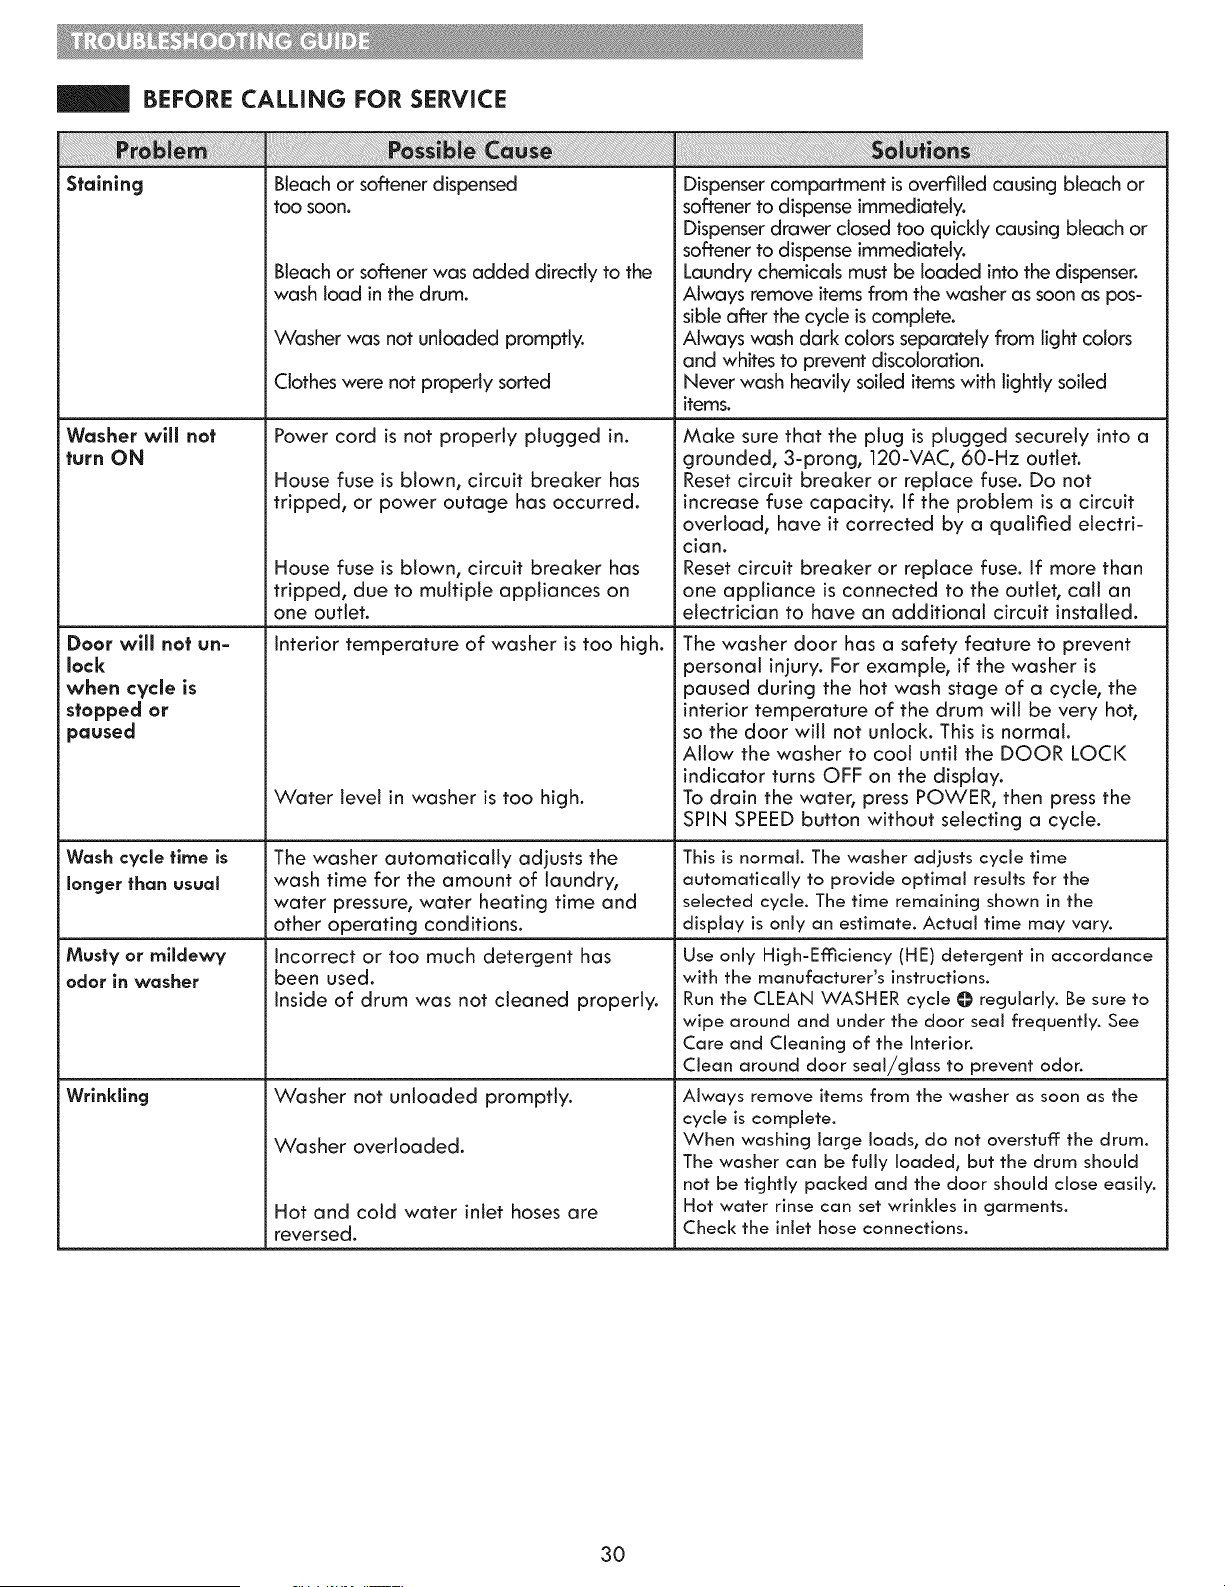
BEFORE CALLING FOR SERVICE
Staining
Washer will not
turn ON
Door wlll not un-
lock
when cycle is
stopped or
paused
Wash cycle time is
longer than usual
Musty or mildewy
odor in washer
Wrinkling
Bleach or softener dispensed
too soon.
Bleach or softener was added directly to the
wash load in the drum.
Washer was not unloaded promptly.
Clothes were not properly sorted
Power cord is not properly plugged in.
House fuse is blown, circuit breaker has
tripped, or power outage has occurred.
House fuse is blown, circuit breaker has
tripped, due to multiple appliances on
one outlet.
Interior temperature of washer is too high.
Water level in washer is too high.
The washer automatically adjusts the
wash time for the amount of laundry,
water pressure, water heating time and
other operating conditions.
Incorrect or too much detergent has
been used.
Inside of drum was not cleaned properly.
Washer not unloaded promptly.
Washer overloaded.
Hot and cold water inlet hoses are
reversed.
Dispenser compartment is overfilled causing bleach or
softener to dispense immediately.
Dispenser drawer closed too quickly causing bleach or
softener to dispense immediately.
Laundry chemicals must be loaded into the dispenser.
Always remove items from the washer as soon as pos-
sible after the cycle iscomplete.
Always wash dark colors separately from light colors
and whites to prevent discoloration.
Never wash heavily soiled items with lightly soiled
items.
Make sure that the plug is plugged securely into a
grounded, 3-prong, 120-VAC, 60-Hz outlet.
Reset circuit breaker or replace fuse. Do not
increase fuse capacity. If the problem is a circuit
overload, have it corrected by a qualifled electri-
cian.
Reset circuit breaker or replace fuse. If more than
one appliance is connected to the outlet, call an
electrician to have an additional circuit installed.
The washer door has a safety feature to prevent
personal injury. For example, if the washer is
paused during the hot wash stage of a cycle, the
interior temperature of the drum will be very hot,
so the door will not unlock. This is normal.
Allow the washer to cool until the DOOR LOCI(
indicator turns OFF on the display.
To drain the water, press POWER, then press the
SPIN SPEED button without selecting a cycle.
This is normal. The washer adjusts cycle time
automatically to provide optimal results for the
selected cycle. The time remaining shown in the
display is only an estimate. Actual time may vary.
Use only High-Efficiency (HE) detergent in accordance
with the manufacturer's instructions.
Run the CLEAN WASHER cycle O regularly. Be sure to
wipe around and under the door seal frequently. See
Care and Cleaning of the Interior.
Clean around door seal/glass to prevent odor.
Always remove items from the washer as soon as the
cycle is complete.
When washing large loads, do not overstuff: the drum.
The washer can be fully loaded, but the drum should
not be tightly packed and the door should close easily.
Hot water rinse can set wrinkles in garments.
Check the inlet hose connections.
3O
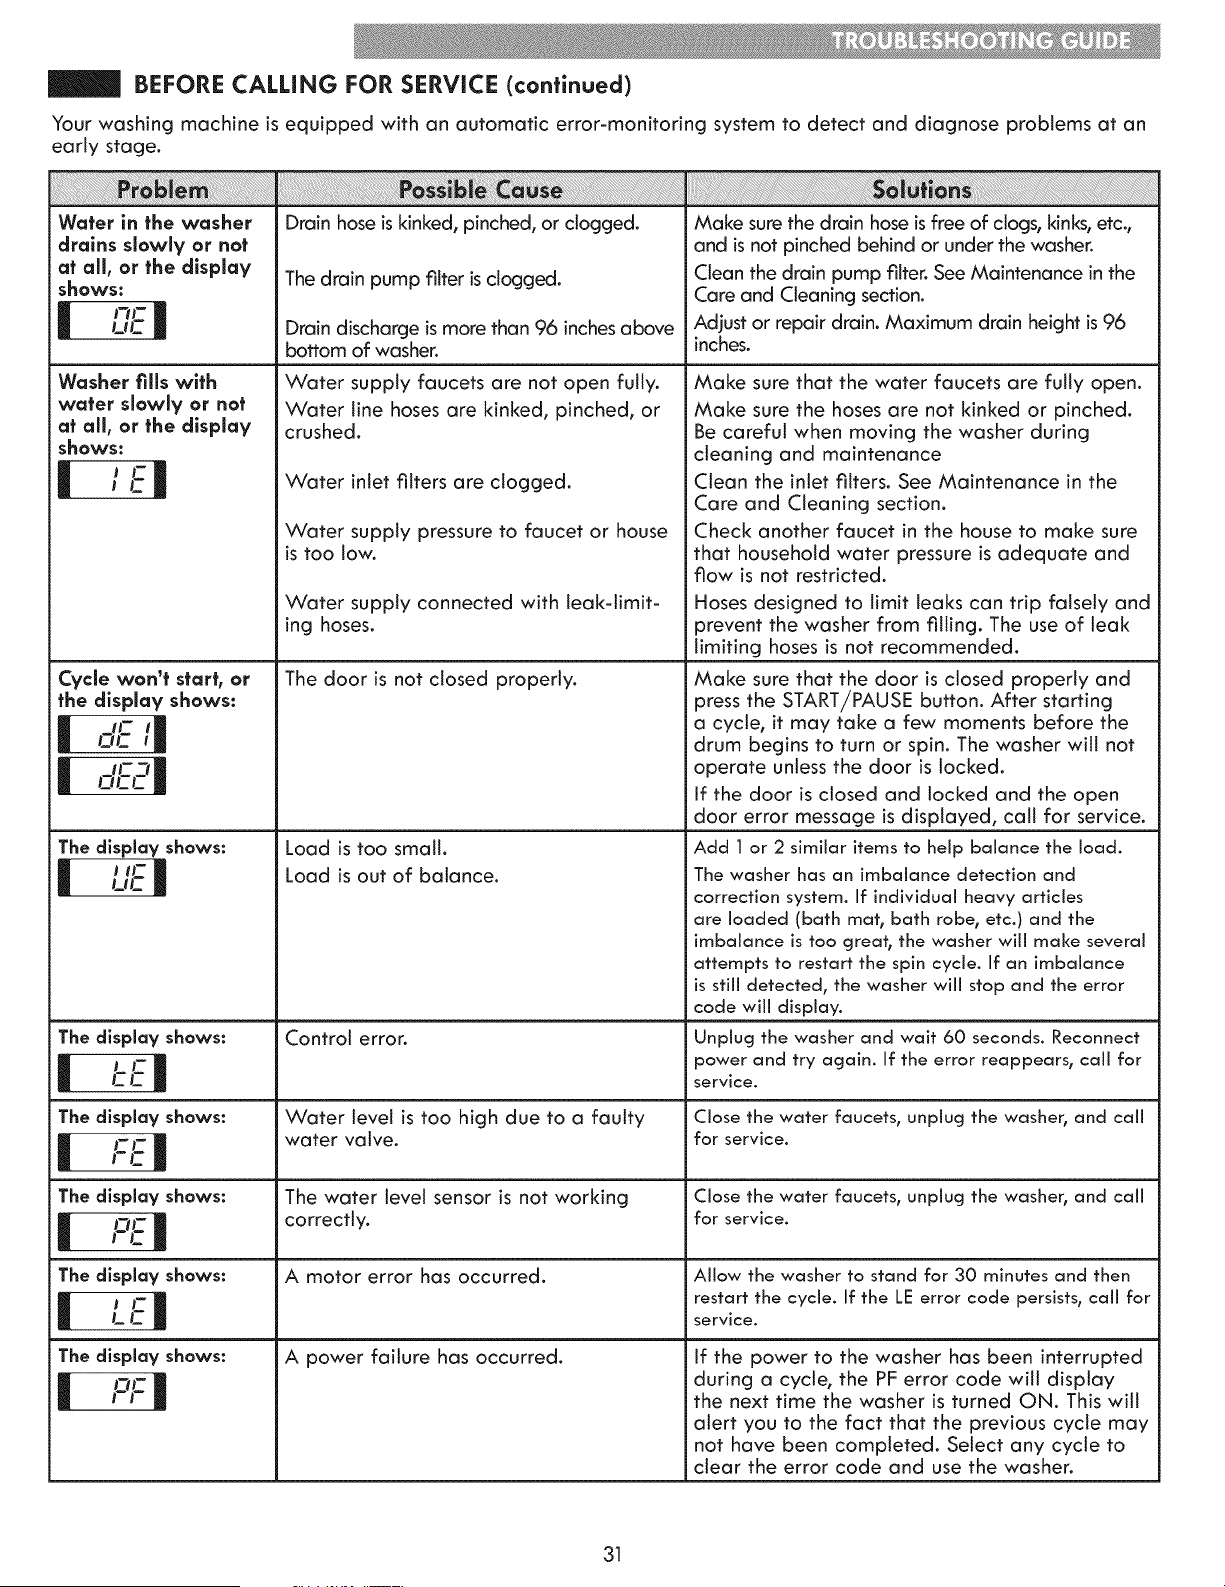
BEFORE CALLING FOR SERVICE (continued)
Your washing machine is
early stage.
Water in the washer
drains slowly or not
at all, or the dlsplay
SHOWS:
I _Tn-uc|
Washer fills with
water slowly or not
at all, or the dlsplay
equipped with an automatic error-monitoring system to detect and diagnose problems at an
Drain hose is kinked, pinched, or clogged.
The drain pump filter is clogged.
Drain discharge is more than 96 inches above
bottom of washer.
Water supply faucets are not open fully.
Water line hoses are kinked, pinched, or
crushed.
iiii_!_i_i_i_C_!!!!_!_!!!_i_i_iiiiiiiiiiiiiiiii_i!_iiii_iiiiiiiiiiii!_iiii!!_iiiiiiiii!_iii_iiiiiiiiiiiiiiiiiiiiiiiiiiiiiiiiiiiiiiiiiiiiiiiiiiiiiiii!_i!_iiiii_i!_i_i_i!i!i!i_iiiiiiiiiiiiiiiii_iiiiiiiiiiiiiiiiii!_!i_i_i!;__;_II_I!'I_i_i_i_i_i_iiiii!!!_iiiiii_i_iiii!_!_!i_i_ii_iiii_!i!;_!!i:!_i!_i!i_:!i!i_iiii_ii_!i_ii!!!i!ii!ii!ii!ii!ii!ii!ii!ii!_i!i_!ii!_i!ii_i_i_i_i_i_i_i_i_i_i_i_i_i_i_i_i_i_iiiiii_iiiiiiiiiiiiiiiiii_iii_iiiiiiiii_iiiiiiii_iiiiiiiiiiiiiiiiiiiiiiiiiiiiiiiiiiiiiiiiiii!!!_ii_ii_ii_ii_ii_ii_ii_ii_ii_ii_iiiiii_iiiiiiiiiiii_iiii_iiiiii_ii_ii_ii_ii_ii_ii_ii_ii_ii_ii_iiiiii_iiiiii_ii_ii_ii_iiiiii_!
i _i_i_ii_!!_!_!_iiiiii/ii_iiii_i_ii!_ii_ii_i!i_iiiiiiii_i_i!_i_ii_ii_i!i_!i_i_i_i_i_i_i_i_i_i_!_iiiiiiiii_i_!_ii!s!Oi_U_ii!ON_i_!__!_i!!!:!_!_i_i_i_i_i_i_i_i_i_i_iii_iii!_iiiiiiJ_!_!!!i_!_!!_!_iiiiiiiiiiiii_ii_iiiiiii_ii_ii!i_i!_!_!;i_i_i_i_i_i_i_i_ii_i_i_i_i_ii!!_i_!_ii_iiiiii_iiiiii_iiii_iiiiiiiiiiiiiiiiiiiiiiiiiiiii_iiii_iiiiiiiiiiii_i_ii_iiiiiiii_!_i
Make sure the drain hose is free of clogs, kinks, etc.,
and is not pinched behind or under the washer.
Clean the drain pump filter. See Maintenance in the
Care and Cleaning section.
Adjust or repair drain. Maximum drain height is 96
inches.
Make sure that the water faucets are fully open.
Make sure the hoses are not kinked or pinched.
Be careful when moving the washer during
shows: cleaning and maintenance
I / E I Water inlet filters are clogged. Clean the inlet filters. See Maintenance in the
Care and Cleaning section.
Water supply pressure to faucet or house Check another faucet in the house to make sure
is too low. that household water pressure is adequate and
flow is not restricted.
Water supply connected with leak-limit- Hoses designed to limit leaks can trip falsely and
ing hoses, prevent the washer from filling. The use of leak
limiting hoses is not recommended.
Cycle won't start, or The door is not closed properly. Make sure that the door is closed properly and
the display shows: press the START/PAUSE button. After starting
If ,,- ,| a cycle, it may take a few moments before the
|
QC i_ drum begins to turn or spin. The washer will not
I ih-__
operate unless the door is locked.
[]
If the door is closed and locked and the open
door error message is displayed, call for service.
The display shows: Load is too small. Add 1or 2 similar items to help balance the load.
il UC''I-! Load is out of balance. The washer has an imbalance detection and
correction system. If individual heavy articles
are loaded (bath mat, bath robe, etc.) and the
imbalance is too greah the washer will make several
attempts to restart the spin cycle. If an imbalance
is still detected, the washer will stop and the error
_ code will display.
The display shows:
'| |
i cc
The display shows:
| '-'-
,-o-|
The display shows:
| |
The display shows:
i
i| Lc|
The display shows:
| PF|
Control error.
Water level is too high due to a faulty
water valve.
The water level sensor is not working
correctly.
A motor error has occurred.
A power failure has occurred.
Unplug the washer and wait 60 seconds. Reconnect
power and try again. If the error reappears, caii for
service.
Close the water faucets, unplug the washeb and coil
for service.
Close the water faucets, unplug the washeb and call
for service.
Allow the washer to stand for 30 minutes and then
restart the cycle. If the LE error code persists, call for
service.
If the power to the washer has been interrupted
during a cycle, the PF error code will display
the next time the washer is turned ON. This will
alert you to the fact that the previous cycle may
not have been completed. Select any cycle to
clear the error code and use the washer.
31
f
I<enmore Limited Warranty
When installed, operated and maintained according to all instructions supplied with the product, if this
appliance fails due to a defect in material and workmanship within one year from the date of purchase, call
1-800-4-MY-HOME ® to arrange for free repair.
If this appliance is ever used for other than private family purposes, this warranty applies for only 90 days
from the date of purchase.
This warranty covers only defects in material and workmanship. Sears will NOT pa¥ for:
1. Expendable items that can wear out from normal use, including but not limited to filters, belts, light bulbs,
and bags.
2. A service technician to instruct the user in correct product installation, operation or maintenance.
3. A service technician to clean or maintain this product.
4. Damage to or failure of this product if it is not installed, operated or maintained according to all the
instructions supplied with the product.
5. Damage to or failure of this product resulting from accident, abuse, misuse or use for other than its
intended purpose.
6. Damage to or failure of this product caused by the use of detergents, cleaners, chemicals or utensils
other than those recommended in all instructions supplied with the product.
Z Damage to or failure of parts or systems resulting from unauthorized modifications made to this product.
Disclaimer of implled warranties; limitation of remedies
Customer's sole and exclusive remedy under this limited warranty shall be product repair as provided herein.
Implied warranties, including warranties of merchantability or fitness for a particular purpose, are limited to
one year or the shortest period allowed by law. Sears shall not be liable for incidental or consequential
damages. Some states and provinces do not allow the exclusion or limitation of incidental or consequential
damages, or limitation on the duration of implied warranties of merchantability or fitness, so these exclusions
or limitations may not apply to you.
This warranty applies only while this appliance is used in the United States or Canada.
This warranty gives you specific legal rights, and you may also have other rights which vary from state to state.
Sears Brands Management Corporation, Hoffman Estates, IL 60179
Sears Canada Inc., Toronto, Ontario, Canada M5B 2C3
32

33
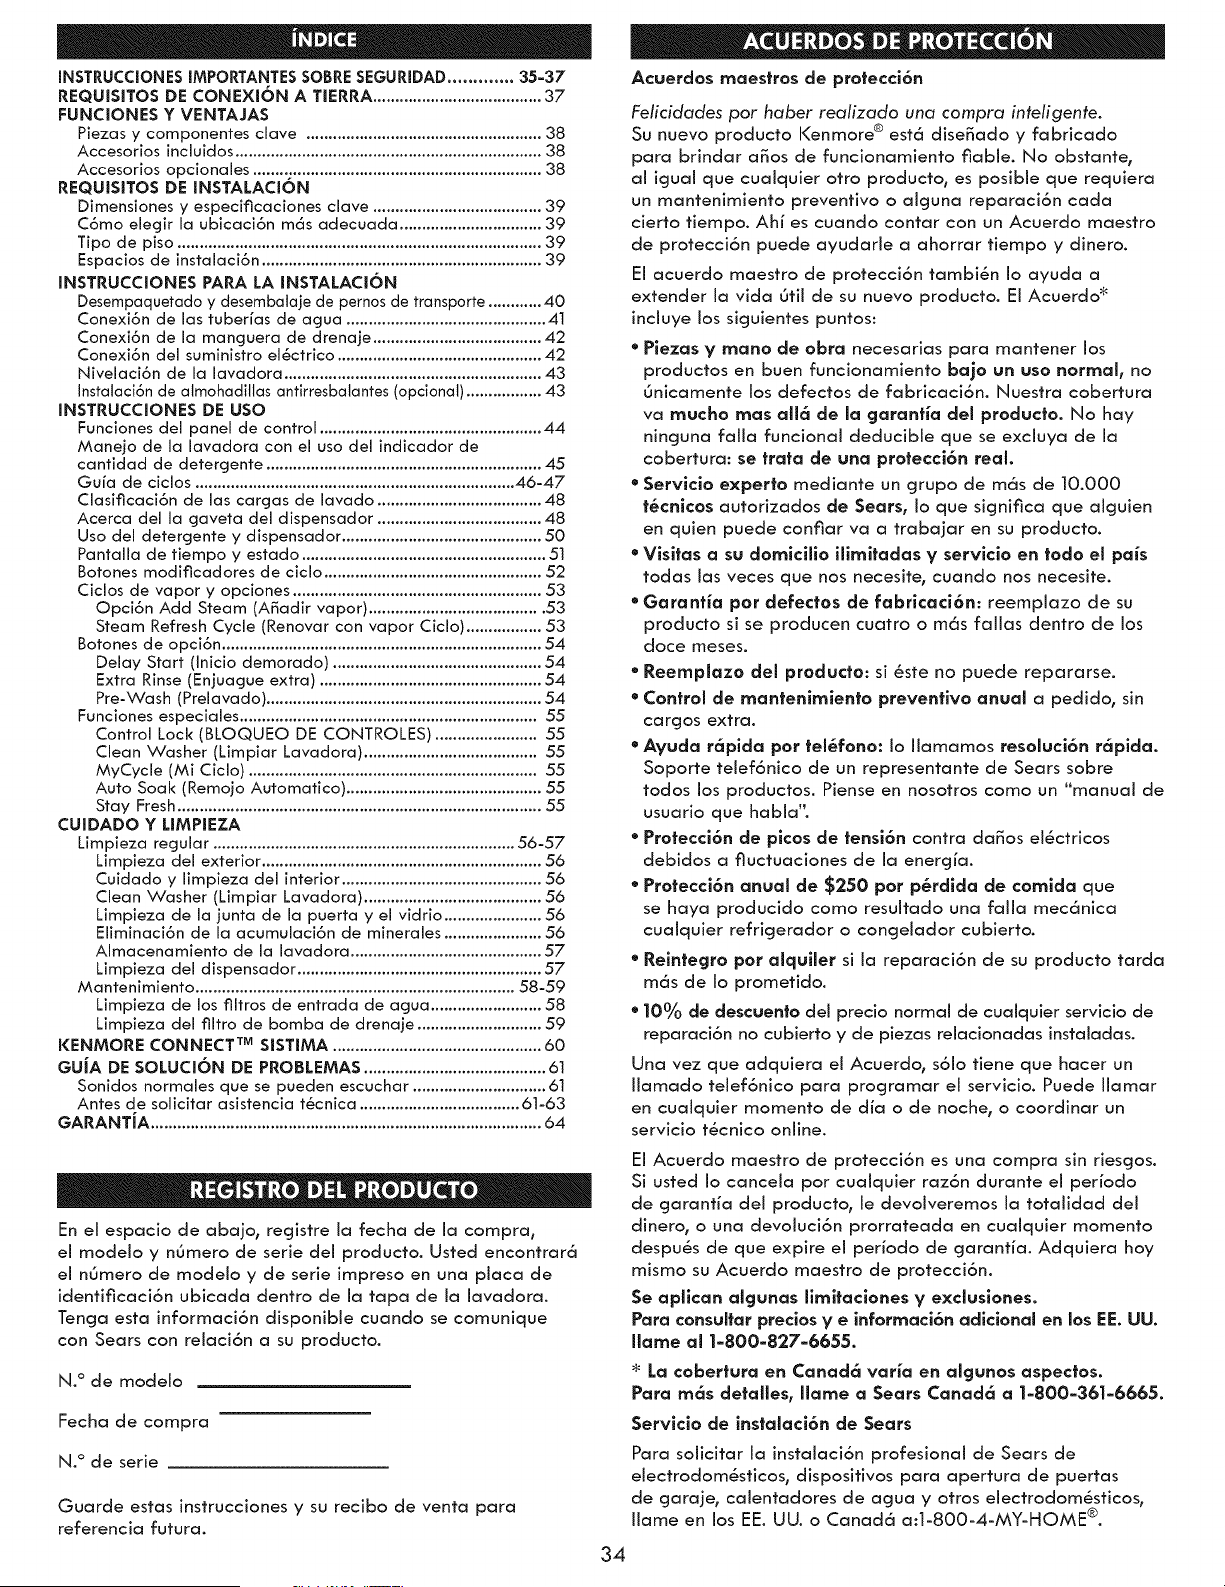
INSTRUCCIONESIMPORTANTESSOBRE$EGURIDAD............. 35=37
REQUISITOS DE CONEXION A TIERRA...................................... 37
FUNCIONES Y VENTAJAS
Piezas y componentes clave ..................................................... 38
Accesorios incluidos..................................................................... 38
Accesorios opcionales ................................................................. 38
REQUISITOS DE INSTALACION
Dimensiones y especificaciones clave ...................................... 39
C6mo elegir la ubicaci6n mc_sadecuada ................................ 39
Tipo de piso .................................................................................. 39
Espacios de instalaci6n ............................................................... 39
INSTRUCCIONES PARA LA INSTALACION
Desempaquetado y desembaJaje de pernos de fransporte ............ 40
Conexi6n de las tuberfas de agua ............................................. 41
Conexi6n de la manguera de drenaie ...................................... 42
Conexi6n del suministro el6ctrico .............................................. 42
Nivelaci6n de la lavadora .......................................................... 43
Instalaci6nde almohadillas anfirresbalantes (optional) ................. 43
INSTRUCCIONES DE USO
Funciones del panei de control ..................................................44
Maneio de la iavadora con el uso del Jndicador de
cantidad de detergente .............................................................. 45
Gu[a de ciclos ........................................................................46-47
Ciasificaci6n de las cargas de lavado ..................................... 48
Acerca del la gaveta del dispensador ..................................... 48
Uso del detergente y dispensador ............................................. 50
Pantaila de tiempo y estado .......................................................5]
Botones modificadores de ciclo ................................................. 52
Ciclos de vapor y opciones ........................................................ 53
Opci6n Add Steam (ASadir vapor) ....................................... 53
Steam Refresh Cycle (Renovar con vapor Ciclo) ................. 53
Botones de opci6n ........................................................................54
Delay Start (Inicio demorado) ............................................... 54
Extra Rinse (Enjuague extra) ..................................................54
Pre-Wash (Preiavado) .............................................................. 54
Funciones especiaies ................................................................... 55
Control Loci<(BLOQUEO DE CONTROLES) ....................... 55
Clean Washer (Limpiar Lavadora) ....................................... 55
MyCycle (MJ Ciclo) ................................................................. 55
Auto Soak (Remojo Automatico) ............................................ 55
Stay Fresh.................................................................................. 55
CUIDADO Y LIMPIEZA
Limpieza regular .................................................................... 56-57
Limpieza del exterior ............................................................... .56
Cuidado y limpieza del interior ..............................................56
Clean Washer (Limpiar Lavadora) ........................................ .56
Limpieza de la junta de la puerta y el vidrio ...................... 56
EJimJnaci6n de Ja acumulaci6n de mJneraJes...................... 56
Almacenamiento de la lavadora ........................................... 57
Limpieza del dispensador ....................................................... 57
MantenJmiento ........................................................................ 58-59
Limpieza de los filtros de entrada de agua ......................... 58
Limpieza del filtro de bomba de drenaje ............................ 59
KENMORE CONNECT TM SISTIMA ............................................... 60
GUiA DE SOLUCION DE PROBLEMAS .........................................61
Sonidos normales que se pueden escuchar .............................. 61
Antes de solJcitar asJstencJa t_cnJca .................................... 6]-63
GARANT|A ........................................................................................ 64
En ei espacio de abajo, registre ia fecha de la compra,
el modelo y nOmero de serie del producto. Usted encontrar_
el nOmero de modelo y de serie impreso en una placa de
identificaci6n ubicada dentro de la tape de la lavadora.
Tencja esta informaci6n disponible cuando se comunique
con Sears con reiaci6n a su producto.
N. ° de modelo
Fecha de compra
N. ° de serie
Guarde estas instrucciones y su recibo de venta para
referencia futura.
34
Acuerdos maestros de protecci6n
Felicidades por haber realizado una compra inteligente.
Su nuevo producto Kenmore ® est6 dise_ado y fabricado
pare brindar a_os de funcionamiento fiabie. No obstante,
ai iguai que cuaiquier otro producto, es posibie que requiera
un mantenimiento preventivo o aicjuna reparaci6n cada
cierto tiempo. Ahf es cuando confer con un Acuerdo maestro
de protecci6n puede ayudarie a ahorrar tiempo y dinero.
Ei acuerdo maestro de protecci6n tambiSn io ayuda a
extender la vide 6tit de su nuevo producto. Ei Acuerdo _
incluye los siguientes puntos:
*Piezas y mano de obra necesarias pare mantener los
productos en buen funcionamiento bajo un uso normal, no
(Jnicamente los defectos de fabricaci6n. Nuestra cobertura
va mucho mas all6 de la garanfia del producto. No hay
ninguna faiia funcionai deducible qua se exciuya de ia
cobertura: sefrafa de una protecci6n real.
* Servlclo experto mediante un cjrupo de m6s de 10.000
t&cnlcos autorizados de Sears, ioque sicjnifica que aiguien
en quien puede confiar va a trabajar en su producto.
" Visltas a su domlcillo illmltadas y servlclo en todo el pa_s
todas las veces quenos necesite, cuando nos necesite.
= GeranfJa pot defectos de fabrlcaci6n: reemplazo de su
producto si se producen cuatro o m6s fallas dentro de los
doce meses.
= Reemplazo del producfo: si _ste no puede repararse.
* Control de mantenlmlento preventlvo anual a pedido, sin
cargos extra.
"Ayuda rc_plda pot telSfono: io ilamamos resoluci6n rc_plda.
Soporte telef6nico de un representante de Sears sobre
todos los productos. Piense en nosotros como un "manual de
usuario que habla 'L
* Profecci6n de plcos de fensi6n contra daSos el_ctricos
debidos a fluctuaciones de la enercjia.
* Protecci6n angel de $250 pot p&rdlda de comlda que
se haya producido como resuitado una falla mec6nica
cuaiquier refrigerador o congelador cubierto.
* Relntegro por alquiler si la reparaci6n de su producto tarda
m6s de Io prometido.
* 10% de descuenfo del precio normal de cualquier servicio de
reparaci6n no cubierto y de piezas relacionadas instaladas.
Una vez que adquiera el Acuerdo, s61o tiene que hacer un
Ilamado telef6nico pare programar el servicio. Puede Ilamar
en cualquier momento de die o de noche, o coordinar un
servicio t_cnico online.
Ei Acuerdo maestro de protecci6n es una compra sin riesgos.
Si usted io canceia por cuaiquier raz6n durante ei periodo
de garantia del producto, le devolveremos la totalidad del
dinero, o una devoluci6n prorrateada en cuaiquier momento
despuSs de que expire ei periodo de garantia. Adquiera hoy
mismo su Acuerdo maestro de protecci6n.
Se apllcan algunas llmltaclones y excluslones.
Pare consulter preclos y e informaci6n adlclonal en los EE. UU.
flame al 1=800=827=6655.
La coberfura en Caned6 versa en algunos aspectos.
Pare m6s detaHes, llama a Sears Caned6 a 1=800=361=6665.
Servlclo de instalaci6n de Sears
Pare solicitar ia instalaci6n profesional de Sears de
electrodom_sticos, dispositivos pare aperture de puertas
de garaje, caientadores de ague y otros electrodom6sticos,
iiame en los EE. UU. o Caned6 a:I-800-4-MY-HOME ®.
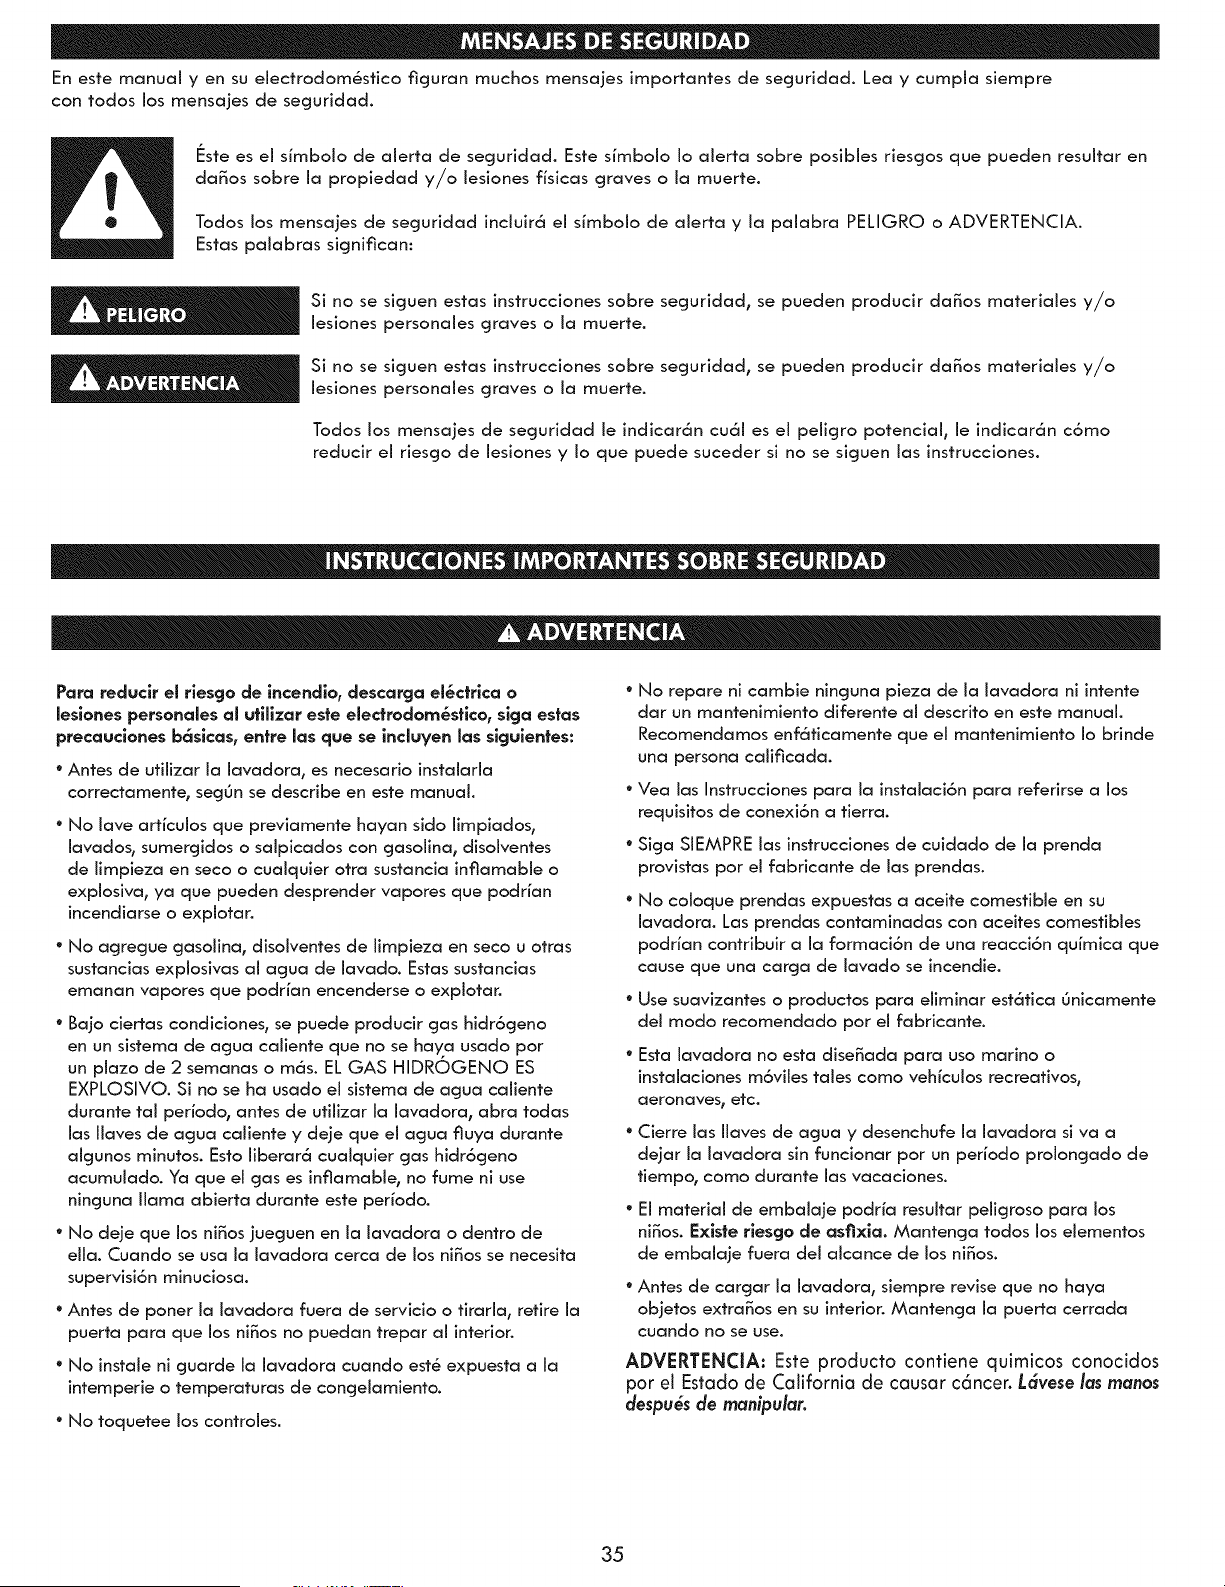
Enestemanualy ensuelectrodom6sticofiguranmuchosmensajesimportantesdeseguridad.Leay cumpiasiempre
contodoslosmensaiesdeseguridad.
F:stees ei simboio de aierta de seguridad. Este simbolo io aierta sobre posibies riesgos que pueden resuitar en
da_os sobre ia propiedad y/o iesiones fisicas graves o ia muerte.
Todos los mensajes de seguridad inciuir6 ei simboio de aierta y ia paiabra PELIGRO o ADVERTENCIA.
Estas paiabras significan:
Si no se siguen estas instrucciones sobre seguridad, se pueden producir da_os materiaies y/o
lesiones personales graves o la muerte.
Si no se siguen estas instrucciones sobre seguridad, se pueden producir da_os materiaies y/o
lesiones personales graves o la muerte.
Todos los mensajes de seguridad ie indicar6n cu61 es ei peiigro potenciai0 ie indicar6n c6mo
reducir ei riesgo de iesiones y io que puede suceder si no se siguen ias instrucciones.
Para reduclr el rlesgo de incendle, descarga el_ctrlca o
leslones persenales al utillzar este electredem_stlco, slga estas
precauclones b6slcas, entre las que se induyen las slgulentes:
° Antes de utilizar la lavadora, es necesario instalarla
correctamente, segOn se describe en este manual.
° No lave articulos que previamente hayan sido limpiados_
iavados, sumergidos o saipicados con gasoiina, disoiventes
de iimpieza en seco o cuaiquier otra sustancia inflamable o
expiosiva, ya que pueden desprender vapores que podrian
incendiarse o expiotar.
° No agregue gasolina, disolventes de iimpieza en seco u otras
sustancias explosivas ai agua de iavado. Estas sustancias
emanan vapores que podrian encenderse o expiotar.
° Bajo ciertas condiciones, se puede producir gas hidr6geno
en un sistema de agua caliente que no se haya usado pot
un plazo de 2 semanas o m6s. EL GAS HIDROGENO ES
EXPLOSIVO. Si no se ha usado ei sistema de agua caiiente
durante tai periodo, antes de utilizar ia iavadora, abra todas
ias iiaves de agua caliente y deje que ei agua fluya durante
aigunos minutos. Esto iiberar6 cuaiquier gas hidr6geno
acumuiado. Ya que ei gas es inflamable, no fume ni use
ninguna llama abierta durante este periodo.
* No deie que los ni_os jueguen en la lavadora o dentro de
ella. Cuando se usa ia iavadora cerca de los ni_os se necesita
supervisi6n minuciosa.
° Antes de poner la iavadora fuera de servicio o tiraria, retire ia
puerta para que los ni_os no puedan trepar ai interior.
° No instale ni guarde ia iavadora cuando est_ expuesta a la
intemperie o temperaturas de congelamiento.
° No toquetee los controles.
° No repare ni cambie ninguna pieza de la lavadora ni intente
dar un mantenimiento diferente al descrito en este manual.
Recomendamos enf6ticamente que el mantenimiento Io brinde
una persona calificada.
° Vea las Instrucciones para la instalaci6n para referirse a los
requisitos de conexi6n a tierra.
° Siga SiEMPRE las instrucciones de cuidado de la prenda
provistas por el fabricante de las prendas.
• No coloque prendas expuestas a aceite comestible en su
iavadora. Las prendas contaminadas con aceites comestibles
podrian contribuir a ia formaci6n de una reacci6n quimica que
cause que una carga de iavado se incendie.
* Use suavizantes o productos para eiiminar est6tica Onicamente
del modo recomendado por el fabricante.
° Esta lavadora no esta dise_ada para uso marino o
instalaciones m6viles tales como vehiculos recreativos0
aeronaves_ etc.
° Cierre ias iiaves de agua y desenchufe ia iavadora siva a
de]ar la iavadora sin funcionar por un periodo proiongado de
tiempo0 como durante ias vacaciones.
° El material de embalaje podria resultar peligroso para los
ni_os. I:xlste rlesge de asfixla. Mantenga todos los elementos
de embalaje fuera del alcance de los ni_os.
° Antes de cargar ia iavadora, siempre revise que no haya
objetos extra_os en su interior. Mantenga la puerta cerrada
cuando no se use.
ADVERTENCIA: Este producto contiene quimicos conocidos
por el Estado de California de causar c6ncer. L6vese las manos
despu6s de manipular.
35
Para reduclr el rlesgo de incendlo, descarga el_ctrlca o
leslones personales al utillzar este electrodom_stlco, slga estas
precauclones b_slcas, entre las que se incluyen las slgulentes:
® Desenchufe la lavadora antes de proceder a su limpleza para
evitar posibles descargas el6ctricas.
* No utillce nunca productos quimlcos fuertes, llmpladores
abraslvos o dlsolventes para llmplar la lavadora° Da_ar6n el
acabado.
* No coloque pa_os grasosos o aceltosos sobre la lavadora° Estas
sustancias despiden vapores que podHan prender fuego a los
materiales.
• No lave prendas que est_n suclas con acelte vegetal o de coclna°
Las mismas pueden quedar con algo de aceite luego del lavado y
prenderse fuego.
• Desconecte este electrodom_stlco de la toma de corrlente
antes de reallzar cualquler funci6n de mantenlmlento° Colocar
los controles en la poslci6n OFF (apagado) no desconecta el
electrodom_sflco de la toma de corrlente. Si no se cumple
con esta advertencia se podr6n producir lesiones graves°
incendios, descargas el_ctricas o muerte.
* No combine detergentes, suavlzantes ¥ otros productos de
lavander_a de dlferentes fabrlcantes en una mlsma carga,
a menos que as_ se especifique en la etlqueta.
* No mezcle bianqueador con cloro con amonlaco o 6cldos,
como vlnagre. Siga las dlrecclones del paquete al usar
productos de lavander_a. Un usa indebido puede producir
gases venenososo Io que puede resultar en heridas graves o
la muerte.
* No coloque las manos dentro de la lavadora cuando sus
par|es est_n en movlmlen|o. Antes de cargar, descargar o
agregar prendas, preslone la periffa selectora de clclos y
espere hasta que la tlna se detenga totalmente antes de
meter las manos en su interior. Si no se cumple con esta
advertencia se podr6n producir lesiones graves° incendioso
descargas el_ctricas o muerte.
* Consultelas INSTRUCCIONESDE INSTALACI6N para obtener
informaci6ndetallada de los procedimientosde conexi6na fierra. Junto
con la lavadora seencuentranlas instruccionesde instalaci6nc omo
referencia. Si cambiara de lugar la lavadora, contrate a una persona del
serviciocalificada para que la controle y reinstale.Si no se cumple con
esta advertencia se podr6n producir lesionesgraves,incendios,descargas
el6ctricas o muerte.
* Bajo ningunaclrcunstancla,corte o quite la tercera clavija (de conexi6n
a tlerra) del cable el_ctrico. Si no secumple con estaadvertencia se
podr6n producir lesionesgraves,incendios,descargas el_ctricas o muerte.
* Por motivos de seguridad personal,este electrodom_sffco debe estar
conectado a fferra adecuadamente. Si no se cumple con esta advertencia
sepodr6n producir lesionesgraves, incendios, descargas el_ctricas o
muerte.
* Elcable de allmentaci6n de este electrodom_sticoest6 equlpado con
un enchufede tres clavijas (de conexi6na tierra) que coincideconuna
toma de corrlentepara tres clavljas (de conexi6na tierra) para asi
minimizar la posibilidad de descarga el_ctrica de esteelectrodom_stico.
* Estalavadora debe estar enchufada a una toma de corrientede 120
V de CA, 60 Hz y conconexi6na tlerra. Si no se cumple con esta
advertencia se podr6n producir lesionesgraves,incendios,descargas
el_ctricas o muerte.
* Sollcffea un electrlcista califlcadoque controlela toma de corrlenteV
el ckcultoel_ctrlcopara asegurarse de que la toma de corrienteest6
correctamenteconectadaa _erra. Sino secumple con estaadvertencia
sepodr6n producir lesionesgraves, incendios,descargas el_ctricas o
muerte.
* Si 0nlcamente se disponede una toma de corrlentede 2 clavijas,ser_
responsabilldady obllgaci6n suya sustltulrlopot otra de 3 clavijas,de
conexi6na tierra, y adecuada para esteuso.Si no se cumple con esta
advertencia se podr6n producir lesionesgraves,incendios,descargas
el_ctricas o muerte.
* No instalarsobrealfombra. Instalela lavadora sobrepisofirme. Si no se
cumple con estaadvertencia, se podr6n producir da_os pot filtraciones.
* No elimlne el cable de conexi6na tlerra. No use un adaptador o
prolongador.Enchufeen una toma de corrienteconconexi6na tlerra
de 3 clavijas. Si no secumple con estasadvertencias se podr6n porducir
lesionesgraves,incendios,descargasel_ctricas o muerte.
* La lavadora deberia estar slempre conectada a un enchufe
individual con un indice de voffaje equivalente al que figura en
su etiqueta de caracteristicas t_cnicas. Esto garantiza el meior
funcionamiento y adem6s previene la sobrecarga de los circuitos
del hogar_ Io cuaJ podria ocasionar riesgos de incendio debido al
recalentamiento de cables.
* Nunca desenchufe su lavadora jalando del cable de corriente.
Siempre tome su enchufe firmemente y iale del mismo hacia
fuerapara retirarlo. Si no se cumpb con esta advertencia se
podr6nproducir lesiones graves_ incendios_ descargas el_ctricas o
muerte.
* Repare o reemplace de inmediato todos los cables de corriente
pelados o con cualquier tipo de da_o. No use un cable con
cortaduras o abrasi6n sobre su extensi6n o extremos. Consulte a
una persona calificada del servicio t_cnico. Si no se cumple con
esta advertencia se podr6n producir lesiones graves_ incendios_
descargas el_ctricas o la muerte.
* AI instalar o cambiar de lugar la lavadora, evite todo tipo de
cortes u otros da_os en el cable de corriente. Si no se cumpb con
esta advertencia_ se podr6n producir lesiones graves_ incendios_
descargas el_ctricas o muerte.
* La lavadora debe set instalada V conectada a tierra pot una
persona especiafizada del servicio t_cnico cumpliendo con bs
c6digos locales para prevenir riesgos de descargas y asegurar la
estabilidad durante el funcionamiento.
* La lavadora es pesada. Se necesitan dos o m6s personas para
instalar y trasladar el electrodom_stico. Si no se cumple esta
advertencia_ se podr6n producir da_os en la propiedad y graves
lesiones personales.
* No almacene ni instale la lavadora en lugares expuestos a
temperaturas de congelaci6n ni a incbmencias meteorol6gicas. Si
no se cumpb con esta advertencia_ se podr6n producir da_os por
fiffraciones.
* Con el fin de reducir el riesgo de descargas el_ctricas no
instale la lavadora en espacios h0medos. Si no se cumpb con
esta advertencia_ se podr6n producir lesiones graves_ incendios_
descargas el_ctricas o muerte.
36
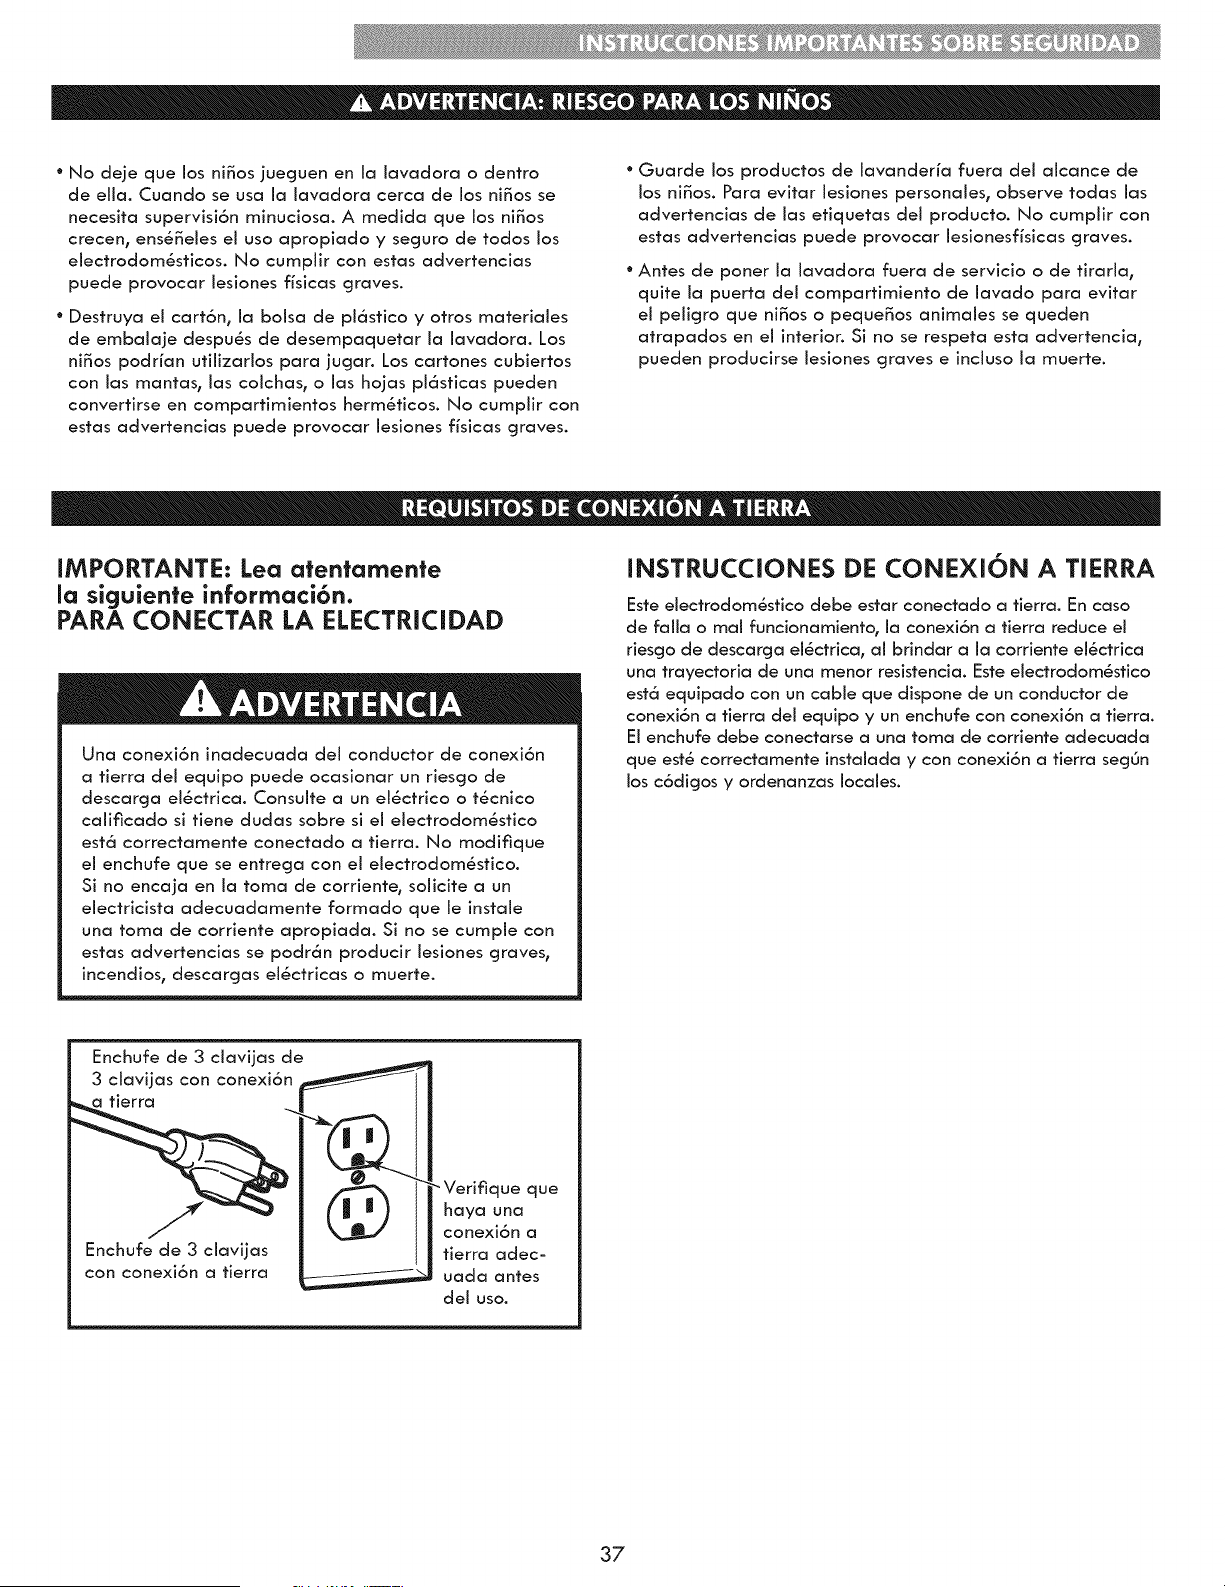
° No deie que los ni_os juecjuen en ia iavadora o dentro
de ella. Cuando se usa la lavadora cerca de los ni_os se
necesita supervisi6n minuciosa. A medida que los ni_os
crecen, ens_eles ei uso apropiado y secjuro de todos los
electrodom(_sticos. No cumpiir con estas advertencias
puede provocar iesiones fisicas graves.
° Destruya ei cart6n, ia balsa de pi6stico y otros materiaies
de embalaje despuSs de desempaquetar la lavadora. Los
ni_os podrian utilizarios para jucjar. Los cartones cubiertos
con ias mantas, ias coichas, o ias hojas pl6sticas pueden
convertirse en compartimientos herm6ticos. No cumpiir con
estas advertencias puede provocar iesiones fisicas graves.
° Guarde los productos de lavanderia fuera del alcance de
los niBos. Para evitar iesiones personales, observe todas ias
advertencias de ias etiquetas del producto. No cumpiir con
estas advertencias puede provocar iesionesfisicas cjraves.
° Antes de poner ia iavadora fuera de servicio o de tiraria,
quite ia puerta dei compartimiento de iavado para evitar
ei pelicjro que ni_os o peque_os animales se queden
atrapados en ei interior. Si no se respeta esta advertencia,
pueden producirse iesiones graves e inciuso ia muerte.
IMPORTANTE: Lea atentamente
Ja siguiente informaci6n.
PARA CONECTAR LA ELECTRECIDAD
Una conexi6n inadecuada del conductor de conexi6n
a tierra dei equipo puede ocasionar un riescjo de
descarcja el_ctrica. Consulte a un el_ctrico o t_cnico
calificado si tiene dudas sobre si ei eiectrodom6stico
est6 correctamente conectado a tierra. No modifique
el enchufe que se entrecja con ei electrodom_stico.
Si no encaja en ia toma de corriente, solicite a un
eiectricista adecuadamente formado que le instaie
una toma de corriente apropiada. Si no se cumpie con
estas advertencias se podr6n producir iesiones cjraves,
incendios, descarcjas eiSctricas o muerte.
INSTRUCCIONES DE CONEXION A TIERRA
Este eiectrodom6stico debe estar conectado a tierra. En caso
de faiJa o maJ funcJonamJento, Ja conexJ6n a tierra reduce el
rJescjo de descarcja ei_ctrJca, aJ brJndar a la corrJente el_ctrica
una trayectoria de una menor resistencia. Este electrodomSstico
est6 equipado con un cable que dispone de un conductor de
conexi6n a tierra dei equipo y un enchufe con conexi6n a tierra.
Ei enchufe debe conectarse a una toma de corriente adecuada
que est_ correctamente instaiada y con conexi6n a tierra secjOn
los c6dJcjos y ordenanzas locales.
Enchufe de 3 ciavijas de
3
clavijas con conexi6n
a tierra ,_,,_,_
Enchufe de 3 clavijas
con conexi6n a tierra _'--
"Verifique que
haya una
conexi6n a
tierra adec-
uada antes
del uso.
37

PIEZA$ Y COMPONENTE$ CLAVE
O
Q
O
O
O
@
O
O
DiSPENSADOR DE DETERGENTE
Existen cuatro comparfimientos, Uno para el
prelavado, et lavado principal, el blanqueador
liquido yet suavizante liquido.
PANEL DE CONTROL DE FACIL USO
El panel t6ctil de cristal liso le permite hacer sus
selecciones con s6to un toque suave del bot6n. La
pantalla LED de f6cit tectura muestra las opciones
del cicto, los ajustes, el estado del ciclo y el tiempo
restante estimado.
NOTA: Los sensores en la lavadora detectan
autom6ticamente el tama_o de la carga de lavado
para optimizar el tiempo de lavado, segOn el ciclo y
las opciones seleccionados.
MOTOR DE IMPULSl6N DIRECTA
El motor de imputsi6n directa proporciona un mejor
rendimiento y fiabilidad adem6s de que aumenta el
ahorro energ6tico.(No se puede ver el motor.)
TINA DE ACERO INOXIDABLE DE GRAN CAPACIDAD
La tina de acero inoxidable de capacidad ultra
grande proporciona una durabilidad superior, y
se inclina para mejorar la eficiencia y permitir un
acceso m6s f6cii para ias prendas grandes.
PUERTA DE BLOQUEO DE FACIL ACCESO
La puerta extra grande se bloquea durante el
, , Cable de
funcionamiento. La puerta no se desbtoquea naSmalimentaci6n xN
que sea seguro hacerto.
PANEL DE ACCESO AL FILTRO
Proporciona un f6cit acceso a la bomba de drenaje,
to cual permite limpiar el fittro o resuperar los Manguera
etementos perdidos sin solicitar asistencia t6cnica, drenaje
PATAS DE NIVELACION
Las cuatro patas de nivelaci6n (dos frontales y
dos posteriores) se pueden ajustar para mejorar la
estabitidad de la tavadora sobre suelos irregulares.
Las paras se ajustan y se fijan en su lugar con la
Itave de ajuste incluida con la lavadora.
CICLOS DE VAPOR DE ALTA EFICIENCIA
Durante los ciclos de vapor de alta eficiencia, el
vapor caliente interactOa con los tejidos para ayudar
a eliminar las manchas dificiles.
Entradas de agua caliente y fria
f
Almohadillas
antirresbalantes
Accesorios incluidos
Cubiertas (4) (para
cubrir los agujeros de los
pernos de transporte)
\
Llave(para retiralos Correa (para
pern0sde transportey asegurar la S0p0rtedelc0d0
paraajustary bl0quear manguera de (paraasegurarla
10spiesde nivelaci6n) drenaje) mangueradedrenaje)
J
Aspecto llave puede variar.
Parte posterior de ta
la lavadora
Pernos/retenedores de transporte (4) 1
NOTA: Lospernos/retenedores DEBEN retirase antes
1
de su funclonamlento. Guarde esta uso futuro.
f Accesorios Opcionales
Extensi6n de la manguera Kit de apilamiento
de drenaie Pedestal (Para secadora)
P/N 5215ER2002K _J D26 17002 (Blanco)
D26 17008 (Jenglbre)
D26 17009 (Pimienta)
WDP3RW (Blanco)
WDP3R (Ro]o cereza silvestre)
WDP3R (Plafino)
Mangueras de agua
caliente y fria
38
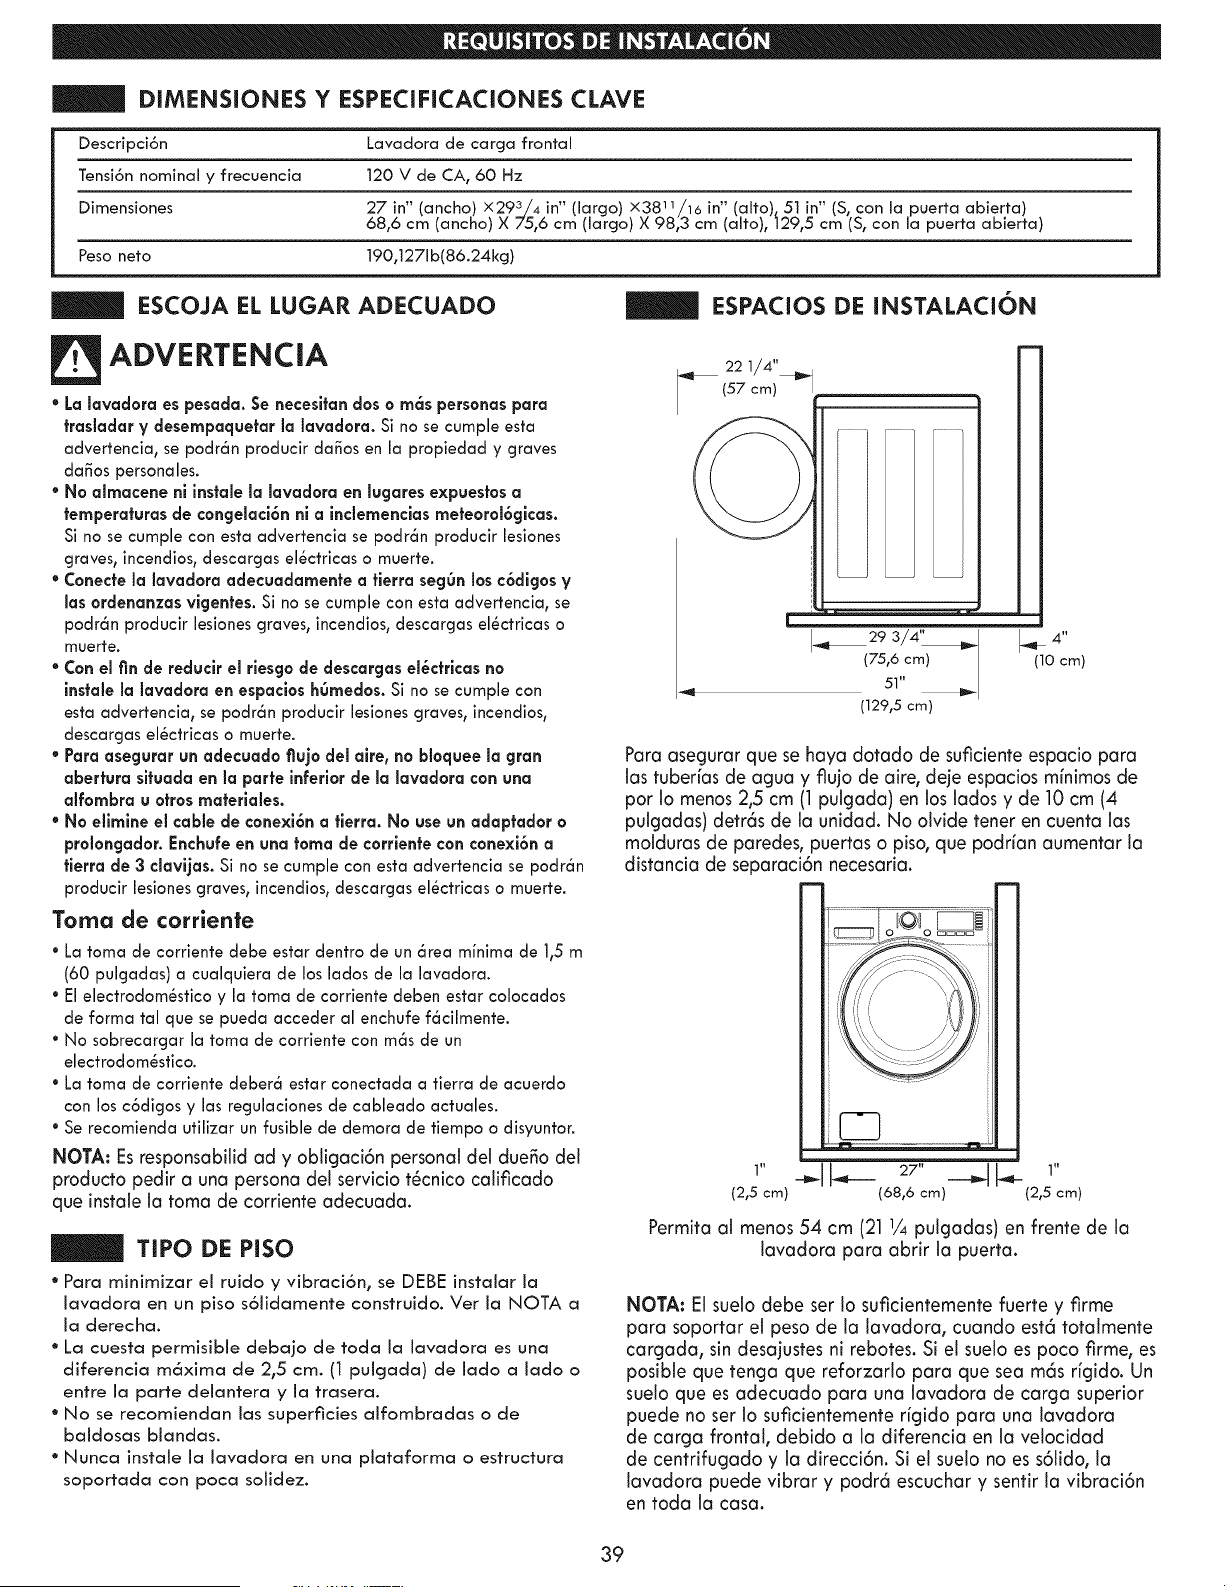
DiMENSIONES Y ESPECIFiCACIONES CLAVE
Descripci6n Lavadora de carga frontal
Tensi6n nominal y frecuencia 120 V de CA, 60 Hz
Dimensiones 27 in" (ancho) x293/4 in" (largo) x3811/16 in" (alto), 51 in" (S, con la puerta abierta)
68,6 cm (ancho) X 75,6 cm (largo) X 98,3 cm (alto), 129,5 cm (S, con la puerta abierta)
Peso nero 190,1271b(86.24kg)
ESCOJA EL LUGAR ADECUADO ESPACIOS DE INSTALACi6N
ADVERTENCIA
• La lavadora es pesada. Se necesltan dos o m6s personas para
trasladar y desempaquetar la lavadora. Si no se cumple esta
advertencia_ se podr6n producir da_os en la propiedad y cjraves
da_os personales.
• No almacene nl instale la lavadora en lugares expuestos a
temperaturas de congelaci6n nl a inclemenclas meteorol6gkas.
Si no se cumple con esta advertencia se podr6n producir lesiones
cjraves_incendios, descarcjas el_ctricas o muerte.
• Conecte la lavadora adecuadamente a tlerra segOn los c6dlgos y
las ordenanzas vlgentes. Si no se cumple con esta advertencia, se
podr6n producir lesiones cjravest incendiost descarcjas el_ctricas o
muerte.
• Con el fin de reduclr el rlesgo de descargas el_ctrlcas no
instale la lavadora en espaclos h0rnedos. Si no se cumple con
esta advertenciat se podr6n producir lesionescjravest incendiost
descarcjas el_ctricas o muerte.
• Para asegurar un adecuado flujo del alre, no bloquee la gran
abertura situada en la parte inferior de la lavadora con una
alfombra u otros materlales.
• No ellmlne el cable de conexi6n a tlerra. No use un adaptador o
prolongador. Enchufe en una toma de corrlente con conexi6n a
flerra de 3 clavlias. Si no se cumple con esta advertencia se podr6n
producir lesiones cjravest incendiost descarcjas el_ctricas o muerte.
Toma de corrienfe
* La toma de corriente debe estar dentro de un 6rea minima de ]t5 m
(60 pulcjadas) a cualquiera de los lados de la lavadora.
* El electrodom6stico y la toma de corriente deben estar colocados
de forma tal que se pueda acceder al enchufe f6cilmente.
* No sobrecarcjar la toma de corriente con m6s de un
electrodom_stico.
* La toma de corriente deber6 estar conectada a tierra de acuerdo
con los c6dicjos y las recjulaciones de cableado actuales.
* Se recomienda utilizar un fusible de demora de tiempo o disyuntor.
NOTA: Es responsabilid ad y obligaci6n personal del due_o del
producto pedir a una persona del servicio t6cnico calificado
que instale la toma de corriente adecuada.
TIPO DE PISO
° Para minimizar el ruido y vibraci6n, se DEBE instalar ia
iavadora en un piso s6iidamente construido. Ver ia NOTA a
ia derecha.
° La cuesta permisibie debajo de toda ia lavadora es una
diferencia m6xima de 2,5 cm. (1 pulgada) de lado a lado o
entre la parte deiantera y ia trasera.
° No se recomiendan ias superficies aifombradas o de
baidosas biandas.
° Nunca instaie ia lavadora en una piafaforma o estructura
soportada con poca soiidez.
I_,_ 29 3/4" _ 1_.9F 4"
(75,6 cm) (10 cm)
51"
(129,5 cm)
Para asegurar que se haya dorado de suficiente espacio para
las tuberfas de agua y flujo de aire, deje espacios minimos de
por lo menos 2,5 cm (1 pulgada) en los lados y de 10 cm (4
pulgadas) detr6s de la unidad. No olvide tener en cuenta las
molduras de paredes, puertas o piso, que podfian aumentar la
distanda de separaci6n necesaria.
m
C3
1, 1,
(2,5 cm) (68,6 cm) (2,5 cm)
Permita al menos 54 cm (21 1/4 pulgadas) en frente de la
lavadora para abrir la puerta.
NOTA: El suelo debe ser 1osuficientemente fuerte y firme
para soportar el peso de la lavadora, cuando est6 totalmente
cargada, sin desajustes ni rebotes. Si el suelo es poco firme, es
posible que tenga que reforzarlo para que sea m6s rfgido. Un
suelo que es adecuado para una lavadora de carga superior
puede no ser Io suficientemente rfgido para una lavadora
de carga frontal, debido a la diferencia en la velocidad
de centrifugado y la direcci6n. Si el suelo no es s61ido,la
lavadora puede vibrar y podr6 escuchar y senfir la vibraci6n
en toda la casa.
39

DESEMPAQUE'rADO Y DESEMBALAJE DE PERNOS DE TRANSPORTE
AI retirar la lavadora de la base de cart6n, asegOresede refirar el
soporte de la tina de espumaen el centro de la basede cart6n.
Consultela figura a confinuaci6n.
Si debe asentar la lavadora hacia abajo para quitar los materiales
de embalaje de la base, siempre proteja el lado de la lavadora y
deposffela con cuidado sobre su lado. NUNCA asientela lavadora
sobre su parte frontal o posterior.
Paraevitar da_os internosdurante el transporte,la lavadora
est6 equipada con cuatro pernosde transporte y retenedoresde
pl6stico.
IMPORTANTE:
• Estospernosy retenedoresNO DEBENretirarsehasta colocar la
lavadora en su ubicaci6n definitiva.
• Estospernosy retenedoresDEBENretirarse antesde poner a
funcionar la lavadora.
• Sino seretiran los pernos y retenedoresde transporte,se pueden
producir fuertesvibraciones y ruido, y, por consiguiente,da_os
permanentesa la lavadora.
NOTA: Elcable de alimentaci6n est6 fijado a la parte posterior
de la lavadora con un perno de transporte para evitar el funciona-
mientocon los pernosde transporte si no seretiran de su lugar.
Base del cart6n
Soporte de
espuma de la tina
\. J
f
'r_---\-_ | Pernos de
transporte
"_- Cable de
corriente
J
1. Comiencecon losdos pernosde transporteinferioresy utilice
lallave de pernos(incluida) para aflojar completamentelos
cuatro pernosde transportegir6ndolos hacia la izquierda.
Pernos de
transporte
\
\
\
Cubierta de _, _)
agujero
2. Retire los conjuntos de pernos movi6ndolos
ligeramente al mismo fiempo que los extrae.
3. Ubique los cuatro tapones de oriflcio incluidos en el
paquete de accesorios y col6quelos en los orificios
de los pernos de transporte.
NOTA: Guarde los conjuntos de pernos para uso
futuro. Para evitar dahos a los componentes internos,
NO transporte la lavadora sin volver a instalar los
pernos de transporte.
4O
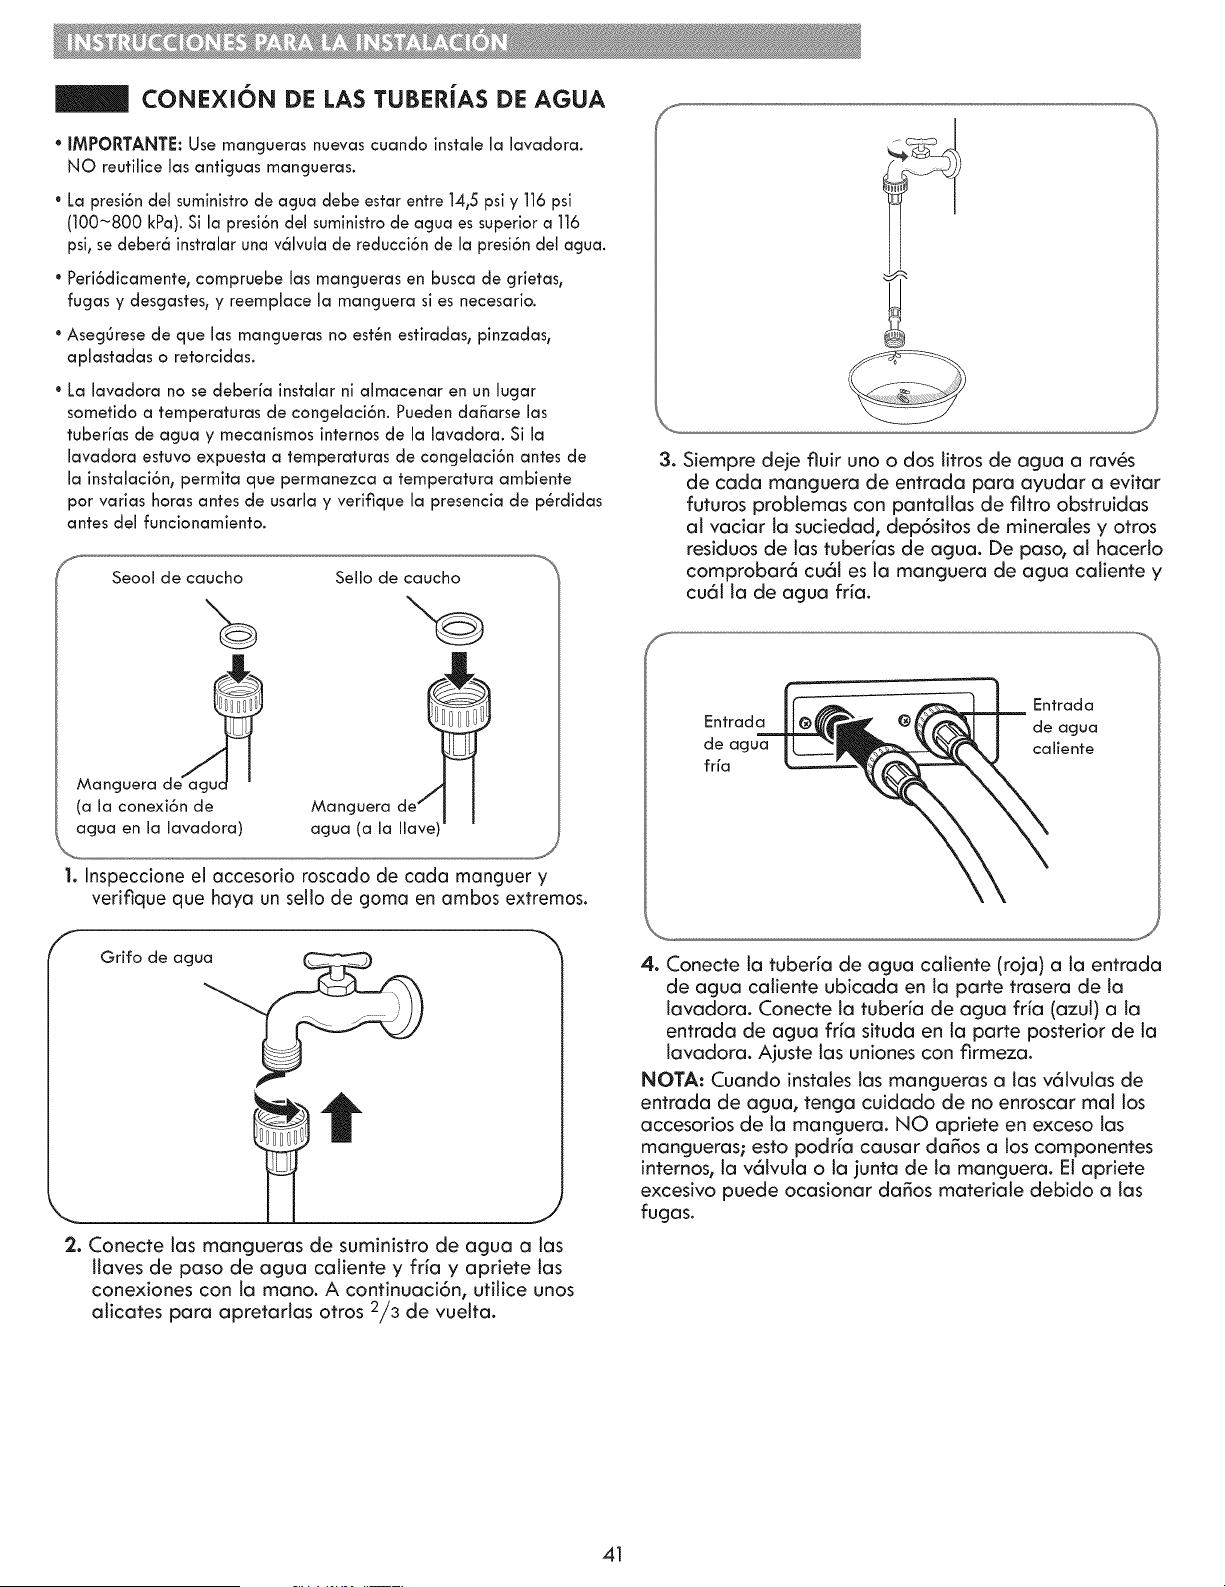
CONEXION DE LAS TUBERiAS DE AGUA
• iMPORTANTE: Use mangueras nuevas cuando instaJeJa lavadora.
NO reutilice las anticjuas mangueras.
• La presi6n del suministro de agua debe estar entre 14,5 psi y 116psi
(100-800 kPa). Si la presi6n del suministro de agua es superior a 116
psi, se deber6 instralar una v61vula de reducci6n de la presi6n del agua.
" Peri6dicamente, compruebe las mangueras en busca de grietas,
fugas y desgastes, y reemplace la manguera si es necesario.
• AsegOrese de que las mangueras no est_n estiradas, pinzadas,
aplastadas o retorcidas.
• La lavadora no se deberfa instaiar ni almacenar en un lugar
sometido a temperaturas de congelaci6n. Pueden da_arse las
tuberfas de agua y mecanismos internos de la lavadora. Si la
lavadora estuvo expuesta a temperaturas de congelaci6n antes de
la instalaci6n, permita que permanezca a temperatura ambiente
por varias horas antes de usarla y verifique la presencia de p_rdidas
antes del funcionamiento.
Seool de caucho Sello de caucho
Manguera de _agud '
(a la conexi6n de
agua en la lavadora)
Manguera de j
agua (a la Ilave)
1. Inspeccione e! accesorio roscado de cada manguer y
verifique que haya un sello de goma en ambos extremos.
Grifo de agu_
2. Conecte las mangueras de suministro de agua alas
llaves de paso de agua caliente y fr_a y apriete las
conexiones con la mano. A continuaci6n, utilice unos
alicates para apretartas otros 2/3 de vuelta.
3. Siempre deje fluir uno o dos litros de agua a rav6s
de cada manguera de entrada para ayudar a evitar
futuros problemas con pantattas de fittro obstruidas
al vaciar ta suciedad, dep6sitos de minerales y otros
residuos de las tuberias de agua. De paso, al hacerto
comprobar6 cu61 es la manguera de agua caliente y
cu61 la de agua fria.
f
Entrada
Entrada de agua
de agua caliente
frfa
J
4. Conecte la tuber_a de agua caliente (roja) a la entrada
de agua caliente ubicada en la parte trasera de la
lavadora. Conecte la tuberia de agua fr_a (azut) a la
entrada de agua fr_a situda en la parte posterior de la
tavadora. Ajuste las uniones con firmeza.
NOTA: Cuando instales las mangueras a las v6tvulas de
entrada de agua, tenga cuidado de no enroscar mal los
accesorios de la manguera. NO apriete en exceso tas
mangueras; esto podr_a causar da_os a los componentes
internos, la v61vuta o la junta de la manguera. Et apriete
excesivo puede ocasionar da_os materiale debido alas
fugas.
41
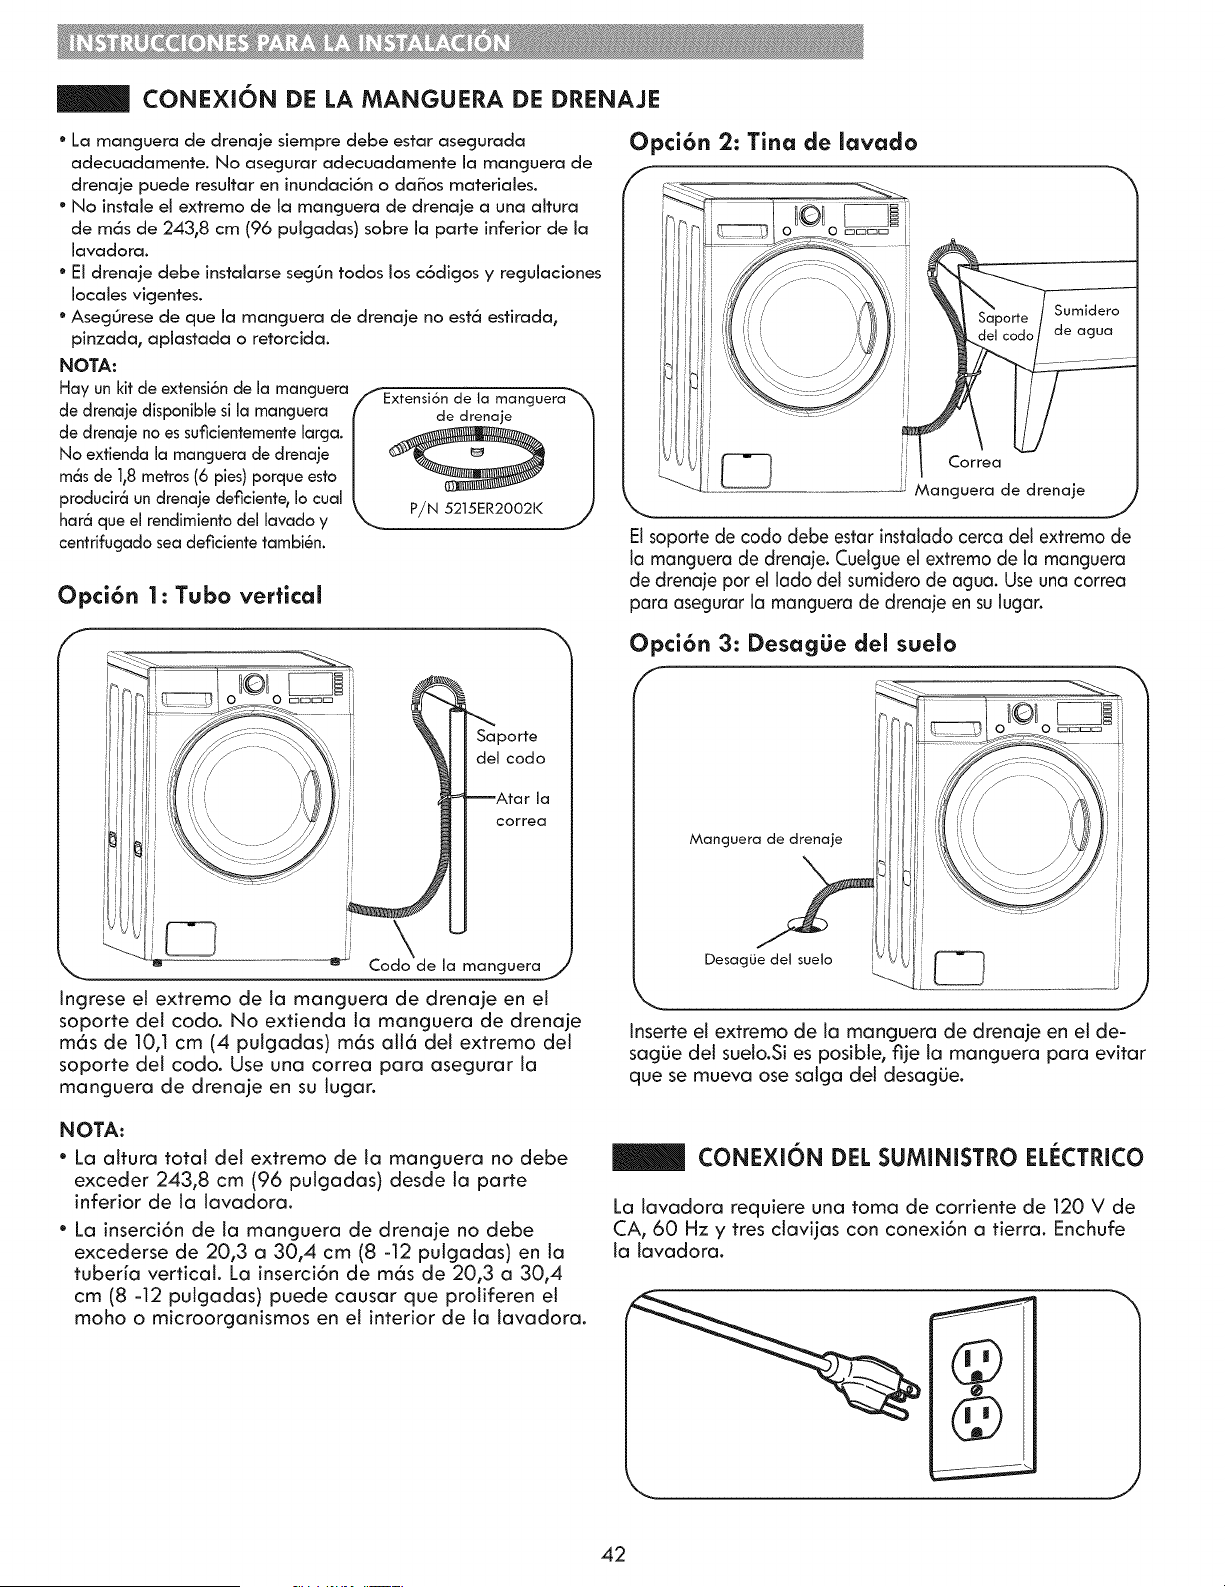
CONEXION DE LA MANGUERA DE DRENAJE
° La manguera de drenaje siempre debe estar asegurada
adecuadamente. No asegurar adecuadamente la manguera de
drenaje puede resuitar en inundaci6n o da_os materiaies.
° No instaie el extremo de ia rnancjuerade drenaje a una altura
de m6s de 243°8 cm (96 puicjadas) sobre ia parte inferior de ia
iavadora.
° Ei drenaje debe instaiarse seg(Jntodos los c6dicjos y regulaciones
locales vicjentes.
° Aseg6resede que la manguera de drenaje no est6 estirada0
pinzada0 apiastada o retorcida.
NOTA:
Hayunkitde extensi6nde la manguera_
.... /Extensi6n de ta manguera
de drenajedlspomblesl la manguera { de drenaje
de drenajenoessuficientementelarga. | _ |
No extiendala manguerade drenaje | _.__ |
m6sde 1,8metros(6 pies)porqueesto | _ |
producir6undrenajedeficiente_Io cual | , -- |
\ P/N 5215ER2002K ]
har6queel rendimientodel lavadoy _,,_ J
centrifugadoseadeflcientetambi6n.
Opci6n 1: Tubo vertical
Saporte
del ¢odo
la
correa
Co_ la manguera j
Ingrese el extremo de la manguera de drenaje en el
soporte del codo. No extienda ta manguera de drenaje
m6s de 10,1 cm (4 putgadas) m6s all6 del extremo del
soporte del codo. Use una correa para asegurar la
manguera de drenaje en su lugar.
NOTA:
* La altura total del extremo de la manguera no debe
exceder 243,8 cm (96 putgadas) desde la parte
inferior de la lavadora.
* La inserci6n de la manguera de drenaje no debe
excederse de 20,3 a 30,4 cm (8 -12 putgadas) en ta
tuberia vertical. La inserci6n de m6s de 20,3 a 30,4
cm (8 -12 putgadas) puede causar que proliferen el
moho o microorganismos en el interior de la lavadora.
Opci6n 2: Tina de lavado
f
,dero
J_
_: Manguera de drenaje
Elsoporte de codo debe estar instaiadocerca dei extremo de
la manguera de drenaje. Cuelgue el extremo de la manguera
de drenaje por el lado del sumidero de agua. Useuna correa
para asegurar la manguera de drenaje en su lugar.
Opci6n 3: DesagLie del suelo
f
F_G_
li
ii 1
!i
Manguera de drenaje J_
- il JI
DesagiJe de sueo J_z U I_/
..... i
"_ IiI
J
Inserte el extremo de la manguera de drenaje en el de-
sagLie del suelo.Si es posible, fije la manguera para evitar
que se mueva ose salga del desagLie.
CONEXION DEL SUMINISTRO EL_:CTRICO
La lavadora requiere una toma de corriente de 120 V de
CA, 60 Hz y tres ctavijas con conexi6n a tierra. Enchufe
la lavadora.
42

NIVELACION DE LA LAVADORA
La tina de su nueva lavadora gira a veiocidades muy eievadas. Para
reducir aJ minimo Jasvibraciones_eJ ruido y eJmovimiento no deseado_
ei piso debe ser una superficie s6fida y niveJada.
NOTA: Aiuste las patas niveiadoras solo en la medida necesaria para
niveiar la lavadora. La extensi6n de las paras niveiadoras m6s de Io
necesario puede causar vibraci6n de la lavadora.
NOTA: Antes de instalar la lavadora_ asegOrese
de que el suelo est8 limpio_seco y libre de poJvo_
sucio_agua y aceites para que las paras de la
lavadora no puedan desfizarse f6ciimente.
Las patas de apoyo podrfan moverse o desfizarse_
conHevando una vibraci6n y ruido excesivos
derivados de un contacto deficiente con eJ
suelo.Consuffe INSTALACION DE ALMOHADILLAS
ANTtRRESBALANTESpara m6s informaci6n.
NOTA: Si debe utilizar una bandeia recolectora, asegOresede seguir
las instrucciones induidas con Ja bandeia recoiectora y de que las
patas de niveiaci6n est_n ajustadas para un contacto flrme y niveiado
con la bandeja. El uso de bandejas recobctoras y la niveiaci6n
inadecuada de Ja m6quina pueden resuitar en una mayor vibraci6n y
ruido durante el funcionamiento.
Las cuatro paras niveiadoras deben apoyarse flrmemente en el piso.
Intente mover Jalavadora de una esquina hacia otra para asegurar que
las cuatro patas niveiadoras tengan un contacto firme sobre el suelo.
f
@ @
--s I
J_
Pies de nivelaci6
\ Pies de nivelaci6n 1
1. Coloque la lavadora en su ubicaci6n final, teniendo especial cudiado
de no presionar, tirar excesivamente o apbstar las tuberbs de agua y
drenaje. Coloque un nivel sobre la parte superior de la lavadora.
Bajar J
2. Afloje las tuercas de fijaci6n de las cuatro paras de nivelaci6n
con la Ilave hasta que ajuste las paras (aspecto llave puede
variar). Utilice la llave para girar las paras hada la derecha
para elevar la lavadora, y en sentido contrario para bajar la
lavadora. Con un nivel, ajuste las paras hasta que la lavadora
quede nivelada de lado a Jado y de adelante hacia atr6s.
AsegOrese de que las cuatro paras est6n en contacto directo
con el suelo.
NOTA: Siva a instalar ta lavadora en et pedestal
opcional, las paras niveladoras de la lavadora deben estar
completamente retraidas. Ufilice las paras de nivelaci6n del
pedestal para nivelar la lavadora. 43
3. Una vez que la lavadora est6 nivelada de lado a lado y de
adelante hacia atr6s, ufilice la Ilave para apretar las cuatro
tuercas de fijaci6n y fijelas a fin de evitar que las paras se
desajusten durante el fundonamiento. AsegOrese de que las
cuatro paras est6n en contacto directo con el suelo.
NOTA: Para asegurarse de que la lavadora est_ correctamente
nivelada_ p6ngala a funcionar con una carga de prueba: coloque
una carga mediana de ropa en la lavadora. Luego_presione POWER
(ENCENDER),seieccione RINSE(ENJUAGUE) y SPIN (CENTRIFUGADO),
y presione el bot6n START/PAUSE(INICIAR/PAUSAR).
Consulte las siguientes secciones para obtener informaci6n adicional
sobre la selecci6n y el funcionamiento de ciclos. Compruebe que
la lavadora no se mueva ni vibre excesivamente durante el ciclo
de centrifugado. Si la lavadora vibra o tiembia_ ajuste las patas de
nivelaci6n_mien#as que la lavadora est8 centrifugando_ hasta reducir
la vibraci6n.
iNSTALACiON DE ALMOHADILLAS
ANTIRRESBALANTES (optional)
Algunas superficies son demasiado resbaladizas y no pueden
evitar que la lavadora se mueva con cargas muy desbal-
anceadas. ,_ pesar de que es normal que una carga ocasional
no est6 balanceada, el exceso de ruido y las vibraciones
pueden sacar la lavadora fuera de su posici6n. Si se presentan
estas condiciones, siga las instrucciones a confinuad6n para la
instalad6n de almohadillas antirresbalantes. Estas almohadil-
las ayudar6n a evitar que la lavadora se mueva en condidones
donde haya demasiado desbalance, para redudr el ruido y la
vibraci6n.
Almohadillas antirresbalantes
Estelado hacia arriba
Pegue el lado adhesivo al piso
tire el soporte
*Coloquehs almohadilhsdebajodeambaspartasfrontaJes.
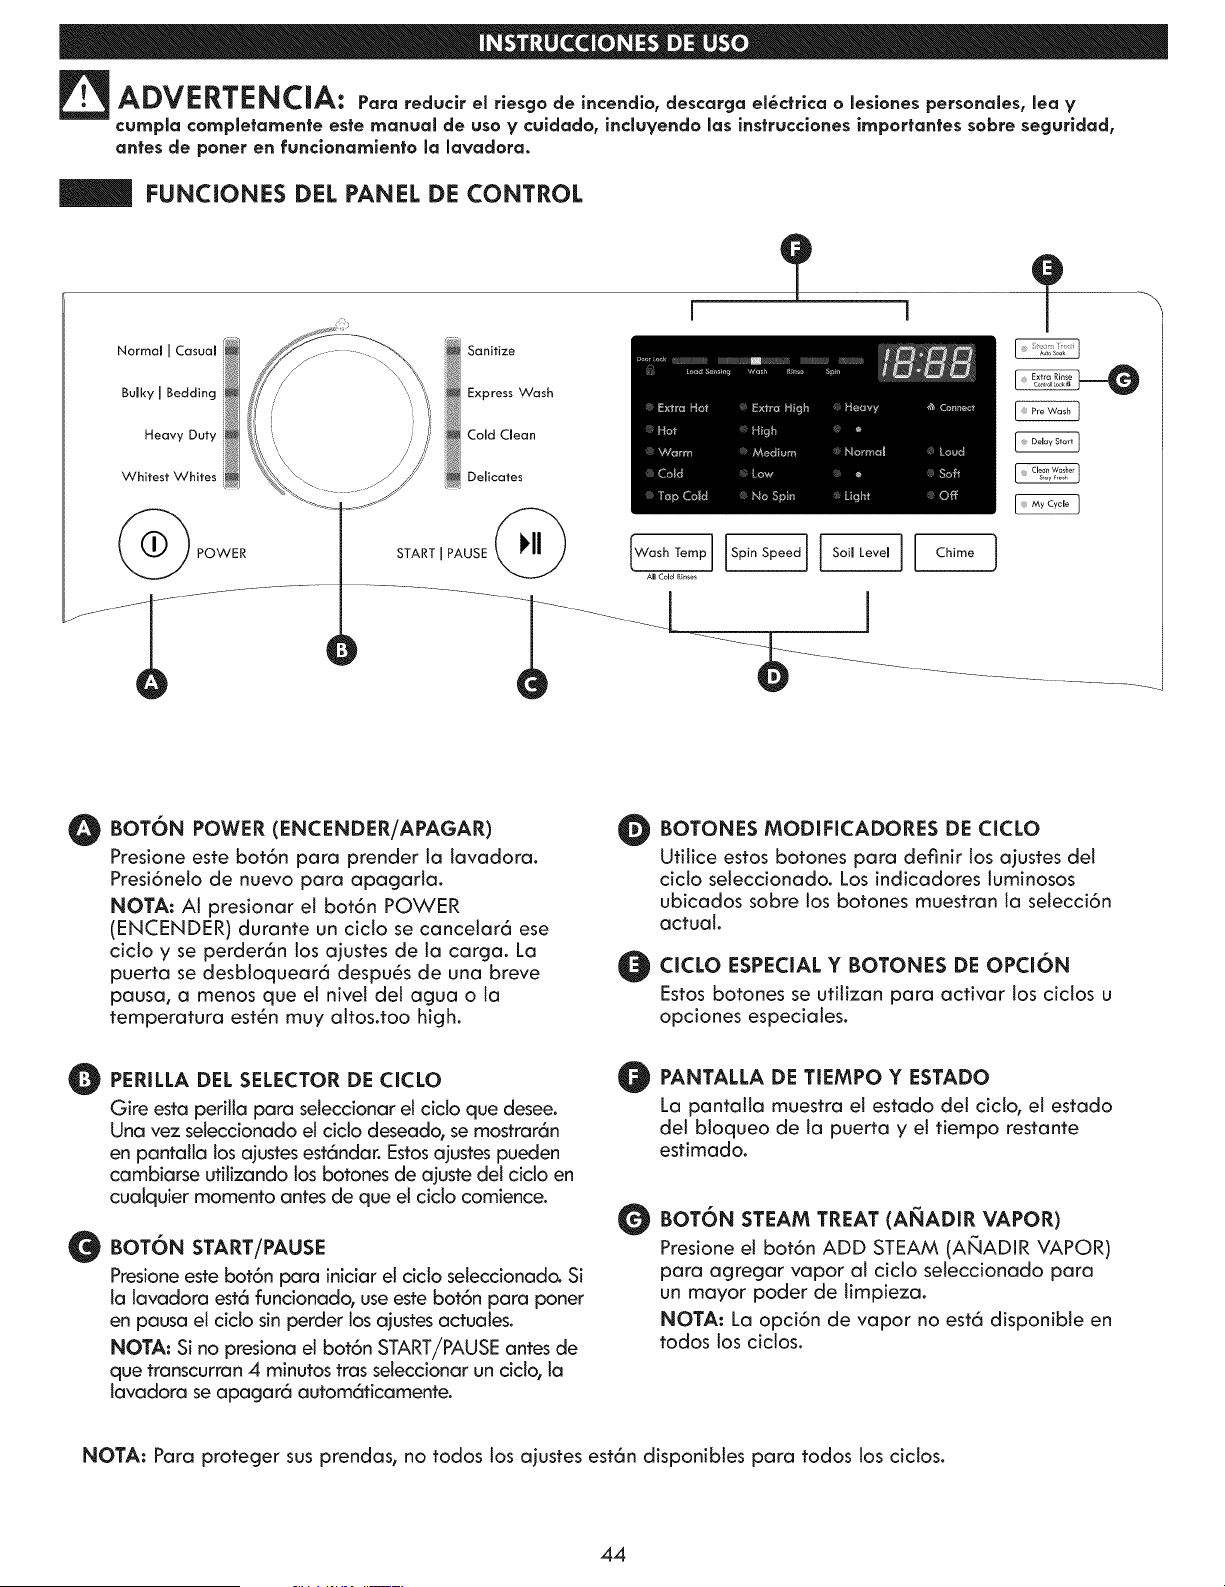
_ ADVERTENCIA: P=a.educlrelrlesgodei=endio,de==gael_tri_aolesionespersonales,leaV
cumpla completamente este manual de usa y culdado, induyendo las instrucclones importantes sabre segurldad,
antes de poner en funclonamlento la lavadora.
FUNCIONES DEL PANEL DE CONTROL
Normam I Casuam
Bulky I Bedding
Heavy Duty
Whitest Whites
Sanitize
Express Wash
CoredCmean
Delicates
POWER
)
STARTIPAUSE
All Cold Rinses
l
O
O
0
BaToN POWER (ENCENDER/APAGAR)
Presione este bot6n pare prender la lavadora.
Presi6nelo de nuevo pare apagarla.
NOTA: AI presionar el bot6n POWER
(ENCENDER) durante un ciclo se canceler6 ese
cido y se perder6n los ajustes de la carga. La
puerta se desbloquear6 despu6s de una breve
pause, a menos que el nivel del ague ola
temperature est6n muy altos.too high.
PERILLA DEL SELECTOR DE CICLO
Gire esta perilia para seleccionar el ciclo que desee.
Una vez seleccJonado ei ciclo deseado, se mostrar6n
en pantalla los ajustes est6ndaro Estos ajustes pueden
cambiarse utilizando los botones de ajuste dei cicio en
cualquier momenta antes de que el cido comience.
BaToN START/PAUSE
Presione este bot6n para iniciar el cido seleccionado. Si
la lavadora est6 funcionado, use este bot6n para poner
en pausa el cido sin perder los ajustes actuales.
NOTA: Si no presiona el bot6n START/PAUSE antes de
que transcurran 4 minutos tras seJeccionar un ciclor la
lavadora se apagar6 autom6ticamente.
O
O
BOTONES MODIFICADORES DE CICLO
Utilice estos botones para definir los ajustes del
ciclo seleccionado. Los indicadores luminosos
ubicados sabre los botones muestran la selecci6n
actual.
CICLO ESPECIAL Y BOTONES DE OPCION
Estos botones se utilizan para activar los ciclos u
opciones especiales.
O
PANTALLA DE TIEMPO Y ESTADO
La pantalla muestra el estado del ciclo, el estado
del bloqueo de la puerta y el tiempo restante
estimado.
O BaToN STEAM TREAT (AI_IADIR VAPOR)
Presione el bot6n ADD STEAM (ANADIR VAPOR)
para agregar vapor al ciclo seleccionado para
un mayor poder de limpieza.
NOTA: La opci6n de vapor no est6 disponible en
redes los ciclos.
NOTA: Pare proteger sus prendas, no redes los ajustes est6n disponibtes pare redes los ciclos.
44
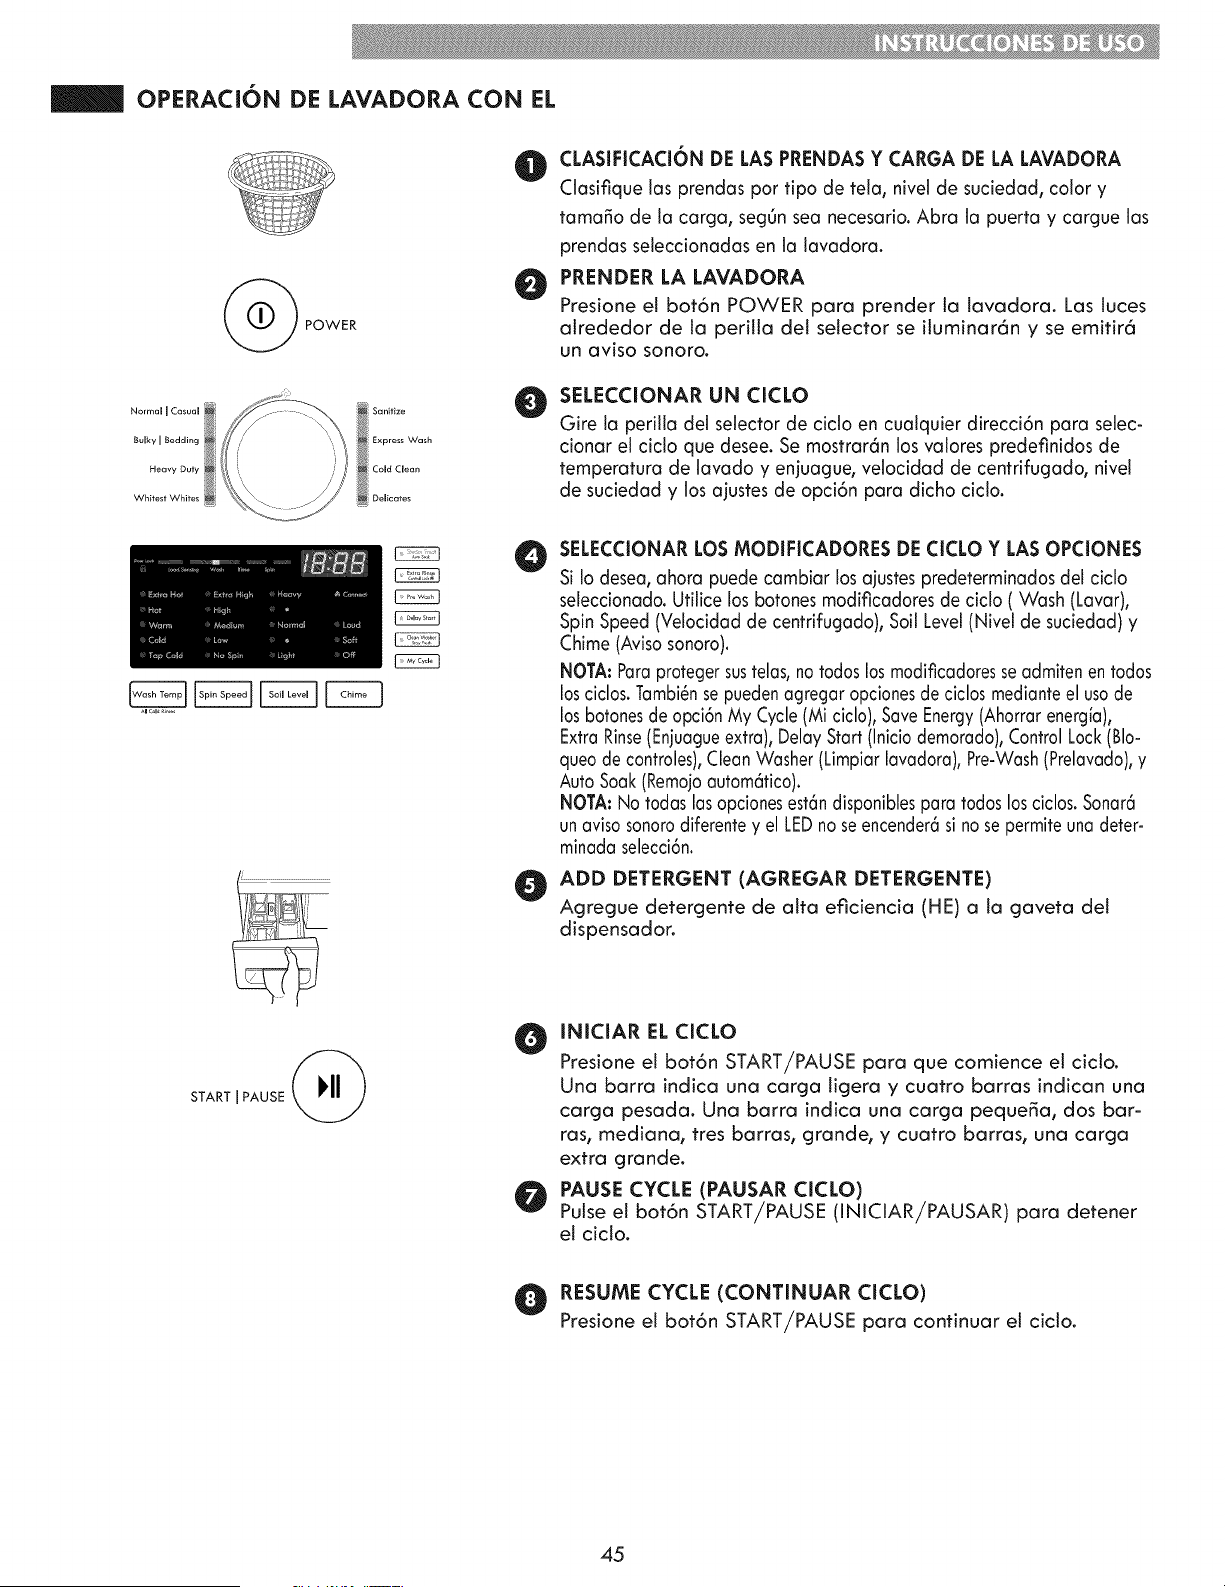
OPERACION DE LAVADORA CON EL
POWER
CLASIFICACI6N DE LASPRENDAS Y CARGA DE LA LAVADORA
Ciasifique los prendas por tipo de teia, nivel de suciedad, color y
tama_o de la carga, segOnsea necesario. Abra la puerta y cargue las
prendas seleccionadas en la lavadora.
O RENDER LA LAVADORA
Presione et bot6n POWER para prender la tavadora. Las luces
akededor de la peritla del selector se ituminar6n y se emitir6
un aviso sonoro.
Normal I Casual
Bulky I Bedding
Heavy Duty
Whifest 'Whites
Sanitize
Express Wash
Cold Clean
Delicates
O
SELECCIONAR UN CICLO
Gire la perilla deJ seJector de ciclo en cualquier direcci6n para selec-
cionar el cido que desee. Se mostrar6n los valores predefinidos de
temperatura de lavado y enjuague, velocidad de centrifugado, niveJ
de suciedad y los ajustes de opci6n para dicho cicio.
O
O
SELECCIONAR LOSMODIFICADORES DE CICLO Y LAS OPCIONES
Si Io desea, ahora puede cambiar los ajustespredeterminados del ciclo
seleccionado.Utilice los botones modificadores de ciclo ( Wash (Lavar),
Spin Speed(Velocidad de centrifugado), Soil Level(Nivel de suciedad) y
Chime(Avisosonoro).
NOTA: Paraprotegersustelas, notodoslos modificadoresseadmitenen todos
losciclos.Tambi6nsepuedenagregar opcionesde ciclosmedianteel usode
losbotonesde opci6n My Cycle(Mi ciclo),SaveEnergy(Ahorrarenerg[a),
ExtraRinse(Enjuagueextra), Delay Start (Inicio demorado),Control Lock(BIo-
queode controles),CleanWasher(Limpiarlavadora), Pre-Wash(Prelavado),y
Auto Soak(Remojoautom6tico).
NOTA: No todas lasopcionesest6ndisponiblespara todos los ciclos.Sonar6
unavisosonorodiferentey el LEDnoseencender6si no sepermite una deter-
minada selecci6n.
ADD DETERGENT (AGREGAR DETERGENTE)
Agregue detergente de alto eficiencia (HE) a la gaveta del
dispensador.
START I PAUSE
O NICIAR EL CICLO
Presione el bot6n START/PAUSE para que comience el ciclo.
Una barra indica una carga tigera y cuatro barras indican una
carga pesada. Una barra indica una carga peque_a, dos bar-
ras, mediana, tres barras, grande, y cuatro barras, una carga
extra grande.
PAUSE CYCLE (PAUSAR CICLO)
Pulse el bot6n START/PAUSE (INICIAR/PAUSAR) para detener
el ciclo.
O RESUME CYCLE (CONTINUAR CICLO)
Presione el bot6n START/PAUSE para continuar el ciclo.
45
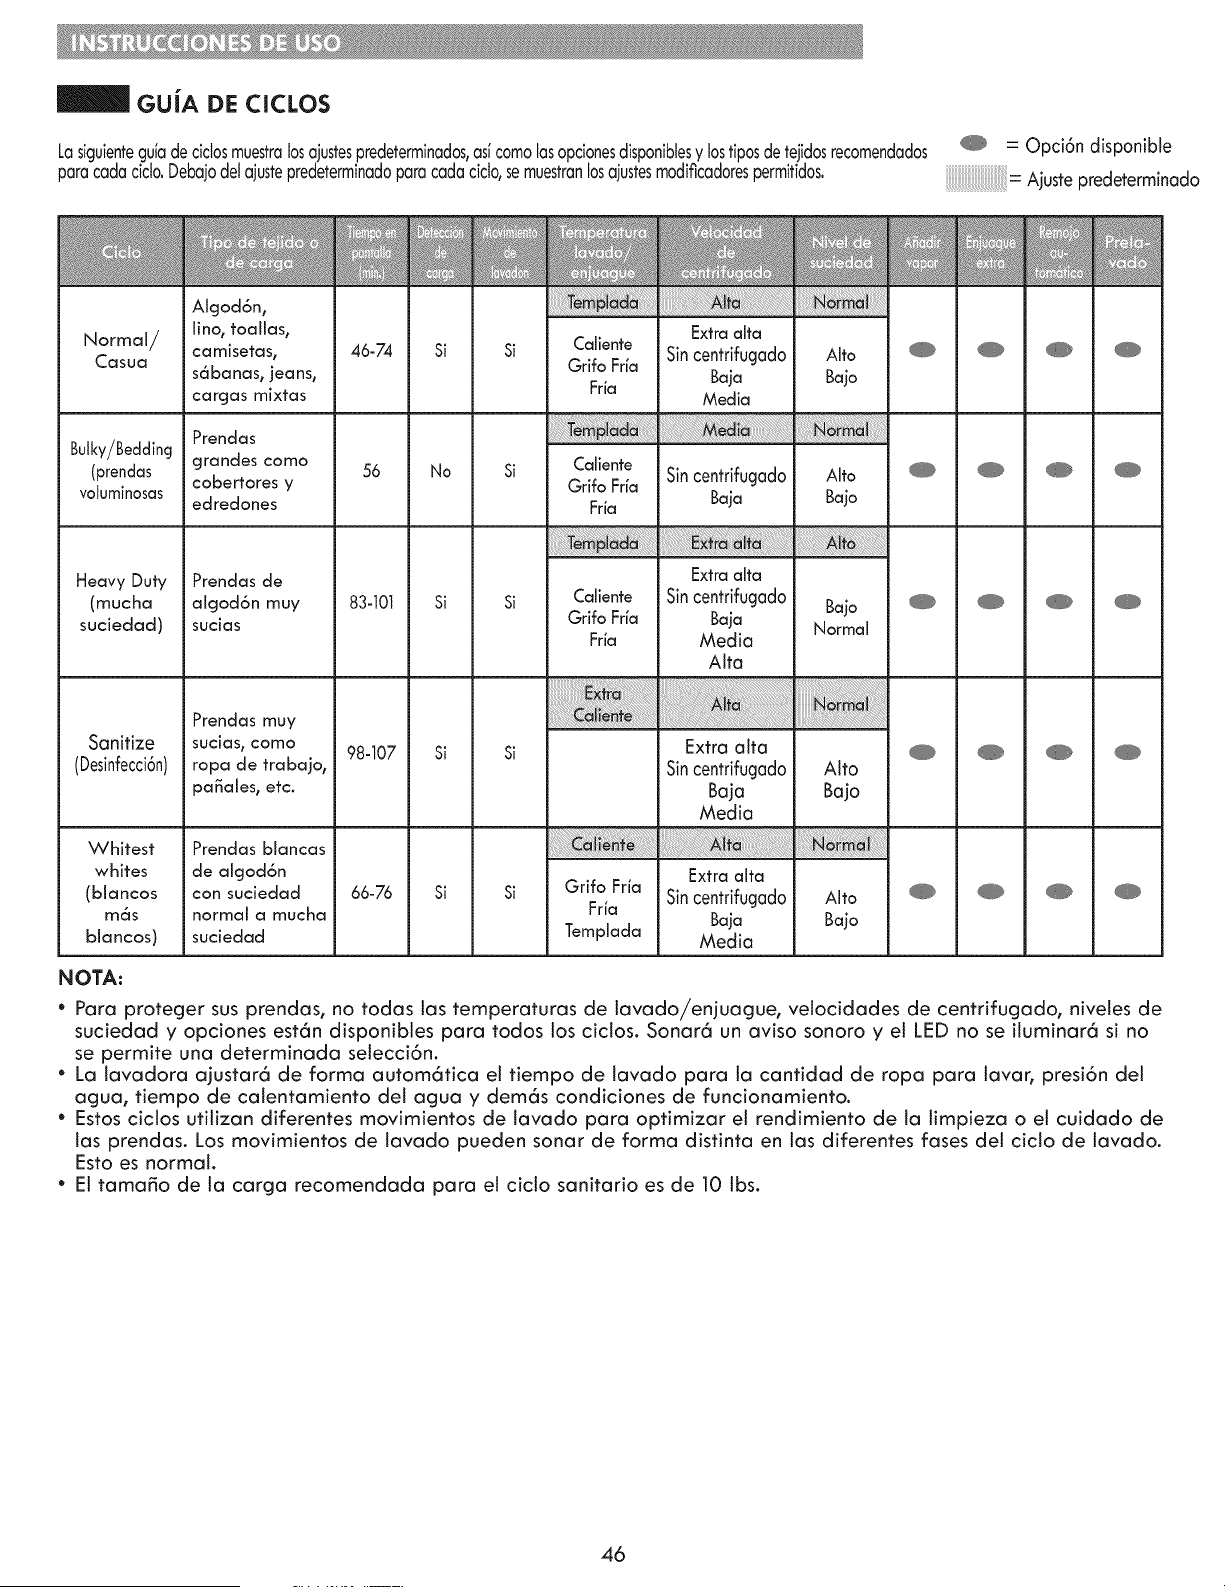
GUiA DECICLOS
Lasiguientegufade cidosmuestralosajustespredeterminados,asfcomolasopcionesdisponibtesy lostiposdetejidosrecomendados _ = Opci6n disponible
paracadacido.Debajodelajustepredeterminadoparacadacicto,semuestranlosajustesmodificadorespermitidos. Ajustepredeterminado
Normal/
Casua
Bulky/Bedding
(prendas
voluminosas
Heavy Duty
(mucha
suciedad)
Sanitize
(Desinfecci6n)
Whitest
whites
(blancos
m_ls
blancos)
AIcjod6n_
lino_ toallas_
camJsetas_
s6banas, ieans,
ca rcjas mixtas
Prendas
grandes como
cobertores y
edredones
Prendas de
algod6n muy
SUCiaS
Prendas muy
sucias, como
ropa de trabajo_
pa_alest etc.
Prendas blancas
de algod6n
con suciedad
normal a mucha
suciedad
Grifo Fria
Fria
Templada
Extraalta
Sincentrifugado
Baja
Media
Alto
Bajo
NOTA:
• Para proteger sus prendas, no todas las temperaturas de lavado/enjuague, velocidades de centrifugado, niveles de
suciedad y opciones est6n disponibtes para todos los ciclos. Sonar6 un aviso sonoro y el LED no se ituminar6 si no
se permite una determinada selecci6n.
• La lavadora ajustar6 de forma autom6tica el tiempo de tavado para la cantidad de ropa para lavar, presi6n del
agua, tiempo de catentamiento del agua y dem6s condiciones de funcionamiento.
• Estos ciclos utilizan diferentes movimientos de lavado para optimizar el rendimiento de ta timpieza o et cuidado de
las prendas. Los movimientos de lavado pueden sonar de forma distinta en las diferentes rases del ciclo de lavado.
Esto es normal.
• El tama_o de la carga recomendada para el ciclo sanitario es de 10 lbs.
46
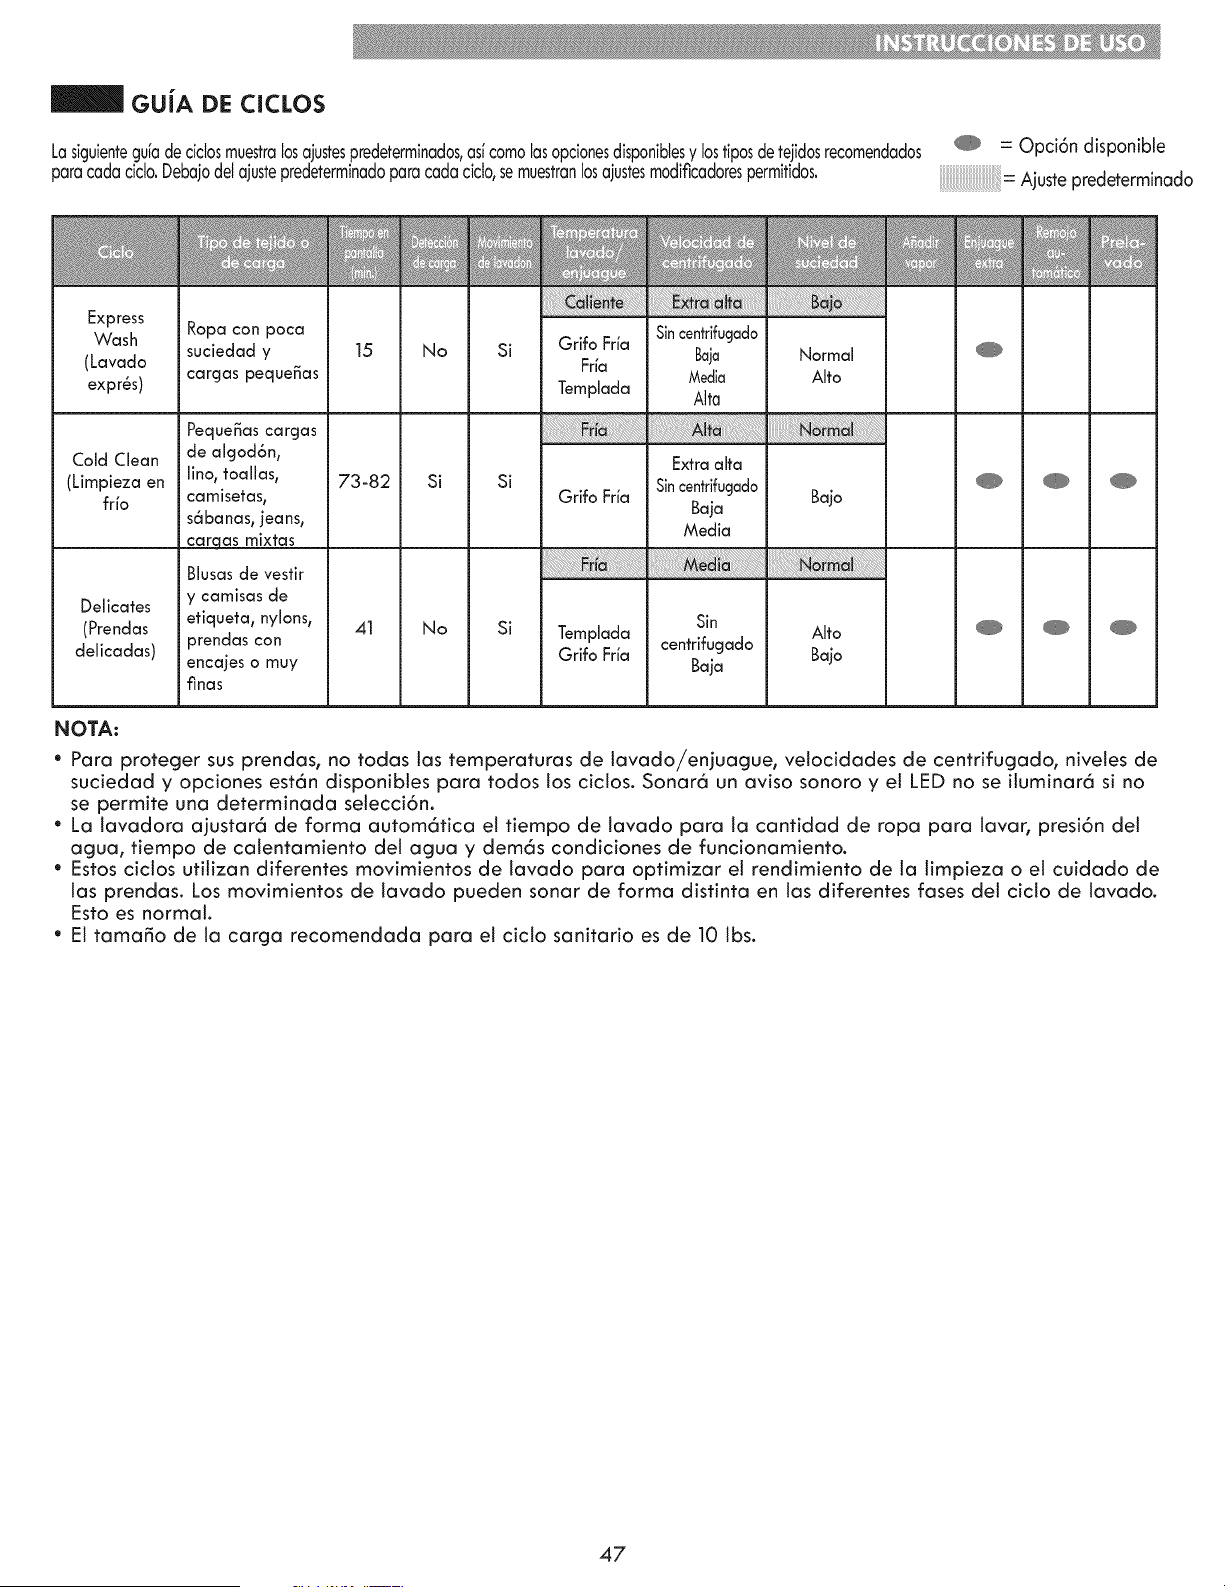
GUiA DE CICLOS
Lasiguientegufadecidosmuestralosajustespredeterminados,asfcomolasopcionesdisponibtesy lostiposdetejidosrecomendados _ -- Opci6n disponible
paracadacido.Debajodelajustepredeterminadoparacadacicto,semuestranlosajustesmodificadorespermitidos. _-Ajustepredeterminado
Express
Wash
(Lavado
expr_s)
Cold Clean
(Limpieza en
frb
Delicates
(Prendas
delicadas)
Ropa con poca
suciedad y
cargas peque_as
Peque_as cargas
de algod6n,
lino, toallas,
camisetas,
s6banas, ieans,
caraas mixtas
Blusasde vestir
y camisasde
etiqueta, nylons,
prendas con
encajeso muy
_]flaS
Grifo Frfa
Frfa
Templada
Grifo Frfa
Templada
Grifo Frfa
Sincentrifucjado
Baja
Media
Alta
Extra alta
Sincentrifucjado
Baja
Media
Sin
centrifugado
Baja
Normal
Alto
NOTA:
• Para proteger sus prendas, no todas las temperaturas de lavado/enjuague, velocidades de centrifugado, niveles de
suciedad y opciones est6n disponibtes para todos los ciclos. Sonar6 un aviso sonoro y el LED no se ituminar6 si no
se permite una determinada selecci6n.
• La lavadora ajustar6 de forma autom6tica el tiempo de tavado para ta cantidad de ropa para lavar, presi6n del
agua, tiempo de catentamiento del agua y dem6s condiciones de funcionamiento.
Estos cictos utilizan diferentes movimientos de lavado para optimizar el rendimiento de ta timpieza o el cuidado de
las prendas. Los movimientos de lavado pueden sonar de forma distinta en las diferentes rases del cido de lavado.
Esto es normal.
El tama_o de la carga recomendada para el ciclo sanitario es de 10 lbs.
47
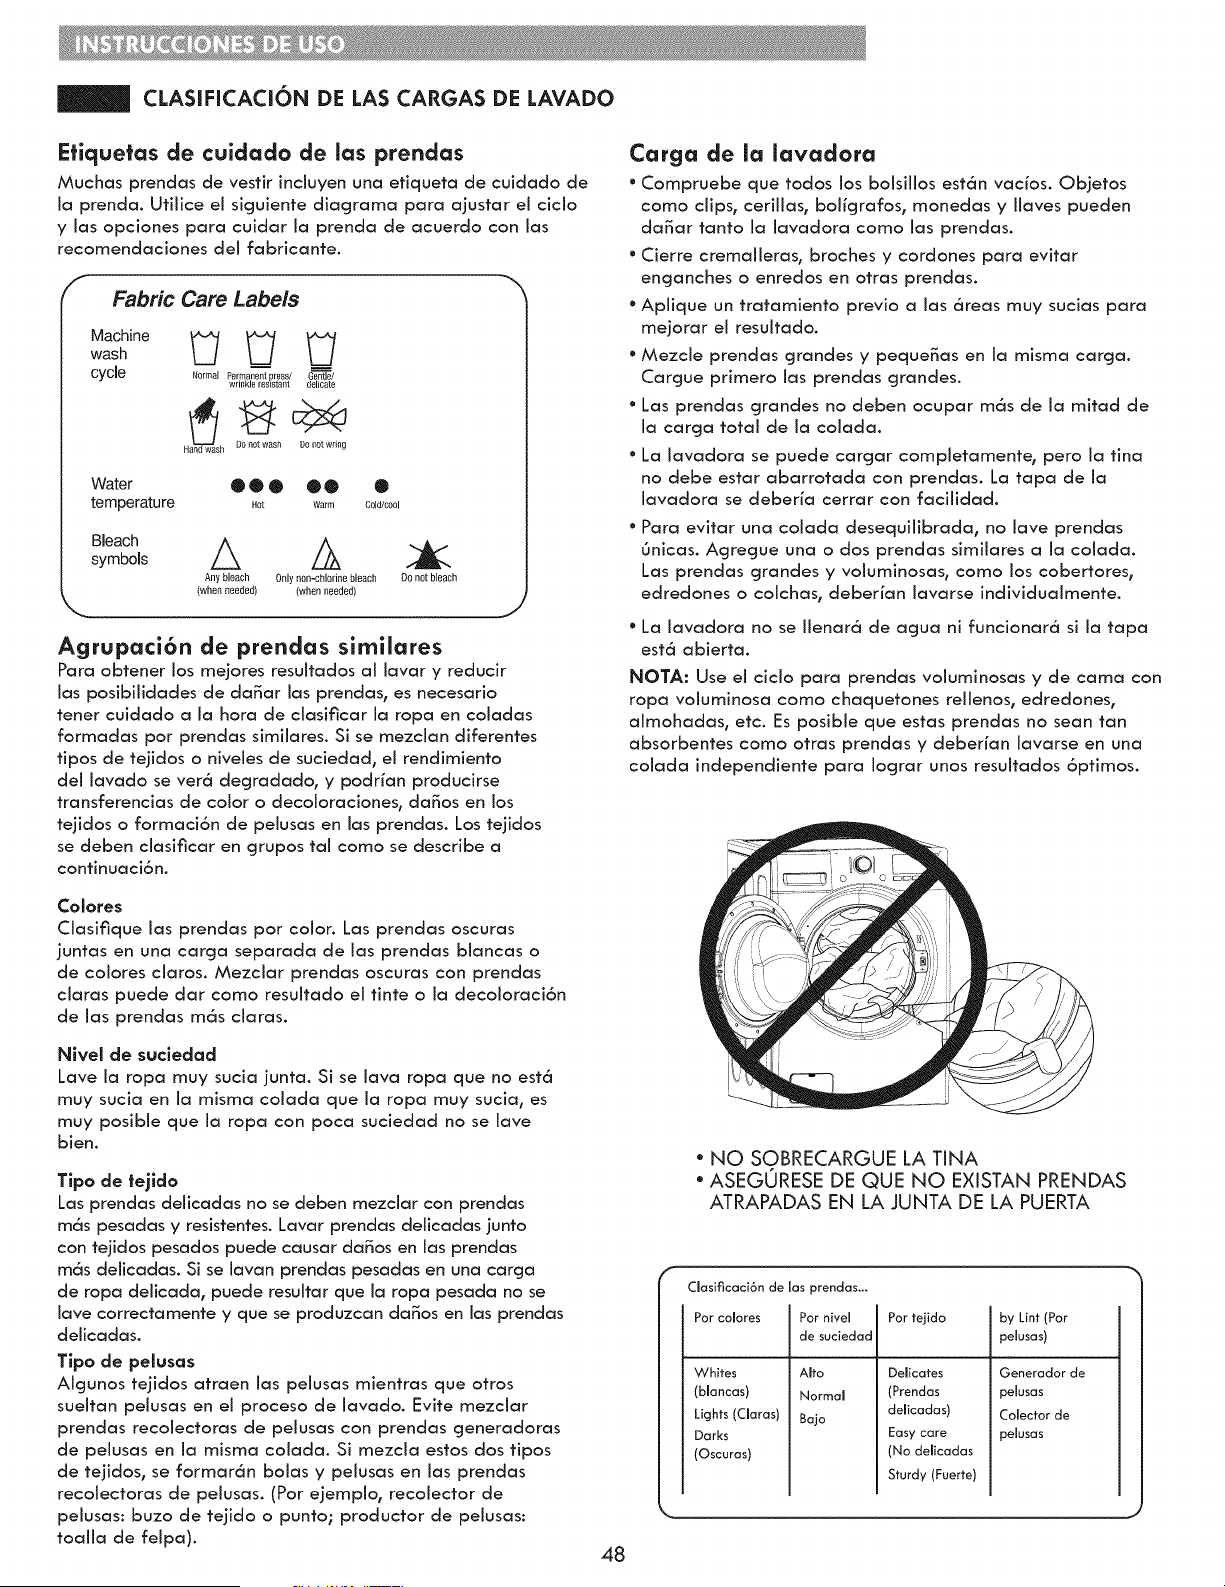
CLASIFICACION DE LAS CAP,GAS DE LAVADO
Efiquetas de cuidado de las prendas
Muchos prendos de vestir inciuyen uno etiqueto de cuidodo de
Io prendo. Utilice ei siguiente diocjromo pore ojustor ei cicio
y los opciones pore cuidor Io prendo de ocuerdo con los
recomendociones del fobriconte.
F
Fabric Care Labels
Machine
cycle Normal Permanent press/ Gentle/
wrinkle resBtant delicate
H h Do not wash Do notwring
Water • O • • • •
temperature .0t Warm C01d/c001
Bleach
symbols _ Z_ ._
Anybleach Only non-chlorinebleach Do not bleach
(when needed) (when needed)
\
Agrupaci6n de prendas similares
Pore obtener los mejores resuitodos el lover y reducir
los posibilidodes de do_or los prendos0 es necesorio
tener cuidodo o Io hero de ciosificor la rope en colodos
formodos per prendos similores. Si se mezclon diferentes
tipos de tejidos o niveles de suciedod_ el rendimiento
del Iovodo se ver6 degrododo, y podrion producirse
tronsferencios de color o decoiorociones, do_os en los
tejidos o formoci6n de pelusos en los prendos. Los tejidos
se deben closificor en grupos tel come se describe o
continuoci6n.
Carga de la lavadora
* Compruebe que todos los bolsillos est6n vocios. Objetos
come dips° cerillos, boligrofos, monedos y lloves pueden
do_or tonto Io Iovodoro come los prendos.
° Cierre cremolleros, broches y cordones pore evitor
engonches o enredos en otros prendos.
° Aplique un trotomiento previo o los 6tees muy sucios pore
mejoror el resultodo.
° Mezcie prendos grondes y peque_os en Io mismo corgo.
Corgue primero los prendos grondes.
° Los prendos grondes no deben ocupor m6s de Io mitod de
Io corgo totol de Io colodo.
° Lo Iovodoro se puede corgor completomente, pero Io tino
no debe ester oborrotodo con prendos. Lo tope de Io
Iovodoro se deberio cerror con focilidod.
° Pore evitor uno colodo desequilibrodo0 no love prendos
0nicos. Agregue uno o dos prendos similores o Io coloda.
Los prendos grondes y voluminosos, come los cobertores0
edredones o colchos0 deberion Iovorse individuolmente.
* Lo lavodoro no se Ilenor6 de oguo ni funcionor6 si Io tope
est6 obierto.
NOTA: Use el cicio pare prendas voluminosos y de come con
ropa voluminoso come choquetones rellenos, edredones,
olmohodos, etc. Es posibie que estos prendos no seen ton
obsorbentes come otros prendos y deberian Iovorse en uno
coiodo independiente pare Iogror unos resuitodos 6ptimos.
Colores
Closifique los prendos per color. Los prendos oscuros
juntos en uno corgo separodo de los prendos bioncos o
de coiores cioros. Mezclor prendos oscuros con prendos
cioros puede dor come resuitodo ei tinte o io decoioroci6n
de los prendos m6s cioros.
Nivel de sucledad
Love Io ropa muy sucio junto. Si se love ropa que no est6
muy sucio en io mismo coiodo que io rope muy sucio, es
muy posibie que io ropa con poco suciedod no se love
bien.
Tipo de fejldo
Los prendos delicodos no se deben mezclor con prendos
m6s pesados y resistentes. Lover prendos delicodas junto
con tejidos pesodos puede cousar do_os en los prendos
m6s delicodos. Si se Iovon prendos pesodos en una corgo
de ropa delicodo, puede resultor que Io rope pesoda no se
love correctomente y que se produzcon da_os en los prendos
delicodos.
Tipo de pelusas
Algunos tejidos otroen los pelusos mientros que otros
suelton pelusos en el proceso de Iovodo. Evite mezclor
prendos recolectoros de pelusos con prendos generodoros
de pelusos en Io mismo coJodo. Si mezclo estos dos tipos
de tejidos, se formor6n bolos y pelusos en los prendos
recolectoros de pelusos. (Per ejemplo, recolector de
pelusos: buzo de tejido o punic; productor de pelusos:
toolio de felpa).
48
* NO SOBRECARGUE LA TINA
" ASEGORESE DE QUE NO EXISTAN PRENDAS
ATRAPADAS EN LA JUNTA DE LA PUERTA
Clasificaci6n de las prendas...
Per colores Per nivel
de suciedad
Whites Alto
(blancas) Normal
Lights (Claras) Bale
Darks
(Oscuras)
Per tejido
Delicates
(Prendas
delicadas)
Easy care
(No deficadas
Sturdy (Fuerte)
by Lint (Per
pelusas)
Generador de
pelusas
Colector de
pelusas
j
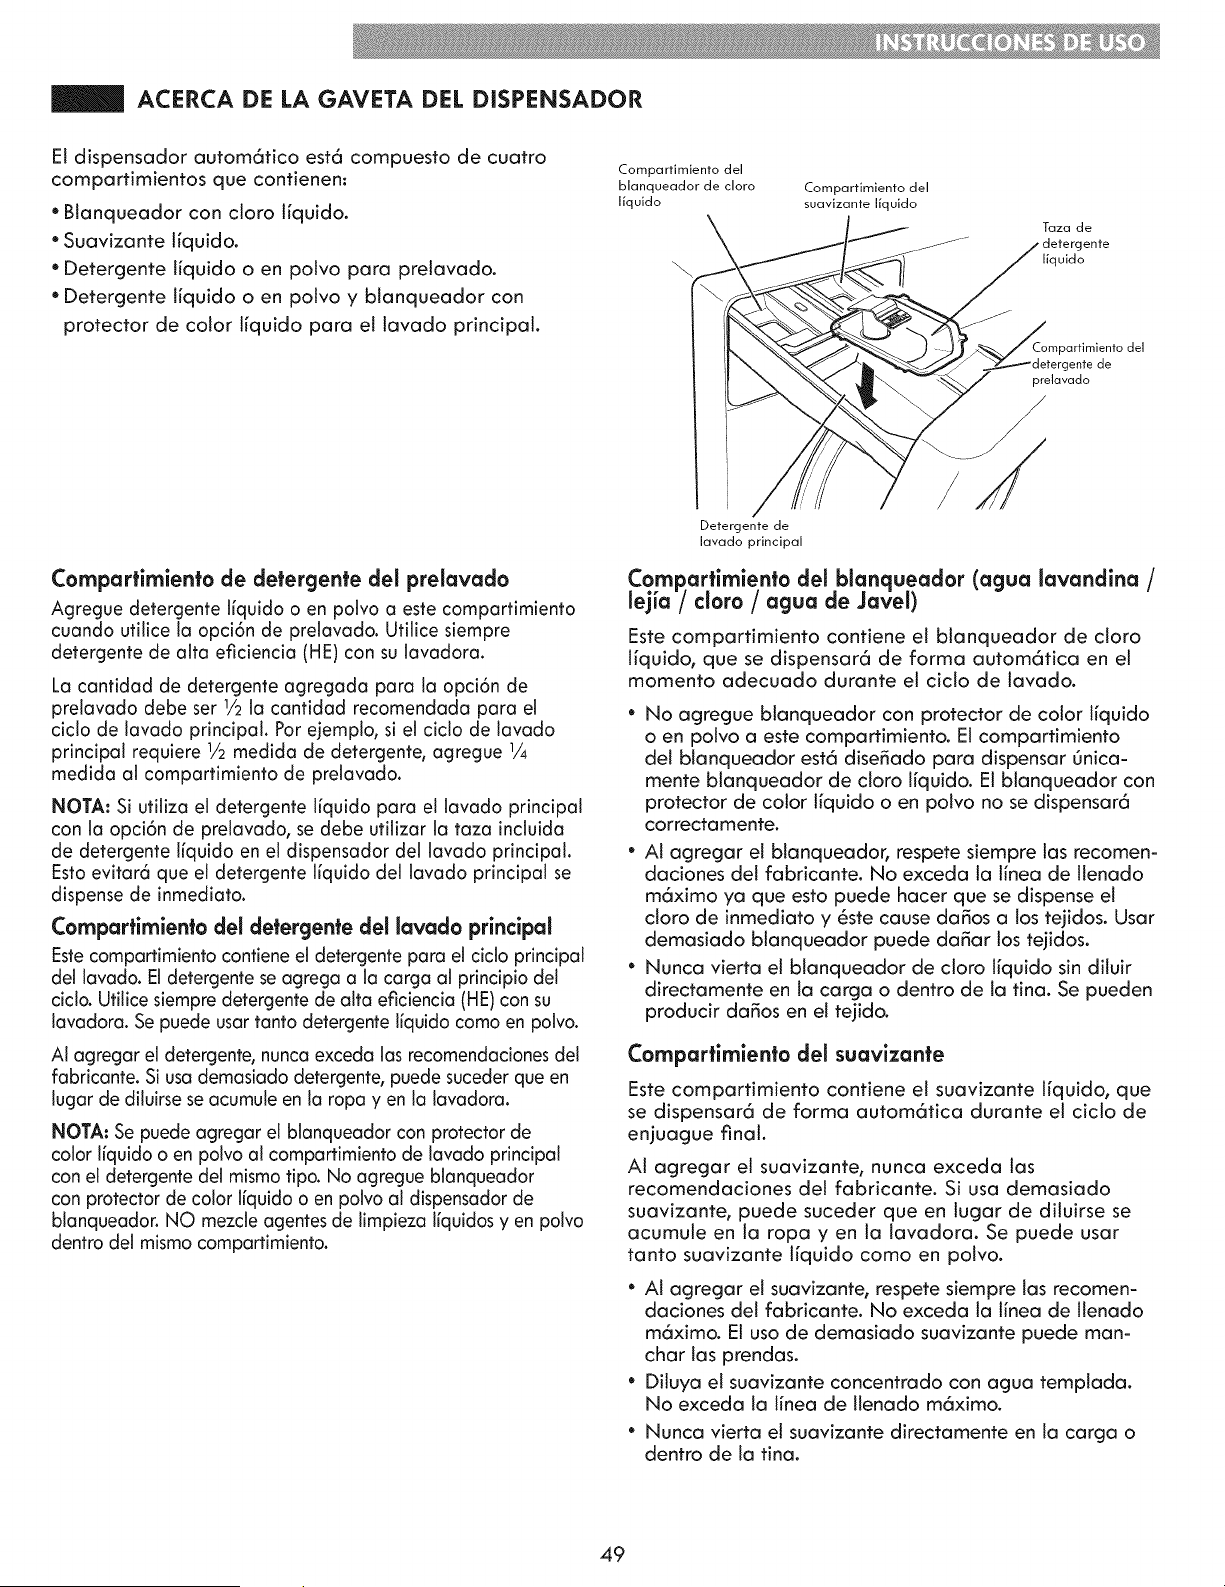
ACERCA DE LA GAVETA DEL DiSPENSADOR
El dispensador autom6tico est6 compuesto de cuatro
comparfimientos que contienen:
* Btanqueador con cloro liquido.
* Suavizante liquido.
* Detergente liquido o en polvo para prelavado.
* Detergente liquido o en potvo y blanqueador con
protector de color liquido para el lavado principal.
Compartimiento de detergente del prelavado
Agregue detergente lfquido o en polvo a este compartimiento
cuando utilice la opci6n de prelavado. Utilice siempre
detergente de alta eficiencia (HE) con su lavadora.
La cantidad de detergente agregada para la opci6n de
prelavado debe ser 1/2la cantidad recomendada para el
ciclo de lavado principal. Por ejemplo, si el ciclo de lavado
principal requiere 1/2medida de detergente, agregue 1/4
medida al compartimiento de prelavado.
NOTA: Si utiliza el detergente lfquido para el lavado principal
con la opci6n de prelavado, se debe utilizar la taza incluida
de detergente lfquido en el dispensador del lavado principal.
Estoevitar6 que el detergente lfquido del lavado principal se
dispense de inmediato.
Compartimiento del detergente del lavado principal
Estecompartimiento contiene el detergente para el ciclo principal
del lavado. Eldetergente se agrega a la carga al principio del
ciclo. Utilice siempre detergente de alta eficiencia (HE) con su
lavadora. Se puede usar tanto detergente Ifquido como en polvo.
AI agregar el detergente, nunca exceda las recomendaciones del
fabricante. Si usa demasiado detergente, puede suceder queen
lugar de diluirse se acumule en la ropa yen la lavadora.
NOTA: Se puede agregar el blanqueador con protector de
color Ifquido o en polvo al compartimiento de lavado principal
con el detergente del mismo tipo. No agregue blanqueador
con protector de color lfquido o en polvo al dispensador de
blanqueador. NO mezcle agentes de limpieza Ifquidos y en polvo
dentro del mismo compartimiento.
Compartimiento del
blanqueador de clara Compartimiento del
liquido suavizante liquido
\\
Taza de
ente
liquido
ente de
prelavado
/
Detergente de
lavado principal
Compartimiento del blanqueador (agua lavandina /
lejia / cloro / agua de Javel)
Este compartimiento contiene el btanqueador de cloro
liquido, que se dispensar6 de forma autom6tica en el
momento adecuado durante el ciclo de lavado.
No agregue blanqueador con protector de color liquido
o en polvo a este compartimiento. El compartimiento
del btanqueador est6 dise_ado para dispensar Onica-
mente blanqueador de ctoro liquido. El blanqueador con
protector de color liquido o en polvo no se dispensar6
correctamente.
* At agregar el blanqueador, respete siempre las recomen-
daciones del fabricante. No exceda la tinea de llenado
m6ximo ya que esto puede hater que se dispense el
ctoro de inmediato y 6ste cause da_os a los tejidos. Usar
demasiado blanqueador puede da_ar los tejidos.
* Nunca vierta el blanqueador de cloro liquido sin dituir
directamente en la carga o dentro de la tina. Se pueden
producir dahos en el tejido.
Compartimiento del suavizante
Este compartimiento contiene el suavizante liquido, que
se dispensar6 de forma autom6tica durante el ciclo de
enjuague final.
AI agregar el suavizante, nunca exceda las
recomendaciones del fabricante. Si usa demasiado
suavizante, puede suceder que en lugar de diluirse se
acumute en la ropa yen la tavadora. Se puede usar
tanto suavizante liquido como en polvo.
* At agregar el suavizante, respete siempre tas recomen-
daciones del fabricante. No exceda ta linea de llenado
m6ximo. El uso de demasiado suavizante puede man-
char las prendas.
Diluya el suavizante concentrado con agua templada.
No exceda la linea de llenado m6ximo.
Nunca vierta el suavizante directamente en la carga o
dentro de la tina.
49
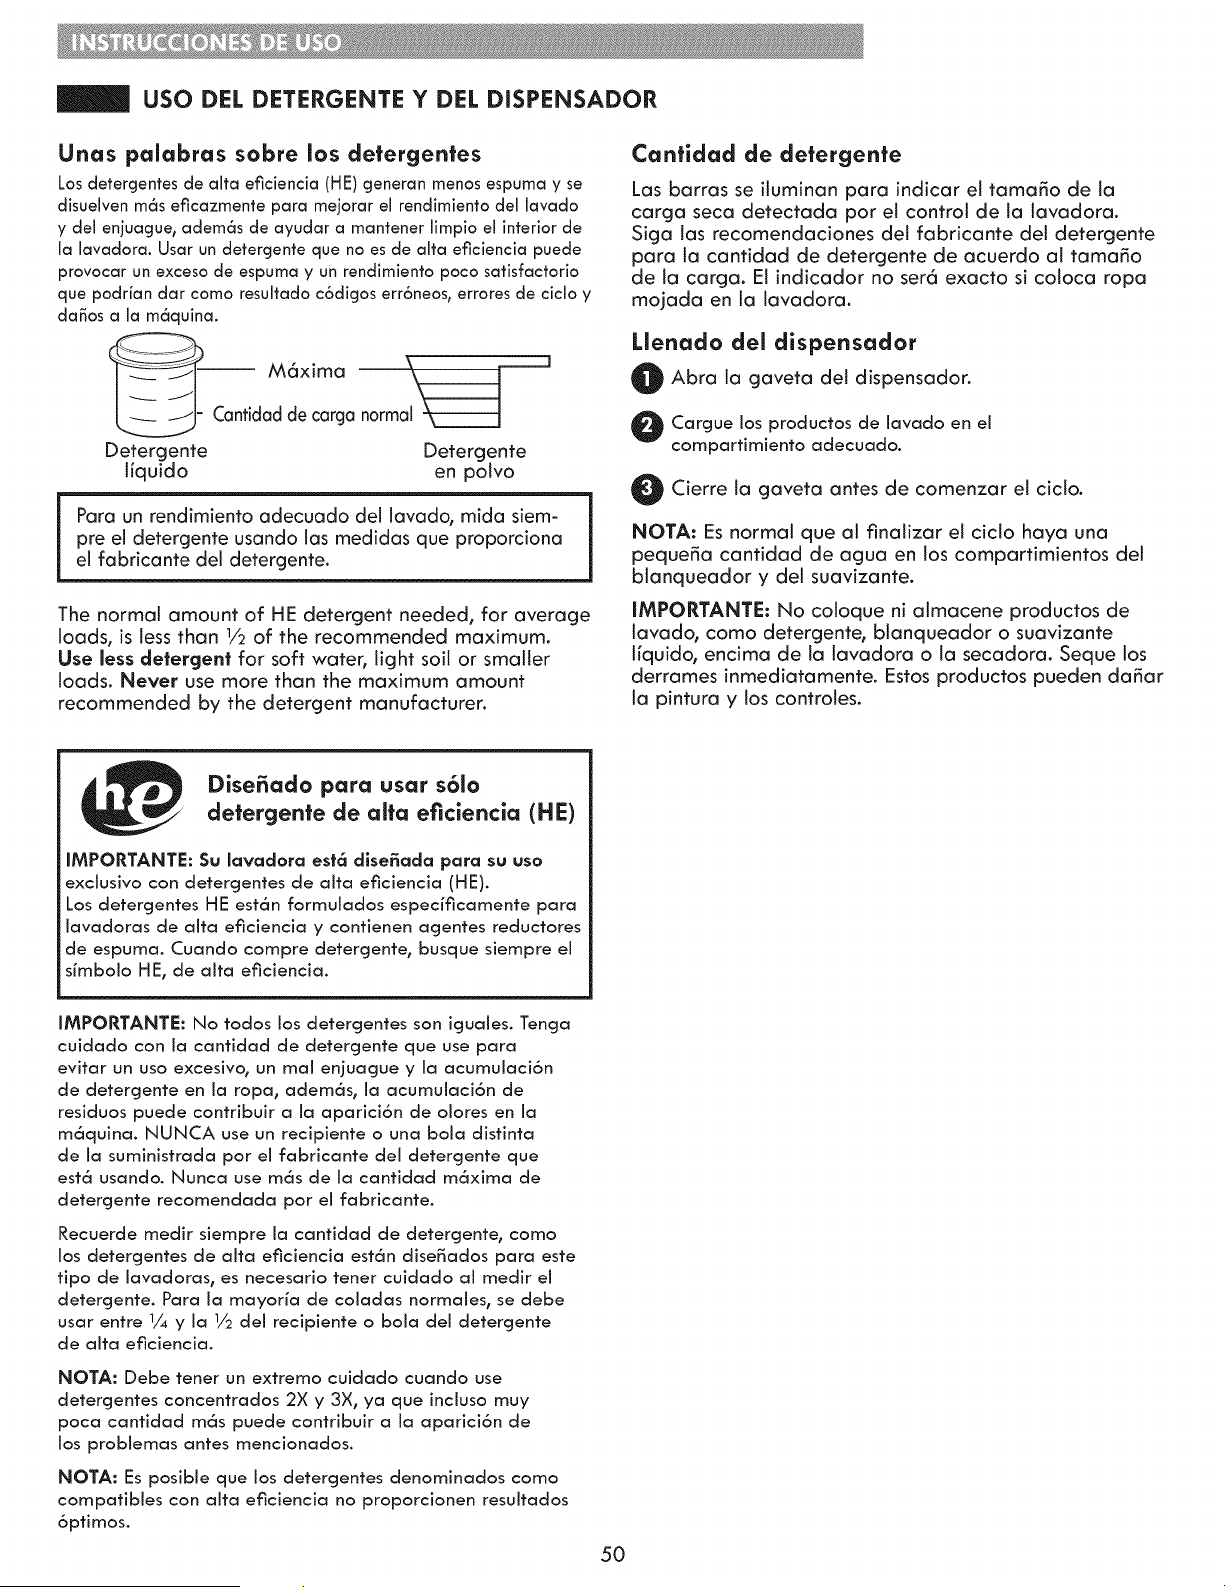
USO DEL DETERGENTE Y DEL DiSPENSADOR
Unas palabras sobre los detergentes
Los detergentes de aita eHciencia (HE) generan menos espuma y se
disuelven rn6s eHcazmente para mejorar el rendimiento del lavado
y del enjuague_ adern6s de ayudar a mantener limpio el interior de
la lavadora. Usar un detergente que no es de alta eHciencia puede
provocar un exceso de espuma y un rendimiento poco satisfactorio
que podrfan dar como resultado c6digos err6neos t errores de ¢iclo y
dafios a la m6quina.
M6xima _ _____s
k____- Cantidad de carga normal
Detergente Detergente
liquido en potvo
Para un rendimiento adecuado del lavado, mida siem-
pre el detergente usando las medidas que proporciona
el fabricante del detergente.
The normal amount of HE detergent needed, for average
loads, is tess than 1/2of the recommended maximum.
Use less detergent for soft water, light soil or smaller
loads. Never use more than the maximum amount
recommended by the detergent manufacturer.
Canfidad de detergente
Las barras se ituminan para indicar el tama_o de la
carga seca detectada por el control de la lavadora.
Siga tas recomendaciones del fabricante del detergente
para la cantidad de detergente de acuerdo at tama_o
de la carga. El indicador no ser6 exacto si cotoca ropa
mojada en la lavadora.
Llenado del dispensador
Abra la gaveta del dispensador.
Cargue los productos de lavado en el
compartimiento adecuado.
O Cierre la gaveta antes de comenzar el ciclo.
NOTA: Es normal que al finalizar el ciclo haya una
peque_a cantidad de agua en los compartimientos del
blanqueador y del suavizante.
IMPORTANTE: No coloque ni almacene productos de
lavado, como detergente, blanqueador o suavizante
liquido, encima de la iavadora o la secadora. Seque los
derrames inmediatamente. Estos productos pueden da_ar
la pintura y los controles.
Dise_ado para usar s6lo
detergente de alfa eficiencia (HE)
IMPORTANTE: Su lavadora est6 dlse_ada para su uso
exclusivo con detergentes de alta eficiencia (HE).
Los detercjentes HE est6n formuiados especificamente para
lavadoras de affa eficiencia y contienen agentes reductores
de espurna. Cuando compre detercjente, busque siempre el
simbolo HE0 de alta eficiencia.
IMPORTANTE: No todos los detergentes son iguaies. Tenga
cuidado con la cantidad de detergente que use para
evitar un uso excesivo, un real eniuague y la acumulaci6n
de detergente en la ropa, adem6s, la acumuJaci6n de
residuos puede contribuir a la aparici6n de olores en la
m6quina. NUNCA use un recipiente o una bola distinta
de la suministrada por el fabricante del detercjente que
est6 usando. Nunca use m6s de la cantidad m6xima de
detergente recomendada por el fabricante.
Recuerde medir siempre ia cantidad de detergente, como
los detergentes de alia eficiencia est6n diseSados para este
tipo de iavadoras0 es necesario tener cuidado ai medir ei
detergente. Para ia mayoria de coiadas normales, se debe
usar entre 1/4 y ia 1/2 dei recipiente o boia dei detergente
de aita eficiencia.
NOTA: Debe tener un extremo cuidado cuando use
defergentes concentrados 2X y 3X, ya que incluso muy
poca cantidad m6s puede contribuir a ia aparici6n de
los probiemas antes mencionados.
NOTA: Es posible que los detercjentes denominados como
compatibles con alta eficiencia no proporcionen resuitados
6ptimos.
50
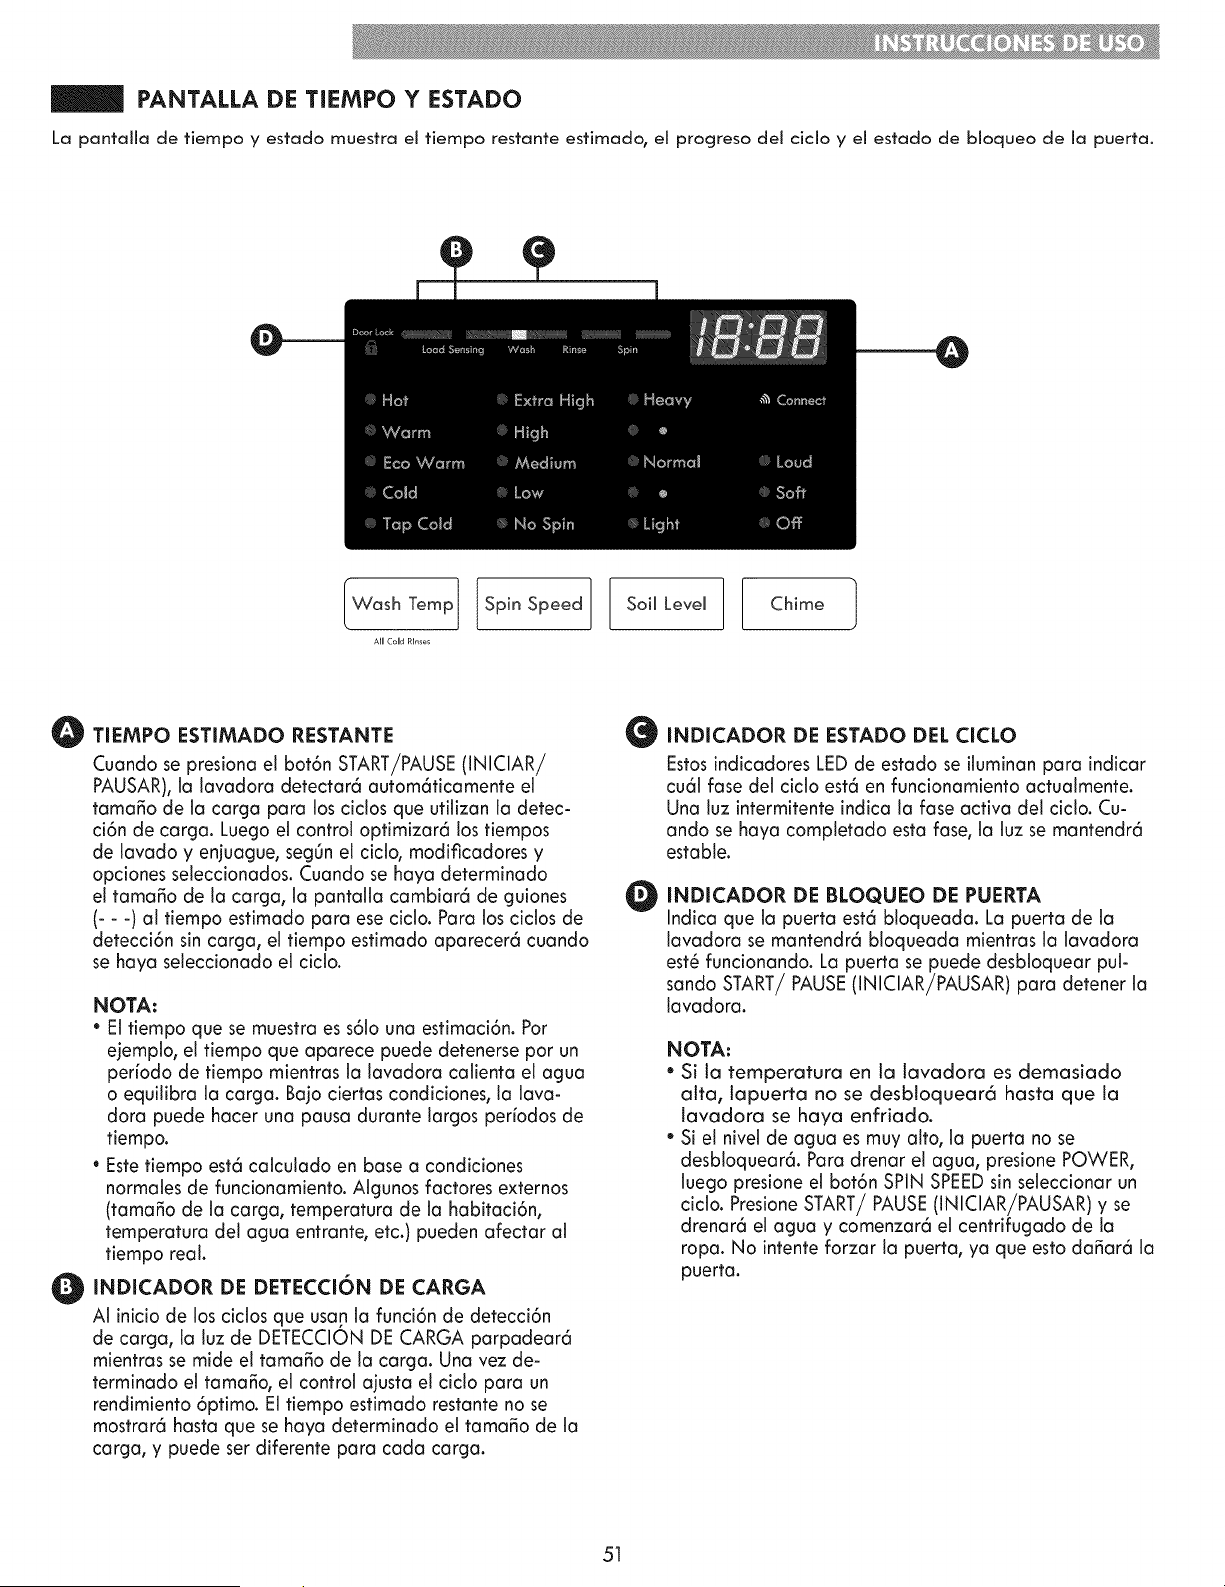
PANTALLA DE TIEMPO Y ESTADO
La pantalla de tiempo y estado muestra el tiempo restante estimado, el progreso del ciclo y el estado de bloqueo de la puerta.
IWoshTemo[SO'0SooeO]so,mLovem[ Chimo1
AIHCoHdRk,_÷_
O TIEMPO ESTIMADO RESTANTE @
Cuando se presiona el bot6n START/PAUSE(INICIAR!
PAUSAR),la lavadora detectar6 autom6ficamente el
tama_o de la carga para los ciclos que utilizan la detec-
ci6n de carga. Luego el control optimizar6 los tiempos
de lavado y enjuague, segOnei cicio, modificadores y
opciones seleccionados. Cuando se haya determinado
el tama_o de la carga, la pantalla cambiar6 de guiones
(- - -) al tiempo estimado para ese ciclo. Para los ciclos de
detecci6n sin carga, el tiempo estimado aparecer6 cuando
se haya seleccionado el ciclo.
NOTA:
* El tiempo que se muestra es s61ouna estimaci6n. Por
ejemplo, el tiempo que aparece puede detenerse por un
perfodo de tiempo mientras la lavadora calienta el agua
o equilibra la carga. Bajo ciertas condiciones, la lava-
dora puede hacer una pausa durante largos perfodos de
tiempo.
* Estetiempo est6 calculado en base a condiciones
normales de funcionamiento. Algunos factores externos
(tama_o de la carga, temperatura de la habitaci6n,
temperatura del agua entrante, etc.) pueden afectar al
tiempo real.
O NDICADOR DE DETECCION DE CARGA
Ai inicio de los cicios que usan ia funci6n de detecci6n
de carga, la luz de DETECCION DE CARGA parpadear6
mientras se mide el tama_o de la carga. Una vez de-
terminado el tama_o, el control ajusta el ciclo para un
rendimiento 6ptimo. El tiempo estimado restante no se
mostrar6 hasta que se haya determinado el tama_o de la
carga, y puede ser diferente para cada carga.
INDICADOR DE ESTADO DEL CICLO
Estosindicadores LED de estado se iluminan para indicar
cu61fase del ciclo est6 en funcionamiento actualmente.
Una luz intermitente indica la fase activa del ciclo. Cu-
ando se haya completado esta fase, la luz se mantendr6
estable.
INDICADOR DE BLOQUEO DE PUERTA
Indica que ia puerta est6 bioqueada. La puerta de ia
lavadora se mantendr6 bloqueada mientras la lavadora
est6 funcionando. La puerta se puede desbloquear pul-
sando START/PAUSE (INICIAR/PAUSAR) para detener la
lavadora.
NOTA:
* Si la temperatura en la tavadora es demasiado
alta, lapuerta no se desbtoquear6 hasta que la
tavadora se haya enfriado.
* Si el nivel de agua es muy alto, la puerta no se
desbloquear6. Para drenar el agua, presione POWER,
luego presione el bot6n SPIN SPEEDsin seleccionar un
ciclo. Presione START/PAUSE (INICIAR/PAUSAR) y se
drenar6 el agua y comenzar6 el centrifugado de la
ropa. No intente forzar la puerta, ya que esto da_ar6 la
puerta.
51
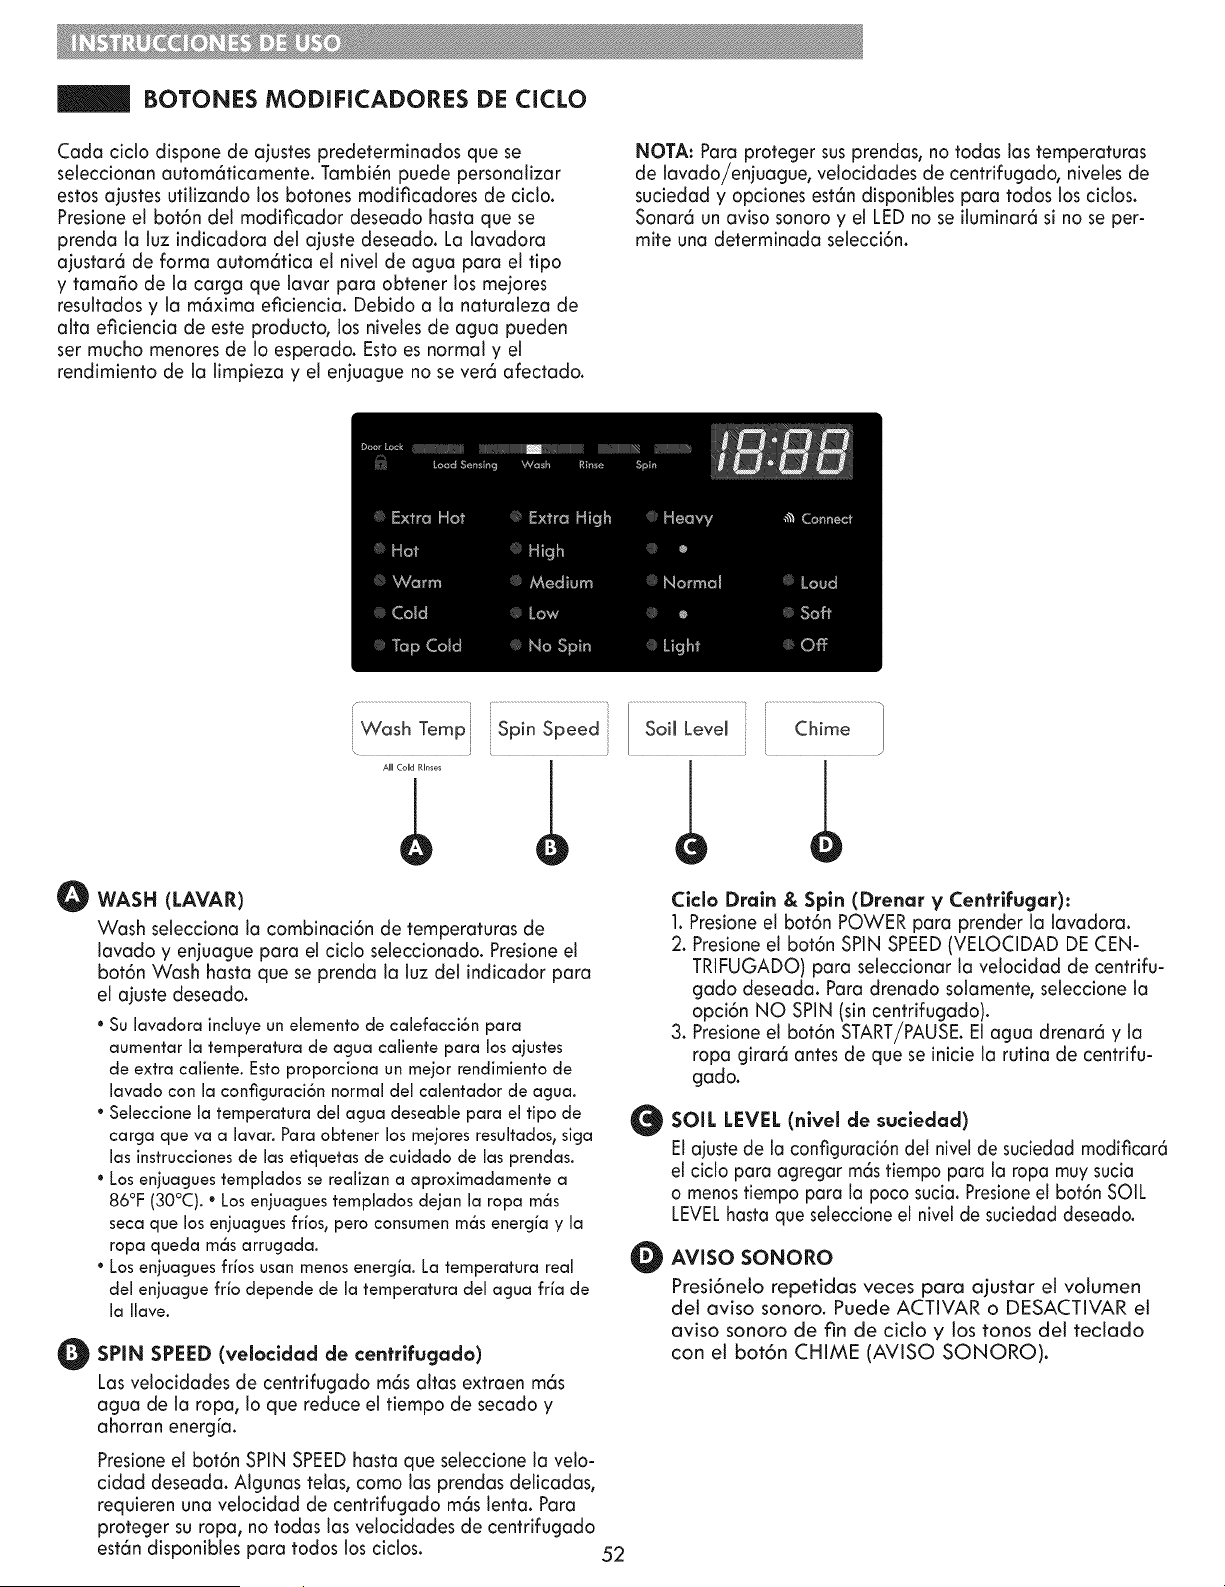
BOTONES MODIFICADORES DE CICLO
Cada ciclo dispone de ajustes predeterminados que se
seleccionan autom6ficamente. Tambi6n puede personalizar
estos ajustes utilizando los botones modificadores de ciclo.
Presione el bot6n del modificador deseado hasta que se
prenda la luz indicadora del ajuste deseado. La lavadora
ajustar6 de forma autom6tica el nivel de agua para el fipo
y tama_o de la carga que lavar para obtener los mejores
resultados y la m6xima eficiencia. Debido a la naturaleza de
alta eficiencia de este producto, los niveles de agua pueden
ser mucho menores de Io esperado. Esto es normal y ei
rendimiento de la limpieza y el enjuague no se ver6 afectado.
NOTA: Para proteger sus prendas, no todas las temperaturas
de lavado!enjuague, velocidades de centrifugado, niveles de
suciedad y opciones est6n disponibles para todos los cicios.
Sonar6 un aviso sonora y el LED no se iluminar6 si no se per-
mite una determinada selecci6n.
Wash Temp _ iiSpin Speed Soil Level Chime
. _ [
O WASH (LAVAR)
Wash selecciona la combinaci6n de temperaturasde
lavado y enjuague para el ciclo seleccionado. Presione el
bot6n Wash hasta que se prenda la luz del indicador para
el ajuste deseado.
* Su lavadora incluye un elemento de calefacci6n para
aumentar la temperatura de agua caliente para los ajustes
de extra caliente. Esto proporciona un mejor rendimiento de
lavado con la conflguraci6n normal del calentador de agua.
* Seleccionela temperatura del agua deseable para el tipo de
carga queva a lavar. Para obtener los mejoresresultados_siga
las instruccionesde lasetiquetas de cuidado de las prendas.
* Losenjuaguestemplados se realizan a aproximadamente a
86°F (30°C).* Losenjuaguestemplados dejan la ropa m6s
secaque losenjuaguesfrios_peroconsumenm6s energia y la
ropa queda m6sarrugada.
" Losenjuaguesfibs usanmenosenergia. La temperatura real
del enjuague frb depende de la temperatura del agua frfa de
la llave.
O SPIN (velacldad centrifugado)
SPEED
de
Las velocidades de centrifugado m6s altas extraen m6s
agua de la ropa, io que reduce ei tiempo de secado y
ahorran energfa.
O
O
Cicla Drain & Spin (Drenar y Centrifugar):
1. Presione el bot6n POWER para prender la lavadora.
2. Presione el bot6n SPIN SPEED(VELOCIDAD DE CEN-
TRIFUGADO) para seleccionar la velocidad de centrifu-
gado deseada. Para drenado solamente, seleccione la
opci6n NO SPIN (sin centrifugado).
3. Presione el bot6n START/PAUSE.El agua drenar6 y la
ropa g_rar6 antes de que se inicie la rutina de centrifu-
gado.
SOIL LEVEL (nlvel de sucieclad)
Elajuste de la configuraci6n del nivel de suciedad modificar6
el ciclo para agregar m6s tiempo para la ropa muy sucia
o menos tiempo para la poco sucia. Presioneel bot6n SOIL
LEVELhasta que seleccioneel nivel de suciedad deseado.
AVISO SONORO
Presi6nelo repetidas veces para ajustar et votumen
del aviso sonora. Puede ACTIVAR o DESACTIVAR el
aviso sonora de fin de ciclo y los tonos del teclado
con el bot6n CHIME (AVISO SONORa).
Presione el bot6n SPIN SPEED hasta que seleccione la velo-
cidad deseada. Algunas telas, coma las prendas delicadas,
requieren una veiocidad de centrifugado m6s ienta. Para
proteger su ropa, no todas ias velocidades de centrifugado
est6n disponibies para todos los cicios.
52

CICLOS Y OPCIONES DE VAPOR
Opci6n AI_iADIR VAPOR
Los ciclos de VAPOR incluyen (Renovar con vapor), Normal!
Casual, Bulky!Bedding (Prendas voluminosas y de cama), ropa
infantil, Heavy Duty (Mucha suciedad), Sanatize y Whitest
Whites (Blancos m6s blancos). AI afiadir vapor a estos ciclos,
se obtiene un rendimiento de limpieza mayor al mismo tiempo
que reduce el consumo de energia y agua. Con el uso de un
rocb de vapor caliente y agua frfa, los tejidos obtienen los
beneficios de un lavado s6per caliente, sin el uso de energfa o
dafio potencial a los tejidos.
Para AI_IADIR VAPOR a un cido:
Prenda ta tavadora (posici6n ON) y gire la peritla
del selector para seteccionar un ciclo que permita
ta opci6n de vapor.
O Presione et bot6n A_,IADIR VAPOR. La lavadora
establecer6 autom6ticamente los ajustes de ciclo.
O Ajuste cualquier otra opci6n
deseada.
Presione el bot6n START/PAUSE para que comience
O el ciclo.
PRECAUCI6N:
La puerta puede estar muy caliente durante los ciclos de va-
por. Estoes normal.
No intente anular el mecanismo de cierre de la puerta o meter
al s manos en la lavadora durante un ciclo de vapor. El vapor
puede ocasionar graves quemaduras.
NOTAS IMPORTANTES SOBRELOS CICLOS DE VAPOR:
• El vapor puede no ser visible durante los ciclos de vapor. Esto
es normal.
• No utilice vapor con tejidos deJicados como la lana, seda o
teJas que se descoloran f6cilmente.
53
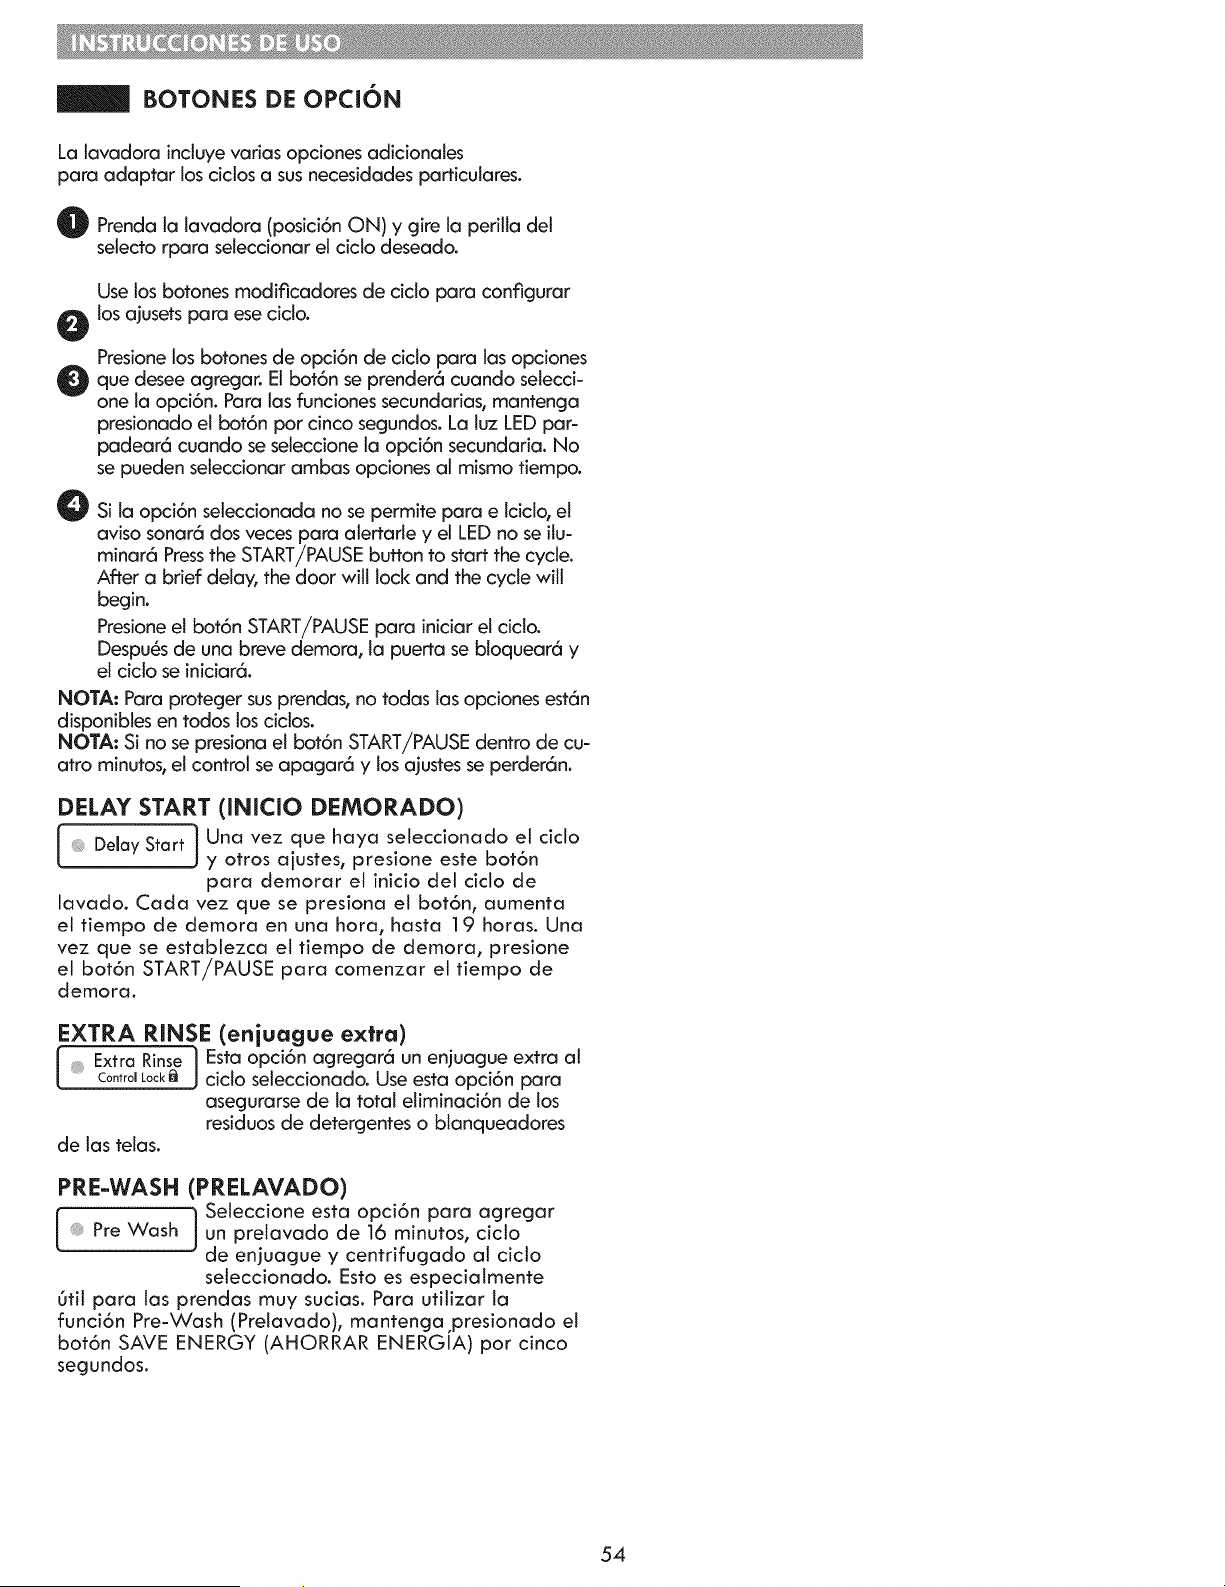
BOTONES DE OPCi6N
La lavadora induye varias opciones adicionales
para adaptar los cictos a sus necesidades particulares.
O Prenda ta lavadora (posici6n ON) y gire la perilla del
selecto rpara seleccionar el cicto deseado.
Use los botones modificadores de cido para configurar
O tos ajusets para ese cido.
Presione los botones de opci6n de cido para las opciones
O que desee El bot6n prender6 cuando selecci-
agregaro
se
one la opci6n. Para tas funciones secundarias, mantenga
presionado el bot6n por cinco segundos. La tuz LED par-
padear6 cuando se seleccione la opci6n secundaria. No
se pueden seteccionar ambas opciones al mismo tiempo.
O Si la opci6n seteccionada no se permite para e lcicto, el
aviso sonar6 dos veces para alertarte y el LED no se ilu-
minar6 Pressthe START/PAUSE button to start the cycle.
After a brief delay, the door will lock and the cycle will
begin.
Presioneet bot6n START/PAUSE para iniciar et ciclo.
Despu6s de una breve demora, la puerta se bloquear6 y
el cicto se iniciar6.
NOTA: Para proteger susprendas, no todas las opciones est6n
disponibles en todos los cidos.
NOTA: Si no se presiona et bot6n START/PAUSEdentro de cu-
atro minutos, el control se apagar6 y los ajustes se perder6n.
DELAY START (INICIO DEMORADO)
_. Delay Start i Una vez que haya seleccionado el ciclo
J
y otros ajustes, presione este bot6n
para demorar el inicio del ciclo de
lavado. Cada vez que se presiona el bot6n, aumenta
el tiempo de demora en una hora, hasta 19 horas. Una
vez que se establezca el tiempo de demora, presione
el bot6n START/PAUSE para comenzar el tiempo de
demora.
EXTRA RINSE (enjuague extra)
. Extra Rinse I Estaopci6n agregar6 un enjuague extra al
Control Lockl_ J cido seleccionado. Use esta opci6n para
asegurarse de la total etiminaci6n de los
residuos de detergentes o blanqueadores
de las telas.
PRE-WASH (PRELAVADO)
un prelavado de 16 minutos, ciclo
de enjuague y centrifugado at cicto
seleccionado. Esto es especialmente
Otil para tas prendas muy sucias. Para utilizar ta
funci6n Pre-Wash (Prelavado), mantenga presionado et
bot6n SAVE ENERGY (AHORRAR ENERGIA) por cinco
segundos.
54
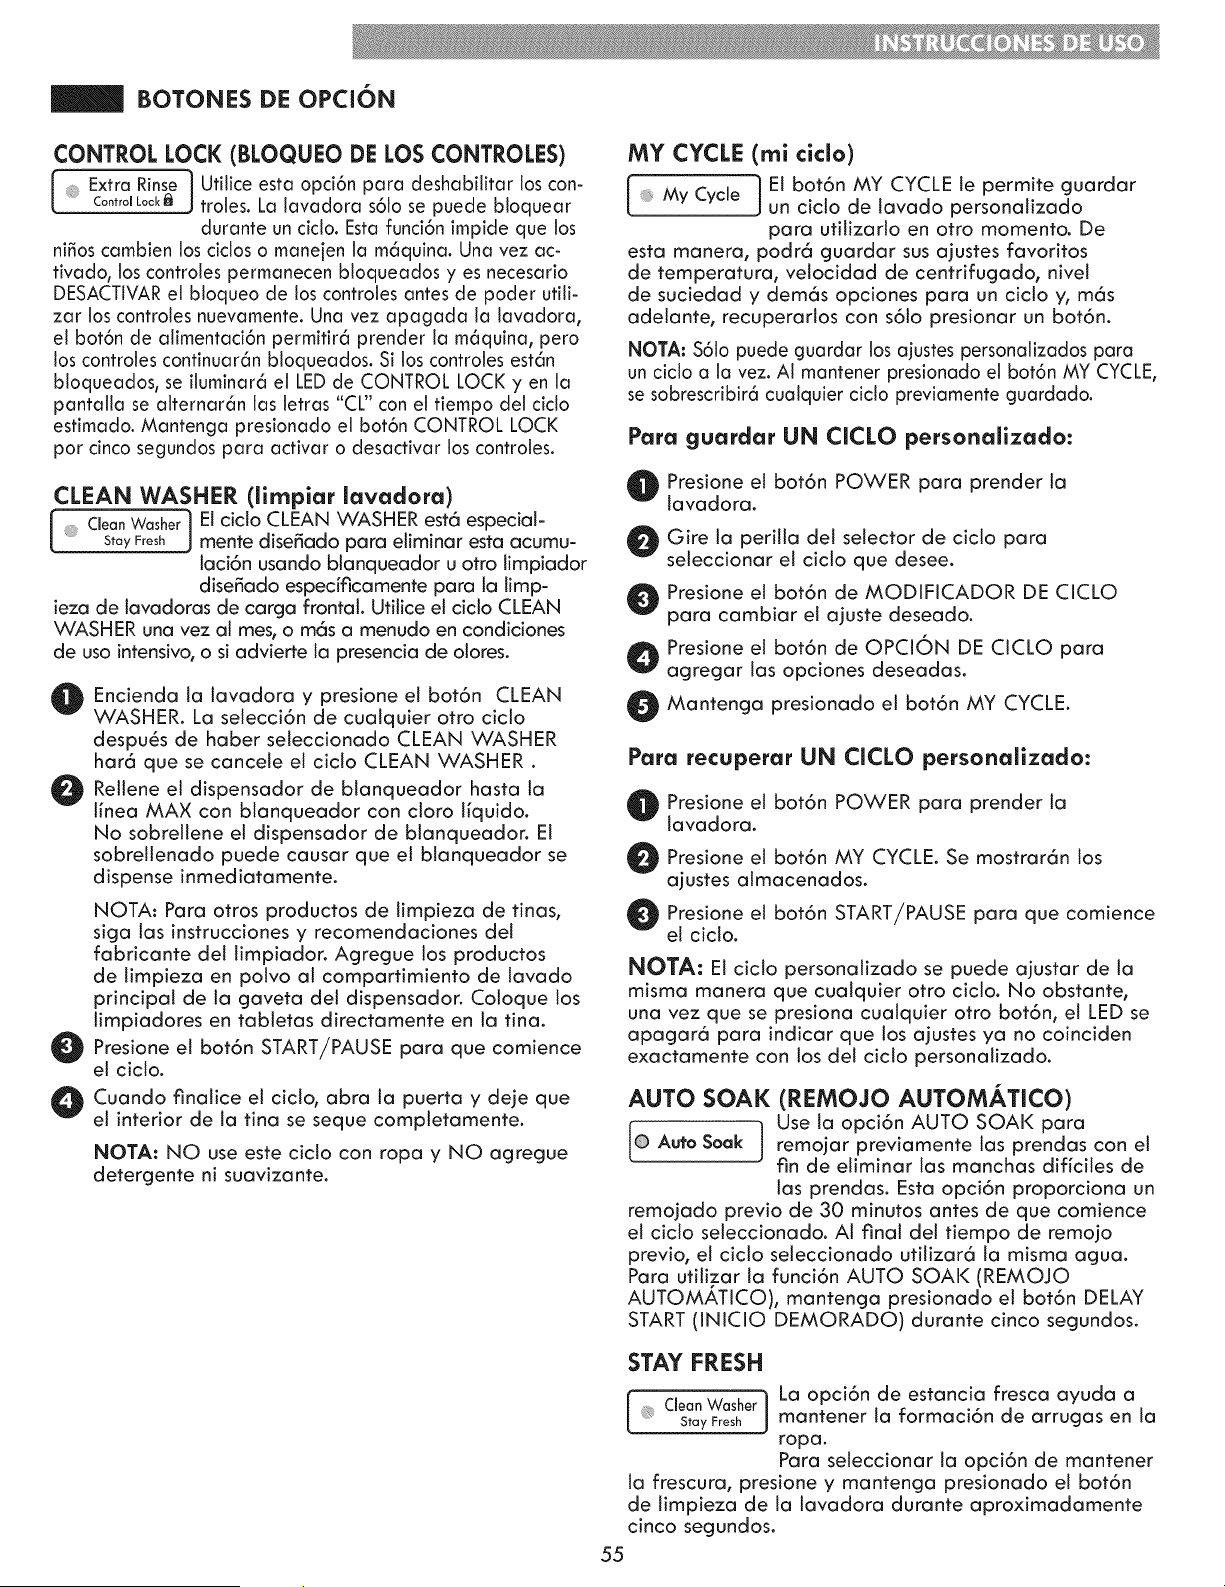
BOTONES DE OPCiON
CONTROL LOCK (BLOQUEO DE LOS CONTROLES)
Extra Rinse | Utilice esta opci6n para deshabilitar los con-
ControILook_lJ troJes. La lavadora s61ose puede bJoquear
durante un cicJo. Estafunci6n [mpide que los
ni_os camb[en los cicJoso mane[en la m6quina. Una vez ac-
tivado r los controles permanecen bJoqueados yes necesar[o
DESACTIVARel bloqueo de los controJes antes de poder utili-
zar los controles nuevamente. Una vez apagada la Javadora r
el bot6n de aJimentaci6n permitir6 prender la m6quinar pero
los controles continuar6n bJoqueados. Si los controles est6n
bloqueadosr se iJuminar6el LEDde CONTROL LOCK yen la
pantalla se alternar6n las letras "CL" con el tiempo del cicJo
estimado. Mantenga presionado el bot6n CONTROL LOCK
pot cinco segundos para activar o desactivar los controles.
CLEAN WASHER (lirnpiar lavadora)
Clean Washer] El cJdo CLEAN WASHER est6 especial-
StayFresh J mente disefiado para eliminar esta acumu-
laci6n usando blanqueador u otro limpiador
disefiado especMcamente para ia timp-
ieza de lavadoras de carga frontal. Utilice el ciclo CLEAN
WASHER una vez al mes, o m6s a menudo en condiciones
de uso intensivo, o si advierte la presencia de olores.
O Encienda ta lavadora presione e[ bot6n CLEAN
Y
WASHER. La selecci6n de cualquier otro cicto
despu6s de haber seleccionado CLEAN WASHER
har6 que se cancele el ciclo CLEAN WASHER.
O ettene et dispensador de blanqueador hasta la
l[nea MAX con blanqueador con cloro l_quido.
No sobrellene el dispensador de blanqueador. El
sobrellenado puede causar que el blanqueador se
dispense inmediatamente.
NOTA: Para otros productos de limpieza de tinas,
siga tas instrucciones y recomendaciones del
fabricante del timpiador. Agregue los productos
de limpieza en polvo al compartimiento de tavado
principal de la gaveta del dispensador. Cotoque los
limpiadores en tabtetas directamente en la tina.
Presione el bot6n START/PAUSE para que comience
O el ciclo.
O Cuando finalice el ciclo, abra la puerta y deje que
el interior de la tina se seque completamente.
NOTA: NO use este cicto con ropa y NO agregue
detergente ni suavizante.
MY CYCLE (mi ¢i¢1o)
1El bot6n MY CYCLE [e permite guardar
My Cycle
J
un ciclo de lavado personalizado
para utilizarto en otro momento. De
esta manera, podr6 guardar sus ajustes favoritos
de temperatura, velocidad de centrifugado, nivel
de suciedad y dem6s opciones para un ciclo y, m6s
adelante, recuperartos con s61o presionar un bot6n.
NOTA: $61o puede guardar los ajustes personalizados para
un ciclo a la vez. AI mantener presionado el bot6n MY CYCLEr
se sobrescribir6 cualquier ciclo previamente guardado.
Para guardar UN CICLO personalizado:
O resione el bot6n POWER para prender la
tavadora.
O ire la peritla del selector de ciclo para
seleccionar el ciclo que desee.
O resione el bot6n de MODIFICADOR DE CICLO
para cambiar el ajuste deseado.
O resione el bot6n de OPCI()N DE CICLO para
agregar las opciones deseadas.
O Mantenga presionado el bot6n MY CYCLE.
Para recuperar UN CICLO personalizado:
O Presione el bot6n POWER prender la
para
tavadora.
O resione el bot6n MY CYCLE. Se mostrar6n los
ajustes almacenados.
Presione el bot6n START/PAUSE para que comience
O el ciclo.
NOTA: El ciclo personalizado se puede ajustar de ta
misma manera que cualquier otro ciclo. No obstante,
una vez que se presiona cualquier otro bot6n, el LED se
apagar6 para indicar que los ajustes ya no coinciden
exactamente con los del cicto personatizado.
AUTO SOAK (REMOJO AUTOMATICO)
If0 A k J'l Use ta opci6n AUTO SOAK para
U!QS°a remojar previamente las prendas con el
fin de eliminar las manchas dificiles de
tas prendas. Esta opci6n proporciona un
remojado previo de 30 minutos antes de que comience
el ciclo seleccionado. AI final del tiempo de remojo
previo, el cicto seteccionado utilizar6 ta misma agua.
Para utilizar la funci6n AUTO SOAK (REMOJO
AUTOMATICO), mantenga presionado el bot6n DELAY
START (INICIO DEMORADO) durante cinco segundos.
STAY FRESH
Clean Washer] La opci6n de estancia fresca ayuda a
StayFresh J mantener la formaci6n de arrugas en la
ropa.
Para seleccionar la opci6n de mantener
la frescura, presione y mantenga presionado el bot6n
de timpieza de la lavadora durante aproximadamente
cinco segundos.
55
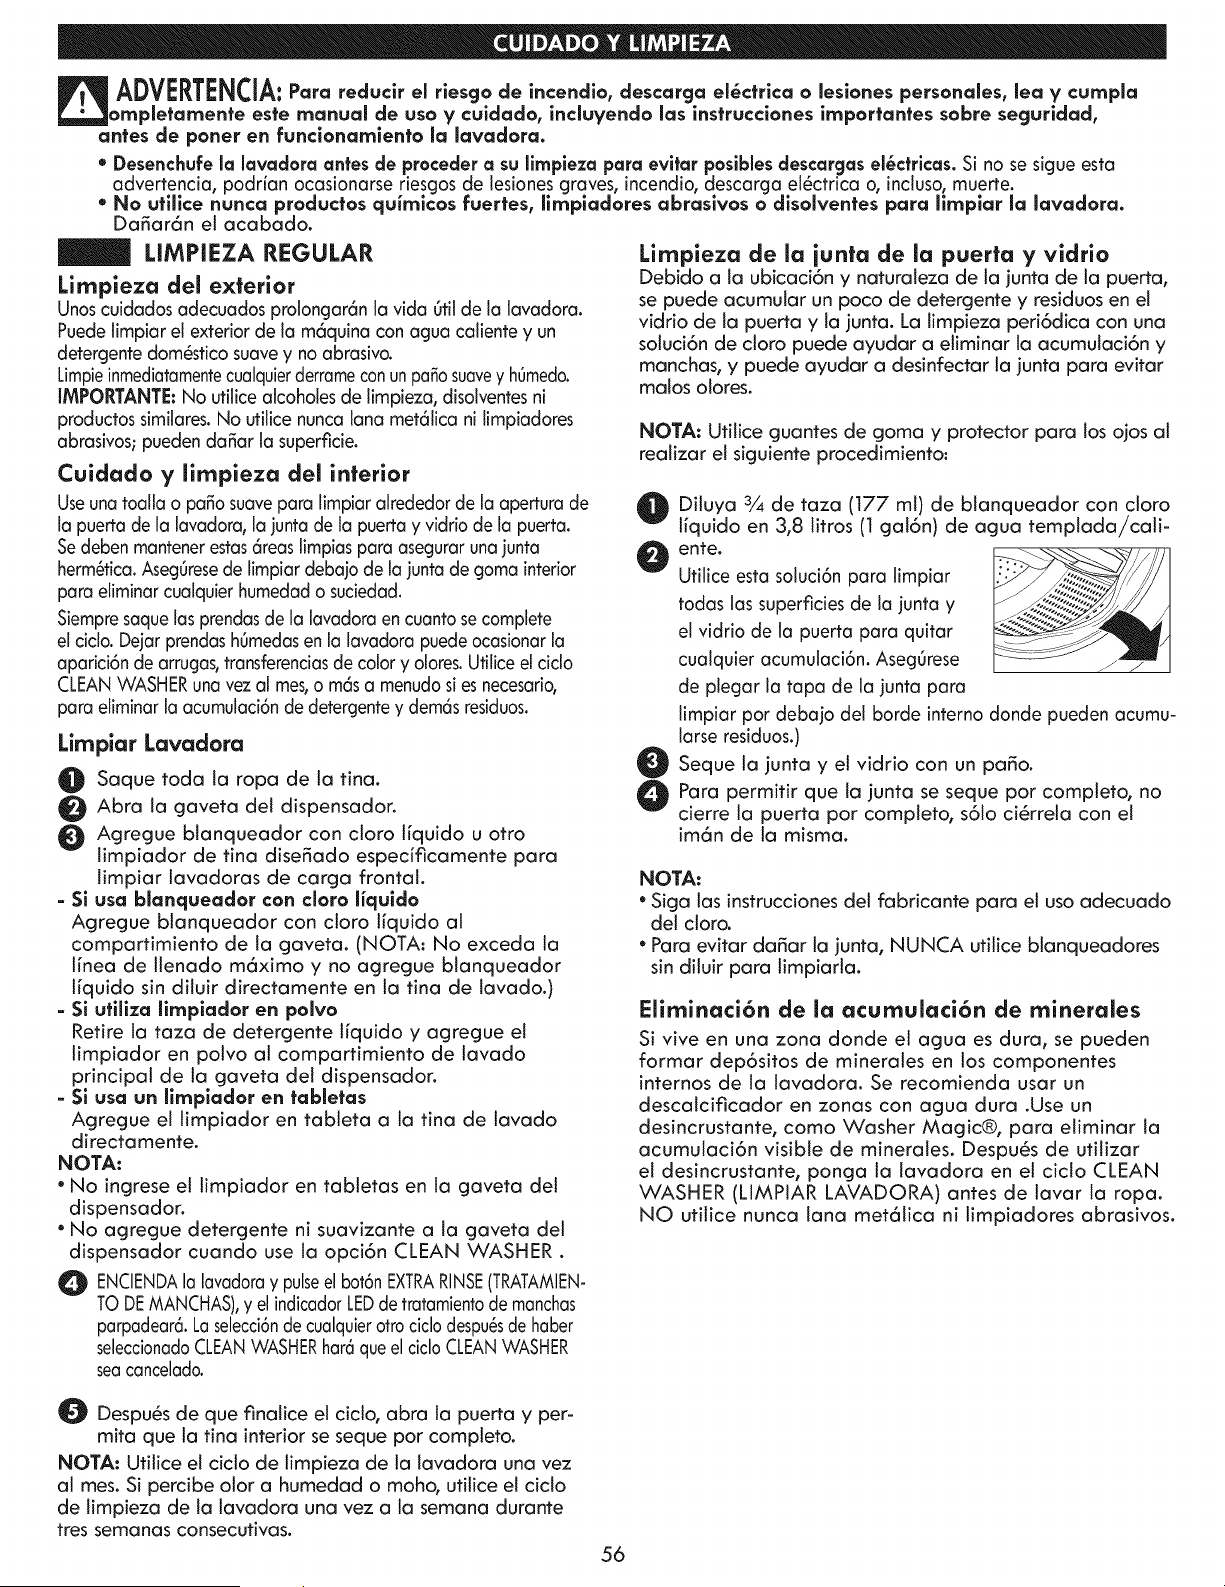
ADVERTENCIA:Paroreauci el iesgodei=e,alo,ae==goel ct icoo leslo,esperso,oles,leoVcumpIo
ompMamente este manual de usa y culdado, incluyendo los instrucciones importantes sabre seguridad,
antes de poner en funcionamienb la lavadora.
, Desenchufe Io Iavadoro antes de proceder o su llmplezo paro evltar poslblesdescargas el_ctrlcas. Si no se sigue esta
advertencia, podr[an ocasionarse riesgos de lesiones graves, incendio,descarga eJ6ctrica o, incJuso,muerte.
* No utilice nunca productos quimlcos fuertes, llmpiadores abraslvos o dlsolventes para llrnpiar la lavadora.
Dahar6n el acabado.
LIMPIEZA REGULAR
Lirnpieza del exterior
Unoscuidados adecuados prolongar6n la vida Otilde la bvadora.
PuedeJimpiarel exterior de la m6quina con agua caliente y un
detergente dom6stico suavey no abrasivo.
Limpieinmediatamentecualquierderrameconunpaso suavey hOmedo.
IMPORTANff: No utilice alcoholesde limpieza, disolventesni
productos simibres. No utilice nunca bna met61icani limpiadores
abrasivos; pueden da_ar la superficie.
Cuidado y limpieza del interior
Useuna toalla o paso suavepara limpiaralrededor de la apertura de
la puerta de la lavadora, la junta de la puertay vidrio de la puerta.
Sedebenmantenerestas6reaslimpiaspara aseguraruna junta
herm6tica.Aseg0resede limpiar debaio de la junta de goma interior
para eliminarcualquier humedado suciedad.
Siempresaque las prendasde la lavadora en cuantosecomplete
el ciclo. Deiar prendash0medasen la lavadora puedeocasionarla
aparici6n de arrugas,transferenciasde color y olores.Utiiiceel ciclo
CLEANWASHERuna vez al mes,o m6sa menudosi es necesario,
para eliminar la acumulaci6nde detergentey dem6sresiduos.
Limpiar Lavadora
O Saque toda la ropa de la tina.
O Abra la gaveta del dispensador.
O Agregue btanqueador con cloro tiquido u otro
limpiador de tina disehado especificamente para
timpiar lavadoras de carga frontal.
- Si usa bianqueador con clara liquldo
Agregue blanqueador con cloro I_quido al
compartimiento de [a gaveta. (NOTA: No exceda [a
[_nea de [lenado m6ximo y no agregue blanqueador
l_quido sin diluir directamente en la tina de lavado.)
- Si ufillzo llmplador en polvo
Retire la taza de detergente I_quido y agregue el
limpiador en polvo al compartimiento de lavado
principal de la gaveta det dispensador.
- Si usa un llmpiador en tabietas
Agregue el timpiador en tableta a la tina de lavado
directamente.
NOT.&:
" No ingrese el limpiador en tabletas en la gaveta del
dispensador.
• No agregue detergente ni suavizante a ta gaveta del
dispensador cuando use la opci6n CLEAN WASHER.
O ENCIENDAla lavadoray pulseelbot6nEXTRARINSE(TRATAMIEN-
TO DEMANCHAS),y el indicadorLEDde tratamientode manchas
parpadear6.Laselecci6nde cualquierotrociclo despu6sde haber
seleccionadoCLEANWASHERhar6queel cicloCLEANWASHER
seacancelado.
Limpieza de la junta de la puerto y vidrio
Debido a la ubicaci6n y naturaleza de ta junta de la puerta,
se puede acumutar un poco de detergente y residuos en el
vidrio de ta puerta y ta junta. La limpieza peri6dica con una
solud6n de ctoro puede ayudar a etiminar la acumulaci6n y
manchas, y puede ayudar a desinfectar la junta para evitar
malos olores.
NOTA: UtiJice guantes de goma y protector para los ojos al
realizar el siguiente procedimiento:
Diluya 3¼de taza (t77 ml) de blanqueador con doro
liquido en 3,8 litros (1 gal6n) de agua templada/cali-
ente.
Utilice esta soluci6n para limpiar
todas ias superficies de la junta y
el vidrio de la puerta para quitar
cualquier acumulaci6n. Aseg0rese
de plegar la tapa de la junta para
limpiar por debajo del borde internodonde pueden acumu-
larse residuos.)
Sequela junta y el vidrio con un paho.
Para permitir que ta junta se seque por completo, no
cierre ta puerta por completo, s61o ci6rrela con el
im6n de la misma.
NOTA:
• Siga Jasinstrucciones del fabricante para el uso adecuado
det doro.
• Para evitar da5ar ta junta, NUNCA ufilice blanqueadores
sin diluir para limpiarla.
Elirninaci6n de la acumulaci6n de minerales
Si vive en una zona donde el agua es dura, se pueden
formar dep6sitos de minerales en los componentes
internos de la lavadora. Se recomienda usar un
descatcificador en zonas con agua dura .Use un
desincrustante, como Washer Magic(D, para eliminar la
acumulaci6n visible de minerales. Despu6s de utilizar
el desincrustante, ponga la lavadora en el ciclo CLEAN
WASHER (LIMPIAR LAVADORA) antes de lavar ta ropa.
NO utilice nunca lana met61ica ni limpiadores abrasivos.
Despu6s de que finalice el ciclo, abra la puerta y per-
mita que la fina interior se seque por completo.
NOTA: Utilice el ciclo de limpieza de la lavadora una vez
ai rues. Si percibe olor a humedad o moho, utiJice el cido
de limpieza de la lavadora una vez a la semana durante
tres semanas consecufivas.
56
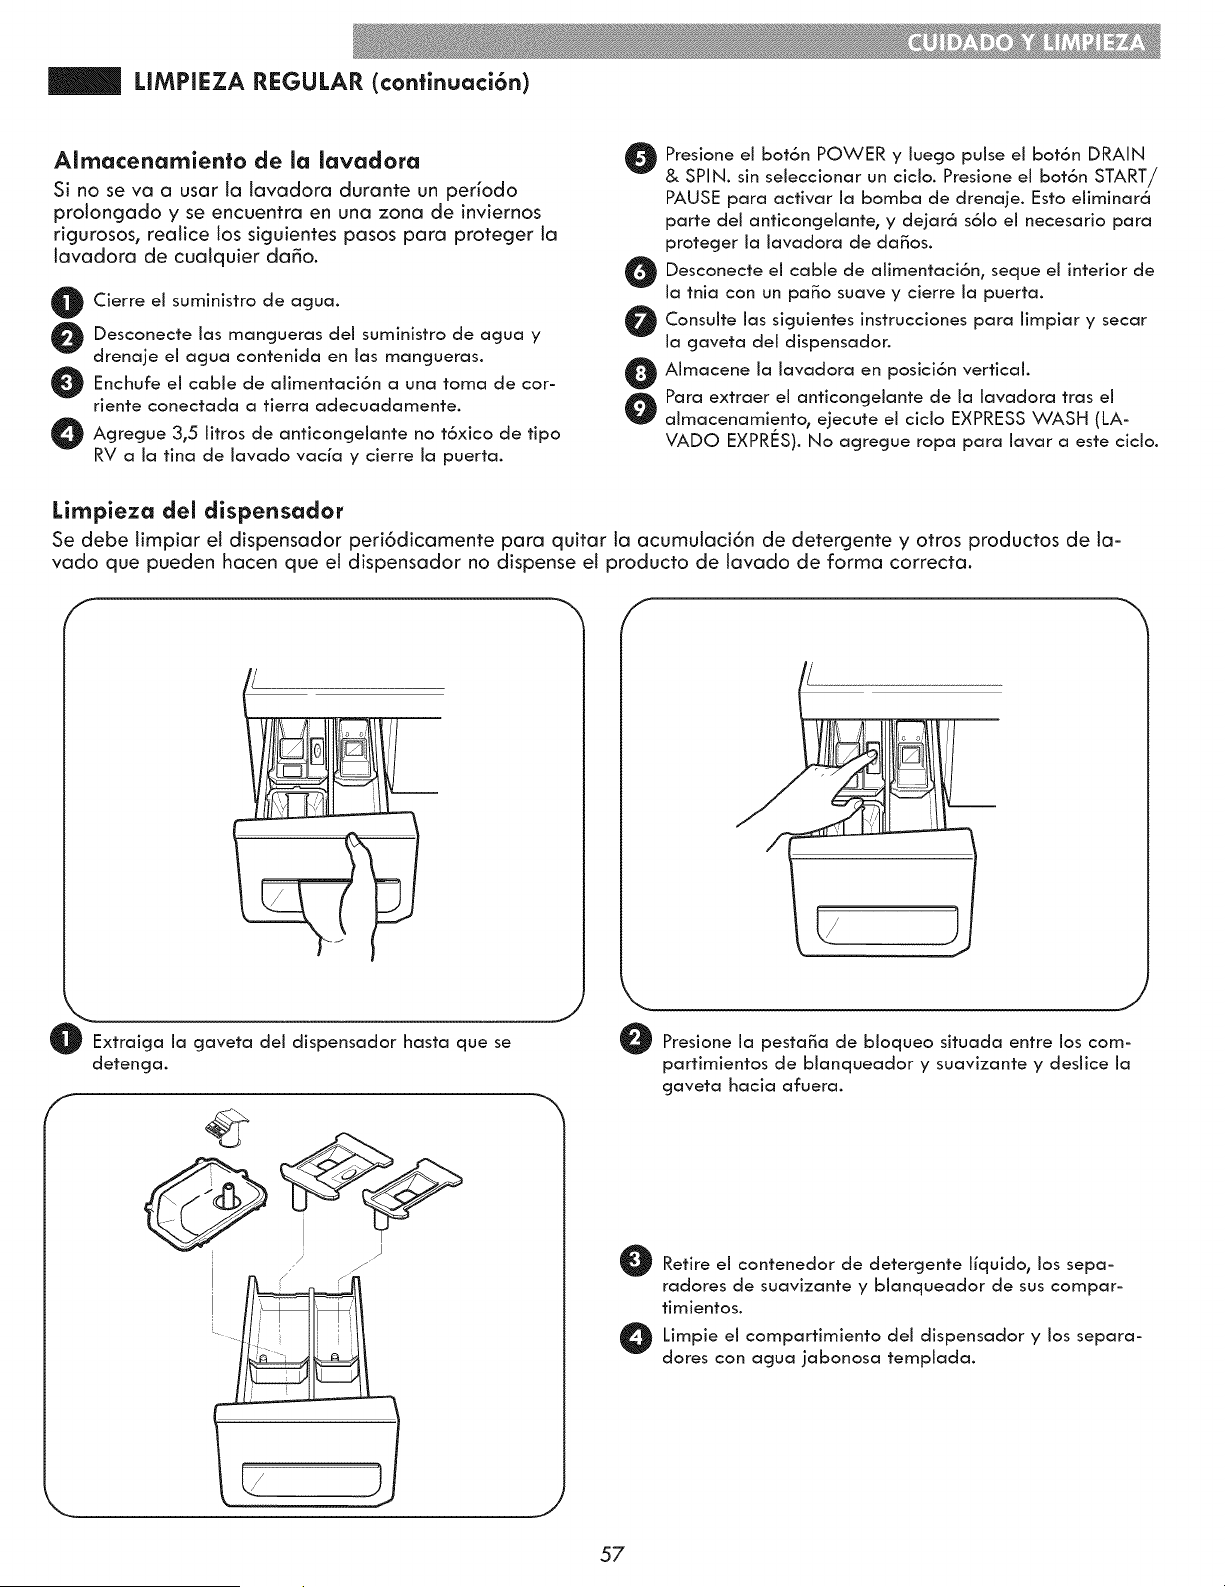
LIMPIEZA REGULAR (confinuaci6n)
AImacenamiento de la lavadora
Si no se va a usar ta tavadora durante un periodo
prolongado y se encuentra en una zona de inviernos
rigurosos, realice tos siguientes pasos para proteger la
lavadora de cualquier da_o.
O Cierre ei suministro de agua.
O esconecte las mangueras del suministro de agua y
drenaje el agua contenida en las mangueras.
O Enchufe ei cable de aiimentaci6n a una toma de cor-
riente conectada a tierra adecuadamente.
O Agregue 3,5 litros de anticongelante no t6xico de tipo
RV a la tina de lavado vacia y cierre la puerta.
O Presione ei bot6n POWER iuego pulse ei bot6n DRAIN
Y
& SPIN. sin seleccionar un cicio. Presione ei bot6n START/
PAUSE para activar ia bomba de drenaje. Esto eiiminar6
parte dei anticoncjelante, y dejar6 s6io ei necesario para
proteger ia iavadora de da_os.
O Desconecte el cable de aiimentaci6n, ei interior de
seque
ia tnia con un paso suave y cierre ia puerta.
Consuite ias siguientes instrucciones iimpiar
para Y
secar
la gaveta del dispensador.
Aimacene ia iavadora en posici6n vertical.
o Para extraer ei anticongelante de la iavadora tras el
aJmacenamiento_ ejecute el ciclo EXPRESS WASH (LA-
VADO EXPRES). No agregue ropa para lavar a este ciclo.
Limpieza del dispensador
Se debe limpiar el dispensador peri6dicamente para quitar la acumulaci6n de detergente y otros productos de Ia-
vado que pueden hacen que el dispensador no dispense el producto de iavado de forma correcta.
J
Extraicja ia cjaveta del dispensador hasta que se
detencja.
f
J
Presione ia pesta_a de bloqueo situada entre los com-
partimientos de bianqueador y suavizante y deslice la
gaveta hacia afuera.
O Retire ei contenedor de detercjente i[quido, los sepa-
radores de suavizante y blanqueador de sus compar-
timientos.
O Limpie el compartimiento del dispensador los
Y separa-
dores con agua jabonosa templada.
57
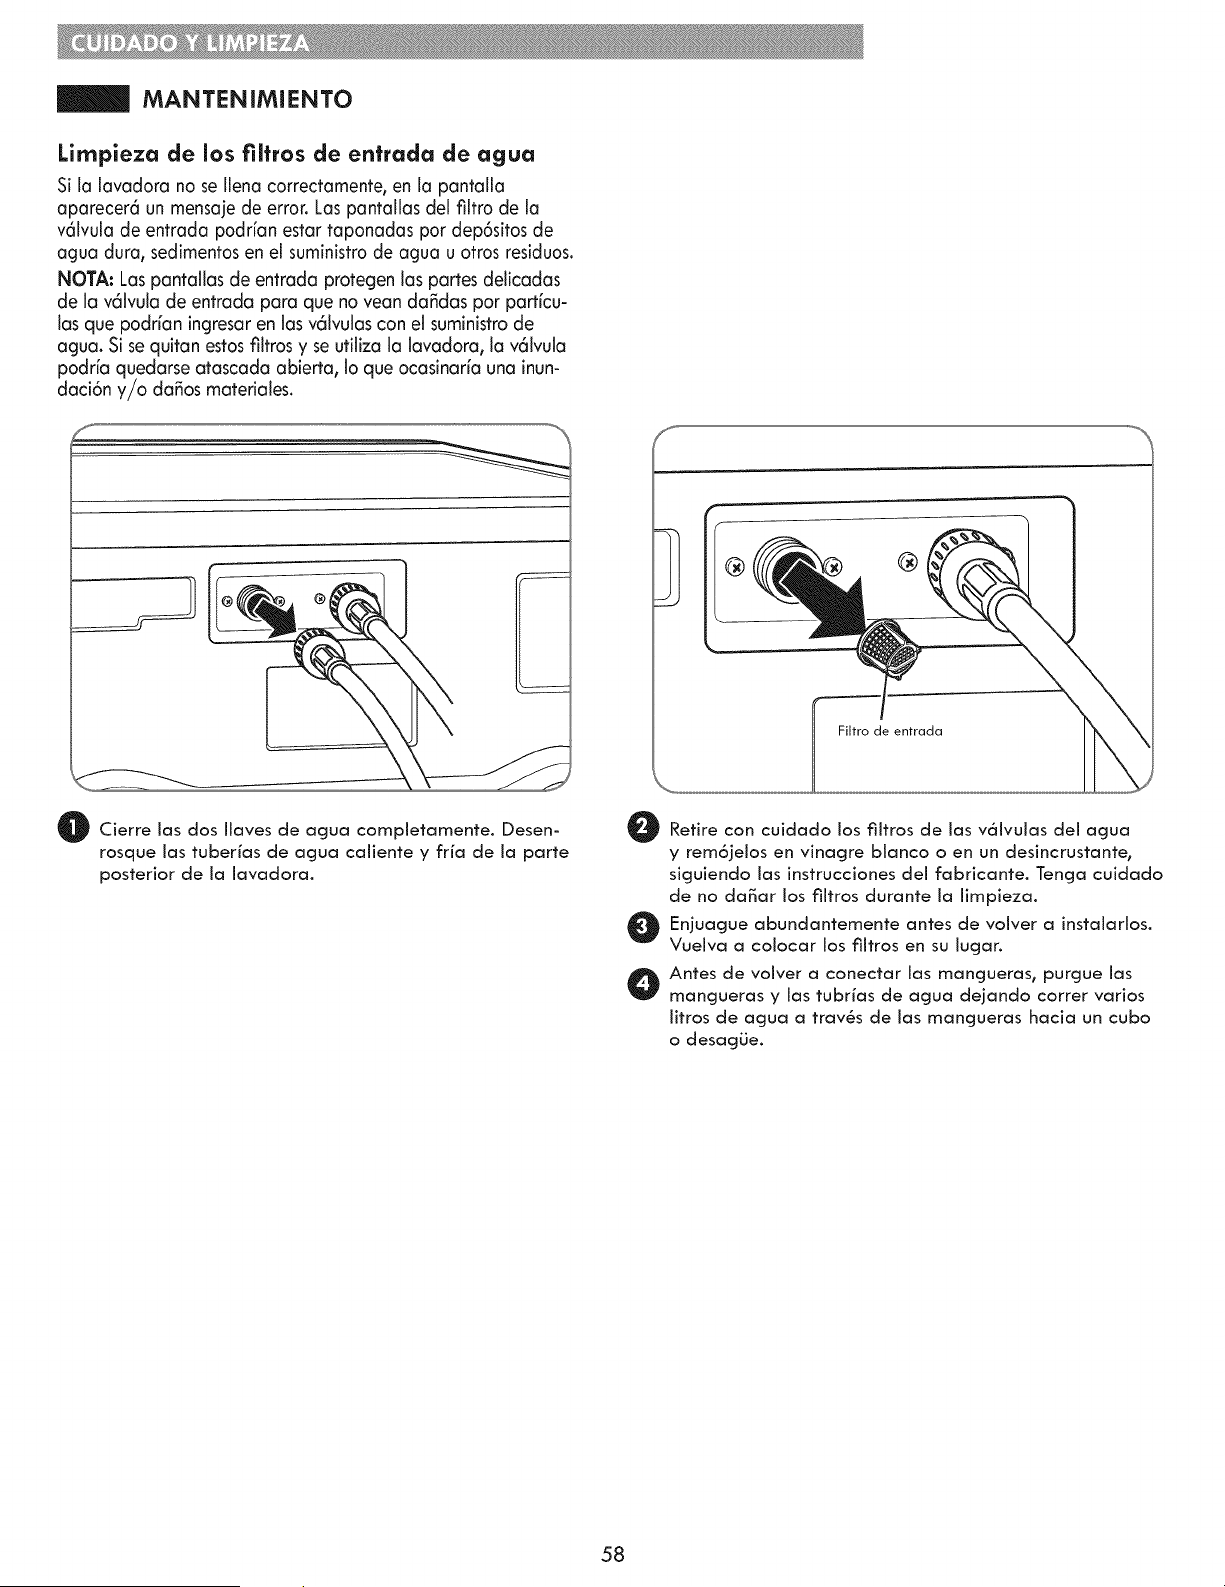
MANTENiMIENTO
Lirnpieza de los filtros de enffada de agua
Si la lavadora no se llena correctamente, en la pantalla
aparecer6 un mensa]e de error. Los pantaJJas deJ fiJtro de Ja
v6JvuJa de entrada podrfan estar taponadas pot dep6sitos de
agua dura, sedJmenfos en el suministro de agua u otros residuos.
NOTA: Las pantaJlas de entrada protegen las partes deJicadas
de Jav6lvuJa de entrada para que no vean da_das pot parffcu-
Jasque podr_an ingresar en las v6JvuJascon eJ suministro de
agua. Si se quitan estos filtros y se utiliza la lavadora, la v61vula
podrfa quedarse atascada abierta, Joque ocasinarfa una inun-
daci6n y/o da_os materiales.
f
@ @
Filtro de entrada
O Cierre las dos Ilaves de agua completamente, Desen-
rosque ias tuberias de agua caliente y fria de ia parte
posterior de ia iavadora.
O Retire con cuidado los filtros de las v_lvulas del agua
y rem6]elos en vinagre bianco o en un desincrustante,
siguiendo ias instrucciones del fabricante. Tenga cuidado
de no daBar los filtros durante la limpieza.
O n]uague abundantemente antes de voiver a instalarios.
Vuelva a colocar los fiitros en su lugar.
O Antes de voiver a conectar las mangueras, purgue las
rnangueras y las tubrias de agua dejando correr varios
iitros de agua a tray,s de las mangueras hacia un cubo
o desagLie.
58
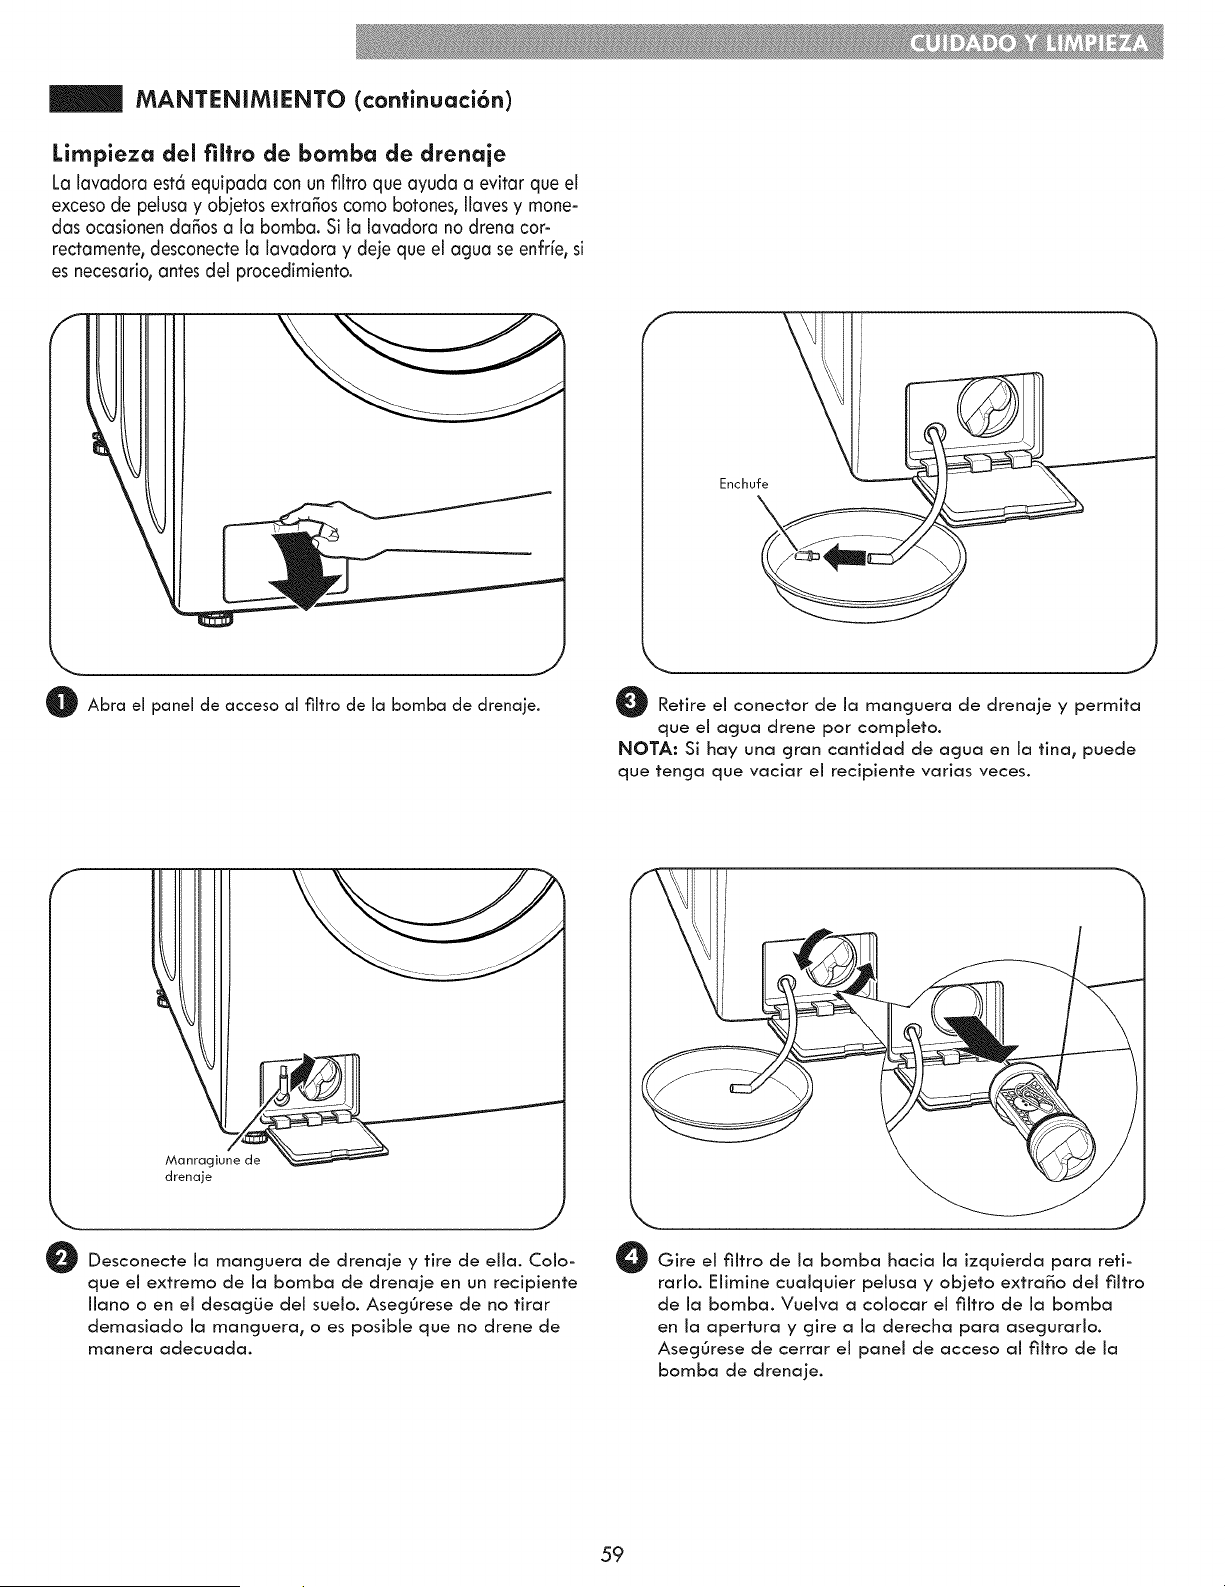
MAN'rENIMIENTO (confinuaci6n)
Lirnpieza del filtro de bornba de drenaje
La lavadora est6 equipada con un filtro que ayuda a evitar que el
exceso de pelusa y ob]etos extra_os como botones, Ilaves y mone-
das ocasionen da_os a la bomba. Si la lavadora no drena cor-
rectamente, desconecte la lavadora y de]e que el agua se enfrfe, si
es necesario, antes del procedimiento.
Abra el panel de acceso al filtro de la bomba de drenaje.
Enchufe
O Retire el conector de la manguera de drenaje y permita
que el acjua drene por completo.
NOTA: Si hay una cjran cantidad de agua en la tina0 puede
que tencja que vaciar el recipiente varias veces.
Manragiune de
drenaje
J
O Desconecte la manguera de drenaje y tire de ella. Coio-
que el extremo de la bornba de drenaje en un recipiente
llano o en el desagLie dei suelo. Aseg0rese de no tirar
demasiado la manguera_ o es posible que no drene de
manera adecuada.
O Gire ei fiitro de ia bomba hacia ia izquierda para reti-
rarJo. Eiimine cualquier pelusa y objeto extra_o del filtro
de la bomba. Vueiva a colocar el fiitro de la bomba
en la apertura y cjire a la derecha para asecjurarlo.
Asecj0rese de cerrar el panel de acceso al filtro de la
bomba de drenaje.
59
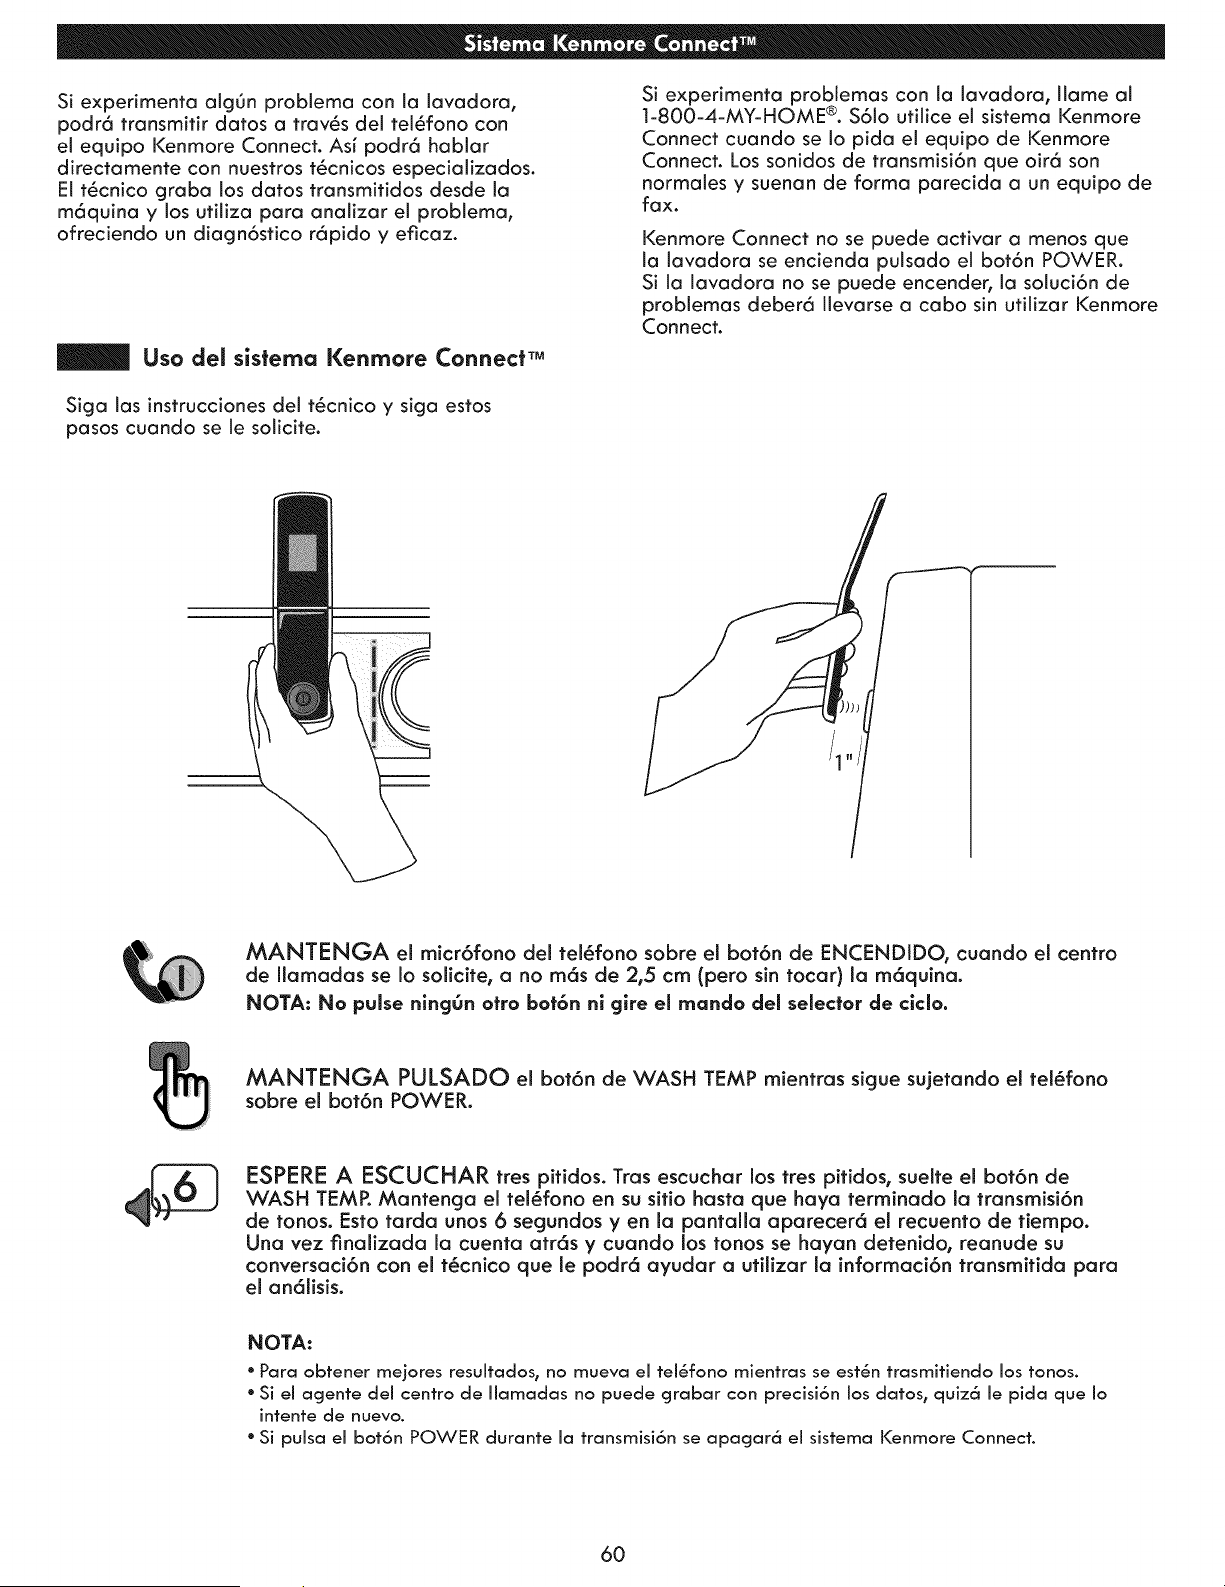
Si experimenta algOn problema con la lavadora,
podr6 transmifir datos a trav6s del tel6fono con
el equipo Kenmore Connect. Asi podr6 hablar
directamente con nuestros t6cnicos especializados.
El t6cnico graba los datos transmifidos desde la
m6quina y los utiliza para analizar el problema,
ofreciendo un diagn6stico r6pido y eficaz.
Uso del sistema Kenmore Connec| TM
Si experimenta problemas con la lavadora, Ilame ai
1-800-4-MY-HOME ®. S6io utilice el sistema Kenmore
Connect cuando se io pida el equipo de Kenmore
Connect. Los sonidos de transmisi6n que oir6 son
normales y suenan de forma parecida a un equipo de
fax.
Kenmore Connect no se puede activar a menos que
la lavadora se encienda pulsado el bot6n POWER.
Si la lavadora no se puede encender, la soluci6n de
problemas deber6 Ilevarse a cabo sin utilizar Kenmore
Connect.
Siga las instrucciones del t6cnico y siga estos
pasos cuando se le solicite.
MANTENGA el micr6fono del tel6fono sobre el bot6n de ENCENDIDO, cuando el centro
de Ilamadas se Io solicite, a no m6s de 2,5 cm (pero sin tocar) la m6quina.
NOTA: No pulse nlng_n otto bot6n nl glre el rnando del selector de clclo.
MANTENGA PULSADO el bot6n de WASH TEMP mientras sigue sujetando el tel6fono
sobre el bot6n POWER.
ESPERE A ESCUCHAR tres pitidos. Tras escuchar los tres pitidos, suelte el bot6n de
WASH TEMP. Mantenga el tel6fono en su sitio basra que haya terminado la transmisi6n
de tonos. Esto tarda unos 6 segundos yen la pantalla aparecer6 el recuento de fiempo.
Una vez finalizada la cuenta atr6s y cuando los tonos se hayan detenido, reanude su
conversaci6n con el t6cnico que le podr6 ayudar a utilizar la informaci6n transmitida para
el an61isis.
NOTA:
* Para obtener mejores resultados, no mueva el tel_fono mientras se est_n trasmitiendo los tonos.
* Si el agente del centro de Ilamadas no puede cjrabar con precisiGn los datos_ quiz6 le pida que Io
intente de nuevo.
* Si pulsa el bot6n POWER durante la transmisi6n se apagarc_ el sistema Kenmore Connect.
6O
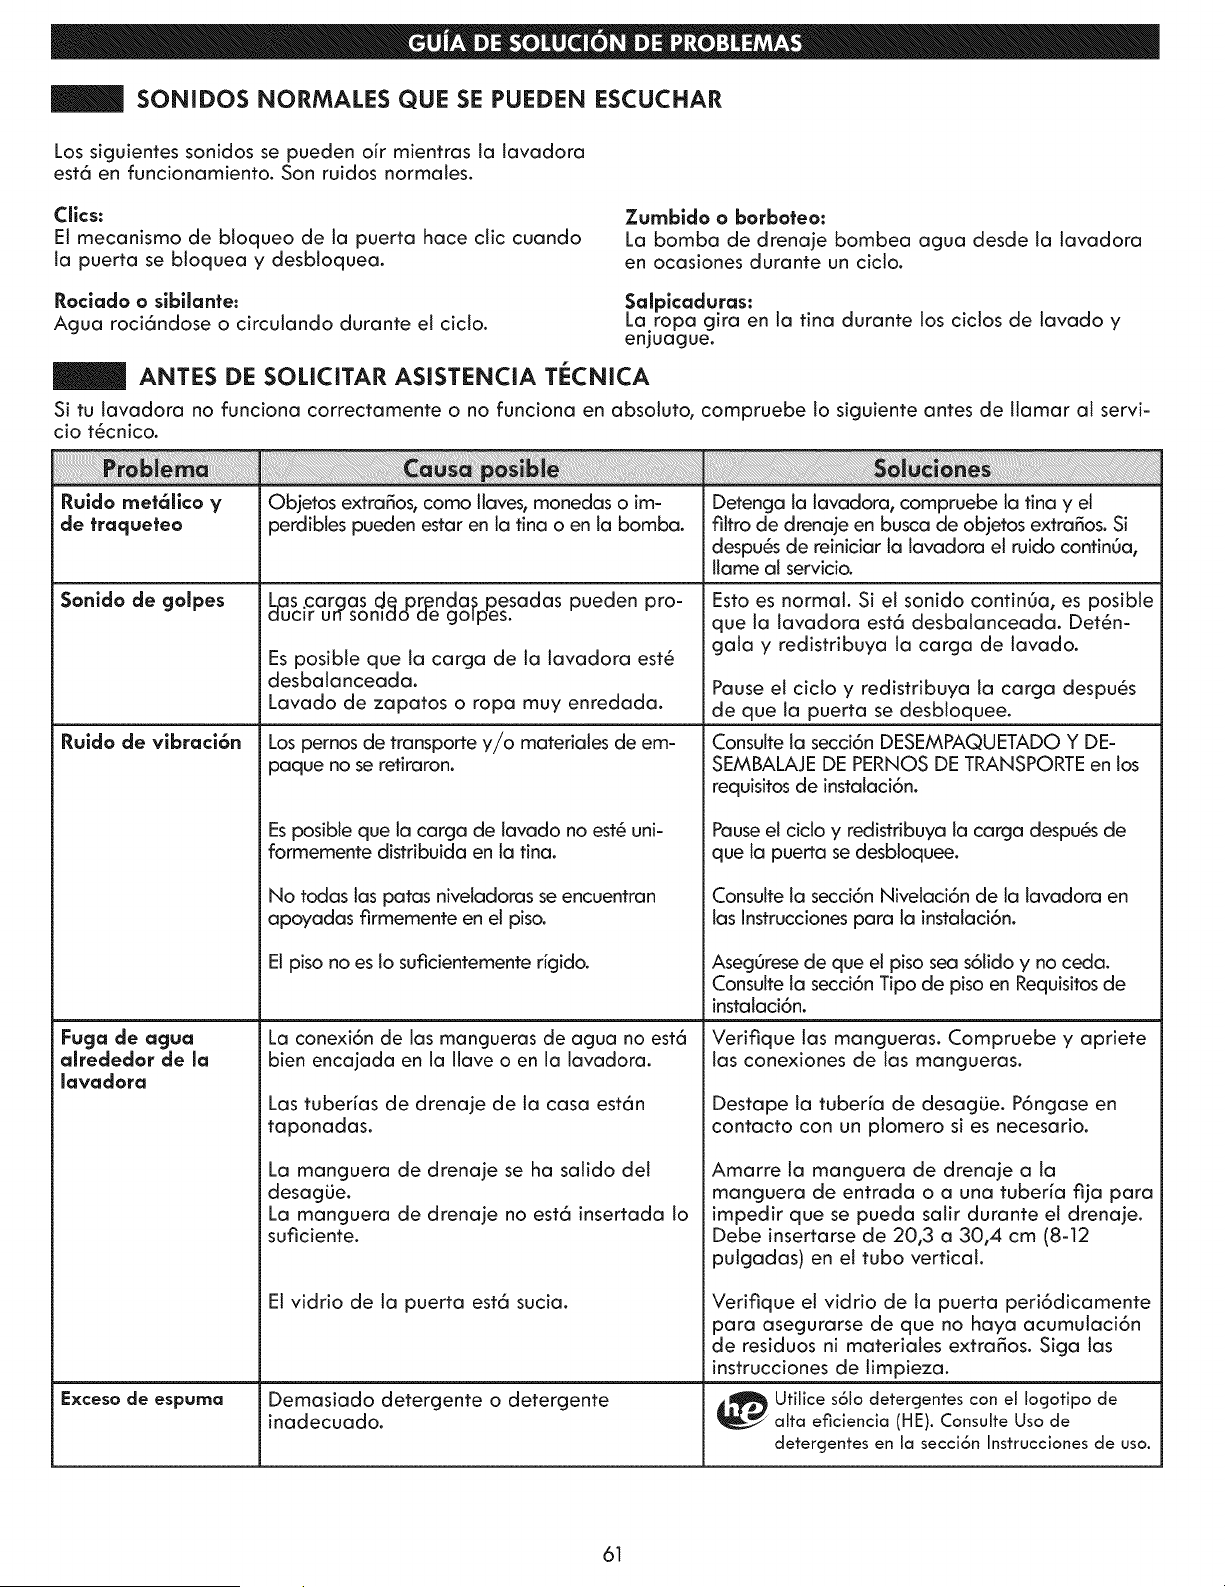
SONIDOS NORMALES QUE SE PUEDEN ESCUCHAR
Los siguientes sonidos se pueden air mientras la lavadora
est6 en funcionamiento. Son ruidos normales.
Clics:
Et mecanismo de bloqueo de la puerta hace clic cuando
la puerta se bloquea y desbtoquea.
Zumbido o borboteo:
La bomba de drenaje bombea agua desde la lavadora
en ocasiones durante un cido.
Roclado o slbilante:
Agua roci6ndose o circutando durante el ciclo.
Salpicaduras:
La.ropa gira en la tina durante los cidos de lavado y
enjuague.
ANTES DE SOLICITAR ASISTENCIA T_:CNICA
Si tu lavadora no funciona correctamente o no funciona en absotuto, compruebe 1o siguiente antes de llamar al servi-
cio t6cnico.
Ruldo met61ico y Objetos extra_os, coma llaves, monedas o im- Detenga la lavadora, compruebe ta tina y el
de traqueteo perdibles pueden estar en la fina o en la bomba, filtro de drenaje en busca de objetos extra_os. Si
despu6s de reiniciar la lavadora el ruido continOa,
llame al servicio.
Sonido de golpes L,as.cargas d_pmnda_ pesadas pueden pro-
auc_r un somaoae goipes.
Ruido de vlbraci6n
Fuga de agua
abededor de la
lavadora
Exceso de espuma
Es posibte que la carga de la lavadora est6
desbalanceada.
Lavado de zapatos o ropa muy enredada.
Los pernos de transporte y/o materiales de em-
paque no se retiraron.
Es posible que ta carga de lavado no est6 uni-
formemente distribuida en la fina.
No todas las patas niveJadoras se encuentran
apoyadas firmemente en el piso.
El piso no es [o suficientemente r_gido.
La conexi6n de las mangueras de agua no est6
bien encajada en la Ilave o en la lavadora.
Esto es normal. Si el sonido continOa, es posible
que la lavadora est6 desbalanceada. Det6n-
gala y redistribuya la carga de lavado.
Pause el cic[o y redistribuya ta carga despu6s
de que la puerta se desbtoquee.
Consulte la secci6n DESEMPAQUETADO Y DE-
SEMBALAJE DE PERNOS DE TRANSPORTE en los
requisitos de instalaci6n.
Pause el cic[o y redistribuya ta carga despu6s de
que la puerta se desbloquee.
Consulte la secci6n Nivelaci6n de la lavadora en
las Instrucciones para la instalaci6n.
AsegOrese de que el piso sea s6tido y no ceda.
Consutte to secci6n Tipo de piso en Requisitos de
instalaci6n.
Verifique tas mangueras. Compruebe y apriete
las conexiones de las mangueras.
Las tuber_as de drenaje de la casa est6n
taponadas.
La manguera de drenaje se ha salido del
desagLie.
Destape la tuber_a de desagLie. P6ngase en
contacto con un plomero si es necesario.
Amarre ta manguera de drenaje a ta
manguera de entrada o a una tuber_a fija para
La manguera de drenaje no est6 insertada 1o
suficiente.
Elvidrio de la puerta est6 sucia.
Demasiado detergente o detergente
inadecuado.
impedir que se pueda salir durante el drenaje.
Debe insertarse de 20,3 a 30,4 cm (8-12
putgadas) en el tubo vertical.
Verifique el vidrio de la puerta peri6dicamente
para asegurarse de que no haya acumutaci6n
de residuos ni materiales extra_os. Siga las
instrucciones de limpieza.
_ tilice s61o detergentes con el Iocjofipo de
alta eficJencJa (HE). Consulte Uso de
detergentes en la secci6n Instrucciones de uso.
61
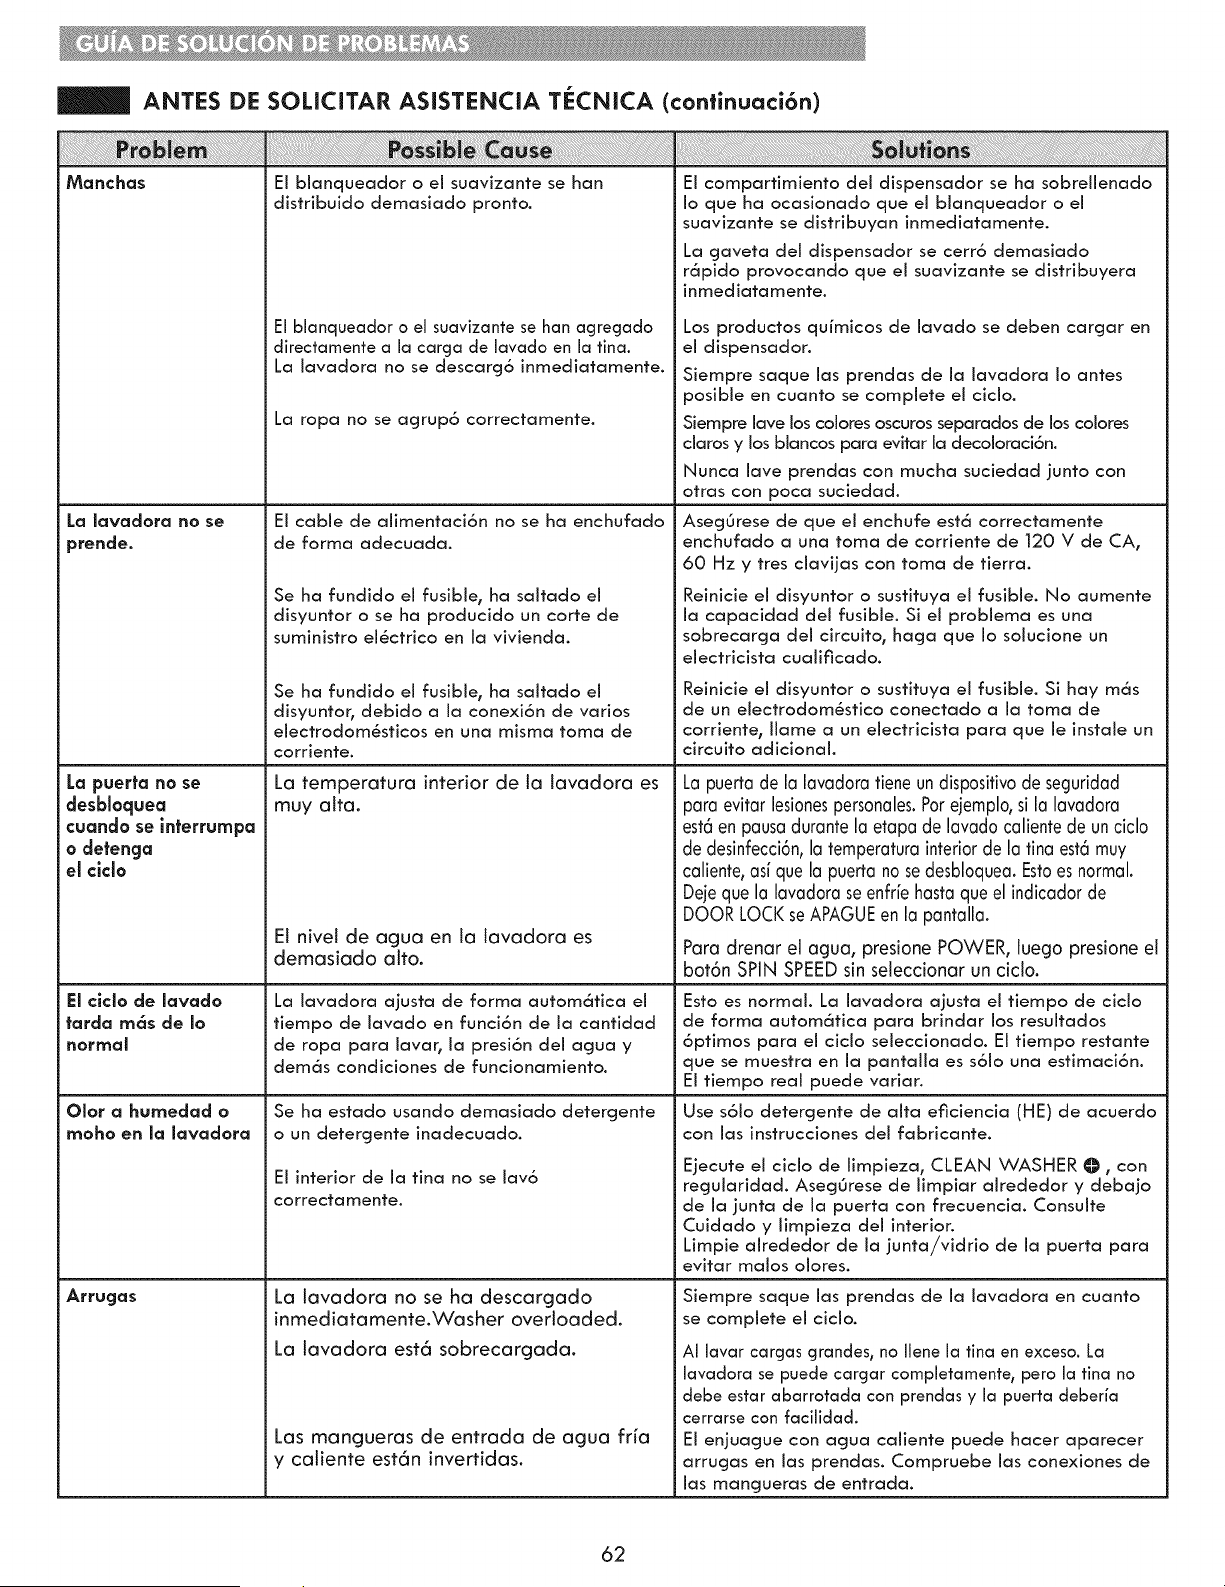
Manchas
La lavadora no se
prende.
La pue#a no se
desbioquea
cuando se interrumpa
o detenga
ei ciclo
El clclo de lavado
tarda mc_s de Io
normcl_
Olor a humedad o
moho en la lavadora
Arrugas
ANTES DE SOLICITAR ASISTENCIA TECNICA (confinuaci6n)
ii! !i ! i ! ! ! !! !i i! i i!iiiiiii;iiiii;iii!i i! i! i! i! i! i! i! ii i!ii i iiiiiii iiiiiiiii ii iiii iiiiii iiiiiiiiii i i!i!i!i!i!i!iiiiiiiiiiiiiiiiiiiiiiiiiiiiiiiiiiiiiiiiiiiiiii i i i!i!i!i!i!i!i i i i i i i i i i i i i i i !i i ! ii i !iiiii i! i! i! i! i! i! i ! ! !; ! i! i! ! i !i!!i!ii! i!ii!iiiii!ii!ii!ii!ii!ii!ii!ii!i!i!iiiii!ii iiiiiiiiiii i! ii!i! ii!i! ii!ii ii ii ii ii ii ii ii iiiiiiiiii i iiiiiiiiiiiiiiiiii i i i i ii iiiiiiii iiiiiiiiiiiiiiiiiiiiiiiiiiiiiiiiiiiiiiiiiiiiiiiiiiiiiiiiiiiiiiiiii!i i!i i¸
Ei bianqueador o el suavizante se ban
distribuido demasiado pronto.
El blanqueador o el suavizante se han acjregado
directamente a la carga de lavado en la tina.
La iavadora no se descarcj6 inmediatamente.
La ropa no se agrup6 correctamente.
Ei cable de alimentaci6n no se ha enchufado
de forma adecuada.
Se ha fundido ei fusible, ha saitado ei
disyuntor o se ha producido un corte de
suministro eiSctrico en ia vivienda.
Se ha fundido el fusible, ha saitado el
disyuntor, debido a ia conexi6n de varios
electrodom(_,sticos en una misma toma de
corriente.
La temperatura interior de la lavadora es
muy alta.
El nivel de agua en la lavadora es
demasiado alto.
La iavadora ajusta de forma autom6tica el
tiempo de iavado en funci6n de ia cantidad
de ropa para iavar, ia presi6n dei agua y
dem6s condiciones de funcionamiento.
Se ha estado usando demasiado detergente
o un detergente inadecuado.
Ei interior de ia tina no se iav6
correctamente.
La lavadora no se ha descargado
inmediatamente.Washer overloaded.
La lavadora est6 sobrecargada.
Las mangueras de entrada de agua fr_a
y caiiente est6n invertidas.
i ! ! i!i i !i!i i illi i i ! !i i! ii ii i!!iiiii!i ii ii ii ii ii ii ii ii ii !i!ii!!i!!i!i!iii!iiiiiiiiii!iiiiiiiiiiiiiiiiiiiiiiiiiiiiiiiiiiiiiiiiiiiiiiiii i! !! i !! i !!!i! !i !i !i !i !i !i !i !i !i !i !i !i !i !i !i !i !i !i !i !i ! i!i ! i!i ! i!i !!i!i!i!ii!ii!ii!ii!!!!!!!!i!i!!!!! ! !!!!!!!!!!!!!! ! ! i!i ! i!! ! i!! ! !! !! !! !! !! !!i!!i!!i!!!!!!!i!!i!!i!!!i!i!i!ii!i ! i !i i !iii! i i! ! ! ii i ! i! i! i! !!!iii!!iiii!ii!!i!ii!ii!ii ii!ii ii!ii ii!ii!iii!i!ii!iiiii!i i!iiiiiiiiiii!i!!i!!i!!i!!i!!i!!i!i!i!iiiiiiiiiiiiiiiiiiiiiiiiiiiiiiiiiiiiiiiiiiiiiiiiiiiiiiiiiiiiiiii !i!i!i!i!i!iiiii!i!ii!ii!iiiiiiiiiiiiiiiii!i!i!i!i!iiiiiiiiiiiiiiiiii!ii!iiiii!ii!!i!ii!i ! i!i ! i!i !!i!i!ii!ii!ii!i!i!i!iiiii!ii!ii!ii!i!ii ! ! i ! ! i ! !!i!i!i!ii!ii!ii!ii ii iiiiiiiiiiiiiiiiiiiiii !!! !i!!!i! ! ! !i!i
Ei compartimiento del dispensador se ha sobrellenado
Io que ha ocasionado que el blanqueador o el
suavizante se distribuyan inmediatamente.
La gaveta dei dispensador se cerr6 demasiado
r6pido provocando que ei suavizante se distribuyera
inmediatamente.
Los productos quimicos de lavado se deben cargar en
ei dispensador.
Siempre saque ias prendas de ia iavadora io antes
posibie en cuanto se complete ei cicio.
Siempre lave los colores oscuros separados de los colores
ciaros y los biancos para evitar ia decoloraci6n.
Nunca lave prendas con mucha suciedad junto con
otras con poca suciedad.
Aseg0rese de que el enchufe est6 correctamente
enchufado a una toma de corriente de 120 V de CA,
60 Hz y tres ciavijas con toma de tierra.
Reinicie ei disyuntor o sustituya ei fusible. No aumente
la capacidad del fusible. Si el problema es una
sobrecarga dei circuito, haga que io soiucione un
eiectricista cuaiificado.
Reinicie el disyuntor o sustituya ei fusible. Si hay m6s
de un electrodom6stico conectado a la toma de
corriente, llame a un electricista para que le instaJe un
circuito adicional.
La puertade la lavadora tiene undispositivode seguridad
para evitar lesionespersonales.Poreiemplo,si la lavadora
est6enpausadurante la etapa de lavado caliente de unciclo
de desinfecci6n,la temperaturainterior de la tina est6muy
caliente,asi que la puertano sedesbloquea.Estoesnormal.
Deieque la lavadora seenfrie hastaque el indicador de
DOOR LOCI(seAPAGUEen la pantalla.
Para drenar el agua, presione POWER, luego presione el
bot6n SPiN SPEEDsin seieccionar un cicio.
Esto es normal. La iavadora ajusta ei tiempo de cicio
de forma autom6tica para brindar los resuitados
6ptimos para ei cicio seieccionado. El tiempo restante
que se muestra en ia pantaiia es s6io una estimaci6n.
Ei tiempo real puede variar.
Use s6io detergente de aita eficiencia (HE) de acuerdo
con las instrucciones del fabricante.
Ejecute el cicio de iimpieza, CLEAN WASHER O, con
reguiaridad. Aseg0rese de limpiar airededor y debajo
de la junta de la puerta con frecuencia. Consuite
Cuidado y iimpieza dei interior.
Limpie airededor de ia junta/vidrio de ia puerta para
evitar malos oiores.
Siempre saque ias prendas de ia iavadora en cuanto
se complete ei cicio.
AI lavar cargas grandes_ no Ilene la tina en exceso. La
lavadora se puede cargar completamente_ pero la tina no
debe estar abarrotada con prendas y la puerta deberia
cerrarse con facilidad.
El enjuague con agua caliente puede hacer aparecer
arrugas en las prendas. Compruebe las conexiones de
las mangueras de entrada.
62
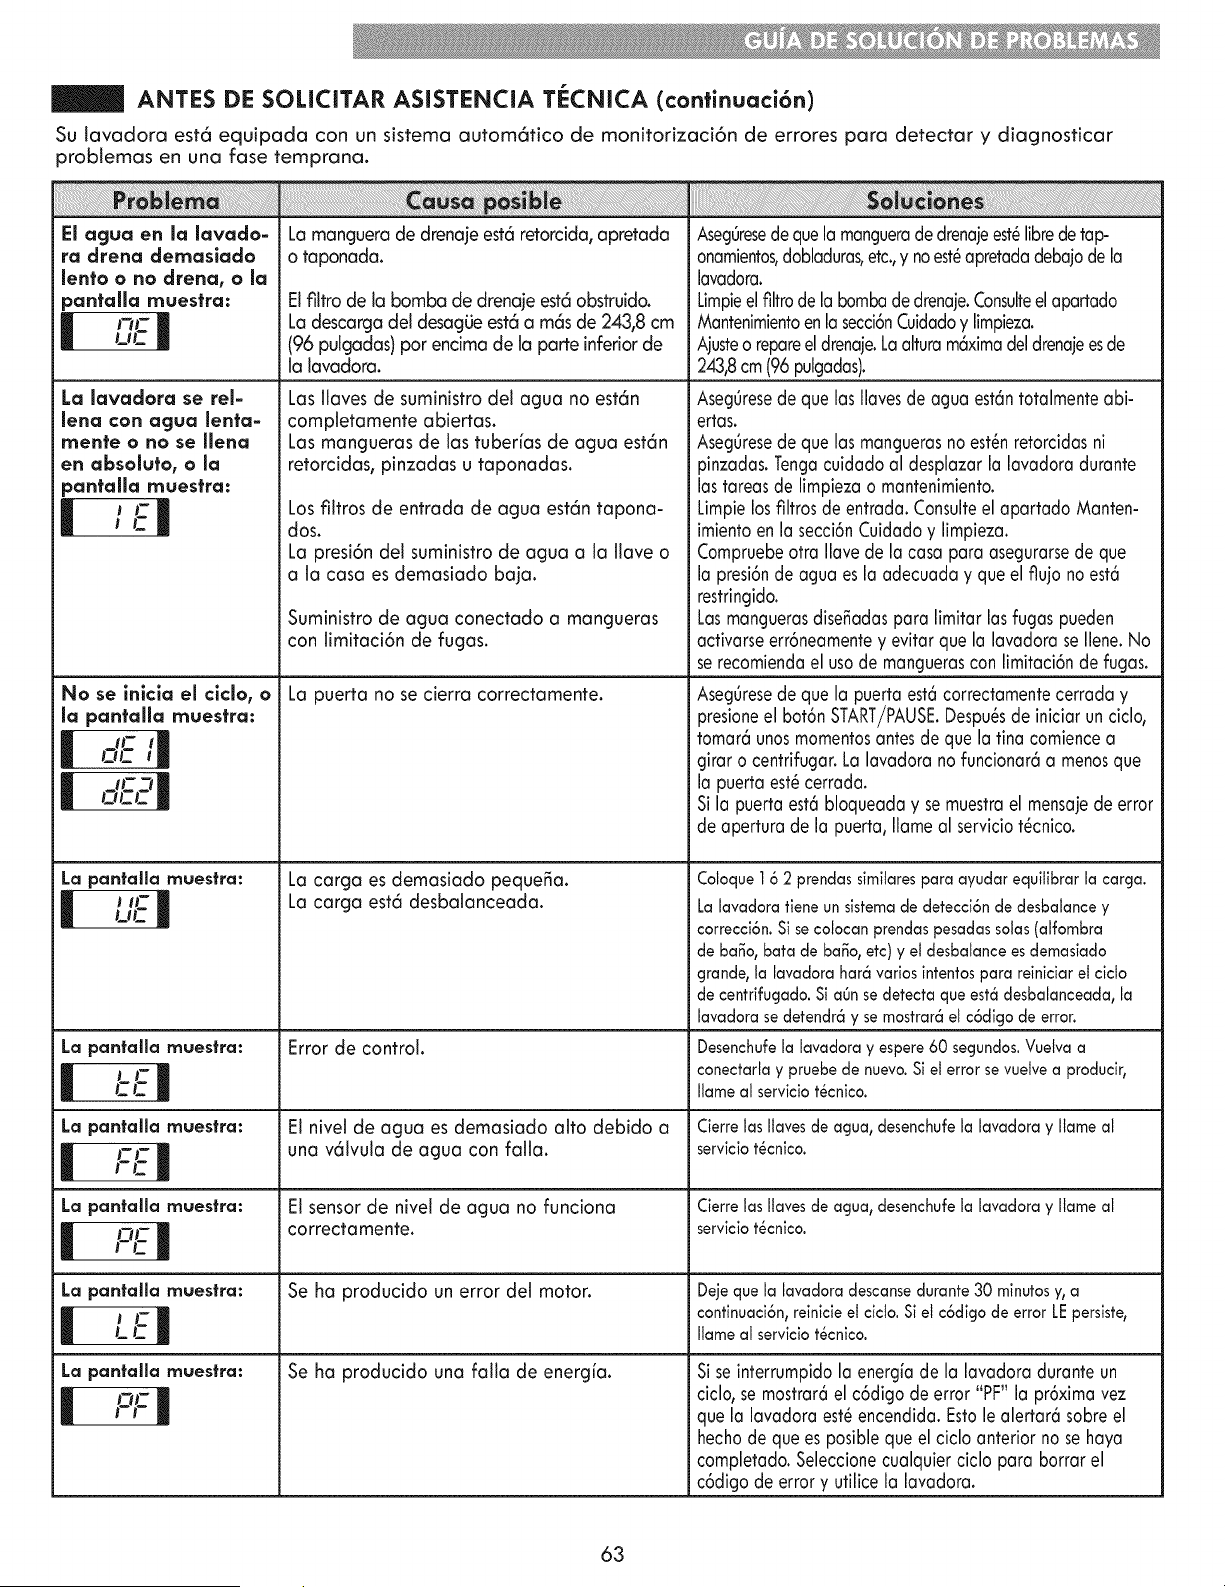
ANTES DE SOLICITAR ASISTENCIA T_:CNICA (confinuaci6n)
Su lavadora est6 equipada con un sistema autom6tico de monitorizaci6n de errores para detectar y diagnosticar
problemas en una fase temprana.
El agua en la lavado-
ra drena clernaslado
lento o no drena, o la
pantalla rnuestra:
I J-_l-u,:|
La lavadora se rel-
lena con agua lenta-
mente o no se Ilena
en absoJuto, o la
pantaHa muestra:
No se inlcla el clclo, o
la pantalla muestra:
m iFo,_-;|
| ir_7|
occj
La pantalla muestra:
I J II-
La pantalla muestra:
I J i-
La pantalla muestra:
I I-R-r,:|
La pantalla muestra:
I LTn-
La pantalla muestra:
I i I-L,:|
La manguerade drenajeest6 retorcida,apretada
o taponada.
Elfiltro de la bomba de drenaje est6obstruido.
Ladescarga del desagiJeest6 a m6sde 243,8 cm
(96 pulgadas) por encimade la parte inferiorde
la lavadora.
Las llaves de suministro del agua no est6n
completamente abiertas.
Las mangueras de las tuber_asde agua est6n
retorcidas, pinzadas u taponadas.
Los filtros de entrada de agua est6n tapona-
dos.
La presi6n del suministro de agua a la Ilave o
a la casa es demasiado baja.
Suministro de agua conectado a mangueras
con limitaci6n de fugas.
La puerta no se cierra correctamente.
La carga es demasiado peque_a.
La carga est6 desbalanceada.
Error de control.
El nivel de agua es demasiado alto debido a
una v61vula de agua con falla.
El sensor de niveJde agua no funciona
correctamente.
Se ha producido un error del motor.
Se ha producido una falla de energfa.
Aseg0resedequela manguerade drenajeest6librede tap-
onamientos,dobladuras,etc.,y noest6apretadadebajode la
lavadora.
Limpieel filtrode la bombadedrenaje.Consulteelapartado
Mantenimientoenla secci6nCuidadoy limpieza.
Ajusteo repareeldrenaje.Laalturam6ximadel drenajeesde
243,8cm(96 pulgadas).
Aseg0resede que las Ilavesde agua est6ntotalmenteabi-
ertas.
Aseg0resede que las manguerasno est6nretorcidasni
pinzadas.Tengacuidado al desplazar la lavadora durante
las tareasde limpiezao mantenimiento.
Limpielosfiltros de entrada.Consulteel apartado Manten-
imientoen la secci6nCuidadoy limpieza.
Compruebeotra Ilavede la casa para asegurarsede que
la presi6nde agua esla adecuaday queel flujo noest6
restringido.
Lasmanguerasdise_adaspara limitar lasfugas pueden
activarseerr6neamentey evitar que la lavadora se Ilene.No
se recomiendael usode manguerascon limitaci6nde fugas.
Aseg0resede que la puerta est6correctamentecerrada y
presioneel bot6n START/PAUSE.Despu6sde iniciar un ciclo,
tomar6 unosmomentosantes de que la tina comiencea
girar o centrifugar.Lalavadora no funcionar6a menosque
la puertaest6 cerrada.
Si la puerta est6bloqueaday semuestrael mensajede error
de apertura de la puerta, Ilameal serviciot6cnico.
Coloque 16 2 prendas similarespara ayudar equitibrar la carga.
La lavadora fiene un sistemade detecci6n de desbalance y
correcci6n. Si secolocan prendas pesadassolas (alfombra
de ba_o,bata de halo, etc) y el desbalance esdemasiado
grande_la lavadora har6 varios intentospara reiniciar el ¢1¢1o
de centrifugado. Si aOnse detecta que est6 desbalanceada, la
lavadora sedetendr6 y semostrar6 el c6digo de error.
Desenchufela lavadora y espere60 segundos.Vuelva a
conectarla y pruebe de nuevo.Si el error sevuelvea producir_
Ilame al servicio t_cnico.
Cierre JasHavesde agua, desenchufeJaJavadoray JJameaJ
serviciot_cnico.
Cierre JasHavesde agua, desenchufeJaJavadoray JJameaJ
serviciot_cnico.
Deje que Ja lavadora descansedurante30 minutos y,a
continuaci6n,reinicie el cicto. Si el c6digo de error LEpersiste,
IJameaJservicio t_cnico.
Si seinterrumpidola energia de la lavadora durante un
ciclo, se mostrar6el c6digo de error "PF" la pr6ximavez
que la lavadora est6encendida.Estole alertar6 sobreel
hechode que es posiblequeel ciclo anterior no se haya
completado.Seleccionecualquier ciclo para borrar el
c6digo de errory utilice la lavadora.
63
f
Garanfia limitada de Kenmore
Si, tras ser instalado, operado y mantenido segOn todas ias instrucciones inciuidas con ei producto, este
electrodom6stico fallara debido a un defecto de materiales o mano de obra dentro del a_o de la fecha de
compra0 iiame ai 1-800-4-MY-HOME® para soiicitar su reparaci6n cjratuita.
Si ei motor de impuisi6n directa presentase defectos de material o mano de obra entre ei segundo a_o y ei
dScimo a partir de ia fecha de compra0 iiame ai nOmero de teiSfono 1-800-4-MY-HOME® para soiicitar un
nuevo motor de manera compietamente gratuita. DespuSs dei primer a_o a partir de ia fecha de compra0
usted ser6 responsabie dei coste de ia mano de obra para instaiar ei motor.
Si este eiectrodom_stico fuera utilizado con fines distintos a los dom_sticos, esta garanfia s6io seria apiicabie
durante 90 dias desde la fecha de compra.
Esta garantia cubre _nlcamente los defectos de materlal ¥ mano de obra. Sears NO pagar6:
1. Elementos consumibles que puedan cjastarse debido al uso normal, inciuyendo entre otros, los filtros, correas,
bombitas de luz y sacos.
2. Un t_cnico de servicio para mostrar al usuario la instalaci6n0 funcionamiento o mantenimiento correctos del producto.
3. Un t_cnico de servicio para reaiizar labores de limpieza o mantenimiento del producto.
4. Da_os o fallas como consecuencia de no secjuir todas las instrucciones de instalaci6n, funcionamiento o
mantenimiento inciuidas con el producto.
5. Da_os o faiJas en caso de accidente, abuso, uso inadecuado o uso con prop6sitos distintos a los fines para los que
rue dise_ado.
6. Da_os o faiJas de este producto provocados por el uso de detercjentes, limpiadores0 quimicos o utensilios diferentes
de los recomendados en todas las instrucciones suministradas con el producto.
7. Da_os o fallas de piezas o sistemas como resuffado de modificaciones sin autorizaci6n hechas a este producto.
Descargo de responsabilldad de garanfias implicltas; llmltaci6n de acclones legales
Las Onicas y exciusivas acciones iegaies dei ciiente bajo esta cjaranfia iimitada ser6n ia reparaci6n dei producto
como se se_aia aquL Las cjaranfias implicitas, inciuyendo garanfias de comerciabilidad y aptitud para un objetivo
particular0 se encuentran iimitadas a un a_o o ai periodo m6s corto permitido por ia iey. Sears no ser6 responsable
de da_os incidentaies o resuitantes. Aigunos estados no permiten ia exciusi6n o iimitaci6n de da_os o iimitaciones
incidentaies o resuitantesr o iimitaciones sobre ia duraci6n de garanfias implicitas o de comerciabilidad o aptitud0
por io tanto ias iimitaciones o exciusiones anteriores pueden no apiicarse en su caso.
Esta garanfia podr6 apiicarse s6io si este electrodom_stico se utiiiza en los Estados Unidos o Canad6.
Esta garantia ie otorga derechos iegaies especificos y usted puede contar con otros derechos_ que pueden variar de
estado a estado.
Sears Brands Management Corporation, Hofl:man Estates, IL 60179
Sears Canada Inc., Toronto, Ontario, Canad6 M5B 2C3
J
64

65

66

67

Your Home
For troubleshooting, product manuals and expert advice:
www.managemylife.com
For repair - in your home - of all major brand appliances,
lawn and garden equipment, or heating and cooling systems,
no matter who made it, no matter who sold it!
For the replacement parts, accessories and
owner's manuals that you need to do-it-yourself.
For Sears professional installation of home appliances
and items like garage door openers and water heaters.
1-800-4-MY-HOME ® (1-800-469-4663)
Call anytime, day or night (U.S.A. and Canada)
www.sears.com www.sears.ca
Our Home
For repair of carry-in items like vacuums, lawn equipment,
and electronics, call anytime for the location of your nearest
Sears Parts & Repair Service Center
1-800-488-1222 (U.S.A.)
www.sears.com
1-800-469-4663 (Canada)
www.sears.ca
To purchase a protection agreement on a product serviced by Sears:
1-800-827-6655 (U.S.A.) 1-800-361-6665 (Canada)
Para pedir servicio de reparaci6n
a domicilio, y para ordenar piezas:
1-888-SU-HOGAR ®
(1-888-784-6427)
Au Canada pour service en fran(_ais:
1-800-LE-FOYER M°
(1-800-533-6937)
www.sears.ca
www.sears.com
TM
® Registered Trademark / Trademark of KCD IP, LLC in the United States, or Sears Brands, LLC in other countries
® Marca Registrada / TMMarca de Fabrica de KCD IP, LLC en Estados Unidos, o Sears Brands, LLC in otros paises
MCMarque de commerce / MDMarque deposee de Sears Brands, LLC