
4
GB
Before operating this system
Music discs encoded with
copyright protection
technologies
This product is designed to playback discs
that conform to the Compact Disc (CD)
standard. Recently, various music discs
encoded with copyright protection
technologies are marketed by some record
companies.
Please be aware that among those discs,
there are some that do not conform to the
CD standard and may not be playable by
this product.
Note on DualDiscs
A DualDisc is a two sided disc product which
mates DVD recorded material on one side
with digital audio material on the other side.
However, since the audio material side does
not conform to the Compact Disc (CD)
standard, playback on this product is not
guaranteed.
Malfunctions that occur during the
normal use of the system will be
repaired by Sony in accordance with the
conditions defined in the limited
warranty for this system. However, Sony
will not be liable for any consequences
arising from a failure to play caused by a
damaged or malfunctioning system.

5
GB
Table of Contents
Before operating this system ................................................................ 4
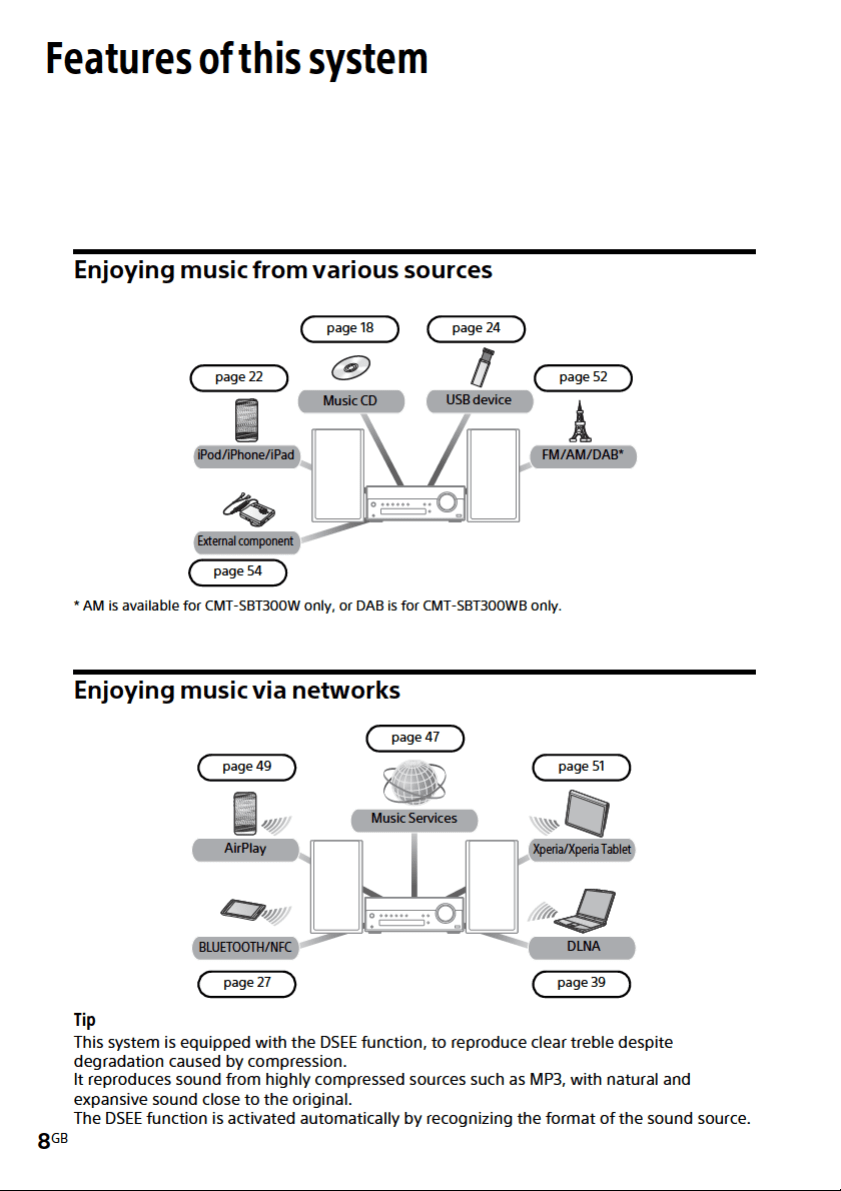
Features of this system.......................................................................... 8
Enjoying music from various sources ................................................ 8
Enjoying music via networks ............................................................ 8
Getting started
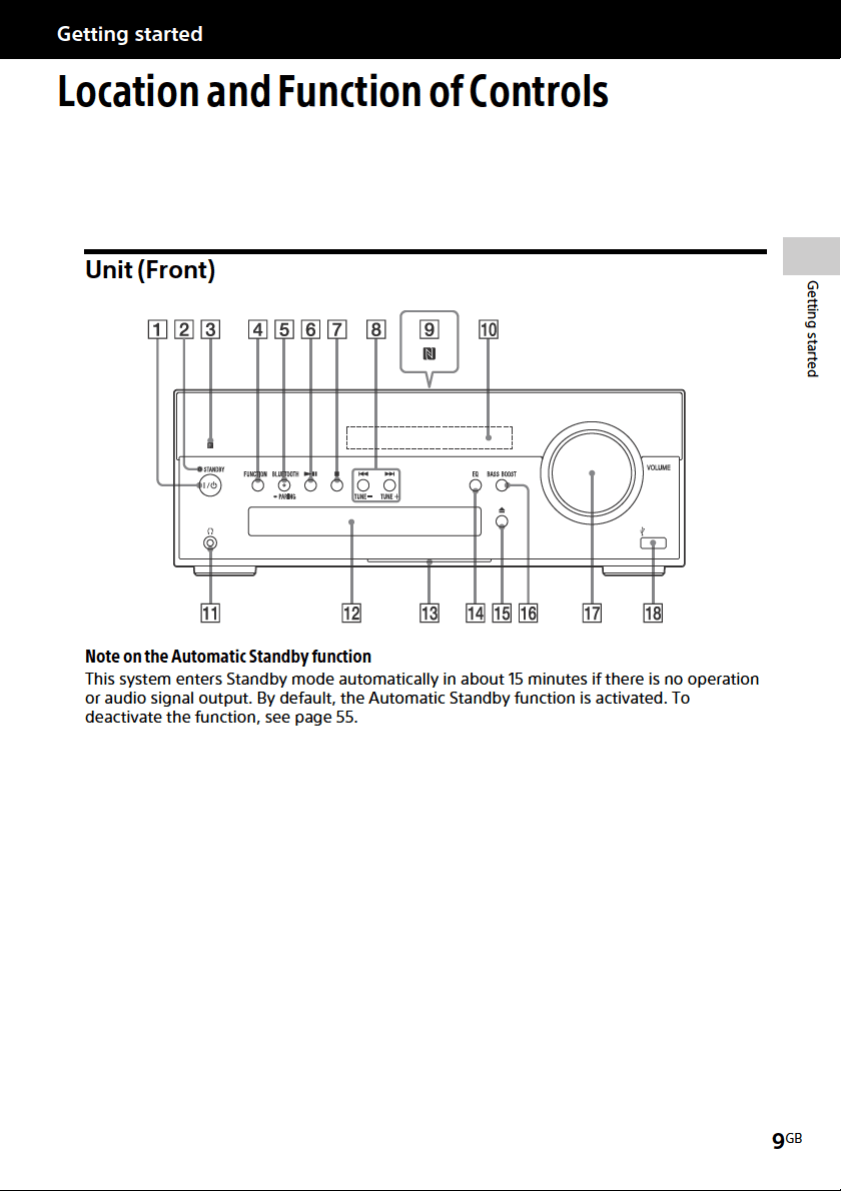
Location and Function of Controls......................................................... 9
Unit (Front)..................................................................................... 9
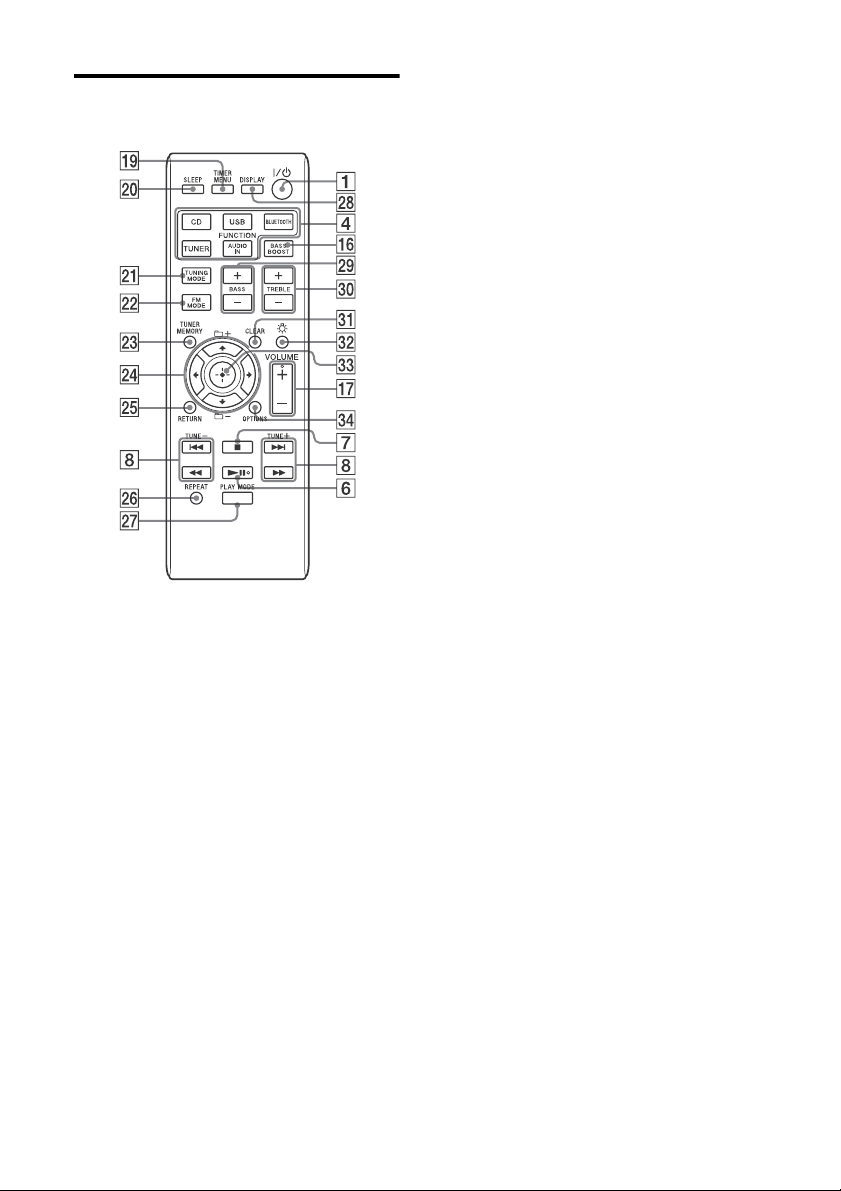
Remote ........................................................................................10
Connections.......................................................................................... 12
Connecting the antennas, speakers and power cord.......................... 12
Connecting the iPod/iPhone/iPad or USB device .............................. 13
Preparing a wireless LAN antenna....................................................14
Attaching speaker pads........................................................................ 15
Inserting the batteries ..........................................................................16
Setting the clock ................................................................................... 17
Operations
Playing a CD-DA/MP3 disc....................................................................18
Creating your own program (Program Play)........................................ 20
Playing an iPod/iPhone/iPad ...............................................................22
Compatible iPod/iPhone/iPad models.............................................22
Charging an iPod/iPhone/iPad .......................................................23
Playing a file on a USB device .............................................................. 24
Charging a USB device....................................................................25
Preparing for a BLUETOOTH connection ..............................................27
Pairing the system with a BLUETOOTH device .................................. 28
Connecting by one-touch action (NFC) ............................................ 29
Listening to music through a BLUETOOTH connection........................ 31

6
GB
Network connections
How to connect your network.............................................................. 33
Setting up for a wireless network ........................................................ 34
Option 1: Method for using an application for smartphones or Tablets
(Android device/iPhone/iPod touch/iPad)
.................................. 34
Option 2: Manual setting method using an Access Point Scan
(for PC/Mac)
............................................................................. 35
Option 3: Method for using a WPS push button at the access point
supporting WPS
....................................................................... 37
Setting up wired networks................................................................... 38
Option 4: DHCP method................................................................. 38
Listening to audio content using DLNA
(Digital Living Network Alliance) ...................................................... 39
Listening to audio content on a computer with Windows 8................ 39
Listening to audio content on a computer with Windows 7 ................ 43
Listening to audio content on a computer with Windows Vista/
Windows XP
............................................................................. 45
Using Internet music streaming (Music Services)................................ 47
Preparing your mobile device for the controller................................ 47
Enjoying Internet music streaming.................................................. 48
Using AirPlay ........................................................................................49
Using “WALKMAN” application on an Xperia/Xperia Tablet ................51
Additional information
Listening to the radio........................................................................... 52
Tuning in a radio station................................................................. 52
Presetting radio stations ................................................................ 53
Running the DAB Automatic Scan manually (CMT-SBT300WB only).... 53
Using optional audio components ...................................................... 54
Setting the Automatic Standby function ............................................. 55
Setting the BLUETOOTH/Network Standby mode .............................. 56
Updating the software......................................................................... 57
Adjusting the sound............................................................................. 58
Changing the display ........................................................................... 59
Using the timers...................................................................................60
Setting the Sleep Timer..................................................................60
Setting the Play Timer....................................................................60

7
GB
Troubleshooting
Troubleshooting .................................................................................. 62
Messages..............................................................................................67
Precautions/Specifications
Precautions.......................................................................................... 69
BLUETOOTH wireless technology......................................................... 71
Specifications........................................................................................73
10
GB
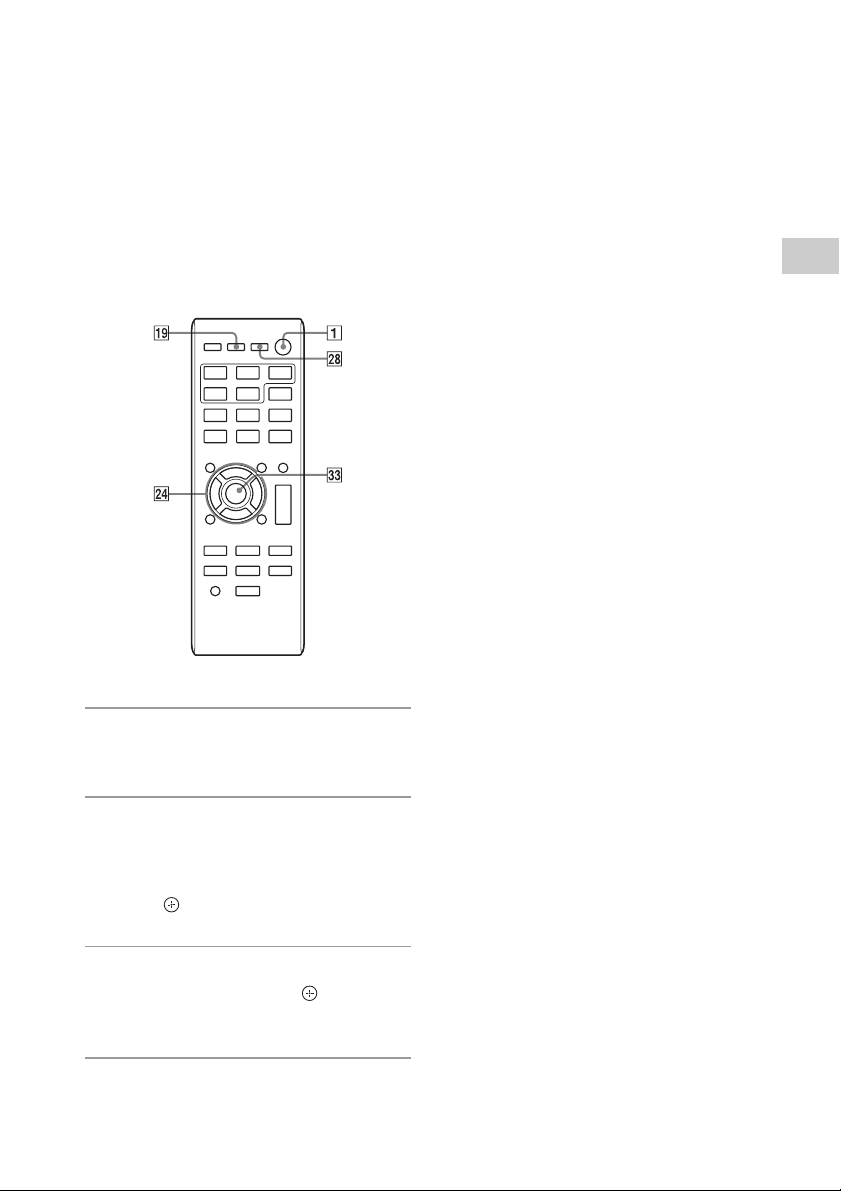
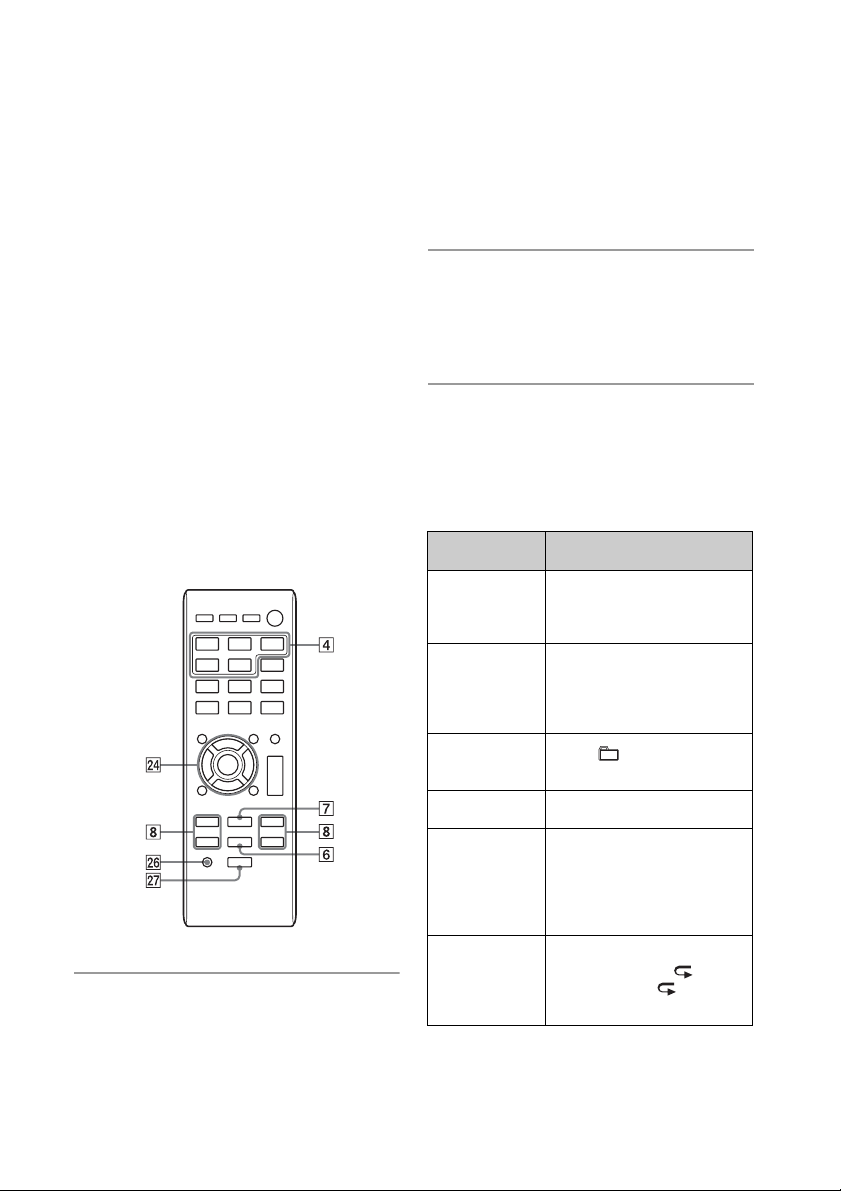
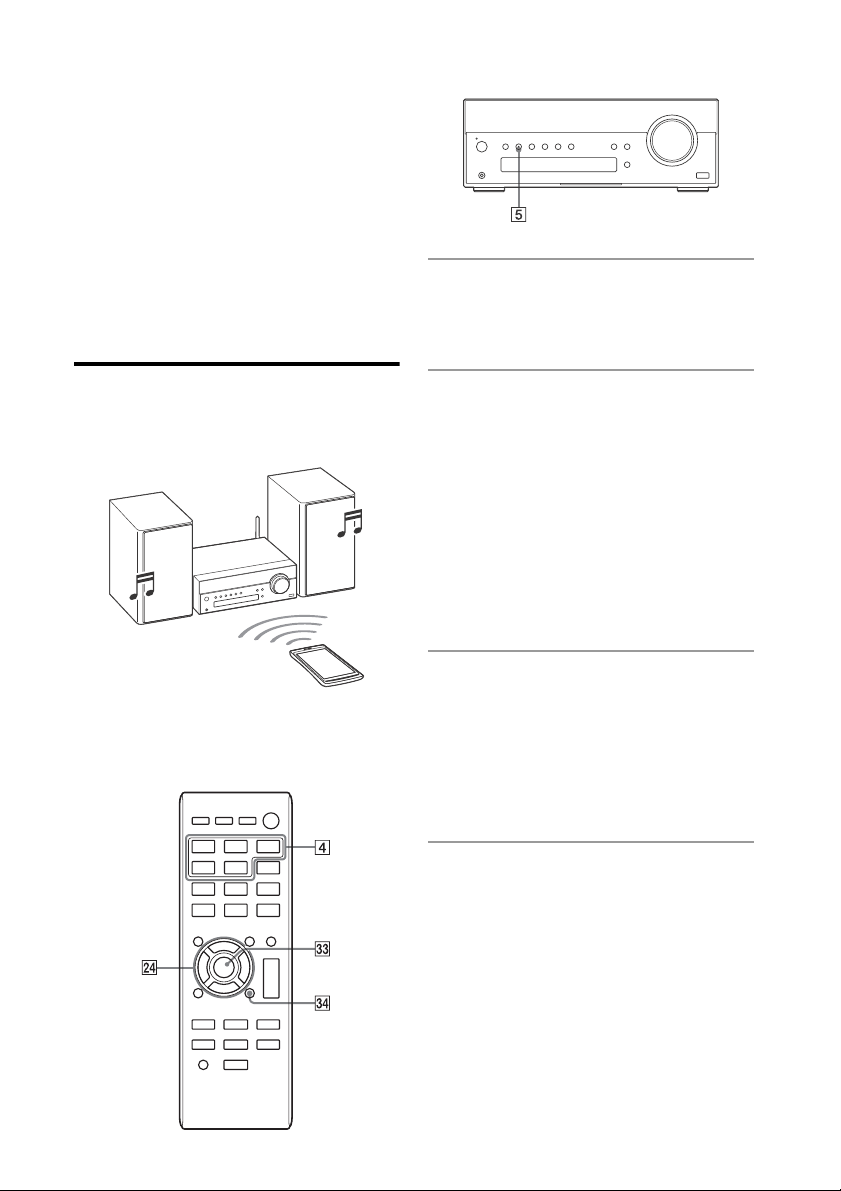
Remote
This manual mainly explains operations
using the remote, but the same operations
can also be performed using the buttons on
the unit having the same or similar names.
/ (power) button
Use to turn the power on or off.
STANDBY indicator
Lights when the power is turned off. The
indicator flashes when the unit detects
abnormality. See “If the STANDBY
indicator flashes” (page 62).
Remote sensor
FUNCTION button(s)
Unit: FUNCTION button
Each time you press the button, the
function is switched to CD, USB,
BLUETOOTH, DAB*, TUNER FM, TUNER
AM* and AUDIO IN.
* AM is available for CMT-SBT300W only, or
DAB is for CMT-SBT300WB only.
Remote: CD, USB, BLUETOOTH, TUNER
and AUDIO IN FUNCTION buttons
Press the corresponding function button
you want to activate.
BLUETOOTH button/indicator
Use to connect/disconnect with a
BLUETOOTH device or to perform pairing
operation (page 28, 29, 32).
The center lamp indicates the connection
status of BLUETOOTH. For details, see
“About the BLUETOOTH indicator”
(page 27).
(play/pause) button
Use to start or pause playback of a CD-
DA or MP3 disc, or a file on the
connected iPod/iPhone/iPad, USB
device or BLUETOOTH device.
(stop) button
Use to stop playback of a CD-DA or MP3
disc, or a file on the connected iPod/
iPhone/iPad, USB device or BLUETOOTH
device.
Radio presetting/music operation
buttons
Unit: TUNE +/– and / buttons
• TUNE +/– buttons
Use to tune in a desired radio station or
to select a preset number of the
registered radio station.
• / buttons
Use to cue the beginning of a track or
file. While holding down the button,
you can fast-forward or fast-rewind the
track or file.
Remote: TUNE +/–, / and /
buttons
• TUNE +/– buttons
Use to tune in a desired radio station or
to select a preset number of the radio
station tuned in.
• / buttons
Use to cue the beginning of a track or
file.
• / buttons
Use to fast-rewind or fast-forward a
track or file.
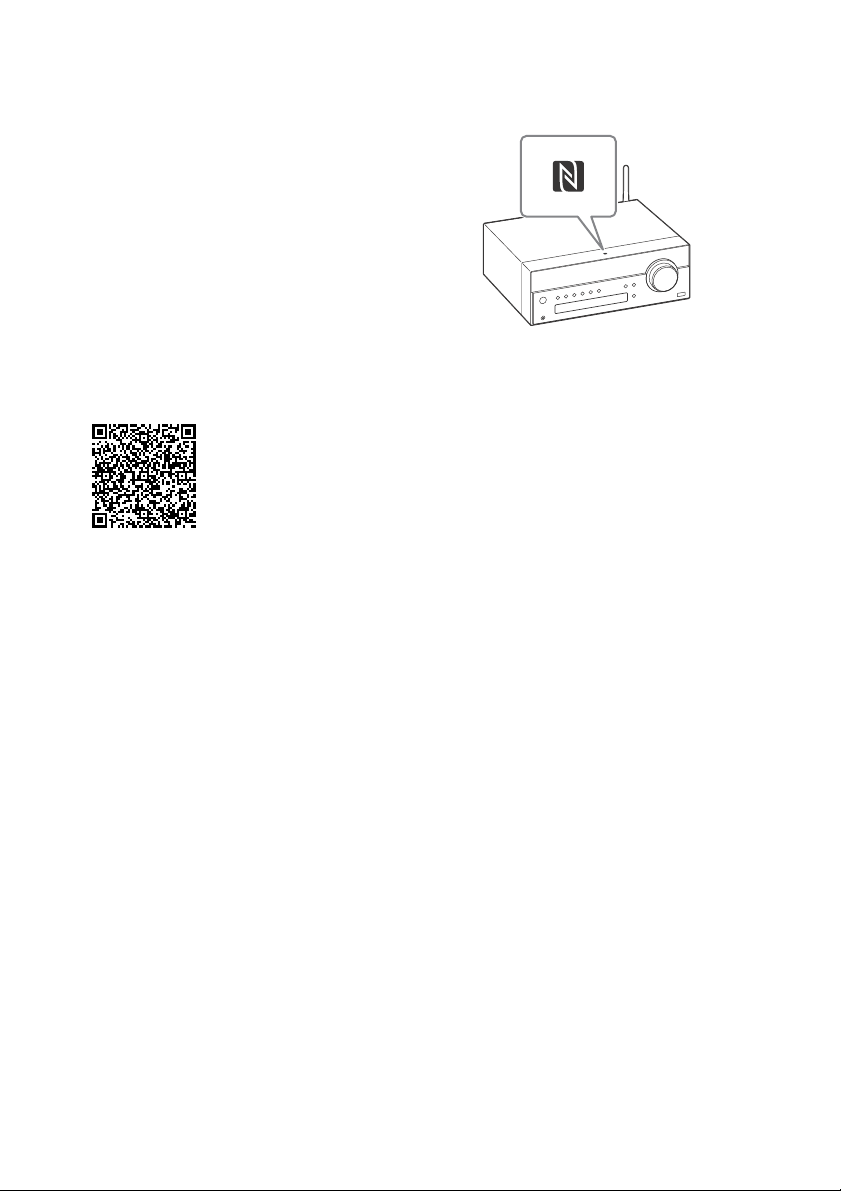
N-Mark
Place a smartphone equipped with the
NFC function close to this mark to
perform BLUETOOTH registration,
connection or disconnection by one-
touch action. For this operation, a setting
is required beforehand (page 30).
Display window
Displays the setting information of the
unit.

11
GB
Getting started
(headphone) jack
Use to connect headphones.
Disc tray
Use to load a CD-DA or MP3 disc
(page 18).
Effect indicator
Informs the operating status of this
system.
EQ button
Use to select bass or treble for sound
adjustment (page 58).
(open/close) button
Use to open/close the disc tray (page 18).
BASS BOOST button
Use to turn on or off the bass boost
(page 58).
Volume dial/button
Unit: VOLUME dial
Use to adjust the volume turning left or
right.
Remote: VOLUME +/– button
Use to adjust the volume pressing the +
or – button.
USB port
Use to connect an iPod/iPhone/iPad.
For details, see “Connecting the iPod/
iPhone/iPad or USB device” (page 13).
TIMER MENU button
Use to set the clock or Play Timer
(page 17, 61).
SLEEP button
Use to set the sleep timer (page 60).
TUNING MODE button
Use to select the tuning mode. Each time
you press the button, the mode changes
to AUTO, PRESET or MANUAL (page 52).
FM MODE button
Use to select FM stereo or monaural
reception (page 52).
TUNER MEMORY button
Use to preset radio stations (page 53).
Operation buttons
• /// buttons
Use to select an item or change the
setting.
• +/– buttons
Use to select a folder (album) on an
MP3 disc or USB device.
RETURN button
Use to return to the previous status.
REPEAT button
Use to select repeat play (page 19, 24).
PLAY MODE button
Use to select the play mode (page 19, 20,
21, 25).
DISPLAY button
Use to change information displayed in
the display window (page 17, 32, 59).
BASS +/– buttons
Use to control the bass sound (page 58).
TREBLE +/– buttons
Use to control the treble sound
(page 58).
CLEAR button
Use to delete a programmed track or
folder (page 21).
(effect indicator) button
Use to turn on/off the effect indicator .
(enter) button
Use to enter a selected item or setting.
OPTIONS button
Use to display an option menu. Press
/ to select the next option menu.
DEL LINK: For deleting the BLUETOOTH
pairing information (page 29).
BT/NW STBY: For setting BLUETOOTH/
Network Standby mode (page 56).
AUTO STBY: For setting Automatic
Standby mode (page 55).
BT
AAC
: For receiving data in AAC codec
format from a BLUETOOTH device
(page 27).
WPS: For connecting to a network using
a WPS-compliant network device
(page 37).
NW RESET: For initializing the network
connection (page 35, 50).
UPDATE: For updating software
(page 57).
The available menus may differ
depending on the function in use.

12
GB
Connections
Connecting the antennas, speakers and power cord
Power input (AC IN)
After all equipments are connected, connect
the power cord to the wall outlet.
Speakers (left/right) connectors
Firmly connect the right speaker cord to
R, and the left speaker cord to L.
AUDIO IN (external input) jack
Connect optional external equipment with
an audio connecting cable (not supplied).
LAN connector
Connect a network cable (not supplied).
Antennas
FM lead antenna (supplied)
(CMT-SBT300W only)
AM loop antenna (supplied)
(CMT-SBT300W only)
DAB/FM lead antenna (supplied)
(CMT-SBT300WB only)
red
Rear of the speaker
13
GB
Getting started
To receive radio broadcasts, connect
antennas.
Find a location and an orientation that
provide good reception, and then fix the
antennas to a stable surface (window, wall,
etc.).
Keep the antennas away from the unit,
power cord and other AV components to
avoid picking noise.
Secure the end of the FM lead antenna with
adhesive tape.
To prepare the AM loop antenna
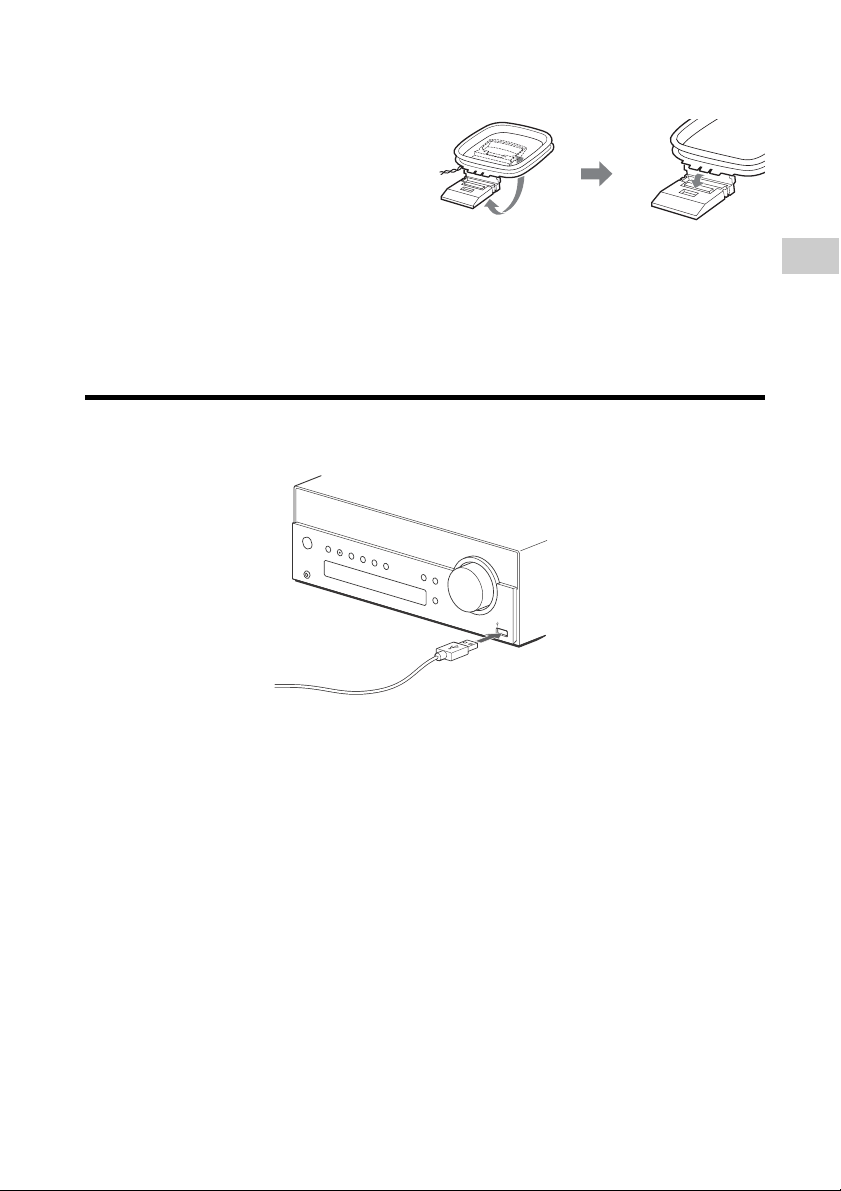
Connecting the iPod/iPhone/iPad or USB device
Connect an iPod/iPhone/iPad or USB device to the USB port .
For connecting an iPod/iPhone/iPad* to the
USB port, use a USB cable supplied with
your iPod/iPhone/iPad.
* For the iPod/iPhone/iPad you can use with this
system, see “Compatible iPod/iPhone/iPad
models” (page 22).
Rewind an antenna cord
wound around the
antenna and raise the
antenna stand.
Stand the antenna and
secure it to the slit until it
clicks.
14
GB
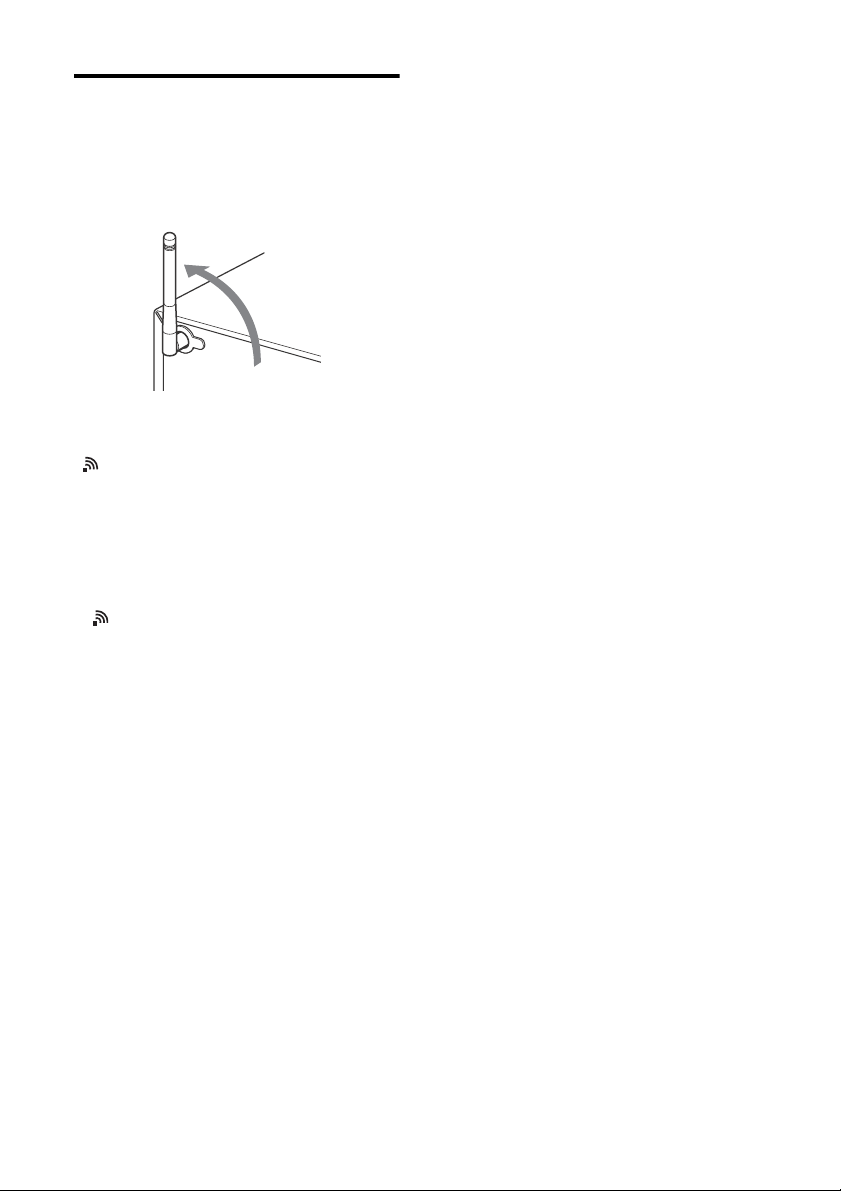
Preparing a wireless LAN
antenna
When making a wireless connection, set the
wireless antenna on the back of the unit in
the upright position.
Note on the wireless LAN signal strength
indicator
“ ” lights up in the display when the
system is turned on and the wireless LAN
connection to the access point is
established.* Check the reception status of
the wireless LAN signal and install the
system where the received signal is strong.
The more segments there are, the stronger
the signal.
* is also displayed for a network (LAN) cable
connection.
15
GB
Getting started
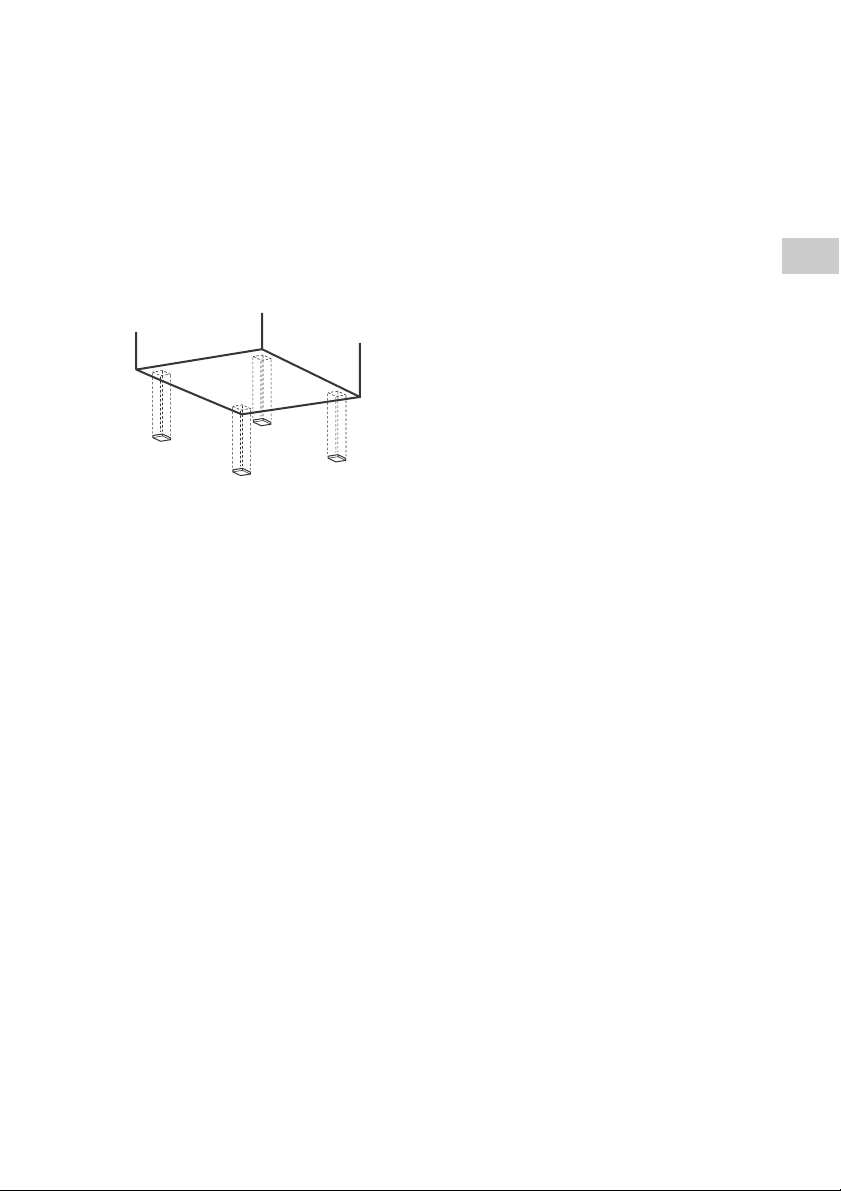
Attaching speaker pads
Attach the supplied speaker pads to the
bottom of the speakers to prevent slipping.

16
GB
Inserting the batteries
Insert two supplied R6 (size AA) batteries,
side first, matching the polarities shown
below.
Notes
• With normal use, the batteries should last for
about 6 months.
• Do not mix an old battery with a new one or mix
different types of batteries.
• If you do not use the remote for a long period of
time, remove the batteries to avoid damage
from battery leakage and corrosion.
17
GB
Getting started
Setting the clock
Set the clock using the buttons on the
remote.
1
Press / (power) to turn on
the system.
2
Press TIMER MENU to select
the clock set mode.
If “PLAY SET” flashes, press /
repeatedly to select “CLOCK,” and then
press (enter) .
3
Press / repeatedly to set
the hour, then press (enter)
.
4
Use the same procedure to set
the minutes.
Note
The clock settings are reset when you disconnect
the power cord or if a power failure occurs.
To display the clock when the
system is off
Press DISPLAY repeatedly to display the
clock. The clock is displayed for about 8
seconds.
If the system is in BLUETOOTH/Network
Standby mode, the clock does not appear
by pressing DISPLAY .
18
GB
Operations
Playing a CD-DA/MP3 disc
1
Press CD FUNCTION .
Press FUNCTION on the unit
repeatedly until “CD” appears in the
display .
2
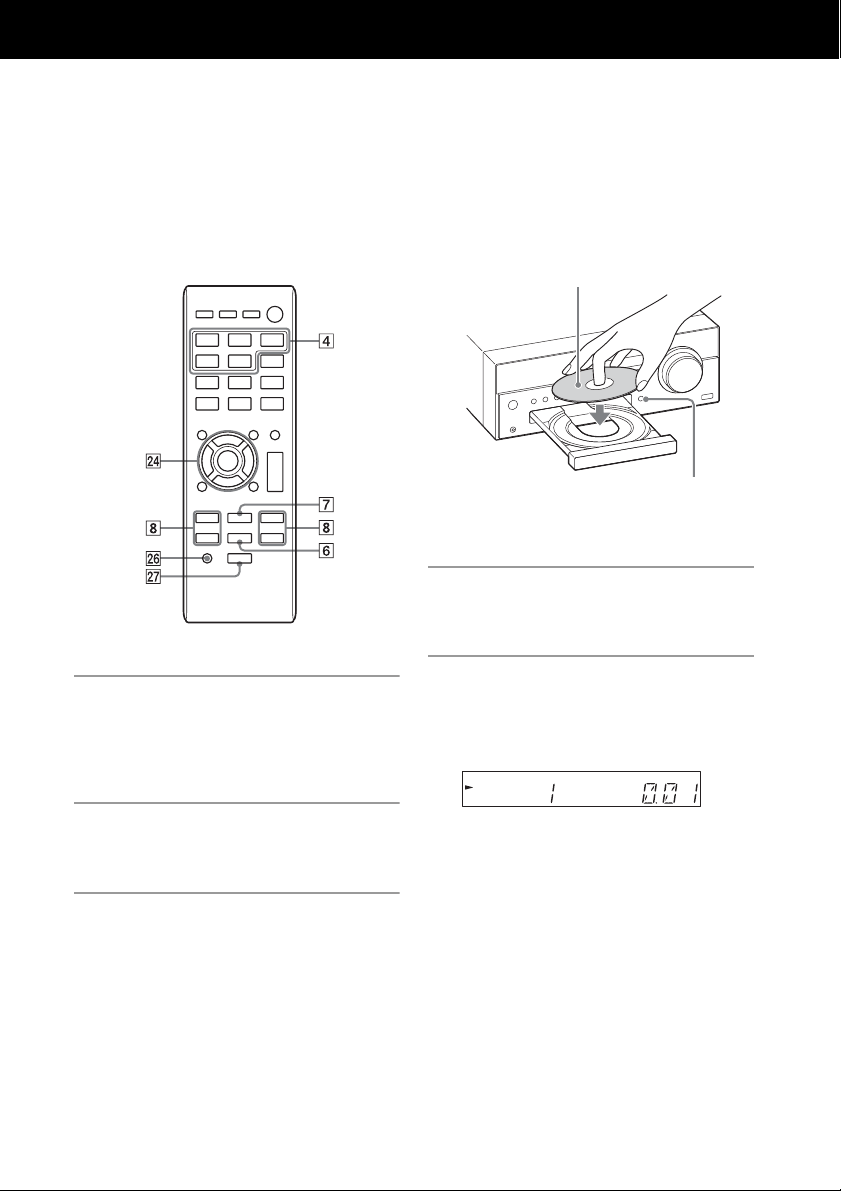
Press the (open/close) button
to open the disc tray .
3
Load a disc with the label side
facing up.
4
Press the (open/close) button
to close the disc tray .
5
Press (play/pause) button
.
Playback starts.
When “NO DISC” appears in the display
No disc is set in the disc tray or a disc
that cannot be played on this system is
set. See “Precautions” (page 69) and
set a playable disc.
Notes
• If you cannot remove a disc and “LOCKED”
appears in the display , contact your nearest
Sony dealer.
• Do not load a disc with non-standard shapes
(e.g., heart, square, star). Doing this may cause
irreparable damage to the system.
• Do not use a disc with tape, stickers or paste on
it as this may cause malfunction.
• When you remove a disc, do not touch the
surface of the disc.
Label side (printed side)
(open/close)
19
GB
Operations
Other operations
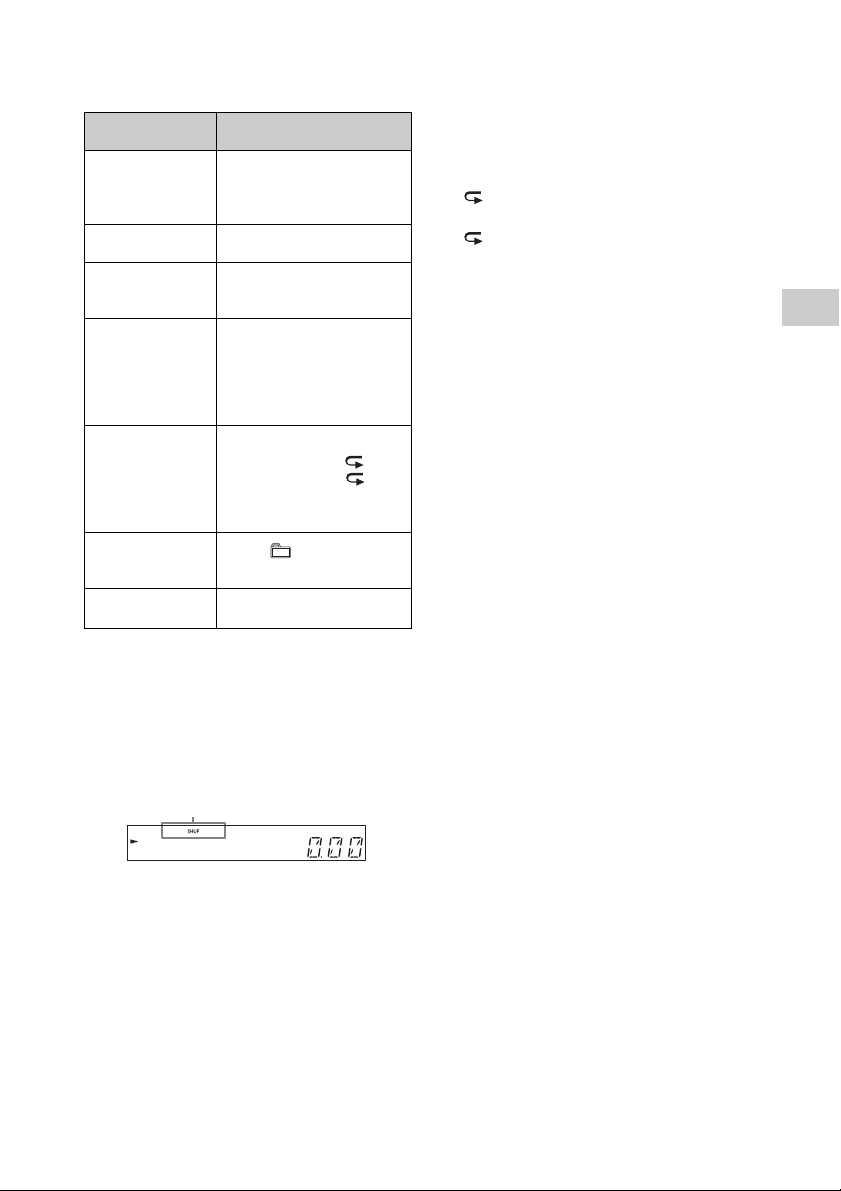
To change the play mode
Press PLAY MODE repeatedly while the
player is stopped. You can select Normal
Play mode (no indication or “FLDR”*
appears), Shuffle Play mode (“SHUF” or
“FLDR SHUF”* appears), or Program Play
mode (“PGM” appears).
* When “FLDR” or “FLDR SHUF” appears, all the
files in the selected folder on the MP3 disc will
be played.
When playing a CD-DA disc, the system
performs the same operation as Normal Play
(no indication) or Shuffle Play “SHUF.”
When “PUSH STOP” appears
You cannot change the play mode during
playback. Stop playback then change the
play mode.
Note on the play mode
If the power cord is disconnected when the
system is on, the play mode returns to
Normal Play.
Notes on Repeat Play
• “ ” indicates that all tracks or files will
be repeated until you stop playback.
• “ 1” indicates that a single track or file
will be repeated until you stop playback.
• If the power cord is disconnected when
the system is on, Repeat Play is cancelled.
Notes on Shuffle Play mode
• When Shuffle Play mode is set to “SHUF,”
the system shuffle-plays all tracks or files
on the disc. When Shuffle Play mode is
set to “FLDR SHUF,” the system shuffle-
plays all tracks or files in the selected
folder.
• When you turn off the system, the
selected Shuffle Play mode (“SHUF” or
“FLDR SHUF”) is cleared and the play
mode returns to Normal Play mode (no
indication or “FLDR”).
Notes on playing MP3 discs
• Do not save unnecessary folders or files
on a disc that has MP3 files.
• Folders that have no MP3 files are not
recognized on the system.
• The system can only play MP3 files that
have a file extension of “.mp3.”
• Even when file name has the “.mp3” file
extension, if it is not an audio MP3 file,
playing this file may generate a loud
noise, which could cause damage of the
system.
• The maximum number of MP3 folders and
files compatible with this system is:
– 999* folders (including the root folder)
– 999 files
– 250 files in a single folder
– 8 folder levels (in the tree structure of
files)
• Compatibility with all MP3 encoding/
writing software, CD-R/RW drive and
recording media cannot be guaranteed.
Incompatible MP3 discs may produce
noise or interrupted audio or may not
play at all.
* This includes folders that have no MP3 or other
files. The number of folders that the system can
recognize may be less than actual number of
folders, depending on the folder structure.
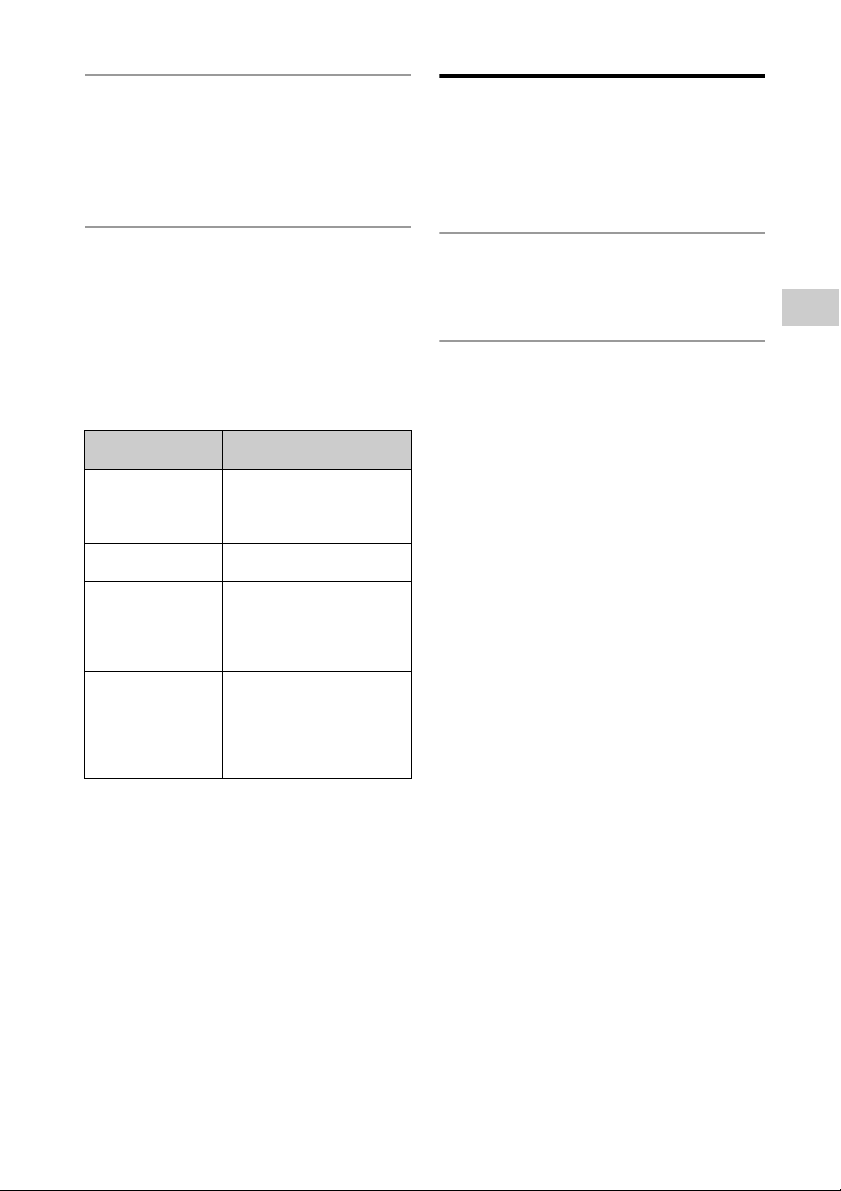
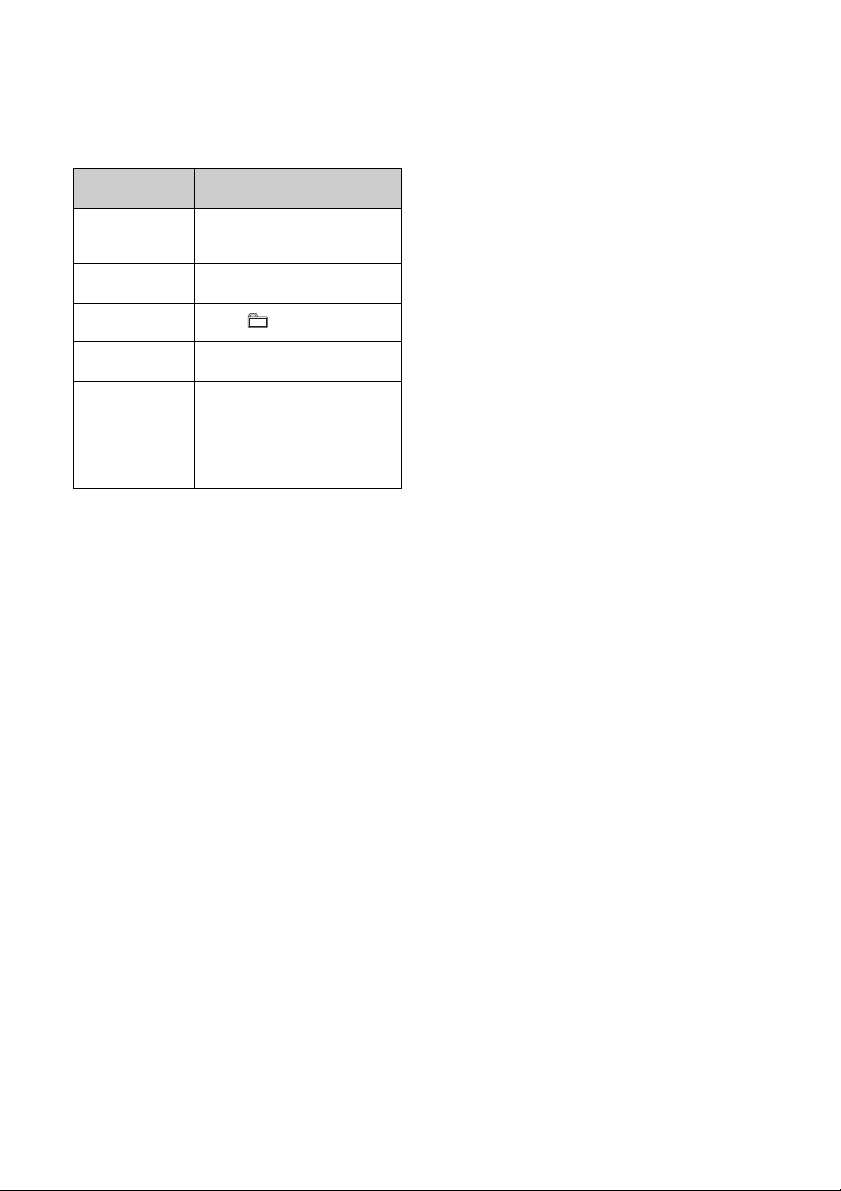
To Do the following:
Pause playback Press . To resume
play, press the button
again.
Stop playback Press .
Select a track or
file
Press / .
Find a point in a
track or file
Hold down /
(or / on the
unit) during playback,
and release the button at
the desired point.
Select Repeat
Play
Press REPEAT
repeatedly until “ ”(all
tracks or files) or“ 1”
(single track or file)
appears.
Select a folder
on an MP3 disc
Press +/
repeatedly.
Remove a disc Press
on the unit.
Play mode
20
GB
Creating your own program (Program Play)
Program the selected tracks or files using
the buttons on the remote.
1
Press CD FUNCTION .
Press FUNCTION on the unit
repeatedly until “CD” appears in the
display .
2
Press PLAY MODE repeatedly
until “PGM” appears to select the
Program Play mode while the
player is stopped.
3
Select a folder (MP3 disc only).
•
Press +/ repeatedly to select
the desired folder.
• Press if you want to program
all files in the folder.
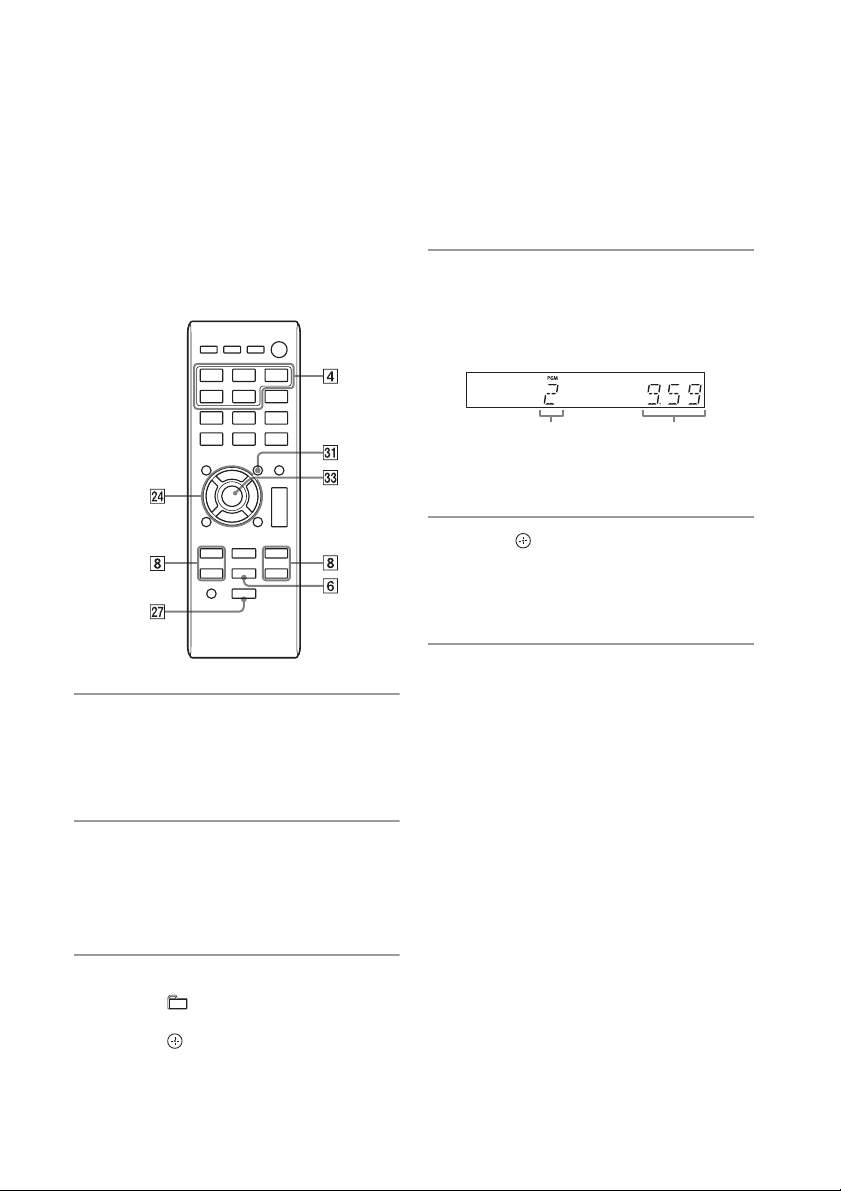
4
Select the desired track or file
number.
Press / repeatedly until the
desired track or file number appears.
5
Press .
“- -.- -” appears when the total playing
time exceeds 100 minutes for a CD-DA
or when you program MP3 files.
6
Repeat steps 3 through 5 to
program additional tracks or
files.
Up to 25 tracks or files can be
programmed.
If “STEP FULL” appears
You attempt to program 26 tracks or
files.
Delete a programmed track or file and
program the new track or file again.
See “To delete the program” (page 21).
Selected track
or file number
Total playing time of
the selected track or
file

21
GB
Operations
7
Press .
Your program of tracks or files starts
playback.
• The programmed files or tracks
remain available until you remove the
disc from the disc tray or unplug the
power cord.
• To play the same program again,
press .
To cancel Program Play
Press PLAY MODE repeatedly until “PGM”
disappears while the player is stopped.
To delete the program
Press CLEAR while the play is stopped.
Each time you press the button, the last
programmed track or file will be deleted.
When all the programmed tracks or files are
deleted, “NO STEP” appears.
Notes
• If the disc is ejected after programming, all the
programmed tracks or files are deleted.
• If the power cord is disconnected when the
system is on, the programmed tracks or files are
deleted.
22
GB
Playing an iPod/iPhone/iPad
You can play an iPod/iPhone/iPad by
connecting it to the system. You can
operate your iPod/iPhone/iPad using the
buttons on this system.
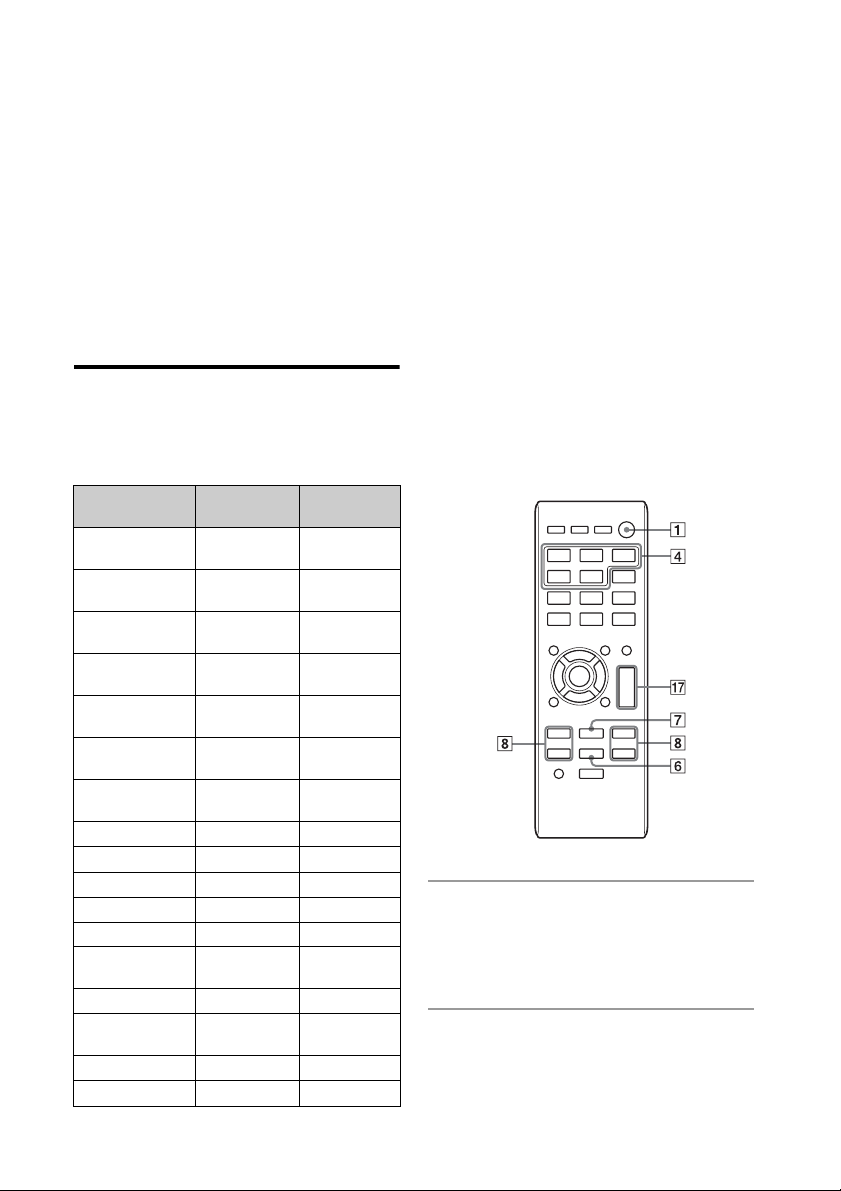
Compatible iPod/iPhone/
iPad models
The iPod/iPhone/iPad models that can be
used with this system are as follows:
as of April, 2013
“Made for iPod,” “Made for iPhone,” and
“Made for iPad” mean that an electronic
accessory has been designed to connect
specifically to iPod, iPhone, or iPad,
respectively, and has been certified by the
developer to meet Apple performance
standards. Apple is not responsible for the
operation of this device or its compliance
with safety and regulatory standards. Please
note that the use of this accessory with
iPod, iPhone, or iPad may affect wireless
performance.
1
Press USB FUNCTION .
Press FUNCTION on the unit
repeatedly until “USB” appears in the
display .
2
Connect the USB cable supplied
with the iPod/iPhone/iPad to the
USB port on the unit.
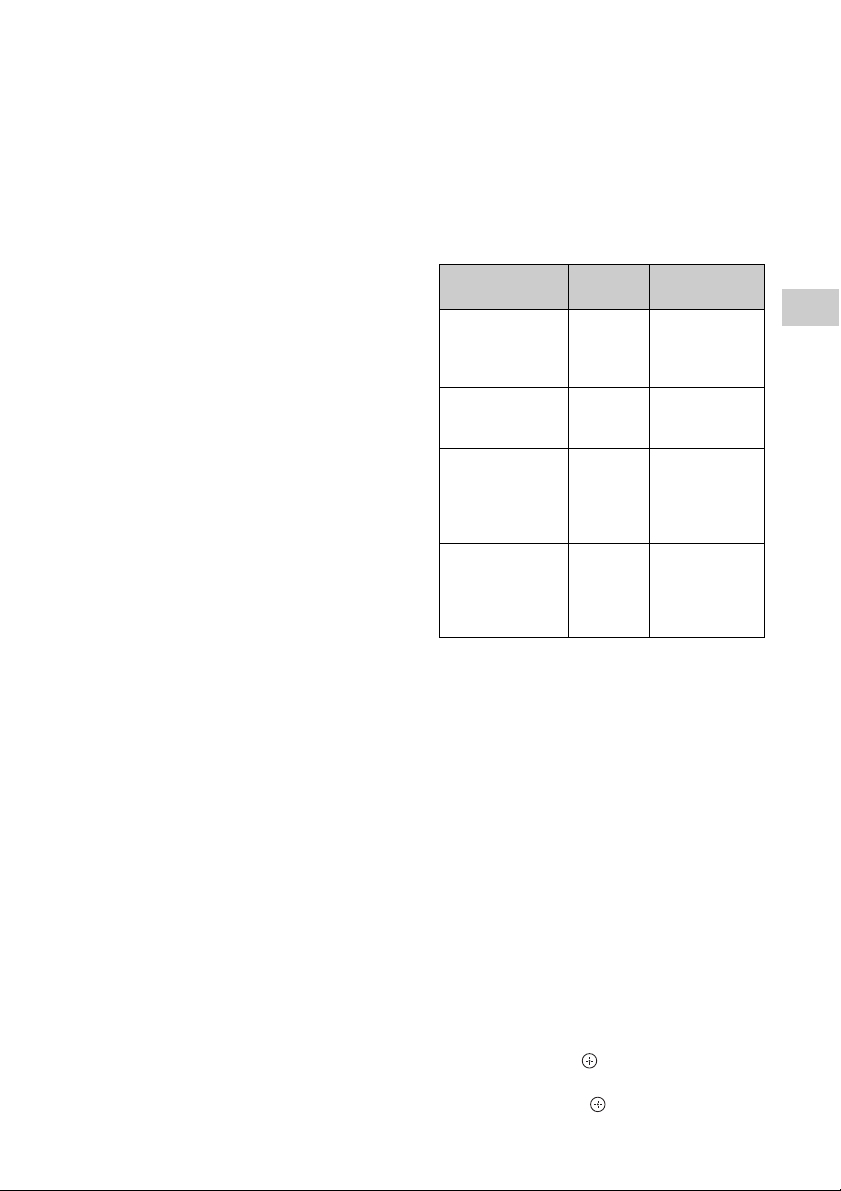
Compatible
model
USB
connection
AirPlay
connection
iPod touch
(5th generation)
iPod touch
(4th generation)
iPod touch
(3rd generation)
iPod nano
(7th generation)
—
iPod nano
(6th generation)
—
iPod nano
(5th generation)
—
iPod nano
(4th generation)
—
iPod classic —
iPhone 5
iPhone 4S
iPhone 4
iPhone 3GS
iPad
(4th generation)
iPad mini
iPad
(3rd generation)
iPad 2
iPad
23
GB
Operations
3
Connect the USB cable supplied
with the iPod/iPhone/iPad to the
iPod/iPhone/iPad.
The function indicator in the display
changes from “USB” to “iPod.”
4
When “iPod” appears in the
display , press to start
playback.
Other operations
You can perform the following operations
using the buttons on the remote or unit of
the system.
Notes
• The performance of the system may vary
depending on the specifications of your iPod/
iPhone/iPad.
• Do not carry the system with an iPod/iPhone/
iPad connected to the system. Doing so may
cause a malfunction.
• To adjust the volume level, use VOLUME +/
on the remote or VOLUME dial on the unit.
• To use an iPod/iPhone/iPad, refer to the user’s
guide of your iPod/iPhone/iPad.
• Sony cannot accept responsibility in the event
that data recorded to iPod/iPhone/iPad is lost
or damaged when using an iPod/iPhone/iPad
with this system.
Charging an iPod/iPhone/
iPad
Charging begins automatically when you
connect an iPod/iPhone/iPad to this system
and the system is turned on.
1
Turn the power of the system on.
Press / (power) to turn on the
system.
2
Connect the iPod/iPhone/iPad to
the USB port on the unit.
For details on connection, see page 13.
Charging the iPod/iPhone/iPad begins.
For details, refer to the user’s guide of
your iPod/iPhone/iPad.
To stop charging the iPod/iPhone/iPad
Press / to turn off the system, and
then disconnect the iPod/iPhone/iPad.
Notes on charging
• You cannot charge an iPod/iPhone/iPad when
the system is off.
• If the system enters Standby mode during
charging of an iPod/iPhone/iPad, the charging
stops in progress. Before charging, turn off the
Automatic Standby function. For details, see
“Setting the Automatic Standby function”
(page 55).
• To see whether charging is operating or not,
check the battery icon on the iPod/iPhone/iPad
display.
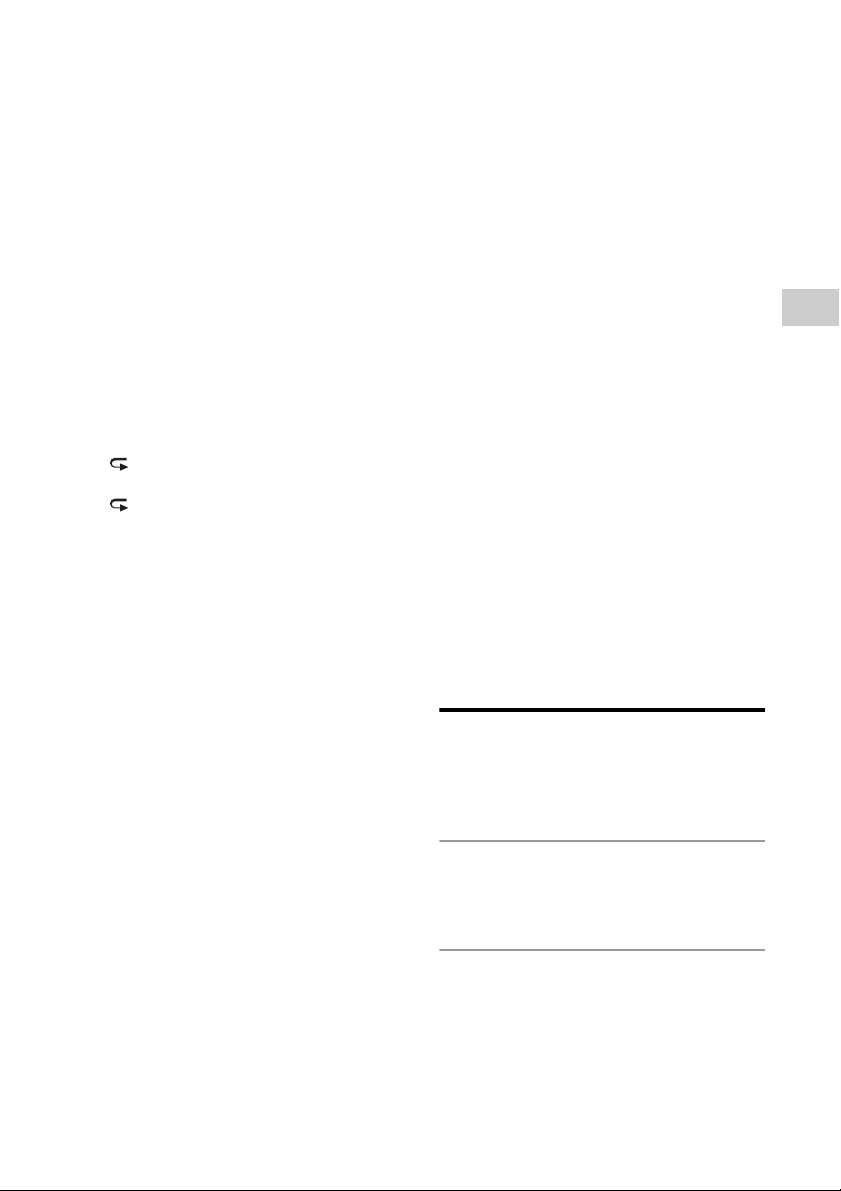
To Do the following:
Pause playback Press or .
To resume play, press
the button again.
Stop playback Press .
Select a track or
chapter of
audiobook/
podcast
Press / .
Find a point in a
track or chapter
of audiobook/
podcast
Hold down /
(/ on the
unit) during playback,
and release the button
at the desired point.
24
GB
Playing a file on a USB device
You can play audio files stored on a USB
device on this system by connecting a USB
memory or USB device to the system.
The audio format that can be played back
on this system is MP3/WMA*/AAC*.
Check the websites below for the
information about compatible USB devices.
For customers in Europe:
http://support.sony-europe.com/
For customers in other countries/regions:
http://www.sony-asia.com/support
* Files with DRM (Digital Rights Management)
copyright protection or files downloaded from
an online music store cannot be played on this
system. If you try to play one of these files, the
system plays the next unprotected audio file.
1
Press USB FUNCTION .
Press FUNCTION on the unit
repeatedly until “USB” appears in the
display .
2
Connect the USB device directly
or via the USB cable supplied
with the USB device to the USB
port on the unit.
3
Press to start playback.
Other operations
You can perform the following operations
using the buttons on the remote or unit of
the system.
*1
When playing a VBR MP3/WMA file, the system
may resume playback from a different point.
*2
When resume play is canceled, the display
returns to the number of folders.
To Do the following:
Pause
playback
Press . To resume
play, press the button
again.
Stop
playback
Press . To resume
play, press *
1
. To
cancel resume play, press
again*
2
.
Select a
folder
Press +/
repeatedly.
Select a file Press / .
Find a point
in a file
Hold down /
(/ on the unit)
during playback, and
release the button at the
desired point.
Select Repeat
Play
Press REPEAT
repeatedly until “ ” (all
audio files) or “ 1” (single
audio file) appears.
25
GB
Operations
To change the play mode
Press PLAY MODE repeatedly while the
player is stopped. You can select Normal
Play mode (no indication or “FLDR”
appears*
1
), or Shuffle Play mode (“SHUF” or
“FLDR SHUF” appears*
2
).
*1
When no indication is selected, the system
plays all files on the USB device. When “FLDR” is
selected, the system plays all files in the
selected folder on the USB device.
*2
When “SHUF” is selected, the system shuffle-
plays all audio files on the USB device. When
“FLDR SHUF” is selected, the system shuffle-
plays all audio files in the selected folder.
Note on the play mode
If the power cord is disconnected when the
system is on, the play mode returns to
Normal Play.
Notes on Repeat Play
• “ ” indicates that all files will be
repeated until you stop playback.
• “ 1” indicates that a single file will be
repeated until you stop playback.
• If the power cord is disconnected when
the system is on, Repeat Play is cancelled.
Note on Shuffle Play mode
When you turn off the system, the selected
Shuffle Play mode (“SHUF” or “FLDR SHUF”)
is cleared and the play mode returns to
Normal Play mode (no indication or “FLDR”).
Notes
• The playback order for the system may differ
from the playback order of the connected digital
music player.
• Be sure to turn off the system before removing
the USB device. Removing the USB device while
the system is turned on may corrupt the data on
the USB device.
• When USB cable connection is necessary,
connect the USB cable supplied with the USB
device to be connected. For details on
connection, refer to the operation manual
supplied with the USB device to be connected.
• It may take time before “READING” appears after
connecting, depending on the type of USB
device connected.
• Do not connect the USB device through a USB
hub.
• When the USB device is connected, the system
reads all the files on the USB device. If there are
many folders or files on the USB device, it may
take a long time to finish reading the USB
device.
• With some connected USB devices, it may take a
long time to transmit signals from the system or
to finish reading the USB device.
• Compatibility with all encoding/writing software
cannot be guaranteed. If audio files on the USB
device were originally encoded with
incompatible software, those files may produce
noise or may malfunction.
• The maximum number of folders and files on
the USB device compatible with this system is:
– 1,000* folders (including the root folder)
– 3,000 files
– 250 files in a single folder
– 8 folder levels (in the tree structure of files)
* This includes folders that have no playable
audio files and empty folders. The number of
folders that the system can recognize may be
less than actual number of folders,
depending on the folder structure.
• The system does not necessarily support all the
functions provided in a connected USB device.
• Folders that have no audio files are not
recognized.
• The audio formats that you can listen to with
this system are as follows:
– MP3: file extension “.mp3”
– WMA: file extension “.wma”
– AAC: file extension “.m4a,” “.mp4” or “.3gp”
Note that even when file name has the correct
file extension, if the actual file differs, the
system may produce noise or may malfunction.
Charging a USB device
Charging begins automatically when you
connect a USB device to this system and the
system is turned on.
1
Turn the power of the system on.
Press / (power) to turn on the
system.
2
Connect a USB device to the USB
port on the unit.
For details on connection, see page 13.
To stop charging the USB device
Press / to turn off the system, and
then disconnect the USB cable.

26
GB
Notes on charging
• You cannot charge the USB device when the
system is off. Some USB devices may not be
charged owing to their characteristics.
• If the system enters Standby mode during
charging of a USB device, the charging stops in
progress. Before charging, turn off the
Automatic Standby function. For details, see
“Setting the Automatic Standby function”
(page 55).
27
GB
Operations
Preparing for a BLUETOOTH connection
You can listen to music from your iPod/
iPhone/iPad or BLUETOOTH device over a
wireless connection.
Before using the BLUETOOTH function,
perform pairing to register your BLUETOOTH
device.
The system supports registration and
connection of the BLUETOOTH device and
NFC, which enables data communication by
just touching a specified location. For
details on NFC, see “Connecting by one-
touch action (NFC)” (page 29).
What is pairing?
The BLUETOOTH devices to be connected
must be registered with each other
beforehand. Pairing is an operation of
registering two devices.
Once a pairing operation is performed, it
does not have to be performed again. In the
following cases, however, a pairing
operation must be performed again:
• Pairing information was erased when the
BLUETOOTH device was repaired.
• You attempt to pair the system with more
than 10 BLUETOOTH devices.
This system can pair with up to 9
BLUETOOTH devices. If you pair another
BLUETOOTH device after pairing with 9
devices was performed, pairing
information of the device that was
connected with the system first is
overwritten with that of the new device.
• Pairing registration information of this
system is erased from the connected
device.
• If you initialize the system or erase the
pairing history with the system, all the
pairing information will be erased.
About the BLUETOOTH indicator
The BLUETOOTH indicator in the center of
the BLUETOOTH button allows checking
of the BLUETOOTH status.
This system supports BLUETOOTH A2DP
(Advanced Audio Distribution Profile) and
AVRCP (Audio Video Remote Control
Profile). For details, see “BLUETOOTH
wireless technology” (page 71).
Notes
• For details on operations of the BLUETOOTH
device to be connected, refer to the operation
manual supplied with your BLUETOOTH device.
• The BLUETOOTH device to be connected must
support A2DP (Advanced Audio Distribution
Profile).
Enabling reception of AAC codec
You can receive data in AAC codec format
from a BLUETOOTH device. To enable
reception, set up using the option menu.
1
Press OPTIONS to display the setting
menu.
2
Press / repeatedly to select “BT
AAC” then press .
3
Press / repeatedly to select “ON” or
“OFF,” then press .
System status Indicator
color
Indicator
status
The system is in
BLUETOOTH
Standby (when
the system is on)
Blue Flashes slowly.
During
BLUETOOTH
pairing
Blue Flashes
quickly.
The system is
attempting to
connect with a
BLUETOOTH
device
Blue Flashes.
The system has
established
connection with
a BLUETOOTH
device
Blue Lit.
28
GB
ON: to receive in AAC codec format
OFF: to receive in SBC codec format
Notes
• If you initiate setup during BLUETOOTH
connection, the connection is cut.
• When using an Apple product, update it to the
latest software version. For details on updating,
refer to the operation manual supplied with your
Apple product.
• If sound is interrupted during reception in AAC
codec format, set the BT AAC menu to “OFF.”
Pairing the system with a
BLUETOOTH device
Connection example
* Check if your WALKMAN is a BLUETOOTH device
or not, referring to the operation manual
supplied with your WALKMAN.
1
Place the BLUETOOTH device to
be connected within 1 meter
from the system.
2
Press BLUETOOTH FUNCTION .
Press FUNCTION on the unit
repeatedly until “BT AUDIO” appears in
the display .
The BLUETOOTH indicator flashes
slowly in blue.
• If the system has been automatically
connected with the BLUETOOTH
device in the past, press BLUETOOTH
on the unit to cancel the
connection so that “BT AUDIO”
appears in the display .
3
Press and hold BLUETOOTH
on the unit for 2 seconds or
longer.
The BLUETOOTH indicator flashes
quickly in blue and “PAIRING” flashes in
the display .
The system is in Pairing mode.
4
Perform the pairing operation on
the BLUETOOTH device and
search for this system with the
BLUETOOTH device.
When searching has finished, a list of
the devices found may appear on the
BLUETOOTH device display.
• This system appears as “SONY:CMT-
SBT300W (Bluetooth)” or “SONY:CMT-
SBT300WB (Bluetooth).” If it does not
appear, perform the procedure from step 1
again.
BLUETOOTH device such as a
“WALKMAN”*

29
GB
Operations
• When establishing connection with this
system, select the audio profile (A2DP,
AVRCP) on the BLUETOOTH device.
• If the BLUETOOTH device does not support
AVRCP (Audio Video Remote Control
Profile), you cannot perform playback or
stop playback with the system.
• For details on operations of the
BLUETOOTH device to be connected, refer
to the operation manual supplied with
your BLUETOOTH device.
5
Select “SONY:CMT-SBT300W
(Bluetooth)” or “SONY:CMT-
SBT300WB (Bluetooth)” in the
display of the BLUETOOTH
device.
If prompted to enter a passkey on the
BLUETOOTH device, enter “0000.”
6
Operate the BLUETOOTH device
and perform BLUETOOTH
connection.
When pairing is completed and
connection with the BLUETOOTH device
is established correctly, the display
changes to “BT AUDIO” from “PAIRING”
and the BLUETOOTH indicator
flashes slowly in blue.
• Depending on the type of
BLUETOOTH device, connection may
start automatically after pairing is
completed.
Notes
• “Passkey” may be called “Passcode,” “PIN code,”
“PIN number” or “Password,” etc.
• The pairing standby status of the system is
cancelled after about 5 minutes. If pairing is not
successful, perform the procedure from step 1
again.
• If you want to pair with several BLUETOOTH
devices, perform the procedure from step 1 to 6
individually for each BLUETOOTH device.
Tip
You can perform a pairing operation or attempt to
make a BLUETOOTH connection with another
BLUETOOTH device while the BLUETOOTH
connection is established with one BLUETOOTH
device. The currently established BLUETOOTH
connection is cancelled when BLUETOOTH
connection with another device is successfully
established.
To erase the pairing registration
information
1
Press BLUETOOTH FUNCTION .
• Press FUNCTION on the unit repeatedly
until “BT AUDIO” appears in the display .
• When the system is connected with a
BLUETOOTH device, the device name set for
the connected BLUETOOTH device appears in
the display of the system. Press
BLUETOOTH on the unit to cancel the
connection with that BLUETOOTH device so
that “BT AUDIO” appears in the display .
2
Press OPTIONS to display the setting
menu.
3
Press / repeatedly to select “DEL
LINK,” then press .
4
Press / repeatedly to select “OK,”
then press .
“COMPLETE” appears in the display and all
the pairing information is erased.
Note
If you have erased the pairing information, you
cannot make a BLUETOOTH connection unless
pairing is performed again. To connect with a
BLUETOOTH device again, you must enter the
passkey on the BLUETOOTH device.
Connecting by one-touch
action (NFC)
NFC is a technology for short-range wireless
communication between various devices
such as a mobile phone and IC tag.
NFC enables data communication by just
touching your device to a specified location.
Compatible smartphones are those
equipped with the NFC function (compatible
operating system: Android version 2.3.3 or
later with the exception of Android 3.x).
Check the website below for information on
compatible devices.
For customers in Europe:
http://support.sony-europe.com/
For customers in other countries/regions:
http://www.sony-asia.com/support
Preparation on your smartphone (Android)
An NFC-compliant application must be
installed on your smartphone. If not
30
GB
installed, you can download “NFC Easy
Connect” from Google Play.
• In some countries and regions, NFC-
compliant application may not be
downloaded.
• For some smartphones, this function may
be available without downloading “NFC
Easy Connect”. In this case, the operation
and specifications of the smartphone may
be different from the description in this
manual. For details, refer to the user’s
guide supplied with your smartphone.
1
Install the application.
If you access using 2D Code
Read the following 2D Code to access.
2
Set your smartphone to enable the NFC
function.
For details, refer to the user’s guide supplied
with your smartphone.
About the “NFC Easy Connect” application
This is a free application especially used for
Android. Search the internet for detailed
information on “NFC Easy Connect” and
download the application.
• In some countries and regions, NFC-compliant
application may not be downloaded.
Making a connection with your
smartphone by one-touch action
Just touch your smartphone to the system.
The system is turned on automatically, and
pairing and BLUETOOTH connection are
established.
1
Start the “NFC Easy Connect” application
on your smartphone.
Check that the application display appears.
2
Touch your smartphone to the unit.
Touch the smartphone to the N-Mark on the
unit and maintain contact until the smartphone
vibrates.
Complete the connection with your
smartphone, following the instructions on the
screen.
Refer to the user’s guide of your smartphone for
the part of your smartphone used as touch
contact.
To disconnect by one-touch action
To disconnect the established connection,
touch your smartphone to the N-Mark on
the unit.
To switch a connected device by one-touch
action
When you touch an NFC-compliant
smartphone to the unit while another
BLUETOOTH device is connected with this
system, the BLUETOOTH device is
disconnected and the system is connected
with the smartphone.
If you touch the smartphone connected with
this system to another NFC-compliant
BLUETOOTH headset or speaker, the
smartphone is disconnected from the
system and connected with the touched
BLUETOOTH device.

31
GB
Operations
Listening to music through a BLUETOOTH
connection
You can operate a BLUETOOTH device that
is paired with the system and play music
through the BLUETOOTH connection.
You can adjust the volume of the system
and perform play/stop operations using the
connected BLUETOOTH device. For details
on the operations, refer to the operation
manual supplied with your BLUETOOTH
device.
Confirm the following before playing music:
• The BLUETOOTH function of the
BLUETOOTH device is enabled.
• Pairing with the system has been
completed.
1
Press BLUETOOTH FUNCTION .
The BLUETOOTH indicator flashes
slowly in blue.
• Press FUNCTION on the unit
repeatedly until “BT AUDIO” appears
in the display .
2
Establish BLUETOOTH connection
with the BLUETOOTH device.
Once connection is established,
“CONNECT” appears in the display
then the name set on the connected
BLUETOOTH device appears.
• If the BLUETOOTH device has been
connected with this system in the
past, it may be connected
automatically with no user operation
required.
• For details on operations of the
BLUETOOTH device, refer to the
operation manual supplied with your
BLUETOOTH device.
3
Press to start playback.
•
Depending on the BLUETOOTH
device, you may have to start up a
music player on the BLUETOOTH
device beforehand.
• Depending on the BLUETOOTH
device, you may have to press
twice.
4
Press VOLUME +/ to adjust
the volume.
•
Turn the VOLUME dial on the unit
left or right to adjust the volume.
• If the volume cannot be changed,
adjust it on your BLUETOOTH device.
32
GB
Other operations
You can perform the following operations
using the buttons on the remote or unit of
the system.
* Depending on the BLUETOOTH device, you may
have to press twice.
Note
The operations described in this manual may not
be available for certain BLUETOOTH devices. In
addition, the actual operations may differ
depending on the connected BLUETOOTH device.
To check the address of a connected
BLUETOOTH device
Press DISPLAY while the name set on the
connected BLUETOOTH device is shown in
the display . The BLUETOOTH device
address appears in two installments in the
display for 8 seconds.
To cancel the connection with the BLUETOOTH
device
Press BLUETOOTH on the unit.
“DISCONNECT” appears in the display .
Depending on the BLUETOOTH device, the
connection may be cancelled automatically
when you stop playback.
To Do the following:
Pause
playback
Press *.
Stop playback Press .
Select a folder Press +/ .
Select a file Press / .
Find a point in
a file
Hold down / (or
/ on the unit)
during playback and
release the button at the
desired point.

33
GB
Network connections
Network connections
How to connect your network
Set up the network after checking your
network environment. Refer to the following
descriptions.
Setting up for a wireless network
Select the suitable method and start to
make the network settings. Do not connect
any network (LAN) cable to the system.
• Option 1: Method for using an application
for smartphones or Tablets (Android
device/iPhone/iPod touch/iPad)
(page 34)
• Option 2: Manual setting method using
an Access Point Scan (for PC/Mac)
(page 35)
• Option 3: Method for using a WPS push
button at the access point supporting
WPS (page 37)
Setting Up for a Wired Network
• Option 4: DHCP method (page 38)
Tip
For connecting the fixed IP address and setting of
the proxy server, use the screen in step 8 of
“Option 2: Manual setting method using an Access
Point Scan (for PC/Mac)” (page 35).
34
GB
Setting up for a wireless network
Note
When setting up a wireless network, SSID
(Wireless Network Name) and Security Key (WEP or
WPA key) may be required. Security key (or
network key) is an encryption key used to limit the
devices with which communication can occur. It is
used to provide higher security for devices
communicating via a wireless LAN router/access
point.
Option 1: Method for using
an application for
smartphones or Tablets
(Android device/iPhone/
iPod touch/iPad)
Notes
• Before starting this procedure, be aware that
your Wi-Fi network will not be protected until
the setting is complete. After the setting is
complete, your Wi-Fi network will be protected
again when you set wireless LAN security.
• The following procedure must be completed
within 30 minutes. If you cannot complete it,
turn off the system and start over from step 1.
• If a trouble occurs during network setup, start
over from step 1.
1
Have the wireless network name
(SSID) and Security Key of the
wireless LAN router/access point
to be used available for
reference.
For the SSID and Security Key, refer to
the operating instructions of the
wireless LAN router/access point.
2
Download the “NS Setup”
application.
You can download the free application
from “Google Play” for Android devices
or “App Store” for iPhone/iPod touch/
iPad.
If you access using 2D Code
Read the following 2D Code to access.
Android
iOS
You can search the application easily if
you type “NS Setup” into the search
screen.
3
Press / (power) to turn on
the system.
4
Press OPTIONS to display the
setting menu.
SSID (Wireless Network Name)
Security Key (WEP or WPA key)

35
GB
Network connections
5
Press / repeatedly to
select “NW RESET,” then press
. When “OK” appears in the
display, press .
The system is automatically turned off.
6
Press / (power) to turn on
the system.
When flashes in the display ,
perform the following operation.
When setting up with an iPhone/iPod
touch/iPad
From the Home screen, go to [Settings]
- [Wi-Fi] and select
“Sony_Wireless_Audio_Setup.”
If “Sony_Wireless_Audio_Setup” does
not appear, wait until flashes in the
display , then perform searching
again.
7
Launch the “NS Setup”
application.
8
Perform setup, following the on-
screen instructions.
When setup is completed, press the
“Play test sound” button to confirm
operation of the system by playing the
test sound.
Notes
• If “Sony_Wireless_Audio_Setup” does not
appear, repeat steps 4 and after.
• Do not connect the network (LAN) cable.
Option 2: Manual setting
method using an Access
Point Scan (for PC/Mac)
Note
Be aware that your Wi-Fi network will not be
protected until the setting is complete. After the
setting is complete, your Wi-Fi network will be
protected again when you set a wireless LAN
security.
1
Have the wireless network name
(SSID) and Security Key of the
wireless LAN router/access point
to be used available for
reference.
For the SSID and Security Key, refer to
the operating instructions of the
wireless LAN router/access point.
2
Press OPTIONS to display the
setting menu.
3
Press / repeatedly to
select “NW RESET,” then press
.
The system is automatically turned off.
4
Press / (power) to turn on
the system.
5
Connect the unit and a Mac or
PC.
For Mac OS X
Turn on Mac.
Select the icon on the top of the
screen.
Select [Sony_Wireless_Audio_Setup]
from the network list.
SSID (Wireless Network Name)
Security Key (WEP or WPA key)
36
GB
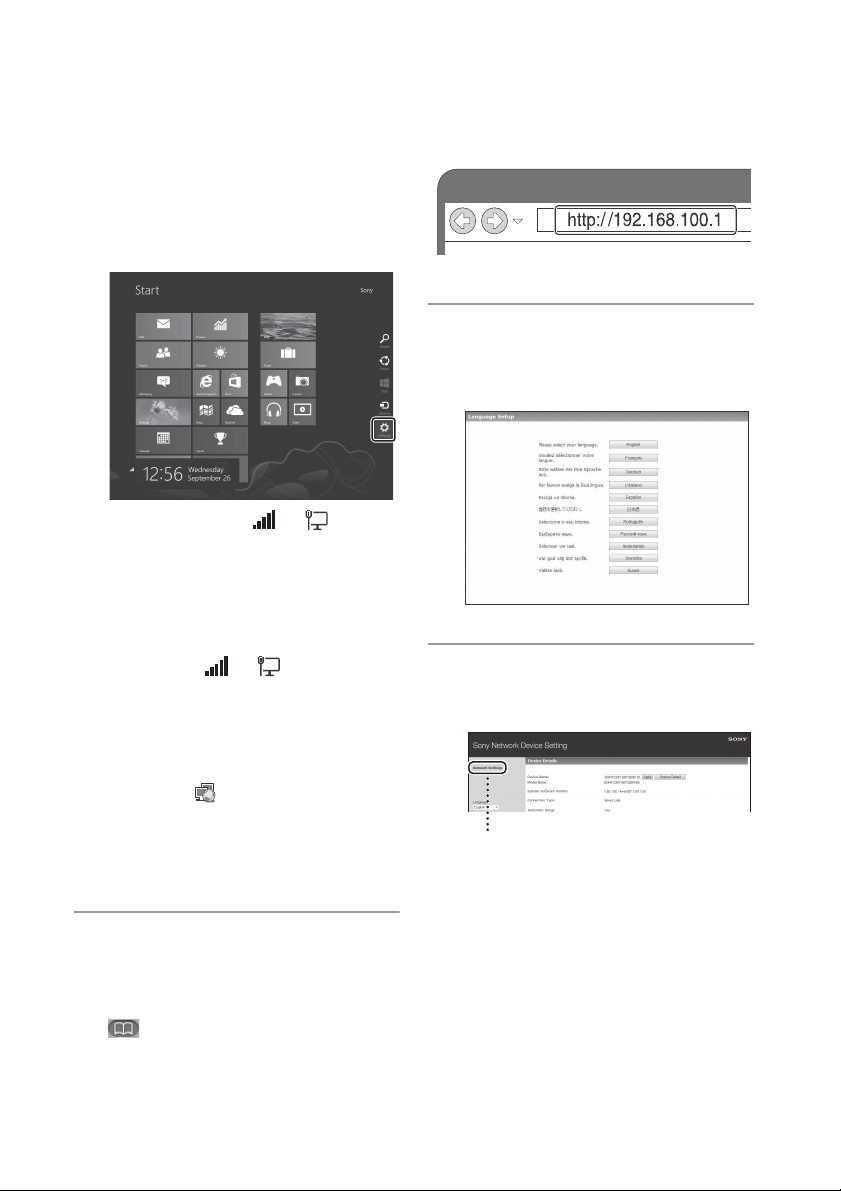
For Windows 8 (Windows UI)
Turn on PC.
Move the mouse pointer to the top-
right (or bottom-right) corner on the
Start screen to display the charms,
and select [Settings].
With a touch panel, display the
charms by swiping from the right end
of the Start screen, and select
[Settings].
Select or tap the or icon.
Select [Sony_Wireless_Audio_Setup]
from the network list.
For Windows 7/Windows 8
Turn on PC.
Click or tap the desktop on the Start
screen.
Select the or icon on the
bottom of the screen.
Select [Sony_Wireless_Audio_Setup]
from the network list.
For Windows Vista
Turn on PC.
Click the icon on the bottom of
the screen.
Select [Connect to a network].
Select [Sony_Wireless_Audio_Setup]
from the network list.
6
Access the [Sony Network Device
Setting] screen.
For Mac
Start Safari and select [Bonjour] under
([Bookmarks]), then select
[SONY:CMT-SBT300W(B) XXXXXX].
For PC
Start the browser and input either of
the following URLs into the browser’s
address bar.
7
Select the desired language
when the [Language Setup]
screen appears.
8
Select [Network Settings] from
the menu.
Network Settings

37
GB
Network connections
9
Select the SSID of the wireless
LAN router/access point, then
input the Security Key (if
applicable).
10
Select [Apply].
11
Select [OK] in the displayed
window.
The system restarts automatically.
12
Connect the Mac or PC to the
wireless LAN router/access point
to be used.
Note
This procedure needs to be completed within 30
minutes. If you cannot complete, start over from
step 3.
Option 3: Method for using a
WPS push button at the
access point supporting
WPS
1
Check whether the network (LAN)
cable (not supplied) is
disconnected.
Disconnect the network (LAN) cable
while the power cord is disconnected if
the network (LAN) cable is connected.
2
Press OPTIONS to display the
setting menu.
3
Press / repeatedly to
select “WPS,” then press .
“OK” appears in the display .
• To cancel the setting, press / to
select “CANCEL,” then press .
4
Press .
“WPS” flashes.
5
Hold down the WPS button on
the access point for more than 3
seconds.
* The position and the shape of the WPS
button are different depending on the
model of the access point.
6
“CONNECT” lights up after “WPS”
flashes for several tens of
seconds in the display window of
the system. Make sure that
lights up after a connection has
been made.
Tip
Refer to the operating instructions of your
wireless LAN router/access point for details
on the WPS button.
SSID
WPS button*
38
GB
Setting up wired networks
Option 4: DHCP method
Usually, the DHCP setting is set to ON when
you connect your computer to the network.
Try the following method if you are using a
wired network.
Set the DHCP setting of your computer to
ON in advance.
1
Check whether your computer
and router are turned on.
2
Connect the system and the
router using a network (LAN)
cable (not supplied).
3
Connect the router and your
computer using a second
network (LAN) cable (not
supplied) or a wireless LAN
connection.
4
Turn the system on.
lights up in the display when the
connection is made.
Network (LAN) cable
(not supplied) or a
wireless LAN
connection
Network (LAN) cable
(not supplied)
39
GB
Network connections
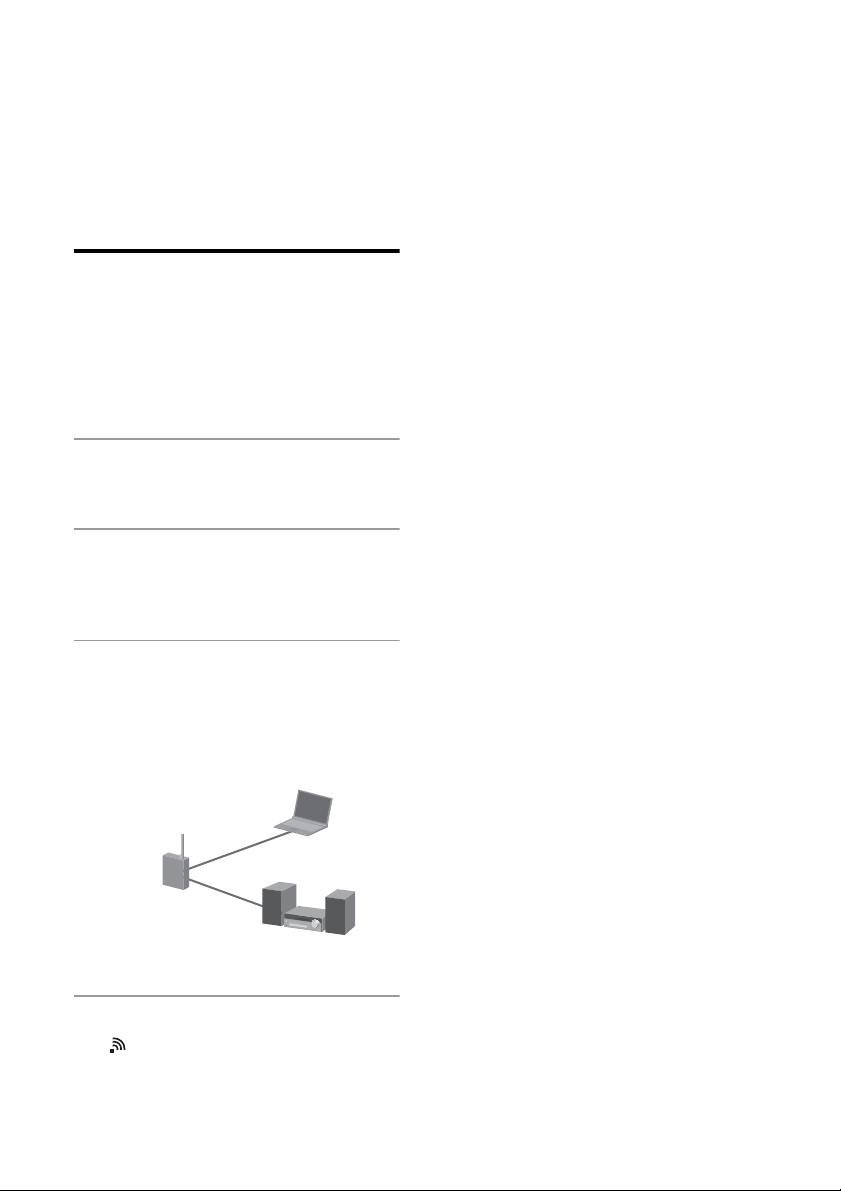
Listening to audio content using DLNA
(Digital Living Network Alliance)
You can play back audio content on DLNA-
compliant servers such as your computer, or
network recorder, etc., on this system by
controlling the server using “Network Audio
Remote” application*. A DLNA-compliant
controller device (a remote control device,
etc.) is needed for the operation.
You can use Windows 7/Windows 8 as both
server and controller.
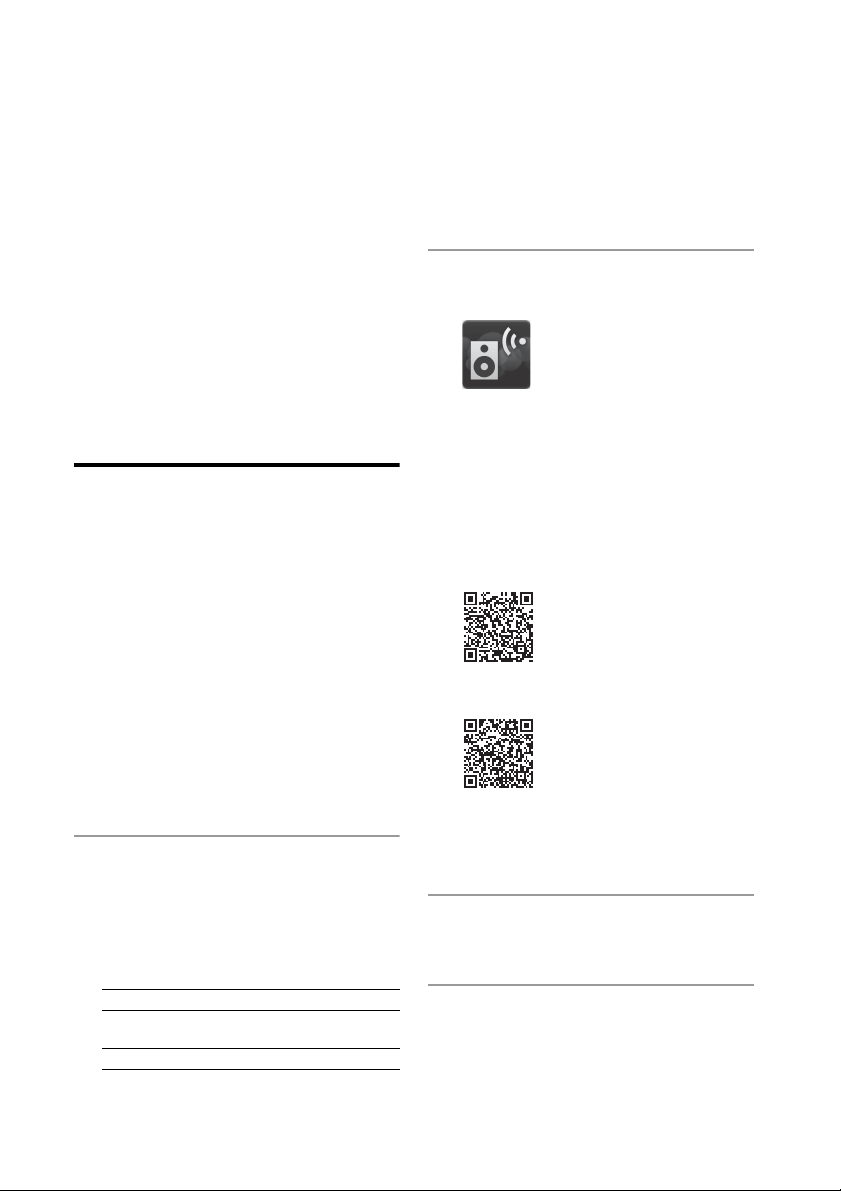
If you access using 2D Code
Read the following 2D Code to access.
Android
iOS
You can search for application easily if you
type “Network Audio Remote” on the search
screen.
The system can play audio content stored
on the server in MP3, Linear PCM, WMA and
AAC* formats. Audio content with DRM
(Digital Rights Management) copyright
protection cannot be played on this system.
* The system can play AAC files with the
extension of “.m4a,” “.mp4,” or “.3gp” only.
Notes
• Generally, it may take a while to recognize each
DLNA-compliant device currently used when
you enjoy audio content via a home network.
• This system cannot play back files in WMA
format with DRM copyright protection. If a WMA
file cannot be played back on this system, check
the property of that file on your computer, and
see whether the file is DRM-copyrighted.
Open a folder or a volume where the WMA file is
stored, and right-click the file to display the
[Property] window. When there is the [Licence]
tab, the file is DRM-copyrighted and cannot be
played back on this system.
• You may not be able to play back some content
with DLNA CERTIFIED products.
Tip
The network function is available by playing back
audio content on a DLNA -compliant server or
controller device, although you cannot select it
using the function button(s) on the unit of this
system.
Listening to audio content
on a computer with
Windows 8
Windows 8 supports DLNA1.5. Windows 8
can be used as both server and controller.
You can listen to audio content on the
server easily using the [Play To] function of
Windows 8.
Device with Network Audio Remote* or
DLNA controller
Server
Network
controlled player
(this system)
Control
Access
Deliver
* Network Audio Remote is application for iOS
and Android. Sony provides the “Network
Audio Remote” application for free.
Control & Deliver
DLNA controller/Server
(Windows 8-based
computer)
Network controlled
player (this system)
40
GB
Note
The items displayed on the computer may be
different from the ones shown in this section,
depending on the version of the operating system
or the computer environment. For details, refer to
the help of your computer.
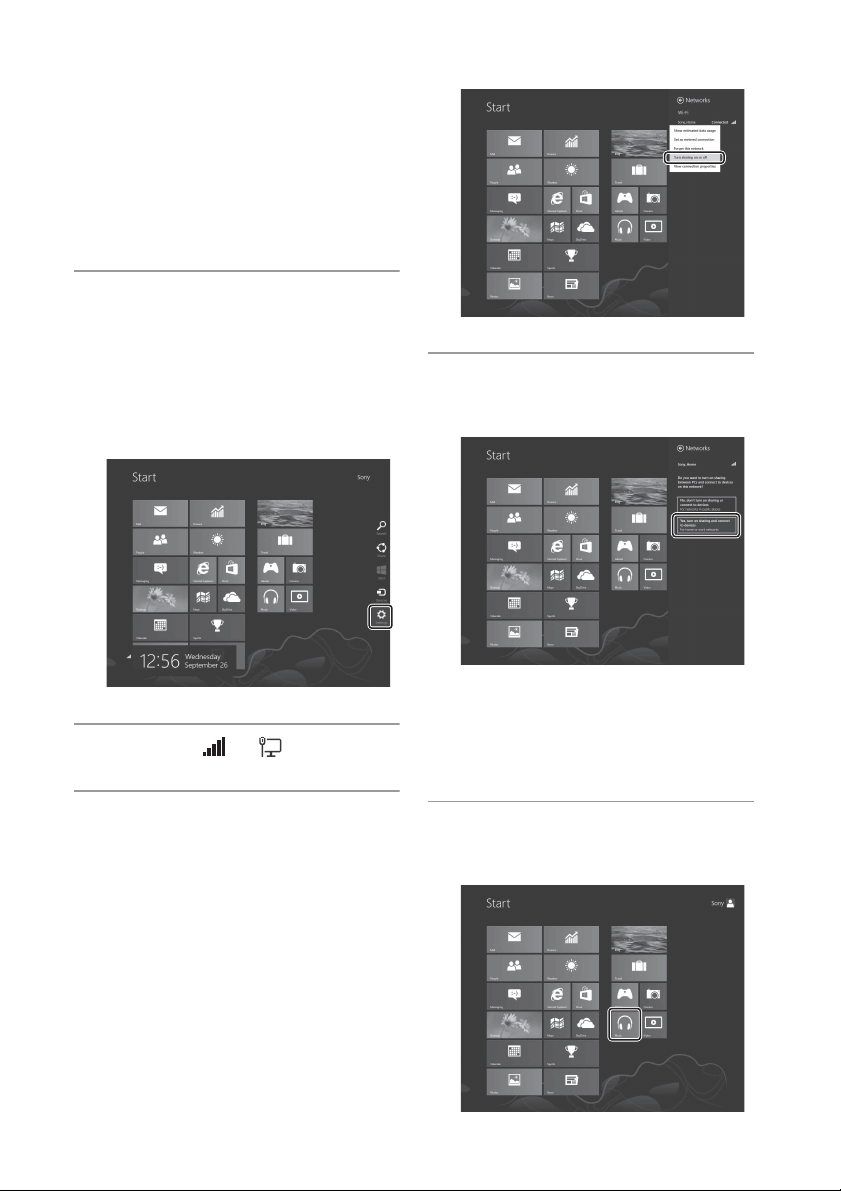
Setting up a computer with
Windows 8
1
Move the mouse pointer to the
top-right (or bottom-right) corner
on the Start screen to display the
charms, and select [Settings].
With a touch panel, display the charms
by swiping from the right end of the
start screen, then select [Settings].
2
Select the or icon.
3
Right-click the name of the
connected network or press and
hold it, and select [Turn sharing
on or off].
4
Select [Yes, turn on sharing and
connect to devices].
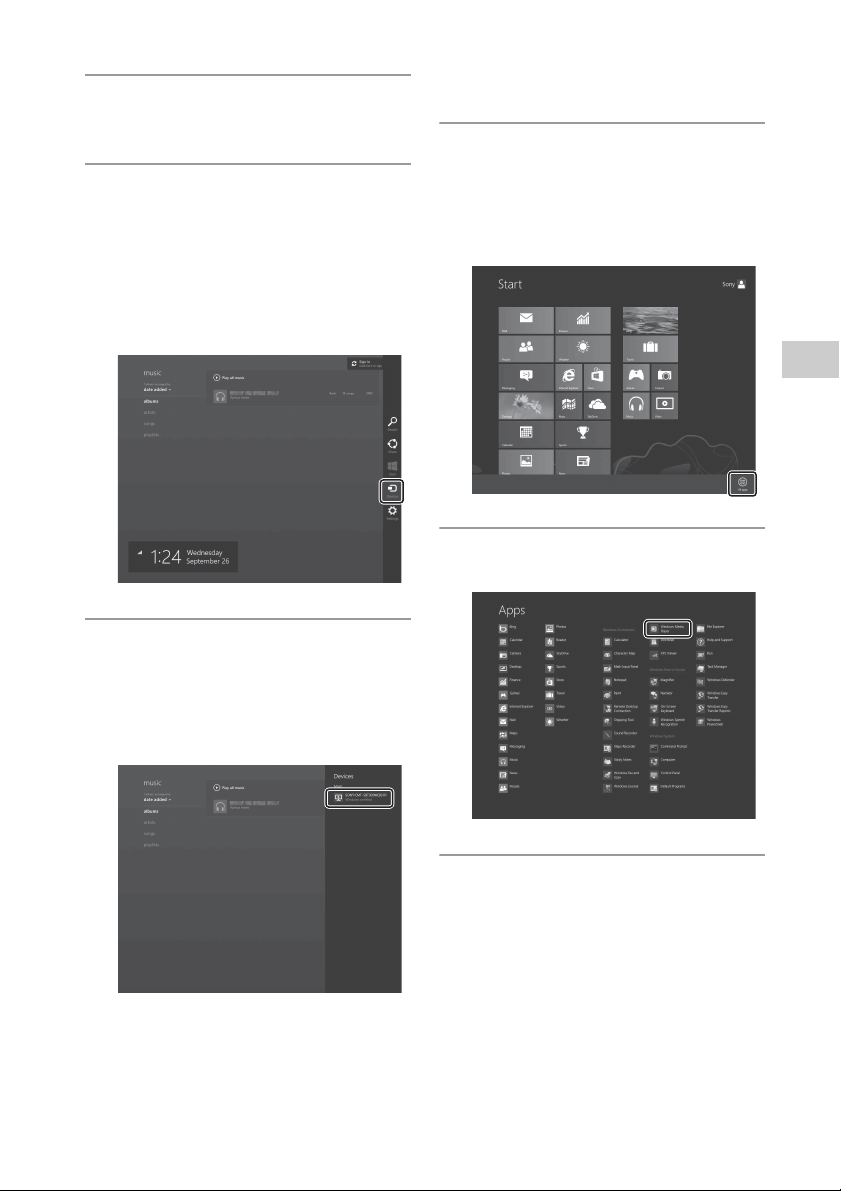
Listening to audio content stored
on a computer with Windows 8
Using “Music” of Windows 8 (Windows UI)
1
Select [Music] on the Start
screen.
41
GB
Network connections
2
Select the desired audio content
and play it back.
3
Move the mouse pointer to the
top-right (or bottom-right) corner
on the Start screen to display the
charms, and select [Devices].
With a touch panel, display the charms
by swiping from the right end of the
start screen, and select [Devices].
4
Select [SONY:CMT-SBT300W(B)
XXXXXX].
The system enters the network function
mode and the selected audio content is
played back.
Using Windows Media Player
1
Right-click on the Start screen.
With a touch panel, swipe the Start
screen from the bottom to top, and
select [All apps] at the bottom right on
the screen.
2
Select [Windows Media Player].
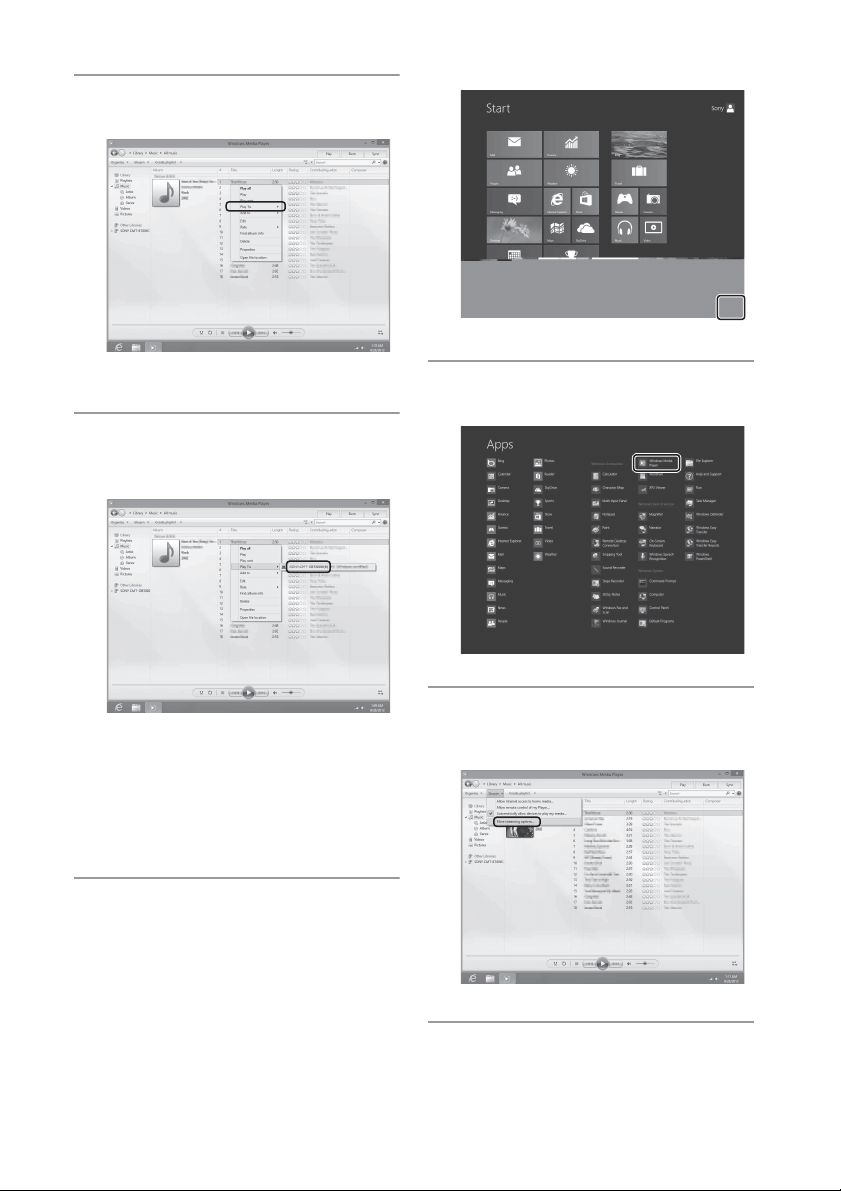
3
Right-click the desired audio
content or press and hold it.
42
GB
4
Select [Play To] from the menu.
The device list appears.
5
Select [SONY:CMT-SBT300W(B)
XXXXXX].
The system enters the network function
mode and the selected audio content is
played back.
Setting up the DLNA controller for using this
PC
1
Right-click on the Start screen.
With a touch panel, swipe the Start
screen from the bottom to top, and
select [All apps] at the bottom-right on
the screen.
2
Select [Windows Media Player].
3
Click or tap [Stream], and select
[More streaming options].
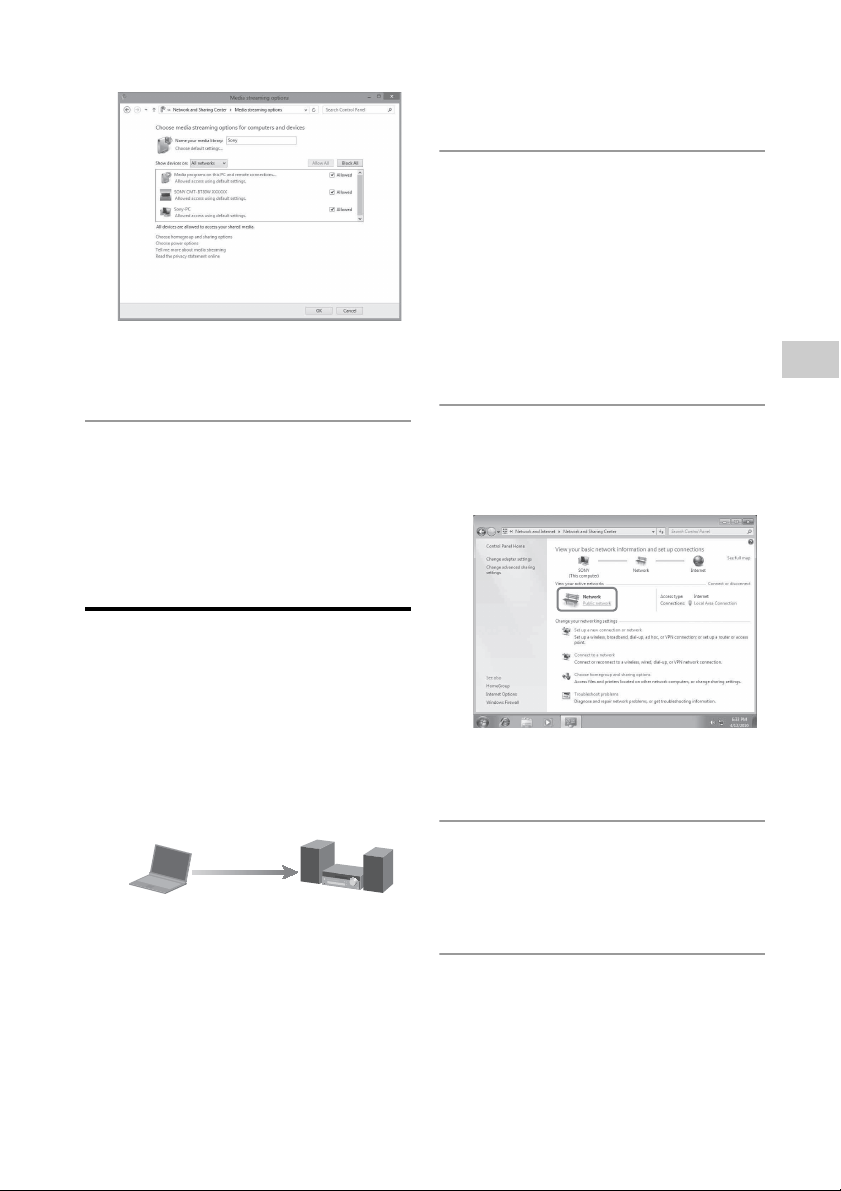
4
Check if all the devices are
allowed.
43
GB
Network connections
If not, select [Allow All], and open the
[Allow All Media Devices] screen. Select
[Allow all the PCs and Media Devices].
5
Select [OK] to close the screen.
The setting is now completed. You can
listen to music stored in you PC using
the DLNA controller.
Listening to audio content
on a computer with
Windows 7
Windows 7 supports DLNA1.5. Windows 7
can be used as both server and controller.
You can listen to audio content on the
server easily using the [Play To] function of
Windows 7.
Note
The items displayed on the computer may be
different from the ones shown in this section,
depending on the version of the operating system
or the computer environment. For details, refer to
the help of your computer.
Setting up a computer with
Windows 7
1
Go to [Start] - [Control Panel] and
select [View network status and
tasks] under [Network and
Internet].
The [Network and Sharing Center]
screen appears.
Tip
If the desired item does not appear in the
display, try to change the display type of the
Control Panel.
2
Select [Public network] under
[View your active networks].
If the display shows other than [Public
network], go to step 5.
The [Set Network Location] screen
appears.
3
Select [Home network] or [Work
network] according to the
environment in which the system
is used.
4
Follow the instructions that
appear on the display according
to the environment in which the
system is used.
When the change is completed,
confirm that the item under [View your
active networks] has been changed to
Control & Deliver
DLNA controller/Server
(Windows 7-based
computer)
Network controlled
player (this system)
44
GB
[Home network] or [Work network] in
the [Network and Sharing Center]
screen.
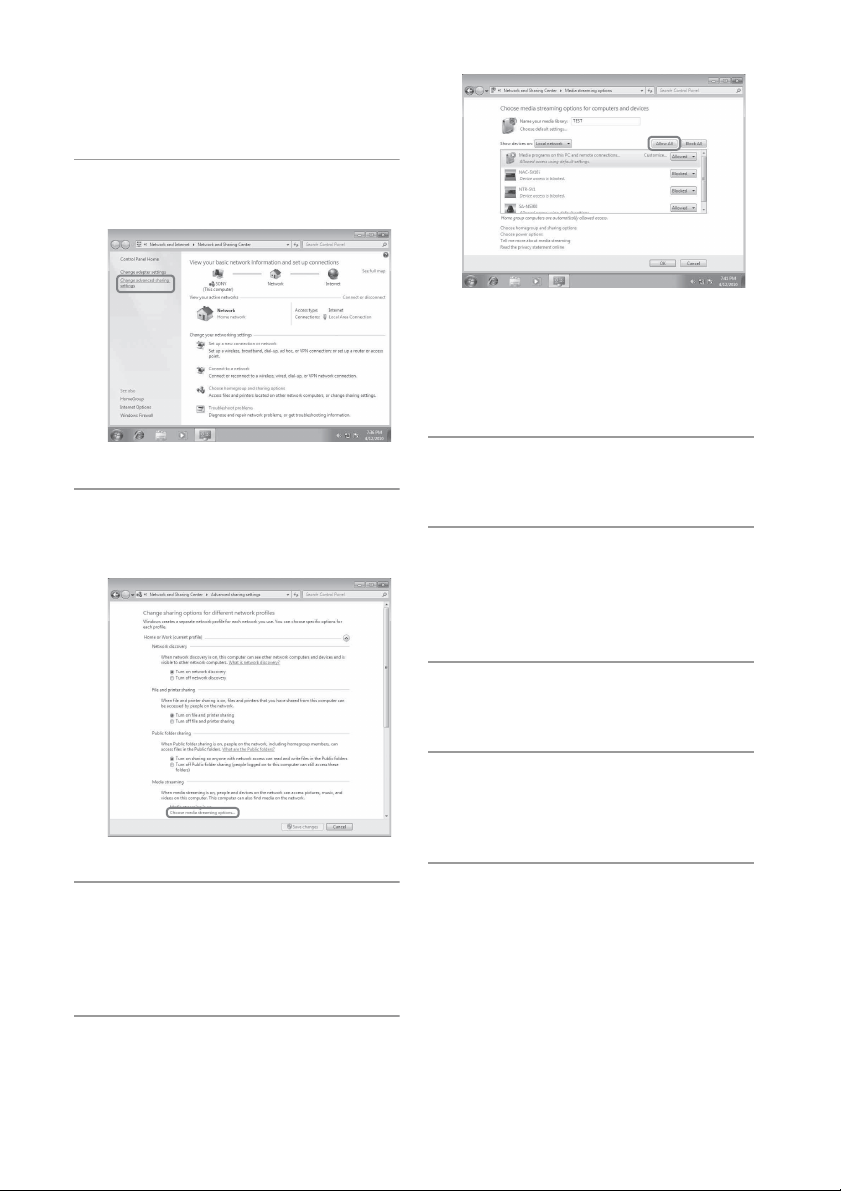
5
Select [Change advanced sharing
settings].
6
Select [Choose media streaming
options...] from [Media
streaming].
7
If [Media streaming is not turned
on] appears in the Media
streaming options screen, select
[Turn on media streaming].
8
Select [Allow All].
The [Allow All Media Devices] screen
opens. If all the devices in the local
network are [Allowed] to access your
network, select [OK] and close the
screen.
9
Select [Allow all computers and
media devices].
10
Select [OK] to close the screen.
Listening to audio content stored
on a computer with Windows 7
1
Start [Windows Media Player] of
Windows 7.
2
Select the desired audio content,
then click the right mouse
button.
3
Select [Play To] from the menu.
45
GB
Network connections
The device list appears.
4
Select [SONY:CMT-SBT300W(B)
XXXXXX].
The system enters the network function
mode and the selected audio content is
played back.
Listening to audio content
on a computer with
Windows Vista/Windows XP
You need to set up Windows Media Player 11
to listen to the music using the Windows
Vista/Windows XP
*
as a server.
*
Windows Media Player 11 is not manufacturer-
installed on Windows XP. Access the Microsoft
website, download the installer, and then install
Windows Media Player 11 on your computer.
Update the software version of your computer to
Windows XP Service Pack 2 or later, then install
Windows Media Player 11. You cannot install
Windows Media Player 11 on versions of
Windows XP prior to Service Pack 2.
Note
The items displayed on the computer may be
different from the ones shown in this section,
depending on the version of the operating system
or the computer environment. For details, refer to
the help of your computer.
Setting up a computer with
Windows Vista/Windows XP
1
Go to [Start] - [All Programs] and
select [Windows Media Player].
Windows Media Player 11 starts up.
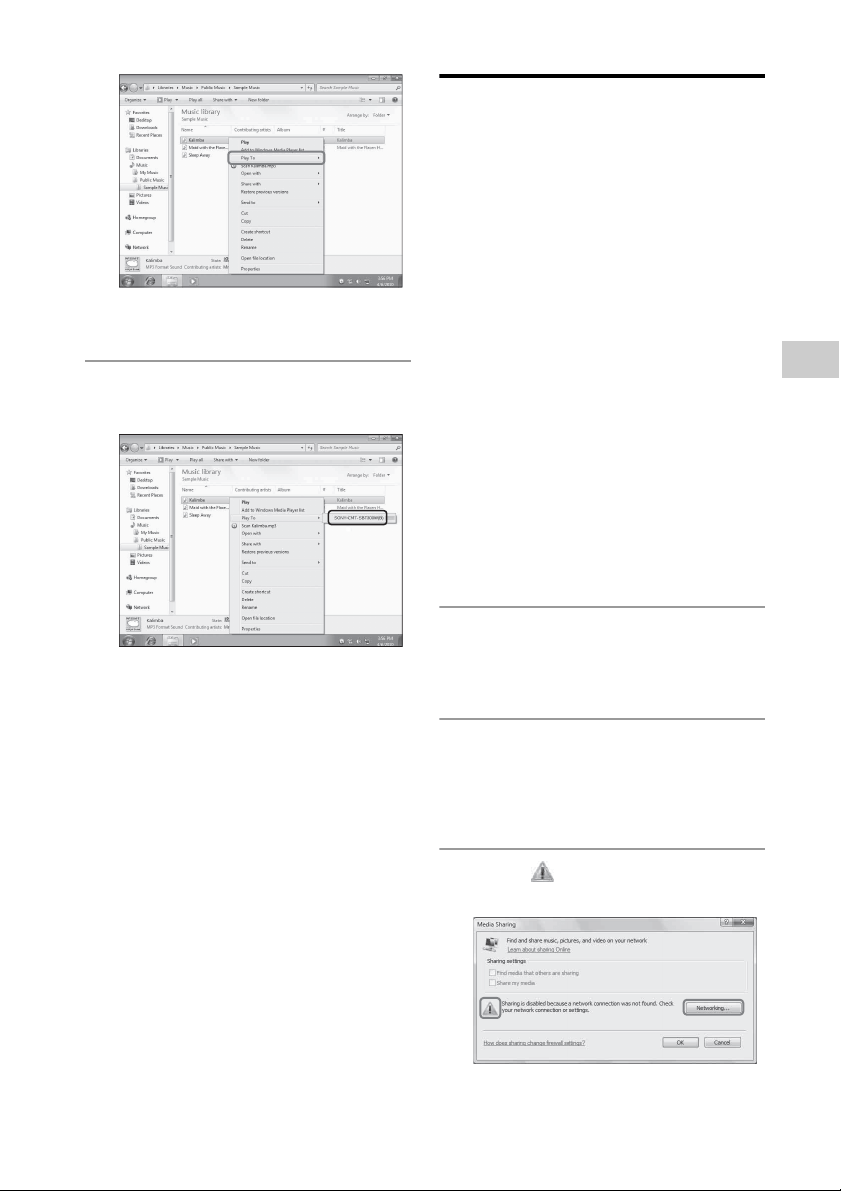
2
Select [Media Sharing...] from the
[Library] menu.
If you are using Windows XP, go to step
8.
3
When is displayed, select
[Networking...].
The [Network and Sharing Center]
screen appears.
46
GB
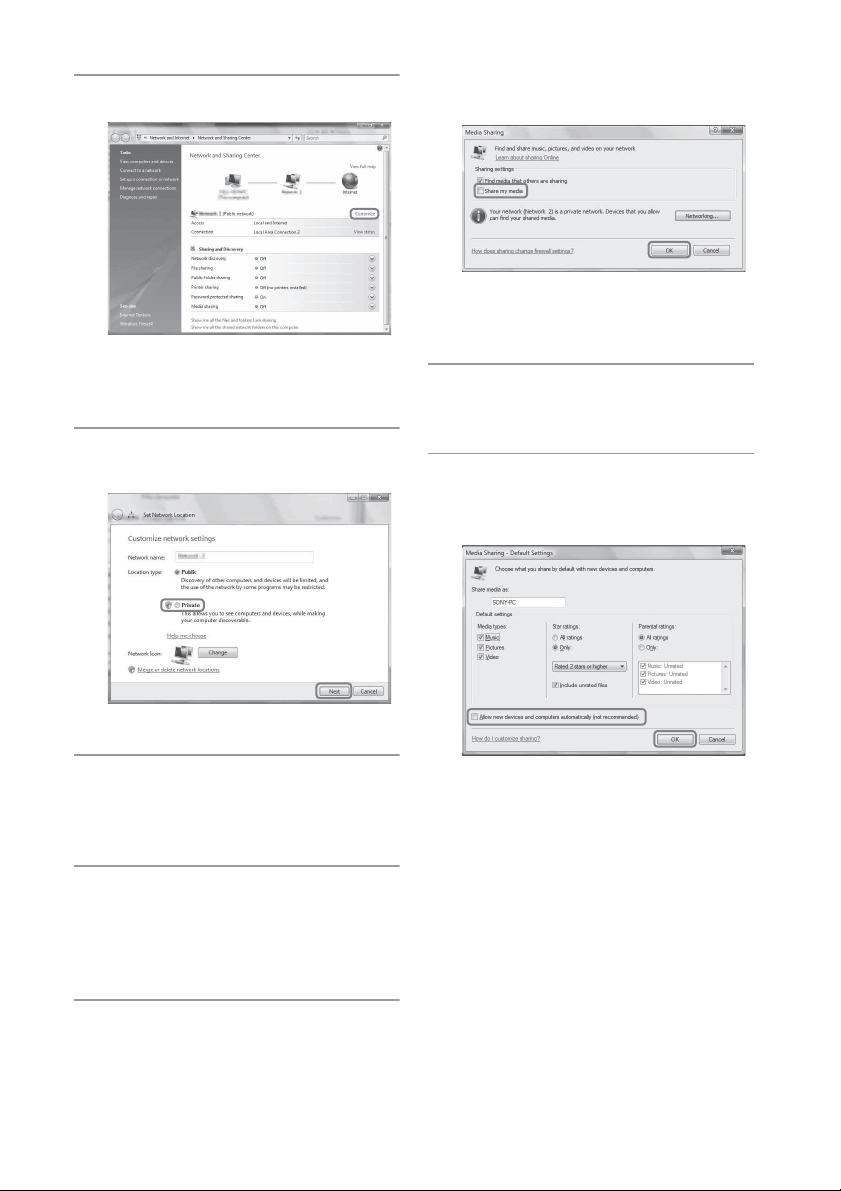
4
Select [Customize].
The [Set Network Location] screen
appears.
5
Add a check next to [Private] and
select [Next].
6
Confirm that the [Location type]
has been changed to [Private]
and select [Close].
7
Confirm that [(Private network)]
is displayed in the [Network and
Sharing Center] screen and close
the screen.
8
If a check is not added next to
[Share my media] in the [Media
Sharing] screen that is displayed
in step 2, add a check next to
[Share my media], then select
[OK].
A list of connectable devices is
displayed.
9
Select [Settings...] that appears
beside [Share my media to:].
10
Add a check next to [Allow new
devices and computers
automatically] and select [OK].
Note
Uncheck this item after you confirm that the
system can connect to the computer and play
audio data on the system.
Listening to audio content stored
on a computer with Windows
Vista/Windows XP
You can play back audio content, using the
DLNA controller.
47
GB
Network connections
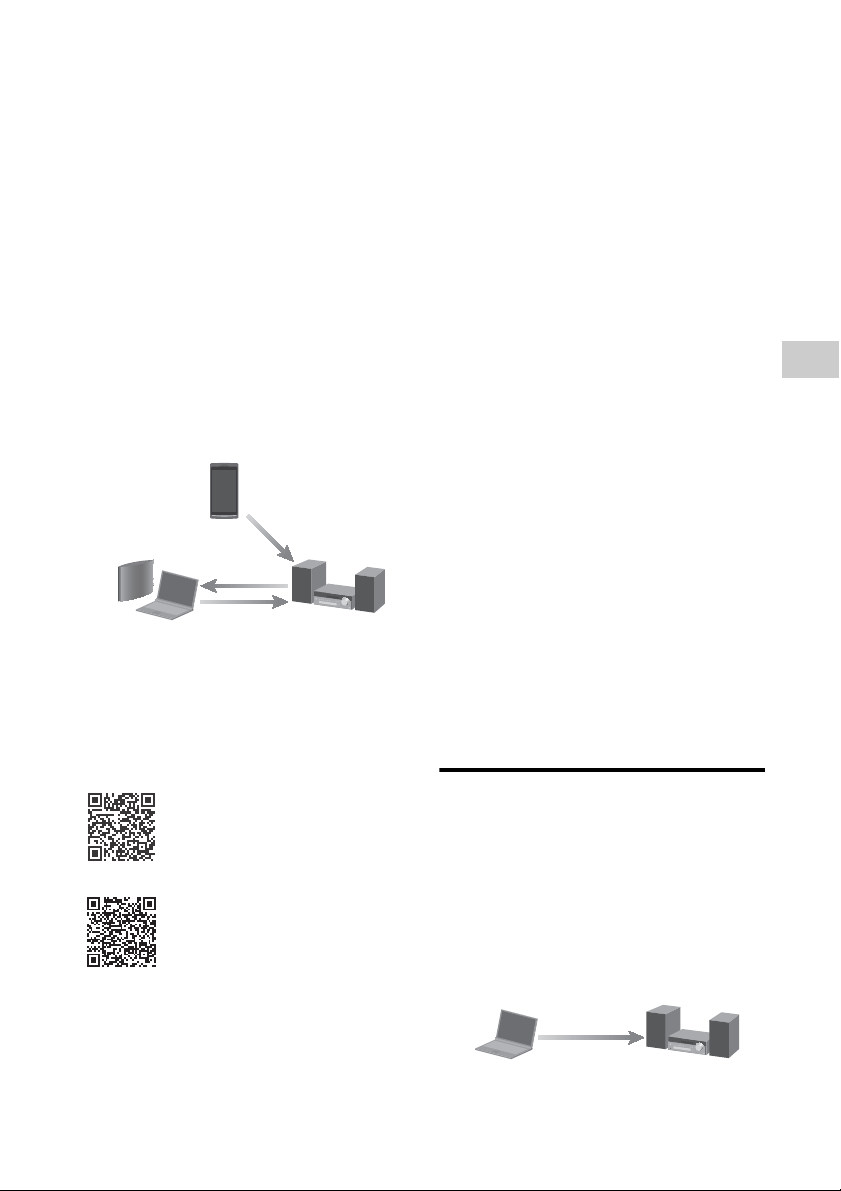
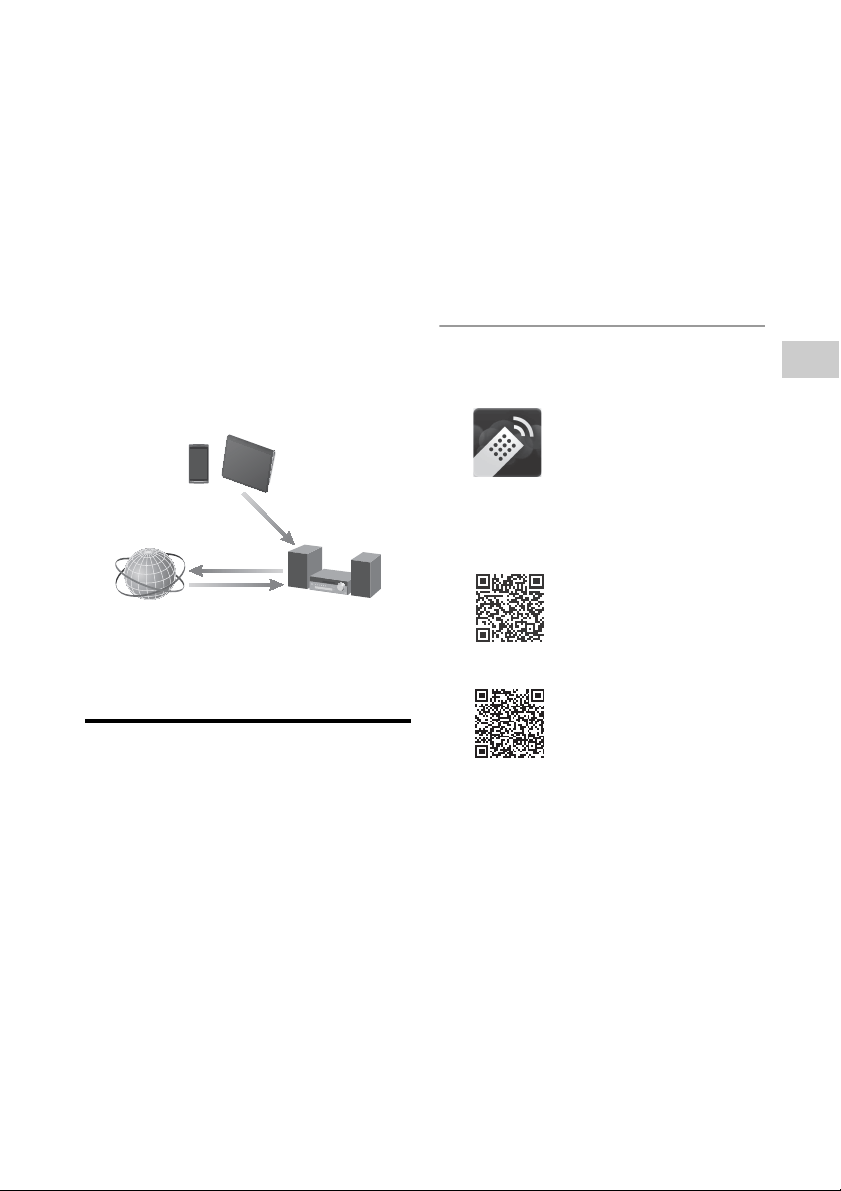
Using Internet music streaming (Music
Services)
You can listen to various Internet music
streaming offered on the Internet without
using a computer. To listen to Internet
music streaming, install "Network Audio
Remote" application on your mobile device
and use the mobile device as a controller
device.
Preparing your mobile
device for the controller
Prepare your mobile device such as a
smartphone or Tablet device, for use as a
controller device.
Notes
• Before using Internet music streaming, check
the following:
– Check that this system and the mobile device
are connected to the same network.*
– Check that the system is turned on.
– Check that the system and the mobile device
are connected to Internet.*
– Check that the system has been recognized
with the controller.
* For details, see “How to connect your
network” (page 33).
• You have to register your system in order to use
Music Unlimited.
For details on registration, refer to the following
website (Oceanian model only):
http://munlimited.com/home
1
Download the “Network Audio
Remote” application.
If you access using 2D Code
Read the following 2D Code to access.
Android
iOS
You can search for application easily if
you type “Network Audio Remote” on
the search screen.
Controller device
Access
Deliver
Control
Internet
This system
48
GB
Enjoying Internet music
streaming
Tip
The screens used in the following section are of
the iPad. The screens of Android devices or
iPhone/iPod touch differ.
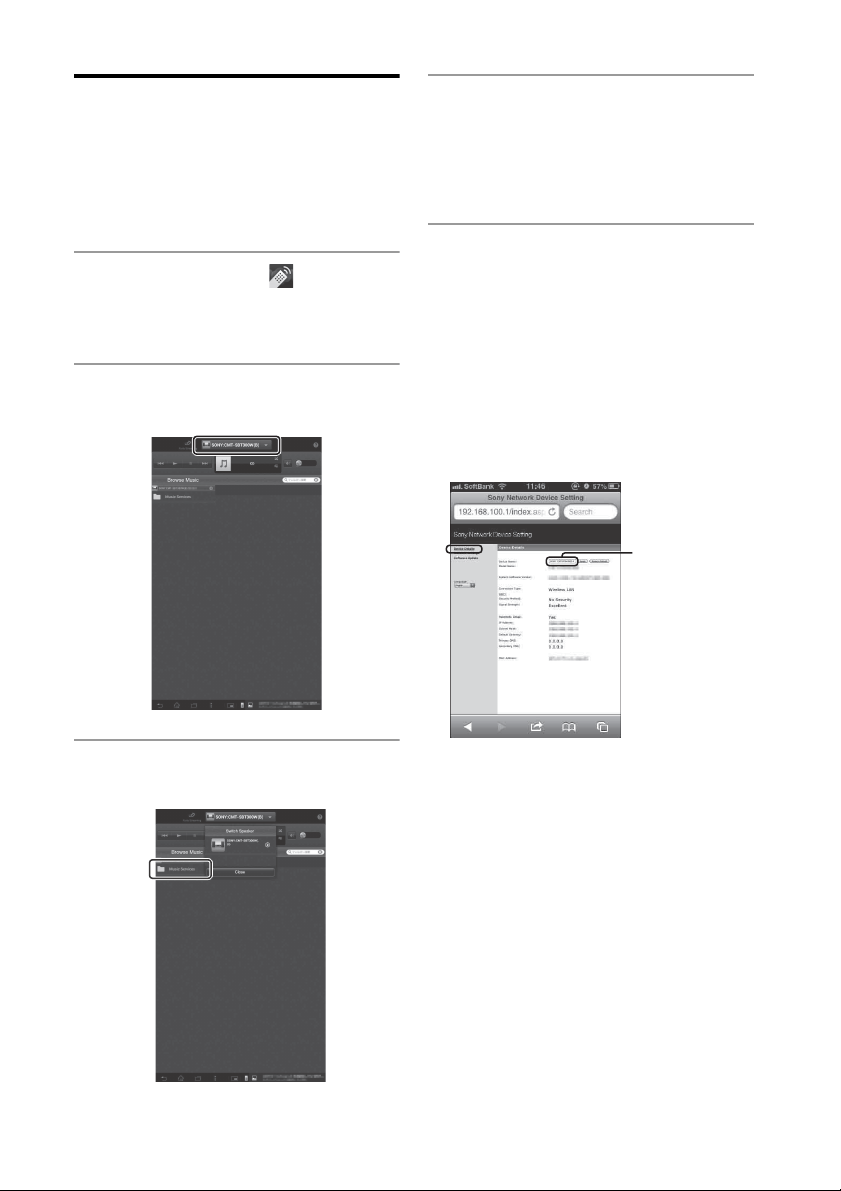
1
Tap or click on the icon on the
screen of the Android device or
iPhone/iPod touch/iPad.
2
Select [SONY:CMT-SBT300W(B)]
from the list.
3
Select [Music Services] from
[Browse Music].
4
Select [Music Unlimited] or
[vTuner].
The services that appear in the list may
differ depending on your area. Select
either [Music Unlimited] or [vTuner].
5
Select the desired playable
content and start playback.
Tip
If playback does not start, perform the process
again from step 1.
To confirm/edit the device name
You can confirm and edit the device name
of this unit, using the Device Details setting
screen on the browser.
Tips
• Very loud sound may output from this unit when
you set the volume too high using an Android
device or iPhone/iPod touch/iPad.
• For details on the use of the Android OS or iOS,
refer to Help of each OS.
• For details on the use of “Network Audio
Remote,” tap/click on the Help icon or Option
icon of it.
Device name
49
GB
Network connections
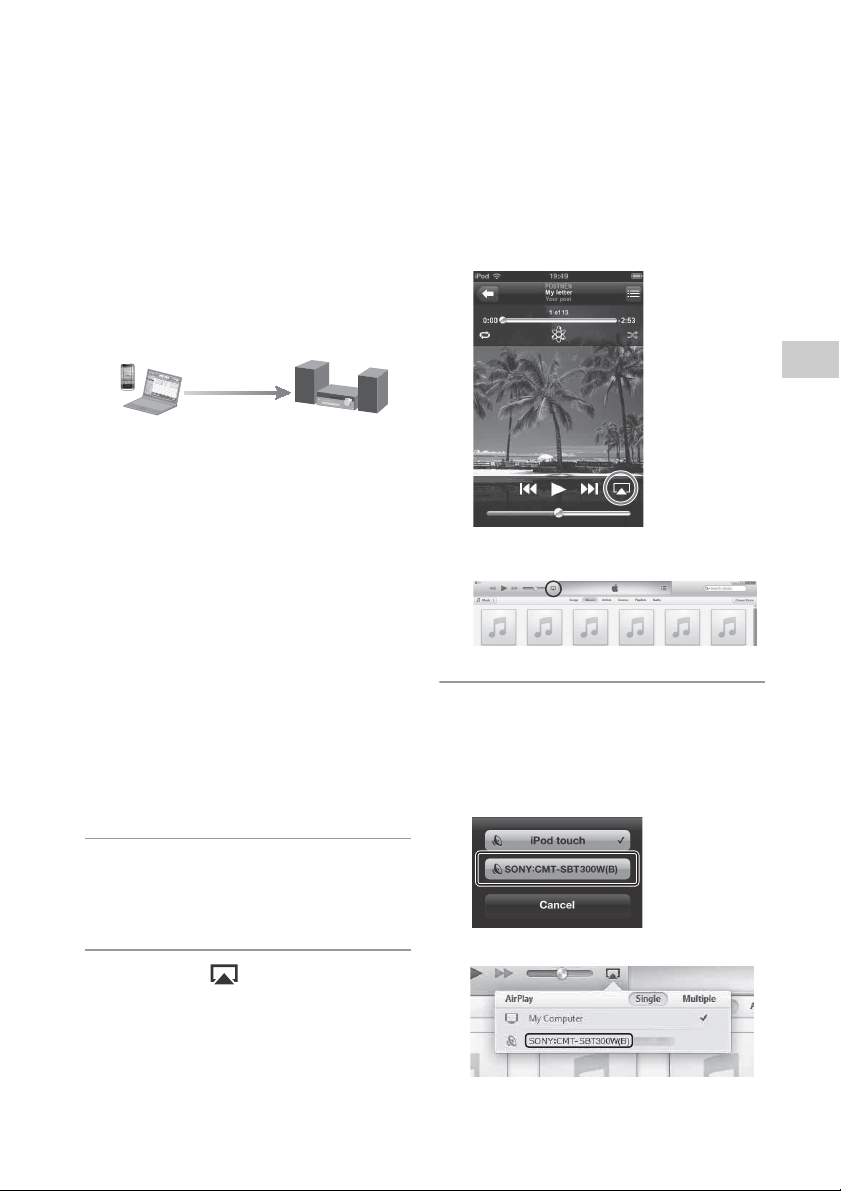
Using AirPlay
You can play music stored in a Mac or
computer or those in iTunes, iPhone, iPod
touch, iPad on this system by using AirPlay.
You can play music wirelessly without
connecting the system to another device.
Compatible iPhone/iPod touch/
iPad models
iPod touch (5th generation), iPod touch (4th
generation), iPod touch (3rd generation),
iPhone 5, iPhone 4S, iPhone 4, iPhone 3GS,
iPad (4th generation), iPad mini, iPad (3rd
generation), iPad 2, iPad: iOS4.3.3 or later
Mac, PC: iTunes10.2.2 or later
Notes
• See “Compatible iPhone/iPod touch/iPad
models” on this page for details on the
supported versions of iOS or iTunes.
• Update iOS or iTunes to the latest version before
using with this system.
• Refer to the operating manual of your device for
details on operating iPhone, iPod touch, iPad,
iTunes or AirPlay.
1
Launch the application of your
iPhone, iPod touch, iPad, or
iTunes.
2
Select the icon at bottom
right of the iPhone, iPod touch or
iPad screen or iTunes window.
iPhone, iPod touch or iPad
iTunes
3
Select [SONY:CMT-SBT300W(B)
XXXXXX] on the AirPlay menu of
iTunes or your iPhone, iPod
touch or iPad.
iPhone, iPod touch or iPad
iTunes
Control & stream

50
GB
4
Start playing back audio content
on an iPhone, iPod touch, iPad or
iTunes.
The system enters the AirPlay function
mode and the selected audio content is
played back.
To confirm/edit the device name
You can confirm and edit the device name
of this system using the setting screen on
the browser.
See the Device Details screen on Step 8 of
“Device Details screen” (page 36) for details.
The edited device name can be reset by
performing “NW RESET” (page 35).
Tips
• If the playback does not start, perform the
process again from step 1.
• Very loud sound may output from this system
when you set the volume too high using iPhone,
iPod touch, iPad or iTunes.
• For details on the use of iTunes, refer to Help of
iTunes.
• The volume level of iPhone, iPod touch, iPad or
iTunes may not be able to be linked with the
volume level of this system.
• AirPlay is available by playing back audio
content on an iPhone/iPod touch/iPad,
although you cannot select it using the function
button(s) on the unit of this system.
51
GB
Network connections
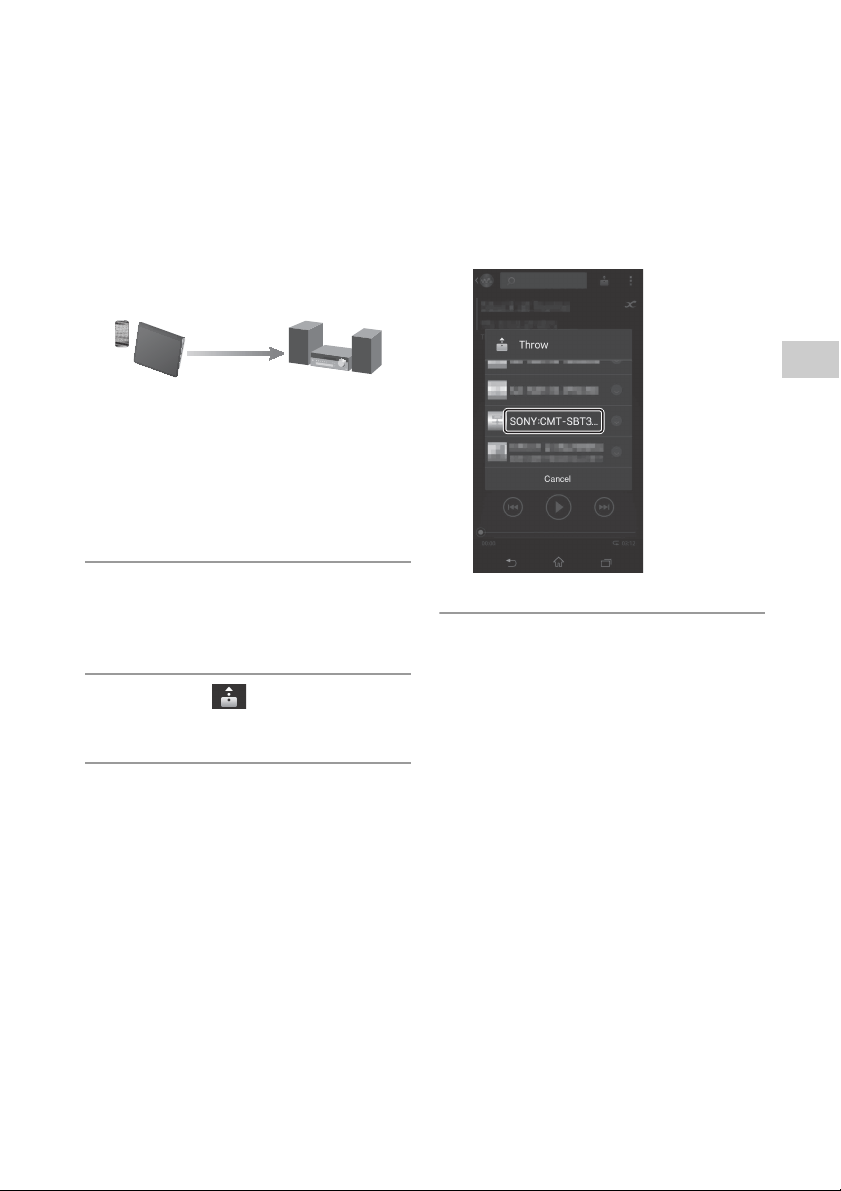
Using “WALKMAN” application on an
Xperia/Xperia Tablet
You can play music stored in Xperia/Xperia
Tablet on this system by using “WALKMAN”
application.
Notes
• Update the Android OS to the latest version
before using it with this system.
• Refer to the operating manual of your Xperia/
Xperia Tablet for details.
1
Launch the “WALKMAN”
application on the Xperia/Xperia
Tablet.
2
Select the icon at the upper
right on the Xperia/Xperia Tablet.
3
Select [SONY:CMT-SBT300W(B)
XXXXXX] on the screen displayed
in step 2.
Xperia/Xperia Tablet
4
Press the playback key and start
playing back audio content on
the Xperia/Xperia Tablet.
The system enters the network function
mode and the selected audio content is
played back.
Tips
• If playback does not start, perform the
procedure again from step 1.
• For details on the use of the Android OS, refer to
Help of Android OS.
• The network function is available by playing
back audio content on an Xperia/Xperia Tablet,
although you cannot select it using the function
button(s) on the unit of this system.
• This system can play back music stored in some
“WALKMAN” models using the Music Throw
function. For details on the Music Throw
function, refer to the operation manual supplied
with your “WALKMAN.”
Control & Stream
52
GB
Additional information
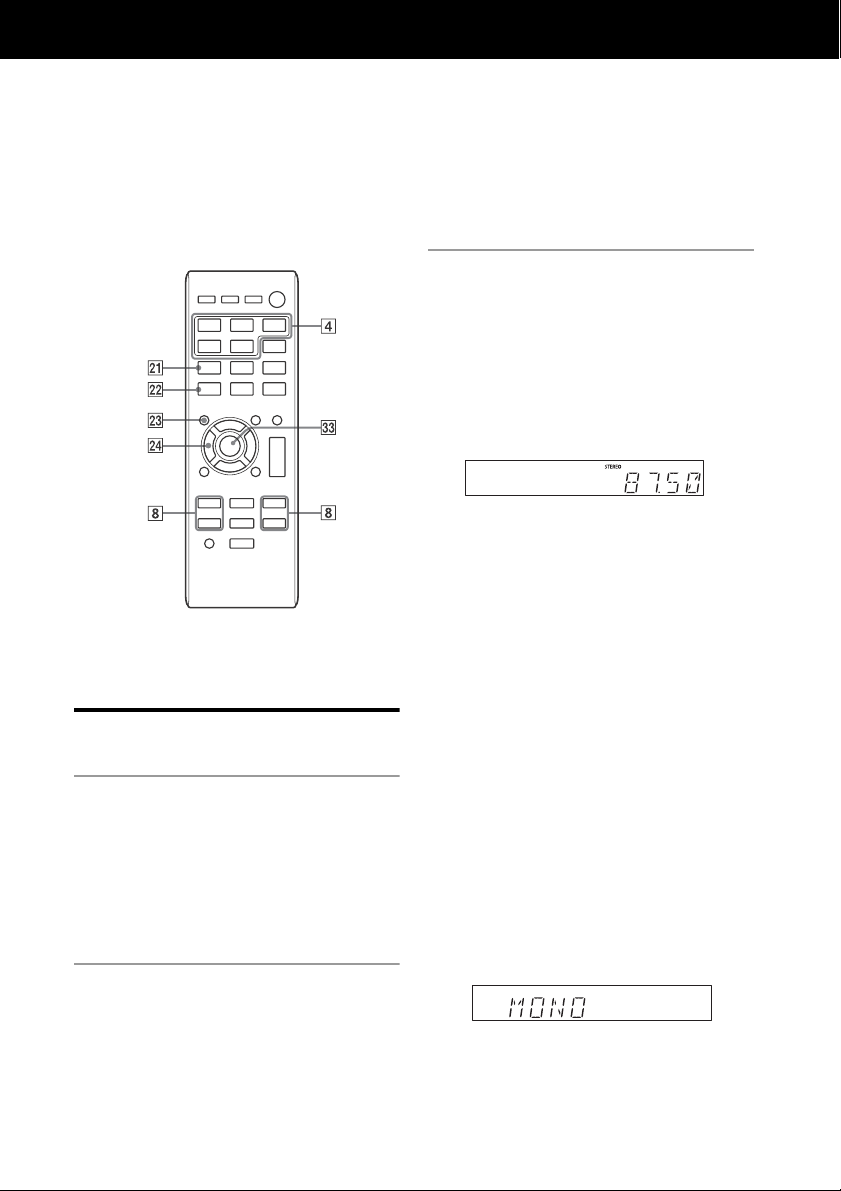
Listening to the radio
Tuning in a radio station
1
Press TUNER FUNCTION to
select a radio band.
Press FUNCTION on the unit
repeatedly until “TUNER FM” or “TUNER
AM” appears (CMT-SBT300W), or “DAB”
or “TUNER FM” appears (CMT-
SBT300WB) in the display .
2
Press TUNING MODE
repeatedly until “AUTO” appears
in the display .
Each time you press the button, the
tuning mode changes to AUTO, PRESET
or MANUAL.
3
Press TUNE +/– .
The frequency indication in the display
starts changing.
Tuning stops automatically when a
radio station is tuned in, and “STEREO”
(when a FM stereo broadcast is
received) appears in the display
(Automatic Scanning).
Manual tuning
Press TUNING MODE repeatedly
until “MANUAL” appears in the display
, and then press TUNE +/– to tune
in the desired station.
Notes on DAB/DAB+ stations (CMT-SBT300WB
only)
• When you tune in a station that provides
RDS services, information such as the
service name or station name is provided
by broadcasts.
• When tuning in a DAB/DAB+ station, it
may take a few seconds before you hear
any sound.
• Primary service is automatically received
when secondary service ends.
• This tuner does not support data services.
Tip
If reception of an FM stereo broadcast is noisy,
press FM MODE repeatedly until “MONO”
appears in the display to select monaural
reception. This reduces noise.
“MONO” is displayed for four seconds.

Additional information
53
GB
To change the AM tuning interval
(except for European models)
The default setting for AM tuning interval is
9 kHz (or 10 kHz for some areas). Use the
buttons on the unit to perform this operation.
1
Press FUNCTION on the unit repeatedly
to select the AM station.
2
Press
/
(power)
to turn off the system.
3
Press and hold FUNCTION and press
/ (power) on the unit.
“STEP 9K” or “STEP 10K” appears in the display
.
When you change the interval, all the AM preset
stations are erased.
Presetting radio stations
You can preset your desired radio stations.
1
Tune in the station you wish to
preset.
2
Press TUNER MEMORY .
3
Press TUNE +/– repeatedly to
select a preset number.
If another station is already assigned to
the selected preset number, the station
is replaced by the new station.
4
Press to register the
station.
“COMPLETE” appears in the display .
5
Repeat steps 1 through 4 to
register other stations.
You can preset up to 20 FM and 10 AM
stations (CMT-SBT300W), or 20 DAB/
DAB+ and 20 FM stations (CMT-
SBT300WB).
To tune in to a preset radio
station
Press TUNING MODE repeatedly until
“PRESET” appears in the display , and
then press TUNE +/– to select the preset
number to which the desired station is
registered.
Running the DAB Automatic
Scan manually (CMT-
SBT300WB only)
Before you can tune in DAB/DAB+ stations,
you must perform a DAB Initial Scan.
When you have moved to another area, also
perform the DAB Initial Scan manually to
update the DAB/DAB+ service information.
1
Press TUNER FUNCTION
repeatedly until “DAB” appears in
the display .
Press FUNCTION on the unit
repeatedly until “DAB” appears in the
display .
2
Press OPTIONS to display the
setting menu.
3
Press / repeatedly to
select “INITIAL,” then press .
4
Press / repeatedly to
select “OK,” then press .
Scanning begins. The scanning
progress is indicated by asterisks
(*******). Depending on the DAB/DAB+
services available in your area,
scanning may take a few minutes.
When scanning is complete, a list of
available services is created.
Notes
• If your country or region does not support DAB/
DAB+ broadcast,“NO SERV” appears.
• This procedure clears all previously stored
presets.
• Before unplugging the DAB/FM lead antenna,
make sure the system is turned off to preserve
your own DAB/DAB+ settings.
Preset number
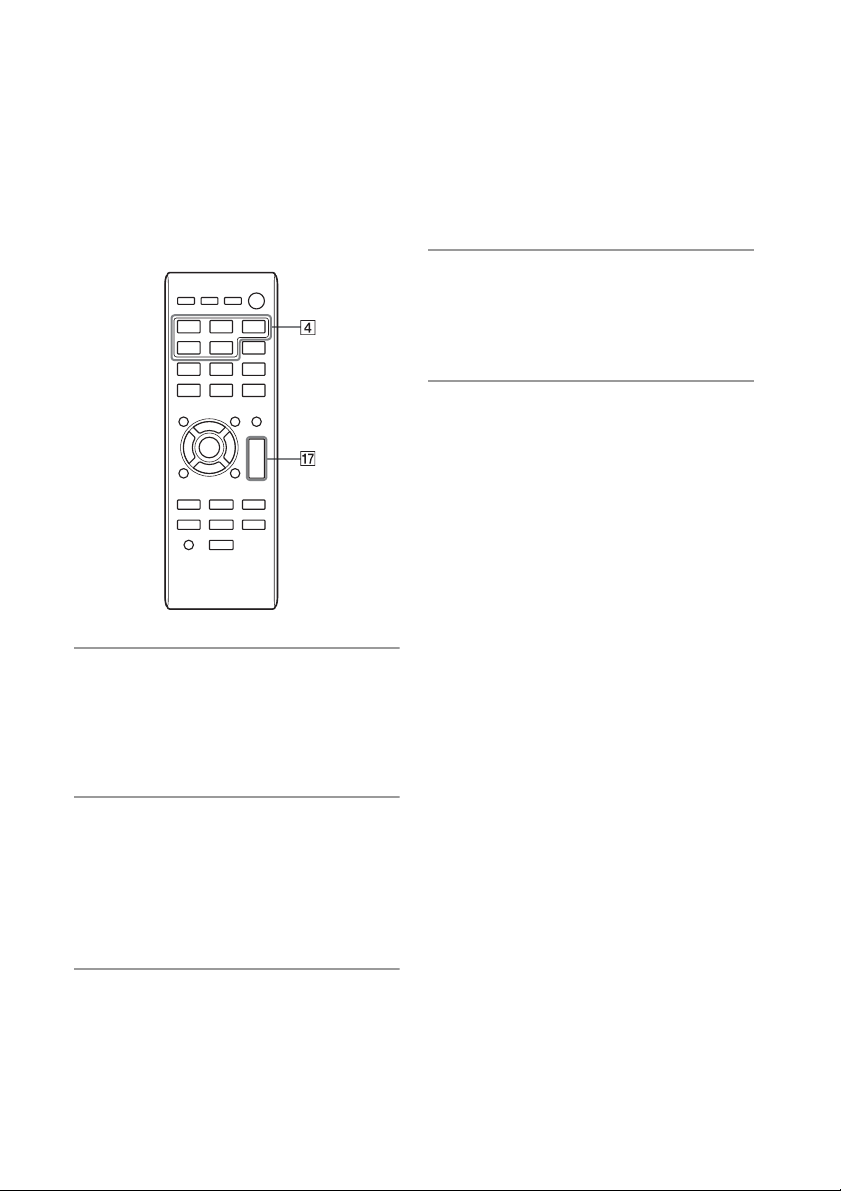
54
GB
Using optional audio components
1
Press VOLUME on the
remote to turn down the volume.
Turn the VOLUME dial on the unit
counterclockwise to turn down the
volume.
2
Connect additional audio
component to the AUDIO IN jack
(page 12).
Connect optional external equipment
with an audio connecting cable (not
supplied).
3
Press AUDIO IN FUNCTION .
Press FUNCTION on the unit
repeatedly until “AUDIO IN” appears in
the display .
4
Start playback of the connected
component.
Adjust the volume on the connected
component during playback.
5
Press VOLUME +/ on the
remote to adjust the volume.
Turn the VOLUME dial on the unit
left or right to adjust the volume.
Note
The system may enter Standby mode automatically
if the volume level of the connected component is
too low. Adjust the component’s volume
accordingly. See “Setting the Automatic Standby
function” (page 55).

55
GB
Additional information
Setting the Automatic Standby function
This system is equipped with an Automatic
Standby function. With this function, the
system enters Standby mode automatically
in about 15 minutes when there is no
operation or audio signal output.
“AUTO STBY” appears in the display for 2
minutes before the system enters Standby
mode.
By default, the Automatic Standby function
is turned on. You can turn off the function
using the option menu.
1
Press OPTIONS to display the
setting menu.
2
Press / repeatedly to
select “AUTO STBY,” then press
.
3
Press / repeatedly to
select “ON” or “OFF,” then press
.
Notes
• The Automatic Standby function is invalid for the
tuner function (FM/AM/DAB
*
), even when you
have enabled it.
• The system may not enter Standby mode
automatically in the following cases:
– while an audio signal is being detected
– during playback of audio tracks or files
– while the preset Sleep Timer or Play Timer is
in process
• The system counts down the time (15 minutes)
again until it enters Standby mode, even when
Automatic Standby function is enabled in the
following cases:
– when a USB device is connected
– when a button on the remote or unit is
pressed
* AM is available for CMT-SBT300W only, or DAB
is for CMT-SBT300WB only.
56
GB
Setting the BLUETOOTH/Network Standby
mode
You can enable/disable BLUETOOTH/
Network Standby mode. When
BLUETOOTH/Network Standby mode is
enabled, the system enters Wait mode for
BLUETOOTH or network connection even
when the system is turned off. The
BLUETOOTH/Network Standby mode is
disabled by default.
1
Press OPTIONS to display the
setting menu.
2
Press / repeatedly to
select “BT/NW STBY,” then press
.
3
Press / repeatedly to
select “ON” or “OFF,” then press
.
4
Press / (power) to turn off
the system.
When “BT/NW STBY” is set to “ON,” the
system turns on and you can listen to
music by activating BLUETOOTH or
AirPlay on the connected component.
Note
Playback on the DLNA device or using Music
Services is not possible.
57
GB
Additional information
Updating the software
You can update the software of this system
by downloading the latest version via a
network.
If the system detects a new update when it
is connected to the Internet, “UPDATE”
appears in the display . You can update
the software using the option menu.
1
Press OPTIONS to display the
setting menu.
2
Press / repeatedly to
select “UPDATE,” then press
.
3
Press / repeatedly to
select “OK,” then press .
Updating begins.
Notes
• Usually it may take about 3 to 10 minutes for the
system to finish the update. More time may be
needed, depending on the network
environment.
• Do not operate the unit or the remote during
updating. Moreover, do not turn off the system
or disconnect the power cord during updating.
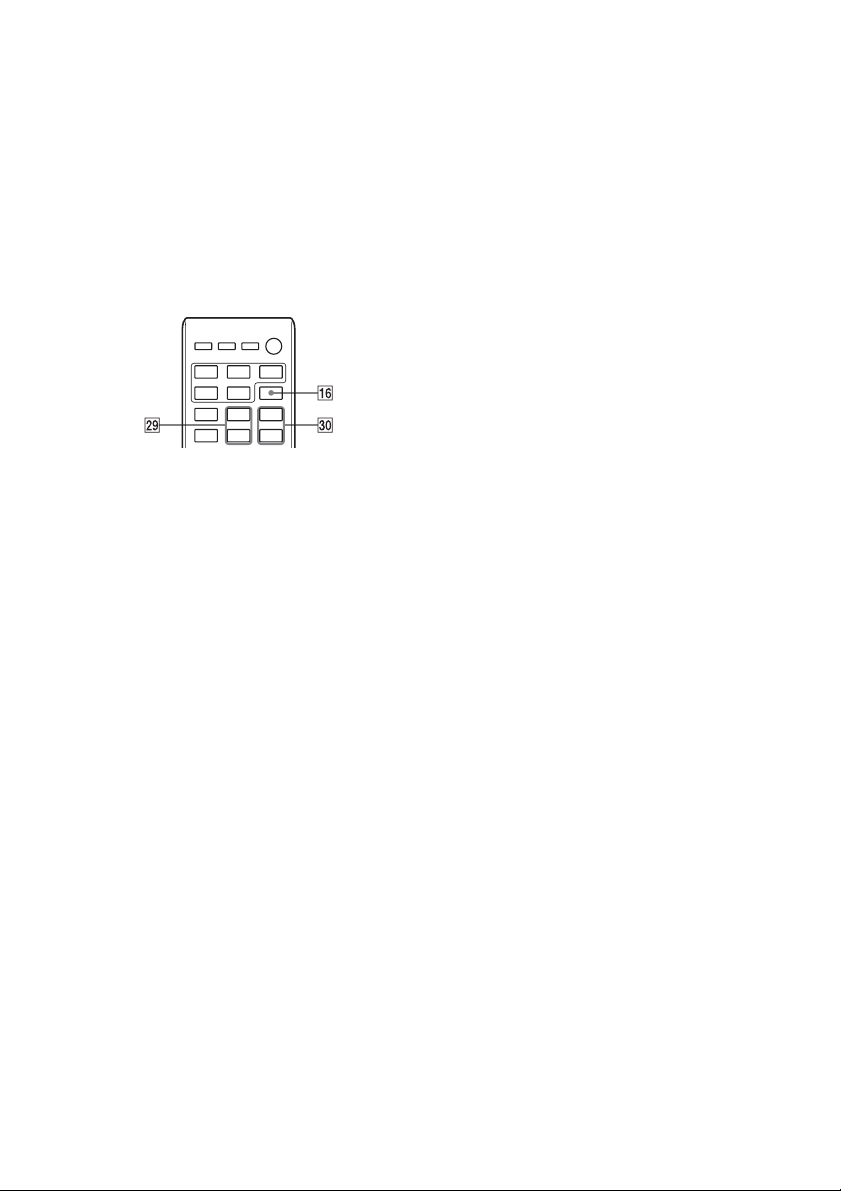
58
GB
Adjusting the sound
You can set the bass boost or adjust the
tone to your preferences.
Setting the bass boost
Press BASS BOOST repeatedly to select
“ON” or “OFF.”
Adjusting the bass and treble
Press BASS +/– to adjust bass or TREBLE
+/– to adjust treble.
• On the unit, press EQ repeatedly to
select “BASS” or “TREBLE,” and adjust the
selected item using TUNE +/– .
Tip
This system is equipped with the DSEE function to
reproduce clear treble despite degradation caused
by compression.
The DSEE function is usually activated
automatically by recognizing the sound source,
but it may not be activated depending on the
function in use.
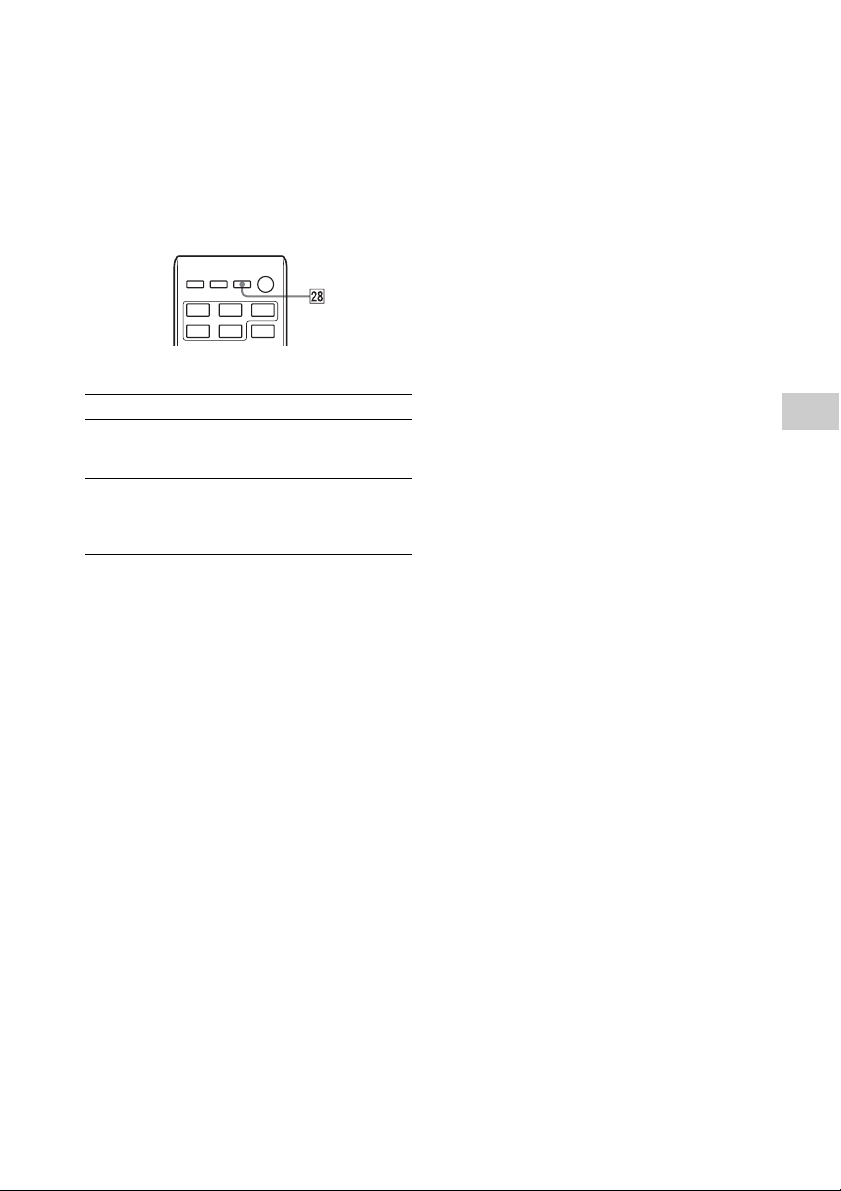
59
GB
Additional information
Changing the display
*1 You can view the information described below
during playback of a CD-DA/MP3 disc.
*2 The information does not appear in
BLUETOOTH/Network Standby mode.
CD-DA disc
– remaining playing time of a track during
playback
– total remaining playing time
MP3 disc
– track or file name
– artist name
– album name
Notes on the display information
• Characters that cannot be displayed appear as
“_”.
• The following are not displayed:
– remaining playing time or total playing time
for an MP3 disc
– remaining playing time for an MP3 file
• The following are not displayed correctly:
– elapsed playing time of an MP3 file encoded
using VBR (Variable Bit Rate).
– folder and file names that do not follow
either the ISO9660 Level 1/Level 2 or Joliet in
the expansion format.
• The following are displayed:
– total playing time for a CD-DA disc (except
when PGM mode is selected and the player is
stopped)
– remaining playing time for a track of CD-DA
disc
– remaining playing time for a CD-DA disc (only
when Normal Play mode is selected during
playback)
– ID3 tag information for MP3 files. ID3 version
2 tag information display has priority when
both ID3 version 1 and version 2 tags are used
for a single MP3 file.
– up to 64 characters for an ID3 tag, where
characters allowed are uppercase letters (A
to Z), numbers (0 to 9), and symbols (˝ $ % ’ (
) * + , – . / < = > @ [ \ ] _ ` { | } ! ? ^ ~)
Notes on the DAB/DAB+ display information (CMT-
SBT300WB only)
The following is also displayed;
– up to 8 characters of service name, up to 128
characters of DLS (Dynamic Label Segment) and
up to 16 characters of ensemble label.
– a value between 0 and 100 indicating the signal
quality is displayed.
To Do the following:
View
information on
the display
*1
Press DISPLAY repeatedly
when the system is on.
Display clock Press DISPLAY repeatedly
when the system is off.
*2
The
clock appears for about 8
seconds.
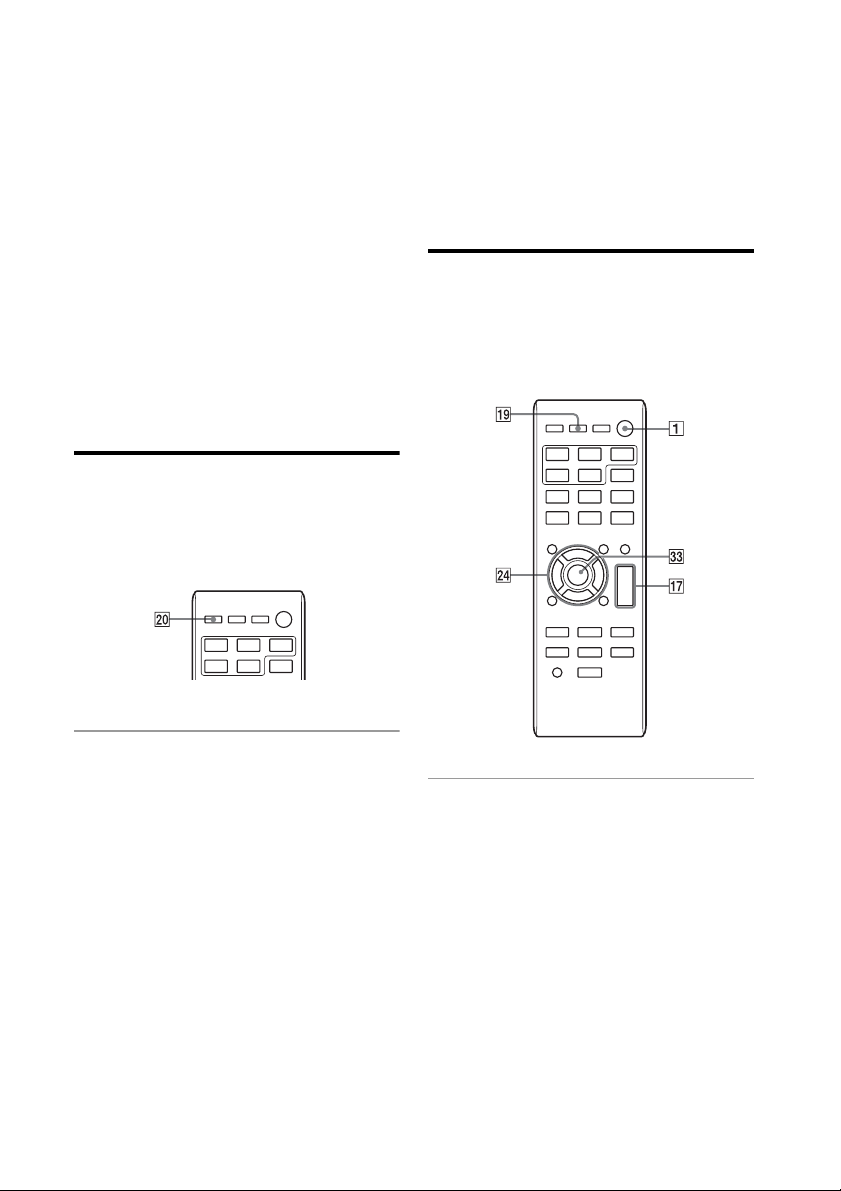
60
GB
Using the timers
The system offers Sleep Timer and Play
Timer.
The Sleep Timer has priority over the Play
Timer.
You can set the timer using the buttons on
the remote.
Setting the Sleep Timer
The system is turned off automatically after
the time set for the Sleep Timer is elapsed.
The Sleep Timer works even if the clock is
not set.
1
Press SLEEP repeatedly to
specify the time.
•
Select “30MIN” to turn off the system
after 30 minutes.
• To cancel the Sleep Timer, select
“OFF.”
Setting the Play Timer
You can listen to a CD-DA or MP3 disc or
radio every day at a preset time.
Make sure you have set the clock before
setting the timer.
1
Prepare the sound source.
•
Prepare the sound source, and turn
the VOLUME dial on the unit left or
right or press VOLUME +/– on the
remote to adjust the volume.
The available sound sources are: CD,
USB, and TUNER (FM, AM or DAB)
*1
FUNCTION
• To play the desired tracks or files on
the disc only, create a program. See
“Creating your own program
(Program Play)” (page 20).
• To listen to a radio program, tune in
the desired station, using Automatic
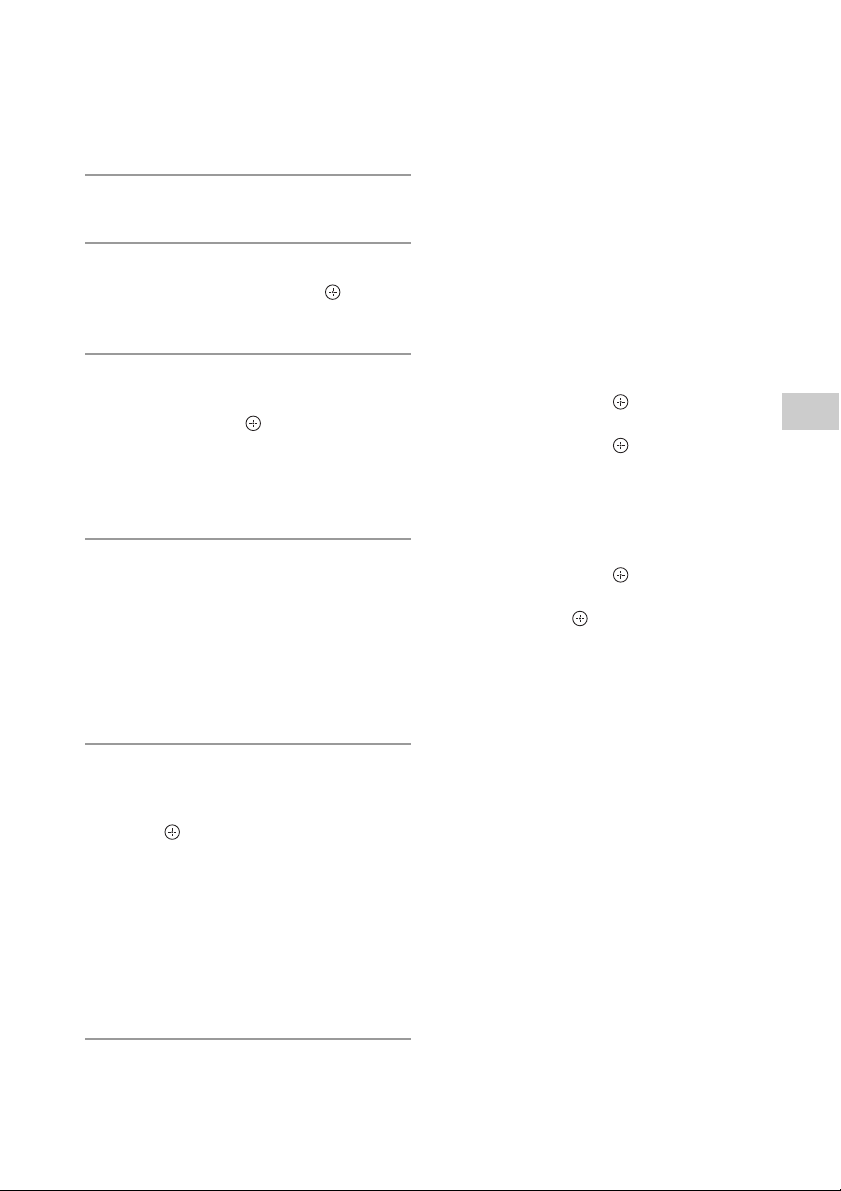
Additional information
61
GB
Scanning, Manual Tuning or Preset
Tuning (page 52).
*1 FM or AM for CMT-SBT300W, or FM or
DAB for CMT-SBT300WB.
2
Press TIMER MENU .
3
Press / repeatedly to select
“PLAY SET,” then press .
The start time flashes in the display .
4
Set the time to start operation.
Press / repeatedly to set the
hour, then press . The minute
indication flashes. Use the procedure
above to set the minutes.
When the start time is set, the system
goes to the stop time setting.
5
Use the same procedure as in
step 4 to set the time to stop the
operation.
If “TIME NG” flashes in the display
The start time and the stop time are set
to the same time. Change the stop
time.
6
Select the sound source.
Press / repeatedly until the
desired sound source appears, then
press .
The available sound sources are: CD,
USB, and TUNER (FM, AM or DAB)
*1
FUNCTION.
*1 FM or AM for CMT-SBT300W, or FM or DAB
for CMT-SBT300WB.
After the sound source selection is
finished, the confirmation display for
the Play Timer appears.
7
Press / (power) to turn off
the system.
•
When the Play Timer is set, the
system automatically turns on about
15 seconds (for FM, AM or DAB
*
) or
about 90 seconds (for a CD-DA disc or
USB device) before the preset time.
• The Play Timer does not work if the
system is on at the preset time. Be
careful not to operate the system
until it is turned on and starts play
with the timer.
* AM is available for CMT-SBT300W only, or
DAB is for CMT-SBT300WB only.
To check the setting
1
Press TIMER MENU .
2
Press / repeatedly to select “TIMER
SEL,” and then press .
3
Press / repeatedly to select “PLAY
SEL,” and then press .
The timer setting appears in the display .
To cancel the timer
1
Press TIMER MENU .
2
Press / repeatedly to select “TIMER
SEL,” and then press .
3
Press / repeatedly to select “OFF,”
and then press .
To change the setting
Perform the same procedures to change the
setting of the Play Timer.
Notes
• When the sound source for a Play Timer is set to
a radio station that you set using Automatic
Scanning (AUTO) or Manual Tuning (MANUAL)
and you change the radio frequency or band
after setting the timer, the radio station setting
for the timer will also be changed.
• When the sound source for a Play Timer is set to
a radio station tuned from a preset radio station
(preset number 1 to 20), and if you change the
frequency of the radio station or band after
setting the timer, the radio station setting for
the timer will not change. The radio station
tuning for the timer is fixed at what you set for it.
Tip
The Play Timer setting remains as long as the
setting is not cancelled manually.
62
GB
Troubleshooting
Troubleshooting
If a problem occurs while operating the
system, follow the steps described below
before consulting your nearest Sony dealer.
If an error message appears, be sure to
make a note of the contents for reference.
1
Check to see if the problem is listed
in this “Troubleshooting” section.
2
Check the following customer
support websites.
For customers in Europe:
http://support.sony-europe.com/
For customers in other countries/
regions:
http://www.sony-asia.com/support
You will find the latest support
information and a FAQ at these
websites.
3
If, after steps 1 and 2, you still
cannot solve the problem, consult
your nearest Sony dealer.
If the problem persists after doing all of
the above, consult your nearest Sony
dealer.
When bringing the product in for
repairs, be sure to bring in the entire
system (main unit and remote).
This product is a system product, and
the entire system is needed to
determine the section requiring repair.
Is the power cord plugged in to a wall outlet
correctly?
This is not a malfunction. The system enters
Standby mode automatically in about 15
minutes when there is no operation or audio
signal output. See “Setting the Automatic
Standby function” (page 55).
If about a minute elapses with no operation,
the clock setting or Play Timer setting is
cancelled automatically. Perform the operation
again from the beginning.
Make sure the speaker cords are connected
correctly.
Check the supplied speakers are used.
Turn the VOLUME dial on the unit clockwise
or press VOLUME + on the remote to turn up
the volume.
Make sure the headphones are disconnected
from the headphone jack.
Make sure an external component is connected
correctly to the AUDIO IN jack and set the
function to AUDIO IN.
The specified station may have temporarily
stopped broadcast.
The balance of left and right sound is false.
Check the left and right speakers are
connected correctly.
Put the speakers symmetrically.
Connect the supplied speakers.
If the STANDBY indicator flashes
Immediately unplug the power cord, and
check the following item:
• Is the speaker cord shorted out?
After the STANDBY indicator stops
flashing, plug the power cord again, and
turn on the system. If the issue persists,
contact your nearest Sony dealer.
General
The system does not turn on.
The system has entered Standby mode
unexpectedly.
The clock setting or the Play Timer
operation has been cancelled unexpectedly.
There is no sound.
63
GB
Troubleshooting
Move the system away from sources of noise.
Connect the system to a different wall outlet.
Use of an AC power tap with a noise filter (not
supplied) is recommended.
Remove any obstacles between the remote
and the remote sensor on the unit, and
position the unit away from fluorescent lights.
Point the remote at the remote sensor on the
unit.
Move the remote closer to the system.
Consult your nearest Sony dealer or local
authorized Sony service facility.
The disc has not been finalized (a CD-R or CD-
RW disc to which data can be added).
Wipe the disc clean, and replace it.
Move the system to a location away from
vibration (for example, on top of a stable
stand).
Oscillation of the speakers may be the cause of
sound skips, depending on the volume level.
Move the speakers away from the unit or
change the location of the speakers.
Return to normal play by pressing PLAY MODE
repeatedly in stop mode until both “PGM”
and “SHUF” in the display disappear.
The following discs can increase the time it
takes to start playback:
• a disc recorded with a complicated tree
structure
• a disc recorded in multi-session format
• a disc that has many folders
Make sure the iPod/iPhone/iPad is connected
securely to the USB port .
Stop playback and connect the iPod/iPhone/
iPad to the system.
Make sure the iPod/iPhone/iPad is updated
with the latest software. If not, update the
iPod/iPhone/iPad before using with the
system.
Turn the VOLUME dial on the unit clockwise
or press VOLUME + on the remote to turn up
the volume.
The iPod/iPhone/iPad may not be supported
by this system. See “Compatible iPod/iPhone/
iPad models” (page 22).
Make sure the iPod/iPhone/iPad is connected
securely to the USB port .
Turn the VOLUME dial on the unit clockwise
or press VOLUME + on the remote to turn up
the volume.
Set the “EQ” setting of the iPod/iPhone/iPad to
“Off” or “Flat.”
The iPod/iPhone/iPad may not be supported
by this system. See “Compatible iPod/iPhone/
iPad models” (page 22).
Shut down any other iOS applications running
on the iPod/iPhone/iPad. For details, refer to
the operation manual supplied with the iPod/
iPhone/iPad.
Make sure the iPod/iPhone/iPad is connected
securely to the USB port .
Make sure the iPod/iPhone/iPad is updated
with the latest software. If not, update the
iPod/iPhone/iPad before using with the
system.
Because the operation of the system and the
i
P
od/iPhone/iPad are different, you may not
be able to operate the iPod/iPhone/iPad using
buttons on the remote or unit. In this case, use
the control buttons on the iPod/iPhone/iPad.
Make sure the iPod/iPhone/iPad is connected
securely to the USB port via the cable
supplied with the iPod/iPhone/iPad.
The iPod/iPhone/iPad cannot be charged
when the system is off.
Severe hum or noise occurs.
The remote does not function.
CD-DA/MP3 disc
“LOCKED” appears in the display and the
disc cannot be removed from the disc tray.
The disc or file will not play.
The sound skips, or the disc will not play.
Play does not start from the first track or file.
Starting playback takes more time than
usual.
iPod/iPhone/iPad
There is no sound.
The sound is distorted.
The iPod/iPhone/iPad does not function.
The iPod/iPhone/iPad cannot be charged.

64
GB
If you connect an unsupported USB device, the
following problems may occur. Check the
information on the websites about compatible
USB devices with URLs listed under “Playing a
file on a USB device” (page 24).
• The USB device is not recognized.
• File or folder names are not displayed on this
system.
• Playback is not possible.
• The sound skips.
• There is noise.
• A distorted sound is output.
The USB device is not connected correctly. Turn
off the system, and then reconnect the USB
device.
An unsupported USB device is connected.
Connect a supported USB device.
Turn off the system, then reconnect the USB
device and turn on the system.
The music data itself contains noise, or the
sound is distorted. Noise may have been
entered when creating music data due to the
conditions of the computer. In this case, delete
the file and send the music data again.
The bit rate used when encoding the files was
low. Send files encoded with higher bit rates to
the USB device.
The reading process may take a long time in
the following cases.
• There are many folders or files on the USB
device.
• The file structure is extremely complex.
• Not enough free space in the memory.
• The internal memory is fragmented.
Send the music data to the USB device again,
as the data stored in the USB device may have
been corrupted.
The character code that can be displayed by
this system are as follows:
• Upper cases (A to Z).
• Numbers (0 to 9).
• Symbols (< > * +, [ ] @ \ _).
Other characters appear as “_.”
Turn off the system and reconnect the USB
device, then turn on the system.
Check the information on the websites about
compatible USB devices with URLs listed under
“Playing a file on a USB device” (page 24).
The USB device does not work properly. Refer
to the operating manual supplied with the USB
device for how to deal with this problem.
Turn off the system and reconnect the USB
device, then turn on the system.
Check the information on the websites about
compatible USB devices with URLs listed under
“Playing a file on a USB device” (page 24).
Set the play mode to Normal Play mode.
Make sure the USB device is connected
securely.
Charging cannot be made when the power of
the system is off.
The USB device may not be supported by this
system. Check the information on the websites
about compatible USB devices.
Connect the antenna properly.
Find a location and an orientation that provide
good reception, and then set up the antenna
again.
Keep the antennas away from the unit, speaker
cord or other AV components to avoid picking
up noise.
Turn off nearby electrical equipment.
USB device
An unsupported USB device is connected.
There is no sound.
There is noise, skipping, or distorted sound.
“READING” is displayed for an extended
time, or it takes a long time before playback
starts.
The file or folder name (album name) is not
displayed correctly.
The USB device is not recognized.
Play does not start.
Play does not start from the first track.
The USB device cannot be charged.
Tuner
Severe hum or noise occurs (“STEREO”
flashes in the display window ), or
broadcasts cannot be received.
65
GB
Troubleshooting
Find a location and an orientation that provide
good reception, and then set up the antenna
again.
Bundle the antenna cables using commercially
available cord clips, for example, and adjust the
cable lengths.
Check all antenna connections, then perform
the DAB Automatic Scan procedure. See
“Running the DAB Automatic Scan manually
(CMT-SBT300WB only)” (page 53).
The current DAB/DAB+ service may not be
available.
Press TUNE +/– to select a different service.
If you have moved to another area, some
services/frequencies may have changed and
you may not be able to tune into your usual
broadcast. Perform the DAB Automatic Scan
procedure to re-register the contents of
broadcasts. (Performing this procedure clears
all previously stored presets.)
Check the location of the system or adjust the
orientation of the antenna to increase the
indicated value of the signal quality.
Check that is lit in the display .
It takes about 1 minute for the system to
acquire an IP address when the system is
turned on in a communication environment
without a router.
When you use a fixed IP address, the same IP
address may be used by other equipment. Use
a different IP address.
If a network (LAN) cable is connected to the
system, the system automatically operates to
establish a wired LAN connection. If you wish to
use a wireless LAN connection, do not connect
a network (LAN) cable to the system.
Check the settings of the wireless LAN router/
access point. If the SSID stealth mode is set to
ON on the access point, set it to OFF. For details
on the settings of the access point, refer to the
operating manual for the access point.
Set up your network after searching the access
point using the access point scan.
Update the firmware of the wireless LAN
router/access point to the latest version.
Make sure the wireless LAN router/access point
is turned on.
Check that appears in the display window
. If not, set up a wireless network again
(page 34).
When the system is connected to a wireless
network, place the wireless LAN/access point
and the system closer together and perform
the setup again.
Depending on the providers, only one
connection to Internet is allowed. In that case,
the system cannot be connected if connection
is occupied. Please consult your carrier or
service provider.
When you turn on your mobile phone (Android
device, Xperia/Xperia Tablet, or iPhone/iPod
touch/iPad) after a moment of power off, try to
restart the "Network Audio Remote"
application.
Several radio stations can be heard at the
same time.
DAB/DAB+ radio station is not received
properly.
The DAB/DAB+ broadcast has been
interrupted.
Network connection
The system cannot connect to the network.
(Other equipment on the network cannot
find or recognize the system.)
The system cannot connect to the network
via a wireless LAN connection.
The system cannot connect to the network
using WPS.
Music Services
The system cannot connect to Music
Services.
66
GB
Make sure that the controller is connected to
the home network.
The multicast control on the access point is
enabled.
This system may be controlled by another
component. To reject the control, set the
BLUETOOTH/Network Standby mode to off
(page 56).
The DLNA server is overloaded. Quit all running
applications.
Wireless signal condition is poor. Stop using
your microwave oven.
The communications speed of the wireless LAN
may become slower for IEEE802.11n-compliant
wireless LAN routers/access points if the
security method is set to WEP or WPA/WPA2-
PSK (TKIP). If the speed becomes lower, change
the security method to WPA/WPA2-PSK (AES).
The encryption (security) scheme varies
depending on the device. For details, refer to
the operating manual for your router/access
point.
Confirm that the audio file is improper or has
been deleted from the server. Refer to the
operating manual of the server.
The server tries to play the audio file in an
audio format that the system does not support.
Check the audio format information on the
server.
Disable the multicast control on the wireless
LAN router/access point. If it is enabled, it may
take several minutes to output the audio. For
details, refer to the operating manual of the
wireless LAN router/access point.
The access from this system is not permitted by
the server. Change the settings on the server to
allow access from this system. For details, refer
to the operating manual of the server.
See “Network connection – The system cannot
connect to the network” (page 65).
Make sure the iOS device or the computer with
iTunes is connected to your home network.
Before using with the system, update iOS or
iTunes to the latest version.
This system may be controlled by another
component. To reject the control, set the
BLUETOOTH/Network Standby mode to off
(page 56).
The server is overloaded. Quit all running
applications.
Update the software version of the iPhone/
iPod Touch/iPad to the latest version.
To reset the system to factory
settings
If the system still does not operate properly,
reset the system to factory settings.
Use buttons on the unit to reset the system
to its factory default settings.
1
Disconnect the power cord and confirm
that the STANDBY indicator is not lit.
Then reconnect the power cord and turn
on the system.
2
Press and hold and / on the
unit until “ALL RESET” appears in the
display.
All user-configured settings, such as the preset
radio stations, clock, timer, and network, are
deleted.
If the problem persists after doing all of the
above, consult your nearest Sony dealer.
Home Network
The controller cannot find this system. (The
controller cannot browse the contents of
this system.)
Music started automatically.
The sound is interrupted.
Playback does not start.
AirPlay
The system cannot be found from an
iPhone/iPod Touch/iPad.
Music started automatically.
The sound skips during playback.
This unit cannot be operated.

67
GB
Troubleshooting
Messages
The following messages may appear or
flash during operation.
CANNOT DOWNLOAD
The system failed downloading the update
data while performing the software update.
Enter the setting menu and update the
software again.
CANNOT PLAY
The system cannot play audio files due to an
unsupported file format or playback
restriction.
CAN’T PLAY
You have set a disc that cannot be
played back on this system, such as CD-
ROM and DVD disc.
COMPLETE
The station preset operation ended
normally.
DATA ERROR
You tried to play an unplayable file.
ERROR
You operated the system during
initialization. Wait for a while until the
initialization is completed.
INITIAL
The system is initializing the network
settings. Some buttons of the system
cannot be operated during this process.
LOCKED
The disc tray is locked and you cannot
remove the disc. Contact your nearest Sony
dealer.
NO CONNECT
The system cannot be connected to the
network.
NO DEVICE
No USB device is connected or the
connected USB device has been removed.
NO DISC
There is no disc in the player, or you have
loaded a disc that cannot be played.
NO MEMORY
The memory media is not inserted in the
USB device, or the system does not identify
the memory media.
NO STEP
All of the programmed tracks have been
erased.
NO SUPPORT
The system does not support the connected
USB device.
NO TRACK
There are not playable files on the USB
device or disc.
NOT IN USE
You pressed an unplayable button.
OVER CURRENT
Remove the USB device from the port and
turn off the system then turn on the system.
PUSH STOP
You pressed PLAY MODE during
playback in the CD or USB function.
READING
The system is reading the information on
the disc or USB device. Some buttons do not
work during reading.
STEP FULL
You tried to program more than 25 tracks or
files.

68
GB
TIME NG
The Play Timer start and end times are set to
the same time.
UPDATE ERROR
The system cannot update the software.
Turn off the system, and then turn it on
again. The system will try to update the
software. If the same message appears,
contact your nearest Sony dealer.
69
GB
Precautions/Specifications
Precautions/Specifications
Precautions
Discs that this system CAN play
• Audio CD-DA discs
• CD-R/CD-RW (audio data of CD-DA tracks
and MP3 files)
Discs that this system CANNOT play
• CD-ROM
• CD-R/CD-RW other than those recorded
in music CD format or format conforming
to ISO9660 Level 1/Level 2, Joliet
• CD-R/CD-RW recorded in multi-session
format and not closed the session
• CD-R/CD-RW of poor recording quality,
CD-R/CD-RW that have scratches or are
dirty, or CD-R/CD-RW recorded with an
incompatible recording device
• CD-R/CD-RW which is finalized incorrectly
• CD-R/CD-RW containing files other than
MPEG 1 Audio Layer-3 (MP3) files
• Discs of non-standard shape (for
example, heart, square, star)
• Discs that have adhesive tape, paper, or
sticker attached to them
• Rental or used discs with attached seals
where the glue extends beyond the seal
• Discs that have labels printed using ink
that feels tacky when touched
Notes on CD-DA discs
• Before playing, wipe the disc with a
cleaning cloth from the center out to the
edge.
• Do not clean discs with solvents, such as
benzine, thinner, or commercially
available cleaners or antistatic spray
intended for vinyl LPs.
• Do not expose discs to direct sunlight or
heat sources such as hot air ducts, nor
leave it in a car parked in direct sunlight.
On safety
• Completely disconnect the power cord
(mains lead) from the wall outlet (mains)
if it is not going to be used for an
extended period of time. When
unplugging the system, always grip the
plug. Never pull the cord itself.
• Should any solid object or liquid get into
the system, unplug the system, and have
it checked by qualified personnel before
operating it again.
• The AC power cord can be changed only
by a qualified service facility.
On placement
• Do not place the system in an inclined
position or in locations that are extremely
hot, cold, dusty, dirty, or humid or lacking
adequate ventilation, or subject to
vibration, direct sunlight or a bright light.
• Be careful when placing the system on
surfaces that have been specially treated
(for example, with wax, oil, polish) as
staining or discoloration of the surface
may result.
• If the system is brought directly from a
cold to a warm location or is placed in a
very damp room, moisture may condense
on the lens inside the CD player, and
cause the system to malfunction. In this
situation, remove the disc, and leave the
system turned on for about an hour until
the moisture evaporates.
On heat buildup
• Heat buildup on the unit during operation
is normal and is not cause for alarm.
• Do not touch the cabinet if it has been
used continuously at a high volume
because the cabinet may have become
hot.
• Do not obstruct the ventilation holes.
Do not use a CD-R/CD-RW disc with no data
stored. Doing so may damage the disc.

70
GB
On the speaker system
This speaker system is not magnetically
shielded, and the picture on nearby TV sets
may become magnetically distorted. In this
situation, turn off the TV, wait 15 to 30
minutes, and turn it back on.
Cleaning the cabinet
Clean this system with a soft cloth slightly
moistened with a mild detergent solution.
Do not use any type of abrasive pads,
scouring powder, or solvents, such as
thinner, benzine, or alcohol.

71
GB
Precautions/Specifications
BLUETOOTH wireless technology
BLUETOOTH wireless technology is a
short-range wireless technology linking
digital devices, such as personal computers
and digital still cameras. Using the
BLUETOOTH wireless technology, you can
operate the units involved within a range of
about 10 meters.
The BLUETOOTH wireless technology is
commonly used between two devices, but a
single device can be connected to multiple
devices.
You do not need wires to get connected as
you do with a USB connection, and you do
not need to place the devices face to face as
you do with wireless infrared technology.
You can use the technology with one
BLUETOOTH device in your bag or pocket.
BLUETOOTH wireless technology is a global
standard supported by thousands of
companies. These companies produce
products that meet the global standard.
Supported BLUETOOTH version and profiles
Profile refers to a standard set of
capabilities for various BLUETOOTH product
capabilities. See “Specifications” (page 73)
for details on the supported BLUETOOTH
version and profiles.
Notes
• To use a BLUETOOTH device connected to this
system, the device must support the same
profile as this system. Note that the functions of
the BLUETOOTH device may be different
depending on the specifications of the device,
even if it has the same profile as this system.
• Because of the properties of BLUETOOTH
wireless technology, playback on this system is
slightly delayed compared with audio playback
on the transmitting device.
Effective communication range
BLUETOOTH devices should be used within
approximately 10 meters (unobstructed
distance) of each other.
The effective communication range may
become shorter under the following
conditions.
– When a person, metal object, wall or
other obstruction is between the
devices with a BLUETOOTH connection
– Locations where a wireless LAN is
installed
– Around microwave ovens that are in
use
– Locations where other electromagnetic
waves occur
Effects of other devices
BLUETOOTH devices and wireless LAN
(IEEE802.11b/g) use the same frequency
band (2.4 GHz). When using your
BLUETOOTH device near a device with
wireless LAN capability, electromagnetic
interference may occur.
This could result in lower data transfer rates,
noise, or inability to connect. If this
happens, try the following remedies:
– Try connecting this system and
BLUETOOTH mobile phone or
BLUETOOTH device when you are at
least 10 meters away from the wireless
LAN equipment.
– Turn off the power to the wireless LAN
equipment when using your
BLUETOOTH device within 10 meters
Effects on other devices
The radio waves broadcast by this system
may interfere with the operation of some
medical devices. Since this interference may
result in malfunction, always turn off the
power on this system, BLUETOOTH mobile
phone and BLUETOOTH device in the
following locations:
– In hospitals, on trains, and in airplanes
– Near automatic doors or fire alarms
Notes
• This system supports security functions that
comply with the BLUETOOTH specification as a
means of ensuring security during

72
GB
communication using BLUETOOTH technology.
However, this security may be insufficient
depending on the setting contents and other
factors, so always be careful when performing
communication using BLUETOOTH technology.
• Sony cannot be held liable in any way for
damages or other loss resulting from
information leaks during communication using
BLUETOOTH technology.
• BLUETOOTH communication is not necessarily
guaranteed with all BLUETOOTH devices that
have the same profile as this system.
• BLUETOOTH devices connected with this system
must comply with the BLUETOOTH specification
prescribed by the BLUETOOTH SIG, Inc., and
must be certified to comply. However, even
when a device complies with the BLUETOOTH
specification, there may be cases where the
characteristics or specifications of the
BLUETOOTH device make it impossible to
connect, or may result in different control
methods, display or operation.
• Noise may occur or the audio may cut off
depending on the BLUETOOTH device
connected with this system, the
communications environment, or surrounding
conditions.

73
GB
Precautions/Specifications
Specifications
Amplifier section
Power output (rated):
25 watts + 25 watts (at 6 ohms, 1 kHz, 1% THD)
RMS power output (reference):
50 watts + 50 watts (per channel at 6 ohms,
1kHz)
Inputs/Outputs
AUDIO IN:
AUDIO IN (external input) jack:
Stereo mini jack, sensitivity 700 mV,
impedance 47 kilohms
(headphone) jack:
Stereo mini jack, 8 ohms or more
USB:
Supported bit rate:
MP3 (MPEG 1 Audio Layer-3): 32 kbps - 320
kbps, VBR
WMA: 48 kbps - 192 kbps, VBR
AAC: 48 kbps -320 kbps
Sampling frequencies:
MP3 (MPEG 1 Audio Layer-3): 32/44.1/48 kHz
WMA: 44.1 kHz
AAC: 44.1 kHz
USB port:
Type A, 5 V DC 2.1 A
CD-DA/MP3 player section
System:
Compact disc and digital audio system
Laser Diode Properties:
Emission Duration: Continuous
Laser Output*: Less than 44.6 μW
* This output is the value measurement at a
distance of 200mm from the objective lens
surface on the Optical Pick-up Block with 7mm
aperture.
Frequency response:
50 Hz – 20 kHz
Signal-to-noise ratio:
More than 90 dB
Dynamic range:
More than 90 dB
Tuner section
AM tuner section (CMT-SBT300W only):
Tuning range:
European models:
531 kHz – 1,602 kHz (with 9 kHz tuning
interval)
Other models:
530 kHz – 1,710 kHz (with 10 kHz tuning
interval)
531 kHz – 1,710 kHz (with 9 kHz tuning
interval)
Antenna:
AM loop antenna
Intermediate frequency:
400 kHz
FM tuner section:
FM stereo, FM superheterodyne tuner
Tuning range:
87.5 MHz – 108.0 MHz (50 kHz step)
Antenna:
FM lead antenna
DAB/DAB+ tuner section (CMT-SBT300WB only):
FM stereo, DAB/FM superheterodyne tuner
Frequency range:
Band-III:
174.928 (5A) MHz – 239.200 (13F) MHz*
Antenna:
DAB/FM lead antenna:
74
GB
DAB/DAB+ frequency table (Band-III):
* Frequencies are displayed to two decimal
places on this system.
Speaker section
Speaker system:
2-way speaker system, Bass Reflex
Woofer: 120 mm, cone type
Tweeter: 25 mm, soft dome type
Rated impedance:
6ohms
Dimensions (W/H/D):
Approx. 150 mm x 270 mm x 220 mm
Mass:
Approx. 2.5 kg (per unit)
BLUETOOTH section
Communication system:
BLUETOOTH Standard version 3.0
Output:
BLUETOOTH Standard Power Class 2
Maximum communication range:
Line of sight approx. 10 m
*1
Frequency band:
2.4 GHz band (2.4000 GHz - 2.4835 GHz)
Modulation method:
FHSS
Compatible BLUETOOTH profiles
*2
:
A2DP (Advanced Audio Distribution Profile)
AVRCP (Audio Video Remote Control Profile)
Supported content protection method
SCMS-T method
Transmission bandwidth
20 Hz – 20,000 Hz (with 44.1 kHz sampling)
*
1
The actual range will vary depending on factors
such as obstacles between devices, magnetic
fields around a microwave oven, static
electricity, reception sensitivity, antenna’s
performance, operating system, software
application, etc.
*
2
BLUETOOTH standard profiles indicate the
purpose of BLUETOOTH communication
between devices.
Network section
LAN port:
RJ-45
10BASE-T/100BASE-TX
(The communication speed may vary
depending on the communication
environment. This system does not
Frequency Label
174.928 MHz 5A
176.640 MHz 5B
178.352 MHz 5C
180.064 MHz 5D
181.936 MHz 6A
183.648 MHz 6B
185.360 MHz 6C
187.072 MHz 6D
188.928 MHz 7A
190.640 MHz 7B
192.352 MHz 7C
194.064 MHz 7D
195.936 MHz 8A
197.648 MHz 8B
199.360 MHz 8C
201.072 MHz 8D
202.928 MHz 9A
204.640 MHz 9B
206.352 MHz 9C
208.064 MHz 9D
209.936 MHz 10A
211.648 MHz 10B
213.360 MHz 10C
215.072 MHz 10D
216.928 MHz 11A
218.640 MHz 11B
220.352 MHz 11C
222.064 MHz 11D
223.936 MHz 12A
225.648 MHz 12B
227.360 MHz 12C
229.072 MHz 12D
230.784 MHz 13A
232.496 MHz 13B
234.208 MHz 13C
235.776 MHz 13D
237.488 MHz 13E
239.200 MHz 13F
75
GB
Precautions/Specifications
guarantee the communication speed and
quality of 10BASE-T/100BASE-TX.)
Wireless LAN:
Compatible standards:
IEEE 802.11 b/g (WEP 64 bit, WEP 128 bit)
Frequency band 2.4 GHz band (2.4000 GHz -
2.4835 GHz)
Available channels ch1 to ch13
WPA/WPA2-PSK (AES)
WPA/WPA2-PSK (TKIP)
General
Power requirements:
AC 220 V - 240 V, 50 Hz/60 Hz
Power consumption:
36 watts
Dimensions (W/H/D) (incl. projecting parts,
excluding speakers):
Approx. 290 mm × 106 mm × 221 mm
Mass (excluding speakers):
Approx. 2.7 kg
Supplied accessories:
Remote (RM-AMU171) (1), R6 (Size AA)
batteries (2), Speaker cords (2), Speaker
pads (8), FM lead/AM loop antenna (1)
(CMT-SBT300W only), DAB/FM lead
antenna (1) (CMT-SBT300WB only), Quick
Setup Guide (1), Operating Instructions (this
manual) (1)
Design and specifications are subject to
change without notice.
Standby power consumption: 0.5 W

76
GB
Trademarks, etc.
• Windows, the Windows logo, and Windows
Media are either registered trademarks or
trademarks of Microsoft Corporation in the
United States and/or other countries.
• This product is protected by certain intellectual
property rights of Microsoft Corporation. Use or
distribution of such technology outside of this
product is prohibited without a license from
Microsoft or an authorized Microsoft subsidiary.
• AirPlay, the AirPlay logo, iPad, iPhone, iPod,
iPod classic, iPod nano, and iPod touch are
trademarks of Apple Inc., registered in the U.S.
and other countries.
• “ ” is a mark of the Wi-Fi Alliance.
• Wi-Fi®, Wi-Fi Protected Access® and Wi-Fi
Alliance® are registered marks of the Wi-Fi
Alliance.
• Wi-Fi CERTIFIED™, WPA™, WPA2™ and Wi-Fi
Protected Setup™ are marks of the Wi-Fi
Alliance.
• DLNA™, the DLNA Logo and DLNA CERTIFIED™
are trademarks, service marks, or certification
marks of the Digital Living Network Alliance.
• MPEG Layer-3 audio coding technology and
patents licensed from Fraunhofer IIS and
Thomson.
• The BLUETOOTH® word mark and logos are
registered trademarks owned by BLUETOOTH
SIG, Inc. and any use of such marks by Sony
Corporation is under license. Other trademarks
and trade names are those of their respective
owners.
• The N Mark is a trademark or registered
trademark of NFC Forum, Inc. in the United
States and in other countries.
• Android is a trademark of Google Inc.
• “Xperia” and “Xperia Tablet” are trademarks of
Sony Mobile Communications AB.
• The system names and product names indicated
in this manual are generally the trademarks or
registered trademarks of the manufacturer.
™ and ® marks are omitted in this manual.


©2013 Sony Corporation Printed in China 4-464-109-12(1)