Loading ...
Loading ...
Loading ...
Unpacking Your Wine Chiller
!. Removeall packaging material Thisinctudesthe foam and the adhesive tape
from all outside and insidesurfaces,as weft asaccessories and racks,Slide
out and removethe plastic or foam guard usedto protect the compressor from
shippingdamage caused by vibration and shock.
2, inspectand removeany remaining packaging,tape or printed materials
before powering on the wine chiller
3. Checkto be sureyou haveall accessoriesand parts listed inthe Partsand
Featuressection.
Proper Air Circulation
Toensurethat your wine chiller works at the maximumefficiency it was
designedfor,you shouldinstallit ina location where there isproper air
circulation, plumbingand electrical connections.
Thefollowing are recommended clearances around the wine chiller:
Sides..................3/'4 inches (19mm)
Top......................2 inches (50mm)
Back....................2 inches (50mm}
Electrical Requirements
Make sure there isa suitable power outlet (1t5volts,t5 amps) with
proper groundingto power thewine chiller.
WARNING: NEVERcut off the third grounding prong from the power cord
plug to accommodate a two prong outlet, Removalof the prong provides no
effective grounding for the appliance, which can result in seriousinjury or death
from electrical shock.
Installation
'Four winechHer isdesignedfor freestanding installationonly.Itshouldnot be
recesseaor built-in. Placethe wine chiller on afloor strong enoughto support it fully
loaded. When movingme J._mesn,le_ nevertilt it bymore thana 45 degrees angle. This
could damage the compressorand the sealed system.
Fthe wne ch ller hasbeentilted more than 45 degrees, Jetit stand inan upright
positionfor at least 1hour prior to plugging it into thepower source. This
will allow the refrigerant to settle and reduce the possibilityof amaffunction in
the cooling system.
Piugthe wine cnmer into anexclusive,properly installedgrounded wall outlet.
Do not unaer any circumstancescutor removethe third (grounding) prong from
the power cord. Seethe WARNING in Electrica_ Reau_rementson me previous
page. Any questionsconcerning power and/or groundingshouldbedirected
toward a certified electrician or aSearsor other qualified servicedealer.
After 0Juggingthe appliance into a wafl outlet,allow the unitto runfor 2-3
hourssomat rneinterior issufficiently cool before opening the door to p_ace
softies into the corn 9arrmem.
Installation Limitations
Do not install your wine cooler in any location not properly insulated or heated,
such as m a garage. Your wine chiller is not designed to operate in fern peralure
settings below 55 ° Fahrenheit
Select a suitable location for the wine chiller on a hard even surface away from
direct sunlight or heat sources such as radiators, baseboard heaters or cooking
aopliances.
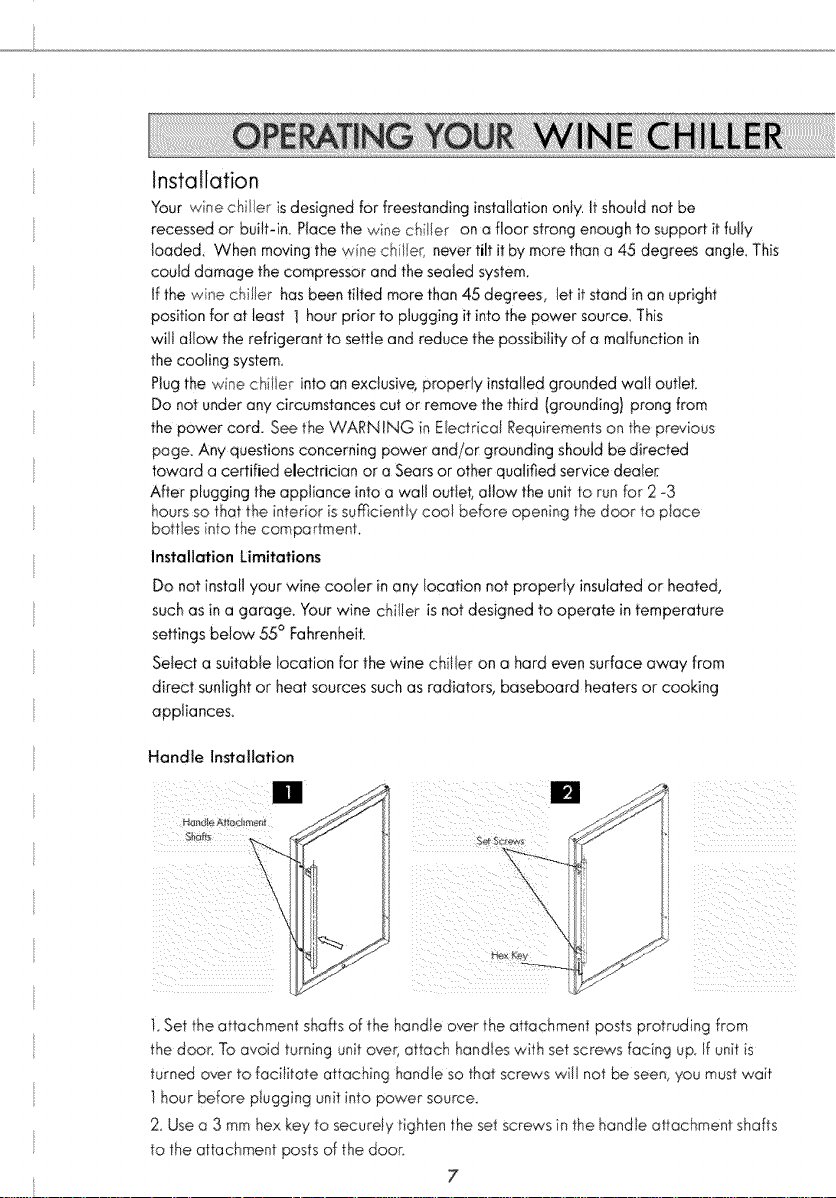
Handle Installation
[] []
1.Set the attacnmem shafts of the handle over me aTTacnmem posts protruding from
the door, To avoid turning unit over, attach handles with set screws facing uo if un_ s
_urnea over to faciDate attaching handle so that screws wi nOTbe seer, ,¢nu must Wa_T
" hour before p_ugging unit into eower source.
2. Use a 3 mm hex ke'y ro secure_y'hgmen me set screws in the r_anaie attachment shafts
to the attacnmem posts of the aoor.
7
6/8/10
Loading ...
Loading ...
Loading ...