Loading ...
Loading ...
Loading ...
6
• SAFETY & INTERNATIONAL SYMBOLS •
This operator's manual describes safety and international symbols and pictographs that may appear on this product. Read the operator's
manual for complete safety, assembly, operating and maintenance and repair information.
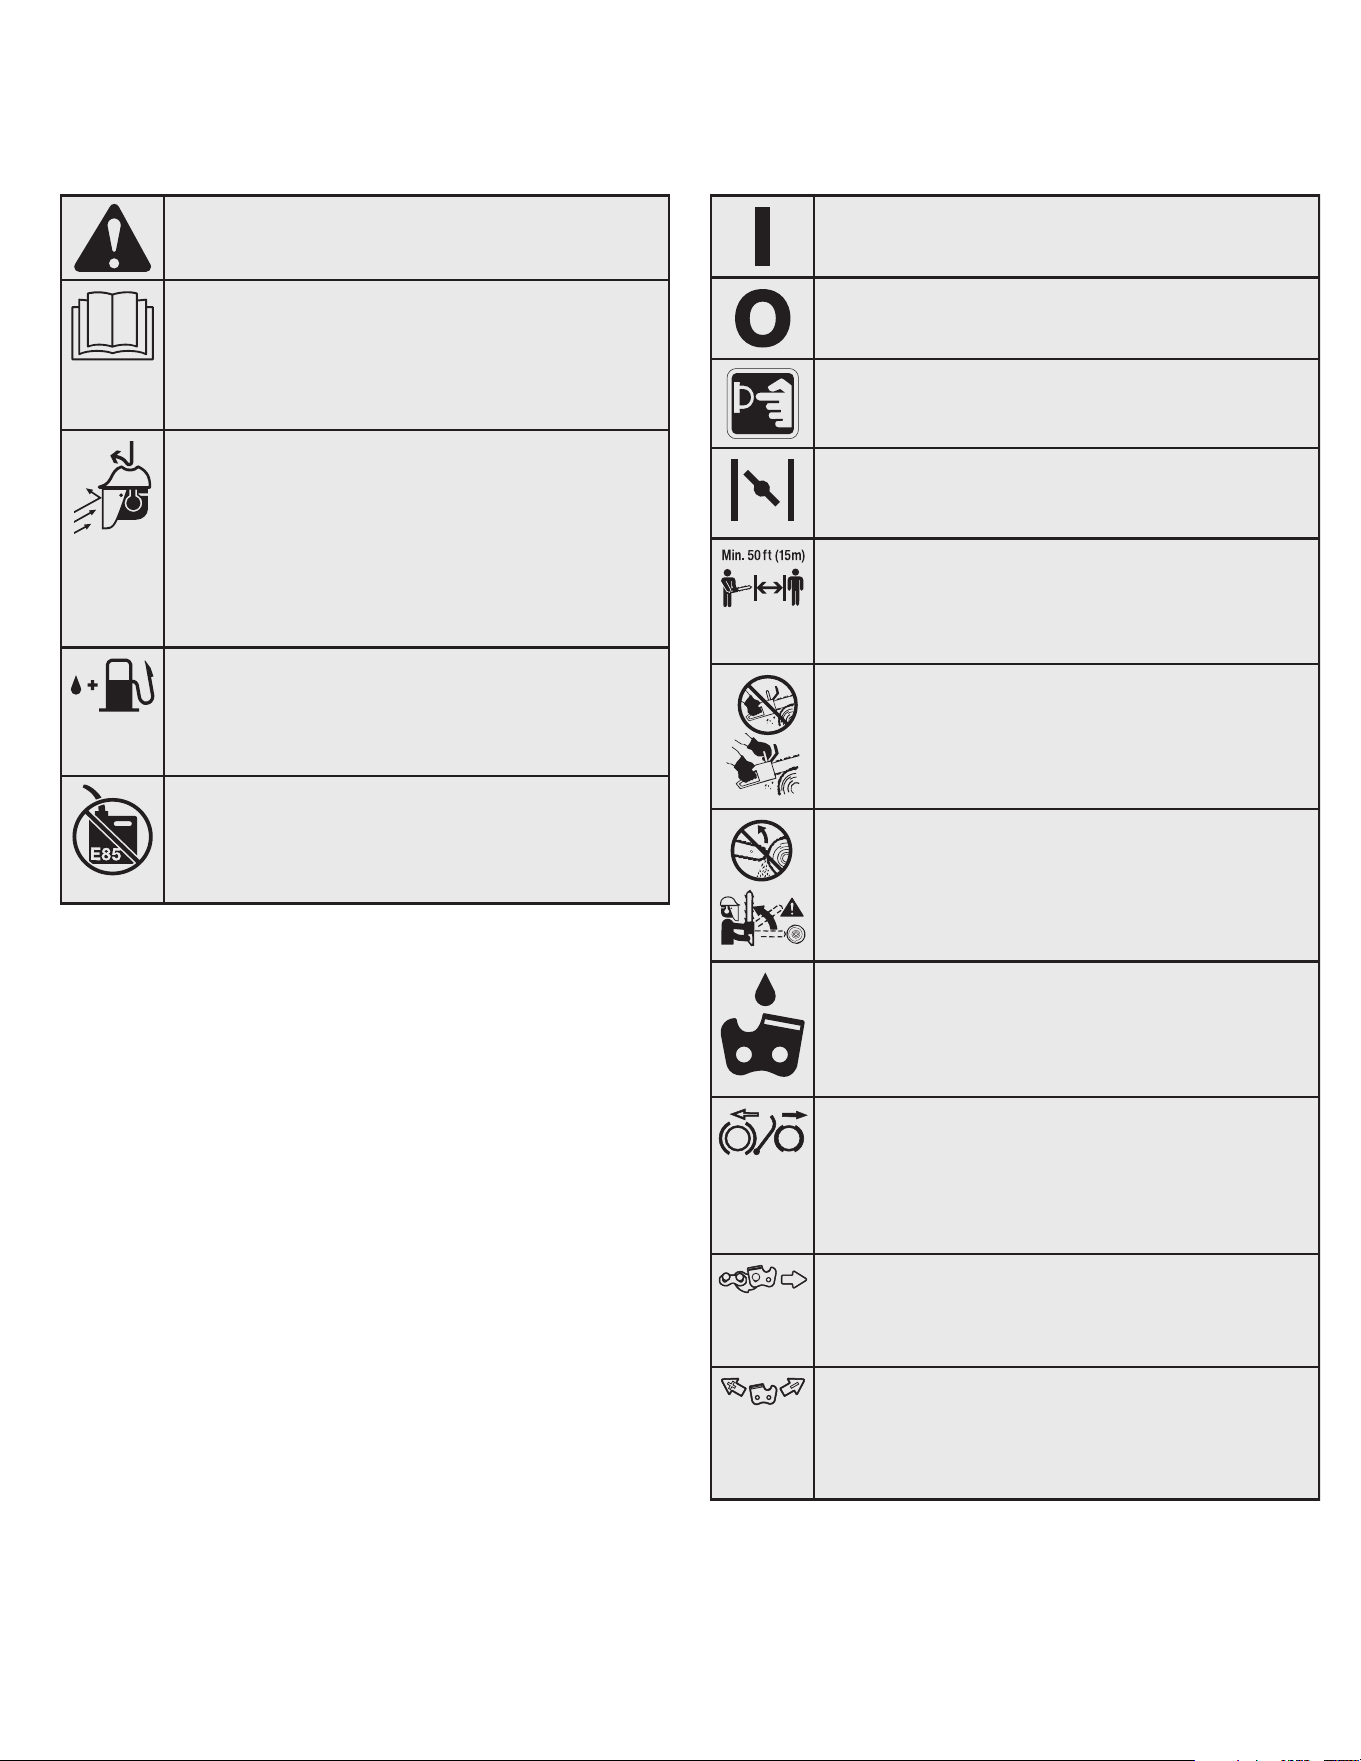
SYMBOL MEANING SYMBOL MEANING
•SAFETY ALERT SYMBOL
Indicates danger, warning or caution. May be used in
conjunction with other symbols or pictographs.
•READ OPERATOR'S MANUAL
WARNING: Read the operator’s
manual(s) and follow all warnings and safety
instructions. Failure to do so can result in serious
injury to the operator and/or bystanders.
•WEAR HEAD, EYE AND HEARING PROTECTION
WARNING: Thrown objects and loud
noise can cause severe eye injury and hearing loss.
Wear eye protection meeting current ANSI Z87.1
standards and ear protection when operating this unit.
Wear head protection when operating this unit; falling
objects can cause severe head injury. Use a full face
shield when needed.
•UNLEADED FUEL
Always use clean, fresh unleaded fuel.
•OIL
Refer to operator’s manual for the proper type of oil.
•DO NOT USE E85 FUEL IN THIS UNIT
WARNING:
It has been proven that fuel
containing greater than 10% ethanol will likely
damage this engine and void the warranty.
•ON/OFF STOP CONTROL
ON / START / RUN
•ON/OFF STOP CONTROL
OFF or STOP
•PRIMER BULB
Push primer bulb, fully and slowly, 10 times.
•CHOKE CONTROL
• Pulled Out - FULL choke position
• Pushed In - RUN position
•KEEP BYSTANDERS AWAY
WARNING:
Keep all bystanders,
especially children and pets, at least 50 feet (15 m)
from the operating area.
•USE BOTH HANDS
WARNING: Always use both hands
while operating the unit. Never use only one hand to
operate the unit.
•KICKBACK
WARNING:
Contact of the guide bar tip
with any object should be avoided. Tip contact may
cause the guide bar to move suddenly upward and
backward, which may cause serious injury.
•CHAIN OIL ADJUSTMENT INDICATOR
The chain must be continously coated with oil to
function properly. Make sure to set the oil adjustment
screw to allow a sufficient amount of oil to flow
continuously onto the chain.
•CHAIN BRAKE
The chain brake immediately stops the moving saw
chain in emergency situations. To manually engage
the chain brake, push the chain brake lever forward
completely. To disengage the chain brake, pull the
chain brake lever back completely.
•CHAIN DIRECTION
Make sure the saw chain faces the direction shown
when installed on the guide bar. Refer to Installing the
Guide Bar and Saw Chain in the Maintenance section.
•CHAIN TENSIONING
Always keep the saw chain properly tensioned. Turn
the chain-tensioning screw clockwise to tighten the
saw chain. Turn the chain-tensioning screw
counterclockwise to loosen the saw chain.
Loading ...
Loading ...
Loading ...