Loading ...
Loading ...
Loading ...
22
REMOVING AND INSTALLING THE GUIDE BAR AND SAW
CHAIN
The guide bar and saw chain need to be removed when certain
maintenance procedures are performed, such as when rotating the
guide bar. When replacing old guide bars and saw chains with new
parts, always use the manufacturer’s specified replacement parts.
Refer to Replacing the Guide Bar and Saw Chain.
Removing the Guide Bar and Saw Chain
1. Make sure the chain brake is disengaged. Refer to Testing the
Chain Brake in the Assembly section.
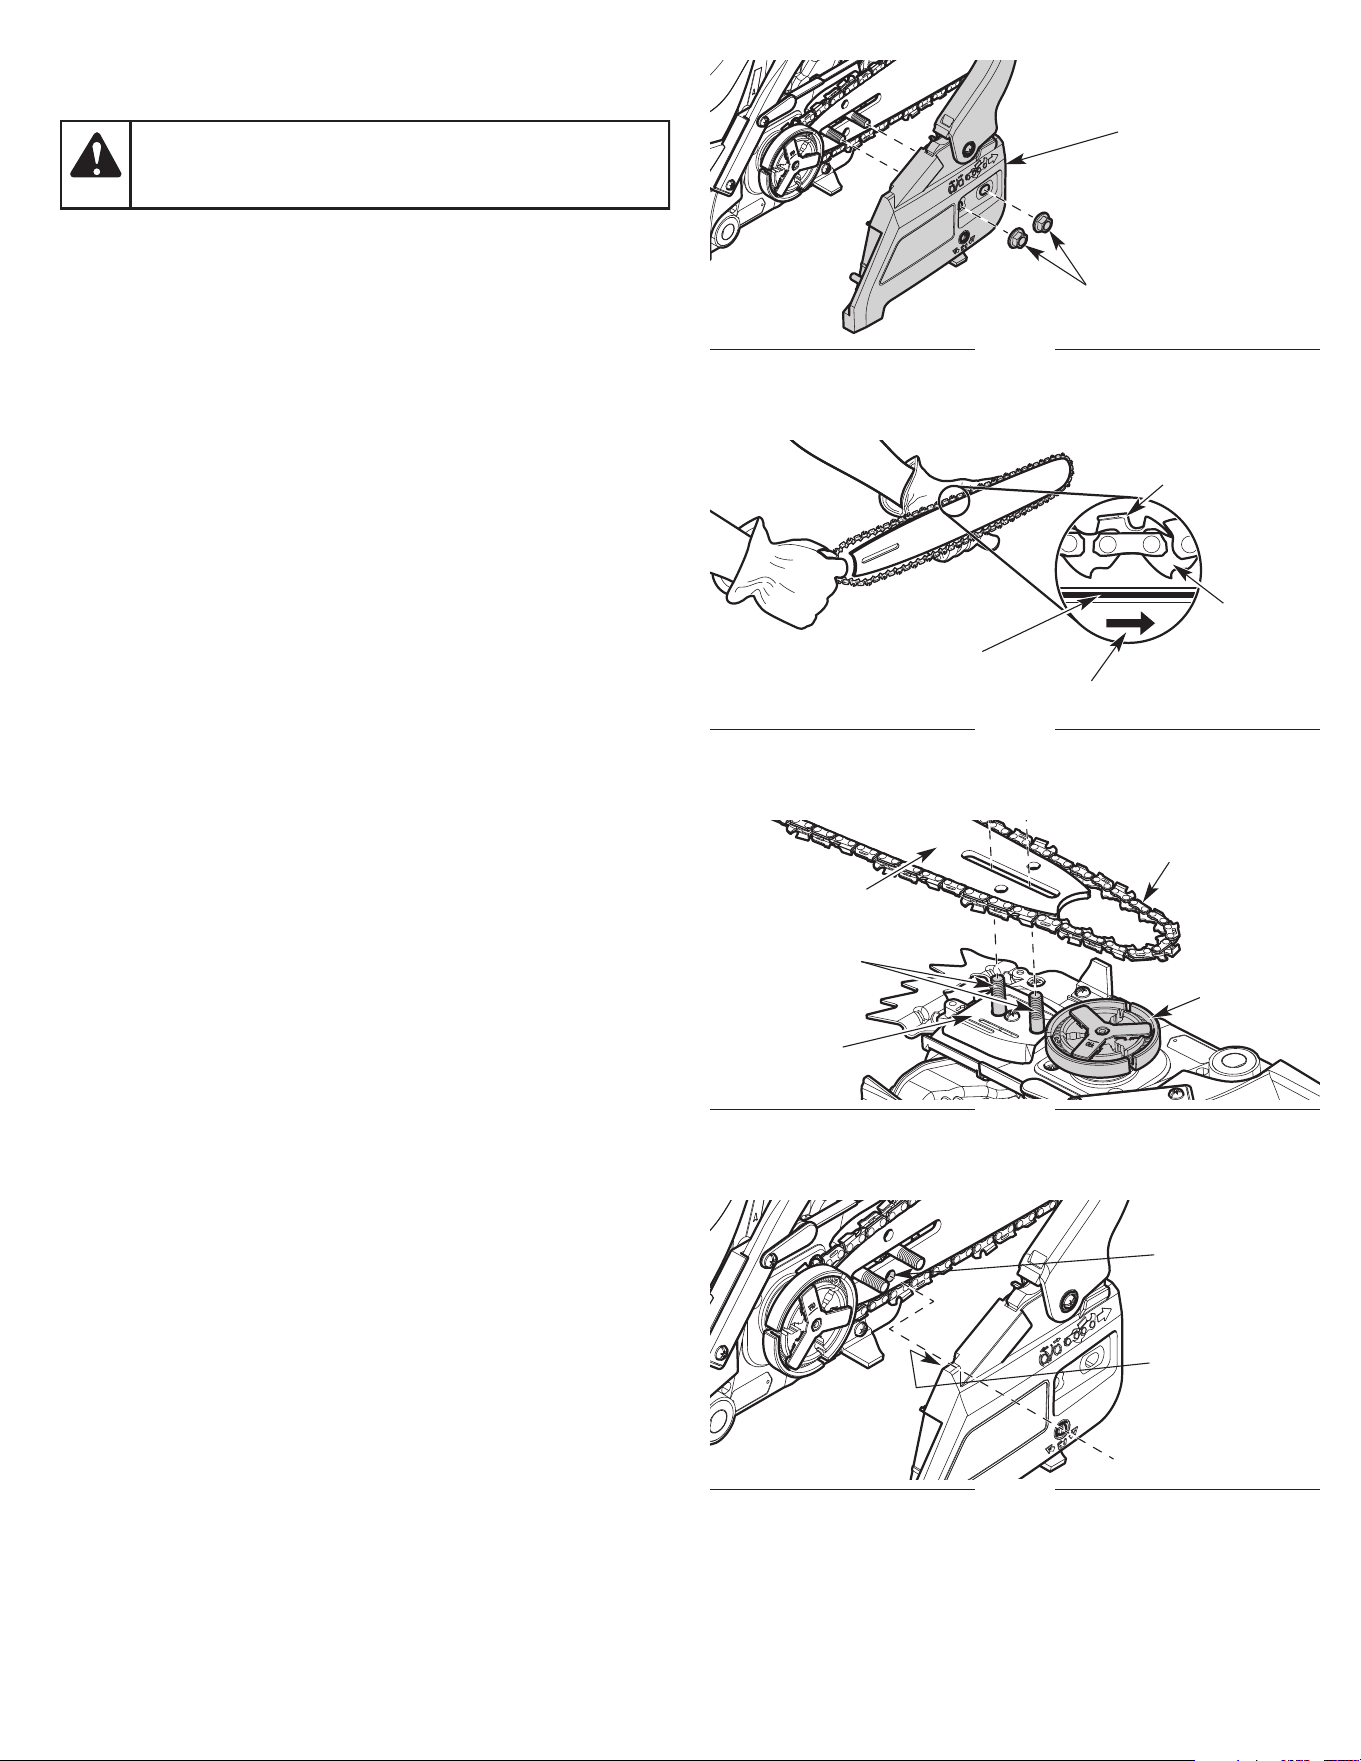
2. Use the scrench or a 1/2 inch (13 mm) wrench to loosen the bar-
retaining nuts (Fig. 29).
3. Remove the bar-retaining nuts and bar cover (Fig. 29).
4. Loosen the saw chain. Refer to Adjusting the Chain Tension.
5. Remove the guide bar and saw chain from the guide bar bolts
(Fig. 31).
6. Remove the saw chain from the guide bar.
Installing the Guide Bar and Saw Chain
1. Set the saw chain on a clean, flat surface and straighten out any
kinks.
2. Fit the saw chain into the guide bar groove (Fig. 30). Make sure
the cutters point in the correct direction of rotation (Fig. 30). Keep a
loop of saw chain at the back end of the guide bar (Fig. 30).
3. Hold the saw chain and guide bar together in position over the
unit. Loop the saw chain around the drive sprocket and install the
guide bar onto the guide bar bolts (Fig. 31). Make sure the guide
bar is flush against the mounting surface. Make sure the flats on
the saw chain are in the grooves on the drive sprocket.
4. Install the bar cover. Make sure the chain-tensioning pin is in the
pin hole on the guide bar (Fig. 32).
5. Place the bar-retaining nuts onto the guide bar bolts and tighten
them hand tight. DO NOT tighten the bar-retaining nuts
completely.
6. Make sure the saw chain is still in the guide bar groove. Adjust
the chain tension. Refer to Adjusting the Chain Tension.
7. Hold the guide bar tip up and securely tighten the bar-retaining nuts.
WARNING:
The saw chain is very sharp. Always wear
heavy-duty protective gloves when handling or performing
maintenance on the saw chain.
MAINTAINING THE SAW CHAIN
For safe, efficient operation, the saw chain must be maintained properly.
The saw chain will wear with use, causing the chain to stretch. This
is normal. When it is no longer possible to obtain a correct chain-
tension adjustment, the saw chain will need to be repaired by an
authorized service dealer or replaced. Refer to Replacing the Guide
Bar and Saw Chain.
Always keep the saw chain sharp. During operation, look for the
following indicators of a dull saw chain:
• Wood chips are small and powdery.
• The saw chain must be forced through the wood.
• The saw chain cuts to one side.
If any of these conditions exist, sharpen or replace the saw chain.
Refer to Sharpening the Saw Chain or Replacing the Guide Bar and
Saw Chain.
NOTE: If you do not fully understand the process for properly
sharpening a saw chain after reading the instructions, have the
saw chain sharpened by an authorized service center or replace
the saw chain.
Fig. 30
Guide Bar Groove
Direction of Rotation
Saw
Chain
Flat
Cutter
Fig. 29
Bar Cover
Bar-Retaining Nuts
Fig. 31
Drive
Sprocket
Guide Bar
Bolts
Guide Bar
Saw Chain
Mounting
Surface
Fig. 32
Pin Hole
Chain-Tensioning
Pin
Loading ...
Loading ...
Loading ...