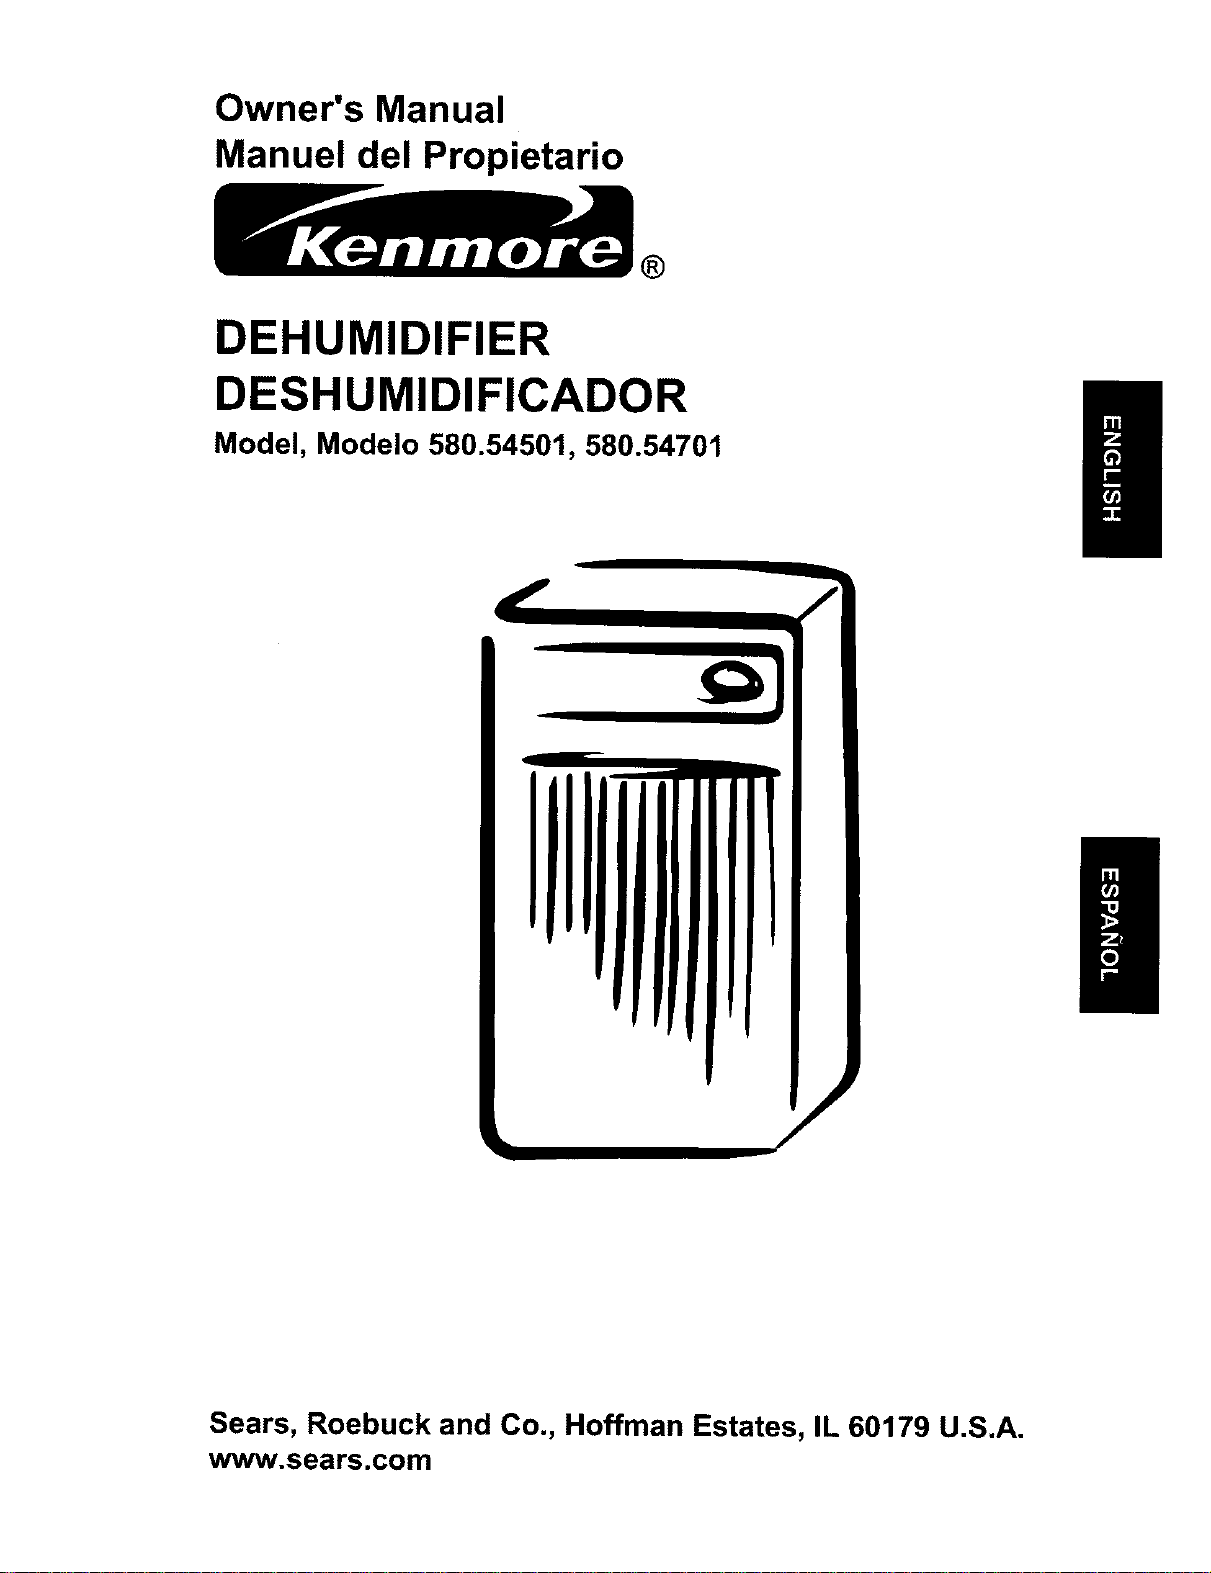
Owner's Manual
Manuel del Propietario
®
DEHUMIDIFIER
DESHUMIDIFICADOR
Model, Modelo 580.54501, 580.54701
Sears, Roebuck and Co., Hoffman Estates, IL 60179 U.S.A.
www.sears.com
Safety Precautions ...................................... 3
Prior to Operation ....................................... 7
Instruction ................................................... 8
Electrical Safety .......................................... 9
Operating Instructions ............................. 11
Installation ................................................. 13
Maintenance .............................................. 14
ESPANOL ................................................... 16
MASTER PROTECTION AGREEMENTS .....31
SERVICE NUMBERS ................... Back cover
Inside you will find many helpful hints on how to use and maintain your dehumidifier
properly. Just a little preventive care on your part can save you a great deal of time and
money over the life of your dehumidifier,
You'll find many answers to common problems in the table of troubleshooting tips. If you
review our table of Troubleshooting Tips first, you may not need to call for service at all.
• The dehumidifier is not intended for use by young children without supervision.
• Young children should be supervised to ensure that they do not play with the dehumidifier.
• When the power cord is to be replaced, replacement work shall be performed by authorized
personnel only using only genuine replacement parts.
FULL ONE YEAR WARRANTY ON DEHUMIDIFIER
For one year from the date of purchase, if this Dehumidifier is operated and maintained
according to the owner's instructions furnished with the product, Sears will repair this
Dehumidifier free of charge, if defective in materials or workmanship.
FULL FIVE YEAR WARRANTY ON SEALED
REFRIGERATION SYSTEM
For five years from the date of purchase, when this Dehumidifier is operated and
maintained according to owner's instructions furnished with the product, Sears will repair
the sealed refrigeration system (consisting of refrigerant, connecting tubing, and
compressor motor) free of charge, if defective in material or workmanship.
WARRANTY SERVICE IS AVAILABLE BY RETURNING UNIT TO THE NEAREST
SEARS SERVICE CENTER IN THE UNITED STATES. CALL 1-800-4-MY-HOME ®FOR
THE NEAREST SERVICE CENTER TO YOU.
This warranty applies only while this Dehumidifier is used in the United States.
This warranty gives you specific legal rights, and you may also have other rights which vary
from state to state.
Sears, Roebuck and Co., D/817WA, Hoffman Estates, IL 60179 U.S.A.
2 Dehumidifier

SafetyPrecautions
READ ALL INSTRUCTION BEFORE USING
• To prevent injuryto the useror other peopleandpropertydamage, thefollowing instructionsmust befollowed.
• Incorrectoperationdue to ignoring instructionswill cause harmor damage; the seriousnessis classified bythe
following indications.
I _ WARNING Thissymbolindicatestheremaybethepossibilityofdeathorseriousinjury._
L_i, CAUTION Ths eymbo ndcatesthepossibility ofinjury or damageto propertyonly. _
• Meaningsof symbols used inthis manualare as shown below.
®
O
Be sure not to do.
Be sure to follow the instruction.
• Installation
C&w...,..
/
• Itmay causefire and electdc
shock.
• Itmaycause explosionor fire.
• Operation
®
• It maycause electricshockand
failure.
pro_y.
..................................... :::::::::::::::::::::::::::::::::_.......... ............................................................................................................................
• Otherwise,it may cause electric • Itmay cause electricshock or • Itmay cause electricshockor
shockor fire. fire. fire.
Owner's Manual 3
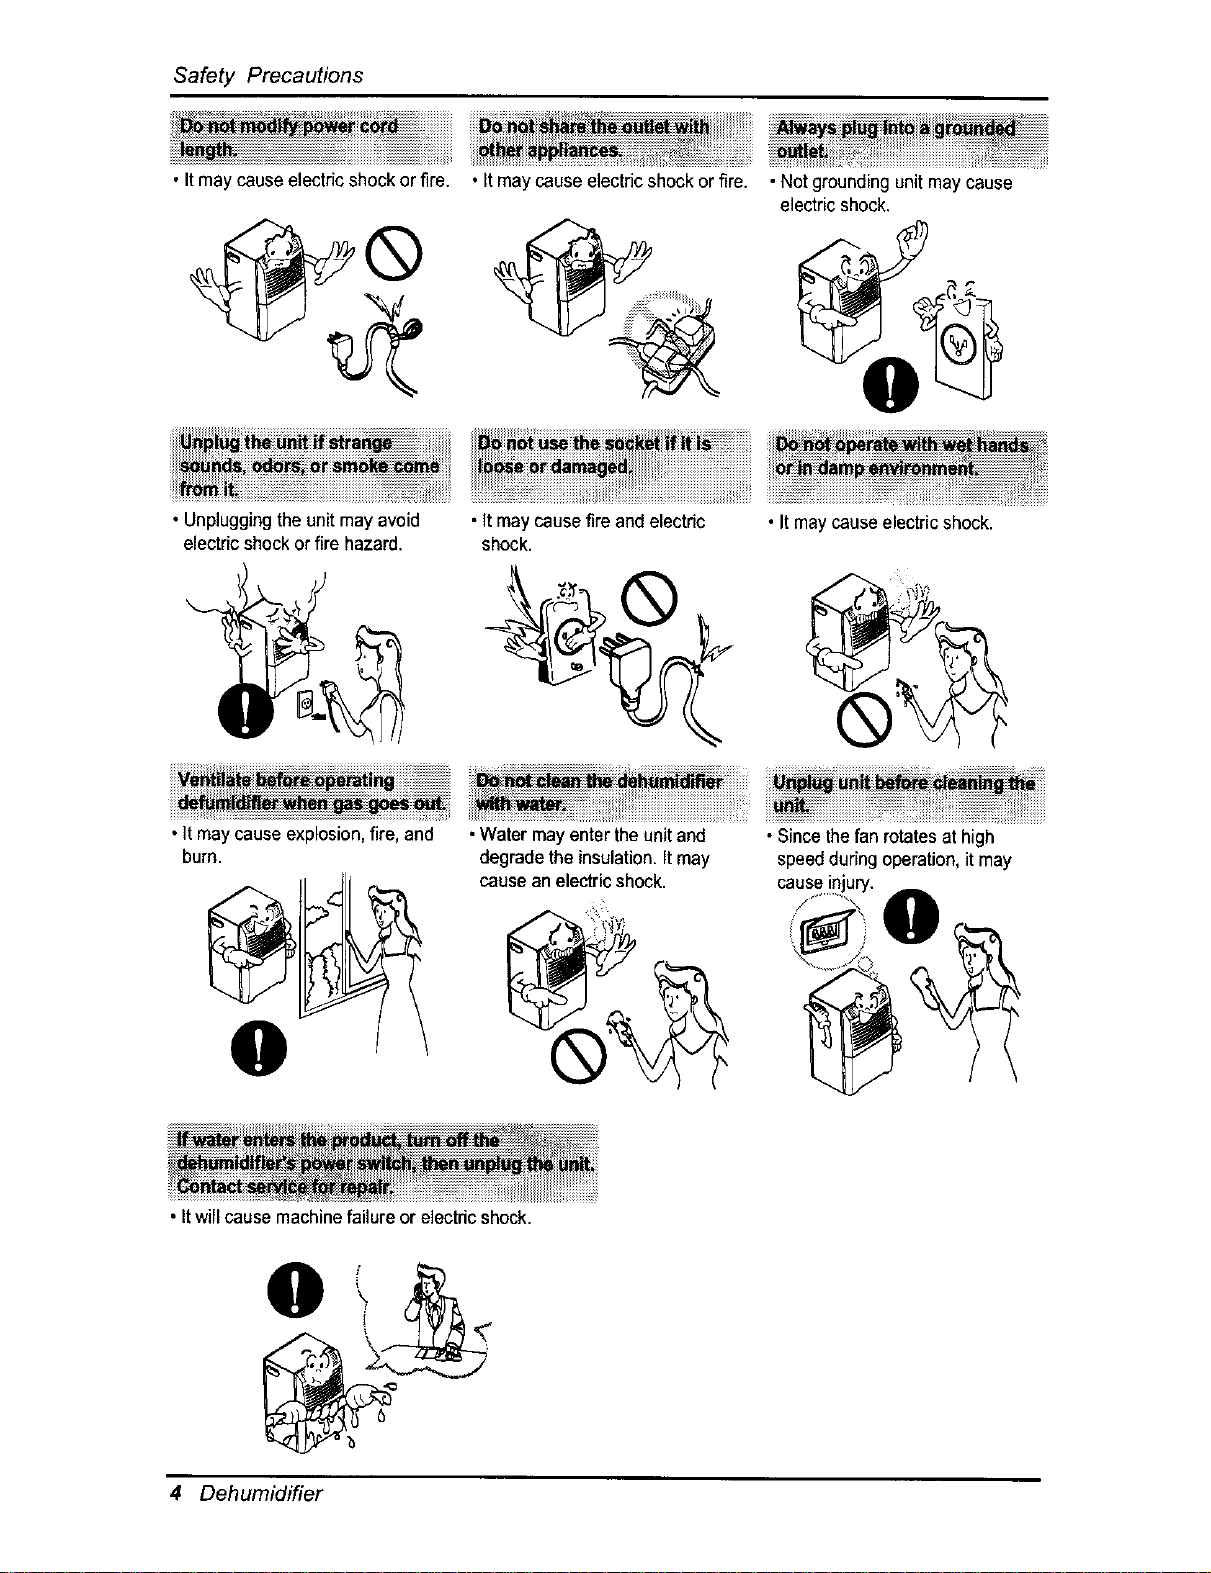
Safety Precautions
• Itmay cause electricshockor fire. • It may cause electricshock or fire• • Not groundingunit maycause
• Unpluggingthe unitmay avoid
electric shockor fire hazard•
electric shock.
• Itmay causefire and electdc •It maycause electricshock•
shock•
•It may cause explosion,fire, and
burn.
•Water mayenter theunit and
degrade the insulation•It may
cause an electricshock.
• Itwill cause machinefailureor electdcshock•
• Sincethefan rotatesat high
speedduring operation,it may
4 Dehumidifier
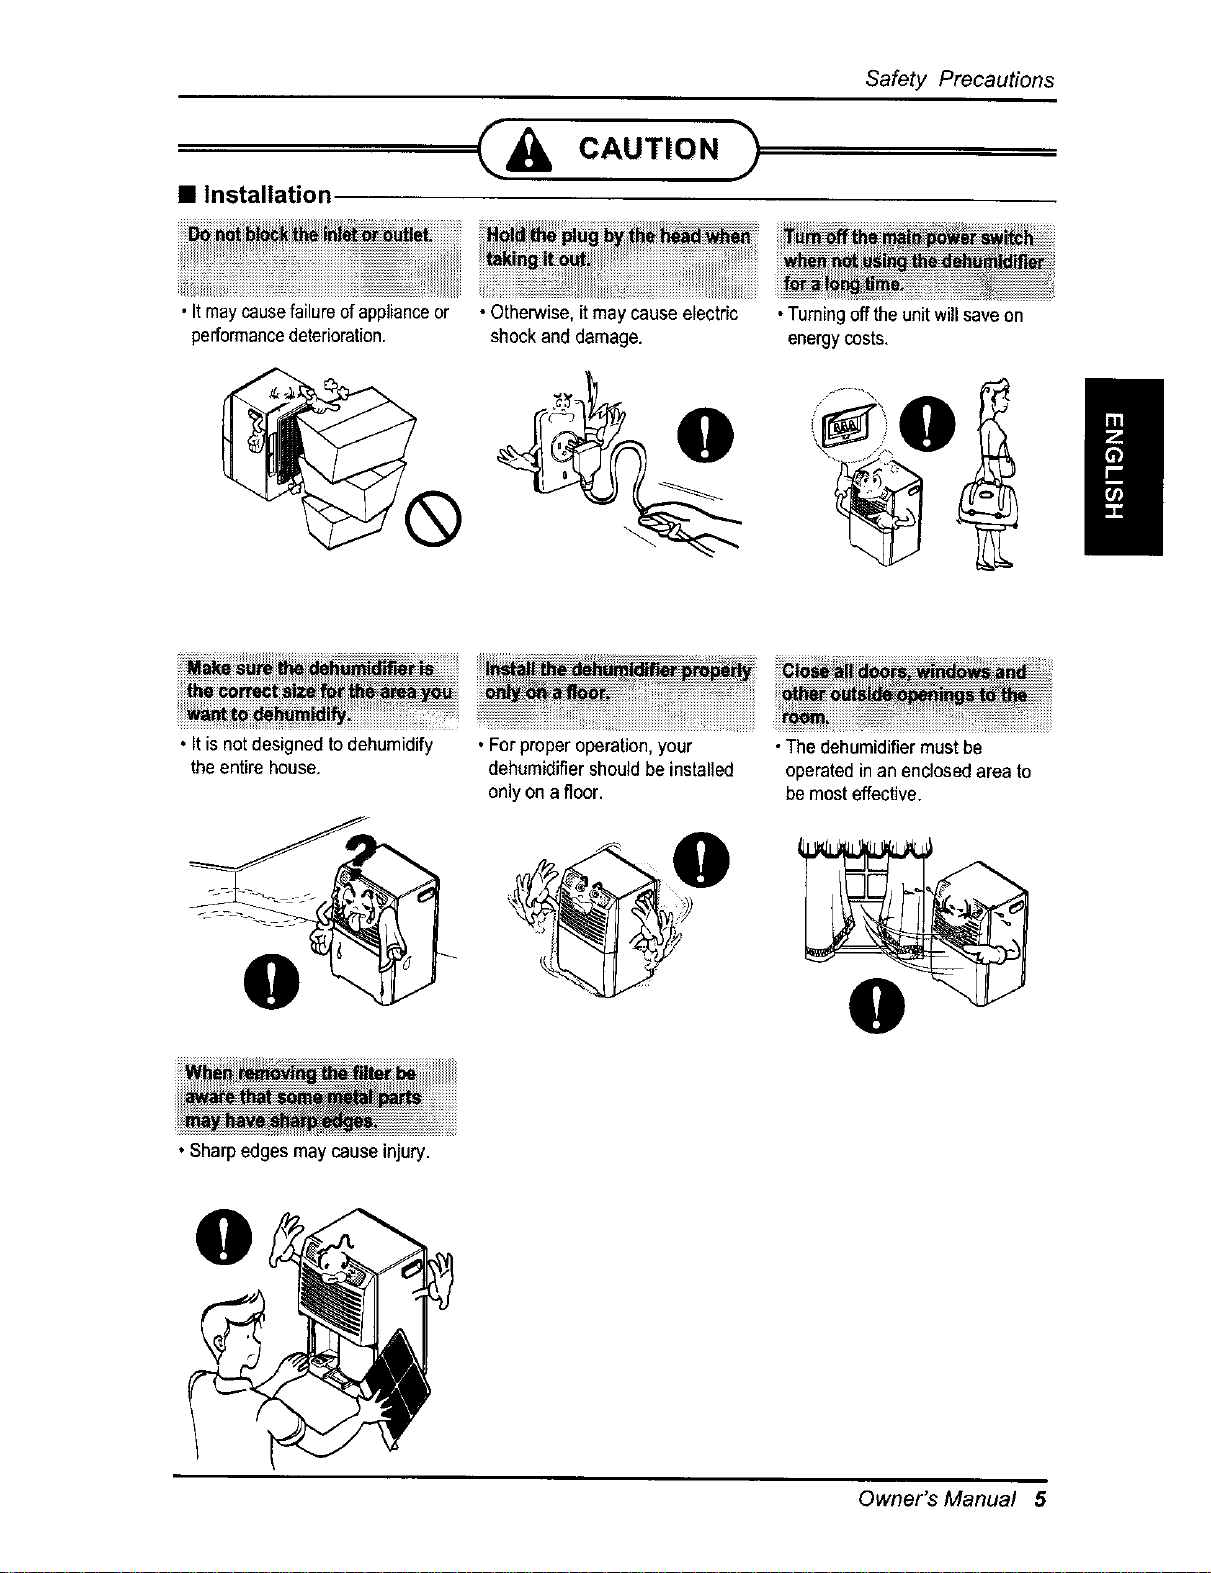
Safety Precautions
• Installation
• Itmaycausefailureof applianceor
performancedeterioration.
• Otherwise,it may cause electric
shockand damage.
iiiii@ii i! iiiiiiiiiiiiiiiiiiiiiiiiiiiiiiiiiiiiiiiiiiiiiiii iiiiiiiiiiiiiiiiiiiiiiiiiiiiii i
•Turningoff the unitwill saveon
energycosts,
i
_i_i_i_i_i_! ....................................................._ii_!_ _i_iiiiiiiiiiiiiiiiiiiiiiiiiii_!!ii%_ii_i_i_ii%_%_i_i_i_i_i_i_i_iii!_i%%i_iiiiiiiiiiiiiiiiii_ii_i_i_i_i_i_i_i_i_i_i_i_i_i_i_i_i_i_i_i_i_i_i_i_i_i_i_i_i_i_i_i_i_i_i_i_i_i_i_i_i_i_!_ii_i_!_iiii_iJ!iiiiJiJJJiJii_JJJJ!i_i_i_i
• Itis not designedtodehumidify °Forproper operation,your •The dehumidifiermustbe
theentire house, dehumidifiershouldbe installed operatedin an enclosedarea to
onlyon afloor, be mosteffective.
• Sharpedgesmay cause injury.
Owner's Manual 5
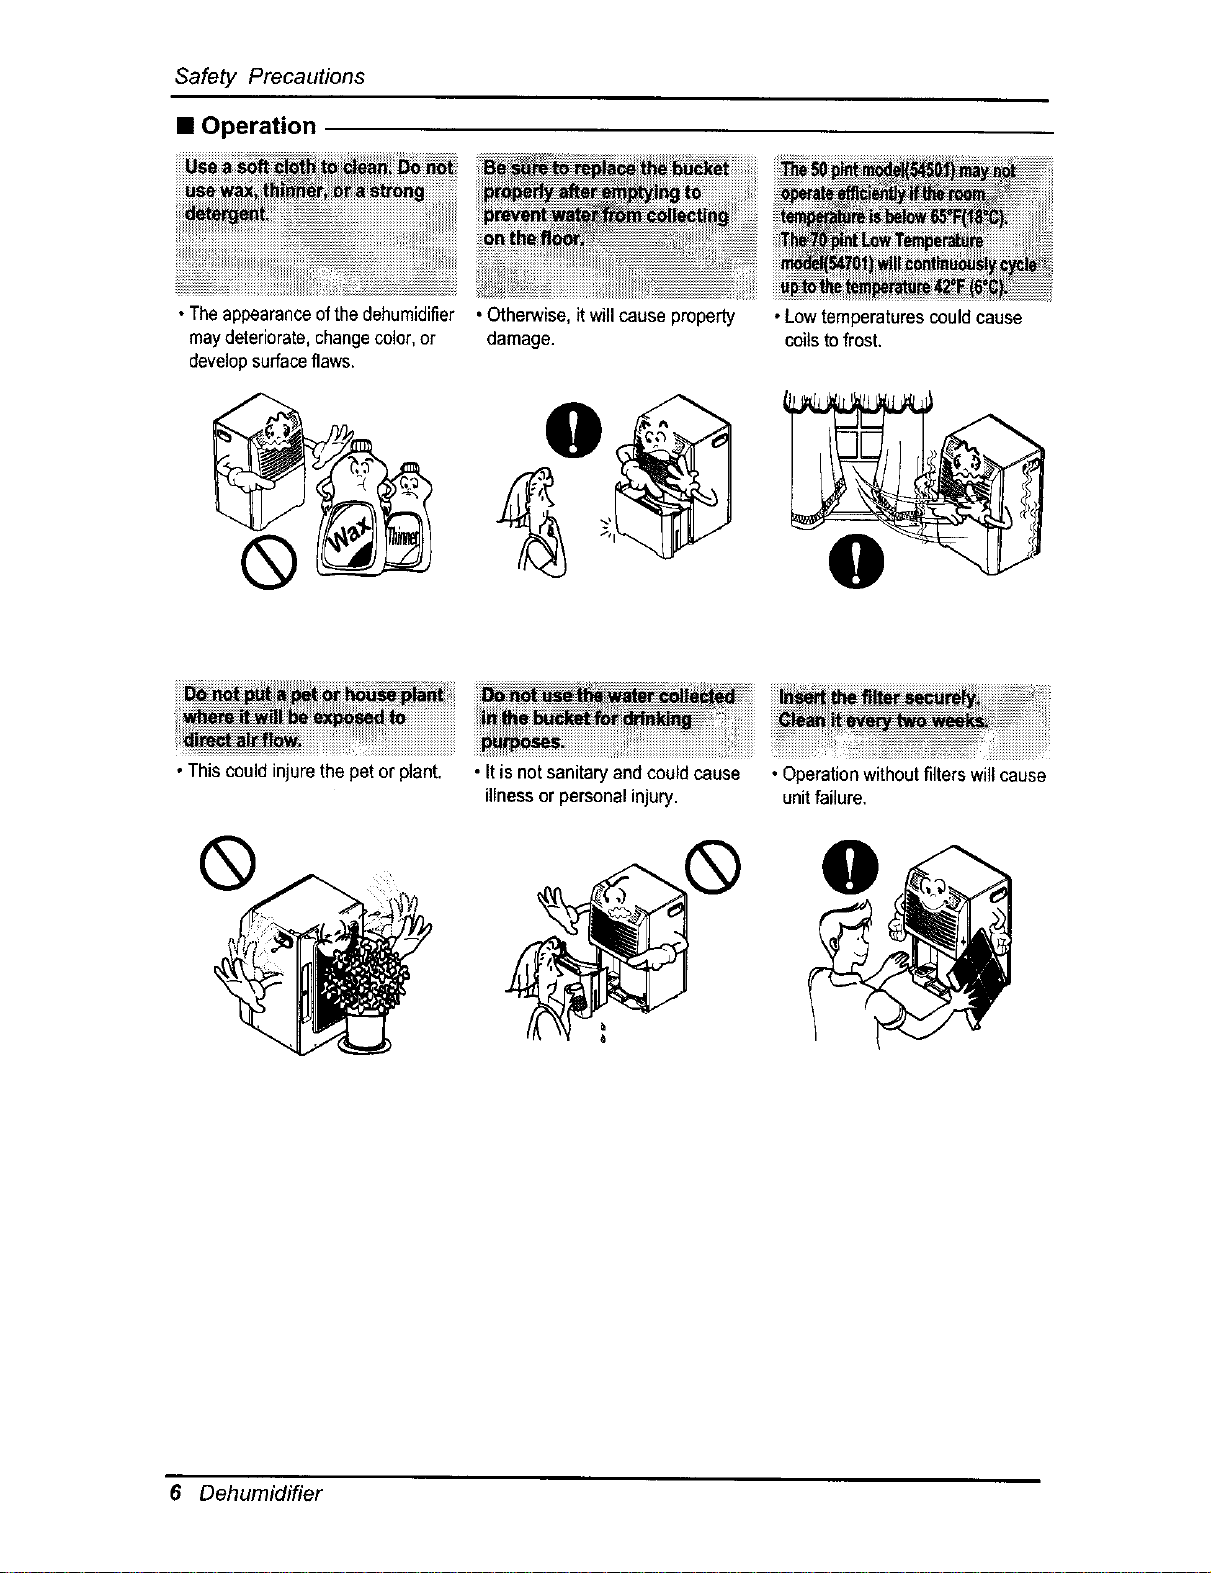
Safety Precautions
• Operation
•Theappearanceofthedehumidifier
maydeteriorate,changecolor,or
developsurfaceflaws,
®
• Otherwise, itwillcause property
damage.
•Lowtemperaturescouldcause
coilsto frost,
0
iii,.vl',e_ii_i_U_ii_!_i_iiiiiiiiiiiiiiiii
•This could injurethe pet or plant.
®
iiiii_iiiiiiiiiiiiiiiiiiiiiiiiiiiiiiiiiiiii_iii_H_i!!i_i_iiiiiiiiiiiiiiiiiiiiiiiiiiiiiiiiiiiiiiiiiiiiiiiiiiiiiiiiii_iii_i_i_iiiiiiiiii_i_iiii_iiiiiiii!!!_!!_ii!iiiiiiiiiiiiiiiiiiiiiiiiiiii!iiiiiiiiiiiii_!_i_i_iiiiiiiiiiiiii!i!!!
• Itis not sanitaryand couldcause • Operationwithoutfilterswill cause
illness or personalinjury, unitfailure.
0
6 Dehumidifier
Priorto Operation
PREPARING FOR OPERATION
1. Plug the power cord in properly to a standard 3-slot grounding wall power outlet.
2. Do not plug any other appliance into the same wall receptacle as this unit.
3. Do not use an extension cord.
4. Do not start/stop operation by plugging/unplugging the power cord.
5. If the cord/plug is damaged, only replace it with an authorized replacement part.
USAGE
1. Being exposed to direct airflow for an extended period of time could be hazardous to your
health. Do not expose occupants, pets, or plants to direct airflow for extended periods of time.
2. Ventilate the room when the dehumidifier is used with other heating devices.
Otherwise the oxygen supply may be inadequate.
3. Do not use this dehumidifier for non-specified special purposes (e.g. preserving precision
devices, food, pets, plants, and art objects). Such usage could damage the items.
CLEANING AND MAINTENANCE
CAUTION:
1. Do not touch the metal parts of the unit when removing the filter. Injuries can occur when
handling sharp metal edges.
2. Do not use water to clean inside the dehumidifier. Exposure to water can destroy the
insulation, leading to possible electric shock.
3. When cleaning the unit, first make sure that the power and breaker are turned off. The fan
rotates at a very high speed during operation. There is a possibility of injury if the unit's
power is accidently turned on while the interior of the unit is being cleaned.
SERVICE
For repair and maintenance, contact your Sears Parts & Repair Center.
Owner's Manual 7
Instruction
SYMBOLS USED IN THIS MANUAL
This symbol alerts you to the risk of electric shock.
This symbol alerts you to the possibility of personal injury or
property damage.
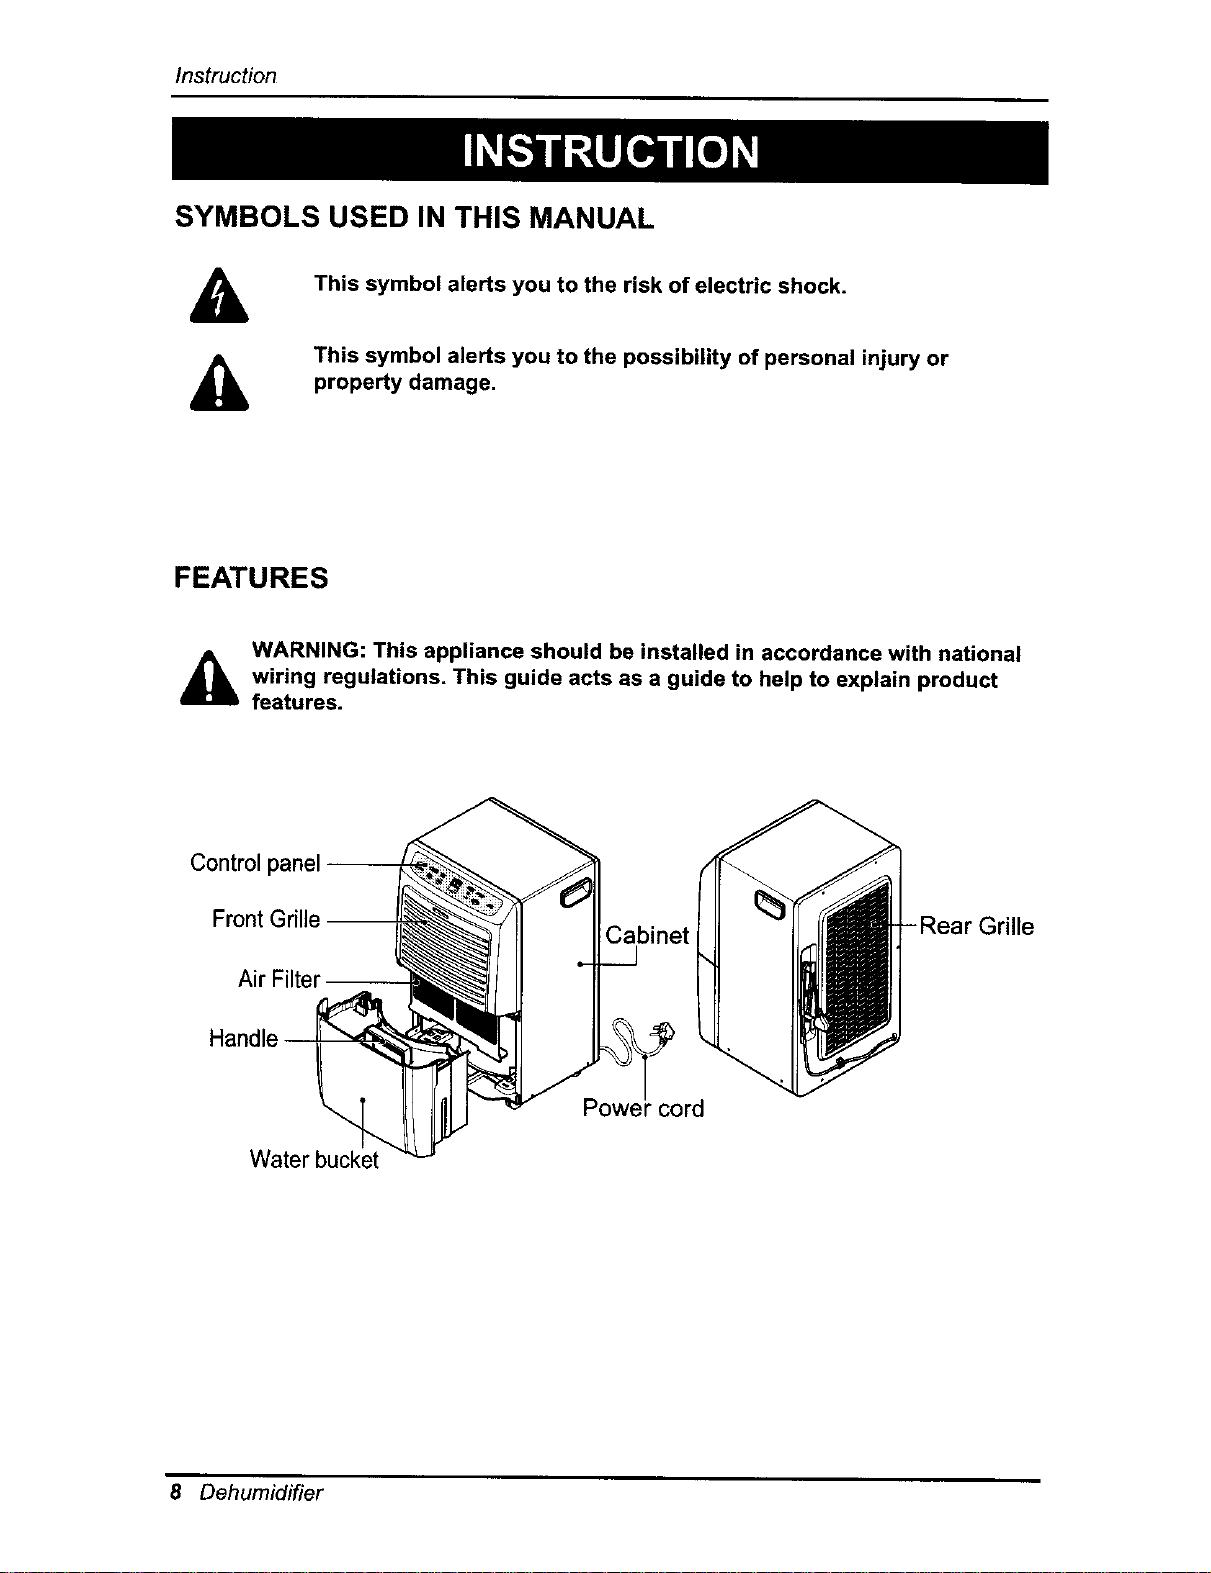
FEATURES
d_k WARNING: This appliance should be installed in accordance with national
wiring regulations, This guide acts as a guide to help to explain product
features.
Control
Front Grille
Air Filter
Water bucket
Cabinet Rear Grille
Powei" cord
8 Dehumidifier
ElectricalSafety
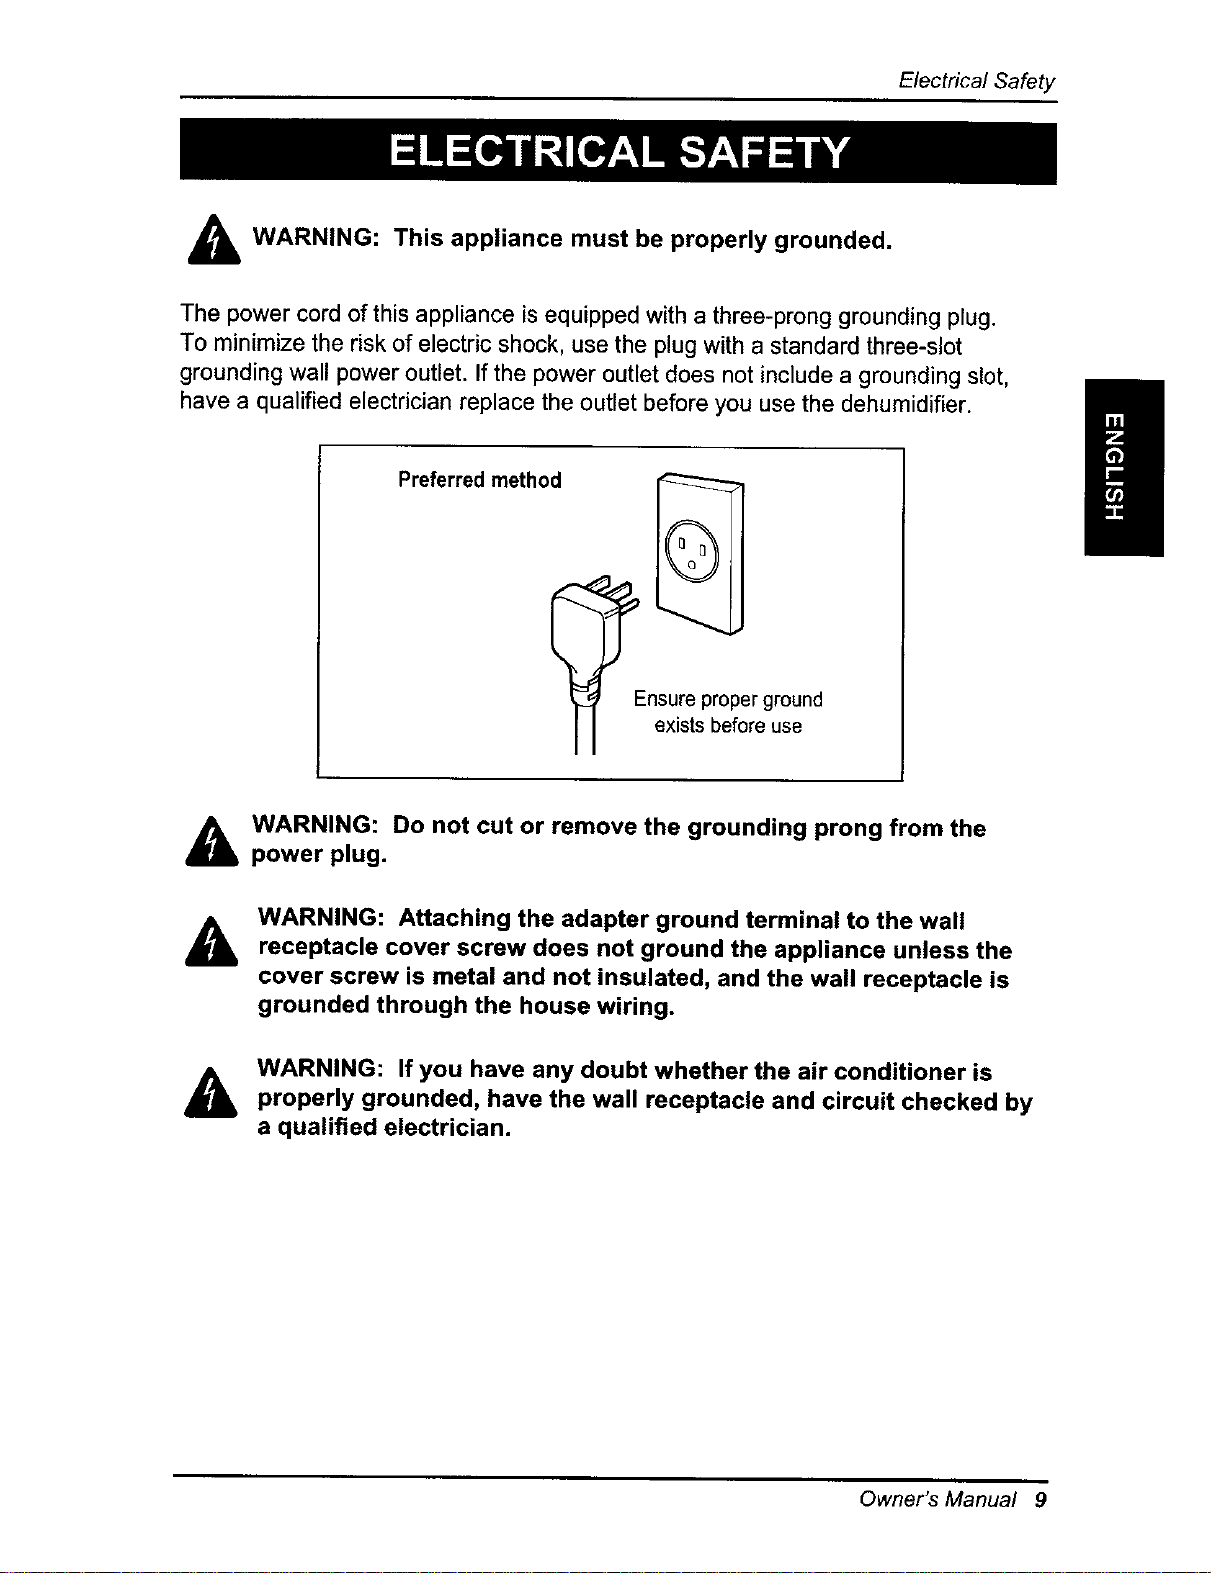
WARNING: This appliance must be properly grounded.
The power cord of this appliance is equipped with a three-prong grounding plug.
To minimize the risk of electric shock, use the plug with a standard three-slot
grounding wall power outlet. If the power outlet does not include a grounding slot,
have a qualified electrician replace the outlet before you use the dehumidifier.
Preferred method
-nsure proper ground
exists before use
WARNING: Do not cut or remove the grounding prong from the
power plug.
&
WARNING: Attaching the adapter ground terminal to the wall
receptacle cover screw does not ground the appliance unless the
cover screw is metal and not insulated, and the wall receptacle is
grounded through the house wiring.
WARNING: If you have any doubt whether the air conditioner is
properly grounded, have the wall receptacle and circuit checked by
a qualified electrician.
Owner's Manual 9
Electrical Safety
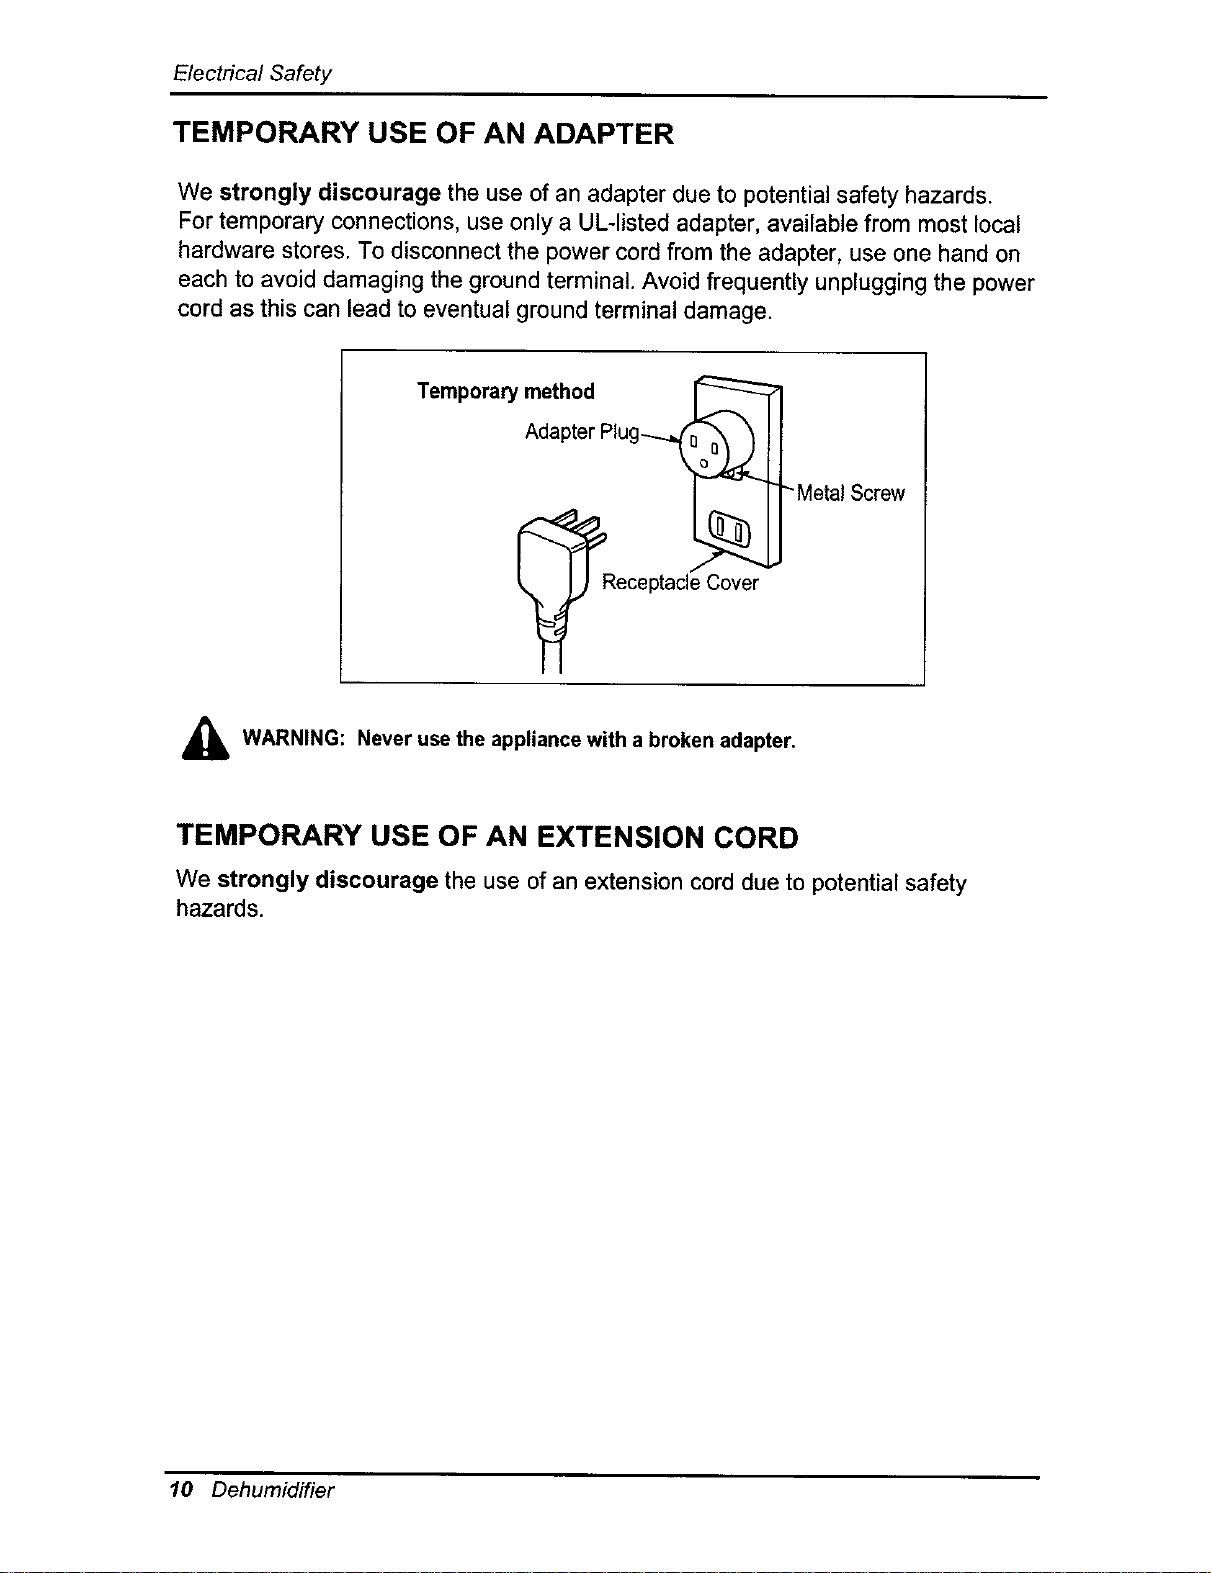
TEMPORARY USE OF AN ADAPTER
We strongly discourage the use of an adapter due to potential safety hazards.
For temporary connections, use only a UL-listed adapter, available from most local
hardware stores. To disconnect the power cord from the adapter, use one hand on
each to avoid damaging the ground terminal. Avoid frequently unplugging the power
cord as this can lead to eventual ground terminal damage.
Temporary method
,_ WARNING: Never use the appliance with a broken adapter.
TEMPORARY USE OF AN EXTENSION CORD
We strongly discourage the use of an extensioncorddue to potentialsafety
hazards.
10 Dehumidifier
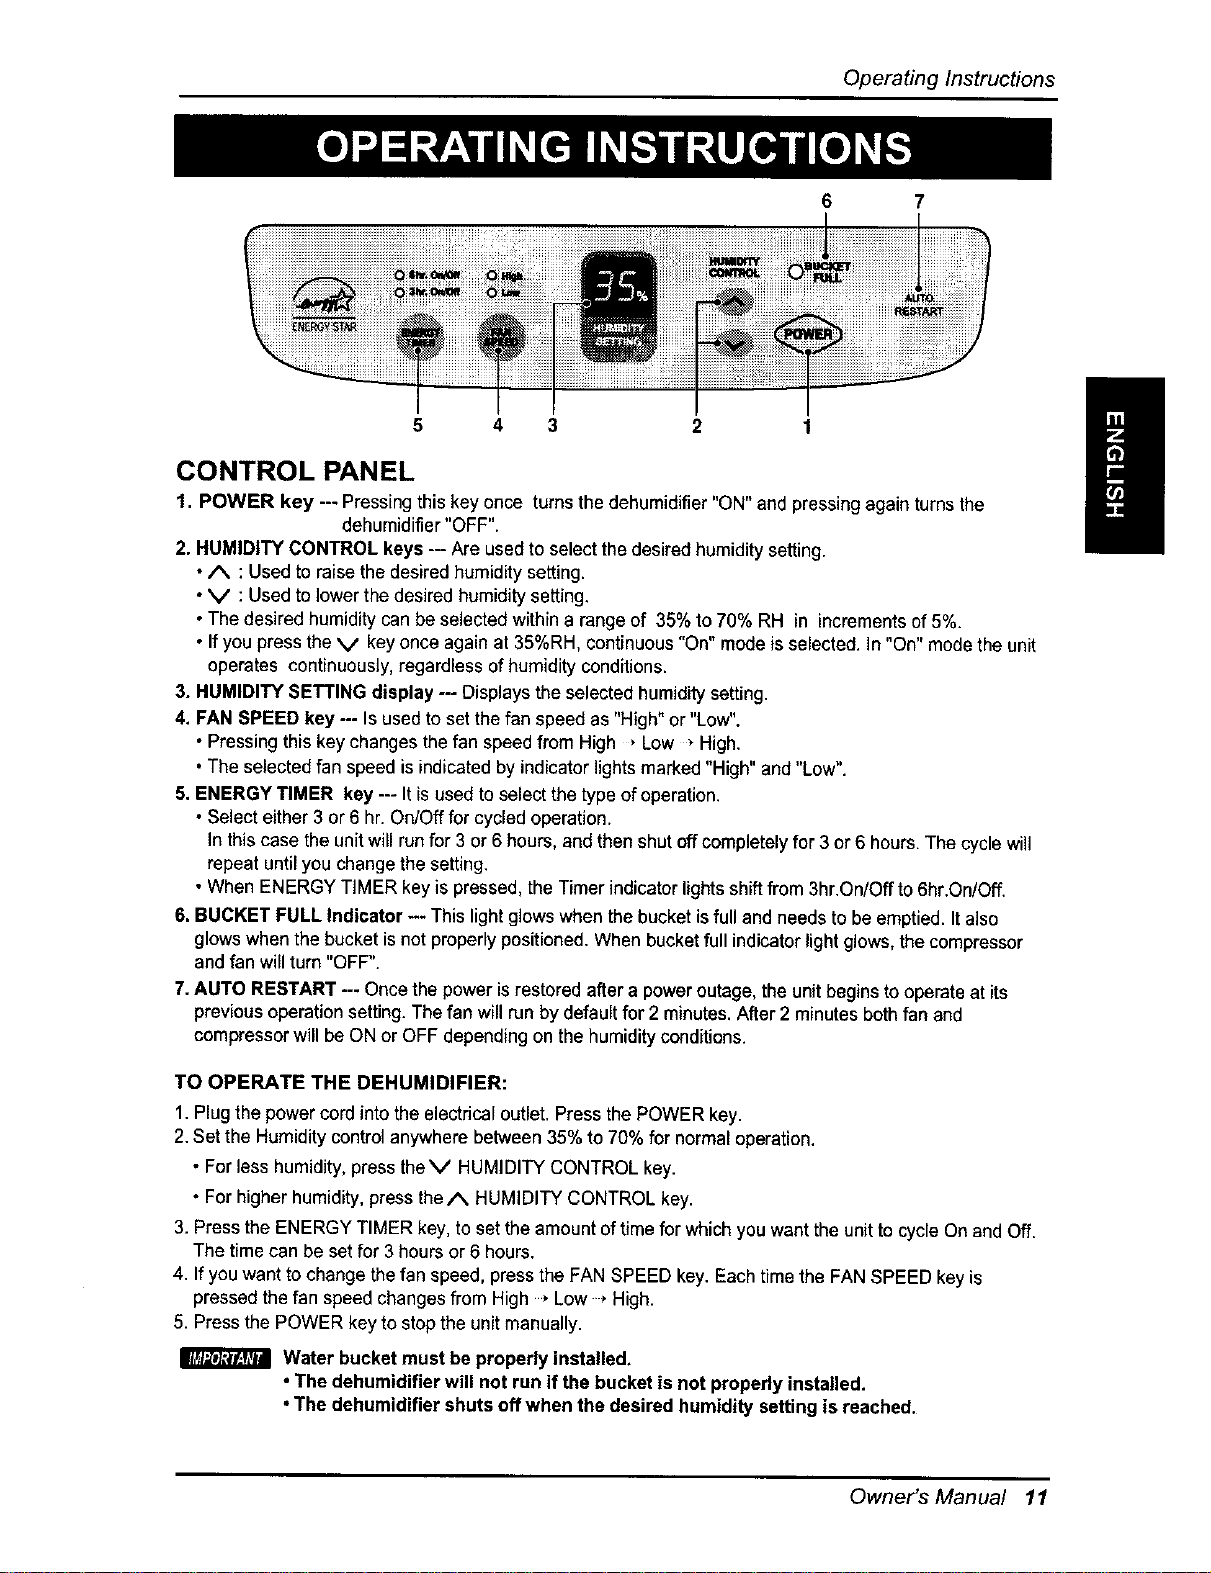
OperatingInstructions
6 7
5 4 3
CONTROL PANEL
1. POWER key --- Pressing this key once turns the dehumidifier "ON" and pressing again turns the
dehumidifier "OFF".
2. HUMIDITY CONTROL keys -- Are used to select the desired humidity setting.
•/k : Usedto raise the desired humidity setting.
•V : Usedto lowerthe desired humidity setting.
•The desired humidity can be selected within a range of 35% to 70% RH in increments of 5%.
• Ifyou press the V key once again at 35%RH, continuous "On" mode isselected. In"On" modethe unit
operates confinuously, regardless of humidity conditions.
3. HUMIDITY SETTING display --- Displays the selected humiditysetting.
4. FAN SPEED key --- Is usedto set the fan speed as "High" or "Low".
• Pressingthis key changes the fan speed from High , Low • High.
•The selected fan speed is indicated by indicator lights marked "High" and"Low".
5. ENERGY TIMER key --- Itisused to select the type of operation.
• Select either 3 or6 hr. On/Offfor cycled operation.
Inthis case the unitwill run for 3 or6 hours, and then shut off completely for 3 or 6 hours. The cyclewill
repeat untilyou changethe setting.
• When ENERGY TIMER keyis pressed, the Timer indicator lights shift from 3hr.On/Off to 6hr.On/Off.
6. BUCKET FULL Indicator -- This light glows when the bucket isfull and needs to be emptied. Italso
glows when the bucket is not properly positioned. When bucketfull indicator light glows, the compressor
and fan will turn "OFF".
7.AUTO RESTART -- Oncethe power is restored after a power outage,the unitbegins tooperate at its
previousoperationsetting.The fan willrun bydefaultfor 2 minutes,After 2 minutes both fan and
compressorwillbeON or OFF depending on the humidity conditions.
TO OPERATE THE DEHUMIDIFIER:
1. Plug the powercord intothe electrical outlet. Press the POWER key.
2.Set the Humidity control anywhere between 35% to 70% for normal operation.
• For less humidity,press theV HUMIDITY CONTROL key.
• For higher humidity,press the/% HUMIDITY CONTROL key.
3. Press the ENERGY TIMER key, to set the amount oftime for which you want the unit tocycle On and Off.
The time can be set for 3 hours or 6 hours.
4. If youwant to change thefan speed, press the FAN SPEED key. Each time the FAN SPEED key is
pressed the fan speed changes from High Low * High.
5. Press the POWER key to stop the unit manually.
Water bucket must beproperly installed,
• The dehumidifier will not run if the bucket is not properly installed.
•The dehumidifier shuts offwhen the desired humidity setting is reached.
Owner's Manual 11
Operating Instructions
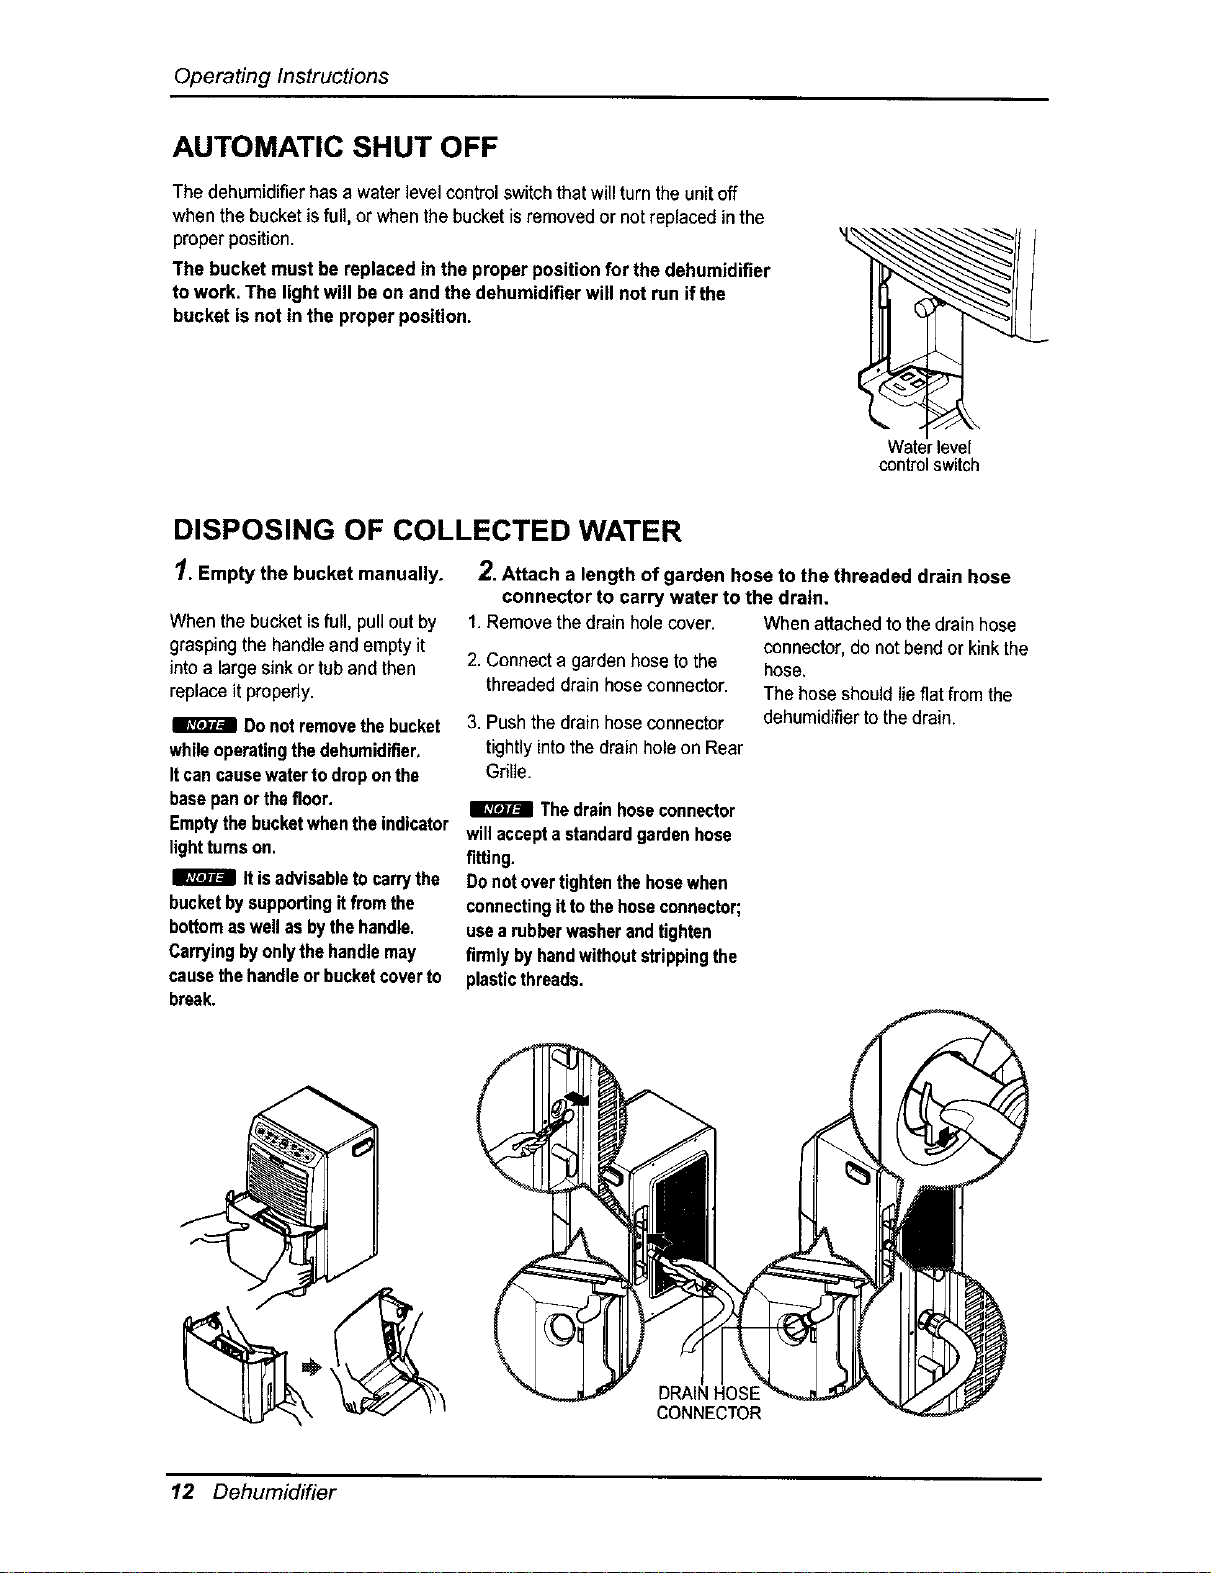
AUTOMATIC SHUT OFF
The dehumidifierhas a waterlevelcontrol switchthat willturntheunitoff
whenthe bucket isfull, or whenthe bucketis removedor notreplacedin the
proper position.
The bucket must be replacedin the properpositionfor the dehumidifier
towork. The lightwill be on and thedehumidifierwill not run ifthe
bucket is not in the properposition.
Waterlevel
controlswitch
DISPOSING OF COLLECTED WATER
1. Empty the bucket manually.
When the bucketisfull, pullout by
graspingthe handleand empty it
into a largesink or tub and then
replace it properly.
Donotremovethebucket
whileoperatingthedehumidifier.
Itcancausewatertodroponthe
basepanorthefloor.
Emptythebucketwhentheindicator
lighttumson.
Itisadvisabletocarrythe
bucketbysupportingitfrom the
bottomaswellasbythehandle.
Carryingbyonlythehandlemay
causethehandleor bucketcoverto
break.
2.Attach a length of garden hose to the threaded drain hose
connector to carry water to the drain.
1.Removethedrain holecover. Whenattachedtothe drain hose
2. Connecta garden hoseto the
threadeddrainhoseconnector.
3. Pushthe drain hoseconnector
tightlyintothe drain hole on Rear
Gdlle.
connector, do notbend or kinkthe
hose.
The hoseshouldlie flat from the
dehumidifierto thedrain.
Thedrainhoseconnector
willaccepta standardgardenhose
fitting.
Donot overtightenthehosewhen
connectingittothehoseconnector;
usea rubberwasherandtighten
firmlybyhandwithoutstrippingthe
plasticthreads.
DRAIN HOSE
CONNECTOR
12 Dehumidifier
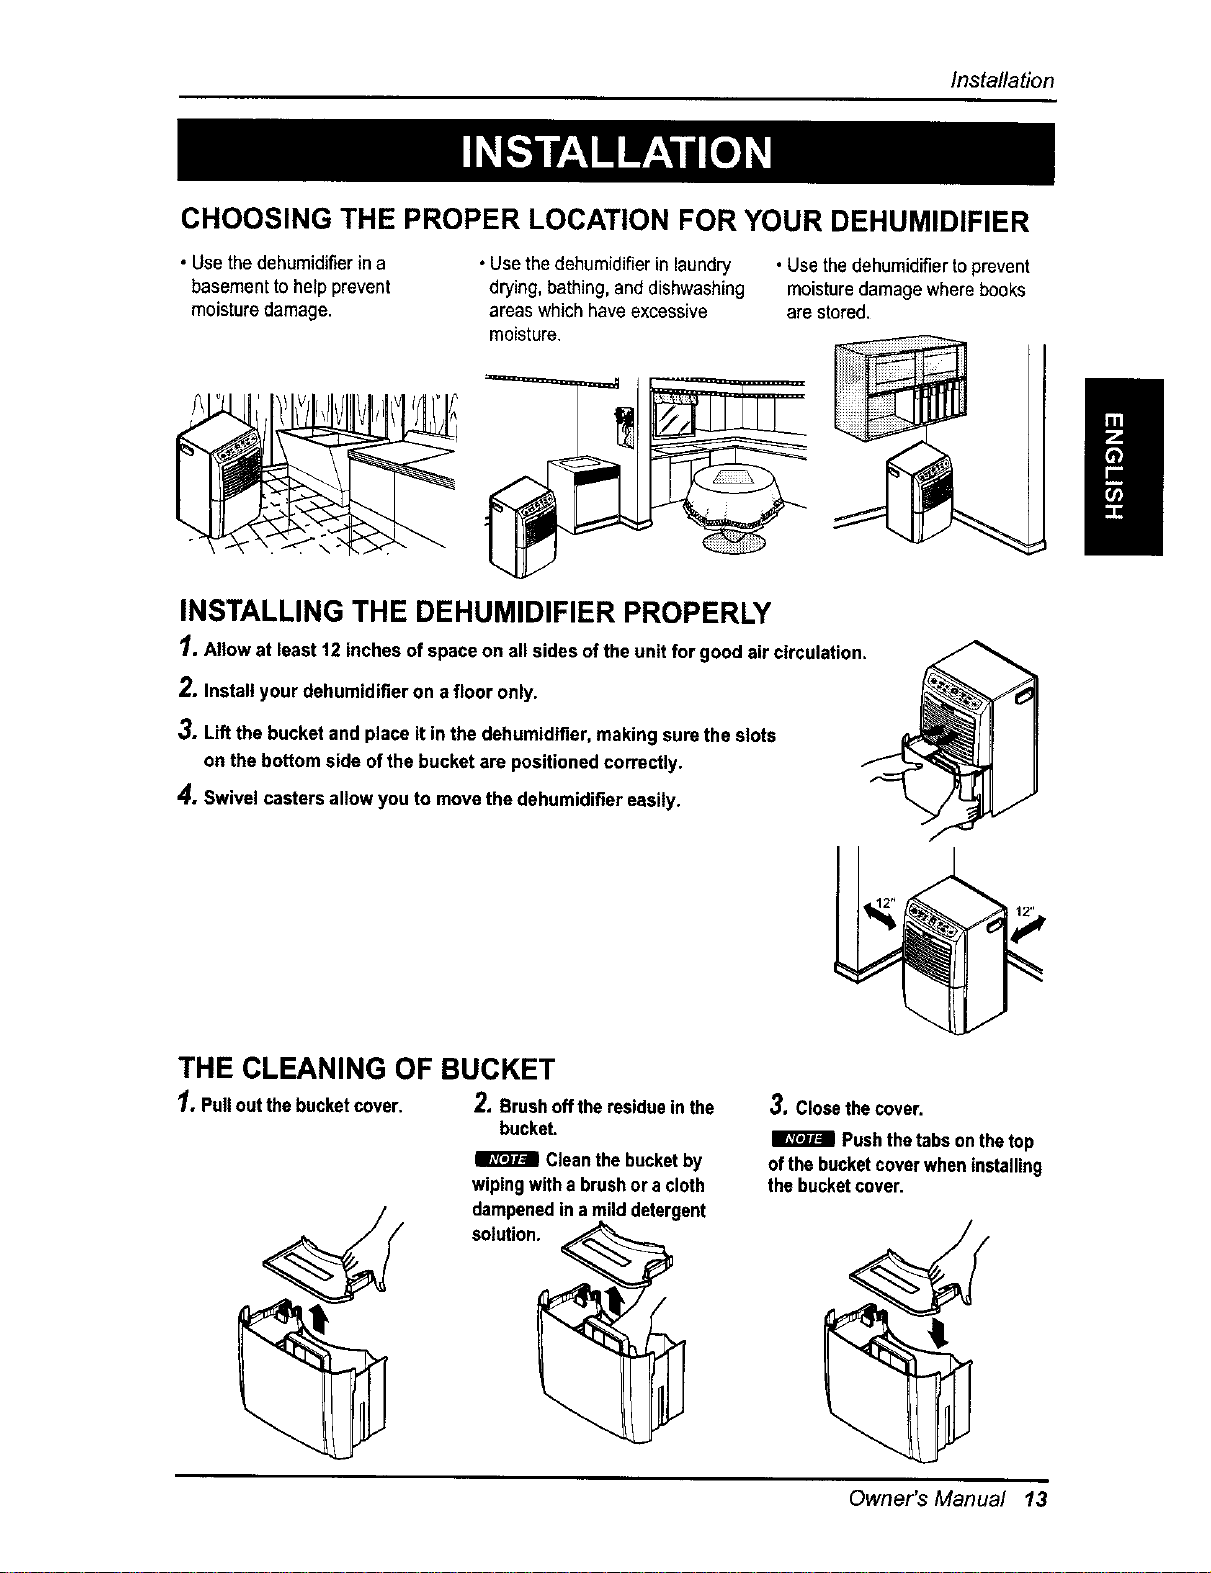
Installation
CHOOSING THE PROPER LOCATION FOR YOUR DEHUMIDIFIER
• Usethe dehumidifierin a
basementtohelp prevent
moisturedamage.
• Usethe dehumidifierinlaundry
drying, bathing, and dishwashing
areaswhich haveexcessive
moisture.
• Use thedehumidifiertoprevent
moisturedamagewhere books
are stored.
INSTALLING THE DEHUMIDIFIER PROPERLY
1. Allow at least12 inchesofspaceon all sides ofthe unitfor good air circulation.
2. Installyour dehumidifieron a floor only.
3. Liftthe bucket and place it in thedehumidifier,makingsurethe slots
on the bottomside ofthe bucketare positionedcorrectly.
4. Swivel castersallowyou to movethe dehumidifiereasily.
THE CLEANING OF BUCKET
1,Pulloutthebucketcover. 2.Brushoffthe residueinthe 3.Closethecover,
bucket.
Cleanthebucketby
wipingwitha brushora cloth
__ _;Imut_;_edin amilddeterge_ nt _
I_1 Pushthetabsonthetop
ofthebucketcoverwheninstalling
thebucketcover,
Owner's Manual 13
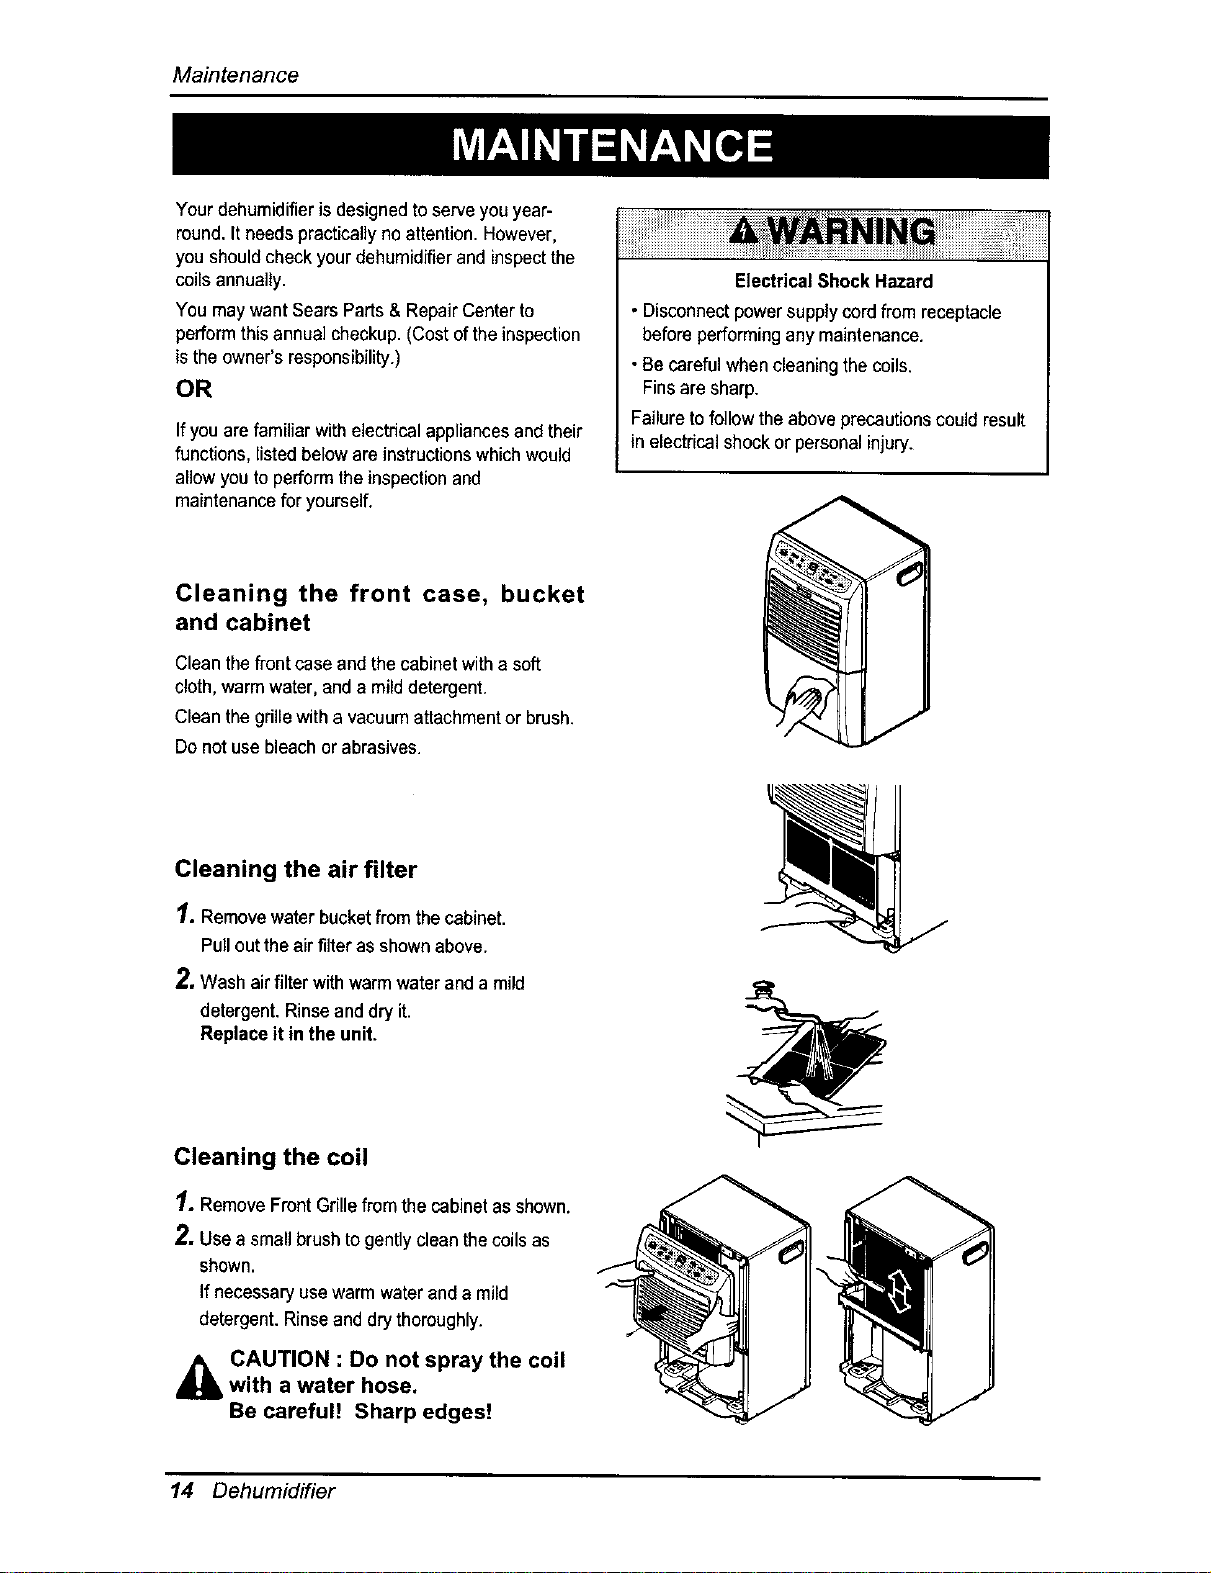
Maintenance
Your dehumidifier is designedto serveyou year-
round.It needs pracficaflyno attention. However,
you shouldcheck yourdehumidifier and inspectthe
coils annually.
You maywantSearsParts& RepairCenterto
perform this annual checkup. (Costof theinspection
is the owner's responsibility.)
OR
If youare familiar withelectricalappliancesand their
functions, listedbelow are instructionswhich would
allow youto perform theinspection and
maintenancefor yourself.
Electrical Shock Hazard
• Disconnectpowersupplycordfrom receptacle
beforeperformingany maintenance.
• Becarefulwhen cleaningthecoils.
Finsare sharp.
Failureto follow theabove precautionscould result
in electricalshock or personalinjury.
Cleaning the front case, bucket
and cabinet
Cleanthe front case and the cabinetwith a soft
cloth,warm water, anda milddetergent.
Cleanthe grillewith a vacuum attachmentor brush.
Do notuse bleachor abrasives.
Cleaning the air filter
1. Removewaterbucketfrom the cabinet.
Pull outthe air filter as shown above.
2, Wash airfilter with warm water anda mild
detergent.Rinse anddry it.
Replaceit in the unit.
Cleaning the coil
1, RemoveFront Grillefrom the cabinet asshown.
2. Usea small brushto gently cleanthecoils as
shown.
If necessaryusewarm waterand a mild
detergent. Rinseand dry thoroughly.
CAUTION : Do not spray the coilwith a water hose.
Be careful! Sharp edges!
14 Dehumidifier
Maintenance
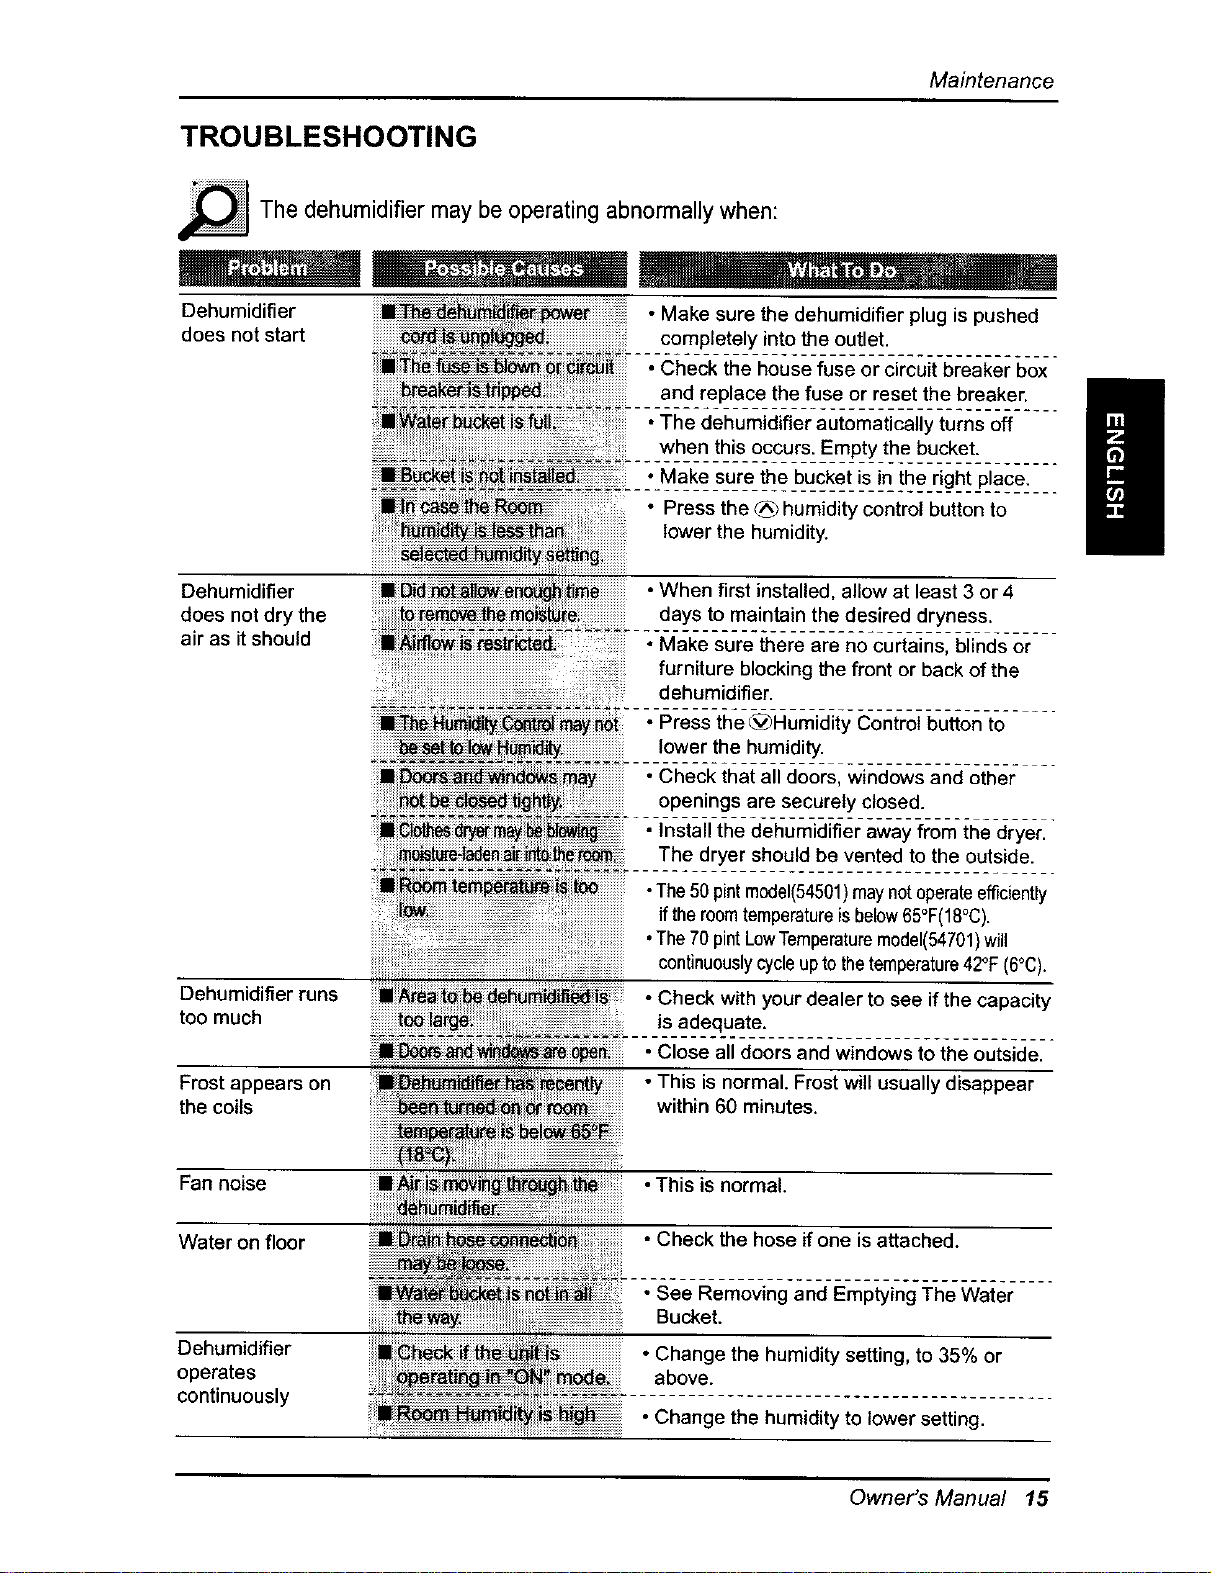
TROUBLESHOOTING
_The may operating abnormally
dehumidifier
be when:
Dehumidifier • Make sure the dehumidifier plug is pushed
does not start completely into the outlet.
• Check the house fuse or circuit breaker box
and replace the fuse or reset the breaker.
•The dehumidifier automatically turns off
when this occurs. Empty the bucket.
• Make sure the bucket is in the right place.
• Press the _ humidity control button to
lower the humidity.
Dehumidifier • When first installed, allow at least 3 or 4
does not dry the days to maintain the desired dryness.
air as it should • Make sure there are no curtains, blinds or
furniture blocking the front or back of the
dehumidifier.
............................................
_'[_i_may_i oPress the _)aumidity Control button to
lower the humidity.
• Check that all doors, windows and other
openings are securely closed.
• Install the dehumidifier away from the dryer.
The dryer should be vented to the outside.
Dehumidifier runs
too much
Frost appears on
the coils
Fan noise
Water on floor
Dehumidifier
operates
continuously
•The50 pintmodel(54501)maynotoperateefficiently
iftheroomtemperatureisbelow65°F(18°C).
•The70 pintLowTemperaturemodel(54701)will
continuouslycycleupto thetemperature42°F(6°C)+
• Check with your dealer to see if the capacity
is adequate.
• Close all doors and windows to the outside.
• This is normal. Frost will usually disappear
within 60 minutes.
•This is normal.
• Check the hose ifone is attached.
• See Removing and Emptying The Water
Bucket.
• Change the humidity setting, to 35% or
above.
• Change the humidity to lower setting.
Owner's Manual 15
Precauciones de seguridad ..................... 17
Antes de la utilizacibn .............................. 21
Instruccibn ................................................. 22
Seguridad el_ctrica ................................... 23
Instrucciones de funcionamiento ............ 25
Instalacibn ................................................. 27
Mantenimiento ........................................... 28
ACUERDOS DE PROTECCIC)N
ESPECIALIZADA ....................................... 31
PARA PEDIR SERVIClO.._.Cubierta Trasera
En su interior encontrar_ muchos consejos Otiles sobre la utilizaci6n y el mantenimiento
adecuado de su deshumidificador. Una simple atenci6n preventiva por su parte puede
ahorrarle mucho tiempo y dinero a Io largo de la vida de su deshumidificador.
Encontrar_ muchas respuestas a los problemas m_s comunes en el cuadro de consejos para
la soluci6n de problemas. Si en primer lugar revisa nuestro cuadro de consejos para la
soluci6n de problemas, es posible que no tenga necesidad de Ilamar al servicio t6cnico.
• Este deshumidificador no estd dise_ado para ser utilizado por ni_os de corta edad sin
supervisi6n.
• Debe vigilarse a los nifios para asegurarse de que no juegan con el deshumidificador.
• Cuando haya que sustituir el cable de alimentacibn, debe realizar el trabajo de
sustitucibn personal autorizado utilizando dnicamente piezas de recambio originales.
UNANO DEGARANT[AENTODASLAS PARTESDELDESHUMIDIFICADOR
Durante un afio a partir de la compra, si el deshumidificador es usado y mantenido de acuerdo con
las instrucciones del usuario adjuntas o suministradas con el aparato, Sears reparar_ el
deshumidificador sin costo alguno si _ste muestra defectos en losmateriales o mano de obra.
ClNCOANOSDE GARANTJACOMPLETAEN ELSISTEMADE
REFRIGERACION
Durante cinco afios a partir de la compra, si el deshumidificador es usado y mantenido de acuerdo
con las instrucciones del usuarioadjuntas o suministradas con el aparato, Sears reparar_ el sistema
de refrigeraci6n sellado (el cual consta de refrigerante, los tubos conectores y el motor compresor) si
_ste muestra defectos en los materiales o mano de obra.
SE OFRECE SERVIClO DE GARANTIA AL REGRESAR LA UNIDAD AL CENTRO DE SERVICIO
SEARS MAS CERCANO EN TODOS LOS ESTADOS UNIDOS. LLAME 1-800-4-MY-HOME® PARA
A M/t.S CERCANO CENTRO DEL SERVICIO A USTED.
Esta garantia s61otiene validez mientras el deshumidificador se este usando en los EstadosUnidos.
Esta garantfa le confiere derechos legales especificos, pero usted podria gozar de otros derechos
que pueden variar de Estado a Estado.
Sears, Roebuck and Co., D/817WA, Hoffman Estates, IL 60179 U.S.A.
16 Deshumidificador
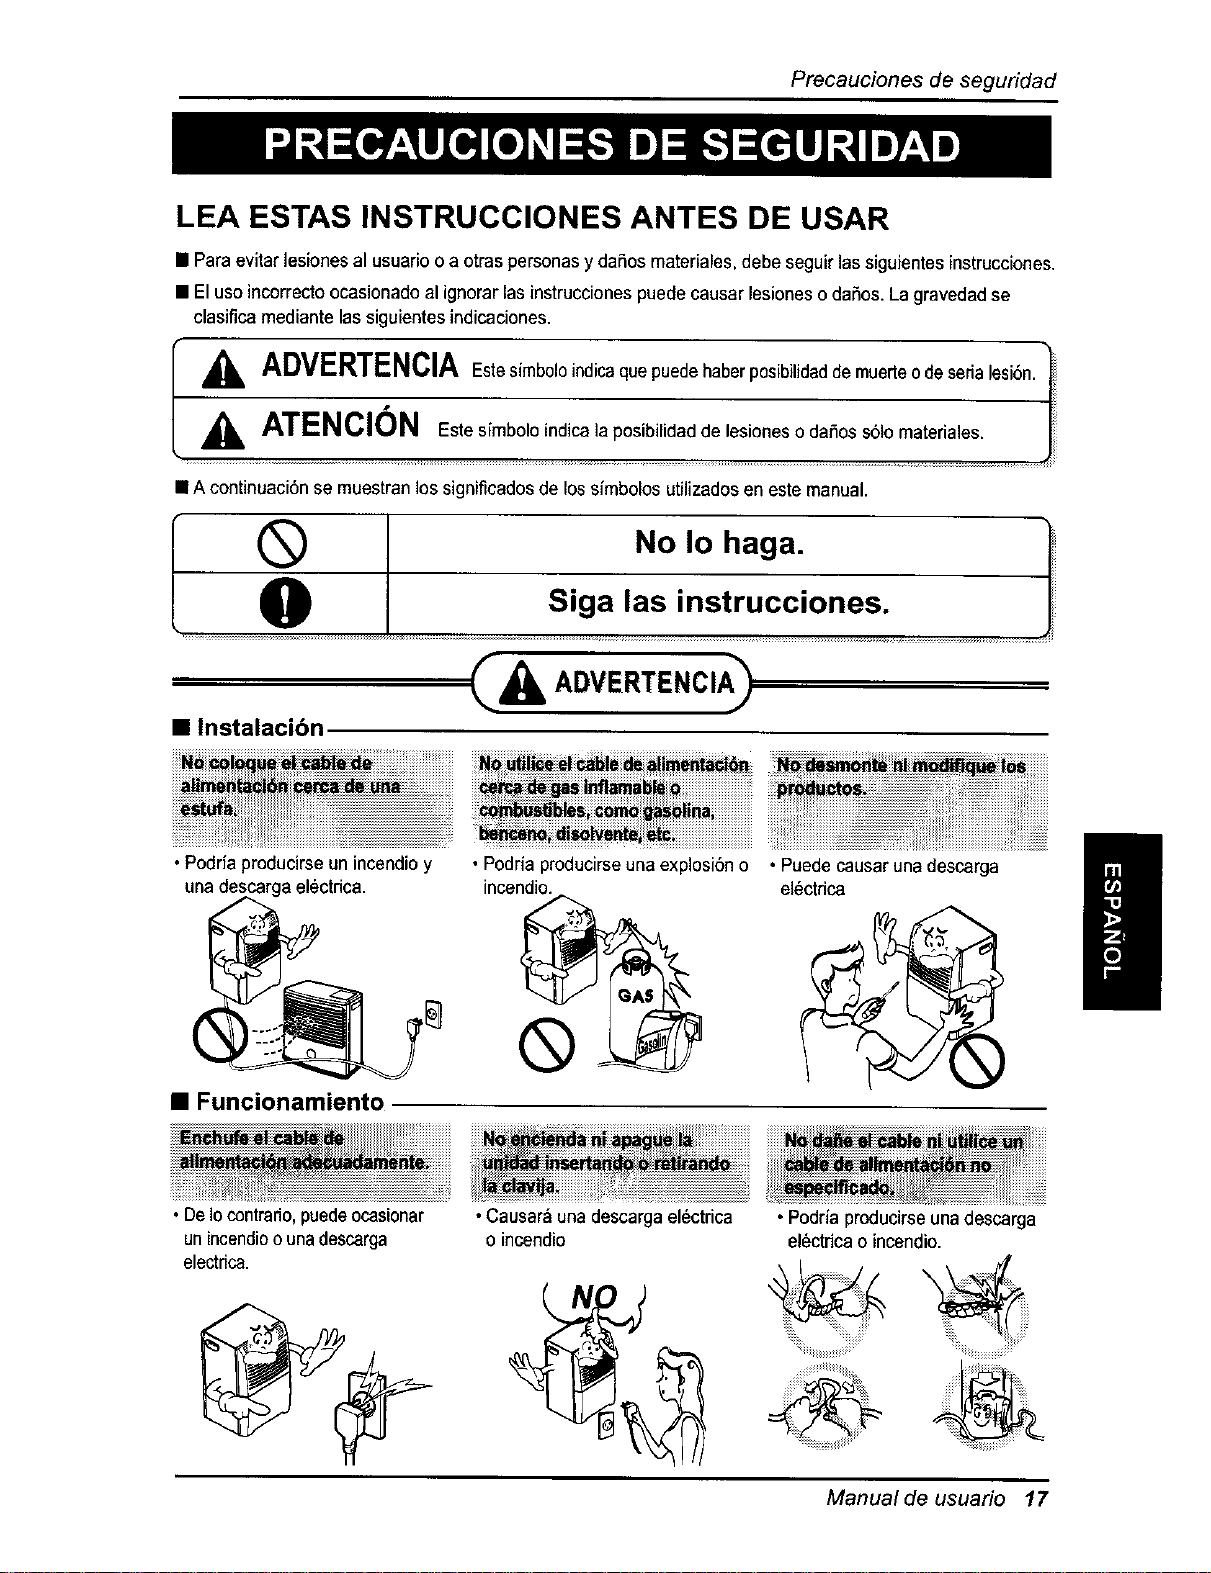
Precaucionesdeseguridad
LEA ESTAS INSTRUCCIONES ANTES DE USAR
• Paraevitar lesiones al usuarioo a otras personasy daSosmateriales,debe seguir lassiguientesinstrucciones.
• Eluseincorrectoocasionado al ignorarlasinstruccionespuede causar lesionesodaSos.Lagravedadse
clasifica mediante lassiguientes indicaciones.
A
ADVERTENCIAEstasimboleindicaquepuedeha_
E"sste_ de lesiones o da!os s61ornateiia!es. I I
A
• A continuaci6nse muestranlos significadosde lossimbolos utilizadosen este manual•
®
0
• Instalacibn
No Io haga. i_
siga, !as instrucci°nes" J
& ADVERT£NCIA>
•Podria producirse un incendioy
una descargael_ctdca.
• Funcionamiento
•Podria producirseuna explosi6n o
incendio.
®
m
• Puedecausar una descarga
el_ctrica
m
_ ,,,,,,__ ................
• De Io contrado, puede ocasionar
un incendio o una descarga
electdca.
• Causar_una descargael_ctrica
o incendio
• Podriaproducirseunadescarga
el_ctricao incendio.
Manual de usuario 17

Precauciones de segufidad
•Causar_ una descargael6ctrica o
incendio.
•Desenchufarla unidad puede
evitar el riesgode descargas
el6ctricaso de incendios.
•Causar_ una descargael6ctrica o
incendio.
| ::: :::: ::::::::::: ::::::.... :::::::::
::::: ::::::
•Podria producirse unadescarga
el6ctricao incendio.
•Si no haytoma de tierra, podrfa
producirseuna descarga
electrica.
• Podriaproducirseuna explosi6n,
incendioy quemaduras.
O
• Elagua podria introducirseen la
unidady degradarel aislamiento.
Podria producirseunadescarga
el6ctrica.
®
• Causarafallo de la maquinao descargaelectrica.
• Puedecausar una descarga
el6ctricao incendio.
•Comoel ventiladorgira a alta
velocidadduranteel
funcionamiento,podrian
producirselesiones.
' 0
' @,
18 Deshumidificador
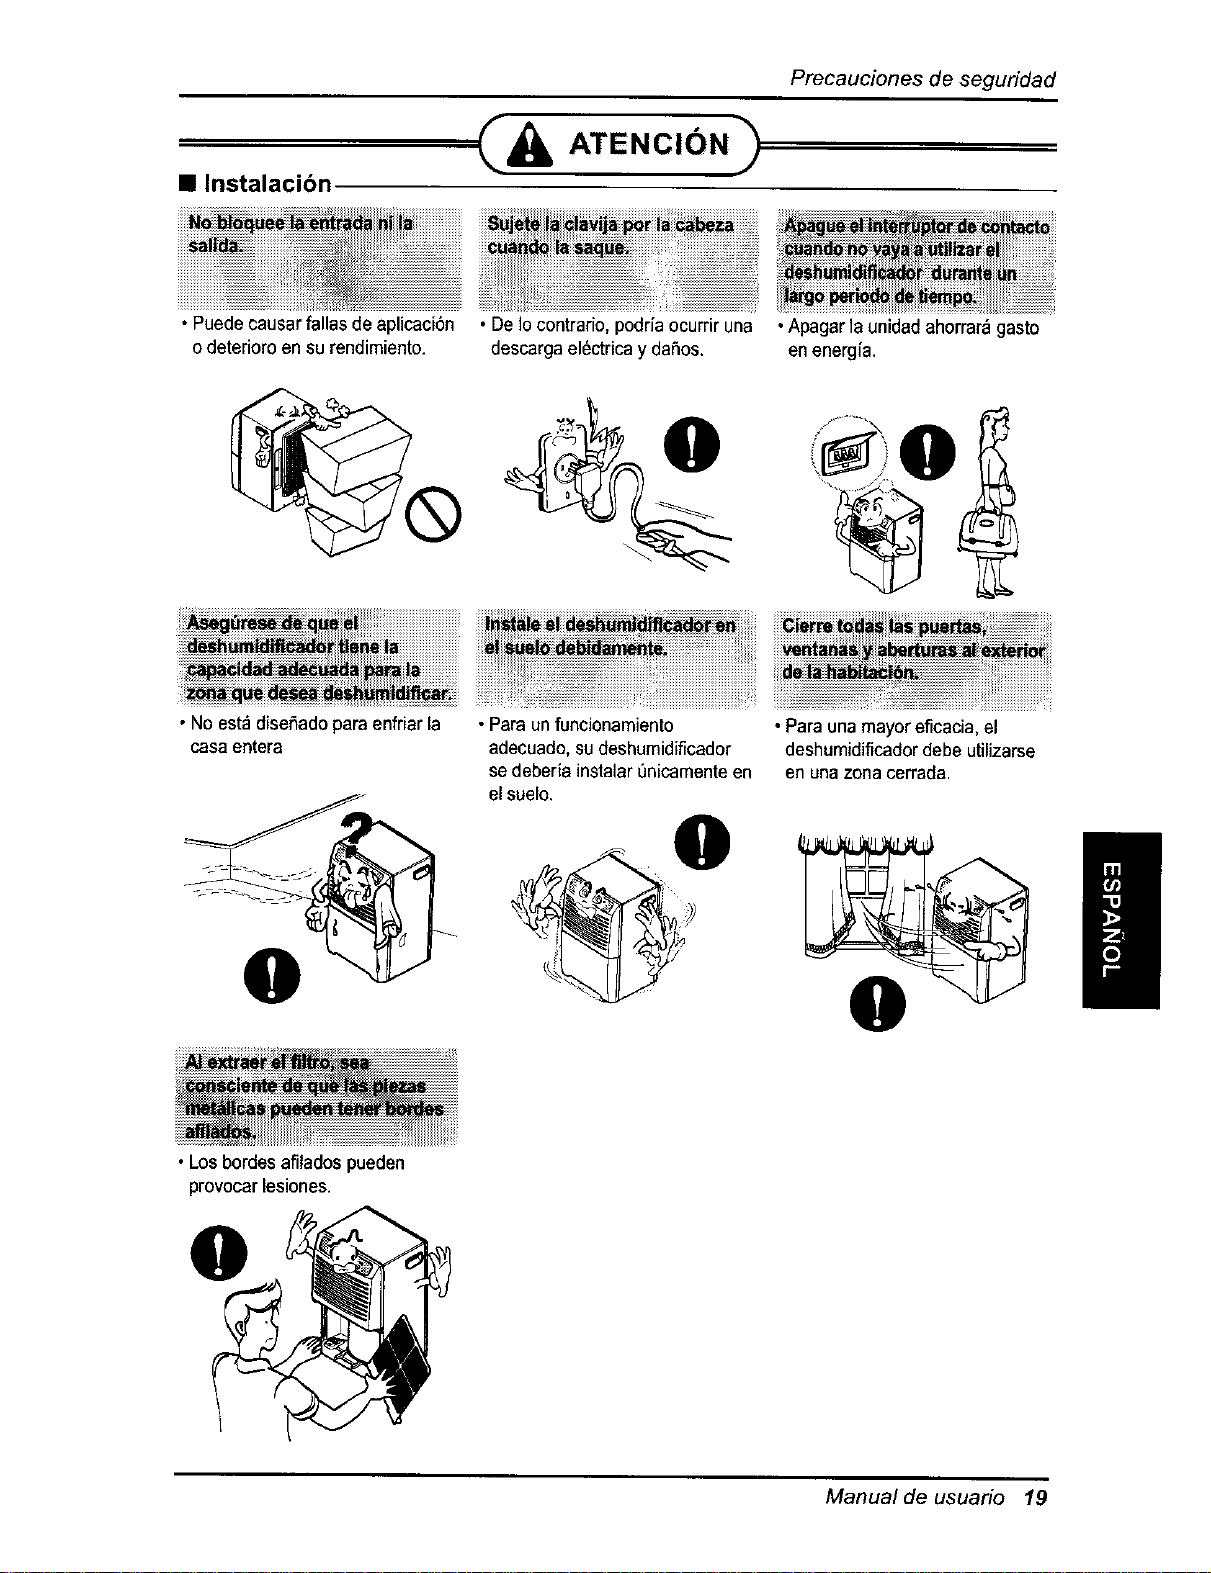
Precaucionesdeseguridad
• Instalacibn
===_& ATENClON)
• Puede causarfallas de apUcaci6n
o deterioroen surendimiento.
•De Iocontrario,podria ocurriruna
descargael_ctricay da5os.
•No est_ diseSadoparaenfriarla
casa entera
O
•Los bordesafilados pueden
provocar lesiones.
• Para un funcionamiento
adecuado,su deshumidiflcador
sedeberia instalarenicamenteen
el suelo.
O
/
•Para una mayor eficacia,el
deshumidificadordebe utilizarse
en unazona cerrada.
I
Manual de usuario 19
Precauciones de seguridad
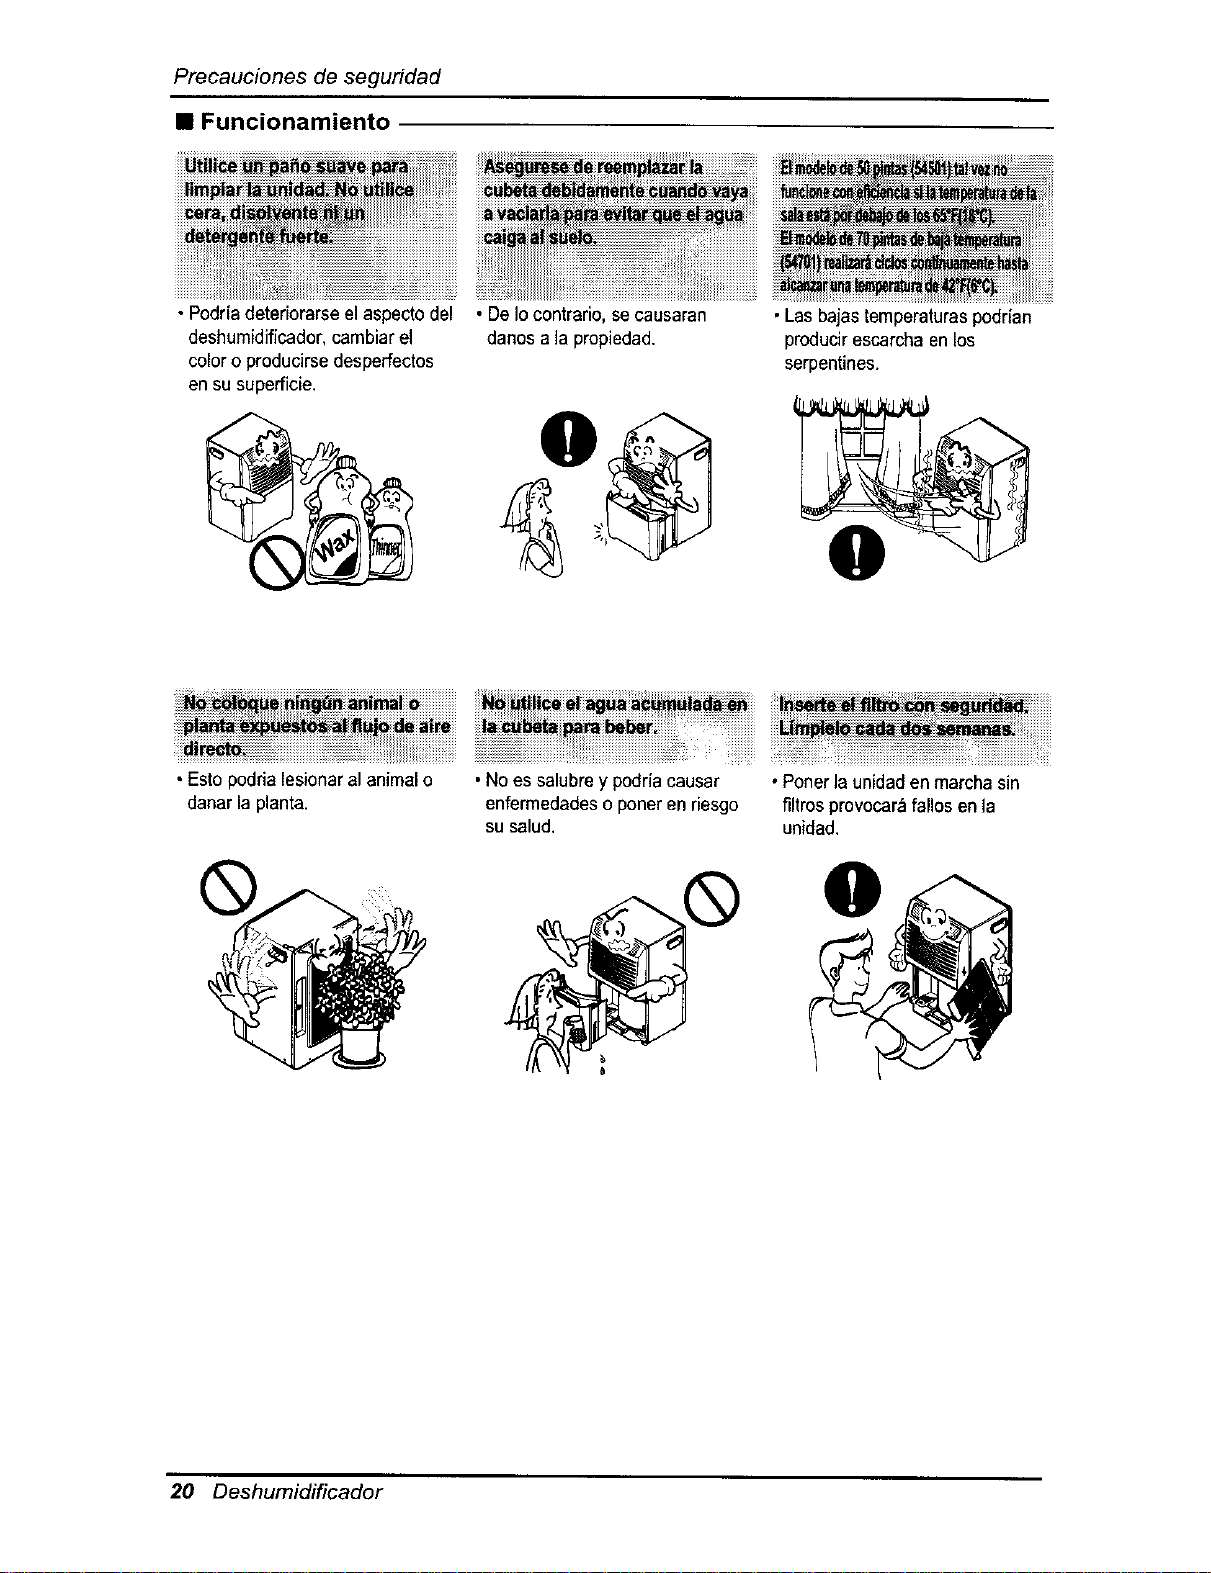
• Funcionamiento
• Podriadetedorarseel aspectodel
deshumidiflcador,cambiarel
coloro producirsedesperfectos
en su superficie.
• DeIocontrario,se causaran
danos a ]apropiedad.
•Lasbajas temperaturaspodr[an
producirescarchaenlos
serpentines.
• Esto podria lesionaral animalo
danar la planta.
• Noes salubrey podr/acausar
enfermedadeso poner en riesgo
su salud.
• Ponerla unidadenmarcha sin
filtros provocar_,fanosen la
unidad.
20 Deshumidificador
Antesdela utilizaci6n
Preparacibn para la utilizacibn
1. Enchufe el cable de alimentaci6n adecuadamente a una toma de pared est_,ndar con tres
clavijas y toma a tierra.
2. No enchufe ningen otro electrodom_stico en el mismo recept_culo que esta unidad.
3. No utilice una alargadera.
4. No inicie/detenga el funcionamiento enchufando/desenchufando el cable de alimentaci6n.
5. Si el cable/clavija se dafia, sustitL_yaloQnicamente por una pieza de recambio autorizada.
UTILIZACION
1. La exposici6n a flujo de aire directo durante un largo periodo de tiempo puede ser perjudicial
para su salud. No exponga a personas, animales o plantas al flujo de aire directo durante
largos periodos de tiempo.
2. Ventile la sala cuando el deshumidificador se use con otros aparatos de calefaccion.
De Io contrario, el suministro de oxigeno puede ser inadecuado.
3. No utilice este deshumidificador para finalidades no especificadas (p.ej., preservar dispositivos
de precision, alimentos, animales, plantas y objetos de arte). Tal uso podria daSar estos
elementos.
LIMPIEZA Y MANTENIMIENTO
ATENCI6N:
1. Notoquelas partes met&licasdela unidadcuandoretireel filtro. Podrfanproducirselesiones conlos bordes
met_licosafilados.
2. Noutilice agua paralimpiarel interiordel deshumidificador.La exposici6nal agua puededestruir el
aislamiento yocasionar una posibledescargaelectdca.
3.Cuando limpiela unidad,primeroasegOresede que la alimentaci6ny el interrupterest_n apagados.El
ventilador gira a unavelocidad muy altaduranteel funcionamiento.Existela posibilidadde lesionsi se
enciende accidentalmentela alimentaciona la unidad mientrasseesta limpiandosu interior.
/
SERVICIO TC:CNICO
Para reparaci6n y mantenimiento, p6ngase en contacto con su Centro de Reparaci6n y de
Recambios Sears.
Manual de usuario 21
Instruccion
S[MBOLOS UTILIZADOS EN ESTE MANUAL
Este simbolo le avisa del riesgo de descarga el6ctrica.
Este simbolo le alerta de la posibilidad de lesiones personales o
dahos a la propiedad.
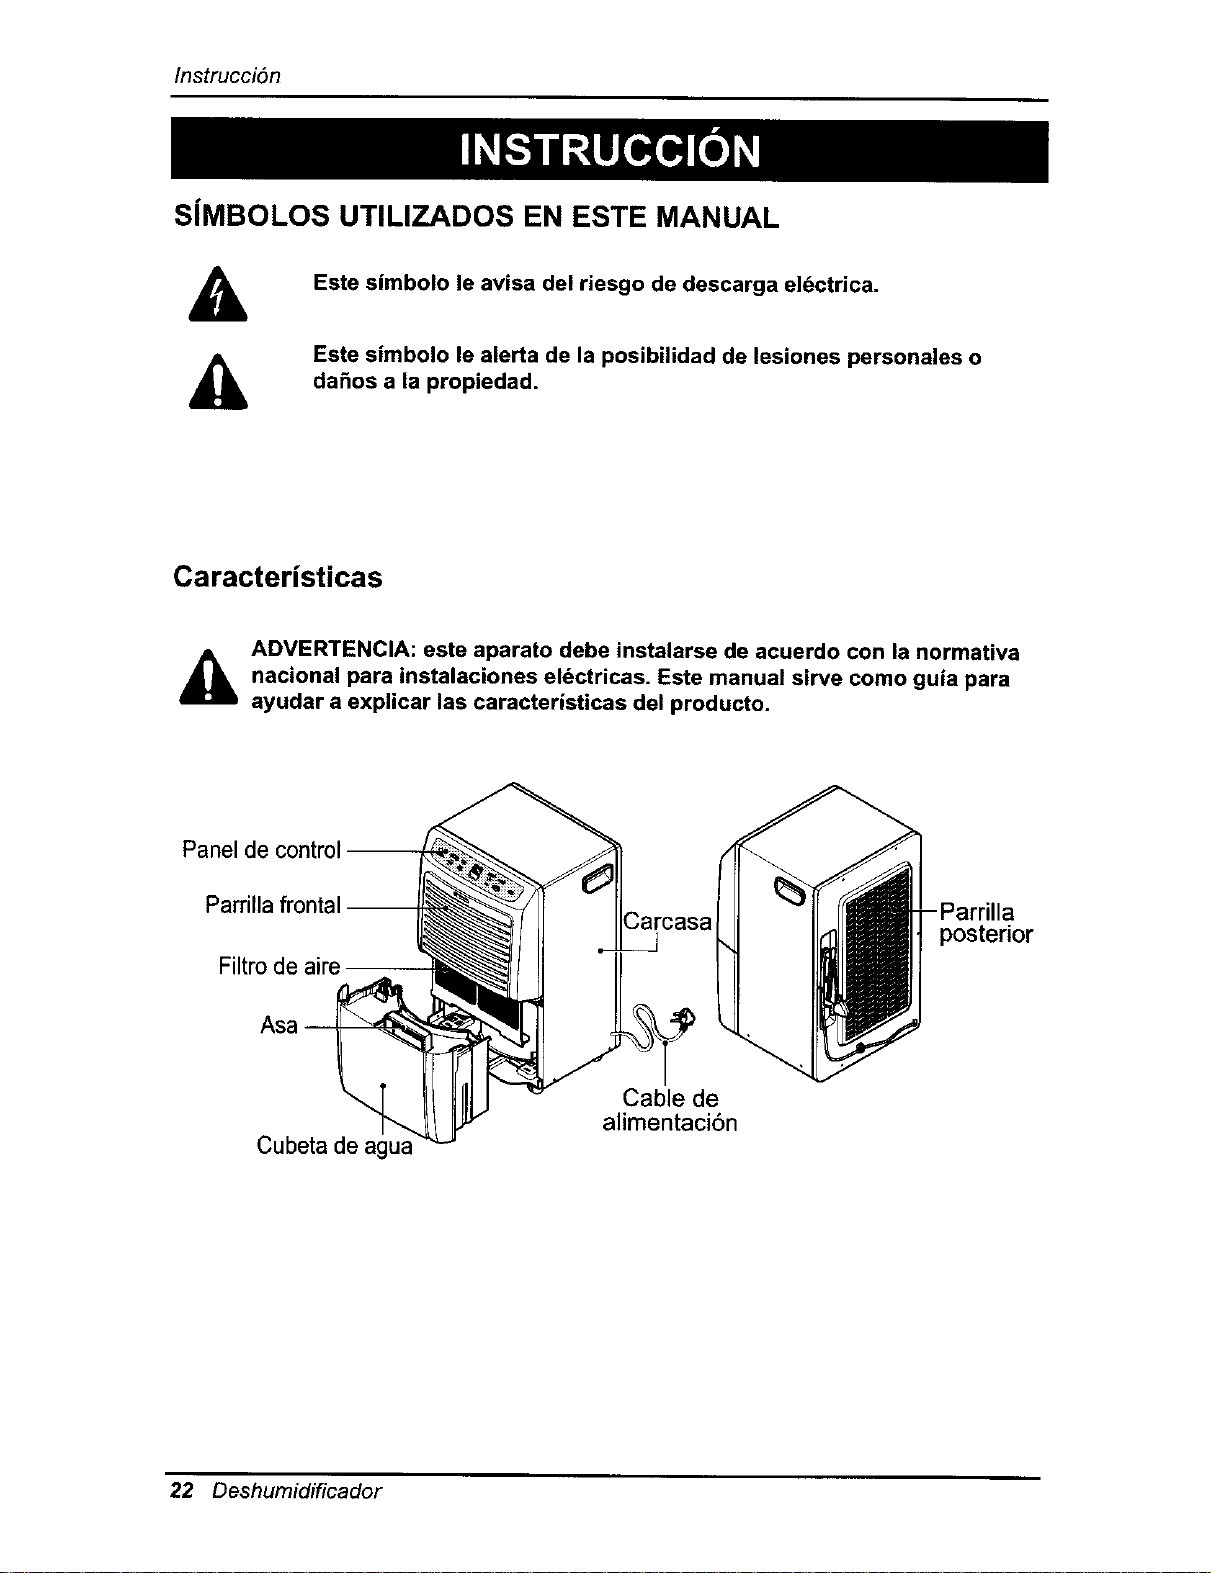
Caracteristicas
_lb DVERTENCIA: este aparato debe instalarse de acuerdo con la normativa
nacional para instalaciones eldctricas. Este manual sirve como guia para
ayudar a explicar las caracteristicas del producto.
Panel de control
Parrilla frontal- a
posterior
Filtro de aire --
Cubeta de agua
Cable de
alimentaci6n
22 Deshumidificador
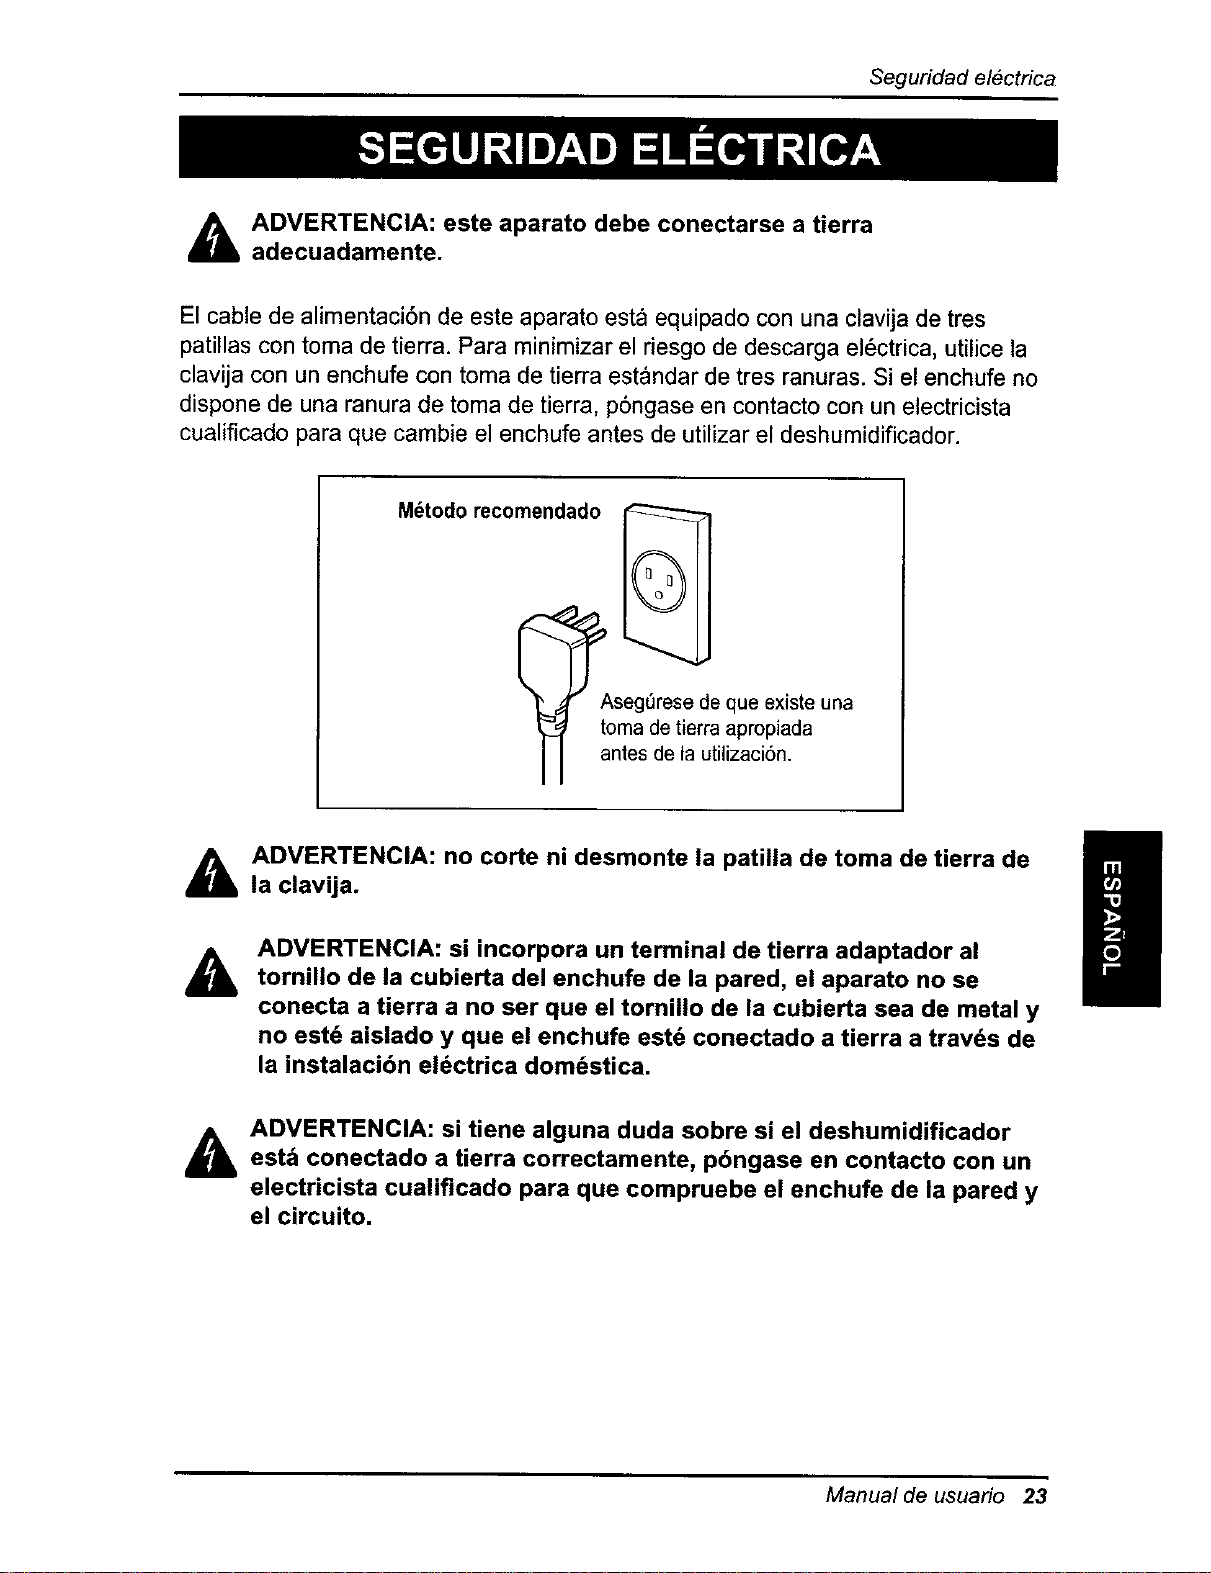
Seguridadelectrica
ADVERTENCIA: este aparato debe conectarse a tierra
adecuadamente.
El cable de alimentaci6n de este aparato esta equipado con una clavija de tres
patillas con toma de tierra. Para minimizar el riesgo de descarga el6ctrica, utilice la
clavija con un enchufe con toma de tierra estandar de tres ranuras. Si el enchufe no
dispone de una ranura de toma de tierra, p6ngase en contacto con un electricista
cualificado para que cambie el enchufe antes de utilizar el deshumidificador.
M_todo recomendado
_seg_rese de que existe una
toma de tierra apropiada
antes de la utilizaci6n.
&
&
ADVERTENCIA: no corte ni desmonte la patilla de toma de tierra de
la clavija.
ADVERTENCIA: si incorpora un terminal de tierra adaptador al
tornillo de la cubierta del enchufe de la pared, el aparato no se
conecta a tierra a no ser que el tornillo de la cubierta sea de metal y
no estd aislado y que el enchufe estd conectado a tierra a travds de
la instalacibn electrica dom_stica.
&
ADVERTENCIA: si tiene alguna duda sobre si el deshumidificador
est_ conectado a tierra correctamente, pbngase en contacto con un
electricista cualificado para que compruebe el enchufe de la pared y
el circuito.
Manual de usuario 23
Seguridad el6ctrica
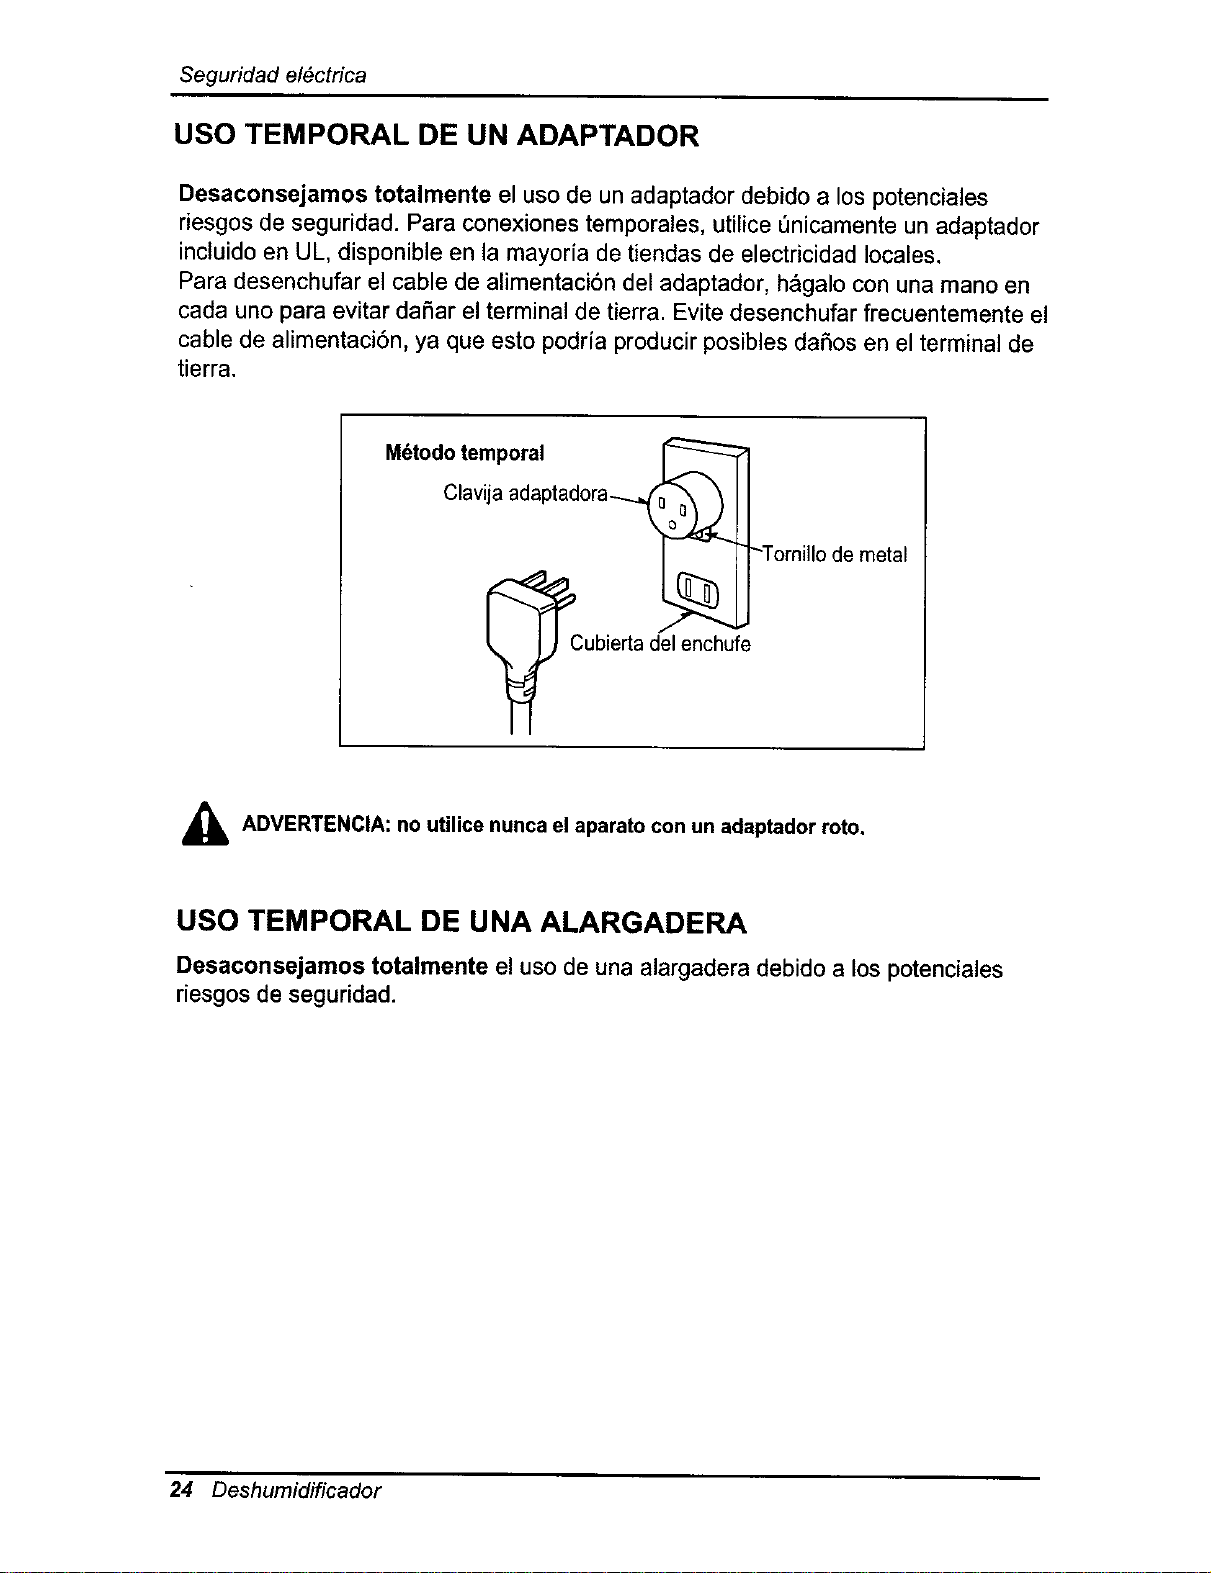
USO TEMPORAL DE UN ADAPTADOR
Desaconsejamos totalmente el uso de un adaptador debido a los potenciales
riesgos de seguridad. Para conexiones temporales, utilice _nicamente un adaptador
incluido en UL, disponible en la mayoria de tiendas de electricidad locales.
Para desenchufar el cable de alimentaci6n del adaptador, h&galo con una mano en
cada uno para evitar daSar el terminal de tierra. Evite desenchufar frecuentemente el
cable de alimentaci6n, ya que esto podrfa producir posibles daSos en el terminal de
tierra.
M6todo temporal
Clavija adaptadora--..._
Cubierta del enchuf_
-Torni]lo de metal
_, ADVERTENClA: no utilice nunca el aparato con un adaptador roto.
USO TEMPORAL DE UNA ALARGADERA
Desaconsejamos totalmente el uso de una alargadera debido a los potenciales
riesgos de seguridad.
24 Deshumidificador
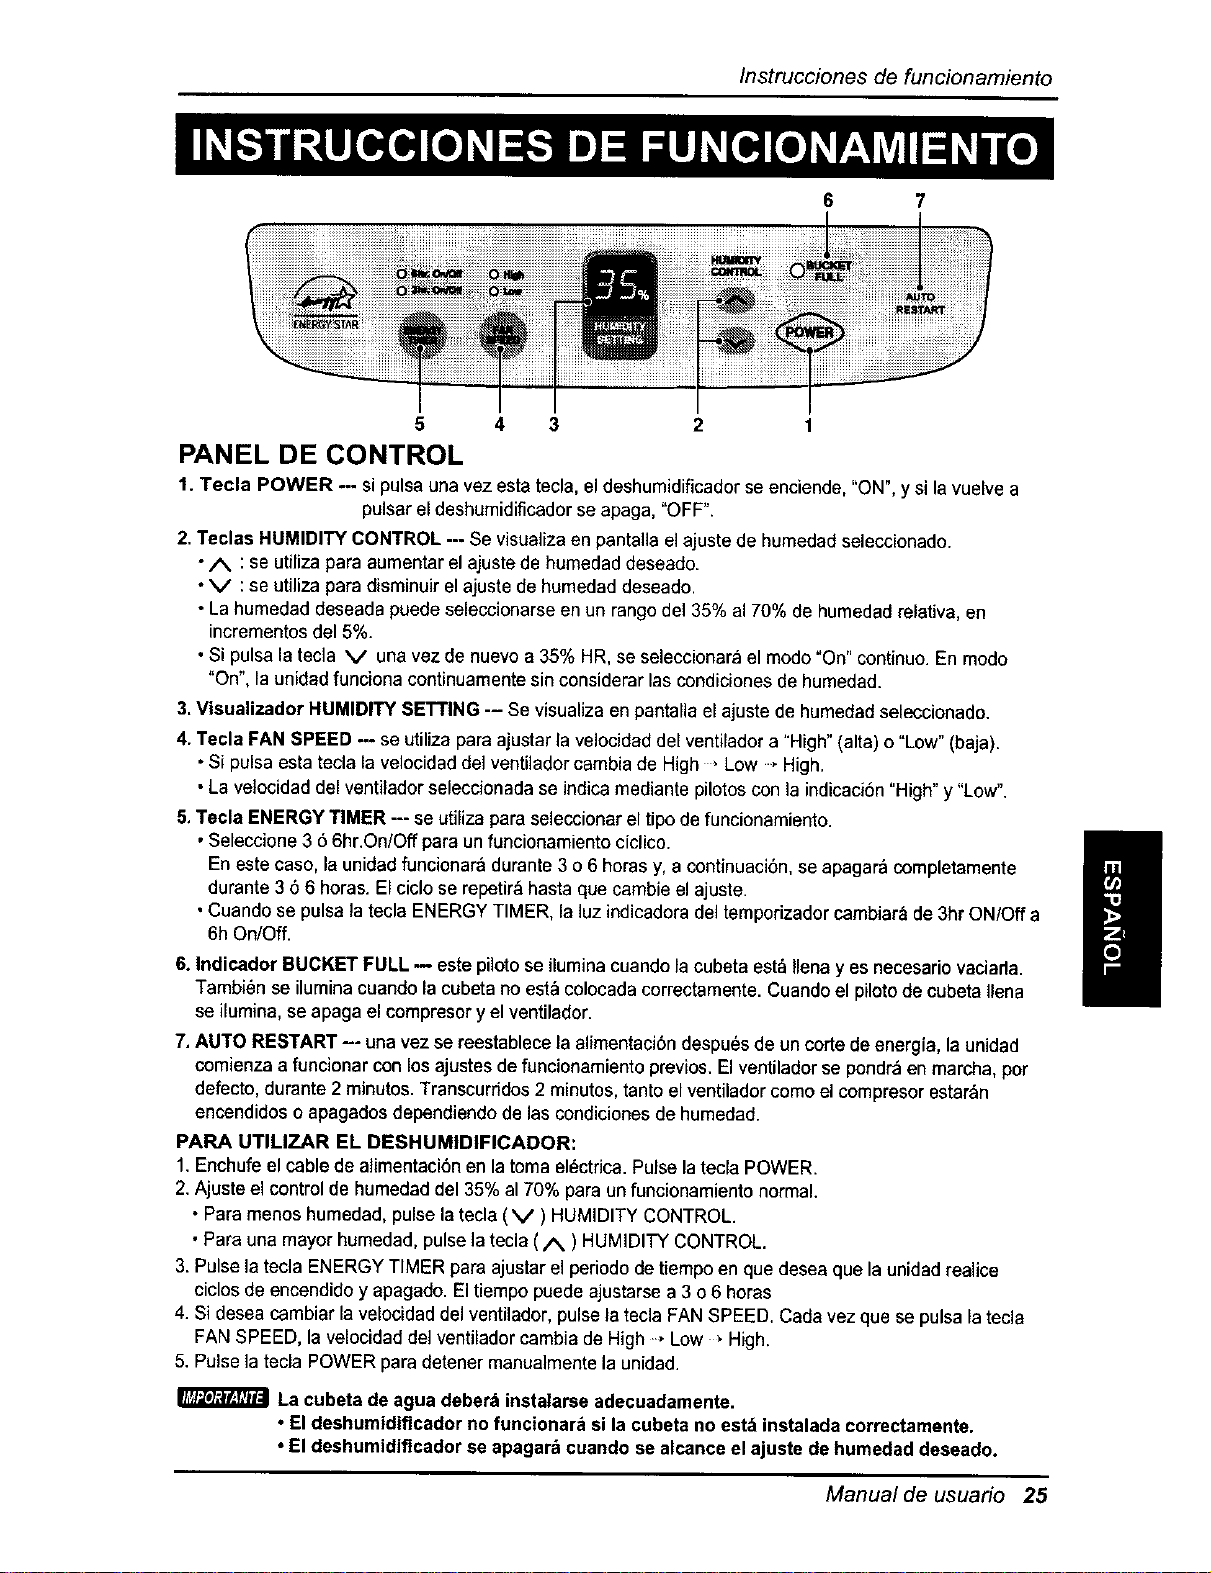
Instruccionesdefuncionamiento
6 7
5 4 3
PANEL DE CONTROL
1. Tecla POWER --- si pulsa una vez esta tecla,el deshumidificador se enciende, "ON", y si la vuelve a
pulsar el deshumidificador se apaga, "OFF".
2. Teclas HUMIDITY CONTROL --- Se visualiza en pantalla el ajuste de humedad seleccionado.
•A :se utiliza para aumentar el ajuste de humedad deseado.
•V :se utiliza para disminuir elajuste de humedad deseado.
•La humedad deseada puede seleccionarse en un rango del 35% a170% de humedad relativa, en
incrementos del 5%.
•Si pulsa la tecla V una vez de nuevo a 35% HR, se seleccionara el modo"On" continuo. En modo
"On", la unidad funciona continuamente sin considerar las condiciones de humedad.
3.Visualizador HUMIDITY SETTING -- Se visualiza en pantalla el ajuste dehumedad seleccionado.
4. Tecla FAN SPEED --- se utiliza para ajustar la velocidad del ventilador a "High" (alta) o "Low" (baja).
•Si pulsa esta tecla la velocidad del ventilador cambia de High , Low., High.
• La velocidad del ventilador seleccionada se indica mediante pilotos con la indicaci6n "High" y "Low".
5,Tecla ENERGY TIMER --- se utiliza para seleccionar eltipo de funcionamiento.
•Seleccione 3 6 6hr.OniOff para un funcionamiento ciclico.
En este caso, la unidad funcionara durante 3 o 6 horas y, a continuaci6n, se apagar_ completamente
durante 3 6 6 horas. El ciclo se repetir_hasta que cambie el ajuste.
• Cuando se pulsa latecla ENERGY TIMER, la luz indicadora del temporizador cambiar_ de 3hr ON/Off a
6h On/Off.
6. Indicador BUCKET FULL m este pilotose ilumina cuando lacubeta estd Ilenay es necesario vaciarla.
Tambi_nse iluminacuandolacubetanoest_ colocadacorrectamenta.Cuando el pilotode cubetaIlena
ae ilumina, se apaga elcompresory el ventilador.
7, AUTO RESTART -- una vez se reestablecela alimentacibn despu6sde un corte de energia, la unidad
comienzaa funcionar conlos ajustesdefuncionamiento previos.El ventiladorse pondr_enmarcha, por
defecto,durante2 minutos. Transcurfidos2 minutos,tantoelventiladorcomoel compresorestar_n
encendidoso apagadosdependiendode lascondicionesde humedad.
PARA UTILIZAR EL DESHUMIDIFICADOR:
1.Enchufe el cable de alimentaci6n en latoma el_ctrica. Pulse latecla POWER.
2. Ajuste el controlde humedadde135% a170% para unfuncionamiento normal.
• Paramenos humedad,pulselatecla(V) HUMIDITY CONTROL.
•Para una mayorhumedad,pulsela tecla( A ) HUMIDITYCONTROL.
3. Pulse la tecla ENERGY TIMER para ajustarelperiododetiempoen que deseaquela unidadrealice
cicIos de encendidoy apagado.Eltiempopuedeajustarse a 3 o6 horas
4. Si desea cambiar lavelocidaddel ventilador,pulsela teclaFANSPEED. Cada vezque se pulsala tecla
FANSPEED, la velocidaddel ventiladorcambiade High* Low _ High.
5. Pulsela tecla POWER paradetener manualmantala unidad.
La cubeta de agua deberb instalarse adecuadamente.
• El deshumidificador no funcionar_ si la cubeta no estb instalada correctamente.
• El deshumidiflcador se apagarb cuando se alcance el ajuste de humedad deseado.
I
Manual de usuario 25
Instrucciones de funcionamiento
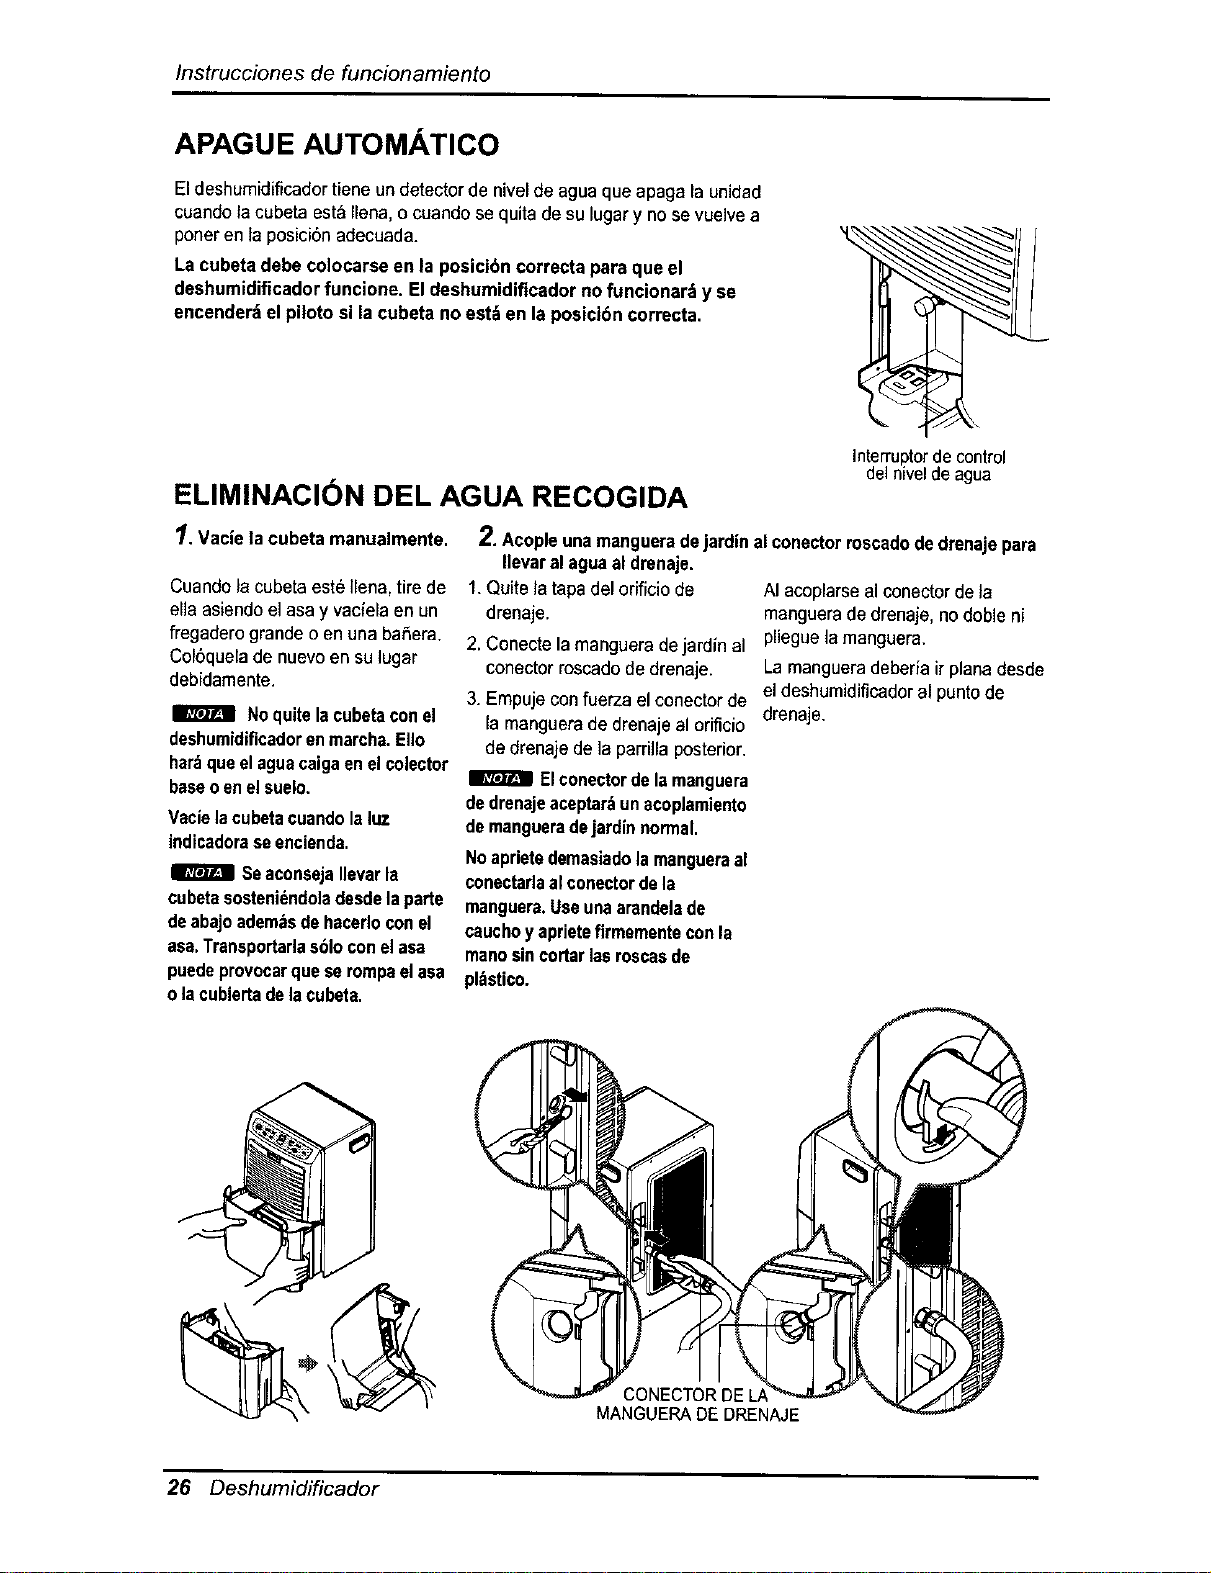
APAGUE AUTOMATICO
El deshumidiflcadortiene undetector de nivelde aguaque apaga la unidad
cuandola cubeta est&Ilena,o cuandose quitade su lugar y nose vuelvea
poneren ]aposici0n adecuada.
Lacubeta debe co]ocarseen la posicibncorrectapara que el
deshumidificadorfuncione. Eldeshumidificadorno funcionar_y se
encenderdelpiloto si lacubeta no est_ en la posicibncorrecta.
ELIMINACION DEL AGUA RECOGIDA
1. Vacielacubeta manualmente.
Cuandofacubetaeste ]lena,tirede
ella asiendoel asa y vaciela en un
fregaderogrande o en una baSera.
Col0quelade nuevoen su lugar
debidamente.
Noquitelacubetaconel
deshumidificadorenmarcha.EIIo
hardqueelaguacaigaenelcolector
baseoenelsuelo.
Vacielacubetacuandolaluz
indicadoraseencienda.
I_ SeaconsejaIlevarla
cubetasosteniendoledesdelaparte
deabajoedemasdehacedoconel
asa.Transportarlasbloconelasa
puedeprovocarqueserompaelasa
olacubiertadelacubeta.
interrupter de control
del nivel de agua
2. Acopleunamangueradejardinalconectorroscadodedrenajepara
Ilevaral aguaal drenaje.
1.Quite]atapadelorificiode AI acoplarsealconectorde]a
drenaje, mangueradedrenaje,nodobleni
2. Conectelamangueradejardinal pliegue la manguera.
conectorroscadodedrenaje. La mangueradeberiairplanadesde
3. Empujeconfuerza elconectorde eldeshumidificadoral puntode
la manguerade drenajeal orificio drenaje.
dedrenaje dela parrillaposterior.
I_ Elconectordelamanguera
de drenajeaceptar:_unacoplamiento
demangueradejardinnormal.
Noaprietedemasiado]amangueraal
conectadaalconectordela
manguere.Useunaarandelade
cauchoyaprieteflrmementeconla
manosincortarlasroscasde
pl=tstico.
CONECTOR DE LJ
MANGUERA DE DRENAJE
26 Deshumidificador
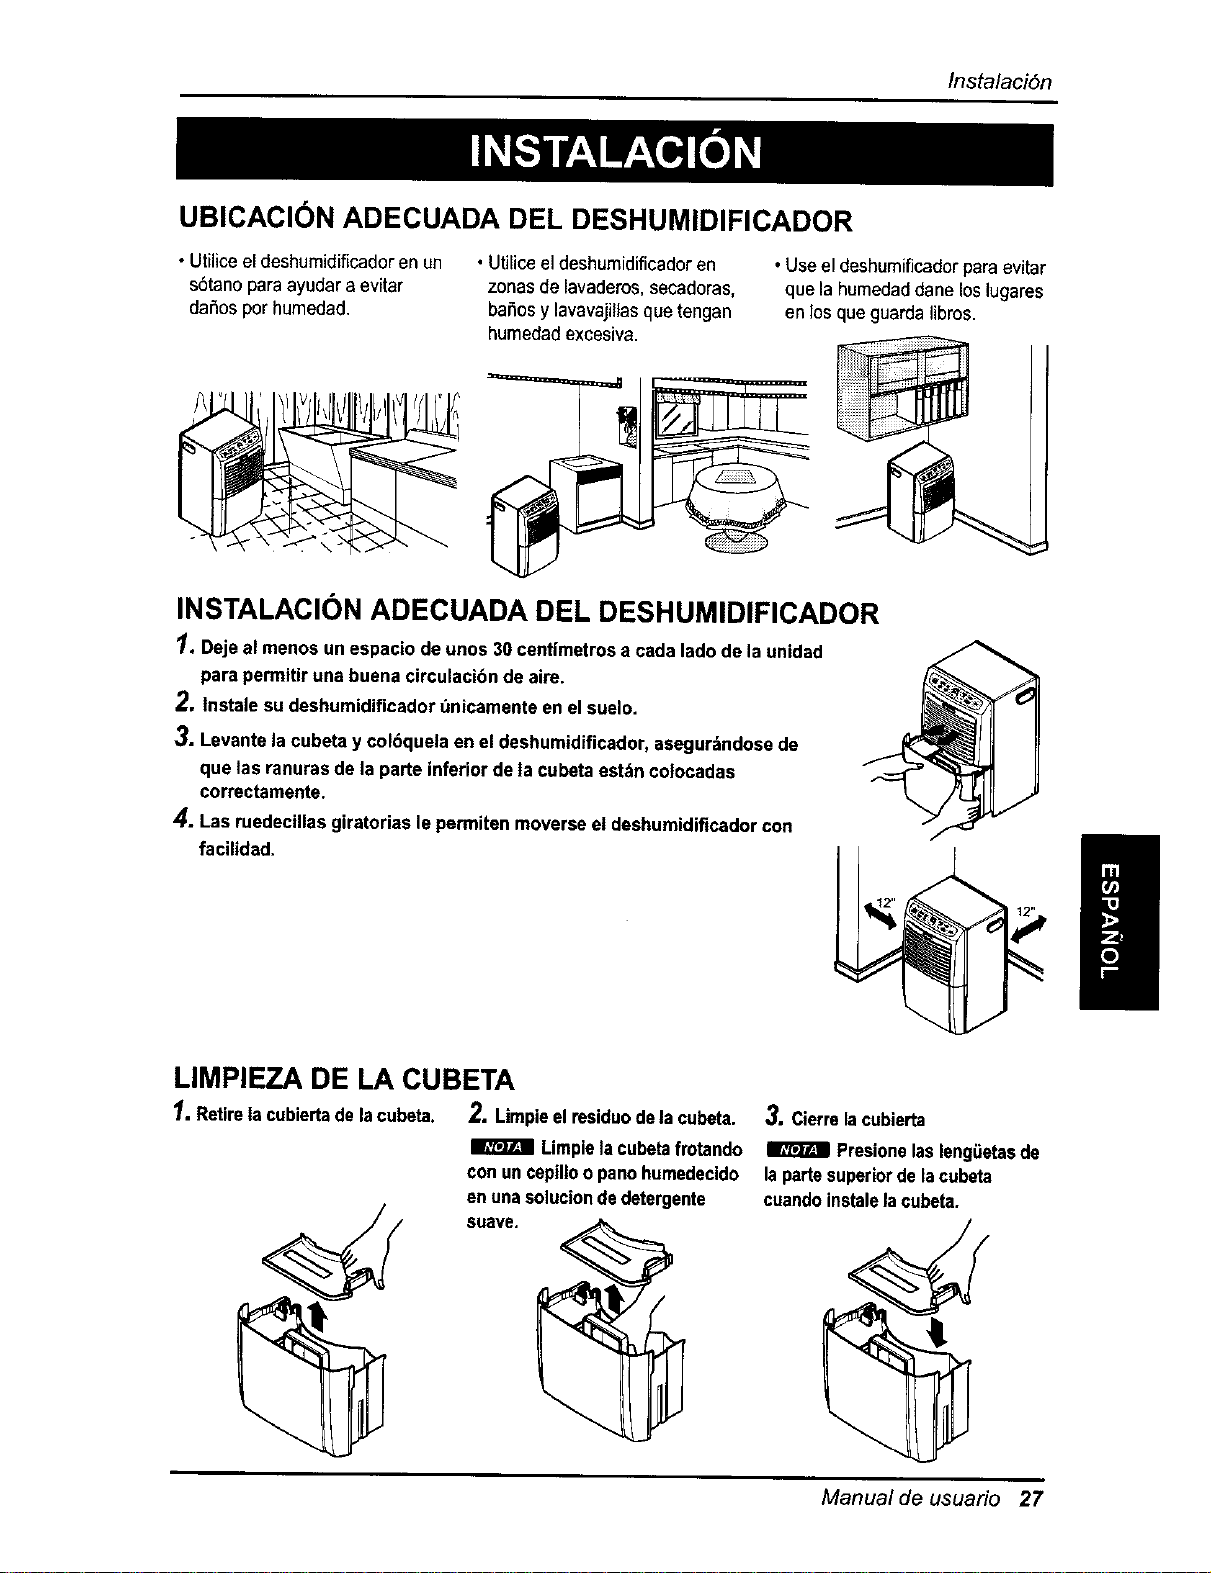
UBICACI6N ADECUADA DEL DESHUMIDIFICADOR
Instalaci6n
• Utiliceel deshumidificadoren un
sbtano paraayudara evitar
dafios por humedad.
• UtiUceel deshumidificadoren
zonas de lavaderos,secadoras,
bai_osy lavavajillasque tengan
humedadexcesiva.
• Use el deshumificadorpara evitar
que la humedaddane loslugares
en losque guarda libros.
INSTALACION ADECUADA DEL DESHUMIDIFICADOR
1.Deje al menos unespacio deunos 30 centimetrosa cada ladode la unidad
para permitiruna buenacirculacibnde aire.
2. tnstale su deshumidificadort_nicamenteenel suelo.
3. Levantela cubeta y col6quetaen el deshumidificador,asegur_ndosede
que lasranuras de la parte inferior deta cubeta estz_ncolocadas
correctamente.
4. Lasruedecillasgiratorias lepermiten moverseel deshumidificadorcon
facilidad.
LIMPIEZA DE LA CUBETA
1. Retirela cubiertadelacubeta. 2. Limpieelresiduodelacubeta. 3. Cierrelacubierta
I_ Limpielacubetafrotando I_ Presionelasleng(ietasde
conun cepilloopanohumedecido lapartssuperiordela cubeta
enunasoluciondedetergents cuandoinstalelacubeta.
Manual de usuario 27
Mantenimiento
Este deshumidificadorest_ diseSadopara funcionar
en cualquier_pocadel aSo.Pr_cticamenteno
necesitacuidados.No obstante,debe revisar el
deshumidificadore inspeccionarlos serpentines
anualmente.
Posiblementeprefieraque sea el Centro de
Reparacionesy Recambiosde Searsquien llevea
caboeste chequeoanuaL (El costede la inspecci6n
esresponsabilidaddel usuario).
O
Siesta familiarizadocon losaparatos electricosy
sus funciones, a continuaci6nse muestranalgunas
instruccionesque le permitir_n realizara usted
mismo la revisi6ny el mantenimiento.
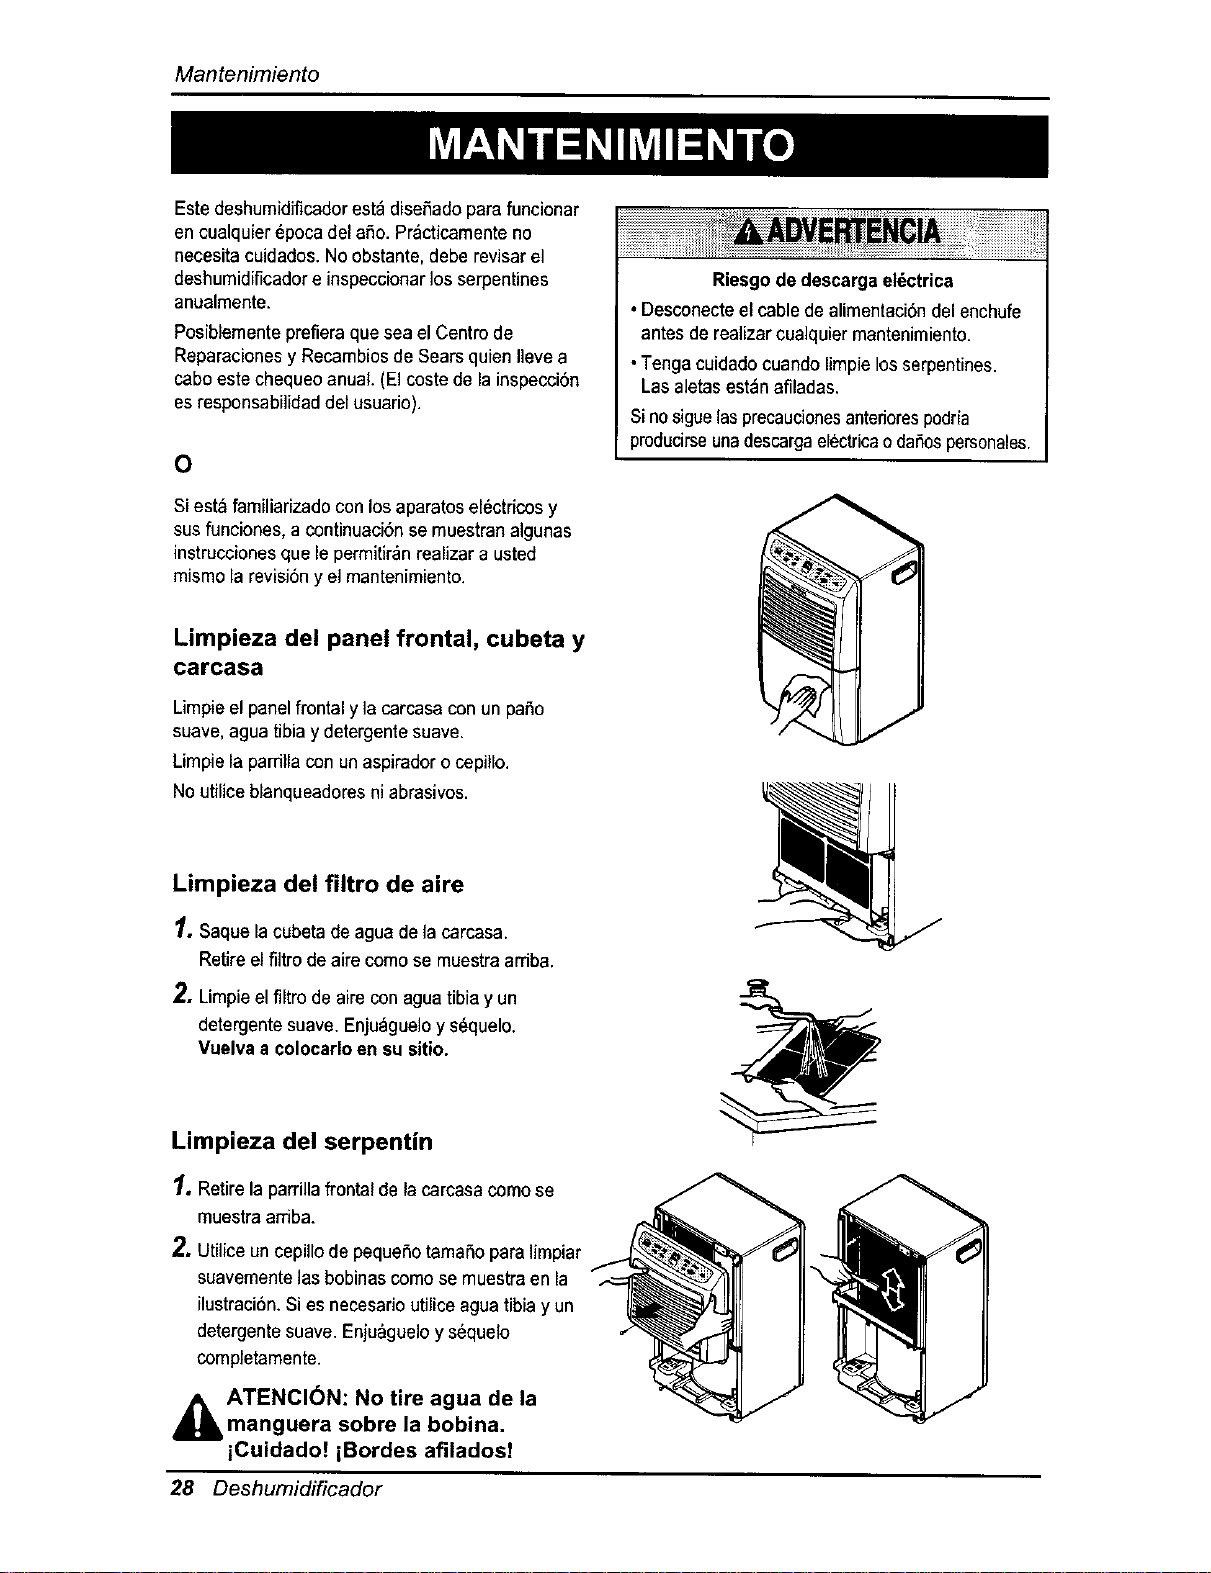
Riesgode descargael_ctrica
• Desconecteel cablede alimentaciSndel enchufe
antesderealizarccalquiermantenimiento.
•Tengacuidadoeuandolimpielosserpentines.
Lasaletasestdnafiladas.
Sinosiguelasprecaucionesantefiorespodria
producirseunadescargaelectriceodafiospersonales.
Limpieza del panel frontal, cubeta y
carcasa
Limpieel panelfrontal y ]acarcasacon un patio
suave,agua tibia y detergentesuave,
Limpiela parrillacon un aspiradoro cepillo.
No utiliceblanqueadoresni abrasivos.
Limpieza del filtro de aire
1, Saque la cubeta deagua de la carcasa.
Retireel flltrodeairecomo se muestraarriba.
2. Limpieel filtro de airs conagua tibiay un
detergentesuave. Enjuagueloy s_quelo.
Vuelvaa colocarloen su sitio.
Limpieza del serpentin
1.Retirela parrillafrontal de la carcasacame se
muestraamba.
2, UtUiceuncepillode pequefiotamafio para lirnpiar
suavementelas bobinascomo se muestraen la
ilustraci6n.Si esnecesario utiliceaguatibia y un
detergentesuave. Enju_gueloys6quelo
completamente.
,_ ATENCI(_N: No tire agua de la
manguera sobre la bobina.
iCuidado! iBordes afiladosT
28 Deshumi_ficador
Mantenimiento
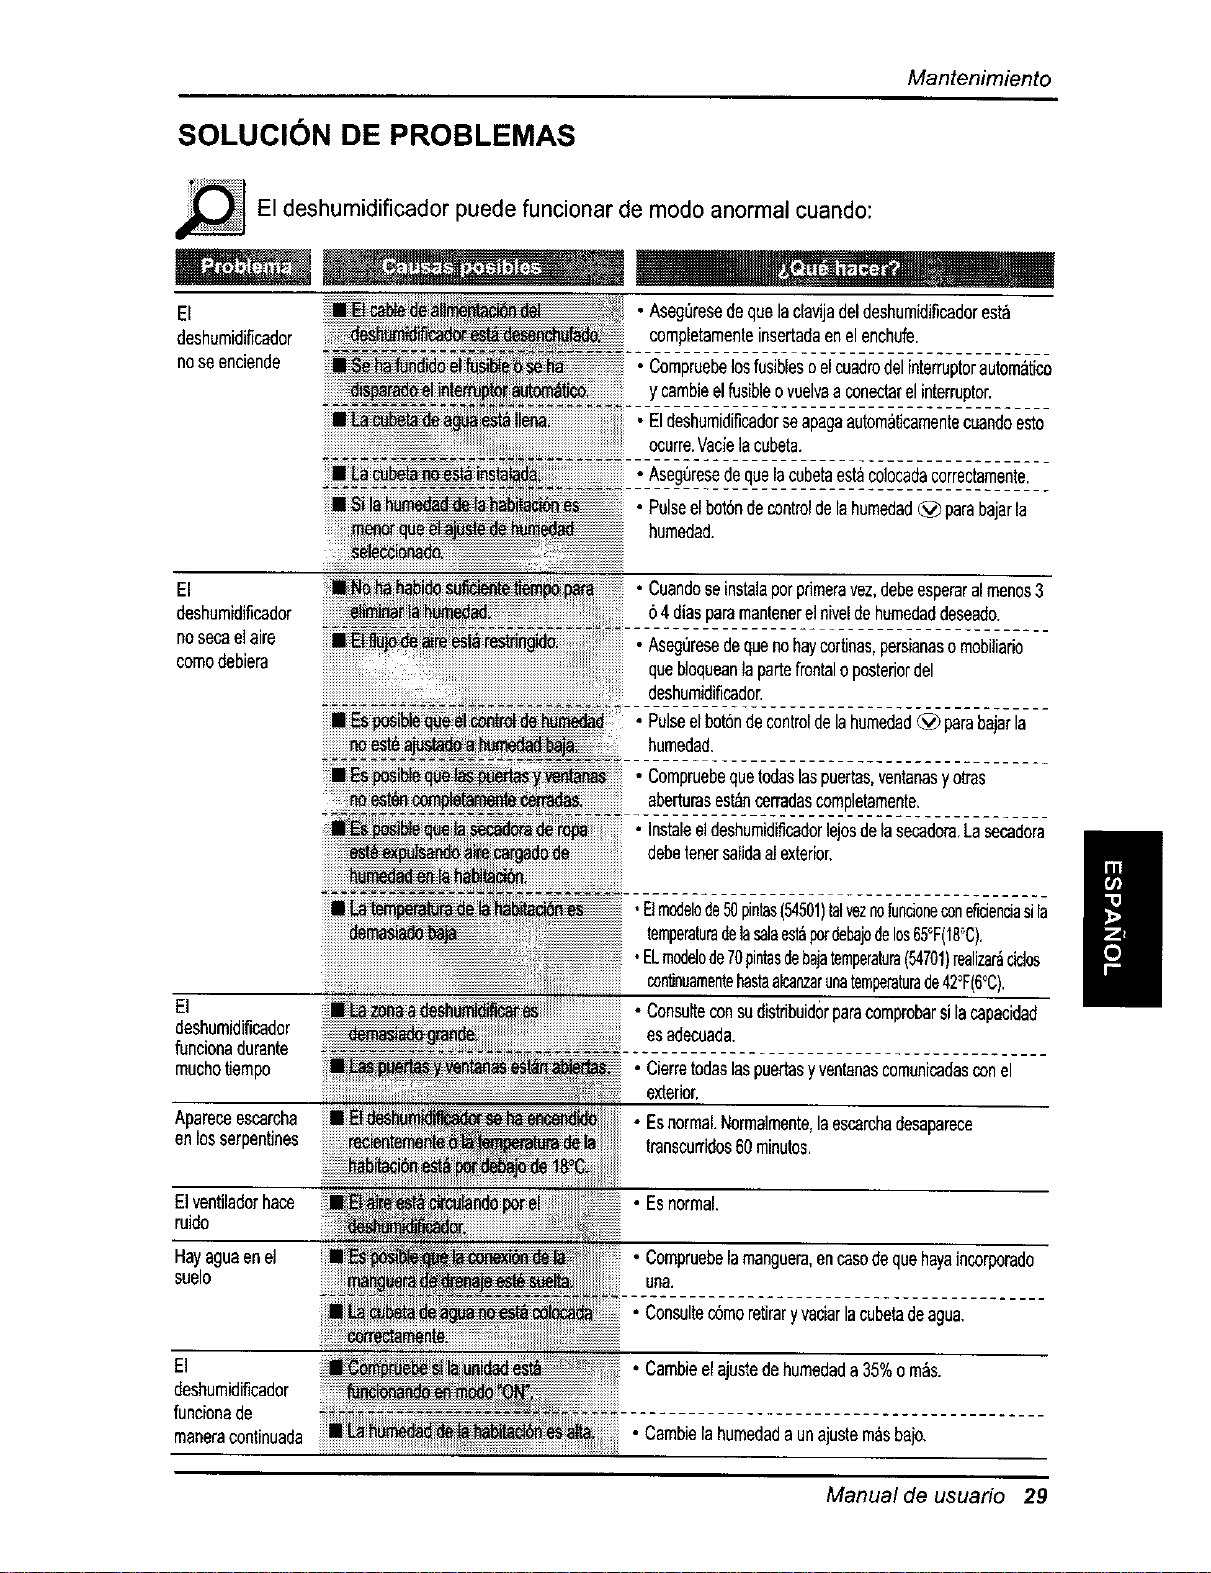
SOLUCION DE PROBLEMAS
El deshumidificador puede funcionar de mode anormal cuando:
El
deshurnidiflcader
noseenciende
• AsegQresedequelaclavijadeldeshumidificadoresta
oompletamenteinsertadaenelenchufe.
• Cornpruebelosfusiblesoelcuadrodelinterrupterautom&tico
ycambieelfusibleovuelvaaconectarelinterrupter.
• Eldeshumidificadorseapagaautomaticarnentecuandoesto
ocurre.Vaelelacubeta.
• Aseg0resedequelacubetaest_colocadacorrectamente.
• Pulseelbot6ndecontroldelehumedad_ parabajarla
humedad.
El
deshumidificador
nosecaelaire
cornodebiera
lt_ _ _ • Cuandoseinstalaperprirneravez,debeesperaralmenos3
64diesparemantenerelniveldehurnedaddeseado.
-A-s-eg_Jre_ de-queno-haicoffin'spers;a-naso-m;b-i,i-a-ro---
queblequeantapertefrontaloposteriordel
deshurnidil'icador,
• Pulseelbot6ndecontroldelahurnedad_) parabajarla
hurnedad,
• Cornpruebequetodaslaspuertas,ventanasyotras
aberturasest_ncerredascornpletamente,
• Instaleeldeshumidificadorlejosdelasecadora.Lasecadora
debetenersalidaalexterior.
El
deshumidificador
funcionadurante
muchotJempo
Apareceescarcha
enlosserpentines
Elventiladorhace
ruido
Hayagueenel
suelo
1/
,Elmodelode50pintas(54501)telveznofuncioneconeficienciasila
temperaturedelasaleest_perdebajodelos65°F(18_C),
I/
•ELmodelode70pintasdebajatemperatura(54701)realizar_dales
continuarnentehastaalcanzarunatemperaturade42°F(6°C),
• Consulteconsudistdbuidorparacornprobarsilacapacidad
esadecuada.
• Cierretodaslaspuertasyventanascomunicadasconel
exterior,
• Esnormal.Norrnalmente,laescarchadesaparece
transcurridos60minutes.
El
deshurnidificador
funeionade
rnaneracontinuada
• Esnormal.
• Compruebelarnanguera,encasedequehayaincorporado
uNa,
• Consuitec6rnoretiraryvaciarlaeubetadeague,
• Carnbieelajustedehumedade 35%om_s.
• Cambielahumedadaunajustemasbajo.
Manual de usuario 29
Nota
30 Deshumidificador
Master Protection Agreements
Congratulations on making a smart purchase.
Your new Kenmore ®product is designed and
manufactured for years of dependable operation.
But like all products, it may require preventive
maintenance or repair from time to time.
That's when having a Master Protection Agreement
can save you money and aggravation.
Purchase a Master Protection Agreement now and
protect yourself from unexpected hassle and
expense.
The Master Protection Agreement also helps extend
the life of your new product. Here's what's included
in the Agreement:
F-v[Expert service by our 12,000 professional
repair specialists
[] Unlimited service and no charge for parts and
labor on all covered repairs
[] "No-lemon" guarantee - replacement of your
covered product if four or more product failures
occur within twelve months
[] Product replacement ifyour covered product
can't be fixed
[] Annual Preventive Maintenance Check at your
request - no extra charge
[] Fast help by phone - phone support from a
Sears technician on products requiring in-home
repair, plus convenient repair scheduling
[] Power surge protection against electrical
damage due to power fluctuations
[] Rental reimbursement if repair of your covered
product takes longer than promised
Once you purchase the Agreement, a simple phone
call isall that ittakes for you to schedule service.
You can call anytime day or night, or schedule a
service appointment online.
Sears has over 12,000 professional repair
specialists, who have access to over 4.5 million
quality parts and accessories. That's the kind of
professionalism you can count on to help prolong
the life of your new purchase for years to come.
Purchase your Master Protection Agreement today!
Some limitations and exclusions apply.
For prices and additional information call
1-800-827-6655.
Sears Installation Service
For Sears professional installation of home
appliances, garage door openers, water
heaters, and other major home items, in the
U.S.A, call 1-800-4-MY-HOME ®
Acuerdos de Protecci6n Especializada
iEnhorabuena! Ha realizado una compra inteligente.
Su nuevo aparato Kenmore® esta disefiado y fabricado
para ofrecerle arias de buen funcionamiento.
Sin embargo, al igual qoe todos los productos,puede
precisar un mantenimiento preventivo o incluso alguna
reparaci6n de vez en cuando. Enesas ocasiones, un
Master Protection Agreement puede ayudarle a ahorrar
dinero e inconvenientes.
Adquiera unMaster Protection Agreement ahora, y
protejase a sf mismo de mo/estias y gastos inesperados,
El Master Protection Agreement le ayudara tambien a
prolongar la vida de su nuevo aparato. Los siguientes
servicios est_e inciuidos:
[] Servicio experto per parte de cuatquiera de
nuestros 12.000 t6cnicos profesionales especialistas
de Sears.
[] Prestacibn de servicios sin limitaciones y sin
cargarte las piezaso lamano de obra en todas las
reparaciones eubiertasporel acuerdo.
[] Garantia seria de sustitucibn de las piezas del
productoeubiertoporel acuerdo,si coatro o mas
piezas se mostrasen defectoosasen un periodode
doce meses.
Sustitucibn del producto por otro nuevo, siel
defeotuosonopudiese repararse.
[] Control de mantenimiento anual preventivo,
sJempreque Iodesee ysingastoadicionalalguno.
[] Asisteneia telefbnica inmediata de un tecnico
especialistaen productosque han deser reparadosa
domicilio, ademas de una programaci6n adecuada de
la reparacion.
[] Proteccibn contra subidas de tensibn que
provoquendafios electricos debidos alas
fluctuaciones en el suministro.
[] Reintegre del alquiler si la reparacion del producto
Ileva mas tiempodel promtetido
Uea vezque haya adquirido el Agreement, no necesitar_
m_s que una simple Ilamada para solicitar elservicio de
su aparato. Ademas, podr_ hacerlo en coalquier momento
del dia o de la noche, o solicitar una cita para prestaci6n
de servicios online.
Sears cuenta con m_s de 12.000tecnicosprofesionales
especialistas en reparaciones, con acceso a mas de 4,5
millones de piezas de sustituci6n y accesodos de calidad.
I_stesera el tipo de profesionalidad y servicio con el que
podr_contar para prolongar la vida de su euevo producto
pot muchos afios, iAdquiera hoy mismo su Master
Protection Agreement#
Se aplicar_n algunas limitaciones y
restricciones.
Si desea hacer alguna consulta sobre los
precios u otra informaci6n adicional, le rogamos
Ilame al tel_fono 1-800-827-6655.
Servicios de Instalacibn Sears
Pera so/iciter servicios de instalaciSn profesionales
de Sears de electrodom_,sticos, mandos de apertura
de puertas de garajes, calentadores de agua y otros
aparatos en los Estados Unidoe, puede Ilamar a
1-800-4-MY-HOME ®
I
I
Manual de usuario 31

Your Home
For repair - in your home-of all major brand appliances,
lawn and garden equipment, or heating and cooling systems,
no matter who made it, no matter who sold it!
For the replacement parts, accessories and
owner's manuals that you need to do-it-yourself.
For Sears professional installation of home appliances
and items like garage door openers and water heaters.
::::::::::::::::::i
::::::::::::::::,,
::::::::
::::::::
1-800-4-MY-HOME _ (1-800-469-4663)
..............._ Call anytime, day or night (U.S.A. and Canada) iiiiiiiiiiiiiiiiiiii
::::::::::::::
:::::::::::::
i{il i www.sears.com www.sears.ca ii_i_i_iiiii_I
iiiiiiiiiiiiiiiiiiii OurHome
iiiiiiiiiiiiiiiiiiii For repair of carry-in items like vacuums, lawn equipment, iiiiiiiii!i!iiii
%_i_i_i_ and electronics, call or go on-line for the location of your nearest iii_
ii:;i;;;:i;i: Sears Parts & Repair Center. iiliii!
!i!i!i!i!i!i:_!_!_:_ 1-800-488-1222 @iii
3 iiiiiiiiiiiiiiiiiiiiiii!ii
;_!ili!ii!iiiiii Call anytime, day or night (U.S,A. only)
To purchase a protection agreement (U.S.A.)
or maintenance agreement (Canada) on a product serviced by Sears: ............
ii_!:!i!i!:!i!:!:! 1-800-827-6655 (U.S.A.) 1-800-361-6665 (Canada)
i_!i_iiiiiiiii
;3;331
]_i,iiii]_iii Para pedir servicio de reparacion Au Canada pour service en fran_;ais: "@i
£C3 _:_
:;:::;:;c; a domicilio, y para ordenar piezas: 1-8O0.LE.FOYER Mc ii!iiiiiiiiiiiiii
_:_:_:_:_;i_i"_ 1.888.SU.HOGARSM (1-800-533-6937) i_i_i;;;;;_
1-888-784-6427)
® Registered Trademark / TMTrademark / SMService Mark of Sears, Roebuck and Co.
® Marca Registrada / TM Marca de F_brica ! sMMarca de Servicio de Sears. Roebuck and Co.
McMarque de commerce / MDMarque deposee de Sears, Roebuck and Co. © Sears. Roeb=_ckand Co.
Part No.: 3828A2.0399E