Documents: Go to download!
- User Manual - (English, Spanish)

- What’s included
- Before you start
- Operations
- Maintenance
- Troubleshooting
Table of contents
Owner's Guide Washer & Dryer
What’s included
Make sure all the parts are included in the product package. If you have a problem with the dryer or the parts, contact a local Samsung customer center or the retailer.
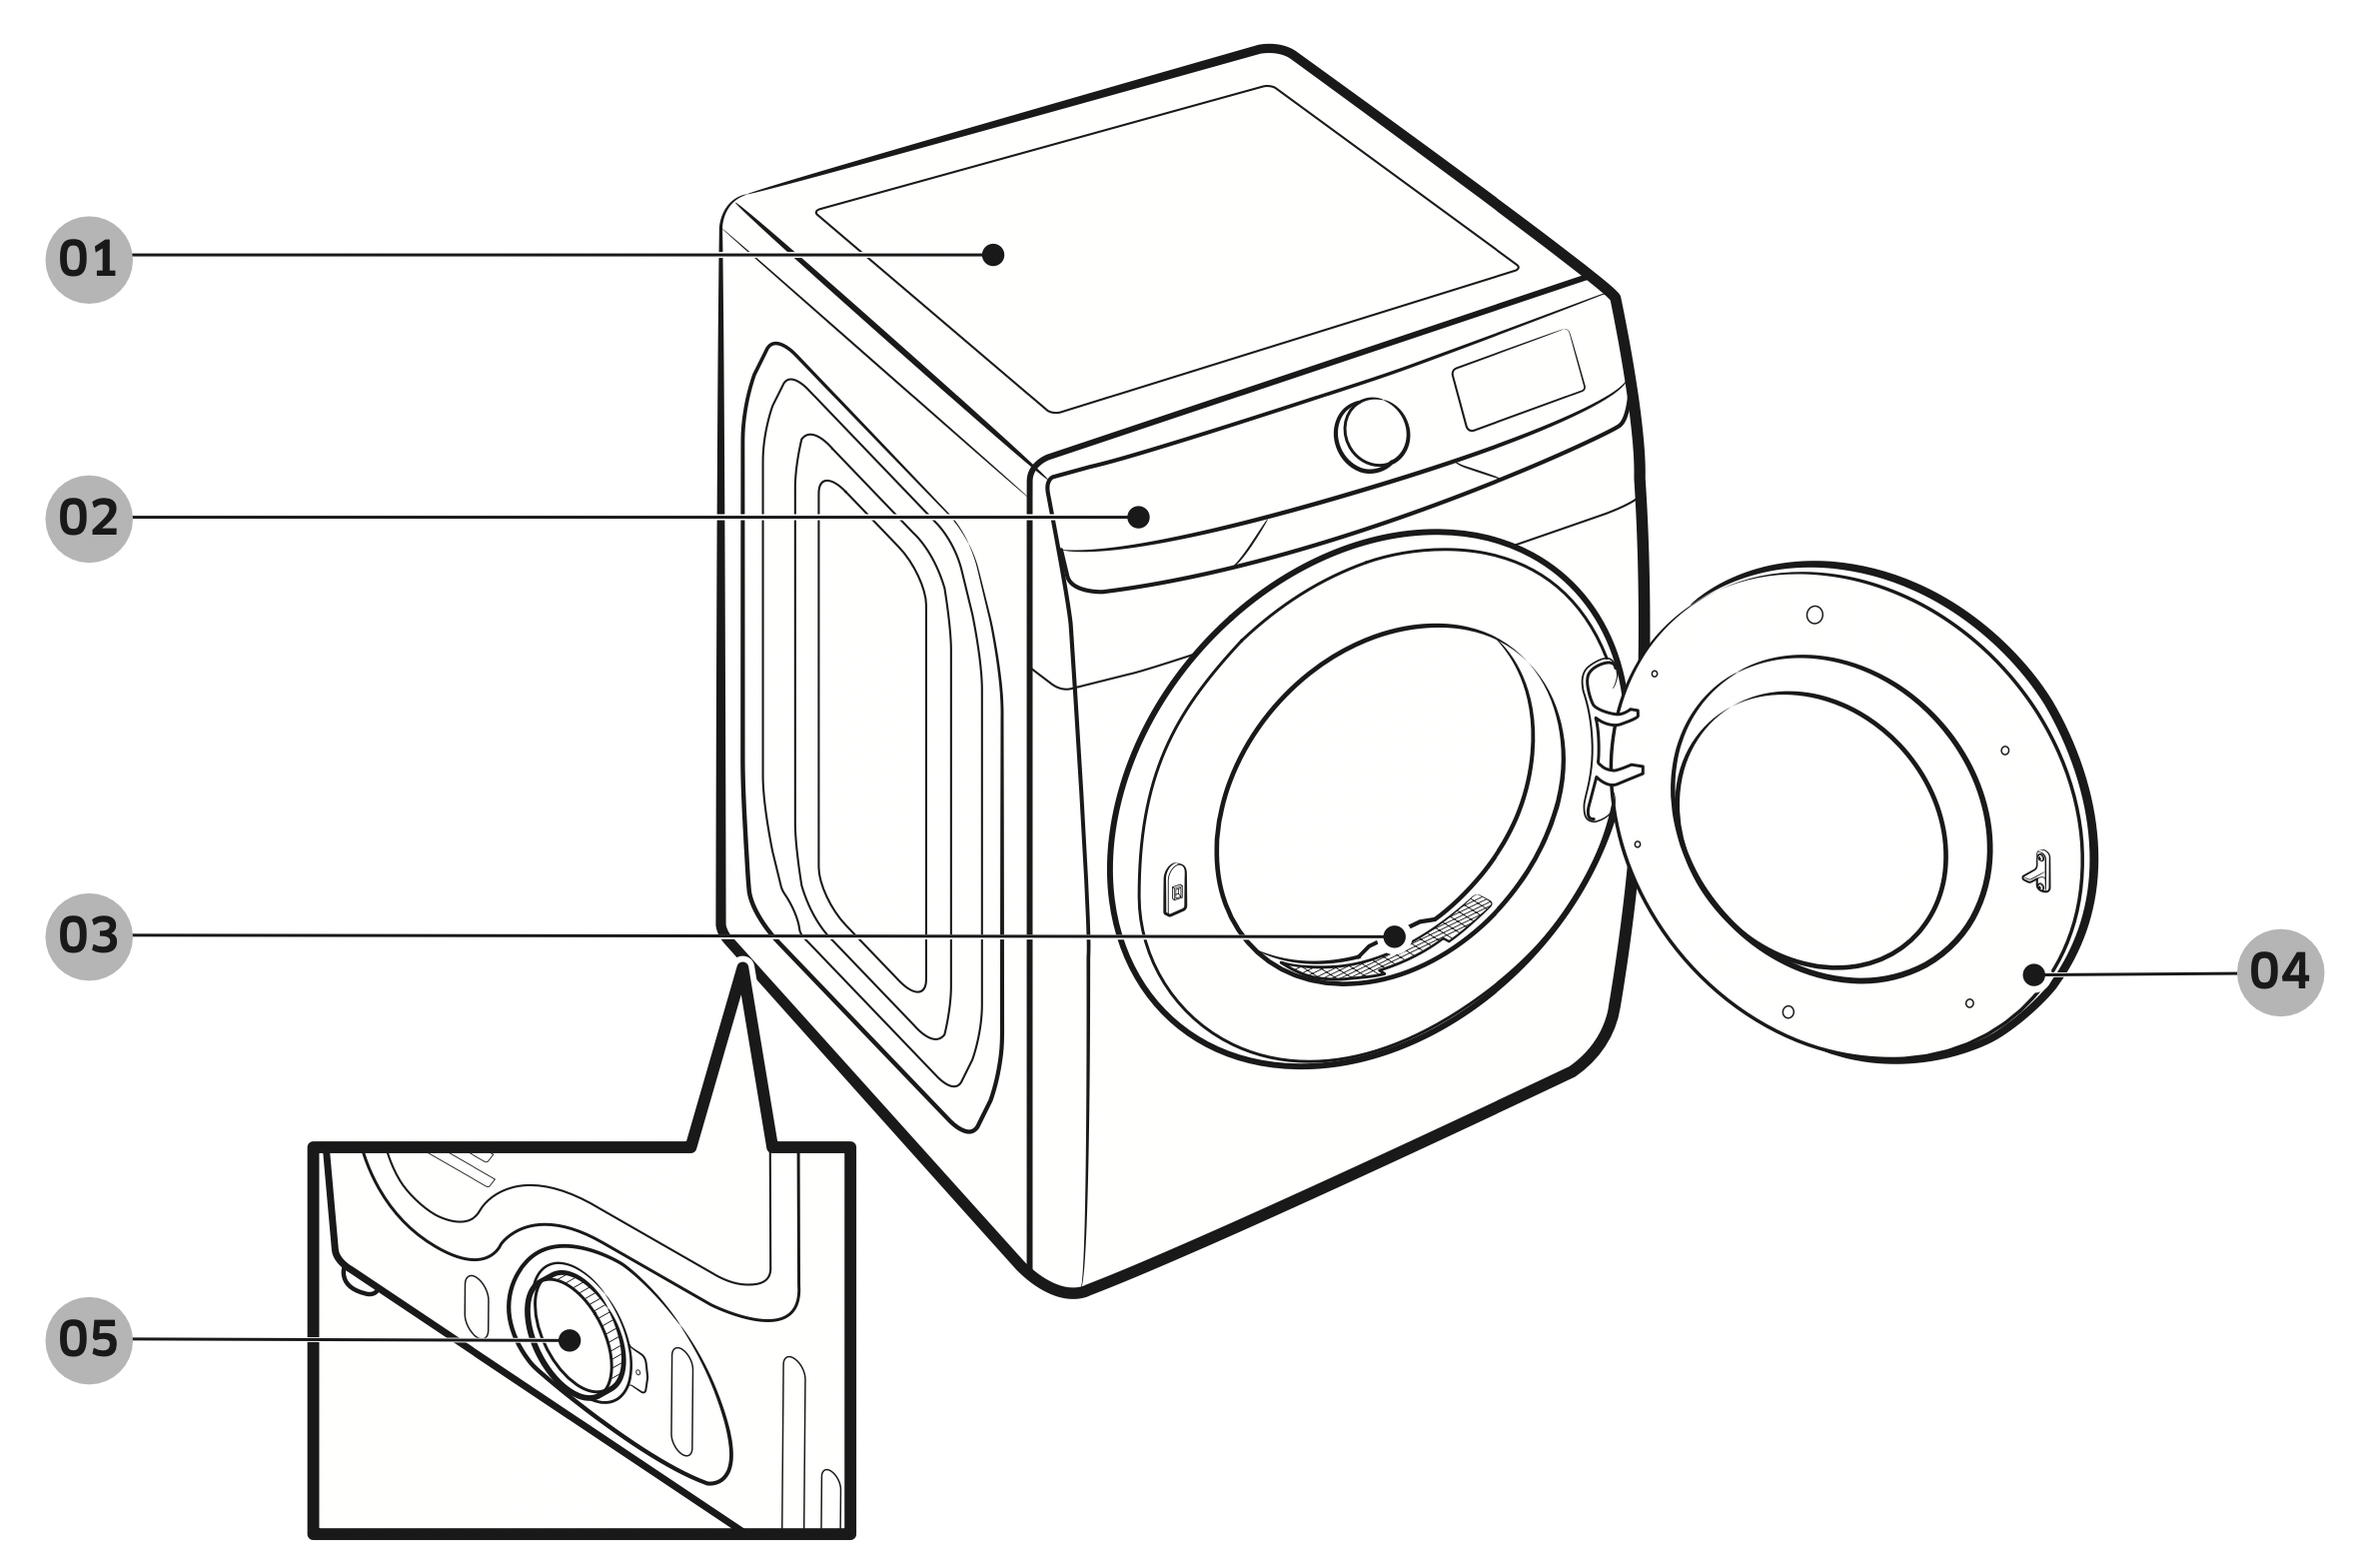
- Worktop
- Control panel
- Lint filter
- Door
- Exhaust duct
Before you start
Here are a few things you should know before starting your dryer.
Sort and load
- Put one wash load in the dryer at a time.
- Do not mix heavy and lightweight items together.
- To improve drying efficiency for one or two items, add a dry towel to the load.
- For best results, untangle items before inserting them into the dryer. Tangled items may degrade the drying efficiency or cause the door to open.
- Overloading reduces the tumbling action, resulting in uneven drying and wrinkling.
- Unless recommended on the care label, do not dry woolens or fiberglass items.
- Avoid drying unwashed items.
- Do not dry items soiled with oil, alcohol, gasoline, etc.
Functional prerequisite
Lint filter
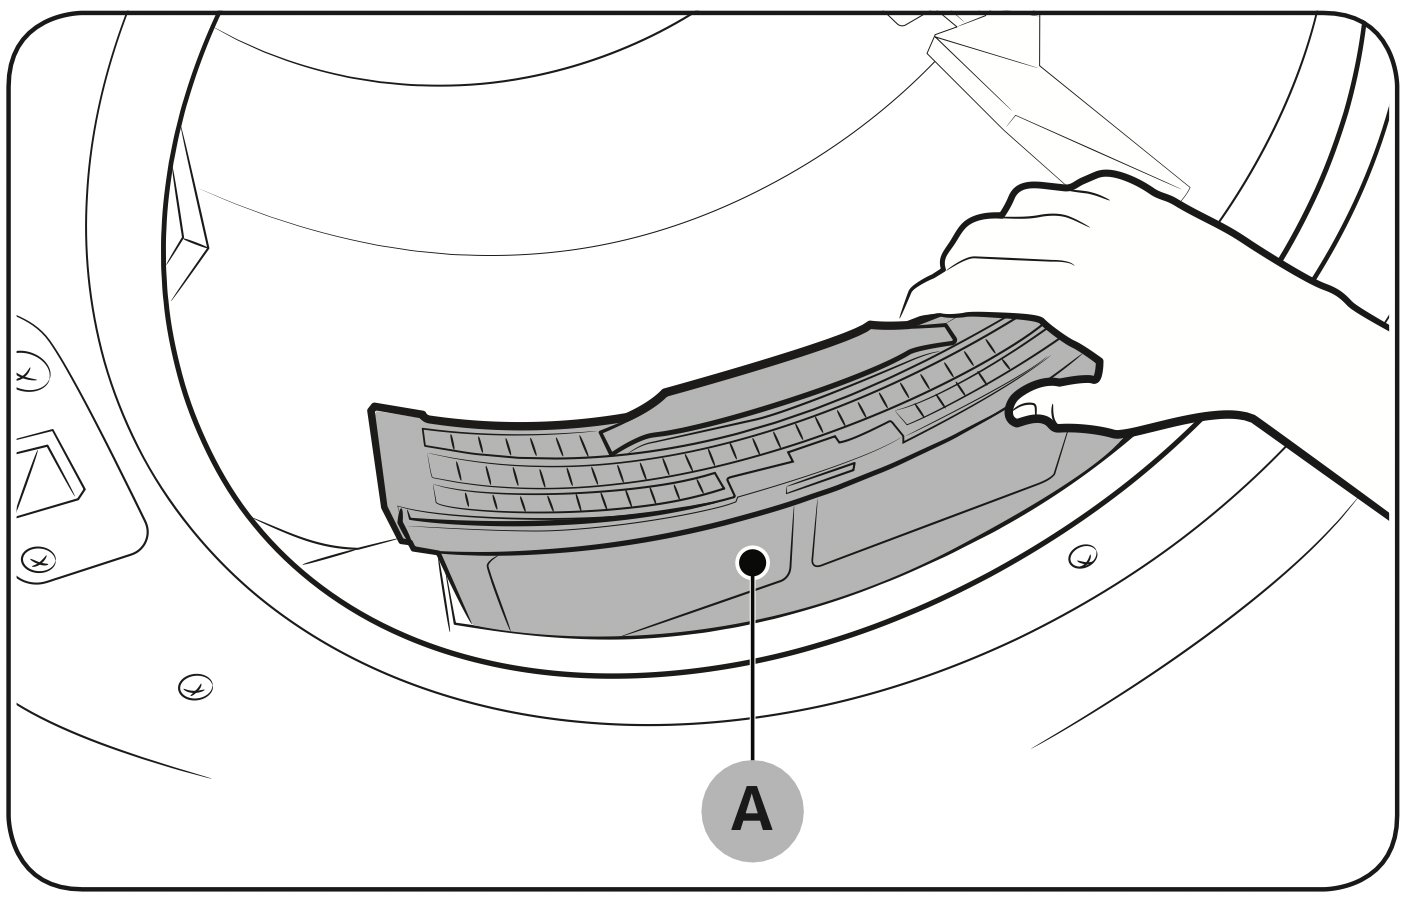
To prevent a risk of fire, make sure to clean the lint filter before or after every load.
- Turn off the dryer.
- Open the door and pull out the lint filter (A) from inside the drum.
- Open the lint filter by separating it at the top.
Remove the lint, and then clean the lint filter. - Close the lint filter, reinsert the lint filter into the dryer, and then close the dryer door.
CAUTION
- Do not operate the dryer without the lint filter in place.
- Do not use a damaged or broken lint filter. This may reduce performance and/or cause fire.
Operations
WARNING: To reduce the risk of fire, electric shock, or injury, read the “Safety information” before operating this appliance.
Control panel
DVE45B6300*
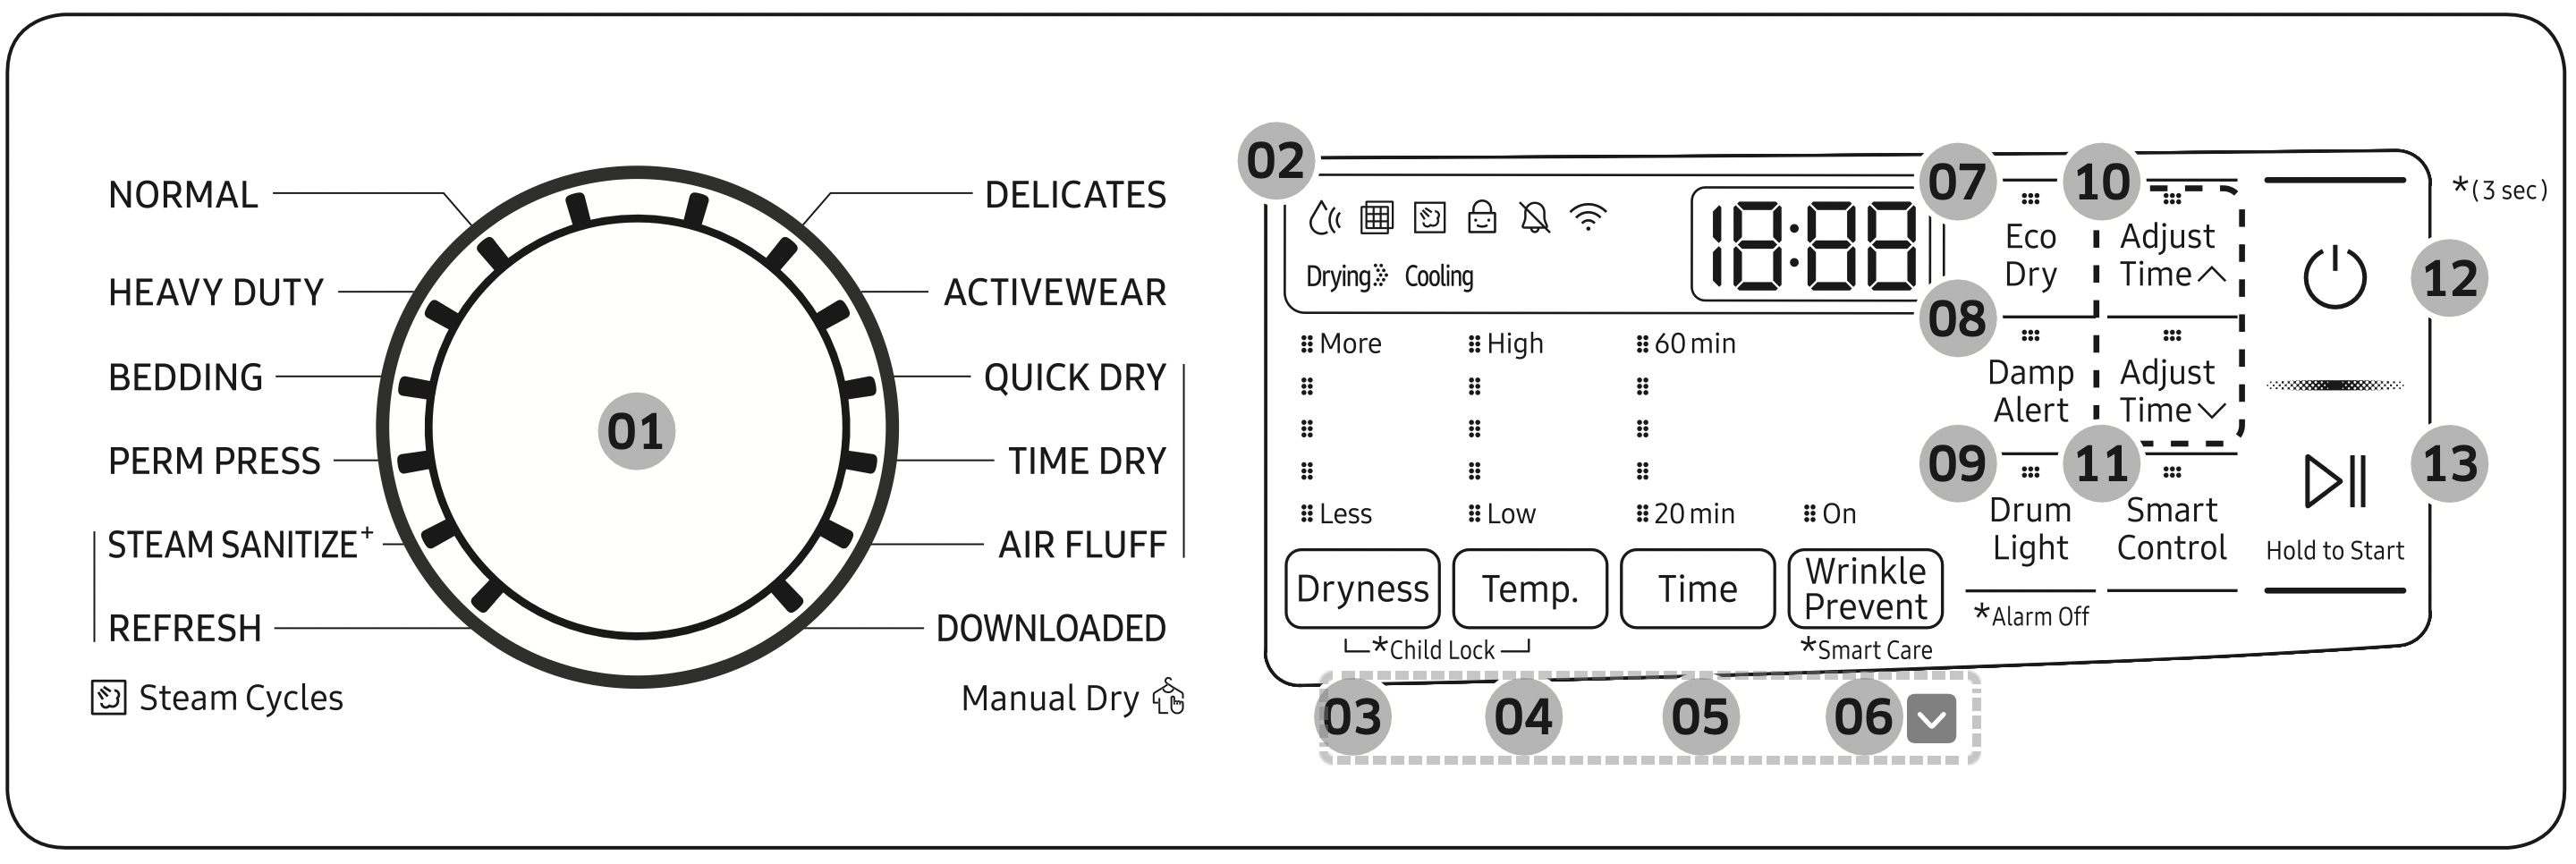

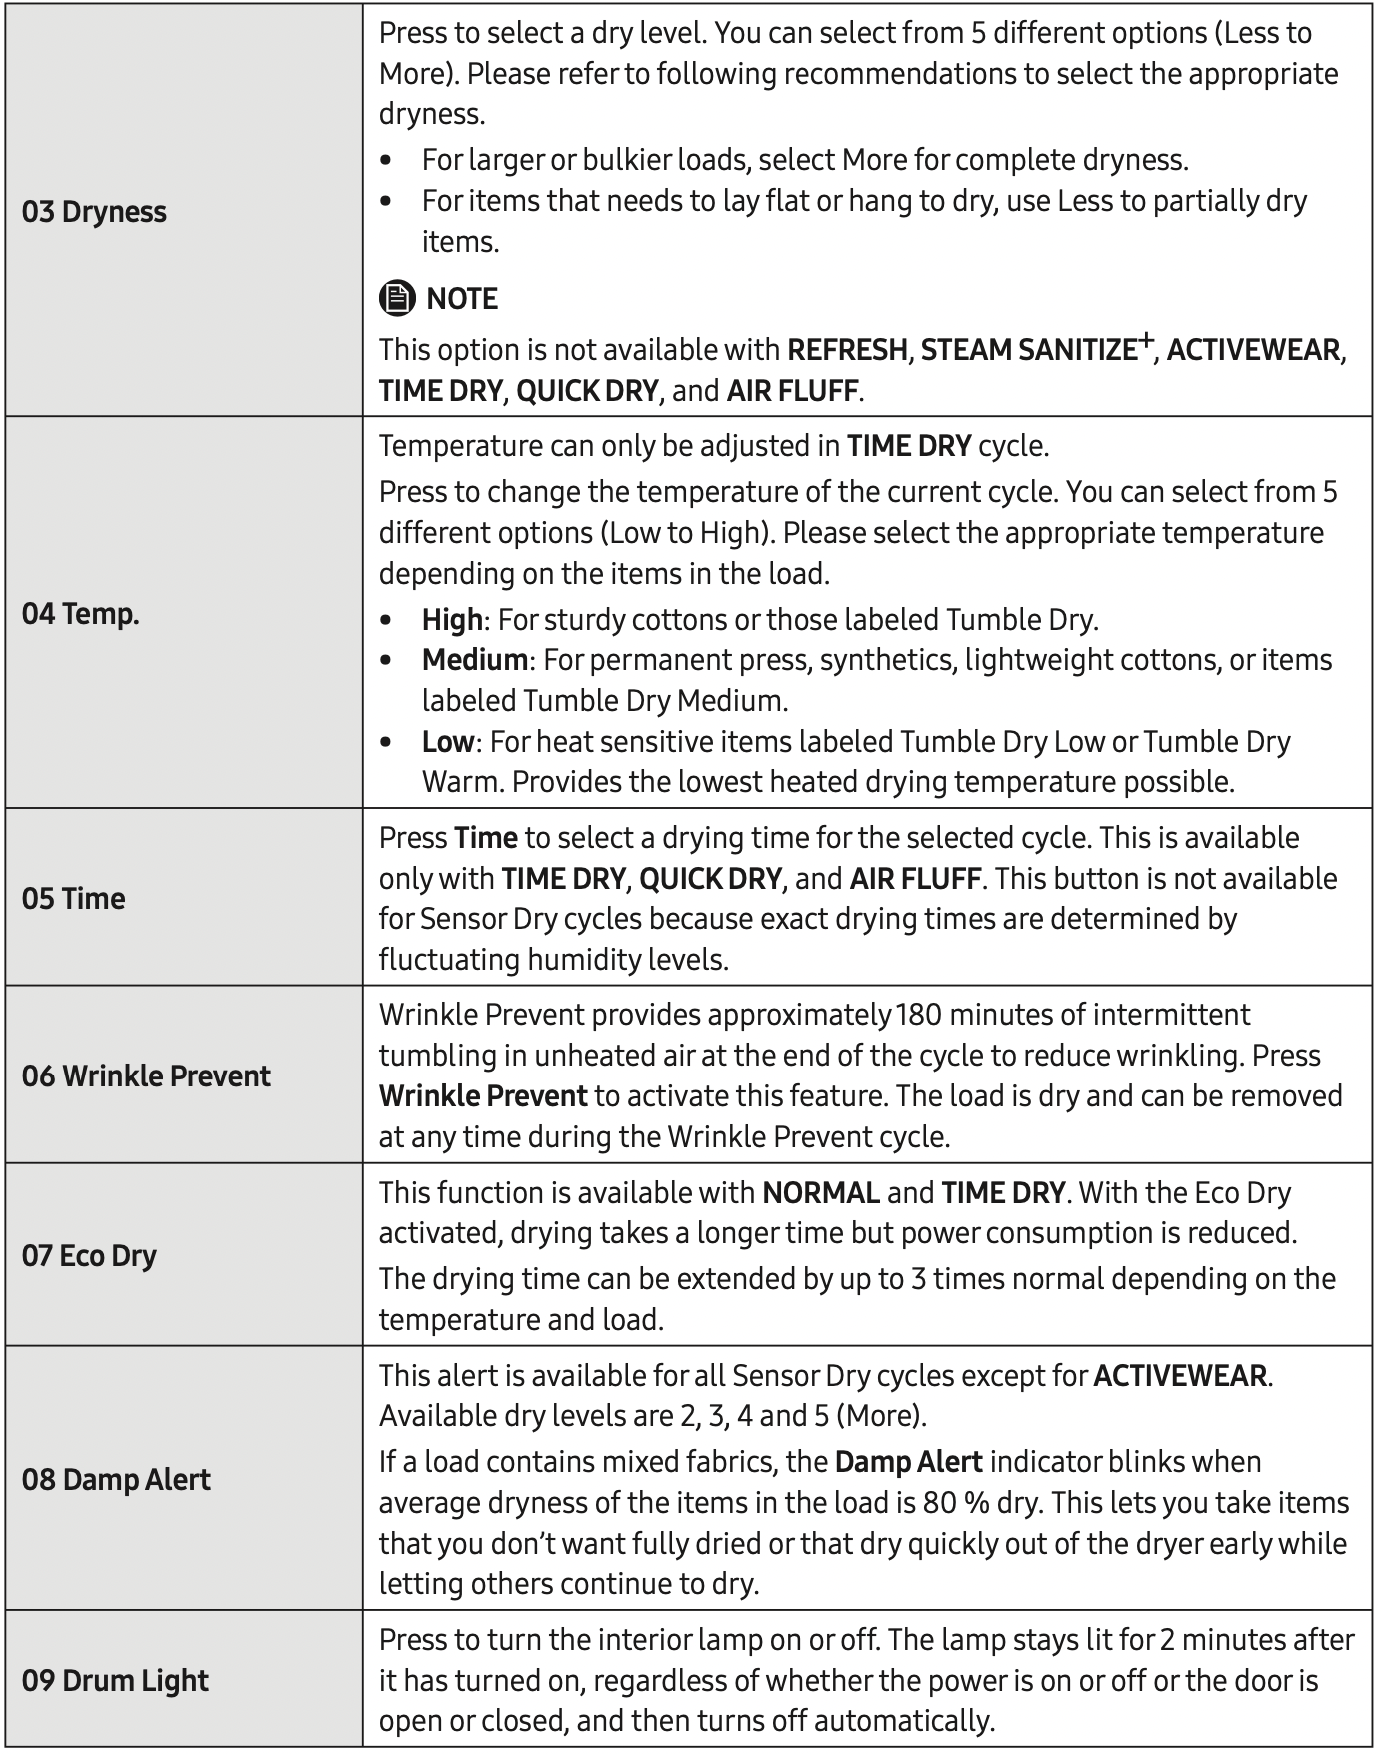
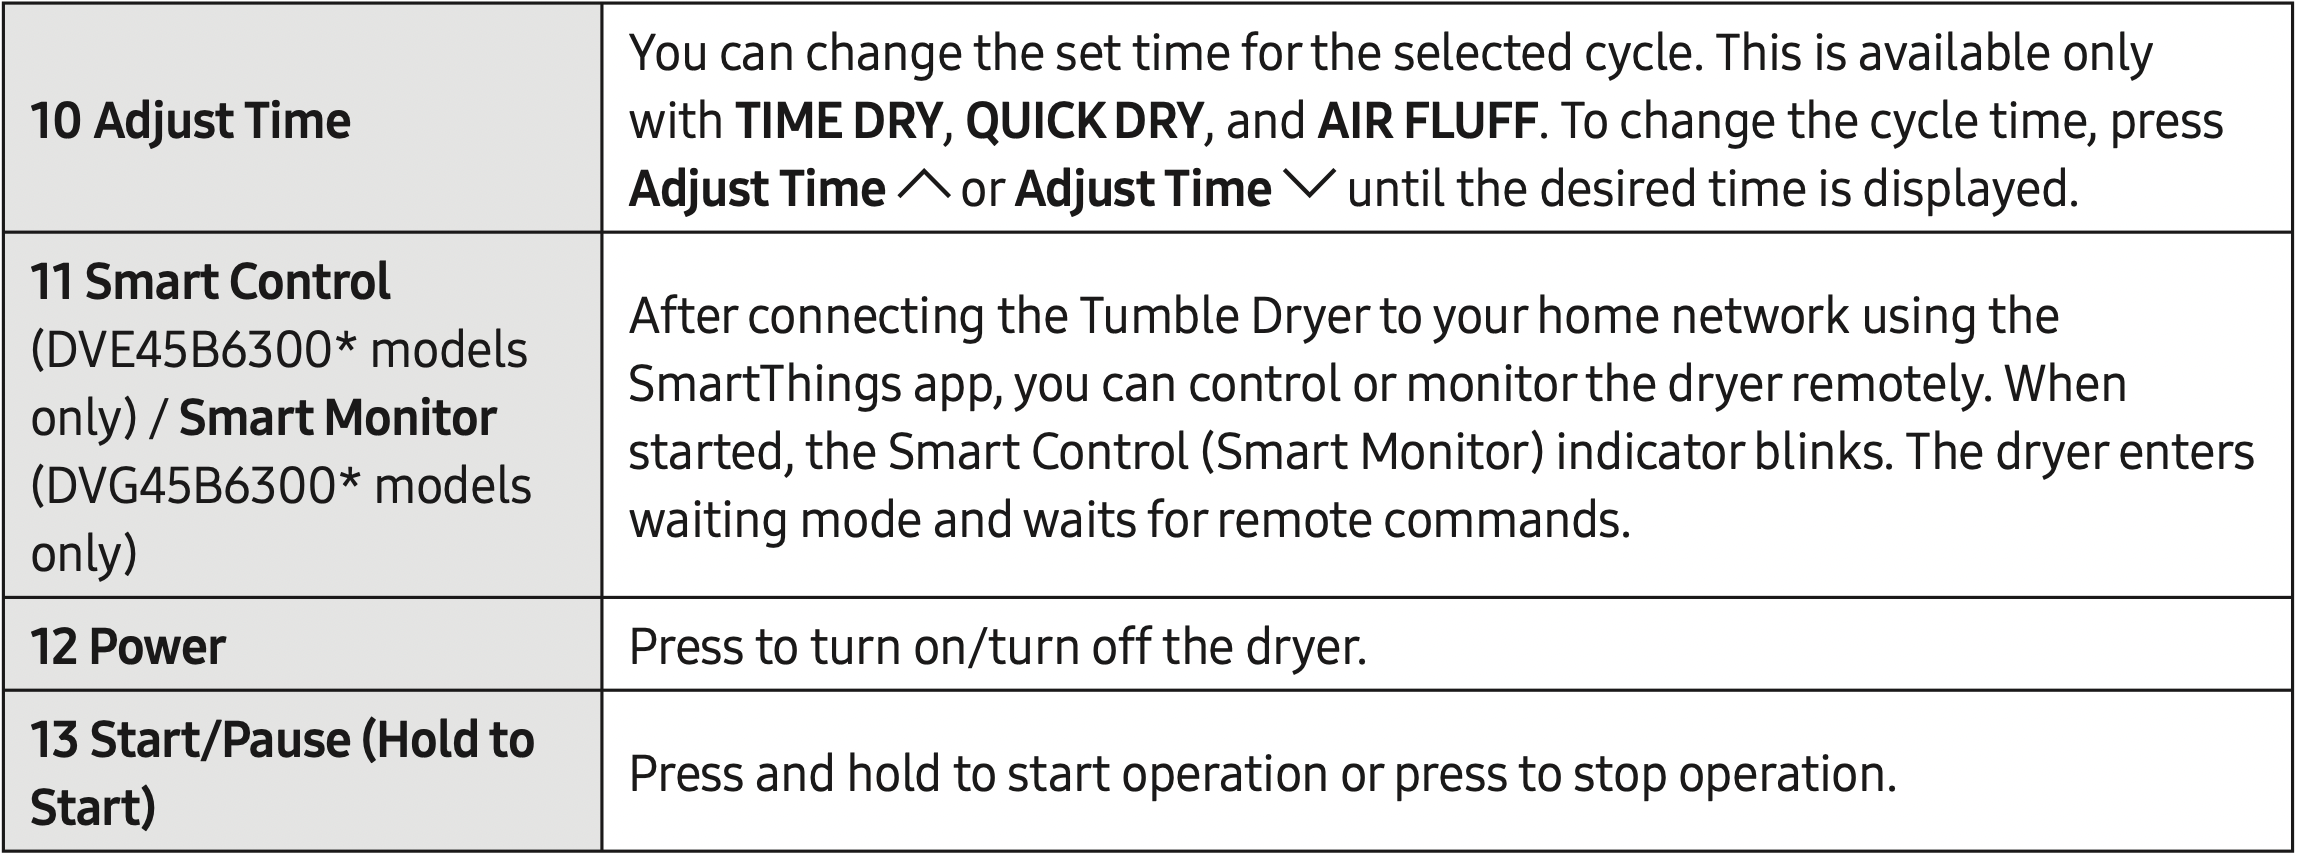
NOTE: Do not take extremely tangled items from your washer and put them into the dryer. They can degrade the drying efficiency of the dryer or cause the door to open. We recommend that you untangle the items before putting them into the dryer. Also, do not put objects on the dryer, especially on the control panel.
CAUTION: Do not spray water directly onto the control panel. This may cause a system failure.
Icon description
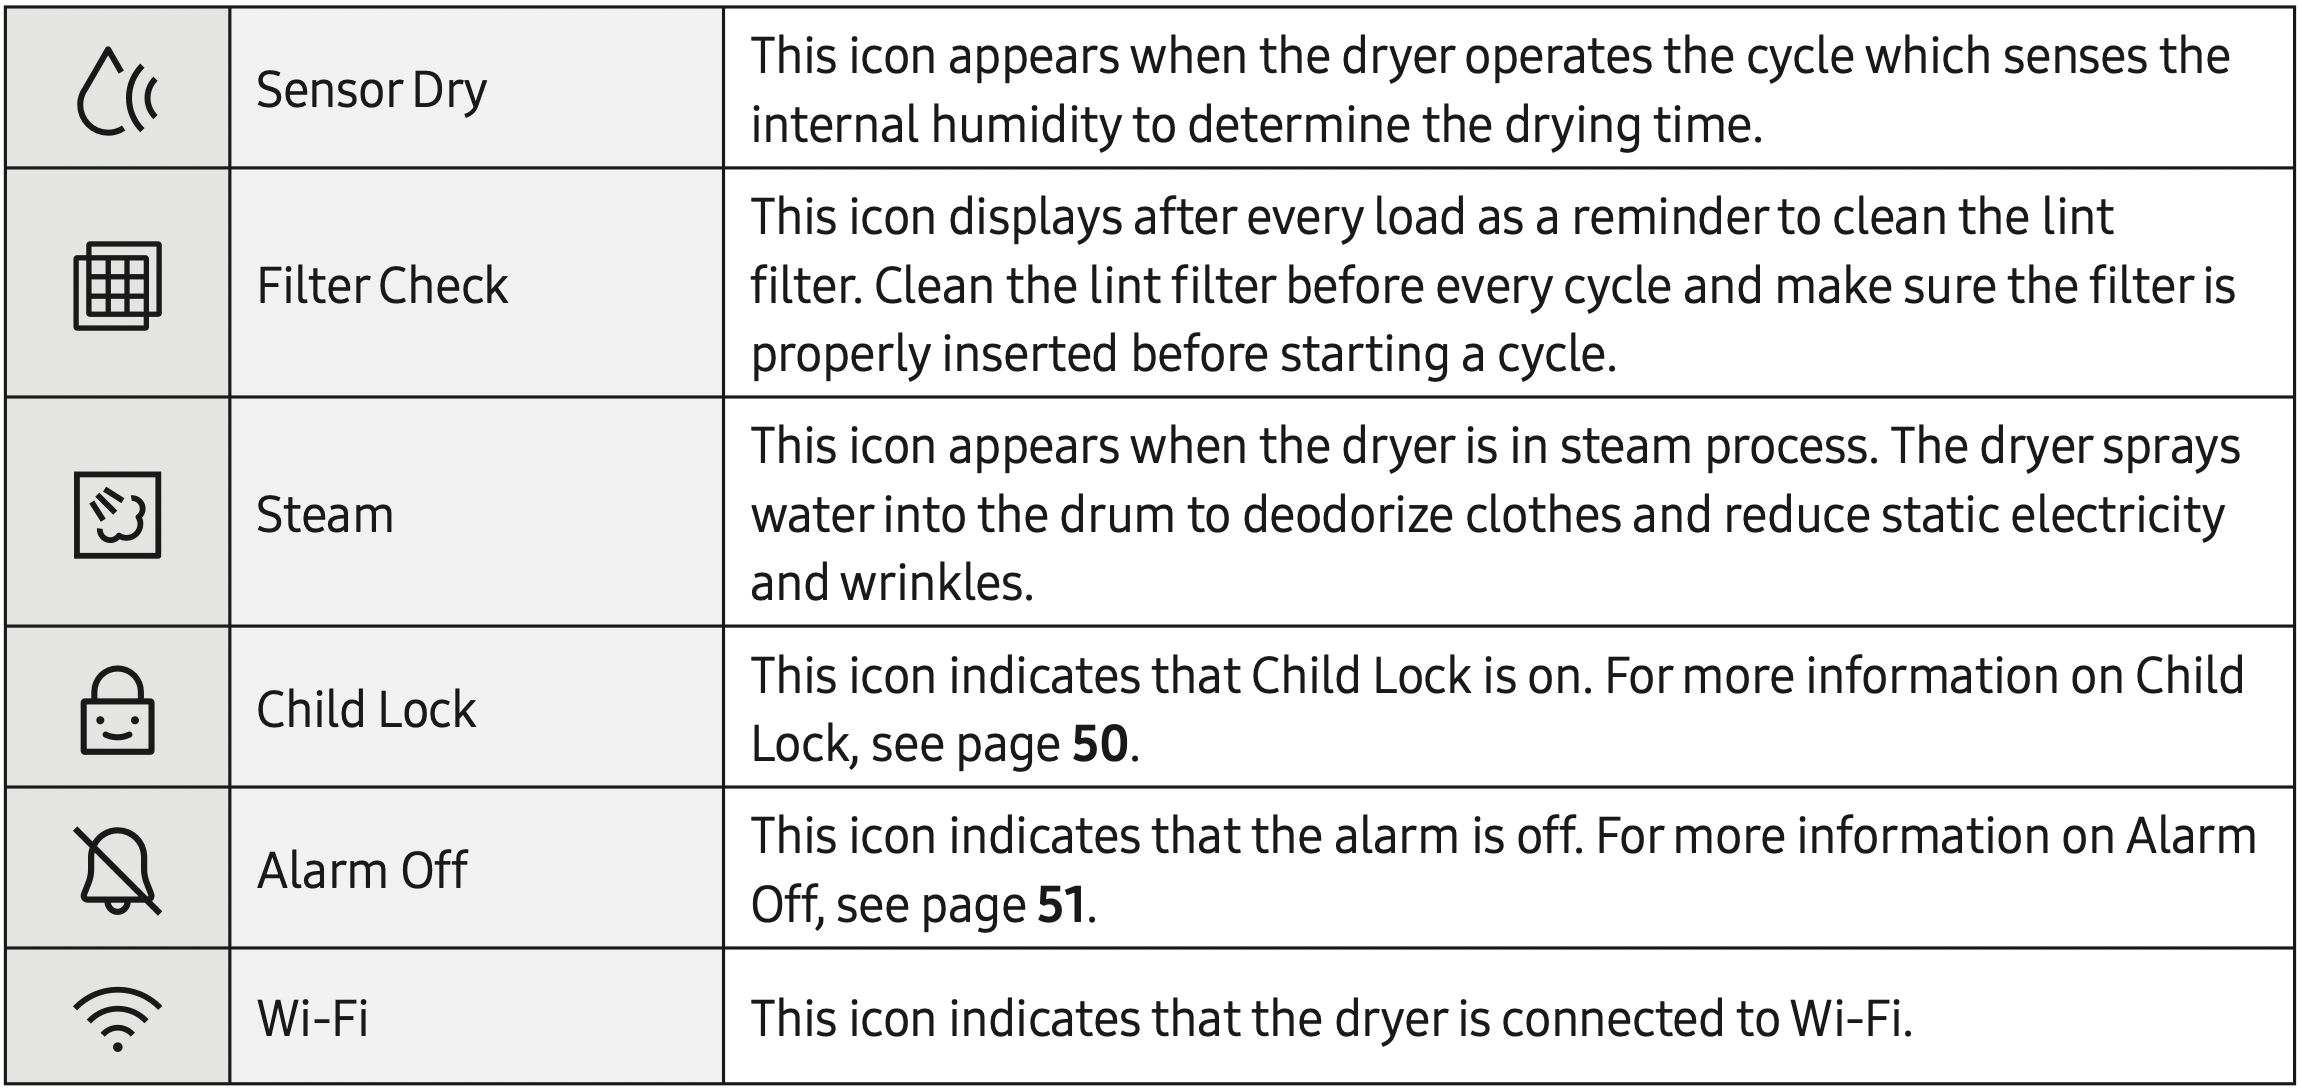
Simple steps to start
- Press Power to turn the dryer on.
- Turn the Cycle Selector to select a cycle.
- Change the cycle settings (Dryness, Temp., and Time) as necessary.
- Select desired options as necessary.
- Press and hold Start/Pause (Hold to Start).
To change the cycle during operation
- Press Start/Pause (Hold to Start) to stop operation.
- Select a different cycle, and repeat steps 2-4 above if necessary.
- Press and hold Start/Pause (Hold to Start) again to start the new cycle.
Cycle overview
Standard Cycles
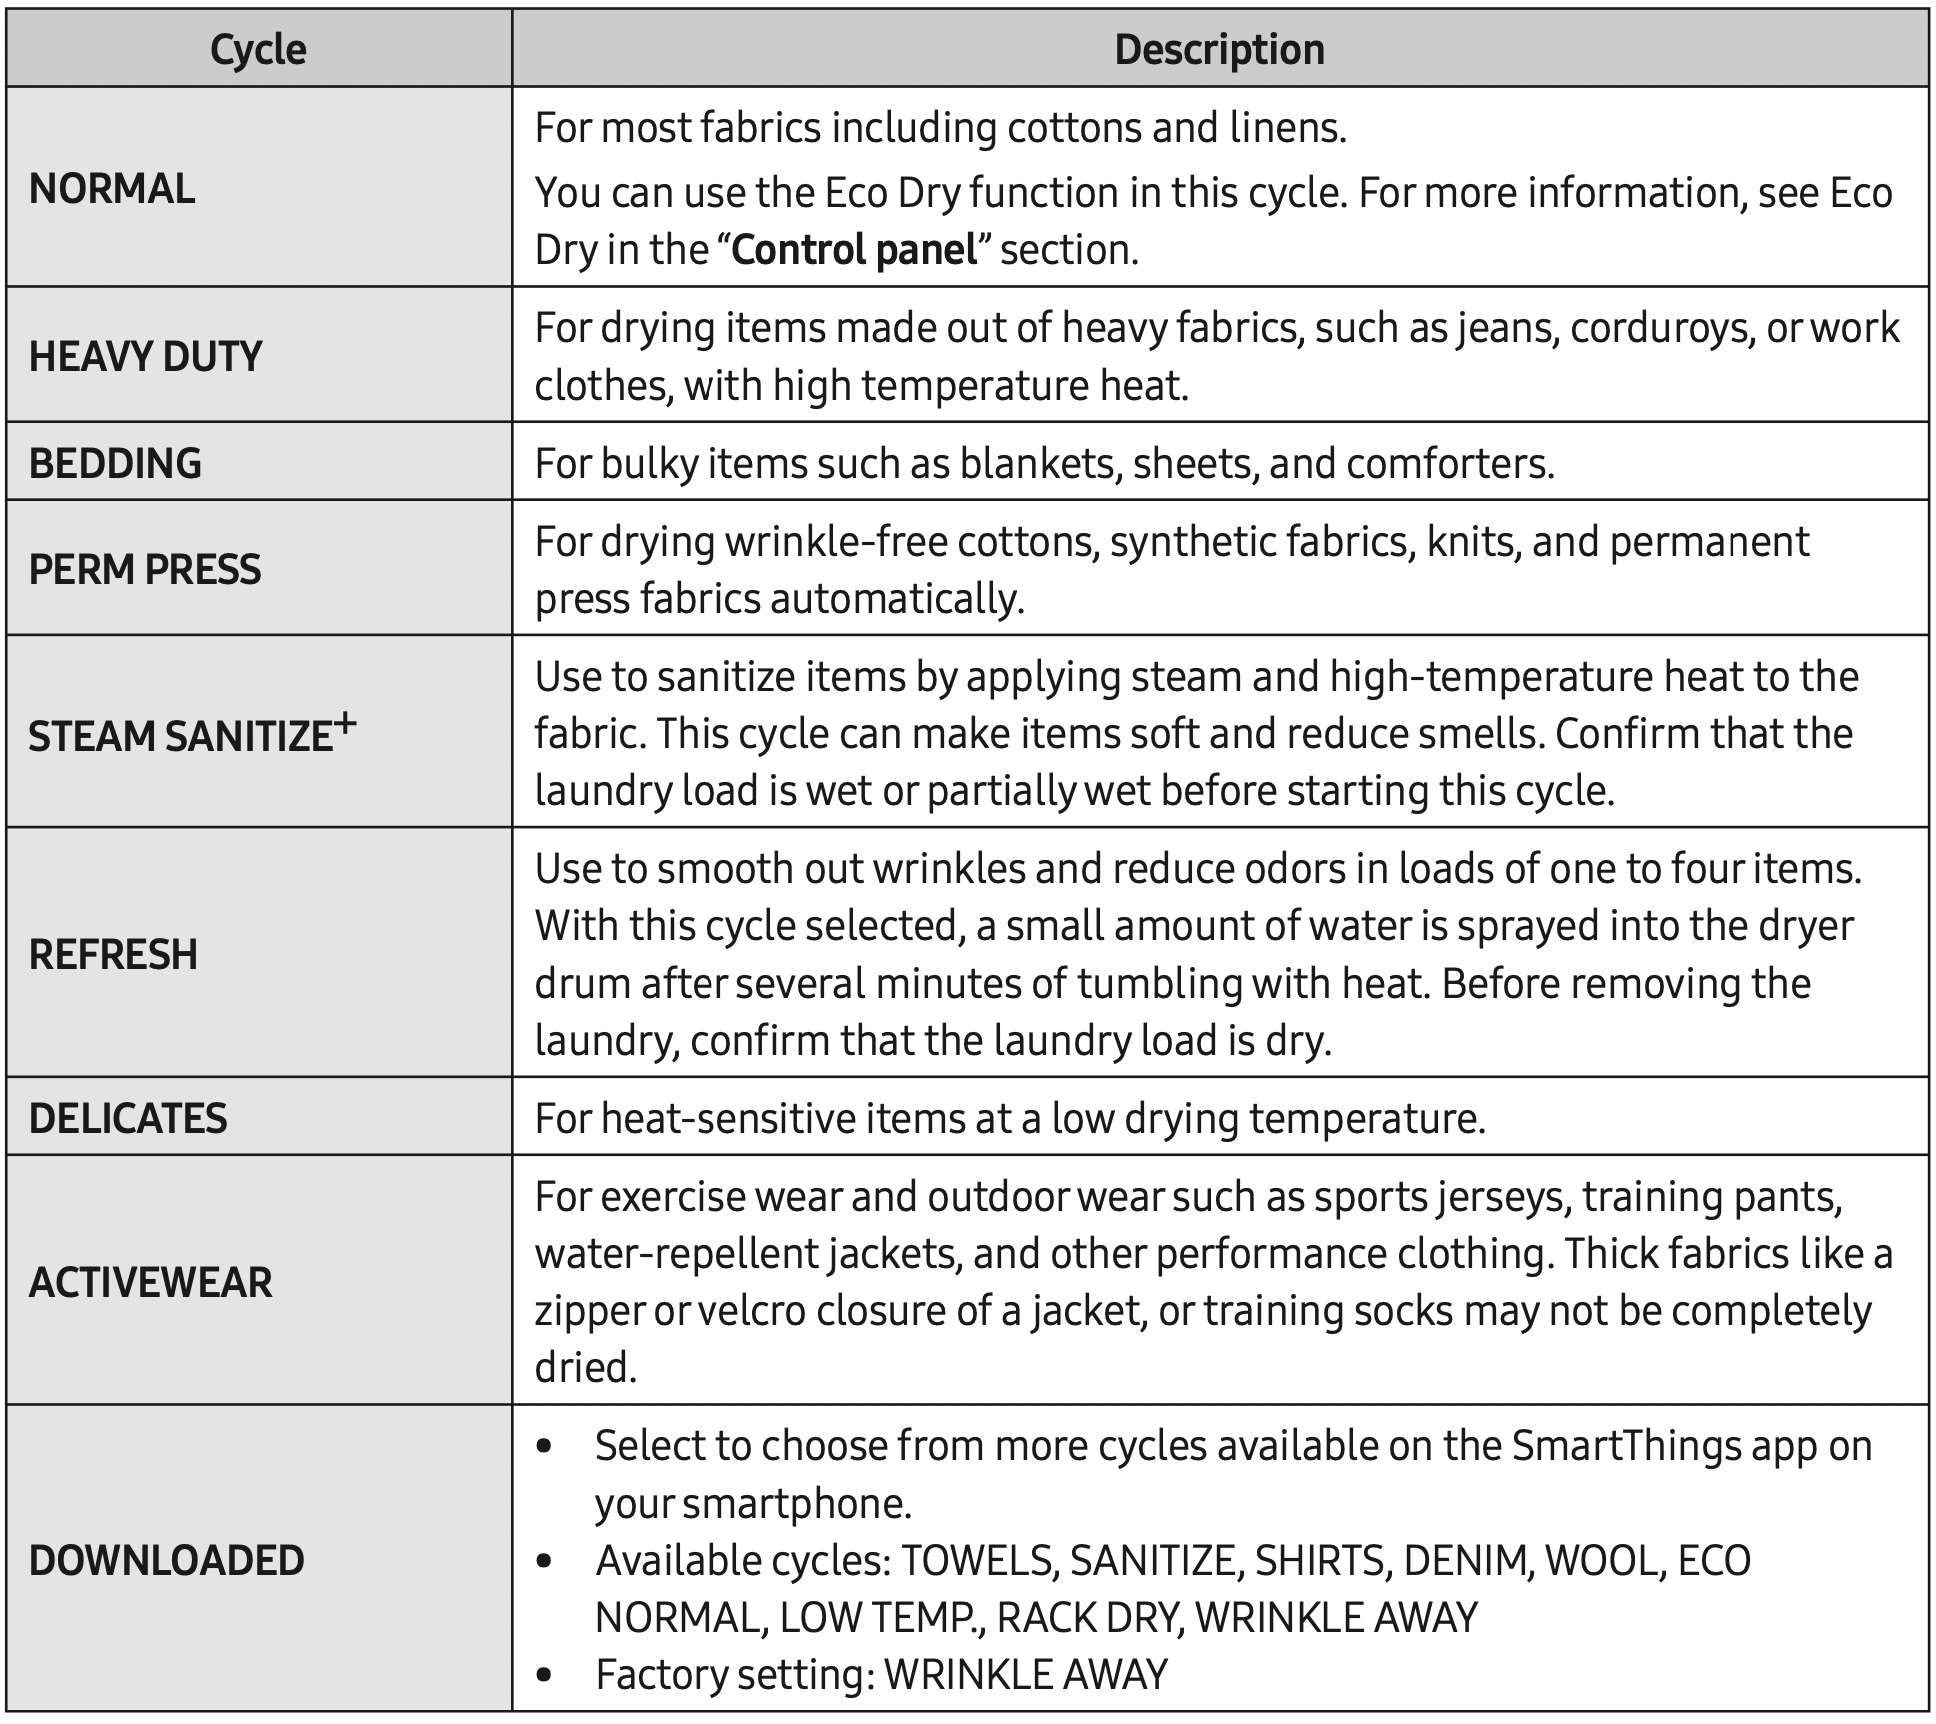
Manual Dry
You can change the drying settings manually to your preference.

Cycle chart
NOTE: For best results, follow the load size recommendations for each dry cycle.
 Large load: Fill the drum to about 3/4 full. Do not add items over this level as they need to tumble freely.
 Medium load : Fill the drum to about 1/2 full.
 Small load : Fill the drum with 3-5 items, not more than 1/4 full.
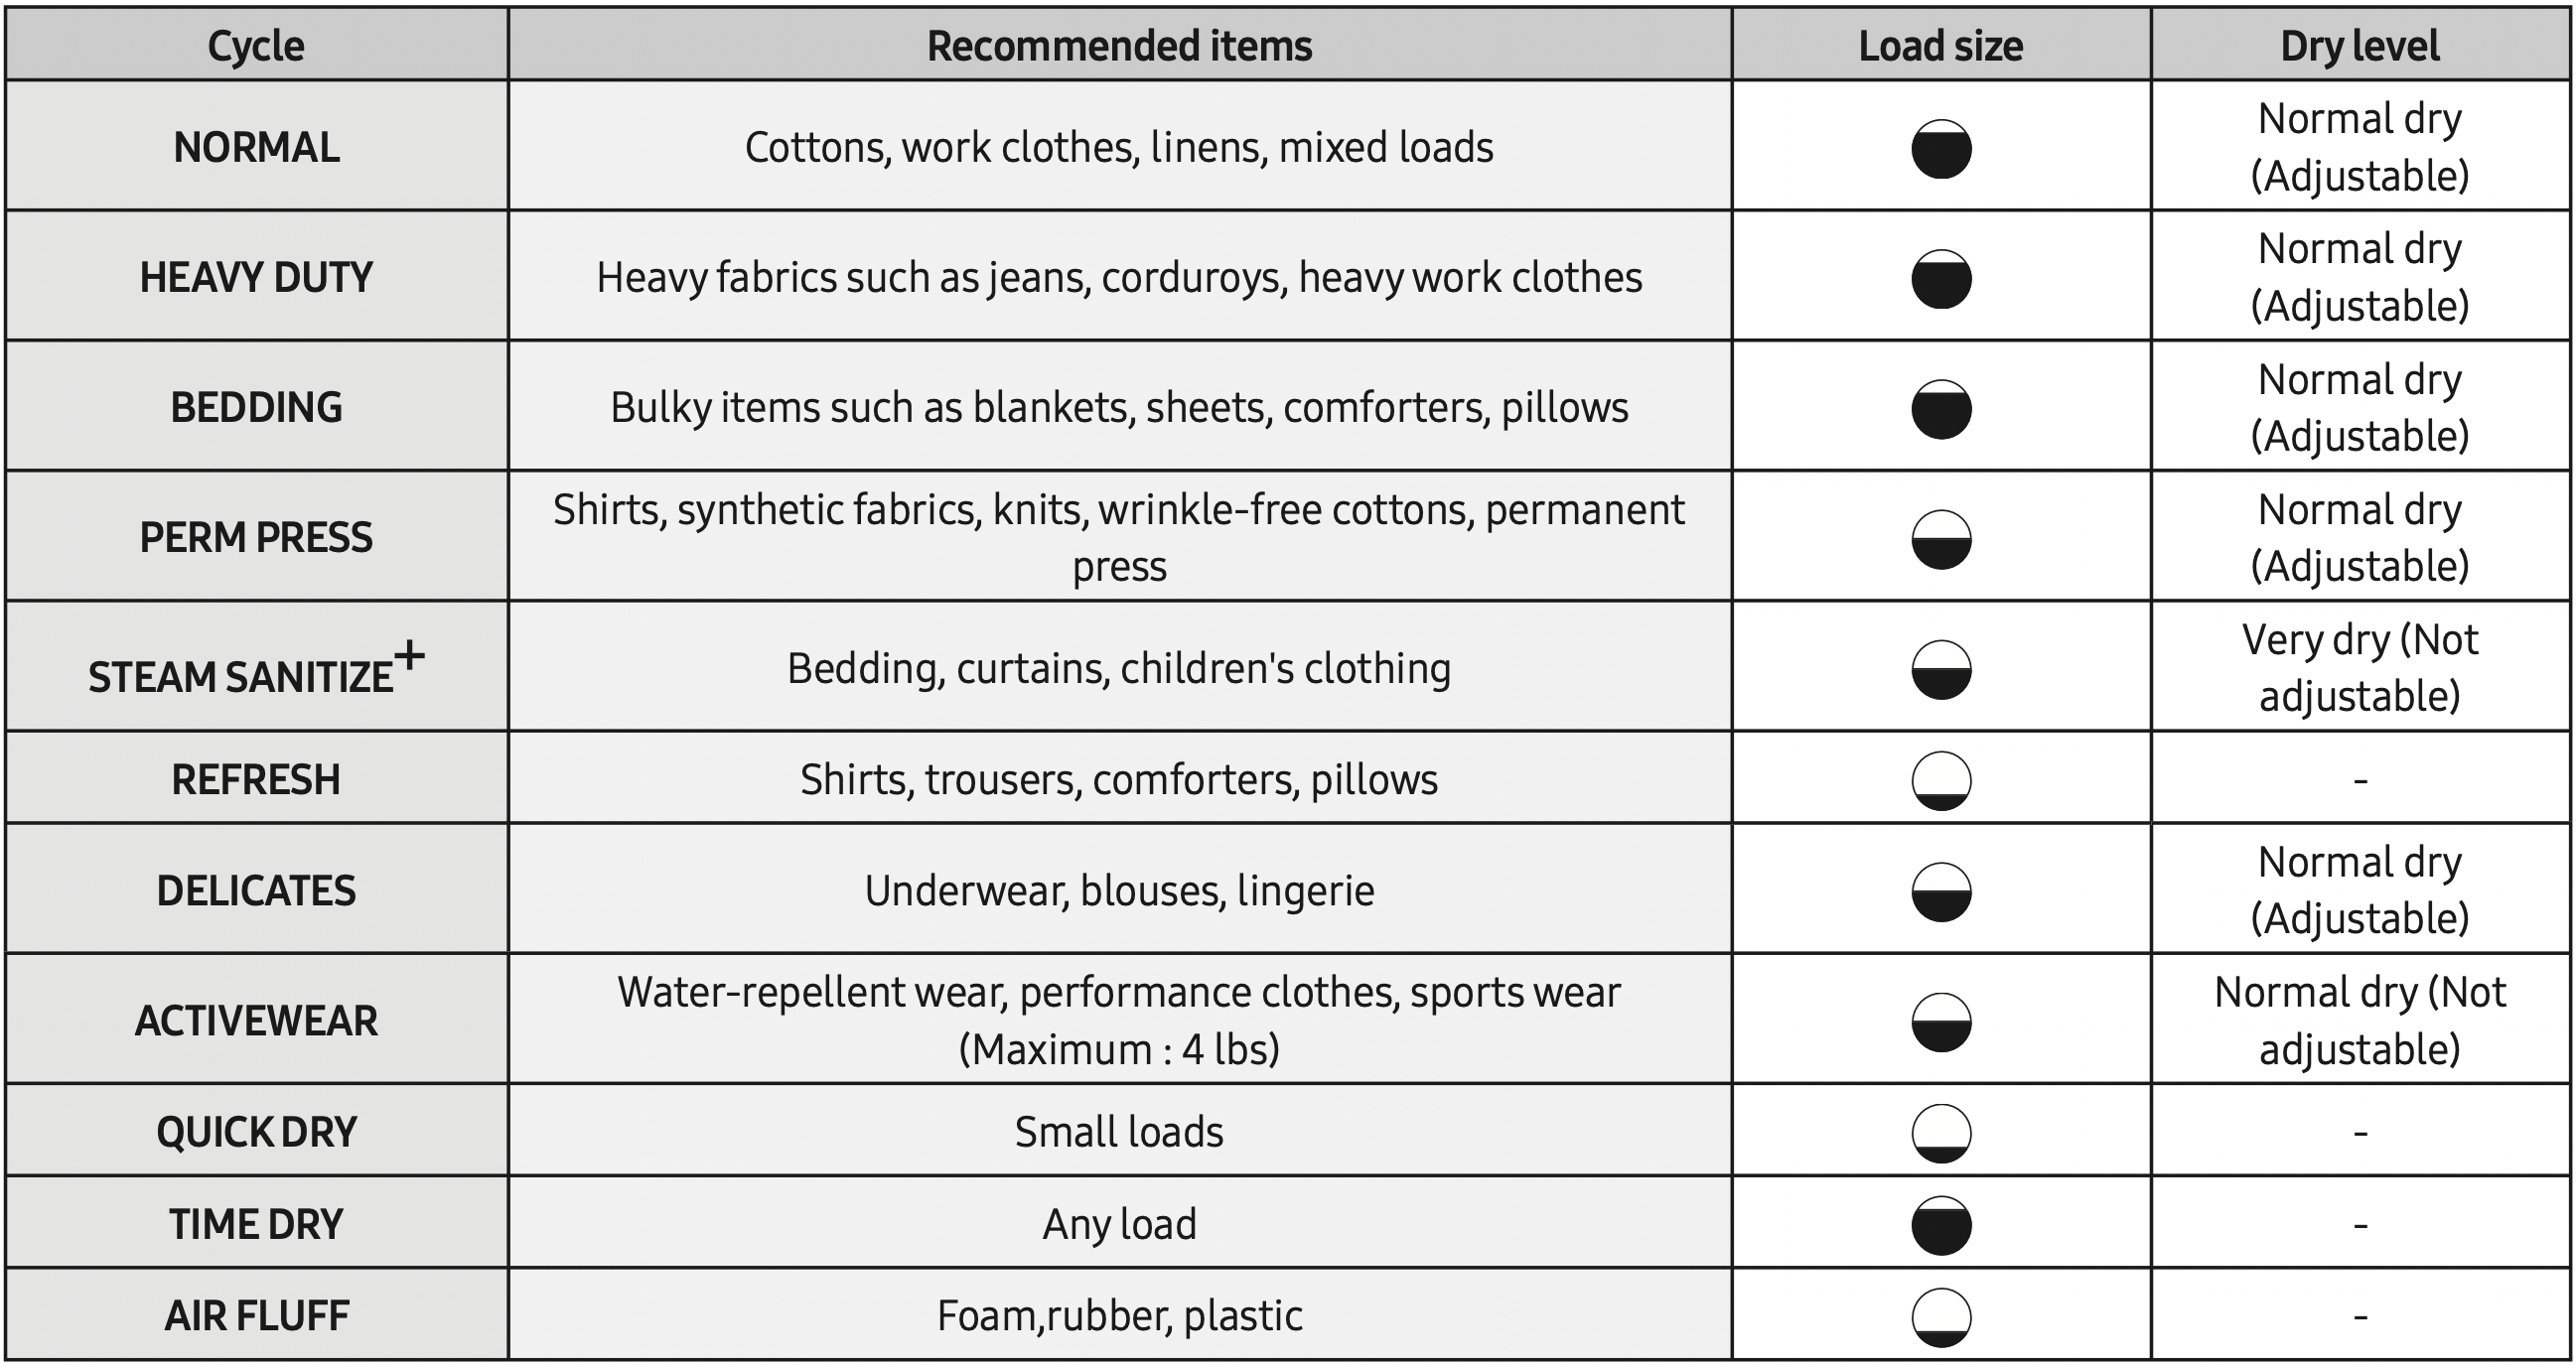
NOTE
 : factory setting,
  : can be selected
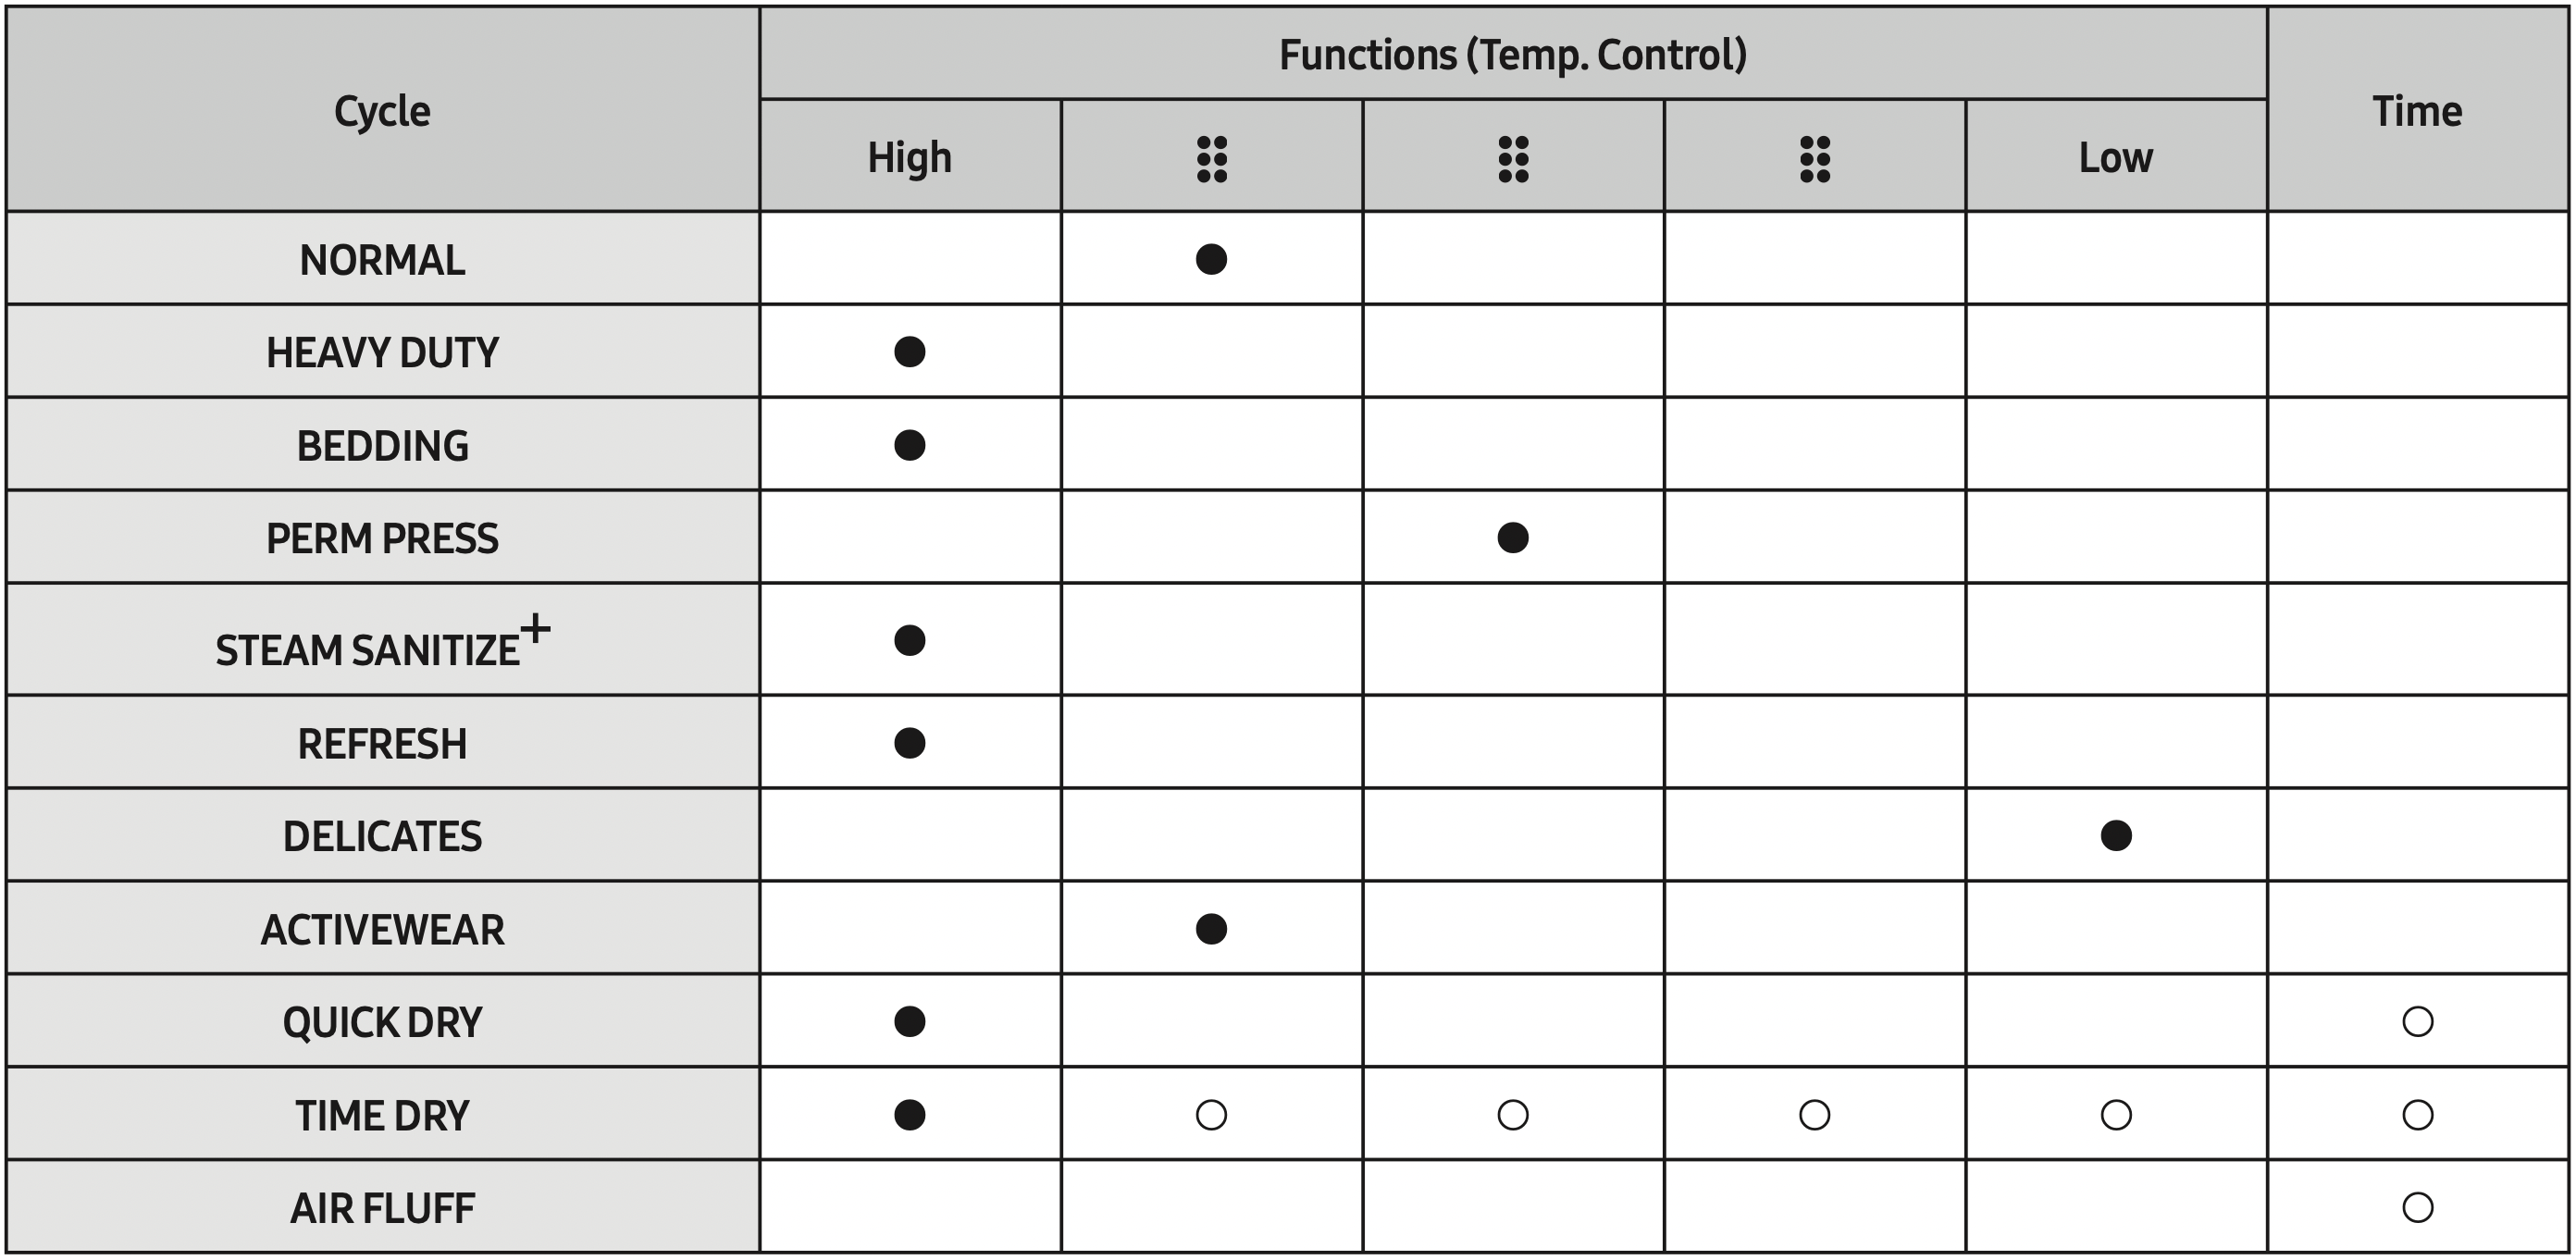
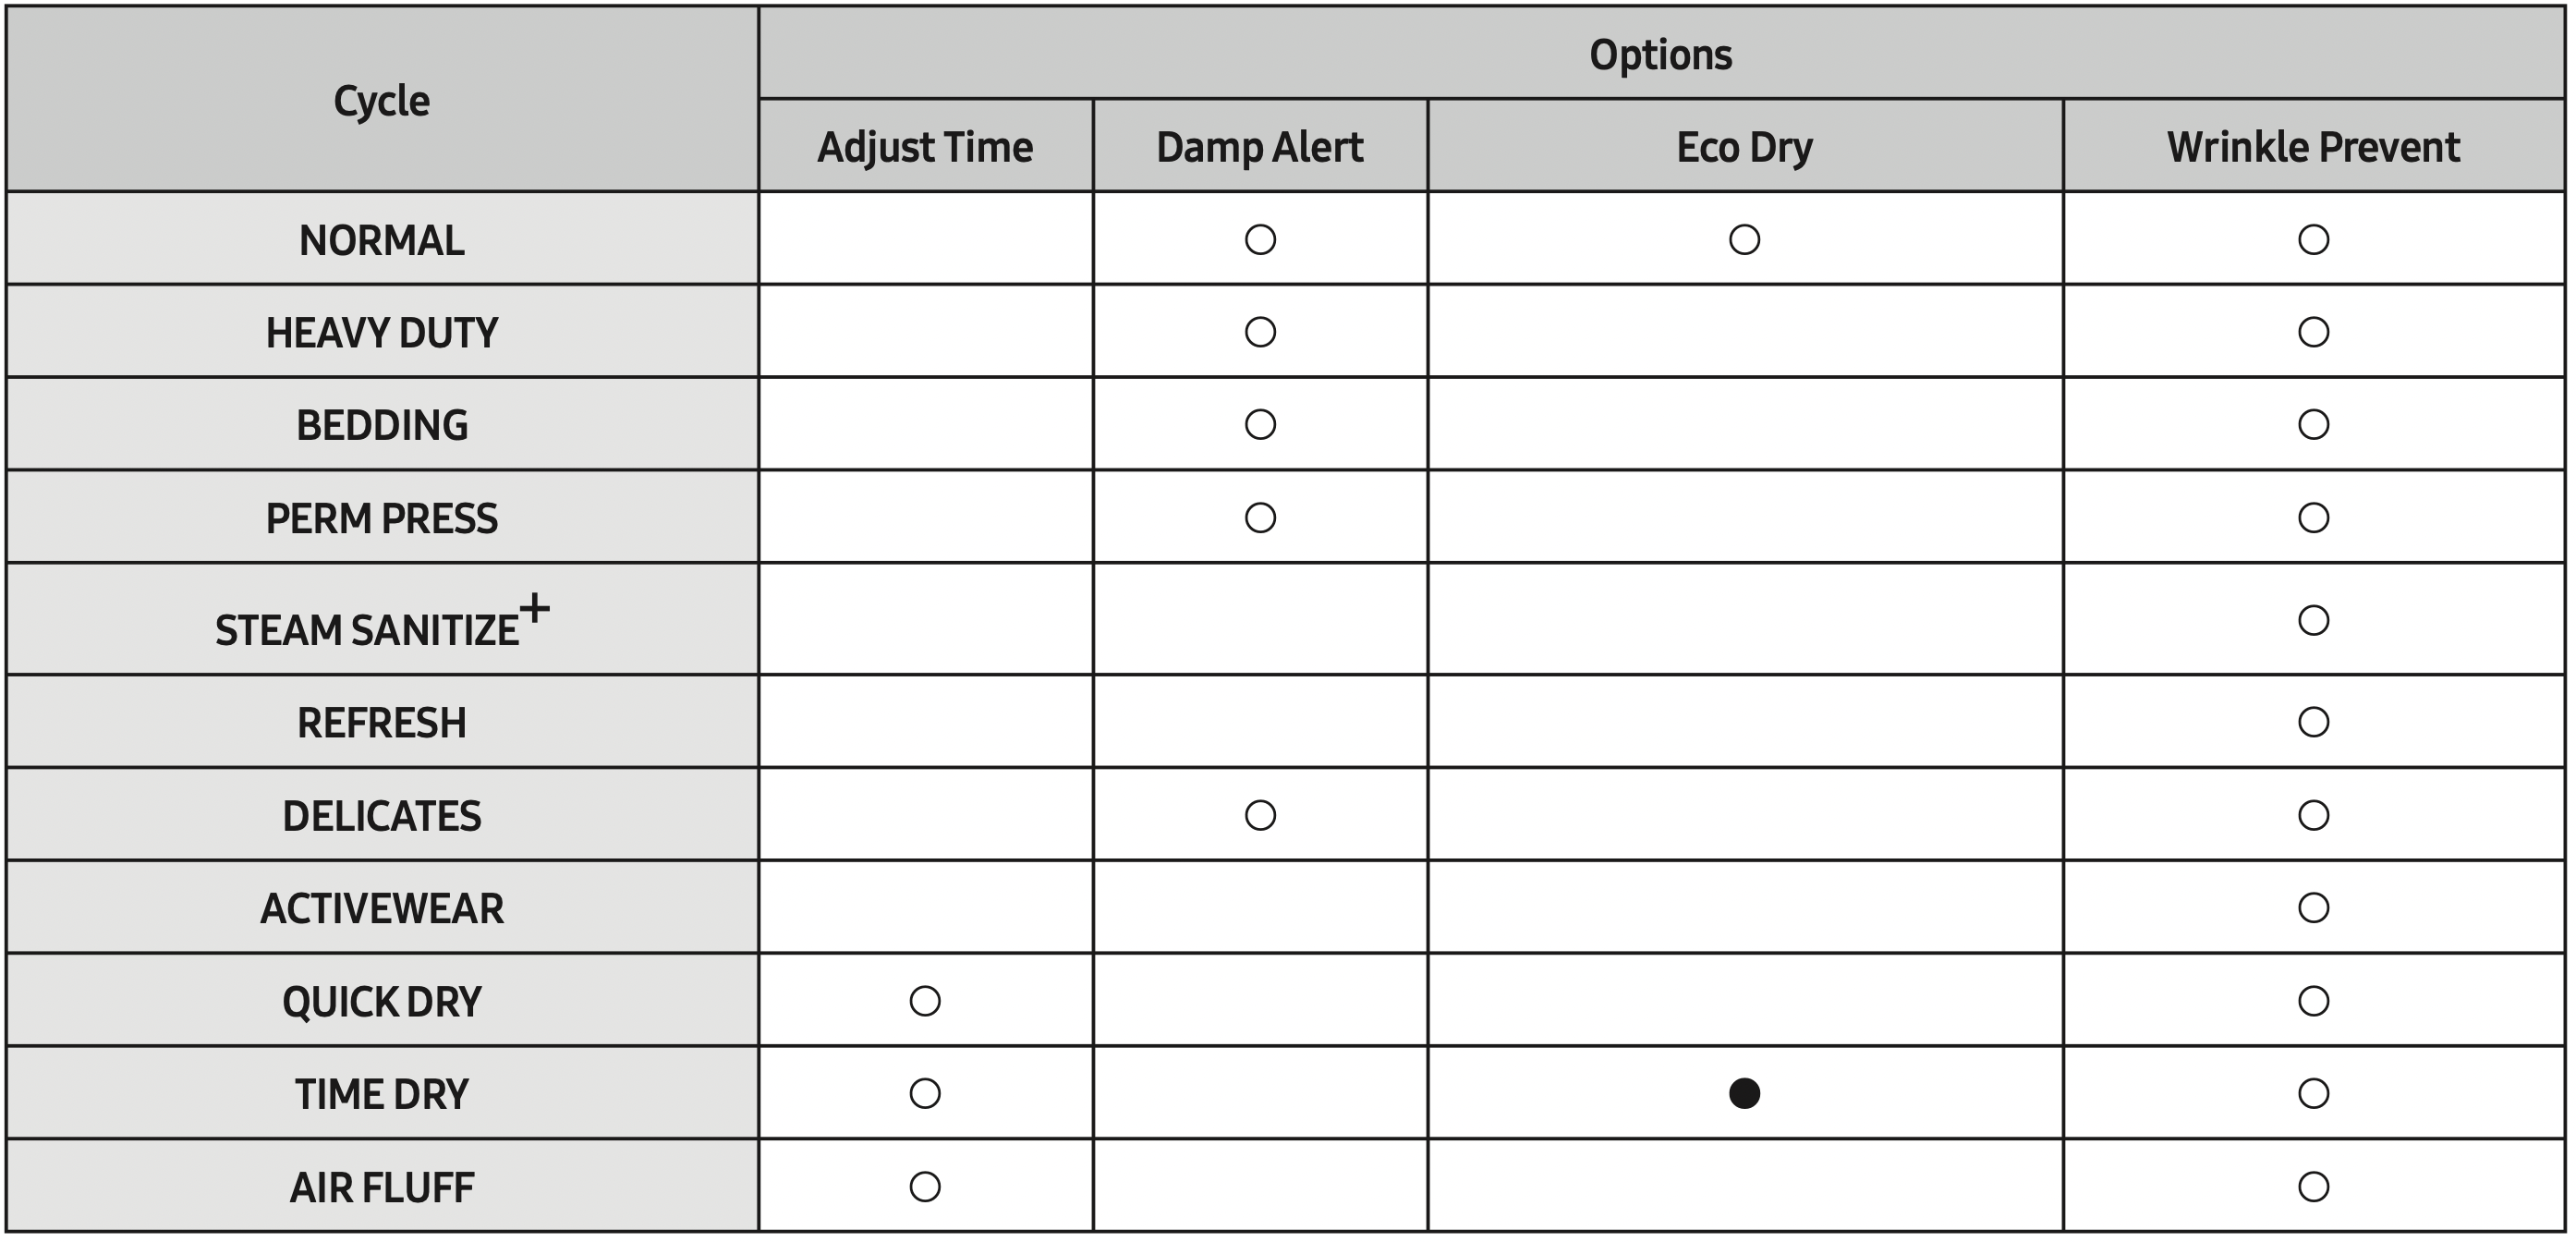
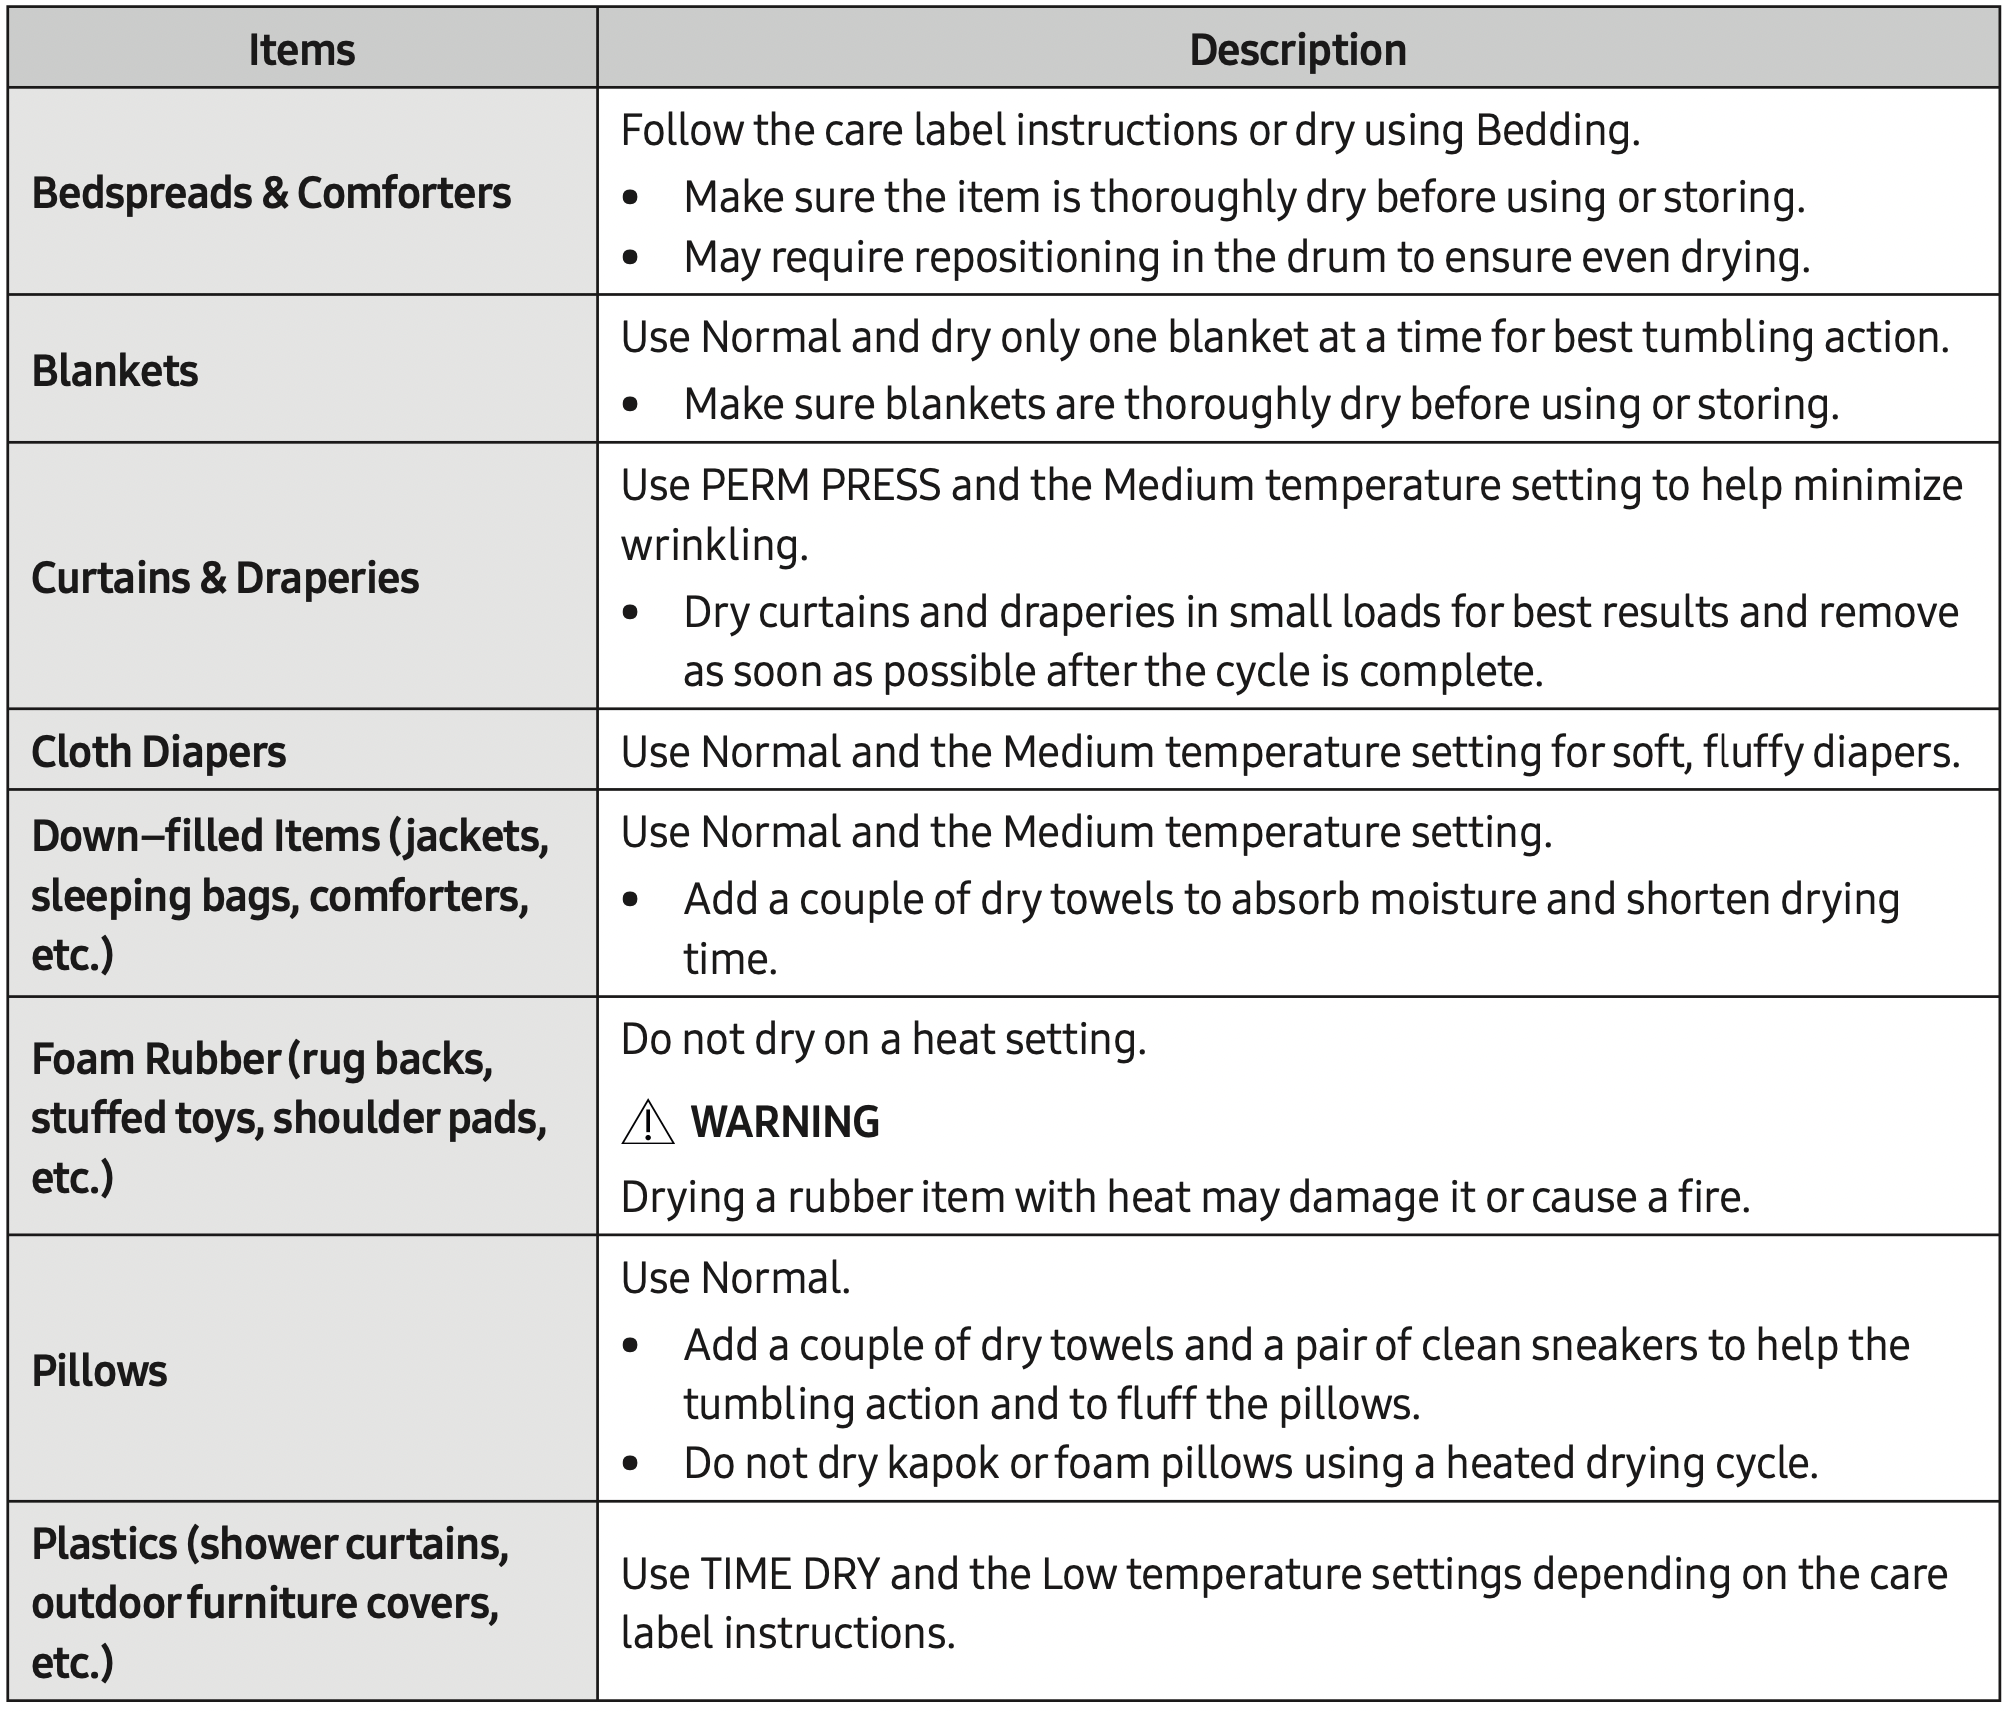
Drying guide
The best way to dry items is to follow the instructions on the care label. If no drying instructions are provided, see the following table for reference.
WARNING
Do not dry:
- Fiberglass items (curtains, draperies, etc.)
- Woolens, unless recommended on the label
- Items spotted or soaked with vegetable or cooking oils
Special features
Child Lock 
Child Lock prevents children from playing with the dryer. When Child Lock is activated, all buttons except for the Power button are disabled.
To activate/deactivate Child Lock, simultaneously press and hold Dryness and Temp. for 3 seconds.
NOTE: Once Child Lock is activated, it will remain active even after you restart the dryer. If other buttons, except for the Power button, do not respond, check the Child Lock indicator. If the indicator is on, follow the instructions above to turn Child Lock off.
Smart Care
To enable this function, you must first download the Samsung Smart Washer/Dryer app at the Play Store or the App Store and install it on a mobile device featuring a camera function. The Smart Care function has been optimized for Galaxy & iPhone series (applicable models only).
- When the dryer detects an issue to check, an information code appears on the display. To enter Smart Care mode, press and hold Wrinkle Prevent for 3 seconds.
- The dryer starts the self-diagnosis procedure and displays an information code if a problem is detected.
- Run the Samsung Smart Washer/Dryer app on your mobile device, and then tap Smart Care.
- Put the mobile device close to the dryer’s display so that the smartphone camera and the dryer face each other. The app automatically recognizes the information code.
- When the information code is recognized correctly, the app provides detailed information about the problem with applicable solutions.
NOTE
- The function name, Smart Care, may differ depending on the language.
- If light is reflected off the dryer's display, the app may fail to recognize the information code.
- If the app fails to recognize the information code, you can enter the code manually in the app.
Alarm off
You can turn the alarm on or off. When the alarm is off, the melody of cycle completion and the power-off beep will not sound. However, the other sounds stay active.
- For the DVE(G)45B6300* model, press and hold Drum Light for 3 seconds.
- Your setting will be retained even after you turn off the dryer. You can turn the alarm back on by pressing and holding the same button for 3 seconds.
DOWNLOADED cycle
You can choose from more cycles available on the SmartThings app on your smartphone.
- On your smartphone, select the DOWNLOADED cycle.
You can choose from TOWELS, SANITIZE, SHIRTS, DENIM, WOOL, ECO NORMAL, LOW TEMP., RACK DRY, and WRINKLE AWAY. - Press Power on your dryer.
- Turn the Cycle Selector to DOWNLOADED.
- Press and hold Start/Pause (Hold to Start).
SmartThings
Wi-Fi connection
On your smartphone, go to Settings, turn on the wireless connection, and then select your AP (Access Point).
- This appliance supports the Wi-Fi 2.4 GHz protocols.
Download
On an app market (Google Play Store, Apple App Store, Samsung Galaxy Apps), find the SmartThings app using the search term “SmartThings”. Download and install the app on your device.
NOTE: The app is subject to change without notice for improved performance.
Log in
You must first log into SmartThings with your Samsung account. To create a new Samsung account, follow the instructions in the app. You don’t need a separate app to create your account.
NOTE: If you have a Samsung account, use the account to log in. A registered Samsung smartphone user automatically logs in.
To register your appliance to SmartThings
- Make sure your smartphone is connected to a wireless network. If not, go to Settings and turn on the wireless connection, and then select your AP (Access Point).
- Open SmartThings on your smartphone.
- If the “A new device is found.” message appears, select Add.
- If no message appears, select + and then select your appliance from the list of devices available. If your appliance is not listed, select Device Type > Specific Device Model, and then add your appliance manually.
- Register your appliance to the SmartThings app.
- Add your appliance to SmartThings. Make sure your appliance is connected to SmartThings.
- When registration is complete, then name of your appliance appears on your smartphone.
Maintenance
Keep the dryer clean for best performance and to lengthen its life cycle.
WARNING
- Certain internal parts are intentionally not grounded and may present a risk of electric shock only during servicing.
- Service Personnel - Do not contact the following parts while the appliance is energized: Control board and inlet valve.
Cleaning
Control panel
- Clean with a soft, damp cloth. Do not use abrasive substances.
- Do not spray liquid cleaning agents directly onto the dryer display.
- Some laundry pre-treatment soil and stain removers may damage the control panel.
- When using liquid cleaning agents, apply them to the cleaning cloth. Do not apply them directly to the dryer. Wipe up any spills or overspray immediately.
Drum
- Remove any stains from the drum with an all-purpose cleaner.
- Tumble old towels or rags to remove any remaining stains or cleaning substances. Stains may still be visible, but will not affect subsequent loads.
Powder coated drum
To clean the powder coated drum, use a damp cloth with a mild, non-abrasive cleaner suitable for easily marred surfaces.
Remove cleaner residue and dry with a clean cloth.
Dryer exterior
- Clean with a soft, damp cloth. Do not use abrasive substances.
- Protect the surface from sharp objects.
- Do not place any heavy or sharp objects or a detergent container on the dryer. They can scratch or damage the top cover of the dryer.
- The dryer has a high-gloss finish on the entire surface. Be careful not to scratch or damage the surface.
Exhaust system
- Check and clean the exhaust system on a regular basis to maintain optimum performance.
- The external exhaust hood must be cleaned frequently to ensure proper air flow
Troubleshooting
Checkpoints
If the dryer operates abnormally, first check the list of problems in the table below and try the suggested actions.
|
Problem |
Action |
|---|---|
|
Does not run. |
|
|
Does not heat. |
|
|
Does not dry. |
|
|
Is noisy. |
|
|
Dries unevenly. |
|
|
Has odors. |
|
|
Lint on clothes. |
|
|
Items still wrinkled after Wrinkle Prevent (Wrinkle Away, Wrinkle Release). |
|
|
Water drips from the nozzle when the Steam cycles starts. |
|
|
Sprayed water is not visible during Steam cycles. |
|
|
Extended time. |
|
If a problem persists, contact a local Samsung service center.
Information codes
If the dryer fails to operate, you may see an information code on the display panel. To determine what you should do, check the list of codes in the table below, and then try the suggested actions.
| Code |
Action |
|---|---|
|
dC |
Operating the dryer with the door open.
|
|
FC |
Invalid power source frequency.
|
|
AC |
Electronic control problem (Invalid Communication).
|
|
HC |
High temperature heating check.
|
|
9C1 |
The electronic control needs to be checked.
|
|
tC |
The Thermistor 1 resistance is very low or high.
|
|
tC5 |
The Thermistor2 resistance is very low or high.
|
|
dF |
Incorrect door switch.
|
|
3C |
The PBA needs to be checked.
|
If any information code keeps appearing on the display, contact a Samsung service center.
