Loading ...
Loading ...
Loading ...
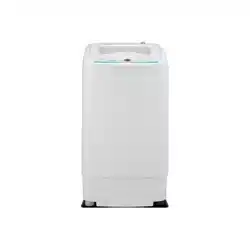
Installation Instructions
Install Your Washer
The water hose connected to the COLD faucet must be connected to the
cold water supply intake.
3.Tighten the fittings by hand until they are snug, and then tighten them an
additional two-thirds of a turn with a wrench.
4.Place the unconnected ends of the hoses into a bucket
and open the faucets connected to the two water supply
hoses for 10 or 15 seconds to remove any foreign substances
from the hoses. Close the faucets before continuing.
When you fasten the fittings, do not fasten them too tightly or apply tape
or sealant to the faucets or water supply intakes. This can damage the
fittings. After you have connected the water supply hoses to the faucets,
ensure that they are connected securely by pulling the water supply hoses
downwards.
6.Tighten the fittings by hand until they are snug, and then tighten them an
additional two-thirds of a turn with a wrench.
Confirm that the water supply hoses are not
twisted or bent. If the hoses are twisted or bent,
the hoses can leak and cause electric shock due
to the water leakage .To ensure the correct water
usage, connect the COLD water faucets.
Installation Instructions
Install Your Washer
7. Turn on the COLD water supplies and check all the water supply intake
connections and the faucets for water leaks.
5. Connect the ends of the water supply
hoses to the water supply intake
connections at the of the washer.
top
WARNING
WARNING
WARNING
13
14
Step 2: Install the Bottom Cover
Step 3: Connect the water hose
Slide the bottom cover into the slots on bottom surface of the unit as in the
following figure, and fix it with screw attached with the unit.
Bottom Cover
1.The Quick Connection Adaptor is primarily for quick connection to a single
faucet, such as a typical kitchen sink, in cases where the washer is stored in a
different place than where it is used. Skip this step if you are connecting the
washer to a sink with separate hot and cold faucets.
The adaptor consists of two parts that quickly connect or disconnect. One part,
the faucet fitting, is for connection to the faucet and the other part, the hose
fitting, connects to the cold water hose of the washer.
-
Pull back on the white ring to free the faucet fitting from the adaptor
for
installation into the faucet.
- Screw the end of the cold water hose onto the base of the hose fitting.
- If the faucet has internal screw threads, unscrew the aerator if present from
the tip of the faucet. Then screw the faucet fitting into the faucet. Make sure
that the black rubber gasket is on the top of the adaptor before screwing it in.
- If the faucet has external screw threads, remove the gasket from the top
of the faucet fitting, and screw the fitting over the external threads.
- Pull back on the white ring to connect the two parts of the adaptor back together.
Pull down on the white ring
to divide the adaptor into
two parts.
Top part: Faucet fitting
Bottom part: Hose fitting
Rubber gasket
Inner threads for outer threaded faucet.
Outer threads for inner threaded faucet
2.Connect the ends of the water supply hoses to the COLD
faucets. For convenience, use the Quick Connection Adaptor
for connection to the cold water faucet. See instructions for
Quick Connection Adaptor use in Step 1 above.
Cold
NOTE:
When connected to a single faucet, be sure to only run cold water washers.
Loading ...
Loading ...
Loading ...