
Table of Contents
IMPORTANT SAFETY INSTRUCTIONS .........
Operating Instructions
Disposal Information ........................
Disposing of the packaging ................
Disposing of your old appliance .............
Environmental Protection / Conservation Issues .
Intended Use ...............................
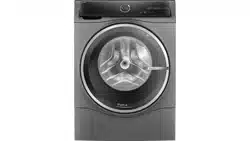
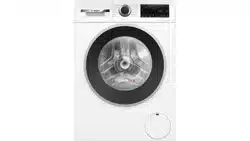
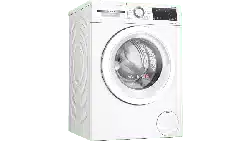
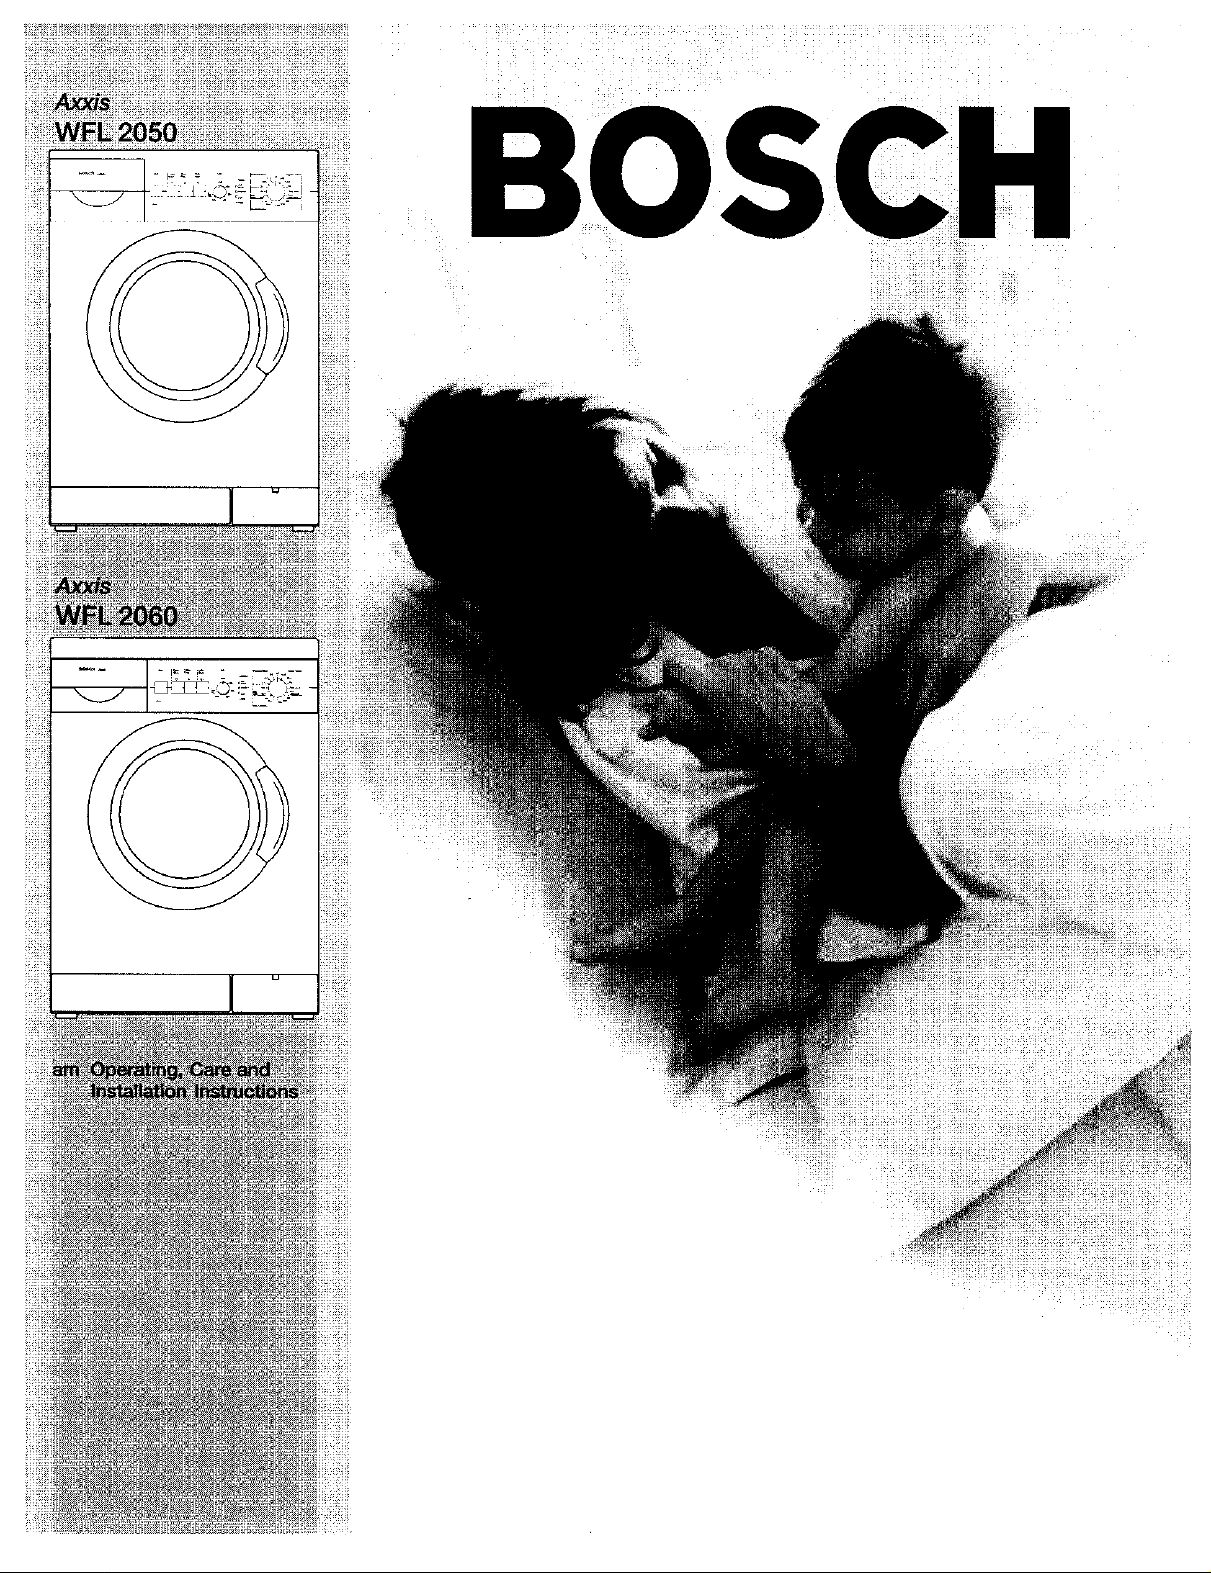
Your New Washing Machine ..................
Control panel ............................
About Your Washing Machine ................
Before Using For the First Time ................
Using For the First Time ......................
Preparing, Sorting and Loading the Laundry .....
Preparing the laundry .....................
Sorting the laundry .......................
Degrees of dirt ...........................
Loading the laundry ......................
6
6
6
6
6
7
8
9
9
9
10
10
10
10
12
13
Laundry Detergents and Additives .............
Dispensing the correct amount
of detergent ............................. 13
Filling laundry detergent and/
or additive dispensers ..................... 13
Selecting Programs ......................... 14
Basic programs .......................... 14
Extra cycle program selector ............... 14
Spin speed selector ...................... 15
Additional function on spin speed selector .... 15
Additional options buttons ................. 15
Washing .................................. 15
Soaking ................................ 17
Bleaching ............................... 17
Decotorizing ............................. 17
Changing a program ...................... 17
Cancelling an active program ............... 17
When the Program has Ended ................ 18
Unloading the laundry ..................... 18
User Maintenance Instructions
User Maintenance Instructions ................ 19
Cleaning and Care ........................ 19
Cleaning the appliance housing
and control panel ......................... 19
Cleaning the drum ........................ 19
Cleaning the detergent dispenser ........... 19
Cleaning the drain pump .................. 20
Cleaning water inlet strainers ............... 22
Descating the washing machine ............ 23
Customer Service ........................... 23
Troubleshooting Minor Faults ................. 24
Installation Instructions
Installation, Connection and Transport ......... 26
Safety information ........................ 26
Factory supplied equipment ............... 26
Dimensions ............................. 28
Installation area .......................... 28
Built in Installation ........................ 29
Levelling procedure ....................... 29
Removing the transport bolts ............... 30
Hose and cable lengths ................... 31
Water connection ........................ 31
Electrical connection ...................... 33
GROUNDING INSTRUCTIONS ............. 33
Transport, e.g. when moving ............... 34
KEEP THESE iNSTRUCTiONS FOR
FUTURE REFERENCE.
(In case of change of ownership, manual
should be conveyed with the washing
machine,)
I PORTANT SAFETY
I STRUCTIONS
To reduce the risk of fire, electric shock, serious
injury or death to persons when using your
washing machine, follow basic precautions,
including the following.
1. BOSCH washers are provided with a manual,
including Operating Instructions, User
Maintenance Instructions and Installation
Instructions. Read all instructions before using
the washing machine.
2. Do not wash articles that have been previously
cleaned in, washed in, soaked in, or spotted
with gasoline, dry cleaning solvents, other
flammable, or explosive substances as they
give off vapors that could ignite or explode.
3. Do not add gasoline, dry cleaning solvents, or
other flammable, or explosive substances to
the wash water. These substances give off
vapors that could ignite or explode.
4. Under certain conditions hydrogen gas may be
produced in a hot water system that has not
been used for 2 weeks or more. HYDROGEN
GAS IS EXPLOSIVE. If the hot water system
has not been used for such a period, before
using a washing machine, turn on all hot water
faucets and let the water flow from each for
several minutes. This will release any
accumulated hydrogen gas. As the gas is
flammable do not smoke or use an open flame
during this time.
5. Do not allow children to play on or in the
appliance. Close supervision of children is
necessary when the appliance is used near
children.
6. Before the appliance is removed from service
or discarded, remove the door and the power
cord/plug.
7. Do not reach into the appliance if the wash
drum is moving.
8. Do not install or store this appliance where it will
be exposed to the weather.
9. Do not tamper with the controls.
10. Do not repair or replace any part of the
appliance or attempt any service unless
specifically recommended in the
user-maintenance instructions or in published
user repair instructions that you understand
and have the skills to carry out.
11. Always be sure to unplug the washing machine
from the eletrical supply before attempting any
service. Disconnect the power cord by
grasping the plug, not the cord.
12. To reduce the risk of fire, clothes, cleaning
rags, mop heads and the like which have traces
of any flammable substance, such as vegetable
oil, cooking oil, petroleum based oils or
distillates, waxes, fats, etc., must not be placed
in the washing machine. These items may
contain some flammable substance(s) after
laundering, which may smoke or catch fire by
itself.
13. Do not use bleach. Hazardous fumes can form.
14. Do not machine wash fiberglass materials
(many curtains and window coverings use
fiberglass materials). Small particals can remain
in the washing machine and stick to fabrics in
subsequent wash loads causing skin irritation.
15. Do not leave children unsupervised near the
washing machine.
16. Keep pets away from the washing machine.
17. Do not insert/pull out the mains plug with wet
hands.
18. Do not pull out the mains plug by tugging the
cable.
19. Do not touch the loading door if washing at
high temperatures.
20. Caution when draining hot water.
4

21, Do not climb onto the washing machineand do
not leanon the open loadingdoor.
22. Do not sit on the top of the washing machine.
23, To reducethe risk of fire or electricalshock,
DO NOT usean extension cord or an adapter
to connect the washing machineto the
electrical power supply.
24, The washing machine must only be usedfor its
intended purpose.
25, Alwaysfollow the fabric care instructions
recommendedby the clothing manufacturer.
26, Replaceworn power cords and/or loose plugs.
27, Make surethat all water connectionsto the
washing machine haveshut-off valve(s)and
that they are readilyaccessible.Closethe
washing machinewater shut-off valve(s)at the
end of each wash day.
28, Check the fill hose connectionson a regular
basisto assurethat they are tight and not
leaking.
29, Always readand followthe instructionsof the
manufacturerof the detergent(s),cleaning
aid(s),fabric softener(s)and static eliminator(s),
which you are using. Heedall warningsand
precautions.
30, Store all laundrychemicalsand aids in a cool
dry placeaccording to the manufacturer's
instructions.
31, To reducethe riskof poisoningor chemical
burns, keep all cleaning products out of the
reachof children.
32, Do not operatethe washing machine with any
guards and/or panels removed.
33, Do not operatethe washing machinewith
missingor broken parts.
34, Do not bypassany safetydevices.
35, Do not operatethis washing machine untilyou
are sure:
a, the washing machine has been installed
according to the INSTALLATION
INSTRUCTIONS.
b, all connectionsfor water, drain, electrical
power and grounding are in compliance
with all localcodes and/or other applicable
codes and requirements.
36, Failureto install,maintainand/or operatethe
washing machineaccording to the
manufacturer's instructions may result in
conditions which can leadto bodily injury
and/or property damage.
Notes:
A.
B.
The IMPORTANT SAFEGUARDS and
WARNINGS presented in this manual do
not cover all possible conditions that may
occur. Common sense, caution and care
must be exercised when installing,
maintaining or operating the washing
machine.
Always contact your dealer, distributor,
service agent or the manufacturer about
any problems or conditions that you do not
understand.
SAVE THESE
INSTRUCTIONS
Please read this instruction manual and all other
information accompanying the washing machine
before operating the appliance.
Please retain all documents for future reference or
for a subsequent appliance owner.
Disposal Information
Disposing of the packaging
The shipping package has protected your new
appliance on its way to your home. All packaging
materials are environment-friendly and recyclable.
Please contribute to a better environment by
disposing of packaging materials in an
environmentally conscious manner.
Please ask your dealer or local authority about
best means of disposal.
Environmental
Protection /
Conservation Issues
Your washing machine uses water, energy and
detergent efficiently, thereby protecting the
environment and reducing your household costs.
Using your washing machine in an efficient and
environmentally friendly manner:
- Avoid using too much detergent.
Use detergent recommended for high efficiency
and front-loading washers.
- Add detergent according to the degree of
soiling, amount of laundry and water hardness,
and observe the detergent manufacturer's
instructions.
Keep children away from shipping carton and
packaging components. Danger of suffocation
from plastic film and folding cartons.
Disposing of your old
appliance
Old appliances are not worthless rubbish!
Environment-conscious recycling can reclaim
valuable raw materials.
Intended Use
Your washing machine is intended:
- For domestic use only.
- For washing machine-washable fabrics in
washing water.
- For operation using cold and hot (140 °F/ 60 °C)
tap water and conventional laundry detergents
and additives that are suitable for use in
washing machines.
On out-of service appliances, unplug mains
plug. Cut off power cord and discard with mains
plug.
To prevent playing children from becoming trapped
and endangered, ensure that the door locking
mechanism is disabled.
6
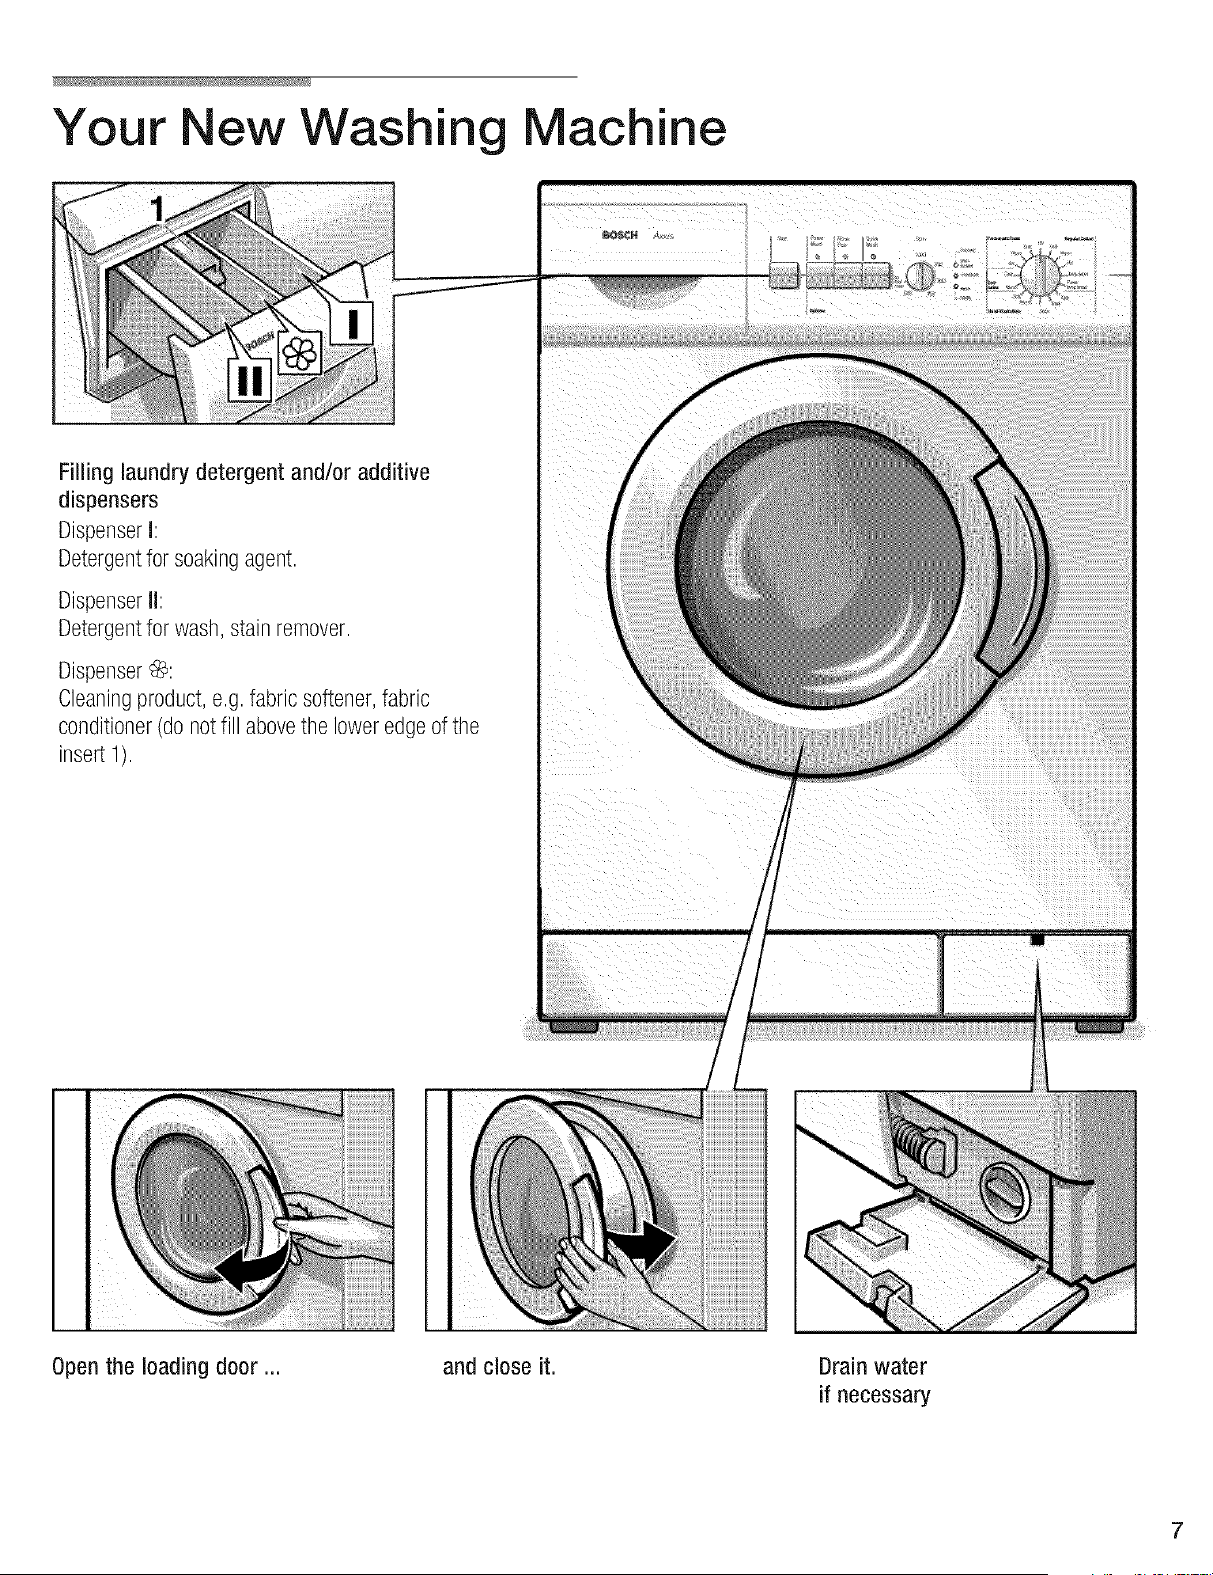
Your New Washing
1
Filling laundry detergent and/or additive
dispensers
DispenserI:
Detergentfor soakingagent.
DispenserI1:
Detergentfor wash, stain remover.
Dispenser_:
Cleaningproduct, e.g. fabric softener,fabric
conditioner(do notfill abovethe lower edgeof the
insert 1).
Machine
!i!i!i_!iiiii_
Open the loading door ...
and close it. Drain water
if necessary
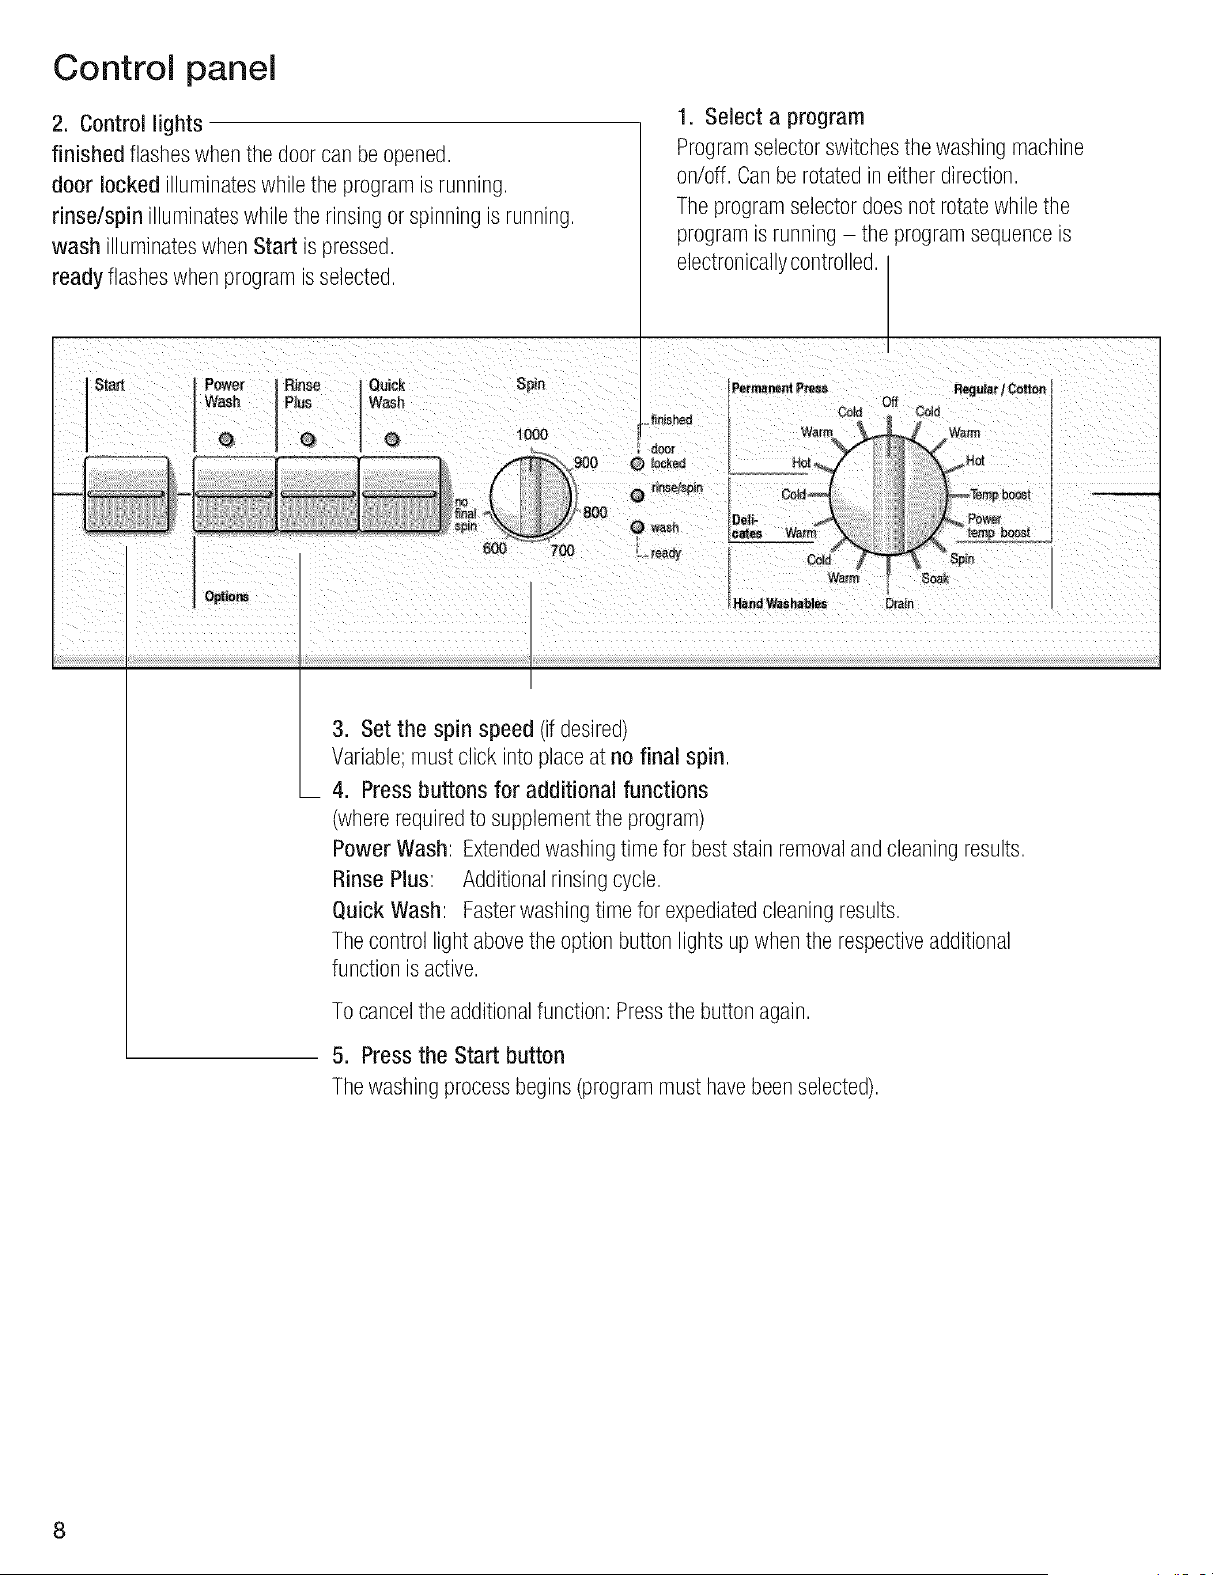
Control panel
2. Control lights
finished flashes when the doorcan beopened,
door locked illuminateswhile the program is running,
rinse/spin illuminateswhile the rinsingor spinning is running,
wash illuminateswhen Start is pressed,
1, Select a program
Programselectorswitchesthe washing machine
on/off, Can be rotated ineither direction,
The programselectordoes not rotate while the
program is running the programsequenceis
ready flashes when program isselected,
StaJt Rinse
Plus
G
electronicallycontrolled,
ewaUick Spin
sh
(_ 1000
,_finished
Qo_r
Permanent P_e_s Regu_r / Coiton
C_d t Cdd
Soak
Hand W_ hables DraP"
3, Set the spin speed (if desired)
Variable;must click into place at no final spin,
4, Press buttons for additional functions
(whererequiredto supplementthe program)
Power Wash: Extendedwashing time for best stain removaland cleaning results,
Rinse Plus: Additionalrinsing cycle,
Quick Wash: Fasterwashingtime for expediatedcleaningresults,
The control light abovethe option button lights up whenthe respectiveadditional
function is active,
To cancel the additionalfunction: Pressthe button again,
5. Press the Start button
The washing processbegins(programmust havebeenselected),
8
About Your Washin
achine
The washing machine offers the following standard
features:
- Horizontal-Axis, Tumble Action Wash System,
without agitator
- Stainless Steel Inner Wash Drum
- Exceptionally Low Energy and Water
Consumption
- Internal Heating Element, for Power temp boost,
up to 160 °F (71 °C)
- High Spin Speeds, up to 1,000 rpm, remove
more water from fabrics to reduce drying time
and energy.
- 4 Fabric and 5 Temperature Settings.
- 3 special cycles
- 3 additional functions
Before Using For the
First Time
The washing machine must have been installed
and connected properly (refer to page 26).
Before beginning to use your washing machine for
the first time:
Check to make sure that the voltage on which
the washing machine is to operate is the same
as shown on the rating plate.
Check to make sure that the water valves to the
washing machine are open.
Using For the
Time
First
Your appliance was tested before leaving the
factory. To remove any water left over from testing
procedures, the first washing cycle should be
carried out without laundry in the machine.
Do not load any laundry.
Turn on the water tap.
Pull out the detergent dispenser up to the end
stop.
Pour approx. 1 litre / 1 3A pt of water into
chamber II of the detergent dispenser.
Half fill the measuring beaker with detergent
and pour into chamber II. Do not use any
special detergents for delicates or woollens
(excessive foam).
Close the detergent dispenser.
Set the program selector to Power temp
boost.
The ready control light is flashing.
Press the Start button.
The wash control light comes on, and the
program starts.
[] door locked illuminates while the program is
running.
The wash control light changes during the
program to rinse/spin.
When the finished flashes:
Set the program selector to Off.
Preparing, Sorting
and Loadin the
Laundry
Preparing the laundry
Sorting the laundry
According to colour to degree of dirt
Items of clothing can become discoloured.
Never wash new multi-coloured items together
with other items.
Loose debris (e.g. coins, paper clips, needles,
nails) can damage items of clothing as well as
parts of the washing machine (e.g. drum).
Empty all pockets on items of clothing.
Brush out any sand from pockets and cuffs.
Close zip-fasteners and button up bed covers.
Remove curtain runners or tie them up in a net /
bag.
The following items must be washed inside a
net / pillow case:
Extremely delicate items, e.g. fine tights,
net curtains.
Small items, e.g. small socks or
handkerchiefs.
Underwired bras (the wire may come loose
during washing and cause damage).
When washing trousers, knitwear and woven
fabrics, e.g. shirts, T-shirts or sweatshirts,
always turn these items inside out.
White items may become grey. Always wash white
and coloured items separately.
Degrees of dirt
Slight dirt
No recognizable dirt or staining. Laundry may have
some body odour.
- Light summer clothing and sportswear that has
only been worn for a few hours.
- T-shirts, shirts and blouses that have been
worn for up to one day.
- Bed linen and guest towels that have been
used for one day.
Normal dirt
Visible dirt and/or some light staining recognizable.
- T-shirts, shirts and blouses that are very sweaty
or have been worn several times.
- Underwear that has been worn for one day.
- Tea towels, hand towels and bed linen that
have been used for up to one week.
- Net curtains (without nicotine staining) that
have not been washed for up to 1/2year.
10
Intensive dirt
Dirtand/or staining recognizable.
- Kitchenhandtowels that have been usedfor
up to one week.
- Fabric napkins.
- Bibs.
- Children's outer clothing or football shirts and
shorts with grass and soil stains.
- Working clothes such as overallsor baker's
and butcher's coats.
Typical stains
- Skin fat, cooking oils/ fat, sauces, mineral oil,
wax (containing fat / oil).
- Tea, coffee, red wine, fruit, vegetables
(bleachable).
- Blood, egg, milk, starch (containing protein /
carbohydrate).
- Soot, soil, sand (pigments), red sand on tennis
clothes.
Removing stains
Wherever possible, remove / pretreat stains whilst
they are still fresh.
First, dab soapy water onto the stain. Do not rub.
Subsequently wash the items of clothing using the
appropriate program.
Several washing cycles may sometimes be
required in order to remove stubborn / dried in
stains.
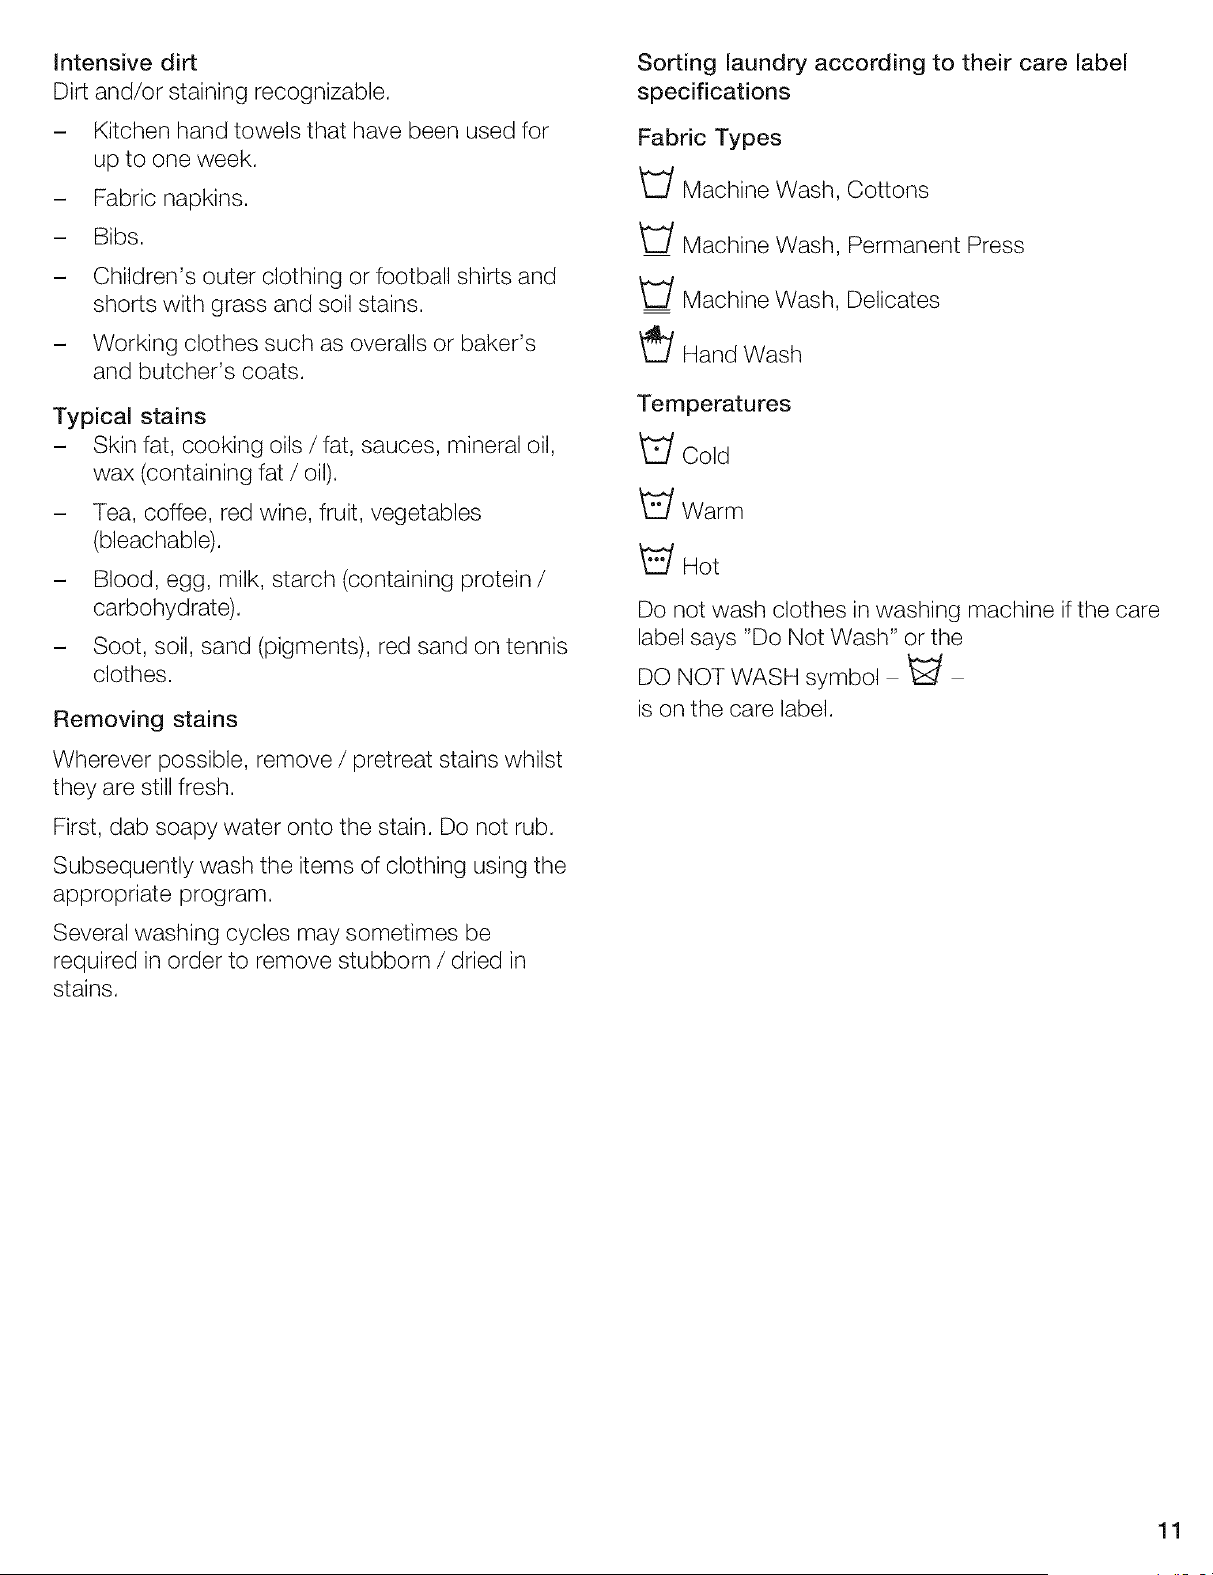
Sorting laundry according to their care label
specifications
Fabric Types
Machine Wash, Cottons
_;/Machine Wash, Permanent Press
_' Machine Wash, Delicates
_;/Hand Wash
Temperatures
Cold
Warm
_/Hot
Do not wash clothes in washing machine if the care
label says "Do Not Wash" or the
DO NOT WASH symbol
is on the care label.
11
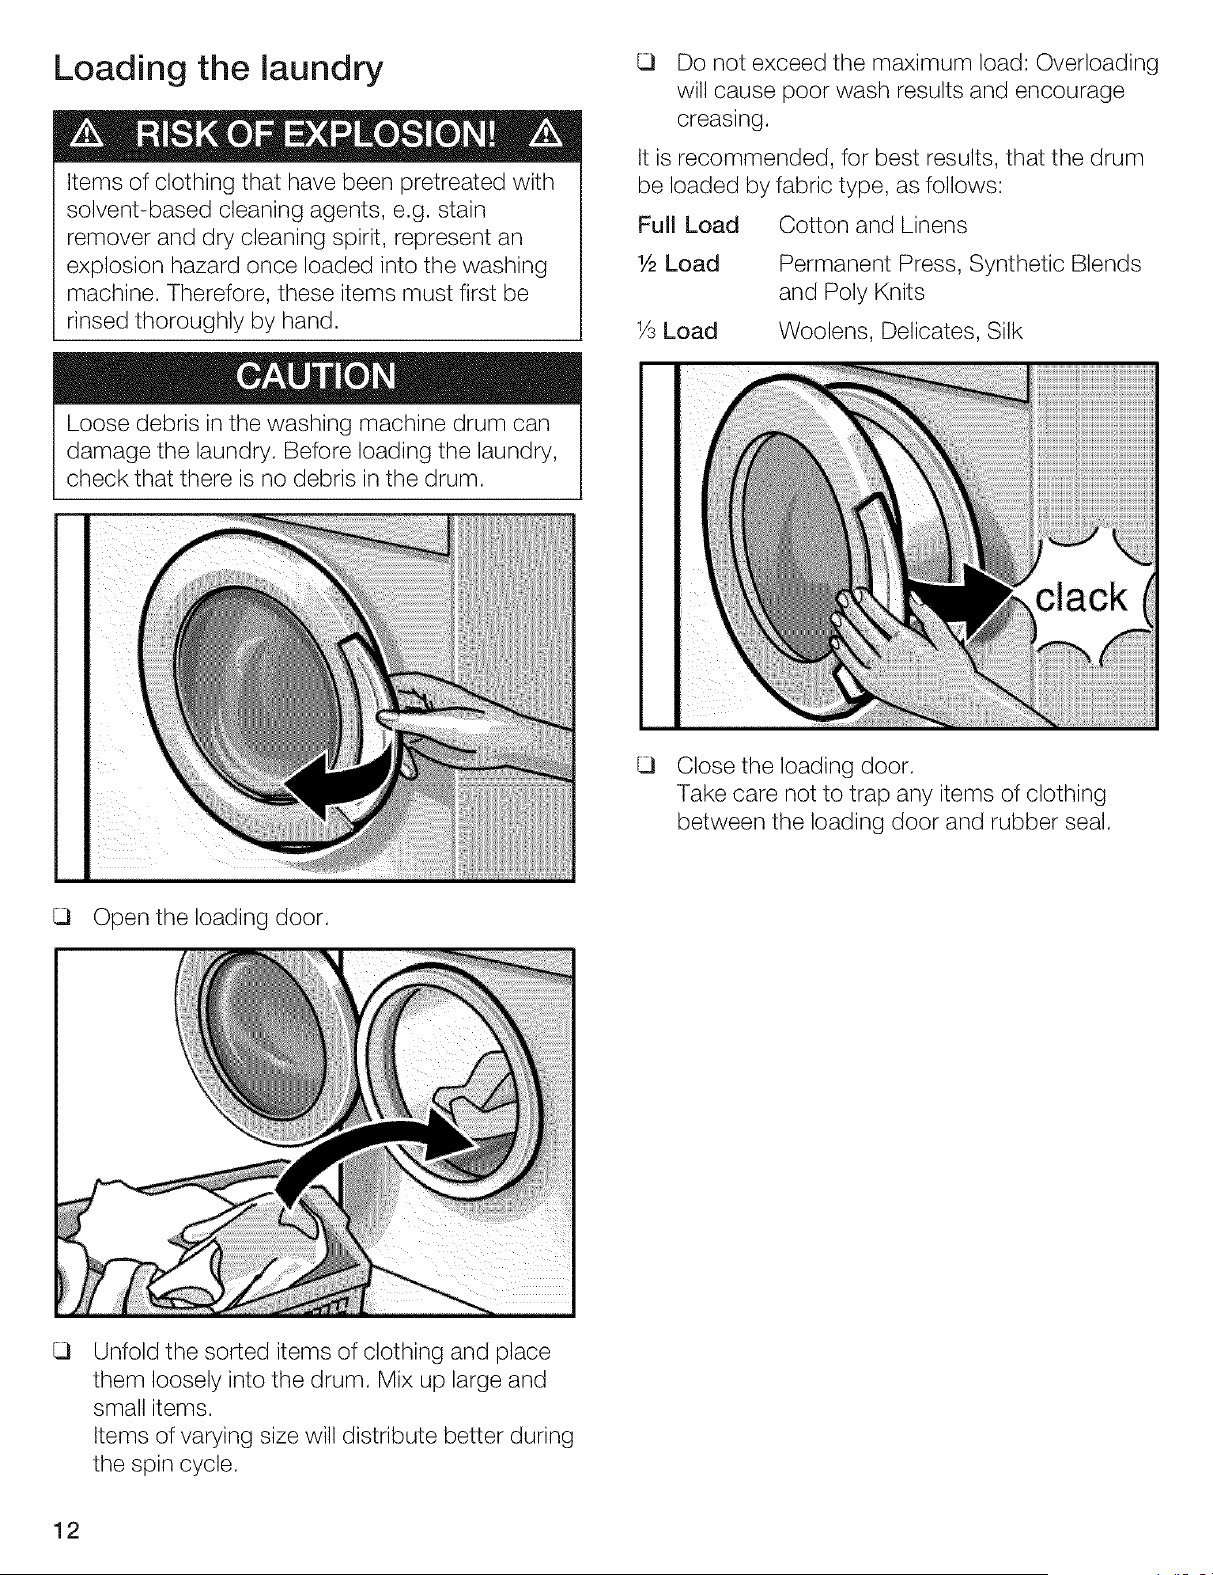
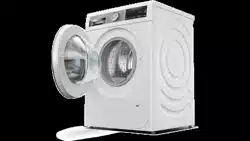
Loading the laundry
Items of clothing that have been pretreated with
solvent-based cleaning agents, e.g. stain
remover and dry cleaning spirit, represent an
explosion hazard once loaded into the washing
machine. Therefore, these items must first be
rinsed thoroughly by hand.
Do not exceed the maximum load: Overloading
will cause poor wash results and encourage
creasing.
It is recommended, for best results, that the drum
be loaded by fabric type, as follows:
Full Load Cotton and Linens
1/2Load
1/3Load
Permanent Press, Synthetic Blends
and Poly Knits
Woolens, Delicates, Silk
Loose debris in the washing machine drum can
damage the laundry. Before loading the laundry,
check that there is no debris in the drum.
Open the loading door.
Close the loading door.
Take care not to trap any items of clothing
between the loading door and rubber seal.
Unfold the sorted items of clothing and place
them loosely into the drum. Mix up large and
small items.
Items of varying size will distribute better during
the spin cycle.
12
Laundry Detergents
and Additives
Dispensing the correct amount
of detergent
Keep detergents and additives out of the reach
of children.
Dispense the detergent according to:
- the water hardness. This information can be
obtained from your local water authority.
- the amount of laundry.
- the amount of soil. Information on soiling can
be found on page 10.
- the specifications of the detergent
manufacturer. Dispensing the correct amount
of detergent relieves the strain on the
environment and ensures optimum washing
results.
[] DO NOT use chlorine bleach in this washing
machine.
If it is necessary to use a detergent made for
top loading washing machines, to avoid
oversudsing, it is recommended that only 1Ato
1/2(approx. 2 3 Tbl.) of the amount
recommended by the detergent manufacturer
for top loading washing machines be used.
Using this lesser amount may effect the
cleaning perfomance. The first time, start with
1Aof the recommended amount. Then, only if
there is a low level of sudsing and your clothes
are not getting clean, try a little more.
Pour liquid detergent into the appropriate
dispensing chamber.
Too little detergent:
The laundry is not cleaned properly and will, after
a while, become grey and stiff.
Greyish brown spots (fat globules) may appear on
the laundry. The heaters may calcify.
Too much detergent:
Environmentally incompatible, excessive foam
reduces wash agitation causing poor washing and
rinsing results.
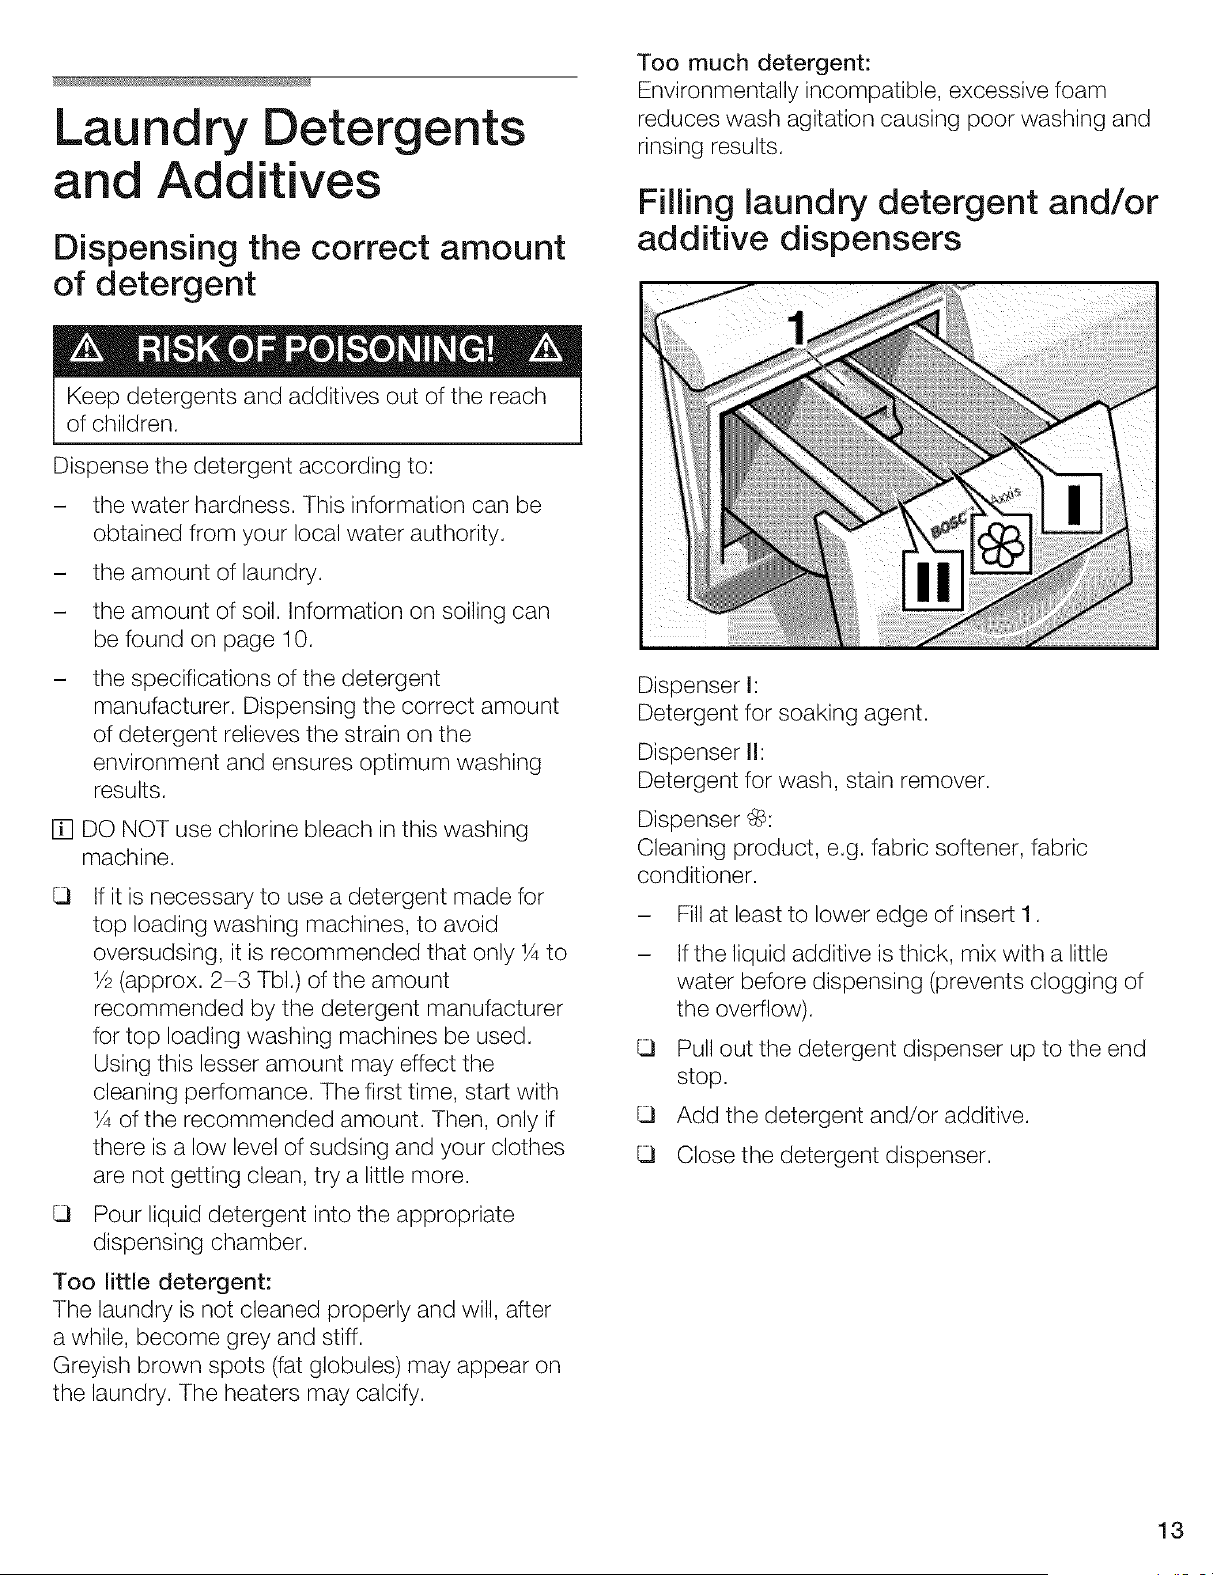
Filling laundry detergent and/or
additive dispensers
Dispenser I:
Detergent for soaking agent.
Dispenser I1:
Detergent for wash, stain remover.
Dispenser _:
Cleaning product, e.g. fabric softener, fabric
conditioner.
Fill at least to lower edge of insert I.
If the liquid additive is thick, mix with a little
water before dispensing (prevents clogging of
the overflow).
Pull out the detergent dispenser up to the end
stop.
Add the detergent and/or additive.
Close the detergent dispenser.
13

Selecting Programs
Basic programs
Select the desired program, see also the program
overview.
Regular/Cotton
Regular/Cotton settings are intended to be used
for colorfast sturdy, hard wearing items made from
cotton or linen, such as:
- Play clothes
- Work clothes
- Sheets
- Towels
- Jeans
- T-shirt, etc.
Refer to the care label on the clothing for settings
to use.
Permanent Press
Permanent Press settings are intended to be
used with permanent press items and items made
from cotton, linen, synthetic or blended fabrics and
outer garments, such as:
- Dress shirts
- Dress pants
- Poly/cotton blend clothing
- Clothes requiring a special tumble sequence
and spin speed to minimize wrinkling.
Delicates
Delicates settings are intended for use with
delicate easy care items made from cotton, satin,
synthetic or blended fabrics and curtains.
No spinning between rinse cycles.
We do not recommend washing these textiles with
other rougher textiles.
Hand Washables
Hand Washables settings are intended for very
delicate easy care items that usually require hand
washing.
These cycles have been specifically designed to
provide extremly gentle treatment of fabrics.
All woolens, silk or other items marked with the
"Hand Wash" symbol, (_), on the care label can be
safely washed in this cycle.
Temperature Settings
Following wash temperatures are available:
Power temp boost - 160 °F (71 °C)
This is the highest temperature setting. The water
temperature is raised to approximately 160 °F
(71 °C).
Temp boost recommended for 145 °F (63 °C)
hot 125 °F (52 °C)
warm - 95 °F (32 °C)
cold 60 °F (15°C)
Extra cycle program selector
Spin
Spin cycle for spinning hand-washed laundry.
Water is drained before the spin cycle.
Maximum spin speed: 800 r.p.m.
Soak
An intergrated soak cycle for pre-treating of heavily
stained items. The soak cycle lasts 2 hours. The
reached temperature is 95 °F (32 °C). It is ending
with a short spin cycle. All the water is pumped out.
Drain
Water is drained after a program with the no final
spin setting for gentle treatment of delicate
laundry.
14

Spin speed selector
Basic setting =
Spin speed selector pointing upward at 1000 rpm.
In the Regular/Cottons program the fabrics will
be spun at the maximum possible spin speed.
In the Permanent Press, Delicates and Hand
Washables programs, a lower spin speed will
automatically be used, regardless of the position of
the spin speed selector for the gentle washing of
the laundry.
Maximum spin speeds
Revolutions Typeof laundry/ Extra cycle
per minute
1000 Regular/Cottons
800 PermanentPress
600 Delicates
800 HandWashables
800 Spin
Additional function on spin
speed selector
no final spin
For delicate laundry and net curtains. The laundry
remains lying in the water after the final rinse.
Use this setting to avoid wrinkles, when the
clothing cannot be taken out of the washing
machine immediatly upon completion of the cycle.
Before the laundry can be unloaded, the Drain
or Spin program must be performed.
Additional options buttons
Power Wash
Recommended for heavily soiled garments.
Particulary recommended when trying to remove
protein stains.
Wash time is extended.
Only cold water is introduced to the drum. The
washing machine then heats the water to the
selected wash temperature. By raising the
temperature from cold through to the set
temperature all components of the detergent are
activated in stages for best stain removal and
cleaning results.
Rinse Plus
When this button is depressed, an additional
rinsing cycle will be added to the selected cycle.
Washing time is extended accordingly.
Quick Wash
Faster wash for expediated cleaning results.
Recommended for 1/2load only. If both buttons for
Power Wash and Quick Wash are pressed, only
Quick Wash is running.
Washing
Turn on the water taps.
15
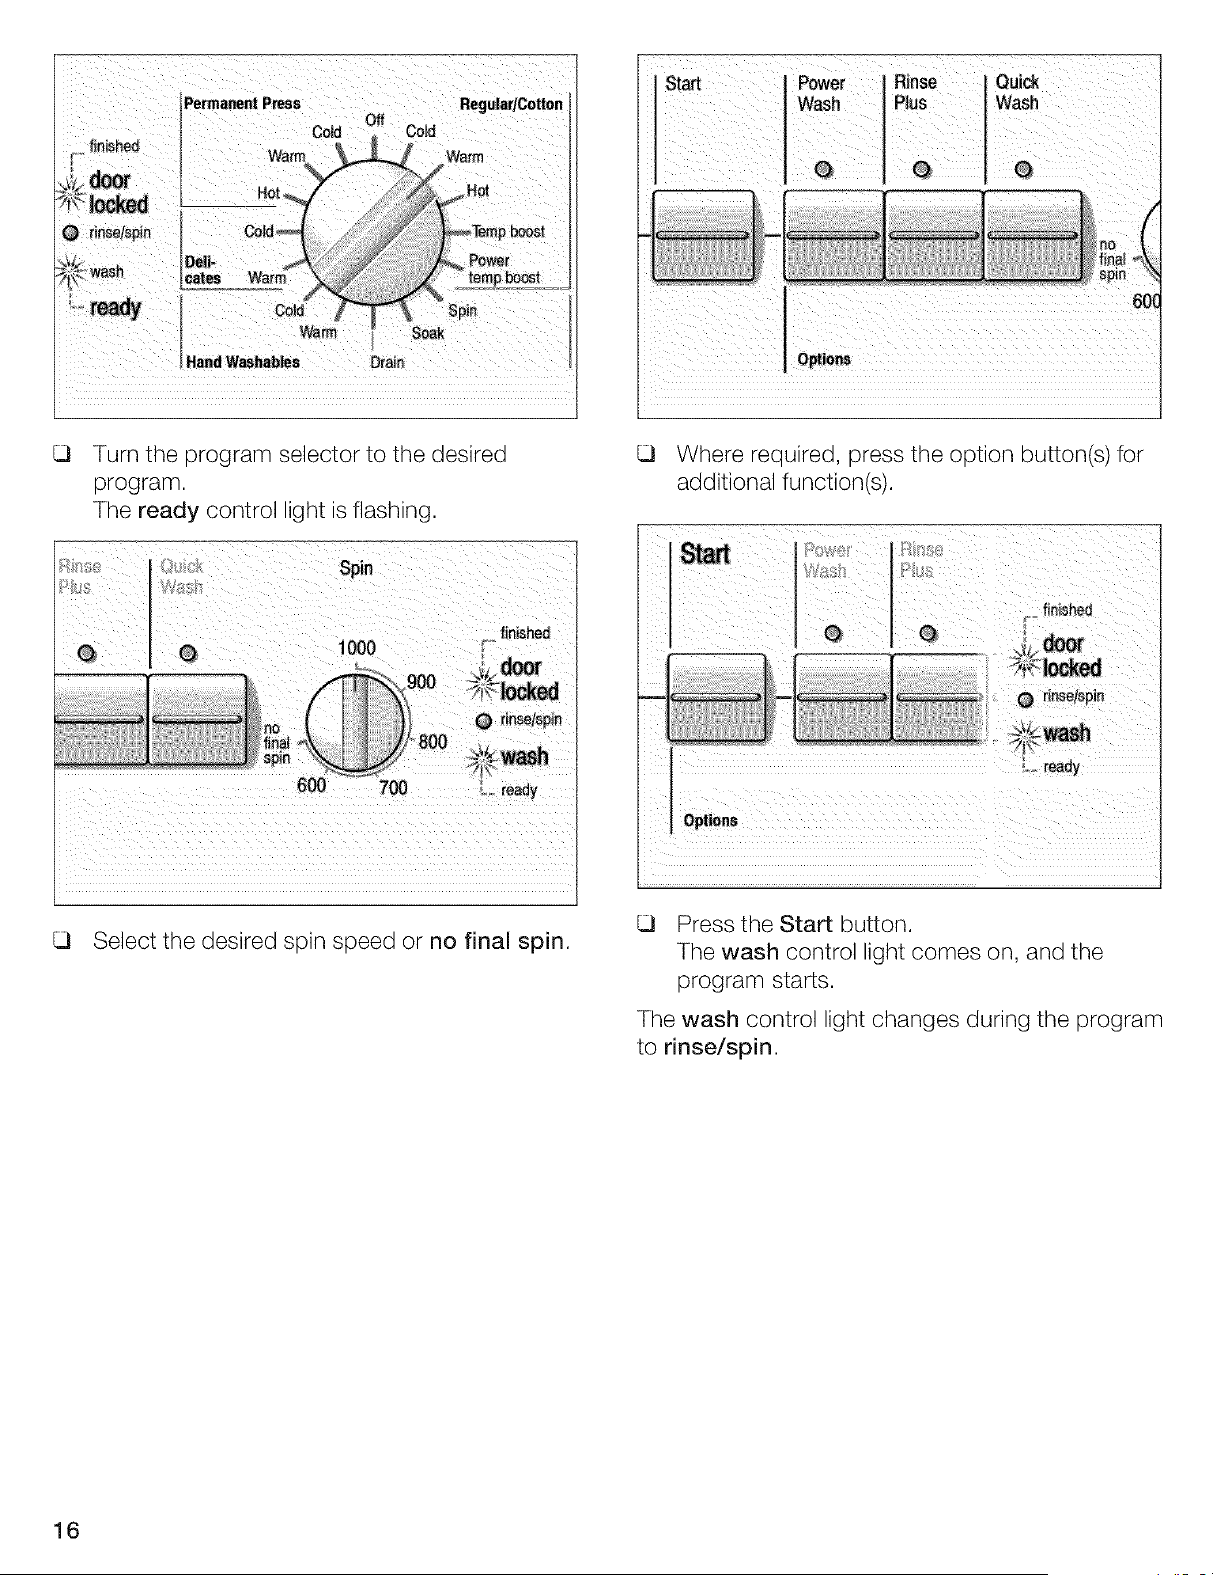
G
Turn the program selector to the desired
program.
The ready control light is flashing.
Spin
1000
O
finished
600 700 ready
Select the desired spin speed or no final spin.
Where required, press the option button(s) for
additional function(s).
Press the Start button.
The wash control light comes on, and the
program starts.
The wash control light changes during the program
to rinse/spin.
16
Soaking
The Soak setting is used to pre-treat heavily
stained items:
Load laundry of the same color.
Add the soaking agent to chamber I according
to the manufacturer's specifications.
Turn the program selector to Soak.
The ready control light is flashing.
Press the Start button.
The wash control light comes on, and the
program starts.
[] The soak cycle lasts 2 hours with a maintained
temperature of 60 °F / 15 °C. It is ended with
a short spin cycle. All the water is pumped out.
Bleaching
DO NOT use chlorine bleach in this washing
machine.
Decolorizing
Decolorants may contain sulphur or chlorine.
These substances can cause parts of the wash-
ing machine to corrode. Do not decolorize items
of laundry in the washing machine.
Changing a program
If you have accidentally selected the wrong
program:
Turn the program selector to Off.
Turn the program selector to the desired
program.
The ready control light is flashing.
Press the Start button.
The wash control light comes on, and the new
program starts.
Cancelling an active program
If you wish to prematurely end a program:
Turn the program selector to Off.
Turn the program selector to Drain or Spin.
The ready control light is flashing.
For Spin, select the desired spin speed (but not no
final spin).
Press the Start button.
The wash control light comes on, and the
program starts.
17
When the Program
has Ended
The finished control ight is flashing.
Permanent P_ess Regular/Cotton
Q rinse/spin
Q wash
ready
Turn the program selector to Off,
and, when required:
Select a program (Drain or Spin).
Press the Start button.
The wash control light comes on, and the
program starts.
The wash control light changes during the program
to rinse/spin.
At the end of the program option, turn the
program selector to Off.
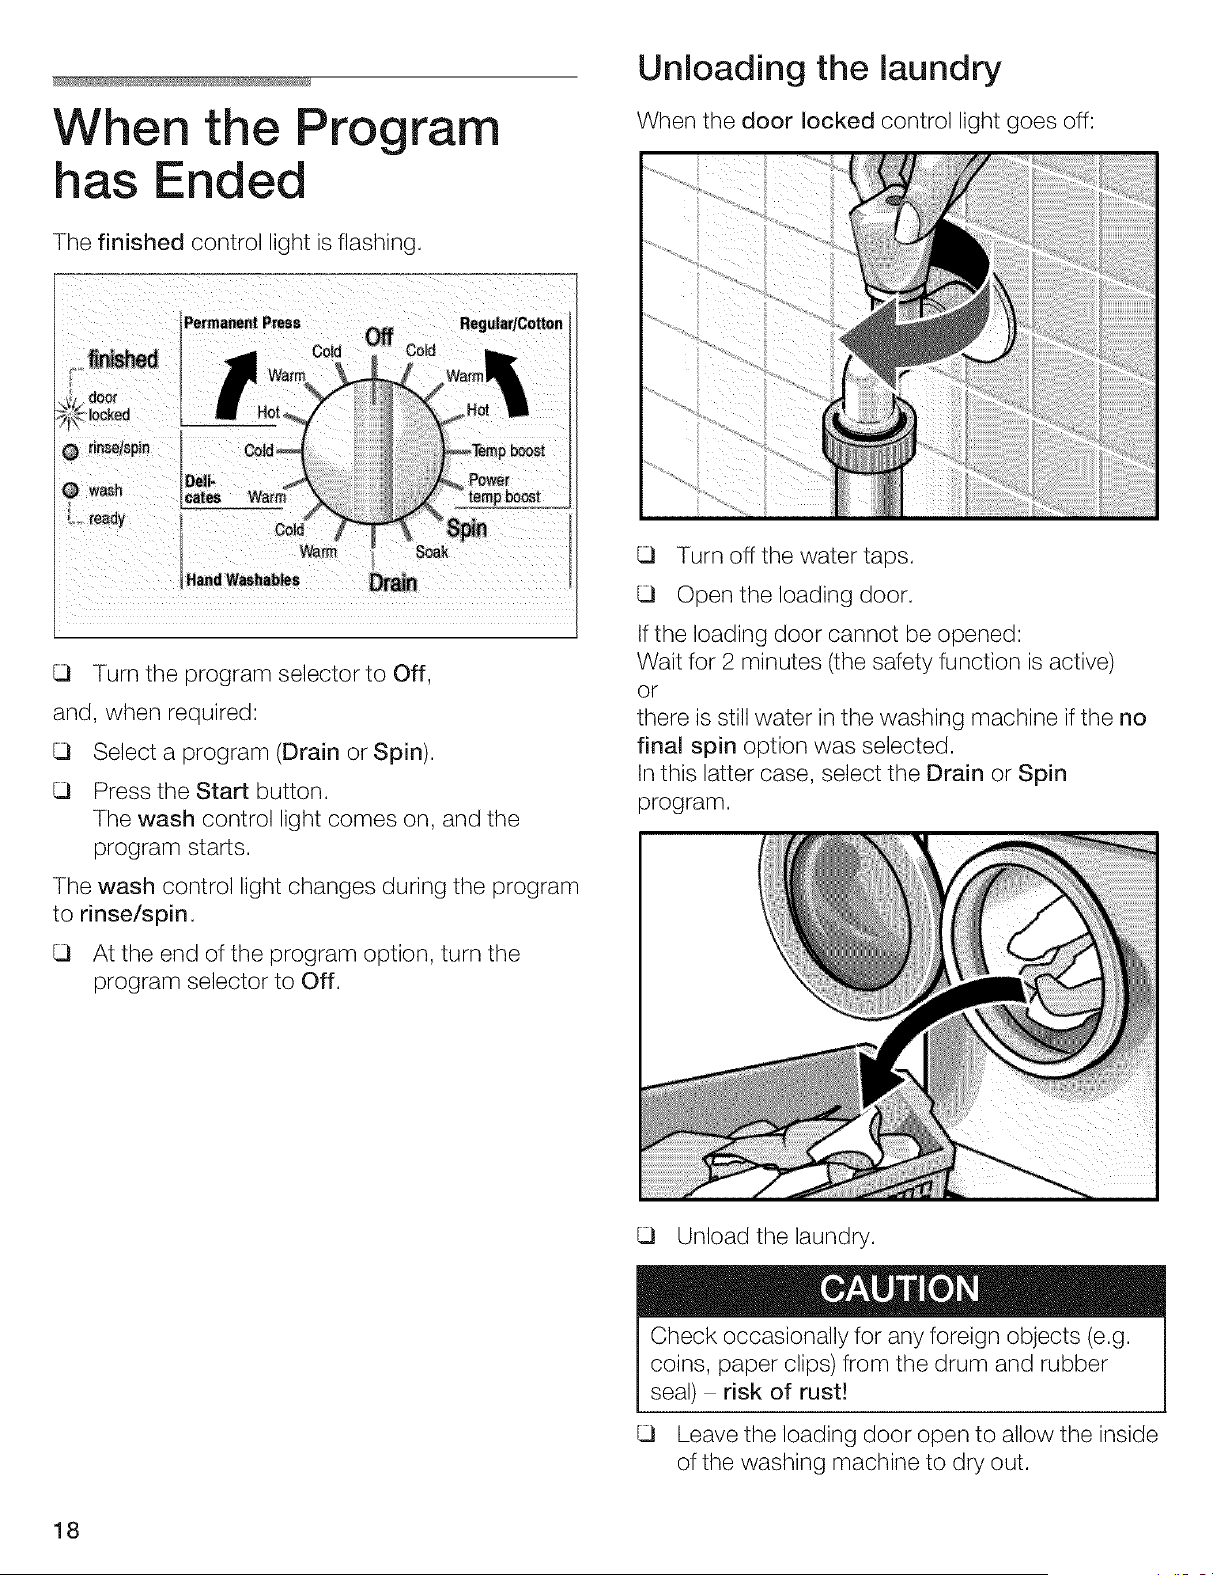
Unloading the laundry
When the door locked control light goes off:
ii
Turn off the water taps.
Open the loading door.
If the loading door cannot be opened:
Wait for 2 minutes (the safety function is active)
or
there is still water in the washing machine if the no
final spin option was selected.
In this latter case, select the Drain or Spin
program.
Unload the laundry.
Check occasionally for any foreign objects (e.g.
coins, paper clips) from the drum and rubber
seal) risk of rust!
Leave the loading door open to allow the inside
of the washing machine to dry out.
18
User aintenance
Instructions
Cleaning and Care
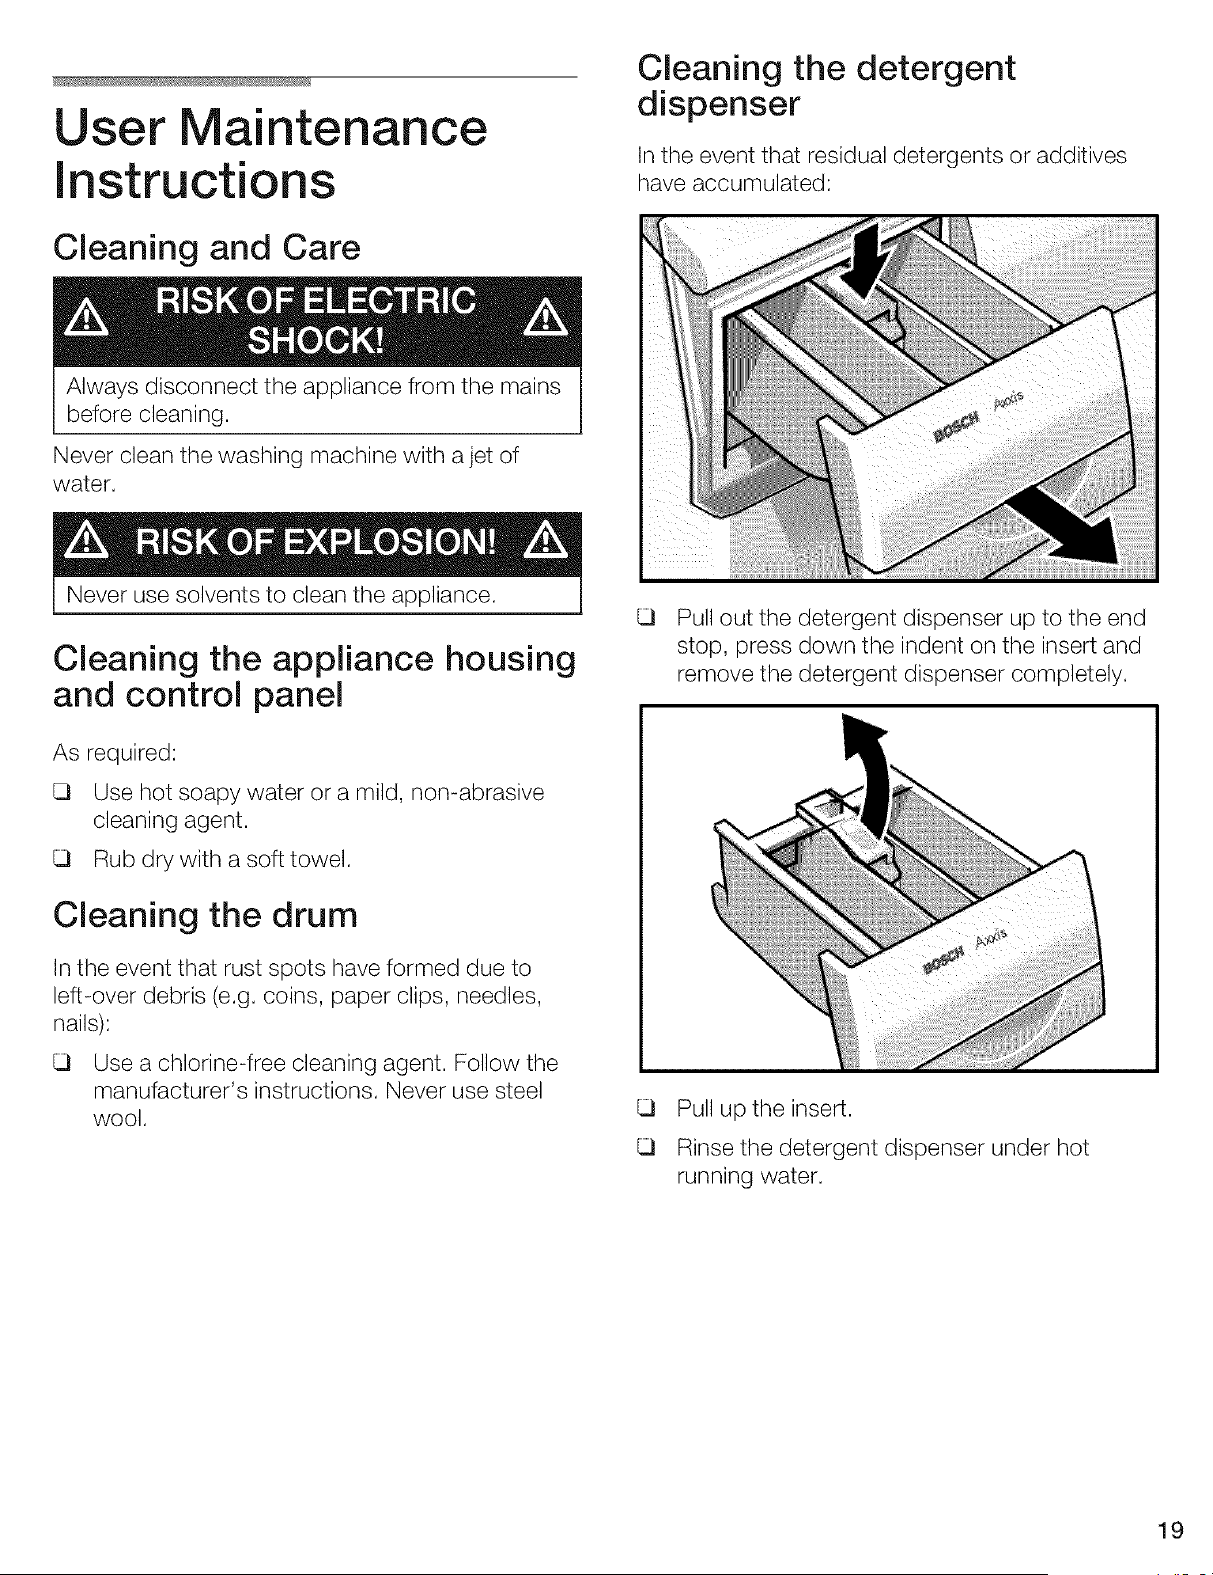
Cleaning the detergent
dispenser
In the event that residual detergents or additives
have accumulated:
Always disconnect the appliance from the mains
before cleaning.
Never clean the washing machine with a jet of
water.
Never use solvents to clean the appliance.
Cleaning the appliance housing
and control panel
As required:
Use hot soapy water or a mild, non-abrasive
cleaning agent.
Rub dry with a soft towel.
Cleaning the drum
In the event that rust spots have formed due to
left-over debris (e.g. coins, paper clips, needles,
nails):
Use a chlorine-free cleaning agent. Follow the
manufacturer's instructions. Never use steel
wool.
Pull out the detergent dispenser up to the end
stop, press down the indent on the insert and
remove the detergent dispenser completely.
Pull up the insert.
Rinse the detergent dispenser under hot
running water.
19
Push down the insert until it clicks into place.
Insertthe detergent dispenser.
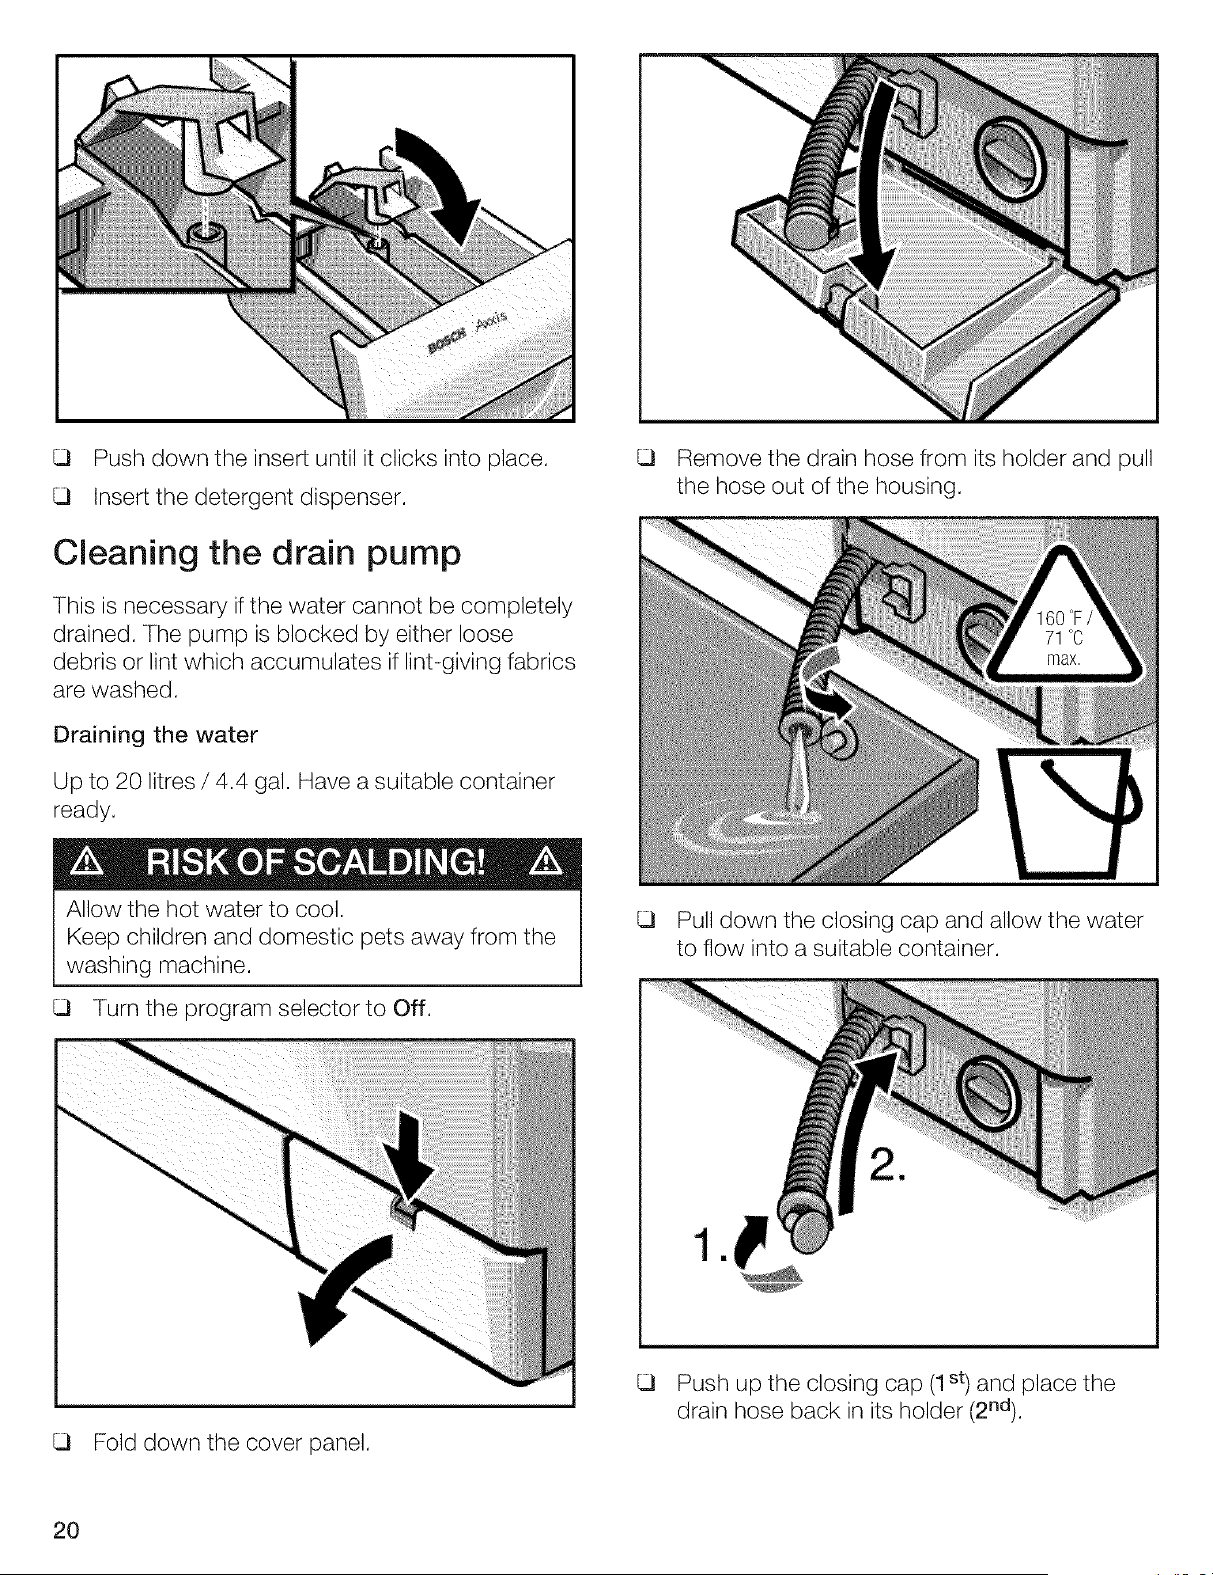
Cleaning the drain pump
This is necessary if the water cannot be completely
drained. The pump is blocked by either loose
debris or lint which accumulates if lint-giving fabrics
are washed.
Draining the water
Up to 20 litres / 4.4 gal. Have a suitable container
ready.
Remove the drain hose from its holder and pull
the hose out of the housing.
Allow the hot water to cool.
Keep children and domestic pets away from the
washing machine.
Turn the program selector to Off.
Pull down the closing cap and allow the water
to flow into a suitable container.
1.
Fold down the cover panel.
Push up the closing cap (1 st) and place the
drain hose back in its holder (2rid).
2O
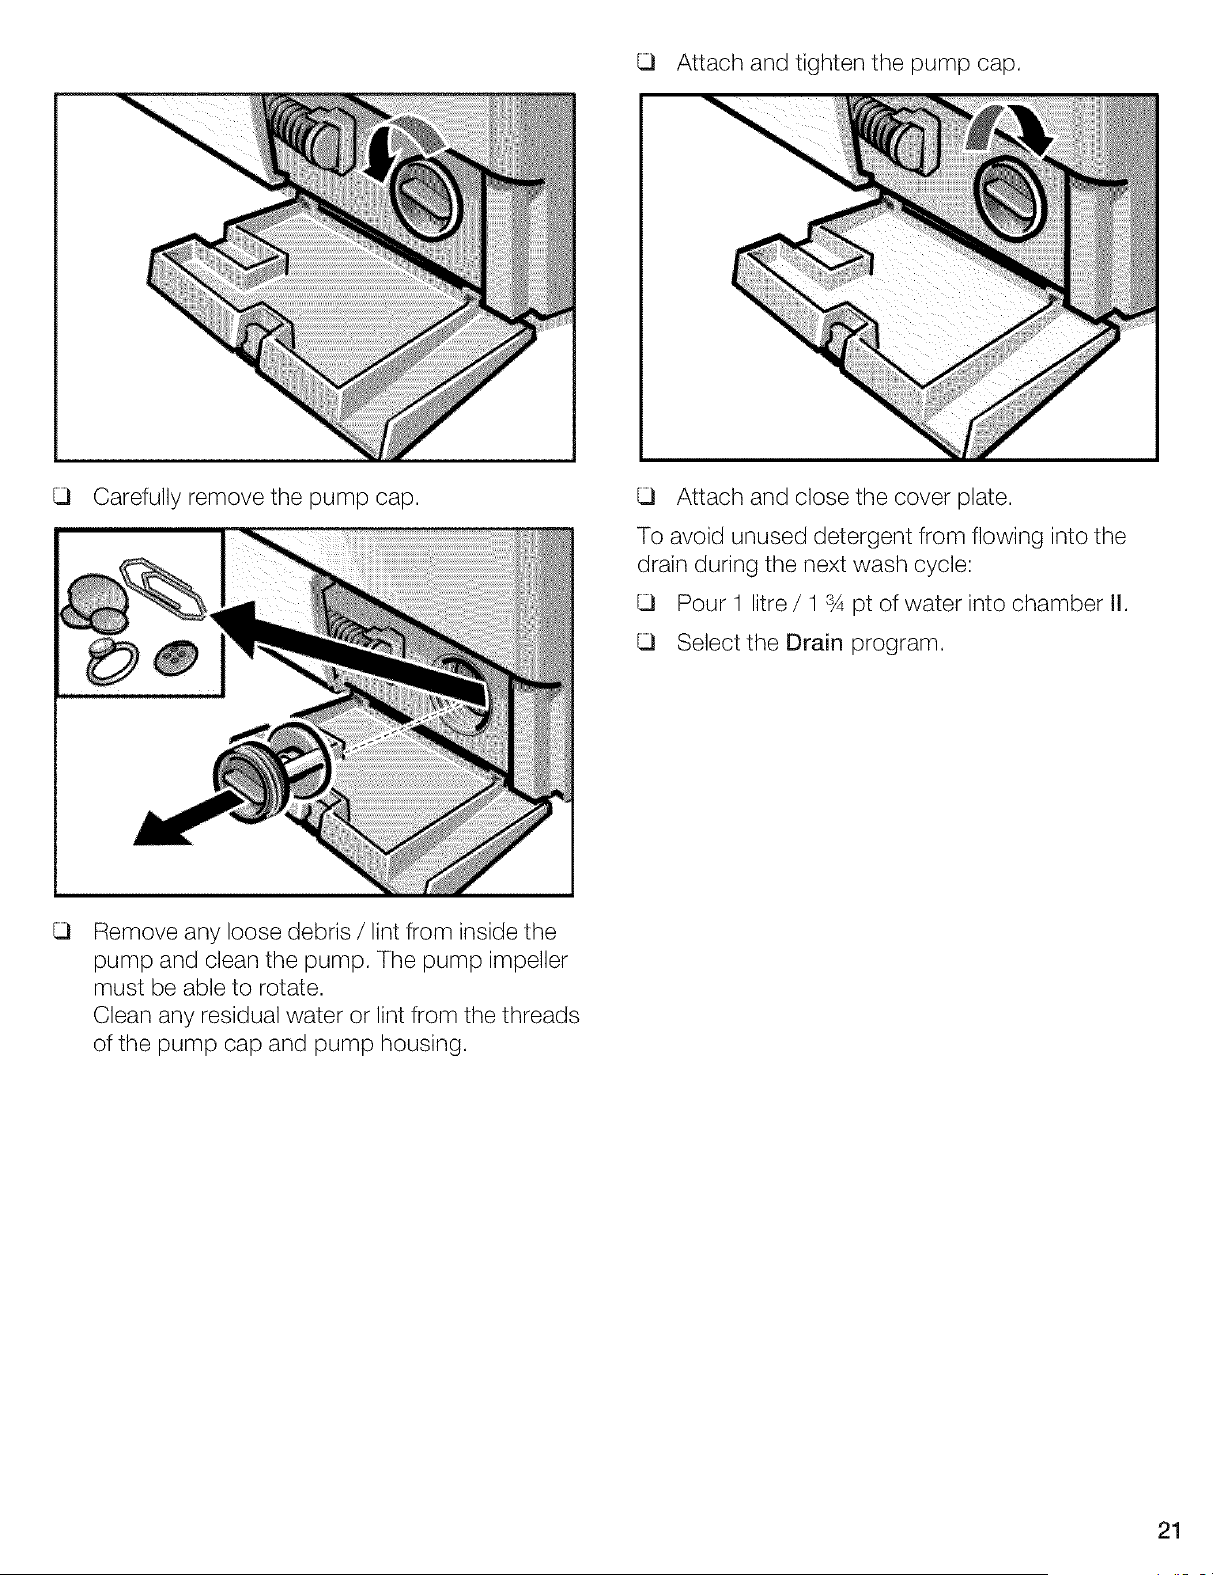
Attach and tighten the pump cap.
Carefullyremovethe pump cap. Attach and close the cover plate.
To avoid unused detergent from flowing into the
drain during the next wash cycle:
Pour 1 litre/ 1 34 pt of water into chamber II.
Select the Drain program.
Remove any loose debris / lint from inside the
pump and clean the pump. The pump impeller
must be able to rotate.
Clean any residual water or lint from the threads
of the pump cap and pump housing.
21
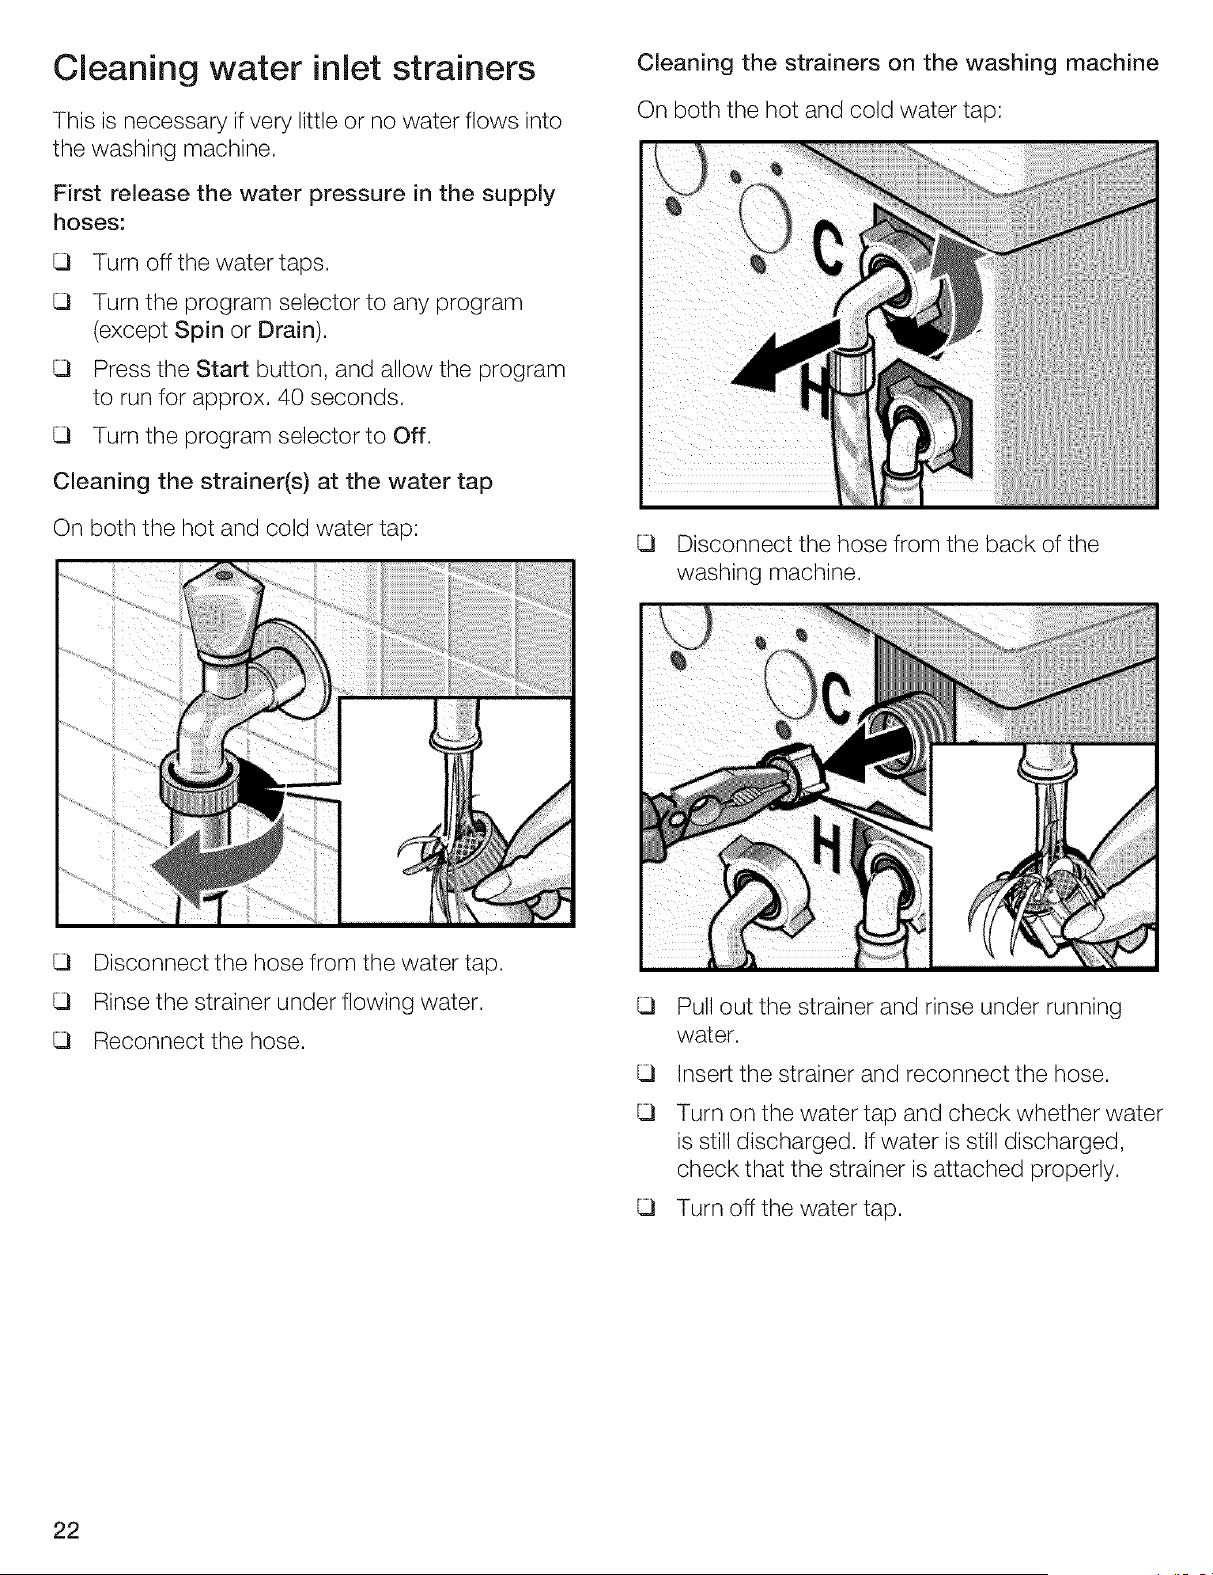
Cleaning water inlet strainers
This is necessary if very little or no water flows into
the washing machine,
First release the water pressure in the supply
hoses:
Turn off the water taps,
Turn the program selector to any program
(except Spin or Drain),
Press the Start button, and allow the program
to run for approx, 40 seconds,
Turn the program selector to Off,
Cleaning the strainer(s) at the water tap
On both the hot and cold water tap:
Disconnect the hose from the water tap.
Rinse the strainer under flowing water.
Reconnect the hose.
Cleaning the strainers on the washing machine
On both the hot and cold water tap:
Disconnect the hose from the back of the
washing machine.
Pull out the strainer and rinse under running
water.
Insert the strainer and reconnect the hose.
Turn on the water tap and check whether water
is still discharged. If water is still discharged,
check that the strainer is attached properly.
Turn off the water tap.
22
Descaling the washing
machine
Descaling agents contain acids which can attack
parts of the washing machine and discolor the
laundry.
Provided that you use the correct amount of
detergent, it is not necessary to descale the
washing machine.
If, however, descaling the appliance becomes
necessary, please follow the instructions provided
by the descaling agent manufacturer.
Customer Service
The washing machine requires no special care
other than the care and cleaning noted above. If
you are having a problem with your washing
machine, before calling for service please refer
to page 24.
If service becomes necessary, contact your dealer
or installer or an authorized service center. Do not
attempt to repair the appliance yourself. Any work
performed by unauthorized personnel may void the
warranty.
If you are having a problem with your washing
machine and are not pleased with the service you
have recieved:
First, )lease contact your installer or the
Authorized Service Contractor in your area and
explain to them why you are not satisfied. This
will usually correct the problem.
If after working with your installer or service
persons the problem still has not been resolved
to your satisfaction, please let us know by
either writing to us at,
BSH Home Appliances
5551 Mc Fadden Ave.
Huntington Beach, LA 92649
or, calling us at,
1-800/944-2904
Please be sure to include, if writing, or have
available, if calling, the following information:
- Model Number
- Serial Number
- Date of Original Purchase
- Date Problem Originated
- Explanation of Problem
Also, if writing, please be sure to include a daytime
telephone number and a copy of sales invoice.
You will find the model number and serial number
information on the rating plate located on the inside
of the door above the door glass.
23
Troubleshooting
inor
Repairs must only be carried out by our
Customer Service or an authorized technician.
If repairs are needed, and assuming that you
cannot eliminate the fault yourself with the aid of
the following table:
Faults
Turn the program selector to Off.
Disconnect the washing machine from the
mains.
Turn off the water tap.
Call Customer Service (refer to page 23).
Fault Cause Action
The loadingdoorcannot be
opened.
Detergentresiduein the
detergentdispenser.
Control lights do not come on.
no final spin was selected.
Safetyfunction is active.
Detergentwas dampor lumpy.
Select Drain or Spin,
Waitfor 2 minutes.
Cleanand drythe detergent dispenser
(referto page19).
Usethe dispensingaid for liquiddetergents,
A fuse has triggered. CallCustomerServicereplacethe fuse.
Powerfailure. An interruptedprogramwill be resumedwhen
power returns.If youwish to unloadthe
laundry,proceedas in "Cleaningthe drain
pump", page20.
Plug is looseor not inserted. Insertthe plug.
Loadingdoor notclosed. Checkwhether laundry istrapped in door.
Closethe loadingdoor(a click should be
heard).
Programdoesnot start.
The ready control lightflashes.
Programdoesnot start.
Water does not enterthe
machineor detergentis not
washedaway.
Water cannotbe seen in drum.
Water is not completely drained.
Water is flowing out from
underneaththe machine.
Start button notpressed. Pressthe Start button.
Watertap notturned on. Turn on water tap.
Supplyhose kinkedor trapped. Eliminatethe cause.
Strainerin supplyhoseclogged. Cleanthe strainer (referto page 22).
Thisis not a fault.
Thewater lies belowthe visible part of the drum.
Loosedebrisis blockingthe pump. Cleanthe pump (referto page 20).
Lint-producing laundrywas washed.The water Cleanthe water drainagepipe and/or drain
drainagepipeor drain hose is blocked, hose.
Thethread of the supply hose is nottight. Tightenthe thread.
Leak in the drain hose. Replacethe drain hose.
24
Fault
Foamcomingoutofthe
detergentdispenser,
Thelaundrywasnotspun
Spinresultunsatisfactory,
Repeatedspinningatshort
intervals,
Theprogramtakeslongerthan
usual,
Cause Action
Toomuchdetergent,
Mix1tablespoonoffabricsoftenerwith½ litre
/ 1 pt of water and pour into chamberI of the
detergentdispenser,
Usedetergentrecommendedfor higheffi-
ciencyandfront-loading washers,
Reducethe amountof detergent nexttime,
Large itemsof clothing becameentangledand Always load largeand small items together
could not be distributedevenlyinthe drum, intothe drum (seealso unbalancedload
Forsafety reasons,the high-speedfinal spin detectionsystem),
cycle was automaticallycancelled,
Spin programselected maximumspin speed800 r,p,m,
Thisis not a fault,
Theimbalancecompensationsystemis attempting to balancethe loadthrough repeatedspins,
Thisis not a fault, Always load largeand small itemstogether
Unbalancedload detection systemattemptsto intothe drum,
distributethe washing evenlyby spinning it
severaltimes,
Thefoam detectionfeature has activatedan Add a more appropriateamountof detergent
additional rinsingcycleto reducethe amount nexttime,
of foam,
The degreeof dirt was higher than supposed, Selecta moresuitable program,
Not enoughdetergent, Add detergentaccordingto the manufacturer's
specifications,
Somephosphate-freedetergentscontain Brushoff spots when laundry is dry,
water-insolubleresiduesthat may appearas
light spots on the laundry,
Unsatisfactorywashing result,
Detergentresidueon the laundry,
Grey residuesonthe laundry,
Dirt accumulationfrom ointments,fats or oils, Add the maximumamount of detergentand
selectthe highestpermissibletemperature
nexttime,
25
Installation,
Connection
and Transport
Safety information
The washing machine is heavy. Take care when
lifting it.
Frozen hoses can tear / burst. Do not install the
washing machine outdoors or in an area prone
to frost.
Be sure to observe all listed warnings and cautions.
These installation instructions are intended for use
by qualified installers. In addition to these
instructions the washer shall be installed:
In the United States, in accordance with the
National Electric Code, ANSI/NFPA70 - latest
edition/State and Municipal codes and/or local
codes.
In Canada, in accordance with the Canadian
Electric Code C22.1 - latest edition/State and
Municipal codes and/or local codes.
If the washing machine is located in a room which
will be exposed to freezing temperatures, or if it is
located in a cabin that is being shut down for the
winter, any residual water in the pump or water inlet
hose(s) must be drained.
To drain the pump refer to page 20.
To drain the water hose(s) refer to page 22.
Take care not to damage the washing machine.
Do not hold onto protruding parts (e.g. loading
door) when lifting.
In addition to the safety information listed here, the
local water and electricity supplier may have special
requirements.
If in any doubt, have the appliance connected by
an authorized technician.
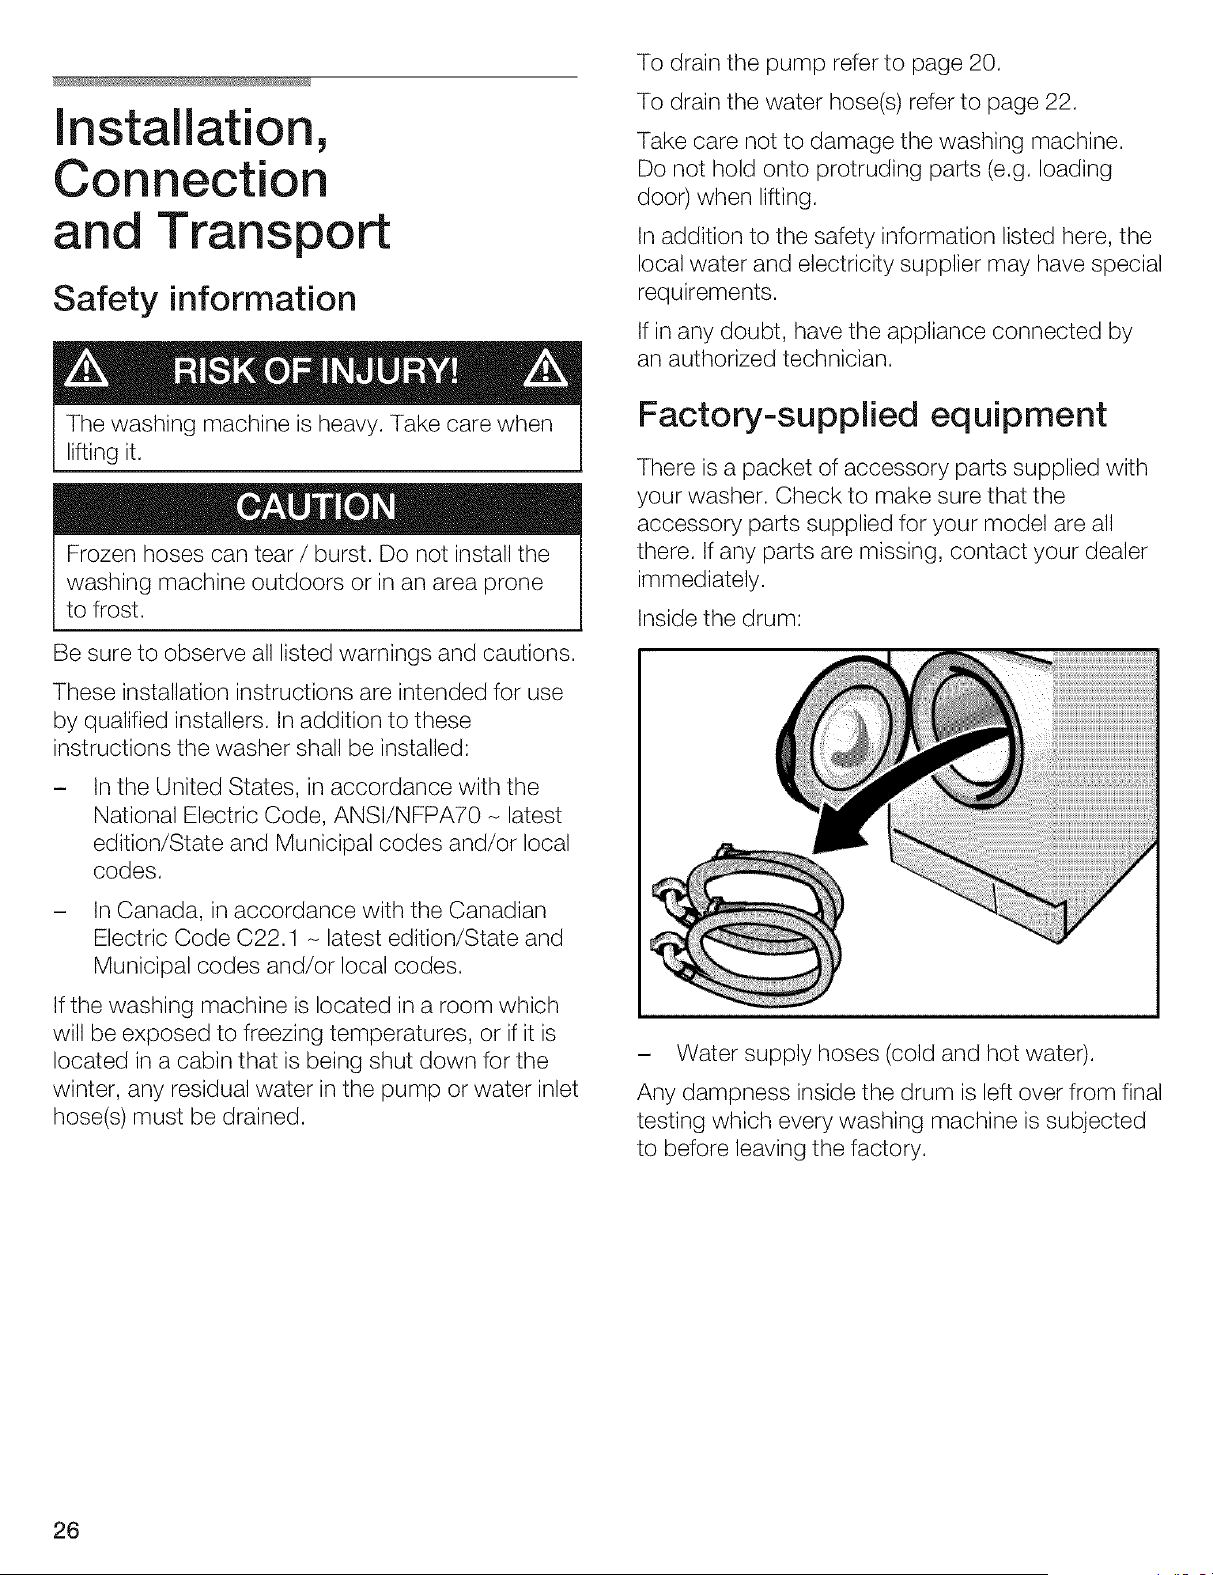
Factory-supplied equipment
There is a packet of accessory parts supplied with
your washer. Check to make sure that the
accessory parts supplied for your model are all
there. If any parts are missing, contact your dealer
immediately.
Inside the drum:
- Water supply hoses (cold and hot water).
Any dampness inside the drum is left over from final
testing which every washing machine is subjected
to before leaving the factory.
26
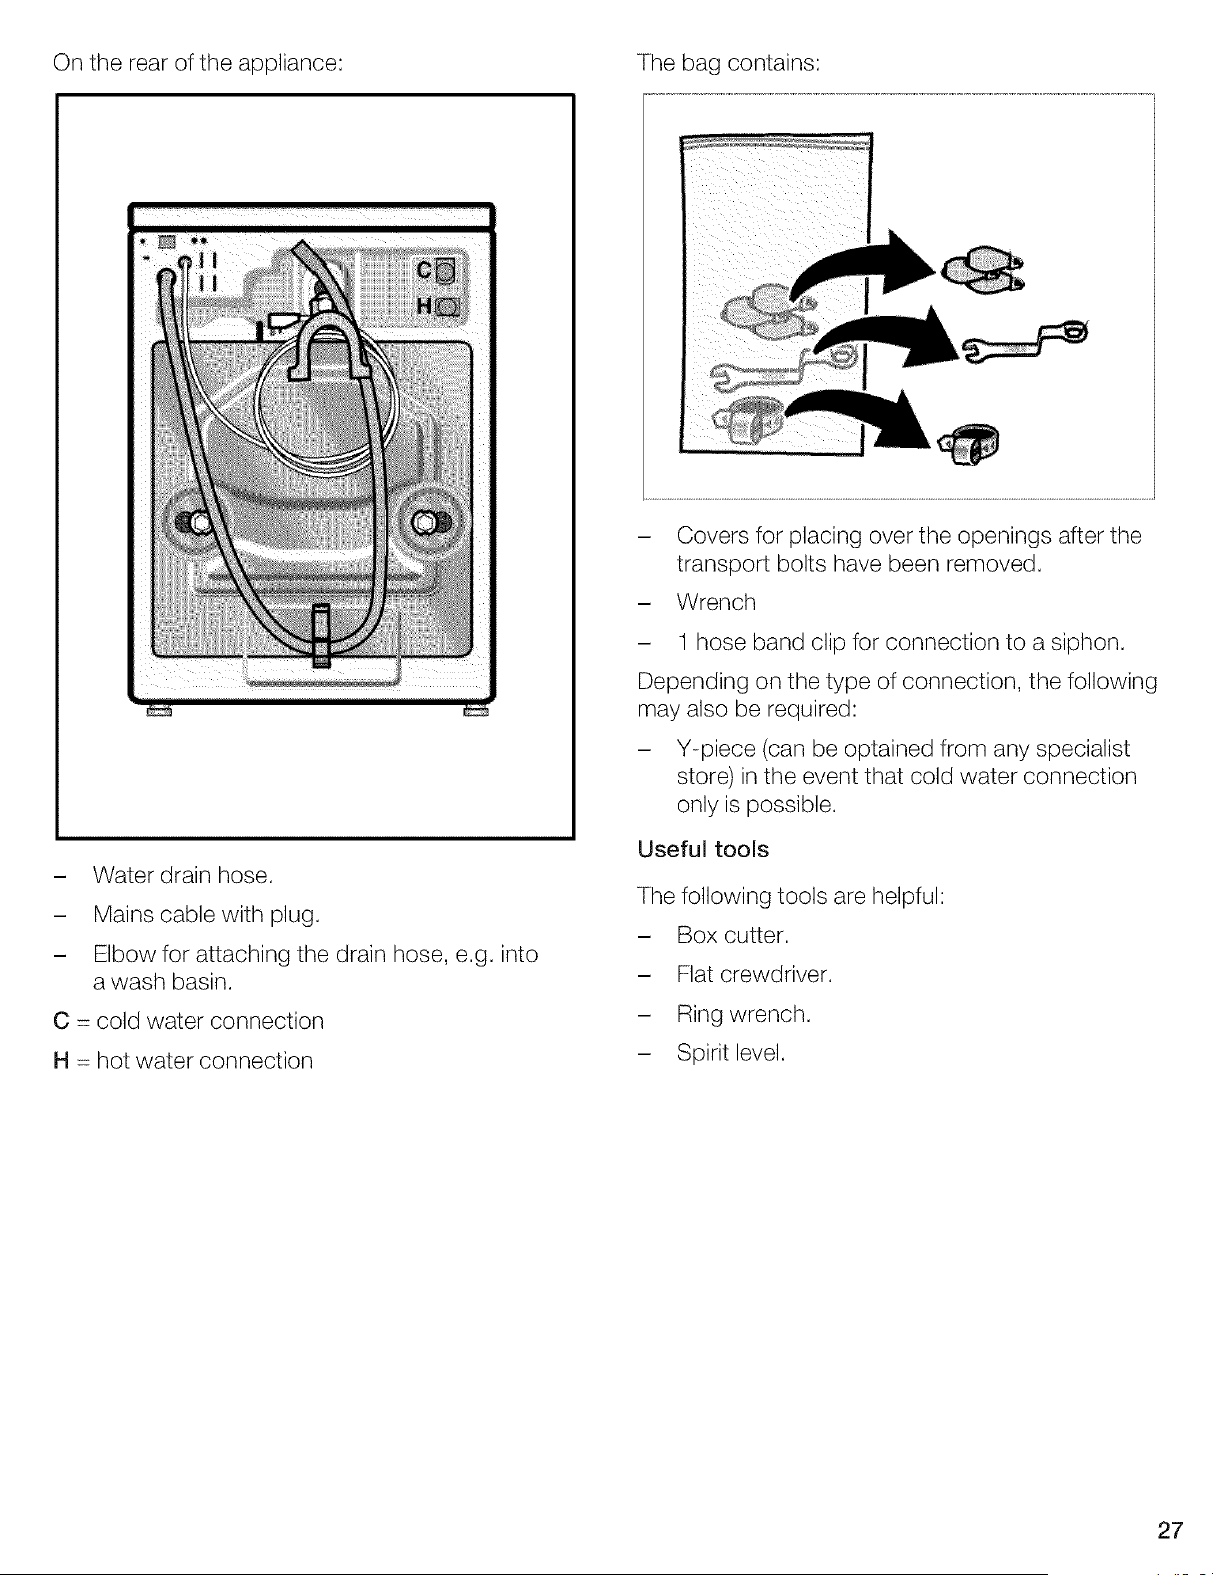
On the rear of the appliance: Thebag contains:
- Water drain hose.
- Mainscablewith plug.
- Elbowfor attaching the drainhose, e.g. into
a wash basin.
C -- cold water connection
H -- hot water connection
- Coversfor placing over the openings afterthe
transport bolts havebeen removed.
- Wrench
- 1 hose band clip for connection to a siphon.
Dependingon the type of connection, the following
mayalso be required:
- Y-piece (can be optainedfrom any specialist
store)in the eventthat cold water connection
only is possible.
Useful tools
Thefollowing tools are helpful:
- Box cutter.
- Flat crewdriver.
- Ringwrench.
- Spirit level.
27
Dimensions Installation area
a -- 600 mm//23 5/8"
b -- 590 mm//22 1/2"
c -- 852 mm//33 1/2"
Approx. weight -- 69 kg//152 Ibs.
Never ground the washer to plastic plumbing
lines, gas lines or hot water pipes.
Appliance stability is important so that the washing
machine does not "walk" during the spin cycles.
The installation area must be solid and even. Soft
floor surfaces, such as carpets or surfaces with
foam backing, are not suitable.
If the washing machine is to be installed on a wood
joist floor:
If possible, place the washing machine in a
corner of the room.
Screw a water-resistant wooden board (at least
30 mm thick) to the floor.
Affix the feet of the washing machine using
holding brackets *
If the washing machine is to be placed on a
pedestal:
Affix the feet of the washing machine using
holding brackets *
• Holding brackets (set) can be obtained
from the Customer Service (order no.
WMZ 2200).
To reduce the risk of fire this washer mjust be
fastened or otherwise secured to an uncovered
concrete floor.
Pedestal Mounting
For mounting the washer on the Bosch 12"
pedestal (accessory No. VVTZ 1210) follow the
instructions supplied with the pedestal.
28
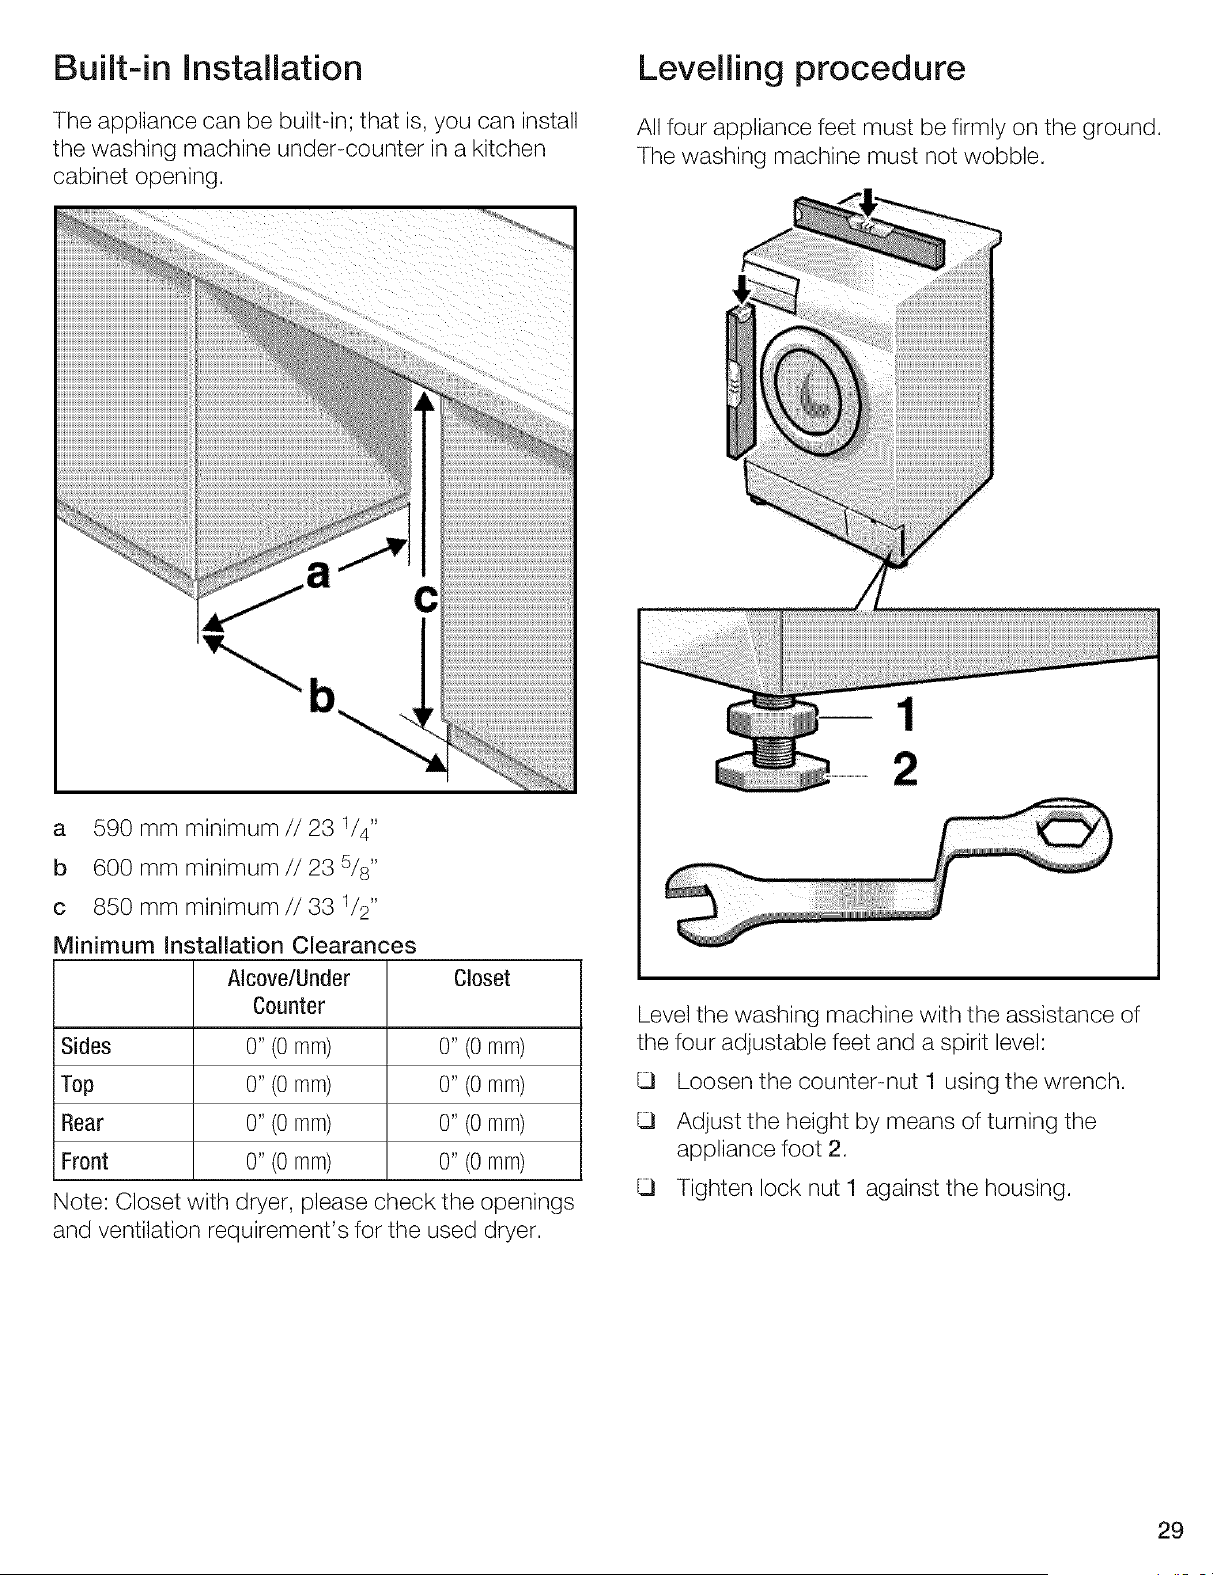
Built-in Installation
The appliance can be built-in; that is, you can install
the washing machine under-counter in a kitchen
cabinet opening.
Levelling procedure
All four appliance feet must be firmly on the ground.
The washing machine must not wobble.
a 590 mm minimum//23 1/4"
b 600 mm minimum//23 5/8"
c 850 mm minimum//33 1/2"
Minimum Installation Clearances
Alcove/Under Closet
Counter
Sides 0" (0 mm) 0" (0 mm)
Top 0" (0 mm) 0" (0 mm)
Rear 0" (0 mm) 0" (0 mm)
Front 0" (0 mm) 0" (0 mm)
Note: Closet with dryer, please check the openings
and ventilation requirement's for the used dryer.
Level the washing machine with the assistance of
the four adjustable feet and a spirit level:
Loosen the counter-nut 1 using the wrench.
Adjust the height by means of turning the
appliance foot 2.
Tighten lock nut I against the housing.
29
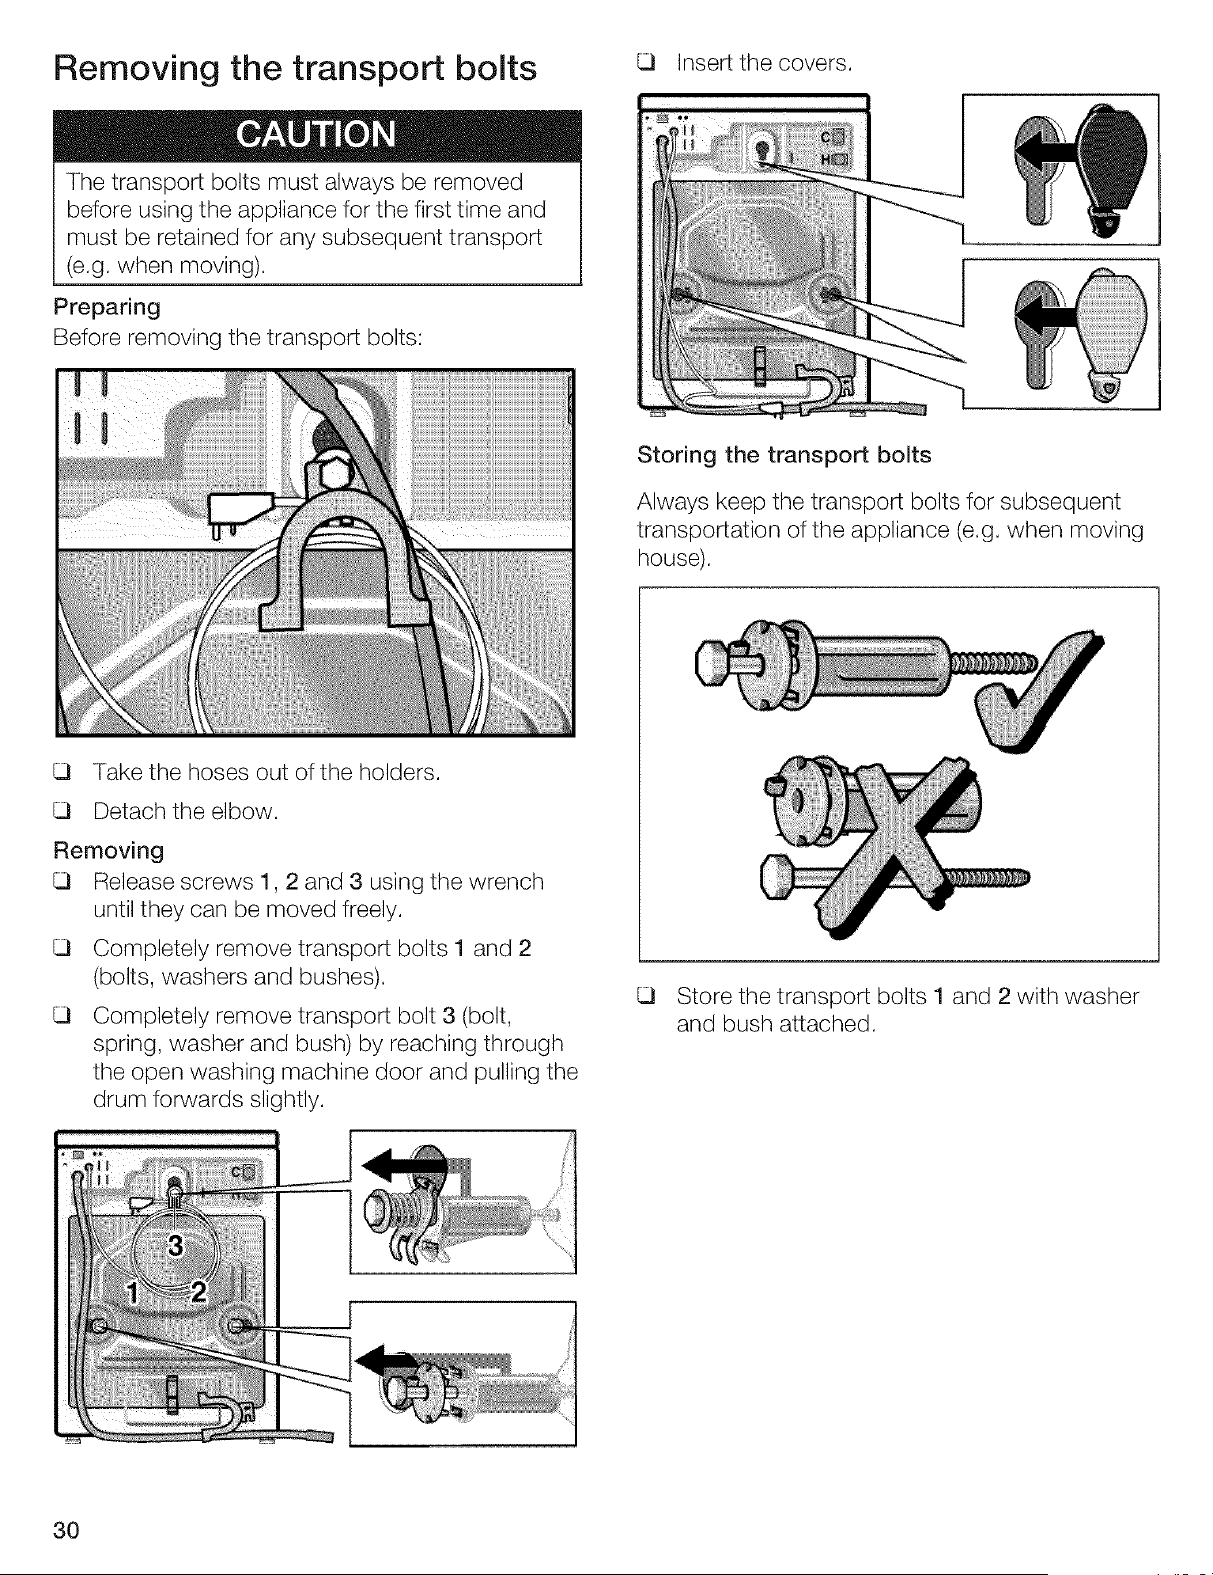
Removing the transport bolts
The transport bolts must always be removed
before using the appliance for the first time and
must be retained for any subsequent transport
(e.g. when moving).
Preparing
Before removing the transport bolts:
Insert the covers.
Storing the transport bolts
Always keep the transport bolts for subsequent
transportation of the appliance (e.g. when moving
house).
Take the hoses out of the holders.
Detach the elbow.
Removing
Release screws 1,2 and 3 using the wrench
until they can be moved freely.
Completely remove transport bolts I and 2
(bolts, washers and bushes).
Completely remove transport bolt 3 (bolt,
spring, washer and bush) by reaching through
the open washing machine door and pulling the
drum forwards slightly.
Store the transport bolts I and 2 with washer
and bush attached.
3O
Hose and cable lengths
Left-hand connection
approx. 35" (90cm)
Right-hand connection
approx. 48¾" (135 cm)
Other hoses
Available from specialty dealers:
- Extended supply hose (approx. 2.2 m//
86.6 in).
Water connection
Water supply
The washing machine must only be operated
with cold and hot (max. 140 °F//60 °C) tap
water. Do not connect the appliance to the mixer
tap of an unpressurized hot-water boiler.
If in any doubt, have the water connection carried
out by an authorized technician.
The water supply hoses must not be:
- Bent or squashed.
- Modified or cut through (stability can no longer
be guaranteed).
Plastic threads must only be tightened by hand.
Do not remove the strainers from the water supply
hoses.
Observe the water pressure in the supply network:
- The water pressure should be between 14.5 to
145 p.s.i. (1 to 10 bars) (when the tap is turned
on, at least 2.2 U. S. gallons (8 liters) of water is
discharged per minute).
- A pressure reducing valve must be installed if
the maximum water pressure is exceeded.
To protect against water demage, the hot and
cold water valves should be accessible when the
washer is in place and should always be turned
off when the washer is not in use.
When washer is being installed in new construc-
tion, or a building that has had its plumbing sys-
tem recently installed or upgraded, the lines
must be flushed prior to installing the washer.
This must be done to clear the lines of any sand,
dirt or residue that may still be in the lines.
31
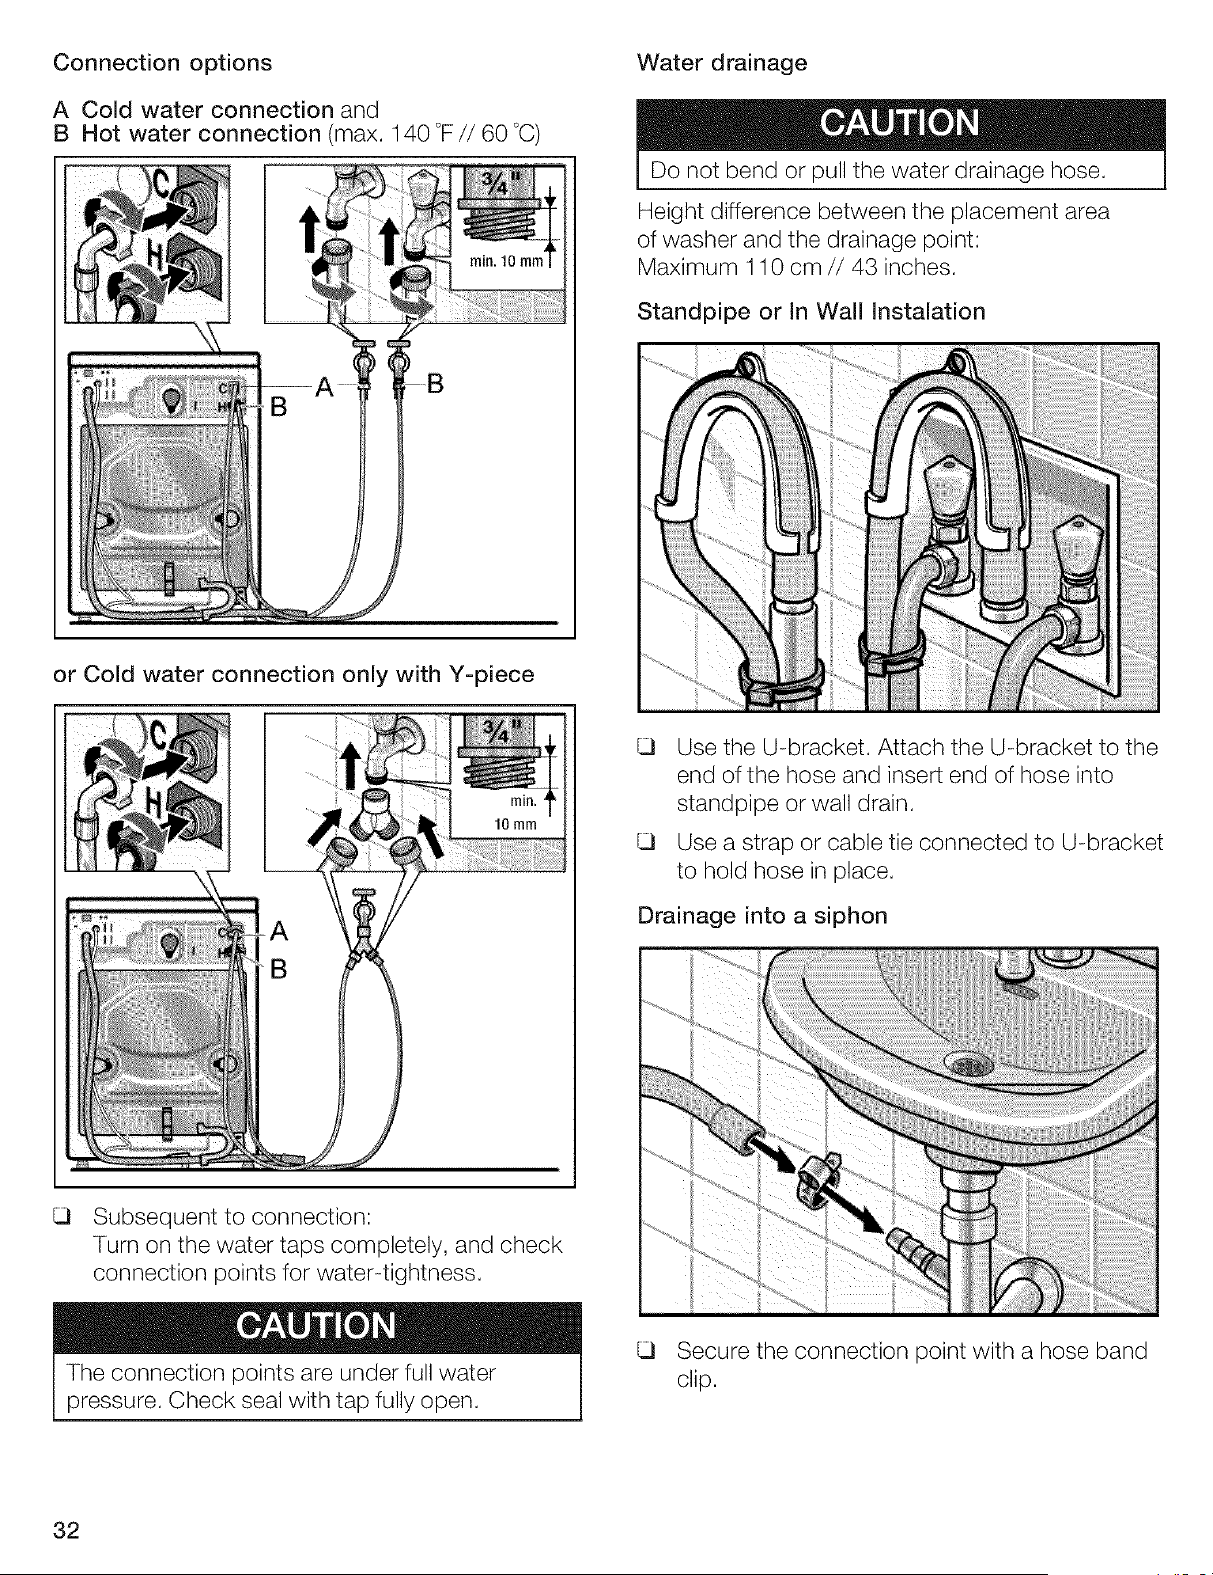
Connection options
A Cold water connection and
B Hot water connection (max,140 °F//60 °C)
Water drainage
Do not bend or pullthe water drainage hose.
Heightdifference betweenthe placement area
of washer and the drainage point:
Maximum110 cm//43 inches.
Standpipe or In Wall Instalation
or Cold water connection only with Y-piece
Use the U-bracket. Attach the U-bracket to the
end of the hose and insert end of hoseinto
standpipe or wall drain.
Use a strap or cable tie connected to U-bracket
to holdhose in place.
Drainage into a siphon
Subsequent to connection:
Turn on the water taps completely, and check
connection points for water-tightness.
Theconnection points are under full water
pressure.Check seal with tap fully open.
Securethe connection point with a hose band
clip.
32
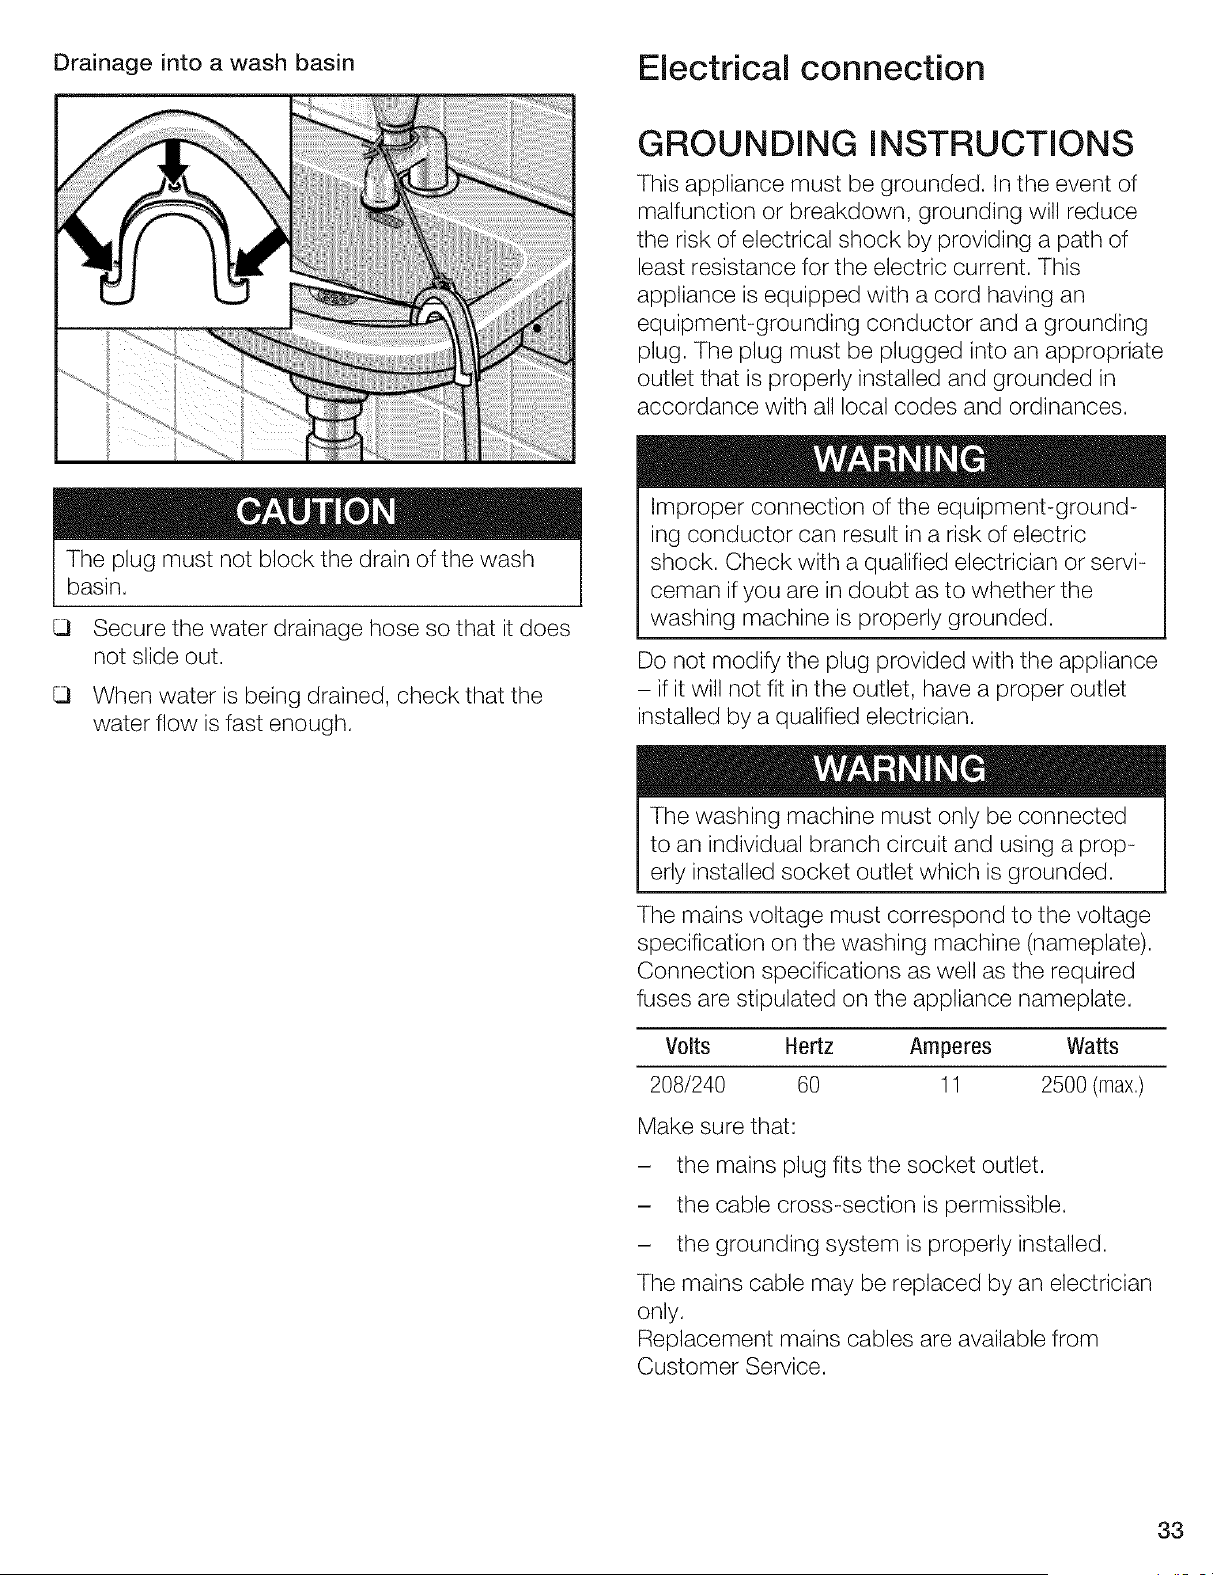
Drainage into a wash basin Electrical connection
The plug must not block the drain of the wash
basin.
Secure the water drainage hose so that it does
not slide out.
When water is being drained, check that the
water flow is fast enough.
GROUNDING INSTRUCTIONS
This appliance must be grounded. In the event of
malfunction or breakdown, grounding will reduce
the risk of electrical shock by providing a path of
least resistance for the electric current. This
appliance is equipped with a cord having an
equipment-grounding conductor and a grounding
plug. The plug must be plugged into an appropriate
outlet that is properly installed and grounded in
accordance with all local codes and ordinances.
Improper connection of the equipment-ground-
ing conductor can result in a risk of electric
shock. Check with a qualified electrician or servi-
ceman if you are in doubt as to whether the
washing machine is properly grounded.
Do not modify the plug provided with the appliance
if it will not fit in the outlet, have a proper outlet
installed by a qualified electrician.
The washing machine must only be connected
to an individual branch circuit and using a prop-
erly installed socket outlet which is grounded.
The mains voltage must correspond to the voltage
specification on the washing machine (nameplate).
Connection specifications as well as the required
fuses are stipulated on the appliance nameplate.
Volts Hertz Amperes Watts
208/240 60 11 2500 (max,)
Make sure that:
- the mains plug fits the socket outlet.
- the cable cross-section is permissible.
- the grounding system is properly installed.
The mains cable may be replaced by an electrician
only.
Replacement mains cables are available from
Customer Service.
33
To reduce the riskof fire or electricalshock,
DO NOT use an extentioncord or an adapter to
connect the washer to the electricalpower
supply.
Inthe eventthat an earthqeakagecircuit breakeris
to be used, only usetypes markedwith the
followingsymbol: IZ_.
Onlythis symbol can guaranteecompliance with all
current regulations.
Do not insert/ remove the mains plug with wet or
damp hands.
Handle the plug body only when removing the plug
from the socket.
Transport, e.g. when moving
Before transporting the washing machine:
- Turn off the water tap,
- Drain any residual water (refer to page 20),
- Release the water pressure in the supply hose
(refer to page 22),
- Disconnect the washing machine from the
mains.
- Dismantle the supply and drainage hose,
- Install the lower 2 transport bolts.
Having transported the appliance and ensured
proper installation and connection, allow the Drain
program to run through before starting the first
wash program.
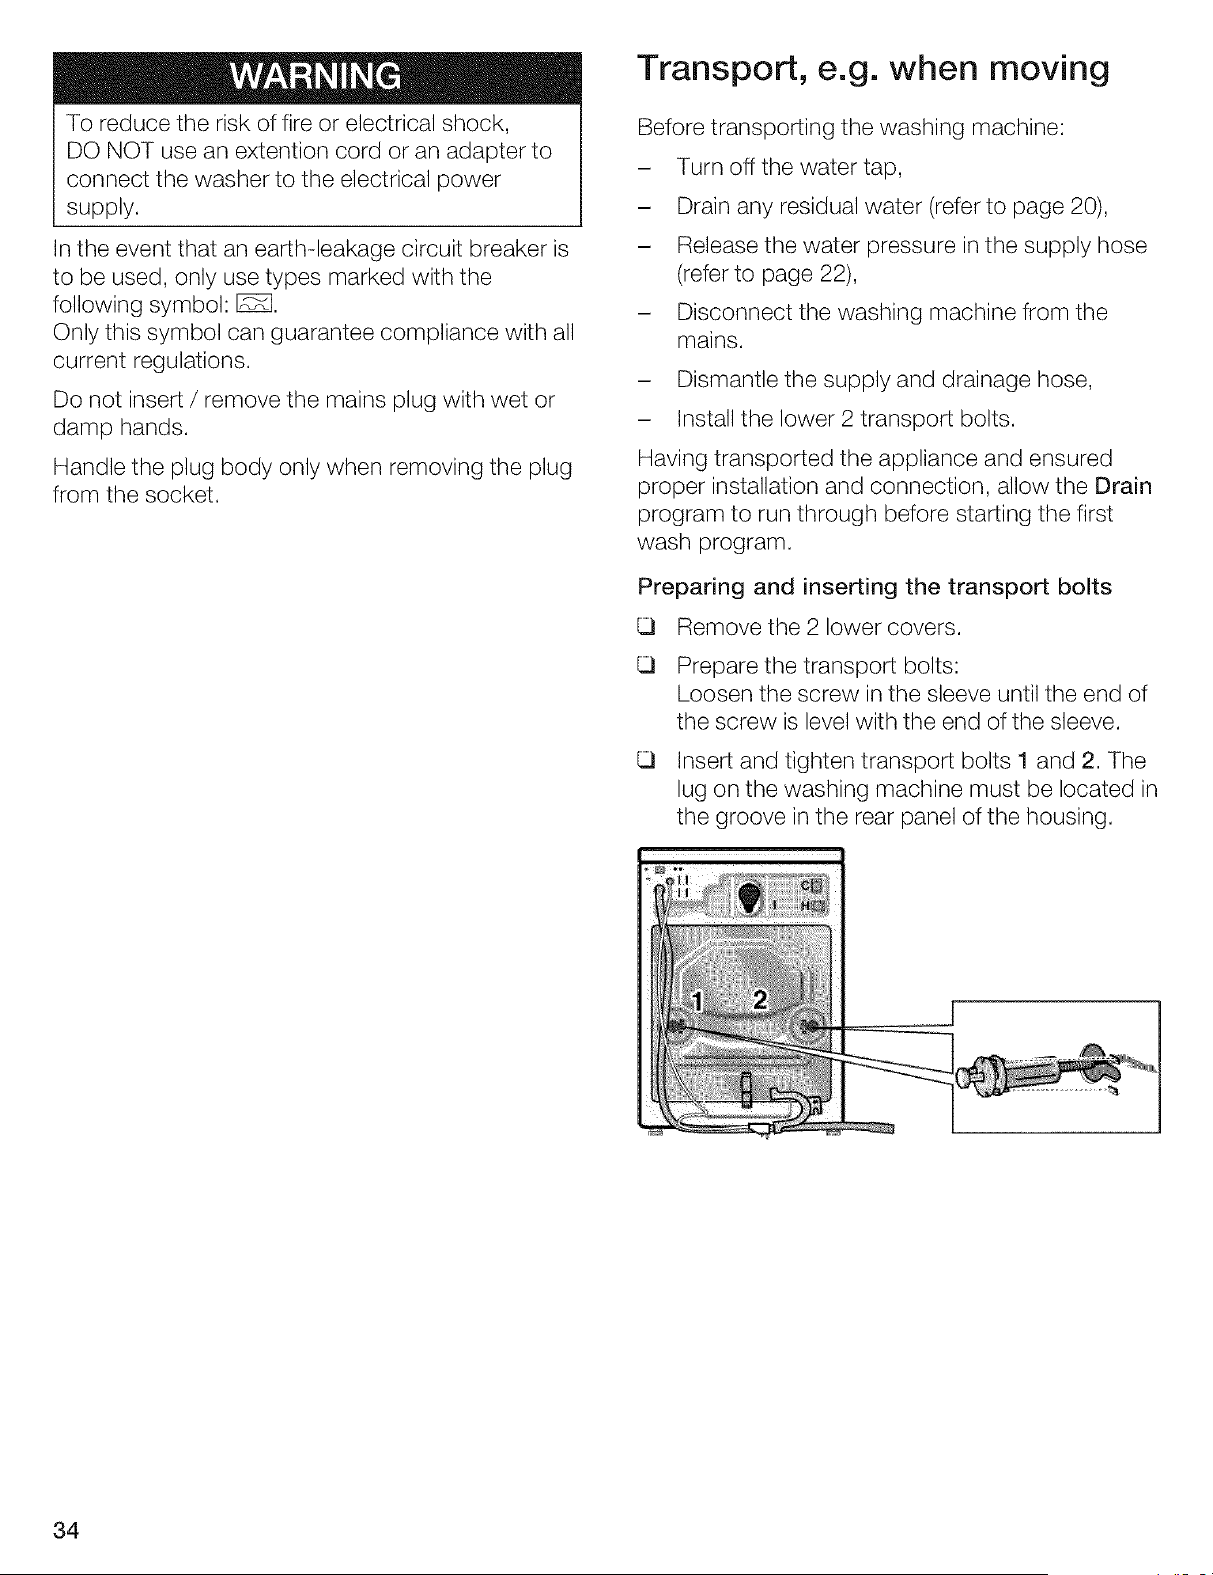
Preparing and inserting the transport bolts
Remove the 2 lower covers.
Prepare the transport bolts:
Loosen the screw in the sleeve until the end of
the screw is level with the end of the sleeve.
Insert and tighten transport bolts I and 2. The
lug on the washing machine must be located in
the groove in the rear panel of the housing.
34

35
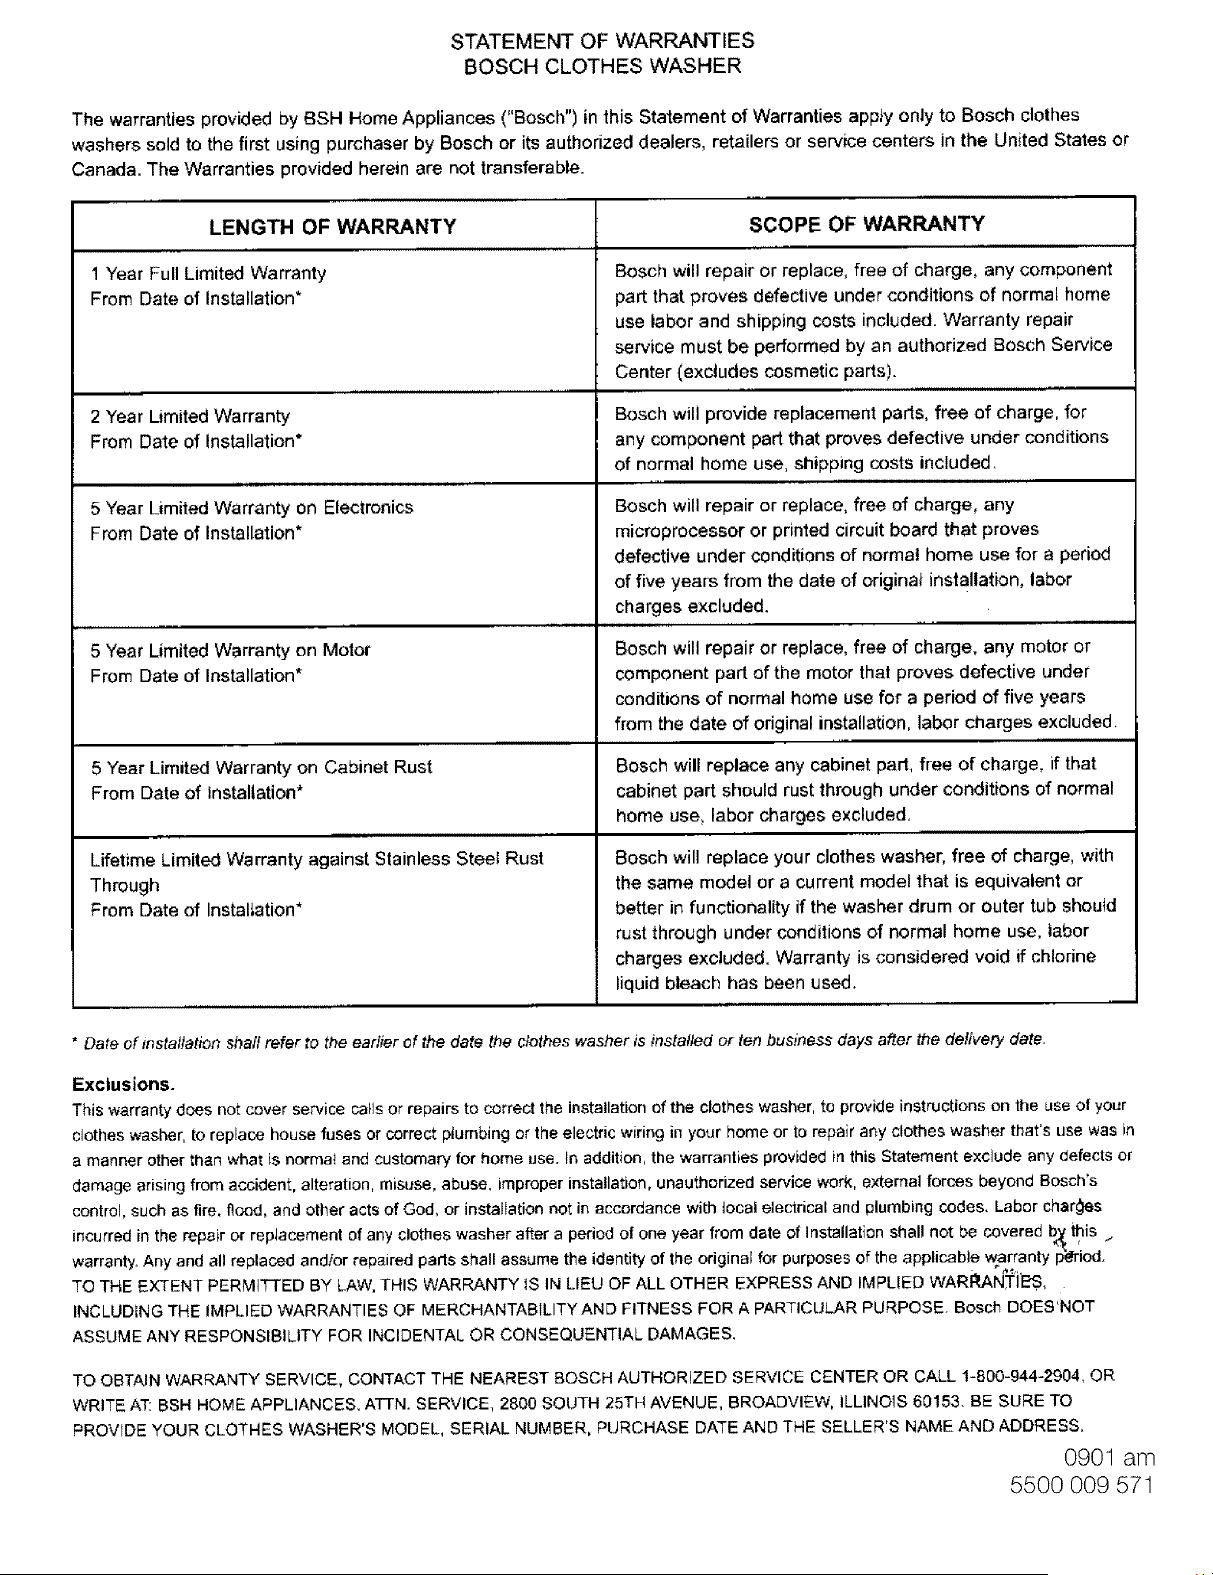
STATEMENT OF WARRANTIES
BOSCH CLOTHES WASHER
The warranties provided by BSH Home Appliances ("Bosch") in this Statement of Warranties app}y only to Bosch clothes
washers sold to the first using purchaser by Bosch or its authorized dealers, retailers or service centers in the United States or
Canada. The Warranties provided herein are not transferable.
LENGTH OF WARRANTY
1 Year Full Limited Warranty
From Date of Installation*
2 Year Limited Warranty
From Date of Installation*
5 Year Limited Warranty on Electronics
From Date of Installation*
5 Year Limited Warranty on Motor
From Date of Installation*
5 Year Limited Warranty on Cabinet Rust
From Date of installation*
Lifetime Limiled Warranty against Stainless Steei Rust
Through
From Date of Installation*
SCOPE OF WARRANTY
Bosch will repair or replace, free of charge, any component
part that proves defective under conditions of normal home
use labor and shipping costs included. Warranty repair
sewice must be performed by an authorized Bosch Service
Center (excludes cosmetic parts).
Bosch will provide replacement parts, free of charge, for
any component part that proves defective under conditions
of normal home use, shipping costs included.
Bosch will repair or replace, free of charge, any
microprocessor or printed circuit board that proves
defective under conditions of normal home use for a period
of five years from the date of originat installation, labor
charges excluded.
Bosch will repair or replace, free of charge, any motor or
component part of the motor that proves defective under
conditions of normal home use for a period of five years
from the date of original installation, labor charges excluded.
Bosch will replace any cabinet part, free of charge, if that
cabinet part should rust through under conditions of normal
home use, labor charges excluded.
Bosch will replace your clothes washer, free of charge, with
the same model or a current model that is equivalent or
better in functionality if the washer drum or outer tub should
rust through under conditions of normal home use, labor
charges excluded. Warranty is considered void if chlorine
liquid bleach has been used.
* Date of installation shaft refer to the earlier of the date the clothes washer is insta!led or ten bus_Y_essdays after the delivery date.
Exclusions.
This warranty does not cover service calls or repairs to correct the installation of the clothes washer, to provide instructions on the use of your
clothes washer, to replace house fuses or correct ptumbing or the electric wirin9 in your home or to repair any clothes washer that's use was in
a manner other than what is normat and customary for home use. In addition, the warranties provided in this Statement e×clude any defects or
damage arising from accident, alteration, misuse, abuse, improper installation, unauthorized service wor_., external forces beyond Bosch's
control, such as fire. riced, and other acts of God, or installation not in accordance with tocal electrical and i_lumbing codes. Labor ehar_s
incurred in the repair or replacement of any clothes washer after a period of one year from date of Installation shall not be covered b_ _is .-
warranty. Any and all replaced and/or repaired parts shall assume the identity of the original for purposes of the applicable warranty p_iod.
TO THE EXTENT PERM]TFED BY LAW. THIS WARRANTY IS IN LIEU OF ALL OTHER EXPRESS AND MPL ED WARRAN_TiE-'s,
INCLUDING THE IMPLIED WARRANTIES OF MERCHANTABILITYAND FITNESS FOR A PARTICULAR PURPOSE. Bosch DOES'NOT
ASSUME ANY RESPONSIBILITY FOR INCIDENTAL OR CONSEQUENTIAL DAMAGES.
TO OBTAIN WARRANTY SERVICE, CONTACT THE NEAREST BOSCH AUTHORIZED SERVICE CENTER OR CALL 1-800-944-2904, OR
WRITE AT: BSH HOME APPLIANCES, ATTN. SERVICE, 2800 SOUTH 25TH AVENUE, BROADVIEW, ILLINOIS 60153. BE SURE TO
PROVIDE YOUR CLOTHES WASHER'S MODEL, SERIAL NUMBER, PURCHASE DATE AND THE SELLER'S NAME AND ADDRESS.
0901 am
5500 009 571