/
Modelo
•
Model
Refrigeradora compacto
Compact Refrigerator
Danby Products Limited, Ontario, Canada N1H 6Z9
Danby Products Inc., Findlay, Ohio, USA 45840
DAR044XA6MDB • DAR044XA6PDB
DAR044XA6LDB • DAR044XA6DDB
DAR044XA6BSLDB
2017.07.05
Refrigerador Compacto
Modelo: DAR044XA6MDB
DAR044XA6PDB
DAR044XA6LDB
DAR044XA6DDB
DAR044XA6BSLDB
Especifi caciones:
Tensión Nominal: 115 V ~
Frecuencia Nominal: 60 Hz
Corriente Nominal: 1,0 A
NOM
Importador:
Ingram Micro México, S.A. de C.V.
Joselillo 3 Int, Piso 5
Col. El Parque
Naucalpan de Juarez, Edo Méx. C.P. 53398
R.F.C. IMM9304016Z4
Manual del propietario...........1 - 7
Owner’s Manual...................8 - 14
1
¡GUARDE ESTAS INSTRUCCIONES!
LA CONECIÓN A TIERRA
Este artefacto debe ser conectado a tierra. En
caso de un corto circuito eléctrico, la conexión a
tierra reduce el riesgo de una descarga eléctrica
proporcionando un cable de retorno para la
corriente eléctrica.
Este aparato está equipado con un cable que tiene
un cable de tierra con un enchufe de conexión
a tierra. El enchufe debe estar conectado a una
toma de corriente que esté instalada y conectada
a tierra correctamente. Si el tomacorriente es un
tomacorriente de pared estándar de 2 clavijas, es
su responsabilidad y obligación personal tenerlo
reemplazado con un enchufe de pared de 3 clavijas
debidamente conectado a tierra. La placa de serie
indica el voltaje y frecuencia que se debe utilizar
para el aparato.
ADVERTENCIA - El uso inadecuado del enchufe
de conexión a tierra puede resultar en un riesgo
de choque eléctrico. Consulte con un electricista
o persona de reparaciones competente si no
comprende buen las instrucciones de conexión a
tierra o si existe alguna duda sobre si el aparato
está conectado a tierra correctament.
NO UTILICE CABLES DE EXTENSIÓN
No conecte el aparato a los cables de extensión ni
con otro aparato en la misma toma de corriente.
No empalme el cable de alimentación. No corte ni
quite en ningún caso la tercera clavija de tierra del
cable de alimentación.
Si el cable de alimentación está dañado, debe
ser reemplazado por el fabricante, su agente de
servicio o persona califi cada similar para evitar
riesgos.
ADVERTENCIA IMPORTANTE
PELIGRO: Riesgo de atrapamiento de niños.
Antes de tirar su electrodoméstico viejo:
• Quite la puerta o la tapa.
• Deje los estantes en su lugar para que los
niños no puedan subir fácilmente.
REQUERIMIENTOS DE SEGURIDAD
Asegúrese de que los componentes se
reemplazarán por componentes similares y que el
mantenimiento se hará por personal de servicio
autorizado de fábrica, para minimizar el riesgo de
encendido debido a piezas incorrectas o servicio
inadecuado.
Este aparato no se destina para utilizarse por
personas (incluyendo niños) cuyas capacidades
físicas, sensoriales o mentales sean diferentes
o estén reducidas, o carezcan de experiencia
o conocimiento, a menos que dichas personas
reciban una supervisión o capacitación para el
funcionamiento del aparato por una persona
responsable de su seguridad.
Los niños deben ser supervisados para asegurar
que no jueguen con el electrodoméstico.
ADVERTENCIA: Mantener libres de obstrucciones
las aberturas de ventilación, en la envolvente del
aparato o en la estructura empotrable.
ADVERTENCIA: No utilizer dispositivos mecánicos u
otros medios para acelerar el proceso de deshielo,
distintos a aquellos a los recomendados por el
fabricante.
ADVERTENCIA: No dañar el circuito de
refrigeración.
ADVERTENCIA: No utilizar aparatos eléctricos
dentro del compartimiento de almacenamiento de
alimentos del aparato, a menos que sean del tipo
recomendado por el fabricante.
ADVERTENCIA PELIGRO DE EXPLOSIÓN
Riesgo de incendio o explosión debido a
la perforación de tuberías de refrigerante.
No utilice objetos afi lados para ayudar en
el desescarche. Por favor, manejese con
precaución. Mantenga los materiales y
vapores infl amables como la gasolina lejos del
refrigerador. Utilice únicamente limpiadores no
infl amables.
La eliminación de este aparato debe realizarse
de acuerdo con las regulaciones federales y
locales.
Importantes Instrucciones de Seguridad
LEA Y SIGA TODAS LAS INSTRUCCIONES DE SEGURIDAD
2
INSTRUCCIONES DE INSTALACIÓN INSTRUCCIONES DE OPERACIÓN
UBICACIÓN
• Se deben utilizar dos personas al mover el
aparato.
• Retire el embalaje interior y exterior antes de la
instalación. Limpie el exterior del aparato con
un paño suave y seco y el interior con un paño
húmedo y tibio.
• Coloque el aparato en un piso que sea lo
sufi cientemente fuerte como para soportarlo
cuando esté completamente cargado.
• Ubique el aparato lejos de la luz directa del sol
y fuentes de calor (estufa, calentador, radiador,
etc.). La luz solar directa y las fuentes de calor
pueden aumentar el consumo eléctrico. Las
temperaturas ambientales extremadamente frías
también pueden causar que la unidad funcione
incorrectamente.
• No utilice este producto cerca del agua, por
ejemplo, en un sótano húmedo o cerca de un
fregadero.
• Este aparato está diseñado para uso doméstico
solamente. Esta unidad no está diseñada para
instalación exterior, incluida la instalación en
cualquier lugar que no sea de temperatura
controlada (garajes, porches, cocheras, etc.).
• Antes de conectar el aparato a una fuente de
alimentación, deje que se mantenga erguido
durante aproximadamente 6 horas; Esto
reducirá la posibilidad de un malfuncionamiento
en el sistema de enfriamiento debido a la
manipulación durante el transporte.
• Esta aparato tiene 52.7 cm (20.8 pulgadas) de
ancho por 84 cm (33.1 pulgadas) de alto por
54.1 cm (21.3 pulgadas) de profundidad; por
favor asegúrese de dejar un espacio mínimo
entre la unidad y todas las paredes circundantes
y las aberturas de ventilación.
• Espere 12.7 cm (5 pulgadas) de espacio entre
la parte posterior, los lados y la parte superior
del aparato y todas las paredes adyacentes.
• Este aparato está diseñado para instalación
independiente y no está diseñado para ser
instalado en un gabinete o mostrador. La
construcción en este aparato puede causar un
mal funcionamiento.
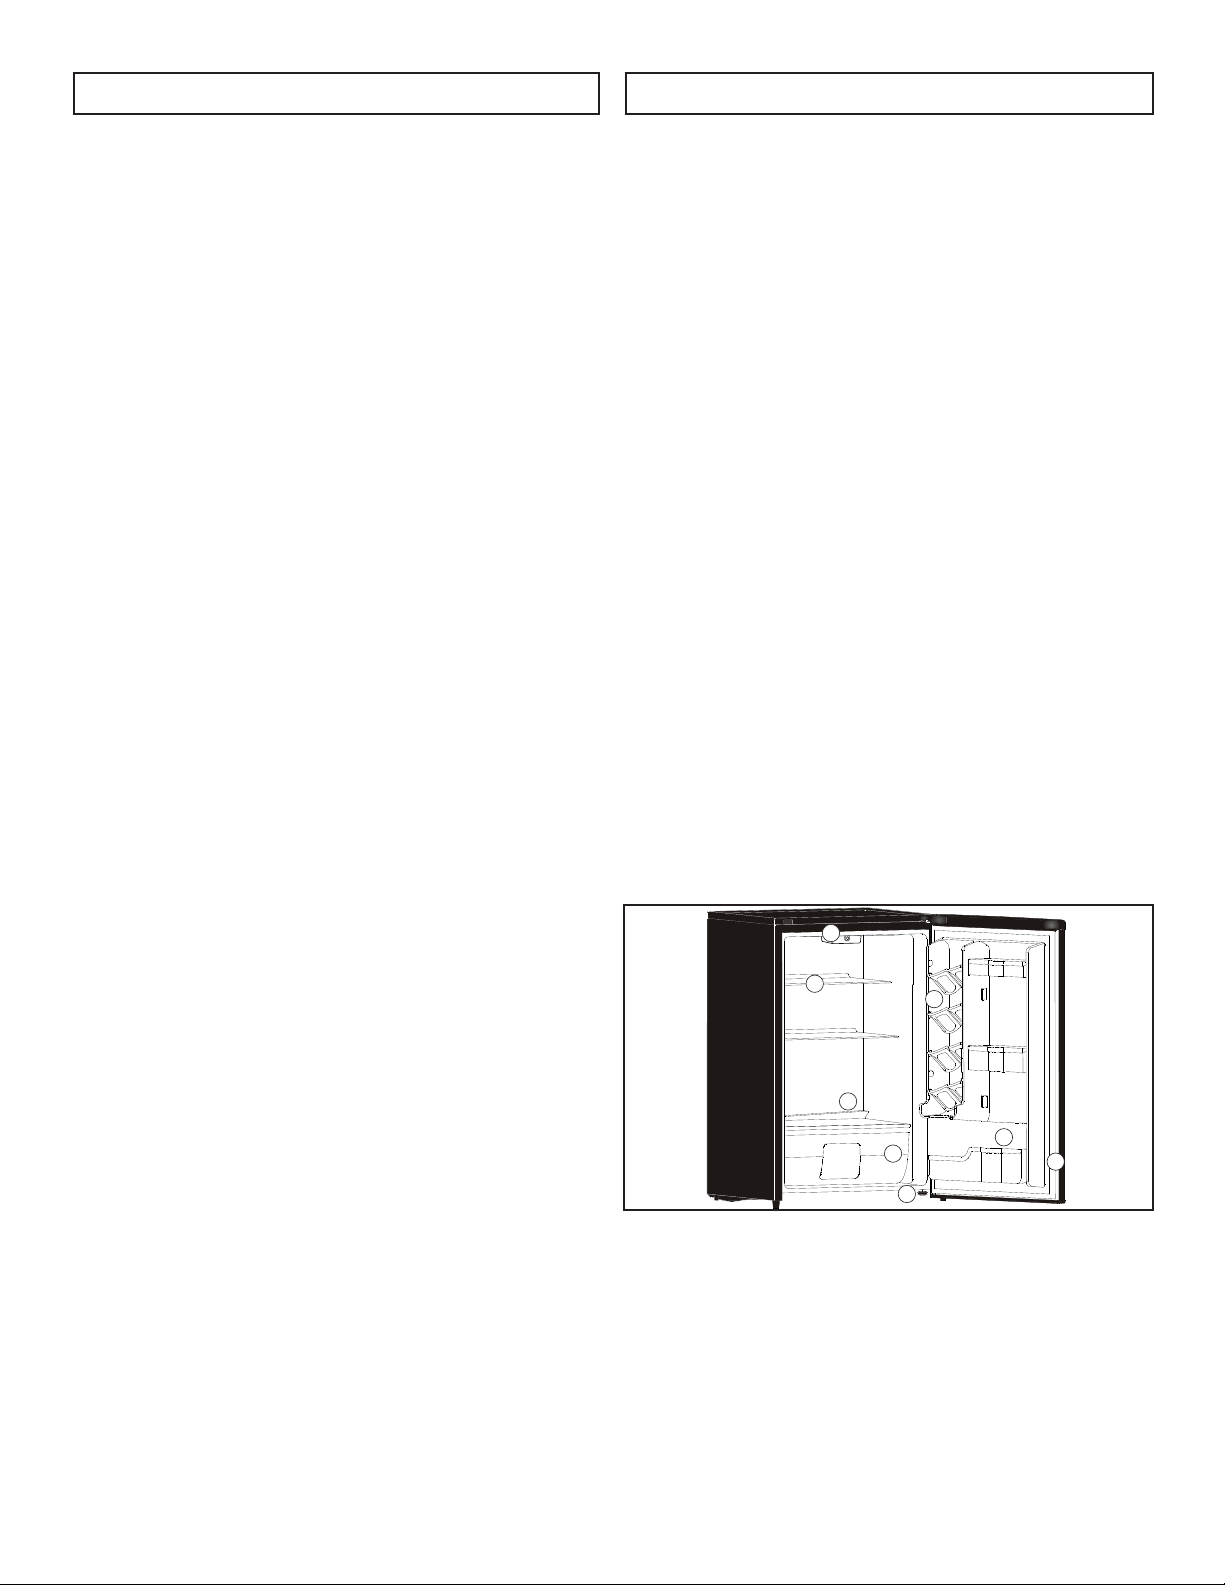
CARACTERISTICAS
1. Dial del termostato: La temperatura se puede
ajustar girando el dial del termostato en el techo
interior del aparato.
2. Estanterías de vidrio
3. Salida de agua de descongelación: El hielo
que se forma en el interior del aparato se
descongela y drena automáticamente a través
de esta salida.
4. Cajón para frutas y verduras
5. Patas niveladoras: Ajuste para que la unidad
esté nivelada.
6. Lámina de puerta CANSTOR ™: Sostiene
355ml latas de pop, jugo o cerveza.
7. Bastidores de botella: Para latas altas,
pequeñas y medianas o frascos.
8. Junta magnética: El cierre hermético de
la puerta mantiene toda la potencia de
enfriamiento bloqueada en su interior.
9. Luz interior (no representado)
2
4
3
1
6
7
5
8
3
INSTRUCCIONES DE OPERACIÓN
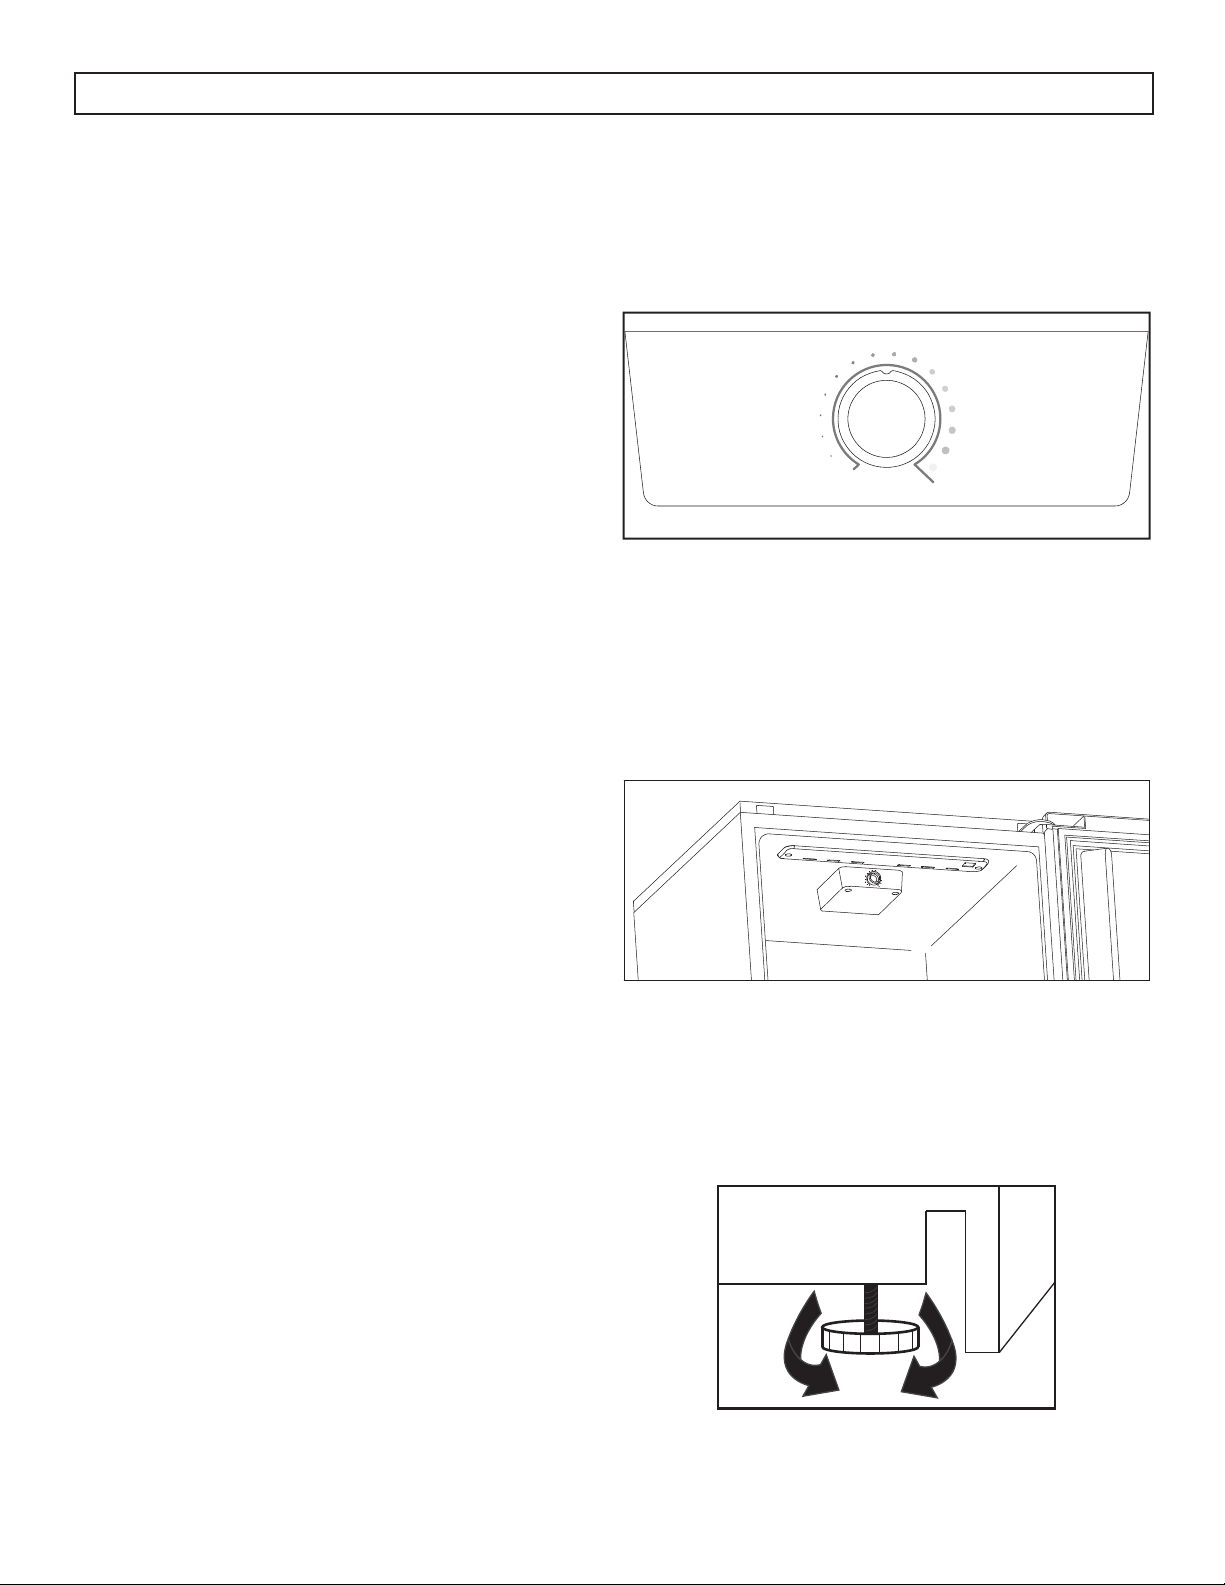
INSTRUCCIONES DE NIVELACIÓN
Hay una pata ajustable en la parte inferior
del aparato que se puede subir o bajar para
asegurarse de que el aparato esté nivelado.
1. Gire la pierna de nivelación en el sentido de
las agujas del reloj hasta el tope, hasta que la
parte superior del pie toque la parte inferior del
chasis.
2. Gire lentamente la pierna de nivelación en el
sentido de las agujas del reloj hasta que el
aparato esté nivelado.
OFF
DIAL DEL TERMOSTATO Y LUZ INTERIOR
El dial del termostato y la carcasa de la luz interior
se encuentran en el techo interior del aparato.
SELECCION DE TEMPERATURA
La temperatura del aparato se puede ajustar
girando el dial del termostato en el techo del
armario.
• Los puntos más grandes y oscuros indican el
ajuste más frío.
• Los puntos más pequeños y más claros indican
el ajuste más cálido.
• La posición “OFF” desactivará la función de
enfriamiento.
La temperatura interna del aparato puede variar en
función de la temperatura ambiente, la cantidad de
artículos almacenados y la frecuencia con que se
abre la puerta.
LUZ INTERIOR
La luz LED interior se encenderá cuando se abra la
puerta del aparato y se apagará cuando la puerta
esté cerrada.
Si la luz interior se quema, póngase en contacto
con un técnico de servicio certifi cado por Danby
para que lo reemplace.
Nota: La funcionalidad del aparato no se ve
afectada si la luz se ha quemado.
OFF
4
INSTRUCCIONES DE OPERACIÓN
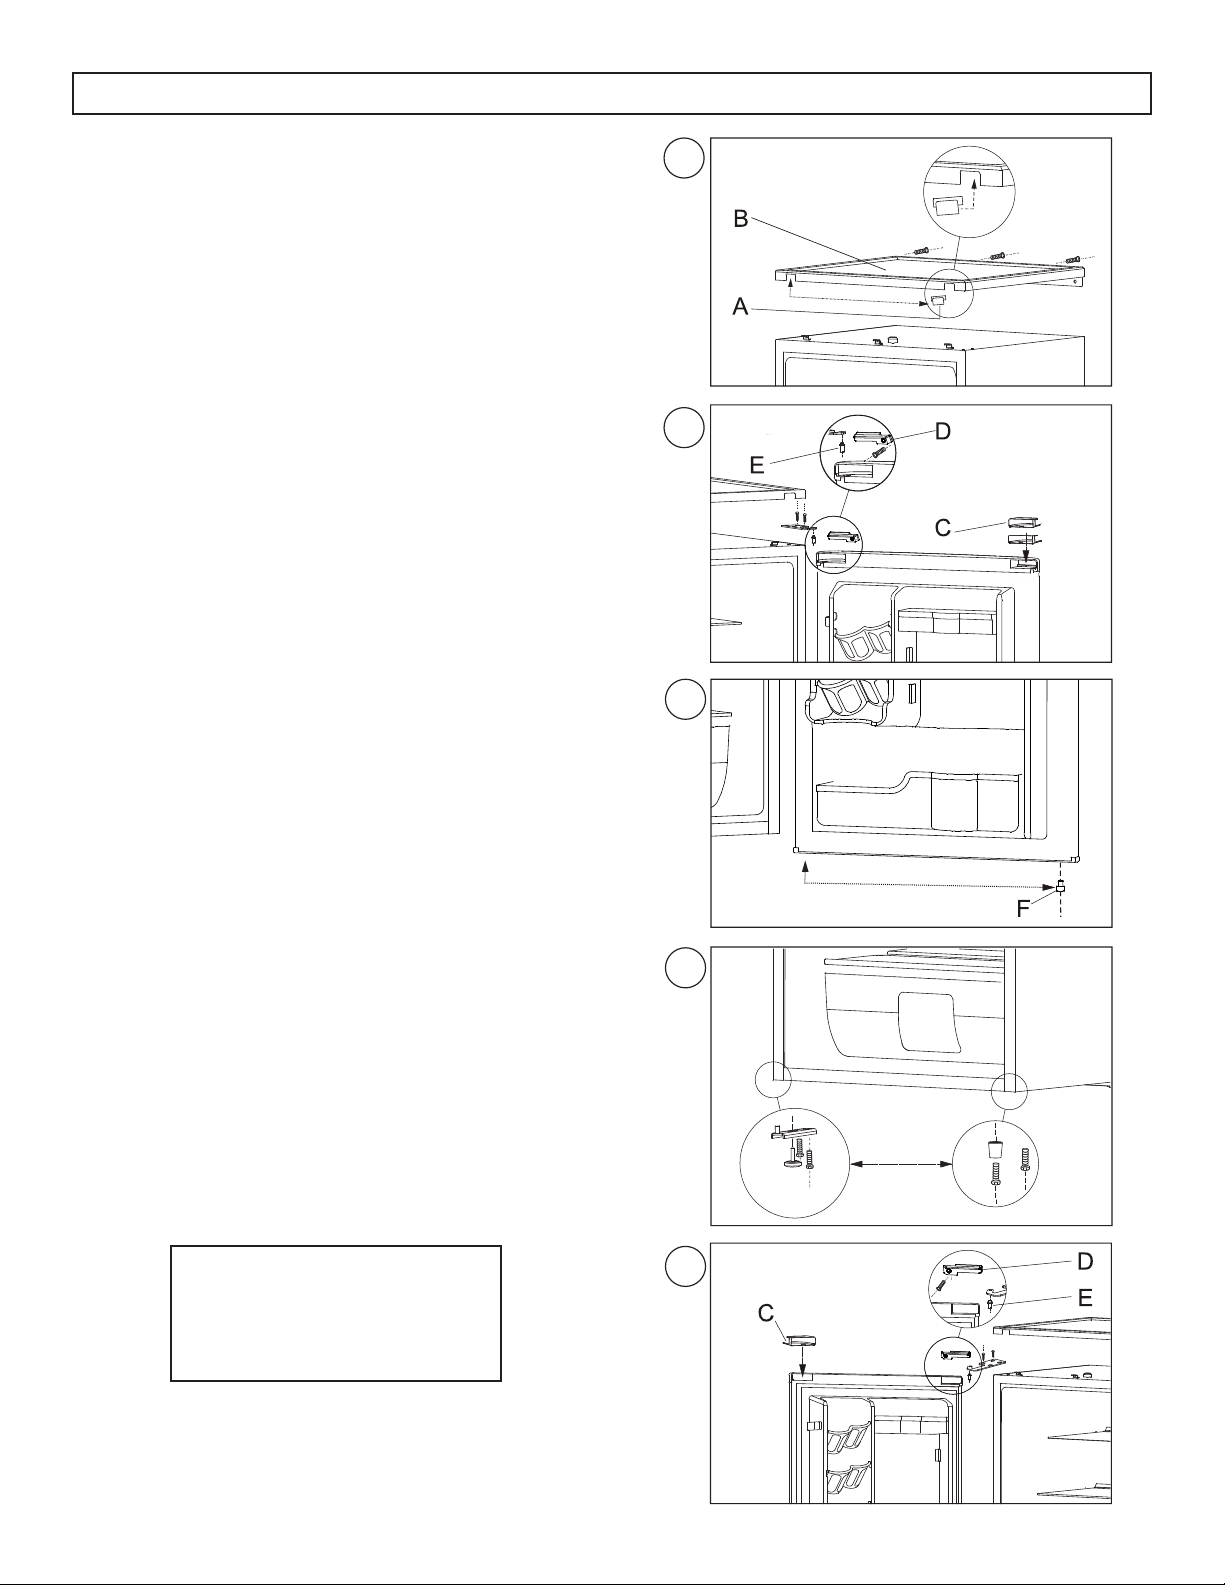
INSTRUCCIONES DE REVERSIÓN DE PUERTA
Si el aparato se coloca en su parte posterior o lateral
durante un período de tiempo prolongado durante
este proceso, se debe permitir que permanezca
erguido durante 6 horas antes de enchufarlo para
evitar daños a los componentes internos.
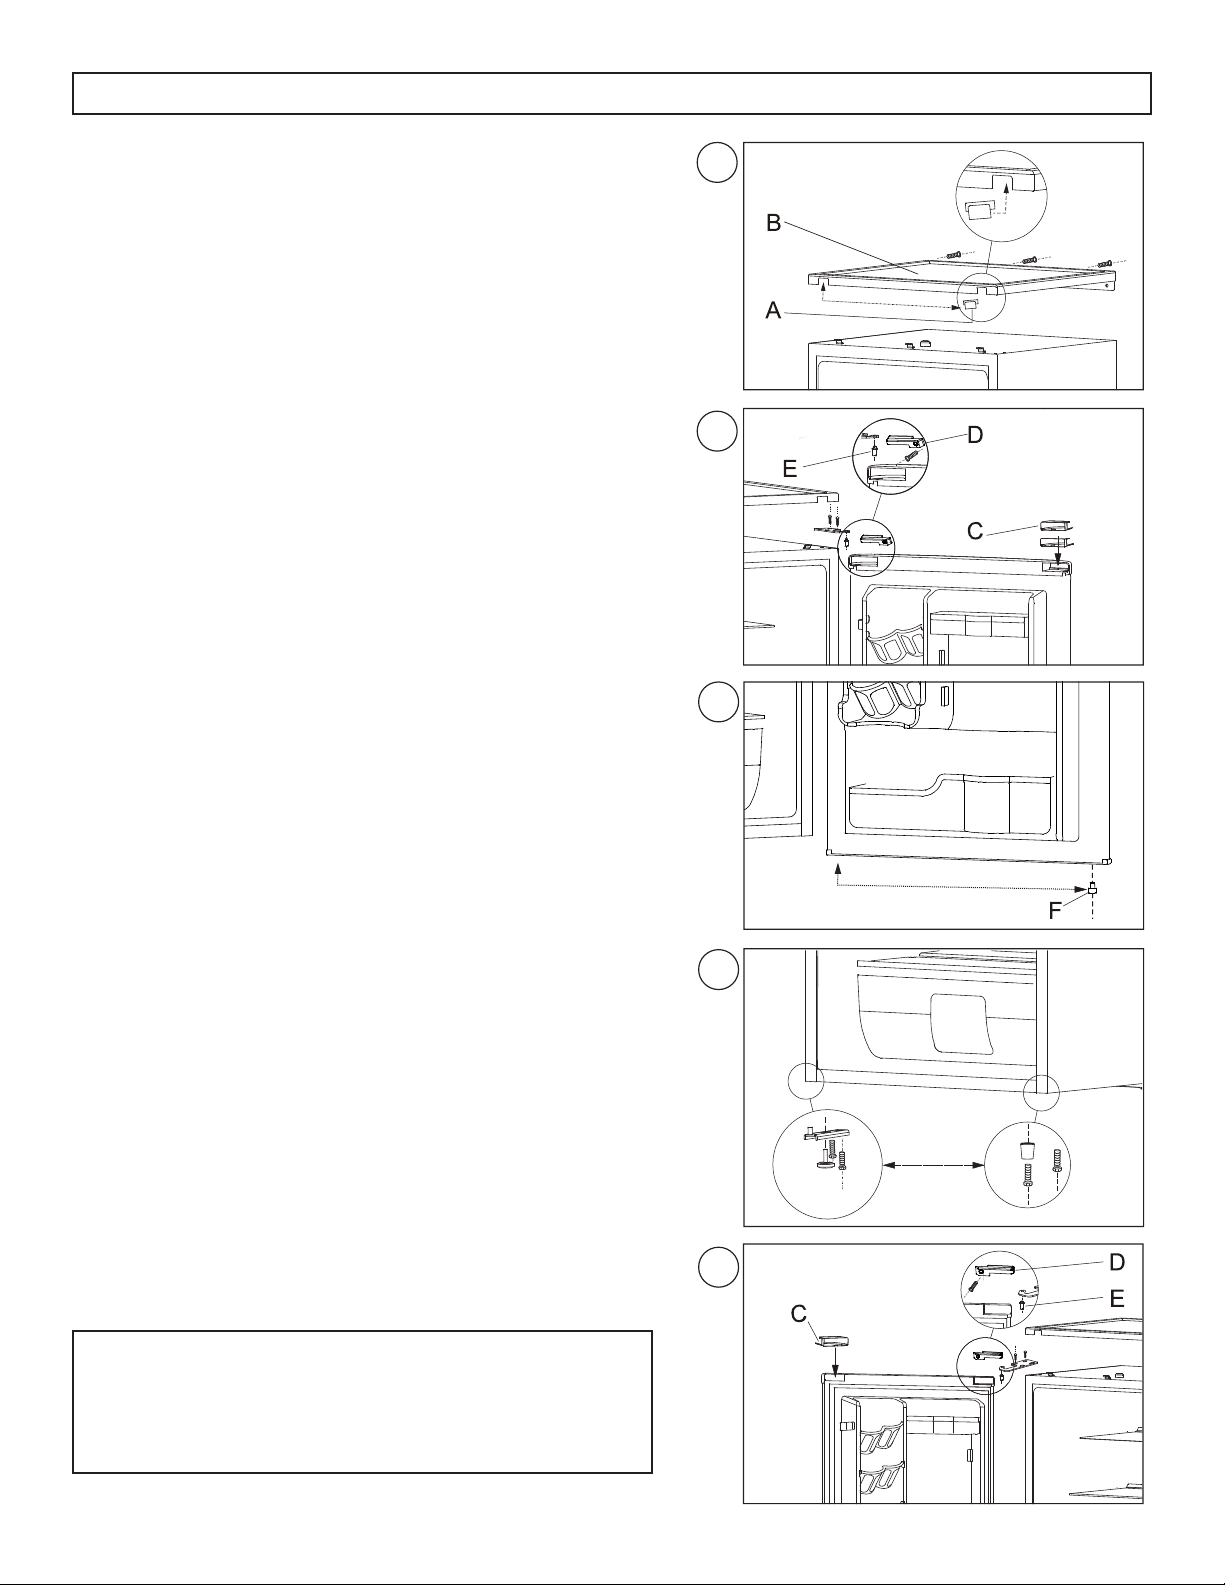
1. Retire los tres tornillos de la parte posterior de la
encimera, levante la parte posterior de la encimera
y tire de ella hacia la parte delantera del aparato
para extraerla. Retire la cubierta del orifi cio de la
bisagra de la encimera del lado izquierdo de la
encimera y muévala al orifi cio de la bisagra en el
lado derecho de la encimera. Véase la fi gura 1.
2. Quite el tornillo de la cubierta del eje de la puerta
y quite la bisagra superior derecha y la puerta
del chasis. Retire el eje de la puerta de la bisagra
superior derecha. Véase la fi gura 2.
3. Retire la cubierta del orifi cio de la bisagra inferior
del lado inferior izquierdo de la puerta y muévala
hacia el lado inferior derecho de la puerta. Véase
la fi gura 3.
4. Retire el pie ajustable y los dos tornillos que
sujetan la bisagra inferior. Mueva la bisagra
inferior al lado izquierdo del chasis e instálela
con los tornillos. Instale el pie ajustable en el lado
izquierdo del aparato y mueva el pie sólido al
lado derecho del aparato. Véase la fi gura 4.
5. La bisagra superior izquierda se encuentra en la
bolsa de accesorios dentro del aparato. Instale el
eje de la puerta en la bisagra superior izquierda.
Instale la bisagra superior izquierda y la puerta
en el chasis. Instale la tapa del husillo de la puerta
con un tornillo. Vuelva a instalar la encimera
colocándola en la parte superior del aparato y
empujándola hacia atrás hasta que encaje en su
lugar y vuelva a instalar los tres tornillos en la
parte posterior. Véase la fi gura 5.
Nota: Al volver a instalar la puerta, asegúrese de
que la parte superior de la puerta está nivelada con
la parte superior del chasis y que la junta de goma
hace un buen sellado con el chasis todo el camino
alrededor.
A. Cubierta del agujero de la charnela de la encimera
B. Encimera
C. Cubierta del orifi cio de la bisagra de la puerta
D. Cubierta del huso de la puerta
E. Eje de la puerta
1
2
3
4
5

CUIDADO Y MANTENIMIENTO
LIMPIEZA
Asegúrese de que la unidad esté desenchufada
antes de limpiar cualquier parte del aparato.
• Para limpiar el interior del aparato, utilice un
paño suave y una solución de una cucharada
de bicarbonato de sodio a un litro de agua o
una solución de jabón suave o algún detergente
suave.
• Lave los estantes removibles en una solución de
detergente suave, luego seque y limpie con un
paño suave.
• Limpie el exterior con un paño suave y húmedo
y un poco de detergente suave.
• Es importante mantener el área limpia donde la
puerta sella contra el gabinete. Limpie este área
con un paño jabonoso. Enjuague con un paño
húmedo y deje secar.
Nota: No utilice limpiadores que contengan
amoníaco o alcohol en el aparato. El amoniaco o
el alcohol pueden dañar el aspecto del aparato.
Nunca utilice limpiadores comerciales o abrasivos
ni objetos afi lados en ninguna parte del aparato.
FALLO DE ALIMENTACIÓN
La mayoría de las fallas de alimentación se corrigen
en pocas horas y no deben afectar la temperatura
de su aparato si minimiza el número de veces que
se abre la puerta. Si la alimentación va a estar
apagada por un período de tiempo más largo,
tome las medidas apropiadas para proteger su
contenido.
Nota: Espere de 3 a 5 minutos antes de intentar
reiniciar el refrigerador si se ha interrumpido la
operación.
DESCONGELAR
Esta unidad está equipada con una función
de descongelación automática y no requiere
descongelación manual. El agua de descongelación
del aparato se canaliza en una bandeja de goteo
situada por encima del compresor. La transferencia
de calor desde el compresor hace que el agua de
descongelación se evapore.
VACACIONES
• Vacaciones cortas: Deje el aparato en
funcionamiento durante las vacaciones de
menos de tres semanas.
• Largas vacaciones: Si el aparato no se va
a utilizar durante varios meses, retire todos
los artículos y apague el aparato. Limpie y
seque el interior a fondo. Para evitar el olor y
el moho, deje la puerta ligeramente abierta,
bloqueándola si es necesario.
SI DEBE MUDARSE
• Eliminar todos los elementos.
• Gire la pierna ajustable hasta la base para
evitar daños.
• Tape la puerta cerrada.
• Asegúrese de que el aparato permanezca
seguro en posición vertical durante el transporte.
Proteja también el exterior del aparato con una
manta o un artículo similar.
• Si el aparato se coloca en su parte posterior o
lateral durante el transporte, al llegar al destino,
permita que permanezca en posición vertical
y sin perturbaciones durante 6 horas para
permitir que el refrigerante se asiente.
DISPOSICIÓN
Este aparato no puede ser tratado como un residuo
doméstico normal, sino que debe ser llevado al
punto de recogida de residuos apropiado para
el reciclaje de componentes eléctricos. Para
obtener información sobre los puntos de recogida
de residuos locales, póngase en contacto con la
agencia local de eliminación de residuos o con la
ofi cina gubernamental.
5

PROBLEMA POSSIBLE CAUSA
No funciona • Un fusible en su casa puede soplarse o el
interruptor de circuito disparado
• El enchufe no está completamente insertado en
la toma de corriente
La temperatura interna no es lo sufi cientemente
fría
• La temperatura está demasiado alta
• La puerta no se cierra correctamente o se abre
demasiado
• Recientemente se agregó una gran cantidad de
alimentos calientes al armario
• Muy cerca de la fuente de calor o de la luz
solar directa
• La temperatura ambiente o la humedad es muy
alta
El aparato funciona continuamente • La temperatura está demasiado fría
• La puerta no se cierra correctamente o se abre
demasiado
• Recientemente se agregó una gran cantidad de
alimentos calientes al armario
• Muy cerca de la fuente de calor o de la luz
solar directa
• La temperatura ambiente o la humedad es muy
alta
SOLUCIÓN SUGERIDA
6

Póliza de Garantía
INGRAM MICRO MEXICO, S.A. de C.V. con domicilio en Joselillo No. 3, piso 5 Col. El Parque,
Municipio Naucalpan de Juárez, Estado de México, C. P. 53398. Tel. 01 800 953 0750 Garantiza
el producto descrito abajo por el término de 1 año (un año) contado a partir del momento de su
compra contra cualquier defecto de funcionamiento o defecto en sus materiales, piezas, partes,
o componentes. Así como también se incluye la mano de obra y los gastos de transportación del
producto que deriven dentro de su red de servicio.
La empresa se compromete a cambiar el producto defectuoso por uno similar con previo diagnóstico
realizado por nuestro centro de servicio. El tiempo de respuesta no será mayor a 30 (treinta) días
naturales contados a partir de la fecha de recepción del producto.
Para hacer efectiva la garantía deberá presentar la póliza debidamente sellada o la factura, recibo o
comprobante correspondiente y el producto y sus accesorios incluidos en el establecimiento donde
lo adquirió; o en la siguiente dirección: Joselillo No. 3, piso 5 Col. El Parque, Municipio Naucalpan de
Juárez, Estado de México, C. P. 53398. En ese mismo lugar podrá obtener partes, componentes y
accesorios.
La presente garantía otorgada deja sin efectos cualquier otra garantía ofrecida por el fabricante o
distribuidor.
1. La reparación o reemplazo del producto y mano de obra, incluyendo gastos de transportación
del producto, serán sin costo alguno para usted, dentro del plazo de garantía.
2. Usted puede adquirir partes, componentes, consumibles y accesorios en el establecimiento
donde adquirió su producto o en las direcciones señaladas arriba.
Excepciones:
a) Cuando el producto se hubiese utilizado en condiciones distintas a las normales.
b) Cuando el producto no hubiese sido operado de acuerdo con la guía rápida de uso que se
le acompaña.
c) Cuando el producto hubiese sido alterado o reparado por personas no autorizadas por
INGRAM MICRO MEXICO, S.A. de C.V.
Marca:
Sello y fecha
Modelo:
Nombre del distribuidor:
Dirección del distribuidor:
Teléfono del distribuidor:
7
SAVE THESE INSTRUCTIONS!
IMPORTANT WARNING
DANGER: Risk of child entrapment. Before
thowing away an old appliance:
• Remove the door or lid.
• Leave the shelves in place so that children
cannot easily climb into the appliance.
WARNING EXPLOSION HAZARD
Risk of fi re or explosion due to puncturing
refrigerant tubing. Do not use sharp objects
to aid in defrost. Please handle with care.
Keep fl ammable materials and vapors such as
gasoline away from the refrigerator. Only use
nonfl ammable cleaner.
Disposal of this appliance should be in
accordance with federal and local regulations.
GROUNDING INSTRUCTIONS
This appliance must be grounded. In the event of an
electrical short circuit, grounding reduces the risk of
electrical shock by providing an escape wire for the
electrical current.
This appliance is equipped with a cord that has a
grounding wire with a grounding plug. The power
cord must be plugged into an outlet that is properly
grounded. If the outlet is a standard 2-prong wall
outlet, it is your responsibility to have it replaced
with a properly grounded 3-prong wall outlet.
The serial rating plate indicates the voltage and
frequency the appliance is designed for.
WARNING - Improper use of the grounding
plug can result in a risk of electric shock.
Consult a qualifi ed electrician or service agent
if the grounding instructions are not completely
understood, or if doubt exists as to whether the
appliance is properly grounded.
DO NOT USE AN EXTENSION CORD
Do not connect your appliance to extension cords
or together with another appliance in the same wall
outlet. Do not splice the power cord. Do not under
any circumstances cut or remove the third ground
prong from the power cord.
If the power supply cord is damaged, it must be
replaced by the manufacturer, its service agent or
similar qualifi ed person in order to avoid hazard.
SAFETY REQUIREMENTS
Ensure that component parts are replaced with like
components and that servicing is done by factory
authorized service personnel, to minimize the risk of
possible ignition due to incorrect parts or improper
service.
This appliance is not intended for use by persons
(including children) whose physical, sensory or
mental capabilities may be different or reduced,
or who lack experience or knowledge, unless such
persons receive supervision or training to operate
the appliance by a person responsible for their
safety.
Children should be supervised to ensure that they
do not play with the appliance.
WARNING: Keep ventilation openings, in the
appliance enclosure or in the built-in structure, clear
of obstruction.
WARNING: Do not use mechanical devices or other
means to accelerate the defrosting process, other
than those recommended by the manufacturer.
WARNING: Do not damage the refrigerant circuit.
WARNING: Do not use electrical appliances inside
the food storage compartments of the appliance,
unless they are of the type recommended by the
manufacturer.
Important Safety Information
READ AND FOLLOW ALL SAFETY INSTRUCTIONS
8
INSTALLATION INSTRUCTIONS OPERATING INSTRUCTIONS
9
LOCATION
• Two people should be used when moving the
appliance.
• Remove interior and exterior packaging prior to
installation. Wipe the outside of the appliance
with a soft, dry cloth and the inside with a
lukewarm, wet cloth.
• Place the appliance on a fl oor that is strong
enough to support it when it is fully loaded.
• Do not place the appliance in direct sunlight or
near sources of heat, such as a stove or heater,
as this can increase electrical consumption.
Extreme cold ambient temperatures may also
cause the appliance to perform improperly.
• Do not use the appliance near water, for
example in a wet basement or near a sink.
• This appliance is intended for household use
only. It is not designed for outside installation,
including anywhere that is not temperature
controlled (garages, porches, vehicles, etc.).
• Before connecting the appliance to a power
source, let it stand upright for approximately
6 hours. This will reduce the possibility of a
malfunction in the cooling system from handling
during transportation.
• This appliance is 52.7 cm (20.8 inches) wide
by 84 cm (33.1 inches) high by 54.1 cm
(21.3 inches) deep. Make sure that you leave
the minimum amount of space between the
appliance and all surrounding walls and vents.
• Allow 12.7 cm (5 inches) of space between the
back, sides and top of the appliance and all
adjacent walls.
• This appliance is intended for free-standing
installation only and is not intended to be
built into a cabinet or counter. Building in this
appliance can cause it to malfunction.
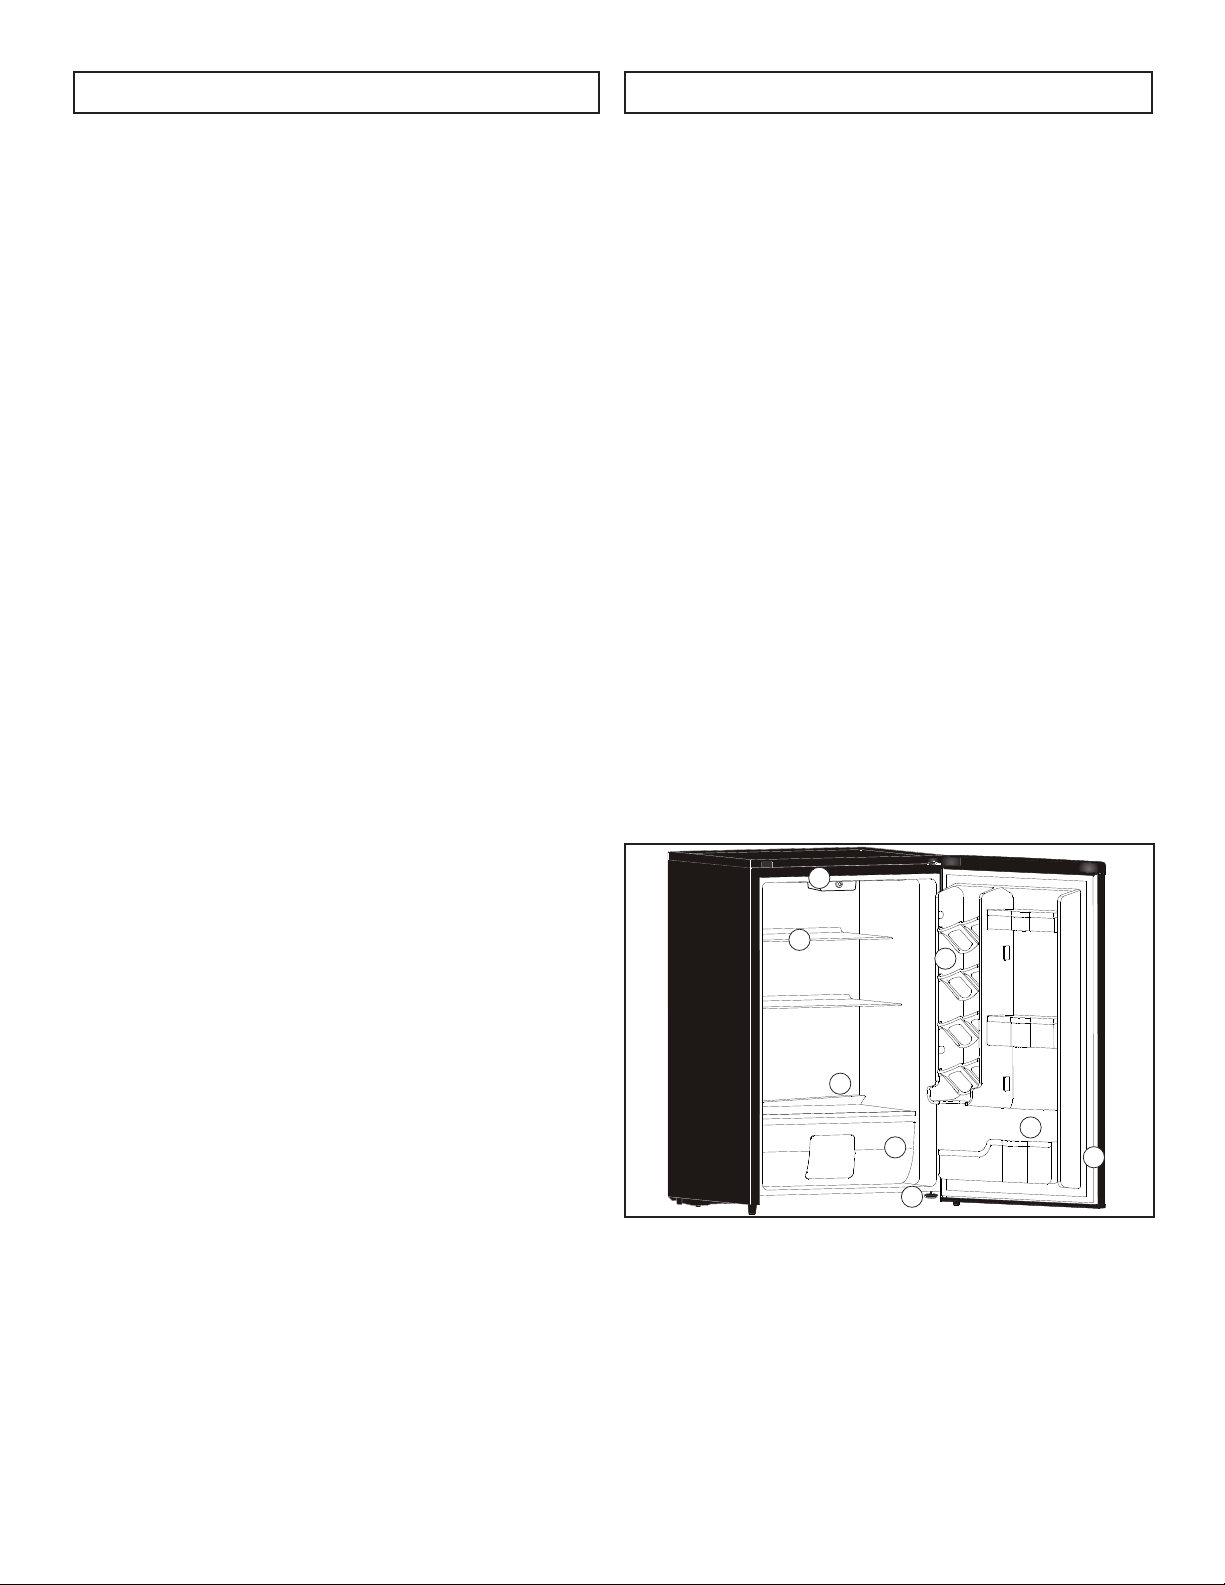
FEATURES
1. Thermostat Dial: Temperature can be adjusted
by turning the thermostat dial on the inner
ceiling of the appliance.
2. Glass Shelves
3. Defrost Water Outlet: Ice that forms inside the
appliance will automatically thaw and drain
through this outlet.
4. Fruit and Vegetable Crisper
5. Leveling Leg: Adjust so the unit is level.
6. CANSTOR™ Door Liner: Holds 355ml cans of
pop, juice, or beer.
7. Bottle Rack: For tall, small and medium cans or
jars.
8. Magnetic Gasket: Tight fi tting door seal keeps
all the cooling power locked inside.
9. Interior Light (not pictured)
2
4
3
1
6
7
5
8
OPERATING INSTRUCTIONS
10
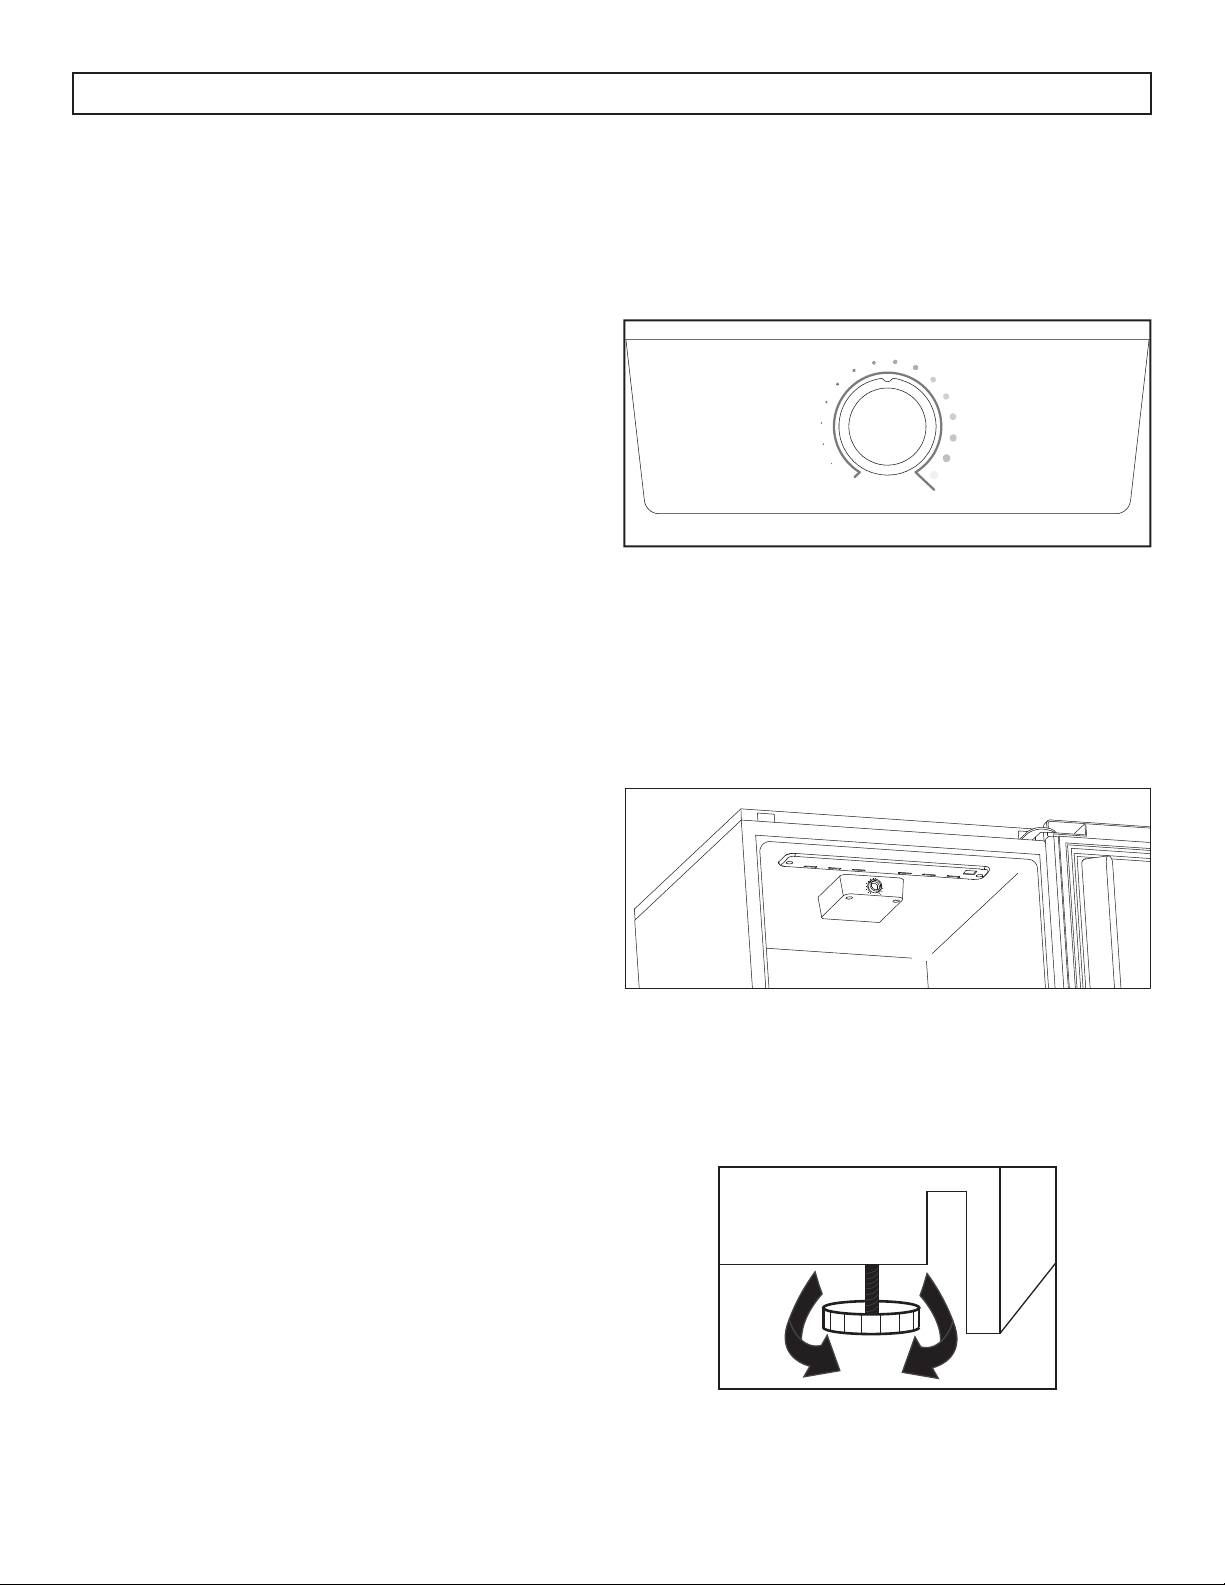
LEVELING INSTRUCTIONS
There is an adjustable leg on the bottom of the
appliance that can be turned up or down to ensure
that the appliance is level.
1. Turn the leveling leg counter-clockwise as far as
it will go, until the top of the foot is touching the
bottom of the chassis.
2. Slowly turn the leveling leg clockwise until the
appliance is level.
OFF
THERMOSTAT DIAL AND INTERIOR LIGHT
The thermostat dial and interior light housing are
located on the inner ceiling of the appliance.
TEMPERATURE SELECTION
The temperature of the appliance can be adjusted
by turning the thermostat dial on the ceiling of the
cabinet.
• The larger, darker dots indicate the coldest
setting.
• The smaller, lighter dots indicate the warmest
setting.
• The “OFF” position will turn off the cooling
function.
Internal temperature of the appliance can vary
based on ambient temperature, the quantity of items
stored and how frequently the door is opened.
INTERIOR LIGHT
The interior LED light will turn on when the door of
the appliance is opened and will turn off when the
door is closed.
If the interior light burns out, contact a Danby
certifi ed service technician to have it replaced.
Note: The functionality of the appliance is not
affected if the light has burned out.
OFF
11
OPERATING INSTRUCTIONS
DOOR REVERSAL INSTRUCTIONS
If the appliance is placed on its back or side for any
length of time during this process, it must be allowed
to remain upright for 6 hours before plugging it in
to avoid damage to the internal components.
1. Remove the three screws from the back of the
worktop, lift the back of the worktop and pull
it toward the front of the appliance to remove
it. Remove the worktop hinge hole cover from
the left side of the worktop and move it to the
hinge hole on the right side of the worktop.
See fi gure 1.
2. Remove the screw from the door spindle cover
and remove the upper right hinge and door
from the chassis. Remove the door spindle from
the upper right hinge. See fi gure 2.
3. Remove the lower hinge hole cover from the
bottom left side of the door and move it to the
bottom right side of the door. See fi gure 3.
4. Remove the adjustable foot and the two screws
holding the bottom hinge. Move the bottom
hinge to the left side of the chassis and install
with the screws. Install the adjustable foot on the
left side of the appliance and move the solid foot
to the right side of the appliance. See fi gure 4.
5. The upper left hinge is in the accessory bag
inside the appliance. Install the door spindle
on the upper left hinge. Install the upper left
hinge and door onto the chassis. Install the door
spindle cover with a screw. Reinstall the worktop
by laying it on top of the appliance and pushing
it toward the back until it clicks into place and
then reinstall the three screws at the back. See
fi gure 5.
Note: When reinstalling the door, ensure that the
top of the door is level with the top of the chassis
and that the rubber gasket makes a good seal with
the chassis all the way around.
A. Worktop Hinge Hole Cover
B. Worktop
C. Door Hinge Hole Cover
D. Door Spindle Cover
E. Door Spindle
1
2
3
4
5

CLEANING
Ensure the appliance is unplugged before cleaning.
• To clean the inside of the appliance, use a soft
cloth and a solution of a tablespoon of baking
soda to one quart of water or a mild soap
solution or some mild detergent.
• Wash removable shelves in a mild detergent
solution, then dry and wipe with a soft cloth.
• Clean the outside with a soft, damp cloth and
some mild detergent.
• It is important to keep the area clean where the
door seals against the cabinet. Clean this area
with a soapy cloth. Rinse with a damp cloth and
let dry.
Note: Do not use cleaners containing ammonia or
alcohol on the appliance. Ammonia or alcohol can
damage the appearance of the appliance. Never
use any commercial or abrasive cleaners or sharp
objects on any part of the appliance.
POWER FAILURE
Most power failures are corrected within a few
hours and should not affect the temperature of your
appliance if you minimize the number of times the
door is opened. If the power is going to be off for
a longer period of time, take the proper steps to
protect your contents.
Note: Wait 3 to 5 minutes before attempting
to restart the refrigerator if operation has been
interrupted.
DEFROST
This appliance is equipped with an automatic
defrost function and does not require manual
defrosting. Defrost water from the appliance is
channeled into a drip tray located above the
compressor. Heat transfer from the compressor
causes the defrost water to evaporate.
CARE & MAINTENANCE
VACATION
• Short vacations: Leave the appliance operating
during vacations of less than three weeks.
• Long vacations: If the appliance will not be used
for several months, remove all items and turn
off the appliance. Clean and dry the interior
thoroughly. To prevent odor and mold growth,
leave the door open slightly, blocking it open if
necessary.
MOVING
• Remove all items.
• Securely tape down all loose items (shelves)
inside your appliance.
• Turn the adjustable leg up to the base to avoid
damage.
• Tape the door shut.
• Be sure the appliance stays secure in the upright
position during transportation. Also protect the
outside of the appliance with a blanket or similar
item.
• If the appliance is placed on its back or side
during transportation, upon reaching the
destination, allow it to remain upright for 6
hours before plugging in to allow the coolant to
settle.
DISPOSAL
This appliance may not be treated as regular
household waste, it should be taken to the
appropriate waste collection point for recycling
of electrical components. For information on local
waste collection points, contact your local waste
removal agency or government offi ce.
12

PROBLEM POSSIBLE CAUSE
No power • A fuse may be blown or the circuit breaker
tripped
• Plug not fully inserted into the wall outlet
Internal temperature not cold enough • Temperature setting is too warm
• Door is not shut properly or opened excessively
• Recently added a large quantity of warm food
to the cabinet
• Close proximity to heat source or direct sunlight
• Ambient temperature or humidity is very high
Appliance runs continuously • Temperature setting is too cold
• Door not shut properly or opened excessively
• Recently added a large quantity of warm food
to the cabinet
• Close proximity to heat source or direct sunlight
• Ambient temperature or humidity is very high
TROUBLESHOOTING
13

Guarantee Policy
INGRAM MICRO MEXICO, S.A. Of C.V. at Joselillo No. 3, 5th fl oor Col. El Parque, Naucalpan
de Juárez Municipality, State of Mexico, CP 53398. Tel. 01 800 953 0750 Guarantee the product
described below for the term of 1 year (one year) counted from the moment of purchase against any
malfunction or defect in their materials, parts or components. The labor and transportation costs of
the product that are within its service network are included.
The company agrees to exchange the defective product for a similar one with previous diagnosis
made by our service center. The response time will not be more than 30 (thirty) calendar days from
the date of receipt of the product.
To make the guarantee effective, you must present the properly sealed policy or the corresponding
invoice or receipt and the product and its accessories included to the establishment where you
purchased it; Or at the following address: Joselillo No. 3, 5th fl oor Col. El Parque, Naucalpan de
Juárez Municipality, State of Mexico, C. P. 53398. Parts, components and accessories may be
obtained at the same location.
This warranty will override any other warranty offered by the manufacturer or distributor.
1. Repair or replacement of the product and workmanship, including transportation costs of the
product, will be free of charge to you within the warranty period.
2. You may purchase parts, components, consumables and accessories at the facility where you
purchased your product or at the addresses listed above.
Exceptions:
a) When the product had been used in abnormal conditions.
b) When the product has not been operated in accordance with the owner's manual.
c) When the product has been altered or repaired by persons not authorized by INGRAM
MICRO MEXICO, S.A. From C.V.
Brand:
Stamp and date
Model:
Dealer name:
Dealer address:
Dealer telephone number:
14

Impreso en China
Printed in China
Modelo
•
Model
Danby Products Limited, Ontario, Canada N1H 6Z9
Danby Products Inc., Findlay, Ohio, USA 45840
DAR044XA6MDB • DAR044XA6PDB
DAR044XA6LDB • DAR044XA6DDB
DAR044XA6BSLDB