Designed by ALPINE Japan
EN
FR
ES
ALPINE ELECTRONICS OF AMERICA, INC.
1500 Atlantic Blvd,
Auburn Hills, Michigan 48326, U.S.A.
Phone 1-800-ALPINE-1 (1-800-257-4631)
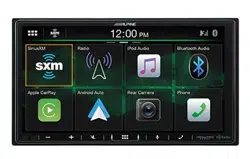
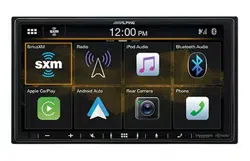
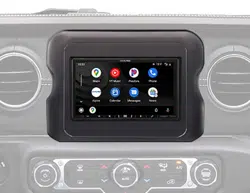
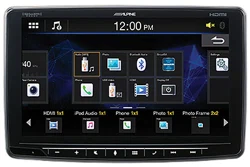
ALPINE HALO11 11-INCH AUDIO/VIDEO RECEIVER
iLX-F411
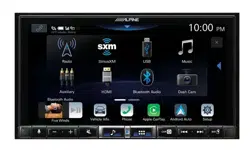
ALPINE HALO9 9-INCH AUDIO/VIDEO RECEIVER
iLX-F409
• OWNER’S MANUAL
Please read before using this equipment.
• MANUAL DE OPERACIÓN
Léalo antes de utilizar este equipo.
• MODE D’EMPLOI
Veuillez lire avant d’utiliser cet appareil.
Thank you for purchasing this Alpine product. Please take a moment to protect your purchase by
registering your product now at the following address: www.alpine-usa.com/registration
.
You will be informed of product and software updates (if applicable), special promotions, news
about Alpine.
Merci d’avoir acheté ce produit Alpine. Nous vous invitons à consacrer un moment à la protection
de votre achat en enregistrant votre produit dès maintenant à l’adresse suivante :
www.alpine-usa.com/registration.
Vous serez tenu informé des mises à jour des produits et des logiciels (le cas échéant), des
promotions spéciales et de l’actualité d’Alpine.
Gracias por adquirir este producto Alpine. Con solo unos pocos pasos podrá proteger su producto,
registrándolo a través de la siguiente dirección: www.alpine-usa.com/registration.
Recibirá información sobre nuevos productos y software, promociones especiales y novedades
sobre Alpine.

2-EN
Contents
Operating Instructions
PRECAUTIONS
IMPORTANT INFORMATION ........................ 5
WARNING
Points to Observe for Safe Usage ........................ 5
WARNING ...................................................... 5
CAUTION ....................................................... 6
NOTICE .......................................................... 7
Getting Started
Location of Controls ............................................. 9
Turning Power On or Off .................................... 9
Initial System Start-Up ......................................... 9
Adjusting the Volume .......................................... 9
Lowering Volume Quickly ................................. 10
Touch Screen Operation .................................... 10
Switching Sources ............................................... 10
Selecting an Item in a List .................................. 10
About the HOME Screen ................................... 11
Editing HOME screen .................................... 11
About the Indicator Display .............................. 11
Setup
Setup Operation .................................................. 12
General Setup
Radio Setup .......................................................... 12
Setting the TUNER (FM) Tone Quality
(Tuner Condition) ....................................... 12
Setting the TUNER (FM) Frequency
Step ................................................................ 13
SiriusXM Setup .................................................... 13
Setting the Parental Lock ................................ 13
Signal Strength Information .......................... 13
Language Setup .................................................... 13
Wallpaper Setup .................................................. 14
Setting a Wallpaper using a default image
........................................................................ 14
Setting a Wallpaper using your image .......... 14
Screen/LED Customize Setup ........................... 14
Setting the Brightness of the Backlighting
(Dimmer) ...................................................... 14
Adjusting the Minimum Level of
Backlight ....................................................... 14
Adjusting the Dimmer of Button Lighting at
Night .............................................................. 14
Clock Setup .......................................................... 15
Display Off Setting .............................................. 15
About iLX-F411/iLX-F409 ................................ 15
Displaying the Product Information ............ 15
Displaying Warranty/Copyright
Information .................................................. 15
Initializing the System .................................... 15
Installation Setup ................................................ 15
Rear Seat Entertainment (RSE) setup .............. 16
Rear Seat Entertainment (RSE) Output
Setting ............................................................ 16
Format Setting ................................................. 16
Steering Wheel Position Setting ........................ 16
iDatalink Setting .................................................. 16
Setting the Default Vehicle Screen ................ 16
Setting the Parking Assist Enable .................. 16
Setting the Maestro Module .......................... 16
Connection (Bluetooth) Setup
Displaying Bluetooth Information ................... 17
Pairing the Bluetooth Device ............................ 17
Setting the Bluetooth Device ......................... 17
Deleting a Bluetooth Device from the list .... 17
Auto Answering Setup ....................................... 17
Apple CarPlay Setup ........................................... 17
Camera Setup
Camera Input Setting ......................................... 18
Camera Signal Input Setting .............................. 18
Rear Camera Guide Settings .............................. 18
Turning the Rear Camera Guide On/Off .... 18
Adjusting the Caution Position ..................... 18
Camera Picture Quality Setup ........................... 19
Camera Interrupt Setting
(DISPLAY OFF Mode) ................................... 19

3-EN
Mute Setting ......................................................... 19
Sound Setup
Setting the Media Xpander (MX) ..................... 19
Equalizer Settings ................................................ 20
Fader/Balance/Bass/Treble/Subwoofer
Settings .............................................................. 20
Setting the Fader/Balance ............................... 20
Adjusting the Bass/Treble .............................. 20
Setting the Subwoofer ..................................... 20
Graphic Equalizer Curve Settings
(Graphic EQ) ................................................... 20
Time Correction Settings ................................... 21
Crossover Settings (X-Over) ............................. 21
Volume Setup ...................................................... 22
Adjusting the Key Sound ................................ 22
Adjusting the Source Volume ........................ 22
Setting the Volume for Android Auto ......... 22
Setting the Volume for Apple CarPlay ......... 22
Adjusting the Volume for Phone .................. 22
Turning Subwoofer ON/OFF ............................ 22
Rear Speaker Setting ........................................... 22
Defeat Setting ....................................................... 22
About the Crossover ........................................... 23
About Time Correction ...................................... 23
Apple CarPlay (Optional)
Access to Apple CarPlay .................................... 25
Android Auto (Optional)
What is Android Auto ........................................ 25
Activate Android Auto ....................................... 25
Radio
Radio Basic Operation
Listening to the Radio ......................................... 26
Presetting Stations Manually ............................. 26
Presetting Stations Automatically ..................... 26
Tuning to Preset Station .................................... 26
USB Flash drive (Optional)
USB Audio
Playback ................................................................ 27
Fast-forwarding/Fast-reversing ........................ 27
Repeat Play ........................................................... 27
Shuffle Play ........................................................... 28
Searching for a Desired Song ............................. 28
USB Video
Setting the Brightness and Contrast ................. 28
Displaying the Subtitle ....................................... 28
USB Photo
Playback ................................................................ 29
Slide Show ............................................................ 29
Setting a Wallpaper with a Photo ..................... 29
iPod mode on iPhone (Optional)
Playback ................................................................ 30
Searching for a Music File .................................. 31
Repeat Play ........................................................... 31
Shuffle Play ........................................................... 31
HDMI Device (Optional)
HDMI Operation ................................................ 32
Setting the Brightness and Contrast ................. 32
SiriusXM Satellite Radio Operation
(Optional)
Receiving Channels with the SiriusXM
Tuner ................................................................. 33
Tuning Channels by Category ........................... 33
Changing the Display ......................................... 34
Checking the SiriusXM Radio ID Number ..... 34
Storing Channel Presets ..................................... 34
Tuning Channels using Presets ......................... 34
Search Function ................................................... 34
Selecting the Channel Directly .......................... 34
Parental Lock Function ...................................... 34
Bluetooth Operation
Setup Before Using .............................................. 35
About Bluetooth .............................................. 35
About the Hands-free Phone ......................... 35
Before Using Bluetooth .................................. 35
Hands-free Phone Control
Answering a Call ................................................. 36
Hanging up the Telephone ................................ 36
Calling ................................................................... 36

4-EN
Making a phone call using the Phone
Menu ............................................................. 36
Using Voice Recognition function ................... 37
Using Siri .......................................................... 37
Voice Dial Function ........................................ 37
Phone Operation Screen .................................... 38
Adjusting the Speech Volume ....................... 38
Changing the Voice Output ........................... 38
Muting the Microphone ................................. 38
DTMF (Touch-Tone) Function .................... 38
Phone Book Function ......................................... 38
Searching in the Phone Book ......................... 38
Synchronizing the Phone Book ..................... 38
Deleting the Phone Book Entries .................. 39
Setting contacts as Favorites
(Shortcut Dialing) ........................................... 39
Bluetooth Audio
Playback ................................................................ 40
Repeat Play ........................................................... 40
Shuffle Play ........................................................... 40
Connecting a Bluetooth Device ........................ 40
Disconnecting the Bluetooth Connection ... 40
Switching the connecting Bluetooth
Device ............................................................ 40
Camera Operation (Optional)
Camera Operation .............................................. 41
Displaying the Camera Image from
the HOME screen ........................................ 41
Displaying the rear view video while the car
is in reverse ................................................... 41
About the Rear Camera Guide .......................... 41
iDataLink Operation
Access to iDataLink Mode ................................. 43
About Parking Sensor screen ......................... 44
Factory Media Operation ................................... 44
Factory SiriusXM Operation ............................. 44
Information
Product Software Update ................................... 45
About the Supported Formats ........................... 45
About MP3/WMA/AAC/FLAC/WAV ........ 45
In Case of Difficulty ............................................ 47
If this Message Appears ...................................... 48
Specifications ....................................................... 49
LIMITED WARRANTY
5-EN
Operating Instructions
IMPORTANT INFORMATION
FCC COMPLIANCE STATEMENT
This equipment has been tested and found to comply with the limits
for a Class B digital device, pursuant to part 15 of the FCC Rules. These
limits are designed to provide more reasonable protection against
harmful interference in a residential installation, and are more
stringent than “outdoor” requirements.
Operation is subjected to the following two conditions: (1) This
device may not cause harmful interference, and (2) this device must
accept any interference received, including interference that may
cause undesired operation.
This equipment generates, uses, and can radiate radio frequency
energy and, if not installed and used in accordance with the
instructions, may cause harmful interference to radio
communications. However, there is no guarantee that interference
will not occur in a particular installation. If this equipment does cause
harmful interference to radio or television reception, which can be
determined by turning the equipment off and on, you are
encouraged to try to correct the interference by one of the following
measures:
• Reorient or relocate the receiving antenna.
• Increase the separation between the equipment and the receiver.
• Connect the equipment into an outlet on a circuit different from
that to which the receiver is connected.
• Consult an experienced radio/TV technician.
Points to Observe for Safe Usage
• Read this manual carefully before using this disc and the system
components. They contain instructions on how to use this product
in a safe and effective manner. Alpine cannot be responsible for
problems resulting from failure to observe the instructions in this
manual.
• This manual uses various pictorial displays to show you how to use
this product safely and to alert you to potential dangers resulting
from improper connections and operation. Following are the
meanings of these pictorial displays. It is important to fully
understand the meanings of these pictorial displays in order to use
this manual and the system properly.
• This product may be used with software applications. Please follow
all usage instructions and warnings when using this product at all
times. Do not use this product or any software application in a
manner which will hinder safe operation of your vehicle.
INSTALL THE PRODUCT CORRECTLY SO THAT THE DRIVER CANNOT WATCH
TV/VIDEO UNLESS THE VEHICLE IS STOPPED AND THE EMERGENCY
BRAKE IS APPLIED.
It is dangerous for the driver to watch TV/Video while driving a
vehicle. Installing this product incorrectly enables the driver to
watch TV/Video while driving. This may cause a distraction,
preventing the driver from looking ahead, thus causing an accident.
The driver or other people could be severely injured.
DO NOT WATCH VIDEO WHILE DRIVING.
Watching the video may distract the driver from looking ahead of
the vehicle and cause an accident.
DO NOT OPERATE ANY FUNCTION THAT TAKES YOUR ATTENTION AWAY
FROM SAFELY DRIVING YOUR VEHICLE.
Any function that requires your prolonged attention should only be
performed after coming to a complete stop. Always stop the vehicle
in a safe location before performing these functions. Failure to do so
may result in an accident.
KEEP THE VOLUME AT A LEVEL WHERE YOU CAN STILL HEAR OUTSIDE
NOISES WHILE DRIVING.
Excessive volume levels that obscure sounds such as emergency
vehicle sirens or road warning signals (train crossings, etc.) can be
dangerous and may result in an accident. LISTENING AT LOUD
VOLUME LEVELS IN A CAR MAY ALSO CAUSE HEARING
DAMAGE.
MINIMIZE DISPLAY VIEWING WHILE DRIVING.
Viewing the display may distract the driver from looking ahead of
the vehicle and cause an accident.
DO NOT DISASSEMBLE OR ALTER.
Doing so may result in an accident, fire or electric shock.
USE ONLY IN CARS WITH A 12 VOLT NEGATIVE GROUND.
(Check with your dealer if you are not sure.) Failure to do so may
result in fire, etc.
PRECAUTIONS
WARNING
WARNING
• Operation of the system while driving is dangerous. Users
should stop vehicle before operating the software.
• Road conditions and regulations take precedence over
information contained on the map display: observe actual
traffic restrictions and circumstances while driving.
• This software is designed for use exclusively in the unit. It
cannot and may not be used in conjunction with other
hardware.
WARNING
This symbol means important instructions. Failure
to heed them can result in serious injury or death.
6-EN
KEEP SMALL OBJECTS SUCH AS SCREWS OUT OF THE REACH OF
CHILDREN.
Swallowing them may result in serious injury. If swallowed, consult
a physician immediately.
USE THE CORRECT AMPERE RATING WHEN REPLACING FUSES.
Failure to do so may result in fire or electric shock.
DO NOT BLOCK VENTS OR RADIATOR PANELS.
Doing so may cause heat to build up inside and may result in fire.
USE THIS PRODUCT FOR MOBILE 12V APPLICATIONS.
Use for other than its designed application may result in fire,
electric shock or other injury.
MAKE THE CORRECT CONNECTIONS.
Failure to make the proper connections may result in fire or
product damage.
BEFORE WIRING, DISCONNECT THE CABLE FROM THE NEGATIVE BATTERY
TERMINAL.
Failure to do so may result in electric shock or injury due to
electrical shorts.
DO NOT ALLOW CABLES TO BECOME ENTANGLED IN SURROUNDING
OBJECTS.
Arrange wiring and cables in compliance with the manual to
prevent obstructions when driving. Cables or wiring that obstruct
or hang up on places such as the steering wheel, gear lever, brake
pedals, etc. can be extremely hazardous.
DO NOT SPLICE INTO ELECTRICAL CABLES.
Never cut away cable insulation to supply power to other
equipment. Doing so will exceed the current carrying capacity of
the wire and result in fire or electric shock.
DO NOT DAMAGE PIPE OR WIRING WHEN DRILLING HOLES.
When drilling holes in the chassis for installation, take precautions
so as not to contact, damage or obstruct pipes, fuel lines, tanks or
electrical wiring. Failure to take such precautions may result in fire.
DO NOT USE BOLTS OR NUTS IN THE BRAKE OR STEERING SYSTEMS TO
MAKE GROUND CONNECTIONS.
Bolts or nuts used for the brake or steering systems (or any other
safety-related system), or tanks should NEVER be used for
installations or ground connections. Using such parts could disable
control of the vehicle and cause fire etc.
DO NOT INSTALL IN LOCATIONS WHICH MIGHT HINDER VEHICLE
OPERATION, SUCH AS THE STEERING WHEEL OR GEARSHIFT.
Doing so may obstruct forward vision or hamper movement etc.
and results in serious accident.
HALT USE IMMEDIATELY IF A PROBLEM APPEARS.
Failure to do so may cause personal injury or damage to the
product. Return it to your authorized Alpine dealer or the nearest
Alpine Service Center for repairing.
HAVE THE WIRING AND INSTALLATION DONE BY EXPERTS.
The wiring and installation of this unit requires special technical
skill and experience. To ensure safety, always contact the dealer
where you purchased this product to have the work done.
USE SPECIFIED ACCESSORY PARTS AND INSTALL THEM SECURELY.
Be sure to use only the specified accessory parts. Use of other than
designated parts may damage this unit internally or may not
securely install the unit in place. This may cause parts to become
loose resulting in hazards or product failure.
ARRANGE THE WIRING SO IT IS NOT CRIMPED OR PINCHED BY A SHARP
METAL EDGE.
Route the cables and wiring away from moving parts (like the seat
rails) or sharp or pointed edges. This will prevent crimping and
damage to the wiring. If wiring passes through a hole in metal, use a
rubber grommet to prevent the wire’s insulation from being cut by
the metal edge of the hole.
DO NOT INSTALL IN LOCATIONS WITH HIGH MOISTURE OR DUST.
Avoid installing the unit in locations with high incidence of
moisture or dust. Moisture or dust that penetrates into this unit may
result in product failure.
CAUTION
This symbol means important instructions. Failure
to heed them can result in injury or material
property damage.

7-EN
NOTICE
Product Cleaning
Use a soft dry cloth for periodic cleaning of the product. For more
severe stains, please dampen the cloth with water only. Anything
else has the chance of dissolving the paint or damaging the plastic.
Temperature
Be sure the temperature inside the vehicle is between +45°C
(+113°F) and 0°C (+32°F) before turning your unit on.
Maintenance
If you have problems, do not attempt to repair the unit yourself.
Return it to your Alpine dealer or the nearest Alpine Service Station
for servicing.
Protecting the USB connector
• Only an iPhone or USB flash drive can be connected to the USB
connector on this unit. Correct performance using other USB
products cannot be guaranteed.
• If the USB connector is used, be sure to use only the supplied
connector cable with the unit. A USB hub is not supported.
• Depending on the connected USB flash drive, the unit may not
function or some functions may not be performed.
• The audio file format that can be played back on the unit is
MP3/WMA/AAC/FLAC/WAV.
• Artist/song name, etc., can be displayed. Certain, special
characters may not be correctly displayed.
On Handling USB Flash drive
• This unit can control a memory storage device that supports the
USB Mass Storage Class (MSC) protocol. Playable audio file
formats are MP3, WMA, AAC, FLAC and WAV.
• USB Flash drive function is not guaranteed. Use USB flash drive
according to the terms of agreement. Read the USB flash drive
Owner’s Manual thoroughly.
• Avoid usage or storage in the following locations:
Anywhere in the car exposed to direct sunlight or high
temperatures.
Anywhere the possibility of high humidity or corrosive
substances are present.
• Fix the USB flash drive in a location where driver operation will
not be hindered.
• USB Flash drive may not function correctly at high or low
temperature.
• Use only certified USB flash drive. Note that even certified USB
flash drive, may not function correctly depending on its type or
state.
• Depending on the settings of the USB flash drive type, memory
state or encoding software, the unit may not play back or display
properly.
• USB Flash drive may take time to start playback. If there is a
particular file other than audio in the USB flash drive, it may take
considerable time before the file is played back or searched.
• The unit can play back “mp3,” “wma” or “m4a” file extensions.
• Do not add the above extensions to a file other than audio data.
This non-audio data will not be recognized. The resulting
playback may contain noise that can damage speakers and/or
amplifiers.
• It is recommended to back up important data on a personal
computer.
• Do not remove the USB device while playback is in progress.
Change SOURCE to something other than USB, then remove the
USB device to prevent possible damage to its memory.
CAUTION
Alpine accepts no responsibility for lost data, etc., even if data, etc., is
lost while using this product.

8-EN
• Windows Media and the Windows logo are trademarks, or
registered trademarks of Microsoft Corporation in the United
States and/or other countries.
• Apple, iPhone, and Siri are trademarks of Apple Inc., registered
in the U.S. and other countries. Apple CarPlay is a trademark of
Apple Inc.
• Use of the Made for Apple and Works with Apple badges means
that an accessory has been designed to connect specifically to the
Apple product(s) identified in the Made for Apple badge and to
work specifically with the technology identified in the Works
with Apple badge, and has been certified by the developer to
meet Apple performance standards. Apple is not responsible for
the operation of this device or its compliance with safety and
regulatory standards.
• Please note that the use of this accessory with an Apple product
may affect wireless performance.
• Use of the Apple CarPlay logo means that a vehicle user interface
meets Apple performance standards. Apple is not responsible for
the operation of this vehicle or its compliance with safety and
regulatory standards. Please note that the use of this product
with iPhone may affect wireless performance.
• Sirius, XM and all related marks and logos are trademarks of
Sirius XM Radio Inc. All rights reserved.
• Google, Android, Android Auto, Google Play and other marks
are trademarks of Google LLC.
• The Bluetooth® word mark and logos are registered trademarks
owned by the Bluetooth SIG, Inc. and any use of such marks by
ALPS ALPINE CO., LTD. is under license.
• The terms HDMI and HDMI High-Definition Multimedia
Interface, and the HDMI Logo are trademarks or registered
trademarks of HDMI Licensing, LLC in the United States and
other countries.
• MPEG Layer-3 audio coding technology licensed from
Fraunhofer IIS and Thomson. Supply of this product only
conveys a license for private, non-commercial use and does not
convey a license nor imply any right to use this product in any
commercial (i.e. revenue-generation) real time broadcasting
(terrestrial, satellite, cable and/or any other media),
broadcasting/streaming via internet, intranets and/or other
networks or in other electronic content distribution systems,
such as pay-audio or audio-on-demand applications. An
independent license for such use is required. For details, please
visit
http://www.mp3licensing.com
9-EN
Location of Controls
RESET switch
The system will be reset.
/ (DOWN/UP) button
Adjusts the volume.
(MUTE) button
Activates/deactivates MUTE mode.
button
Activate Siri function or voice recognition mode.
(HOME) button
Displays the HOME screen.
(Phone) button
Displays the Phone Menu screen.
Touch to start a conversation when a call is incoming.
/ button
Seeks down/up stations in radio mode or down/up a track,
chapter, etc., in other audio/visual sources.
Dimmer Sensor
Senses the brightness of the car interior.
Turning Power On or Off
When the ignition key is turned to ACC or ON, the opening screen will
be automatically displayed.
1 Turn the ignition key to the ACC or ON position.
The unit turns on.
• When the unit is used for the first time, the Radio main screen is
displayed.
• When turned on, the unit displays the last screen that was
displayed before the ignition key was turned off. For example, if
the unit is in radio mode when ignition is turned off, it will remain
in radio mode when ignition is turned back on.
2 To turn the unit to off, turn the ignition key to the OFF
position.
• The unit is a precision device. Careful handling of the unit should
provide you with years of trouble-free operation.
• Some of this unit’s functions cannot be performed while the vehicle is in
motion. Be sure to stop your vehicle in a safe location and apply the
parking brake before attempting these operations.
Initial System Start-Up
Be sure to press the RESET switch when using the unit for the first time,
after changing the car battery, etc.
1 Turn off the unit power.
2 Press the RESET switch with a ballpoint pen or similar
pointed object.
Adjusting the Volume
Adjust the volume by touching / .
Volume decreases/increases continuously by touching and holding
/.
Volume: 0 to 35
Getting Started
About the button descriptions used in this Owner’s
Manual
The buttons found on the face of the unit are expressed in bold
(e.g. (HOME)). The buttons found on the touch-screen display
are shown in bold within brackets, [ ] (e.g. [OK]).
RESET switch
10-EN
Lowering Volume Quickly
Audio Mute function instantly lowers the volume level to 0.
1 Touch the (MUTE) button to activate MUTE mode.
The audio level will be 0.
2 Touch the (MUTE) button again to bring the audio
back to previous volume level.
Touch Screen Operation
You can operate the unit by using the touch panel display.
• Be sure to touch the onscreen button lightly with the pad of your finger
to avoid scratching the display.
Touch operation
Touch a button or list item on the screen lightly.
• If you touch a button and there is no reaction, remove your finger.
• Onscreen buttons that cannot be operated are dimmed.
Swipe operation
Move your finger lightly with a swipe.
Drag & Drop operation
Touch and hold the desired item, then drag it to its new location by
moving your finger, then release your finger to place the item.
• Except for USB Photo mode, it is not possible to narrow the screen with
two fingers (pinch in) or spread the screen (pinch out).
Switching Sources
1 Touch the (HOME) button.
The HOME screen is displayed.
2 Touch a widget of your desired source.
• In the HOME screen, you can change the widget location on the screen.
For details, see “About the HOME Screen” (page 11).
Selecting an Item in a List
To scroll through a list, perform the following operations.
Touch the screen and slide your finger up and down.
The screen will scroll along with your finger movement.
• After touching the screen, move your finger away from the screen before
dragging and that item will be selected.
Returns to the previous screen. Depending
on the function, this button may cancel the
operations performed on the screen.
11-EN
About the HOME Screen
In the HOME screen, select a widget to perform various settings and
operations of the function.
Touch the (HOME) button.
The HOME screen is displayed.
• You can also display the HOME screen by touching [] at the top of
the screen.
HOME screen example
• After selecting [Audio] widget, it is possible to switch the mode to USB
Audio mode, iPod mode for iPhone or Bluetooth Audio mode.
In the Widgets editing screen, you can change the audio source order or
set the display/hide settings.
1 Touch and hold the HOME screen for at least a second.
The widgets editing screen is displayed.
• The source icon displayed in the Widgets editing screen is
displayed only when usable setup and conditions of each Audio
source are fulfilled. For details on setup and conditions of each
audio source, see “Switching Sources” (page 10).
Adding a widget
Drag and drop a widget from the additional candidate widgets
area to the desired position of the HOME screen image area.
• To show more candidate widgets, swipe horizontally.
• There are 3 sizes of widgets.
Changing the order of widget
Drag and drop the widget to the desired location.
Deleting a widget from the HOME screen
Drag and drop a widget from the HOME screen image area to .
• is displayed while touching a widget.
2 Touch the (HOME) button.
The HOME screen is displayed.
About the Indicator Display
The Indicator Bar at the top of the screen displays various types of
information, like the current time.
Recalls the HOME screen.
Displays the currently playing audio source. Touch to return
to the Audio source screen.
Indicates the current time.
You can switch between the 12 hour display and 24 hour display
options (page 15).
Displays the SiriusXM signal strength when connecting to
SiriusXM Tuner. (If SiriusXM Tuner is not connected, it is not
displayed.)
Lights up when connected to a Bluetooth compatible
device. (Does not display when connection is set to OFF.)
Editing HOME screen
You cannot operate the Widgets editing screen while
driving.
Your vehicle must be parked with the ignition key in the ACC or ON
position. For details, see “To display the Setup Menu screen” in
“Setup Operation” (page 12).
Widget
Touch to activate the function.
HOME screen navigation
Swipe the HOME screen horizontally with your
finger to change the page. Up to 3 pages exist.
Additional candidate widgets
HOME screen image
12-EN
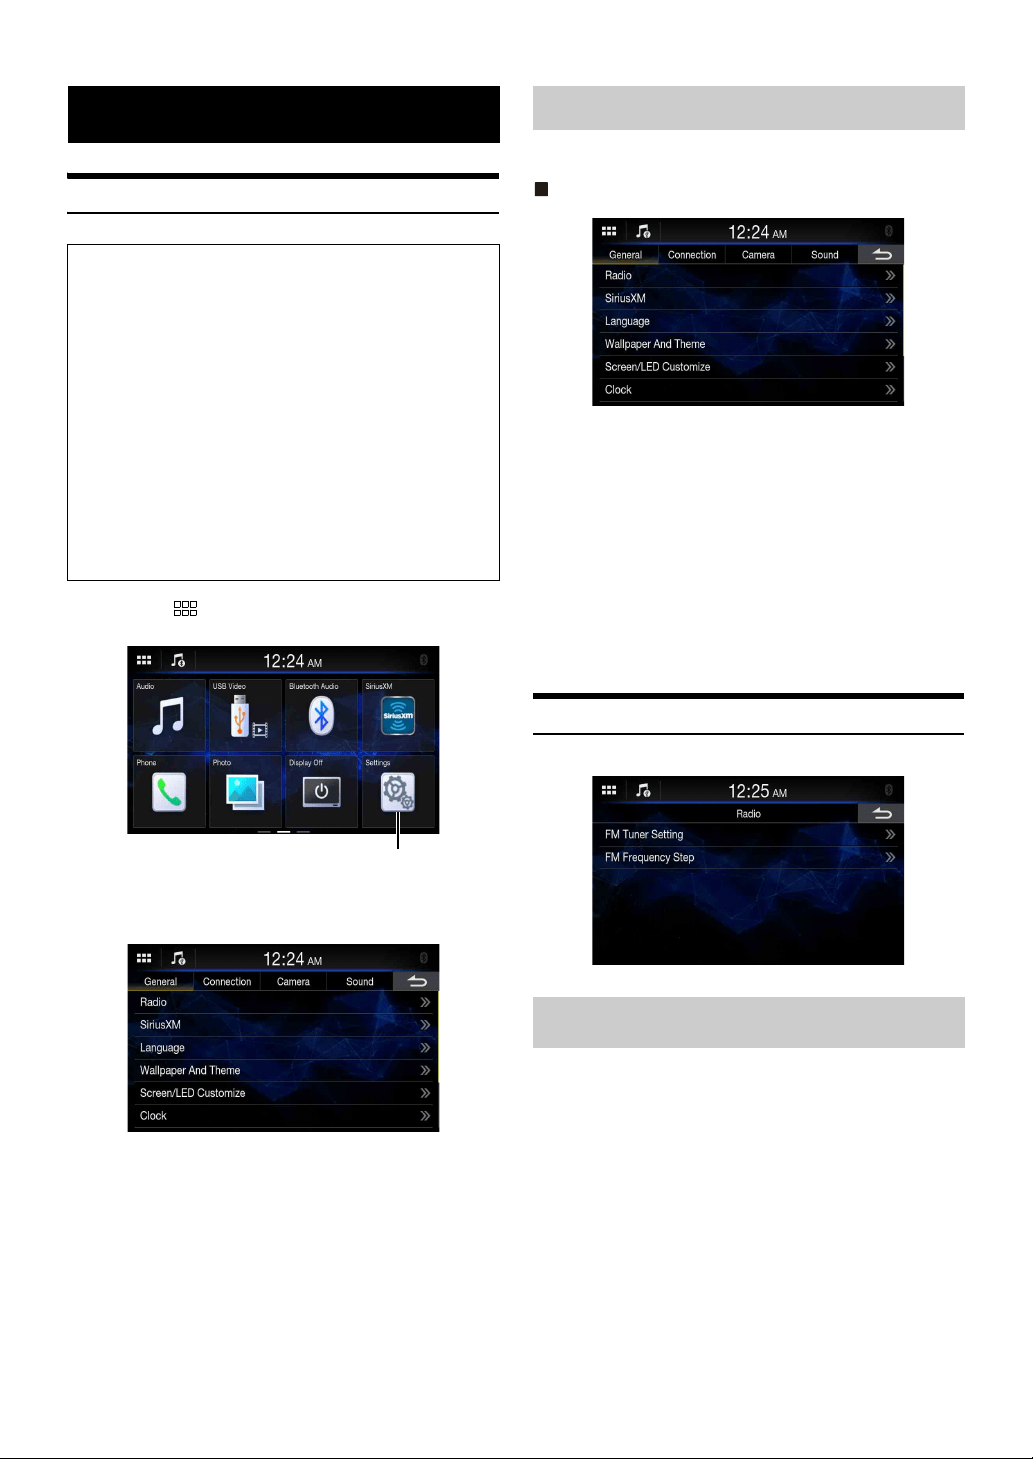
Setup Operation
1 Touch the (HOME) button.
The HOME screen is displayed.
2 To uc h [Settings].
The Settings menu screen is displayed.
3 Touch the required setting genre on the upper part of
the Settings menu screen, and then touch the setting
item.
Setting genres:
General: See “General Setup” (page 12).
Connection: See “Connection (Bluetooth) Setup” (page 17).
Camera: See “Camera Setup” (page 18).
Sound: See “Sound Setup” (page 19).
[General] is selected on the Settings menu screen.
General Setup Menu screen
Setting items:
Radio (page 12)
SiriusXM (page 13)
Language (page 13)
Wallpaper And Theme (page 14)
Screen/LED Customize (page 14)
Clock (page 15)
Display Off (page 15)
About (page 15)
Installation (page 15)
Rear Seat Entertainment (RSE) (page 16)
Steering Wheel Position (page 16)
iDatalink ((page 16))
Radio Setup
[Radio] is selected on the General Setup Menu screen.
This unit can set your preferred tone quality for FM radio source.
Setting item:
FM Tuner Setting
Setting contents:
Normal (Initial setting) / HiFi / Stable
• Noise may be more noticeable when [HiFi] is set, depending on the
reception status. In this case, the [Normal] setting is recommended.
Setup
To display the Setup Menu screen:
Your vehicle must be parked with the ignition key in the ACC or ON
position. To do this, follow the procedures below.
1 Bring your vehicle to a complete stop at a safe location.
Engage the parking brake.
2 Release the parking brake. (For safety, release the parking
brake while depressing the foot brake pedal).
3 Engage the parking brake again.
• For automatic transmission vehicles, place the transmission lever in
the Park position.
Now, the locking system for the Setup operation has been released.
Engaging the parking brake can reactivate the Setup Menu, as long as
the car’s ignition has not been turned off. It is not necessary to repeat
the above procedure (1 through 3).
Each time the ignition is turned OFF, perform the above procedure.
[Settings] button
General Setup
Setting the TUNER (FM) Tone Quality (Tuner
Condition)
Normal: Standard setting
HiFi: High-quality setting
Stable: Control noise
13-EN
During manual tuning, you can select the frequency step for FM analog
radio station searching.
Setting item:
FM Frequency Step
Setting contents:
100 kHz / 200 kHz (Initial setting)
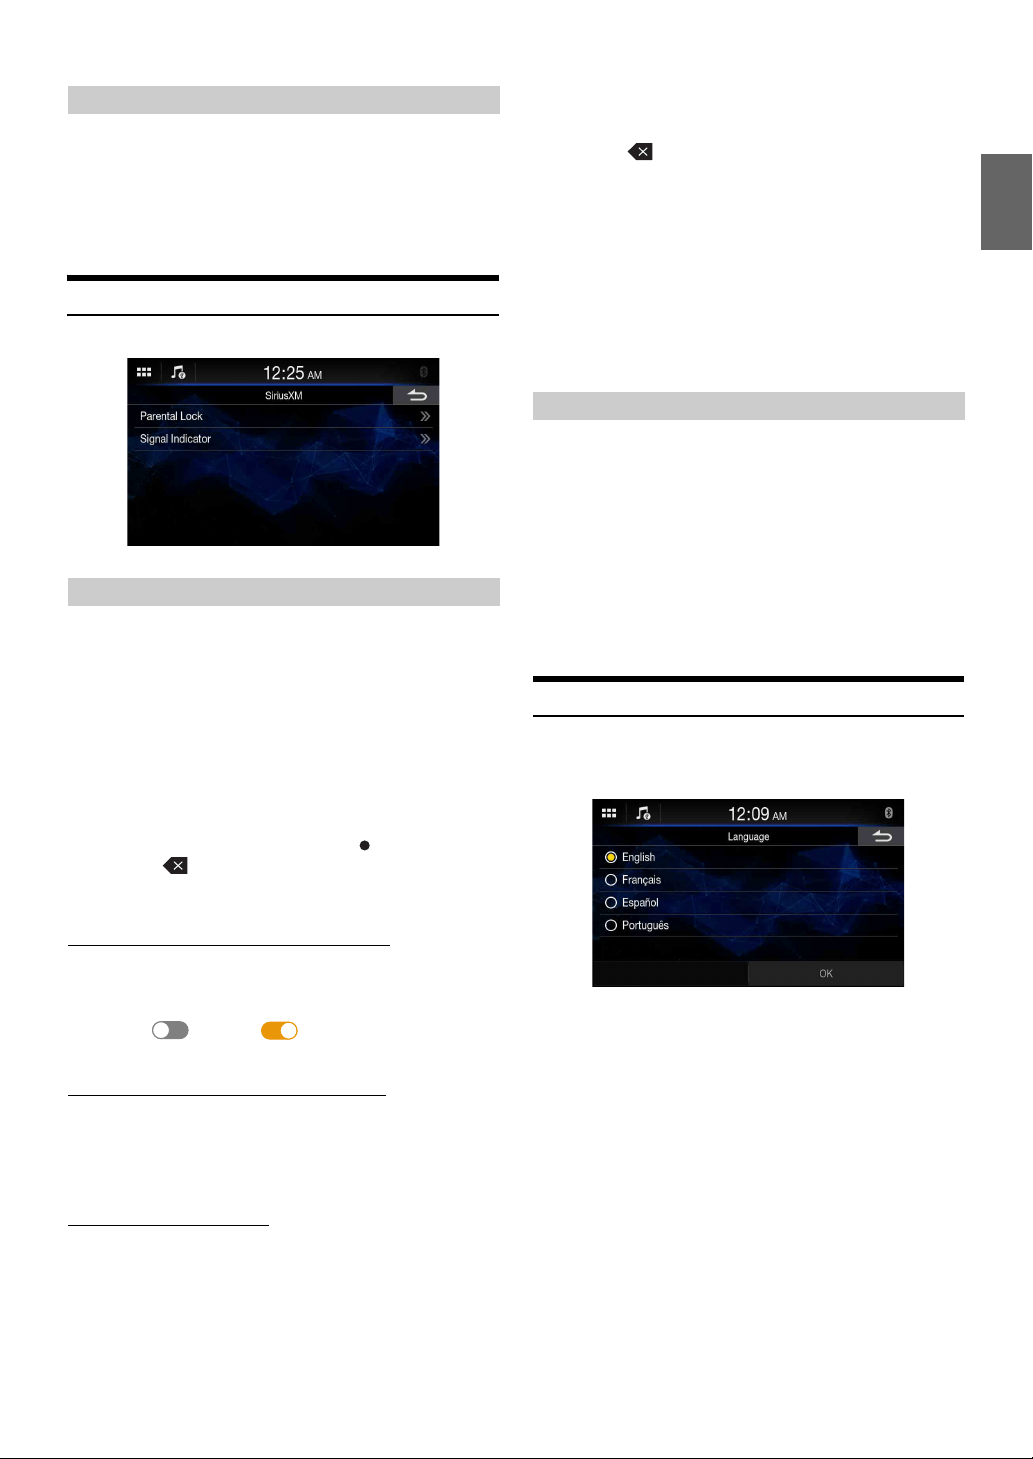
SiriusXM Setup
[Sirius XM] is selected on the General Setup Menu screen.
You can lock out channels with passcode protection. Channels that are
locked cannot be accessed without entering the passcode. You can
unlock a channel or change the passcode using this menu option.
Setting item:
Parental Lock
1 To uc h [Parental Lock].
A passcode input screen is displayed.
2 Touch the numeric keypad to input a 4-digit passcode.
The initial default 4-digit passcode is set to 0000.
After entering the digit, it is displayed as “ ”.
•Touch [] to delete an entered number.
3 To uc h [OK].
Setting the Lock status of individual channels
4 To uc h [Locked Channels].
The channels list screen is displayed.
5 Touch [ ] (Off) or [ ] (On) of the channels list to
set the Parent Lock.
Clearing the Lock of ALL the locked Channels
4 To uc h [Clear All Locked Channels].
5 To uc h [Yes] to clear the lock of all the locked channels.
Touch [No] to cancel.
Changing the Lock Passcode
4 To uc h [Edit Code].
The numeric keypad screen is displayed.
5 Use the keypad to enter the current (old) 4-digit
passcode, and then touch [OK].
The initial passcode is set to “0000.”
•Touch [] to delete an entered number.
6 To uc h [OK] to confirm the entry.
7 Now use the keypad to enter the new 4-digit passcode.
8 To uc h [OK].
9 Use the keypad to enter the new 4-digit passcode a
second time to verify it, and then touch [OK].
• Remember to keep a note of the passcode in a safe place in case you
forget the code.
While listening to a SiriusXM Channel, the Signal strength of the
current channel will be displayed.
Setting item:
Signal Indicator
This menu item displays the SiriusXM signal strength as Excellent,
Good, Weak or No Signal.
• If the Signal indicator reports Weak or No Signal and your vehicle is
parked outside with no obstructions to the southern sky, then your
SiriusXM antenna may not be properly installed or may have become
damaged.
Language Setup
[Language] is selected on the General Setup Menu screen. The Setup
menu, feedback information, etc. for this unit can be changed to appear
in the selected language.
Setting item:
Language
Setting contents:
English, Français, Español, Português
• The currently selected language is displayed.
Setting the TUNER (FM) Frequency Step
Setting the Parental Lock
Signal Strength Information
14-EN
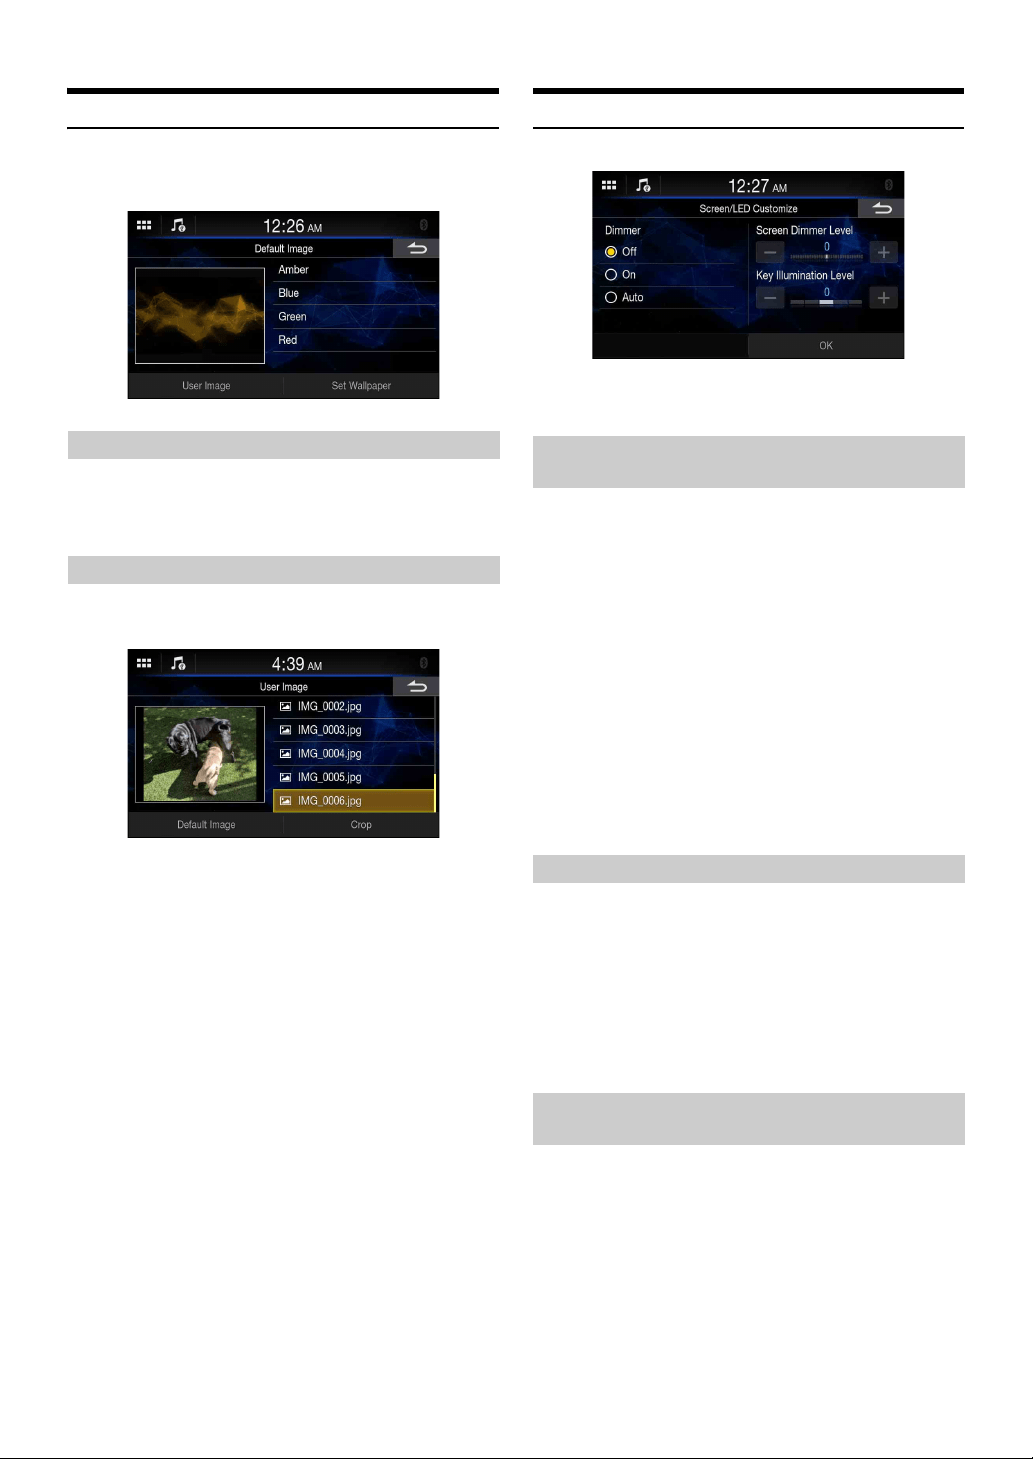
Wallpaper Setup
[Wallpaper And Theme] is selected on the General Setup Menu screen.
You can change the wallpaper of the display screen from 4 different
colored default images or your image.
Setting contents:
Amber / Blue / Green / Red
Touch the desired image, and then touch [Set Wallpaper].
1 To uc h [User Image].
The image selecting screen is displayed.
2 Select an image stored on the connected USB Flash
drive.
The selected image thumbnail is displayed.
If not using an image as a wallpaper, touch [Default Image] to
return to the previous screen without selecting.
3 To uc h [Crop].
4 Touch the area to be trimmed for a wallpaper.
If the image is 800 × 480 pixel, this step is not necessary.
5 To uc h [Set Theme] to change the theme color.
6 Touch the desired color.
7 To uc h [Set Wallpaper].
Screen/LED Customize Setup
[Screen/LED Customize] is selected on the General Setup Menu screen.
Setting item:
Dimmer / Screen Dimmer Level / Key Illumination Level
Backlighting is provided by LEDs light built into the liquid crystal panel.
The illumination control adjusts the brightness of the backlighting based
on the car ambient lighting for easier viewing.
Setting item:
Dimmer
Setting contents:
Off, On, Auto (Initial setting)
•When [On] is set, the setting is also applied for the button lighting in
“Adjusting the Dimmer of Button Lighting at Night” (page 14) and
“Adjusting the Minimum Level of Backlight” (page 14).
You can adjust the brightness of the backlight. This function could be
used, for instance, to change the screen brightness while traveling at
night.
Setting item:
Screen Dimmer Level
Setting contents:
-15 to 15 (Initial setting: 0)
• This setting is only available when “Dimmer” is set to [On] or [Auto].
You can adjust the brightness of the button lighting at night with the
dimmer.
Setting item:
Key Illumination Level
Setting level:
-2 to 2 (Initial setting: 0)
• This setting is only available when “Dimmer” is set to [On] or [Auto].
Setting a Wallpaper using a default image
Setting a Wallpaper using your image
Setting the Brightness of the Backlighting
(Dimmer)
Off: Deactivate Auto Dimmer mode to keep the background
illumination of the monitor bright.
On: Keep the background illumination of the monitor dark.
Auto: Adjust the brightness of the background illumination of
the monitor automatically to the brightness of the car
interior.
Adjusting the Minimum Level of Backlight
Adjusting the Dimmer of Button Lighting at
Night
15-EN
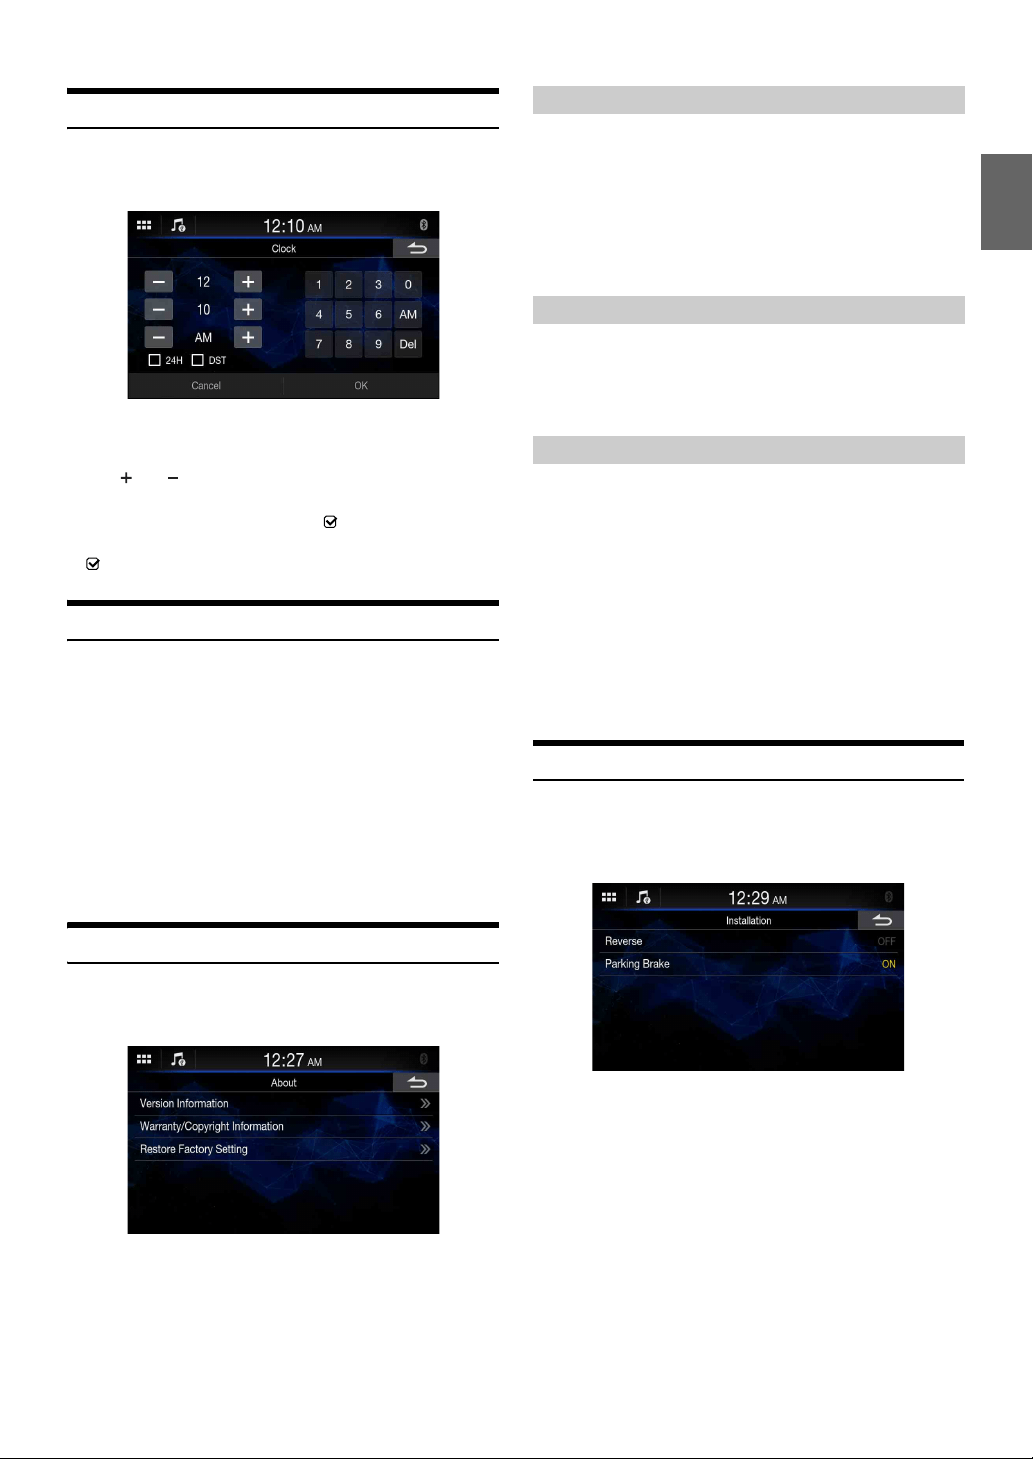
Clock Setup
[Clock] is selected on the General Setup Menu screen.
You can set the current time and the clock display type, 12-hour or 24-
hour, depending on your preference.
Setting item:
Clock
Touch [ ] or [ ] to adjust the hour, minute and AM/PM.
You can also use the number keys.
* To change to 24-hour, set “24H” to [On] ().
* To set the daylight saving time (Summer Time mode), set “DST” to [On]
().
Display Off Setting
When [Display Off] is selected on the General Setup Menu screen, the
display is turned Off.
Setting item:
Display Off
• To cancel Display Off mode, touch the screen or any button.
• Display Off mode is canceled when the power or ACC is turned off.
• When the gear lever is shifted to the reverse (R) position and the rear
camera is connected, the rear camera image is displayed.
• When a call is received on a Bluetooth-connected phone, the incoming
call screen is displayed.
• You can also activate Display Off mode directly by touching the
[Display Off] widget on the HOME screen.
About iLX-F411/iLX-F409
[About] is selected on the General Setup Menu screen.
[About] enables you to check the Serial No., Firmware Version, Model
Name, and to initialize various settings.
You can view the version information of this product. Make note of this
information and refer to it whenever you contact Alpine Tech Support
or an Alpine-authorized dealer.
Setting item:
Version Information
Setting contents:
Serial No. / SYSTEM version / Firmware Version
Setting item:
Warranty/Copyright Information
Setting contents:
Open source licenses / Notice
You can initialize all data, to restore the factory settings. Remove the
USB flash drive, etc. from the system before operation
1 Touch [Restore Factory Setting].
2 After the confirmation message appears, touch [Yes].
The system starts initialization.
The confirmation screen appears.
3 Touch [Confirm].
• Do not turn on/off the power, change the ignition key position or
remove the screen panel until system restart is completed.
Installation Setup
[Installation] is selected on the General Setup Menu screen.
Vehicle Setup enables you to check the connection status of Reverse
Lead/Parking Brake Lead.
When selecting the item, the Installation check screen is displayed.
Setting item:
Installation
Setting contents:
Reverse / Parking Brake
Displaying the Product Information
Displaying Warranty/Copyright Information
Initializing the System
16-EN
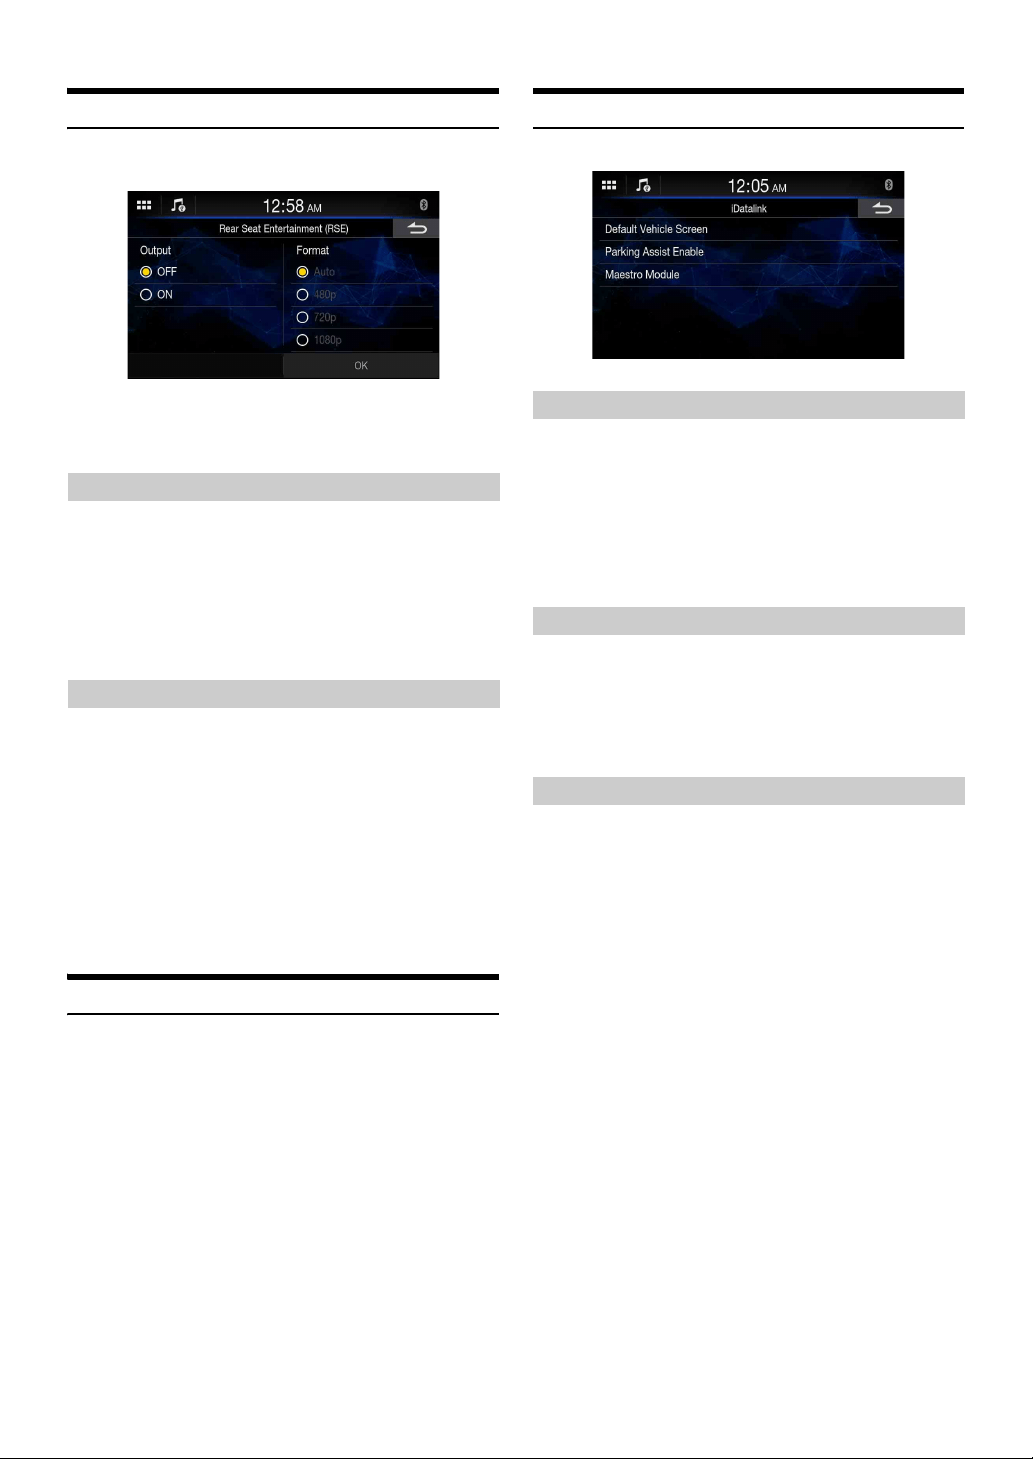
Rear Seat Entertainment (RSE) setup
[Rear Seat Entertainment (RSE)] is selected on the General Setup
Menu screen.
Setting items:
Output (page 16)
Format (page 16)
When a Rear monitor equipped with HDMI input is connected to this
unit, change this setting to “On.” You can output images to the Rear
monitor.
Setting item:
Output
Setting contents:
Off (Initial setting) / On
When the Output setting is [On], you can configure the HDMI Output
format setting (resolution).
Setting item:
Format
Setting contents:
Auto: The suitable format resolution is automatically selected.
480p: Output resolution is fixed at 480p.
720p: Output resolution is fixed at 720p.
1080p: Output resolution is fixed at 1080p.
• Depending on the monitor connected to the HDMI Output, the
resolution may not be able to be selected.
Steering Wheel Position Setting
Set this item when Apple CarPlay is used/Android smartphone which
installed Android Auto App is connected.
This setting influences Apple CarPlay/Android Auto mode.
Setting item:
Steering Wheel Position
Setting contents:
Left (Initial setting) / Right
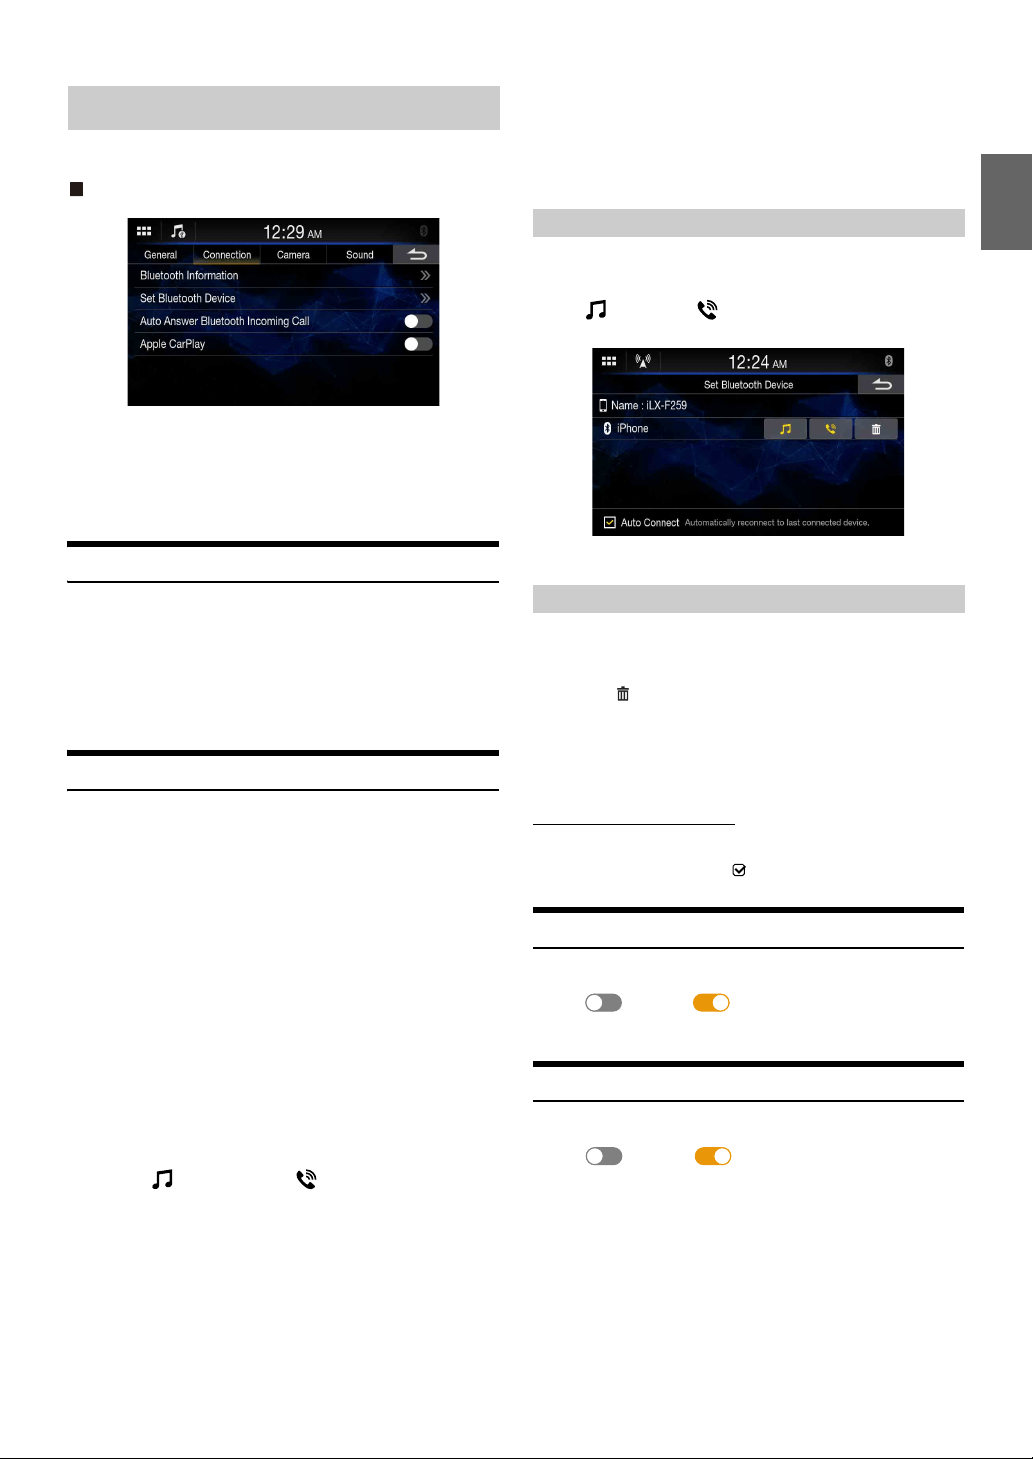
iDatalink Setting
[iDatalink] is selected on the General Setup Menu screen.
You can set the Default Vehicle Screen displayed in iDataLink mode.
Setting item:
Default Vehicle Screen
Setting contents:
Gauges / Climate / Parking Assist / Vehicle Info. / Last Mode (Initial setting)
• Depending on the car, some setting contents or this setting item may not
be displayed.
You can set up the camera for Parking Assist.
Setting item:
Parking Assist Enable
Setting contents:
Off (Initial setting) / Primary Camera / Secondary Camera
You can change the setting of the connected iDataLink module.
Setting item:
Maestro Module
• This setting is only available when the iDataLink Maestro? module
(sold separately) is connected.
• Depending on the iDataLink module, the setting contents may differ.
Rear Seat Entertainment (RSE) Output Setting
Format Setting
Setting the Default Vehicle Screen
Setting the Parking Assist Enable
Setting the Maestro Module
17-EN
[Connection] is selected on the Setup menu screen.
Connection Setup Menu screen
Setting items:
Bluetooth Information (page 17)
Set Bluetooth Device (page 17)
Auto Answer Bluetooth Incoming Call (page 17)
Apple CarPlay (page 17)
Displaying Bluetooth Information
[Bluetooth Information] is selected on the Connection Setup Menu
screen.
You can display the Bluetooth device name and device address of this
unit.
Setting item:
Bluetooth Information
Pairing the Bluetooth Device
[Set Bluetooth Device] is selected on the Connection Setup Menu
screen.
Search for Bluetooth compatible devices.
Setting item:
Set Bluetooth Device
1 To uc h [Set Bluetooth Device].
The Bluetooth Setup screen is displayed.
• You can also display the Bluetooth Setup screen directly by
touching the [Bluetooth Settings] widget on the HOME screen.
2 Select this unit on the Bluetooth device.
A message about the device to be registered is displayed.
3 To uc h [Yes].
The Bluetooth device is connected.
If you connecting to a smartphone, a message to download the
phonebook is displayed.
4 To uc h [] (Audio) or/and [] (Hands-free) of the
device you want to connect from the list.
• You can register up to 5 Bluetooth compatible mobile phones.
• You can connect 1 Blutooth Device to each of Bluetooth Audio
mode and Hands-free mode.
• The Bluetooth registration process differs depending on the device
version and SSP (Simple Secure Pairing). If a 4 or 6 character Passcode
appears on this system, enter the Passcode on the Bluetooth device.
• If a 6 character Passkey appears on this device, make sure the same
passkey is displayed on the Bluetooth compatible device and touch
[OK].
• If all 5 devices have been registered, you cannot register a 6th device. To
register another device, you need to delete one of the other 5 devices
first.
Select one of 5 paired Bluetooth compatible devices that you previously
registered.
To uc h [] (Audio) or [] (Hands-free) of the device you
want to connect from the Paired Device list.
• You can also change the connected device by touching the device name.
You can delete the information of a previously connected Bluetooth
compatible device.
1 To uc h [] of the Bluetooth compatible device to delete
from the Paired Device list.
2 To uc h [Yes].
•Touching [No] will cancel the setting.
Setting the Auto Connection
You can connect the last connected device automatically.
Set “Auto Connect” to [On] ().
Auto Answering Setup
You can set to answer an incoming call automatically.
Touch [ ] (Off) or [ ] (On) of “Auto Answer Bluetooth
Incoming Call”.
Apple CarPlay Setup
To use the Apple CarPlay (page 25), set “Apple CarPlay” to [On].
Touch [ ] (Off) or [ ] (On) of “Apple CarPlay”.
Connection (Bluetooth) Setup
Audio: Device is used as an Audio device.
Hands-free: Device is used as a Hands Free Device.
Setting the Bluetooth Device
Deleting a Bluetooth Device from the list
18-EN
[Camera] is selected on the Setup Menu screen.
You can set up items related to the Camera.
Camera Setup Menu screen
Setting items:
Camera Select (page 18)
Camera Signal (page 18)
Parking Guide Adjust (page 18)
Visual Adjust (page 19)
Camera Interrupt (DISPLAY OFF Mode) (page 19)
Mute While Backing Up (page 19)
Camera Input Setting
[Camera Select] is selected on the Camera Setup Menu screen.
Setting item:
Camera Select
Setting contents:
Off (Initial setting) / Rear
Camera Signal Input Setting
[Camera Signal] is selected on the Camera Setup Menu screen.
When the camera is connected, the video input signal type can be
chosen.
Further setting item:
Camera Signal
Setting contents:
NTSC (Initial setting) / PAL
Rear Camera Guide Settings
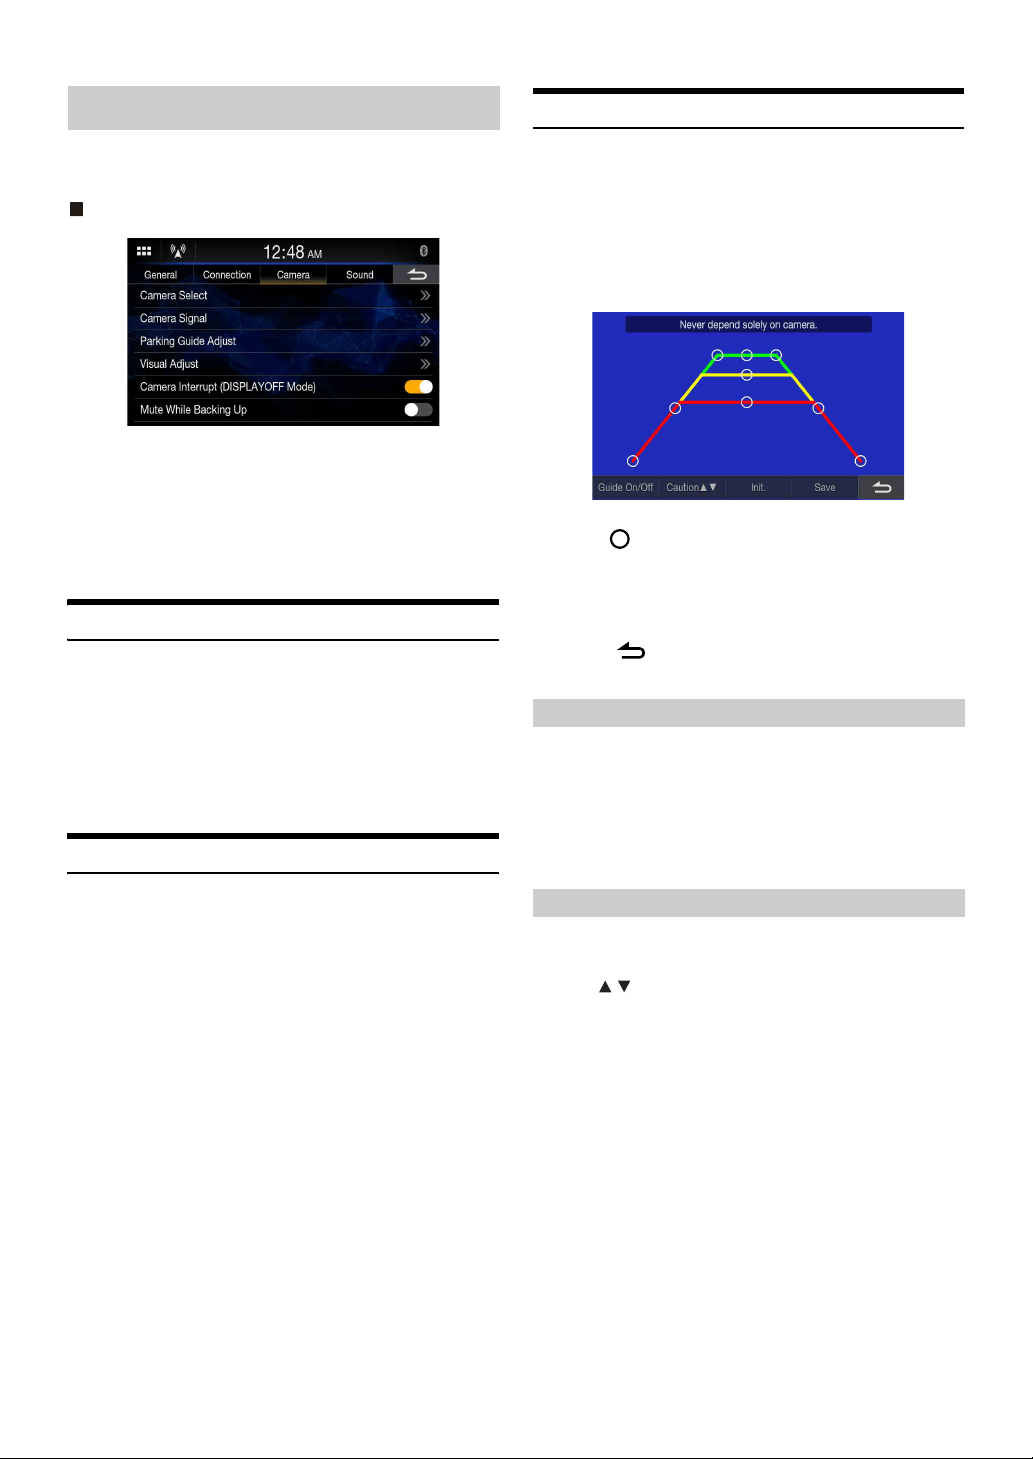
[Parking Guide Adjust] is selected on the Camera Setup Menu screen.
You can adjust the camera guide position.
Setting item:
Parking Guide Adjust
1 To uc h [Parking Guide Adjust] on the Camera Setup
menu screen.
The camera guide adjustment screen is displayed.
2 Slide [] to adjust.
3 After the adjustment is completed, touch [Save].
•Touching [Init.] clears adjustments and returns to the setting
before guide line alteration.
4 To uc h [] to complete the adjustment and return to
the previous screen.
When displaying the rear camera view on the screen, you can set to hide
or show the camera guide.
Setting item:
Guide On/Off
Setting contents:
Off / On
You can move the position of the displaying message on the screen.
Setting item:
Caution
Camera Setup
Off: No camera is connected.
Rear: Rear camera is connected.
Turning the Rear Camera Guide On/Off
Adjusting the Caution Position
19-EN
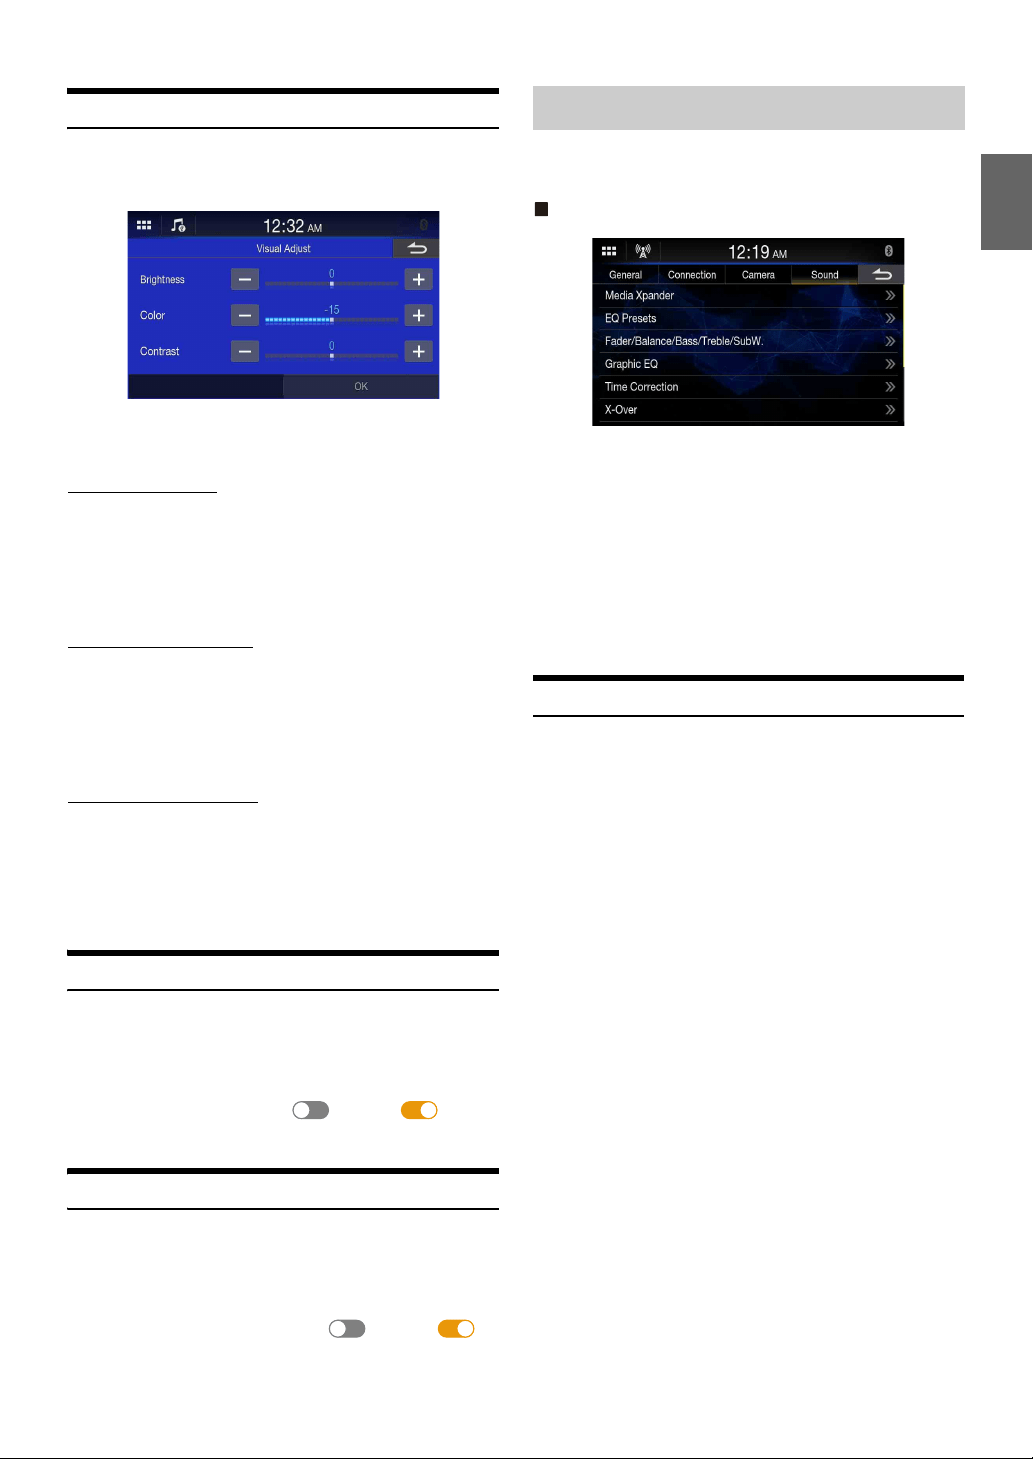
Camera Picture Quality Setup
[Visual Adjust] is selected on the Camera Setup Menu screen.
You can adjust the picture quality for the primary and secondary
cameras.
Setting item:
Visual Adjust
Adjusting Brightness
Setting item:
Brightness
Setting contents:
-15 to 15 (Initial setting: 0)
• You can adjust the brightness between MIN (-15) and MAX (+15).
Adjusting Color of Display
Setting item:
Color
Setting contents:
-15 to 15 (Initial setting: 0)
• You can adjust the color between MIN (-15) and MAX (+15).
Adjusting Display Contrast
Setting item:
Contrast
Setting contents:
-15 to 15 (Initial setting: 0)
• You can adjust the contrast between MIN (-15) and MAX (+15).
Camera Interrupt Setting (DISPLAY OFF Mode)
You can set whether to display the rear camera image when the gear
lever is moved to the reverse (R) position while the unit is turned off.
Setting item:
Camera Interrupt (DISPLAYOFF Mode)
To set Display Off Mode, touch [ ] (Off) or [ ] (On) of
“Camera Interrupt (DISPLAYOFF Mode)”.
Mute Setting
You can set the sound will be muted automatically when the gear lever is
moved to the reverse (R) position.
Setting item:
Mute While Backing Up
To set the rear speaker to On, touch [ ] (Off) or [ ]
(On) of “Mute While Backing Up”.
[Sound] is selected on the Settings menu screen.
You can set up items related to the sound quality.
Sound Setup Menu screen
Setting items:
Media Xpander (page 19)
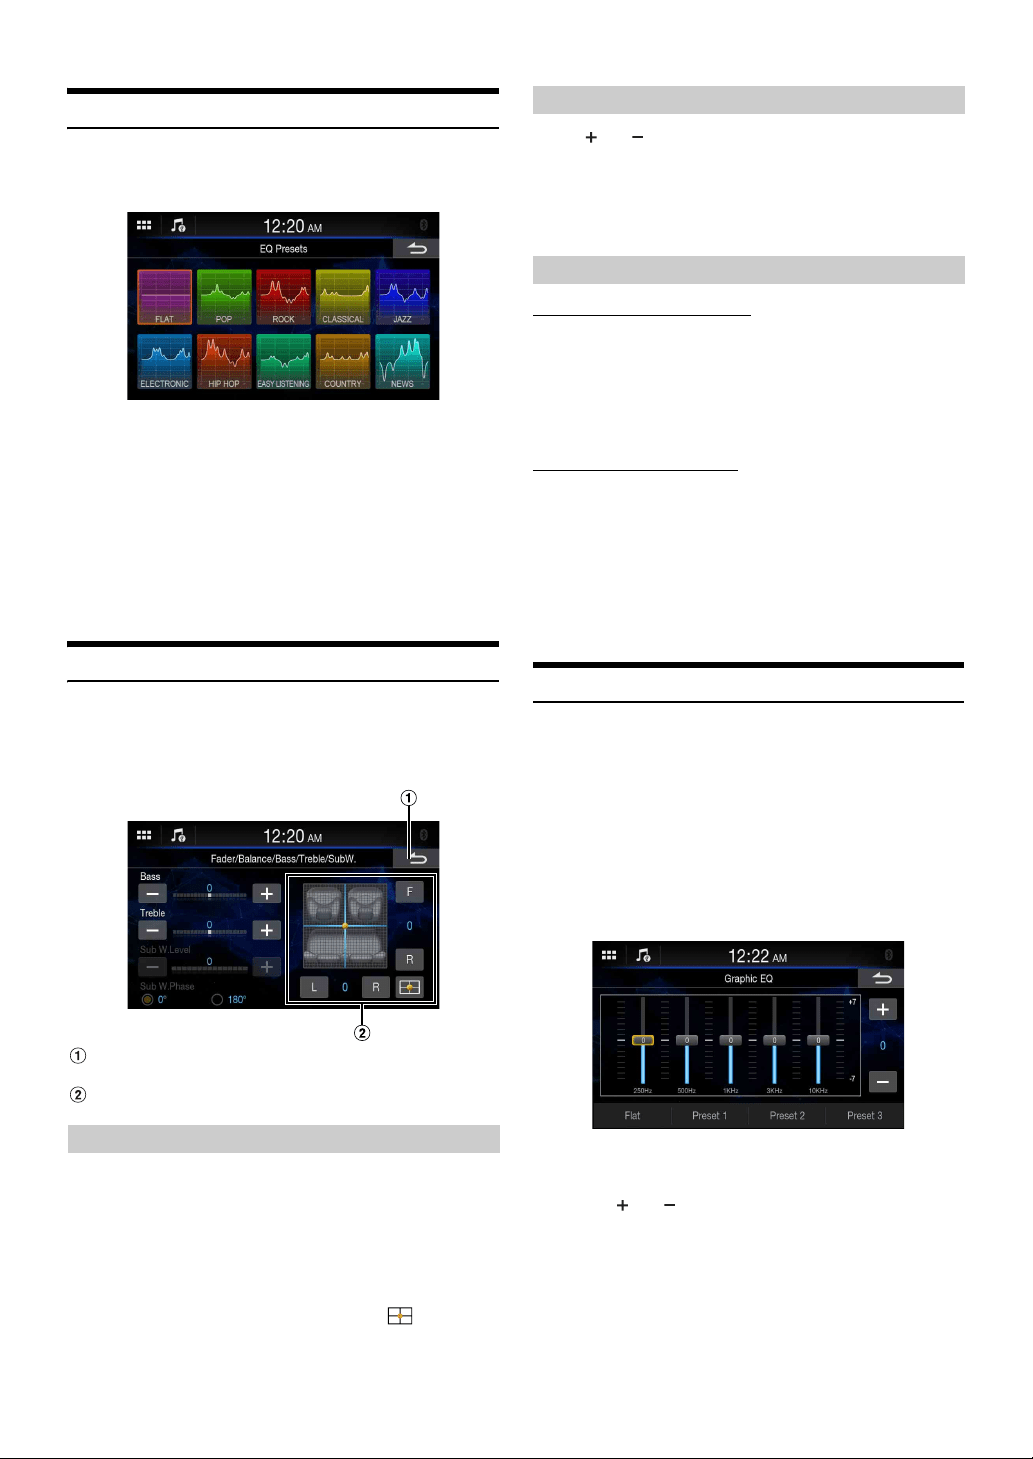
EQ Presets (page 20)
Fader/Balance/Base/Treble/SubW. (page 20)
Graphic EQ (page 20)
Time Correction (page 21)
X-Over (page 21)
Volume (page 22)
Subwoofer (page 22)
Rear Speaker (page 22)
Defeat (page 22)
Setting the Media Xpander (MX)
[Media Xpander] is selected on the Sound Setup Menu screen.
Media Xpander (MX) makes vocals or instruments sound distinct
regardless of the music source. The SiriusXM, USB Flash drive and iPod,
will be able to reproduce the music clearly even in cars with a lot of road
noise.
Setting item:
Media Xpander
1 Touch the check box of [ALL MX].
2 Touch any of [Off ] [Level 1] [Level 2] [Level 3].
•To cancel MX mode, set [Off] in step 1.
• MP3/WMA/AAC can have its own MX setting.
• When the Defeat setting is [On], you cannot perform the set up.
• The MX setting can be performed only when a source is currently
selected.
Sound Setup
20-EN
Equalizer Settings
[EQ Presets] is selected on the Sound Setup Menu screen.
10 typical equalizer settings are preset at the factory for a variety of
musical source material.
Setting item:
EQ Presets
Setting contents:
FLAT (Initial setting) / POP / ROCK / CLASSICAL / JAZZ / ELECTRONIC / HIP
HOP / EASY LISTENING / COUNTRY / NEWS
• Only one type can be set to On.
• When Equalizer Presets is set, the linked Graphic EQ settings are also
changed. We recommend storing Graphic EQ settings in a Preset in
advance.
• The Equalizer Presets setting can be configured when Defeat is Off.
Fader/Balance/Bass/Treble/Subwoofer Settings
[Fader/Balance/Bass/Treble/SubW.] is selected on the Sound Setup
Menu screen.
Setting item:
Fader/Balance/Bass/Treble/SubW.
Cancel
Sound setup finishes.
Fader/Balance Image area
Touch the desired point within the image area, or touch [F]
(Front), [R] (Rear), [L] (Left) or [R] (Right).
Fader:
15 (F) to 15 (R)
Balance:
15 (L) to 15 (R)
• To reset to the initial setting (F/R: 0, L/R: 0), touch [ ].
Touch [ ] or [ ] for each item to be adjusted.
Setting item:
Bass, Treble
Setting contents:
-10 to 10 (Initial setting: 0)
Adjusting the Subwoofer Level
Setting item:
Sub W.Level
Setting contents:
0 (Initial setting) to 15
• This setting is only available when “Subwoofer” is set to [On] (page 22).
Setting the Subwoofer Phase
The subwoofer output phase is toggled Subwoofer Normal (0°) or
Subwoofer Reverse (180°).
Setting item:
Sub W.Phase
Setting contents:
0° (Initial setting), 180°
• This setting is only available when “Subwoofer” is set to [On] (page 22).
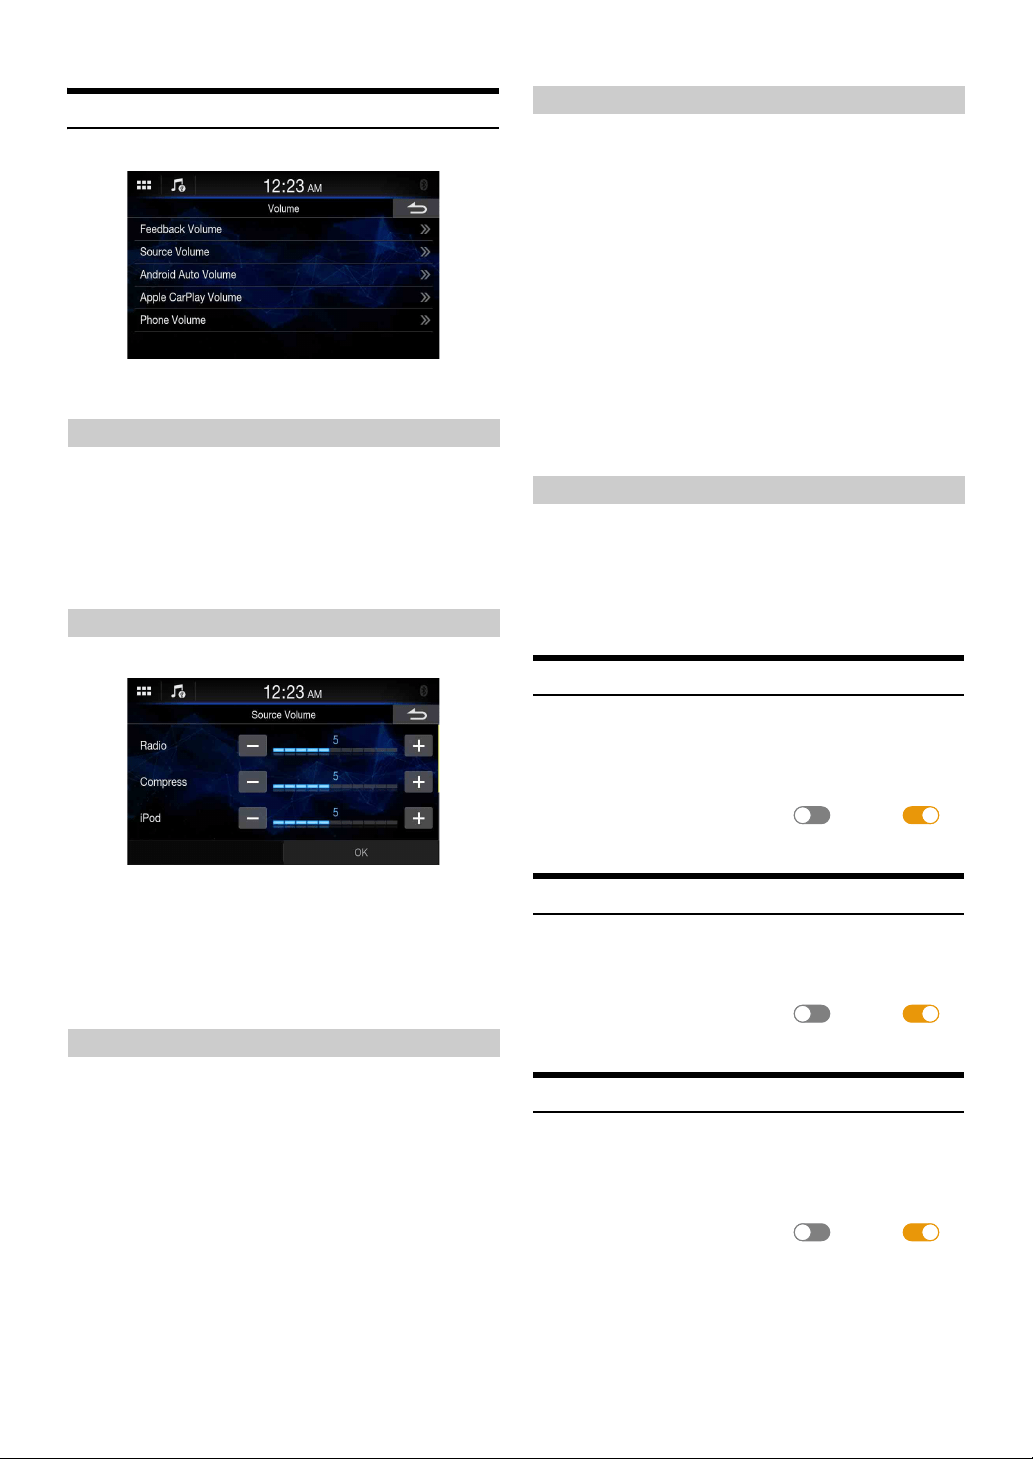
Graphic Equalizer Curve Settings (Graphic EQ)
[Graphic EQ] is selected on the Sound Setup Menu screen.
You can modify the Equalizer settings to create a response curve more
appealing to your personal taste.
Setting item:
Graphic EQ
Setting contents:
-7 to 7
• This setting is only available when “Defeat” is set to [On] (page 22).
1 To uc h [Graphic EQ] on the Sound Setup menu screen.
2 Touch the band to be adjusted.
3 To uc h [] or [] to adjust the level of the band.
• You can also adjust the level of the band by moving the slider.
4 To adjust another band, repeat step 2 to 3, and adjust all
bands.
Setting the Fader/Balance
Adjusting the Bass/Treble
Setting the Subwoofer
21-EN
5 To store the adjusted setting value, touch and hold
[Preset 1], [Preset 2], or [Preset 3] for at least 2 seconds.
• Settings exceeding the frequency of adjacent bands are not available.
• While adjusting the Graphic EQ, you should consider the frequency
response of the connected speakers.
• When the Graphic EQ is adjusted, the Equalizer Presets are overridden.
• When Equalizer Presets is set, the linked Graphic EQ settings are also
changed. We recommend storing Graphic EQ settings in a Preset in
advance.
•Touch [Flat] to initialize all values.
Calling the Graphic EQ adjusted value
To uc h [Preset 1], [Preset 2], or [Preset 3].
The setting stored in the Preset will be recalled.
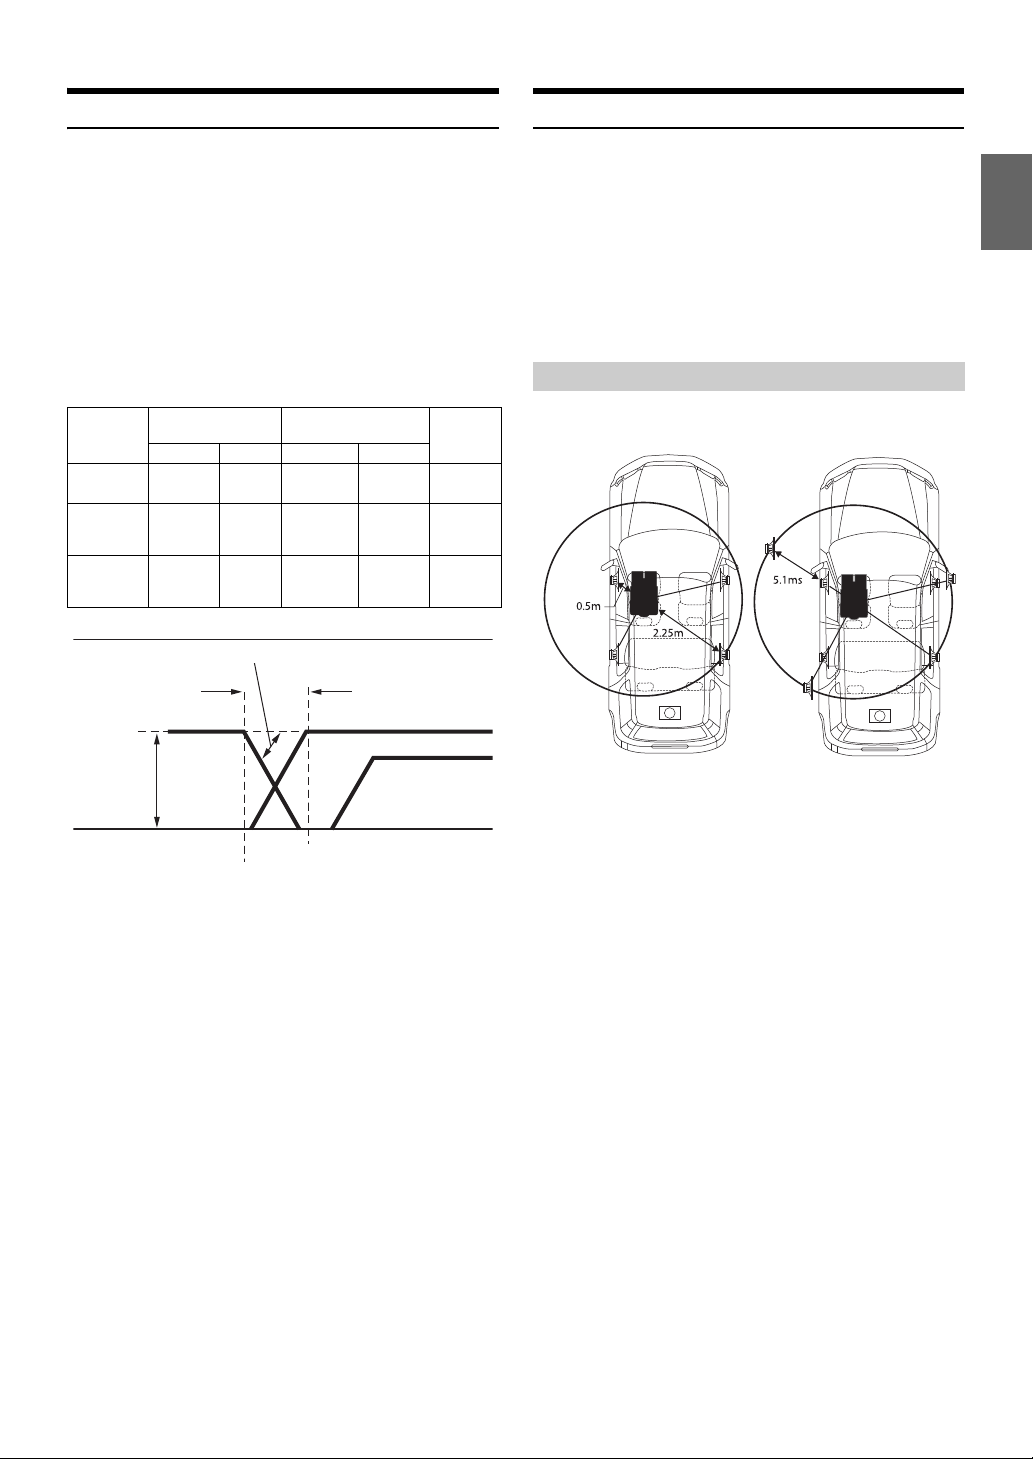
Time Correction Settings
[Time Correction] is selected on the Sound Setup Menu screen.
Before performing the following procedures, see “About Time
Correction” (page 23).
Setting item:
Time Correction
1 To uc h [Time Correction] on the Sound Setup menu
screen.
2 Touch the Correction mode button, and then select [ms],
[cm] or [inch].
3 To uc h [] or [] for each speaker to adjust the time or
distance.
0.0 msec to 9.9 msec (0.1 msec/step)
0.0 cm (0.0 inch) to 336.6 cm (132.56 inch) (3.4 cm/step)
All speaker setting values are adjustable in the range of 20 ms or
680 cm.
4 To store the adjusted setting value, touch and hold
[Preset 1], [Preset 2], or [Preset 3] for at least 2 seconds.
•Touch [Flat] to set all values to 0.0.
• If the Rear Speaker setting is Off, the Rear Speaker setting cannot be
edited (page 22).
• If the Subwoofer setting is Off, the Subwoofer setting cannot be edited
(page 22).
Calling the Time Correction Value
Calling the pre-set time correction value.
To uc h [Preset 1], [Preset 2], or [Preset 3] on the time
correction screen.
The setting stored in the Preset will be recalled.
Crossover Settings (X-Over)
[X-Over] is selected on the Sound Setup Menu screen.
Before performing the following procedures, see “About the Crossover”
(page 23).
Setting item:
X-Over
1 To uc h [X-Over] on the Sound Setup menu screen.
2 To uc h [Channel], and then select [Front HPF], [Rear
HPF] or [SubW.LPF].
3 Adjust the crossover to your preference.
Selecting the Cut-Off Frequency
Touch [] or [] of “Freq.” (Frequency), and then select the cut-
off frequency.
Setting contents:
20.0 / 25.0 / 31.5 / 40.0 / 50.0 / 63.0 / 80.0 (Initial setting) / 100.0 / 125.0 /
160.0 / 200.0 Hz
Adjusting the Slope
Touch [] or [] of “Slope”, and then adjust the HPF or LPF slope.
Setting contents:
0 (Initial setting) / 6 / 12 / 18 / 24 dB/oct.
Adjusting the Level
Touch [] or [] of “Level”, and then adjust the HPF or LPF level.
Setting contents:
-12 to 0 dB (Initial setting: 0)
4 Repeat steps 2 to 3 to make adjustment to the other
channels.
5 To store the adjusted setting value, touch and hold
[Preset 1], [Preset 2], or [Preset 3] for at least 2 seconds.
•Touch [Flat] to initialize all values.
• If the Rear Speaker setting is Off, the Rear Speaker setting cannot be
edited (page 22).
• If the Subwoofer setting is Off, the Subwoofer setting cannot be edited
(page 22).
• While adjusting the X-Over you should consider the frequency response
of the connected speakers.
Calling the X-Over adjusted value
To uc h [Preset 1], [Preset 2], or [Preset 3].
The setting stored in the Preset will be recalled.
Correction mode
Channel
22-EN
Volume Setup
[Volume] is selected on the Sound Setup menu screen.
• Settable source differs depending on the connected device and settings.
You can change the volume of the sound heard when a button is
touched.
Setting item:
Feedback Volume
Setting contents:
0 to 7 (Initial setting: 4)
Touch [Source Volume] on the Volume Setup menu screen.
Setting item:
Radio / Compress* / iPod / Bluetooth Audio / Sirius XM **Offset
Setting contents:
0 to 11 (Initial setting: 5)
* Compressed Media is the music data in a USB flash drive (MP3/WMA/
AAC/FLAC/WAV).
When an Android Smartphone is connected, touch [Android Auto
Volum e] to set the volume for Android Auto mode.
Setting Item:
Media **Offset
Setting contents:
0 to 11 (Initial setting: 5)
Setting Item:
Notification
Setting contents:
0 to 35 (Initial setting: 12)
When an iPhone 5s or later is connected, touch [Apple CarPlay
Volum e] to set the volume for Apple CarPlay mode.
Setting Item:
Media **Offset
Setting contents:
0 to 11 (Initial setting: 5)
Setting Item:
Notification
Setting contents:
0 to 35 (Initial setting: 12)
Setting Item:
Ringtone / Phone Calls
Setting contents:
0 to 11 (Initial setting: 5)
You can adjust the speaker volume and receive volume, during the call.
Setting item:
Speaker Volume / Mic Level / Ringtone Volume
Setting contents:
0 to 11 (Initial setting: 5)
Turning Subwoofer ON/OFF
If an optional subwoofer is connected to the unit, make the following
setting.
Setting item:
Subwoofer
To set the rear speaker to On, touch [ ] (Off) or [ ]
(On) of “Subwoofer”.
Rear Speaker Setting
You can set the rear speaker output to Off.
Setting item:
Rear Speaker
To set the rear speaker to On, touch [ ] (Off) or [ ]
(On) of “Rear Speaker”.
Defeat Setting
If Defeat is On, the Equalizer setting are turned Off. This disables any
settings made for these functions.
Setting item:
Defeat
To set the rear speaker to On, touch [ ] (Off) or [ ]
(On) of “Defeat”.
Adjusting the Key Sound
Adjusting the Source Volume
Setting the Volume for Android Auto
Setting the Volume for Apple CarPlay
Adjusting the Volume for Phone
23-EN
About the Crossover
Crossover (X-Over):
This unit is equipped with an active crossover. The crossover limits the
frequencies delivered to the outputs. Each channel is controlled
independently. Thus, each speaker pair can be driven by the frequencies
for which they have been optimally designed.
The crossover adjusts the HPF (high pass filter) or LPF (low pass filter)
of each band, and also the slope (how fast the filter rolls off the highs or
lows).
Adjustments should be made according to the reproduction
characteristics of the speakers. Depending on the speakers, a passive
network may not be necessary. If you are unsure about this point, please
consult your authorized Alpine dealer.
• HPF (high pass filter): Cuts the lower frequencies and allows the higher
frequencies to pass.
• LPF (low pass filter): Cuts the higher frequencies and allows the lower
frequencies to pass.
• Slope: The level change (in dB) for a frequency change of one octave.
• The higher the slope value, the steeper the slope becomes.
• Adjust the slope to FLAT to bypass the HP or LP filters.
• Do not use a tweeter without the HPF on or set to a low frequency, as it
may cause damage to the speaker due to the low frequency content.
• Adjustment should be made according to the recommended crossover
frequency of the connected speakers. Determine the recommended
crossover frequency of the speakers. Adjusting to a frequency range
outside that recommended may cause damage to the speakers.
For the recommended crossover frequencies of Alpine speakers, refer to
the respective Owner’s Manual.
We are not responsible for damage or malfunction of speakers caused by
using the crossover outside the recommended value.
About Time Correction
The distance between the listener and the speakers in a car vary widely
due to the complex speaker placement. This difference in the distances
from the speakers to the listener creates a shift in the sounds image and
frequency characteristics. This is caused by the time delay between the
sound reaching the listener’s right versus the left ear.
To correct this, this unit is able to delay the audio signal to the speakers
closest to the listener. This effectively creates a perception of increased
distance for those speakers. The listener can be placed at an equal
distance between the left and right speakers for optimum staging.
The adjustment will be made for each speaker in 3.4 cm steps.
Adjust the time correction level of the front left speaker to a high value
and the rear right to zero or a low value.
The sound is not balanced because the distance between the listening
position and the various speakers is different.
The difference in distance between the front left speaker and the rear right
speaker is 1.75 m (68-7/8").
Here we calculate the time correction value for the front left speaker in the
diagram on the above.
Conditions:
Farthest Speaker – listening position : 2.25 m (88-9/16")
Front left speaker – listening position : 0.5 m (19-11/16")
Calculation: L = 2.25 m – 0.5 m = 1.75 m (68-7/8")
Time correction = 1.75 ÷ 343* × 1,000 = 5.1 (ms)
* Speed of sound: 343 m/s (765 mph) at 20°C
In other words, giving the front left speaker a time correction value of 5.1
ms makes it seem as if its distance from the listener is the same as the
distance to the farthest speaker.
Time correction eliminates the differences in the time required for the
sound to reach the listening position.
The time of the front left speaker is corrected by 5.1 ms so that its sound
reaches the listening position at the same time as the sound of other
speakers.
Cut-off frequency
(1/3 octave steps)
Slope
Level
HPF LPF HPF LPF
Subwoofer
(LPF)
----
20 Hz -
200 Hz
----
0, 6, 12, 18,
24 dB/oct.
0 to
–12 dB
Rear
speaker
(HPF)
20 Hz -
200 Hz
----
0, 6, 12, 18,
24 dB/oct.
----
0 to
–12 dB
Front
speaker
(HPF)
20 Hz -
200 Hz
----
0, 6, 12, 18,
24 dB/oct.
----
0 to
–12 dB
Level
adjusting
(0 to –12 dB)
Output frequency
range
Output frequency range
Slope adjusting
20 Hz
(Different from actual
display)
LPF cut-off
frequency
HPF cut-off
frequency
Low range High range
Slope
FLAT
Subwoofer Rear speaker
Front speaker
200 Hz
Example 1. Listening Position: Front Left Seat

24-EN
Adjust the time correction level of each speaker to almost the same level.
1 Sit in the listening position (driver’s seat, etc.) and
measure the distance (in meters) between your head and
the various speakers.
2 Calculate the difference between the distance correction
value to the farthest speaker and the other speakers.
L = (distance to farthest speaker) – (distance to other speakers)
These values are the time correction values for the different speakers.
Setting these values to make each sound reach the listening position
at the same time as the sound of other speakers.
Time Correction Value List
Example 2. Listening Position: All Seats
Time
Difference
(msec)
Distance
(cm)
Distance
(inch)
Time
Difference
(msec)
Distance
(cm)
Distance
(inch)
0.0 0.0 0.0 5.1 173.4 68.3
0.1 3.4 1.3 5.2 176.8 69.7
0.2 6.8 2.7 5.3 180.2 71.0
0.3 10.2 4.0 5.4 183.6 72.4
0.4 13.6 5.4 5.5 187.0 73.7
0.5 17.0 6.7 5.6 190.4 75.0
0.6 20.4 8.0 5.7 193.8 76.4
0.7 23.8 9.4 5.8 197.2 77.7
0.8 27.2 10.7 5.9 200.6 79.1
0.9 30.6 12.1 6.0 204.0 80.4
1.0 34.0 13.4 6.1 207.4 81.7
1.1 37.4 14.7 6.2 210.8 83.1
1.2 40.8 16.1 6.3 214.2 84.4
1.3 44.2 17.4 6.4 217.6 85.8
1.4 47.6 18.8 6.5 221.0 87.1
1.5 51.0 20.1 6.6 224.4 88.4
1.6 54.4 21.4 6.7 227.8 89.8
1.7 57.8 22.8 6.8 231.2 91.1
1.8 61.2 24.1 6.9 234.6 92.5
1.9 64.6 25.5 7.0 238.0 93.8
2.0 68.0 26.8 7.1 241.4 95.1
2.1 71.4 28.1 7.2 244.8 96.5
2.2 74.8 29.5 7.3 248.2 97.8
2.3 78.2 30.8 7.4 251.6 99.2
2.4 81.6 32.2 7.5 255.0 100.5
2.5 85.0 33.5 7.6 258.4 101.8
2.6 88.4 34.8 7.7 261.8 103.2
2.7 91.8 36.2 7.8 265.2 104.5
2.8 95.2 37.5 7.9 268.6 105.9
2.9 98.6 38.9 8.0 272.0 107.2
3.0 102.0 40.2 8.1 275.4 108.5
3.1 105.4 41.5 8.2 278.8 109.9
3.2 108.8 42.9 8.3 282.2 111.2
3.3 112.2 44.2 8.4 285.6 112.6
3.4 115.6 45.6 8.5 289.0 113.9
3.5 119.0 46.9 8.6 292.4 115.2
3.6 122.4 48.2 8.7 295.8 116.6
3.7 125.8 49.6 8.8 299.2 117.9
3.8 129.2 50.9 8.9 302.6 119.3
3.9 132.6 52.3 9.0 306.0 120.6
4.0 136.0 53.6 9.1 309.4 121.9
4.1 139.4 54.9 9.2 312.8 123.3
4.2 142.8 56.3 9.3 316.2 124.6
4.3 146.2 57.6 9.4 319.6 126.0
4.4 149.6 59.0 9.5 323.0 127.3
4.5 153.0 60.3 9.6 326.4 128.6
4.6 156.4 61.6 9.7 329.8 130.0
4.7 159.8 63.0 9.8 333.2 131.3
4.8 163.2 64.3 9.9 336.6 132.7
4.9 166.6 65.7
5.0 170.0 67.0
25-EN
Apple CarPlay is a smarter, safer way to use your iPhone in the car.
Apple CarPlay takes the things you want to do with your iPhone while
driving and puts them right on the unit. You can get directions, make
calls, send and receive messages, and listen to music, all in a way that
allows you to stay focused on the road. Just plug in your iPhone to
the unit and go.
• Before using this function, plug in your iPhone using Lightning to USB
Cable (Supplied with iPhone) to the unit.
• Some functions may not be available while driving.
• About iPhone models usable with this unit, see “iPod mode on iPhone
(Optional)” (page 30). Only an iPhone 5s or later compatible with
Apple CarPlay function.
• Before operating Apple CarPlay, set “Apple CarPlay” to [On] (page 17).
Access to Apple CarPlay
1 Touch the (HOME) button.
The HOME screen is displayed.
2 Touch [Apple CarPlay].
The Apple CarPlay screen is displayed.
Touch the desired App icon on the unit, or use Siri function by
touching the button.
• When a used iPhone 5s or later is reconnected, touch the pop-up
message-“Apple CarPlay connected.” within 5 seconds to access to Apple
CarPlay screen, or you can ignore prompt by touching [ ] on the
top right.
• The App must be Apple CarPlay compatible in order to appear in the
Home screen.
What is Android Auto
Android Auto is designed to make it easier to use apps from your phone
while you’re on the road. Navigate with Google Maps, listen to playlists
or podcasts from your favorite apps, and more.
Activate Android Auto
Download the Android Auto App from the Google Play store before
continuing.
Just plug in your smartphone to the unit’s USB connector, then follow
the prompt to pair your smartphone with the unit.
• The connected smartphone with Android Auto will disconnect other
phone’s Bluetooth connection and pair to the unit.
1 Touch the (HOME) button.
The HOME screen is displayed.
2 Touch [Android Auto].
The Android Auto screen is displayed.
• When a used smartphone is reconnected, touch the pop-up
message-“Android Auto connected” within 5 seconds to access to
Android Auto screen, or you can ignore prompt by touching
[ ] on the top right.
• You can make a call, use voice recognition function and Android
Auto’s compatible navigation app, etc.
• Only Google approved apps with necessary driver-safety measures
in place can be used.
Apple CarPlay
(Optional)
Android Auto
(Optional)
26-EN
There are 3 types of [Radio] widgets for the HOME screen.
Radio main screen example
Information display
Increases frequency
Touch and hold to change the frequency continuously.
Preset button
Displays the preset stations with a short touch.
Touch for at least 1 second to memorize the current station as a
preset station.
Displays the Sound Setup Menu screen (page 19).
Switches a band.
Memorizes stations automatically
Switches a Seek mode.
Decreases frequency
Touch and hold to change the frequency continuously.
Listening to the Radio
1 Touch the (HOME) button and select radio mode.
The display shows the radio mode screen.
2 To uc h [Band] repeatedly to select the desired band from
[FM1] / [FM2] / [AM].
3 To uc h [DX Seek], [Local Seek] or [Manual] repeatedly to
select the tuning mode.
The radio frequency up or down button changes depending on
the tuning mode.
• During Forced Analog mode, digital broadcasts cannot be
received.
* Depending on the signal, a digital or analog broadcast is received.
4 To uc h [], [], [], [] to change the radio frequency
up or down respectively.
In Manual mode, touch and hold to change the frequency
continuously.
Presetting Stations Manually
1 Tune in a desired radio station you wish to store in the
preset memory by manual or automatic seek tuning.
2 Touch and hold the Preset number you want to store for
at least 1 second.
The selected station is stored.
3 Repeat the procedure to store up to 5 other stations
onto the same band.
To use this procedure for other bands, simply select the desired
band and repeat the procedure.
A total of 18 stations can be stored in the preset memory
(6 stations for each band; FM1, FM2 or AM).
• If a preset memory has already been set in the same preset number, it
will be cleared and the new station will be memorized.
Presetting Stations Automatically
The tuner can automatically seek and store 6 strong stations in the
selected band in ascending order of frequency.
Select the desired band then touch and hold [A.Memo].
The tuner automatically seeks and stores 6 strong stations into the
preset buttons in ascending order of frequency.
When automatic storing has completed, the station stored in the
preset 1 is selected.
• If no stations are stored, the tuner will return to the original station you
were listening to before the automatic storing procedure began.
• You can cancel this process by touching [A.Memo] while the tuner is
automatically seeking stations. Canceling will return the tuner preset to
the previous setting.
Tuning to Preset Station
After selecting the desired band, touch the desired preset
button.
The preset station is received.
Radio
Radio Basic Operation
DX Seek (Distance) mode* Automatically receives a receivable
digital broadcast. Both strong and weak
stations will be tuned in.
Local Seek mode*
Automatically receives a strong digital
broadcast only.
Manual mode
The frequency is manually tuned in
steps.
27-EN
You can play back music files (MP3/WMA/AAC/FLAC/WAV), video
files (MP4/AVI/WMV/MOV) and photo files (JPG/PNG/BMP) stored
in a USB flash drive on the internal player of this system.
USB Audio mode screen
Artwork display
Information display
Finds the beginning of next chapter/Fast-forwards when
touched for at least 1 second
Shuffle mode
Repeat mode
Displays the Sound Setup Menu screen (page 19)
Switches to iPod mode of iPhone or Bluetooth Audio.
Displays the search screen
Pause and Play
Elapsed time/Total time for playing
Current track number/Total track number
Finds the beginning of the current file/Finds a previous file
within one second after playback starts/Fast-reverses when
touched for at least 1 second
Playback
1 Touch the (HOME) button and select USB Audio
mode.
The display shows the USB Audio mode screen.
2 To uc h [] or [] to select the desired track (file).
Returning to the beginning of the current (or previous) track (file):
Touch [].
Fast reverse :
Touch and hold [].
Advancing to the beginning of the next track (file) :
Touch [].
Fast forward :
Touch and hold [].
3 To pause playback, touch [].
Touching [] again will resume playback.
• The playback time may not be correctly displayed when a VBR
(Variable Bit Rate) recorded file is played back.
• If there is tag information, artist name/album name/track name is
displayed.
•ID3 tag/WMA tag
If an MP3/WMA/AAC/FLAC/WAV file contains ID3 tag/WMA tag
information, the ID3 tag/WMA tag information is displayed. (e.g., song
name, artist name, and album name)
•When selecting a [Audio] widget on the HOME screen, touch [Audio
Select] to select [USB]. If [USB] is already selected, you can start
playback by selecting a [Audio] widget on the HOME screen.
Fast-forwarding/Fast-reversing
1 During playback, touch and hold [ ] (Fast-reverse) or
touch and hold [] (Fast-forward).
Touch and hold for more than 1 second to forward/reverse at 8x
speed. Keep touching to switch the speed to 16x and 32x.
2 Release [ ] or [ ] to return to normal playback.
• No sound is played back during fast-forwarding/fast-reversing.
Repeat Play
Touch [ ], [ ] or [ ] to select Repeat Play mode.
USB Flash drive
(Optional)
WARNING
It is dangerous for the driver to watch video while driving
the vehicle. The driver may be distracted from looking
ahead and an accident could occur.
Install the unit correctly so that the driver cannot watch a
video unless the car is stopped and the parking brake is
applied.
If the unit is not installed correctly, the driver will be able
to watch a video while driving and may be distracted
from looking ahead and cause an accident. The driver or
other people could be severely injured.
USB Audio
ALL : All files are repeatedly played back.
File : Only the file currently playing is repeatedly played back.
Folder :Only files in a folder are repeatedly played back.
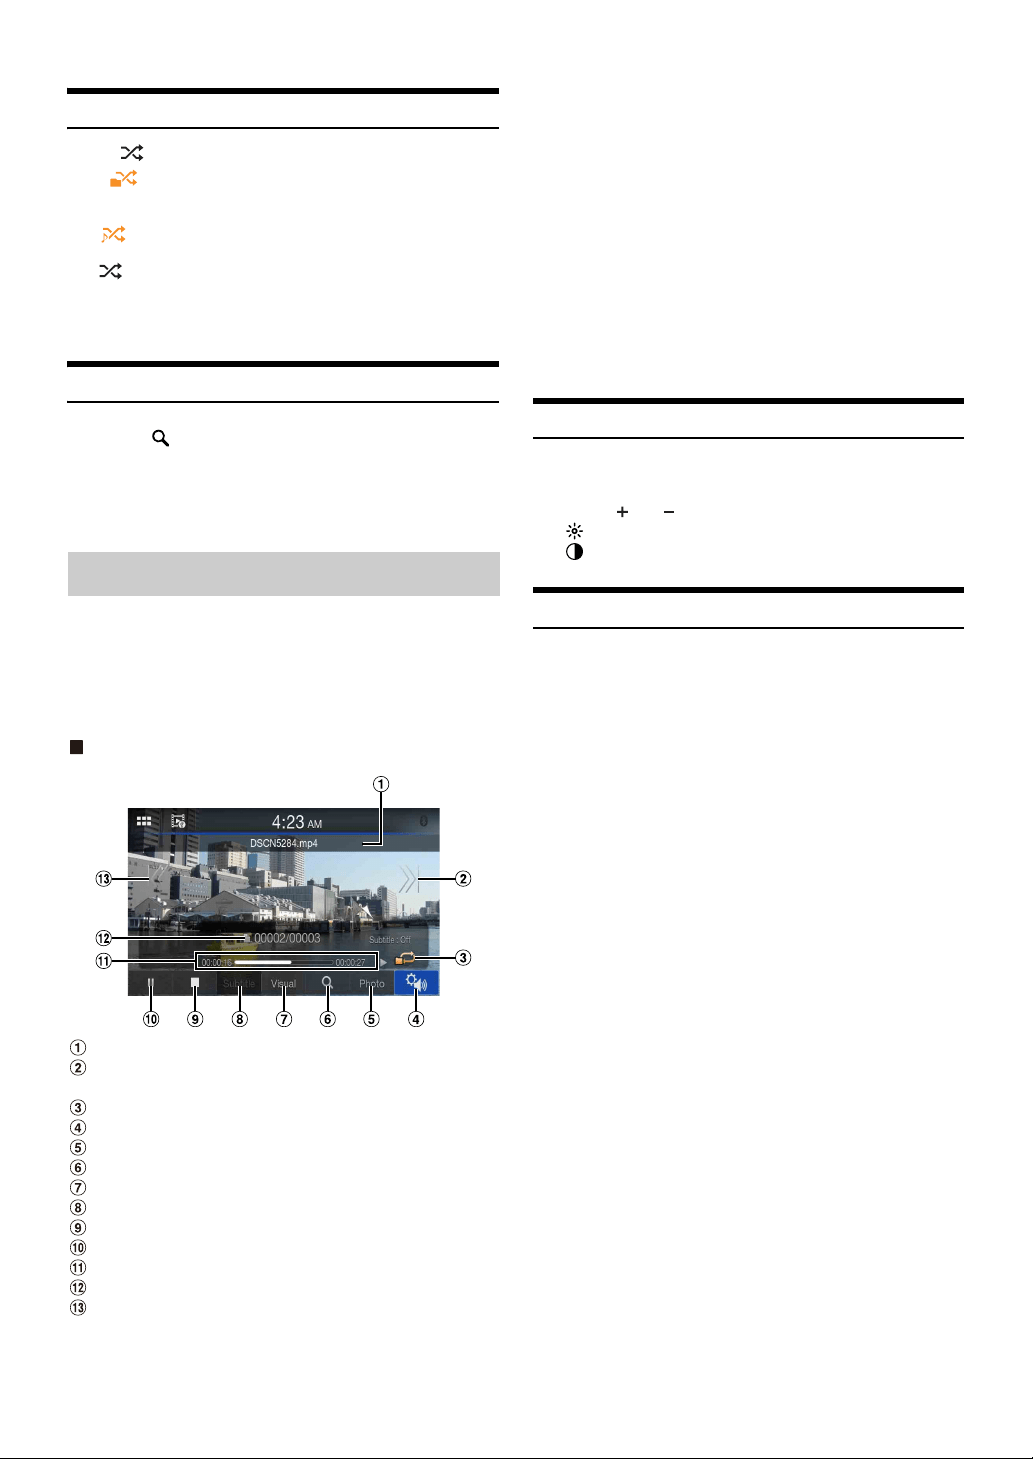
28-EN
Shuffle Play
To uc h [] to select Shuffle Play mode.
• If you select a track by using the search mode, the Shuffle mode will be
canceled.
Searching for a Desired Song
1 To uc h [] (Search).
2 Touch your desired Folder name or File name.
When you select a Folder name, repeat the same procedure to select
another Folder name or File name.
The video formats (USB Flash drive) supported by the unit are as
follows.
- Supported Container: AVI/MP4/WMV/MOV/MPG
- Supported Video Coding: H.264/MPEG-4 AVC
- Supported Audio Coding: MP3, AAC, MPEG2 audio
- MAX File Size: 4GB
USB Video mode screen
File Name
Finds the beginning of next file/Fast-forwards when
touched for at least 1 second
Shuffle mode
Displays the Sound Setup Menu screen (page 19)
Switches to USB Photo mode
Displays the search screen
Sets the Brightness and Contrast
Displays the Subtitle
Stop
Pause and Play
Elapsed time/Total time for playing
Current file number/Total file number
Finds the beginning of the current file/Finds a previous file
within one second after playback starts/Fast-reverses when
touched for at least 1 second
For the basic operations on USB Video mode, refer to “Playback”
(page 27), “Fast-forwarding/Fast-reversing” (page 27) and “Searching
for a Desired Song” (page 28). Select “USB Video mode” instead for
“USB Audio mode.”
• To select USB Video mode, touch the [USB Video] or [Video] widget
on the HOME screen.
• When searching for a desired video, touch [Repeat videos] for Repeat
mode.
During the USB Video playback, touch the screen to display the
operation screen.
• The operation screen changes to the visual screen in the USB Video
mode for 5 seconds after an operation has been performed.
• For your safety, video is not displayed and only audio can be heard
while driving.
Setting the Brightness and Contrast
1 Touch [Visual].
2 Touch [ ] or [ ] to adjust the Brightness and Contrast.
: Adjusting the Brightness
: Adjusting the Contrast
Displaying the Subtitle
Depending on the video file such as ".smi" or ".srt", you can display the
subtitle contained on the file.
To uc h [Subtitle].
To cancel displaying the subtitle, touch [Subtitle] again.
• If the file is not supported or the subtitle is not contained on the file,
[Subtitle] is not available.
Folder : A Folder is selected randomly and songs in the Folder are
played back in order. After all songs are played in a Folder,
the next Folder is selected randomly.
Song : All songs in the Folder (Folder/File) including the song
currently being played are played back in random sequence.
OFF : Shuffle mode is Off.
USB Video
29-EN
USB Photo mode Preview screen
USB Photo mode screen
Photo Preview
Photo files List
Switches to USB Video mode
Sets the photo as a wallpaper (page 14)
Sets the Time Interval for the Slide Show
Applies an Effect to the photo
Plays the Slide Show
File Name
During the USB Photo playback, touch the screen to display the
operation screen.
• The operation screen changes to the visual screen in the USB Photo
mode for 5 seconds after an operation has been performed.
Playback
1 Touch the (HOME) button and select USB Photo
mode.
The display shows the USB Photo mode screen.
• To select USB Photo mode, touch the [Photo] or [Photo Frame]
widget on the HOME screen.
2 Select the desired photo from the photo files list.
• To select the other photo (file), touch [] to return to the previous
screen.
Slide Show
The Slide Show shows photos that change every 3 seconds.
To uc h [Play].
• To stop the Slide Show, touch the screen.
Setting the Effect for Playback
You can set the playback effect how switches to the photo for Slide Show.
To uc h [Effect], and then select the desired effect.
Setting the Time Interval for Slide Show
You can set the time interval to switch to the next photo.
To uc h [Time Interval], and then select the desired time
interval.
Setting a Wallpaper with a Photo
To set a wallpaper with your favorite photo, refer to “Setting a Wallpaper
using your image” (page 14).
USB Photo
30-EN
A separately sold Lightning to USB cable (KCU-471i), etc., is required.
• This unit does not support video playback from iPhone which connected
to this unit via USB Connector.
• Internet or telephone function, etc., of the iPhone is not controllable
from the unit, but these functions can be controlled using the iPhone
itself.
• Before operating iPod mode on iPhone, set “Apple CarPlay” to [Off]
(page 17).
About iPhone models usable with this unit
• The following devices have been tested and shown to work with
this unit. Correct function of earlier versions cannot be
guaranteed.
iPhone X
iPhone 8
iPhone 8 Plus
iPhone 7
iPhone 7 Plus
iPhone SE
iPhone 6s
iPhone 6s Plus
iPhone 6
iPhone 6 Plus
iPhone 5s
iPod main screen example
Artwork display
Information display*
Finds the beginning of the current file/Finds a previous file
within one second after playback starts/Fast-reverses when
touched for at least 1 second
Shuffle mode
Repeat mode
Displays the Sound Setup Menu screen (page 19).
Switches to the USB Flash drive or Bluetooth Audio.
Displays the search screen
Pause and Play
Elapsed time/Total time for playing
Current song no./Total song no.
Finds the beginning of the current file/Finds a previous file
within one second after playback starts/Fast-reverses when
touched for at least 1 second
* Podcast mode.
Playback
1 Touch the (HOME) button and select iPod mode.
The display shows the iPod mode screen.
2 To uc h [] or [] or to select the desired track (file).
Returning to the beginning of the current (or previous) track (file):
Touch [].
Fast reverse the current track :
Touch and hold [].
Advancing to the beginning of the next track (file) :
Touch [].
Fast forward the current track :
Touch and hold [].
3 To pause playback, touch [].
• If a song is playing on the iPhone before it is connected to the unit, it
will continue playing when it is connected.
• An episode may have several chapters. The chapter can be changed by
touching [] or [].
• If the artist, album or song name, created in iTunes, has too many
characters, songs may not be played back when connected to the unit.
Therefore, a maximum of 64 characters is recommended. The
maximum number of characters for the unit is 64.
• Some characters may not be correctly displayed.
•When selecting a [Audio] widget on the HOME screen, touch [Audio
Select] to select [iPod]. If [iPod] is already selected, you can start
playback by selecting a [Audio] widget on the HOME screen.
iPod mode on
iPhone (Optional)
31-EN
Searching for a Music File
An iPhone can contain thousands of songs. For this reason, this unit
can make various searches using the search function as shown below.
Using the Playlist/Artist/Album/Podcast/Audiobook/Genre/
Composer/Song/Radio search mode’s individual hierarchy, you can
narrow down your search as shown in the table below.
<Music Search Menu>
For example: Searching by Artist name
The following example explains how an Artists search is performed.
1 To uc h [] (Search) during playback.
2 To uc h [Artists].
The Artists search screen is displayed.
3 Select the desired artist.
4 Touch the desired album’s name.
All songs of the selected album are displayed.
5 Touch the desired song’s name.
The selected song is played back.
Repeat Play
To uc h [] to select Repeat Play mode.
Shuffle Play
1 To uc h [] to select Shuffle Play mode.
Hierarchy 1 Hierarchy 2 Hierarchy 3 Hierarchy 4
Playlists Songs — —
Artists Albums Songs —
Albums Songs — —
Songs — — —
Genres Artists Albums Songs
Composers Albums Songs —
Podcasts Episodes — —
Audiobooks — — —
Radio — — —
ALL : All files are repeatedly played back.
File : Only the file currently playing is repeatedly played back.
OFF : Repeat mode is Off.
Songs : Song shuffle randomly plays back songs within a
selected category (playlist, album, etc.). The songs
within the category are played just once until all
songs have been played.
OFF : Shuffle mode is Off.
32-EN
Devices supporting HDMI can connect and play back through this unit
(for example, an optional DVD Player, iPhone or other Smartphones).
• The HDMI/MHL connecting cable differs depending on the connected
device corresponding to HDMI. Prepare optional HDMI/MHL
connecting cable sets suitable for your device.
HDMI Operation
iPhone, Smartphone, etc.
The output of your electronic device will be mirrored on this unit
through the HDMI connector. Control from this unit is not
possible.
• The electronic device must possess an HDMI output interface.
• Not all devices with an HDMI output interface can be recognised
by this unit.
• Use only the Alpine Special HDMI connection cable.
1 Press the (HOME) button to select HDMI.
The display shows the HDMI mode screen.
• You can select and change the source in the HOME screen
(page 11).
• For your safety, video is not displayed and only audio can be heard
while driving.
2 In HDMI player mode, the screen of the device displays
the content of electronic equipment by mirror image.
Sets the Brightness and Contrast
Displays the Sound Setup Menu screen (page 19).
Setting the Brightness and Contrast
1 To uc h [Visual].
2 Touch [ ] or [ ] to adjust the Brightness and Contrast.
: Adjusting the Brightness
: Adjusting the Contrast
HDMI Device
(Optional)
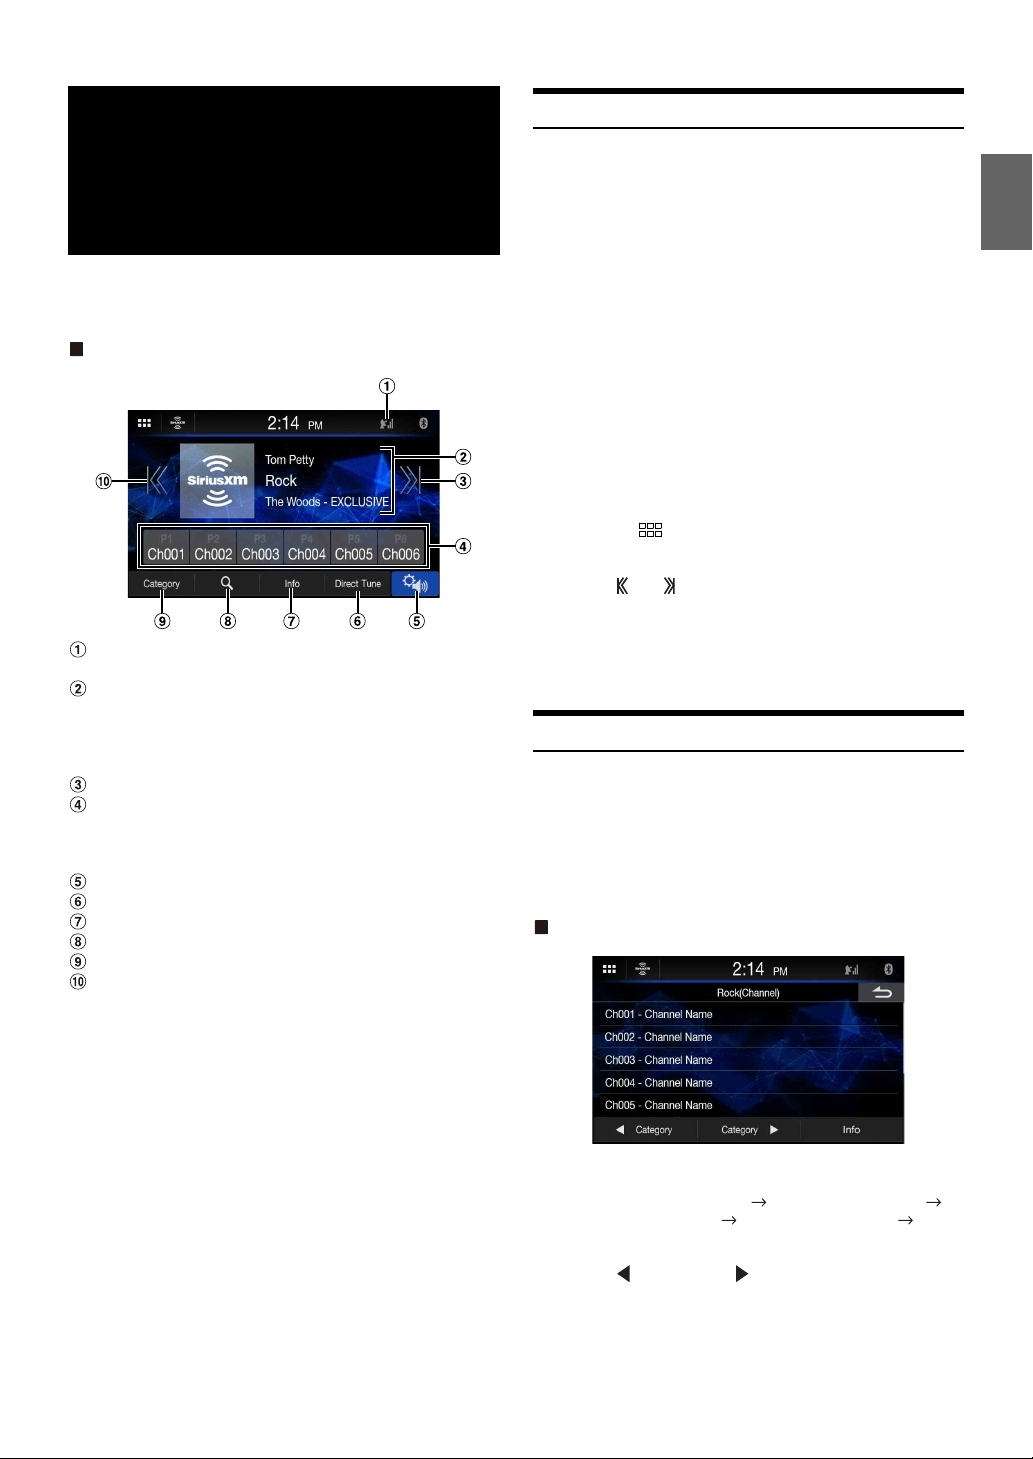
33-EN
SiriusXM Tuner operation:
When an optional SiriusXM Tuner is connected to this unit, the
following operations may be performed.
SiriusXM main screen example (Song Info. Mode)
Signal Indicator
Indicates the signal strength of SiriusXM.
Information display
Channel Info. Mode:
Channel No/Long Channel Name/Category Name
Song Info.Mode:
Artist Name/Song Name/Content Info
Changes to the next channel
Preset buttons
Displays the preset channels with a short touch.
Touch for at least 1 second to memorize the current channel as a
preset channel.
Displays the Sound Setup Menu screen (page 19).
Select the channel number
Changes text information
Displays the search screen
Changes to category browsing mode
Changes to the previous channel
Receiving Channels with the SiriusXM Tuner
About SiriusXM Satellite Radio
Only SiriusXM® brings you more of what you love to listen to, all in one
place. Get over 140 channels, including commercial-free music plus the
best sports, news, talk, comedy and entertainment. Welcome to the
world of satellite radio. A SiriusXM Vehicle Tuner and Subscription are
required. For more information, visit www.siriusxm.com.
After you have found the SiriusXM Radio ID, you can activate your
radio. See “Checking the SiriusXM Radio ID Number” (page 34).
In the USA, you can activate online or by calling SiriusXM Listener
Care:
• Visit www.siriusxm.com/activatenow
• Call SiriusXM Listener Care at 1-866-635‐2349
For Canadian Subscriptions, please contact:
• Visit www.siriusxm.ca/activatexm
• Call XM Customer Care at 1‐877‐438‐9677
• The SiriusXM Satellite Radio controls on this unit are available only
when a SiriusXM Tuner is connected.
1 Touch the (HOME) button and select SiriusXM mode.
The display shows the SiriusXM mode screen.
2 To uc h [] or [] to select the desired channel. Touching
and holding either button will rapidly browse through
the channels.
• Refer to the SiriusXM Tuner User Guide for details on how to install the
SiriusXM Tuner.
Tuning Channels by Category
Channels are grouped into categories based on the type of content heard
on the channels.
1 To uc h [Category] on the SiriusXM main screen to
activate the category browsing mode.
The channels within the category of the current channel are
listed.
Category browsing mode screen example
•Touching [Info] changes the display of information for the
channels in the category with the following three options.
Channel No./Channel Name Channel No./Artist Name
Channel No./Song Title Channel No./Content Info
Channel No./ Channel Name
2 To uc h [ Category] or [ Category] on the category
browsing mode screen to select a desired category.
The Category Name is shown at the top of the display.
3 Select the desired channel.
SiriusXM Satellite
Radio Operation
(Optional)

34-EN
Changing the Display
Text information, such as the channel name, artist name/feature, and
song/program title, is available with SiriusXM. The unit can display this
text information as explained below.
To uc h [Info].
Each time you touch this button, the Channel Info. mode and the
Song Info. mode switch alternately. For displayed contents, see
“SiriusXM main screen example (Song Info. Mode)” (page 33).
Checking the SiriusXM Radio ID Number
To subscribe to the SiriusXM Satellite Radio service, it is necessary to
locate and identify the Radio ID of your SiriusXM Tuner. You can check
the Radio ID on the bottom surface of the SiriusXM Tuner box. You can
also check it from this unit by performing the following procedure.
1 While receiving SiriusXM Radio, touch [] or [] to
select channel “0”.
The unit displays the Radio ID number.
2 To cancel the Radio ID number display, change the
channel to a channel other than “0”.
• The SiriusXM Radio ID does not contain the letters I, O, S, or F.
Storing Channel Presets
You can store 6 of your favorite SiriusXM channels for easy recall with
Preset buttons.
1 Touch and hold the Preset number you want to store for
at least 1 second to store the channel.
2 Repeat the procedure to store up to 5 other channels.
A total of 6 channels can be stored in the preset memory.
• If you store a new channel into a preset which already has a channel
assigned, the current channel will be cleared and replaced with the new
one.
Tuning Channels using Presets
Touch any one of the Preset numbers you have already
stored in the Preset mode screen.
The preset channel is received.
Search Function
1 To uc h [].
The Search list screen appears.
Search item:
All Channels / Category Name*
* The Category name for the channel currently being received is
displayed.
• You can switch the category by touching [] or [] on the List screen
after selecting a Search item.
• You can switch the display format by touching [Info] in the List screen
after selecting a Search item.
Channel No./Channel Name Channel No./Artist Name Channel
No./Song Title Channel No./Content Info Channel No./Channel
Name
Searching by Channel
2 To uc h [All Channels].
All Channels will be displayed in a list.
3 Touch the selected channel.
The channel you selected is received.
Searching by Category
2 Touch Category Name.
The channels within the category of the current channel are
listed.
3 Touch the selected channel.
The channel you selected is received.
Selecting the Channel Directly
You can directly select the channel number by using the numeric
keypad.
1 To uc h [Direct Tune].
The numeric keypad input screen is displayed.
2 Touch to input the channel number.
3 To uc h [OK].
The selected channel is received.
Parental Lock Function
The Parental Control feature allows you to limit access to any SiriusXM
channels, including those with mature content. When enabled, the
Parental Control feature requires you to enter a passcode to tune to the
locked channels. For information on setting the Parental Control
passcode, see “Setting the Parental Lock” (page 13).
When a locked channel is selected, “Channel <xxx> Locked” is displayed
and then the numeric keypad appears for you to enter the passcode.
Input the 4-digit passcode you set in “Setting the Parental
Lock” (page 13).
The initial number is 0000.
• If you input a wrong passcode, “Incorrect Pass Code entered” is
displayed.
• After entering the correct passcode, you can access all locked channels
without entering the passcode again until the unit is powered off and
then back on.
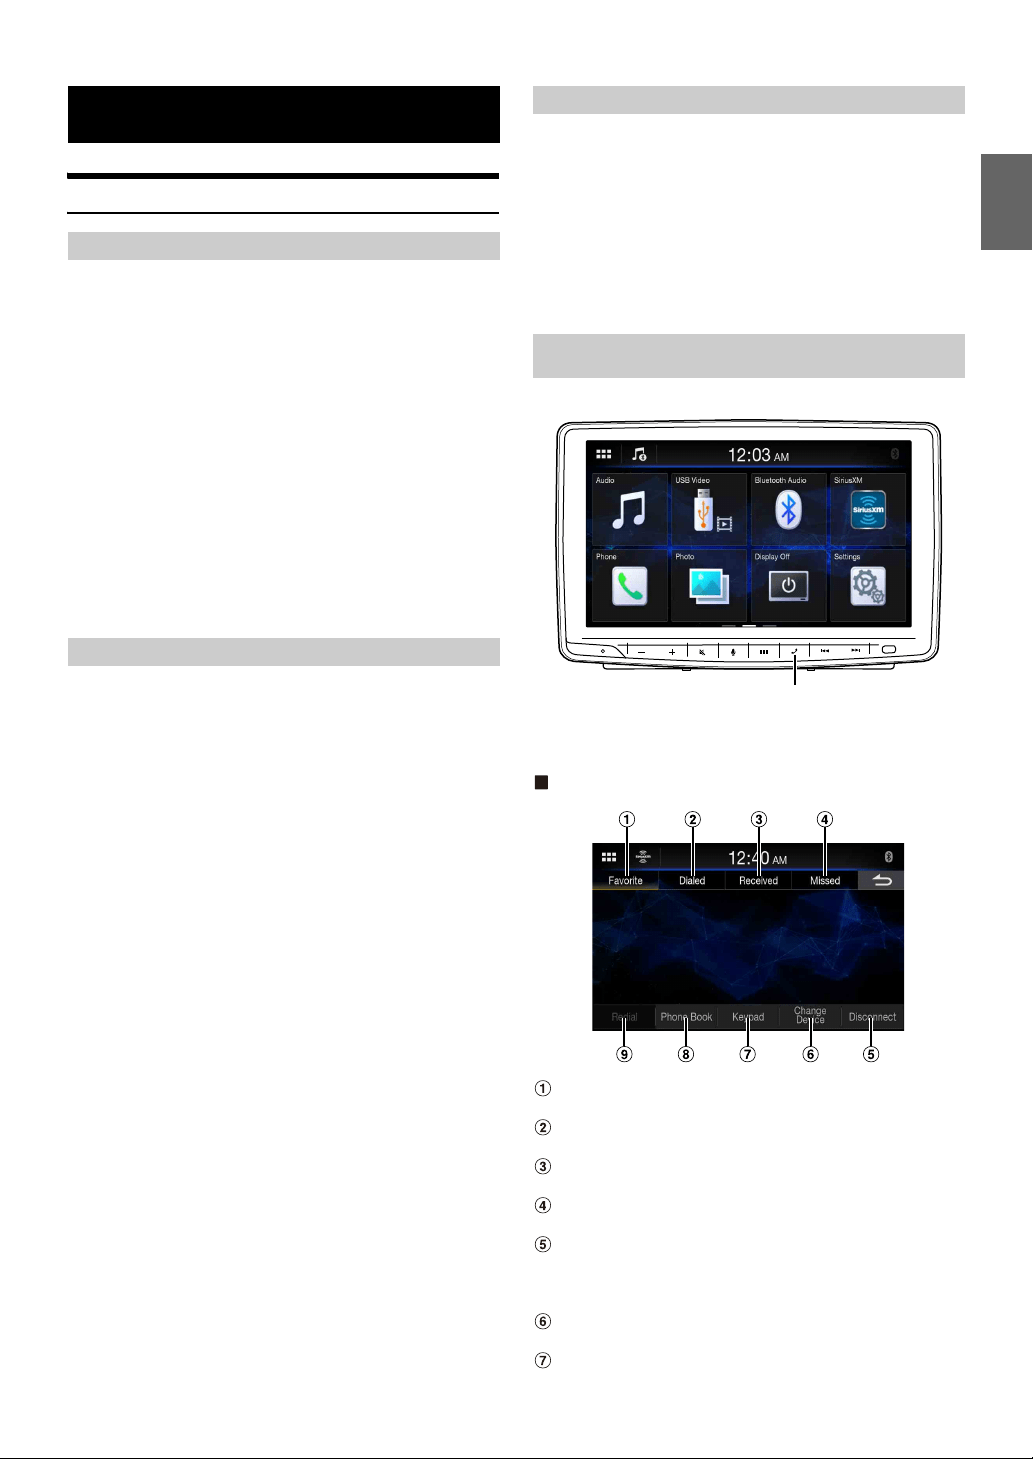
35-EN
Setup Before Using
Bluetooth is a wireless technology allowing communication between a
mobile device or personal computer over short distances. This enables a
hands-free call or data transmission between Bluetooth compatible
devices. Bluetooth transmission is available in the unlicensed 2.4 GHz
spectrum if the distance between devices is within 10 meters. For details,
refer to the Bluetooth website (http://www.bluetooth.com/).
• Depending on the Bluetooth version, a Bluetooth compatible device
may not be able to communicate with this unit.
• Proper function of this unit with all Bluetooth compatible devices is not
guaranteed. For handling of the Bluetooth compatible device, consult
your Alpine dealer or Alpine website.
• Depending on the surroundings, Bluetooth wireless connection may be
unstable.
• When you place a call, or perform setup operations, be sure to stop your
car in a safe place.
• Depending on the connected Bluetooth compatible device(s), the
function may differ. Also refer to the Owner’s Manual of the connected
device(s).
Hands-free calls are possible when using a HFP (Hands-Free Profile)
compatible mobile phone with this unit.
• Avoid performing a hands-free call in heavy traffic or on narrow or
winding streets.
• Close the windows while calling to reduce background noise.
• If both calling parties are using hands-free devices, or the call is made in
a noisy location, difficulty hearing the other person’s voice is normal.
• Depending on telephone line conditions or certain mobile devices used,
voices may sound unnatural.
• When using a microphone, speak as directly as you can into the
microphone to obtain the best sound quality.
• Certain mobile phone features are dependent on the capabilities and
settings of your service provider’s network. Additionally, certain features
may not be activated by your service provider, and/or the provider’s
network settings may limit the feature’s functionality.
Always contact your service provider about feature availability and
functionality.
All features, functionality, and other product specifications, as well as
the information contained in the Owner’s Manual are based upon the
latest available information and are believed to be accurate at the time
of printing.
Alpine reserves the right to change or modify any information or
specifications without notice or obligation.
• Notice that when you connect an iPhone 5s or later/Android
smartphone which installed Android Auto App, the operation screen
may differ from this section.
Before using the hands-free phone/audio function, the following
settings need to be made.
Register a Bluetooth device in this unit.
• See “Connection (Bluetooth) Setup” (page 17).
• You can search for this unit using a Bluetooth compatible device, and
then connect that Bluetooth compatible device to this unit. The device
name of this unit is “iLX-F411” or “iLX-F409” and the initial number
of the passcode is “0000.” Also refer to the Owner’s Manual of the
connected device(s).
Touch the Phone button to display the Phone menu screen.
• You can also display the Phone menu screen by selecting the [Phone]
widget on the HOME screen.
Phone menu screen example
Favorite
Displays a list of numbers set as your favorite.
Dialed
Displays a list of dialed calls.
Received
Displays a list of the received calls.
Missed
Displays a list of the missed calls.
Disconnect
Disconnects the Bluetooth device. After disconnecting, the
display changes to [Reconnect] to connect the disconnected
device again.
Change Device
Displays the Bluetooth Setup screen.
Keypad
Bluetooth Operation
About Bluetooth
About the Hands-free Phone
Before Using Bluetooth
Hands-free Phone Control
Phone button
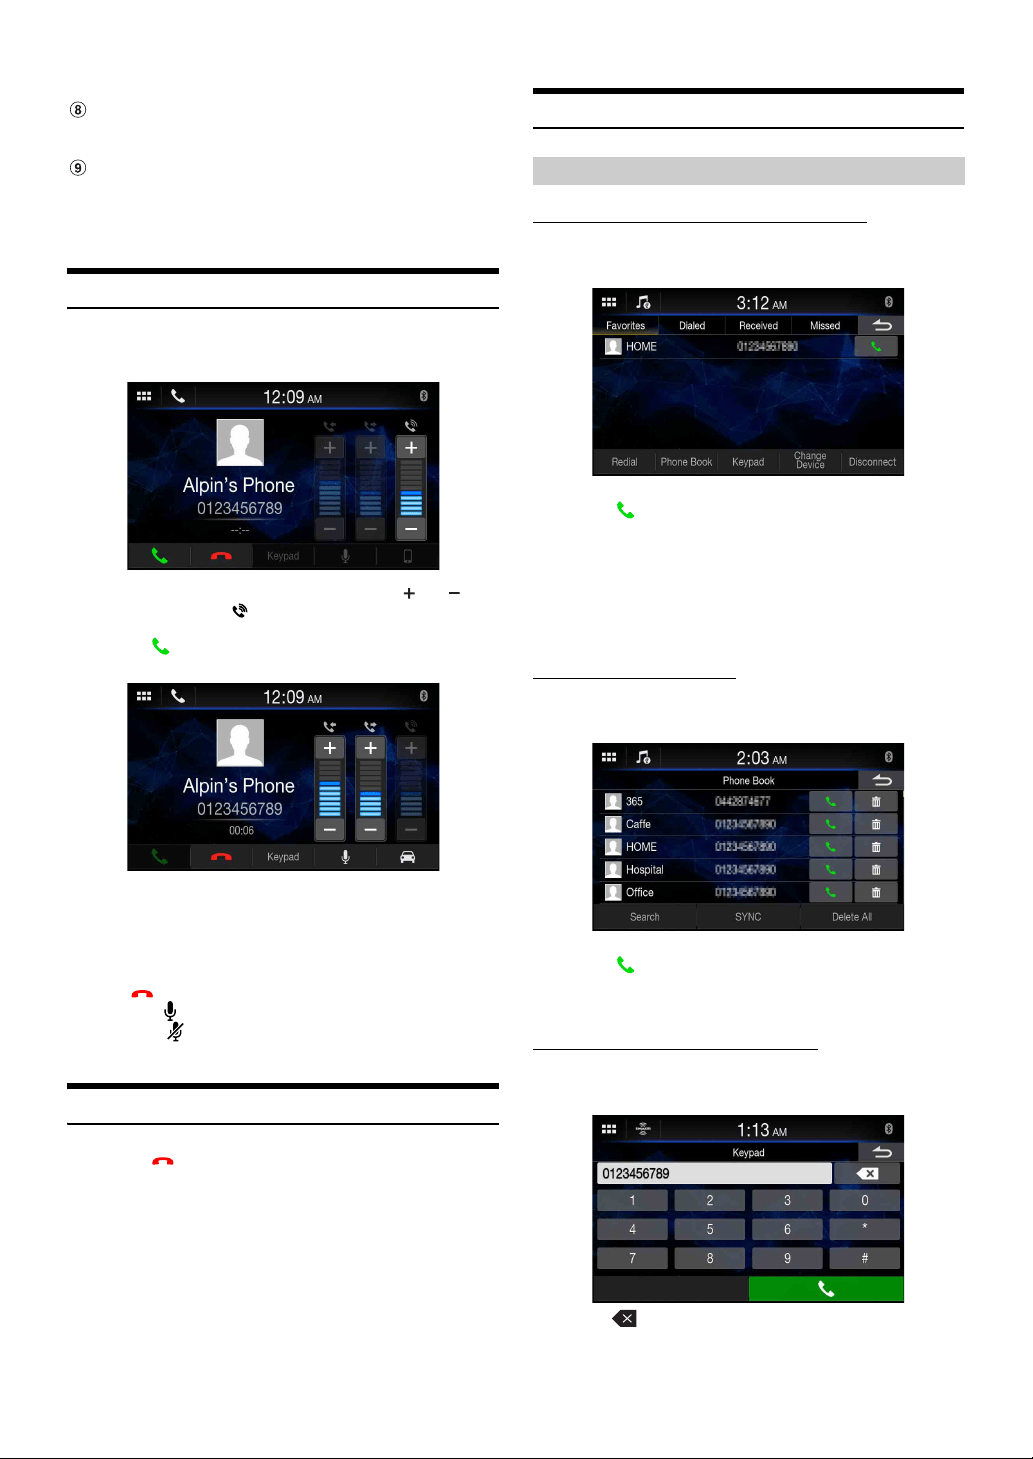
36-EN
Use to type a phone number.
Phone Book*
You can make a phone call from the Phone Book, or edit the
Phone Book.
Redial
Dials to the last called number.
* If the Hands-Free Phone is not connected, the Bluetooth Setup screen will
be displayed. See “Connection (Bluetooth) Setup” (page 17).
Answering a Call
1 An incoming call triggers the ringtone and an incoming
call display.
• You can adjust the ringtone volume by touching [] or [] of
“Ringtone Volume ( )”.
2 To uc h [].
The call starts.
• During a call, the audio for the current mode on the unit is muted. After
calling, playback will resume.
• When the caller’s number is transmitted to the system, if the caller’s
name is stored in the phone book, the name is displayed. If the name is
not stored, the number is displayed.
•Touch [] (Decline) to reject an incoming call.
• By touching [], you can mute the microphone. To cancel MUTE
mode, touch []. For details, see “Phone Operation Screen” (page 38).
• If another call comes during a call, operate on the Bluetooth Device.
Hanging up the Telephone
1 To uc h [] (End Call).
The call finishes.
Calling
Making a phone call from the Recent Events list
1 Select a category from [Favorite], [Dialed], [Received] or
[Missed] on the Phone menu.
2 To uc h [] of the name or number of the contact which
you want to call.
3 To uc h [Call].
The phone call is started.
•To use [Favorite], see “Setting contacts as Favorites (Shortcut Dialing)”
(page 39).
Calling from the Phone Book
1 To uc h [Phone Book] on the Phone menu.
The Phone Book screen appears.
2 To uc h [] of the name or number of the contact which
you want to call.
The phone call is started.
Entering a Phone Number to Make a Call
1 To uc h [Keypad] on the Phone menu.
The number input screen (Keypad) appears.
Touch [] to delete an entered number.
2 Enter the phone number you wish to call.
• You can enter up to 21 digits.
Making a phone call using the Phone Menu

37-EN
3 To uc h [] (Call).
A confirmation message of the phone number appears.
4 To uc h [Call].
The phone call is started.
Calling in Private
When using the Private Call setting, the conversation is not output
through the speaker.
To uc h [] during the call.
• To change the Bluetooth device, touch [Change Device] to display the
Bluetooth Setup screen. See “Connection (Bluetooth) Setup” (page 17).
Using Voice Recognition function
You can use Siri function of your iPhone or make a telephone call by
using voice operation of your smartphone.
• When using Apple CarPlay or Android Auto, the operation screen may
differ from the screen design in the Owner’s Manual.
You can use the Siri function of your iPhone. To use this function, set
the Siri setting of your iPhone to ON.
• Connect your iPhone to the unit via Bluetooth, then set to “Hands-free”
(page 17).
• The available functions differ depending on the connected iPhone.
• Ask Siri to play a track from the music library applies only to USB
source.
• Siri and other streaming services are enabled by connecting to
compatible smartphones that are able to receive data. Please ensure that
cellular data and/or Wi-Fi is turned on in the smartphone to enjoy
these features.
• Extensive use of Siri or other streaming services may increase your
phone’s data usage. Please check with your phone company to ensure
you have an appropriate Data plan.
1 To uc h [] button.
The Voice Recognition mode screen is displayed.
2 Speak into the microphone supplied with this unit.
3 To finish the Voice Control mode, touch [Cancel].
• Depending on the iPhone, the Siri function may finish automatically.
• For adjusting the volume, see “Adjusting the Speech Volume” (page 38).
You can make a telephone call by using voice operation.
• Connect your smartphone to the unit via Bluetooth, then set to “Hands-
free” (page 17).
1 To uc h [] button.
The Voice Dial mode screen is activated.
2 Say the telephone number* or name* you want to call,
into the microphone.
* The number and name depend on the voice dial information stored
in the smartphone.
3 To finish the Voice Dial mode, touch [Cancel].
• You can perform this operation only when a voice dial compatible
smartphone is connected.
• The Voice Dial function performance depends on the recognition range
of the smartphone and mounting location of the microphone.
Note when the microphone is mounted.
• Voice dial operation depends on the function being available on the
smartphone. For details, refer to the owner’s manual of the smartphone.
• Depending on the smartphone, the Voice Dial operation may finish
automatically.
• For adjusting the volume, see “Adjusting the Speech Volume” (page 38).
Using Siri
Voice Dial Function
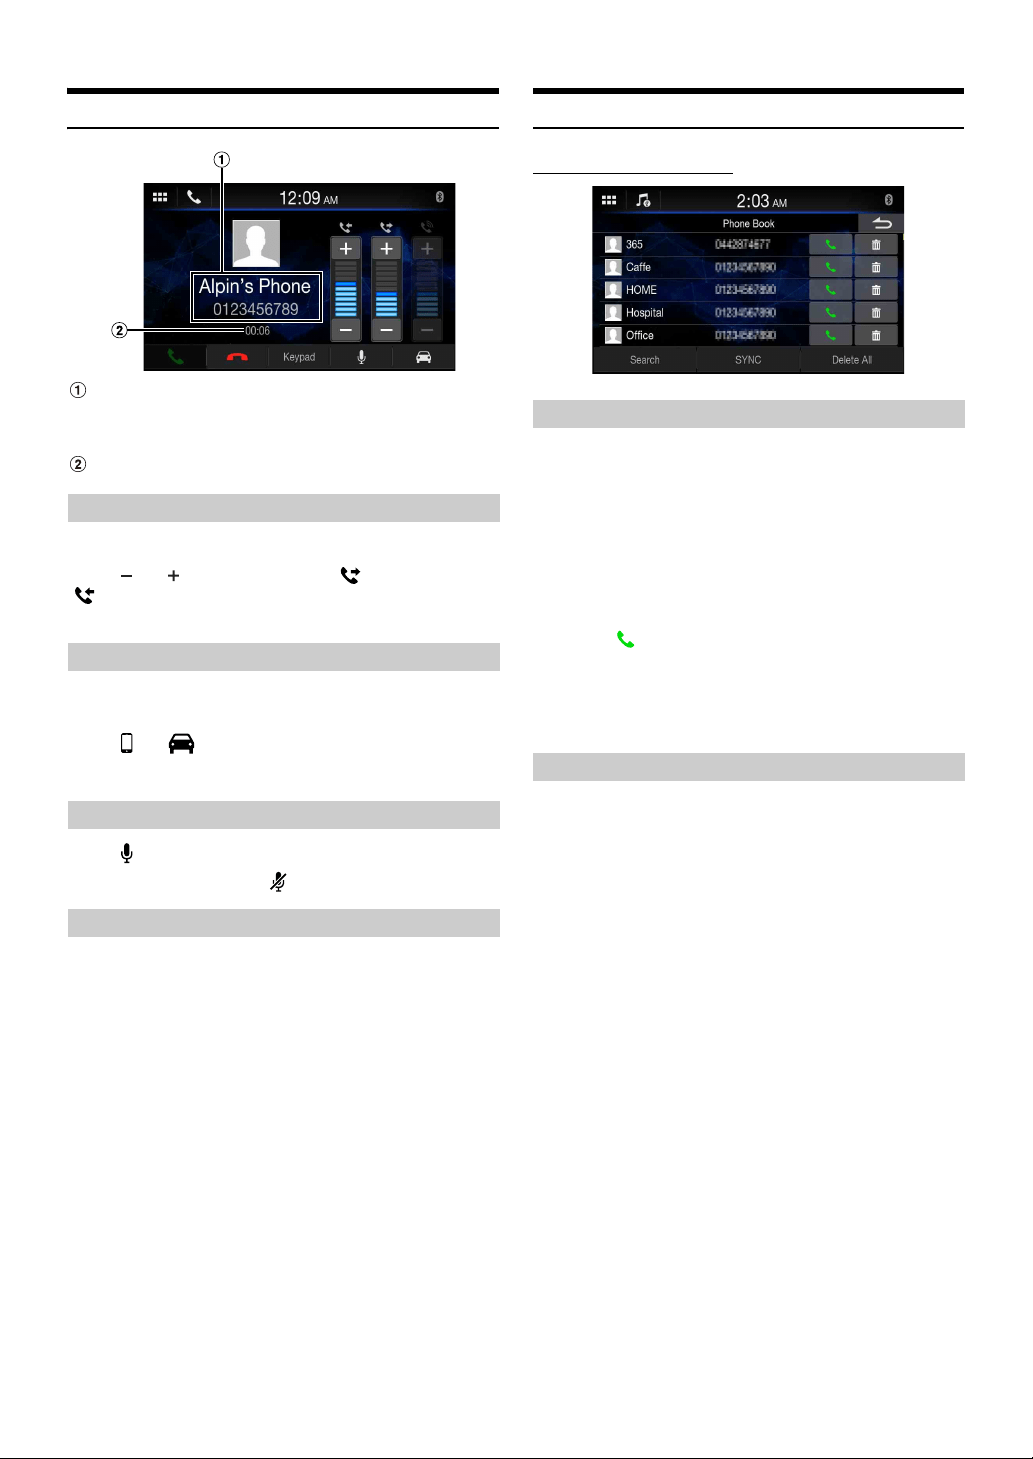
38-EN
Phone Operation Screen
Name and phone number
• If it is registered with a Group, the Group Name is also displayed.
Although, depending on the connected mobile phone, it may not
be displayed.
Conversation time
You can adjust Caller Level and Microphone Level.
To uc h [] or [] of “Speaker Volume ( )” or “Mic Level
()”.
You can adjust the volume in 11 levels.
The voice output for calls is switchable between car speakers and the
mobile phone speaker.
To uc h [] or [].
• Depending on the mobile phone, this operation may not be possible.
To uc h [].
• To cancel MUTE mode, touch [].
Transmits a DTMF (Touch-Tone) during a call.
1 To uc h [Keypad].
The number input screen (Keypad) appears.
2 Input number.
• You can transmit a Touch-Tone signal during a call.
Phone Book Function
Phone Book screen example
You can make a call using the phone book search function.
1 To uc h [Search] on the Phone Book screen.
The Input User Name screen (Keypad) is displayed.
2 Input the string of letters of the name that you want to
search, then touch [OK].
A list of names beginning with the string of letters you entered is
displayed.
3 To uc h [] of the name or number of the contact which
you want to call.
The phone call is started.
• If there are fewer than five registered items in the phone book, you
cannot use the phone book search function.
You can synchronize the system’s phone book with the mobile phone’s
phone book.
1 To uc h [SYNC] on the Phone Book screen.
The confirmation screen is displayed.
2 To uc h [Yes].
Synchronization of the phone books starts.
• You can store up to 1,000 registered name in the phone book.
• You can store up to 5 phone numbers by one person’s name.
Adjusting the Speech Volume
Changing the Voice Output
Muting the Microphone
DTMF (Touch-Tone) Function
Searching in the Phone Book
Synchronizing the Phone Book
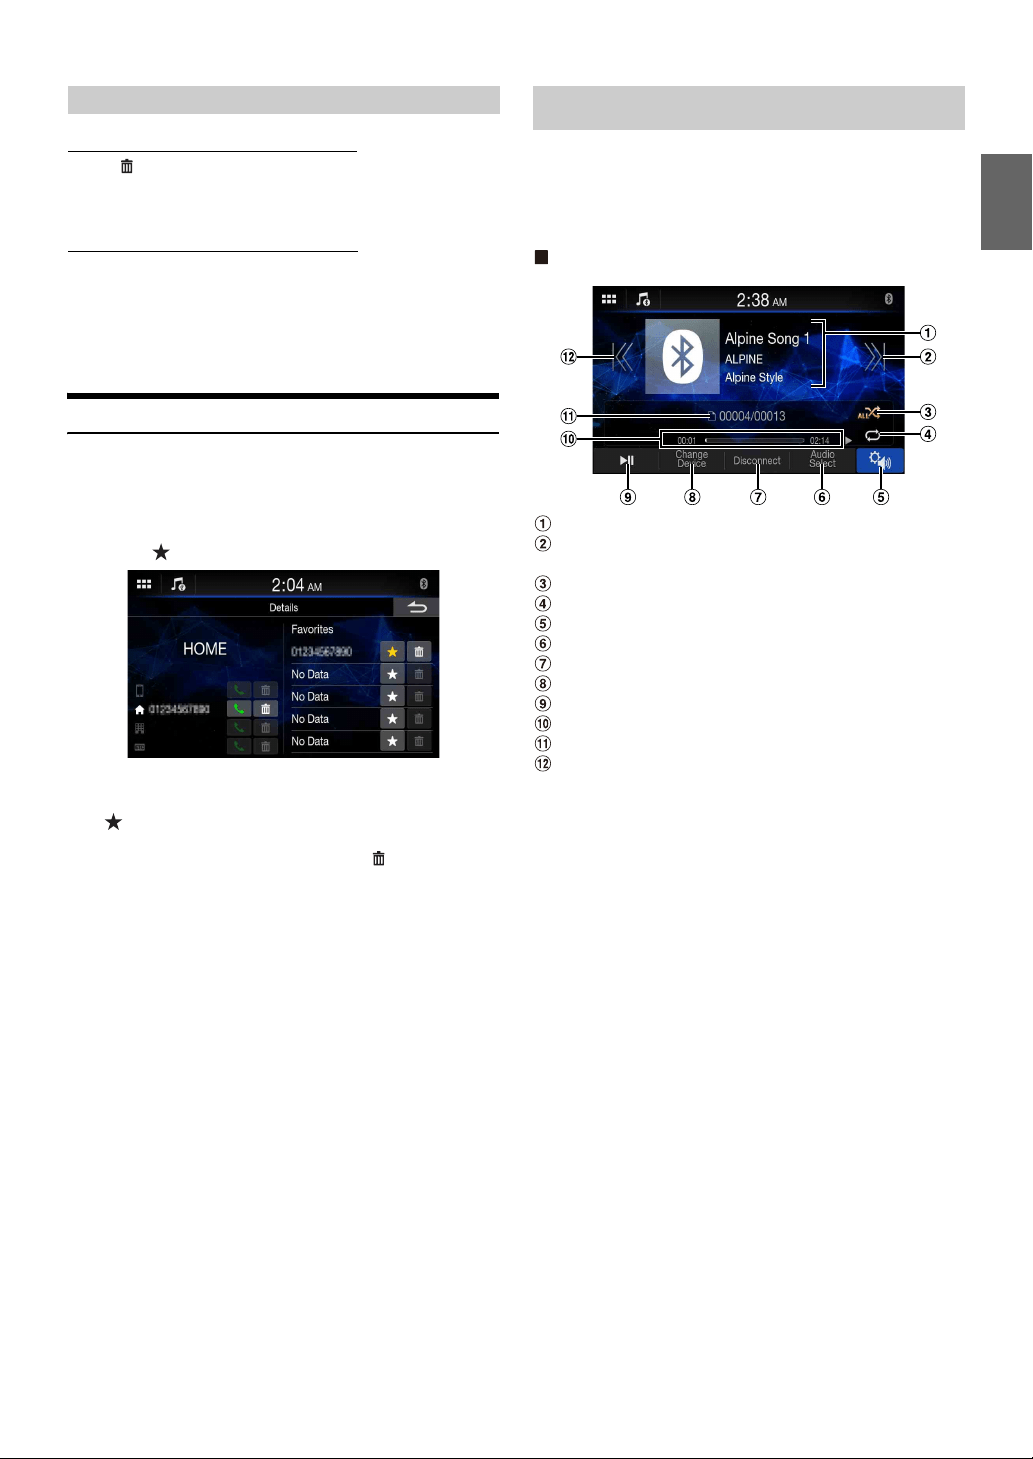
39-EN
Deleting One Entry from the Phone Book
To uc h [] of the contact name (or phone number) you want
to delete.
The selected number is deleted.
Deleting All Entries from the Phone Book
1 To uc h [Delete All] on the Phone Book screen.
The confirmation screen is displayed.
2 To uc h [Yes].
All entries of the phone book are deleted.
Setting contacts as Favorites (Shortcut Dialing)
You can set contacts from the Phone Book, Dialed, Received, and
Missed list as favorites.
1 Touch the name or phone number on the list.
2 To uc h [] of “Favorites.”
The phone number is set as a Favorite.
• Up to 5 contacts can be set as Favorites.
•If [] has already been set with a number, touching it overwrites the
number.
• To delete a contact from the Favorites list, touch [].
If a Bluetooth compatible mobile phone, portable player, etc. is
connected by wireless, you can play back a song (operation is
controllable from the unit).
• Operation may vary, depending on the Bluetooth compatible device.
Bluetooth Audio main screen example
Information display
Finds the beginning of next chapter/Fast-forwards when
touched for at least 1 second
Shuffle mode
Repeat mode
Displays the Sound Setup Menu screen (page 19).
Switches to the USB Flash drive or iPod mode of iPhone.
Disconnects the Bluetooth device
Changes the Bluetooth device.
Pause and Play
Elapsed time/Total time for playing
Current track number/Total track number
Finds the beginning of the current file/Finds a previous file
within one second after playback starts/Fast-reverses when
touched for at least 1 second
• The displayed onscreen buttons may differ depending on the AVRCP
version.
• Song title/Artist title/Album title/Elapsed time do not display for
AVRCP Ver. 1.0.
• To play back audio, a mobile phone or a portable player conforming to
A2DP (Advanced Audio Distribution Profile) or AVRCP (Audio/Video
Remote Control Profile) is required.
Not all functions work with all devices.
• During a call, sound on the Bluetooth audio source is paused.
Compatible AVRCP versions: 1.0, 1.3, 1.4, 1.5
• Available functions may differ depending on the AVRCP version.
Deleting the Phone Book Entries
Bluetooth Audio
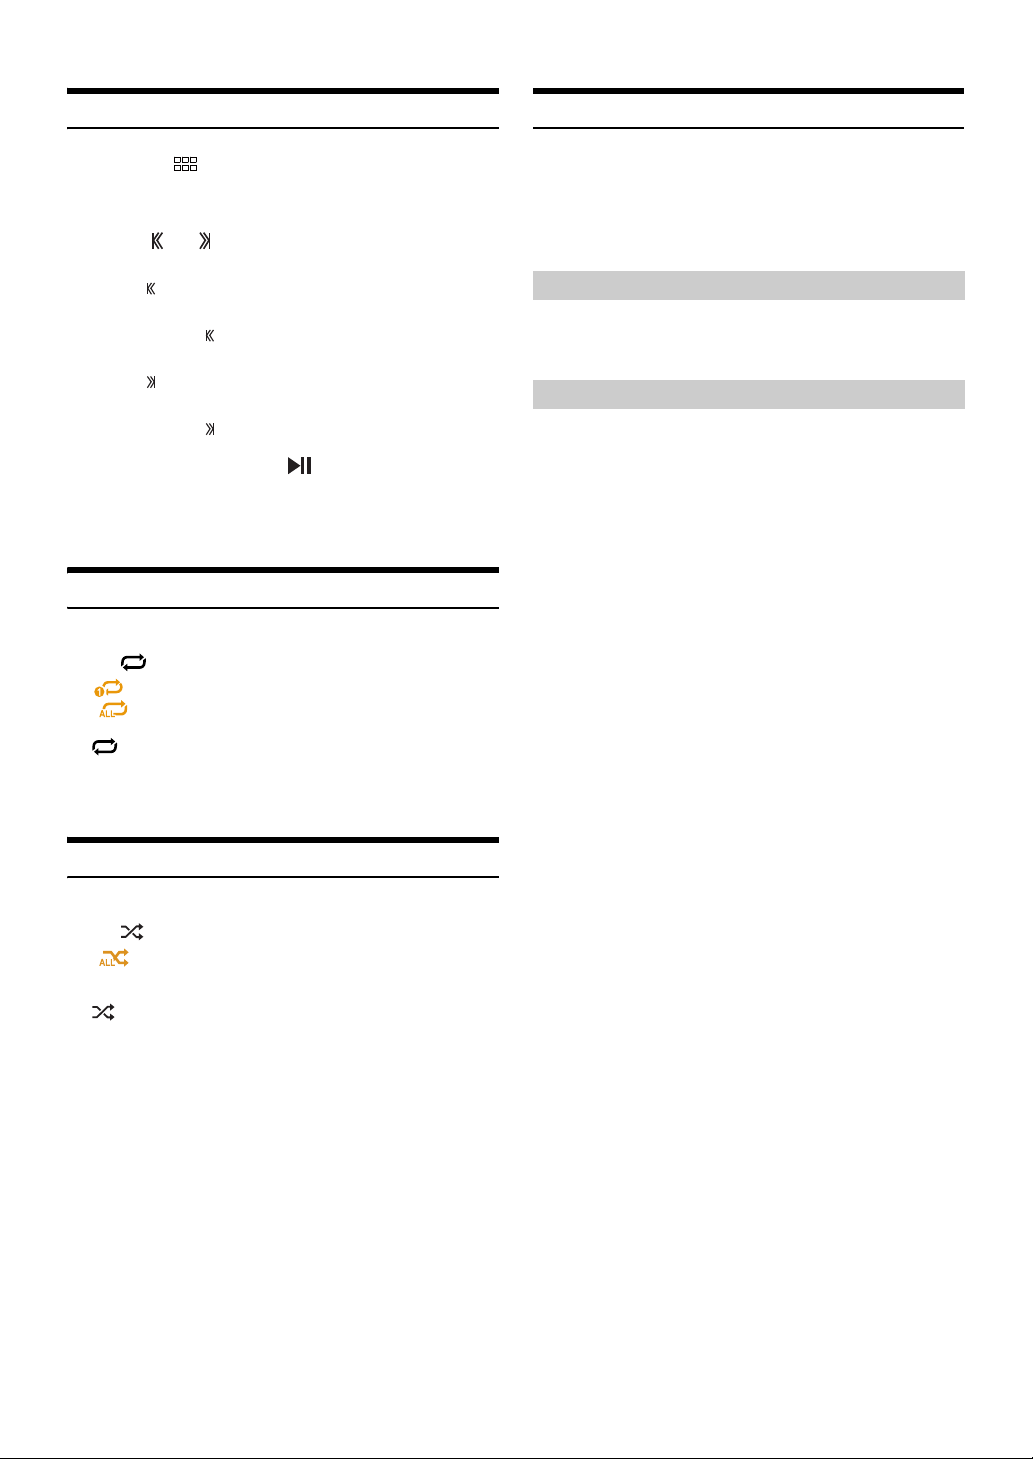
40-EN
Playback
1 Touch the (HOME) button and select Bluetooth
Audio mode.
The display shows the Bluetooth Audio mode screen.
2 To uc h [] or [] to select the desired track (file).
Returning to the beginning of the current file:
Touch [].
Fast backward the current file:
Touch and hold [].
Advance to the beginning of the next file:
Touch [].
Fast forward the current file:
Touch and hold [].
3 To pause playback, touch [ ].
•When selecting a [Audio] widget on the HOME screen, touch [Audio
Select] to select [BT]. If [BT] is already selected, you can start playback
by selecting a [Audio] widget on the HOME screen.
Repeat Play
Available for AVRCP Ver. 1.4 and 1.5 only.
To uc h [] repeatedly to select Repeat Play mode.
• Operations may differ depending on the connected Bluetooth
compatible device.
Shuffle Play
Available for AVRCP Ver. 1.4 and 1.5 only.
To uc h [] to select Shuffle Play mode.
• Operations may differ depending on the connected Bluetooth
compatible device.
Connecting a Bluetooth Device
Registering a Bluetooth device in the unit enables automatic connection.
If it does not connect automatically, run through the connection
procedure again.
To uc h [Reconnect] on the Bluetooth Audio screen.
The Bluetooth connection will start.
To uc h [Disconnect] on the Bluetooth Audio screen.
The Bluetooth connection is disconnected.
If multiple Bluetooth devices are registered in this device, you can
change the connection among the registered devices.
1 To uc h [Change Device] on the Bluetooth Audio screen.
2 Touch the device name.
The connection will transfer to the selected device.
File : Only the track currently playing is repeatedly played back.
ALL : Once all of the songs have finished playing, play back is
repeated, starting with the first song.
Off : Repeat mode is Off.
ALL : All songs in the Bluetooth compatible devices are played back
in random sequence. Any one song does not play back again
until all songs have been played back.
Off : Shuffle mode is Off.
Disconnecting the Bluetooth Connection
Switching the connecting Bluetooth Device
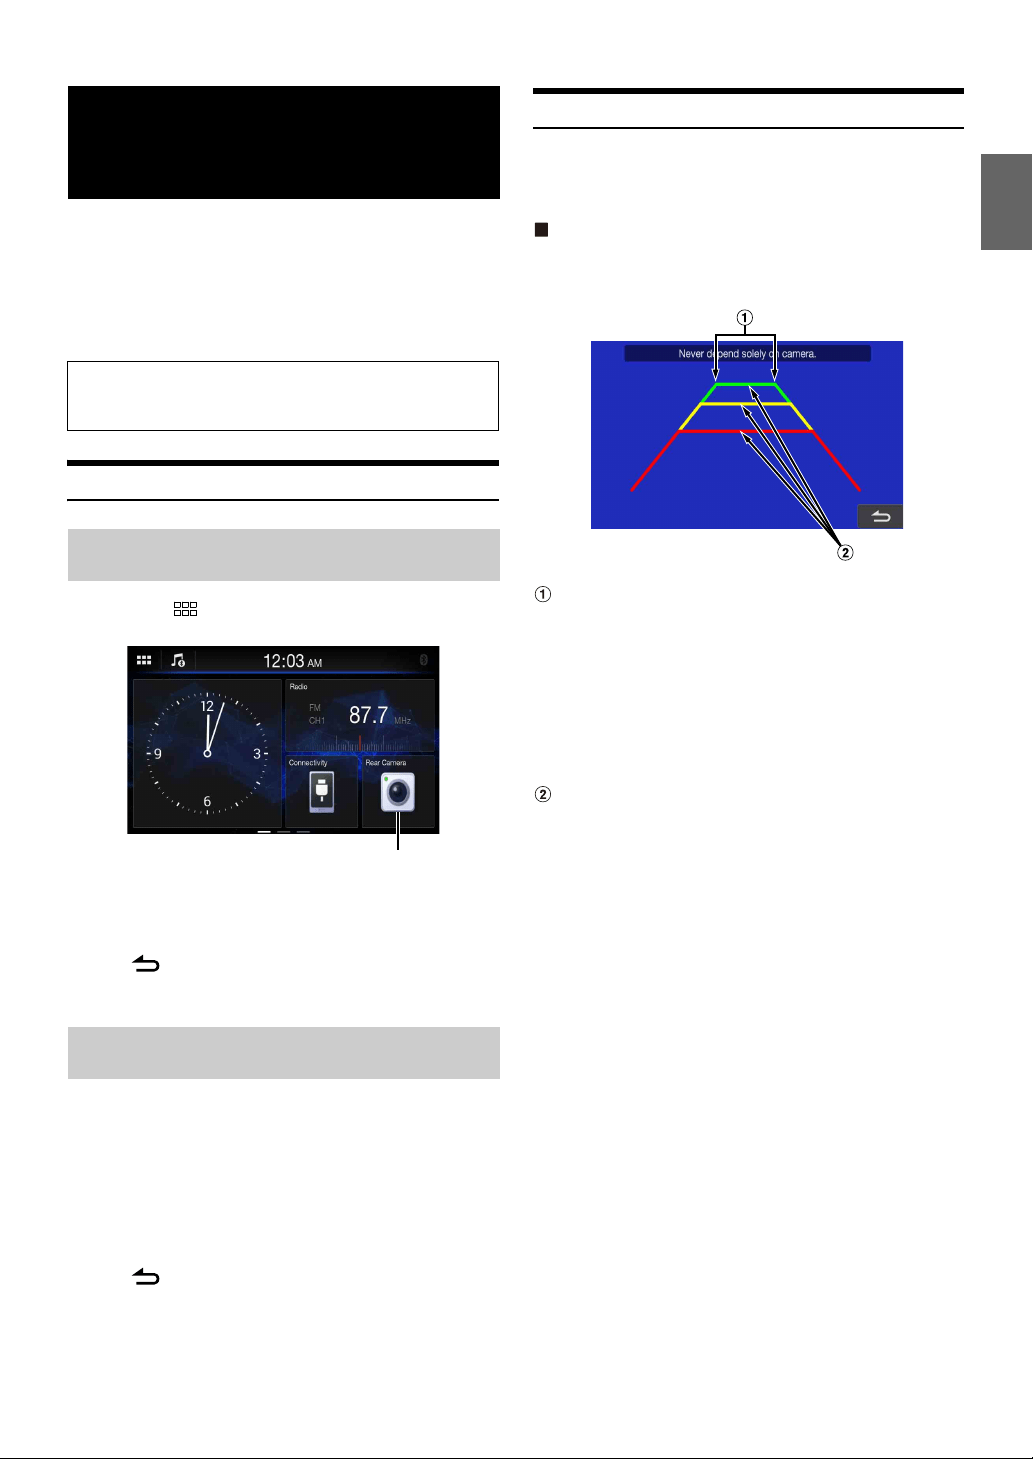
41-EN
When an optional camera is connected, the view video of camera can be
output to the monitor.
Rear camera:
If a rear camera is connected, when the vehicle is reversed, the rear
camera view (guide marks for vehicle width and available distance) is
displayed automatically on the screen of this unit.
Camera Operation
1 Touch the (HOME) button.
The HOME screen is displayed.
•If [Camera Select] is set to [Off] (page 18), the [Rear Camera]
button cannot be selected.
2 To uc h [Rear Camera].
•Touch [] to return to the main source screen or previous screen.
• You can perform a Guide Adjustment for the rear view image. For
details, see “About the Rear Camera Guide” (page 41).
1 Shift the gear lever to the reverse (R) position.
The rear view image is displayed while the car remains in
reverse.
2 If you shift the gear lever to a position other than reverse
(R), the monitor returns to the previous screen.
• Never depend solely on the camera when backing up. Always turn and
look and only use the camera for additional assistance.
• This function is effective when the reverse wire is properly connected.
•Touch [] to return to the main source screen or previous screen.
• You can perform a Guide Adjustment for the rear view image. For
details, see “About the Rear Camera Guide” (page 41).
About the Rear Camera Guide
To display the guide, set “Turning the Rear Camera Guide On/Off ”
(page 18) to On. Also, to adjust the guide, see “Rear Camera Guide
Settings” (page 18).
Indication mark meaning
When the car is put into reverse gear, the monitor switches to the rear
view camera image. Guides appear to help visualize the car’s width and
distance from the rear bumper.
Car width extension lines (red, yellow and green in order
of distance)
If properly calibrated, the marks indicate the car’s width. This
helps guide the car’s path when backing up in a straight line.
The marks represent the distance from the rear of the car (from
the rear end of the bumper).
• The marks do not move in synchronization with the steering
wheel.
• Set the marks to suit the car’s width.
Distance guidance lines
The marks represent the distance from the rear of the car (from
the rear end of the bumper).
• The marks do not move in synchronization with the steering
wheel.
• We recommend that you measure the actual distance to the
marks when parked on a level surface.
• Depending on the condition of the car or road surface, the range of
vision may vary.
• The camera has a limited range of vision. Objects at extreme angles to
the camera (e.g. under the bumper or at opposite ends of the bumper)
may not be in the its field-of-vision.
• The rear camera image may have a tint which is different from the
actual surroundings.
• Depending on the car, the guidance may deviate to the right or left. This
is not a malfunction.
Camera Operation
(Optional)
You can adjust the quality of the camera image.
Setting items: Brightness / Color / Contrast
See “Camera Picture Quality Setup” (page 19).
Displaying the Camera Image from the HOME
screen
Displaying the rear view video while the car is
in reverse
[Rear Camera] button
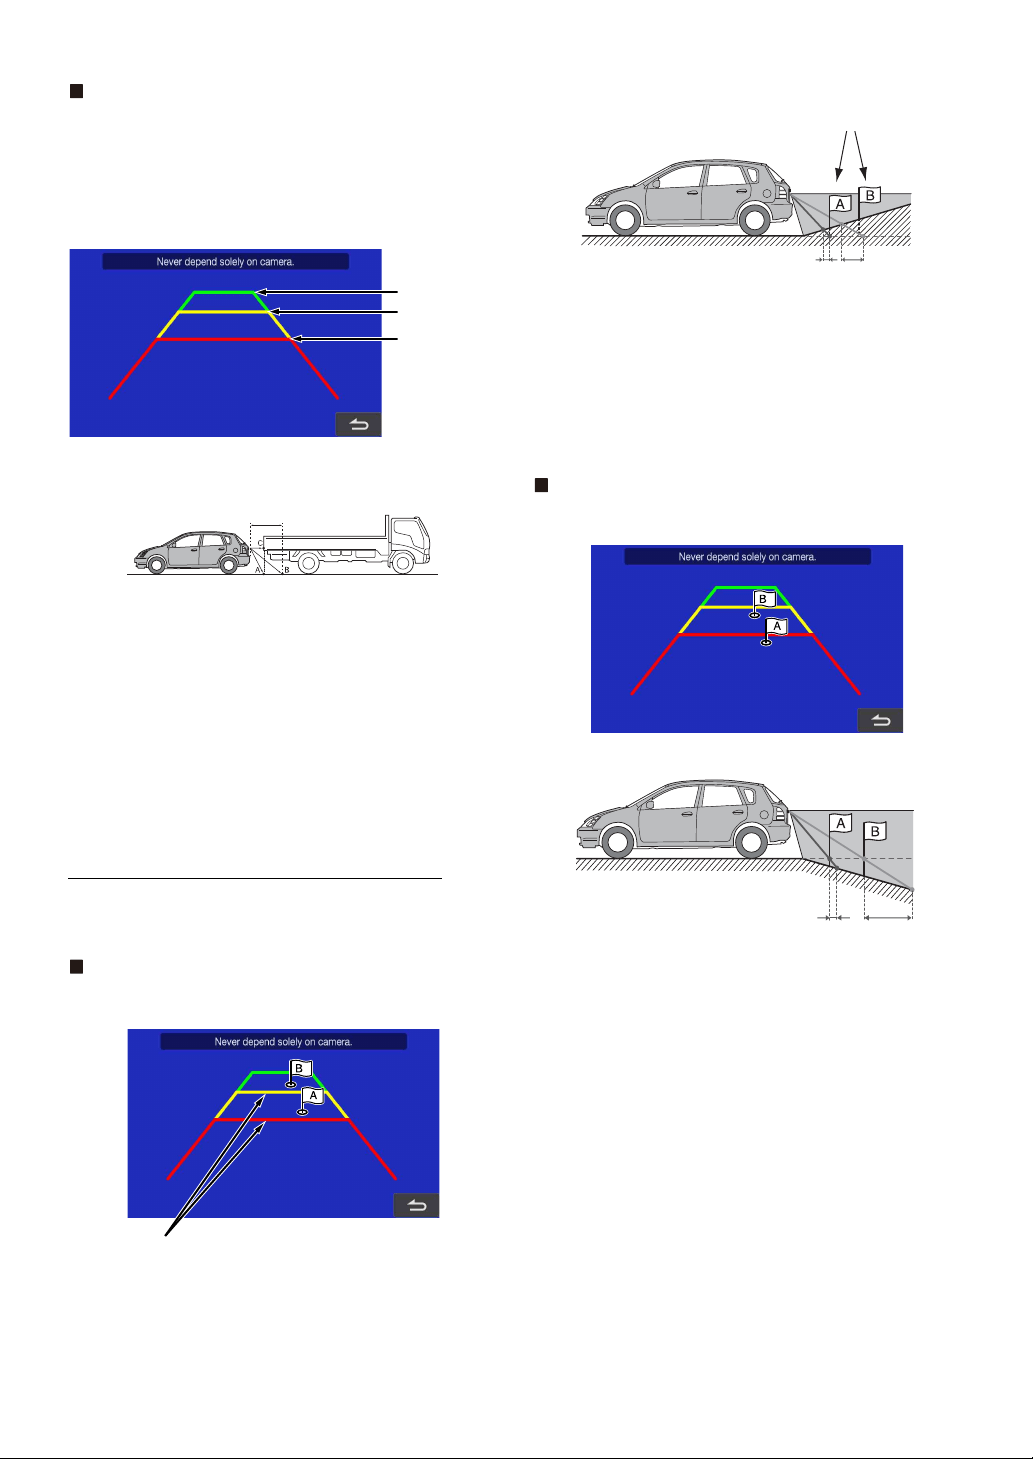
42-EN
Distance guidance mark
The distance guides represent the ground level distance from the rear
bumper. It is difficult to accurately estimate the distance to objects above
ground level.
In the following example, the distance to A is 0.5 m and the distance to B
is 1 m.
<Screen>
<Positions of A, B and C>
In the screen, according to the distance guidance marks, the
truck seems to be parked about 1 m away (at the position B).
In actual fact, however, if you reversed to position A, you
would collide with the truck.
In the screen, positions A, B and C seem to be located in order
of proximity. However, in actual fact, the position A and C are
the same distance, and B is farther away than positions A and
C.
• The car width extension mark represents the distance to the road
surface. The distance to an object on the road is not accurately
represented by the guides.
Error between the screen and the actual road surface
In the following conditions, errors are produced between the screen
guidance and the actual road surface. (The illustrations represent a case
when the camera is installed in the standard position.)
When there is a steep upward slope behind the car
(example)
<Screen>
<Situation of the car>
The distance guidance mark represents the distance to a flat
road surface. Therefore in the case of an upward slope
behind the car, the distance guides are displayed closer to
the rear bumper than the actual distance. For example, if
there is an obstacle on the upward slope, it may appear
farther away than its actual position.
Also, an error may occur between the guidance and the
actual path of the car on the road surface.
When there is a steep downward slope behind the car
(example)
<Screen>
<Situation of the car>
In the case of a downward slope behind the car, the distance
guides are displayed farther from the rear bumper than the
actual distance.
If there is an obstacle on the downward slope, it seems closer
than its actual position.
Also, an error may occur between the guidance and the
actual path of the car on the road surface.
C
B
A (about 0.5 m)
about 1 m
Distance guidance marks
Actual distances
Error Error
Error Error
43-EN
When the unit is connected to the car’s iDataLink module, you can
transfer and receive data between the car and the unit to check the car’s
status, or to make various operations from the unit.
• An iDataLink module (sold separately) is required.
• Available functions differ depending on your vehicle. For details, refer to
your vehicle’s instruction manual.
About Audio Interrupt
Audio Interrupt is the function that outputs sound from the unit when
Voice Information (audio reading from the phone book, etc.)* from the
vehicle occurs.
• The Audio Interrupt function of the vehicle differs depending on the
type and grade of the vehicle.
* For your safety, when interrupted with Voice Information, you cannot
operate the buttons on the front panel or the touch buttons on the
display, except for some operations.
- The operating restrictions may differ depending on which mode the
unit is in during Voice Information.
- You can use the [ ] / [ ] (UP/DOWN) button to control the
volume of Voice Information.
Access to iDataLink Mode
You can check the car’s status, set the air conditioning, etc.
1 Touch the (HOME) button to select Vehicle info
mode.
• The iDataLink mode screen selected in “Setting the Default
Vehicle Screen” (page 16) is displayed.
2 Touch the desired tag on the top of the screen.
Select item:
Climate / Gauges / Park Sensor / Vehicle Info. / Car Setting
• The displayed tag options differ depending on the type of vehicle.
3 Adjust or confirm the item/information accordingly.
• Operable functions and displays may differ depending on the vehicle.
iDataLink Function Screen example
Climate screen example
You can control the temperature inside the vehicle, etc.
Gauges screen example
You can check the vehicle’s speed, the engine’s rotation speed, etc.
Parking sensor screen example
You can check the distance from the front and rear of the vehicle to an
obstacle.
• If the car sensor detects an obstacle, the screen automatically changes to
the Parking sensor screen. For details, see “About Parking Sensor screen”
(page 44).
Vehicle Information screen example
You can check for open doors, check the tire pressure, the battery life,
etc. for the vehicle.
Car Setting screen example (Generic List screen)
The Generic List/Popup Window/Current source control screen is
displayed.
iDataLink Operation

44-EN
The Parking sensor screen turns on when the front or rear sensor on
your vehicle detects an obstacle within a certain distance.
Parking Sensor Full screen example
When the front or rear sensor detects an obstacle within a certain
distance, the Parking Sensor screen is displayed, and the indicator ( -
) that corresponds with that area lights up.
Indicator colors when an obstacle is detected.
• Depending on the speed of the vehicle, when moving faster than a
certain speed, the Parking Sensor screen may not be displayed.
• Vehicles that do not have the obstacle detection sensor cannot use this
function.
Parking Sensor Camera interlock screen example (Rear
camera)
You can check for obstacles through an interlocked camera image by
connecting a Rear Camera.
• Touch the Camera image area to switch to the Camera full screen.
(While displaying the Camera full screen, touch the Camera screen,
then touch [ ] to return to the Parking Sensor Camera interlock
screen.)
• Touch the car icon to switch to the Parking sensor full screen. (Touch
[ ] on the Parking Sensor full screen to return to the Parking Sensor
Camera interlock display.)
• To use this function, set the Camera Select setting of the Rear Camera,
to “Rear”. For details, see “Camera Input Setting” (page 18).
Factory Media Operation
You can operate the Factory Audio (USB/iPod/Bluetooth Audio) from
this unit.
Touch the (HOME) button to select Factory Media mode.
The display shows the Factory Media mode screen.
• For the basic operations on Factory Media mode, refer to “USB Audio”
(page 27), “iPod mode on iPhone (Optional)” (page 30) and “Bluetooth
Audio” (page 39).
Swipe to the right or left to change to the Function mode.
• Available functions differ depending on your vehicle.
Factory SiriusXM Operation
You can operate the Factory SiriusXM from this unit.
Touch the (HOME) button to select Factory SiriusXM
mode.
The display shows the Factory SiriusXM mode screen.
• For the basic operations on Factory SiriusXM mode, refer to “SiriusXM
Satellite Radio Operation (Optional)” (page 33).
Swipe to the right or left to change to the Function mode.
• Available functions differ depending on your vehicle.
About Parking Sensor screen
Red: close distance
Orange: medium distance
Yellow: long distance
45-EN
Product Software Update
This product use software that can be updated through a USB flash
drive. Download the software from the Alpine website and update the
product using the USB flash drive.
Updating this product
Check the Alpine website for details on updating.
http://www.alpine-usa.com
Important information on the software
About the software license of the product
The software installed in the product contains open-source software.
For details, refer to the “Open source licenses” screen on this unit. See
“Displaying Warranty/Copyright Information” (page 15).
About the Supported Formats
What is MP3?
MP3, whose official name is “MPEG Audio Layer 3,” is a compression
standard prescribed by the ISO, the International Standardization
Organization and MPEG which is a joint activity institution of the IEC.
MP3 files contain compressed audio data. MP3 encoding is capable
of compressing audio data at extremely high ratios, reducing the size
of music files to as much as one-tenth their original size. This is
achieved while still maintaining near CD quality. The MP3 format
realizes such high compression ratios by eliminating the sounds that
are either inaudible to the human ear or masked by other sounds.
What is WMA?
WMA, or “Windows Media™ Audio,” is compressed audio data.
WMA is similar to MP3 audio data.
What is AAC?
AAC is the abbreviation for “Advanced Audio Coding,” and is a basic
format of audio compression used by MPEG2 or MPEG4.
What is FLAC?
FLAC (Free Lossless Audio Codec) is an audio file codec for lossless
compression, developed and offered as open source software.
Codecs with lossy compression forms, such as MP3 and AAC, reduce
part of the data to improve compression efficiency.
However, FLAC can reconstruct compressed data to be an identical
copy of the original data by performing lossless compression. The
compression ratio of FLAC is about 50%.
Method for creating MP3/WMA/AAC/FLAC/WAV (USB Flash drive) files
Audio data is compressed using software with MP3/WMA/AAC/FLAC/
WAV (USB Flash drive) codecs. For details on creating MP3/WMA/
AAC/FLAC/WAV (USB Flash drive) files, refer to the user’s manual for
that software.
MP3/WMA/AAC/FLAC/WAV (USB Flash drive) files that are playable
on this device have the file extensions.
MP3: “mp3”
WMA: “wma”
AAC: “m4a”
FLAC: “flac”/”fla”
WAV: “wav”
WMA is not supported for the following files, Windows Media Audio
Professional, Windows Media Audio 10 std or Windows Media Audio
10 Pro Lossless.
There are many different versions of the AAC format. Confirm that the
software being used conforms to the acceptable formats listed
above. It’s possible that the format may be unplayable even though
the extension is valid.
Playback of AAC files encoded by iTunes is supported.
Supported playback sampling rates and bit rates
MP3 (USB Flash drive)
WMA (USB Flash drive)
AAC (USB Flash drive)
FLAC (USB Flash drive)
WAV (USB Flash drive)
This device may not play back correctly depending on sampling
rates.
ID3 tags/WMA tags
This device supports ID3 tag v1.0, v1.1, v2.2, v2.3, v2.4, and WMA tag
Ver.1.x. If tag data is in an MP3/WMA/AAC file, this device can display
the title (track title), artist name, and album name ID3 tag/WMA tag
data.
For non-supported characters, “?” is displayed.
The number of characters may be limited, or not correctly displayed,
depending on the tag information.
Playing back MP3/WMA/AAC/FLAC/WAV
MP3/WMA/AAC files are prepared, then written to a USB flash drive.
• Maximum numbers of playable files/folders
USB Flash drive: 10,000 files/folders (including Root Folder)
• Largest playable file size: 512 MB
Playback may not be performed if a disc exceeds the limitations
described above.
If a file/folder name is long, the maximum possible number of files
may decrease.
• Both Audio and Video files are counted if their formats are
playable on this unit.
Media supported
The media that this device can play back a USB flash drive.
Information
About MP3/WMA/AAC/FLAC/WAV
CAUTION
Except for private use, duplicating audio data (including
MP3/WMA/AAC/FLAC/WAV data) or distributing,
transferring, or copying it, whether for free or for a fee,
without permission of the copyright holder is strictly
prohibited by the Copyright Act and by international
treaty.
Sampling rates: 8 kHz, 11.025 kHz, 12 kHz, 16 kHz, 22.05 kHz,
24 kHz, 32 kHz, 44.1 kHz, 48 kHz
Bit rates: 8 - 320 kbps
Sampling rates: 8 - 48 kHz
Bit rates: 8 - 384 kbps
Sampling rates: 8 - 48 kHz
Bit rates: 8- 384 kbps
Sampling rates: 8 - 48 kHz
Bit rates: 8 - 384 kbps
Sampling rates: 8 - 48 kHz
Bit rates: 64 - 1,536 kbps
46-EN
Corresponding File Systems
This device supports FAT 16/32.
Order of files
Files are played back in the order that the writing software writes
them to the disc. Therefore, the playback order may not be what’s
expected. Verity the writing order in the software’s documentation.
The playback order of the folders and files is as follows. (The
following numbers may differ from actually displayed numbers.)
Terminology
Bit rate
This is the “sound” compression rate specified for encoding. The higher
the bit rate, the higher the sound quality, but also the larger the files.
Sampling rate
This value shows how many times per second the data is sampled
(recorded). For example, music CDs use a sampling rate of 44.1 kHz, so
the sound is sampled (recorded) 44,100 times per second. The higher the
sampling rate, the higher the sound quality, but also the larger the
volume of data.
Encoding
Converting music CDs, WAVE (AIFF) files, and other sound files into
the specified audio compression format.
Ta g
Song information such as track titles, artist names, album names, etc.,
written into MP3/WMA/AAC/FLAC/WAV (USB flash drive) files.
Root folder
The root folder (or root directory) is found at the top of the file system.
The root folder contains all folders and files. It is created automatically
for all burned discs.
The maximum nested folder depth is 8 (including the root
directory). File names are limited to 256 characters (including the
extension).
Valid characters for folder/file names are letters A-Z (all caps),
numbers 0-9, and ‘_’ (underscore).
Root
Folder
Folder
MP3/WMA/AAC/FLAC/
WAV File

47-EN
In Case of Difficulty
Basic
No function or display.
• Vehicle’s ignition is off.
- If connected according to the instructions, the unit will not
operate with the vehicle’s ignition off.
• Improper power lead connections.
- Check power lead connections.
•Blown fuse.
- Check the fuse on the battery lead of the unit; replace with the
proper value if necessary.
• Internal micro-computer malfunctioned due to interference
noise, etc.
- Press the RESET switch with a ballpoint pen or other pointed
article.
No sound or unnatural sound.
• Incorrect setting of volume/balance/fader controls.
- Readjust the controls.
• Connections are not properly or securely made.
- Check the connections and firmly connect.
Screen not displayed.
• Brightness/Contrast control is set at the minimum position.
- Adjust the Brightness/Contrast control.
• Temperature in the vehicle is too low.
- Increase the vehicle’s interior temperature to operation
temperature range.
• Connections to the Auxiliary Device are not securely made.
- Check the connections and firmly connect.
• The Parking Brake Lead is not connected.
• The Parking Brake is not engaged.
- Connect the Parking Brake Lead, then engage the Parking
Brake.
Movement of displayed picture is abnormal.
• Temperature in the vehicle is too high.
- Allow the vehicle’s interior temperature to cool.
Radio
Unable to receive stations.
• No antenna, or open connection in the antenna cable.
- Make sure the antenna is properly connected; replace the
antenna or cable if necessary.
Unable to tune stations in the seek mode.
• You are in a weak signal area.
- Make sure the tuner is in DX mode.
• If the area you are in is a primary signal area, the antenna may
not be grounded and connected properly.
- Check your antenna connections; make sure the antenna is
properly grounded at its mounting location.
• The antenna may not be the proper length.
- Make sure the antenna is fully extended; if broken, replace the
antenna with a new one.
Broadcast is noisy.
• The antenna is not the proper length.
- Extend the antenna fully; replace it if it is broken.
• The antenna is poorly grounded.
- Make sure the antenna is grounded properly at its mounting
location.
• The station signal is weak and noisy.
- If above solution does not work, tune in another station.
USB Audio
Unit does not operate.
• Condensation.
- Wait a while (about 1 hour) for the condensation to dry.
Picture is unclear or noisy.
• Vehicle’s battery power is weak.
-Check the battery power and wiring.
(The unit may malfunction if the battery power is under 11
volts with a load applied.)
Handsfree Phone
Ringtone is small
• Depending on your phone, the ringtone volume may be small, it
is not a failure.
If you encounter a problem, please turn the power off,
then on again. If the unit is still not functioning normally,
please review the items in the following checklist. This
guide will help you isolate the problem if the unit is at
fault. Otherwise, make sure the rest of your system is
properly connected, or then consult your authorized
Alpine dealer.

48-EN
If this Message Appears
Various messages are displayed on the screen during operation. In
addition to the messages telling you the current status or providing
guidance for the next operation, there are also the following error
messages. If one of these error messages is displayed, carefully follow the
instructions in the solution column.
System
This operation is prohibited for your safety.
• A setup operation, etc., was carried out while the vehicle was
running.
- Move the vehicle to a safe location, stop, and engage the
parking brake, then carry out this operation.
Unsupported USB device connected.
• A USB flash drive with a hub is connected.
- You cannot play back from a USB flash drive with a hub. USB
hub connections are also not supported.
Audio/Visual
Unsupported USB device connected.
• An iPhone that is not supported by the unit is connected.
- Connect an iPhone that is supported by the unit.
• A USB device that is not supported by the unit is connected.
- Attempt to connect another USB flash drive.
•Communication error.
- Turn the ignition key off, and then set to ON again.
- Check the display by reconnecting between the iPhone and the
unit, using the iPhone cable.
- Check the display by reconnecting between the USB flash drive
and the unit.
• Caused by the iPod/iPhone Software Version not being
compatible with this unit.
- Update the iPhone Software Version to be compatible with this
unit.
• The iPhone is not verified.
- Change to another iPhone.
No Song
• There are no data in the iPhone.
- Download data to the iPhone and connect to the unit.
No File
• There are no data in the USB flash drive.
- Download data to the USB flash drive and connect to this unit.
File format not supported.
• A copy-protected WMA file has been detected.
- You can only play back non-copy-protected files.
• A sampling rate/bit rate not supported by the unit is used.
- Use a sampling rate/bit rate supported by the unit.
Bluetooth
No Bluetooth
• The Bluetooth audio device was not connected correctly.
- Check the settings for the unit and the Bluetooth audio device
and reconnect.
SiriusXM
Check Tuner
• The SiriusXM Tuner is disconnected or the unit is having trouble
communicating with the Tuner.
- Connect the Tuner or check the Tuner connection to the back
of the unit.
Check Antenna
• The SiriusXM Satellite Radio antenna or cable is either damaged
or not connected correctly to the SiriusXM Tuner.
- Check that the SiriusXM antenna cable is connected to the
SiriusXM Tuner and check that the antenna cable is not kinked
or otherwise damaged. Replace the antenna if necessary.
- SiriusXM products are available at your local car audio retailer
or online at www.shop.siriusxm.com.
No Signal
• The SiriusXM satellite signal is too weak at the current location.
- Move the vehicle to a location with a clear view of the southern
sky.
- Make sure the Satellite Radio antenna is properly mounted and
not obstructed by metal objects.
Channel Not Subscribed
Call SiriusXM to Subscribe
• The active channel has become unsubscribed or the requested
channel is not available in your subscription package.
- In the U.S.A., visit www.siriusxm.com or call 1-866-635-2349 if
you have questions about your subscription package or would
like to subscribe to this channel. In Canada, visit
www.siriusxm.ca or call 1-877-438-9677.
- The unit will revert to the previously selected channel or to
channel 1 automatically.
Channel <xxx> Not Available
• The active channel is no longer in the SiriusXM channel lineup
or the user has entered an invalid channel number.
- Visit www.siriusxm.com for information on the current
channel lineup.
• The unit will revert to the previous channel or to channel 1
automatically.
Subscription Updated
Press Any Key to Continue
•Your subscription has been updated.
- Touch [OK] to clear this message.
Channel <xxx> Locked
• A locked channel is selected.
- Input the passcode on the number keypad screen, see “Parental
Lock Function” (page 34). If wrong passcode is entered,
“Incorrect Pass Code entered” will be displayed and the unit
will revert to the previous channel.

49-EN
Specifications
MONITOR SECTION
FM TUNER SECTION
AM TUNER SECTION
USB SECTION
HDMI SECTION
Bluetooth SECTION
GENERAL
CHASSIS SIZE
• Due to continuous product improvement, specifications and design are
subject to change without notice.
• The LCD panel is manufactured using an extremely high precision
manufacturing technology. Its effective pixel ratio is over 99.99%. This
means that there is a possibility that 0.01% of the pixels could be either
always ON or OFF.
Screen Size 11” (iLX-F411)
9” (iLX-F409)
LCD Type Transparent type TN LCD
Operation System TFT active matrix
Number of Picture Elements 1,152,000 pcs.
(800 × 480 × 3 (RGB))
Effective Number of Picture Elements
99% or more
Illumination System LED
Tuning Range 87.7 – 107.9 MHz
Mono Usable Sensitivity 9.3 dBf (0.8 µV/75 ohms)
50 dB Quieting Sensitivity 13.5 dBf (1.3 µV/75 ohms)
Alternate Channel Selectivity 80 dB
Signal-to-Noise Ratio 65 dB
Stereo Separation 35 dB
Capture Ratio 2.0 dB
Tuning Range 530 – 1,710 kHz
Usable Sensitivity 25.1 V/28 dBf
USB requirements USB 2.0
Max. Power Consumption 1,500 mA (CDP Support)
USB Class USB (Play From Device)/
USB (Mass Storage Class)
File System FAT16/32
Number of Channels 2-Channels (Stereo)
Frequency Response*
1
5 – 20,000 Hz (±1 dB)
Total Harmonic Distortion 0.008% (at 1 kHz)
Dynamic Range 95 dB (at 1 kHz)
Signal-to-Noise Ratio 100 dB
Channel Separation 85 dB (at 1 kHz)
*1 Frequency response may differ depending on the encoder software/bit
rate.
Input Format 720p/480p/VGA
Output Format 1080p/720p/480p
Bluetooth Specification Bluetooth V4.1
Output Power +4 dBm Ave. (Power class 2)
Profile HFP (Hands-Free Profile)
PBAP (Phone Book Access Profile)
A2DP (Advanced Audio
Distribution Profile)
AVRCP (Audio/Video Remote
Control Profile)
Power Requirement 14.4 V DC
(11–16 V allowable)
Operating temperature -4°F to +140°F
(-20°C to + 60°C)
Power Output 16 W RMS × 4*
2
*2 Primary amplifier ratings per CEA-2006 Standard
• Power output: measured at 4 Ohms and ≤ 1% THD+N
• S/N: 80 dBA (reference: 1 W into 4 Ohms)
Weight 3.0 kg (6 lbs. 10 oz) (iLX-F411)
2.4 kg (5 lbs. 5 oz) (iLX-F409)
Audio output level
Preout (Front, Rear): 4V/10k ohms (max.)
Preout (Subwoofer): 4V/10k ohms (max.)
Width 178 mm (7")
Height 50 mm (2")
Depth 160 mm (6-5/16")
LIMITED WARRANTY
ALPINE ELECTRONICS OF AMERICA, INC. (“Alpine”), is dedicated to quality craftsmanship and is pleased to offer this Warranty. We suggest that you
read it thoroughly. Should you have any questions, please contact your Dealer or contact Alpine at one of the telephone numbers listed below.
PRODUCTS COVERED:
This Warranty covers Car Audio Products and Related Accessories (“the
product”). Products purchased in the Canada are covered only in the
Canada. Products purchased in the U.S.A. are covered only in the U.S.A.
LENGTH OF WARRANTY:
This Warranty is in effect for one year from the date of the first
consumer purchase.
WHO IS COVERED:
This Warranty only covers the original purchaser of the product, who
must reside in the United States, Puerto Rico or Canada.
WHAT IS COVERED:
This Warranty covers defects in materials or workmanship (parts and
labor) in the product.
WHAT IS NOT COVERED:
This Warranty does not cover the following:
Damage occurring during shipment of the product to Alpine for
repair (claims must be presented to the carrier).
Damage caused by accident or abuse, including burned voice coils
caused by over-driving the speaker (amplifier level is turned up
and driven into distortion or clipping). Speaker mechanical failure
(e.g. punctures, tears or rips). Cracked or damaged LCD panels.
Dropped or damaged hard drives.
Damage caused by negligence, misuse, improper operation or
failure to follow instructions contained in the Owner’s manual.
Damage caused by act of God, including without limitation,
earthquake, fire, flood, storms or other acts of nature.
Any cost or expense related to the removal or reinstallation of the
product.
Service performed by an unauthorized person, company or
association.
Any product which has the serial number defaced, altered or
removed.
Any product which has been adjusted, altered or modified without
Alpine’s consent.
Any product not distributed by Alpine within the United States,
Puerto Rico or Canada.
Any product not purchased from an Authorized Alpine Dealer.
HOW TO OBTAIN WARRANTY SERVICE:
You are responsible for delivery of the product to an Authorized
Alpine Service Center or Alpine for repair and for payment of any
initial shipping charges. Alpine will, at its option, repair or replace
the product with a new or reconditioned product without charge.
If the repairs are covered by the warranty, and if the product was
shipped to an Authorized Alpine Service Center or Alpine, Alpine
will pay the return shipping charges.
You should provide a detailed description of the problem(s) for
which service is required.
You must supply proof of your purchase of the product.
You must package the product securely to avoid damage during
shipment. To prevent lost packages it is recommended to use a
carrier that provides a tracking service.
HOW WE LIMIT IMPLIED WARRANTIES:
ANY IMPLIED WARRANTIES INCLUDING FITNESS FOR USE AND
MERCHANTABILITY ARE LIMITED IN DURATION TO THE PERIOD OF THE
EXPRESS WARRANTY SET FORTH ABOVE AND NO PERSON IS
AUTHORIZED TO ASSUME FOR ALPINE ANY OTHER LIABILITY IN
CONNECTION WITH THE SALE OF THE PRODUCT.
HOW WE EXCLUDE CERTAIN DAMAGES:
ALPINE EXPRESSLY DISCLAIMS LIABILITY FOR INCIDENTAL AND
CONSEQUENTIAL DAMAGES CAUSED BY THE PRODUCT. THE TERM
“INCIDENTAL DAMAGES” REFERS TO EXPENSES OF TRANSPORTING
THE PRODUCT TO THE ALPINE SERVICE CENTER, LOSS OF THE
ORIGINAL PURCHASER’S TIME, LOSS OF THE USE OF THE PRODUCT,
BUS FARES, CAR RENTALS OR OTHERS COSTS RELATING TO THE CARE
AND CUSTODY OF THE PRODUCT. THE TERM “CONSEQUENTIAL
DAMAGES” REFERS TO THE COST OF REPAIRING OR REPLACING OTHER
PROPERTY WHICH IS DAMAGED WHEN THIS PRODUCT DOES NOT
WORK PROPERLY. THE REMEDIES PROVIDED UNDER THIS WARRANTY
ARE EXCLUSIVE AND IN LIEU OF ALL OTHERS.
HOW STATE/PROVINCIAL LAW RELATES TO THE
WARRANTY:
This Warranty gives you specific legal rights, and you may also have
other rights which vary from state to state and province to province. In
addition, some states/provinces do not allow limitations on how long
an implied warranty lasts, and some do not allow the exclusion or
limitation of incidental or consequential damages. Accordingly,
limitations as to these matters contained herein may not apply to you.
IN CANADA ONLY:
This Warranty is not valid unless your Alpine car audio product has
been installed in your vehicle by an Authorized Installation Center, and
this warranty stamped upon installation by the installation center.
HOW TO CONTACT CUSTOMER SERVICE:
Should the product require service, please call the following number
for your nearest Authorized Alpine Service Center.
Or visit our website at; http://www.alpine-usa.com
CAR AUDIO 1-800-ALPINE-1 (1-800-257-4631)
NAVIGATION 1-888-NAV-HELP (1-888-628-4357)
ALPINE ELECTRONICS OF AMERICA, INC., 1500 Atlantic Blvd, Auburn Hills, Michigan 48326, U.S.A.
Do not send products to this address.
Call the toll free telephone number or visit the website to locate a service center.

About the Rules of Bluetooth Electromagnetic Radiation Regulation
USA/Canada
FCC/IC CAUTION
This device complies with Industry Canada’s license-exempt RSSs. Operation is subject to the following two
conditions:
(1) This device may not cause interference; and
(2) This device must accept any interference, including interference that may cause undesired operation of the
device.
Changes or modifications not expressly approved by the party responsible for compliance could void the user’s
authority to operate the equipment.
This equipment complies with FCC/IC radiation exposure limits set forth for an uncontrolled environment and
meets the FCC radio frequency (RF) Exposure Guidelines and RSS-102 of the IC radio frequency (RF) Exposure rules.
This equipment has very low levels of RF energy that it deemed to comply without maximum permissive exposure
evaluation (MPE). But it is desirable that it should be installed and operated keeping the radiator at least 20 cm or
more away from person’s body.
Le présent appareil est conforme aux CNR d’Industrie Canada applicables aux appareils radio exempts de licence.
L’exploitation est autorisée aux deux conditions suivantes :
(1) l’appareil ne doit pas produire de brouillage;
(2) l’utilisateur de l’appareil doit accepter tout brouillage radioélectrique subi, même si le brouillage est susceptible
d’en compromettre le fonctionnement.
Cet équipement est conforme aux limites d’exposition aux rayonnements énoncées pour un environnement non
contrôlé et respecte les règles les radioélectriques (RF) de la FCC lignes directrices d’exposition et d’exposition aux
fréquences radioélectriques (RF) CNR-102 de l’IC. Cet équipement émet une énergie RF très faible qui est considérée
conforme sans évaluation de l’exposition maximale autorisée (MPE). Cependant, il est souhaitable qu’il devrait être
installé et utilisé en gardant une distance de 20 cm ou plus entre le radiateur et le corps humain.
Don’t forget to take a moment to protect your purchase by registering your product now at the following
address: www.alpine-usa.com/registration.
N’oubliez pas de consacrer un moment à la protection de votre achat en enregistrant votre produit dès
maintenant à l’adresse suivante : www.alpine-usa.com/registration.
Recuerde que con solo unos pocos pasos podrá proteger su producto, registrándolo a través de la siguiente
dirección: www.alpine-usa.com/registration.