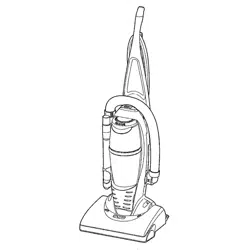
Owner'sManual
ManualDe/Propietario
VacuumCleaner
Aspiradora
Model, Modelo
116.35622
116.35623
CAUTION:
Read and follow all
safety and operating
instructions before first
use of this product.
CUIDADO:
Leay siguetodaslas
instruccionesde operaci6n
yseguddad antesdel usode
esteproducto.
®
Sears, Roebuck and Co., Hoffman Estates, IL 60179 U.S.A.
www.sears.com
Printed in Mexico
Part No. C01ZCKAO_UI3_-KCa1ZCKAZI3UO Impreso en Mexico
Before Using Your New
Vacuum Cleaner .................... 2
Kenmore Vacuum Cleaner Warranty ... 2
Important Safety Instructions ......... 3
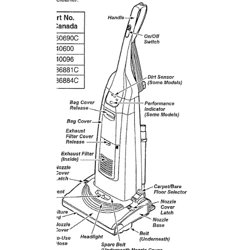
Parts and Features .................. 4
Assembly instructions ............. 5-6
Operating Instructions ............... 6
Cord Release ....................... 6
Pile HeightSelectionand Setting ........ 7
Carpet/Bare FloorSelector ............ 7
Releasingthe Handle ................. 6
TouchControl ...................... 8
Attachments ..................... 8-10
AttachmentUse Chart ............... t0
VacuumingTips .................... 11
PerformanceFeatures ............. 11-12
Vacuum Cleaner Care ............... 13
VacuumCleaner Storage ............. 13
CleaningExteriorand Attachments ..... 13
DustBag Replacement .............. 14
FilterReplacement .................. 15
BeltChangingand Agitator
Cleaning ....................... 16-18
Clog Removal ..................... 19
LightBulb Replacement .............. 20
AgitatorServicing................... 21
Troubleshooting .................... 22
Requesting Assistance
Or Service ................... BackPage
Please read this guide. It will help you assemble and operate your new Kenmore vacuum
cleaner in the safest and most effective way.
For more information about vacuum cleaner care and operation, call your nearest Sears store.
You will need the complete model and serial numbers when requesting information. Your vacu-
um cleaner's model and serial numbers are located on the Model and Serial Number Plate.
Use the space below to record the model number and serial number of your new Kenmore
vacuum cleaner.
Model No.
Serial No.
Date of Purchase
Keep this book and your sales check (receipt) in a safe place for future reference.
LIMITED ONE YEAR WARRANTY ON KENMORE VACUUM CLEANER
This warranty is for one year from the date of purchase, and includes only private household
vacuum cleaner use. During the warranty year, when this vacuum cleaner is operated and
maintained according to the owner's manual instructions, Sears will repair any defects in
material or workmanship free of charge.
This warranty excludes vacuum cleaner bags, belts, light bulbs, and filters, which are
expendable parts and become worn during normal use.
For warranty service, return this vacuum cleaner to the nearest Sears Service Center in
the United States.
This warranty applies only while this product is in use in the United States. This warranty gives
you specific legal rights, and you may also have other rights which vary from state to state.
Sears, Roebuck and Co., D/817 WA, Hoffman Estates, IL 60179
2
WARNING:
Your safety is important to us.To reduce the risk
of fire, electrical shock, injury to persons or
damage when using your vacuum cleaner, follow
basic safety precautions including the following:
Read allinstructions in this manual before
assembling or using your vacuum cleaner.
Use your vacuum cleaner only as
described in this manual. Use only with
Sears recommended attachments.
Disconnect e_ectficalsupply before per-
forming maintenance to the brush area.
Failure to do so could result in electrical
shockor injury from movingparts.
Do not leave vacuum cleaner when
plugged in. Unplug from outlet when not in
use and before performing maintenance.
To reduce the risk of electrical shock - Do
not use outdoors or on wet surfaces.
Do not allow to be used as a toy. Close
attention is necessary when used by or
near children.
Do not use with a damaged cord or plug.
If vacuum cleaner is not working as !t
should, has been dropped, damaged, len
outdoors or aroppeo in water return itto a
Sears Serv ce Center.
Do not pull or carry by cord, use cord as
a handle,close a door on cord, or pull cord
around sharp edges or corners. Do not run
vacuum cJeaner over cord. Keep coro
away from heated surfaces.
Do not unplug by pulling on cord. To
unplug, grasp the plug, not the cord.
Do not handle plug or vacuum cleaner with
wet hands.
Do not put any objects into openings.
Do not use with any opening blocked;
keep free of dust, lint, hair, and anything
that may reduce air flow.
Keep hair, loose clothing,fingers, and all
parts of body away from openings and
moving parts.
Turn off all controlsbefore unplugging.
Do not restvacuumcleaner onsteps.
Do not put on chairs,tables, etc. Keep
on floor.
Do not use vacuum cleaner to pick up
flammable or combustibleliquids(gaso-
line, cleaning fluid, pedumes, etc.), or
use in areas where they may be present.
The fumes from these substances can cre-
ate a fire hazard or explosion.
Do not pick up anything that is burning or
smoking, such as cigarettes, matches, or
hot ashes.
Do not use vacuum cleaner withoutdust
bag and/orfilters in place.
Always change the dust bag after vacu-
uming carpet cleaners or freshener, pow-
ders, and fine dust. These products clo(
the bag, reduce airflow and can cause the
bag to burst, Failure to change the bag
promptly could cause permanent damage
to the cleaner.
Do not use the vacuum cleaner to pick up
sharphard objects,smalltoys,pins,paper
clips, etc. They may damagethe cleaneror
dustbag.
Always turn off and unplug the vacuum
cleaner before connectin_l or disconnect-
ing either hose, Handi-ma'[e Jr.
You are responsible for making sure that
your vacuum cleaner is not used by any-
one unable to operate it properly.
SAVE THESE INSTRUCTIONS
Proper assembly and safe use of your vacuum cleaner are your responsibilities. Your
cleaner is intended for Household use. Read this Owner's Manual carefully for important
use and safety information. This guide contains safety statements under warning and
caution symbols.
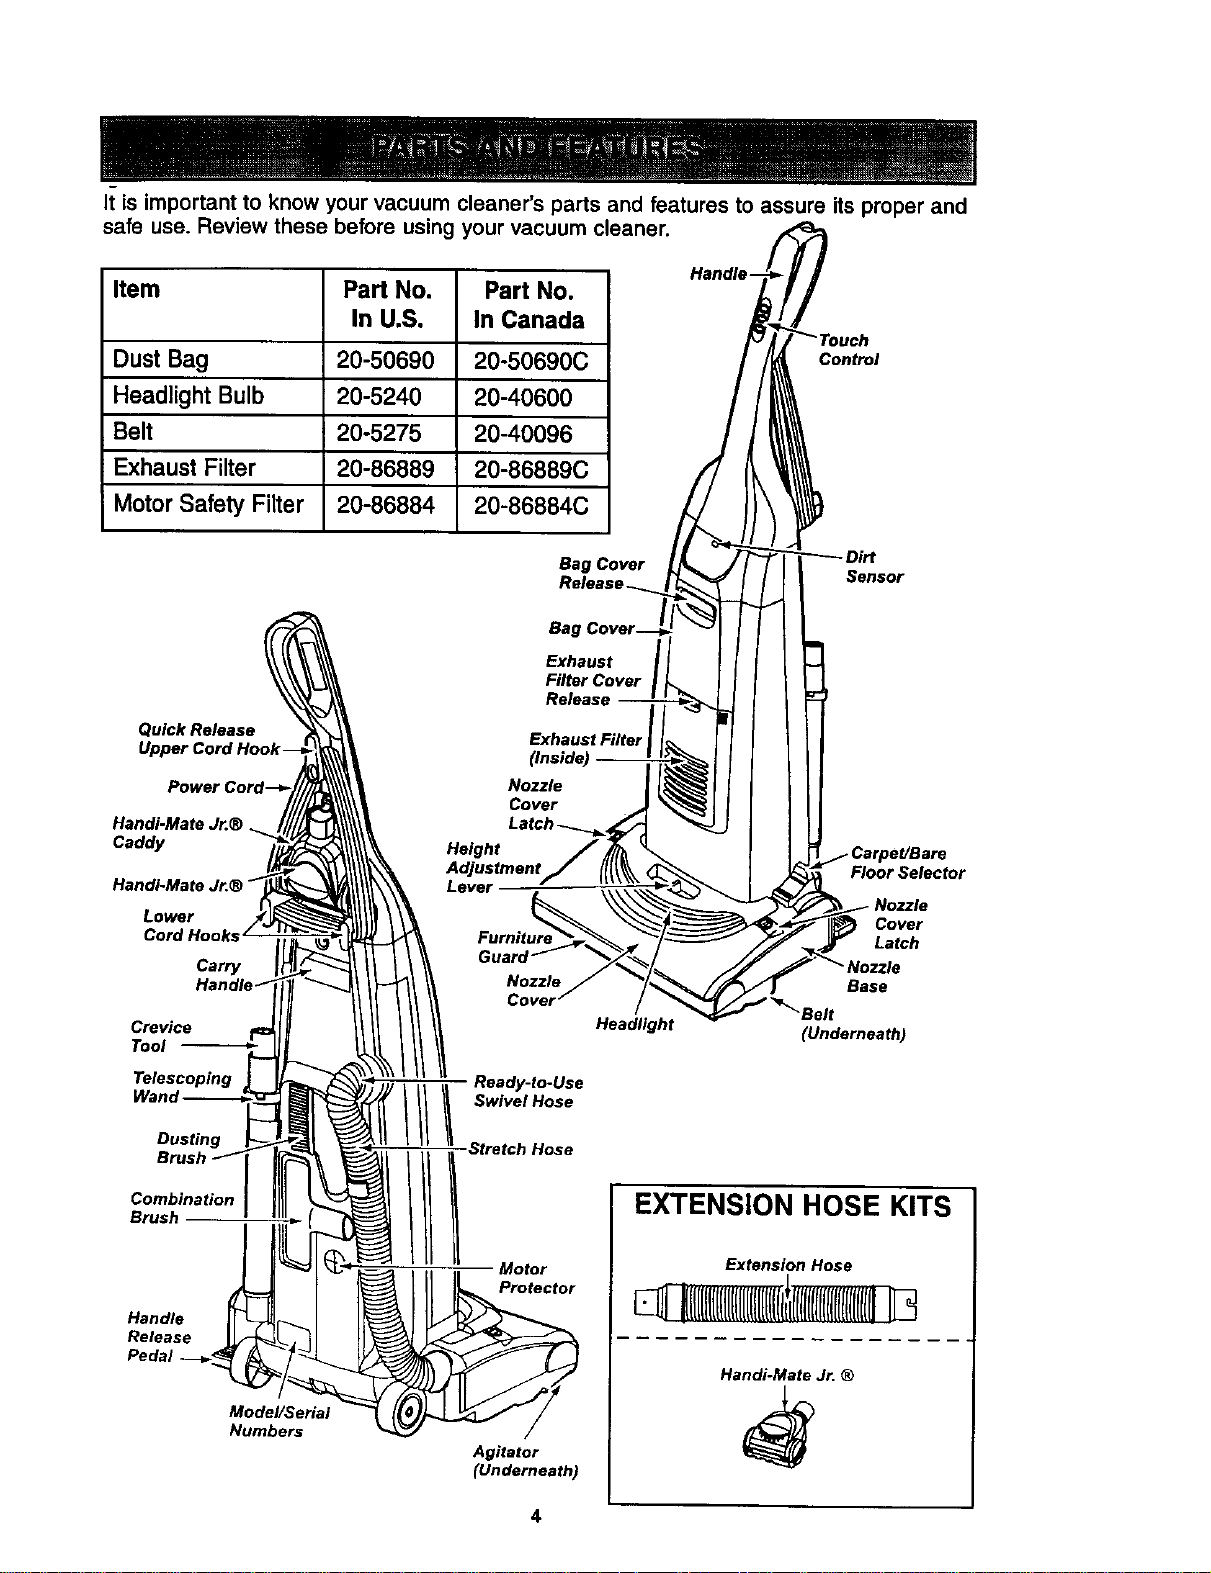
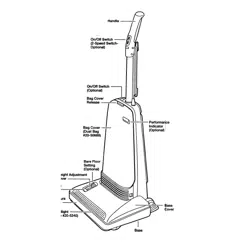
It is important to know your vacuum cleaner's parts and features to assure its proper and
safe use. Review these before using your vacuum cleaner.
Item Part No. Part No.
In U.S, In Canada
Dust Bag 20-50690 20-50690C
Headlight Bulb 20-5240 20-40600
Belt 20-5275 20-40096
Exhaust Filter 20-86889 20-86889C
Motor Safety Filter 20-86884 20-86884C
Control
Bag Cover
Sensor
Quick Release
Handi-MateJ_®
Caddy
HandI-Mate Jr.®
Lower
Cord Hooks
Carry
Crevice
Tool
Telescoping
Dusting
Combination
Brush
Handle
Release
Pedal
Model/Serial
Numbers
Height
Level
Ready-to-Use
////..No.
Stretch Hose
Motor
Protector
Agitator
(Underneath)
Floor Selector
Headlight
Cover
Latch
Base
Belt
(Underneath)
EXTENSION HOSE KITS
Extension Hose
Handi-Mate Jr. ®
_ IPlease payspecialattentionto these hazardalert boxes,and follow anyinstructionsl
Igiven. WARNING statementsalertyou tosuchdangersas fire, electricshock,burnsI
land personal injury. CAUTION statements alert you to such dangerouspersonalI
linjury and/or propertydamage, I
WARNING
Electrical Shock Hazard
Do not plug into the electrical sup-
ply until the assembly is complete.
Failure to do so could result In elec.
trical shock or injury.
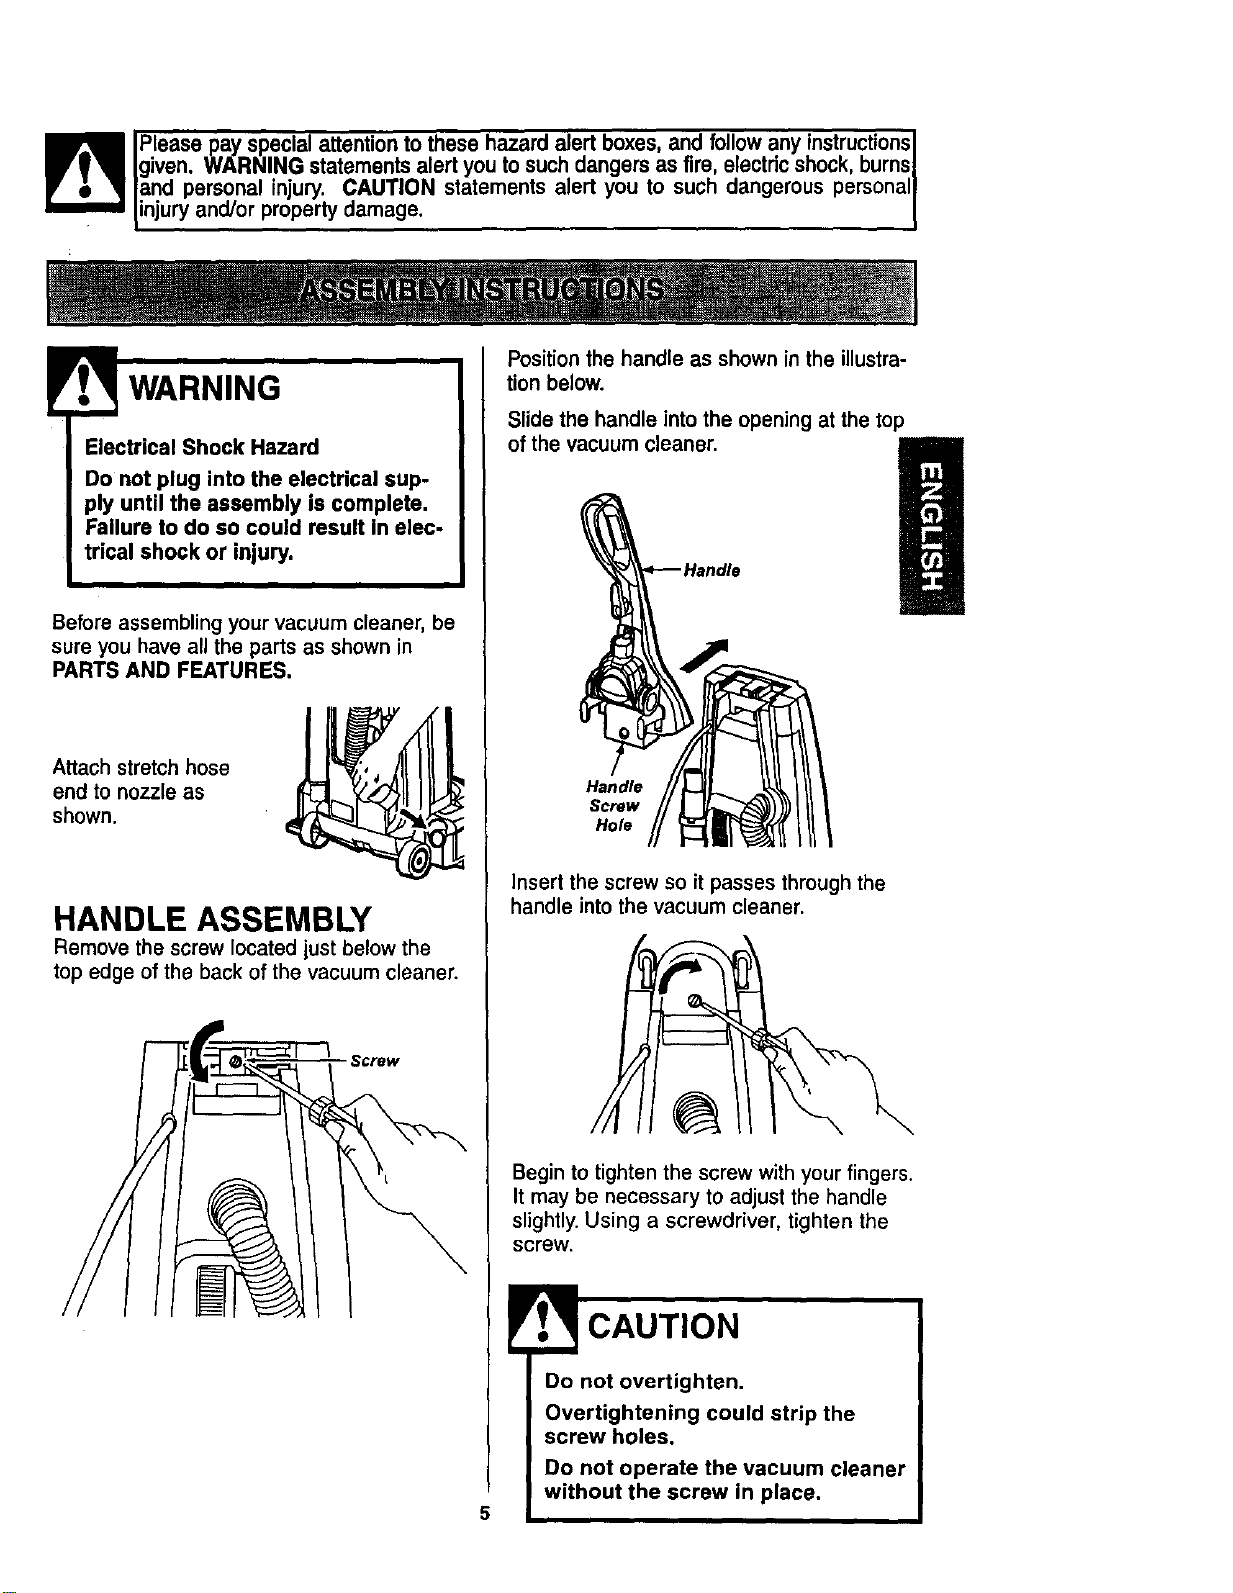
Before assembling your vacuum cleaner, be
sure you have all the parts as shown in
PARTS AND FEATURES.
Attach stretch hose
end to nozzle as
shown.
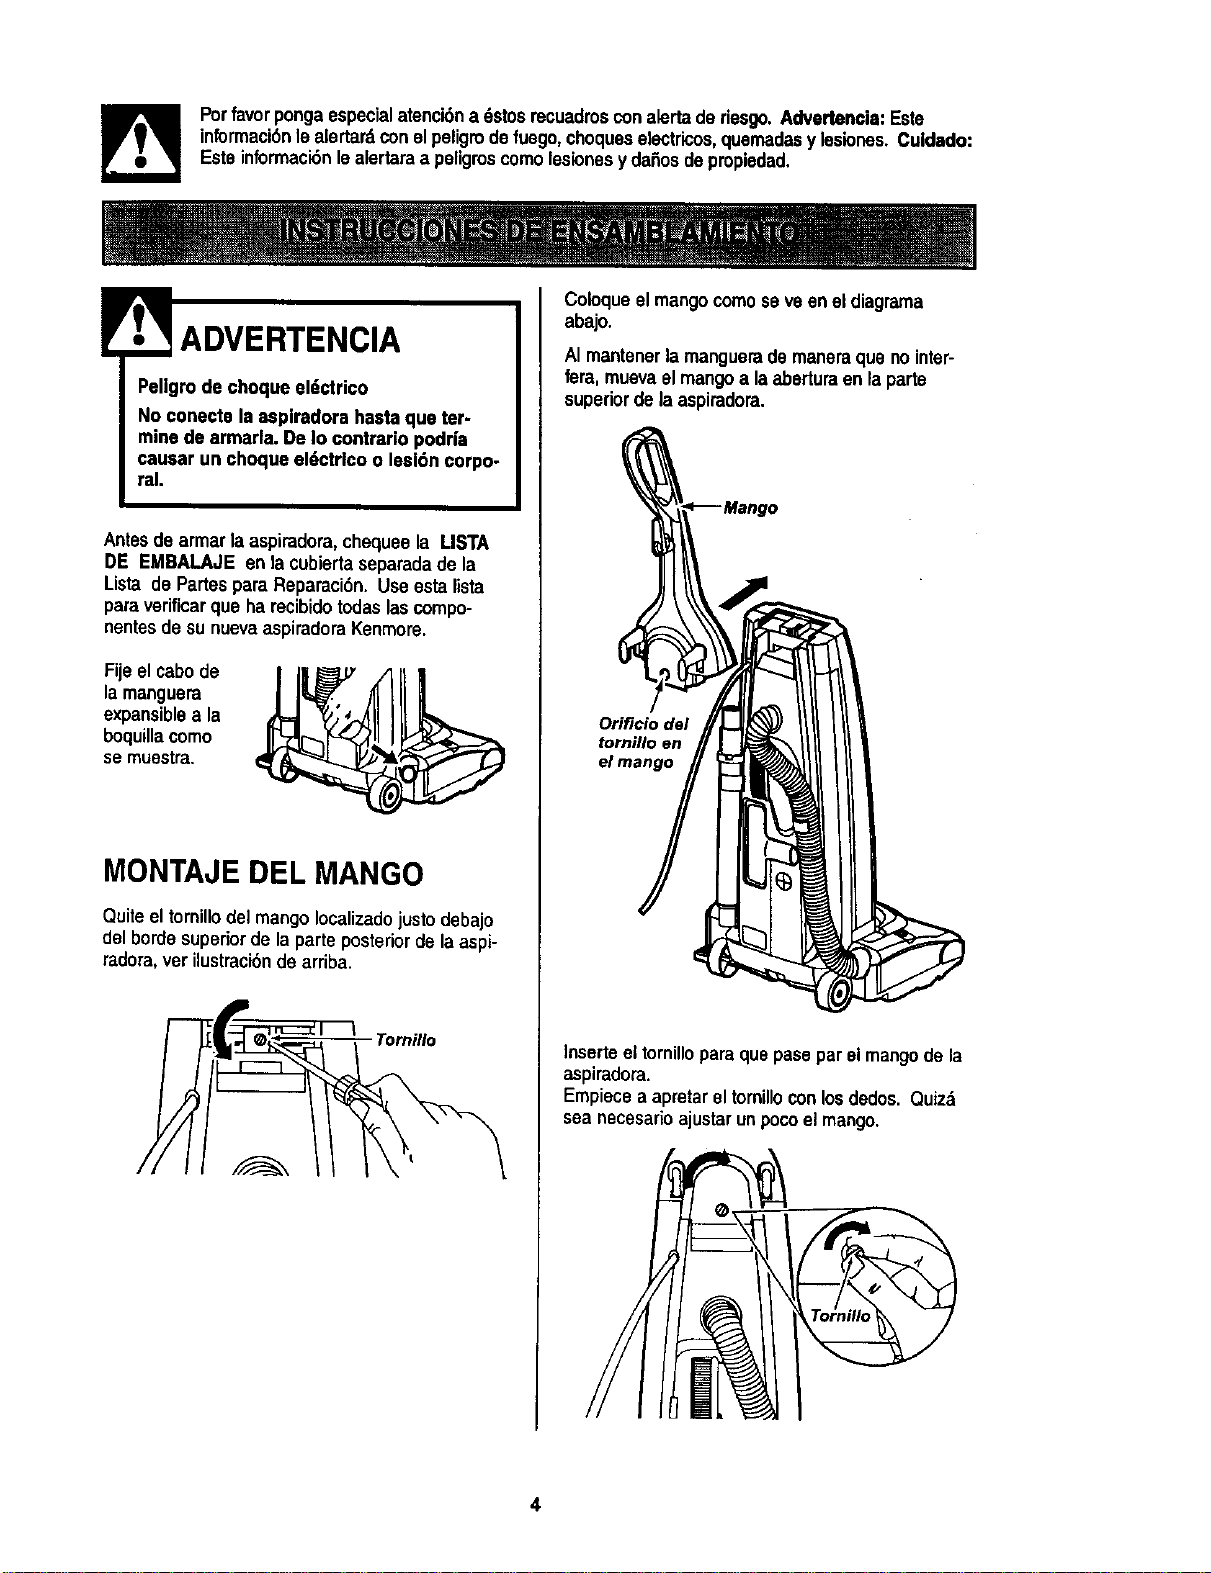
HANDLE ASSEMBLY
Remove the screw located just below the
top edge of the back of the vacuum cleaner.
Screw
Position the handle as shown in the illustra-
tion below.
Slide the handle into the opening at the top
of the vacuum cleaner.
Handle
Screw
Hole
insert the screw so it passes through the
handle into the vacuum cleaner.
Begin to tighten the screw with your fingers.
It may be necessary to adjust the handle
slightly. Using a screwdriver, tighten the
screw.
Do not overtighten.
Overtightening could strip the
screw holes.
Do not operate the vacuum cleaner
without the screw in place,
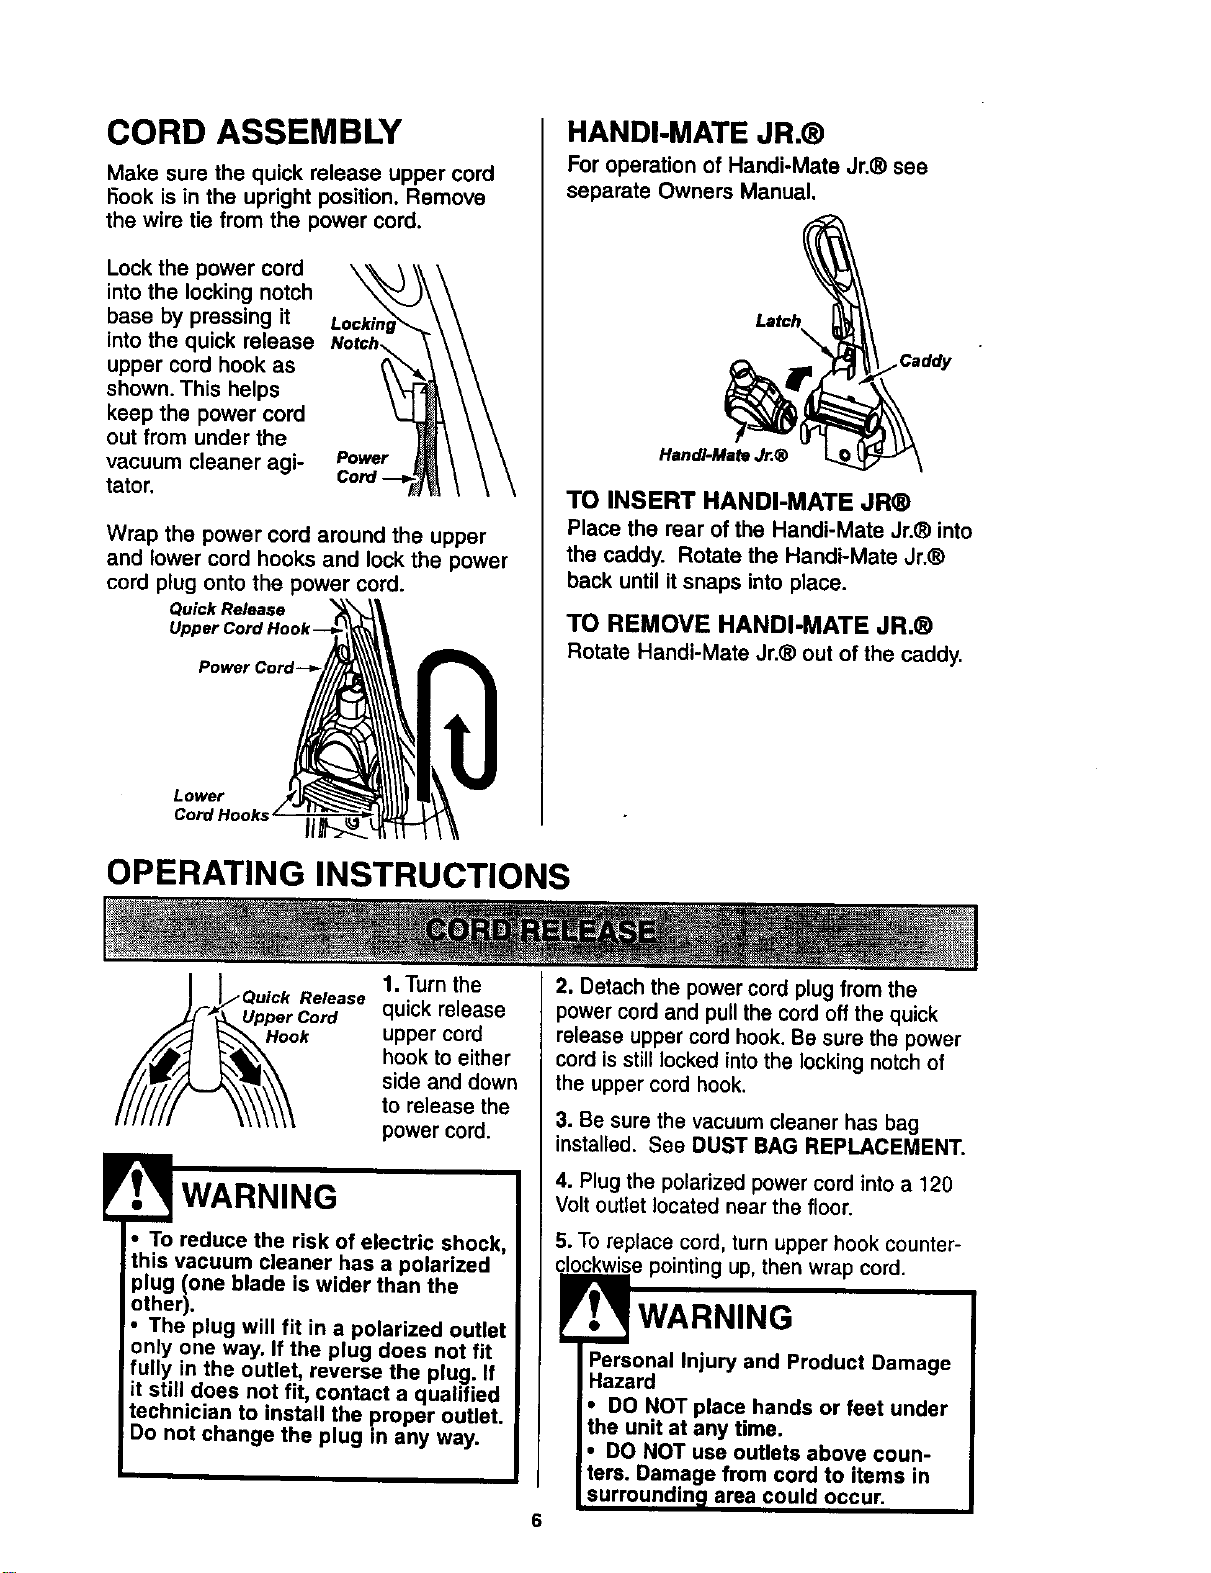
CORD ASSEMBLY
Make sure the quick release upper cord
I-3ookis in the upright position. Remove
the wire tie from the power cord.
Lock the power cord
into the locking notch
base by pressing it
into the quick release
upper cord hook as
shown. This helps
keep the power cord
out from under the
vacuum cleaner agi-
tator.
Power
Wrap the power cord around the upper
and lower cord hooks and lock the power
cord plug onto the power cord.
Quick Release
Lower
HANDI-MATE JR.®
For operation of Handi-Mate Jr.® see
separate Owners Manual.
La_h_ __
TO INSERT HANDI-MATE JR®
Place the rear of the Handi-Mate Jr.® into
the caddy. Rotate the Handi-Mate Jr.®
back until it snaps into place.
TO REMOVE HANDI-MATE JR.®
Rotate Handi-Mate Jr.® out of the caddy.
OPERATING INSTRUCTIONS
l
1. Turn the
Release
Upper Cord quick release
Hook upper cord
hook to either
side and down
to release the
power cord.
WARNING
• To reduce the risk of electric shock,
this vacuum cleaner has a polarized
plug (one blade is wider than the
other).
• The plug will fit in a polarized outlet
only one way. If the plug does not fit
fully in the outlet, reverse the plug. If
it still does not fit, contact a qualified
technician to install the proper outlet.
Do not change the plug in any way.
2. Detach the power cord plug from the
power cord and pull the cord off the quick
release upper cord hook. Be sure the power
cord is still locked into the locking notch of
the upper cord hook.
3. Be sure the vacuum cleaner has bag
installed. See DUST BAG REPLACEMENT.
4. Plug the polarized power cord into a 120
Volt outlet located near the floor.
5. To replace cord, turn upper hook counter-
clockwise pointing up, then wrap cord.
WARNING
6
Injury and Product Damage
Hazard
• DO NOT place hands or feet under
the unit at any time.
• DO NOT use outlets above coun-
ters. Damage from cord to items in
urroundin area could occur.
Toselectapileheightsetting:
Turnoffvacuumcleaner. Select a pile height
setting by tilting the vacuum cleaner back
until front wheels are lifted slightly off the
floor.
Slide the adjustment lever to the correct
setting.
There are tour (4) pile height settings on the
vacuum cleaner. Use the LOW setting for
most low-pile carpets and bare floor
cleaning (with agitator OFF), and the HIGH
setting for high-pile carpets like shag carpet,
scatter rugs, etc. Use the other settings as
needed for carpet heights in-between low
and high pile.
CAUTION
Do not allow vacuum cleaner to
remain in one spot for any length
of time when the agitator is turn-
ing. Damage to carpet may occur.
SOME MODELS
Bare floor setting: Slide the carpet/bare
floor selector all the way back and down
toward the bottom of the nozzle until it
locks into place.
In this position the brush assembly does
not revolve. This setting should be used
for cleaning hardwood and tile floors and
when any attachments (tools) are
used.
Carpet setting: Slide the selector all the
way forward and up to the carpet
position.
In this position the brush assembly will
turn. When carpets are being cleaned the
selector should be in this position.
Attention: Refer to your carpet manufac-
turers cleaning recommendations. Some
more delicate carpets may require that
they be vacuumed with the agitator turned
off, to prevent carpet damage.
! CAUTION
Do not allow vacuum cleaner to
remain in one spot for any length
of time when the agitator is turn-
ing. Damage to carpet may occur.
Note: For longer belt life, turn the vacuum
cleaner off before moving selector, other-
wise make sure the selector is pushed
fully and quickly as possible to the
desired position. Failure to do so can
cause the belt to rub on the selector shaft
and may result in the belt becoming hot
and creating a burning rubber smell.
Carpet/Bare
Floor Selector
To Bare Floor
Position
To Carpet
Position
7
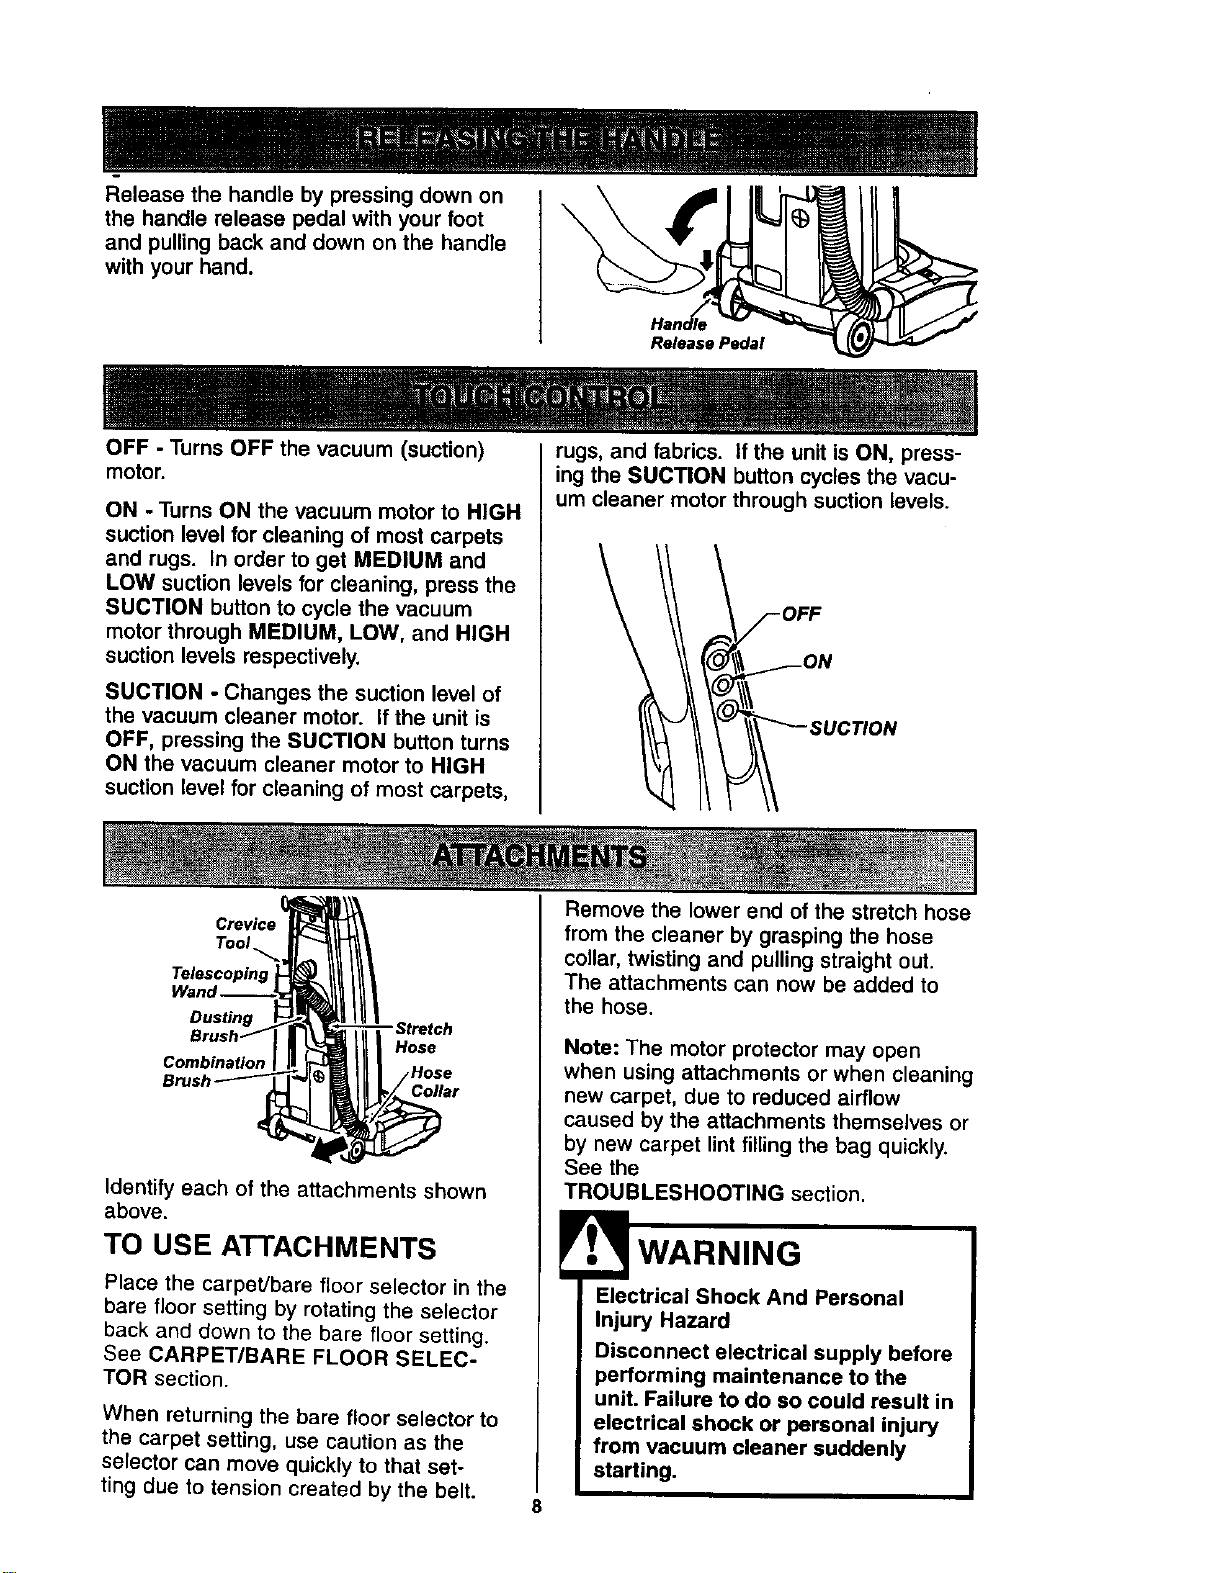
Releasethehandlebypressingdownon
thehandlereleasepedalwithyourfoot
and pulling back and down on the handle
with your hand.
Release Pedal
OFF - Turns OFF the vacuum (suction)
motor.
ON - Turns ON the vacuum motor to HIGH
suction level for cleaning of most carpets
and rugs. In order to get MEDIUM and
LOW suction levels for cleaning, press the
SUCTION button to cycle the vacuum
motor through MEDIUM, LOW, and HIGH
suction levels respectively.
SUCTION - Changes the suction level of
the vacuum cleaner motor. If the unit is
OFF, pressing the SUCTION button turns
ON the vacuum cleaner motor to HIGH
suction level for cleaning of most carpets,
rugs, and fabrics, if the unit is ON, press-
ing the SUCTION button cycles the vacu-
um cteaner motor through suction levels.
Dusting
Combination
Hos_
_Hose
Collar
Identify each of the attachments shown
above.
TO USE ATTACHMENTS
Place the carpeVbare floor selector in the
bare floor setting by rotating the selector
back and down to the bare floor setting.
See CARPET/BARE FLOOR SELEC-
TOR section.
When returning the bare floor selector to
the carpet setting, use caution as the
selector can move quickly to that set-
ting due to tension created by the belt.
Remove the tower end of the stretch hose
from the cleaner by grasping the hose
collar, twisting and pulling straight out.
The attachments can now be added to
the hose.
Note: The motor protector may open
when using attachments or when cleaning
new carpet, due to reduced airflow
caused by the attachments themselves or
by new carpet lint filling the bag quickly.
See the
TROUBLESHOOTING section.
Electrical Shock And Personal
Injury Hazard
Disconnect electrical supply before
performing maintenance to the
unit. Failure to do so could result in
electrical shock or personal injury
from vacuum cleaner suddenly
starting.
8
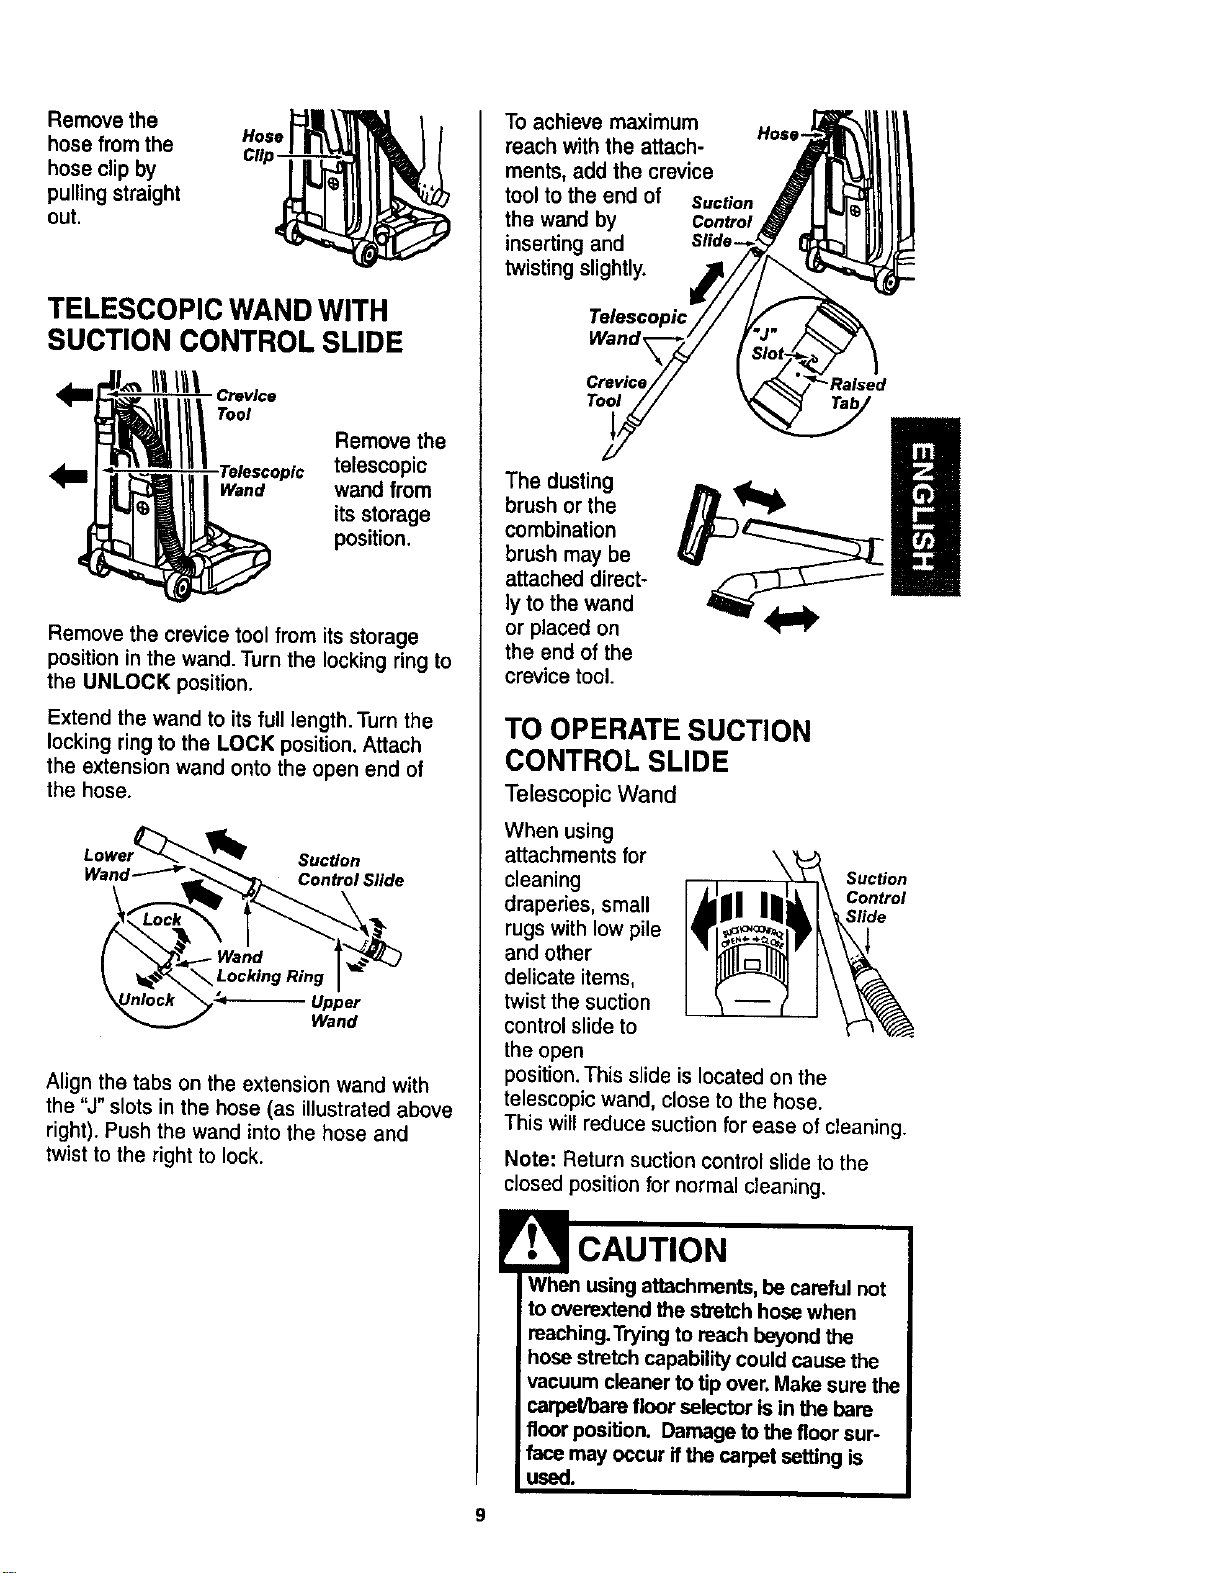
Remove the
hose from the Hose
hose clip by
pulling straight
out.
TELESCOPIC WAND WITH
SUCTION CONTROL SLIDE
Crevice
Tool
Remove the
Telescopic telescopic
Wand wand from
its storage
position.
Remove the crevice tool from its storage
position in the wand. Turn the locking ring to
the UNLOCK position.
Extend the wand to its full length. Turn the
locking ring to the LOCK position. Attach
the extension wand onto the open end of
the hose.
Lower_"_ '_ Suction
Wand'-""-_'.,_"_p_ Control Slide
_ Wand _.-_..]
_Unloc_ "_,-<- Upper
Wand
Align the tabs on the extension wand with
the "J" slots in the hose (as illustrated above
right). Push the wand into the hose and
twist to the right to lock.
To achieve maximum Hose-
reach with the attach-
ments, add the crevice
tool to the end of suction
the wand by Control
inserting and
twisting slightly.
Telescopic
Wand
Toot
"Ra_ed
The dusting
brush or the
combination
brush may be
attached direct-
ly to the wand
or placed on
the end of the
crevice tool.
TO OPERATE SUCTION
CONTROL SLIDE
Telescopic Wand
When using
attachments for \
cleaning Suction
Control
draperies, small S#de
rugs with low pile
and other
delicate items,
twist the suction
control stide to
the open
position. This slide is located on the
telescopic wand, close to the hose.
This will reduce suction for ease of cleaning.
Note: Return suction control slide to the
closed position for normal cleaning.
When using attachments, be careful not
to overextend the stretch hose when
reaching. Trying to reach beyond the
hose stretch capability could cause the
vacuum cleaner to tip over, Make sure the
carpet/bare floor selector is in the bare
floor position. Damage to the floor sur-
face may occur ifthe carpet setting is
used.
9

TO STORE ATTACHMENTS
Remove dusting brush or combination
Drush. Snap into appropriate storage location.
Remove crevice tool from the wand by twist-
ing. Lay aside.
Remove the extension wand from the hose.
Twist the wand to the left and pull from the
hose end.
Wand
Unlock
\
Locking
Ring I_
Upper
Wand
Unlock the wand by turning the wand lock-
ing ring to the UNLOCK position.
Slide the lower wand into the upper wand,
Turn the wand locking ring to the LOCK
position.
Place the crevice tool down into the com-
pressed wand. Snap into the appropriate
storage location.
Reinsert the hose fully into the opening on
the nozzle body from which it was removed.
Press firmly to assure connection
!
CAUTION
DO NOT pull the vacuum cleaner
around the room by the hose.
Property damage or personal injury
could result.
EXTENSION HOSE
Some models include an extension hose
which connects to the stretch hose on the
vacuum cleaner for a longer cleaning reach.
Insert the two tabs on the end of the
Unit Hose _ Extension Hose
extension hose into the two "J" shaped slots
on the stretch hose and twist to connect.
All attachments and the telescopic wand can
be attached to the open end of the hose.
CAUTION
When using the stretch hose or with
the extension hose attached, the
vacuum cleaner should be on a solid
surface on the same level or below
the level of the user's feel DO NOT
use the hoses when the vacuum
cleaner is above the level of the
user's feet.
ATTACHMENT
DUSTING BRUSH
CREVICE TOOL
COMBINATION BRUSH
Handi-Mate Jr.®
CLEANING AREA
Furniture*
=/
v'
=/
on fabrics.
Between
Cushions*
v'
t/
*Always clean attachmentsbefore usin
Stairs Walls
v'
v'
v'
l/
V' = Applicable
10
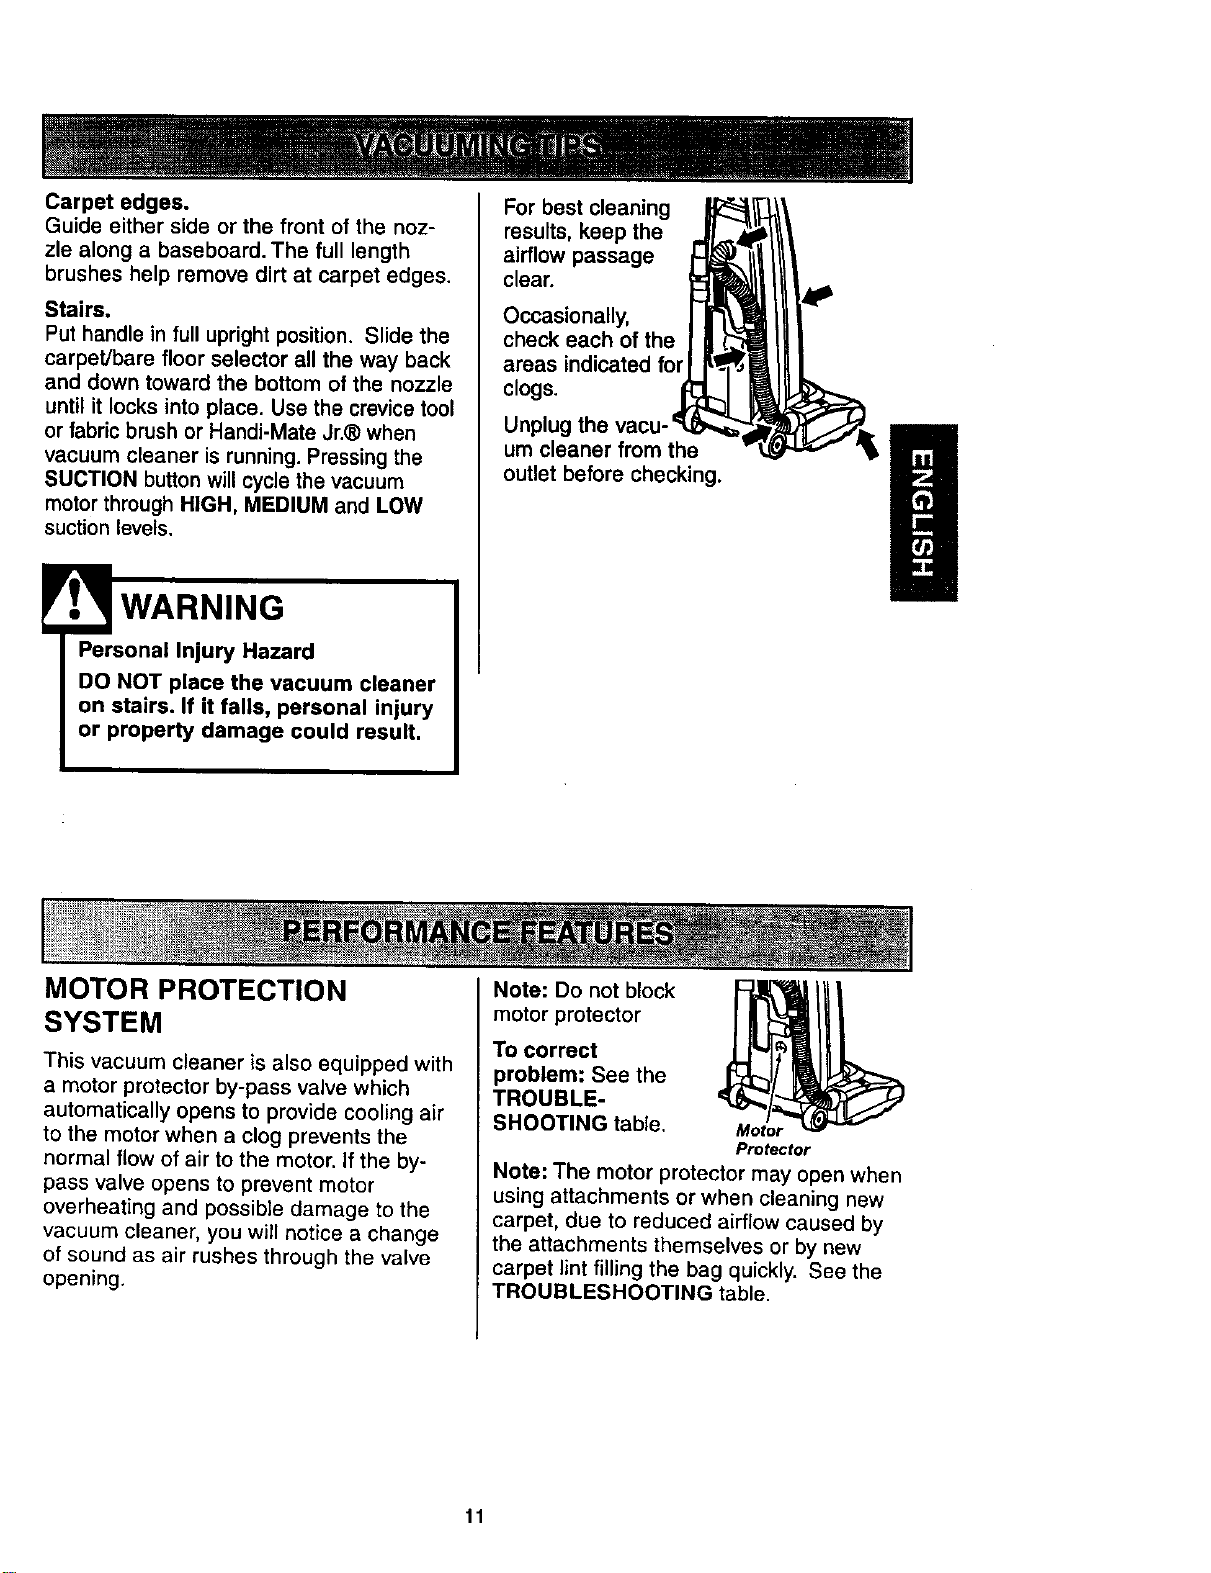
Carpet edges.
Guide either side or the front of the noz-
zle along a baseboard. The full length
brushes help remove dirt at carpet edges.
Stairs.
Put handle in full upright position. Slide the
carpet/bare floor selector all the way back
and down toward the bottom of the nozzle
until it locks into place. Use the crevice tool
or fabric brush or Handi-Mate Jr.® when
vacuum cleaner is running. Pressing the
SUCTION button will cycle the vacuum
motor through HIGH, MEDIUM and LOW
suction levels.
WARNING
Personal Injury Hazard
DO NOT place the vacuum cleaner
on stairs. If it falls, personal injury
or property damage could result,
For best cleaning
results, keep the
airflow passage
clear.
Occasionally,
check each of the
areas indicated for
clogs.
Unplug
um cleaner from the
outlet before checking.
MOTOR PROTECTION
SYSTEM
This vacuum cleaner is also equipped with
a motor protector by-pass valve which
automatically opens to provide cooling air
to the motor when a clog prevents the
normal flow of air to the motor, if the by-
pass valve opens to prevent motor
overheating and possible damage to the
vacuum cleaner, you will notice a change
of sound as air rushes through the valve
opening.
Note: Do not block
motor protector
To correct
problem: See the
TROUBLE-
SHOOTING table. Motor
Protector
Note: The motor protector may open when
using attachments or when cleaning new
carpet, due to reduced airflow caused by
the attachments themselves or by new
carpet lint filling the bag quickly. See the
TROUBLESHOOTING table.
11
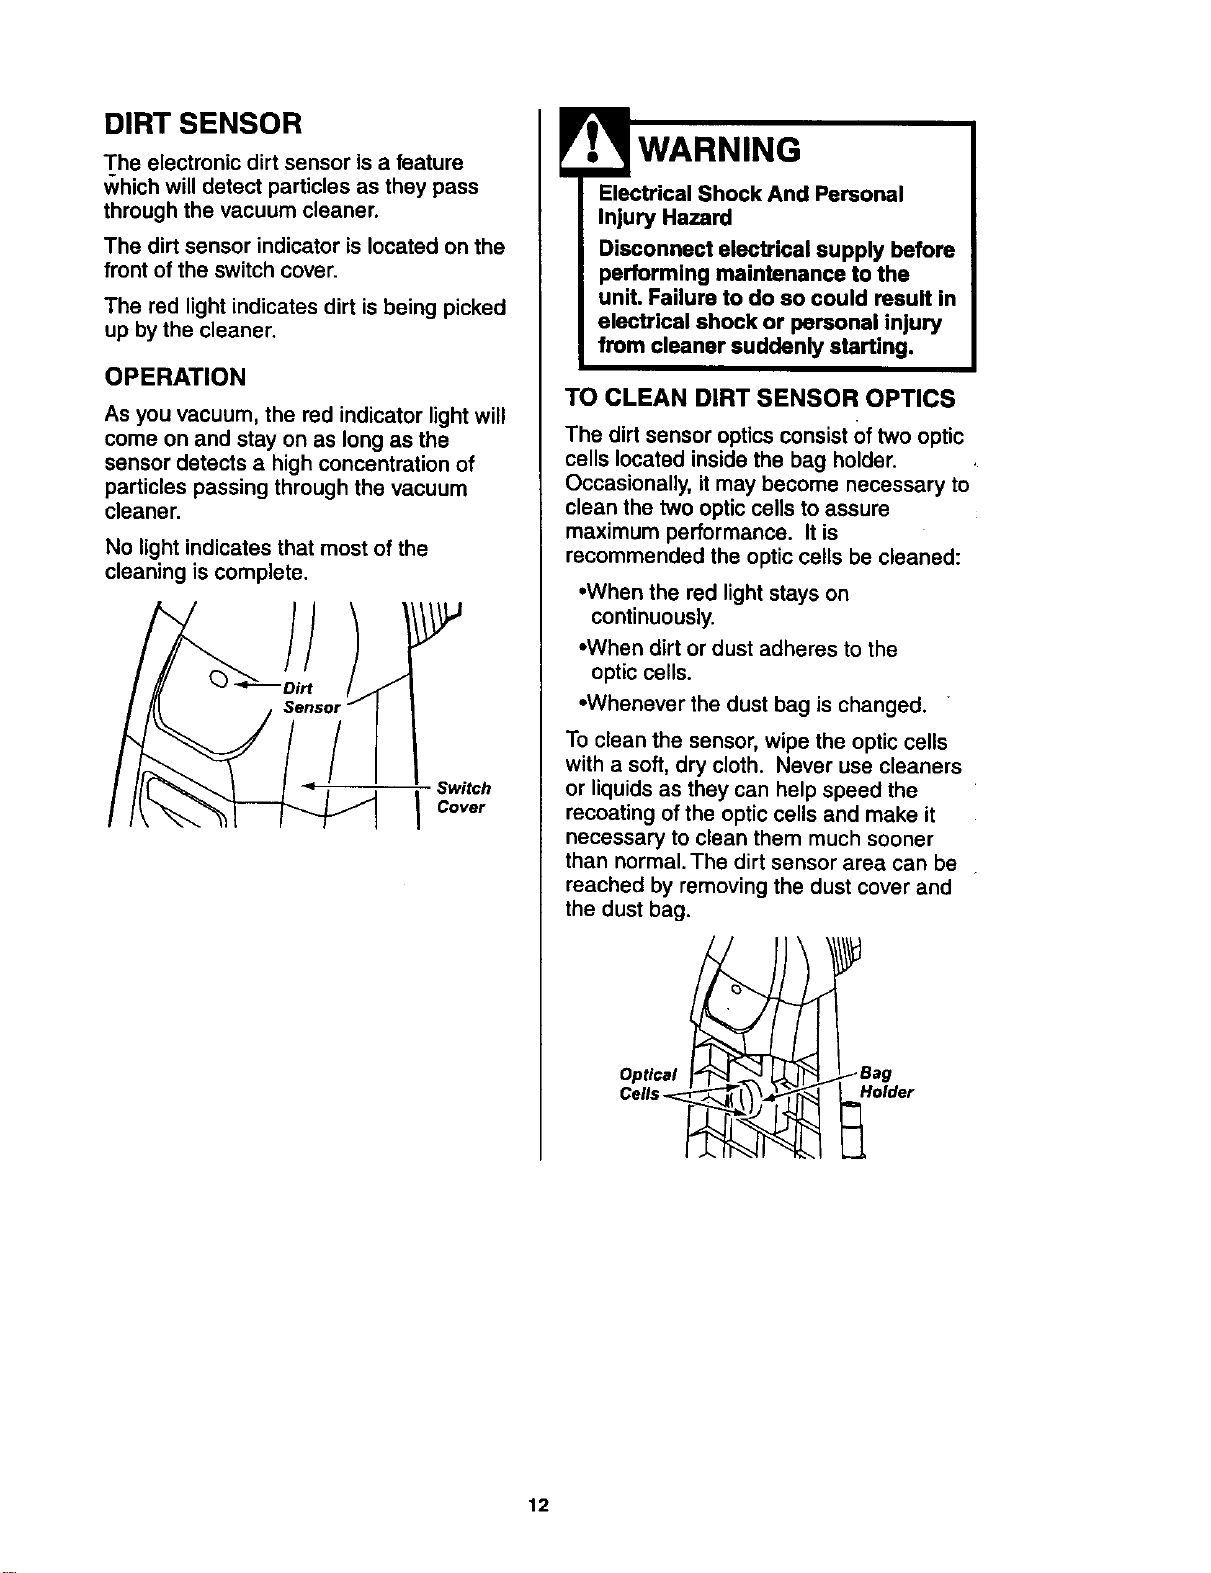
DIRT SENSOR
The electronic dirt sensor is a feature
which will detect particles as they pass
through the vacuum cleaner.
The dirt sensor indicator is located on the
front of the switch cover.
The red light indicates dirt is being picked
up by the cleaner.
OPERATION
As you vacuum, the red indicator light will
come on and stay on as long as the
sensor detects a high concentration of
particles passing through the vacuum
cleaner.
No light indicates that most of the
cleaning is complete.
Switch
I Cover
Electrical Shock And Personal
Injury Hazard
Disconnect electrical supply before
performing maintenance to the
unit. Failure to do so could result in
electrical shock or personal injury
from cleaner suddenly starting.
TO CLEAN DIRT SENSOR OPTICS
The dirt sensor optics consist Of two optic
cells located inside the bag holder.
Occasionally, it may become necessary to
clean the two optic cells to assure
maximum performance. It is
recommended the optic cells be cleaned:
•When the red light stays on
continuously.
•When dirt or dust adheres to the
optic cells.
•Whenever the dust bag is changed.
To clean the sensor, wipe the optic cells
with a soft, dry cloth. Never use cleaners
or liquids as they can help speed the
recoating of the optic cells and make it
necessary to clean them much sooner
than normal. The dirt sensor area can be
reached by removing the dust cover and
the dust bag.
Optical
Cells _.
Ii
_Bag
Holder
12
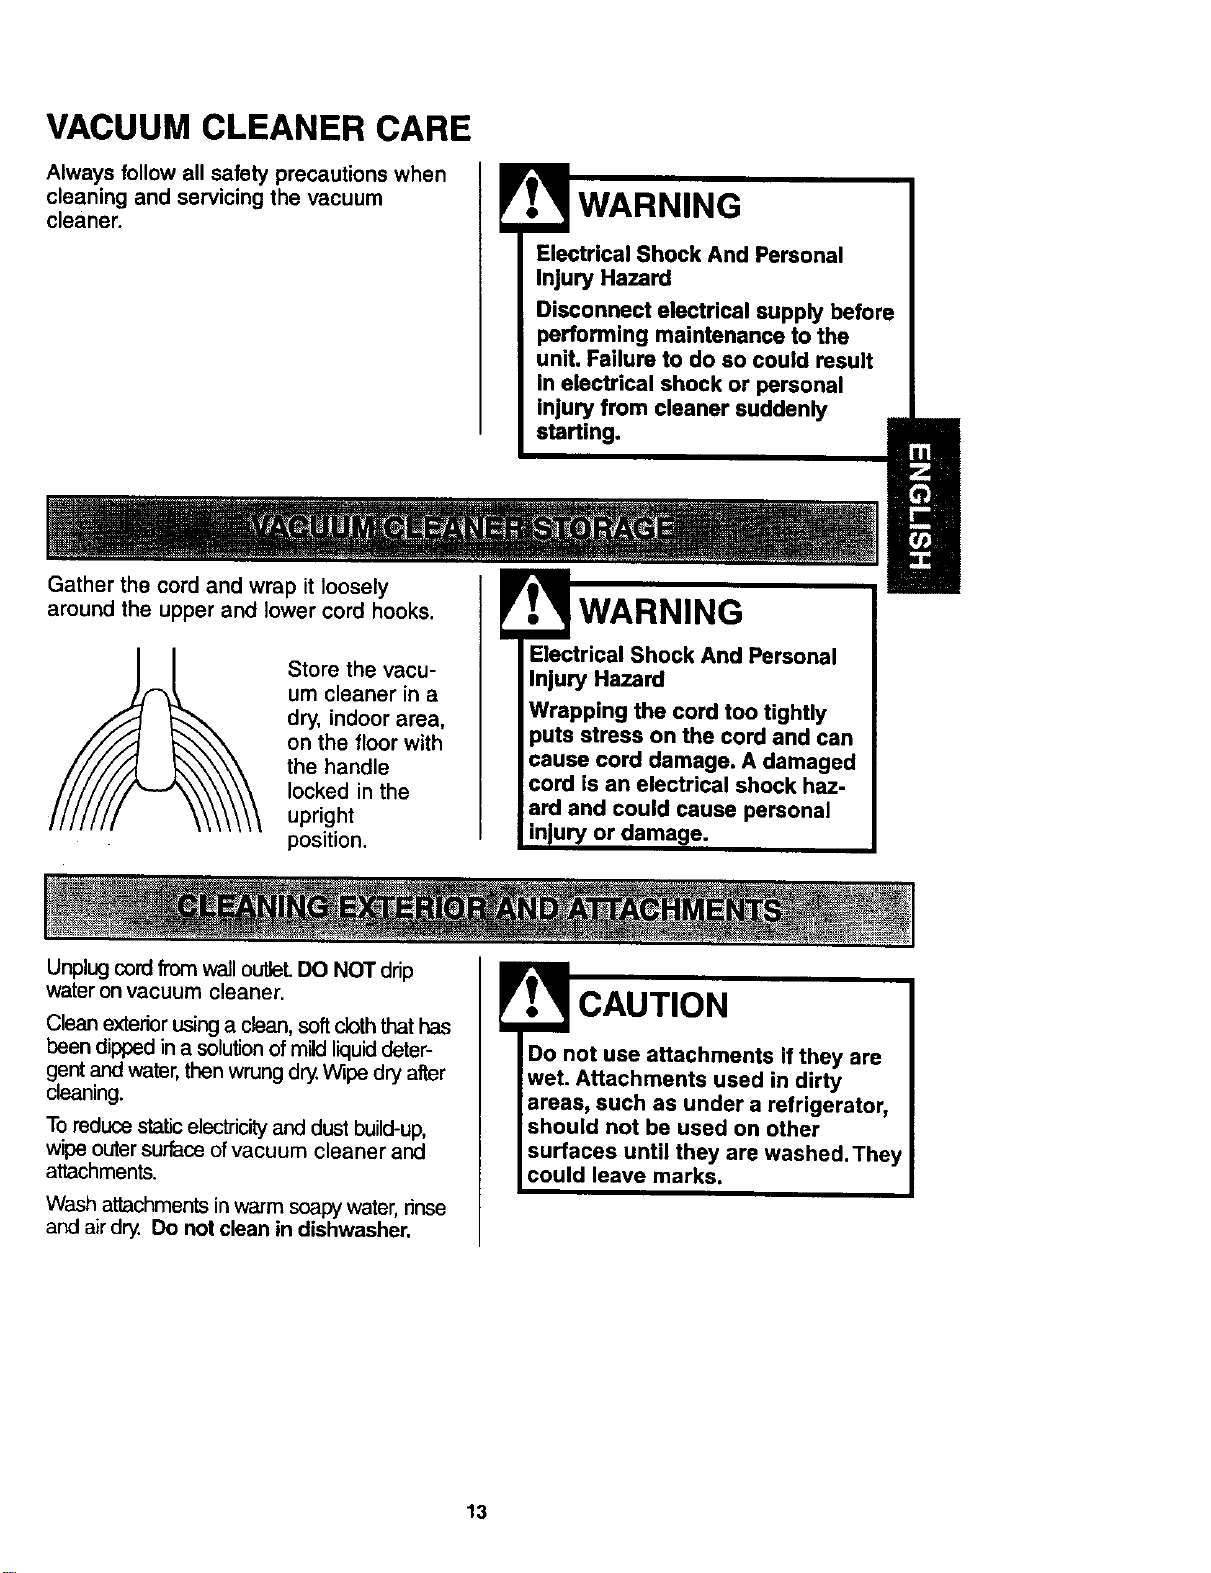
VACUUM CLEANER CARE
Always follow all safety precautions when
cleaning and servicing the vacuum
cleaner.
Electrical Shock And Personal
Injury Hazard
Disconnect electrical supply before
performing maintenance to the
unit. Failure to do so could result
in electrical shock or personal
injury from cleaner suddenly
starting.
Gather the cord and wrap it loosely
around the upper and lower cord hooks.
Store the vacu-
um cleaner in a
dry, indoor area,
on the floor with
the handle
locked in the
upright
position.
WARNING
Electrical Shock And Personal
Injury Hazard
Wrapping the cord too tightly
he cord and can
ged
cord is an electrical shock haz-
ard and could cause personal
or damage.
Unplug cordfrom wall outleL DO NOT drip
water on vacuum cleaner.
Clean exterior using a clean, soft cloth that has
been dipped in a solution of mild liquid deter-
gent and water, then wrung dry. Wipe dry after
cleaning.
To reduce static electricity and dust build-up,
wipe outer surface of vacuum cleaner and
attachments.
Wash attachments in warm soapy water, rinse
and air dry. Do not clean in dishwasher.
Do not use attachments if they are
wet. Attachments used in dirty
areas, such as under a refrigerator,
should not be used on other
surfaces until they are washed. They
could leave marks.
13
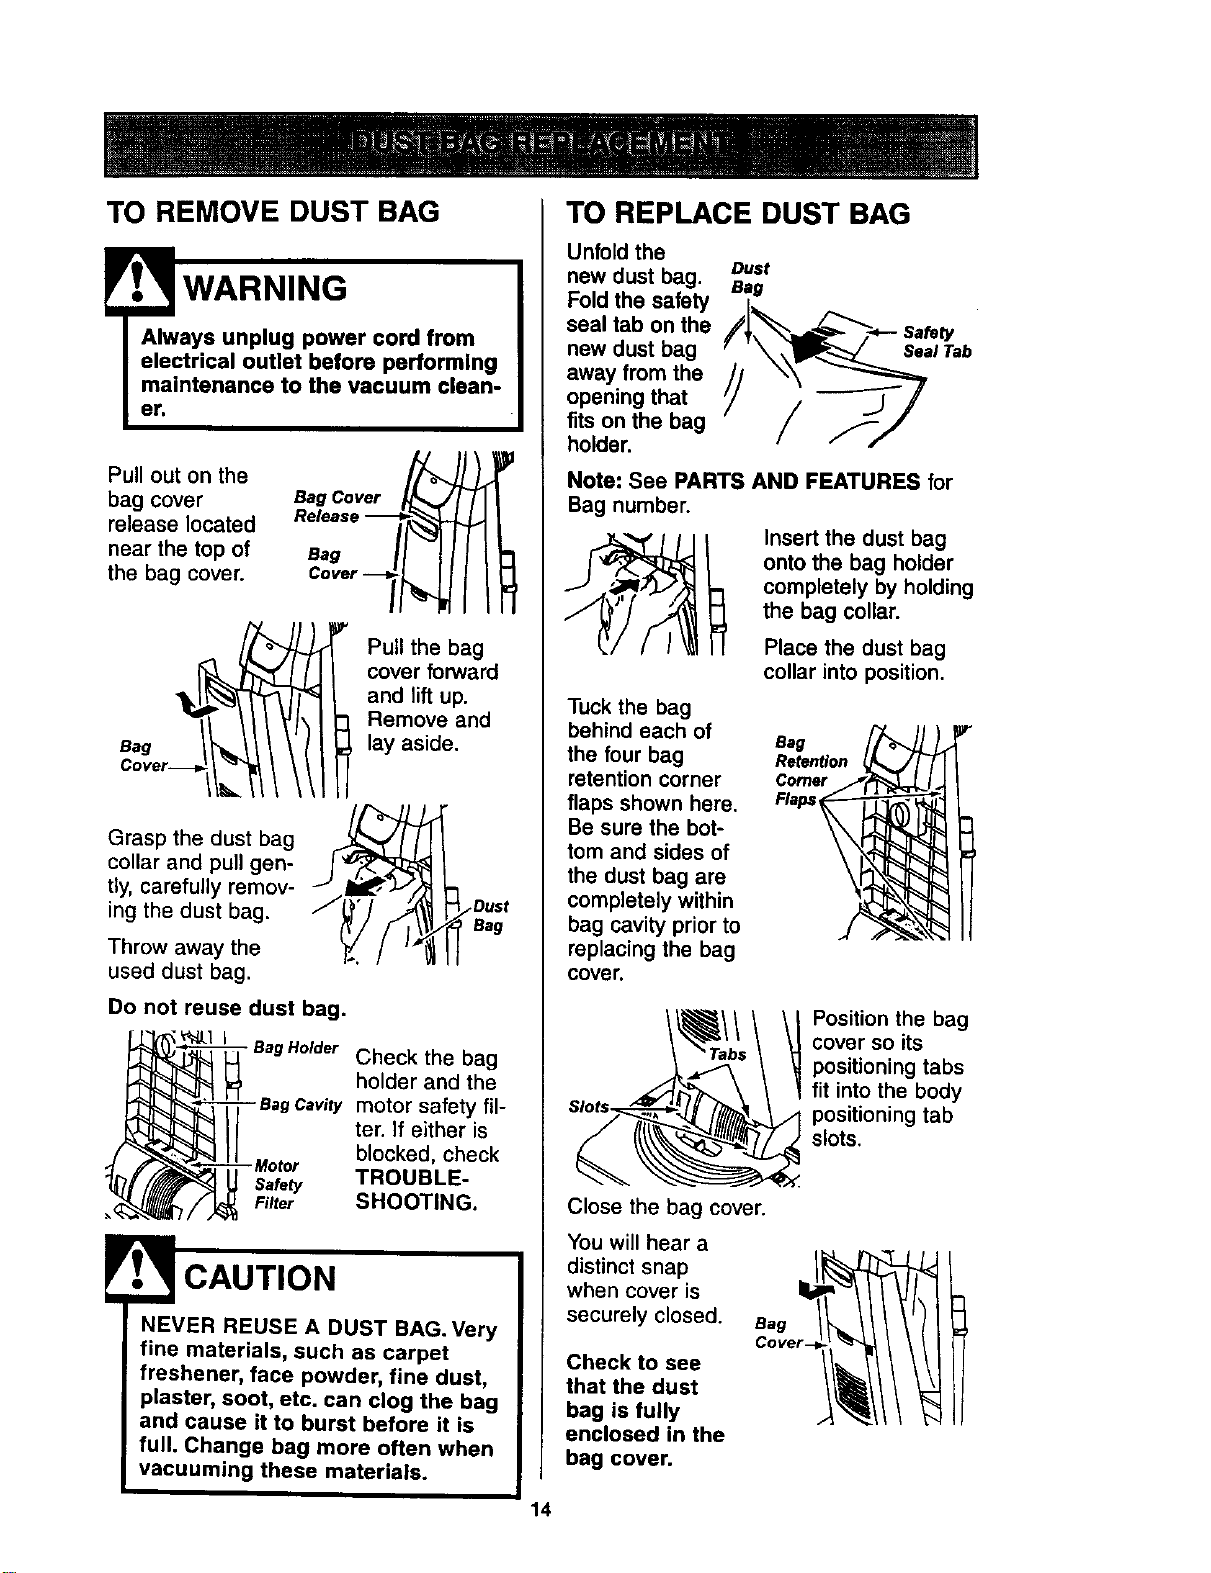
TO REMOVE DUST BAG
! WARNING
Always unplug power cord from
electrical outlet before performing
maintenance to the vacuum clean-
st.
Pull out on the
bag cover
release located
near the top of
the bag cover.
Bag Cover
O°"r-l
Bag
Pull the bag
cover forward
and lift up.
Remove and
lay aside.
Grasp the dust bag
collar and pull gen-
tly, carefully remov-
ing the dust bag.
Throw away the
used dust bag.
Bag
Do not reuse dust bag.
_ l Bag Holder Check the bag
holder and the
/_-_-_eagCavitymotorsafetyfil-
ter. if either is
blocked, check
SHOOTING.
NEVER REUSE A DUST BAG.Very
fine materials, such as carpet
freshener, face powder, fine dust,
plaster, soot, etc. can clog the bag
and cause it to burst before it is
full. Change bag more often when
vacuuming these materials.
TO REPLACE DUST BAG
Unfold the
new dust bag.
Fold the safety
seal tab on the
new dust bag
away from the
opening that
fits on the bag
holder.
Dust
Bag
Note: See PARTS AND FEATURES for
Bag number.
__ Insert the dust bag
onto the bag holder
completely by holding
the bag collar.
Place the dust bag
collar into position.
Tuck the bag
behind each of
the four bag
retention corner
flaps shown here.
Be sure the bot-
tom and sides of
the dust bag are
completely within
bag cavity prior to
replacing the bag
cover.
Bag
Retention
Comer
Flaps
Position the bag
cover so its
positioning tabs
fit into the body
positioning tab
slots.
Close the bag cover.
You will hear a
distinct snap
when cover is
securely closed. Bag
Check to see
that the dust
bag is fully
enclosed in the
bag cover.
14
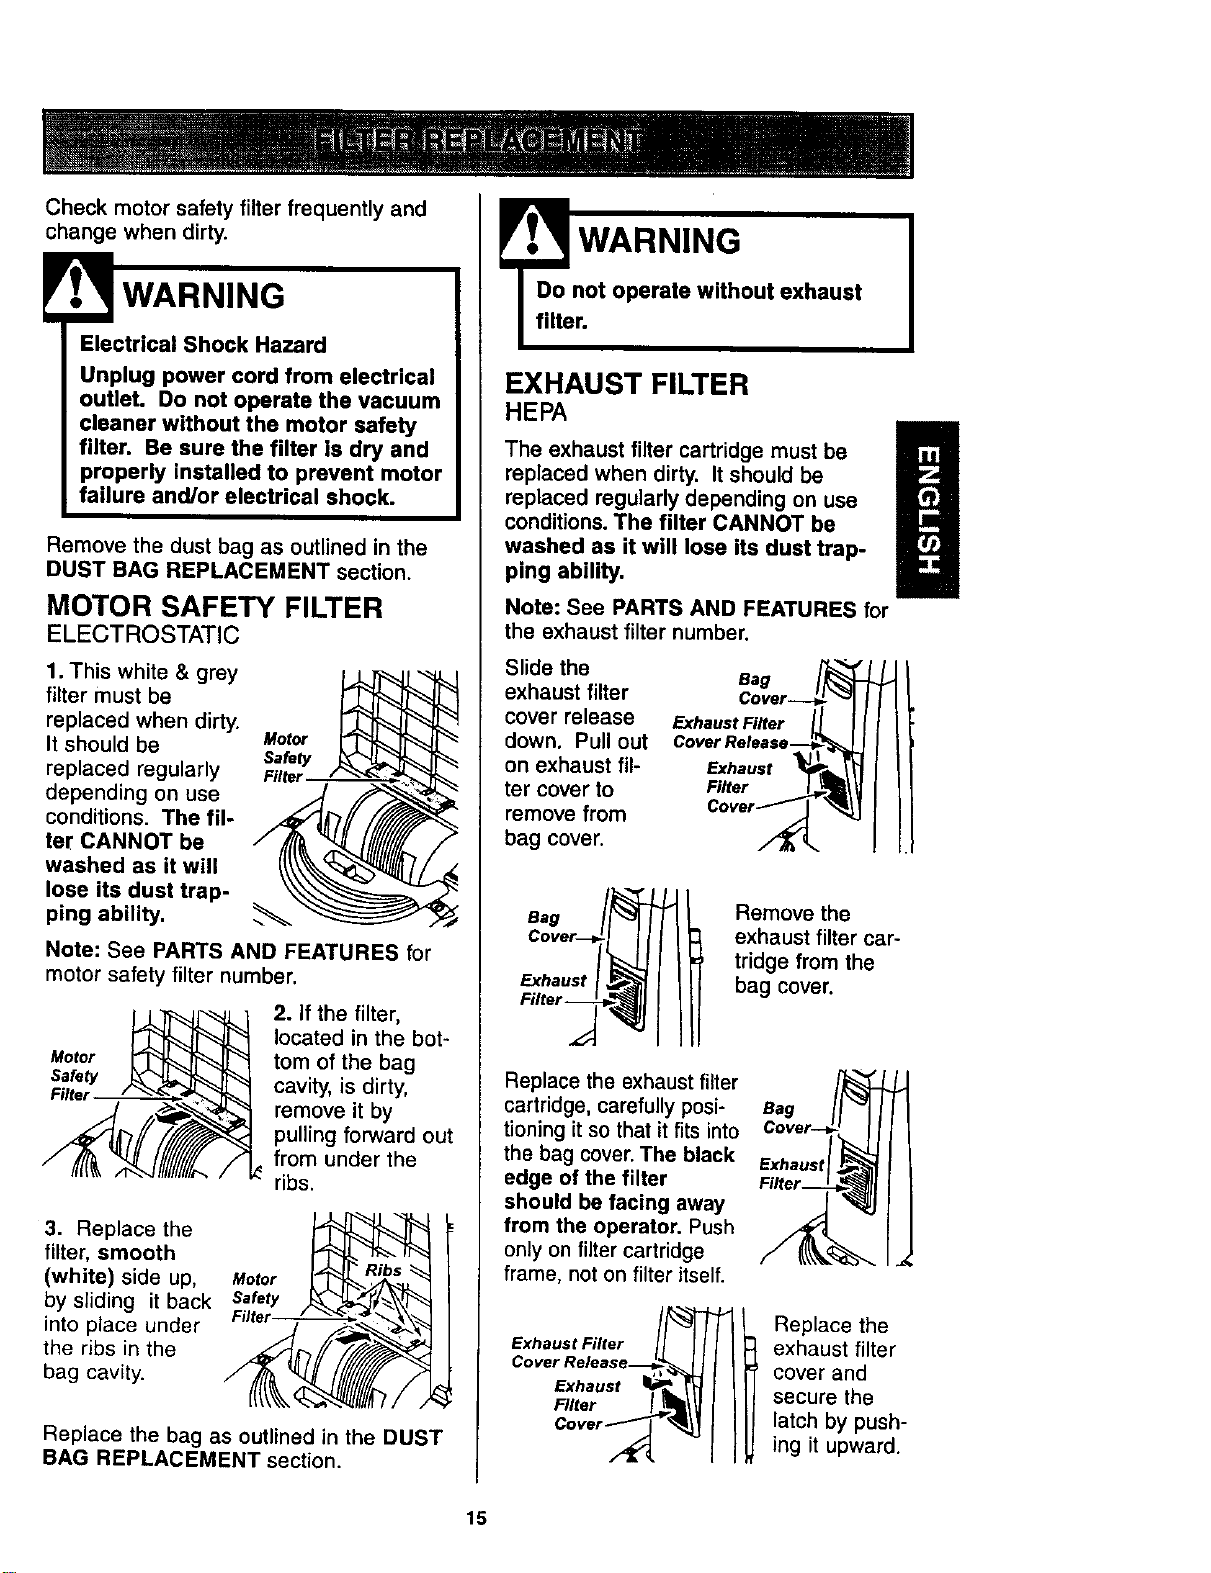
Check motor safety filter frequently and
change when dirty.
Electrical Shock Hazard
Unplug power cord from electrical
outlet. Do not operate the vacuum
cleaner without the motor safety
filter. Be sure the filter is dry and
properly installed to prevent motor
failure and/or electrical shock.
Remove the dust bag as outlined in the
DUST BAG REPLACEMENT section.
MOTOR SAFETY FILTER
ELECTROSTATIC
1. This white & grey
filter must be
replaced when dirty.
It should be Motor
SafeW
replaced regularly FilteJ
depending on use
conditions. The ill-
ter CANNOT be
washed as it will
lose its dust trap-
ping ability.
Note: See PARTS AND FEATURES for
motor safety filter number.
Motor
Safety
Filter
2. If the filter,
located in the bot-
tom of the bag
cavity, is dirty,
remove it by
pulling forward out
from under the
ribs.
3. Replace the
filter, smooth
(white) side up, Motor
by sliding it back Safety
into place under
the ribs in the
bag cavity.
Replace the bag as outlined in the DUST
BAG REPLACEMENT section.
! WARNING
Do not operate without exhaust
filter.
EXHAUST FILTER
HEn
The exhaust filter cartridge must be
replaced when dirty. It should be
g
replaced regularly depending on use
conditions. The filter CANNOT be
washed as it will lose its dust trap-
ping ability.
Note: See PARTS AND FEATURES for
the exhaust filter number.
Slide the
exhaust filter
cover release
down. Pull out
on exhaust fil-
ter cover to
remove from
bag cover.
Bag
Cover---_ "_1
Exhaust Fi.er I_L I J
Cover ReleaserS1 I
Exhaus,
Filter _wJ_\
Cove,_" _4j
Bag
Exhaust
Remove the
exhaust filter car-
tridge from the
bag cover.
Replace the exhaust filter
cartridge, carefully posi-
tioning it so that it fits into
the bag cover. The black
edge of the filter
should be facing away
from the operator. Push
only on filter cartridge
frame, not on filter itself.
--r
Cover Release_
Exhaust _-
F,tor I
Bag
Exhaus
Replace the
exhaust filter
cover and
secure the
latch by push-
ing it upward.
15
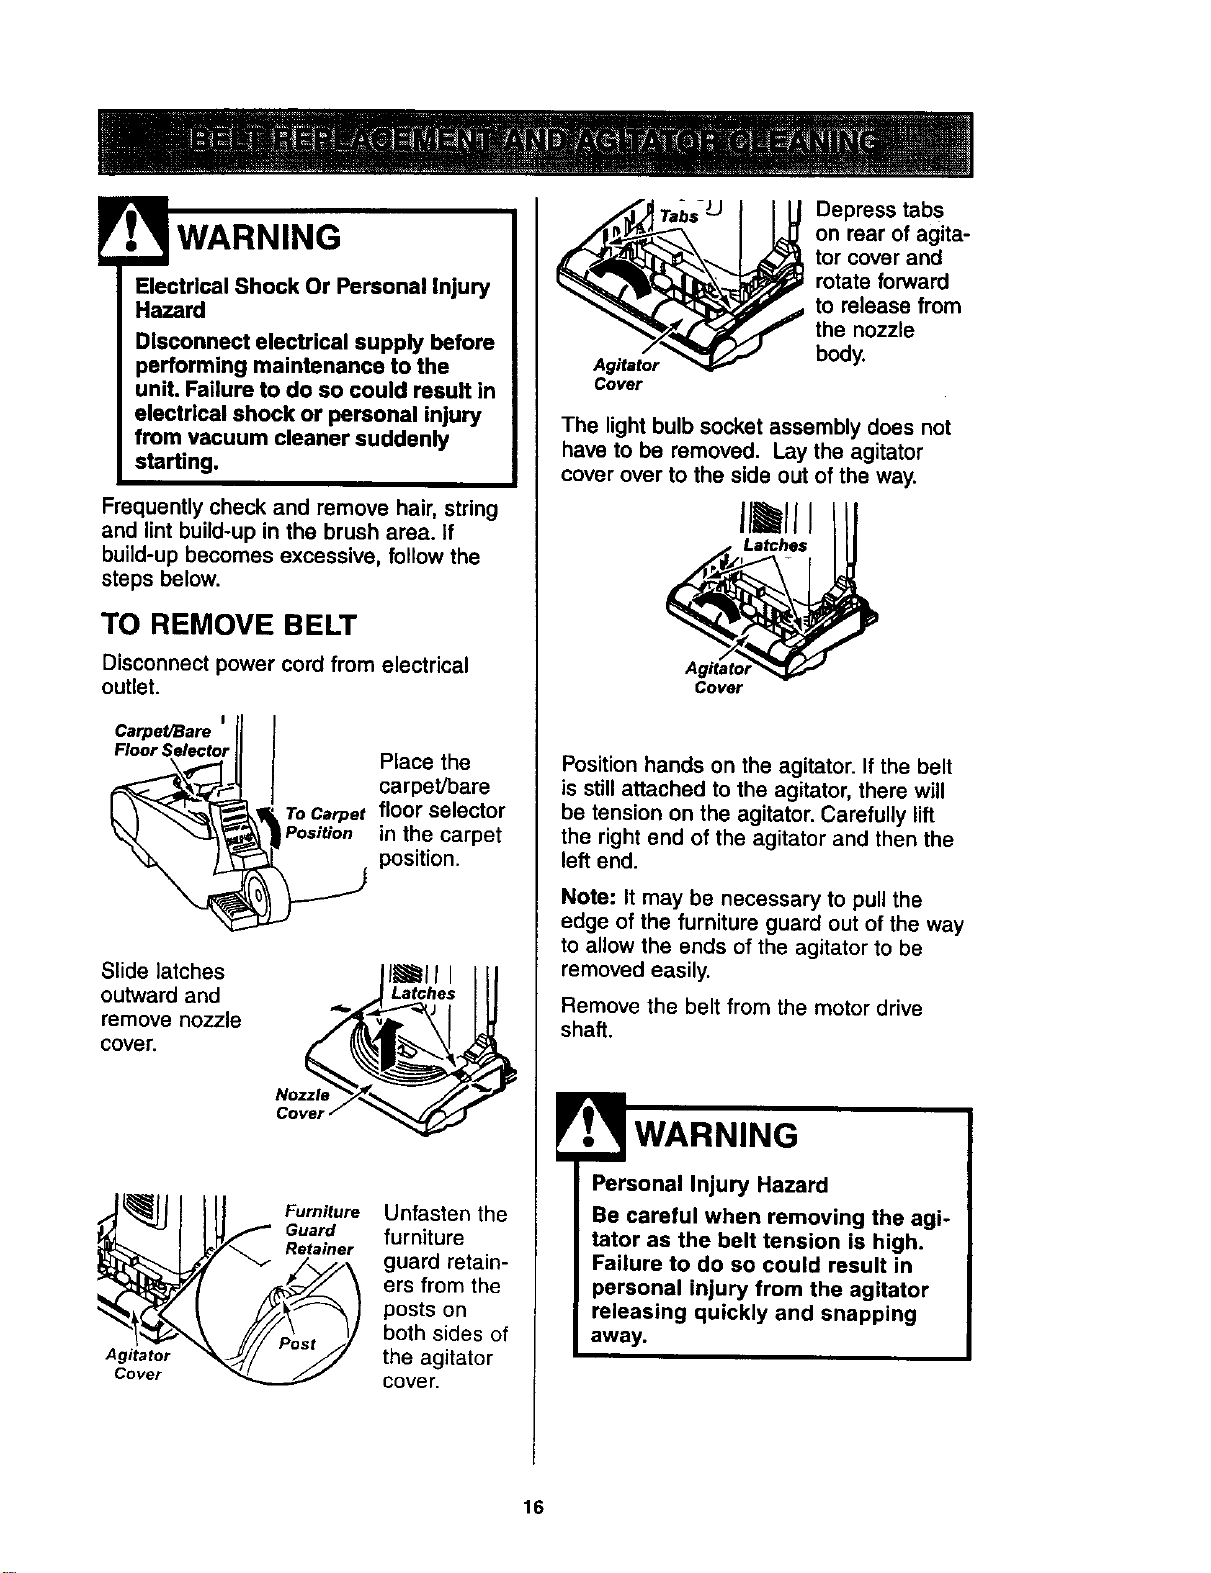
Electrical Shock Or Personal Injury
Hazard
Disconnect electrical supply before
performing maintenance to the
unit. Failure to do so could result in
electrical shock or personal injury
from vacuum cleaner suddenly
starting.
Frequently check and remove hair, string
and lint build-up in the brush area. If
build-up becomes excessive, follow the
steps below.
TO REMOVE BELT
Disconnect power cord from electrical
outlet.
Cerpet/Bare = ll
Floor Selector_ Place the
_, carpet/bareL_,
_,_, To Carper floor selector
in the carpet
position.
Slide latches
outward and
remove nozzle
cover.
|l_ll l
_,_Latches III
Nozzle _ //7
Cover /
Agitator
Cover
Furniture
Guard
Reta_er
Unfasten the
furniture
guard retain-
ers from the
posts on
both sides of
the agitator
cover.
Agitator
Cover
Depress tabs
on rear of agita-
tor cover and
rotate forward
to release from
the nozzle
body.
The light bulb socket assembly does not
have to be removed. Lay the agitator
cover over to the side out of the way.
Cover
Position hands on the agitator. If the belt
is still attached to the agitator, there will
be tension on the agitator. Carefully lift
the right end of the agitator and then the
left end.
Note: It may be necessary to pull the
edge of the furniture guard out of the way
to allow the ends of the agitator to be
removed easily.
Remove the belt from the motor drive
shaft.
Personal Injury Hazard
Be careful when removing the agi-
tator as the belt tension is high.
Failure to do so could result in
personal injury from the agitator
releasing quickly and snapping
away.
16
TO CLEAN AGITATOR
Note: In order to keep cleaning efficiency
high and to prevent damage to your vacuum
cleaner, THE AGITATOR MUST BE
CLEANED EVERYI"IME THE BELT IS
CHANGED.
The agitatormust be cleaned accordingto
the followingschedule:
Vacuum Use
HEAVY
(used daily)
MODERATE
(used 2-3 times/week)
Clean Aqitator
everyweek
every month
LIGHT
(used 1 time/week)
every 2 months
Remove anydirtordebris inthe beltpath
area or inthe agitatorarea.
Agitator Assembly
Carefully remove the brush end caps and
remove any string or debris located on the
agitator assembly or agitator shaft.
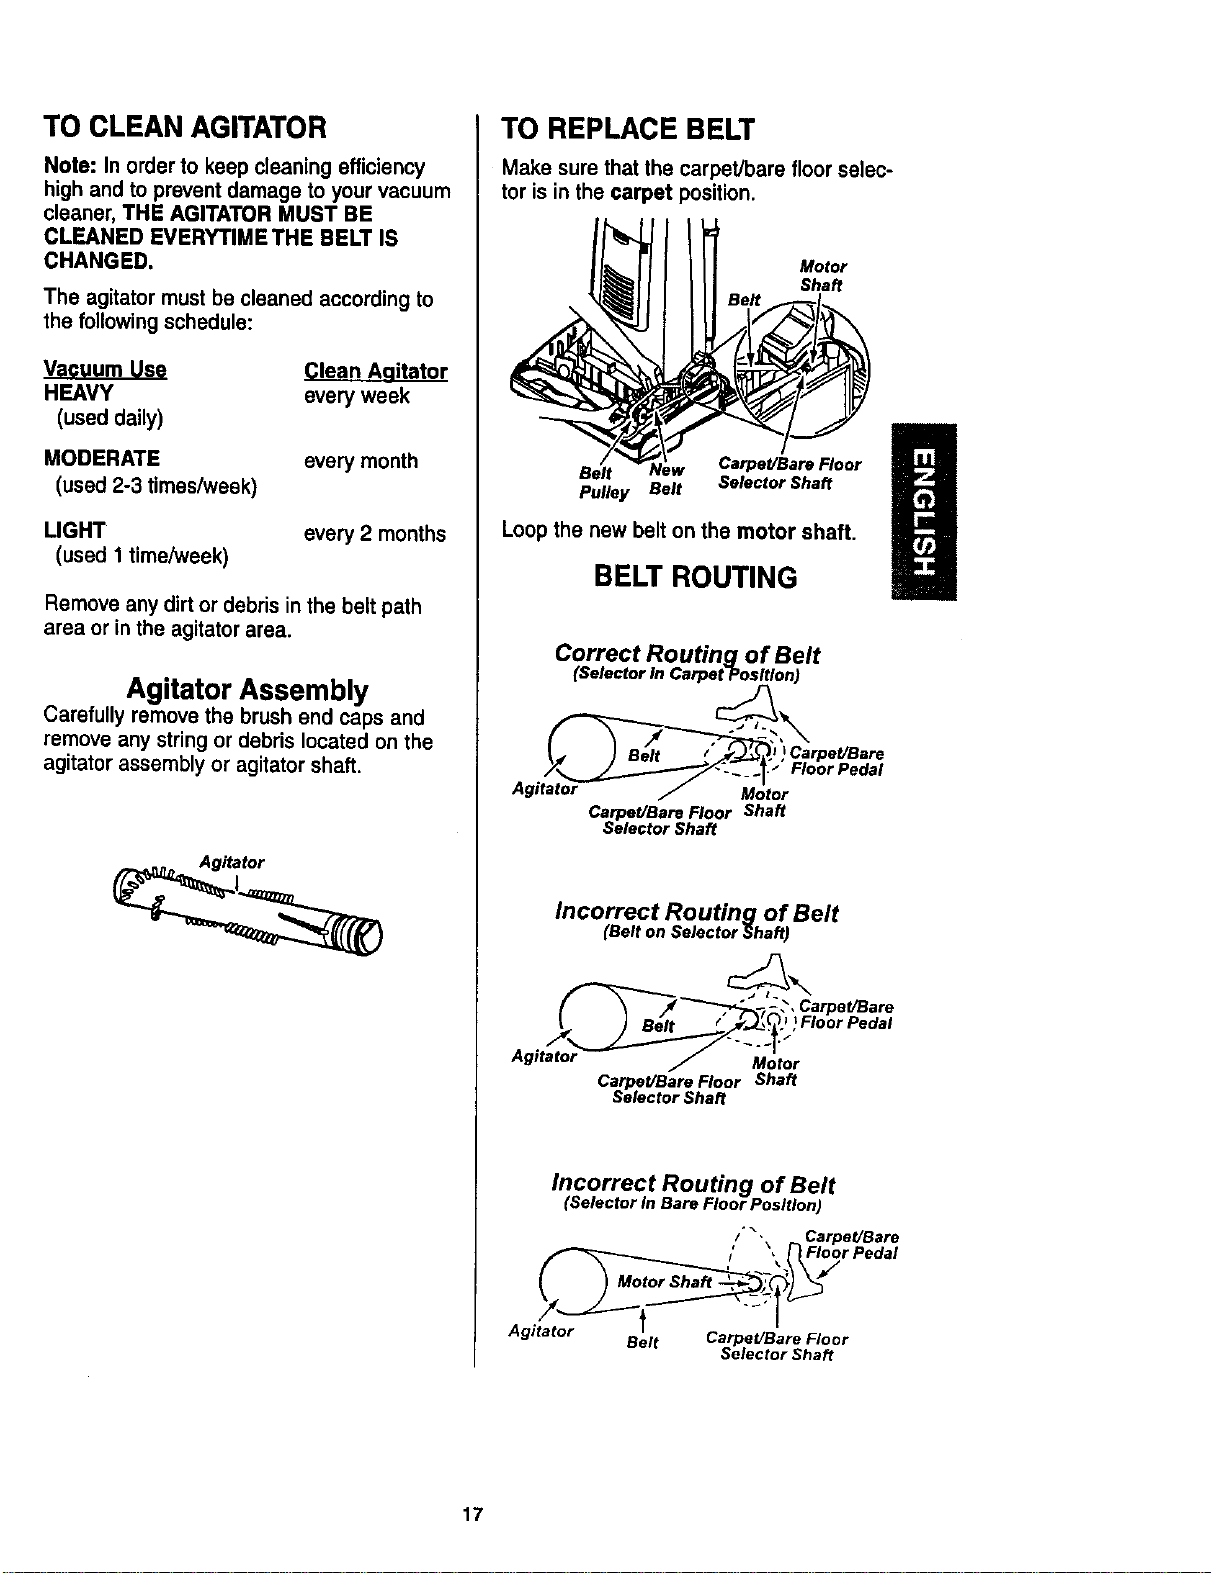
TO REPLACE BELT
Make sure that the carpet/bare floor selec-
tor is in the carpet position.
Motor
Shaft
Belt Carpet/Bare Floor
Pulley Belt Selector Shaft
Loop the new belt on the motor shaft.
BELT ROUTING
Correct Routing of Belt
(Selector In Carpet Position)
., ) BElt / _; )Carpet/Bare
Agit_at__t;rFlOor Pedal
Carpet/Bare Floor Shaft
Selector Shaft
Incorrect Routing of Belt
(Belt on Selector Shaft)
_-_" -_- ,_,CarpeVBare
..I) Floor Pedal
Carpet/Bare Floor Shaft
Selector Shaft
Incorrect Routing of Belt
(Selector in Bare Floor Position)
/'"-\ CarpeVBare
I' '4 /'} Floor Pedal
Agitator Belt Carpet/Bare Floor
Selector Shaft
17
NOTE: See PARTS AND FEATURES for
belt number.
Loop the other end of the belt on the belt
pulley on the agitator.
Insert the agitator by placing the rounded
portion of the end cap down into the slot
in the nozzle base.
Note: It may be necessary to hold the fur-
niture guard out of the way in order to
allow proper insertion of the agitator into
the nozzle base.
Agitator Nozzle
Base
Furniture Base
Guard End Slot
Cap
Note: Care must be taken due to the belt
tension during reassembly.
Press firmly,
checking to
see that
each end is
completely
inserted.
Check to see that the belt is centered on
the belt pulley. Turn the agitator with your
fingers to see that it turns freely.
To re-attach
the agitator
cover, insert
the six (6)
tabs into the
six slots
along the
front edge of
the nozzle
base.
Tabs/
Slots
Lower the agitator cover to its original
position. After positioning the agitator
cover, push forward on the two (2) locking
tabs in order to ensure that they are
securely in place.
Re-fasten
the furniture
guard retain-
ers to the
posts on
both sides of
the agitator
cover.
Agitator
Cover
Furniture
Guard
Retainer
Note: If the agitator cover is not installed
correctly,you may experience a loss of
performance and possible agitator vibra-
tion, etc.
Headlight
PRre
Lock Tabs
Securely In
Place
Make sure the headlight wires are tucked
securely in place.
Replace the
nozzle cover
and secure
the latches.
Nozzle
Cover
18
Always follow all safety precautions when
cleaning and servicing the vacuum
cleaner.
WARNING
Electrical Shock Or Personal Injury
Hazard
Disconnect electrical supply before
performing maintenance to the
unit. Failure to do so could result in
electrical shock or personal Injury
from the vacuum cleaner suddenly
starting.
If the vacuum cleaner does not seem to
have adequate suction, first check if the
dust bag is full or if a filter is clogged. See
DUST BAG REPLACEMENT and FIL-
TER REPLACEMENT.
If the bag and filter areas are free of
clogs, check the hose area. Remove the
lower end of the stretch hose from the
cleaner by grasping the hose collar, twist-
ing, and pulling straight
out.
Plug in the vacuum
cleaner and turn it 4
on. Stretch
the hose to Stretch
maximum length HoseIn
and then allow andOut
the hose to return to its
natural length.
Turn the unit off and unplug
the unit.
Visually inspect the hose and the base
area into which the hose is inserted.
Remove any visible clog.
Re-insert the hose into the opening on
the lower body from which it was
removed. Press firmly to assure connec-
tion.
If the bag and filter areas and the hose
areas are free of clogs, check the floor
nozzle area. To check this area, see the
section on BELT REPLACEMENT AND
AGITATOR CLEANING.
Hose
Hose
Collar
Return the vacuum cleaner to the upright
position before plugging into an electrical
outlet.
Personal Injury Hazard
DO NOT place hands or feet
underneath the unit at any time.
The agitator will be revolving
rapidly when the vacuum cleaner
is turned on and is in the carpet
setting.
19
Electrical Shock Or Personal Injury
Hazard
Disconnect electrical supply before
performing maintenance to the
unit. Failure to do so could result in
electrical shock or personal injury
from the vacuum cleaner suddenly
starting.
TO REMOVE LIGHT BULB
Disconnect power cord from electrical
outlet.
Nozzle
Slide latches
outward and
remove noz-
zle cover
CAUTION
Remove the
light bulb by
pushing the
bulb in while
turning coun-
terclockwise
to release
from the
slot.Then pull
the light bulb
straight out.
To replace the
light bulb,
carefully insert
and turn
clockwise to
securely fit
into slot.
Note: See PARTS AND FEATURES for
bulb number,
CAUTION
reassembled.
Replace the
nozzle cover
and secure the
latches.
Latches
Nozzle
Cover
2O
_._ WARNING
Electrical Shock Or Personal Injury
Hazard
Disconnect electrical supply before
performing maintenance to the
unit. Failure to do so could result in
electrical shock or personal injury
from vacuum cleaner suddenly
starting.
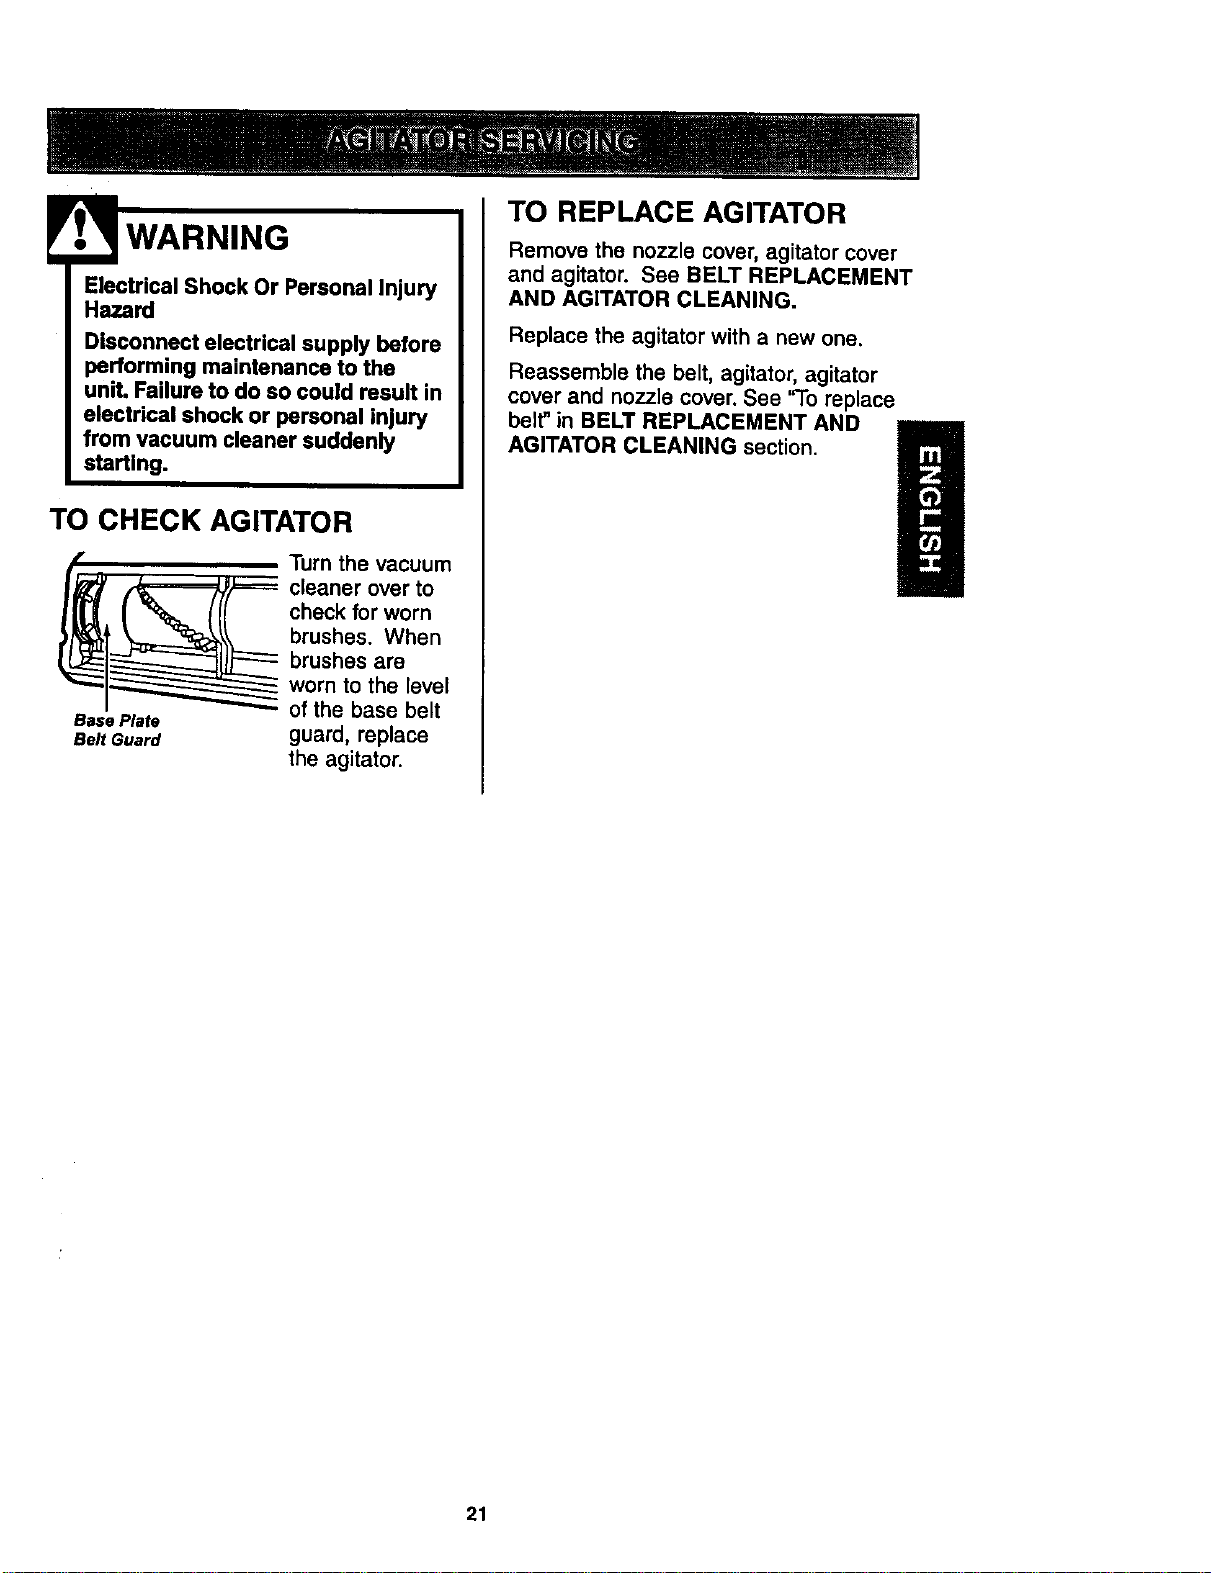
TO CHECK AGITATOR
__ urn the vacuum
cleaner over to
check for worn
brushes. When
brushes are
_1_ worn to the level
I _ of the base belt
Base Plate
aeJt Guard guard, replace
the agitator.
TO REPLACE AGITATOR
Remove the nozzle cover, agitator cover
and agitator. See BELT REPLACEMENT
AND AGITATOR CLEANING.
Replace the agitator with a new one.
Reassemble the belt, agitator, agitator
cover and nozzle cover. See '9o replace
belt" in BELT REPLACEMENT AND
AGITATOR CLEANING section.
21

Review this table to find do-it-yourself solutions for minor performance problems. Any other
service needed should be performed by a Sears or other qualified service agent.
!
Disconnect electrical supply before performing maintenance to the
unit. Failure to do so could result in electrical shock or personal injury.
Vacuum cleaner
won't run.
Poor _ob of dirt
pick-up.
1. Unpluggedat wall outlet,
2. Tripped circuitbreaker/blownfuse
at household service panel.
1. Plug in firmly,select desired setting
on touchcontrol
2. Reset circuitbreaker or replacefuse.
1. Full or cloggeddust bag.
2. Wrong pile height setting.
3. Worn agitator.
4. Clogged nozzle or bag holder.
5. Clogged hose.
6. Hole in hose.
7. Broken/misplaced belt.
8. Hose not inserted fully.
9. Motor protectionsystem activated..
tO. Dirty filters.
1. Change bag.
2. Adjustsetting.
3. Replace agitator.
4. Check CLOG REMOVAL.
5. Check forclogs,
6. Replace hose,
7. Replac_fix be_t.
8. Insert hose fully.
9. Check for clogs.
tO. Change motorsafety filter and
exhaust filter.
Vacuum Cleaner picks 1. Wrong pileheight setting. 1. Adjust setting.
up moveable rugs or
pushes too hard.
Light won't work. 1. Burned outlight bulb. 1. Change lightbulb.
Agitator does not 1. Brokenbelt. 1. Replace belt.
turn.
2. Bare floor selectorin bare 2. Move selectortothe carpet setting.
floor setting.
3. Belt installed incorrectly. 3. Check BELT REPLACEMENT AND
AGITATORCLEANING.
Air flow restricted 1. Attachment use restrictsairflow. 1. Check ATTACHMENTS,
with attachment use.
Sound changes. 2. New carpet fuzz clogged air path. 2. Check CLOG REMOVAL and clean
hose.
Excessive noise as 1. Belt rubbingon carpet/bare floor 1. Pushselector all the way forward.
vacuum cleaner is shut selectorshaft.
off.
Dirt Sensor, some 1. Dirty optic cells. 1. Clean opticcells.
models, will not work.
22
Antes de usar su asplradora nueva ..... I
Garantia de |a aspiradora de Kenmore... 1
Instrucciones importantes de
segurldad ............................ 2
Piezas y caractedsticas ................ 3
Instrucciones de ensamblamiento ..... 4-5
Instrucciones de operaci6n ............ 5
Liberaci#n_1 cord6nek_ctrico.......... 6
Ajustey selecci6nde niveldepelode la
alfombra ............................ 6
Selectordepisosconalfombray .......... 6
sinalfombra
Desprendk_ientodel mango..............7
Pulsadorde Control.................... 7
Accesorios......................... 7-9
Cuadrode usodelosaccesorios.......... 9
Sugerenclasparsaspirar ............... 10
Caractorlsticasderendimiento........ 10-11
Cuidado de la aspiradora .............. 12
Almacenamiontode laaspiradora ........ 12
Limpiezadelexterior y delosaccesorios... 12
Cambiode labolsaparapolvo........... 13
Cambiodelfirms .................... 14
Carnbiodela cortesy limpiezadel
agitador ......................... 15-17
C6moeliminarlos residuosde basura
en losconductos..................... 18
Cambiodela bombilla................. 19
Cuidadodetagitador .................. 20
Reconocimlento de problemas ......... 21
Informaci6n de assistancia
o servJcio ................ PosteriorCubierta
Potfavorleaestaguiaquele ayudaraa assemblary operarsuaspiradoranuevade Kenmoroenuna manera
mas seguray effectiva.
Paramas informaci6nacercadel cuidadoy operaci6nde estaaspirador,flamea su tJondaSearsmascercana.
Cuandoprequnteporinformaci6nustednecisitar_el n0memcompletodesoftsy modelode laaspiradoraque
estdIocadoen laplacadelosn_merosde modeloy sede.
Use el espacio deabajo pararegistrarel n0merode modeloy seriepara sunuevaaspiradoradoKenmore.
Numoro de Modelo
NOmerode Serie
FochadeCompra
Matengaeste libray surecJboon ulugarseguropara referenciasfuturas.
GARANT[ALIMITADADEUNAI_O DELA ASPIRADORAKENMORE
Esta garantlaes por unaSodesdela fecha decompra,eincluyesolamenteel usode laaspiradoraen
hogaresprivados.Duranteel aSodogarantia,cuandolaaspiradoraes operaday mantenidadeacuerdoal
manualde instruccionesdeldueSo,Sears reparardcualquierdefectoenmaterialeso fabricaci6nlibredecargo.
Esta garantiaexcluyelasbolsasdecolecci6n,correas,lamparillas,y filtros,lascualessonpartesgastablesque
sedeterioranconelusonormal.
Paraelservicio degarantla,retorne ests aspiradoraal Centrode ServicioSearsm._scercanoenlos
EstadosUnidos.
Esta garantiaseapJicasolamentemientras este productoest,.en uso en los EstadosUnidos.Estagarantia le
da a ustodderechoslegalesespecfficos,y usted puedetonertambi_notros derechos loscualesvariande
estadoa ostado.
Soars,Roebuckand Co.,D/817WA,HoffmanEstates,IL 60179
! ADVERTI=NP-n& Susegurldadeam.uylmportanteparanosotrea,Para
• --,-., -vmn reducirelriesgodeincendio,choqueek_trico,lesi6ncor.
petaloda_osal utllizarsu asplradom,actdedeacuerdo
Leaestemanualantesde armaroutilizarsu
aspimdom.
Usesuaspiradoradnicamenteen laforma
descritaen estemanual.UseDnicamentecon
acoesoriosrecomendadosper Sears,
Parareducirel riesgodechequeel6ctdco,nouse
suaspiradoraal aire librenisabresuperficies
mojadas.
Desconectelapmvisi6nde electricidadantes de
efectuarel mantenimientodel drea del cepillo.
DeIocontrariopodrfacausarunchequeel6ctrico
olesi6ncorporal.
Siempredabeapagarsuaspiradoraantesde
desconectarla.
No desconectelaaspiradoratirandodelcord6n
el_ctrloo.Paradesconectarla,haleel enchufe,no
elcord6n.
No uselaaspiradorasielcord6n o elenchufe
es_ dafiado.Silaaspiradorano estd
funclonandoadecuadamenteo sise hadejado
caer,estddaSada,se hadejadoexpuestaa la
intemperieose hadejadocaerenagua,devudl-
valaa unCentredeserviciodeSears.
No halenitransportelaaspiradoraperelcord6n;
no useel cord6ncome mango;no cierrepuertas
sobreelcord6n;no haleel cord6nsobmrebor-
desagudosniesquinas.No pasela aspiradora
sobreelcord6n.Mantengaelcord6nalejadode
superficiescalientes.
No abandonelaaspiradoracuandoest6conec-
tada.Descondctelacuandonolaest6 usandoy
antesdedarleservicio.
No permitaquesea utilizadacomejuguete.Se
mquieretenermayorcuidadocuandosea
utilizadaenlaproximidadde niSoso pernifios.
No toquelaaspiradoranielenchufeconlas
manesmojadas.
No coloqueobjetosenlasaberturas.
No utilicelaaspiradorasialgunaaberturaestd
bloqueada;mantdngalalibradepolvo,pelusa,
cabellosycualquieracosaquepodriadisminuir
elflujodeaim.
Mantengaelcabello,ropasuelta,dedosy todas
laspartesdelcuerpoalejadosde lasaberturasy
_=ezasmeednicas.
con precaudonesb_sloeadesegudd_l,entreelias:
No descanselaaspimdomsabreescalones.
La manguera contieno cablesel6ctricos.No los
usecuandoest_ndaSadosopinohados,Evite
levantarobjetosafilados.
Slempreapag6laaspiradoraantesdeconectar
o dedesconoctarlamangusraola boquillaelec-
trica.
No usela aspiradorasintenerinstaladala bolsa
parapolvoy/olosfiltros.
Cambiesiemprela bolsaparapolvodespu_sde
aspirarlimpiadomsdealfombrasodesodorantes,
talcosy pelvesfines.Estospmductosatascanla
bolsa,reducenelflujode airey puedencausar
que dsta se rompa.Sinocambialabolsapodria
ocaslonarda_opermanentea laaspiradora.
No uselaaspiradoraparalevantarobjetosagu-
dos,juguetespequefios,alfilems, sujetapapeles,
etc.Podriandafiarlaaspiradorao labolsapara
polvo.
No levanteningunacosaquese est_quemando
o emitiendohumo,comecigarrillos,cerilloso
cenizascalientes.
No usela aspiradoraparaaspirarliquidos
inflamablesocombustibles(gasolJna,liquidos
paralimpieza,perfumes,etc.)ni lauseen
lugaresdonde6stospodrianestarpresentes.Los
vaporesdeestassustanciaspuedencrearun
peligmdeincendiooexplosi6n.
Tengacuidadoespecial alutilizarlaaspiradora
enescalones.No lacoloquesobresillas,mesas,
etc.Mantdngelaenelpiso.
Usted es responsabledeasegurarquesu aspira-
dora no seautilizadaper ningunapersonaqueno
puedamanejadacorrectamente.
GUARDE ESTAS INSTRUCCIONES
Elarmadoy usoseguro de su aspiradorasonsu responsabilidad.Estaaspiradoraha sidedise_ada
exclusivamentepara usodom_stico.La aspiradoradeber_ almacenarseen un lugarseco yen el interior.
Lea este Manualdel pmpietarlo detenidamente,puescontiene informaci6nimportantesobreseguridady
uso.Esta quiacontiene informaci6nsobreseguridad debajode simbolosde advertieneiacuidado.
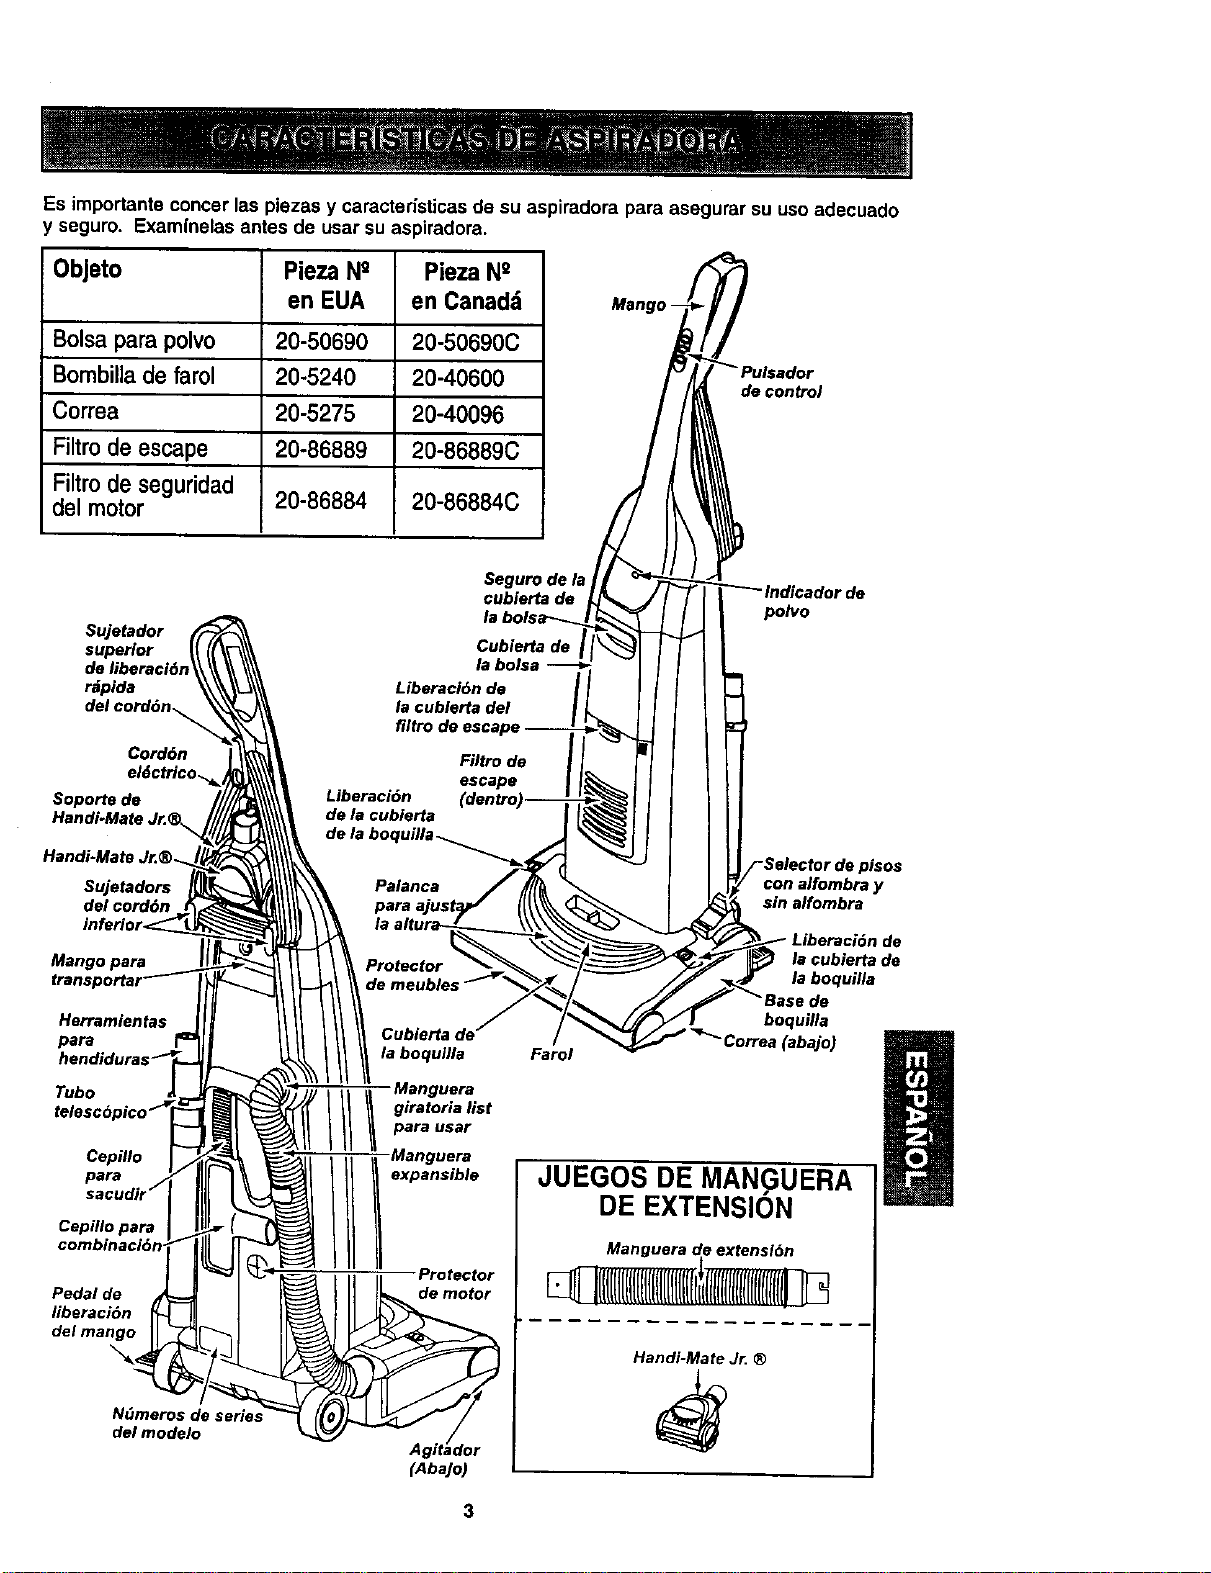
Es importanteconcer las piezas y caracteristicas de su aspiradora pars asegurar su uso adecuado
seguro. Examlnelas antes de usar su aspiradora.
Objeto Pieza N° Pieza N°
en EUA en Canad_
Bolsa para polyp 20-50690 20-50690C
Bombilla de farol 20-5240 20-40600
Correa 20-5275 20-40096
Filtm de escape 20-86889 20-86889C
Filtro de seguridad
del motor 20-86884 20-86884C
Mango-
de control
Sujetador
superior
r_pida
del cord6n_.
Cord6n
Soporte de
Handi-Mate Jr.
Handi-Mate Jr.®.
Sujetadors
del cord6n
Mango pars
Herramientas
pars
Tubo
Cepfllo
para
Cepfllo pars
Pedal de
liberaci6n
del mango
N(_meros de serie,_
del modelo
Seguro de Is
cubierta de
la bolsa-'_.
Liberaci6n de
la cublerta del
filtro
Filtro de
escape
Liberaci6n (dentt_
de la cubierta
dela
Palanca
para
_e
polyp
de pisos
con alfombray
sin alfombra
Protector
de
la cubierta de
la boquilla
Cubierta de"
la boqullla
II I Manguera
giratoria list
pars user
expansible
Protector
de motor
(AbaJo)
Farol
boquilla
a (abajo)
JUEGOS DE MANGUERA
DE EXTENSION
Handi-Mate J_ ®
3
Porfavorpongaespecialatenci6na dstos recuadrosconalertade riesgo.Advertenoia:Este
informacibnle alertardcon elpeligmdefuego,chequesalectricos,quemadasy lesiones.Culdado:
Esteinformaci6nlealertaraa peligroscomo lesionesy dafiosdepropiedad.
........................................ ! _ = , i i¸
Peligrode choque el,;ctrico
No conecte la aspiradora hastaqua ter-
minede armada. De Io contrario podr|a
causar un choqueel6ctrlco o lesl6n corpo-
ral,
Antesde armarlaaspiradora,chequeela LISTA
DE EMBALAJE en lacubiertaseparadade la
Lista de PartesparaReparaci6n. Useestalista
paraverificarque harecibidotodaslascompo-
nentesde sunuevaaspiradoraKenmore.
Fijeel cabode
lamanguera
expansiblea la
boquillacomo
se muestra.
MONTAJE DEL MANGO
Quiteel tornillo delmango Iocalizadojusto debajo
delbordesuperiorde laparteposteriorde laaspi-
radora,verUustracibndearriba.
Tornillo
Coloqueel mangocomose veenei diagrama
abajo.
AI mantenerla manguerade maneraque nointer-
fera,muavael mangoa laaberturaenla parfa
superiorde laaspiradora.
Orificio del
Inserteeltornilloparaquepasepar el mangode la
aspiradora.
Empiecea apretareltornillocon losdedos. Quizd
sea necesarioajustar unpocoel mango.
COLOCAClONDEL
CORDON
Asegdresedequeelsujetadorsuperiordelcord6n
delibemci6nrdpidase encuentreen posioi6nverti-
cal.Quiteelalambreconel queestdatadoelcord6n
el_ctdco.
Asegureelcord6n
eldctricoen laranura
de labase
presionandoloenel
ganchosuperiorde
liberaci6nrdpidapara
elcord6nel_ctrico
comosemuestra.Esto
Cord6n
elect.r/co-.-_
ayudaa queelcord6nnoseenrededebajodel
agitadordelaaspiradora.
Enrolleelcord6neldctdcoalrededordelossujeta-
doressuperiory inferiory presionelaranuradel
enchufesobreelcord6n.
de liberacidn rdpida
del cord6n
Cord6n
Sujetadors
inferior
del c
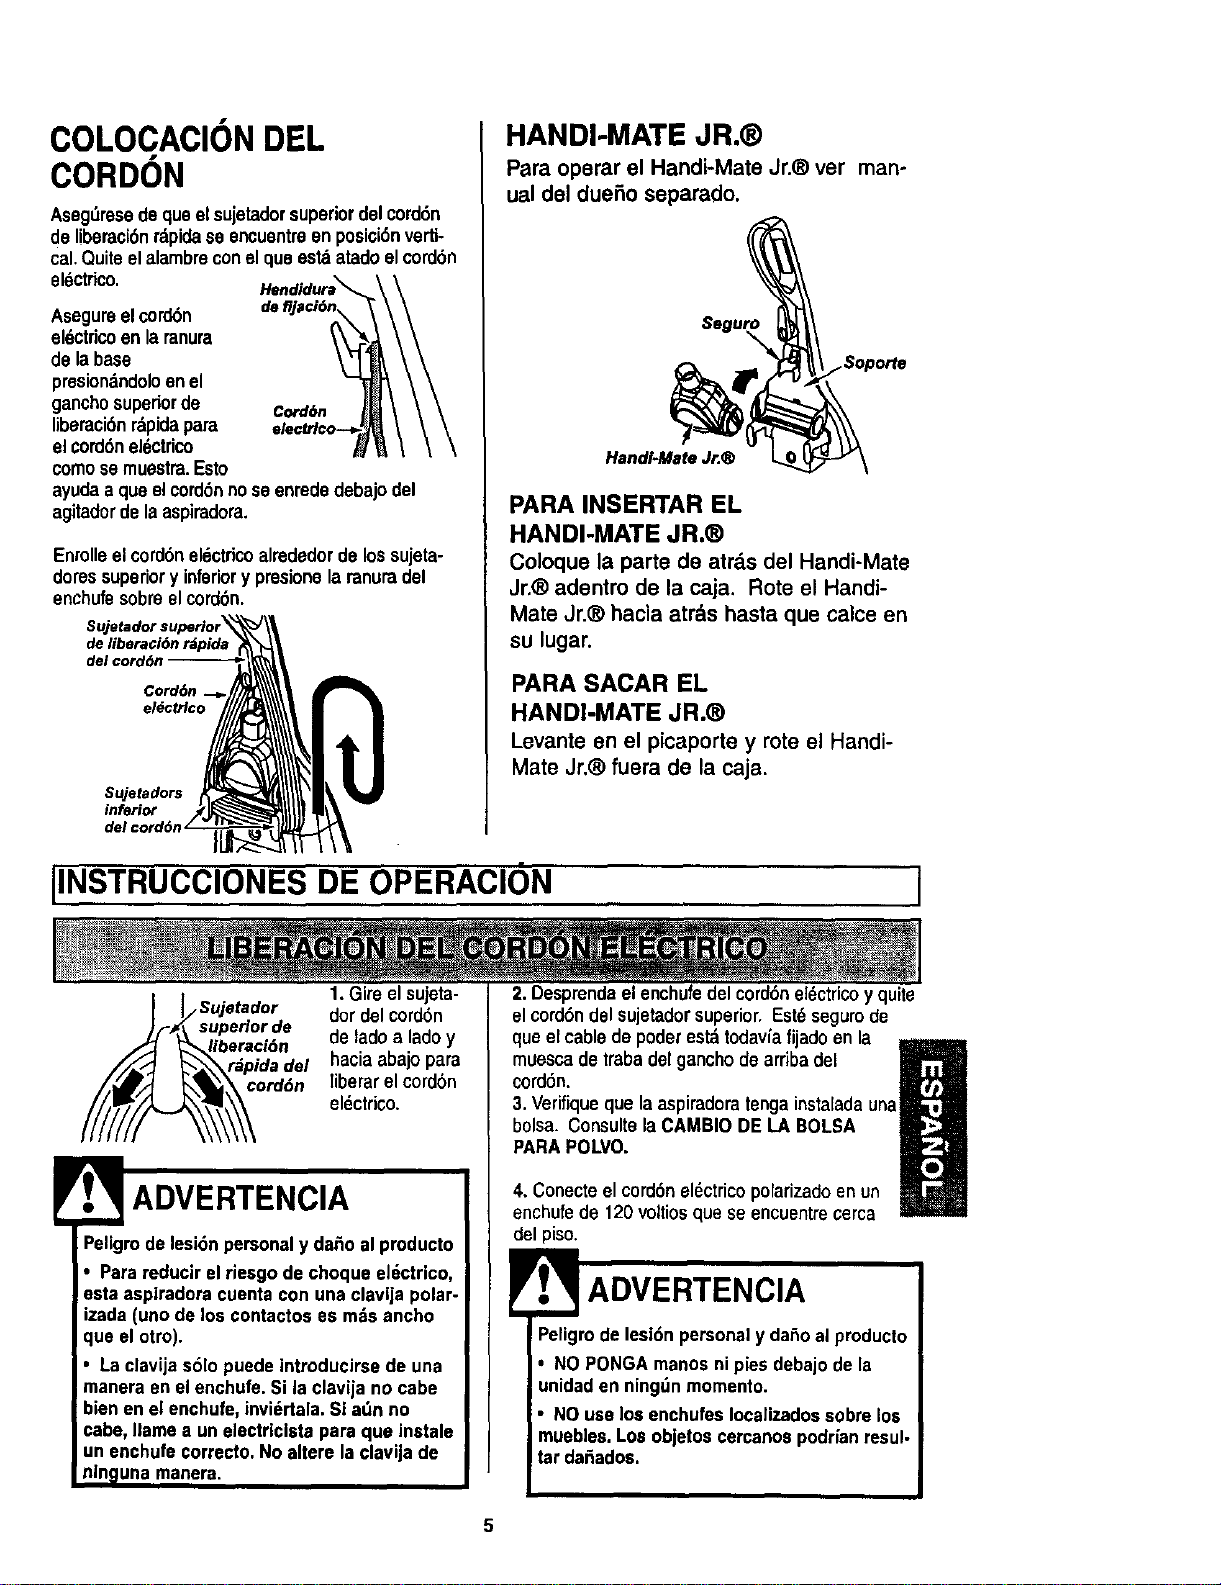
HANDI-MATE JR.®
Para operar el Handi-Mate Jr.® ver man-
ual del duefio separado.
HandI.MateJr.®
PARA INSERTAR EL
HANDI-MATE JR.®
Coloque la parte de atrds del Handi-Mate
Jr.® adentro de la caja. Rote el Handi-
Mate Jr,® hacia atr&s hasta que calce en
su lugar.
PARA SACAR EL
HANDI-MATE JR.®
Levante en el picaporte y rote el Handi-
Mate Jr,® fuera de la caja.
IINSTRUCCIONES DE OPERACION
_Sujetador
uperlor de
eracidn
ida del
ordon
1.Gire elsujeta-
dor del cord6n
de lado a lado y
haciaabajo para
liberar el cord6n
eldctrico.
ADVERTENCIA
Peligrode lesi6npersonaly da_o al producto
• Parareducirel riesgode choque el_,ctrico,
esta aspiradoracuenta con una clavija polar-
izada(unode los contactoses mdsancho
que el otro).
• Laclavijas61opuede introducirsede una
manera enel enchufe.Si la clavijano cabe
bienen el enchufe,invi_rtala.Si a_n no
cabe, Ilame a un electriclstapara que instale
un enchufecorrecto.No altere la clavijade
nin_lunamanera.
2. Desprendaelenchufedel cord6nel6ctricoy quite
elcord6ndel sujetadorsuperior,Est_segurode
que elcabledepoderes_ todavlafijadoen la
mmmm
muescade trabadelgancho de arriba del
cordSn.
!1
3. Verifiqueque la aspiradoratenga instaladauna
bolsa. Consultela CAMBIODE LA BOLSA
PARAPOLVO,
4, Conecteel cord6nel_ctricopolarizadoenun
enchufede 120voltiosquese encuentrecerca
delpiso.
ADVERTENCIA
Peligrodelesi6n personaly da_oal producto
* NO PONGAmanosni pies debajode la
unidaden ningdnmomento.
• NOuselos enchufesIocalizadossobrelos
muebles.Los objetoscercanospodrianresul-
tar dafiados.
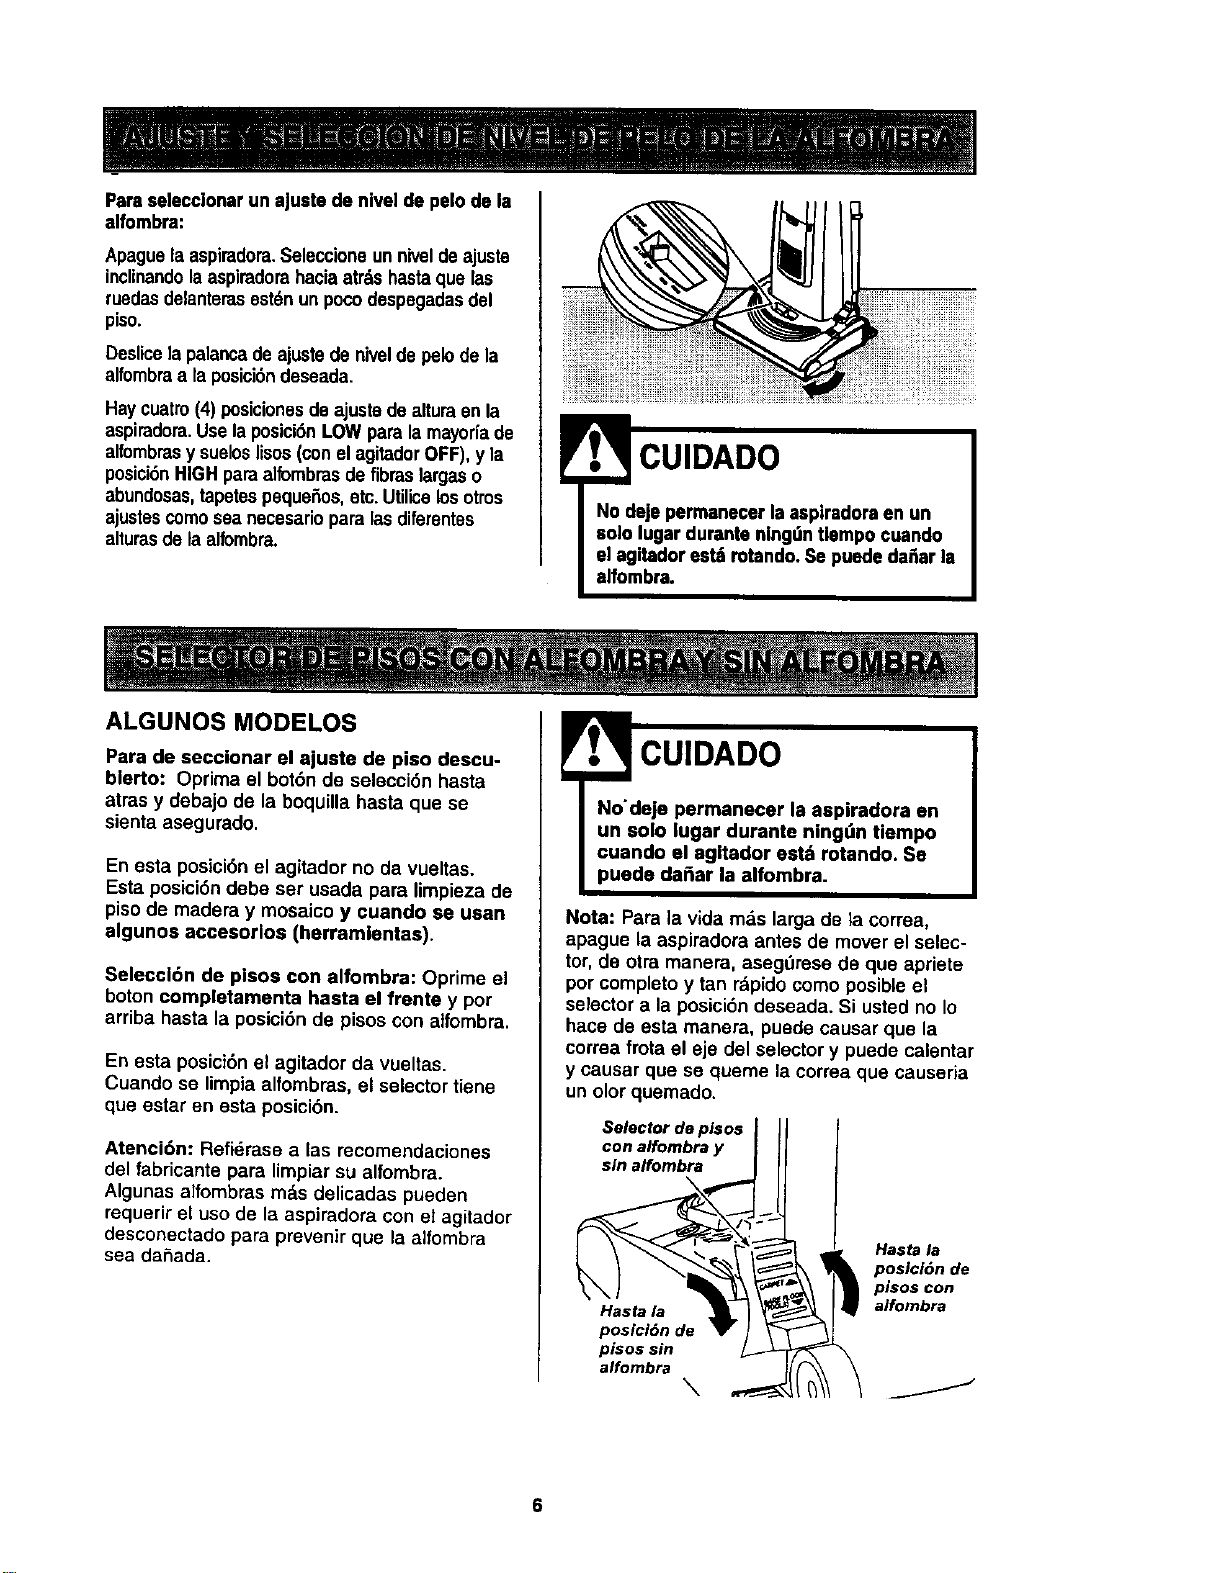
Parase]ecclonarunajustedeniveldepelodela
alfombra:
Apaguelaaspiradora.Seleccioneunniveldeajuste
inclinandolaaspiradorahaciaatr_lshastaque las
ruedasdelanterasest6nun pocodespegadasdel
piso.
Deslicela palancadeajustede niveldepelode la
alfombraa laposici6ndeseada.
Haycuatro(4) posiclonesde ajustadealtura en la
aspiradora.Uselaposloi6nLOW para lamayodade
alfombrasy sueloslisos(conelagitadorOFF),y la
posici6nHIGHparaalfombrasde fibras largaso
abundosas,tapetespeque_os,etc.Utilicelosotms
ajustescomosea necesariopara lasdiferentes
alturasdela alfombra.
CUIDADO
ALGUNOS MODELOS
Para de seccionar el ajuste de piso descu-
bierto: Oprima el bot6n de selecci6n hasta
arras y debajo de la boquilla hasta que se
sienta asegurado.
En esta posici6n el agitador no da vueltas.
Esta posici6n debe ser usada para limpieza de
piso de madera y mosaico y ¢uando se usan
algunos accesorlos (herramlentas).
Seleccl6n de pisos con alfombra: Oprime el
boton completamenta hasta el frente y por
arriba hasta la posici6n de pisoscon atfombra,
En esta posici6n el agitador da vueltas.
Cuando se limpia alfombras, el selector tiene
que estar en esta posici6n.
Atenci6n: Refidrase alas recomendaciones
del fabricante para limpiarsu alfombra.
Algunas alfombras m_,sdelicadas pueden
requerir el uso de la aspiradora con el agitader
desconectado para prevenir que la alfombra
sea daSada.
CUIDADO
Nota: Para la vida mas larga de la correa,
apague la aspiradora antes de mover el selec-
tor, de otra manera, asegdrese de que apriete
por completo y tan r;_pido como posible el
selector a la posici6n deseada. Si usted no Io
hace de esta manera, puede causar que la
correa frota el eje del selector y puede calentar
y causar que se queme la correa que causeria
un olor quemado.
Selector de pisos
con alfombra y
sin alfombra
Hasta la
posici6n de
pisos sin
alfombra
\
Hasta la
posicl6n de
plsos con
alfombra
J
Desprenda el mango pisando el pedal de lib-
eraci6n y tiranda del mango hacia abajo con la
mano.
delmango
OFF - Apaga el motor de succi6n de la
aspiradora.
ON - Prende (ON) el motor de la aspirado-
ra al nivel de ALTA succion para limpiar la
mayor[a de las alfombras. A fin de obtener
niveles de succi6n MEDIO y BA,,IO para
limpiar, apriete el bot6n SUCClON para
ciclar el motor de la aspiradora a traves de
tos niveles de succi6n MEDIO, BAJO, y
ALTO respectivamente.
SUCCION - Cambia el nivel de succi6n del
motor de la aspiradora. Si la unidad estd
apagada (OFF), apretando el bot6n
SUCCI6N
prende
solamente el
motor de la
aspiradora a
un nivel de
succi6n
ALTO para
limpiar la mayoria de las affombras,
tapetes y telas. Si la unidad est& prendida
(ON), apretando el bot6n de SUCCION
cicla el motor de la aspiradora a trav_s de
los niveles de succi6n.
Herramienta
para hendidura5
Tubo
Cepillo
Cepillo para
- Manguera
expansible
Collar de
manguera
Identifiquecada unode los accesorios mostra-
dos a continuaci6n.
COMO UTILIZAR LOS
ACCESORIOS
Para selectionar la selecci6n de pisos sin
alfombra, gira el selector altr&s y abajo hasta ra
selecci6n de pisos sin alfombra. Ver secci6n
de PISOS CON ALFOMBRA¥ SIN
ALFOMBRA.
7
Cuando regrese hasta la selecci6n de pisos
con alfombra, cuida que el selector puede
moverse rdpidamente hasta la selecci6n a
causa de la tensi6n de la correa.
Saca la parte inferiorde la manguera expansi-
ble de la aspiradora y tirando por atr&s.
Ahora se puede conectar la manguera.
m
Nota: La vMvula de desviaci6n puede estar
abierta mientras se usan los accesofios o
para limpiar una alfombra nueva a causa de
un flujo reducido de aire por los accesorios
mismos o por la pelusa de la alfombra que
Ilene la bolsa rapidamente. Consulteel
cuadro RECONOCIMIENTO DE PROBLEMAS.
ADVERTENCIA
Peligro de choque eldctrico o lesi6n cor-
poral
Desconecte la unidad antes de dando
mantenimiento. De Io contrarlo podria
producirse un choque eldctrico o causar
lesi6n corporal si la aspiradora arranca
de manera |mprevlsta.
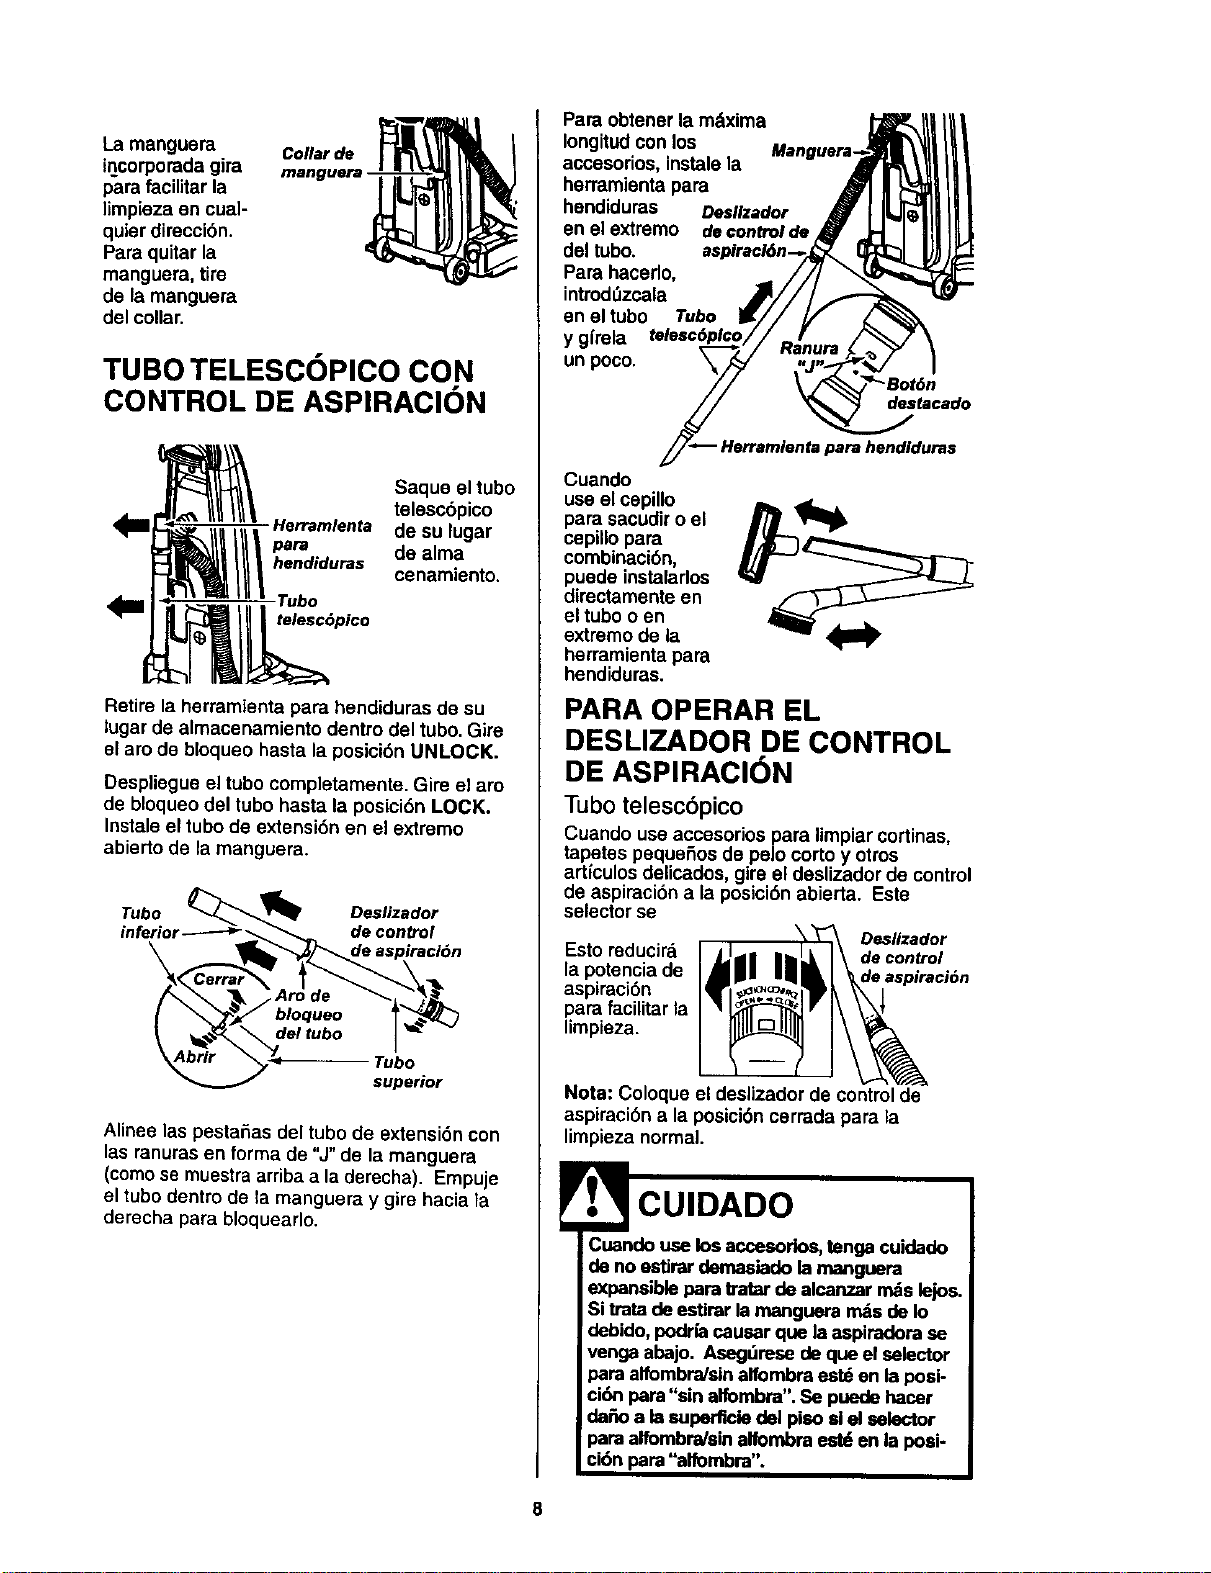
Lamanguera Collarde
incorporadagira manguera-
para facilitar la
limpieza on cua]-
quier direccibn.
Para quitar la
manguera, tire
de la manguera
del collar.
TUBO TELESCOPICO CON
CONTROL DE ASPIRAClON
Saque el tubo
telescbpico
Herramlenta de su lugar
pare de alma
hendiduras
cenamiento.
Tubo
telesc6pico
Retire la herramienta para hendiduras de su
lugar de almacenamiento dentro del tubo. Gire
el aro de bloqueo hasta la posici6n UNLOCK.
Despliegue el tubo completamente. Gire el aro
de bloqueo del tube hasta la posici6n LOCK.
Instale el tubo de extensi6n en el extremo
abierto de la manguera.
Tubo _'_ Deslizador
inferior------_'_ __ decontrol
\ _l_de aspiraciOn
( \'_ bloqueo _
,_o,- _. r_bo
superior
Alinee las pestafias del tubo de extensi6n con
las ranuras en forma de "J" de la manguera
(como se muestra arriba ala derecha). Empuje
el tubo dentro de la manguera y gire hacia la
derecha para bloquearlo.
Para obtener la mdxima _t,_l_ _
Iongitud con los Mengueta-,-_lr_| |_
accesorios, instalela -,_i_t \_| |_
herramienta para ,_ JlL_lll
hendiduras Desllzador _ I I_1111
enelextremo decontrolde_ Ill
del tubo. aspiracl6n--,-._lT.," _ _)_1_
Para hacerlo, //I _L_,,,,_'_I
introd_zcala .,_///__-
en el tubo Tube IK// // _.
y glrela telesc6plao// - ! /_ 7 \
unpoco. _-_/,_ .an_._._j_" 1
// \/_,,,"--8ot6.
_/_ Herramienta pare hendlduras
Cuando
useel cepillo
para sacudir o el
cepillo para
combinaci6n,
puede instalarlos
dimctamente en
el tubo o en
extremo de la
herramienta para
hendiduras.
PARA OPERAR EL
DESLIZADOR DE CONTROL
DE ASPIRACION
Tubo telesc6pico
Cuando use accesorios para limpiar cortinas,
tapetes pequefios do pelo corto y otros
articulos delicados, gire el deslizador de control
de aspiraci6n ala posici6n abierta. Este
selector se
Desllzador
Esto reducira decontrol
la potenciade deaepiraci6n
aspiraci6n
para faciUtarla
limpieza.
Nota: Coloque el desiizador de controlde
aspiraci6n ala posici6n cerrada para la
limpieza normal.
,_ CUIDADO
Cuandouse los accesorlos,tongacuidado
de no estJrardema$iado la manguem
expansiblepare tratar de alcanzar rndslejos.
Si tratade estirarla manguera rndsde Io
debido, podrfacausar que laaspiradora se
venga abajo. Asegdmse de que el selector
para alfombra/sinalfombra est_ en la posi-
ci6n pare"sin alfombra".Se puede hacer
de_o ale superficiedel piso siel selector
pare alfombndsinalfombra estden la posi-
ci6n para "alfombm". I
I
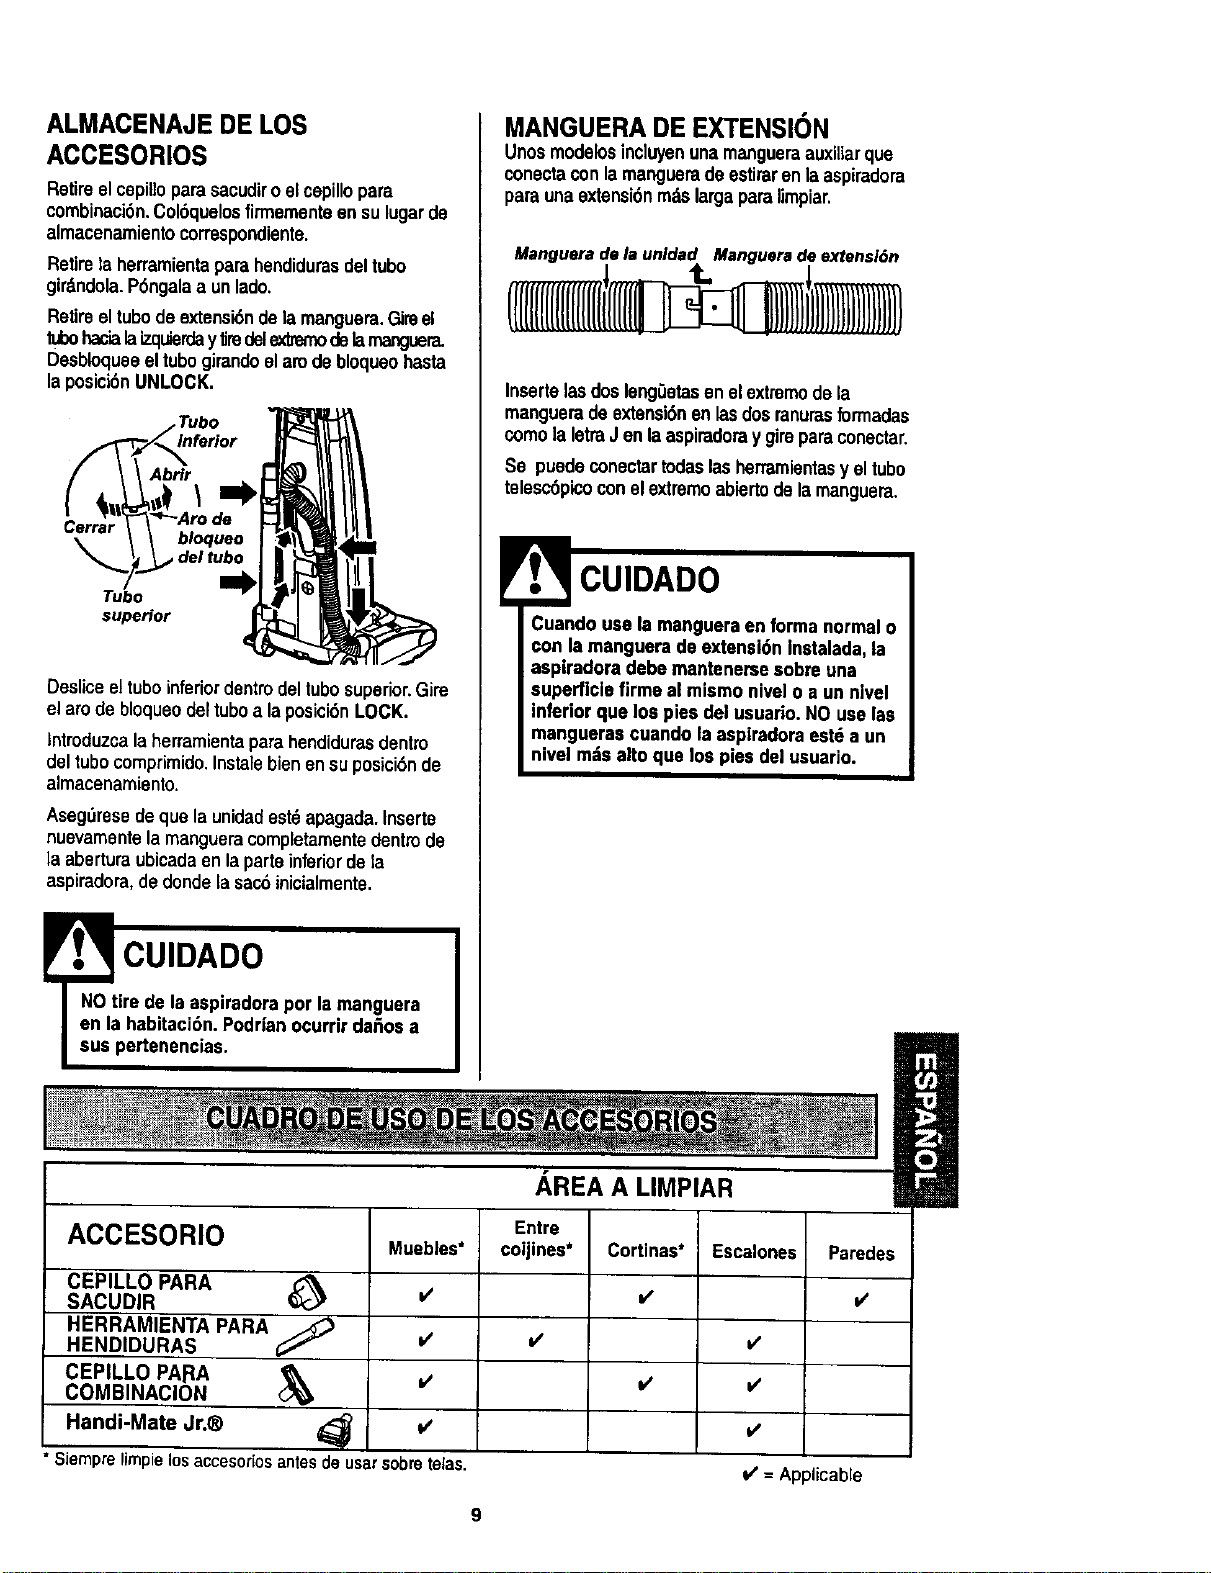
ALMACENAJE DE LOS
ACCESORIOS
Retireelcepilloparasacudiroelcepillopara
combinaci6n.Col6quelosfirmementeensulugarde
almacenamientocorrespondiente.
Retirela herramientaparahendidurasdeltube
girdndola.P6ngalaa unlade,
Retireeltubedeextensi6ndelamanguara.Gireel
tubehacialaizquierday1iredelexlmmodelamanguera.
Desbloqueeeltubegirandoelam debloqueohasta
laposici6nUNLOCK.
Tubo
Abrlr
\
Cerrar bloqueo
del tubo
Tubo
supeHor
Desliceeltubeinferiordentindeltubesuperior.Gire
el arede bloqueodeltubea laposici6nLOCK.
lnlroduzca laherramientaparahendidurasdentzo
deltubecomprimido.Instalebienensuposici6nde
almacenamiento.
Asegbresedeque la unidadest6apagada.Inserte
nuevamentelamangueracompletamentedentinde
laaberturaubicadaen laparteinferiordela
aspiradora,dederide[asacdinicialmente,
! CUIDADO
NOtire de laaspiradoraper la manguera
en la habitaci6n.Podr|anocurrir dafiosa
sue pertenencias.
MANGUERADE EXTENSION
UnosmodelosincIwen unamangueraauxitiarqua
conectaconlamanguerade estiraronlaaspiradora
parsunaextensi6nm,'tslargaparalimpiar.
InsertelasdoslengGetasen elextremede la
manguerade extensi6nenlasdosranurasformadas
comela letraJ enlaaspiradoray gireparsconectar.
So puedeconeotartodaslasherramientasy eltube
telesc6picoconelextremeabiertode lamanguera.
CUIDADO
Cuandousa la mangueraenforma normalo
con la manguerade axtensi6ninstalada,la
aspiradoradebe mantanersa sobreuna
superficiefirme el mismo nivalo a un nlvel
inferior que los pies del usuario.NO uselas
mangueras cuando la aspiradoraestda un
nivelmdsalto que los pies del usuario.
ACCESORIO
CEPILLO PARA
SACUDIR
HERRAMIENTA PARA
HENDIDURAS
CEPILLO PAISA
COMBINAClON
Handi-Mate Jr.®
Muebles*
v'
* Siemprelimpielosaccesoriosantesdeusarsobretelas.
AREA A UMPIAR
Entre
coijines*
v'
Cortinas*
=/
=/
Escalones Psredes
v'
v'
v'
V' = Applicable
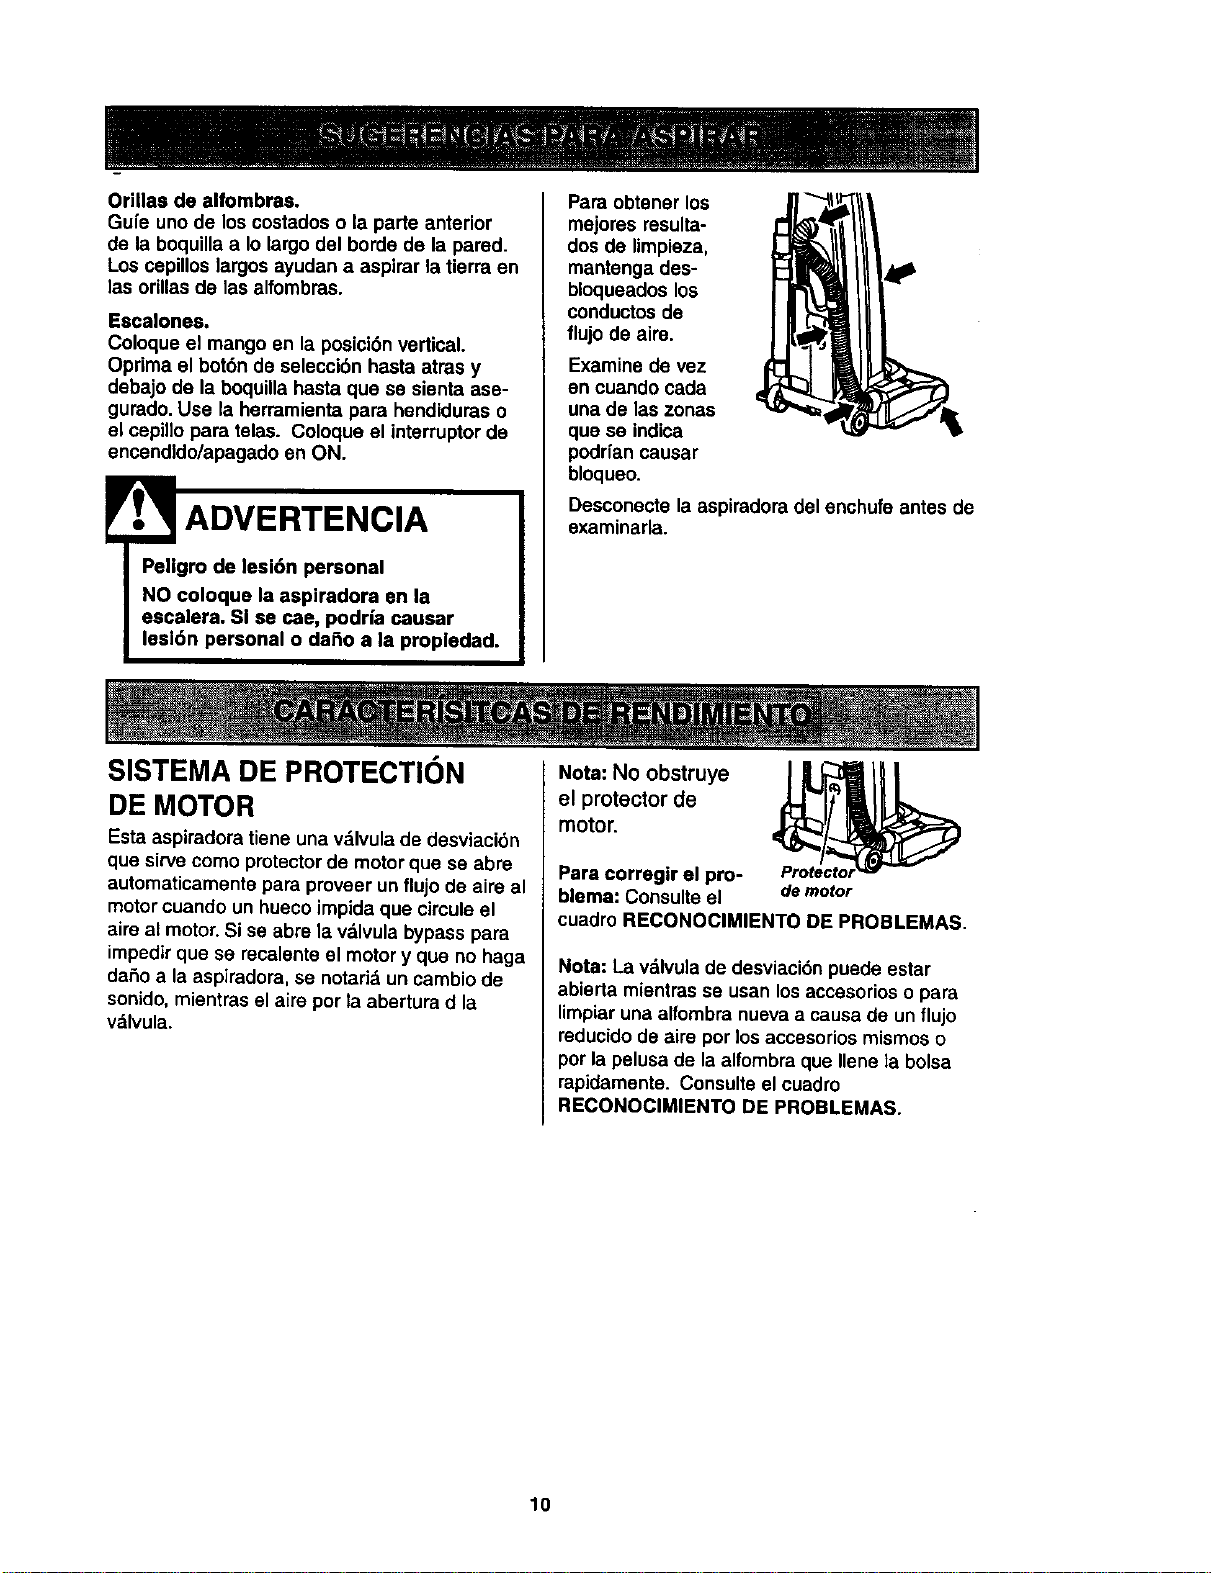
Orillaadealfombras.
Gufeunodeloscostadosolaparteanterior
delaboquillaaIolargodelbordedelapared.
Loscepilloslargosayudanaaspirarlatierraen
lasorillasdelasalfombras.
Esca]ones.
Coloqueelmangoenlaposici6nvertical.
Opdmaelbot6ndeselecci6nhastaatrasy
debajodelaboquillahastaquesesientaase-
gurado.Uselaherramientaparehendiduraso
elcepilloparatelas.Coloqueel interruptor de
encendldo/apagado en ON.
ADVERTENCIA
Para obtener los
mejores resulta-
dos de limpieza,
mantenga des-
bloqueadoslos
conductosde
flujo de aire.
Examine de vez
en cuando cada
una de las zonas
que se indica
podrfancausar
bloqueo.
Desconecte la aspiredora del enchufe antes de
examinarla.
SISTEMA DE PROTECTION Nota: No obstruye
DE MOTOR el protector de
motor.
Esta aspiradora tiene una vdlvula de desviaci6n
que sirve como protector de motorque se abre
automaticamente para proveer un flujo de aire al
motorcuando un hueco impida que circule el
aire al motor. Si se abre la valvula bypass para
impedirque se recalente el motory que no haga
dafio a la aspiradora, se notarialun cambio de
sonido, mientras el aire por la abertura d la
vdlvula.
Para corregir el pro-
blema: Consulte el demotor
cuadro RECONOCIMIENTO DE PROBLEMAS.
Nota: La vdlvula de desviaci6n puede estar
abierta mientras se usan losaccesorios o para
limpiaruna alfombra nueva a causa de un flujo
reducidode aire per los accesorios mismos o
porla pelusa de la alfombra que Ilene ]a bolsa
rapidamente. Consulte el cuadre
RECONOCIMIENTO DE PROBLEMAS.
10
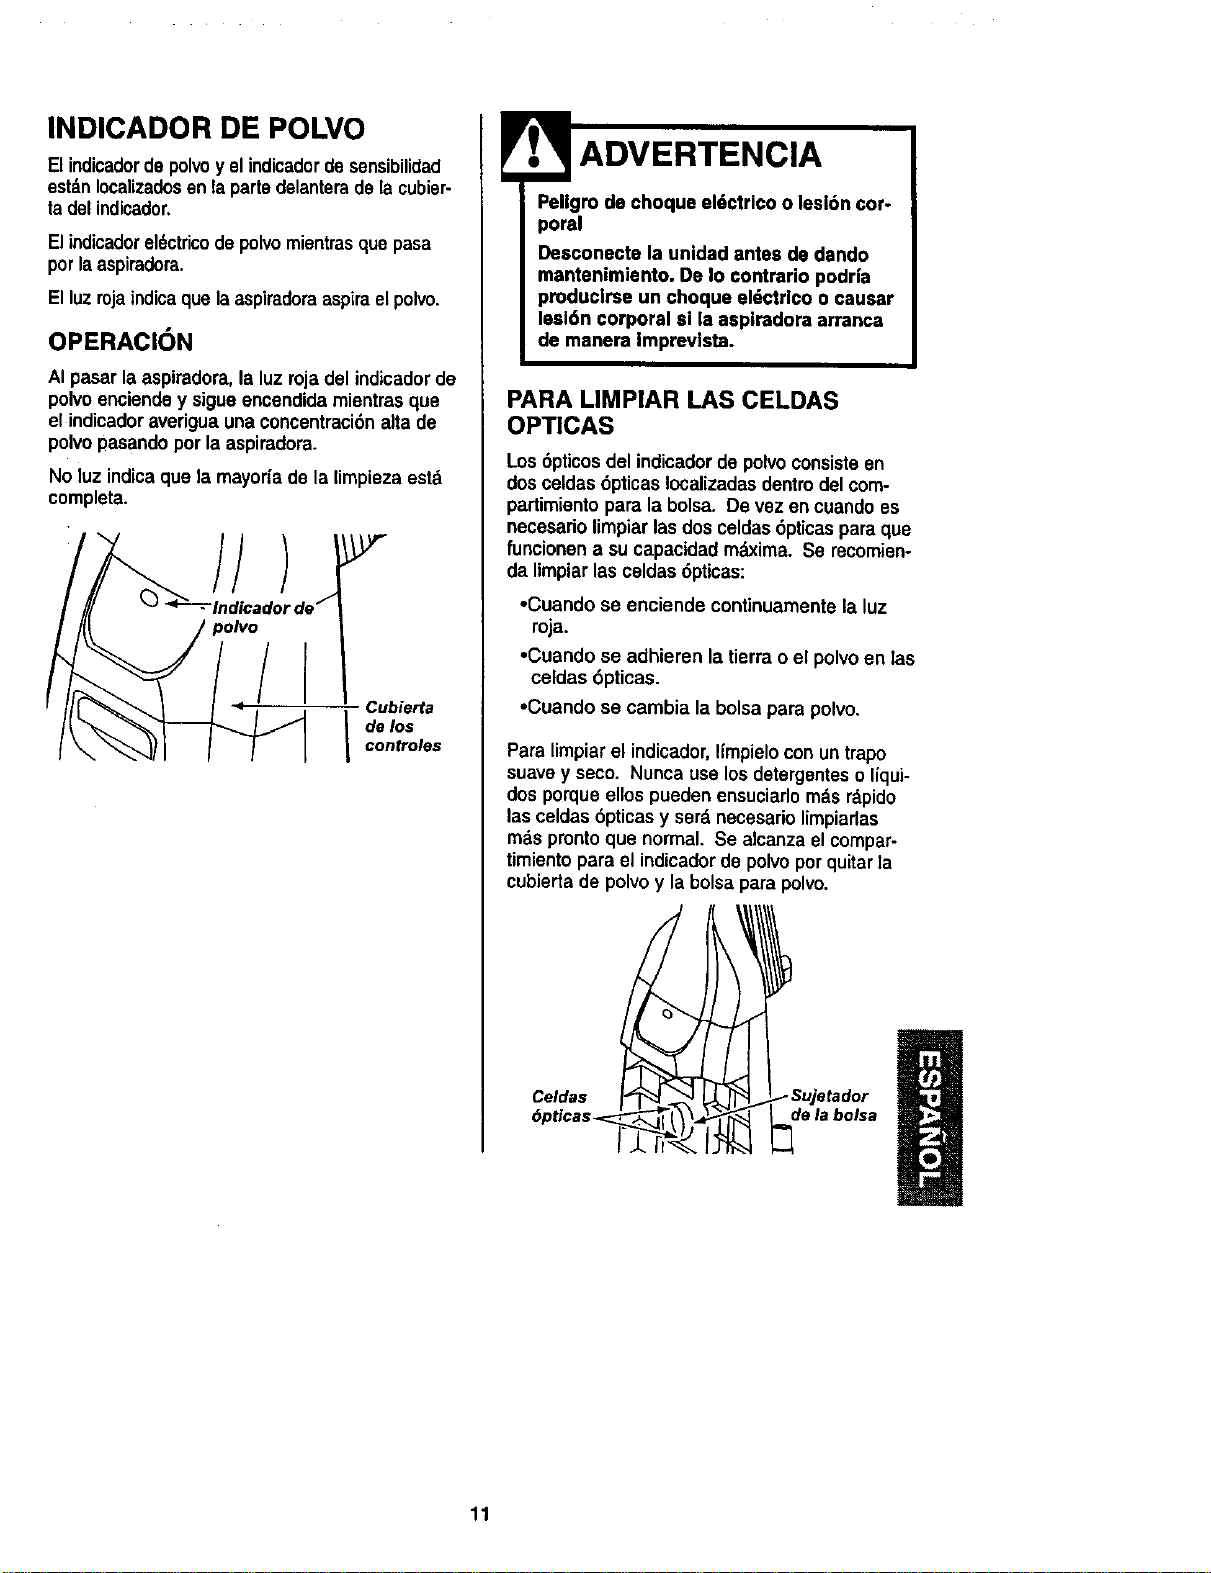
INDICADOR DE POLVO
Elindicadordepolvoy el indicadordesensibilidad
estdnIocalizadosenla partedelanteradela cubier-
ta del indicador,
Elindicadorel6ctricodepolvomientrasquepasa
porlaaspiradora.
Elluzrojaindicaque laaspiradoraaspiraelpolvo.
OPERACION
AI pasar la aspiradora,la luz rojadel indicador do
polvo enciende y sigueencendida mientrasque
el indicadoraverigua unaconcentraci6nalta de
polvo pasando porla aspiradora.
No luz indicaque la mayor{ado la limpiezaestd
completa.
//
Cubierta
I de los
controles
Pellgro de choque el6ctrlco o lesl6n cor-
poral
Desconecte la unidad antes de dando
mantenimiento. De Io contrario podr|a
produclrse un choque eldctrlco o causar
lesl6n corporal sl la aspiradora arranca
de manera Imprevista.
PARA LIMPIAR LAS CELDAS
OPTICAS
Los6pUcosdel indicadordo polvoconsisteen
dosceldas 6pticasIocalizadasdentrodel com-
partimientopara la bolsa. De vez encuandoes
necesariolimpiarlasdos celdas6pticas para que
funcionen a sucapacidadmdxima. Se recomien-
da limpiarlas celdas6pticas:
•Cuando se enciende continuamente la luz
roja.
•Cuando se adhieren latierra o el polvoen Ias
celdas 6pticas.
•Cuando se cambia la bolsa para polvo.
Para limpiarel indicador,Ifmpielocon untrapo
suavey seco. Nuncause losdetergenteso liqui-
dos porqueellospueden ensuciarlom_.sr_.pido
lasceldas 6pticasy serd necesariolimpiarlas
rods prontoque normal. Se alcanzael compar-
timientopara el indicadorde polvoporquitarla
cubiertade polvoy labolsapara polvo.
Celdas _ _Sujetador
6pticas_-'-_- _ l \ de la bolsa
11

ICUIDADO DE LA ASPIRADORA J
Siga siempre todas las instrucciones de
seguridad al limpiary darle servicio a su IADVERTENCIA
aspiradora.
Pellgro de choque eldctrlco o lesi6n cor-
poral
Descone_e la unidad antes de dando
mantenlmlento. De Io contrarlo podria
pmducirsa un choque el6ctrl¢o o causar
lesl6n corporal slla aepiradora arranca
de manera Impmvlsta.
, ............................. r i
Recoja el cord6n y enrr611eloen los sujetado-
res superior e inferior,sin qua quede muy
apretado°
Guarde la aspiradora
bajo techo en un lu-
gar seco, con el
mango en posici6n
vertical.
Peligro de choque el6ctrico o lesi6n
corporal
Si enrolla el cord6n muy apretado pue-
de tensarlo mucho y causarle dahos.
De da_aree, el cord6n podr|a causar
descargas eldctrlcas y leslones o
daSos personales,
Desconecte el cord6n eldctricode la clavijade
la pared. NO choree agua sobre la asplra-
dora.
Limpie el exterior con un trapo suave y limpio,
que ha sido exprimido despuds de remojar en
una soluci6nde agua y detergente liquido
ligero. Seque el exterior con un traposeco des-
pu_s de limpiar.
Limpie la superficie exterior del receptaculoy
de los accesorios para reducir la electricidad
est_.tica y la acumulaci6n de polvo.
Lave los accesorios en agua tibia jabonosa,
enjuagua y deje secar al aim. No los lave en
lavadora de platos.
CUIDADO
Io use los accesorlos si estdn moja-
dos. Los accesorios qua se utilicen en
,ireas suclas, debajo del refrlgarador, no
deben usarse en otras superficies sin
antes ser lavados. Podrian dejar mar-
Gas,
12
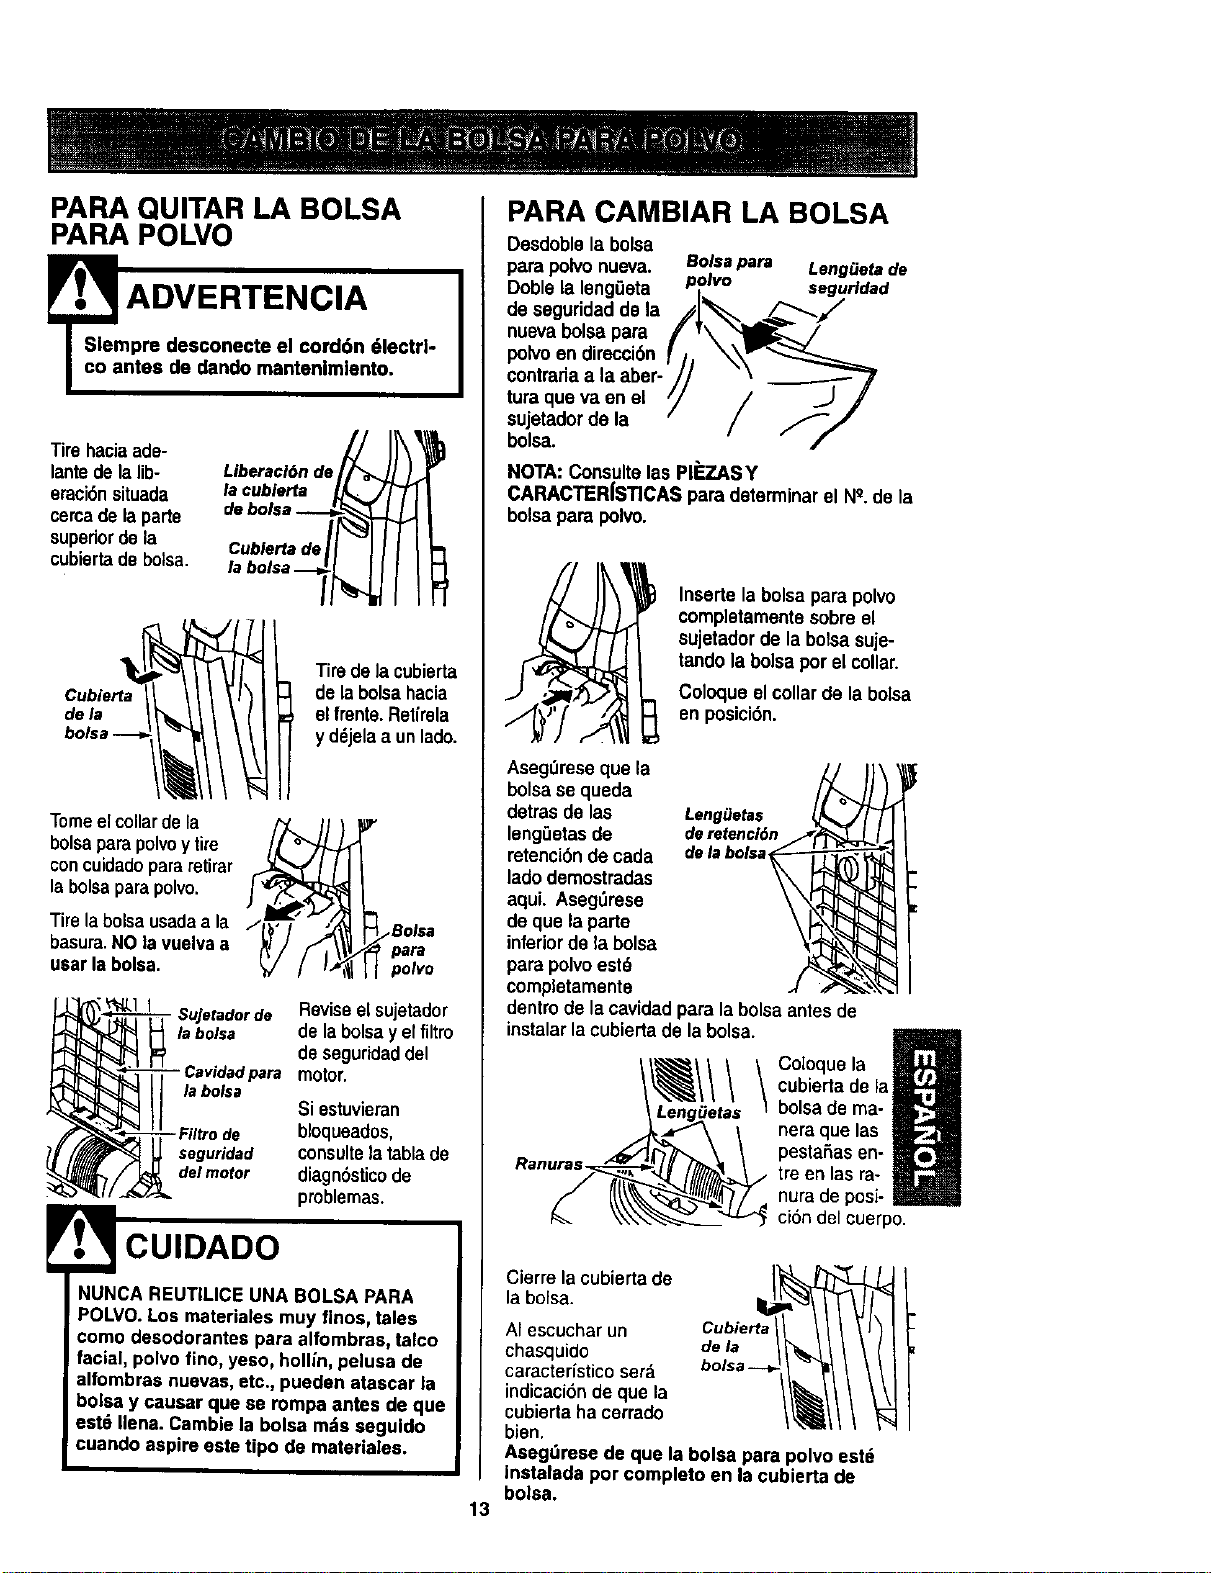
PARA QUITAR LA BOLSA
PARA POLVO
=sT= ADVERTENCIA I
pre desconecte el cord6n 61ectrl-
ntes de dando mantenlmlento.
Tirehaciaada-
lantede lalib-
eraci6nsituada
cercade laparte
supedordela
cubiertadebolsa.
Liberacl6nde_
Cublertade/_
labolsa--_
de la
Tiredelacubierta
de labolsahacia
el fmnte.Retirela
y d_jelaa unlado.
Tomeelcollarde la /'_ll_
bolsaparapolvoy tire
concuidadopararetirar
labolsaparapolvo.
Tire la bolsausadaa la / , ,
basura.NO lavuelvaa
usar labolsa.
_ Bolsa
para
polvo
- Sujetadorde Revise el sujetador
la bolsa de la bolsa y el filtro
de seguridad del
para motor.
la bolsa
Si estuvieran
- Filtro de bloqueados,
seguridad consulte la tabla de
delmotor diagnSsticode
problernas.
F.t' CUIDADO
NUNCA REUTILICE UNA BOLSA PARA
POLVO.Los materiales muy finos, tales
como desodorantes para alfombraa, talco
facial, polvo fino, yeso, hog/n, pelusa de
alfombras nuevas,etc., pueden atascar la
balsa y causar que se rompa antes de que
eat6 Ilena. Cambie la bolsa mds seguido
cuando aspire este tipo de materialea.
13
PARA CAMBIAR LA BOLSA
Desdoblela bolsa
para polvo nueva. Bolsapara Leng_etade
Doble la leng0eta polvo segurldad
de seguridadde la j_,=,./_-'--_!
nueva bolsapara / v\ ___ /
po ,oendir i6, r/,
centrariaa la aber- ,I/ "\ --_'_J'
tura queva en el /// ..J J
sujetadorde la -- f//
bolsa. " /
NOTA: Consultelas PI_,.AS Y
CARACTER|STICAS para determinarel N_.de la
bolsapara polvo.
Insertela bolsapara polvo
completamentasobreel
sujetadorde labolsasuje-
tandola bolsa porel collar.
Coloqueelcollarde labolsa
en posici6n.
AsegOreseque la
bolsase queda
detras de las LengiJetas
leng_etasde deretencl6n
retenci6nde cada delabolsa
ladodemostradas
aqui. Aseg_irese
de que laparte
inferiorde la bolsa
para polvoestd
cempletamente
dentrode la cavidadpara la bolsaantesde
instalarlacubiertade la bolsa.
Ranuras.
Coloque la
cubiertade la
belsa de ma-
nera que las
pestaSasen-
tre en las ra-
nura de posi-
ci6n del cuerpo.
laCierrebolsa.lacubiertade J_L_
AI escuchar un ii//bs_rta/1_1
chasquido
caracteristico ser_.
indicaci6n de que la
cubierta ha cerrado
bien.
AaegOresede que la bolsa para polvo est_
instalada por completo en la cubierta de
bolsa.
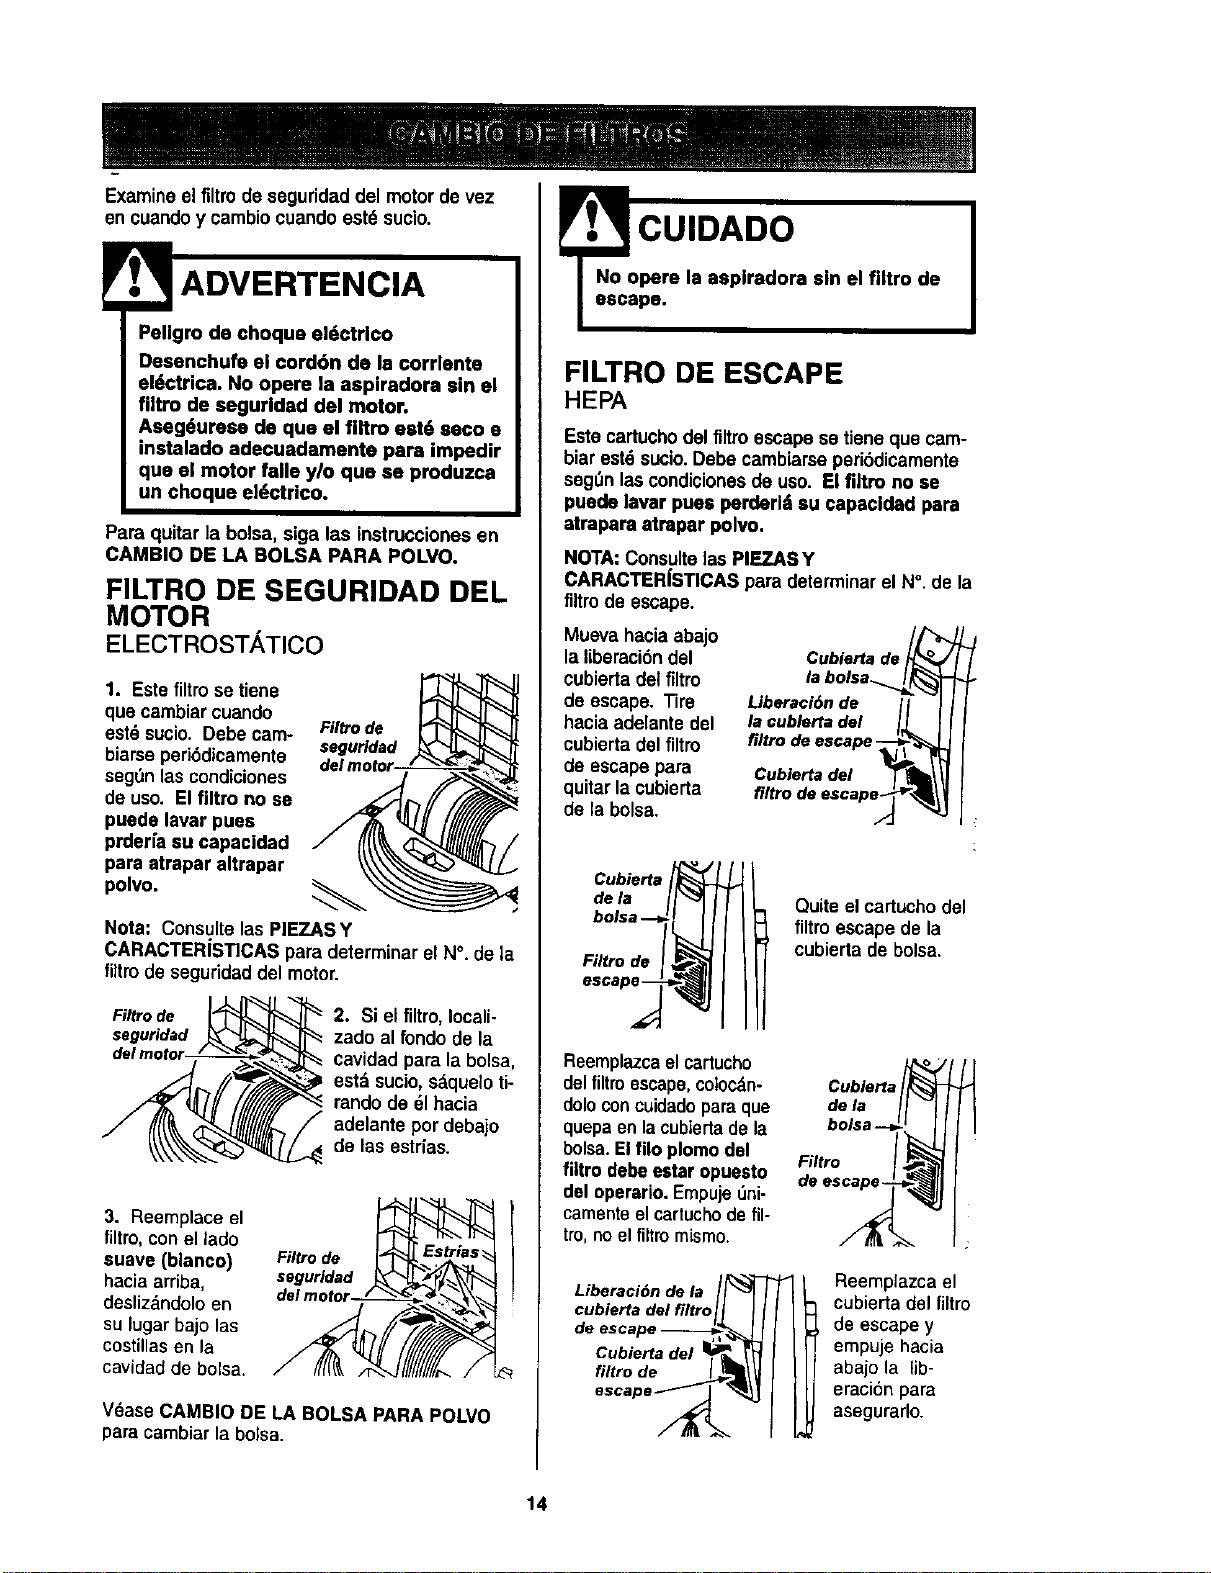
Examineelfirm de seguridaddel motordevez
en cuandoy cambiocuandoestd sucio.
ADVERTENCIA I
Patigm de cheque et6ctrlco
Desenchufe el cord6n de la corrlanta
eldctrlca. No opere la aapiradora sin el
filtro de aegurldad del motor.
Aseg_urese de que el flltro eat6 aeco a
inatalado adecuadamante pare impedir
qua el motor falle ylo que se produzca
un cheque el,Jctrico.
Para quitar la bolsa, siga las instruccionesen
CAMBIO DE LA BOLSA PARA POLVO.
FILTRO DE SEGURIDAD DEL
MOTOR
ELECTROSTATICO
1. Este filtrose tiene
quecambiarcuando
estdsucio. Debe cam-
biarseperi6dicamente
seg_n lascondiciones
de use. El filtro no se
pueda laver pues
prderia su capacidad
para atrapar altrapar
polvo.
Filtro de
seguridad
Nota: Consultelas PIEZASY
CARACTERiSTICAS para determinarel N°. de ta
filtm de seguridaddel motor.
Filtro de
seguridad
2. Si el filtro,Iocali-
zado al fondo de la
cavidad pare la bolsa,
estdsucio,sdqueloti-
rando de 61hacia
adelanteper debajo
de las estr(as.
3. Reemplace el
filtro, conel lado
suave (blanco)
hacia arriba,
deslizdndolo en
su lugar bajo las
costillas en la
cavidad de bolsa.
Filtro de
seguridad
del motor--l-/ _
V6ase CAMBIO DE LA BOLSA PARA POLVO
para cambiar la bolsa.
CUIDADO
No opere la asplradora sin el filtro de
escape.
FILTRO DE ESCAPE
HEPA
Este cartuchodel filtroescapese tiene que cam-
biarestdsucio.Debe cambiarseperi6dicamente
segOnlascondicionesde use. El firm no se
puede |avar puas perderl su capacldad para
atrapara atrapar polvo.
NOTA:Consulte las PIEZASY
CARACTER|ST|CAS para determinarel N°. de la
filtm de escape.
Mueva haciaabajo
la liberacidndel
cubierta del filtro
de escape. Tire
hacia adelante del
cubiertadel fi_Im
de escape para
quitarla cubierta
de labolsa.
Cubierta de _o
la bolsa_
Liberaci6n de II
la cublerta del I_L
filtro de escape-_-_ l_
Cubierta del "___t_l
flltro de escape_
Gubierta
dela
F/Itro de
Quite el cartuchodel
filtroescapede la
cubierta de bolsa.
Reemplazcael cartucho
del filtmescape,coloc_n-
doleconcuidadopareque
quepaen lacubiertade la
boise. Elrue plomo del
filtro debeester apuesto
del operario.Empuje5ni-
camenteelcartuchodefil-
tro,no el filtromismo.
Liberaci6n de la
cubierta del filtro
de escape ----_,,
Cubierta del 1_
,.,re
escape _ _
Cublerta °i
de la
bolsa ---=
Filtro I
de es_
Reemplazca el
cubierta del filtro
de escapey
empuje hacia
abajo la lib-
eracion para
asegurarlo.
14
ADVERTENCIA
Pellgm de choque eldctrico o lesl6n
corporal
Desconecte la unidad antes de dando
mantenlmlento. De Io contrarlo podHa
producirse un choque el_ctrico o csu-
sar lesi6n corporal sl la aspiradora
arranca de manera Imprevista.
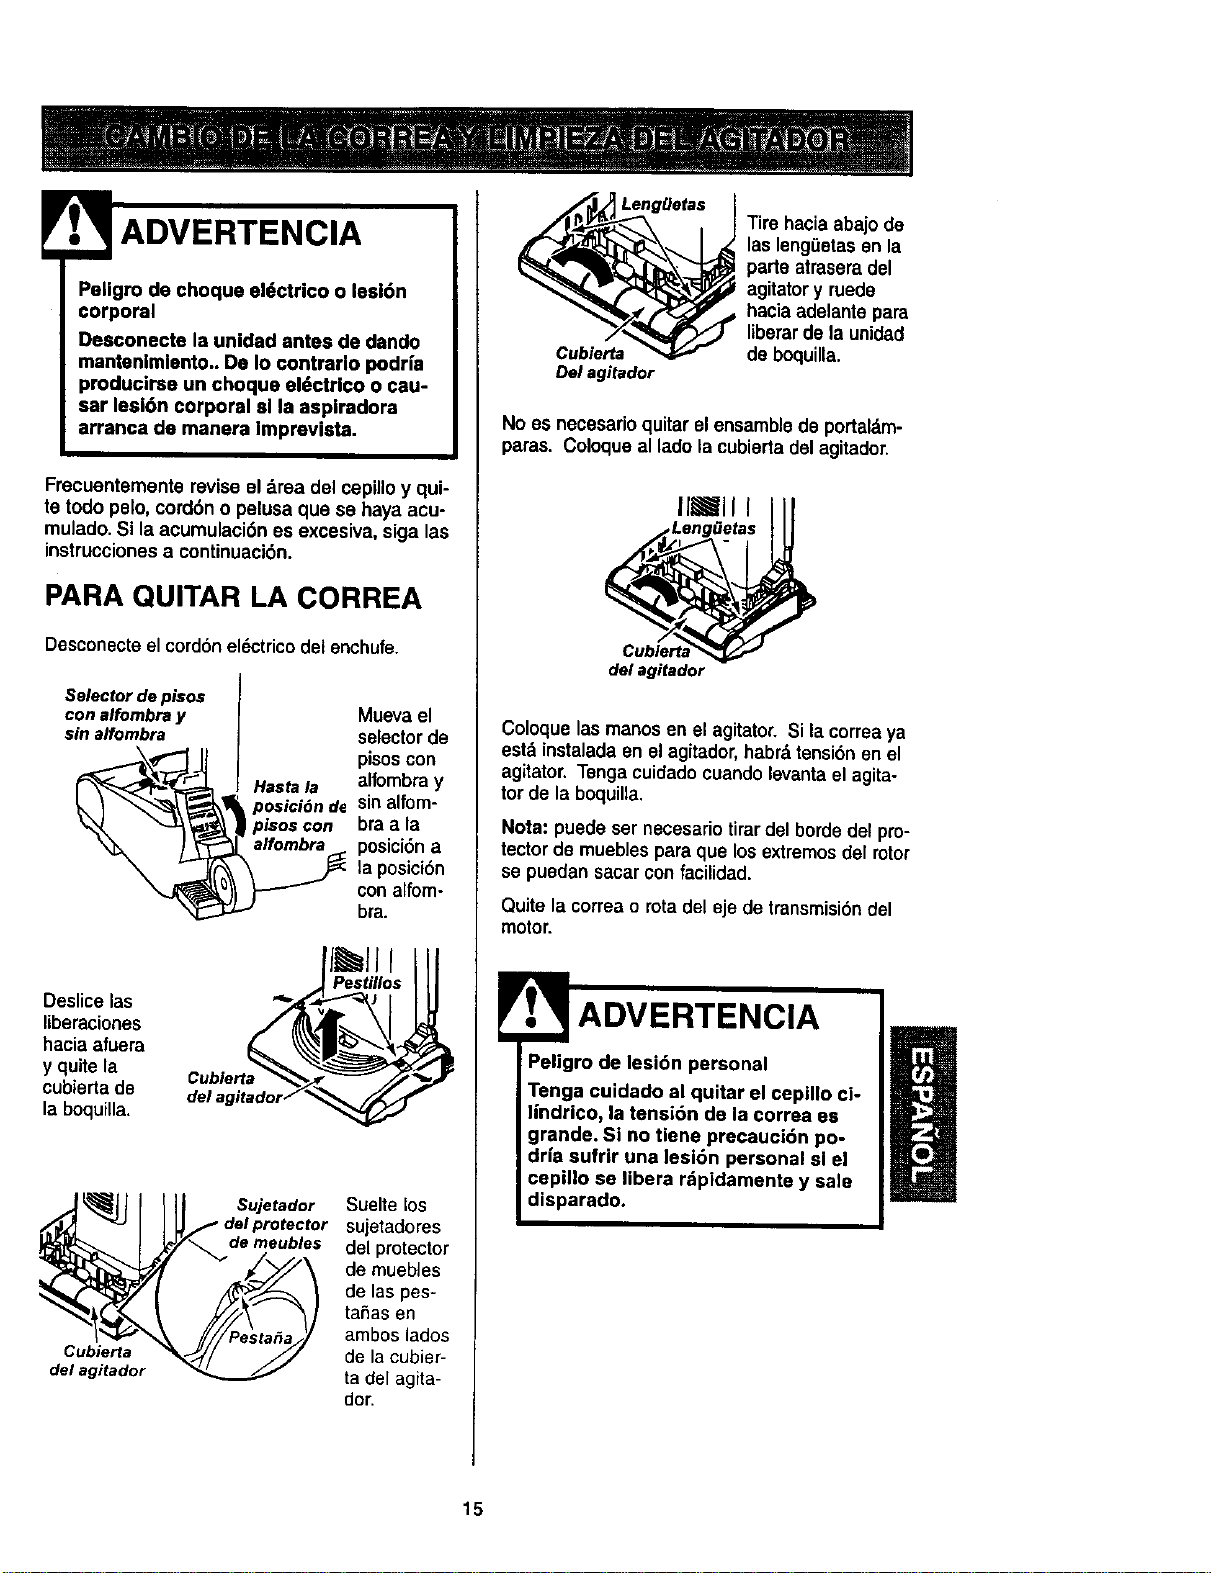
Frecuentemente revise el drea del cepilloy qui-
te todo pelo, cord6n o pelusa qua se hays acu-
mulado.Si laacumulaci6n es excesiva, siga las
instruccionesa continuaci6n.
PARA QU|TAR LA CORREA
Desconecteel cord6nel6ctrico del enchufe.
Selectordepisos
conalfombray
sin alfombra
Deslicelas ""
liberaciones
hacia afuera
y quitela
cubiertade
la boquitta.
Muevael
selector de
pisoscon
alfombra y
sinalfem-
bra a la
posici6n a
la posici6n
con alfom-
bra.
Pestillos
Cubierta
del agitador
Sujetador
de meubles
Suelte los
sujetadores
del protector
de muebles
de las pes-
tahas en
ambos lados
de la cubier-
ta del agita-
dot'.
Lengge_s
Cub!errs
De! agitador
Tire hacia abajode
las leng_etas en la
parte atraseradel
agitatory ruede
hacia adelante para
liberarde la unidad
de boquilla.
No es necesarioquitarel ensamblede portal,m-
paras. Coloque al ladola cubiertadel agitador.
IlJll I
Leng_etas
de! agitador
Coloque las manos en el agitator.Si la correaya
estd instaladaen el agitador,habrd tensi6nen el
agitator. Tenga cuidado cuando levanta el agita-
tor de la boquilla.
Nota: puede ser necesario tirardel borde del pro-
tectorde mueblespara que los extremos del rotor
se puedansaear confacilidad.
Quite la correao rotadel eje de transmisi6ndel
motor.
Peligro de lesi6n personal
Tenga cuidado al quitar el cepillo ci°
tindrico, |a tensi6n de la correa es
grande. SI no tiene precauci6n po-
drfa sufrir una lesi6n personal sl el
cepillo se libera rdpidamente y sale
disparado.
15
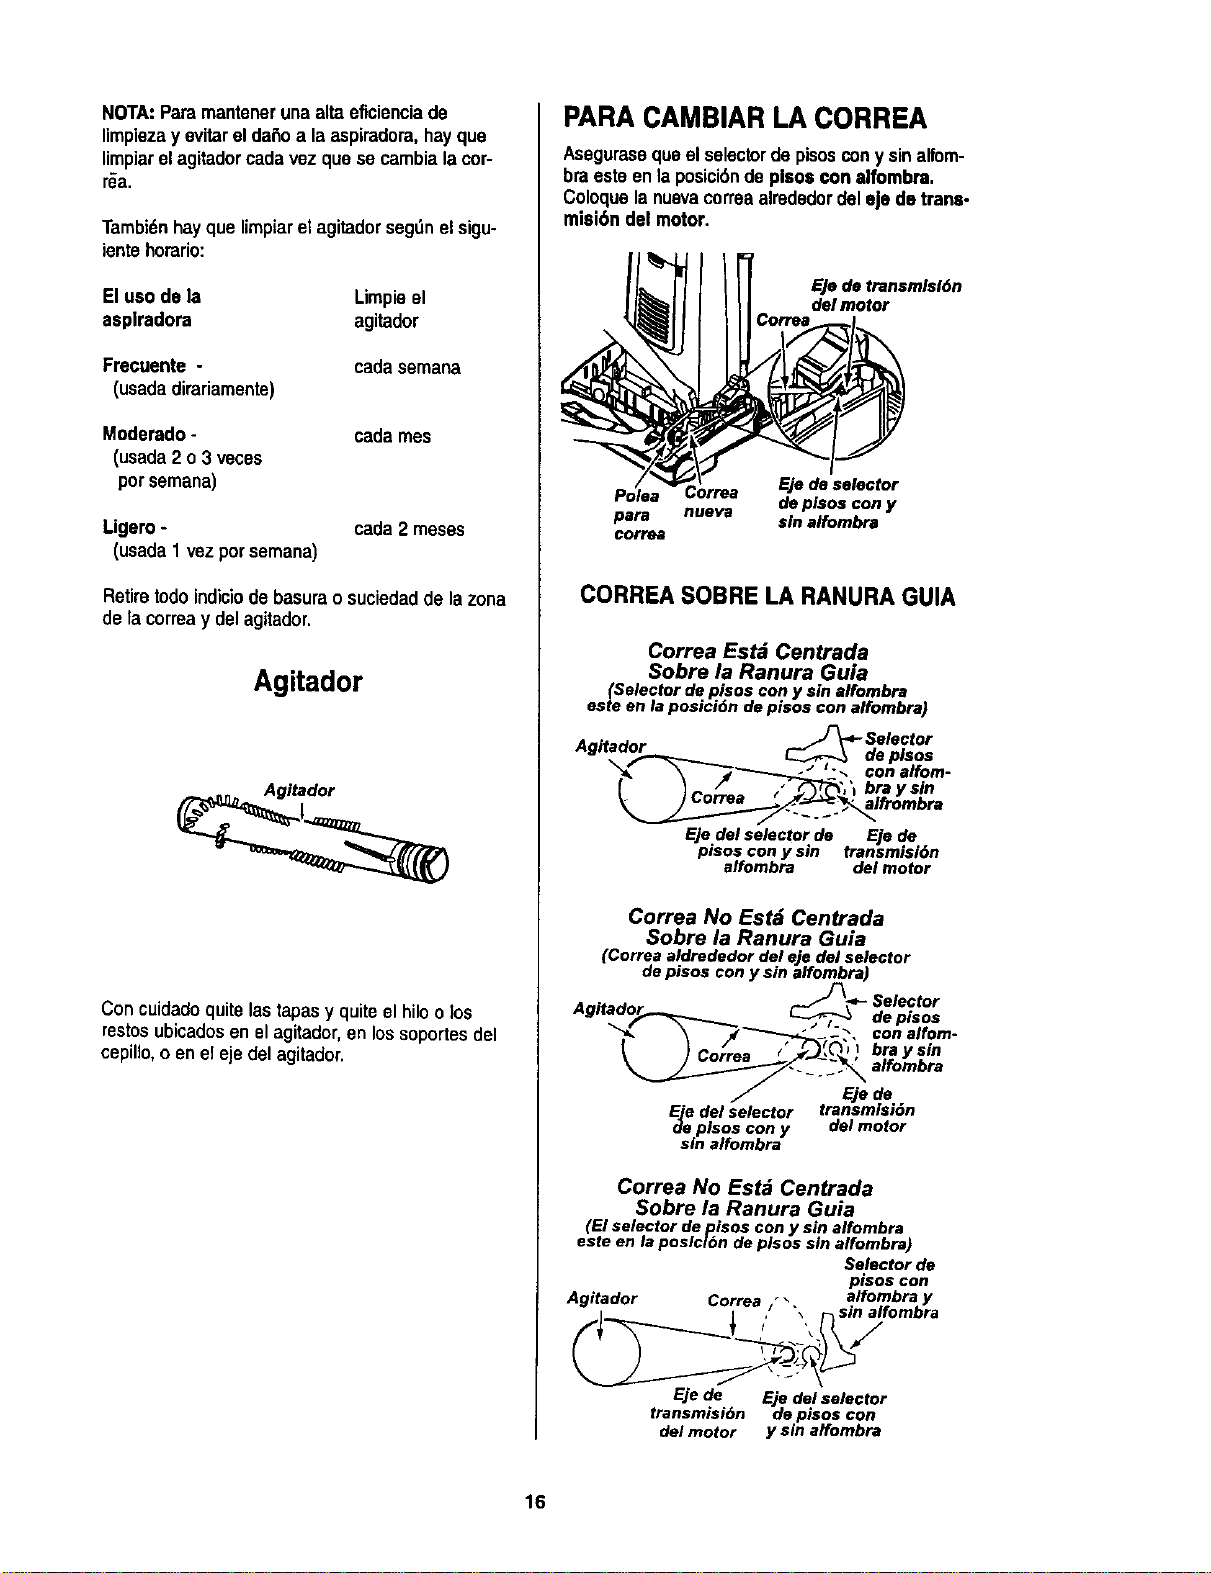
NOTA:Paramantenerunaaltaeficienciade
limpiezayevitarelda6oalaaspiradora,hayque
limpiarelagitadorcadavezquesecambialacor-
r_a.
Tambi_nhayque limpiarel agitadorsegL_nel sigu-
ientehorario:
El uso de la Limpieel
asplradora agitador
Frecuente -
(usadadirariamente)
cadasemana
Moderado-
(usada2 o3 veces
pot semana)
cadames
Ligero-
(usada1 vezporsemana)
cada2 meses
Retire todo indiciode basura o suciedadde la zona
de la correay del agitador.
Agitador
Con cuidadoquite lastapasy quite el hilo o los
restosubicadosen elagitador, en lossoportes del
cepillo,o en elejedel agitador.
PARA CAMBIAR LA CORREA
Aseguraseque el selectordepisoscony sinalfom-
braestoen laposici6nde plsoscon alfombra.
Coloquelanuevacorreaalrededordeleje de trane-
misi6n del motor.
EJode transmlsldn
del motor
Eje de selector
Poise de plsos con y
para nueva sin alfombra
correa
CORREA SOBRE LA RANURA GUIA
Correa Estd Centrada
Sobre la Ranura Guia
(Selector de pisos con y sin affombra
este en la posici6n de pisos con affombra)
A "÷"_ ._-Selector
"_ \ _'3"-_-__'._, conalfom-
_o- ) Corr.. / "_, I bray sin
Ejedelselectorde Ejede
pisos con y sin transmisl6n
alfombra de/motor
Correa No Estd Centrada
Sobre la Ranura Guia
(Correa aldrededor del eje del selector
de pisos con y sin alfombra)
__ -_- Selector
de pisos
con alfom-
bray sin
alfombra
Eje de
_ee del selector transmisidn
plsos con y del motor
sin alfombra
Correa No Estd Centrada
Sobre la Ranura Guia
(El selector de pisos con y sin alfombra
este en la poslclOn de plsos sin alfombra)
Selector de
pisoscon
Agitador Correa "\ alfombray
i ! / "_ _sin alfombra
Ejede Eje delselector
transmisidn depisoscon
delmotor y sin affombra
16
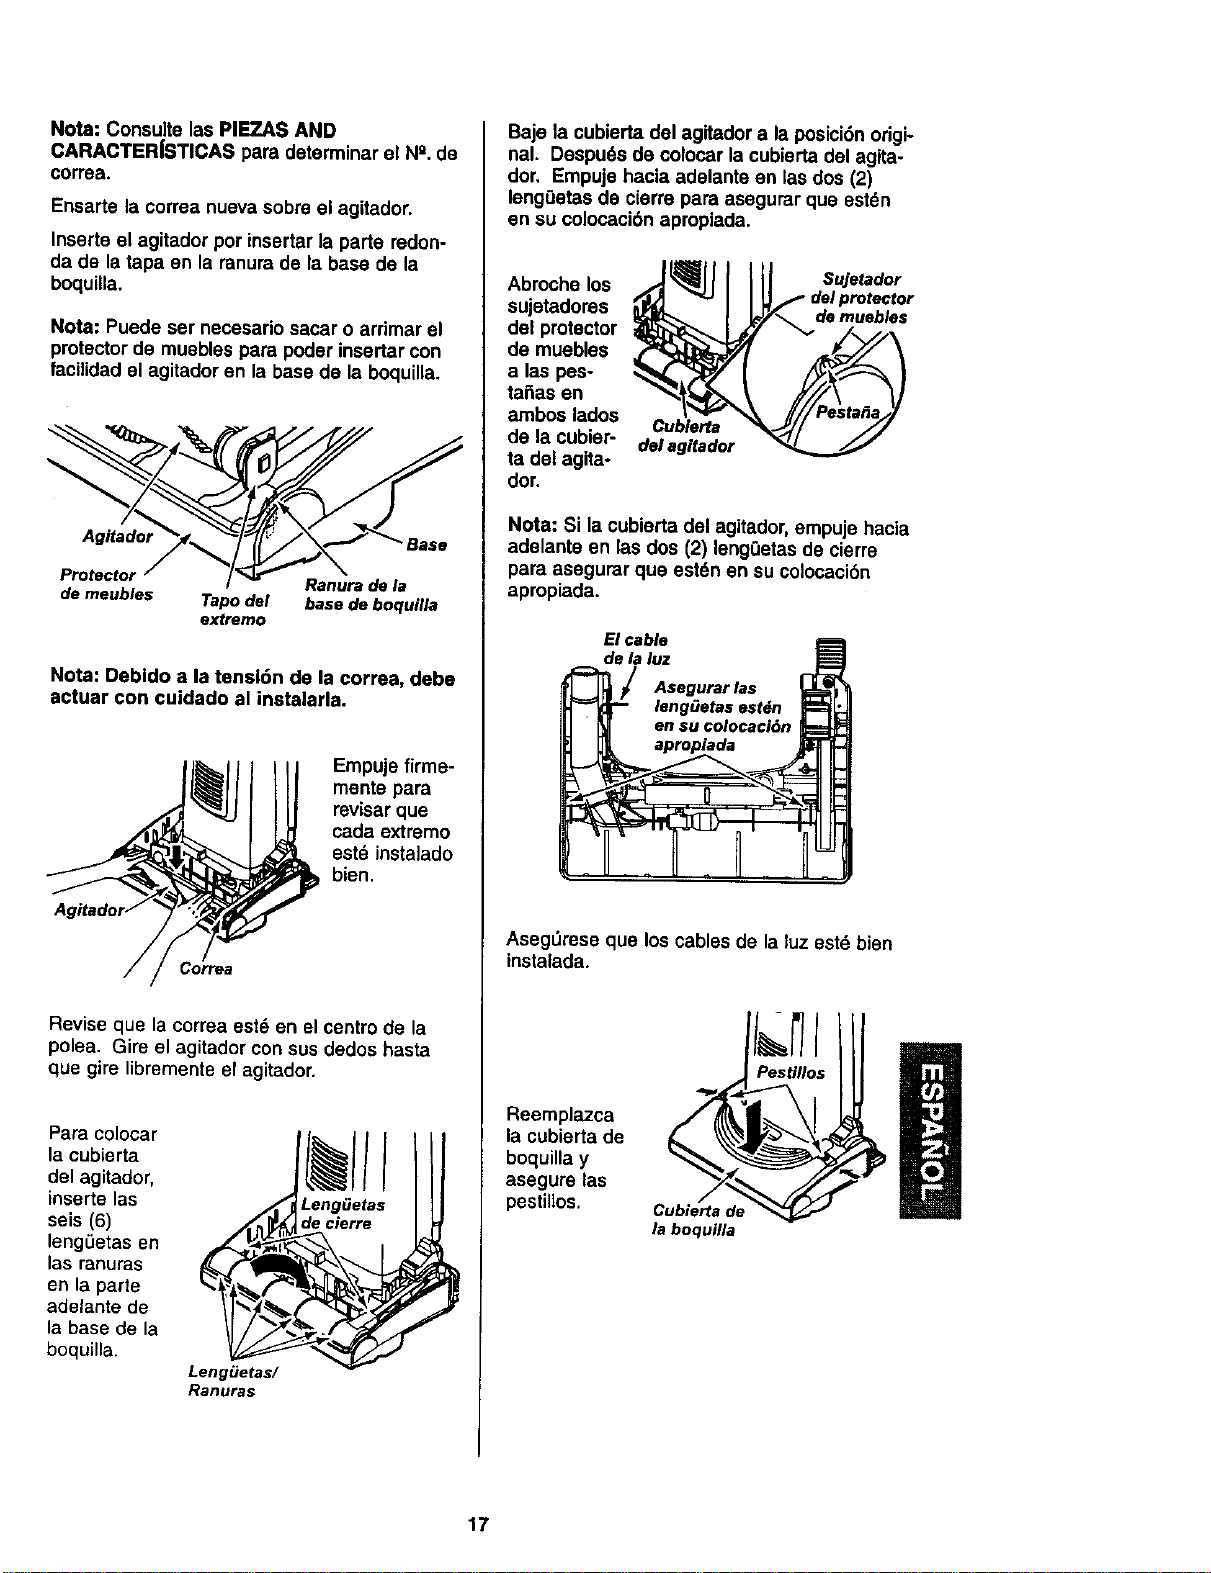
Nota:ConsultelasPIEZASAND
CARACTER|STICASparadeterminarelN_.de
correa.
Ensarte la correa nueva sobre el agitador.
Inserte el agitador por insertar la parte redon-
da de la tapa en la ranura de la base de la
boquilla.
Nota: Puede ser necesario sacar o arrimar el
protectorde muebles para poder insertar con
facilidadel agitadoren la base de la boquina.
Agitador Base
Protectol
Ranura de la
de meubles Tapo del base de boquilla
extremo
Nota: Debldo a la tensl6n de la correa, debe
actuar con cuidado al instalarla.
Empuje firme-
mente para
revisar que
cada extremo
estd instalado
bien.
Revise que la correa est_ en el centro de la
polea. Gire el agitador con sus dedos hasta
que gire librementeel agitador.
Para colocar
la cubierta
del agitador,
inserte las
seis (6)
lengLietasen
las ranuras
en la parte
adelante de
la base de la
boquilla.
LengiJetas/
Ranuras
Leng_etas
decierre
Baje la cubierta del agitador a la posici6norigi-
nal. Despu6s de colocar la cubierta del agita-
dor, Empuje hacia adelante en las dos (2)
leng0etas de cierre para asegurar que estdn
en su colocaci6n apropiada.
Abrocho los
sujetadores
del protector
de muebles
alas pes-
taSas en
ambos lades
de la cubier-
ta del agita-
dor.
Cublerta
del agitador
Sujetador
demuebles
Nota: Si la cubierta del agitador, empuje hacia
adelante en las dos (2) lengOetasde cierre
para asegurar que est6n en su colocaci6n
apropiada.
El cable
de la luz
Asegurar las
lengOetas estdn
en su colocaci6n
apropiada
AsegOrese que los cables de la luz est6 bien
instalada.
Reemplazca
la cubierta de
boquilla y
asegure las
pestiilos.
Cubierta de
la boquilla
17
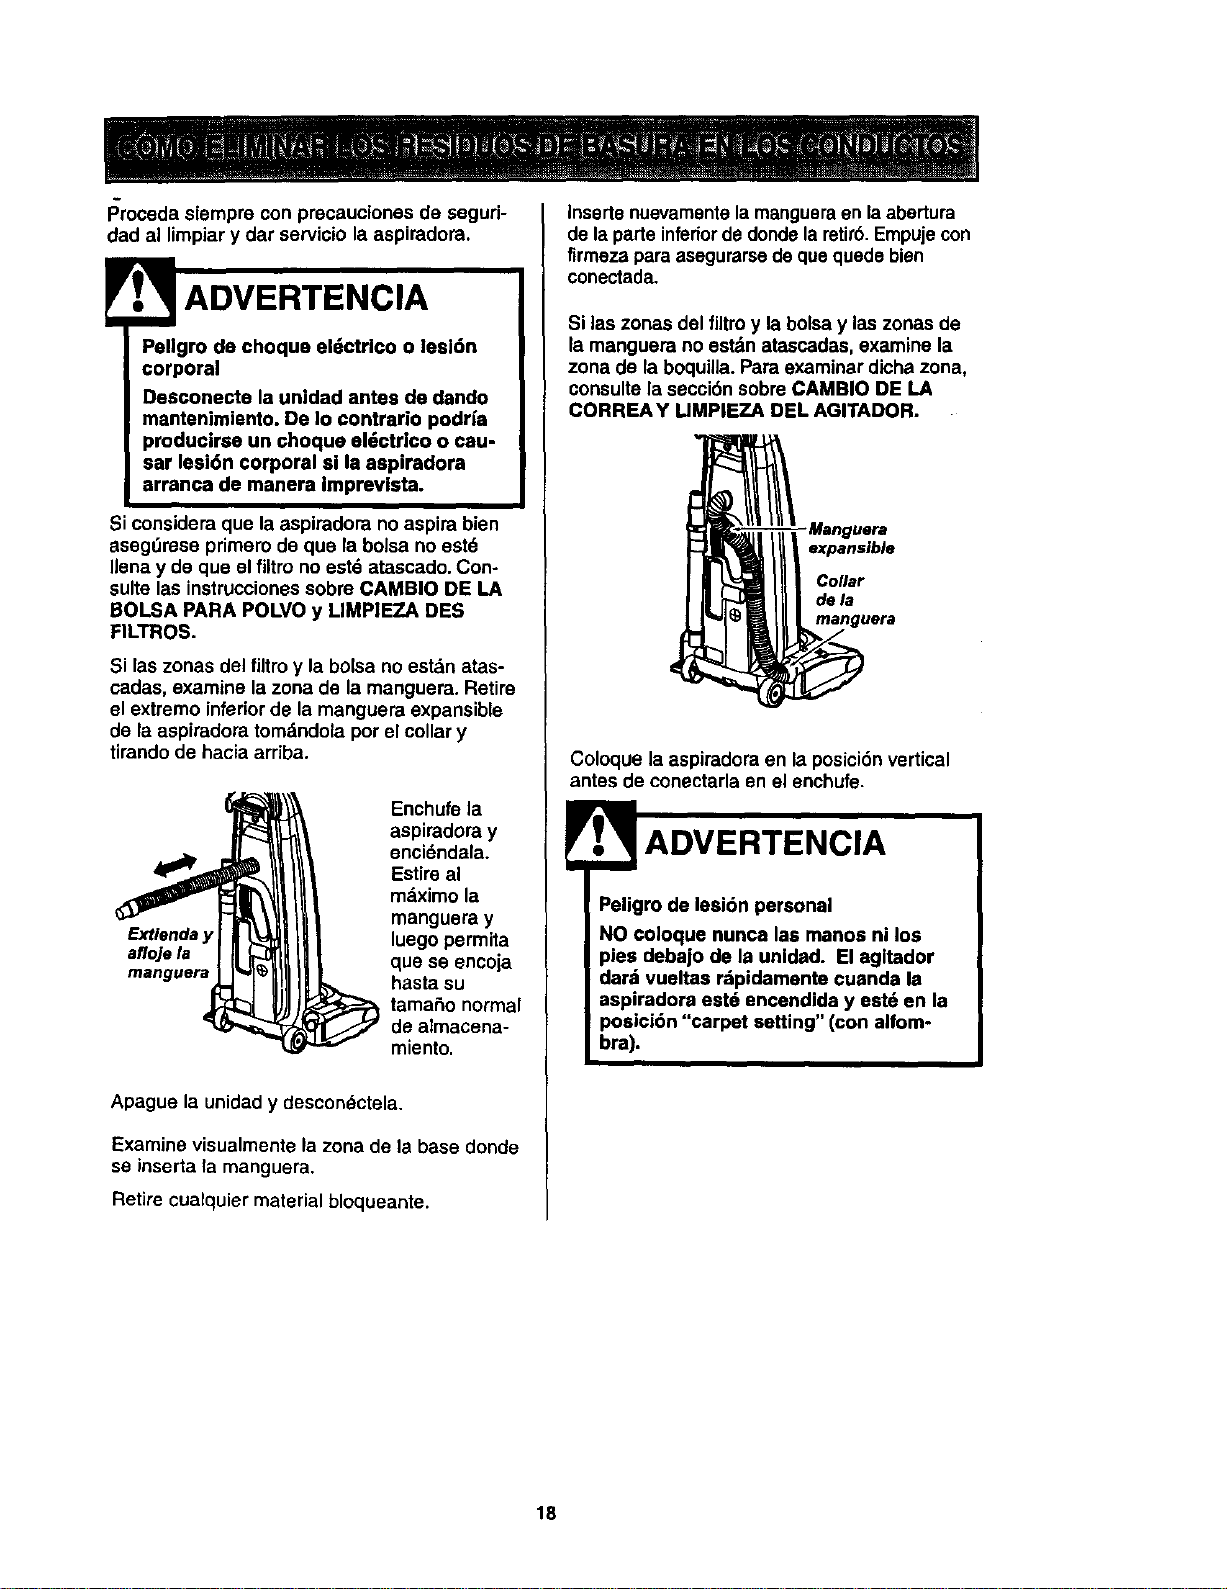
Procedasiempreconprecaucionasdeseguri-
dad al limpiary dar servicio la aspiradora.
Pellgro de choqua el_ctrico o lesl6n
corporal
Dasconecta la unidad antes de dando
mantenimiento. De Io contrario podr_a
producirse un choquo al_ctrlco o cau-
sar lesi6n corporal si la aspiradora
arranca de manera imprevlsta.
Si considera que la aspiradora noaspira bien
asegt_reseprimero de qua la bolsa no est6
Ilenay de qua el filtrono est6 atascado. Con-
sure las instruccionessobre CAMBIO DE LA
BOLSA PARA POLVO y LIMP|EZA DES
FILTROS.
Si las zonas del filtro y la bolsa no estdn atas-
cadas, examine lazona de la manguera. Retire
el extremo inferiorde la manguera expansible
de la aspiradora tomdndola por el collar y
tirandode hacia ardba.
Extienda
afloje la
Enchufe ia
aspiradora y
enci6ndala.
Estire al
mdximo la
manguera y
luego permita
que se encoja
basra su
tamaSo normal
de almacena-
miento.
Apague la unidady descon_ctela.
Examine visualmente la zona de la base donde
se inserta Tamanguera.
Retire cualquier material bloqueante.
Inserte nuevamentela mangueraen la abertura
de laparte inferiorde dondelaretir6.Empujecon
firmeza para asegurarsedeque quedebien
conectada.
Si ias zonas del filtro y la bolsay las zonas de
la manguera no estdn atascadas, examine la
zona de la boquilla. Para examinar dicha zona,
consulte la secci6n sobre CAMBIO DE LA
CORNEA Y LIMPIEZA DEL AGITADOR.
-Manguera
expansible
Collar
dela
manguera
Coloque la aspiradora en la posici6n vertical
antes de conectarla en el enchufe.
Peligro de lesi6n personal
NO coloque nunca las manos ni los
pies debajo de la unidad. El agltador
dard vueltas r=tpidamante cuanda la
aspiradora est6 encendida y est6 en la
posicidn "carpet setting" (con alfom-
bra).
18
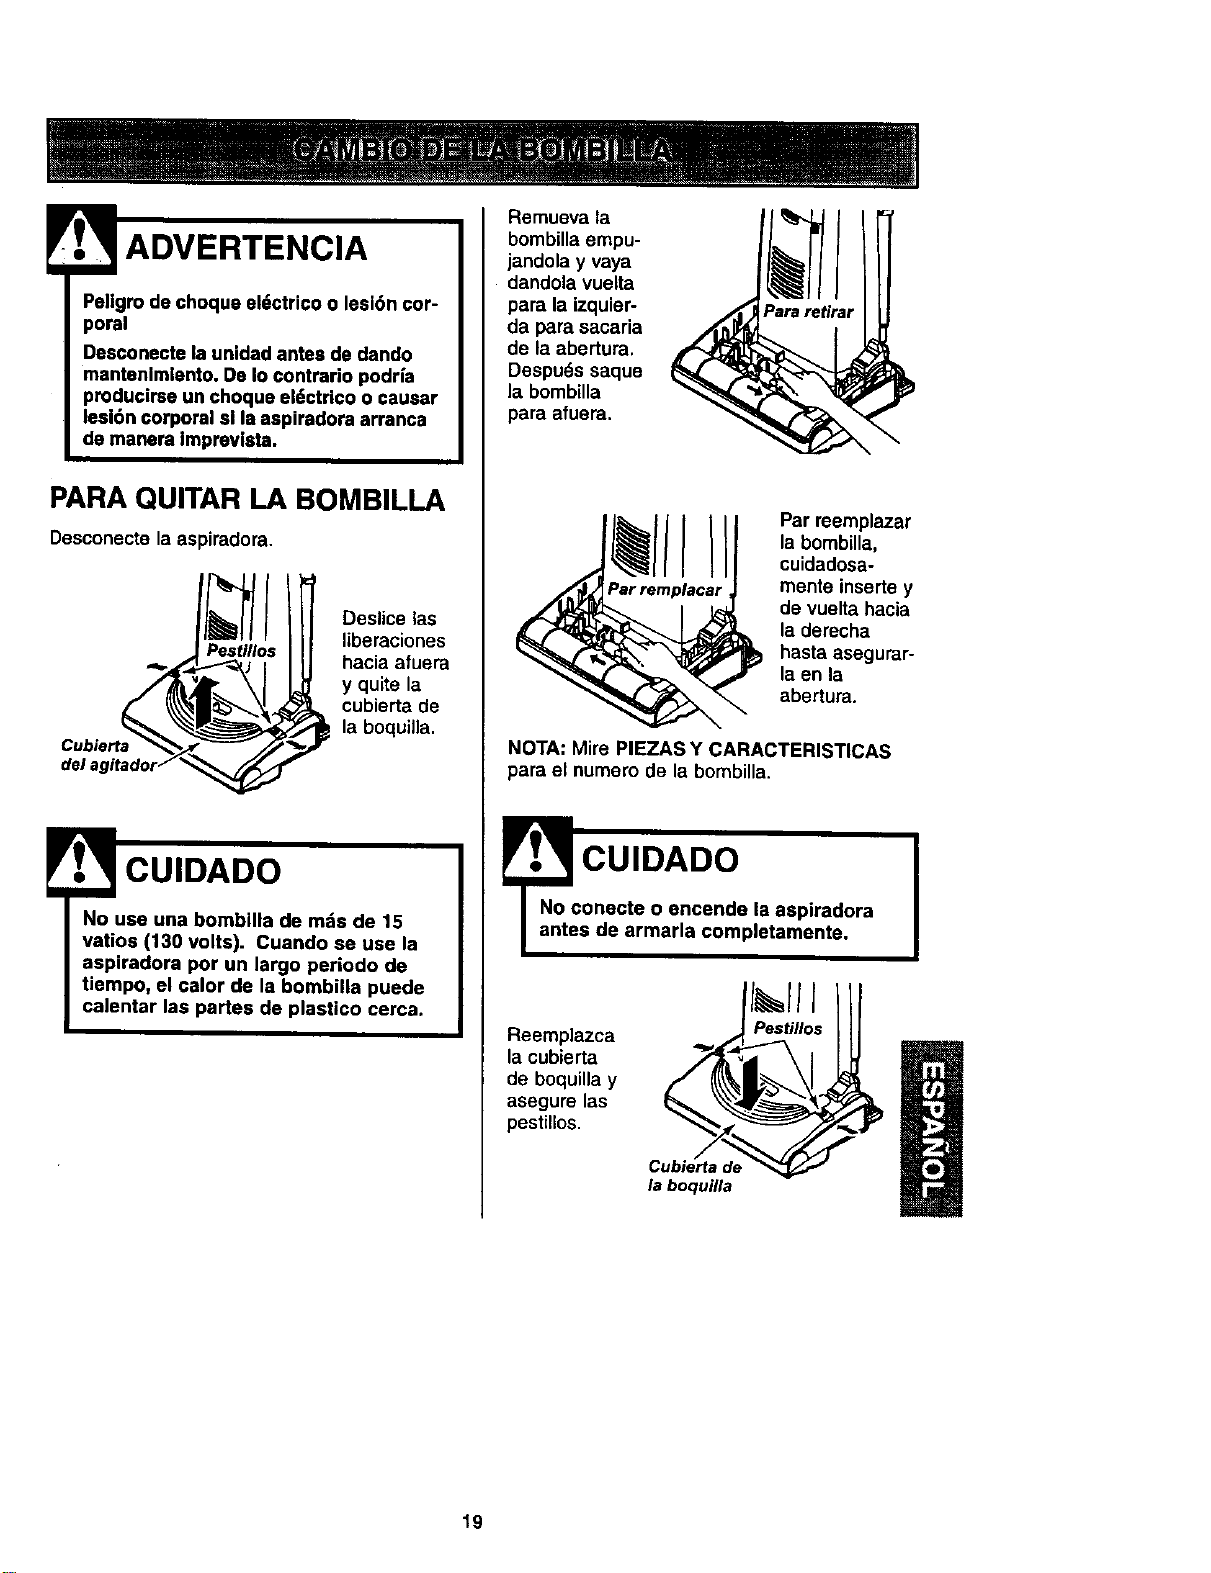
ADVERTENCIA
Pe|igro de choque ei6ctrico o leslbn cor-
poral
Desconecte la unidad antes de dando
mantenlmlento. De Io contrarlo podrfa
producirse un choque el6ctrico o causar
lesi6n corporal sl la aspiradora arranca
de manera Impravlsta.
PARA QUITAR LA BOMBILLA
Oesconecte [a aspiradora.
del a
Deslice las
liberaciones
hacia afuera
y quite la
cubierta de
la boquilla.
CUIDADO
No use una bombilla de mds de 15
vatios (130 volts). Cuando se use la
aspiradora por un largo periodo de
tiempo, el calor de la bombilla puede
calontar las partes de plastico cerca.
Remueva la
bombilla empu-
jandola y vaya
dandola vuelta
para la izquier-
da para sacaria
de la abertura.
Despu_s saque
la bombilla
para afuera.
Par reemplazar
la bombilla,
cuidadosa-
mente inserte y
de vuelta hacia
la derecha
hasta asegurar-
la en la
abertura.
NOTA: Mire P|EZAS Y CARACTERISTICAS
para el numero de la bombilla.
CUIDADO I
onoete o encendo la aspiradora
s de armada completamente.
Reemplazca
la cubierta
de boquilla y
asegure las
pestillos.
Cubierta de
la boquUta
19
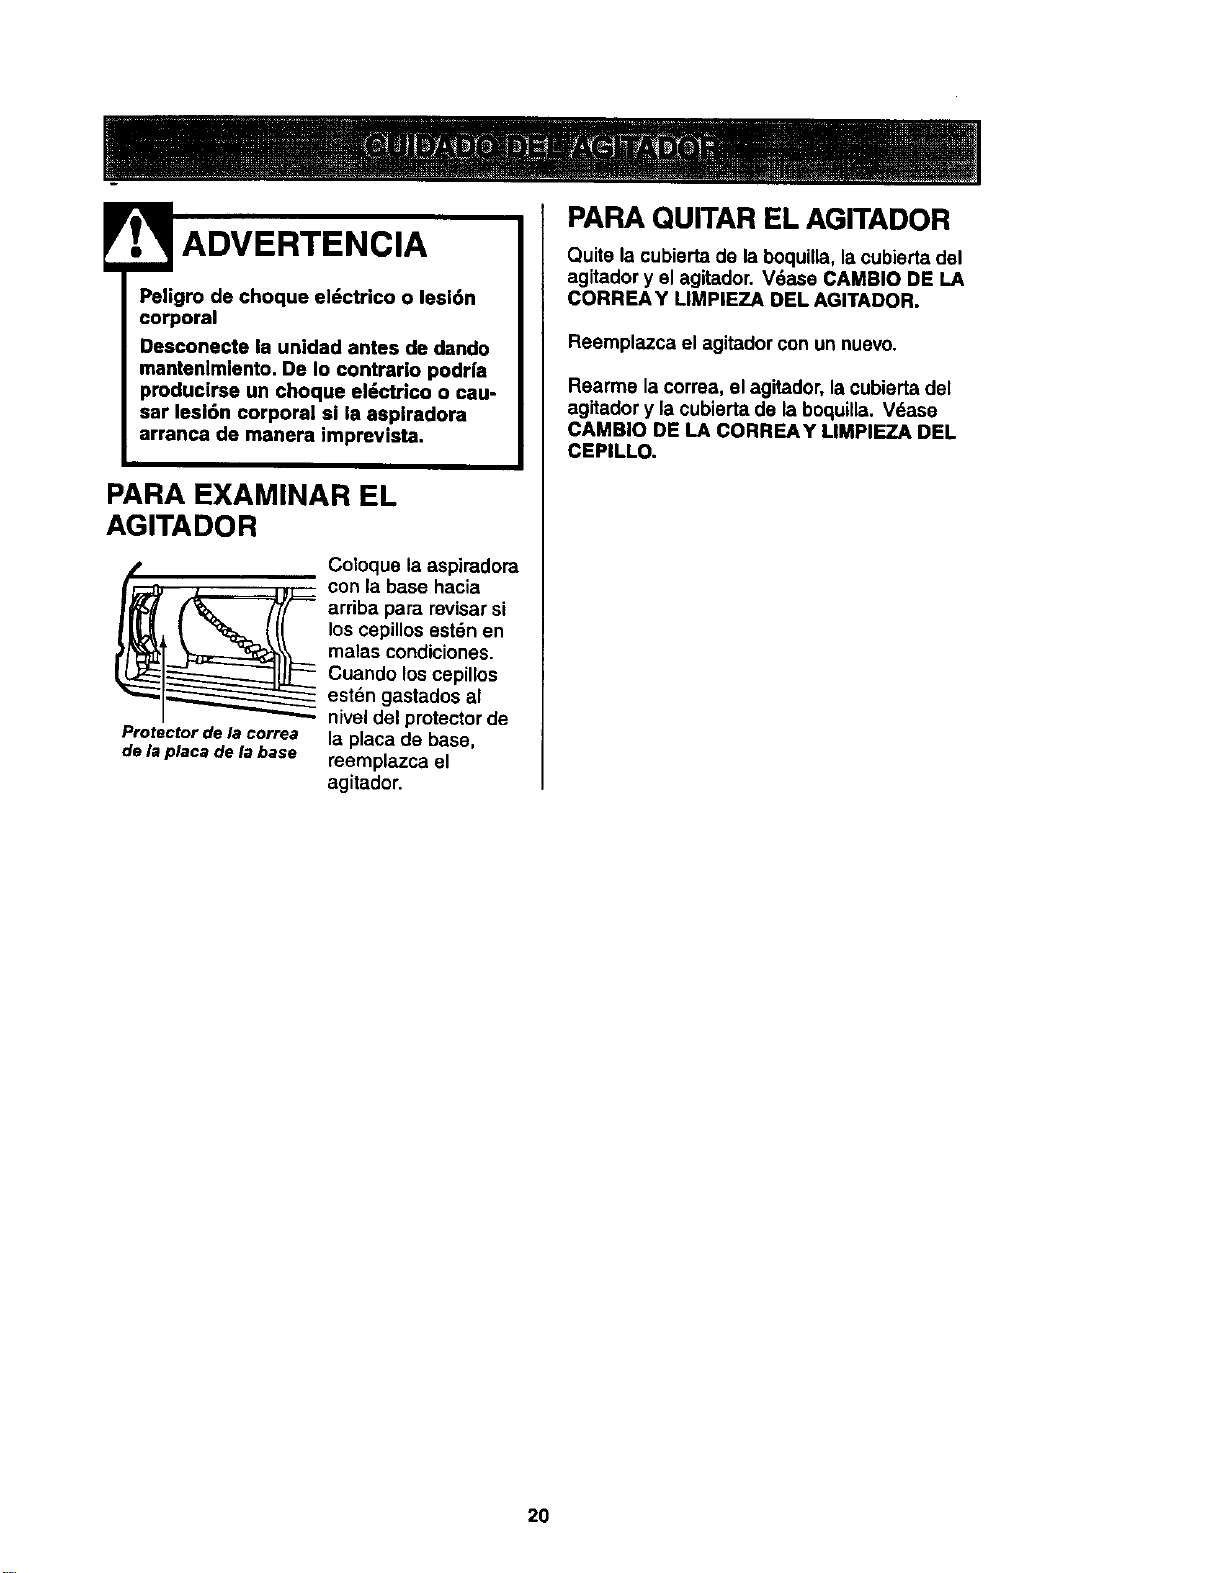
Psligro de choque el_ctrico o lesi6n
corporal
Desconecte la unidad antes de dando
mantenlmlento. De Io contrarlo podr|a
producirse un choque eldctrico o cau.
sar lesl6n corporal si la aspiradora
arranca de manera imprevista.
PARA EXAMINAR EL
AGITADOR
Protector de la correa
de la placa de la base
Coloque la aspiradora
con la base hacia
arriba para revisar si
los cepillosest6n en
malas condiciones.
Cuando los cepillos
est6n gastados al
niveldel protectorde
la placa de base,
reemplazca el
agitador.
PARA QUITAR EL AGITADOR
Quite la cubierta de la boquilla, la cubisrta del
agitador y el agitador. Vdase CAMBIO DE LA
CORREA Y LIMPIEZA DEL AGITADOR.
Reemplazca el agitadorcon un nuevo.
Rearme la correa, el agitador, lacubierta del
agitador y la cubierta de la boquilla. Vdase
CAMBIO DE LA CORREAY MMPIEZA DEL
CEPILLO.
20
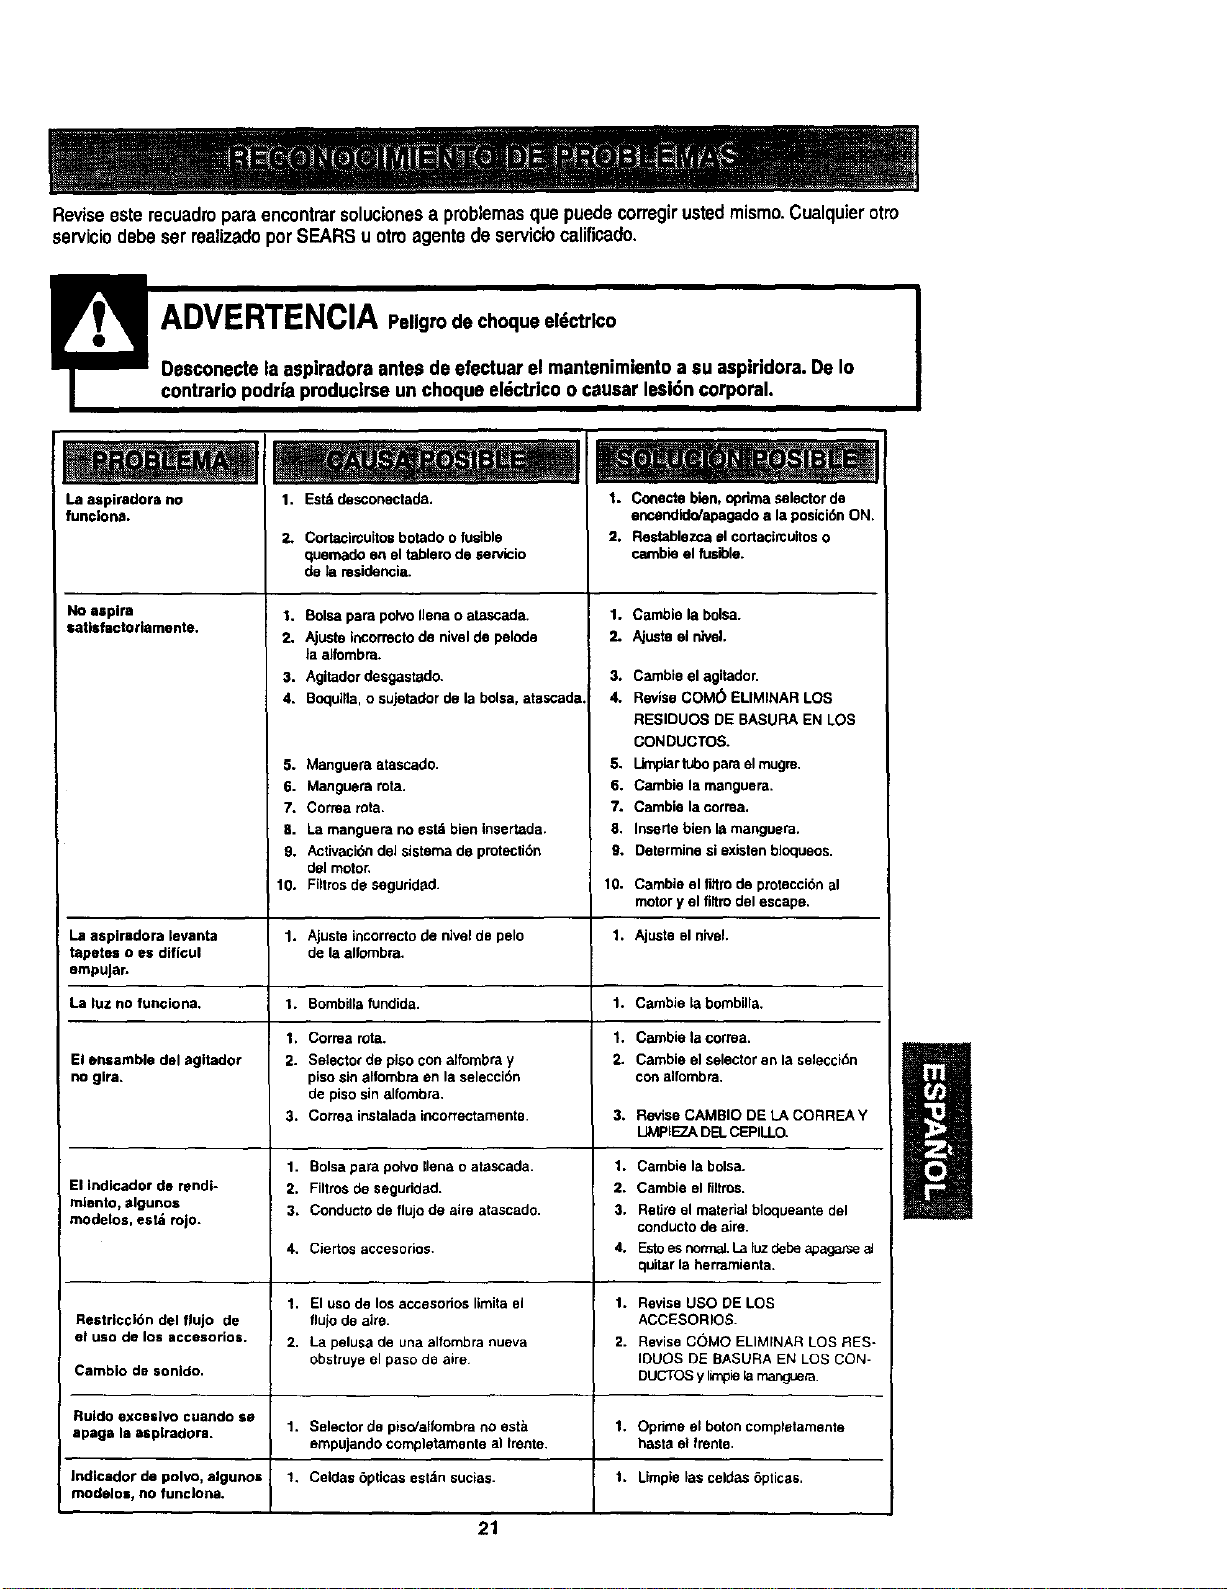
Reviseesterecuadroparaencontrarsolucionesaproblemasque puedecorregirustedmismo.Cualquierotto
serviciodebeserrealizadoporSEARSu otroagentede serviciocalificado.
contrarlopodrfa produclrseunchoque el6ctdco o causer lesl6ncorporal.
La aspiradora no 1. Est_ desconectada.
funcJona.
No aspira
satlsfactoriamente,
2. Cortacin;uitosbotado o fusible
quemado en el tablerode sewicio
de la residencia.
1, Boisepare poh/oIJenao atascada,
2, Ajuste ibcorrecto de nivelde pelode
laalfombra.
3. Agitadordesgastado.
4. Bcquilla,o sujetadorde la boise,atascada.
5. Manguera atascado.
6. Manguera rata.
7. Correa rota.
8. La manguera no est6 bien tnsertada.
9, Activaci6ndel sistema de protection
deJmotor,
Filtrosde seguridad.
1. Conecte bien, oprima selector de
encendido/apagado ala posici6n ON.
2. Flestablezca el cortadmuitos o
cambie el fusible.
Correa rote,
Selector de piso con alfombra y
piso sin alfombra en la selecci6n
de piso sin alfombra.
Correa instalada incorrectamente. 3.
Bolsa para polvo liana o atascada. 1.
Filtros de seguridad. 2.
Conducto de flujo de aire atascado. 3.
Ciertos accesorios. 4.
El uso de los accesorios limita el 1.
flujo de aire.
La pelusa de una alfombra nueva 2.
obstruye el paso de aire
Selector de pise/alfombra no est_l 1.
empujando completamente al Irente.
Celdas 6pticas est_n sucias. 1.
1. Cambie la bolsa.
2. Ajustael nivel.
3. Cambie el agitador,
4. ReviseCOM(5 ELIMINAR LOS
RESIDUOS DE BASURA EN LOS
CONDUCTOS.
5. Umplar lubopara elmugm,
6, Cambie la manguera,
7. Cambie la correa,
8. Insertebien la manguera.
9. Determine siexistenbl(X:lueos.
10. 10. Cambie el fittro de protecci_n al
motor y el fi_trodel escape.
La aspiradora levanta 1. Ajuste incormcto de nivel de pelo 1. Ajuste el niveL
tapetes o es diflcul de la alfombra.
empuJar.
La fuz no funciona, 1. Bombilla fundida. 1. Cambie la bombilla.
1. 1. Cambie la correa,
El eniamble dal agitador 2. 2. Cambie el selector en la selecci_Sn
no glra. con alfombra.
3. Revise CAMBIO DE LA CORREA Y
IJMPIEZA DEL CEPILLO.
1. Cambie la bolsa.
El indicador de rendf- 2. Cambie el filtros.
mlento, elgunos 3. Retire el material bloqueante del
modelos, est& rojo. conducto de aire.
4. Esto es norma], La iuz debe apaga_e aJ
quilar la herramienta.
1. Revise USO DE LOS
Restriccl6n del flujo de ACCESORIOS.
at uso de los accesorios. 2. Revise COMO ELIMINAR LOS RES-
IDUOS DE BASURA EN LOS CON-
Cambio de sonido. DUCTOS y limpiela manguera.
Ruldo excasivo cuando se
apage la asplradora. 1. Opdme el boron completamente
haste el frente.
Jndicador de polvo, algunos 1. Limpie Fasceldes 6pticas,
modelos, no funcJona.
21
Your Home
For repair - in your home - of all major brand appliances,
lawn and garden equipment, or heatingand coolingsystems,
no matter who made it, no matter who sold itl
For the replacement parts,accessories and
owner's manuals that you need to do-it-yourseff.
For Sears professional installation of home appliances
and items like garage door openers and water heaters.
1-8O0-4-MY-HOME _ Anytime, day or night
(1-800-469-4663) (U.S.A. and Canada)
www,sears.com www.sears.ca
Our Home
For repair of carry-in products like vacuums, lawn equipment,
and electronics, call or go on-line for the nearest
Sears Parts and Repair Center.
1-800-488-1222 Anytime, day or night (U.S.A. only)
www.sears.com
To purchase a protection agreement (U.S.A.)
or maintenance agreement (Canada) on a product serviced by Sears:
1-800-827-6655 (U.S.A.) 1-800-361-6665 (Canada)
" iiiii!!iii!i!!i!!!ili! iill
ii !i!ili!iiii !i,i
Para pedir serviciode reparacibn
a domicilio, y para ordenar piezas:
1-888-SU..HOGARsM
(1-888-784-6427)
Au Canada pourservice en franc..ais:
1-800-LE-FOYER ic
(1-800-533-6937)
www.sears.ca
8WAR"
© Sears, Roebuck and Co.
Registered Trademark / TM Trademark J s_ Service Mark ol Sears, Roebuck and Co.
® Marca RegJstrada / TU Marca de Fabrica / su Marca de Servicio de Sears, Roebuck and Co.
MCMarque de commerce / MDMarque ddpos_e de Sears, Roebuck and Co.