
Page 1
User Manual
Food Dehydrator
MODEL: WFD201W
1. READ these instructions carefully before installing and operating the
product. Keep them for further reference.
2. Record in the space below the “SERIAL NO.” found on the nameplate on
your product and retain this information for future reference.
SERIAL NO.:
Please save sales receipt for warranty.

Page 2
Thank you for purchasing our
Westinghouse product. This easy-
to-use manual will guide you in
getting the best use of your unit.
Remember to record the model and
serial numbers. They are on a label
on the back of the product.
_____________________________
Model number
_____________________________
Serial number
_____________________________
Date of purchase
Staple your receipt to your manual. You will need it to obtain warranty service.
PRODUCT REGISTRATION
CONTENTS
SAFETY INFORMATION
Important Safety Instructions .......................................................................................................................................... 3
Polarized Plug ............................................................................................................................................................................ 4
SET UP & USE
Parts & Features ....................................................................................................................................................................... 5
Operation Instructions .................................................................................................................................................... 6-12
CLEANING & CARE ..............................................................................................................................................13
TROUBLESHOOTING & WARRANTY
Before You Call For Service ................................................................................................................................................13
Customer Service .....................................................................................................................................................................13
Troubleshooting ....................................................................................................................................................................... 14
Limited Warranty ......................................................................................................................................................................15

Page 3
IMPORTANT SAFETY INSTRUCTIONS
1. Read all instructions.
2. Do not touch hot surfaces. Use handles or knobs.
3. To protect against electrical shock do not immerse cord, plugs, or
(unit base) in water or other liquid.
4. Close supervision is necessary when any appliance is used by or near
children.
5. Unplug from outlet when not in use and before cleaning. Allow to
cool before putting on or taking off parts.
6. Do not operate any appliances with a damaged cord or plug or after
the appliance malfunctions or has been damaged in any manner.
Return appliance to the nearest authorized service facility for
examination, repair or adjutsment.
7. The use of accessory attachments not recommended by the
appliance manufacturer may cause injuries.
8. Do not use outdoors.
9. Do not let cor hang over edge of table or counter or touch hot
surfaces.
10. Do not place on or near a hot gas or electric burner or in a heated
oven.
11. Always attach plug to appliance rst, then plug cord into the wall
outlet. To disconnect, turn any control to “off”, then remove plug
from wall outlet.
12. Do not use appliance for other than intended use.
SAVE THESE INSTRUCTIONS
HOUSEHOLD USE ONLY
SAFETY INFORMATION
DANGER
DANGER - Immediate hazards
which WILL result in severe
personal injury or death
WARNING
WARNING - Hazards or unsafe
practices which COULD result in
severe personal injury or death
CAUTION
CAUTION - Hazards or unsafe
practices which COULD result in
minor personal injury
WARNING
When using electrical appliances, basic safety
precautions should be followed, including the following
WARNING: To reduce the risk of burns, electric shock,
re, and injury to persons:

Page 4
SAFETY INFORMATION
POLARIZED PLUG
This appliance has a polarized plug (one blade is wider than the other). To reduce
the risk of electrical shock, the plug is intended to t into a polarized outlet only one
way. If the plug does not t fully into the outlet, reverse the plug. If it still does not
t, contact a qualied electrician. DO NOT ATTEMPT TO MODIFY THE PLUG IN ANY
WAY.
POWER SUPPLY CORD
Longer extension cords are available & may be used if care is excercised in their use.
1. The marked electrical ratings of the cord should be at least as great as the
electrical rating of the appliance.
2. The cord shall be arranged so that it will not dape over the countertop
where it can be pulled on by children or tripped over unintentionally.
NOTE: Neither Westinghouse nor the dealer can accept any liability for damage to the product or
personal injury resulting from failure to observe the electrical connection procedures.
WARNING
Improper use of the grounding
plug can result in a risk of electric shock.

Page 5
SET UP & USE
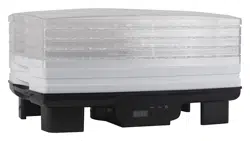
PARTS & FEATURES
CONTROL PANEL
Lid
Trays
Display/Control Panel
Display
Temperature Control Button Time Control Button
ON/OFF Power Button

Page 6
SET UP & USE
BEFORE FIRST TIME USE
• Remove all packaging from the appliance.
• Check that your mains voltage corresponds with that stated on the
appliances rating label.
• Wash the lid and tray sections of the appliance in warm soapy water.
The power base should be cleaned with a damp cloth (do not wash
the power base with water).
PREPARING THE FOOD
Unlike tinned fruit there is no extra sugar added during the de-
hydrating process (unless the user adds sugar as an optional extra, this
can sometimes produce a bitter taste) it is important to follow these
basic guide lines to produce the best quality food:
• Always ensure that the food is in date and of good quality.
• It is best to use tree-ripened fruits as they contain the highest natural
sugar content.
• Do not use over-ripe or rotting fruits and vegetables, if the food has
bruised or discoloured parts, please remove the discoloured section
before dehydrating.
• Some fruits such as apples, pears and apricots are pre-treated to
slow the loss of vitamins and also to prevent discolouring. Always
thoroughly wash food to ensure it does not contain dirt, bacteria and
other harmful substances.
• It’s optional to peel fruit and vegetables before drying them. The
peel can become tough during the drying process. However it comes
down to your personal preference.
• It may be necessary to steam/ blanch vegetables before drying them.
This is due to the different textures of the vegetables.

Page 7
STACKING THE
TRAYS
Before loading the trays with food
it is a good idea to make sure
that they are all aligned correctly
by stacking them up near the
preparation area. The indented side
of the tray is always at the top.
Trays have alignment arrows cast
into the handle. The arrows should
be visible on top of the tray handles.
Incorrectly stacked trays will hinder
the drying process.
Once the trays are all correct
side up you can stack them in
two different ways. Depending
on the thickness of the food you
can change the stacking height
by simply rotating a tray 180˚ to
change it to either tall or short
stacked.
Any combination of stacking can
be used to accommodate the foods
being dried. An example would
be a short tray stack for banana
chips and a tall tray stack for large
strawberries.
TO BEGIN USE
1. Safely place the appliance on a at
and level surface. Load and insert
the trays, then insert the plug into
the electrical outlet.
2. To adjust the temperature press
the “TEMP” button and select
the temperature you require.
To change the temperature in
singular digits, press the button
without holding it in. To increase
the temperature rapidly, hold the
button.
3. Set the desired amount of time by
pressing and holding the “TIME”
button. The number displayed
in the digital display represents
the number of hours the
appliance will operate at before
automatically turning off. When
pressing the button, the digital
display will cycle from 1 hour
through to 48 hours then restart
at 1 again. Individual presses of
the button will advance the count
by one hour. Holding the button
will advance the time quicker.
4. Press the ON/OFF button to
begin the programmed cycle.
The colon in the timer display
will begin to ash indicating it is
running. The display shows the
remaining time of operation in the
format HH MM. You will also hear
the fan operating.
5. The appliance will stop
automatically when the time
expires or you can stop it any
time using the ON/OFF button.
Remove the plug from the outlet.
If you wish to add more time during
the cycle or if you want to change
SET UP & USE
Set the trays in
place so that all
the arrows on
the handles are
visible on the top
of the handles.

Page 8
SET UP & USE
the set temperature, press the
ON/OFF button once to stop the
process, change the desired setting
as described above and then restart
it by pressing the ON/OFF switch
again.
DRYNESS TEST
• Fruits, if dried properly, should have
a pliable and leathery texture with
little moisture (less than 20%). It is a
frequent problem that people over dry
fruit. This can lead to a poor taste and
the fruit having less nutritional value.
Therefore to achieve the best possible
taste from dehydrated food ensure the
correct drying time is followed.
• Vegetables should be chewy and
brittle however different vegetables
can vary in texture.
STORAGE OF FOODS
• It is vital to store de-hydrated food
correctly in order to maintain the
quality and taste of the product. Ensure
that all dried foods are stored in a cool
dark place; the cooler the food is kept
the longer the optimal quality will be
maintained.
• If it is possible please store the food in
a refrigerator or freezer. Alternatively,
you can store dried foods in a cool
place in your home.
• Be aware that light causes the quality
and nutritional value of the food to
deteriorate.
• When storing the food it is
recommended to store it in a sealed
bag or a darkened container
• The naturally high sugar and acid
content contained in many fruits allows
them to be stored for longer periods
of time.
• When packaged and stored correctly
most fruit can last for about a year
while vegetables can be stored for up
to about 6 months.
• Do not consume fruits and vegetables
that show any signs of deterioration.
DEHYDRATING TIPS
HERBS
It is recommended to dry new
leaves. Once the leaves are dry
put them into paper bags or glass
jars and store them in a dark cool
place.
Herbs and spices are most
avorful when they rst open
and should be harvested
while very fresh, before they
begin to blossom. Because the
aromatic oils are very sensitive,
temperatures should be 90˚F
- 100˚F (30˚- 40˚C) for drying.
Take care not to load trays too
heavily as this will prolong the
drying time.
Dried owers, herbs and spices
used for potpourri should be dried
at temperatures ranging from
90˚F - 100˚F (30˚ - 40˚C) to
maintain aroma and color.

Page 9
FRUITS, FRUIT ROLLS AND
VEGETABLES
Fruits, fruit rolls and vegetables
should be dried at 130˚F - 140˚F
(55˚ - 60˚C). By drying foods in
this temperature range you will
minimize the loss of heat-sensitive
vitamins A and C. All foods sweat
when they begin to dry, the
temperature may be set higher
than 140˚F (60˚C) during the rst
couple of hours of drying. The
actual temperature of the food
will remain 15˚F - 20˚F (6˚ to 8˚C)
lower than the air temperature for
the rst couple of hours.
NUTS AND SEEDS
Nuts and seeds are high in oil, and
if higher temperatures are used,
they will tend to become rancid,
developing off avors. The best
temperature is from 90˚F - 100˚F
(30˚ - 40˚C).
RE-HYDRATING
FOODS
Foods that have been dehydrated
can be re-hydrated in water. This
can be performed in 3 ways:
1. Fruits and vegetables can be
soaked in water for 2-6 hours.
Ensure that they are refrigerated
during this process.
2. They can be soaked in boiling
water for 5-10 minutes until
they have reached the desired
consistency.
3. You can also re-hydrate fruits and
vegetables by cooking them. Do
not add seasoning or sugar during
this process. A good general rule
is to use 2 cups of water to the
fruit and allow it to stew.
SET UP & USE

Page 10
SET UP & USE
DEHYDRATING VEGETABLES
Vegetable Preparing
Dryness
test
Approx. time
(hours)
Artichoke
Cut into 1/3 inch strips and boil for about
ten mins
Brittle 6-14
Asparagus
Cut into 1 inch pieces. Tips yield better
product
Brittle 6-14
Beans Cut and steam until translucent Brittle 8-26
Beets Blanch, cool, remove tops and roots, slice Brittle 8-26
Brussel sprout Cut sprouts from stalk. Cut in half lengthway Crispy 8-30
Broccoli Trim and cut. Steam tender, about 3-5 min Brittle 6-20
Cabbage
Trim and cut into 1/8 inch strips. Cut core into
1/4 inch strips
Leathery 6-14
Carrots Steam until tender. Shred or cut into slices Leathery 6-12
Cauliower Steam blanch until tender. Trim and cut Leathery 6-16
Celery Cut stalks into 1/4 inch slices Brittle 6-14
Chives Chop Brittle 6-10
Cucumber Cut into 1/2 inch slices Leathery 6-18
Aubergine/Squash Trim and slice 1/4 inch to 1/2 inch thick Brittle 6-18
Garlic Remove skin from clove and slice Brittle 6-16
Chilli’s Dry whole Leathery 6-14
Mushrooms Slice, chop or dry whole Leathery 6-14
Onions Slice thinly or chop Brittle 8-14
Peas Shell and blanch for 3-5 minutes Brittle 8-14
Peppers Cut into 1/4 inch strips or rings, remove seeds Brittle 4-14
Potatoes
Slice, dice or cut. Steam blanch 8 to 10
minutes
Brittle 6-18
Rhubarb
Remove outer skin and cut into 1/8 inch
lengths
No
moisture
6-38
Spinach
Stem blanch until wilted, but not soggy. Kale
etc
Brittle 6-16
Tomatoes Remove skin. Cut into halves or slice Leathery 6-24
Corguette Slice into 1/4 inch pieces Brittle 6-18
Note: The times and procedures, which are described in the table above are only a guide.
Personal preferences of customers can differ to that as described in the table. It is recommended
to experiment with times and temperatures to achieve your preferred texture and taste.

Page 11
SET UP & USE
DEHYDRATING FRUITS
Fruit Preparing Dryness test Approx. time (hours)
Apples Pare, core and cut into slices or rings Pliable 5-6
Artichoke Cut into 1/8 inch strips Brittle 5-13
Apricots Clean, cut in halves or in slices Pliable 12-38
Banana Peel and cut into 1/8 inch slices Crisp 8-38
Berries
Cut strawberries into 1/4 inch slices, other
berries whole
No moisture 8-26
Cherries Pitting is optional, or pit when 50% dry Leathery 8-34
Cranberries Chop or leave whole Pliable 6-26
Dates Pit and slice Leathery 6-26
Figs Slice Leathery 6-26
Grapes Leave whole Pliable 8-38
Nectarines
Cut in half, dry with skin side down. Pit when
50% dry
Pliable 8-26
Orange rind Peel in long strips Brittle 8-16
Peaches
Pit when 50% dry. Halve or quarter with cut
side up
Pliable 10-34
Pears Peel and slice Pliable 8-30
PREPARING MEAT, FISH, POULTRY & GAME
It is recommended to pickle meat before dehydrating it to save
its natural taste and make the meat softer. Ensure that the meat is
marinated for at least 3 hours. Please note the longer your marinade the
meat, the better the avour will be.
It is necessary to add salt to pickle as it helps to remove the water from
the meat and allows it to dehydrate more efciently. Always use clean
meats. Meats with higher fat content do not dry correctly.

Page 12
SET UP & USE
STANDARD PICKLE:
• 1/2 cup soy sauce
• tbsp. Brown sugar
• 1/2 cup of Worcestershire sauce
• 1/2 tsp onion powder
• Garlic clove, crushed
• 2 tbsp. ketchup
• 1 to 1 3/4 tsp. salt
• 1/2 tsp. pepper
Note: Mix ingredients together.
POULTRY
Before starting the drying process, poultry should be prepared by either boiling or
frying it.
FISH
It is recommended to boil or bake it on a stove before beginning the dehydrating
process (bake it for about 15 minutes on 200˚c (392˚F) or until the sh becomes
easily broken).
MEAT AND GAME
Prepare the meat by cutting it into small pieces and placing it into the appliance for
about 2-8 hours or until all moisture has gone.
Meats and sh should be dried on the highest temperature setting of your
dehydrator. These temperatures also keep bacteria and other spoilage micro-
organisms, common to meat and sh, to a minimum during the rst stages of drying.
MAKING BEEF JERKY
As with nearly all foods, it is important to start with a quality cut of meat. Select
a lean cut or round steak about one to one and a half inches thick, trim off all the
excess fat and connective tissue. Fat hampers how well the meat will dry and the
connective tissue will make the beef jerky hard to chew.
For easier cutting, place meat in the freezer for about 30 minutes to partially freeze.
Then turn it over and freeze it for an additional 15 minutes. Cut across the grain into
strips about 1/8 inch thick.
Marinate the strips for three hours.
Drain the marinated strips on a paper towel, and place the strips on the drying tray.
Remember to protect the dehydrator from dripping foods as described earlier in
the manual. Dehydrate until strips are quite dry and can bend without breaking. This
will take from 6-16 hours. Unlike other dried meats, jerky should be slightly chewy but
not brittle.

Page 13
CLEANING AND CARE
CLEANING THE UNIT
1. Before cleaning check if the appliance is unplugged and has fully cooled down.
2. Clean the base of the appliance with the help of a damp cloth and then rub it dry
3. Wash the lid and tray sections of the appliance in warm soapy water.
4. Do not use metal brushes or abrasives to clean the appliance, as it can damage the
surfaces.
BEFORE YOU CALL FOR SERVICE
IF THE PRODUCT FAILS TO OPERATE:
A) Check for a blown circuit fuse or a tripped main circuit breaker. If these seem to
be operating properly, test the outlet with another appliance.
B) Check to make sure the control panel is programmed correctly and the timer is
set.
IF NONE OF THE ABOVE SOLVES THE PROBLEM, DO NOT TRY TO ADJUST OR
REPAIR THE PRODUCT YOURSELF.
CUSTOMER SERVICE
IMPORTANT
DO NOT RETURN THIS PRODUCT TO THE STORE
If you have a problem with this product, please contact the W
Appliance Co. Customer Satisfaction Center at 1-855-855-0294.
DATED PROOF OF PURCHASE, MODEL # AND SERIAL #
REQUIRED FOR WARRANTY SERVICE
TROUBLESHOOTING & WARRANTY

Page 14
TROUBLESHOOTING
Troubleshoot your problem by using the chart below. If the food dehydrator still
does not work properly, contact W Appliance Co. customer service center or the
nearest authorized service center. Customers must never troubleshoot internal
components. Only a certied technician should attempt food dehydrator repair.
TROUBLE POSSIBLE CAUSE POSSIBLE REMEDY
• No heat
• No fan
• No power • Be sure the unit is plugged in
• Make sure the power is
switched on.
• Check the outlet is working.
• No heat
• No fan
• Broken wire in unit • Do not use the appliance,
send it for repairs.
• Return for service.
• Slow drying • Trays overlled.
• Fan jammed or running to
slowly.
• Air leaks due to warped or
improperly stacked trays.
• Air must ow freely around
food for proper drying.
Reduce quantity in trays or
rearrange food.
• Check for foreign objects
jamming fan.
• Check that the food on the
trays is not blocking air ow
through tray stack. Make sure
central chimney of tray is not
obstructed..
• Uneven drying • Variation in food thickness
and ripeness.
• Trays not rotated.
• Too much food in drying
trays.
• Check that the food is of
similar thickness
• Rotate trays once or twice
during dehydration process
• Check that the food on the
trays is not blocking air ow
through tray stack. Make sure
central chimney of tray is not
obstructed.
• Overheating or insufcient
heat
• Temperature control not
functioning at proper
range.
• Temperature in the lowest
tray should be approx. 140˚F
(60˚ C) with empty trays
in place. If temperature
varies signicantly, adjust
accordingly or return for
service.
• Noisy fan/motor • Foreign matter in fan
• Motor bearing worn
• Check for foreign objects
jamming fan.
TROUBLESHOOTING & WARRANTY

Page 15
LIMITED WARRANTY
Westinghouse brand is used under license.
Any repair, replacement, or warranty service,
and all questions about this product should be
directed to W Appliance Co. at 1 (855) 855-
0294 from the USA or Puerto Rico.
W Appliance Co. warrants to the original purchaser
that the product will be free from defects in material,
parts and workmanship for the period designated for
this product. The warranty commences the day the
product is purchased and covers up to a period of
1 year (12 months) for labor/1 year (12 months) for
parts (manufacturing defects only).
W Appliance Co. agrees that it will, at its option,
replace the defective product with either a new or
remanufactured product equivalent to your original
purchase during the warranty period. Should the
Part warranty period exceed the Labor warranty
period, W Appliance Co. will supply at no charge
for the remainder of the Part warranty, any new
or remanufactured replacement parts as required
by the product. During this period all labor and
service charges will become the responsibility of the
customer.
Exclusions: This warranty does not apply to the
below:
1. If the appearance or exterior of
the product has been damaged or
defaced, altered or modied in design or
construction.
2. If the product original serial number
has been altered or removed or cannot
be readily determined.
3. If there is damaged due to power line
surge, user damage to the AC power
cord or connection to improper voltage
source.
4. If damage is due to general misuse,
accidents or acts of God.
5. If repair attempts are done by
unauthorized service agents, use of
parts other than genuine parts or parts
obtained from persons other than
authorized service companies.
6. On units that have been transferred
from the original owner.
7. On products that have been purchased
as refurbished, like new, second-hand, in
a “As-Is” or “Final Sale” terms.
8. To products used in a commercial or
rental setting.
9. To products used in settings other than
ordinary household use or used other
than in accordance with the provided
instructions.
10. To damages for service calls for
improper installations.
11. To damages to decorative trims,
nishes of the appliance or home
incurred during installation.
12. Transportation and shipping costs.
13. Labor after the initial 12 months.
14. Food loss for loss due to product
failure or delay in service, repair or
replacement.
15. To charges occurred for after hour
service, weekend, holiday charges, tolls
or mileage expense for service calls to
remote areas.
16. Charges to make product available for
service, such as removal of trim, shelves
etc. that are not a part of the appliance.
17. Service calls to install or correct the
installation of your product.
18. Service calls to instruct you how to use
your product.
19. Service calls to repair or replace the
house fuse, reset the circuit breaker or
correct the wiring in the house.
REPAIR OR REPLACEMENT AS PROVIDED UNDER
THIS WARRANTY IS THE EXCLUSIVE REMEDY OF
THE CUSTOMER; W Appliance Co. SHALL NOT BE
LIABLE FOR ANY INCIDENTAL OR CONSEQUENTIAL
DAMAGES FOR BREACH OF ANY EXPRESS OR
IMPLIED WARRANTY ON THIS PRODUCT, EXCEPT
TO THE EXTENT PROHIBITED BY APPLICABLE LAW.
ANY IMPLIED WARRANTY OF MERCHANTABILITY
OF FITNESS FOR A PARTICULAR PURPOSE ON THIS
PRODUCT IS LIMITED TO THE DURATION OF THE
WARRANTY.
Some states do not allow the exclusion or limitations
of incidental or consequential damages, or limitations
on how long the warranty lasts. In these cases the
above exclusions or limitations may not apply to you.
This warranty gives you specic legal rights and you
may also have other rights which vary from state to
state.
Obtaining Service: To obtain service, product
literature, supplies or accessories please call
1 (855) 855-0294 to create a ticket for exchange/
repair. Please make sure to provide the date of
purchase, model number and a brief description of the
problem. Our customer service representative
will contact you or send detailed return instructions.
W Appliance Co. does not warrant that the appliance will work
properly in all environmental conditions, and makes no warranty
and representation, either implied or expressed, with respect
to the quality, performance, merchantability, or tness for a
particular purpose other than the purpose identied within this
user’s manual. W Appliance Co. has made every effort to ensure
that this user’s manual is accurate and disclaims liability for any
inaccuracies or omissions that may have occurred. Information
in this user’s manual is subject to change without notice and
does not represent a commitment on the part of W Appliance
Co. W Appliance Co. reserves the right to make improvements
to this user’s manual and/or to the products described in this
user’s manual at any time without notice. If you nd information
in this manual that is incorrect, misleading, or incomplete, please
contact us at 1- 855-855-0294.
W Appliance Co.,
New York, NY 10018
TROUBLESHOOTING & WARRANTY

Page 16
, WESTINGHOUSE, and INNOVATION YOU CAN BE SURE OF
are trademarks of Westinghouse Electric Corporation. Used under
license by W Appliance Company. All Rights Reserved.
102615