Loading ...
Loading ...
Loading ...
Discharge Pipe and Pressure Tank Connections / Electrical 6
For parts or assistance, call Simer Customer Service at 1-800-468-7867 / 1-800-546-7867
STANDARD TANK CONNECTION
(FIGURE 6)
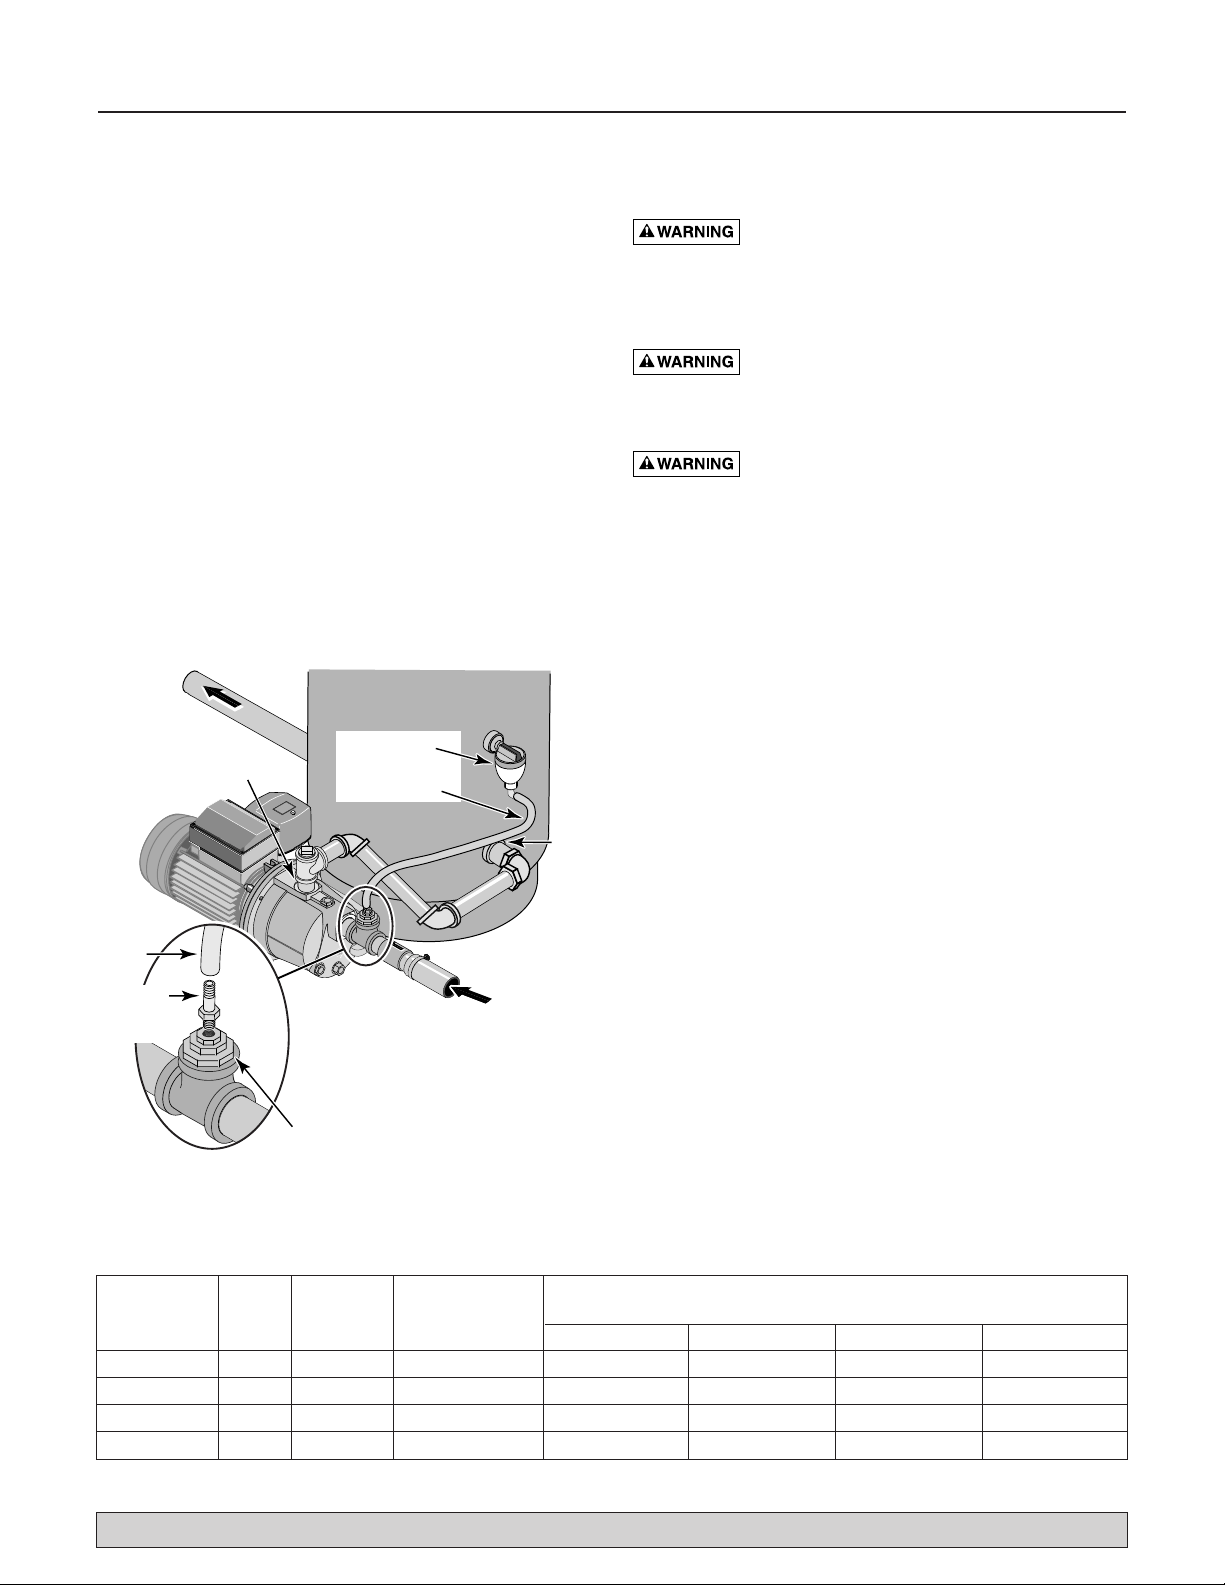
1. Install a tee in the pump discharge port (see Figure 6).
2. Run a pipe from the pump discharge port to the inlet
port of your tank. The pipe size must be at least as
large as the discharge port.
3. Install a tee with reducing bushings in the suction
pipe as shown in Figure 6.
4. Install a barbed fitting in the smallest bushing (1/8"
NPT).
5. Run the AVC tubing from the barbed fitting on the suc-
tion pipe tee to the port in the AVC mounted on the
tank. See the instructions provided with the tank and
the AVC for details. The AVC port location may vary.
Congratulations! You have just completed the tank con-
nection for your jet pump.
ELECTRICAL
Hazardous voltage. Can shock, burn, or kill.
Connect ground wire before connecting power supply
wires. Use the wire size (including the ground wire) spec-
ified in the wiring chart. If possible, connect the pump to
a separate branch circuit with no other appliances on it.
Explosion hazard. Do not ground to a gas
supply line.
Wiring
Fire hazard. Incorrect voltage can cause a
fire or seriously damage the motor and voids the warranty.
The supply voltage must be within ±10% of the motor
nameplate voltage. Do not alter the wiring in the motor.
Connect to 115 Volt supply only.
Install, ground, wire, and maintain your pump in compli-
ance with the National Electrical Code (NEC) or the
Canadian Electrical Code (CEC), as applicable, and with
all local codes and ordinances that apply. Consult your
local building inspector for code information.
Connection Procedure:
Your Pressure Switch looks like one of those shown in
Figure 7. Connect the power supply as shown for your
type of switch.
1. Connect the ground wire first as shown in Figure 7.
The ground wire must be a solid copper wire at least
as large as the power supply wires.
2. There must be a solid metal connection between the
pressure switch and the motor for motor grounding
protection. If the pressure switch is not connected to
the motor, connect the green ground screw in the
switch to the green ground screw under the motor
end cover. Use a solid copper wire at least as large as
the power supply wires.
3. Connect the ground wire to a grounded lead in a ser-
vice panel, to a metal underground water pipe, to a
metal well casing at least ten feet (3M) long, or to a
ground electrode provided by the power company or
the hydro authority.
Maximum Branch Distance in Feet (m) from Motor To Supply
Load Circuit Breaker Wires Sizes AWG (mm
2
)
Model Volts Amps Rating (Amps)*
0-100 (0-30) 101-200 (31-61) 201-300 (62-91) 301-400 (92-122)
2800, 2800E 115 7.2 15 14 (2) 12 (3) 10 (5.5) 8 (8.4)
2802 115 8.6 15 14 (2) 10 (5.5) 8 (8.4) 6 (14)
2802E 115 8.6 15 14 (2) 10 (5.5) 8 (8.4) 6 (14)
2803 115 10.5 15 14 (2) 10 (5.5) 10 (5.5) 6 (14)
WIRING CHART – RECOMMENDED WIRE AND FUSE SIZES
To Household
Water System
Suction Hose
From Well
Air Volume
Control (AVC)
Tank
Inlet
Port
AVC Tubing
Pump
Discharge
Port
Install a tee in the suction line. Install
reducing bushings down to 1/8" NPT
for the barbed fitting. Install the AVC
tube between the barbed fitting and
the port on the bottom of the AVC
(which is mounted on the tank).
Reducers
AVC
Tube
1/8" NPT
Barbed
Fitting
Figure 6 – Standard Tank Connections
* When using fuses, dual element or Fusetron time delay fuses are recommended for all motor circuits.
Loading ...
Loading ...
Loading ...