Loading ...
Fit the bottom bracket into the slot in the heater and then fix it to the wall.
Test that the heater is now securely fixed to the wall.
Positioning the heater
Always ensure that the heater is stood on a firm, level base near to, but
not directly beneath, a suitable mains supply socket.
Ensure that curtains and furniture are not positioned close to the chosen
position, as this would create a potential fire hazard.
We recommend that the heater should be wall-mounted in rooms where
children may be left unattended.
See also ‘Important Safety Advice’.
Free standing use (all models except DXW200S)
NEVER USE THE HEATER FREE STANDING WITHOUT THE FEET
FITTED.
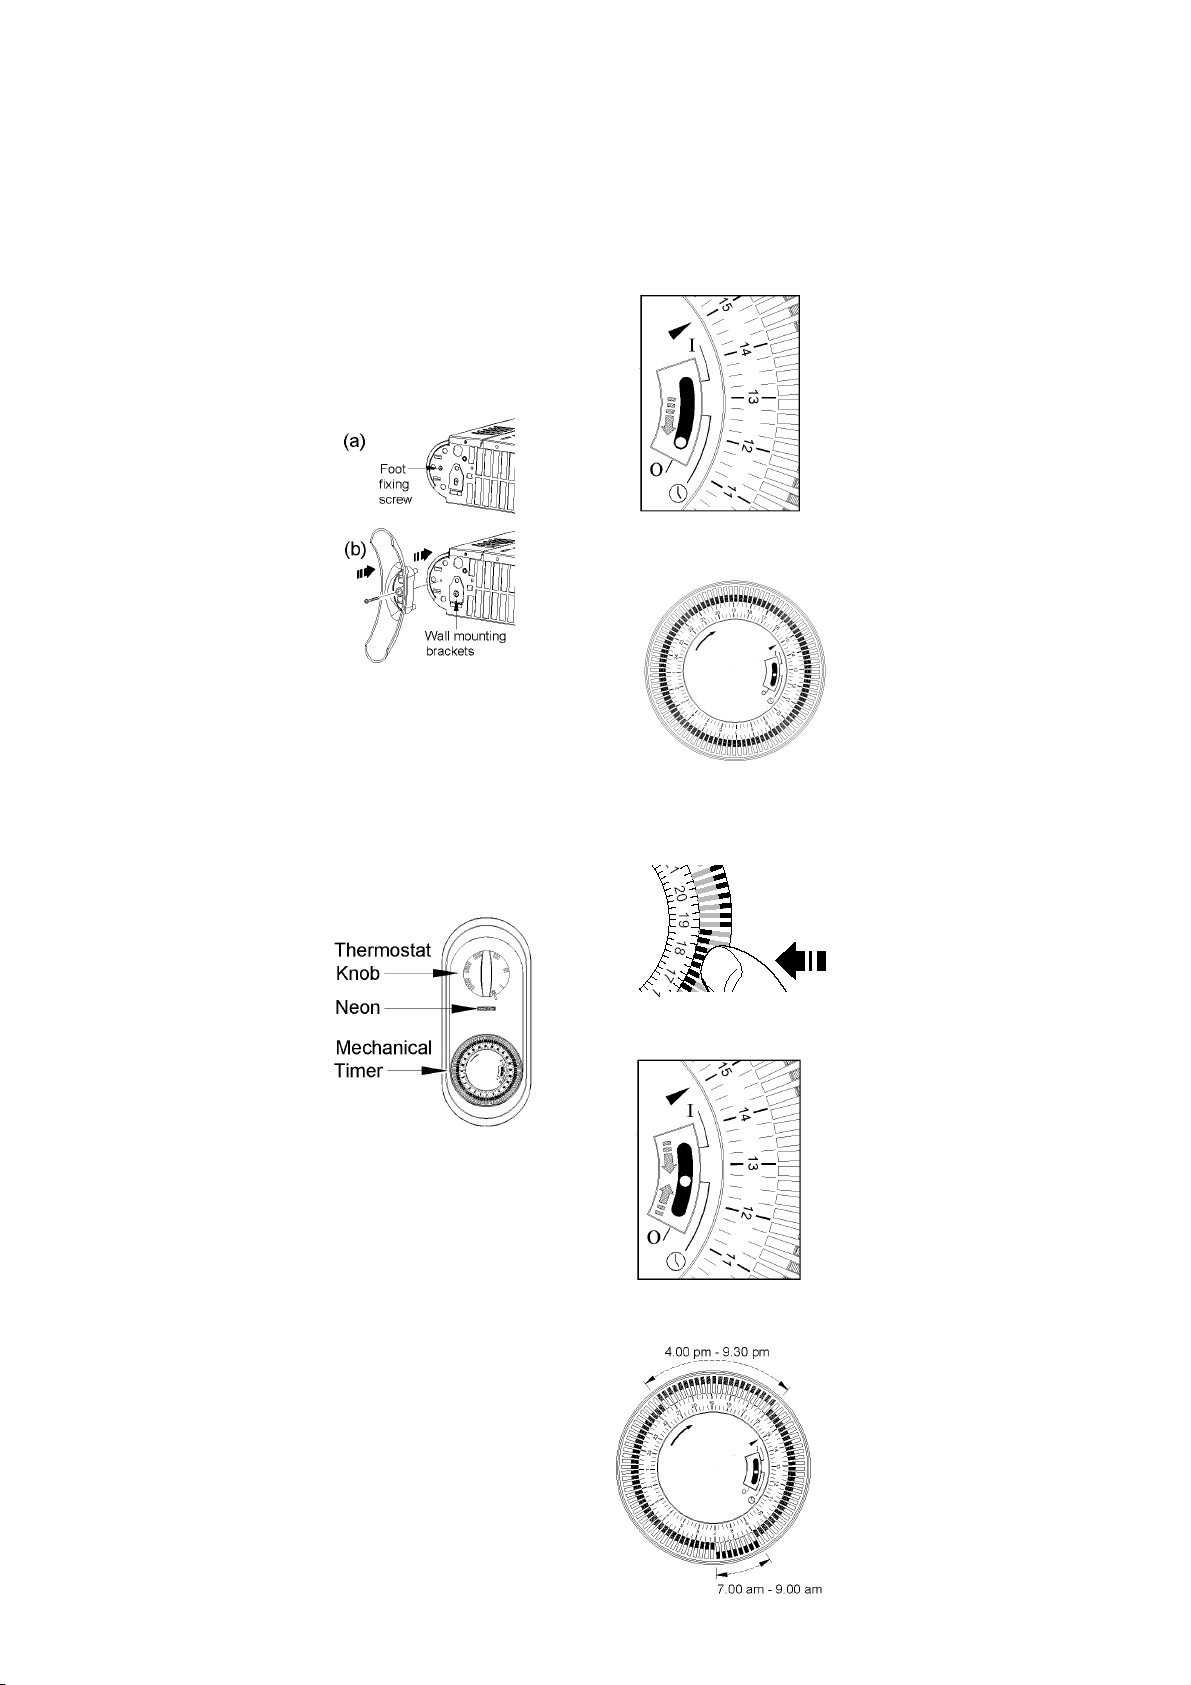
Lay the heater on its back, and locate
the foot fixing screw (see a. in Fig. 3).
Remove the screw using an
X–head screwdriver, then align foot
over slots and holes in base (see ‘b’
in Fig. 3) and push into slots until the
foot clips into place.
Finally take the foot fixing screw, insert
and tighten using a screwdriver to
secure the foot.
Fig. 3
NOTE – The wall mounting brackets indicated in Fig. 3 can be left secured
to the base if they are not required.
Using the heater
Switch on at the wall socket.
On models with a neon, the red POWER ON neon will light when the
heater is connected to the power supply.
The timer clock will operate all the time that the heater is connected to the
mains supply.
Set the timer control switch as required
for OFF, Manual or Automatic
operation – see ‘Timer Operation’.
On models DX200S , DXW200S &
DX300S the heat selector switch
positions are as follows :
I - Low heat output
II - High heat output
On model DX300S there is also an
Fig. 4
On – Off switch - operation as follows :
(Model DX200T , DX300T
O - Off & DX300TF control shown)
I - On
The heat output is controlled by the thermostat - see ‘Thermostat’
Please note – the element has been coated with a protective film which
will burn off during the first few minutes of use and may cause a small
amount of fuming. This is quite normal – the fumes are non-toxic and will
quickly disappear. We recommend that you open a window to ventilate the
room when using the heater for the first time.
Controls
Thermostat
The thermostat controls the heat output according to the room
temperature.
This ensures that the heater will not produce heat unnecessarily when the
room is warm.
To set the temperature you require, turn the thermostat knob clockwise
until the desired temperature is reached. Alternatively to heat a cold room
quickly, turn the thermostat knob up fully.
When the room has reached the desired temperature, turn the thermostat
knob anti-clockwise until the thermostat just clicks off.
The heater will now automatically operate at this temperature.
The thermostat also has a frost protection setting marked ‘∗’. This setting
is useful in areas such as garages to prevent frost damage. If the
thermostat is set to its minimum setting ∗, the heater will cycle ON and
OFF to maintain a temperature of approximately 5°C to help protect
against frosty conditions.
Timer Operation
Set the I - ¡ - 0 slide switch on the timer
Fig. 5 to :
Position O – for Heating Off
Position I – for Manual operation
– This setting allows power to the heater
uninterrupted by the timer settings. The
heat selector switch will control the
output (see ‘Using the heater’).
Position ¡ - for ‘Auto’ operation
DO NOT disconnect this heater from the
mains supply unless it is being taken out
Fig. 5 of use (e.g. in summer or for storage),
otherwise the timer clock will stop.
Setting the time of day
To set the time of day, rotate the timer
dial clockwise (indicated by the arrow)
until the correct time of day is opposite
the reference mark ► (see Fig. 5). The
24-hour clock is used ; e.g. time shown
for 4 pm is ‘16’ (16:00hrs).
Fig. 6
Setting the auto ON and OFF times
To set the timer :
1. Using your finger tip or the tip of a
pencil, push in as many segments as
necessary around the dial, according to
the times you don’t require heat – see
Fig. 7. Each segment pushed in switches
the heater OFF for that part of the hour.
All other segments will be ON. For
example, Fig. 9 shows the timer set to
switch the heater ON between 7 am and
Fig. 7 9 am and between 4 pm and 9.30 pm .
2. You can select as many ON periods
as you like, within the 24-hour day. The
settings will repeat every day until
changed.
3. To change ON and OFF times,
simply push in any ‘ON’ segments you
wish to cancel and pull out new ON
segments as required.
Switching to ‘Auto’
Fig. 8 Set the heat selector and thermostat for
the heat output required.
Check that the clock shows the correct
time of day. Set the I -
¡ - 0 slide switch
to position marked
¡ (see Fig. 8) -
the convector will switch ON and OFF
according to the timer settings (see
Fig 9).
IMPORTANT NOTES
Remember to observe all safety
warnings when operating the heater on
auto setting unattended or attended . . If
the mains supply to the heater is
interrupted, the timer clock will stop until
power is restored ; reset the time of day
Fig. 9 to ensure correct ON and OFF times.
Loading ...
Loading ...