
Hammer Drill
241-0730
OPERATOR’S MANUAL
CAUTION:
To Reduce The Risk Of Injury, User Must Read And
Understand Operator’s Manual. Save These Instructions For
Future Reference.
For questions / comments, technical assistance or repair parts
Please Call Toll Free at: 1-888-686-1484 (M-F 8am – 6pm)

Page 2
General Safety Rules ..........................................................................3-4
Specic Safety Rules ..........................................................................4
Symbols ................................................................................................5
General Use Statement .........................................................................6
Specications .......................................................................................6
Electrical ...............................................................................................7
Features ...............................................................................................8
Operation ....... ..............................................................................9-10
Working Hints For Your Hammer Drill ..............................................11
Maintenance ........... .........................................................................11
Accessories ............. ........................................................................11
Notes ................... .........................................................................12
Warranty ................... .........................................................................13
Customer Service Infor mation .............................................................14
TABLE OF CONTENTS

Page 3
GENERAL POWER TOOL
SAFETY WARNINGS
WARNING
Read all safety warnings and
instructions. Failure to follow the warnings
and instructions may result in electric shock,
re and/or serious injury.
Save all warnings and instructions for
future reference.
The term power tool in the warnings refers to
your electric (corded) power tool or
battery-operated (cordless) power tool.
SAVE THESE INSTRUCTIONS
WORK AREA SAFETY
• Keep work area clean and well lit.
Cluttered or dark areas invite accidents.
• Do not operate power tools in explosive
atmospheres, such as in the presence of
ammable liquids, gases or dust. Power
tools create sparks which may ignite the dust
or fumes.
• Keep children and bystanders away
while operating a power tool. Distractions
can cause you to lose control.
WARNING
Some dust created by power
sanding, sawing, grinding, drilling and other
construction activities contains chemicals
known to the state of California to cause cancer,
birth defects or other reproductive harm. Some
examples of these chemicals are:
• Lead from lead-based paints,
• Crystalline silica from bricks and cement
and other masonry products,
• Arsenic and chromium from chemically-
treated lumber.
Your risk from these exposures varies,
depending on how often you do this type
of work. To reduce your exposure to these
chemicals, work in a well ventilated area, and
work with approved safety equipment, such as
those dust masks that are specially designed to
lter out microscopic particles.
WARNING
This product may contain lead,
phthalates or other chemicals known to the
state of California to cause cancer, birth defects
and other reproductive harm. Please wash your
hands after use.
WARNING
Read all safety warnings and
instructions. Failure to follow the warnings
and instructions may result in electric shock,
re and/or serious injury.
Save all warnings and instructions for future
reference.
• The term power tool in the warnings refers
to your electric (corded) power tool or battery-
operated (cordless) power tool.
ELECTRICAL SAFETY
• Power tool plugs must match the
outlet. Never modify the plug in any way.
Do not use any adapter plugs with grounded
power tools. Unmodied plugs and matching
outlets will reduce risk of electric shock.
• Avoid body contact with grounded
surfaces such as pipes, radiators, ranges
and refrigerators. There is an increased risk
of electric shock if your body is grounded.
• Do not expose power tools to rain or
wet conditions. Water entering a power tool
will increase the risk of electric shock.
• Do not abuse the cord. Never use the
cord for carrying, pulling or unplugging
the power tool. Keep cord away from
heat, oil, sharp edges or moving parts.
Damaged or entangled cords increase the
risk of electric shock.
• When operating a power tool outdoors,
use an extension cord suitable for outdoor
use. Use of a cord suitable for outdoor use
reduces the risk of electric shock.
• If operating a power tool in a damp
location is unavoidable, use a residual
current device (RCD) protected supply.
Use of an RCD reduces the risk of electric
shock.
PERSONAL SAFETY
• Stay alert, watch what you are doing
and use common sense when operating a
power tool. Do not use a power tool while
you are tired or under the inuence of
drugs, alcohol or medication. A moment of
inattention while operating power tools
may result in serious personal injury.
• Use personal protective equipment.
Always wear eye protection. Protective
equipment such as dust mask, non-skid
safety shoes, hard hat, or hearing protection
used for appropriate conditions will reduce
personal injuries.
GENERAL SAFETY RULEs

Page 4
• Prevent unintentional starting. Ensure
the switch is in the off-position before
connecting to power source and/or
battery pack, picking up or carrying the
tool. Carrying power tools with your nger on
the switch or energizing power tools that have
the switch on invites accidents.
• Remove any adjusting key or wrench
before turning the power tool on. A wrench
or a key left attached to a rotating part of the
power tool may result in personal injury.
• Do not overreach. Keep proper footing
and balance at all times. This enables
better control of the power tool in unexpected
situations.
• Dress properly. Do not wear loose
clothing or jewellery. Keep your hair,
clothing
and gloves away from moving parts. Loose
clothes, jewellery or long hair can be caught
in moving parts.
• If devices are provided for the
connection of dust extraction and
collection facilities, ensure these are
connected and properly used. Use of
a dust collection device can reduce dust-
related hazards.
POWER TOOL USE AND CARE
• Do not force the power tool. Use the
correct power tool for your application.
The correct power tool will do the job better
and safer at the rate for which it was designed.
• Do not use the power tool if the switch
does not turn it on and off. Any power tool
that cannot be controlled with the switch is
dangerous and must be repaired.
• Disconnect the plug from the power
source and/or the battery pack from
the power tool before making any
adjustments, changing accessories, or
storing power tools. Such preventive safety
measures reduce the risk of starting the
power tool accidentally.
• Store idle power tools out of the reach
of children and do not allow persons
unfamiliar with the power tool or these
instructions to operate the power tool.
Power tools are dangerous in the hands of
untrained users.
• Maintain power tools. Check for
misalignment or binding of moving parts,
breakage of parts and any other condition
that may affect the power tool’s operation.
If damaged, have the power tool repaired
before use. Many accidents are caused by
poorly maintained power tools.
• Keep cutting tools sharp and clean.
Properly maintained cutting tools with sharp
cutting edges are less likely to bind and are
easier to control.
• Use the power tool, accessories and
tool bits etc., in accordance with these
instructions and in the manner intended
for the particular type of power tool, taking
into account the working conditions and
the work to be performed. Use of the power
tool for operations other than those intended
could result in a hazardous situation.
SERVICE
• Have your power tool serviced by
a qualied repair person using only
identical replacement parts. This will
ensure that the safety of the power tool is
maintained.
GENERAL SAFETY RULE
DRILL SAFETY WARNINGS
• Wear ear protectors with hammer drills.
Exposure to noise can cause hearing loss.
• Use auxiliary handles supplied with the
tool. Loss of control can cause personal
injury.
• Hold power tool by insulated gripping
surfaces, when performing an operation
where the cutting accessory may contact
hidden wiring or its own cord. Cutting
accessory contacting a ”live” wire may make
exposed metal parts of the power tool “live”
and could give the operator an electric shock.
Page 5
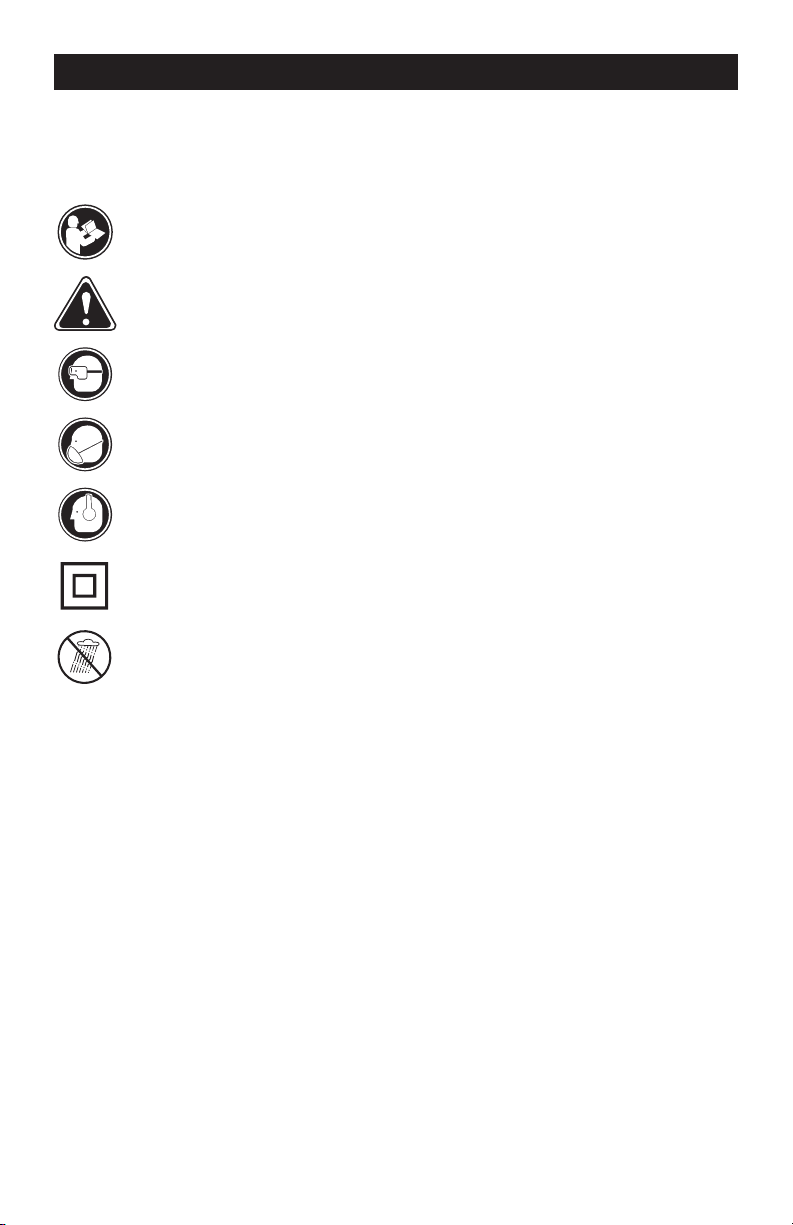
IMPORTANT: Your power tool and its Instruction Manual may contain “WARNING ICONS” (a
picture symbol intended to alert you to, and/or instruct you as to how to avoid a potentially
hazardous condition). Understanding and heeding these symbols will help you operate your tool
better and safer. Shown below are some of the symbols you may see.
SAVE THESE INSTRUCTIONS
To reduce the risk of injury, user must read instruction manual
Warning
Wear eye protection
Wear a dust mask
Wear ear protection
Double insulated
Don’t use in the rain
SYMBOLS

Page 6
Do not attempt to use this product until you thoroughly read and completely
understand the instruction manual. Pay close attention to the safety rule, includ-
ing Danger, Warnings, and Cautions.
The operation of any tool can result in foreign objects being thrown into your
eyes, which can result in severe eye damage. Before beginning any operation,
always wear safety goggles or safety glasses with side shields and a full face
shield when needed. We recommend the Wide Vision Safety Mask for use over
your eyeglasses or standard safety glasses with side shields. Always wear eye
protection that complies with ANSI Z87.1.
WARNING
WARNING
GENERAL USE STATEMENT (APPLICATIONS)
Sku: 2410730
Voltage: 120 V 60 Hz AC
Amps: 8.5AMPS
No-load speed: 0-3000 RPM
Impact rate: 48000 BPM
Chuck capacity:
1/2” (13 mm)
Max drilling capacity:
Masonry:
3/4”(20mm)
Wood:
1-3/8”(35mm)
Steel
1/2”(13mm)
Protection class:
/II
Cord length:
12’
Weight:
5.5 lbs
Page 7
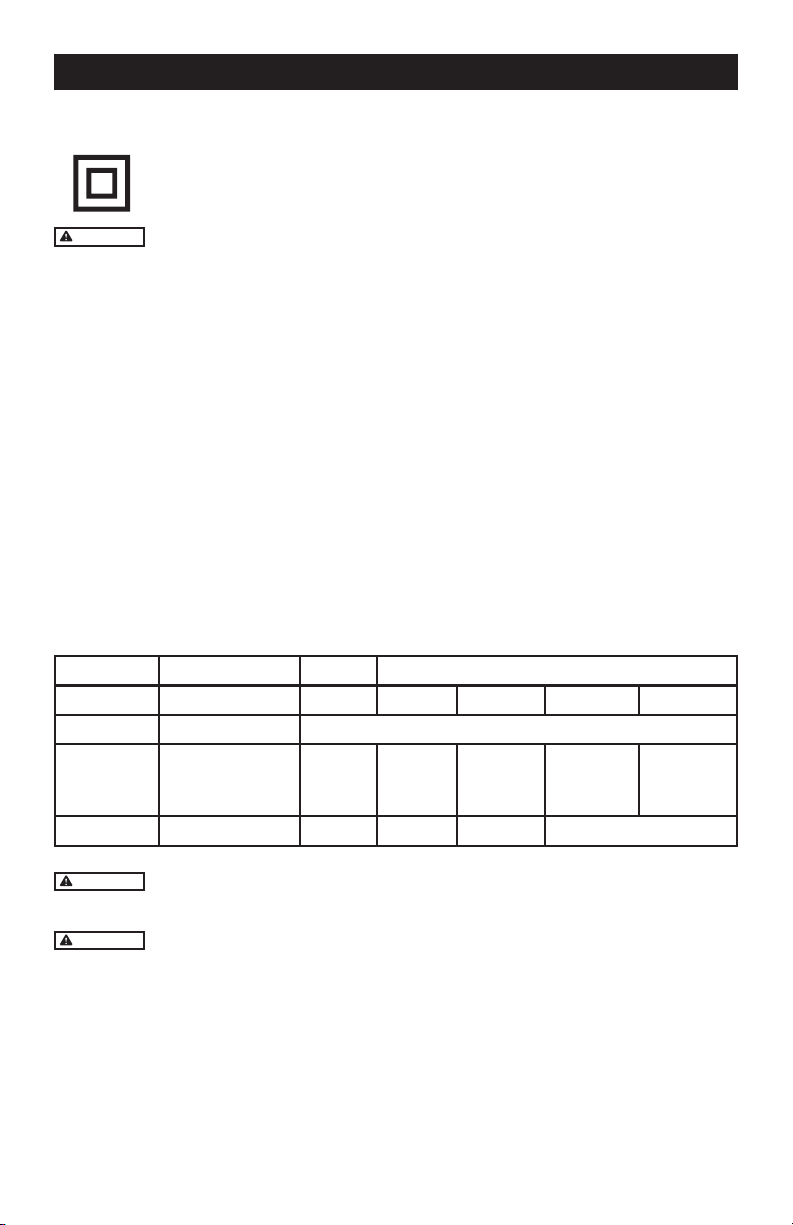
DOUBLE INSULATION
Double insulation is a safety concept for electric power tools, which eliminates
the need for the usual three-wire grounded power cord. All exposed metal parts
are isolated from the internal metal motor components with protecting insulation.
Double insulated tools do not need to be grounded.
WARNING
The double insulated system is intended to protect the user from shock resulting from
a break in the tool’s internal wiring. Observe all normal safety precautions to avoid electrical shock.
IMPORTANT: Servicing a tool with double insulation requires extreme care and knowledge
of the system and should be performed only by a qualied service technician. Always use the
original factory replacement parts when servicing.
ELECTRICAL CONNECTION
The Hammer DRILL has a precision-built electric motor. It should be connected to a power supply that
is 120 volts, 60 Hz, AC only (normal household current). Do not operate this tool on direct current (DC).
A substantial voltage drop will cause a loss of power and the motor to overheat. If your tool does not
operate when plugged into an outlet, double-check the power supply.
USE PROPER EXTENSION CORD. Make sure your extension cord is in good condition. When us-
ing an extension cord, be sure to use one heavy enough to carry the current your product will draw.
An undersized cord will cause a drop in line voltage resulting in loss of power and overheating. Table
1 shows the correct size to use depending on cord length and nameplate ampere rating. If in doubt,
use the next heavier gage. The smaller the gage number, the heavier the cord.
Table 1 Minimum gauge for cord
Rating Volts Total length of cord in feet
Ampere 120V 25ft. 50ft. 100 ft. 150 ft.
More Than Not More Than AWG
0
6
10
6
10
12
18
18
16
16
16
16
16
14
14
14
12
12
12 16 14 12 Not Recommended
CAUTION
Keep the extension cord clear of the working area. Position the cord so that it will not get
caught on lumber, tools or other obstructions while you are working with a power tool.
WARNING
Check extension cords before each use. If damaged replace immediately. Never use a tool
with a damaged cord since touching the damaged area could cause electrical shock resulting in serious
injury.
ELECTRICAL
Page 8
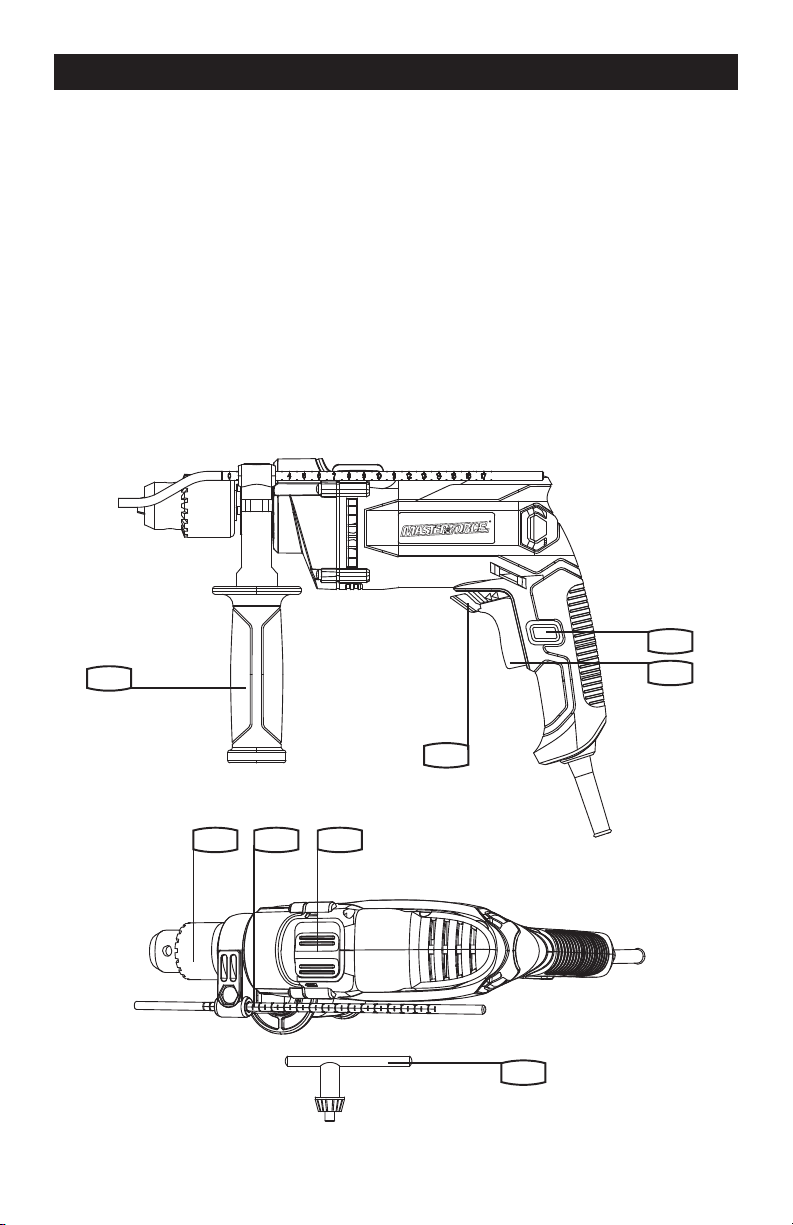
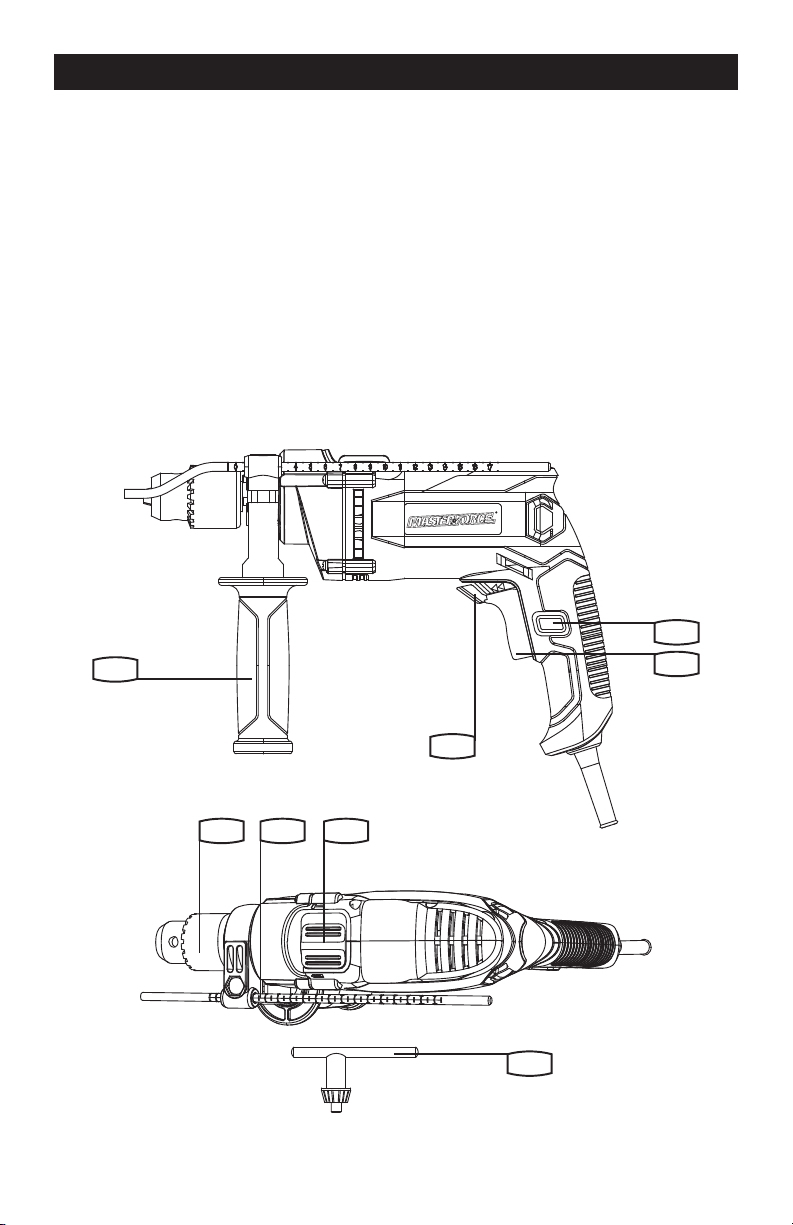
KNOW YOUR HAMMER DRILL
Before attempting to use any tool, familiarize yourself with all the operating features and safety
requirements.
1. Keyed chuck
2. Depth gauge
3. Hammer or drill selector
4. Switch lock-on switch
5. On/off switch
6. Forward and reverse rotation
7. Auxiliary handle
8. Chuck key
FEATURE
31 2
7
4
5
6
8
Page 9
OPERATION INSTRUCTIONS
NOTE: Before using the tool, read the
instruction book carefully.
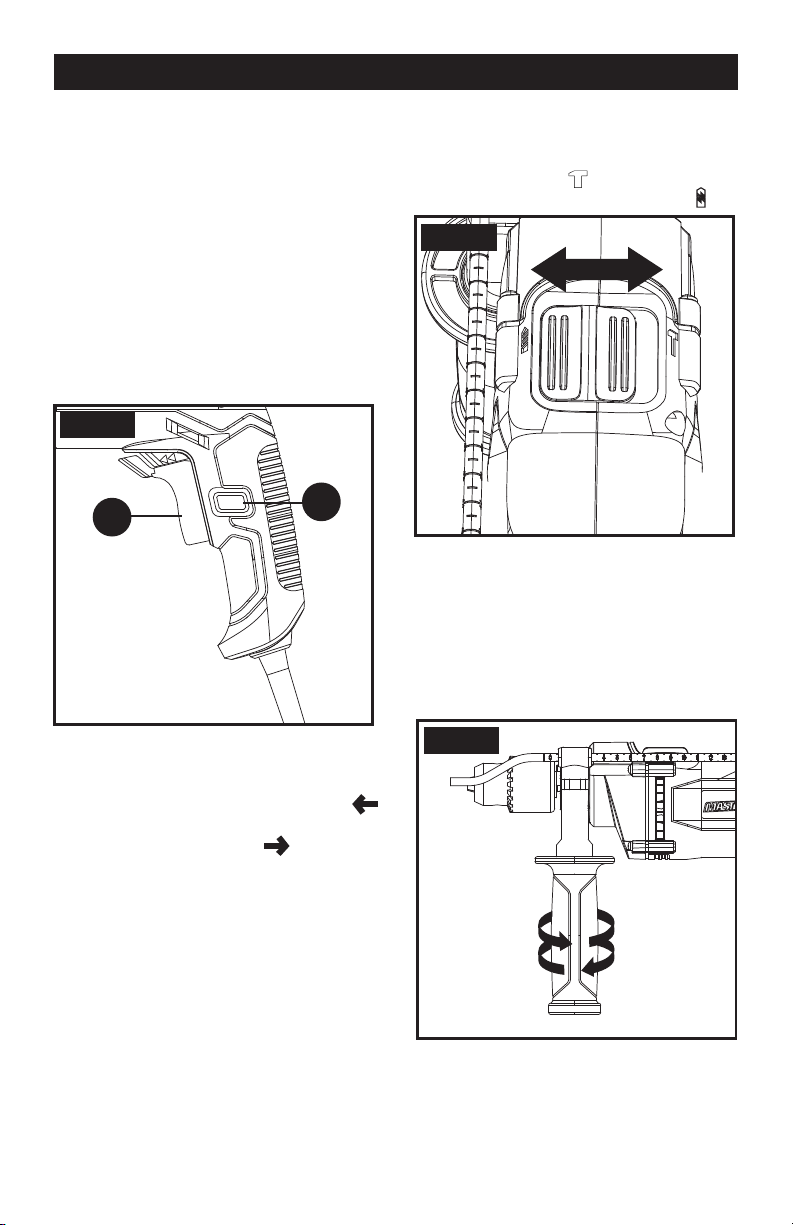
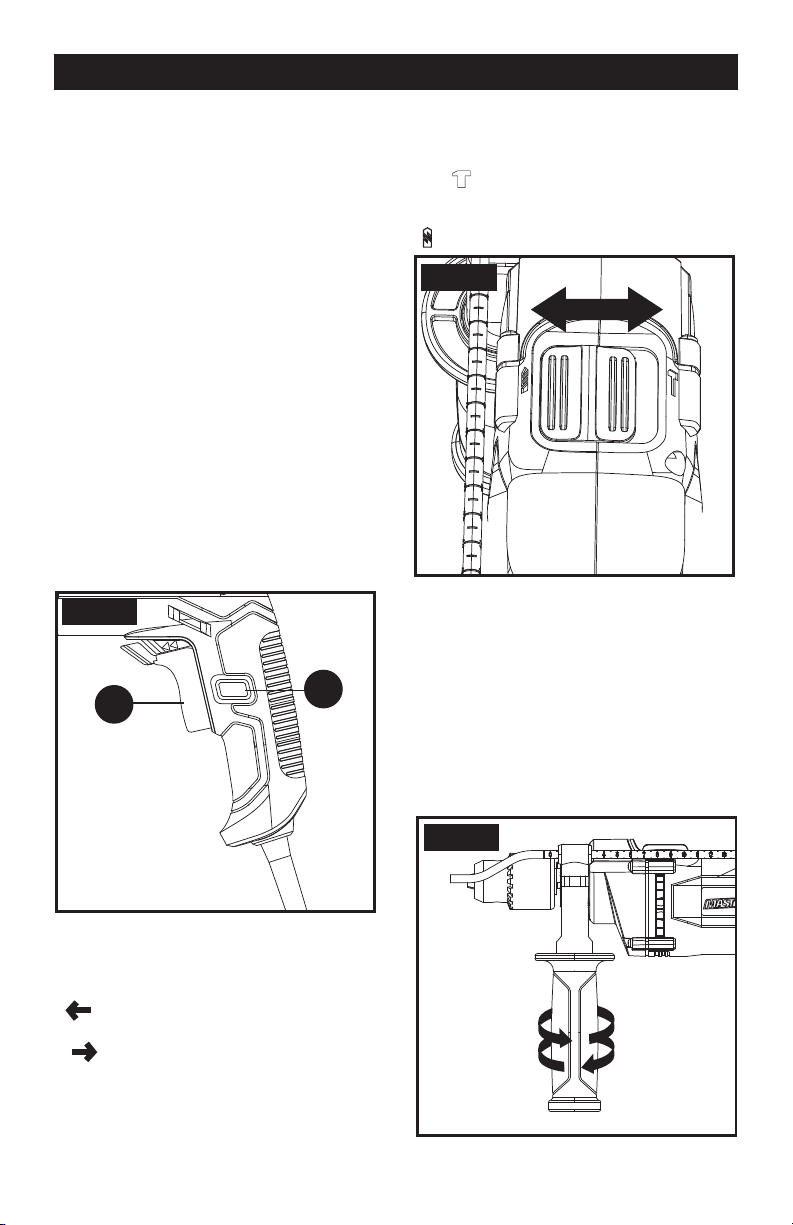
1. ON/OFF SWITCH
Depress to start and release to stop your tool.
2. SWITCH LOCK-ON BUTTON (SEE FIG. A)
Depress on/off switch (5) then lock-on button
(4), release on/off switch rst and lock-on
button second. Your switch is now locked on
for continuous use. To switch off your tool just
depress and release the on/ off switch.
3. FORWARD AND REVERSE ROTATION
CONTROL (6)
For drilling use forward rotation marked “
”(lever is moved to the left). Only use
reverse rotation marked “
”(lever is
moved to the right) to release a jammed drill
bit.
Never change the direction of rotation when
the tool is rotating, wait until it has stopped.
4. HAMMER OR DRILLING CONTROL
(SEE FIG B)
When drilling masonry and concrete choose
the Hammer position
. When drilling wood,
metal, plastic choose the Drill position .
Fig. C
4
5
Fig. A
Fig. B
Fig. D Fig. E
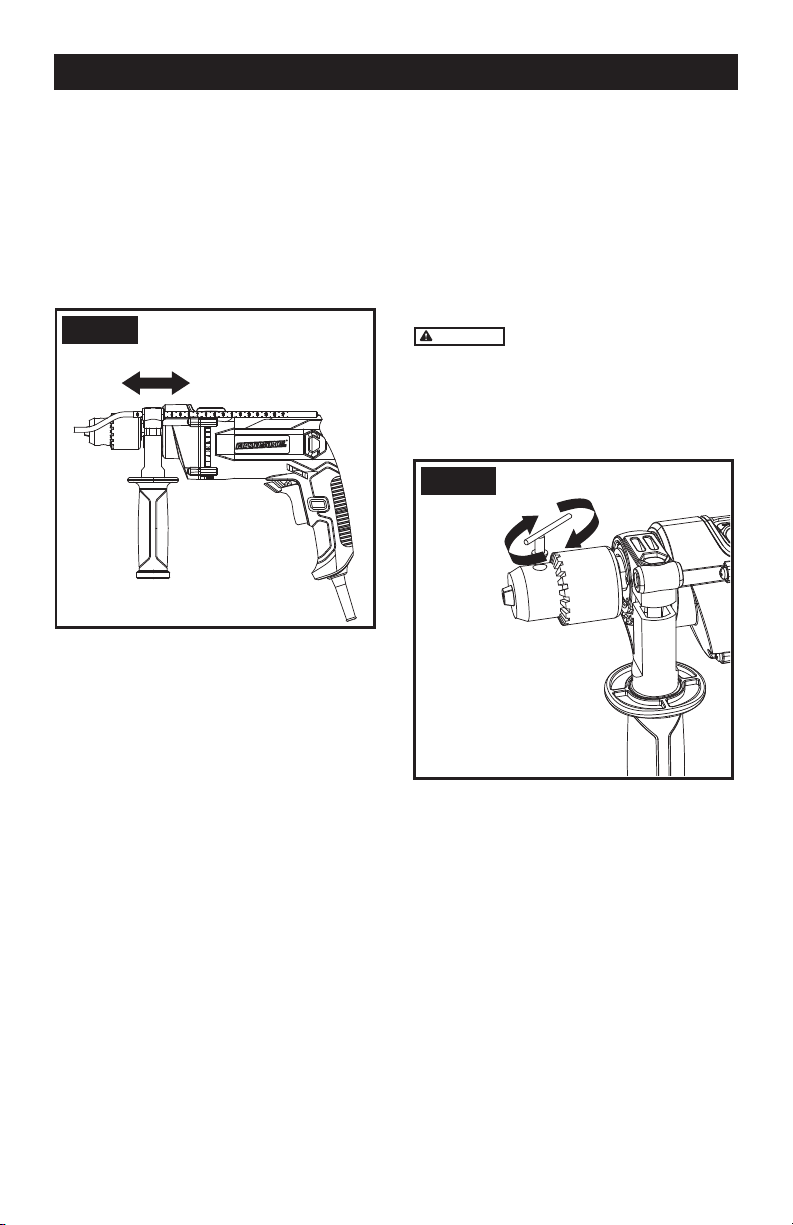
5. AUXILIARY HANDLE (SEE FIG C)
Slide the handle onto the drill and rotate to
the desired working position. To clamp the
auxiliary handle rotate the handgrip clock-
wise. To loosen the auxiliary handle, rotate
the hand grip counter-clockwise. Always use
the auxiliary handle .
Fig. C
4
5
Fig. A
Fig. B
Fig. D Fig. E
OPERATION
Fig. C
4
5
Fig. A
Fig. B
Fig. D Fig. E
Page 10
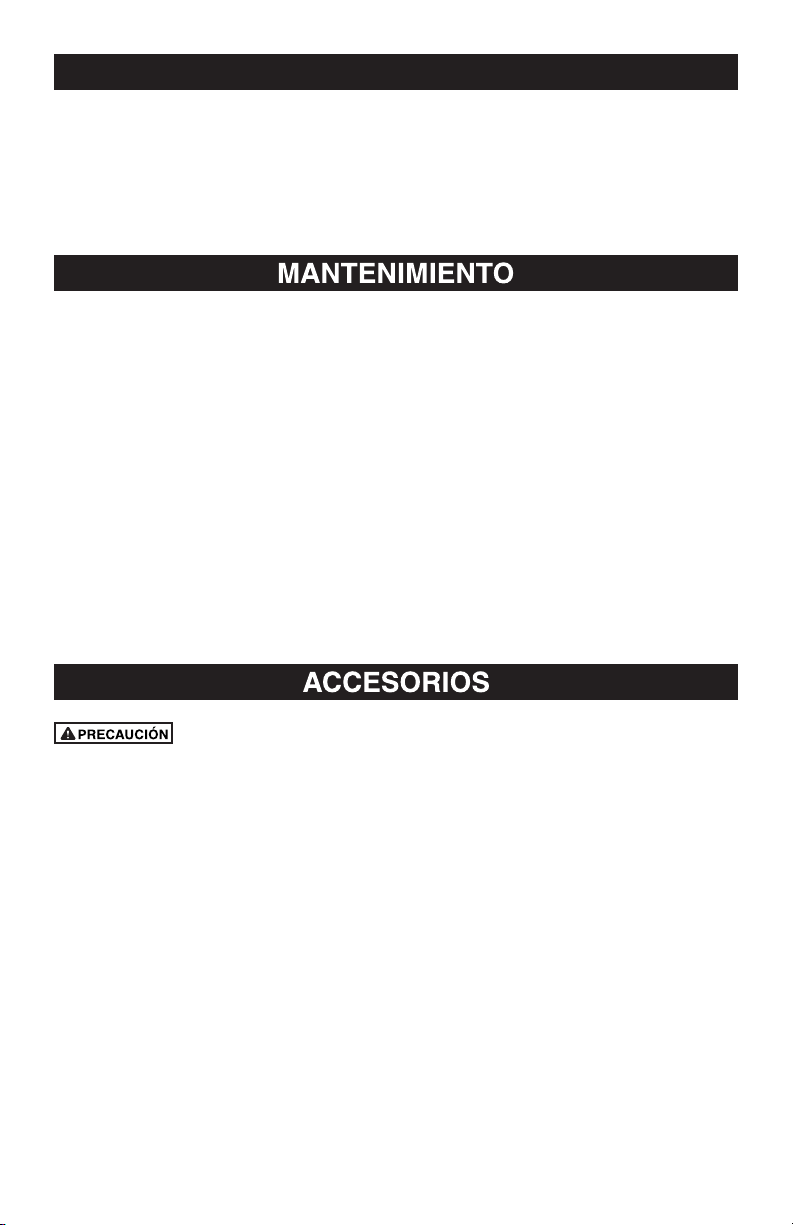
6. ADJUSTABLE DEPTH GAUGE(SEE FIG
D).
Fit the drill bit into the chuck. Loosen the
depth gauge (2) by rotating the handle grip
counter -clockwise. Slide the depth gauge
until the distance between the depth gauge
end and the drill/driver bit end is equal to
the depth of hole you wish to make. Then
clamp the depth gauge by rotating the handle
clockwise.
7. MOUNTING OF BIT IN CHUCK (SEE FIG
E).
When mounting the drill bit, insert bit between
the chuck jaws as far as it will go. Ensure drill
bit is in the centre of the chuck jaws. Using
the chuck key provided, there are three holes
in which the chuck key should be inserted.
Tighten at all three holes, not just one. Your
drill bit is now locked in the chuck. The bit
can be removed by reversing the above
procedure.
WARNING
Before installing accessory,
remove plug from power supply. Do not
attempt to tighten drill bits (or any other
accessory) by gripping the front part of the
chuck and turning the tool on. Damage to the
chuck and personal injury may result.
OPERATION
Fig. C
4
5
Fig. A
Fig. B
Fig. D
Fig. E
Fig. C
4
5
Fig. A
Fig. B
Fig. D
Fig. E

Page 11
Remove the plug from the socket before carrying out any adjustment, servicing or
maintenance.
Keep tools sharp and clean for better and safer performance. Follow instructions for lubricating
and changing accessories. Inspect tool cords periodically and if damaged, have repaired by
authorized service facility.
Your power tool requires no additional lubrication or maintenance. There are no user serviceable
parts in your power tool. Never use water or chemical cleaners to clean your power tool. Wipe
clean with a dry cloth. Always store your power tool in a dry place. Keep the motor ventilation
slots clean. Keep all working controls free of dust.
If the supply cord is damaged, it must be replaced by the manufacturer, its service agent or
similarly qualied persons in order to avoid a hazard.
1pc Chuck key
1pc Auxiliary handle
1pc Depth gauge
We recommend that you purchase your accessories from the same store that sold you the tool. Use
good quality accessories marked with a well-known brand name. Choose the type according to the
work you intend to undertake. Refer to the accessory packaging for further details. Store personnel
can assist you and offer advice.
If your power tool becomes too hot, set the speed to maximum and run no load for 2-3 minutes
to cool the motor.
Tungsten carbide drill bits should always be used for concrete and masonry.
When drilling in metal, only use HSS drill bits in good condition.
Where possible use a pilot hole before drilling a large diameter hole.
WORKING HINTS FOR YOUR DRILL

Page 12
NOTES

Page 13
SAVE YOUR RECEIPTS
THIS WARRANTY IS VOID WITHOUT THEM
MASTERFORCE
®
Hammer Drill
WARRANTY
90-DAY MONEY BACK GUARANTEE:
This MASTERFORCE
®
brand power tool carries our 90-DAY Money Back Guarantee.
If you are not completely satised with your MASTERFORCE
®
brand power tool for
any reason within ninety (90) days from the date of purchase, return the tool with your
original receipt to any MENARDS
®
retail store, and we will provide you a refund – no
questions asked.
3-YEAR LIMITED WARRANTY:
This MASTERFORCE
®
brand power tool carries our famous No Hassle 3-Year Limited
Warranty to the original purchaser. If, during normal use, this
MASTERFORCE
®
power tool breaks or fails due to a defect in material or workmanship
within three (3) years from the date of original purchase, simply bring this tool with the
original sales receipt back to your nearest MENARDS
®
retail store. At its discretion,
MASTERFORCE
®
agrees to have the tool or any defective part(s) repaired or replaced
with the same or similar MASTERFORCE
®
product or part free of charge, within the
stated warranty period, when returned by the original purchaser with original sales
receipt. Not withstanding the foregoing, this limited warranty does not cover
any damage that has resulted from abuse or misuse of the Merchandise.
This warranty: (1) excludes expendable parts including but not limited to blades,
brushes, belts, bits, light bulbs, and/or batteries; (2) shall be void if this tool is used
for commercial and/or rental purposes; and (3) does not cover any losses, injuries to
persons/property or costs. This warranty does give you specic legal rights and you
may have other rights, which vary from state to state. Be careful, tools are dangerous if
improperly used or maintained. Seller’s employees are not qualied to advise you on the
use of this Merchandise. Any oral representation(s) made will not be binding on seller or
its employees. The rights under this limited warranty are to the original purchaser of the
Merchandise and may not be transferred to any subsequent owner.
This limited warranty is in lieu of all warranties, expressed or implied including warranties
or merchantability and tness for a particular purpose. Seller shall not be liable for any
special, incidental, or consequential damages. The sole exclusive remedy against the
seller will be for the replacement of any defects as provided herein, as long as the seller
is willing or able to replace this product or is willing to refund the purchase price as
provided above. For insurance purposes, seller is not allowed to demonstrate any of
these power tools for you.
For questions / comments, technical assistance or repair parts
Please Call Toll Free at: 1-888-686-1484 ( (M-F 8am – 6pm)
SAV E YOUR RECEIPTS. THIS WARRANTY IS VOID WITHOUT THEM

Page 14
CUSTOMER SERVICE INFORMATION:
Now that you have purchased your tool, should a need ever exist for repair parts or service,
simply contact your nearest
store or call 1-888-686-1484. Be sure to provide all
pertinent facts when you call or visit.
Rotomartillo
Para reducir el riesgo de lesiones, el usuario
debe leer y comprender el manual del operador. Guarde estas
instrucciones para referencia en el futuro.
Para preguntas / comentarios, asistencia técnica o partes de
reparación
Por favor llame al número telefónico gratuito al: 1-888-686-1484
(Lunes-Viernes 8am – 6pm)
241-0730

Page 16
Reglas de seguridad generales........................................................17-18
Reglas de seguridad especícas.........................................................19
Símbolos ............................................................................................20
Declaración de uso general .................................................................21
Especicaciones .................................................................................21
Eléctrico ..............................................................................................22
Características ...................................................................................23
Operación ..... ..............................................................................24-25
Trabajo consejos para su taladro ................................................26
Mantenimiento ........ .........................................................................26
Accesorios .......... ........................................................................26
Notas...................................................................................................27
Garantía ............... .........................................................................28
Información de servicio al cliente ........................................................29
TABLA DE CONTENIDO

Page 17
SEGURIDAD ÁREA DE TRABAJO
•
Mantenga el área de trabajo limpia y bien
iluminada Las áreas desordenadas u oscuras
pueden provocar accidentes.
•
No opere herramientas eléctricas en
atmósferas explosivas, como en presencia
de líquidos inamables, gases o polvo. Las
herramientas eléctricas producen chispas
que pueden encender el polvo o los vapores.
•
Mantenga a los niños y transeúntes
alejados mientras utiliza una herramienta
eléctrica. Las distracciones pueden hacer
que pierda el control.
El polvo creado por el
lijado, aserrado, esmerilado, taladrado y
otras actividades de construcción contienen
sustancias químicas que el estado de
California como causante de cáncer, defectos
de nacimiento y otros daños reproductivos.
Algunos ejemplos de estos productos
químicos son:
• El plomo de las pinturas a base de plomo,
• El sílice cristalino de ladrillos, cemento y
otros productos de albañilería,
• Arsénico y cromo de madera tratada
químicamente.
Su riesgo de estas exposiciones varía,
dependiendo de la frecuencia con que se
realice este tipo de trabajo. Para reducir la
exposición a estas sustancias químicas,
trabaje en un área bien ventilada y trabaje
con equipo de seguridad aprobado, como
máscaras contra el polvo especialmente
diseñadas para ltrar partículas
microscópicas.
Conserve todas las advertencias e
instrucciones para consulta futura.
El término “herramienta eléctrica” que gura
en todas las advertencias que aparecen a
continuación hace referencia a la herramienta
que funciona con la red de suministro
eléctrico (con cable) o a la herramienta
eléctrica accionada a baterías (sin cable).
Este producto puede
contener plomo, ftalatos u otras sustancias
químicas que el estado de California como
causante de cáncer, defectos de nacimiento
y otros daños reproductivos. Por favor, lávese
las manos después de su uso.
Lea todas las advertencias
e instrucciones de seguridad. Si no se siguen
las advertencias e instrucciones puede
provocar una descarga eléctrica, incendio
y / o lesiones graves. Guarde todas las
advertencias e instrucciones para futuras
consultas.
• La herramienta eléctrica plazo en las
advertencias hace referencia a su (con
cable) herramienta de energía eléctrica o
(inalámbrico) herramienta eléctrica a pilas.
SEGURIDAD ELECTRICA
• El enchufe del aparato debe
corresponder a la toma de corriente.
Nunca modique el enchufe de ninguna
manera. No utilice enchufes adaptadores
con herramientas eléctricas conectadas a
tierra. Los enchufes no modicados y los
tomacorrientes coincidentes reducirán el
riesgo de descarga eléctrica.
• Evite el contacto corporal con
supercies conectadas a tierra tales
como tuberías, radiadores, estufas y
refrigeradores. Existe un mayor riesgo
de descarga eléctrica si su cuerpo está
conectado a tierra.
• No exponga las herramientas
eléctricas a la lluvia oa condiciones de
humedad. Entra agua en una herramienta
eléctrica aumentará el riesgo de descarga
eléctrica.
• No abuse del cable. Nunca utilice el
cable para transportar, tirar o desenchufar
la herramienta eléctrica. Mantenga el cable
alejado del calor, aceite, bordes alados
o piezas móviles. Los cables dañados o
enredados aumentan el riesgo de descarga
eléctrica.
• Cuando utilice una herramienta
eléctrica en el exterior, utilice un cable
de extensión adecuado para uso en
exteriores. El uso de un cable adecuado
para uso al aire libre reduce el riesgo de
descarga eléctrica.
• Si utiliza una herramienta eléctrica en
un lugar húmedo, es necesario utilizar un
dispositivo de corriente residual (RCD) de
suministro protegida. El uso de un RCD
reduce el riesgo de descarga eléctrica.
SEGURIDAD PERSONAL
• Manténgase alerta, preste atención
REGLAS DE SEGURIDAD GENERALESs

Page 18
a lo que está haciendo y use el sentido
común cuando utilice una herramienta
eléctrica. No utilice una herramienta
eléctrica si está cansado o bajo la inuencia
de drogas, alcohol o medicamentos. Un
momento de distracción mientras opera
una herramienta eléctrica puede resultar en
lesiones personales graves.
• Utilice equipo de protección personal.
Siempre use protección para los ojos.
Equipo especial de protección, tales como una
mascarilla antipolvo, zapatos de seguridad
antideslizantes, casco o protección auditiva
en las condiciones adecuadas reducirá las
lesiones personales.
• Evitar el arranque imprevisto.
Asegúrese de que el interruptor está en la
posición de apagado antes de conectarlo
a la fuente de energía y / o la batería, coger
o transportar la herramienta. Transportar
herramientas eléctricas con el dedo en
el interruptor o energizante herramientas
eléctricas con el interruptor encendido puede
provocar accidentes.
• Retire cualquier llave de ajuste o de
tuerca antes de encender la herramienta
eléctrica. Una herramienta o llave
colocada en una pieza giratoria de la
herramienta eléctrica puede resultar en
lesiones personales.
• No se estire. Mantenga la postura y el
equilibrio en todo momento. Esto permite
un mejor control de la herramienta eléctrica
en situaciones inesperadas.
• Vístase de manera adecuada. No use
ropa suelta o joyas. Mantenga su cabello,
ropa y guantes alejados de las piezas
móviles. La ropa suelta, las joyas y el pelo
largo pueden quedar atrapados en las piezas
móviles.
• Si se proporcionan dispositivos para
la conexión de extracción de polvo e
instalaciones de recogida, asegúrese
de que estén conectados y se utilizan
adecuadamente. El uso de recolección de
polvo puede reducir los peligros relacionados
con el polvo.
USO DE HERRAMIENTAS ELÉCTRICAS Y
CUIDADO
• No fuerce la herramienta eléctrica.
Utilice la herramienta eléctrica correcta
para su aplicación. La herramienta eléctrica
correcta hará el trabajo mejor y más seguro a
la velocidad para la que fue diseñada.
• No utilice la herramienta eléctrica si
el interruptor no la enciende y apaga.
Cualquier herramienta eléctrica que no
pueda controlarse con el interruptor es
peligrosa y debe ser reparada.
• Desconecte el enchufe de la fuente
de alimentación y / o la batería de la
herramienta eléctrica antes de realizar
ajustes, cambiar accesorios o almacenar
herramientas eléctricas. Estas medidas
de seguridad preventivas reducen el riesgo
de encender la herramienta eléctrica
accidentalmente.
• Herramientas de tienda eléctricas
fuera del alcance de los niños y no
permita que personas no familiarizadas
con la herramienta mecánica o con estas
instrucciones operen la herramienta. Las
herramientas eléctricas son peligrosas en
manos de personas inexpertas.
• Mantenga las herramientas eléctricas.
Verique la alineación de las piezas
móviles, rotura de piezas y cualquier
otra condición que pueda afectar el
funcionamiento de la herramienta
eléctrica. Si está dañada, reparar la
herramienta eléctrica antes de utilizarla.
Muchos accidentes son causados por
herramientas eléctricas mal mantenidas.
• Mantenga las herramientas de corte
aladas y limpias. Los útiles mantenidos
correctamente con los bordes de corte
alados son menos propensas a trabarse y
son más fáciles de controlar.
• Utilice las herramientas eléctricas,
accesorios, útiles, etc., de acuerdo
con estas instrucciones y de la manera
prevista para el tipo de herramienta
eléctrica, teniendo en cuenta las
condiciones de trabajo y la tarea a
realizar. Utilice la herramienta eléctrica para
operaciones distintas de las indicadas podría
resultar en una situación peligrosa.
SERVICIO
• Haga que su herramienta eléctrica
por un experto cualicado que utilice
sólo piezas de repuesto idénticas. Esto
asegurará que se mantenga la seguridad de
la herramienta eléctrica.
REGLAS DE SEGURIDAD GENERALESs

Page 19
REGLAS DE SEGURIDAD ESPECÍFICAS
ADVERTENCIAS DE SEGURIDAD
TALADRO
• Utilice protectores auditivos con los
taladros de percutor. La exposición al ruido
puede causar pérdida de la audición.
• Utilice los mangos auxiliares
suministrados con la herramienta. La
pérdida de control puede causar lesiones
personales.
• Mantenga la herramienta eléctrica
por las supercies aislantes cuando
realice una operación en el accesorio
de corte pueda entrar en contacto con
cables ocultos o con su propio cable.
Cortar accesorio en contacto con un cable
“vivo” puede hacer que las partes metálicas
expuestas de la herramienta eléctrica “en
vivo” y podría dar al operador una descarga
eléctrica.

Page 20
IMPORTANTE: Su herramienta eléctrica y su Instructivo puede contener “ICONOS DE
ADVERTENCIA” (un símbolo en imagen que le advierte, y/o le indica cómo evitar un condición
potencialmente peligrosa). Entender y apegarse a estos símbolos le ayudará a operar su
herramienta mejor y de manera más segura. A continuación se muestran algunos de los símbolos
que puede ver.
CONSERVE ESTAS INSTRUCCIONES
Para reducir el riesgo de lesiones, el usuario deberá leer el manual de instrucciones
Advertencia
Use lentes de seguridad
Use máscara contra el polvo
Use protección auditiva
Doble aislamiento
No lo use en la lluvia
SÍMBOLOS
Page 21
No intente usar este producto hasta que lea minuciosamente y entienda por completo
el instructivo. Ponga mucha atención a las reglas de seguridad, incluyendo peligro,
Advertencias, y Precauciones.
La operación de cualquier herramienta puede resultar en que objetos extraños sean
arrojados hacia susojos, lo que puede resultar en daño severo a los ojos. Antes de co-
menzar cualquier operación, siempre use gafas o lentes de seguridad con protectores
laterales y una careta completa cuando sea necesario. Recomendamos la Máscara
de seguridad de visión amplia para uso sobre sus lentes o gafas de seguridad están-
dar con protectores laterales. Siempre use protección para los ojos que cumpla con
ANSI Z87.1.
DECLARACIÓN DE USO GENERAL (APLICACIONES)
Sku: 2410730
Voltaje: 120 V 60 Hz AC
Amps: 8.5 AMPS
Velocidad sin carga: 0-3000 RPM
Mandril con llave:
1/2” (13 mm)
Capacidad máx. de perforación:
Mampostería:
3/4” (20 mm)
Madera:
1-3/8” (35 mm)
Acero :
1/2” (13 mm)
Clase de protección:
/II
Longitud de cable:
12’
Peso:
5.5 lbs

Page 22
DOBLE AISLAMIENTO
El doble aislamiento es un concepto de seguridad para herramientas eléctricas,
que elimina la necesidad del cable eléctrico con tierra de tres alambres habitual.
Todas las partes de metal expuestas están aisladas de los componentes de metal
internos del motor con aislamiento de protección.
Las tierras con doble aislamiento no necesitan conectarse a tierra.
El sistema de doble aislamiento está diseñado para proteger al usuario contra
choque que resulte de una ruptura en el cableado interno de la herramienta. Observe todas las pre-
cauciones normales de seguridad para evitar el choque eléctrico.
IMPORTANTE: Dar servicio a una herramienta con doble aislamiento requiere cuidado
extremo y conocimiento del sistema y sólo debe ser realizado por un técnico de servicio
calicado. Siempre use las partes de reemplazo de fábrica originales cuando dé servicio.
CONEXIÓN ELÉCTRICA
La lijadora de banda tiene un motor eléctrico integrado de precisión. Se debe conectar a un suminis-
tro de energía que tenga 120 voltios, 60 Hz, sólo CA (corriente doméstica normal). No opere esta her-
ramienta en corriente directa (CD). Una caída de voltaje substancial causará una pérdida de energía
y el motor se sobrecalentará. Si su herramienta no opera cuando esté conectada a un enchufe, revise
de nuevo el suministro de energía.
USE EL CABLE DE EXTENSIÓN ADECUADO. Asegúrese que su cable de extensión esté en
buenas condiciones. Cuando use un cable de extensión, asegúrese usar uno lo sucientemente
fuerte para manejar la corriente que requerirá su producto. Un cable de menor capacidad causará
una caída en el voltaje de línea que resulte en una pérdida de energía y sobrecalentamiento. La Tabla
1 muestra el tamaño correcto a usar dependiendo de la longitud del cable y la capacidad de amperes
de la placa de identicación. Si tiene dudas, use el siguiente calibre mayor. Mientras menor es el
número de calibre, el cable es más pesado.
Las palabras en la imagen también se deben traducir, 16 palabras en total.
Rating Voltios Longitud total de la cuerda en pies
Amperaje 120V 25ft. 50ft. 100 ft. 150 ft.
Más de No más de AWG
0
6
10
6
10
12
18
18
16
16
16
16
16
14
14
14
12
12
12 16 14 12 No se recomienda
Mantenga el cable de extensión libre del área de trabajo. Coloque el cable de forma
que no quede atrapado sobre madera, herramientas u otras obstrucciones mientras esta trabajando
con una herramienta eléctrica.
Revise los cables de extensión antes de cada uso. Si están dañados reemplácelos de
inmediato. Nunca use una herramienta con un cable dañado ya que tocar el área dañada podría causar
choque eléctrico que resulte en lesiones serias
ELÉCTRICO
Page 23
CONOZCA SU ROTOMARTILLO
Antes de intentar usar cualquier herramienta, familiarícese con todas las características de
operación y los requerimientos de seguridad.
1. Mandril con llave
2. Calibrador de profundidad
3. Selector de martillo o taladro
4. Interruptor de bloqueo de interruptor
5. Interruptor de encendido/apagado
6. Rotación frontal y reversa
7. Manija auxiliar
8. Llave de mandril
CARACTERÍSTICAS
31 2
7
4
5
6
8
Page 24
INSTRUCCIONES DE OPERACIÓN
NOTA: Antes de usar la herramienta, lea el
instructivo cuidadosamente.
1. INTERRUPTOR DE ENCENDIDO/APAGA-
DO
Presione para encender y libere para detener
su herramienta.
2. BOTÓN DE BLOQUEO EN ENCENDIDO
DE INTERRUPTOR (VER FIG. A)
Presione el interruptor de encendido/
apagado (5) y después el botón de bloqueo
en encendido
(4), libere el interruptor de encendido/
apagado primero y después el
botón de bloqueo en encendido. Su interruptor
ahora está bloqueado en encendido
para uso continuo. Para apagar su
herramienta sólo
presione y libere el interruptor de encendido/
apagado.
3. CONTROL DE ROTACIÓN FRONTAL
Y REVERSA (6)
Para perforar use la rotación frontal marcada
“
”(la palanca se mueve a la izquierda).
Sólo use la rotación de reversa marcada
“
”(la palanca se mueve a la derecha)
para liberar la broca atorada.
Nunca cambie la dirección de rotación
cuando
la herramienta esté girando, espere hasta
que se detenga.
4. CONTROL DE MARTILLO O TALADRO
(VEA LA FIG B)
Cuando perfore mampostería y concreto
elija
la posición de Martillo. Cuando per-
fore madera, metal, plástico elija la posición
de Taladro
.
Fig. C
4
5
Fig. A
Fig. B
Fig. D Fig. E
5. MANIJA AUXILIAR (VER FIG C)
Deslice la manija sobre el taladro y gire a
la posición de operación deseada. Para
asegurar la
manija auxiliar gire la empuñadura en sen-
tido de las manecillas del reloj.
Para aojar la manija auxiliar, gire
la empuñadura en sentido contrario a las
manecillas del reloj. Siempre use
la manija auxiliar.
Fig. C
4
5
Fig. A
Fig. B
Fig. D Fig. E
OPERACIÓN
Fig. C
4
5
Fig. A
Fig. B
Fig. D Fig. E

Page 25
6. INDICADOR DE PROFUNDIDAD AJUST-
ABLE (VER FIG D).
Coloque la broca en el mandril. Aoje el
indicador de profundidad (2) girando la
empuñadura en sentido contrario a las
manecillas del reloj. Deslice el indicador de
profundidad hasta que la distancia entre el
extremo del indicador de profundidad y la
broca del taladro/destornillador sea igual a
la profundidad del oricio que desee realizar.
Después sujete el indicador de profundidad
girando la empuñadura en sentido de las
manecillas del reloj.
7. INSTALACIÓN DE BROCA EN MANDRIL
(VER FIG E).
Cuando instale la broca, insértela entre las
mordazas del mandril tanto como sea posible.
Asegúrese que las brocas estén en el centro
de las mordazas del mandril. Utilizando la
llave para mandril incluida, hay tres oricios
en los que se debe insertar la llave para
mandril. Apriete en los tres oricios, no sólo
en uno. Su broca ahora está asegurada en el
mandril. La broca se puede retirar invirtiendo
el procedimiento anterior.
Antes de instalar el
accesorio, retire el enchufe del tomacorriente.
No intente apretar las brocas (o cualquier
otro accesorio) sujetando la parte delantera
del mandril y encendiendo la herramienta.
Puede resultar en daño al mandril o lesiones
personales.
OPERACIÓN
Fig. C
4
5
Fig. A
Fig. B
Fig. D
Fig. E
Fig. C
4
5
Fig. A
Fig. B
Fig. D
Fig. E
Page 26
Mantenga sus herramientas aladas y limpias para un mejor desempeño y más seguro. Siga
las instrucciones para lubricar y cambiar los accesorios. Revise los cables de la herramienta
periódicamente y pida que una instalación de servicio autorizada los repare si están dañados.
Su herramienta eléctrica no requiere lubricación o mantenimiento adicional. No hay partes a las
que el usuario pueda dar servicio en su herramienta eléctrica. Nunca use agua o limpiadores
químicos para limpiar su herramienta eléctrica. Limpie con una tela seca. Siempre guarde
su herramienta eléctrica en un lugar seco. Mantenga limpias las ranuras de ventilación del
motor. Mantenga todos los controles de operación libres de polvo. Si el cable de suministro está
dañado, debe ser reemplazado por el fabricante, su agente de servicio o personas calicadas
de forma similar para evitar peligros.
1. Si su herramienta eléctrica no arranca, revise el enchufe en el suministro de energía primero.
2. Si su herramienta eléctrica disminuye su eciencia, revise la velocidad de la herramienta y el
tipo de accesorio.
3. Si no se resuelve el problema, regrese la herramienta a un concesionario autorizado para la
reparación.
Si su herramienta eléctrica se calienta demasiado, ajustar la velocidad al máximo y ejecutar sin
carga durante 2-3 minutos para enfriar el motor. Tungsteno brocas de carburo siempre se deben
utilizar para el hormigón y mampostería. Cuando taladre en metal, solamente utilice brocas HSS
en buenas condiciones. Siempre que sea posible utilizar un agujero piloto antes de perforar un
agujero de gran diámetro.
Estos accesorios o suplementos se recomiendan para uso con su Multi-herramienta especicada
en este manual. El uso de cualquier otro accesorio o suplemento podría presentar un riesgo de
lesiones a las personas. Sólo use el accesorio o suplemento para su propósito indicado.
1pc Clave Chuck
1pc Empuñadura auxiliar
1pc Calibre de profundidad
TRABAJO CONSEJOS PARA SU TALADRO

Page 27
NOTAS

Page 28
Garantía De Rotomartillo de 2 velocidades de 1/2” MASTERFORCE
®
GARANTÍA DE DEVOLUCIÓN DE DINERO DE 90 DÍAS:
Esta herramienta eléctrica de la marca MASTERFORCE
®
tiene nuestra Garantía de
devolución de dinero de 90 DÍAS. Si no está completamente satisfecho con su herramienta
eléctrica marca MASTERFORCE
®
por cualquier razón dentro de noventa (90) días desde
la fecha de compra, regrese la herramienta con su recibo original a cualquier tienda al
menudeo MENARDS
®
, y le proporcionaremos un reembolso – sin hacer ninguna pregunta.
GARANTÍA LIMITADA DE 3 AÑOS:
Esta herramienta eléctrica marca MASTERFORCE
®
tiene nuestra famosa Garantía Limitada
de 3 Años sin Complicaciones para el comprador original. Si, durante el uso normal, esta
herramienta eléctrica MASTERFORCE
®
se descompone o falla debido a un defecto en
material o mano de obra dentro de tres (3) años desde la fecha de la compra original,
simplemente lleve esta herramienta con el recibo de ventas original de regreso a su
tienda al menudeo MENARDS
®
más cercana. A su criterio, MASTERFORCE
®
acuerda
que la herramienta o cualquier parte defectuosa se repare o reemplace con el mismo
producto o parte MASTERFORCE
®
o similar libre de cargo, dentro del periodo de
garantía mencionado, cuando sea devuelta por el comprador original con el recibo de
ventas original. Sin importar lo presente, esta garantía limitada no cubre ningún daño
que haya resultado a partir de abuso o mal uso de la Mercancía.
Esta garantía: (1) excluye partes desechables que incluyen, sin limitarse a aspas, cepillos,
bandas brocas, focos, y/o baterías; (2) se anulará si esta herramienta se usa para
propósitos comerciales y/o de renta; y (3) no cubre ninguna pérdida, lesiones a personas/
daño a la propiedad o costos. Esta garantía le otorga derechos legales especícos y puede
tener otros derechos, que varían de un estado a otro. Tenga cuidado, las herramientas
son peligrosas si se usan incorrectamente o se les da mantenimiento inadecuado. Los
empleados del vendedor no están calicados para aconsejarlo sobre el uso de esta
Mercancía. Cualquier representación verbal realizada no será vinculante para el vendedor
o sus empleados Los derechos bajo esta garantía limitada son para el comprador original
de la Mercancía y no se pueden transferir a ningún propietario subsecuente.
Esta garantía limitada está en lugar de todas las garantías, expresas o implícitas
incluyendo garantías o comerciabilidad o adecuación para un propósito particular.
El vendedor no será responsable por cualquier daño especial, incidental o en
consecuencia. El único remedio exclusivo contra el vendedor será el reemplazo de
cualquier defecto como se indica en el presente, siempre y cuando el vendedor desee
o pueda reemplazar este producto o desee reembolsar el precio de compra como
se indica anteriormente. Para propósitos de seguro, no se permite que el vendedor
demuestre ninguna de estas herramientas eléctricas para usted.
Para preguntas / comentarios, asistencia técnica o partes de reparación
Por favor llame al número telefónico gratuito al: 1-888-686-1484 ( (Lunes-Viernes 8am – 6pm)
CONSERVE SUS RECIBOS. ESTA GARANTÍA ES
NULA SIN ELLOS

Page 29
INFORMACIÓN DE SERVICIO AL CLIENTE:
Ahora que adquirió su herramienta, si alguna vez existe la necesidad de partes de reparación o
servicio, simplemente póngase en contacto con su tienda
más cercana o llame
al 1-888-686-1484. Asegúrese de proporcionar todos los hechos pertinentes cuando llame o
nos visite.