Loading ...
Loading ...

98764C (Rev. J - 08/17)
EZWSSM-1A, EZWSSMJO-2A, LZWSSM-1A, LZWSSMJO-2A
Page 3
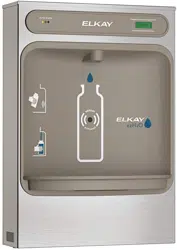
NAMEPLATE
ALCOVE
DRAIN TRAY
TOP COVER
SENSOR LENS
FRONT VIEW
REAR VIEW
BACK PANEL
REAR CROSS MEMBER
(ON OUTER WRAPPER)
BOTTOM COVER
120V POWER SUPPLY CORD
OUTER WRAPPER
FILTER
Pre-Installation (reference Rough-In, Fig. 1, Page 2)
1. Ensure Wall is structurally sound to bear the loads imparted by the ezH2O
®
Surface Mount Bottle Filling
Station (On-Wall Bottle Filler). If necessary, install a Wall Support Carrier (not supplied).
2. Ensure Water Supply LineandDrainLinearesizedandlocatedasspeciedtheRough-indiagram.
3. Ensure electrical Wall Outlet is within reach of Power Cord and is live with electrical power. See Warnings.
4. Test GFCI before proceeding: Push Test button to ensure power cuts off. Then push Reset before operating.
5. Attach Service Stop Valve (not supplied) to Water Supply line orienting the 3/8"O.D. female compression outlet
horizontally to the left. Purge water line and test for leakage. Correct any leakage.
6. Ensure package contains the following components:
Wall Mounting (reference Rough-In, Fig. 1, Page 2)
1. Remove Bottom Cover from Bottle Filler by removing two(2) screws from bottom of unit. Use a 5/32" hex
wrench (not supplied). Remove and place aside new Filter Cartridge shipped inside Bottle Filler.
2. Remove Back Panel from Bottle Filler by removing two(2) screws from top of unit that secures the Top Cover.
3. Fasten Back Panel to structurally secure wall thru eight(8) 7/16" obround holes with fasteners appropriate
forwalltype.LocateBackPanelasspeciedinRough-In.Ifnecessary,attachtoWallSupportCarrier(not
supplied).
4. Ensure Bottom Cover is not obstructed by the roughed-in Water and Drain Lines. Test by sliding Bottom
Cover up into Back Panel opening. If Bottom Cover is prevented from seating properly, reposition Water and/or
DrainLinesslightlyuntiltheBottomCovertseasily.
5. Before hanging the On-Wall Bottle Filler, ensure the Insulated Waterline is routed inside of the Rear Cross
Member. If outside the Cross Member, reposition to inside or else the unit cannot be installed properly.
6. Hang the On-Wall Bottle Filler onto the Back Panel, aligning three(3) tabs into three(3) slots on Rear Cross
Member.
7. Secure Bottle Filler to Back Panel by replacing Top Cover on top of unit and fastening with two(2) supplied
screws.
120V FILTERED UNIT SHOWN
DISPENSING
NOZZLE
INSULATED
WATERLINE
INSTALLATION INSTRUCTIONS
Loading ...
Loading ...
Loading ...