Loading ...
2
BATTERY REPLACEMENT
•
Exhausted batteries are to be removed from the product.
INSTALLATION AND OPERATION INSTRUCTIONS
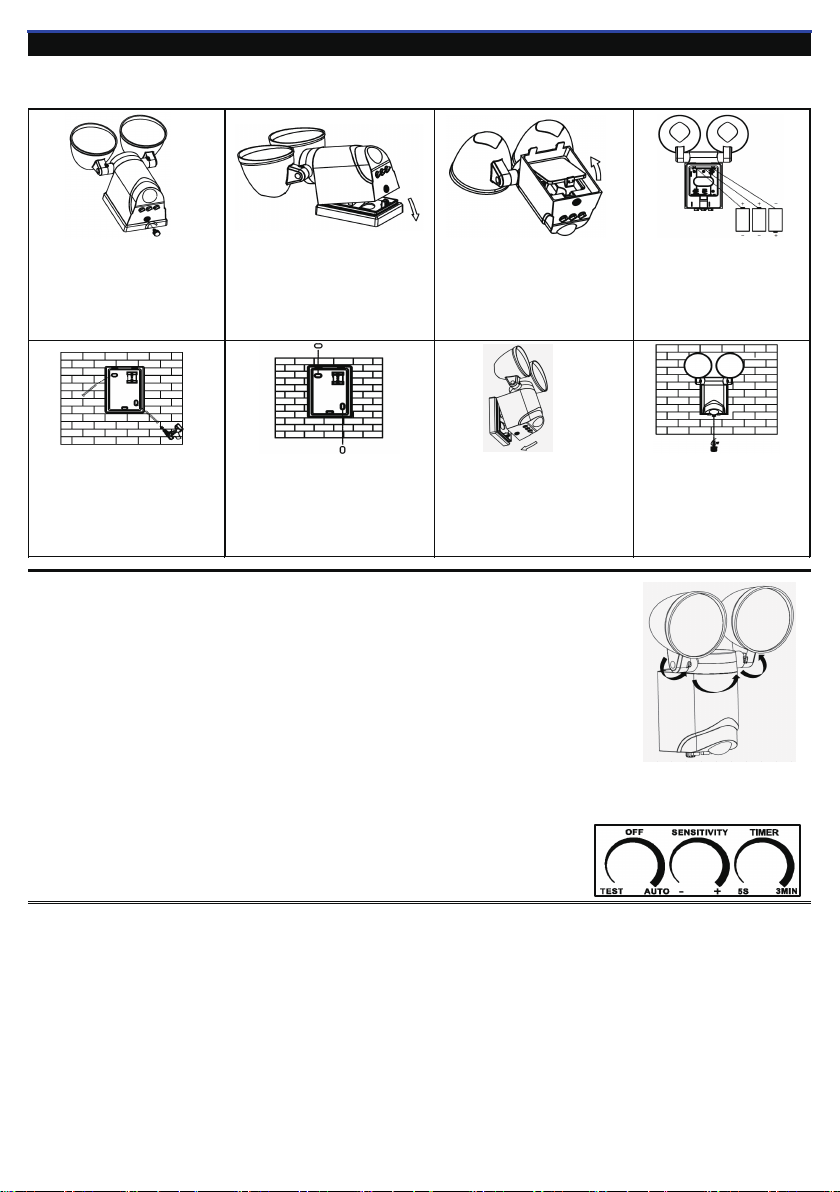
1. The light fixture and mounting bracket
are held together by 2 locking tabs on the
top and a screw on the bottom. Unfasten
the locking screw from the bottom of
mounting bracket.
2. Open the battery case cover
by finger.
7. Line up the light fixture with the
mounting bracket.
8. Fix the mou
nting bracket to the
light with attached screw tightly.
6. Use attached two rubber seals to fill
the screw hole.
Note: While the batteries are exhausted the light will not turn on.
Use only new alkaline C size batteries with 1.5V rating for replacement.
•
Batteries should be recycled or disposed of as per state and local guidelines.
•
Do not mix old and new batteries.
•
Do not mix alkaline, standard (c
arbon-zinc) or rechargeable batteries.
•
Do not dispose of batteries in fire.
OPERATIONAL INSTRUCTIONS
5. If mounting to wall or brick, drill two
suitable holes using power drill (not
included) into the mounting surface.
Use attached two screws and two
anchors to fix the mounting bracket on
the wall tightly.
•
Gently remove all parts from the package and lay them out on a smooth surface.
INSTALLATION
1. Setting the sensor for testing: Sensor's initial setting switch will be set at the TEST position. After inserting
the new batteries for the first time the light will turn on and enter a "warm-up" period for about 10 seconds,
automatically entering into TEST MODE. The light will operate during the day or night. The light will stay on for
5 seconds after all motion is stopped.
2
. Adjust the head of light fixture toward to left or right direction to get the desired light direction.
3. Adjust the head of light fixture toward to up and down to get the desired light direction.
4. Setting the sensor adjustment rotary switch as your desired setting before use.
SENSITIVITY - To increase the detection distance, rotate the “SENSITIVITY” switch toward the “+”
(high) posit
ion.To decrease the detection distance, rotate the “SENSITIVITY” switch toward the “-”
(low) position.
TIMER - Controls how long your security light will remain on. Rotate the “TIMER” switch toward the “5S”
position to decrease the remain time. Rotate the “TIMER” switch toward the “3MIN” position to
increase the remain time. The remain time range is from 5 seconds to 3 min
utes.
5. Set the switch from TEST position to AUTO position. At night, turns light ON automatically when motion is
detected and turns light OFF automatically in setting time after all motion is stopped.
Sensor Range: Up to 9 m / 30 ft. x 180 degree spread (Varies with various environment).
Lumens output: 1,500 lumens / 5,000K (Max, use three new alkaline C size 1.5V batteries).
2. Remove the mounting bracket
from the light.
•
Batteries are to be
inserted with the correct polarity.
•
Non-rechargeable batteries are not to be recharged.
4. Insert three new alkaline C size
1.5V batteries (not included). Then
close the battery case cover. Do
not mix old and new batteries.
Make sure the polarity are all
correct.
Loading ...