OWNER'S MANUAL Range
RANGE MAINTENANCE AND CARE
General Cleaning
- IMPORTANT: Before cleaning, make sure all controls are OFF and the oven and cooktop are cool. Always follow label instructions on cleaning products.
- Soap, water, and a soft cloth or sponge are suggested first, unless otherwise noted.
EXTERIOR PORCELAIN ENAMEL SURFACES (on some models)
Food spills containing acids, such as vinegar and tomato, should be cleaned as soon as the entire range is cool. These spills may affect the finish.
Cleaning Method:
- Glass cleaner, mild liquid cleaner, or nonabrasive scrubbing pad: Gently clean around the model/serial/rating plate because scrubbing may remove numbers.
- Affresh®† Kitchen and Appliance Cleaner Part Number W10355010 (not included): See the Quick Start Guide for ordering information.
STAINLESS STEEL (on some models)
NOTE: To avoid damage to stainless steel surfaces, do not use soap-filled scouring pads, abrasive cleaners, Cooktop Cleaner, steel-wool pads, gritty washcloths, or abrasive paper towels. Damage may occur to stainless steel surfaces, even with one-time or limited use.
Cleaning Method:
- Rub in direction of grain to avoid damaging.
- Affresh® Stainless Steel Cleaner Part Number W10355016 (not included): See the Quick Start Guide for ordering information.
METALLIC PAINT (on some models)
- Do not use abrasive cleaners, cleaners with bleach, rust removers, ammonia, or sodium hydroxide (lye) because paint surface may stain.
PORCELAIN-COATED GRATES AND CAPS
Food spills containing acids, such as vinegar and tomato, should be cleaned as soon as the cooktop, grates and caps are cool. These spills may affect the finish. To avoid chipping, do not bang grates, and caps against each other or hard surfaces such as cast iron cookware. Do not reassemble caps on burners while wet. Do not clean in the Self-Cleaning cycle.
Cleaning Method:
- Nonabrasive plastic scrubbing pad and mildly abrasive cleanser: Clean as soon as cooktop, grates, and caps are cool.
- Dishwasher (grates only, not caps): Use the most-aggressive cycle. Cooked-on soils should be soaked or scrubbed before going into a dishwasher. Although the burner grates are durable, they may lose their shine and/or discolor when washed in a dishwasher.
- Gas Grate and Drip Pan Cleaner Part Number 31617 (not included): See the Quick Start Guide for ordering information.
SURFACE BURNERS
- Food spills containing acids, such as vinegar and tomato, should be cleaned as soon as the cooktop, grates, and caps are cool. These spills may affect the finish.
- To avoid chipping, do not bang grates and caps against each other or hard surfaces such as cast iron cookware.
- Do not reassemble caps on burners while wet.
- Do not clean in the Self-Cleaning cycle.
- Do not clean in dishwasher.
- Cleaning Method:
- Nonabrasive plastic scrubbing pad and mildly abrasive cleanser: Clean as soon as cooktop, grates, burners, and caps are cool.
- Gas Grate and Drip Pan Cleaner (not included).
COOKTOP CONTROLS
- To avoid damage to the cooktop controls, do not use steel wool, abrasive cleansers, or oven cleaner.
- To avoid damage, do not soak knobs. When replacing knobs, make sure knobs are in the Off position.
- On some models, do not remove seals under knobs.
- Cleaning Method:
- Soap and water: Pull knobs straight away from control panel to remove
CONTROL PANEL AND OVEN DOOR EXTERIOR
- To avoid damage to the control panel, do not use abrasive cleaners, steel-wool pads, gritty washcloths, or abrasive paper towels.
- Cleaning Method:
- Glass cleaner and soft cloth or sponge: Apply glass cleaner to soft cloth or sponge, not directly on panel.
- Affresh® Kitchen and Appliance Cleaner Part Number W10355010 (not included): See the Quick Start Guide for ordering information.
OVEN RACKS
Cleaning Method:
- Steel-wool pad
- For racks that have discolored and are harder to slide, a light coating of vegetable oil applied to the rack guides will help them slide.
- Dishwasher (steam rack water reservoir only, not racks): Although the water reservoir is durable, it may lose its shine and/or discolor when washed in a dishwasher.
STORAGE/WARMING DRAWER (on some models)
- Check that storage/warming drawer is cool and empty before cleaning.
- Cleaning Method:
OVEN CAVITY
- Do not use oven cleaners.
- Food spills should be cleaned when oven cools. At high temperatures, foods react with porcelain. Staining, etching, pitting, or faint white spots can result.
- Cleaning Method:
- Self-Cleaning cycle: See the “Self-Cleaning Cycle” or “Clean Cycle” section first.
Self-Cleaning Cycle
WARNING: Burn Hazard Do not touch the oven during the Self-Cleaning cycle. Keep children away from the oven during Self-Cleaning cycle. Failure to follow these instructions can result in burns.
- IMPORTANT: The health of some birds is extremely sensitive to the fumes given off during the Self-Cleaning cycle. Exposure to the fumes may result in death to certain birds. Always move birds to another closed and well-ventilated room.
- Keep the kitchen well-ventilated during the Self-Cleaning cycle to help get rid of heat, odors, and smoke.
- Do not block the oven vent(s) during the Self-Cleaning cycle. Air must be able to move freely. Depending on your model, see the “Oven Vent” or “Oven Vents” section in the Quick Start Guide.
- Do not clean, rub, damage, or move the oven door gasket.
Prepare Range
- Remove the broiler pan, grid, cookware and bakeware, all cooking utensils, oven racks, and aluminum foil and, on some models, the temperature probe from the oven.
- Use a damp cloth to clean inside door edge and the 11/2" (3.8 cm) area around the inside oven cavity frame, being certain not to move or bend the gasket.
- Wipe out any loose soil to reduce smoke and avoid damage. At high temperatures, foods react with porcelain. Staining, etching, pitting, or faint white spots can result. This will not affect cooking performance.
- Remove plastic items from the cooktop because they may melt.
- Remove all items from the storage drawer.
How the Cycle Works
- IMPORTANT: The heating and cooling of porcelain on steel in the oven may result in discoloring, loss of gloss, hairline cracks and popping sounds.
- Before self-cleaning, make sure the door is completely closed or the door will not lock and the Self-Cleaning cycle will not begin.
- The Self-Cleaning cycle uses very high temperatures, burning soil to a powdery ash.
- Once the oven has completely cooled, remove ash with a damp cloth. To avoid breaking the glass, do not apply a cool, damp cloth to the inner door glass before it has completely cooled.
- To stop the Self-Cleaning cycle at any time, press the Cancel keypad. If the temperature is too high, the oven door will remain locked and “cool” and “(lock symbol) ” will be displayed. The cooling fan may continue to run.
- When “locked” shows in the display, the door of the oven cannot be opened. To avoid damage to the door, do not force the door open when “locked” is displayed.
- Once the cleaning temperature has been reached, the electronic control requires a 12 hour delay before another Self-Cleaning cycle can be started. The oven light will not function during the Self-Cleaning cycle.
Electronic Oven Control with Adjustable Clean Time (on some models): The Self-Cleaning cycle is time adjustable between 2 hours 30 minutes and 4 hours 30 minutes in 15 or 30 minute increments. Suggested clean times are 2 hours 30 minutes for light soil and 4 hours 30 minutes for heavy soil. The last 30 minutes of the cycle is for cooldown. To Self-Clean:
- Press SELF CLEAN.
- Press the Temp/Time “+” or “-” keypad to enter the desired Self-Cleaning cycle time.
- Press START. The oven door will automatically lock. The DOOR LOCKED and CLEAN indicator lights will be displayed. The time remaining will also be displayed.
- When the self-clean cycle is complete and the oven cools, the DOOR LOCKED and CLEAN indicator lights will turn off.
- When the oven is completely cooled, remove ash with a damp cloth. To exit the Self-Cleaning cycle before completed, press CANCEL. The door will unlock once the oven cools.
GAS CONVERSIONS
- Gas conversions from Natural gas to propane gas or from propane gas to Natural gas must be done by a qualified installer.
- WARNING: Explosion Hazard Use a new CSA International approved gas supply line. Install a shut-off valve. Securely tighten all gas connections. If connected to propane, have a qualified person make sure gas pressure does not exceed 14ʺ (36 cm) water column. Examples of a qualified person include: licensed heating personnel, authorized gas company personnel, and authorized service personnel. Failure to do so can result in death, explosion, or fire.
- WARNING: This conversion kit shall be installed by a qualified service agency in accordance with the manufacturer’s instructions and all applicable codes and requirements of the authority having jurisdiction. If the information in these instructions is not followed exactly, a fire, explosion or production of carbon monoxide may result causing property damage, personal injury or loss of life. The qualified service agency is responsible for the proper installation of this kit. The installation is not proper and complete until the operation of the converted appliance is checked as specified in the manufacturer’s instructions supplied with the kit.
Propane Gas Conversion
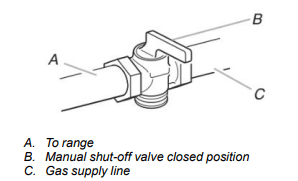
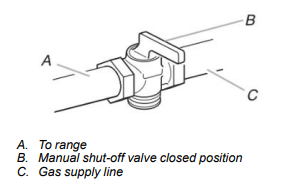
1. Turn manual shutoff valve to the closed position.
2. Unplug range or disconnect power.
To Convert Gas Pressure Regulator (Natural gas to Propane)
1. Remove the premium storage drawer, warming drawer or baking drawer. See the “Remove/Replace Drawer”, “Storage Drawer” or “Warming Drawer or Premium Storage Drawer” section.
2. Locate gas pressure regulator at rear of the drawer compartment. NOTE: On models with a warming drawer or baking drawer, an access cover must be removed to access the gas pressure regulator.
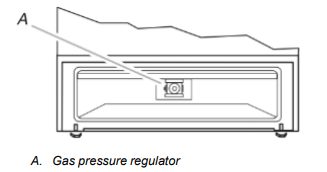
IMPORTANT: Do not remove the gas pressure regulator.
3. Remove plastic cover from gas pressure regulator cap
4. Turn gas pressure regulator cap counterclockwise with a 5/8" (1.6 cm) combination wrench to remove. NOTE: Do not remove the spring beneath the cap.
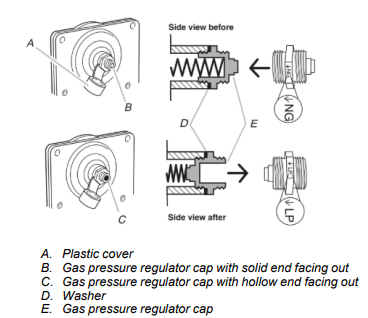
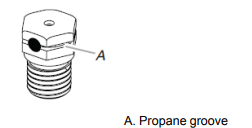
5. Turn over the gas pressure regulator cap and reinstall on regulator so that the hollow end faces out and the marking “↓LP” is facing the direction shown in the above drawing.
6. Replace plastic cover over gas pressure regulator cap
To Convert Surface Burners (Natural Gas to Propane Gas)
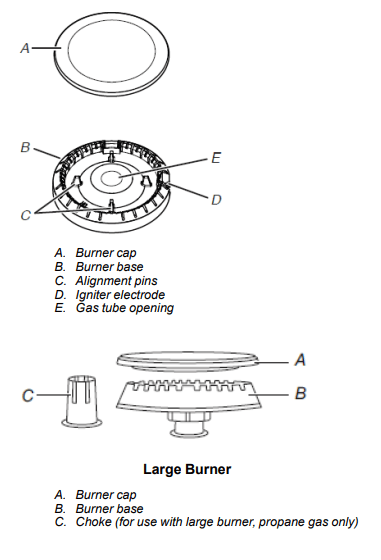
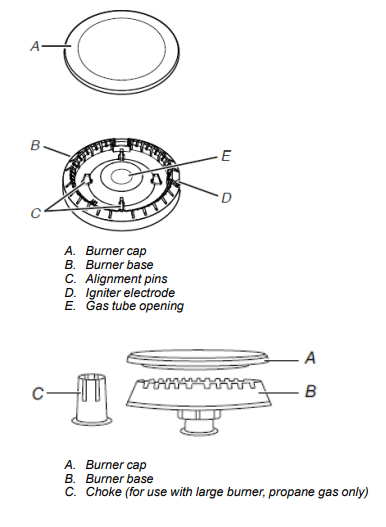
- Remove burner cap.
- Remove the burner base
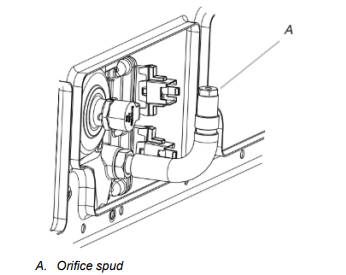
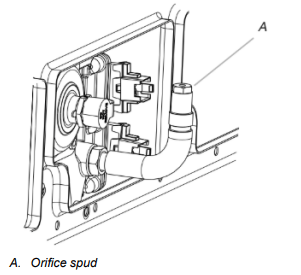
3. Apply masking tape to the end of a 9/32" (7 mm) nut driver to help hold the gas orifice spud in the nut driver while changing it. Press nut driver down onto the gas orifice spud and remove by turning it counterclockwise and lifting out. Set gas orifice spud aside.
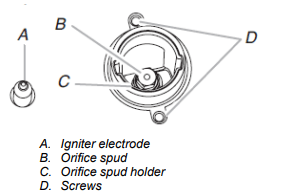
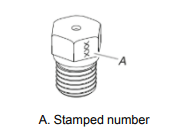
4. Remove the orifice spuds shipped in the literature package in the oven. Gas orifice spuds are stamped with a number and have a groove in the hex area. Replace the Natural gas orifice spud with the correct propane gas orifice spud.
Refer to the following chart for correct Propane gas orifice spud placement.
| Placement |
Burner Rating / Type |
Size (mm) |
ID Number |
| LF |
14,200 BTU |
1.08 |
108AM |
| LR |
8,000 BTU |
0.84 |
084AM |
| RF |
14,200 BTU |
1.08 |
108AM |
| RR |
5,000 BTU |
0.64 |
064AM |
| CTR |
8,000 BTU |
0.84 |
084AM |
NOTE: Refer to the model/serial/rating plate located on the oven frame behind the top left side of the oven door for proper sizing of spuds for each burner location.
5. Place Natural gas orifice spuds in the orifice spud bag. IMPORTANT: Keep the Natural gas orifice spuds in case of reinstallation with Natural gas.
6. Replace the burner base.
7. Replace burner cap.
8. Repeat steps 1-7 for the remaining burners.
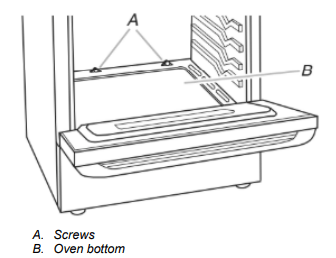
To Convert Oven Bake Burner (Natural Gas to Propane Gas)
1. Remove the oven racks.
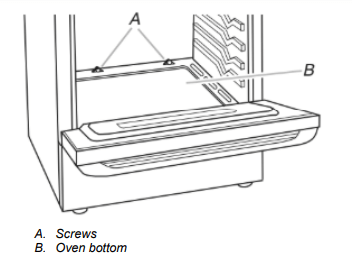
2. Remove 2 screws at the rear of the oven bottom.
3. Lift the rear of the oven bottom up and back until the front of the panel is away from the front frame. Remove from oven and set it aside on a covered surface.
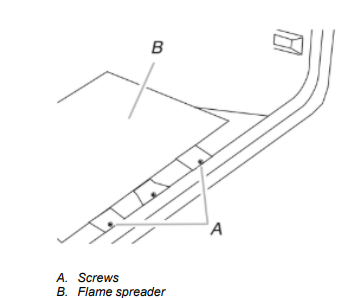
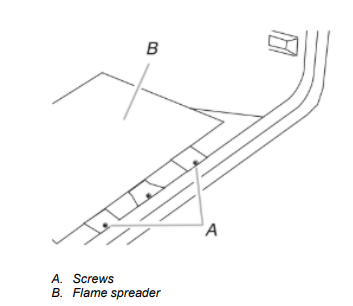
4. Remove 2 screws from the front tabs of the flame spreader. Lift the front of the flame spreader and pull forward to remove tabs from rear of oven and set it aside on a covered surface.
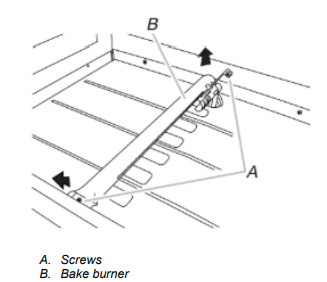
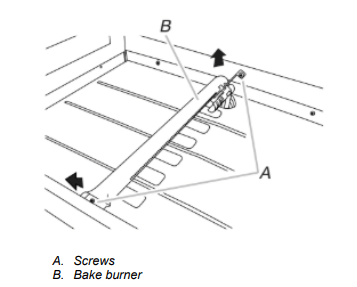
5. Remove 2 screws from the bake burner.
6. Slide the front of the bake burner to the side to remove tab from front of oven. Lift the back of the bake burner off the oven orifice, and set the bake burner aside.
7. Use a 3/8" (1 cm) nut driver or combination wrench and turn the Natural gas bake burner orifice spud counterclockwise to remove. The spud will be stamped with a “49.”
8. Replace the “49” spud with a “57” spud. Install the Propane gas bake burner orifice spud, turning it clockwise until snug. IMPORTANT: Do not overtighten.
9. Position the back of the bake burner over the oven orifice, and slide the tab on front of the bake burner into the front of the oven.
10. Reattach the bake burner with 2 screws.
11. Insert the tabs on the rear of the flame spreader into the rear of the oven.
12. Reattach the front tabs of the flame spreader to the oven with 2 screws.
13. Position the front of the oven bottom panel toward the front frame and lower the rear of the oven bottom panel into the oven.
14. Reattach the oven bottom panel with 2 screws.
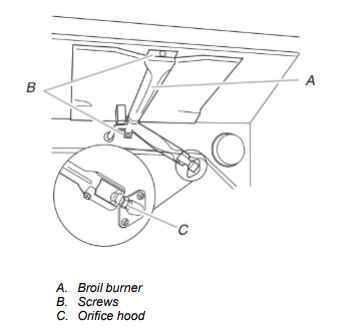
To Convert Oven Broil Burner (Natural Gas to Propane Gas)
1. Remove the screw from the broil burner
2. Remove the flame spreader.
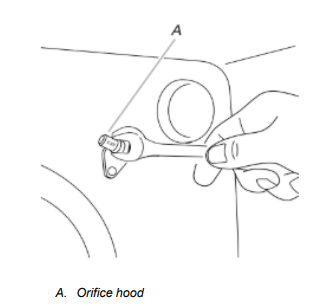
3. Remove the broil burner from the broil burner orifice hood. NOTE: The broil burner will hang in the back of the oven while changing the orifice hood.
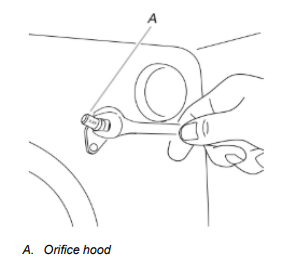
4. Use a 3/8" (1 cm) combination wrench and turn the Natural gas broil burner orifice hood counterclockwise to remove. The hood will be stamped with a “53.”
5. Replace the “53” hood with a “090” hood. Install the Propane gas broiler burner orifice hood, turning it clockwise until snug. IMPORTANT: Do not overtighten
6. Place the broil burner on the broil burner orifice hood and insert the broil burner ceramic igniter in the hole in the rear of the oven.
7. Position the broil burner against the top of the oven and attach it with 2 screws.
8. Replace storage drawer, warming drawer or premium storage drawer. See the “Storage Drawer” or “Warming Drawer or Premium Storage Drawer” section.
9. Replace the oven door if it has been removed. See the “Oven Door” section.
10. Replace the oven racks.
Complete Installation (Natural Gas to Propane Gas)
- Refer to the “Make Gas Connection” section for properly connecting the range to the gas supply.
- Refer to the “Electronic Ignition System” section for proper burner ignition, operation and burner flame adjustments. IMPORTANT: You may have to adjust the “LO” setting for each cooktop burner. Checking for proper cooktop, bake and broil burner flame is very important. The small inner cone should have a very distinct blue flame 1/4" (0.64 cm) to 1/2" (1.3 cm) long. The outer cone is not as distinct as the inner cone. Propane gas flames have a slightly yellow tip.
- Refer to “Complete Installation” in the “Installation Instructions” section of this manual to complete this procedure. NOTE: Make sure to save the orifices that have just been replaced in the conversion.
Natural Gas Conversion
WARNING: Tip Over Hazard A child or adult can tip the range and be killed. Install anti-tip bracket to floor or wall per installation instructions. Slide range back so rear range foot is engaged in the slot of the anti-tip bracket. Re-engage anti-tip bracket if range is moved. Do not operate range without anti-tip bracket installed and engaged. Failure to follow these instructions can result in death or serious burns to children and adults.
1. Turn manual shutoff valve to the closed position.
2. Unplug range or disconnect power.
To Convert Gas Pressure Regulator (Propane Gas to Natural Gas)
1. Remove the premium storage drawer, warming drawer or baking drawer or premium storage drawer. See the Remove/Replace Drawer, Storage Drawer or Warming Drawer or Premium Storage Drawer section.
2. Locate gas pressure regulator at rear of the drawer compartment. NOTE: On models with a warming drawer or baking drawer, an access cover must be removed to access the gas pressure regulator.
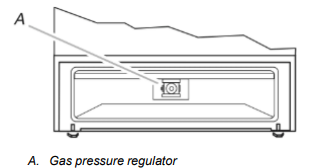
IMPORTANT: Do not remove the gas pressure regulator.
3. Remove plastic cover from gas pressure regulator cap.
4. Turn gas pressure regulator cap counterclockwise with a 5/8" (1.6 cm) combination wrench to remove. NOTE: Do not remove the spring beneath the cap.
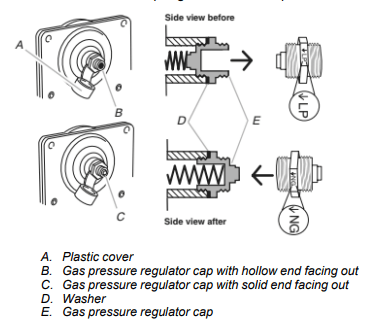
5. Turn over the gas pressure regulator cap and reinstall on regulator so that the solid end faces out and the marking “↓NG” is facing the direction shown in the above drawing.
6. Replace plastic cover over gas pressure regulator cap.
To Convert Surface Burners (Propane Gas to Natural Gas)
1. Remove burner cap.
2. Remove the burner base
3. Apply masking tape to the end of a 9/32" (7 mm) nut driver to help hold the gas orifice spud in the nut driver while changing it. Press nut driver down onto the gas orifice spud and remove by turning it counterclockwise and lifting out. Set gas orifice spud aside.
4. Gas orifice spuds are stamped with a number on the side. Replace the propane gas orifice spud with the correct Natural gas orifice spud.
Refer to the following chart for the correct Natural gas orifice spud placement.
Natural Gas Orifice Spud Chart
| Burner Rating |
Size (mm) |
ID Number |
| 18,000 BTU |
2.00 |
200AM |
| 17,000 BTU |
1.96 |
196AM |
| 15,000 BTU |
1.80 |
180AM |
| 9,500 BTU |
1.40 |
140AM |
| 8,000 BTU |
1.30 |
130AM |
| 5,000 BTU |
1.00 |
100AM |
NOTE: Refer to the model/serial/rating plate located on the oven frame behind the top right-hand side of the oven door for proper sizing of spuds for each burner location.
5. Place propane gas orifice spuds in the orifice spud bag. IMPORTANT: Keep the propane gas orifice spuds in case of reinstallation with propane gas.
6. Replace the burner base using both screws.
7. Replace burner cap.
8. Repeat steps 1 through 7 for the remaining burners.
To Convert Oven Bake Burner (Propane Gas to Natural Gas)
1. Remove the oven racks.
2. Remove 2 screws at the rear of the oven bottom
3. Lift the rear of the oven bottom up and back until the front of the panel is away from the front frame. Remove from oven and set it aside on a covered surface.
4. Remove 2 screws from the front tabs of the flame spreader. Lift front of the flame spreader and pull forward to remove tabs from rear of oven and set it aside on a covered surface.
5. Remove 2 screws from the bake burner.
6. Slide the front of the bake burner to the side to remove tab from front of oven. Lift the back of the bake burner off the oven orifice, and set the bake burner aside.
7. Use a 3/8" (1 cm) nut driver or combination wrench and turn the Propane gas bake burner orifice spud counterclockwise to remove. The spud will be stamped with a “57.”
8. Replace the “57” spud with a “49” spud. Install the Natural gas bake burner orifice spud, turning it clockwise until snug. IMPORTANT: Do not overtighten.
9. Position the back of the bake burner over the oven orifice, and slide the tab on front of the bake burner into the front of the oven
10. Reattach the bake burner with 2 screws.
11. Insert the tabs on the rear of the flame spreader into the rear of the oven.
12. Reattach the front tabs of the flame spreader to the oven with 2 screws.
13. Position the front of the oven bottom panel toward the front frame and lower the rear of the oven bottom panel into the oven.
14. Reattach the oven bottom panel with 2 screws.
To Convert Oven Broil Burner (Propane Gas to Natural Gas)
1. Remove the screw from the broil burner
2. Remove the broil burner from the broil burner orifice hood. NOTE: The broil burner will hang in the back of the oven while changing the orifice hood.
3. Using a 3/8" (9.5 mm) combination wrench, turn the Propane gas broil burner orifice hood counterclockwise to remove. The hood will be stamped with a “090.
4. Replace the “090” hood with a “53” hood. Install the Natural gas broiler burner orifice hood, turning it clockwise until snug. IMPORTANT: Do not overtighten.
5. Place the broil burner on the broil burner orifice hood and insert the broil burner ceramic igniter in the hole in the rear of the oven.
6. Position the broil burner against the top of the oven and attach it with 2 screws.
7. Replace storage drawer or warming drawer. See the “Storage Drawer” or “Warming Drawer or Premium Storage Drawer” section.
8. Replace the oven door. See the “Oven Door” section.
9. Replace the oven racks.
Complete Installation (Propane Gas to Natural Gas)
- Refer to the “Make Gas Connection” section for properly connecting the range to the gas supply.
- Refer to the “Electronic Ignition System” section for proper burner ignition, operation and burner flame adjustments. IMPORTANT: You may have to adjust the “LO” setting for each cooktop burner. Checking for proper cooktop, bake and broil burner flame is very important. Natural gas flames do not have yellow tips.
- Refer to “Complete Installation” in the “Installation Instructions” section of this manual to complete this procedure. NOTE: Make sure to save the orifices that have just been replaced in the conversion.
Moving the Range
When moving range, slide range onto cardboard or hardboard to avoid damaging the floor covering.
If removing the range is necessary for cleaning or maintenance:
For power supply cord-connected ranges:
- Slide range forward.
- Turn manual shutoff valve to the closed position.
- Unplug the power supply cord.
- Disconnect the gas supply tubing.
- Complete cleaning or maintenance.
- Reconnect the gas supply tubing.
- Open the manual shutoff valve in the gas supply line.
- Plug in power supply cord.
- Slide range back so rear range foot is under anti-tip bracket.
- Refer to the “Verify Anti-Tip Bracket Is Installed and Engaged” section to verify engagement.
- Check that range is level.