Loading ...
Loading ...
Loading ...
EN
FR
ES
1514
PROGRAMS MENU
TIME SET
(min)
TEMPERATURE (°C) LID POSITION
cooking with
pressure
Default
Range
Default
Range
Lid closed +
locked
Lid closed +
not locked
Lid raised
Browning 10 1-60 160 100-160
•
Reheat 4 1-60 104 not applicable
••
Simmer
veg 15 1-35 108 not applicable
•
•
fish 15 1-35 104 not applicable
•
meat/
bean
15 5-35 112 not applicable
•
Pressure
cooking
high 30 5-40 112 not applicable
•
•
medium
30 5-40 108 not applicable
•
low 30 5-40 104 not applicable
•
Baby food 30 5-70 112 not applicable
••
Baking 40 5-60 150 not applicable
•
Slow cooking 2h
2h-
9h
85 not applicable
•
PROGRAMS MENU
TIME SET (min) LID POSITION
Default
Range
closed + locked not locked / raised
DIY Chef
1
10 1-60
70°C 70°C
2 80°C 80°C
3 90°C 90°C
4
LOW*(104°C)
100°C
5
MEDIUM*(108°C)
110°C
6
HIGH*(112°C)
120°C
Rice, Oatmeal (Porridge), Baby Food, Baking, Slow cooking,
Reheat functions
• Press the corresponding key of the desired function, the screen displays the default cooking time.
• Then press
and set the desired time by pressing or keys.
• Then press . The appliance enters into cooking preheat and the screen displays a
rotating red circle « ».
• When the temperature for cooking is reached, the appliance switches automatically to
counting down signifying the cooking phase has started.
• At the end of the count down the appliance will beep to announce the end of cooking.
Note : Refer to the table on pages 13 and 14 for the lid position for each function.
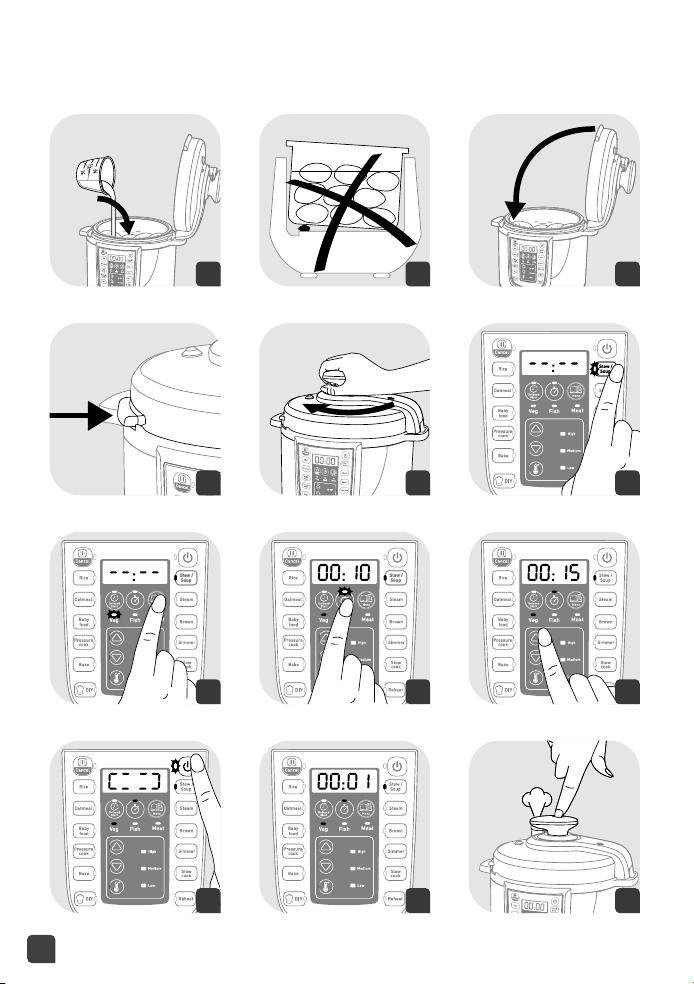
Stew/Soup, Steam, Simmer functions
• Press the corresponding key of the desired function, the screen displays the default cooking
time, the indicator for the type of food lights up as the default and the corres-
ponding pressure level indicator lights comes on too.
• If needed you can change the time and type of food.
• To change cooking time, press
and set the desired time by pressing or keys.
• To change the type of food, press Menu key several times until the indicator of the desired
type of food lights up. The specified food will have a red light indicator light underneath.
• Then press
. The appliance enters into cooking preheat and the screen displays « ».
• When the temperature for cooking is reached, the appliance switches automatically to
cooking phase, and the time previously set starts counting down.
• At the end of the count down the appliance will beep to announce the end of cooking.
• The appliance enters into keep warm mode (see Keep Warm chapter).
Note : refer to the table on pages 13 and 14 for the lid position for each function.
Browning function
• You can add oil first and then the ingredients, or add oil and ingredients at the same time.
• Press the Browning key, the screen displays the default temperature.
• If needed you can change the temperature by pressing or keys.
• Then if you want to change the browning time press and set the desired time by
pressing or keys.
• You are able to change the temperature by pressing the temperature key (
) and
or key.
• Then press . The appliance enters into cooking preheat and the screen displays « ».
• When the temperature for cooking is reached, the appliance switches automatically to
cooking phase, and the time previously set starts counting down.
• At the end of the count down the appliance will beep to announce the end of cooking.
Note :
* The lid must remain open during browning.
* To avoid the oil overheating do not use the browning function for more than 30 minutes.
COOKING PROGRAM INSTRUCTIONS
*Cooking with pressure
Loading ...
Loading ...
Loading ...