User Guide for Garage Door Opener
Connect With Your Smartphone
You will need:
• Wi-Fi® enabled smartphone, tablet or laptop
• Broadband Internet Connection
• Wi-Fi® signal in the garage (2.4 GHz, 802.11b/g/n required)
• Password for your home network (router's main account, not guest network)
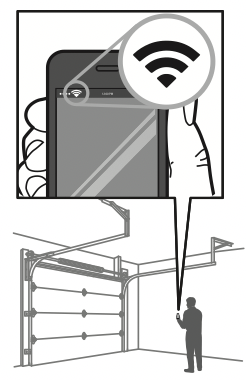
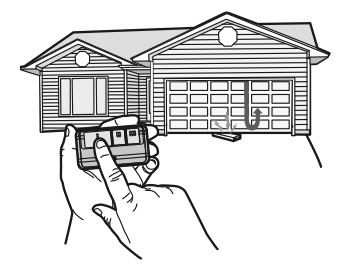
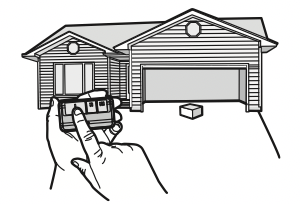
Test the Wi-Fi ® Signal Strength
Make sure your mobile device is connected to your Wi-Fi® network. Hold your mobile device in the place where your garage door opener is installed and check the Wi-Fi signal strength.
Check Signal Strength. If you see:
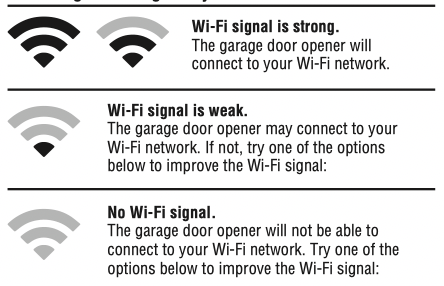
• Move your router closer to the garage door opener to minimize interference from walls and other objects
• Buy a Wi-Fi range extender
Download the myQ ® App to Set Up an Account and Connect
Open and close your door, get alerts and set schedules from anywhere. Connected smart garage door openers also receive software updates to ensure the opener has the latest operational features.
The garage door opener must run through a complete cycle before it will activate Wi-Fi® programming.
1. Download the myQ® App.
2. Set up an account and connect.
If you already have the myQ® App installed:
1. Check that your mobile device has the latest software.
2. Download the latest version of the myQ ® App.

Wi-Fi Status
| LED |
Definition |
| Blue |
Off - Wi-Fi® is not turned on.
Blinking - Garage door opener is in Wi-Fi® learn mode.
Solid - Mobile device connected to the garage door opener.
|
| Blue and Green |
Blinking - Attempting to connect to router. |
| Green |
Blinking - Attempting to connect to the Internet server.
Solid - Wi-Fi® has been set up and garage door opener is connected to the Internet.
|

Google Play and the Google Play logo are trademarks of Google LLC.
App Store and the Apple and App Store logos are trademarks of Apple Inc.
Programming
Remote Control
Below are the steps to program a new or existing remote control. Test remote control before reprogramming.
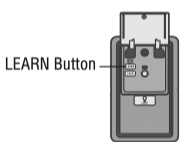
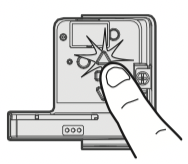
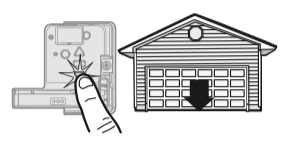
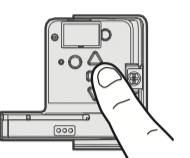
1. Press and release the LEARN Button on the garage door opener.
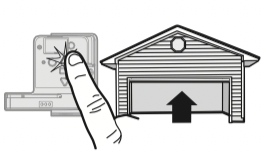
2. Press and hold the button on the remote control that you wish to use. Release the button when the garage door opener lights blink or two clicks are heard.
Note: Remote may vary.
OR
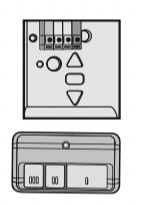
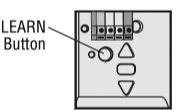
For Multi-Function Control Panel
1. Press the LEARN button on the door control to enter Programming Mode.
2. Press the LEARN button again, the LED will flash once.
3. Press the button on the remote control that you wish to operate your garage door.
OR
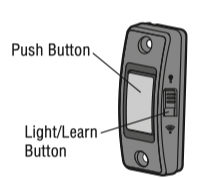
For Push Button Door Control
1. Press and hold the Light button and the Push button until the Push button LED begins to blink.
2. Press the button on the remote control that you wish to operate your garage door.
If your vehicle is equipped with a Homelink® , you may require an external adapter depending on the make, model, and year of your vehicle.
Wireless Keyless Entry
Refer to the instructions provided with your keyless entry OR go to Chamberlain.com to download instructions.
To Erase the Memory
Erase ALL Remote Controls and Keyless Entries
Press and hold the LEARN button until the LED goes out (approximately 6 seconds).
All remote controls and keyless entries are now erased.
Erase ALL Devices (Including myQ® enabled accessories)
1. Press and hold the LEARN button until the LED goes out (approximately 6 seconds).
2. Immediately press and hold the LEARN button until the LED goes out. All codes are now erased.
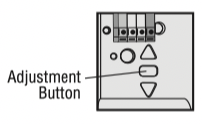
Erase the Wi-Fi Network from the Garage Door Opener
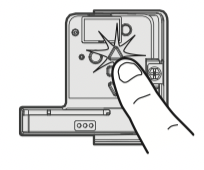
Press and hold the adjustment button until 3 beeps are heard (approximately 6 seconds).
Operation
WARNING
To prevent possible SERIOUS INJURY or DEATH from a falling garage door:
• If possible, use emergency release handle to disengage trolley ONLY when garage door is CLOSED. Weak or broken springs or unbalanced door could result in an open door falling rapidly and/or unexpectedly.
• NEVER use emergency release handle unless garage doorway is clear of persons and obstructions.
• NEVER use handle to pull door open or closed. If rope knot becomes untied, you could fall.
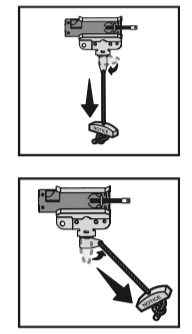
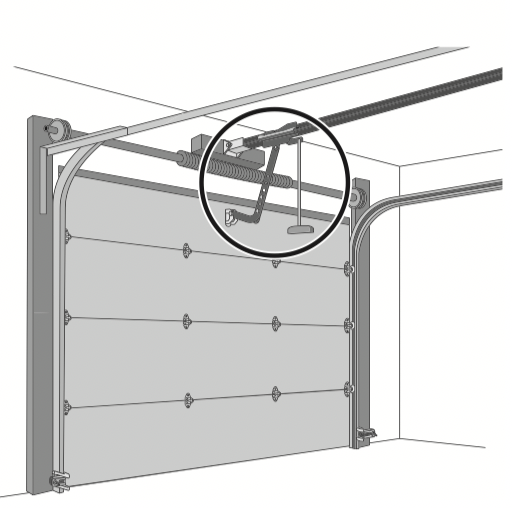
To Open the Door Manually
NOTE: Disengage any door locks before proceeding.
1. The door should be fully closed if possible.
2. Pull down on the emergency release handle.
Lockout Feature
1. Pull the emergency release handle down and back. The door can then be raised and lowered manually as often as necessary.
2. To disengage the lockout feature, pull the handle straight down.
The trolley will reconnect on the next time the opener is activated.
Use an A19 incandescent (100W maximum) or compact fluorescent 26W (100W equivalent) light bulb. DO NOT USE halogen, short neck, or specialty light bulbs. DO NOT USE LED bulbs.
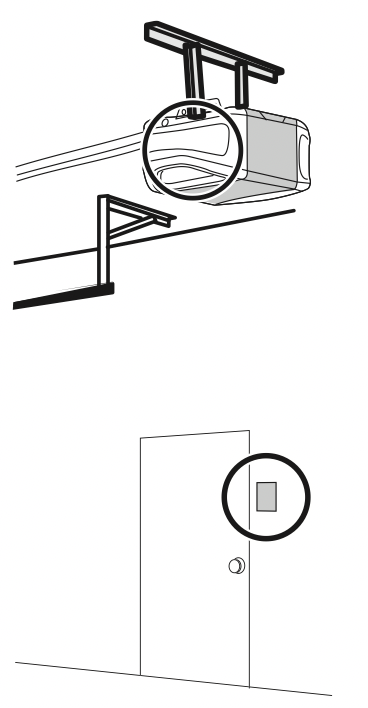
Door Control
Multi-Function Control Panel
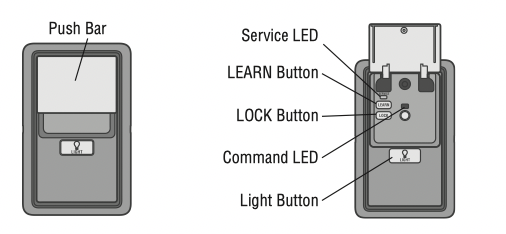
OR
Push Button Door Control
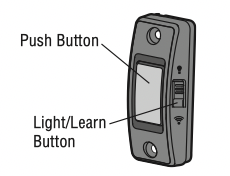
• The garage door opener must run through a complete cycle before it will activate Wi-Fi ® programming.
The Protector System ® (Safety Reversing Sensors)
WARNING
Be sure power is NOT connected to the garage door opener BEFORE installing the safety reversing sensor.
To prevent SERIOUS INJURY or DEATH from closing garage door:
• Correctly connect and align the safety reversing sensor. This required safety device MUST NOT be disabled.
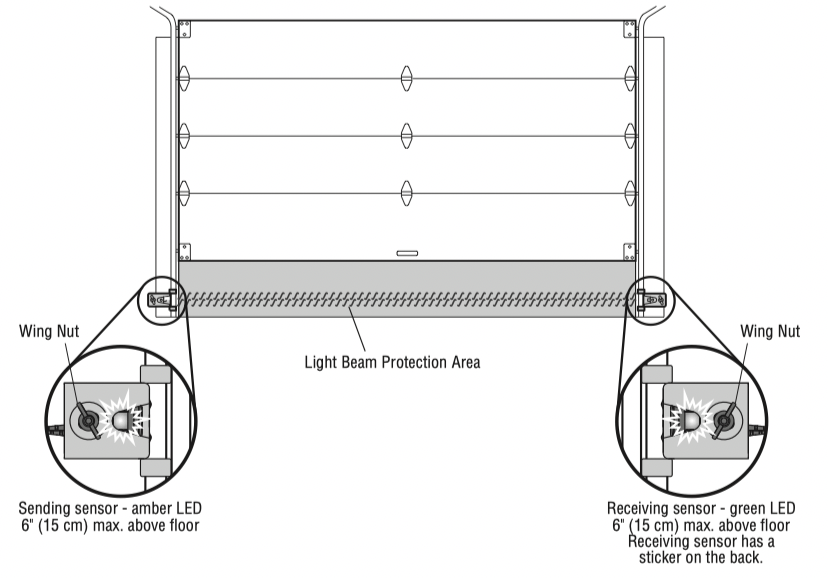
• Install the safety reversing sensor so beam is NO HIGHER than 6" (15 cm) above garage floor.
The door will not close if the sensors have not been installed and aligned correctly.
When the light beam is obstructed or misaligned while the door is closing, the door will reverse. If the door is already open, it will not close.
The sensors can be aligned by loosening the wing nuts, aligning the sensors, and tightening the wing nuts. Check to make sure the LEDs in both sensors are glowing steadily. The LEDs in both sensors will glow steadily if they are aligned and wired correctly.
If either of the sensor LEDs are off, there is no power to the sensor:
1. Check that you have power to the garage door opener.
2. Check the sensor wire is not shorted or broken.
3. Check that the sensors are wired correctly; white wires to white terminal and white/black wires to grey terminal.
If the green receiving sensor LED is blinking, the sensors are obstructed or misaligned:
1. Check for obstructions in the sensor light beam.
2. Align the sensors.
3. If the receiving sensor (green LED) faces direct sunlight, switch the sensors to opposite sides of the door to assure proper operation.
Adjustment
Introduction
WARNING : Without a properly installed safety reversal system, persons (particularly small children) could be SERIOUSLY INJURED or KILLED by a closing garage door.
• Incorrect adjustment of garage door travel limits will interfere with proper operation of safety reversal system.
• After ANY adjustments are made, the safety reversal system MUST be tested. Door MUST reverse on contact with 1-1/2" (3.8 cm) high object (or 2x4 laid flat) on floor.
CAUTION : To prevent damage to vehicles, be sure fully open door provides adequate clearance.
Your garage door opener is designed with electronic controls to make setup and adjustments easy. The adjustments allow you to program where the door will stop in the open (UP) and close (DOWN) position. The electronic controls sense the amount of force required to open and close the door. The force is adjusted automatically when you program the travel.
NOTE: If anything interferes with the door’s upward travel it will stop. If anything interferes with the door’s downward travel, it will reverse.
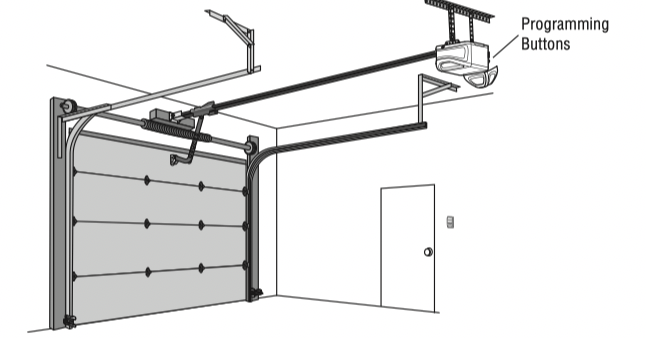
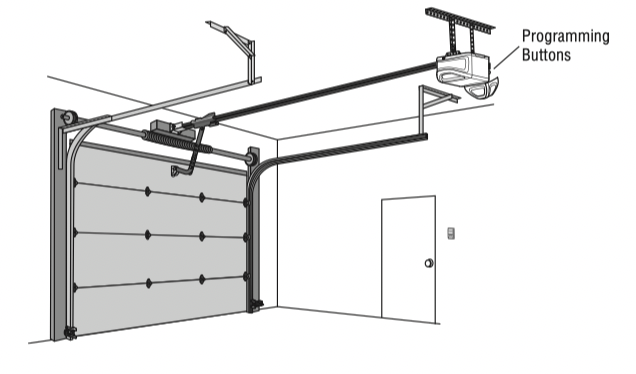
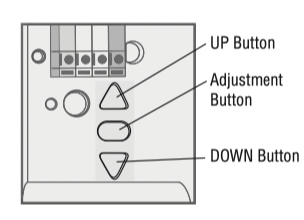
Programming Buttons
The programming buttons are located on the back panel of the garage door opener and are used to program the travel. While programming, the UP and DOWN buttons can be used to move the door as needed.
1 - Program the Travel
WARNING : Without a properly installed safety reversal system, persons (particularly small children) could be SERIOUSLY INJURED or KILLED by a closing garage door.
• Incorrect adjustment of garage door travel limits will interfere with proper operation of safety reversal system.
• After ANY adjustments are made, the safety reversal system MUST be tested. Door MUST reverse on contact with 1-1/2" (3.8 cm) high object (or 2x4 laid flat) on floor.
Note: While programming the travel, the UP and DOWN buttons can be used to move the door as needed. During the Automatic Force Setup, the door will automatically open and close.
1. Press and hold the Adjustment Button until the UP Button begins to flash and/or a beep is heard. The Safety Reversing Sensors will be disconnected during the Program the Travel process.
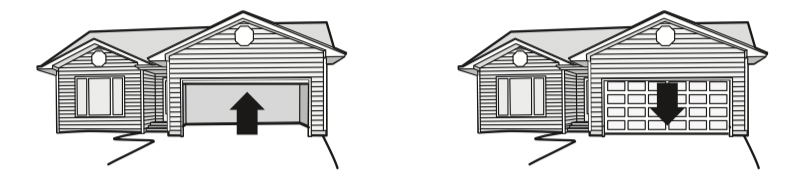
2. Press and hold the UP Button until the door is in the desired UP position.
3. Once the door is in the desired UP position press and release the Adjustment Button. The garage door opener lights will flash twice and the DOWN Button will begin to flash.
4. Press and hold the DOWN button until the door is in the desired DOWN position.
5. Once the door is in the desired DOWN position press and release the Adjustment Button. The garage door opener lights will flash twice. Program the Travel is now complete. If the garage door opener lights flash 5 times, then programming has timed out and the Travel Limits have not been set. Please restart the Program the Travel process.
2 - Automatic the up and down
Once both the up and down positions have been manually set, the Safety Reversing Sensors will reconnect and become operational. Then, the opener will enter a force-sensing operation by automatically moving the door open and close. The garage door opener will sound an audible and visual alert before automatically opening and closing the door. The garage door opener will beep three times, confirming that the Automatic Force Setup completed successfully. Adjustment is complete.
If you hear one long beep after the door attempts to move, then the Automatic Force Set Up has not completed successfully. Please start over at step 1 of Program the Travel.
3 - Test the Safety Reversal System
WARNING : Without a properly installed safety reversal system, persons (particularly small children) could be SERIOUSLY INJURED or KILLED by a closing garage door.
• Safety reversal system MUST be tested every month.
• After ANY adjustments are made, the safety reversal system MUST be tested. Door MUST reverse on contact with 1-1/2" (3.8 cm) high object (or 2x4 laid flat) on the floor.
1. With the door fully open, place a 1-1/2 inch (3.8 cm) board (or a 2x4 laid flat) on the floor, centered under the garage door.
2. Press the remote control push button to close the door. The door MUST reverse when it makes contact with the board.
If the door stops but does not reverse:
1. Repeat Program the Travel (see Adjustment Step 1);
2. Repeat the Safety Reversal test.
If the test continues to fail, call a trained door systems technician.
4 - Test the Protector System®
WARNING : Without a properly installed safety reversing sensor, persons (particularly small children) could be SERIOUSLY INJURED or KILLED by a closing garage door.
1. Open the door. Place an obstruction in the path of the door.
2. Press the remote control push button to close the door. The door will not move more than an inch (2.5 cm).
The garage door opener will not close from a remote control if the LED in either safety reversing sensor is off (alerting you to the fact that the sensor is misaligned or obstructed).
If the garage door opener closes the door when the safety reversing sensor is obstructed (and the sensors are no more than 6 inches [15 cm] above the floor), call for a trained door systems technician.
Maintenance
Every Month
• Manually operate door. If it is unbalanced or binding, call a trained door systems technician.
• Check to be sure door opens and closes fully. Adjust if necessary, page 12.
• Test the safety reversal system. Adjust if necessary, page 13.
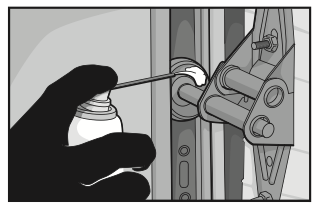
Every Year
• Oil door rollers, bearings and hinges. The garage door opener does not require additional lubrication. Do not grease the door tracks.
• (If applicable) Test the battery backup and consider replacing the battery to ensure the garage door opener will operate during an electrical power outage.
1. Unplug the garage door opener from AC power. The battery status LED will glow solid orange (opener is operating on battery power) or will flash (low battery power).
2. Open and close the door using the remote control or door control.
3. In battery backup mode, the Automatic Garage Door Lock will unlock when the garage door is opened, and will remain disabled until power is restored.
4. Plug in the garage door opener. Verify the battery status LED is flashing green (battery is charging).
Every Two to Three Years
• Use a rag to wipe away the existing grease from the garage door opener rail. Reapply a small layer of white lithium grease to the top and underside of the rail surface where the trolley slides.
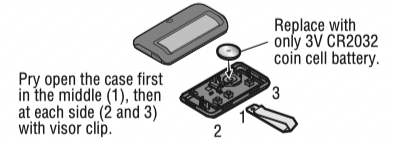
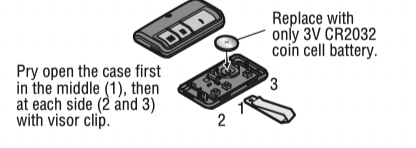
The Remote Control Battery
WARNING
To prevent possible SERIOUS INJURY or DEATH:
• NEVER allow small children near batteries.
• If battery is swallowed, immediately notify doctor.
To reduce risk of fire, explosion or chemical burn:
• Replace ONLY with 3V CR2032 coin batteries.
• DO NOT recharge, disassemble, heat above 212°F (100°C) or incinerate.
1 button
3-Button
Troubleshooting
Below are basic troubleshooting tips, for additional help and support videos visit support.chamberlain.com or contact your installing dealer.
My garage door opener will not close:
Check to make sure the LEDs in both sensors are glowing steadily. The LEDs in both sensors will glow steadily if they are aligned and wired correctly. See page 10.
My vehicle’s Homelink® is not programming to my garage door opener:
Depending on the make, model, and year of your vehicle an external adapter may be required. Visit homelink for additional information.
My garage door opener beeps:
The garage door opener can beep for several reasons:
• The opener senses an obstruction while traveling.
• Garage door opener has been activated through a device or feature such as Timer-to-Close, garage door monitor or Internet Gateway.
My neighbor’s remote control opens my garage door:
Erase the memory from your garage door opener and reprogram the remote control(s).
The garage door moves 6-8" , stops or reverses:
• Manually open and close the garage door. Garage door may be binding or there may be an obstruction. If the door is binding, call a trained door systems technician.
• Possible travel module failure.
My remote control will not activate the garage door:
Verify the lock feature is not activated on the door control or reprogram the remote control.
The wall-mounted door control will not function:
The wires for the door control are shorted or the door control is faulty.
Garage door opener hums for 1-2 seconds with no movement and 5 flashes and 5 beeps occur:
Manually open and close the garage door. Garage door may be binding or there may be an obstruction. If the door is binding, call a trained door systems technician.
Cannot connect garage door opener to home Wi-Fi network:
Ensure the myQ® Serial number was entered correctly and try again. The myQ® characters are between A-F and 0-9 only.
Automatic Garage Door Opener Safety & Maintenance Guide
Garage Door Opener Safety – An Automatic Decision
A garage door is the largest moving object in the home. An improperly adjusted garage door and opener can exert deadly force when the door closes – which could lead to entrapment of children or adults and subsequent injury or death.
Proper installation, operation, maintenance, and testing of the garage door and automatic opener are necessary to provide a safe, trouble-free system. Careless operation or allowing children to play with or use garage door opener controls are also dangerous situations that can lead to tragic results. A few simple precautions can protect your family and friends from potential harm. Please review the safety and maintenance tips in this guide carefully and keep it for reference. Check the operation of your garage door and opener to ensure they function in a safe and trouble-free manner. Be sure to read all Important Safety Information found in your garage door opener’s manual as it provides more details and safety considerations than can be supplied with this guide.
Garage Door Openers are Not Toys
Discuss garage door and opener safety with your children. Explain the danger of being trapped under the door.
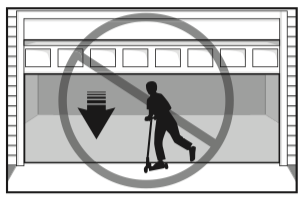
Stay away from a moving door.
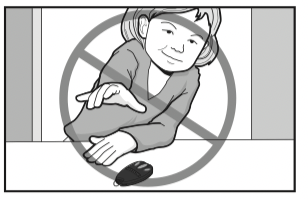
Keep transmitters and remote controls out of reach of children. Do not let children play with or use transmitters or other remote control devices.
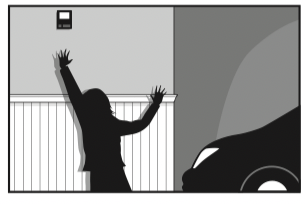
The wall-mounted push button should be out of reach of children, at least 5 feet from the nearest standing surface and away from all moving parts. Mount and use the button where you can clearly see the closing garage door.

Keep the door in sight until it completely closes when using the wall-mounted push button or transmitter.
Routine Maintenance Can Prevent Tragedies
Make monthly inspection and testing of your garage door and opener system a part of your regular routine. Review your owner’s manual for both the door and door opener. If you don’t have the owner’s manuals, contact the manufacturer(s) and request a copy for your specific model(s). Look for the opener model number on the back of the power unit.
WARNING – Springs are under high tension. Only qualified individuals should adjust them.
Visually check the door and installation:
• Starting with the door in the closed position, use the manual disconnect on the opener to disconnect the door.
• Look for signs of wear or damage on hinges, rollers, springs, and door panels.
• These parts may require periodic lubrication. Check the owner’s manual for suggested maintenance.
• If any signs of damage are evident, contact a trained door systems technician for assistance.
• Verify the photoeye height is no higher than 6" from the garage floor.
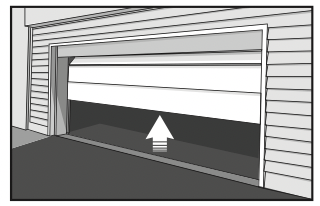
Test the door for proper operation:
• Open and close the door manually using handles or suitable gripping points.
• The door should move freely and without difficulty.
• The door should balance and stay partially open 3–4 feet above the floor.
• If you detect any signs of improper operation, contact a trained door systems technician for assistance.
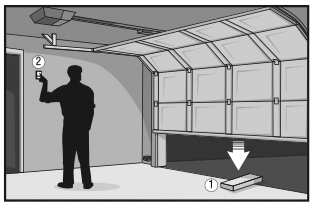
Test the opener safety features:
• Reconnect the opener to the door using the manual disconnect and open the door.
• Place a 2x4 board flat in the path of the door (1) and try to close it (2). The door should stop when it comes in contact with the 2x4 and then reverse direction.
• Block the photoelectric sensor by waving an object in front of the sensor and attempt to close the door. The door should not close unless the wall-mounted push button is manually held during operation.
• If the opener does not perform as described, contact a trained door systems technician for assistance.