HOT SPOT CRYSTAL
SPOTLESS SMART
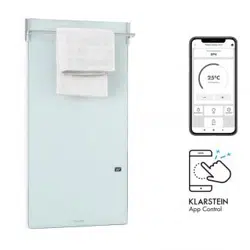
Infrarot-Heizung
Infrared Heater
Radiador infrarrojo
Radiateur Infrarouge
Radiatore a infrarossi
Infrarood verwarming
Hinweis: Dieses Produkt ist nur für gut isolierte Räume
oder für den gelegentlichen Gebrauch geeignet.
Note: This product is only suitable for well insulated
spaces or occasional use.
Nota: Este producto está indicado únicamente en
lugares abrigados o para una utilización punctual.
Remarque : Ce produit ne peut être utilisé que dans
des locaux bien isolés ou de manière occasionnelle.
Advertencia: Questo prodotto è adatto solo per spazi
ben isolati o uso occasionale.
Opmerking: Dit product is alleen geschikt voor goed
geïsoleerde ruimten of voor incidenteel gebruik.
www.klarstein.com
10035064 10035065


3
DE
Sehr geehrter Kunde,
wir gratulieren Ihnen zum Erwerb Ihres Gerätes. Lesen Sie
die folgenden Hinweise sorgfältig durch und befolgen Sie
diese, um möglichen Schäden vorzubeugen. Für Schäden,
die durch Missachtung der Hinweise und unsachgemäßen
Gebrauch entstehen, übernehmen wir keine Haftung. Scannen
Sie den folgenden QR-Code, um Zugriff auf die aktuellste
Bedienungsanleitung und weitere Informationen rund um das
Produkt zu erhalten.
INHALTSVERZEICHNIS
Sicherheitshinweise4
Produkdatenblatt5
Installation6
Anzeigen und Funktionstasten8
Inbetriebnahme und Bedienung9
Gerätesteuerung per Smartphone11
Reinigung und Pege12
Hinweise zur Entsorgung13
Konformitätserklärung13
TECHNISCHE DATEN
Artikelnummer 10035064, 10035065
Spannung 220 – 240 V
Frequenz 50/ 60 Hz
Leistung 750 W
English 15
Español 27
Français 39
Italiano 51
Nederlands 63

4
DE
SICHERHEITSHINWEISE
• Prüfen Sie vor der Benutzung die Spannung auf der Geräteplakette und schließen
Sie das Gerät nur an Steckdosen an, die der Spannung des Geräts entsprechen.
• Falls das Netzkabel beschädigt ist, lassen Sie es von einer ausgebildeten Fachkraft ersetzen.
• Stellen Sie den Kamin nicht direkt unter der Steckdose auf.
• Halten Sie einen Meter Abstand zu brennbaren Materialien wie Möbeln,
Vorhängen oder Ähnlichem.
• Lassen Sie das Gerät während der Benutzung nicht unbeaufsichtigt.
• Lassen Sie das Gerät nicht unbeaufsichtigt, während es an die Steckdose
angeschlossen ist.
• Benutzen Sie das Gerät außerhalb der Reichweite von Kindern. Kinder dürfen das
Gerät nur unter Aufsicht bedienen.
• Das Gerät ist nicht für den kommerziellen Gebrauch, sondern nur für Gebrauch im
Haushalt und in ähnlichen Umgebungen vorgesehen.
• Benutzen Sie das Gerät nicht wenn es Fehlfunktionen aufweist oder in irgendeiner
Form beschädigt wurde.
• Reparaturen dürfen nur von ausgebildeten Fachkräften durchgeführt werden.
• Falsch oder eigenständig ausgeführte Reparaturen stellen ein Verletzungsrisiko dar.
• Verlegen Sie das Netzkabel nicht unter Teppichen oder Läufern.
• Achten Sie darauf, dass das Netzkabel nicht über scharfe Kanten oder heiße
Ober ächen verläuft.
• Decken Sie den Kamin nicht ab, um Überhitzen zu vermieden.
• Benutzen Sie das Gerät nicht mit einem externen Timer, einer ferngesteuerten Steckdose
oder einem anderen Gerät, das den Kamin automatisch ein- und ausschaltet.
• Tauchen Sie das Gerät nicht in Wasser oder andere Flüssigkeiten.
• Benutzen Sie das Gerät nicht in der Nähe von Badewannen, Duschen oder
Swimmingpools.
• Benutzen Sie das Gerät nicht im Freien.
• Benutzen Sie das Gerät nicht mit nassen Händen.
• Benutzen Sie das Gerät nicht auf oder in der Nähe heißer Ober ächen.
• Benutzen Sie das Gerät nicht mit beschädigtem Netzkabel.
• Ziehen Sie vor der Reinigung den Stecker aus der Steckdose und lassen Sie das
Gerät vollständig abkühlen.
• Benutzen Sie zur Reinigung keine Scheuermittel.
• Verwenden Sie nur Zubehör, das vom Hersteller ausdrücklich dafür zugelassen ist.
• Kinder, physisch und körperlich eingeschränkte Menschen sollten das Gerät nur
benutzen, wenn sie vorher von einer Aufsichtsperson ausführlich mit den Funktionen
und den Sicherheitsvorkehrungen vertraut gemacht wurden.
• Achten Sie darauf, dass Kinder nicht mit dem Gerät spielen.
VORSICHT
Verbrennungsgefahr! Einige Geräteteile können sehr heiß werden.
Achten Sie darauf, dass Sie oder Ihre Kinder sich nicht daran
verbrennen.

PRODUKDATENBLATT
Modellkennung(en) 10035064
Angabe Symbol Wert Einheit Angabe Einheit
Wärmeleistung Nur bei elektrischen Speicher-Einzelraumheizgeräten:
Art der Regelung der Wärmezufuhr
Nennwärmeleistung P
nom
0,8
kW Manuelle Regelung der Wärmezufuhr mit
integriertem Thermostat
k.A.
Mindestwärmeleistung
(Richtwert)
P
min
k.A.
kW Manuelle Regelung der Wärmezufuhr
mit Rückmeldung der Raum- und/oder
Außentemperatur
k.A.
Maximale kontinuierliche
Wärmeleistung
P
max,c
0,8
kW Elektronische Regelung der Wärmezufuhr
mit Rückmeldung der Raum- und/oder
Außentemperatur
k.A.
Hilfsstromverbrauch
Wärmeabgabe mit Gebläseunterstützung k.A.
Bei Nennwärmeleistung
(Ventilator-Motor)
el
max
k.A. kW
Art der Wärmeleistung/Raumtemperaturkontrolle
Bei Mindestwärmeleistung
(Ventilator-Motor)
el
min
k.A. kW Einstuge Wärmeleistung, keine
Raumtemperaturkontrolle
nein
Im Bereitschaftszustand el
SB
0,90
kW Zwei oder mehr manuell einstellbare Stufen,
keine Raumtemperaturkontrolle
nein
Raumtemperaturkontrolle mit mechanischem
Thermostat
nein
Mit elektronischer Raumtemperaturkontrolle nein
Mit elektronischer Raumtemperaturkontrolle und
Tageszeitregelung
nein
Mit elektronischer Raumtemperaturkontrolle und
Wochentagsregelung
ja
Sonstige Regelungsoptionen
Raumtemperaturkontrolle mit Präsenzerkennung nein
Raumtemperaturkontrolle mit Erkennung offener
Fenster
nein
Mit Fernbedienungsoption ja
Mit adaptiver Regelung des Heizbeginns nein
Mit Betriebszeitbegrenzung ja
Mit Schwarzkugelsensor nein
Kontaktangaben Chal-Tec GmbH, Wallstraße 16, 10179, Berlin, Deutschland

6
DE
INSTALLATION
Installationsanleitung
Wenn Sie über ein Werkzeug verfügen, können sie das Gerät gemäß der in der
Bedienungsanleitung beschriebenen Vorgehensweise installieren. Es besteht ebenfalls
die Möglichkeit, den Verkäufer, seinen Kundendienst oder eine in ähnlicher Weise
qualizierte Elektroinstallationsrma mit der Installation des Geräts zu beauftragen.
Schritt 1
Verwenden Sie vor der Installation des Geräts, wie in der Abbildung unten gezeigt,
die Installationspositionierungskartonage A1 mit Löchern, um eine Markierung der
Installationsposition an der Wand anzubringen (die Wand muss das Gewicht des
Geräts tragen können). Beim Anbringen der Markierung muss die horizontale Seite
der Pappe parallel zum Boden ausgerichtet sein. Auf der Position mit der Markierung
bohren Sie vier Löcher mit einer Bohrung von 10 mm und einer Tiefe von nicht weniger
als 70 mm. Achten Sie darauf, dass das Loch senkrecht zur Wand verläuft. Stellen Sie
sicher, dass der seitliche Abstand und der vertikale Abstand zwischen zwei Löchern den
Angaben in der Abbildung unten entsprechen:
A A1

7
DE
Der Abstand zwischen den Löchern sollte wie unten dargestellt sein:
WARNUNG
Verletzungsgefahr! Dieses Gerät sollte zur Gefahrenvermeidung für
kleine Kinder so installiert werden, dass sich die unterste beheizte
Schiene 550 mm oberhalb des Bodens be ndet.

8
DE
Fixieren Sie die 4 Halterungen mit der Expansionsschraube an der Wand. Die
xierten Halterungen können bewegt werden, um die Position anzupassen, damit das
Glaspaneel xiert werden kann.
Schritt 2
Entfernen Sie zunächst due Schutzfolie
an der Rückseite des Glases. Fixieren
Sie anschließend das Glaspaneel an
der bereits befestigten Wandhalterung.
Beachten Sie, dass die befestigte
Wandhalterung für die Installation des
Glaspaneels bewegt werden kann.
Ziehen Sie anschließend die Schrauben
an der Seite jeder Halterungsabdeckung
(insgesamt 4) fest.
ANZEIGEN UND FUNKTIONSTASTEN
Bedienfeld
Bildschirm
Sensor WLAN-Signal
Ein/Aus
Modus
Temperatur
Timer

9
DE
Fernbedienung
1 Ein/Aus
2 Modustaste
3 Temperaturtaste
4 Timer
5 Kindersicherung
INBETRIEBNAHME UND BEDIENUNG
Stellen Sie vor der Verwendung des Geräts sicher, dass sich das Gerät und dessen
Zubehör in gutem Zustand benden.
Da beim Versand aus dem Werk einige der Elemente zur Verpackung demontiert
werden, werden diese speziellen Elemente bei der Entnahme aus dem
Verpackungskarton getrennt voneinander entnommen. Da das Gerät hauptsächlich aus
Glas besteht, überprüfen Sie bei der Entnahme aus der Verpackung sorgfältig, ob es in
gutem Zustand ist. Wenn Sie feststellen, dass es während des Transportes beschädigt
wurde, informieren Sie sofort den Hersteller oder den Kundendienst.
Verwendung
• Platzieren Sie das Gerät auf einer stabilen Oberäche.
• Stecken Sie den Netzstecker des Geräts in eine 220 -240 V ~ 50 Hz Steckdose
und bringen Sie den Netzschalter, welcher sich an der Seite des Geräts bendet, in
die Position „I“. Ein Piepton ist dann zu hören.
• Schalten Sie das Gerät durch Drückend der Taste ein. Der LE-Bildschirm zeigt
die Raumtemperatur an. Durch Berühren des Bedienfeldes oder der Fernbedienung
können Sie die Leistung, die Temperatur und die Zeit einstellen.
• Schalten Sie das Gerät aus und ziehen Sie den Netzstecker aus der Steckdose,
wenn dieses über einen längeren Zeitraum nicht in Verwendung ist.
• Decken Sie das Gerät keinesfalls ab. Das Gerät darf nicht in Duschen oder
Swimmingpools gestellt werden.

10
DE
Einschalten
Bringen Sie zunächst den Netzschalter des Geräts, welcher sich an der Seite des Geräts
bendet, in die Position „I“. Drücken Sie zur Funktionseinstellung die Taste . Im
oberen Teil des Bedienfelds wird die Raumtemperatur angezeigt. Das Gerät läuft nun
auf niedriger Leistungsstufe.
Modus
Drücken Sie zur Anpassung der Leistung die Modustaste.
Temperatureinstellung
Drücken Sie die Temperaturtaste, um die gewünschte Temperatur im Bereich von
5 °C – 40 °C einzustellen. Jedes Mal, wenn das Gerät gestartet wird, wird die
Innentemperatur angezeigt. Wenn die Raumtemperatur die von Ihnen eingestellte
Temperatur erreicht, wechselt das Gerät von der hohen auf die niedrige Leistungsstufe.
Wenn die Raumtemperatur um mindestens 2 °C höher ist als die eingestellte Temperatur,
stellt das Gerät den Betrieb ein. Sobald die Temperatur wieder um 2 °C sinkt, nimmt das
Gerät, in Abhängigkeit von der eingestellten Zieltemperatur, den Betrieb wieder auf.
Timer
Der Timer kann so eingestellt werden, dass das Gerät zu einem gewünschten Zeitpunkt
automatisch ein- oder ausgeschaltet wird. Es kann ein Zeitintervall zwischen 1 und 24
Stunden eingestellt werden.
Kindersicherung
Wenn Sie auf der Fernbedienung die Kindersicherungstaste 3 Sekunden lang gedrückt
halten, werden alle Tasten deaktiviert. Sie können die Kindersicherung auf die gleiche
Art und Weise deaktivieren. Sollten Sie die Fernbedienung nicht zur Hand haben,
können Sie auf dem Bedienfeld für 5 Sekunden die Heiztaste gedrückt halten, um den
Bildschirm zu sperren/ entsperren.

11
DE
GERÄTESTEUERUNG PER SMARTPHONE
Wenn Sie Ihr Klarstein-Gerät in Ihr heimisches WLAN einbinden, können Sie es ganz
bequem über die dazugehörige Klarstein-App bedienen. Die App ermöglicht es Ihnen,
nicht nur das Gerät über Ihr Smartphone fernzusteuern, sondern bietet Ihnen zudem
Zugang zu Rezepten und weiterführenden Informationen.
Gehen Sie folgendermaßen vor, um Ihr Smartphone mit Ihrem Klarstein-Gerät zu
verbinden:
1 Laden Sie zuerst die Klarstein-App herunter, indem Sie mit Ihrem Smartphone den
QR-Code scannen (siehe unten) oder laden Sie diese direkt aus dem App Store
oder bei Google Play herunter.
2 Versichern Sie sich, dass Ihr Smartphone mit demselben WLAN-Netzwerk
verbunden ist, mit dem Ihr Klarstein-Gerät verbunden werden soll.
3 Öffnen Sie die Klarstein-App.
4 Melden Sie sich mit Ihrem Konto an. Wenn Sie noch keinen Account haben,
registrieren Sie sich in der Klarstein-App.
5 Folgen Sie den Anweisungen der App.
App-Download
Verwenden Sie die Scan-Funktion Ihres Handys, um den QR-Code zu scannen, und
speichern Sie die App auf Ihrem Smartphone.
Hinweis: Weitere Hinweise zur Bedienung der App und Hilfestellungen zur
Herstellung der Verbindung mit Ihrem Gerät liefert Ihnen die App, sobald Sie sie das
erste Mal öffnen.
iOS Android

12
DE
Fehlerbehebung bei Verbindungsproblemen
Wenn Ihr Klarstein-Gerät im WLAN nicht gefunden werden kann, überprüfen Sie
Folgendes:
• Ist das Gerät eingesteckt?
• Ist die WLAN-Funktion des Smartphones aktiviert?
• Ist die WLAN-Funktion des Klarstein-Gerätes aktiviert? (Befolgen Sie die
Anweisungen in der App.)
• Ist das WLAN-Passwort korrekt eingegeben worden?
• Benden sich Router, Klarstein-Gerät und Smartphone während des
Kopplungsversuches in unmittelbarer Nähe? (Idealerweise nicht mehr als 5 m
voneinander entfernt.)
• Falls Sie in den Einstellungen ihres WLAN-Routers das 2,4-GHz-Band deaktiviert
haben, aktivieren Sie dieses in Ihren Routereinstellungen.
Hinweis: Für weitere Hilfestellungen folgen Sie den Anweisungen der App beim
Verbindungsaufbau.
REINIGUNG UND PFLEGE
• Ziehen Sie vor der Reinigung und Wartung des Geräts immer den Netzstecker aus
der Steckdose und lassen Sie das Gerät vollständig abkühlen.
• Reinigen Sie die Luftauslässe regelmäßig.
• Verwenden Sie zur Reinigung niemals aggressive oder scheuernde
Reinigungsmittel.
• Reinigen Sie die Außenhülle mit einem weichen, feuchten Tuch. Lassen Sie keine
Flüssigkeit in das Heizgerät eindringen!
• Verwenden Sie keinen Alkohol, Benzin, Scheuermittel, Möbelpolitur oder grobe
Bürsten zur Reinigung der Heizung. Dies kann zur Beschädigung oder Abnutzung
der Oberäche des Heizgerätes führen.
• Wenn Sie die Heizung längere Zeit nicht benutzen, entnehmen Sie bitte die
Batterien der Fernbedienung (um Korrosion zu vermeiden) und bewahren Sie die
Fernbedienung an einem sicheren Ort auf.

13
DE
HINWEISE ZUR ENTSORGUNG
Wenn es in Ihrem Land eine gesetzliche Regelung zur
Entsorgung von elektrischen und elektronischen Geräten
gibt, weist dieses Symbol auf dem Produkt oder auf der
Verpackung darauf hin, dass dieses Produkt nicht im
Hausmüll entsorgt werden darf. Stattdessen muss es zu
einer Sammelstelle für das Recycling von elektrischen
und elektronischen Geräten gebracht werden. Durch
regelkonforme Entsorgung schützen Sie die Umwelt und die
Gesundheit Ihrer Mitmenschen vor negativen Konsequenzen.
Informationen zum Recycling und zur Entsorgung dieses
Produkts, erhalten Sie von Ihrer örtlichen Verwaltung oder
Ihrem Hausmüllentsorgungsdienst.
KONFORMITÄTSERKLÄRUNG
Hersteller:
Chal-Tec GmbH, Wallstraße 16, 10179 Berlin, Deutschland.
Importeur für Großbritannien:
Chal-Tec UK limited
Unit 6 Riverside Business Centre
Brighton Road
Shoreham-by-Sea
BN43 6RE
United Kingdom
Die vollständige Konformitätserklärung des Herstellers nden
Sie unter folgendem Link: use.berlin/10035064


15
EN
Dear Customer,
Congratulations on purchasing this device. Please read the
following instructions carefully and follow them to prevent
possible damages. We assume no liability for damage caused
by disregard of the instructions and improper use. Scan the QR
code to get access to the latest user manual and more product
information.
CONTENT
Safety Instructions16
Product Data Sheet17
Installation18
Displays and Function Keys20
Commissioning and Operation21
Device Control by Smartphone23
Cleaning and Care24
Disposal Considerations25
Declaration of Conformity25
TECHNICAL DATA
Item number 10035064, 10035065
Voltage 220 – 240 V
Frequency 50/ 60 Hz
Performance 750 W
WiFi standard
802.11 b/g/n
WiFi frequency
2,4 GHz
WiFi radio-frequency power (max.)
20 dBm

16
EN
SAFETY INSTRUCTIONS
• Do not use the appliance until it is securely xed as described in this manual.
• Check that the voltage indicates on the data plate corresponds with that of the local
network before connecting the appliance to the mains power supply.
• If the supply cord is damaged, it must be replaced by a quali ed engineer in order
to avoid a hazard.
• The replace heater must not be positioned directly under the power socket.
• Keep furniture, curtains and other ammable material at least 1 meter away from
the appliance.
• Do not leave the appliance unattended during use.
• Do not leave the appliance unattended whilst connected to the mains supply.
• Keep out of reach of children and do not allow them to operate this appliance.
• This appliance is intended for household use only and should not be used for
industrial purposes.
• Do not operate this appliance after a malfunction or after being damaged in any way.
• Repairs to electrical appliances should only be performed by a quali ed electrician.
• Improper repairs may place user at serious risk.
• Do not run the mains cable under carpets, rugs, etc.
• Do not allow the mains cable to hang over sharp edges or come in contact with hot surfaces.
• In order to avoid overheating, do not cover the heater.
• Do not use this heater with a programmer, timer, separate remote control system or
any other device that switches the heater on automatically, since a re risk exists if
the heater is covered or positioned incorrectly.
• Never immerse the product in water or any other liquid for any reasons.
• Do not use this heater in the immediate surroundings of a bath, a shower or a
swimming pool.
• Do not use the appliance outdoors.
• Do not use if you have wet hands.
• Never use the appliance on or near hot surfaces.
• Do not operate with a damaged cord.
• Before cleaning the appliance, make sure it is unplugged from the power and that it is
completely cooled.
• Do not clean the appliance with abrasive chemicals.
• Never use accessories that are not recommended or supplied by the manufacturer.
It could cause danger to the user or damage to the appliance.
• This appliance is not intended for use by persons (including children) with reduced
Physical, sensory or mental capabilities, or lack of experience and knowledge
unless they have been given supervision or instruction concerning use of the
appliance by a person responsible for their safety.
• Children should be supervised to ensure that they do not play with the appliance.
CAUTION
Risk of burns! Some parts of this product can become very hot and
cause burns. Particular attention has to be given where children and
vulnerable people are present.

17
EN
PRODUCT DATA SHEET
Model identier(s): 10035064
Item Symbol Value Unit Item Unit
Heat output Type of heat input, for electric storage local space
heaters only
Nominal heat output P
nom
0,8
kW manual heat charge control, with integrated
thermostat
N/A
Minimum heat output
(indicative)
P
min
N/A
kW manual heat charge control with room and/or
outdoor temperature feedback
N/A
Maximum continuous heat
output
P
max,c
0,8
kW electronic heat charge control with room and/or
outdoor temperature feedback
N/A
Auxiliary electricity consumption
fan assisted heat output N/A
At nominal heat output
(fan motor)
el
max
N/A kW
Type of heat output/room temperature control
At minimum heat output
(fan motor)
el
min
N/A kW single stage heat output and no room
temperature control
no
In standby mode el
SB
0,90
kW Two or more manual stages, no room
temperature control
no
with mechanic thermostat room temperature
control
no
with electronic room temperature control no
electronic room temperature control plus day
timer
no
electronic room temperature control plus week
timer
yes
Other control options (multiple selections possible)
room temperature control, with presence
detection
no
room temperature control, with open window
detection
no
with distance control option yes
with adaptive start control no
with working time limitation yes
with black bulb sensor no
Contact details Chal-Tec GmbH, Wallstraße 16, 10179, Berlin, Germany

18
EN
INSTALLATION
Installation instructions
If you have a tool, you can install the device according to the procedure described in
the operating instructions. It is also possible to ask the seller, his service department or a
similarly qualied electrical installation company to install the equipment.
Step 1
Before installing the unit as shown in the gure below, use the installation positioning
cardboard box A1 with holes to mark the installation position on the wall (the wall must
be able to support the weight of the unit). When applying the mark, the horizontal side
of the cardboard must be parallel to the oor. In the position with the mark, drill four
holes with a 10 mm hole and a depth of no less than 70 mm. Make sure that the hole is
perpendicular to the wall. Make sure that the lateral distance and the vertical distance
between two holes are as shown in the gure below:
A A1

19
EN
The distance between the holes should be as shown below:
WARNING
Danger of injury! To avoid danger for small children, this unit should be
installed so that the lowest heated rail is 550 mm above the oor.

20
EN
Fix the 4 brackets to the wall with the expansion screw. The xed brackets can be moved
to adjust the position to x the glass panel.
Step 2
First remove the protective lm on the
back of the glass. Then x the glass panel
to the already attached wall bracket.
Note that the attached wall bracket can
be moved for the installation of the glass
panel. Then tighten the screws on the side
of each bracket cover (4 in total).
DISPLAYS AND FUNCTION KEYS
Control panel
Display
Signal Controller WiFi
Power
Mode
Temperature
Timer

21
EN
Remote control
1 On/Off
2 Mode button
3 Temperature button
4 timer
5 Child lock
COMMISSIONING AND OPERATION
Before using the device, make sure that the device and its accessories are in good
condition.
Since some of the elements are disassembled for packing when shipped from the
factory, these special elements are removed separately when you take them out of
the packing box. Since the unit is mainly made of glass, carefully check that it is in
good condition when removing it from the packaging. If you discover that it has been
damaged during transport, immediately inform the manufacturer or customer service.
Operation
• Place the device on a stable surface.
• Insert the power plug of the unit into a 220-240 V ~ 50 Hz power outlet and set the
power switch located on the side of the unit to the „I“ position. A beep will then be
heard.
• Switch the unit on by pressing the button . The LE screen displays the room
temperature. You can set the power, temperature and time by touching the control
panel or remote control.
• Turn the unit off and unplug the power cord from the wall outlet when it is not used
for a long period of time.
• Do not cover the unit under any circumstances. Do not place the unit in showers or
swimming pools.

22
EN
Switch on
First, set the power switch of the device, which is located on the side of the device, to the
„I“ position. Press the button to set the function. The upper part of the control panel
displays the room temperature. The unit will now run at a low power level.
Mode
Press the Mode button to adjust the power.
Temperature adjustment
Press the temperature button to set the desired temperature in the range 5 °C - 40 °C.
Each time the appliance is started, the indoor temperature is displayed. When the indoor
temperature reaches the temperature you set, the unit will switch from high to low power.
If the room temperature is at least 2 °C higher than the set temperature, the unit stops
operating. As soon as the temperature drops by 2 °C again, the unit resumes operation,
depending on the set target temperature.
Timer
The timer can be set to automatically switch the unit on or off at a desired time. A time
interval between 1 and 24 hours can be set.
Parental lock
If you press and hold the parental control button on the remote control for 3 seconds,
all buttons are disabled. You can deactivate the parental control in the same way. If you
do not have the remote control at hand, you can press and hold the heat button on the
control panel for 5 seconds to lock/unlock the screen.

23
EN
DEVICE CONTROL BY SMARTPHONE
If you integrate the device into your home WiFi, you can conveniently operate it via the
associated Klarstein app. The app not only allows you to remotely control the device via
your smartphone, but also gives you access to recipes and additional information.
Follow these steps to connect your smartphone to your Klarstein device:
1 Download the Klarstein app rst by scanning the QR code with your smartphone
(see below), or download it directly from App Store or Google Play.
2 Make sure your smartphone is connected to the same WiFi network that your
Klarstein device is to be connected to.
3 Open the Klarstein app.
4 Sign in to your account. If you do not have an account, sign up in the Klarstein app.
5 Follow the instructions from the app.
App Download
Use the scan function of your smartphone to scan the QR code and save the app on
your smartphone.
Note: The app provides further information on how to use the app and help on how
to connect to your device as soon as you open it for the rst time.
iOS Android

24
EN
Troubleshooting connection problems
If your Klarstein device cannot be found in the WLAN, check the following:
• Is the device plugged in?
• Is the WiFi feature of my phone enabled?
• Is the WiFi function of the Klarstein device activated? (Follow the instructions in the
app)
• Has the WLAN password been entered correctly?
• Are the router, Klarstein device and smartphone in the immediate vicinity during the
connection attempt? (Ideally no more than 5 m apart)
• If you have deactivated the 2.4 GHz band in the settings of your wireless router,
activate it in your router settings.
Note: For further help, follow the instructions in the app when setting up the
connection.
CLEANING AND CARE
• Always unplug the appliance from the power outlet and allow it to cool down
completely before cleaning and servicing the appliance.
• Clean the air vents regularly.
• Never use aggressive or abrasive cleaning agents for cleaning.
• Clean the outer cover with a soft, damp cloth. Do not allow any liquid to penetrate
the heater!
• Never use alcohol, petrol, abrasive cleaners, furniture polish or coarse brushes to
clean the heater. This may cause damage or wear to the surface of the heater.
• If you do not use the heater for a long time, remove the batteries from the remote
control (to prevent corrosion) and store the remote control in a safe place.

25
EN
DISPOSAL CONSIDERATIONS
If there is a legal regulation for the disposal of electrical
and electronic devices in your country, this symbol on the
product or on the packaging indicates that this product must
not be disposed of with household waste. Instead, it must be
taken to a collection point for the recycling of electrical and
electronic equipment. By disposing of it in accordance with
the rules, you are protecting the environment and the health of
your fellow human beings from negative consequences. For
information about the recycling and disposal of this product,
please contact your local authority or your household waste
disposal service.
DECLARATION OF CONFORMITY
Manufacturer:
Chal-Tec GmbH, Wallstrasse 16, 10179 Berlin, Germany.
Importer for Great Britain:
Chal-Tec UK limited
Unit 6 Riverside Business Centre
Brighton Road
Shoreham-by-Sea
BN43 6RE
United Kingdom
The complete declaration of conformity of the manufacturer
can be found at the following link: use.berlin/10035064


27
ES
Estimado cliente:
Le felicitamos por la adquisición de este producto. Lea
atentamente el siguiente manual y siga cuidadosamente las
instrucciones de uso con el n de evitar posibles daños. La
empresa no se responsabiliza de los daños ocasionados por
un uso indebido del producto o por haber desatendido las
indicaciones de seguridad. Escanee el código QR para obtener
acceso al manual de usuario más reciente y otra información
sobre el producto:
ÍNDICE DE CONTENIDOS
Indicaciones de seguridad28
Hoja de datos del producto29
Instalación30
Indicadores y teclas de función32
Puesta en funcionamiento33
Control del dispositivo por smartphone35
Limpieza y cuidado36
Retirada del aparato37
Declaración de conformidad37
DATOS TÉCNICOS
Número de artículo 10035064, 10035065
Frecuencia 220 – 240 V
Tensión 50/ 60 Hz
Potencia 750 W
WiFi estándar
802.11 b/g/n
WiFi frecuencia
2,4 GHz
WiFi potencia de radiofrecuencia (max.)
20 dBm

28
ES
INDICACIONES DE SEGURIDAD
• Antes de utilizar el aparato, compruebe la tensión en la placa técnica del mismo y
conecte el aparato solamente a tomas de corriente que se adecuen a dicha tensión.
• Si el cable de alimentación está dañado, deberá ser sustituido por un servicio técnico.
• No coloque el calefactor justo bajo una toma de corriente.
• Mantenga los materiales in amables, como muebles, cortinas o similares, a un
metro de distancia.
• Mantenga el aparato fuera del alcance de los niños. Los niños solamente podrán
manejar el aparato si se encuentran bajo supervisión.
• Este aparato no ha sido concebido para un uso comercial, sino doméstico o para
entornos similares.
• No utilice el aparato si detecta fallos en su funcionamiento o si se ha visto dañado
de otro modo.
• Las reparaciones solamente podrán realizarse por parte de un servicio técnico
cuali cado.
• Las reparaciones mal realizadas o por cuenta del usuario representan un riesgo de
lesiones.
• No coloque el cable de alimentación bajo alfombras.
• Asegúrese de que el cable de alimentación no entre en contacto con super cies
calientes ni cantos a lados.
• No cubra el calefacto para evitar un sobrecalentamiento.
• No conecte el aparato a tomas de corriente manejadas por control remoto ni con
temporizador ni otro aparato que encienda o apague automáticamente el calefacto.
• No sumerja el aparato en agua ni en ningún otro líquido.
• No utilice el aparato cerca de bañeras, duchas o piscinas.
• No utilice el aparato al aire libre.
• No manipule el aparato con las manos mojadas.
• No utilice el aparato encima o cerca de super cies calientes.
• No utilice el aparato con el cable de alimentación dañado.
• Desconecte el enchufe antes de limpiar el aparato y deje que este se enfríe por
completo.
• Para la limpieza, no utilice productos abrasivos.
• Utilice exclusivamente los accesorios recomendados por el fabricante.
• Este aparato puede ser utilizado por niños mayores de 8 años y personas con
discapacidades físicas, sensoriales y mentales y/o con falta de experiencia y
conocimientos, siempre y cuando hayan sido instruidos sobre el uso del aparato y
comprendan los peligros y riesgos asociados.
• Asegúrese de que los niños no jueguen con el aparato.
ATENCIÓN
Existe riesgo de quemaduras. Las piezas del aparato pueden alcanzar
temperaturas muy elevadas. Tenga cuidado de que los niños no se
quemen.

29
ES
HOJA DE DATOS DEL PRODUCTO
Denominación del modelo 10035064
Dato Símbolo Valor Unidad Dato Unidad
Potencia térmica Solo con disposítivos de acumulación de calor
eléctricos para abastecimiento local: Tipo de regulación
del abastecimiento de calor
Potencia térmica nominal P
nom
0,8
kW Regulación manual del abastecimiento de calor
con termostato integrado:
n/a
Potencia térmica mínima
(valor orientativo)
P
min
N/A
kW Regulación manual de abastecimiento de calor
con aviso de temperatura ambiente y/o exterior
n/a
Potencia térmica continua
máxima
P
max,c
0,8
kW Regulación electrónica de abastecimiento de
calor con aviso de temperatura ambiente y/o
exterior
n/a
Consumo de corriente auxiliar
Disípación de calor con ventilación auxiliar n/a
Con potencia térmica
nominal
el
max
N/A kW
Tipo de potencia térmica/control de temperatura
ambiente
Con potencia térmica mínima el
min
N/A kW Potencia térmica de un solo nivel, sín control de
temperatura ambiente
no
En modo de espera el
SB
0,90
W Dos o más niveles regulables manualmente, sín
control de temperatura ambiente
no
Control de temperatura ambiente con termostato
mecánico
no
Con control electrónico de temperatura
ambiente
no
Con control de temperatura ambiente y
regulación del momento del día
no
Con control de temperatura ambiente y
regulación del día de la semana
sí
Otras opciones de regulación
Control de temperatura ambiente con detección
de presencia
no
Control de temperatura ambiente con detección
de ventanas abiertas
no
Con opción de control remoto sí
Con regulación adaptable del comienzo de la
calefacción
no
Con limitación de tiempo de funcionamiento sí
Con sensor de bulbo negro no
Información de contacto Chal-Tec GmbH, Wallstraße 16, 10179, Berlín (Alemania)

30
ES
INSTALACIÓN
Instrucciones de instalación
Si dispone de herramientas, puede instalar el aparato siguiendo el proceso indicado
en el manual de instrucciones. No obstante, también existe la posibilidad de solicitar al
vendedor, a su servicio de atención al cliente o a una empresa instaladora cualicada
que instale el aparato.
Paso 1
Antes de instalar el aparato y como se muestra en la siguiente ilustración, utilice el
cartón de posicionamiento A1 con oricios para realizar las marcas de la posición
de instalación en la pared (la pared debe poder soportar el peso del aparato). Al
realizar la marca, el lado horizontal del cartón debe encontrarse en posición paralela
al suelo. Una vez posicionada la marca, perfore cuatro oricios con una broca de 10
mm y una profundidad mínima de 70 mm. Asegúrese de perforar el oricio en dirección
perpendicular a la pared. Asegúrese de que la distancia lateral y vertical entre ambos
oricios cumpla con las indicaciones que aparecen en la imagen:
A A1

31
ES
La distancia entre los ori cios debe ser la siguiente:
ADVERTENCIA
Riesgo de lesiones. Para evitar riesgos para los niños pequeños, el
aparato debe instalarse de modo que el riel calefactor inferior se sitúe
a 550 mm del suelo.

32
ES
Fije los 4 soportes a la pared con los tornillos de expansión. Los soportes jados
pueden desplazarse para ajustar la posición para que el panel acristalado se pueda
jar.
Paso 2
Primero, retire la lámina protectora
de la parte trasera del aparato. A
continuación, je el panel acristalado
en el soporte de pared ya instalado.
Recuerde que el soporte de pared
instalado puede desplazarse para
montar el panel. A continuación,
apriete los tornillos en el lateral de cada
recubrimiento del soporte (4 en total).
INDICADORES Y TECLAS DE FUNCIÓN
Panel de control
Pantalla
Sensor de señal wi
On/off
Modo
Temperatura
Temporizador

33
ES
Mando a distancia
1 On/off
2 Tecla de modo
3 Tecla de temperatura
4 Temporizador
5 Bloqueo para niños
PUESTA EN FUNCIONAMIENTO
Antes de utilizar el aparato, asegúrese de que tanto el aparato como los accesorios se
encuentren en buen estado.
Puesto que durante el envío desde fábrica se desmontan algunos elementos para su
embalaje, estos elementos especiales se retiran por separado al sacarlos de la caja de
cartón. Puesto que el aparato está principalmente fabricado en cristal, al extraerlo del
embalaje debe comprobar detenidamente si se encuentra en buen estado. Si detecta
que se ha dañado durante el transporte, informe inmediatamente al fabricante o al
servicio de atención al cliente.
Utilización
• Coloque el aparato sobre una supercie estable.
• Conecte el enchufe del aparato a una toma de corriente de 220 - 240 V ~ 50 Hz
y coloque el interruptor principal situado en el lateral del aparato en la posición
„I“. En ese momento, sonará un pitido.
• Encienda el aparato pulsando la tecla . La pantalla led muestra la temperatura
ambiente. Al tocar el panel de control o el mando a distancia puede regular la
potencia, la temperatura y el tiempo.
• Apague el aparato y desconecte el enchufe de la toma de corriente si no lo utiliza
durante un periodo de tiempo prolongado.
• No cubra el aparato en ningún caso. El aparato no debe ser utilizado en duchas ni
en piscinas.

34
ES
Encender
Primero coloque el interruptor principal del aparato, situado en uno de los lados, en la
posición „I“. Para seleccionar una función, pulse la tecla . En la parte superior del
panel de control aparecerá la temperatura ambiente. El aparato funcionará con el nivel
de potencia más bajo.
Modo
Pulse la tecla de modo para ajustar la potencia.
Conguración de temperatura
Presione la tecla de temperatura para seleccionar la temperatura deseada en un rango
de 5 °C - 40 °C. Cada vez que se enciende el aparato se muestra la temperatura
interior. Cuando la temperatura ambiente sea igual a la que usted ha seleccionado,
el aparato pasa del nivel alto de potencia al nivel bajo. Si la temperatura ambiente es
2 °C superior a la temperatura seleccionada, el aparato detiene su funcionamiento.
Cuando la temperatura descienda 2 °C, el aparato reanudará su funcionamiento en
función de la temperatura seleccionada.
Temporizador
El temporizador se puede congurar para que el aparato se apague o se encienda en
un momento determinado de manera automática. Puede seleccionarse un periodo de
entre 1 y 24 horas.
Bloqueo para niños
Si pulsa la tecla de bloqueo infantil durante 3 segundos en el mando a distancia, todas
las teclas quedan desactivadas. Puede desactivar el bloqueo realizando la misma
acción de nuevo. Si no tiene a mano el mando a distancia, puede mantener pulsada
la tecla de calefacción del panel de control durante 5 segundos para bloquear y
desbloquear la pantalla.

35
ES
CONTROL DEL DISPOSITIVO POR SMARTPHONE
Si conecta el aparato a su red WLAN doméstica, podrá controlarlo cómodamente
mediante la App correspondiente de Klarstein. La App le permite no solo controlar el
aparato mediante su smartphone, sino que también le ofrece acceso a recetas y otra
información adicional.
Proceda del siguiente modo para conectar su smartphone al dispositivo Klarstein.
1 Descargue primero la App de Klarstein escaneando el código QR con su
smartphone (véase más abajo) o descárguelo directamente de la App Store o de
Google Play.
2 Asegúrese de que su smartphone esté conectado a la misma red WiFi a la que
debe conectarse su dispositivo Klarstein.
3 Abra la App de Klarstein.
4 Inicie sesión con su cuenta. Si aún no tiene una cuenta, regístrese en la aplicación
Klarstein.
5 Siga las instrucciones que aparecerán en la app.
Descarga la aplicación
Utilice la función de escaneado de su teléfono para escanear el código QR y guarde
la app en su smartphone.
Nota: La aplicación proporciona más información sobre cómo usar la aplicación y
ayuda sobre cómo conectarse al dispositivo tan pronto como se abre por primera
vez.
iOS Android

36
ES
Solución de problemas de conexión
Si su dispositivo Klarstein no se encuentra en la WLAN, compruebe lo siguiente:
• ¿Está enchufado el dispositivo?
• ¿Está activada la función WiFi de mi teléfono?
• ¿Está activada la función WiFi del dispositivo Klarstein? (Sigue las instrucciones de
la aplicación)
• ¿Se ha introducido correctamente la contraseña WLAN?
• ¿Están el router, el dispositivo Klarstein y el smartphone en las inmediaciones
durante el intento de conexión? (Idealmente no más de 5 m de separación)
• Si ha desactivado la banda de 2,4 GHz en la conguración de su encaminador
inalámbrico, actívela en la conguración de su encaminador.
Nota: Para obtener más ayuda, sigue las instrucciones de la aplicación al congurar
la conexión.
LIMPIEZA Y CUIDADO
• Desconecte el enchufe antes de limpiar y de realizar mantenimiento en el aparato
y deje que este se enfríe por completo.
• Limpie las salidas de aire periódicamente.
• No utilice productos de limpieza agresivos ni abrasivos para limpiar el aparato.
• Limpie el exterior del aparato con un paño suave y húmedo. No deje que ningún
líquido se ltre al interior del aparato.
• No utilice alcohol, gasolina, polvos abrasivos, cera para muebles ni cepillos de
cerdas duras para limpiar el radiador. Esto puede dañar o desgastar la supercie
del radiador.
• Si no utiliza el radiador durante un periodo de tiempo prolongado, retire las pilas
del mando a distancia (para evitar la corrosión) y conserve el mando a distancia
en un lugar seguro.

37
ES
RETIRADA DEL APARATO
Si en su país existe una disposición legal relativa a la
eliminación de aparatos eléctricos y electrónicos, este
símbolo estampado en el producto o en el embalaje
advierte que no debe eliminarse como residuo doméstico.
En lugar de ello, debe depositarse en un punto de recogida
de reciclaje de aparatos eléctricos y electrónicos. Una
gestión adecuada de estos residuos previene consecuencias
potencialmente negativas para el medio ambiente y la salud
de las personas. Puede consultar más información sobre el
reciclaje y la eliminación de este producto contactando con
su administración local o con su servicio de recogida de
residuos.
DECLARACIÓN DE CONFORMIDAD
Fabricante:
Chal-Tec GmbH, Wallstraße 16, 10179 Berlín, Alemania.
Importador para Gran Bretaña:
Chal-Tec UK limited
Unit 6 Riverside Business Centre
Brighton Road
Shoreham-by-Sea
BN43 6RE
United Kingdom
Puede descargar la declaración de conformidad completa del
fabricante en el siguiente enlace: use.berlin/10035064


39
FR
Cher client,
Toutes nos félicitations pour l’acquisition de ce nouvel
appareil. Veuillez lire attentivement les instructions suivantes de
branchement et d’utilisation an d’éviter d’éventuels dommages.
Le fabricant ne saurait être tenu pour responsable des dommages
dus au non-respect des consignes de sécurité et à la mauvaise
utilisation de l’appareil. Scannez le QR-Code pour accéder à
la dernière version du mode d‘emploi et à d‘autres informations
concernant le produit:
SOMMAIRE
Consignes de sécurité40
Fiche de données produit41
Installation42
Afchages et touches de fonction44
Mise en marche et utilisation45
Contrôle de l‘appareil par smartphone47
Nettoyage et entretien48
Conseils pour le recyclage49
Déclaration de conformité49
FICHE TECHNIQUE
Numéro d'article 10035064, 10035065
Tension 220 – 240 V
Fréquence 50/ 60 Hz
Puissance 750 W
WiFi standard
802.11 b/g/n
WiFi fréquence
2,4 GHz
WiFi puissance de radiofréquence (max.)
20 dBm

40
FR
CONSIGNES DE SÉCURITÉ
• Avant utilisation, véri ez la tension sur l‘étiquette de l‘appareil et ne branchez
l‘appareil que sur des prises correspondant à la tension de l‘appareil.
• Si le câble d‘alimentation est endommagé, faites-le remplacer par un professionnel
quali é.
• Ne placez pas le radiateur directement sous une prise.
• Tenez l‘appareil à un mètre de distance des matériaux combustibles tels que
meubles, rideaux ou similaires.
• Utilisez l‘appareil hors de portée des enfants. Les enfants ne sont autorisés à utiliser
l‘appareil que sous surveillance.
• L‘appareil n‘est pas destiné à un usage commercial, mais seulement pour une
utilisation domestique et dans des environnements similaires.
• N‘utilisez pas l‘appareil s‘il fonctionne mal ou a été endommagé de quelque façon
que ce soit.
• Les réparations ne peuvent être effectuées que par des spécialistes quali és.
• Les réparations mal effectuées ou de votre propre chef représentent un risque de
blessure.
• Ne faites pas passer le câble d‘alimentation sous des tapis ou moquettes.
• Assurez-vous que le câble d‘alimentation ne passe pas sur des recoins pointus ou
des surfaces chaudes.
• Ne recouvrez pas le radiateur pour éviter la surchauffe.
• N‘utilisez pas l‘appareil avec une minuterie externe, une prise de courant
télécommandée ou un autre appareil qui allume et éteint automatiquement le poêle.
• Ne plongez pas l‘appareil dans l‘eau ou d‘autres liquides.
• N‘utilisez pas l‘appareil près d‘une baignoire, d‘une douche ou d‘une piscine.
• N‘utilisez pas l‘appareil à l‘extérieur.
• N‘utilisez pas l‘appareil avec des mains mouillées.
• N‘utilisez pas l‘appareil sur ou à proximité de surfaces chaudes.
• N‘utilisez pas l‘appareil avec un câble d‘alimentation endommagé.
• Avant le nettoyage, débranchez la che de la prise et laissez l‘appareil refroidir
complètement.
• N‘utilisez pas d‘abrasifs pour le nettoyage.
• N‘utilisez que des accessoires expressément approuvés par le fabricant.
• Cet appareil peut être utilisé par des enfants de 8 ans ou plus et des personnes
ayant des capacités physiques, sensorielles et mentales limitées et / ou
dénuées d‘expérience et de connaissances, à condition d‘avoir été instruits au
fonctionnement de l‘appareil par une personne responsable et d‘en comprendre les
risques associés.
• Veillez à ce que les enfants ne jouent pas avec l‘appareil.
ATTENTION
Risque de brûlures ! Certaines parties de l‘appareil peuvent devenir très
chaudes. Veillez à ne pas vous brûler ni vous-même ni vos enfants.

41
FR
FICHE DE DONNÉES PRODUIT
Référence (s) du produit 10035064
Donnée Symbole Valeur Unité Donnée Unité
Puissance calorique Uniquement pour les radiateurs électriques à
accumulation : Type de régulation de l'apport de chaleur
Puissance calorique
nominale
P
nom
0,8
kW Régulation manuelle de l'apport de chaleur
avec thermostat intégré
Sans
objet
Puissance calorique
minimale (indicative)
P
min
n.c.
kW Régulation manuelle de l'apport de chaleur
avec indication de la température de la pièce
et/ou de l'extérieur
Sans
objet
Puissance maximale
continue de chauffage
P
max,c
0,8
kW Régulation électronique de l'apport de chaleur
avec indication de la température de la pièce
et/ou de l'extérieur
Sans
objet
Consommation de courant auxiliaire
Apport de chaleur assisté par ventilateur Sans
objet
A puissance calorique
nominale
el
max
n.c. kW
Type de chauffage/contrôle de la température de la
pièce
A puissance calorique
minimale
el
min
n.c. kW Chauffage à une seule vitesse, pas de contrôle
de la température ambiante
non
En mode veille el
SB
0,90
W Deux vitesses ou plus réglables manuellement,
pas de contrôle de la température ambiante
non
Contrôle de la température ambiante par
thermostat mécanique
non
Contrôle électronique de la température
ambiante
non
Contrôle électronique de la température
ambiante et régulation par jour
non
Contrôle électronique de la température
ambiante et régulation par semaine
oui
Autres options de régulation
Contrôle de la température ambiante avec
détection de présence
non
Contrôle de la température ambiante avec
détection de fenêtre ouverte
non
Avec option télécommande oui
Avec contrôle du démarrage du chauffage non
Avec limitation de la durée de fonctionnement oui
Avec globe noir capteur de température non
Coordonnées de contact Chal-Tec GmbH, Wallstraße 16, 10179, Berlin, Allemagne

42
FR
INSTALLATION
Guide d‘installation
Si vous disposez d‘un outil, vous pouvez installer l‘appareil en suivant la procédure
décrite dans le mode d‘emploi. Vous avez également la possibilité de demander au
vendeur, au service client ou à une entreprise d‘électricité de qualication similaire
d‘installer l‘appareil.
Étape 1
Avant d‘installer l‘appareil, comme indiqué dans la gure ci-dessous, utilisez le carton
de positionnement A1 avec des trous pour marquer l‘emplacement d‘installation sur le
mur (le mur doit pouvoir supporter le poids de l‘appareil). Lors du marquage, le côté
horizontal du carton doit être parallèle au sol. Une fois l‘emplacement marqué, percez
quatre trous avec un alésage de 10 mm et une profondeur d‘au moins 70 mm. Assurez-
vous que le trou est perpendiculaire au mur. Assurez-vous que la distance latérale et
la distance verticale entre deux trous correspondent aux informations de l‘illustration
ci-dessous :
A A1

43
FR
La distance entre les trous doit être celle qui est indiquée ci-dessous :
MISE EN GARDE
Risque de blessure ! Pour éviter de présenter un danger pour les jeunes
enfants, cet appareil doit être installé de manière à ce que le rail
chauffant le plus bas soit à 550 mm au-dessus du sol.

44
FR
Fixez les 4 supports au mur avec la vis d‘expansion. Vous pouvez déplacer les supports
xes pour ajuster la position an de pouvoir xer le panneau de verre.
Étape 2
Retirez d‘abord le lm protecteur au
dos de la vitre. Fixez ensuite le panneau
de verre au support mural déjà installé.
Notez que le support mural installé peut
se déplacer pour installer le panneau de
verre. Serrez ensuite les vis sur le côté de
chaque cache de support (4 au total).
AFFICHAGES ET TOUCHES DE FONCTION
Panneau de contrôle
Ecran
Capteur de signal Wi
Marche/arrêt
Mode
Température
Minuterie

45
FR
Télécommande
1 Marche /Arrêt
2 Touche de mode
3 Touche de température
4 Minuterie
5 Verrouillage parental
MISE EN MARCHE ET UTILISATION
Avant d‘utiliser l‘appareil, assurez-vous qu‘il est en bon état ainsi que ses accessoires.
Étant donné que certains des éléments sont démontés au moment de l‘emballage au
départ de l‘usine, ces éléments spéciaux se retirent séparément de l‘emballage.
L‘appareil étant principalement en verre, vériez soigneusement qu‘il est en bon état
lorsque vous le retirez de l‘emballage. Si vous constatez qu‘il a été endommagé
pendant le transport, informez immédiatement le fabricant ou le service client.
Utilisation
• Placez l‘appareil sur une surface stable.
• Insérez la che secteur de l‘appareil dans une prise 220-240 V ~ 50 Hz et placez
l‘interrupteur principal situé sur le côté de l‘appareil en position „I“. Vous entendrez
alors un bip.
• Allumez l‘appareil en appuyant sur le bouton . L‘écran LED afche la
température ambiante. Vous pouvez régler la puissance, la température et l‘heure
en touchant le panneau de commande ou la télécommande.
• Éteignez l‘appareil et débranchez la che de la prise si vous prévoyez de ne pas
l‘utiliser pendant une période prolongée.
• Ne couvrez en aucun cas l‘appareil. L‘appareil ne doit pas être placé dans une
pièce de douche ou près d‘une piscine.

46
FR
Pour allumer l‘appareil
Mettez d‘abord l‘interrupteur d‘alimentation de l‘appareil situé sur le côté en position
„I“. Appuyez sur le bouton bouton pour régler la fonction. La température ambiante
s‘afche dans la partie supérieure du panneau de commande. L‘appareil fonctionne
maintenant à faible puissance.
Mode
Appuyez sur la touche Mode pour régler la puissance.
Réglage de la température
Appuyez sur la touche de température pour régler la température souhaitée entre 5 °C
et 40 °C. La température ambiante s‘afche à chaque démarrage de l‘appareil. Lorsque
la température ambiante atteint la température que vous avez dénie, l‘appareil passe
du niveau de puissance élevé au niveau de puissance faible. Si la température ambiante
est supérieure d‘au moins 2 °C à la température réglée, l‘appareil cesse de fonctionner.
Dès que la température redescend de 2 °C, l‘appareil redémarre en fonction de la
température cible réglée.
Minuterie
Vous pouvez régler la minuterie pour que l‘appareil s‘allume ou s‘éteigne
automatiquement à l‘heure souhaitée. Vous pouvez régler un délai compris entre 1 et
24 heures.
Verrouillage parental
Si vous maintenez la touche de verrouillage parental de la télécommande pendant 3
secondes, toutes les touches seront désactivées. Vous pouvez désactiver le contrôle
parental de la même manière. Si vous n‘avez pas la télécommande à portée de main,
vous pouvez maintenir la touche de chauffage du panneau de commande pendant 5
secondes pour verrouiller / déverrouiller l‘écran.

47
FR
CONTRÔLE DE L‘APPAREIL PAR SMARTPHONE
Si vous connectez l‘appareil à votre réseau Wi-Fi domestique, vous pouvez l‘utiliser
facilement via l‘application Klarstein associée. L‘application vous permet non seulement
de contrôler à distance l‘appareil via votre smartphone, mais vous donne également
accès à des recettes et à des informations supplémentaires.
Procédez comme suit pour connecter votre smartphone avec votre appareil Klarstein :
1 Téléchargez d‘abord l‘application Klarstein en scannant le code QR avec votre
smartphone (voir ci-dessous) ou téléchargez-le directement depuis l‘App Store ou
Google Play.
2 Assurez-vous que votre smartphone est connecté au même réseau WiFi que votre
appareil Klarstein.
3 Ouvrez l‘application Klarstein.
4 Connectez-vous avec votre compte. Si vous n‘avez pas encore de compte,
inscrivez-vous dans l‘application Klarstein.
5 Suivez les indications de l‘application.
Téléchargement de l‘application
Utilisez la fonction de scan de votre téléphone portable pour scanner le QR Code et
télécharger l‘application sur votre smartphone.
Remarque : L‘application fournit des informations supplémentaires sur la façon
d‘utiliser l‘application et de l‘aide sur la façon de se connecter à votre appareil dès
que vous l‘ouvrez pour la première fois.
iOS Android

48
FR
Dépannage des problèmes de connexion
Si votre appareil Klarstein ne se trouve pas dans le WLAN, vériez les points suivants :
• L‘appareil est-il branché ?
• La fonction WiFi de mon téléphone est-elle activée ?
• La fonction WiFi de l‘appareil Klarstein est-elle activée ? (Suivez les instructions
dans l‘application)
• Le mot de passe WLAN a-t-il été saisi correctement ?
• Le routeur, l‘appareil Klarstein et le smartphone se trouvent-ils à proximité
immédiate pendant la tentative de connexion ? (Idéalement, pas plus de 5 m de
distance)
• Si vous avez désactivé la bande des 2,4 GHz dans les paramètres de votre routeur
sans l, activez-la dans les paramètres de votre routeur.
Remarque : Pour plus d‘aide, suivez les instructions de l‘application lors de la
conguration de la connexion.
NETTOYAGE ET ENTRETIEN
• Avant de nettoyer et d‘entretenir l‘appareil, retirez toujours la che de la prise et
laissez l‘appareil refroidir complètement.
• Nettoyez régulièrement les sorties d‘air.
• N‘utilisez jamais d‘agents de nettoyage agressifs ou abrasifs.
• Nettoyez le couvercle extérieur avec un chiffon doux et humide. Ne laissez aucun
liquide pénétrer dans le radiateur !
• N‘utilisez pas d‘alcool, d‘essence, d‘abrasifs, de cire pour meubles ou de brosses
à récurer pour nettoyer le radiateur. Cela peut endommager ou user la surface du
radiateur.
• Si vous ne comptez pas utiliser le radiateur pendant une longue période, retirez les
piles de la télécommande (pour éviter la corrosion) et conservez la télécommande
en lieu sûr.

49
FR
CONSEILS POUR LE RECYCLAGE
S‘il existe une réglementation pour l‘élimination ou le recyclage
des appareils électriques et électroniques dans votre pays,
ce symbole sur le produit ou sur l‘emballage indique que cet
appareil ne doit pas être jeté avec les ordures ménagères. Vous
devez le déposer dans un point de collecte pour le recyclage
des équipements électriques et électroniques. La mise au
rebut conforme aux règles protège l‘environnement et la santé
de vos semblables des conséquences négatives. Pour plus
d‘informations sur le recyclage et l‘élimination de ce produit,
veuillez contacter votre autorité locale ou votre service de
recyclage des déchets ménagers.
DÉCLARATION DE CONFORMITÉ
Fabricant :
Chal-Tec GmbH, Wallstraße 16, 10179 Berlin, Allemagne.
Importateur pour la Grande Bretagne :
Chal-Tec UK limited
Unit 6 Riverside Business Centre
Brighton Road
Shoreham-by-Sea
BN43 6RE
United Kingdom
La déclaration complète de conformité du fabricant est
accessible par le lien suivant : use.berlin/10035064


51
IT
Gentile cliente,
La ringraziamo per aver acquistato il dispositivo. La preghiamo
di leggere attentamente le seguenti istruzioni per l’uso e di
seguirle per evitare possibili danni tecnici. Non ci assumiamo
alcuna responsabilità per danni scaturiti da una mancata
osservazione delle avvertenze di sicurezza e da un uso
improprio del dispositivo. Scansionare il codice QR seguente,
per accedere al manuale d’uso più attuale e per ricevere
informazioni sul prodotto.
INDICE
Avvertenze di sicurezza52
Scheda informativa del producto53
Installazione54
Spie e tasti funzione56
Messa in funzione e utilizzo57
Gestione tramite smartphone59
Pulizia e manutenzione60
Smaltimento61
Dichiarazione di conformità61
DATI TECNICI
Codice articolo 10035064, 10035065
Alimentazione 220 – 240 V
Frequenza 50/ 60 Hz
Potenza 750 W
WiFi standard
802.11 b/g/n
WiFi frequenza
2,4 GHz
WiFi potenza a radiofrequenza (max.)
20 dBm

52
IT
AVVERTENZE DI SICUREZZA
• Prima dell‘uso, controllare la tensione sulla targhetta del dispositivo e collegare il
dispositivo solo ad una presa che corrisponde alla tensione indicata.
• Se il cavo di alimentazione è danneggiato, farlo sostituire da un tecnico quali cato.
• Non posizionare il dispositivo direttamente sotto la presa.
• Tenere materiali in ammabili come mobili, tende o simili ad un metro di distanza.
• Tenere il dispositivo fuori dalla portata dei bambini. I bambini possono utilizzare il
dispositivo solo se sorvegliati.
• Il dispositivo non è per un uso commerciale, bensì per un uso domestico e per
ambienti simili.
• Non utilizzare il dispositivo se presenta malfunzionamenti o se è danneggiato in
qualche modo.
• Le riparazioni possono essere eseguite solo da un tecnico quali cato.
• Le riparazioni eseguite in modo errato o autonomamente comportano il rischio di
infortuni.
• Non sistemare il cavo di alimentazione sotto tappeti o simili.
• Assicurarsi che il cavo di alimentazione non sia collocato su spigoli vivi o super ci
calde.
• Non coprire il dispositivo per evitare il pericolo di surriscaldamento.
• Non utilizzare il dispositivo con un timer esterno, una presa con telecomando o un
altro apparecchio che accende e spenge automaticamente il dispositivo.
• Non immergere il dispositivo in acqua o in altri liquidi.
• Non utilizzare il dispositivo vicino a vasche da bagno, docce o piscine.
• Non utilizzare il dispositivo all‘aperto.
• Non utilizzare il dispositivo con le mani bagnate.
• Non utilizzare il dispositivo sopra o vicino a super ci calde.
• Non utilizzare il dispositivo con un cavo di alimentazione danneggiato.
• Prima di eseguire la pulizia, disinserire la spina dalla presa e far raffreddare
completamente il dispositivo.
• Non utilizzare prodotti abrasivi per la pulizia.
• Utilizzare solo accessori espressamente approvati dal produttore.
• Questo dispositivo può essere utilizzato da bambini a partire da 8 anni e da
persone con limitate capacità siche e psichiche o con conoscenza ed esperienza
limitate, solo se sono stati istruiti sulle modalità d’uso e comprendono i rischi e i
pericoli connessi.
• Assicurarsi che i bambini non giochino con il dispositivo.
ATTENZIONE
Pericolo di ustioni! Alcuni componenti del dispositivo possono diventare
molto caldi. Prestare la massima attenzione in presenza di bambini e di
persone vulnerabili.

53
IT
SCHEDA INFORMATIVA DEL PRODUCTO
Identicazione del modello (i) 10035064
Indicazione Simbolo Valore Unità Indicazione Unità
Potenza termica Solo per gli apparecchi per il riscaldamento d'ambiente
locale elettrici ad accumulo: Tipo di controllo
dell´apporto termico
Potenza termica nominale P
nom
0,8 kW Controllo manuale del carico termico con
termostato integrato
N.D.
Potenza termica minima
(valore indicativo)
P
min
n.i. kW Controllo manuale del carico termico con
riscontro della temperatura ambiente e/o
esterna
N.D.
Potenza termica massima
continua
P
max,c
0,8 kW Controllo elettronico del carico termico con
riscontro della temperatura ambiente e/o
esterna
N.D.
Consumo di elettricità ausiliaria
Potenza termica con supporto del ventilatore N.D.
Per la potenza termica
nominale
el
max
n.i. kW
Tipo di potenza termica / controllo della temperatura
ambiente
Per la potenza termica
minima
el
min
n.i. kW Potenza termica di un solo livello, senza
controllo della temperatura ambiente
no
In modalità di attesa el
SB
0,90 W Due o più livelli impostabili manualmente, senza
controllo della temperatura ambiente
no
Con controllo della temperatura ambiente
tramite termostato meccanico
no
Con controllo elettronico della temperatura
ambiente
no
Controllo elettronico della temperatura
ambiente e timer giornaliero
no
Controllo elettronico della temperatura
ambiente e timer settimanale
si
Altre opzioni di controllo
Controllo della temperatura ambiente con
rilevamento di presenza
no
Controllo della temperatura ambiente con
rilevamento di nestre aperte
no
Con opzione telecomando si
Con controllo di avvio adattabile no
Con limitazione del tempo di funzionamento si
Con sensore lampada nero no
Informazioni di contatto Chal-Tec GmbH, Wallstraße 16, 10179, Berlino, Germania

54
IT
INSTALLAZIONE
Istruzioni per l’installazione
Se si ha a disposizione un attrezzo, si può installare il dispositivo seguendo le istruzioni
riportate nel manuale utente. Si può anche contattare il rivenditore, il suo servizio
d’assistenza o un’azienda elettrotecnica qualicata per far montare il dispositivo.
Primo passo
Prima di installare il dispositivo, munirsi di un cartonato sagomato A1 con fori come
mostrato nella gura sottostante, per segnare la posizione di montaggio alla parete (la
parete deve essere in grado di sostenere il peso del dispositivo). Per apporre il segno,
il lato orizzontale del cartone deve essere parallelo al pavimento. Forare quattro buchi
da 10 mm a una profondità non minore di 70 mm sulla posizione segnata. Assicurarsi
che il foro sia perpendicolare alla parete e che la distanza laterale e verticale tra due
fori corrispondano alle indicazioni della gura sottostante:
A A1

55
IT
La distanza tra i fori deve essere uguale a quella indicata nella gura sottostante:
AVVERTENZA
Pericolo di lesioni! Per evitare pericoli per bambini piccoli, il dispositivo
deve essere installato in modo tale che la guida riscaldata inferiore si
trovi a 550 mm dal pavimento.

56
IT
Fissare i 4 supporti alla parete per mezzo delle viti a espansione. Muovere i supporti
per regolare la posizione in modo tale da ssare il pannello di vetro.
Secondo passo
Rimuovere prima di tutto la pellicola
protettiva sul retro del vetro. Dopodiché
ssare il pannello di vetro al supporto
a parete appena sistemato. Ricordarsi
che il supporto può essere mosso per
montare il pannello di vetro. Stringere
poi le viti su ogni lato della copertura del
supporto (in tutto sono 4).
SPIE E TASTI FUNZIONE
Pannello di controllo
Schermo
Sensore segnale WiFi
On/Off
Modalità
Temperatura
Timer

57
IT
Telecomando
1 On/Off
2 Tasto modalità
3 Tasto temperatura
4 Timer
5 Blocco di sicurezza bambini
MESSA IN FUNZIONE E UTILIZZO
Prima dell’utilizzo vericare che il dispositivo e i suoi accessori non siano danneggiati.
Quando si apre il cartone si troveranno dei pezzi separati, dato che per spedire il
dispositivo alcuni elementi sono stati smontati. Visto che il dispositivo è composto
principalmente dal vetro, assicurarsi che sia in buono stato. Se si dovesse appurare
che è stato danneggiato durante il trasporto, bisognerà informare immediatamente il
produttore o il servizio d’assistenza.
Utilizzo
• Sistemare il dispositivo su una supercie stabile.
• Inserire la spina in una presa da 220 – 240 V ~ 50 Hz e posizionare l’interruttore
a lato del dispositivo su “I”. Il dispositivo emette un suono.
• Accendere il dispositivo premendo il tasto . Sullo schermo LE viene visualizzata
la temperatura della stanza. Toccando il pannello di controllo o il telecomando è
possibile impostare la potenza, la temperatura e l’ora.
• Spegnere il dispositivo e togliere la spina dalla presa se non viene utilizzato per un
periodo di tempo prolungato.
• Non coprire mai il dispositivo e non posizionarlo in docce o piscine.

58
IT
Accensione
Posizionare innanzitutto l’interruttore a lato del dispositivo su “I” e premere il tasto
per impostare la funzione. Sul lato superiore del pannello di controllo viene visualizzata
la temperatura della stanza. Il dispositivo funziona sul livello minimo di potenza.
Modalità
Premere il tasto modalità per regolare la potenza.
Impostazione della temperatura
Premere il tasto della temperatura per impostare la temperatura desiderata tra 5 °C e
40 °C. Ogni volta che si aziona il dispositivo viene visualizzata la temperatura interna.
Quando la temperatura ambiente raggiunge la temperatura impostata, il dispositivo
passa dal livello massimo a quello minimo. Se la temperatura della stanza è di 2 °C
maggiore rispetto a quella impostata, il dispositivo blocca il funzionamento. Quando la
temperatura scende di 2 °C, il dispositivo riprende il funzionamento indipendentemente
dalla temperatura da raggiungere impostata.
Timer
Si può impostare il timer in modo tale che il dispositivo si accenda o si spenga
automaticamente a proprio piacimento. E’ possibile impostare un lasso di intervallo tra
1 e 24 ore.
Blocco di sicurezza bambini
Se si tiene premuto per 3 secondi il tasto del blocco di sicurezza bambini sul
telecomando si disattivano tutti i tasti. Allo stesso modo è possibile disattivare il blocco
di sicurezza bambini. Se non si ha a portata di mano il telecomando, è possibile
tenere premuto per 5 secondi il tasto del riscaldamento sul pannello di controllo per
sbloccare/bloccare lo schermo.

59
IT
GESTIONE TRAMITE SMARTPHONE
Se si collega l‘apparecchio al WiFi, è possibile gestirlo comodamente con la relativa
applicazione Klarstein. L‘app non solo consente di controllare l´apparecchio da
remoto dal proprio smartphone, ma consente anche di accedere a ricette e ad altre
informazioni.
Per collegare il telefono al dispositivo Klarstein, procedere come segue:
1 Per prima cosa scaricare l‘app Klarstein scansionando il codice QR con lo
smartphone (vedere sotto) o scaricarla direttamente dall‘App Store o da Google
Play.
2 Accertarsi che lo smartphone sia connesso alla stessa rete WiFi a cui deve
collegarsi il dispositivo Klarstein.
3 Aprire l‘applicazione Klarstein.
4 Accedere con il proprio account. Se non si possiede ancora un account, registrarsi
nell‘app Klarstein.
5 Seguire le istruzioni contenute nell‘App.
App-Download
Utilizzare la funzione di scansione del telefono per eseguire la scansione del codice
QR e salvare l‘applicazione sullo smartphone.
Nota: L‘applicazione fornisce ulteriori informazioni su come utilizzarla e su come
connettersi al dispositivo non appena viene aperta per la prima volta.
iOS Android

60
IT
Risoluzione dei problemi di connessione
Se il dispositivo Klarstein non si trova nella WLAN, controllare quanto segue:
• Il dispositivo è collegato?
• La funzione WiFi del telefono è abilitata?
• La funzione WiFi del dispositivo Klarstein è attivata? (Seguire le istruzioni nell‘app)
• La password WLAN è stata immessa correttamente?
• Il router, il dispositivo Klarstein e lo smartphone sono nelle immediate vicinanze
durante il tentativo di connessione? (Idealmente a non più di 5 m di distanza)
• Se la banda da 2,4 GHz è stata disattivata nelle impostazioni del router wireless,
attivarla nelle impostazioni del router.
Nota: Per ulteriori informazioni, seguire le istruzioni nell‘app quando si congura la
connessione.
PULIZIA E MANUTENZIONE
• Spegnere il dispositivo prima di pulirlo e staccare la spina dalla presa. Lasciare che
il dispositivo si raffreddi completamente.
• Pulire regolarmente le uscite di ventilazione.
• Non utilizzare mai detergenti aggressivi o abrasivi.
• Pulire l’involucro esterno con un panno morbido umido. Non fare entrare liquidi nel
riscaldatore!
• Non utilizzare alcol, benzina, sostanze abrasive, cera per mobili o spazzole ruvide
per pulire il riscaldatore onde evitare che la supercie si danneggi o si logori.
• Se non si usa il riscaldatore per un periodo di tempo prolungato, conservare il
telecomando in un luogo sicuro e rimuovere le pile (per evitare che si corrodano).

61
IT
SMALTIMENTO
Se nel proprio paese si applicano le regolamentazioni
inerenti lo smaltimento di dispositivi elettrici ed elettronici,
questo simbolo sul prodotto o sulla confezione segnala che
questi prodotti non possono essere smaltiti con i ri uti normali
e devono essere portati a un punto di raccolta di dispositivi
elettrici ed elettronici. Grazie al corretto smaltimento dei
vecchi dispositivi si tutela il pianeta e la salute delle persone
da possibili conseguenze negative. Informazioni riguardanti il
riciclo e lo smaltimento di questi prodotti si ottengono presso
l’amministrazione locale oppure il servizio di gestione dei
ri uti domestici.
DICHIARAZIONE DI CONFORMITÀ
Produttore:
Chal-Tec GmbH, Wallstraße 16, 10179 Berlino, Germania.
Importatore per la Gran Bretagna:
Chal-Tec UK limited
Unit 6 Riverside Business Centre
Brighton Road
Shoreham-by-Sea
BN43 6RE
United Kingdom
La dichiarazione di conformità completa del produttore è
disponibile al seguente link: use.berlin/10035064


63
NL
Geachte klant,
hartelijk gefeliciteerd met de aanschaf van dit apparaat. Lees
de hierna volgende handleiding aandachtig door en volg de
instructies op om schade te voorkomen. Voor schade veroorzaakt
door het niet in acht nemen van de instructies of door onjuist
gebruik nemen wij geen verantwoordelijkheid. Scan de QR
code voor toegang tot de meest actuele gebruikershandleiding
en voor meer informatie rondom het artikel.
INHOUDSOPGAVE
Veiligheidsinstructies64
Productgegevens65
Installatie66
Display en functietoetsen68
Ingebruikname en bediening69
Bediening per smartphone71
Reiniging en onderhoud72
Instructies voor afvoer73
Conformiteitsverklaring73
TECHNISCHE GEGEVENS
Artikelnummer 10035064, 10035065
Stroomvoorziening 220 – 240 V
Frequentie 50/ 60 Hz
Vermogen 750 W
WiFi-norm
802.11 b/g/n
WiFi-frequentie
2,4 GHz
WiFi zendvermogen (max.)
20 dBm

64
NL
VEILIGHEIDSINSTRUCTIES
• Controleer voor de ingebruikname of de spanning op het stopcontact overeenkomt
met het vermogen van het apparaat en sluit het apparaat alleen aan als dit het
geval is.
• Wanneer de stroomkabel of de stekker beschadigd is laat u deze door een
gekwali ceerde kracht vervangen.
• Plaats het apparaat niet direct onder een stopcontact.
• Houdt een meter afstand tot brandbare materialen zoals meubels en gordijnen.
• Laat het apparaat niet zonder toezicht wanneer het in gebruik is.
• Laat het apparaat niet zonder toezicht wanneer het op het stroomnet is
aangesloten.
• Gebruik het apparaat buiten bereik van kinderen. Kinderen mogen het apparaat
alleen onder toezicht bedienen.
• Het apparaat is niet voor commercieel gebruik maar uitsluitend voor gebruik in
conventionele huishoudens en gelijkwaardige omgevingen.
• Gebruik het apparaat niet wanneer het een foutmelding aangeeft of op wat voor
manier dan ook beschadigd is.
• Reparaties mogen uitsluitend door gediplomeerd vakpersoneel worden uitgevoerd.
• Onjuiste of zelf uitgevoerde reparaties veroorzaken een risico op verwonding.
• Leg de stroomkabel niet onder een tapijt of loper.
• Let erop dat de stroomkabel niet langs scherpe randen of hete oppervlaktes ligt.
• Dek de haard niet af om oververhitting te voorkomen.
• Gebruik het apparaat niet met een externe timer, een stopcontact met
tijdschakelaar of een ander apparaat dat de haard automatisch aanzet en
uitschakelt.
• Dompel het apparaat niet in water of andere vloeistof(fen) onder.
• Gebruik het apparaat niet in de nabijheid van een bad, douche of zwembad.
• Gebruik het apparaat niet buitenshuis.
• Gebruik het apparaat niet met natte handen.
• Gebruik het apparaat niet op of in de nabijheid van hete oppervlaktes.
• Gebruik het apparaat niet wanneer de stroomkabel beschadigd is.
• Neem voordat u het apparaat schoonmaakt altijd de stekker uit het stopcontact en
laat het apparaat volledig afkoelen.
• Gebruik voor het reinigen geen schurende middelen.
• Gebruik alleen accessoires die nadrukkelijk door de fabrikant zijn goedgekeurd.
• Kinderen en personen met een beperkte lichamelijke en/of geestelijke gezondheid
mogen het apparaat alleen gebruiken wanneer ze van tevoren door een
toezichthoudend persoon uitvoerig met de veiligheidsvoorschriften en functies
vertrouwd zijn gemaakt.
• Let erop dat kinderen niet met het apparaat spelen.
LET OP
Verbrandingsgevaar! Sommige onderdelen kunnen heel heet worden.
Let erop dat u, uw kinderen, kwetsbare personen en huisdieren zich niet
branden.

65
NL
PRODUCTGEGEVENS
Artikelidenticatie 10035064
Aanduiding Symbol Waarde Eenheid Aanduiding Eenheid
Warmtevermogen Alleen voor individuele elektrische ruimteverwarmers:
regulering van de warmtetoevoer
Nominaal warmtevermogen P
nom
0,8
kW Handmatige regeling van de warmtetoevoer
met ingebouwde thermostaat
n.v.t.
Minimaal warmtevermogen
(richtwaarde)
P
min
k.A.
kW Handmatige regeling van de warmtetoevoer
met terugmelding van de kamer- en/ of externe
temperatuur
n.v.t.
Maximaal continue
warmtevermogen
P
max,c
0,8
kW Elektronische regeling van de warmtetoevoer
met terugmelding van de kamer- en/ of externe
temperatuur
n.v.t.
Hulpenergieverbruik
Warmteafgifte met ondersteuning van een
ventilator
n.v.t.
Bij nominaal warmtevermogen
(ventilator motor)
el
max
k.A. kW
Type warmtevermogen / Kamertemperatuurcontrole
Bij minimaal warmtevermogen
(ventilator motor)
el
min
k.A. kW Enkele warmtestand, geen
kamertemperatuurcontrole
nee
In stand-by modus el
SB
0,90
kW Twee of meer handmatig in te stellen standen,
geen kamertemperatuurcontrole
nee
Controle kamertemperatuur met mechanische
thermostaat
nee
Met elektronische kamertemperatuurcontrole nee
Met elektronische kamertemperatuurcontrole en
tijdregulering
nee
Met elektronische kamertemperatuurcontrole en
weekdagregulering
ja
Overige reguleringsopties
Kamertemperatuurcontrole met
aanwezigheidsherkenning
nee
Kamertemperatuurcontrole met open raam
detectie
ja
Met afstandsbedieningsoptie nee
Met adaptieve regeling van de start van de
verwarming
nee
Met bedrijfstijdbegrenzing nee
Met elektronische sensor nee
Contactinformatie Chal-Tec GmbH, Wallstraße 16, 10179, Berlijn, Duitsland

66
NL
INSTALLATIE
Installatiehandleiding
Wanneer u gereedschap tot uw beschikking heeft kunt u het apparaat installeren
volgens de in deze gebruikershandleiding genoemde procedure. Het is daarnaast ook
mogelijk om de verkoper, diens klantenservice of een gelijkwaardig gekwaliceerde
elektrotechnische installateur opdracht te geven het toestel te installeren.
Stap 1
Gebruik voor de installatie van het apparaat de positioneringskaart A1 (zie afbeelding
hieronder) met gaatjes om de markering van de installatie op de muur te tekenen
(de muur moet het gewicht van het apparaat kunnen dragen). Bij het tekenen van de
markering moet de horizontale kant van het karton parallel met de vloer geplaatst zijn.
Op de plaats van de markering boort u vier gaten met een doorsnede van 10 mm en
een diepte van niet minder dan 70 mm. Let erop dat het gat loodrecht op de muur staat.
Zorg ervoor dat de zijdelingse en de verticale afstand tussen twee gaten overeenkomen
met de weergave in de afbeelding hieronder:
A A1

67
NL
De afstand tussen de gaten moet zijn zoals hier onder aangegeven:
LET OP
Verwondingsgevaar! Om gevaarlijke situaties voor kleine kinderen te
vermijden, moet het apparaat zo worden geïnstalleerd dat de onderste
verwarmde rail zich 550 mm boven de vloer bevindt.

68
NL
Fixer de vier houders met de expansieschroef in de muur. De gexeerde houders kunnen
bewogen worden om de positie aan te passen zodat het glazen paneel kan worden
gexeerd.
Stap 2
Verwijder vervolgens het beschermende
folie aan de achterkant van het glas.
Fixeer daarna het glazen paneel aan de
reeds bevestigde wandhouders. Let erop
dat de bevestigde wandhouders kunnen
worden bewogen voor de installatie van
het glazen paneel. Draai aansluitend
de schroeven aan de kant van elke
afdekking vast (in totaal 4).
DISPLAY EN FUNCTIETOETSEN
Controlepaneel
Beeldscherm
Sensor wi signaal
Aan/ Uit
Modus
Temperatuur
Timer

69
NL
Afstandsbediening
1 Aan / Uit
2 Modus
3 Temperatuur
4 Timer
5 Kinderslot
INGEBRUIKNAME EN BEDIENING
Controleer voor het gebruik of het apparaat en de bijbehorende accessoires in goede
toestand verkeren.
Daar sommige elementen voor verzending in de fabriek worden gedemonteerd,
worden deze speciale elementen afzonderlijk van elkaar uit de verpakking gehaald.
Aangezien het toestel voornamelijk uit glas bestaat dient u, wanneer u het apparaat uit
de verpakking neemt, zorgvuldig te controleren of het in goede staat verkeert. Wanneer
u constateert dat het toestel tijdens het transport beschadigd is neemt u direct contact op
met de fabrikant of de klantenservice.
Gebruik
• Plaats het apparaat op een stabiel oppervlak.
• Plaats de stekker van het apparaat in een stopcontact met 220 – 240 V ~ 50 Hz
en zet de schakelaar, aan de zijkant van het apparaat, in positie “I”. U hoort een
pieptoon.
• Zet het apparaat aan door op de toets te drukken. Het LE beeldscherm laat
de kamertemperatuur zien. Door het aanraken van het controlepaneel of via de
afstandsbediening kunt u het vermogen, de temperatuur en de tijd instellen.
• Schakel het apparaat uit het neem de stekker uit het stopcontact wanneer deze
gedurende langere tijd niet gebruikt word.
• Dek het apparaat in geen geval af en plaats het niet in een doucheruimte of nabij
een zwembad.

70
NL
Aanzetten
Zet, om te beginnen, de netschakelaar van het apparaat, aan de zijkant van het toestel,
in positie “I”. Druk voor het instellen van de functie op de knop. In het bovenste deel
van het controlepanel wordt de kamertemperatuur weergegeven. Het apparaat is nu
actief op de laagste stand.
Modus
Druk voor het aanpassen van het vermogen op de modus-toets.
Temperatuurinstelling
Druk op de temperatuur-toets om de gewenste temperatuur binnen een bereik van
5°C – 40°C in te stellen. Telkens wanneer het apparaat aangezet wordt, wordt de
interne temperatuur weergegeven. Wanneer de kamertemperatuur de door u ingestelde
temperatuur bereikt wisselt het apparaat van de hoogste naar de laagste stand.
Wanneer de kamertemperatuur minimaal 2°C hoger is dan de ingestelde temperatuur
stopt het apparaat. Zodra de temperatuur weer met 2°C daalt schakelt het apparaat,
afhankelijk van de ingestelde temperatuur, zich weer in.
Timer
De timer kan zo ingesteld worden dat het apparaat op een gewenst tijdstip automatisch
aan of uit gaat. Hij kan met een tijdsinterval van 1 tot 24 uur worden geprogrammeerd.
Kinderslot
Wanneer u de kinderslot-toets op de afstandsbediening gedurende 3 seconden
ingedrukt houdt, worden alle toetsen geblokkeerd. U kunt het kinderslot op dezelfde
manier deactiveren. Wanneer u de afstandsbediening niet bij de hand heeft kunt u de
verwarmingstoets op het controlepaneel gedurende 5 seconden ingedrukt houden om
het beeldscherm te blokkeren / vrij te geven.

71
NL
BEDIENING PER SMARTPHONE
Wanneer u uw Klarstein toestel met uw wi netwerk thuis verbindt, kunt u het heel
eenvoudig via de daarbij horende Klarstein app bedienen. De app maakt het u niet
alleen mogelijk het apparaat via uw smartphone te bedienen maar biedt daarnaast
toegang tot, bijvoorbeeld, recepten en andere uitgebreide informatie.
Ga als volgt te werk om uw smartphone met uw Klarstein apparaat te verbinden:
1 Download eerst de Klarstein app door met uw smartphone de onderstaande QR
code te scannen of download deze direct vanuit de App store of via Google Play.
2 Verzeker uzelf ervan dat uw smartphone met hetzelfde wi netwerk verbonden is
als waarmee u uw Klarstein apparaat wilt verbinden.
3 Open de Klarstein applicatie.
4 Meldt u zich met uw account aan. Wanneer u nog geen account heeft registreert u
zich in de Klarstein app.
5 Volg de aanwijzingen in de app.
App download
Gebruik de scan-functie van uw mobiele telefoon om de QR code te scannen en sla de
app in uw smartphone op.
Tip: Verdere informatie met betrekking tot het gebruik van de app en ondersteuning
voor het tot stand brengen van een verbinding met uw toestel vindt u in de app zodra
u die voor het eerst opent.
iOS Android

72
NL
Probleemoplossing bij verbindingsproblemen
Wanneer uw Klarstein apparaat niet in uw wi systeem wordt gevonden controleert u
het volgende:
• Is het apparaat aangesloten?
• Is de wi functie van de smartphone geactiveerd?
• Is de wi functie van het Klarstein apparaat geactiveerd? (volg de aanwijzingen in
de app)
• Is het wi wachtwoord correct ingevoerd?
• Zijn de router, het Klarstein apparaat en de smartphone tijdens de
koppelingspoging in directe nabijheid van elkaar? (in het meest ideale geval niet
meer dan 5 m van elkaar verwijdert)
• Wanneer in de instellingen van uw wi router de 2,4 Ghz band gedeactiveerd is
activeert u deze in de routerinstellingen.
Tip: Voor meer ondersteuning volgt u de instructies van de app bij het tot stand
brengen van een verbinding.
REINIGING EN ONDERHOUD
• Voordat u met de reiniging begint schakelt u het apparaat uit en laat het volledig
afkoelen. Neem vervolgens de stekker uit het stopcontact.
• Reinig de ventilatieopeningen regelmatig.
• Gebruik voor het reinigen nooit agressieve of schurende schoonmaakmiddelen.
• Reinig de buitenkant met een zachte, vochtige doek. Let erop dat er geen vloeistof
in het toestel loopt!
• Gebruik geen alcohol, benzine, schuurmiddel, meubelpoets of grove borstels voor
het reinigen van het verwarmingstoestel. Dit kan tot beschadiging en slijtage van het
oppervlak leiden.
• Wanneer u de verwarming gedurende langere tijd niet gebruikt neemt u de
batterijen uit de afstandsbdiening (om corrosie te voorkomen) en bewaart u de
afstandsbediening op een droge, veilige plaats.

73
NL
INSTRUCTIES VOOR AFVOER
Wanneer in uw land een wettelijke regeling geldt voor het
afvoeren van elektrische en elektronische apparaten, wijst
het hiernaast afgebeelde symbool, op het product zelf of op
de verpakking, erop dat het betreffende product niet met het
huisvuil afgevoerd mag worden. In plaats daarvan dient het
naar een centraal depot voor het recyclen van elektrische en
elektronische apparaten te worden gebracht. Door het afval
volgens de voorschriften af te voeren beschermt u het milieu
en de gezondheid van uw medemensen tegen de negatieve
consequenties. Informatie over recycling en de afvoer van dit
product ontvangt u van uw gemeente of van uw plaatselijke
grondstoffen- en afvaldienst.
CONFORMITEITSVERKLARING
Fabrikant:
Chal-Tec GmbH, Wallstraße 16, 10179 Berlijn, Duitsland.
Importeur voor Groot-Brittannië:
Chal-Tec UK limited
Unit 6 Riverside Business Centre
Brighton Road
Shoreham-by-Sea
BN43 6RE
United Kingdom
De volledige conformiteitsverklaring van de fabrikant is te
vinden onder de volgende link: use.berlin/10035064


