Vibratory Corded Clipper
Model No. DS, ST, 850, SST & STX
Rotary Corded Clipper
Model No. 8483
Operating Manual
Manual De Operación
Manual D’Utilisation
Includes But Not Limited To:
All Wahl, 5 Star & Sterling Vibratory Clippers
and Rotary Clippers Pilot & Nugget
IMPORTANT
SAFEGUARDS
When using your electrical appliance, basic precautions should always
be followed, including the following:
READ ALL INSTRUCTIONS AND SAFEGUARDS
BEFORE USING THIS APPLIANCE.
DANGER
To reduce the risk of death or injury by electric shock:
1. Do not reach for an appliance that has fallen into water. Unplug
immediately from the outlet. Note: Some electrical parts inside the
appliance are electrically live, even with the switch “OFF.”
2. Do not use while bathing or in a shower.
3. Do not place or store appliance where it can fall or be pulled into a
tub or sink. Do not place in or drop into water or other liquid.
4. Always unplug this appliance before cleaning.
5. Always unplug this appliance from the electrical outlet
immediately after using.
WARNING
To reduce the risk of burns, electrical shock or injury to persons:
1. This appliance can be used by children aged from 14 years and
above and persons with reduced physical, sensory or mental
capabilities or lack of experience and knowledge if they have been
given supervision or instruction, by a person responsible for their
safety, concerning the use of the appliance in a safe way and
understand the hazards involved. Children should be supervised to
ensure that they do not play with the appliance. Cleaning and user
maintenance shall not be made by children without supervision.
2. Use this appliance only for its intended use as described in this manual.
Do not use attachments not recommended by the manufacturer.
3. Never operate this appliance if it has a damaged cord or plug, if it is
not working properly, if it has been dropped or damaged, or if it
has been dropped into water. Return the appliance to Wahl Clipper
Corporation for examination and repair.
4. Keep the cord away from heated surfaces.
5. Never operate the appliance with the air openings blocked or while
on a soft combustible surface, such as a bed or couch, where air
openings may be blocked. Keep the air openings (if any) free from
lint, hair or the like.
6. Do not use outdoors or operate where aerosol (spray) products are
being used or where oxygen is being administered.
7. Never drop or insert any object into any opening.
8. Do not use this appliance with a damaged or broken comb nor with
teeth missing from the blades, as injury may occur. Before use,
make certain blades are aligned properly. (See Clipper or Trimmer
Care Instructions. May not be applicable for all appliances.)
9. During use, do not place or leave the appliance where it is expected
to be subject to damage by an animal, or exposed to weather.
10. To disconnect, turn all controls to “OFF,” then remove plug from outlet.
11. Turn all controls to “OFF” before placing on or removing blades or
attachments.
12. An appliance with a permanently attached cord should never be
left unattended when plugged in.
13. Keep this appliance dry.
14. If your appliance is grounded (see Fig. 1 for grounded plug), connect
it to a properly grounded outlet only. (See Grounding Instructions.)
SAVE THESE
INSTRUCTIONS
THIS APPLIANCE IS FOR COMMERCIAL USE ONLY
TECHNICAL SUPPORT AND QUESTIONS
Phone: 1-800-776-9245
Email: [email protected]
Website: www.wahlpro.com
Wahl Clipper Corporation offers a limited warranty on this product.
Please visit our website for full warranty terms.
© WAHL CLIPPER CORPORATION
Sterling, IL USA
FORM #92566-601 Printed in USA
For servicing, please ship your product prepaid to:
Wahl Service Center
3001 North Locust Street
Sterling, IL 61081
FIND US ON SOCIAL MEDIA
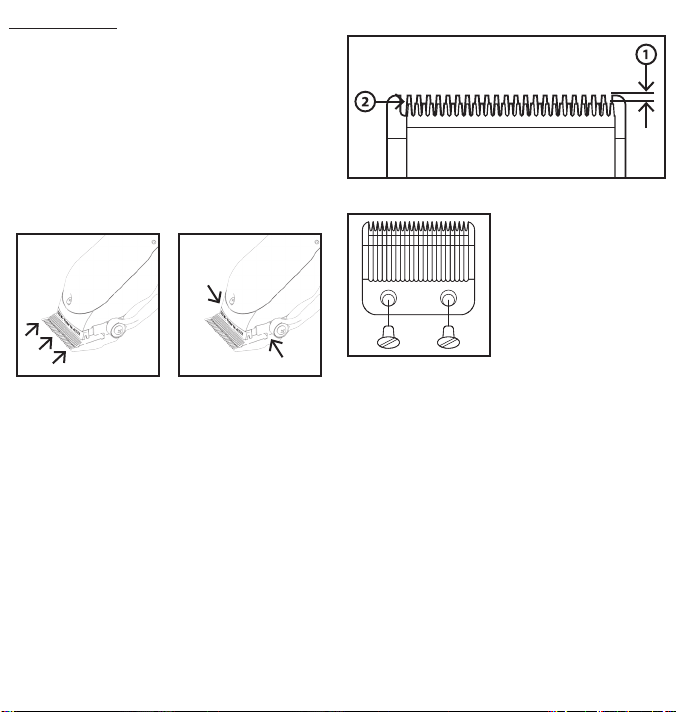
BLADE ALIGNMENT DIAGRAM
ALIGNING 2 HOLE BLADES
Slightly loosen both blade screws at
base of stationary blade, just
enough to be able to shift the
blade. Move blade adjustment lever
to the full forward position. With
the blade screws loosened, the
bottom blade can be aligned with
the top blade.
1. Points of the top blade teeth should be 1/32” to 1/16”
(.79mm to 1.59mm) back and parallel to the points of bottom
blade teeth. This is important so the clipper doesn’t cut too close
or allow the moving top blade to touch the skin. (See Blade
Alignment Diagram.)
2. Extreme left hand tooth of top blade must be on the first small
tooth of bottom blade. (See Blade Alignment Diagram.)
3. After blade is aligned, tighten screws.
4. Plug clipper in, turn switch ON and OFF a couple of times, and
then recheck alignment of blades.
CLIPPER USE
USING CORDED CLIPPERS
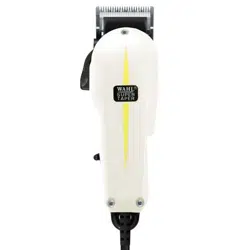
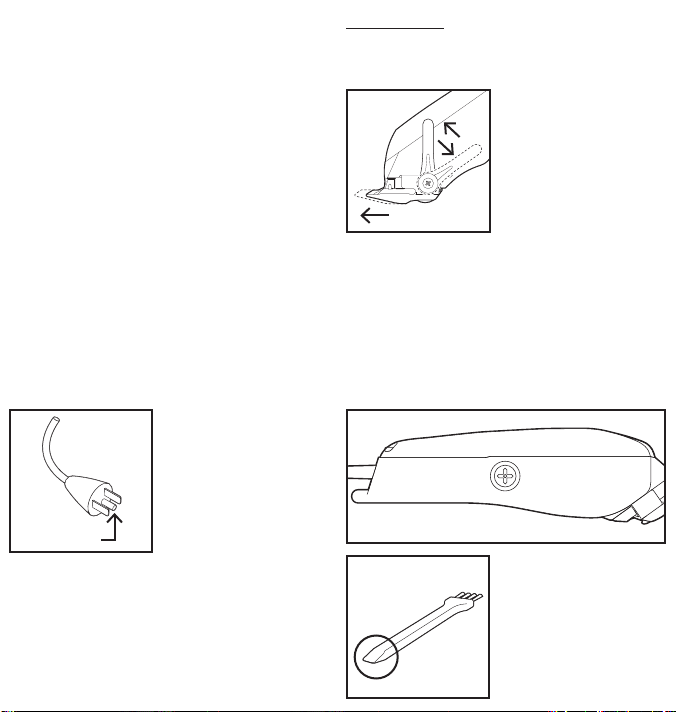
TAPER LEVER
Some clippers are equipped with an
adjustable taper lever that changes
the closeness of your cut. When the
lever is in the uppermost position, the
blades will give the closest cut.
Pushing the lever downward
gradually increases the cutting length.
(Not found on all clipper models.)
POWER ADJUSTMENT SCREW
MAXIMIZING POWER TO THE BLADES
To adjust power, turn power screw in clockwise direction until clipper
makes a noise caused by the arm hitting the coil. Then, slowly turn
power screw out (counter-clockwise) just until noise stops then
continue turning 1/8 to 1/4 of a turn more, this is maximum power.
(Not found on all clipper models.)
POWER ADJUSTMENT SCREW DIAGRAM
QUICK TIP
Use the brush handle tip to
adjust the power screw.
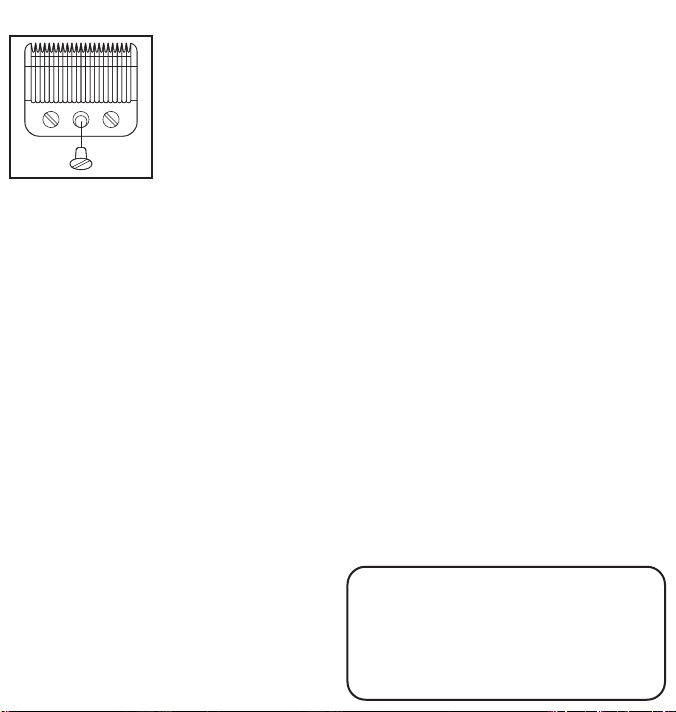
CLIPPER CARE
BLADE CARE AND OILING
In order to ensure that you get the most life and performance out of
the clipper, we recommend oiling daily. To oil it properly, the clipper
should be held so the blades are in a downward position as shown.
Place one drop of Wahl oil in the center of the movable top blade
and one drop of oil on each end of the top blade. Turn clipper switch
ON and run to distribute the oil. When oil is evenly distributed, turn
clipper OFF and wipe off excess oil with a soft cloth. Periodically oil
heel of blade (shown in image) to reduce blade friction.
(USE WAHL OIL ONLY)
WIPE OFF EXCESS OIL so it does not run into the motor compartment.
Oil in the motor compartment will eventually lead to poor motor performance.
Blades should be oiled after using disinfectant or sanitizing solution.
UNIT CARE
Use a clean cloth (dry or dampened with water).
DO NOT USE bleach, benzene or thinner to clean the unit.
CORD CARE
The cord should never be used to pull the clipper. Freedom of
movement needs to be maintained. Care should be used to keep the
cord untwisted, and undamaged. When stored, the cord should be
coiled and placed neatly in a dry place.
ALIGNING 3 HOLE BLADES
Slightly loosen the three blade
screws of the stationary blade, just
enough to be able to shift the
blade. Move blade adjustment lever
to the full forward position. With
the blade screws loosened, the
bottom blade can be aligned with
the top blade.
1. Points of the top blade teeth should be 1/32” to 1/16”
(.79mm to 1.59mm) back and parallel to the points of bottom
blade teeth. This is important so the clipper doesn’t cut too close
or allow the moving top blade to touch the skin. (See Blade
Alignment Diagram.)
2. Extreme left hand tooth of top blade must be on the first small
tooth of bottom blade. (See Blade Alignment Diagram.)
3. After blade is aligned, tighten screws.
4. Plug clipper in, turn switch ON and OFF a couple of times, and
then recheck alignment of blades.
TROUBLESHOOTING
If your corded clipper does not seem to be operating properly, please
check the following:
• Check the outlet’s current by plugging another appliance
(one you know is in proper working condition) into the outlet.
• Make sure the unit is not connected to a power source that turns
itself off when lights are turned off.
• Make sure the unit is clean and free of hair or other contaminants.
• Verify that the blade assembly moves freely and is mounted properly.
If you still encounter problems with your unit, send your unit to
Wahl Clipper Corporation with a note explaining the problem.
Wahl Clipper Corporation offers a limited warranty on this product.
Please visit our website for full warranty terms.
For servicing, please ship your product prepaid to:
Wahl Service Center
3001 North Locust Street
Sterling, IL 61081
POWER ADJUSTMENT SCREW
(SEE POWER ADJUSTMENT SCREW DIAGRAM)
TORNILLO DE AJUSTE DE POTENCIA
(CONSULTE EL DIAGRAMA DEL TORNILLO DE AJUSTE DE POTENCIA)
VIS DE RÉGLAGE DE LA PUISSANCE
(VOIR LE DIAGRAMME DE LA VIS DE RÉGLAGE DE LA PUISSANCE)
CLIPPER LID
TAPA DE LA CORTADORA
COUVERCLE DE LA TONDEUSE
CLIPPER BLADE SET
CONJUNTO DE CUCHILLAS DE LA CORTADORA
ENSEMBLE DE LAMES DE LA TONDEUSE
MOVEABLE TOP BLADE
CUCHILLA SUPERIOR MÓVIL
LAME SUPÉRIEURE AMOVIBLE
STATIONARY BOTTOM BLADE
CUCHILLA INFERIOR FIJA
LAME INFÉRIEURE FIXE
BLADE SCREWS
TORNILLOS DE CUCHILLAS
VIS DE LAMES
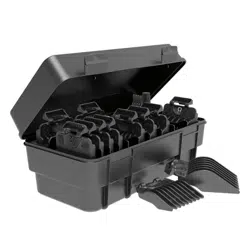
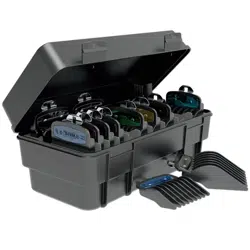
CLIPPER CASE
ESTUCHE DE LA CORTADORA
ÉTUI À TONDEUSE
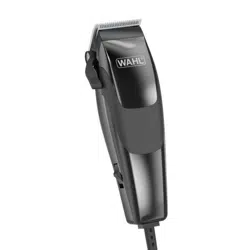
ON/OFF SWITCH
INTERRUPTOR DE ENCENDIDO/APAGADO
INTERRUPTEUR « MARCHE/ARRÊT » (ON/OFF)
POWER CORD
CABLE DE ALIMENTACIÓN
CORDON D’ALIMENTATION
HANGING LOOP
(USED FOR STORING)
LAZO PARA COLGAR
(SE USA PARA ALMACENAMIENTO)
ANNEAU DE SUSPENSION
(UTILISÉ POUR LE RANGEMENT)
BLADE ADJUSTMENT LEVER
(SHOWN IN DOWN POSITION GIVING BLADE LONGEST CUTTING LENGTH)
PALANCA DE AJUSTE DE LAS CUCHILLAS
(SE MUESTRA EN LA POSICIÓN ABAJO, QUE BRINDA LA LONGITUD DE
CORTE MÁS LARGA DE LAS CUCHILLAS)
LEVIER DE RÉGLAGE DE LA LAME
(ILLUSTRÉ EN POSITION ABAISSÉE, CE QUI DÉMONTRE LA LONGUEUR DE
COUPE LA PLUS LONGUE DE LA LAME)
GROUNDING INSTRUCTIONS
(Grounding Instructions only apply if the appliance has a grounding pin
as shown in Figure 1.) This appliance should be grounded. In the
event of an electrical short circuit, grounding reduces the risk of
electric shock by providing an escape wire for the electric current.
This appliance is equipped with a cord having a grounding wire with
an appropriate grounding plug. The plug must be plugged into an
outlet that is properly installed and grounded in accordance with all
local codes and ordinances.
DANGER – Improper use of the grounding plug can result in a
risk of electric shock.
If repair or replacement of the cord or plug is necessary, do not
connect the grounding wire to either flat-blade terminal. The wire
with insulation having an outer surface that is green with or without
yellow stripes is the grounding wire. Check with a qualified
electrician or serviceman if the grounding instructions are not
completely understood, or if in doubt as to whether the appliance is
properly grounded. Do not modify the plug provided; if it will not fit
the outlet, have the proper outlet installed by a qualified electrician.
FIGURE 1
GROUNDING
PIN
PERIODICALLY OIL
HEEL OF BLADE
3 STEP SYSTEM

Vibratory Corded Clipper
Model No. DS, ST, 850, SST & STX
Rotary Corded Clipper
Model No. 8483
Operating Manual
Manual De Operación
Manual D’Utilisation
Includes But Not Limited To:
All Wahl, 5 Star & Sterling Vibratory Clippers
and Rotary Clippers Pilot & Nugget
IMPORTANT
SAFEGUARDS
When using your electrical appliance, basic precautions should always
be followed, including the following:
READ ALL INSTRUCTIONS AND SAFEGUARDS
BEFORE USING THIS APPLIANCE.
DANGER
To reduce the risk of death or injury by electric shock:
1. Do not reach for an appliance that has fallen into water. Unplug
immediately from the outlet. Note: Some electrical parts inside the
appliance are electrically live, even with the switch “OFF.”
2. Do not use while bathing or in a shower.
3. Do not place or store appliance where it can fall or be pulled into a
tub or sink. Do not place in or drop into water or other liquid.
4. Always unplug this appliance before cleaning.
5. Always unplug this appliance from the electrical outlet
immediately after using.
WARNING
To reduce the risk of burns, electrical shock or injury to persons:
1. This appliance can be used by children aged from 14 years and
above and persons with reduced physical, sensory or mental
capabilities or lack of experience and knowledge if they have been
given supervision or instruction, by a person responsible for their
safety, concerning the use of the appliance in a safe way and
understand the hazards involved. Children should be supervised to
ensure that they do not play with the appliance. Cleaning and user
maintenance shall not be made by children without supervision.
2. Use this appliance only for its intended use as described in this manual.
Do not use attachments not recommended by the manufacturer.
3. Never operate this appliance if it has a damaged cord or plug, if it is
not working properly, if it has been dropped or damaged, or if it
has been dropped into water. Return the appliance to Wahl Clipper
Corporation for examination and repair.
4. Keep the cord away from heated surfaces.
5. Never operate the appliance with the air openings blocked or while
on a soft combustible surface, such as a bed or couch, where air
openings may be blocked. Keep the air openings (if any) free from
lint, hair or the like.
6. Do not use outdoors or operate where aerosol (spray) products are
being used or where oxygen is being administered.
7. Never drop or insert any object into any opening.
8. Do not use this appliance with a damaged or broken comb nor with
teeth missing from the blades, as injury may occur. Before use,
make certain blades are aligned properly. (See Clipper or Trimmer
Care Instructions. May not be applicable for all appliances.)
9. During use, do not place or leave the appliance where it is expected
to be subject to damage by an animal, or exposed to weather.
10. To disconnect, turn all controls to “OFF,” then remove plug from outlet.
11. Turn all controls to “OFF” before placing on or removing blades or
attachments.
12. An appliance with a permanently attached cord should never be
left unattended when plugged in.
13. Keep this appliance dry.
14. If your appliance is grounded (see Fig. 1 for grounded plug), connect
it to a properly grounded outlet only. (See Grounding Instructions.)
SAVE THESE
INSTRUCTIONS
THIS APPLIANCE IS FOR COMMERCIAL USE ONLY
TECHNICAL SUPPORT AND QUESTIONS
Phone: 1-800-776-9245
Email: [email protected]
Website: www.wahlpro.com
Wahl Clipper Corporation offers a limited warranty on this product.
Please visit our website for full warranty terms.
© WAHL CLIPPER CORPORATION
Sterling, IL USA
FORM #92566-601 Printed in USA
For servicing, please ship your product prepaid to:
Wahl Service Center
3001 North Locust Street
Sterling, IL 61081
FIND US ON SOCIAL MEDIA
BLADE ALIGNMENT DIAGRAM
ALIGNING 2 HOLE BLADES
Slightly loosen both blade screws at
base of stationary blade, just
enough to be able to shift the
blade. Move blade adjustment lever
to the full forward position. With
the blade screws loosened, the
bottom blade can be aligned with
the top blade.
1. Points of the top blade teeth should be 1/32” to 1/16”
(.79mm to 1.59mm) back and parallel to the points of bottom
blade teeth. This is important so the clipper doesn’t cut too close
or allow the moving top blade to touch the skin. (See Blade
Alignment Diagram.)
2. Extreme left hand tooth of top blade must be on the first small
tooth of bottom blade. (See Blade Alignment Diagram.)
3. After blade is aligned, tighten screws.
4. Plug clipper in, turn switch ON and OFF a couple of times, and
then recheck alignment of blades.
CLIPPER USE
USING CORDED CLIPPERS
TAPER LEVER
Some clippers are equipped with an
adjustable taper lever that changes
the closeness of your cut. When the
lever is in the uppermost position, the
blades will give the closest cut.
Pushing the lever downward
gradually increases the cutting length.
(Not found on all clipper models.)
POWER ADJUSTMENT SCREW
MAXIMIZING POWER TO THE BLADES
To adjust power, turn power screw in clockwise direction until clipper
makes a noise caused by the arm hitting the coil. Then, slowly turn
power screw out (counter-clockwise) just until noise stops then
continue turning 1/8 to 1/4 of a turn more, this is maximum power.
(Not found on all clipper models.)
POWER ADJUSTMENT SCREW DIAGRAM
QUICK TIP
Use the brush handle tip to
adjust the power screw.
CLIPPER CARE
BLADE CARE AND OILING
In order to ensure that you get the most life and performance out of
the clipper, we recommend oiling daily. To oil it properly, the clipper
should be held so the blades are in a downward position as shown.
Place one drop of Wahl oil in the center of the movable top blade
and one drop of oil on each end of the top blade. Turn clipper switch
ON and run to distribute the oil. When oil is evenly distributed, turn
clipper OFF and wipe off excess oil with a soft cloth. Periodically oil
heel of blade (shown in image) to reduce blade friction.
(USE WAHL OIL ONLY)
WIPE OFF EXCESS OIL so it does not run into the motor compartment.
Oil in the motor compartment will eventually lead to poor motor performance.
Blades should be oiled after using disinfectant or sanitizing solution.
UNIT CARE
Use a clean cloth (dry or dampened with water).
DO NOT USE bleach, benzene or thinner to clean the unit.
CORD CARE
The cord should never be used to pull the clipper. Freedom of
movement needs to be maintained. Care should be used to keep the
cord untwisted, and undamaged. When stored, the cord should be
coiled and placed neatly in a dry place.
ALIGNING 3 HOLE BLADES
Slightly loosen the three blade
screws of the stationary blade, just
enough to be able to shift the
blade. Move blade adjustment lever
to the full forward position. With
the blade screws loosened, the
bottom blade can be aligned with
the top blade.
1. Points of the top blade teeth should be 1/32” to 1/16”
(.79mm to 1.59mm) back and parallel to the points of bottom
blade teeth. This is important so the clipper doesn’t cut too close
or allow the moving top blade to touch the skin. (See Blade
Alignment Diagram.)
2. Extreme left hand tooth of top blade must be on the first small
tooth of bottom blade. (See Blade Alignment Diagram.)
3. After blade is aligned, tighten screws.
4. Plug clipper in, turn switch ON and OFF a couple of times, and
then recheck alignment of blades.
TROUBLESHOOTING
If your corded clipper does not seem to be operating properly, please
check the following:
• Check the outlet’s current by plugging another appliance
(one you know is in proper working condition) into the outlet.
• Make sure the unit is not connected to a power source that turns
itself off when lights are turned off.
• Make sure the unit is clean and free of hair or other contaminants.
• Verify that the blade assembly moves freely and is mounted properly.
If you still encounter problems with your unit, send your unit to
Wahl Clipper Corporation with a note explaining the problem.
Wahl Clipper Corporation offers a limited warranty on this product.
Please visit our website for full warranty terms.
For servicing, please ship your product prepaid to:
Wahl Service Center
3001 North Locust Street
Sterling, IL 61081
POWER ADJUSTMENT SCREW
(SEE POWER ADJUSTMENT SCREW DIAGRAM)
TORNILLO DE AJUSTE DE POTENCIA
(CONSULTE EL DIAGRAMA DEL TORNILLO DE AJUSTE DE POTENCIA)
VIS DE RÉGLAGE DE LA PUISSANCE
(VOIR LE DIAGRAMME DE LA VIS DE RÉGLAGE DE LA PUISSANCE)
CLIPPER LID
TAPA DE LA CORTADORA
COUVERCLE DE LA TONDEUSE
CLIPPER BLADE SET
CONJUNTO DE CUCHILLAS DE LA CORTADORA
ENSEMBLE DE LAMES DE LA TONDEUSE
MOVEABLE TOP BLADE
CUCHILLA SUPERIOR MÓVIL
LAME SUPÉRIEURE AMOVIBLE
STATIONARY BOTTOM BLADE
CUCHILLA INFERIOR FIJA
LAME INFÉRIEURE FIXE
BLADE SCREWS
TORNILLOS DE CUCHILLAS
VIS DE LAMES
CLIPPER CASE
ESTUCHE DE LA CORTADORA
ÉTUI À TONDEUSE
ON/OFF SWITCH
INTERRUPTOR DE ENCENDIDO/APAGADO
INTERRUPTEUR « MARCHE/ARRÊT » (ON/OFF)
POWER CORD
CABLE DE ALIMENTACIÓN
CORDON D’ALIMENTATION
HANGING LOOP
(USED FOR STORING)
LAZO PARA COLGAR
(SE USA PARA ALMACENAMIENTO)
ANNEAU DE SUSPENSION
(UTILISÉ POUR LE RANGEMENT)
BLADE ADJUSTMENT LEVER
(SHOWN IN DOWN POSITION GIVING BLADE LONGEST CUTTING LENGTH)
PALANCA DE AJUSTE DE LAS CUCHILLAS
(SE MUESTRA EN LA POSICIÓN ABAJO, QUE BRINDA LA LONGITUD DE
CORTE MÁS LARGA DE LAS CUCHILLAS)
LEVIER DE RÉGLAGE DE LA LAME
(ILLUSTRÉ EN POSITION ABAISSÉE, CE QUI DÉMONTRE LA LONGUEUR DE
COUPE LA PLUS LONGUE DE LA LAME)
GROUNDING INSTRUCTIONS
(Grounding Instructions only apply if the appliance has a grounding pin
as shown in Figure 1.) This appliance should be grounded. In the
event of an electrical short circuit, grounding reduces the risk of
electric shock by providing an escape wire for the electric current.
This appliance is equipped with a cord having a grounding wire with
an appropriate grounding plug. The plug must be plugged into an
outlet that is properly installed and grounded in accordance with all
local codes and ordinances.
DANGER – Improper use of the grounding plug can result in a
risk of electric shock.
If repair or replacement of the cord or plug is necessary, do not
connect the grounding wire to either flat-blade terminal. The wire
with insulation having an outer surface that is green with or without
yellow stripes is the grounding wire. Check with a qualified
electrician or serviceman if the grounding instructions are not
completely understood, or if in doubt as to whether the appliance is
properly grounded. Do not modify the plug provided; if it will not fit
the outlet, have the proper outlet installed by a qualified electrician.
FIGURE 1
GROUNDING
PIN
PERIODICALLY OIL
HEEL OF BLADE
3 STEP SYSTEM

RESOLUCIÓN DE PROBLEMAS
Si la cortadora con cable no parece estar funcionando, verifique lo
siguiente:
• Verifique la corriente del tomacorriente enchufando otro aparato
(uno que sepa que funciona bien) en el tomacorriente.
• Asegúrese de que la unidad no esté conectada a una fuente de
alimentación que se apague cuando se apaguen las luces.
• Asegúrese de que la unidad estén limpios y libres de cabello u
otros contaminantes.
• Verifique que el conjunto de cuchillas se mueva libremente y esté
montado en forma correcta.
Si igual experimenta problemas con su unidad, envíela junto a
Wahl Clipper Corporation con una nota describiendo el problema.
Wahl Clipper Corporation ofrece una garantía limitada para este
producto. Para conocer todos los términos de garantía, visite nuestro
sitio web.
ESSUYEZ L’EXCÈS D’HUILE pour ne pas qu’elle s’infiltre dans le
compartiment du moteur. Si de l’huile se retrouve dans le
compartiment du moteur, cela pourrait en diminuer le rendement.
Les lames devraient être huilées après utilisation de
désinfectant ou de solution d’assainissement.
ENTRETIEN DE L’APPAREIL
Utilisez un chiffon propre (sec ou humecté avec de l’eau).
NE PAS utiliser de javellisant, de benzène ou de solvant pour
nettoyer l’appareil.
ENTRETIEN DU CORDON
Il ne faut jamais se servir du fil pour tirer la tondeuse. La liberté de
mouvement doit être maintenue. Il faut prendre soin de ne pas tordre
le cordon ou gêner son déplacement. Pour l’entreposage, le cordon
devrait être enroulé et placé soigneusement dans un endroit sec.
DIAGRAMME D’ALIGNEMENT DES LAMES
ALIGNEMENT DES LAMES À 2 TROUS
Desserrez légèrement les deux vis à
la base de la lame fixe, tout juste
assez pour que vous soyez en mesure
de la déplacer. Déplacez le levier de
réglage de la lame complètement
vers l’avant. Une fois les vis
desserrées, la lame inférieure peut
être alignée avec la lame supérieure.
1. Les pointes des dents de la lame supérieure devraient être de
0,79 mm à 1,59 mm (1/32 po à 1/16 po) vers l’arrière et
parallèles aux pointes des dents de la lame inférieure. C’est
important, car cela permet d’empêcher la tondeuse de couper
trop près et la lame supérieure amovible de toucher la peau.
(Voir le Diagramme d’alignement des lames.)
2. La dent située à l’extrême gauche de la lame supérieure doit se
superposer à la première petite dent de la lame inférieure. (Voir
le Diagramme d’alignement des lames.)
3. Une fois la lame bien alignée, resserrez les vis.
4. Branchez la tondeuse, allumez et éteignez-la à quelques reprises,
puis revérifiez l’alignement des lames.
ALIGNEMENT DES LAMES À 3 TROUS
Desserrez légèrement les trois vis de
la lame fixe, tout juste assez pour
que vous soyez en mesure de la
déplacer. Déplacez le levier de
réglage de la lame complètement
vers l’avant. Une fois les vis
desserrées, la lame inférieure peut
être alignée avec la lame supérieure.
1. Les pointes des dents de la lame supérieure devraient être de
0,79 mm à 1,59 mm (1/32 po à 1/16 po) vers l’arrière et
parallèles aux pointes des dents de la lame inférieure. C’est
important, car cela permet d’empêcher la tondeuse de couper
trop près et la lame supérieure amovible de toucher la peau.
(Voir le Diagramme d’alignement des lames.)
2. La dent située à l’extrême gauche de la lame supérieure doit se
superposer à la première petite dent de la lame inférieure.
(Voir le Diagramme d’alignement des lames.)
3. Une fois la lame bien alignée, resserrez les vis.
4. Branchez la tondeuse, allumez et éteignez-la à quelques reprises,
puis revérifiez l’alignement des lames.
DÉPANNAGE
Si votre tondeuse avec cordon ne semble pas fonctionner, veuillez
vérifier ce qui suit :
• Vérifiez que le courant de la prise d’alimentation fonctionne en y
branchant un autre appareil (que vous savez en bon état de
fonctionner).
• Assurez-vous que l’appareil n’est pas branché à une source
d’alimentation qui s’arrête automatiquement lorsque les
lumières sont éteintes.
• Assurez-vous que l’appareil est propre et exempt de poils ou
d’autres saletés.
• Assurez-vous que l’assemblage des lames se déplace librement
et est fixé correctement.
Si votre appareil vous pose toujours des problèmes, envoyez-le à
Wahl Clipper Corporation avec une note expliquant le problème.
Wahl Clipper Corporation offre une garantie limitée sur ce produit.
Veuillez consulter notre site Web pour obtenir toutes les modalités
de la garantie.
UTILISATION DE LA TONDEUSE
UTILISATION DE TONDEUSES AVEC CORDON
LEVIER D’EFFILAGE
Certaines tondeuses sont dotées
d’un levier d’effilage réglable qui
permet d’ajuster la longueur de
votre coupe. Lorsque le levier est
dans sa position la plus haute, les
lames vous procureront la coupe la
plus courte. Si vous pressez sur le
levier vers le bas, ceci augmente
graduellement la longueur de
coupe. (N’est pas disponible sur tous
les modèles de tondeuses.)
VIS DE RÉGLAGE DE LA PUISSANCE
MAXIMISATION DE LA PUISSANCE DES LAMES
Pour régler la puissance, tournez la vis de puissance dans le sens
horaire jusqu’à ce que le son du manche frappant la bobine se fasse
entendre. Ensuite, tournez lentement la vis de puissance dans le sens
antihoraire jusqu’à ce que le son s’arrête, puis continuez d’un
huitième ou d’un quart de tour afin d’atteindre la puissance
maximale. (N’est pas disponible sur tous les modèles de tondeuses.)
DIAGRAMME DE LA VIS DE RÉGLAGE DE LA PUISSANCE
CONSEIL RAPIDE
Utilisez la pointe du manche de
la brosse pour régler la vis
d’alimentation.
ENTRETIEN DE LA TONDEUSE
ENTRETIEN ET HUILAGE DES LAMES
Afin de tirer le maximum de votre tondeuse en matière de durée de
vie et de rendement, nous vous recommandons de la huiler chaque
jour. Pour bien la huiler, il faut tenir la tondeuse de sorte que les
lames soient orientées vers le bas, comme il est illustré. Versez une
goutte d’huile Wahl au centre de la lame supérieure amovible et une
goutte à chaque extrémité de la lame supérieure. Mettez
l’interrupteur de la tondeuse sur la position « marche » (ON ») et
faites-la fonctionner afin que l’huile se répartisse uniformément. Une
fois cela effectué, éteignez la tondeuse et essuyez l’excès d’huile à
l’aide d’un linge doux. Huilez périodiquement le talon de la lame
(illustré dans l’image) pour réduire le frottement sur la lame.
(UTILISEZ UNIQUEMENT DE L’HUILE WAHL)
USO DE LA CORTADORA
USO DE CORTADORAS CON CABLE
PALANCA CÓNICA
Algunas cortadoras vienen con una
palanca cónica ajustable que
modifica la proximidad de corte.
Cuando coloca la palanca en la
posición más arriba, las cuchillas
realizan un corte más al ras. Si
empuja la palanca hacia abajo,
aumenta gradualmente la longitud
de corte. (No está presente en todos
los modelos de cortadora.)
TORNILLO DE AJUSTE DE POTENCIA
MAXIMIZA LA POTENCIA SUMINISTRADA A LAS CUCHILLAS
Para ajustar la potencia, gire el tornillo de potencia hacia la derecha
hasta que la cortadora emita un ruido causado porque el brazo
golpea la bobina. A continuación, gire lentamente el tornillo de
potencia hacia fuera (hacia la izquierda) solo hasta que el ruido cese
y luego, siga girando 1/8 a 1/4 de vuelta más; esa es la potencia
máxima. (No está presente en todos lo modelos de cortadora.)
DIAGRAMA DEL TORNILLO DE AJUSTE DE POTENCIA
CONSEJO RÁPIDO
Use la punta del mango del
cepillo para ajustar el tornillo
de potencia.
CUIDADO DE LA CORTADORA
CUIDADO Y LUBRICACIÓN DE LA CORTADORA
Para garantizar una vida útil más prolongada y un rendimiento
óptimo de la cortadora, le recomendamos lubricarla a diario. Para
lubricarla correctamente, debe sostenerla de tal manera que las
cuchillas queden hacia abajo, como muestra la ilustración. Vierta una
gota de aceite Wahl en el centro de la cuchilla móvil superior y otra
en cada extremo de la cuchilla superior. Encienda la cortadora y
hágala funcionar para que se distribuya el aceite. Después de que el
aceite se distribuya de manera uniforme, apague la cortadora y
limpie el exceso de aceite con un paño suave. Lubrique regularmente
el mango de la cuchilla (se muestra en la imagen) para reducir la
fricción de la cuchilla.
(USE EXCLUSIVAMENTE ACEITE WAHL)
LIMPIE EL EXCESO DE ACEITE para evitar que ingrese al compartimiento
del motor. La presencia de aceite en el compartimiento del motor
puede causar una merma en su rendimiento.
Debe aceitar las cuchillas después de limpiarlas con una
solución desinfectante o de limpieza.
CUIDADO DE LA UNIDAD
Use un paño limpio (seco o humedecido con agua).
NO USE lejía, benceno ni diluyente para limpiar la unidad.
CUIDADO DEL CABLE
El cable nunca debe usarse para tirar de la cortadora. Es necesario
mantener la libertad de movimiento. Es necesario tener cuidado para
evitar que el cable se retuerza o se dañe. Cuando está guardado, el cable
debe estar enrollado y colocado de manera prolija en un lugar seco.
DIAGRAMA DE ALINEACIÓN DE CUCHILLAS
ALINEACIÓN DE CUCHILLAS DE 2 ORIFICIOS
Afloje levemente ambos tornillos en
la base de la cuchilla fija, solo lo
suficiente para mover la cuchilla.
Mueva la palanca de ajuste de la
cuchilla a la posición completamente
hacia delante. Con los tornillos de la
cuchilla flojos, puede alinear la
cuchilla inferior con la superior.
1. Las puntas de los dientes de la cuchilla superior deben estar
1/32” a 1/16” (0.79 mm a 1.59 mm) atrás y paralelos con las
puntas de los dientes de la cuchilla inferior. Esto es importante
para que la cortadora no corte demasiado al ras ni permita que la
cuchilla superior móvil toque la piel. (Consulte el Diagrama de
alineación de cuchillas.)
2. El diente situado en el extremo izquierdo de la cuchilla superior
debe coincidir con el primer diente pequeño de la cuchilla
inferior. (Consulte el Diagrama de alineación de cuchillas.)
3. Después de alinear la cuchilla, apriete los tornillos.
4. Enchufe la cortadora, enciéndala y apáguela un par de veces y
luego, vuelva a revisar la alineación de las cuchillas.
ALINEACIÓN DE CUCHILLAS DE 3 ORIFICIOS
Afloje levemente los tres tornillos
de la cuchilla fija, solo lo suficiente
para mover la cuchilla. Mueva la
palanca de ajuste de la cuchilla a la
posición completamente hacia
delante. Con los tornillos de la
cuchilla flojos, puede alinear la
cuchilla inferior con la superior.
1. Las puntas de los dientes de la cuchilla superior deben estar
1/32” a 1/16” (0.79 mm a 1.59 mm) atrás y paralelos con las
puntas de los dientes de la cuchilla inferior. Esto es importante
para que la cortadora no corte demasiado al ras ni permita que la
cuchilla superior móvil toque la piel. (Consulte el Diagrama de
alineación de cuchillas.)
2. El diente situado en el extremo izquierdo de la cuchilla superior
debe coincidir con el primer diente pequeño de la cuchilla
inferior. (Consulte el Diagrama de alineación de cuchillas.)
3. Después de alinear la cuchilla, apriete los tornillos.
4. Enchufe la cortadora, enciéndala y apáguela un par de veces y
luego, vuelva a revisar la alineación de las cuchillas.
Si necesita servicio, envíe su producto con franqueo prepagado a:
Wahl Service Center
3001 North Locust Street
Sterling, IL 61081
LUBRIQUE
REGULARMENTE EL
MANGO DE LA
CUCHILLA
SISTEMA DE 3 PASOS
MEDIDAS DE SEGURIDAD
IMPORTANTES
Cuando use su aparato eléctrico, debe seguir siempre las precauciones
básicas, que incluyen:
ANTES DE USAR ESTE APARATO, LEA TODAS LAS
INSTRUCCIONES Y MEDIDAS DE SEGURIDAD.
PELIGRO
Para reducir el riesgo de muerte o lesiones por descarga
eléctrica:
1. No intente tomar un aparato que cayó al agua. Desenchúfelo de inmediato
del tomacorriente. Nota: Algunas piezas eléctricas dentro del aparato
permanecen energizadas, incluso si pasa el interruptor a “OFF” (Apagado).
2. No lo use mientras se esté bañando o duchando.
3. No coloque ni guarde el aparato en un lugar desde donde pueda caerse o
ser halado a una tina o un lavabo. No lo coloque ni deje caer dentro de
agua ni otro líquido.
4. Antes de limpiar este aparato, siempre desenchúfelo.
5. Desenchufe siempre este aparato del tomacorriente eléctrico
inmediatamente después de usarlo.
ADVERTENCIA
Para reducir el riesgo de quemaduras, descarga eléctrica o
lesiones a las personas:
1. Este aparato puede ser utilizado por niños de 14 años o más y por personas
con capacidades físicas, sensoriales o mentales reducidas, o con falta de
experiencia y conocimiento, si son supervisados o han recibido
instrucciones por parte de una persona responsable de su seguridad con
respecto al uso del aparato en forma segura y si comprenden los peligros
inherentes. Debe supervisar a los niños para asegurarse de que no jueguen
con el aparato. Los niños no deben ocuparse de la limpieza y el
mantenimiento del aparato sin supervisión.
2. Use este aparato solo para el fin previsto que se describe en este manual.
No use accesorios no recomendados por el fabricante.
3. Procure no operar nunca este aparato si el cable de alimentación o el
enchufe están dañados, si no funciona correctamente, después de que se
ha caído o dañado o después de que ha tenido contacto con agua.
Devuelva el aparato a Wahl Clipper Corporation para su revisión y
reparación.
4. Mantenga el cable alejado de superficies calientes.
5. Procure no operar nunca el aparato con las aberturas de aire bloqueadas o
sobre una superficie combustible blanda, como una cama o un sofá, donde
es posible que estas aberturas queden bloqueadas. Mantenga las aberturas
de aire (si las hay) libres de pelusa, cabello o residuos semejantes.
6. No lo use al aire libre ni lo opere donde se estén usando productos en
aerosol (spray) o se esté administrando oxígeno.
7. Nunca deje caer ni introduzca ningún objeto en ningún orificio.
8. No use este aparato con un peine dañado o roto, ni si le faltan dientes a las
cuchillas, pues pueden producirse lesiones. Antes del uso, asegúrese de
que las cuchillas estén alineadas en forma correcta. (Consulte las
Instrucciones de cuidado de la Cortadora o de la Recortadora. Esto tal vez no
se aplique a todos los aparatos.)
9. Mientras lo usa, no coloque ni deje el aparato donde pueda quedar
expuesto a daños por parte de un animal o por inclemencias climáticas.
10. Para desconectar, apague todos los controles y luego retire el enchufe del
tomacorriente.
11. Apague todos los controles antes de colocar o extraer cuchillas o accesorios.
12. No debe dejar nunca sin supervisión un aparato con un cable conectado
permanentemente que esté enchufado.
13. Mantenga este aparato seco.
14. Si su aparato está puesto a tierra (consulte la Fig. 1 para ver un enchufe
puesto a tierra), conéctelo solo a un tomacorriente debidamente puesto a
tierra. (Lea las Instrucciones de puesta a tierra.)
GUARDE ESTAS
INSTRUCCIONES
ESTE APARATO ES EXCLUSIVAMENTE PARA USO
COMERCIAL
MISES EN GARDE
IMPORTANTES
Lorsque vous utilisez votre appareil électrique, suivez toujours les
précautions de base suivantes :
VEUILLEZ LIRE TOUTES LES INSTRUCTIONS ET MESURES
DE PROTECTION AVANT D’UTILISER CET APPAREIL.
DANGER
Pour réduire le risque de blessure ou de décès dû à une
décharge électrique :
1. Ne touchez pas un appareil qui est tombé dans l’eau. Débranchez-le
immédiatement de la prise. Avis : Certains éléments électriques à
l’intérieur de l’appareil sont sous tension même lorsque l’interrupteur est
en position « arrêt » (OFF).
2. Ne l’utilisez pas en prenant un bain ou une douche.
3. Ne posez ni ne rangez l’appareil dans un endroit d’où il pourrait tomber ou
se retrouver dans une baignoire ou un lavabo. Ne le mettez pas ou ne le
faites pas tomber dans l’eau ou dans un autre liquide.
4. Débranchez toujours cet appareil avant de le nettoyer.
5. Débranchez toujours cet appareil de la prise électrique immédiatement
après usage.
AVERTISSEMENT
Pour réduire le risque de brûlure, de décharge électrique ou de
blessure :
1. Cet appareil peut être utilisé par des enfants de plus de 14 ans et des
personnes ayant des capacités physiques, sensorielles ou mentales réduites
ou manquant d’expérience ou de connaissances si elles ont pu profiter, par
l’intermédiaire d’une personne responsable de leur sécurité, d’une
surveillance ou d’instructions préalables concernant l’usage de l’appareil
en toute sécurité et la compréhension des risques encourus. Les enfants
doivent être surveillés pour éviter qu’ils ne jouent avec l’appareil.
L’entretien et le nettoyage de l’appareil ne doivent pas être effectués par
les enfants sans surveillance.
2. Utilisez cet appareil uniquement pour son usage prévu décrit dans ce
manuel. N’utilisez pas d’accessoires non recommandés par le fabricant.
3. N’utilisez jamais cet appareil si son cordon ou sa prise est endommagé, s’il
ne fonctionne pas correctement, s’il est tombé ou s’il est endommagé, ou
s’il est tombé dans l’eau. Renvoyez l’appareil à Wahl Clipper Corporation
pour qu’il soit examiné et réparé.
4. Éloignez le cordon d’alimentation des surfaces chaudes.
5. Ne faites jamais fonctionner l’appareil lorsque ses évents sont bloqués ou
s’il est posé sur une surface molle combustible, comme un lit ou un divan,
ce qui peut bloquer ses évents. Gardez les évents (le cas échéant) exempts
de peluches, de poils ou de toute autre substance semblable.
6. N’utilisez pas cet appareil à l’extérieur, ne le faites pas fonctionner là où
des produits aérosol (vaporisés) sont utilisés ou là où de l’oxygène est
administré.
7. Ne faites jamais tomber ni n’insérez un objet dans l’une de ses ouvertures.
8. N’utilisez pas cet appareil avec un guide de coupe endommagé ou cassé,
ou lorsque des dents sont cassées sur les lames, car vous pourriez subir des
blessures. Avant l’utilisation, assurez-vous que les lames sont bien
alignées. (Consultez les instructions de la tondeuse ou de la tondeuse de
finition. Ne s’applique pas nécessairement à tous les appareils.)
9. Lors de l’utilisation de l’appareil, ne pas le poser ou le ranger à un endroit
où il pourrait être exposé aux intempéries ou endommagé par un animal.
10. Pour débrancher l’appareil, réglez tous les boutons de contrôle sur « arrêt »
(OFF), puis retirez la fiche de la prise de courant.
11. Réglez tous les boutons de contrôle sur « arrêt » (OFF) avant de placer ou
d’enlever les lames et les pièces jointes.
12. Un appareil à câble fixe ne doit jamais être laissé sans surveillance lorsque
branché.
13. Garder cet appareil au sec.
14. Si votre appareil est mis à la terre (voir Fig. 1 pour la fiche reliée à la terre),
ne le branchez que sur une prise correctement mise à la terre. (Consultez
les Instructions relatives à la mise à la terre.)
CONSERVEZ CES
INSTRUCTIONS
CET APPAREIL EST EXCLUSIVEMENT DESTINÉ À
UN USAGE COMMERCIAL
HUILEZ
PÉRIODIQUEMENT LE
TALON DE LA LAME
SYSTÈME À 3 ÉTAPES
Pour l’entretien, veuillez expédier votre produit prépayé à :
Wahl Service Center
3001 North Locust Street
Sterling, IL 61081
INSTRUCCIONES DE PUESTA A TIERRA
(Las instrucciones de puesta a tierra solo se aplican si el aparato tiene
una clavija de puesta a tierra, como se muestra en la Figura 1.) Este
aparato debe ponerse a tierra. En caso de un cortocircuito eléctrico, la
puesta a tierra reduce el riesgo de descarga eléctrica al proporcionar
un cable de escape para la corriente eléctrica. Este aparato cuenta
con un cable que tiene un cable a tierra con un enchufe de puesta a
tierra apropiado. El enchufe debe enchufarse en un tomacorriente
correctamente instalado y puesto a tierra de conformidad con todos
los códigos y ordenanzas locales.
PELIGRO – El uso indebido del enchufe de puesta a tierra
puede crear un riesgo de descarga eléctrica.
Si es necesario reparar o cambiar el cable o el enchufe, no conecte el
cable a tierra a ninguno de los terminales de cuchilla plana. El cable
con aislamiento que tiene una superficie externa verde con o sin
rayas amarillas es el cable de puesta a tierra. Consulte a un
electricista o técnico calificado si no comprende totalmente las
instrucciones de puesta a tierra, o si duda de si el aparato está
debidamente puesto a tierra. No modifique el enchufe
proporcionado; si no entra en el tomacorriente, pídale a un
electricista calificado que instale el tomacorriente adecuado.
INSTRUCTIONS DE MISE À LA TERRE
(Les instructions de mise à la terre ne s’appliquent que si l’appareil est
équipé d’une broche de mise à la terre comme indiqué dans la Figure 1.)
Cet appareil doit être mis à la terre. En cas de court circuit électrique,
la mise à la terre réduit le risque de décharge électrique grâce à un fil
qui permet au courant électrique de s’échapper. Cet appareil est
muni d’un cordon électrique comportant un conducteur de terre et
une fiche de mise à la terre. La fiche doit être branchée dans une
prise installée et mise à la terre de façon appropriée conformément
aux normes et aux règlements locaux.
DANGER – L’utilisation inadéquate de la fiche de mise à la
terre peut entraîner un risque de décharge électrique.
Si le cordon doit être réparé ou remplacé, ne pas brancher le fil de
terre de l’appareil sur une borne sous tension. Le fil à gaine verte,
avec ou sans bande jaune, est le fil de mise à la terre. Communiquez
avec un électricien qualifié ou un technicien si vous ne comprenez
pas bien les instructions de mise à la terre ou si vous n’êtes pas sûr
que l’appareil est mis à la terre de façon adéquate. Ne pas modifier la
fiche offerte de ce produit. Si elle ne convient pas à votre prise de
courant, faire installer une nouvelle prise de courant convenable par
un électricien qualifié.
FIGURA 1
CLAVIJA DE
PUESTA A TIERRA
FIGURE 1
BROCHE DE MISE
À LA TERRE
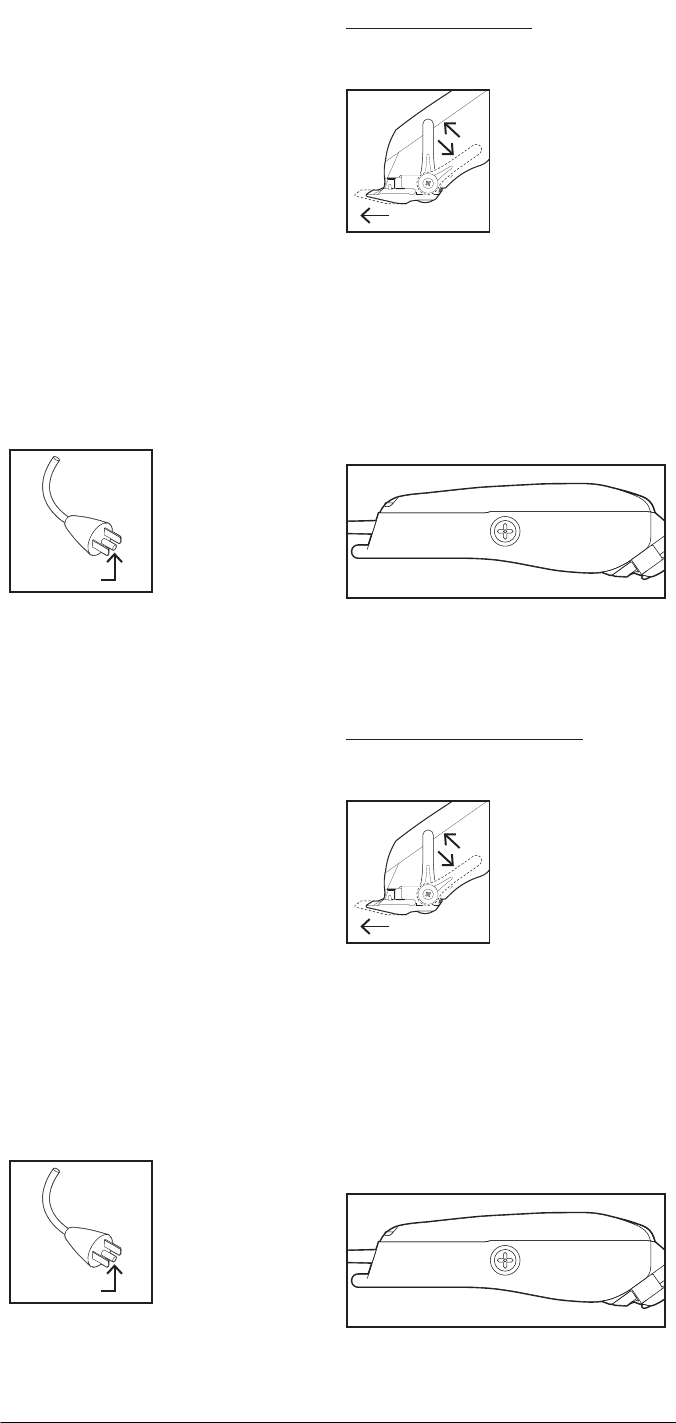
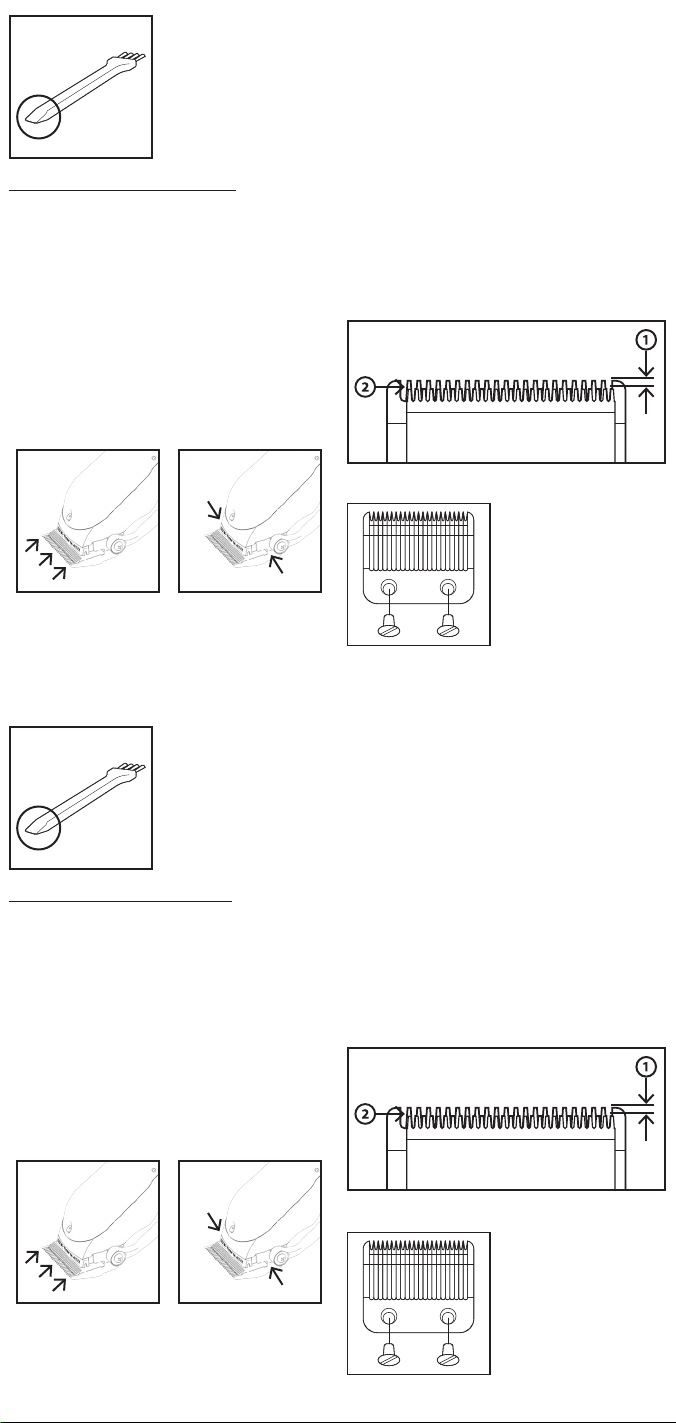
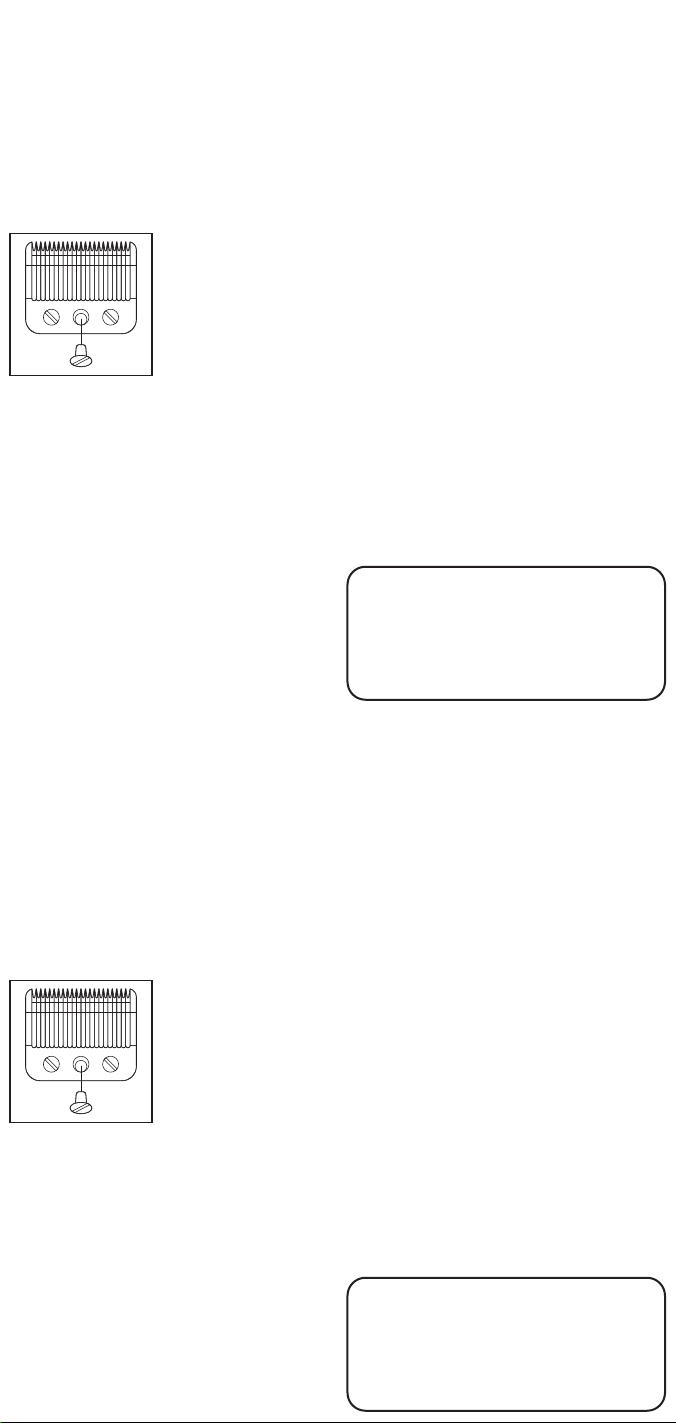
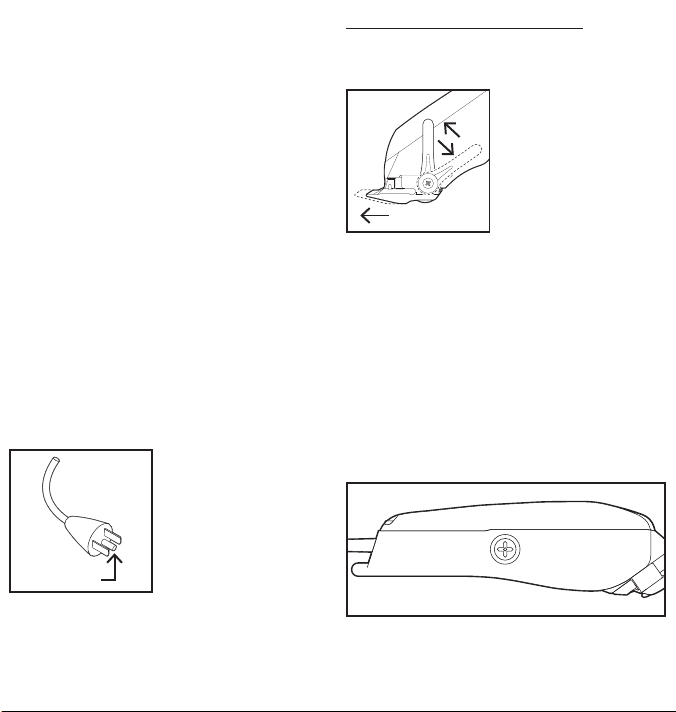
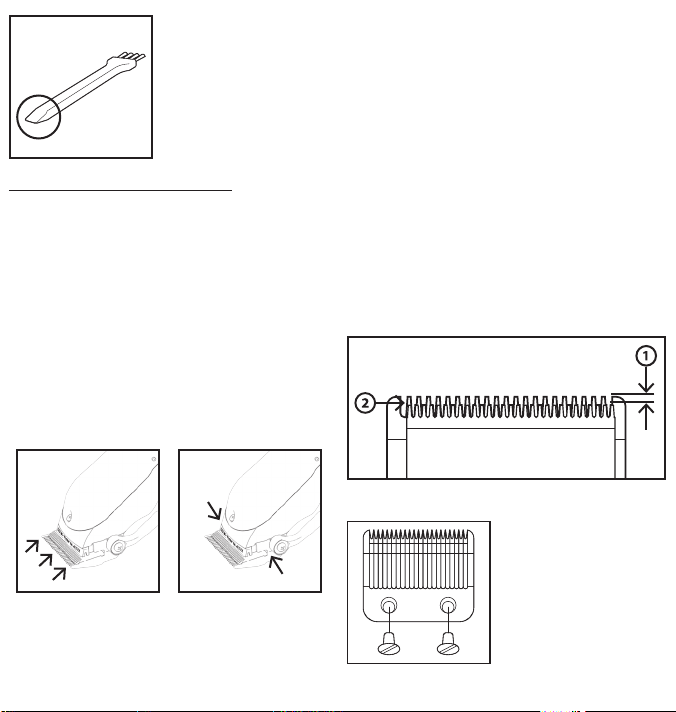
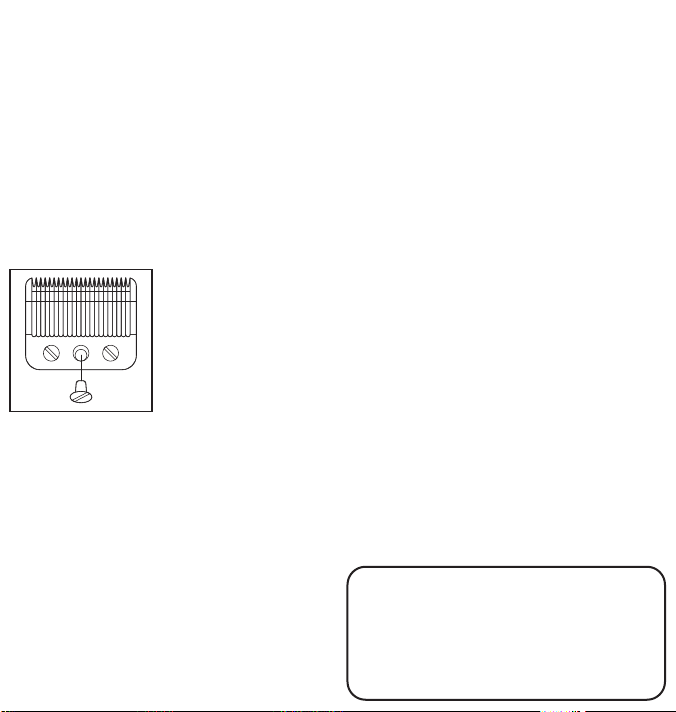