
How to Give a Haircut
1. Start at the back of the head. Holding
the clipper as shown, lightly stroke
upward making sure you are taking
off the desired amount of hair. Work
your way up to the crown of the head
in layers. When completed, comb the
area to remove any loose hair and
to determine whether you need any
further cutting.
2. Repeat
the same
procedure for
each side of
the head. Make
sure the length
of the hair is
trimmed to the
same length on
both sides of
the head.
3. To cut the hair
at the top of
the head, hold the hair between your
fingers and cut a small amount at a
time. Cut from the front to the back.
4.
Remove the trimming guide and
replace with either the left or right
ear guide. The shorter guide teeth are
designed to be toward the ear. Move
the clipper from the back of the head
to the front. This creates a tapered
effect around
the ears and
back of the
neck.
5. The final trim
can be made
with the hair
clipper or
the included
scissors.
Make sure to
check over the
entire head for
any uneven areas. For styled hair or
Register Your New Product Today!
By registering your new Remington
®
product you will receive these important benefits:
Proof of ownership • Product protection • Product registration • Special offers
Register online at: www.RemingtonProducts.com
A Superior Cut
Every Time
Use and
Care Guide
Model HC-822A
IMPORTANT SAFETY
INSTRUCTIONS
When using an electrical appliance,
basic precautions should always be
observed, including the following.
Read all instructions before using
this appliance.
DANGER
To reduce the risk of electric shock:
■Do not reach for an appliance that
has fallen into water. Unplug it
immediately.
■Do not use while bathing or in
the shower.
■Do not place or drop into water
or other liquid.
■Do not place or store this appliance
where it can fall or be pulled into a
tub or sink.
■Always unplug this appliance from
the electrical outlet immediately
after using.
■Unplug this appliance before
cleaning it.
WARNING
To reduce the risk of burns, fire,
electric shock or injury to persons:
■This appliance is for household use
only.
■An appliance should never be left
unattended when it’s plugged in.
■Close supervision is necessary
when this appliance is used by,
on, or near children or persons
■Always attach the plug to the
appliance, then to the outlet. To
disconnect, turn all controls to
OFF, then remove plug from outlet.
Detach removable power cords
from appliances for storage.
■Do not place this appliance on any
surface while operating.
■This power unit is intended to be
correctly oriented in a vertical or
floor mount position.
■This appliance has a polarized plug
(one blade is wider than the other).
As a safety feature, this plug will
fit in a polarized outlet only one
way. If the plug does not fit fully
in the outlet, reverse the plug. If it
still does not fit, contact a qualified
electrician. Do not attempt to
defeat this safety feature.
■Do not use this appliance with a
damaged or broken cutting unit,
as injury may occur. Always make
certain blades are aligned properly.
■This clipper is designed for use
with 120 Volts AC, 60 HZ electrical
outlets. Do not connect the clipper
to a higher voltage than indicated,
as it may result in personal injury
and/or damage to the clipper.
with special needs.
■Use this appliance only for its
intended use as described in this
manual. Do not use attachments
not recommended by Spectrum
Brands, Inc.
■Keep the cord away from heated
surfaces.
■Never operate this appliance if it
has a damaged cord or plug, if it is
not working properly, if it has been
dropped or damaged, or if it has
been dropped into water. If any
of these things happen, return
the appliance to a Remington
authorized service center for
examination and repair.
■Never drop or insert any object into
any of the appliance’s openings.
■Do not use outdoors or operate
where aerosol (spray) products are
being used, or where oxygen is
being administered.
■Always store this appliance and
cord in a moisture-free area.
Do not store it in temperatures
exceeding 140°F (60°C).
■Do not plug or unplug this
appliance when your hands are
wet.
■Do not use an extension cord
or a voltage converter with this
appliance.
SAvE ThESE INSTRUCTIONS
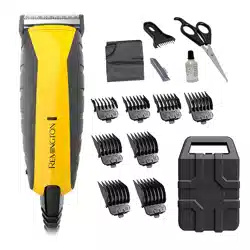
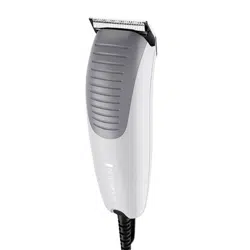
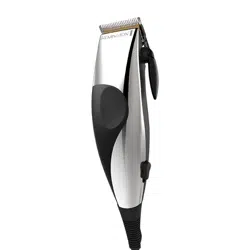
Product Features
HC-822
The Remington® HC-822 hair clipper provides a quick and easy way to obtain
professional-looking haircuts at home. Developed to combine professional grade
titanium-coated blades with a powerful, low noise motor, this hair clipper enables
you to achieve customized, modern looks and traditional hairstyles. To help you
create those styles, and to extend the life of your hair clipper, please read all
instructions before using.
1
12
14
13
15
16
23 24 25
18
20
22
17
19
21
2
4
6
8
3
5
7
9
10
11
1. Premium Rubberized Clipper
2. 1” (25mm) Guide Comb
3. 7/8” (22mm) Guide Comb
4. 3/4” (18mm) Guide Comb
5. 5/8” (16mm) Guide Comb
6. 1/2” (12mm) Guide Comb
7. 3/8” (9mm) Guide Comb
8. 1/4” (6mm) Guide Comb
9. 1/8” (3mm) Guide Comb
10. Right Ear Taper Guide Comb
11. Left Ear Taper Guide Comb
12. Blade Guard
13. Barber Scissors
14. Neck Brush
15. Styling Comb
16. Cleaning Brush
17. Sectioning Clip
18. Sectioning Clip
19. Sectioning Clip
20. Sectioning Clip
21. Sectioning Clip
22. Sectioning Clip
23. Cape
24. Storage Case
25. Styling Guide
Line Cord Safety Tips
NOTE: This appliance has a polarized
plug (one blade is wider than the
other). As a safety feature, this plug
will fit in a polarized outlet only one
way. If the plug does not fit fully in
the outlet, reverse the plug.
If it still does not fit, contact a quali-
fied electrician. Do not attempt to
defeat this safety feature.
1. To insert plug, grasp it firmly and
guide it into outlet.
2. To disconnect the appliance, grasp
the plug and remove it from outlet.
Do not pull or yank on the cord or
appliance. Do not wrap the cord
around the appliance.
Blade Care
The life of your clippers will depend
on frequency of use, care, hair type
and condition. The HC-822 blades
are lubed for life and do not require
additional oiling.
Before Cutting Hair
1. Make sure your hair clipper is
runnning
smoothly
with a slight
vibration.
2. Place the
cape around
the neck of
the person
whose hair
is being
trimmed or
cut.
3. This person
should be
seated so that the top of their head
is at your eye level.
4. Comb the hair as it is normally
styled.
5. Comb out all knots and tangles.
6. Ensure the hair is dry. Hair clippers
perform best with dry hair, making
it easier to see how much hair is
being cut.
7. Hold the hair clipper in the palm of
one hand with your thumb resting
firmly on the top of the hair clipper.
This grip provides comfortable
cutting control. Although the hair
clipper may be used with the left
or right hand, using it right-handed
allows you to access the taper
lever more easily.
To Attach Trimming Guides
1. Select the trimming guide that
matches the length you want
the hair to be after the cut. The
trimming guides are numbered
and marked with 1/8” (3mm),
1/4” (6mm), 3/8” (9mm), 1/2”
(12mm), 5/8”(16mm), 3/4”(18mm),
7/8”(22mm), and 1”(25mm).
2. While the clipper is off, hold the
trimming guide with the teeth up.
Slide the trimming guide onto the
blades until it locks into place.
How to Use
Usage Tips
Performance Guarantee
giving quick
trims, you
may prefer
using your
hair clipper
without the
trimming
guide.
6. The adjustable
taper control
lever allows
you to gradu-
ally change
the closeness of your cut, either
with or without a trimming guide.
When the lever is fully forward
the blades will give you the clos-
est cut. Moving the lever gradu-
ally backward
increases the
cut length.
Very short
styles
1. Using the
1/2” (12mm)
trimming
guide, hold
the comb flat
against the
head and move the hair clipper
from the back of the neck to the
crown of the head.
2. Cut in a similar manner from the
side to the top of the head. Then
cut from the front to the crown of
the head.
3. If a “Flat Top” style is desired,
remove the trimming guide and
use the barber’s comb. Trim a
little at a time until a flat look is
achieved.
Trimming Beards &
Mustaches
1. Comb your beard in the direction
it grows.
Giving a Comfortable,
Even Cut
Allow the clipper to cut through the
hair without moving it too quickly.
Moving the clipper too quickly may
create a pulling sensation.
Use short strokes when cutting, and
initially use the longest trimming
guide. You can always use a closer
trimming guide later if you want a
closer cut.
2. Determine
the length
you want
the beard
to remain,
and fit the
appropriate
trimming
guide.
Remember
the 1/8”
(3mm) guide
will give you the shortest beard
while the 1” (25mm) will give you
the longest. If you want a longer
beard you can use the styling
comb as a trimming guide.
3. Start trimming under your chin and
work toward your ear and beard
line. Cut in different directions for a
uniform trim.
4. Lightly stroke the edge of your
mustache in a downward
movement.
Maintenance
■Do not wrap the cord around the
appliance.
■This appliance does not contain
any user-serviceable parts. Bring
this appliance to an authorized
service representative for service.
Performance Guarantee
Spectrum Brands, Inc.
Money-Back Offer
If within 30 days after you have
purchased your Remington
®
product,
you are not satisfied with it and
would like a refund, just return it,
together with the sales receipt, to the
retailer from whom it was purchased.
Spectrum Brands, Inc. will reimburse
all retailers who accept such appli-
ances within 30 days from date of
purchase. If you have any questions
regarding this money-back guaran-
tee, please call 800-736-4648 in the
U.S. or 800-268-0425 in Canada.
Limited Five-Year Warranty
Spectrum Brands, Inc. warrants this
product against any defects that are
due to faulty material or workman-
ship for a five-year period from the
original date of consumer purchase.
This warranty does not include dam-
age to the product resulting from
accident or misuse.
If the product should become defec-
tive within the warranty period,
we will replace it free of charge.
Return your product with your name,
address and day time phone number
to: Remington Returns Center, 507
Stokely Dr., P.O. Box 1, Deforest, WI
53532. For more information call
800-736-4648 in the US or 800-
268-0425 in Canada.
Warranty
This warranty gives you specific legal
rights, and you may also have other
rights that vary from state to state.
Some states do not allow the exclu-
sion or limitation of incidental or con-
sequential damages, or limitations on
how long an implied warranty lasts,
so the above limitations and exclu-
sions may not apply to you.
U.S. residents: To order accessories,
contact us at 800-392-6544, visit us
at www.RemingtonProducts.com, or
visit your local retailer.
Canadian residents: To order accesso-
ries, please call 800-268-0425 or visit
us at www.RemingtonProducts.com
KEEP ORIGINAL SALES RECEIPT
AS PROOF OF PURCHASE FOR
WARRANTY PURPOSES.
Questions or comments:
Call 800-736-4648 in the U.S. or
800-268-0425 in Canada or visit
www.RemingtonProducts.com
REMINGTON is a Registered
Trademark of ROVCAL, Inc.,
a subsidiary of Spectrum Brands, Inc.
© 2012 ROVCAL, Inc.
Job # 2012-6-27_146
8/12
Dist by:
Spectrum Brands, Inc.
Madison, WI 53711
Dist by:
Spectrum Brands Canada, Inc.,
4180 Sladeview Cresent,
Mississauga, ON L5L 0A1
Manufactured to Remington's
specifications in the PRC
T22-0000566
120VAC 60Hz
Contains
listed adaptor
Contient un
adaptateur
homologué UL
This warranty does not cover products damaged by the following:
■ Accident, misuse, abuse or alteration of the product
■ Servicing by unauthorized persons
■ Use with unauthorized accessories
■ Connecting it to incorrect current and voltage
■ Wrapping cord around appliance causing premature wear & breakage
■ Any other conditions beyond our control
No responsibility, obligations, or liability is assumed for the installation or mainte-
nance of this product.
SPECTRUM BRANDS, INC. SHALL NOT BE RESPONSIBLE FOR ANY INCIDENTAL,
SPECIAL OR CONSEQUENTIAL DAMAGES RESULTING FROM THE USE OF THIS PRODUCT.
ALL IMPLIED WARRANTIES, INCLUDING BUT NOT LIMITED TO IMPLIED WARRANTIES
OF FITNESS AND MERCHANTABILITY, ARE LIMITED IN DURATION TO FIVE YEARS FROM
DATE OF ORIGINAL PURCHASE
.

Technique de coupe
1. Commencez à l’arrière de la tête.
Tenez la tondeuse tel qu’illustré
et donnez de petits coups vers le
haut en vous assurant de couper
la quantité voulue de cheveux.
Remontez ainsi jusque sur le dessus
de la tête section par section.
Lorsque vous avez terminé une
section, peignez les cheveux pour
faire tomber les cheveux coupés et
déterminer si
vous devez
en couper
davantage.
2. Répétez pour
chaque côté
de la tête.
Assurez-vous
de couper les
deux côtés
de la même
longueur.
3. Pour couper les cheveux sur le
dessus de la tête, tenez les cheveux
entre les doigts et coupez une petite
quantité à la fois. Coupez de l’avant
vers l’arrière.
4. Retirez le peigne de guidage et
remplacez-le par le peigne pour le
tour d’oreille droite ou gauche. Les
dents les plus courtes doivent pointer
en direction de l’oreille. Déplacez
la tondeuse
de l’arrière
de la tête
vers l’avant.
Ceci produit
un dégradé
autour des
oreilles et
dans le cou.
5. La finition peut
se faire avec
la tondeuse ou
avec les ciseaux de coiffeur fournis.
Vérifiez que les cheveux sont coupés
Une coupe supérieure
à chaque fois
Guide d’utilisation
et d’entretien
Modèle HC-822A
MESURES DE SÉCURITÉ
IMPORTANTES
Des mesures de sécurité
élémentaires, dont les suivantes,
s’imposent lors de l’utilisation d’un
appareil électrique. Lisez toutes
les directives avant d’utiliser cet
appareil.
DANGER
Afin de réduire le risque de choc
électrique:
■Ne tentez pas de repêcher
un appareil tombé à l’eau.
Débranchez-le immédiatement.
■ N’utilisez pas cet appareil en
prenant un bain ou une douche.
■ Évitez de déposer et d’échapper
cet appareil dans l’eau ou tout
autre liquide.
■ Évitez de déposer ou de ranger cet
appareil près d’une baignoire ou
d’un évier dans lequel il pourrait
tomber.
■ Débranchez toujours cet
appareil de la prise électrique
immédiatement après l’avoir
utilisé.
■ Débranchez cet appareil avant de
le nettoyer.
AVERTISSEMENT
Afin de réduire le risque de brûlure,
d’incendie, de choc électrique ou
de blessure:
■Cet appareil est destiné à un usage
domestique seulement.
■ Évitez de brancher ou de
débrancher cet appareil avec les
mains mouillées.
■ N’utilisez pas de rallonge ni de
convertisseur de tension avec cet
appareil.
■ Fixez toujours d’abord la fiche à
l’appareil, puis l’adaptateur à la
prise de courant. Pour débrancher,
placez toutes les commandes
en position ARRÊT, puis retirez
l’adaptateur de la prise de courant.
Retirez le cordon d’alimentation
amovible de l’appareil avant de
ranger ce dernier.
■ Évitez de déposer l’appareil
directement sur une surface
quelconque pendant qu’il est en
marche.
■ Le chargeur est conçu pour être
branché à la verticale ou dans une
prise au sol.
■ Cet appareil est muni d’une
fiche polarisée (dont une broche
est plus large que l’autre). Par
mesure de sécurité, la fiche ne
peut être branchée dans une
prise polarisée que dans un sens.
Si la fiche n’entre pas dans la
prise, retournez-la. Si elle n’entre
toujours pas, communiquez avec
un électricien qualifié. Ne tentez
pas de contourner ce dispositif de
sécurité.
■ N’utilisez pas cet appareil
si le dispositif de coupe est
endommagé ou brisé, car vous
pourriez vous blesser. Assurez-
vous toujours que les lames sont
bien alignées.
■ Cette tondeuse est conçue pour
être branchée dans une prise
électrique de 120 V c.a., 60 Hz.
Ne branchez pas la tondeuse
dans une prise dont la tension est
supérieure à celle indiquée car ceci
pourrait provoquer des blessures
personnelles et des dommages à
la tondeuse
■ Ne laissez jamais un appareil sans
surveillance lorsqu’il est branché.
■ Surveillez étroitement les enfants
ou les personnes ayant des
besoins spéciaux qui sont à
proximité de l’appareil, qui s’en
servent ou sur qui l’on s’en sert.
■ N’utilisez cet appareil que
pour l’usage prévu dans
ce livret. N’utilisez jamais
d’autres accessoires que ceux
recommandés par Spectrum
Brands, Inc.
■ Tenez le cordon loin des surfaces
chauffées.
■ N’utilisez jamais cet appareil si le
cordon ou la fiche est endommagé,
si l’appareil ne fonctionne pas
correctement, s’il a été échappé
ou endommagé ou s’il est tombé
dans l’eau. Le cas échéant,
retournez l’appareil à un centre de
service Remington autorisé où on
l’examinera et le réparera.
■ Évitez d’échapper ou d’insérer des
objets quelconques dans l’appareil.
■ N’utilisez pas cet appareil à
l’extérieur ni là où l’on utilise des
produits aérosol ou administre de
l’oxygène.
■ Rangez toujours cet appareil et son
cordon à l’abri de l’humidité. Évitez
de le ranger à des températures
dépassant 60 °C (140 °F).
CONSERvEZ CES DIRECTIvES
Caractéristiques du produit
HC-822
La tondeuse à cheveux HC-822 de Remington® est un outil qui permet d’obtenir
rapidement et facilement chez soi des coupes de cheveux d’allure professionnelle.
Combinant des lames recouvertes de titane de qualité professionnelle à un moteur
puissant et silencieux, cette tondeuse à cheveux vous permet de créer des styles
personnalisés, modernes ou traditionnels. Pour vous aider à réaliser ces styles,
et pour garantir une longue durée de vie à la tondeuse, veuillez lire toutes les
directives avant d’utiliser la tondeuse.
1
12
14
13
15
16
23 24 25
18
20
22
17
19
21
2
4
6
8
3
5
7
9
10
11
1. Tondeuse caoutchoutée haut de gamme
2. Peigne de guidage de 1 po (25 mm)
3. Peigne de guidage de 7/8 po (22 mm)
4. Peigne de guidage de 3/4 po (18 mm)
5. Peigne de guidage de 5/8 po (16 mm)
6. Peigne de guidage de 1/2 po (12 mm)
7. Peigne de guidage de 3/8 po (9 mm)
8. Peigne de guidage de 1/4 po (6 mm)
9. Peigne de guidage de 1/8 po (3 mm)
10. Peigne pour le tour d’oreille droite
11. Peigne pour le tour d’oreille gauche
12. Protège-lames
13. Ciseaux de coiffeur
14. Balayette
15. Peigne de coiffeur
16. Brosse de nettoyage
17. Pince à séparer
18. Pince à séparer
19. Pince à séparer
20. Pince à séparer
21. Pince à séparer
22. Pince à séparer
23. Cape
24. Boîtier de rangement
25. Mode d’emploi
Conseils de sécurité à propos
du cordon
REMARQUE: Cet appareil est muni
d’une fiche polarisée (dont une
broche est plus large que l’autre).
Par mesure de sécurité, la fiche
ne peut être branchée dans une
prise polarisée que dans un sens.
Si la fiche n’entre pas dans la
prise, retournez-la. Si elle n’entre
toujours pas, communiquez avec un
électricien qualifié. Ne tentez pas de
contourner ce dispositif de sécurité.
1. Pour brancher la fiche, saisissez-la
fermement et entrez-la dans la
prise.
2. Pour débrancher la tondeuse,
saisissez la fiche et tirez
doucement. Ne tirez pas d’un
coup sec sur le cordon ni sur la
tondeuse. N’enroulez pas le
cordon autour de l’appareil.
Entretien des lames
La durée de vie de votre tondeuse
dépendra de sa fréquence
d’utilisation, de son entretien et du
type et de l’état des cheveux coupés.
Les lames de la tondeuse HC-822
sont lubrifiées
à vie et
n’auront jamais
besoin d’être
huilées.
Avant de
couper les
cheveux
1. Assurez-
vous que la
tondeuse
fonctionne
doucement,
avec une
légère vibration.
2. Placez la cape autour du cou de
la personne à qui vous coupez les
cheveux.
3. La personne devrait être assise à
hauteur telle que le dessus de sa
tête se trouve au niveau de vos
yeux.
4. Peignez les cheveux comme à
l’habitude.
5. Démêlez bien tous les nœuds.
6. Les cheveux doivent être secs.
Les tondeuses à cheveux donnent
les meilleurs résultats dans des
cheveux secs, avec lesquels il est
plus facile de constater la quantité
de cheveux coupés.
7. Tenez la tondeuse dans la paume
d’une main, le pouce reposant
fermement sur le dessus de la
tondeuse. Cette prise permet de
bien maîtriser la coupe. Bien que la
tondeuse puisse être utilisée autant
avec la main droite que la main
gauche, le fait de l’utiliser dans la
main droite permet d’accéder plus
facilement au levier d’ajustement.
Pose des peignes de guidage
1. Sélectionnez le peigne
correspondant à la longueur
désirée des cheveux une fois
ceux-ci coupés. La longueur de
coupe des peignes est indiquée
sur chacun : 1/8 po (3 mm), 1/4
po (6 mm), 3/8 po (9 mm), 1/2 po
(12 mm), 5/8 po (16 mm), 3/4 po
(18 mm), 7/8 po (22 mm) et 1 po
(25 mm).
2. La tondeuse à l’arrêt, tenez le
peigne les dents en haut. Glissez
le peigne sur les lames jusqu’à ce
qu’il se verrouille en place.
Mode d’emploi Conseils d’utilisation
Garantie de rendement
également
sur toute la
tête. Pour
créer un style
particulier
ou pour des
retouches
rapides,
utilisez la
tondeuse sans
peigne de
guidage.
6. Le levier
d’ajustement vous permet de
varier graduellement la longueur
de la coupe, avec ou sans peigne
de guidage. Lorsque le levier est
complètement poussé vers l’avant,
les lames coupent le plus ras. En
ramenant
le levier
graduellement
vers l’arrière
on allonge la
longueur de
coupe.
Coupes très
courtes
1. Utilisez le
peigne de 1/2
po (12 mm)
et, en le maintenant bien à plat
contre la tête, déplacez la tondeuse
de la nuque vers le sommet de
la tête.
2. Faites de même sur les côtés en
remontant jusque sur le dessus
de la tête. Puis coupez de l’avant
jusque sur le sommet de la tête.
3. Si vous désirez un effet «coupe
en brosse», retirez le peigne de
guidage et utilisez le peigne de
coiffeur. Coupez une petite section
à la fois jusqu’à l’obtention de
l’effet désiré.
Pour une coupe uniforme et
en tout confort
Passez la tondeuse lentement dans
les cheveux pour lui donner le
temps de couper. Un mouvement
trop rapide peut occasionner une
sensation de tiraillement. Taillez les
cheveux par petits coups et utilisez
au départ le peigne de guidage le
plus long. Vous pouvez toujours
utiliser un peigne plus court par la
suite si vous désirez couper plus ras.
Taille de la barbe et de la
moustache
1. Peignez la barbe dans le sens de
la pousse.
2. Déterminez de quelle longueur
vous désirez que la barbe soit
et fixez le peigne de guidage
correspondant sur la tondeuse.
Souvenez-vous que le peigne de
1/8 po (3 mm) produira la barbe
la plus courte et celui de 1 po (25
mm) la barbe la plus longue. Si
vous désirez
une barbe
plus longue,
utilisez le
peigne de
coiffeur pour
vous guider.
3. Commencez à tailler sous le
menton et remontez vers une
oreille et la ligne supérieure de la
barbe. Coupez dans plusieurs sens
pour obtenir une coupe uniforme.
4. Donnez de petits coups sur le bord
de la moustache en un mouvement
descendant.
Entretien
Garantie de rendement
Garantie de remboursement de
Spectrum Brands, Inc.
Si vous n’êtes pas satisfait et
désirez obtenir un remboursement
au cours des 30 jours qui suivent
l’achat de ce produit Remington®,
retournez simplement le produit
avec son reçu de caisse au détaillant
où vous l’avez acheté. Spectrum
Brands, Inc. remboursera tous les
détaillants qui acceptent ces produits
dans les 30 jours suivant la date
d’achat. Si vous avez des questions
concernant la présente garantie de
remboursement, veuillez composer le
800-736-4648 aux É.-U. ou le 800-
268-0425 au Canada.
Garantie limitée de cinq ans
Spectrum Brands, Inc. garantit ce
produit contre toute défectuosité
due à des vices matériels et de
fabrication pour une période de cinq
ans à compter de la date d’achat
initiale, à l’exception des dommages
résultant d’un accident ou d’un
mauvais usage.
Si ce produit devait faire défaut au
cours de la période de garantie,
nous le remplacerons sans frais.
Retournez votre produit accompagné
de vos nom, adresse et numéro de
téléphone de jour à : Remington
Returns Center, 507 Stokely Dr., P.O.
Box 1, Deforest, WI 53532. Pour
de plus amples renseignements,
composez le 800-736-4648 aux
É.-U. ou le 800-268-0425 au
Canada.
Garantie
La présente garantie vous confère
des droits spécifiques, cependant
vous pouvez avoir d’autres droits qui
varient d’un État ou d’une province
à l’autre. Par exemple, certains
États n’autorisent pas l’exclusion ni
la limite des dommages indirects
et consécutifs ni la limite de durée
d’une garantie implicite, par con-
séquent les limites et les exclusions
ci-dessus peuvent ne pas s’appliquer
à vous.
Résidents des É.-U. : Pour com-
mander des accessoires, communi-
quez avec nous au 800-392-6544,
visitez-nous sur le site www.
RemingtonProducts.com, ou rendez-
vous chez votre détaillant local.
Résidents du Canada : Pour com-
mander des accessoires, veuillez
composer le 800-268-0425 ou
visitez-nous sur le site www.
RemingtonProducts.com.
CONSERVEZ LE REÇU DE CAISSE
ORIGINAL COMME PREUVE D’ACHAT
AUX FINS DE LA GARANTIE.
Questions ou commentaires:
Composez le 800-736-4648 aux
É.-U. ou ke 800-268-0425 au
Canada ou visitez
www.RemingtonProducts.com
® Marque déposée de ROVCAL, Inc.
une filiale de Spectrum Brands, Inc.
© 2012 ROVCAL, INC.
Travail n° 2012-6-27_146
8/12
Dist par:
Spectrum Brands, Inc.
Madison, WI 53711
Dist par:
Spectrum Brands Canada, Inc.,
4180 Sladeview Cresent,
Mississauga, ON L5L 0A1
Fabriqué selon les spécifications de
Remington en RPC.
T22-0000566
120 V c.a., 60Hz
Contains
listed adaptor
Contient un
adaptateur
homologué UL
Cette garantie ne couvre pas les produits endommagés par ce qui suit:
■ Accident, mésusage, usage abusif ou modification du produit
■ Réparation par des personnes non autorisées
■ Utilisation avec des accessoires non autorisés
■ Branchement de l’appareil dans une prise possédant une tension ou un
courant inadéquat
■ Enroulement du cordon autour de l’appareil entraînant l’usure prématurée et
le bris
■ Toute autre circonstance indépendante de notre volonté
Aucune responsabilité ni obligation n’est assumée pour l’installation et l’entretien de ce
produit.
SPECTRUM BRANDS, INC. DÉCLINE TOUTE RESPONSABILITÉ POUR LES DOMMAGES
INDIRECTS, PARTICULIERS OU CONSÉCUTIFS RÉSULTANT DE L’UTILISATION DE CE
PRODUIT. TOUTES LES GARANTIES IMPLICITES, Y COMPRIS SANS TOUTEFOIS S’Y
LIMITER LES GARANTIES DE QUALITÉ MARCHANDE ET D’ADÉQUATION À UN USAGE
PARTICULIER, SONT LIMITÉES À UNE PÉRIODE DE CINQ ANS À COMPTER DE LA DATE
D’ACHAT INITIALE.
Enregistrez votre nouveau produit dès aujourd’hui!
En enregistrant votre nouveau produit Remington® vous profiterez des avantages importants que voici:
Preuve de propriété • Protection du produit • Enregistrement du produit • Offres spéciales
Enregistrez votre produit en ligne à l’adresse : www.RemingtonProducts.com
■N’enroulez pas le cordon autour de
l’appareil.
■Cet appareil ne contient aucune
pièce pouvant être remplacée par
l’utilisateur. Au besoin, apportez-le
chez un représentant de service
autorisé pour le faire réparer.