
Loading ...
Loading ...
Loading ...
13
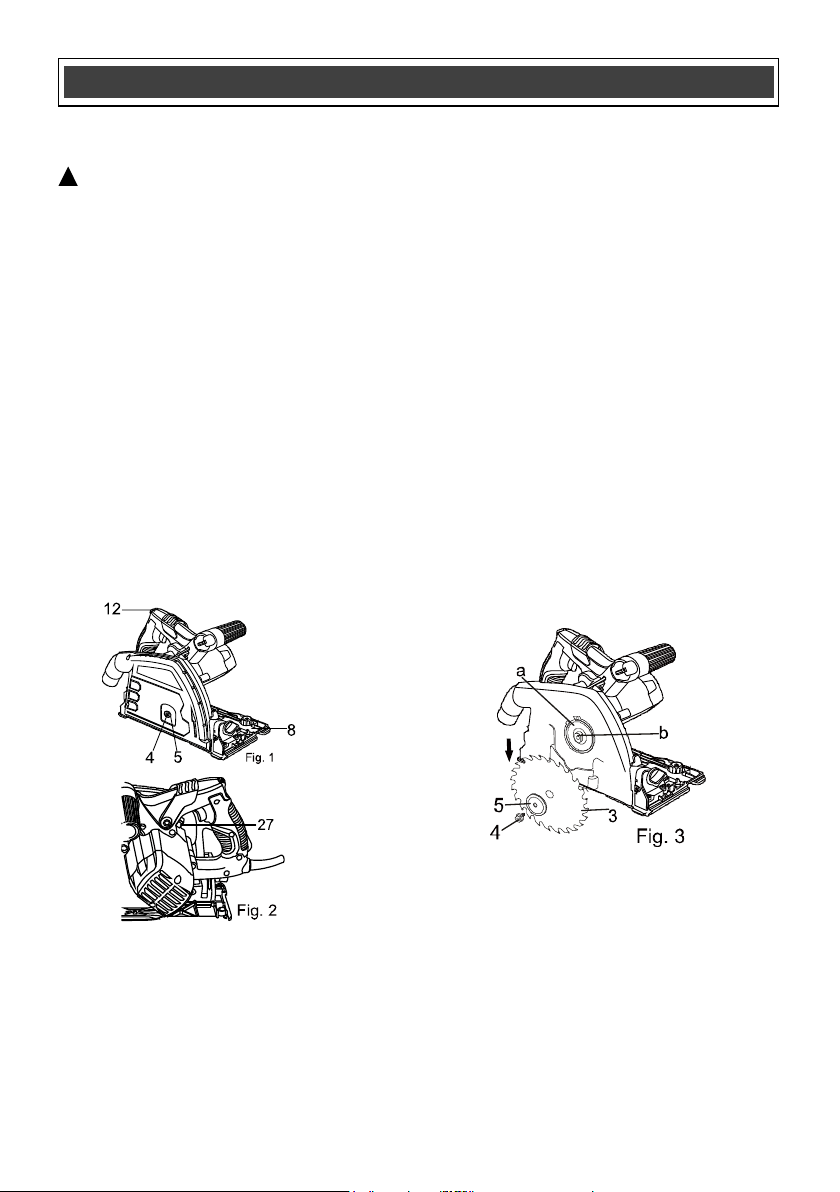
INSTALLING THE BLADE
WARNING: Always remove the plug
from the power source before installing or
removing a blade or adjusting the saw in any
way.
1. Place a clean piece of cardboard on a
workbench to protect the blade and the
workbench.
2. Push the plunge release (12), rotate the
saw head clockwise until the blade
securing bolt and the guard window are in
same position.( Fig. 1)
3. Insert the 5 mm blade hex key into the
blade securing bolt (4).( Fig. 1)
4. Press the spindle locking lever (27) (Fig. 2)
and Rotate the blade hex screw counter
clockwise and remove both the blade
screw and the outer flange (5). ( Fig. 1)
NOTE: If the arbor turns with the blade screw,
then press on the blade locking lever (27) and
slowly rotate the blade screw until the locking
lever engages the spindle (Fig. 2).
The tool is supplied with 2 blades;
Blade 24T (see (3) in Know your Plunge cut
circular saw on page 12
– Coarse wood blade suitable for fast coarse
cutting of wood and light density composite
materials (comes installed on tool) (Fig. 3)
Blade 40T (see (26) in Know your Plunge cut
circular saw on page 12)
– Fine wood blade for smooth clean cuts in
wood and normal use in very light density
woods and composite materials.
NOTE: Do NOT remove the inner flange (a)
from the arbor (b). (see Fig.3)
5. Slide the blade upward through the slot in
the base plate and place the blade hole
onto the arbor.
NOTE: Make sure the blade teeth are pointing
toward the front of the saw.
6. Place the outer flange (5) onto the arbor
and thread the blade screw (4) into the
arbour. ( Fig. 1)
7. Tighten the blade screw.
NOTE: Press on the spindle locking lever (27)
and slowly rotate the blade screw clockwise until
the locking lever engages the spindle. Continue
to turn the blade screw clockwise until the blade
is firmly tightened onto the spindle. (Fig. 2)
When installing a new blade, make sure you
follow these precautions:
a) Make sure the teeth at the bottom of the
blade are pointing toward the front of the saw.
b) Check the inner flange washer to make sure
the thicker boss is pointing toward the motor.
d) Make sure the flanged blade screw is NOT
cross threaded and is fully tightened with the
wrench provided.
ASSEMBLY AND OPERATING
!
SAVE THESE INSTRUCTIONS FOR REFERENCE
Loading ...
Loading ...
Loading ...