SUMMERJAM
Standventilator
Stand Fan
Ventilador de pie
Ventilateur sur pied
Ventilatore verticale
www.klarstein.com
10031451 10031452 10031453

3
DE
Sehr geehrter Kunde,
wir gratulieren Ihnen zum Erwerb Ihres Gerätes. Lesen Sie
die folgenden Hinweise sorgfältig durch und befolgen Sie
diese, um möglichen Schäden vorzubeugen. Für Schäden,
die durch Missachtung der Hinweise und unsachgemäßen
Gebrauch entstehen, übernehmen wir keine Haftung.
Scannen Sie den folgenden QR-Code, um Zugri auf die
aktuellste Bedienungsanleitung und weitere Informationen
rund um das Produkt zu erhalten.
INHALTSVERZEICHNIS
Sicherheitshinweise 4
Geräteübersicht 5
Zusammenbau 6
Bedienung 6
Reinigung und Pege 8
Hinweise zur Entsorgung 8
TECHNISCHE DATEN
Artikelnummer 10031451, 10031452, 10031532
Stromversorgung 220-240 V ~ 50 Hz
Leistung 50 W
HERSTELLER & IMPORTEUR (UK)
Hersteller:
Chal-Tec GmbH, Wallstraße 16, 10179 Berlin, Deutschland.
Importeur für Großbritannien:
Chal-Tec UK limited
Unit 6 Riverside Business Centre
Brighton Road
Shoreham-by-Sea
BN43 6RE
United Kingdom
English 9
Español 15
Français 21
Italiano 27

4
DE
SICHERHEITSHINWEISE
• Kinder könnten sich an den Verpackungsmaterialien und Altgeräten verletzen.
Entsorgen Sie das Verpackungsmaterial daher umgehend.
• Kinder ab 8 Jahren, psychisch, sensorisch und körperlich eingeschränkte
Menschen dürfen das Gerät nur benutzen, wenn sie vorher von einer für
sie verantwortlichen Aufsichtsperson ausführlich mit den Funktionen und
den Sicherheitsvorkehrungen vertraut gemacht wurden und die damit
verbundenen Risiken verstehen. Kinder dürfen das Gerät nur unter Aufsicht
reinigen oder warten.
• Lassen Sie das Gerät nicht unbeaufsichtigt.
• Prüfen Sie vor der Benutzung die Angabe der Spannung auf dem Typenschild.
Schließen Sie das Gerät nur an Steckdosen an, die der Spannung des Geräts
entsprechen.
• Benutzen Sie das Gerät nur für den vorgesehenen Verwendungszweck
entsprechend der Beschreibung in der Bedienungsanleitung.
• Halten Sie sich beim Zusammenbau genau an die Anleitung. Eine falsche
Vorgehensweise kann zu irreparablen Schäden am Gerät führen.
• Schalten Sie das Gerät aus und ziehen Sie den Stecker aus der Steckdose,
bevor Sie das Gerät reinigen oder wenn Sie es nicht mehr benutzen.
• Das Gerät darf nicht verwendet werden, wenn es Anzeichen von
Beschädigungen aufweist. Falls das Gerät nicht ordnungsgemäß funktioniert,
schalten Sie es umgehend aus und wenden Sie sich an einen Fachbetrieb in
Ihrer Nähe.
• Falls das Netzkabel oder der Stecker beschädigt sind, müssen sie vom
Hersteller, einem autorisierten Fachbetrieb oder einer ähnlich qualizierten
Person ersetzt werden.
• Schließen Sie das Gerät nicht an Mehrfachsteckdosen an.
• Benutzen Sie kein Verlängerungskabel.
• Schließen Sie das Gerät nicht an Zeitschaltuhren oder ferngesteuerte
Steckdosen an.
• Benutzen oder verstauen Sie das Gerät nicht in der Nähe von Wärmequellen,
wie Heizungen.
• Tauchen Sie das Gerät und den Stecker niemals in Wasser oder andere
Flüssigkeiten. Falls Wasser darauf ausläuft, ziehen Sie umgehend den
Stecker aus der Steckdose und lassen Sie das Gerät von einem Fachbetrieb
überprüfen.
• Wenn Sie das Gerät erstmals benutzen, entfernen Sie alle Folien und das
komplette Verpackungsmaterial.
• Ziehen Sie den Stecker nicht am Kabel aus der Steckdose, sondern halten Sie
ihn beim Abziehen mit der Hand fest.
• Bevor Sie den Stecker in die Steckdose stecken, versichern Sie sich, dass das
Gerät ausgeschaltet ist.
• Ziehen Sie das Netzkabel nicht in die Länge.
• Achten Sie das darauf, dass alle Luftein- und Luftauslässe frei und nicht
zugedeckt sind, damit sich das Gerät nicht überhitzt.

5
DE
• Achten Sie darauf, dass das Netzkabel nicht über scharfe Kanten oder
Oberächen verläuft. Hängen Sie das Gerät nicht an der Decke oder Wand auf,
außer es ist für diesen Betrieb ausgelegt.
• Lassen Sie um das Gerät herum genug Platz zu Wänden, Möbeln oder
anderen Geräten, um die bestmögliche Leistung zu erzielen.
• Benutzen Sie das Gerät nicht in der Nähe von Gasöfen oder Gasheizungen.
• Stellen Sie das Gerät nicht in die Nähe oder direkt unter Vorhänge.
• Decken Sie das Gerät nicht ab.
• Setzen Sie sich und andere Personen nicht dem direkten Luftstrom aus, damit
Sie sich nicht erkälten.
• Wenn Sie das Gerät nicht mehr benutzen, verstauen Sie es in der
Originalverpackung an einem trockenen Ort.
• Ziehen Sie immer den Stecker aus der Steckdose, bevor Sie das Gerät reinigen,
warten, verstauen oder wenn Sie es nicht mehr benutzen.
• Benutzen Sie das Gerät nicht in der Nähe explosiver oder entammbarer
Stoe oder Flüssigkeiten.
• Das Gerät ist nicht für den kommerziellen Gebrauch, sondern nur für
Gebrauch im Haushalt und in ähnlichen Umgebungen vorgesehen. Dazu
zählen Küchen in Büros, Bauernhöfen, Hotels, Motels und Einrichtungen, die
Bed & Breakfast anbieten.
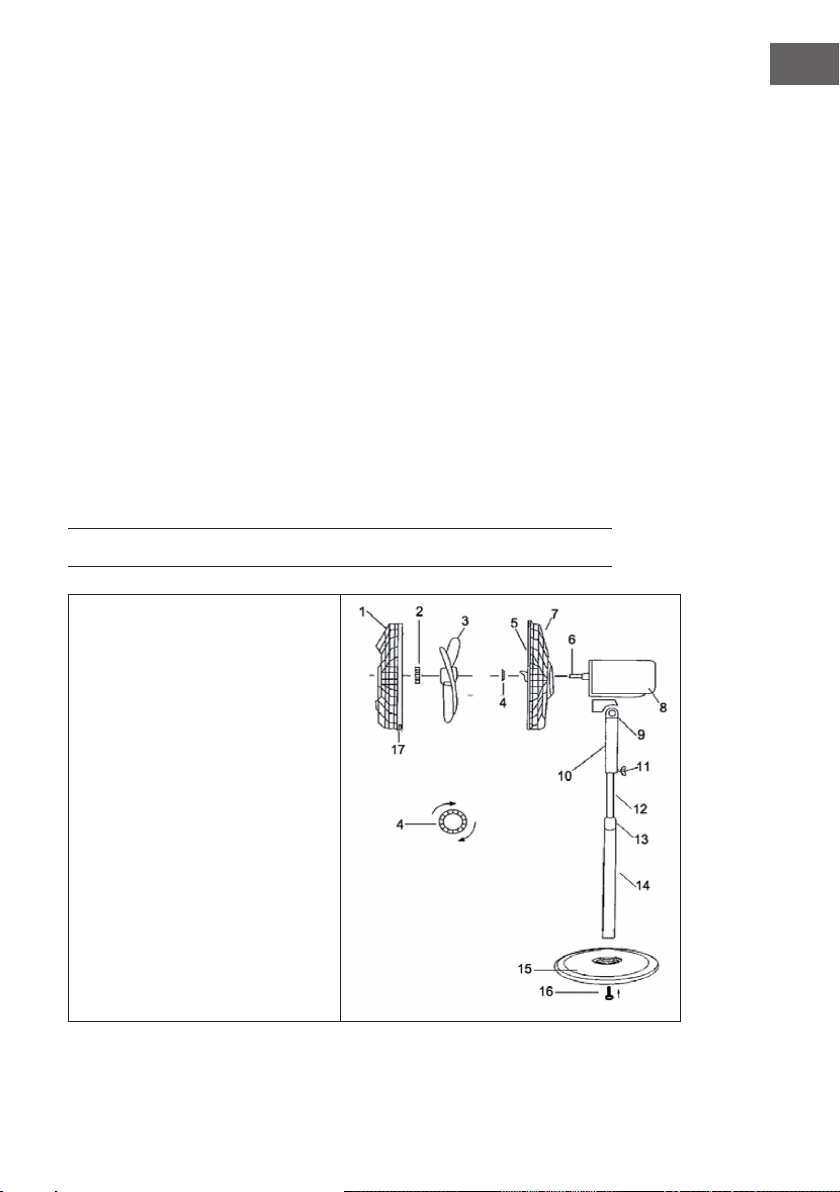
GERÄTEÜBERSICHT
1 Vorderes Gitter
2 Ventilatorkappe
3 Lüfterügel
4 Befestigungsmutter
5 Hinteres Gitter
6 Motorspindel
7 Griff
8 Motorgehäuse
9 Feststellschraube
10 Schalter
11 Einstellschraube
12 Inneres Rohr
13 Höhenverstellbund
14 Außenrohr
15 Ständer
16 Schraube
6
DE
ZUSAMMENBAU
Basis zusammenbauen
Lösen Sie die Schraube (16), die unten am Außenrohr (14) befestigt ist. Schieben
Sie das Innenrohr (12) in das Außenrohr und befestigen Sie die Rohre mit der
Schraube an der Basis. Setzen Sie das Motorgehäuse (8) auf das Innenrohr und
befestigen Sie es mit den mitgelieferten Schrauben. Versichern Sie sich, dass der
Motor fest auf dem Innenrohr sitzt.
Ventilator und Gitter anbringen
1. Entfernen Sie die Mutter von der Vorderseite des Motors, indem Sie sie gegen
den Uhrzeigersinn drehen.
2. Setzen Sie das hintere Gitter vorne an den Motor. Der Gri sollte nach oben
zeigen, so dass die Befestigungszapfen am Motorgehäuse in die Löcher des
Gitters greifen.
3. Drehen Sie die Befestigungsmutter im Uhrzeigersinn fest. Ziehen Sie sie aber
nicht zu fest an.
4. Schieben Sie den Lüfterügel auf die Motorspindel und richten Sie den Schlitz
an der Rückseite des Flügels an der Spindel aus.
5. Drehen Sie die Ventilatorkappe gegen den Uhrzeigersinn fest.
6. Richten Sie das vordere Gitter am hinteren Gitter aus, so dass die Löcher zum
Verschrauben übereinander liegen. Schieben Sie eine Schraube durch das
Loch und schrauben Sie sie mit einer Mutter fest. Ziehen Sie sie noch nicht
komplett an.
7. Schließen Sie die Sicherungsklammern und achten Sie darauf, dass sie korrekt
auf dem Gitterrand sitzen.
8. Ziehen Sie dann die Mutter und die Schraube am Gitter vollständig fest.
BEDIENUNG
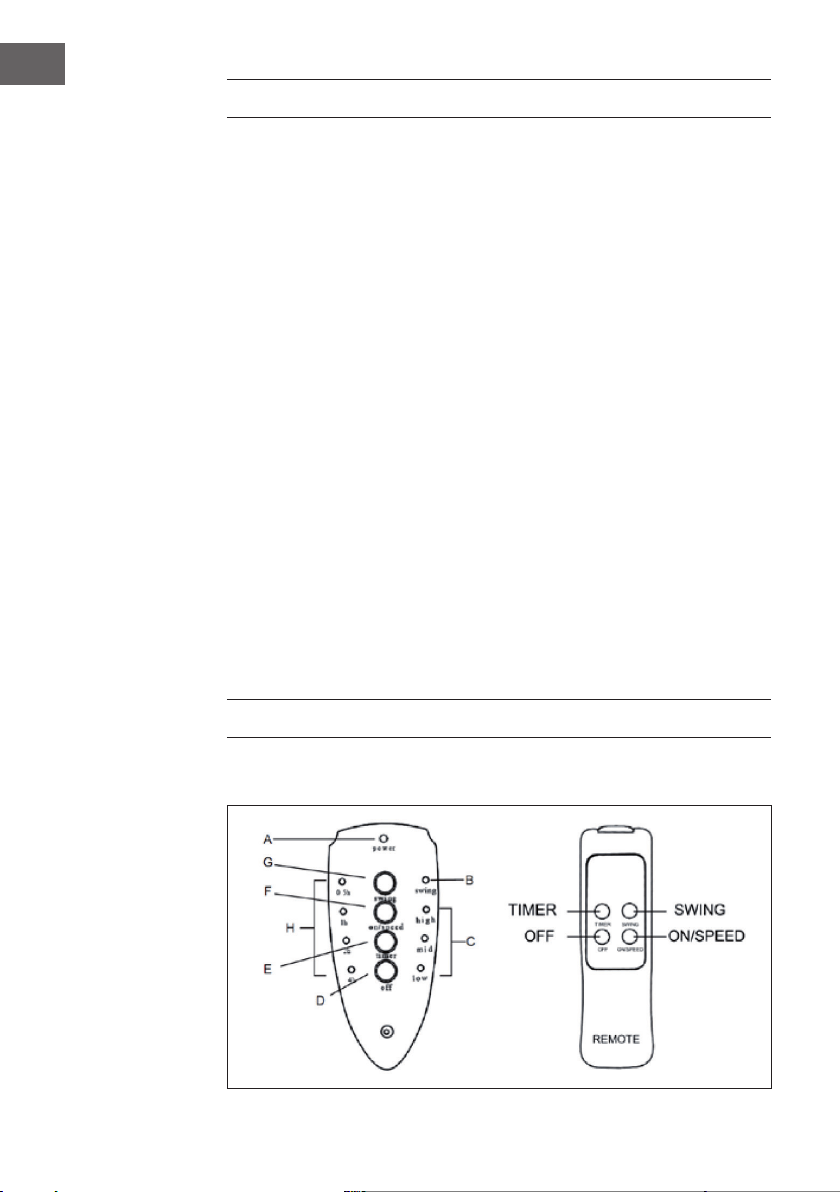
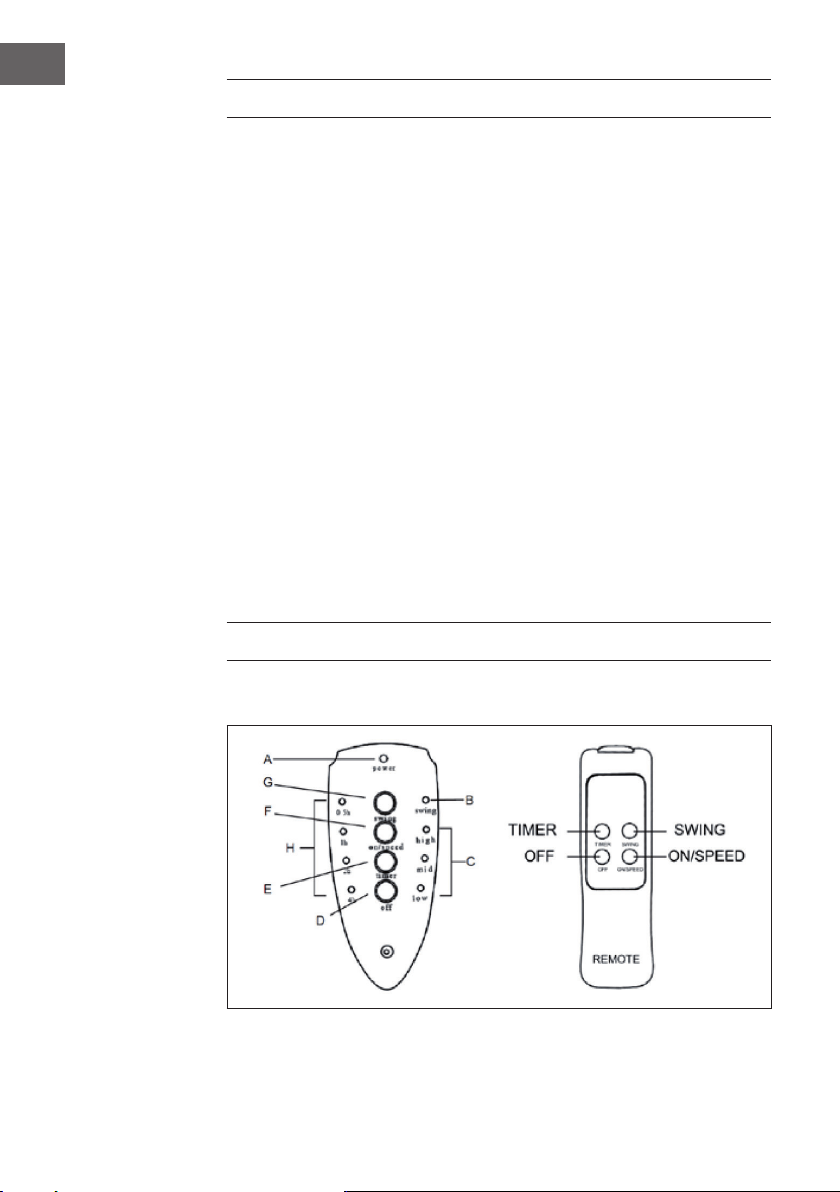
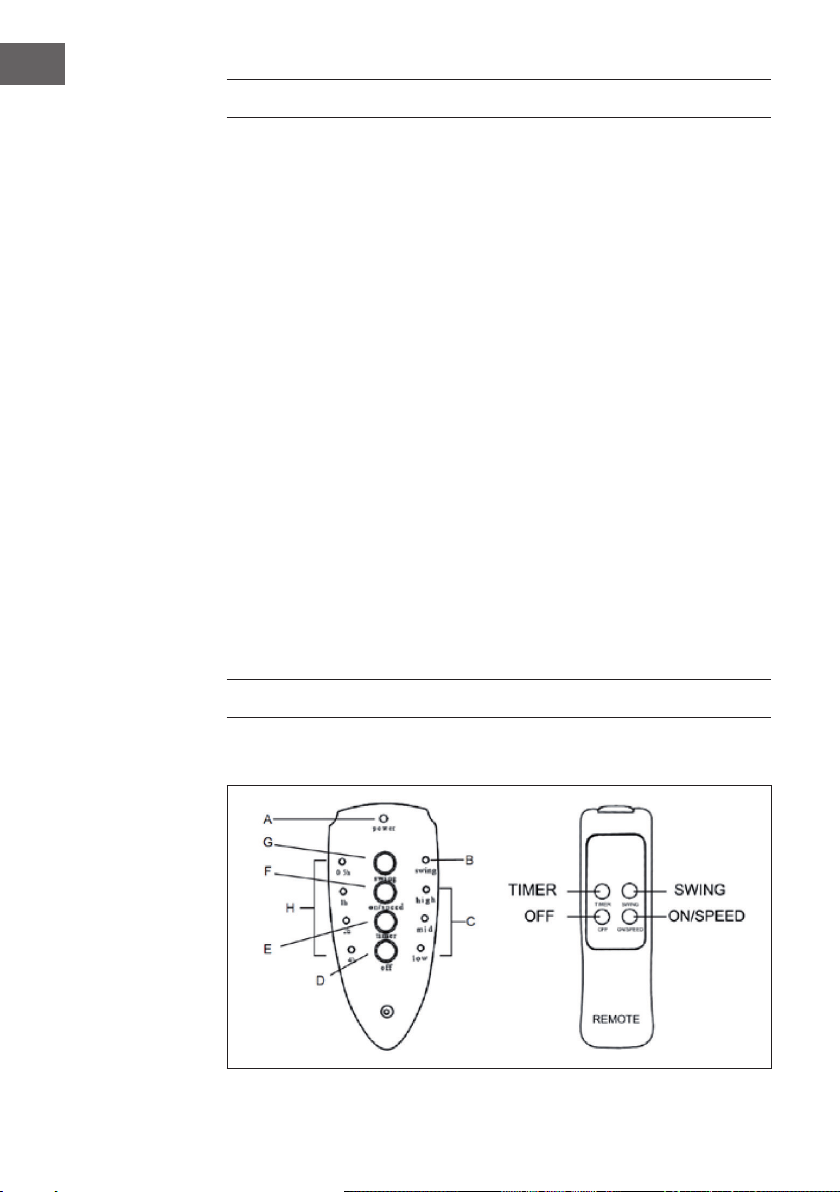
Bedienfeld und Fernbedienung

7
DE
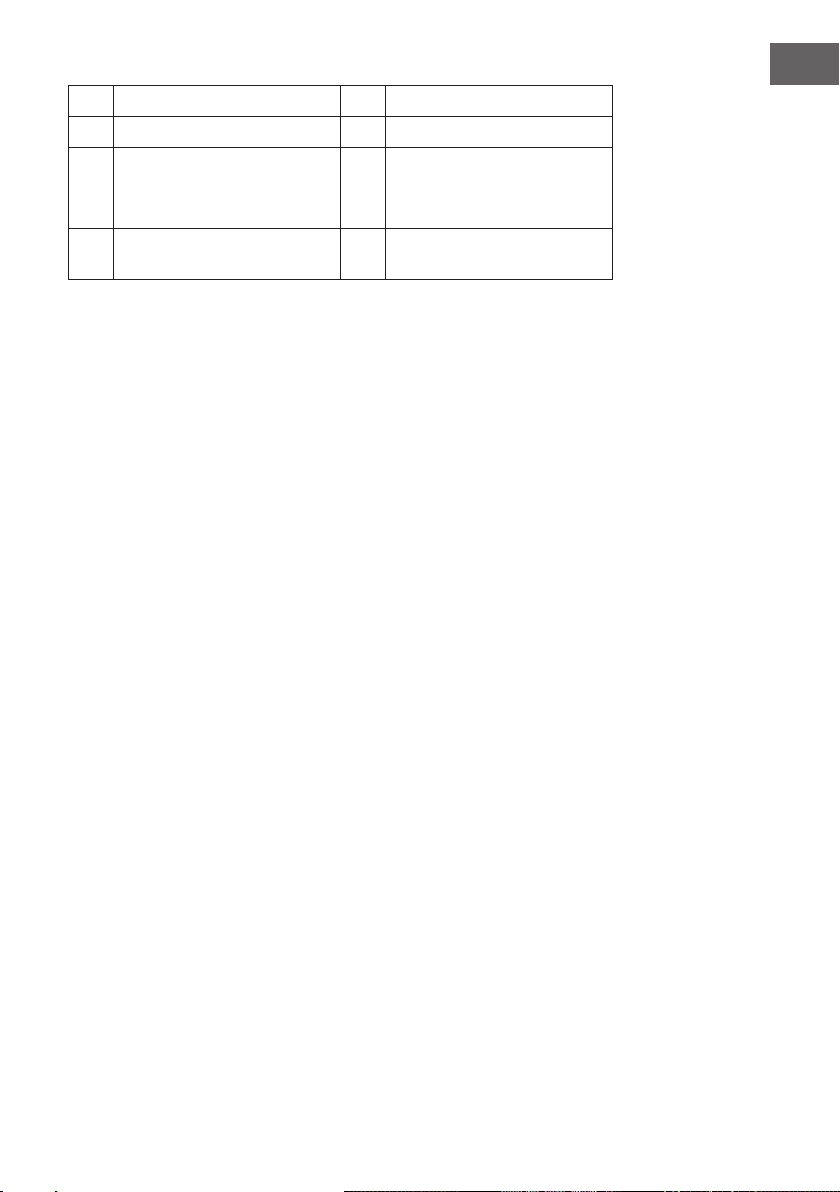
A Betriebsanzeige E TIMER-Taste
B SWING-Kontrollleuchte F
EIN (ON) und
Geschwindigkeit (SPEED)
C
Geschwindigkeitsanzeige
Hoch (high)
Mittel (mid)
Niedrig (low)
G SWING-Taste
D AUS-Taste (OFF) H
TIMER-Anzeige
0.5h / 1h / 2h / 4h
Inbetriebnahme und Bedienung
1. Schließen Sie das Gerät an eine Steckdose an. Die Betriebsanzeige (A) geht an.
2. Schalten Sie das Gerät ein, indem Sie die Taste ON/SPEED (F) am Bedienfeld
drücken. Der Lüfter beginnt mit niedriger Geschwindigkeit zu laufen. Die
Geschwindigkeitsanzeige (C) leuchtet.
3. Um die Geschwindigkeit zu ändern, drücken Sie mehrmals die Taste ON/
SPEED (F). Die Geschwindigkeit ändert sich mit jedem Tastendruck. Die
entsprechende Anzeige (C) leuchtet auf.
4. Damit der Lüfter hin- und herschwingt, drücken Sie die Taste SWING (G).
Die SWING-Kontrollleuchte (B) geht an und der Lüfter beginnt hin- und
herzuschwingen. Um die Schwingung zu stoppen, drücken Sie erneut die
SWING-Taste (G).
5. Der Ventilator verfügt über einen Timer. Nachdem Sie das Gerät eingeschaltet
haben, drücken Sie die Taste TIMER (E) und der Lüfter läuft so lange, wie Sie
es eingestellt haben. Drücken Sie dazu mehrmals die TIMER-Taste und die
Zeit ändert sich mit jedem Tastendruck. Die Kontrollleuchten (H) leuchten auf.
Nach Ablauf der eingestellten Zeit schaltet sich der Ventilator automatisch ab.
Der Timer kann von 0.5-7,5 Stunden eingestellt werden. Die Zeit ergibt sich
aus der Summe der leuchtenden Kontrollleuchten (H).
6. Der Luftstrom kann durch Kippen des Motors nach oben oder unten gelenkt
werden. Lösen Sie die Feststellschraube (9) und stellen Sie den Motor so ein,
dass er in die gewünschte Richtung zeigt. Ziehen Sie die Schraube wieder fest.
7. Um den Lüfter auszuschalten, drücken Sie die Taste OFF (D).
8. Ziehen Sie immer den Stecker aus der Steckdose, wenn Sie das Gerät nicht
mehr benutzen.
Hinweis zur Fernbedienung
Die Tasten auf der Fernbedienung haben dieselbe Funktion, wie die Tasten am
Bedienfeld. Versichern Sie sich, dass Batterien richtig herum in die Fernbedienung
eingelegt werden. Mischen Sie keine Batterietypen und tauschen Sie bei einem
Batteriewechsel immer alle Batterien gleichzeitig aus. Achten Sie drauf die
Batterien durch Batterien des selben Typs (2xAAA) zu ersetzen.
8
DE
REINIGUNG UND PFLEGE
• Ziehen Sie immer den Stecker aus der Steckdose, bevor Sie das Gerät reinigen.
Tauchen Sie Stecker, Netzkabel oder das gesamte Gerät nie komplett in
Wasser oder andere Flüssigkeiten.
• Benutzen Sie zur Reinigung kein Spülmittel, Gas, Benzin oder andere
Lösungsmittel, um das Gerät nicht zu beschädigen.
• Ziehen Sie den Stecker aus der Steckdose und warten Sie, bis der Ventilator
angehalten hat.
• Reinigen Sie die Oberäche mit einem feuchten Lappen.
• Wir empfehlen Ihnen, den Ventilator einmal im Monat zu reinigen.
• Falls Sie den Ventilator längere Zeit nicht benutzen, lagern Sie ihn an einem
kühlen, trockenen Ort außerhalb der Reichweite von Kindern. Lagern Sie das
Gerät nicht an warmen Orten mit direkter Sonneneinstrahlung.
HINWEISE ZUR ENTSORGUNG
Wenn es in Ihrem Land eine gesetzliche Regelung
zur Entsorgung von elektrischen und elektronischen
Geräten gibt, weist dieses Symbol auf dem Produkt oder
auf der Verpackung darauf hin, dass dieses Produkt
nicht im Hausmüll entsorgt werden darf. Stattdessen
muss es zu einer Sammelstelle für das Recycling von
elektrischen und elektronischen Geräten gebracht
werden. Durch regelkonforme Entsorgung schützen
Sie die Umwelt und die Gesundheit Ihrer Mitmenschen
vor negativen Konsequenzen. Informationen zum
Recycling und zur Entsorgung dieses Produkts,
erhalten Sie von Ihrer örtlichen Verwaltung oder Ihrem
Hausmüllentsorgungsdienst.
Dieses Produkt enthält Batterien. Wenn es in Ihrem
Land eine gesetzliche Regelung zur Entsorgung von
Batterien gibt, dürfen die Batterien nicht im Hausmüll
entsorgt werden. Informieren Sie sich über die örtlichen
Bestimmungen zur Entsorgung von Batterien. Durch
regelkonforme Entsorgung schützen Sie die Umwelt
und die Gesundheit Ihrer Mitmenschen vor negativen
Konsequenzen.
9
EN
Dear Customer,
Congratulations on purchasing this device. Please read the
following instructions carefully and follow them to prevent
possible damages. We assume no liability for damage
caused by disregard of the instructions and improper use.
Scan the QR code to get access to the latest user manual and
more product information.
CONTENT
Safety Instructions 10
Product Overview 11
Assembling 12
Operation 12
Cleaning and Care 14
Disposal Considerations 14
TECHNICAL DATA
Item number 10031451, 10031452, 10031532
Power supply 220-240 V ~ 50 Hz
Power consumtion 50 W
MANUFACTURER & IMPORTER (UK)
Manufacturer:
Chal-Tec GmbH, Wallstrasse 16, 10179 Berlin, Germany.
Importer for Great Britain:
Chal-Tec UK limited
Unit 6 Riverside Business Centre
Brighton Road
Shoreham-by-Sea
BN43 6RE
United Kingdom

10
EN
SAFETY INSTRUCTIONS
• Packaging materials (plastic bags, polystyrene, staples etc.) Must be kept out
of the reach of children as they could be hazardous.
• Children over the age of 8 and persons with reduced physical, sensory or
mental capabilities or those with a lack of experience and knowledge may only
use the device if they are instructed on how to do so by a person responsible
for their safety, or if they are supervised and understand the hazards
associated with the use of the device. Children may not clean or carry out user
maintenance without supervision.
• Do not leave the appliance unattended.
• Before connecting the appliance, check that the appliance rating corresponds
to the mains rating.
• This appliance must only be used for the purpose for which it has been
manufactured. As a stand fan. The manufacturer is not responsible for any
damage caused by improper or incorrect use.
• The installation/assembly of the device will be made according to the
indications of the manufacturer. A wrong procedure may cause damages to
persons, animals or objects, for which the manufacturer cannot be considered
responsible.
• Before cleaning or carrying out maintenance on the appliance, disconnect it
from the electrical mains by removing the plug from the electrical outlet or by
switching o the system switch.
• The appliance is not to be used if there are signs of damage. If the appliance
is faulty and/or operating incorrectly, switch it o without tampering with it. If
the above is disregarded, the safety of the appliance may be compromised.
• If the supply cord is damaged, it must be replaced by the manufacturer, its
service agent or similarly qualied persons in order to avoid a hazard.
• Do not power the device using multiple sockets.
• Do not use adapters and/or extension cable.
• The device must not be switched on using external timers and/or other
remote control devices which are not specied in this manual.
• Do not use or store the device near heat sources (heaters, stoves).
• Do not dip the device in water or other liquids; in case the accidental fall in the
water do not try to take it out, but rst of all unplug immediately the power
cable from the socket.
• If you use the device for the rst time, make sure to remove any label or
protective sheet which blocks its proper functioning.
• Do not pull the plug out of the socket by the cable, but hold it rmly by hand
when pulling it o.
• Before plugging the plug into a wall outlet, make sure that the unit is switched o.
• Always unplug the power cable to avoid the overheating and avoid stretching it.
• Make sure that all air intakes and outlets are free and not covered so that the
unit does not overheat.
• Avoid placing the power cable on abrasive or sharp surfaces or in positions
where it can be damaged easily.

11
EN
• Do not hang the fan on the wall or ceiling unless this type of installation is
provided and explained in this manual.
• Place the device at a proper distance from the objects or surrounding walls
making sure that its functioning will not cause accidental damages.
• Do not use the device near gas stoves or open ames in general.
• Do not use the device near curtains or textiles.
• Do not cover the device during functioning.
• Do not expose yourself for a long period to the air ow generated by the
device because it can cause damage to the health.
• If the fan must be stored for a long period and is not used regularly, place the
fan in its original packaging in a dry place.
• Always remember to unplug the power cable of the device if it is not used
for a long period, before storing, cleaning or performing any maintenance
operation.
• Do not use the appliance in the presence of potentially ammable or explosive
liquids or gases.
• The appliance is not intended for commercial use, but only for household and
similar environments. This includes kitchens in oces, farms, hotels, motels
and Bed & Breakfasts. Do not use outdoors.
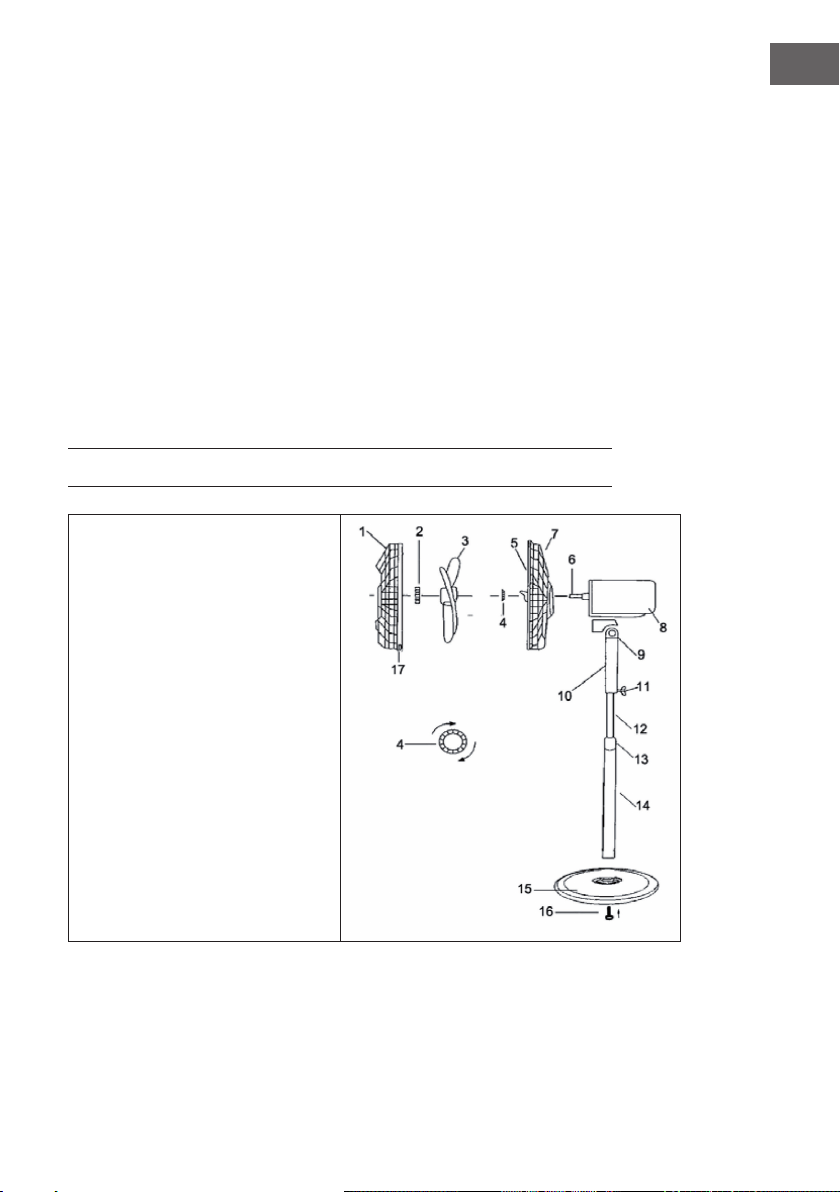
PRODUCT OVERVIEW
1 Front grille
2 Fan cap
3 Fan blade
4 Fastening nut
5 Rear grille
6 Motor spindle
7 Handle
8 Motor housing
9 Locking screw
10 Switch
11 Adjusting screw
12 Inner tube
13 Height adjustment collar
14 Outer tube
15 Stand
16 Screw
12
EN
ASSEMBLING
Assembling the base
Loosen the screw (16) attached to the bottom of the outer tube (14). Slide the inner
tube (12) into the outer tube and secure the tubes to the base with the screw. Place
the motor housing (8) on the inner tube and secure it with the screws provided.
Make sure the motor is rmly seated on the inner tube.
Attaching the fan and grille
1. Remove the nut from the front of the motor by turning it counterclockwise.
2. Place the rear grille on the front of the motor. The handle should be facing
up so that the mounting pegs on the motor housing engage the holes in the
grille.
3. Tighten the fastening nut clockwise. However, do not overtighten it.
4. Slide the fan blade onto the motor spindle and align the slot on the back of
the blade with the spindle.
5. Tighten the fan cap counterclockwise.
6. Align the front grille with the rear grille so that the holes for screwing are on
top of each other. Slide a bolt through the hole and tighten it with a nut. Do
not tighten it completely yet.
7. Close the locking clips and make sure they are correctly seated on the edge of
the grille. 8.
8. Then fully tighten the nut and bolt on the grille.
OPERATION
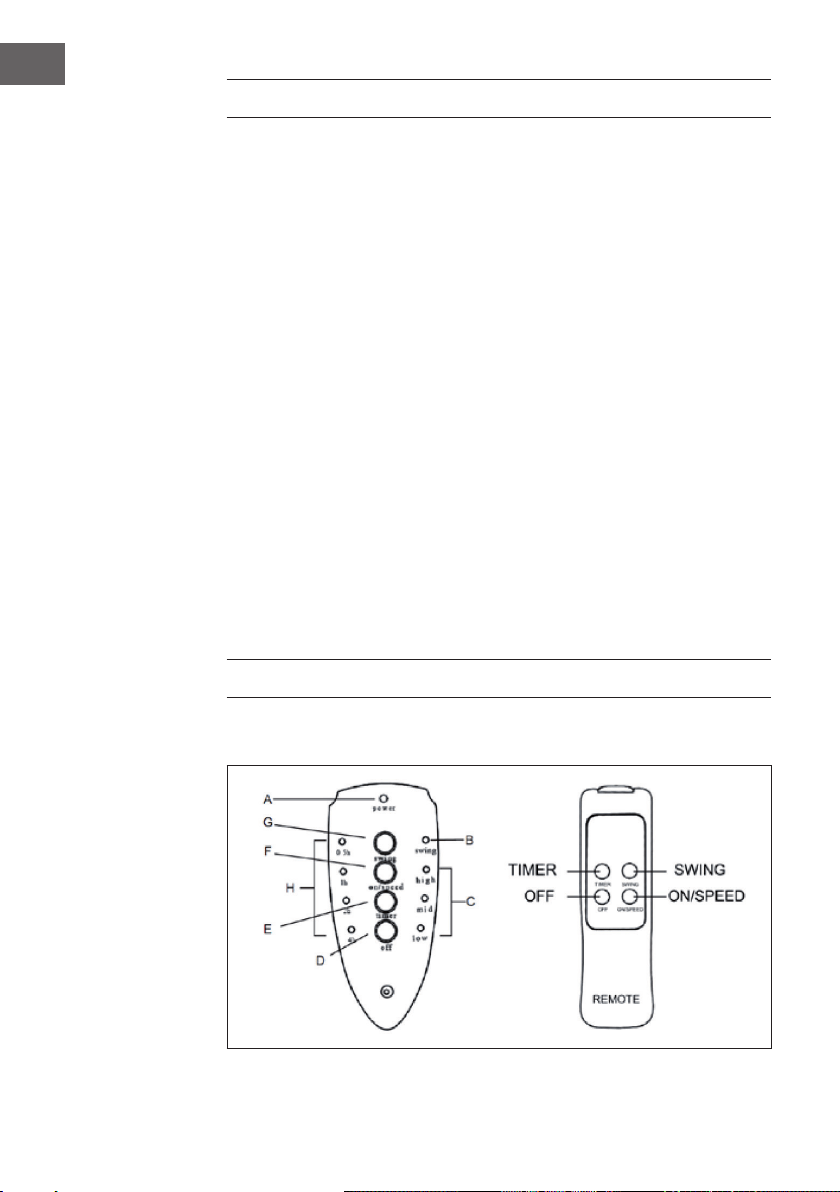
Control panel and remote control
13
EN
A Operating indicator E TIMER key
B SWING indicator light F ON (ON) and speed (SPEED)
C
Speed indicator
High (high)
Medium (mid)
Low (low)
G SWING button
D OFF button (OFF) H
TIMER display
0.5h / 1h / 2h / 4h
Commissioning and Operation
1. Connect the device to a power outlet. The power indicator (A) turns on.
2. Switch on the unit by pressing the ON/SPEED key (F) on the control panel. The
fan starts to run at low speed. The speed indicator (C) lights up.
3. To change the speed, press the ON/SPEED key (F) several times. The speed
changes with each press of the key. The corresponding indicator (C) lights up.
4. To make the fan swing back and forth, press the SWING key (G). The SWING
indicator light (B) turns on and the fan begins to oscillate back and forth. To
stop the oscillation, press the SWING button (G) again.
5. The fan has a timer. After you turn on the unit, press the TIMER button (E) and
the fan will run as long as you set it. To do this, press the TIMER button several
times and the time will change with each press of the button. The indicator
lights (H) will light up. After the set time has elapsed, the fan will automatically
turn o. The timer can be set from 0.5-7.5 hours. The time results from the
sum of the illuminated control lights (H).
6. The air ow can be directed upwards or downwards by tilting the motor.
Loosen the xing screw (9) and adjust the motor so that it points in the
desired direction. Tighten the screw again.
7. To switch o the fan, press the OFF key (D).
8. Always unplug the unit when not in use.
Note on the remote control
The buttons on the remote control have the same function as the buttons on the
control panel. Make sure that batteries are inserted into the remote control the
right way around. Do not mix battery types and always replace all batteries at the
same time when changing batteries. Be sure to replace the batteries with batteries
of the same type (2xAAA).
14
EN
CLEANING AND CARE
• Always unplug the unit before moving or servicing.
• Do not immerse the power cord, plug and the whole unit into water or rinse
under the tap.
• Do not use detergent, gasoline, benzene, thinner, or other solvents to clean
the unit to avoid damage of the appliance.
• Unplug the unit and wait until the fan stop running before cleaning.
• Use a damp cloth to clean the surface of the fan.
• If the fan will not be used for a long time, store it in the cool, dry, safety place
and far away from children. Do not store the appliance in hot place and under
sunshine.
• It is recommended to clean the fan every month.
DISPOSAL CONSIDERATIONS
If there is a legal regulation for the disposal of electrical
and electronic devices in your country, this symbol on the
product or on the packaging indicates that this product
must not be disposed of with household waste. Instead,
it must be taken to a collection point for the recycling
of electrical and electronic equipment. By disposing of
it in accordance with the rules, you are protecting the
environment and the health of your fellow human beings
from negative consequences. For information about the
recycling and disposal of this product, please contact your
local authority or your household waste disposal service.
This product contains batteries. If there is a legal
regulation for the disposal of batteries in your country,
the batteries must not be disposed of with household
waste. Find out about local regulations for disposing
of batteries. By disposing of them in accordance with
the rules, you are protecting the environment and the
health of your fellow human beings from negative
consequences.

15
ES
Estimado cliente:
Le felicitamos por la adquisición de este producto. Lea
atentamente el siguiente manual y siga cuidadosamente
las instrucciones de uso con el n de evitar posibles daños.
La empresa no se responsabiliza de los daños ocasionados
por un uso indebido del producto o por haber desatendido
las indicaciones de seguridad. Escanee el código QR para
obtener acceso al manual de usuario más reciente y otra
información sobre el producto.
ÍNDICE DE CONTENIDOS
Indicaciones de seguridad 16
Visión general del aparato 17
Montaje 18
Uso 18
Limpieza y cuidado 20
Indicaciones sobre la retirada del aparato 20
DATOS TÉCNICOS
Número de artículo
Suministro eléctrico
220-240 V ~ 50/60 Hz
Potencia
FABRICANTE E IMPORTADOR (REINO UNIDO)
Fabricante:
Chal-Tec GmbH, Wallstraße 16, 10179 Berlín, Alemania.
Importador para Gran Bretaña:
Chal-Tec UK limited
Unit 6 Riverside Business Centre
Brighton Road
Shoreham-by-Sea
BN43 6RE
United Kingdom

16
ES
INDICACIONES DE SEGURIDAD
• Los niños podrían provocarse lesiones con el material de embalaje y los
artículos viejos. Por ello, deseche el material de embalaje inmediatamente.
• Los niños mayores de 8 años y las personas con discapacidad física, sensorial
o psíquica, o con falta de experiencia y conocimientos pueden utilizar el
aparato si han sido previamente instruidos por su tutor o supervisor sobre
el funcionamiento del mismo y conocen las funciones, las indicaciones de
seguridad y los riesgos asociados. No permita que niños jueguen con el
aparato. Los niños solamente podrán limpiar el aparato si se encuentran bajo
supervisión.
• No deje la unidad desatendida.
• Antes de utilizar el aparato, compruebe la tensión en la placa técnica del
mismo. Conecte el aparato solamente a tomas de corriente que se adecuen a
la tensión del mismo.
• Utilice el aparato solamente para el n indicado en este manual de
instrucciones.
• Cíñase a las instrucciones para montar el aparato. Un procedimiento
incorrecto puede provocar daños en el aparato.
• Antes de limpiar el aparato o si no lo utiliza, apáguelo y desconecte el enchufe
de la toma de corriente.
• No utilice el aparato si presenta signos de deterioro. Si el aparato no funciona
correctamente, apáguelo inmediatamente y contacte con un servicio técnico
de su ciudad.
• Si el cable de alimentación o el enchufe están dañados, deberán ser
sustituidos por el fabricante, un servicio técnico autorizado o una persona
igualmente cualicada.
• No conecte el aparato a una base múltiple.
• No utilice un cable alargador.
• No conecte el aparato a tomas de corriente manejadas por control remoto ni
con temporizador.
• No utilice ni almacene el aparato cerca de fuentes de calor, como radiadores.
• No sumerja el aparato ni el enchufe en agua ni en ningún otro líquido. Si cae
agua encima del aparato, desconecte enseguida el enchufe de la toma de
corriente y contacte con un servicio técnico para que compruebe el aparato.
• Si utiliza el aparato por primera vez, retire todos los plásticos y todo el
material de embalaje.
• Para desconectar el aparato no tire del cable, sino del cuerpo del enchufe.
• Asegúrese de que el aparato está apagado antes de conectar el enchufe a la
toma de corriente.
• No tire del cable de alimentación.
• Asegúrese de que todas las entradas y salidas de aire estén libres y no
obstruidas para evitar que el aparato se sobrecaliente.
• Asegúrese de que el cable de alimentación no pase por cantos o supercies
aladas.

17
ES
• No cuelgue el aparato del techo o de una pared a menos que se haya
concebido para ese tipo de instalación.
• Deje suciente espacio alrededor del aparato con respecto a paredes,
mobiliario u otros objetos para obtener el mejor rendimiento posible.
• No utilice el aparato cerca hornos de gas ni calefacciones de gas.
• No coloque el aparato al lado ni justo debajo de cortinas.
• No cubra el aparato.
• No se recomienda que usted ni otras personas se sienten directamente frente
a la corriente de aire, pues podrían resfriarse.
• Si no utiliza el aparato durante un periodo prolongado de tiempo, guárdelo en
un lugar seco dentro de su embalaje original.
• Antes de limpiar, guardar o realizar reparaciones en el aparato, apáguelo y
desconecte el enchufe de la toma de corriente.
• No utilice el aparato cerca de sustancias o líquidos explosivos o altamente
inamables.
• Este aparato no ha sido concebido para un uso comercial, sino doméstico o
para entornos similares. Entre estos se encuentran ocinas, granjas, hoteles,
moteles e instalaciones que ofrecen servicio bed&breakfast. No utilice el
aparato al aire libre.
VISIÓN GENERAL DEL APARATO
1 Rejilla superior
2 Tapa de las aspas
3 Aspas del ventilador
4 Tuerca de jación
5 Rejilla trasera
6 Eje del motor
7 Asa
8 Carcasa del motor
9 Tornillo de sujeción
10 Interruptor
11 Tornillo de ajuste
12 Tubo interior
13 Regulador de altura
14 Tubo exterior
15 Soporte
16 Tornillo
18
ES
MONTAJE
Montaje de la base
Suelte el tornillo (16) que está jado al tubo exterior (14). Deslice el tubo interior
(12) en el interior del tubo ex- terior y je ambas piezas a la base con el tornillo.
Coloque la carcasa del motor (8) sobre el tubo interior y fíjela con los tornillos
incluidos. Asegúrese de que el procesador está colocado en el tubo interior.
Montar ventilador y rejilla
1. Retire la tuerca de la parte delantera del motor girándola en el sentido
contrario de las agujas del reloj.
2. Coloque la rejilla trasera en la parte delantera del motor. El asa debe estar
orientada hacia arriba para que las pinzas de jación se agarren a la carcasa
del motor en los oricios de la rejilla.
3. Apriete la tuerca de jación en el sentido de las agujas del reloj. No la apriete
demasiado fuerte.
4. Desplace las aspas del ventilador sobre el eje y oriente la ranura de la parte
trasera del aspa al eje.
5. Gire la tapa de las aspas en el sentido contrario de las agujas del reloj.
6. Oriente la rejilla delantera hacia la rejilla trasera para que los oricios queden
superpuestos para los tornillos. Pase un tornillo por el oricio y apriételo junto
con una tuerca. No los apriete completamente todavía.
7. Cierre las pinzas de seguridad y asegúrese de que están correctamente
colocadas sobre el marco de la rejilla.
8. A continuación, apriete completamente la tuerca y el tornillo.
USO
Panel de control y mando a distancia

19
ES
A Indicador de funcionamiento E Botón TIMER
B Indicador luminoso SWING F ON y velocidad
C
Indicador de velocidad
Alta (high)
Media (mid)
Baja (low)
G Botón SWING
D Botón OFF H
Indicador TIMER
0.5h/1h/2h/4h
Puesta en marcha y uso
1. Conecte el aparato a una toma de corriente. El indicador de funcionamiento
(A) se enciende.
2. Encienda el aparato pulsando el botón ON/SPEED (F) del panel de control. El
ventilador comienza a funcio- nar a velocidad baja. El indicador de velocidad
(C) se ilumina.
3. Para modicar la velocidad, pulse varias veces el botón ON/SPEED
(F). La velocidad se modica cada vez que pulse el botón. El indicador
correspondiente (C) se ilumina.
4. Para que el ventilador oscile de un lado a otro, pulse el botón SWING (G). El
indicador luminoso SWING (8) se enciende y el ventilador comienza a oscilar
de un lado a otro. Para detener la oscilación, pulse de nuevo el botón SWING
(G).
5. El ventilador dispone de un temporizador. Después de haber encendido el
aparato, pulse el botón TIMER (E) y el ventilador funciona en el modo en que
lo ha ajustado. Pulse varias veces el botón TIMER y el tiempo se modica
con cada pulsación. Los indicadores luminosos (H) se encienden. Cuando
transcurra el tiempo seleccionado, el ventilador se apaga automáticamente.
El temporizador puede ajustarse en un rango de 0,5 a 7,5 horas. El tiempo se
compone de la suma de los indicadores luminosos encendidos (H).
6. La corriente de aire puede orientarse hacia arriba o hacia abajo moviendo el
motor. Suelte los tornillos de jación (9) y ajuste el motor de tal manera que
adquiera la orientación deseada. Apriete de nuevo el tornillo.
7. Para apagar el ventilador, pulse el botón OFF (D).
8. Desconecte siempre el enchufe de la toma de corriente cuando no utilice el
aparato.
Indicaciones para el uso del mando a distancia
Los botones del mando a distancia tienen la misma función que los del panel
de control. Asegúrese de que las pilas estén bien colocadas dentro del mando
a distancia. No mezcle distintos tipos de batería y cambie siempre todas las
pilas simultáneamente. Asegúrese de sustituir las pilas por otras del mismo tipo
(2XAAA).

20
ES
LIMPIEZA Y CUIDADO
• Desenchufe el aparato antes de limpiarlo.
• Nunca sumerja el aparato, el cable de alimentación ni el enchufe en agua ni
en ningún otro líquido.
• No utilice detergentes, gas, gasolina u otros productos de limpieza para
limpiar el aparato.
• Desenchufe el aparato y espere hasta que este se haya detenido por
completo.
• Limpie la supercie con un paño húmedo.
• Le recomendamos limpiar el ventilador al menos una vez al mes.
• Si no utiliza el ventilador durante un periodo prolongado de tiempo, guárdelo
en un lugar fresco y seco fuera del alcance de los niños. No guarde el aparato
en lugares a altas temperaturas o expuestos a la luz directa del sol.
INDICACIONES SOBRE LA RETIRADA DEL APARATO
Si en su país existe una disposición legal relativa a la
eliminación de aparatos eléctricos y electrónicos, este
símbolo estampado en el producto o en el embalaje
advierte que no debe eliminarse como residuo doméstico.
En lugar de ello, debe depositarse en un punto de
recogida de reciclaje de aparatos eléctricos y electrónicos.
Una gestión adecuada de estos residuos previene
consecuencias potencialmente negativas para el medio
ambiente y la salud de las personas. Puede consultar más
información sobre el reciclaje y la eliminación de este
producto contactando con su administración local o con
su servicio de recogida de residuos.
Este producto contiene baterías. Si en su país existe una
disposición legal relativa a la eliminación de baterías,
estas no deben eliminarse como residuo doméstico.
Infórmese sobre la normativa vigente relacionada con
la eliminación de baterías. Una gestión adecuada de
estos residuos previene consecuencias potencialmente
negativas para el medio ambiente y la salud de las
personas.

21
FR
Chère cliente, cher client,
Toutes nos félicitations pour l’acquisition de ce nouvel appareil.
Veuillez lire attentivement et respecter les instructions
de ce mode d’emploi an d’éviter d’éventuels dommages.
Le fabricant ne saurait être tenu pour responsable des
dommages dus au non-respect des consignes de sécurité et à
la mauvaise utilisation de l’appareil. Scannez le QR-Code pour
accéder à la dernière version du mode d‘emploi et à d‘autres
informations concernant le produit.
SOMMAIRE
Consignes de sécurité 22
Aperçu de l‘appareil 23
Montage 24
Utilisation 24
Nettoyage et entretien 26
Informations sur le recyclage 26
FICHE TECHNIQUE
Numéro d’article
10031451, 10031452, 10031532
Alimentation électrique
220-240 V ~ 50 Hz
Puissance
50 W
FABRICANT ET IMPORTATEUR (UK)
Fabricant :
Chal-Tec GmbH, Wallstraße 16, 10179 Berlin, Allemagne.
Importateur pour la Grande Bretagne :
Chal-Tec UK limited
Unit 6 Riverside Business Centre
Brighton Road
Shoreham-by-Sea
BN43 6RE
United Kingdom

22
FR
CONSIGNES DE SÉCURITÉ
• Les matériaux d‘emballage et les vieux appareils peuvent blesser les enfants.
Jetez le matériel d‘emballage immédiatement.
• Les enfants âgés de plus de 8 ans et les personnes ayant des capacités
physiques, sensorielles ou mentales réduites ou dénués d‘expérience et de
connaissances ne doivent utiliser l‘appareil que si la personne responsable
de leur sécurité leur en a expliqué le fonctionnement, ou s‘ils sont supervisés
et comprennent les dangers liés à l‘utilisation de l‘appareil. Les enfants ne
peuvent ni nettoyer ni entretenir l‘appareil sans surveillance.
• Ne laissez pas l‘appareil sans surveillance.
• Vériez la tension sur l‘étiquette de l‘appareil avant utilisation. Ne branchez
l‘appareil que sur des prises correspondant à la tension de l‘appareil.
• Utilisez l‘appareil uniquement pour l‘usage auquel il est destiné, comme décrit
dans le mode d‘emploi.
• Suivez attentivement les instructions lors de l‘assemblage. Un mauvais
assemblage peut causer des dommages irréparables à l‘appareil.
• Eteignez l‘appareil et débranchez le cordon d‘alimentation avant de le nettoyer
ou lorsque vous ne l‘utilisez pas.
• L‘appareil ne doit pas être utilisé s‘il présente des signes de dommages. Si
l‘appareil ne fonctionne pas correctement, éteignez-le immédiatement et
contactez un spécialiste à proximité.
• Si le cordon d‘alimentation ou la che sont endommagés, ils doivent être
remplacés par le fabricant, par un spécialiste agréé ou par une personne de
même qualication.
• Ne branchez pas l‘appareil sur une prise multiple.
• N‘utilisez pas de rallonge.
• Ne connectez pas l‘appareil à une minuterie ou à une prise télécommandée.
• N‘utilisez pas et ne stockez pas l‘appareil à proximité de sources de chaleur
telles que des radiateurs.
• Ne plongez jamais l‘appareil et la che dans de l‘eau ou tout autre liquide. Si
de l‘eau est renversée sur l‘appareil, débranchez immédiatement la che et
faites vérier l‘appareil par un atelier spécialisé.
• Lorsque vous utilisez l‘appareil pour la première fois, retirez tous les lms et
les matériaux d‘emballage.
• Ne débranchez pas l‘appareil en tirant sur le câble mais tirez sur la che elle-
même.
• Avant de brancher la che dans la prise, assurez-vous que l‘appareil est éteint.
• N‘étirez pas le cordon d‘alimentation.
• Assurez-vous que toutes les entrées et sorties d’air sont dégagées et non
couvertes an que l’appareil ne surchaue pas.
• Assurez-vous que le cordon d‘alimentation ne passe pas sur des arêtes ou des
surfaces coupantes.
23
FR
• Ne suspendez pas l‘appareil au plafond ou au mur sauf s‘il est conçu pour
cette utilisation.
• Laissez susamment d‘espace entre l‘appareil et les murs, meubles ou tout
autre équipement an d‘obtenir les meilleures performances possibles.
• N‘utilisez pas l‘appareil à proximité de cuisinières à gaz ou d‘appareils de
chauage au gaz.
• Ne placez pas l‘appareil près ou directement sous un rideau.
• Ne couvrez pas l‘appareil.
• Ne vous exposez pas, et ne laissez pas d‘autres personnes s‘exposer au ux
d‘air direct an d‘éviter les rhumes.
• Lorsque vous cessez d‘utiliser l‘appareil, rangez-le dans son emballage
d‘origine, dans un endroit sec.
• Débranchez toujours l‘appareil avant de le nettoyer, de le réparer, de le ranger
ou lorsque vous cessez de l‘utiliser.
• N‘utilisez pas l‘appareil à proximité de substances ou de liquides explosifs ou
inammables.
• L‘appareil n‘est pas destiné à un usage commercial, mais uniquement à un
usage domestique et à des environnements similaires. Ceux-ci comprennent
les cuisines de bureaux, les fermes, les hôtels, les motels et les lieux
d‘hébergement qui proposent des services de type Bed & Breakfast. N‘utilisez
pas l‘appareil à l‘extérieur.
APERÇU DE L‘APPAREIL
1 Grille avant
2 Capuchon du ventilateur
3 Pales du ventilateur
4 Écrou de xation
5 Grille arrière
6 Broche du moteur
7 Poignée
8 Boîtier du moteur
9 Vis de xation
10 Interrupteur
11 Vis de réglage
12 Tube intérieur
13 Bague de réglage de la hauteur
14 Tube extérieur
15 Socle
16 Vis

24
FR
MONTAGE
Montage de la base
Dévisser la vis (16) xée en bas du tube extérieur (14). Introduire le tube intérieur
(12) dans le tube extérieur et xer les tubes au socle avec la vis. Placer le boîtier
du moteur (8) sur le tube intérieur et le xer avec les vis fournies. S’assurer que le
moteur est bien xé au tube intérieur.
Montage du ventilateur et de la grille
1. Dévisser l’écrou de l’avant du moteur en le tournant dans le sens contraire des
aiguilles d’une montre.
2. Installer la grille arrière à l’avant du moteur. La poignée doit être dirigée vers
le haut de sorte à ce que la broche d’entraînement du boîtier du moteur se
che dans le trou de la grille.
3. Visser l’écrou de xation dans le sens des aiguilles d’une montre. Cependant,
ne pas trop le serrer.
4. Faire passer les pales du ventilateur sur la broche du moteur et aligner la
fente sur la brocher à l’arrière des pales.
5. Visser capuchon du ventilateur dans le sens contraire des aiguilles d’une
montre.
6. Faire coïncider la grille avant avec la grille arrière de sorte à ce que les trous
de vissage soient superposés. Introduire une vis dans le trou et la visser avec
un écrou. Ne pas la serrer complètement.
7. Refermer les attaches de sécurité et veiller à ce qu’elles soient correctement
positionnées sur le rebord de la grille.
8. Enn, visser à fond l’écrou et la vis de la grille.
UTILISATION
Panneau de commande et télécommande

25
FR
A Témoin de fonctionnement E Touche TIMER
B Témoin lumineux SWING F
MARCHE (ON) et
vitesse (SPEED)
C
Voyant de vitesse
Haut (high)
Moyen (mid)
Bas (low)
G Touche SWING
D Touche d’arrêt (OFF H
Voyant TIMER
0,5 h / 1 h / 2 h / 4 h
Mise en marche et utilisation
1. Brancher l’appareil à une prise. Le voyant lumineux (A) s’allume.
2. Allumer l’appareil en appuyant sur la touche ON/SPEED (F) sur le panneau de
commande. Le ventilateur se met à fonctionner à basse vitesse. Le voyant de
vitesse (C) s’allume.
3. Pour modier la vitesse, appuyer plusieurs fois sur la touche ON/SPEED (F). La
vitesse est modiée à chaque pression de touche. Le voyant (C) correspondant
s’allume.
4. Pour que le ventilateur se mette à osciller latéralement, appuyer sur la
touche SWING (G). Le témoin lu- mineux SWING (B) s’allume et le ventilateur
commence à osciller latéralement. Pour arrêter l’oscillation, appuyer de
nouveau sur la touche SWING (G).
5. Le ventilateur est équipé d’un minuteur. Une fois l’appareil allumé, appuyer
sur la touche TIMER (E) et le ventilateur fonctionne pendant la durée
paramétrée. Appuyer plusieurs fois sur la touche TIMER ; la durée est modiée
à chaque pression de la touche. Les témoins lumineux (H) s’allument. Une fois
la durée écoulée, le ventilateur s’arrête automatiquement. Le minuteur peut
être réglé pour une durée de 0,5 à 7,5 heures. La durée est indiquée par la
somme des voyants lumineux allumés (H).
6. Le ux d’air peut être dirigé vers le haut ou vers le bas en inclinant le moteur.
Desserrer la vis de xation (9) et régler le moteur de sorte à ce qu’il soit dirigé
dans la bonne direction. Puis resserrer la vis.
7. Pour éteindre le ventilateur, appuyer sur la touche OFF (D).
8. Toujours débrancher l’appareil après utilisation.
Remarques sur la télécommande
Les touches de la télécommande ont les mêmes fonctions que celles du panneau
de commande. S’assurer que les piles ont été introduites dans le bon sens. Ne pas
mélanger les types de piles et toujours remplacer toutes les piles en même temps
en cas de remplacement des piles. Veiller à remplacer les piles par des piles de
même type (2x AAA).

26
FR
NETTOYAGE ET ENTRETIEN
• Toujours débrancher l’appareil avant de le nettoyer.
• Ne jamais plonger entièrement la che d’alimentation, le cordon
d’alimentation ou l’appareil dans l’eau ou tout autre liquide.
• Ne pas utiliser de liquide vaisselle, de gaz, d’essence ou tout autre solvant
pour nettoyer l’appareil, an de ne pas l’endommager.
• Débrancher l’appareil et attendre que le ventilateur s’arrête.
• Nettoyer les surfaces de l’appareil avec une éponge humide.
• Il est recommandé de nettoyer le ventilateur une fois par mois.
• En cas d’inutilisation prolongée de l’appareil, l’entreposer dans un endroit frais
et sec hors de la portée des enfants. Ne pas ranger l’appareil dans un lieu
chaud directement exposé aux rayons du soleil.
INFORMATIONS SUR LE RECYCLAGE
S‘il existe une réglementation pour l‘élimination ou le
recyclage des appareils électriques et électroniques dans
votre pays, ce symbole sur le produit ou sur l‘emballage
indique que cet appareil ne doit pas être jeté avec les
ordures ménagères. Vous devez le déposer dans un point
de collecte pour le recyclage des équipements électriques
et électroniques. La mise au rebut conforme aux règles
protège l‘environnement et la santé de vos semblables
des conséquences négatives. Pour plus d‘informations
sur le recyclage et l‘élimination de ce produit, veuillez
contacter votre autorité locale ou votre service de
recyclage des déchets ménagers.
Ce produit contient des piles. S‘il existe une
réglementation pour l‘élimination ou le recyclage des
piles dans votre pays, vous ne devez pas les jeter avec les
ordures ménagères. Renseignez-vous sur les dispositions
locales relatives à la collecte des piles usagées. La mise au
rebut conforme aux règles protège l‘environnement et la
santé de vos semblables des conséquences négatives.

27
IT
Gentile cliente,
La ringraziamo per aver acquistato il dispositivo. La
preghiamo di leggere attentamente le seguenti istruzioni
per l’uso e di seguirle per evitare possibili danni tecnici. Non
ci assumiamo alcuna responsabilità per danni scaturiti da
una mancata osservazione delle avvertenze di sicurezza e da
un uso improprio del dispositivo. Scansionare il codice QR
seguente, per accedere al manuale d’uso più attuale e per
ricevere informazioni sul prodotto.
INDICE
Avvertenze di sicurezza 28
Descrizione del dispositivo 29
Assemblaggio 30
Utilizzo 30
Pulizia e manutenzione 32
Avviso di smaltimento 32
DATI TECNICI
Numero articolo
Alimentazione
220-240 V ~ 50 Hz
Potenza
PRODUTTORE E IMPORTATORE (UK)
Produttore:
Chal-Tec GmbH, Wallstraße 16, 10179 Berlino, Germania.
Importatore per la Gran Bretagna:
Chal-Tec UK limited
Unit 6 Riverside Business Centre
Brighton Road
Shoreham-by-Sea
BN43 6RE
United Kingdom

28
IT
AVVERTENZE DI SICUREZZA
• I bambini possono ferirsi con materiali d’imballaggio e vecchi dispositivi.
Smaltire immediatamente tutti i materiali d’imballaggio.
• Questo dispositivo può essere utilizzato dai bambini maggiori di 8 anni e
dalle persone con limitate capacità siche, sensoriali o mentali o da persone
con esperienza e conoscenze insucienti, solo se sono stati informati sulle
funzioni del dispositivo e sono consapevoli dei rischi e dei pericoli connessi. I
bambini non devono giocare con il dispositivo. I bambini non possono pulire e
utilizzare il dispositivo senza la supervisione di un adulto.
• Non lasciare l‘unità incustodita.
• Controllare la tensione sulla targhetta del dispositivo prima dell’utilizzo.
Collegare il dispositivo solo a prese elettriche con tensione corrispondente.
• Utilizzare il dispositivo solo per gli scopi previsti, in accordo con quanto
descritto nel manuale d’uso.
• Durante il montaggio, seguire precisamente le istruzioni. Un procedimento
errato può causare danni irreparabili al dispositivo.
• Spegnere il dispositivo e staccare la spina prima di pulirlo o se non lo si usa
più.
• Il dispositivo non va utilizzato se mostra segni di danni. Se il dispositivo non
funziona correttamente, spegnerlo immediatamente e rivolgersi a un’azienda
specializzata nelle vicinanze.
• Se cavo o spina sono danneggiati, devono essere sostituiti dal produttore, da
un’azienda tecnica autorizzata o da una persona con qualica equivalente.
• Non collegare il dispositivo a ciabatte multipresa.
• Non utilizzare prolunghe.
• Non collegare il dispositivo a timer o a prese elettriche con comando a
distanza.
• Non utilizzare o stoccare il dispositivo vicino a fonti di calore, come
riscaldamenti.
• Non immergere il dispositivo e la spina in acqua o altri liquidi. Se cade sopra
dell’acqua, staccare subito la spina e far controllare il dispositivo da un’azienda
specializzata.
• Quando si utilizza il dispositivo per la prima volta, rimuovere tutte le pellicole e
il materiale d’imballaggio.
• Non staccare la spina tirando il cavo, ma impugnando saldamente la spina
stessa.
• Prima di inserire la spina nella presa elettrica, assicurarsi che il dispositivo sia
spento.
• Assicurarsi che i punti di ingresso e uscita dell’aria siano liberi e non coperti,
altrimenti potrebbe surriscaldarsi il dispositivo.
• Assicurarsi che il cavo non passi sopra a bordi o superci taglienti.
29
IT
• Non appendere il dispositivo alla parete o al sotto, a meno che non sia
adatto a questo tipo di utilizzo.
• Lasciare abbastanza spazio libero tra il dispositivo e pareti, mobili o altri
dispositivo, in modo da ottenere le migliori prestazioni possibili.
• Non utilizzare il dispositivo vicino a forni e stufe a gas.
• Non posizionare il dispositivo vicino o direttamente sotto a tende.
• Non coprire il dispositivo.
• Non esporre sé stessi e altre persone direttamente alla corrente d’aria, in
modo da non prendersi un rareddore.
• Quando non si utilizza più il dispositivo, riporlo in un luogo asciutto dentro
all’imballaggio originale.
• Staccare sempre la spina prima di eettuare pulizia o manutenzione, prima di
riporre il dispositivo o quando non lo si utilizza più.
• Non utilizzare il dispositivo vicino a materiali e liquidi esplosivi o inammabili.
• Il dispositivo non è adatto a usi commerciali, ma solo casalinghi e in contesti
simili, come cucine presso uci, agriturismo, hotel, motel e bed & breakfast.
Non utilizzare il dispositivo all‘aperto.
DESCRIZIONE DEL DISPOSITIVO
1 Griglia anteriore
2 Tappo ventilatore
3 Pala ventilatore
4 Dado di ssaggio
5 Griglia posteriore
6 Albero motore
7 Impugnatura
8 Alloggiamento motore
9 Vite di serraggio
10 Interruttore
11 Vite di regolazione
12 Tubo interno
13 Regolazione altezza
14 Tubo esterno
15 Base
16 Vite
30
IT
ASSEMBLAGGIO
Assemblare la base
Svitare la vite (16) che si trova in basso sul tubo esterno (14). Inserire il tubo
interno (12) nel tubo esterno e ssare i tubi alla base utilizzando la vite. Mettere
l´alloggiamento del motore (8) sul tubo interno e ssarlo utilizzando le viti incluse
nella consegna. Assicurarsi che il motore sia posizionato saldamente sul tubo
interno.
Installare il ventilatore e la griglia
1. Rimuovere il dado sulla parte frontale del motore, ruotandolo in senso
antiorario.
2. Inserire la griglia posteriore sulla parte frontale del motore. L´impugnatura
deve essere rivolta verso l‘alto in modo che i perni di ssaggio siano inseriti
correttamente nei fori della griglia.
3. Ruotare il dado di ssaggio in senso orario. Non serrare il dado troppo
saldamente.
4. Inserire la pala del ventilatore sull´albero motore e allineare la fessura sul
retro della pala all´albero motore.
5. Serrare il tappo del ventilatore ruotandolo in senso antiorario.
6. Allineare la griglia anteriore alla griglia posteriore in modo che i fori si trovino
gli uni sopra gli altri. Inserire una vite attraverso il foro e serrarla con un dado.
Non serrare completamente la vite.
7. Chiudere i morsetti di ssaggio ed accertarsi che siano ssati correttamente
sul bordo della griglia.
8. Serrare completamente il dado e la vite sulla griglia.
UTILIZZO
Pannello dei comandi e telecomando

31
IT
A Spia di alimentazione E Tasto TIMER
B Spia SWING F
Accensione (ON) e velocità
(SPEED)
C
Spia velocità
Elevata (high)
Centrale (mid)
Bassa (low)
G Tasto SWING
D Tasto spegnimento (OFF) H
Spia TIMER
0.5h / 1h / 2h / 4h
Messa in funzione e utilizzo
1. Collegare il dispositivo ad una presa. La spia di alimentazione (A) si accende.
2. Accendere il dispositivo premendo il tasto ON/SPEED (F) sul pannello dei
comandi. Il ventilatore si mette in funzione a bassa velocità. La spia della
velocità (C) si accende.
3. Per modicare la velocità, premere ripetutamente il tasto ON/SPEED (F). La
velocità cambia ad ogni pres- sione del tasto. La spia corrispondente (C) si
accende.
4. Per attivare l´oscillazione del ventilatore, premere il tasto SWING (G). La
spia SWING (B) si accende e il ven- tilatore inizia ad oscillare. Per arrestare
l‘oscillazione, premere il tasto SWING (G).
5. Il ventilatore dispone di un timer. Dopo aver acceso il dispositivo, premere il
tasto TIMER (E) e il ventilatore si mette in funzione in base all´impostazione.
Premere ripetutamente il tasto TIMER e il tempo si modica ad ogni pressione
del tasto. Le spie di controllo (H) si accendono. Allo scadere del tempo
impostato il venti- latore si spegne automaticamente. Il tempo impostabile è
compreso tra 0.5 e 7,5 ore.
6. Il usso d‘aria può essere diretto verso l‘alto o verso il basso inclinando il
motore. Svitare la vite di serraggio
(9) e dirigere il motore nella direzione desiderata. Serrare di nuovo la vite
saldamente.
7. Per spegnere il ventilatore, premere il tasto OFF (D).
8. In caso di inutilizzo, rimuovere la spina dalla presa.
Note sull´uso del telecomando
I tasti del telecomando hanno le stesse funzioni dei tasti sul pannello dei comandi.
Assicurarsi che le pile siano inserite correttamente. Non mischiare tipi diversi di
pile e sostituire tutte le pile contemporaneamente. Sosti- tuire le pile con altre
dello stesso tipo (2xAAA).
32
IT
PULIZIA E MANUTENZIONE
• Disinserire sempre la spina dalla presa di corrente prima di eseguire la pulizia
del dispositivo.
• Non immergere la spina, il cavo di alimentazione o l’intero dispositivo in acqua
o altri liquidi.
• Per la pulizia non utilizzare prodotti detergenti, gas, benzine o altri solventi
che possono danneggiare il dispositivo.
• Disinserire la spina dalla presa di corrente e attendere che il ventilatore si
arresti completamente.
• Lavare le superci utilizzando un panno umido.
• Si consiglia di pulire il ventilatore una volta al mese.
• In caso di inutilizzo prolungato, custodire il ventilatore in una luogo fresco,
asciutto e fuori dalla portata dei bambini. Non conservare il dispositivo in un a
luogo caldo e particolarmente illuminato dai raggi diretti del sole.
AVVISO DI SMALTIMENTO
Se nel proprio paese si applicano le regolamentazioni
inerenti lo smaltimento di dispositivi elettrici ed
elettronici, questo simbolo sul prodotto o sulla confezione
segnala che questi prodotti non possono essere
smaltiti con i riuti normali e devono essere portati a
un punto di raccolta di dispositivi elettrici ed elettronici.
Grazie al corretto smaltimento dei vecchi dispositivi si
tutela il pianeta e la salute delle persone da possibili
conseguenze negative. Informazioni riguardanti il riciclo
e lo smaltimento di questi prodotti si ottengono presso
l’amministrazione locale oppure il servizio di gestione dei
riuti domestici.
Il prodotto contiene batterie. Se nel proprio paese si
applicano le regolamentazioni inerenti lo smaltimento
di batterie, non possono essere smaltite con i normali
riuti domestici. Preghiamo di informarvi sulle
regolamentazioni vigenti sullo smaltimento delle batterie.
Grazie al corretto smaltimento dei vecchi dispositivi si
tutela l’ambiente e la salute delle persone da conseguenze
negative.