www.klarstein.com
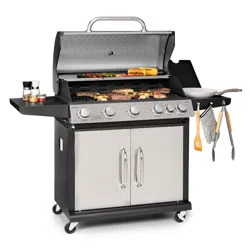
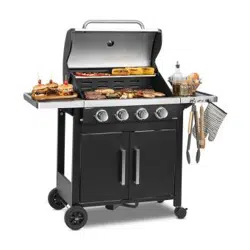
TOMAHAWK 4.0
Gas Griller
10033511
2531-20


3
EN
Technical Data 4
Safety Instructions 5
Overview 6
Installation 7
Connection to Appliance 11
Checking for Leaks 12
Lighting Instructions for Barbecue 13
Cleaning and Care 14
Troubleshooting 15
Dear Customer,
Congratulations on purchasing this device. Please read the
following instructions carefully and follow them to prevent
possible damages. We assume no liability for damage caused
by disregard of the instructions and improper use. Scan the QR
code to get access to the latest user manual and more product
information.
CONTENTS
4
EN
TECHNICAL DATA
Item number
10033511
Total heat input 12.8 kW (932 g/h)
Burners heat input 3.2 kW (233 g/h) x 4
Gas category I3 + (28-30/37) I3B/P (30) I3B/P (50)
Types of gas Butane (G30) Propane (G31) Butane, propane or their mixtures
Gas pressure 28-30 mbar 37 mbar 28-30 mbar 50 mbar
Grill burner
injection size
0.85 mm 0.8 mm 0.85 mm 0.75 mm
Side burner
injector size
0.85 mm 0.8 mm 0.85 mm 0.75 mm
I3 + (28-30/37) BE, FR, IT, LU, IE, GB, GR, PT, ES, CY, CZ, LT, SK, CH, SI, LV
I3B/P (30) LU, NL, DK, FI, SE, CY, CZ, LT, MT, SK, SI, BG, IS, NO, TR, HR, RO, IT, HU, LV
I3B/P(37) PL
I3B/P (50) AT, DE, CH, LU, SK
Identication number
2531CS-0055
Important Notes • WARNING: accessible parts may be very hot. Keep young children
away.
• Read the instructions before using the appliance.
• Use the appliance in well-ventilated areas.
• Any modications of the appliance may be dangerous.
• Turn off the gas supply at the gas cylinder after use.
Chal-Tec GmbH
Wallstraße 16
10179 Berlin
Germany
2531-20
5
EN
SAFETY INSTRUCTIONS
• FOR OUTDOOR USE ONLY.
• PLEASE READ INSTRUCTIONS CAREFULLY BEFORE ASSEMBLY.
• RETAIN THIS MANUAL FOR FUTURE REFERENCE.
WARNING: Danger of hazardous fi re or explosion
Follow the instructions.
• Read the instructions before using the appliance.
• Retain this manual for future reference.
• Use outdoors only.
• Warning: accessible parts may be very hot. Keep young children away.
• Do not move the appliance during use.
• Turn off the gas supply at the gas cylinder after use.
• Do not modify the appliance.
• This appliance must be kept away from ammable materials during use.
• The regulator and hose must be connected correctly to the appliance. A spanner
must be used to tighten the nut onto the connection thread.
• Do not keep any gas cylinder inside the barbecue trolley when it is in use. It is
forbidden to insert / put gas cylinder into the appliance.
For your safety if, you smell gas:
1. Turn off gas supply at gas cylinder.
2. Extinguish all naked ames; do not operate any electrical appliances.
3. Ventilate the area.
4. Check for leaks as detailed in this manual.
5. If odour persists, contact your dealer or gas supplier immediately.
Precautions
1. Leak test all connections after each cylinder re ll or before each use.
2. Never check for leaks with a match or open ame.
3. Do not store or use gasoline or other ammable vapours and liquids in the vicinity
of this or any other appliance.
4. Any LP cylinder not connected for use shall not be stored in the vicinity of this or any
other appliance.
• The ventilation openings of the cylinder compartment must absolutely never be
obstructed.
• Always take precautions when changing the gas cylinder by carrying out the
change away from any source of ignition.
6
EN
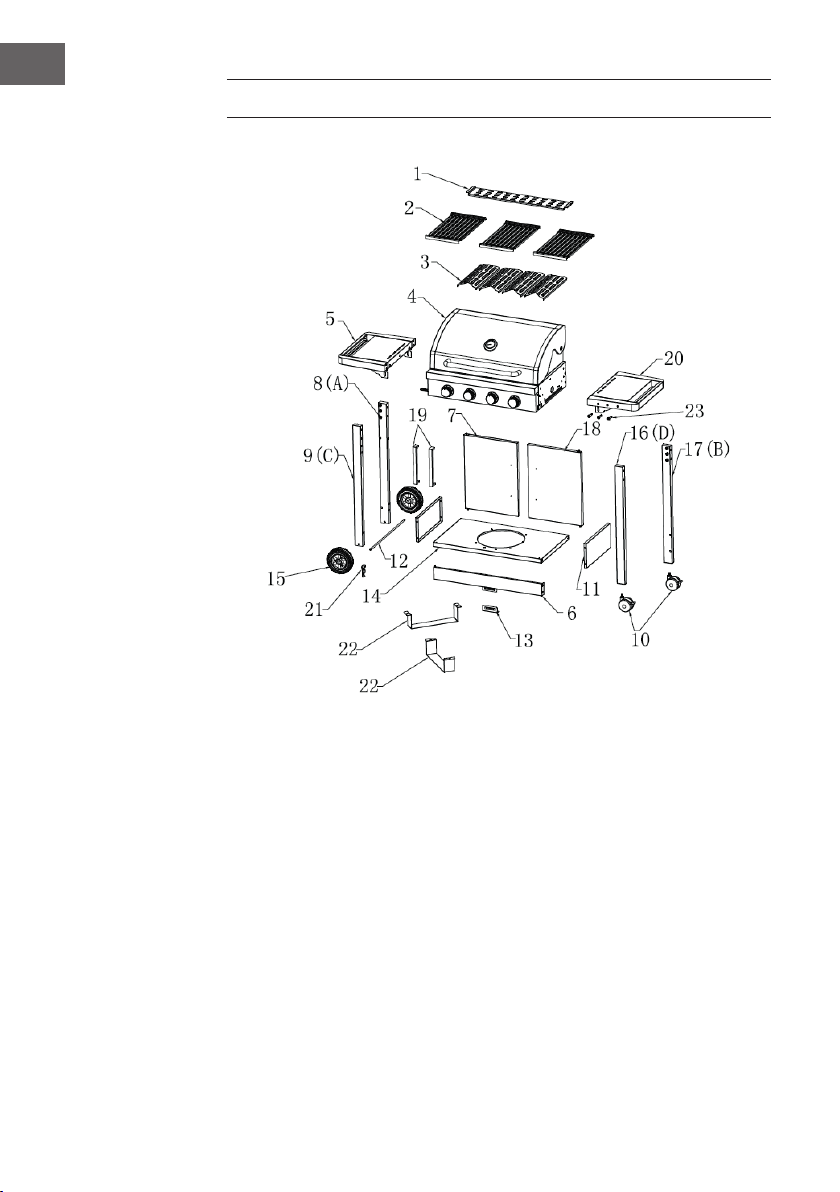
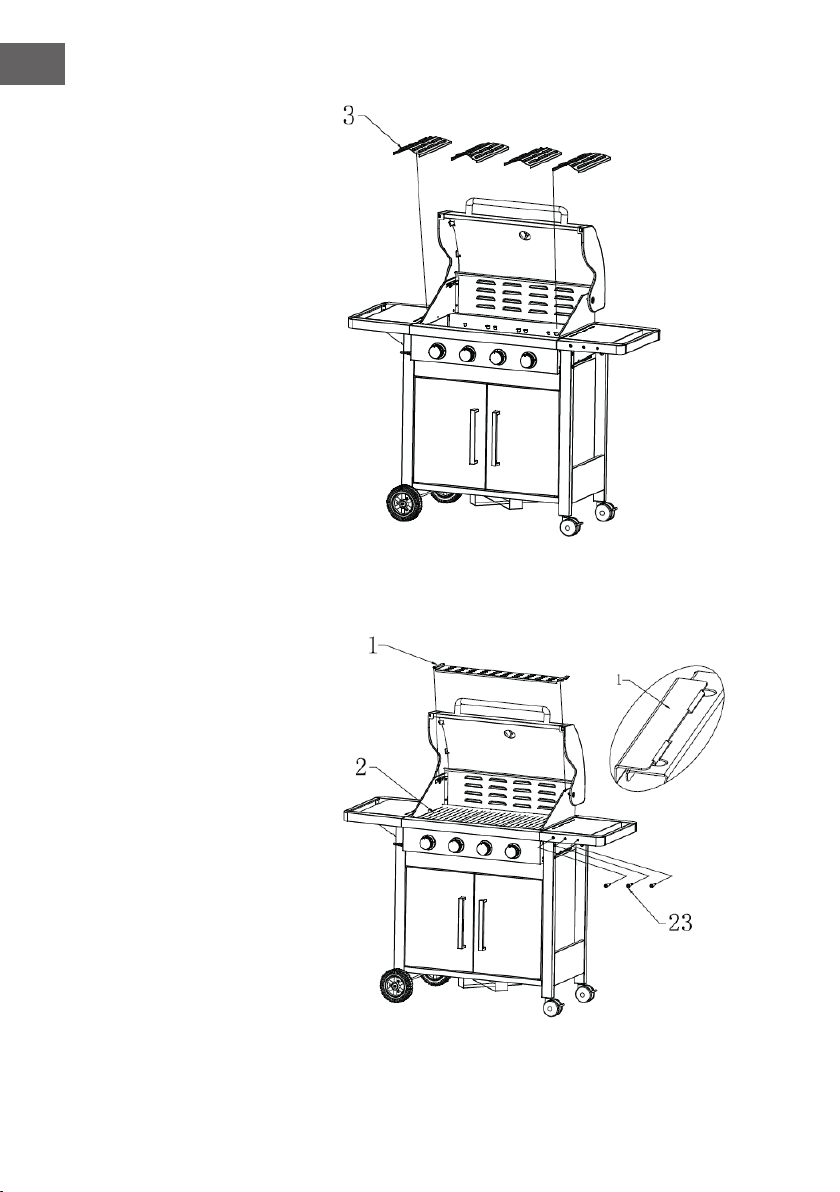
OVERVIEW
1 Warming plate (1 pc)
2 Cooking grill (2 pcs)
3 Flame tamer (3 pcs)
4 Body (1 pc)
5 Left side table (1 pcs)
6 Beam (1 pc)
7 Left door (1 pc)
8 Trolley left back leg (1 pc)
9 Trolley left front leg (1 pc)
10 Small wheel (2 pcs)
11 Trolley side panel (2 pcs)
12 Wheel axle (1 pc)
13 Magnet (1 pc)
14 Trolley bottom panel (1 pc)
15 6 inch plastic wheel (2 pcs)
16 Trolley right front leg (1 pc)
17 Trolley right back leg (1 pc)
18 Right door (1 pc)
19 Door handle (2 pcs)
20 Right side table (1 pc)
21 Split pin (2 pcs)
22 Tank shelf (2 pcs)
23 M6 Step peg (3 pcs)
7
EN
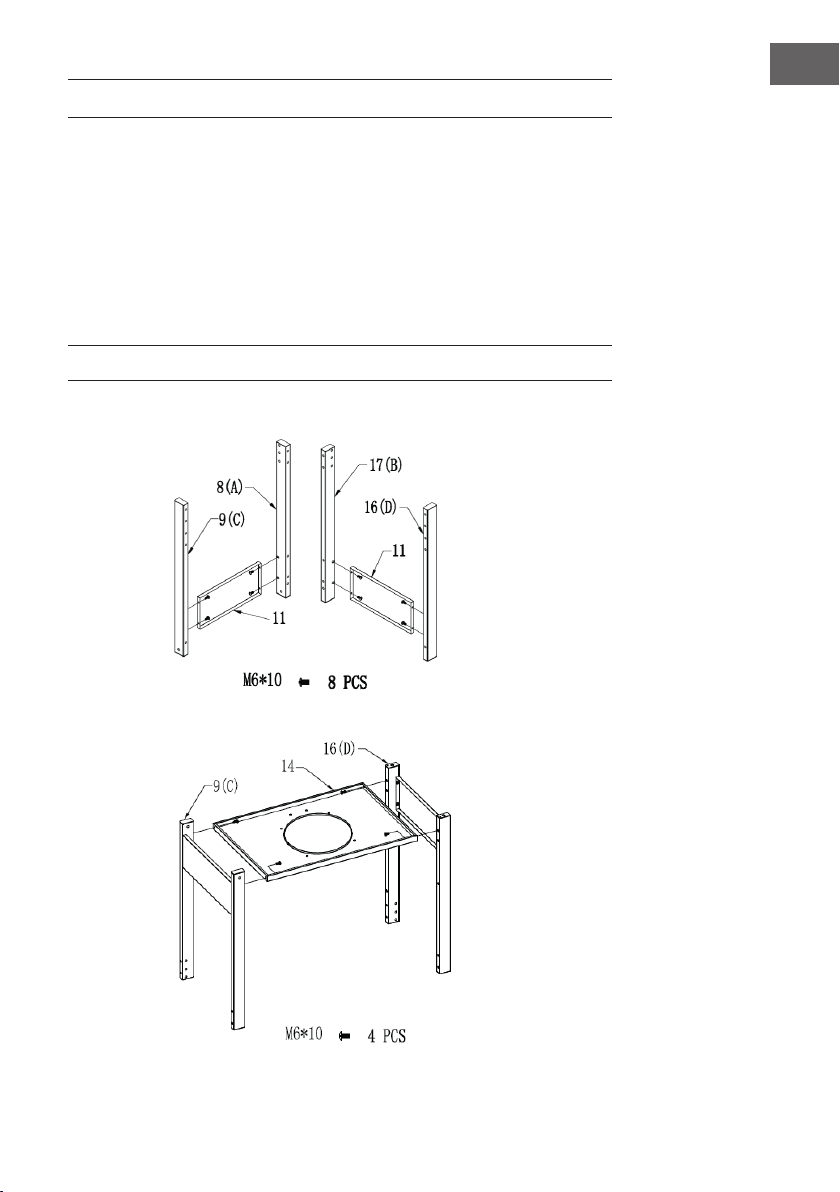
INSTALLATION
WARNING: Whilst every effort has made in manufacture of your barbecue to remove
any sharp edges, you should handle all components with care in order to avoid
accidental injury.
Tools required: Either a Phillips screwdriver or at-bladed screwdriver and either a
spanner (we have supplied a multifunction spanner) or a pair of pliers.
ASSEMBLY:
Please read all instructions thoroughly before proceeding. Find a large, clean area in
which to assemble your trolley barbecue. Please refer to the parts list and assembly
diagram as necessary. Assembly of the barbecue involves many large components, it is
advisable to have two people assemble the unit.
NOTICE: Make sure all the plastic protection is removed before assembling!
1
2
8
EN
3
4
5
9
EN
6
7
10
EN
9
8

11
EN
CONNECTION TO APPLIANCE
• This appliance is only suitable for use with low-pressure butane or propane gas or
LPG mixtures, tted with the appropriate low-pressure regulator via a exible hose.
• The hose should be secured to the regulator and the appliance with hose clips.
Make sure the exible hose cannot come in contact with hot surfaces and avoid
twisting.
• Use a suitable regulator that is certied to BSEN 12864 or EN 16129. Make sure
the regulator and exible hose comply with local code.
Regulator and hose
Use only regulators and hoses approved for LP Gas at the above pressures. The life
expectancy of the regulator is estimated at 2 years.
The use of the wrong regulator or hose is unsafe; always check that you have the correct
items before operating the barbecue.
The hose used must conform to the relevant standard for the country of use. Worn or
damaged hoses must be replaced. Ensure that the hose is not obstructed, kinked, or in
contact with any part of the barbecue other than at its connection.
For exible hoses
• Avoid twisting the exible hose when the appliance is in use. The length of the
exible hose shall not exceed 1.5 m. In Finland, the length shall not exceed 1.2 m.
The hose should be certied according to the applicable EN Standard and comply
with local code.
Storage of appliance
• Storage of an appliance indoors is only permissible if the cylinder is disconnected
and removed from the appliance. When the appliance is not to be used for a
longer period of time it should be stored in its original packaging in a dry dust-free
environment.
Gas cylinder
The gas cylinder should not be dropped or handled roughly! If the appliance is not in
use, the cylinder must be disconnected. Replace the protective cap on the cylinder after
disconnecting the cylinder from the appliance. The gas cylinder must be located outside
the body of the appliance.
Always connect or replace the cylinder in a well-ventilated area and away from any
source of ignition, never in the presence of a ame, spark or heat source.
Cylinders must be stored outdoors in an upright position and out of the reach of children.
The cylinder must never be stored where temperatures can reach over 50 °C. Do not
store the cylinder near ames, pilot lights or other sources of ignition. DO NOT SMOKE.
This barbecue is designed for use outdoors, away from any ammable materials. It
is important that there are no overhead obstructions and that there is a minimum

12
EN
distance of 1 m from the side or rear of the appliance. It is important that the
ventilation openings of the appliance are not obstructed. The barbecue must be
used on a level, stable surface. The appliance should be protected from direct draughts
and shall be positioned or protected against direct penetration by any trickling water
(e.g. rain).
Make sure that the gas cylinder compartment (if any) is not obstructed, keep it ventilated
and clean.
CHECKING FOR LEAKS
• Make 2-3 uid ounces of leak-detecting solution by mixing one part washing-up
liquid with 3 parts water.
• Ensure the control valve is 'OFF'.
• Connect the regulator to the cylinder and ON/OFF valve to the burner, ensure the
connections are secure then turn ON the gas.
• Brush the soapy solution onto the hose and all joints. If bubbles appear you have a
leak, which must be rectied before use.
• Retest after xing the fault
• Turn OFF the gas at the cylinder after testing.
• If leakage is detected and cannot be rectied, do not attempt to cure leakage but
consult your gas dealer.

13
EN
LIGHTING INSTRUCTIONS FOR BARBECUE
1. Open the hood of the barbecue before attempting to light the burners.
2. Turn all the control knobs clockwise to 'OFF' position.
3. Connect the regulator to the gas bottle. Turn the gas supply 'ON' at the regulator.
Check with the use of soapy water for any gas leakage between the bottle and the
regulator.
4. Push down the front left control knob and keep pressing whilst turning anti-clockwise
to the “HIGH” position (a clicking sound will be heard). This will light the left hand
burner. Observe if the burner has lit. If not repeat this process.
5. If the burner has not lit after retrying wait 5 minutes and repeat step 4.
6. Adjust the heat by turning the knob to the High/Low position.
7. If the burner does not light, light the appliance with a match using the lighting hole
in the side of the appliance. Consult your gas dealer to rectify the ignition.
8. To light the remaining burners in sequence from left to right, repeat 4 above. The
cross-lighting channel between the burners will light the burner adjacent to it.
9. To turn the barbecue ‘OFF’ turn the cylinder valve or regulator switch to the ‘OFF’
position and then turn the control knob on the appliance clockwise to the ‘OFF’
position.
Warning: If the burner fails to ignite, turn the control knob off (clockwise) and also
turn the cylinder valve off. Wait ve minutes before attempting to relight with ignition
sequence.
• Before cooking for the rst time, operate the barbecue for about 15 minutes with the
lid closed and the gas turned on LOW. This will 'heat clean' the internal parts and
dissipate odour from the painted nish.
• Clean your barbecue after each use. DO NOT use abrasive or ammable cleaners,
as it will damage the parts of the product and may start a re. Clean with warm
soapy water.
• WARNING: Danger of burns.
• Accessible parts may be very hot. Keep young children away from the hot
appliance at all times (even while it is cooling down).
• It is recommended that protective gloves (e. g. oven gloves) be used when handling
particularly hot components.

14
EN
CLEANING AND CARE
WARNING: Danger of burns
All cleaning and maintenance should be carried out when the barbecue
is cool and with the fuel supply turned OFF at the gas cylinder.
Cleaning
'Burning off' the barbecue after every use (for approx 15 minutes) will keep excessive
food residue to a minimum.
Outside surface
1. Use mild detergent or baking soda and hot water solution. Non-abrasive scouring
powder can be used on stubborn stains, then rinse with water.
2. If the inside surface of the barbecue lid has the appearance of peeling paint,
baked-on grease build-up has turned to carbon and is aking off. Clean thoroughly
with strong hot soapy water solution.
Interior of barbecue bottom
Remove residue using brush, scraper and/or cleaning pad then wash with a soapy
water solution. Rinse with water and allow to dry.
Wooden surface
Wash with a soft cloth and hot soapy water solution. Rinse with water. Do not use
abrasive cleaners, degreasers or a concentrated barbecue cleaner on wooden parts.
Cooking grid
Use a mild soapy water solution. Non-abrasive scouring power can be used on
stubborn stains then rinse with water.
Cleaning the burner assembly
CAUTION: All cleaning and maintenance should be carried out when the barbecue is
cool and with the fuel supply turned OFF at the gas cylinder.
1. Turn the gas OFF at the control knob and disconnect the cylinder.
2. Remove cooling grate.
3. Clean the burner with a soft brush or blow clean with compressed air and wipe with
a cloth.
4. Clean any clogged ports with a pipe cleaner or stiff wire (such as an opened paper
clip).
15
EN
TROUBLESHOOTING
Problem Possible Cause Solution
Burners will not light using
the ignition system.
LP gas cylinder is empty. Replace with full cylinder.
Faulty regulator.
Have regulator
checked or replace.
Obstructions in burner. Clean burner.
Obstructions in gas
jets or gas hose.
Clean jets and gas hose.
Electrode wire loose
or disconnected on
electrode or ignition unit.
Reconnect wire.
Electrode or wire
is damaged.
Faulty push button igniter.
Change electrode and
wire change igniter.
Burner will not light
with a match.
LP gas cylinder is empty. Replace with full cylinder.
Faulty regulator.
Have regulator
checked or replace.
Obstructions in burner. Clean burner.
Obstructions in gas
jets or gas hose.
Clean jets and gas hose.
Low ame or ashback
(re in burner tube -
a hissing or roaring
noise may be heard)
LP gas cylinder too small.
Use larger cylinder.
Obstructions in burner. Clean burner.
Obstructions in gas
jets or gas hose.
Clean jets and gas hose.
Windy conditions.
Use grill in a more
sheltered position.
16
EN
DISPOSAL CONSIDERATIONS
If there is a legal regulation for the disposal of electrical
and electronic devices in your country, this symbol on the
product or on the packaging indicates that this product must
not be disposed of with household waste. Instead, it must be
taken to a collection point for the recycling of electrical and
electronic equipment. By disposing of it in accordance with
the rules, you are protecting the environment and the health of
your fellow human beings from negative consequences. For
information about the recycling and disposal of this product,
please contact your local authority or your household waste
disposal service.
MANUFACTURER & IMPORTER (UK)
Manufacturer:
Chal-Tec GmbH, Wallstrasse 16, 10179 Berlin, Germany.
Importer for Great Britain:
Chal-Tec UK limited
Unit 6 Riverside Business Centre
Brighton Road
Shoreham-by-Sea
BN43 6RE
United Kingdom